OWNER'S MANUAL
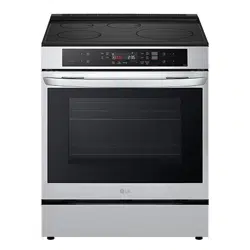
ELECTRIC INDUCTION
RANGE
Read this owner's manual thoroughly before operating the appliance and keep
it handy for reference at all times.
ENGLISH
LSIU6338*E
MFL71878863
Rev.00_081426
www.LGSIGNATURE.com
Copyright © 2026 LG Electronics. All Rights Reserved
Scan to see the online manual.
en-us_main.book.book Page 1 Friday, August 14, 2026 1:47 PM
TABLE OF CONTENTS
2
4 IMPORTANT SAFETY
INSTRUCTIONS
4 READ ALL INSTRUCTIONS BEFORE USE
4 Safety Messages
4 Anti-tip Device
5 WARNING
5 Installation
5 Operation
6 Maintenance
7 Risk of Fire and Flammable Materials
7 Button Cell or Coin Batteries Symbol
8 Safety Standard for Button Cell or Coin
Batteries
9CAUTION
9 Operation
9 Maintenance
10 PRODUCT OVERVIEW
10 Product Features
10 Exterior and Interior
10 Product Specifications
11 Accessories
12 INSTALLATION
12 Before Installing
12 Installation Overview
12 Tools Needed
13 Parts
13 Unpacking and Moving the Range
15 Choosing the Proper Location
15 Dimensions and Clearances
16 Electricity
17 Flooring
17 Ambient Temperature
17 Leveling
17 Leveling the Range
17 Connecting Electricity
17 Electrical Requirements
18 Connecting the Power Cord / Conduit
22 Optional Rear Filler
22 Installing the Rear Filler
23 Anti-tip Device
23 Installing the Anti-tip Device
24 Test Run
24 Test the Range Before Use
24 Rubber Gaskets
24 Installing the Rubber Gaskets
24 Removing/Assembling Oven Door Handle
24 Before Removing/Assembling the Oven
Door Handle
25 Removing Oven Door Handle
25 Assembling Oven Door Handle
26 OPERATION
26 Control Panel
26 Control Panel Features
28 Knob Features
28 Knob Lighting
29 Changing Oven Settings
29 Minimum & Maximum Default Settings
30 Wi-Fi
30 Remote Start
30 Control Lock
31 Display
31 Brightness
31 Clock Theme
31 Volume
31 Language
32 Date & Time
32 Temperature Unit
32 Sabbath
33 Start Screen
33 Temperature Adjustment
34 Convection Auto Conversion
34 Preheat Alarm Light
34 Smart Diagnosis
TM
34 Factory Reset
34 Open Source License
34 Cooktop
34 Precautions When Using the Cooktop
36 Cooking Areas
36 Benefits of Induction Surface Cooking
36 Induction Cookware
37 Cookware Placement
38 Pan Sensing
en-us_main.book.book Page 2 Friday, August 14, 2026 1:47 PM
3
38 Minimum and Maximum Pan Size
39 Cookware Compatibility Indicator
40 Home Canning
40 Using the Cooking Elements
41 Using the Knob Lock
41 Recommended Surface Cooking Settings
42 Power Management
42 Turning on the Warm Zone
43 Oven
43 Before Using the Oven
43 Oven Vent
43 Using Gliding Oven Racks
44 Using Heavy Duty Oven Racks
44 Meat Probe
45 Bake
46 Convection Bake and Roast
48 Recommended Baking and Roasting
Guide
49 Broil
50 Recommended Broiling Guide
52 Air Fry
55 Recommended Air Frying Guide
56 Air Sous-Vide
57 Recommended Air Sous-Vide Guide
57 Air Roast
58 Pizza
59 Frozen Meal
60 Dehydrate
61 Warm
61 Proof
62 Crispy Reheat
63 Auto Cook
64 Auto Cook Guide
95 SMART FUNCTIONS
95 LG ThinQ Application
95 LG ThinQ Application Features
95 Installing LG ThinQ Application and
Connecting an LG Appliance
96 RF Module Specifications
96 FCC Statement
96 FCC RF Radiation Exposure Statement
97 Open Source Software Notice
Information
97 Smart Diagnosis
TM
Feature
97 Using LG ThinQ to Diagnose Issues
97 Using Audible Diagnosis to Diagnose
Issues
98 MAINTENANCE
98 Cleaning
98 Interior
98 Exterior
100 Cooktop Surface
103 EasyClean
105 Self Clean
107 Removing/Assembling Lift-Off Oven
Doors
108 Removing/Assembling Drawers
109 Removing/Assembling the Vent Trim
109 Periodic Maintenance
109 Changing the Oven Light
111 TROUBLESHOOTING
111 FAQs
111 Frequently Asked Questions
113 Before Calling for Service
113 Cooking
115 Parts & Features
117 Noises
118 Wi-Fi
119 LIMITED WARRANTY
119 USA
119 TERMS AND CONDITIONS
119 THIS LIMITED WARRANTY DOES NOT
COVER:
123 PROCEDURE FOR RESOLVING DISPUTES:
en-us_main.book.book Page 3 Friday, August 14, 2026 1:47 PM
4 IMPORTANT SAFETY INSTRUCTIONS
IMPORTANT SAFETY INSTRUCTIONS
READ ALL INSTRUCTIONS BEFORE USE
Download this owner's manual at http://www.LGSIGNATURE.com
Safety Messages
Your safety and the safety of others are very important.
We have provided many important safety messages in this manual and on your appliance. Always read and
follow all safety messages.
All safety messages will tell you what the potential hazard is, tell you how to reduce the chance of injury,
and tell you what may happen if the instructions are not followed.
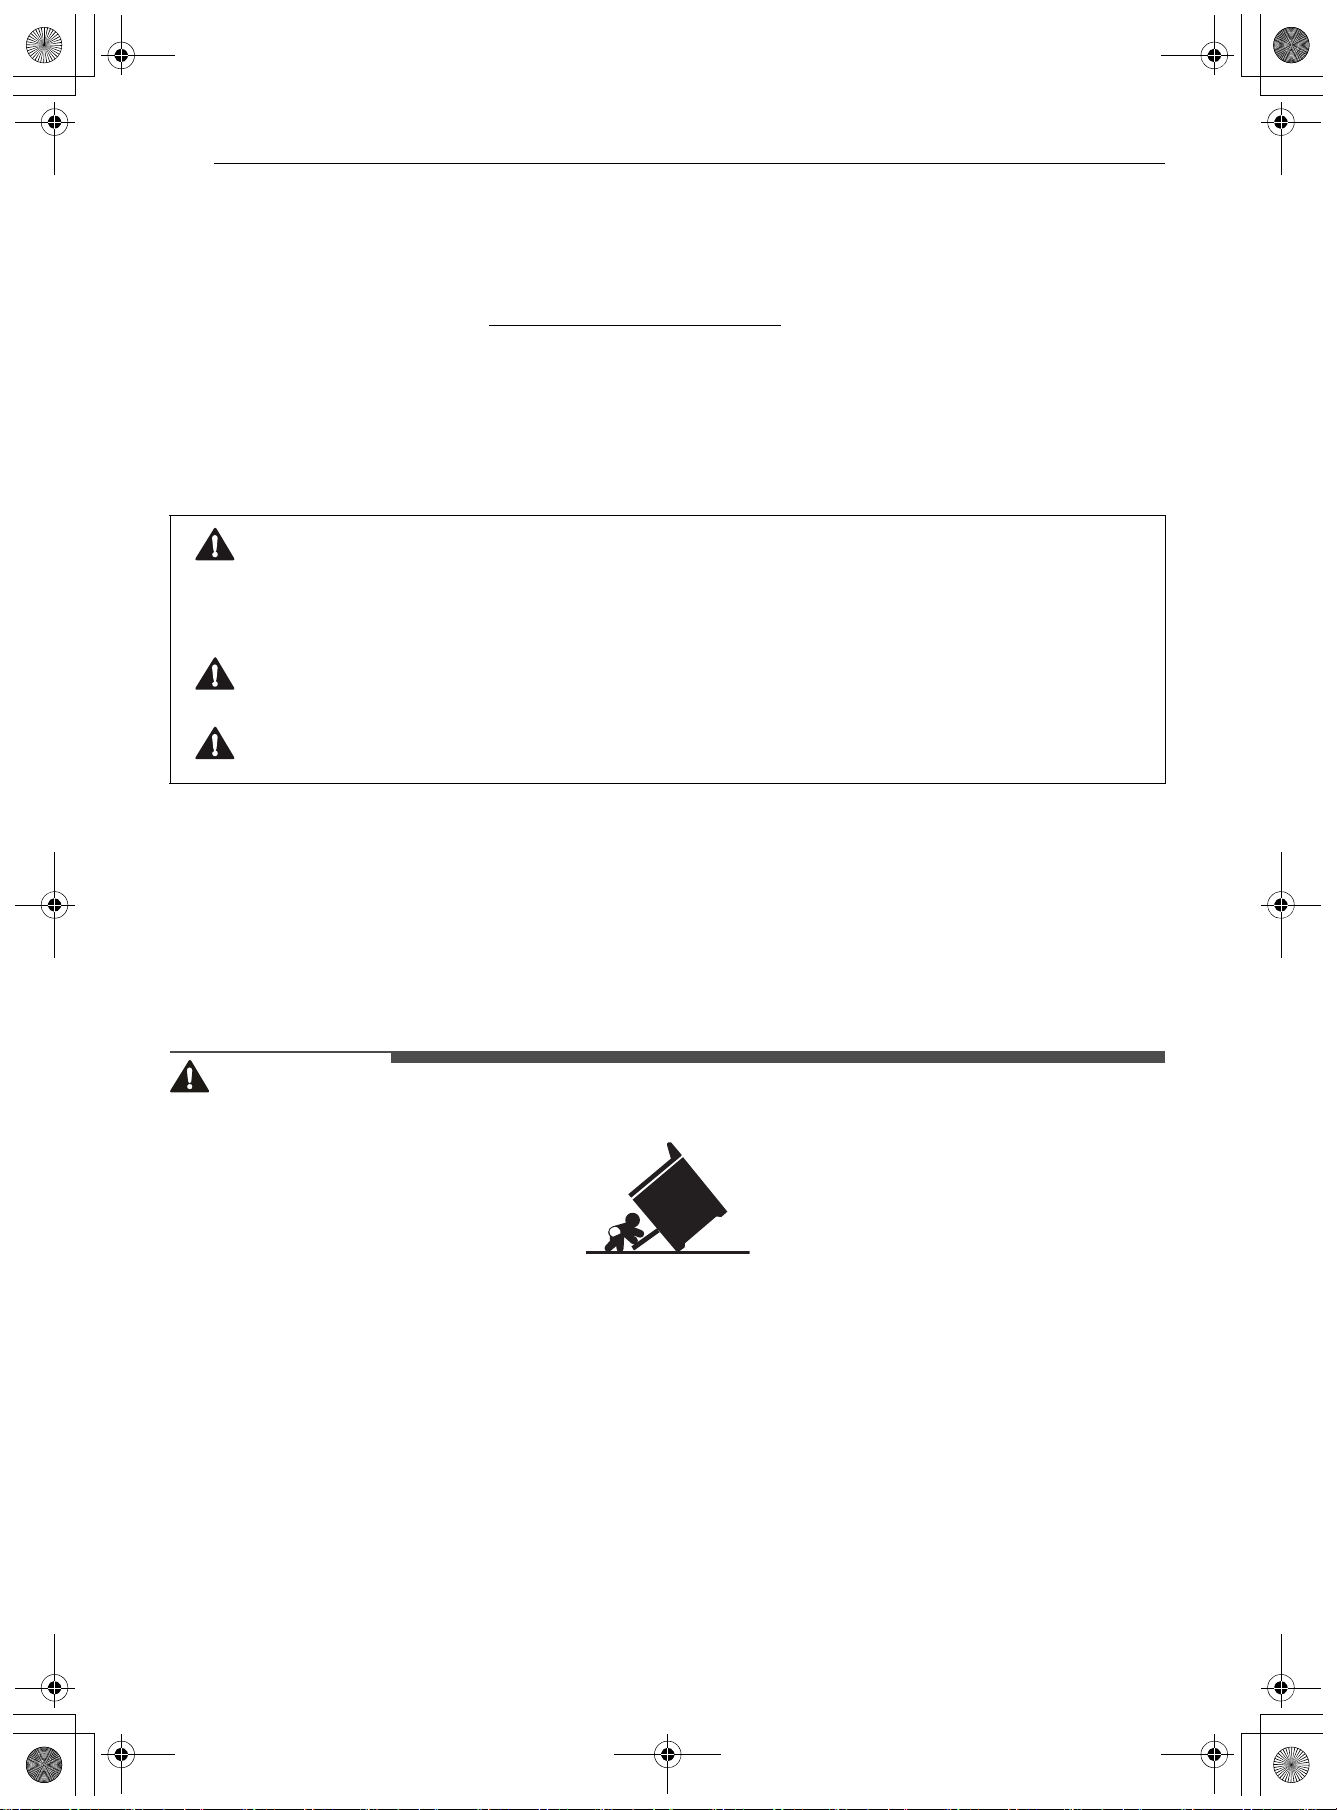
Anti-tip Device
To reduce the risk of tipping, the appliance must be secured by a properly installed anti-tip device. To
check if the device is installed properly, verify that the anti-tip device is engaged, or grasp the top rear
edge of the range back guard and carefully attempt to tilt it forward. Refer to the installation section for
instructions.
WARNING
• A child or adult can tip the range and be killed.
• Install the anti-tip device to the structure and/or the range. Verify the anti-tip device has been properly
installed and engaged by following the guide on the anti-tip bracket template.
• Engage the range to the anti-tip device by following the guide on the anti-tip bracket template. Ensure
the anti-tip device is re-engaged when the range is moved by following the guide on the anti-tip bracket
template.
• Re-engage the anti-tip device if the range is moved. Do not operate the range without the anti-tip device
in place and engaged.
• See installation instructions for details.
• Failure to do so can result in death or serious burns to children or adults.
• Do not rest large, heavy items such as whole turkeys on the open oven door. The range could tip forward
and cause injury.
This is the safety alert symbol.
This symbol alerts you to potential hazards that can kill or injure you and others. All safety messages
will follow the safety alert symbol and either the word WARNING or CAUTION.
These words mean:
WARNING
You may be killed or seriously injured if you do not follow instructions.
CAUTION
You may be injured or cause damage to the product if you do not follow instructions.
en-us_main.book.book Page 4 Friday, August 14, 2026 1:47 PM
5IMPORTANT SAFETY INSTRUCTIONS
ENGLISH
• Do not step or sit on the oven door. The range could be tipped and injury might result from spilled hot
liquid, food, or the range itself.
• Never remove the oven legs. The range will not be secured to the anti-tip bracket if the legs are
removed.
WARNING
WARNING
• To reduce the risk of explosion, fire, death, electric shock, injury or scalding to persons when using this
product, follow basic precautions, including the following:
Installation
• Do not line the oven walls, racks, bottom, or any other part of the oven with aluminum foil or any other
material. Doing so will disrupt heat distribution, produce poor baking results and cause permanent
damage to the oven interior. (Aluminum foil will melt to the interior surface of the oven.)
• To eliminate the risk of burns or fire by reaching over heated surface units, cabinet storage space
located above the surface units should be avoided. If cabinet storage is to be provided, the risk can be
reduced by installing a range hood that projects horizontally a minimum of 5 inches beyond the bottom
of the cabinets.
• Do not use aluminum foil or any other material to line the oven bottom. Improper installation of these
liners may result in a risk of electric shock or fire.
• Make sure your range is properly installed and grounded by a qualified installer, according to the
installation instructions. Any adjustment and service should be performed only by qualified range
installers or service technicians.
Operation
• Do not leave children alone or unsupervised near the appliance when it is in use or is still hot. Children
should never be allowed to sit or stand on any part of the appliance as they could be injured or burned.
• Children should not be allowed to play with controls or other parts of the appliance.
• DO NOT TOUCH HEATING ELEMENTS OR INTERIOR SURFACES OF OVEN. Heating elements may be hot
even though they are dark in color. Interior surfaces of an oven become hot enough to cause burns.
During and after use, do not touch or let clothing or other flammable materials contact heating elements
or interior surfaces of the oven until they have had sufficient time to cool. Other surfaces, such as oven
vent openings and surfaces near these openings, oven doors, and windows of oven doors, also get hot
and may cause burns if not cooled.
• Surface units may be hot even though they are dark in color. Areas near surface units may become hot
enough to cause burns. During and after use, DO NOT TOUCH SURFACE UNITS OR AREAS NEAR UNITS or
let clothing or other flammable materials contact surface units or areas near units until they have had
sufficient time to cool. This includes the cooktop and the area above the oven door.
• Use care when opening the oven door. The hot air and steam that escape can cause burns to hands, face
and eyes. Let hot air or steam escape from the oven before removing or replacing food in the oven.
• Do not use plastic to cover food. Use foil or oven-safe lids only.
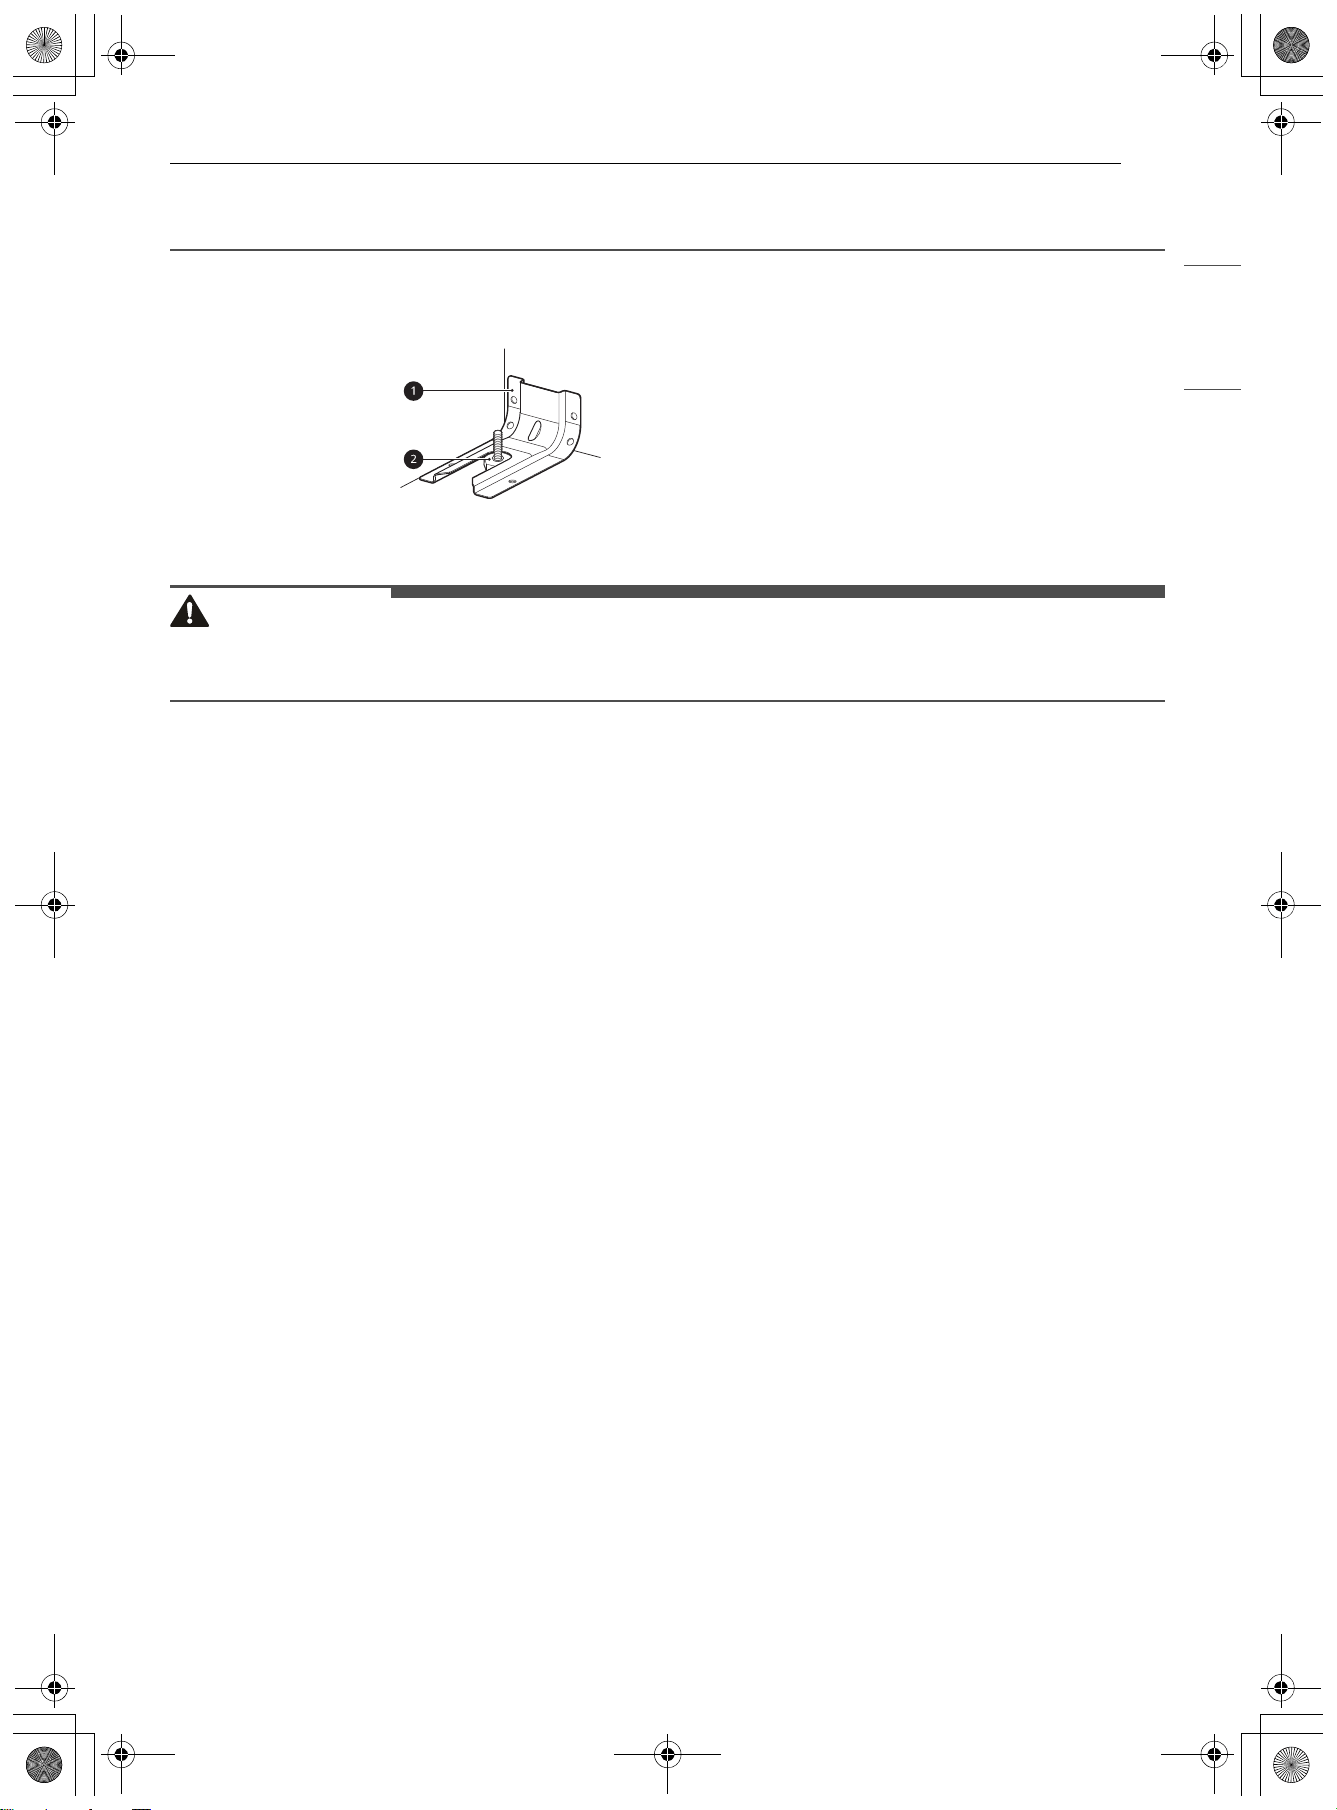
aAnti-tip bracket
bLeveling leg
en-us_main.book.book Page 5 Friday, August 14, 2026 1:47 PM

6 IMPORTANT SAFETY INSTRUCTIONS
• Never attempt to dry a pet in the oven.
• Never use your appliance for warming or heating the room.
• Always use pot holders or oven mitts when removing food from the oven or the surface element.
Cookware will be hot. Use only dry pot holders. Moist or damp pot holders on hot surfaces may result in
burns from steam. Do not let the pot holder touch hot heating elements. Do not use a towel or other
bulky cloth to remove food.
• Do not heat unopened food containers. Pressure in the containers may cause them to burst which may
result in injury.
• Be certain that all packing materials are removed from the appliance before operating. Keep plastic,
clothes, paper, and other flammable materials away from parts of the appliance that may become hot.
• Do not allow aluminum foil or the temperature probe to contact heating elements.
• Do not touch the hot surface between the bottom of the oven door and the top of the drawer on the
front of the oven while the oven is in operation. The surface becomes hot and can cause burns and other
injury.
• Do not touch the oven racks while they are hot.
• If a rack must be moved while the oven is hot, do not let the pot holder contact the hot heating element
in the oven.
• Pull the oven rack to the stop-lock position when loading and unloading food from the oven. This helps
prevent burns caused by touching hot surfaces of the door and oven walls.
• Do not use the oven if a heating element develops a glowing spot during use or shows other signs of
damage. A glowing spot indicates the heating element may fail and present a potential burn, fire, or
shock hazard. Turn the oven off immediately and have the heating element replaced by a qualified
service technician.
• During oven operation, the upper surface of the drawer cavity becomes hot and may cause burns. Never
allow children to remain unsupervised near the oven or cooktop.
• Do not put your hand inside the drawer while the oven is operating.
• Keep Oven Vent Duct Unobstructed. Areas near the vent may become hot during operation and may
cause burns. Do not block the vent opening. Avoid placing plastics near the vent as heat may distort or
melt the plastic.
• REMOTE OPERATION - This appliance is configurable to allow remote operation at any time. Do not store
any flammable materials or temperature sensitive items inside, on top or near surface units of the
appliance.
• Never leave any items on the cooktop. The hot air from the vent may ignite flammable items and will
increase pressure in closed containers, which may cause them to burst.
Maintenance
• Do not allow children to crawl into the oven.
• Let hot cookware and utensils cool in a safe place, out of reach of small children.
• If the door glass, cooktop glass, surface, or oven heating unit of the range are damaged, discontinue use
of the range and call for service.
• Do not allow anyone to climb, stand or hang on the door, storage drawer or cooktop. They could
damage the range and even tip it over, causing severe personal injury.
• Always disconnect power from the appliance before servicing.
• Before replacing the oven light, switch off the electrical power to the oven at the main fuse or circuit
breaker panel. Failure to do so can result in severe personal injury, death, or electrical shock.
• Never pour cold water over a hot oven for cleaning. Doing so may cause the oven to malfunction.
en-us_main.book.book Page 6 Friday, August 14, 2026 1:47 PM
7IMPORTANT SAFETY INSTRUCTIONS
ENGLISH
Risk of Fire and Flammable Materials
• Do not store or use flammable material in the oven or near or on the cooktop. Flammable materials
include paper, plastic, pot holders, linens, wall coverings, curtains, and gasoline or other flammable
vapors and liquids such as grease or cooking oil. These materials can be ignited when the oven and
cooktop are in use.
• Use extreme caution when moving or disposing of hot grease.
• Wear proper apparel. Do not wear loose-fitting or hanging garments, which may ignite if they contact
hot surfaces, and cause severe burns.
• Do not use the oven for drying clothes. Only use the oven for its intended purpose.
• If cabinet storage is provided directly above the cooking surface, only use it to store items that are not
frequently used and can be safely stored in an area subjected to heat. Temperatures may be unsafe for
volatile items such as flammable liquids, cleaners or aerosol sprays.
• Do not use water on grease fires. Should an oven fire occur, leave the oven door closed and turn the
oven off. If the fire continues, throw baking soda on the fire or use a fire extinguisher. Do not put water
or flour on the fire. Flour may be explosive and water can spread a grease fire and cause personal injury.
Button Cell or Coin Batteries Symbol
INGESTION HAZARD: This product contains a button cell or coin battery.
en-us_main.book.book Page 7 Friday, August 14, 2026 1:47 PM
8 IMPORTANT SAFETY INSTRUCTIONS
Safety Standard for Button Cell or Coin Batteries
• Remove and immediately recycle or dispose of used batteries
according to local regulations and keep away from children.
- Do NOT dispose of batteries in household trash or incinerate.
• Even used batteries may cause severe injury or death.
• Call a local poison control center for treatment information.
• Non-rechargeable batteries are not to be recharged.
• Do not force discharge, recharge, disassemble, heat above 140 ℉
(60 ℃) or incinerate.
- Doing so may result in injury due to venting, leakage or explosion
resulting in chemical burns.
• Product contains non-replaceable batteries.
• Battery Type : ML621-TZ1
• Nominal Voltage : 3.0 V
WARNING
• INGESTION HAZARD: This product contains
a button cell or coin battery.
• DEATH or serious injury can occur if
ingested.
• A swallowed button cell or coin battery can
cause Internal Chemical Burns in as little
as 2 hours.
• KEEP new and used batteries OUT OF
REACH of CHILDREN.
• Seek immediate medical attention if a
battery is suspected to be swallowed or
inserted inside any part of the body.
en-us_main.book.book Page 8 Friday, August 14, 2026 1:47 PM
9IMPORTANT SAFETY INSTRUCTIONS
ENGLISH
SAVE THESE INSTRUCTIONS
CAUTION
CAUTION
• To reduce the risk of minor injury to persons, malfunction, or damage to the product or property when
using this product, follow basic precautions, including the following:
Operation
• Always heat fat slowly, and watch as it heats.
• If frying combinations of oils and fats, stir them together before heating.
• Use a deep fat thermometer, if possible, to prevent overheating fat beyond the smoking point.
• Use the least possible amount of fat for effective shallow or deep-fat frying. Filling the pan with too much
fat can cause spillovers when food is added.
• Accessible parts may become hot when the broiler is in use.
• Do not place food or cookware on the bottom of the oven cavity. Doing so will cause permanent damage
to the oven bottom finish.
• When using cooking or roasting bags in the oven, follow the manufacturer’s directions.
Maintenance
• Do not store items of interest to children in cabinets above a range or on the back guard of a range.
Children climbing on the range to reach items could be seriously injured.
• Do not repair or replace any part of the appliance unless specifically recommended in the manual. All
other servicing should be performed by a qualified technician.
• Do not use harsh etching, abrasive cleaners or sharp metal scrapers to clean the oven door glass
because they can scratch the surface. Scratches may cause the glass to shatter.
• Make sure oven lights are cool before cleaning.
• Do not clean the door gasket. The door gasket is essential for a good seal. Care should be taken not to
rub, damage, or move the gasket.
• Clean in the self-clean cycle only parts listed in this manual. Before self-cleaning the oven, remove the
broiler pan, all oven racks, the meat probe and any cookware, utensils or food from the oven.
en-us_main.book.book Page 9 Friday, August 14, 2026 1:47 PM
10 PRODUCT OVERVIEW
PRODUCT OVERVIEW
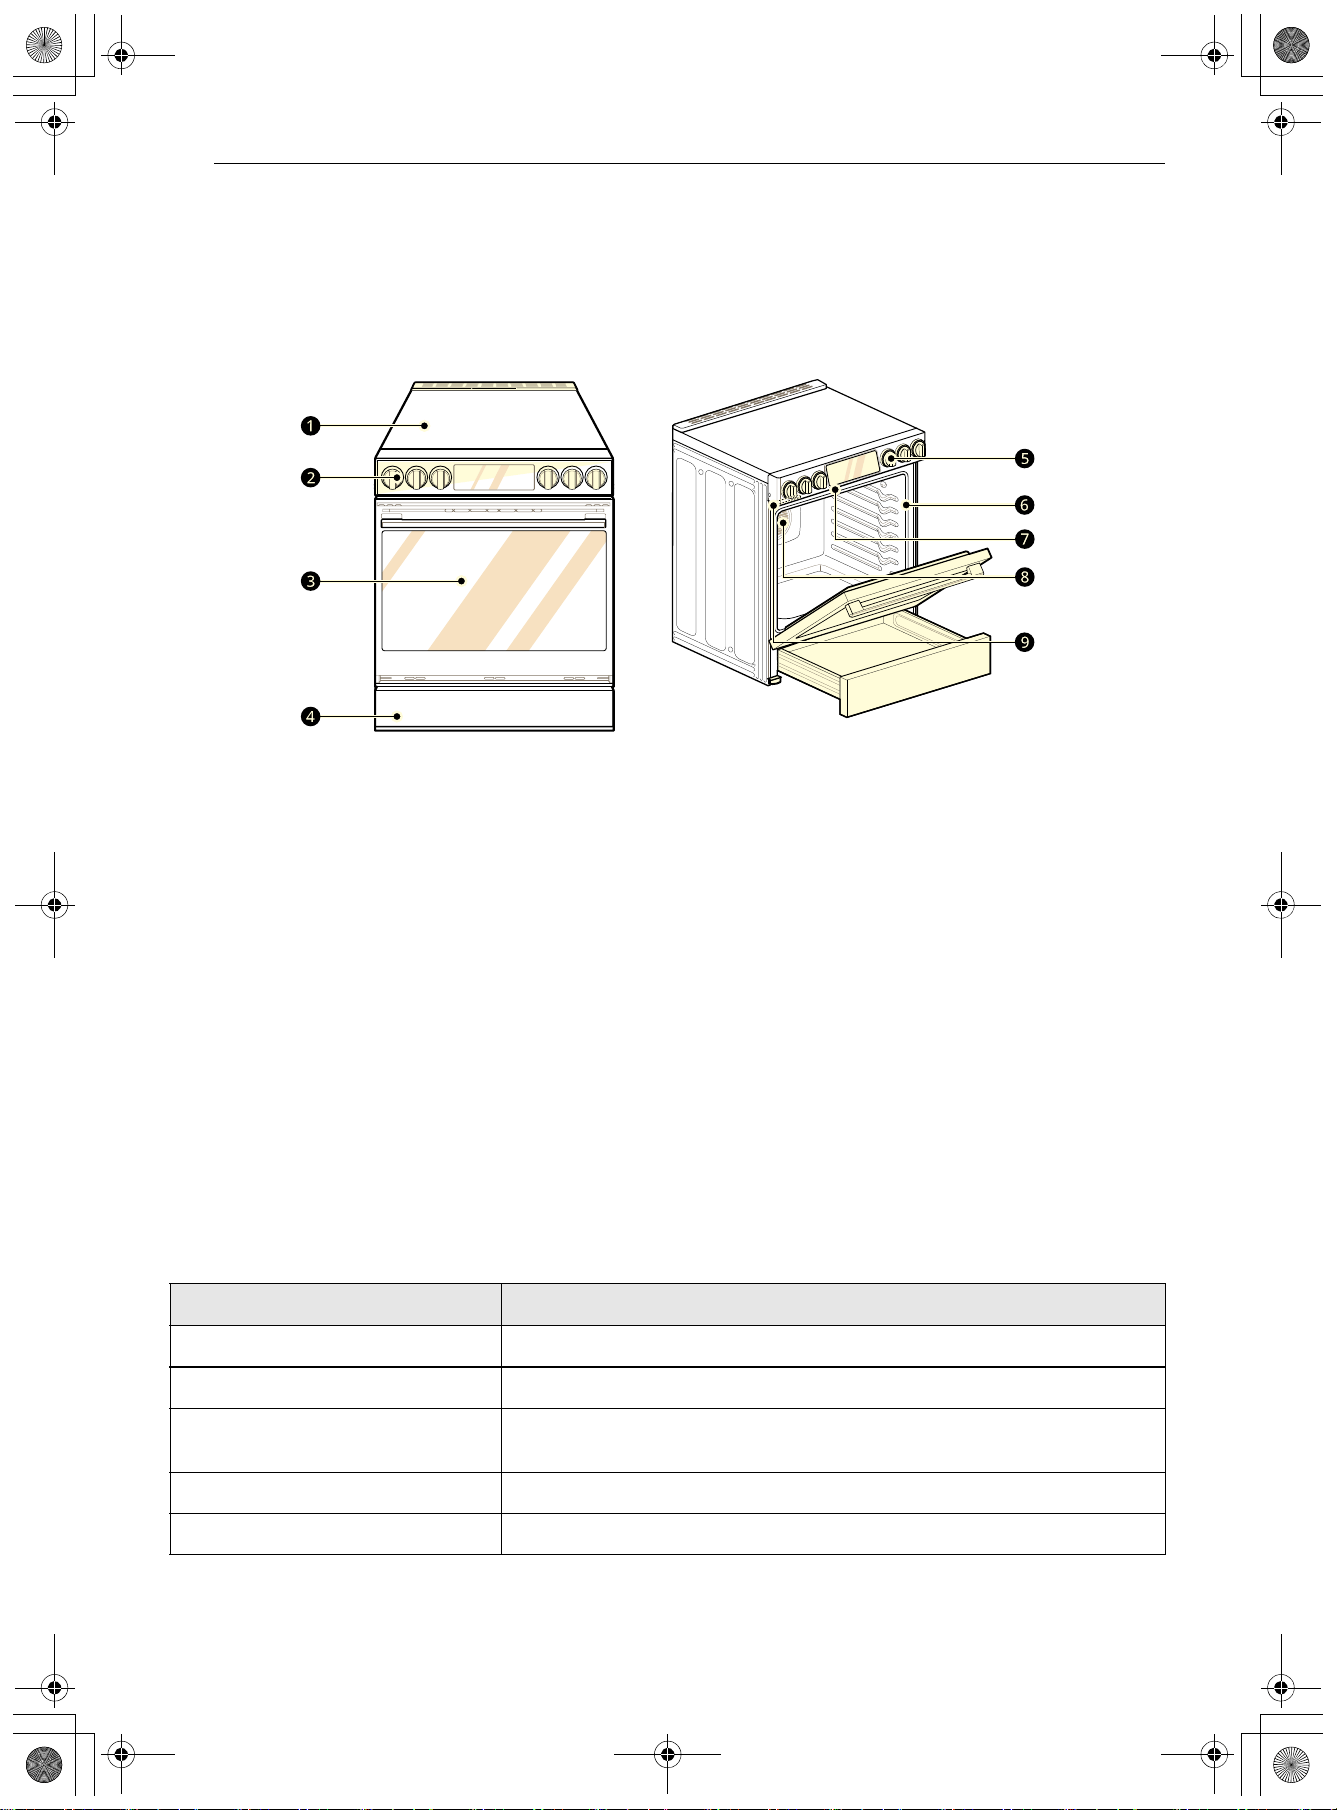
Product Features
Exterior and Interior
a Cooktop
b Cooktop controller
c Oven door
d Storage drawer
e Temp Knob
f Gasket
g Broil Burner
h Convection burner
i Model & serial number plate
Product Specifications
The appearance and specifications listed in this manual may vary due to constant product improvements.
Oven Range Models LSIU6338*E
Description Electric Slide In Oven Range
Electrical requirements 12.1 kW 120/240 VAC or 10.2 kW 120/208 VAC
Exterior Dimensions 29 7/8" (W) x 36 1/2" (H) x 26 7/8" (D) (D with door closed)
75.9 cm (W) x 92.7 cm (H) x 68.3 cm (D) (D with door closed)
Height to cooking surface 36" (91.3 cm)
Total capacity 6.3 cu. ft.
en-us_main.book.book Page 10 Friday, August 14, 2026 1:47 PM
11PRODUCT OVERVIEW
ENGLISH
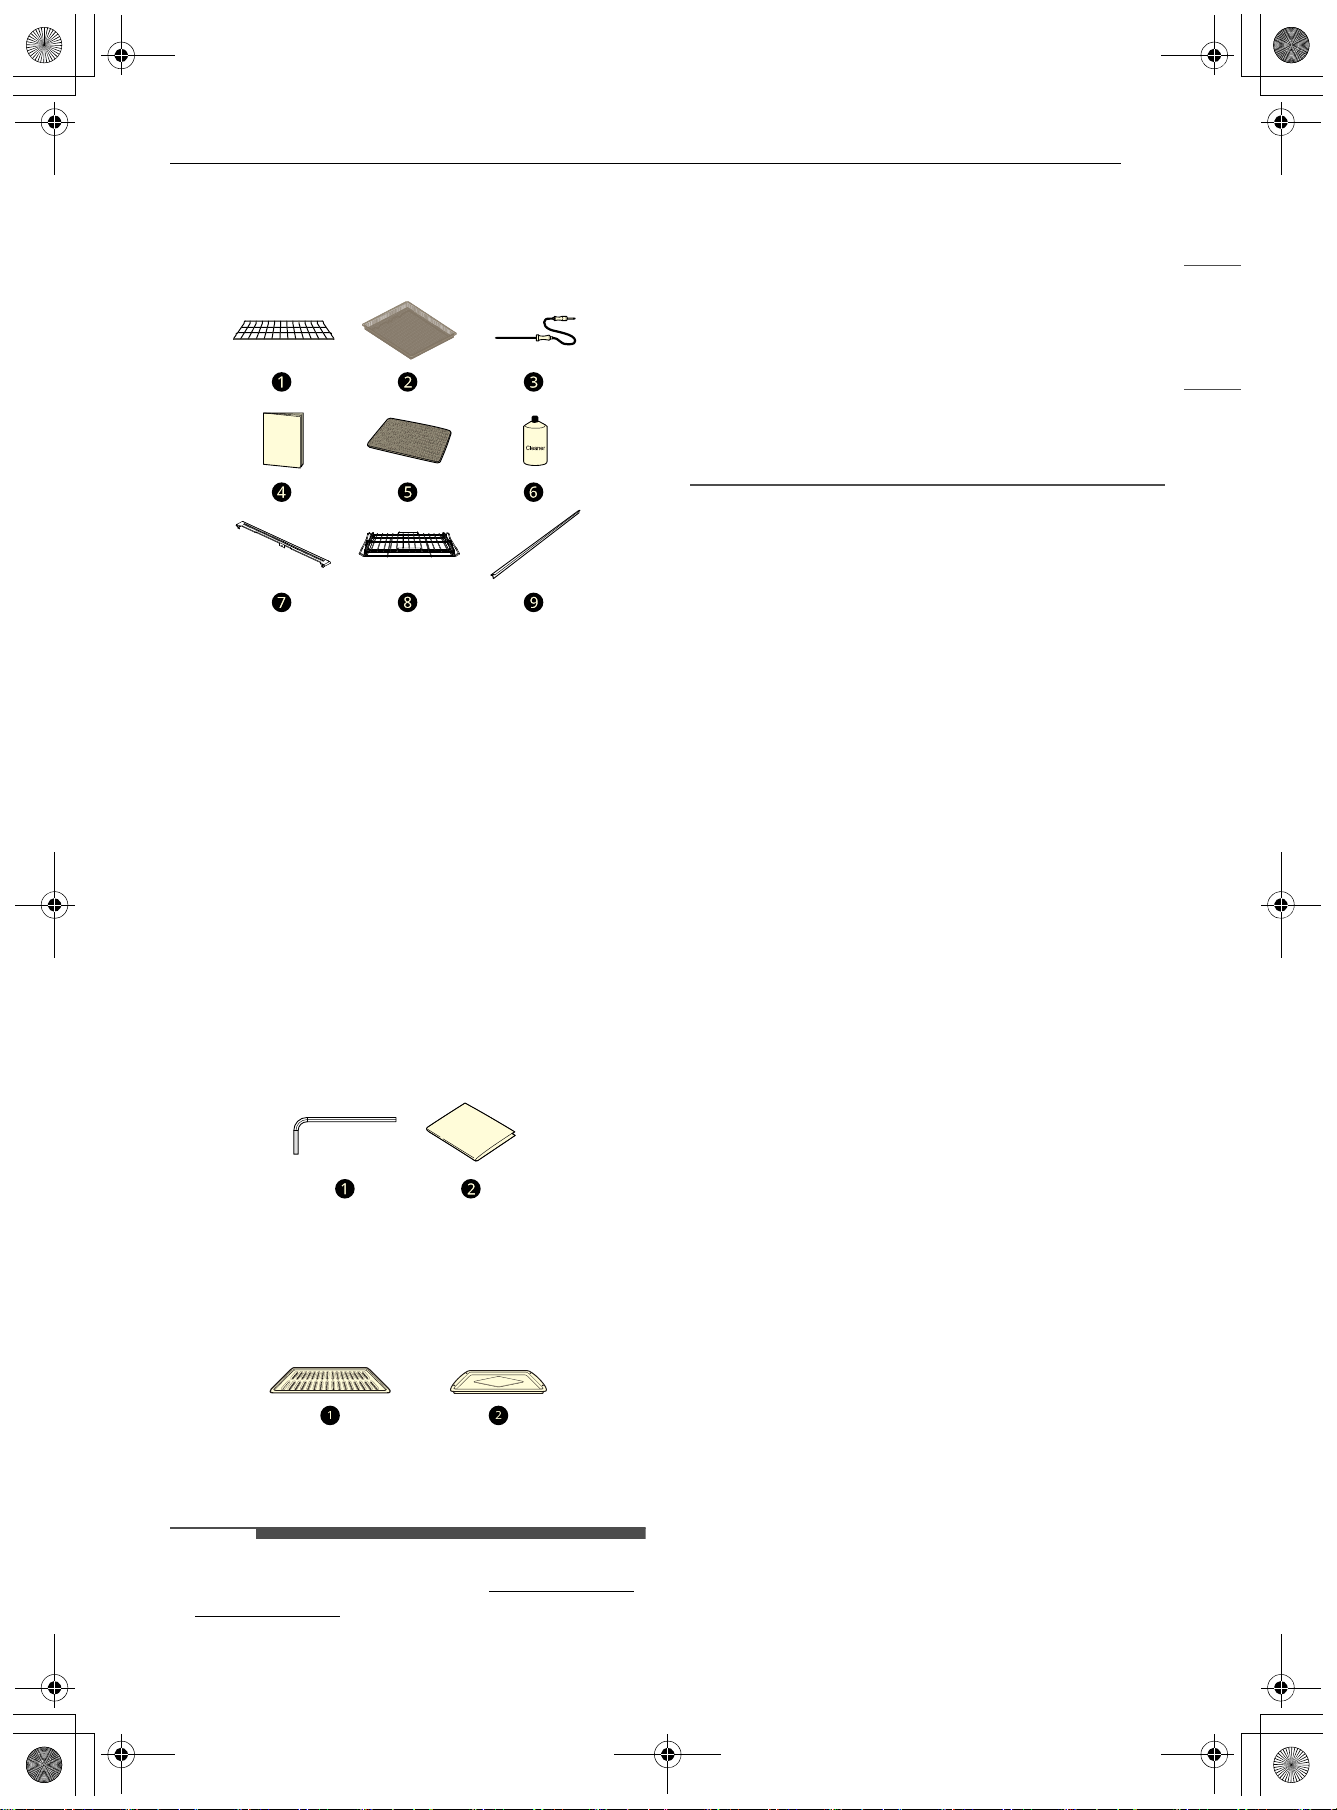
Accessories
Included Accessories
a Heavy Duty Rack (2 ea)
b Air Fry Tray (1 ea)
c Meat Probe (1 ea)
d Owner’s Manual (1 ea)
e Non-scratch Scouring Pad (1 ea)
f Cooktop Cleaner (1 ea)
g Rear Filler (1 ea)
h Gliding Rack (1 ea)
i Rubber Gasket (2 ea)
Handle SVC Kit
a 3/32" Allen wrench (1 ea)
b Template (1 ea)
Optional Accessories (sold separately)
a Grid
b Broiler Pan
NOTE
• Contact LG Customer Service at 1-800-984-6306
(1-888-542-2623
in Canada) if any accessories
are missing.
• For your safety and for extended product life,
only use authorized components.
• The manufacturer is not responsible for product
malfunction or accidents caused by the use of
separately purchased, unauthorized
components or parts.
• The images in this guide may be different from
the actual components and accessories, which
are subject to change by the manufacturer
without prior notice for product improvement
purposes.
en-us_main.book.book Page 11 Friday, August 14, 2026 1:47 PM
12 INSTALLATION
INSTALLATION
Before Installing
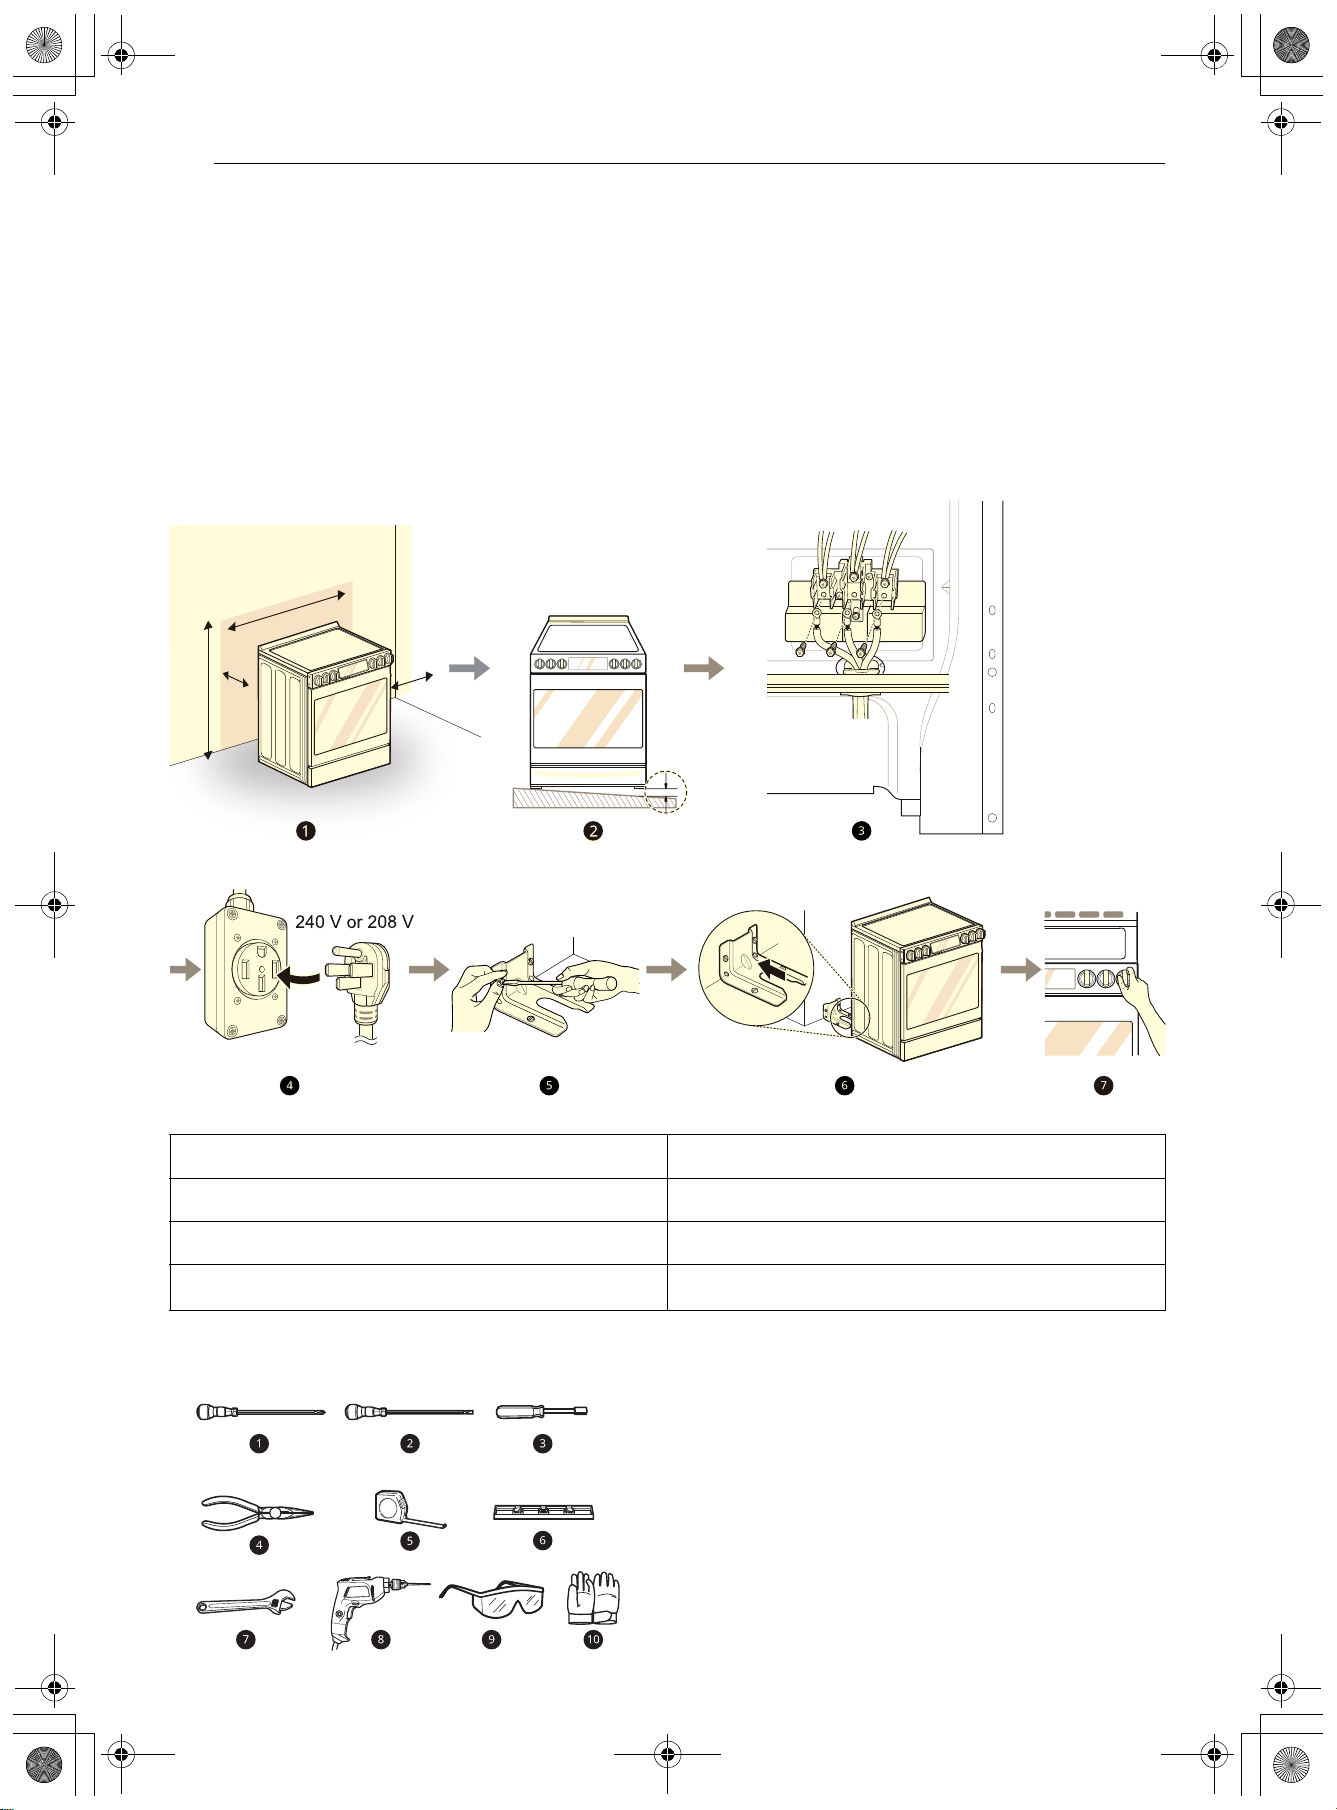
Installation Overview
Please read the following installation instructions first after purchasing this product or transporting it to
another location.
The images in this guide may be different from the actual components and accessories, which are subject
to change by the manufacturer without prior notice for product improvement purposes.
Tools Needed
a Phillips Screwdriver
b Flat-blade Screwdriver
c 1/4" Nut Driver
d Pliers
e Tape Measure
f Level
a Check and choose the proper location e Install anti-tip device
b Level the range f Engage the anti-tip device
c Connect electric range g Test run
d Plug in the power cord
en-us_main.book.book Page 12 Friday, August 14, 2026 1:47 PM
13INSTALLATION
ENGLISH
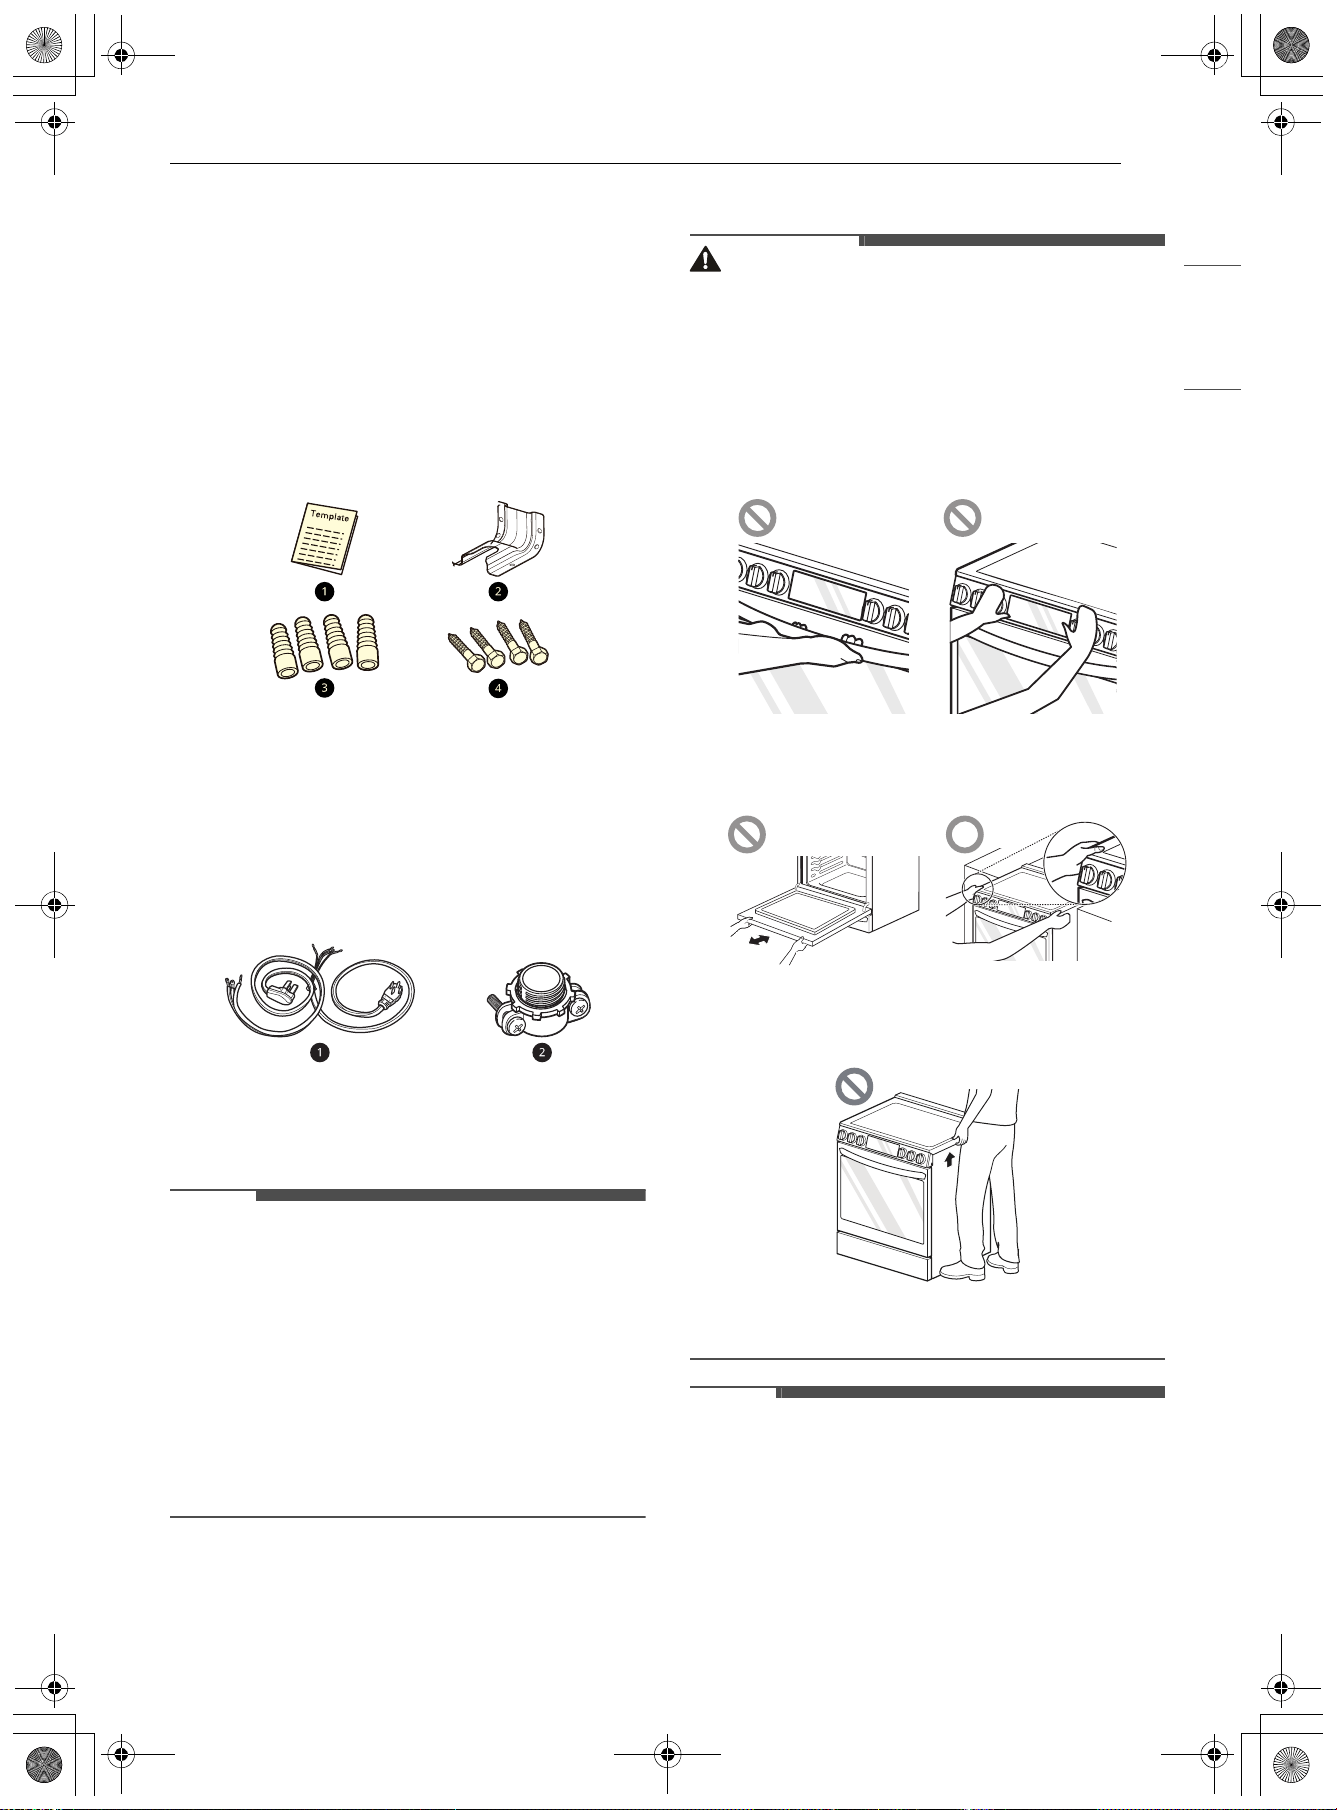
g Adjustable Wrench
h Drill
i Safety Glasses
j Gloves
Parts
Parts Provided
a Template (1 ea)
b Anti-tip Bracket Kit (1 ea)
c Anchor Sleeves (4 ea)
d Lag Bolts (4 ea)
Parts Not Provided
a 4-Wire Cord or 3-Wire Cord (UL approved 40 or
50 AMP)
b Strain Relief (for conduit installations only)
NOTE
• Observe all governing codes and ordinances.
• Have the installer show you the location of the
circuit breaker or fuse. Mark it for easy
reference.
• As when using any appliance generating heat,
there are certain safety precautions you should
follow.
• Be sure your range is installed and grounded
properly by a qualified installer or service
technician.
Unpacking and Moving the Range
WARNING
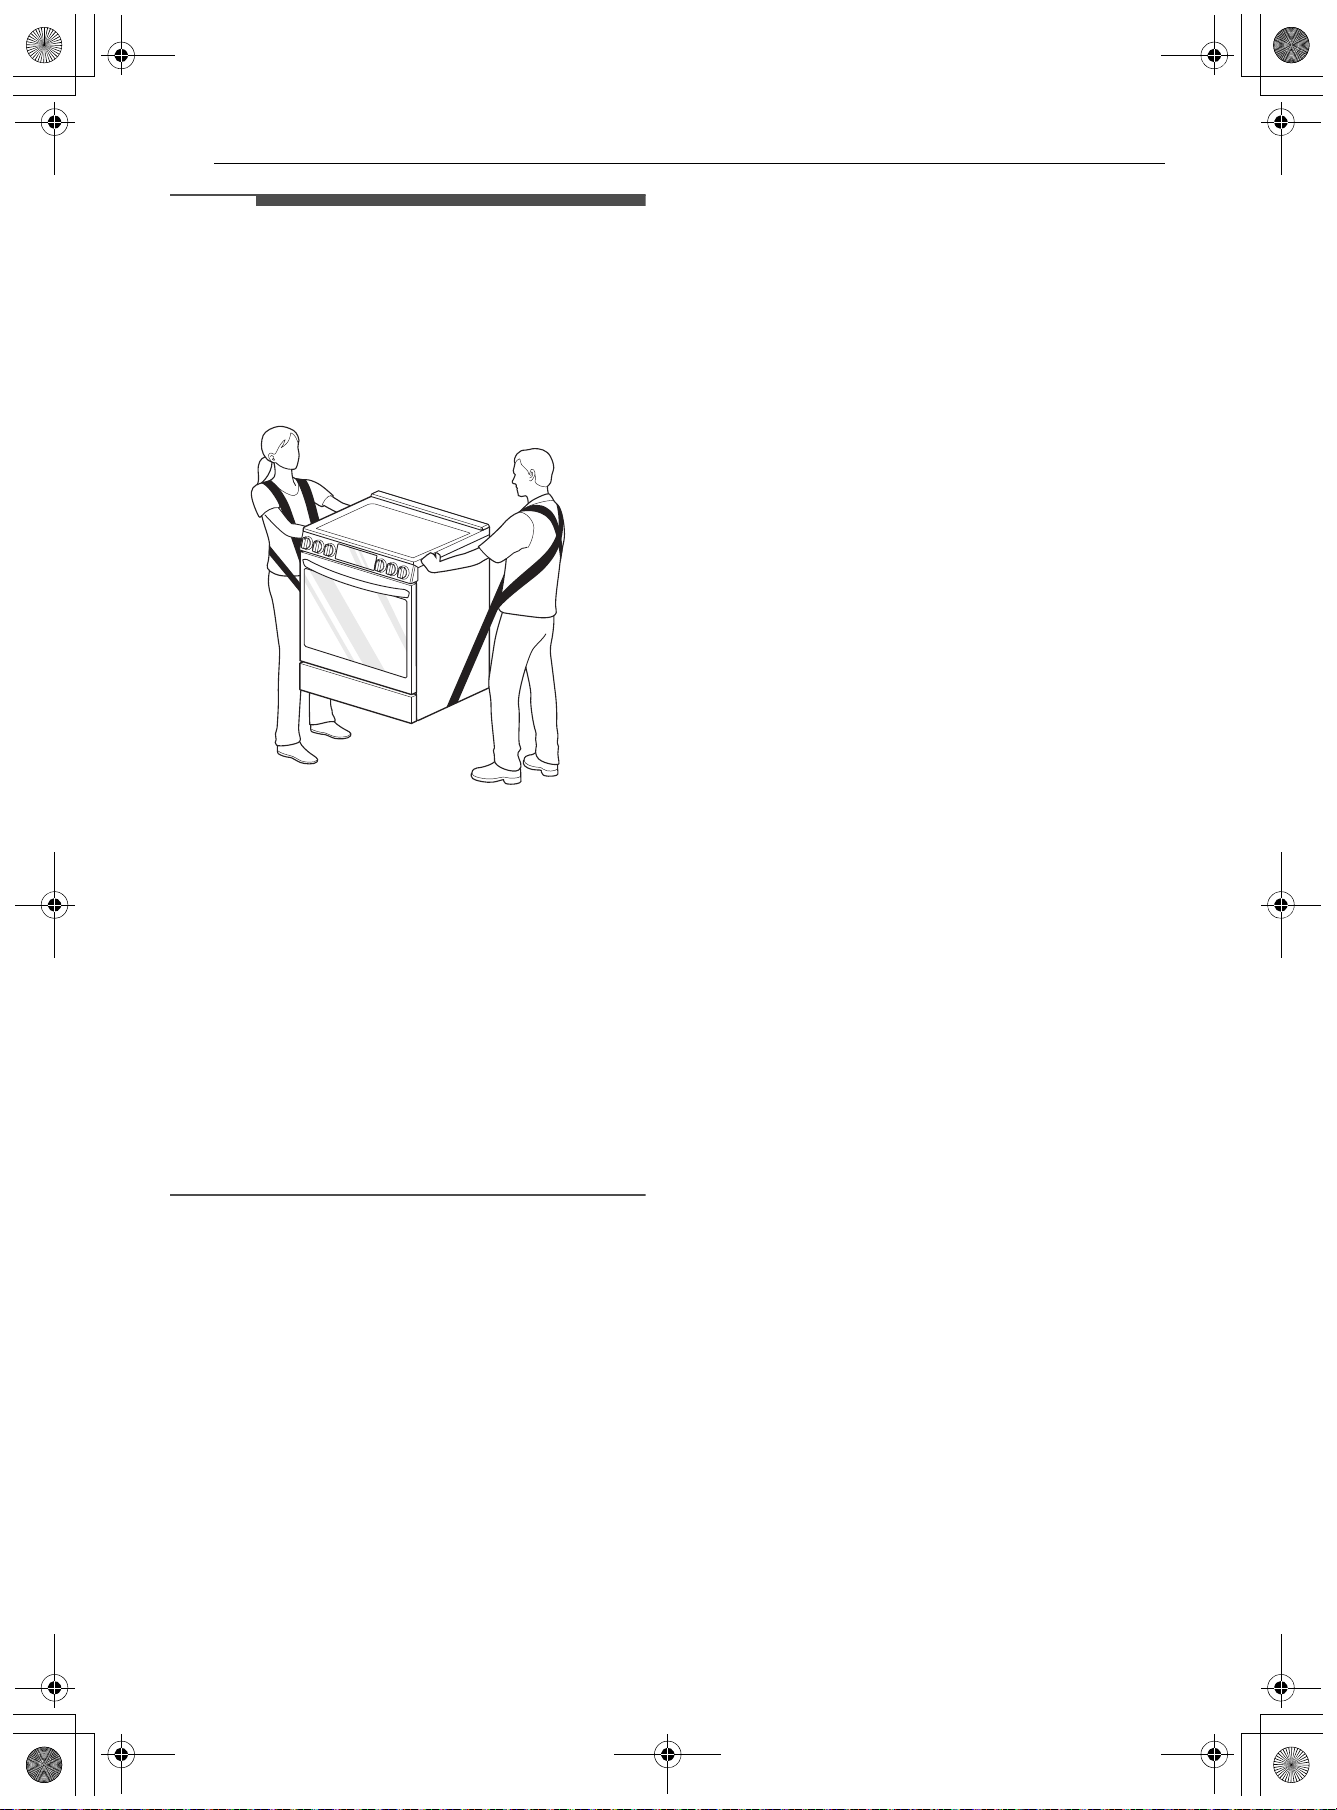
• You should use two or more people to move and
install the range. (Excessive Weight Hazard)
Failure to do so can result in back or other injury.
• Do not use the door handles or knobs to push or
pull the range during installation or when
moving the range out for cleaning or service.
Doing so can result in serious damage to the
range.
• Do not push or pull the range by grabbing the
open oven door or cooktop only. Doing so can
result in serious damage to the range.
• Do not lift the range using the cooktop or door
handle. Doing so can cause damage and
improper operation of the range.
• To reduce the risk of burns, do not move this
appliance while it is hot.
NOTE
• The image may differ from the actual model.
en-us_main.book.book Page 13 Friday, August 14, 2026 1:47 PM
14 INSTALLATION
NOTE
• Your range is heavy and can be installed on soft
floor coverings such as cushioned vinyl or
carpeting. Use care when moving the range on
this type of flooring. Use a belt when moving the
range to prevent damaging the floor. Or slide
the range onto cardboard or plywood to avoid
damaging the floor covering.
• Remove packing material, tape and any
temporary labels from your range before using.
Do not remove any warning-type labels, the
model and serial number label, or the Tech
Sheet that is located on the back of the range.
• To remove any remaining tape or glue, rub the
area briskly with your thumb. Tape or glue
residue can also be easily removed by rubbing a
small amount of liquid dish soap over the
adhesive with your fingers. Wipe with warm
water and dry.
• Do not use sharp instruments, rubbing alcohol,
flammable fluids, or abrasive cleaners to remove
tape or glue. These products can damage the
surface of your range.
en-us_main.book.book Page 14 Friday, August 14, 2026 1:47 PM
15INSTALLATION
ENGLISH
Choosing the Proper Location
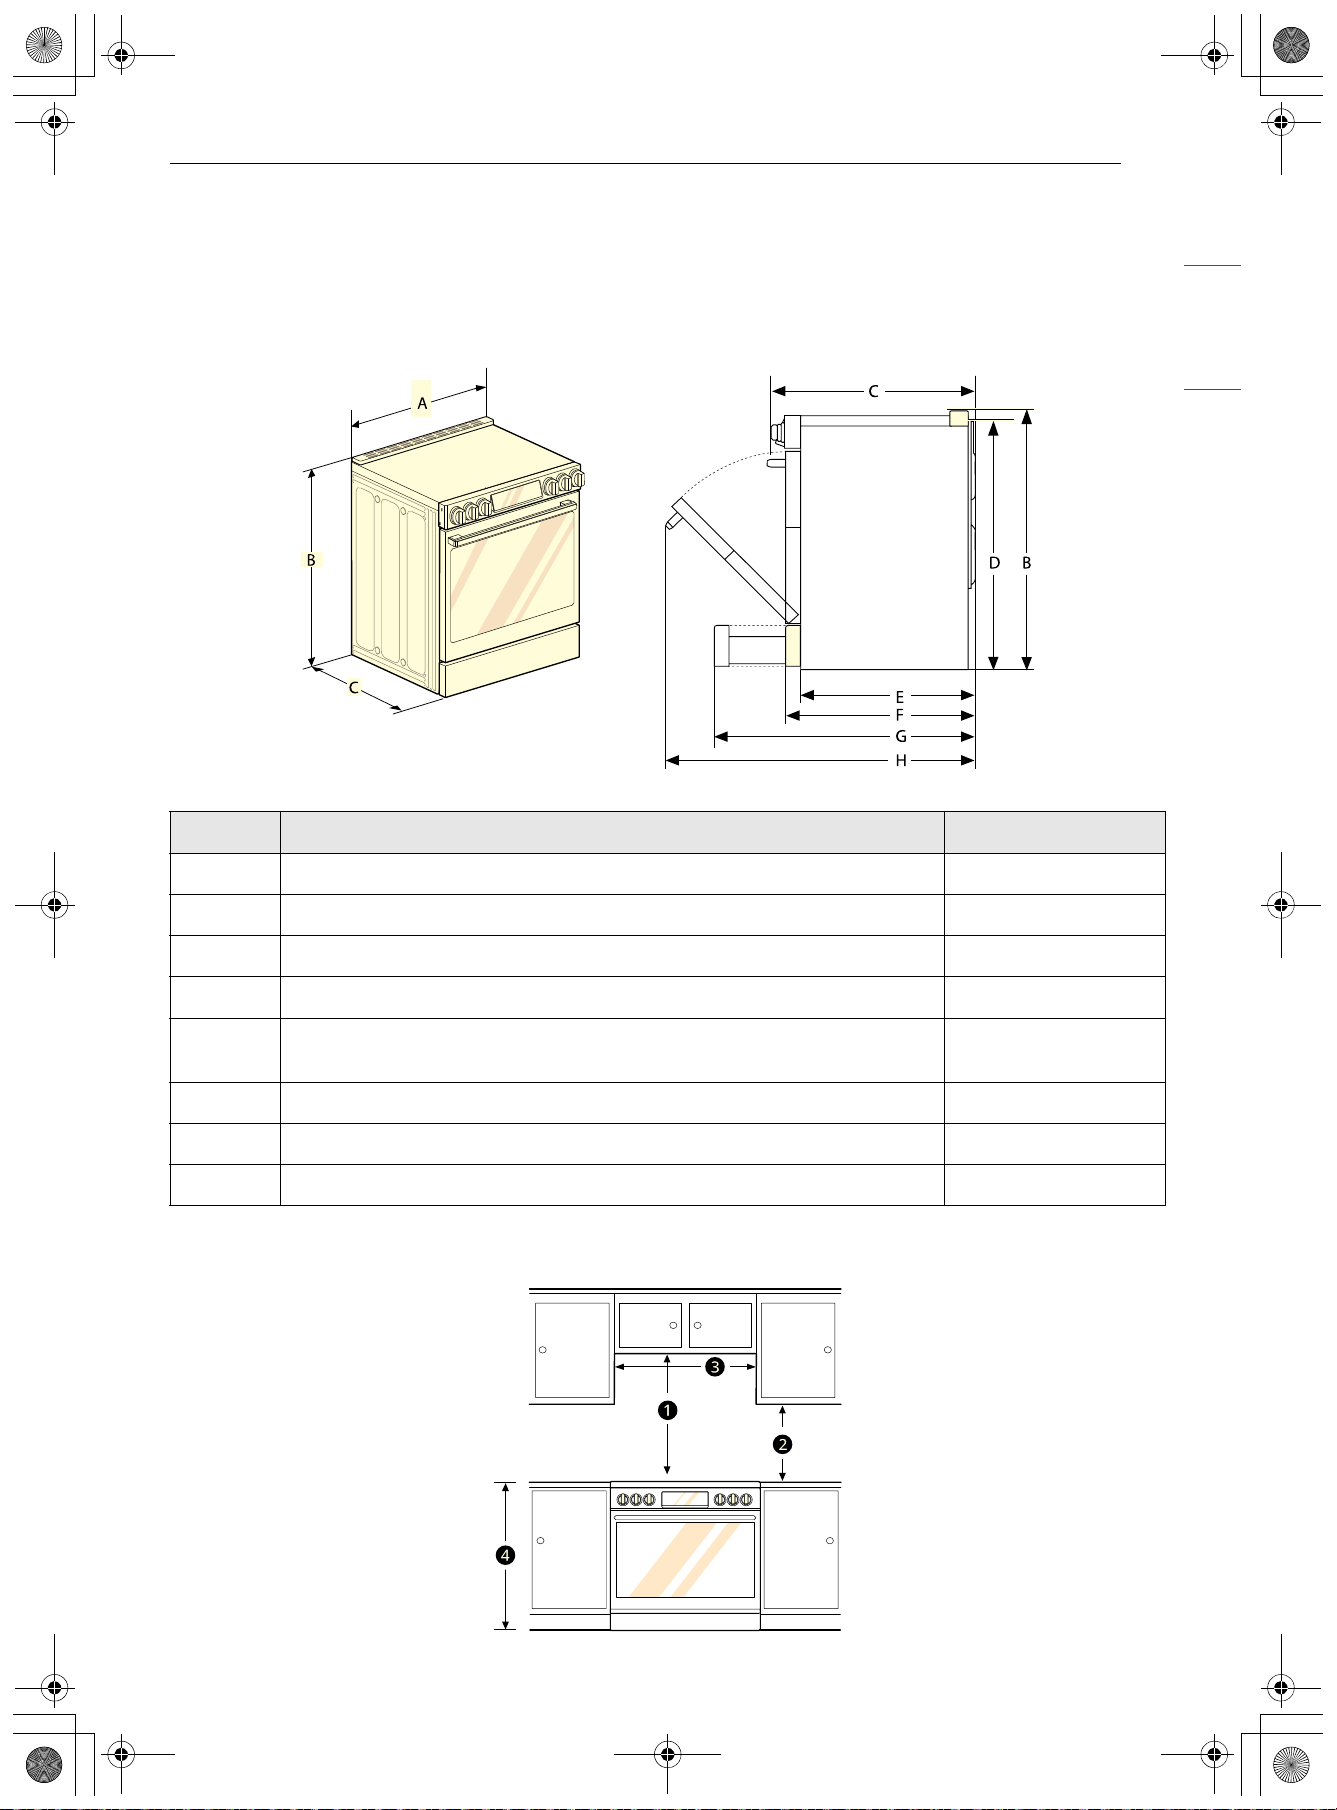
Dimensions and Clearances
Dimensions
Minimum Dimensions
- Dimensions LSIU6338*E
AWidth 29 7/8" (758.8 mm)
BHeight 36 1/2" (927.1 mm)
C Depth (Includes Door Handle) 29 5/16" (743.9 mm)
D Height (Excludes Vent Trim) 36" (914.4 mm)
E
Depth (Includes only the product body that is loaded into the cabinet.
Excludes door, drawer, and handles)
24 3/4" (629.4 mm)
F Depth (Excludes Door Handle) 26 7/8" (682.5 mm)
G Depth when drawer is fully opened 38 7/16" (976.7 mm)
H Depth when door is fully opened 48 5/8" (1235.9 mm)
en-us_main.book.book Page 15 Friday, August 14, 2026 1:47 PM
16 INSTALLATION
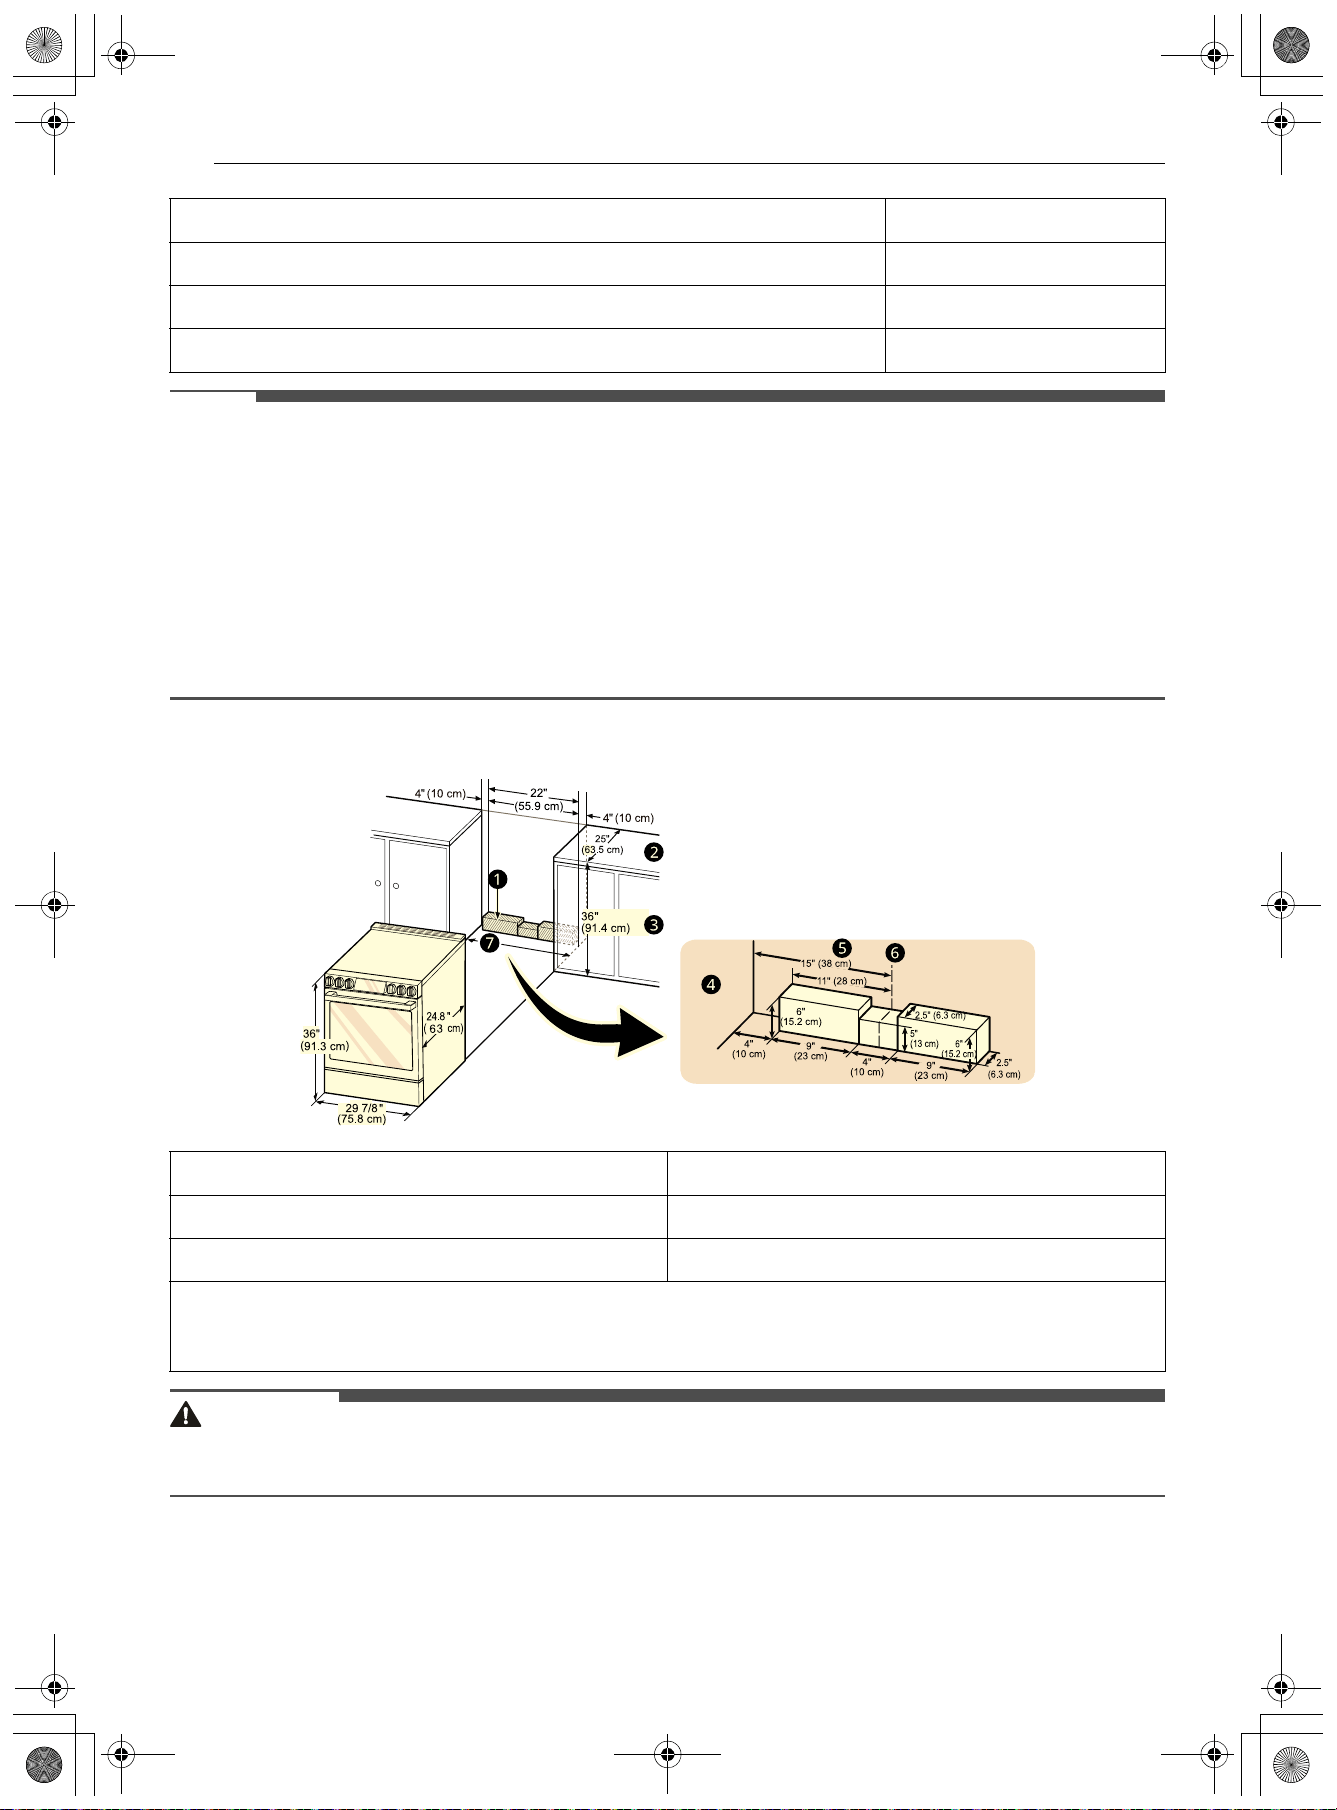
NOTE
• a 30" (76.2 cm) minimum clearance between the top of the cooking surface and the bottom of an
unprotected wood or metal cabinet; or 24" (60.9 cm) minimum when bottom of wood or metal cabinet is
protected by not less than 1/4" (0.64 cm) flame retardant millboard covered with not less than no. 28
MSG sheet steel, 0.015" (0.381 mm) stainless steel, 0.024" (0.610 mm) aluminum or 0.020" (0.508 mm)
copper.
•
b 15" (38.1 cm) minimum between countertop and adjacent cabinet bottom.
• Important – Save for the use of the local electrical inspector.
• For installation in Canada, a free-standing range is not to be installed closer than 15/32" (12 mm) from
any adjacent surface.
Clearances
CAUTION
• The height of the countertop afterleveling the range should be higher than the surface height of the
oven cooktop glass to prevent damage caused by impact on the glass rim.
Electricity
The range should always be plugged into its own individual properly grounded electrical outlet.
a Minimum distance from top of range to combustible surface overhead
30" (76.2 cm)
b Minimum distance from countertop to overhead cabinets at side
15" (38.1 cm)
c Minimum opening in overhead cabinets
30" (76.2 cm)
d Height of countertop
36" (91.3 cm)
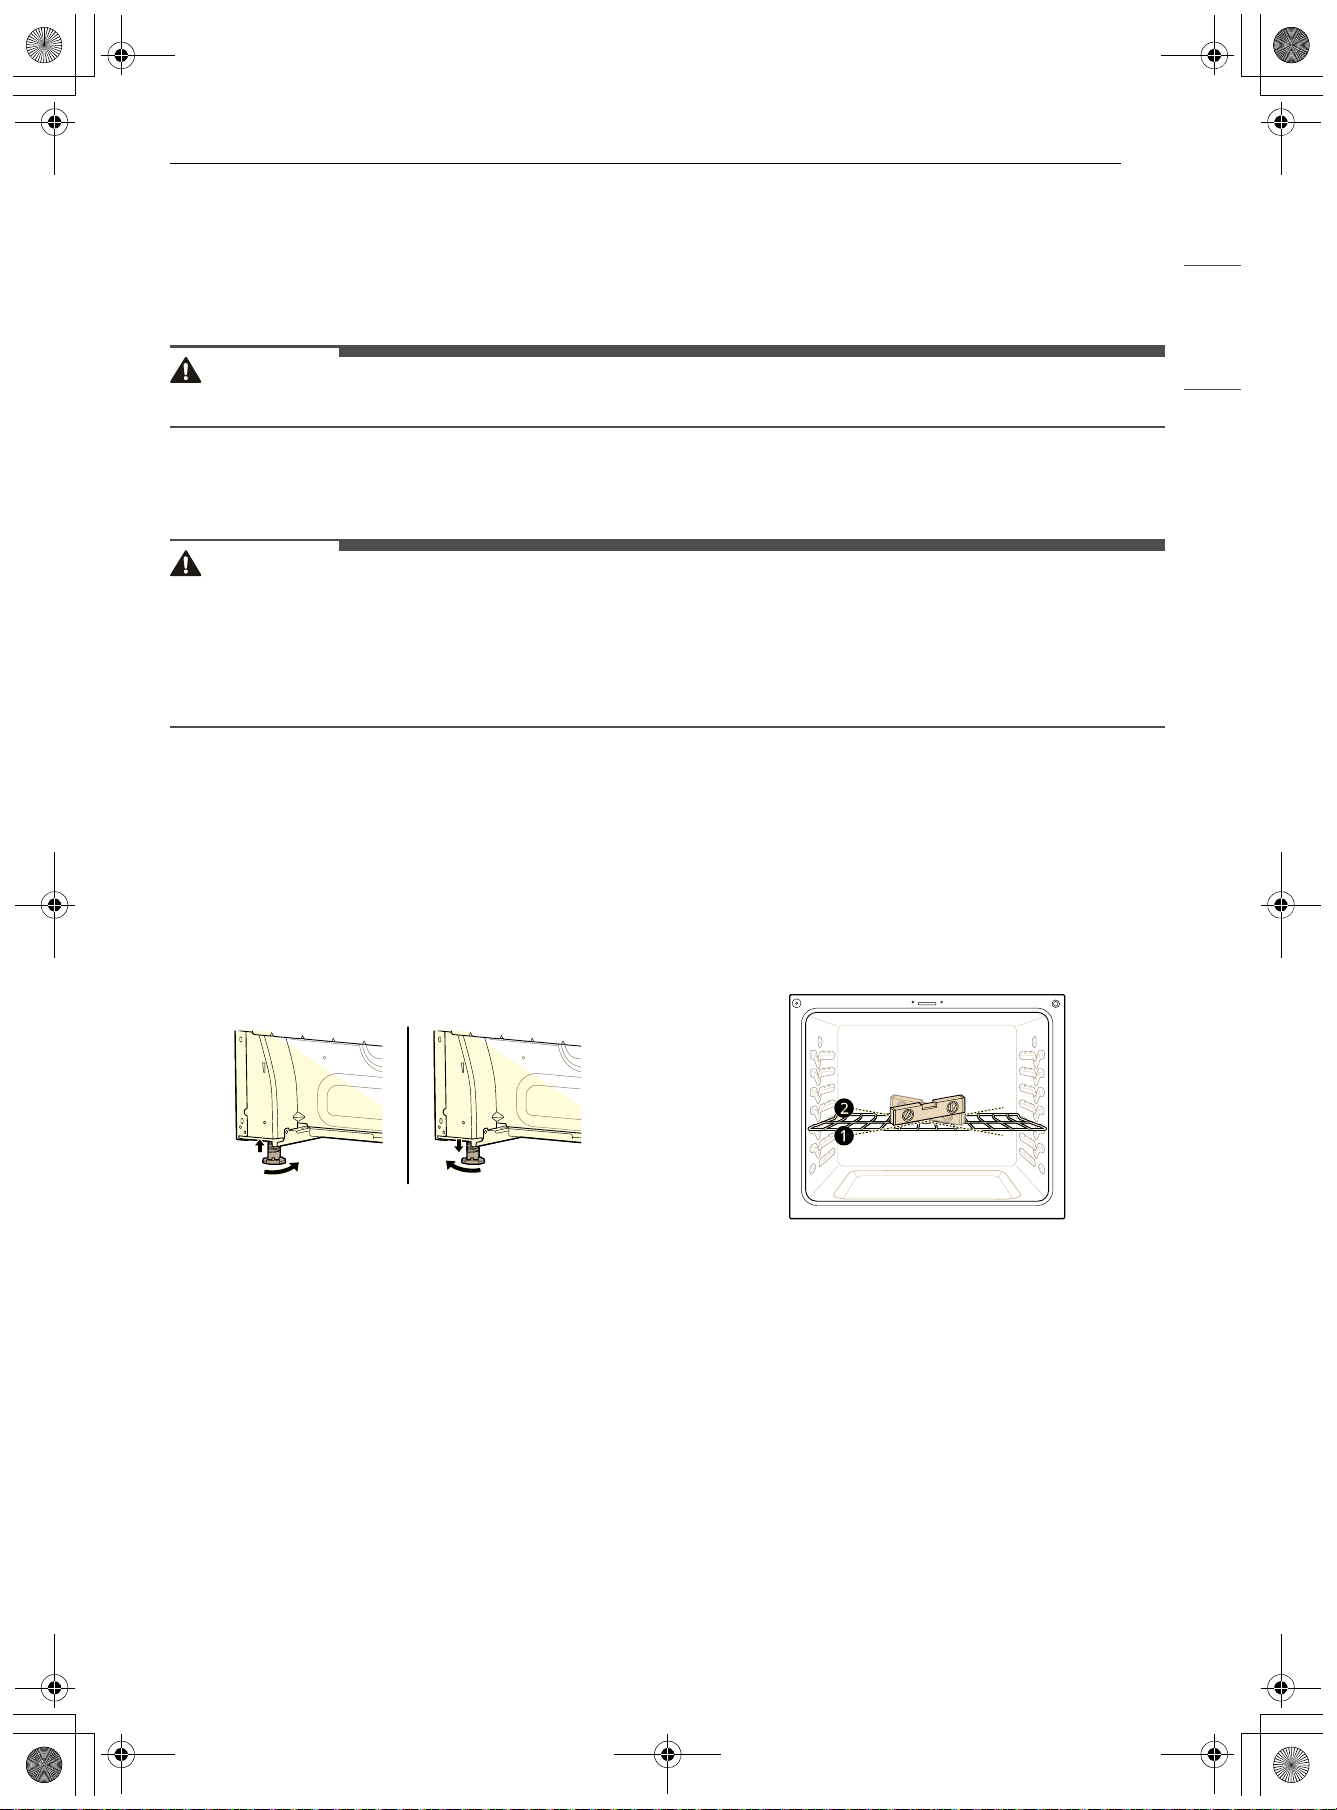
a Acceptable Electrical Outlet Area b Normal Countertop Depth
c Counter Top Height d Cabinet
e Wall f Center
g Cabinet Opening
= 30" (76.2 cm) For U.S.A
= 30" (76.2 cm) ~ 31" (78.7 cm) For CANADA
en-us_main.book.book Page 16 Friday, August 14, 2026 1:47 PM
17INSTALLATION
ENGLISH
• This prevents overloading house wiring circuits which could cause a fire hazard from overheated wires.
• It is recommended that a separate circuit serving only this appliance be provided.
Flooring
CAUTION
• Use an insulated pad or 1/4 in. (0.64 cm) plywood under the range if installing the range over carpeting.
Ambient Temperature
CAUTION
• Make sure wall coverings, countertops and cabinets around the range can withstand the heat (up to 194
°F) generated by the range. Discoloration, delamination or melting may occur. This range has been
designed to comply with the maximum allowable wood cabinet temperature of 194 °F.
• Before installing the range in an area covered with linoleum or other synthetic floor covering, make sure
the floor covering can withstand temperatures of at least 200 °F (93 °C).
Leveling
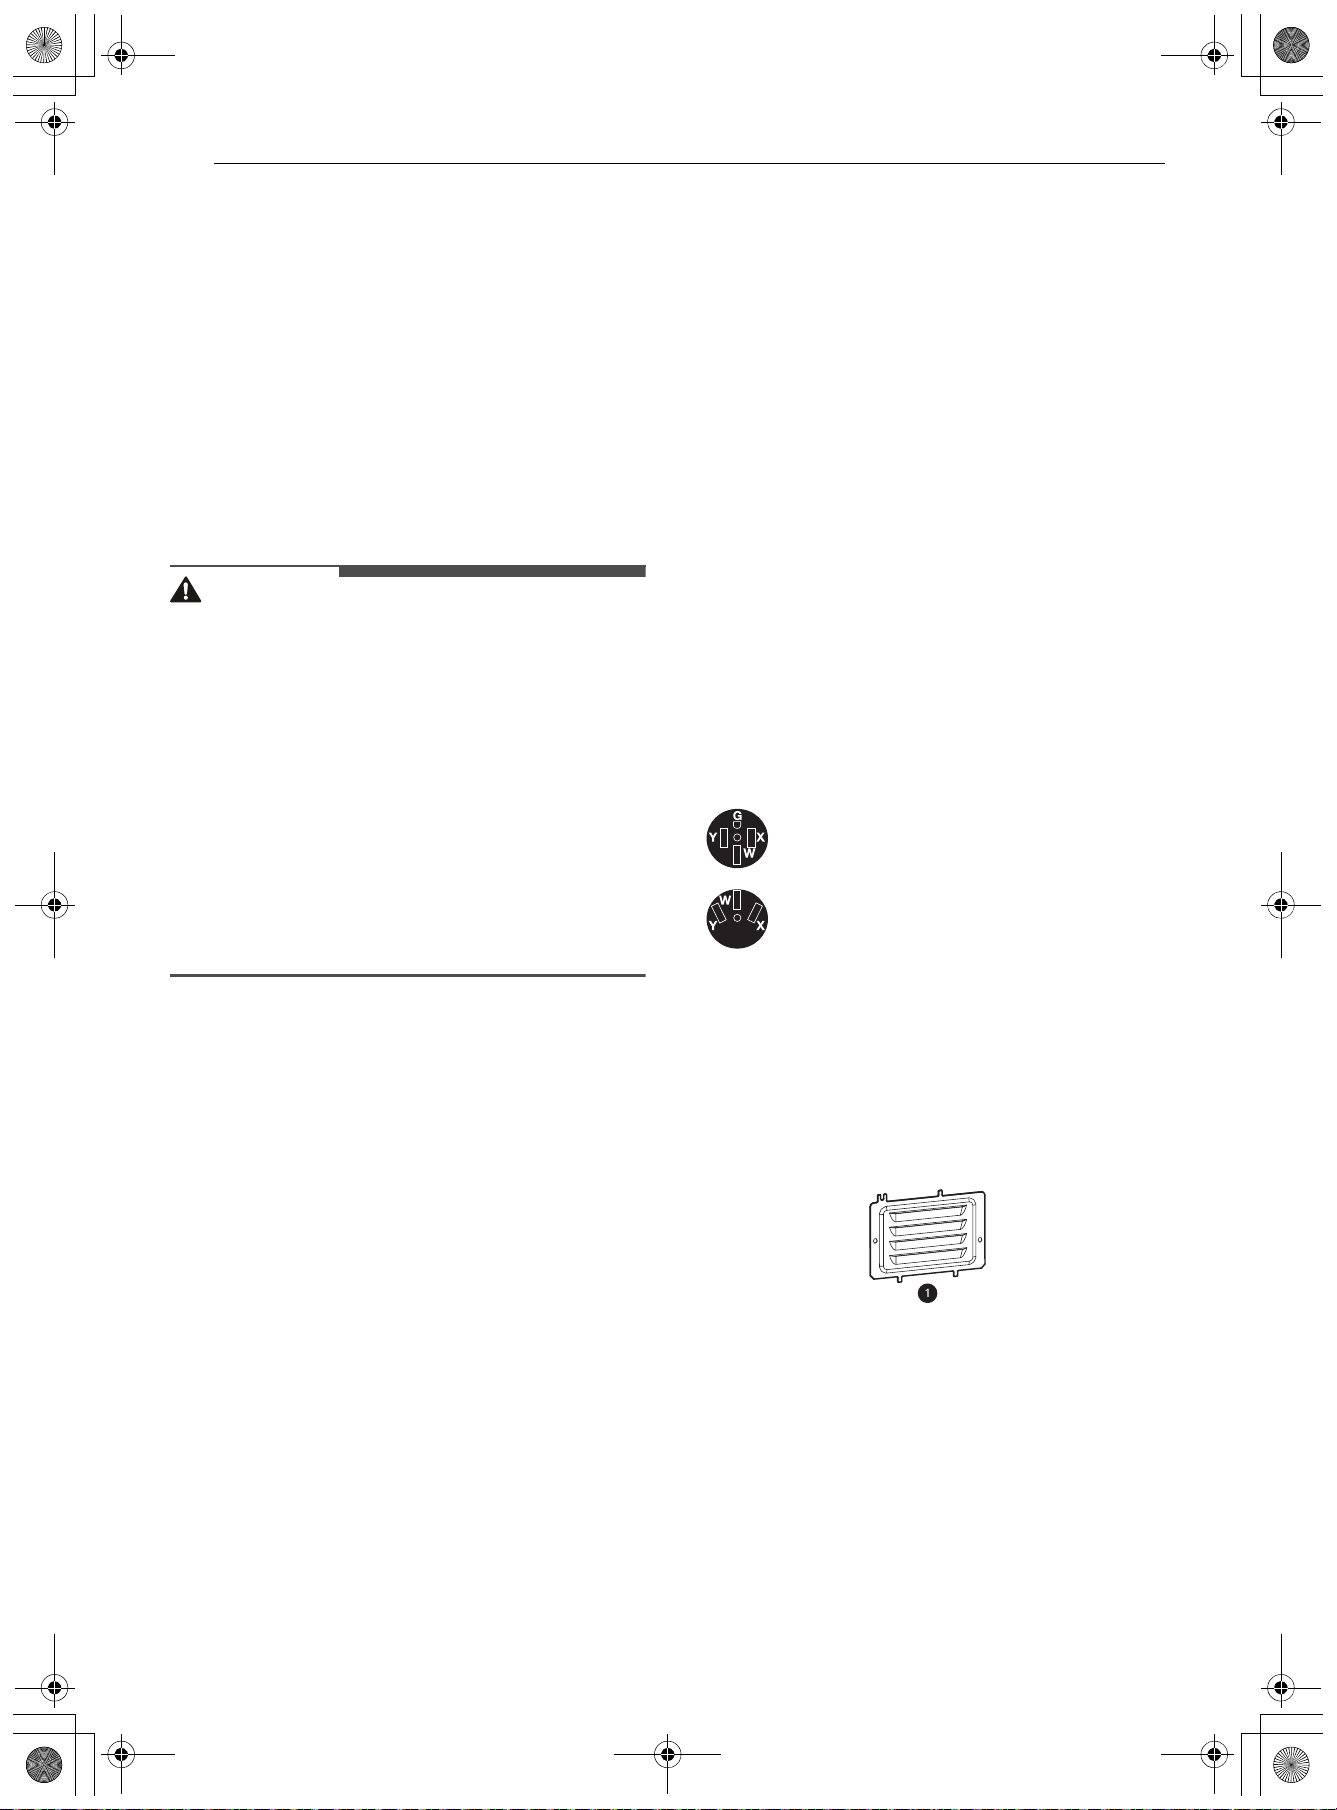
Leveling the Range
Level the range by adjusting the leveling legs with
a wrench. Extending the legs slightly may also
make it easier to insert the rear leg into the anti-tip
bracket.
Checking Adjustments
1 Place the level diagonally on the oven rack,
and check each direction for level.
• First check direction
a. Then check
direction
b.
2 If the level doesn’t show that the rack is level,
adjust the leveling legs with a wrench.
Connecting Electricity
Electrical Requirements
This appliance must be installed and grounded on
a branch circuit by a qualified technician in
accordance with the National Electrical code ANSI/
NFPA NO. 70 - latest edition.
All wiring should conform to local and NEC codes.
This range requires a single-phase, 3 wire, AC 120/
en-us_main.book.book Page 17 Friday, August 14, 2026 1:47 PM
18 INSTALLATION
208 V or 120/240 V 60 Hz electrical system. Use
only a 3-conductor or a 4-conductor UL - listed
range cord with closed-loop terminals, open-end
spade lugs with upturned ends or similar
termination. Do not install the power cord without
a strain relief.
A range cord rated at 40 amps with 120/240 V
minimum range is required.
If a 50 amp range cord is used, it should be
marked for use with 1 3/8" diameter connection
openings. This appliance may be connected by
means of a conduit or power cord. If a conduit is
being used, refer to "3-Wire Connection: Conduit"
or "4-Wire Connection: Conduit" sections.
WARNING
• Allow 2 to 3 ft (61.0 cm to 91.4 cm) of slack in the
line so that the range can be moved if servicing
is ever necessary.
• The power supply cord and plug should not be
modified. If the plug will not fit the outlet, have a
proper outlet installed by a qualified electrician.
• Using an extension cord to connect the power is
prohibited. Connect the power cord and plug
directly.
• Electrical ground is required on this appliance.
• Make sure that the power cord is not pinched by
the range or heavy objects. Failure to do so can
result in serious burns or electrical shock.
Specified Power Cord Kit Rating
Case 1
• Voltage: 120/240 volts (3-wire)
• Range rating: 8,750 W - 16,500 W
• Specified rating of power supply-cord kit,
amperes: 40 A or 50 A
• Diameter (inches) of range connection opening
- Power cord: 1 3/8"
- Conduit: 1 1/8"
Case 2
• Voltage: 120/240 volts (3-wire)
• Range rating: 16,501 W - 22,500 W
• Specified rating of power supply-cord kit,
amperes: 50 A
• Diameter (inches) of range connection opening
- Power cord: 1 3/4"
- Conduit: 1 3/8"
Case 3
• Voltage: 120/208 volts (3-wire)
• Range rating: 7,801 W- 12,500 W
• Specified rating of power supply-cord kit,
amperes: 40 A or 50 A
• Diameter (inches) of range connection opening
- Power cord: 1 3/8"
- Conduit: 1 1/8"
Case 4
• Voltage: 120/208 volts (3-wire)
• Range rating: 12,501 W - 18,500 W
• Specified rating of power supply-cord kit,
amperes: 50 A
• Diameter (inches) of range connection opening
- Power cord: 1 3/4"
- Conduit: 1 3/8"
3, 4 - Wire Electrical Wall Receptacle
Connecting the Power Cord /
Conduit
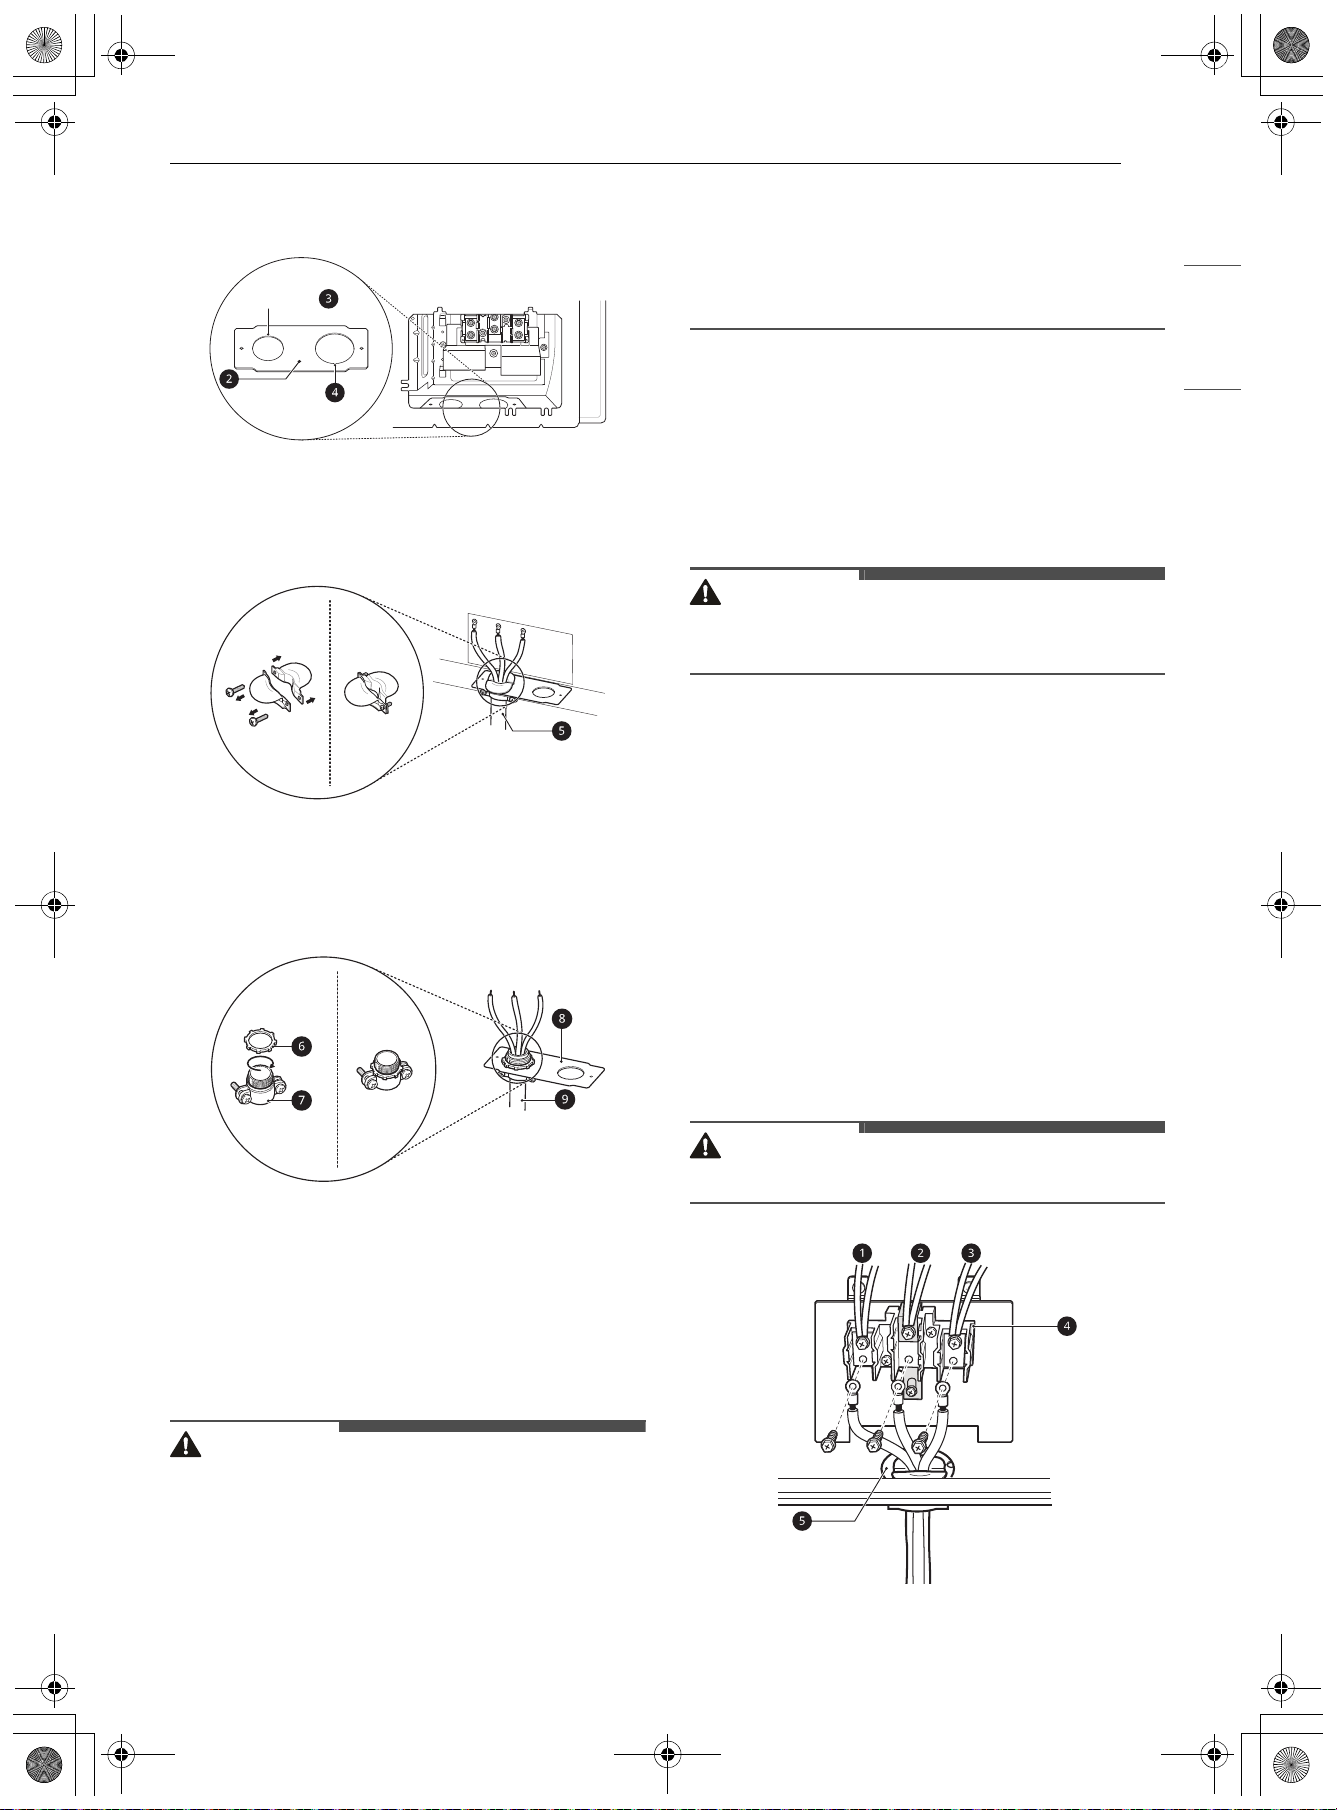
The rear access cover a must be removed. Loosen
the two screws with a screwdriver. The terminal
block will then be accessible.
Use the cord/conduit connection plate
b to install
the power cord or conduit. Leave the connection
plate as installed for power cord installations.
Remove the connection plate for conduit
installations and rotate it to use the smaller 1 1/8
4 Wire receptacle (14-50R)
3 Wire receptacle (10-50R)
en-us_main.book.book Page 18 Friday, August 14, 2026 1:47 PM
19INSTALLATION
ENGLISH
in. (2.8 cm) conduit hole c instead of the 1 3/8 in.
(3.5 cm) power cord hole
d.
For power cord
e installations, hook the strain
relief over the 1 3/8 in. (3.5 cm) power cord hole
located below the rear of the oven. Insert the
power cord through the strain relief and tighten it.
For conduit installations, insert the conduit strain
relief in the 1 1/8 in. (2.8 cm) conduit hole. Then
install the conduit through the body of the strain
relief and fasten the strain relief with its ring.
f Ring
g Body
h Cord/Conduit Connection Plate
i Conduit
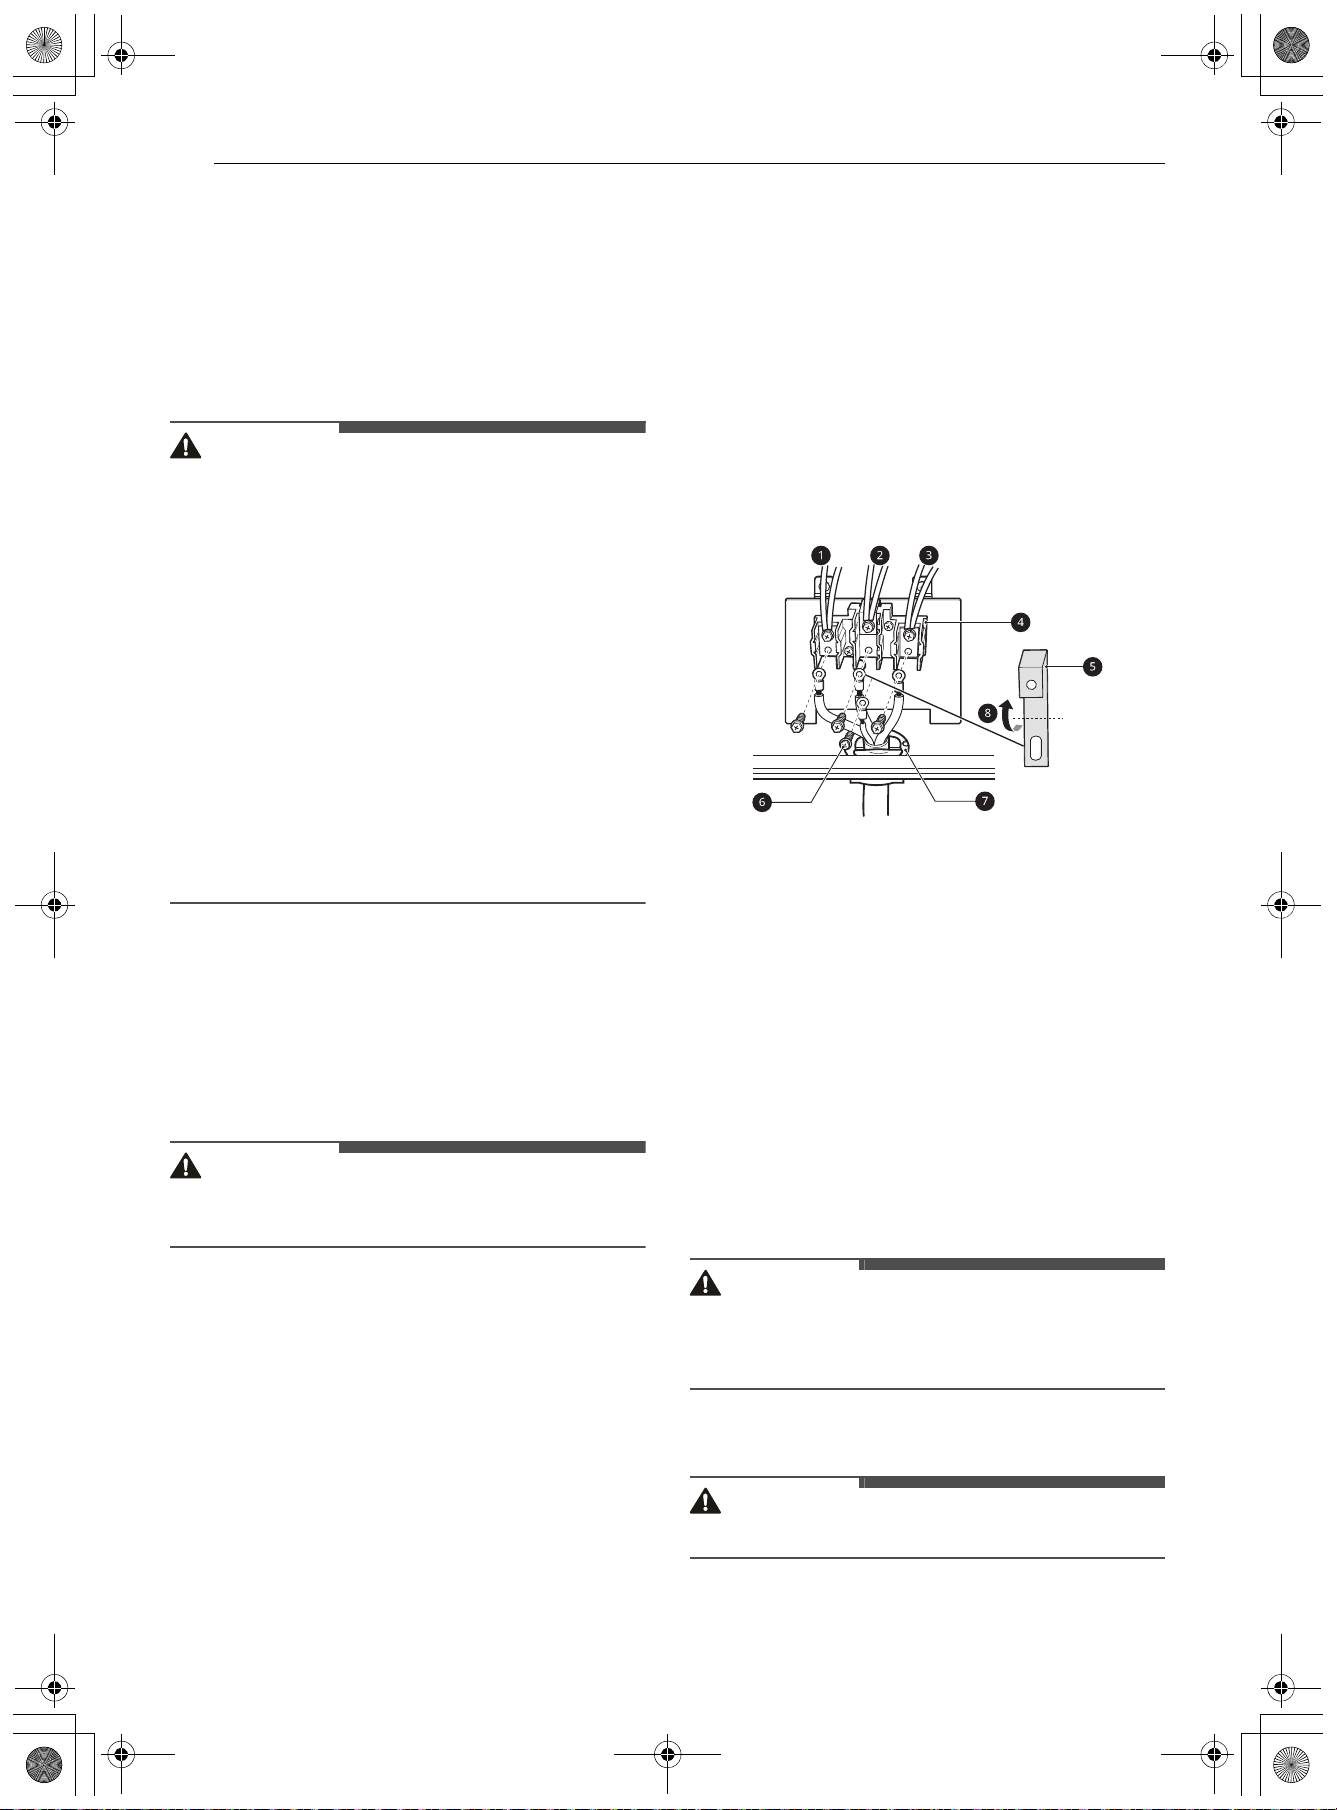
3-Wire Connection: Power Cord
WARNING
• The white middle (neutral or ground) wire of a 3-
wire power cord or a 3-wire conduit has to be
connected to the middle post of the main
terminal block. The remaining two wires of the
power cord or conduit have to be connected to
the outside posts of the main terminal
connection block. Failure to do so can result in
electrical shock, severe personal injury or death.
• If screws are not tightened securely, it can result
in electrical spark and severe personal injury or
death.
1 For power cord installations, hook the strain
relief over the power cord hole (1 3/8") located
below the rear of the oven.
2 Insert the power cord through the strain relief
and tighten it.
CAUTION
• Do not install the power cord without a strain
relief.
3 Remove the lower 3 screws from the terminal
block and retain them.
4 Insert the 3 screws through each power cord
terminal ring and into the lower terminals of
the terminal block.
• Make sure that the white center wire is
connected to the center lower position of
the terminal block.
5 Tighten the 3 screws securely into the
terminal block.
CAUTION
• Do not remove the ground strap connections.
a Black
1
1
/
8
"
(2.8 cm)
1
3
/
8
"
(3.5 cm)
en-us_main.book.book Page 19 Friday, August 14, 2026 1:47 PM
20 INSTALLATION
b White
c Red
d Terminal Block
e Cord/Conduit Connection Plate
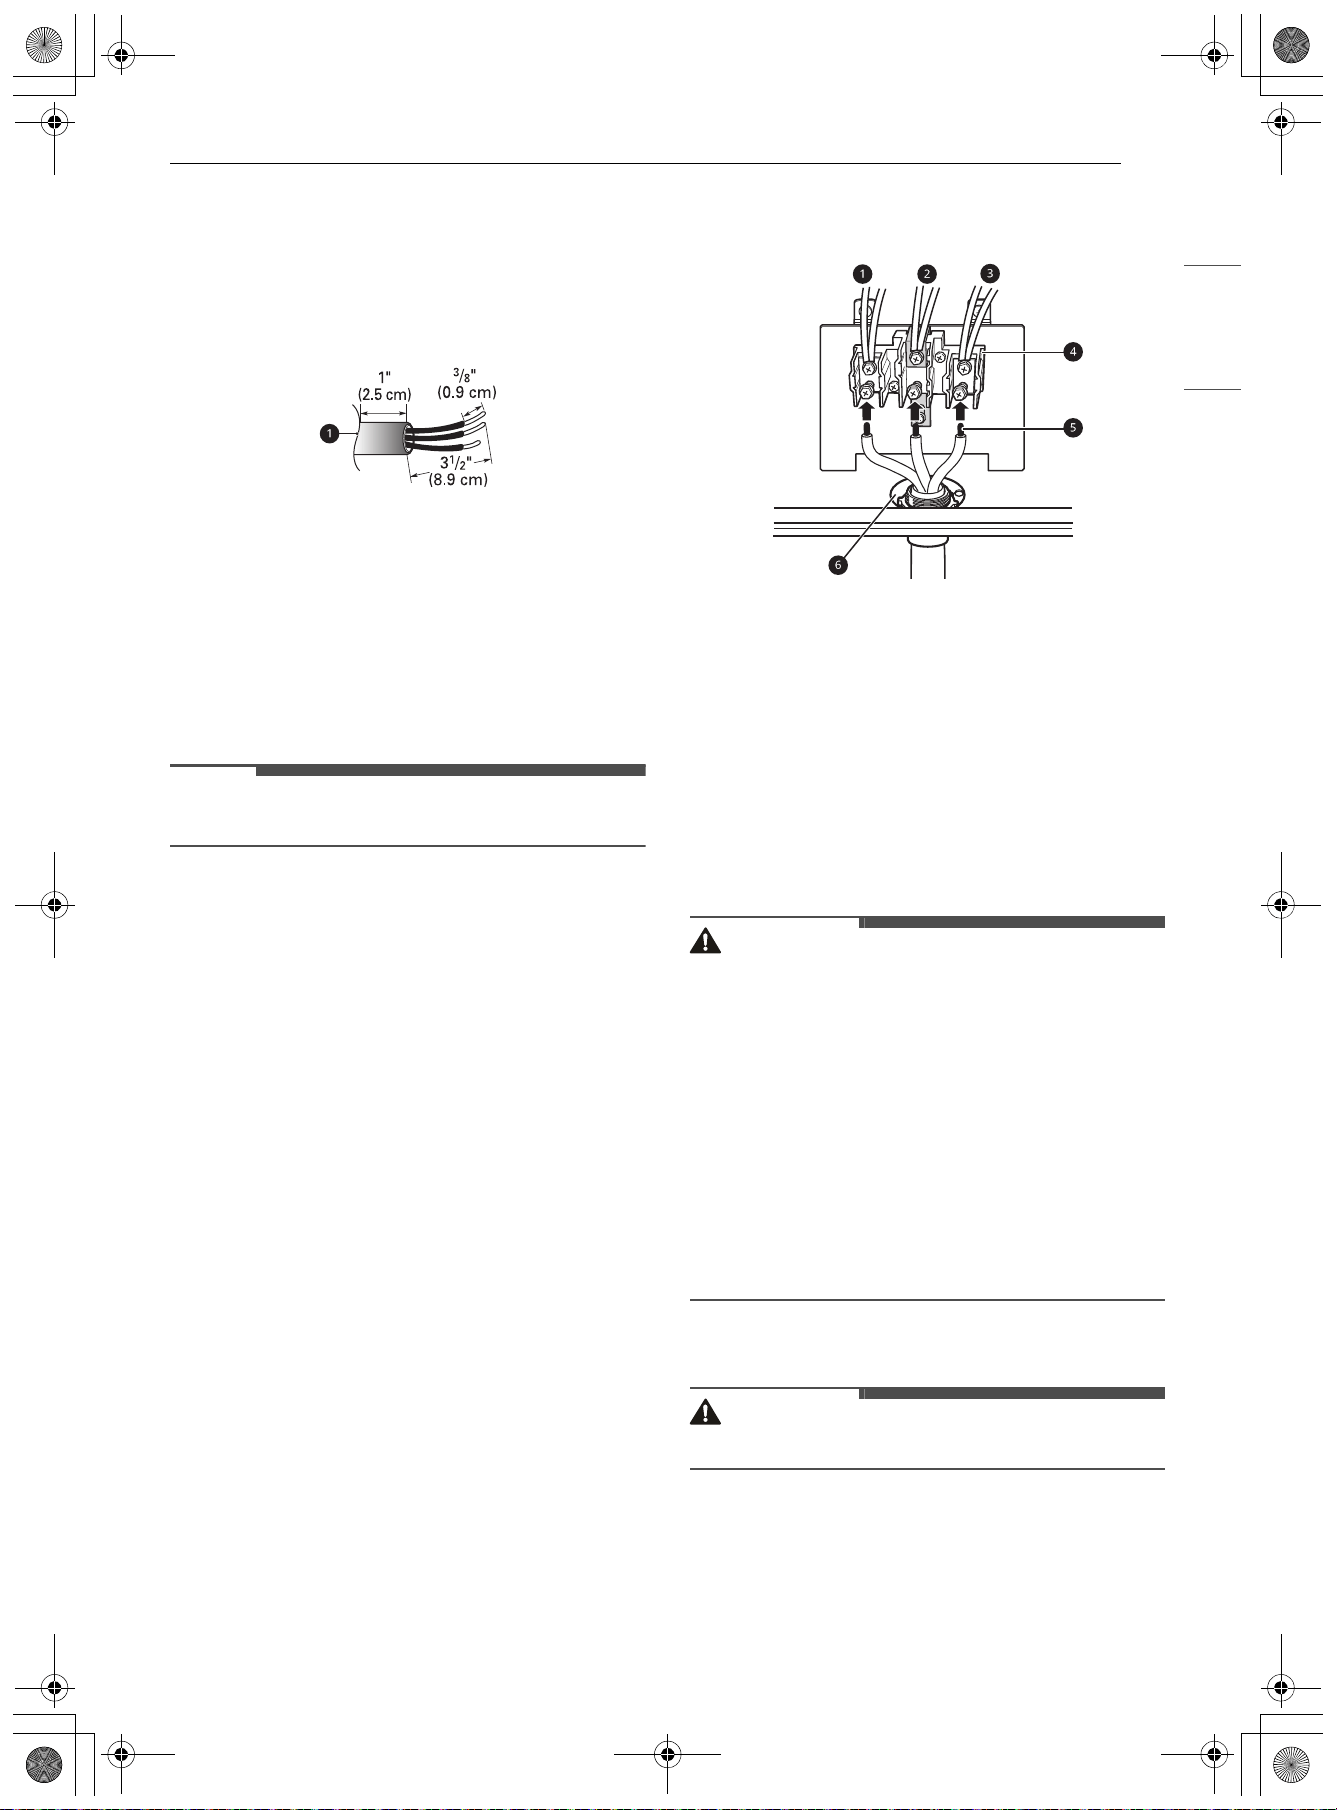
4-Wire Connection: Power Cord
WARNING
• Only a 4-conductor power-supply cord kit rated
120/240 volts, 50 amperes and marked for use
with ranges with closed-loop connectors or
opened spade lugs with upturned ends must be
used. The white middle (neutral) wire of the
power cord or 4-wire conduit has to be
connected to the middle post of the main
terminal block. The other two wires of the power
cord or conduit have to be connected to the
outside posts of the main terminal connection
block. The 4th ground wire (green) must be
connected to the frame of the range with the
ground screw. Failure to do so can result in
electrical shock, severe personal injury or death.
• If screws are not tightened securely, it can result
in electrical spark and severe personal injury or
death.
1 For power cord installations, hook the strain
relief over the power cord hole (1 3/8") located
below the rear of the oven.
2 Insert the power cord through the strain relief
and tighten it.
CAUTION
• Do not install the power cord without a strain
relief.
3 Remove the lower 3 screws from the terminal
block and retain them.
4 Remove the ground screw and bend the end
of the ground strap up so the slot is over the
hole of the center screw removed in step 3.
5 Insert the ground screw into the power cord
ground wire (green) terminal ring and secure
it to the range frame.
6 Insert the 3 screws through each power cord
terminal ring and into the lower terminals of
the terminal block.
• Make sure that the white center (neutral)
wire is connected to the center lower
position of the terminal block.
7 Tighten the 3 screws securely into the
terminal block.
• The center screw now attaches the bent up
ground strap to the block.
a Black
b White
c Red
d Terminal Block
e Ground Strap
f Ground Screw
g Cord/Conduit Connection Plate
h Bend strap up and attach.
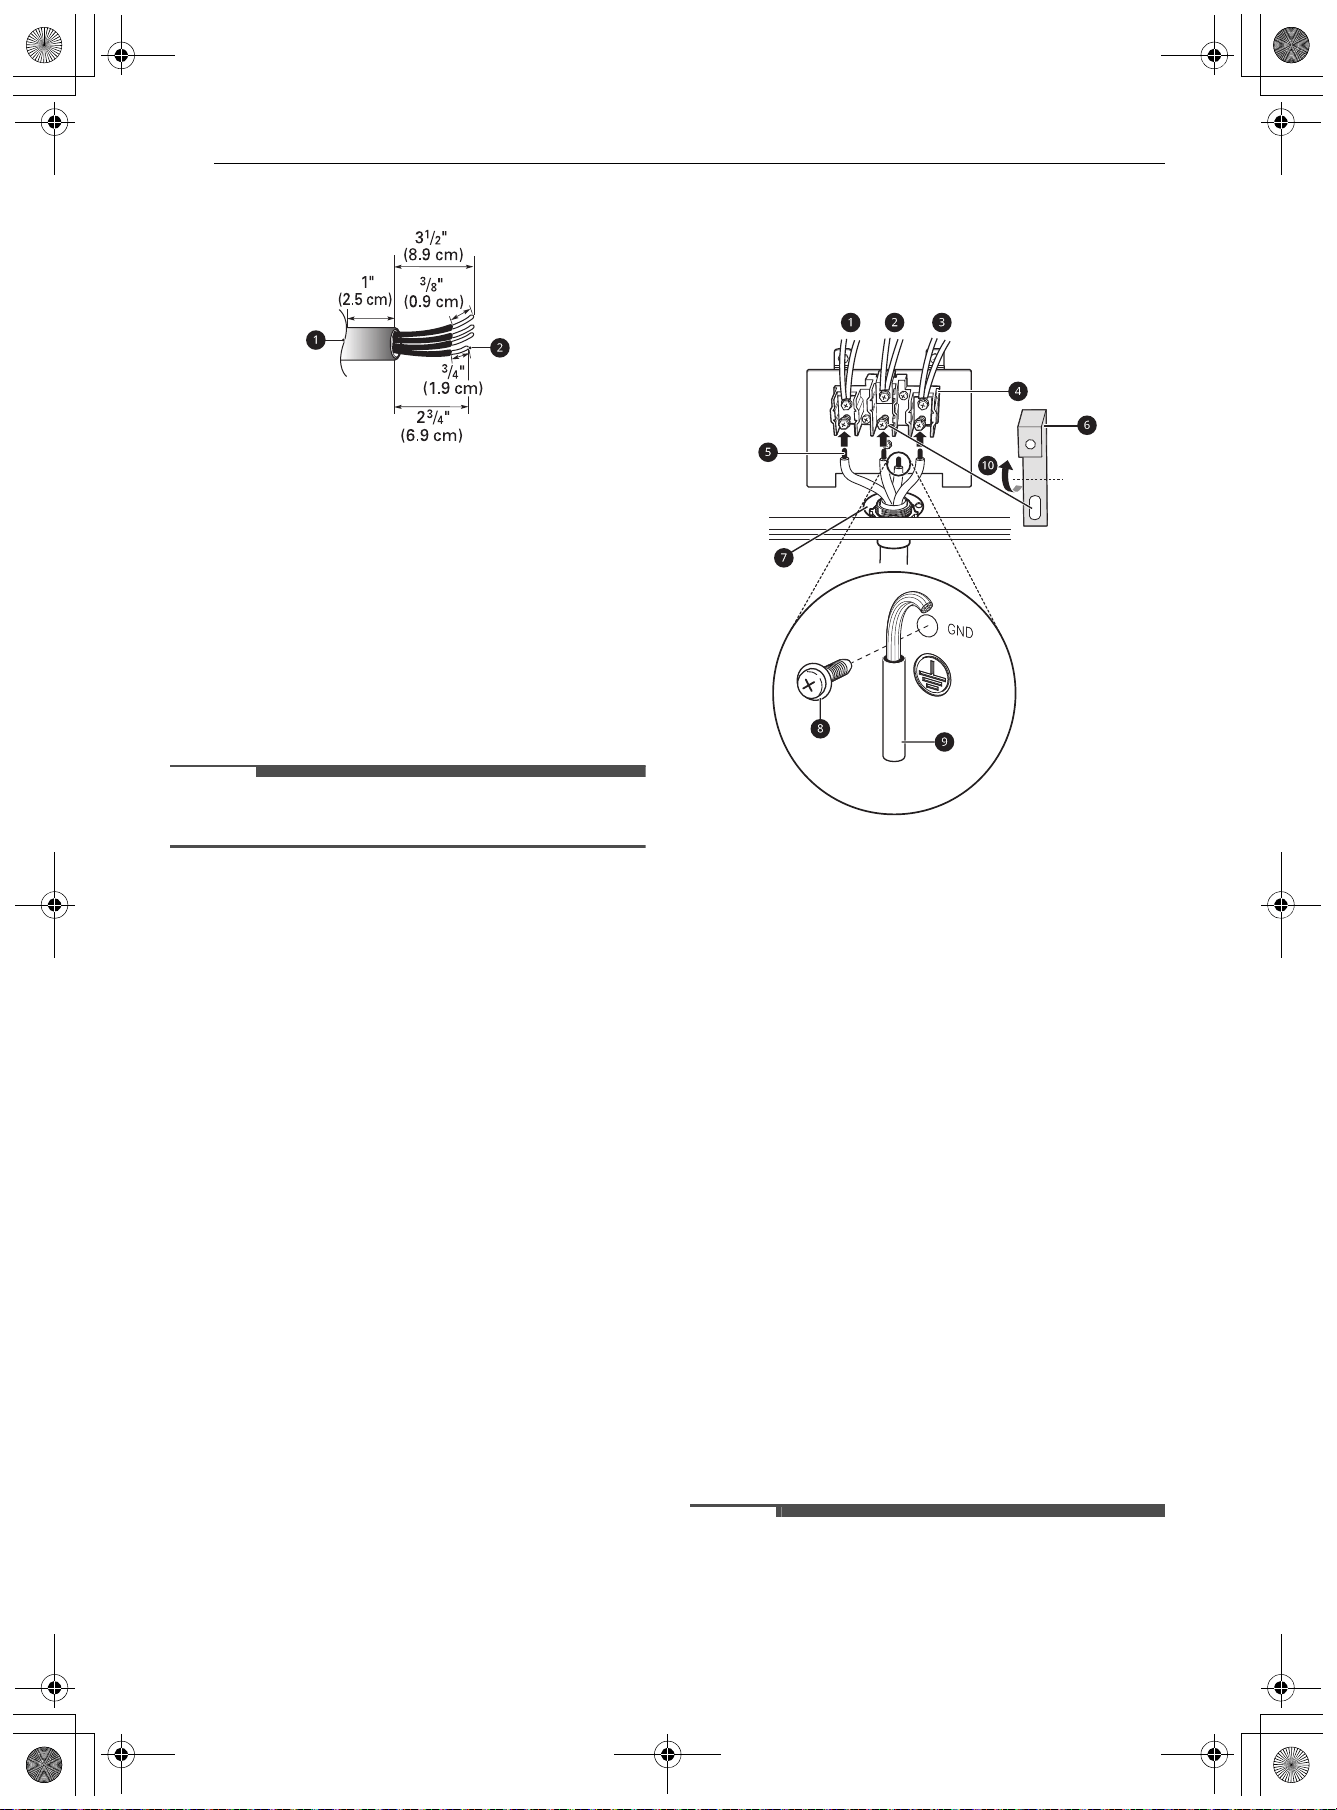
3-Wire Connection: Conduit
WARNING
• If screws are not tightened securely, it can result
in electrical spark and severe personal injury or
death.
Conduit Installations
CAUTION
• Do not install the conduit without a strain relief.
en-us_main.book.book Page 20 Friday, August 14, 2026 1:47 PM
21INSTALLATION
ENGLISH
1 Remove the cord/conduit connection plate
from the rear of the oven and rotate it.
• The conduit hole (1 1/8") must be used.
2 Prepare the conduit wires as shown below.
a Cord/Conduit connection plate
3 Install the conduit strain relief.
1) Insert the strain relief in the 1 1/8 in. (2.8
cm) conduit hole.
2) Install the conduit through the body of
the strain relief and fasten the strain relief
with its ring.
NOTE
• For conduit installations, purchase a strain relief.
4 Reinstall the cord/conduit connection plate.
Conduit Connections
If the wire in the conduit is copper it must be 8 or
10 AWG wiring.
If the wire in the conduit is aluminum it must be 6
or 8 AWG wiring.
1 Loosen the lower 3 screws from the terminal
block.
2 Insert the bare wire (white/neutral) end
through the center terminal block opening.
Do not remove the ground strap connections.
3 Insert the two side bare wire ends into the
lower left and the lower right terminal block
openings.
4 Tighten the 3 screws securely into the
terminal block. (approximately 35 - 50 IN-LB)
a Black
b White
c Red
d Terminal Block
e Wire Ends
f Conduit Connection Plate
4-Wire Connection: Conduit
WARNING
• The white middle (neutral) wire of the power
cord or 4-wire conduit has to be connected to
the middle post of the main terminal block. The
other two wires of the power cord or conduit
have to be connected to the outside posts of the
main terminal connection block. The 4th ground
wire (green) must be connected to the frame of
the range with the ground screw. Failure to do
so can result in electrical shock, severe personal
injury or death.
• If screws are not tightened securely, it can result
in electrical spark and severe personal injury or
death.
Conduit Installations
CAUTION
• Do not install the conduit without a strain relief.
1 Remove the cord/conduit connection plate
from the rear of the oven and rotate it.
• The conduit hole (1 1/8") must be used.
en-us_main.book.book Page 21 Friday, August 14, 2026 1:47 PM
22 INSTALLATION
2 Prepare the conduit wires as shown below.
a Cord/Conduit Connection Plate
b Ground Wire
3 Install the conduit strain relief.
1) Insert the strain relief in the 1 1/8 in. (2.8
cm) conduit hole.
2) Install the conduit through the body of
the strain relief and fasten the strain relief
with its ring.
NOTE
• For conduit installations, purchase a strain relief.
4 Reinstall the cord/conduit connection plate.
Conduit Connections
If the wire in the conduit is copper it must be 8 or
10 AWG wiring.
If the wire in the conduit is aluminum it must be 6
or 8 AWG wiring.
1 Loosen the 2 lower left and right screws from
the terminal block. Remove the lower 2 center
screws. Do not discard any screws.
2 Remove the ground screw and bend the end
of the ground strap up so the slot is over the
hole of the center screw removed in step 1.
3 Attach the ground (green) bare wire end to
the range frame and secure it in place with
the ground screw.
4 Insert the bare wire (white/neutral) end
through the center terminal block opening.
The center screw now attaches the bent up
ground strap to the block.
5 Insert the two side bare wire ends into the left
and the right terminal block openings.
Tighten the 3 screws securely into the
terminal block. (approximately 35 - 50 IN-LB)
a Black
b White
c Red
d Terminal Block
e Wire Ends
f Ground Strap
g Conduit Connection Plate
h Ground Screw
i Ground Wire
j Bend strap up and attach.
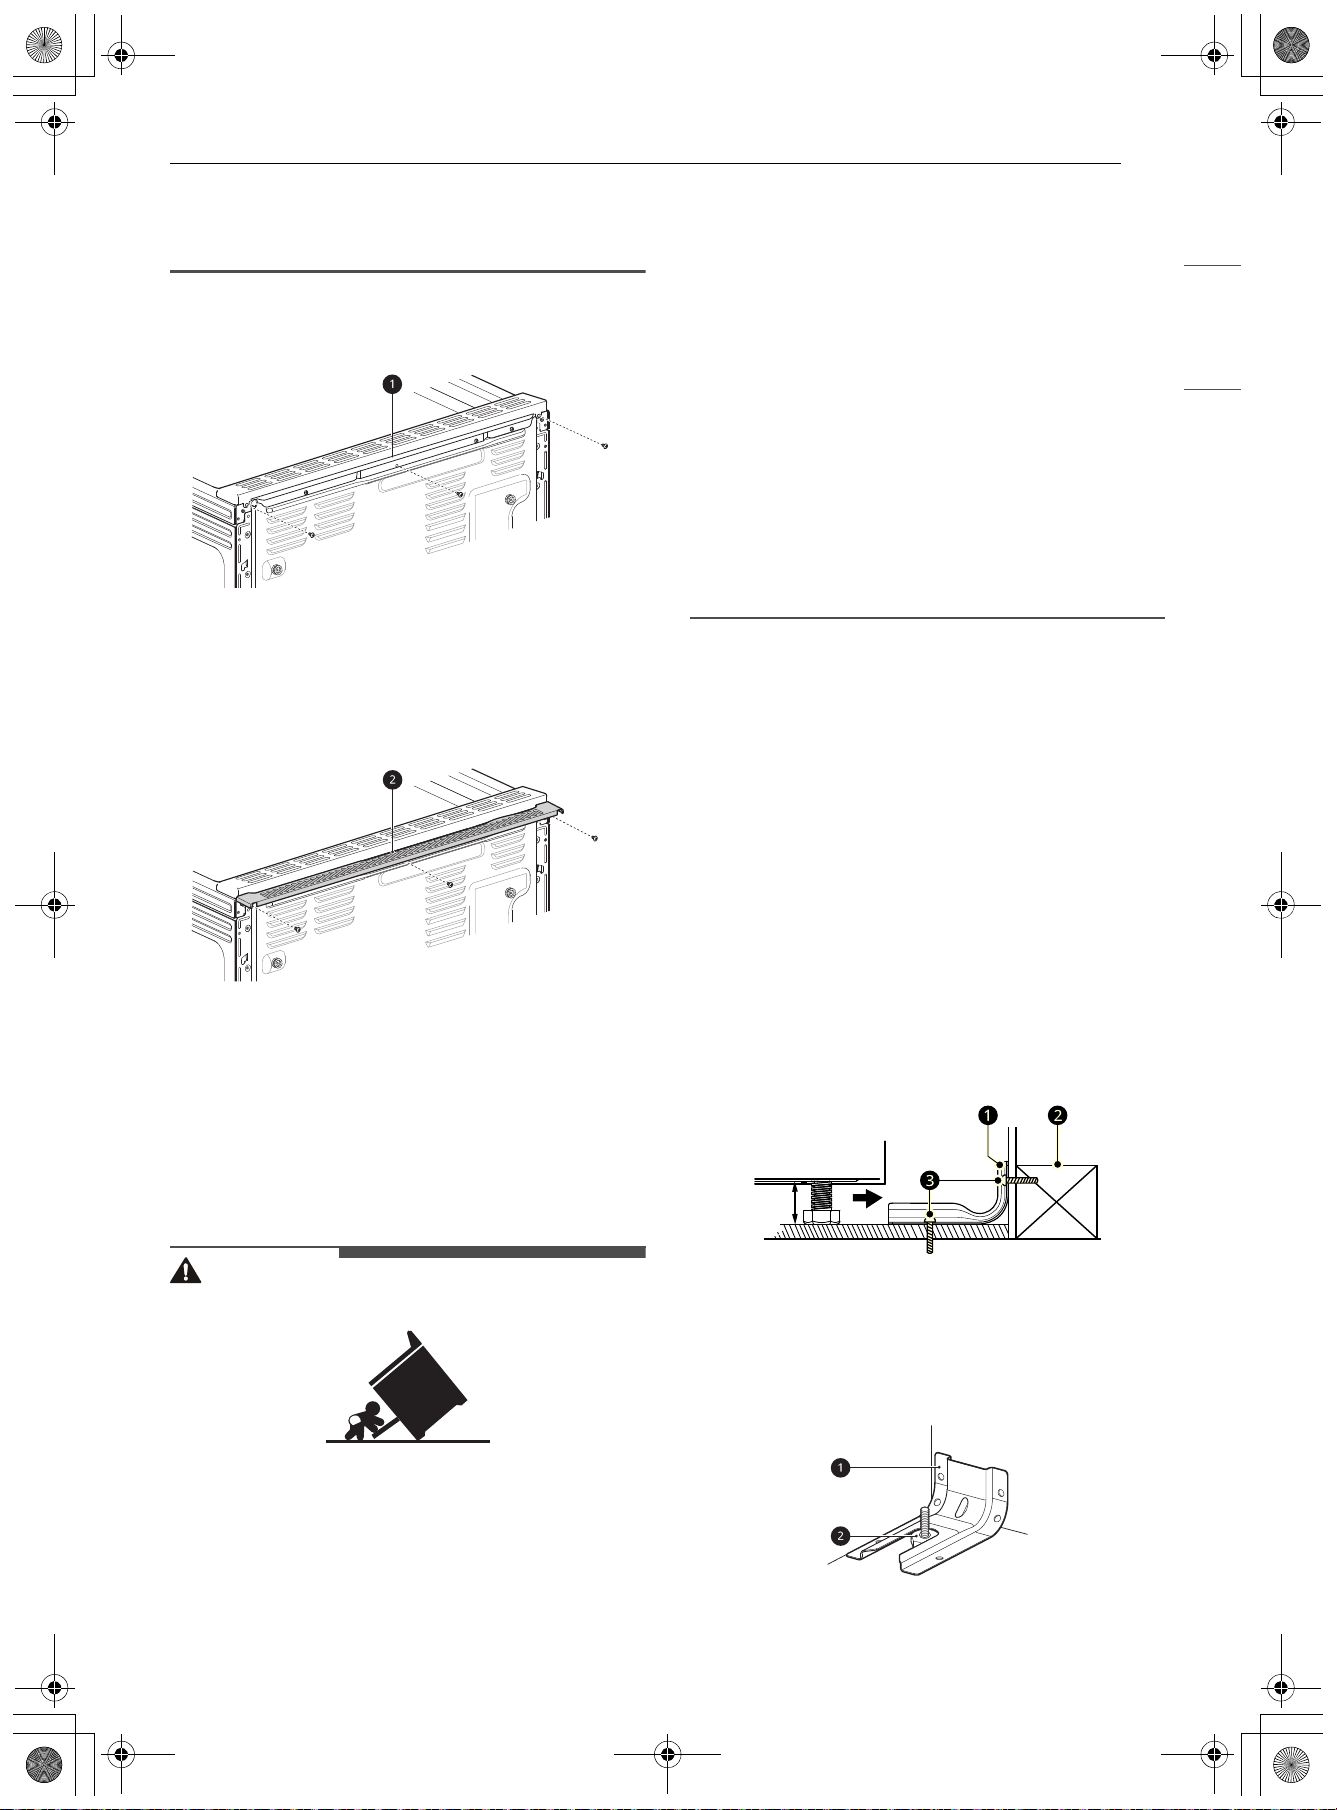
Optional Rear Filler
Installing the Rear Filler
If the counter does not bridge the opening at the
rear wall, the rear filler kit that is provided with the
slide-in range will be needed.
NOTE
• If the countertop depth is greater than 25 3/8"
there will be a gap between the filler kit and the
back wall.
en-us_main.book.book Page 22 Friday, August 14, 2026 1:47 PM
23INSTALLATION
ENGLISH
• If the countertop depth is less than 24 3/4", the
control panel will not sit flush with the
countertop.
1 Using a screwdriver, remove the three screws
holding the rear top plate in place.
a Rear Top Plate
2 Attach the rear top plate and filler assembly
as shown, using three screws removed in step
1.
b Rear filler
Anti-tip Device
Installing the Anti-tip Device
Tip Hazard
WARNING
• A child or adult can tip the range and be killed.
• Install the anti-tip device to the structure and/or
the range. Verify the anti-tip device has been
properly installed and engaged by following the
guide on the anti-tip bracket template.
• Engage the range to the anti-tip device by
following the guide on the anti-tip bracket
template. Ensure the anti-tip device is re-
engaged when the range is moved by following
the guide on the anti-tip bracket template.
• Re-engage the anti-tip device if the range is
moved. Do not operate the range without the
anti-tip device in place and engaged.
• See installation instructions for details.
• Failure to follow these instructions can result in
death or serious burns to children or adults.
• Range must be secured with an approved anti-
tip device.
• The range could be tipped by standing, sitting or
leaning on an open door if the range or anti-tip
device is not properly installed.
• The use of this device does not preclude tipping
of the range when not properly installed.
• After installing the anti-tip device, verify that it is
in place by carefully attempting to tilt the range
forward.
• This range has been designed to meet all
recognized industry tip standards for all normal
conditions.
• The installation of the anti-tip device must meet
all local codes for securing the appliance.
Using the Anti-tip Bracket Template
• The anti-tip bracket is packaged with an
installation template. The instructions include
necessary information to complete the
installation. Read and follow the range
installation instruction sheet.
•Screws
c must enter wood or concrete.
a Anti-tip Bracket
b Wall Plate
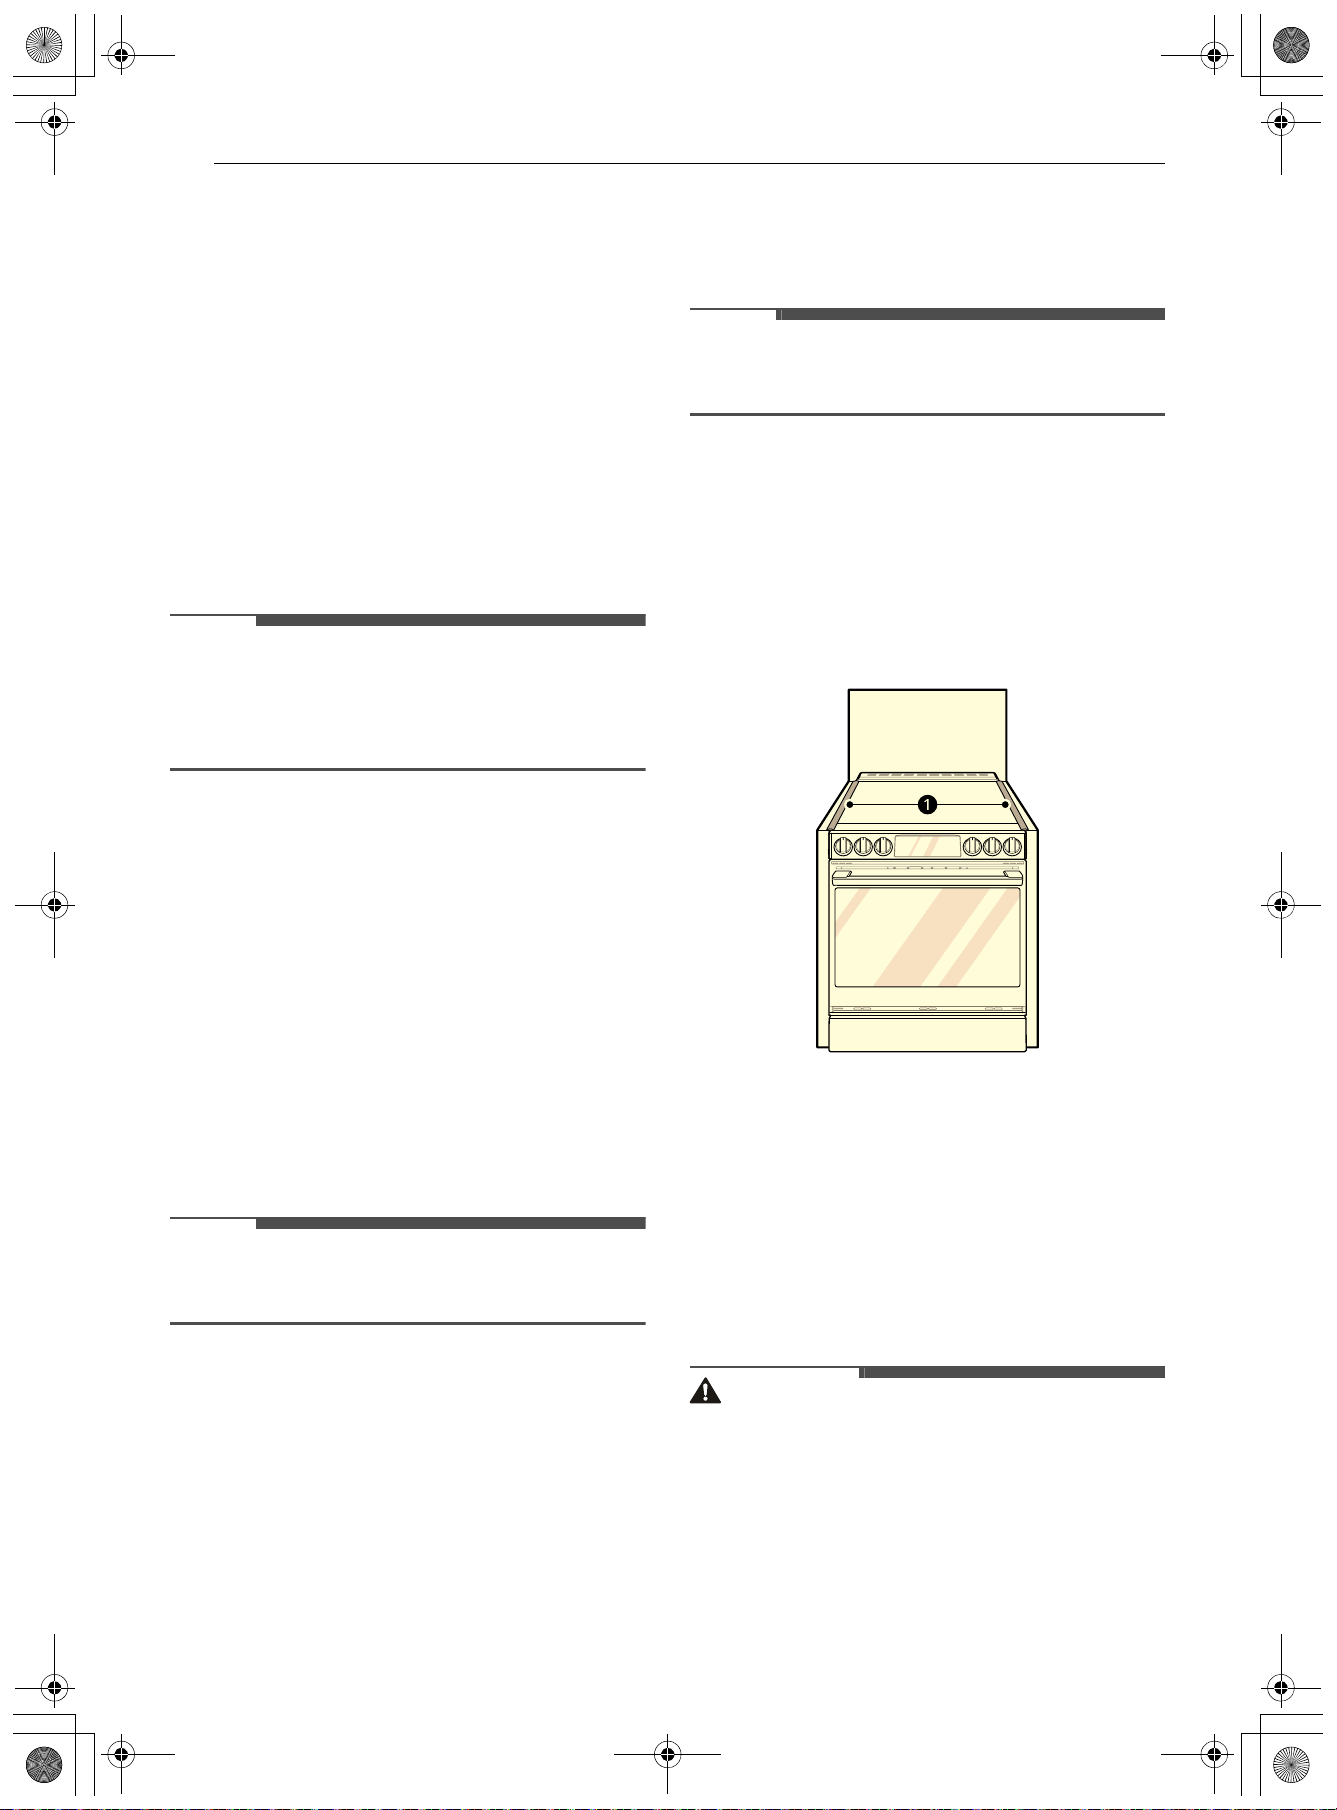
Engaging the Anti-tip Device
a Anti-tip Bracket
en-us_main.book.book Page 23 Friday, August 14, 2026 1:47 PM
24 INSTALLATION
b Leveling Leg
1 Slide the range against the wall, making sure
the back leg slides into and engages the anti-
tip bracket.
2 Check for proper installation by grasping the
front edge of the cooktop and carefully
attempting to tilt the range forward.
Test Run
Test the Range Before Use
NOTE
• Do not try to light either the Bake or Broil
burners during a power outage. The range has
an electrical ignition system and cannot be used
without power.
Checking Operation of Bake Burners
To check ignition of the Bake burner, follow the
steps below:
1 Remove all packing materials from inside the
oven cavity.
2 Tap Manual Cook and tap Bake.
• Make sure the door is closed.
• Default Temperature is 350 ℉.
3 Tap Start.
NOTE
• It may take between 30 and 90 seconds for the
burner to start heating.
Checking Operation of Broil Burners
To check ignition of the Broil burner, follow the
steps below:
1 Remove all packing materials from inside the
oven cavity.
2 Tap Manual Cook and tap Broil.
• Make sure the door is closed.
• Default Temperature setting is High.
3 Tap Start.
NOTE
• It may take between 30 and 90 seconds for the
burner to start heating.
Rubber Gaskets
Installing the Rubber Gaskets
• Install one of the rubber gaskets provided on
each side of the range between the range and
the adjoining countertop. Look at a.
Removing/Assembling Oven
Door Handle
Before Removing/Assembling the
Oven Door Handle
• Tools Needed
- 3/32" Allen wrench
CAUTION
• When assembling or disassembling the handles,
grasp the handle firmly to avoid dropping it.
• When assembling or disassembling the handles,
wear gloves for your safety.
• We suggest you have another person hold the
handle in place while you remove/insert the
screws.
en-us_main.book.book Page 24 Friday, August 14, 2026 1:47 PM
25INSTALLATION
ENGLISH
• Do not swing the handle into nearby people or
animals.
• Make sure that the set screws are in place and
the pockets at the ends of the handles are
aligned correctly over the mounting fasteners on
the doors. The set screws should be loose
enough to allow the pockets to slide down into
place over the mounting fasteners on the door.
• Make sure that there is not a gap between the
door and handle after assembling the handle.
• After assembling the handle, pull the door open
to make sure the screws are fully assembled.
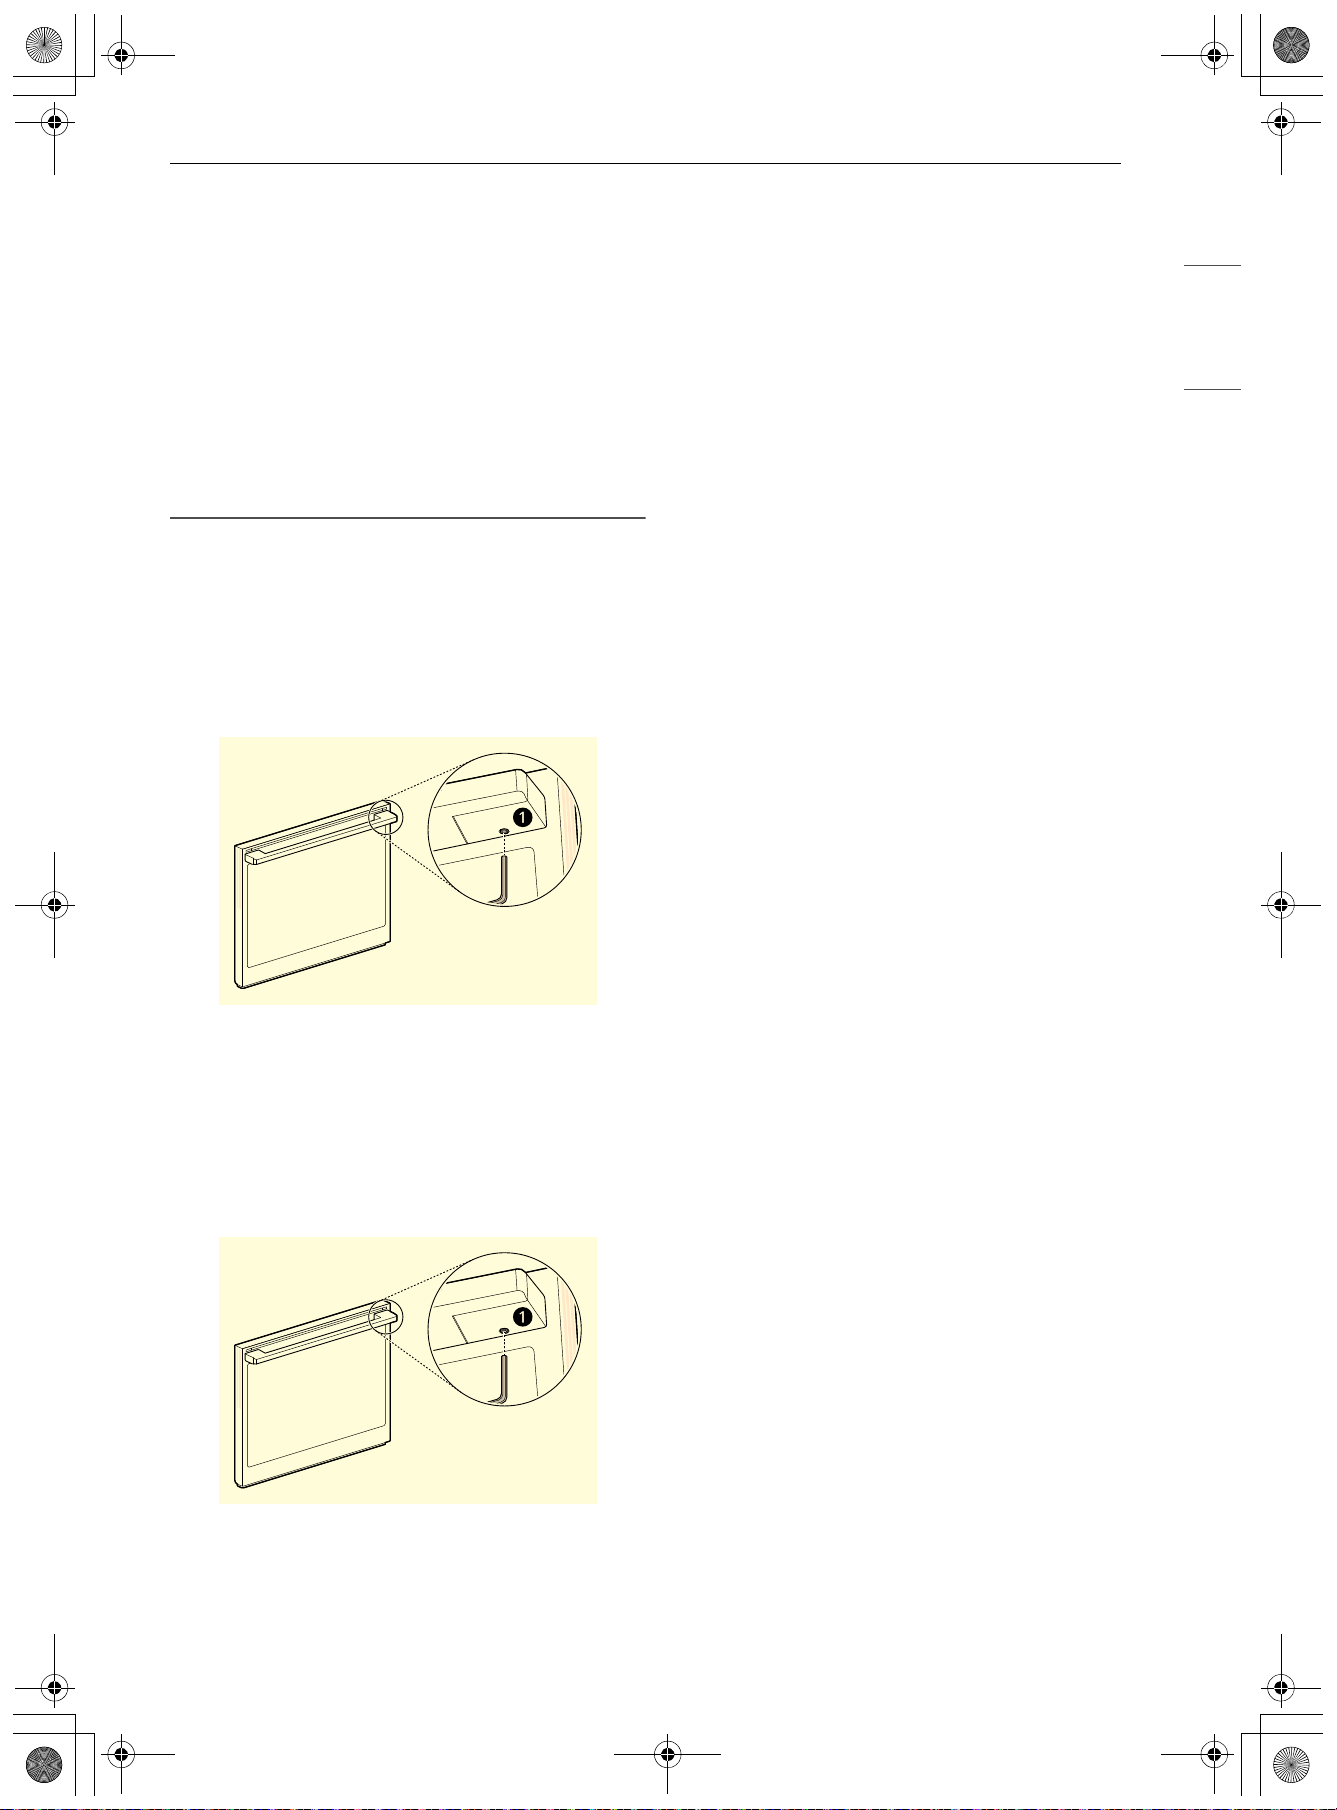
Removing Oven Door Handle
1 Loosen the set screws a located on the lower
side of the handle with a 3/32 in. Allen wrench
and remove the handle.
Assembling Oven Door Handle
1 Place the handle on the door by fitting the
handle footprints over the mounting
fasteners and tightening the set screws
a
with a 3/32 in Allen wrench.
en-us_main.book.book Page 25 Friday, August 14, 2026 1:47 PM
26 OPERATION
OPERATION
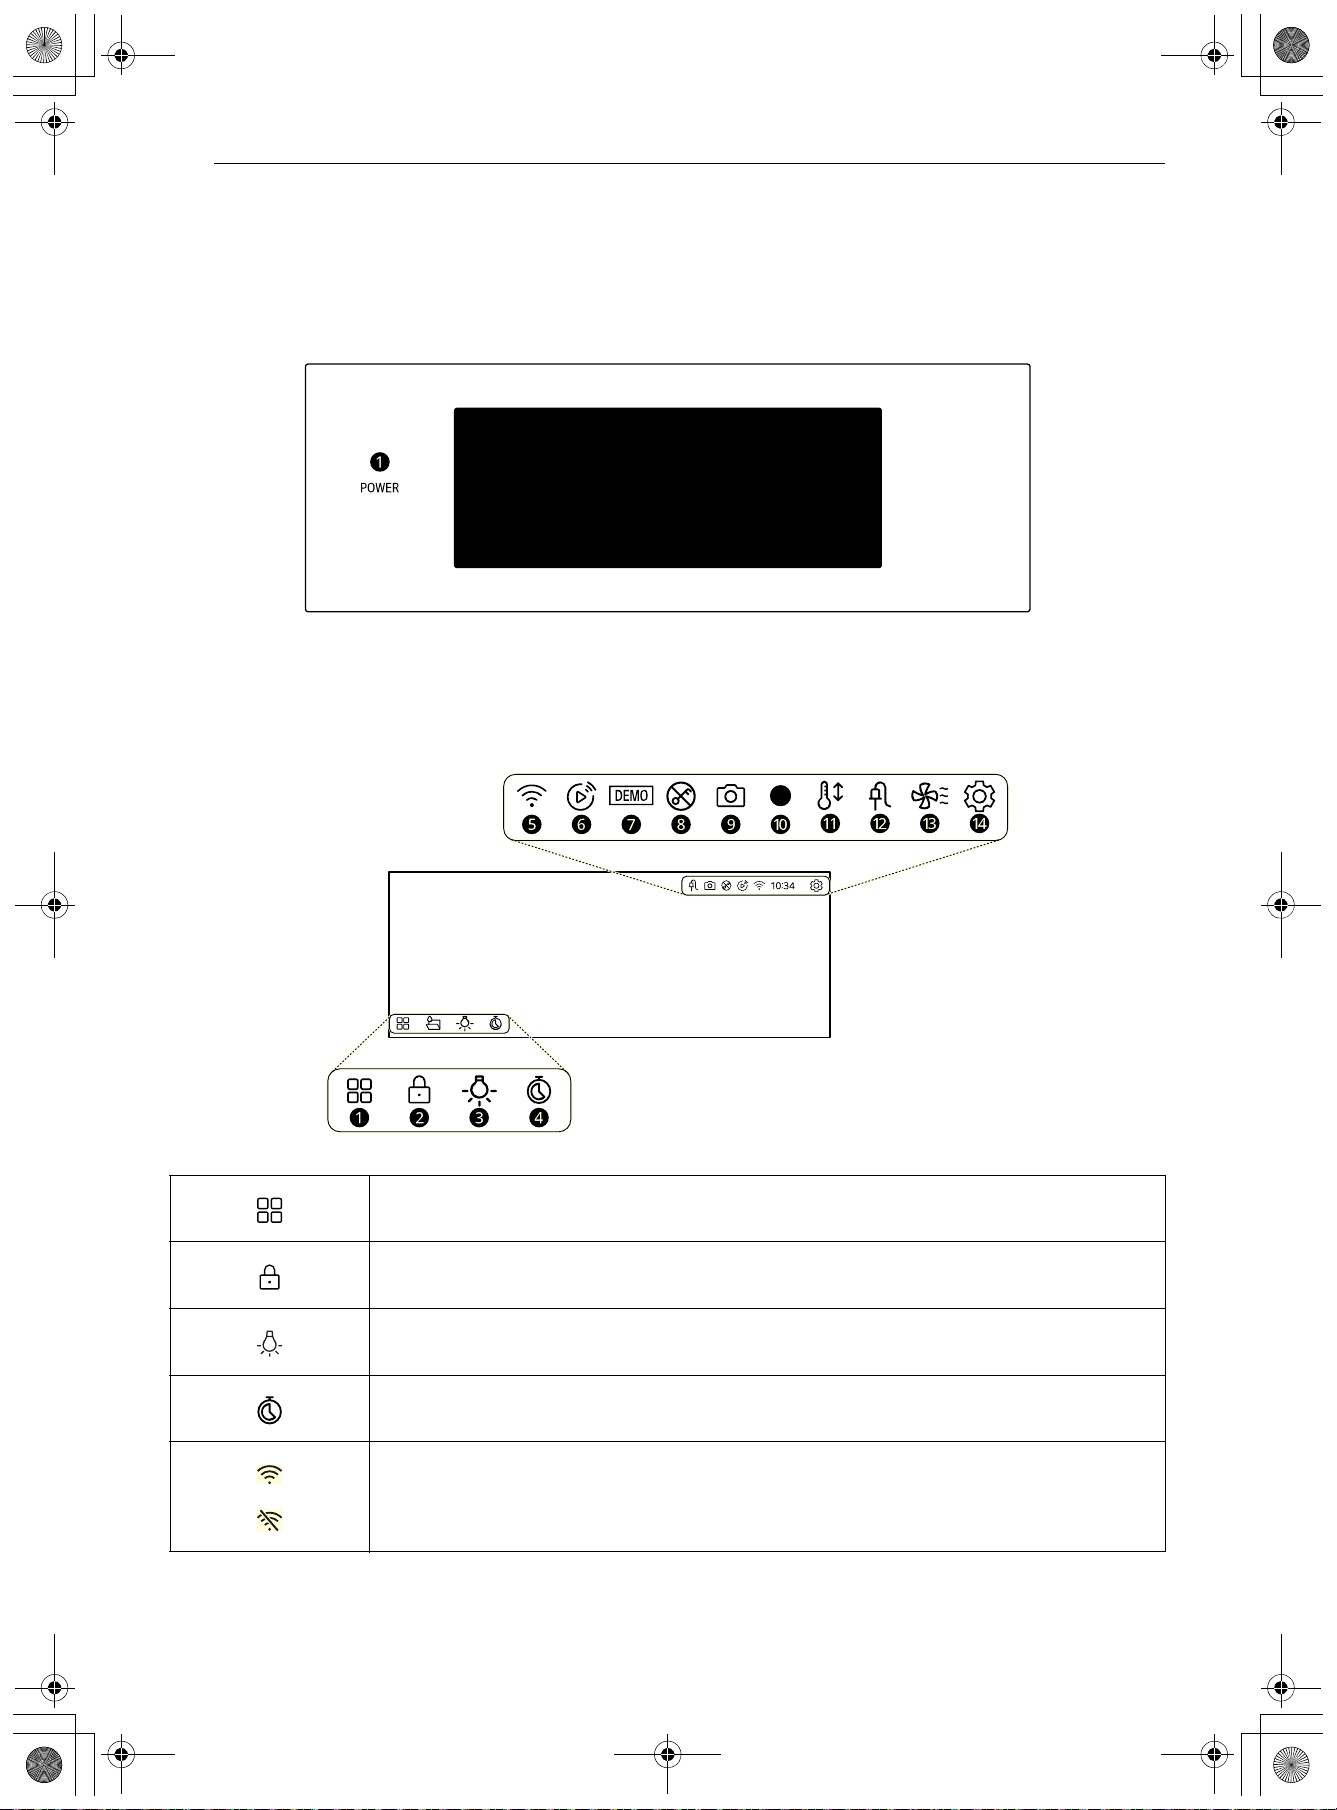
Control Panel
Control Panel Features
a Power On/Off button
Display Icons
Icons appear in display when activated.
a All Modes Icon
Tap to go to the All Modes screen.
b Control Lock Icon
Tap to activate the Control Lock function.
c Light Icon
Tap to turn on or off the interior oven lamp.
d Timer Icon
Tap to go to the timer setting screen or timer editing screen.
e Wi-Fi Icon
• Appears when oven is connected to Wi-Fi.
• Appears when oven is disconnected from Wi-Fi or is not connected in application.
en-us_main.book.book Page 26 Friday, August 14, 2026 1:47 PM
27OPERATION
ENGLISH
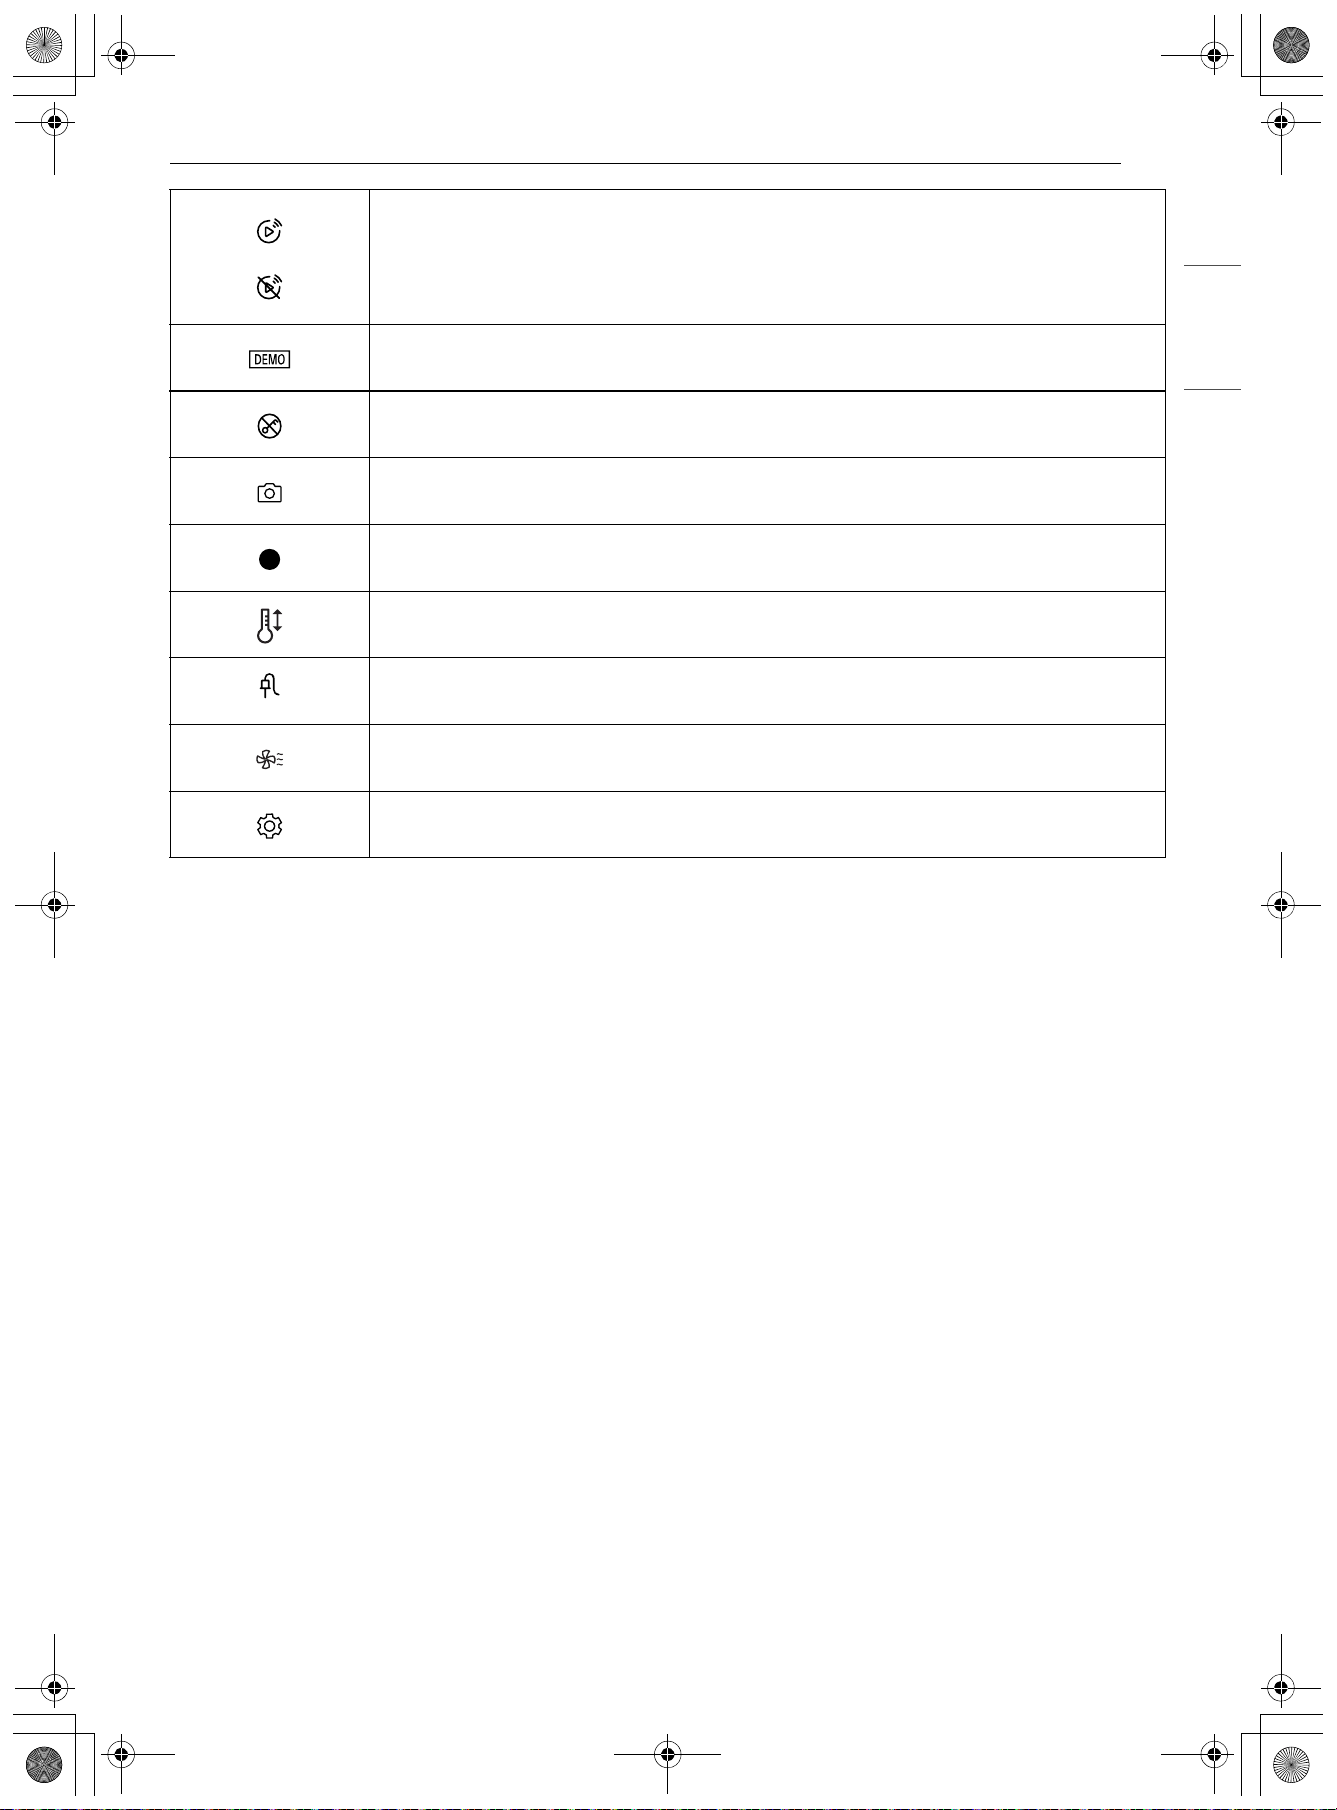
f Remote Start Icon
• Appears when Remote Start is active.
• Appears when Remote Start is active, but Wi-Fi setting is OFF or Wi-Fi is
disconnected.
g Demo Mode Icon
Appears when Demo mode is on.
h Door Lock Icon
Appears when Door Lock is on.
i Camera Icon
Appears when Camera is on. (On some models)
j REC Icon
Appears when Camera is recording. (On some models)
k Auto Conversion Icon
Appears when Convection Auto Conversion is turned on.
l Probe Icon
Appears when probe is connected.
m Oven Cooling Icon
Appears during or after oven operation to indicate cooling fan is running in oven.
n Settings Icon
Tap to go to the Settings screen.
en-us_main.book.book Page 27 Friday, August 14, 2026 1:47 PM
28 OPERATION
Knob Features
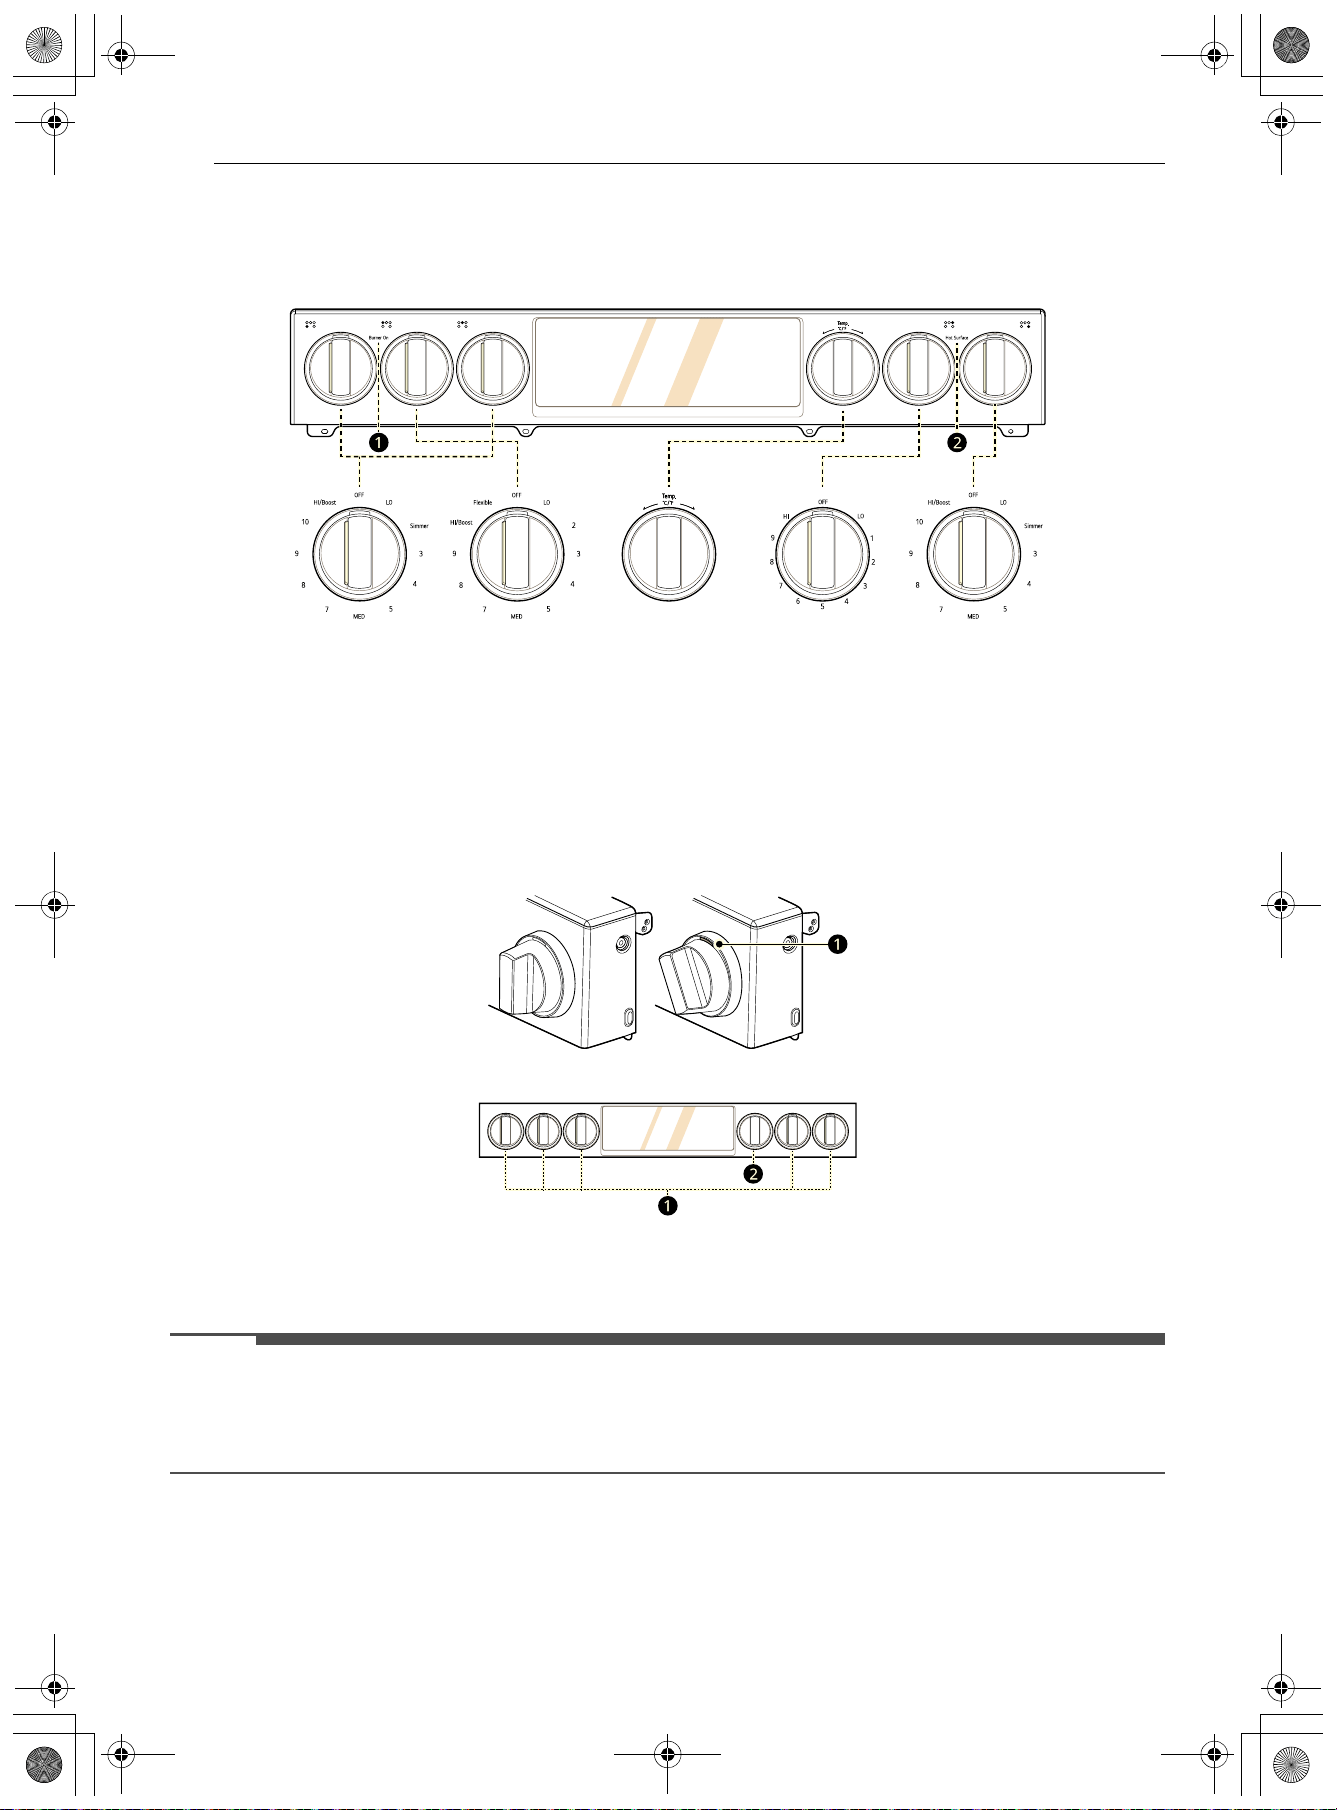
After cleaning the cooktop control knobs, make sure to replace each knob in the correct position. Failure to
do so can result in improper operation of the burners.
a Burner On Indicator
b Hot Surface Indicator
Knob Lighting
Knob lighting illuminates the edge of the knob when you turn the knob to operate the heating elements
(excluding temp knob).
a Knob Lighting
b Temp Knob
NOTE
• Temp Knob does not have knob lighting.
• Turning on Control Lock does not prevent the knob lighting or cooktop elements from turning on when
a cooktop knob is turned.
en-us_main.book.book Page 28 Friday, August 14, 2026 1:47 PM
29OPERATION
ENGLISH
Changing Oven Settings
Minimum & Maximum Default Settings
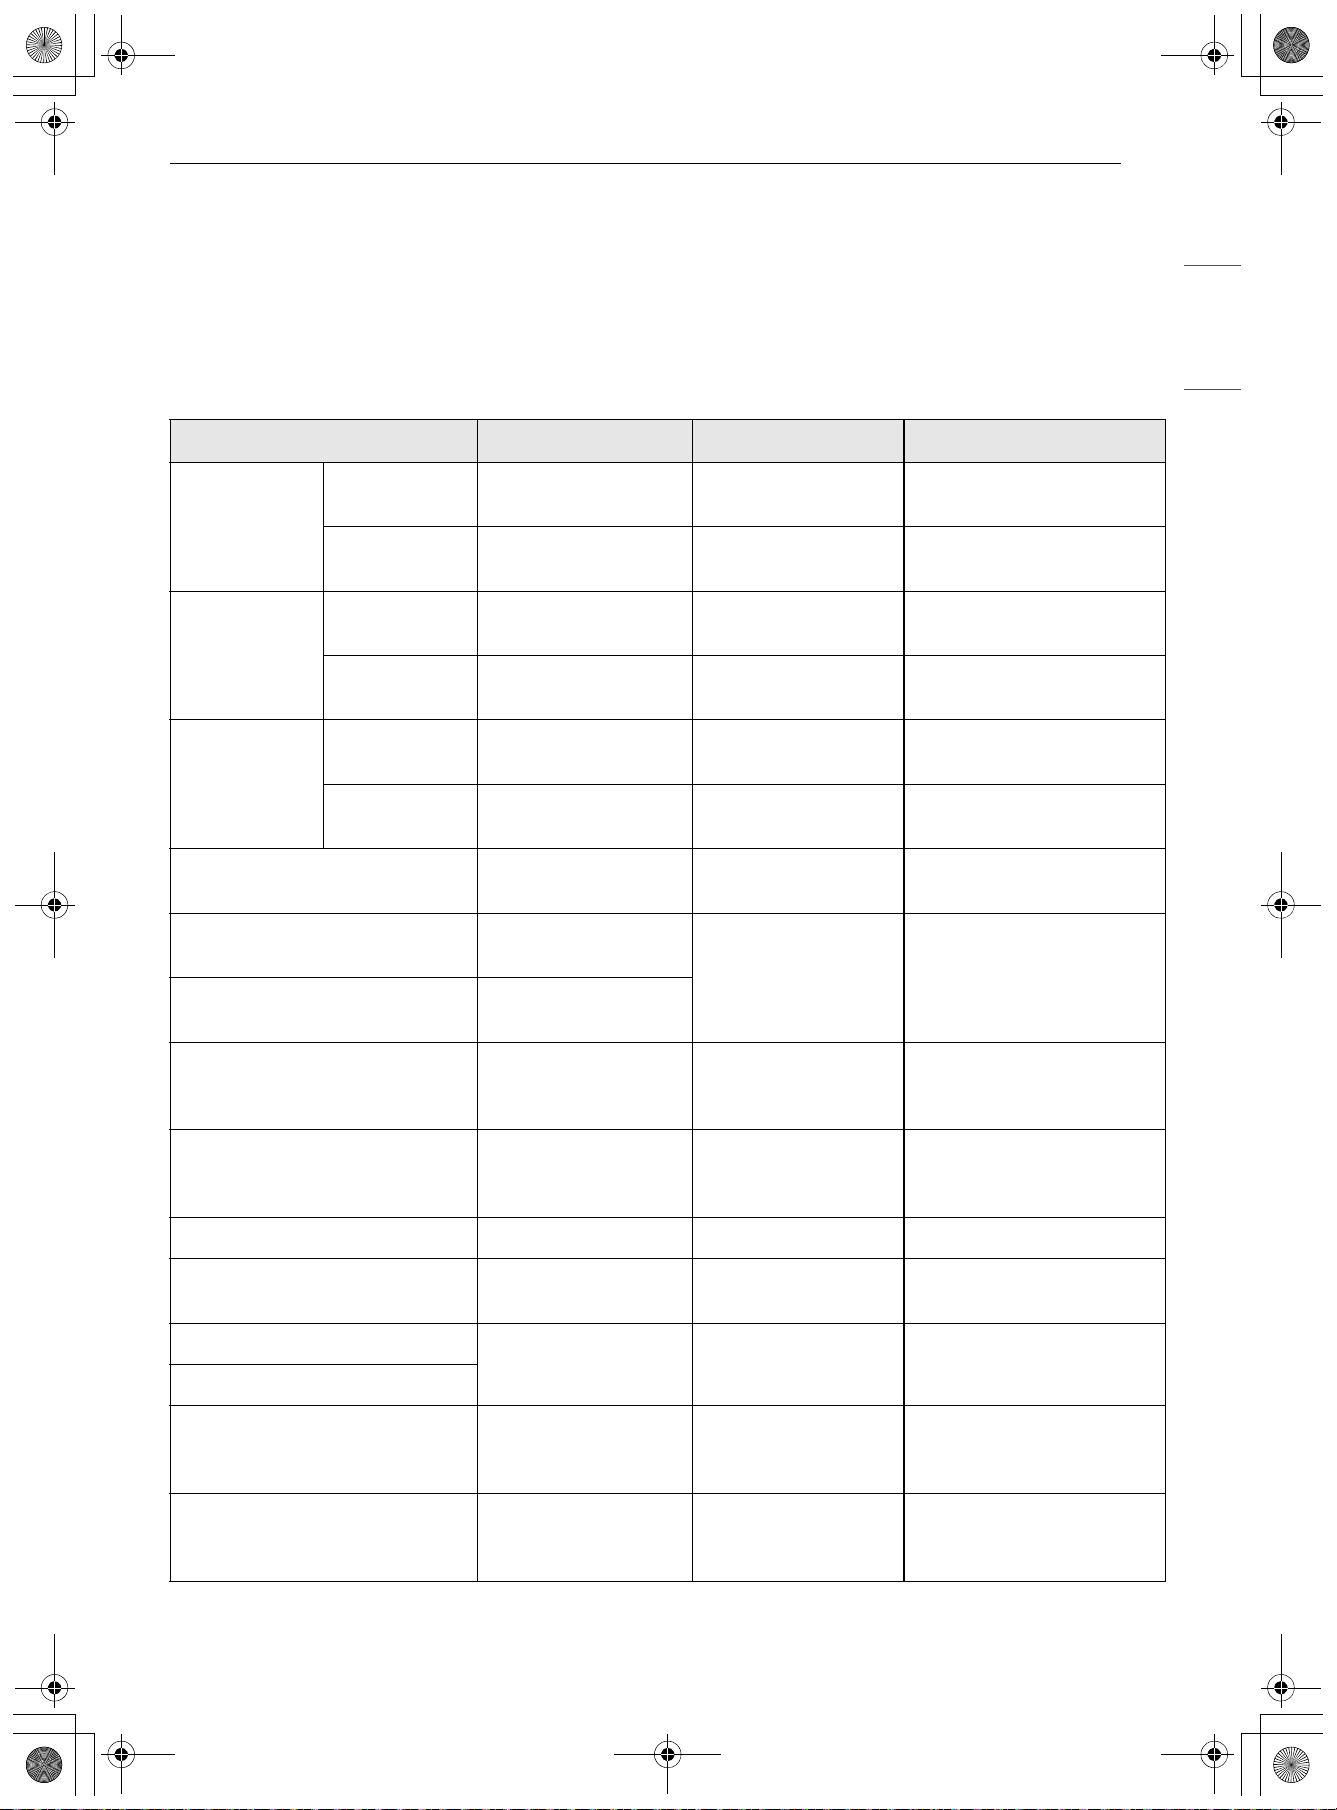
All of the features listed have a minimum and a maximum time or temperature setting that may be
entered into the controls. An entry acceptance beep sounds each time a control button is pressed.
An entry error tone (two short tones) sounds if the entry of the temperature or time is below the minimum
or above the maximum setting for the feature.
Feature Min. Temp. / Time Max. Temp. / Time Default
Clock
12 hr.
1:00
hr. / min.
12:59
hr. / min.
-
24 hr.
0:00
hr. / min.
23:59
hr. / min.
-
Timer
12 hr.
0:01
min. / sec.
11:59
hr. / min.
-
24 hr.
0:01
min. / sec.
11:59
hr. / min.
-
Cook Time
12 hr.
0:01
hr. / min.
11:59
hr. / min.
-
24 hr.
0:01
hr. / min.
11:59
hr. / min.
-
Bake 170 °F / 80 °C 550 °F / 285 °C
350 °F / 175 ℃
12 hr.
Convection Bake
170 °F / 80 °C
80 ℃ (*66 ℃)
550 °F (*525 °F) /
285 °C (*271 °C)
350 °F (*325 °F) /
175 ℃ (*161 ℃)
12 hr.
Convection Roast 300 °F (*275 °F) /
150 ℃ (*136 ℃)
Broil
Low
0:01
hr. / min.
High
2:59
hr. / min.
High
3 hr.
Warm
Low
0:01
hr. / min.
High
2:59
hr. / min.
Medium
3 hr.
Proof - - 12 hr.
Pizza 300 °F / 150 °C 550 °F / 285 °C
350 °F / 175 ℃
12 hr.
Frozen Meal
300 °F / 150 ℃ 550 °F / 285 ℃
400 °F / 205 ℃
12 hr.
Air Fry
Air Sous-Vide
100 °F / 38 ℃
0:01
hr
. / min.
205 °F / 96 ℃
47:59
hr. / min.
130 °F / 54 ℃
48 hr.
Air Roast
300 °F / 150 ℃
0:01
hr. / min.
550 °F / 285 ℃
11:59
hr. / min.
400 °F / 205 ℃
12 hr.
en-us_main.book.book Page 29 Friday, August 14, 2026 1:47 PM
30 OPERATION
NOTE
• * Using auto conversion
• Default cook mode times are without setting a cook time.
Wi-Fi
Connect the appliance to a home Wi-Fi network to
use Remote Start and other smart functions. See
the Smart Functions section for more details.
Setting Up Wi-Fi
1 Tap the Settings icon at the top right of the
screen and tap Network & System.
2 Tap Wi-Fi.
3 Tap Set Up Wi-Fi.
4 Follow the instructions in the Wi-Fi Guide in
the display.
Resetting Wi-Fi
1 Tap the Settings icon at the top right of the
screen and tap Network & System.
2 Tap Wi-Fi.
3 Tap Reset Wi-Fi.
4 Follow the instructions in the Wi-Fi Guide in
the display.
Remote Start
This feature can be used with the Manual Cook
modes to remotely start or stop the cooking
operation. The appliance must be connected to a
home Wi-Fi network to use Remote Start.
Setting Remote Start
1 Tap the Settings icon at the top right of the
screen and tap Network & System.
2 Tap the toggle switch next to Remote Start to
select On or Off.
3 If On is selected, the Remote Start icon
appears at the top of the display.
4 Follow the instructions in the LG ThinQ app
for using the Remote Start function.
Control Lock
The Control Lock feature automatically prevents
most oven controls from being turned on. All
functions are disabled except the POWER button.
Control Lock does not lock the oven door.
Crispy Reheat
300 °F / 150 ℃
0:01
hr. / min.
550 °F / 285 ℃
11:59
hr. / min.
350 °F / 175 ℃
12 hr.
Dehydrate
100 °F / 38 ℃
0:01
hr. / min.
200 °F / 93 ℃
11:59
hr. / min.
160 °F / 71 ℃
12 hr.
Probe 80 °F / 30 °C 210 °F / 95 °C 150 °F / 65 °C
Self Clean 3 hr. 5 hr. 4 hr.
EasyClean - - 10 min.
Feature Min. Temp. / Time Max. Temp. / Time Default
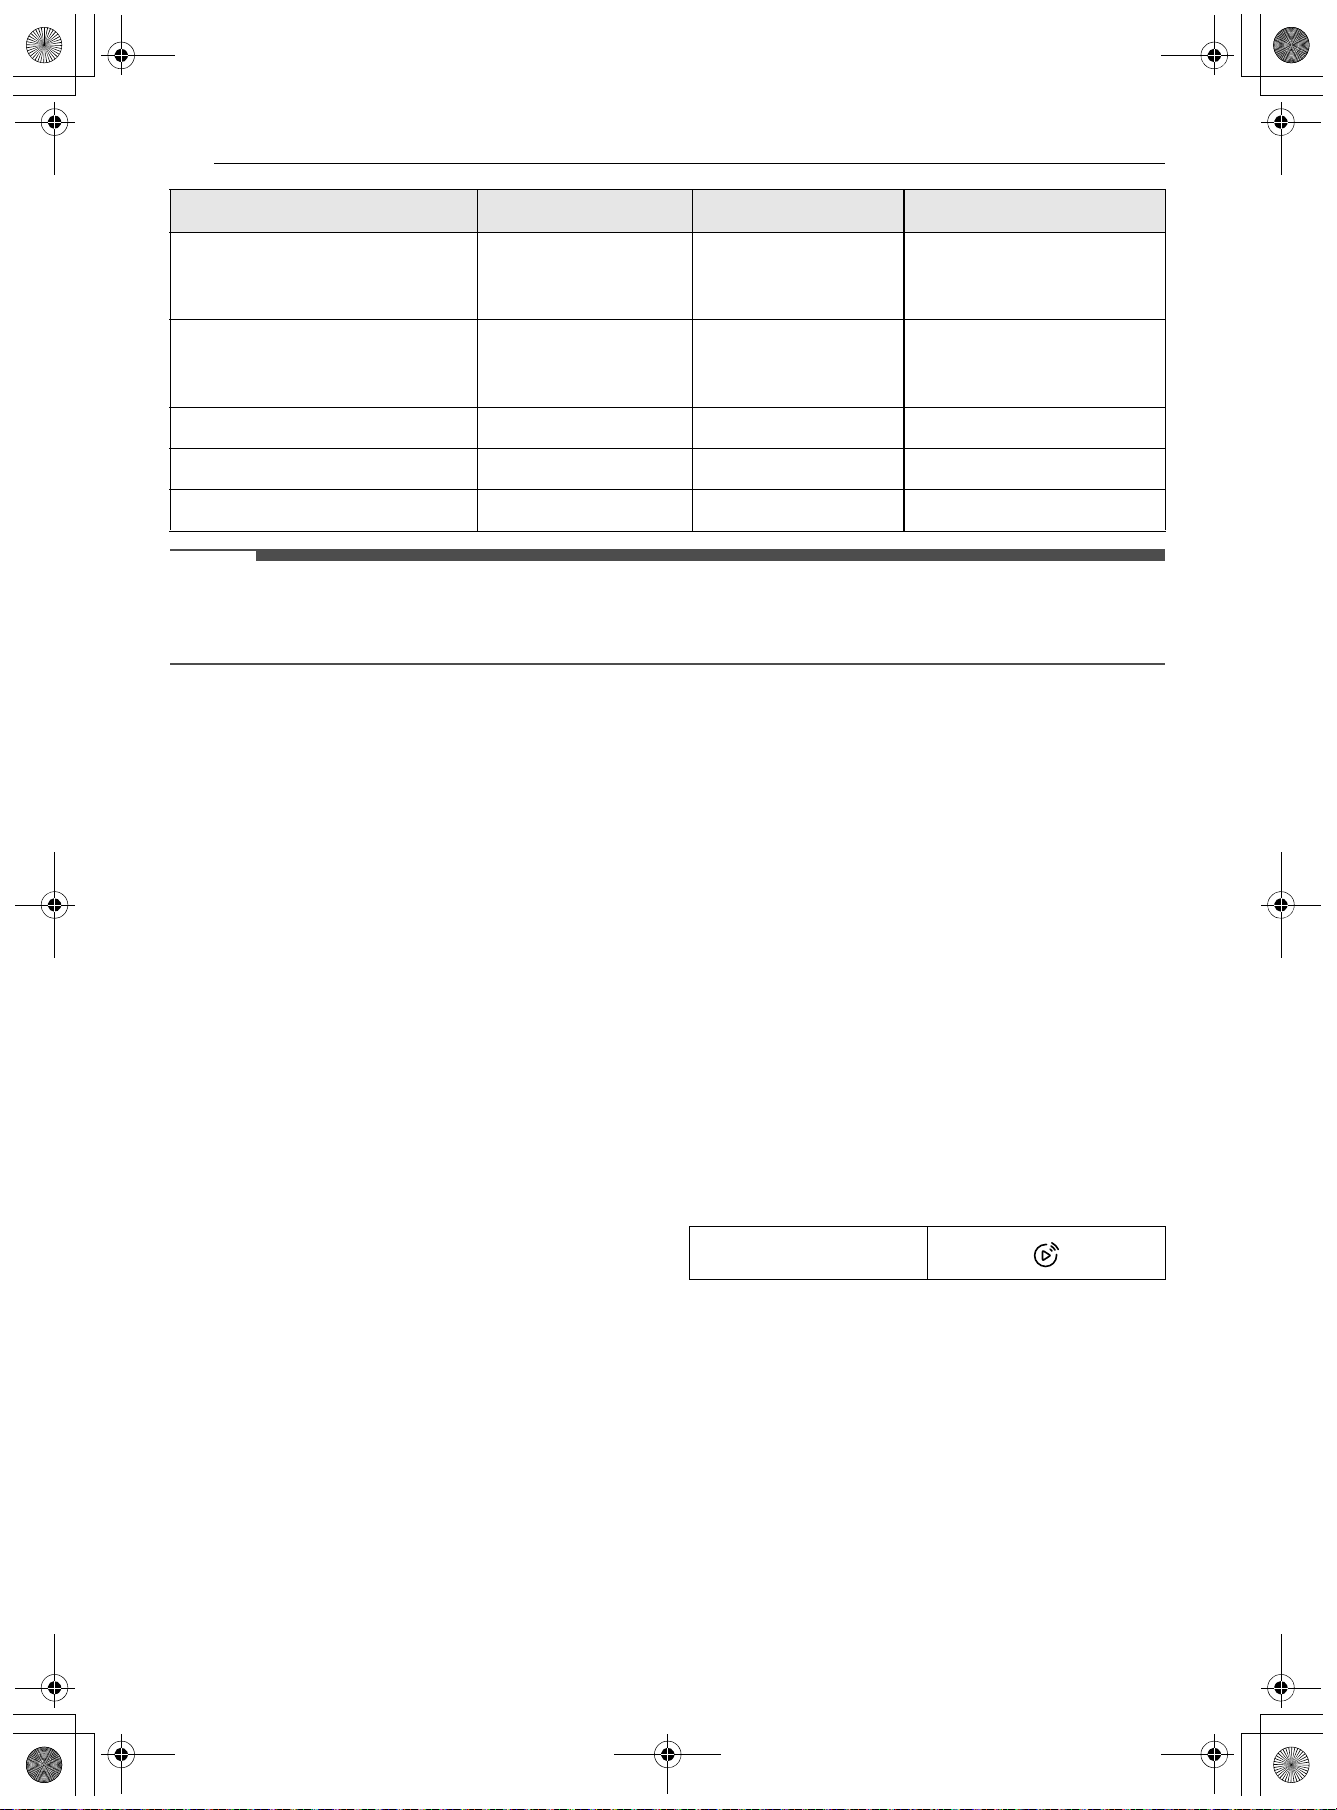
Remote Start icon
en-us_main.book.book Page 30 Friday, August 14, 2026 1:47 PM
31OPERATION
ENGLISH
Lock
1 Tap the Settings icon at the top right of the
screen and tap Display & Sound.
2 Tap the toggle switch next to Control Lock to
select On or Off.
Unlock
1 Tap any part of the screen while Control Lock
is on.
2 A popup screen appears. Tap and hold the
lock icon for 3 seconds to turn off Control
Lock.
Display
Set the length of time before the display sleeps.
There are three options you can select.
• ON: Always on
• OFF: Automatically turns off if idle for 5 minutes.
• Night Mode: Turns off from 10:00 PM to 5:00
AM.
Setting Display Option
1 Tap the Settings icon at the top right of the
screen, and tap Display & Sound.
2 Tap Display.
3 Select the desired option.
Brightness
Adjust the brightness of the LCD display from 20 %
to 100 % in increments of 20 %.
Setting Display Brightness
1 Tap the Settings icon at the top right of the
screen, and tap Display & Sound.
2 Tap Brightness.
3 Adjust the brightness by tapping the +/-
button, tapping the bar, or dragging the bar.
Clock Theme
There are five different clock themes available.
Setting Clock Theme
1 Tap the Settings icon at the top right of the
screen, and tap Display & Sound.
2 Tap Clock Theme.
3 Swipe to browse through the clock themes
and select a clock theme.
Volume
Adjust the volume of the following features: oven
start, button operation, end of cooking, preheating
complete.
Setting the Oven Volume
1 Tap the Settings icon at the top right of
screen, and tap Display & Sound.
2 Tap Volume.
3 Adjust the volume by tapping the +/- button,
tapping the bar, or dragging the bar.
NOTE
• Oven volume can be selected from 3 options:
High, Low, and Mute.
• Cooktop volume can be selected from 2 options:
High and Mute.
Language
Set the display language to English, Spanish, or
French.
en-us_main.book.book Page 31 Friday, August 14, 2026 1:47 PM
32 OPERATION
Selecting a Language
1 Tap the Settings icon at the top right of the
screen, and tap General.
2 Tap Language.
3 Select the desired language.
Date & Time
The date and time show in the LCD display when
the oven is not in use.
NOTE
• When the Auto Time Sync setting is turned on,
the server's date and time is applied
automatically. Auto Time Sync requires a Wi-Fi
connection.
• When the Auto Time Sync setting is turned off,
Date & Time can be set separately.
Setting Auto Time Sync
1 Tap the Settings icon at the top right of the
screen, and tap General.
2 Tap Date & Time.
3 Tap the toggle switch next to Auto Time Sync
to select On or Off.
Setting Date
1 Tap the Settings icon at the top right of the
screen, and tap General.
2 Tap Date & Time.
3 Tap Date.
4 Scroll to set the correct date.
Setting Current Time
1 Tap the Settings icon at the top right of the
screen, and tap General.
2 Tap Date & Time.
3 Tap Time.
4 Scroll to set the correct hour and minutes. You
can also tap number pad icon and enter the
desired numbers.
Setting Time Format
1 Tap the Settings icon at the top right of the
screen, and tap General.
2 Tap Date & Time.
3 Tap the toggle switch next to 24-Hour Time to
select 12 H or 24 H.
Temperature Unit
Set the oven temperature display to show either
Fahrenheit (℉) or Celsius (℃) units. The oven
defaults to Fahrenheit unless changed by the user.
Selecting Fahrenheit or Celsius
1 Tap the Settings icon at the top right of the
screen and tap General.
2 Tap Temperature Unit.
3 Select the desired Temperature Unit.
Sabbath
Sabbath mode is typically used on the Jewish
Sabbath and Holidays. When the Sabbath mode is
activated, the oven does not turn off until the
Sabbath mode is deactivated. In Sabbath mode, all
Number pad icon
en-us_main.book.book Page 32 Friday, August 14, 2026 1:47 PM
33OPERATION
ENGLISH
oven function buttons are inactive. Sabbath and
the set temperature will appear in the display.
When Sabbath mode is enabled, the appliance can
be used without having to be powered on or
turned off.
While the oven is in Sabbath mode, the following
functions are disabled:
Temperature Adjustments, Cooking Time, Display,
Oven Light On/Off, Alarm Functions and Wi-Fi.
Setting Sabbath Mode
1 Tap the Settings icon at the top right of the
screen and tap General.
2 Tap Sabbath.
3 Tap the temperature to set the desired
temperature. Adjust the temperature by
tapping the +/- button, tapping the bar, or
dragging the bar.
• You can also use the number pad icon to set
the temperature directly and then tap OK.
4 If desired, tap cook time to set the cook time.
Scroll to set the desired cook time.
• You can also use the number pad icon to set
the cook time directly and then tap OK.
5 Tap Start.
6 To stop the Sabbath mode, press the POWER
button on the control panel.
NOTE
• If a cook time is set, the oven turns off
automatically at the end of the cook time,
without chiming. The oven remains in Sabbath
mode, but is turned off.
• If no cook time is set, the oven will not
automatically turn off.
• After a power failure, the display will turn back
on in Sabbath mode, but the oven will be off.
• Always close the oven door before engaging
Sabbath Mode.
• Probe is not available in Sabbath mode.
Start Screen
There are five different screen themes available.
Setting Start Screen
1 Tap the Settings icon at the top right of the
screen and tap Customized.
2 Tap Start Screen.
3 Select the desired start screen theme.
• Main Menu
• Manual Cook
• Auto Cook
• Recent Cook
• My Recipes
Temperature Adjustment
Your new oven may cook differently than the one it
replaced. Use your new oven for a few weeks to
become more familiar with it before changing the
temperature settings. If after familiarizing yourself
with the new oven, you still think that it is too hot
or too cold, you can adjust the oven temperature
yourself.
NOTE
• To begin, either raise or lower the thermostat 15
℉ (8 ℃). Try the oven with the new setting. If the
oven still needs adjustment, raise or lower the
thermostat again, using the first adjustment as a
gauge. For example, if the adjustment was too
much, raise or lower the thermostat 10 ℉ (5 ℃).
If the adjustment was not enough, raise or lower
the thermostat 20 ℉ (11 ℃). Proceed in this way
until the oven is adjusted to your satisfaction.
Adjusting the Temperature
1 Tap the Settings icon at the top right of the
screen, and tap Customized.
2 Tap Temperature Adjustment.
3 Adjust the temperature by tapping the +/-
button, tapping the bar, or dragging the bar.
en-us_main.book.book Page 33 Friday, August 14, 2026 1:47 PM
34 OPERATION
Convection Auto Conversion
When Convection Bake and Convection Roast
are selected, Convection Auto Conversion
automatically converts the standard recipe
temperature entered to a convection temperature
by subtracting 25 ℉ / 14 ℃. This auto-converted
temperature shows on the display. For example,
select Convection Bake, enter 350 ℉, and 325 ℉
shows on the display after preheat.
Setting Convection Auto Conversion
1 Tap the Settings icon at the top right of the
screen, and tap Customized.
2 Tap the toggle switch next to Convection
Auto Conversion to select On or Off.
3 When Convection Auto Conversion is
activated, the Auto Conversion icon appears
at the top of the display.
Preheat Alarm Light
When the oven reaches its set-temperature, the
preheat alarm light flashes 5 times or until the
oven door is opened.
You can turn the preheat alarm light on or off.
Setting the Preheat Alarm Light
1 Tap the Settings icon at the top right of the
screen, and tap Customized.
2 Tap the toggle switch next to Preheat Alarm
Light to select On or Off.
Smart Diagnosis
TM
Smart Diagnosis
TM
can be run through the LG
ThinQ smartphone application or by calling for
support. Place your smartphone's mouthpiece
near the top left corner of the screen. See "Smart
Diagnosis Function" in the Smart Functions section
for detailed instructions.
1 Tap the Settings icon at the top right of the
screen, and tap Maintenance & Info.
2 Tap Smart Diagnosis.
3 Tap Start to start the diagnostic tone.
Factory Reset
This function returns all settings to the factory
defaults.
CAUTION
• All stored data will be deleted.
1 Tap the Settings icon at the top right of the
screen, and tap Maintenance & Info.
2 Tap Factory Reset.
3 A popup will appear in the display. If you want
to reset data to the factory defaults, tap
Reset.
Open Source License
This screen displays a list of the open source
software contained in this product. Refer to the
indicated licenses for the terms and conditions of
their use.
1 Tap the Settings icon at the top right of the
screen and tap Maintenance & Info.
2 Tap Open Source License.
3 Tap View Contents to read open source
license contents.
Cooktop
Precautions When Using the
Cooktop
WARNING
Before Cooking
• Do not cook on a broken cooktop. If the cooktop
is broken, cleaning solutions and spillovers may
penetrate the broken cooktop and create a risk
en-us_main.book.book Page 34 Friday, August 14, 2026 1:47 PM
35OPERATION
ENGLISH
of electric shock. Contact a qualified technician
immediately.
During Cooking
• Turn cookware handles inward so they don't
extend over adjacent surface units. This reduces
the risk of burns, ignition of flammable
materials, and spillage due to unintentional
contact with the cookware.
• Always place the pan in the center of the surface
unit you are cooking on. Never leave surface
units unattended at high heat settings. Proper
contact of cookware to burner also will improve
efficiency. Boilovers cause smoking and greasy
spills that may catch on fire.
After Cooking
• Clean cooktop with caution. Do not use sponges
or cloth to wipe spills on a hot cooking area. Use
a proper metal scraper. If a wet sponge or cloth
is used to wipe spills on a hot cooking area, it can
cause steam burns. Some cleaners can produce
noxious fumes if applied to a hot surface.
CAUTION
Before Cooking
• Do not use the glass cooktop surface as a cutting
board.
• Do not turn surface units on before placing
cookware.
• Do not store heavy items above the cooktop
surface that could fall and damage it.
• Do not place or store flammable or heat
sensitive items on the induction cooktop, even
when the cooktop is not in use.
• Place cookware on the cooking elements before
turning on the induction cooktop.
• Do not place sealed containers on the cooktop.
During Cooking
• Never cook directly on the glass. Always use
cookware.
• Do not place metallic objects such as knives,
forks, spoons, and lids on the induction cooktop
surface; they can get hot.
• Use this appliance only for normal household
use. It is not designed for commercial or
industrial use.
• Never use the appliance to heat the room.
• Use caution when plugging electrical appliances
into power outlets near the cooktop. Keep power
cords from any contact with the cooktop or
cookware.
• Overheated fat and oil can catch fire quickly.
Never leave surface elements unattended when
frying foods.
• Do not use the induction cooktop to heat
aluminum foil, products wrapped in aluminum
foil, or frozen foods packaged in aluminum
cookware.
• Use caution when plugging electrical appliances
into outlets near the cooktop to keep power
cords away from the hot cooktop or cookware.
• Users with pacemakers and active heart
implants must keep their upper body at a
minimum distance of 1 ft (30 cm) from active
induction cooking elements. If in doubt, consult
the implant manufacturer or your doctor.
After Cooking
• Immediately clean spills on the cooking area to
prevent a tough cleaning chore later.
• Do not use a steel-wool pad or scrub pad or
abrasive cleaning pads. They can scratch the
surface.
• After use, switch off the induction cooking
element using its control. Do not rely on the pan
sensor.
Pan Preheat Recommendations
Induction cooking may decrease the amount of
time required to preheat cookware compared to
cooking on a radiant element cooktop or gas
surface burner.
Pay close attention to all food items while cooking
on the cooktop or in the oven, and until all cooking
processes are complete.
CAUTION
• Remember that induction surface cooking
initially heats the cookware very quickly if the
cookware does not contain food.
Noises during Cooktop Operation
• Induction Sound: The electronic processes
involved with induction cooking create some
unfamiliar background noises such as a slight
buzzing sound. These noises are a normal part
of the induction cooking process.
• Cookware Vibration Sound: Some cookware
will buzz, depending on its construction or base
material. The buzz may be more noticeable if the
pan or its contents are cold or if the bottom of
the pan is not flat. As the pan heats up, the noise
will decrease. The noise will also decrease if the
power level setting is reduced.
en-us_main.book.book Page 35 Friday, August 14, 2026 1:47 PM
36 OPERATION
• Cooling Fan Sound: The fan may operate while
the induction cooktop is in use to reduce the
temperature of the product. The cooling fan may
also operate after the cooktop is turned off.
NOTE
• When using the induction cooktop, operational
noises are more noticeable while cooking in
Boost mode. But very loud noises are not
normal when induction cooking.
Hot Cookware and Residual Heat
CAUTION
• Unlike radiant surface elements, induction
cooking elements do not glow red when hot. You
can be burned if the glass surface is hot from the
residual heat transferred from the cookware. Do
not touch hot cookware or pans. Use oven mitts
or potholders to protect hands from burns.
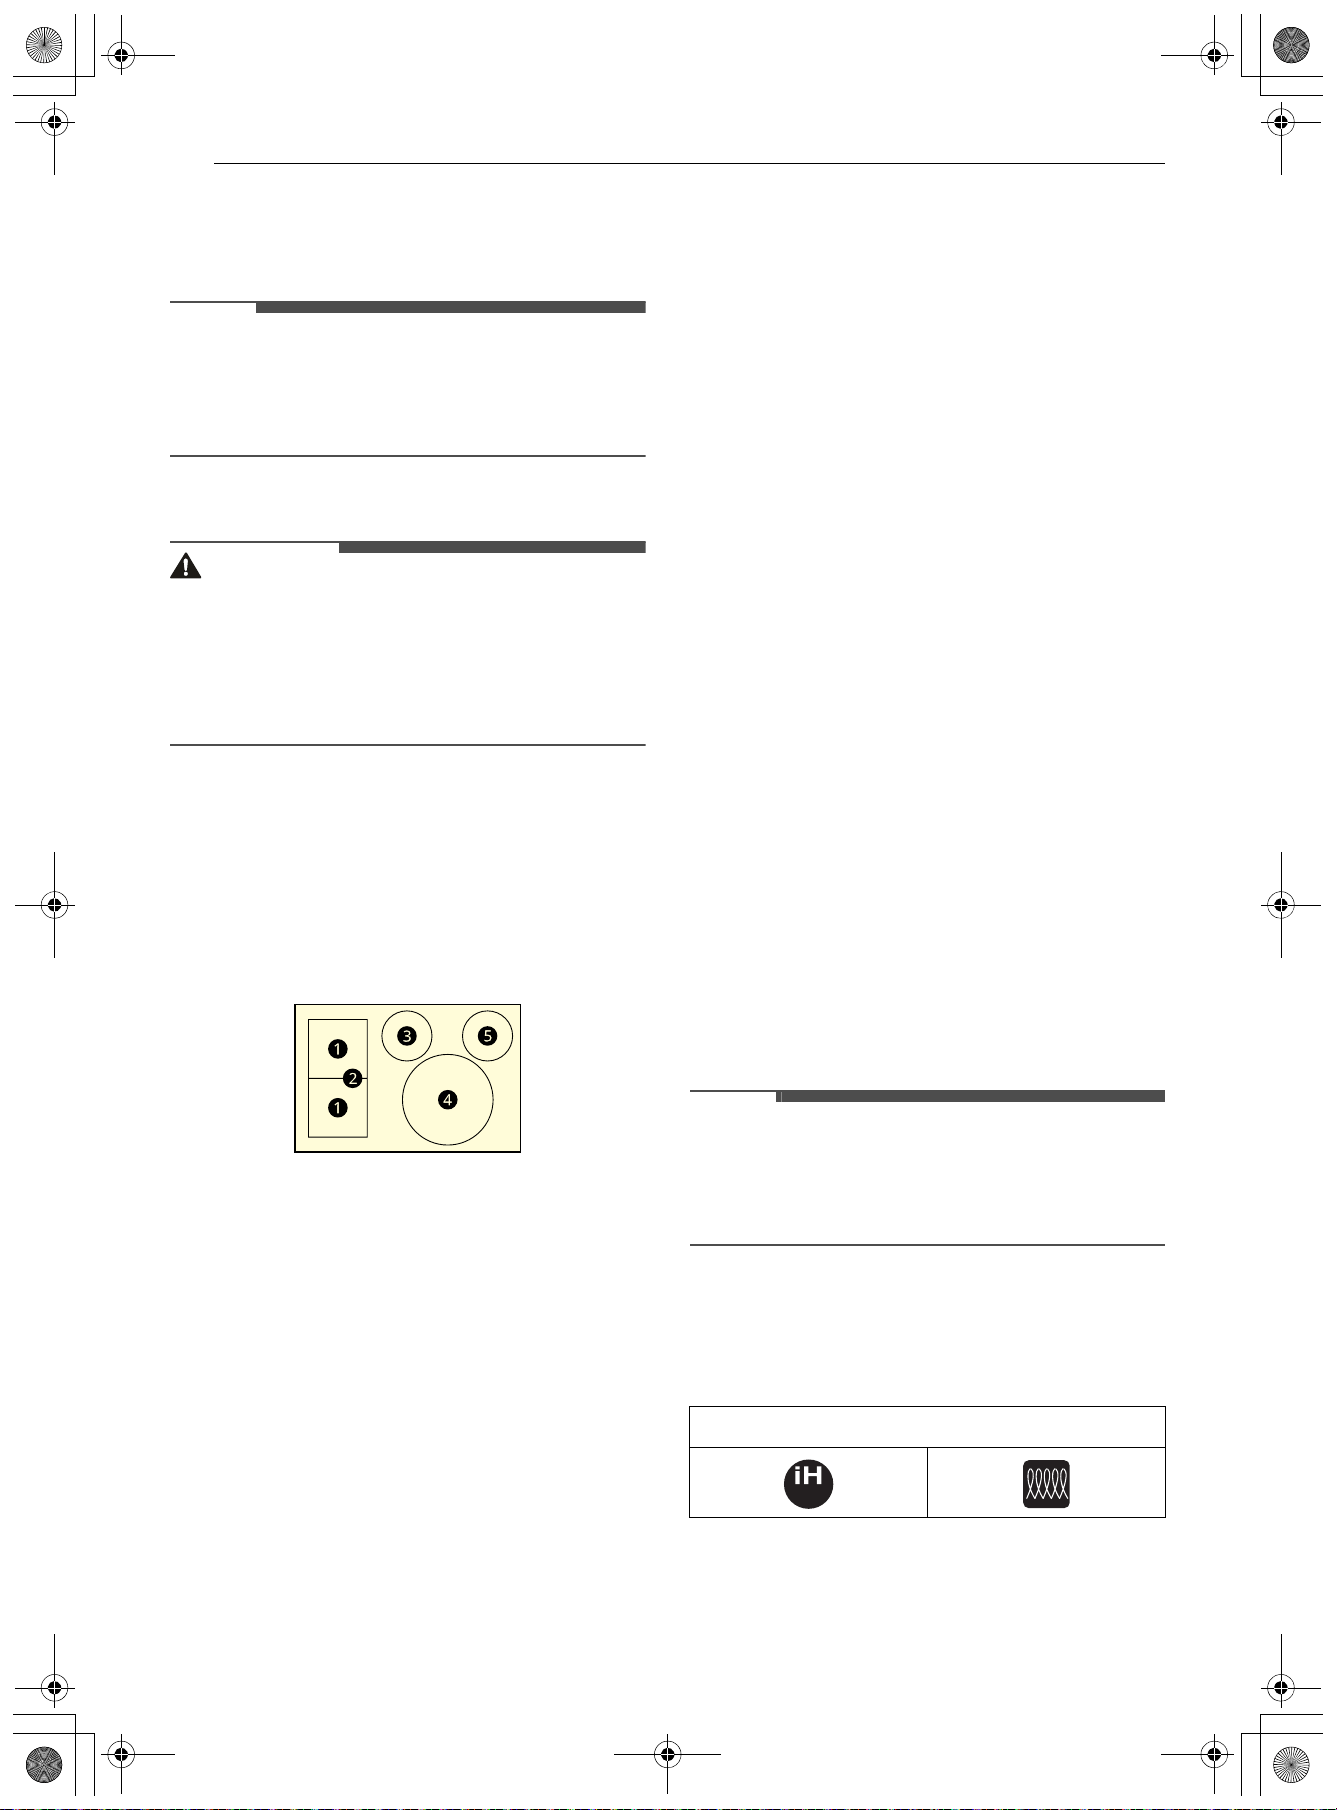
Cooking Areas
The cooktop is equipped with four induction
cooking elements of different sizes and a radiant
heat warming zone. The wattage ratings below are
maximum outputs. The second rating is the
maximum output for Boost mode.
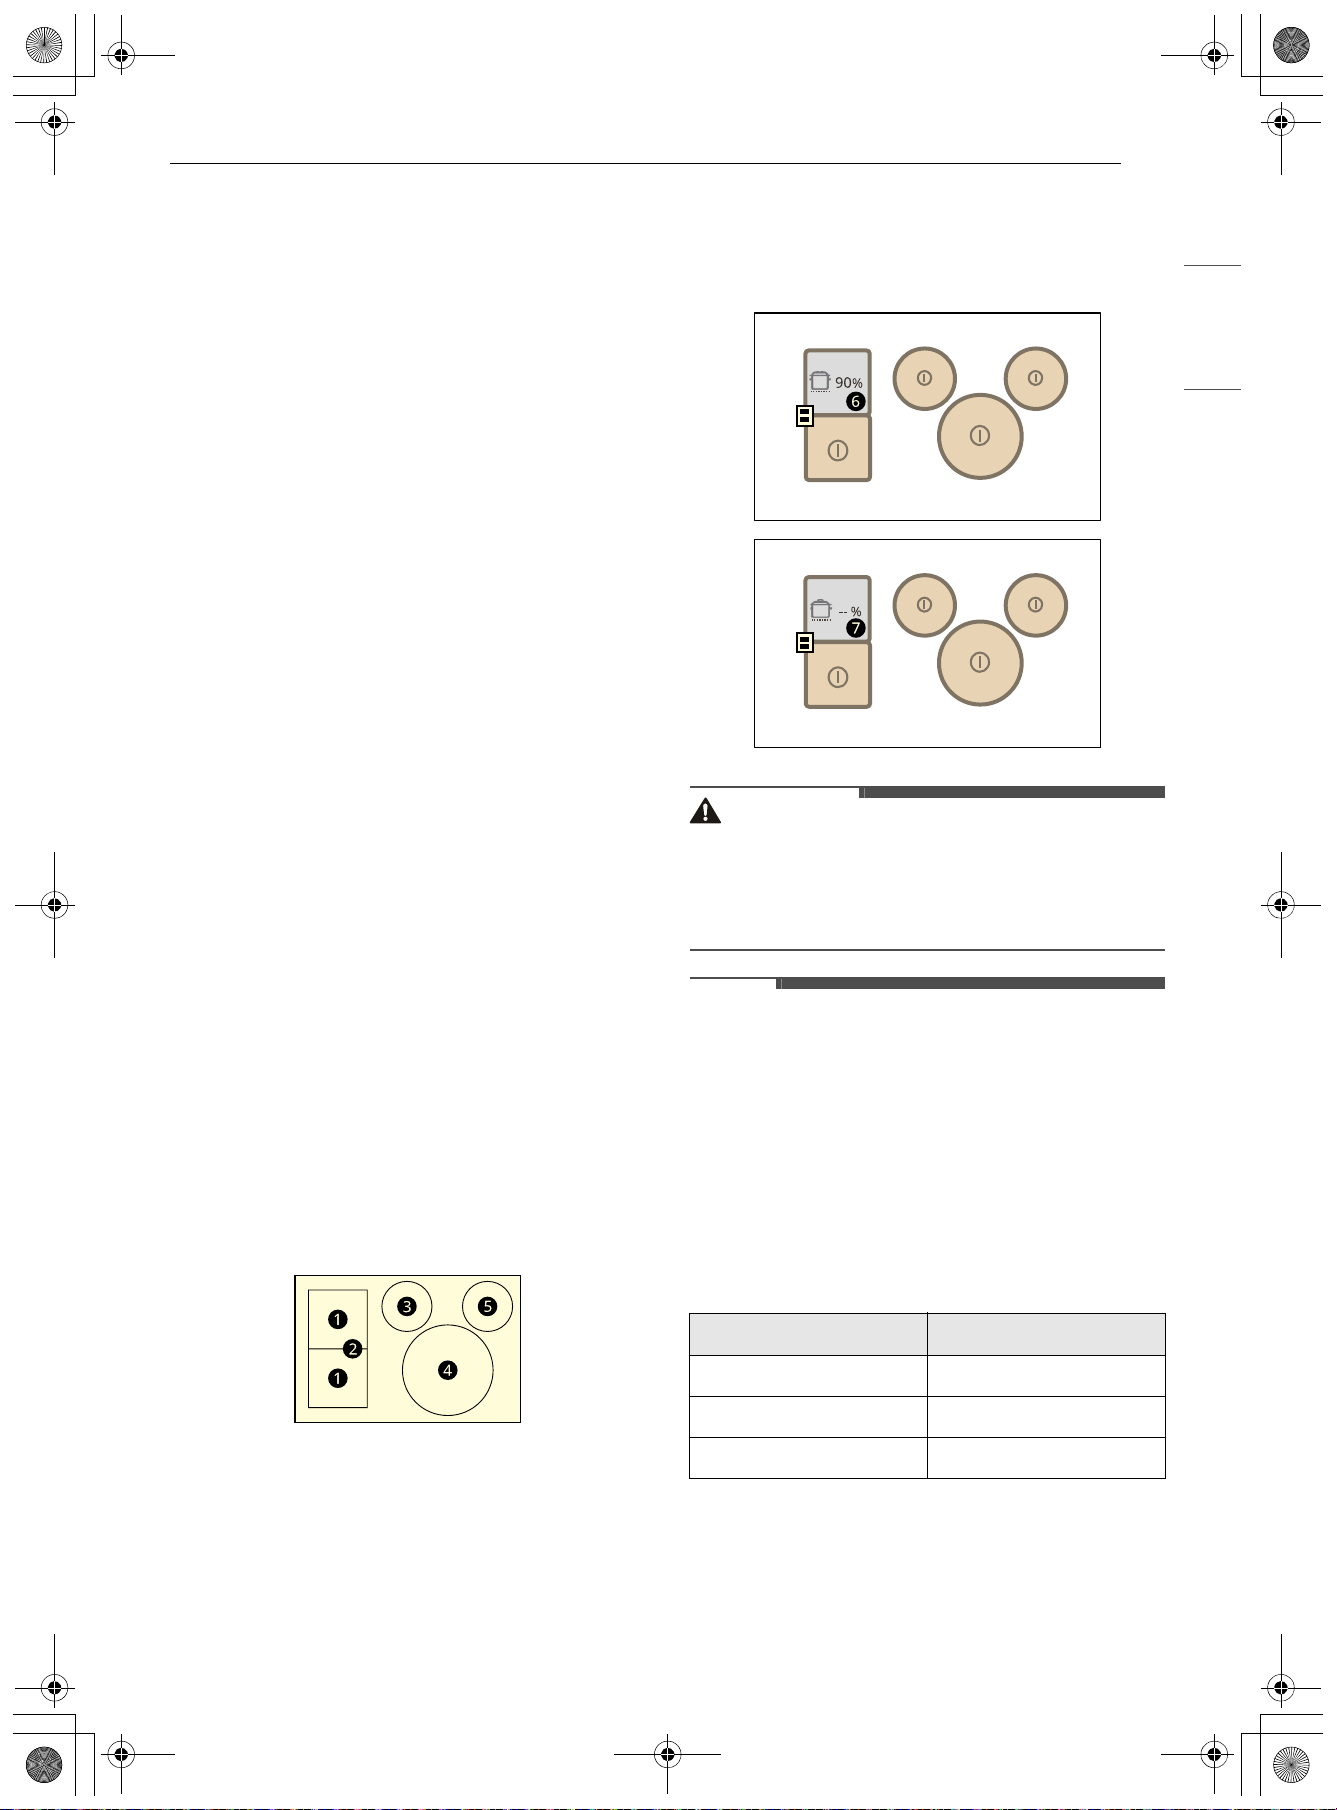
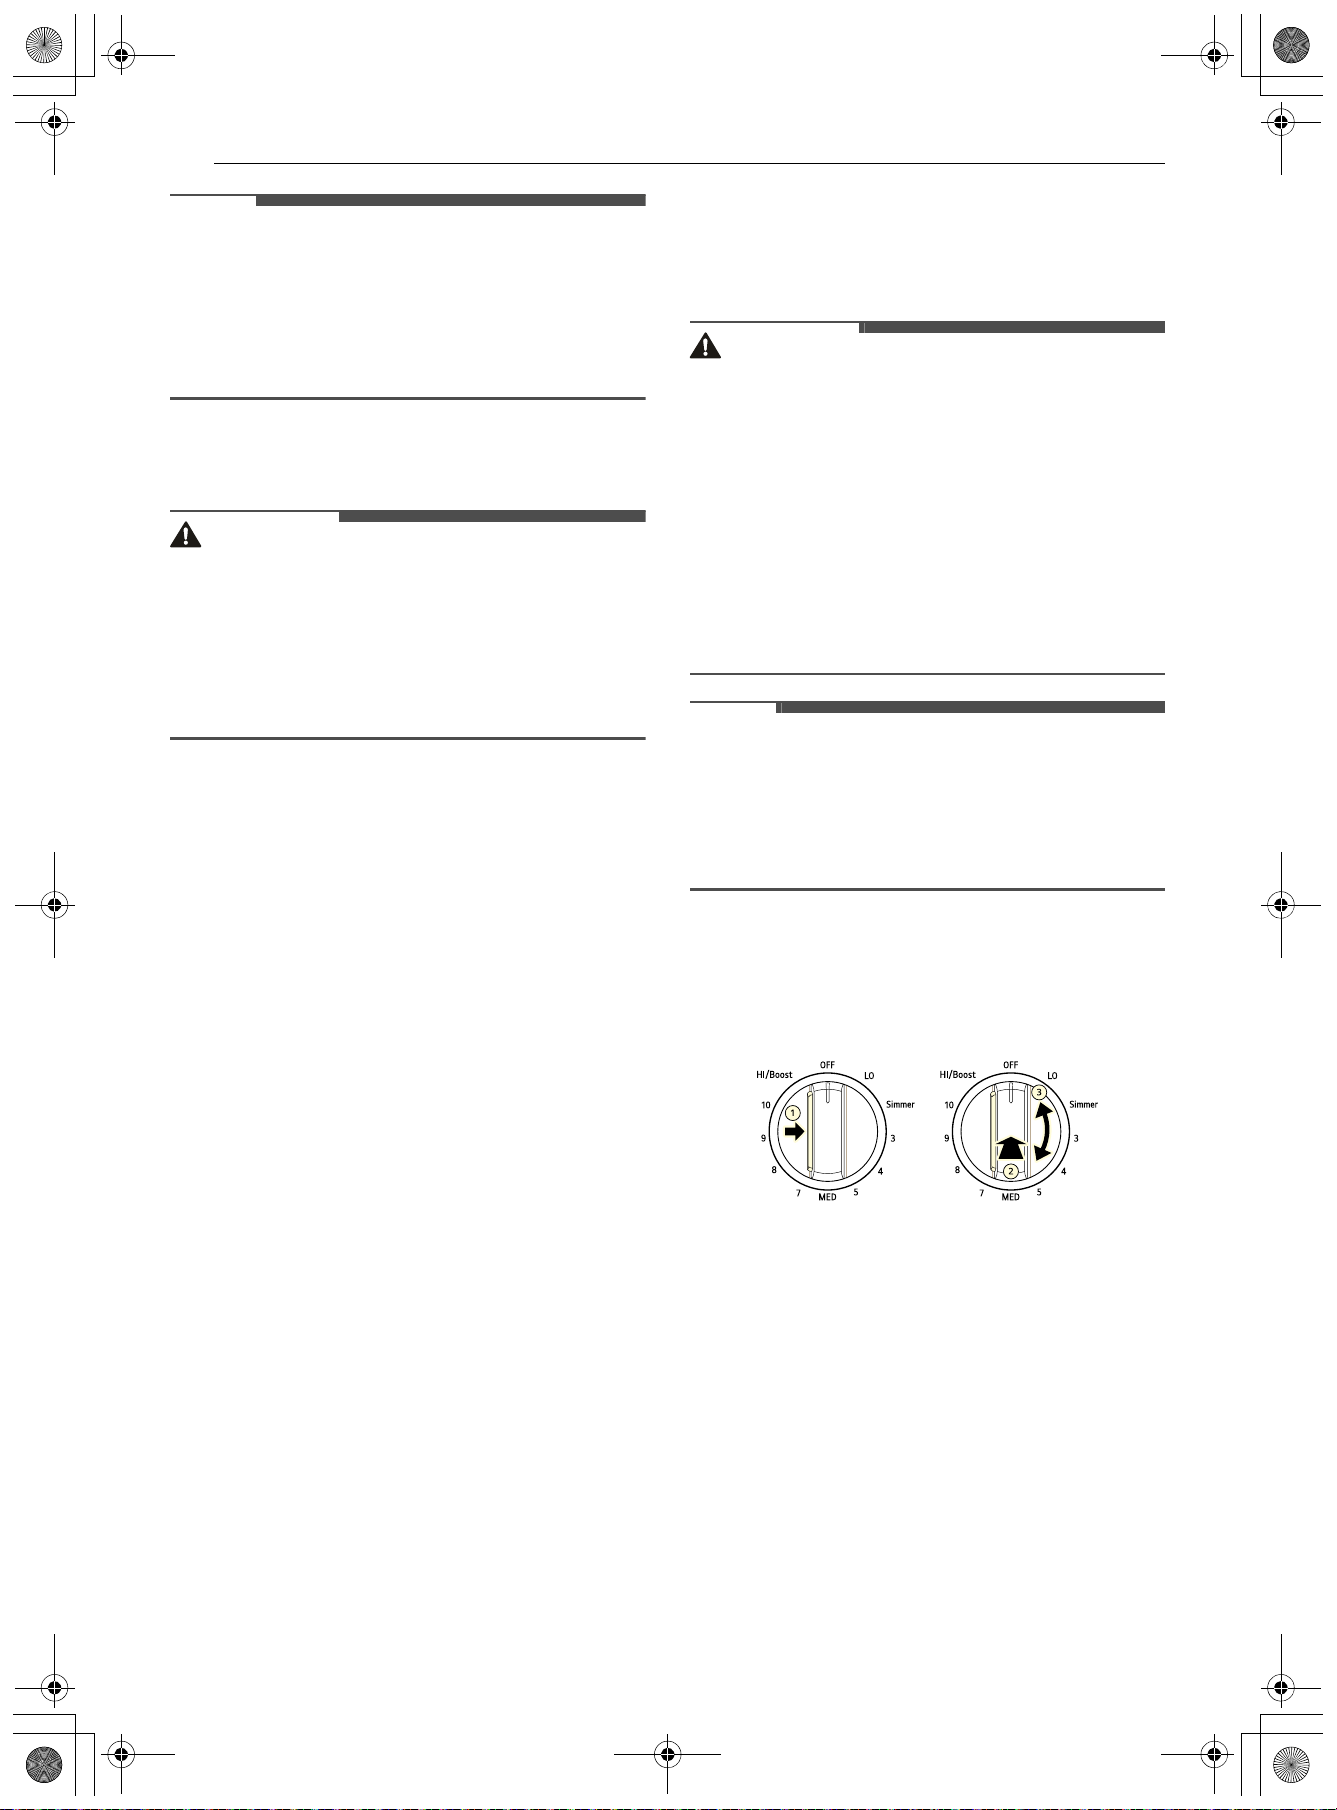
a Induction Left Front/Rear Cooking Element:
8 1/2" x 7 1/8", 1650 W / 3300 W (240 V)
b Induction Flex Zone Cooking Element:
8 1/2" x 14 3/16", 2800 W / 3300 W (240 V)
c Induction Center Rear Cooking Element:
6", 1300 W / 1800 W (240 V)
d Induction Right Front Cooking Element:
11", 2400 W / 4300 W (240 V)
e Radiant Heat Warm Zone
6", 100W (240 V)
Benefits of Induction Surface
Cooking
Speed and Efficiency
Induction cooking elements heat faster and use
less energy. Induction power levels quickly boil
liquids and are efficient when simmering.
A Cooler Cooktop
Whether induction cooking elements are turned
on or off, they remain cooler than radiant
elements. Virtually no heat is wasted because the
heat begins with the presence of cookware.
Easy Cleanups
Cooler cooking elements make for easier cleaning.
Spills resist sticking or burning so they wipe up
easily.
Pan Size Detection
A sensor automatically detects and adapts the
induction cooking element to the pan size in use
for more consistent, even cooking.
Greater Responsiveness
Induction cooking elements are more responsive
than their electric or gas counterparts because
only the pan heats. Induction elements heat more
easily and are just as responsive when reducing
temperatures to a simmer.
Induction Cookware
NOTE
• Before using the induction cooking elements,
carefully read and follow these cookware
recommendations and the instructions in the
pan sensing sections.
When purchasing pans for use on the induction
cooktop, look for cookware identified by the
manufacturer as "induction ready" or "induction
capable", or that is marked by the manufacturer as
specifically designed for induction cooking.
The base material of the cookware must be
magnetic for the cooking elements to activate. Use
a magnet to check if the cookware base material is
suitable. If the magnet sticks to the bottom of the
Symbols of Induction Compatible Cookware
en-us_main.book.book Page 36 Friday, August 14, 2026 1:47 PM
37OPERATION
ENGLISH
cookware, the cookware can be used for induction
cooking.
For the best possible surface cooking results, use
only high-quality, heavy gauge steel cookware on
the induction cooking elements. Follow
manufacturer's recommendations when using
induction cookware.
Induction Cookware Types
The three most common induction cookware types
available are stainless steel, cast iron, and
porcelain-enamel-coated metals.
• Stainless Steel is generally excellent for
induction cooking. It is durable, easy to clean,
and resists staining.
NOTE
• Not all stainless steel cookware is magnetic;
stainless steel is not always suitable for
induction cooking.
• Cast Iron cooks evenly and is also good for
induction cooking. Do not slide cast iron
cookware on the cooktop; cast iron cookware
with a rough surface will scratch the ceramic
cooktop.
• Porcelain-enamel-coated metals have variable
heating characteristics depending on the quality
of the base metal. Make sure the porcelain-
enamel coating is smooth to avoid scratching
the ceramic cooktop.
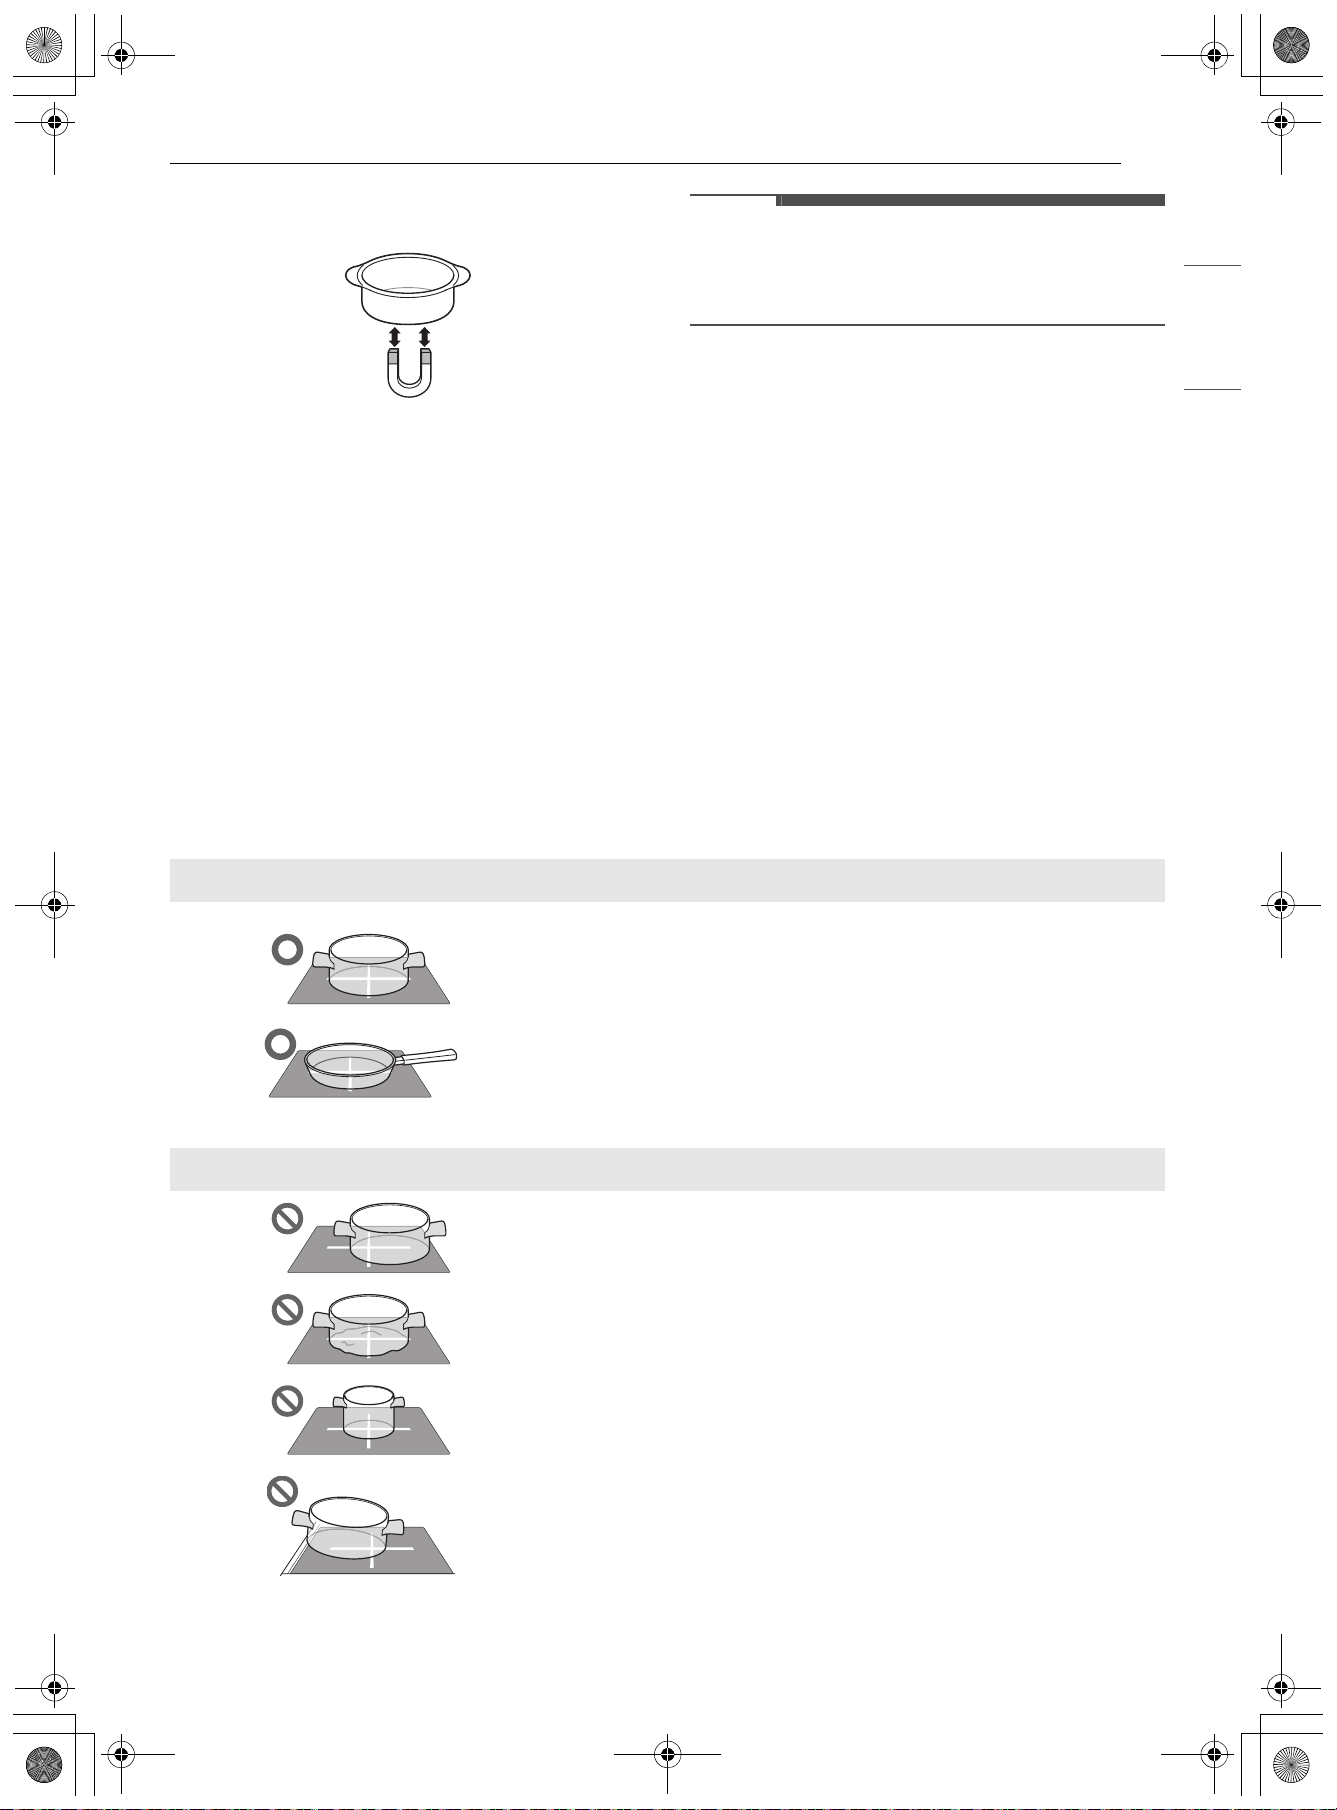
Cookware Placement
Use the proper cookware and place it correctly on
the cooktop. One or more of the cooking elements
will not heat if any of the incorrect conditions
shown is detected by the sensors located below
the ceramic cooktop surface. Correct the problem
before attempting to use the cooktop.
Correct Use
• Cookware is centered correctly on surface of cooking
element.
• Pan has flat bottom and straight sides.
• Pan size meets or exceeds the recommended minimum size
for the cooking element.
• Pan rests completely on the cooktop surface.
• Pan is properly balanced.
Incorrect Use
• Cookware is not centered on surface of cooking element.
• Pan has curved or warped bottom or sides.
• Pan does not meet the minimum size required for the
cooking element used.
• Pan bottom rests on cooktop trim or does not rest
completely on the cooktop surface.
en-us_main.book.book Page 37 Friday, August 14, 2026 1:47 PM
38 OPERATION
Pan Sensing
The cooking-element sensors located below the
cooktop surface require certain cookware
conditions to be met before the induction cooking
elements can operate.
The cooking zone LED bar may display a pan
sensing error message. If a cooking element is
activated and no cookware is detected, the
affected induction cooking zone LED bar will
fluctuate. If the cookware does not meet the
correct conditions, the cooking zone may not heat.
If the problem is not corrected, the affected
cooking element will automatically deactivate after
one minute.
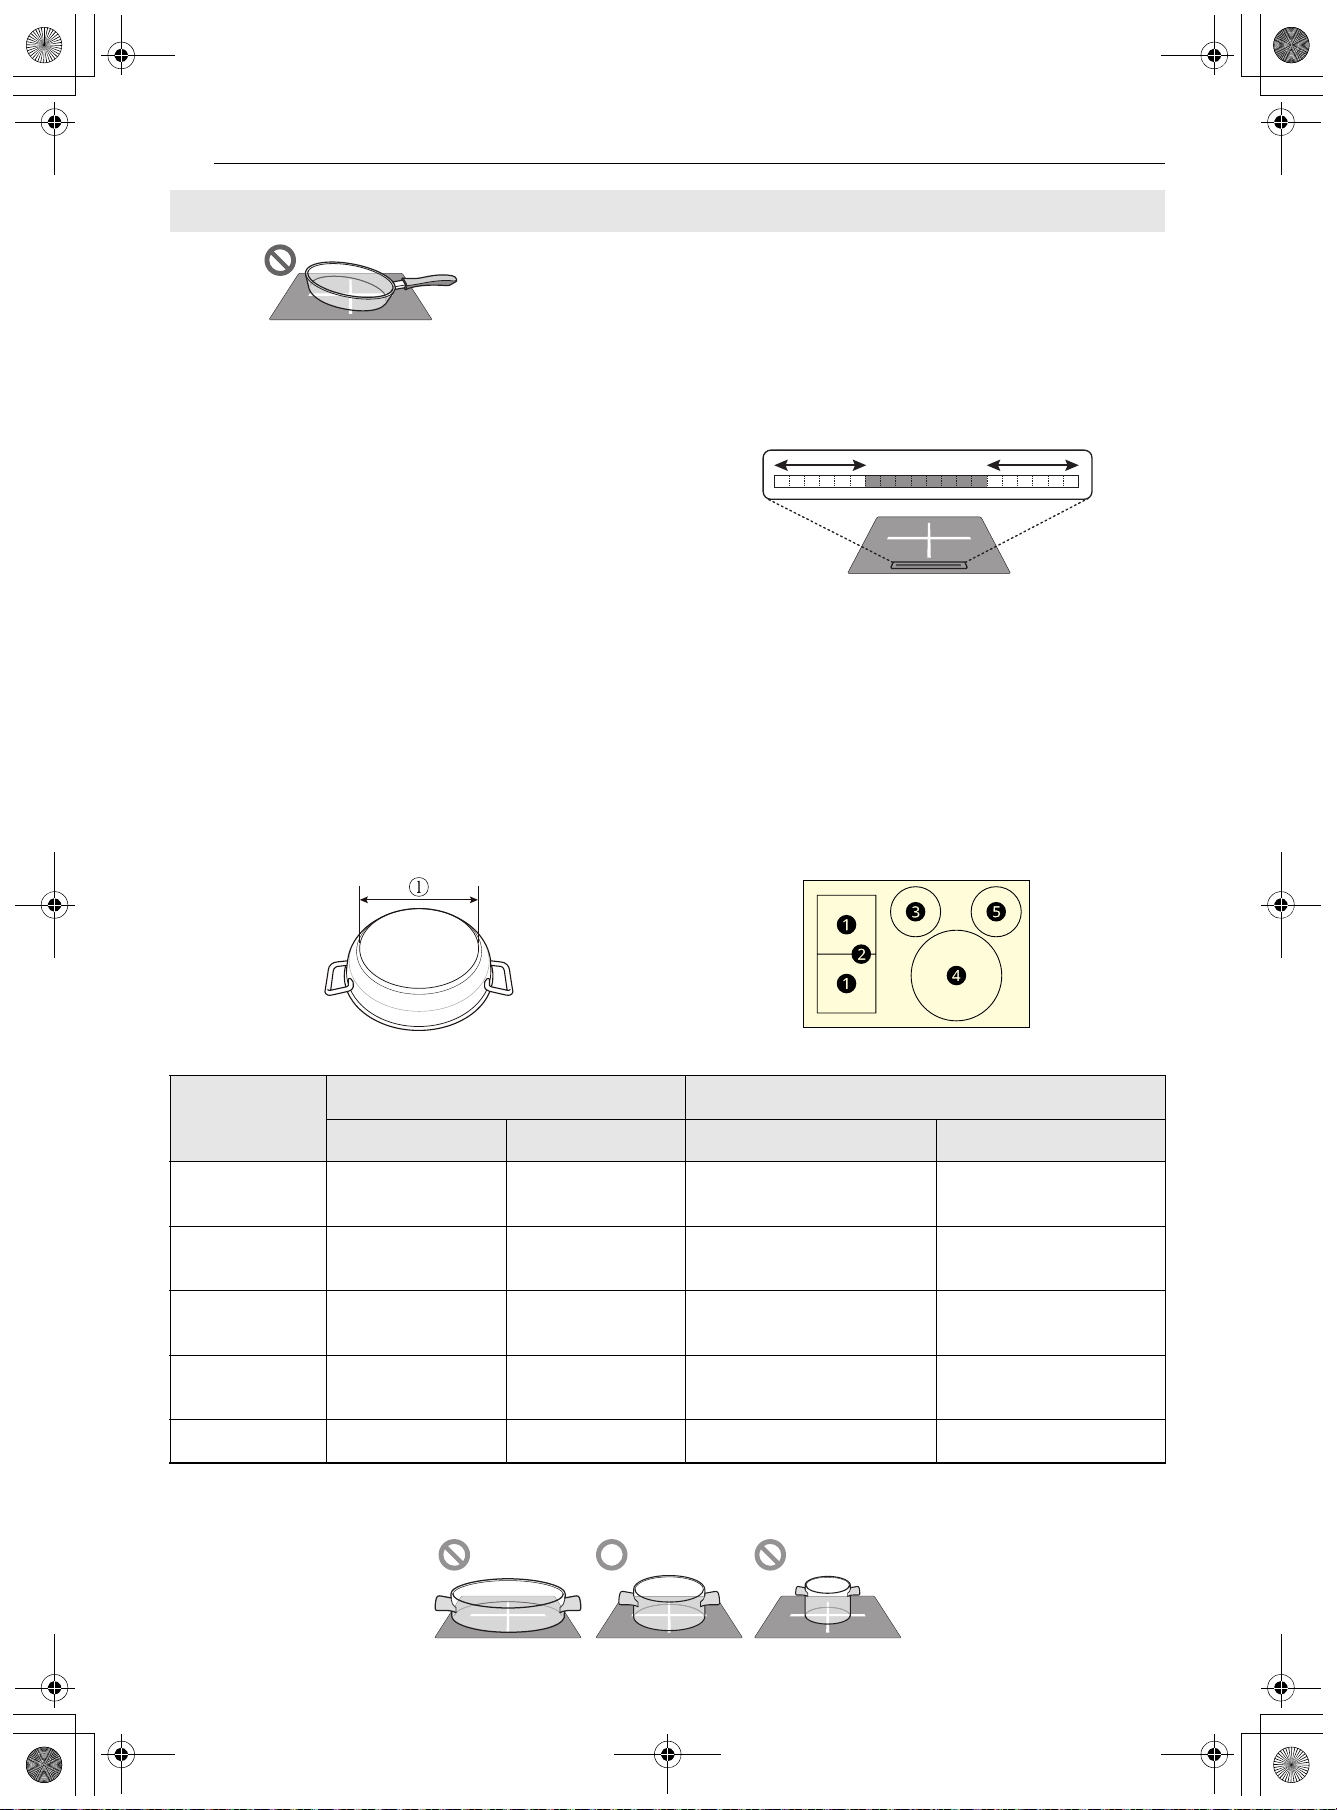
Minimum and Maximum Pan Size
There are four cooking elements on the induction cooktop. Each element requires an appropriate pan size
to be used effectively. The bottom size of the pan must be between the maximum and minimum diameter
A for proper cooking to occur.
The pan must make full contact with the glass surface without the bottom of the pan touching the metal
cooktop trim.
• Pan is unbalanced by heavy handle.
Incorrect Use
Cooking Area
Heater
Diameter of Pan Bottom A
Type Size (inch) Min. Max.
a
Induction 8 1/2 x 7 1/8
5 13/16"
(147 mm)
7 1/8"
(180 mm)
b
Induction 8 1/2 x 14 3/16
4 3/4"
(120 mm)
10 5/8"
(270 mm)
c
Induction 6
5.5"
(140 mm)
7"
(178 mm)
d
Induction 11
9.5"
(241 mm)
11.8"
(300 mm)
e
Warm 6 - -
en-us_main.book.book Page 38 Friday, August 14, 2026 1:47 PM
39OPERATION
ENGLISH
If the correct induction cookware—centered on any of the active cooking elements—is too small, the
affected cooking element’s LED bar fluctuates and the pan does not heat.
Cookware Compatibility Indicator
The cookware compatibility indicator shows how
efficiently the cookware will heat on the induction
cooktop elements.
1 Turn off all cooktop elements in use.
2 Put enough water in the cookware to cover
the bottom. Place the cookware on the center
of the desired cooktop element.
• Select an element that is appropriate for the
size of the cookware.
3 Tap the Settings icon at the top right of
screen, and tap Maintenance & Info.
4 Tap Cookware Compatibility Indicator.
5 Set the power level on the selected element to
10.
6 Tap OK, and the number of the desired
cooktop element ( a, c, d) at the same time
for at least 3 seconds. The indicator
f is
shown on the display. When indicator is not
checked,
g is shown on display.
7 This test does not apply to the Warm Zone e
and the cooktop element b with the Flex
function activated. .
CAUTION
• Turn off all cooktop elements before starting to
avoid getting a false result.
• The indicator is not available if more than two
cooktop elements are in use.
NOTE
• The cookware compatibility indicator is based on
the manufacturer's internal standards and is for
reference only.
• The indicator may vary depending on the usage
environment, power voltage and cookware
temperature.
• The indicator may vary from element to element
even for the same type of cookware.
• For efficient cooking, use cookware with an
indicator of 90 or above.
Indicator Compatibility
0 - 10 Low
20 - 80 Medium
90 - 100 High
en-us_main.book.book Page 39 Friday, August 14, 2026 1:47 PM
40 OPERATION
NOTE
• If the indicator is low, check the base material,
size and shape of the cookware. Cookware with a
low indicator, even if it has an IH mark, may heat
less efficiently or make noise when heated. This
is normal, and the cookware can still be used
safely.
Home Canning
CAUTION
• Canning can generate large amounts of steam.
Use extreme caution to prevent burns. Raise the
lid so that steam is vented away from you. Safe
canning requires that harmful micro-organisms
are destroyed and jars are sealed completely.
When using a water bath canner, maintain a
gentle but steady boil for the required time.
Read and observe the following precautions when
home canning. Read the information on the USDA
(United States Department of Agriculture) website
and follow the recommendations there for home
canning procedures.
• Use only quality, flat-bottomed canners when
home canning. Use a ruler to check the bottom
of the canner for flatness.
• Canners with ridges that radiate from the
bottom center are not suitable for use on a
ceramic glass cooktop.
• The diameter of the canner should not exceed
the maximum cooking element markings by
more than one inch. Use smaller diameter
canners on ranges with ceramic-glass or open-
coil-electric cooktops.
• Start with hot tap water to boil water more
quickly. Bring water to an initial boil using the
highest heat setting. Once the water is boiling,
reduce the heat as much as possible while
maintaining the boil.
• It is best to can small amounts and keep the
canner light enough to lift.
• Do not leave the water bath or pressure canner
on high heat for extended periods.
• Alternate surface elements between each batch
to allow the elements and surrounding surfaces
to cool down. Do not can using the same
element all day.
Using the Cooking Elements
Turning On Cooking Elements (Except
Warming Zone)
CAUTION
• Clean the knobs regularly. Soil or foreign objects
on the knobs may interfere with the operation of
the button.
• Do not apply excessive force when using the
buttons and lock functions, or they may be
damaged.
• The surfaces of the knobs may be hot after
cooking. Allow the knobs to cool sufficiently or
put on an oven mitt before touching them.
• The buttons must be properly set to ensure the
intended functions of the knobs.
NOTE
• To use the cooktop knobs without pressing in
the side button, use the button lock function.
• If removing and reassembling the knob, press
and hold the side button while pushing the knob
fully onto shaft.
1 Press in the side button on the knob. A
2 Push the control knob in. B
3 Turn the knob in either direction to select the
desired setting. A short beep sounds and the
cooking element's LED bar shows its current
setting.
Cooking Element LED Bar
The range provides an LED bar for each cooking
element on the cooktop. Check messages in the
display window and use the LEDs with the
en-us_main.book.book Page 40 Friday, August 14, 2026 1:47 PM
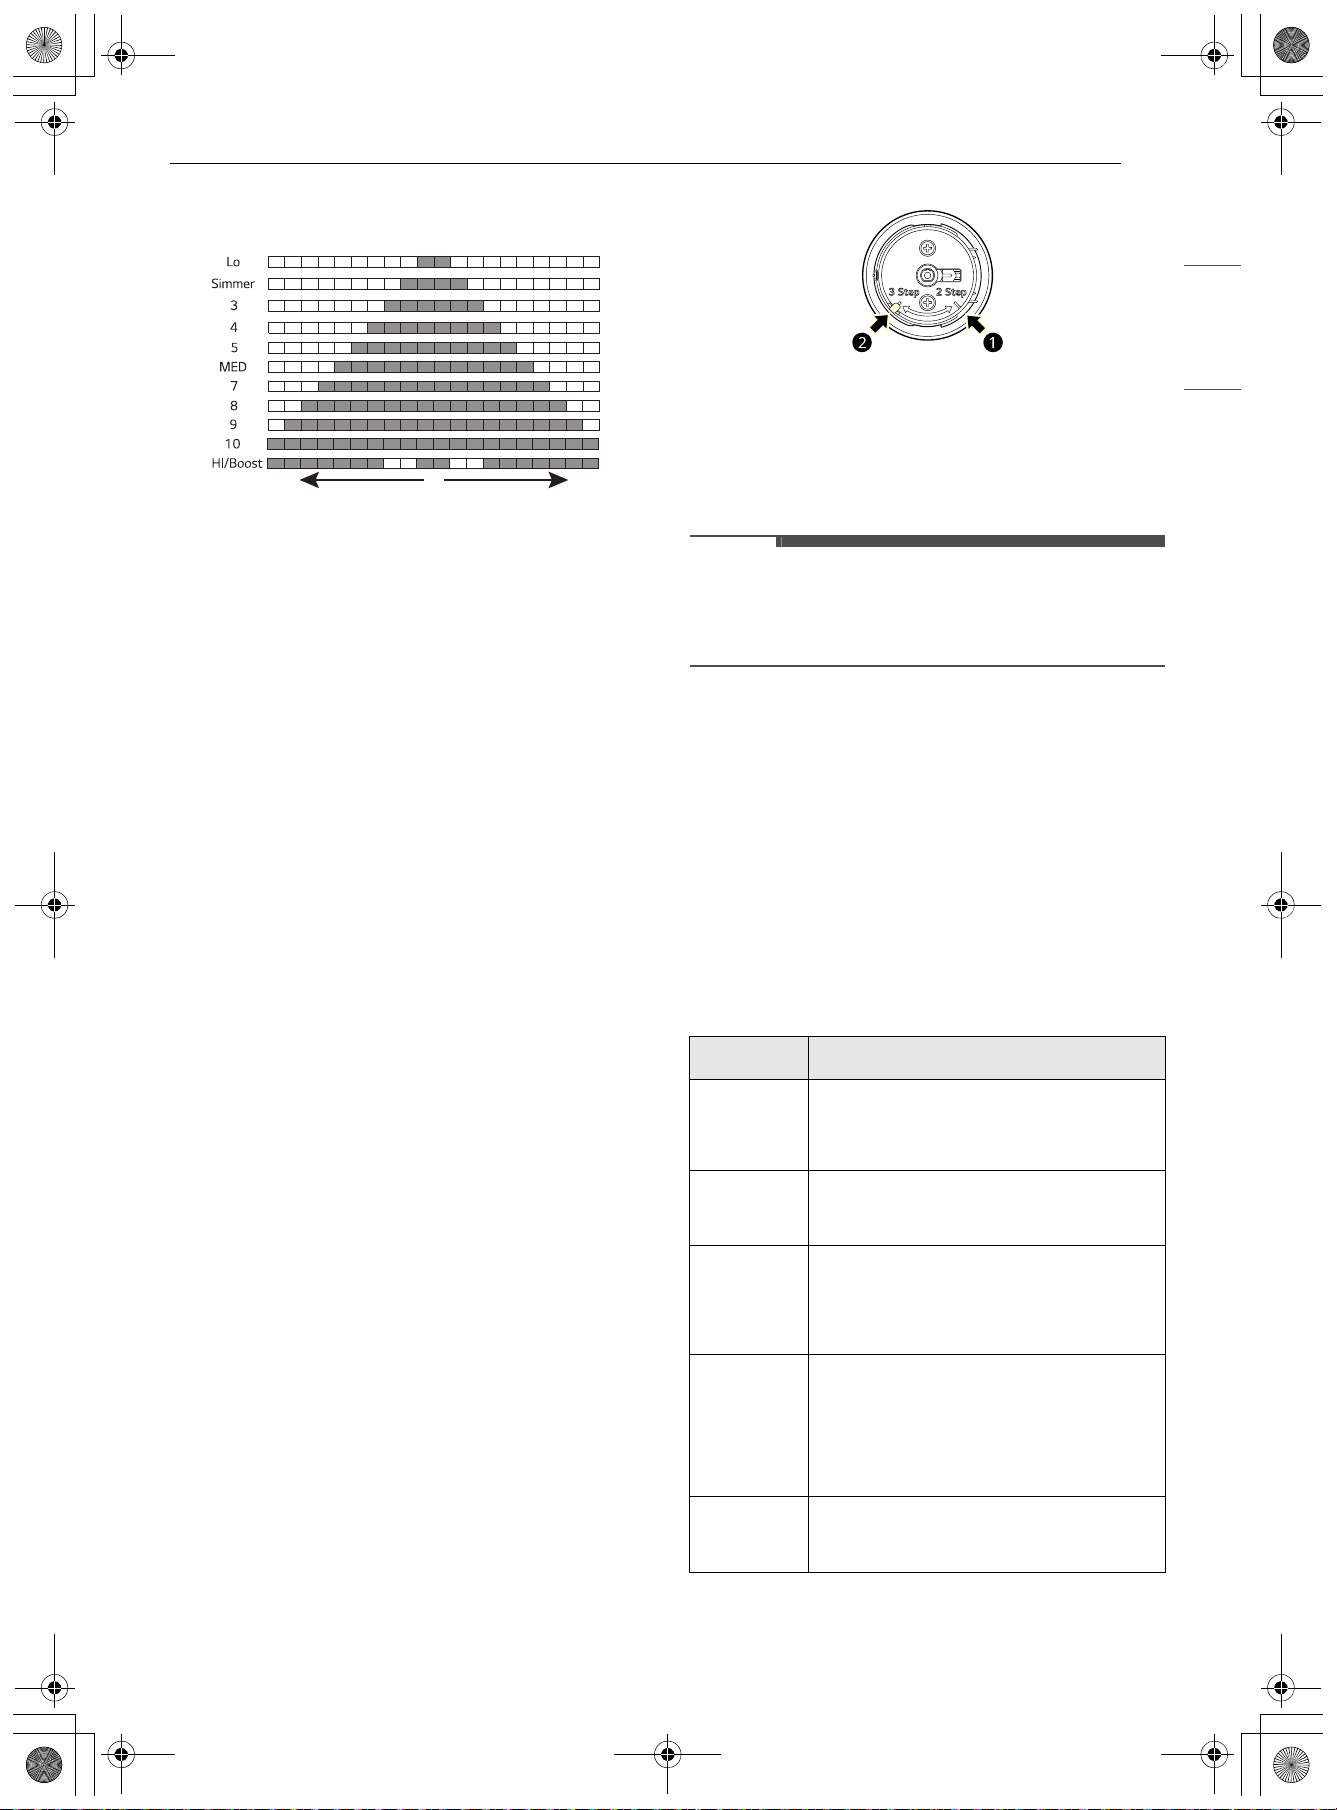
41OPERATION
ENGLISH
corresponding control knobs to monitor the power
levels of the elements.
Boost Power Level
Boost mode is only available immediately after
activating a cooking element. When the cooking
element is set to the Boost mode, the LED bar
flashes and the Boost mode stays in operation for
up to 10 minutes. After 10 minutes, the cooking
element automatically returns to the Hi setting.
Hot Surface Indicator
The hot surface indicator light glows as long as any
surface cooking area is too hot to touch.
It remains on after the element is turned off and
until the surface has cooled to approximately 130
°F.
It is normal for the surface elements to cycle on
and off when cooking at lower temperature
settings.
Using the Knob Lock
You can adjust the Knob Lock on each cooktop
knob so you don’t have to press the button in to
use the knob. Remove and adjust one knob at a
time.
1 Make sure the knob is in the OFF position and
pull it straight off the stem.
2 On the back of the knob ring, rotate the black
tab to the 2 Step or 3 Step position.
• If you slide the tab to the 2 Step
a position,
the knob can be used without pressing in
the button.
• If you slide the tab to the 3 Step b position,
you must press in the button to use the
knob.
3 Once the Knob Lock is adjusted as desired,
reinstall the knob. To reinstall, hold the knob
with the OFF label at the top and slide the
knob directly onto the stem.
NOTE
• The black tab must be aligned with the 2 Step or
3 Step mark to ensure proper operation of the
knob and button.
Recommended Surface Cooking
Settings
Start most surface cooking on a higher setting and
then adjust to a lower setting to finish cooking.
The suggested settings may need adjustments,
depending on cookware design and quality and on
the amount of food being prepared.
Use quality cookware that is constructed with a
magnetic base material and that meets the
minimum and maximum pan size requirements.
Setting Recommended Use
HI/Boost
• Use to heat a large amount of
food or to bring large pans of
water to a boil
10-HI/
Boost
• Bring liquid to a boil
• Start most cooking
MED-10
• Hold a rapid boil, fry, deep fat fry
• Quickly brown or sear food
• Steaks, cutlets, grilled meat
3-MED
• Maintain a slow boil
• Fry or sauté foods
• Cook soups, sauces and gravies
•Eggs, pancakes
Simmer-3
• Stew or steam food
• Simmer
en-us_main.book.book Page 41 Friday, August 14, 2026 1:47 PM
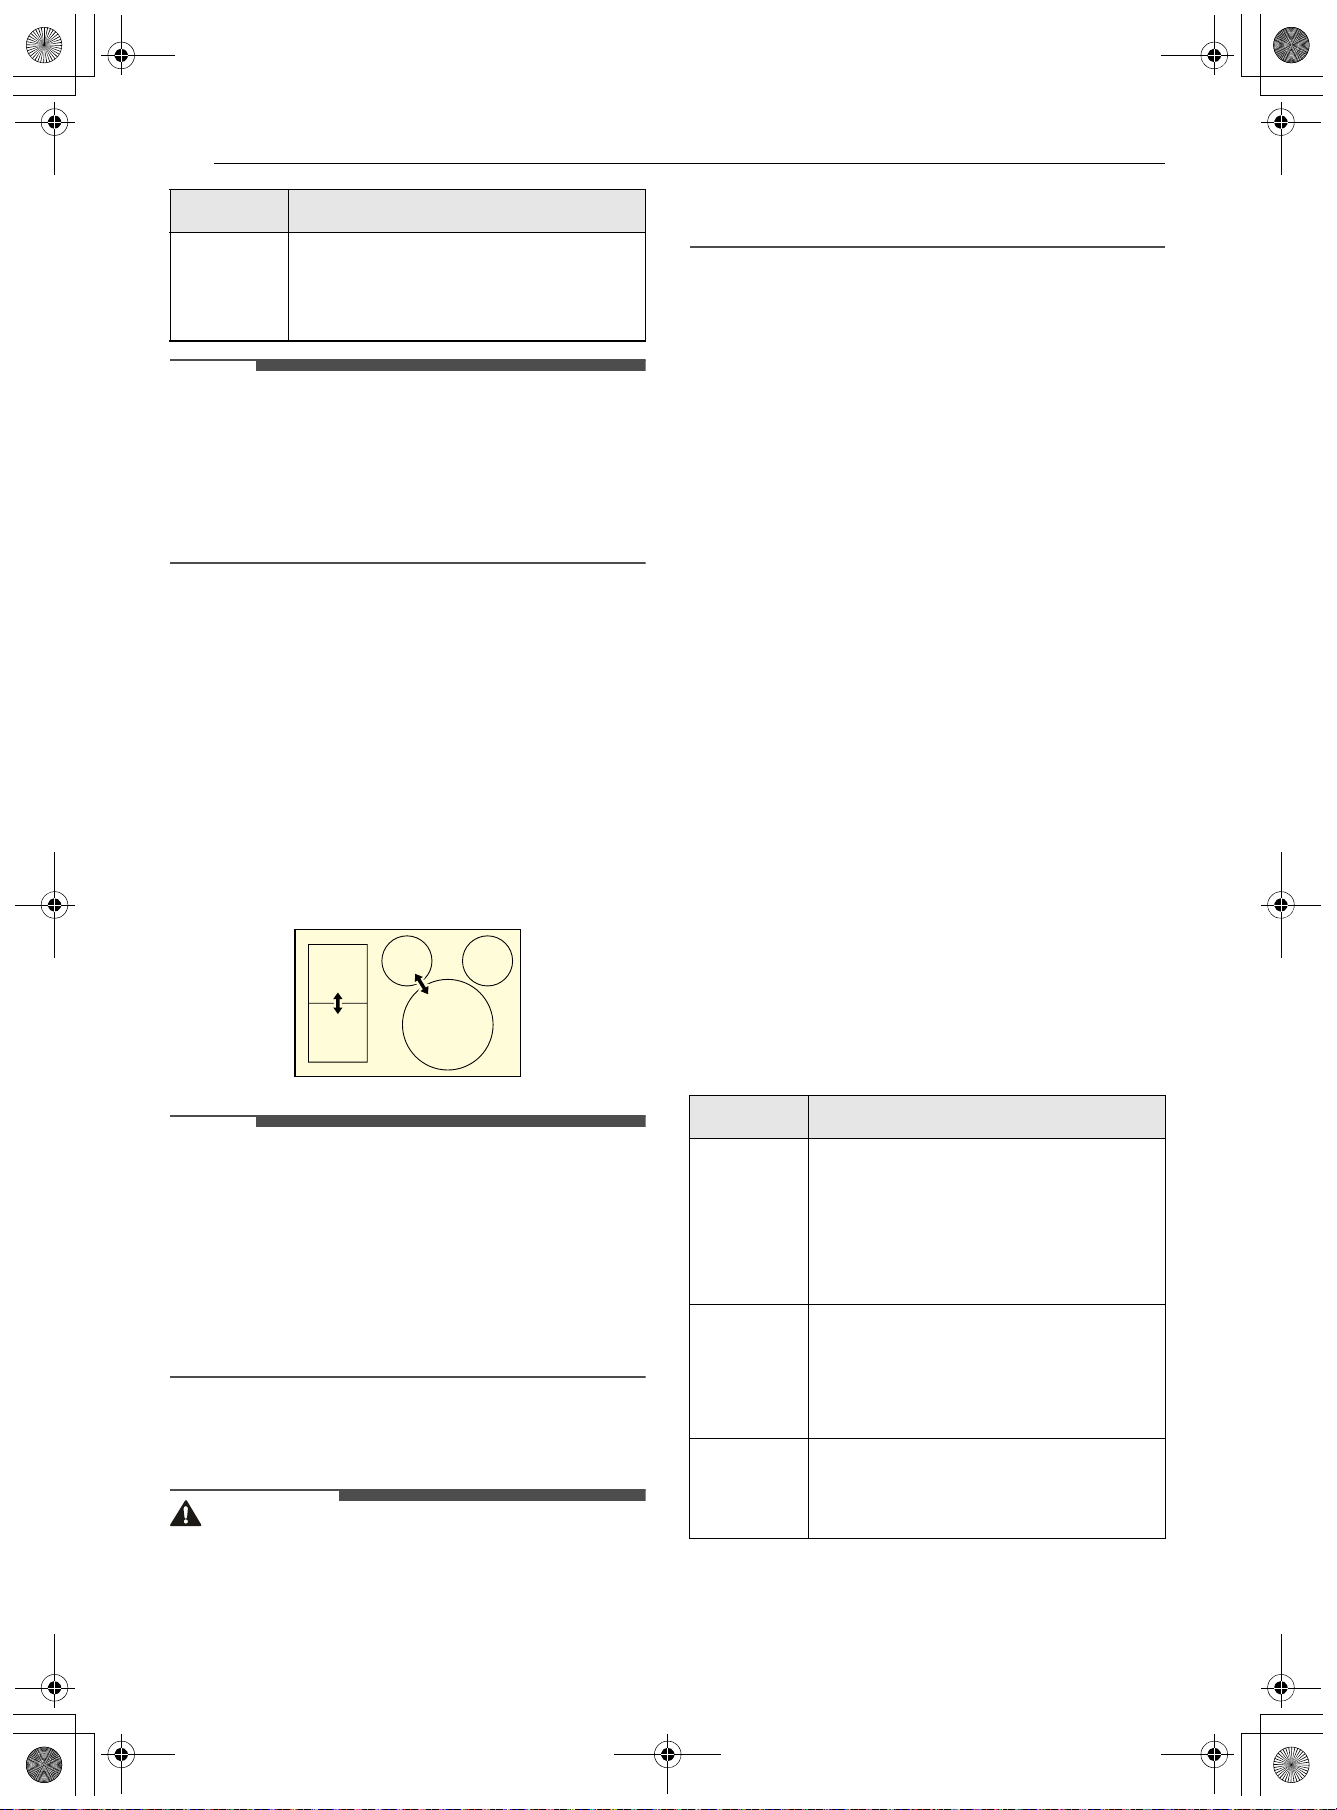
42 OPERATION
NOTE
• Suggested cook settings are only a guide.
Results may vary depending on the type of
cookware being used on the induction surface or
the quantity of food being cooked. Adjust the
settings as needed to achieve the desired
results.
Power Management
The cooking zones, which consist of paired
cooking elements, are restricted to drawing a
certain maximum amount of power.
If you turn on the Boost function for one element
while its paired element is in use, the Power
Management function may automatically reduce
the power of both elements. For consistent
performance when using multiple elements, use
elements in separate cooking zones.
NOTE
• If the combined heat of the oven and the surface
burners is sufficiently high, the output of the
surface burners is reduced to avoid damage to
the product.
• Both elements in a set of paired elements cannot
use the Boost mode at the same time. To use the
Boost mode on two elements simultaneously,
use non-paired elements.
Turning on the Warm Zone
CAUTION
• FOOD POISON HAZARD : Bacteria may grow in
food at temperatures below 140 °F.
- Always start with hot food. Do not use the
warm setting to heat cold food.
- Do not use the warm setting for more than 2
hours.
The Warm Zone, located in the back right of the
glass surface, will keep hot, cooked food at serving
temperature. Use the Warm Zone to keep food
warm after it has already been cooked. Attempting
to cook uncooked or cold food on the Warm Zone
could result in a food-borne illness.
1 Push the Warm Zone element knob in.
2 Turn the knob in either direction to the
desired setting.
For best results:
• When warming pastries or breads, leave an
opening in the cover to allow moisture to
escape.
• Do not use plastic wrap to cover food. Plastic
may melt onto the surface and be very difficult
to remove.
• Use only dishware, utensils and cookware that
are recommended for oven and cooktop use.
• Food on the warmer should be kept in its
container or covered with a lid or aluminum foil
to maintain food quality.
• Do not allow aluminum foil to contact the hot
induction cooktop surface.
If a particular food is not listed, start with the
medium heat level and adjust as needed. Most
foods can be kept at serving temperatures by
using the medium heat level.
Lo-
Simmer
• Keep food warm
• Melt chocolate or butter
• Simmer
Setting Recommended Use
Setting Food Item
Low
(Lo-3)
• Vegetables
•Rice
•Pasta
• Sugary sauces (tomato sauce,
BBQ sauce)
Medium
(3-7)
• Cream-based soups and sauces
• Stews and chili
• Warming empty plates or serving
dishes
High
(7-Hi)
• Broth-based soups
• Hot beverages (hot cider, hot
chocolate)
en-us_main.book.book Page 42 Friday, August 14, 2026 1:47 PM
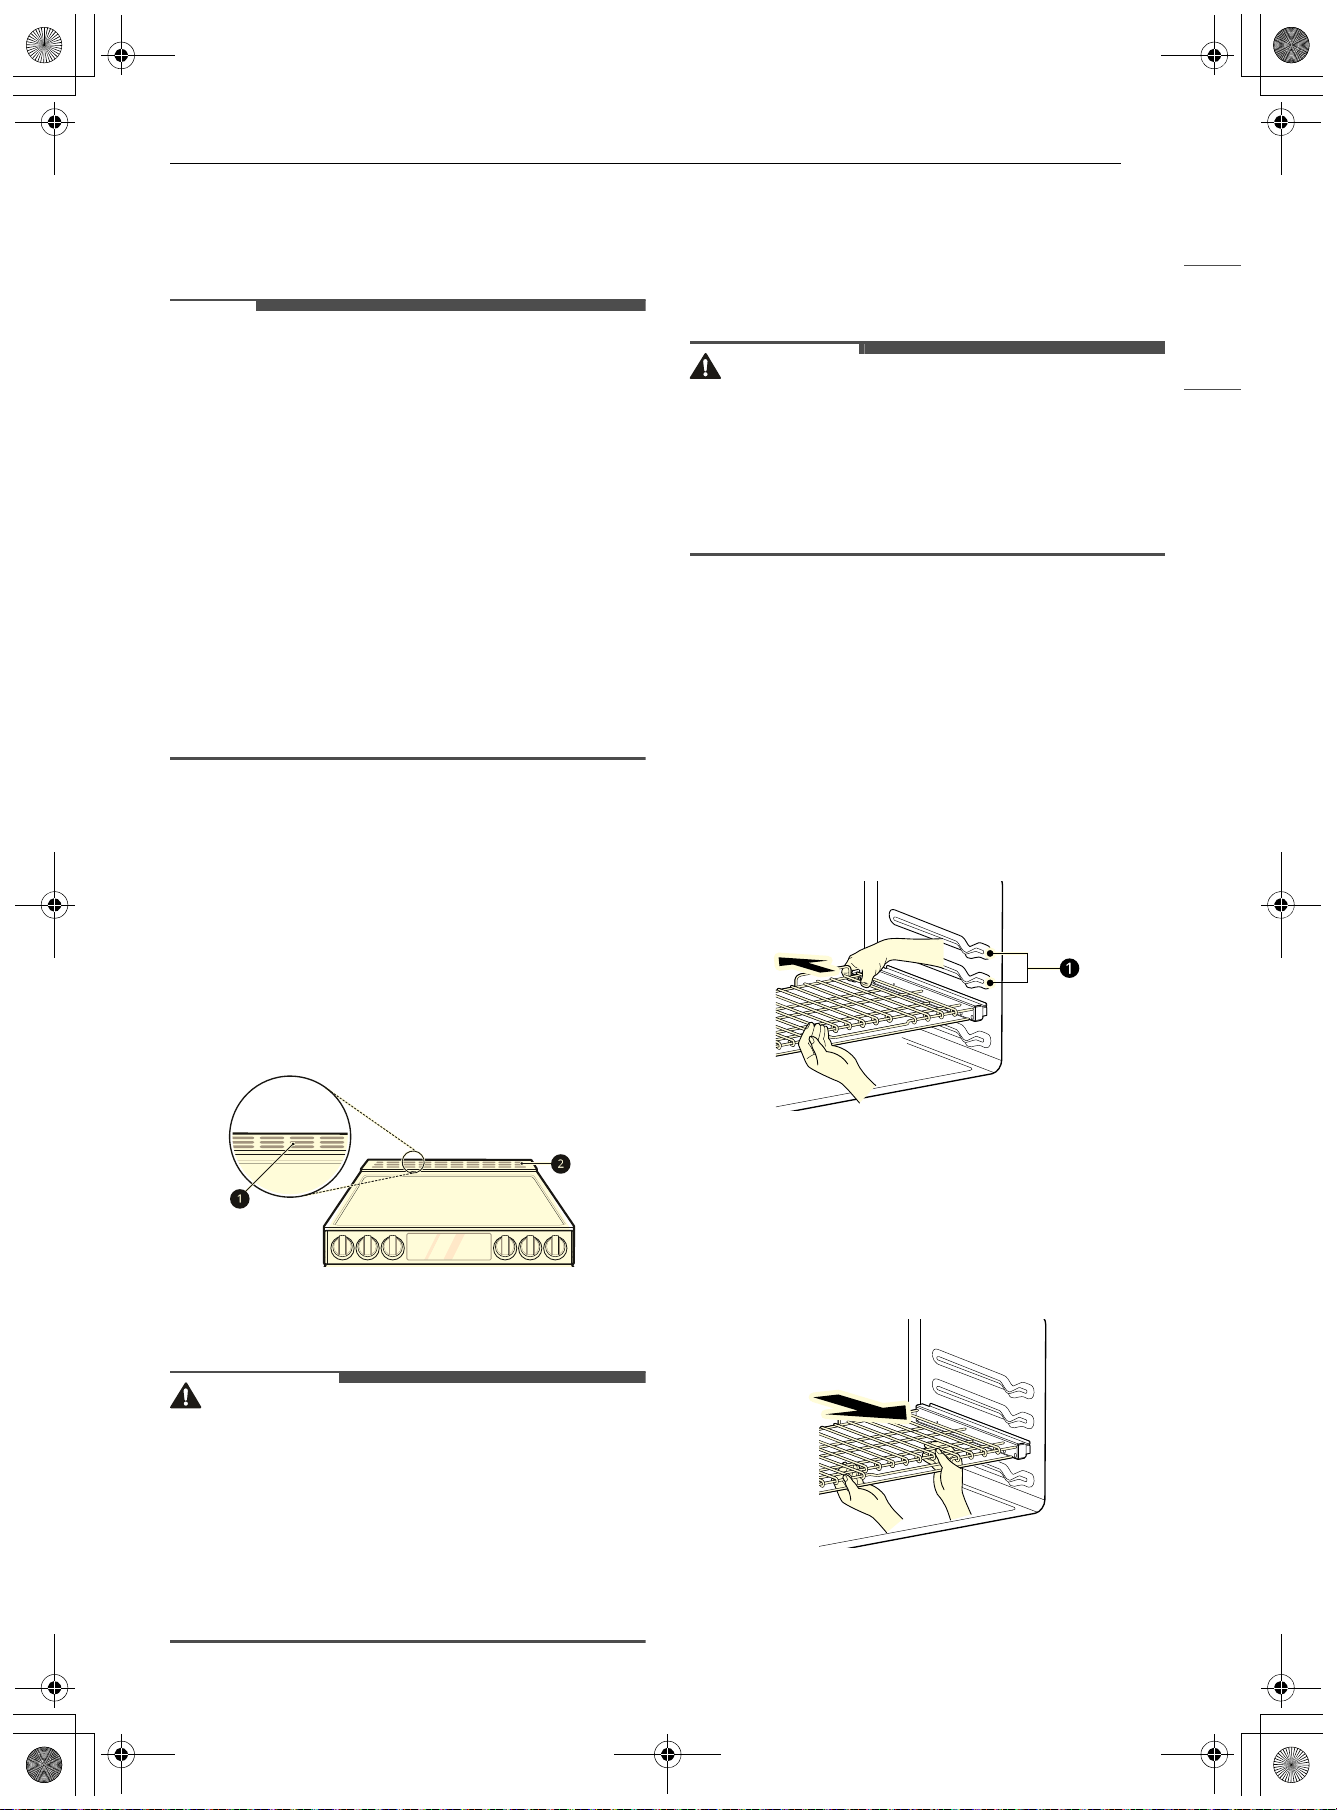
43OPERATION
ENGLISH
Oven
Before Using the Oven
NOTE
• Because the oven temperature cycles, an oven
thermometer placed in the oven cavity may not
show the same temperature that is set on the
oven.
• It is normal for the convection fan to run while
preheating during a regular bake cycle.
• The convection fan motor may run periodically
during a regular bake cycle.
• The fan turns off if the door is left open during
baking. The fan turns back on automatically once
the door is closed.
• Avoid opening the oven door more than
necessary during use. This helps the oven
maintain temperature, prevents unnecessary
heat loss, and saves on energy use.
Oven Vent
Areas near the vent may become hot during
operation and may cause burns. Do not block the
vent opening. Avoid placing plastics near the vent
as heat may distort or melt the plastic.
It is normal for steam to be visible when cooking
foods with high moisture content.
a Oven Vent
b Vent trim
CAUTION
• The edges of the range vent are sharp. Wear
gloves when cleaning the range to avoid injury.
• Do not block, touch or place items around the
oven vent during cooking.
- Do not block the oven vent when cooking to
allow for proper air flow. Do not touch vent
openings or nearby surfaces during any
cooking operation.
Using Gliding Oven Racks
The gliding racks slide in and out on a frame. This
keeps heavy cookware level and prevents it from
sliding forward when the rack is completely
extended.
CAUTION
• Place oven racks in the desired location before
turning on the oven to avoid burns.
• Do not cover the racks with aluminum foil, or
any other material, or place anything on the
bottom of the oven. Doing so will result in poor
baking and may damage the oven bottom.
Installing Gliding Racks
1 Start with the rack in the closed position. Hold
the rack with one hand at the center front and
the other hand at the back right corner.
2 Carefully insert the rack between the rack
guides, and slide it back until the shelf drops
into place.
a Rack guides
3 Once the rack is secured in the back, pull the
entire rack forward until the rack locks into
place.
en-us_main.book.book Page 43 Friday, August 14, 2026 1:47 PM
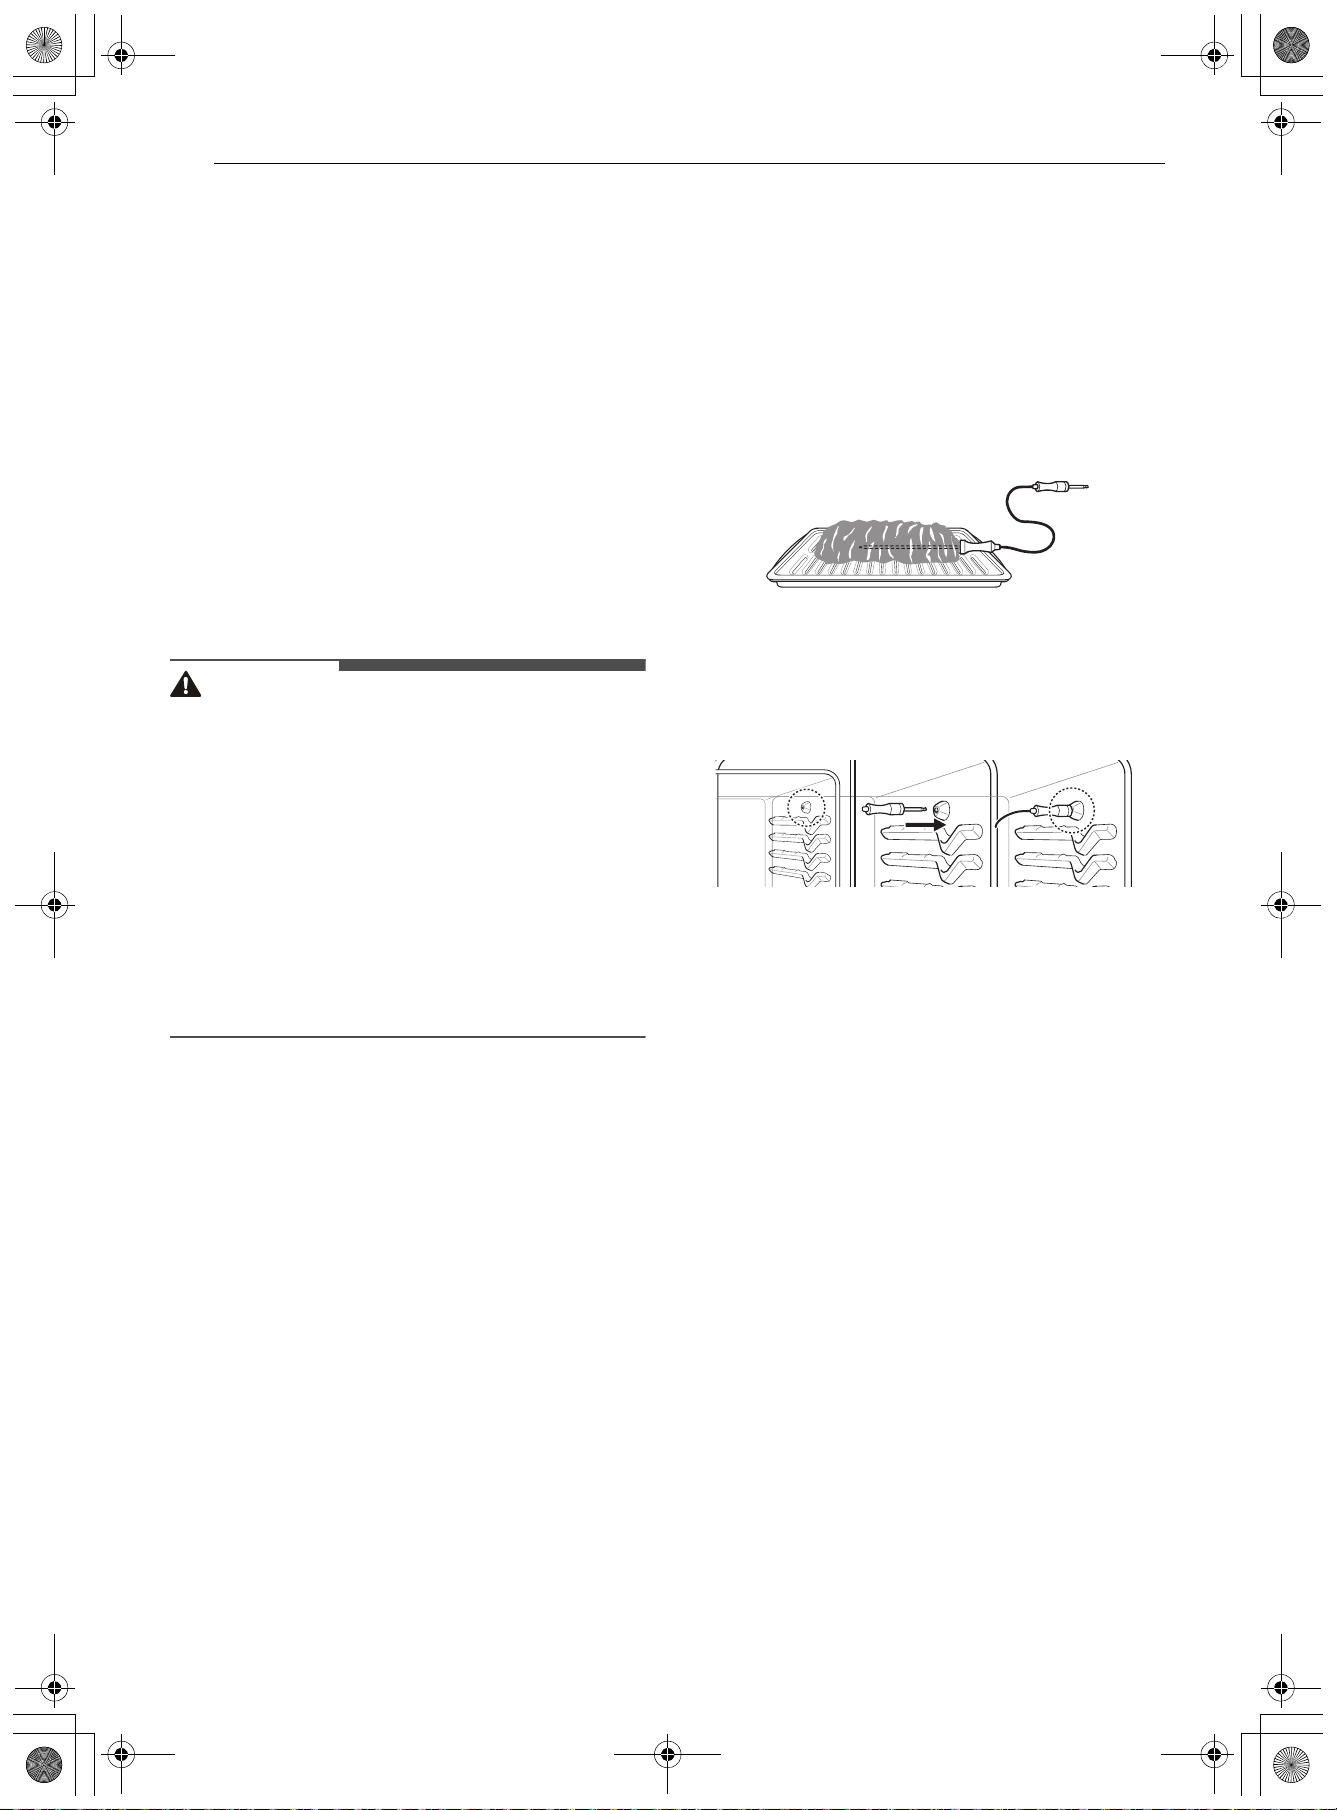
44 OPERATION
Removing Gliding Racks
1 With the rack in the closed position, grasp the
front of the rack and frame and lift up. Slowly
push the rack towards the back wall until it is
free of the rack stop.
2 After disengaging the rack stop, lift the back
of the rack and pull the rack and frame out
between the rack guides.
Using Heavy Duty Oven Racks
The racks have a turned-up back edge that
prevents them from being pulled out of the oven
cavity.
CAUTION
• Reposition oven racks before turning the oven
on to prevent burns.
• Do not cover the racks with aluminum foil, or
any other material, or place anything on the
bottom of the oven. Doing so will result in poor
baking and may damage the oven bottom.
• Only arrange oven racks when the oven is cool.
• Do not place objects heavier than 33 lb (15 kg)
on the racks. Do not place heavy objects on the
corners of the racks. Doing so can damage the
racks or cause them to come off the rails, which
may result in injury.
Removing Racks
1 Pull the rack straight out until it stops.
2 Lift up the front of the rack and pull it out.
Replacing Racks
1 Place the end of the rack on the support.
2 Tilt the front end up and push the rack in.
Meat Probe
The meat probe accurately measures the internal
temperature of meat, poultry and casseroles. It is
available on Bake, Convection Bake, Convection
Roast, Air Roast, or some menus of Auto Cook.
Always unplug and remove the meat probe from
the oven when removing food. Before using, insert
the probe into the center of the thickest part of the
meat or into the inner thigh or breast of poultry,
away from fat or bones. Place food in the oven and
connect the meat probe to the jack. Keep the
probe as far away from heat sources as possible.
Setting the Meat Probe Function
1 Insert the meat probe into the meat.
2 Connect the meat probe to the jack.
• Probe connected appears in the display
and the probe icon appears at the top of the
display.
To Cook Using the Meat Probe
Function
1 Select cook mode. Probe is available on Bake,
Convection Bake, Convection Roast and Air
Roast.
2 Tap Probe and set the desired cook
temperature by tapping the +/- button,
tapping the bar, or dragging the bar. You can
also use the number pad icon to set the cook
temperature directly.
3 When you have selected the desired cook
settings, tap Start at the bottom right to
begin cooking.
To Stop Cooking
1 Tap Stop at the bottom right of the screen.
• A pop-up notification appears on the
display.
2 Tap Stop on the pop-up.
en-us_main.book.book Page 44 Friday, August 14, 2026 1:47 PM
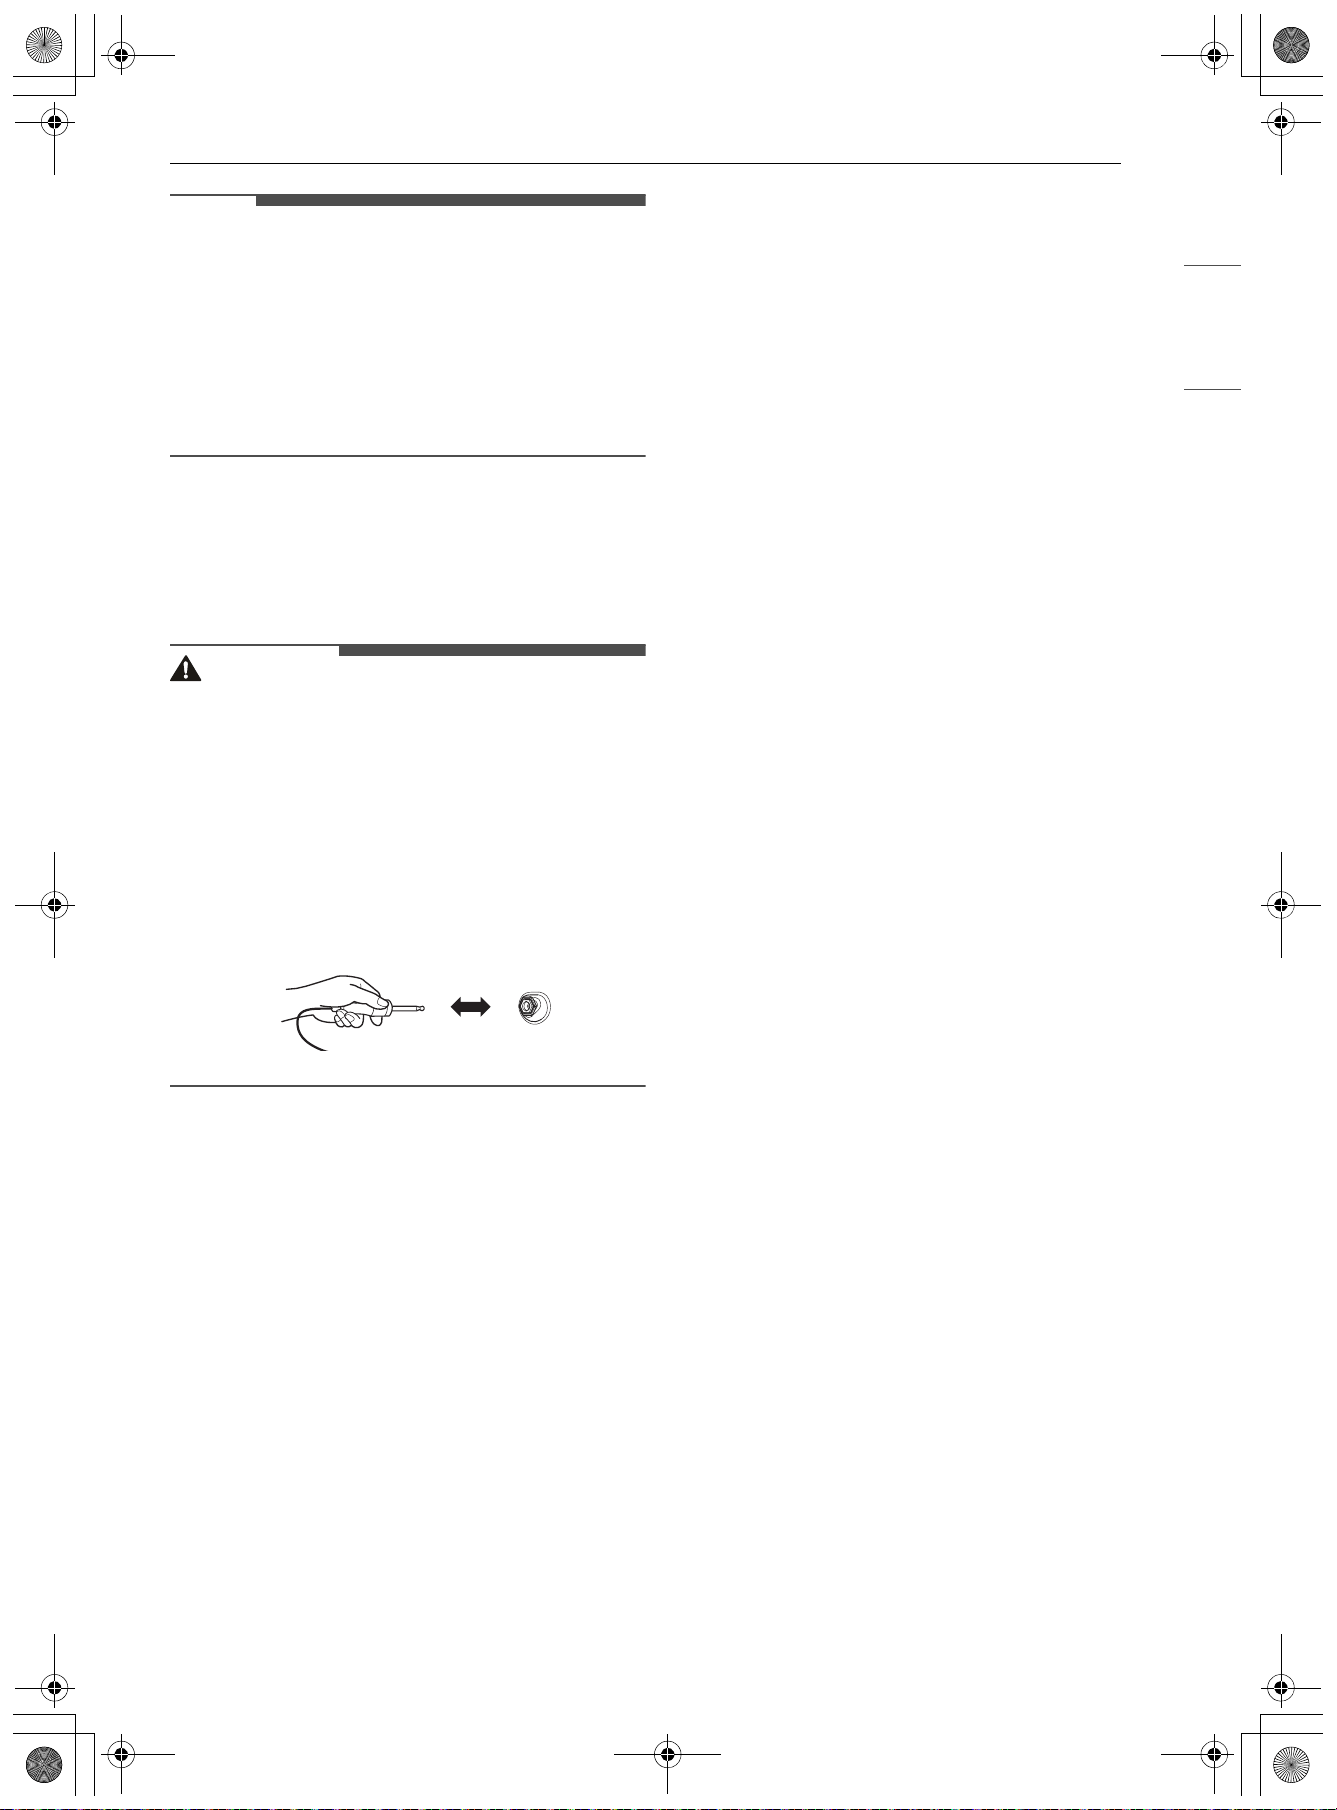
45OPERATION
ENGLISH
NOTE
• The default probe temperature is 150 °F (65 °C),
but can be changed to any temperature between
80 °F (30 °C) and 210 °F (95 °C). The display
shows the changing probe temperature. When
the set probe temperature is reached, the oven
shuts off automatically.
• To avoid breaking the probe, make sure food is
completely defrosted before inserting.
IMPORTANT NOTE
Tap the Stop button to cancel cooking with the
probe at any time. To avoid breaking the probe,
make sure food is completely defrosted before
inserting.
CAUTION
• Always use an oven mitt to remove the
temperature probe. Do not touch the broil
element. Failure to obey this caution can result
in severe personal injury.
• To avoid damage to the meat probe, do not use
tongs to pull on the probe when removing it.
• Do not store the meat probe in the oven.
• Do not pull the wire to remove the probe. Hold
the probe head, not the wire, when inserting or
removing the probe.
Bake
Bake is used to prepare foods such as pastries,
breads and casseroles.
The oven can be programmed to bake at any
temperature from 170
8 (80 7) to 550 8 (285 7).
The default temperature is 350
8 (175 7). The
meat probe can also be used with this mode.
Setting the Bake Mode
1 Press the POWER button.
2 Tap Manual Cook and scroll to select Bake.
3 Tap 3 or drag the option card to set the cook
options.
4 Tap Temperature and set the desired cook
temperature by tapping the +/- button,
tapping the bar, or dragging the bar. You can
also use the number pad icon to set the cook
temperature directly.
5 If desired, tap Cook Time or Start at to set
the cook time or cooking start time.
You can also use the number pad icon to set
the cooking temperature directly.
6 Tap When Finished to add a function after
cooking is complete.
• Keep Warm: Keeps the food warm after
cooking is complete.
• Stay On: Continues the previously selected
cooking mode after cooking is complete.
• Turn Off: Turns off automatically when
cooking is complete, without any additional
functions operating.
7 When you have selected the desired cook
settings, tap Start at the bottom right to
begin cooking.
8 A chime sounds once preheating is complete.
9 A chime sounds at the end of the set cook
time and a notification appears in the display.
10 Tap Done to complete cooking. If needed, you
can tap + Cook Time to continue cooking, or
tap Keep Warm to maintain the food at
serving temperature.
Changing the Cook Settings
1 Tap 3 at the middle right of the screen.
2 Tap the option you want to change to make
adjustments.
3 Tap Apply at the bottom right to apply the
modified settings to your recipe.
en-us_main.book.book Page 45 Friday, August 14, 2026 1:47 PM
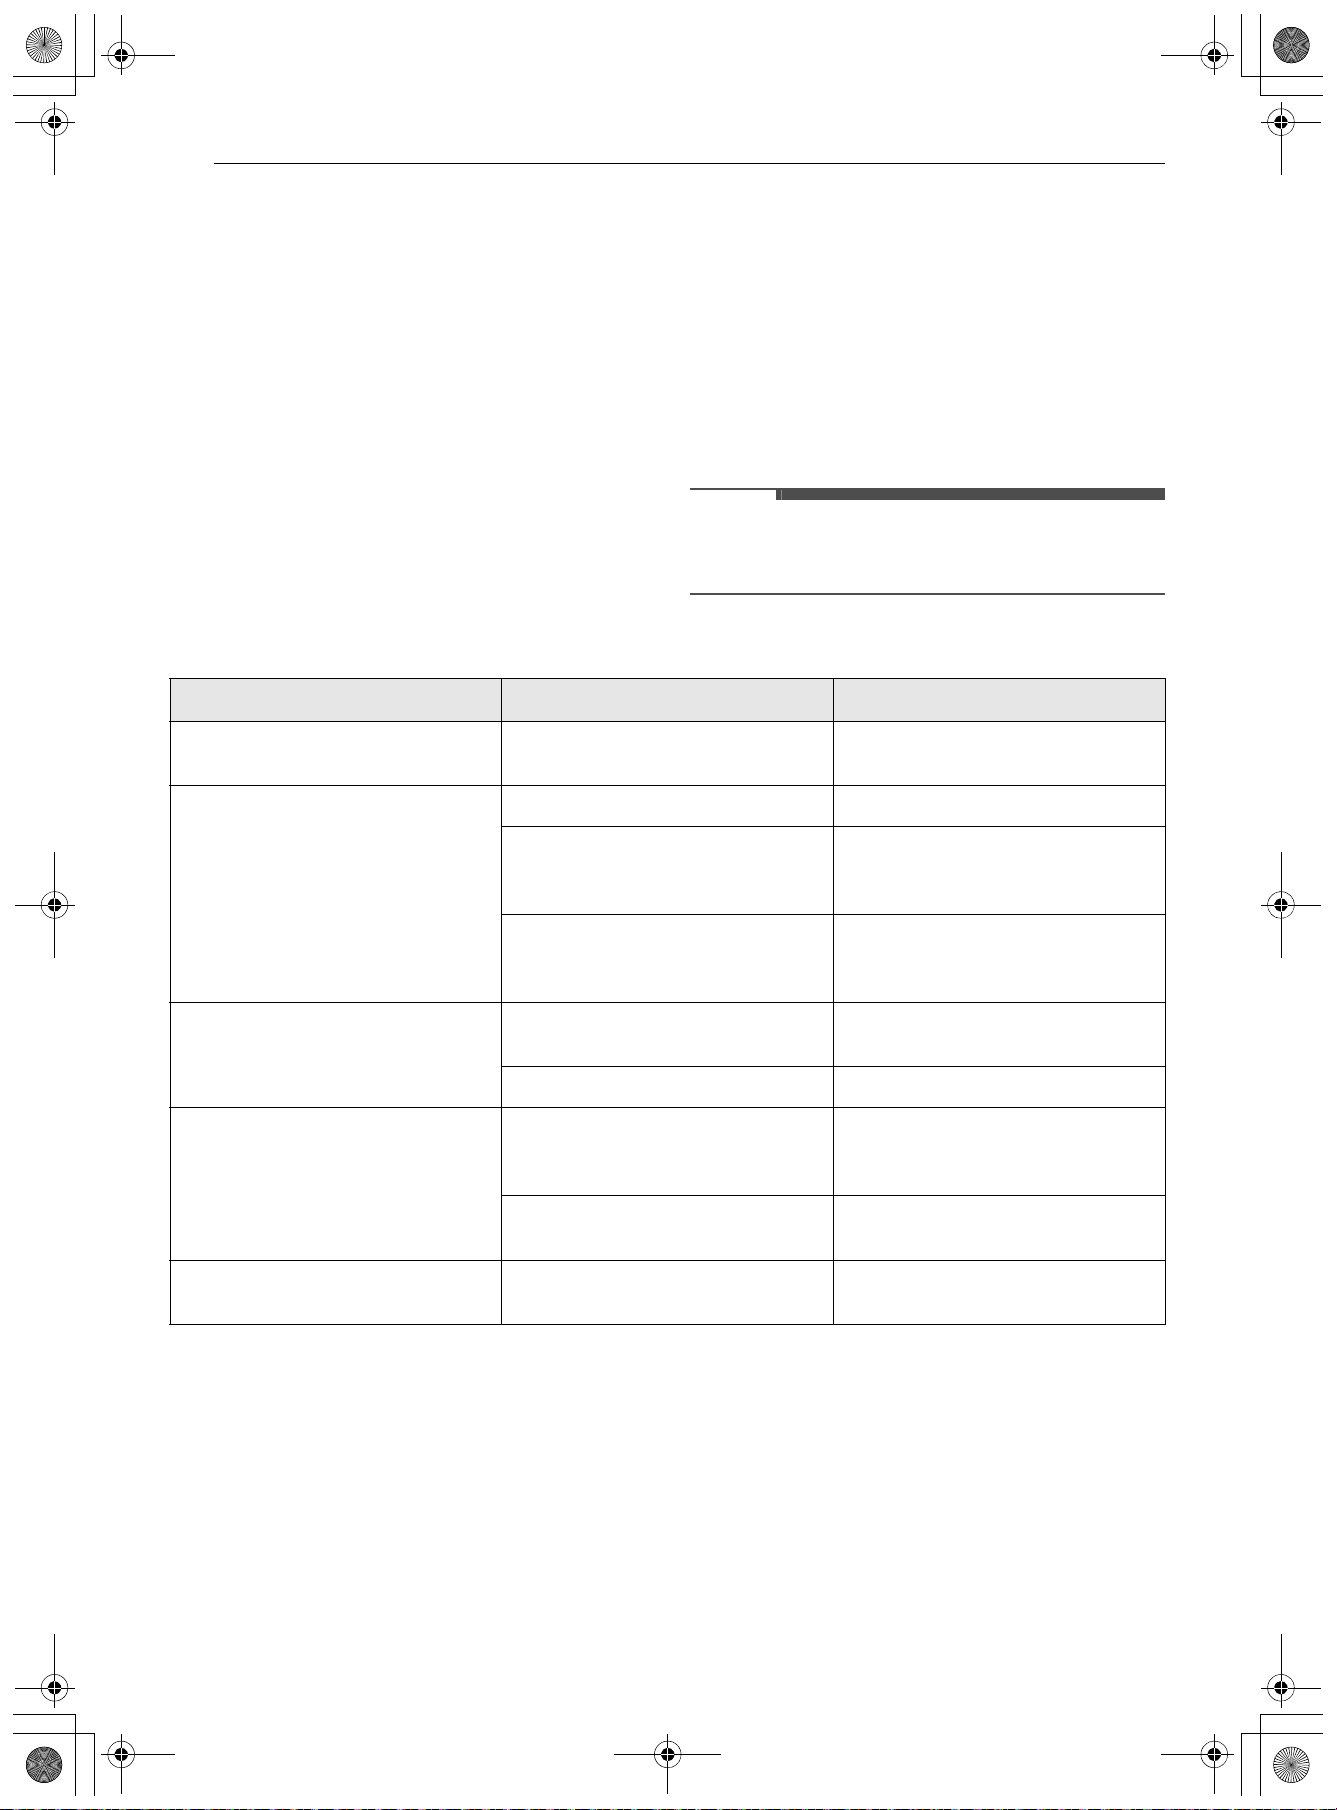
46 OPERATION
4 Tap 4 to return to the previous screen without
making changes.
To Stop Cooking
1 Tap Stop at the bottom right of the screen.
• A pop-up notification appears on the
display.
2 Tap Stop on the pop-up.
Baking Pans
• When baking in Bake modes, use baking pans
with a dark metal or coated surface.
• When baking with Convection Bake, you can
also use baking pans with a bright metal surface.
• Always place cake pans in the middle of the tray
or oven rack.
• When baking with Bake, you can place two
baking pans side by side in the oven for a baking
time that is only slightly longer.
NOTE
• If no cook time is set, the oven turns off
automatically after 12 hours.
Tips for Baking
Convection Bake and Roast
The convection system uses a fan to circulate the
heat evenly within the oven. Improved heat
distribution allows for even cooking and excellent
results while cooking with single or multiple racks.
The Convection Roast feature is designed to give
optimum roasting performance. Convection Roast
combines cooking with the convection fan to roast
meats and poultry. The heated air circulates
around the food from all sides, sealing in juices
and flavors. Foods are crispy brown on the outside
while staying moist on the inside. Convection
roasting is especially good for large tender cuts of
meat, uncovered.
Setting the Convection Bake and Roast
Mode
1 Press the POWER button.
Results of Baking Possible Cause Solution
The cake base is too light Wrong oven rack position
Use a dark baking tin or put the
cake one rack lower down.
Cake collapses (turns lumpy,
soggy)
Oven temperature too high Set the temperature slightly lower.
Baking time too short
Set a longer baking time. The
baking time cannot be reduced by
setting a higher temperature.
Mixture contains too much liquid
Use less liquid. Follow instructions
for dough mixing times, especially
when using kitchen appliances.
Cakes are too dry
Oven temperature too low
Next time set a slightly higher
temperature.
Baking time too long Set a slightly shorter baking time.
Cakes are browned unevenly
Baking temperature too high and
baking time too short
Set a slightly lower baking
temperature and a slightly longer
baking time.
Mixture unevenly distributed
Distribute the mixture evenly over
the baking tray/tin.
Baking time too long Temperature too low
Next time set a slightly higher
temperature.
en-us_main.book.book Page 46 Friday, August 14, 2026 1:47 PM
47OPERATION
ENGLISH
2 Tap Manual Cook and scroll to select
Convection Bake or Convection Roast.
3 Tap 3 or drag the option card to set the cook
options.
4 Tap Temperature to set the desired cooking
temperature by tapping the +/- button,
tapping the bar, or dragging the bar.
You can also use the number pad icon to set
the cooking temperature directly.
5 If desired, tap Cook Time or Start at to set
the cook time or cooking start time.
You can also use the number pad icon to set
the cooking time directly.
6 Tap When Finished to add a function after
cooking is complete.
• Keep Warm: Keeps the food warm after
cooking is complete.
• Stay On: Continues the previously selected
cooking mode after cooking is complete.
• Turn Off: Turns off automatically when
cooking is complete, without any additional
functions operating.
7 When you have selected the desired cook
settings, tap Start at the bottom right to
begin cooking.
8 A chime sounds once preheating is complete.
9 A chime sounds at the end of the set cook
time and a notification appears in the display.
10 Tap Done to complete cooking. If needed, you
can tap + Cook Time to continue cooking, or
tap Keep Warm to maintain the food at
serving temperature.
NOTE
• If no cook time is set, the oven turns off
automatically after 12 hours.
• The heating elements and fan turn off if the door
is opened. They turn on again after the door is
closed.
• The oven fan runs while convection baking and
convection roasting. The fan stops when the
door is opened. In some cases, the fan may shut
off during a convection bake cycle.
Changing the Cook Settings
1 Tap 3 at the middle right of the screen.
2 Tap the option you want to change to make
adjustments.
3 Tap Apply at the bottom right to apply the
modified settings to your recipe.
4 Tap 4 to return to the previous screen without
making changes.
To Stop Cooking
1 Tap Stop at the bottom right of the screen.
• A pop-up notification appears on the
display.
2 Tap Stop on the pop-up.
Tips for Convection Baking
• Use Convection Bake for faster and more even
multiple-rack cooking of pastries, cookies,
muffins, biscuits, and breads of all kinds.
• Bake cookies and biscuits on pans with no sides
or very low sides to allow heated air to circulate
around the food. Food baked on pans with a
dark finish will cook faster.
• When using Convection Bake, place the oven
racks in the positions suggested in the charts in
this manual.
• Multiple oven rack cooking may slightly increase
cook times for some foods.
Tips for Convection Roasting
The Convection Roast feature is designed to give
optimum roasting performance. Convection Roast
combines cooking with the convection fan to roast
meats and poultry. The heated air circulates
around the food from all sides, sealing in juices
and flavors. Foods are crispy brown on the outside
while staying moist on the inside. Convection
en-us_main.book.book Page 47 Friday, August 14, 2026 1:47 PM
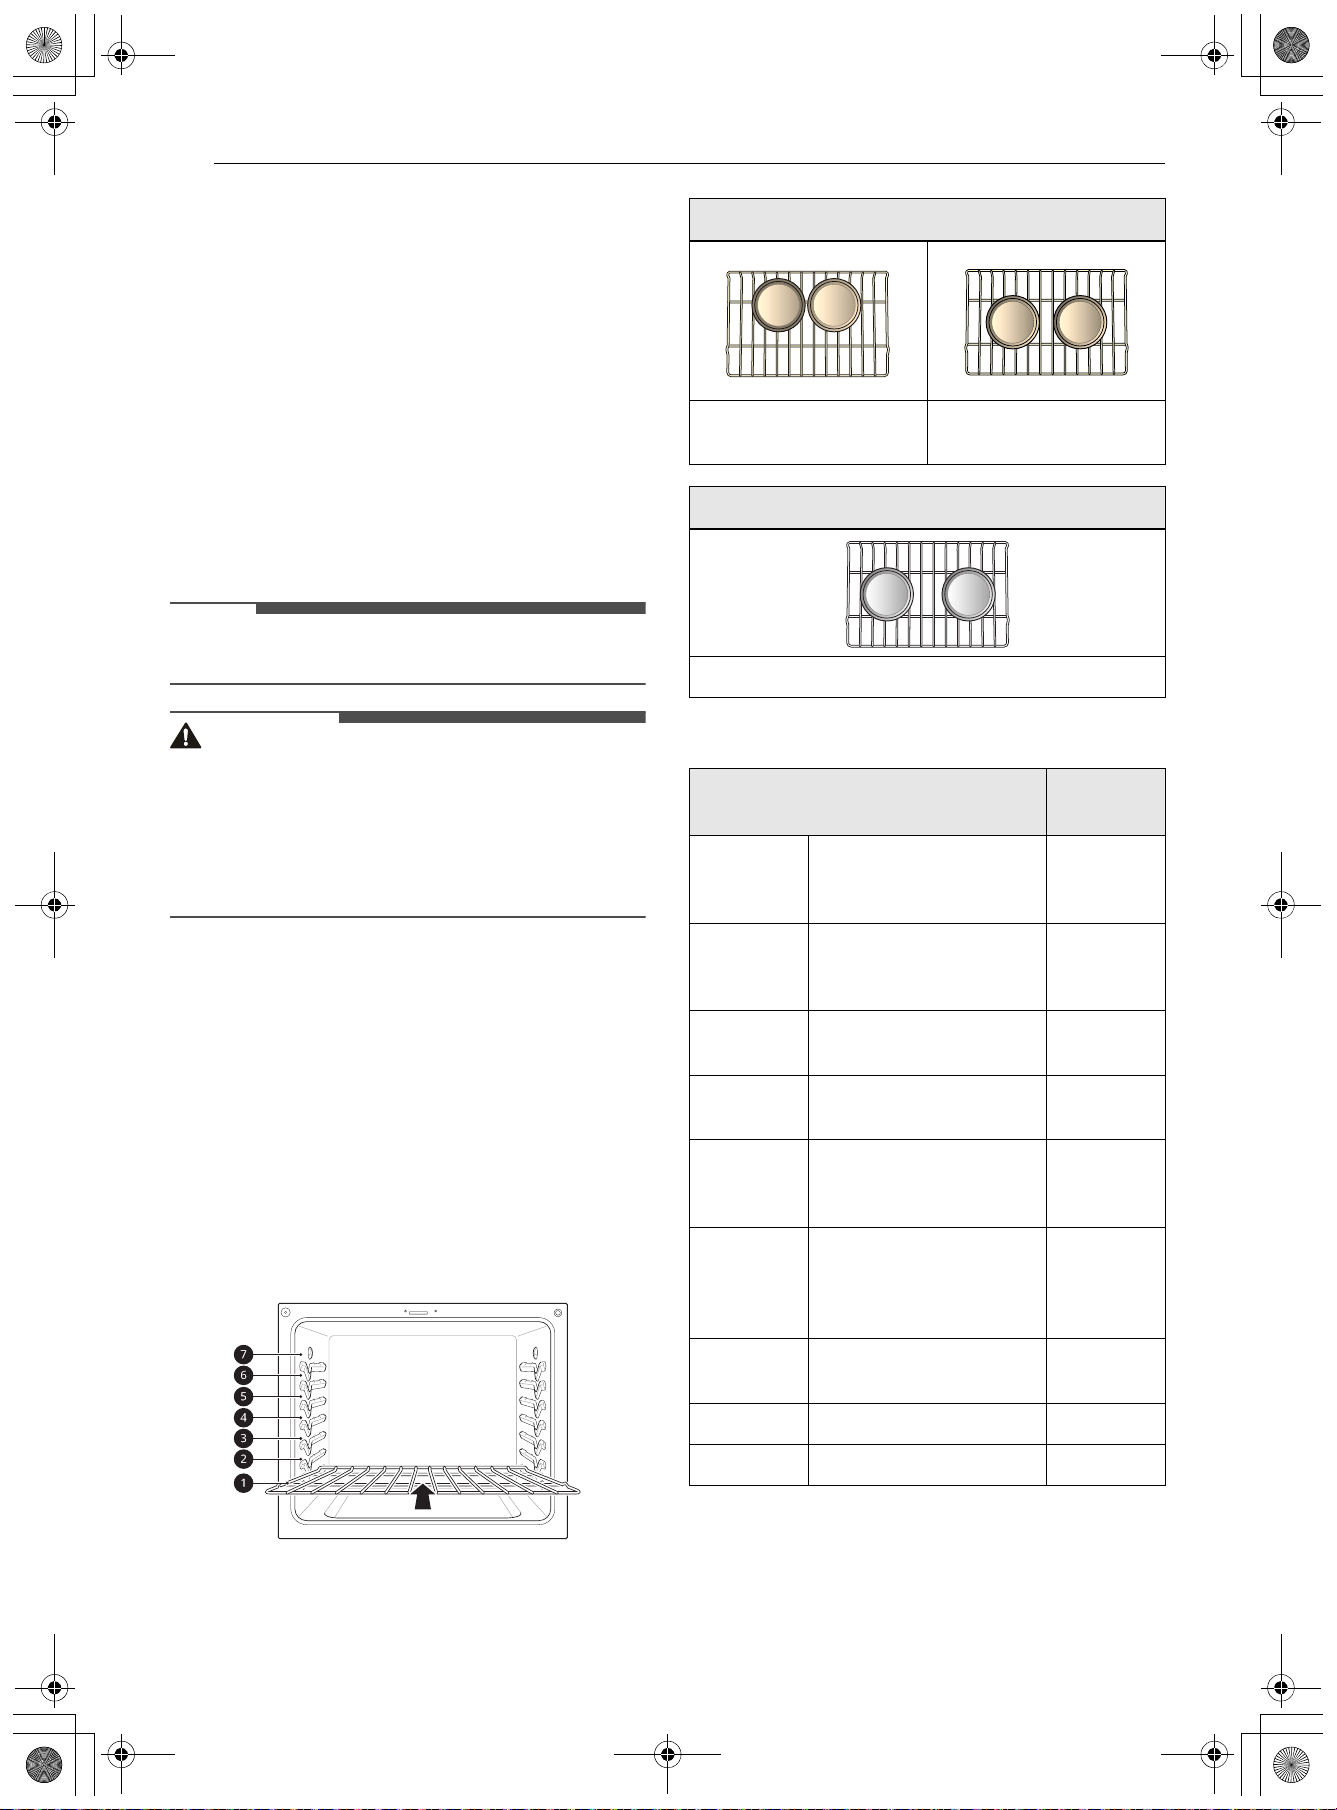
48 OPERATION
roasting is especially good for large tender cuts of
meat, uncovered.
Use a broiler pan and grid when preparing meats
for convection roasting. The broiler pan catches
grease spills and the grid helps prevent grease
splatters.
1 Place the oven rack in the recommended
position.
2 Place the grid in the broiler pan.
3 Place the broiler pan on the oven rack.
NOTE
• Broiler pan and grid are sold separately
CAUTION
• Do not use a broiler pan without a grid.
• Do not cover the grid with aluminum foil.
• Position food (fat side up) on the grid.
• Pressing the POWER button during cooking
clears all settings.
Recommended Baking and
Roasting Guide
Baking results will be better if baking pans are
centered in the oven as much as possible. If
cooking on multiple racks, place the oven racks in
the positions shown.
Multiple-rack cooking saves time and energy.
Whenever possible, cook foods requiring the same
cooking temperature together in one oven.
Rack and Pan Placement
Baking Rack Guide
Multiple rack baking
Heavy duty rack
(Position 1)
Heavy duty rack
(Position 5)
Single rack baking
Heavy duty rack
Food
Rack
position
Cakes
Layer cakes
Bundt cakes
Angel food cake
2
3
2
Cookies
Sugar cookies
Chocolate chips
Brownies
4
4
4
Pizza
Fresh
Frozen
4
4
Pastry
Crust
From scratch
Refrigerated
4
4
Breads
Biscuit, canned
Biscuit, from scratch
Muffins
5
5
4
Desserts
Fruit crisps and
cobblers, from scratch
Pies, from scratch, 2-
crust fruit
4
4
Custards
Cheesecake, crème
brulée
2
Soufflés Sweet or savory 2
Casserole Frozen lasagna 4
en-us_main.book.book Page 48 Friday, August 14, 2026 1:47 PM
49OPERATION
ENGLISH
Roasting Rack Guide
Broil
The Broil function uses intense heat from the
upper heating element to cook food. Broiling
works best for tender cuts of meat, fish, and thinly
cut vegetables.
Some models may feature a hybrid broiler
consisting of an inner broiler that utilizes a carbon
heating element which provides instantaneous
heat, and a traditional outer broiling element.
During normal broiler operation, it is normal for
either element to cycle off intermittently.
CAUTION
• Do not cover the oven rack with aluminum foil.
Doing so will cause a fire.
• Should an oven fire occur, leave the oven door
closed and turn the oven off. If the fire
continues, throw baking soda on the fire or use a
fire extinguisher.
• DO NOT put water or flour on the fire. Flour may
be explosive and water can cause a grease fire to
spread and cause personal injury.
• When using your broiler, the temperature inside
the oven will be extremely high. Take care to
avoid possible burns by:
- Keeping the door closed when broiling
- Always wearing oven mitts when inserting or
removing food items
NOTE
• This appliance is designed for closed-door
broiling. Close the door to set the Broil function.
If the door is open, the Broil function cannot be
set and Close the door to start cooking
appears on the display. Close the door and reset
the Broil function. If the door is opened during
broiling, the broil burner turns off after five
seconds. The broiler turns back on automatically
once the door is closed.
Setting the Broil Mode
1 Press the POWER button.
2 Tap Manual Cook and scroll to select Broil.
3 Tap 3 or drag the option card to set the cook
options.
4 Tap Temperature and select the desired cook
temperature: Low, or High.
5 If desired, tap Cook Time or Start at to set
the cook time or cooking start time.
You can also use the number pad icon to set
the cooking time directly.
6 Tap When Finished to add a function after
cooking is complete.
• Keep Warm: Keeps the food warm after
cooking is complete.
• Turn Off: Turns off automatically when
cooking is complete, without any additional
functions operating.
7 When you have selected the desired cook
settings, tap Start at the bottom right to
begin cooking.
8 A chime sounds at the end of the set cook
time and a notification appears in the display.
9 Tap Done to complete cooking. If needed, you
can tap + Cook Time to continue cooking, or
Food
Rack
position
Beef
Rib
Rare
Medium
Well done
2
2
2
Boneless
rib, top
sirloin
Rare
Medium
Well done
2
2
2
Beef
tenderloin
Rare
Medium
2
2
Pork
Rib 2
Bone-in, sirloin 2
Ham, cooked 2
Poultry
Whole chicken 2
Chicken pieces 2
Turkey 2
en-us_main.book.book Page 49 Friday, August 14, 2026 1:47 PM
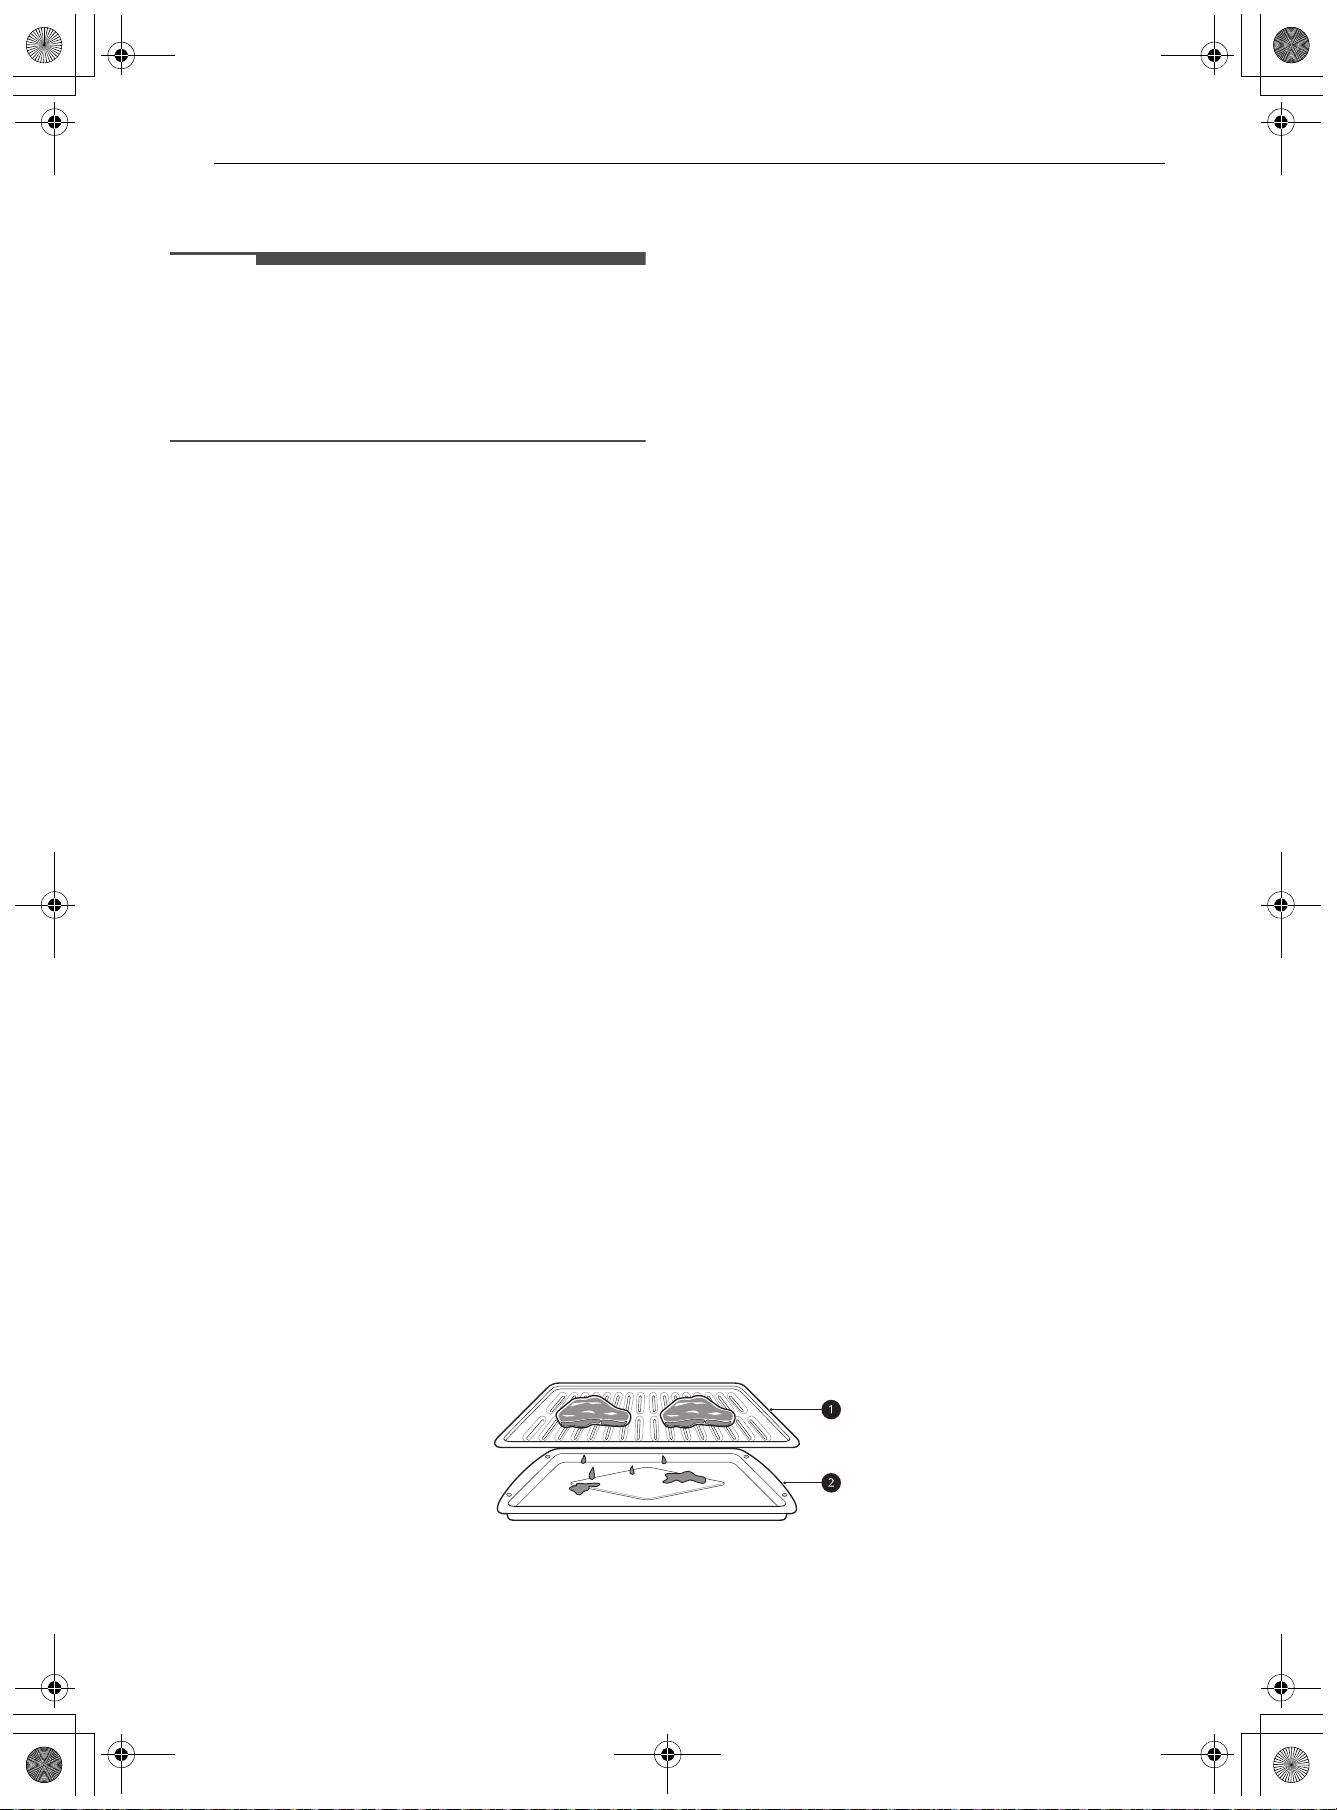
50 OPERATION
tap Keep Warm to maintain the food at
serving temperature.
NOTE
• If the cook time is not set, the oven automatically
turns off after 3 hours.
• The heating elements and fan turn off if the door
is opened. They turn on again after the door is
closed.
Changing the Cook Settings
1 Tap 3 at the middle right of the screen.
2 Tap the option you want to change to make
adjustments.
3 Tap Apply at the bottom right to apply the
modified settings to your recipe.
4 Tap 4 to return to the previous screen without
making changes.
To Stop Cooking
1 Tap Stop at the bottom right of the screen.
• A pop-up notification appears on the
display.
2 Tap Stop on the pop-up.
Tips for Reducing Smoke
Due to the intense heat associated with broiling, it
is normal to experience smoke during the cooking
process. This smoke is a natural byproduct of
searing and should not cause you to worry. If you
are experiencing more smoke than you are
comfortable with, use the following tips to reduce
the amount of smoke in your oven.
• Always use a broiler pan. Do not use saute pans
or regular baking sheets for safety reasons.
• The broiler pan should always be thoroughly
cleaned and at room temperature at the
beginning of cooking.
• Always run your cooktop ventilation system or
vent hood during broiling.
• Keep the interior of your oven as clean as
possible. Leftover debris from prior meals can
burn or catch fire.
• Avoid fatty marinades and sugary glazes. Both of
these will increase the amount of smoke you
experience. If you would like to use a glaze,
apply it at the very end of cooking.
• If you are experiencing significant smoke with
any food item, consider:
- Lowering the broiler to the Low setting.
- Lowering the rack position to cook the food
farther away from the broiler.
- Using the High broil setting to achieve the
level of searing you desire, and then either
switching to the Low broil setting, or switching
to the Medium broil setting.
• As a rule, fattier cuts of meat and fish will
produce more smoke than leaner items.
• Adhere to the guidelines in the Recommended
Broiling Guide section whenever possible.
Recommended Broiling Guide
The size, weight, thickness, starting temperature, and your preference of doneness will affect broiling
times.
This guide is based on meats at refrigerator temperature. For best results when broiling, use a pan
designed for broiling.
a Grid (sold separately)
b Broiler Pan (sold separately)
en-us_main.book.book Page 50 Friday, August 14, 2026 1:47 PM
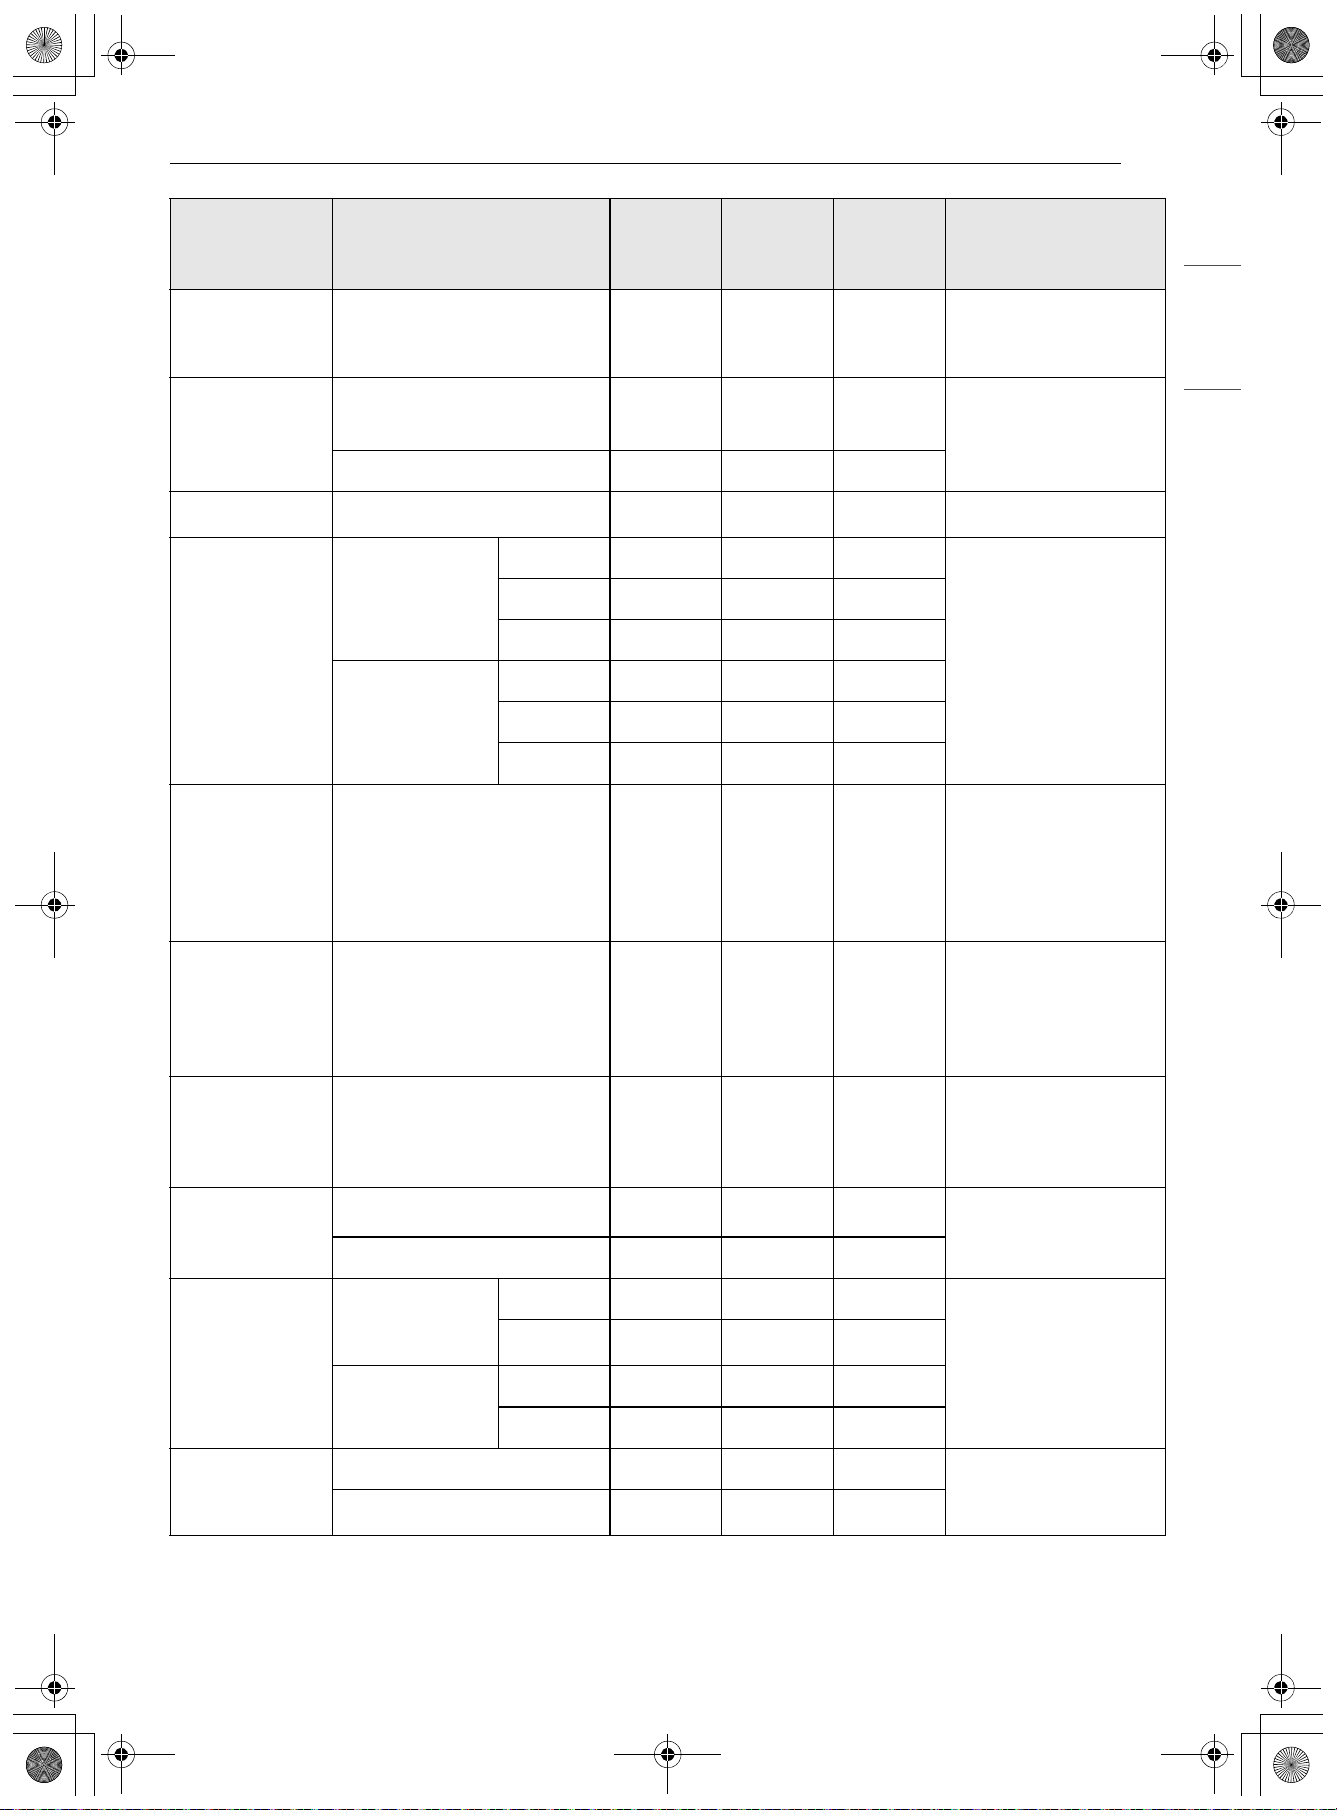
51OPERATION
ENGLISH
• This guide is only for reference. Adjust cook time according to your preference.
• Do not use the gliding rack in position 7.
Food
Quantity and/or
Thickness
Rack
Position
First
Side
(min.)
Second
Side
(min.)
Comments
Hamburgers
9 patties
1
/
2
to
3
/
4
" thick
73-62-4
Space evenly. Up to 9
patties may be broiled
at once.
Chicken
1 whole, 2 to 2
1
/
2
lbs., split
lengthwise
5 8-10 4-6
Broil skin-side-down
first.
2 Breasts 5 8-10 5-7
Toast 1 to 9 pieces 7 0.5-1 0.5
Beef Steaks
1" thick
1 to 1
1
/
2
lbs.
Rare 7 3-5 2-4
Steaks less than 1"
thick cook through
before browning. Pan
frying is
recommended. Slash
fat.
Medium 7 4-6 2-4
Well done 7 5-7 3-5
1
1
/
2
" thick
2 to 2
1
/
2
lbs.
Rare 5 7-9 4-6
Medium 5 9-11 6-8
Well done 5 11-13 8-10
Lobster Tails
2–4
10 to 12 oz. each
59-12
Do not
turn over
Cut through back of
shell. Spread open.
Brush with melted
butter before broiling
and after half of
broiling time.
Fish Fillets
1
/
4
to
1
/
2
" thick
62-42-4
Handle and turn very
carefully. Brush with
lemon butter before
and during cooking, if
desired.
Ham Slices
(precooked)
1
/
2
" thick
52-42-4
Increase time 5 to 10
minutes per side for 1
1/2" thick or home-
cured ham.
Pork Chops
Well done
2 (
1
/
2
" thick)
63-64-7
2 (1" thick) about 1 lb. 5 5-8 5-8
Lamb Chops
2 (1" thick)
about 10 to 12
oz.
Medium 6 3-5 2-5
Well done
65-74-7
2 (1
1
/
2
" thick)
about 1 lb.
Medium 6 7-9 7-9
Well done 6 9-11 7-9
Salmon Steaks
2 (1" thick) 5 8-10 3-5 Grease pan. Brush
steaks with melted
butter.
4 (1" thick) about 1 lb.
5 9-11 4-6
en-us_main.book.book Page 51 Friday, August 14, 2026 1:47 PM
52 OPERATION
NOTE
• The USDA advises that consuming raw or undercooked fish, meat, or poultry can increase your risk of
food-borne illness.
• The USDA has indicated the following as safe minimum internal temperatures for consumption:
- Ground beef: 160 °F (71.1 °C)
- Poultry: 165 °F (73.9 °C)
- Beef, veal, pork, or lamb: 145 °F (62.8 °C)
- Fish / Seafood: 145 °F (62.8 °C)
Tips for Broiling
• Beef
- Steaks and chops should always be allowed to rest for five minutes before being cut into and eaten.
This allows the heat to distribute evenly through the food and creates a more tender and juicy result.
- Pieces of meat that are thicker than two inches should be removed from the refrigerator 30 minutes
prior to cooking. This will help them cook more quickly and evenly, and will produce less smoke when
broiling. Cooking times will likely be shorter than the times indicated in the Broiling Chart.
- For bone-in steaks or chops that have been frenched (all meat removed from around the bone), wrap
the exposed sections of bone in foil to reduce burning.
• Seafood
- When broiling skin-on fish, always use the Lo broil setting and always broil the skin side last.
- Seafood is best consumed immediately after cooking. Allowing seafood to rest after cooking can cause
the food to dry out.
- It is a good idea to rub a thin coating of oil on the surface of the broiling pan before cooking to reduce
sticking, especially with fish and seafood. You can also use a light coating of non-stick pan spray.
• Vegetables
- Toss your vegetables lightly in oil before cooking to improve browning.
Air Fry
The Air Fry function is specially designed for oil-
free frying.
The Air Fry mode can be programmed to cook at
any temperature from 300
8 (150 7) to 550 8
(285
7). The default temperature is 400 8 (205
7).
Temperatures can reach up to 50 8 (10 7) above
the set temperature for optimal crisping
performance.
Setting the Air Fry Mode
1 Press the POWER button.
2 Tap Manual Cook and scroll to select Air Fry.
3 Tap 3 or drag the option card to set the cook
options. Tap Temperature and set the
desired cook temperature by tapping the +/-
button, tapping the bar, or dragging the bar.
You can also use the number pad icon to set
the cooking temperature directly.
4 If desired, tap Cook Time or Start at to set
the cook time or cooking start time.
You can also use the number pad icon to set
the cooking time directly.
5 Tap When Finished to add a function after
cooking is complete.
• Keep Warm: Keeps the food warm after
cooking is complete.
• Stay On: Continues the previously selected
cooking mode after cooking is complete.
en-us_main.book.book Page 52 Friday, August 14, 2026 1:47 PM
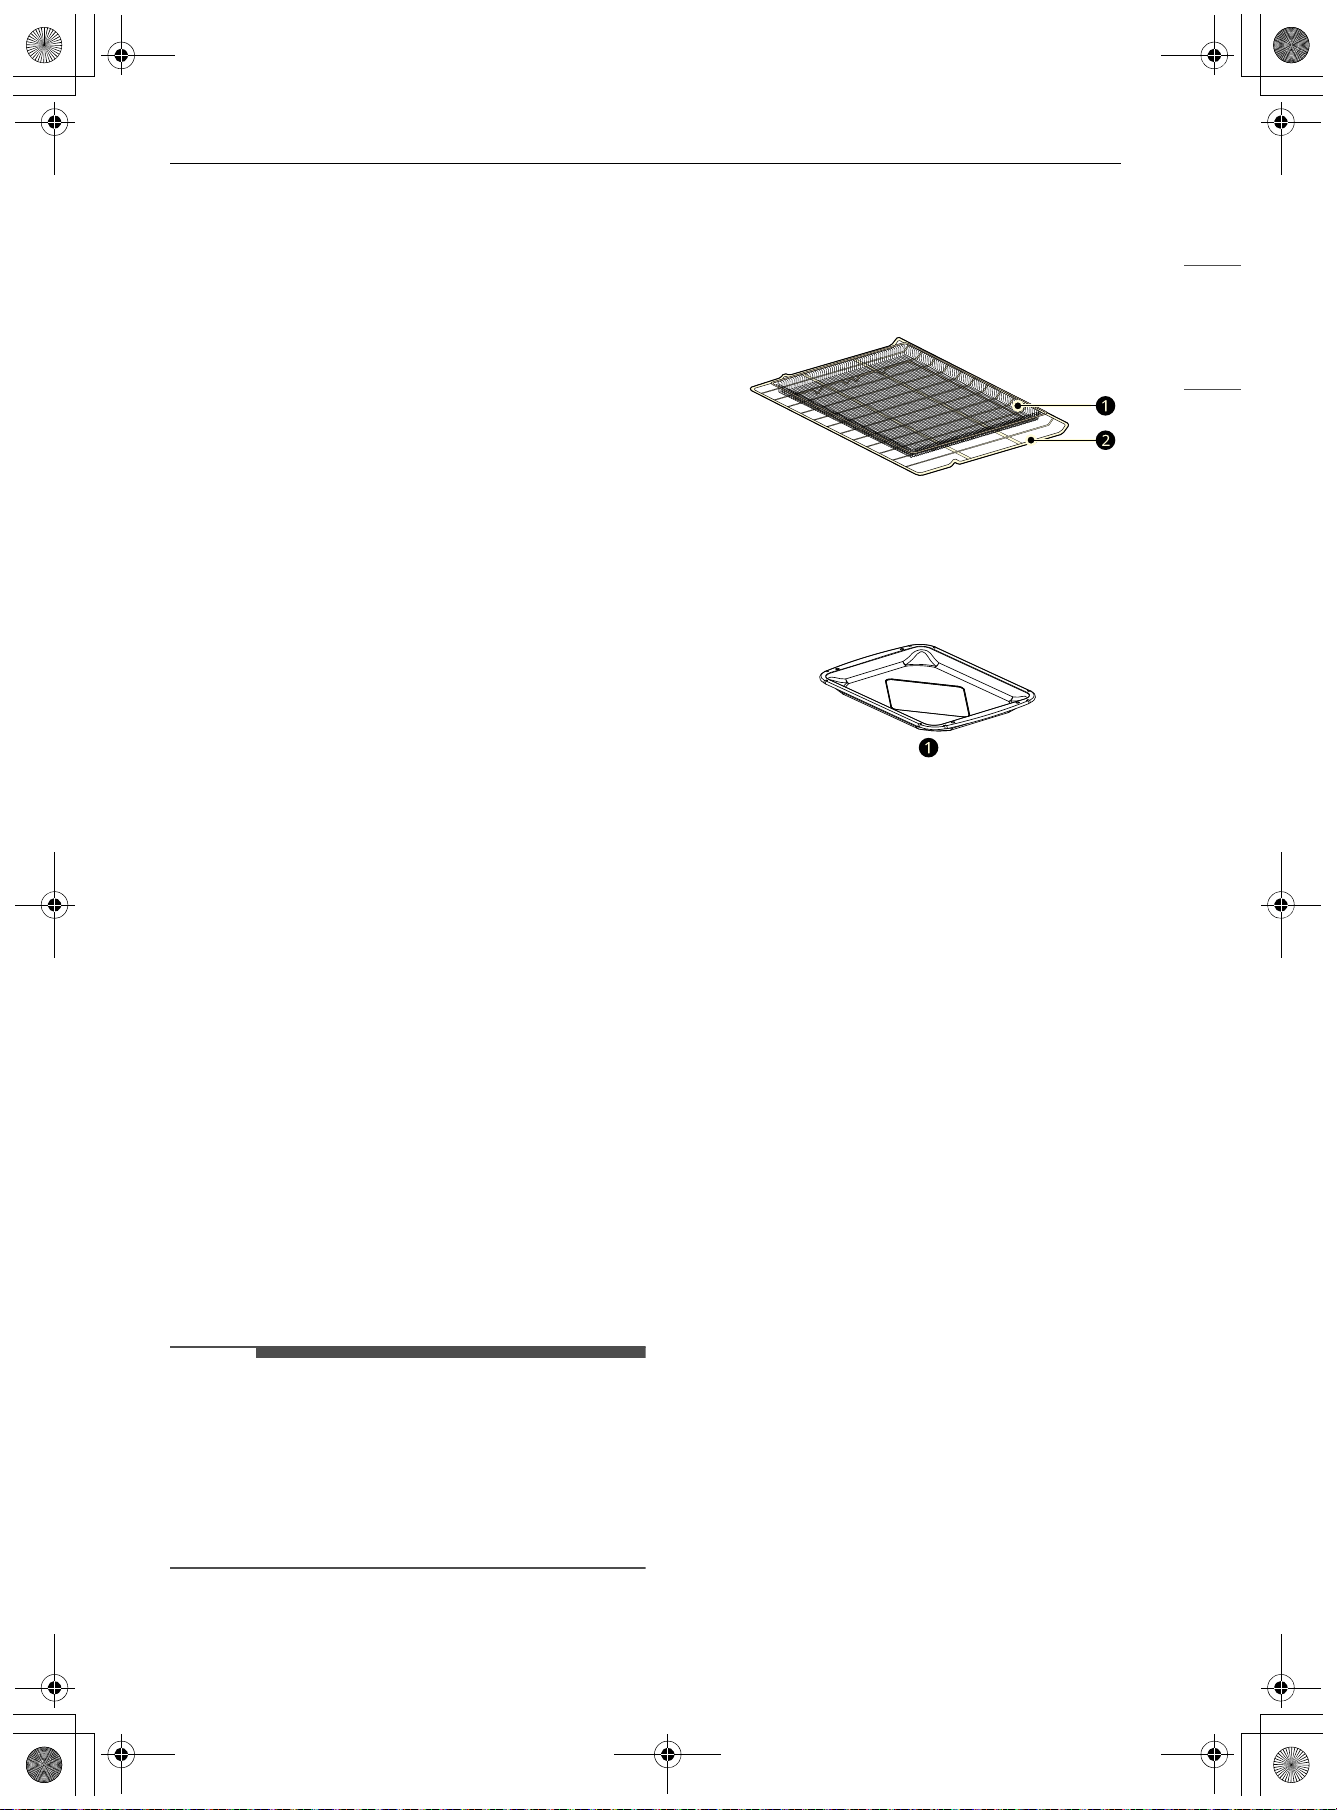
53OPERATION
ENGLISH
• Turn Off: Turns off automatically when
cooking is complete, without any additional
functions operating.
6 When you have selected the desired cook
settings, tap Start at the bottom right to
begin cooking.
7 A chime sounds at the end of the set cook
time and a notification appears in the display.
8 Tap Done to complete cooking. If needed, you
can tap + Cook Time to continue cooking, or
tap Keep Warm to maintain the food at
serving temperature.
Changing the Cook Settings
1 Tap 3 at the middle right of the screen.
2 Tap the option you want to change to make
adjustments.
3 Tap Apply at the bottom right to apply the
modified settings to your recipe.
4 Tap 4 to return to the previous screen without
making changes.
To Stop Cooking
1 Tap Stop at the bottom right of the screen.
• A pop-up notification appears on the
display.
2 Tap Stop on the pop-up.
NOTE
• No preheating is required when using the Air Fry
mode.
• If cooking multiple batches, the later batches
may take less time to cook.
• Wet batters and coatings will not crisp or set
when using the Air Fry mode.
Tips for Air Fry
• For best results, use the provided air fry tray.
- The mesh section of the air fry tray can be
cleaned in a dishwasher.
a Air Fry Tray
b Heavy Duty Rack
• If you don't have the air fry tray, place food on a
wire rack inside a foil-lined broiler pan.
a Broiler Pan (sold separately)
• For best results, cook food on a single rack
placed in the positions suggested in the chart in
this manual.
• Spread the food out evenly in a single layer.
• Use either the air fry tray or a dark baking tray
with no sides or short sides that does not cover
the entire rack. This allows for better air
circulation.
• If desired, spray the baking tray or air fry tray
with a pan spray. Use an oil that can be heated to
a high temperature before smoking, such as
avocado, grapeseed, peanut or sunflower oil.
• Place a foil-lined baking tray on a rack in position
1 to catch the oil falling from the food. For high-
fat foods like chicken wings, add a few sheets of
parchment paper to absorb the fat.
• Check food often and shake it or turn it over for
crisper results.
• Prepared frozen foods may cook faster with the
Air Fry mode than stated on the package.
Reduce the cooking time by about 20 percent,
check food early, and adjust cooking time as
needed.
• Use a food thermometer to make sure food has
reached a safe temperature for consumption.
Eating undercooked meats can increase your
risk of food-borne illness.
• For the crispiest results, dredge fresh chicken
wings or tenders in seasoned flour. Use 1/3 cup
flour for 2 pounds of chicken.
en-us_main.book.book Page 53 Friday, August 14, 2026 1:47 PM
54 OPERATION
Recommendations When Air Frying
High-Fat Foods
Foods high in fat will smoke when using the Air Fry
mode. For best results, follow these
recommendations when air frying foods that are
high in fat, such as chicken wings, bacon, sausage,
hot dogs, turkey legs, lamb chops, ribs, pork loin,
duck breasts, or some plant-based proteins.
CAUTION
• Never cover slots, holes, or passages in the oven
bottom or cover entire racks with materials such
as aluminum foil. Doing so blocks airflow
through the oven and can result in carbon
monoxide poisoning. Aluminum foil can also
trap heat, causing a fire hazard or poor oven
performance.
• Turn on your exhaust hood at a high fan setting
before you start Air Fry and leave it on for 15
minutes after you're done.
• Open a window or sliding glass door, if possible,
to make sure the kitchen is well-ventilated.
• Keep the oven free from grease buildup. Wipe
down the interior of the oven before and after
air frying (once the oven has cooled).
• Run oven cleaning cycles (EasyClean) regularly,
depending on how often and what types of food
you Air Fry.
• Avoid opening the oven door more than
necessary to help maintain the oven
temperature, prevent heat loss, and save
energy.
• Air-frying fresh chicken pieces such as wings or
drumsticks with the skin left on can produce
smoke as the fat renders at high temperatures.
If the smoke is excessive, use the Convection
Roast mode instead of Air Fry.
en-us_main.book.book Page 54 Friday, August 14, 2026 1:47 PM
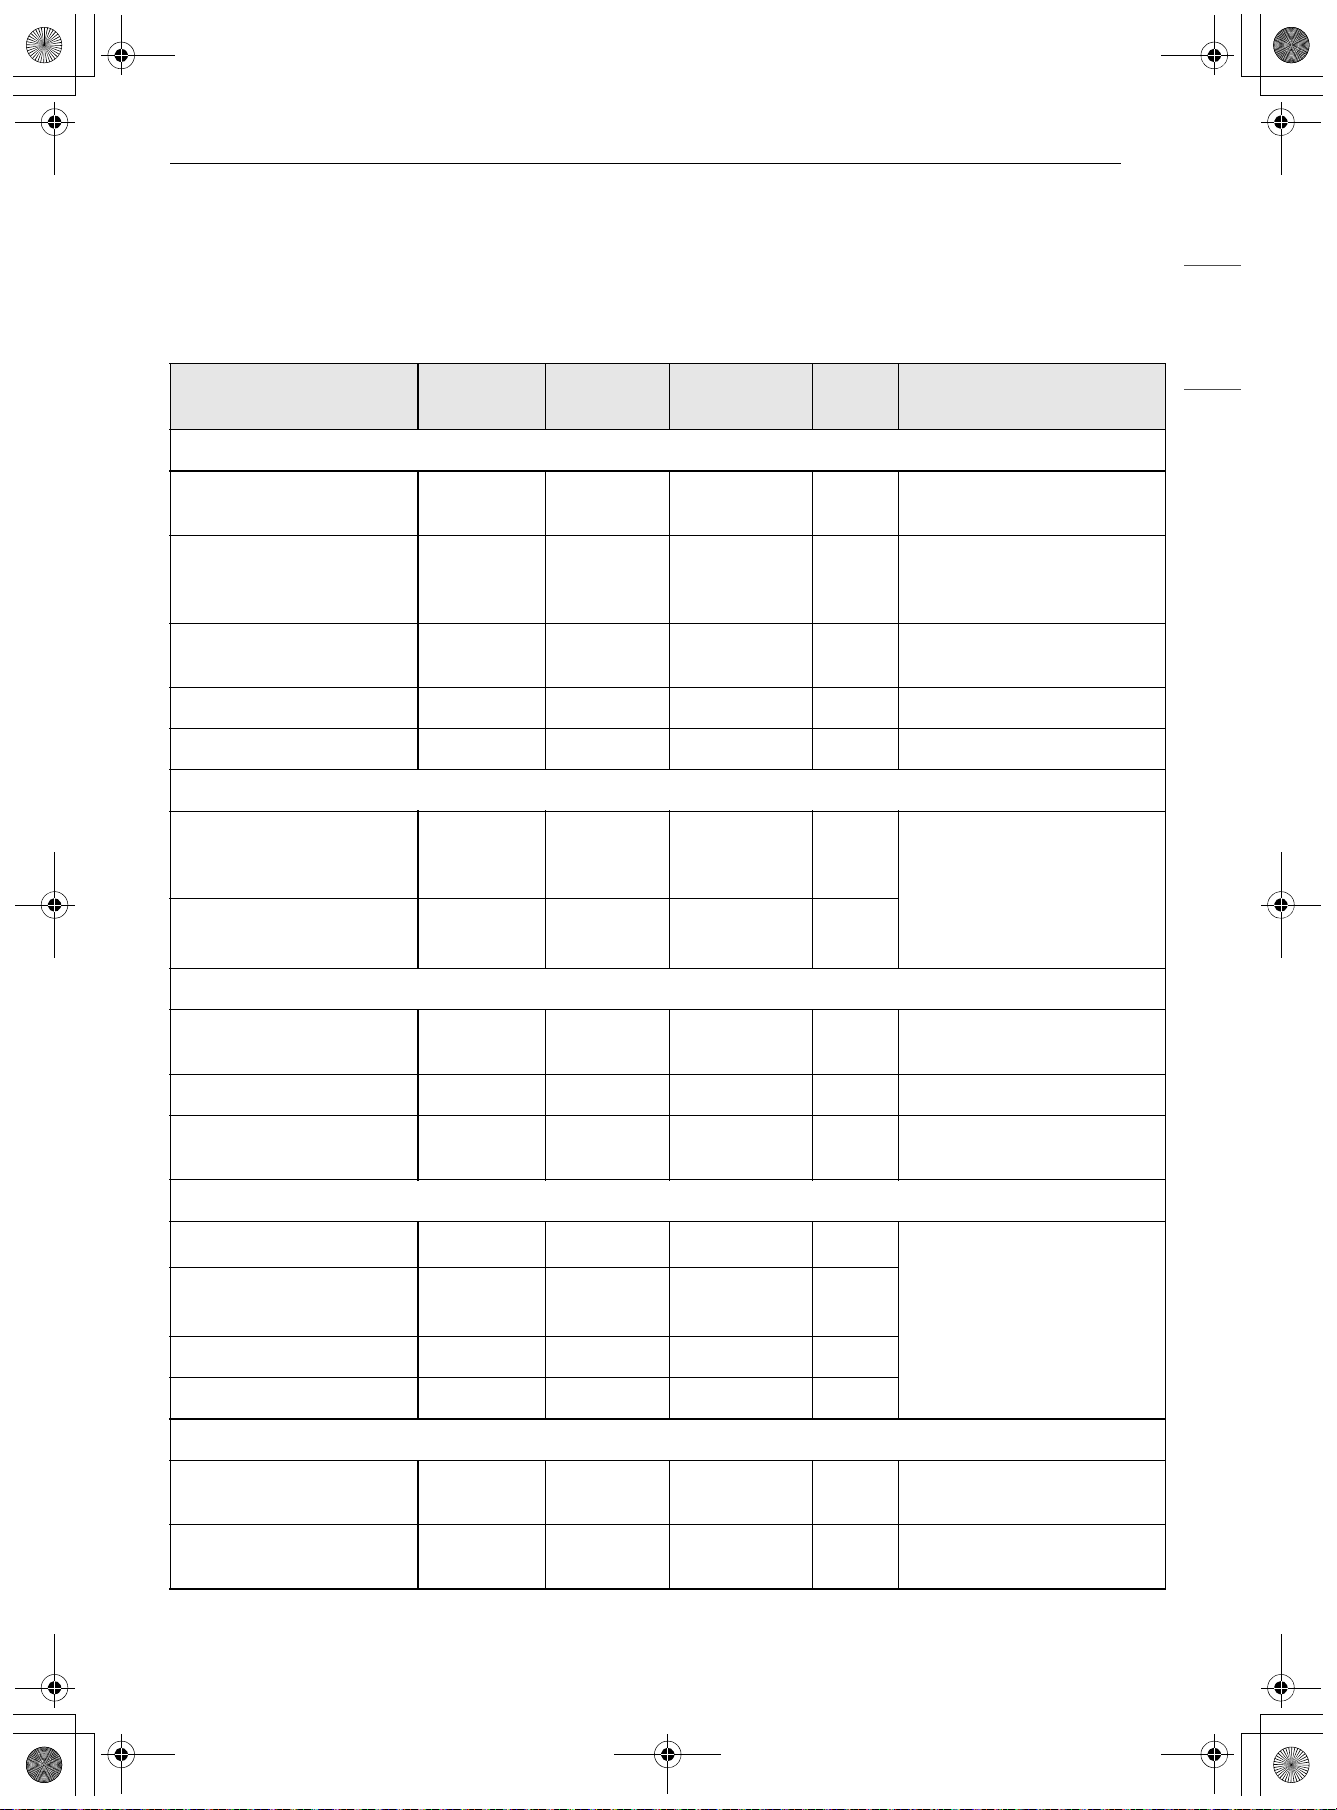
55OPERATION
ENGLISH
Recommended Air Frying Guide
• Arrange food evenly in a single layer.
• Put a foil-lined baking pan on a rack in position 1
to catch drips. If needed, add parchment paper
to absorb oil and reduce smoking.
• Flip food over during cooking to avoid burning it.
† High-fat items may produce more smoke when
cooked using Air Fry. For less smoke, cook using
Convection Roast mode.
Recommended Items
Quantity
(oz)
Temp. (°F)
Rack
Position
Time Guide
POTATOES-Frozen
Frozen French Fries
(Shoestring)
20 425 4 15-25
Frozen French Fries
(Crinkle cut, 3/8" or 10
mm)
35 400 4 20-30
Frozen Sweet Potato
Fries
25 425 4 15-30
Frozen Tater Tots 50 450 4 20-30
Frozen Hash Browns 40 450 4 20-30
POTATOES-Fresh/Homemade
Homemade French Fries
(3/8" x 3/8" or 10 x 10
mm)
25 450 4 20-30 Cut the potatoes and soak
for 30 minutes in hot tap
water. Drain and pat dry.
Brush or lightly spray with
3 tbsp. of oil. Add salt and
pepper to taste.
Homemade Potato
Wedges
60 450 4 25-35
CHICKEN-Frozen
Frozen Chicken Nuggets,
Crispy
30 425 4 15-25
Frozen Chicken Strips 35 425 4 30-40
Frozen Hot Wings, Bone-
in
50 425 4 30-40
CHICKEN-Fresh, Skin on
Fresh Chicken Wings
†
40 450 4 25-35 Brush or lightly spray with
1 tbsp. of oil. Add salt and
pepper to taste.
Fresh Chicken
Drumsticks
†
70 450 4 30-40
Thighs 40 450 4 25-35
Breasts 40 450 4 25-35
OTHER
Frozen Onion Rings,
Breaded
20 400 4 15-25
Frozen Spring Rolls (0.7
oz each)
45 425 4 15-25
en-us_main.book.book Page 55 Friday, August 14, 2026 1:47 PM
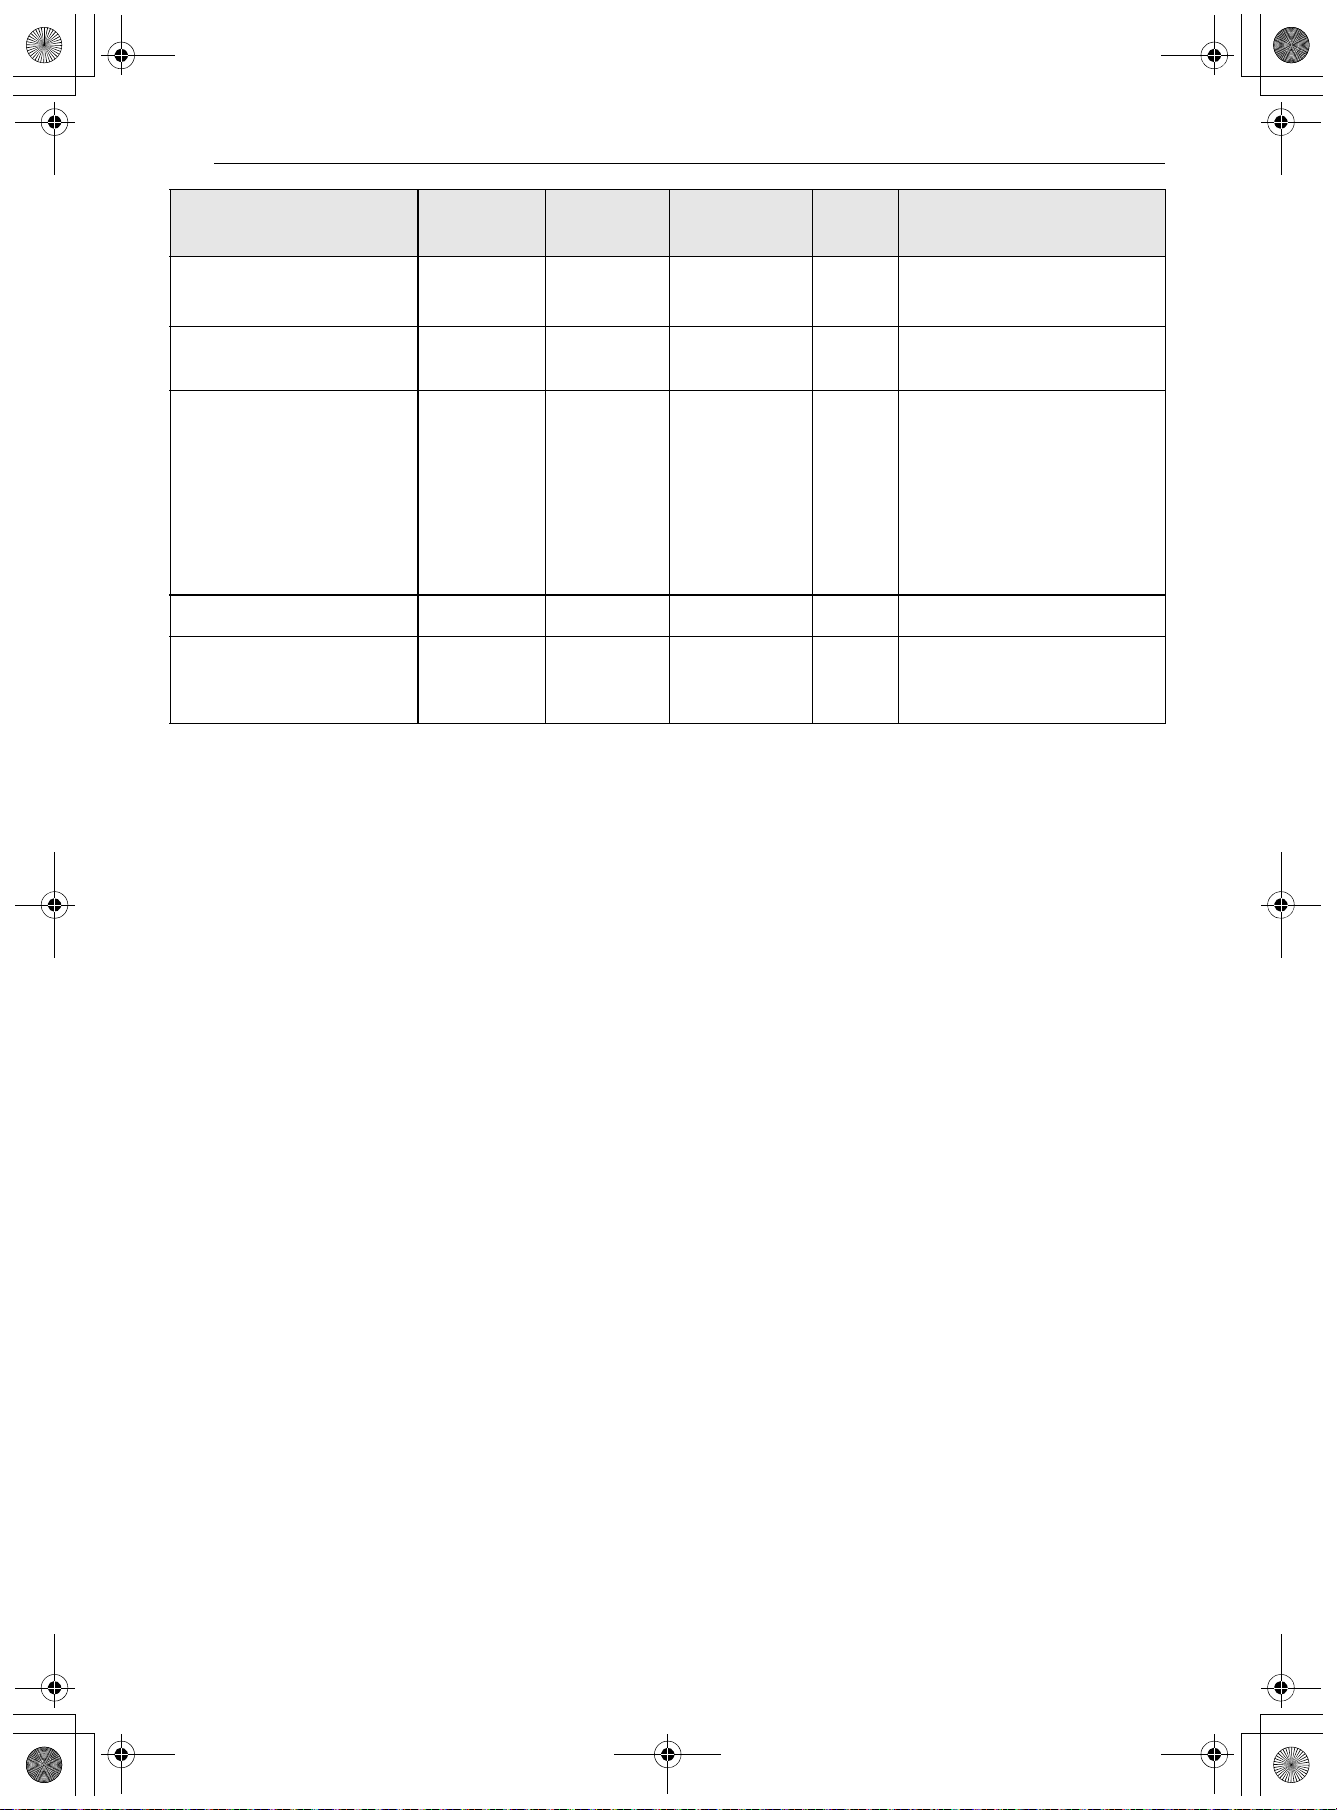
56 OPERATION
Air Sous-Vide
This feature is only available on some models.
Air Sous-Vide cooking uses air to cook foods "low
and slow." Use it to cook meat, fish, seafood,
poultry or vegetables. Food must be vacuum
packed in pouches. It is not necessary to preheat
the oven when using Air Sous-Vide. Refer to the
cooking guide for recommended Air Sous-Vide
settings.
Benefits of Air Sous-Vide
The lower temperatures and long cooking times
used in Air Sous-Vide cooking provide many
benefits.
• Healthier
Compared to other cooking methods, sous vide
retains most of the original nutrients in food.
• Safe and Convenient
The long cooking times used in sous vide
cooking allow food to be pasteurized. Because
food is vacuum packed before cooking, the
unopened pouches can be quickly chilled then
easily stored after cooking.
• Crisp and Moist Results
The fine temperature control of sous vide
cooking is an excellent way to achieve the
perfect texture when cooking meat and poultry.
The low temperatures used retain more of the
moisture in food than conventional cooking
methods. After cooking, a final sear in a frying
pan adds the perfect crisp finish.
Setting Air Sous-Vide Mode
1 Press the POWER button.
2 Tap Manual Cook and scroll to select Air
Sous-Vide.
3 Tap 3 or drag the option card to set the cook
options. Tap Temperature and set the
desired cook temperature by tapping the +/-
button, tapping the bar, or dragging the bar.
You can also use the number pad icon to set
the cook temperature directly.
4 If desired, tap Cook Time or Start at to set
the cook time or cooking start time.
You can also use the number pad icon to set
the cooking time directly.
5 Tap When Finished to add a function after
cooking is complete.
• Stay On: Continues the previously selected
cooking mode after cooking is complete.
• Turn Off: Turns off automatically when
cooking is complete, without any additional
functions operating.
Thin Sausage
†
(2.5 oz
each, diameter 0.8")
90 400 4 15-25
Frozen Coconut Shrimp 25 400 4 15-25 Brush or lightly spray the
surface of food with oil.
Fresh Scallops on the half
shell (35.3 oz)
35 425 4 20-30 Melt 4 tbsp. of butter and
brush on scallops. Mix 1/2
cup bread crumbs, 1 tbsp.
minced garlic, 1/4 cup
grated parmesan cheese
and season to taste.
Sprinkle mixture over
scallops.
Fresh Shrimp 50 425 4 25-35
Mixed Vegetables 35 425 4 15-25 Brush or lightly spray with
4 tbsp. of olive oil. Add salt
and pepper to taste.
Recommended Items
Quantity
(oz)
Temp. (°F)
Rack
Position
Time Guide
en-us_main.book.book Page 56 Friday, August 14, 2026 1:47 PM
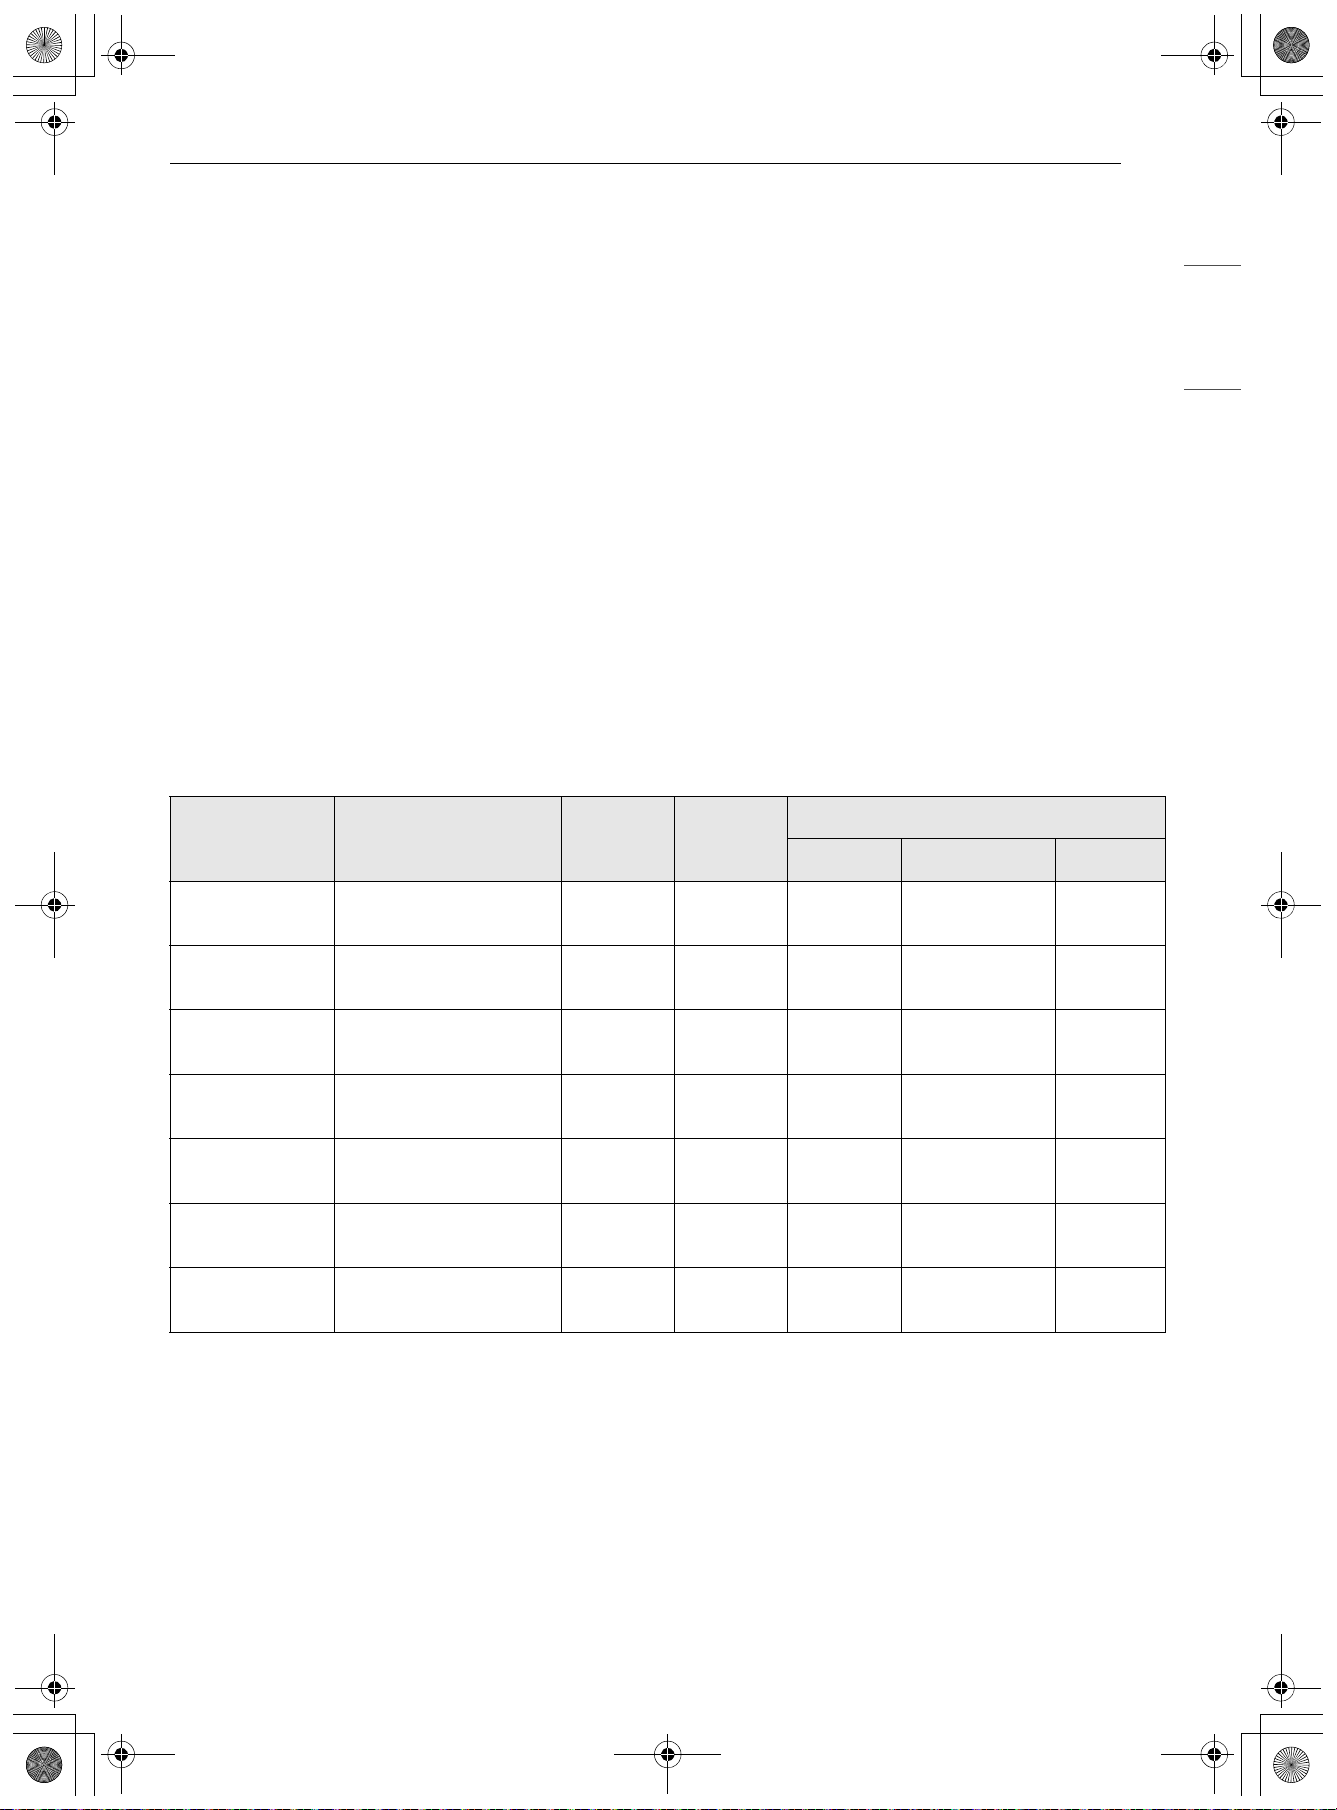
57OPERATION
ENGLISH
6 When you have selected the desired cook
settings, tap Start at the bottom right to
begin cooking.
7 A chime sounds at the end of the set cook
time and a notification appears in the display.
8 Tap Done to complete cooking. If needed, you
can tap + Cook Time to continue cooking.
Changing the Cook Settings
1 Tap 3 at the middle right of the screen.
2 Tap the option you want to change to make
adjustments.
3 Tap Apply at the bottom right to apply the
modified settings to your recipe.
4 Tap 4 to return to the previous screen without
making changes.
To Stop Cooking
1 Tap Stop at the bottom right of the screen.
• A pop-up notification appears on the
display.
2 Tap Stop on the pop-up.
Recommended Air Sous-Vide Guide
Air Roast
Air Roast is a quick and convenient way to roast
without preheating.
The Air Roast mode can be programmed to cook at
any temperature from 300
8 (150 7) to 550 8
(285 7). The default temperature is 400 8 (205
7). The meat probe can also be used with this
mode.
Setting the Air Roast Mode
1 Press the POWER button.
2 Tap Manual Cook and scroll to select Air
Roast.
Food
Quantity
(oz)
Rack
Position
Temp.
(°F)
Time
Min Target Max
Beef steak 1” thick
14~17 oz
3
135 - 2.5 hr. 3 hr.
Chicken
breast
4-6 oz
3
150 - 2 hr. 2.5 hr.
Chicken
Thighs(bone in)
6~8 oz 3 155 - 4 hr. 6 hr.
Salmon 1” thick
5 oz
3
140 - 2 hr. 2.5 hr.
Asparagus 2.8 oz / 6 ea
5.6 oz / 12 ea
3
185 20 min. 30 min. 45 min.
Potatoes 1/2”diced
up to 36 oz.
3 200 - 2.5 hr. -
Carrots 1/2”diced
up to 18 oz.
3 200 1.5 hr. 2 hr. 3 hr.
en-us_main.book.book Page 57 Friday, August 14, 2026 1:47 PM

58 OPERATION
3 Tap 3 or drag the option card to set the cook
options. Tap Temperature and set the
desired cook temperature by tapping the +/-
button, tapping the bar, or dragging the bar.
You can also use the number pad icon to set
the cook temperature directly.
4 If desired, tap Cook Time or Start at to set
the cook time or cooking start time.
You can also use the number pad icon to set
the cook time directly.
5 Tap When Finished to add a function after
cooking is complete.
• Keep Warm: Keeps the food warm after
cooking is complete.
• Stay On: Continues the previously selected
cooking mode after cooking is complete.
• Turn Off: Turns off automatically when
cooking is complete, without any additional
functions operating.
6 When you have selected the desired cook
settings, tap Start at the bottom right to
begin cooking.
7 A chime sounds at the end of the set cook
time and a notification appears in the display.
8 Tap Done to complete cooking. If needed, you
can tap + Cook Time to continue cooking, or
tap Keep Warm to maintain the food at
serving temperature.
Changing the Cook Settings
1 Tap 3 at the middle right of the screen.
2 Tap the option you want to change to make
adjustments.
3 Tap Apply at the bottom right to apply the
modified settings to your recipe.
4 Tap 4 to return to the previous screen without
making changes.
To Stop Cooking
1 Tap Stop at the bottom right of the screen.
• A pop-up notification appears on the
display.
2 Tap Stop on the pop-up.
Pizza
This system is designed to give the optimum
cooking performance for pizza by automatically
selecting a combination of the broil and bake
heating systems.
Setting the Pizza Mode
1 Press the POWER button.
2 Tap Manual Cook and scroll to select Pizza.
3 Tap 3 or drag the option card to set the cook
options.
4 Tap Temperature and set the desired cook
temperature by tapping the +/- button,
tapping the bar, or dragging the bar.
You can also use the number pad icon to set
the cook temperature directly.
5 If desired, tap Cook Time or Start at to set
the cook time or cooking start time.
You can also use the number pad icon to set
the cook time directly.
6 Tap When Finished to add a function after
cooking is complete.
• Keep Warm: Keeps the food warm after
cooking is complete.
• Stay On: Continues the previously selected
cooking mode after cooking is complete.
• Turn Off: Turns off automatically when
cooking is complete, without any additional
functions operating.
en-us_main.book.book Page 58 Friday, August 14, 2026 1:47 PM
59OPERATION
ENGLISH
7 When you have selected the desired cook
settings, tap Start at the bottom right to
begin cooking.
8 A chime sounds once preheating is complete.
9 A chime sounds at the end of the set cook
time and a notification appears in the display.
10 Tap Done to complete cooking. If needed, you
can tap + Cook Time to continue cooking, or
tap Keep Warm to maintain the food at
serving temperature.
NOTE
• Preheating is necessary for better cooking
results.
• Place the food in the oven after preheating.
• Rotate frozen pizzas halfway through cooking.
Extend the cooking time as needed to meet the
desired level of doneness.
Changing the Cook Settings
1 Tap 3 at the middle right of the screen.
2 Tap the option you want to change to make
adjustments.
3 Tap Apply at the bottom right to apply the
modified settings to your recipe.
4 Tap > to return to the previous screen without
making changes.
To Stop Cooking
1 Tap Stop at the bottom right of the screen.
• A pop-up notification appears on the
display.
2 Tap Stop on the pop-up.
Frozen Meal
The Frozen Meal function is specially designed for
cooking frozen prepared meals.
No preheating is required when using the Frozen
Meal mode.
Setting the Frozen Meal Mode
1 Press the POWER button.
2 Tap Manual Cook and scroll to select Frozen
Meal.
3 Tap 3 or drag the option card to set the cook
options. Tap Temperature and set the
desired cook temperature by tapping the +/-
button, tapping the bar, or dragging the bar.
You can also use the number pad icon to set
the cook temperature directly.
4 If desired, tap Cook Time or Start at to set
the cook time or cooking start time.
You can also use the number pad icon to set
the cook time directly.
5 Tap When Finished to add a function after
cooking is complete.
• Keep Warm: Keeps the food warm after
cooking is complete.
• Stay On: Continues the previously selected
cooking mode after cooking is complete.
• Turn Off: Turns off automatically when
cooking is complete, without any additional
functions operating.
6 When you have selected the desired cook
settings, tap Start at the bottom right to
begin cooking.
7 A chime sounds at the end of the set cook
time and a notification appears in the display.
8 Tap Done to complete cooking. If needed, you
can tap + Cook Time to continue cooking, or
tap Keep Warm to maintain the food at
serving temperature.
en-us_main.book.book Page 59 Friday, August 14, 2026 1:47 PM

60 OPERATION
Changing the Cook Settings
1 Tap 3 at the middle right of the screen.
2 Tap the option you want to change to make
adjustments.
3 Tap Apply at the bottom right to apply the
modified settings to your recipe.
4 Tap 4 to apply the modified settings to your
recipe.
To Stop Cooking
1 Tap Stop at the bottom right of the screen.
• A pop-up notification appears on the
display.
2 Tap Stop on the pop-up.
Dehydrate
Use this function to dry fruit, vegetables, and beef
to create healthy and nutritious snacks without
using chemicals and preservatives. Place
parchment paper on the metal tray and spread the
food in a single layer. Dehydrate temperatures
range from 100 ℉ to 200 ℉.
Setting the Dehydrate Mode
1 Press the POWER button.
2 Tap Manual Cook and scroll to select
Dehydrate.
3 Tap <3 or drag the option card to set the cook
options. Tap Temperature and set the
desired cook temperature by tapping the +/-
button, tapping the bar, or dragging the bar.
You can also use the number pad icon to set
the cook temperature directly.
4 If desired, tap Cook Time or Start at to set
the cook time or cooking start time.
You can also use the number pad icon to set
the cook time directly.
5 Tap When Finished to add a function after
cooking is complete.
• Keep Warm: Keeps the food warm after
cooking is complete.
• Stay On: Continues the previously selected
cooking mode after cooking is complete.
• Turn Off: Turns off automatically when
cooking is complete, without any additional
functions operating.
6 When you have selected the desired cook
settings, tap Start at the bottom right to
begin cooking.
7 A chime sounds at the end of the set cook
time and a notification appears in the display.
8 Tap Done to complete cooking. If needed, you
can tap + Cook Time to continue cooking.
Changing the Dehydrate Settings
1 Tap 3 at the middle right of the screen.
2 Tap the option you want to change to make
adjustments.
3 Tap Apply at the bottom right to apply the
modified settings to your recipe.
4 Tap 4 to return to the previous screen without
making changes.
To Stop Dehydrate
1 Tap Stop at the bottom right of the screen.
• A pop-up notification appears on the
display.
2 Tap Stop on the pop-up.
en-us_main.book.book Page 60 Friday, August 14, 2026 1:47 PM
61OPERATION
ENGLISH
Warm
This function will maintain an oven temperature of
less than 200
8 (93 7). It will keep cooked food
warm for serving up to 3 hours after cooking has
finished.
Setting the Warm Mode
1 Press the POWER button.
2 Tap Manual Cook and scroll to select Warm.
3 Select the desired temperature: Low,
Medium, or High.
4 If desired, tap Cook Time or Start at to set
the cook time or cooking start time.You can
also use the number pad icon to set the
cooking time directly.
5 Tap When Finished to add a function after
cooking is complete.
• Stay On: Continues the previously selected
cooking mode after cooking is complete.
• Turn Off: Turns off automatically when
cooking is complete, without any additional
functions operating.
6 When you have selected the desired cook
settings, tap Start at the bottom right to
begin cooking.
7 Tap Done to complete cooking. If needed, you
can tap + Cook Time to continue cooking.
Changing the Warm Settings
1 Tap 3 at the middle right of the screen.
2 Tap the option you want to change to make
adjustments.
3 Tap Apply at the bottom right to apply the
modified settings to your recipe.
4 Tap 4 to return to the previous screen without
making changes.
To Stop Warming
1 Tap Stop at the bottom right of the screen.
• A pop-up notification appears on the
display.
2 Tap Stop on the pop-up.
NOTE
• The Warm function is intended to keep food
warm. Do not use it to cool food down.
Proof
This feature maintains a warm oven for rising
yeast-leavened products before baking.
Setting the Proof Mode
1 Press the POWER button.
2 Tap Manual Cook and scroll to select Proof.
3 If desired, tap Cook Time or Start at to set
the cook time or cooking start time.You can
also use the number pad icon to set the
cooking time directly.
4 Tap When Finished to add a function after
cooking is complete.
• Stay On: Continues the previously selected
cooking mode after cooking is complete.
• Turn Off: Turns off automatically when
cooking is complete, without any additional
functions operating.
5 When you have selected the desired cook
settings, tap Start at the bottom right to
begin cooking.
6 Tap Done to complete cooking. If needed, you
can tap + Cook Time to continue cooking.
en-us_main.book.book Page 61 Friday, August 14, 2026 1:47 PM
62 OPERATION
Changing the Proof Settings
1 Tap 3 at the middle right of the screen.
2 Tap the option you want to change to make
adjustments.
3 Tap Apply at the bottom right to apply the
modified settings to your recipe.
4 Tap 4 to return to the previous screen without
making changes.
To Stop Proofing
1 Tap Stop at the bottom right of the screen.
• A pop-up notification appears on the
display.
2 Tap Stop on the pop-up.
NOTE
• To avoid lowering the oven temperature and
lengthening proofing time, do not open the oven
door unnecessarily. Check bread products early
to avoid over proofing.
• Do not use the Proofing mode for warming food
or keeping food hot. The proofing oven
temperature is not hot enough to keep foods at
safe temperatures. Use the Warm feature to
keep food warm. Proofing does not operate
when the oven is above 125 ℉. "Oven is too hot.
Try again after it cools down." shows in the
display.
• It is normal for the fan to operate during the
Proof function.
• The proof feature automatically provides the
optimum temperature for the proofing process,
and therefore does not have a temperature
adjustment.
• For best results, cover the dough with a cloth or
with plastic wrap. (The plastic may need to be
anchored underneath the container so the oven
fan does not blow it off.)
Crispy Reheat
Crispy Reheat is a new cooking function that
restores the texture of foods that have become
soggy and lost their crispiness.
Setting the Crispy Reheat Mode
1 Press the POWER button.
2 Tap Manual Cook and scroll to select Crispy
Reheat.
3 Tap 3 or drag the option card to set the cook
options. Tap Temperature and set the
desired cook temperature by tapping the +/-
button, tapping the bar, or dragging the bar.
You can also use the number pad icon to set
the cooking temperature directly.
4 If desired, tap Cook Time or Start at to set
the cook time or cooking start time.
You can also use the number pad icon to set
the cooking time directly.
5 Tap When Finished to add a function after
cooking is complete.
• Keep Warm: Keeps the food warm after
cooking is complete.
• Stay On: Continues the previously selected
cooking mode after cooking is complete.
• Turn Off: Turns off automatically when
cooking is complete, without any additional
functions operating.
6 When you have selected the desired cook
settings, tap Start at the bottom right to
begin cooking.
7 A chime sounds at the end of the set cook
time and a notification appears in the display.
8 Tap Done to complete cooking. If needed, you
can tap + Cook Time to continue cooking, or
tap Keep Warm to maintain the food at
serving temperature.
en-us_main.book.book Page 62 Friday, August 14, 2026 1:47 PM

63OPERATION
ENGLISH
Changing the Cook Settings
1 Tap 3 at the middle right of the screen.
2 Tap the option you want to change to make
adjustments.
3 Tap Apply at the bottom right to apply the
modified settings to your recipe.
4 Tap 4 to return to the previous screen without
making changes.
To Stop Cooking
1 Tap Stop at the bottom right of the screen.
• A pop-up notification appears on the
display.
2 Tap Stop on the pop-up.
Auto Cook
The Auto Cook function provides guidance for
cooking foods or dishes that may be unfamiliar. It
contains preset programs for cooking many
popular food items, with information on
recommended preheating, accessories, and rack
position for optimal results.
Setting Auto Cook Mode
1 Press the POWER button and tap Auto Cook.
2 Select category to filter the options.
3 Scroll through or tap the letters to find and
select an item.
4 Follow the recommendations in the display
regarding accessories and rack position.
5 Tap Start at the bottom right to begin
cooking.
en-us_main.book.book Page 63 Friday, August 14, 2026 1:47 PM
64 OPERATION
Auto Cook Guide
• Preheat oven first for most items.
• Preheat for 5 minutes when broiling.
• If using probe, insert food and probe before preheating.
NOTE
• When cooking thin cuts of meat, insert the probe into the thickest part of the meat. If the probe is
inserted incorrectly, the oven could turn off too soon. See the Probe section for instructions.
Beef
Menu
Amount Food Temp.
Remark Instructions
Cookware
Rack
Position
Beef
Tenderloin
2~4 lb. Refrigerated
Probe cook
Ingredients
Kosher salt, ground black pepper, garlic
powder to taste
Instructions
Prepare beef tenderloin, trimmed. Brush or
lightly spray with oil. Add salt, garlic powder
and pepper to taste. Place the tenderloin on the
grid on the broiler pan.
Grid on
broiler pan
2
Roast Beef
2~4 lb. Refrigerated
Probe cook
Ingredients
Kosher salt, ground black pepper, garlic
powder to taste
Instructions
Prepare beef sirloin, trimmed. Brush or lightly
spray with oil. Add salt, garlic powder and
pepper to taste. Place the sirloin on the grid on
the broiler pan.
Grid on
broiler pan
2
Prime Rib
8~12 lb. Refrigerated
Probe cook
Ingredients
Kosher salt, ground black pepper, garlic
powder to taste
Instructions
Prepare the bone-in prime rib. Brush or lightly
spray with oil. Add salt, garlic powder and
pepper to taste. Place the prime rib in the
roasting pan.
Roasting
pan
2
Pork
Menu
Amount Food Temp.
Remark Instructions
Cookware Rack Position
Pork Ribs
2~4 lb. Refrigerated Ingredients
Kosher salt, ground black pepper to taste
Instructions
Prepare bone-in pork ribs, trimmed. Brush or
lightly spray with oil. Add salt and pepper to
taste. Place the pork ribs on the grid on the
broiler pan.
Grid on
broiler pan
2
en-us_main.book.book Page 64 Friday, August 14, 2026 1:47 PM
65OPERATION
ENGLISH
Pork Chops
1~6 EA Refrigerated Ingredients
Kosher salt, ground black pepper to taste
Instructions
Prepare bone-in pork chops, about 6 oz.
each, trimmed. Brush or lightly spray with oil.
Add salt and pepper to taste. Place the pork
chops on the grid on the broiler pan.
Grid on
broiler pan
4
Pork Loin
2~4 lb. Refrigerated
Probe cook
Ingredients
Kosher salt, ground black pepper to taste
Instructions
Prepare pork loin, about 4 inches in diameter,
trimmed. Brush or lightly spray with 1 tbsp.
of oil. Add salt and pepper to taste. Place the
pork loin on the grid on the broiler pan.
Grid on
broiler pan
2
Pork
Tenderloin
2~4 lb. Refrigerated
Probe cook
Ingredients
Kosher salt, ground black pepper to taste
Instructions
Prepare pork tenderloin, 2~3 inches in
diameter, trimmed. Brush or lightly spray
with 1 tbsp. of oil. Add salt and pepper to
taste. Place the tenderloin on the grid on the
broiler pan.
Grid on
broiler pan
2
Lamb
Menu
Amount Food Temp.
Remark Instructions
Cookware
Rack
Position
Rack of
Lamb
2~4 lb. Refrigerated
Probe
cook
Ingredients
Canola oil, kosher salt, ground black pepper to taste
Instructions
Prepare rack of lamb, trimmed. Brush or lightly
spray with 1 tbsp. of oil. Add salt and pepper to
taste. Place the rack of lamb on the grid on the
broiler pan.
Grid on
broiler pan
2
Bone-in
Leg of
Lamb
5~7 lb. Refrigerated
Probe
cook
Ingredients
Canola oil, kosher salt, ground black pepper to taste
Instructions
Prepare bone-in leg of lamb, trimmed. Brush or
lightly spray with 1 tbsp. of oil. Add salt and pepper
to taste. Place the leg of lamb in the roasting pan.
Roasting pan 2
Pork
Menu
Amount Food Temp.
Remark Instructions
Cookware Rack Position
en-us_main.book.book Page 65 Friday, August 14, 2026 1:47 PM
66 OPERATION
Sausage
Menu
Amount
Food
Temp.
Remark Instructions
Cookware
Rack
Position
Italian
Sausage
1~8 EA Refrigerated When the
oven beeps,
turn food
over.
Prepare sausages, about 3.5 oz. each. Spray a
rimmed sheet pan with cooking spray. Place the
Italian sausages on the half sheet pan and space
the sausages 1 1/2 in. apart from each other.
1/2 Sheet
Pan
2
Hot dog
1~8 EA Refrigerated When the
oven beeps,
turn food
over.
Prepare hot dogs, about 2 oz. each. Spray a
rimmed sheet pan with cooking spray. Place the
hot dogs on the half sheet pan and space the hot
dogs 1 1/2 in. apart from each other.
1/2 Sheet
Pan
2
Fish
Menu
Amount Food Temp.
Instructions
Cookware Rack Position
Fish Fillet
1~4 EA Refrigerated Ingredients
Kosher salt, ground black pepper, oil to taste
Instructions
Prepare the fish fillets, about 7 oz. each, and about
1~1.5 in. thick. Brush or lightly spray with oil. Add salt
and pepper to taste. Place the fillets on the grid on the
broiler pan.
Grid on broiler
pan
4
Cod Fillet
1~4 EA Refrigerated Ingredients
Kosher salt, ground black pepper, oil to taste
Instructions
Prepare the cod fillets, about 7 oz. each, and about
1~1.5 in. thick. Brush or lightly spray with oil. Add salt
and pepper to taste. Place the fillets on the grid on the
broiler pan.
Grid on broiler
pan
4
Salmon Fillet
1~4 EA Refrigerated Ingredients
Kosher salt, ground black pepper, oil to taste
Instructions
Prepare the salmon fillets, about 7 oz. each, and 3/4 in.
thick. Brush or lightly spray with oil. Add salt and
pepper to taste. Place the fillets on the grid on the
broiler pan.
Grid on broiler
pan
4
Baked
Shrimp
1~2 lb. Refrigerated Ingredients
Kosher salt, ground black pepper, oil to taste
Instructions
Prepare the shrimp, peel and devein (if necessary).
Brush or lightly spray with oil. Add salt and pepper to
taste. Place the shrimp on the grid on the broiler pan.
Grid on broiler
pan
4
Tilapia Fillet
1~4 EA Refrigerated Ingredients
Kosher salt, ground black pepper, oil to taste
Instructions
Prepare the tilapia fillets, about 7 oz. each, and about
1~1.5 in. thick. Brush or lightly spray with oil. Add salt
and pepper to taste. Place the fillets on the grid on the
broiler pan.
Grid on broiler
pan
4
en-us_main.book.book Page 66 Friday, August 14, 2026 1:47 PM
67OPERATION
ENGLISH
Lobster Tails
1~2 EA Refrigerated Ingredients
Salt, pepper to taste, 1 tbsp butter - melted
Instructions
Prepare the lobster tails, about 5 oz. each. Butterfly
the lobster tails. Brush with melted butter. Add salt to
taste. Place the lobster tails on the grid on the broiler
pan.
Grid on broiler
pan
4
Salmon
Steak
1~4 EA Refrigerated Ingredients
Kosher salt, ground black pepper, oil to taste
Instructions
Prepare the salmon steaks, about 7 oz. each, and
about 1.5~2 in. thick. Brush or lightly spray with oil.
Add salt and pepper to taste. Place the salmon on the
grid on the broiler pan.
Grid on broiler
pan
4
Tuna Steak
1~4 EA Refrigerated Ingredients
Salt, pepper, oil to taste
Instructions
Prepare the tuna steaks, about 7 oz. each, and about
1.5~2 in. thick. Brush or lightly spray with oil. Add salt
and pepper to taste. Place the tuna on the grid on the
broiler pan.
Grid on broiler
pan
1
Poultry
Menu
Amount Food Temp.
Remark Instructions
Cookware Rack Position
Spatchcock
Chicken
4~6 lb /
chicken
Refrigerated
Probe cook
Ingredients
Kosher salt, ground black pepper, to taste
Instructions
Prepare the chicken, about 4~6 lb.
Spatchcock the chicken by removing the
backbone. Add salt, pepper and herbs to
taste. Place the chicken with the skin side up
on the grid on the broiler pan.
Grid on
broiler pan
2
Chicken
Drumsticks
4~16 EA Refrigerated Ingredients
Kosher salt, ground black pepper, oil to taste
Instructions
Prepare the chicken drumsticks, about 4 oz.
each. Brush or lightly spray with oil. Add salt
and pepper to taste. Place the chicken
drumsticks on the grid on the broiler pan.
Grid on
broiler pan
4
Fresh
Chicken
Wings
10~20 EA Refrigerated Ingredients
Salt, pepper, oil to taste
Instructions
Prepare the fresh chicken wings, about 3 oz.
each. Brush or lightly spray with oil. Add salt
and pepper to taste. Place the fresh chicken
wings on the grid on the broiler pan.
Grid on
broiler pan
4
Fish
Menu
Amount Food Temp.
Instructions
Cookware Rack Position
en-us_main.book.book Page 67 Friday, August 14, 2026 1:47 PM
68 OPERATION
Frozen
Buffalo
Wings
10~20 EA Frozen Ingredients
Kosher salt, ground black pepper, oil to taste
Instructions
Prepare the frozen chicken wings, about 3 oz.
each. Add salt and pepper to taste, if
necessary. Place the frozen chicken wings on
the grid on the broiler pan.
Grid on
broiler pan
3
Frozen
Chicken
Wings
(Raw)
10~20 EA Frozen Ingredients
Kosher salt, ground black pepper, oil to taste
Instructions
Prepare the frozen chicken wings, about 3 oz.
each. Add salt and pepper to taste, if
necessary. Place the frozen chicken wings on
the grid on the broiler pan.
Grid on
broiler pan
4
Chicken
Breasts
1~8 EA Refrigerated Ingredients
Kosher salt, ground black pepper, oil to taste
Instructions
Prepare the fresh chicken breasts, about 6 oz.
each. Brush or lightly spray with oil. Add salt
and pepper to taste. Place the chicken
breasts on the grid on the broiler pan.
Grid on
broiler pan
4
Whole
Chicken
5~7 lb /
chicken
Refrigerated
Probe cook
Ingredients
Kosher salt, ground black pepper, to taste
Instructions
Prepare the whole chicken, about 5~7 lb.
Truss the chicken. Add salt and pepper to
taste. Place the whole chicken on the grid on
the broiler pan.
Grid on
broiler pan
2
Turkey
Breasts
1~4 EA Refrigerated
Probe cook
Ingredients
Kosher salt, ground black pepper, oil to taste
Instructions
Prepare the turkey breasts, about 3 lb. each.
Brush or lightly spray with oil. Add salt and
pepper to taste. Place the turkey breasts on
the grid on the broiler pan.
Grid on
broiler pan
2
Whole
Turkey
12~16 lb. Refrigerated
Probe cook
Ingredients
Kosher salt, ground black pepper, to taste
Instructions
Prepare the whole turkey, about 12~16 lb.
Add salt and pepper to taste. Place the whole
turkey in the roasting pan.
Roasting pan 2
Turkey with
Stuffing
12~16 lb. Refrigerated
Probe cook
Ingredients
Kosher salt, ground black pepper, to taste
Instructions
Prepare the turkey, about 12~16 lb. Add
stuffing to the cavity of the turkey. Add salt
and pepper to taste. Place the turkey with
stuffing in the roasting pan.
Roasting pan 2
Poultry
Menu
Amount Food Temp.
Remark Instructions
Cookware Rack Position
en-us_main.book.book Page 68 Friday, August 14, 2026 1:47 PM
69OPERATION
ENGLISH
Spatchcock
Turkey
7~12 lb. Refrigerated
Probe cook
Ingredients
Kosher salt, ground black pepper, to taste
Instructions
Prepare the turkey, about 7~12 lb.
Spatchcock the turkey by removing the
backbone. Add salt, pepper and herbs to
taste. Place the turkey with the skin side up in
the roasting pan.
Roasting pan 2
Poultry
Menu
Amount Food Temp.
Remark Instructions
Cookware Rack Position
en-us_main.book.book Page 69 Friday, August 14, 2026 1:47 PM
70 OPERATION
Casseroles
Menu
Amount
Food
Temp.
Remark Instructions
Cookware
Rack
Position
Homemade
Lasagna
1 casserole
(serves 6)
Room
When the
oven
beeps,
remove
the cover
on the
food.
Ingredients
1 lb. ground beef, cooked
32 oz ricotta cheese
2 cups mozzarella cheese
1/2 cup grated parmesan cheese
2 eggs
2 24-oz jars tomato sauce
1 box no-boil lasagna sheets
Instructions
Serves 6
1) Combine the ricotta cheese, 1 cup of
mozzarella cheese and 1/4 cup of
parmesan cheese in a bowl. Add the
eggs and combine.
2) Spread 1 cup of tomato sauce on the
bottom of the baking dish.
3) Lay down 4 lasagna sheets, then 1 cup
tomato sauce and 1/2 of the ricotta
cheese mixture. Top with half of the
cooked meat.
4) Repeat step 3.
5) Top with 4 more lasagna sheets and the
remaining tomato sauce.
6) Sprinkle with the remaining mozzarella
and parmesan cheeses.
7) Place the baking dish on the rack for the
image recognition.
8) Remove the baking dish while
preheating and cover with foil.
9) After preheating, place the covered
baking dish on the rack.
10) When the oven beeps, remove the foil.
11) Continue baking until cooking is
complete.
13 x 9 inch
baking dish
3
en-us_main.book.book Page 70 Friday, August 14, 2026 1:47 PM
71OPERATION
ENGLISH
Homemade
Mac &
Cheese
1 casserole
(serves 6)
Room
Ingredients
Bread Crumb Topping
1 cup panko bread crumbs
2 tbsp unsalted butter, melted
Macaroni
1 pound elbow macaroni pasta
Cheese Sauce
4 tbsp unsalted butter
1/3 cup all-purpose flour
1 tsp ground mustard
1 tsp ground paprika
5 cups half and half
4 oz processed cheese
12 oz sharp white cheddar cheese, shredded
4 oz smoked gouda cheese, shredded
1 tsp Sriracha sauce
Instructions
Serves 6
Bread Crumb Topping
In a bowl, combine the bread crumbs and the
melted butter; set aside.
Macaroni
Cook the pasta in a large pot of boiling, salted
water until al dente, according to the package
recommendations. Drain and set aside.
13 x 9 inch
baking dish
2
Casseroles
Menu
Amount
Food
Temp.
Remark Instructions
Cookware
Rack
Position
en-us_main.book.book Page 71 Friday, August 14, 2026 1:47 PM
72 OPERATION
Homemade
Mac &
Cheese
1 casserole
(serves 6)
Room
Cheese Sauce
1) In the same pot the pasta was cooked in,
melt the 4 tbsp butter over medium heat.
Add the flour and stir to combine with
the butter.
2) Stir the ground mustard and paprika into
the butter-flour mixture. Cook this
mixture for 2 minutes, stirring
frequently.
3) Whisk in the half and half slowly to avoid
lumps.
4) Bring the half and half and butter-flour
mixture to a simmer, stirring
occasionally all the way to the bottom of
the pot.
5) Lower the heat and stir frequently for
five minutes until the sauce has
thickened.
6) Add the processed cheese and stir to
melt it into the sauce.
7) Off the heat, add the cheddar and gouda
cheeses, a little bit at a time, until all the
cheeses are melted into the sauce.
8) Stir in the Sriracha sauce.
9) Add the drained pasta and stir to
combine with the cheese sauce.
10) Transfer the pasta and cheese sauce
mixture to a casserole dish.
11) Top evenly with the bread crumb
mixture.
12) After preheating, place the baking dish in
the oven.
13 x 9 inch
baking dish
2
Casseroles
Menu
Amount
Food
Temp.
Remark Instructions
Cookware
Rack
Position
en-us_main.book.book Page 72 Friday, August 14, 2026 1:47 PM
73OPERATION
ENGLISH
Gratin
Potatoes
1 casserole
(Serves 6~8)
Room
When the
oven
beeps,
remove
the cover
on the
food.
Ingredients
1 tbsp unsalted butter, room temperature
1 garlic clove, smashed
2 1/2 pounds Yukon Gold potatoes or 4-5 russet
potatoes, washed
2 1/2 cups heavy cream
4 oz Gruyere or Parmesan cheese, grated
kosher salt and ground black pepper to taste
Instructions
1) Generously butter the casserole dish.
2) Rub the smashed garlic clove all over the
buttered casserole dish.
3) Cut the potatoes into 1/8 inch thick slices
using a knife or a mandolin.
4) Build the dauphinoise by placing a
portion of the heavy cream onto the
bottom of the casserole dish.
5) Follow this with some of the sliced
potatoes, the cheese, and salt and
pepper.
6) Add more of the heavy cream and repeat
with the potatoes, cheese, and salt and
pepper.
7) Continue to build and layer the potatoes
to fill the casserole dish.
8) Place the baking dish on the rack for the
image recognition.
9) Remove the baking dish while
preheating the oven and cover the top
layer of potatoes with parchment paper.
Press down on the paper so it touches
the potatoes.
10) After preheating, place the covered
baking dish directly on the rack.
11) When the oven beeps, remove the
parchment paper.
13 x 9 inch
baking dish
2
Casseroles
Menu
Amount
Food
Temp.
Remark Instructions
Cookware
Rack
Position
en-us_main.book.book Page 73 Friday, August 14, 2026 1:47 PM
74 OPERATION
Pizza
Menu
Amount
Food
Temp.
Instructions
Cookware
Rack
Position
Frozen Thin
Crust
1 pizza (about
18.5 oz)
Frozen
1) Remove the pizza from the packaging.
2) Place the pizza directly on the rack for the image
recognition.
3) Remove the pizza while preheating the oven.
4) After preheating, place the pizza directly on the rack.
Directly On
Rack
4
Frozen
Rising Crust
1 pizza (about
29 oz)
Frozen
1) Remove the pizza from the packaging.
2) Place the pizza directly on the rack for the image
recognition.
3) Remove the pizza while preheating the oven.
4) After preheating, place the pizza directly on the rack.
Directly On
Rack
4
Homemade
Pizza
14-inch pizza
(serves 6~8)
Room
Ingredients
Dough
8 oz all-purpose flour
1/2 tbsp kosher salt
1/2 cup warm water, about 115
8
1/8 tsp sugar
1/2 tbsp active dry yeast
1 tbsp olive oil + more for brushing
Homemade Sauce
1 28-oz can of whole peeled tomatoes (preferably San
Marzano)
1 6-oz can of tomato paste, 1 tbsp fresh basil, roughly
chopped
2 tbsp olive oil, or olive oil blend, 1 tbsp kosher salt
1/2 tsp black pepper, 1 tbsp granulated garlic, 1 tbsp sugar
※ Store bought sauce can be used instead for simplicity.
Pizza
1/2 to 3/4 cup sauce, 8 oz shredded mozzarella cheese
On Pizza pan 4
en-us_main.book.book Page 74 Friday, August 14, 2026 1:47 PM
75OPERATION
ENGLISH
Homemade
Pizza
14-inch pizza
(serves 6~8)
Room
Instructions
Dough
1) In the bowl of an electric stand mixer, whisk together
the flour and salt.
2) In a separate bowl, add the water, sugar, yeast, and
olive oil.
3) Whisk together the yeast mixture. Set it aside until it
foams and bubbles, about 3-5 minutes.
4) Place the mixer bowl onto the mixer stand and attach
the dough hook.
5) Add the yeast mixture to the flour and begin mixing
the dough on medium speed for 8 1/2 minutes. If the
dough is not completely combined, mix for another
minute. If the dough is sticking to the bowl, add
another 1/4 cup of flour and mix for another minute.
If the dough is too dry, add another 1/4 cup of water
and mix for another minute.
6) Pick the dough up and begin to form a ball by gently
folding the dough under itself.
7) Place onto a lightly oiled sheet pan.
8) Brush the dough ball with olive oil to keep it moist.
9) Cover with plastic wrap and allow dough to rise until
doubled in size, about an hour or so.
10) Turn the dough ball onto a lightly floured surface.
11) Begin shaping the dough ball by pressing down with
your fingertips into the dough to form a 6-inch-round
circle.
12) Use a small amount of flour as needed to prevent
sticking.
On Pizza pan 4
Pizza
Menu
Amount
Food
Temp.
Instructions
Cookware
Rack
Position
en-us_main.book.book Page 75 Friday, August 14, 2026 1:47 PM
76 OPERATION
Homemade
Pizza
14-inch pizza
(serves 6~8)
Room
Sauce
1) Open the cans of tomatoes and empty them into a
blender.
2) Roughly chop the basil.
3) Add the tomato paste, chopped basil, and spices to
the blender.
4) Blend the ingredients until the sauce is well blended,
about 30 seconds.
Pizza
1) To stretch the dough, place the dough onto a lightly
floured surface and gently press into a circle, flipping
several times and adding a pinch of flour if the dough
is sticky. Once you have a 6- or 8-inch circle, begin
rolling with the rolling pin to gently stretch the
dough, turning it slightly to keep the circle shape.
2) Place your pizza dough onto a lightly floured pizza
peel or nonstick pizza pan. You can cut the dough
with a pizza cutter to form a circle or to make it
smaller.
3) Use a dough docker or fork to make indents in the
dough.
4) These holes prevent bubbles in your pizza crust.
5) Evenly spread the sauce over the entire surface of
the dough, leaving a 1-inch gap around the outer
edge of the dough.
6) Place the cheese on top of the sauce.
7) Leave about a half-inch border from the sauce edge.
The cheese is going to spread and will stay on top of
your pizza this way.
8) Place the pizza pan or peel in the oven for image
recognition.
9) Remove the pizza while preheating.
10) After preheating, place the pizza pan on the rack or
use the peel to transfer the pizza to a pizza stone.
11) After cooking, cool for 5 minutes before slicing.
On Pizza pan 4
Pizza
Menu
Amount
Food
Temp.
Instructions
Cookware
Rack
Position
en-us_main.book.book Page 76 Friday, August 14, 2026 1:47 PM
77OPERATION
ENGLISH
Pastry
Menu
Amount Food Temp.
Instructions
Cookware Rack Position
Refrigerated
Croissants
2~8 EA Refrigerated Prepare the croissants. Roll the croissant triangles
into croissant shapes. Place the croissants on the
ungreased half sheet pan. Place the half sheet pan
in the oven for image recognition. Remove the half
sheet pan while preheating. After preheating, place
the half sheet pan with the croissants back in the
oven.
1/2 Sheet Pan 3
Frozen Dinner
Rolls
1~6 EA Frozen Place the frozen dinner rolls on the half sheet pan.
Place the half sheet pan in the oven for image
recognition. Remove the half sheet pan while
preheating. After preheating, place the half sheet
pan with the frozen dinner rolls back in the oven.
1/2 Sheet Pan 3
Refrigerated
Cinnamon Rolls
1 can(8 rolls) Refrigerated Prepare the Cinnamon Rolls. Place the rolls with
cinnamon side up on an ungreased cake pan. Place
the cake pan in the oven for image recognition.
Remove the cake pan while preheating. After
preheating, place the cake pan with the cinnamon
rolls back in the oven.
9 inch round
cake pan
3
Vegetables
Menu
Amount Food Temp.
Remark Instructions
Cookware Rack Position
Baby Carrots
15~30 oz Refrigerated Ingredients
Kosher salt, ground black pepper, oil to taste
Instructions
1) Wash and peel (if necessary) the baby
carrots.
2) Brush or lightly spray with oil.
3) Add salt and pepper to taste.
4) Place the baby carrots on the half sheet
pan.
1/2 Sheet
Pan
3
Carrots,
Diced
15~30 oz Refrigerated Ingredients
Kosher salt, ground black pepper, oil to taste
Instructions
1) Peel and cut carrots into 1/2~3/4 in.
cubes.
2) Brush or lightly spray with oil.
3) Add salt and pepper to taste.
4) Place the carrots on the half sheet pan.
1/2 Sheet
Pan
3
en-us_main.book.book Page 77 Friday, August 14, 2026 1:47 PM
78 OPERATION
White
Mushrooms
5~20 oz Refrigerated Ingredients
Kosher salt, ground black pepper, oil to taste
Instructions
1) If desired, cut mushrooms into halves.
2) Brush or lightly spray with oil.
3) Add salt and pepper to taste.
4) Place the mushrooms on the half sheet
pan.
1/2 Sheet
Pan
3
Asparagus
5~20 oz Refrigerated Ingredients
Kosher salt, ground black pepper, oil to taste
Instructions
1) Trim the heartier, woody ends of the
asparagus and discard.
2) Brush or lightly spray with oil.
3) Add salt and pepper to taste.
4) Place the asparagus on the half sheet
pan.
1/2 Sheet
Pan
3
Broccoli
15~30 oz Refrigerated Ingredients
Kosher salt, ground black pepper, oil to taste
Instructions
1) Cut the broccoli into bite-size florets.
2) Brush or lightly spray with oil.
3) Add salt and pepper to taste.
4) Place the broccoli on the half sheet pan.
1/2 Sheet
Pan
3
Cauliflower
15~30 oz Refrigerated Ingredients
Kosher salt, ground black pepper, oil to taste
Instructions
1) Cut the cauliflower into bite-size florets.
2) Brush or lightly spray with oil.
3) Add salt and pepper to taste.
4) Place the cauliflower on the half sheet
pan.
1/2 Sheet
Pan
3
Brussels
Sprouts
15~30 oz Refrigerated Ingredients
Kosher salt, ground black pepper, oil to taste
Instructions
1) Cut brussels sprouts in half, or in
quarters if they are large.
2) Brush or lightly spray with oil.
3) Add salt and pepper to taste.
4) Place the brussels sprouts on the half
sheet pan.
1/2 Sheet
Pan
3
Vegetables
Menu
Amount Food Temp.
Remark Instructions
Cookware Rack Position
en-us_main.book.book Page 78 Friday, August 14, 2026 1:47 PM
79OPERATION
ENGLISH
Beets, Diced
15~30 oz Refrigerated Ingredients
Kosher salt, ground black pepper, oil to taste
Instructions
1) Peel and cut beets into 1/2~3/4 in.
cubes
2) Brush or lightly spray with oil.
3) Add salt and pepper to taste.
4) Place the diced beets on the half sheet
pan.
1/2 Sheet
Pan
3
Sweet
Potatoes,
Diced
15~30 oz Room Ingredients
Kosher salt, ground black pepper, oil to taste
Instructions
1) Peel and cut sweet potatoes into 1/2~3/
4 in. cubes.
2) Brush or lightly spray with oil.
3) Add salt and pepper to taste.
4) Place the diced sweet potatoes on the
half sheet pan.
1/2 Sheet
Pan
3
Sweet
Potato,
Whole
1~4 EA (8 oz
each)
Room
1) Wash and prick the skin all over the
sweet potatoes.
2) Place the sweet potatoes directly on the
rack.
Directly On
Rack
3
Cherry
Tomatoes
15~30 oz Refrigerated Ingredients
Kosher salt, ground black pepper, oil to taste
Instructions
1) Wash the cherry tomatoes.
2) Remove stems, if present.
3) Brush or lightly spray with oil.
4) Add salt and pepper to taste.
5) Place the cherry tomatoes on the half
sheet pan.
1/2 Sheet
Pan
3
Corn on the
Cob
1 sheet
(8~12 oz
each)
Refrigerated
When oven
beeps,
turn food
over.
Ingredients
Kosher salt, ground black pepper, to taste, 1/2
tbsp. of oil per (1/2) piece
Instructions
1) Remove husks and silk from corn cobs
and cut cobs in half.
2) Brush or lightly spray with oil.
3) Add salt and pepper to taste.
4) Place the corn on a half sheet pan.
5) When the oven beeps, turn the food
over.
1/2 Sheet
Pan
3
Vegetables
Menu
Amount Food Temp.
Remark Instructions
Cookware Rack Position
en-us_main.book.book Page 79 Friday, August 14, 2026 1:47 PM
80 OPERATION
Green Beans
10~20 oz Refrigerated Ingredients
Kosher salt, ground black pepper, oil to taste
Instructions
1) Wash the green beans.
2) Brush or lightly spray with oil.
3) Add salt and pepper to taste.
4) Place the green beans on a half sheet
pan.
1/2 Sheet
Pan
3
Potatoes
Menu
Amount Food Temp.
Instructions
Cookware
Rack
Position
Home Fries
15~30 oz Room Ingredients
For 15 oz of Yukon Gold potatoes
2 tbsp olive oil
1 tsp kosher salt
1/2 tsp ground black pepper
1 tsp smoked paprika
1/2 tsp garlic powder
2 tbsp chopped parsley, for garnish
Instructions
1) Dice potatoes into 1" cubes and place on half sheet
pan.
2) Season the potatoes with salt, spices, and olive oil. Mix
thoroughly.
3) Roast for 20 min depending on the size, stirring
halfway through the cooking process.
4) Garnish with fresh herbs for color and serve
immediately.
1/2 Sheet Pan 3
Potato
Wedges
15~30 oz Room Ingredients
Kosher salt, ground black pepper, oil to taste
Instructions
1) Wash and cut the potatoes into wedges.
2) Brush or lightly spray with oil.
3) Add salt and pepper to taste.
4) Place the potatoes on a half sheet pan.
1/2 Sheet Pan 3
Vegetables
Menu
Amount Food Temp.
Remark Instructions
Cookware Rack Position
en-us_main.book.book Page 80 Friday, August 14, 2026 1:47 PM
81OPERATION
ENGLISH
Smashed
Potatoes
15~30 oz Room Ingredients
Kosher salt, ground black pepper, oil to taste
Instructions
1) Cook russet potatoes in boiling water for 15 minutes
and then strain and chill.
2) Combine all spices in a small mixing bowl.
3) Smash the potatoes using the side of a knife to flatten.
4) Place smashed potatoes on a half sheet pan.
5) Add olive oil and seasoning.
1/2 Sheet Pan 3
Dessert
Menu
Amount
Food
Temp.
Instructions
Cookware
Rack
Position
Apple Pie
9" pie
(serves 6)
Room
Ingredients
Pie Crust
2 1/2 cups pastry flour, 1 tsp salt, 1 tsp sugar
2 sticks unsalted butter, cut into small pieces and well chilled
4-6 tbsp ice water, as needed
Apples
8 tart apples, like Granny Smith
2 tbsp lemon juice, 1/4 cup sugar, 1/2 tsp ground cinnamon
1/2 tsp kosher salt, 1 tbsp unsalted butter, cut into small
pieces
Instructions
Pie Crust
1) Use a food processor with a blade attachment to
combine the pastry flour, salt and sugar.
2) Add the chilled butter pieces and pulse until it
resembles coarse meal.
3) Add ice cold water a tablespoon at a time and mix
until the dough just comes together.
4) Turn the dough onto a lightly floured counter and
bring the dough together.
5) Divide the dough into 2 equal portions and flatten
each into a disk. Wrap each in plastic wrap and
refrigerate for an hour.
Pie pan
directly on
rack and catch
pan on rack
below
3
Potatoes
Menu
Amount Food Temp.
Instructions
Cookware
Rack
Position
en-us_main.book.book Page 81 Friday, August 14, 2026 1:47 PM
82 OPERATION
Apple Pie
9" pie
(serves 6)
Room
Apples
1) Peel, core, quarter and thinly slice the apples and
place them in a large bowl.
2) Toss the apples with the lemon juice, followed by the
sugar, cinnamon, and kosher salt.
To Assemble the Pie
1) On a well floured counter, roll each pie dough out to
12 inches in diameter. Use one rolled out pie dough
to line a deep pie pan.
2) Add the apples to the pie pan and dot with 1 tbsp
butter.
3) Use the other pie dough to cover the filling. Tuck the
top crust under the bottom crust all around. Pinch
together to close.
4) Cut a few slits in the top crust to allow steam to
escape. In a small bowl, combine 1 egg and 1 tbsp
milk. Brush the egg wash over the top crust.
5) Place the pie in the oven for image recognition.
6) Remove the pie while preheating the oven.
7) After preheating, place the pie pan directly on the
rack and a foil-lined catch pan on the rack below.
8) Cool on a rack for 1 hour before serving.
Pie pan
directly on
rack and catch
pan on rack
below
3
Dessert
Menu
Amount
Food
Temp.
Instructions
Cookware
Rack
Position
en-us_main.book.book Page 82 Friday, August 14, 2026 1:47 PM
83OPERATION
ENGLISH
Brownies
1 Pan (serves
6)
Room
Ingredients
1/2 stick unsalted butter, 6 oz semisweet chocolate, chopped
1/2 cup dark brown sugar, 1 cup sugar, 3 large eggs
1/4 cup cocoa powder, 1/2 tsp kosher salt
1/2 cup + 2 tbsp all-purpose flour
Instructions
Serves 6
1) Line an 8"x8" baking pan with parchment paper.
2) In a microwave-safe bowl, combine the butter and
chocolate.
3) Microwave in short intervals and stir after each
interval until melted and smooth.
4) Add the sugars and whisk until combined.
5) Add the eggs one at a time, mixing until
incorporated.
6) Sift the cocoa powder, salt and flour into the bowl
and mix until combined.
7) Pour the batter into the 8"x8" baking pan.
8) Place the baking pan in the oven for image
recognition.
9) Remove the pan while preheating the oven.
10) After the oven preheats, place the pan back in the
oven.
11) After cooking, let the brownies cool for 15 minutes in
the pan before slicing.
8x8 inch pan 3
Dessert
Menu
Amount
Food
Temp.
Instructions
Cookware
Rack
Position
en-us_main.book.book Page 83 Friday, August 14, 2026 1:47 PM
84 OPERATION
Scones
1 sheet of 24
scones
Room
Ingredients
2 1/4 cups pastry flour, 2 tsp sugar, 2 tbsp + 1 tsp baking
powder
4 1/2 tsp kosher salt, 3 sticks unsalted butter, chilled and cut
into small pieces 6 cups all-purpose flour, 3 cups buttermilk
Instructions
Makes 24 scones
1) Use a food processor with the blade attachment to
combine the pastry flour, sugar, baking powder and
salt.
2) Add the chilled butter pieces and pulse until the
mixture resembles coarse meal.
3) In a large bowl, combine the all-purpose flour with
the mixture from the food processor.
4) Add the buttermilk and mix until the dough comes
together.
5) Turn the dough onto a floured surface and roll out to
1 1/2 in. thick.
6) Cut the dough into the desired shape or use a round
biscuit cutter.
7) Transfer the cut scones to a parchment lined half
sheet pan.
8) Place the half sheet pan in the oven for image
recognition.
9) Remove the half sheet pan while preheating the
oven.
10) After the oven preheats, place the scones back in the
oven to cook.
1/2 Sheet Pan 3
Dessert
Menu
Amount
Food
Temp.
Instructions
Cookware
Rack
Position
en-us_main.book.book Page 84 Friday, August 14, 2026 1:47 PM
85OPERATION
ENGLISH
Sponge Cake
2 cakes Room Ingredients
1 cup cake flour, 6 large eggs, separated
1 cup sugar, 3/4 cup sugar for egg yolks, 1/4 cup sugar for
egg whites
2 tsp vanilla, 1/4 tsp salt
Instructions
1) Grease the bottom and sides of two 9" cake pans
with unsalted butter. Line the bottoms of the cake
pans with parchment paper and butter the paper.
Dust the pans with all-purpose flour.
2) Use an electric mixer with a whisk attachment to
combine the egg yolks with 3/4 cup sugar. Beat on
medium high for 5 minutes until the egg yolk
mixture is thick and pale in color.
3) In a clean bowl, use an electric mixer with a whisk
attachment to beat the egg whites until soft peaks
form. Slowly add 1/4 cup sugar and continue beating
until stiff, glossy peaks form.
4) Fold 1/3 of the yolk mixture at a time into the
whipped whites.
5) Sift the cake flour over the egg mixture and gently
fold it in.
6) Divide the batter equally between the pans.
7) Place the pans in the oven for image recognition.
8) Remove the pans while preheating the oven.
9) After preheating the oven, place the pans in the oven
and bake.
10) Let the cakes cool for 5 minutes before inverting
onto a cooling rack.
9 in. cake pans 3
Dessert
Menu
Amount
Food
Temp.
Instructions
Cookware
Rack
Position
en-us_main.book.book Page 85 Friday, August 14, 2026 1:47 PM
86 OPERATION
Cheesecake
1 cake
(serves 6~8)
Room
Ingredients
Cookie Crust
1 stick unsalted butter, room temperature
2 tbsp granulated sugar, 1 cup brown sugar, 1 egg
1 cup all-purpose flour, 1/4 tsp baking soda
1/8 tsp baking powder, 1/4 tsp salt
Cheesecake Batter
2 lb. cream cheese, room temperature, 1 1/2 cups
granulated sugar
2 eggs, 2 egg yolks, 5 tbsp heavy cream, 1/2 tsp vanilla
extract
Instructions
Cookie Crust
1) Preheat the oven to 350 8 in the Bake mode.
2) Pan spray and line the 9" springform cake pan with
parchment paper.
3) Place the butter in the bowl of a stand mixer and
begin to soften it with the paddle attachment.
4) Add the sugar and brown sugar and cream them
with the butter until well blended, 3 to 5 minutes.
5) Add the egg to the mixture and combine.
6) Add the flour, baking soda, baking powder and salt
to the mixer bowl and mix gently until just combined.
7) Remove the bowl from the mixer and empty it into
the prepared pan. Gently press the cookie dough
down to line the entire bottom of the springform
pan.
8) Place the pan in the oven and bake for 20 minutes.
9) Allow the cookie to cool while preparing the
cheesecake batter.
9" springform
pan in water
bath
3
Dessert
Menu
Amount
Food
Temp.
Instructions
Cookware
Rack
Position
en-us_main.book.book Page 86 Friday, August 14, 2026 1:47 PM
87OPERATION
ENGLISH
Cheesecake
1 cake
(serves 6~8)
Room
Cheesecake Batter
1) Place the cream cheese in the bowl of a stand mixer
and mix to soften it.
2) Add the sugar and mix until well combined, about 5
minutes.
3) Add the eggs and egg yolks slowly to ensure they are
well combined.
4) Add the heavy cream and vanilla extract and mix
until just combined.
5) Pour the batter on top of the cooled cookie crust in
the springform pan.
6) Wrap the bottom of the springform pan with foil,
carrying it up the sides.
7) Place the foil-wrapped springform pan into a larger
casserole dish.
8) Add just enough water to the casserole dish to reach
up the sides of the pan but not above the foil.
9) Place the cheesecake in the oven for image
recognition.
10) Remove the cheesecake while the oven is preheating.
11) After preheating, place the casserole dish with the
cheesecake in the oven and bake.
12) Allow the cake to cool in the water bath for 1 hour.
After an hour, remove it from the water bath and
place it in the refrigerator overnight in the
springform pan.
9" springform
pan in water
bath
3
Dessert
Menu
Amount
Food
Temp.
Instructions
Cookware
Rack
Position
en-us_main.book.book Page 87 Friday, August 14, 2026 1:47 PM
88 OPERATION
Chocolate
Chip Cookies
36 cookies (12
to a sheet)
Room
Ingredients
(Makes 3 dozen cookies)
2 1/2 sticks salted butter, 1 1/4 cups brown sugar, 1 cup + 2
tbsp sugar
2 large eggs, 1 tsp vanilla extract, 3 2/3 cups all-purpose
flour
1 1/4 tsp baking powder, 1 1/4 tsp baking soda
1 1/4 tsp fine sea salt, 20 oz chocolate chips
Instructions
Cooked 12 to a sheet pan.
1) Cream the butter with the sugars in an electric mixer
until light, about 5 minutes. Scrape down the bowl
and paddle as needed.
2) Add the eggs one at a time, mixing well after each
addition.
3) Scrape down the bowl and paddle and add the
vanilla.
4) Sift the flour, powder, baking soda and salt together.
5) Add the dry mixture to the wet mixture.
6) Scrape down the bowl and paddle.
7) Fold in the chocolate chips.
8) Line half sheet pans with parchment paper.
9) Scoop the cookie dough onto the pans in a 3x4
pattern.
10) Place a half sheet pan in the oven for image
recognition.
11) Remove the half sheet pan while preheating the
oven.
12) After preheating, place the half sheet pan in the
oven. Bake the cookies one half sheet pan at a time.
1/2 Sheet Pan 3
Dessert
Menu
Amount
Food
Temp.
Instructions
Cookware
Rack
Position
en-us_main.book.book Page 88 Friday, August 14, 2026 1:47 PM
89OPERATION
ENGLISH
Baguette
2 demi
baguettes
Room
Ingredients
0.25 oz package active dry yeast, about 3/4 tbsp of yeast
11 oz water, about 100
8
18 oz bread flour
1 tbsp of salt
Instructions
1) In a small bowl dissolve the yeast in the warm water
using a whisk.
2) Add the yeast and water mixture to the bowl of an
electric mixer.
3) Add the bread flour and salt to the bowl.
4) Use the dough hook to mix the dough on low speed
for 7 minutes.
5) Place the dough into a bowl and let it rise for 30
minutes or until doubled in size.
6) Punch the dough down and let it rise again until
doubled in size.
7) Remove the dough and place it on a work surface.
8) Divide the dough into 2 equal pieces.
9) Shape each piece into a small baguette.
10) Place the baguettes onto a parchment lined half
sheet pan.
11) Cover the baguettes with plastic wrap and allow to
double in size.
12) After the baguettes have doubled in size, use a
serrated knife and slash each baguette with 3 four
inch long, half inch deep, diagonal slashes.
13) Place the baguettes on the half sheet pan.
14) Place the half sheet pan in the oven for image
recognition.
15) Remove the half sheet pan while preheating the
oven.
16) After preheating, place the half sheet pan back in the
oven.
1/2 Sheet Pan 3
Dessert
Menu
Amount
Food
Temp.
Instructions
Cookware
Rack
Position
en-us_main.book.book Page 89 Friday, August 14, 2026 1:47 PM
90 OPERATION
Fruit Tart
1 tart Room Ingredients
Tart Dough
2 cups all-purpose flour, 1 1/2 tbsp sugar, 1 tbsp brown
sugar
1 1/2 sticks unsalted butter, cold and cut into small pieces
1 whole egg, 1 egg yolk, 2 tbsp ice water
Pastry Cream
2/3 cup sugar, 1/4 cup cornstarch
pinch of kosher salt, 2 large eggs, 2 cups milk
2 tbsp unsalted butter, cut into small pieces, 2 tsp vanilla
Instructions
Tart Dough
1) Place the flour and sugars into the work bowl of a
food processor and pulse to combine.
2) Add the cold pieces of butter and pulse until the
mixture resembles coarse meal.
3) Add the whole egg, egg yolk and the ice water and
pulse until the dough just forms a ball.
4) Remove from the work bowl and form into a disc.
Wrap the dough in plastic wrap and place it in the
refrigerator while the filling is being made.
Pastry Cream
1) In a saucepan, combine the sugar and milk. Gently
warm it to a lazy simmer.
2) In a bowl, combine the eggs, cornstarch, salt and
vanilla. Add the warm milk mixture to the egg
mixture in small amounts to temper the eggs and
avoid cooking them.
3) Return everything back to the saucepan and cook the
custard until it thickens and begins to bubble.
4) Strain through a fine mesh strainer and stir in the
butter. Cool the pastry cream to room temperature
before using.
Tart pan 3
Dessert
Menu
Amount
Food
Temp.
Instructions
Cookware
Rack
Position
en-us_main.book.book Page 90 Friday, August 14, 2026 1:47 PM
91OPERATION
ENGLISH
Fruit Tart
1 tart Room To Assemble the Tart
1) Remove the tart dough from the refrigerator.
2) Place the dough on a lightly floured work surface.
3) Sprinkle a little more flour on the dough and roll the
dough out to 1/8" thick.
4) Gently spray the tart pan with pan spray and line the
tart pan with the dough.
5) Place the tart pan in the oven for image recognition.
6) Remove the tart pan while preheating the oven.
7) After preheating the oven, place the tart pan back in
the oven.
8) After cooking, allow the tart shell to cool completely
before adding the pastry cream and decorating with
fresh fruit.
Tart pan 3
Muffins
1 Pan Room Ingredients
2 cups all-purpose flour, 1/2 cup sugar, 2 tsp baking powder
1/2 tsp kosher salt, 3/4 cup milk
1/2 cup unsalted butter, melted and cooled, 2 large eggs
Instructions
1) Line a muffin pan with paper liners and set aside.
2) In a small bowl, whisk the flour, sugar, baking
powder, and salt together.
3) In a medium bowl, whisk the milk, butter, and eggs
together until well combined.
4) Add the dry ingredients to the wet ingredients and
stir with a silicone spatula just until combined.
5) Divide the batter evenly between the muffin cups.
6) Place the muffin pan in the oven for image
recognition.
7) Remove the muffin pan while preheating the oven.
8) After preheating is done, place the muffin pan in the
oven.
Muffin pan 3
Toast
Menu
Amount Food Temp.
Remark Instructions
Cookware
Rack
Position
Bagels
1~4 EA Room
Slice the bagels in half along the narrow edge.
Place the bagels with the inner side up on the
grid on the broiler pan.
Grid on
broiler pan
5
Dessert
Menu
Amount
Food
Temp.
Instructions
Cookware
Rack
Position
en-us_main.book.book Page 91 Friday, August 14, 2026 1:47 PM
92 OPERATION
Bread
Slices
1~4 EA Room
When oven
beeps, turn
food over
Place bread slices on the grid on the broiler
pan.
When the oven beeps, flip the bread over.
Grid on
broiler pan
5
English
Muffins
1~4 EA Room Slice the English muffins in half along the
narrow edge.
Place the English muffins with the inner side up
on the grid on the broiler pan.
Grid on
broiler pan
5
Frozen Products
Menu
Amount Food Temp.
Instructions
Cookware
Rack
Position
Chicken
Nuggets
10~40 EA (0.6
oz each)
Frozen
Place frozen chicken nuggets on the LG air fry tray with a
catch pan below.
Air Fry Tray 4
Chicken
Tenders
6~24 EA (1 oz
each)
Frozen
Place frozen chicken tenders on the LG air fry tray with a
catch pan below.
Air Fry Tray 4
Mozzarella
Sticks
6~24 EA (1 oz
each)
Frozen
Place frozen mozzarella sticks on the LG air fry tray with a
catch pan below.
Air Fry Tray 4
Mac & Cheese
1 casserole
(40oz)
Frozen
1) Remove casserole from packaging.
2) Place the casserole on the half sheet pan in the
oven for image recognition.
3) Remove the casserole and half sheet pan while
preheating the oven.
4) After preheating, place the half sheet pan with the
frozen mac and cheese back in the oven.
1/2 Sheet Pan 3
Burritos
1~8 EA (5 oz
each)
Frozen
1) Remove burritos from packaging.
2) Place the burritos on the half sheet pan in the
oven for image recognition.
3) Remove the burritos and the half sheet pan while
preheating the oven.
4) After preheating, place half sheet pan with
burritos back in the oven.
1/2 Sheet Pan 3
Biscuits
5~20 EA (2 oz
each)
Frozen
Remove the package and place the frozen biscuits on the
LG air fry tray with a catch pan below.
Air Fry Tray 4
Toast
Menu
Amount Food Temp.
Remark Instructions
Cookware
Rack
Position
en-us_main.book.book Page 92 Friday, August 14, 2026 1:47 PM
93OPERATION
ENGLISH
Tater Tots
1~4 servings Frozen Place the frozen tater tots on the LG air fry tray with a
catch pan below.
1 serving is about 12 oz.
Air Fry Tray 3
French Fries
Straight
1~4 servings Frozen Place frozen french fries on the LG air fry tray with a catch
pan below.
1 serving is about 5 oz.
Air Fry Tray 4
French Fries
Crinkled
1~4 servings Frozen Place frozen french fries on the LG air fry tray with a catch
pan below.
1 serving is about 8 oz.
Air Fry Tray 4
Hash Browns
Patties
4~16 EA (2.3 oz
each)
Frozen
Place frozen hash browns on the LG air fry tray with a
catch pan below.
Air Fry Tray 4
Sweet Potato
Fries
1~4 servings Frozen Place frozen sweet potato fries on the LG air fry tray with
a catch pan below.
1 serving is about 6 oz.
Air Fry Tray 4
Onion Rings
1~4 servings Frozen Place frozen onion rings on the LG air fry tray with a catch
pan below.
1 serving is about 5 oz.
Air Fry Tray 4
Breaded Fish
Fillets
4~16 EA (2 oz
each)
Frozen
Place frozen breaded fish fillets on the LG air fry tray with
a catch pan below.
Air Fry Tray 4
Breakfast
Sausages
6~24 EA (1 oz
each)
Frozen
Place frozen breakfast sausages on the LG air fry tray
with a catch pan below.
Air Fry Tray 4
Corn Dogs
2~8 EA (2.75 oz
each)
Frozen
1) Remove corn dogs from packaging.
2) Place the corn dogs on the half sheet pan in the
oven for image recognition.
3) Remove the corn dogs on the half sheet pan while
preheating the oven.
4) Afterpreheating, place half sheet pan with corn
dogs back in the oven.
1/2 Sheet Pan 4
Egg Rolls
2~4 EA (2.7 oz
each)
Frozen
1) Remove egg rolls from packaging.
2) Place the egg rolls on the half sheet pan in the
oven for image recognition.
3) Remove the egg rolls on the half sheet pan while
preheating the oven.
4) After preheating, place half sheet pan with egg
rolls back in the oven.
5) When the oven beeps, flip the egg rolls over.
1/2 Sheet Pan 3
Frozen Products
Menu
Amount Food Temp.
Instructions
Cookware
Rack
Position
en-us_main.book.book Page 93 Friday, August 14, 2026 1:47 PM
94 OPERATION
CAUTION
• Take care when opening the oven door during or after steam cooking. Hot steam can cause scalding.
• After any steam cooking cycle, the drying function will run automatically. It is normal to hear the steam
pump running during the drying function.
Meatballs
6~24 EA (0.5 oz
each)
Frozen
1) Remove meatballs from packaging.
2) Place the meatballs on the halfsheet pan in the
oven for image recognition.
3) Remove the meatballs on the half sheet pan while
preheating the oven.
4) After preheating, place half sheetpan with
meatballs back in the oven.
5) When the oven beeps, flip the meatballs over.
1/2 Sheet Pan 3
Pretzels
2~6 EA (2.2 oz
each)
Frozen
1) Remove pretzels from packaging.
2) Place the pretzels on the half sheet pan in the
oven for imagerecognition.
3) Remove the pretzels on the half sheet pan while
preheating the oven.
4) After preheating, place half sheet pan with
pretzels back in the oven.
1/2 Sheet Pan 3
Frozen Products
Menu
Amount Food Temp.
Instructions
Cookware
Rack
Position
en-us_main.book.book Page 94 Friday, August 14, 2026 1:47 PM
95SMART FUNCTIONS
ENGLISH
SMART FUNCTIONS
LG ThinQ Application
This feature is only available on models with Wi-Fi.
The LG ThinQ application allows you to
communicate with the appliance using a
smartphone.
LG ThinQ Application Features
• Product Upgrades
- On models with the LG UP Home Appliance
feature, experience new features by
upgrading the product through the LG ThinQ
app.
• Scan to Cook
- Scan the barcode on a ready-made meal using
the LG ThinQ application and send the
recommended or customized cooking
instructions straight to your oven. Remote
Start must be activated on the oven to use
Scan to Cook.
• Monitoring
- This function helps you check the current
status, remaining time, cook settings and end
time in one place.
• Product Notifications
- Turn on the Push Alerts to receive appliance
status notifications. The notifications are
triggered even if the LG ThinQ application is
not open.
• Timer
- You can set the timer from the application.
• Settings
- Allows you to set various options on the oven
and in the application.
• Smart Diagnosis
TM
- This function provides useful information for
diagnosing and solving issues with the
appliance based on the pattern of use.
• Firmware Update
- Keep the appliance updated.
NOTE
• In the following cases, you must update the
network information for each appliance in the
LG ThinQ application under Device Cards
~
Settings
~ Change Network.
- wireless router is changed
- wireless router password is changed
- Internet service provider is changed
• This information is current at the time of
publication. The application is subject to change
for product improvement purposes without
notice to users.
• Scan to Cook cannot be used while the timer is
running. Cancel the timer operation to use Scan
to Cook.
Installing LG ThinQ Application and
Connecting an LG Appliance
Models with QR Code
Scan the QR code attached to the product using
the camera or a QR code reader application on
your smartphone.
Models without QR Code
1 Search for and install the LG ThinQ
application from the Google Play Store or
Apple App Store on a smartphone.
2 Run the LG ThinQ application and sign in with
your existing account or create an LG account
to sign in.
3 Touch the add (~ ) button on the LG ThinQ
application to connect your LG appliance.
Follow the instructions in the application to
complete the process.
NOTE
• To verify the Wi-Fi connection, check that the Wi-
Fi indicator on the control panel is lit.
• The appliance supports 2.4 GHz Wi-Fi networks
only. To check your network frequency, contact
your Internet service provider or refer to your
wireless router manual.
en-us_main.book.book Page 95 Friday, August 14, 2026 1:47 PM
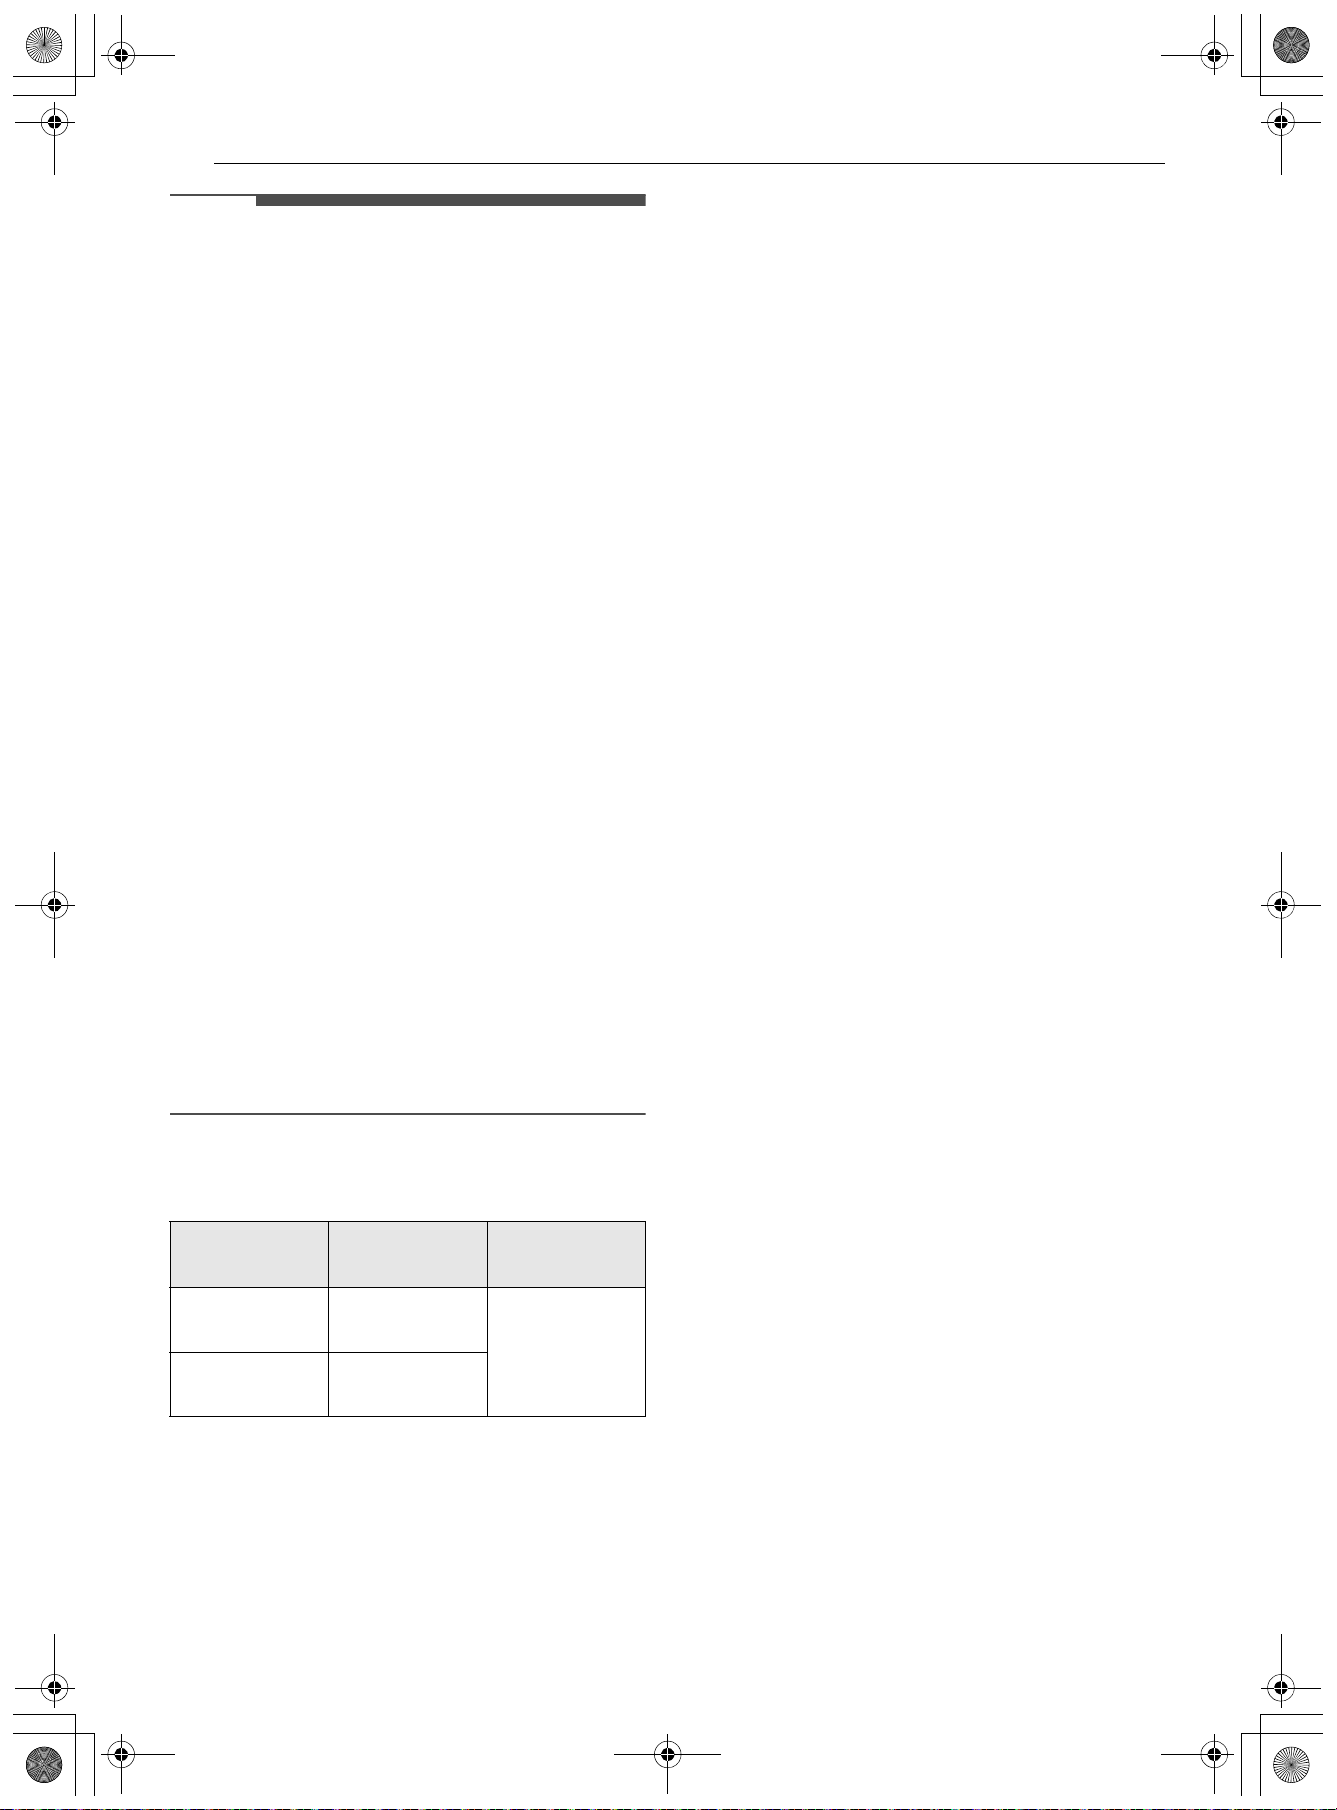
96 SMART FUNCTIONS
NOTE
• LG ThinQ is not responsible for any network
connection problems or any faults, malfunctions,
or errors caused by network connection.
• The surrounding wireless environment can
make the wireless network service run slowly.
• If the distance between the appliance and the
wireless router is too far, the signal becomes
weak. It may take a long time to connect or fail
to install the application.
• If the appliance is having trouble connecting to
the Wi-Fi network, it may be too far from the
router. Purchase a Wi-Fi repeater (range
extender) to improve the Wi-Fi signal strength.
• The network connection may not work properly
depending on the Internet service provider.
• The Wi-Fi may not connect or the connection
may be interrupted because of the home
network environment.
• If the appliance cannot be connected due to
problems with the wireless signal transmission,
unplug the appliance and wait about a minute
before trying again.
• The wireless network name (SSID) should be a
combination of English letters (A-Z) and numbers
(0-9). Do not use special characters.
• Smartphone user interface (UI) may vary
depending on the mobile operating system (OS)
and the manufacturer.
• If the security protocol of the router is set to
WEP, network setup may fail. Change the
security protocol (WPA2 is recommended), and
connect the product again.
RF Module Specifications
† This feature is only available on some models.
FCC Statement
This equipment has been tested and found to
comply with the limits for a Class B digital device,
pursuant to part 15 of the FCC Rules for
transmitter module and part 18 of the FCC Rules
for this equipment. These limits are designed to
provide reasonable protection against harmful
interference in a residential installation. This
equipment generates, uses and can radiate radio
frequency energy and, if not installed and used in
accordance with the instructions, may cause
harmful interference to radio communications.
However, there is no guarantee that interference
will not occur in a particular installation. If this
equipment does cause harmful interference to
radio or television reception, which can be
determined by turning the equipment off and on,
the user is encouraged to try to correct the
interference by one or more of the following
measures:
• Reorient or relocate the receiving antenna.
• Increase the separation between the equipment
and the receiver.
• Connect the equipment into an outlet on a
circuit different from that to which the receiver is
connected.
• Consult the dealer or an experienced radio/TV
technician for help.
This device (transmitter module contained in this
product) complies with part 15 of the FCC Rules.
Operation is subject to the following two
conditions:
(1) This device may not cause harmful interference
and
(2) This device must accept any interference
received, including interference that may cause
undesired operation.
Any changes or modifications in construction of
this device which are not expressly approved by
the party responsible for compliance could void
the user’s authority to operate the equipment.
FCC RF Radiation Exposure
Statement
This equipment complies with FCC radiation
exposure limits set forth for an uncontrolled
environment. This transmitter must not be co-
located or operating in conjunction with any other
antenna or transmitter.
This equipment should be installed and operated
with a minimum distance of 20 cm (7.8 inches)
between the antenna and your body. Users must
follow the specific operating instructions for
satisfying RF exposure compliance.
Type
Frequency
Range
Output
Power (Max.)
Wi-Fi
2400 MHz -
2472 MHz
< 1 W
Bluetooth
†
2400 MHz -
2483.5 MHz
en-us_main.book.book Page 96 Friday, August 14, 2026 1:47 PM
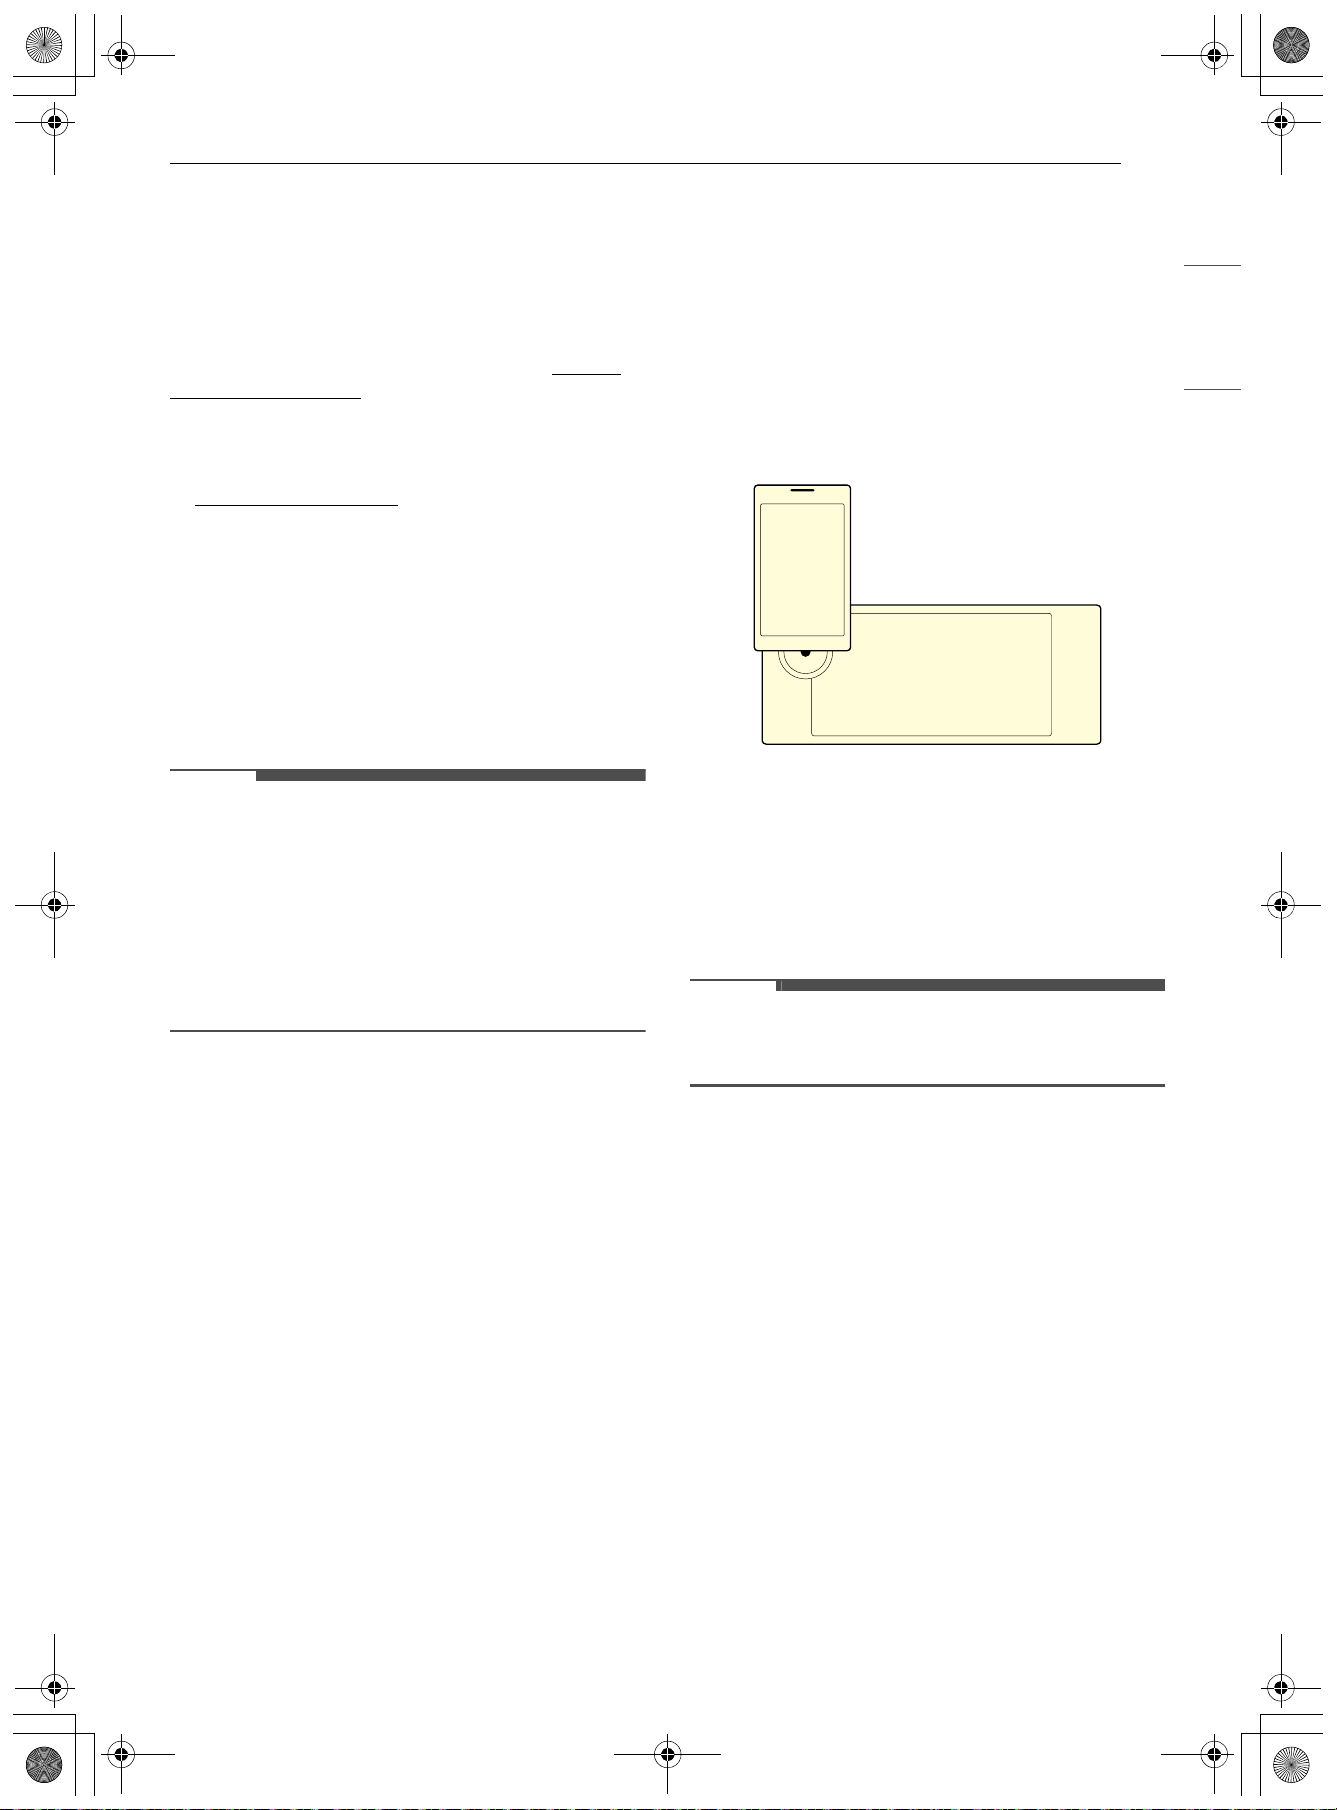
97SMART FUNCTIONS
ENGLISH
Open Source Software Notice
Information
To obtain the source code that is contained in this
product, under GPL, LGPL, MPL, and other open
source licenses that have the obligation to disclose
source code, and to access all referred license
terms and copyright notices, please visit https://
opensource.lge.com.
LG Electronics will also provide open source code
to you for a charge covering the cost of
performing such distribution upon email request
This offer is valid to anyone in receipt of this
information for a period of three years after our
last shipment of this product.
Smart Diagnosis
TM
Feature
Use this feature to help you diagnose and solve
problems with your appliance.
NOTE
• For reasons not attributable to LGE’s negligence,
the service may not operate due to external
factors such as, but not limited to, Wi-Fi
unavailability, Wi-Fi disconnection, local app
store policy, or app unavailability.
• The feature may be subject to change without
prior notice and may have a different form
depending on where you are located.
Using LG ThinQ to Diagnose Issues
If you experience a problem with your Wi-Fi
equipped appliance, it can transmit
troubleshooting data to a smartphone using the
LG ThinQ application.
• Launch the LG ThinQ application and select the
Smart Diagnosis feature in the menu. Follow
the instructions provided in the LG ThinQ
application.
Using Audible Diagnosis to
Diagnose Issues
Follow the instructions below to use the audible
diagnosis method.
• Launch the LG ThinQ application and select the
Smart Diagnosis feature in the menu. Follow
the instructions for audible diagnosis provided
in the LG ThinQ application.
1 Tap the Settings icon at the top right of the
screen, tap Maintenance & Info, tap Smart
Diagnosis and tap Start to start the
diagnostic tone.
- If the display has been locked, you must
deactivate the lock and then reactivate it.
2 Place your phone's mouthpiece near the top
left corner of the screen.
3 Keep the phone in place until the tone
transmission has finished. The display will
count down the time. Once the countdown
is over and the tones have stopped, the
diagnosis will be displayed in the
application.
NOTE
• For best results, do not move the phone while
the tones are being transmitted.
en-us_main.book.book Page 97 Friday, August 14, 2026 1:47 PM
98 MAINTENANCE
MAINTENANCE
Cleaning
CAUTION
• Do not clean this appliance with bleach.
• To prevent burns, wait until the cooktop has
cooled down before touching any of its parts.
• Always wear gloves when cleaning the cooktop.
Interior
Do not use oven cleaners to clean the oven cavity.
Use the product's EasyClean function regularly to
clean light soil. For stubborn soil, use the Self
Clean function (on some models) or clean
manually using the following tips.
• A plastic spatula can be used as a scraper to
scrape off any chunks or debris before and
during oven cleaning.
• Using the rough side of a non-scratch scouring
pad may help to take off burnt-on stains better
than a soft sponge or towel.
• Certain non-scratch scrubbing sponges, such as
those made of melamine foam, available at local
stores, can also help improve cleaning.
CAUTION
• Do not use oven cleaners, harsh chemical
cleaners, bleach, vinegar, steel scouring pads, or
abrasive pads or cleansers to clean the oven, as
they can permanently damage the oven surface.
• Do not clean the gasket.
Exterior
Control Panel
To prevent activating the control panel during
cleaning, disconnect power to the appliance. Clean
up splatters with a damp cloth using a glass
cleaner. Remove heavier soil with warm, soapy
water. Do not use abrasives of any kind.
Front Manifold Panel and Knobs
It is best to clean the manifold panel after each use
of the range. For cleaning, use a damp cloth and
mild soapy water or a 50/50 solution of vinegar
and water. Rinse with clean water and polish dry
with a soft cloth.
CAUTION
• Do not use abrasive cleansers, strong liquid
cleaners, plastic scouring pads or oven cleaners
on the manifold panel. Doing so will damage the
finish.
• Do not try to bend the knobs by pulling them up
or down, and do not hang a towel or other
objects on them. This can damage the gas valve
shaft.
• The control knobs may be removed for easy
cleaning.
• To clean the knobs, make sure that they are in
the OFF position and pull them straight off the
stems.
• To replace the knobs, make sure the knob has
the OFF position centered at the top, and slide
the knob directly onto the stem.
NOTE
• To prevent scratching, do not use abrasive
cleaners on any of these materials.
Painted and Decorative Trim
For general cleaning, use a cloth with hot soapy
water. For more difficult soil and built-up grease,
apply a liquid detergent directly onto the soil.
Leave it on for 30 to 60 minutes. Rinse with a damp
cloth and dry. Do not use abrasive cleaners.
Stainless Steel Surfaces
To avoid scratches, do not use steel wool pads.
1 Place a small amount of stainless steel
appliance cleaner or polish on a damp cloth or
paper towel.
2 Clean a small area, rubbing with the grain of
the stainless steel if applicable.
3 Dry and buff with a clean, dry paper towel or
soft cloth.
4 Repeat as necessary.
en-us_main.book.book Page 98 Friday, August 14, 2026 1:47 PM
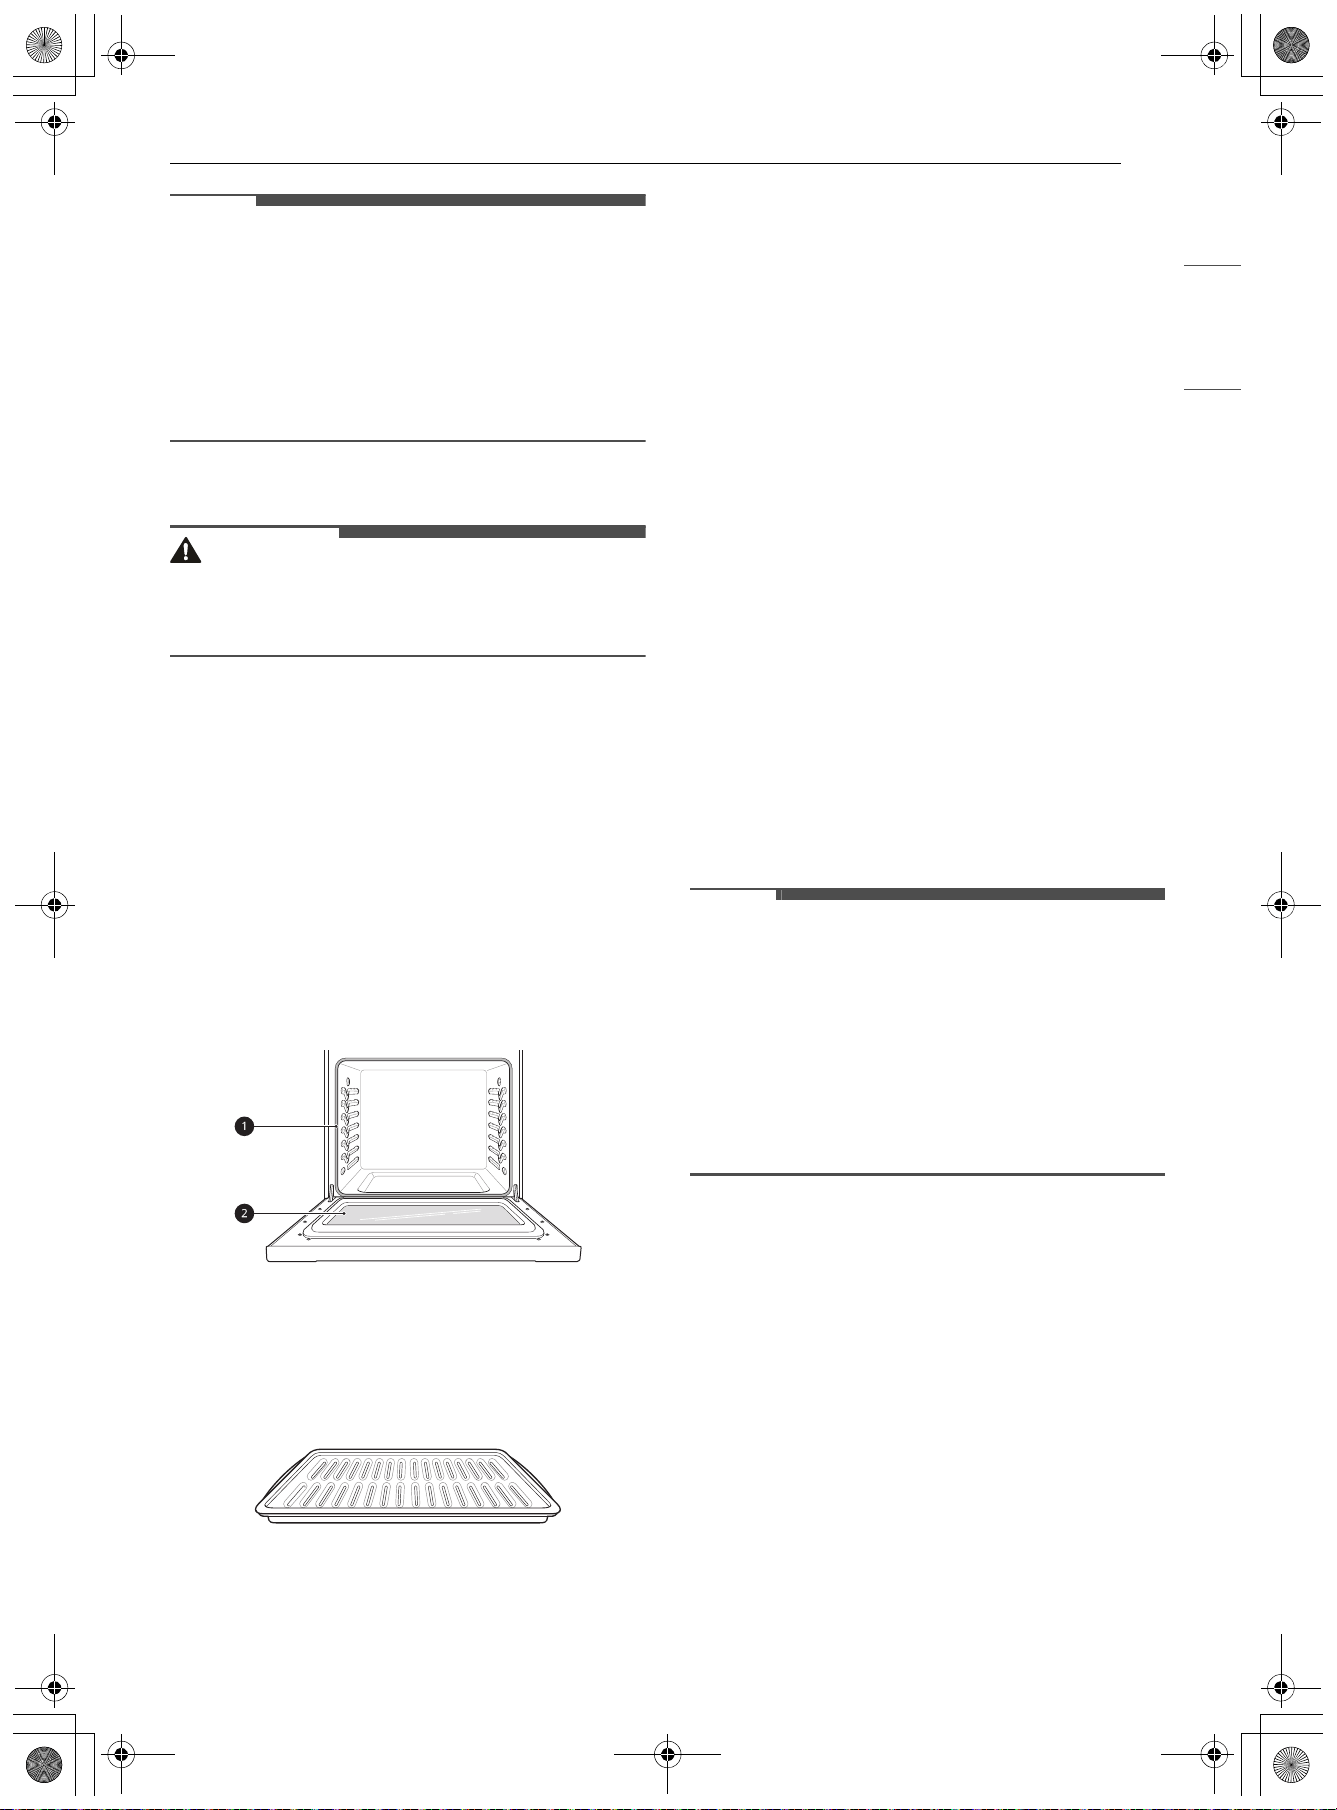
99MAINTENANCE
ENGLISH
NOTE
• To clean the stainless steel surface, use warm
sudsy water or a stainless steel cleaner or polish.
• Always wipe in the direction of the metal surface
finish.
• Stainless steel appliance cleaner or polish can be
purchased online or from most retailers of
appliances or home goods.
Oven Door
CAUTION
• Do not use harsh cleaners or harsh abrasive
cleaning materials on the outside of the oven
door. Doing so can cause damage.
• Use soapy water to thoroughly clean the oven
door. Rinse well. Do not immerse the door in
water.
• You may use a glass cleaner on the outside glass
of the oven door. Do not spray water or glass
cleaner on the door vents.
• Do not use oven cleaners, cleaning powders, or
harsh abrasive cleaning materials on the outside
of the oven door.
• Do not clean the oven door gasket. The oven
door gasket is made of a woven material that is
essential for a good seal. Care should be taken
not to rub, damage, or remove this gasket.
a Don’t hand clean oven door gasket
b Do hand clean door
Broiler Pan and Grid
• Do not store a soiled broiler pan or grid
anywhere in the range.
• Do not clean the broiler pan or grid in a self
cleaning mode. (Available on some models)
• Remove the grid from the pan. Carefully pour
out the grease from the pan into a proper
container.
• Wash and rinse the broiler pan and grid in hot
water with a soap-filled or plastic scouring pad.
• If food has burned on, sprinkle the grid with
cleaner while hot and cover with wet paper
towels or a dishcloth. Soaking the pan will
remove burned-on foods.
• Both the broiler pan and grid may be cleaned
with a commercial oven cleaner or in the
dishwasher.
Oven Racks
Remove the oven racks before operating the Self
Clean cycle (on some models) and EasyClean.
1 Clean with a mild, abrasive cleaner.
• Food spilled into the tracks could cause the
racks to become stuck.
2 Rinse with clean water and dry.
NOTE
• For models with Self Clean function:
- If the racks are cleaned using the Self Clean
cycle (not recommended), the color will turn
slightly blue and the finish will become dull.
After the Self Clean cycle is complete, and the
oven has cooled, rub the sides of the racks
with wax paper or a cloth containing a small
amount of oil. This will make the racks glide
more easily into the rack tracks.
Vent Louvers
• The appearance of the range may differ from
model to model.
en-us_main.book.book Page 99 Friday, August 14, 2026 1:47 PM
100MAINTENANCE
Use a vacuum cleaner with a brush or crevice
attachment to clean the vent louvers a. Do not
remove the panel covering the range.
Cooktop Surface
Glass-Ceramic Cooktop
WARNING
• To protect hands from burns, always wear oven mitts or use pot holders while using a scraper on the hot
cooking surface.
CAUTION
• If any sugar or food containing sugar spills, or plastic or foil melts on the cooktop, remove the material
IMMEDIATELY with a metal razor scraper while the cooking surface is still hot to avoid the risk of damage
to the glass-ceramic surface. When used correctly, the scraper will not damage the cooktop surface.
• If water or food containing water spills, remove the spill IMMEDIATELY with a dry paper towel.
• Do not use scrub pads or abrasive cleaning pads. They may damage your cooktop surface.
Use ceramic cooktop cleaner on the glass cooktop. Other cleaners may not be as effective or may scratch,
damage or stain the cooktop surface.
To maintain and protect the surface of the glass cooktop, follow these steps:
1 Before using the cooktop for the first time, clean it with a ceramic cooktop cleaner. This helps protect
the top and makes cleanup easier.
2 Use ceramic cooktop cleaner daily to help keep the cooktop looking new.
3 Shake the cleaner well. Apply a few drops of cleaner directly to the cooktop.
4 Use a paper towel to clean the entire cooktop surface.
5 Rinse with clear water and use a dry cloth or paper towel to remove all cleaning residue.
en-us_main.book.book Page 100 Friday, August 14, 2026 1:47 PM
101MAINTENANCE
ENGLISH
NOTE
• Any damage or failure of the product resulting from the items below may not be covered under the
LIMITED WARRANTY.
- Sugary spillovers (such as preserves, ketchup, tomato sauce, jellies, fudge, candy, syrups, or chocolate)
or melted plastics can cause pitting on the surface of your cooktop.
- If food or water containing calcium (such as baking powder, wine, milk, spinach, or broccoli) is spilled
on the cooktop, it can permanently stain or discolor the surface.
Burned-On Residue
1 While the cooktop is still warm, remove any burnt on deposits or spilled food from the glass-ceramic
cooking surface with a suitable metal razor scraper.
NOTE
• Do not use a dull or nicked blade.
• Hold the scraper at approximately a 30° angle to the cooktop.
• The razor scraper will not damage the markings on the cooking surface.
• Take care to avoid damaging the seal when cleaning the cooktop with a metal razor scraper.
2 When the cooking surface has completely cooled, apply a few fingertip-sized dabs of a glass-ceramic
cooktop cleaner in each burner area. Spread the cleaner over the cooktop surface with a damp paper
towel. Leave the cleaner on for 10 minutes before rinsing it off.
3 Rinse with clean water and wipe the cooktop surface with a clean, dry paper towel.
Cooktop Seal
1 To remove burned-on soil from the seal around the outside of the glass-ceramic cooktop, cover the
area with a warm, wet cloth to soften the soil.
en-us_main.book.book Page 101 Friday, August 14, 2026 1:47 PM
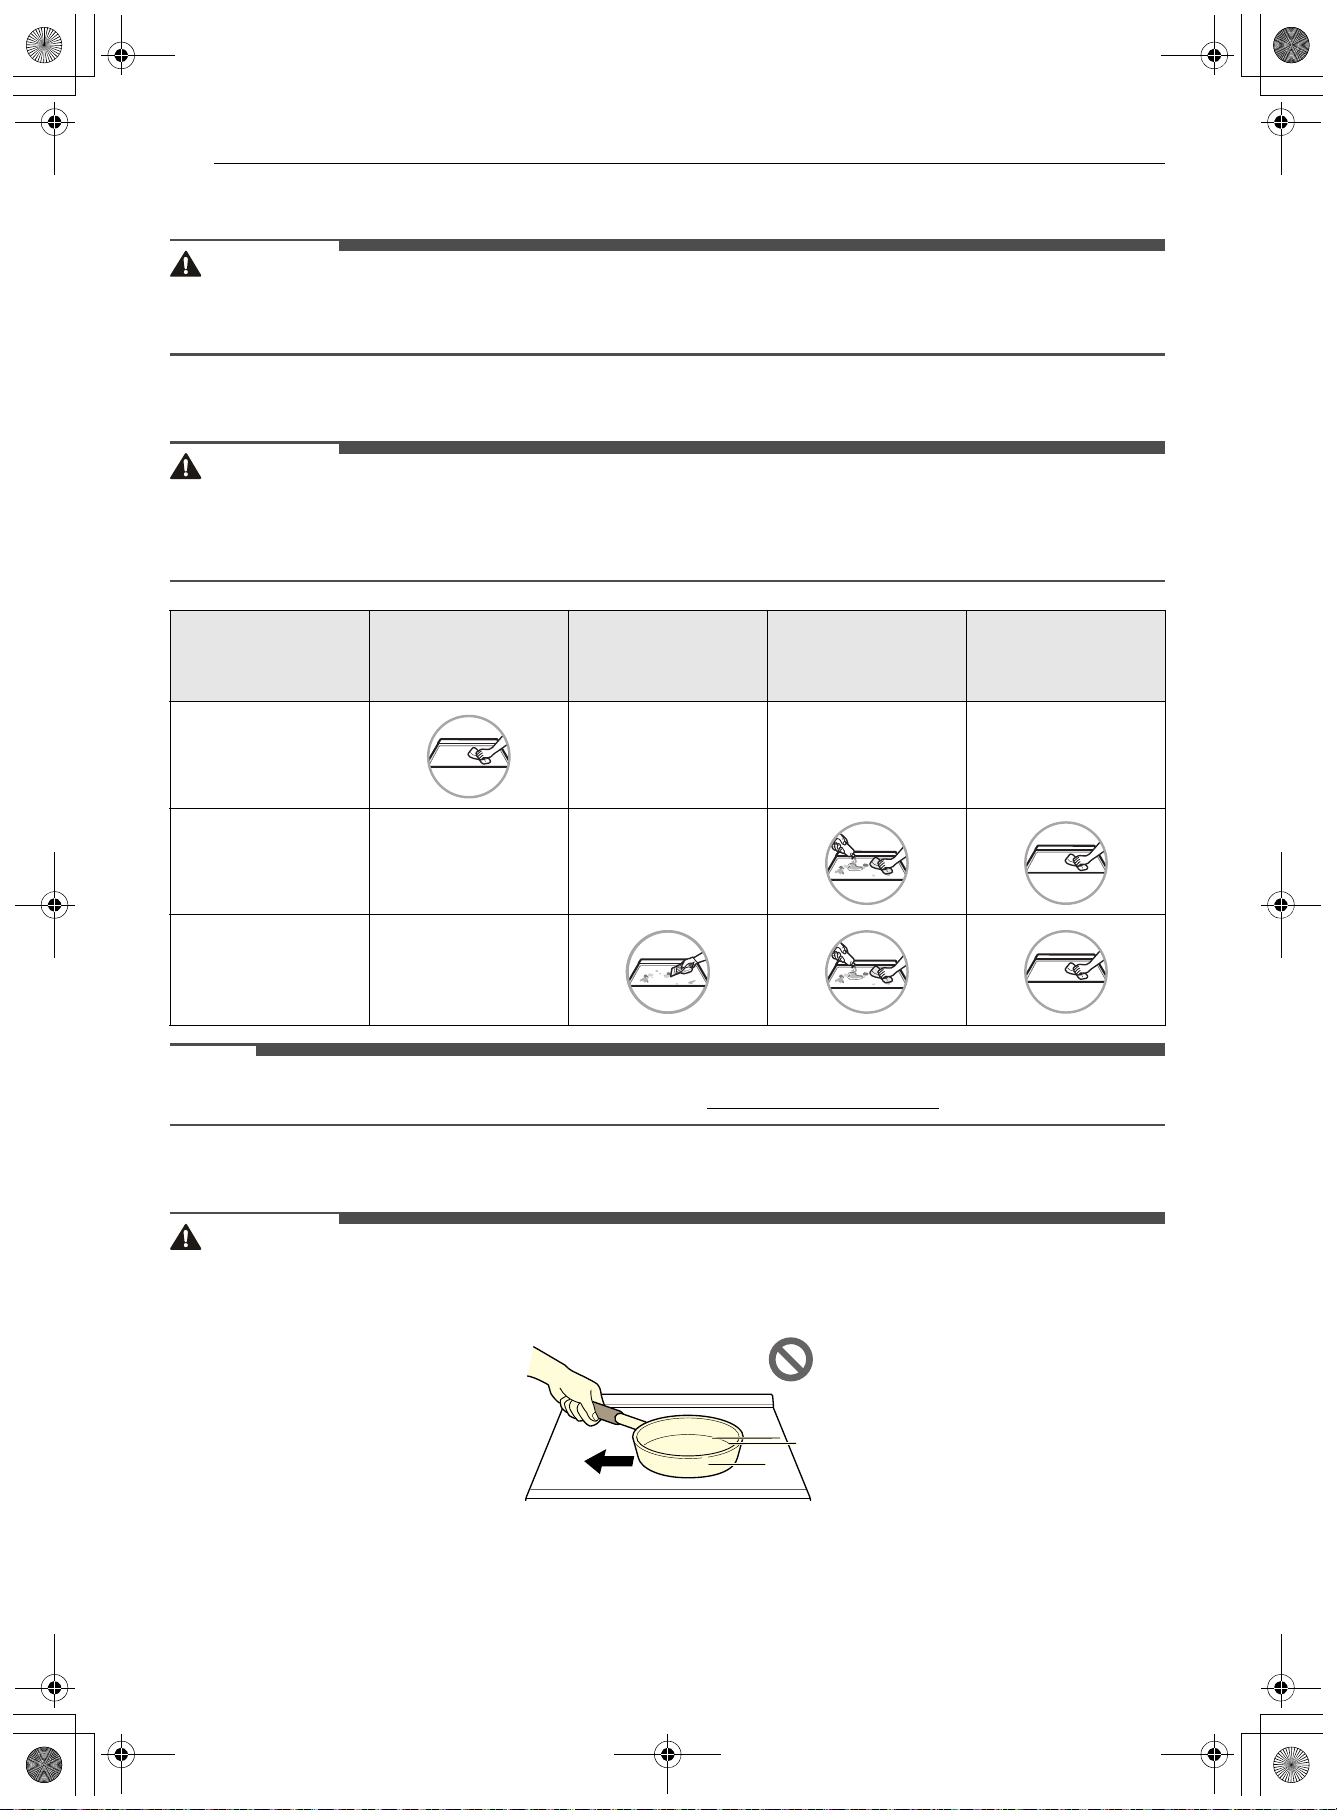
102MAINTENANCE
2 After a few minutes, wipe the area clean with a mild, nonabrasive cleaner.
CAUTION
• Do not use a knife or any sharp object to clean the seal around the outside of the glass-ceramic cooktop.
• Take care to avoid damaging the seal when cleaning the cooktop with a metal razor scraper.
Maintaining the Cooktop
CAUTION
• Do not use chlorine bleach, ammonia, or other cleaners not specifically recommended for use on glass-
ceramic cooktops.
• Let your glass-ceramic cooking surface cool off before cleaning.
NOTE
• For additional product information, visit our website at www.LGSIGNATURE.com
Metal Marks and Scratches
CAUTION
• Always use heavier gauge, high-quality cookware on the cooking elements and do not slide it on the
ceramic cooktop surface. Even high-quality cookware can scratch the cooktop surface.
• Any cookware that has a rough or dirty bottom can mark and scratch the cooktop surface. Always start
with clean cookware.
-
Wipe off with a
damp towel and
mild detergent
Use a metal
scraper
Apply cooktop
cleaner. Rub with
a towel.
Rinse with a
damp towel, then
wipe dry.
Regular
(Recommended
after each use)
---
Occasional
(Recommended
every week)
--
Thorough
(Recommended for
tough stains or
burnt-on food)
-
en-us_main.book.book Page 102 Friday, August 14, 2026 1:47 PM
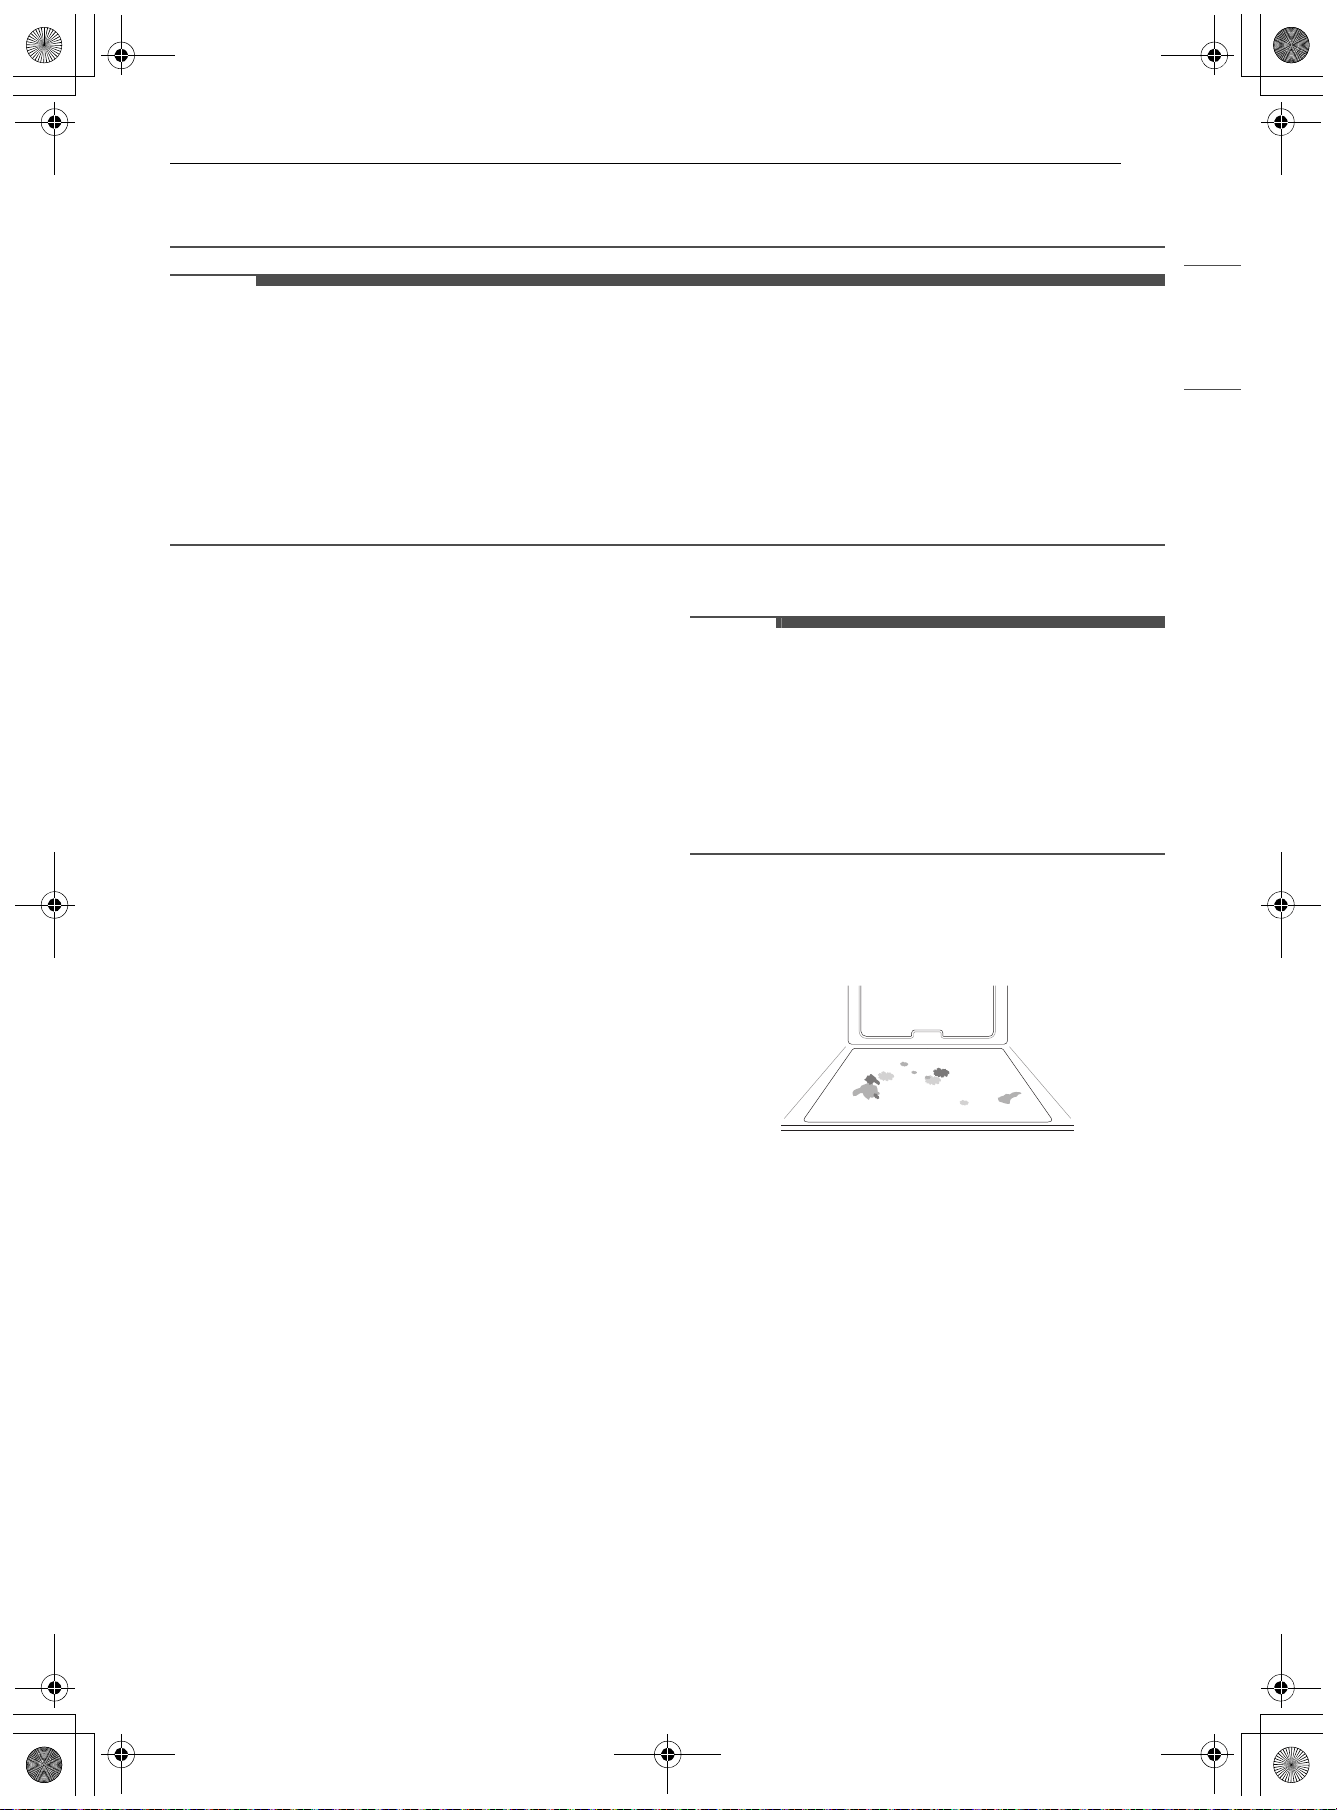
103MAINTENANCE
ENGLISH
• Do not use cookware if there is foreign matter on the cooktop surface. Always clean the cooktop surface
before cooking.
NOTE
• Any damage or failure of the product resulting from the items below may not be covered under the
LIMITED WARRANTY.
- Be careful not to slide pots and pans across the cooktop. Doing so will leave metal markings on the
cooktop surface. To help remove these marks, use a ceramic cooktop cleaner with a cleaning pad for
ceramic cooktops.
- If pots with a thin overlay of aluminum or copper are allowed to boil dry, the overlay may leave a black
discoloration on the cooktop. This should be removed immediately before heating again or the
discoloration may be permanent.
EasyClean
LG’s EasyClean enamel technology provides two
cleaning options for the inside of the range. The
EasyClean feature takes advantage of LG’s new
enamel to help lift soils without harsh chemicals,
and it runs using ONLY WATER for just 10 minutes
in low temperatures to help loosen LIGHT soils
before hand cleaning.
While EasyClean is quick and effective for small
and LIGHT soils, the Self Clean feature can be used
to remove HEAVY, built up soils. The intensity and
high heat of the Self Clean cycle may result in
smoke which will require the opening up of
windows to provide ventilation. Compared to the
more intense Self Clean process, your LG oven
gives you the option of cleaning with LESS HEAT,
LESS TIME, and virtually NO SMOKE OR FUMES.
You can reduce energy use by cleaning light oven
soils with the EasyClean feature instead of Self
Clean.
When needed, the range still provides the Self
Clean option for longer, more thorough oven
cleaning for heavier, built up soils.
• For hard to reach areas such as the back surface
of the oven, it is better to use the Self Clean
cycle.
Benefits of EasyClean
• Helps loosen light soils before hand-cleaning
• EasyClean only uses water; no chemical cleaners
• Makes for a better Self Clean experience
- Delays the need for a Self Clean cycle
- Minimizes smoke and odors
- Can allow shorter Self Clean time
NOTE
• For models without Self Clean option
- The EasyClean feature may not be effective in
removing heavy, built-up soils. Because the
range does not include a Self Clean option,
clean the oven regularly using the EasyClean
feature to prevent heavy, burnt-on soil from
building up in the oven.
When to Use EasyClean
• Example of oven soiling
Case 1
- Soil pattern: Small drops or spots
- Types of soils: Cheese or other ingredients
- Common food items that can soil your oven:
Pizza
Case 2
- Soil pattern: Light splatter
- Types of soils: Fat/grease
- Common food items that can soil your oven:
Steaks, broiled / Fish, broiled / Meat roasted at
low temperatures
en-us_main.book.book Page 103 Friday, August 14, 2026 1:47 PM
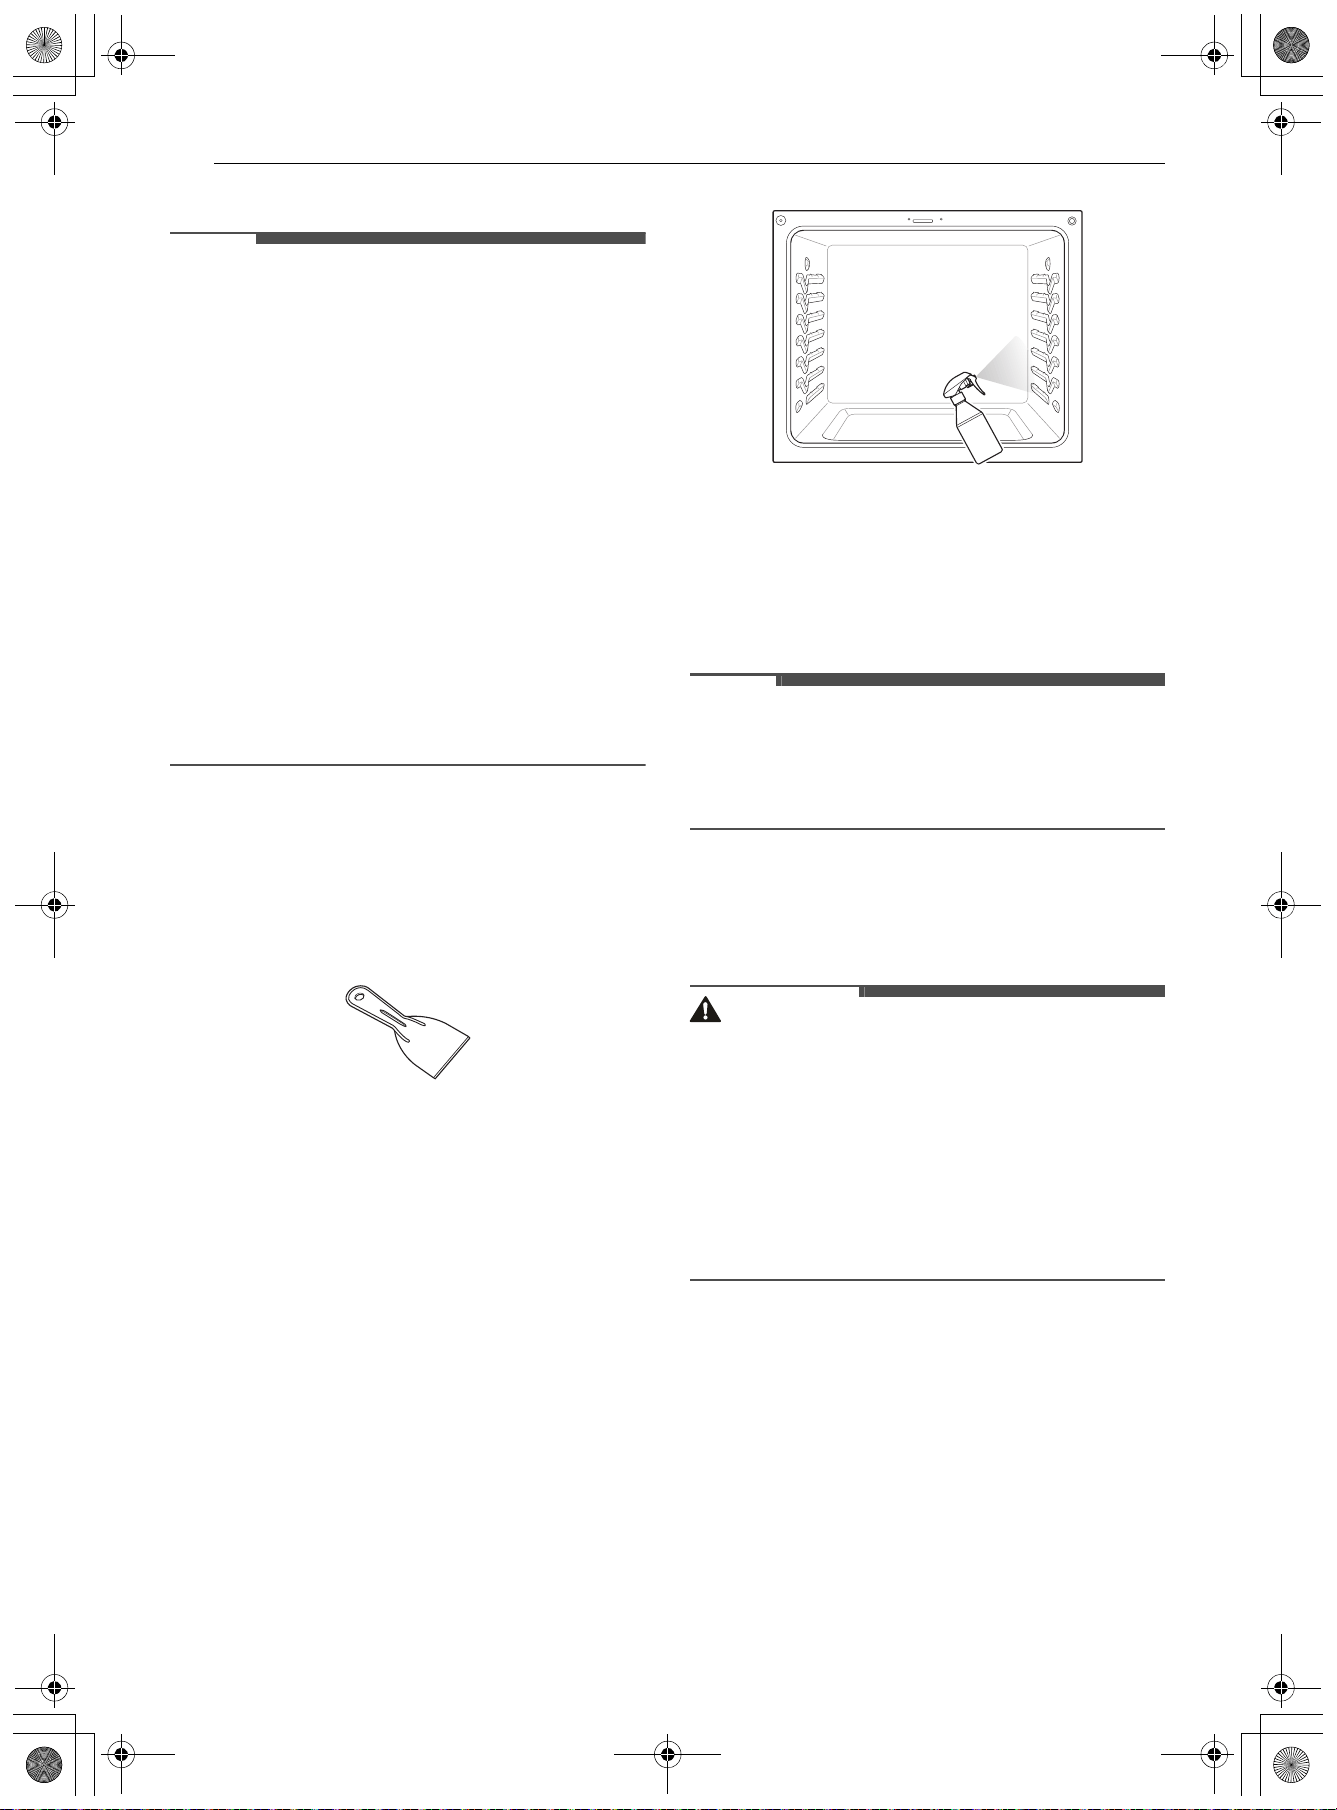
104MAINTENANCE
EasyClean Instruction Guide
NOTE
• Allow the oven to cool to room temperature
before using the EasyClean cycle. If your oven
cavity is above 150 °F (65 °C), Hot will appear in
the display, and the EasyClean cycle will not be
activated until the oven cavity cools down.
• The range should be level to ensure that the
bottom surface of the oven cavity is entirely
covered by water at the beginning of the
EasyClean cycle.
• For best results, use distilled or filtered water.
Tap water may leave mineral deposits on the
oven bottom.
• Soil baked on through several cooking cycles will
be more difficult to remove with the EasyClean
cycle.
• Do not open the oven door during the EasyClean
cycle. Water will not get hot enough if the door is
opened during the cycle.
1 Remove oven racks and accessories from the
oven.
2 Scrape off and remove any burnt-on debris
with a plastic scraper.
• Suggested plastic scrapers:
- Hard plastic spatula
- Plastic pan scraper
- Plastic paint scraper
- Old credit card
3 Fill a spray bottle (10 oz or 300 ml) with water
and use the spray bottle to thoroughly spray
the inside surfaces of the oven.
4 Use at least 1/5 (2 oz or 60 ml) of the water in
the bottle to completely saturate the soil on
both the walls and in the corners of the oven.
5 Spray or pour the remaining water (8 oz or
240 ml) onto the bottom center of the oven
cavity. The indentation on the oven bottom
should be fully covered to submerge all soils.
Add water if necessary.
NOTE
• If cleaning multiple ovens, use an entire bottle of
water to clean each oven. Do not spray water
directly on the door. Doing so will result in water
dripping to the floor.
6 Close the oven door. Scroll and tap Cleaning.
Tap EasyClean. Tap Start at the bottom right
to begin cleaning.
CAUTION
• Some surfaces may be hot after the EasyClean
cycle. Wear rubber gloves while cleaning to
prevent burns.
• During the EasyClean cycle, the oven becomes
hot enough to cause burns. Wait until the cycle is
over before wiping the inside surface of the
oven. Failure to do so may result in burns.
• Avoid leaning or resting on the oven door glass
while cleaning the oven cavity.
7 A tone will sound at the end of the 10 minute
cycle. Tap Done to complete cooking.
8 After the cleaning cycle and during hand-
cleaning, enough water should remain on the
oven bottom to completely submerge all soils.
Add water if necessary. Place a towel on the
floor in front of the oven to capture any water
that may spill out during hand-cleaning.
en-us_main.book.book Page 104 Friday, August 14, 2026 1:47 PM
105MAINTENANCE
ENGLISH
9 Clean the oven cavity immediately after the
EasyClean cycle by scrubbing with a wet, non-
scratch scouring sponge or pad. (The scouring
side will not scratch the finish.) Some water
may spill into the bottom vents while
cleaning, but it will be captured in a pan under
the oven cavity and will not hurt the burner.
NOTE
• Do not use any steel scouring pads, abrasive
pads or cleaners as these materials can
permanently damage the oven surface.
10 Once the oven cavity is cleaned, wipe any
excess water with a clean dry towel. Replace
racks and any other accessories.
11 If some light soils remain, repeat the above
steps, making sure to thoroughly soak the
soiled areas.
• For models with Self Clean function
- If stubborn soils remain after multiple
EasyClean cycles, run the Self Clean cycle.
Be sure that the oven cavity is empty of
oven racks and other accessories, and
that the oven cavity surface is dry before
running the Self Clean cycle. Consult the
Self Clean section of your owner’s manual
for further details. If a Self Clean option is
not available, scrape off and remove
stubborn soil using a scraper.
NOTE
• If you forget to saturate the inside of the oven
with water before starting EasyClean, turn the
oven mode knob to the OFF position to end the
cycle. Wait for the range to cool to room
temperature and then spray or pour water into
the oven and start another EasyClean cycle.
• The cavity gasket may be wet when the
EasyClean cycle finishes. This is normal. Do not
clean the gasket.
• If mineral deposits remain on the oven bottom
after cleaning, use a cloth or sponge soaked in
vinegar to remove them.
• It is normal for the fan to operate during the
EasyClean cycle.
• Using commercial oven cleaners or bleach to
clean the oven is not recommended. Instead,
use a mild liquid cleanser with a pH value below
12.7 to avoid discoloring the enamel.
Self Clean
The Self Clean cycle uses extremely hot
temperatures to clean the oven cavity. While
running the Self Clean cycle, you may notice
smoking or an odor. This is normal, especially if
the oven is heavily soiled. During Self Clean, the
kitchen should be well ventilated to minimize the
odors from cleaning.
Before Starting Self Clean
• Clean only parts listed in manual. Remove the
oven racks, broiler pan, broiler grid, all
cookware, aluminum foil or any other material
from the oven.
- If oven racks are left in the oven cavity during
the Self Clean cycle, they will discolor and
become difficult to slide in and out.
• The kitchen should be well ventilated to
minimize the odors from cleaning. Open a
window or turn on a ventilation fan or hood
before self-cleaning.
• Wipe any heavy spillovers on the bottom of the
oven.
• Make sure that the oven light cover is in place
and the oven light is off.
• Clean the frame of the oven and door with hot
soapy water. Rinse well.
WARNING
• If the oven is heavily soiled with oil, self-clean the
oven before using the oven again. The oil could
cause a fire.
• If there is a fire in the oven during self-clean,
turn the oven off and wait for the fire to go out.
Do not force the door open. Introduction of
fresh air at self-clean temperatures may lead to
a burst of flame from the oven. Failure to follow
this instruction may result in severe burns.
CAUTION
• Do not use oven cleaners. Commercial oven
cleaner or oven liner protective coating of any
kind should not be used in or around any part of
the oven.
en-us_main.book.book Page 105 Friday, August 14, 2026 1:47 PM
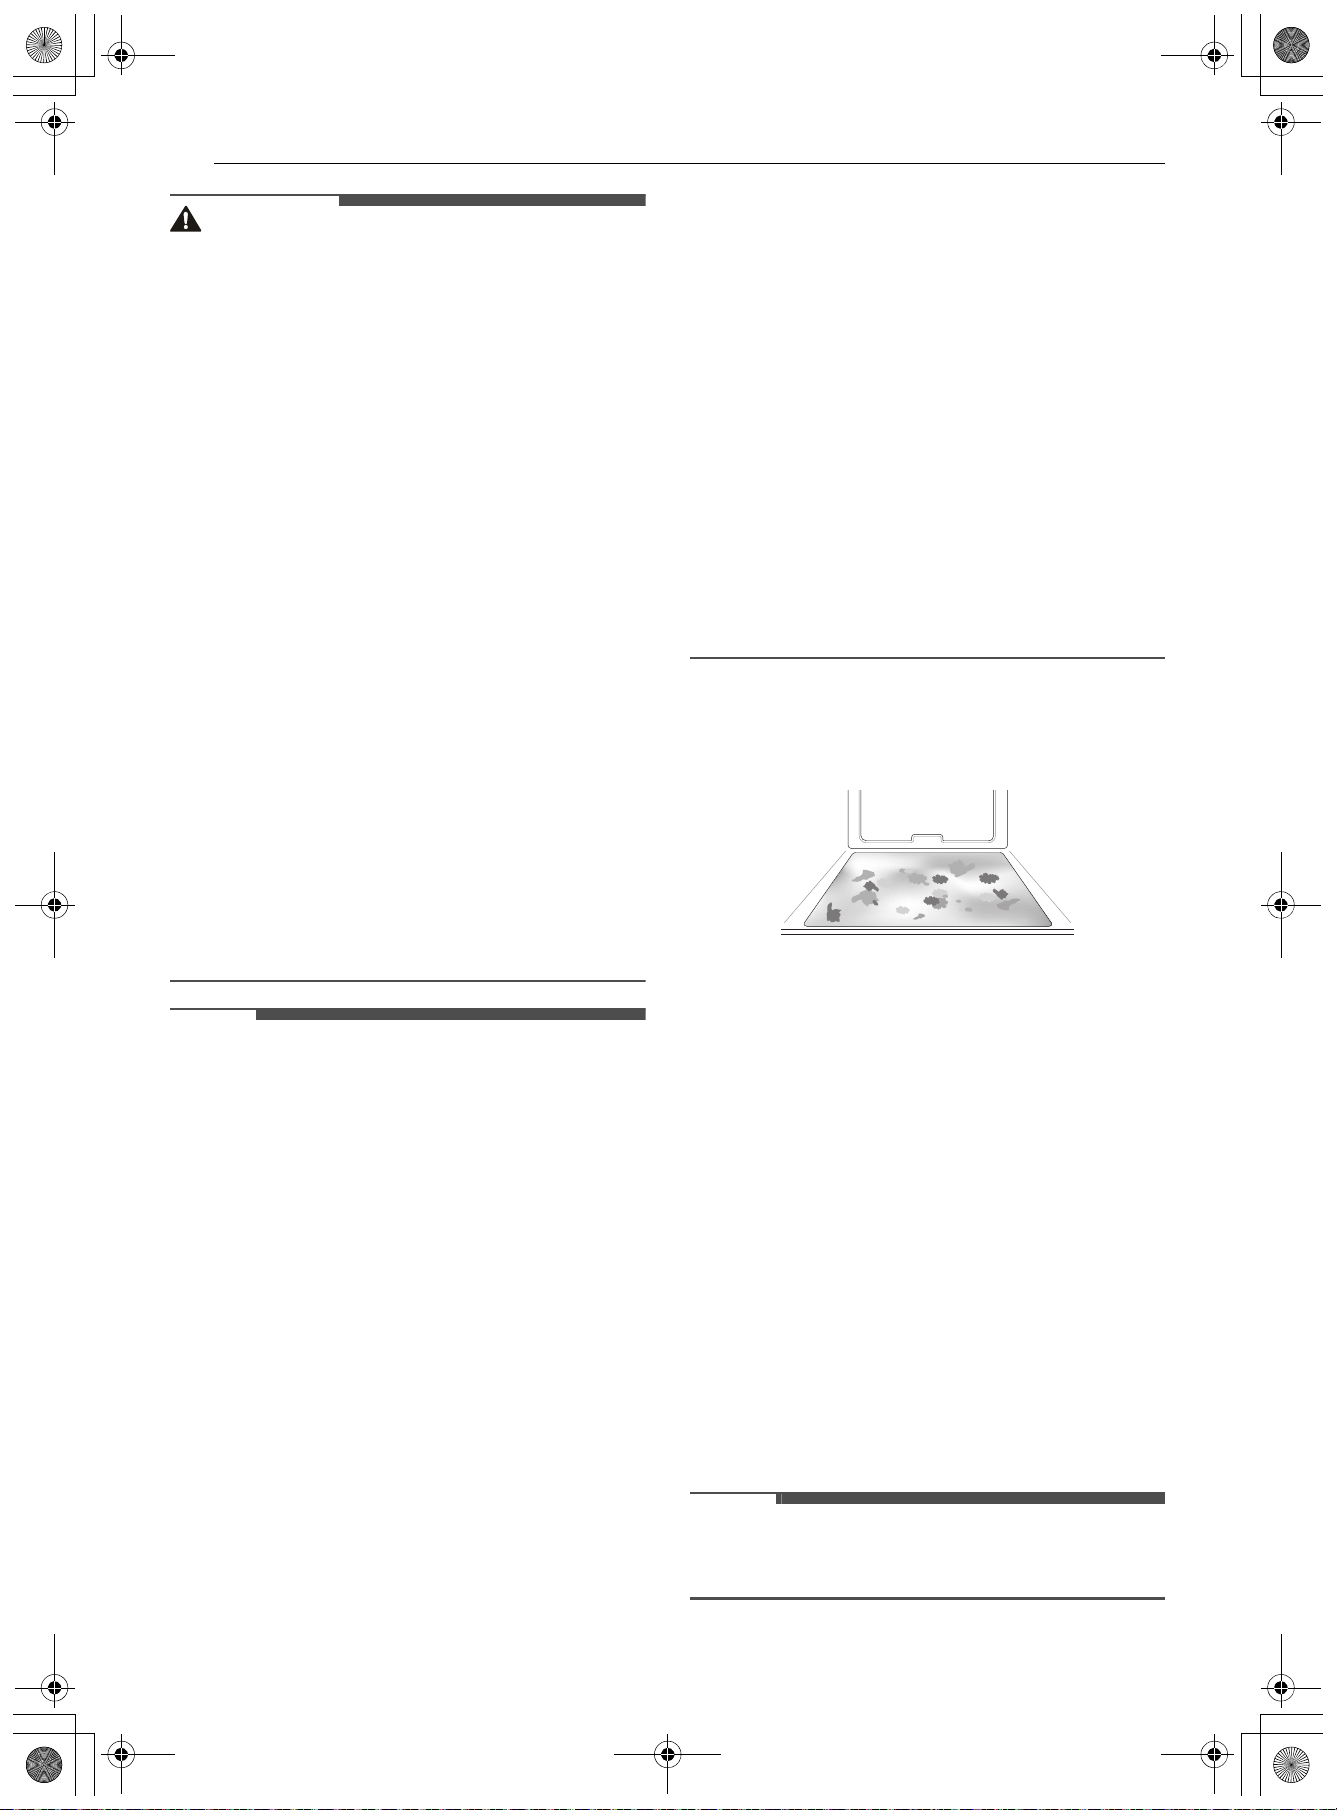
106MAINTENANCE
CAUTION
•The oven displays an F error code and sounds
three long beeps during the self-cleaning
process if it malfunctions in the self-clean mode.
Switch off the electrical power to the main fuse
or breaker and have the oven serviced by a
qualified technician.
• If the self cleaning mode malfunctions, turn the
range off and disconnect the power supply. Have
it serviced by a qualified technician.
• It is normal for parts of the oven to become hot
during a Self Clean cycle. Avoid touching the
cooktop, door, window or oven vent area during
a Self Clean cycle.
• Do not leave small children unattended near the
appliance. During the Self Clean cycle, the
outside of the range can become very hot to the
touch.
•If you have pet birds, move them to another
well-ventilated room. The health of some birds is
extremely sensitive to the fumes given off during
the Self Clean cycle of any range.
• Do not line the oven walls, racks, bottom or any
other part of the range with aluminum foil or
any other material. Doing so will destroy heat
distribution, produce poor baking results and
cause permanent damage to the oven interior
(aluminum foil will melt to the interior surface of
the oven).
NOTE
• The oven light cannot be turned on during a Self
Clean cycle. The oven light cannot be turned on
until the oven temperature has cooled below
500 ˚F (260 ˚C) after a Self Clean cycle is
complete.
• During the Self Clean cycle, the cooktop
elements and warming drawer cannot be used.
• Clean the frame of the oven and door with hot
soapy water. Rinse well.
• Do not clean the gasket. The fiberglass material
of the oven door gasket cannot withstand
abrasion. It is essential for the gasket to remain
intact. If you notice it becoming worn or frayed,
replace it.
• It is normal for the fan to operate during the Self
Clean cycle.
• As the oven heats, you may hear sounds of metal
parts expanding and contracting. This is normal
and will not damage the oven.
• You may notice some white ash in the oven.
Wipe it off with a damp cloth or a soap-filled
steel wool pad after the oven cools. If the oven is
not clean after one Self Clean cycle, repeat the
cycle.
• If oven racks were left in the oven and do not
slide smoothly after a Self Clean cycle, wipe racks
and rack supports with a small amount of
vegetable oil to make them glide more easily.
• After a Self Clean cycle, fine lines may appear in
the porcelain because it went through heating
and cooling. This is normal and will not affect
performance.
• The Self Clean cycle cannot be started if the
Control Lock / Lockout feature is active.
• If the clock is set for a 12-hour display (default)
the Delayed Self Clean can never be set to start
more than 12 hours in advance.
• After the oven is turned off, the convection fan
keeps operating until the oven has cooled down.
When to Use Self Clean
• Example of oven soiling
Case 1
• Soil pattern: Medium to heavy splatter
• Types of soils: Fat/grease
• Common food items that can soil your oven:
Meat roasted at high temperatures
Case 2
• Soil pattern: Drops or spots
• Types of soils: Filling or sugar based soils
• Common food items that can soil your oven: Pies
Case 3
• Soil pattern: Drops or spots
• Types of soils: Cream or tomato sauce
• Common food items that can soil your oven:
Casseroles
NOTE
• The Self Clean cycle can be used for soil that has
been built up over time.
en-us_main.book.book Page 106 Friday, August 14, 2026 1:47 PM
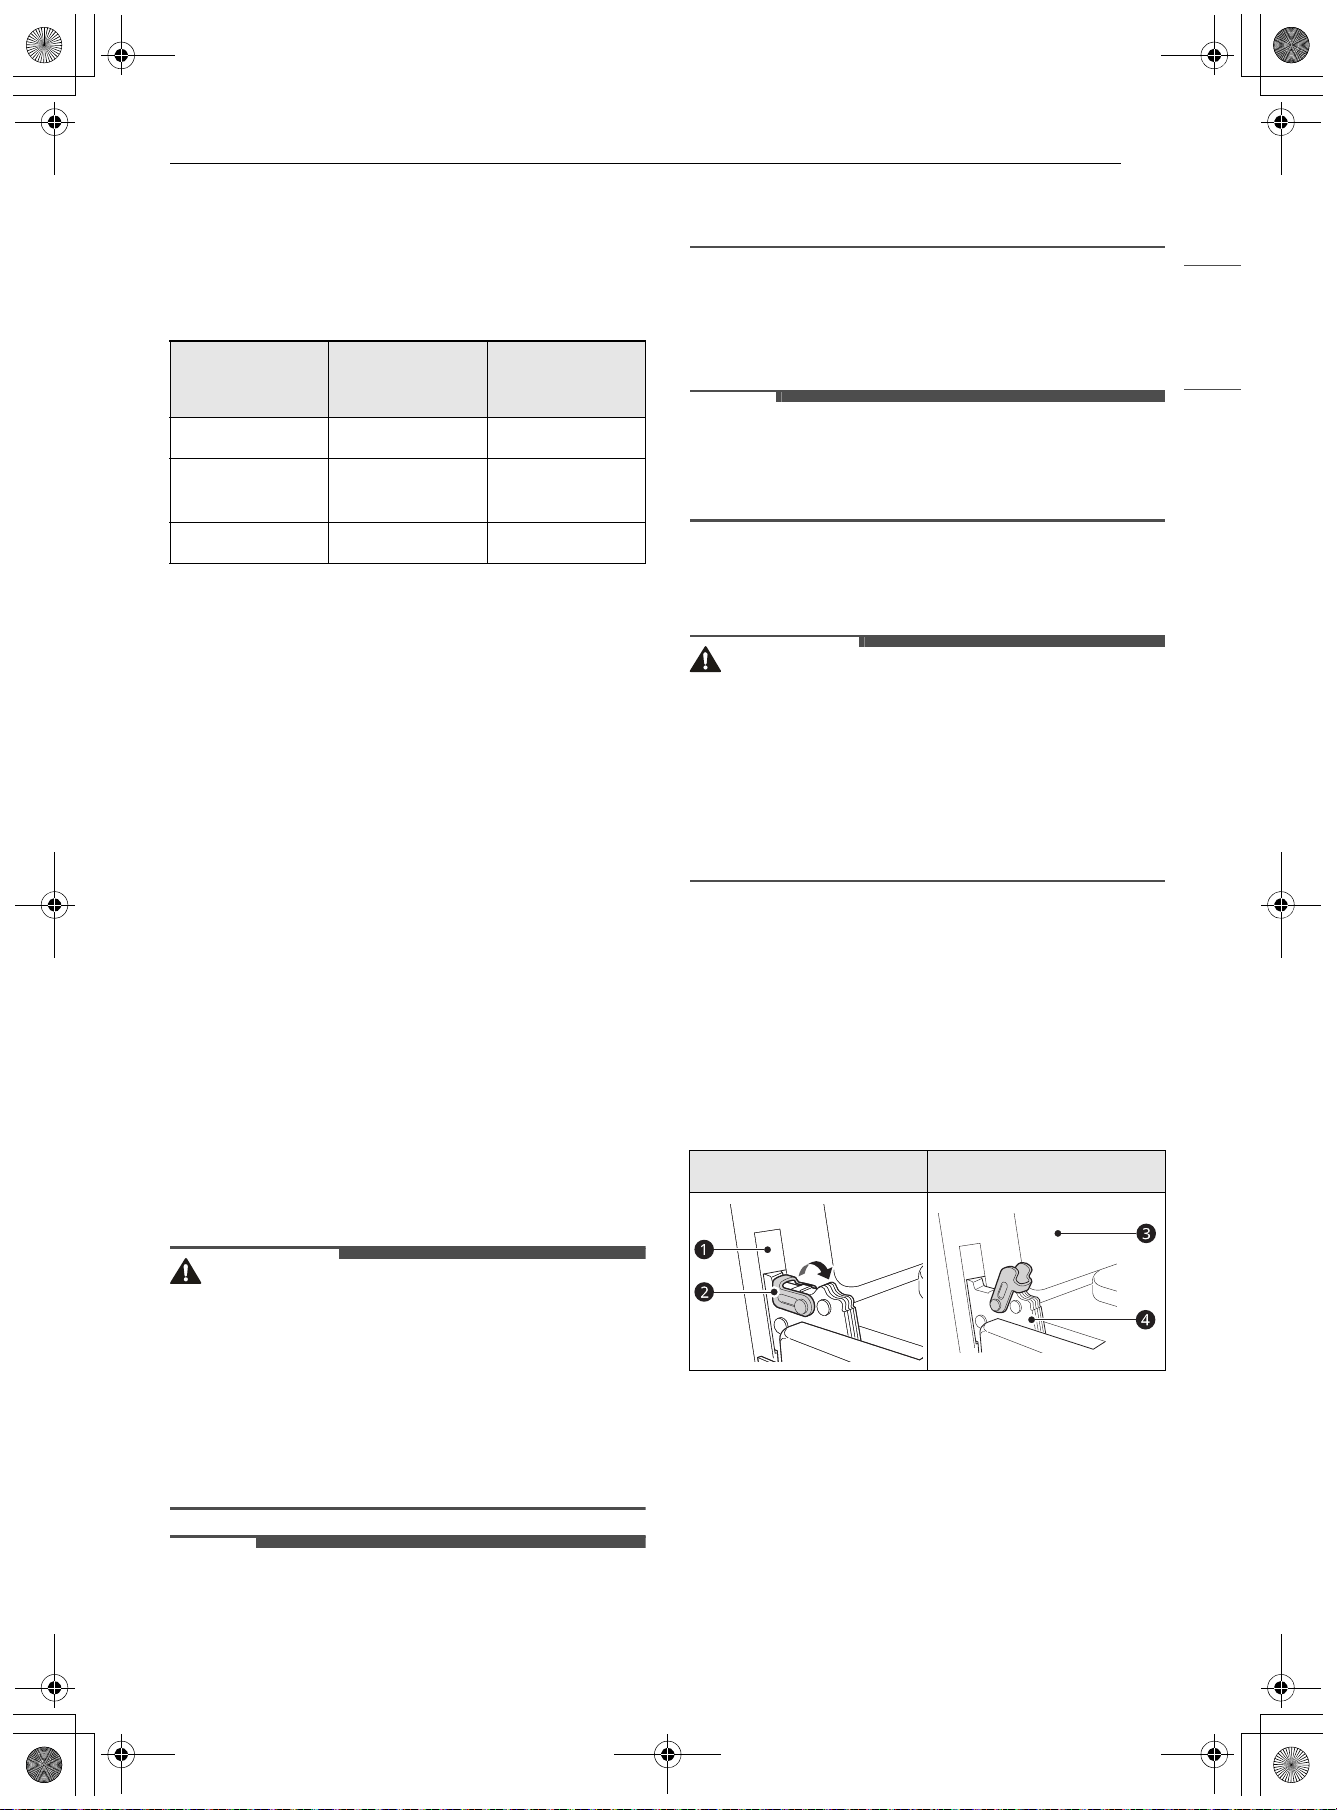
107MAINTENANCE
ENGLISH
Setting Self Clean
The Self Clean function has cycle times of 3, 4, or 5
hours.
Self Clean Setting Guide
1 Remove all racks and accessories from the
oven.
2 Close the oven door. Scroll and tap Cleaning.
Tap Self Clean. The oven defaults to the
recommended four-hour Self Clean for a
moderately soiled oven.
If desired, tap Cleaning Time to set the
cleaning time. Select one of the three: 3 hr, 4
hr, 5 hr.
If desired, tap Starts at to set the cleaning
start time.
3 Tap Start at the bottom right to begin
cleaning.
4 Once the Self Clean cycle is set, the oven door
locks automatically and the lock icon
k
displays. You will not be able to open the oven
door until the oven has cooled. The lock
releases automatically when the oven has
cooled.
CAUTION
• Do not force the oven door open when the lock
icon is displayed. The oven door remains locked
until the oven temperature has cooled. Forcing
the door open will damage the door.
• Use care when opening the oven door after the
Self Clean cycle. Stand to the side of the oven
when opening the door to allow hot air or steam
to escape. The oven may still be VERY HOT.
NOTE
• It may become necessary to cancel or interrupt a
Self Clean cycle due to excessive smoke or fire in
the oven. To cancel the Self Clean function, Tap
Stop at the bottom right.
Removing/Assembling Lift-Off
Oven Doors
NOTE
• Parts may be changed due to product
improvement and may look different than
shown in images.
Door Care Instructions
Most oven doors contain glass that can break.
CAUTION
• Do not close the oven door until all the oven
racks are fully in place.
• Do not hit the glass with pots, pans, or any other
object.
• Scratching, hitting, jarring, or stressing the glass
may weaken its structure causing an increased
risk of breakage at a later time.
Removing Doors
1 Fully open the door.
2 Lift up the hinge lock b and flip it towards the
hinge arm
d completely. Repeat on other
side.
a Slot
b Hinge Lock
c Oven Frame
d Hinge Arm
3 Firmly grasp both sides of the door at the top.
Oven Cavity
Soil Level
Number
Button
Cycle
Time
Lightly Soiled 1 3 hr.
Moderately
Soiled
24 hr.
Heavily Soiled 3 5 hr.
Locked Position Unlocked Position
en-us_main.book.book Page 107 Friday, August 14, 2026 1:47 PM
108MAINTENANCE
4 Partially close the door to approximately 5
degrees a. If the position is correct, the hinge
arms will move freely.
a about 5°
5 Lift and pull the door towards you until the
hinge latches are completely loosened.
Assembling Doors
1 Firmly grasp both sides of the door at the top.
2 Fully insert the hinge arms a into the slots b
until the indentations c on the hinge arms
rest on the bottom edges of the slots.
a Hinge Arm
b Bottom Edge of Slot
c Indentation
3 Slowly open the door fully. Make sure that the
hinge arms are properly engaged in the slots.
4 Lift up the hinge lock b and flip it towards the
oven c until it clicks into position. Repeat on
other side.
a Slot
b Hinge Lock
c Oven Frame
d Hinge Arm
5 Close the oven door.
Removing/Assembling Drawers
Removing Drawers
CAUTION
• Disconnect the electrical power to the range at
the main fuse or circuit breaker panel. Failure to
do so can result in severe personal injury, death,
or electrical shock.
Most cleaning can be done with the drawer in
place; however, the drawer may be removed if
further cleaning is needed. Use warm water to
thoroughly clean.
1 Fully open the drawer.
2 Unscrew the screw a on each side at the back
of the drawer.
Unlocked Position Locked Position
en-us_main.book.book Page 108 Friday, August 14, 2026 1:47 PM
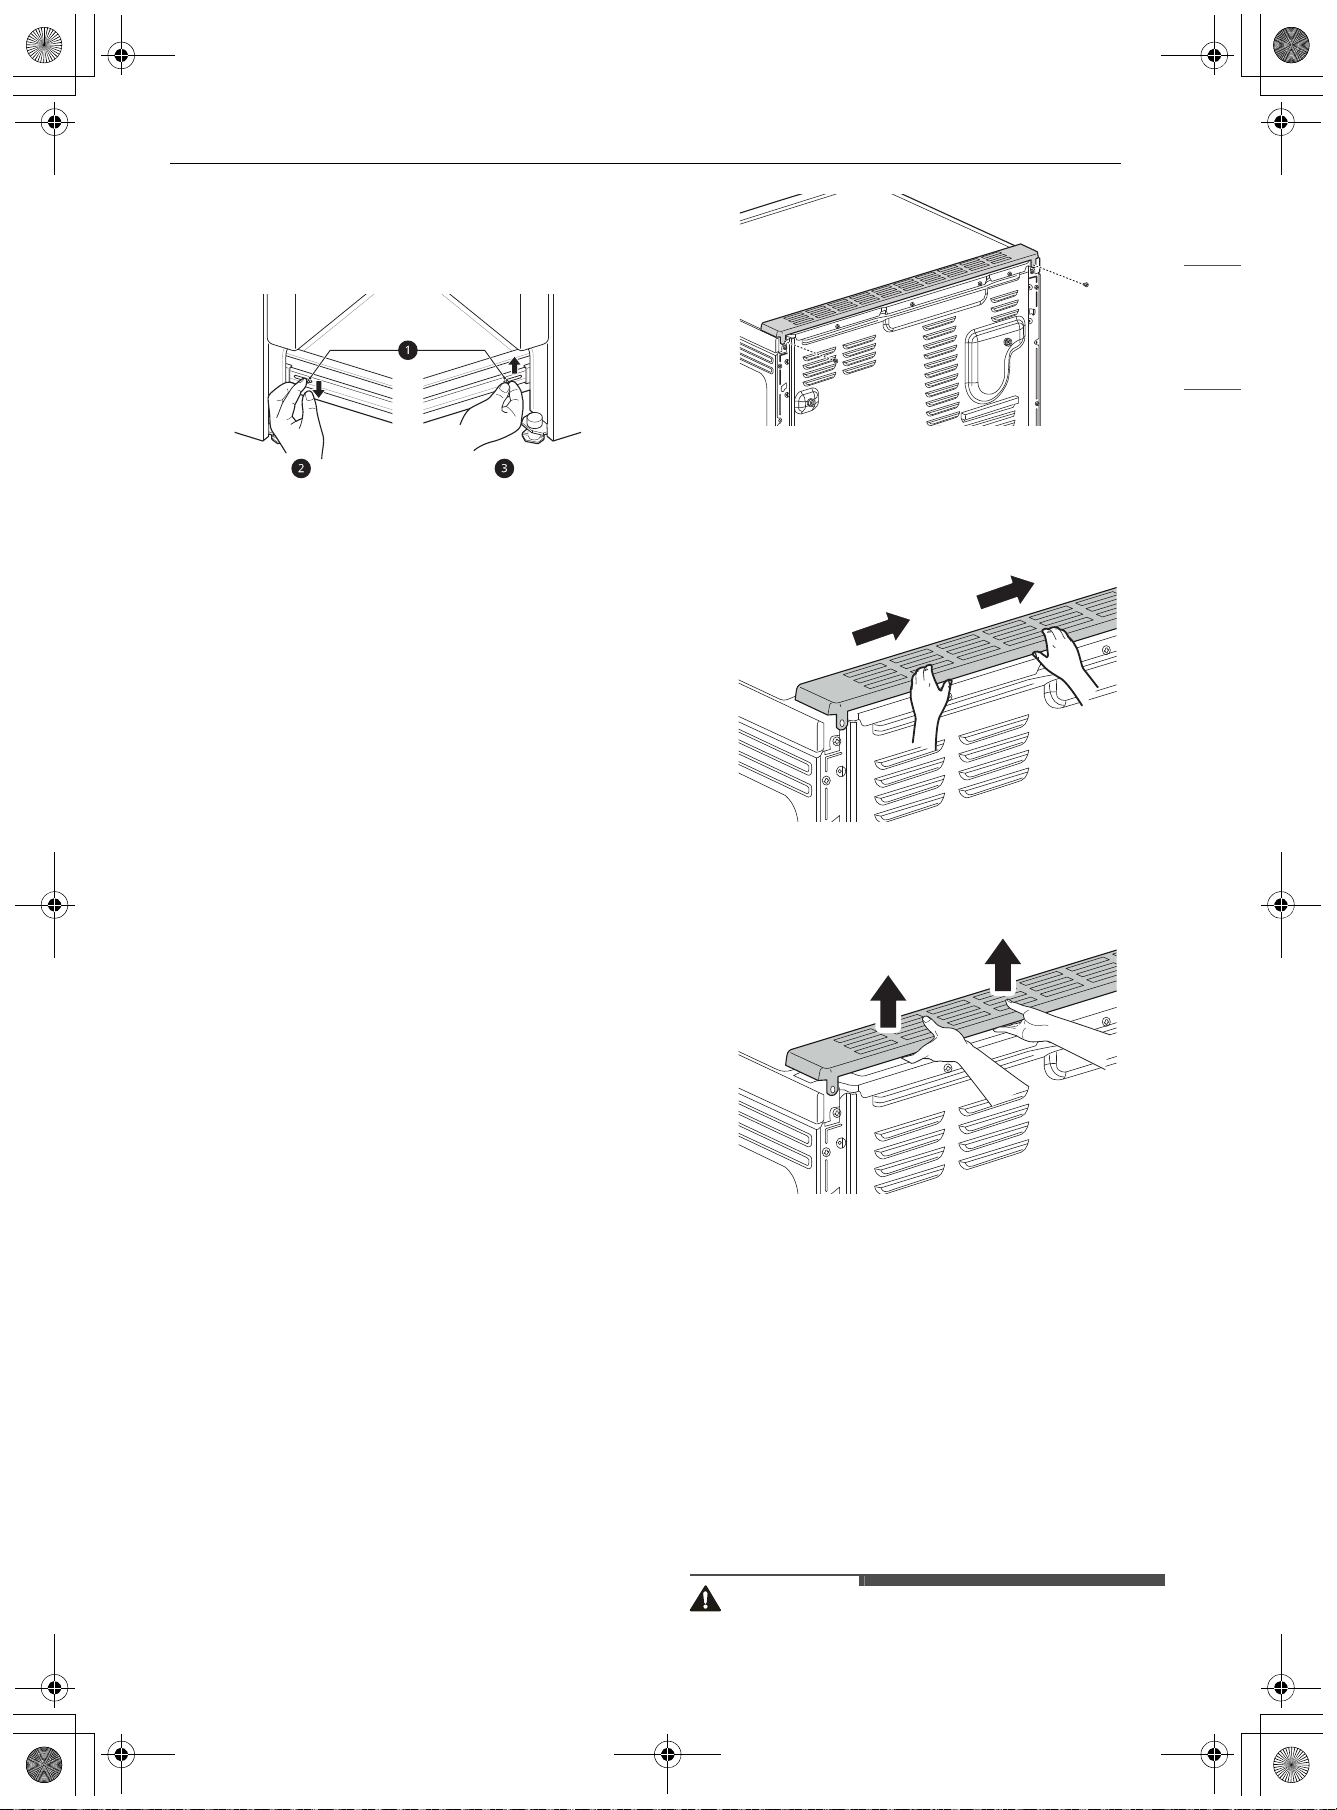
109MAINTENANCE
ENGLISH
3 Locate the glide lever on each side of the
drawer. Push down on the left glide lever and
pull up on the right glide lever.
a Lever
b Push down with finger
c Pull up with finger
4 Pull the drawer away from the range.
Assembling Drawers
1 Pull the bearing glides to the front of the
chassis glide.
2 Align the glide on each side of the drawer with
the glide slots on the range.
3 Push the drawer into the range until levers
click (approximately 2 inches).
4 Insert and tighten the screws on the sides at
the back of the drawer.
5 Pull the drawer open again to seat the
bearing glides into position.
Removing/Assembling the Vent
Trim
Removing the Vent Trim
1 Using a screwdriver, remove the two screws
holding the vent trim in place.
2 Move the vent trim in the indicated direction
approximately 1/4".
3 Lift the vent trim.
Assembling the Vent Trim
Assemble the vent trim in the reverse sequence of
its removal.
Periodic Maintenance
Changing the Oven Light
The oven light is a standard 40-watt appliance
halogen lamp. It turns on when the oven door is
open. When the oven door is closed, press Light to
turn it on or off.
WARNING
• Make sure that the oven and lamp are cool.
en-us_main.book.book Page 109 Friday, August 14, 2026 1:47 PM
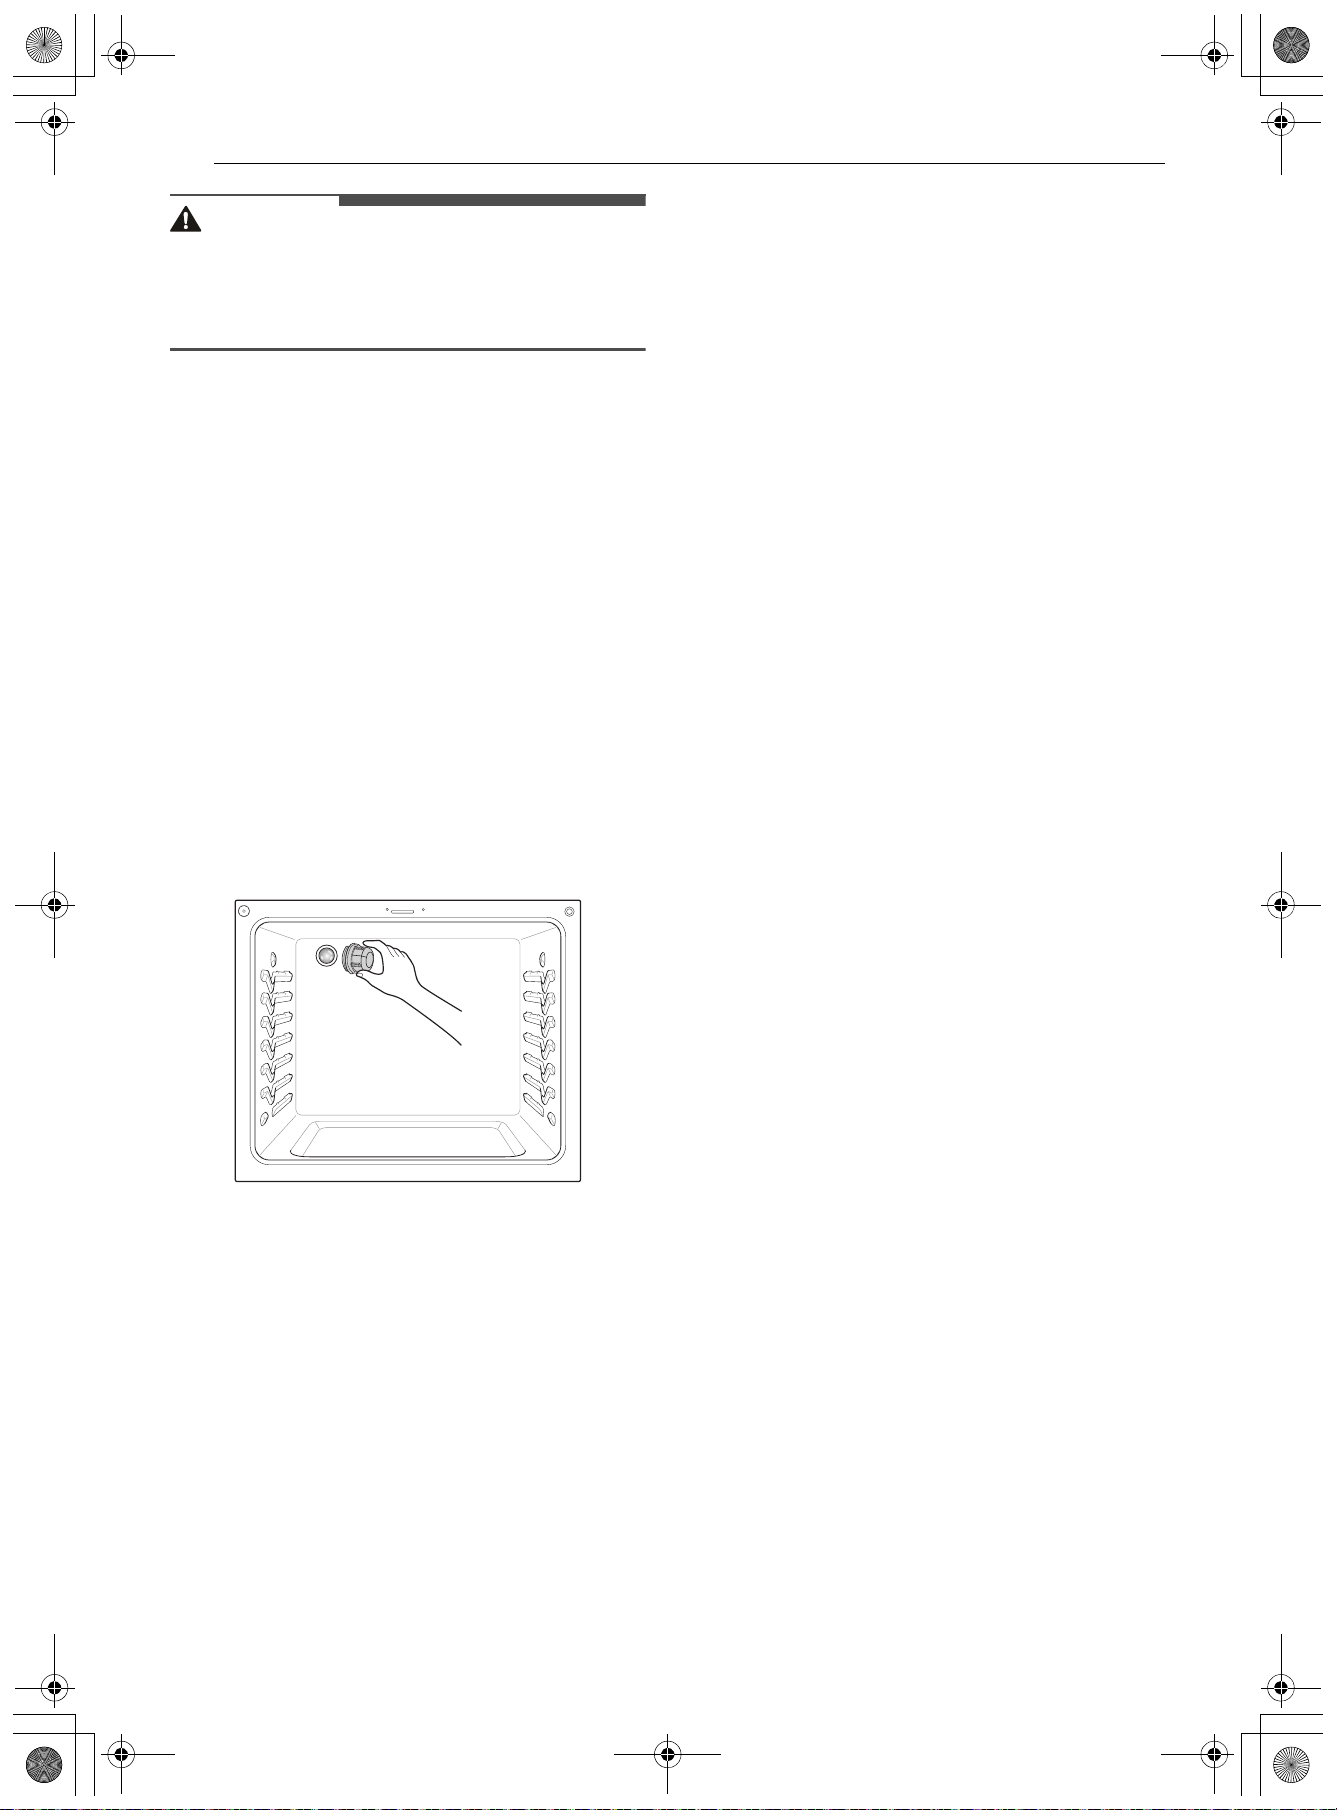
110MAINTENANCE
WARNING
• Disconnect the electrical power to the range at
the main fuse or circuit breaker panel. Failure to
do so can result in severe personal injury, death,
or electrical shock.
1 Unplug the range or disconnect power.
2 Turn the glass lamp cover in the back of the
oven counterclockwise to remove.
3 Remove the halogen lamp from the socket.
4 Insert the new halogen lamp.
5 Insert the glass lamp cover and turn it
clockwise.
6 Plug in the range or reconnect the power.
en-us_main.book.book Page 110 Friday, August 14, 2026 1:47 PM
111TROUBLESHOOTING
ENGLISH
TROUBLESHOOTING
FAQs
Frequently Asked Questions
CAUTION
• Foil may be used to wrap food in the oven or warming drawer, but do not allow the foil to come into
contact with the exposed heating/broiling elements in the oven. The foil could melt or ignite, causing
smoke, fire, or injury.
Q: What types of cookware are recommended for use with the cooktop?
A:
• The pans must have a flat bottom and straight sides.
• Only use heavy-gauge pans.
• The pan size must match the amount of food to be prepared and the size of the surface
element.
• Use tight fitting lids.
• Only use flat-bottom woks.
Q: Why do the heating elements appear to be turning ON and OFF during use of the cooktop or
oven?
A: Depending on your cooktop element setting or the temperature selected in your oven, it is normal for
the cooking elements to cycle on and off.
Q: My new oven doesn’t cook like my old one. Is there something wrong with the temperature
settings?
A: No. Your oven has been factory tested and calibrated. For the first few uses, follow your recipe times
and temperatures carefully. If you still think your new oven is too hot or too cold, you can adjust the
oven temperature yourself to meet your specific cooking needs. Refer to the Changing Oven Settings
section in this manual for easy instructions on how to adjust your thermostat.
Q: Is it normal to hear a clicking noise coming from the back of my oven when I am using it?
A: Your new range is designed to maintain a tighter control over your oven’s temperature. You may hear
your oven’s heating elements click on and off more frequently on your new oven. This is normal.
Q: Why is the time flashing?
A: This means that the product has just been plugged in, or that it has experienced a power
interruption. To clear the flashing time, touch any button and reset the clock if needed.
Q: During convection cooking the fan stops when I open the door. Is that normal?
A: Yes, this is normal. When the door is opened, the convection fan will stop until the door is closed.
Q: Can I use aluminum foil to catch drippings in my oven cavity?
A: Never use aluminum foil to line the bottom or sides of the oven or the warming drawer (on some
models). The foil will melt and stick to the bottom surface of the oven and will not be removable. Use
a foil-lined sheet pan placed on a lower oven rack to catch drippings instead. (If foil has already
melted onto the bottom of the oven, it will not interfere with the oven’s performance.)
Q: Can I use aluminum foil on the racks?
A: Do not cover racks with aluminum foil. Covering entire racks with foil restricts air flow, leading to
poor cooking results. Use a sheet pan lined with foil under fruit pies or other acidic or sugary foods to
prevent spillovers from damaging the oven finish.
en-us_main.book.book Page 111 Friday, August 14, 2026 1:47 PM

112TROUBLESHOOTING
Q: Can I leave my racks in the oven when running a Self Clean cycle? (On some models)
A: No. Although it will not damage the racks, it will discolor them and may make them hard to slide in
and out during use. Remove all items from the oven before starting a Self Clean cycle.
Q: What should I do if my racks are sticky and have become hard to slide in and out?
A: Over time, the racks may become hard to slide in and out. Apply a small amount of olive oil to the
sides of the racks. This will work as a lubricant for easier gliding.
Q: What should I do for hard to remove stains on my cooktop?
A: The cooktop should be cleaned after every use to prevent permanent staining. When cooking foods
with high sugar content, such as tomato sauce, clean the stain off with a scraper while the cooktop is
still warm. Use an oven mitt when scraping to prevent burns. Refer to the MAINTENANCE section of
this owner's manual for further instruction.
Q: Why aren't the function buttons working?
A:
Make sure that the range is not in Control Lock / Lockout mode. The lock
k will show in the display if
Control Lock / Lockout is activated. To deactivate Control Lock / Lockout, refer to the Control Lock /
Lockout section. The unlock melody sounds and Loc appears in the display until the controls are
unlocked. On models with Sabbath mode, make sure that the range is not in Sabbath mode. See the
Sabbath Mode section of the manual for instructions.
Q: My range is still dirty after running the EasyClean cycle. What else should I do?
A: The EasyClean cycle only helps to loosen light soils in your oven range to assist in hand-cleaning of
your oven. It does not automatically remove all soils after the cycle. Some scrubbing of your oven
range is required after running the EasyClean cycle.
Q: I tried scrubbing my oven after running EasyClean, but some soils still remain. What can I do?
A: The EasyClean feature works best when the soils are fully soaked and submerged in water before
running the cycle and during hand-cleaning. If soils are not sufficiently soaked in water, it can
negatively affect the cleaning performance. Repeat the EasyClean process using sufficient water.
• For models with Self Clean function:
Sugar-based and certain greasy soils are especially hard to clean. If some stubborn soils
remain, use the Self Clean feature to thoroughly clean your oven.
Q: Soils on my oven walls are not coming off. How can I get the oven walls clean?
A: Soils on the side and rear walls of your oven range may be more difficult to fully soak with water. Try
repeating the EasyClean process with more than the ¼ cup (2 oz or 60 ml) of spray recommended.
Q: Will EasyClean get all of the soils and stains out completely?
A: It depends on the soil type. Sugar-based and certain grease stains are especially hard to clean. Also, if
stains are not sufficiently soaked in water, this can negatively affect cleaning performance.
• For models with Self Clean function:
If stubborn or built-up stains remain, use the Self Clean feature. Refer to the Self Clean section
of your owner's manual.
Q: Are there any tricks to getting some of the stubborn soils out?
A: Scraping the soils with a plastic scraper before and during hand-cleaning is recommended. Fully
saturating soils with water is also recommended.
• For models with Self Clean function:
Certain types of soils are harder to clean than others. For these stubborn soils, the Self Clean
cycle is recommended. Consult the Self Clean section of your owner's manual for details.
Q: Is it safe for my convection fan or heater element to get wet during EasyClean?
en-us_main.book.book Page 112 Friday, August 14, 2026 1:47 PM
113TROUBLESHOOTING
ENGLISH
Before Calling for Service
Review this section before calling for service; doing so will save you both time and money.
For detailed information or videos, visit www.lg.com
for the troubleshooting page.
Cooking
A: Yes. The convection fan or heater element may get a little wet during cleaning. However, direct spray
onto the broil burner and heater elements is not necessary because these are self-cleaning during
regular use.
Q: Do I need to use all 1 ¼ cups (10 oz or 300 ml) of water for EasyClean?
A: Yes. It is highly recommended that 1 cup (8 oz or 240 ml) of water be sprayed or poured on the
bottom and an additional ¼ cup (2 oz or 60 ml) of water be sprayed on walls and other soiled areas to
fully saturate the soils for better cleaning performance.
Q: I see smoke coming out of my oven range’s cooktop vents during EasyClean. Is this normal?
A: This is normal. This is not smoke. It is actually water vapor (steam) from the water in the oven cavity.
As the oven heats briefly during EasyClean, the water in the cavity evaporates and escapes through
the oven vents.
Q: How often should I use EasyClean?
A: EasyClean can be performed as often as you wish. EasyClean works best when your oven is LIGHTLY
soiled from such things as LIGHT grease splatter and small drops of cheese. Please refer to the
EasyClean section in your owner's manual for more information.
Q: What is required for EasyClean?
A: A spray bottle filled with 1¼ cups (10 oz or 300 ml) of water, a plastic scraper, a non-scratch scrubbing
pad and a towel. You should not use abrasive scrubbers such as heavy-duty scouring pads or steel
wool.
Q: How can I help keep children safe around the range?
A: Children should be supervised around the range whenever it is in use, and after use until surfaces
have cooled. You can also use the Control Lock / Lockout feature to help prevent children from
accidentally turning on the cooktop or oven. The Control Lock / Lockout feature disables most control
panel buttons and the cooktop control knobs. On some models, it also locks the oven door. Consult
the Control Lock / Lockout section of your owner’s manual for details. (In models without a Self Clean
option, the Control Lock / Lockout feature locks the controls but does not lock the oven door.)
Q: Why isn't the Instaview working? (On some models only)
A: Level the range by adjusting the leveling legs with a wrench.
Problem Possible Cause & Solution
Oven will not work Plug on range is not completely inserted in the electrical outlet.
• Make sure electrical plug is plugged into a live, properly grounded outlet.
A fuse in your home may be blown or the circuit breaker tripped.
• Replace the fuse or reset the circuit breaker.
Oven controls improperly set.
• See the "Oven" section in the Operation chapter.
Oven too hot.
• Allow the oven to cool to below locking temperature.
en-us_main.book.book Page 113 Friday, August 14, 2026 1:47 PM
114TROUBLESHOOTING
Steam is exhausted
through the oven
vent.
Cooking foods with high moisture produces steam.
• This is normal.
Appliance does not
operate.
Cord is not plugged in correctly.
• Make sure cord is plugged correctly into outlet. Check circuit breakers.
Service wiring is not complete.
• Contact your electrician for assistance.
Power outage.
• Check house lights to be sure. Call your local electric company for service.
Sabbath mode is activated (on some models).
sb appears in the display and all function
buttons are inactive.
• Press and hold the Settings button for 3 seconds or until
sb disappears from the display.
Oven smokes
excessively during
broiling.
Control not set properly.
• Follow instructions under Setting Oven Controls.
Meat too close to the element.
• Reposition the rack to provide proper clearance between the meat and the element.
Preheat broil element for searing.
Meat not properly prepared.
• Remove excess fat from meat. Cut remaining fatty edges to prevent curling.
Insert on broiler pan wrong side up and grease not draining.
• Always place the grid on the broiler pan with ribs up and slots down to allow grease to drip
into the pan.
Grease has built up on oven surfaces. Old grease or food spatters cause excessive
smoking.
• Regular cleaning is necessary when broiling frequently.
Food does not bake
or roast properly
Oven controls improperly set.
• See the "Oven" section in the Operation chapter.
Rack position is incorrect or the rack is not level.
• See the "Oven" section in the Operation chapter.
Incorrect cookware or cookware of improper size being used.
• See the "Oven" section in the Operation chapter.
Oven sensor needs to be adjusted.
• See the "Calibrating the Oven Temperature" section in the Operation chapter.
Food does not broil
properly
Oven controls improperly set.
• Make sure you select the Broil mode properly.
Improper rack position being used.
• See the Broiling Guide.
Cookware not suited for broiling.
• Use broiling pan and grid.
Aluminum foil used on the broiling pan and grid has not been fitted properly and slit as
recommended.
• See the "Oven" section in the Operation chapter.
In some areas the power voltage may be low.
• Preheat the broil element for 5-7 minutes. See the Broiling Guide.
Problem Possible Cause & Solution
en-us_main.book.book Page 114 Friday, August 14, 2026 1:47 PM
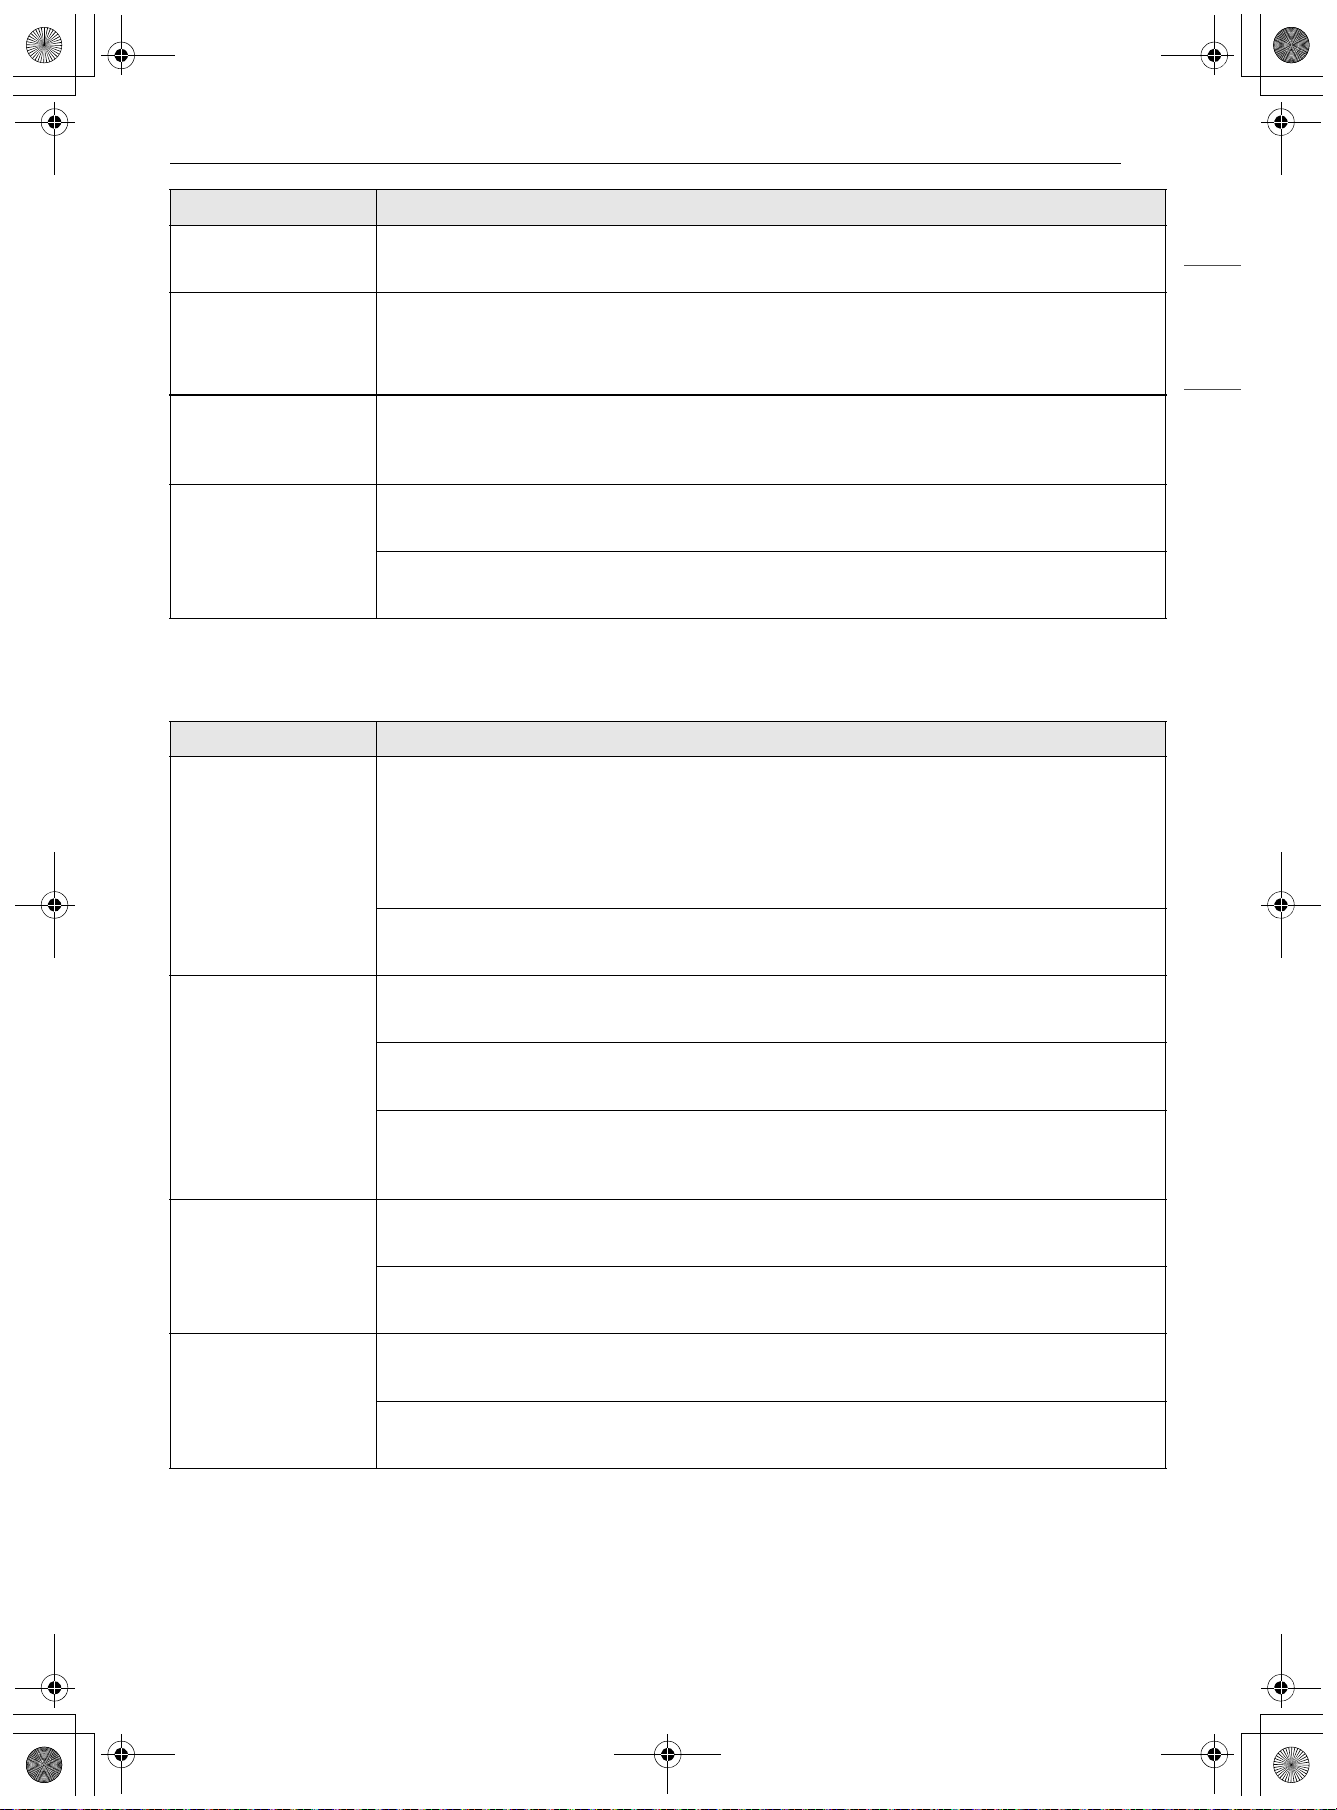
115TROUBLESHOOTING
ENGLISH
Parts & Features
Oven temperature
too hot or too cold
Oven sensor needs to be adjusted.
• See the "Calibrating the Oven Temperature" section in the Operation chapter.
Excessive smoking
during a Self Clean
cycle (On some
models)
Excessive soil.
• Turn off the Self Clean function. Open the windows to rid the room of smoke. Wait until the
Self Clean mode is cancelled. Wipe up the excess soil and reset the clean.
Burning or oily odor
emitting from the
vent
This is normal in a new oven.
• This will disappear in time. To speed the process, set a Self Clean cycle for a minimum of 3
hours. See the Self Clean section. (On some models)
Moisture collects on
oven window or
steam comes from
oven vent
This happens when cooking foods high in moisture.
• This is normal.
Excessive moisture was used when cleaning the window.
• Do not use excessive moisture when cleaning the window.
Problem Possible Cause & Solution
Range is not level. Poor installation.
• Place oven rack in center of oven. Place a level on the oven rack. Adjust leveling legs at
base of range until the oven rack is level.
• Be sure floor is level and strong and stable enough to adequately support range.
• If floor is sagging or sloping, contact a carpenter to correct the situation.
Kitchen cabinet alignment may make range appear unlevel.
• Be sure cabinets are square and have sufficient room for range clearance.
Cannot move
appliance easily.
Appliance must be
accessible for
service.
Cabinets not square or are built in too tightly.
• Contact builder or installer to make appliance accessible.
Carpet interferes with range.
• Provide sufficient space so range can be lifted over carpet.
Anti-tip device engaged.
• Uninstall the anti-tip device to move the range. Reengage the anti-tip device after pulling
the range out for cleaning, service, or any other reason.
Surface units will not
maintain a rolling
boil or cooking is not
fast enough.
Improper cookware being used.
• Use pans which are flat and match the diameter of the surface unit selected.
In some areas, the power(voltage) may be low.
• Cover pan with a lid until desired heat is obtained.
Surface units do not
work properly.
A fuse in your home may be blown or the circuit breaker tripped.
• Replace the fuse or reset the circuit breaker.
Cooktop controls improperly set.
• Check to see the correct control is set for the surface unit you are using.
Problem Possible Cause & Solution
en-us_main.book.book Page 115 Friday, August 14, 2026 1:47 PM
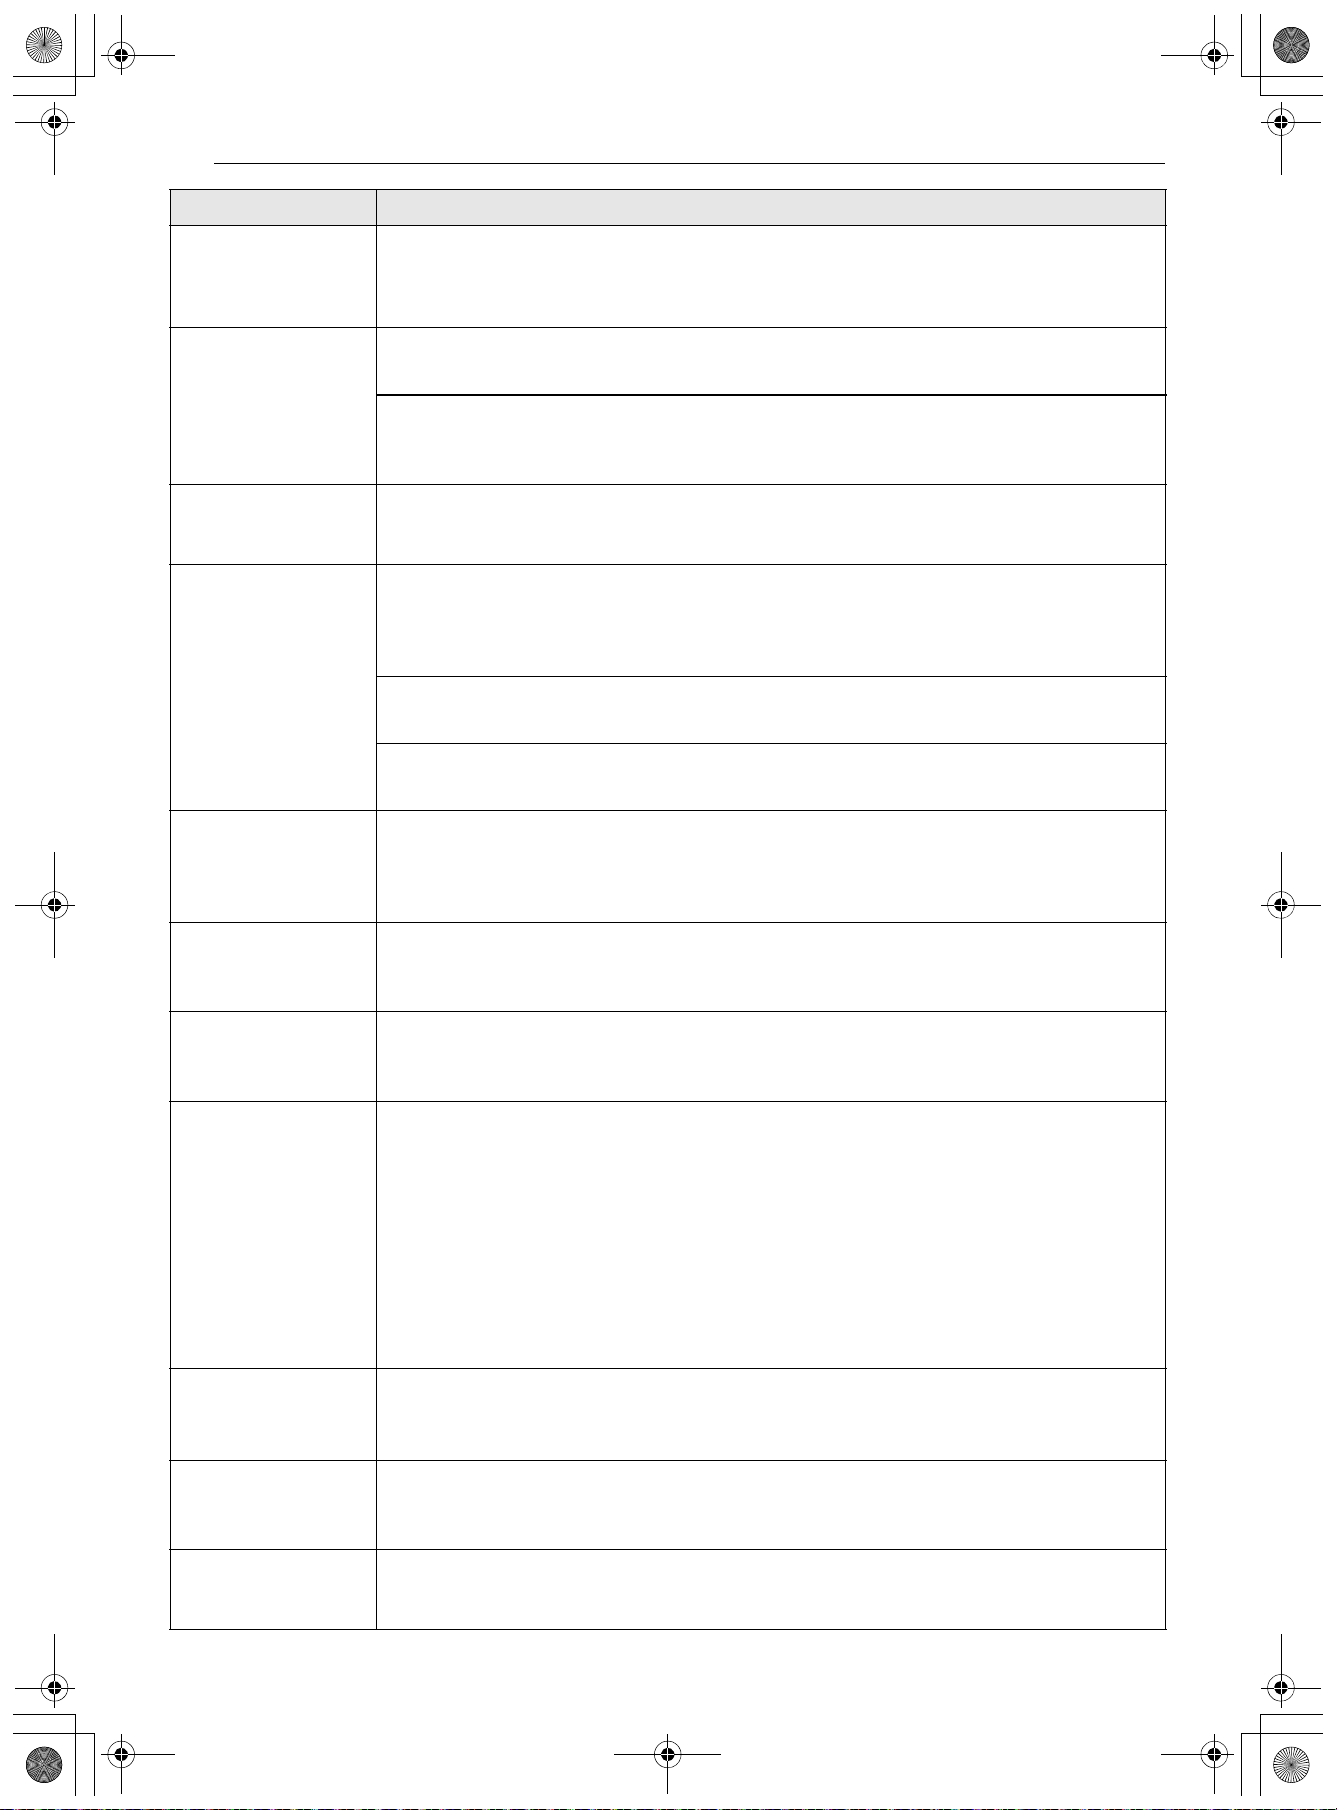
116TROUBLESHOOTING
Surface unit stops
glowing when
changed to a lower
setting.
The unit is still on and hot.
• This is normal.
Areas of
discoloration on the
cooktop
Food spillovers not cleaned before next use.
• See the "Glass-Ceramic Cooktop" section in the MAINTENANCE chapter.
Hot surface on a model with a light-colored cooktop.
• This is normal.The surface may appear discolored when it is hot. This is temporary and will
disappear as the glass cools.
Frequent cycling on
and off of surface
units
The element will cycle on and off to maintain the heat setting.
• This is normal.
Scratches or
abrasions on
cooktop surface
Coarse particles such as salt or sand between cooktop and utensils can cause
scratches.
• Be sure the cooktop surface and bottoms of utensils are clean before using. Small
scratches do not affect cooking and will become less visible with time.
Cleaning materials not recommended for glass-ceramic cooktop have been used.
• See the "Glass-Ceramic Cooktop" section in the MAINTENANCE chapter.
Cookware with rough bottom has been used.
• Use smooth, flat-bottomed cookware.
Metal marks Scraping of metal utensils on cooktop surface.
• Do not slide metal utensils on cooktop surface. Use a glass-ceramic cooktop cleaning
creme to remove the marks. See the "Glass-Ceramic Cooktop" section in the
MAINTENANCE chapter.
Brown streaks or
specks
Boilovers are cooked onto surface.
• Use a blade scraper to remove soil. See the "Glass-Ceramic Cooktop" section in the
MAINTENANCE chapter.
Areas of
discoloration on
cooktop
Mineral deposits from water and food.
• Remove using a glass-ceramic cooktop cleaning creme. Use cookware with clean, dry
bottoms.
Oven control beeps
and displays any F
code error.
Electronic control has detected a fault condition.
• Turn off the oven function you are using to clear the display and stop beeping. Reprogram
oven. If fault recurs, record fault number and contact a service agent.
- [Case 1]
Code: F-3
Cause: Key short error
- [Case 2]
Code: F-9
Cause: Oven not heating
Oven control
displays Sb/5b/S6/56
error code.
This code is not an error code. It indicates that the product's Sabbath mode
sb is
activated.
• See the "Using the Sabbath Mode" section in the Operation chapter.
Displayed colon in
the clock is flashing
This means that the product has just been plugged in, or that it has experienced a
power interruption.
• This is normal. Reset the clock or press any button to stop the flashing.
CLEAN and door
flash in the display
(On some models)
The Self Clean cycle has been selected, but the door is not closed.
• Close the oven door.
Problem Possible Cause & Solution
en-us_main.book.book Page 116 Friday, August 14, 2026 1:47 PM
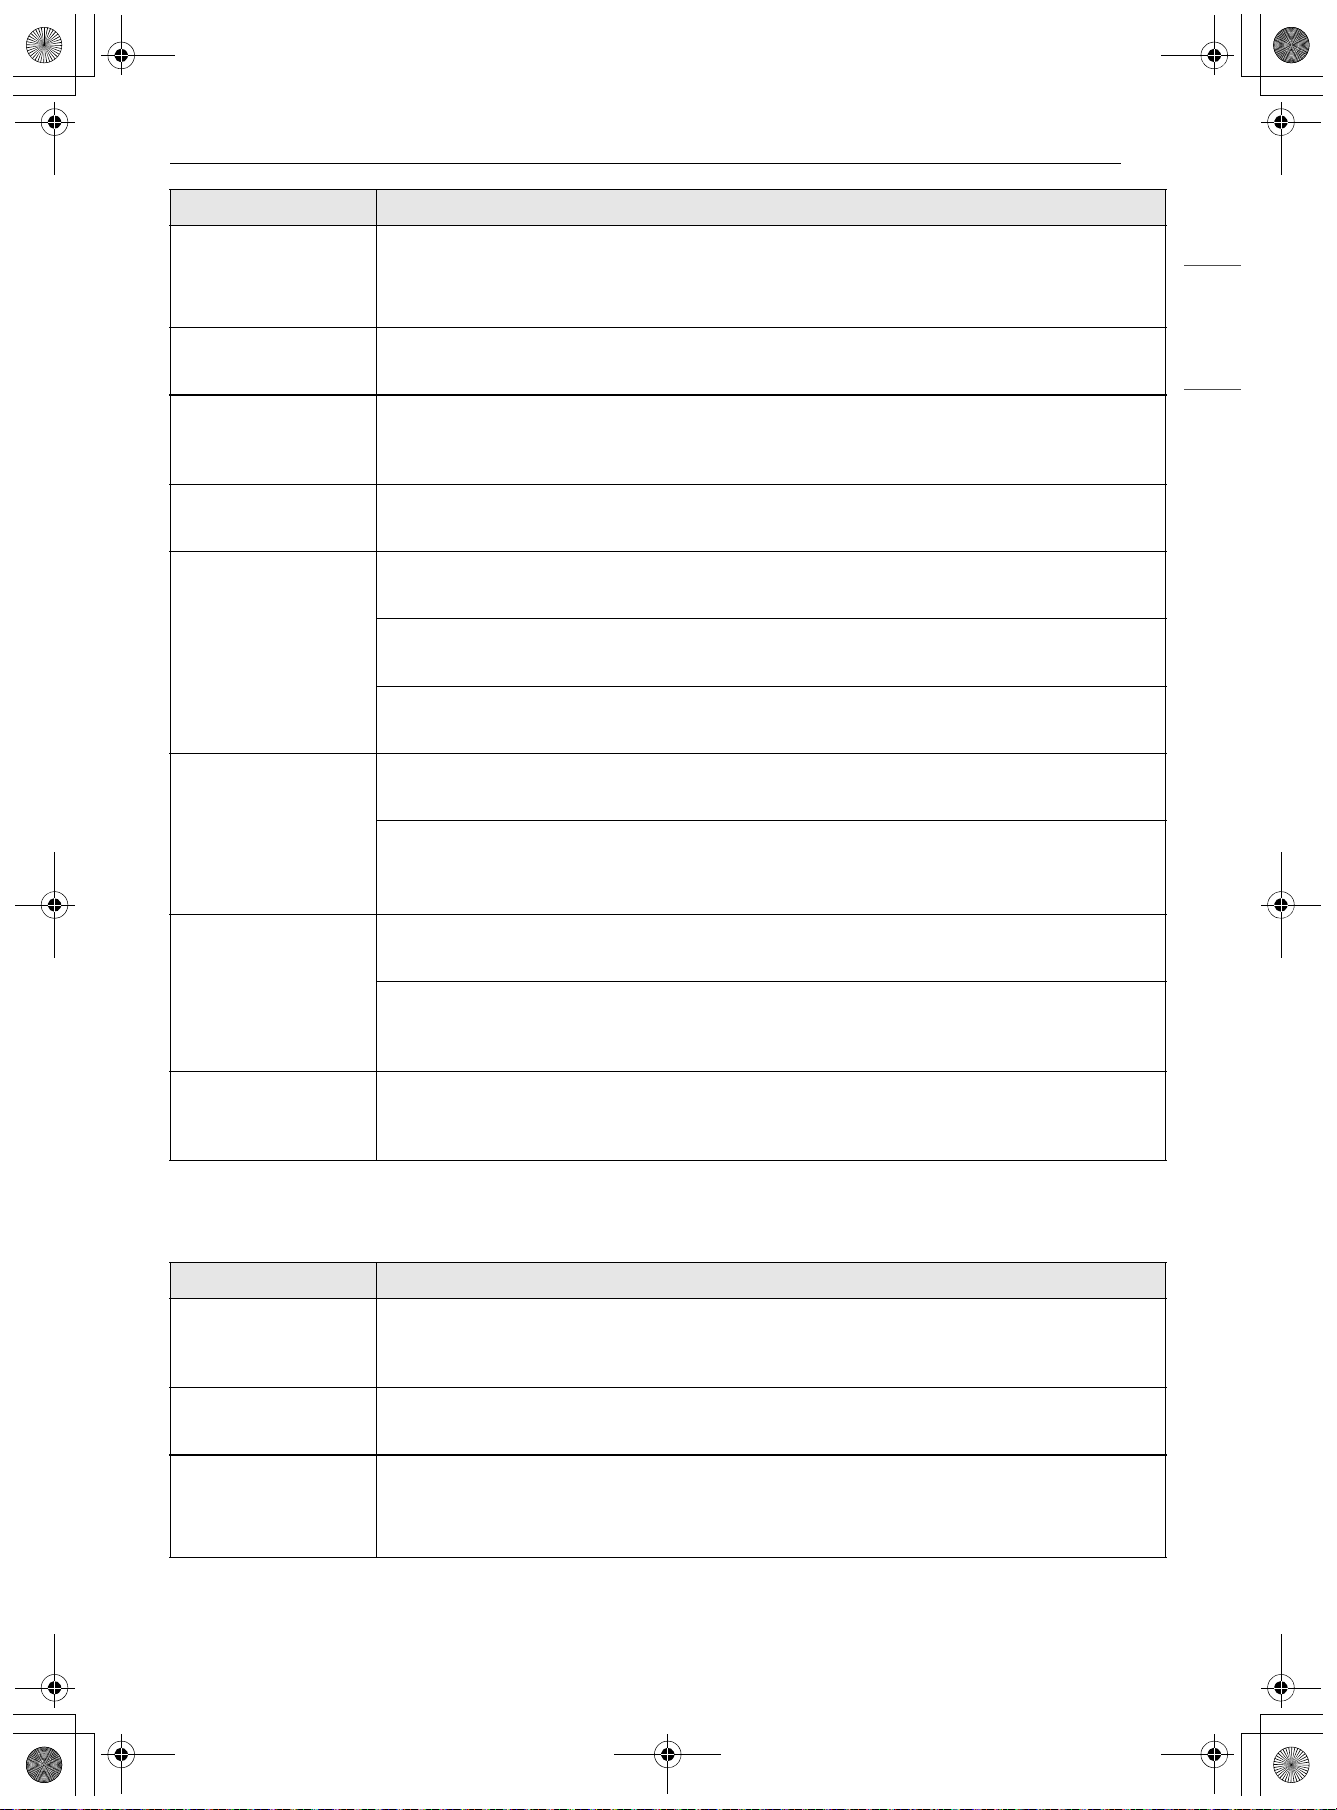
117TROUBLESHOOTING
ENGLISH
Noises
Loc is on in the
display when you
want to cook (On
some models)
The oven is locked because of the Control Lock / Lockout feature.
• Deactivate the Control Lock / Lockout feature.
Oven light does not
work.
It is time to replace the lamp or the lamp is loose.
• Replace or tighten lamp. See "Changing the Oven Light" section in this Owner’s Manual.
Convection fan
stops. (During
Conv.Bake mode)
Convection fan stops during a convection bake cycle. It is done to allow for more even
heating during the cycle.
• This is not a failure of the range and should be considered normal operation.
Fan operation
(During Bake mode)
This is to ensure even baking results.
• It is normal for the fan to operate periodically throughout a normal bake cycle in the oven.
Oven will not Self
Clean. (On some
models)
The oven temperature is too high to set a Self Clean operation.
• Allow the range to cool and reset the controls.
Oven controls improperly set.
• See the Self Clean section.
A Self Clean cycle cannot be started if the oven Control Lock / Lockout feature is active.
• See the "Control Lock / Lockout" in "Changing Oven Settings" section.
Oven door does not
open after a Self
Clean cycle (On some
models)
Oven is too hot.
• Allow the oven to cool below locking temperature.
The control and door may be locked.
• Allow about one hour for the oven to cool after the completion of a Self Clean cycle. The
door can be opened when the lock
k is no longer displayed.
The oven is not clean
after a Self Clean
cycle (On some
models)
Oven controls not properly set.
• See the Self Clean section.
Oven was heavily soiled.
• Clean up heavy spillovers before starting the clean cycle. Heavily soiled ovens may need to
Self Clean again or for a longer period of time.
Oven racks are
difficult to slide (On
some models)
The shiny, silver-colored racks were cleaned in a Self Clean cycle.
• Apply a small amount of vegetable oil to a paper towel and wipe the edges of the oven
racks with the paper towel.
Problem Possible Cause & Solution
“Crackling” or
“popping” sound
This is the sound of the metal heating and cooling during cooking. On models with Self
Clean, this can also happen during the Self Clean function.
• This is normal.
Fan noise A convection fan may automatically turn on and off.
• This is normal.
A chime sounds
when surface
elements are turned
on.
When any cooktop burner is activated, a chime sounds to indicate the cooktop is in use.
• This is normal.
Problem Possible Cause & Solution
en-us_main.book.book Page 117 Friday, August 14, 2026 1:47 PM
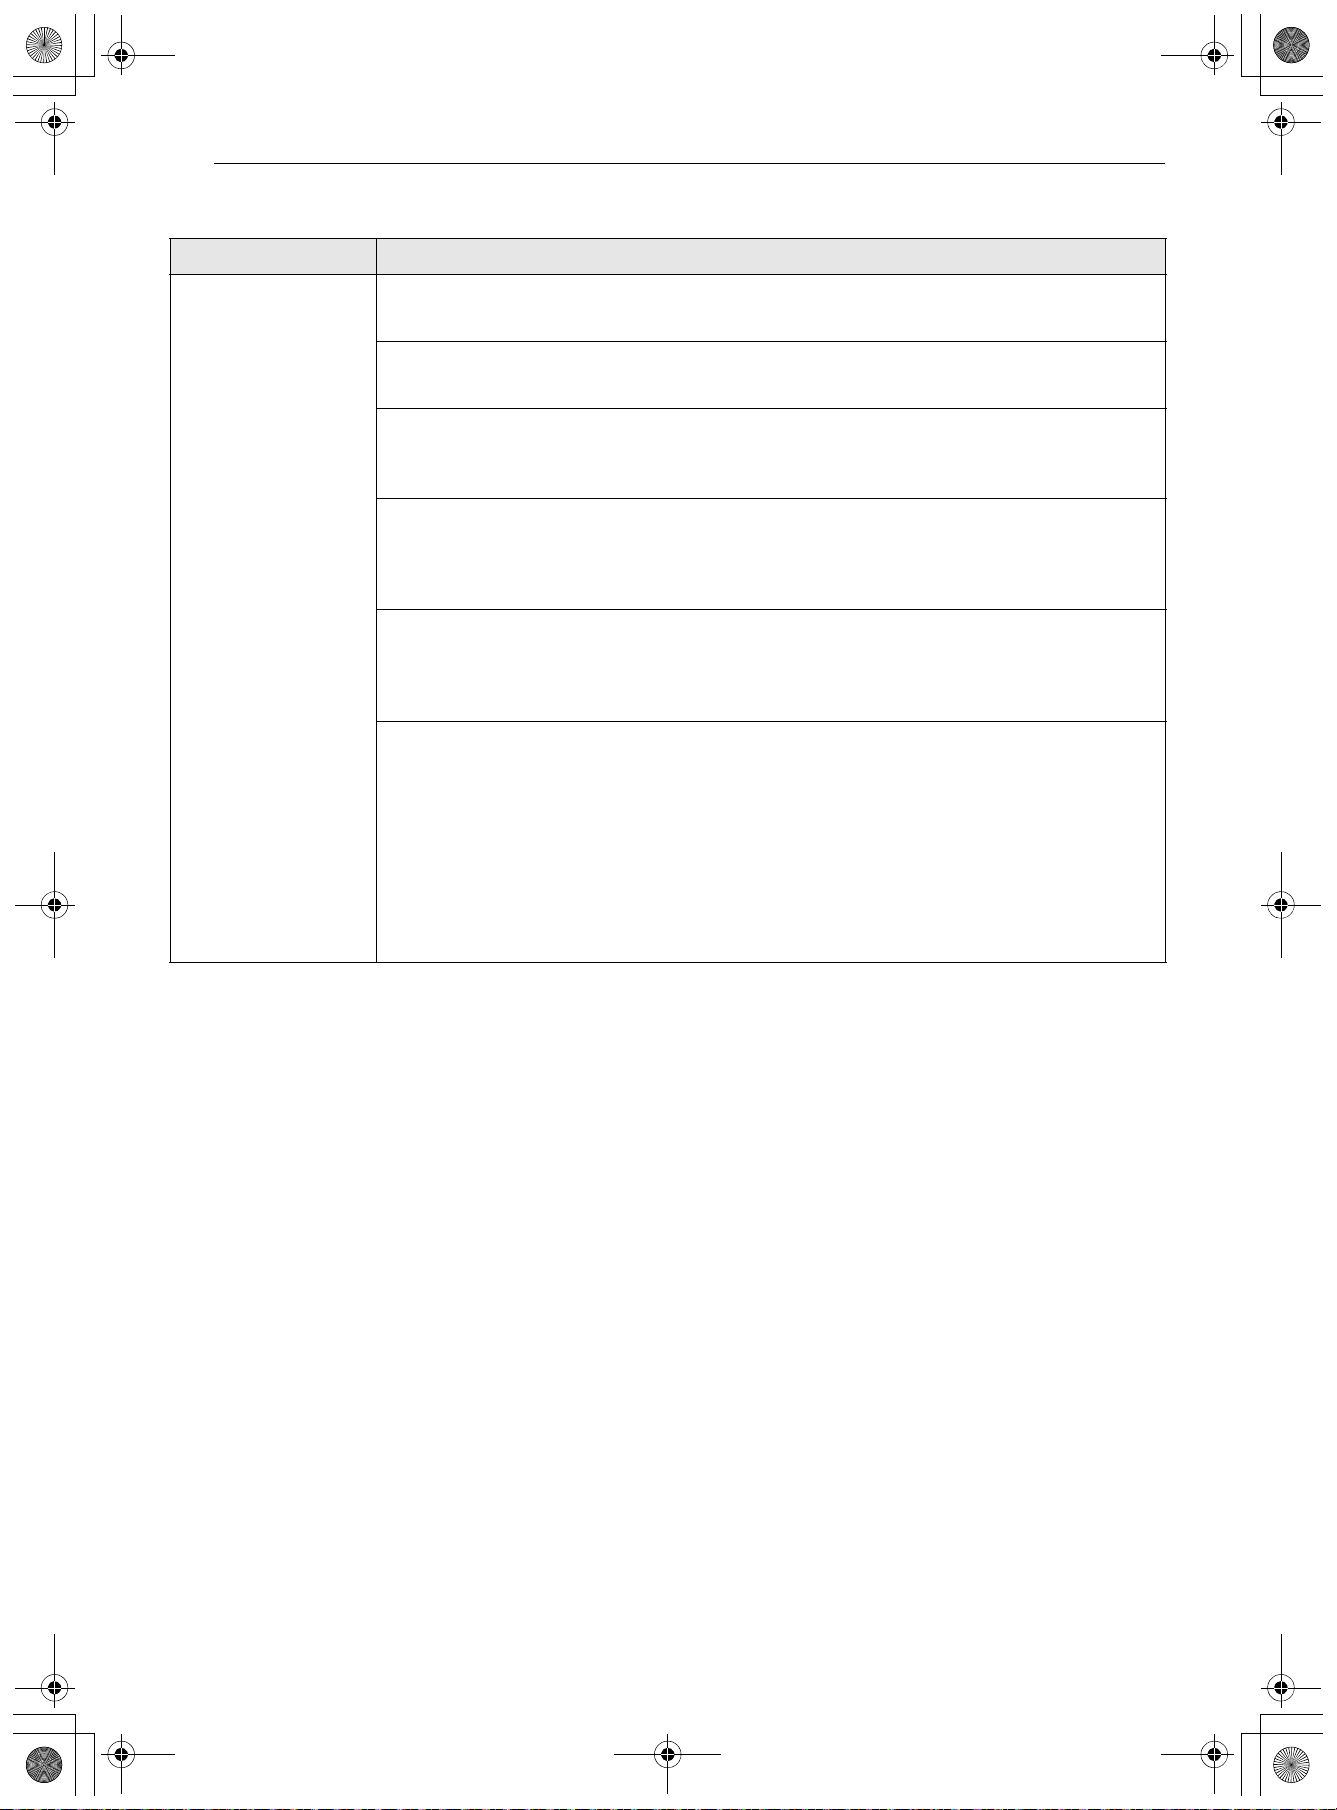
118TROUBLESHOOTING
Wi-Fi
Problem Possible Cause & Solution
Trouble connecting
appliance and
smartphone to Wi-Fi
network
The password for the Wi-Fi network was entered incorrectly.
• Delete your home Wi-Fi network and begin the connection process again.
Mobile data for your smartphone is turned on.
• Turn off the Mobile data on your smartphone before connecting the appliance.
The wireless network name (SSID) is set incorrectly.
• The wireless network name (SSID) should be a combination of English letters (A-Z) and
numbers (0-9). Do not use special characters.
The router frequency is not 2.4 GHz.
• Only a 2.4 GHz router frequency is supported. Set the wireless router to 2.4 GHz and
connect the appliance to the wireless router. To check the router frequency, check with
your Internet service provider or the router manufacturer.
The appliance and the router are too far apart.
• If the appliance is too far from the router, the signal may be weak and the connection may
not be configured correctly. Move the router closer to the appliance or purchase and
install a Wi-Fi repeater.
During Wi-Fi setup, the app is requesting a password to connect to the product (on
certain phones).
• Locate the network name which starts with "LG" under Settings > Networks. Note the last
part of the network name.
- If the network name looks like LGE_Appliance_XX-XX-XX, enter lge12345.
- If the network name looks like LGE_Appliance_XXXX, enter XXXX twice as your password.
For example, if the network name appears as LGE_Appliance_8b92, then you would
enter 8b928b92 as your password. In this instance, the password is case sensitive and
the last 4 characters are unique to your appliance.
en-us_main.book.book Page 118 Friday, August 14, 2026 1:47 PM
119LIMITED WARRANTY
ENGLISH
LIMITED WARRANTY
USA
TERMS AND CONDITIONS
ARBITRATION NOTICE: THIS LIMITED WARRANTY CONTAINS AN ARBITRATION PROVISION THAT
REQUIRES YOU AND LG ELECTRONICS (“LG”) TO RESOLVE DISPUTES BY BINDING ARBITRATION
INSTEAD OF IN COURT, UNLESS YOU CHOOSE TO OPT OUT. IN ARBITRATION, CLASS ACTIONS AND
JURY TRIALS ARE NOT PERMITTED. PLEASE SEE THE SECTION TITLED “PROCEDURE FOR RESOLVING
DISPUTES” BELOW.
Should your LG Electric Range ("Product") fail due to a defect in materials or workmanship under normal
and proper use, during the warranty period set forth below, LG will, at its option, repair or replace the
Product. This limited warranty is valid only to the original retail purchaser of the Product (“You”) and
applies only when purchased lawfully and used within the United States including U.S. Territories.
• Replacement Products and parts are warranted for the remaining portion of the original warranty period
or ninety (90) days, whichever is greater.
• Replacement Products and parts may be new, reconditioned, refurbished, or otherwise factory
remanufactured.
• Replaced Product or part(s) will be the property of LG.
• Proof of original retail purchase specifying the Product model and date of purchase is required to obtain
warranty service under this limited warranty.
EXCEPT TO THE EXTENT PROHIBITED BY APPLICABLE LAW, ANY IMPLIED WARRANTY OF
MERCHANTABILITY OR FITNESS FOR A PARTICULAR PURPOSE ON THE PRODUCT IS LIMITED IN
DURATION TO THE DURATION OF THE ABOVE LIMITED WARRANTY. UNDER NO CIRCUMSTANCES
SHALL LG OR ITS U.S. DISTRIBUTORS/DEALERS BE LIABLE FOR ANY INDIRECT, INCIDENTAL,
CONSEQUENTIAL, SPECIAL, OR PUNITIVE DAMAGES, INCLUDING, WITHOUT LIMITATION, LOST
GOODWILL, LOST REVENUES OR PROFITS, WORK STOPPAGE, IMPAIRMENT OF OTHER GOODS, COST OF
REMOVAL AND REINSTALLATION OF THE PRODUCT, LOSS OF USE, OR ANY OTHER DAMAGES WHETHER
BASED IN CONTRACT, TORT, OR OTHERWISE. LG’S TOTAL LIABILITY, IF ANY, SHALL NOT EXCEED THE
PURCHASE PRICE PAID BY YOU FOR THE PRODUCT.
SOME STATES DO NOT ALLOW THE EXCLUSION OR LIMITATION OF INCIDENTAL OR CONSEQUENTIAL
DAMAGES OR LIMITATIONS ON HOW LONG AN IMPLIED WARRANTY LASTS, SO THE ABOVE
EXCLUSIONS OR LIMITATIONS MAY NOT APPLY TO YOU. THIS LIMITED WARRANTY GIVES YOU
SPECIFIC LEGAL RIGHTS AND YOU MAY ALSO HAVE OTHER RIGHTS THAT VARY FROM STATE TO STATE.
THIS LIMITED WARRANTY DOES NOT COVER:
• Service trips to deliver, pick up, or install, educate how to operate, correct wiring, or correct
unauthorized repairs.
• Damage or failure of the Product to perform during power failures and interrupted or inadequate
electrical service.
• Damage or failure of the Product caused by leaky or broken water pipes, frozen water pipes, restricted
drain lines, inadequate or interrupted water supply or inadequate supply of air.
• Damage or failure of the Product resulting from operating the Product in a corrosive atmosphere or
contrary to the Product owner’s manual.
Warranty Period Scope of Warranty HOW SERVICE IS HANDLED
Two (2) years from the
date of original retail
purchase, or from the
date of delivery as per
applicable law
Parts and Labor (internal
/ functional parts only)
LG will provide, free of charge, all labor and in-home
service to replace defective part(s).
en-us_main.book.book Page 119 Friday, August 14, 2026 1:47 PM

120LIMITED WARRANTY
• Damage or failure of the Product caused by accidents, pests and vermin, lightning, wind, fire, floods, acts
of nature, or any other causes beyond the control of LG.
• Damage or failure of the Product caused by unauthorized modification or alteration, or if the Product is
used for other than the intended purpose, or any water leakage where the Product was not properly
installed.
• Damage or failure of the Product caused by incorrect electrical current, voltage, or plumbing codes.
• Damage or failure of the Product caused by transportation, storage, and/or handling, including
scratches, dents, chips, and/or other damage to the finish of the Product, unless such damage is
reported within one (1) week of delivery.
• Damage or failure of the Product resulting from misuse, abuse, improper installation, repair, or
maintenance. Improper repair includes the use of parts not authorized by LG. Improper installation or
maintenance includes installation or maintenance contrary to the Product owner’s manual.
• Damage or failure of the Product caused by the use of parts, components, accessories, consumable
cleaning products, or any other products or services that were not authorized by LG.
• Damage or missing items to any display or open box Product.
• Refurbished Product or any Product sold “As Is”, “Where Is”, “With all Faults”, or similar disclaimer.
• Products with original serial numbers that have been removed, altered, or cannot be readily determined.
• Increases in utility costs and additional utility expenses.
• Any noises associated with normal operation.
• Products used for other than normal and proper household use (e.g., commercial, business, or industrial
settings, including any retail or food service establishments, or any commercial lodging/transient rental
setting), or any use contrary to the Product owner's manual.
• Costs associated with removal and reinstallation of the Product for repairs, or the removal and
reinstallation of the Product if it is installed in an inaccessible location or not installed in accordance with
the Product Owner's manual.
• Accessories, removable components, or consumable parts (e.g. Shelves, door bins, drawers, water/air
filters, racks, light bulbs, batteries, etc., as applicable), except for internal/functional parts covered under
this limited warranty.
en-us_main.book.book Page 120 Friday, August 14, 2026 1:47 PM
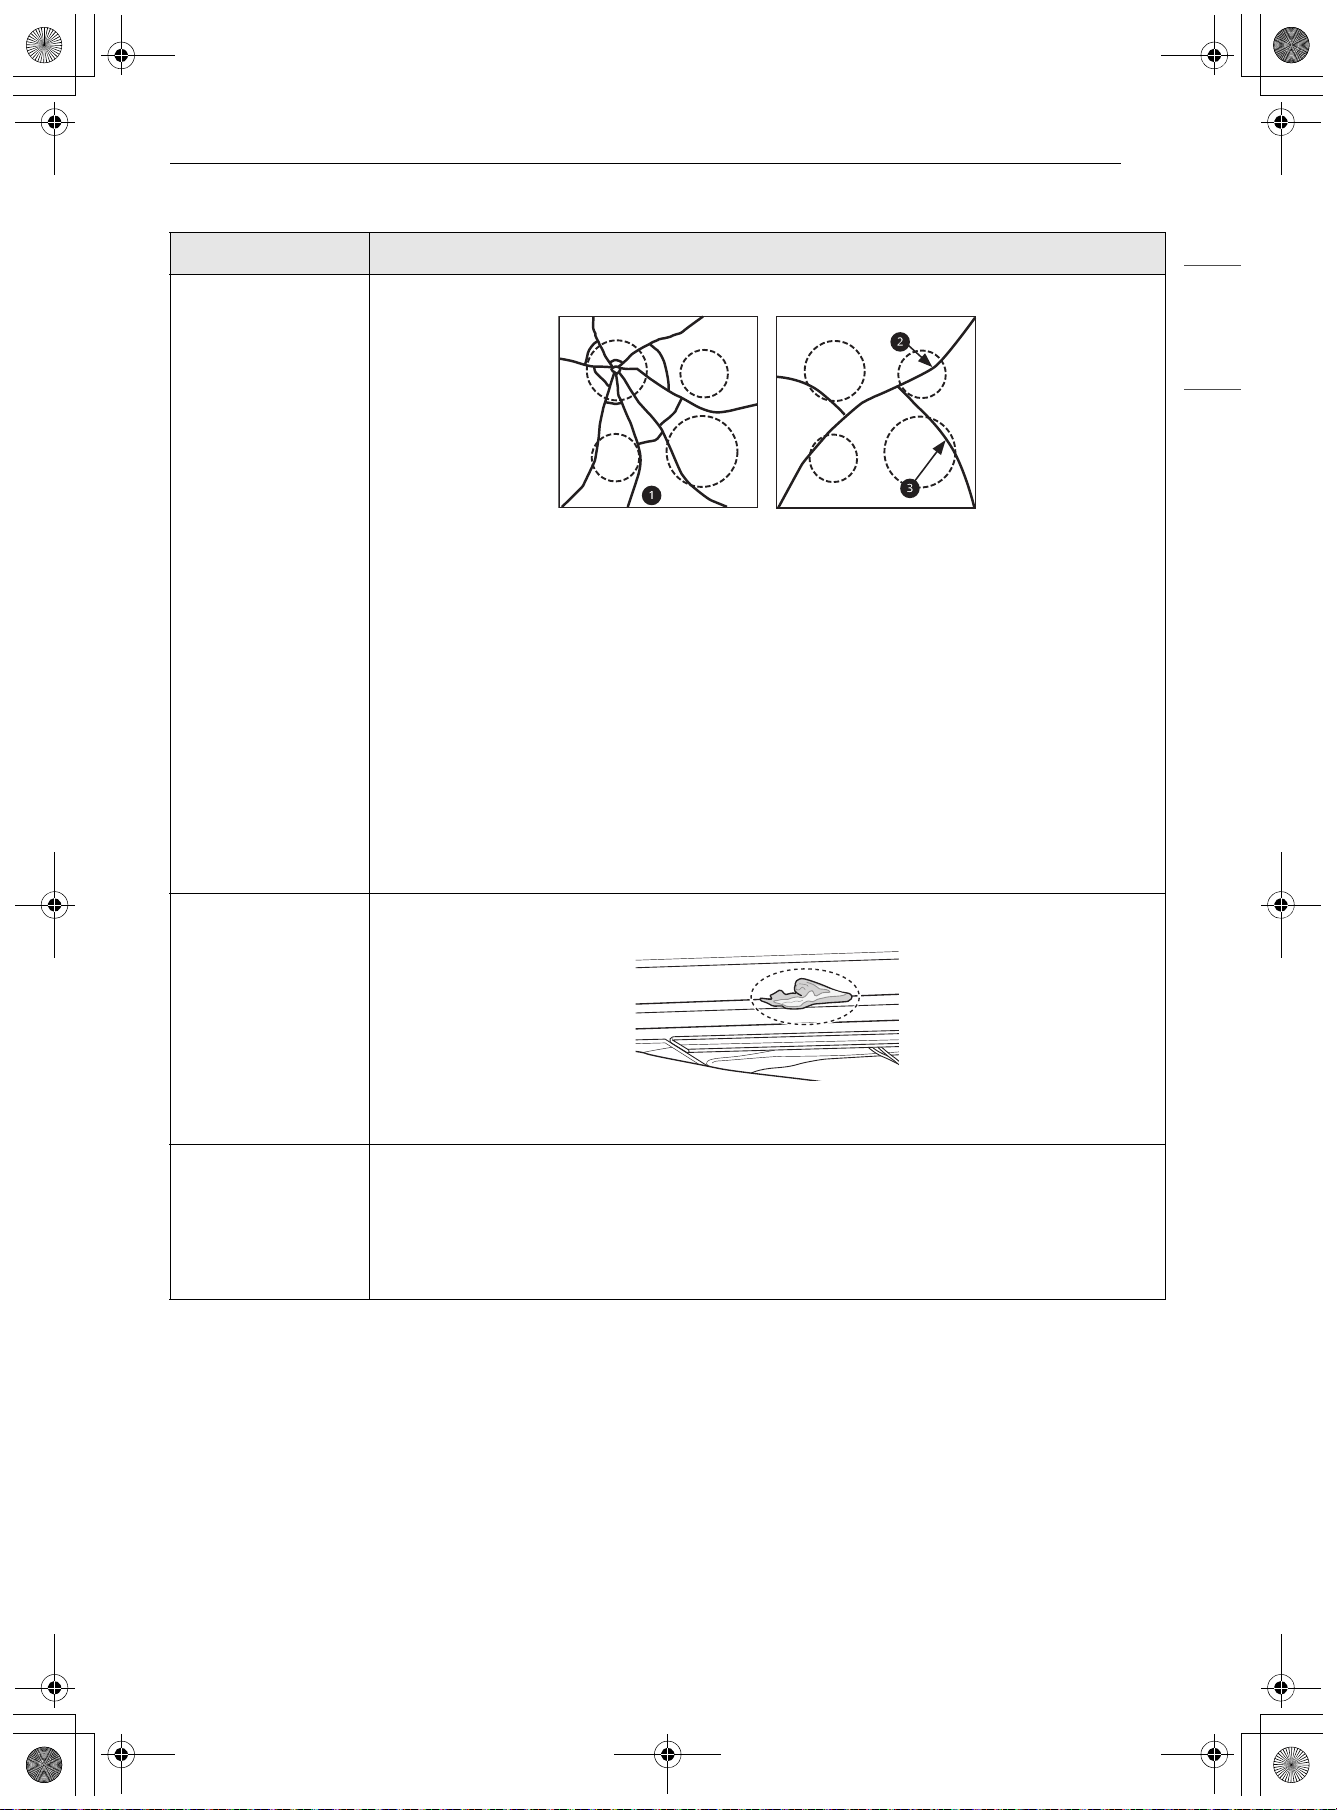
121LIMITED WARRANTY
ENGLISH
Not Covered by this Limited Warranty
Problem Possible Cause & Prevention
Cooktop crack Cooktop crack caused by impact of object
• A: Out of warranty
- a Mechanical breakage
• B: In warranty
-
b Primary crack c Secondary crack
• DO NOT store heavy items above the cooktop surface as they could fall and
damage it.
• DO NOT scratch the cooktop or the cooktop could crack.
• Clean the cooktop before and after using.
NOTE
• Damage caused after delivery (Not covered by warranty)
Cooktop enamel
chipping off
Improper usage
• Do not hit enamel cooktop.
Pitting of the
cooktop glass
If not removed immediately, sugary spillovers (such as preserves, ketchup,
tomato sauce, jellies, fudge, candy, syrups, or chocolate) or melted plastic or foil
can cause surface pitting of the cooktop. (Not covered by warranty)
• Remove the molten material IMMEDIATELY with a metal razor scraper.
• For safety, wear an oven mitt or hot pad while scraping the hot surface.
AB
en-us_main.book.book Page 121 Friday, August 14, 2026 1:47 PM
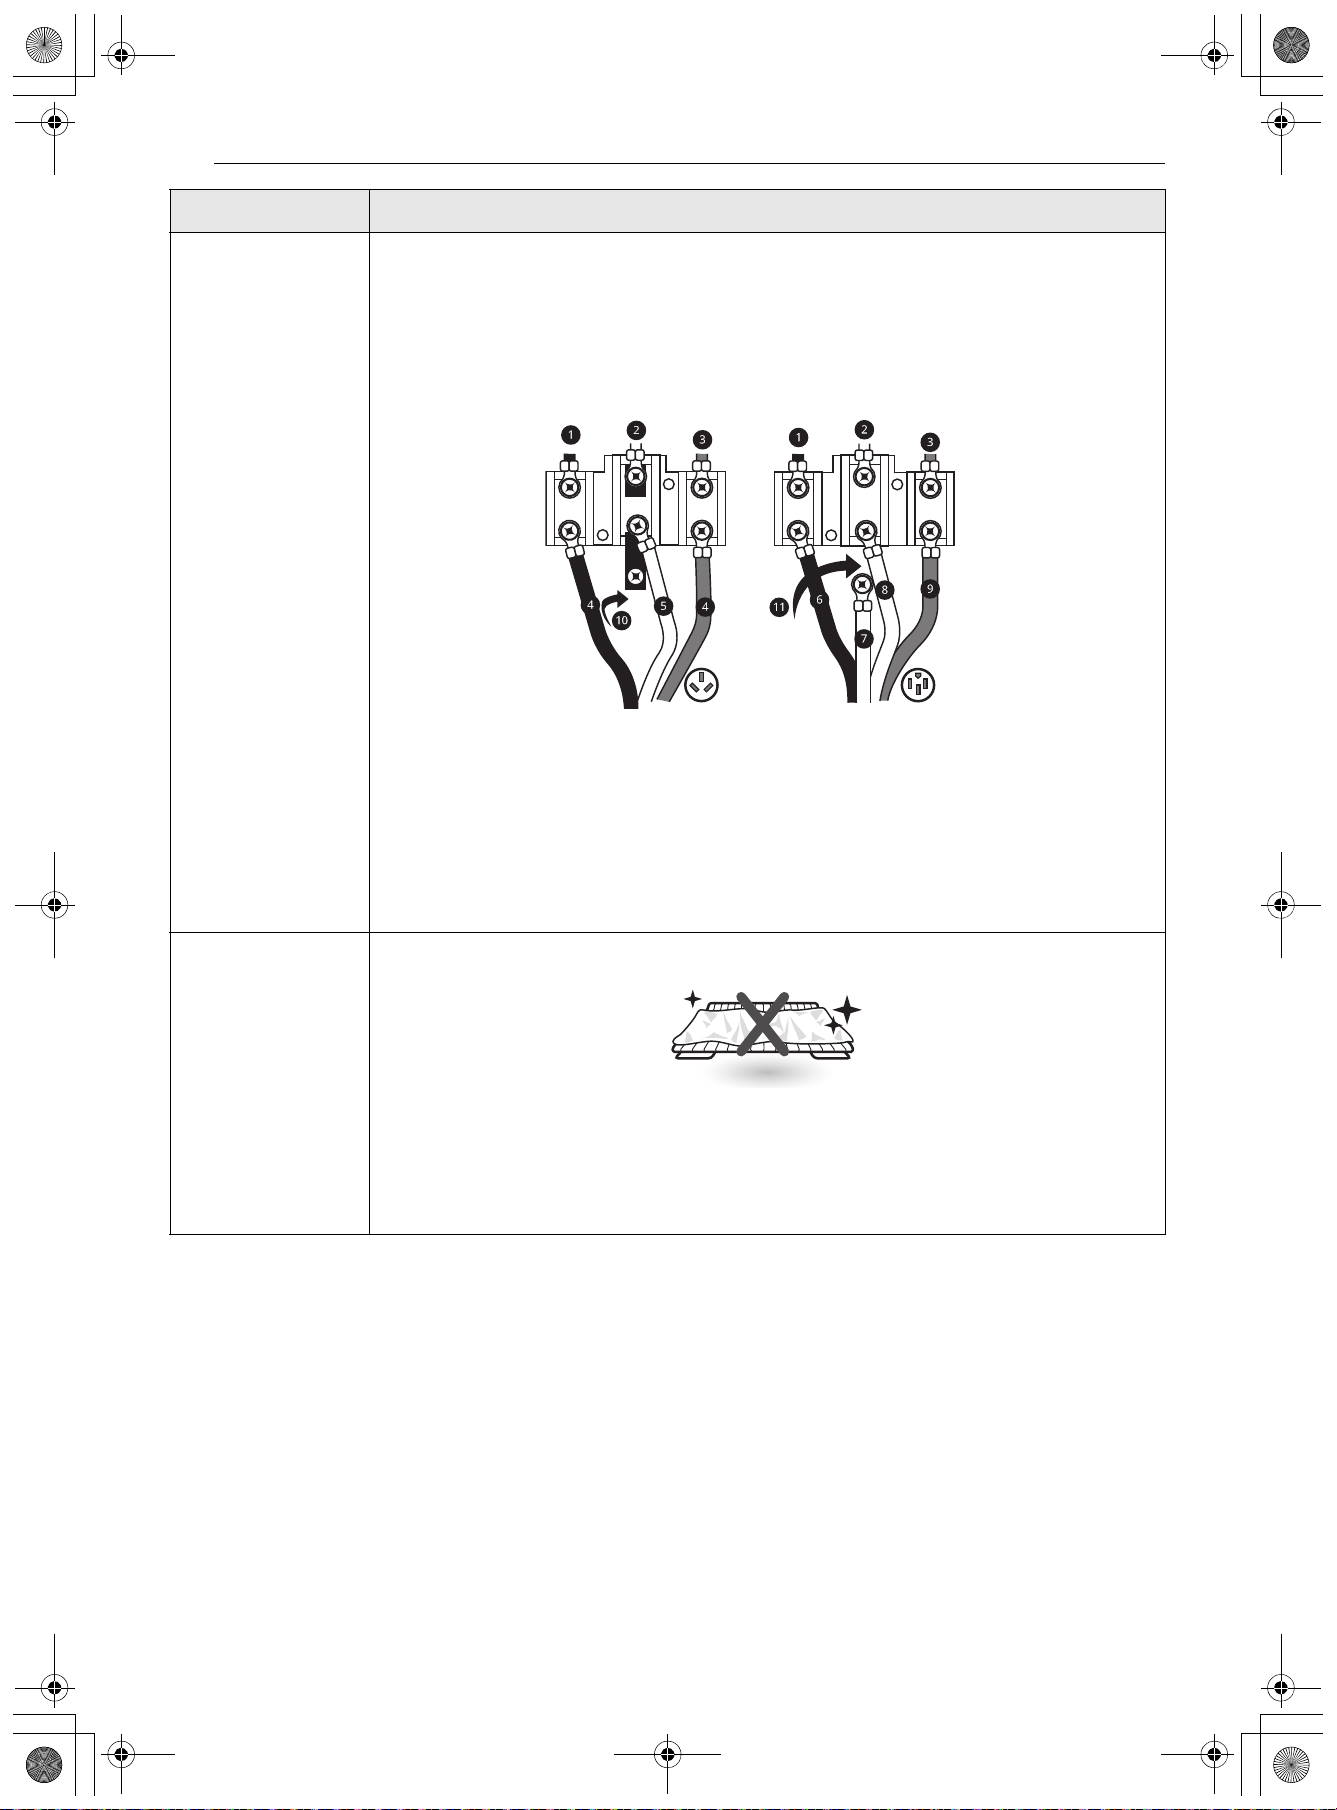
122LIMITED WARRANTY
Unit has no power 1. House power turned off (power supply)
• Check power at main board before calling for service.
2. Tripped breaker
• Match power cord type and outlet type.
3. The power cord is not installed properly.
• Properly install the power cord.
• A: 3-WIRE HOOK UP
• B: 4-WIRE HOOK UP
a Black b White c Red d Outer wire
e Center wire (neutral) f Black wire
g Green ground wire h White wire (neutral)
i Red wire j Ground strap k Remove ground strap
Oven or racks are
stained after
using aluminum
foil
Aluminum foil has melted in the oven
• Never cover the oven bottom or cover an entire rack with materials such as
aluminum foil.
• If the foil has already melted onto the oven, it will not affect the performance of
the oven.
Problem Possible Cause & Prevention
<NEMA 10-50>
<NEMA 14-50>
AB
en-us_main.book.book Page 122 Friday, August 14, 2026 1:47 PM
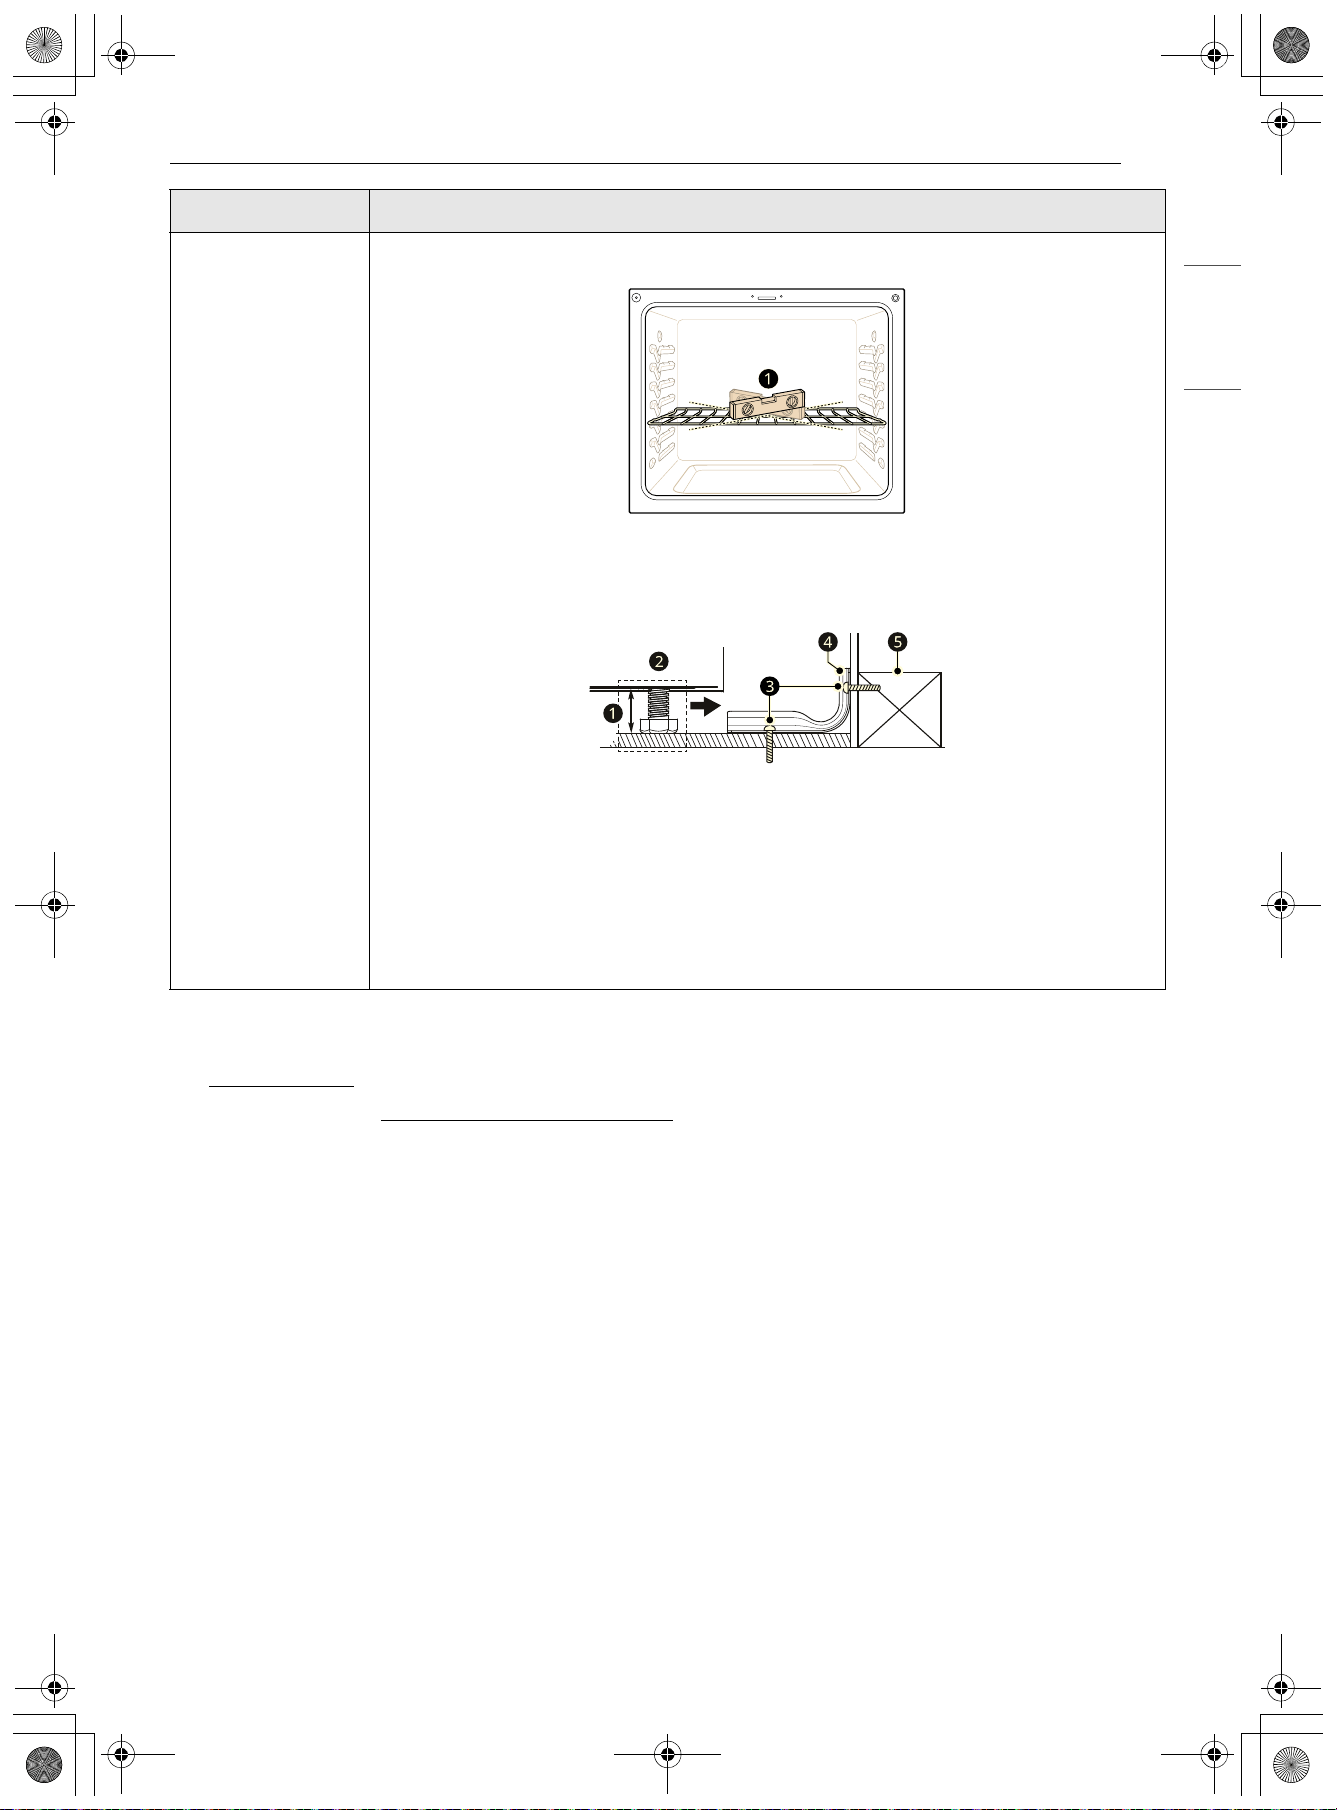
123LIMITED WARRANTY
ENGLISH
The cost of repair or replacement under these excluded circumstances shall be borne by You.
TO OBTAIN WARRANTY SERVICE AND ADDITIONAL INFORMATION
Call 1-800-984-6306
and select the appropriate option from the menu.
Or visit our website at http://www.LGSIGNATURE.com
Or by mail: LG Electronics Customer Service P.O. Box 240007 Huntsville, AL 35813 ATTN: CIC
PROCEDURE FOR RESOLVING DISPUTES:
ALL DISPUTES BETWEEN YOU AND LG ARISING OUT OF OR RELATING IN ANY WAY TO THIS LIMITED
WARRANTY OR THE PRODUCT SHALL BE RESOLVED EXCLUSIVELY THROUGH BINDING ARBITRATION, AND
NOT IN A COURT OF GENERAL JURISDICTION. BINDING ARBITRATION MEANS THAT YOU AND LG ARE EACH
WAIVING THE RIGHT TO A JURY TRIAL AND TO BRING OR PARTICIPATE IN A CLASS ACTION.
Definitions. For the purposes of this section, references to “LG” mean LG Electronics U.S.A., Inc., its
parents, subsidiaries and affiliates, and each of their officers, directors, employees, agents, beneficiaries,
predecessors in interest, successors, assigns and suppliers; references to “dispute” or “claim” shall include
any dispute, claim or controversy of any kind whatsoever (whether based in contract, tort, statute,
regulation, ordinance, fraud, misrepresentation or any other legal or equitable theory) arising out of or
relating in any way to the sale, condition or performance of the product or this Limited Warranty.
Notice of Dispute. In the event you intend to commence an arbitration proceeding, you must first notify
LG in writing at least 30 days in advance of initiating the arbitration by sending a letter to LG at LG
Electronics, USA, Inc. Attn: Legal Department- Arbitration 111 Sylvan Avenue, Englewood Cliffs, NJ 07632.
You and LG agree to engage in good faith discussions in an attempt to amicably resolve your claim. The
notice must provide your name, address, and telephone number; identify the product that is the subject of
Surface is not level
Oven is tipping
Range not leveled
• Check with installer first.
• Use carpenter’s level a to check level.
Anti-tip device not installed correctly
a Approximately 0.65" (16.5 mm)
b Level both sides of range
c Screw must enter wood or concrete
d Anti-tip bracket
e Wall plate
• Check with installer first.
Problem Possible Cause & Prevention
en-us_main.book.book Page 123 Friday, August 14, 2026 1:47 PM
124 LIMITED WARRANTY
the claim; and describe the nature of the claim and the relief being sought. If you and LG are unable to
resolve the dispute within 30 days, either party may proceed to file a claim for arbitration.
Agreement to Binding Arbitration and Class Action Waiver. Upon failure to resolve the dispute during
the 30 day period after sending written notice to LG, you and LG agree to resolve any claims between us
only by binding arbitration on an individual basis, unless you opt out as provided below. Any dispute
between you and LG shall not be combined or consolidated with a dispute involving any other person’s or
entity’s product or claim. More specifically, without limitation of the foregoing, any dispute between you
and LG shall not under any circumstances proceed as part of a class or representative action. Instead of
arbitration, either party may bring an individual action in small claims court, but that small claims court
action may not be brought on a class or representative basis.
Arbitration Rules and Procedures. To begin arbitration of a claim, either you or LG must make a written
demand for arbitration. The arbitration will be administered by the American Arbitration Association
(“AAA”) and will be conducted before a single arbitrator under the AAA’s Consumer Arbitration Rules that
are in effect at the time the arbitration is initiated (referred to as the “AAA Rules”) and under the
procedures set forth in this section. The AAA Rules are available online at www.adr.org/consumer
. Send a
copy of your written demand for arbitration, as well as a copy of this provision, to the AAA in the manner
described in the AAA Rules. You must also send a copy of your written demand to LG at LG Electronics,
USA, Inc. Attn: Legal Department- Arbitration 111 Sylvan Avenue, Englewood Cliffs, NJ 07632. If there is a
conflict between the AAA Rules and the rules set forth in this section, the rules set forth in this section will
govern. This arbitration provision is governed by the Federal Arbitration Act. Judgment may be entered on
the arbitrator’s award in any court of competent jurisdiction. All issues are for the arbitrator to decide,
except that issues relating to the scope and enforceability of the arbitration provision and to the
arbitrability of the dispute are for the court to decide. The arbitrator is bound by the terms of this
provision.
Governing Law. The law of the state of your residence shall govern this Limited Warranty and any
disputes between us except to the extent that such law is preempted by or inconsistent with applicable
federal law.
Fees/Costs. You do not need to pay any fee to begin an arbitration. Upon receipt of your written demand
for arbitration, LG will promptly pay all arbitration filing fees to the AAA unless you seek more than $25,000
in damages, in which case the payment of these fees will be governed by the AAA Rules. Except as
otherwise provided for herein, LG will pay all AAA filing, administration and arbitrator fees for any
arbitration initiated in accordance with the AAA Rules and this arbitration provision. If you prevail in the
arbitration, LG will pay your attorneys’ fees and expenses as long as they are reasonable, by considering
factors including, but not limited to, the purchase amount and claim amount. Notwithstanding the
foregoing, if applicable law allows for an award of reasonable attorneys’ fees and expenses, an arbitrator
can award them to the same extent that a court would. If the arbitrator finds either the substance of your
claim or the relief sought in the demand is frivolous or brought for an improper purpose (as measured by
the standards set forth in Federal Rule of Civil Procedure 11(b)), then the payment of all arbitration fees will
be governed by the AAA Rules. In such a situation, you agree to reimburse LG for all monies previously
disbursed by it that are otherwise your obligation to pay under the AAA Rules. Except as otherwise
provided for, LG waives any rights it may have to seek attorneys’ fees and expenses from you if LG prevails
in the arbitration.
Hearings and Location. If your claim is for $25,000 or less, you may choose to have the arbitration
conducted solely on the basis of (1) documents submitted to the arbitrator, (2) through a telephonic
hearing, or (3) by an in-person hearing as established by the AAA Rules. If your claim exceeds $25,000, the
right to a hearing will be determined by the AAA Rules. Any in-person arbitration hearings will be held at a
location within the federal judicial district in which you reside unless we both agree to another location or
we agree to a telephonic arbitration.
Opt Out. You may opt out of this dispute resolution procedure. If you opt out, neither you nor LG can
require the other to participate in an arbitration proceeding. To opt out, you must send notice to LG no
later than 30 calendar days from the date of the first consumer purchaser’s purchase of the product by
either: (i) sending an e-mail to [email protected]
, with the subject line: “Arbitration Opt Out” or (ii) calling 1-
800-980-2973. You must include in the opt out e-mail or provide by telephone: (a) your name and address;
(b) the date on which the product was purchased; (c) the product model name or model number; and (d)
the serial number (the serial number can be found (i) on the product; or (ii) online by accessing https://
www.lg.com/us/support and clicking on “How do I find my model number?”).
en-us_main.book.book Page 124 Friday, August 14, 2026 1:47 PM

125LIMITED WARRANTY
ENGLISH
You may only opt out of the dispute resolution procedure in the manner described above (that is, by e-mail
or telephone); no other form of notice will be effective to opt out of this dispute resolution procedure.
Opting out of this dispute resolution procedure will not affect the coverage of the Limited Warranty in any
way, and you will continue to enjoy the full benefits of the Limited Warranty. If you keep this product and
do not opt out, then you accept all terms and conditions of the arbitration provision described above.
en-us_main.book.book Page 125 Friday, August 14, 2026 1:47 PM
Memo
en-us_main.book.book Page 126 Friday, August 14, 2026 1:47 PM

MANUAL DEL PROPIETARIO
ESTUFA INDUCCIÓN
ELÉCTRICA
Lea el manual del propietario detenidamente previo a operar el
electrodoméstico y mantengalo al alcance para futuras referencias.
ESPAÑOL
LSIU6338*E
www.LGSIGNATURE.com
Copyright © 2026 LG Electronics. Todos los derechos reservados
Escanee el código QR para ver el manual.
es-us_main.book.book Page 1 Friday, August 14, 2026 2:15 PM
ÍNDICE
2
5 INSTRUCCIONES IMPORTANTES
DE SEGURIDAD
5 LEA TODAS LAS INSTRUCCIONES ANTES DE
UTILIZAR
5 Mensajes de seguridad
5 Dispositivo antivuelco
6 ADVERTENCIA
6 Instalación
6 Funcionamiento
8 Mantenimiento
8 Riesgo de incendio y materiales
inflamables
8 Símbolo de baterías tipo botón
9 Estándar de seguridad para pilas de
botón o moneda
10 PRECAUCIÓN
10 Funcionamiento
10 Mantenimiento
11 DESCRIPCIÓN GENERAL DEL
PRODUCTO
11 Características del producto
11 Exterior e interior
11 Especificaciones del producto
12 Accesorios
13 INSTALACIÓN
13 Antes de la instalación
13 Descripción general de la instalación
13 Herramientas necesarias
14 Piezas
14 Desembalaje y traslado de la estufa
16 Elección de la ubicación adecuada
16 Dimensiones y espacios
18 Electricidad
18 Suelo
18 Temperatura ambiente
18 Nivelando
18 Nivelación de la estufa
19 Conexión de electricidad
19 Requisitos eléctricos
20 Conexión del cable de alimentación/
conducto
24 Relleno trasero opcional
24 Instalación de la placa trasera
25 Dispositivo antivuelco
25 Instalación del dispositivo antivuelco
25 Prueba de funcionamiento
25 Pruebe la estufa antes de usarla
26 Juntas de goma
26 Instalación de las juntas de goma
26 Extracción/Colocación de la manija de la
puerta del horno
26 Antes de extraer/colocar la manija de la
puerta del horno
27 Extracción de la manija de la puerta del
horno
27 Colocación de la manija de la puerta del
horno
28 FUNCIONAMIENTO
28 Panel de control
28 Funciones del panel de control
30 Características de las perillas
30 Luz de perilla
31 Cambio de configuración del horno
31 Configuraciones mínimas y máximas
predeterminadas
32 Wi-Fi
32 Inicio remoto
33 Bloqueo de control
33 Pantalla
33 Brillo
33 Tema del reloj
33 Volumen
34 Idioma
34 Fecha y hora
35 Unidad de temperatura
35 Sabbath
35 Pantalla de Inicio
36 Ajuste de temperatura
36 Modo de conversión automática a
convección
36 Luz de alarma de precalentado
36 Smart Diagnosis
TM
37 Restablecimiento de fábrica
37 Licencia de código abierto
es-us_main.book.book Page 2 Friday, August 14, 2026 2:12 PM
3
37 Placa de cocción
37 Precauciones al utilizar la placa de
cocción
39 Áreas de cocción
39 Beneficios de la cocción en superficie por
inducción
39 Utensilios de cocina de inducción
40 Colocación de los utensilios de cocina
41 Detección de ollas
41 Tamaño mínimo y máximo de las ollas
42 Indicador de compatibilidad para
utensilios de cocina
43 Conservas caseras
43 Uso de los elementos de cocción
44 Uso del Bloqueo de Perillas
44 Configuraciones recomendadas de
cocción en superficie
45 Control de potencia
45 Encendido de la zona de calentamiento
46 Horno
46 Antes de usar el horno
46 Ventilación del horno
47 Uso de los estantes deslizantes del horno
47 Uso de los estantes resistentes del horno
48 Meat Probe (Sonda para carne)
49 Bake (Hornear)
50 Hornear y rostizar por convección
52 Guía de recomendaciones para hornear y
rostizar
53 Broil (Asar)
55 Guía de recomendaciones para asar
57 Freír con aire
60 Guía para freír con aire recomendada
61 Cocción al vacío con aire
62 Guía de cocción al vacío por flujo de aire
recomendada
63 Rostizar con aire
64 Pizza
65 Frozen Meal (Comida congelada)
66 Deshidratar
66 Calentar
67 Proof (Leudar)
68 Recalentamiento crujiente
69 Cocción automática
70 Guía de cocción automática
103 FUNCIONES INTELIGENTES
103 Aplicación LG ThinQ
103 Funciones de la aplicación LG ThinQ
103 Instalación de la aplicación LG ThinQ y
conexión de un electrodoméstico LG
104 Especificaciones del módulo RF
104 Declaración de la FCC
105 Declaración sobre exposición a la
radiación de RF de la FCC
105 Software de código abierto
105 Función Smart Diagnosis
TM
105 Uso de LG ThinQ para diagnosticar
problemas
105 Uso del diagnóstico audible para
diagnosticar problemas
107 MANTENIMIENTO
107 Limpieza
107 Interior
107 Exterior
109 Superficie de la placa de cocción
112 EasyClean
115 Self Clean (Autolimpieza)
117 Remover/Ensamblar puertas elevables de
horno
118 Extracción y colocación de cajones
119 Extracción/montaje de la moldura de
ventilación
119 Mantenimiento periódico
119 Cambio de la luz del horno
121 SOLUCIÓN DE PROBLEMAS
121 Preguntas Frecuentes
121 Preguntas frecuentes
124 Antes de llamar al servicio técnico
124 Cocción
126 Partes y Características
128 Ruidos
129 Wi-Fi
130 GARANTÍA LIMITADA
130 EE. UU.
130 TÉRMINOS Y CONDICIONES
es-us_main.book.book Page 3 Friday, August 14, 2026 2:12 PM

4
130 ESTA GARANTÍA LIMITADA NO CUBRE LO
SIGUIENTE:
134 PROCEDIMIENTO PARA RESOLVER
DISPUTAS:
es-us_main.book.book Page 4 Friday, August 14, 2026 2:12 PM
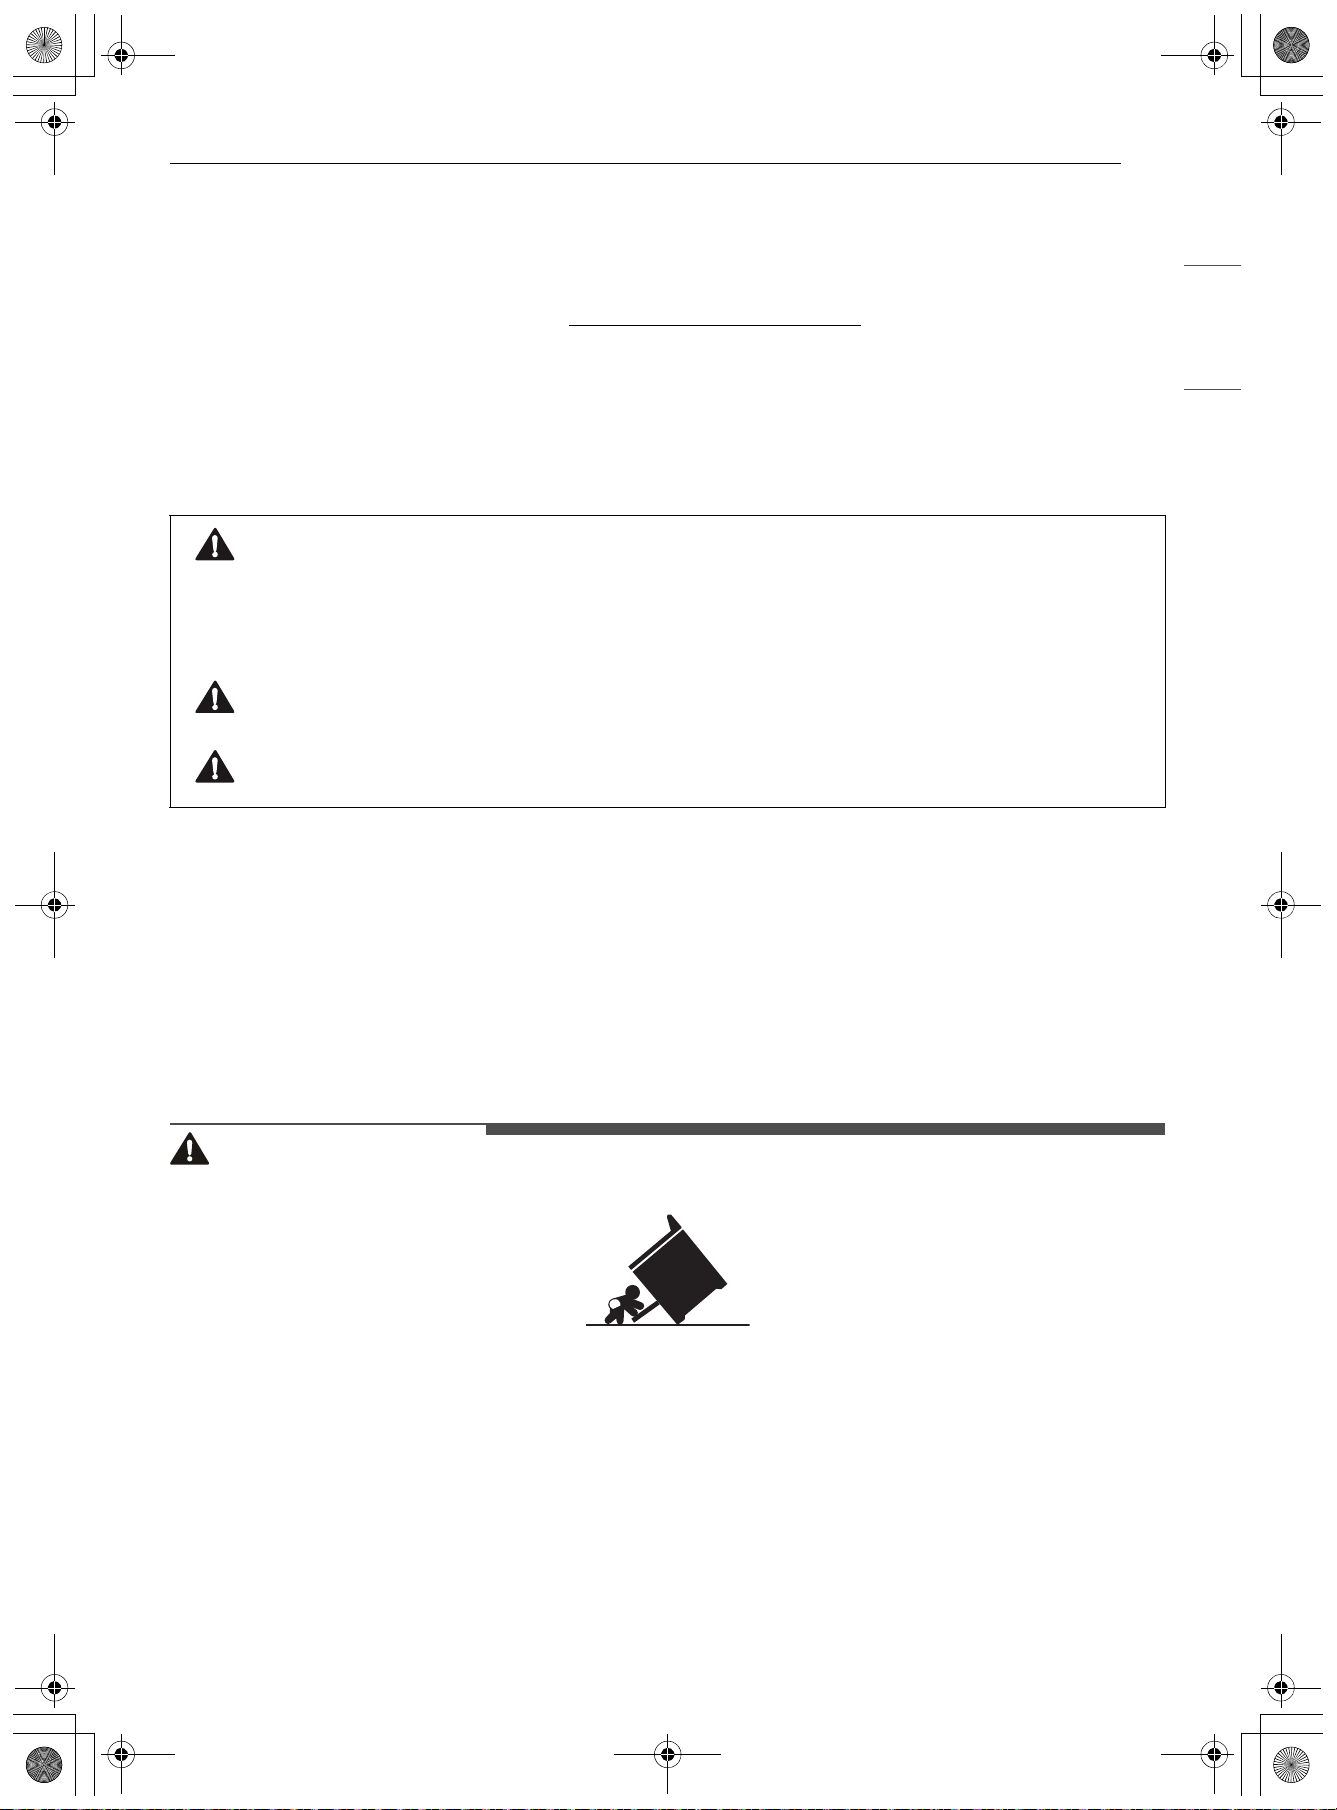
5INSTRUCCIONES IMPORTANTES DE SEGURIDAD
ESPAÑOL
INSTRUCCIONES IMPORTANTES DE SEGURIDAD
LEA TODAS LAS INSTRUCCIONES ANTES DE UTILIZAR
Descargue este manual del propietario en http://www.LGSIGNATURE.com
Mensajes de seguridad
Su seguridad y la de los demás son muy importantes.
Tanto en este manual como en el equipo, hemos proporcionado muchos mensajes de seguridad
importantes. Siempre debe leer y respetar todos los mensajes de seguridad.
Todos los mensajes de seguridad le indicarán cuál es el riesgo potencial, le indicarán cómo reducir la
probabilidad de lesiones y le proporcionarán información sobre qué podría suceder si no se siguen las
instrucciones.
Dispositivo antivuelco
Para reducir el riesgo de vuelco, el electrodoméstico debe estar asegurado con un dispositivo antivuelco
instalado de manera adecuada. Para comprobar si el dispositivo está instalado correctamente, verifique
que el dispositivo antivuelco esté bien sujeto, o tome el borde superior trasero de la protección posterior
de la estufa e intente inclinarla hacia adelante con cuidado. Consulte la sección de instalación para obtener
instrucciones.
ADVERTENCIA
• Un niño o adulto pueden volcar la estufa y morir.
• Coloque el dispositivo antivuelco en la estructura y/o estufa. Verifique que el dispositivo antivuelco se
haya instalado y acoplado correctamente siguiendo la guía del soporte antivuelco.
• Enganche la estufa al dispositivo antivuelco conforme a la guía del soporte antivuelco. Asegúrese que el
dispositivo antivuelco se vuelva a acoplar cuando se mueva la estufa según la guía del soporte
antivuelco.
• Vuelva a enganchar el dispositivo antivuelco si mueve la estufa. No opere la estufa sin el dispositivo
antivuelco en su lugar y enganchado.
• Consulte las instrucciones de instalación para obtener los detalles.
• Si no sigue estas instrucciones puede ocasionar la muerte o quemaduras graves en niños o adultos.
Este es el símbolo de alerta de seguridad.
Este símbolo le advierte sobre posibles riesgos que pueden ocasionar lesiones o la muerte a usted o
a otros. El símbolo de alerta de seguridad siempre estará acompañado de las palabras
"ADVERTENCIA" o "PRECAUCIÓN" y seguido de un mensaje de seguridad importante.
Estos términos significan lo siguiente:
ADVERTENCIA
El incumplimiento de las instrucciones podría causarle la muerte o lesiones graves.
PRECAUCIÓN
El incumplimiento de las instrucciones podría causarle lesiones o daños al producto.
es-us_main.book.book Page 5 Friday, August 14, 2026 2:12 PM
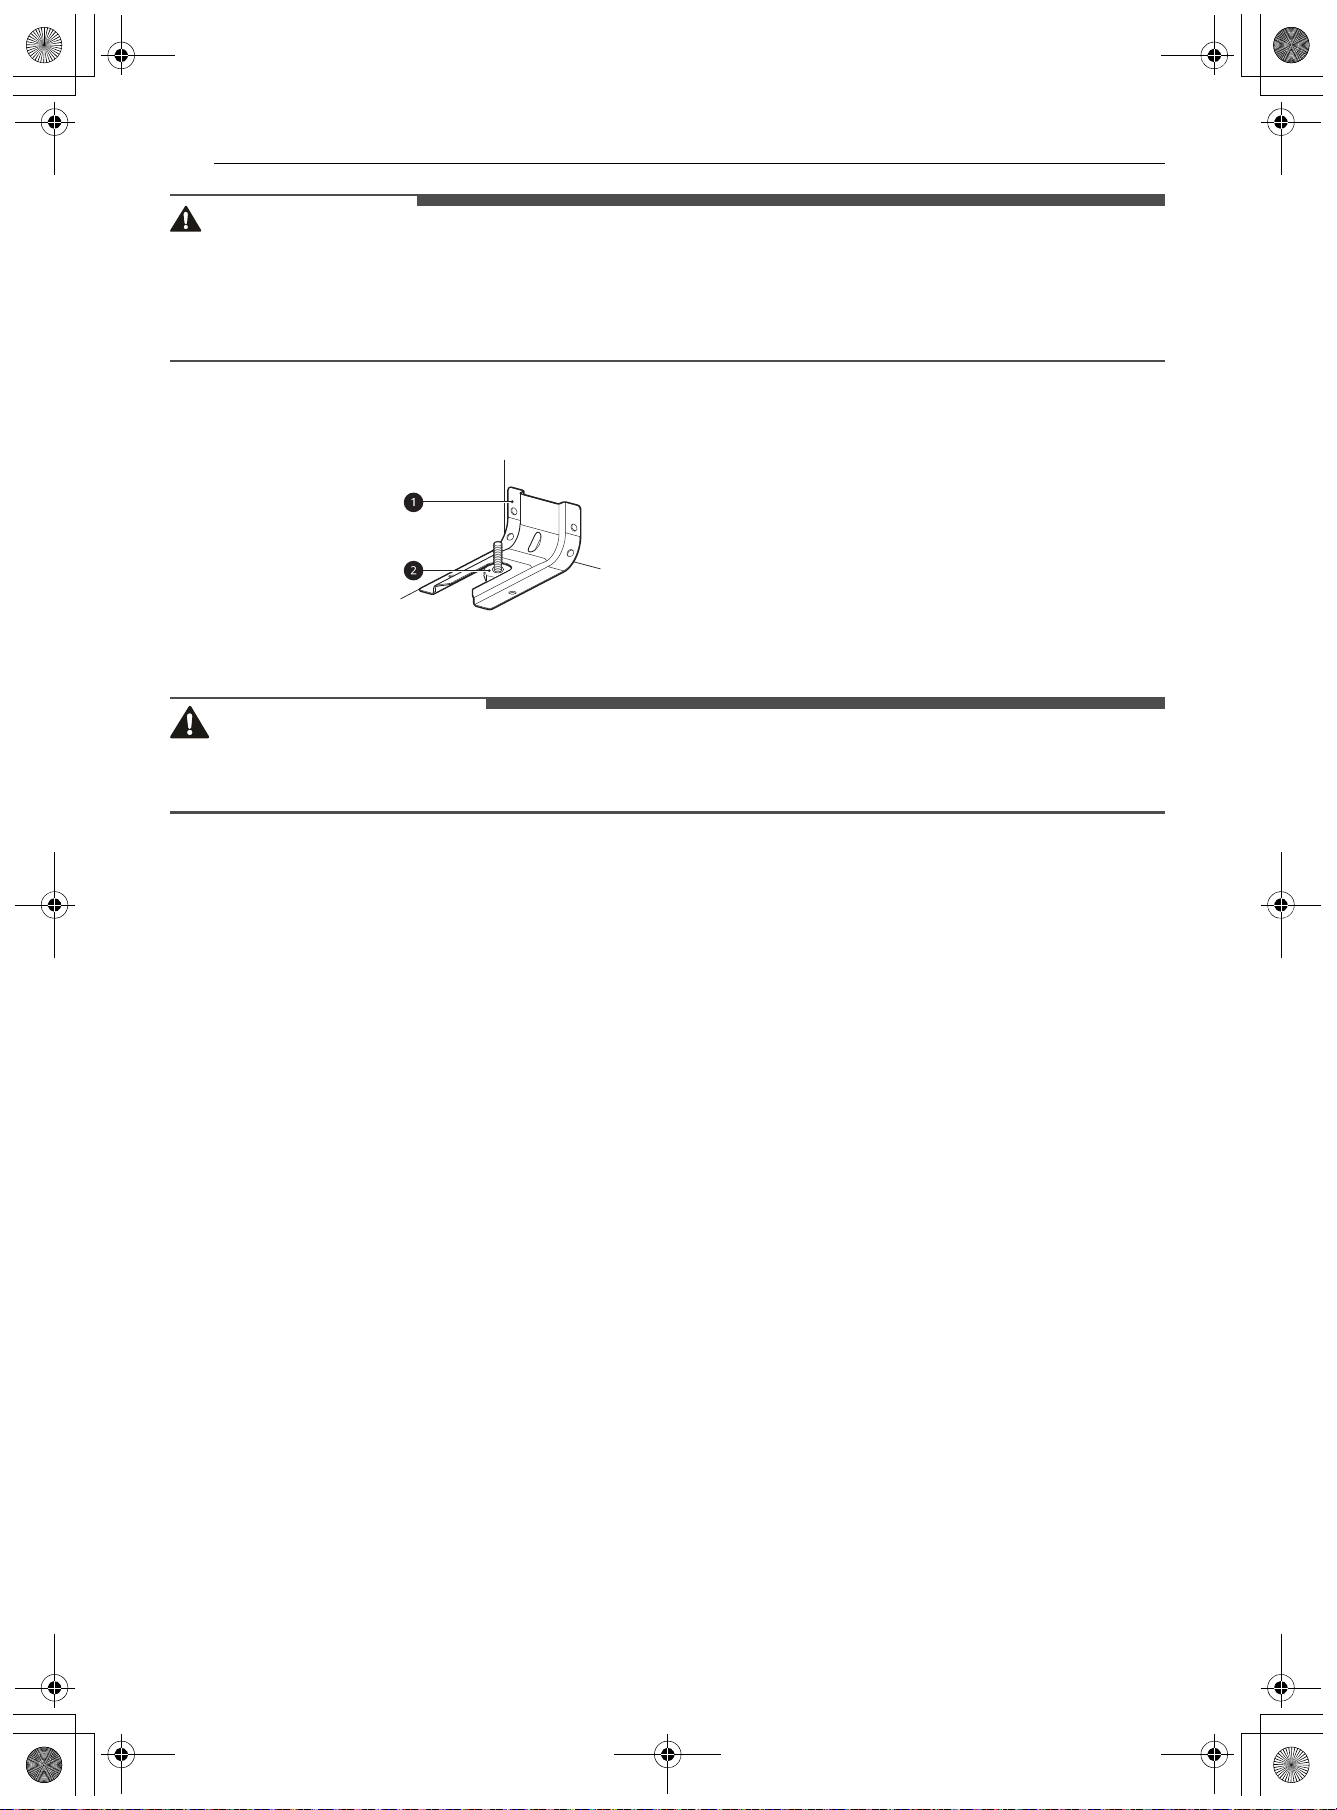
6 INSTRUCCIONES IMPORTANTES DE SEGURIDAD
ADVERTENCIA
• No coloque objetos grandes y pesados, como pavos enteros, sobre la puerta del horno abierta. La estufa
podría inclinarse hacia adelante y ocasionar lesiones.
• No se pare ni se siente sobre la puerta del horno. La estufa podría inclinarse y usted podría sufrir
lesiones con líquidos calientes derramados, alimentos calientes o la estufa misma.
• Nunca retire las patas del horno. La estufa no estará asegurada al soporte antivuelco si se retiran las
patas del horno.
ADVERTENCIA
ADVERTENCIA
• Para reducir el riesgo de explosiones, incendios, descargas eléctricas, quemaduras, lesiones o muerte de
las personas al usar este producto, siga las precauciones básicas, incluidas las siguientes:
Instalación
• No recubra las paredes del horno, los estantes, el fondo ni ninguna otra parte del horno con papel de
aluminio ni ningún otro material. Esto destruye la distribución de calor, produce resultados de horneado
deficientes y causa daños permanentes al interior del horno. (El papel de aluminio se fundirá en la
superficie interior del horno).
• Para eliminar el riesgo de quemaduras o incendio al estirarse sobre las llamas de las unidades de la
superficie encendidas, se debe evitar el espacio de almacenamiento del gabinete ubicado sobre las
unidades de superficie. Si se proporcionará almacenamiento en gabinetes, el riesgo se puede reducir
instalando una campana extractora sobre la estufa, que se proyecte hacia adelante 5 pulgadas como
mínimo al frente de los gabinetes.
• No utilice papel de aluminio ni ningún otro material para revestir la base del horno. La instalación
inadecuada de estos revestimientos podría causar riesgo de descarga eléctrica o incendio.
• Haga que un instalador calificado instale y conecte a tierra su estufa de manera apropiada, de acuerdo
con las instrucciones de instalación. Cualquier ajuste y servicio deben realizarlo instaladores de estufas
de calificados o técnicos de servicio.
Funcionamiento
• No deje a los niños solos o sin supervisión cerca del electrodoméstico en uso o todavía caliente. Nunca
se debe permitir que los niños se sienten o paren sobre ninguna parte del electrodoméstico, ya que
podrían lesionarse o quemarse.
• No debe permitir que los niños jueguen con los controles ni con ninguna otra parte del
electrodoméstico.
• NO TOQUE LOS ELEMENTOS CALENTADORES NI LAS SUPERFICIES INTERIORES DEL HORNO. Los
elementos calentadores podrían estar calientes, incluso cuando presenten un color oscuro. Las
superficies interiores del horno se calientan lo suficiente como para causar quemaduras. Durante y
después del uso, no toque ni permita que la vestimenta u otro material inflamable entren en contacto
con los elementos calentadores ni las superficies interiores del horno, hasta que hayan tenido tiempo
suficiente para enfriarse. Otras superficies, como los orificios de ventilación del horno y las superficies
a Soporte antivuelco
b Pata de nivelación
es-us_main.book.book Page 6 Friday, August 14, 2026 2:12 PM

7INSTRUCCIONES IMPORTANTES DE SEGURIDAD
ESPAÑOL
cercanas a estos orificios, las puertas del horno y las ventanas de las puertas del horno también se
calientan y podrían causar quemaduras.
• Las hornallas superficiales podrían estar calientes incluso cuando presenten un color oscuro. Las áreas
cercanas a las hornallas superficiales podrían calentarse lo suficiente como para causar quemaduras.
Durante y después de su uso, NO TOQUE LAS HORNALLAS SUPERFICIALES NI LAS ÁREAS CERCANAS ni
permita que la vestimenta u otro material inflamable entren en contacto con las hornallas o las
superficies cercanas hasta que hayan tenido tiempo suficiente para enfriarse. Esto incluye la placa de
cocción y el área sobre la puerta del horno.
• Abra la puerta del horno con cuidado. El aire caliente y el vapor que salen del horno pueden causar
quemaduras en las manos, el rostro y los ojos. Permita que el aire caliente o el vapor salgan del horno
antes de sacar o colocar nuevamente la comida en el horno.
• No utilice plástico para cubrir los alimentos. Utilice únicamente papel de aluminio o tapas seguras para
horno.
• Nunca intente secar una mascota en el horno.
• Nunca utilice su electrodoméstico para calefaccionar el ambiente.
• Utilice siempre agarraderas o guantes para horno cuando retire alimentos del horno o del elemento de
la superficie. Los utensilios de cocina estarán calientes. Utilice solo agarraderas secas. Las agarraderas
húmedas o mojadas sobre superficies calientes podrían producir quemaduras por vapor. No permita
que la agarradera toque los elementos calentadores. No utilice una toalla u otra tela gruesa para retirar
alimentos.
• No caliente recipientes de alimentos cerrados. La presión puede causar una explosión que podría
generar lesiones.
• Asegúrese de retirar todos los materiales del embalaje antes de la puesta en funcionamiento. Mantenga
el plástico, telas, papel y otros materiales inflamables lejos de las piezas del electrodoméstico que se
podrían calentar.
• No permita que el papel de aluminio ni la sonda de temperatura entren en contacto con las hornallas.
• No toque la superficie caliente entre la parte inferior de la puerta del horno y la parte superior del cajón,
en el frente del horno, mientras está en funcionamiento. La superficie se calienta y puede causar
quemaduras y otras lesiones.
• No toque los estantes del horno mientras están calientes.
• Si se debe mover un estante mientras el horno está caliente, evite que la agarradera toque el quemador
del horno.
• Tire del estante del horno hasta llegar a la posición de detención y bloqueo al cargar, y descargar
alimentos del horno. Esto ayuda a prevenir quemaduras causadas al tocar superficies calientes de la
puerta y las paredes del horno.
• No utilice el horno si el quemador desarrolla un punto de brillo durante el uso o si muestra otros signos
de daño. Un punto de brillo indica que el quemador podría fallar y representar un peligro potencial de
quemadura, incendio o descarga eléctrica. Apague el horno de inmediato y solicite que un técnico
calificado reemplace el quemador.
• Cuando el horno está en funcionamiento, la superficie superior de la cavidad del cajón se calienta y
puede causar quemaduras. Nunca deje a los niños sin supervisión cerca del horno o de la placa de
cocción.
• No ponga la mano dentro del cajón mientras el horno está en funcionamiento.
• Mantenga el conducto de ventilación del horno sin obstrucciones. Las áreas cercanas a la ventilación
podrían calentarse durante el funcionamiento y causar quemaduras. No bloquee la abertura de
ventilación. Evite colocar plásticos cerca de la ventilación, ya que el calor podría deformar o derretir el
plástico.
• USO REMOTO - Este artefacto se puede configurar para permitir su uso remoto en todo momento. No
almacene materiales inflamables o artículos sensibles a la temperatura en el interior, encima o cerca de
las unidades de superficie del artefacto.
• Nunca deje objetos sobre la placa de cocción. El aire caliente de la ventilación puede encender objetos
inflamables y aumentar la presión de los recipientes cerrados, lo que pued
e provocar su estallido.
es-us_main.book.book Page 7 Friday, August 14, 2026 2:12 PM
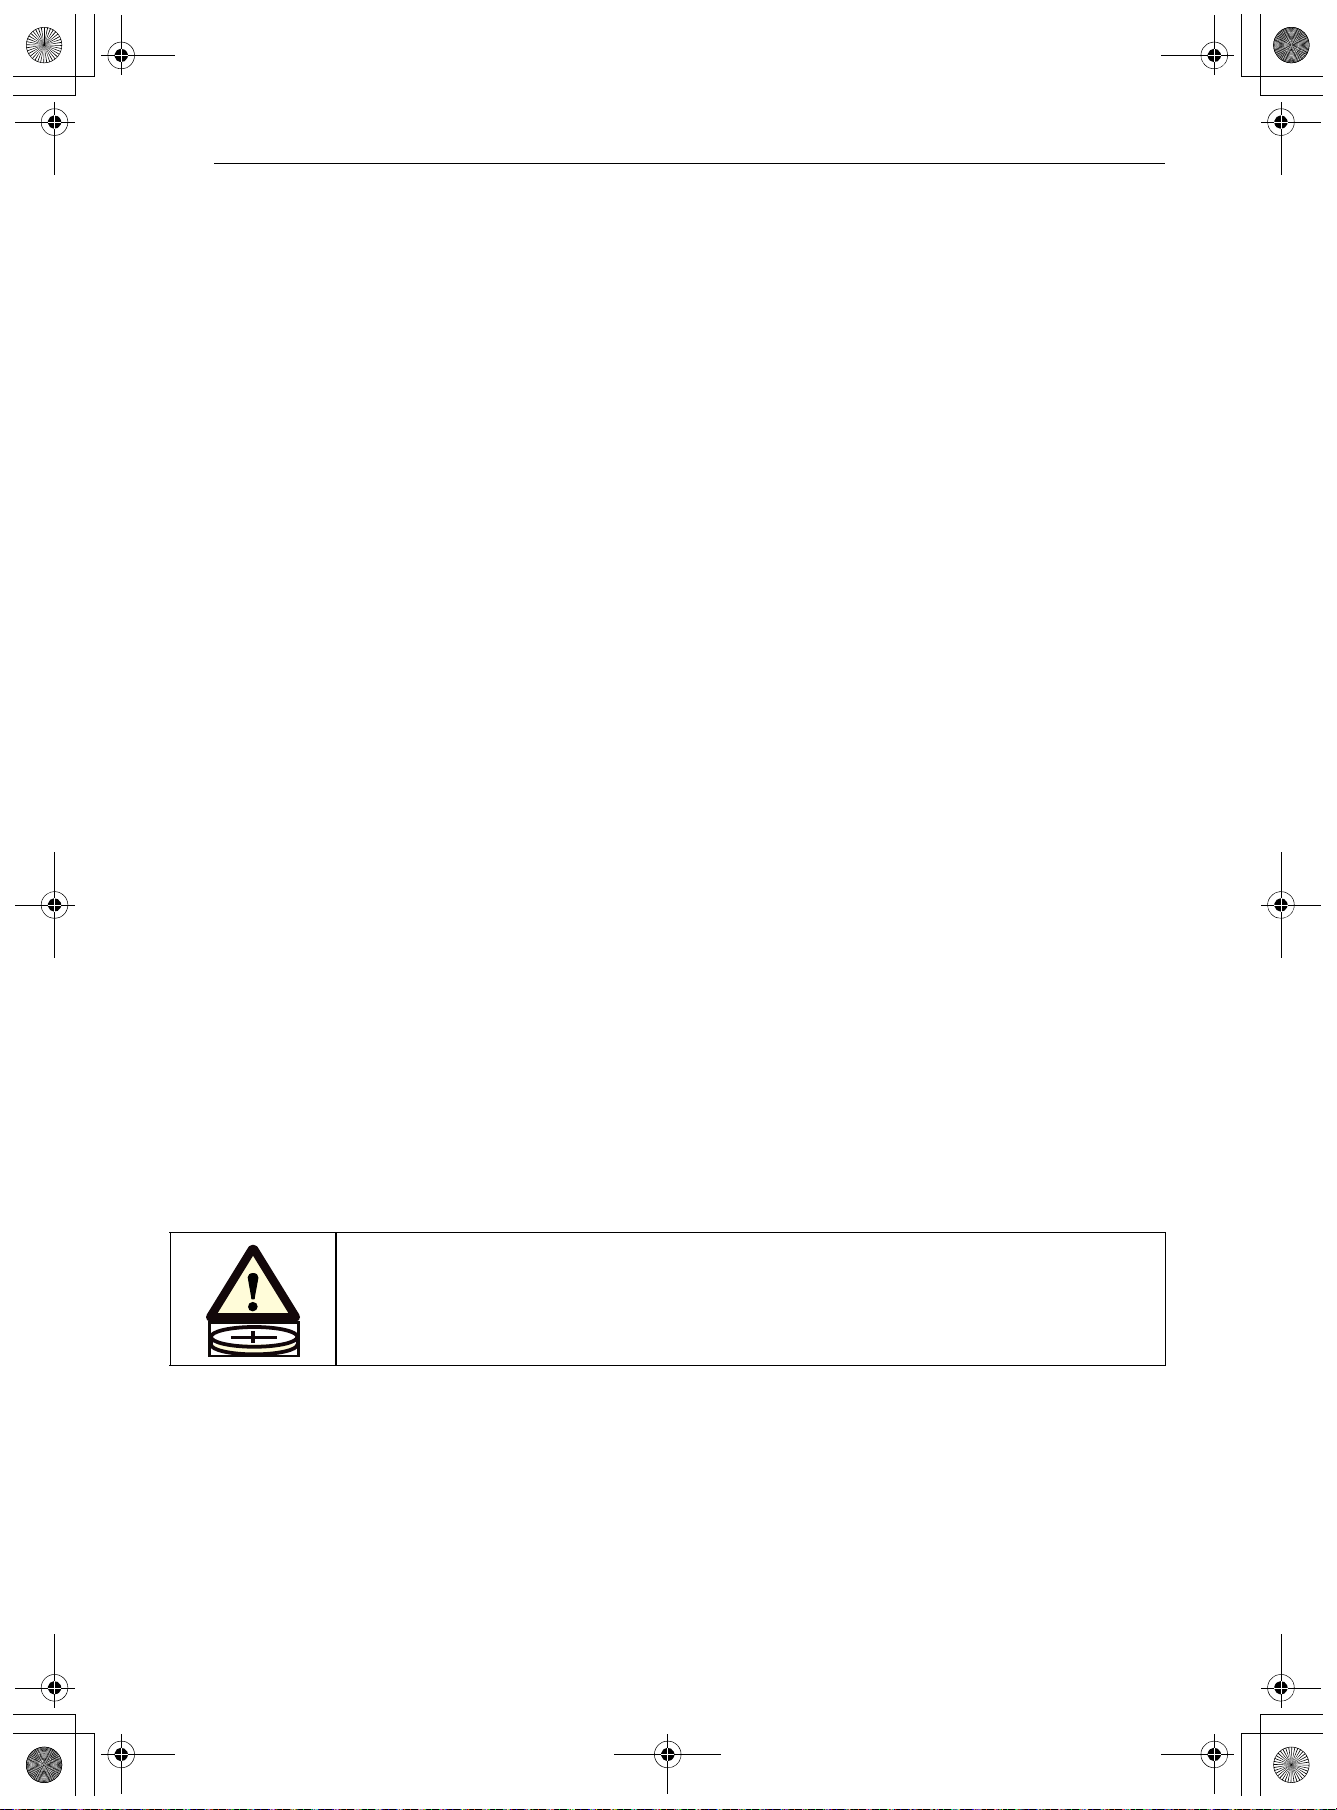
8 INSTRUCCIONES IMPORTANTES DE SEGURIDAD
Mantenimiento
• No permita que los niños se metan dentro del horno.
• Deje que los utensilios calientes se enfríen en un lugar seguro, fuera del alcance de los niños.
• Si el vidrio de la puerta, la vitrocerámica de la placa de cocción, la superficie o la resistencia del horno
están dañados, deje de usar la estufa y solicite servicio técnico.
• No permita que nadie se suba, pare o cuelgue de la puerta, del cajón de almacenamiento ni de la placa
de cocción. Podrían causar daños a la estufa e incluso hacerla caer, lo que generaría lesiones personales
graves.
• Siempre desconecte la energía del electrodoméstico antes de que se efectúen tareas de mantenimiento.
• Antes de reemplazar la luz del horno, desconecte la energía eléctrica del horno desde el fusible principal
o el panel disyuntor. Si no lo hace, podría causar lesiones graves, descargas eléctricas o la muerte.
• Nunca derrame agua fría sobre el horno caliente para limpiarlo. Si lo hace, podría provocar el mal
funcionamiento del horno.
Riesgo de incendio y materiales inflamables
• No almacene ni utilice material inflamable en el horno ni cerca de la placa de cocción. Los materiales
inflamables incluyen papel, plástico, agarraderas, telas, recubrimientos para paredes, cortinas y gasolina
u otros vapores inflamables y líquidos como grasa o aceite de cocina. Estos materiales pueden
prenderse fuego cuando el horno y la placa de cocción están en uso.
• Tenga sumo cuidado al mover o desechar grasa caliente.
• Use vestimenta adecuada. No use prendas holgadas o que cuelguen, ya que podrían prenderse fuego en
contacto con superficies calientes y causar quemaduras graves.
• No utilice el horno para secar ropa. Solo use el horno para el propósito para el que fue diseñado.
• Si posee gabinetes de almacenamiento directamente sobre la superficie de cocción, use solo para
guardar los objetos que use con poca frecuencia y que puedan almacenarse de manera segura en un
lugar expuesto al calor. Las altas temperaturas pueden ser peligrosas para objetos volátiles como
líquidos inflamables, limpiadores o aerosoles.
• No utilice agua para apagar incendios provocados por grasa. Si se produce un incendio en el horno,
mantenga la puerta del horno cerrada y apague el horno. Si el fuego continúa, arroje bicarbonato de
sodio sobre el fuego o utilice un extinguidor. No arroje agua ni harina sobre el fuego. La harina podría
ser explosiva y el agua podría hacer que un incendio causado por grasa se propague y genere lesiones
personales.
Símbolo de baterías tipo botón
PELIGRO DE INGESTIÓN: este producto contiene una pila de botón o moneda.
es-us_main.book.book Page 8 Friday, August 14, 2026 2:12 PM
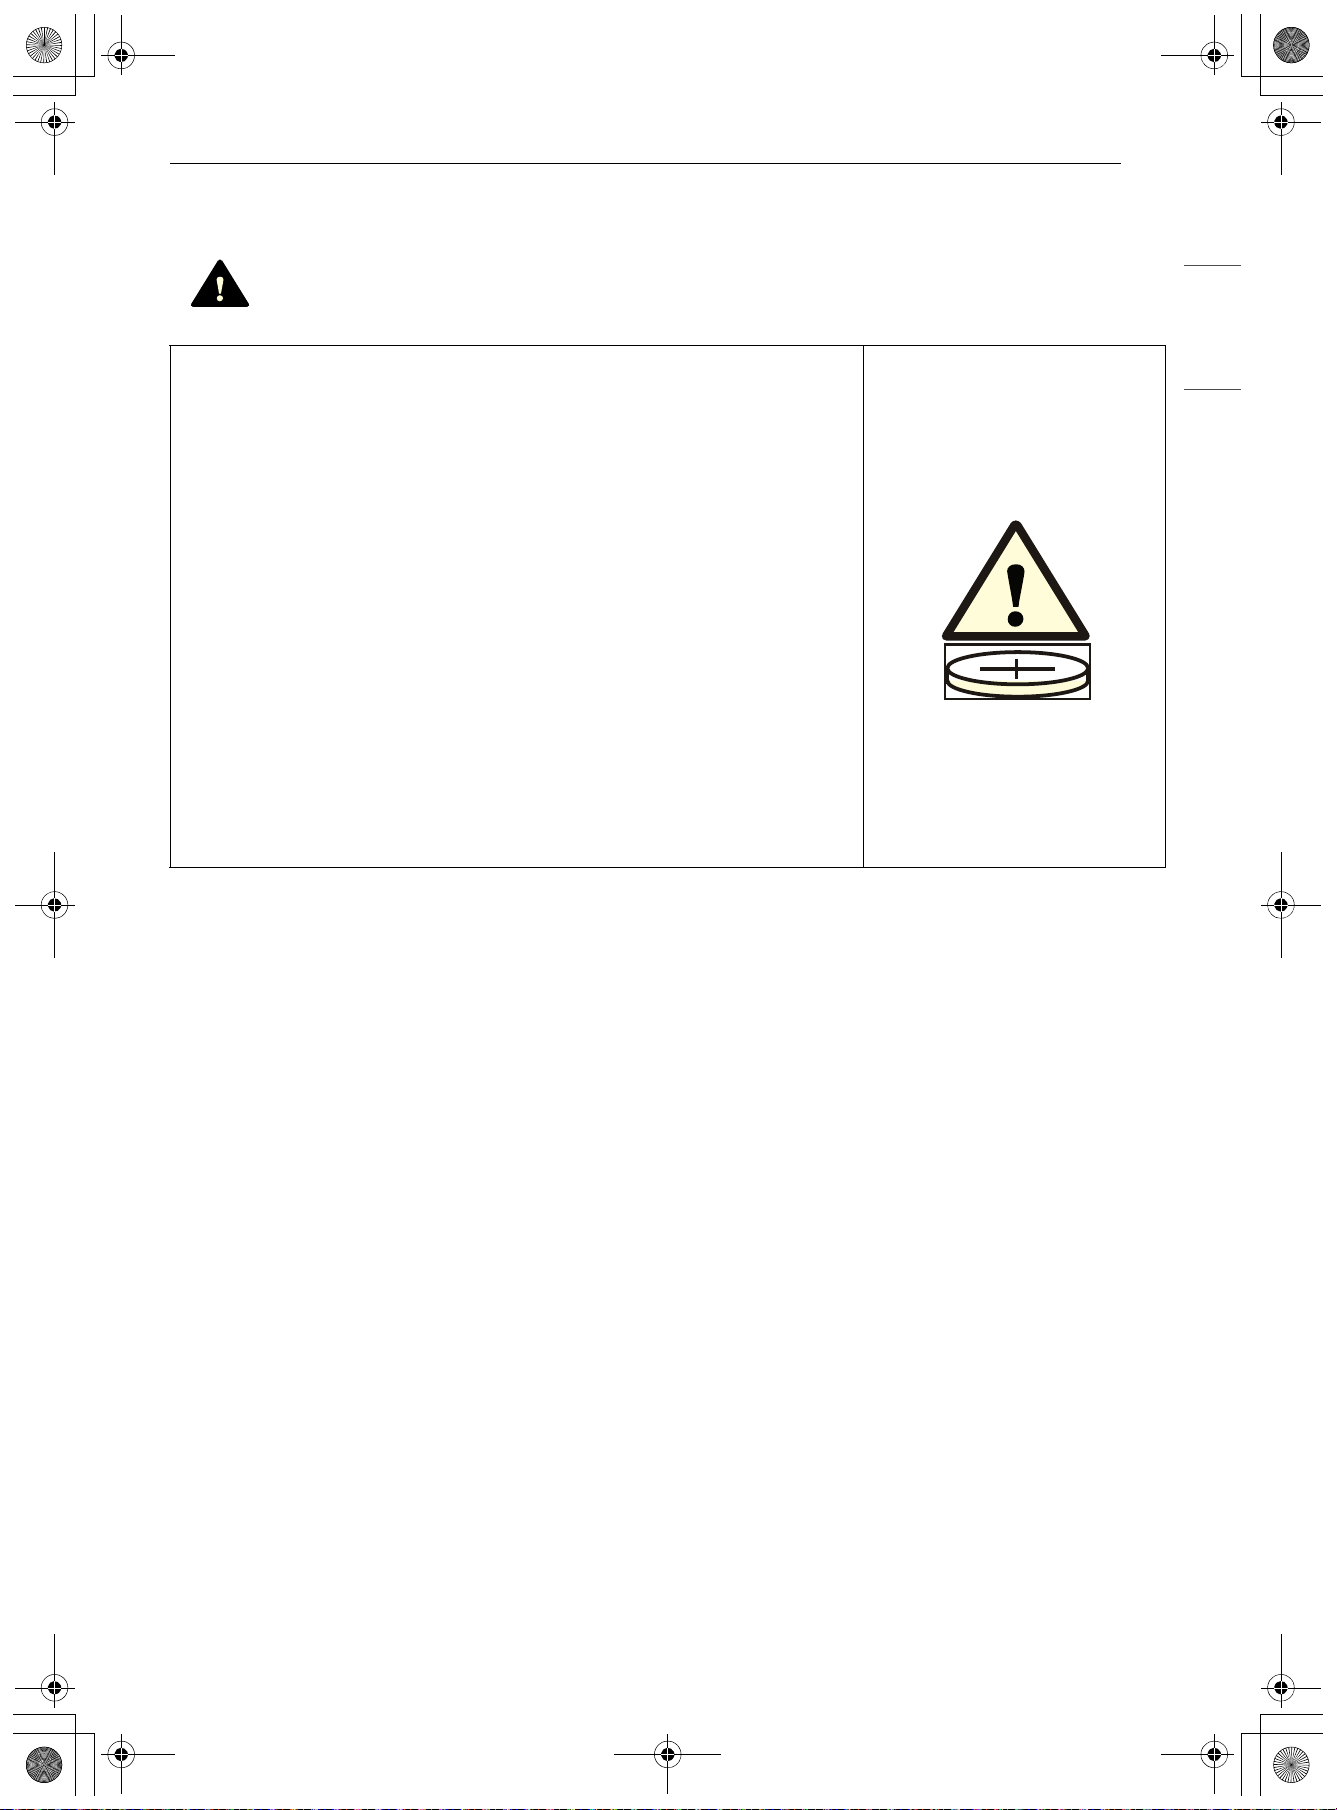
9INSTRUCCIONES IMPORTANTES DE SEGURIDAD
ESPAÑOL
Estándar de seguridad para pilas de botón o moneda
• Retire y recicle o deseche inmediatamente las pilas usadas de
acuerdo con las regulaciones locales y manténgalas alejadas de los
niños.
- NO deseche pilas con la basura doméstica ni las incinere.
• Incluso las pilas usadas podrían causar lesiones graves o la
muerte.
• Llame a un centro de control local de toxicología para obtener
información de tratamiento.
• Las pilas no recargables no deben ser recargadas.
• No fuerce la descarga, la recarga, el desmontaje, el calentamiento
arriba de 140 ℉ (60 ℃) ni la incineración.
- De lo contrario, podría resultar en lesiones debido a fugas, y
quemaduras químicas por escapes o explosiones.
• El producto contiene pilas no sustituibles.
• Tipo de pila: ML621-TZ1
• Tensión nominal: 3.0 V
ADVERTENCIA
• PELIGRO DE INGESTIÓN: este producto
contiene una pila de botón o moneda.
• Si se ingiere, puede producirse la MUERTE o
una lesión seria.
• Si se traga una pila de botón o moneda, se
pueden producir Quemaduras químicas
internas en tan solo 2 horas.
• MANTENGA las pilas nuevas y usadas
FUERA DEL ALCANCE de los NIÑOS.
• Obtenga atención médica inmediata si
sospecha que una pila fue tragada o
insertada en alguna parte del cuerpo.
es-us_main.book.book Page 9 Friday, August 14, 2026 2:12 PM
10 INSTRUCCIONES IMPORTANTES DE SEGURIDAD
GUARDE ESTAS INSTRUCCIONES
PRECAUCIÓN
PRECAUCIÓN
• Para reducir el riesgo de lesiones menores a personas, mal funcionamiento o daños en el producto o la
propiedad durante el uso de este producto, siga las precauciones básicas, incluidas las siguientes:
Funcionamiento
• Siempre caliente la grasa lentamente y vigile mientras aumenta la temperatura.
• Si freirá una combinación de aceites y grasas, mézclelos antes de calentarlos.
• Si es posible, utilice un termómetro para frituras a fin de evitar que la grasa se caliente por encima del
punto de humeo.
• Utilice la menor cantidad posible de grasa para rehogados o frituras profundas efectivos. Llenar la
sartén con demasiada grasa podría causar derrames al agregar los alimentos.
• Las partes accesibles podrían calentarse cuando se utiliza la asadera.
• No coloque alimentos ni utensilios de cocina en el fondo de la cavidad del horno. Si lo hace, causará
daños permanentes al acabado de la base del horno.
• Al usar bolsas para hornear o asar en el horno, siga las instrucciones del fabricante.
Mantenimiento
• No guarde objetos de interés para los niños en los gabinetes que se encuentran arriba de la estufa o
sobre la protección trasera de la estufa; si los niños suben a la estufa para alcanzar algo que buscan,
podrían sufrir lesiones graves.
• No repare ni reemplace ninguna pieza del electrodoméstico a menos que así se recomiende
específicamente en el manual. Un técnico calificado debe estar a cargo de todas las demás tareas de
mantenimiento.
• No utilice limpiadores ásperos, abrasivos ni espátulas de metal para limpiar el vidrio de la puerta del
horno, ya que podrían rayar la superficie. Los arañazos podrían hacer que el vidrio se quiebre.
• Asegúrese de que las luces del horno estén frías antes de limpiar.
• No limpie la junta de la puerta. La junta de la puerta es esencial para lograr un buen sellado. No debe
frotar, dañar ni mover la junta.
• Limpie con el ciclo de autolimpieza solo las partes indicadas en este manual. Antes de realizar la
autolimpieza del horno, retire la asadera, todos los estantes del horno, la sonda para carne y cualquier
otro utensilio de cocina, utensilio o alimento del horno.
es-us_main.book.book Page 10 Friday, August 14, 2026 2:12 PM
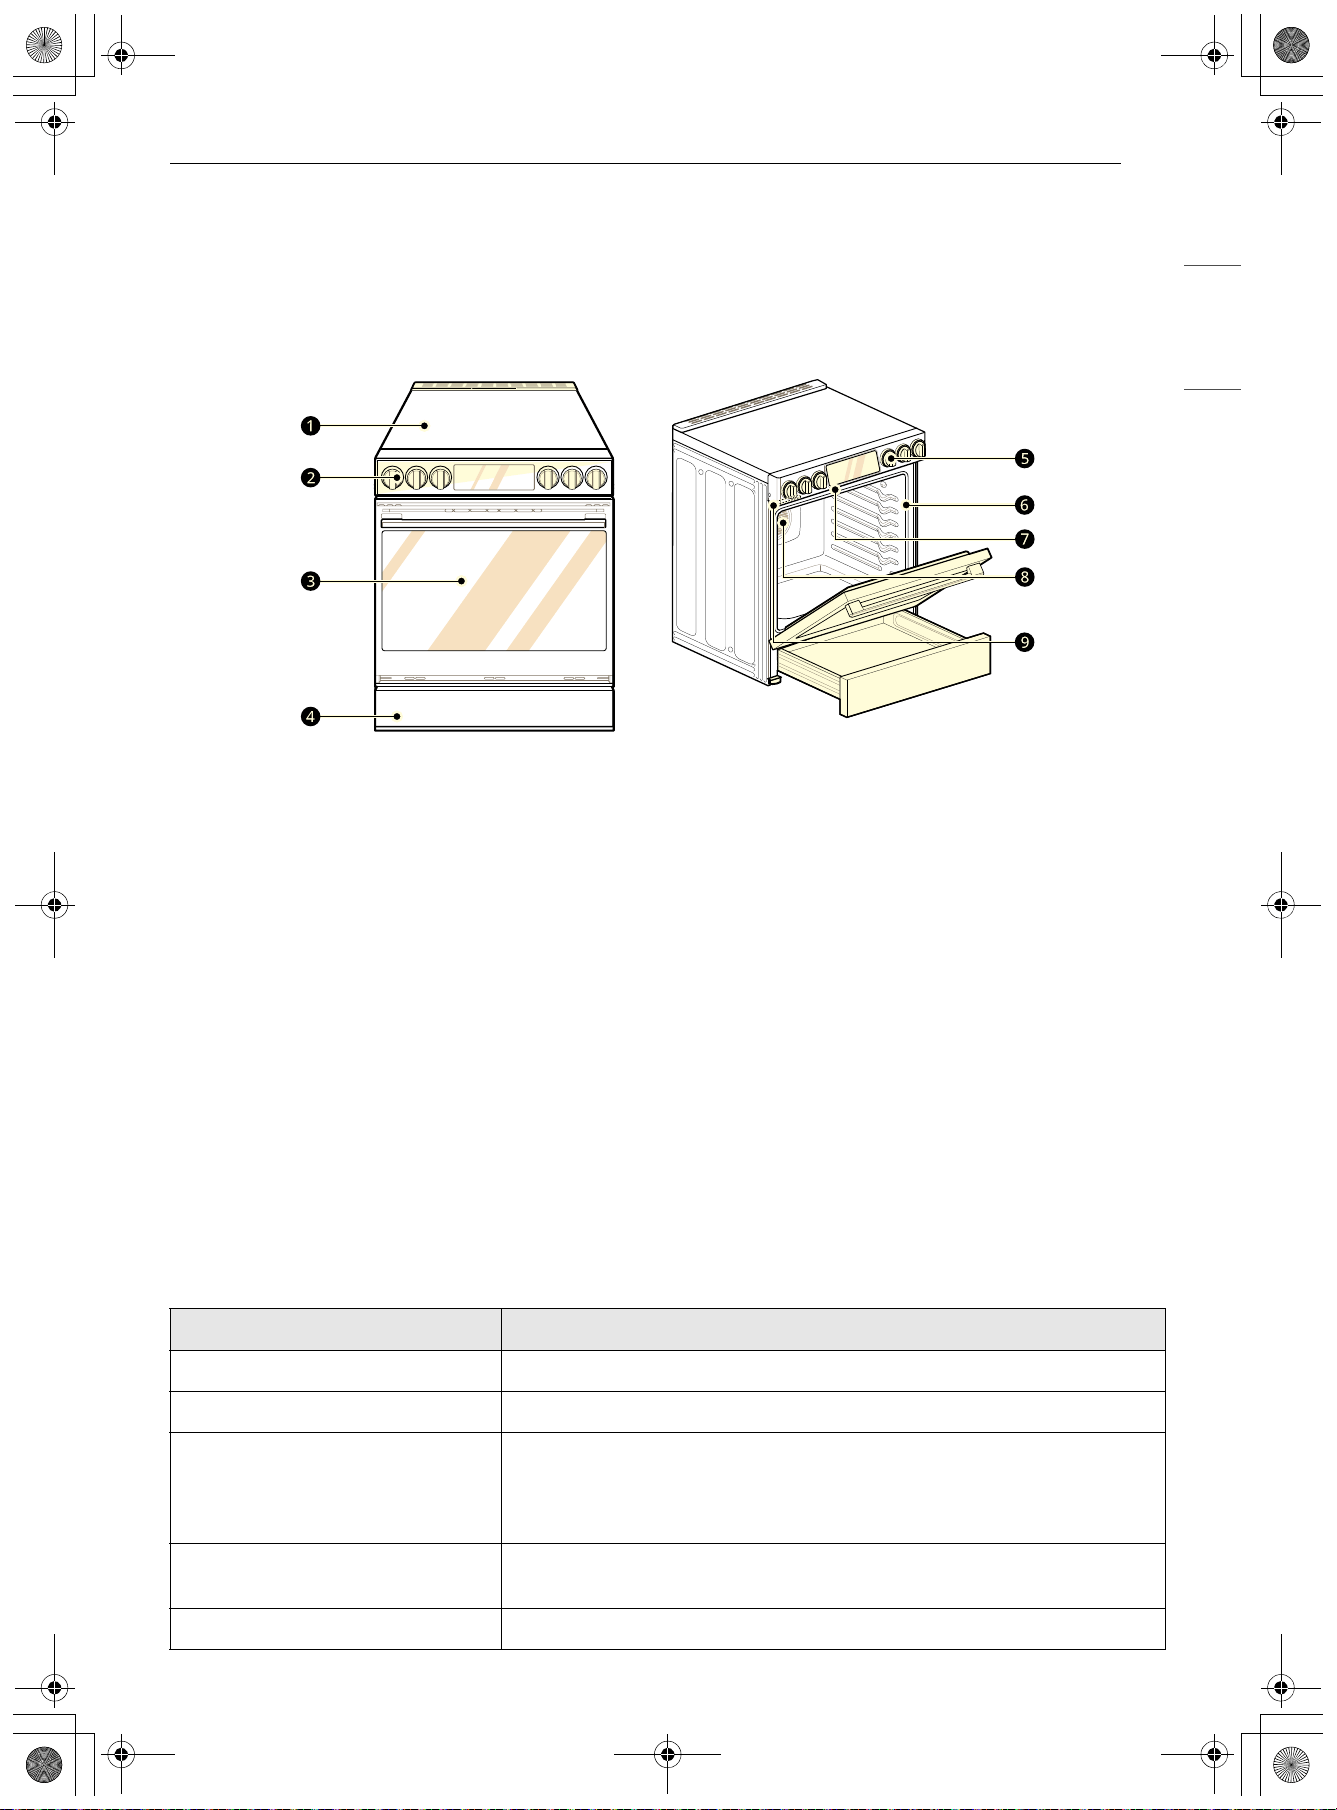
11DESCRIPCIÓN GENERAL DEL PRODUCTO
ESPAÑOL
DESCRIPCIÓN GENERAL DEL PRODUCTO
Características del producto
Exterior e interior
a Placa de cocción
b Controlador de la placa de cocción
c Puerta del horno
d Cajón de almacenamiento
e Control de temperatura
f Junta
g Quemador de asado
h Quemador de convección
i Placa con el número de serie y modelo
Especificaciones del producto
La apariencia y las especificaciones detalladas en este manual podrían variar debido a mejoras constantes
en el producto.
Modelos de estufas con horno LSIU6338*E
Descripción Estufa con horno eléctrica empotrable
Requisitos eléctricos 12.1 kW 120/240 VCA o 10.2 kW 120/208 VCA
Dimensiones exteriores 29 7/8" (ancho) x 36 1/2" (alto) x 26 7/8" (profundidad) (Profundidad con
la puerta cerrada)
75.9 cm (Ancho) x 92.7 cm (Alto) x 68.3 cm (Profundidad) (Profundidad
con la puerta cerrada)
Altura hasta la superficie de
cocción
36" (91.3 cm)
Capacidad total 6.3 pies cúbicos
es-us_main.book.book Page 11 Friday, August 14, 2026 2:12 PM
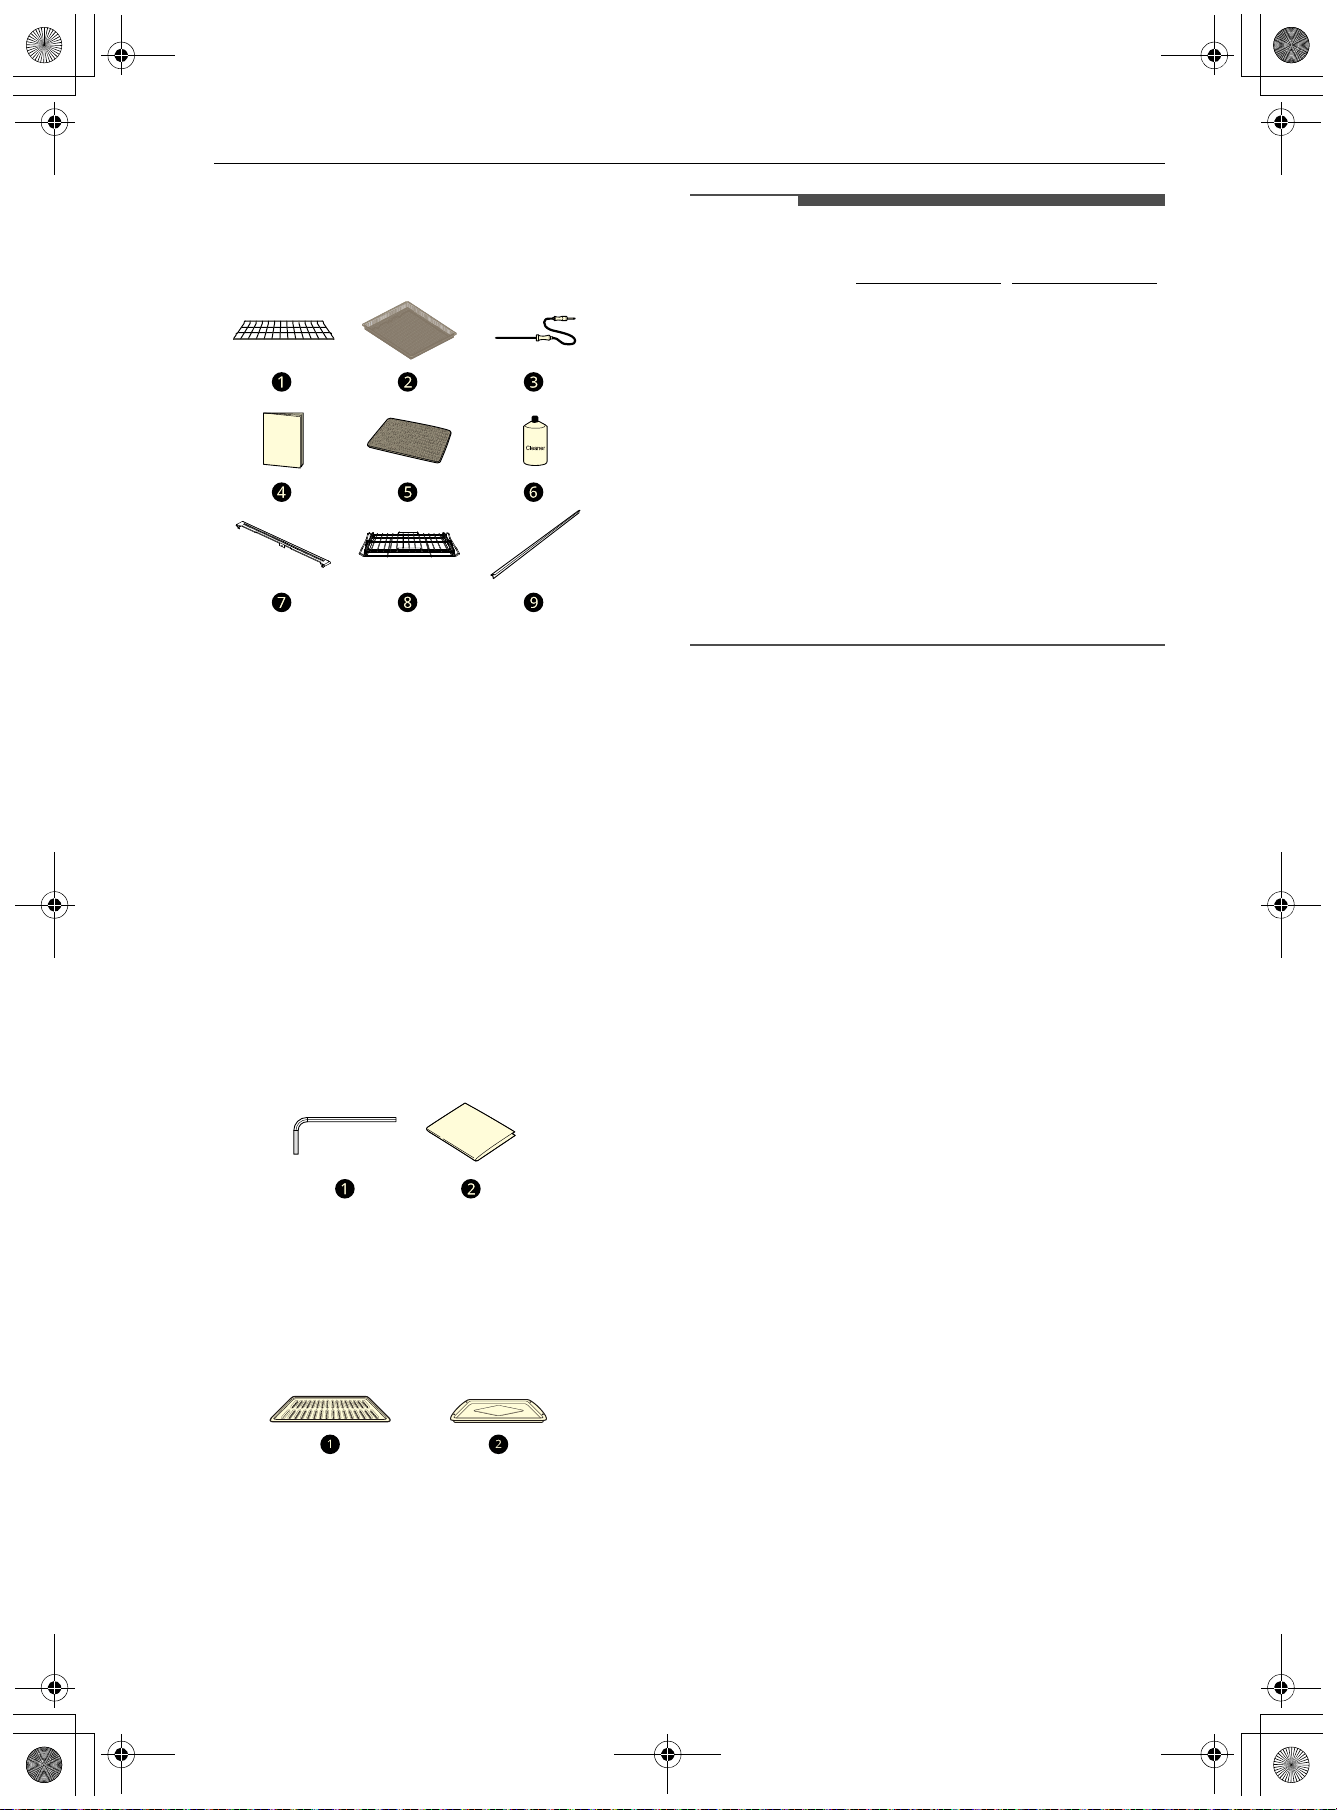
12 DESCRIPCIÓN GENERAL DEL PRODUCTO
Accesorios
Accesorios incluidos
a Estante resistente (2 c/u)
b Estante de freír con aire (1 c/u)
c Sonda para carne (1 c/u)
d Manual del propietario (1 c/u)
e Esponja de limpieza que no raya (1 c/u)
f Limpiador para placas de cocción (1 c/u)
g Placa trasera (1 c/u)
h Estante deslizante (1 c/u)
i Junta de goma (2 c/u)
Kit de servicio de la manija
a Llave Allen de 3/32" (1 unidad)
b Plantilla (1 c/u)
Accesorios opcionales (se venden por
separado)
a Rejilla
b Asadera
NOTA
• Comuníquese con el Servicio de atención al
cliente de LG al 1-800-984-6306 (1-888-542-2623
en Canadá) si le falta algún accesorio.
• Para su seguridad y una mayor duración del
producto, utilice únicamente componentes
autorizados.
• El fabricante no es responsable del mal
funcionamiento del producto ni de accidentes
causados por el uso de componentes o piezas no
autorizados y comprados por separado.
• Las ilustraciones en esta guía pueden diferir de
los componentes y accesorios reales, los cuales
están sujetos a cambios sin previo aviso por
parte del fabricante a fin de introducir mejoras
en el producto.
es-us_main.book.book Page 12 Friday, August 14, 2026 2:12 PM
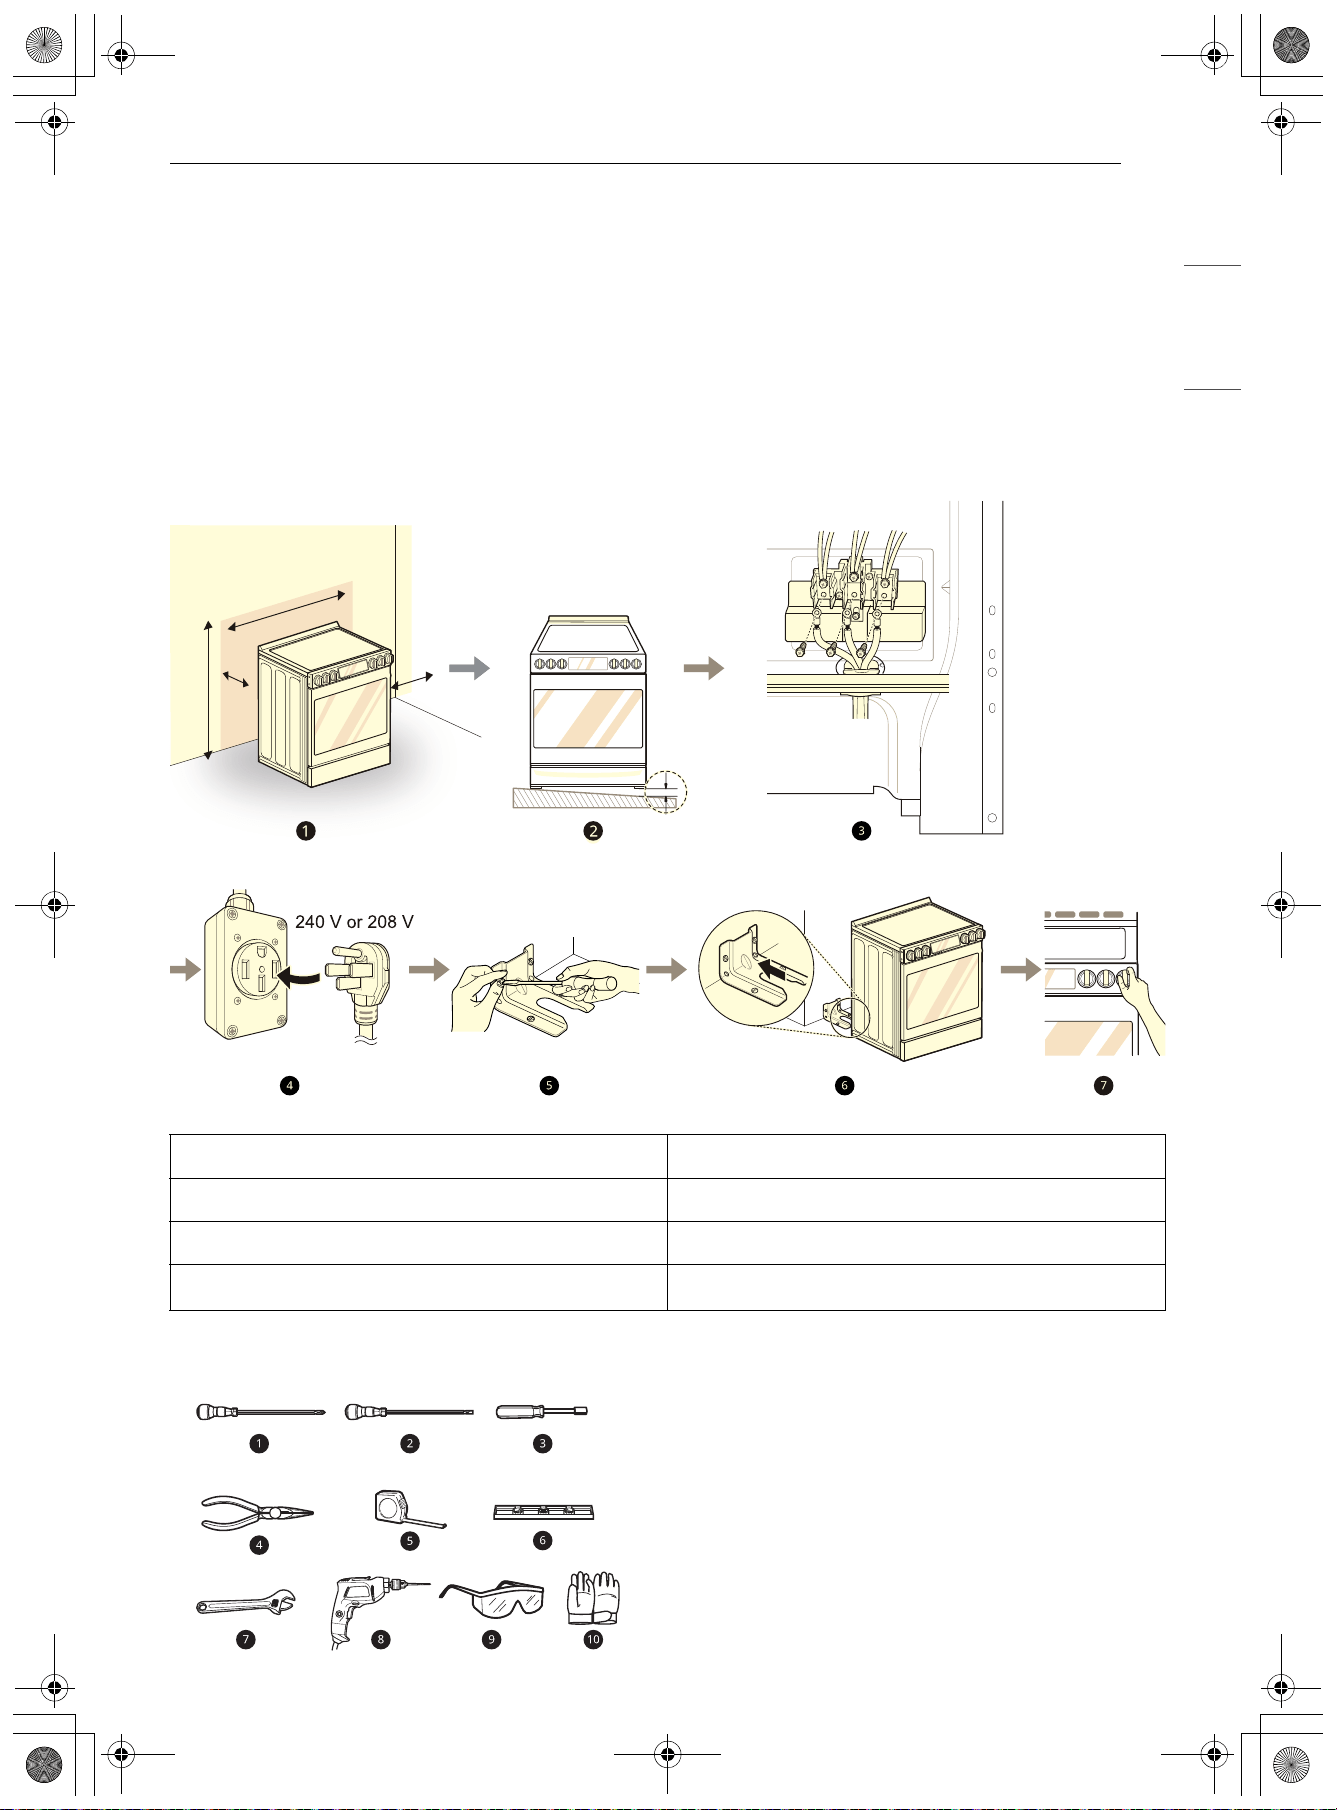
13INSTALACIÓN
ESPAÑOL
INSTALACIÓN
Antes de la instalación
Descripción general de la instalación
Lea las siguientes instrucciones de instalación inmediatamente después de adquirir este producto o
transportarlo a otra ubicación.
Las ilustraciones en esta guía pueden diferir de los componentes y accesorios reales, los cuales están
sujetos a cambios sin previo aviso por parte del fabricante a fin de introducir mejoras en el producto.
Herramientas necesarias
a Destornillador Phillips
b Destornillador de hoja plana
c Llave para tuercas de 1/4"
d Pinzas
e Cinta medidora
f Nivel
a Verifique y elija la ubicación adecuada e Instale el dispositivo antivuelco
b Nivele la estufa f Conecte el dispositivo antivuelco
c Conecte la estufa eléctrica g Prueba de funcionamiento
d Enchufe el cable de alimentación
es-us_main.book.book Page 13 Friday, August 14, 2026 2:12 PM
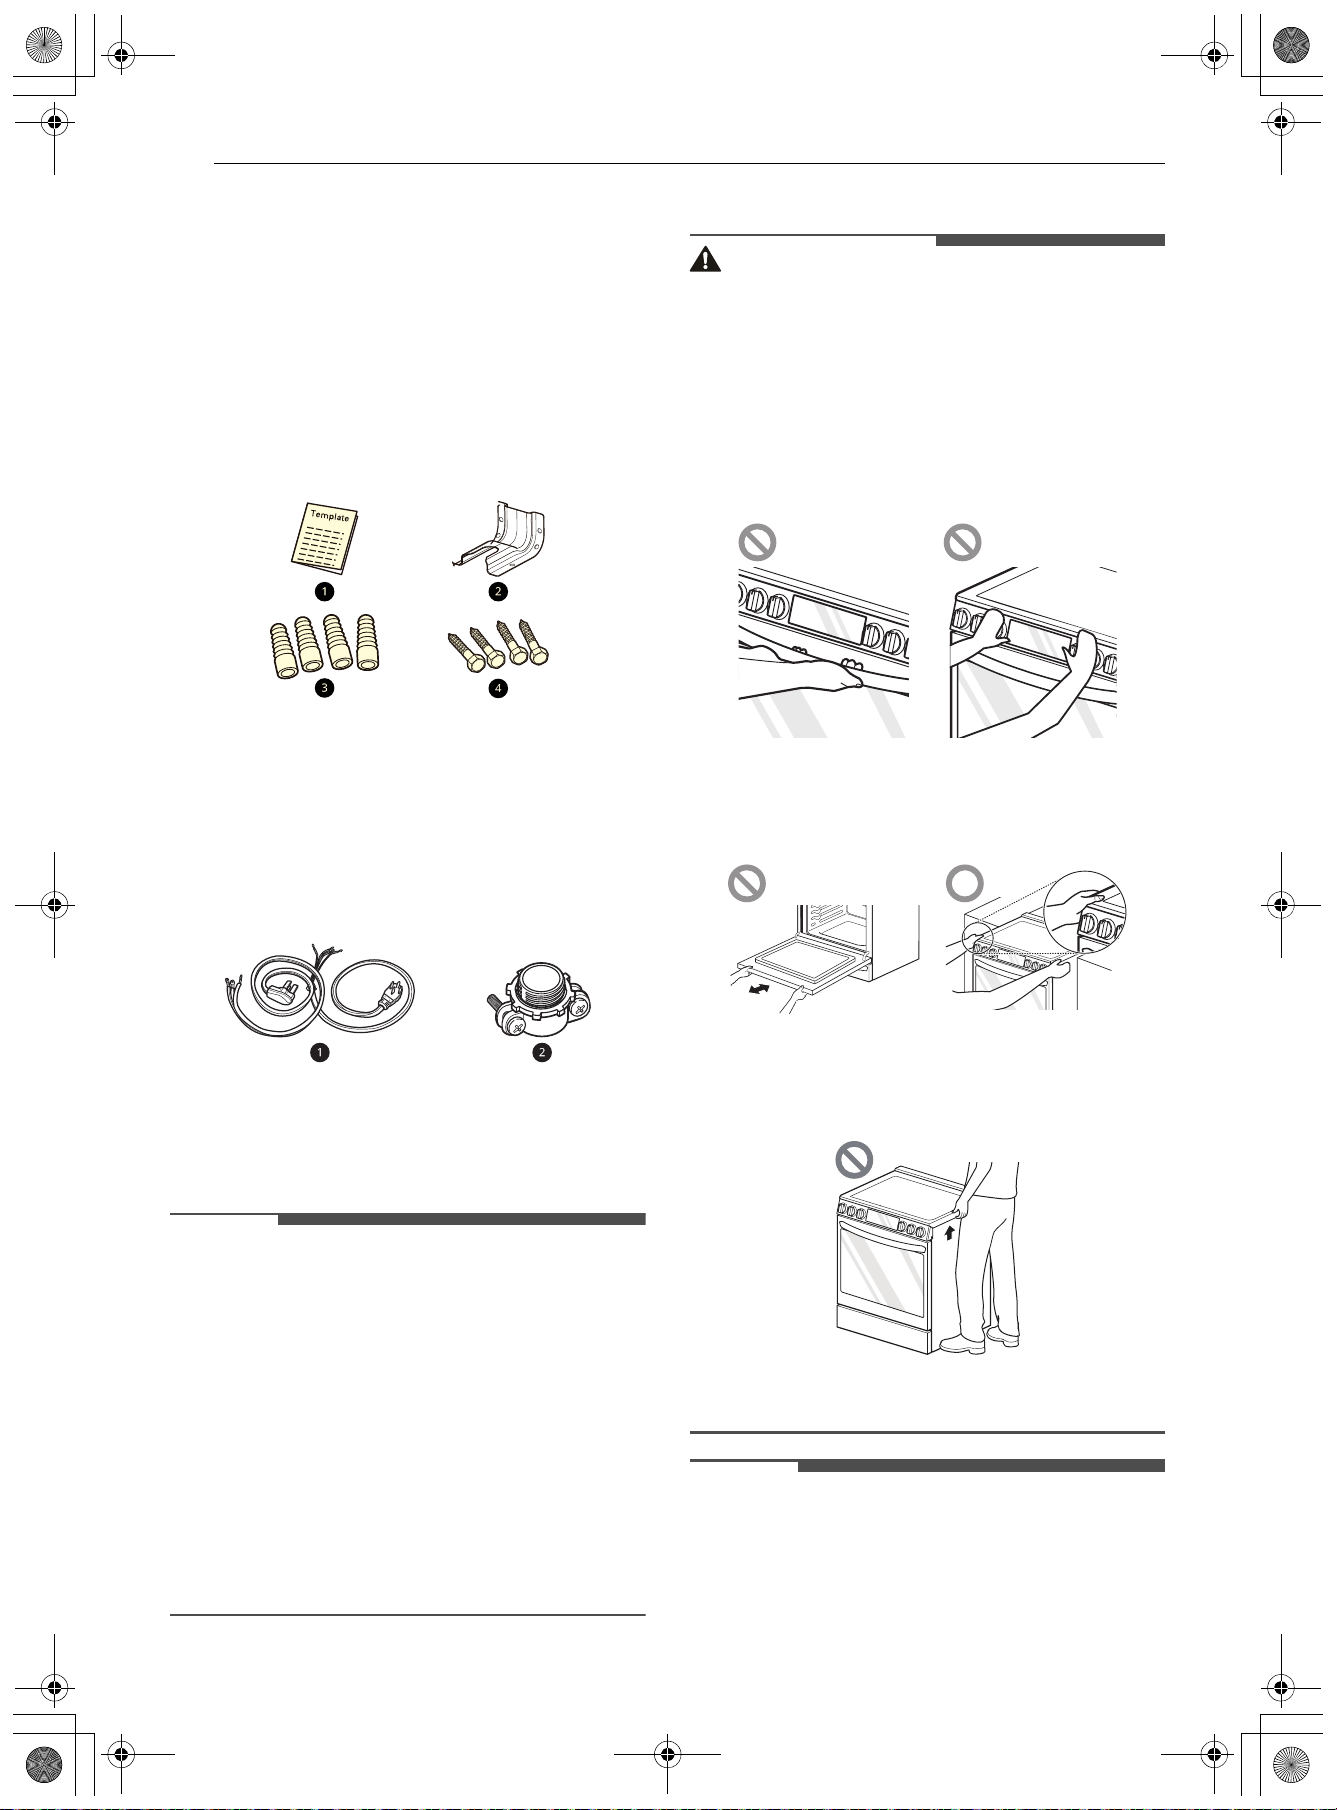
14 INSTALACIÓN
g Llave ajustable
h Taladro
i Gafas de seguridad
j Guantes
Piezas
Piezas incluidas
a Plantilla (1 c/u)
b Juego del soporte antivuelco (1 c/u)
c Casquillos de anclaje (4 c/u)
d Pernos tirafondo (4 c/u)
Piezas no incluidas
a Cable eléctrico de 4 hilos o cable eléctrico de
3 hilos (40 o 50 AMP aprobado por UL)
b Pasacables (solo para instalaciones de
conductos)
NOTA
• Cumpla todos los códigos y ordenanzas
vigentes.
• Solicite al instalador que le muestre la ubicación
del disyuntor o fusible. Márquelo para que sea
fácil de detectar.
• Al igual que al utilizar cualquier otro
electrodoméstico que genera calor, existen
determinadas precauciones de seguridad que se
deben respetar.
• Asegúrese de que su estufa esté instalada
correctamente y con la conexión a tierra
adecuada, a cargo de un instalador o técnico de
mantenimiento calificado.
Desembalaje y traslado de la estufa
ADVERTENCIA
• Debe haber dos o más personas para mover e
instalar la estufa. (Peligro de peso excesivo) Si no
se cumple con esto, se pueden producir lesiones
en la espalda o de otro tipo.
• No utilice las manijas de la puerta ni perillas para
empujar o tirar de la estufa durante la
instalación, ni al mover la estufa para tareas de
limpieza o reparaciones. Si lo hace podría causar
daños graves a la estufa.
• No agarre solo la puerta abierta del horno ni la
placa de cocción para empujar la estufa o tirar
de ella, ya que puede causar daños graves en la
estufa.
• No levante la estufa usando la placa de cocción
ni la manija de la puerta. Esto puede provocar
daños y un funcionamiento inadecuado de la
estufa.
• Para reducir el riesgo de quemaduras, no mueva
el electrodoméstico mientras esté caliente.
NOTA
• La imagen puede ser distinta al modelo real.
• La estufa es pesada y puede instalarse sobre
revestimientos blandos para pisos como vinilo
acolchado o piso alfombrado. Tenga cuidado al
mover la estufa sobre este tipo de pisos. Utilice
es-us_main.book.book Page 14 Friday, August 14, 2026 2:12 PM
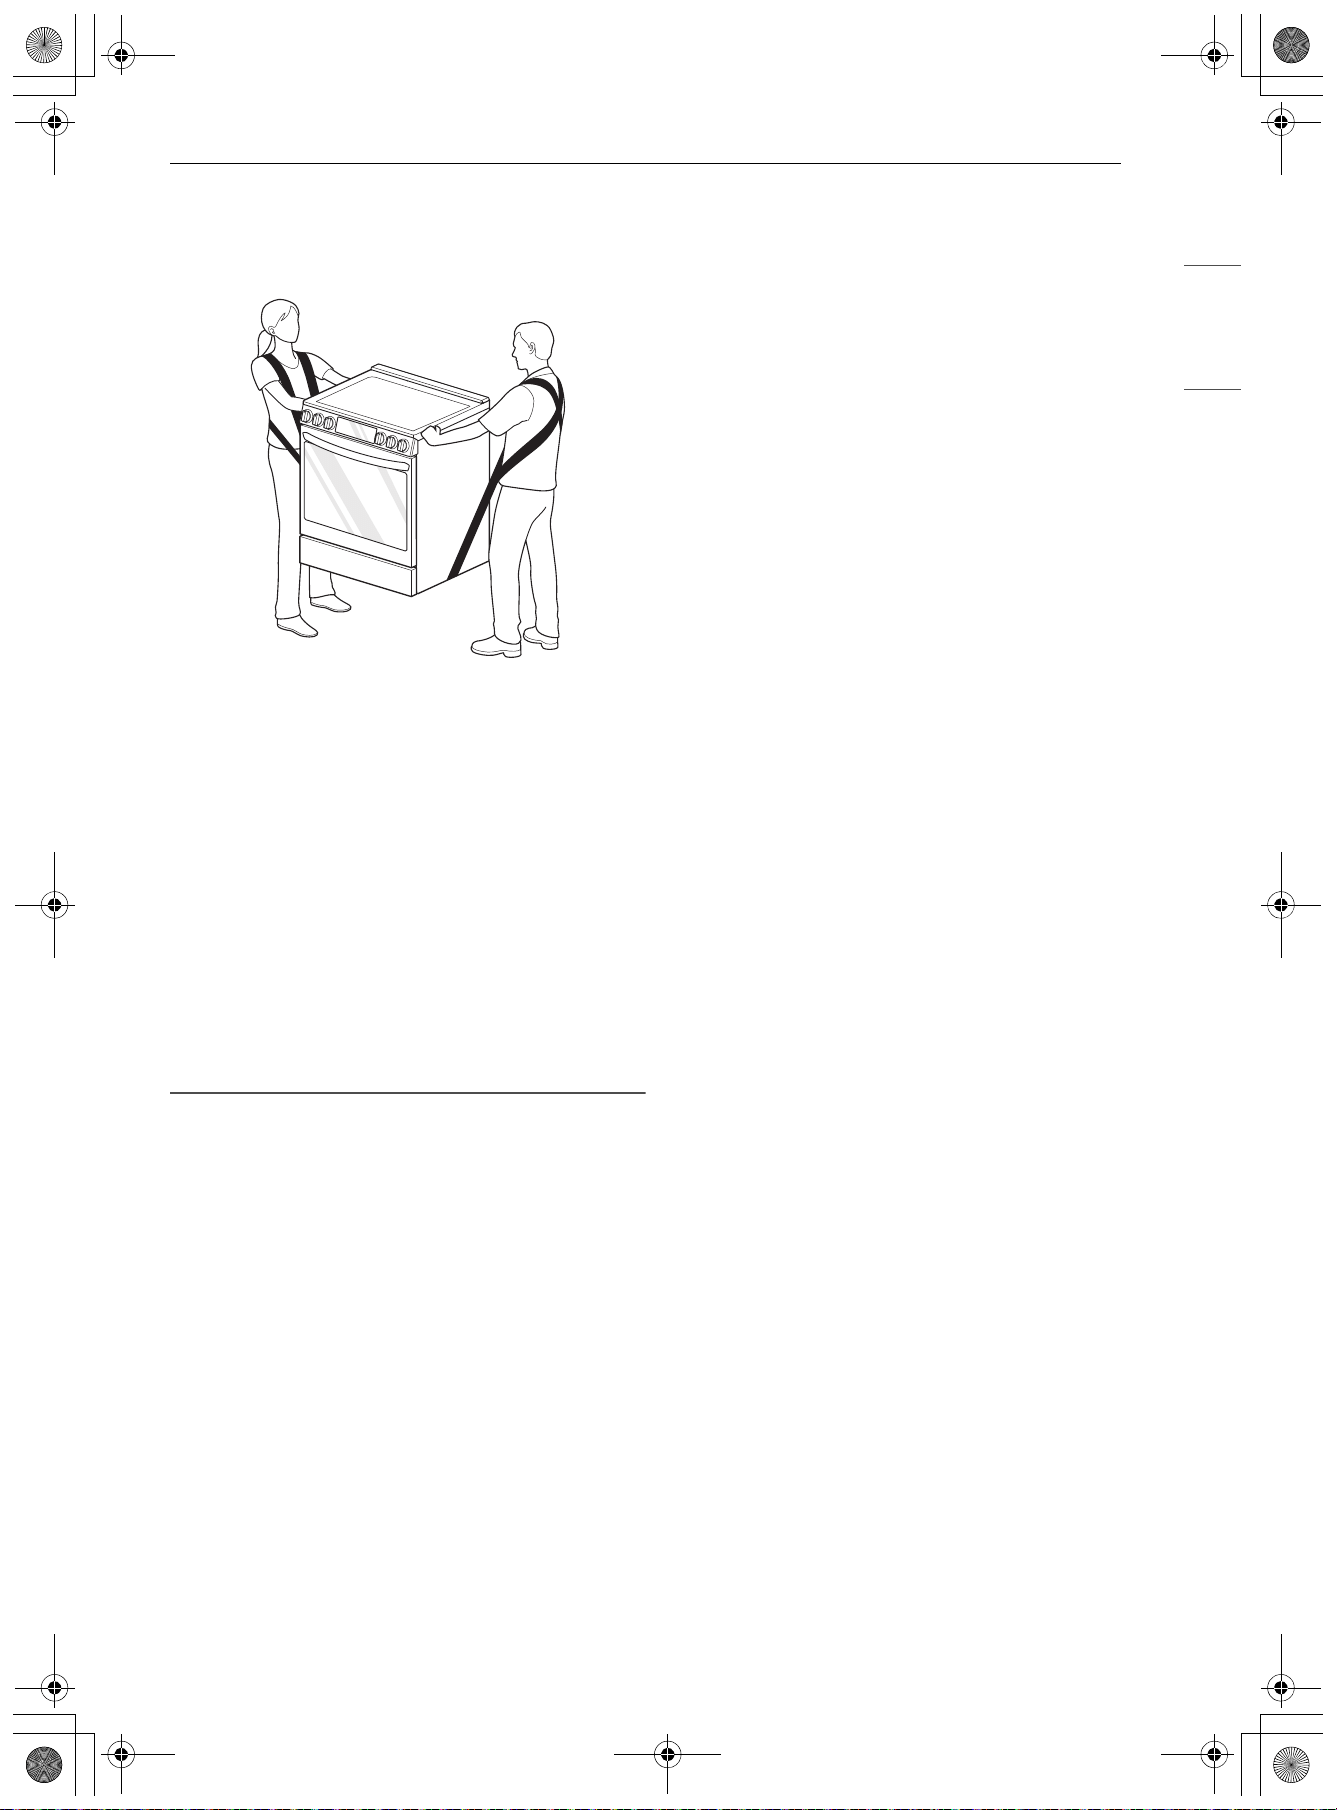
15INSTALACIÓN
ESPAÑOL
una correa al mover la estufa para evitar dañar
el piso. O deslice la estufa sobre un cartón o
madera enchapada para evitar dañar el
revestimiento del piso.
• Retire el material de embalaje, la cinta y
cualquier etiqueta temporaria de la estufa, antes
de usarla. No retire las etiquetas de advertencia,
del modelo y número de serie ni la hoja técnica
ubicada en la parte trasera de la estufa.
• Para remover cualquier cinta adhesiva o goma
restante frote enérgicamente el área con su
pulgar. La cinta adhesiva o residuos de goma
pueden ser fácilmente removidos frotando una
pequeña cantidad de jabón líquido para platos
con sus dedos. Limpie con agua caliente y seque.
• No utilice instrumentos puntiagudos, alcohol
para frotar, fluidos inflamables o limpiadores
abrasivos para remover cinta adhesiva o goma.
Estos productos pueden dañar la superficie de la
estufa.
es-us_main.book.book Page 15 Friday, August 14, 2026 2:12 PM
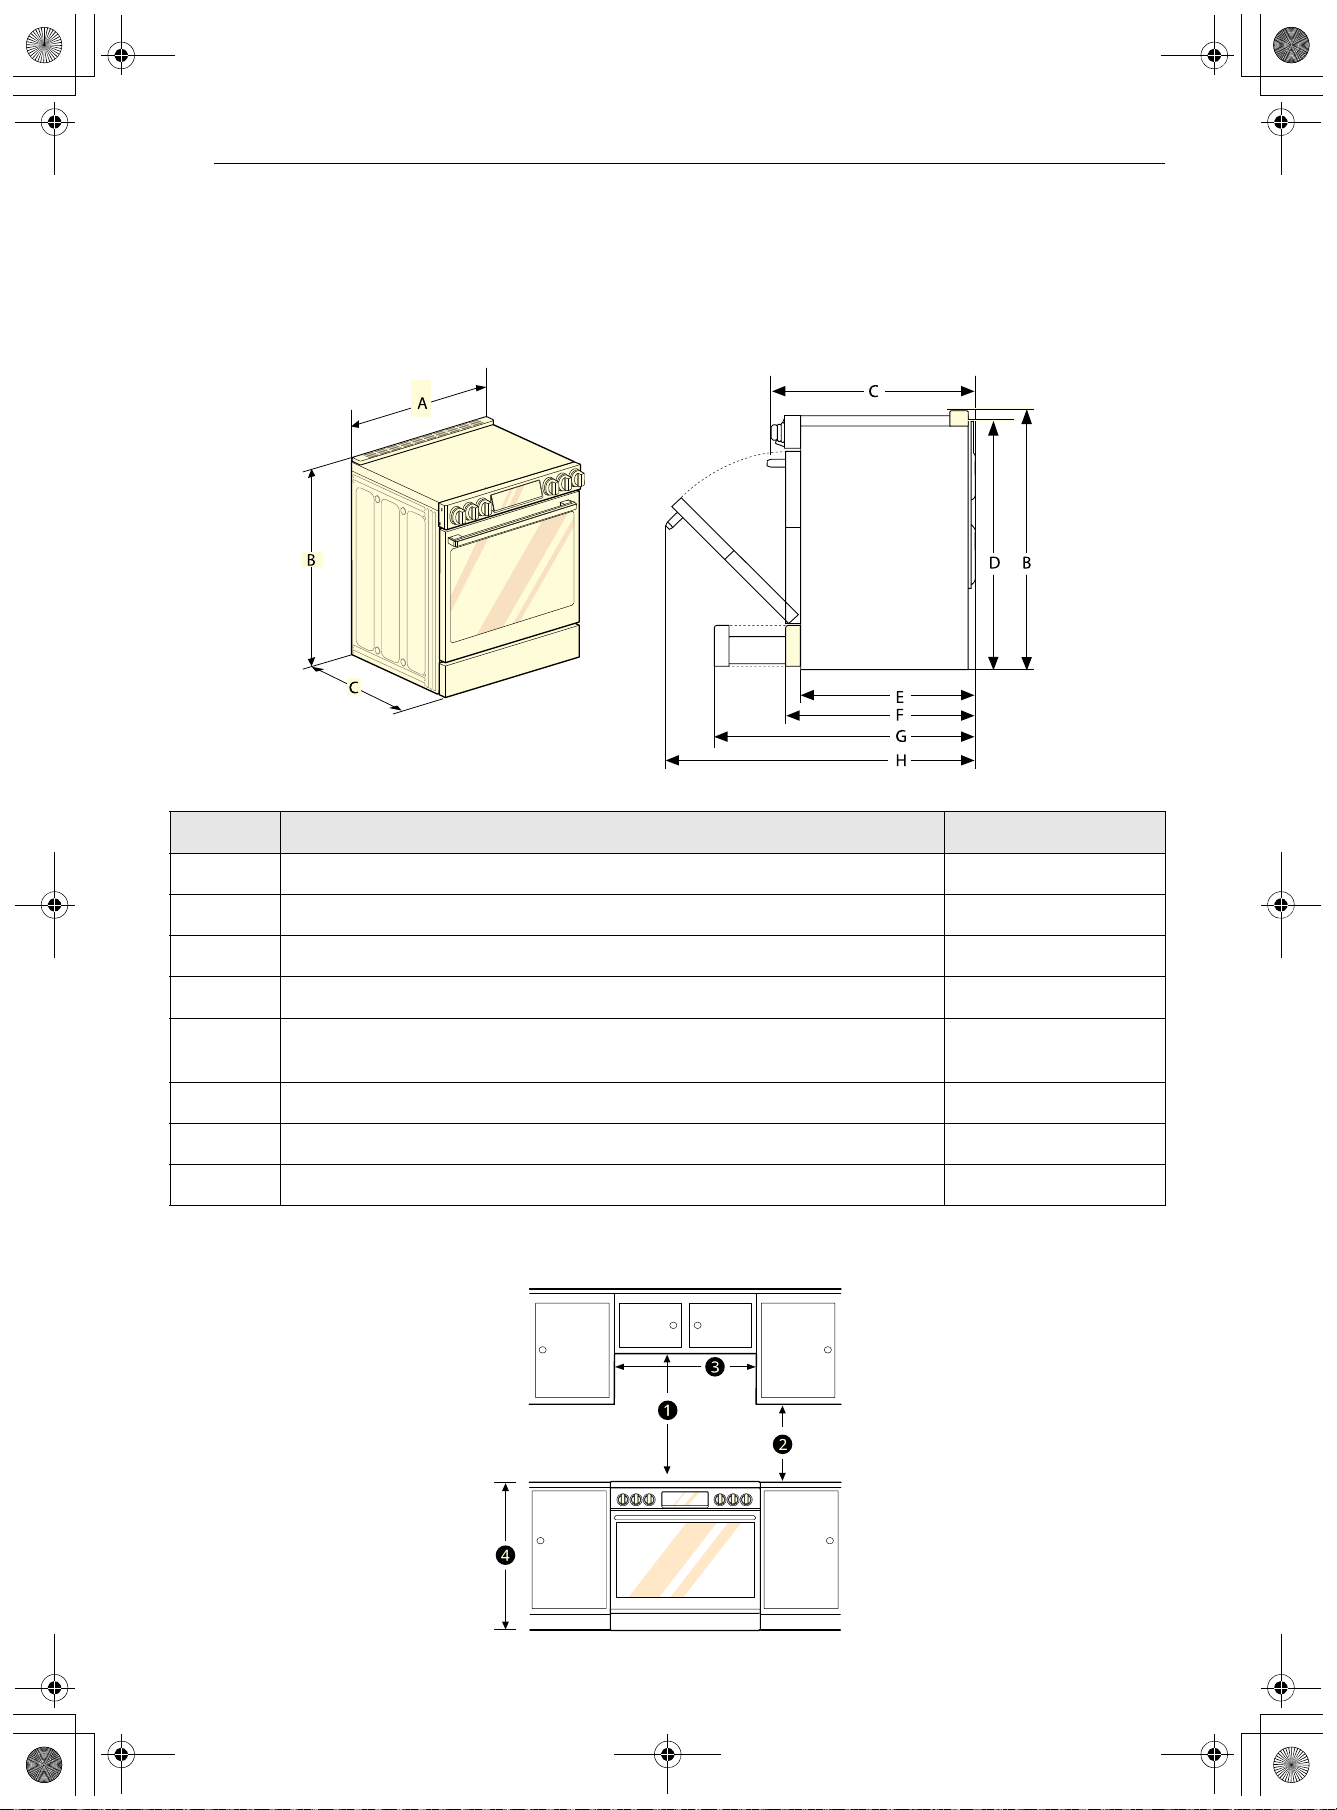
16 INSTALACIÓN
Elección de la ubicación adecuada
Dimensiones y espacios
Dimensiones
Dimensiones mínimas
- Dimensiones LSIU6338*E
AAncho 29 7/8" (758.8 mm)
BAlto 36 1/2" (927.1 mm)
C Profundidad (Incluye manija de la puerta) 29 5/16" (743.9 mm)
D Alto (No incluye moldura de ventilación) 36" (914.4 mm)
E
Profundidad (Incluye solo el cuerpo del producto que se carga en el
gabinete. No incluye puerta, cajón y manijas)
24 3/4" (629.4 mm)
F Profundidad (No incluye manija de la puerta) 26 7/8" (682.5 mm)
G Profundidad cuando el cajón está totalmente abierto 38 7/16" (976.7 mm)
H Profundidad cuando la puerta está totalmente abierta 48 5/8" (1235.9 mm)
es-us_main.book.book Page 16 Friday, August 14, 2026 2:12 PM
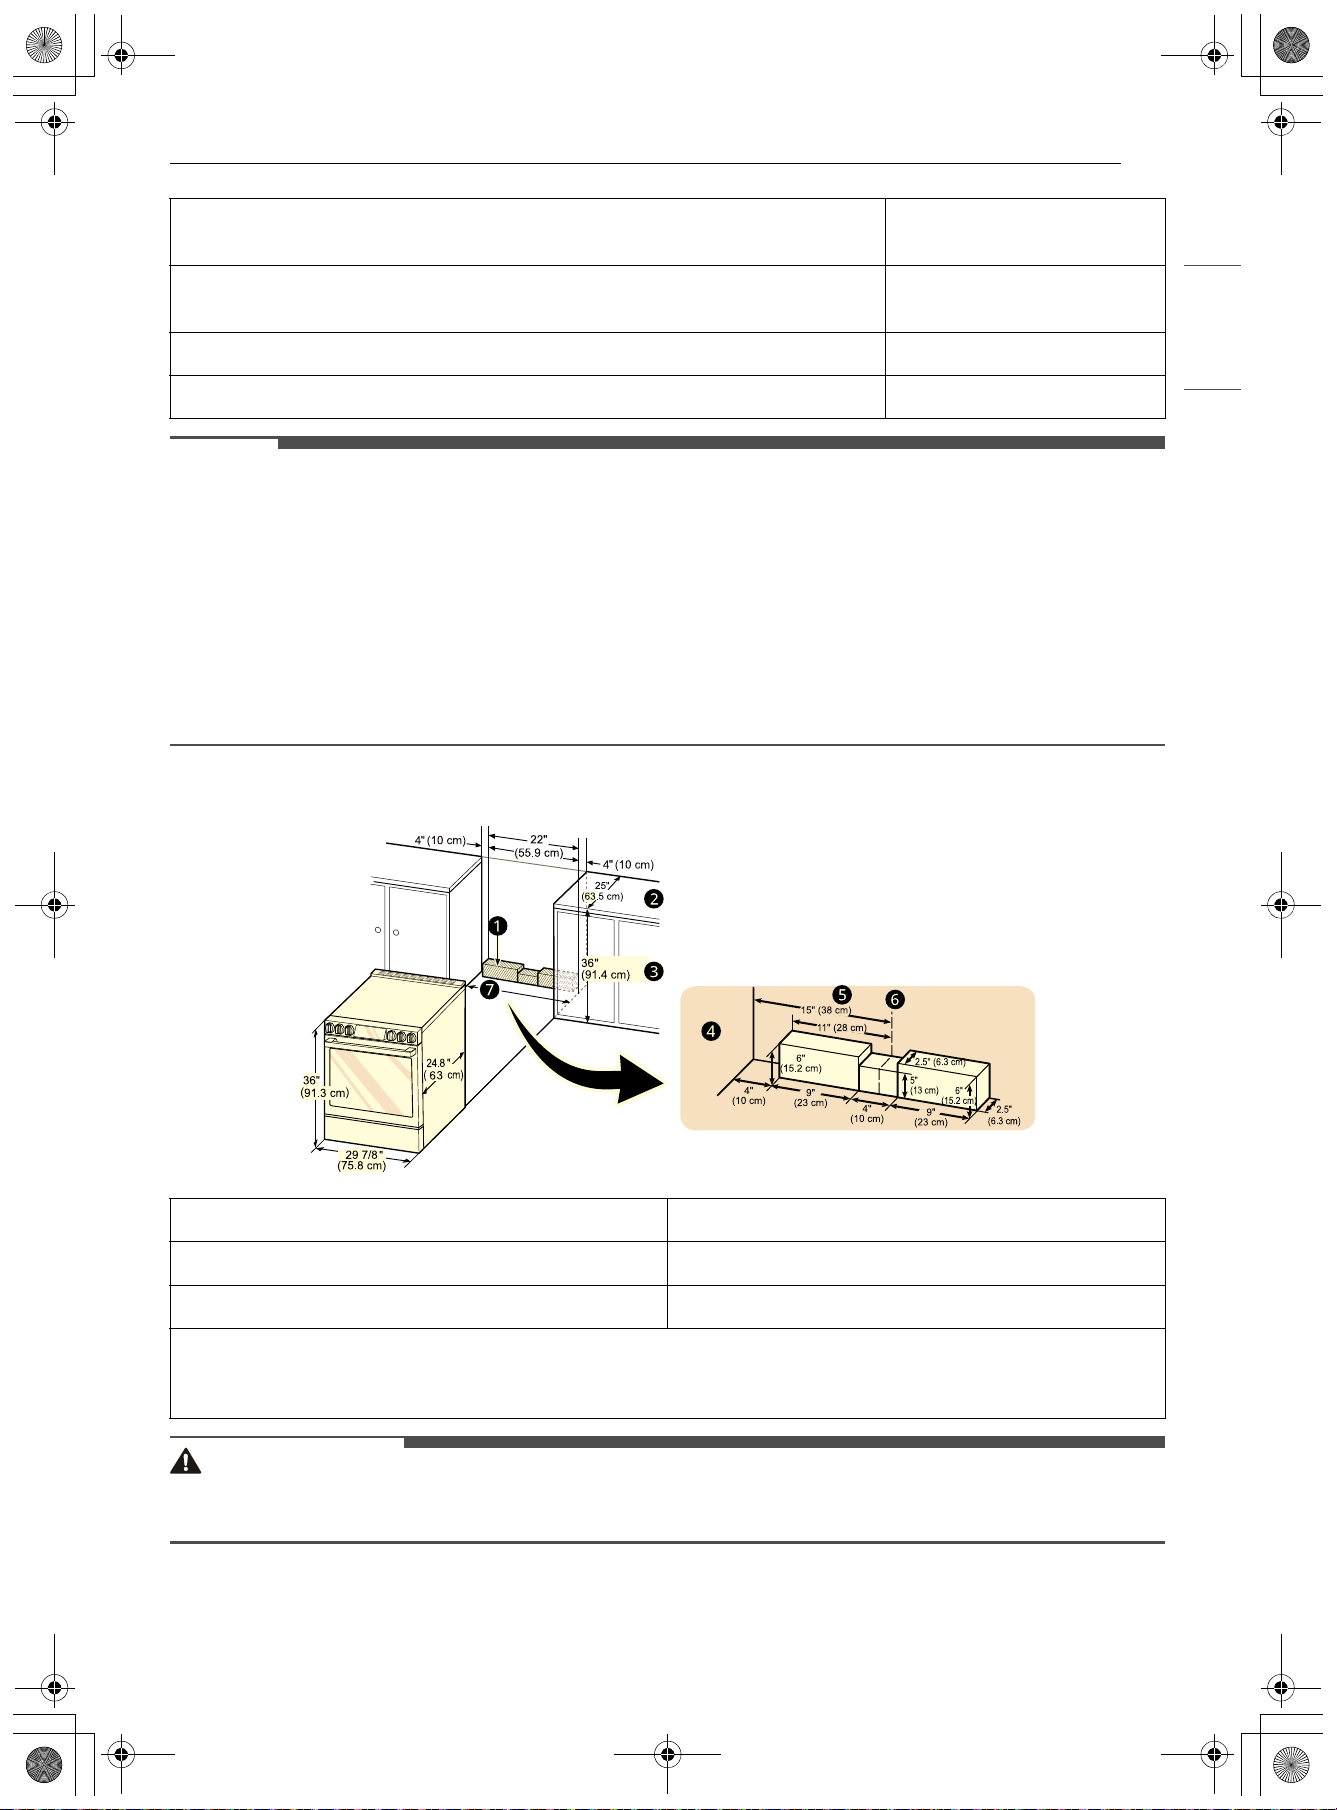
17INSTALACIÓN
ESPAÑOL
NOTA
• a 30" (76.2 cm) de espacio mínimo entre la parte superior de la superficie de cocción y la parte inferior
de un gabinete de madera o metal no protegido; o 24" (60.9 cm) mínimo cuando el fondo del gabinete
de madera o metal está protegido por 1/4" (0.64 cm) como mínimo, de material pirorresistente cubierto
con una lámina de acero superior a n.º 28 MSG, 0.015" (0.381 mm) de acero inoxidable,
0.024" (0.610 mm) de aluminio o 0.020" (0.508 mm) de cobre.
•
b 15" (38.1 cm) de espacio mínimo entre la encimera y la parte inferior del gabinete adyacente.
• Importante – Guarde para el uso del inspector eléctrico local.
• Para la instalación en Canadá, no se debe instalar una estufa independiente (no empotrable) a menos de
15/32" (12 mm) de distancia de cualquier superficie adyacente.
Espacios libres
PRECAUCIÓN
• La altura de la encimera tras nivelar la cocina debe ser mayor que la altura de la superficie del vidrio de la
placa de cocción del horno para evitar daños debidos a un impacto en el borde del vidrio.
a Distancia mínima desde la parte superior de la estufa hasta la superficie
combustible sobre el artefacto
30" (76.2 cm)
b Distancia mínima desde la encimera hasta los gabinetes superiores del
costado
15" (38.1 cm)
c Abertura mínima en los gabinetes sobre el artefacto
30" (76.2 cm)
d Altura de la encimera
36" (91.3 cm)
a Área de tomacorriente aceptable b Profundidad normal de la encimera
c Altura de la encimera d Gabinete
e Pared f Centro
g Apertura del gabinete
= 30" (76.2 cm) para EE. UU.
= de 30" (76.2 cm) a 31" (78.7 cm) Para CANADÁ
es-us_main.book.book Page 17 Friday, August 14, 2026 2:12 PM
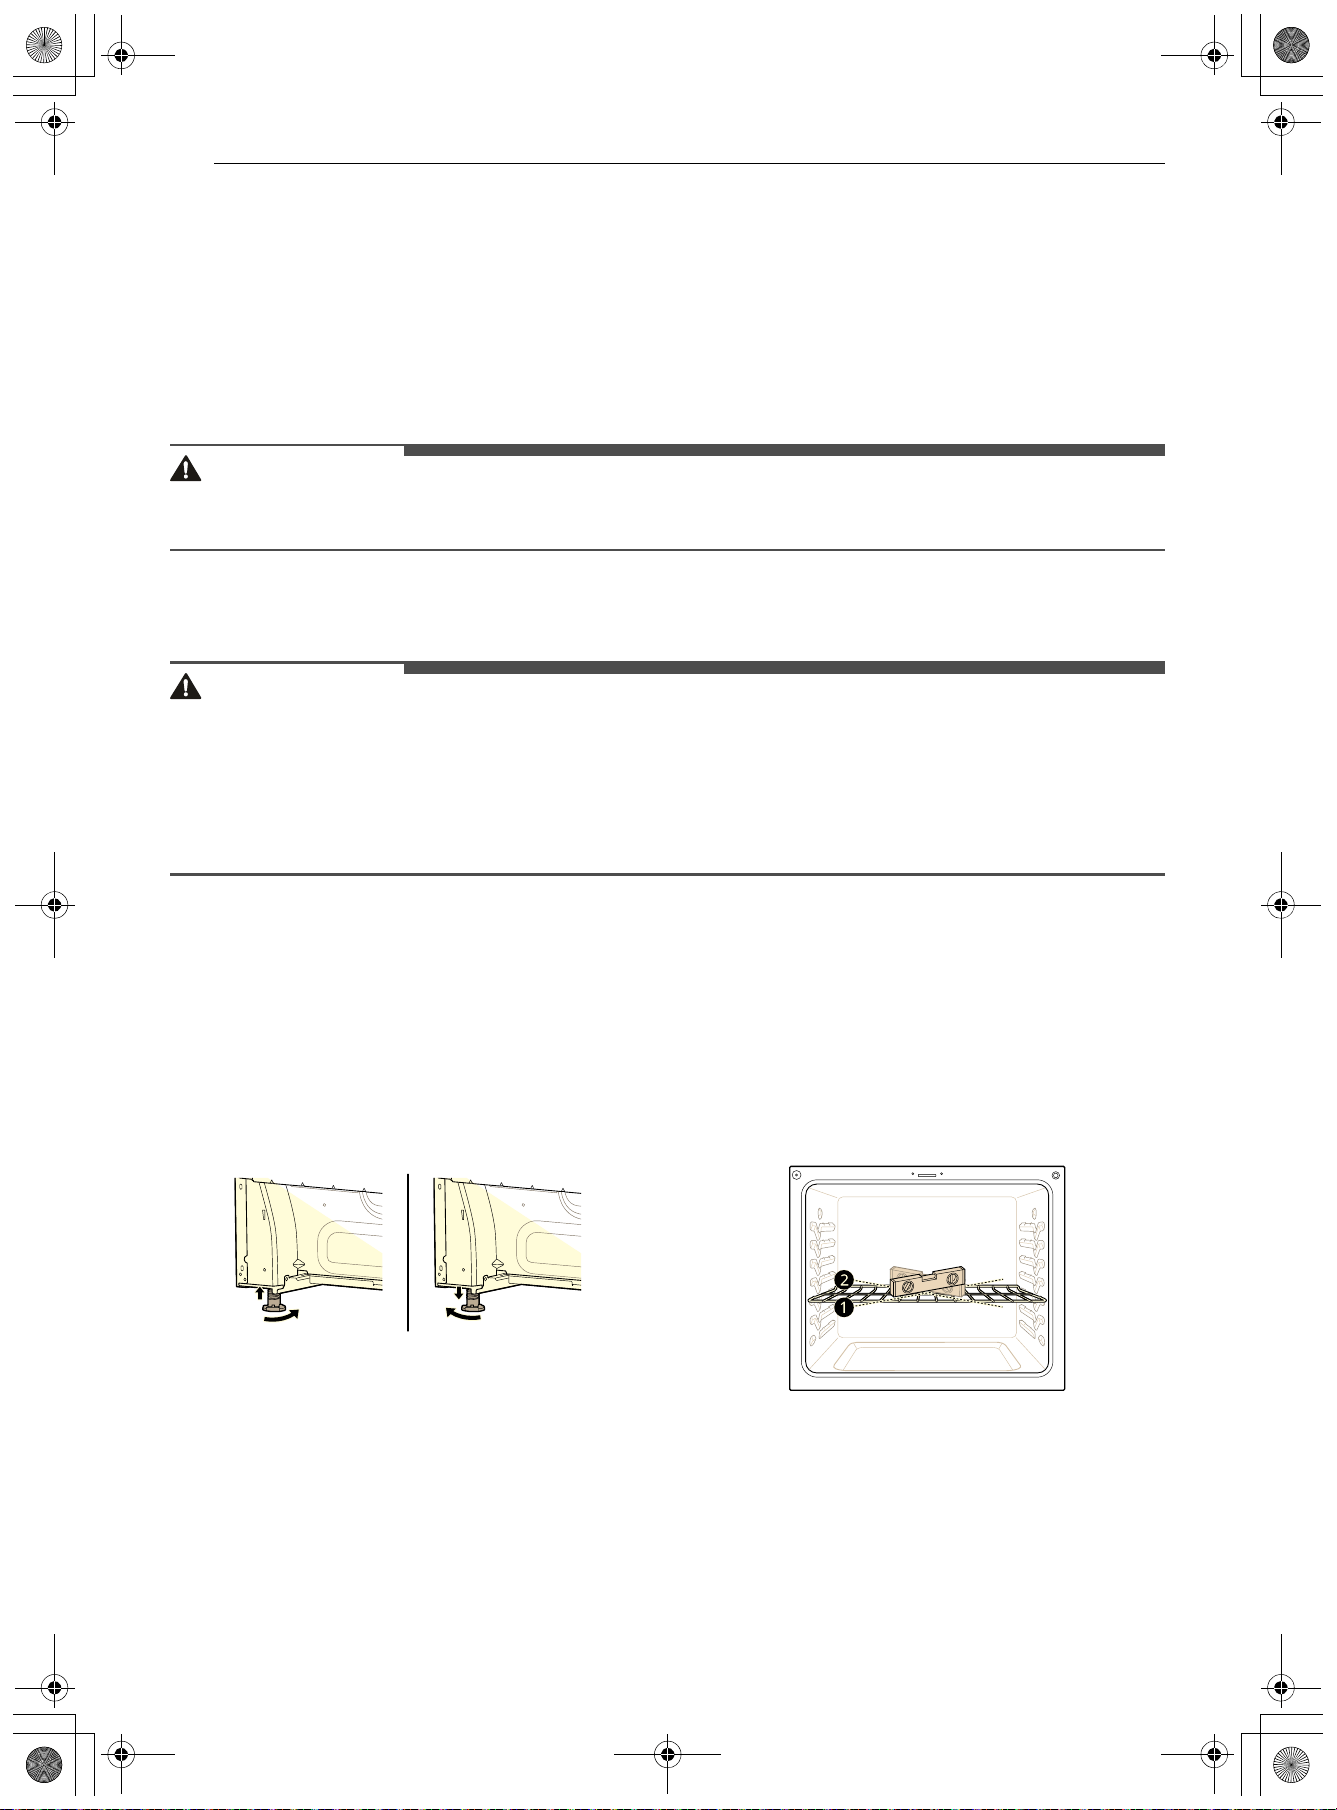
18 INSTALACIÓN
Electricidad
La estufa debe estar siempre enchufada en su propio tomacorriente individual con conexión a tierra.
• Esto evita sobrecargar los circuitos eléctricos de la vivienda, lo que podría causar un peligro de incendio,
debido a los cables sobrecalentados.
• Se recomienda la instalación de un circuito exclusivo para este electrodoméstico.
Suelo
PRECAUCIÓN
• Utilice una almohadilla de aislamiento o una placa de madera enchapada de 1/4 pulgada (0.64 cm)
debajo de la estufa si la instala sobre piso alfombrado.
Temperatura ambiente
PRECAUCIÓN
• Asegúrese de que los revestimientos de las paredes, las encimeras y los gabinetes alrededor de la estufa
puedan resistir el calor (hasta 194 ºF) generado por la estufa. Puede producirse decoloración,
delaminación o fusión. Esta estufa está diseñada para cumplir con la temperatura máxima permitida del
gabinete de madera de 194 ºF.
• Antes de instalar la estufa en un área cubierta con linóleo u otro revestimiento sintético para pisos,
asegúrese de que este pueda soportar temperaturas de 200 °F (93 °C), como mínimo.
Nivelando
Nivelación de la estufa
Nivele la estufa ajustando las patas de nivelación
con una llave. Si extiende las patas ligeramente,
podría ser más fácil insertar la pata trasera en el
soporte antivuelco.
Verificación de los ajustes
1 Ubique el nivelador en diagonal sobre el
estante el horno y verifique en todas
direcciones para nivelar.
• Primero verifique la dirección
a. Luego
verifique la dirección
b.
2 Si el nivelador no queda equilibrado sobre el
estante, ajuste las patas de nivelación con una
llave.
es-us_main.book.book Page 18 Friday, August 14, 2026 2:12 PM
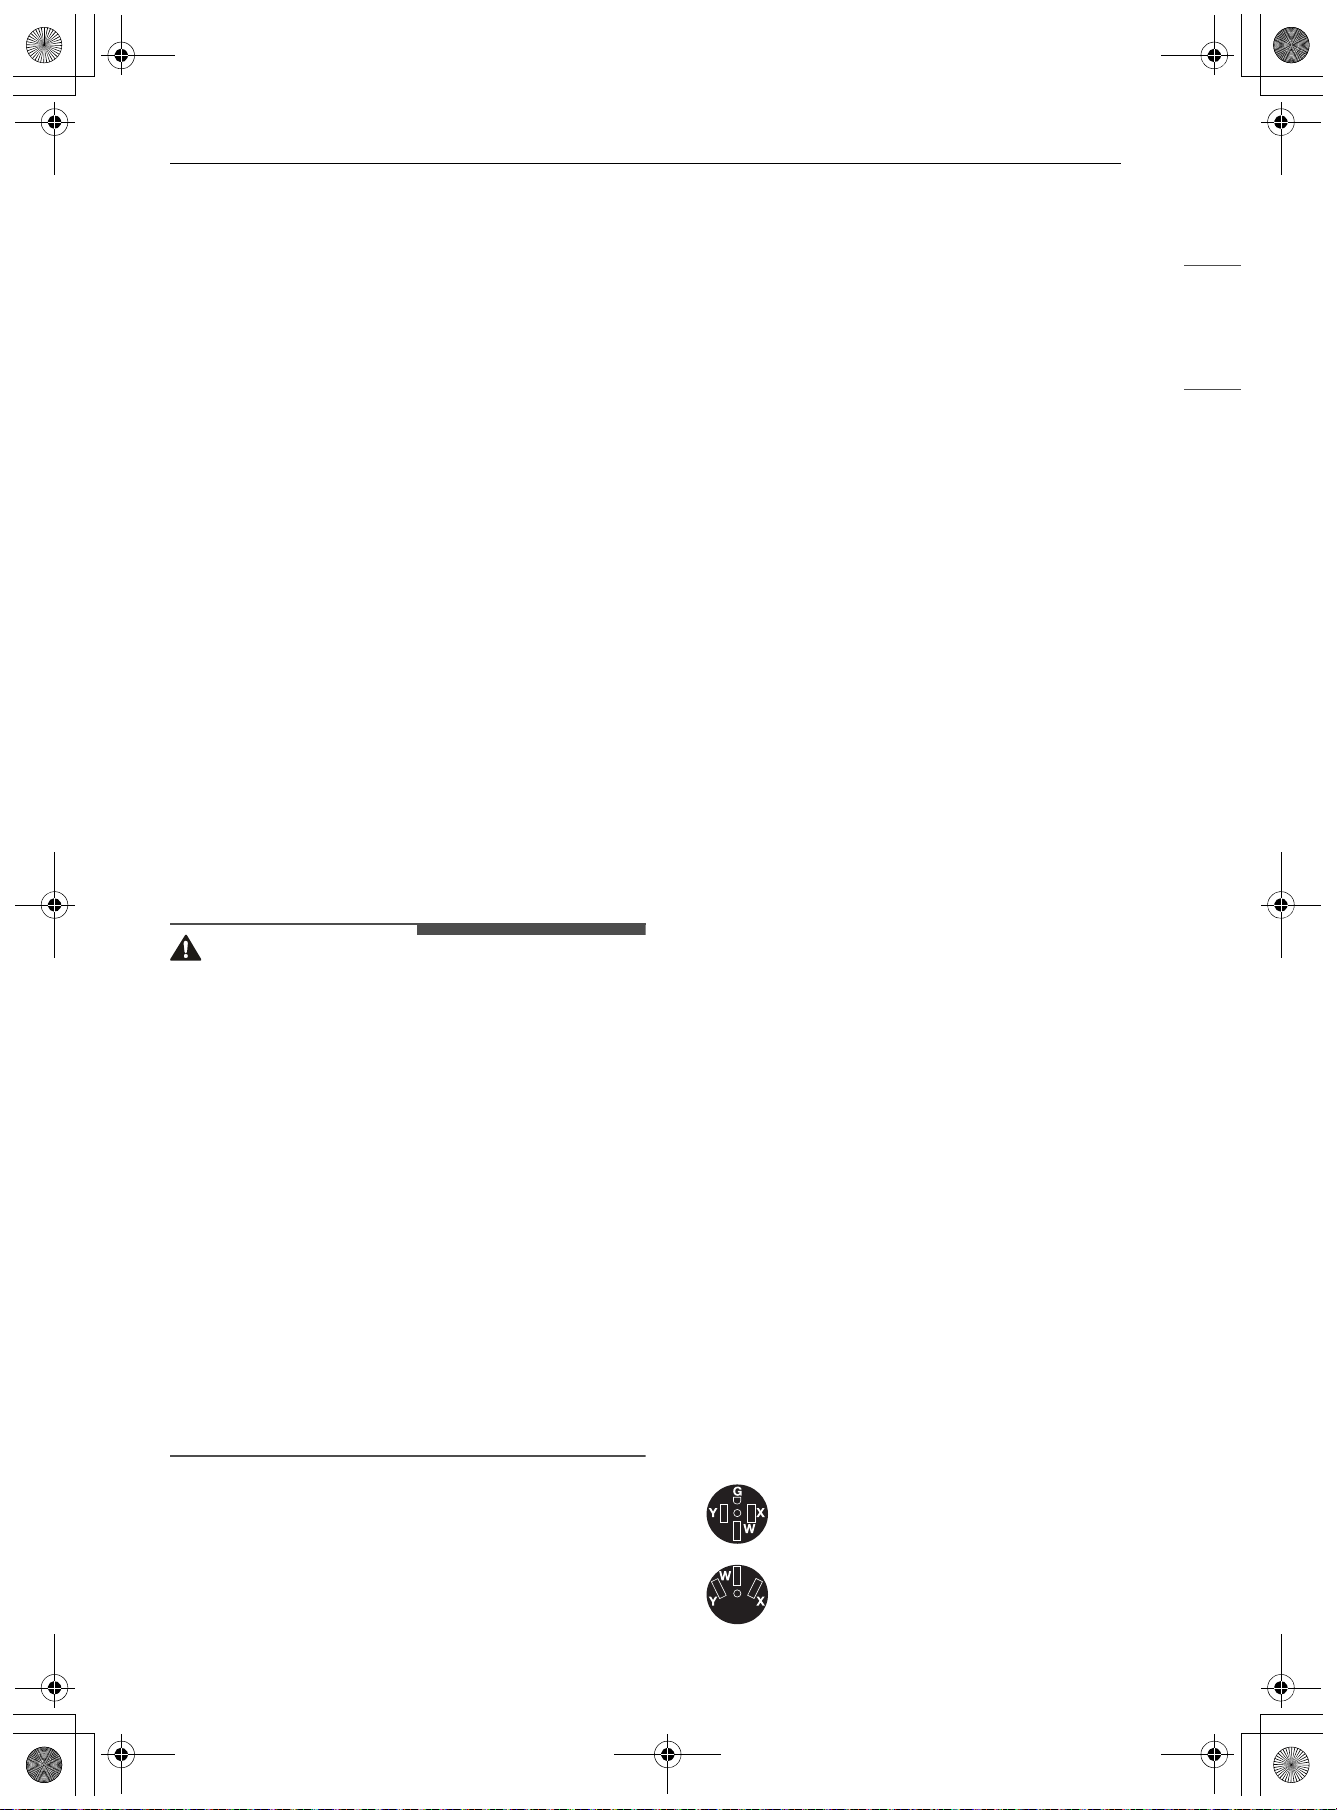
19INSTALACIÓN
ESPAÑOL
Conexión de electricidad
Requisitos eléctricos
Un técnico calificado debe instalar este
electrodoméstico e incluir una conexión a tierra en
un circuito derivado, de acuerdo con el Código
Eléctrico Nacional ANSI/NFPA N.° 70, en su edición
más reciente.
Todo el cableado debe cumplir con el Código
Eléctrico Nacional (National Electrical Code, NEC) y
el local. Esta estufa requiere un cable monofásico
de 3 hilos, un sistema eléctrico de 120/208 VCA o
120/240 V 60 Hz. Utilice únicamente un cable para
estufa de 3 o 4 conductores homologados por UL
con terminales de circuito cerrado, terminales de
horquilla abiertos o una terminación similar. No
instale el cable de alimentación sin un pasacables.
Se requiere un cable apto para estufas de
40 amperios con un rango mínimo de 120/240 V.
Si se utiliza un cable apto para estufas de
50 amperios, debe estar indicado para un uso con
aberturas de conexión de 1 3/8" de diámetro. Este
electrodoméstico puede conectarse por medio de
un conducto o un cable de alimentación. Si se
utiliza un conducto, consulte las secciones
"Conexión con cable de 3 hilos: Conducto" o
"Conexión con cable de 4 hilos: Conducto".
ADVERTENCIA
• Deje de 2 a 3 pies (61.0 cm a 91.4 cm) de lugar
libre en la línea para que se pueda mover la
estufa si es necesario hacer reparaciones.
• No se deben modificar ni el cable de
alimentación ni el enchufe. Si el enchufe no
entra en el tomacorriente, debe solicitar que un
electricista calificado instale un tomacorriente
adecuado.
• Se prohíbe utilizar un cable de extensión para
conectar la energía eléctrica. Conecte el cable de
alimentación y enchufe directamente.
• Se requiere una conexión eléctrica a tierra en
este electrodoméstico.
• Asegúrese de que el cable de alimentación no
esté presionado por la estufa ni por objetos
pesados. Si no verificara esto y el cable estuviera
presionado, podría sufrir quemaduras graves o
descargas eléctricas.
Valores nominales especificados del
juego del cable de alimentación
Caso 1
• Voltaje: 120/240 voltios (3 hilos)
• Tensión nominal de la estufa: 8.750 W - 16.500 W
• Corriente nominal especificada del juego del
cable de alimentación, amperios: 40 A o 50 A
• Diámetro (pulgadas) de la abertura de conexión
de la estufa
- Cable de alimentación: 1 3/8"
- Conducto: 1 1/8"
Caso 2
• Voltaje: 120/240 voltios (3 hilos)
• Tensión nominal de la estufa: 16.501 W - 22.500
W
• Corriente nominal especificada del juego del
cable de alimentación, amperios: 50 A
• Diámetro (pulgadas) de la abertura de conexión
de la estufa
- Cable de alimentación: 1 3/4"
- Conducto: 1 3/8"
Caso 3
• Voltaje: 120/208 voltios (3 hilos)
• Tensión nominal de la estufa: 7.801 W - 12.500 W
• Corriente nominal especificada del juego del
cable de alimentación, amperios: 40 A o 50 A
• Diámetro (pulgadas) de la abertura de conexión
de la estufa
- Cable de alimentación: 1 3/8"
- Conducto: 1 1/8"
Caso 4
• Voltaje: 120/208 voltios (3 hilos)
• Tensión nominal de la estufa: 12.501 W - 18.500
W
• Corriente nominal especificada del juego del
cable de alimentación, amperios: 50 A
• Diámetro (pulgadas) de la abertura de conexión
de la estufa
- Cable de alimentación: 1 3/4"
- Conducto: 1 3/8"
Receptáculo eléctrico de pared para
cables de 3 o 4 hilos
Receptáculo para cable de 4 hilos (14-
50R)
Receptáculo para cable de 3 hilos (10-
50R)
es-us_main.book.book Page 19 Friday, August 14, 2026 2:12 PM
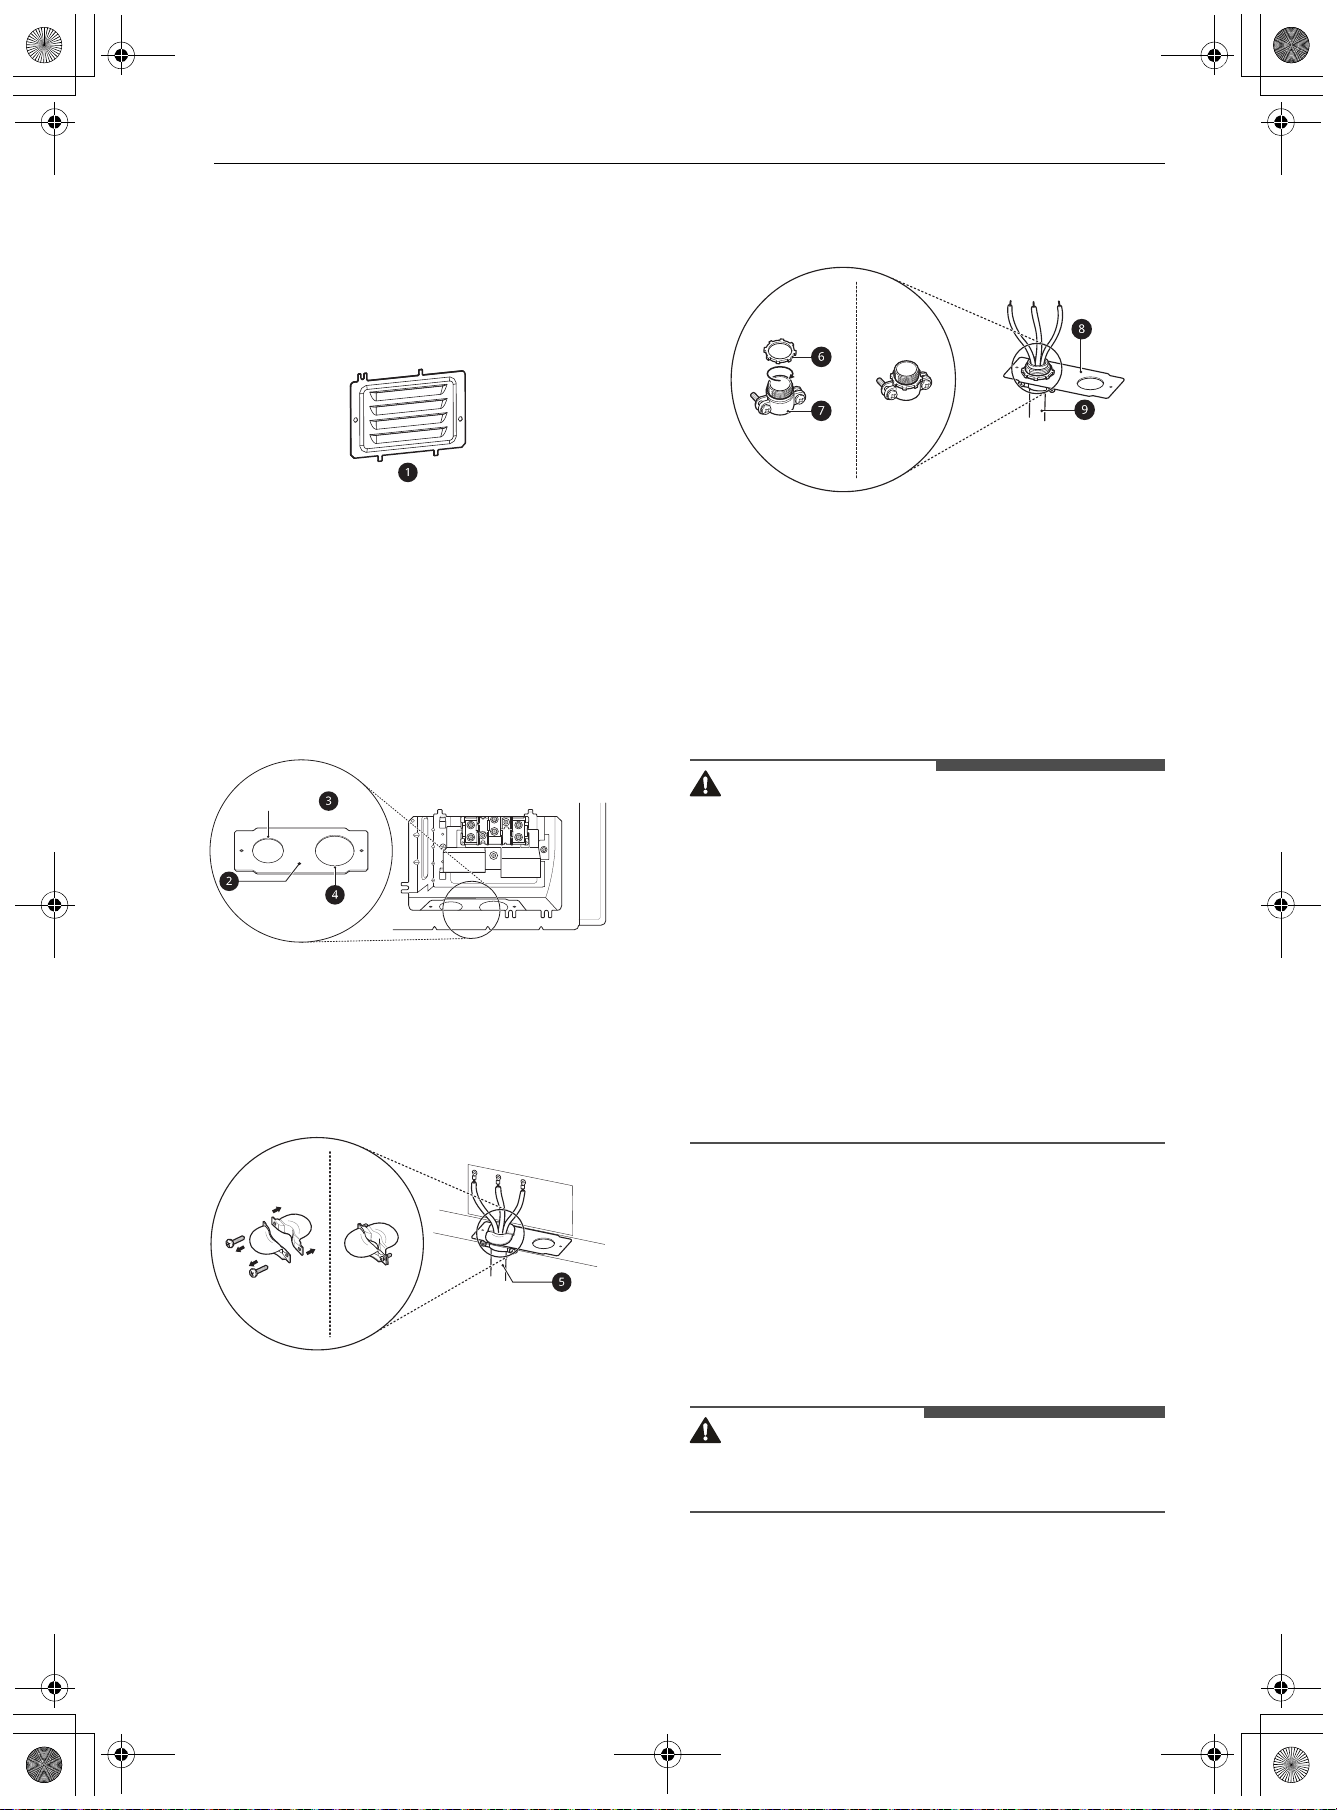
20 INSTALACIÓN
Conexión del cable de
alimentación/conducto
Se debe retirar la cubierta de acceso trasera a.
Afloje los dos tornillos con un destornillador. El
bloque de terminales debe quedar accesible.
Utilice la placa de conexión del cable/conducto
b
para instalar el cable de alimentación o el
conducto. Deje la placa de conexión como estaba
instalada para las instalaciones del cable de
alimentación. Retire la placa de conexión para las
instalaciones de conductos y gírela para utilizar el
orificio para conducto
c más pequeño de 1 1/
8 pulg. (2.8 cm), en lugar del orificio para cable de
alimentación
d de 1 3/8 pulg. (3.5 cm).
Para instalaciones con cable de alimentación
e,
enganche el pasacables sobre el orificio para cable
de alimentación de 1 3/8 pulg. (3.5 cm), ubicado
por debajo de la parte trasera del horno. Inserte el
cable de alimentación a través del pasacables y
ajústelo.
Para instalaciones de conductos, inserte el
pasacables del conducto en el orificio
correspondiente de 1 1/8 pulgadas (2.8 cm).
Luego, instale el conducto a través del cuerpo del
pasacables y ajústelo con su anillo.
f Anillo
g Cuerpo
h Placa de conexión del cable/conducto
i Conducto
Conexión de 3 hilos: Cable de
alimentación
ADVERTENCIA
• El hilo del medio (neutro o tierra) de un cable de
alimentación de 3 hilos o un conducto de 3 hilos
se debe conectar al poste medio del bloque de
terminales principal. Los dos hilos restantes del
cable de alimentación o del conducto se deben
conectar a los postes exteriores del bloque de
terminales principal. De lo contrario, podría
causar lesiones personales graves, descargas
eléctricas o la muerte.
• Si los tornillos no están ajustados de manera
segura, podría generarse una chispa eléctrica y
causar lesiones personales graves o incluso la
muerte.
1 Para instalaciones con cable de alimentación,
enganche el pasacables sobre el orificio para
cable de alimentación (1 3/8") ubicado por
debajo de la parte trasera del horno.
2 Inserte el cable de alimentación a través del
pasacables y ajústelo.
PRECAUCIÓN
• No instale el cable de alimentación sin un
pasacables.
3 Retire los 3 tornillos inferiores del bloque de
terminales y consérvelos.
1
1
/
8
"
(2.8 cm)
1
3
/
8
"
(3.5 cm)
es-us_main.book.book Page 20 Friday, August 14, 2026 2:12 PM
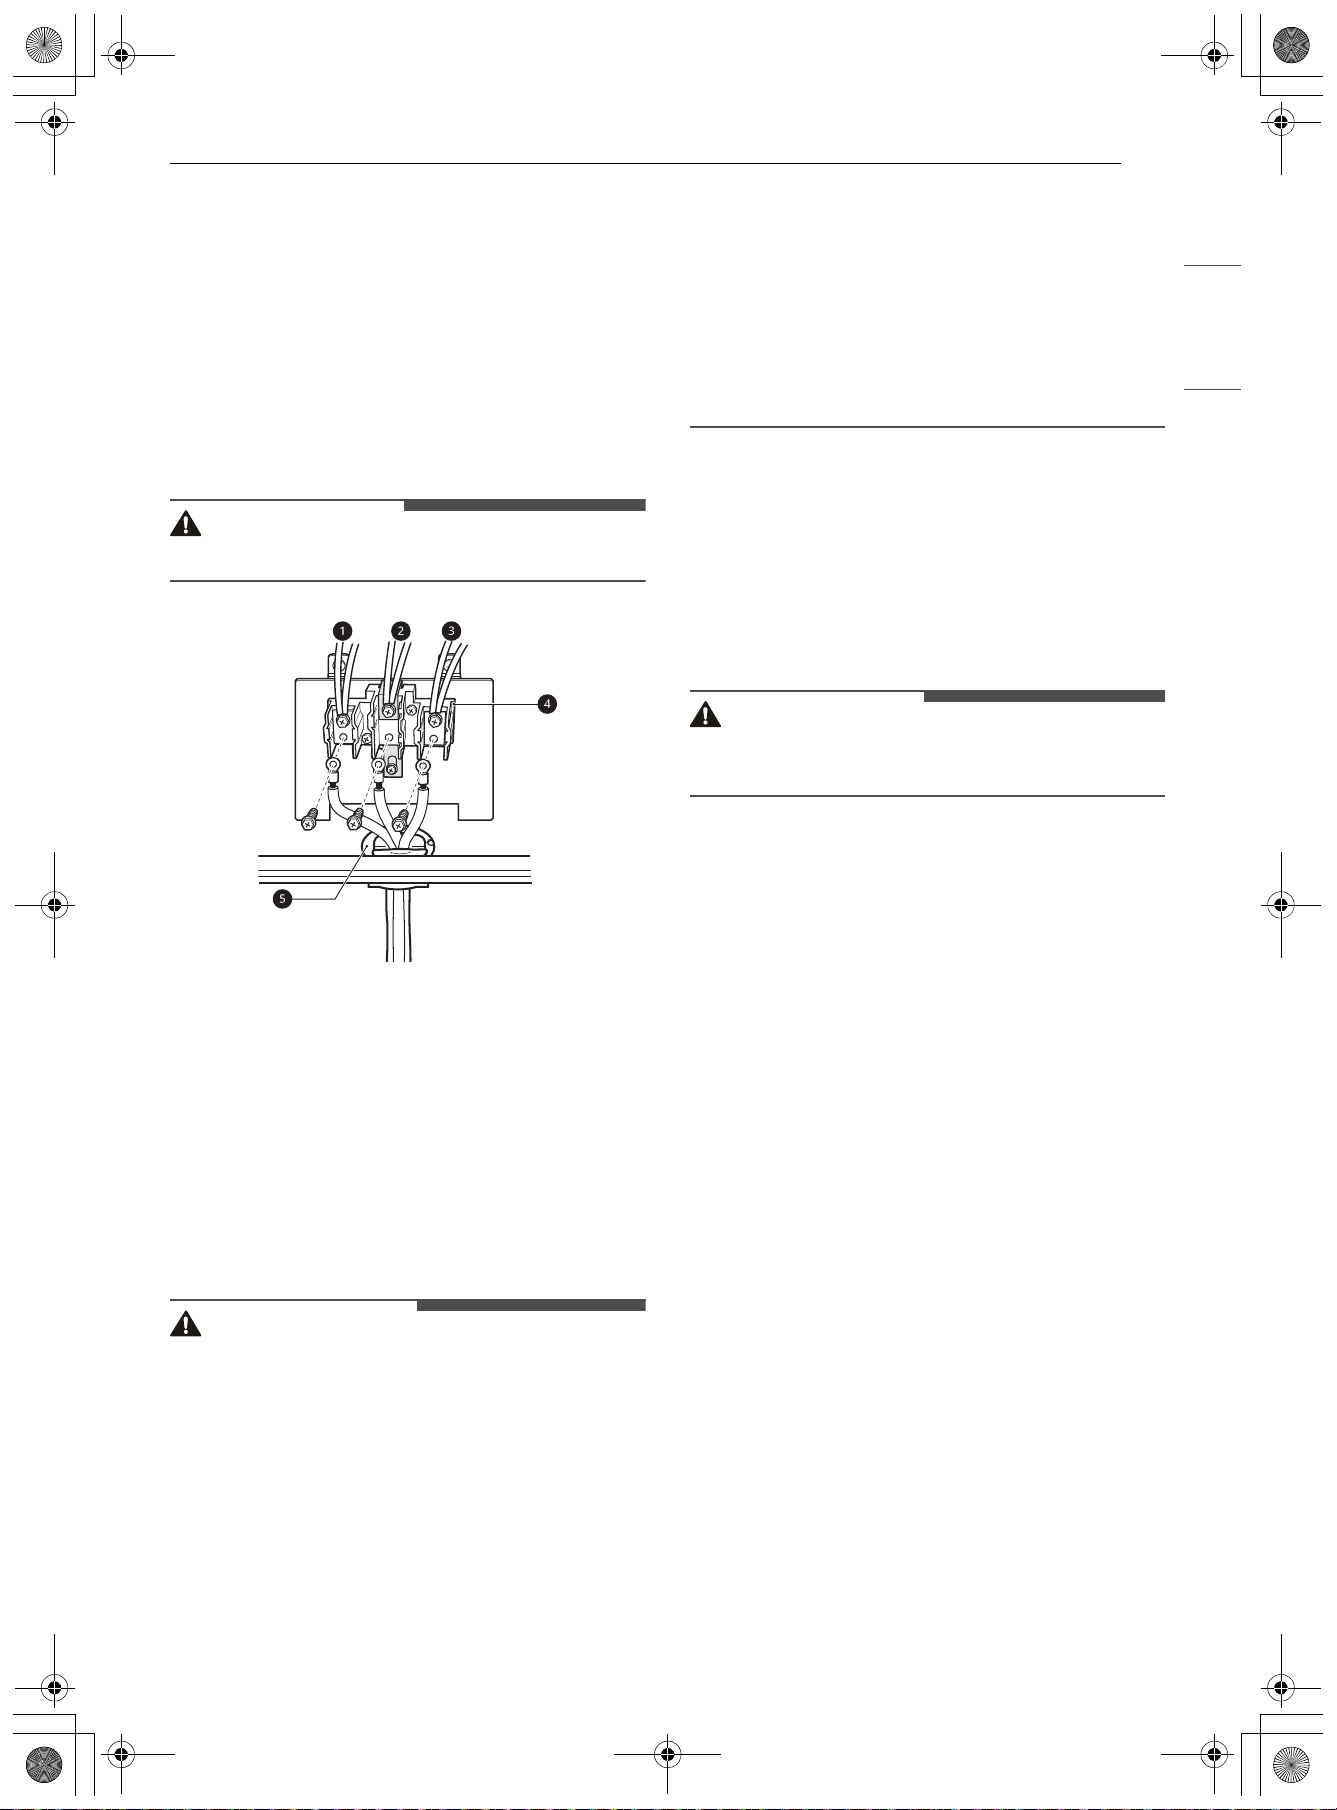
21INSTALACIÓN
ESPAÑOL
4 Inserte los 3 tornillos a través de cada anillo
de terminales del cable de alimentación y en
los terminales inferiores del bloque.
• Asegúrese de que el hilo central blanco esté
conectado a la posición central inferior del
bloque de terminales.
5 Ajuste los 3 tornillos de manera segura al
bloque de terminales. No retire las
conexiones de la correa a tierra.
PRECAUCIÓN
• No retire las conexiones de la correa a tierra.
a Negro
b Blanco
c Rojo
d Bloque de terminales
e Placa de conexión del cable/conducto
Conexión de 4 hilos: Cable de
alimentación
ADVERTENCIA
• Solo debe utilizar un juego de cable de
alimentación de 4 conductores con un valor
nominal de 120/240 voltios, 50 amperios y
marcado para uso en estufas de conectores de
circuito cerrado o terminales de horquilla
abiertos con los extremos hacia arriba. El hilo
blanco del medio (neutro) del cable de
alimentación o conducto de 4 hilos se debe
conectar al poste medio del bloque de
terminales principal. Los otros dos hilos del
cable de alimentación o conducto se deben
conectar a los postes exteriores del bloque de
terminales principal. El cuarto cable a tierra
(verde) se debe conectar al marco de la estufa
con el tornillo de conexión a tierra. De lo
contrario, podría causar lesiones personales
graves, descargas eléctricas o la muerte.
• Si los tornillos no están ajustados de manera
segura, podría generarse una chispa eléctrica y
causar lesiones personales graves o incluso la
muerte.
1 Para instalaciones con cable de alimentación,
enganche el pasacables sobre el orificio para
cable de alimentación (1 3/8") ubicado por
debajo de la parte trasera del horno.
2 Inserte el cable de alimentación a través del
pasacables y ajústelo.
PRECAUCIÓN
• No instale el cable de alimentación sin un
pasacables.
3 Retire los 3 tornillos inferiores del bloque de
terminales y consérvelos.
4 Retire el tornillo de conexión a tierra y doble
el extremo de la correa de conexión a tierra
para que la ranura quede sobre el orificio del
tornillo central que retiró en el paso 3.
5 Inserte el tornillo a tierra en el anillo del
terminal del hilo a tierra del cable de
alimentación (verde) y fíjelo al marco de la
estufa.
6 Inserte los 3 tornillos a través de cada anillo
de terminales del cable de alimentación y en
los terminales inferiores del bloque.
• Asegúrese de que el hilo central blanco
(neutro) esté conectado a la posición central
inferior del bloque de terminales.
es-us_main.book.book Page 21 Friday, August 14, 2026 2:12 PM
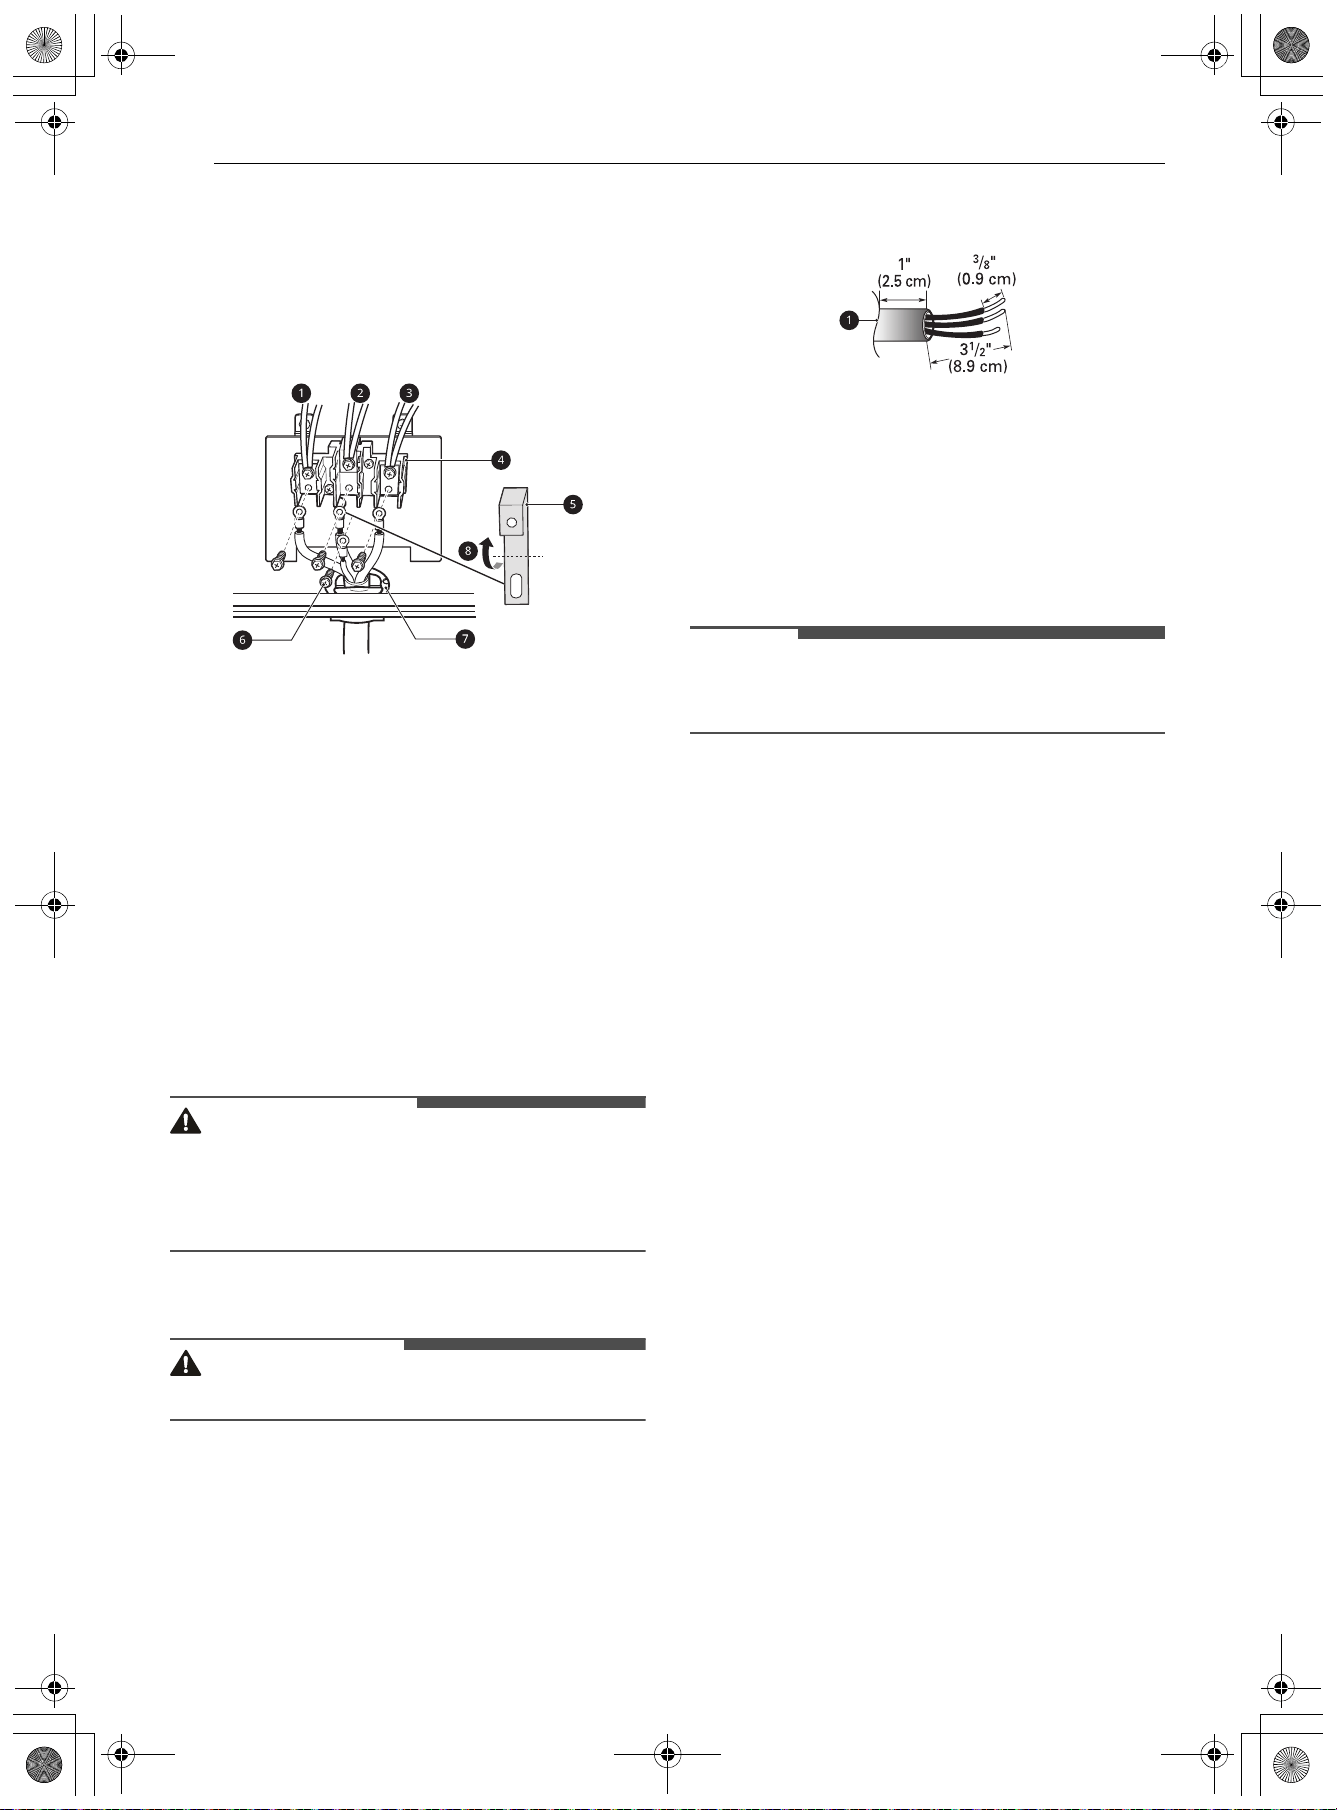
22 INSTALACIÓN
7 Ajuste los 3 tornillos de manera segura al
bloque de terminales. No retire las
conexiones de la correa a tierra.
• El tornillo central ahora fija la correa de
conexión a tierra, plegada hacia arriba al
bloque.
a Negro
b Blanco
c Rojo
d Bloque de terminales
e Correa de conexión a tierra
f Tornillo de conexión a tierra
g Placa de conexión del cable/conducto
h Doble la correa hacia arriba y fíjela.
Conexión de 3 hilos: Conducto
ADVERTENCIA
• Si los tornillos no están ajustados de manera
segura, podría generarse una chispa eléctrica y
causar lesiones personales graves o incluso la
muerte.
Instalaciones del conducto
PRECAUCIÓN
• No instale el conducto sin un pasacables.
1 Retire la placa de conexión de conductos de la
parte posterior del horno y gírela.
• Se debe utilizar el orificio para conductos (1
1/8").
2 En primer lugar, prepare los hilos del
conducto como se indica a continuación.
a Placa de conexión del cable/conducto
3 Instale el pasacables del conducto.
1) Inserte el pasacables en el orificio para
conducto de 1 1/8 pulg.(2.8 cm).
2) Instale el conducto a través del cuerpo del
pasacables y ajústelo con su anillo.
NOTA
• Para instalaciones de conductos, compre un
pasacables.
4 Vuelva a colocar la placa de conexión del
cable/conducto.
Conexiones de conductos
Si el hilo del conducto es de cobre debe ser un
cableado de 8 o 10 AWG.
Si el hilo del conducto es de aluminio debe ser un
cableado de 6 u 8 AWG.
1 Afloje los 3 tornillos inferiores del bloque de
terminales.
2 Inserte el extremo expuesto del cable (blanco/
neutro) a través de la abertura central del
bloque de terminales. No retire las
conexiones de la correa a tierra.
3 Inserte los dos extremos expuestos del cable
en las aberturas inferiores izquierda y
derecha del bloque de terminales.
es-us_main.book.book Page 22 Friday, August 14, 2026 2:12 PM
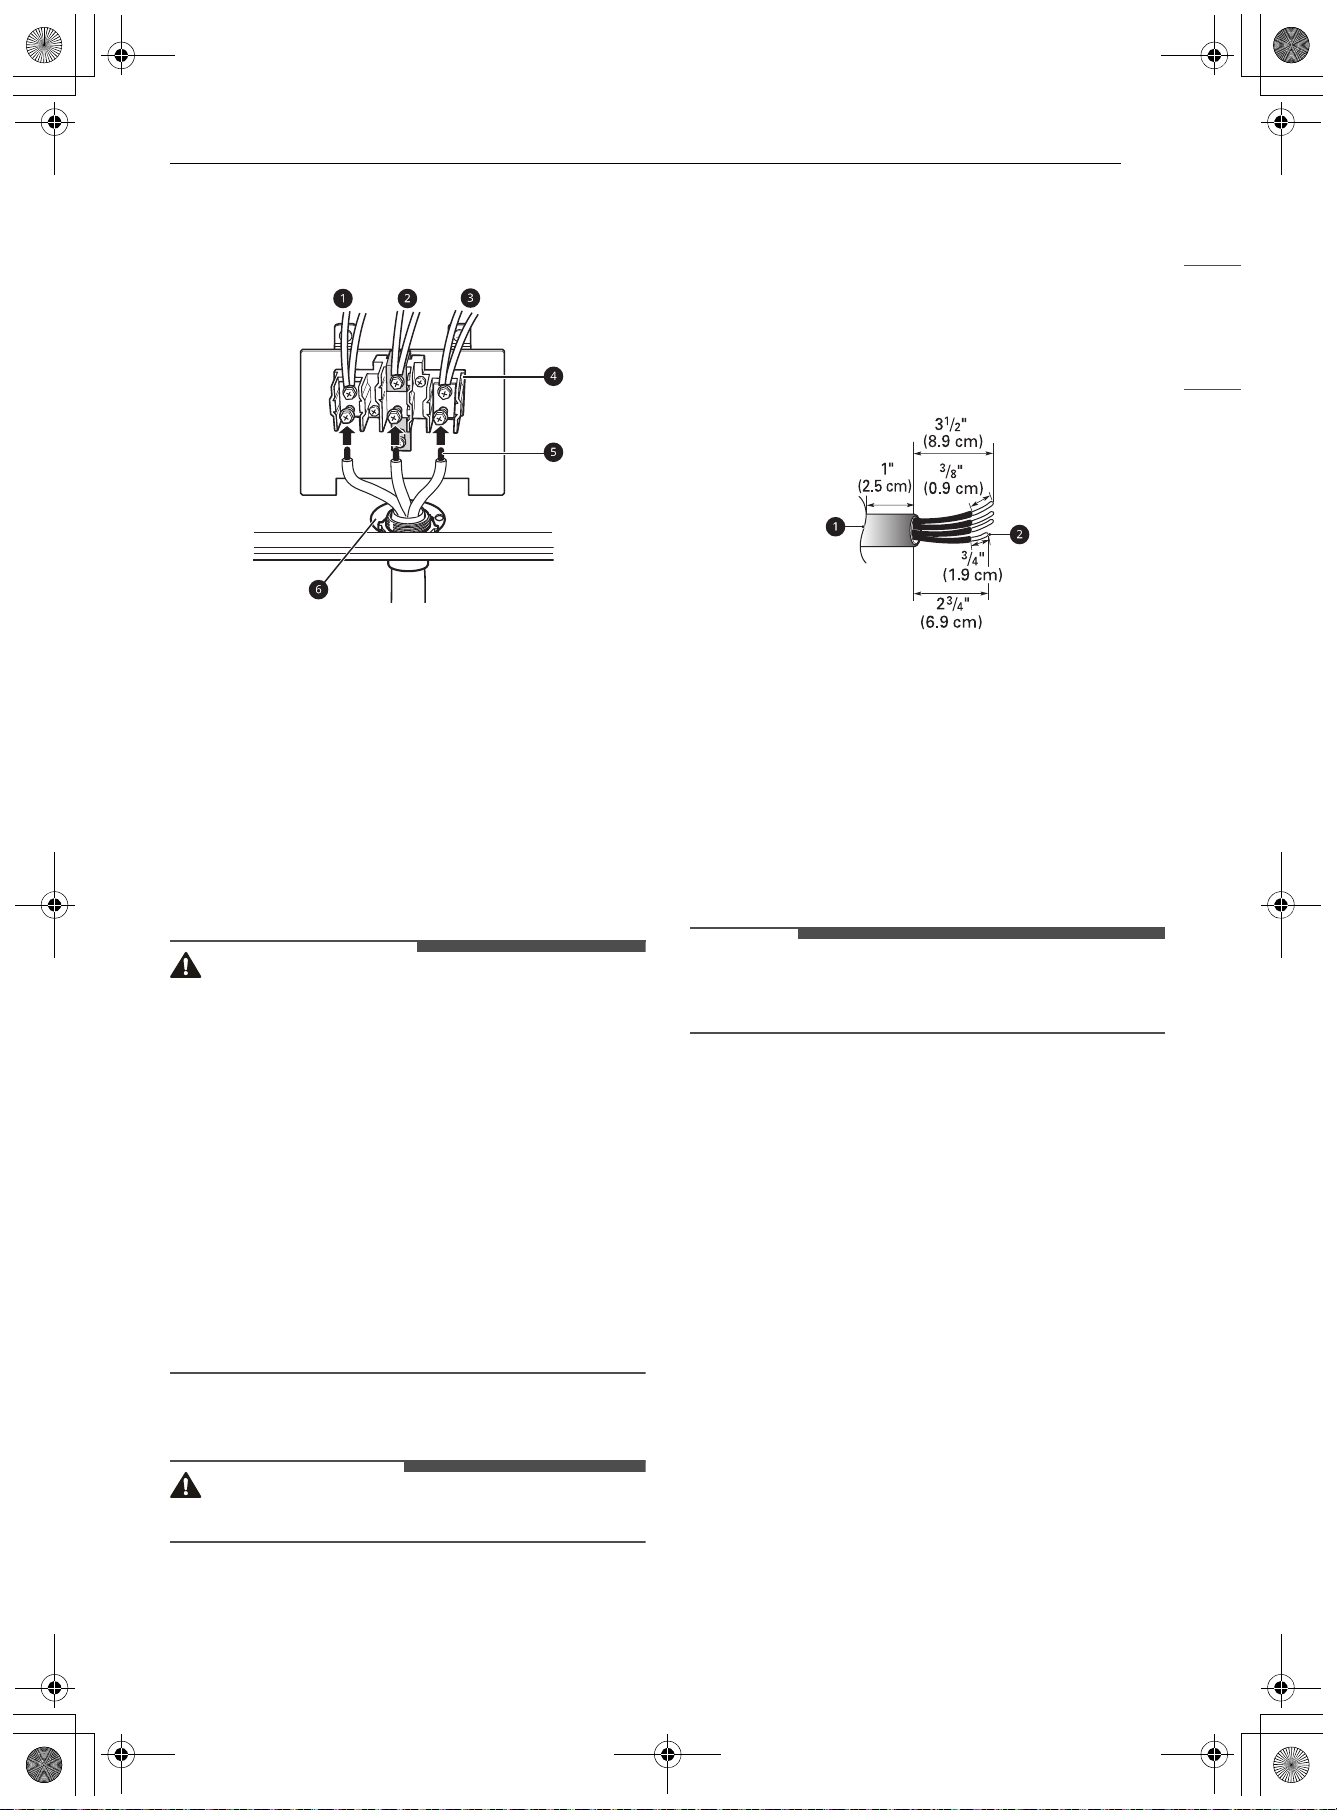
23INSTALACIÓN
ESPAÑOL
4 Ajuste los 3 tornillos de manera segura al
bloque de terminales (aproximadamente de
35 a 50 pulg-lb).
a Negro
b Blanco
c Rojo
d Bloque de terminales
e Extremos del cable
f Placa de conexión del conducto
Conexión de 4 hilos: Conducto
ADVERTENCIA
• El hilo blanco del medio (neutro) del cable de
alimentación o conducto de 4 hilos se deben
conectar al poste medio del bloque de
terminales principal. Los otros dos hilos del
cable de alimentación o conducto se deben
conectar a los postes exteriores del bloque de
terminales principal. El cuarto cable a tierra
(verde) se debe conectar al marco de la estufa
con el tornillo de conexión a tierra. De lo
contrario, podría causar lesiones personales
graves, descargas eléctricas o la muerte.
• Si los tornillos no están ajustados de manera
segura, podría generarse una chispa eléctrica y
causar lesiones personales graves o incluso la
muerte.
Instalaciones del conducto
PRECAUCIÓN
• No instale el conducto sin un pasacables.
1 Retire la placa de conexión de conductos de la
parte posterior del horno y gírela.
• Se debe utilizar el orificio para conductos (1
1/8").
2 En primer lugar, prepare los hilos del
conducto como se indica a continuación.
a Placa de conexión del cable/conducto
b Cable de conexión a tierra
3 Instale el pasacables del conducto.
1) Inserte el pasacables en el orificio para
conducto de 1 1/8 pulg.(2.8 cm).
2) Instale el conducto a través del cuerpo del
pasacables y ajústelo con su anillo.
NOTA
• Para instalaciones de conductos, compre un
pasacables.
4 Vuelva a colocar la placa de conexión del
cable/conducto.
Conexiones de conductos
Si el hilo del conducto es de cobre debe ser un
cableado de 8 o 10 AWG.
Si el hilo del conducto es de aluminio debe ser un
cableado de 6 u 8 AWG.
1 Afloje los 2 tornillos inferiores izquierdo y
derecho del bloque de terminales. Retire los 2
tornillos centrales inferiores. No descarte
ningún tornillo.
2 Retire el tornillo de conexión a tierra y doble
el extremo de la correa de conexión a tierra
para que la ranura quede sobre el orificio del
tornillo central que retiró en el paso 1.
es-us_main.book.book Page 23 Friday, August 14, 2026 2:12 PM
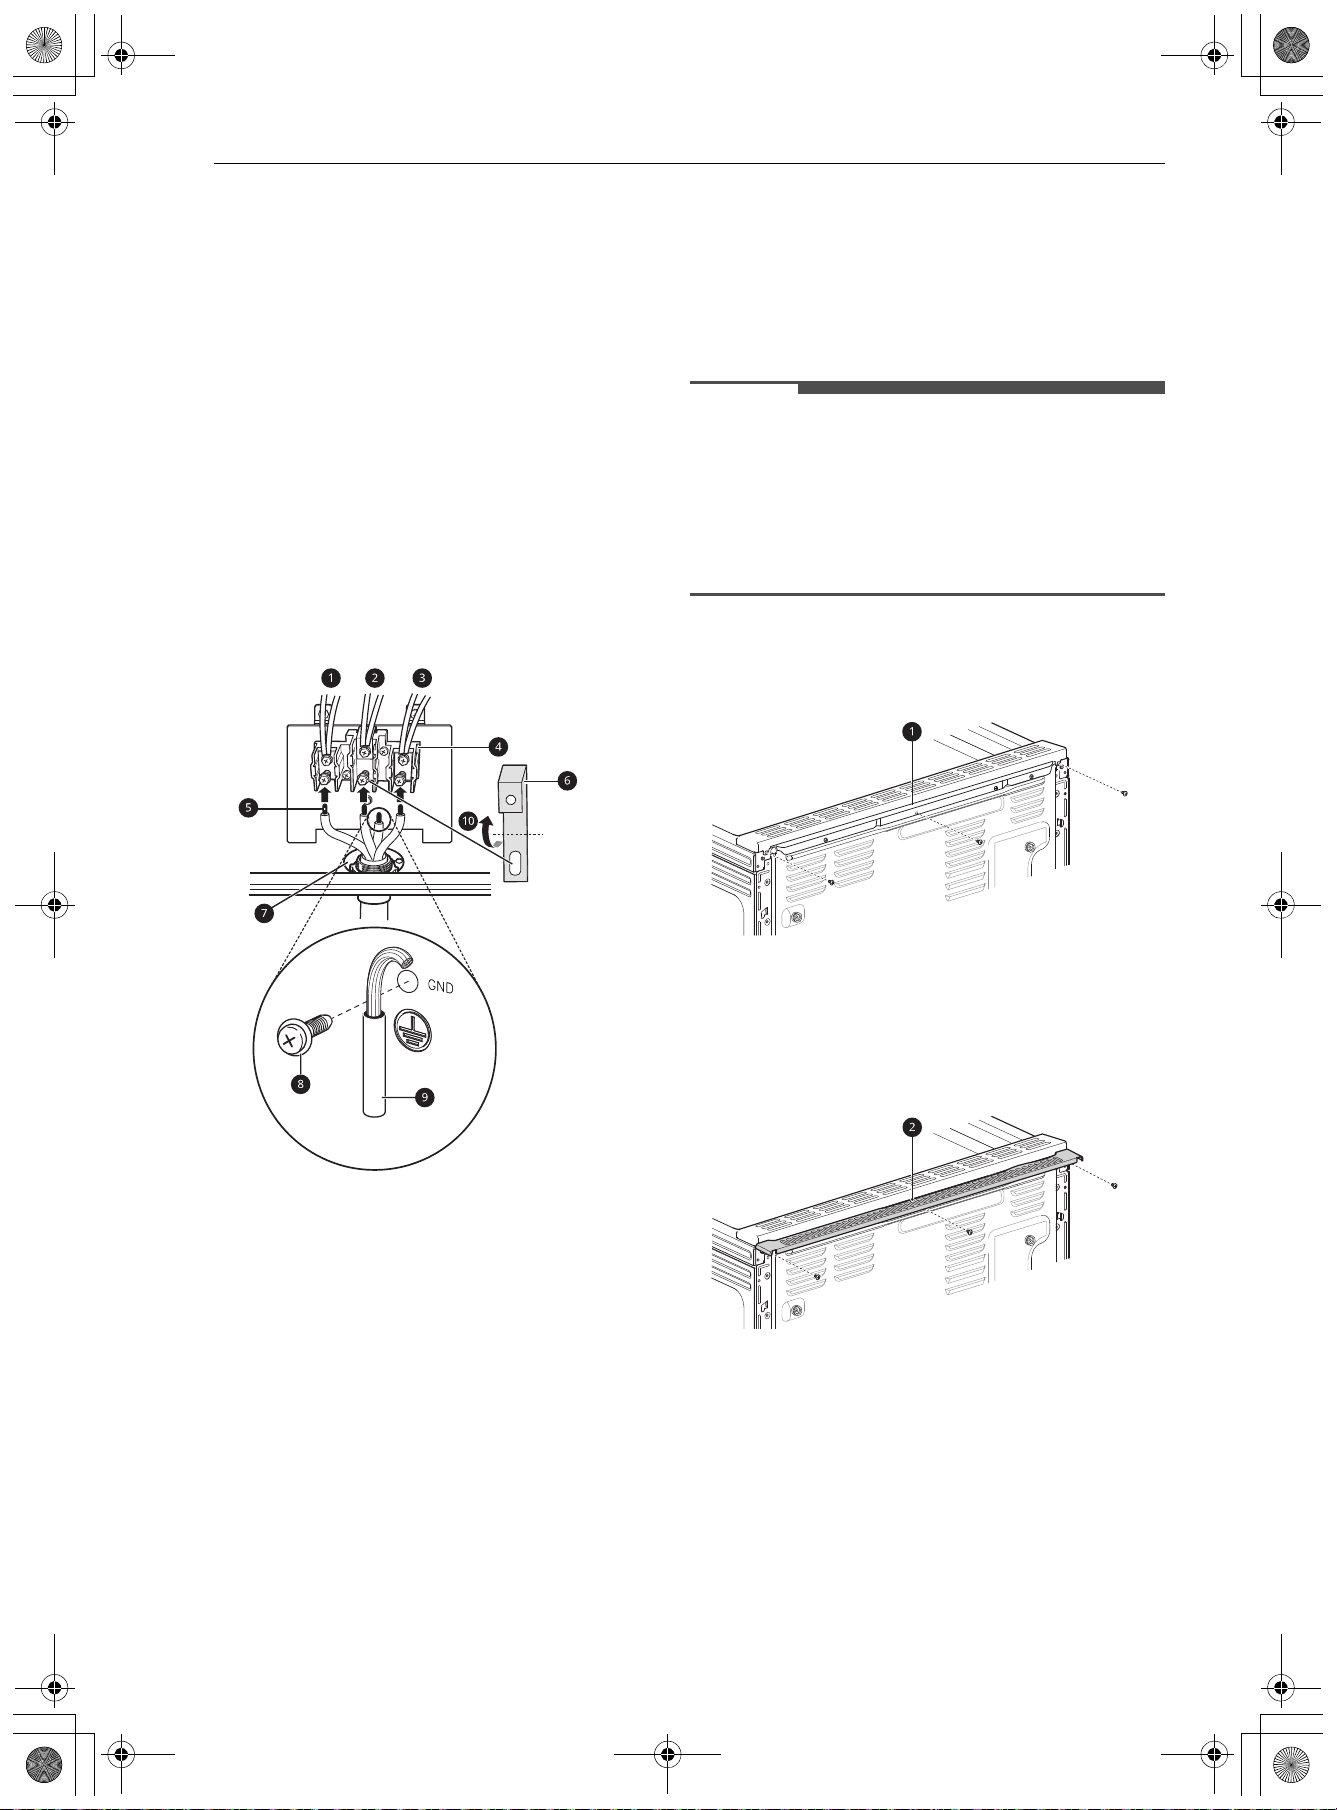
24 INSTALACIÓN
3 Una el extremo expuesto del cable de
conexión a tierra (verde) al marco de la estufa
y asegúrelo con el tornillo de conexión a
tierra.
4 Inserte el extremo expuesto del cable (blanco/
neutro) a través de la abertura central del
bloque de terminales. El tornillo central ahora
fija la correa de conexión a tierra, plegada
hacia arriba, al bloque.
5 Inserte los dos extremos expuestos del cable
a través de las aberturas izquierda y derecha
del bloque de terminales. Ajuste los 3 tornillos
de manera segura al bloque de terminales
(aproximadamente de 35 a 50 pulg-lb).
a Negro
b Blanco
c Rojo
d Bloque de terminales
e Extremos del cable
f Correa de conexión a tierra
g Placa de conexión del conducto
h Tornillo de conexión a tierra
i Cable de conexión a tierra
j Doble la correa hacia arriba y fíjela.
Relleno trasero opcional
Instalación de la placa trasera
Si la encimera no cubre la abertura en la pared
posterior, se necesitará el kit de placa trasera que
se suministra con la estufa empotrable.
NOTA
• Si la profundidad de la encimera es mayor que
25 3/8", habrá un espacio entre el kit y la pared
posterior.
• Si la profundidad de la encimera es menor que
24 3/4", el panel de control no se colocará al ras
de la encimera.
1 Con un destornillador, retire los tres tornillos
que sujetan la placa superior trasera en su
lugar.
a Placa superior trasera
2 Fije el conjunto de placa superior trasera y
relleno como se muestra en la imagen, con
los tres tornillos que retiró en el paso 1.
b Placa trasera
es-us_main.book.book Page 24 Friday, August 14, 2026 2:12 PM
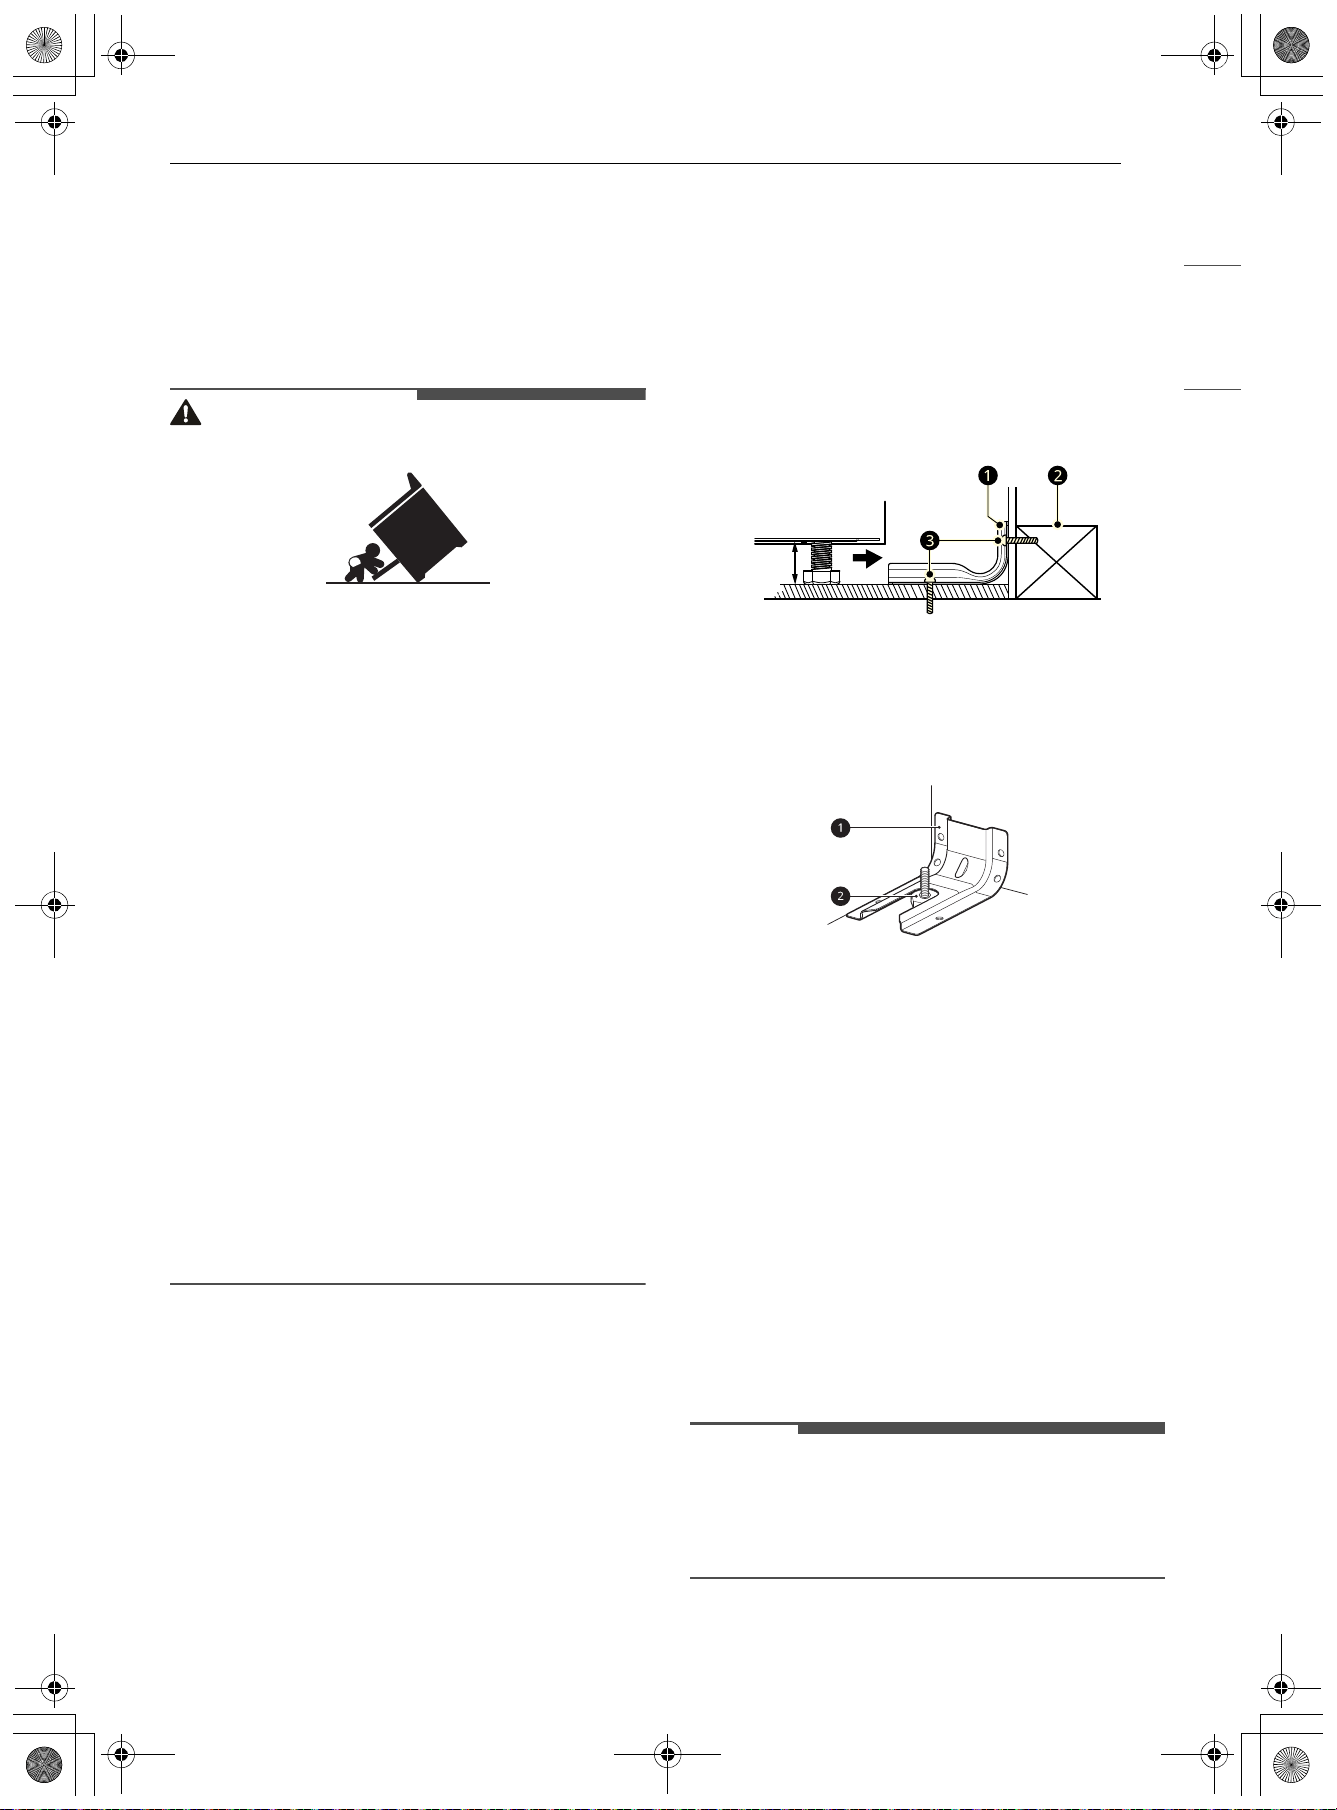
25INSTALACIÓN
ESPAÑOL
Dispositivo antivuelco
Instalación del dispositivo
antivuelco
Peligro de vuelco
ADVERTENCIA
• Un niño o adulto pueden volcar la estufa y morir.
• Coloque el dispositivo antivuelco en la estructura
y/o estufa. Verifique que el dispositivo antivuelco
se haya instalado y acoplado correctamente
siguiendo la guía del soporte antivuelco.
• Enganche la estufa al dispositivo antivuelco
conforme a la guía del soporte antivuelco.
Asegúrese que el dispositivo antivuelco se
vuelva a acoplar cuando se mueva la estufa
según la guía del soporte antivuelco.
• Vuelva a enganchar el dispositivo antivuelco si
mueve la estufa. No opere la estufa sin el
dispositivo antivuelco en su lugar y enganchado.
• Consulte las instrucciones de instalación para
obtener los detalles.
• Si no sigue estas instrucciones puede ocasionar
la muerte o quemaduras graves en niños o
adultos.
• Se debe asegurar la estufa con un dispositivo
antivuelco aprobado.
• La estufa puede inclinarse si una persona se
pone de pie, se sienta o apoya en la puerta
abierta y el dispositivo antivuelco no está
instalado de manera adecuada.
• El uso de este dispositivo no impide que la estufa
se caiga si no está bien instalado.
• Después de instalar el dispositivo antivuelco,
intente inclinar la estufa hacia adelante para
verificar una correcta instalación.
• Esta estufa está diseñada para cumplir con todos
los estándares de vuelco reconocidos por la
industria para todas las condiciones normales.
• La instalación del dispositivo antivuelco debe
cumplir con todos los códigos locales para
asegurar el electrodoméstico.
Uso de la plantilla de soporte
antivuelco
• Se incluye un soporte antivuelco con una
plantilla de instalación. Las instrucciones
incluyen la información necesaria para
completar la instalación. Lea y siga la hoja de
instrucciones de instalación de la estufa.
• Los tornillos
c deben ser aptos para madera u
hormigón.
a Soporte antivuelco
b Placa de pared
Colocación del dispositivo antivuelco
a Soporte antivuelco
b Pata de nivelación
1 Deslice la estufa contra la pared y asegúrese
de que la pata trasera se deslice y se
enganche en el soporte antivuelco.
2 Verifique la correcta instalación sujetando el
borde delantero de la placa de cocción e
intente inclinar la estufa hacia adelante.
Prueba de funcionamiento
Pruebe la estufa antes de usarla
NOTA
• No intente encender los quemadores de
Hornear o Asar durante un corte de energía. La
estufa tiene un sistema de encendido eléctrico y
no se puede utilizar sin energía eléctrica.
es-us_main.book.book Page 25 Friday, August 14, 2026 2:12 PM
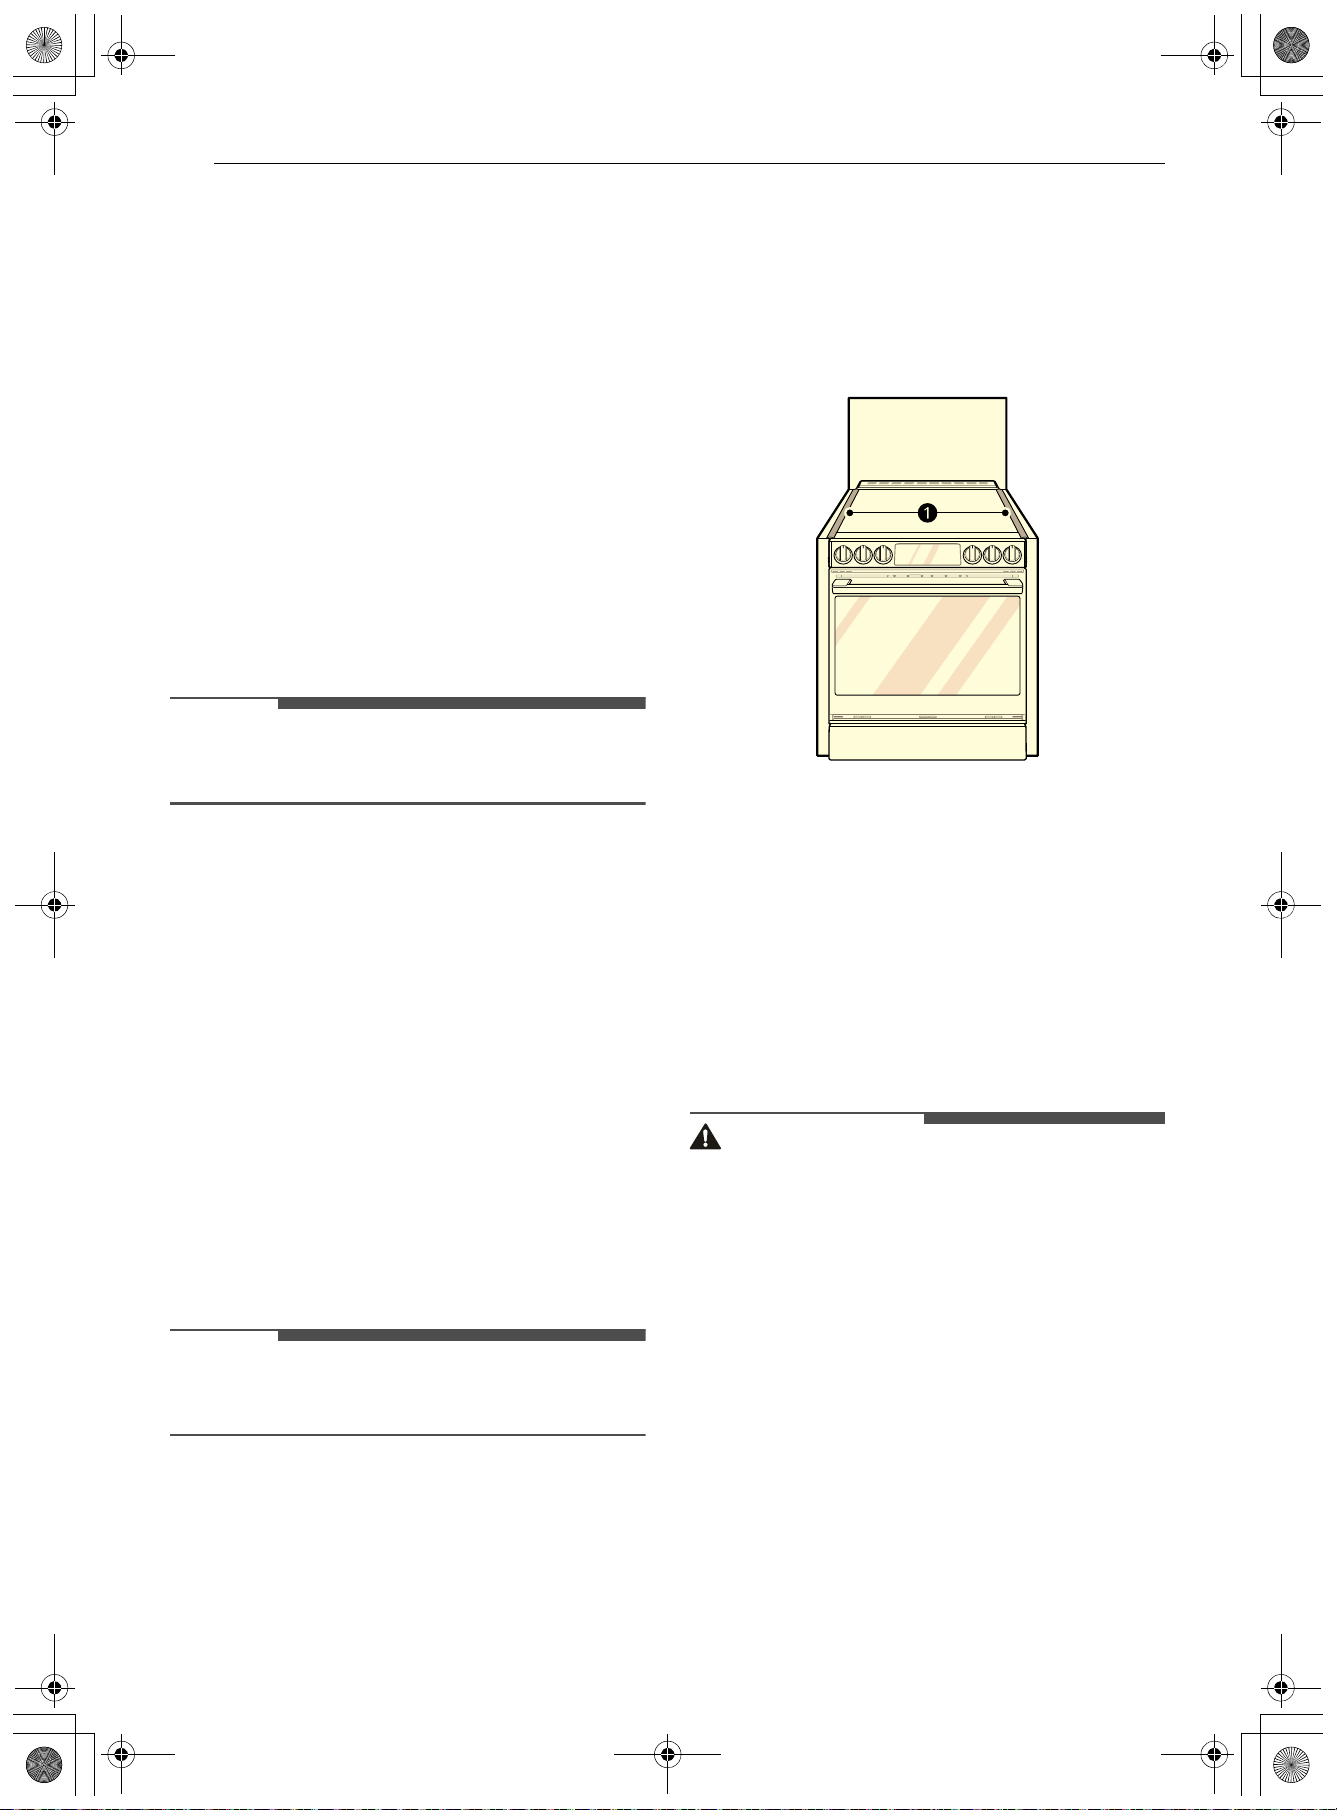
26 INSTALACIÓN
Verificación del funcionamiento de los
quemadores para hornear
Para verificar el encendido del quemador para
hornear, siga los pasos que se indican a
continuación:
1 Retire todos los materiales de embalaje del
interior de la cavidad del horno.
2 Pulse Cocción manual (Cocción manual) y,
seguidamente, Hornear.
• Asegúrese de que la puerta esté cerrada.
• La temperatura por defecto es 350 ºF
(180 ºC).
3 Pulse "Iniciar" (Cámara y Alta cocina con IA).
NOTA
• El quemador podría demorar entre 30 y 90
segundos para comenzar a calentar.
Verificación del funcionamiento de los
quemadores para asar
Para verificar el encendido del quemador para
asar, siga los pasos que se indican a continuación:
1 Retire todos los materiales de embalaje del
interior de la cavidad del horno.
2 Pulse Cocción manual (Cocción manual) y,
seguidamente, Asar.
• Asegúrese de que la puerta esté cerrada.
• El ajuste por defecto de la temperatura es
Alto (Alta).
3 Pulse "Iniciar" (Cámara y Alta cocina con IA).
NOTA
• El quemador podría demorar entre 30 y 90
segundos para comenzar a calentar.
Juntas de goma
Instalación de las juntas de goma
• Instale una de las juntas de goma
proporcionadas a cada lado de la estufa, entre la
estufa y la barra contigua. Fíjese en a.
Extracción/Colocación de la
manija de la puerta del
horno
Antes de extraer/colocar la manija
de la puerta del horno
• Herramientas necesarias
- Llave Allen de 3/32"
PRECAUCIÓN
• Asegúrese de sujetar firmemente la manija al
colocarla o extraerla para evitar que se caiga.
• Póngase guantes para su protección al colocar o
extraer manijas.
• Le sugerimos que otra persona sostenga la
manija en su lugar mientras usted extrae/inserta
los tornillos.
• No balancee la manija para evitar golpear a
personas o animales cercanos.
• Verifique que los tornillos de fijación están en su
lugar y que las cavidades de las manijas en sus
extremos están colocadas correctamente por
encima de las fijaciones de montaje de las
puertas. Las cavidades deben poder deslizarse
hacia abajo sobre las fijaciones de montaje de la
puerta gracias a que los tornillos de fijación
están suficientemente aflojados.
es-us_main.book.book Page 26 Friday, August 14, 2026 2:12 PM
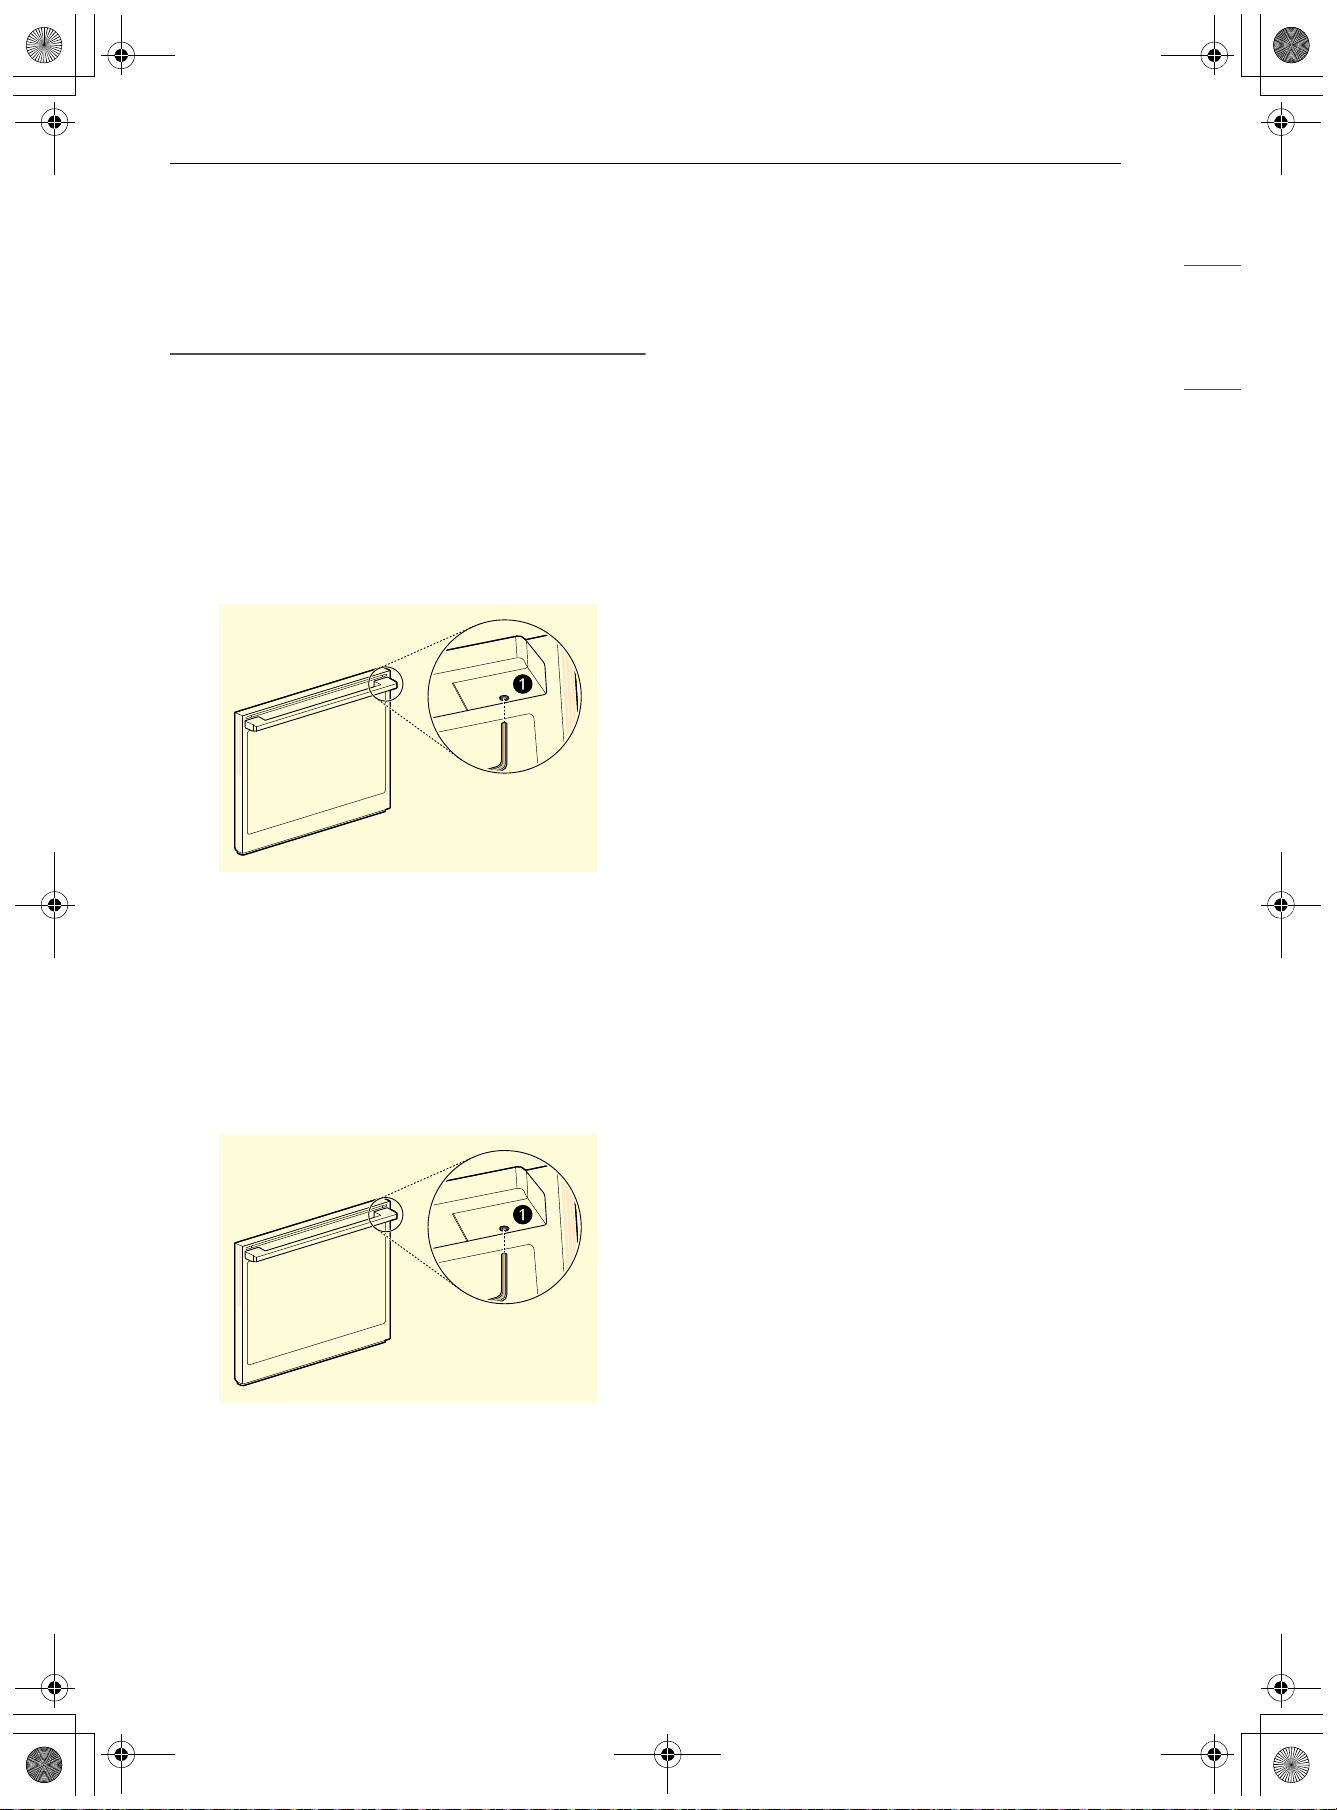
27INSTALACIÓN
ESPAÑOL
• Asegúrese de que no quede ningún espacio
entre la puerta y la manija, luego de instalar la
manija.
• Luego de colocar la manija, abra la puerta para
verificar que todos los tornillos están totalmente
montados.
Extracción de la manija de la puerta
del horno
1 Afloje los tornillos de fijación a situados en la
parte inferior de la manija con una llave Allen
de 3/32 pulg. y retire la manija.
Colocación de la manija de la
puerta del horno
1 Coloque la manija de la puerta ajustando las
huellas de la manija por encima de las
fijaciones de montaje y apriete los tornillos de
fijación
a con una llave Allen de 3/32 pulg.
es-us_main.book.book Page 27 Friday, August 14, 2026 2:12 PM
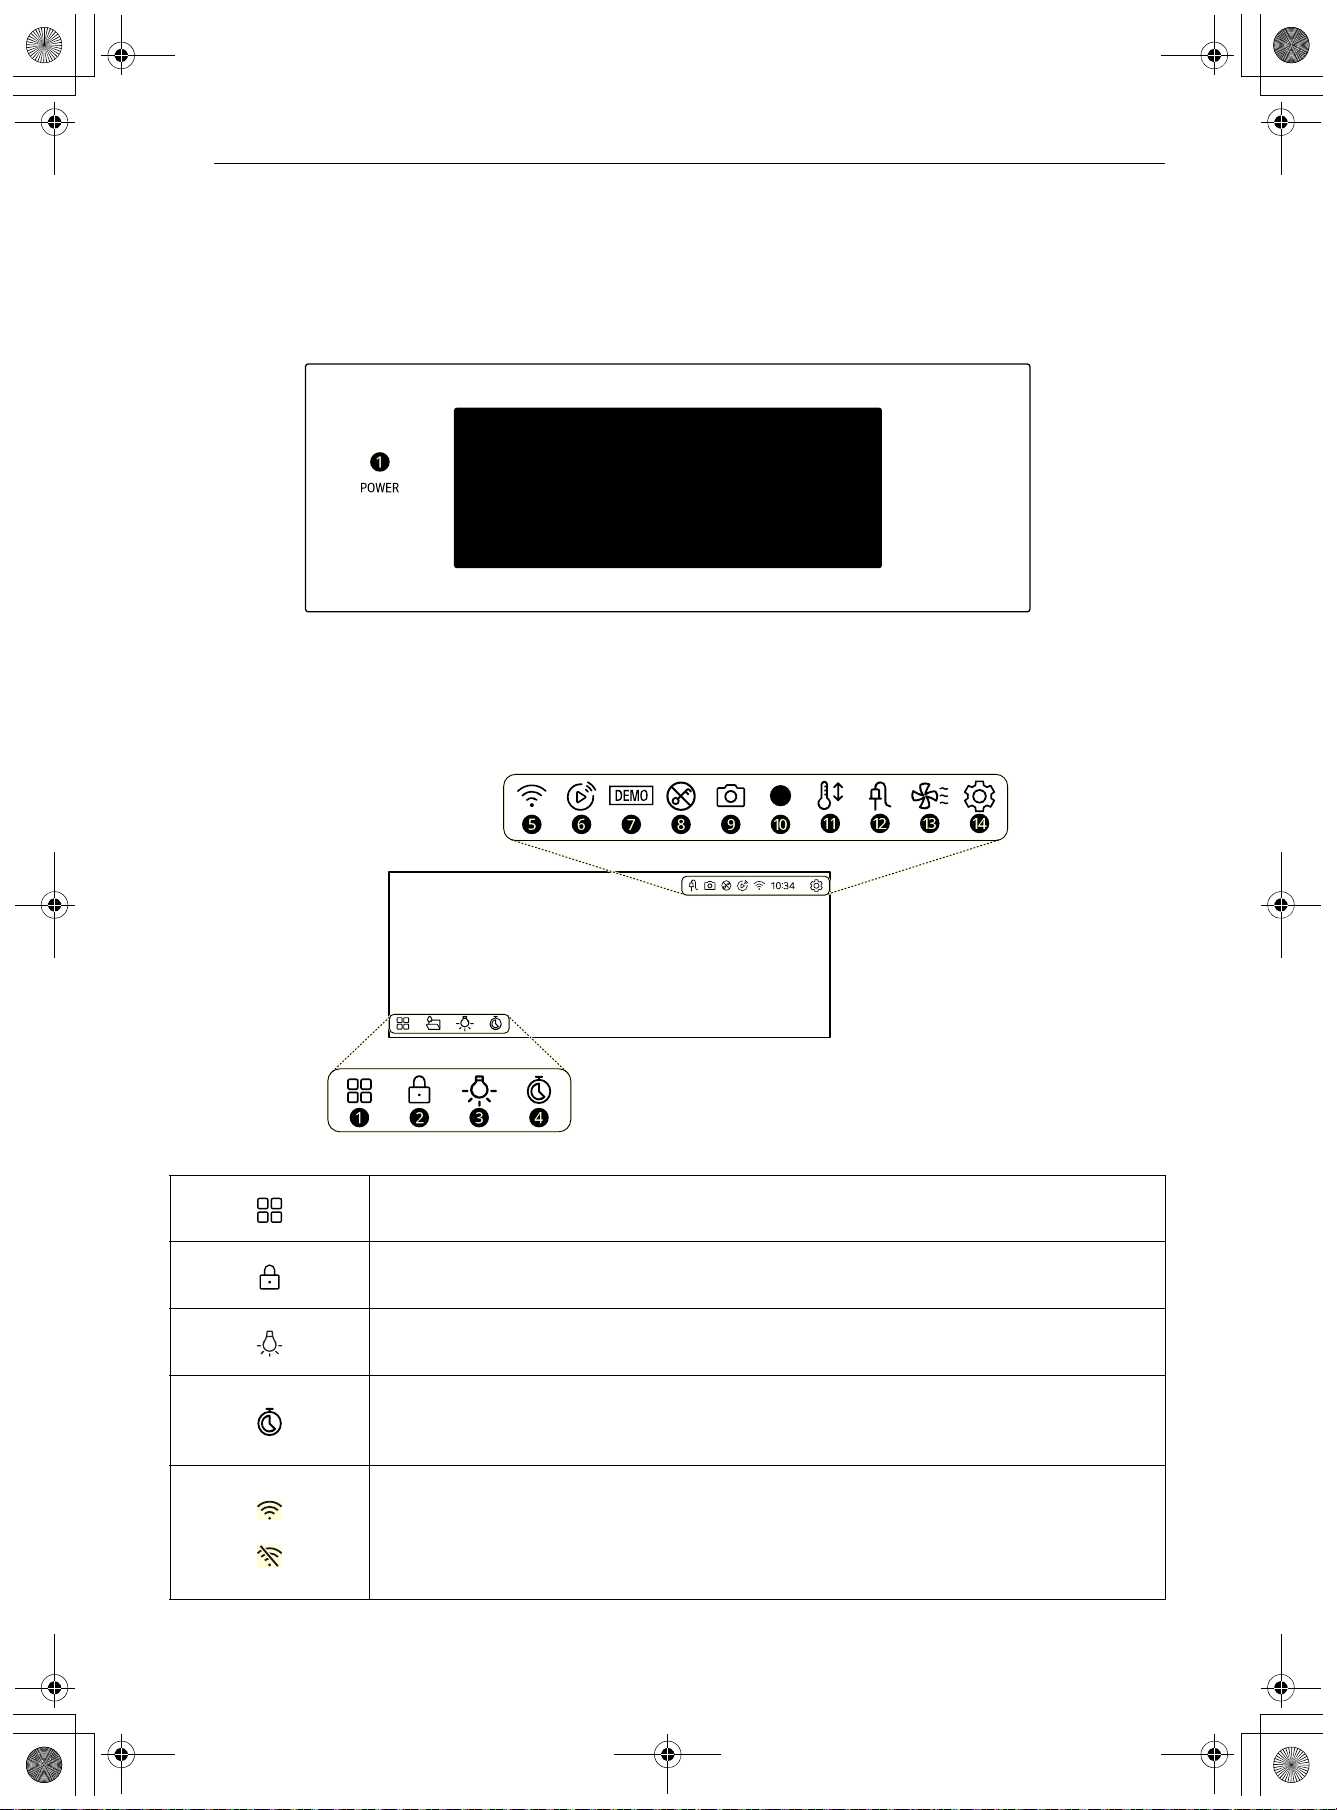
28 FUNCIONAMIENTO
FUNCIONAMIENTO
Panel de control
Funciones del panel de control
a Botón Encendido/Apagado
Iconos de la pantalla
Los iconos aparecen en la pantalla cuando se activan.
a Ícono de todos los modos
Toque para ir a la pantalla Todos los modos.
b Ícono del bloqueo del control
Pulse para activar la función Bloqueo de control.
c Ícono de la luz
Pulse para encender o apagar la lámpara interior del horno.
d Icono del temporizador
Toque para ir a la pantalla de ajuste del temporizador o a la pantalla de edición del
temporizador.
e Icono Wi-Fi
• Aparece cuando el horno está conectado a la red Wi-Fi.
• Aparece cuando el horno está desconectado de la red Wi-Fi o no está conectado
en la aplicación
es-us_main.book.book Page 28 Friday, August 14, 2026 2:12 PM
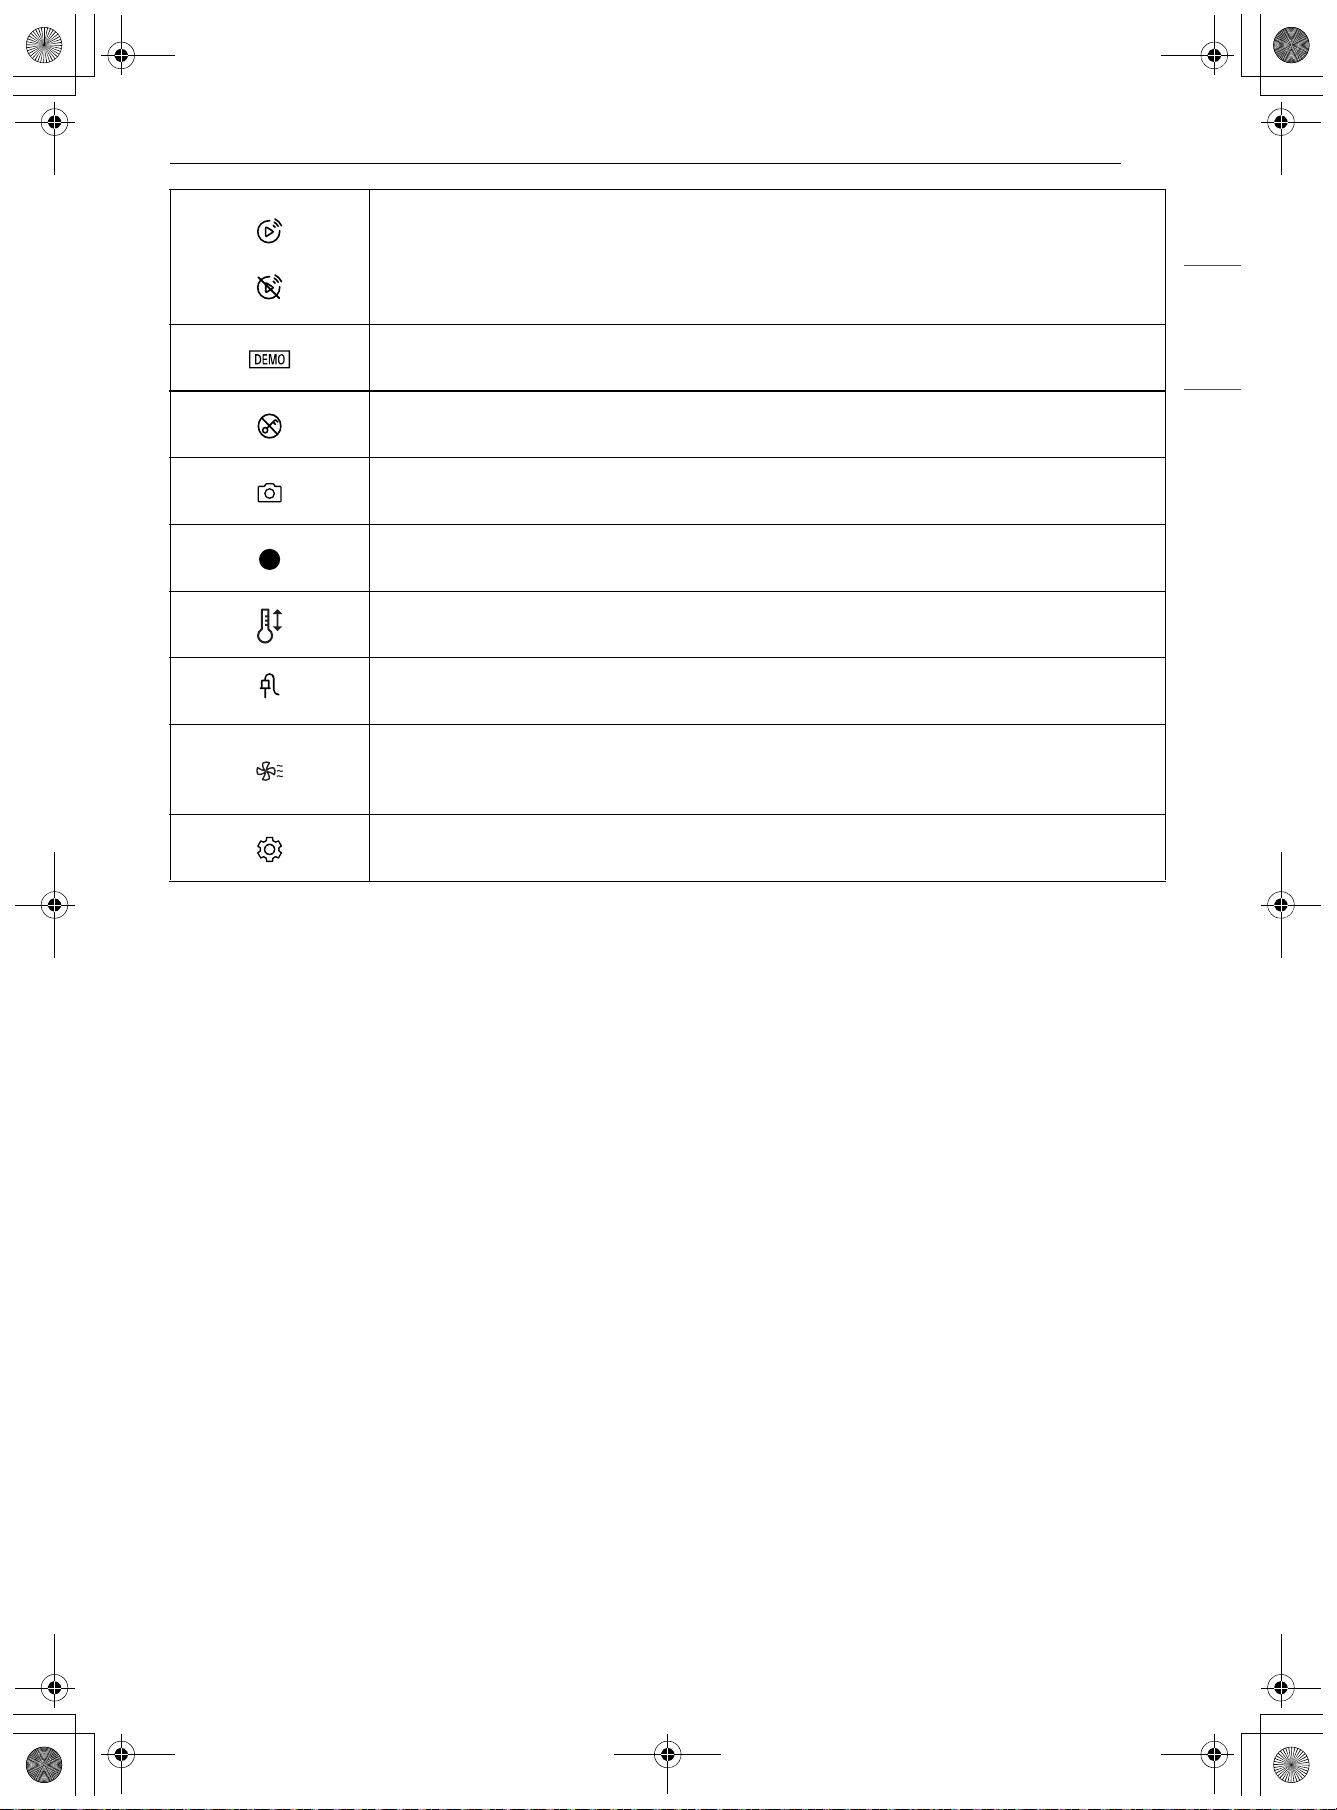
29FUNCIONAMIENTO
ESPAÑOL
f Icono Inicio remoto
• Aparece cuando el inicio remoto está activado.
• Aparece cuando el inicio remoto está activado, pero la red Wi-Fi está desactivada
o desconectada.
g Icono modo demo
Aparece cuando el modo Demo está activado
h Icono bloqueo de puerta
Aparece cuando el bloqueo de puerta está activado.
i Icono de cámara
Aparece cuando la cámara está encendida (en algunos modelos).
j Icono REC
Aparece cuando la cámara está grabando (en algunos modelos).
k Icono de conversión automática
Aparece cuando la conversión automática de la convección está activada.
l Icono de sonda
Aparece cuando la sonda está conectada.
m Icono de enfriamiento del horno
Aparece durante el funcionamiento del horno (o tras finalizar) para indicar que el
ventilador del horno está encendido.
n Icono de ajustes
Pulse para acceder a la pantalla de ajustes.
es-us_main.book.book Page 29 Friday, August 14, 2026 2:12 PM
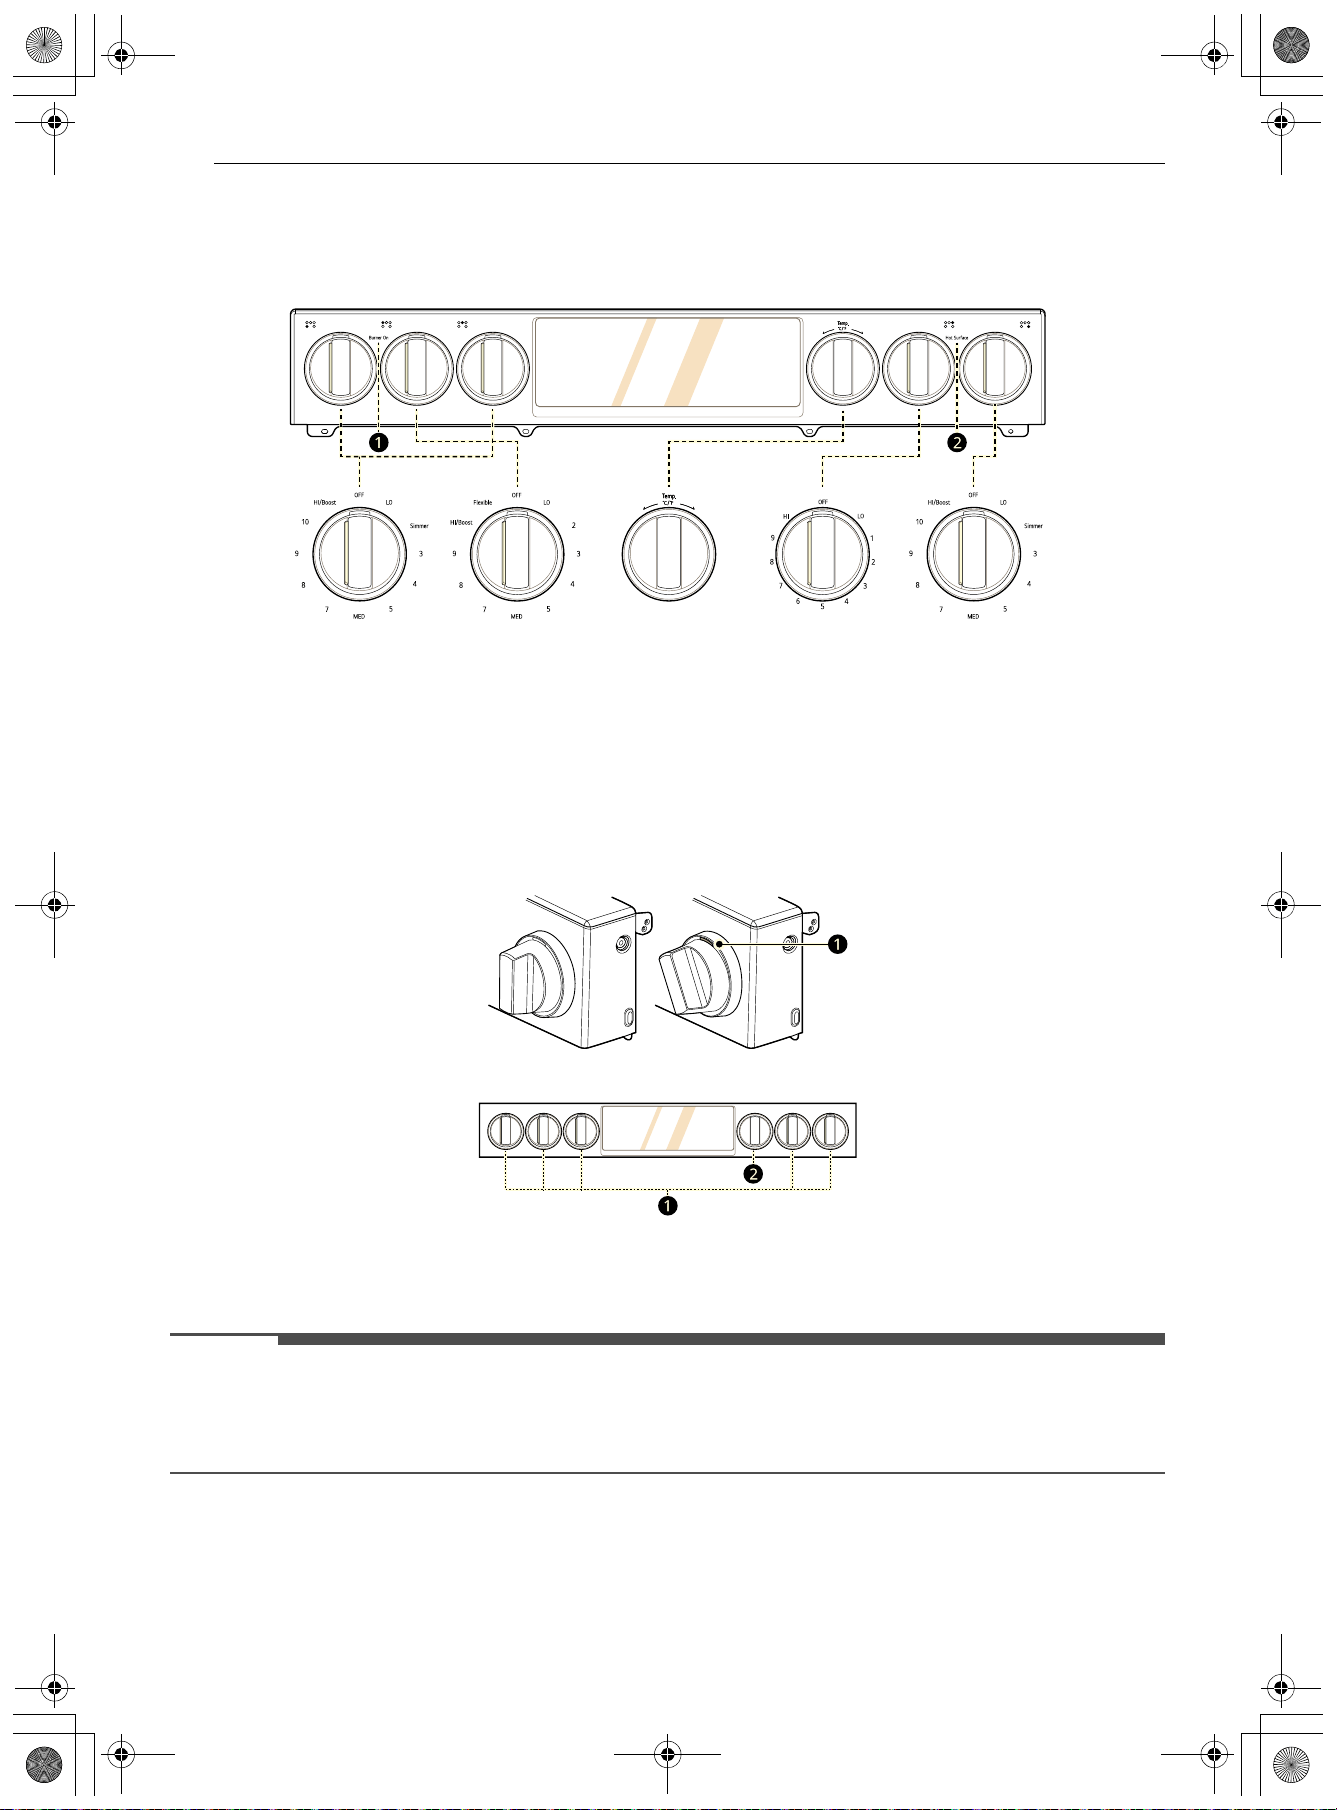
30 FUNCIONAMIENTO
Características de las perillas
Después de limpiar las perillas de control de la placa de cocción, asegúrese de volver a colocarlas en la
posición correcta; de lo contrario podría ocasionar un mal funcionamiento de los quemadores.
a Indicador Burner On
b Indicador Hot Surface
Luz de perilla
La luz de la perilla ilumina el borde de esta al girarla para controlar los elementos calentadores (sin incluir
el control de temperatura).
a Luz de perilla
b Control de temperatura
NOTA
• El control de temperatura no tiene iluminación en el control.
• La activación de Bloqueo de control no impide que la luz de la perilla o los elementos de la placa de
cocción se enciendan al girar una perilla de la placa de cocción.
es-us_main.book.book Page 30 Friday, August 14, 2026 2:12 PM
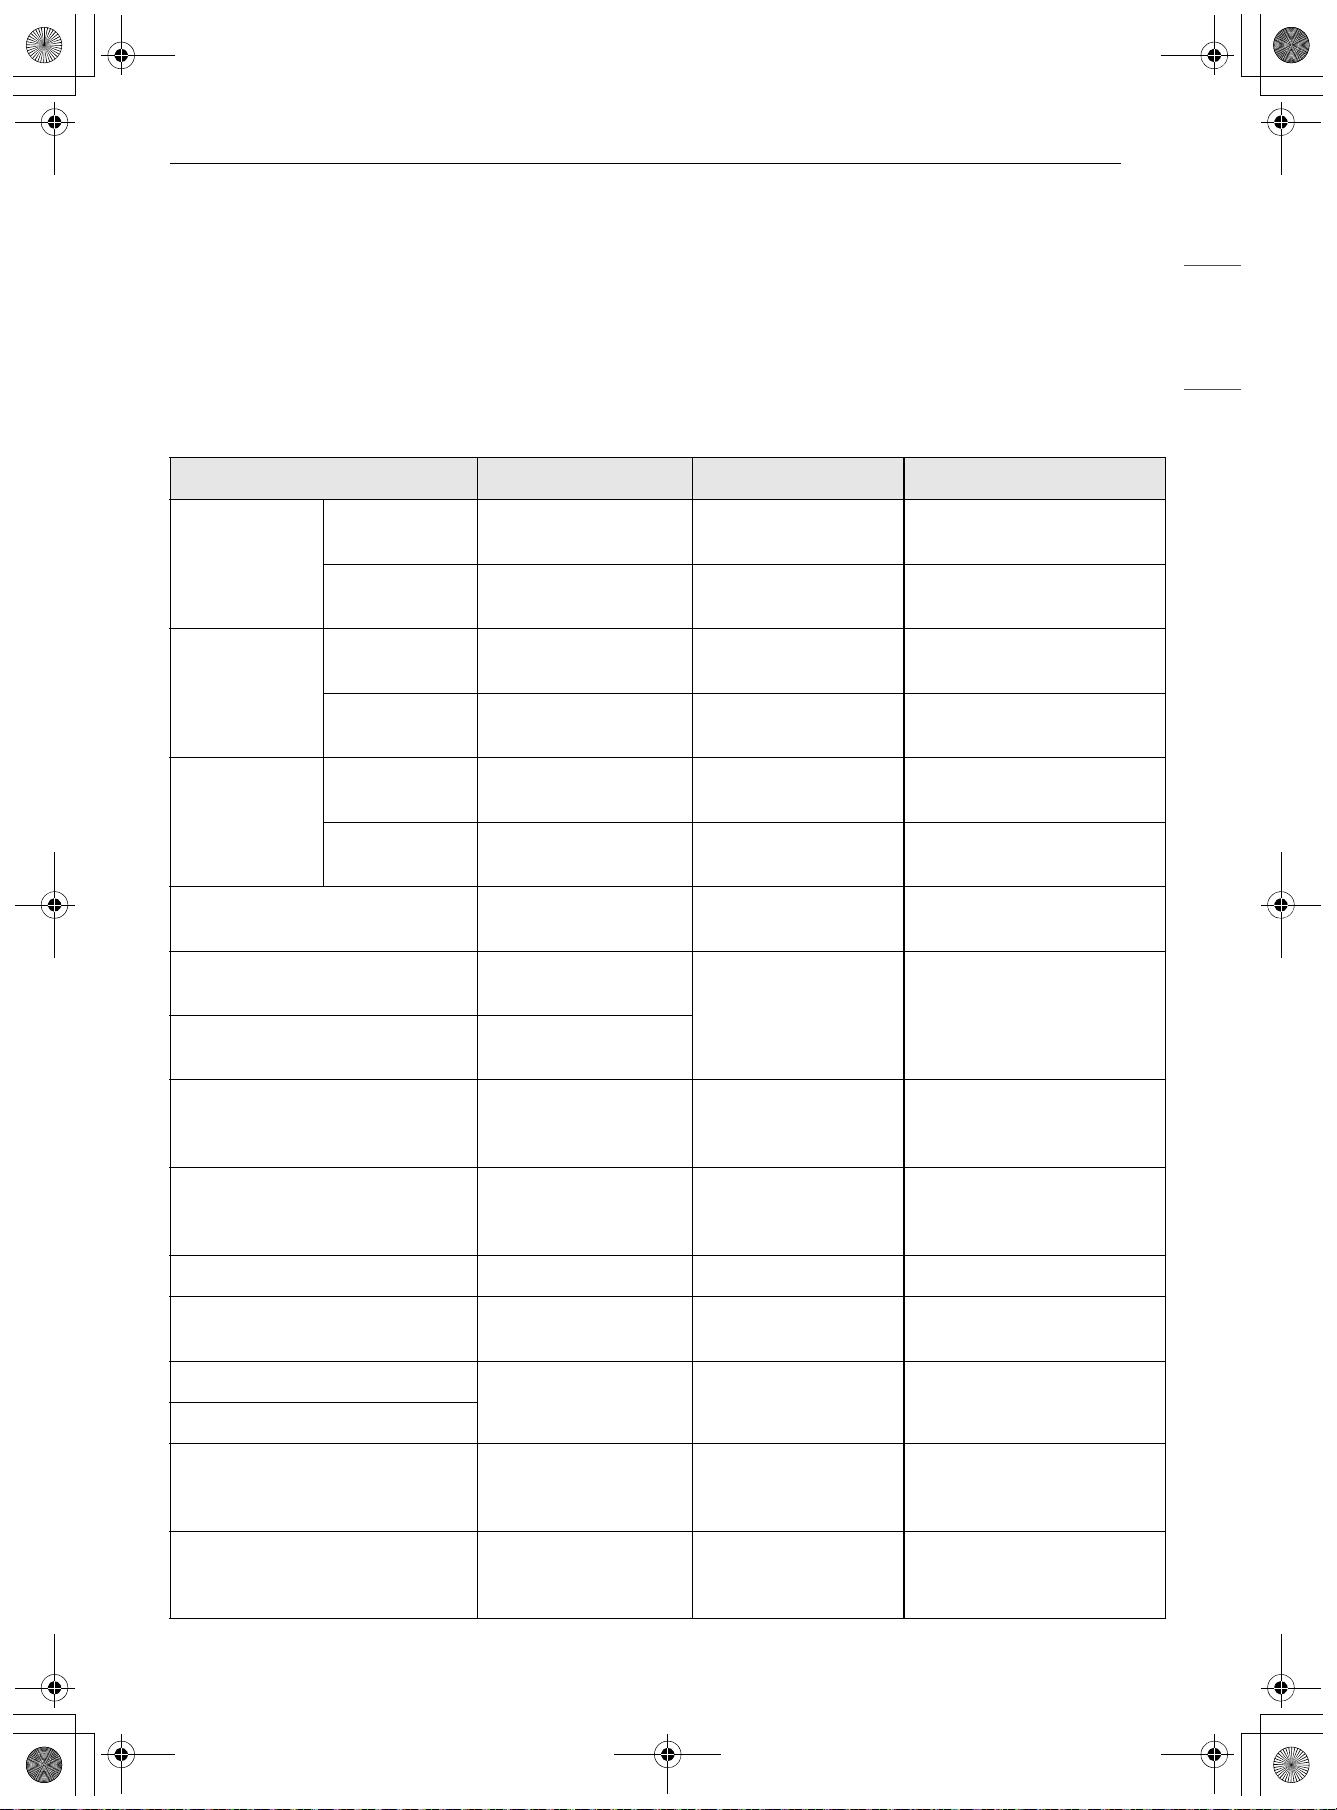
31FUNCIONAMIENTO
ESPAÑOL
Cambio de configuración del
horno
Configuraciones mínimas y máximas predeterminadas
Todas las funciones detalladas tienen un ajuste mínimo y máximo de tiempo o temperatura que puede
ingresarse en el control. Cada vez que se presiona un botón de control, suena un pitido.
Suena un tono de error de la entrada (dos tonos cortos) si la entrada de la temperatura o tiempo está por
debajo de la configuración mínima o por encima de la máxima para esa función.
Características Min. Temp. / Hora Máx. Temp. / Hora Predeterminado
Reloj
12 horas
01:00
h/min.
12:59
h/min.
-
24 horas
0:00
h/min.
23:59
h/min.
-
Temporizador
12 horas
0:01
min./seg.
11:59
h/min.
-
24 horas
0:01
min./seg.
11:59
h/min.
-
Tiempo de
cocción
12 horas
0:01
h/min.
11:59
h/min.
-
24 horas
0:01
h/min.
11:59
h/min.
-
Hornear 170 °F / 80 °C 550 °F / 285 °C
350 °F / 175 °C
12 horas
Horneado por convección
170 °F / 80 °C
80 ℃ (*66 ℃)
550 °F (*525 °F) /
285 °C (*271 °C)
350 °F (*325 °F) /
175 ℃ (*161 ℃)
12 horas
Asado por convección 300 °F (*275 °F) /
150 ℃ (*136 ℃)
Asar
Bajo
0:01
h/min.
Alto
02:59
h/min.
Alto
3horas
Calentar
Bajo
0:01
h/min.
Alto
02:59
h/min.
Media
3horas
Prueba --12horas
Pizza 300 °F / 150 °C 550 °F / 285 °C
350 °F / 175 °C
12 horas
Comida congelada
300 °F / 150 °C 550 °F / 285 °C
400 °F / 205 °C
12 horas
Fritura al aire
Cocción al vacío
100 °F / 38 °C
0:01
h/min.
205 °F / 96 °C
47:59
h/mi
n.
130 °F / 54 °C
48 horas
Asado al aire
300 °F / 150 °C
0:01
h/min.
550 °F / 285 °C
11:59
h/min.
400 °F / 205 °C
12 horas
es-us_main.book.book Page 31 Friday, August 14, 2026 2:12 PM
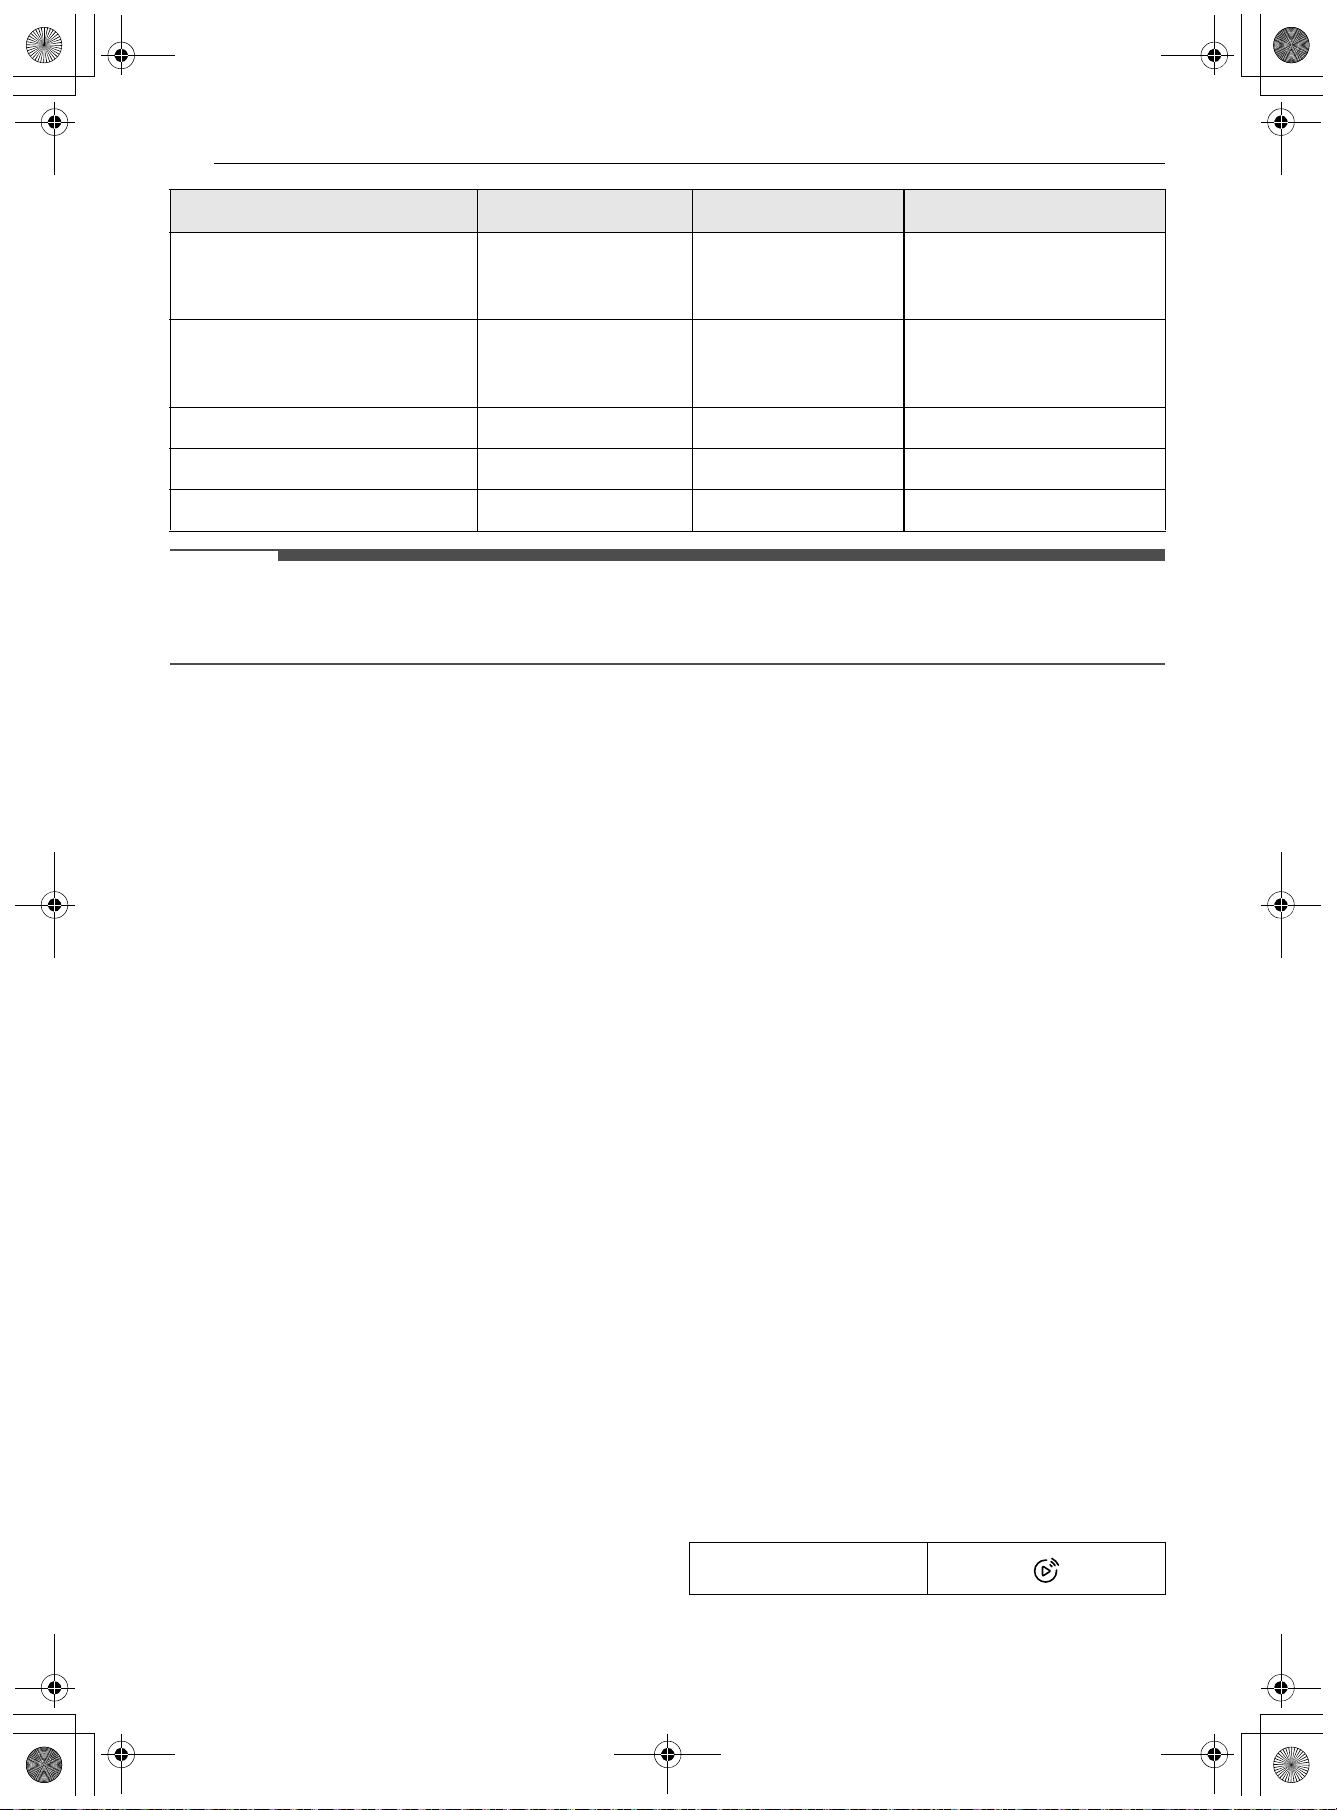
32 FUNCIONAMIENTO
NOTA
• * Uso de la conversión automática
• Los tiempos predeterminados del modo de cocción se habilitan si no se configura un tiempo de cocción.
Wi-Fi
Conecte el electrodoméstico a una red Wi-Fi
doméstica para utilizar el Inicio remoto y otras
funciones inteligentes. Consulte la sección
Funciones inteligentes para obtener más detalles.
Ajuste de Wi-Fi
1 Pulse el ícono Ajustes en la parte superior
derecha de la pantalla y, seguidamente, pulse
Red y sistema.
2 Pulse "Wi-Fi" (Cámara y Alta cocina con IA).
3 Pulse "Ajustar Wi-Fi" (Cámara y Alta cocina
con IA).
4 Siga las instrucciones en la Guía Wi-Fi de la
pantalla.
Reinicio del Wi-Fi
1 Pulse el ícono Ajustes en la parte superior
derecha de la pantalla y, seguidamente, pulse
Red y sistema.
2 Pulse "Wi-Fi" (Cámara y Alta cocina con IA).
3 Pulse "Restablecer Wi-Fi" (Cámara y Alta
cocina con IA).
4 Siga las instrucciones en la Guía Wi-Fi de la
pantalla.
Inicio remoto
Esta función se puede usar con los modos Cocción
manual para iniciar o detener remotamente la
operación de cocción. El electrodoméstico debe
estar conectado a una red doméstica Wi-Fi para
poder usar Inicio remoto.
Configuración de Inicio remoto
1 Pulse el ícono Ajustes en la parte superior
derecha de la pantalla y, seguidamente, pulse
Red y sistema.
2 Pulse el interruptor ubicado junto a Inicio
remoto para seleccionar Encendido u
Apagado.
3 Si Encendido está seleccionado, el icono
Inicio remoto aparece en la parte superior de
la pantalla.
Recalentar crujiente
300 °F / 150 °C
0:01
h/min.
550 °F / 285 °C
11:59
h/min.
350 °F / 175 °C
12 horas
Deshidratar
100 °F / 38 °C
0:01
h/min.
200 °F / 93 °C
11:59
h/min.
160 °F / 71 °C
12 horas
Sonda 80 °F / 30 °C 210 °F / 95 °C 150 °F / 65 °C
Autolimpieza 3horas 5horas 4horas
EasyClean - - 10 min.
Características Min. Temp. / Hora Máx. Temp. / Hora Predeterminado
Icono Inicio remoto
es-us_main.book.book Page 32 Friday, August 14, 2026 2:12 PM

33FUNCIONAMIENTO
ESPAÑOL
4 Siga las instrucciones en la app LG ThinQ
para usar la función Inicio remoto.
Bloqueo de control
La función de Bloqueo de control evita
automáticamente que se enciendan la mayoría de
los controles del horno. Todas las funciones están
deshabilitadas excepto el botón de Alimentación.
El bloqueo de control no bloquea la puerta del
horno.
Lock (Bloquear)
1 Pulse el ícono Ajustes en la parte superior
derecha de la pantalla y, seguidamente, pulse
Pantalla & Sonido.
2 Pulse el interruptor ubicado junto a Bloqueo
de control para seleccionar Encendido u
Apagado.
Desbloquear
1 Toque en cualquier parte de la pantalla
mientras Bloqueo de control está encendido.
2 Una pantalla emergente aparece. Toque y
mantenga pulsado el icono de candado por 3
segundos para apagar el Bloqueo de control.
Pantalla
Ajuste la duración del tiempo previo a que la
pantalla esté en reposo.
Hay tres opciones que puede seleccionar.
• Encendido: siempre encendido
• Apagado: se apaga automáticamente si está
inactiva por 5 minutos.
• Modo nocturno: se apaga de 10:00 PM a 5:00
AM.
Ajuste de la opción de pantalla
1 Pulse el ícono Ajustes en la parte superior
derecha de la pantalla y, seguidamente, pulse
Pantalla & Sonido.
2 Pulse "Pantalla" (Cámara y Alta cocina con
IA).
3 Seleccione la opción deseada.
Brillo
Ajuste el brillo de la pantalla LCD del 20 % al 100 %
en incrementos de 20 %.
Ajuste del brillo de la pantalla
1 Pulse el ícono Ajustes en la parte superior
derecha de la pantalla y, seguidamente, pulse
Pantalla & Sonido.
2 Pulse "Brillo" (Cámara y Alta cocina con IA).
3 Ajuste la luminosidad pulsando los botones +/
-, pulsando la barra o arrastrando la barra.
Tema del reloj
El reloj cuenta con cinco temas diferentes.
Ajuste del tema del reloj
1 Pulse el ícono Ajustes en la parte superior
derecha de la pantalla y, seguidamente, pulse
Pantalla & Sonido.
2 Pulse "Tema del reloj" (Cámara y Alta cocina
con IA).
3 Deslice para navegar por los temas del reloj y
seleccione uno de ellos.
Volumen
Ajuste el volumen de las siguientes funciones:
inicio del horno, funcionamiento de botones, fin de
cocción, precalentamiento completo.
Ajuste del Horno volumen
1 Pulse el ícono Ajustes en la parte superior
derecha de la pantalla y, seguidamente, pulse
"Pantalla & Sonido".
2 Pulse "Volumen" (Cámara y Alta cocina con
IA).
es-us_main.book.book Page 33 Friday, August 14, 2026 2:12 PM
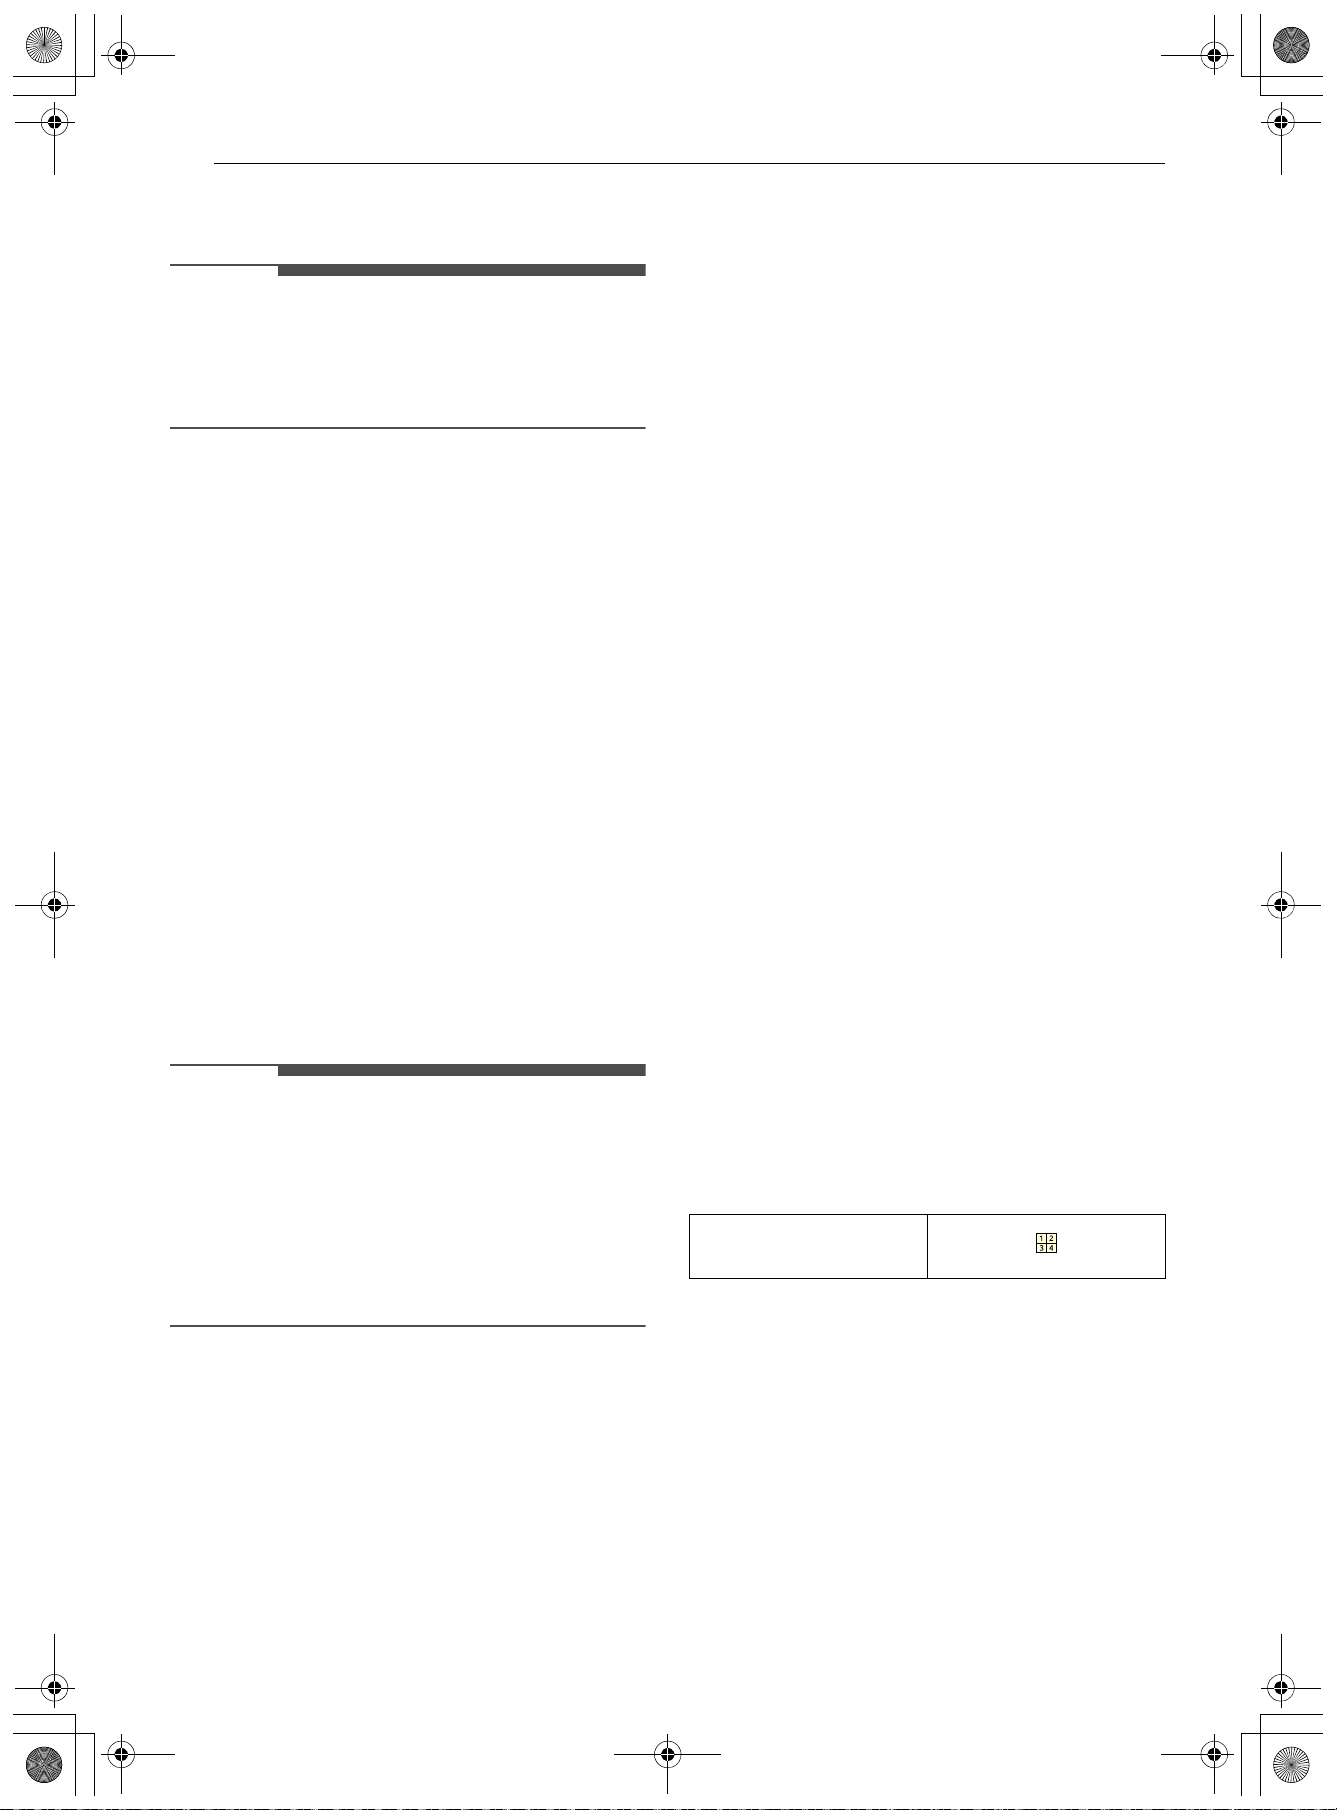
34 FUNCIONAMIENTO
3 Ajuste el volumen pulsando los botones +/-,
pulsando la barra o arrastrando la barra.
NOTA
• Hay 3 opciones de volumen: Alto (Alto), Bajo
(Bajo), y Silenciar (Silenciado).
• La placa de cocción tiene dos opciones de
volumen: Alto (Alto) y Silenciar (Silenciado).
Idioma
Seleccione el idioma de visualización entre inglés,
español o francés.
Selección de idioma
1 Pulse el ícono Ajustes en la parte superior
derecha de la pantalla y, seguidamente, pulse
General.
2 Pulse "Idioma" (Cámara y Alta cocina con IA).
3 Seleccione el idioma que desee.
Fecha y hora
La fecha y la hora se muestran en la pantalla LCD
cuando el horno no está en uso.
NOTA
• Cuando el ajuste de sincronización automática
de la hora está activado, la fecha y la hora del
servidor se aplican automáticamente. La
sincronización automática de la hora requiere
una conexión Wi-Fi.
• La fecha y la hora se pueden configurar por
separado si la configuración de sincronización
automática de la hora está desactivada.
Configuración de la sincronización
horaria automática
1 Pulse el ícono Ajustes en la parte superior
derecha de la pantalla y, seguidamente, pulse
General.
2 Pulse "Fecha y hora" (Cámara y Alta cocina
con IA).
3 Pulse el interruptor ubicado junto a
Sincronización automática de la hora para
seleccionar Encendido u Apagado.
Ajuste de fecha
1 Pulse el ícono Ajustes en la parte superior
derecha de la pantalla y, seguidamente, pulse
General.
2 Pulse "Fecha y hora" (Cámara y Alta cocina
con IA).
3 Pulse "Fecha" (Cámara y Alta cocina con IA).
4 Desplácese para establecer la fecha correcta.
Ajuste de la hora actual
1 Pulse el ícono Ajustes en la parte superior
derecha de la pantalla y, seguidamente, pulse
General.
2 Pulse "Fecha y hora" (Cámara y Alta cocina
con IA).
3 Pulse "Tiempo" (Cámara y Alta cocina con IA).
4 Desplácese para programar las horas y
minutos correctos. También puede presionar
el icono de botón numérico e ingresar los
números deseados.
Ajuste el formato de hora
1 Pulse el ícono Ajustes en la parte superior
derecha de la pantalla y, seguidamente, pulse
General.
2 Pulse "Fecha y hora" (Cámara y Alta cocina
con IA).
3 Pulse el interruptor ubicado junto a Tiempo
de 24 horas para seleccionar 12 H u 24 H.
Icono del teclado
numérico
es-us_main.book.book Page 34 Friday, August 14, 2026 2:12 PM
35FUNCIONAMIENTO
ESPAÑOL
Unidad de temperatura
Configure la visualización de la temperatura del
horno para que muestre unidades Fahrenheit (℉)
o Celsius (℃). El ajuste predeterminado del horno
es en unidades Fahrenheit, a menos que lo cambie
el usuario.
Selección de grados Fahrenheit o
Celsius
1 Pulse el ícono Ajustes en la parte superior
derecha de la pantalla y, seguidamente, pulse
General.
2 Pulse "Unidad de temperatura" (Cámara y
Alta cocina con IA).
3 Seleccione la unidad de temperatura deseada.
Sabbath
El Modo Sabbath se usa generalmente en las
fiestas y el Sabbath judío. Cuando el modo
Sabbath está activo, el horno no se apaga hasta
que se desactive el modo Sabbath. En el modo
Sabbath, todos los botones de función del horno
están inactivos. Aparecerá Sabbat y la
temperatura establecida en la pantalla.
Cuando el modo Sabbat está habilitado, el
electrodoméstico se puede usar sin tener que
encenderlo o apagarlo.
Mientras el horno está en modo Sabbat, las
siguientes funciones están deshabilitadas:
Ajustes de Temperatura, Tiempo de cocción,
Pantalla, Encendido/Apagado de la luz del horno,
Funciones de alarma y Wi-Fi.
Ajuste del modo Sabbath
1 Pulse el ícono Ajustes en la parte superior
derecha de la pantalla y, seguidamente, pulse
General.
2 Pulse "Sabbat" (Cámara y Alta cocina con IA).
3 Pulse Temperature para establecer la
temperatura deseada. Para ajustar la
temperatura, pulse los botones +/-, pulse la
barra o arrastre la barra.
• También puede usarse el ícono del teclado
numérico para configurar la temperatura
directamente. Pulse "De acuerdo" para
confirmar.
4 Si lo desea, pulse tiempo de cocción para
establecer la duración de cocción. Desplácese
para establecer el tiempo de cocción deseado.
• También puede usarse el ícono del teclado
numérico para configurar el tiempo de
cocción directamente. Pulse "De acuerdo"
para confirmar.
5 Pulse "Iniciar" (Cámara y Alta cocina con IA).
6 Para detener el modo Sabbat, presione el
botón Alimentación en el panel de control.
NOTA
• Si se configura un tiempo de cocción, el horno se
apaga automáticamente al final de ese tiempo
de cocción, sin que suene. El horno permanece
en modo Sabbath, pero está apagado.
• Si no se configura un tiempo de cocción, el
horno no se apagará automáticamente.
• Después de un corte de energía, la pantalla se
volverá a encender en modo Sabbath, pero el
horno se apagará.
• Siempre cierre la puerta del horno antes de
activar el modo Sabbath.
• La sonda no está disponible en el modo Sabbath.
Pantalla de Inicio
Hay cinco temas de pantalla diferentes
disponibles.
Configuración de la Pantalla de Inicio
1 Pulse el ícono Ajustes en la parte superior
derecha de la pantalla y, seguidamente, pulse
Personalizado.
2 Pulse "Pantalla inicial" (Cámara y Alta cocina
con IA).
es-us_main.book.book Page 35 Friday, August 14, 2026 2:12 PM
36 FUNCIONAMIENTO
3 Seleccione el tema de la pantalla de inicio que
desee.
• Menú principal
• Cocción manual
• Autococción
• Cocción reciente
• Mis recetas
Ajuste de temperatura
El horno nuevo podría cocinar de manera
diferente que la de su horno anterior. Use el horno
nuevo durante algunas semanas para
familiarizarse con él antes de cambiar los ajustes
de temperatura. Si, después de familiarizarse con
el horno nuevo, sigue pensando que la
temperatura está demasiada elevada o baja,
puede ajustar la temperatura del horno.
NOTA
• Para comenzar, suba o baje el termostato 15 °F
(8 °C). Pruebe el horno con la nueva
configuración. Si el horno aún necesita un
ajuste, suba o baje nuevamente el termostato y
utilice el primer ajuste como referencia
medidora. Por ejemplo, si el ajuste fue excesivo,
suba o baje el termostato 10 °F (5 °C). Si el ajuste
no fue suficiente, suba o baje el termostato 20 °F
(11 °C). Proceda de esta manera hasta que el
horno quede ajustado para su satisfacción.
Ajuste de la temperatura
1 Pulse el ícono Ajustes en la parte superior
derecha de la pantalla y, seguidamente, pulse
Personalizado.
2 Pulse "Ajuste de temperatura" (Cámara y
Alta cocina con IA).
3 Ajuste la temperatura pulsando los botones
+/-, pulsando la barra o arrastrando la barra.
Modo de conversión automática a
convección
Cuando se seleccionan los modos Horneado por
convección y Asado por convección, la función
Conversión automática a convección convierte de
manera automática la temperatura estándar de la
receta ingresada en una temperatura de
convección al restar 25 °F/14 °C. Esta temperatura
convertida automáticamente aparece en la
pantalla. Por ejemplo, si selecciona Horneado por
convección e ingresa 350 °F, en la pantalla
aparecerá 325 °F después de precalentar.
Configuración del modo de conversión
automática a convección
1 Pulse el ícono Ajustes en la parte superior
derecha de la pantalla y, seguidamente, pulse
Personalizado.
2 Pulse el interruptor ubicado junto a
Conversión automática de convección para
seleccionar Encendido u Apagado.
3 Cuando se activa Conversión automática de
convección, el icono de Conversión
automática aparece en la parte superior de la
pantalla.
Luz de alarma de precalentado
Cuando el horno alcanza la temperatura
programada, la luz de alarma de precalentamiento
titila 5 veces o hasta que se abra la puerta del
horno.
Puede encender o apagar la luz de la alarma de
precalentamiento.
Ajuste de la luz de alarma de
precalentamiento
1 Pulse el ícono Ajustes en la parte superior
derecha de la pantalla y, seguidamente, pulse
Personalizado.
2 Pulse el interruptor ubicado junto a Luz de
alarma de precalentamiento para
seleccionar Encendido u Apagado.
Smart Diagnosis
TM
Smart Diagnosis
TM
se puede ejecutar a través de la
aplicación para teléfonos inteligentes LG ThinQ o
llamando al soporte. Coloque la boquilla de su
teléfono inteligente cerca de la esquina superior
izquierda de la pantalla. Consulte "Función Smart
Diagnosis" en la sección Smart Diagnosis para
obtener instrucciones detalladas.
es-us_main.book.book Page 36 Friday, August 14, 2026 2:12 PM
37FUNCIONAMIENTO
ESPAÑOL
1 Pulse el ícono Ajustes en la parte superior
derecha de la pantalla y, seguidamente, pulse
Mantenimiento e información.
2 Pulse "Smart Diagnosis" (Cámara y Alta
cocina con IA).
3 Pulse Iniciar para iniciar el tono de
diagnóstico.
Restablecimiento de fábrica
Esta función regresa todos los ajustes a los
predeterminados de fábrica.
PRECAUCIÓN
• Todos los datos almacenados serán eliminados.
1 Pulse el ícono Ajustes en la parte superior
derecha de la pantalla y, seguidamente, pulse
Mantenimiento e información.
2 Pulse "Restablecer los ajustes de fábrica"
(Cámara y Alta cocina con IA).
3 Aparecerá una ventana emergente en la
pantalla. Si desea restablecer los datos a los
valores predeterminados de fábrica, pulse
Reinicio.
Licencia de código abierto
Esta pantalla muestra una lista del software de
código abierto contenido en este producto.
Consulte las licencias indicadas para conocer los
términos y condiciones de su uso.
1 Pulse el ícono Ajustes en la parte superior
derecha de la pantalla y, seguidamente, pulse
Mantenimiento e información.
2 Pulse "Licencia de código abierto" (Cámara y
Alta cocina con IA).
3 Pulse Ver contenido para leer el texto de la
Licencia de Código Abierto.
Placa de cocción
Precauciones al utilizar la placa de
cocción
ADVERTENCIA
Antes de cocinar
• No cocine sobre una placa de cocción dañada. Si
la superficie de cocción está dañada, las
soluciones de limpieza y todo lo que se derrame
pueden penetrar en la placa de cocción con
daños y causar riesgo de descarga eléctrica.
Comuníquese con un técnico calificado
inmediatamente.
Durante la cocción
• Gire las manijas de los utensilios de cocina hacia
adentro para que no se extiendan sobre las
unidades de superficie adyacentes. Esto reduce
el riesgo de quemaduras, ignición de materiales
inflamables y derrames debido al contacto no
intencional con los utensilios de cocina.
• Coloque siempre la olla en el centro de la unidad
de la superficie en la que está cocinando. Nunca
deje las unidades de la superficie de cocción
desatendidas a temperaturas altas. El contacto
adecuado del utensilio de cocina con el
quemador también mejorará la eficacia del
artefacto. Los derrames provocan humo y
derrames grasosos que podrían incendiarse.
Después de la cocción
• Limpie la estufa con precaución. No use
esponjas o paños para limpiar derrames en un
área de cocción caliente. Utilice un raspador de
metal adecuado. Si usa una esponja o un paño
húmedo para limpiar los derrames en un área de
cocción caliente se pueden provocar
quemaduras por vapor. Algunos limpiadores
pueden producir vapores nocivos si se aplican
sobre una superficie caliente.
PRECAUCIÓN
Antes de cocinar
• No utilice la superficie de la placa de cocción de
vidrio como tabla de cortar.
• No encienda las unidades de la superficie antes
de colocar la batería de cocina.
• No almacene artículos pesados sobre la
superficie de la placa de cocción que puedan
caerse y dañarla.
• No coloque ni guarde artículos inflamables o
sensibles al calor sobre la placa de inducción,
incluso cuando no esté en uso.
es-us_main.book.book Page 37 Friday, August 14, 2026 2:12 PM
38 FUNCIONAMIENTO
PRECAUCIÓN
• Coloque los utensilios de cocina sobre los
elementos de cocción antes de encender la placa
de inducción.
• No coloque recipientes sellados sobre la placa
de cocción.
Durante la cocción
• Nunca cocine directamente sobre el vidrio.
Siempre utilice utensilios de cocina.
• No coloque objetos metálicos como cuchillos,
tenedores, cucharas y tapas sobre la superficie
de la placa de inducción; pueden calentarse.
• Utilice este aparato solo para un uso doméstico
normal. No está diseñado para uso comercial o
industrial.
• No utilice nunca el aparato para calentar la
habitación.
• Tenga cuidado al enchufar los aparatos
eléctricos en las tomas de corriente cercanas a la
placa de cocción. Evite que los cables de
alimentación entren en contacto con la placa de
cocción o los utensilios de cocina.
• La grasa y el aceite sobrecalentados pueden
incendiarse rápidamente. Nunca deje los
elementos de la superficie sin supervisión al freír
alimentos.
• No utilice la placa de inducción para calentar
papel de aluminio, productos envueltos en papel
de aluminio o alimentos congelados envasados
en utensilios de aluminio.
• Tenga cuidado al enchufar los aparatos
eléctricos en las tomas de corriente cercanas a la
placa de cocción para mantener los cables de
alimentación alejados de la placa de cocción o de
los utensilios de cocina calientes.
• Los usuarios con marcapasos e implantes
cardíacos activos deben mantener la parte
superior del cuerpo a una distancia mínima de 1
pie (30 cm) de los elementos de cocción por
inducción activos. En caso de duda, consulte al
fabricante del implante o a su médico.
Después de la cocción
• Limpie inmediatamente los derrames en el área
de cocción para evitar una tarea de limpieza
ardua más adelante.
• No utilice almohadillas de lana de acero,
esponjas limpiadoras ni limpiadores abrasivos.
Pueden rayar la superficie.
• Después del uso, apague el elemento de cocción
por inducción utilizando su control. No confíe en
el sensor de la olla.
Recomendaciones para el
precalentamiento de la olla
La cocción por inducción puede disminuir la
cantidad de tiempo necesario para precalentar los
utensilios de cocina en comparación con la cocción
en una placa de cocción de elementos radiantes o
en un quemador de superficie de gas.
Preste mucha atención a todos los alimentos
mientras se cocinan en la placa de cocción o en el
horno, y hasta que se completen todos los
procesos de cocción.
PRECAUCIÓN
• Recuerde que la cocción por inducción calienta
inicialmente los utensilios de cocina muy
rápidamente si estos no contienen alimentos.
Ruidos durante el funcionamiento de
la placa de cocción
• Sonido de inducción: los procesos electrónicos
implicados en la cocción por inducción crean
algunos sonidos de fondo no familiares, como
un ligero zumbido. Estos ruidos son normales y
son parte del proceso de cocción por inducción.
• Sonido de vibración de los utensilios de
cocina: algunos utensilios de cocina zumban,
dependiendo de su construcción o del material
de la base. El zumbido puede ser más
perceptible si la olla o el contenido están fríos o
si la parte inferior de la olla no es plana. A
medida que la olla se calienta, el ruido
disminuye. El ruido también disminuirá si se
reduce el nivel de potencia.
• Sonido del ventilador de enfriamiento: el
ventilador puede funcionar mientras la placa de
inducción se encuentra en uso para reducir la
temperatura del producto. El ventilador de
enfriamiento también puede funcionar después
de apagar la placa de cocción.
NOTA
• Cuando se utiliza la placa de inducción, los
ruidos de funcionamiento son más perceptibles
mientras se cocina en modo Boost. Pero los
ruidos muy fuertes no son normales cuando se
cocina por inducción.
Calentamiento de los utensilios de
cocina y el calor residual
PRECAUCIÓN
• A diferencia de los elementos de superficie
radiante, los elementos de cocción por inducción
es-us_main.book.book Page 38 Friday, August 14, 2026 2:12 PM
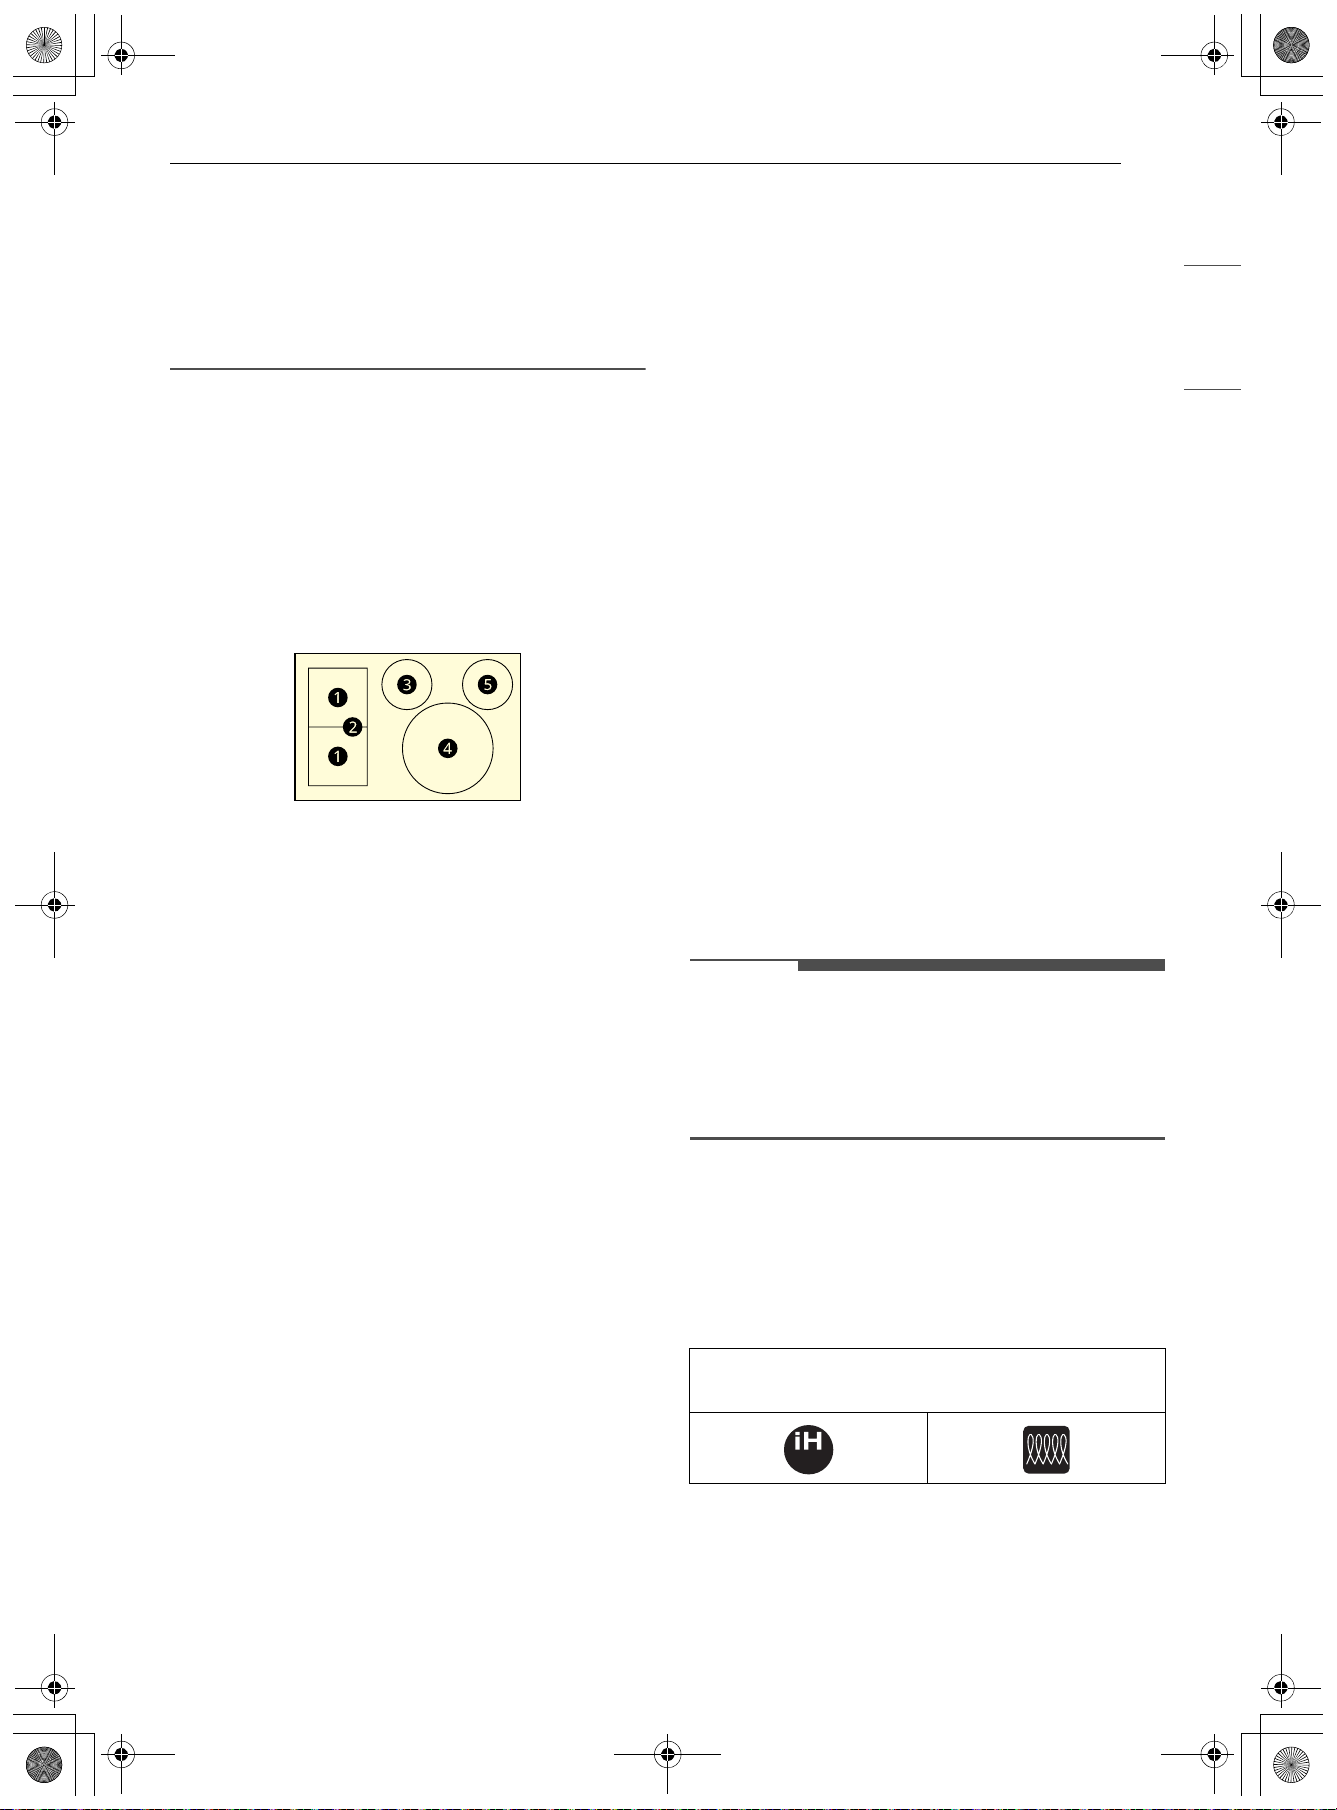
39FUNCIONAMIENTO
ESPAÑOL
no brillan en rojo cuando están calientes. Usted
puede quemarse si la superficie de vidrio está
caliente por el calor residual transferido por los
utensilios de cocina. No toque las ollas o
sartenes calientes. Utilice guantes de cocina o
agarraderas para proteger las manos de las
quemaduras.
Áreas de cocción
La placa de cocción está equipada con cuatro
elementos de cocción por inducción de diferentes
tamaños y un área de calentamiento de calor
radiante. Las potencias indicadas a continuación
son las máximas. El segundo valor es la potencia
máxima para el modo Boost.
a Elemento de cocción frontal/posterior
izquierdo de inducción:
8 1/2" x 7 1/8", 1650 W / 3300 W (240 V)
b Elemento de cocción de zona flexible de
inducción:
8 1/2" x 14 3/16", 2800 W / 3300 W (240 V)
c Elemento de cocción posterior central de
inducción:
6", 1300 W / 1800 W (240 V)
d Elemento de cocción frontal derecho de
inducción:
11", 2400 W / 4300 W (240 V)
e Área de calentamiento de calor radiante
6", 100 W (240 V)
Beneficios de la cocción en
superficie por inducción
Rapidez y eficacia
Los elementos de cocción por inducción se
calientan más rápido y consumen menos energía.
Los niveles de potencia de la inducción hacen
hervir rápidamente los líquidos y son eficientes al
cocinar a fuego lento.
Una placa de cocción más fría
Tanto si los elementos de cocción por inducción
están encendidos como apagados, permanecen
más fríos que los elementos radiantes.
Prácticamente no se desperdicia calor porque el
calor comienza con la presencia de los utensilios
de cocina.
Limpieza fácil
Los elementos de cocción más fríos facilitan la
limpieza. Los derrames se resisten a pegarse o
quemarse, por lo que se limpian fácilmente.
Detección del tamaño de la olla
Un sensor detecta y adapta automáticamente el
elemento de cocción por inducción al tamaño de la
olla en uso para una cocción más consistente y
uniforme.
Mayor capacidad de respuesta
Los elementos de cocción por inducción tienen
mayor capacidad de respuesta que sus homólogos
eléctricos o de gas porque solo se calienta la olla.
Los elementos de inducción se calientan más
fácilmente y son igual de sensibles cuando se
reduce la temperatura a fuego lento.
Utensilios de cocina de inducción
NOTA
• Antes de utilizar los elementos de cocción por
inducción, lea atentamente y siga estas
recomendaciones sobre los utensilios de cocina
y las instrucciones de las secciones de detección
de ollas.
Cuando compre sartenes para usar en la placa de
inducción, busque utensilios de cocina
identificados por el fabricante como "preparados
para la inducción" o "aptos para la inducción", o
que estén marcados por el fabricante como
específicamente diseñados para cocinar por
inducción.
El material de la base de los utensilios de cocina
debe ser magnético para que los elementos de
cocción se activen. Utilice un imán para comprobar
si el material de la base de los utensilios de cocina
es adecuado. Si el imán se adhiere al fondo de los
Símbolos de utensilios de cocina compatibles para
la inducción
es-us_main.book.book Page 39 Friday, August 14, 2026 2:12 PM
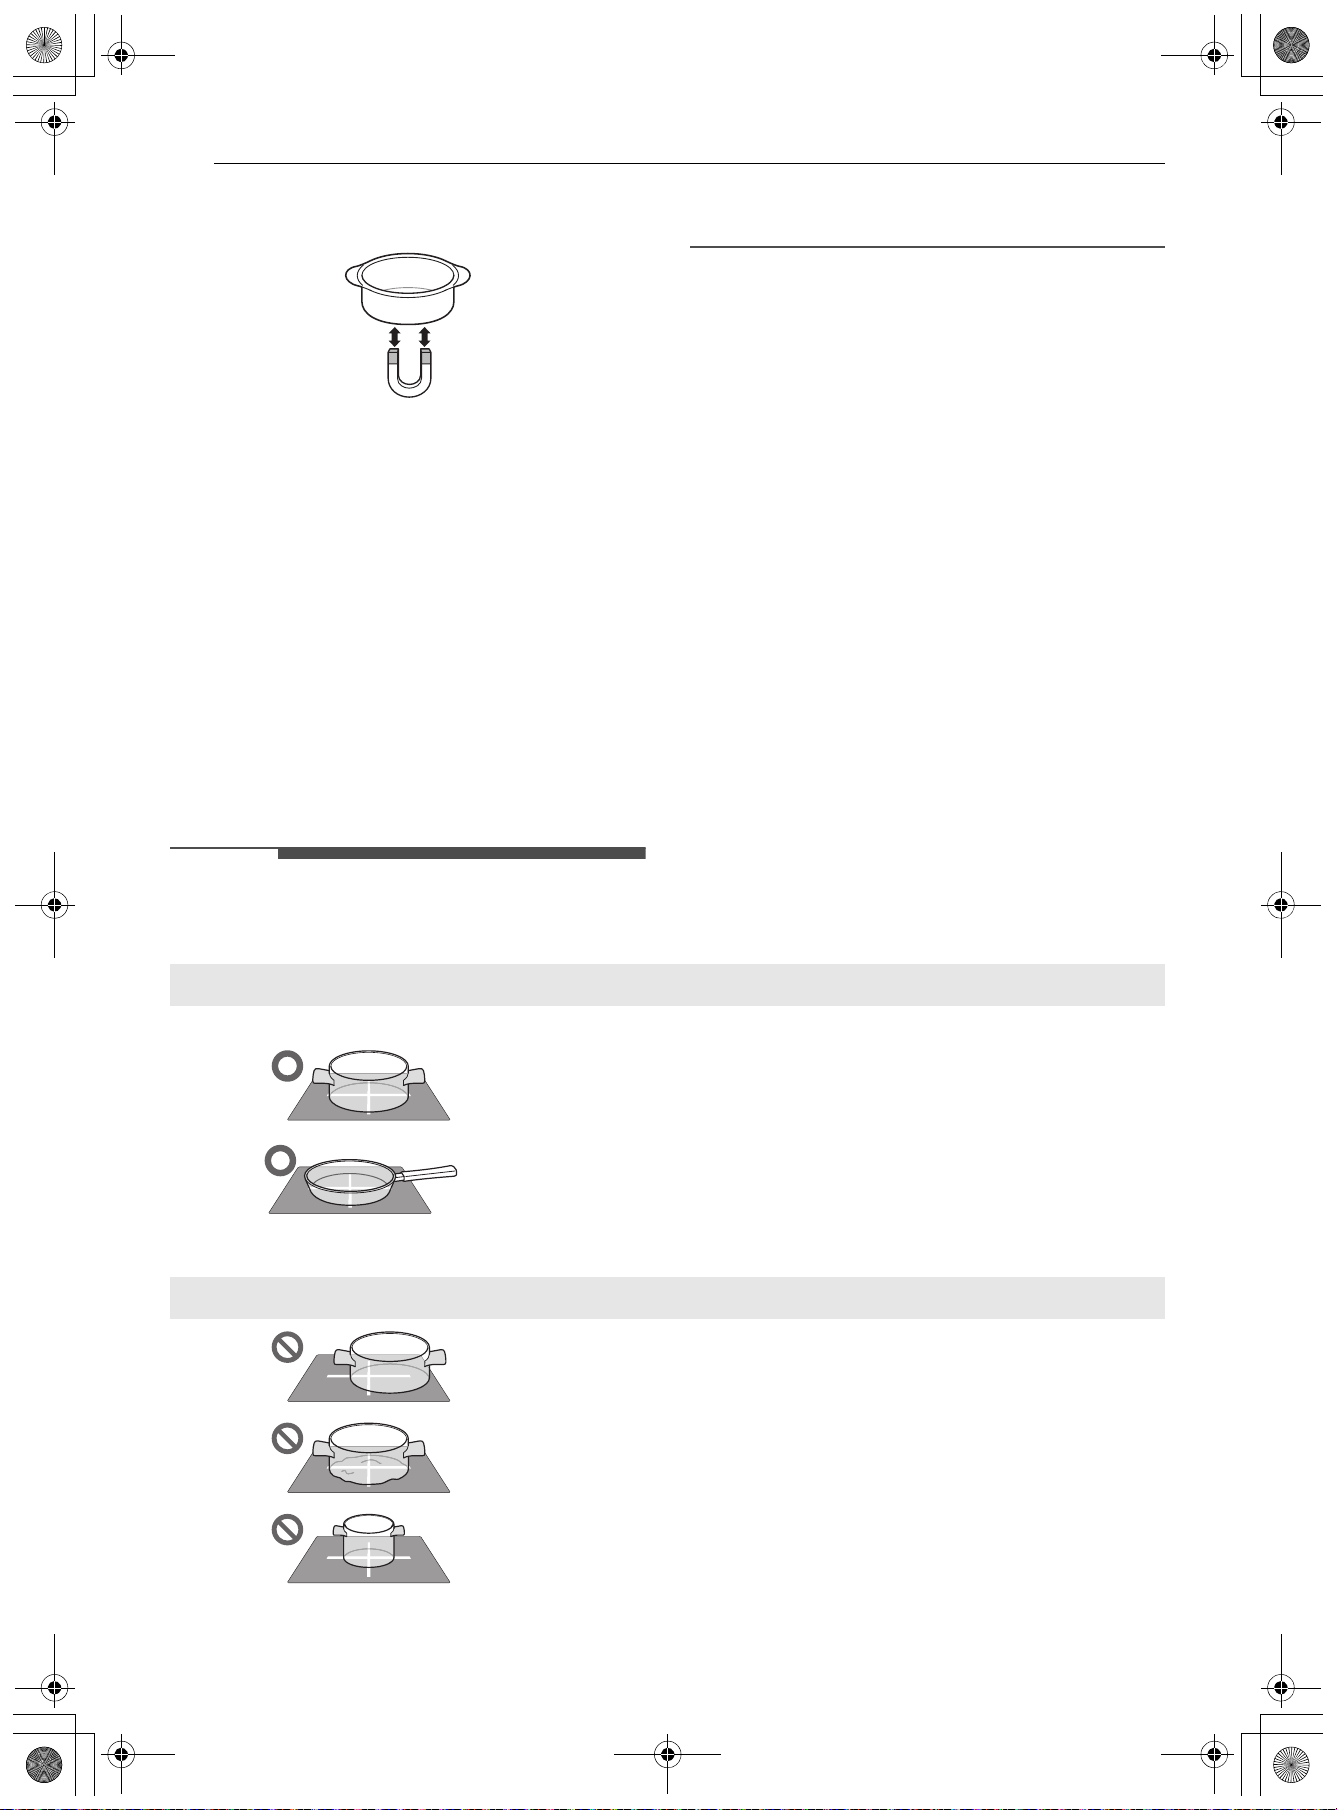
40 FUNCIONAMIENTO
utensilios de cocina, pueden utilizarse para la
cocción por inducción.
Para obtener los mejores resultados de cocción en
la superficie, utilice solo utensilios de cocina de
acero de alta calidad y de gran calibre en los
elementos de cocción por inducción. Siga las
recomendaciones del fabricante cuando utilice
utensilios de cocina de inducción.
Tipos de utensilios de cocina de
inducción
Los tres tipos más comunes de utensilios de cocina
de inducción disponibles son el acero inoxidable,
el hierro fundido y los metales recubiertos de
esmalte de porcelana.
•El acero inoxidable suele ser excelente para la
cocina de inducción. Es duradero, fácil de limpiar
y resistente a las manchas.
NOTA
• No todos los utensilios de cocina de acero
inoxidable son magnéticos; el acero inoxidable
no siempre es adecuado para la cocina de
inducción.
•El hierro fundido se cocina de manera uniforme
y también es bueno para la cocina de inducción.
No deslice los utensilios de cocina de hierro
fundido sobre la placa de cocción; los utensilios
de cocina de hierro fundido con una superficie
rugosa rayarán la placa de cocción de cerámica.
•Los metales recubiertos de esmalte de
porcelana tienen características de
calentamiento variables dependiendo de la
calidad del metal base. Asegúrese de que el
revestimiento de esmalte de porcelana sea liso
para evitar que se raye la placa de cocción de
cerámica.
Colocación de los utensilios de
cocina
Utilice los utensilios de cocina adecuados y
colóquelos correctamente en la placa de cocción.
Uno o más de los elementos de cocción no se
calentarán si alguna de las condiciones incorrectas
mostradas es detectada por los sensores ubicados
debajo de la superficie de la placa de cocción de
cerámica. Corrija el problema antes de intentar
utilizar la placa de cocción.
Uso correcto
• Los utensilios de cocina están centrados correctamente en la
superficie del elemento de cocción.
• La olla tiene el fondo plano y los lados rectos.
• El tamaño de la olla cumple o excede el tamaño mínimo
recomendado para el elemento de cocción.
• La olla se apoya completamente en la superficie de la placa
de cocción.
• La olla está correctamente equilibrada.
Uso incorrecto
• Los utensilios de cocina no están centrados en la superficie
del elemento de cocción.
• La olla tiene el fondo o los lados curvados o deformados.
• La olla no tiene el tamaño mínimo requerido para el
elemento de cocción utilizado.
es-us_main.book.book Page 40 Friday, August 14, 2026 2:12 PM
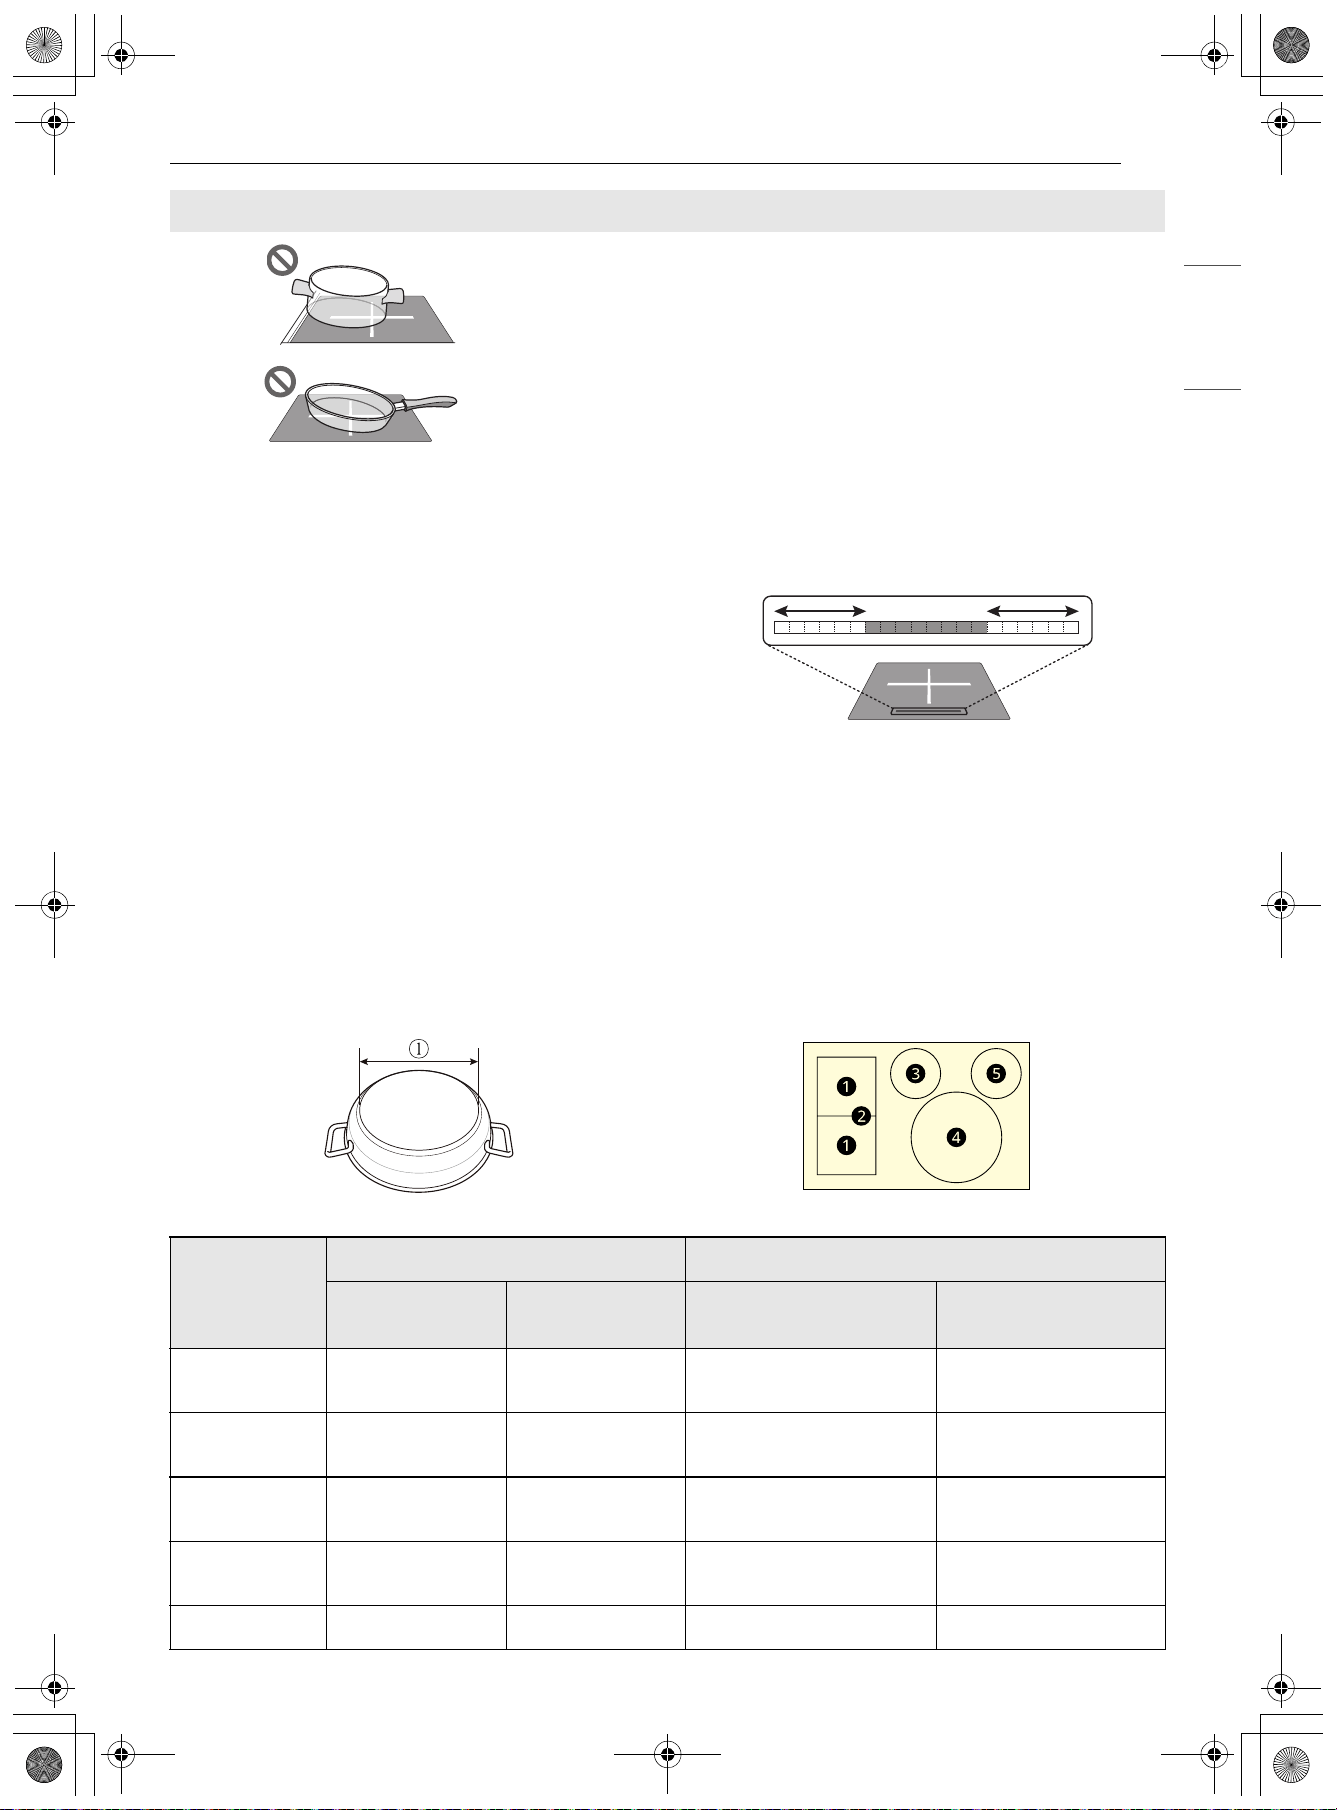
41FUNCIONAMIENTO
ESPAÑOL
Detección de ollas
Los sensores de los elementos de cocción
ubicados debajo de la superficie de la placa de
cocción requieren que se cumplan ciertas
condiciones de los utensilios de cocina antes de
que los elementos de cocción por inducción
puedan funcionar.
La barra de LED de la zona de cocción puede
mostrar un mensaje de error de detección de ollas.
Si se activa un elemento de cocción y no se detecta
ningún utensilio de cocina, la barra LED de la zona
de cocción por inducción afectada fluctuará. Si los
utensilios de cocina no cumplen con las
condiciones correctas, la zona de cocción puede
no calentar.
Si el problema no se corrige, el elemento de
cocción afectado se desactivará automáticamente
después de un minuto.
Tamaño mínimo y máximo de las ollas
Hay cuatro elementos de estufa en la placa de cocción por inducción. Cada elemento requiere de un
tamaño de olla apropiado para que se use de manera eficaz. El tamaño de la parte inferior de la olla debe
ser entre el diámetro máximo y mínimo
A para cocinar adecuadamente.
• El fondo de la olla se apoya en el borde de la superficie de
cocción o no se apoya completamente en la superficie de la
placa de cocción.
• La olla está desequilibrada por un mango pesado.
Uso incorrecto
Área de
cocción
Calentador
Diámetro de la parte inferior de la olla A
Tipo
Tamaño
(pulgadas)
Min. Máx.
a
Inducción 8 1/2 x 7 1/8
5 13/16"
(147 mm)
7 1/8"
(180 mm)
b
Inducción 8 1/2 x 14 3/16
4 3/4"
(120 mm)
10 5/8"
(270 mm)
c
Inducción 6
5.5"
(140 mm)
7"
(178 mm)
d
Inducción 11
9.5"
(241 mm)
11.8"
(300 mm)
e
Calentar 6 - -
es-us_main.book.book Page 41 Friday, August 14, 2026 2:12 PM
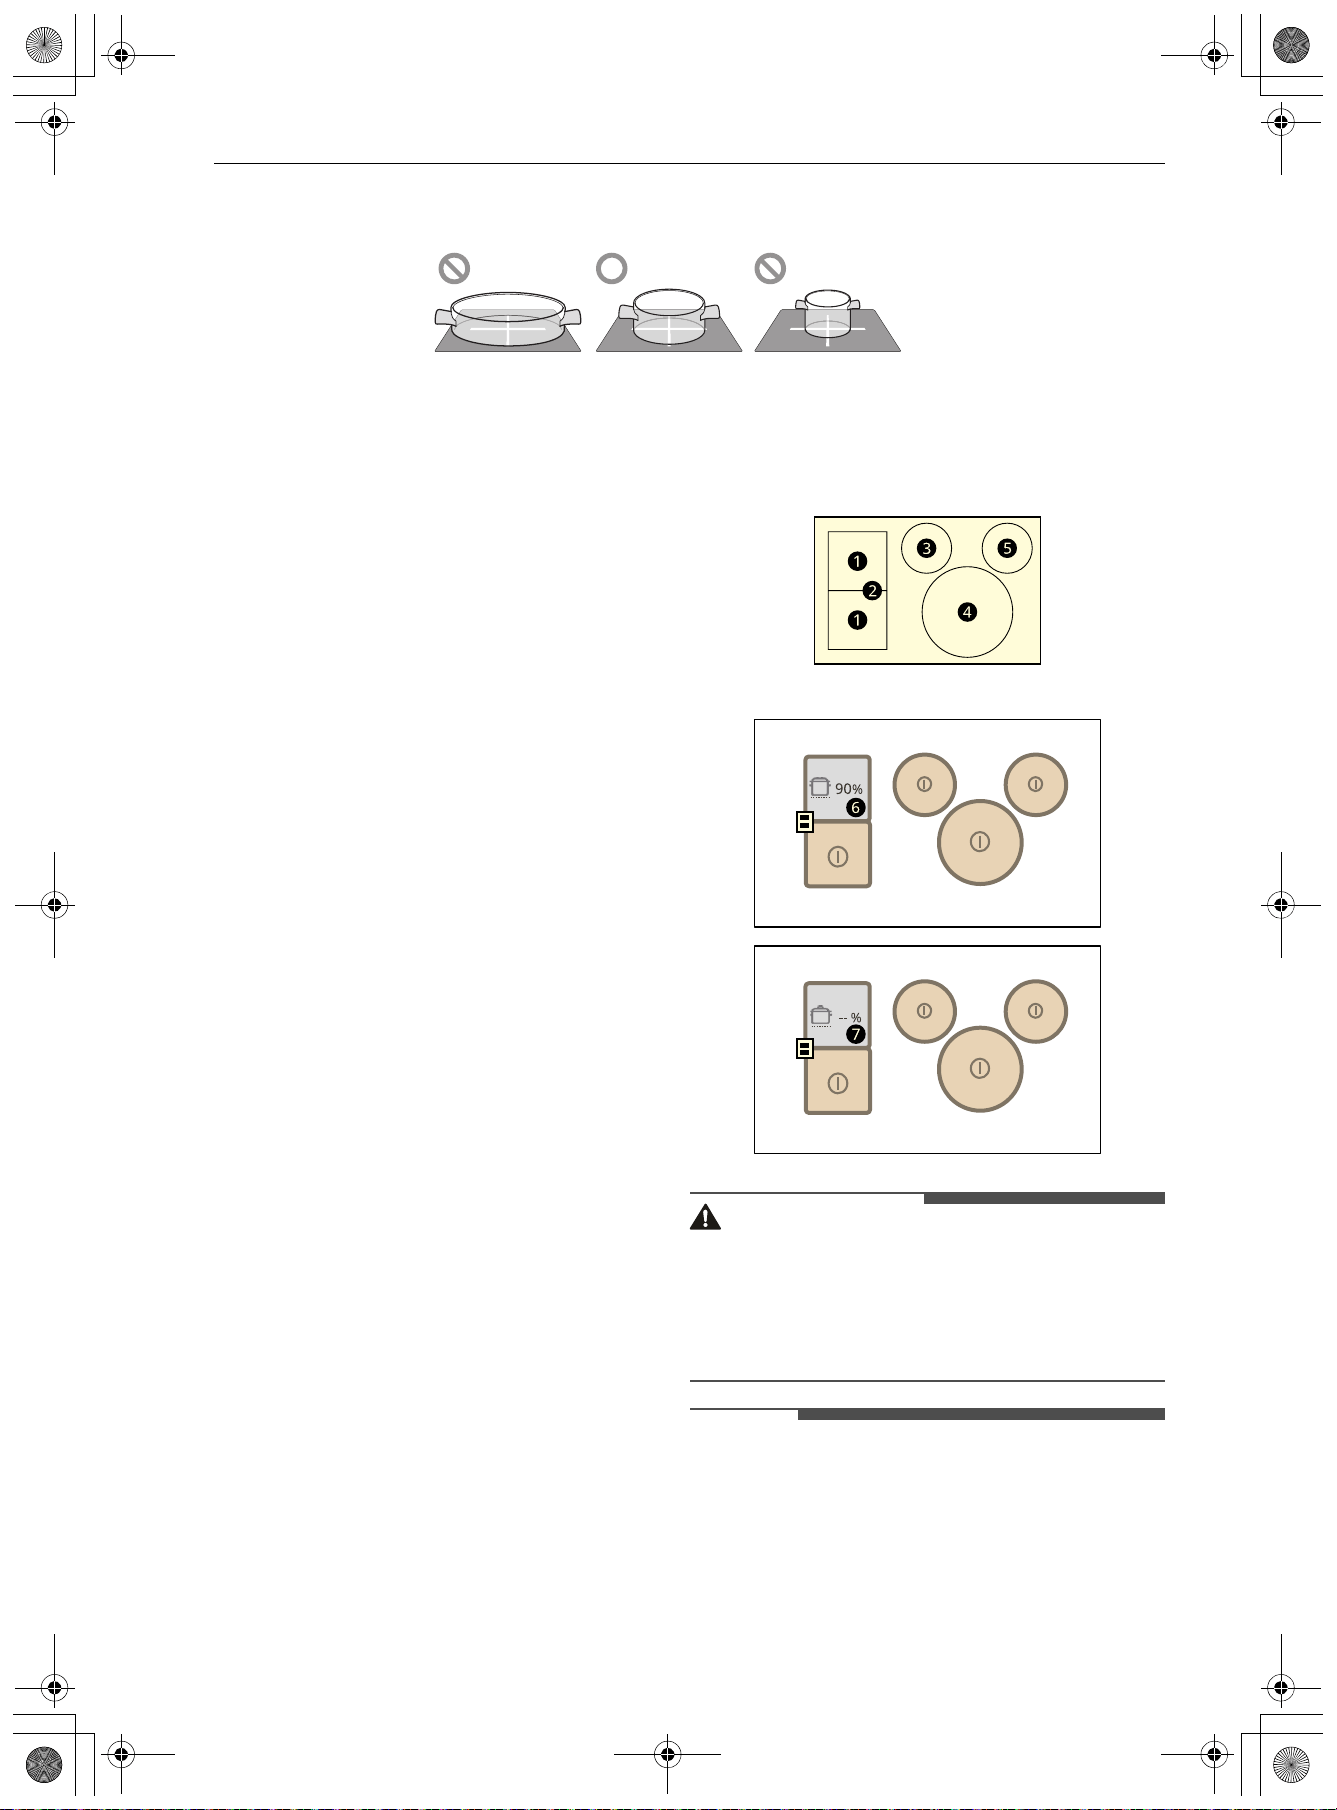
42 FUNCIONAMIENTO
La olla debe hacer contacto total con la superficie de vidrio sin que la parte inferior de la olla toque el
borde de la superficie de cocción de metal.
Si los utensilios de cocina de inducción correctos (centrados en cualquiera de los elementos de cocción
activos) son demasiado pequeños, la barra LED del elemento de cocción afectado fluctúa y la olla no se
calienta.
Indicador de compatibilidad para
utensilios de cocina
El indicador de compatibilidad para utensilios de
cocina muestra la eficiencia con la que los
utensilios de cocina se calentarán en los
elementos de la placa de cocción de inducción.
1 Apague todos los elementos de la placa de
cocción que estén en uso.
2 Coloque suficiente agua en la olla para cubrir
el fondo. Coloque los utensilios de cocina en
el centro de la placa de cocción deseada.
• Seleccione un elemento que sea apropiado
para el tamaño de los utensilios de cocina.
3 Pulse el ícono Ajustes en la parte superior
derecha de la pantalla y, seguidamente, pulse
"Mantenimiento e información".
4 Pulse "Indicador de compatibilidad de
utensilios de cocina" (Cámara y Alta cocina
con IA).
5 Ajuste el nivel de potencia del elemento
seleccionado a 10.
6 Pulse De acuerdo y el número del elemento
deseado de la placa de cocción (
a, c, d) al
mismo tiempo durante al menos 3 segundos.
El indicador
f se muestra en la pantalla. Si el
indicador no está seleccionado, se muestra
g
en la pantalla.
7 Esta prueba no se aplica a la zona caliente e y
el elemento de la placa de cocción b con la
función Flex activada.
PRECAUCIÓN
• Antes de comenzar, apague todos los elementos
de la placa de cocción para evitar obtener un
resultado falso.
• El indicador no está disponible si hay más de dos
elementos de la placa de cocción en uso.
NOTA
• El indicador de compatibilidad de los utensilios
de cocina se basa en los estándares internos del
fabricante y sirve únicamente como referencia.
• El indicador puede variar según el entorno de
uso, la tensión de alimentación y la temperatura
de los utensilios de cocina.
es-us_main.book.book Page 42 Friday, August 14, 2026 2:12 PM
43FUNCIONAMIENTO
ESPAÑOL
• El indicador puede variar de un elemento a otro,
incluso para el mismo tipo de utensilios de
cocina.
• Para una cocción eficiente, utilice utensilios de
cocina con un indicador de 90 o superior.
• Si el indicador es bajo, compruebe el material de
la base, el tamaño y la forma de los utensilios de
cocina. Los utensilios de cocina con un indicador
bajo, aunque tengan la marca IH, pueden
calentar de forma menos eficiente o hacer ruido
al calentarse. Esto es normal, y los utensilios de
cocina pueden seguir utilizándose con
seguridad.
Conservas caseras
PRECAUCIÓN
• Las conservas pueden generar grandes
cantidades de vapor. Extreme las precauciones
para evitar quemaduras. Levante la tapa para
que el vapor salga lejos de usted. Las conservas
seguras requieren que se destruyan los
microorganismos dañinos y que los tarros se
sellen completamente. Cuando utilice un
recipiente al baño María, mantenga un hervor
suave pero constante durante el tiempo
necesario.
Lea y tenga en cuenta las siguientes precauciones
cuando haga conservas caseras. Lea la
información del sitio web del USDA (Departamento
de Agricultura de los Estados Unidos) y siga las
recomendaciones que allí se dan para los
procedimientos de conservas caseras.
• Utilice únicamente recipientes de fondo plano de
calidad cuando haga conservas caseras. Utilice
una regla para comprobar que el fondo del
recipiente sea plano.
• Los recipientes con crestas que salen del centro
del fondo no son adecuados para su uso en una
vitrocerámica.
• El diámetro del recipiente no debe sobrepasar
las marcas del elemento de cocción máximo en
más de una pulgada. Utilice ollas de menor
diámetro en estufas con vitrocerámica o
eléctricas de bobina abierta.
• Comience con agua caliente del grifo para hervir
el agua más rápidamente. Lleve el agua a la
ebullición inicial utilizando el ajuste de calor más
alto. Una vez que el agua esté hirviendo, reduzca
el calor al máximo mientras mantiene el hervor.
• Es mejor conservar pequeñas cantidades y
mantener el recipiente lo suficientemente ligero
como para levantarlo.
• No deje el baño maría ni los recipientes a
presión a fuego alto durante mucho tiempo.
• Alterne los elementos de superficie entre cada
lote para permitir que los elementos y las
superficies circundantes se enfríen. No utilice el
mismo elemento durante todo el día.
Uso de los elementos de cocción
Encendido de los elementos de cocción
(excepto la zona de calentamiento)
PRECAUCIÓN
• Limpie las perillas regularmente. La suciedad u
objetos extraños en las perillas podrían interferir
con el funcionamiento del botón.
• No aplique fuerza excesiva al utilizar los botones
y las funciones de bloqueo, ya que podrían
dañarse.
• Las superficies de las perillas podrían estar
calientes luego de la cocción. Deje que las
perillas se enfríen lo suficiente o póngase un
guante de cocina previo a tocarlas.
• Los botones deben estar ajustados
correctamente para garantizar las funciones
previstas de las perillas.
NOTA
• Para utilizar las perillas de la placa de cocción sin
presionar el botón lateral, utilice la función de
bloqueo de botón.
• Si va a remover y reensamblar la perilla,
mantenga pulsado el botón lateral mientras
presiona la perilla completamente sobre el eje.
1 Presione el botón lateral de la perilla. A
2 Empuje el mando de control hacia dentro. B
Indicador Compatibilidad
0 - 10 Bajo
20 - 80 Término medio
90 - 100 Alto
es-us_main.book.book Page 43 Friday, August 14, 2026 2:12 PM
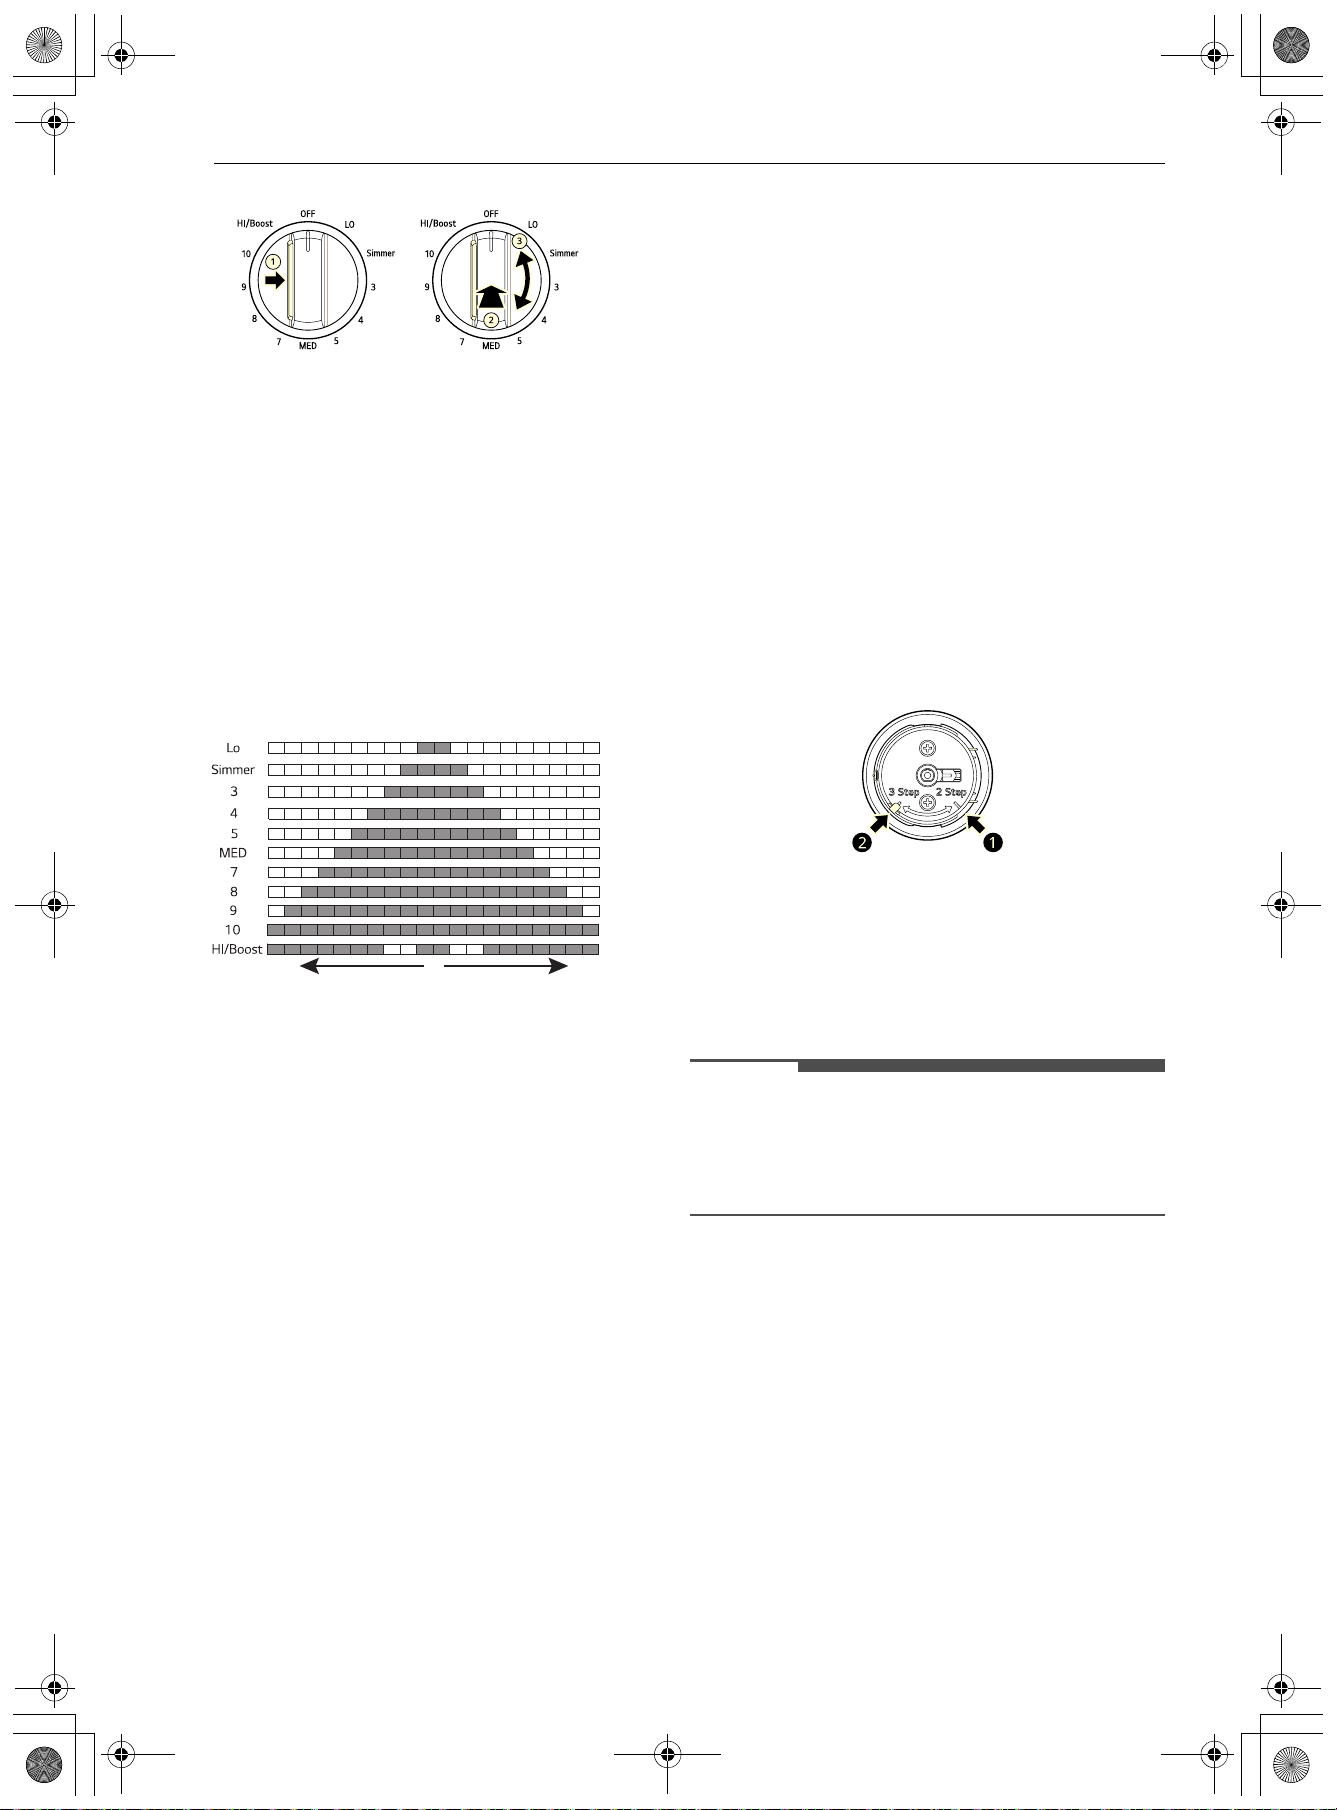
44 FUNCIONAMIENTO
3 Gire el mando en cualquier dirección para
seleccionar el ajuste deseado. Suena un breve
pitido y la barra LED del elemento de cocción
muestra su ajuste actual.
Barra de LED de los elementos de cocción
La estufa dispone de una barra de LED para cada
elemento de cocción de la placa. Compruebe los
mensajes en la ventana de la pantalla y utilice los
LED con los mandos de control correspondientes
para controlar los niveles de potencia de los
elementos.
Nivel de potencia Boost
El modo Boost solo está disponible
inmediatamente después de activar un elemento
de cocción. Cuando el elemento de cocción se
ajusta al modo Boost, la barra de LED parpadea y
el modo Boost permanece en funcionamiento
hasta 10 minutos. Después de 10 minutos, el
elemento de cocción vuelve automáticamente al
ajuste Hi.
Indicador de superficie caliente
La luz indicadora de superficie caliente
permanecerá encendida mientras cualquier área
de la superficie de cocción se encuentre
demasiado caliente para tocarla.
Permanecerá encendida hasta que se apague y
hasta que la superficie se haya enfriado
aproximadamente a 130 °F.
Es normal que los elementos de la superficie se
enciendan y apaguen cuando se cocina a
temperaturas más bajas.
Uso del Bloqueo de Perillas
Puede ajustar el bloqueo de perilla en cada perilla
de la placa de cocción para que no tenga que
presionar el botón para utilizar la perilla. Retire y
ajuste una perilla a la vez.
1 Asegúrese de que la perilla está en la posición
Apagado y tire de ella hacia afuera de su eje.
2 En la parte posterior del anillo de la perilla,
gire la pestaña negra a la posición de 2 Step o
3 Step.
• Si desliza la lengüeta a la posición 2 Step
a,
la perilla se puede usar sin presionar el
botón.
• Si desliza la lengüeta a la posición 3 Step b,
debe presionar el botón para usar la perilla.
3 Una vez que el bloqueo de la perilla esté
ajustado como desee, vuelva a instalar la
perilla. Para reinstalar, sostenga la perilla con
la etiqueta Apagado en la parte superior y
deslice la perilla directamente sobre su eje.
NOTA
• La lengüeta negra debe estar alineada con la
marca 2 Step o 3 Step para garantizar el
funcionamiento adecuado de la perilla y del
botón.
Configuraciones recomendadas de
cocción en superficie
Comience la mayoría de la cocción en superficie en
un ajuste más alto y luego cambie a un ajuste más
bajo para terminar la cocción.
Los ajustes sugeridos pueden requerir
modificaciones, dependiendo del diseño y la
calidad de los utensilios de cocina y de la cantidad
de alimentos que se preparen.
Utilice utensilios de cocina de calidad que estén
construidos con un material de base magnética y
que cumplan con los requisitos de tamaño mínimo
y máximo de la olla.
es-us_main.book.book Page 44 Friday, August 14, 2026 2:12 PM
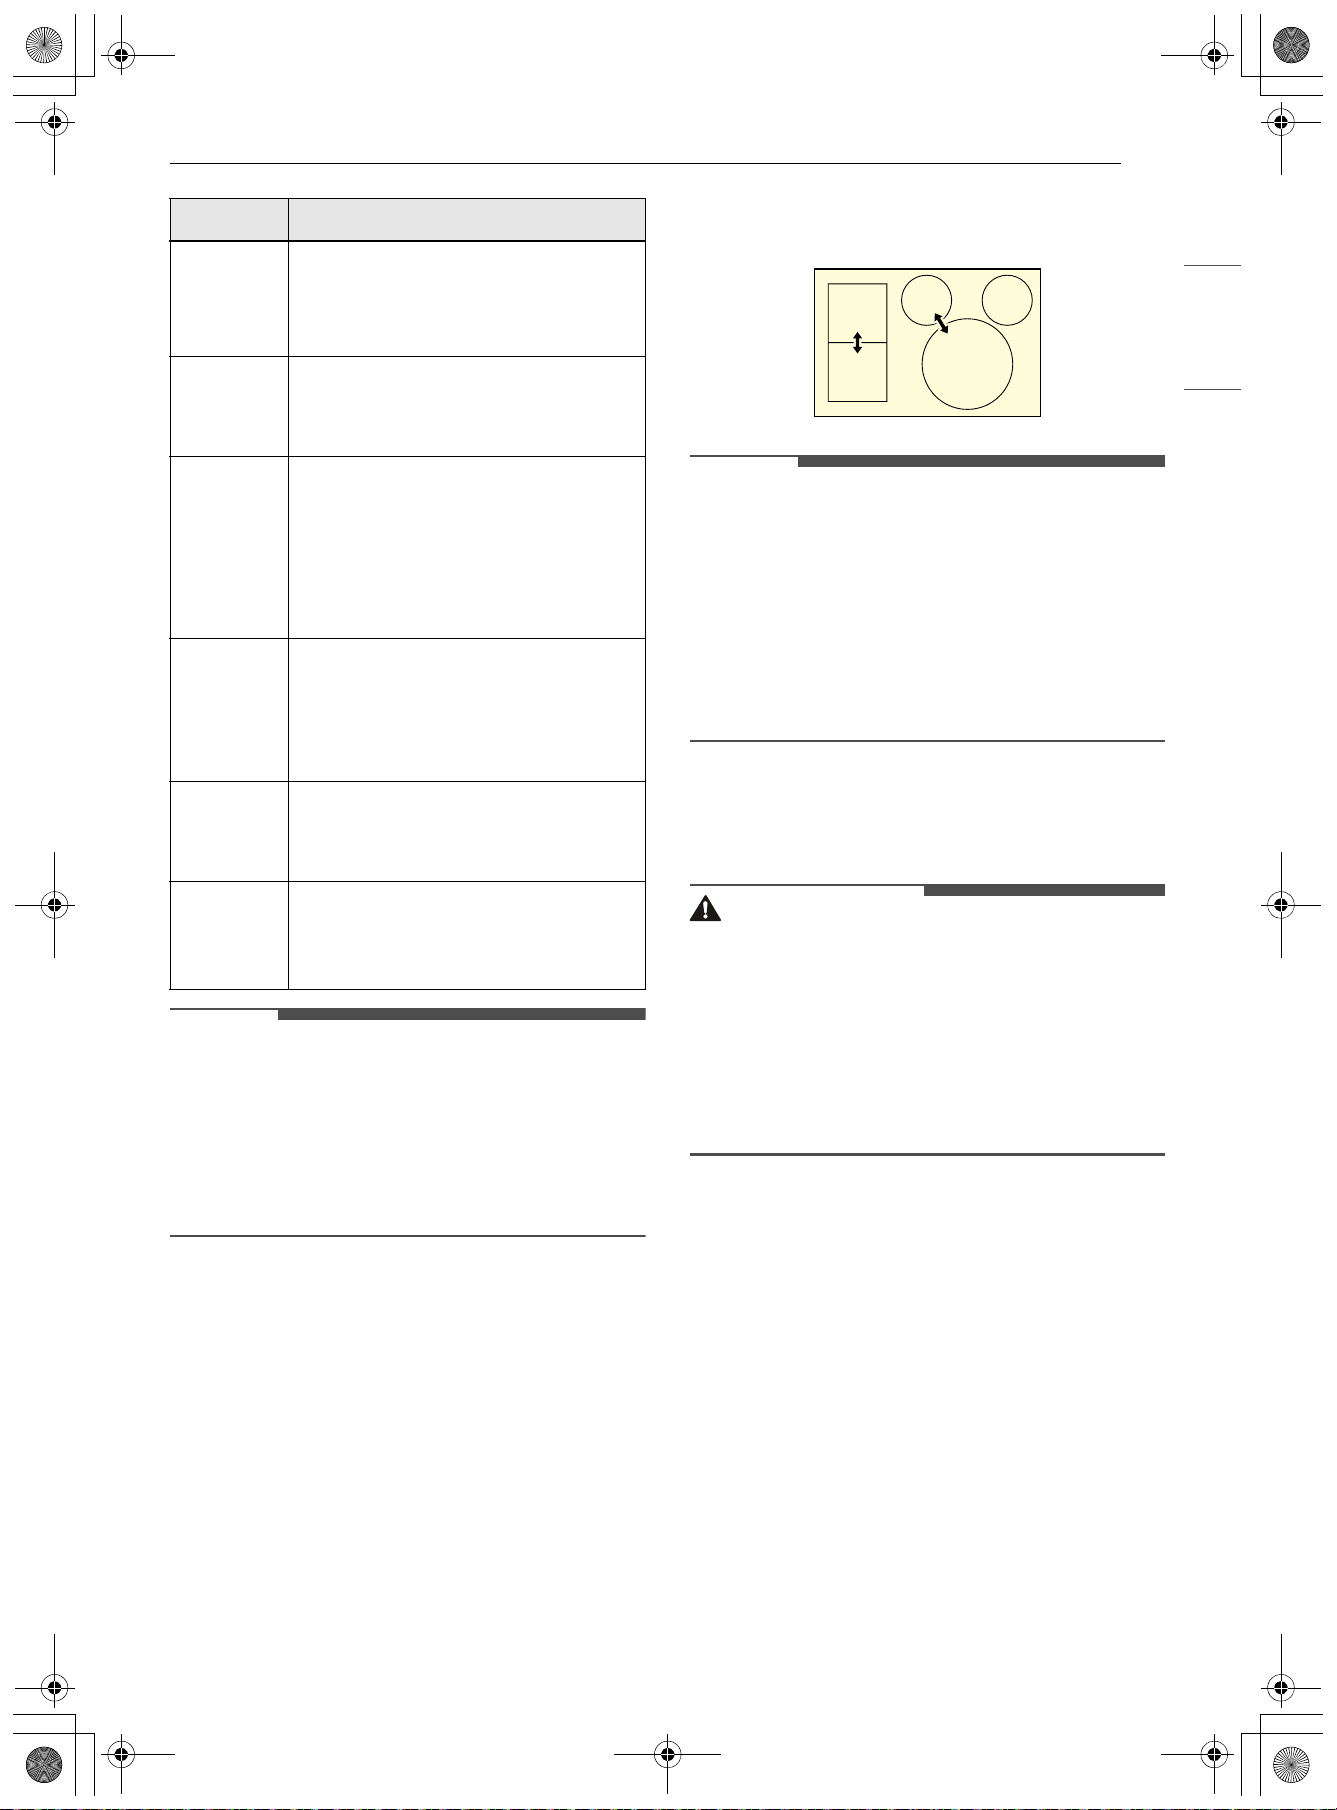
45FUNCIONAMIENTO
ESPAÑOL
NOTA
• Los ajustes de cocción sugeridos son sólo una
guía. Los resultados podrían variar dependiendo
del tipo de utensilios de cocina que se utilicen
sobre la superficie de inducción o de la cantidad
de alimentos que se cocinen. Ajuste los ajustes
según sea necesario para lograr los resultados
deseados.
Control de potencia
Las zonas de cocción, que consisten en elementos
de cocción emparejados, están limitadas a
consumir una determinada cantidad máxima de
energía.
Si enciende la función Boost para un elemento
mientras su elemento emparejado está en uso, la
función de administración de energía puede
reducir automáticamente la potencia de ambos
elementos. Para obtener un rendimiento
consistente cuando se utilizan varios elementos,
utilice los elementos en zonas de cocción
separadas.
NOTA
• Si el calor combinado del horno y de los
quemadores de superficie es suficientemente
alto, la potencia de los quemadores de superficie
se reduce para evitar daños en el producto.
• Los dos elementos de un conjunto de elementos
emparejados no pueden utilizar el modo Boost
al mismo tiempo. Para utilizar el modo Boost en
dos elementos simultáneamente, utilice
elementos no emparejados.
Encendido de la zona de
calentamiento
PRECAUCIÓN
• PELIGRO DE VENENO ALIMENTARIO: Las
bacterias pueden crecer en los alimentos con
temperaturas inferiores a 140 °F.
- Siempre empiece con comida caliente. No use
la configuración de calentamiento para
calentar alimentos fríos.
- No utilice la configuración de calentamiento
durante más de 2 horas.
La Zona de calentamiento, ubicada en la parte
posterior derecha de la superficie de vidrio,
mantendrá los alimentos cocidos calientes a la
temperatura adecuada para servir. Use la Zona de
calentamiento para mantener la comida caliente
después de que ya se haya cocinado. Si intenta
cocinar alimentos crudos o fríos en la Zona de
calentamiento podría provocar enfermedades
transmitidas por los alimentos.
1 Presione la perilla del elemento Warm Zone
(Zona de calentamiento) en.
2 Gire la perilla en cualquier dirección hasta el
ajuste deseado.
Para obtener mejores resultados:
Ajuste Uso recomendado
HI/Boost
• Utilizar para calentar una gran
cantidad de alimentos o para
hacer hervir grandes ollas de
agua
10-HI/
Boost
• Llevar líquidos al hervor
• Comenzar la mayor parte de la
cocción
MED-10
• Mantener un hervor rápido,
rehogado o fritura
• Dorado o sellado rápido de
alimentos
• Filetes, chuletas, carne a la
parrilla
3-MED
• Mantener un hervor lento
• Fritura o salteado de alimentos
• Cocinar sopas, salsas y aderezos
• Huevos, panqueques
Simmer-3
• Cocinar alimentos estofados o al
vapor
• Cocción a fuego lento
Lo-
Simmer
• Mantener calientes los alimentos
• Derretir chocolate o manteca
• Cocción a fuego lento
es-us_main.book.book Page 45 Friday, August 14, 2026 2:12 PM
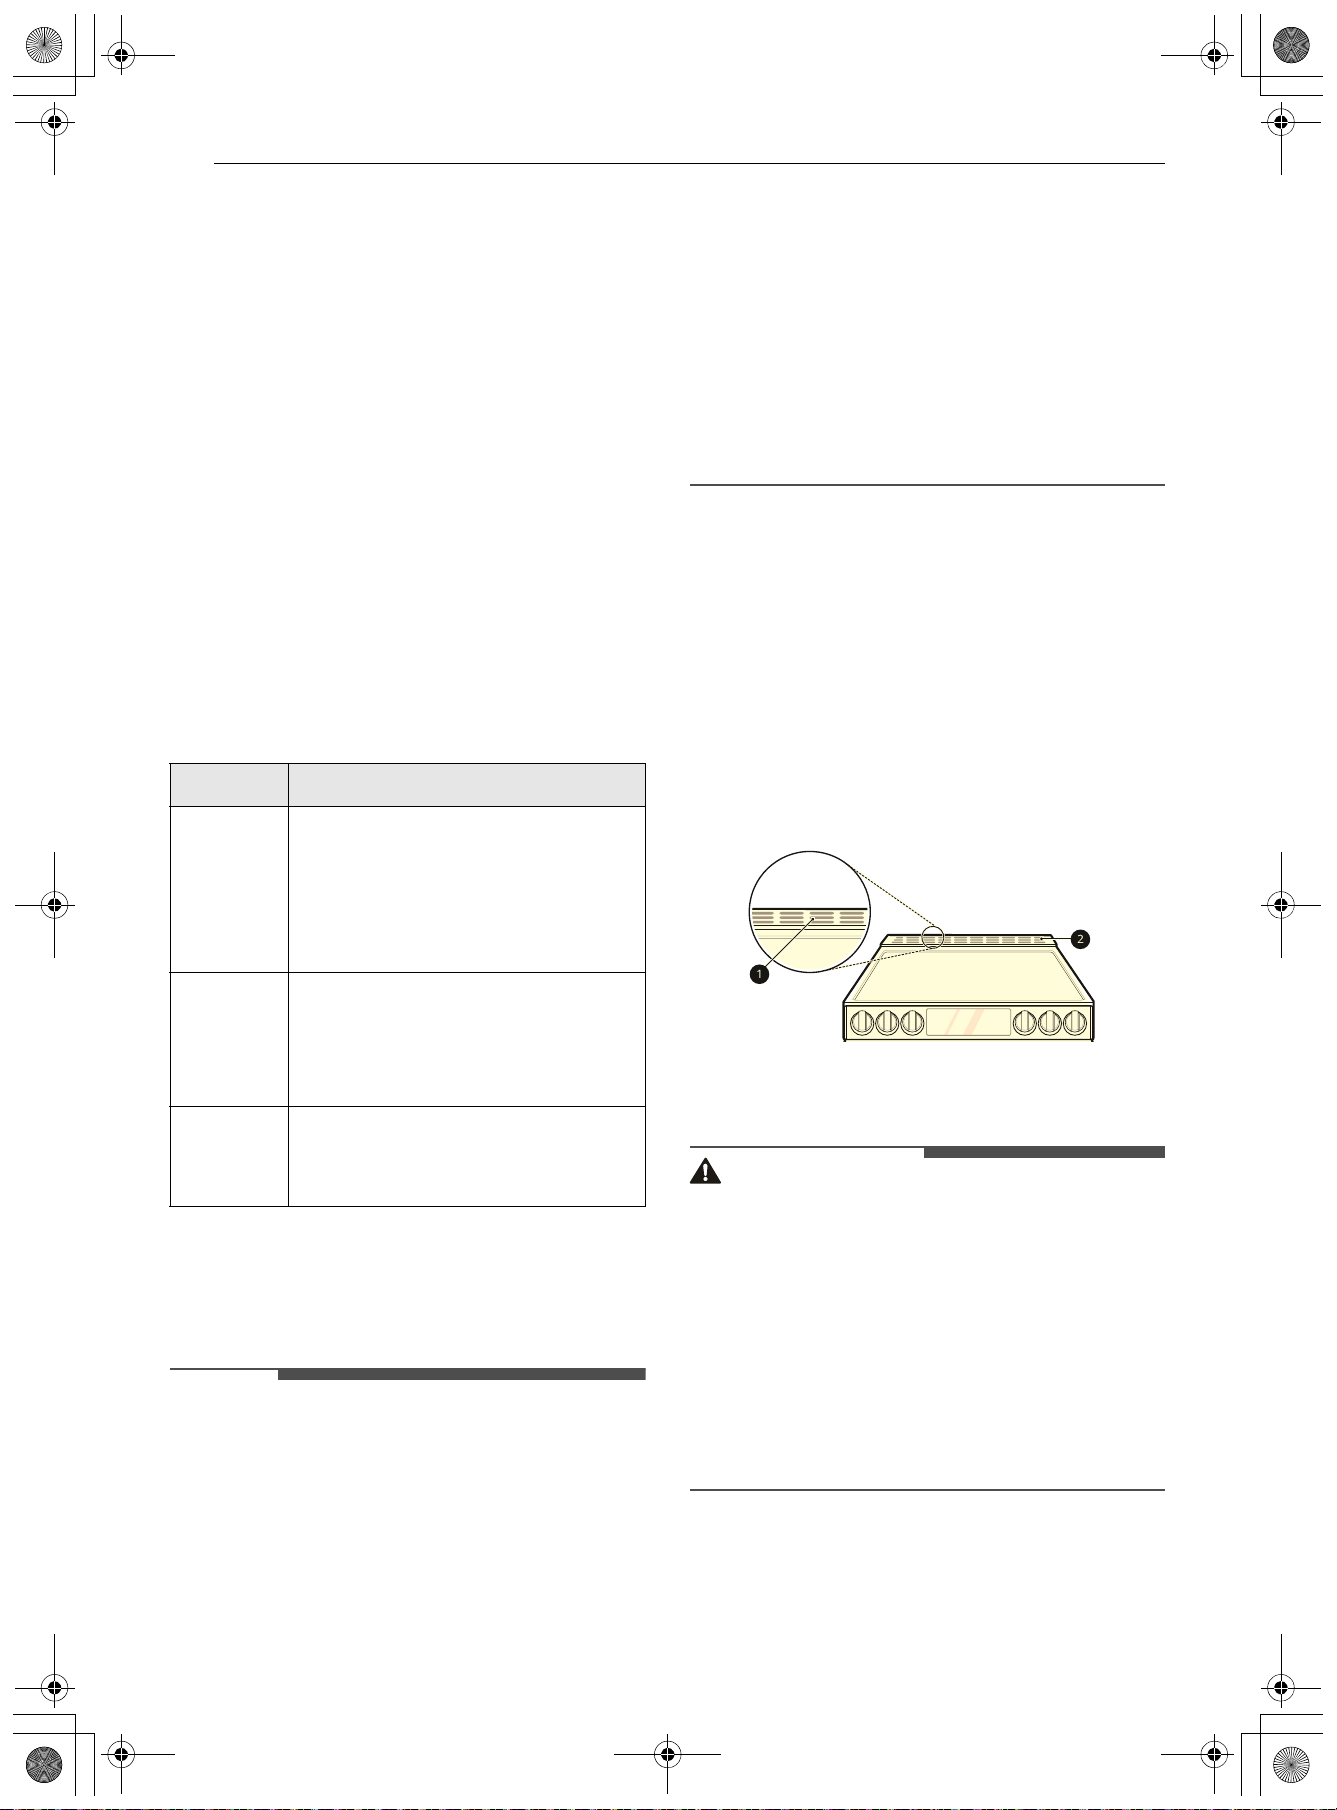
46 FUNCIONAMIENTO
• Cuando caliente pasteles o panes, deje una
abertura en la tapa para permitir que salga la
humedad.
• No utilice envolturas plásticas para cubrir
alimentos. El plástico podría derretirse sobre la
superficie y ser muy difícil de limpiar.
• Utilice únicamente la vajilla, los utensilios y la
batería de cocina recomendados para su uso en
el horno y la placa de cocción.
• Los alimentos que se encuentran en el
calentador deben guardarse en su recipiente o
cubrirse con una tapa o papel de aluminio para
mantener su calidad.
• No permita que el papel de aluminio entre en
contacto con la superficie caliente de la placa de
inducción.
Si un alimento en particular no está en la lista,
comience con el nivel de calor medio y ajuste
según sea necesario. La mayoría de los alimentos
pueden mantenerse a la temperatura adecuada
utilizando el nivel de calor medio.
Horno
Antes de usar el horno
NOTA
• Como la temperatura del horno es cíclica, es
posible que el termómetro que está dentro de la
cavidad del horno no indique la misma
temperatura configurada.
• Es normal que el ventilador de convección
funcione durante el precalentamiento en un
ciclo normal de horneado.
• El motor del ventilador de convección puede
funcionar periódicamente durante un ciclo
normal de horneado.
• El ventilador se apaga si la puerta se deja abierta
durante el horneado. El ventilador vuelve a
activarse automáticamente cuando la puerta se
cierra.
• Evite abrir la puerta del horno más de lo
necesario durante el uso. Esto ayuda a que el
horno mantenga la temperatura, evita la pérdida
innecesaria de calor y ahorra energía.
Ventilación del horno
Las áreas cercanas a la ventilación podrían
calentarse durante el funcionamiento y causar
quemaduras. No bloquee la abertura de
ventilación. Evite colocar plásticos cerca de la
ventilación, ya que el calor podría deformar o
derretir el plástico.
Es normal que se vea vapor cuando se cocinan
alimentos con un alto contenido de humedad.
a Ventilación del horno
b Reborde de ventilación
PRECAUCIÓN
• Los bordes de la ventilación de la estufa son
filosos. Para evitar sufrir lesiones, use guantes
cuando limpie la estufa.
• No bloquee, toque ni coloque elementos
alrededor de la ventilación del horno durante la
cocción.
- No bloquee la ventilación del horno cuando
cocine para permitir un flujo de aire adecuado.
No toque las aberturas de ventilación ni las
superficies cercanas durante cualquier
operación de cocina.
Ajuste Alimento
Bajo
(Lo-3)
•Verduras
• Arroz
• Pasta
• Salsas azucaradas (salsa de
tomate, salsa barbacoa)
Término
medio
(3-7)
• Sopas y salsas a base de crema
• Guisos y chile
• Calentar los platos vacíos o las
fuentes de servir
Alto
(7-Hi)
• Sopas a base de caldo
• Bebidas calientes (sidra caliente,
chocolate caliente)
es-us_main.book.book Page 46 Friday, August 14, 2026 2:12 PM
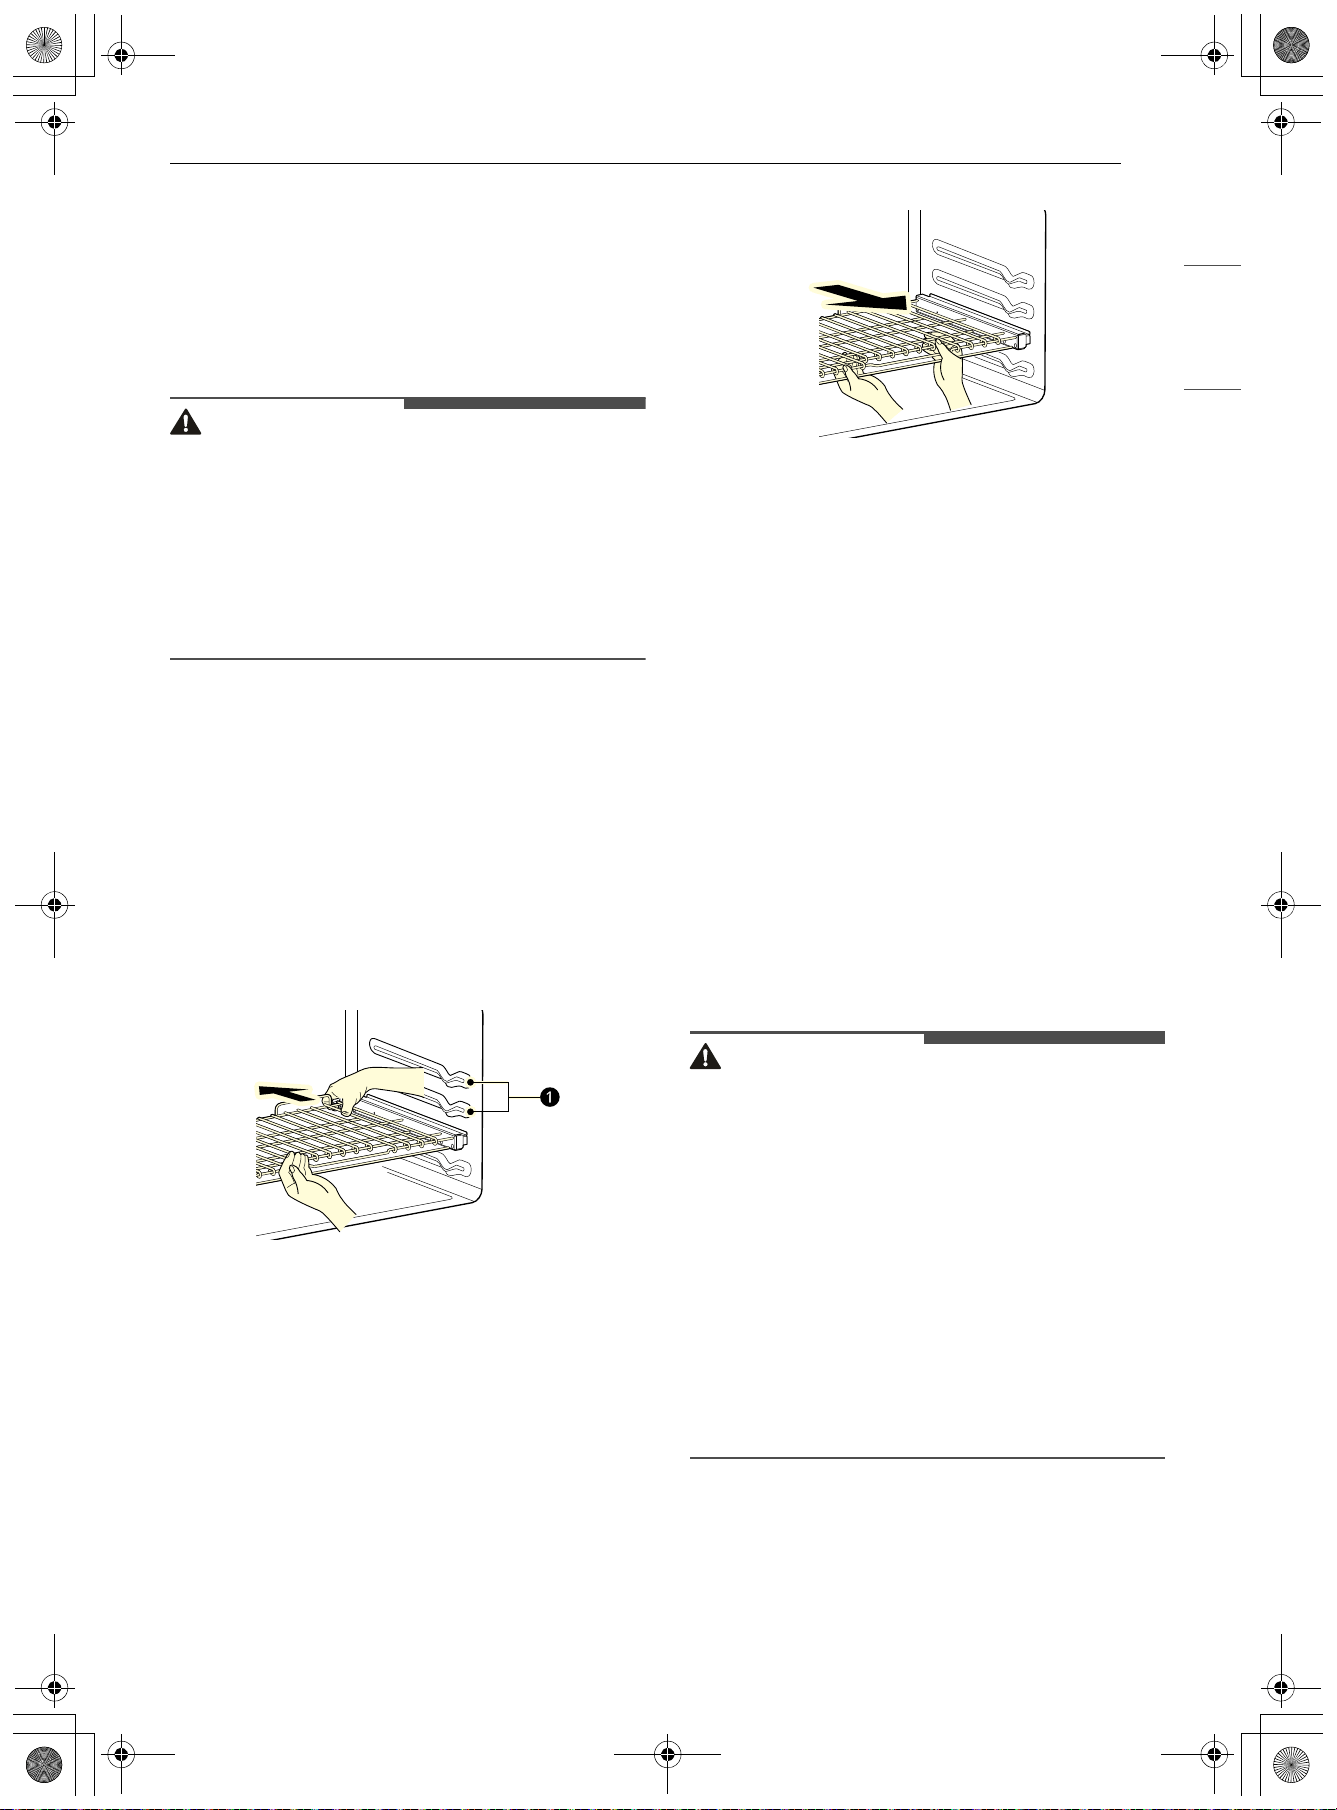
47FUNCIONAMIENTO
ESPAÑOL
Uso de los estantes deslizantes del
horno
Los estantes deslizantes se deslizan hacia adentro
y hacia afuera en un marco. Esto mantiene los
utensilios de cocina pesados nivelados y evita que
se deslicen hacia adelante cuando el estante está
completamente extendida.
PRECAUCIÓN
• Coloque los estantes del horno en la ubicación
deseada antes de encender el horno para evitar
quemaduras.
• No cubra los estantes con papel de aluminio o
cualquier otro material, ni coloque nada sobre la
parte inferior del horno. Si lo hace, podría
generar un proceso de horneado deficiente y
dañar la base del horno.
Instalación de los estantes deslizantes
1 Comience con el estante en la posición
cerrada. Sostenga el estante con una mano en
el centro de la parte delantera y la otra mano
en la esquina posterior derecha.
2 Inserte con cuidado el estante entre las guías
del estante, y deslícelo hacia atrás hasta que
el estante quede en su lugar.
a Guías de estante
3 Una vez que el estante esté bien colocado en
la parte posterior, tire de todo el estante hacia
adelante hasta que el estante encaje en su
lugar.
Extracción de los estantes deslizantes
1 Con el estante en la posición cerrada, sujete la
parte delantera del estante y el marco y
levántelo. Empuje lentamente el estante hacia
la pared trasera hasta que esté libre del tope
del estante.
2 Después de desenganchar el tope del estante,
levante la parte posterior del estante y tire del
estante y el marco hacia afuera entre las guías
del estante.
Uso de los estantes resistentes del
horno
Los estantes tienen un borde posterior hacia
arriba que evita que salgan de la cavidad del
horno.
PRECAUCIÓN
• Reposicione los estantes del horno antes de
encender el horno para evitar quemaduras.
• No cubra los estantes con papel de aluminio o
cualquier otro material, ni coloque nada sobre la
parte inferior del horno. Si lo hace, podría
generar un proceso de horneado deficiente y
dañar la base del horno.
• Acomode los estantes del horno solo cuando el
horno esté frío.
• No coloque objetos que pesen más de 33 lb
(15 kg) sobre los estantes. No coloque objetos
pesados en las esquinas de los estantes. De lo
contrario, los estantes podrían dañarse o salirse
de los rieles y causar lesiones personales.
Extracción de los estantes
1 Tire del estante hacia afuera hasta que se
detenga.
es-us_main.book.book Page 47 Friday, August 14, 2026 2:12 PM
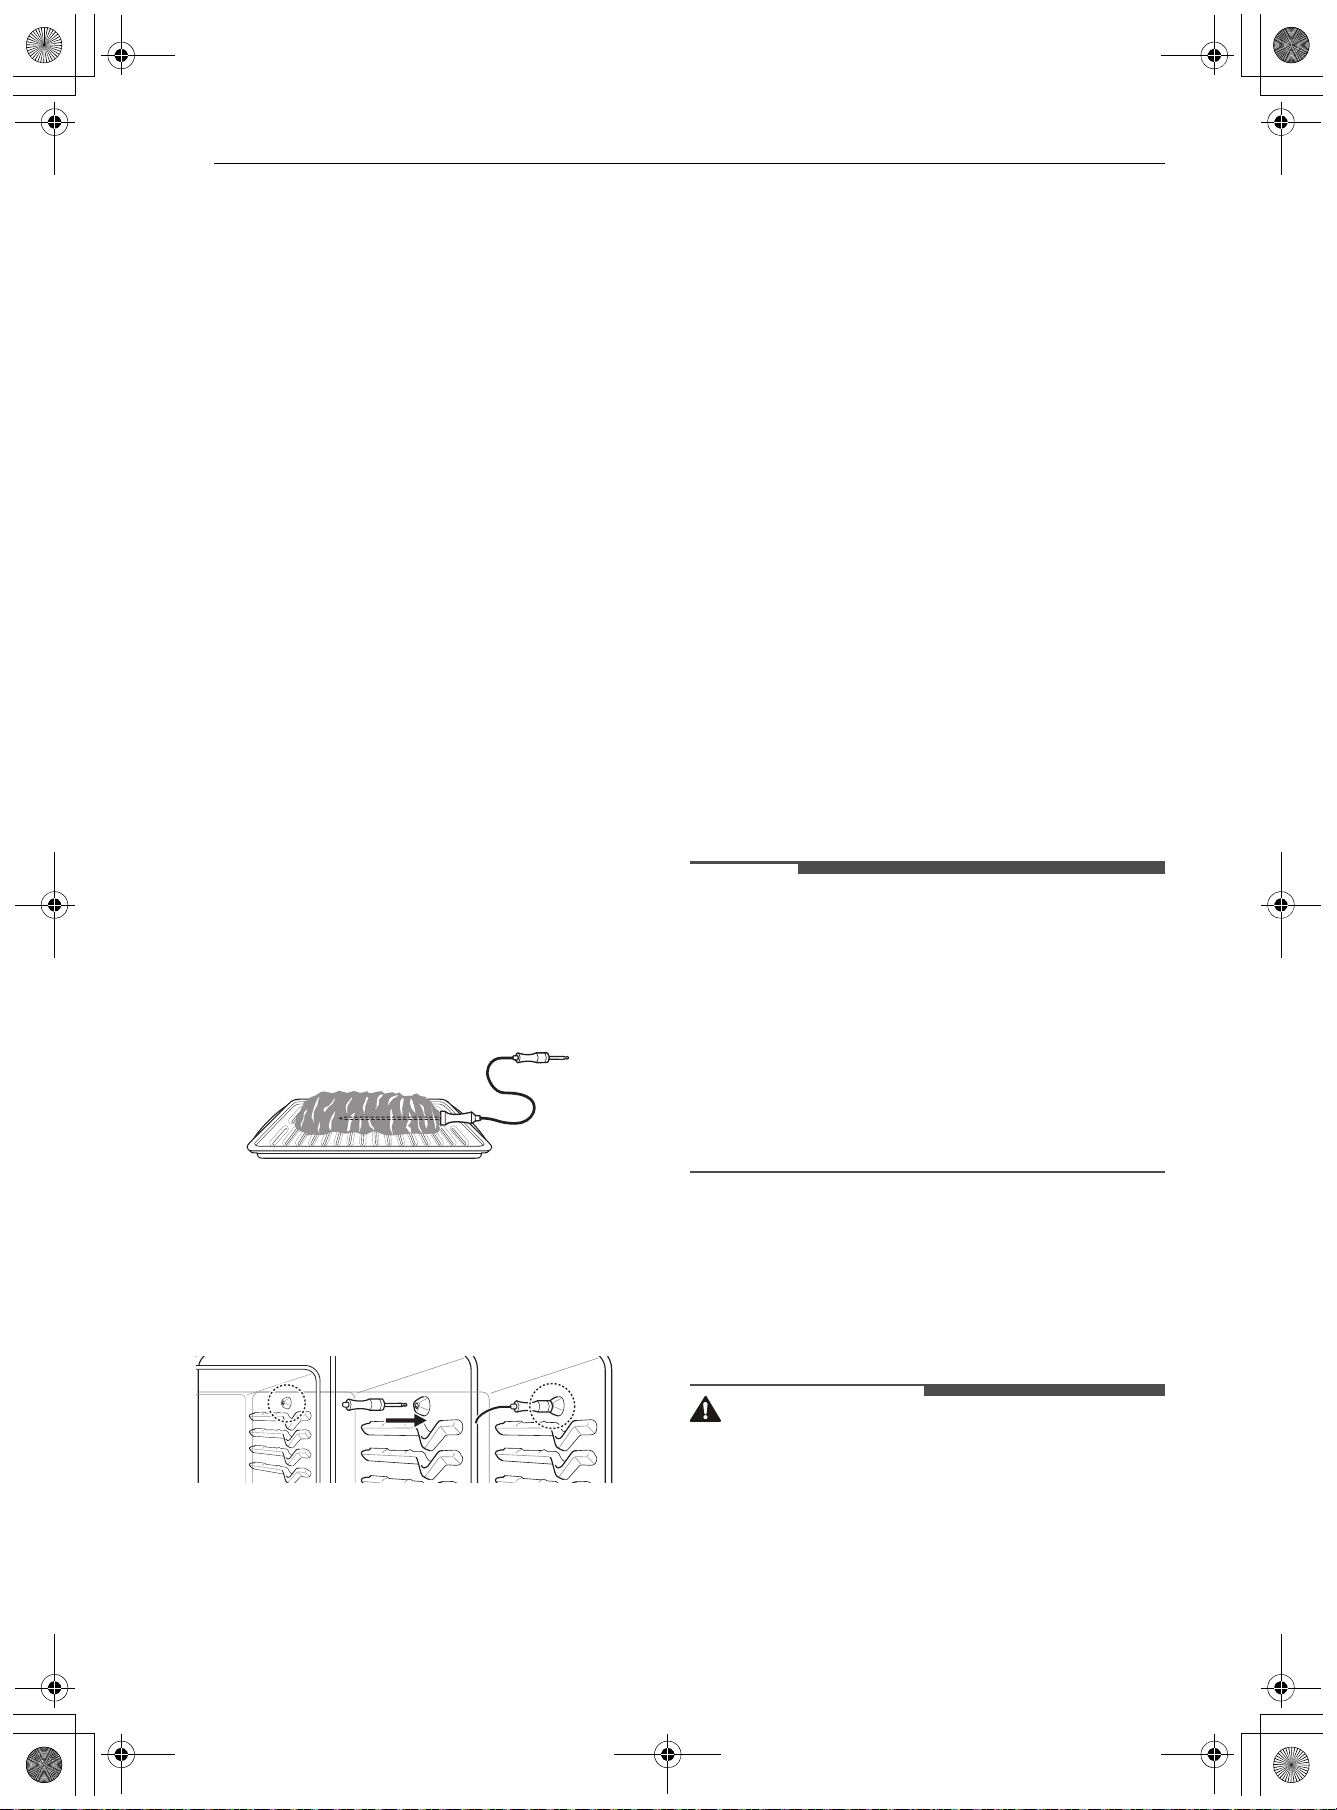
48 FUNCIONAMIENTO
2 Levante el frente del estante y tire de él hacia
afuera.
Cómo volver a colocar de los estantes
1 Coloque el extremo del estante sobre el
soporte.
2 Incline el extremo frontal hacia arriba y
empuje el estante hacia adentro.
Meat Probe (Sonda para carne)
La sonda para carne mide con precisión la
temperatura interna de la carne, las aves y los
estofados. Está disponible durante las funciones
de Hornear, Hornear por convección, Rostizar por
convección, Rostizar con aire o algunos menús de
Cocción automática. Desenchufe y extraiga
siempre la sonda para carne del horno al retirar la
comida. Antes de usar, inserte la sonda en el
centro de la parte más gruesa de la carne, en el
muslo interno o en la pechuga de las aves, alejada
de la grasa o los huesos. Coloque la comida en el
horno y enchufe la sonda para carne al conector
hembra. Mantenga la sonda lo más alejada de las
fuentes de calor que sea posible.
Ajuste de la función Sonda para carne
1 Inserte la sonda en la carne.
2 Enchufe la sonda para carne al conector
hembra.
• Sonda conectada aparece en la pantalla y
el ícono de sonda aparece en la parte
superior de la pantalla.
Uso de la función Sonda para Carne al
cocinar
1 Seleccione el modo de cocción. La sonda está
disponible con Hornear, Horneado por
convección, Asado por convección y Asado
al aire.
2 Pulse Sonda para establecer la temperatura
de cocción deseada pulsando los botones +/-,
pulsando la barra o arrastrando la barra.
También se puede utilizar el icono del teclado
numérico para establecer la temperatura de
cocción directamente.
3 Tras seleccionar la configuración de cocción
deseada, pulse Iniciar (Inicio) en la parte
inferior derecha para comenzar la cocción.
Para detener la cocción
1 Pulse Detener en la parte inferior derecha de
la pantalla.
• Aparece una notificación emergente en la
pantalla.
2 Pulse Detener en el elemento emergente.
NOTA
• La temperatura predefinida para la sonda es de
150°F (65°C), pero puede modificarse a
cualquier temperatura entre 80 °F (30 °C) y
210 °F (95 °C). La pantalla muestra la
temperatura modificada de la sonda. Cuando se
alcanza la temperatura configurada de la sonda,
el horno se apaga automáticamente.
• Para evitar la rotura de la sonda, asegúrese de
que los alimentos estén descongelados
completamente antes de insertarla.
NOTA IMPORTANTE
Pulse el botón Detener si desea cancelar la
cocción con sonda en cualquier momento. Para
evitar que la sonda se rompa, asegúrese de que la
comida esté totalmente descongelada antes de
insertarle la sonda.
PRECAUCIÓN
• Utilice siempre un guante para horno al retirar la
sonda de temperatura. No toque el asador. Si no
se cumple con esta advertencia, se pueden
producir lesiones personales graves.
• Para evitar daños en la sonda para carne, no use
pinzas para tirar de la sonda al retirarla.
• No guarde la sonda para carne dentro del horno.
es-us_main.book.book Page 48 Friday, August 14, 2026 2:12 PM
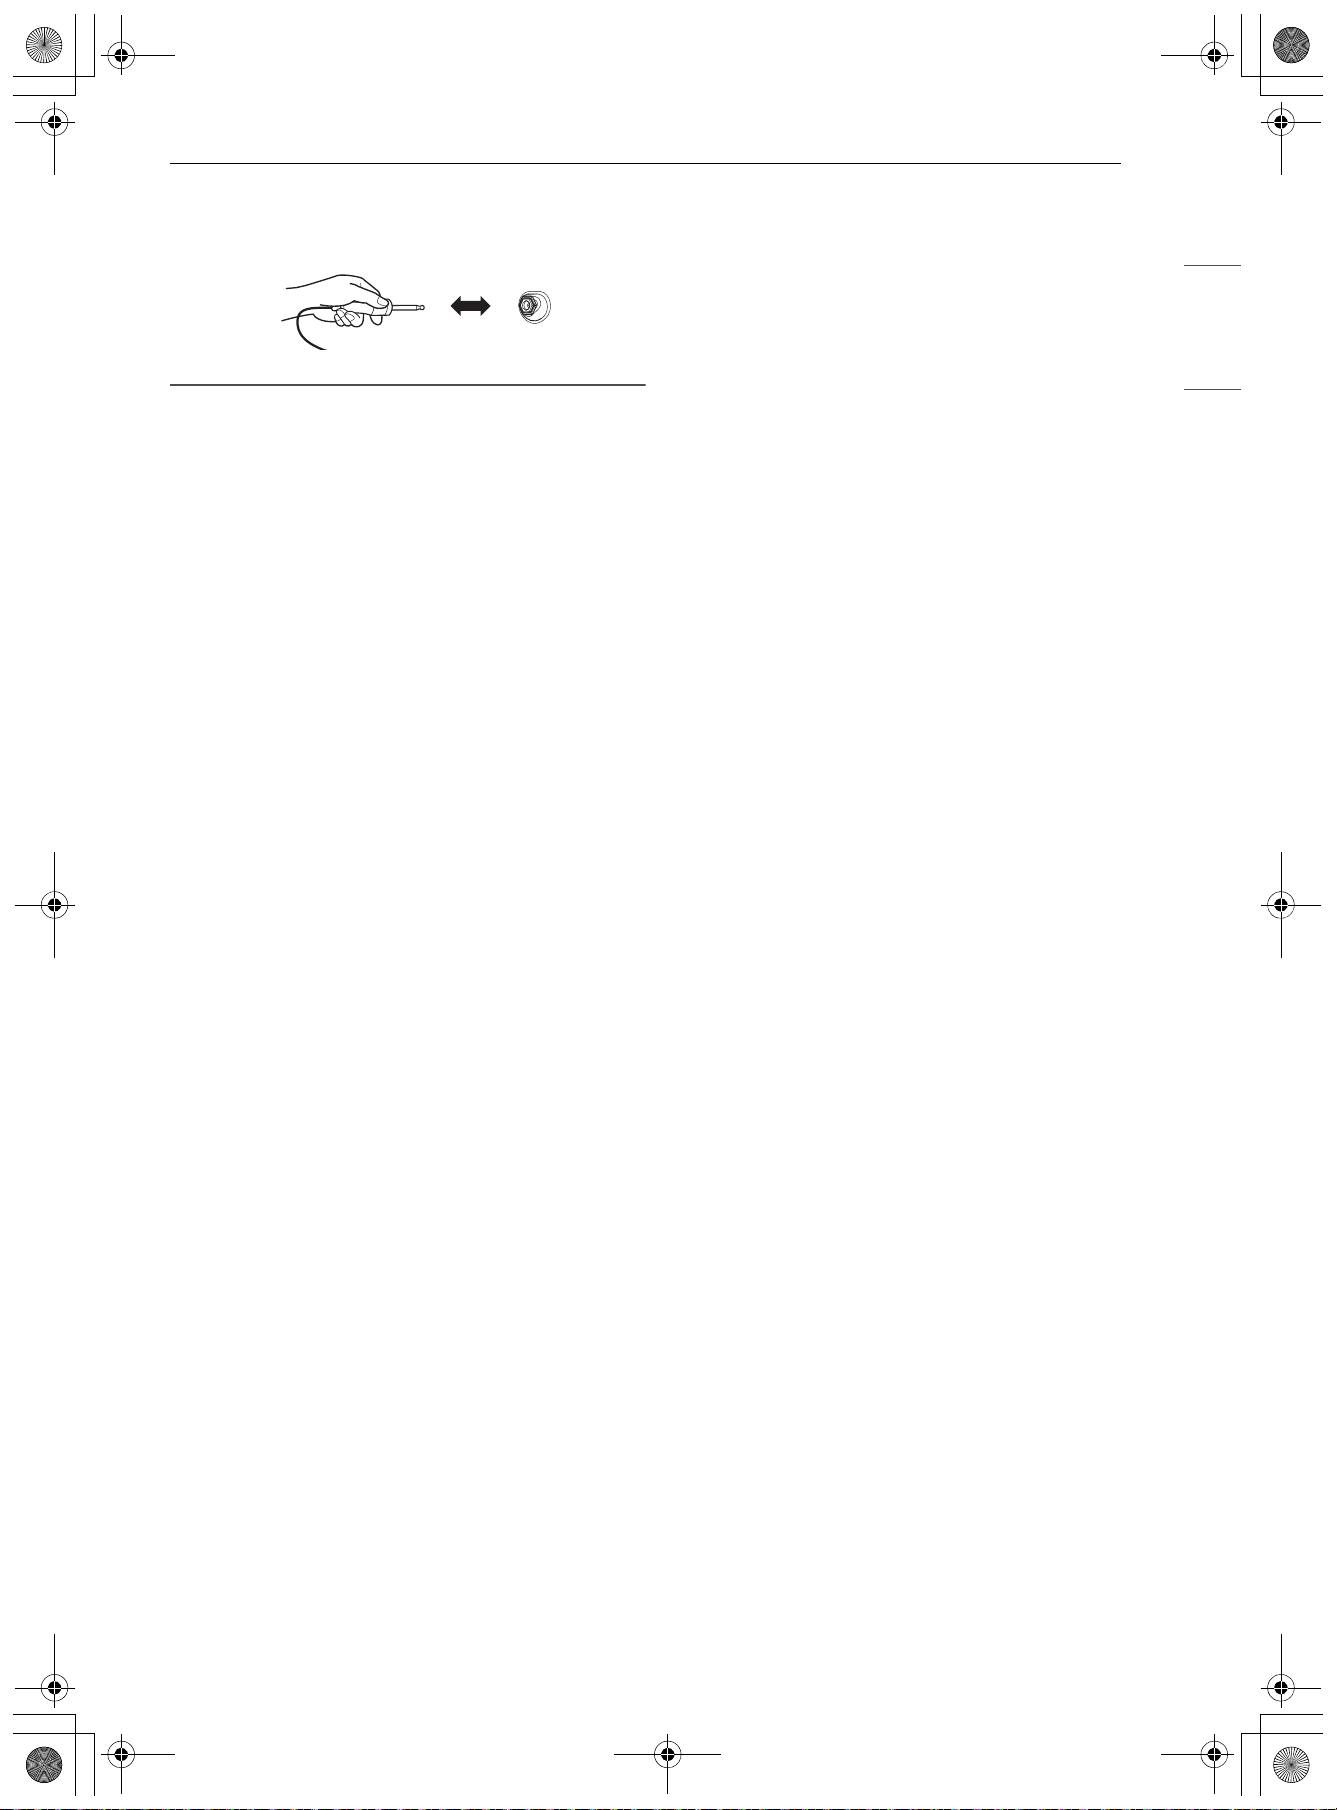
49FUNCIONAMIENTO
ESPAÑOL
• No tire del cable para quitar la sonda. Al insertar
o retirar la sonda, sostenga el cabezal de la
sonda, no el cable.
Bake (Hornear)
La función Hornear se utiliza para preparar
alimentos como pasteles, panes y estofados.
Es posible programar el horno para hornear a
cualquier temperatura entre 170
8 (80 7) a 550 8
(285 7). La temperatura predeterminada 350 8
(175
7). Con este modo también se puede utilizar
la sonda para carne.
Ajuste de la función Hornear
1 Presione el botón Alimentación.
2 Pulse Cocción manual (Cocción manual) y
desplácese para seleccionar Hornear
(Hornear).
3 Pulse 3 o arrastre la tarjeta de opciones para
establecer las opciones de cocción.
4 Pulse Temperatura para establecer la
temperatura de cocción deseada pulsando los
botones +/-, pulsando la barra o arrastrando
la barra. También se puede utilizar el icono
del teclado numérico para establecer la
temperatura de cocción directamente.
5 Si lo desea, pulse Tiempo de cocción (Tiempo
de cocción) o Iniciar a para establecer el
tiempo de cocción o la hora de inicio de
cocción.
También se puede usar el ícono del teclado
numérico para ajustar la temperatura de
cocción directamente.
6 Pulse Cuando termine (Al finalizar) para
añadir una función una vez completada la
cocción.
• Mantener caliente: Mantiene los alimentos
calientes tras la cocción.
• Mantener encendido: Se conserva el modo
de cocción seleccionado previamente tras
haberse completado la cocción.
• Apagar: Se apaga automáticamente una
vez completada la cocción, sin ninguna
función adicional de funcionamiento.
7 Tras seleccionar la configuración de cocción
deseada, pulse Iniciar (Inicio) en la parte
inferior derecha para comenzar la cocción.
8 Suena un timbre cuando finaliza el
precalentamiento.
9 Transcurrido el tiempo de cocción
establecido, suena un timbre y aparece una
notificación en la pantalla.
10 Pulse Terminado para finalizar la cocción. Si
fuera necesario, puede pulsar + Tiempo de
cocción (Prolongar el tiempo de cocción) para
continuar con la cocción o pulsar Mantener
caliente para mantener la comida a la
temperatura adecuada para servirla.
Cambiar los ajustes de Cocción
1 Pulse 3 en la parte media derecha de la
pantalla de inicio.
2 Pulse la opción que desee cambiar para
realizar los ajustes deseados.
3 Pulse Aplicar en la parte inferior derecha
para aplicar los ajustes modificados a sus
recetas.
4 Pulse 4 para volver a la pantalla anterior sin
hacer cambios.
Para detener la cocción
1 Pulse Detener en la parte inferior derecha de
la pantalla.
• Aparece una notificación emergente en la
pantalla.
es-us_main.book.book Page 49 Friday, August 14, 2026 2:12 PM
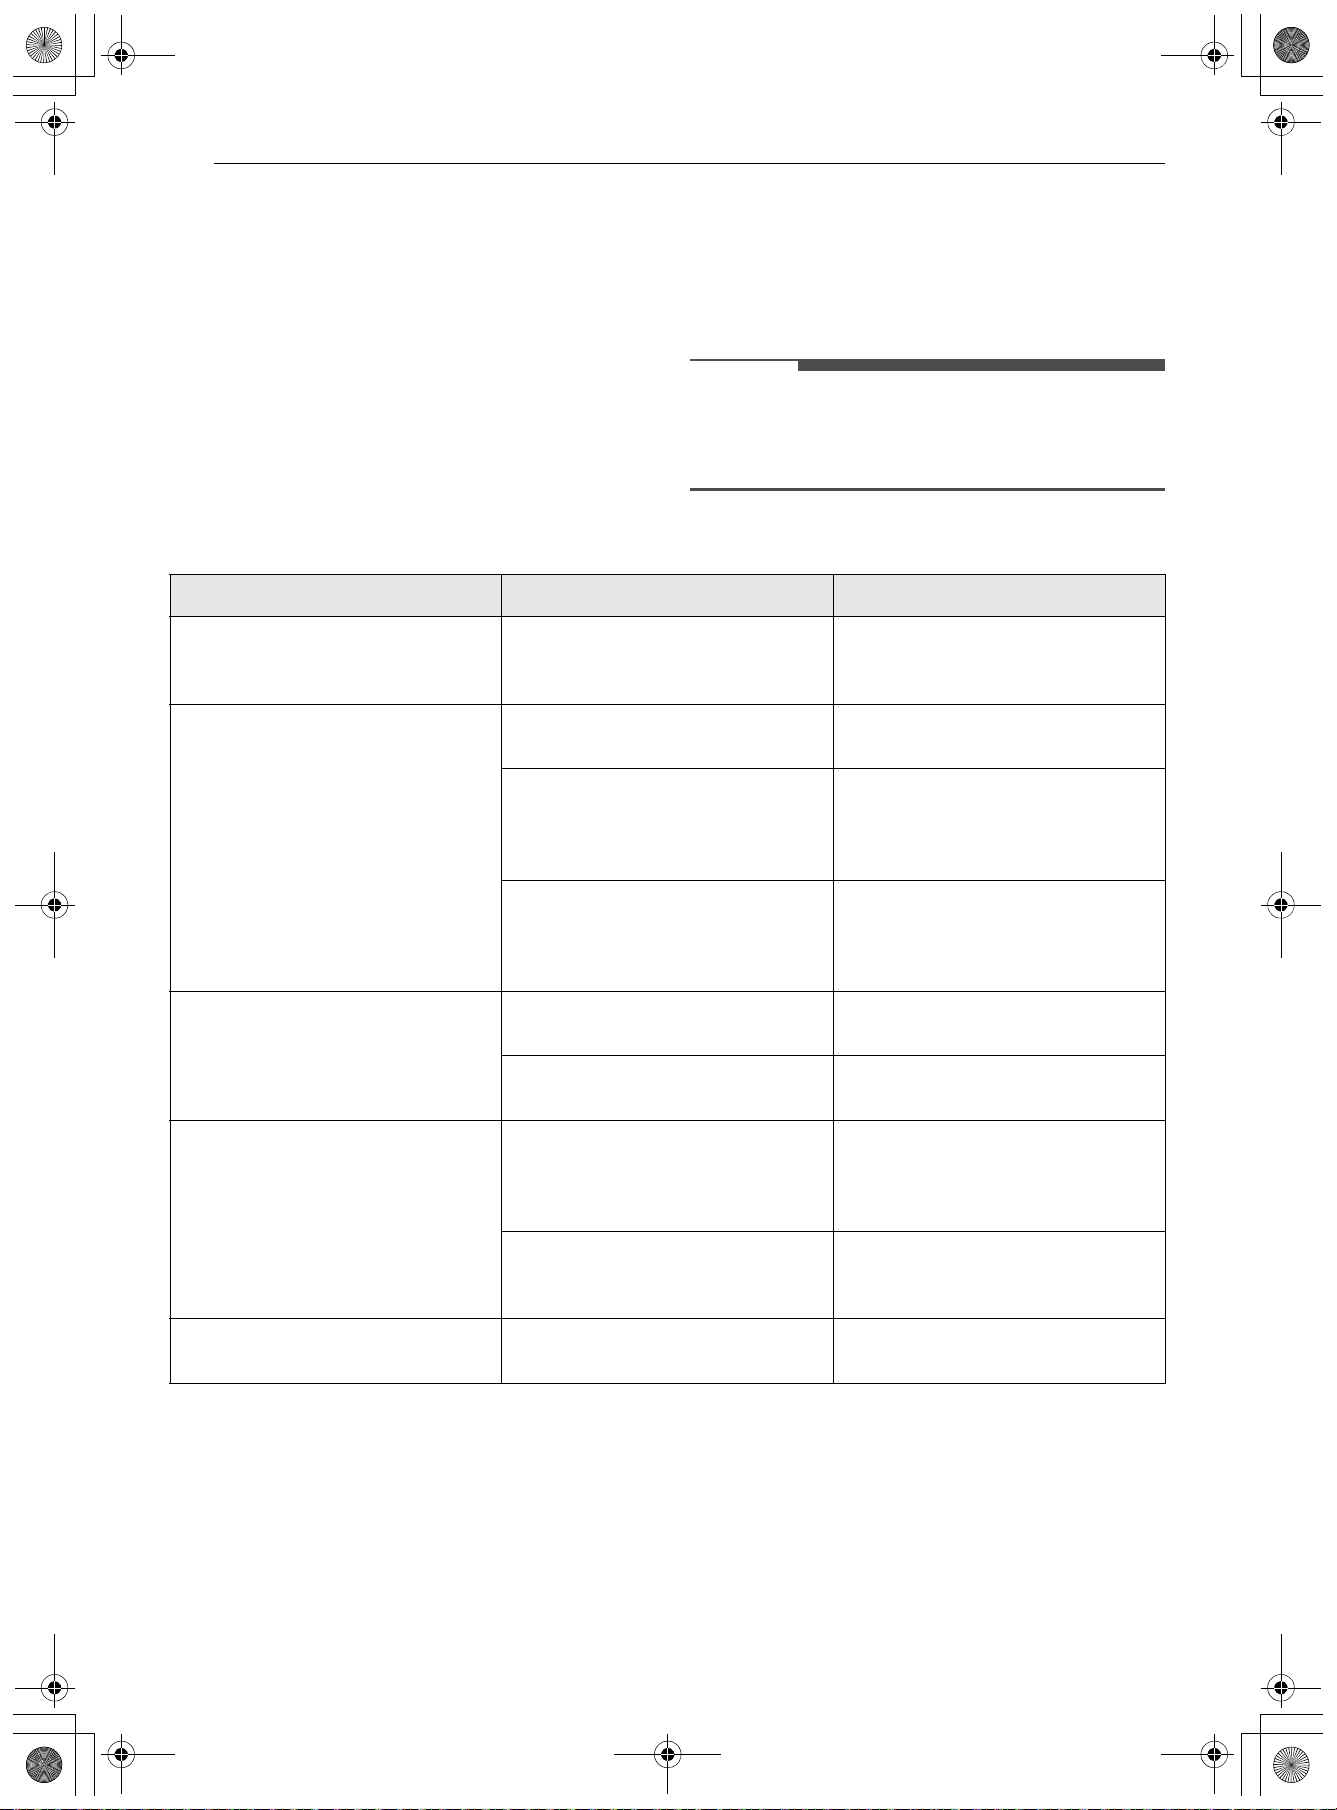
50 FUNCIONAMIENTO
2 Pulse Detener en el elemento emergente.
Moldes para hornear
• Al hornear en modos Hornear, use moldes para
hornear con un metal oscuro o una superficie
recubierta.
• Al hornear con Horneado por convección,
también puede usar moldes para hornear con
una superficie metálica brillante.
• Coloque siempre moldes para tartas en el centro
de la bandeja o el estante del horno.
• Cuando se hornea con Hornear, puede colocar
dos moldes para hornear lado a lado en el horno
por un tiempo de horneado que sea solo
ligeramente más largo.
NOTA
• Si no se configura un tiempo de cocción, el
horno se apagará automáticamente luego de 12
horas.
Consejos para el horneado
Hornear y rostizar por convección
El sistema de convección usa un ventilador para
hacer circular el calor de manera uniforme dentro
del horno. Esto mejora la distribución del calor y
permite una cocción uniforme y excelentes
resultados mientras se cocina con un solo estante
o con varios.
La función de rostizado por convección está
diseñada para ofrecer resultados de rostizado
óptimos. El rostizado por convección combina la
cocción con el ventilador de convección para
rostizar carnes y aves. El aire caliente circula
alrededor de los alimentos desde todos los
ángulos, y sella los jugos y los sabores. Los
alimentos cocinados de esta manera quedan
Resultados de horneado Causa posible Solución
La base del pastel es demasiado
ligera
Posición incorrecta del estante del
horno
Utilice un molde de horneado
oscuro o coloque el pastel un
estante más abajo.
El pastel se desmorona (se vuelve
grumoso, empapado)
Temperatura del horno demasiado
alta
Ajuste la temperatura ligeramente
más baja.
Tiempo de horneado demasiado
corto
Establezca un tiempo de horneado
más largo. El tiempo de horneado
no puede reducirse ajustando una
temperatura más alta.
La mezcla contiene demasiado
líquido
Utilice menos líquido. Siga las
instrucciones sobre los tiempos de
amasado, especialmente cuando
utilice aparatos de cocina.
Los pasteles están demasiado
secos
Temperatura del horno demasiado
baja
La próxima vez ajuste una
temperatura ligeramente más alta.
Tiempo de horneado demasiado
largo
Fije un tiempo de horneado
ligeramente más corto.
Los pasteles se doran de forma
desigual
Temperatura del horno demasiado
alta y tiempo de horneado
demasiado corto
Fije una temperatura de horneado
ligeramente más baja y un tiempo
de horneado ligeramente más
largo.
La mezcla se distribuye de forma
desigual
Distribuya la mezcla
uniformemente por la bandeja/
molde de horneado.
Tiempo de horneado demasiado
largo
Temperatura demasiado baja
La próxima vez ajuste una
temperatura ligeramente más alta.
es-us_main.book.book Page 50 Friday, August 14, 2026 2:12 PM
51FUNCIONAMIENTO
ESPAÑOL
dorados y crocantes por fuera, y jugosos por
dentro. El rostizado por convección es ideal para
cortes de carne grandes y tiernos, sin cubrir.
Ajuste del modo de Hornear y rostizar
por convección
1 Presione el botón Alimentación.
2 Pulse "Cocción manual" (Cocción manual) y
seleccione Horneado por convección
Horneado por convección) o Asado por
convección (Asado por convección).
3 Pulse 3 o arrastre la tarjeta de opciones para
establecer las opciones de cocción.
4 Pulse Temperatura para establecer la
temperatura de cocción deseada. Para ajustar
la temperatura, pulse los botones +/-, pulse la
barra o arrastre la barra.
También se puede usar el ícono del teclado
numérico para ajustar la temperatura de
cocción directamente.
5 Si lo desea, pulse Tiempo de cocción (Tiempo
de cocción) o Iniciar a para establecer el
tiempo de cocción o la hora de inicio de
cocción.
También puede usar el ícono del teclado
numérico para configurar el tiempo de
cocción directamente.
6 Pulse Cuando termine (Al finalizar) para
añadir una función una vez completada la
cocción.
• Mantener caliente: Mantiene los alimentos
calientes tras la cocción.
• Mantener encendido: Se conserva el modo
de cocción seleccionado previamente tras
haberse completado la cocción.
• Apagar: Se apaga automáticamente una
vez completada la cocción, sin ninguna
función adicional de funcionamiento.
7 Tras seleccionar la configuración de cocción
deseada, pulse Iniciar (Inicio) en la parte
inferior derecha para comenzar la cocción.
8 Suena un timbre cuando finaliza el
precalentamiento.
9 Transcurrido el tiempo de cocción
establecido, suena un timbre y aparece una
notificación en la pantalla.
10 Pulse Terminado para finalizar la cocción. Si
fuera necesario, puede pulsar + Tiempo de
cocción (Prolongar el tiempo de cocción) para
continuar con la cocción o pulsar Mantener
caliente para mantener la comida a la
temperatura adecuada para servirla.
NOTA
• Si no se configura un tiempo de cocción, el
horno se apagará automáticamente luego de 12
horas.
• Los elementos calefactores y el ventilador se
apagan si se abre la puerta. Se vuelven a
encender después de cerrar la puerta.
• El ventilador del horno funciona mientras se
hornea por convección y se rostiza por
convección. Si la puerta está abierta, el
ventilador se detiene. En algunos casos, el
ventilador podrá detenerse durante un ciclo de
hornear por convección.
Cambiar los ajustes de Cocción
1 Pulse 3 en la parte media derecha de la
pantalla de inicio.
2 Pulse la opción que desee cambiar para
realizar los ajustes deseados.
3 Pulse Aplicar en la parte inferior derecha
para aplicar los ajustes modificados a sus
recetas.
4 Pulse 4 para volver a la pantalla anterior sin
hacer cambios.
Para detener la cocción
1 Pulse Detener en la parte inferior derecha de
la pantalla.
• Aparece una notificación emergente en la
pantalla.
es-us_main.book.book Page 51 Friday, August 14, 2026 2:12 PM
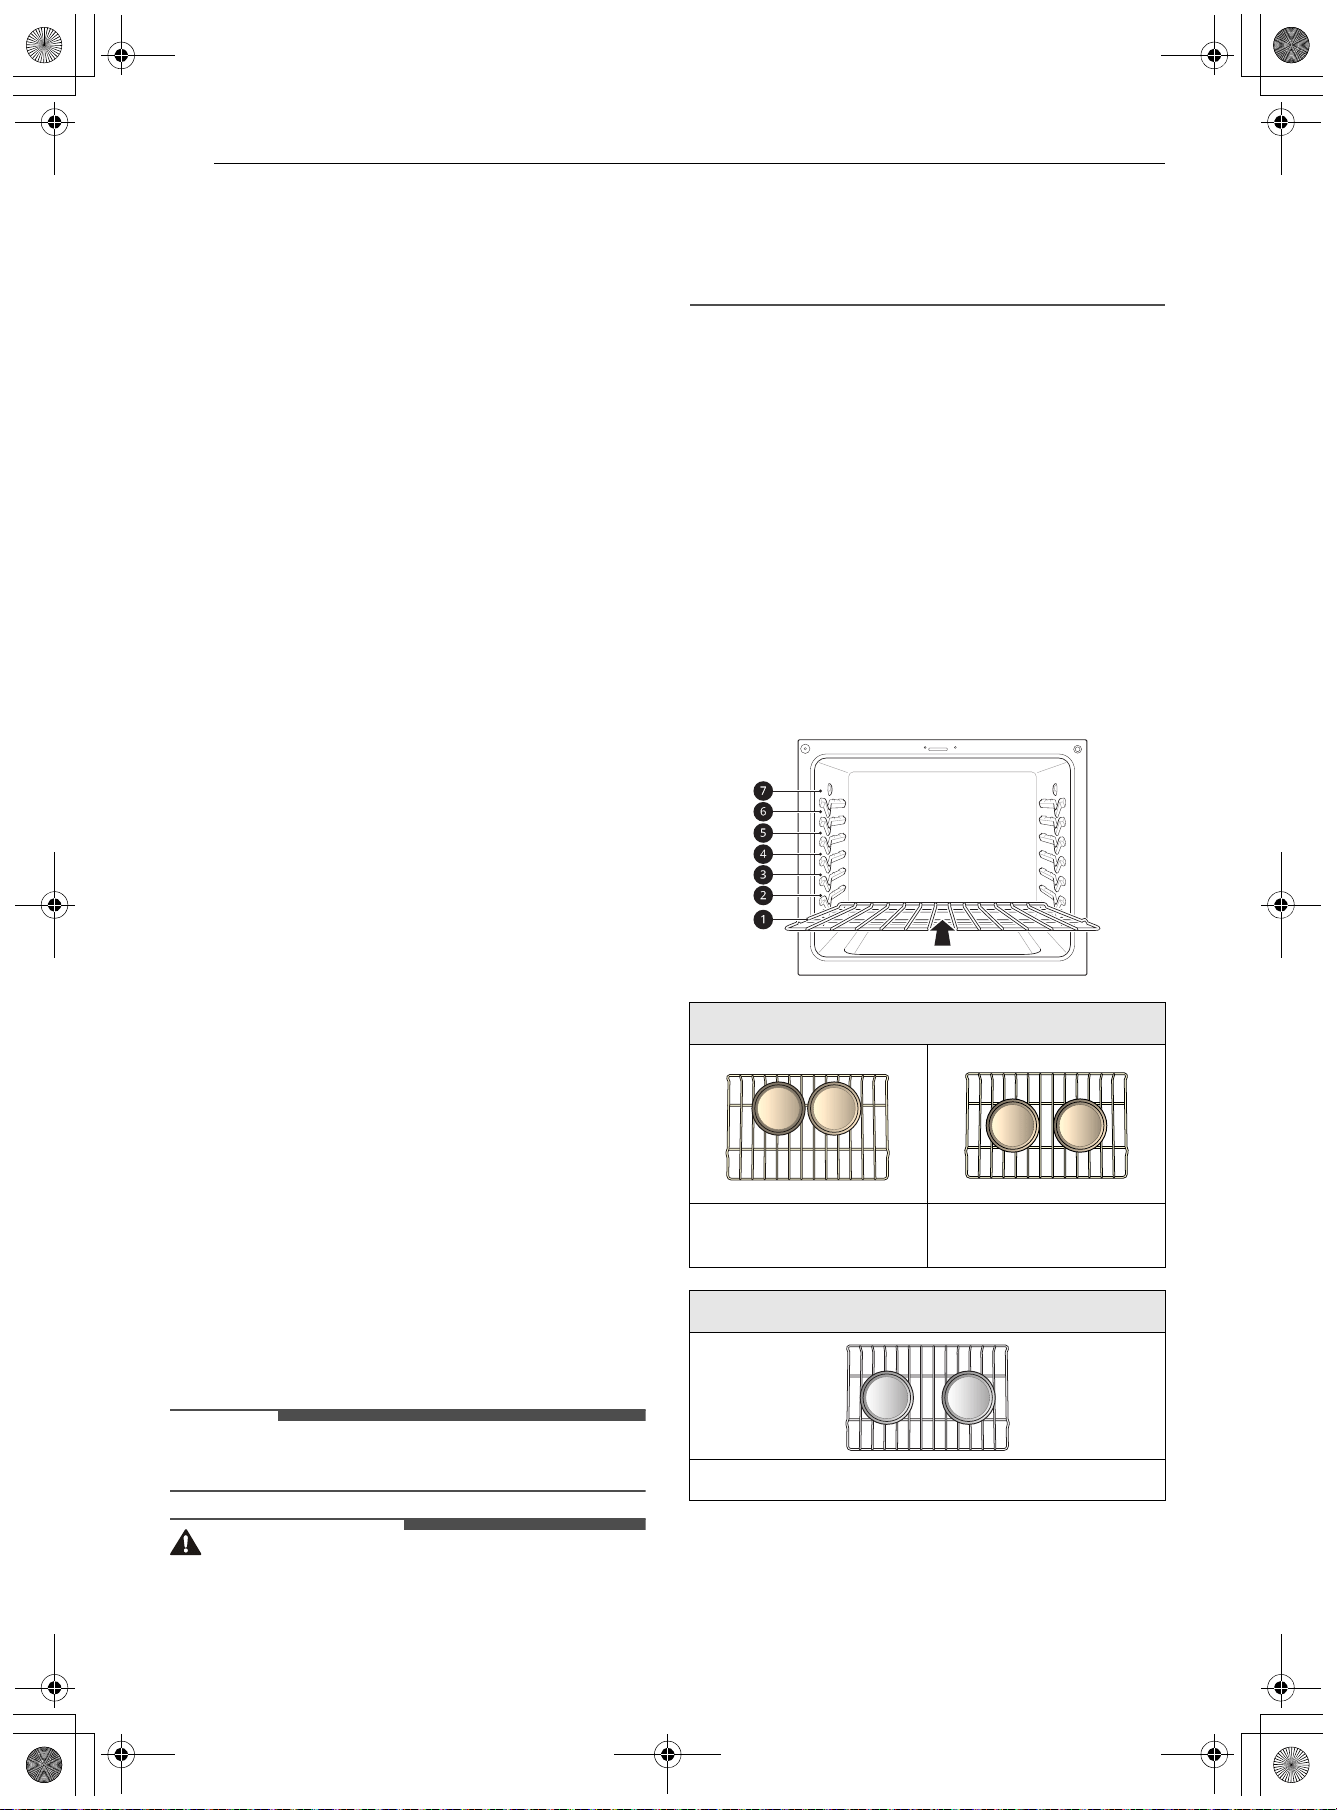
52 FUNCIONAMIENTO
2 Pulse Detener en el elemento emergente.
Consejos para el horneado por
convección
• Utilice el horneado por convección para lograr
una cocción más rápida y uniforme de pasteles,
galletas, muffins, bizcochos y panes de todo tipo
en varios estantes.
• Hornee galletas y bizcochos en bandejas sin
lados o con lados muy bajos para permitir que el
aire caliente circule alrededor de la comida. Los
alimentos horneados en bandejas con un
acabado oscuro se cocinarán más rápido.
• Si usa el Horneado por convección, coloque los
estantes del horno en las posiciones sugeridas
en las tablas que se muestran en este manual.
• La cocción con varios estantes puede aumentar
ligeramente los tiempos de cocción de algunos
alimentos.
Consejos para asar por convección
La función de rostizado por convección está
diseñada para ofrecer resultados de rostizado
óptimos. El rostizado por convección combina la
cocción con el ventilador de convección para
rostizar carnes y aves. El aire caliente circula
alrededor de los alimentos desde todos los
ángulos, y sella los jugos y los sabores. Los
alimentos cocinados de esta manera quedan
dorados y crocantes por fuera, y jugosos por
dentro. El rostizado por convección es ideal para
cortes de carne grandes y tiernos, sin cubrir.
Use una asadera y una rejilla cuando prepare
carnes para asar por convección. La asadera
contiene la grasa derramada, y la rejilla ayuda a
prevenir las salpicaduras de grasa.
1 Coloque el estante del horno en la posición
recomendada.
2 Coloque la rejilla en la asadera.
3 Coloque la asadera en el estante del horno.
NOTA
• La asadera y rejilla se venden por separado.
PRECAUCIÓN
• No use una asadera sin rejilla.
• No cubra la rejilla con papel de aluminio.
• Coloque los alimentos (con la grasa hacia arriba)
en la rejilla.
• La presión del botón Alimentación durante la
cocción elimina todos los ajustes.
Guía de recomendaciones para
hornear y rostizar
Los resultados del horneado serán mejores si las
bandejas para hornear están centradas en el
horno todo lo posible. Si cocina en varios estantes,
coloque los estantes del horno en las posiciones
que se muestran.
La cocción con varios estantes ahorra tiempo y
energía. Siempre que sea posible, cocine los
alimentos que requieran la misma temperatura de
cocción juntos en un horno.
Colocación de estantes y bandejas
Horneado en varios estantes
Estante resistente
(Posición 1)
Estante resistente
(Posición 5)
Horneado en un solo estante
Estante resistente
es-us_main.book.book Page 52 Friday, August 14, 2026 2:12 PM
53FUNCIONAMIENTO
ESPAÑOL
Guía para horneado en estantes
Guía para rostizado en estantes
Broil (Asar)
La función Asar utiliza calor intenso del elemento
calentador superior para cocinar los alimentos. La
función Asar funciona mejor cuando se asan cortes
de carne tiernos, pescado y vegetales cortados
finos.
Algunos modelos pueden incluir un asador híbrido
compuesto por un asador interior que utiliza un
elemento calentador de carbón que proporciona
calor instantáneo y un elemento asador exterior
tradicional. Durante el funcionamiento normal del
asador, cualquiera de los elementos se puede
apagar de forma intermitente.
PRECAUCIÓN
• No cubra el estante del horno con papel de
aluminio. Si lo hace, se prenderá fuego.
• Si se produce un incendio en el horno, deje la
puerta del horno cerrada y apáguelo. Si el fuego
continúa, eche bicarbonato sódico al fuego o
utilice un extintor.
• NO eche agua ni harina al fuego. La harina
puede ser explosiva y el agua puede hacer que
un incendio provocado por grasa se propague y
cause lesiones personales.
• Cuando use su asador, la temperatura dentro
del horno será extremadamente elevada. Tenga
cuidado de evitar posibles quemaduras por los
siguientes motivos:
- Mantenga la puerta cerrada al asar
- Siempre use guantes de cocina al insertar o
quitar alimentos
Comida
Posición
del
estante
Pasteles
Pasteles en capas
Pasteles en savarín
Pastel de ángel
2
3
2
Galletas
Galletas azucaradas
Con chispas de
chocolate
Con chocolate y nueces
4
4
4
Pizza
Fresca
Congelado
4
4
Masa de
hojaldre
Casera
Refrigerado
4
4
Panes
Bizcochos, enlatados
Bizcochos, caseros
Madalenas
5
5
4
Postres
Frutas azucaradas y
crujientes, caseras
Pasteles caseros con
frutas de doble corteza
4
4
Cremas
Cheesecake, crème
brulée
2
Suflés Dulces o salados 2
Cazuela Lasaña congelada 4
Comida
Posición
del
estante
Carne de
res
Costilla
Poco
cocidos
Término
medio
Bien
cocidos
2
2
2
Costillas
deshuesad
as,
solomillo
superior
Poco
cocidos
Término
medio
Bien
cocidos
2
2
2
Lomo de
res
Poco
cocidos
Término
medio
2
2
Cerdo
Costilla 2
Con hueso, solomillo 2
Jamón, cocido 2
Aves
Pollo entero 2
Presas de pollo 2
Pavo 2
Comida
Posición
del
estante
es-us_main.book.book Page 53 Friday, August 14, 2026 2:12 PM
54 FUNCIONAMIENTO
NOTA
• Este electrodoméstico está diseñado para asar
con la puerta cerrada. Cierre la puerta para
configurar la función Asar. Si la puerta está
abierta, la función Asar no se puede configurar,
y aparece la palabra Cierre la puerta para
iniciar la cocción. en la pantalla. Cierre la puerta
y restablezca la función Asar. Si la puerta se abre
durante el proceso de asar, el quemador se
apaga luego de cinco segundos. El quemador
para asar se vuelve a encender
automáticamente una vez cerrada la puerta.
Configuración del modo Asar
1 Presione el botón Alimentación.
2 Pulse Cocción manual (Cocción manual) y
desplácese para seleccionar Asar (Hornear).
3 Pulse 3 o arrastre la tarjeta de opciones para
establecer las opciones de cocción.
4 Pulse Temperatura y seleccione la
temperatura de cocción deseada: Bajo (Baja),
o Alto (Alta).
5 Si lo desea, pulse Tiempo de cocción (Tiempo
de cocción) o Iniciar a para establecer el
tiempo de cocción o la hora de inicio de
cocción.
También puede usar el ícono del teclado
numérico para configurar el tiempo de
cocción directamente.
6 Pulse Cuando termine (Al finalizar) para
añadir una función una vez completada la
cocción.
• Mantener caliente: Mantiene los alimentos
calientes tras la cocción.
• Apagar: Se apaga automáticamente una
vez completada la cocción, sin ninguna
función adicional de funcionamiento.
7 Tras seleccionar la configuración de cocción
deseada, pulse Iniciar (Inicio) en la parte
inferior derecha para comenzar la cocción.
8 Transcurrido el tiempo de cocción
establecido, suena un timbre y aparece una
notificación en la pantalla.
9 Pulse Terminado para finalizar la cocción. Si
fuera necesario, puede pulsar + Tiempo de
cocción (Prolongar el tiempo de cocción) para
continuar con la cocción o pulsar Mantener
caliente para mantener la comida a la
temperatura adecuada para servirla.
NOTA
• Si el tiempo de cocción no está configurado, el
horno se apaga automáticamente después de 3
horas.
• Los elementos calefactores y el ventilador se
apagan si se abre la puerta. Se vuelven a
encender después de cerrar la puerta.
Cambiar los ajustes de Cocción
1 Pulse 3 en la parte media derecha de la
pantalla de inicio.
2 Pulse la opción que desee cambiar para
realizar los ajustes deseados.
3 Pulse Aplicar en la parte inferior derecha
para aplicar los ajustes modificados a sus
recetas.
4 Pulse 4 para volver a la pantalla anterior sin
hacer cambios.
Para detener la cocción
1 Pulse Detener en la parte inferior derecha de
la pantalla.
• Aparece una notificación emergente en la
pantalla.
2 Pulse Detener en el elemento emergente.
Consejos para reducir el humo
Debido al intenso calor asociado con el asado, es
normal experimentar humo durante el proceso de
cocción. Este humo es un producto secundario
natural del proceso de dorado y no debe
es-us_main.book.book Page 54 Friday, August 14, 2026 2:12 PM
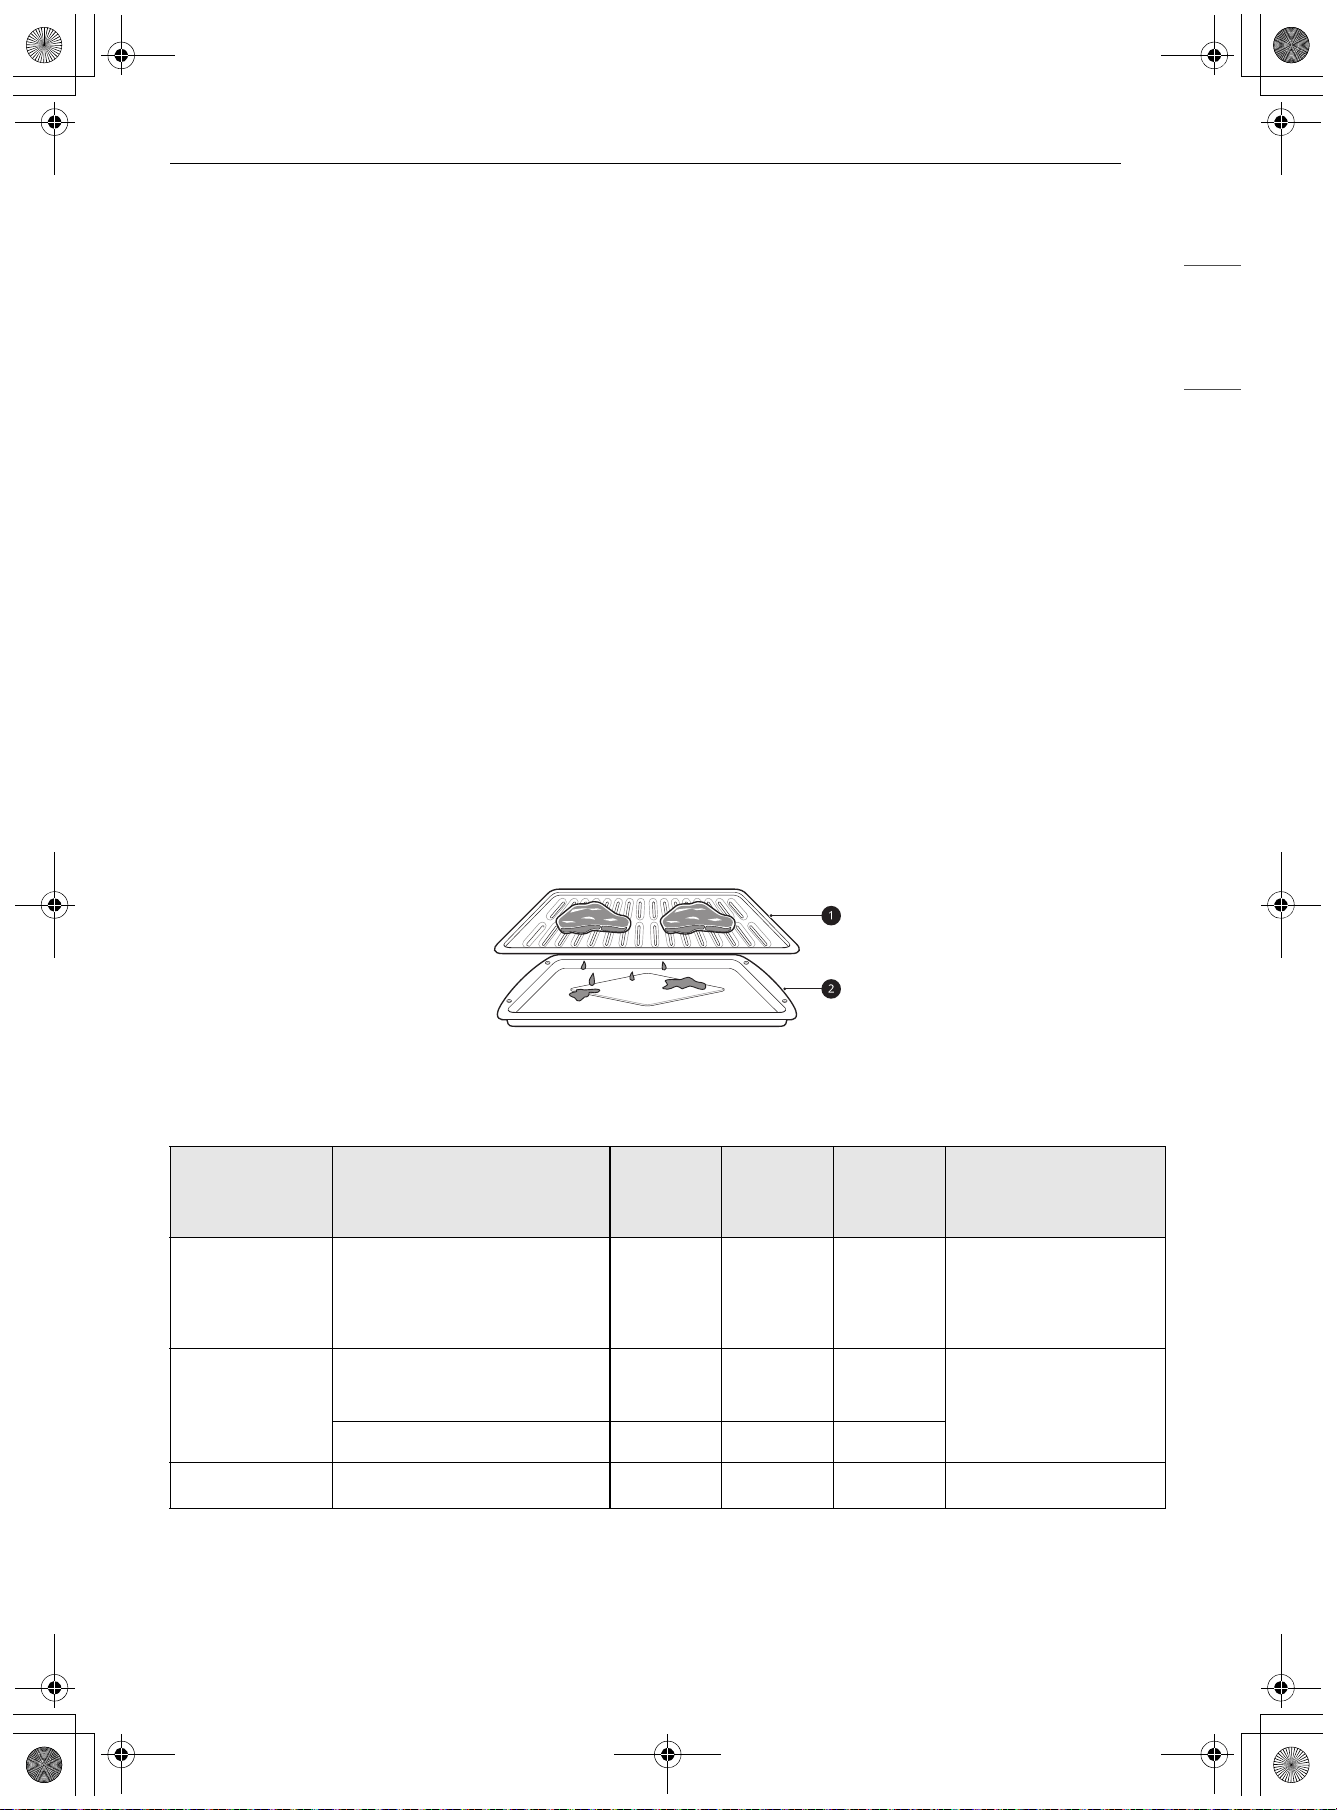
55FUNCIONAMIENTO
ESPAÑOL
preocuparlo. Si hay más humo del esperado, siga
estos consejos para reducir la cantidad de humo
en su horno.
• Utilice siempre una asadera. No use sartenes o
bandejas para hornear normales por razones de
seguridad.
• La asadera debe estar siempre limpia y a
temperatura ambiente al comienzo de la
cocción.
• Siempre encienda el sistema de ventilación de la
placa de cocción o la campana de ventilación
durante el asado.
• Mantenga el interior del horno lo más limpio
posible. Los restos de comidas anteriores
pueden quemarse o incendiarse.
•Evite los adobos grasos y los glaseados
azucarados. Ambos aumentarán la cantidad de
humo presente. Si desea utilizar un glaseado,
aplíquelo al final de la cocción.
• Si experimenta demasiado humo con algún
alimento, considere lo siguiente:
- Bajar el asador a la configuración Bajo.
- Bajar la posición del estante para cocinar los
alimentos más lejos del asador.
- Utilice la configuración Alto de asar para
lograr el nivel de dorado que desee y luego
cambie a la configuración Bajo de asar o
cambie a la función Medium de asar.
• Como regla general, los cortes de carne y
pescado más grasos producirán más humo que
los más magros.
• Siga las indicaciones de la sección Guía
recomendada para asar siempre que sea
posible.
Guía de recomendaciones para asar
El tamaño, el peso, el espesor, la temperatura inicial y su preferencia de cocción afectarán el tiempo de
asado.
Esta guía se basa en carnes a temperatura de refrigerador. Para obtener mejores resultados al asar, use
una bandeja especial para asar.
a Rejilla (se vende por separado)
b Asadera (se vende por separado)
Comida Cantidad y/o espesor
Posición
del
estante
Primer
lado
(min.)
Segundo
lado
(min.)
Comentarios
Hamburguesa
s
9 hamburguesas
1
/
2
a
3
/
4
" de espesor
73-62-4
Espaciar de manera
uniforme. Se pueden
asar hasta 9
hamburguesas.
Pollo
1 entero de 2 a 2
1
/
2
lb,
cortado a lo largo
5 8-10 4-6
Ase primero con el
lado de la piel hacia
abajo.
2 pechugas 5 8-10 5-7
Tostadas De 1 a 9 piezas 7 0.5-1 0.5
es-us_main.book.book Page 55 Friday, August 14, 2026 2:12 PM
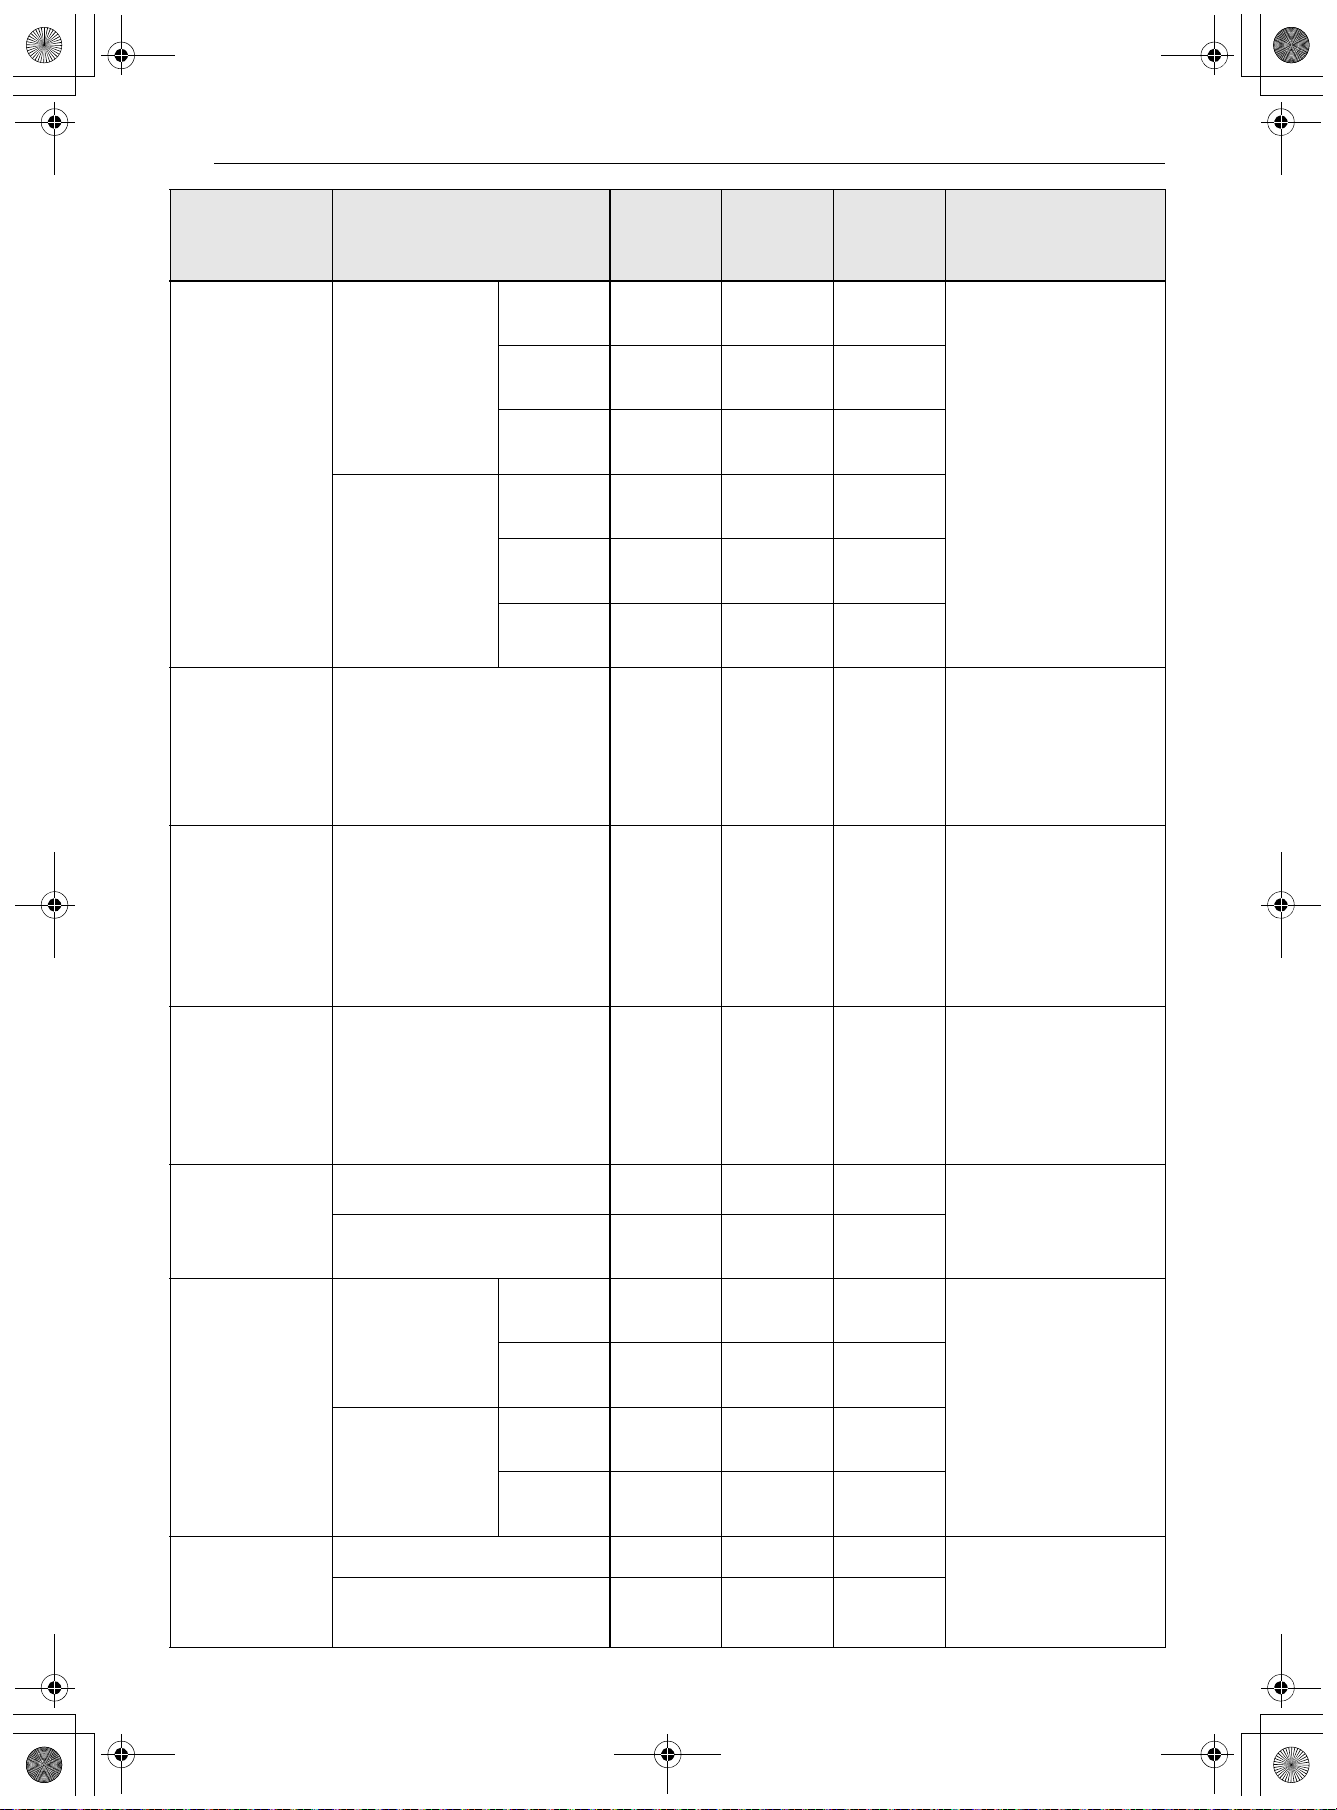
56 FUNCIONAMIENTO
Bistecs de
carne vacuna
1" de espesor
1 a 1
1
/
2
lb.
Poco
cocidos
73-52-4
Los bistecs de menos
de 1" de espesor se
cocinan totalmente
antes de dorarse. Se
recomienda usar una
sartén. Corte la grasa.
Término
medio
74-62-4
Bien
cocidos
75-73-5
1
1
/
2
" de
espesor
2 a 2
1
/
2
lb.
Poco
cocidos
57-94-6
Término
medio
5 9-11 6-8
Bien
cocidos
5 11-13 8-10
Colas de
langostas
2–4
10 a 12 oz. cada una
59-12
No las
gire.
Corte la parte trasera
del caparazón. Abra
bien. Pincele con
mantequilla derretida
antes de asar y en la
mitad de la cocción.
Filetes de
pescado
1
/
4
a
1
/
2
" de espesor
62-42-4
Mueva y gire con
mucho cuidado.
Pincele con
mantequilla con limón
antes de la cocción y
durante la cocción si
lo desea.
Fetas de
jamón
(precocidas)
1
/
2
" de espesor
52-42-4
Aumente el tiempo de
5 a 10 minutos por
lado para un espesor
de 1 1/2" o para
jamón ahumado
casero.
Chuletas de
cerdo
Bien cocidos
2 (
1
/
2
" de espesor)
63-64-7
2 (1" de espesor) de
alrededor de 1 lb.
55-85-8
Chuletas de
cordero
2 (1" de
espesor) de
alrededor de 10
a 12 oz.
Término
medio
63-52-5
Bien
cocidos
65-74-7
2 (1
1
/
2
" de
espesor) de
alrededor de 1
lb.
Término
medio
67-97-9
Bien
cocidos
6 9-11 7-9
Filetes de
salmón
2 (1" de espesor) 5 8-10 3-5 Engrase la bandeja.
Pincele los filetes con
mantequilla
derretida.
4 (1" de espesor) de
alrededor de 1 lb.
5 9-11 4-6
Comida Cantidad y/o espesor
Posición
del
estante
Primer
lado
(min.)
Segundo
lado
(min.)
Comentarios
es-us_main.book.book Page 56 Friday, August 14, 2026 2:12 PM
57FUNCIONAMIENTO
ESPAÑOL
• Esta guía es meramente de referencia. Ajuste el tiempo de cocción según su preferencia.
• No utilice el estante deslizante en la posición 7.
NOTA
• El Departamento de Agricultura de los Estados Unido (United States Department of Agriculture, USDA)
advierte que el consumo de pescado, carne o aves crudos o poco cocidos puede aumentar el riesgo de
enfermedades transmitidas por los alimentos.
• El USDA ha indicado que las siguientes constituyen temperaturas internas mínimas de seguridad para el
consumo:
- Carne molida de vaca: 160 °F (71.1 °C)
- Aves: 165 °F (73.9 °C)
- Carne de vaca, ternera, cerdo o cordero: 145 °F (62.8 °C)
- Pescado/mariscos: 145 °F (62.8 °C)
Consejos para asar
• Carne de res
- Los filetes y chuletas siempre deben dejarse reposar durante cinco minutos antes de cortarlos y
comerlos. Esto permite que el calor se distribuya uniformemente a través de la comida y crea un
resultado más tierno y jugoso.
- Los trozos de carne que tengan más de dos pulgadas de espesor deben sacarse del refrigerador
30 minutos antes de cocinarlos. Esto permitirá cocinar de manera más rápida y uniforme, y producirá
menos humo al asar. Los tiempos de cocción probablemente serán más cortos que los tiempos
indicados en la Tabla para asar.
- En el caso de los bistecs con hueso o las chuletas deshuesadas (que se les quitó toda la carne
alrededor del hueso), envuelva las secciones expuestas del hueso en papel de aluminio para reducir el
quemado.
• Mariscos
- Al asar pescado con piel, utilice siempre la configuración de Asar y ase siempre por último el lado de la
piel.
- Es mejor consumir los mariscos inmediatamente después de cocinarlos. Dejar reposar los mariscos
después de cocinarlos puede hacer que los alimentos se sequen.
- Es una buena idea frotar una capa fina de aceite en la superficie de la asadera antes de cocinar para
evitar que se pegue, especialmente con pescados y mariscos. También puede usar una capa ligera de
aerosol antiadherente para sartenes.
• Vegetales
- Mezcle las verduras ligeramente en aceite antes de cocinarlas para mejorar el dorado.
Freír con aire
La función Freír con aire está especialmente
diseñada para freír sin aceite.
El modo Freír con aire puede ser programado para
la cocción a cualquier temperatura desde 300
8
(150
7) a 550 8 (285 7). La temperatura
predeterminada es 400
8 (205 7).
Las temperaturas pueden alcanzar temperaturas
de hasta 50 8 (10 7) por encima de la
temperatura de ajuste para un desempeño óptimo
de punto crujiente.
Ajuste del modo Freír con aire
1 Presione el botón Alimentación.
2 Pulse Cocción manual (Cocción manual) y
desplácese para seleccionar Fritura al aire
(Hornear).
es-us_main.book.book Page 57 Friday, August 14, 2026 2:12 PM
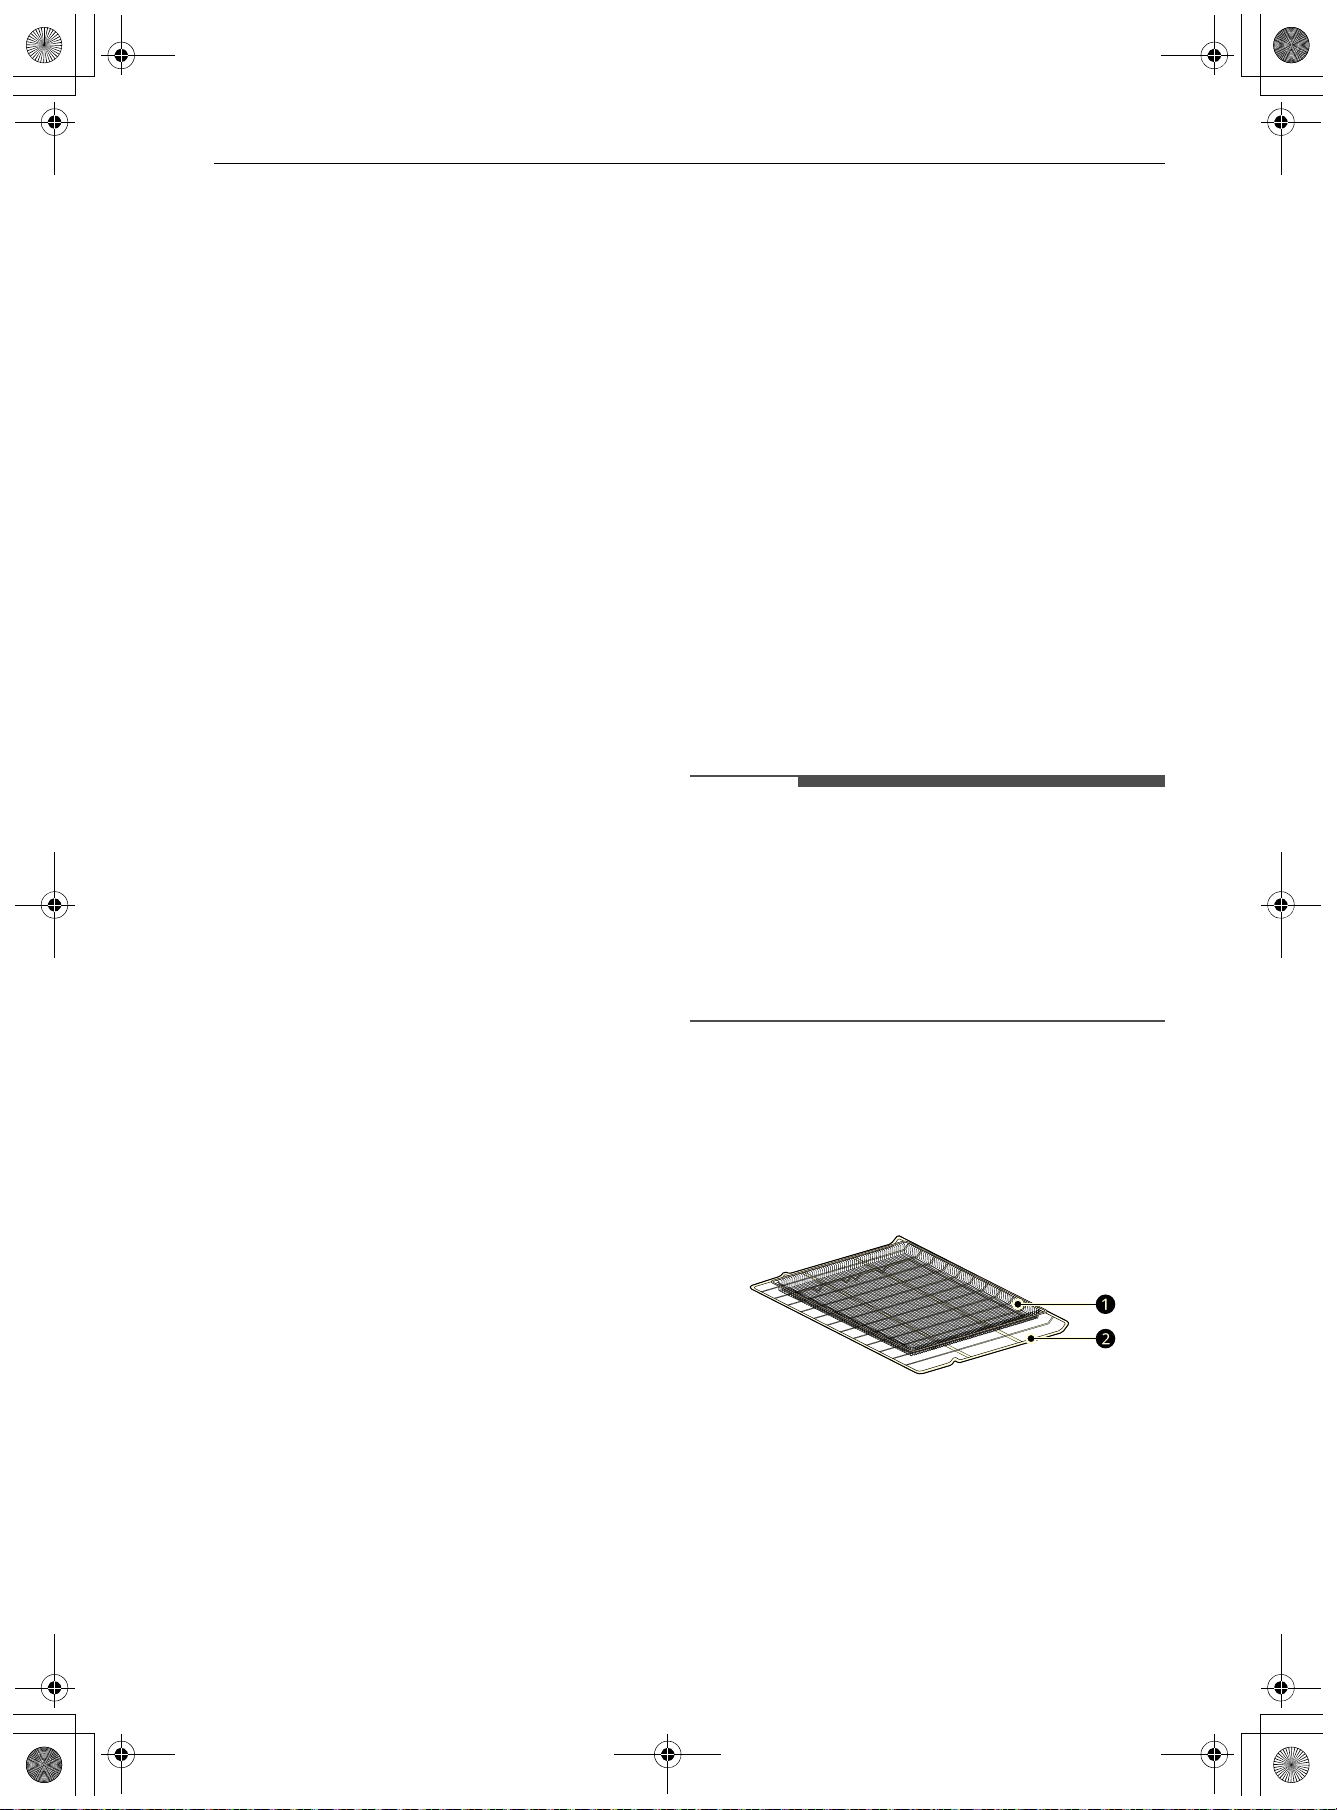
58 FUNCIONAMIENTO
3 Pulse 3 o arrastre la tarjeta de opciones para
establecer las opciones de cocción. Pulse
Temperatura y establezca la temperatura de
cocción deseada pulsando los botones +/-,
pulsando la barra o arrastrando la barra.
También se puede usar el ícono del teclado
numérico para ajustar la temperatura de
cocción directamente.
4 Si lo desea, pulse Tiempo de cocción (Tiempo
de cocción) o Iniciar a para establecer el
tiempo de cocción o la hora de inicio de
cocción.
También puede usar el ícono del teclado
numérico para configurar el tiempo de
cocción directamente.
5 Pulse Cuando termine (Al finalizar) para
añadir una función una vez completada la
cocción.
• Mantener caliente: Mantiene los alimentos
calientes tras la cocción.
• Mantener encendido: Se conserva el modo
de cocción seleccionado previamente tras
haberse completado la cocción.
• Apagar: Se apaga automáticamente una
vez completada la cocción, sin ninguna
función adicional de funcionamiento.
6 Tras seleccionar la configuración de cocción
deseada, pulse Iniciar (Inicio) en la parte
inferior derecha para comenzar la cocción.
7 Transcurrido el tiempo de cocción
establecido, suena un timbre y aparece una
notificación en la pantalla.
8 Pulse Terminado para finalizar la cocción. Si
fuera necesario, puede pulsar + Tiempo de
cocción (Prolongar el tiempo de cocción) para
continuar con la cocción o pulsar Mantener
caliente para mantener la comida a la
temperatura adecuada para servirla.
Cambiar los ajustes de Cocción
1 Pulse 3 en la parte media derecha de la
pantalla de inicio.
2 Pulse la opción que desee cambiar para
realizar los ajustes deseados.
3 Pulse Aplicar en la parte inferior derecha
para aplicar los ajustes modificados a sus
recetas.
4 Pulse 4 para volver a la pantalla anterior sin
hacer cambios.
Para detener la cocción
1 Pulse Detener en la parte inferior derecha de
la pantalla.
• Aparece una notificación emergente en la
pantalla.
2 Pulse Detener en el elemento emergente.
NOTA
• Cuando se usa el modo Freír con aire, no se
requiere precalentamiento.
• Si cocina varias tandas de comidas, las últimas
tandas pueden tardar menos en cocinarse.
• Los batidos y recubrimientos húmedos no se
doran ni se endurecen cuando se usa el modo
Freír con aire.
Consejos para Air Fry (Freír con aire)
• Para obtener mejores resultados, utilice el
estante para Air Fry.
- La sección de la malla de la bandeja para freír
con aire se puede limpiar en lavavajillas.
a Bandeja para freír con aire
b Estante resistente
es-us_main.book.book Page 58 Friday, August 14, 2026 2:12 PM
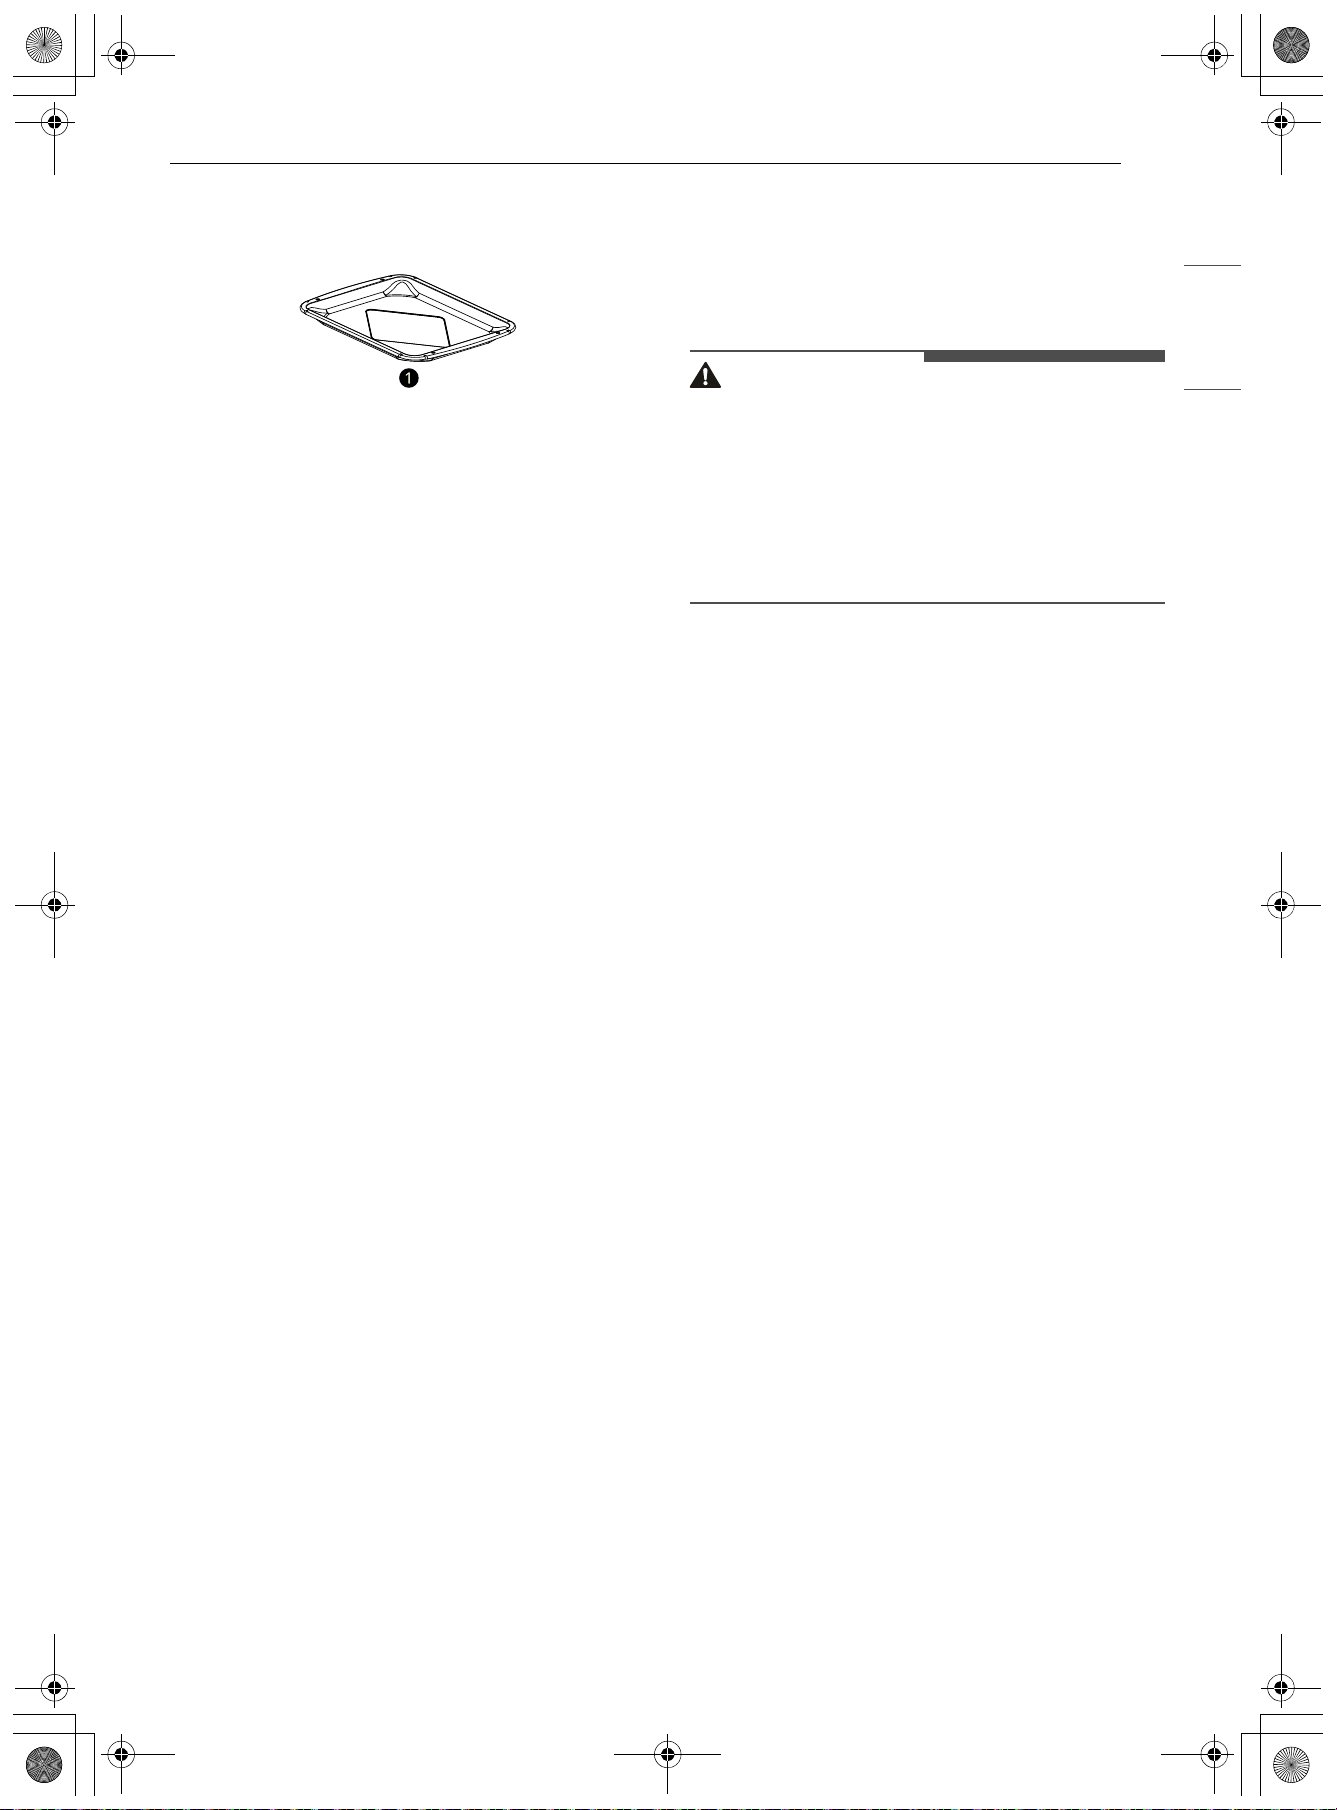
59FUNCIONAMIENTO
ESPAÑOL
• Si no tiene la bandeja para freír con aire, coloque
los alimentos sobre un estante dentro de una
asadera forrada con papel de aluminio.
a Asadera (se vende por separado)
• Para obtener mejores resultados, cocine los
alimentos en un solo estante colocado en las
posiciones sugeridas en la tabla en este manual.
• Distribuya los alimentos de manera uniforme en
una sola capa.
• Use la bandeja para freír con aire o una bandeja
para hornear oscura sin lados o con lados bajos
que no cubra todo el estante. Esto permite una
mejor circulación del aire.
• Si lo desea, rocíe con aerosol para sartenes la
bandeja para hornear o la bandeja para freír con
aire. Use un aceite que se pueda calentar a una
temperatura elevada antes de provocar humo;
como por ejemplo, aceite de aguacate, semillas
de uva, maní o girasol.
• Coloque una bandeja para hornear forrada con
papel de aluminio en un estante en la posición 1
para atrapar el aceite que caiga de los alimentos.
Para alimentos con alto contenido de grasa,
como las alitas de pollo, agregue algunas hojas
de papel de horno para absorber la grasa.
• Controle los alimentos con frecuencia y agítelos
o gírelos para obtener resultados más
crujientes.
• Con el modo Freír con aire, los alimentos
congelados preparados pueden cocinarse más
rápido de lo que se indica en el paquete.
Reduzca el tiempo de cocción en
aproximadamente un 20 %, verifique los
alimentos con anticipación y ajuste el tiempo de
cocción según sea necesario.
• Use un termómetro para alimentos si desea
asegurarse de que hayan alcanzado una
temperatura adecuada para el consumo. Comer
carnes mal cocidas puede aumentar el riesgo de
enfermedades transmitidas por los alimentos.
• Para obtener resultados más crujientes, reboce
las alitas de pollo frescas o los filetes en harina
sazonada. Use 1/3 taza de harina cada 2 libras de
pollo.
Recomendaciones para freír alimentos
con alto contenido de grasa
Los alimentos con alto contenido de grasa se
ahumarán cuando se use el modo Freír con aire.
Para obtener mejores resultados, siga estas
recomendaciones al freír alimentos con alto
contenido de grasa, como alitas de pollo, tocino,
salchichas, salchichas, muslos de pavo, chuletas de
cordero, costillas, lomo de cerdo, pechugas de
pato o algunas proteínas de origen vegetal.
PRECAUCIÓN
• Nunca cubra ranuras, orificios o pasajes en la
base del horno ni cubra todos los estantes con
materiales como papel de aluminio. Si lo hace,
bloqueará el flujo de aire a través del horno y
puede provocar una intoxicación por monóxido
de carbono. El papel de aluminio también puede
atrapar el calor y provocar riesgo de incendio o
un rendimiento deficiente del horno.
• Encienda la campana extractora en una
configuración de ventilador alta antes de iniciar
el modo Freír con aire, y déjela encendida
durante 15 minutos después de que haya
terminado.
• En lo posible, abra una ventana o una puerta
para asegurarse de que la cocina esté bien
ventilada.
• Mantenga el horno libre de grasa acumulada.
Limpie el interior del horno antes y después de
freír con aire (una vez que el horno se haya
enfriado).
• Ejecute ciclos de limpieza del horno (EasyClean)
con regularidad, según la frecuencia y el tipo de
alimentos que cocina con Freír con aire.
• Evite abrir la puerta del horno más de lo
necesario para ayudar a mantener la
temperatura del horno, evitar la pérdida de calor
y ahorrar energía.
• Freír con aire piezas de pollo frescas, como alitas
o muslos, sin piel, puede producir humo ya que
la grasa se derrite a altas temperaturas. Si el
humo es excesivo, use el modo de asado por
convección en lugar del modo Freír con aire.
es-us_main.book.book Page 59 Friday, August 14, 2026 2:12 PM
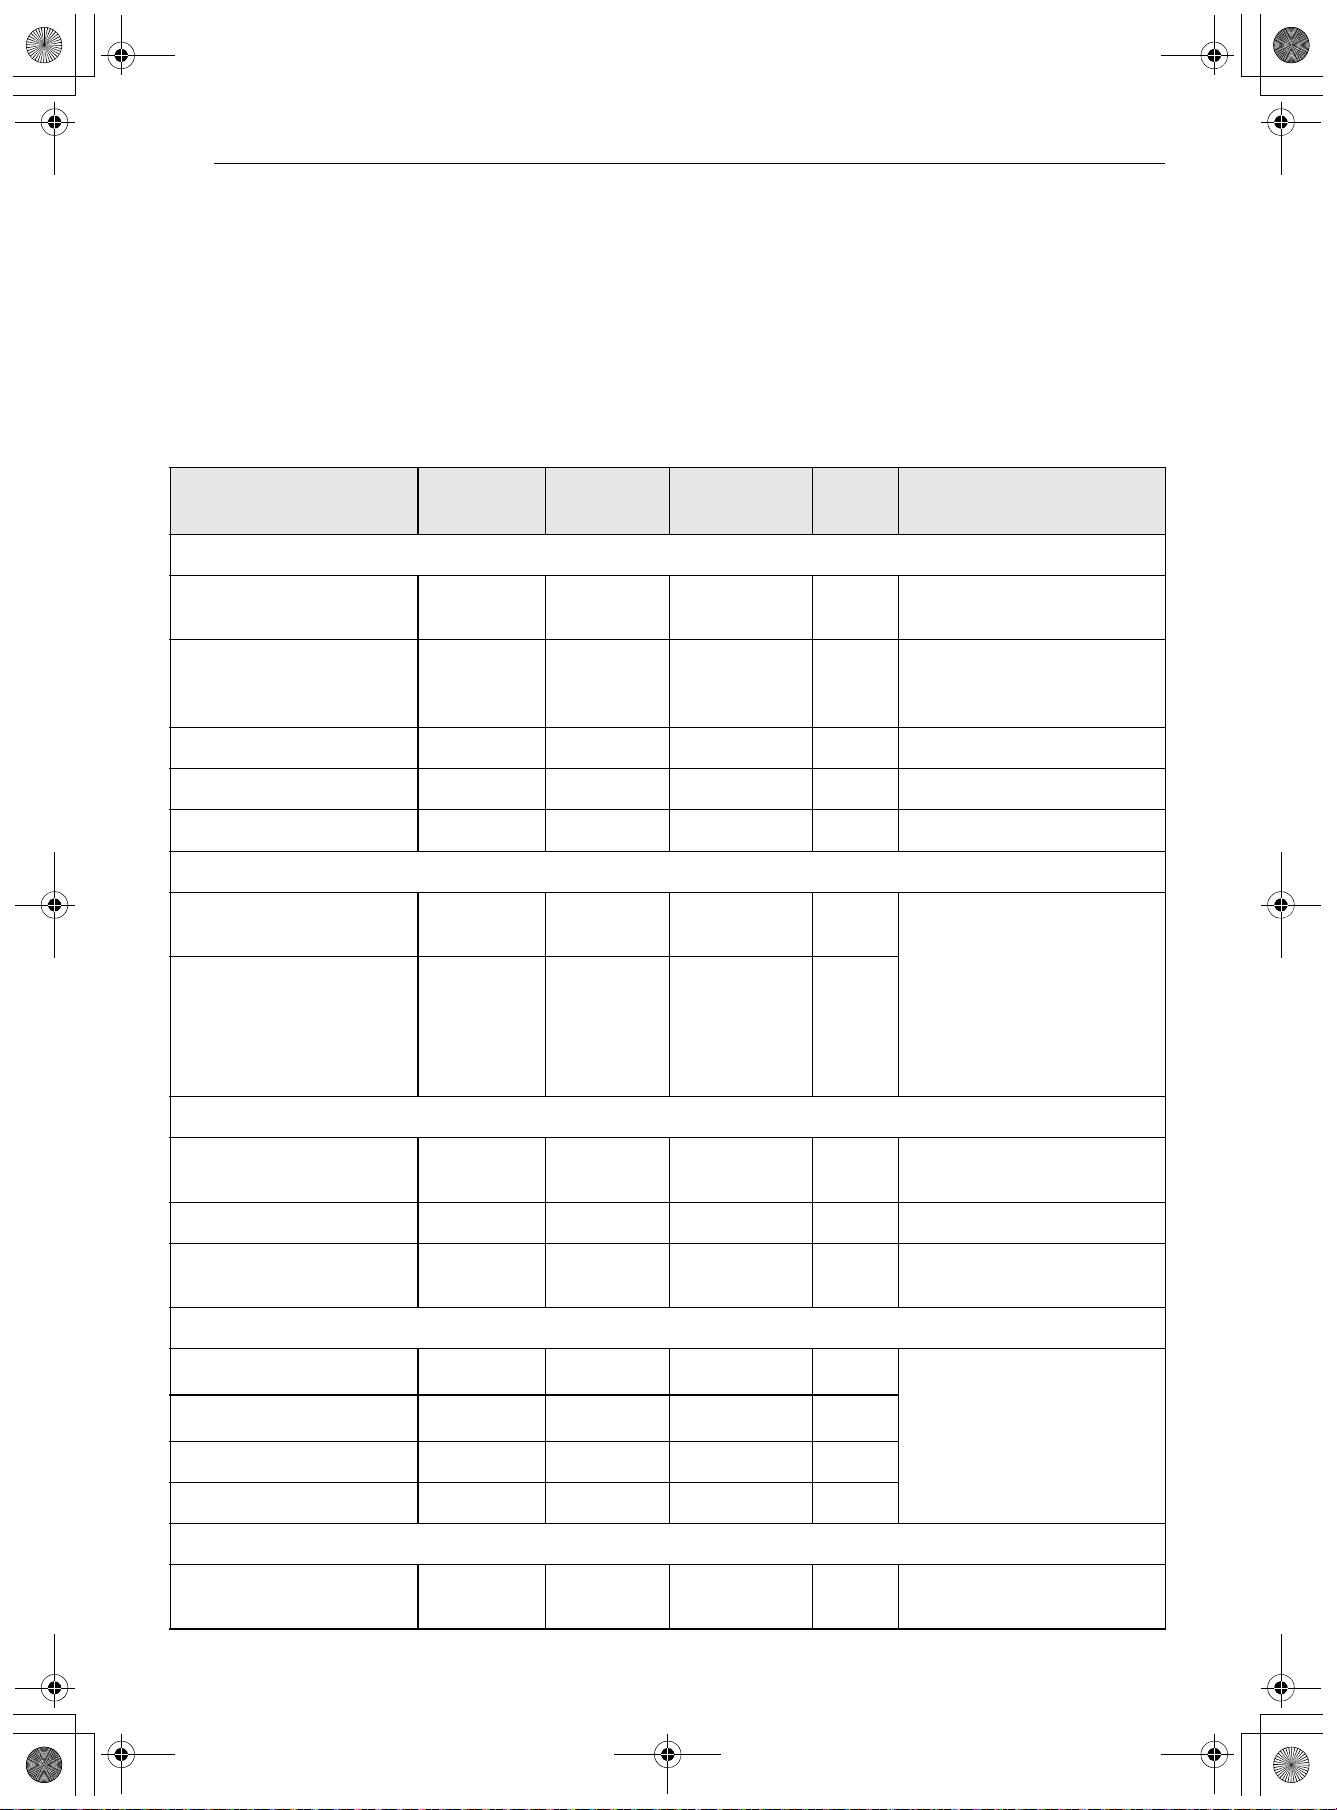
60 FUNCIONAMIENTO
Guía para freír con aire
recomendada
• Disponga los alimentos de manera uniforme en
una sola capa.
• Coloque una bandeja para hornear forrada con
papel de aluminio en un estante en la posición 1
para que caigan las gotas. Si es necesario,
agregue papel de horno para absorber el aceite
y reducir el humo.
• Dé vuelta los alimentos durante la cocción para
evitar que se quemen.
† Los alimentos con mucha grasa pueden
producir más humo si se los cocina con la
función Air Fry (Freír con aire). Para reducir el
humo, cocine con el modo de Rostizado por
convección.
Puntos recomendados
Cantidad
(onzas)
Temp. (°F)
Posición del
estante
Hora Guía
PAPAS congeladas
Papas fritas congeladas
(Shoestring)
20 425 4 15-25
Papas fritas congeladas
(corte ondulado, 3/8" o
10 mm)
35 400 4 20-30
Batatas fritas congeladas 25 425 4 15-30
Tater Tots congeladas 50 450 4 20-30
Hash Browns congeladas 40 450 4 20-30
PAPAS frescas/caseras
Papas fritas caseras (3/8"
x 3/8" o 10 x 10 mm)
25 450 4 20-30 Corte las papas y
sumérjalas durante 30
minutos en agua caliente
del grifo. Escurra y seque.
Pinte o rocíe ligeramente
con 3 cucharadas de aceite.
Agregue sal y pimienta a
gusto.
Gajos de papas caseras 60 450 4 25-35
POLLO congelado
Nuggets crocantes de
pollo congeladas
30 425 4 15-25
Tiras de pollo congeladas 35 425 4 30-40
Alitas de pollo
congeladas
50 425 4 30-40
POLLO fresco con piel
Alitas de pollo frescas
†
40 450 4 25-35 Pinte o rocíe ligeramente
con 1 cucharadas de aceite.
Agregue sal y pimienta a
gusto.
Patitas de pollo frescas
†
70 450 4 30-40
Muslos 40 450 4 25-35
Pechugas 40 450 4 25-35
OTRAS
Aros de cebolla
empanados congelados
20 400 4 15-25
es-us_main.book.book Page 60 Friday, August 14, 2026 2:12 PM
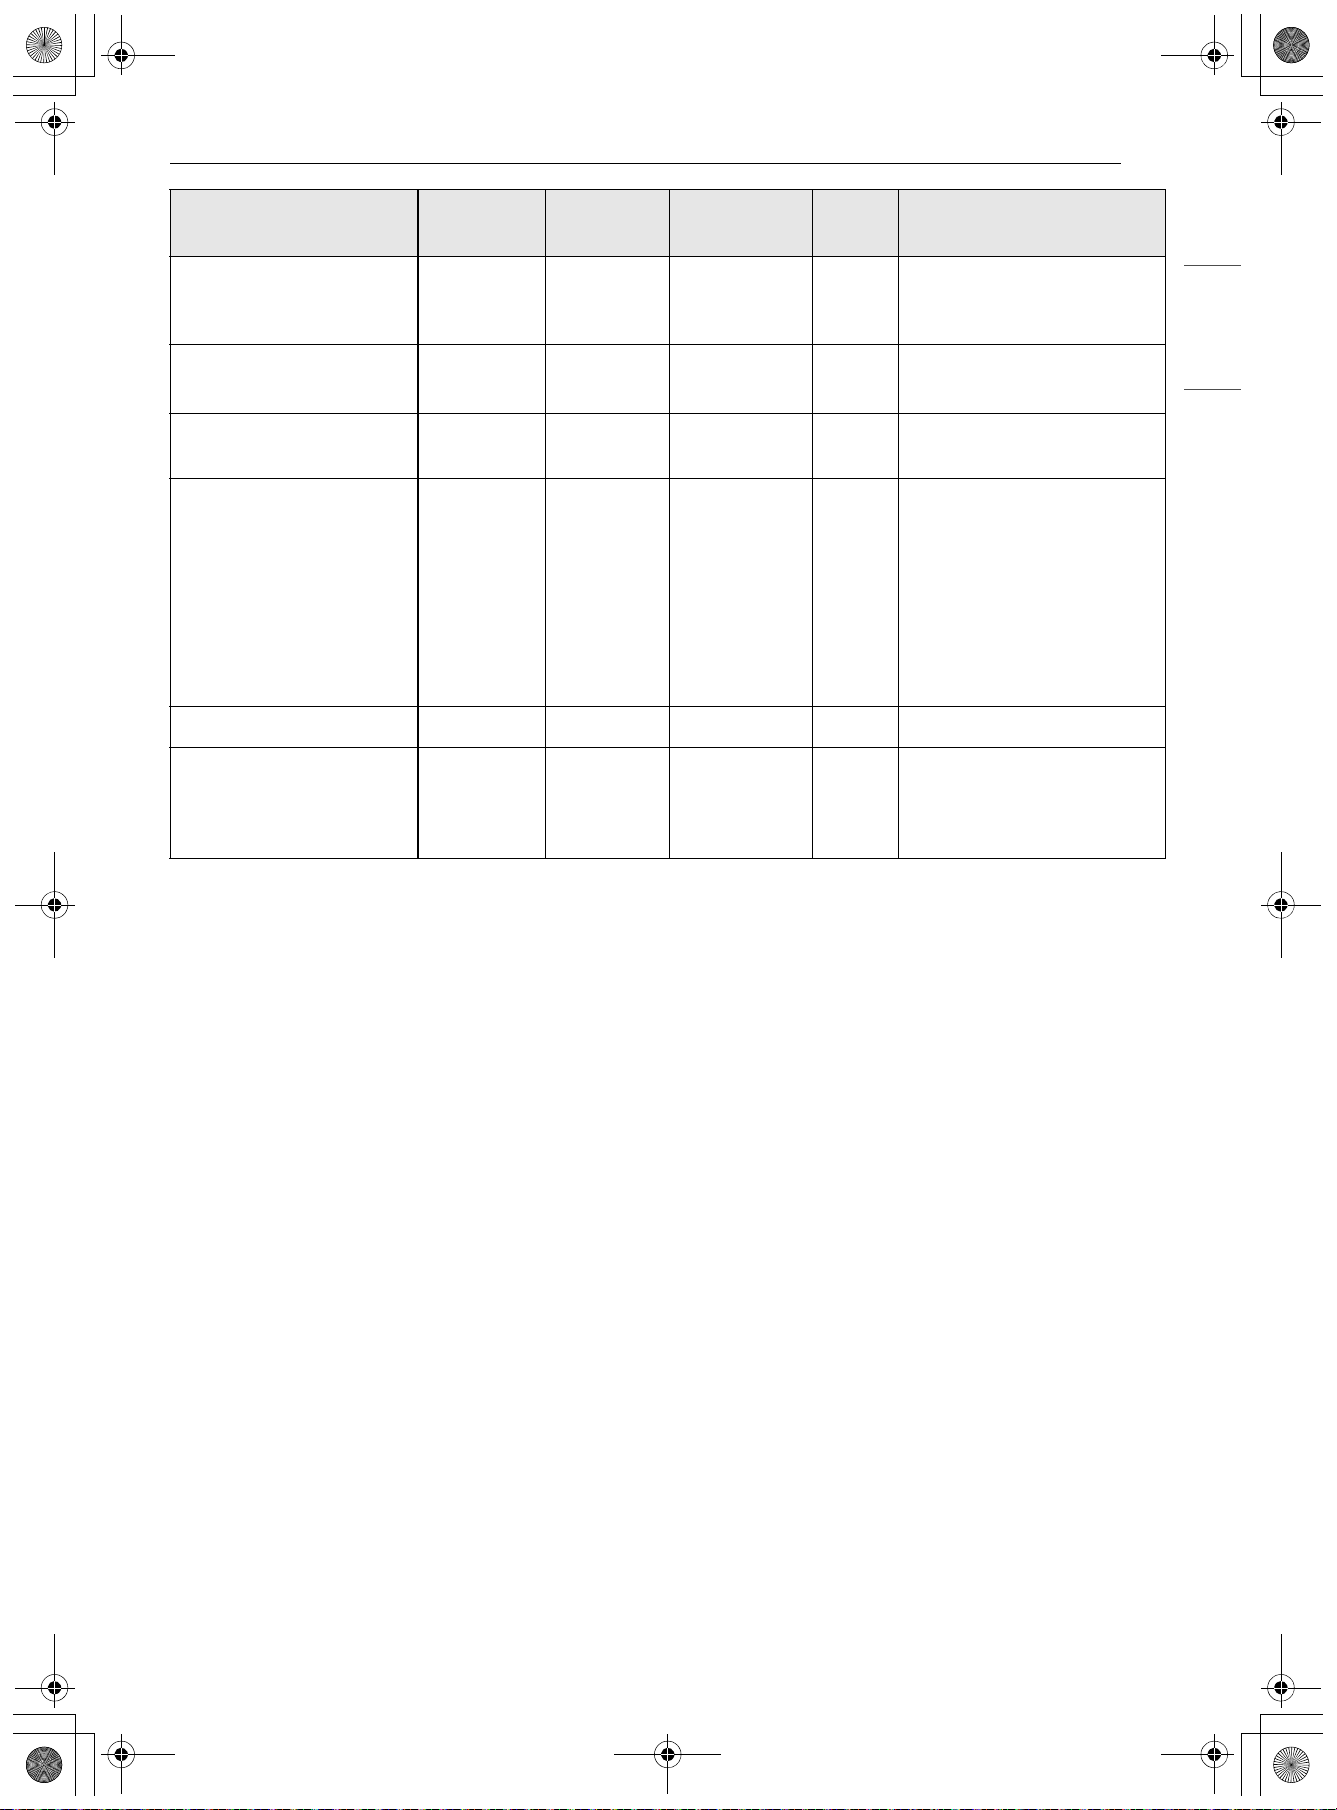
61FUNCIONAMIENTO
ESPAÑOL
Cocción al vacío con aire
Esta característica solamente está disponible en
algunos modelos.
La Cocción al vacío por flujo de aire usa aire para
cocinar los alimentos " a fuego lento y despacio".
Úselo para cocinar carne, pescado, mariscos, aves
o verduras. Los alimentos deben envasarse al
vacío en bolsas. No es necesario precalentar el
horno cuando se usa la Cocción al vacío por flujo
de aire. Consulte la guía de cocción para conocer
los ajustes recomendados de la Cocción al vacío
por flujo de aire.
Beneficios de la Cocción al vacío con
aire
Las bajas temperaturas y los tiempos de cocción
prolongados utilizados en la Cocción al vacío con
aire ofrecen muchos beneficios.
• Más saludable
En comparación con otros métodos de cocción,
la cocción al vacío retiene la mayoría de los
nutrientes originales de los alimentos.
• Seguro y conveniente
Los tiempos de cocción prolongados que se
utilizan en la cocción al vacío permiten
pasteurizar los alimentos. Debido a que los
alimentos se envasan al vacío antes de
cocinarlos, las bolsas sin abrir se pueden enfriar
rápidamente y luego guardar fácilmente
después de la cocción.
• Resultados crujientes y húmedos
El control fino de la temperatura de la cocción al
vacío es una excelente manera de lograr la
textura perfecta al cocinar carne y aves. Las
bajas temperaturas que se emplean en esta
cocción retienen más humedad en los alimentos
que los métodos de cocción convencionales.
Después de cocinar, un último dorado en una
sartén agrega el perfecto acabado crujiente.
Configuración del modo de Cocción al
vacío con aire
1 Presione el botón Alimentación.
2 Pulse Cocción manual (Cocción manual) y
desplácese para seleccionar Cocción al vacío
(Hornear).
Rollos primavera
congelados (0.7 onzas c/
u)
45 425 4 15-25
Salchichas
†
(2.5 onzas c/u,
0.8" de diámetro)
90 400 4 15-25
Camarones con coco
congelados
25 400 4 15-25 Pinte o rocíe con aceite la
superficie del alimento.
Ostiones frescos en su
media concha (35.3
onzas)
35 425 4 20-30 Derrita 4 cucharadas de
manteca y pinte los
ostiones. Mezcle 1/2 taza
de pan rallado, 1 cucharada
de ajo picado, 1/4 de tasa
de queso parmesano
rallado y condimente a
gusto. Esparza la mezcla
sobre los ostiones.
Camarones frescos 50 425 4 25-35
Vegetales mixtos 35 425 4 15-25 Pinte o rocíe ligeramente
con 4 cucharadas de aceite
de oliva. Agregue sal y
pimienta a gusto.
Puntos recomendados
Cantidad
(onzas)
Temp. (°F)
Posición del
estante
Hora Guía
es-us_main.book.book Page 61 Friday, August 14, 2026 2:12 PM
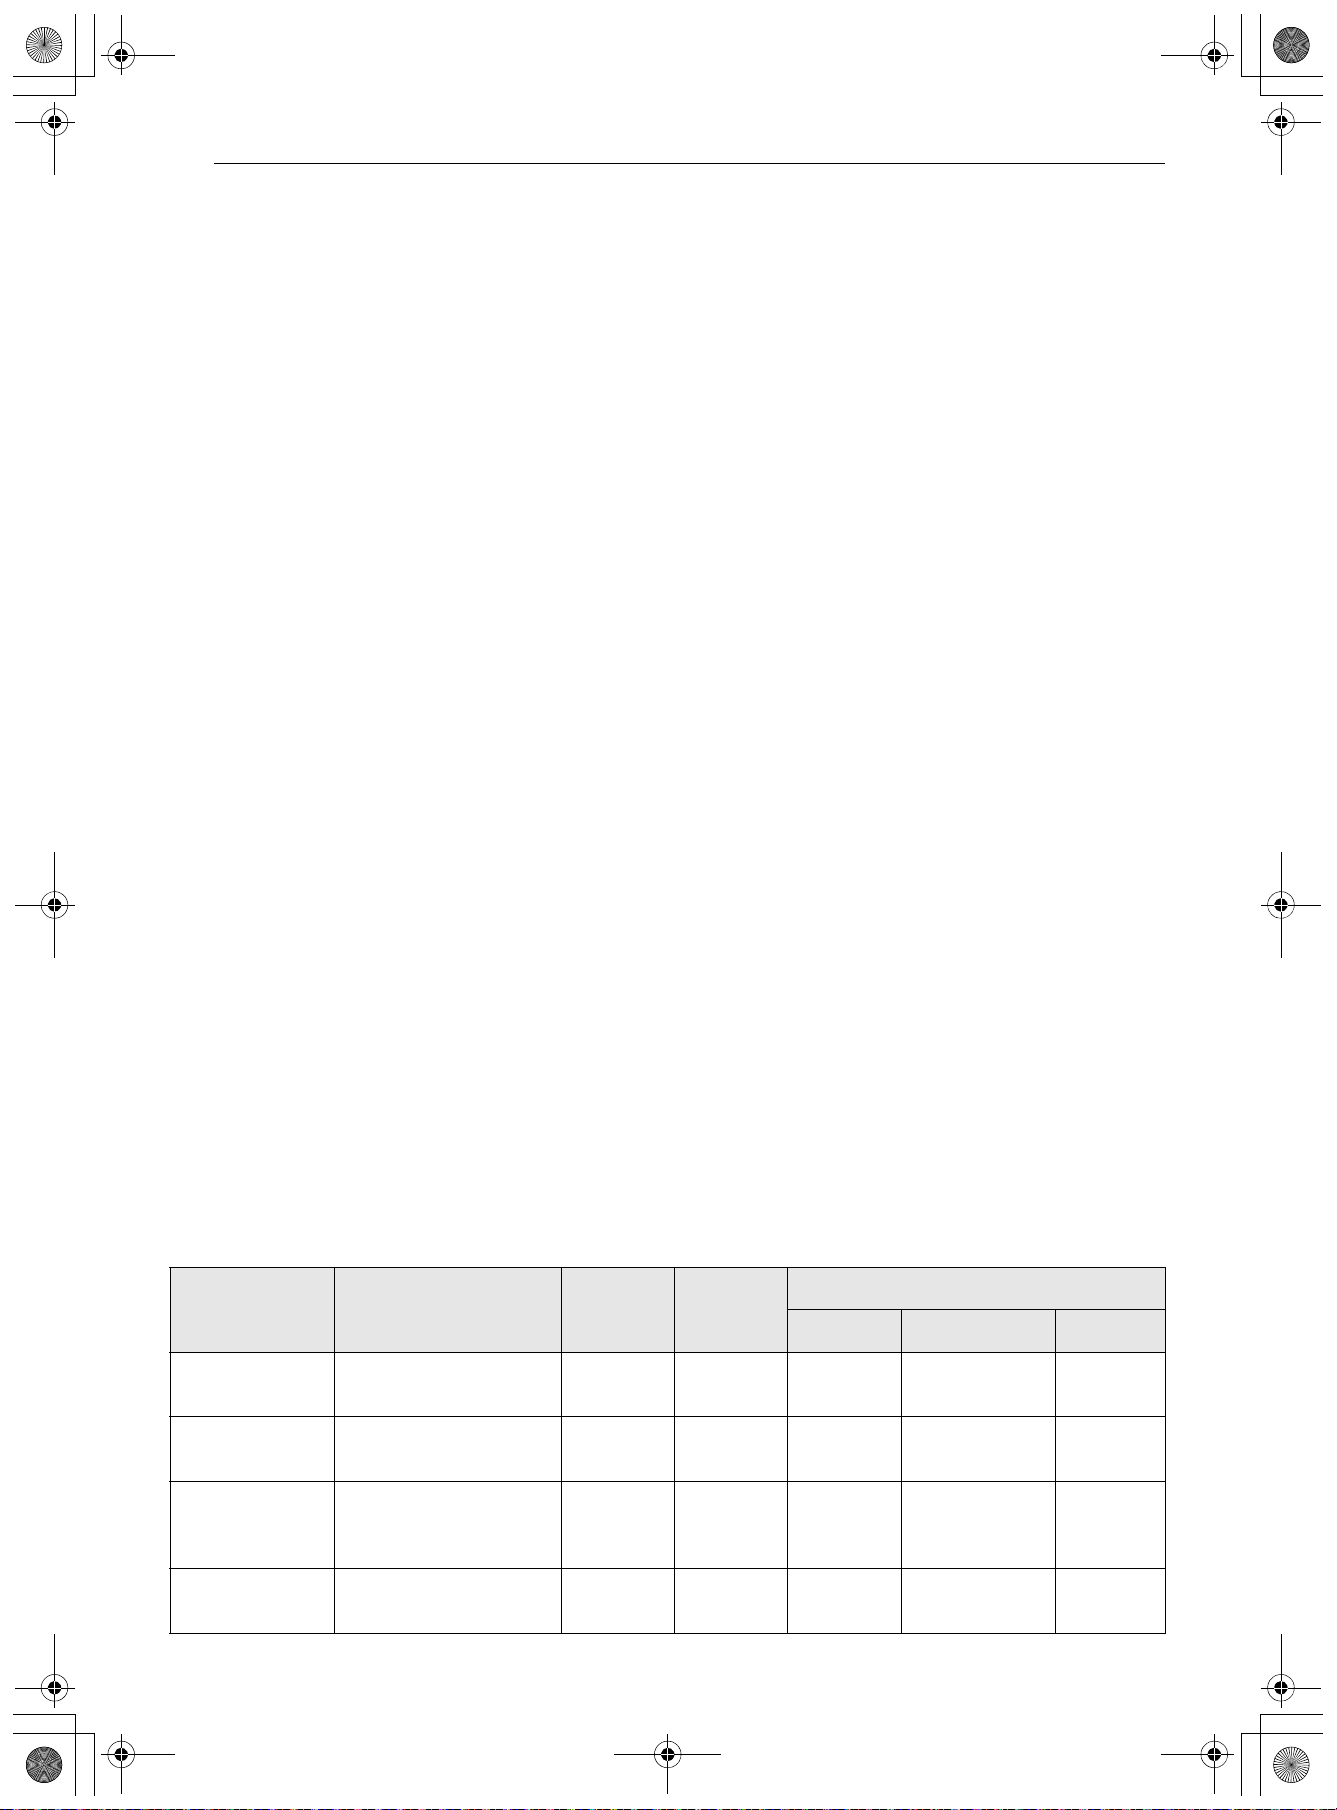
62 FUNCIONAMIENTO
3 Pulse 3 o arrastre la tarjeta de opciones para
establecer las opciones de cocción. Pulse
Temperatura y establezca la temperatura de
cocción deseada pulsando los botones +/-,
pulsando la barra o arrastrando la barra.
También puede usar el ícono del teclado
numérico para ajustar la temperatura de
cocción directamente.
4 Si lo desea, pulse Tiempo de cocción (Tiempo
de cocción) o Iniciar a para establecer el
tiempo de cocción o la hora de inicio de
cocción.
También puede usar el ícono del teclado
numérico para configurar el tiempo de
cocción directamente.
5 Pulse Cuando termine (Al finalizar) para
añadir una función una vez completada la
cocción.
• Mantener encendido: Se conserva el modo
de cocción seleccionado previamente tras
haberse completado la cocción.
• Apagar: Se apaga automáticamente una
vez completada la cocción, sin ninguna
función adicional de funcionamiento.
6 Tras seleccionar la configuración de cocción
deseada, pulse Iniciar (Inicio) en la parte
inferior derecha para comenzar la cocción.
7 Transcurrido el tiempo de cocción
establecido, suena un timbre y aparece una
notificación en la pantalla.
8 Pulse Terminado para finalizar la cocción. Si
fuera necesario, puede pulsar + Tiempo de
cocción (Prolongar el tiempo de cocción) para
continuar la cocción.
Cambiar los ajustes de Cocción
1 Pulse 3 en la parte media derecha de la
pantalla de inicio.
2 Pulse la opción que desee cambiar para
realizar los ajustes deseados.
3 Pulse Aplicar en la parte inferior derecha
para aplicar los ajustes modificados a sus
recetas.
4 Pulse 4 para volver a la pantalla anterior sin
hacer cambios.
Para detener la cocción
1 Pulse Detener en la parte inferior derecha de
la pantalla.
• Aparece una notificación emergente en la
pantalla.
2 Pulse Detener en el elemento emergente.
Guía de cocción al vacío por flujo de aire recomendada
Comida
Cantidad
(onzas)
Estante
Posición
Temp.
(°F)
Hora
Min. Objetivo Max
Bistec de res 1" de espesor
14~17 oz
3
135 - 2.5 horas 3 horas
Pechuga
de pollo
4-6 oz
3
150 - 2 horas 2.5 horas
Pechuga
Muslos (con
hueso)
6~8 oz 3 155 - 4 horas 6 horas
Salmón 1" de espesor
5 oz
3
140 - 2 horas 2.5 horas
es-us_main.book.book Page 62 Friday, August 14, 2026 2:12 PM
63FUNCIONAMIENTO
ESPAÑOL
Rostizar con aire
El rostizado con aire es una forma rápida y práctica
de asar sin necesidad de precalentamiento.
El modo Asado con aire puede programarse para
cocinar a cualquier temperatura, desde 300
8 (150
7) a 550 8 (285 7). La temperatura
predeterminada es 400 8 (205 7). Este modo
permite el uso de la sonda para carne.
Ajuste del modo Rostizar con aire
1 Presione el botón Alimentación.
2 Pulse Cocción manual (Cocción manual) y
desplácese para seleccionar Asado al aire
(Hornear).
3 Pulse 3 o arrastre la tarjeta de opciones para
establecer las opciones de cocción. Pulse
Temperatura y establezca la temperatura de
cocción deseada pulsando los botones +/-,
pulsando la barra o arrastrando la barra.
También puede usar el ícono del teclado
numérico para ajustar la temperatura de
cocción directamente.
4 Si lo desea, pulse Tiempo de cocción (Tiempo
de cocción) o Iniciar a para establecer el
tiempo de cocción o la hora de inicio de
cocción.
También puede usar el ícono del teclado
numérico para configurar el tiempo de
cocción directamente.
5 Pulse Cuando termine (Al finalizar) para
añadir una función una vez completada la
cocción.
• Mantener caliente: Mantiene los alimentos
calientes tras la cocción.
• Mantener encendido: Se conserva el modo
de cocción seleccionado previamente tras
haberse completado la cocción.
• Apagar: Se apaga automáticamente una
vez completada la cocción, sin ninguna
función adicional de funcionamiento.
6 Tras seleccionar la configuración de cocción
deseada, pulse Iniciar (Inicio) en la parte
inferior derecha para comenzar la cocción.
7 Transcurrido el tiempo de cocción
establecido, suena un timbre y aparece una
notificación en la pantalla.
8 Pulse Terminado para finalizar la cocción. Si
fuera necesario, puede pulsar + Tiempo de
cocción (Prolongar el tiempo de cocción) para
continuar con la cocción o pulsar Mantener
caliente para mantener la comida a la
temperatura adecuada para servirla.
Cambiar los ajustes de Cocción
1 Pulse 3 en la parte media derecha de la
pantalla de inicio.
2 Pulse la opción que desee cambiar para
realizar los ajustes deseados.
Espárragos 2.8 onzas (6 c/u)
5.6 onzas (12 c/u)
3
185 20 min. 30 min. 45 min.
Papas Dados de 1/2"
hasta 36 onzas
3 200 - 2.5 horas -
Zanahorias Dados de 1/2"
hasta 18 onzas
3 200 1.5 horas 2 horas 3 horas
Comida
Cantidad
(onzas)
Estante
Posición
Temp.
(°F)
Hora
Min. Objetivo Max
es-us_main.book.book Page 63 Friday, August 14, 2026 2:12 PM
64 FUNCIONAMIENTO
3 Pulse Aplicar en la parte inferior derecha
para aplicar los ajustes modificados a sus
recetas.
4 Pulse 4 para volver a la pantalla anterior sin
hacer cambios.
Para detener la cocción
1 Pulse Detener en la parte inferior derecha de
la pantalla.
• Aparece una notificación emergente en la
pantalla.
2 Pulse Detener en el elemento emergente.
Pizza
Este sistema está diseñado para brindar un
desempeño de cocción óptimo para pizzas al
seleccionar automáticamente una combinación de
los sistemas de calentamiento para asar y hornear.
Configuración del modo Pizza
1 Presione el botón Alimentación.
2 Pulse Cocción manual (Cocción manual) y
desplácese para seleccionar Pizza (Hornear).
3 Pulse 3 o arrastre la tarjeta de opciones para
establecer las opciones de cocción.
4 Pulse Temperatura para establecer la
temperatura de cocción deseada. Para ajustar
la temperatura, pulse los botones +/-, pulse la
barra o arrastre la barra.
También puede usar el ícono del teclado
numérico para ajustar la temperatura de
cocción directamente.
5 Si lo desea, pulse Tiempo de cocción (Tiempo
de cocción) o Iniciar a para establecer el
tiempo de cocción o la hora de inicio de
cocción.
También puede usar el ícono del teclado
numérico para configurar el tiempo de
cocción directamente.
6 Pulse Cuando termine (Al finalizar) para
añadir una función una vez completada la
cocción.
• Mantener caliente: Mantiene los alimentos
calientes tras la cocción.
• Mantener encendido: Se conserva el modo
de cocción seleccionado previamente tras
haberse completado la cocción.
• Apagar: Se apaga automáticamente una
vez completada la cocción, sin ninguna
función adicional de funcionamiento.
7 Tras seleccionar la configuración de cocción
deseada, pulse Iniciar (Inicio) en la parte
inferior derecha para comenzar la cocción.
8 Suena un timbre cuando finaliza el
precalentamiento.
9 Transcurrido el tiempo de cocción
establecido, suena un timbre y aparece una
notificación en la pantalla.
10 Pulse Terminado para finalizar la cocción. Si
fuera necesario, puede pulsar + Tiempo de
cocción (Prolongar el tiempo de cocción) para
continuar con la cocción o pulsar Mantener
caliente para mantener la comida a la
temperatura adecuada para servirla.
NOTA
• El precalentamiento es necesario para obtener
mejores resultados de cocción.
• Coloque los alimentos en el horno luego del
precalentamiento.
• Gire las pizzas congeladas a mitad de cocción.
Prolongue el tiempo de cocción según sea
necesario para lograr el nivel de cocción
deseado.
Cambiar los ajustes de Cocción
1 Pulse 3 en la parte media derecha de la
pantalla de inicio.
2 Pulse la opción que desee cambiar para
realizar los ajustes deseados.
es-us_main.book.book Page 64 Friday, August 14, 2026 2:12 PM

65FUNCIONAMIENTO
ESPAÑOL
3 Pulse Aplicar en la parte inferior derecha
para aplicar los ajustes modificados a sus
recetas.
4 Pulse > para volver a la pantalla anterior sin
hacer cambios.
Para detener la cocción
1 Pulse Detener en la parte inferior derecha de
la pantalla.
• Aparece una notificación emergente en la
pantalla.
2 Pulse Detener en el elemento emergente.
Frozen Meal (Comida congelada)
La función Comida congelada está especialmente
diseñada para cocinar comidas preparadas
congeladas.
Cuando se usa el modo Frozen Meal (Comida
congelada), no se requiere precalentamiento.
Ajuste del modo Comida congelada
1 Presione el botón Alimentación.
2 Pulse Cocción manual (Cocción manual) y
desplácese para seleccionar Comida
congelada (Hornear).
3 Pulse 3 o arrastre la tarjeta de opciones para
establecer las opciones de cocción. Pulse
Temperatura y establezca la temperatura de
cocción deseada pulsando los botones +/-,
pulsando la barra o arrastrando la barra.
También puede usar el ícono del teclado
numérico para ajustar la temperatura de
cocción directamente.
4 Si lo desea, pulse Tiempo de cocción (Tiempo
de cocción) o Iniciar a para establecer el
tiempo de cocción o la hora de inicio de
cocción.
También puede usar el ícono del teclado
numérico para configurar el tiempo de
cocción directamente.
5 Pulse Cuando termine (Al finalizar) para
añadir una función una vez completada la
cocción.
• Mantener caliente: Mantiene los alimentos
calientes tras la cocción.
• Mantener encendido: Se conserva el modo
de cocción seleccionado previamente tras
haberse completado la cocción.
• Apagar: Se apaga automáticamente una
vez completada la cocción, sin ninguna
función adicional de funcionamiento.
6 Tras seleccionar la configuración de cocción
deseada, pulse Iniciar (Inicio) en la parte
inferior derecha para comenzar la cocción.
7 Transcurrido el tiempo de cocción
establecido, suena un timbre y aparece una
notificación en la pantalla.
8 Pulse Terminado para finalizar la cocción. Si
fuera necesario, puede pulsar + Tiempo de
cocción (Prolongar el tiempo de cocción) para
continuar con la cocción o pulsar Mantener
caliente para mantener la comida a la
temperatura adecuada para servirla.
Cambiar los ajustes de Cocción
1 Pulse 3 en la parte media derecha de la
pantalla de inicio.
2 Pulse la opción que desee cambiar para
realizar los ajustes deseados.
3 Pulse Aplicar en la parte inferior derecha
para aplicar los ajustes modificados a sus
recetas.
4 Pulse 4 para aplicar los ajustes modificados a
sus recetas.
Para detener la cocción
1 Pulse Detener en la parte inferior derecha de
la pantalla.
• Aparece una notificación emergente en la
pantalla.
es-us_main.book.book Page 65 Friday, August 14, 2026 2:12 PM

66 FUNCIONAMIENTO
2 Pulse Detener en el elemento emergente.
Deshidratar
Use esta función para secar frutas, verduras y
carne de res para crear refrigerios saludables y
nutritivos sin usar productos químicos ni
conservantes. Coloque papel pergamino en la
bandeja de metal y esparza la comida en una sola
capa. Las temperaturas de deshidratación oscilan
entre 100 ℉ y 200 ℉.
Ajuste del modo Deshidratar
1 Presione el botón Alimentación.
2 Pulse Cocción manual (Cocción manual) y
desplácese para seleccionar Deshidratar
(Hornear).
3 Pulse 3 o arrastre la tarjeta de opciones para
establecer las opciones de cocción. Pulse
Temperatura y establezca la temperatura de
cocción deseada pulsando los botones +/-,
pulsando la barra o arrastrando la barra.
También puede usar el ícono del teclado
numérico para ajustar la temperatura de
cocción directamente.
4 Si lo desea, pulse Tiempo de cocción (Tiempo
de cocción) o Iniciar a para establecer el
tiempo de cocción o la hora de inicio de
cocción.
También puede usar el ícono del teclado
numérico para configurar el tiempo de
cocción directamente.
5 Pulse Cuando termine (Al finalizar) para
añadir una función una vez completada la
cocción.
• Mantener caliente: Mantiene los alimentos
calientes tras la cocción.
• Mantener encendido: Se conserva el modo
de cocción seleccionado previamente tras
haberse completado la cocción.
• Apagar: Se apaga automáticamente una
vez completada la cocción, sin ninguna
función adicional de funcionamiento.
6 Tras seleccionar la configuración de cocción
deseada, pulse Iniciar (Inicio) en la parte
inferior derecha para comenzar la cocción.
7 Transcurrido el tiempo de cocción
establecido, suena un timbre y aparece una
notificación en la pantalla.
8 Pulse Terminado para finalizar la cocción. Si
fuera necesario, puede pulsar + Tiempo de
cocción (Prolongar el tiempo de cocción) para
continuar la cocción.
Cambiar los ajustes de Deshidratar
1 Pulse 3 en la parte media derecha de la
pantalla de inicio.
2 Pulse la opción que desee cambiar para
realizar los ajustes deseados.
3 Pulse Aplicar en la parte inferior derecha
para aplicar los ajustes modificados a sus
recetas.
4 Pulse 4 para volver a la pantalla anterior sin
hacer cambios.
Para detener Deshidratar
1 Pulse Detener en la parte inferior derecha de
la pantalla.
• Aparece una notificación emergente en la
pantalla.
2 Pulse Detener en el elemento emergente.
Calentar
Esta función mantendrá una temperatura del
horno inferior a 200
8 (93 7). Mantendrá los
alimentos calientes para su servicio hasta 3 horas
luego de que la cocción finalice.
Ajuste del Modo Calentar
1 Presione el botón Alimentación.
es-us_main.book.book Page 66 Friday, August 14, 2026 2:12 PM
67FUNCIONAMIENTO
ESPAÑOL
2 Pulse Cocción manual (Cocción manual) y
desplácese para seleccionar Calentar
(Hornear).
3 Seleccione la temperatura deseada: Bajo,
Media, o Alto.
4 Si lo desea, pulse Tiempo de cocción o
Iniciar a para configurar el tiempo de cocción
o la hora de inicio de cocción. También puede
usar el ícono del teclado numérico para
configurar el tiempo de cocción directamente.
5 Pulse Cuando termine (Al finalizar) para
añadir una función una vez completada la
cocción.
• Mantener encendido: Se conserva el modo
de cocción seleccionado previamente tras
haberse completado la cocción.
• Apagar: Se apaga automáticamente una
vez completada la cocción, sin ninguna
función adicional de funcionamiento.
6 Tras seleccionar la configuración de cocción
deseada, pulse Iniciar (Inicio) en la parte
inferior derecha para comenzar la cocción.
7 Pulse Terminado para finalizar la cocción. Si
fuera necesario, puede pulsar + Tiempo de
cocción (Prolongar el tiempo de cocción) para
continuar la cocción.
Cambiar los ajustes de Calentamiento
1 Pulse 3 en la parte media derecha de la
pantalla de inicio.
2 Pulse la opción que desee cambiar para
realizar los ajustes deseados.
3 Pulse Aplicar en la parte inferior derecha
para aplicar los ajustes modificados a sus
recetas.
4 Pulse 4 para volver a la pantalla anterior sin
hacer cambios.
Para detener el Calentamiento
1 Pulse Detener en la parte inferior derecha de
la pantalla.
• Aparece una notificación emergente en la
pantalla.
2 Pulse Detener en el elemento emergente.
NOTA
• La función Calentar está diseñada para
mantener calientes los alimentos. No la use para
bajar la temperatura de los alimentos.
Proof (Leudar)
Esta función mantiene el horno caliente para
leudar los productos con levadura antes de
hornear.
Configuración del modo Leudar
1 Presione el botón Alimentación.
2 Pulse Cocción manual (Cocción manual) y
desplácese para seleccionar Prueba
(Hornear).
3 Si lo desea, pulse Tiempo de cocción o
Iniciar a para configurar el tiempo de cocción
o la hora de inicio de cocción. También puede
usar el ícono del teclado numérico para
configurar el tiempo de cocción directamente.
4 Pulse Cuando termine (Al finalizar) para
añadir una función una vez completada la
cocción.
• Mantener encendido: Se conserva el modo
de cocción seleccionado previamente tras
haberse completado la cocción.
• Apagar: Se apaga automáticamente una
vez completada la cocción, sin ninguna
función adicional de funcionamiento.
5 Tras seleccionar la configuración de cocción
deseada, pulse Iniciar (Inicio) en la parte
inferior derecha para comenzar la cocción.
es-us_main.book.book Page 67 Friday, August 14, 2026 2:12 PM
68 FUNCIONAMIENTO
6 Pulse Terminado para finalizar la cocción. Si
fuera necesario, puede pulsar + Tiempo de
cocción (Prolongar el tiempo de cocción) para
continuar la cocción.
Modificación de los ajustes de
fermentación
1 Pulse 3 en la parte media derecha de la
pantalla de inicio.
2 Pulse la opción que desee cambiar para
realizar los ajustes deseados.
3 Pulse Aplicar en la parte inferior derecha
para aplicar los ajustes modificados a sus
recetas.
4 Pulse 4 para volver a la pantalla anterior sin
hacer cambios.
Para detener Leudar
1 Pulse Detener en la parte inferior derecha de
la pantalla.
• Aparece una notificación emergente en la
pantalla.
2 Pulse Detener en el elemento emergente.
NOTA
• Para evitar que baje la temperatura del horno y
que se prolongue el tiempo de leudado, no abra
la puerta del horno si no es necesario. Revise los
alimentos panificados con tiempo para evitar un
leudado excesivo.
• No use el modo de leudado para calentar
comida ni para mantener calientes los
alimentos. La temperatura del horno para el
leudado no es lo suficientemente alta para
mantener alimentos a temperaturas seguras.
Use la función Calentar para mantener calientes
los alimentos. La función Leudar no funciona si
la temperatura es inferior a 125 ℉. La pantalla
mostrará la palabra "El horno está demasiado
caliente. Inténtelo de nuevo después de que
se enfríe.".
• Es normal que el ventilador funcione durante la
función Leudar.
• La función de prueba proporciona
automáticamente la temperatura óptima para el
proceso de prueba y, por lo tanto, no tiene un
ajuste de temperatura.
• Para obtener mejores resultados, cubra la masa
con un paño o con una envoltura de plástico. (Es
posible que sea necesario anclar el plástico
debajo del recipiente para que el ventilador del
horno no se apague).
Recalentamiento crujiente
Crispy Reheat es una nueva función de cocción
que restaura la textura de los alimentos que se
han humedecido y ablandado perdiendo su
textura crujiente.
Activación del modo Crispy Reheat
1 Presione el botón Alimentación.
2 Pulse Cocción manual (Cocción manual) y
desplácese para seleccionar Recalentar
crujiente (Hornear).
3 Pulse 3 o arrastre la tarjeta de opciones para
establecer las opciones de cocción. Pulse
Temperatura y establezca la temperatura de
cocción deseada pulsando los botones +/-,
pulsando la barra o arrastrando la barra.
También se puede usar el ícono del teclado
numérico para ajustar la temperatura de
cocción directamente.
4 Si lo desea, pulse Tiempo de cocción (Tiempo
de cocción) o Iniciar a para establecer el
tiempo de cocción o la hora de inicio de
cocción.
También puede usar el ícono del teclado
numérico para configurar el tiempo de
cocción directamente.
5 Pulse Cuando termine (Al finalizar) para
añadir una función una vez completada la
cocción.
• Mantener caliente: Mantiene los alimentos
calientes tras la cocción.
• Mantener encendido: Se conserva el modo
de cocción seleccionado previamente tras
haberse completado la cocción.
es-us_main.book.book Page 68 Friday, August 14, 2026 2:12 PM

69FUNCIONAMIENTO
ESPAÑOL
• Apagar: Se apaga automáticamente una
vez completada la cocción, sin ninguna
función adicional de funcionamiento.
6 Tras seleccionar la configuración de cocción
deseada, pulse Iniciar (Inicio) en la parte
inferior derecha para comenzar la cocción.
7 Transcurrido el tiempo de cocción
establecido, suena un timbre y aparece una
notificación en la pantalla.
8 Pulse Terminado para finalizar la cocción. Si
fuera necesario, puede pulsar + Tiempo de
cocción (Prolongar el tiempo de cocción) para
continuar con la cocción o pulsar Mantener
caliente para mantener la comida a la
temperatura adecuada para servirla.
Cambiar los ajustes de Cocción
1 Pulse 3 en la parte media derecha de la
pantalla de inicio.
2 Pulse la opción que desee cambiar para
realizar los ajustes deseados.
3 Pulse Aplicar en la parte inferior derecha
para aplicar los ajustes modificados a sus
recetas.
4 Pulse 4 para volver a la pantalla anterior sin
hacer cambios.
Para detener la cocción
1 Pulse Detener en la parte inferior derecha de
la pantalla.
• Aparece una notificación emergente en la
pantalla.
2 Pulse Detener en el elemento emergente.
Cocción automática
La función Cocción automática proporciona
orientación para cocinar alimentos o platos con los
que quizás no esté familiarizado. Contiene
programas preestablecidos para cocinar muchos
alimentos populares, con información sobre el
precalentamiento recomendado, los accesorios y
la posición del estante para obtener resultados
óptimos.
Ajuste del modo de cocción automática
1 Pulse el botón Alimentación y,
seguidamente, pulse Autococción.
2 Seleccione categoría para filtrar las opciones.
3 Desplácese o toque las letras para buscar y
seleccionar un elemento.
4 Siga las recomendaciones en la pantalla con
respecto a los accesorios y la posición del
estante.
5 Pulse Iniciar en la parte inferior derecha para
iniciar la cocción.
es-us_main.book.book Page 69 Friday, August 14, 2026 2:12 PM
70 FUNCIONAMIENTO
Guía de cocción automática
• Precaliente el horno primero para la mayoría de los artículos.
• Precaliente durante 5 minutos al asar.
• Si usa sonda, inserte alimentos y sonda antes de precalentar.
NOTA
• Cuando cocine cortes finos de carne, inserte la sonda en la parte más gruesa de la carne. Si la sonda se
inserta incorrectamente, el horno podría apagarse demasiado pronto. Consulte la sección Sonda para
obtener instrucciones.
Carne de res
Menú
Cantidad
Temp. del
alimento
Observaci
ón
Instrucciones
Utensilio
de cocina
Posición del
estante
Solomillo
de res
2~4 lb. Refrigerado
Cocción
con sonda
Ingredientes
Sal kosher, pimienta negra molida, ajo en polvo
al gusto
Instrucciones
Prepare el lomo de res, recortado. Cepille o
rocíe ligeramente con aceite. Agregue sal, ajo
en polvo y pimienta al gusto. Coloque el lomo
en la rejilla de la asadera.
Rejilla sobre
asadera
2
Ternera
asada
2~4 lb. Refrigerado
Cocción
con sonda
Ingredientes
Sal kosher, pimienta negra molida, ajo en polvo
al gusto
Instrucciones
Prepare el solomillo de res, recortado. Cepille o
rocíe ligeramente con aceite. Agregue sal, ajo
en polvo y pimienta al gusto. Coloque el
solomillo en la rejilla de la asadera.
Rejilla sobre
asadera
2
Costilla
8~12 lb. Refrigerado
Cocción
con sonda
Ingredientes
Sal kosher, pimienta negra molida, ajo en polvo
al gusto
Instrucciones
Prepara la costilla con hueso. Cepille o rocíe
ligeramente con aceite. Agregue sal, ajo en
polvo y pimienta al gusto. Coloque las costillas
en la fuente para rostizar.
Fuente para
rostizar
2
es-us_main.book.book Page 70 Friday, August 14, 2026 2:12 PM
71FUNCIONAMIENTO
ESPAÑOL
Cerdo
Menú
Cantidad
Temp. del
alimento
Observació
n
Instrucciones
Utensilio de
cocina
Posición del
estante
Costillas de
cerdo
2~4 lb. Refrigerado Ingredientes
Sal kosher, pimienta negra molida al gusto
Instrucciones
Prepare las costillas de cerdo con hueso,
recortadas. Pincélelas o rocíelas ligeramente
con aceite. Agregue sal y pimienta al gusto.
Coloque las costillas de cerdo en la rejilla de
la asadera.
Rejilla sobre
asadera
2
Chuletas
de cerdo
1~6 C/U Refrigerado Ingredientes
Sal kosher, pimienta negra molida al gusto
Instrucciones
Prepare chuletas de cerdo con hueso,
aproximadamente 6 oz. cada uno, recortado.
Cepille o rocíe ligeramente con aceite.
Agregue sal y pimienta al gusto. Coloque las
chuletas de cerdo en la rejilla de la asadera.
Rejilla sobre
asadera
4
Lomo de
cerdo
2~4 lb. Refrigerado
Cocción con
sonda
Ingredientes
Sal kosher, pimienta negra molida al gusto
Instrucciones
Prepare el lomo de cerdo, de
aproximadamente 4 pulgadas de diámetro,
recortado. Cepille o rocíe ligeramente con 1
cucharada. de aceite. Agrega sal y pimienta al
gusto. Coloque el lomo de cerdo en la rejilla
de la asadera.
Rejilla sobre
asadera
2
Solomillo
de cerdo
2~4 lb. Refrigerado
Cocción con
sonda
Ingredientes
Sal kosher, pimienta negra molida al gusto
Instrucciones
Prepare el lomo de cerdo, de 2~3 pulgadas
de diámetro, recortado. Cepille o rocíe
ligeramente con 1 cucharada de aceite.
Agregue sal y pimienta al gusto. Coloque el
lomo en la rejilla de la asadera.
Rejilla sobre
asadera
2
Cordero
Menú
Cantidad
Temp. del
alimento
Observac
ión
Instrucciones
Utensilio
de cocina
Posición del
estante
Costilla
s de
cordero
2~4 lb. Refrigerado
Cocción
con sonda
Ingredientes
Aceite de canola, sal kosher, pimienta negra al gusto
Instrucciones
Prepare el costillar de cordero, recortado. Cepille o
rocíe ligeramente con 1 cucharada de aceite.
Agregue sal y pimienta al gusto. Coloque el costillar
de cordero en la rejilla de la asadera.
Rejilla sobre
asadera
2
es-us_main.book.book Page 71 Friday, August 14, 2026 2:12 PM
72 FUNCIONAMIENTO
Pierna
de
cordero
con
hueso
5~7 lb. Refrigerado
Cocción
con sonda
Ingredientes
Aceite de canola, sal kosher, pimienta negra al gusto
Instrucciones
Prepare la pierna de cordero con hueso, recortada.
Cepille o rocíe ligeramente con 1 cucharada de
aceite. Agregue sal y pimienta al gusto. Coloque la
pierna de cordero en la fuente para rostizar.
Fuente para
rostizar
2
Salchicha
Menú
Cantidad
Temp. del
alimento
Observació
n
Instrucciones
Utensilio de
cocina
Posición
del estante
Salchicha
italiana
1~8 C/U Refrigerado
Cuando el
horno emita
un pitido,
voltee la
comida.
Prepare salchichas, de aproximadamente 3.5 oz.
cada una. Rocíe una sartén con borde con aceite
en aerosol para cocinar. Coloque las salchichas
italianas en la bandeja de media hoja y espacie
las salchichas 1 1/2 pulg. separadas la una de la
otra.
Bandeja de
1/2 hoja
2
Perrito
caliente
1~8 C/U Refrigerado Cuando el
horno emita
un pitido,
voltee la
comida.
Prepare hot dogs, de aproximadamente 2 oz.
cada uno. Rocíe una sartén con borde con aceite
en aerosol. Coloque los hot dogs en la sartén de
media hoja y espacie los hot dogs 1 1/2 pulg.
separados el uno del otro.
Bandeja de
1/2 hoja
2
Pescado
Menú
Cantidad
Temp. del
alimento
Instrucciones
Utensilio de
cocina
Posición del
estante
Filete de
pescado
1~4 C/U Refrigerado Ingredientes
Sal kosher, pimienta negra molida, aceite al gusto
Instrucciones
Prepare los filetes de pescado, aproximadamente 7 oz.
cada uno, y alrededor de 1~1.5 pulg. de grosor. Cepille
o rocíe ligeramente con aceite. Agregue sal y pimienta
al gusto. Coloque los filetes en la rejilla de la asadera.
Rejilla sobre
asadera
4
Filete de
bacalao
1~4 C/U Refrigerado Ingredientes
Sal kosher, pimienta negra molida, aceite al gusto
Instrucciones
Prepare los filetes de bacalao, de aproximadamente 7
oz. cada uno, y alrededor de 1~1.5 pulg. de grosor.
Cepille o rocíe ligeramente con aceite. Agregue sal y
pimienta al gusto. Coloque los filetes en la rejilla de la
asadera.
Rejilla sobre
asadera
4
Cordero
Menú
Cantidad
Temp. del
alimento
Observac
ión
Instrucciones
Utensilio
de cocina
Posición del
estante
es-us_main.book.book Page 72 Friday, August 14, 2026 2:12 PM
73FUNCIONAMIENTO
ESPAÑOL
Filete de
salmón
1~4 C/U Refrigerado Ingredientes
Sal kosher, pimienta negra molida, aceite al gusto
Instrucciones
Prepare los filetes de salmón, aproximadamente 7 oz.
cada uno, y 3/4 pulg. de grosor. Cepille o rocíe
ligeramente con aceite. Agregue sal y pimienta al
gusto. Coloque los filetes en la rejilla de la asadera.
Rejilla sobre
asadera
4
Gamba al
horno
1~2 lb. Refrigerado Ingredientes
Sal kosher, pimienta negra molida, aceite al gusto
Instrucciones
Prepare el camarón, pélelo y devánelo (si es
necesario). Pincélelo o rocíelo ligeramente con aceite.
Agregue sal en polvo y pimienta al gusto. Coloque el
camarón en la rejilla de la asadera.
Rejilla sobre
asadera
4
Filete de
tilapia
1~4 C/U Refrigerado Ingredientes
Sal kosher, pimienta negra molida, aceite al gusto
Instrucciones
Prepare los filetes de tilapia, de aproximadamente 7
oz. cada uno, y alrededor de 1~1.5 pulg. de grosor.
Cepille o rocíe ligeramente con aceite. Agregue sal y
pimienta al gusto. Coloque los filetes en la rejilla de la
asadera.
Rejilla sobre
asadera
4
Colas de
langosta
1~2 C/U Refrigerado Ingredientes
Sal, pimienta al gusto, 1 cucharada de mantequilla
derretida
Instrucciones
Prepara las colas de langosta, aproximadamente 5 oz.
cada uno. Corte en forma de mariposa las colas de
langosta. Unte con mantequilla derretida. Agregue sal
al gusto. Coloque las colas de langosta en la rejilla de
la asadera.
Rejilla sobre
asadera
4
Filete de
salmón
1~4 C/U Refrigerado Ingredientes
Sal kosher, pimienta negra molida, aceite al gusto
Instrucciones
Prepara los filetes de salmón, aproximadamente 7 oz.
cada uno, y alrededor de 1.5~2 pulg. de grosor. Cepille
o rocíe ligeramente con aceite. Agregue sal y pimienta
al gusto. Coloque el salmón en la rejilla de la asadera.
Rejilla sobre
asadera
4
Filete de
atún
1~4 C/U Refrigerado Ingredientes
Sal, pimienta, aceite al gusto
Instrucciones
Prepare los filetes de atún, aproximadamente 7 oz.
cada uno, y alrededor de 1.5~2 pulg. de grosor. Cepille
o rocíe ligeramente con aceite. Agregue sal y pimienta
al gusto. Coloque el atún en la rejilla de la asadera.
Rejilla sobre
asadera
1
Pescado
Menú
Cantidad
Temp. del
alimento
Instrucciones
Utensilio de
cocina
Posición del
estante
es-us_main.book.book Page 73 Friday, August 14, 2026 2:12 PM
74 FUNCIONAMIENTO
Aves de corral
Menú
Cantidad
Temp. del
alimento
Observaci
ón
Instrucciones
Utensilio de
cocina
Posición del
estante
Pollo asado
4~6 lb / pollo Refrigerado
Cocción con
sonda
Ingredientes
Sal kosher, pimienta negra molida, al gusto
Instrucciones
Prepare el pollo, aproximadamente de 4 a 6
libras. Salpique el pollo quitándole el
espinazo. Agregue sal, pimienta y hierbas al
gusto. Coloque el pollo con la piel hacia
arriba en la rejilla de la asadera.
Rejilla sobre
asadera
2
Muslos de
pollo
4~16 C/U Refrigerado Ingredientes
Sal kosher, pimienta negra molida, aceite al
gusto
Instrucciones
Prepare los muslos de pollo, de unas 4 oz.
cada uno. Pincélelos o rocíelos ligeramente
con aceite. Agregue sal y pimienta al gusto.
Coloque los muslos de pollo en la rejilla de la
asadera.
Rejilla sobre
asadera
4
Alitas de
pollo
frescas
10~20 C/U Refrigerado Ingredientes
Sal, pimienta, aceite al gusto
Instrucciones
Prepare las alitas de pollo frescas,
aproximadamente 3 oz. cada una. Cepille o
rocíe ligeramente con aceite. Agregue sal y
pimienta al gusto. Coloque las alitas de pollo
frescas en la rejilla de la asadera.
Rejilla sobre
asadera
4
Alitas de
búfalo
congeladas
10~20 C/U Congelado Ingredientes
Sal kosher, pimienta negra molida, aceite al
gusto
Instrucciones
Prepare las alitas de pollo congeladas,
aproximadamente 3 oz. cada una. Agregue
sal y pimienta al gusto, si es necesario.
Coloque las alitas de pollo congeladas en la
rejilla de la asadera.
Rejilla sobre
asadera
3
Alitas de
pollo
congeladas
(crudas)
10~20 C/U Congelado Ingredientes
Sal kosher, pimienta negra molida, aceite al
gusto
Instrucciones
Prepare las alitas de pollo congeladas,
aproximadamente 3 oz. cada una. Agregue
sal y pimienta al gusto, si es necesario.
Coloque las alitas de pollo congeladas en la
rejilla de la asadera.
Rejilla sobre
asadera
4
es-us_main.book.book Page 74 Friday, August 14, 2026 2:12 PM
75FUNCIONAMIENTO
ESPAÑOL
Pechugas
de pollo
1~8 C/U Refrigerado Ingredientes
Sal kosher, pimienta negra molida, aceite al
gusto
Instrucciones
Prepare las pechugas de pollo frescas,
aproximadamente 6 oz. cada una. Cepille o
rocíe ligeramente con aceite. Agregue sal y
pimienta al gusto. Coloque las pechugas de
pollo en la rejilla de la asadera.
Rejilla sobre
asadera
4
Pollo entero
5~7 lb /pollo Refrigerado
Cocción con
sonda
Ingredientes
Sal kosher, pimienta negra molida, al gusto
Instrucciones
Prepare el pollo entero, de aproximadamente
5~7 libras. Ate el pollo. Agregue sal y
pimienta al gusto. Coloque el pollo entero en
la rejilla de la asadera.
Rejilla sobre
asadera
2
Pechugas
de pavo
1~4 C/U Refrigerado
Cocción con
sonda
Ingredientes
Sal kosher, pimienta negra molida, aceite al
gusto
Instrucciones
Prepare las pechugas de pavo,
aproximadamente 3 lb. cada uno. Cepille o
rocíe ligeramente con aceite. Agregue sal y
pimienta al gusto. Coloque las pechugas de
pavo en la rejilla de la asadera.
Rejilla sobre
asadera
2
Pavo entero
12~16 lb. Refrigerado
Cocción con
sonda
Ingredientes
Sal kosher, pimienta negra molida, al gusto
Instrucciones
Prepare el pavo entero, de aproximadamente
12~16 lb. Agregue sal y pimienta al gusto.
Coloque el pavo entero en la fuente para
rostizar.
Fuente para
rostizar
2
Pavo
relleno
12~16 lb. Refrigerado
Cocción con
sonda
Ingredientes
Sal kosher, pimienta negra molida, al gusto
Instrucciones
Prepare el pavo, aproximadamente de 12~16
lb. Agregue relleno a la cavidad del pavo.
Agregue sal y pimienta al gusto. Coloque el
pavo con el relleno en la fuente para rostizar.
Fuente para
rostizar
2
Pavo a la
plancha
7~12 lb. Refrigerado
Cocción con
sonda
Ingredientes
Sal kosher, pimienta negra molida, al gusto
Instrucciones
Prepare el pavo, aproximadamente de 7~12
libras. Salpique el pavo quitando el espinazo.
Agregue sal, pimienta y hierbas al gusto.
Coloque el pavo con la piel hacia arriba en la
fuente para rostizar.
Fuente para
rostizar
2
Aves de corral
Menú
Cantidad
Temp. del
alimento
Observaci
ón
Instrucciones
Utensilio de
cocina
Posición del
estante
es-us_main.book.book Page 75 Friday, August 14, 2026 2:12 PM
76 FUNCIONAMIENTO
Guiso
Menú
Cantidad
Temp. del
alimento
Observac
ión
Instrucciones
Utensilio de
cocina
Posición
del
estante
Lasaña
casera
1 cazuela
(para 6
personas)
Ambiente
Cuando el
horno
emita un
pitido,
retire la
tapa de los
alimentos.
Ingredientes
1 lb. carne molida de res, cocida
32 oz de queso ricotta
2 tazas de queso mozzarella
1/2 taza de queso parmesano rallado
2 huevos
2 tarros de 24 oz de salsa de tomate
1 caja de láminas de lasaña sin hervir
Instrucciones
Para 6 personas
1) Combine el queso ricotta, 1 taza de
queso mozzarella y 1/4 de taza de queso
parmesano en un bol. Agregue los
huevos y combine.
2) Unte 1 taza de salsa de tomate en el
fondo de la fuente para hornear.
3) Coloque 4 láminas de lasaña, luego 1
taza de salsa de tomate y 1/2 de la
mezcla de queso ricotta. Cubra con la
mitad de la carne cocida.
4) Repita el paso 3.
5) Cubra con 4 láminas de lasaña más y la
salsa de tomate restante.
6) Espolvoree con el resto de los quesos
mozzarella y parmesano.
7) Coloque la fuente para hornear en el
estante para el reconocimiento de la
imagen.
8) Retire la fuente para hornear mientras
precalienta y cubra con papel aluminio.
9) Luego de precalentar, coloque la fuente
para hornear cubierta en el estante.
10) Cuando el horno emita un pitido, retire el
papel de aluminio.
11) Continúe horneando hasta que se
complete la cocción.
fuente para
hornear de 13
x 9 pulgadas
3
es-us_main.book.book Page 76 Friday, August 14, 2026 2:12 PM
77FUNCIONAMIENTO
ESPAÑOL
Macarrones
con queso
caseros
1 cazuela
(para 6
personas)
Ambiente
Ingredientes
Cobertura de pan rallado
1 taza de pan rallado panko
2 cucharadas de mantequilla sin sal, derretida
Macarrones
1 libra de pasta de macarrones codo
Salsa de queso
4 cucharadas de mantequilla sin sal
1/3 taza de harina multiuso
1 cucharadita de mostaza molida
1 cucharadita de pimentón molido
5 tazas de mitad y mitad
4 oz de queso fundido
12 oz de queso cheddar blanco afilado, rallado
4 oz de queso gouda ahumado, rallado
1 cucharadita de salsa Sriracha
Instrucciones
Para 6 personas
Cobertura de pan rallado
En un bol, mezcle el pan rallado y la mantequilla
derretida; reserve.
Macarrones
Cueza la pasta en una olla grande de agua
hirviendo con sal hasta que esté al dente,
según las recomendaciones del paquete.
Escurra y reserve.
fuente para
hornear de 13
x 9 pulgadas
2
Guiso
Menú
Cantidad
Temp. del
alimento
Observac
ión
Instrucciones
Utensilio de
cocina
Posición
del
estante
es-us_main.book.book Page 77 Friday, August 14, 2026 2:12 PM
78 FUNCIONAMIENTO
Macarrones
con queso
caseros
1 cazuela
(para 6
personas)
Ambiente
Salsa de queso
1) En la misma olla en la que se cocinó la
pasta, derrita las 4 cucharadas de
mantequilla a fuego medio. Agregue la
harina y revuelva para combinar con la
mantequilla.
2) Incorpore la mostaza molida y el
pimentón a la mezcla de mantequilla y
harina. Cocine esta mezcla durante 2
minutos, removiendo con frecuencia.
3) Batir la mitad y la mitad lentamente para
evitar grumos.
4) Lleve la mezcla de mitad y mitad y
mantequilla y harina a fuego lento,
revolviendo ocasionalmente hasta el
fondo de la olla.
5) Baje el fuego y revuelva con frecuencia
por cinco minutos hasta que la salsa se
haya espesado.
6) Agregue el queso procesado y revuelva
para derretirlo en la salsa.
7) Fuera del fuego, agregue los quesos
cheddar y gouda, poco a poco, hasta que
todos los quesos se derritan en la salsa.
8) Agregue la salsa Sriracha.
9) Agregue la pasta escurrida y revuelva
para combinar con la salsa de queso.
10) Transfiera la mezcla de pasta y salsa de
queso a una cazuela.
11) Cubra uniformemente con la mezcla de
pan rallado.
12) Después de precalentar, coloque la
fuente para hornear en el horno.
fuente para
hornear de 13
x 9 pulgadas
2
Guiso
Menú
Cantidad
Temp. del
alimento
Observac
ión
Instrucciones
Utensilio de
cocina
Posición
del
estante
es-us_main.book.book Page 78 Friday, August 14, 2026 2:12 PM
79FUNCIONAMIENTO
ESPAÑOL
Patatas
gratinadas
1 cazuela
(para 6~8
personas)
Ambiente
Cuando el
horno
emita un
pitido,
retire la
tapa de los
alimentos.
Ingredientes
1 cucharada de mantequilla sin sal, a
temperatura ambiente
1 diente de ajo, machacado
2 1/2 libras de papas Yukon Gold o 4-5 papas
russet, lavadas
2 1/2 tazas de crema espesa
4 oz de queso Gruyere o parmesano, rallado
sal kosher y pimienta negra molida al gusto
Instrucciones
1) Unte generosamente con mantequilla la
cazuela.
2) Frote el diente de ajo machacado por
toda la cazuela con mantequilla.
3) Corte las papas en rodajas de 1/8 de
pulgada de grosor con un cuchillo o una
mandolina.
4) Genere la dauphinoise colocando una
porción de la crema espesa en el fondo
de la cazuela.
5) Sigue esto con algunas de las papas en
rodajas, el queso y sal y pimienta.
6) Agregue más crema espesa y repita con
las papas, el queso, la sal y la pimienta.
7) Continúe construyendo y colocando las
papas en capas para llenar la cazuela.
8) Coloque la fuente para hornear en el
estante para el reconocimiento de la
imagen.
9) Saque la fuente para hornear mientras
precalienta el horno y cubra la capa
superior de patatas con papel
pergamino. Presione el papel para que
toque las patatas.
10) Una vez precalentado, coloque la fuente
de horno cubierta directamente sobre el
estante.
11) Cuando el horno emita un pitido, retire el
papel pergamino.
fuente para
hornear de 13
x 9 pulgadas
2
Guiso
Menú
Cantidad
Temp. del
alimento
Observac
ión
Instrucciones
Utensilio de
cocina
Posición
del
estante
es-us_main.book.book Page 79 Friday, August 14, 2026 2:12 PM
80 FUNCIONAMIENTO
Pizza
Menú
Cantidad
Temp. del
alimento
Instrucciones
Utensilio de
cocina
Posición
del
estante
Corteza fina
congelada
1 pizza (aprox.
18.5 oz)
Congelado
1) Retire la pizza del envase.
2) Coloque la pizza directamente sobre el estante para
el reconocimiento de la imagen.
3) Retire la pizza mientras se precalienta el horno.
4) Una vez precalentado, coloque la pizza directamente
en el estante.
Directamente
sobre el estante
4
Corteza
congelada
1 pizza (aprox.
29 oz)
Congelado
1) Retire la pizza del envase.
2) Coloque la pizza directamente sobre el estante para
el reconocimiento de la imagen.
3) Retire la pizza mientras se precalienta el horno.
4) Una vez precalentado, coloque la pizza directamente
en el estante.
Directamente
sobre el estante
4
Pizza casera
Pizza de 14
pulgadas
(para 6~8
personas)
Ambiente
Ingredientes
Masa
8 onzas de harina para todo uso
1/2 cucharada de sal kosher
1/2 taza de agua tibia, aproximadamente 115
8
1/8 cucharadita de azúcar
1/2 cucharadita de levadura seca activa
1 cucharada de aceite de oliva + más para cepillar
Salsa casera
1 lata de 28 onzas de tomates pelados enteros
(preferiblemente San Marzano)
1 lata de pasta de tomate de 6 onzas, 1 cucharada de
albahaca fresca, picada en trozos grandes
2 cucharadas de aceite de oliva o mezcla de aceite de oliva, 1
cucharada de sal kosher
1/2 cucharadita de pimienta negra, 1 cucharada de ajo
granulado, 1 cucharada de azúcar
※ La salsa comprada en la tienda se puede usar en su lugar
por simplicidad.
Pizza
1/2 a 3/4 de taza de salsa, 8 onzas de queso mozzarella
rallado
En una bandeja
para pizzas
4
es-us_main.book.book Page 80 Friday, August 14, 2026 2:12 PM
81FUNCIONAMIENTO
ESPAÑOL
Pizza casera
Pizza de 14
pulgadas
(para 6~8
personas)
Ambiente
Instrucciones
Masa
1) En el tazón de una batidora eléctrica, mezcle la
harina y la sal.
2) En un bol aparte, agregue el agua, el azúcar, la
levadura y el aceite de oliva.
3) Batir la mezcla de levadura. Déjelo a un lado hasta
que forme espuma y burbujas, aproximadamente de
3-5 minutos.
4) Coloque el bol de la batidora en el soporte de la
batidora y coloque el gancho para amasar.
5) Agregue la mezcla de levadura a la harina y comience
a mezclar la masa a velocidad media durante 8 1/2
minutos. Si la masa no está completamente
combinada, mezcle durante otro minuto. Si la masa
se pega al bol, agregue otro 1/4 de taza de harina y
mezcle por otro minuto. Si la masa está demasiado
seca, agregue otro 1/4 de taza de agua y mezcle
durante otro minuto.
6) Levante la masa y comienza a formar una bola
doblando suavemente la masa debajo de sí misma.
7) Coloque en una bandeja ligeramente engrasada.
8) Unte la bola de masa con aceite de oliva para
mantenerla húmeda.
9) Cubra con una envoltura de plástico y deje que la
masa suba hasta que duplique su tamaño,
aproximadamente una hora más o menos.
10) Voltee la bola de masa sobre una superficie
ligeramente enharinada.
11) Comience a darle forma a la bola de masa
presionando hacia abajo con las yemas de los dedos
en la masa para formar un círculo redondo de 6
pulgadas.
12) Use una pequeña cantidad de harina según sea
necesario para evitar que se pegue.
En una bandeja
para pizzas
4
Pizza
Menú
Cantidad
Temp. del
alimento
Instrucciones
Utensilio de
cocina
Posición
del
estante
es-us_main.book.book Page 81 Friday, August 14, 2026 2:12 PM
82 FUNCIONAMIENTO
Pizza casera
Pizza de 14
pulgadas
(para 6~8
personas)
Ambiente
Salsa
1) Abra las latas de tomates y vacíelas en una batidora.
2) Pique la albahaca en trozos grandes.
3) Agregue la pasta de tomate, la albahaca picada y las
especias a la batidora.
4) Bata los ingredientes hasta que la salsa esté bien
mezclada, unos 30 segundos.
Pizza
1) Para estirar la masa, colóquela sobre una superficie
ligeramente enharinada y presione suavemente en
círculo, volteándola varias veces y agregando una
pizca de harina si la masa está pegajosa. Una vez que
tenga un círculo de 6 u 8 pulgadas, comience a rodar
con el rodillo para estirar suavemente la masa,
girándola ligeramente para mantener la forma del
círculo.
2) Coloque la masa de pizza en una pala de pizza
ligeramente enharinada o en un molde
antiadherente para pizza. Puede cortar la masa con
un cortador de pizza para formar un círculo o para
hacerla más pequeña.
3) Use un rodillo de aguja o un tenedor para hacer
pequeños agujeros en la masa.
4) Estos agujeros evitan burbujas en la masa de la pizza.
5) Extienda uniformemente la salsa sobre toda la
superficie de la masa, dejando un espacio de 1
pulgada alrededor del borde exterior de la masa.
6) Coloque el queso encima de la salsa.
7) Deje aproximadamente un borde de media pulgada
desde el borde de la salsa. El queso se extenderá y se
mantendrá sobre la pizza de esta manera.
8) Coloque el molde para pizza o la pala en el horno
para reconocer la imagen.
9) Retire la pizza mientras precalienta.
10) Después de precalentar, coloque el molde para pizza
en el estante o use la pala para transferir la pizza a
una piedra para pizza.
11) Después de cocinar, enfríe por 5 minutos antes de
cortar.
En una bandeja
para pizzas
4
Pizza
Menú
Cantidad
Temp. del
alimento
Instrucciones
Utensilio de
cocina
Posición
del
estante
es-us_main.book.book Page 82 Friday, August 14, 2026 2:12 PM
83FUNCIONAMIENTO
ESPAÑOL
Pastelería
Menú
Cantidad
Temp. del
alimento
Instrucciones
Utensilio de
cocina
Posición del
estante
Croissants
refrigerados
2~8 C/U Refrigerado Prepare los croissants. Enrolle los triángulos de
croissant en forma de croissant. Coloque los
croissants en el molde engrasado de media hoja.
Coloque la bandeja de media hoja en el horno para
reconocer la imagen. Retire la bandeja de media
hoja mientras precalienta. Después de precalentar,
vuelva a colocar la bandeja de media hoja con los
croissants en el horno.
Bandeja de 1/2
hoja
3
Panecillos
congelados
1~6 C/U Congelado Coloque los panecillos congelados en la bandeja de
media hoja. Coloque la bandeja de media hoja en el
horno para reconocer la imagen. Retire la bandeja
de media hoja mientras precalienta. Después de
precalentar, vuelva a colocar la bandeja de media
hoja con los panecillos congelados en el horno.
Bandeja de 1/2
hoja
3
Rollos de canela
refrigerados
1 lata (8 rollos) Refrigerado Prepare los rollos de canela. Coloque los rollos con
el lado de canela hacia arriba en un molde para
pastel sin engrasar. Coloque el molde en el horno
para reconocimiento de imágenes. Retire el molde
mientras el horno se está precalentando. Después
de precalentarlo, vuelva a colocar el molde con los
rollos de canela en el horno.
Molde redondo
de 9 pulgadas
3
Verduras
Menú
Cantidad
Temp. del
alimento
Observaci
ón
Instrucciones
Utensilio
de cocina
Posición del
estante
Zanahorias
baby
15~30 oz Refrigerado Ingredientes
Sal kosher, pimienta negra molida, aceite al
gusto
Instrucciones
1) Lave y pele (si es necesario) las
zanahorias baby.
2) Cepille o pulverice con aceite.
3) Agregue sal y pimienta al gusto.
4) Coloque las zanahorias baby en la
bandeja de media hoja.
Bandeja de
1/2 hoja
3
es-us_main.book.book Page 83 Friday, August 14, 2026 2:12 PM
84 FUNCIONAMIENTO
Zanahorias,
cortadas en
dados
15~30 oz Refrigerado Ingredientes
Sal kosher, pimienta negra molida, aceite al
gusto
Instrucciones
1) Pele y corte las zanahorias en dados de
1/2~3/4 pulg.
2) Cepille o pulverice con aceite.
3) Agregue sal y pimienta al gusto.
4) Coloque las zanahorias en la bandeja
de media hoja.
Bandeja de
1/2 hoja
3
Setas
blancas
5~20 oz Refrigerado Ingredientes
Sal kosher, pimienta negra molida, aceite al
gusto
Instrucciones
1) Si lo desea, corte los champiñones en
mitades.
2) Cepille o pulverice con aceite.
3) Agregue sal y pimienta al gusto.
4) Coloque los champiñones en la bandeja
de media hoja.
Bandeja de
1/2 hoja
3
Espárragos
5~20 oz Refrigerado Ingredientes
Sal kosher, pimienta negra molida, aceite al
gusto
Instrucciones
1) Recorte los extremos más duros y
leñosos de los espárragos y deséchelos.
2) Cepille o pulverice con aceite.
3) Agregue sal y pimienta al gusto.
4) Coloque los espárragos en la bandeja
de media hoja.
Bandeja de
1/2 hoja
3
Brócoli
15~30 oz Refrigerado Ingredientes
Sal kosher, pimienta negra molida, aceite al
gusto
Instrucciones
1) Corte el brócoli en ramilletes del
tamaño de un bocado.
2) Cepille o pulverice con aceite.
3) Agregue sal y pimienta al gusto.
4) Coloque el brócoli en la bandeja de
media hoja.
Bandeja de
1/2 hoja
3
Verduras
Menú
Cantidad
Temp. del
alimento
Observaci
ón
Instrucciones
Utensilio
de cocina
Posición del
estante
es-us_main.book.book Page 84 Friday, August 14, 2026 2:12 PM
85FUNCIONAMIENTO
ESPAÑOL
Coliflor
15~30 oz Refrigerado Ingredientes
Sal kosher, pimienta negra molida, aceite al
gusto
Instrucciones
1) Corte la coliflor en ramilletes del
tamaño de un bocado.
2) Cepille o pulverice con aceite.
3) Agregue sal y pimienta al gusto.
4) Coloque la coliflor en la bandeja de
media hoja.
Bandeja de
1/2 hoja
3
Coles de
Bruselas
15~30 oz Refrigerado Ingredientes
Sal kosher, pimienta negra molida, aceite al
gusto
Instrucciones
1) Corte las coles de Bruselas por la mitad,
o en cuartos si son grandes.
2) Cepille o pulverice con aceite.
3) Agregue sal y pimienta al gusto.
4) Coloque las coles de Bruselas en la
bandeja de media hoja.
Bandeja de
1/2 hoja
3
Remolachas,
cortada
15~30 oz Refrigerado Ingredientes
Sal kosher, pimienta negra molida, aceite al
gusto
Instrucciones
1) Pele y corte las remolachas en dados de
1/2~3/4 pulg.
2) Cepille o pulverice con aceite.
3) Agregue sal y pimienta al gusto.
4) Coloque las remolachas cortadas en
dados en la media bandeja.
Bandeja de
1/2 hoja
3
Boniatos, en
dados
15~30 oz Ambiente Ingredientes
Sal kosher, pimienta negra molida, aceite al
gusto
Instrucciones
1) Pele y corte las batatas en dados de 1/
2~3/4 pulg.
2) Cepille o pulverice con aceite.
3) Agregue sal y pimienta al gusto.
4) Coloque las batatas cortadas en dados
en la bandeja de media hoja.
Bandeja de
1/2 hoja
3
Verduras
Menú
Cantidad
Temp. del
alimento
Observaci
ón
Instrucciones
Utensilio
de cocina
Posición del
estante
es-us_main.book.book Page 85 Friday, August 14, 2026 2:12 PM
86 FUNCIONAMIENTO
Camote
(entero)
1~4 C/U (8
oz cada una)
Ambiente
1) Lave y pinche la piel por todas las
batatas.
2) Coloque las batatas directamente sobre
el estante.
Directament
e sobre el
estante
3
Tomates
cherry
15~30 oz Refrigerado Ingredientes
Sal kosher, pimienta negra molida, aceite al
gusto
Instrucciones
1) Lave los tomates cherry.
2) Retire los tallos, si hay presencia de
ellos.
3) Cepille o pulverice con aceite.
4) Agregue sal y pimienta al gusto.
5) Coloque los tomates cherry en la
bandeja de media hoja.
Bandeja de
1/2 hoja
3
Mazorca de
maíz
1 hoja (8~12
oz cada uno)
Refrigerado
Cuando el
horno
emite un
pitido,
voltee la
comida.
Ingredientes
Sal kosher, pimienta negra molida, al gusto, 1/
2 cucharada de aceite por (1/2) pieza
Instrucciones
1) Retire las cáscaras y la seda de las
mazorcas de maíz y córtelas por la
mitad.
2) Cepille o pulverice con aceite.
3) Agregue sal y pimienta al gusto.
4) Coloque el maíz en una bandeja de
media hoja.
5) Cuando el horno emita un pitido, voltee
la comida.
Bandeja de
1/2 hoja
3
Guisantes
10~20 oz Refrigerado Ingredientes
Sal kosher, pimienta negra molida, aceite al
gusto
Instrucciones
1) Lave los ejotes.
2) Cepille o pulverice con aceite.
3) Agregue sal y pimienta al gusto.
4) Coloque los ejotes en una bandeja de
media hoja.
Bandeja de
1/2 hoja
3
Verduras
Menú
Cantidad
Temp. del
alimento
Observaci
ón
Instrucciones
Utensilio
de cocina
Posición del
estante
es-us_main.book.book Page 86 Friday, August 14, 2026 2:12 PM
87FUNCIONAMIENTO
ESPAÑOL
Patatas
Menú
Cantidad
Temp. del
alimento
Instrucciones
Utensilio de
cocina
Posición del
estante
Patatas
fritas
caseras
15~30 oz Ambiente Ingredientes
Para 15 oz de papas Yukon Gold
2 cucharadas de aceite de oliva
1 cucharadita de sal kosher
1/2 cucharadita de pimienta negra molida
1 cucharadita de pimentón ahumado
1/2 cucharadita de ajo en polvo
2 cucharadas de perejil picado, para adornar
Instrucciones
1) Corte las papas en cubos de 1 pulgada y colóquelas en
una bandeja de media hoja.
2) Sazone las papas con sal, especias y aceite de oliva.
Mezcle bien.
3) Rostice por 20 minutos dependiendo del tamaño,
revolviendo a mitad del proceso de cocción.
4) Decore con hierbas frescas para darle color y sirva de
inmediato.
Bandeja de 1/
2 hoja
3
Cuñas de
patata
15~30 oz Ambiente Ingredientes
Sal kosher, pimienta negra molida, aceite al gusto
Instrucciones
1) Lave y corte las patatas en gajos.
2) Cepille o pulverice con aceite.
3) Agregue sal y pimienta al gusto.
4) Coloque las papas en una bandeja de media hoja.
Bandeja de 1/
2 hoja
3
Puré de
patatas
15~30 oz Ambiente Ingredientes
Sal kosher, pimienta negra molida, aceite al gusto
Instrucciones
1) Cocine las papas russet en agua hirviendo durante 15
minutos y luego cuele y enfríe.
2) Combine todas las especias en un bol pequeño para
mezclar.
3) Aplaste las papas usando el costado de un cuchillo para
aplanarlas.
4) Coloque el puré de papas en una bandeja de media
hoja.
5) Agregue el aceite de oliva y el condimento.
Bandeja de 1/
2 hoja
3
es-us_main.book.book Page 87 Friday, August 14, 2026 2:12 PM
88 FUNCIONAMIENTO
Postre
Menú
Cantidad
Temp. del
alimento
Instrucciones
Utensilio de
cocina
Posición
del
estante
Tarta de
manzana
Pastel de 9"
(para 6
personas)
Ambiente
Ingredientes
Base del pastel
2 1/2 tazas de harina de repostería, 1 cucharadita de sal, 1
cucharadita de azúcar
2 barritas de mantequilla sin sal, cortada en trozos
pequeños y bien fría
4-6 cucharadas de agua helada, según sea necesario
Manzanas
8 manzanas ácidas, como la Granny Smith
2 cucharadas de jugo de limón, 1/4 taza de azúcar, 1/2
cucharadita de canela molida
1/2 cucharadita de sal kosher, 1 cucharada de mantequilla
sin sal, cortada en trozos pequeños
Instrucciones
Base del pastel
1) Use un procesador de alimentos con un accesorio de
cuchilla para combinar la harina de repostería, la sal
y el azúcar.
2) Agregue los trozos de mantequilla fría y pulse hasta
que se asemeje a una harina gruesa.
3) Agregue agua helada una cucharada a la vez y
mezcle hasta que la masa se junte.
4) Coloque la masa en una barra ligeramente
enharinada y junte la masa.
5) Divida la masa en 2 porciones iguales y aplana cada
una en un disco. Envuelva cada uno en una envoltura
de plástico y refrigere por una hora.
Molde para
pasteles
directamente
en el estante y
bandeja
antigoteo en
el estante
inferior
3
es-us_main.book.book Page 88 Friday, August 14, 2026 2:12 PM
89FUNCIONAMIENTO
ESPAÑOL
Tarta de
manzana
Pastel de 9"
(para 6
personas)
Ambiente
Manzanas
1) Pele, quite el corazón, corte en cuartos y rodajas
finas las manzanas y colóquelas en un bol grande.
2) Mezcle las manzanas con el jugo de limón, seguido
del azúcar, la canela y la sal kosher.
Para montar el pastel
1) En una barra bien enharinada, enrolle cada masa
para pastel a 12 pulgadas de diámetro. Use una
masa para pastel enrollada para forrar un molde
para pastel hondo.
2) Agregue las manzanas al molde para pastel y
salpique con 1 cucharada de mantequilla.
3) Use la otra masa para pastel para cubrir el relleno.
Meta la costra superior debajo de la costra inferior
por todas partes. Pellizque para cerrar.
4) Corte algunas hendiduras en la costra superior para
permitir que escape el vapor. En un bol pequeño,
combine 1 huevo y 1 cucharada de leche. Cepille el
huevo lavado sobre la costra superior.
5) Coloque el pastel en el horno para el reconocimiento
de la imagen.
6) Retire el pastel mientras precalienta el horno.
7) Luego de precalentar, coloque el molde para pastel
directamente sobre el estante y una bandeja
antigoteo forrado con papel de aluminio en el
estante inferior.
8) Deje enfriar en un estante por 1 hora antes de servir.
Molde para
pasteles
directamente
en el estante y
bandeja
antigoteo en
el estante
inferior
3
Postre
Menú
Cantidad
Temp. del
alimento
Instrucciones
Utensilio de
cocina
Posición
del
estante
es-us_main.book.book Page 89 Friday, August 14, 2026 2:12 PM
90 FUNCIONAMIENTO
Brownies
1 bandeja
(para 6
personas)
Ambiente
Ingredientes
1/2 barrita de mantequilla sin sal, 6 onzas de chocolate
semidulce picado
1/2 taza de azúcar moreno, 1 taza de azúcar, 3 huevos
grandes
1/4 taza de cacao en polvo, 1/2 cucharadita de sal kosher
1/2 taza + 2 cucharadas de harina multiuso
Instrucciones
Para 6 personas
1) Forre un molde para hornear de 8"x8" con papel
pergamino.
2) En un recipiente apto para microondas, combine la
mantequilla y el chocolate.
3) Cocine en el microondas en intervalos cortos y
revuelva luego de cada intervalo hasta que se derrita
y quede suave.
4) Agregue los azúcares y bata hasta que se combinen.
5) Agregue los huevos uno a la vez, mezclando hasta
que se incorporen.
6) Tamice el cacao en polvo, la sal y la harina en el tazón
y mezcle hasta que se combinen.
7) Vierta la masa en el molde para hornear de 8"x8".
8) Coloque la bandeja para hornear en el horno para
reconocer la imagen.
9) Remueva la bandeja mientras precalienta el horno.
10) Después de que el horno se precaliente, vuelva a
colocar la bandeja en el horno.
11) Después de cocinar, deje que los brownies se enfríen
por 15 minutos en la bandeja antes de cortarlos en
rodajas.
bandeja de
8x8 pulgadas
3
Postre
Menú
Cantidad
Temp. del
alimento
Instrucciones
Utensilio de
cocina
Posición
del
estante
es-us_main.book.book Page 90 Friday, August 14, 2026 2:12 PM
91FUNCIONAMIENTO
ESPAÑOL
Bollos
1 hoja de 24
bollos
Ambiente
Ingredientes
2 1/4 tazas de harina de repostería, 2 cucharaditas de
azúcar, 2 cucharadas + 1 cucharadita de levadura en polvo
4 1/2 cucharaditas de sal kosher, 3 barras de mantequilla sin
sal, refrigeradas y cortadas en trozos pequeños, 6 tazas de
harina multiuso, 3 tazas de suero de leche
Instrucciones
Para 24 bollos
1) Utilice un robot de cocina con cuchillas para mezclar
la harina de repostería, el azúcar, la levadura en
polvo y la sal.
2) Agregue los trozos de mantequilla fría y pulse hasta
que la mezcla se asemeje a una harina gruesa.
3) En un bol grande, combine la harina multiuso con la
mezcla del procesador de alimentos.
4) Agregue el suero de leche y mezcle hasta que la
masa se una.
5) Voltee la masa sobre una superficie enharinada y
extiéndala hasta 1 1/2 pulg. de grosor.
6) Corte la masa en la forma deseada o usa un cortador
de galletas redondo.
7) Transfiera las escenas cortadas a un molde de media
hoja forrado con pergamino.
8) Coloque la bandeja de media hoja en el horno para
reconocer la imagen.
9) Retire la bandeja de media hoja mientras precalienta
el horno.
10) Después de que el horno se precaliente, vuelva a
colocar los bollos en el horno para que se cocinen.
Bandeja de 1/2
hoja
3
Postre
Menú
Cantidad
Temp. del
alimento
Instrucciones
Utensilio de
cocina
Posición
del
estante
es-us_main.book.book Page 91 Friday, August 14, 2026 2:12 PM
92 FUNCIONAMIENTO
Bizcocho
2 pasteles Ambiente Ingredientes
1 taza de harina para pastel, 6 huevos grandes, separados
1 taza de azúcar, 3/4 taza de azúcar para las yemas de
huevo, 1/4 taza de azúcar para las claras de huevo
2 cucharaditas de vainilla, 1/4 cucharadita de sal
Instrucciones
1) Engrase el fondo y los laterales de dos moldes para
tartas de 9" con mantequilla sin sal. Forre el fondo de
los moldes para tartas con papel pergamino y unte el
papel con mantequilla. Espolvoree los moldes con
harina multiuso.
2) Utilice una mezcladora eléctrica con un accesorio
batidor para combinar las yemas de huevo con 3/4
de taza de azúcar. Bata a velocidad media-alta
durante 5 minutos hasta que la mezcla de yemas
esté espesa y de color pálido.
3) En un bol limpio, utilice una batidora eléctrica con el
accesorio batidor para batir las claras de huevo hasta
que se formen picos suaves. Añadir lentamente 1/4
de taza de azúcar y seguir batiendo hasta que se
formen picos firmes y brillantes.
4) Incorpore 1/3 de la mezcla de yemas a la vez a las
claras montadas.
5) Tamizar la harina para tartas sobre la mezcla de
huevos e incorporarla suavemente.
6) Repartir la masa a partes iguales en los moldes.
7) Coloque los moldes en el horno para el
reconocimiento de imagen.
8) Retire los moldes mientras se precalienta el horno.
9) Una vez precalentado el horno, coloque los moldes
en el horno y hornee.
10) Deje enfriar los pasteles durante 5 minutos antes de
invertirlos sobre un estante para enfriar.
Molde de 9
pulg.
3
Postre
Menú
Cantidad
Temp. del
alimento
Instrucciones
Utensilio de
cocina
Posición
del
estante
es-us_main.book.book Page 92 Friday, August 14, 2026 2:12 PM
93FUNCIONAMIENTO
ESPAÑOL
Tarta de
queso
1 pastel
(para 6~8
personas)
Ambiente
Ingredientes
Base de galleta
1 barra de mantequilla sin sal, a temperatura ambiente
2 cucharadas de azúcar granulada, 1 taza de azúcar morena,
1 huevo
1 taza de harina multiuso, 1/4 cucharadita de bicarbonato de
sodio
1/8 cucharadita de levadura en polvo, 1/4 cucharadita de sal
Masa de tarta de queso
2 lb. de queso crema, temperatura ambiente, 1 1/2 tazas de
azúcar granulada
2 huevos, 2 yemas de huevo, 5 cucharadas de crema espesa,
1/2 cucharadita de extracto de vainilla
Instrucciones
Base de galleta
1) Precaliente el horno a 350 8 en el modo Hornear.
2) Rocíe y forre el molde para pasteles con forma de
resorte de 9" con papel pergamino.
3) Coloque la mantequilla en el bol de una mezcladora
de pie y comience a ablandarla con el accesorio de
paleta.
4) Agregue el azúcar y el azúcar morena y mézclelos
con la mantequilla hasta que estén bien mezclados,
de 3 a 5 minutos.
5) Agregue el huevo a la mezcla y combine.
6) Agregue la harina, el bicarbonato de sodio, el polvo
de hornear y la sal al bol de la mezcladora y mezcle
suavemente hasta que se combinen.
7) Remueva el bol de la batidora y vacíelo en la sartén
preparada. Presione suavemente la masa para
galletas hacia abajo para forrar todo el fondo del
molde desmontable.
8) Coloque la bandeja en el horno y hornee por 20
minutos.
9) Deja que la galleta se enfríe mientras prepara la
masa de tarta de queso.
bandeja
desmontable
de 9" en baño
de agua
3
Postre
Menú
Cantidad
Temp. del
alimento
Instrucciones
Utensilio de
cocina
Posición
del
estante
es-us_main.book.book Page 93 Friday, August 14, 2026 2:12 PM
94 FUNCIONAMIENTO
Tarta de
queso
1 pastel
(para 6~8
personas)
Ambiente
Masa de tarta de queso
1) Coloque el queso crema en el bol de una mezcladora
de pie y mezcle para ablandarlo.
2) Agregue el azúcar y mezcle hasta que esté bien
combinado, aproximadamente 5 minutos.
3) Agregue los huevos y las yemas de huevo
lentamente para asegurarse de que estén bien
combinados.
4) Agregue la crema espesa y el extracto de vainilla y
mezcle hasta que se combinen.
5) Vierta la masa sobre la corteza de galleta enfriada en
el molde desmontable.
6) Envuelva el fondo del molde desmontable con papel
de aluminio, llevándolo por los lados.
7) Coloque el molde desmontable envuelto en papel de
aluminio en una cazuela más grande.
8) Agregue solo suficiente agua a la cazuela para que
llegue a los lados de la sartén, pero no por encima
del papel de aluminio.
9) Coloque la tarta de queso en el horno para reconocer
la imagen.
10) Retire la tarta de queso mientras el horno se
precalienta.
11) Después de precalentar, coloque la cazuela con la
tarta de queso en el horno y hornee.
12) Deje que la tarta se enfríe al baño maría durante 1
hora. Después de una hora, retírelo del baño maría y
colóquelo en el refrigerador durante la noche en el
molde desmontable.
bandeja
desmontable
de 9" en baño
de agua
3
Postre
Menú
Cantidad
Temp. del
alimento
Instrucciones
Utensilio de
cocina
Posición
del
estante
es-us_main.book.book Page 94 Friday, August 14, 2026 2:12 PM
95FUNCIONAMIENTO
ESPAÑOL
Galletas con
pepitas de
chocolate
36 galletas (12
por hoja)
Ambiente
Ingredientes
(Para 3 docenas de galletas)
2 1/2 barritas de mantequilla salada, 1 1/4 tazas de azúcar
moreno, 1 taza + 2 cucharadas de azúcar
2 huevos grandes, 1 cucharadita de extracto de vainilla, 3 2/
3 tazas de harina multiuso
1 1/4 cucharadita de levadura en polvo, 1 1/4 cucharadita de
bicarbonato
1 1/4 cucharadita de sal marina fina, 20 oz de trocitos de
chocolate
Instrucciones
Se pueden cocinar 12 en una bandeja.
1) Cremar la mantequilla con los azúcares en una
mezcladora eléctrica hasta que esté ligera, unos 5
minutos. Raspe el bol y la pala según sea necesario.
2) Agregue los huevos uno a la vez, mezclando bien
luego de cada adición.
3) Raspe el bol y la paleta y agregue la vainilla.
4) Tamice la harina, el polvo, el bicarbonato de sodio y
la sal juntos.
5) Agregue la mezcla seca a la mezcla húmeda.
6) Raspe el botón y la pala.
7) Incorpore las chispas de chocolate.
8) Forre bandejas de media hoja con papel pergamino.
9) Coloque la masa para galletas en los moldes en un
patrón de 3x4.
10) Coloque una bandeja de media hoja en el horno para
reconocer la imagen.
11) Retire la bandeja de media hoja mientras precalienta
el horno.
12) Después del precalentamiento, coloque el bandeja
de media hoja en el horno. Hornee las galletas en
una bandeja de media hoja de una vez.
Bandeja de 1/2
hoja
3
Postre
Menú
Cantidad
Temp. del
alimento
Instrucciones
Utensilio de
cocina
Posición
del
estante
es-us_main.book.book Page 95 Friday, August 14, 2026 2:12 PM
96 FUNCIONAMIENTO
Baguette
2 demi
baguettes
Ambiente
Ingredientes
paquete de 0.25 oz de levadura seca activa,
aproximadamente 3/4 cucharadas de levadura
11 oz de agua, aproximadamente 100
8
18 oz de harina de pan
1 cucharada de sal
Instrucciones
1) En un bol pequeño, disuelva la levadura en el agua
tibia con un batidor.
2) Agregue la mezcla de levadura y agua al tazón de
una batidora eléctrica.
3) Agregue la harina de pan y la sal al bol.
4) Use el gancho para amasar para mezclar la masa a
baja velocidad durante 7 minutos.
5) Coloque la masa en un bol y déjela reposar durante
30 minutos o hasta que duplique su tamaño.
6) Golpea la masa hacia abajo y deja que suba
nuevamente hasta que duplique su tamaño.
7) Retire la masa y colóquela sobre una superficie de
trabajo.
8) Divida la masa en 2 trozos iguales.
9) Dele forma a cada pieza en una baguette pequeña.
10) Coloque las baguettes en un molde de media hoja
forrado con pergamino.
11) Cubra las baguettes con papel de plástico y deje que
dupliquen su tamaño.
12) Después de que las baguettes hayan duplicado su
tamaño, use un cuchillo de sierra y corte cada
baguette con 3 cortes diagonales de cuatro pulgadas
de largo y media pulgada de profundidad.
13) Coloque las baguettes en la bandeja de media hoja.
14) Coloque la bandeja de media hoja en el horno para
reconocer la imagen.
15) Retire la bandeja de media hoja mientras precalienta
el horno.
16) Luego del precalentamiento, coloque la bandeja de
media hoja de regreso en el horno.
Bandeja de 1/2
hoja
3
Postre
Menú
Cantidad
Temp. del
alimento
Instrucciones
Utensilio de
cocina
Posición
del
estante
es-us_main.book.book Page 96 Friday, August 14, 2026 2:12 PM
97FUNCIONAMIENTO
ESPAÑOL
Tarta de fruta
1 pay Ambiente Ingredientes
Masa de pay
2 tazas de harina multiuso, 1 1/2 cucharadas de azúcar, 1
cucharada de azúcar moreno
1 1/2 barritas de mantequilla sin sal, fría y cortada en trozos
pequeños
1 huevo entero, 1 yema de huevo, 2 cucharadas de agua
helada
Crema pastelera
2/3 taza de azúcar, 1/4 taza de harina de maíz
una pizca de sal kosher, 2 huevos grandes, 2 tazas de leche
2 cucharadas de mantequilla sin sal, cortada en trozos
pequeños, 2 cucharaditas de vainilla
Instrucciones
Masa de pay
1) Coloque la harina y los azúcares en el bold de trabajo
de un procesador de alimentos y pulse para
combinar.
2) Agregue los trozos fríos de mantequilla y pulse hasta
que la mezcla se asemeje a una harina gruesa.
3) Agregue el huevo entero, la yema de huevo y el agua
helada y pulse hasta que la masa forme una bola.
4) Retire del recipiente de trabajo y forme un disco.
Envuelva la masa en papel de plástico y colóquela en
el refrigerador mientras se hace el relleno.
Crema pastelera
1) En una cazuela, combine el azúcar y la leche.
Caliéntelo suavemente hasta que hierva a fuego
lento.
2) En un bol, combine los huevos, la harina de maíz, la
sal y la vainilla. Agregue la mezcla de leche tibia a la
mezcla de huevo en pequeñas cantidades para
templar los huevos y evitar cocinarlos.
3) Regrese todo a la cacerola y cocine las natillas hasta
que espese y comience a burbujear.
4) Cuele a través de un colador de malla fina y agregue
la mantequilla. Enfríe la crema pastelera a
temperatura ambiente antes de usarla.
Bandeja para
pays
3
Postre
Menú
Cantidad
Temp. del
alimento
Instrucciones
Utensilio de
cocina
Posición
del
estante
es-us_main.book.book Page 97 Friday, August 14, 2026 2:12 PM
98 FUNCIONAMIENTO
Tarta de fruta
1 pay Ambiente Para montar el pay
1) Retire la masa de pay del refrigerador.
2) Coloque la masa sobre una superficie de trabajo
ligeramente enharinada.
3) Espolvoree un poco más de harina sobre la masa y
extiéndala hasta que tenga un grosor de 1/8".
4) Rocíe suavemente el molde para pays con spray para
tartas y forre el molde para pays con la masa.
5) Coloque el molde para pays en el horno para
reconocer la imagen.
6) Remueva la bandeja para pays mientras precalienta
el horno.
7) Después de precalentar el horno, vuelva a colocar el
molde para pays en el horno.
8) Una vez cocida, deje enfriar completamente la base
del pay antes de añadir la crema pastelera y decorar
con fruta fresca.
Bandeja para
pays
3
Magdalenas
1 bandeja Ambiente Ingredientes
2 tazas de harina multiuso, 1/2 taza de azúcar, 2
cucharaditas de levadura en polvo
1/2 cucharadita de sal kosher, 3/4 de taza de leche
1/2 taza de mantequilla sin sal, derretida y fría, 2 huevos
grandes
Instrucciones
1) Forre un molde para muffins con forros de papel y
reserve.
2) En un bol pequeño, mezcle la harina, el azúcar, la
levadura en polvo y la sal.
3) En un bol mediano, bata la leche, la mantequilla y los
huevos hasta que estén bien combinados.
4) Agregue los ingredientes secos a los ingredientes
húmedos y revuelva con una espátula de silicona
hasta que se combinen.
5) Divida la masa de manera uniforme entre los moldes
para muffins.
6) Coloque el molde para muffins en el horno para
reconocer la imagen.
7) Retire el molde para muffins mientras precalienta el
horno.
8) Una vez que haya terminado de precalentar, coloque
el molde para muffins en el horno.
Molde para
muffins
3
Postre
Menú
Cantidad
Temp. del
alimento
Instrucciones
Utensilio de
cocina
Posición
del
estante
es-us_main.book.book Page 98 Friday, August 14, 2026 2:12 PM
99FUNCIONAMIENTO
ESPAÑOL
Tostar
Menú
Cantidad
Temp. del
alimento
Observació
n
Instrucciones
Utensilio
de cocina
Posición del
estante
Bagels
1~4 C/U Ambiente Corte los bagels por la mitad a lo largo del
borde estrecho.
Coloque los bagels con la cara interior hacia
arriba sobre la rejilla de la asadera.
Rejilla sobre
asadera
5
Rebanad
as de pan
1~4 C/U Ambiente Cuando el
horno emita
un pitido,
voltee los
alimentos
Coloque las rebanadas de pan en la rejilla de la
asadera.
Cuando el horno emita un pitido, voltee el pan.
Rejilla sobre
asadera
5
Magdale
nas
inglesas
1~4 C/U Ambiente Corte los muffins ingleses por la mitad a lo
largo del borde estrecho.
Coloque los muffins ingleses con la cara
interior hacia arriba sobre la rejilla de la
asadera.
Rejilla sobre
asadera
5
Producto congelado
Menú
Cantidad
Temp. del
alimento
Instrucciones
Utensilio de
cocina
Posición del
estante
Nuggets de
pollo
10~40 C/U (0.6
oz cada una)
Congelado
Coloque los nuggets de pollo congelados en la bandeja
de freír al aire LG con una bandeja antigoteo debajo.
Bandeja para
freír con aire
4
Tiras de pollo
6~24 C/U (1 oz
cada una)
Congelado
Coloque los filetes de pollo congelados en la bandeja de
freír al aire LG con una bandeja antigoteo debajo.
Bandeja para
freír con aire
4
Palitos de
mozzarella
6~24 C/U (1 oz
cada una)
Congelado
Coloque los palitos de mozzarella congelados en la
bandeja de freír al aire LG con una bandeja antigoteo
debajo.
Bandeja para
freír con aire
4
Macarrones
con queso
1 cazuela (40
oz)
Congelado
1) Retire la cazuela del empaque.
2) Coloque la cazuela en la bandeja de media hoja en
el horno para reconocer la imagen.
3) Retire la cazuela y la bandeja de media hoja
mientras precalienta el horno.
4) Después de precalentar, vuelva a colocar la
bandeja de media hoja con los macarrones con
queso congelados en el horno.
Bandeja de 1/2
hoja
3
es-us_main.book.book Page 99 Friday, August 14, 2026 2:12 PM
100 FUNCIONAMIENTO
Burritos
1~8 C/U (5 oz
cada una)
Congelado
1) Saque los burritos del empaque.
2) Coloque los burritos en la bandeja de media hoja
en el horno para reconocer la imagen.
3) Remueva los burritos y la bandeja de media hoja
mientras precalienta el horno.
4) Después de precalentar, vuelva a colocar la
bandeja de media hoja con burritos en el horno.
Bandeja de 1/2
hoja
3
Galletas
5~20 C/U (2 oz
cada una)
Congelado
Remueva el envase y coloque las galletas congeladas en
la bandeja de freír al aire LG con una bandeja antigoteo
debajo.
Bandeja para
freír con aire
4
Patatas fritas
1~4 porciones Congelado
Coloque los tater tots congelados en la bandeja de freír al
aire LG con una bandeja antigoteo debajo.
1 porción es de aproximadamente 12 oz.
Bandeja para
freír con aire
3
Patatas fritas
rectas
1~4 porciones Congelado
Coloque las papas fritas congeladas en la bandeja de freír
al aire LG con una bandeja antigoteo debajo.
1 porción es de aproximadamente 5 oz.
Bandeja para
freír con aire
4
Patatas fritas
onduladas
1~4 porciones Congelado
Coloque las papas fritas congeladas en la bandeja de freír
al aire LG con una bandeja antigoteo debajo.
1 porción es de aproximadamente 8 oz.
Bandeja para
freír con aire
4
Patatas
Hashbrowns
4~16 C/U (2.3
oz cada una)
Congelado
Coloque las hash browns congeladas en la bandeja de
freír al aire LG con una bandeja antigoteo debajo.
Bandeja para
freír con aire
4
Patatas fritas
dulces
1~4 porciones Congelado
Coloque las batatas fritas congeladas en la bandeja de
freír al aire LG con una bandeja antigoteo debajo.
1 porción es de aproximadamente 6 oz.
Bandeja para
freír con aire
4
Aros de
cebolla
1~4 porciones Congelado
Coloque los anillos de cebolla congelados en la bandeja
de freír al aire LG con una bandeja antigoteo debajo.
1 porción es de aproximadamente 5 oz.
Bandeja para
freír con aire
4
Filete de
pescado
empanado
4~16 C/U (2 oz
cada una)
Congelado
Coloque los filetes de pescado empanado congelados en
la bandeja de freír al aire LG con una bandeja antigoteo
debajo.
Bandeja para
freír con aire
4
Salchicha
para el
desayuno
6~24 C/U (1 oz
cada una)
Congelado
Coloque las salchichas congeladas en la bandeja de freír
al aire LG con una bandeja antigoteo debajo.
Bandeja para
freír con aire
4
Producto congelado
Menú
Cantidad
Temp. del
alimento
Instrucciones
Utensilio de
cocina
Posición del
estante
es-us_main.book.book Page 100 Friday, August 14, 2026 2:12 PM
101FUNCIONAMIENTO
ESPAÑOL
PRECAUCIÓN
• Tenga cuidado al abrir la puerta del horno durante o después de cocinar al vapor. El vapor caliente
podría causar quemaduras.
Perros de
maíz
2~8 C/U (2.75
oz cada una)
Congelado
1) Retire los corn dogs del empaque.
2) Coloque los corn dogs en la bandeja de media
hoja dentro del horno para el reconocimiento de
imágenes.
3) Retire los corn dogs con la bandeja de media hoja
mientras el horno se está precalentando.
4) Después de precalentar, vuelva a colocar la
bandeja de media hoja con los corn dogs en el
horno.
Bandeja de 1/2
hoja
4
Rollitos (egg
rolls)
2~4 C/U (2.7 oz
cada una)
Congelado
1) Retire los egg rolls del empaque.
2) Coloque los egg rolls en la bandeja de media hoja
dentro del horno para el reconocimiento de
imágenes.
3) Retire los egg rolls con la bandeja de media hoja
mientras el horno se está precalentando.
4) Después de precalentar, vuelva a colocar la
bandeja de media hoja con los egg rolls en el
horno.
5) Cuando el horno emita un pitido, dé la vuelta a los
egg rolls.
Bandeja de 1/2
hoja
3
Albóndigas
6~24 C/U (0.5
oz cada una)
Congelado
1) Retire las albóndigas del empaque.
2) Coloque las albóndigas en la bandeja de media
hoja dentro del horno para el reconocimiento de
imágenes.
3) Retire las albóndigas con la bandeja de media hoja
mientras el horno se está precalentando.
4) Después de precalentar, vuelva a colocar la
bandeja de media hoja con las albóndigas en el
horno.
5) Cuando el horno emita un pitido, dé la vuelta a las
albóndigas.
Bandeja de 1/2
hoja
3
Pretzels
2~6 C/U (2.2 oz
cada una)
Congelado
1) Retire los pretzels del empaque.
2) Coloque los pretzels en la bandeja de media hoja
dentro del horno para el reconocimiento de
imágenes.
3) Retire los pretzels con la bandeja de media hoja
mientras el horno se está precalentando.
4) Después de precalentar, vuelva a colocar la
bandeja de media hoja con los pretzels en el
horno.
Bandeja de 1/2
hoja
3
Producto congelado
Menú
Cantidad
Temp. del
alimento
Instrucciones
Utensilio de
cocina
Posición del
estante
es-us_main.book.book Page 101 Friday, August 14, 2026 2:12 PM
102 FUNCIONAMIENTO
PRECAUCIÓN
• Después de cualquier ciclo de cocción al vapor, la función de secado se ejecutará automáticamente. Es
normal escuchar la bomba de vapor funcionando durante la función de secado.
es-us_main.book.book Page 102 Friday, August 14, 2026 2:12 PM
103FUNCIONES INTELIGENTES
ESPAÑOL
FUNCIONES INTELIGENTES
Aplicación LG ThinQ
Esta característica solo está disponible en modelos
con Wi-Fi.
La aplicación LG ThinQ le permite comunicarse
con el electrodoméstico usando un teléfono
inteligente.
Funciones de la aplicación LG ThinQ
• Actualizaciones del producto
- En los modelos con la función LG UP Home
Appliance, descubra nuevas funciones con
solo actualizar el producto a través de la
aplicación LG ThinQ.
• Escanear para cocinar
- Escanee el código de barras en una comida
precocinada usando la aplicación LG ThinQ y
envíe las instrucciones de cocción
recomendadas o personalizadas directamente
a su horno. Arranque remoto debe estar
activado en el horno para usar la función
Escanear para Cocinar.
• Monitoreo
- Esta función le ayuda a comprobar el estado
actual, el tiempo restante, la configuración de
cocción y la hora de finalización en un lugar.
• Notificaciones de productos
- Active las alertas push para recibir
notificaciones sobre el estado del
electrodoméstico. Las notificaciones se activan
incluso si la aplicación LG ThinQ no está
abierta.
• Temporizador
- Se puede configurar el temporizador desde la
aplicación.
• Ajuste
- Le permite configurar varias opciones en el
horno y en la aplicación.
• Smart Diagnosis
TM
- Esta función brinda información útil para
diagnosticar y resolver problemas con el
producto conforme a su patrón de uso.
• Actualización de Firmware
- Mantiene el electrodoméstico actualizado.
NOTA
• En los siguientes casos, debe actualizar la
información de red para cada electrodoméstico
en la aplicación LG ThinQ en tarjeta del
electrodoméstico ~ Ajustes ~ Cambio de
red.
- el router inalámbrico ha cambiado
- la contraseña del router inalámbrico ha
cambiado
- el proveedor de servicio de internet ha
cambiado
• Esta información está actualizada en el
momento de su publicación. La aplicación está
sujeta a cambios, con fines de mejorar el
producto, sin previo aviso a los usuarios.
• No se puede utilizar Scan to Cook (Escanear para
cocinar) mientras el temporizador está
funcionando. Cancele la operación del
temporizador para usar Scan to Cook.
Instalación de la aplicación LG
ThinQ y conexión de un
electrodoméstico LG
Modelos con código QR
Escanee el código QR adjunto al producto con la
cámara o alguna aplicación de lectura de códigos
QR de su teléfono inteligente.
Modelos sin código QR
1 Busque la aplicación LG ThinQ en la tienda
Google Play o Apple App Store desde su
teléfono inteligente e instálela.
2 Ejecute la aplicación LG ThinQ e inicie sesión
con su cuenta existe o cree una cuenta de LG
para iniciar sesión.
3 Pulse el botón Agregar (~) en la aplicación LG
ThinQ para conectar su electrodoméstico LG.
Siga las instrucciones en la aplicación y
complete el proceso.
es-us_main.book.book Page 103 Friday, August 14, 2026 2:12 PM
104 FUNCIONES INTELIGENTES
NOTA
• Para verificar la conexión Wi-Fi, revise que el
indicador Wi-Fi en el panel de control esté
encendido.
• El electrodoméstico funciona únicamente con
redes Wi-Fi de 2.4 GHz. Contacte a su proveedor
de servicios de internet o verifique el manual del
enrutador inalámbrico para revisar la frecuencia
de su red.
• LG ThinQ no es responsable de ningún
problema de conexión de red o falla, mal
funcionamiento o errores provocados por la
conexión de red.
• El entorno inalámbrico circundante puede hacer
que el servicio de red inalámbrica funcione
lentamente.
• Si la distancia entre el electrodoméstico y el
enrutador inalámbrico es demasiada, la señal
será débil. Probablemente le tome más tiempo
conectarse o no pueda instalar la aplicación.
• Si el aparato tiene problemas para conectarse a
la red Wi-Fi, es posible que se encuentre
demasiado lejos del enrutador. Adquiera un
repetidor Wi-Fi (extensor de alcance) para
mejorar la intensidad de la señal Wi-Fi.
• Es posible que la conexión de red no funcione
bien por cuestiones relacionadas con su
proveedor de servicios de Internet.
• Es posible que la conexión Wi-Fi no se conecte o
se interrumpa debido al entorno de la red
doméstica.
• Si el electrodoméstico no puede conectarse
debido a problemas con la transmisión de la
señal inalámbrica, desenchufe el artefacto y
espere alrededor de un minuto antes de
intentarlo de nuevo.
• El nombre de la red inalámbrica (SSID) debe ser
una combinación de letras (A-Z) y números (0-9).
No utilice caracteres especiales.
• La interfaz de usuario (IU) del teléfono
inteligente puede variar en función del sistema
operativo (OS) del móvil y el fabricante.
• Puede que la configuración de red falle si el
protocolo de seguridad del enrutador está en
WEP. Cambie el protocolo de seguridad por otro
(se recomienda el WPA2) y conecte el producto
de nuevo.
Especificaciones del módulo RF
† Esta característica solamente está disponible en
algunos modelos.
Declaración de la FCC
Este equipo ha sido probado y cumple con los
límites para un dispositivo digital de Clase B, de
acuerdo con la parte 15 de las Reglas de la FCC
para el módulo transmisor y la parte 18 de las
Reglas de la FCC para este equipo. Estos límites
están diseñados para ofrecer una protección
razonable contra interferencias dañinas en una
instalación residencial. Este equipo genera, usa y
puede emitir energía de radiofrecuencia y, si no se
instala y utiliza de acuerdo con las instrucciones,
podría causar interferencias dañinas a las
comunicaciones por radio. Sin embargo, no se
garantiza que dicha interferencia no pueda ocurrir
en instalaciones particulares. Si este equipo causa
interferencia dañina a la recepción de radio o
televisión, que se puede determinar encendiendo
y apagando el equipo, se aconseja al usuario
intentar corregir la interferencia realizando alguna
de las siguientes acciones:
• Reorientar o reubicar la antena receptora.
• Aumentar la separación entre el equipo y el
receptor.
• Conectar el equipo a una toma de corriente en
un circuito diferente del utilizado por el receptor.
• Consultar al vendedor o a un técnico de radio/TV
con experiencia para solicitar ayuda.
Este dispositivo (el módulo transmisor contenido
en este producto) cumple con la parte 15 de las
Reglas FCC. La operación está sujeta a las
siguientes dos condiciones:
(1) Este dispositivo no debe causar interferencia
dañina, y
(2) Este dispositivo debe aceptar cualquier
interferencia recibida, incluso aquellas que
pudieran causar un funcionamiento no deseado
del dispositivo.
Cualquier cambio o modificación en la
construcción de este dispositivo, que no cuente
con la aprobación expresa de la parte responsable
Tipo
Rango de
frecuencia
Potencia de
salida (máx.)
Wi-Fi
2400 MHz -
2472 MHz
< 1 W
Bluetooth
†
2400 MHz -
2483.5 MHz
es-us_main.book.book Page 104 Friday, August 14, 2026 2:12 PM
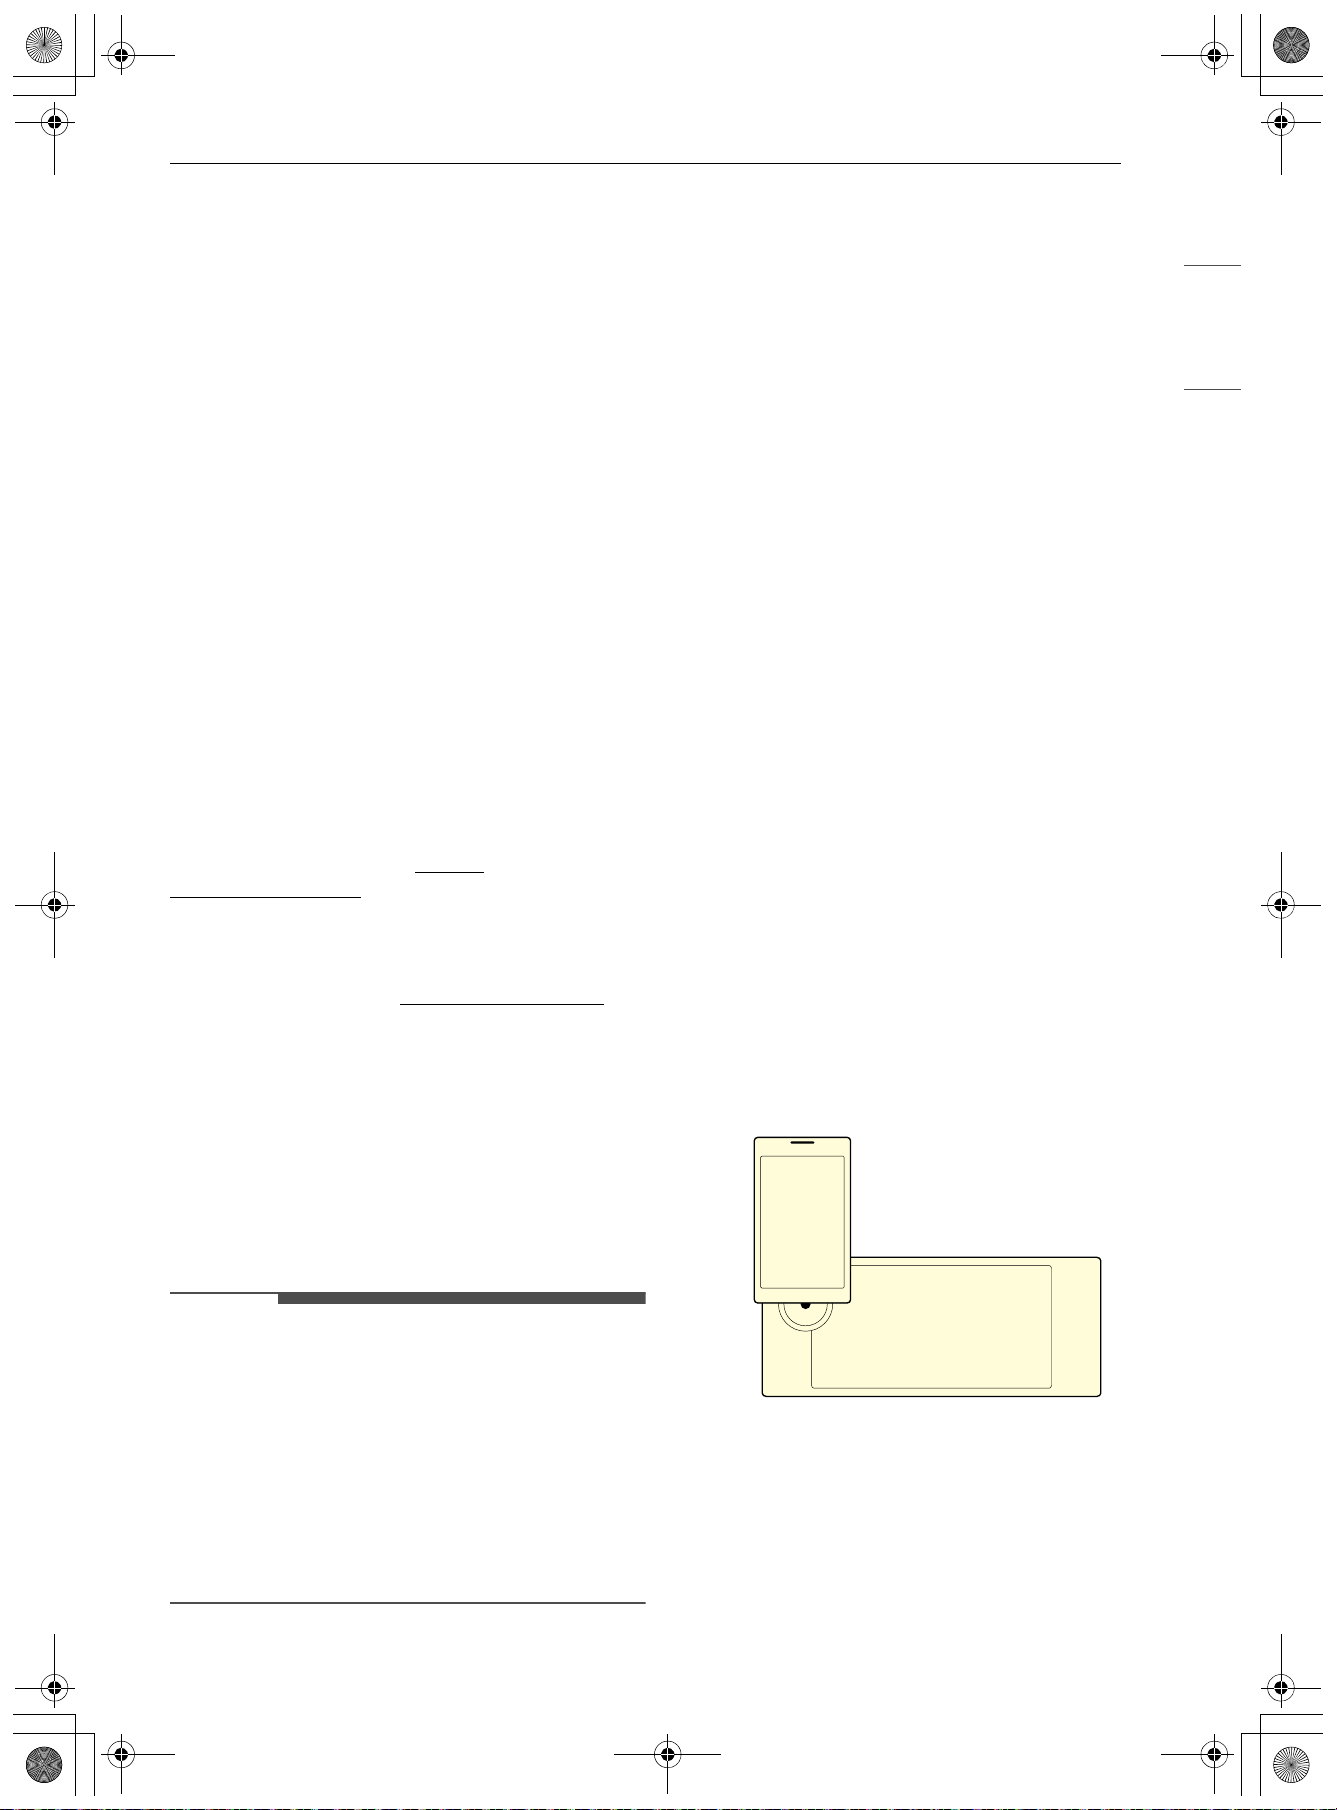
105FUNCIONES INTELIGENTES
ESPAÑOL
del cumplimiento, puede anular la autorización del
usuario para operarlo.
Declaración sobre exposición a la
radiación de RF de la FCC
Este equipo cumple con los límites de exposición a
la radiación de la FCC establecidos para entornos
no controlados. Este transmisor no se debe ubicar
ni operar junto con ninguna otra antena ni
transmisor.
El equipo se debe instalar y operar con una
distancia mínima de 20 cm (7.8 pulg.) entre la
antena y su cuerpo. Los usuarios deben seguir las
instrucciones de operación específicas de manera
tal de cumplir con las normas de exposición a la
RF.
Software de código abierto
Para obtener el código fuente incluido en este
producto, bajo las licencias GPL, LGPL, MPL y otras
licencias de código abierto que obligan a divulgar
el código fuente, y para acceder a todos los
términos de licencia mencionados, así como a los
avisos de copyright, visite https://
opensource.lge.com.
LG Electronics también le proporcionará el código
fuente de código abierto por un cargo que cubra el
coste de realizar dicha distribución, previa solicitud
por correo electrónico a open[email protected].
Esta oferta es válida para todo aquel que reciba
esta información durante un período de tres años
después de que se envíe el último cargamento de
este producto.
Función Smart Diagnosis
TM
Utilice esta función como ayuda para diagnosticar
y resolver problemas con su electrodoméstico.
NOTA
• Por motivos no atribuibles a la negligencia de
LGE, es posible que el servicio no funcione
debido a factores externos como, por ejemplo, la
falta de disponibilidad de Wi-Fi, desconexión de
Wi-Fi, política de la tienda de aplicaciones local o
falta de disponibilidad de aplicaciones, entre
otros.
• Esta función puede estar sujeta a cambios sin
previo aviso y puede tener una forma diferente
según dónde se encuentre ubicado.
Uso de LG ThinQ para diagnosticar
problemas
Si experimenta un problema con su
electrodoméstico equipado con Wi-Fi, este puede
transmitir datos sobre la resolución de problemas
a un teléfono inteligente con la aplicación LG
ThinQ.
• Inicie la aplicación LG ThinQ y seleccione la
función Smart Diagnosis en el menú. Siga las
instrucciones provistas en la aplicación LG
ThinQ.
Uso del diagnóstico audible para
diagnosticar problemas
Siga las instrucciones a continuación para utilizar
el método de diagnóstico audible.
• Inicie la aplicación LG ThinQ y seleccione la
función Smart Diagnosis en el menú. Siga las
instrucciones para el diagnóstico audible
provistas en la aplicación LG ThinQ.
1 Pulse el ícono Ajustes en la parte superior
derecha de la pantalla, pulse
Mantenimiento e información, pulse
Smart Diagnosis y pulse Iniciar para iniciar
el tono de diagnóstico.
- Si la pantalla ha sido bloqueada, debe
desactivar el bloqueo y luego reactivarlo.
2 Coloque el micrófono de su teléfono cerca
de la esquina superior izquierda de la
pantalla.
3 Mantenga el teléfono en su sitio hasta que
haya terminado la transmisión de tonos. La
pantalla mostrará la cuenta regresiva del
tiempo. Una vez que haya finalizado la
cuenta regresiva del tiempo y los tonos se
hayan detenido, aparecerá el diagnóstico
en la aplicación.
es-us_main.book.book Page 105 Friday, August 14, 2026 2:12 PM

106 FUNCIONES INTELIGENTES
NOTA
• Para obtener resultados óptimos, no mueva el
teléfono mientras se transmitan los tonos.
es-us_main.book.book Page 106 Friday, August 14, 2026 2:12 PM
107MANTENIMIENTO
ESPAÑOL
MANTENIMIENTO
Limpieza
PRECAUCIÓN
• No limpie este aparato con lejía.
• Para evitar quemaduras, deje enfriar la parte
superior de la estufa antes de tocar cualquiera
de sus piezas.
• Use guantes para limpiar la parte superior.
Interior
No utilice limpiadores de horno para limpiar la
cavidad del horno. Utilice la función EasyClean del
producto regularmente para limpiar la suciedad
ligera. Para la suciedad rebelde, utilice la función
Autolimpieza (en algunos modelos) o limpie
manualmente con los siguientes consejos.
• Se puede usar una espátula plástica como
raspador para quitar los restos o residuos antes
de la limpieza del horno o durante el proceso.
• Puede resultar de ayuda usar el lado áspero de
una esponja que no raye para quitar manchas
quemadas mejor que con una esponja blanda o
una toalla.
• Algunas esponjas que no rayan, como las hechas
de espuma de melamina, disponibles en las
tiendas locales, también pueden ayudar a
mejorar la limpieza.
PRECAUCIÓN
• No utilice limpiadores para hornos, limpiadores
químicos abrasivos, lejía, vinagre, esponjas de
acero ni paños o limpiadores abrasivos para
limpiar el horno, ya que pueden dañar
permanentemente la superficie del horno.
• No limpie las juntas.
Exterior
Panel de control
Para evitar que el panel de control se active
durante la limpieza, desconecte el
electrodoméstico de la alimentación eléctrica.
Limpie las salpicaduras con un paño húmedo y
limpiacristales. Elimine la suciedad más difícil con
una solución de agua tibia jabonosa. No use
ningún tipo de abrasivos.
Perillas y panel del múltiple delantero
Se recomienda limpiar el panel del múltiple
después de cada uso de la estufa. Para limpiarlo,
use un paño húmedo y una solución de agua
jabonosa suave o una solución mitad agua y mitad
vinagre. Enjuague con agua limpia y seque con un
paño suave.
PRECAUCIÓN
• No use limpiadores abrasivos, limpiadores
líquidos fuertes, esponjas abrasivas plásticas ni
limpiadores para horno en el panel del múltiple.
Si lo hace, dañará el acabado.
• No intente doblar las perillas moviéndolas hacia
arriba o hacia abajo y no cuelgue toallas ni otros
objetos de ellas. Puede dañar el eje de la válvula
de gas.
• Las perillas de control se pueden quitar para
limpiarlas fácilmente.
• Para limpiar las perillas, asegúrese de que estén
en la posición Apagado y sáquelas de los
vástagos.
• Para volver a colocarlas, asegúrese de que la
perilla esté colocada en la posición Apagado
centrada en la parte superior y deslice la perilla
directamente sobre el vástago.
NOTA
• Para evitar rayas, no use limpiadores abrasivos
en ninguno de estos materiales.
Reborde decorativo y pintado
Para la limpieza general, use un paño con agua
jabonosa caliente. En el caso de suciedad más
difícil y grasa acumulada, aplique detergente
líquido directamente sobre la suciedad. Déjelo
reposar allí entre 30 y 60 minutos. Enjuague con
un paño húmedo y seque. No use limpiadores
abrasivos.
Superficies de acero inoxidable
Para evitar hacer rayas, no use esponjas de lana de
acero.
1 Coloque una pequeña cantidad de limpiador
o pulidor para electrodomésticos de acero
inoxidable en un paño o una toalla de papel
húmedos.
es-us_main.book.book Page 107 Friday, August 14, 2026 2:12 PM
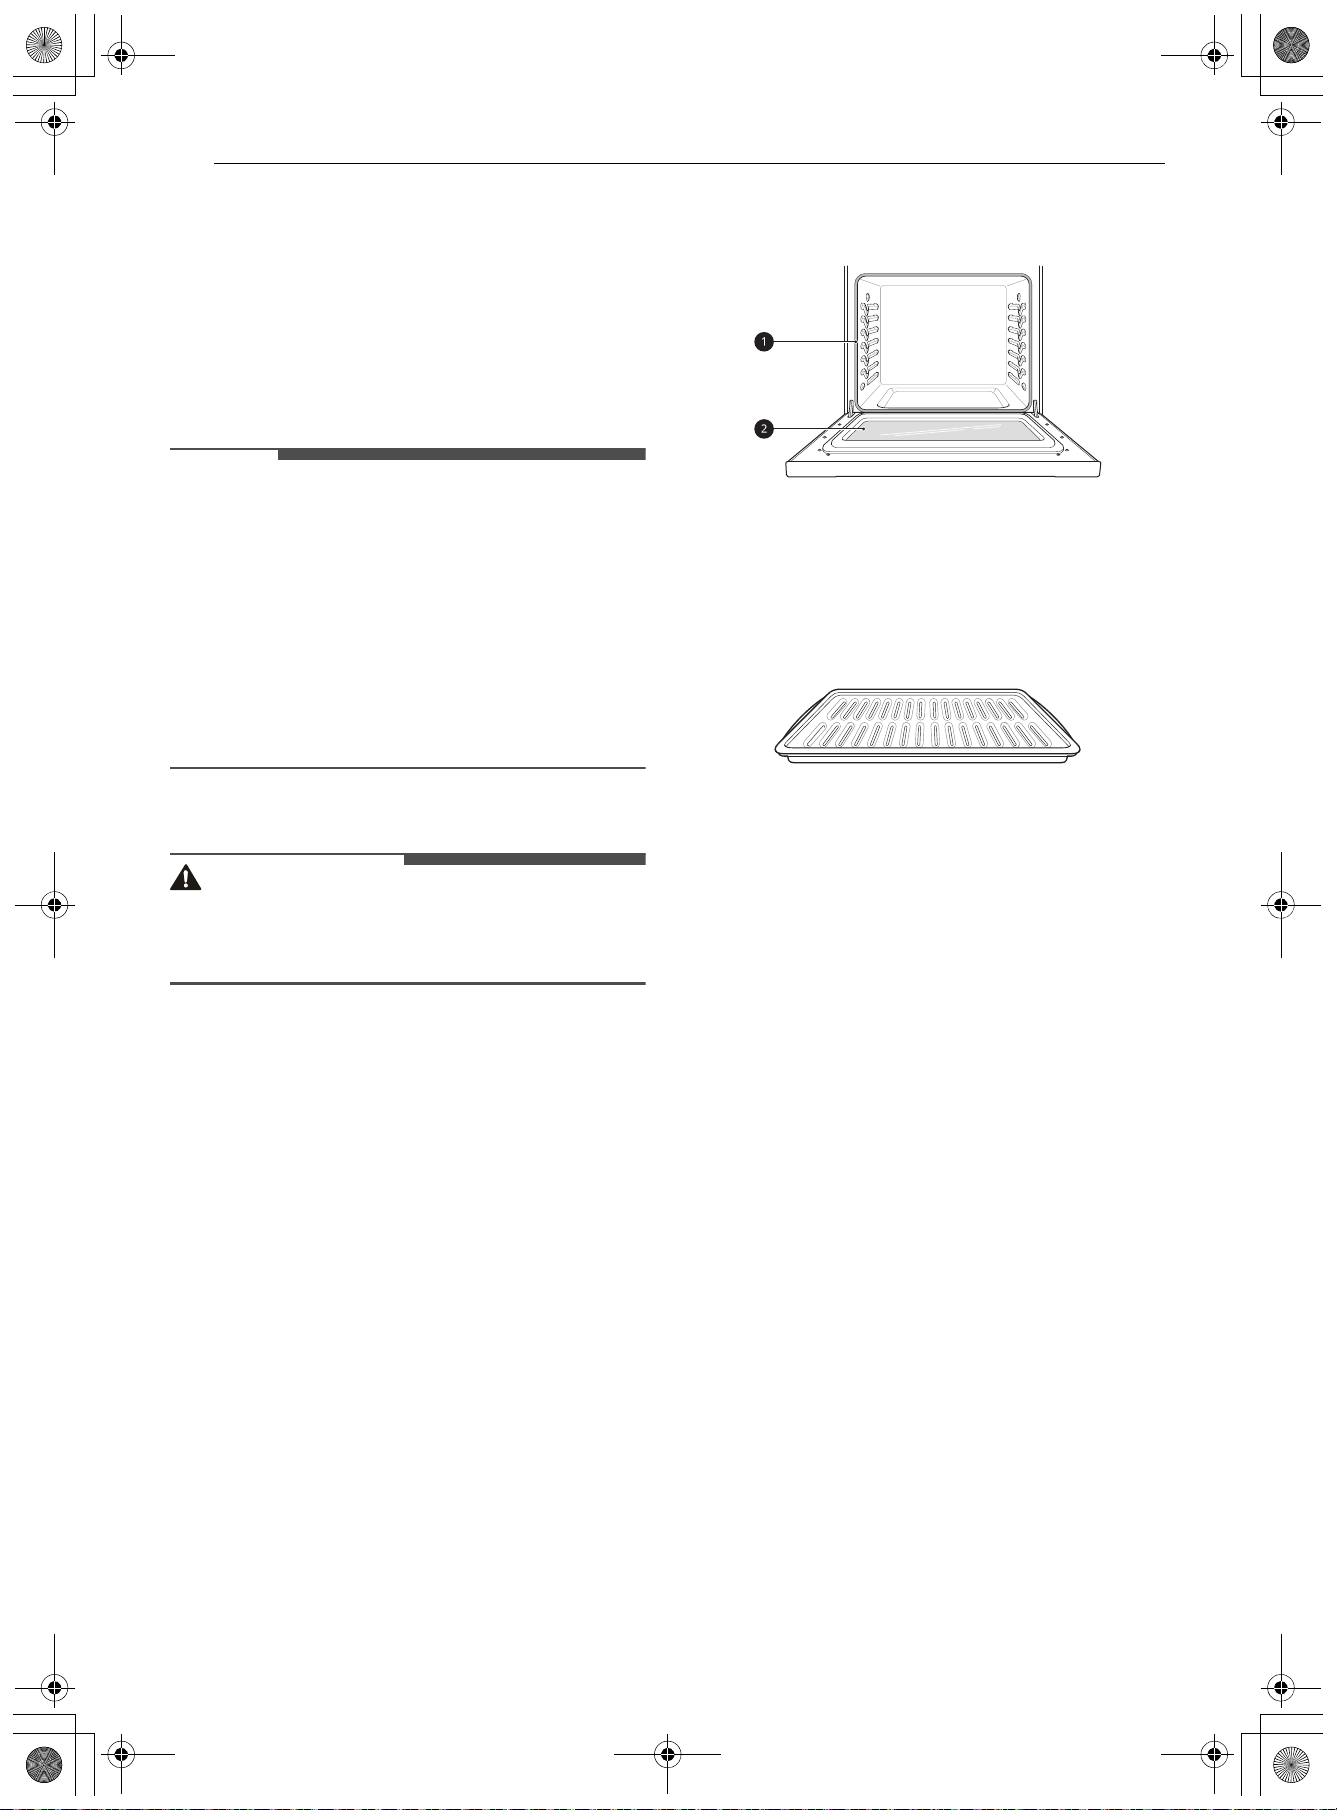
108 MANTENIMIENTO
2 Limpie un área pequeña y friegue siguiendo
el grano del acero inoxidable si corresponde.
3 Seque y saque brillo con un paño suave o una
toalla de papel secos y limpios.
4 Repita si fuera necesario.
NOTA
• Para limpiar la superficie de acero inoxidable,
utilice agua tibia jabonosa, limpiador o pulidor
para acero inoxidable.
• Limpie siempre en la dirección del acabado de la
superficie de metal.
• Los limpiadores o pulidores para
electrodomésticos de acero inoxidable pueden
comprarse por Internet o en la mayoría de los
comercios minoristas de electrodomésticos o
artículos para el hogar.
Puerta del horno
PRECAUCIÓN
• No use limpiadores ásperos ni materiales
abrasivos de limpieza en el exterior de la puerta
del horno. Si lo hace, podría causar daños.
• Use agua jabonosa para limpiar bien la puerta
del horno. Enjuague bien. No sumerja la puerta
en agua.
• Puede usar un limpiador para vidrios en la parte
externa de la puerta del horno. No rocíe agua ni
limpiador para vidrios en las ventilaciones de la
puerta.
• No use limpiadores para horno, polvos
limpiadores ni materiales abrasivos de limpieza
en el exterior de la puerta del horno.
• No limpie la junta de la puerta del horno. La
junta está hecha de material tejido que es
fundamental para lograr un buen sellado. Se
debe tener cuidado de no frotar, dañar ni quitar
esta junta.
a No limpie manualmente la junta de la puerta
del horno
b Limpie manualmente la puerta
Asadera y rejilla
• No guarde una asadera o rejilla sucia en ninguna
parte de la estufa.
• No limpie la asadera ni la rejilla en el modo de
autolimpieza. (Disponible en algunos modelos)
• Retire la rejilla de la asadera. Vierta la grasa de la
asadera en un recipiente adecuado con cuidado.
• Lave y enjuague la asadera y la rejilla con agua
caliente y una esponja abrasiva plástica o con
jabón.
• Si hay comida quemada, rocíe la rejilla con
limpiador mientras está caliente y cúbrala con
toallas de papel húmedas o un paño de cocina.
Al sumergir la asadera se removerán los restos
de comida quemada.
• Tanto la asadera como la rejilla se pueden
limpiar con un limpiador para horno comercial o
en el lavavajillas.
Estantes del horno
Retire los estantes del horno antes de iniciar el
ciclo Self Clean (en algunos modelos) y la función
EasyClean.
1 Limpie con un limpiador abrasivo suave.
• Los alimentos derramados en las guías
pueden atascar los estantes.
2 Enjuague con agua limpia y seque.
es-us_main.book.book Page 108 Friday, August 14, 2026 2:12 PM
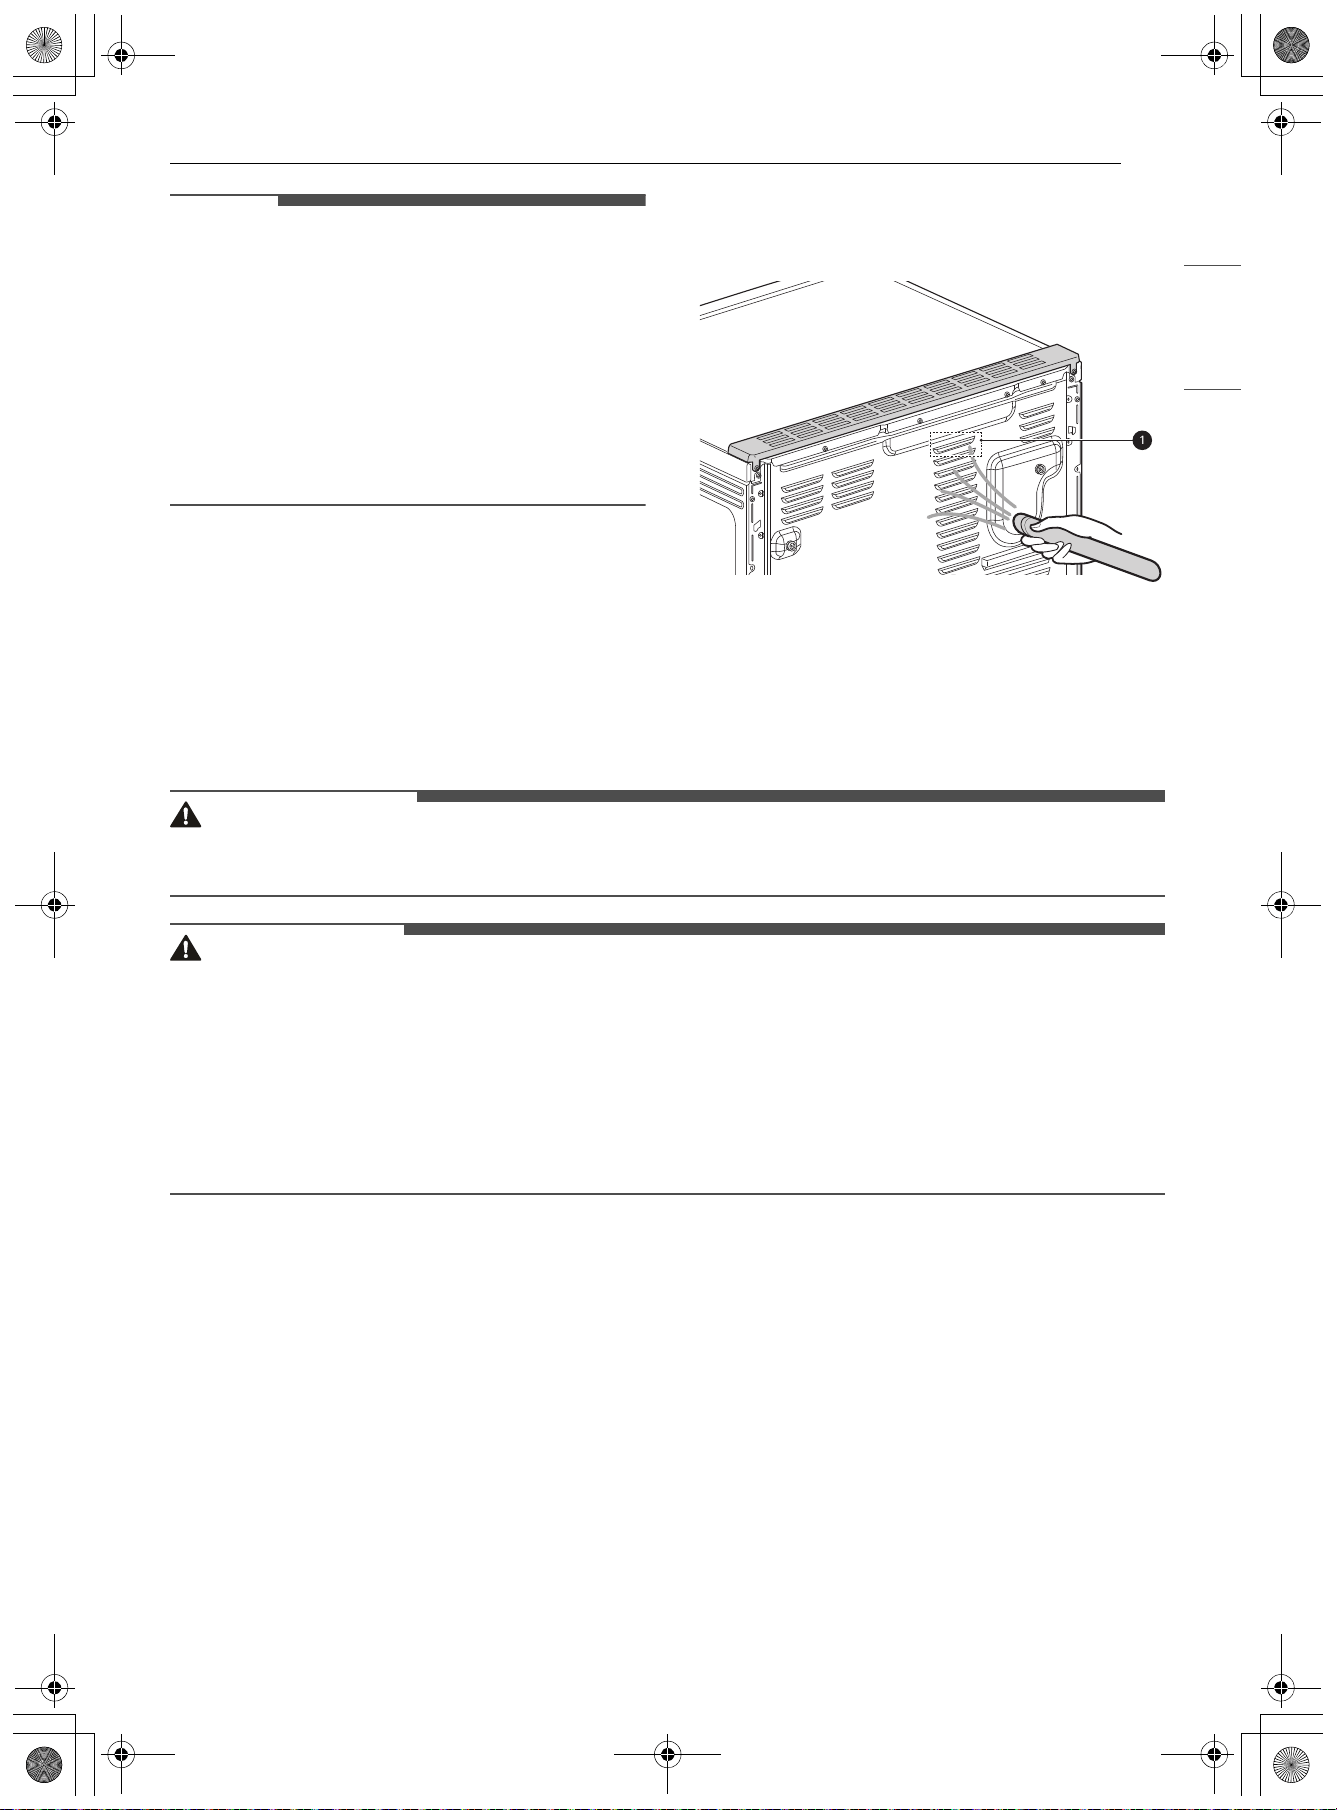
109MANTENIMIENTO
ESPAÑOL
NOTA
• Para modelos con función Self Clean:
- Si limpia los estantes usando el ciclo Self Clean
(no recomendado), el color cambiará a azul
claro y el acabado perderá el brillo. Una vez
finalizado el ciclo Self Clean y después de que
el horno se haya enfriado, frote los costados
de los estantes con papel encerado o con un
paño que contenga una pequeña cantidad de
aceite. Esto hará que los estantes se deslicen
más fácilmente en las guías.
Celosía de ventilación
• La apariencia de la estufa puede variar entre los
distintos modelos.
Use una aspiradora con un accesorio de cepillo o
boquilla para limpiar la celosía de ventilación a.
No quite el panel que cubre la estufa.
Superficie de la placa de cocción
Placa de cocción de vitrocerámica
ADVERTENCIA
• Para proteger las manos de las quemaduras, use siempre guantes de cocina o una agarradera mientras
utiliza un raspador en la superficie de cocción caliente.
PRECAUCIÓN
• Si se derrama azúcar o alimentos que contienen azúcar, o plástico o papel de aluminio en la placa de
cocción, retire el material INMEDIATAMENTE con un raspador de metal mientras la superficie de la placa
de cocción aún está caliente para evitar el riesgo de que se dañe la superficie de vitrocerámica. Si se usa
correctamente, el raspador no dañará la superficie.
• Si se derrama agua o alimentos que contienen agua, elimine el derrame INMEDIATAMENTE con una
toalla de papel seca.
• No use esponjas limpiadoras ni limpiadores abrasivos, ya que pueden dañar la superficie de la placa de
cocción.
En la placa de cocción de vidrio, use un limpiador para placas de cocción de cerámica. Es posible que otros
limpiadores no sean tan efectivos o pueden rayar, dañar o manchar la superficie de la placa de cocción.
Para mantener y proteger la superficie de la placa de cocción de vidrio, siga estos pasos:
1 Antes de usar la placa de cocción por primera vez, límpiela con un limpiador para placas de cocción de
cerámica. Esto ayuda a proteger la parte superior y facilita la limpieza.
2 Use un limpiador para placas de cocción de cerámica diariamente para ayudar a mantener la placa
como nueva.
3 Agite bien el limpiador. Aplique unas gotas de limpiador directamente sobre la placa de cocción.
4 Use una toalla de papel para limpiar toda la superficie de la placa de cocción.
es-us_main.book.book Page 109 Friday, August 14, 2026 2:12 PM
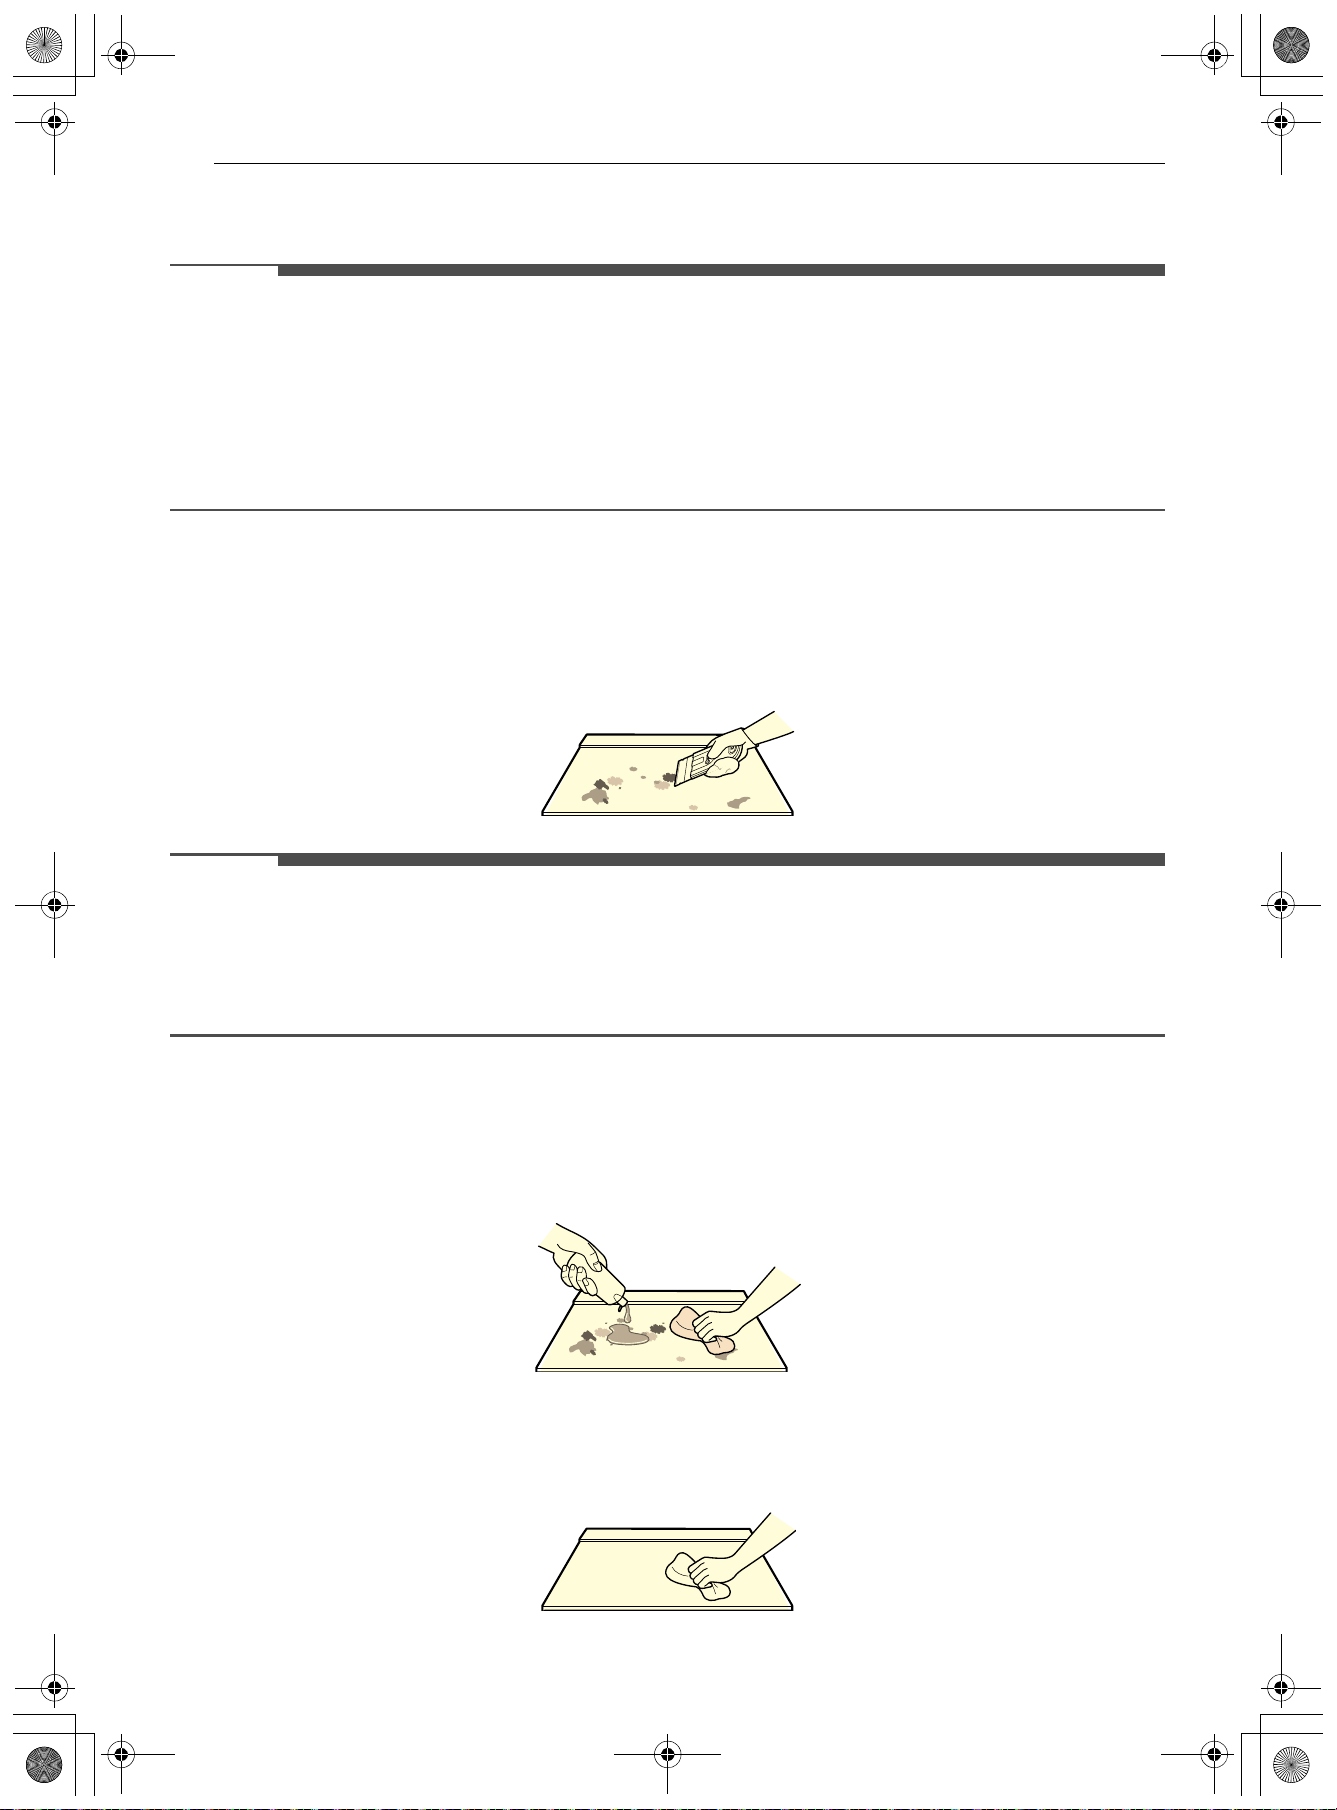
110 MANTENIMIENTO
5 Enjuague con agua limpia y use un paño seco o una toalla de papel para eliminar todos los residuos
de limpieza.
NOTA
• Es posible que cualquier daño o falla del producto que resulte de los elementos que se describen a
continuación no estén cubiertos por la GARANTÍA LIMITADA.
- Los derrames de alimentos azucarados (como conservas, kétchup, salsa de tomate, jaleas, dulces,
jarabes o chocolate) o plásticos derretidos pueden causar picaduras en la superficie de la placa de
cocción.
- Si se derrama comida o agua que contenga calcio (como polvo de hornear, vino, leche, espinacas o
brócoli) sobre la placa de cocción, puede manchar o decolorar la superficie de forma permanente.
Residuos quemados
1 Mientras la placa de cocción aún está caliente, retire los depósitos quemados o los alimentos
derramados de la superficie de la placa de cocción de vitrocerámica con un raspador de metal
adecuado.
NOTA
• No utilice una cuchilla desafilada o mellada.
• Sostenga el raspador en un ángulo de aproximadamente 30° con respecto a la placa de cocción.
• El raspador no dañará las marcas en la superficie de cocción.
• Tenga cuidado de no dañar la junta cuando limpie la placa de cocción con un raspador metálico.
2 Cuando la superficie de cocción se haya enfriado por completo, aplique unas gotitas de un limpiador
para placas de cocción de vitrocerámica en las áreas de cada quemador. Distribuya el limpiador sobre
la superficie de la placa de cocción con una toalla de papel húmeda. Deje actuar durante 10 minutos
antes de enjuagar.
3 Enjuague con agua limpia, y limpie la superficie de la placa de cocción con una toalla de papel limpia y
seca.
es-us_main.book.book Page 110 Friday, August 14, 2026 2:12 PM
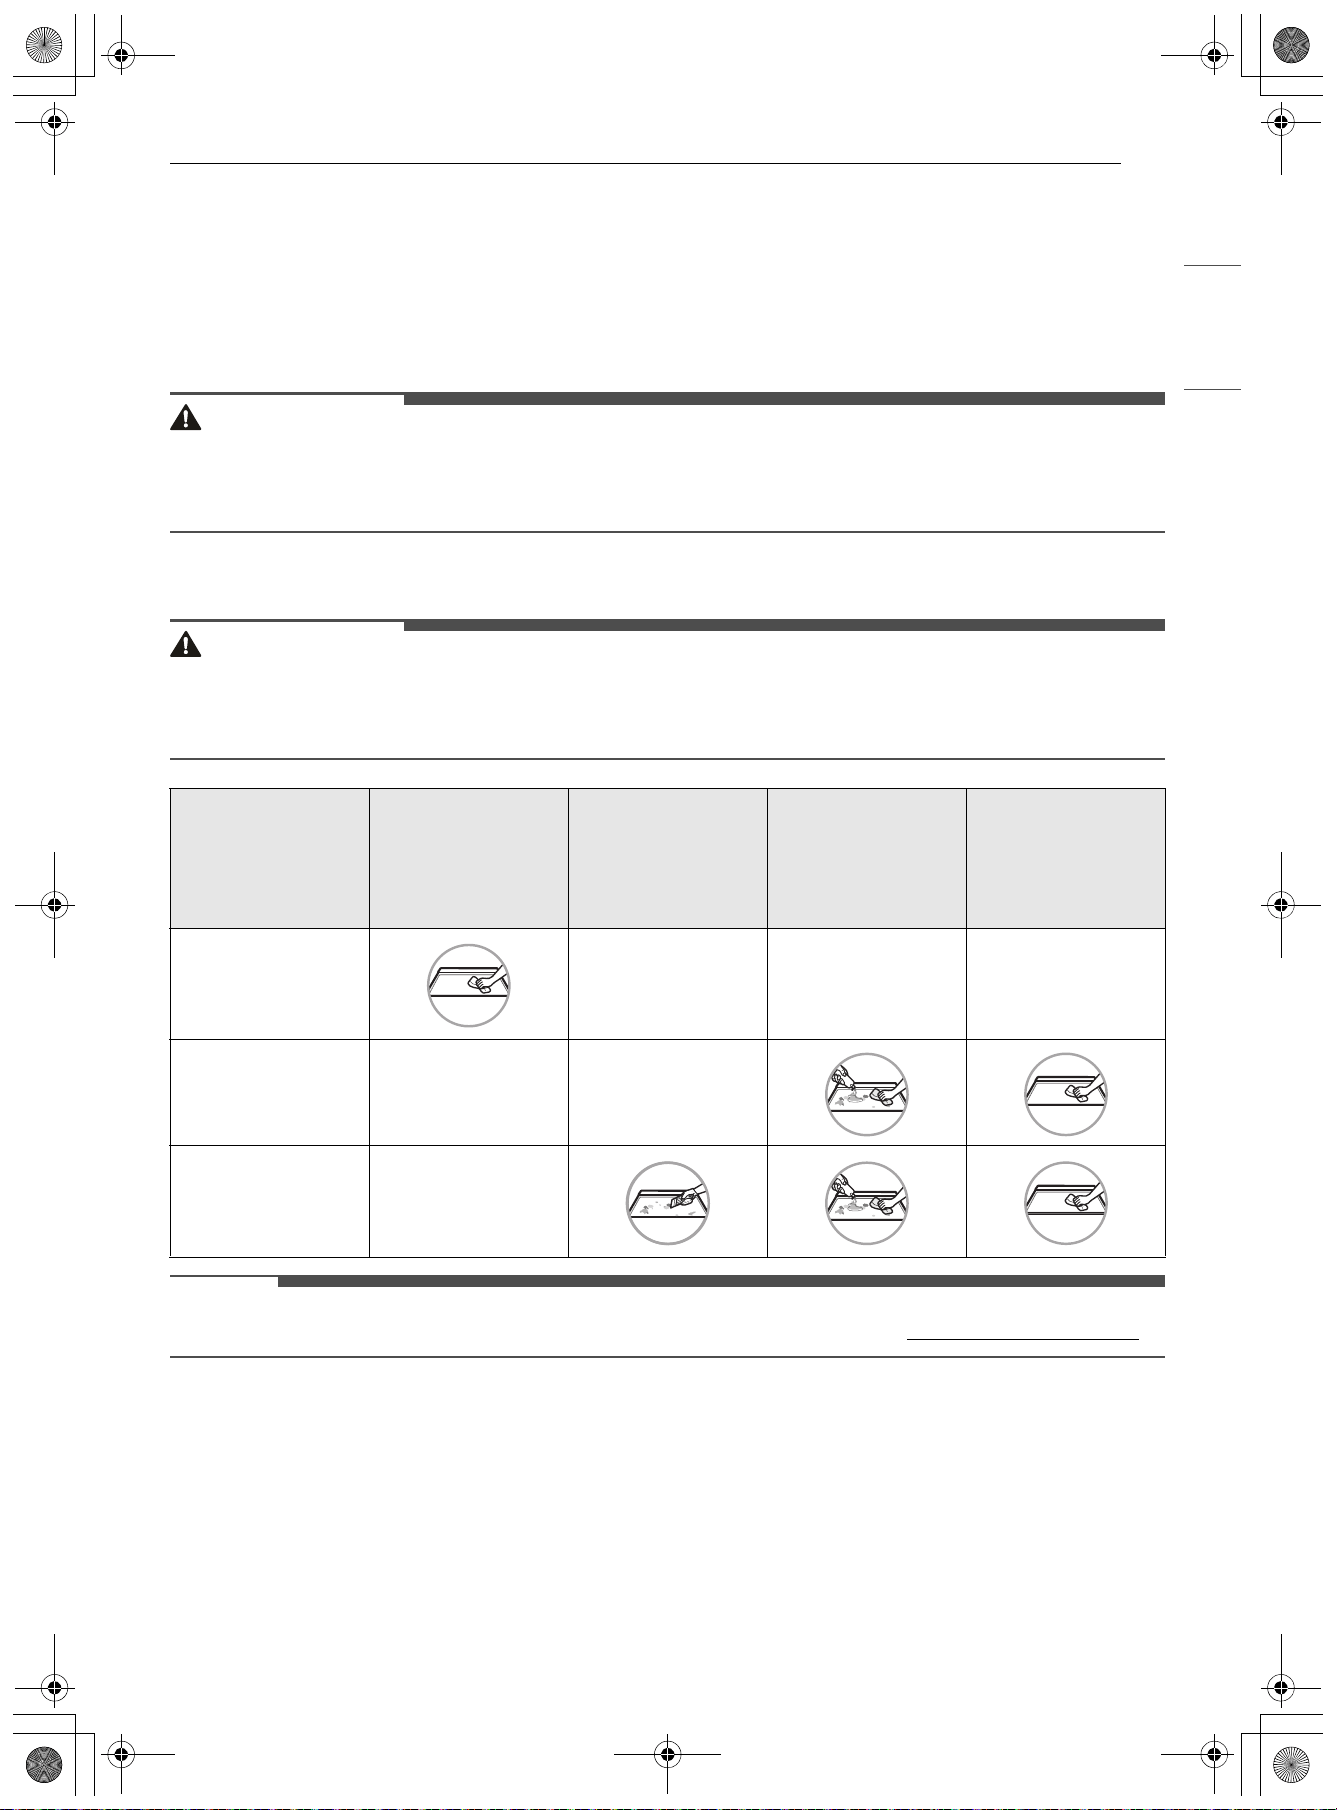
111MANTENIMIENTO
ESPAÑOL
Junta de la placa de cocción
1 Para eliminar la suciedad quemada de la junta que rodea el exterior de la placa de cocción
vitrocerámica, cubra la zona con un paño húmedo y caliente para ablandar la suciedad.
2 Luego de unos minutos, limpie la zona con un limpiador suave no abrasivo.
PRECAUCIÓN
• No utilice un cuchillo ni ningún objeto afilado para limpiar la junta que rodea el exterior de la placa de
cocción vitrocerámica.
• Tenga cuidado de no dañar la junta cuando limpie la placa de cocción con un raspador metálico.
Mantenimiento de la placa de cocción
PRECAUCIÓN
• No use blanqueador con cloro, amoníaco u otros limpiadores que no estén específicamente
recomendados para su uso en placas de cocción de vitrocerámica.
• Deje que la superficie de cocción de vitrocerámica se enfríe antes de limpiarla.
NOTA
• Para obtener más información sobre el producto, visite nuestro sitio web en www.LGSIGNATURE.com
-
Limpie con una
toalla húmeda y
un detergente
suave
Use un raspador
de metal
Aplique el
limpiador para
superficies de
cocción. Frote
con una toalla.
Enjuague con una
toalla húmeda y
luego seque.
Regular
(recomendado
después de cada
uso)
---
Ocasional
(recomendado cada
semana)
--
Completo
(recomendado para
manchas difíciles o
comida quemada)
-
es-us_main.book.book Page 111 Friday, August 14, 2026 2:12 PM
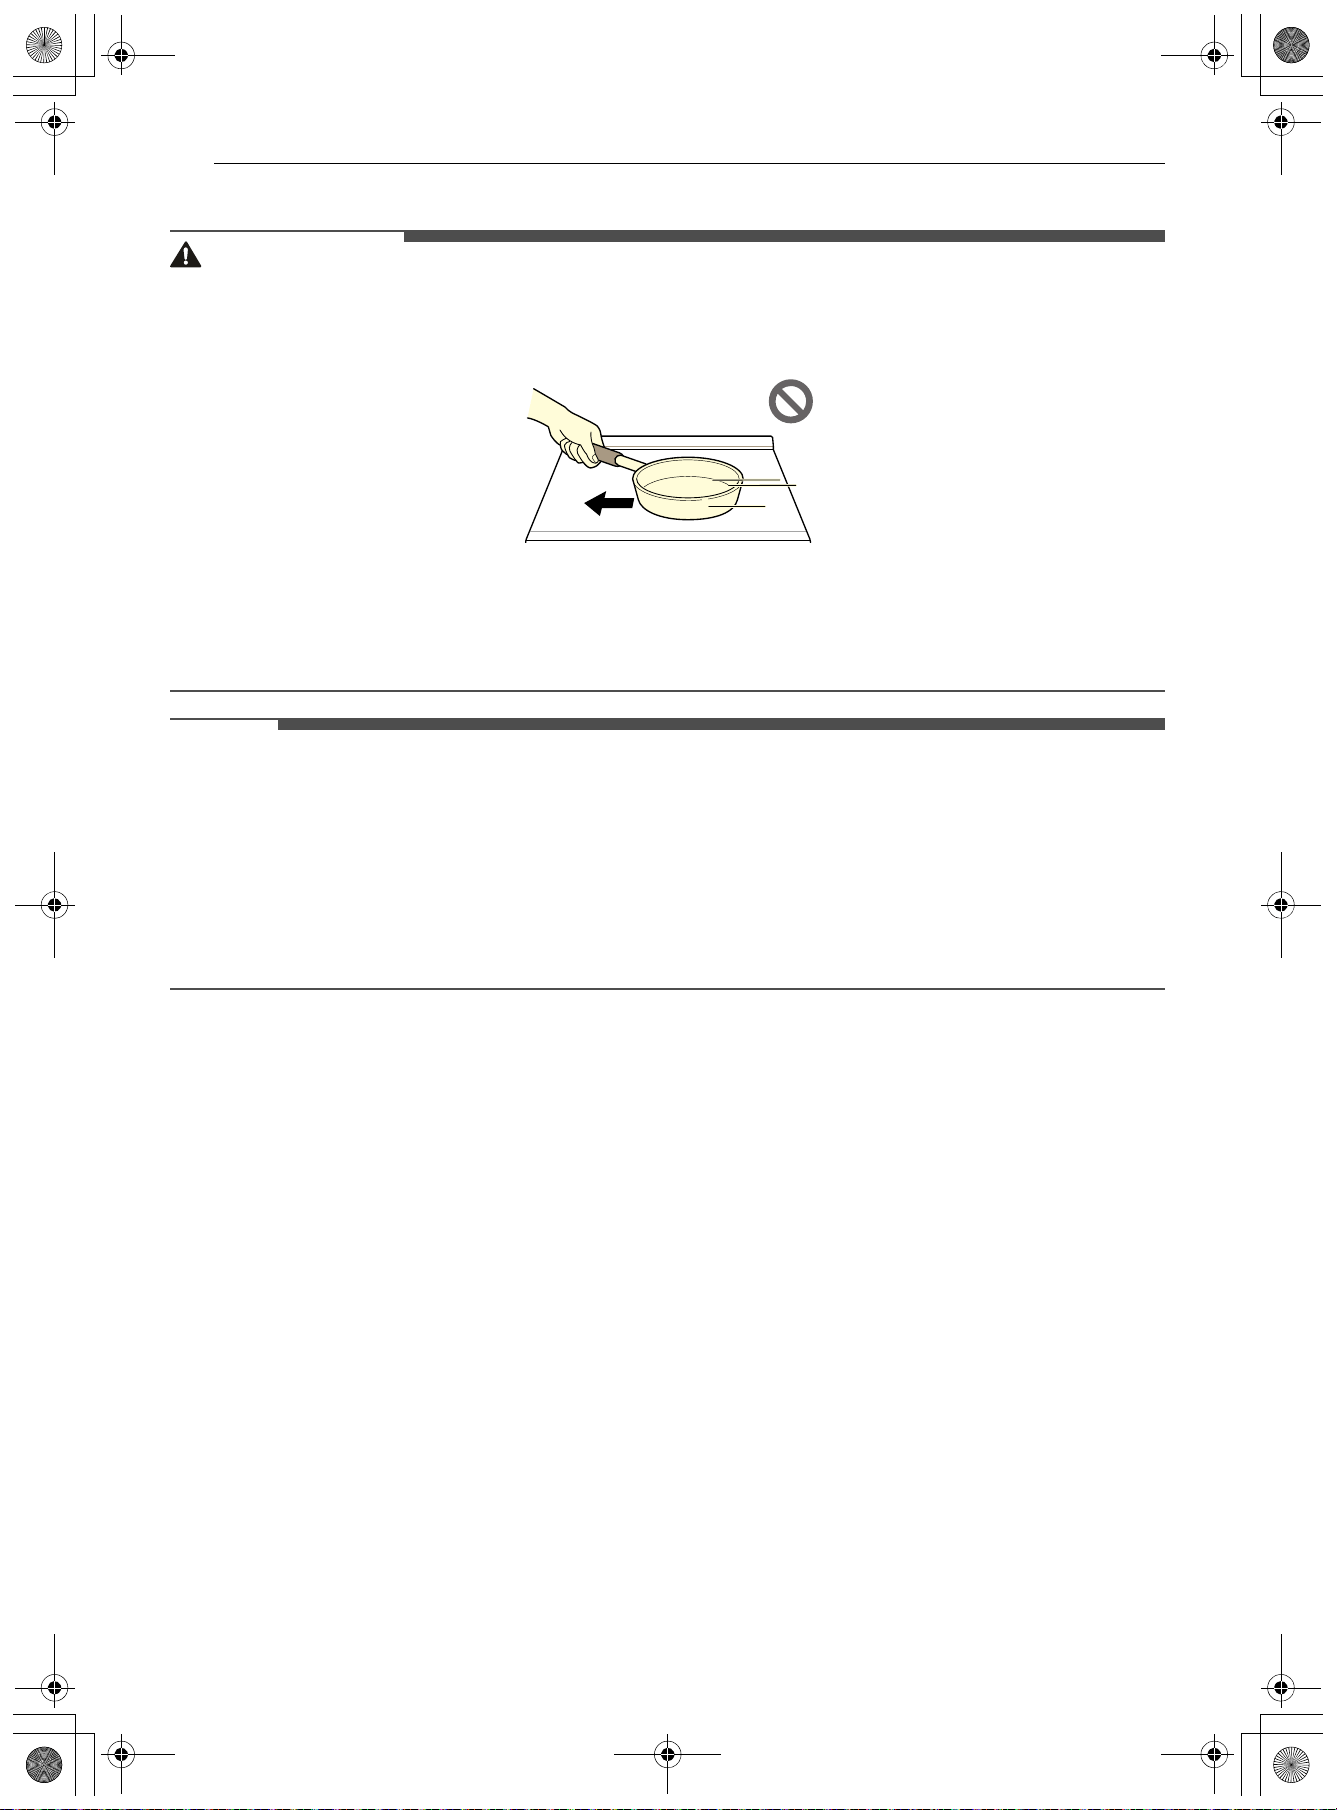
112 MANTENIMIENTO
Marcas de metal y rayas
PRECAUCIÓN
• Utilice siempre utensilios de cocina de mayor calibre y calidad sobre los elementos de cocción y no los
deslice sobre la superficie de la placa de cocción de cerámica. Incluso los utensilios de cocina de alta
calidad pueden rayar la superficie de la placa de cocción.
• Cualquier utensilio de cocina que tenga un fondo áspero o sucio puede marcar y rayar la superficie de la
placa de cocción. Empiece siempre con utensilios de cocina limpios.
• No use utensilios de cocina si hay alguna materia extraña en la superficie de la placa de cocción. Siempre
limpie la superficie antes de cocinar.
NOTA
• Es posible que cualquier daño o falla del producto que resulte de los elementos que se describen a
continuación no estén cubiertos por la GARANTÍA LIMITADA.
- Tenga cuidado de no deslizar ollas y sartenes por la placa de cocción para evitar que queden marcas
de metal. Si desea eliminar estas marcas, use un limpiador para placas de cocción de cerámica con una
esponja limpiadora para tal fin.
- Si las ollas con una capa delgada de aluminio o cobre se dejan hervir en seco, la capa puede dejar una
decoloración negra sobre la placa de cocción. Esta mancha se debe eliminar de inmediato antes de
volver a calentar o la decoloración puede ser permanente.
EasyClean
La tecnología esmaltada de LG EasyClean ofrece
dos opciones de limpieza para el interior de la
estufa. La función EasyClean se beneficia con el
nuevo esmalte de LG ya que ayuda a despegar la
suciedad sin usar químicos fuertes y funciona
SOLAMENTE CON AGUA durante apenas 10
minutos a baja temperatura para aflojar la
suciedad LEVE antes de la limpieza manual.
Si bien la función EasyClean es rápida y eficaz para
la suciedad LEVE y pequeña, la función Self Clean
se puede usar para quitar la suciedad DIFÍCIL
acumulada. La intensidad y la alta temperatura del
ciclo Self Clean pueden producir humo, de modo
que se deberán abrir las ventanas para ventilar. En
comparación con el proceso más intenso de Self
Clean, el horno LG le brinda la opción de limpiar
con MENOS CALOR, en MENOS TIEMPO y,
prácticamente, SIN HUMO NI VAPORES. Puede
reducir el uso de energía limpiando la suciedad
leve del horno con la función EasyClean en lugar
de usar Self Clean.
Cuando sea necesario, la estufa ofrece también la
opción de Self Clean más prolongada y profunda
del horno para quitar la suciedad más difícil
acumulada.
• Para limpiar áreas difíciles de alcanzar, como la
superficie trasera del horno, es mejor usar el
ciclo Self Clean.
Beneficios de EasyClean
• Ayuda a aflojar la suciedad leve antes de la
limpieza manual
• EasyClean solo usa agua; no usa limpiadores
químicos
• Favorece una mejor experiencia de Self Clean
- Retrasa la necesidad de un ciclo Self Clean
- Minimiza el humo y los olores
- Puede acortar el tiempo de Self Clean
es-us_main.book.book Page 112 Friday, August 14, 2026 2:12 PM
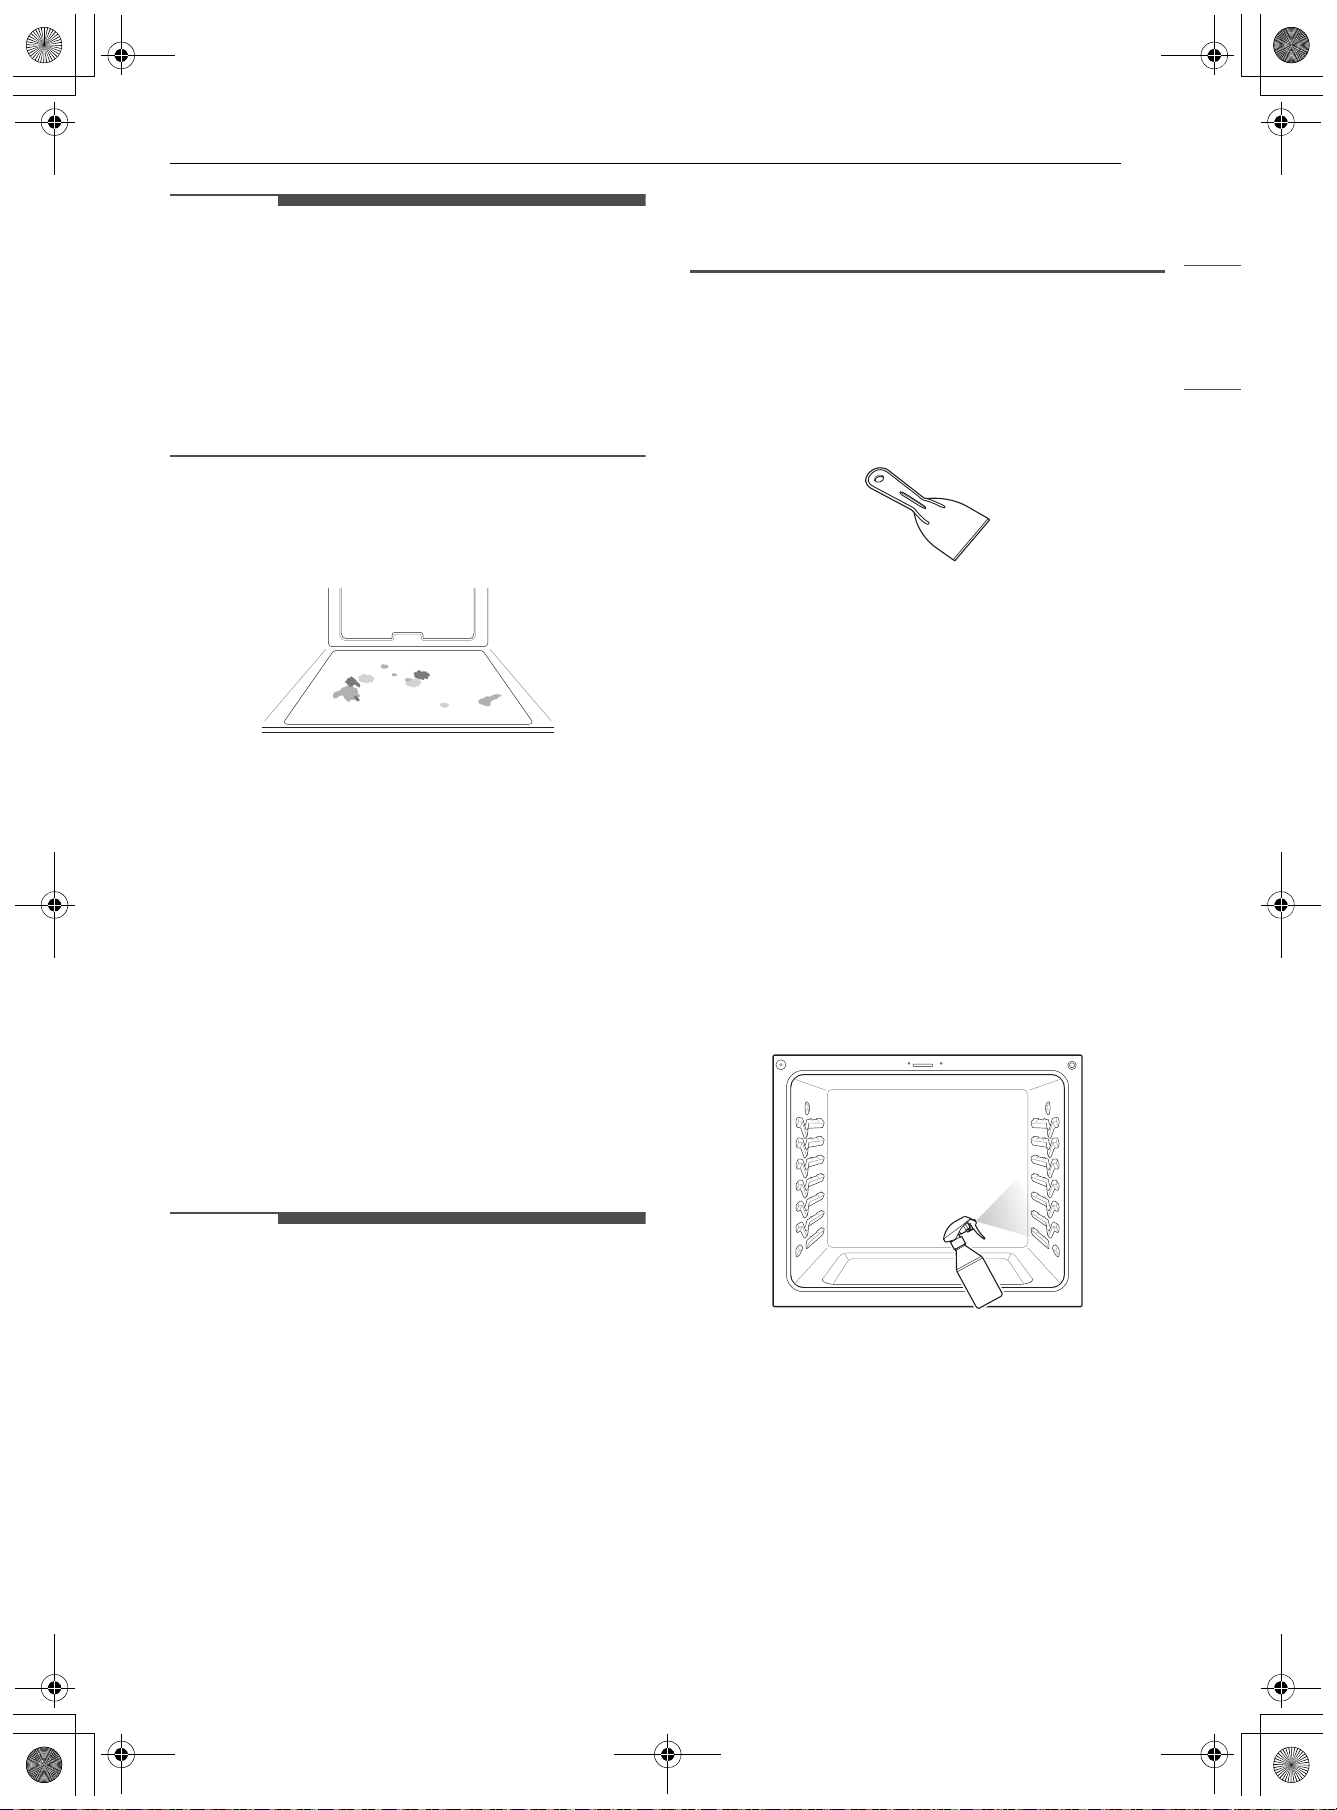
113MANTENIMIENTO
ESPAÑOL
NOTA
• Para modelos sin la opción de Self Clean
- La función EasyClean tal vez no sea efectiva
para quitar la suciedad difícil acumulada.
Debido a que la estufa no incluye una opción
de Self Clean, limpie el horno periódicamente
con la función EasyClean para evitar que se
acumulen residuos difíciles quemados en el
horno.
Cuándo usar EasyClean
• Ejemplo de suciedad en el horno
Caso 1
- Forma de la suciedad: gotitas o manchitas
- Tipos de suciedad: queso u otros ingredientes
- Alimentos comunes que pueden ensuciar el
horno: pizza
Caso 2
- Forma de la suciedad: salpicadura leve
- Tipos de suciedad: grasa/aceite
- Alimentos comunes que pueden ensuciar el
horno: bistecs, asados / pescado, asado /
carne rostizada a baja temperatura
Guía de instrucciones de EasyClean
NOTA
• Permita que el horno se enfríe a temperatura
ambiente antes de usar el ciclo EasyClean. Si la
cavidad del horno alcanza una temperatura
superior a 150 °F (65 °C), aparecerá "Hot" en la
pantalla y el ciclo EasyClean no se activará hasta
que la cavidad del horno se enfríe.
• La estufa debe estar nivelada para garantizar
que la superficie inferior de la cavidad del horno
esté completamente cubierta con agua al
comienzo del ciclo EasyClean.
• Para obtener mejores resultados, use agua
destilada o filtrada. El agua del grifo puede dejar
depósitos minerales en la base del horno.
• La suciedad quemada en varios ciclos de cocción
será más difícil de quitar con el ciclo EasyClean.
• No abra la puerta del horno durante el ciclo
EasyClean. El agua no se calienta lo suficiente si
se abre la puerta durante este ciclo.
1 Quite los estantes y los accesorios del horno.
2 Raspe y retire los residuos quemados con un
raspador plástico.
• Raspadores plásticos sugeridos:
- Espátula de plástico dura
- Raspador plástico para bandejas
- Raspador plástico para pintura
- Tarjeta de crédito vieja
3 Llene un envase rociador con agua (10 oz o
300 ml) y utilícelo para rociar bien las
superficies interiores del horno.
4 Use por lo menos 1/5 (2 oz o 60 ml) del agua
de la botella para saturar completamente la
suciedad en las paredes y las esquinas del
horno.
5 Rocíe o vierta el agua restante (8 oz o 240 ml)
en el centro de la base de la cavidad del
horno. La hendidura en la base del horno
debe estar totalmente cubierta para sumergir
toda la suciedad. Agregue agua si fuera
necesario.
es-us_main.book.book Page 113 Friday, August 14, 2026 2:12 PM
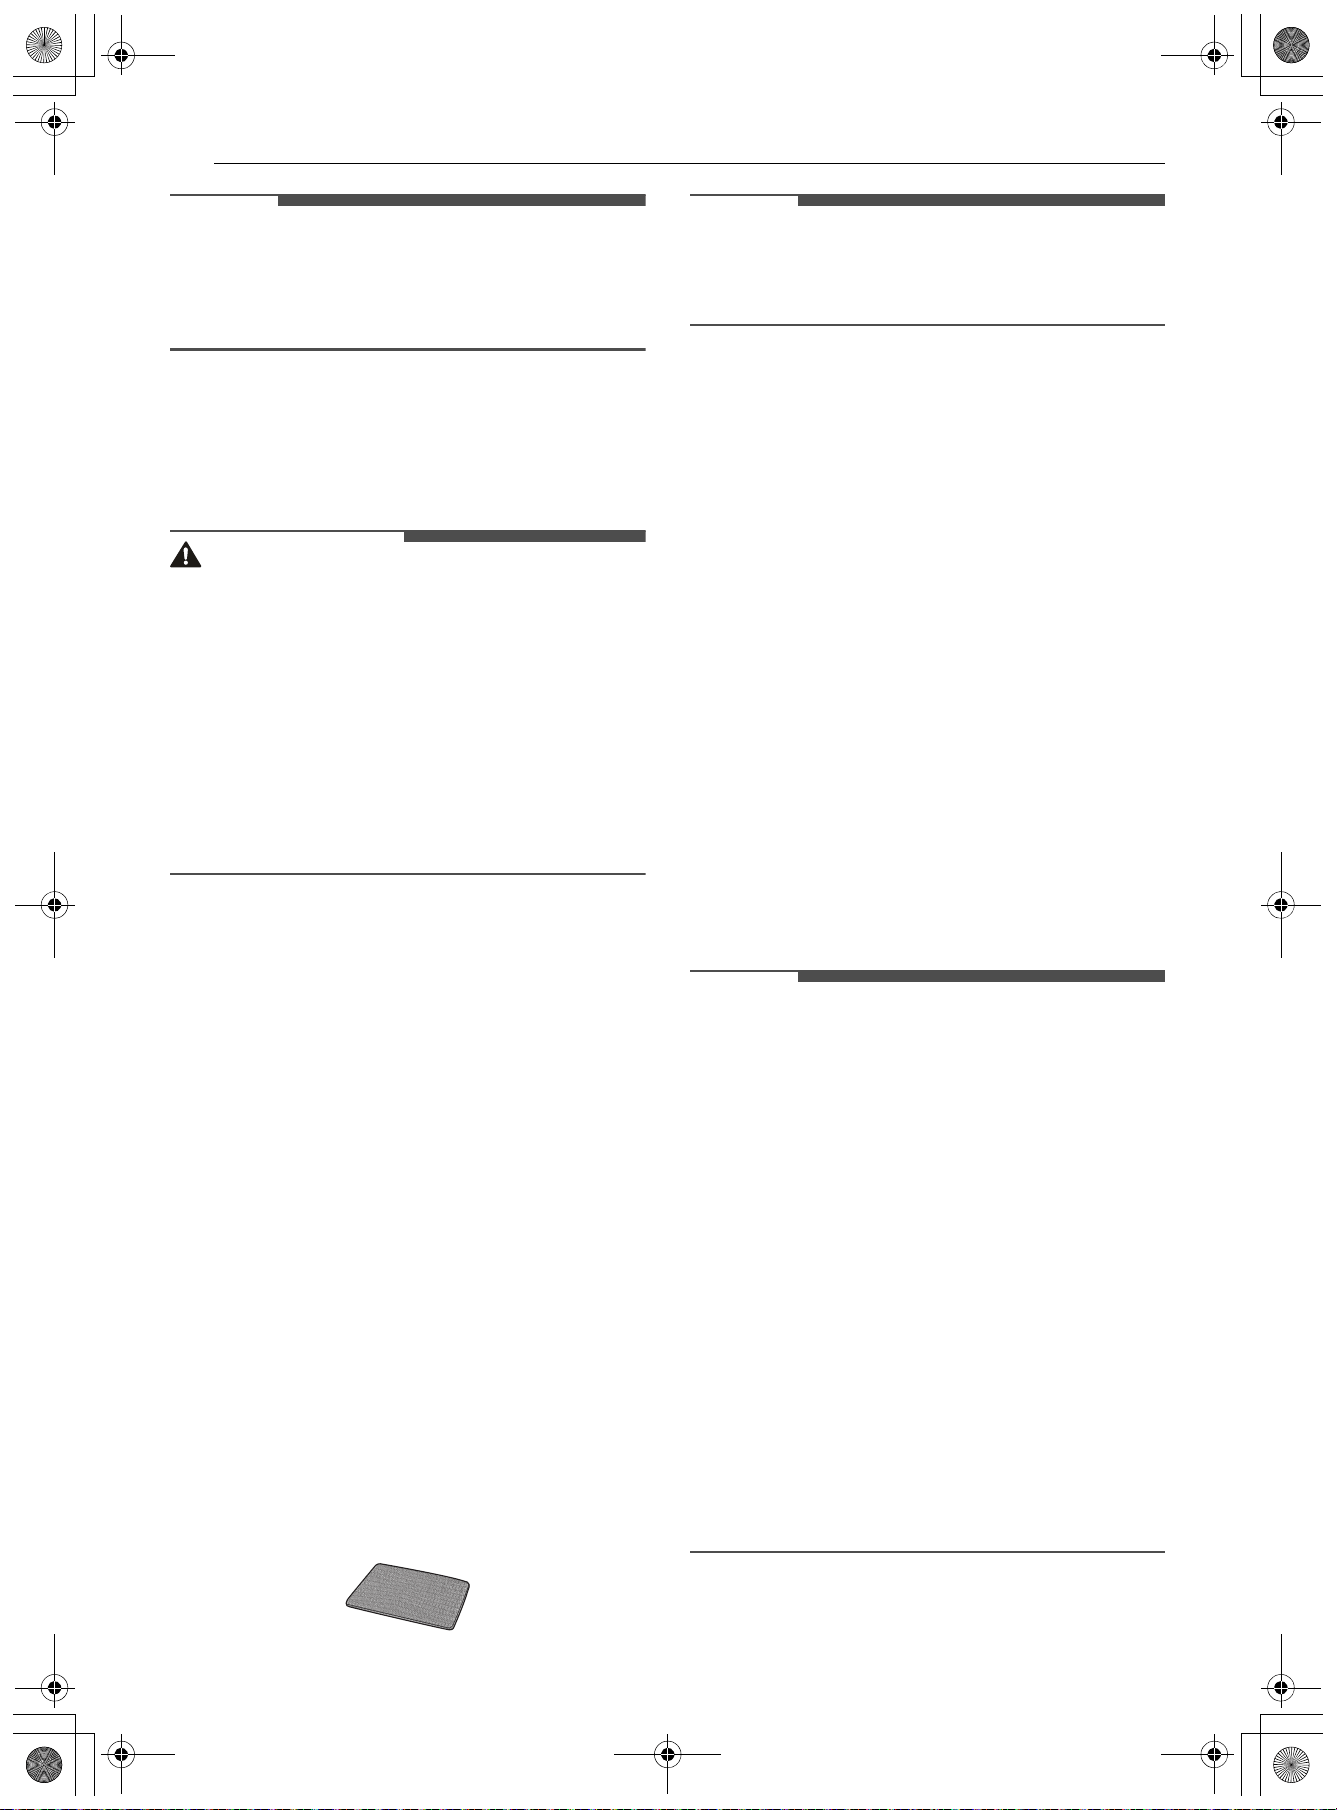
114 MANTENIMIENTO
NOTA
• Si limpia varios hornos, use una botella de agua
entera para cada uno. No rocíe agua
directamente en la puerta. Si lo hace, el agua
caerá al piso.
6 Cierre la puerta del horno. Desplácese y
pulseLimpieza (Limpieza). Pulse EasyClean.
Pulse Iniciar en la parte inferior derecha para
iniciar la limpieza.
PRECAUCIÓN
• Algunas superficies pueden quedar calientes
después del ciclo EasyClean. Use guantes de
goma cuando limpie para evitar quemaduras.
• Durante el ciclo EasyClean, el horno se calienta
lo suficiente como para provocar quemaduras.
Espere hasta que el ciclo termine antes de
limpiar la superficie interna del horno. Si no
espera, podría quemarse.
• Evite apoyarse o posarse sobre el vidrio de la
puerta del horno mientras limpia la cavidad del
horno.
7 Se emitirá un tono al final del programa de
10 minutos. Pulse Terminado para finalizar la
cocción.
8 Después del ciclo de limpieza y durante la
limpieza manual, debe quedar suficiente agua
en la base del horno para sumergir
completamente la suciedad. Agregue agua si
fuera necesario. Coloque una toalla en el piso
frente al horno para absorber el agua que
pueda derramarse durante la limpieza
manual.
9 Limpie la cavidad del horno inmediatamente
después del ciclo EasyClean fregando con una
esponja o un paño de limpieza húmedos que
no rayen. (El lado para refregar no rayará el
acabado). Se puede derramar un poco de
agua en las ventilaciones de la base cuando se
realice la limpieza, pero se recogerá en una
bandeja que se encuentra debajo de la
cavidad del horno y no dañará el quemador.
NOTA
• No use esponjas de acero ni paños o limpiadores
abrasivos, ya que estos materiales pueden dañar
en forma permanente la superficie del horno.
10 Una vez que haya limpiado la cavidad del
horno, quite el exceso de agua con una toalla
limpia y seca. Vuelva a colocar los estantes y
demás accesorios.
11 Si queda alguna suciedad leve, repita los
pasos anteriores y asegúrese de empapar
bien las áreas sucias.
• Para modelos con función Self Clean
- Si queda suciedad rebelde después de
varios ciclos EasyClean, ejecute el ciclo
Self Clean. Asegúrese de que se hayan
retirado de la cavidad del horno los
estantes y los demás accesorios y que la
superficie de la cavidad esté seca antes de
ejecutar el ciclo Self Clean. Consulte la
sección Self Clean (Autolimpieza) del
manual del propietario para obtener más
detalles. Si la opción de Self Clean no está
disponible, raspe y retire la suciedad
difícil usando un raspador.
NOTA
• Si olvida empapar el interior del horno con agua
antes de comenzar el ciclo EasyClean, gire la
perilla de modo del horno hasta la posición
Apagado (APAGADO) para finalizar el ciclo.
Espere que la estufa se enfríe a temperatura
ambiente y, luego, rocíe o vierta agua en el
horno y comience otro ciclo EasyClean.
• La junta de la cavidad puede quedar mojada
cuando termine el ciclo EasyClean. Esto es
normal. No limpie la junta.
• Si quedan depósitos minerales en la base del
horno después de la limpieza, use un paño o una
esponja impregnada en vinagre para quitarlos.
• Es normal que el ventilador funcione durante el
ciclo EasyClean.
• No es recomendable el uso de limpiadores
comerciales o blanqueadores para limpiar el
horno. Utilice un limpiador líquido suave con un
valor de pH inferior a 12.7 para evitar que el
esmalte pierda el color.
es-us_main.book.book Page 114 Friday, August 14, 2026 2:12 PM
115MANTENIMIENTO
ESPAÑOL
Self Clean (Autolimpieza)
El ciclo Self Clean usa temperaturas sumamente
altas para limpiar la cavidad del horno. Mientras se
ejecuta el ciclo de autolimpieza, es posible que
perciba humo u olor. Esto es normal,
especialmente si el horno está muy sucio. Durante
el ciclo Self Clean, se debe ventilar bien la cocina
para minimizar los olores de la limpieza.
Antes de comenzar Self Clean
• Limpie solo las partes mencionadas en el
manual. Quite los estantes del horno, la asadera,
la rejilla de la asadera, los recipientes, el papel
de aluminio o cualquier otro material del horno.
- Si se dejan los estantes en el horno durante el
ciclo Self Clean se decolorarán y será difícil
deslizarlos hacia adentro o hacia afuera.
• La cocina debe estar bien ventilada para
minimizar los olores de la limpieza. Abra una
ventana o encienda un ventilador o extractor
antes de la autolimpieza.
• Limpie los derrames difíciles en la base del
horno.
• Asegúrese de que la tapa de la luz del horno esté
en su lugar y que la luz esté apagada.
• Limpie el marco del horno y la puerta con agua
jabonosa caliente. Enjuague bien.
ADVERTENCIA
• Si el horno está muy sucio con aceite, realice una
autolimpieza del horno antes de volver a
utilizarlo. El aceite puede provocar un incendio.
• En caso de un incendio en el horno durante la
autolimpieza, apáguelo y espere a que se
apague el fuego. No fuerce la puerta para
abrirla. El ingreso de aire fresco a las
temperaturas de autolimpieza puede producir
un estallido de llamas en el horno. Si no sigue
estas instrucciones podría sufrir quemaduras
graves.
PRECAUCIÓN
• No use limpiadores para horno. No deben
usarse limpiadores comerciales ni
revestimientos protectores para horno de
ningún tipo alrededor de las piezas del horno.
• Aparece un código de error F en la pantalla del
horno y suenan tres pitidos largos durante el
proceso de autolimpieza si el modo de
autolimpieza no funciona correctamente.
Desconecte la energía eléctrica del fusible
principal o el disyuntor y hágalo revisar por un
técnico calificado.
• Si el modo de autolimpieza no funciona
correctamente, apague la estufa y desconecte la
alimentación eléctrica. Hágalo revisar por un
técnico calificado.
• Es normal que las piezas del horno se calienten
durante el ciclo Self Clean. No toque la placa de
cocción de la estufa, la ventana ni el área de
ventilación del horno durante el ciclo Self Clean.
• No deje a niños pequeños sin supervisión cerca
del aparato. Durante el ciclo Self Clean, el
exterior de la estufa puede estar muy caliente al
tacto.
• Si tiene aves domésticas, llévelas a otra sala bien
ventilada. La salud de algunas aves es muy
sensible a los vapores emanados durante el ciclo
Self Clean de cualquier estufa.
• No recubra las paredes del horno, los estantes,
el fondo ni ninguna otra parte de la estufa con
papel de aluminio ni con ningún otro material.
Esto destruye la distribución de calor, produce
resultados de horneado deficientes y causa
daños permanentes al interior del horno (el
papel de aluminio se fundirá en la superficie
interior del horno).
NOTA
• La luz del horno no se puede encender durante
el ciclo Self Clean. La luz del horno no se puede
encender hasta que la temperatura sea inferior
a 500 ˚F (260 ˚C) después de completar el ciclo
Self Clean.
• Durante el ciclo Self Clean, no se pueden usar los
elementos de la placa de cocción ni el cajón de
calentamiento.
• Limpie el marco del horno y la puerta con agua
jabonosa caliente. Enjuague bien.
• No limpie la junta. La fibra de vidrio de la junta
de la puerta del horno no resiste la abrasión. Es
fundamental que la junta permanezca intacta. Si
nota que está gastada o deshilachada,
reemplácela.
• Es normal que el ventilador funcione durante el
ciclo Self Clean.
• A medida que el horno se calienta, es posible
que escuche ruidos por la expansión y
contracción de las piezas metálicas. Es normal y
no dañará el horno.
• Es posible que note un poco de ceniza blanca en
el horno. Límpiela con un paño húmedo o una
esponja de lana de acero con jabón después de
que el horno se enfríe. Si el horno no está limpio
después de un ciclo de autolimpieza, repita el
ciclo.
es-us_main.book.book Page 115 Friday, August 14, 2026 2:12 PM
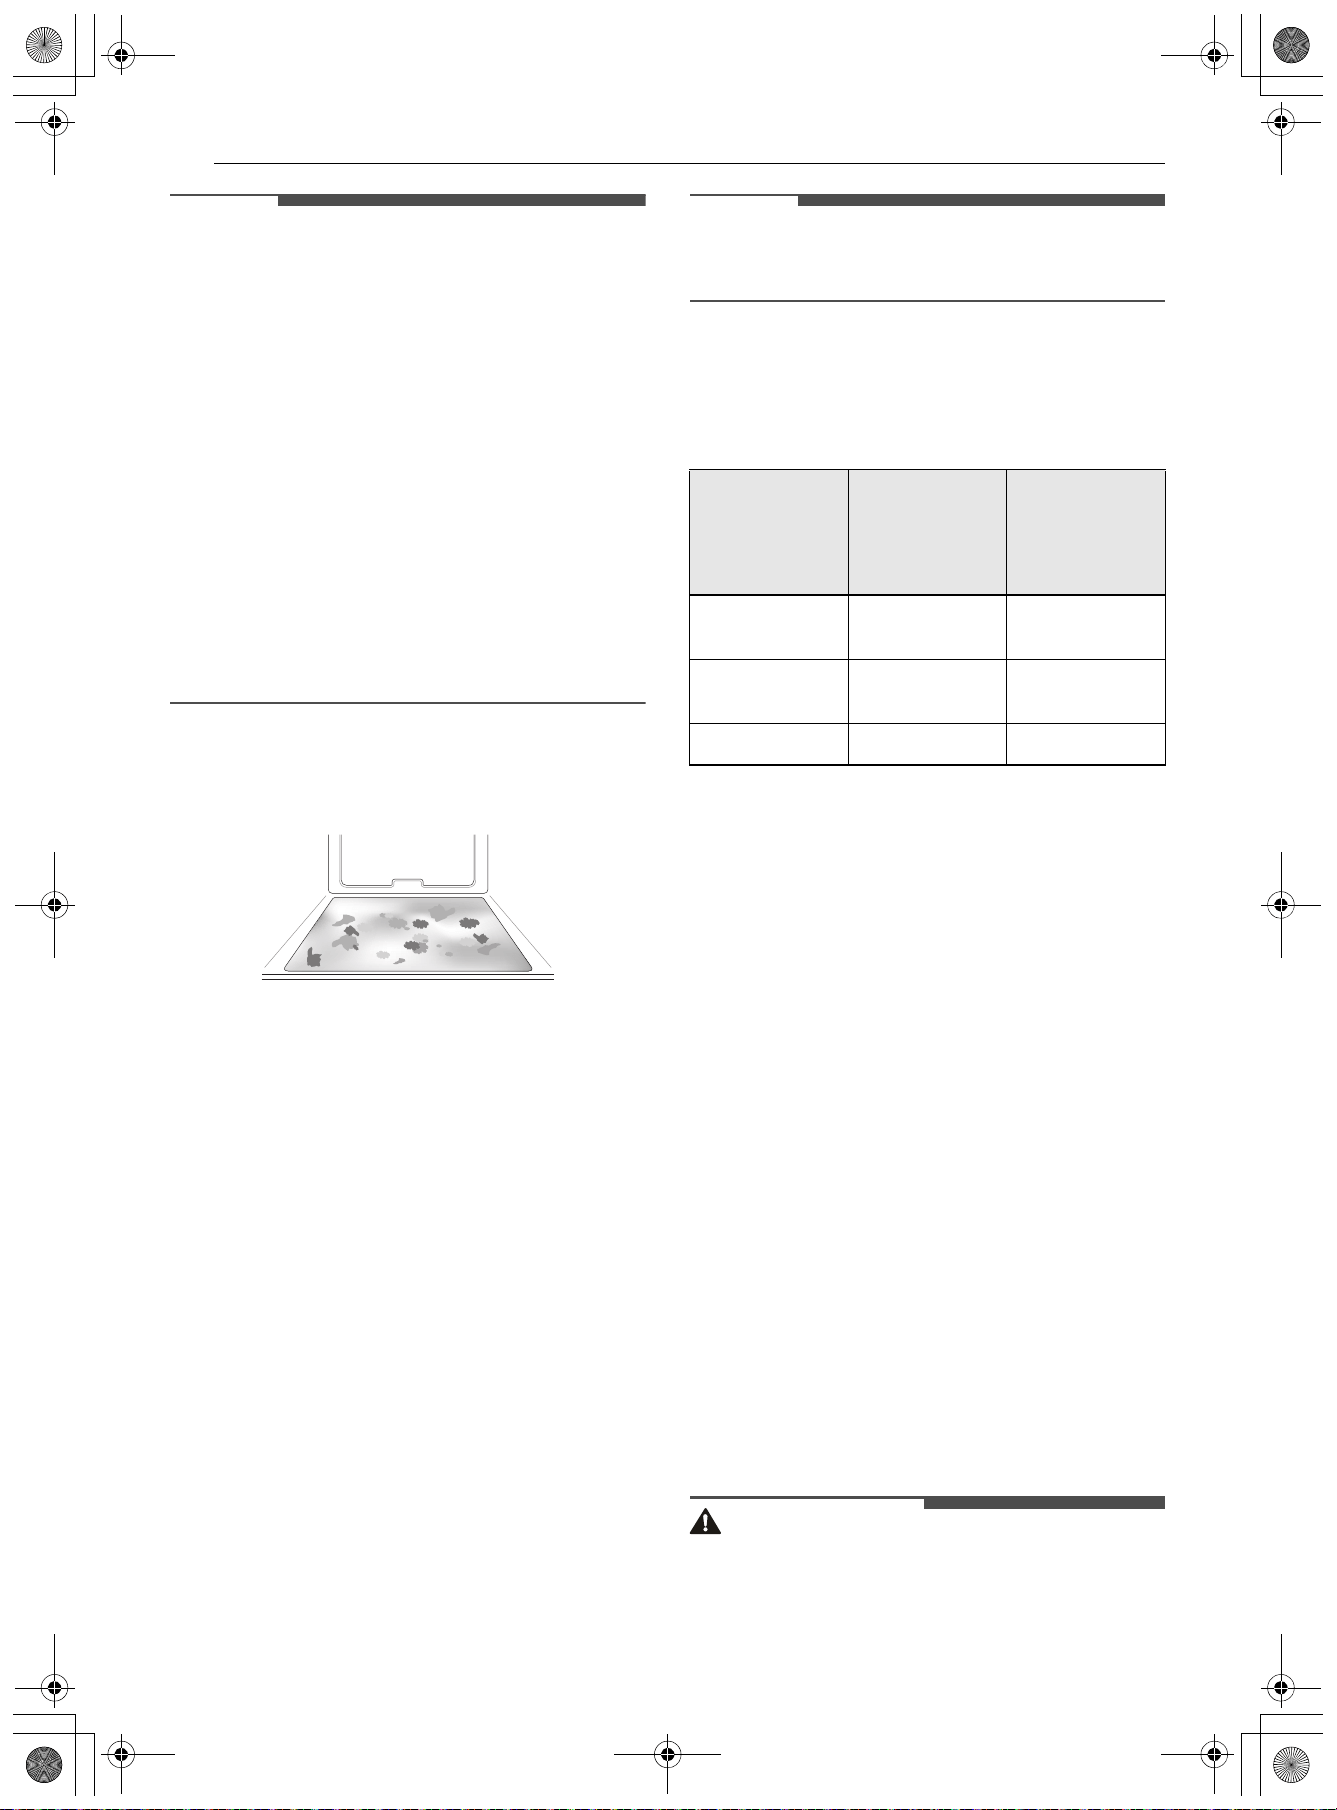
116 MANTENIMIENTO
NOTA
• Si se dejaron los estantes en el horno y no se
deslizan bien después de un ciclo Self Clean,
aplique a los estantes y sus soportes un poco de
aceite vegetal para que se desplacen con
facilidad.
• Pueden aparecer líneas finas en la porcelana
porque fue sometida a frío y calor. Esto es
normal y no afecta su desempeño.
• No se puede iniciar el ciclo Self Clean si está
activa la función Bloqueo de Control/Bloqueo.
• Si el reloj está configurado para una
visualización de 12 horas (predeterminado), Self
Clean atrasada nunca se podrá iniciar con más
de 12 horas de anticipación.
• Luego de que se apague el horno, el ventilador
de convección seguirá funcionando hasta que el
horno se haya enfriado.
Cuándo usar Self Clean
• Ejemplo de suciedad en el horno
Caso 1
• Forma de la suciedad: salpicadura mediana a
grande
• Tipos de suciedad: grasa/aceite
• Alimentos comunes que pueden ensuciar el
horno: carne rostizada a alta temperatura
Caso 2
• Forma de la suciedad: gotas o manchas
• Tipos de suciedad: relleno o suciedad de
alimentos con azúcar
• Alimentos comunes que pueden ensuciar el
horno: tartas
Caso 3
• Forma de la suciedad: gotas o manchas
• Tipos de suciedad: crema o salsa de tomate
• Alimentos comunes que pueden ensuciar el
horno: estofados
NOTA
• El ciclo de autolimpieza puede usarse para
suciedad que se haya acumulado con el tiempo.
Ajuste de Self Clean
La función Self Clean tiene ciclos de 3, 4 o 5 horas.
Guía de ajuste de la función Self Clean
1 Quite todos los estantes y los accesorios del
horno.
2 Cierre la puerta del horno. Desplácese y pulse
Limpieza. Pulse Autolimpieza. El horno
activa por defecto el programa recomendado
de limpieza automática de cuatro horas en
caso de suciedad moderada.
Si lo desea, pulse "Hora de limpieza" para
seleccionar el tiempo de limpieza. Seleccione
3 hr, 4 hr o 5 hr.
Si lo desea, pulse "Iniciar a" para establecer la
hora de inicio de limpieza.
3 Pulse "Iniciar" en la parte inferior derecha
para iniciar la limpieza.
4 Una vez que se haya configurado el ciclo de
autolimpieza, la puerta del horno se traba
automáticamente y aparece el icono del
candado
k No podrá abrir la puerta del
horno hasta que el horno se haya enfriado. El
bloqueo se libera de manera automática
cuando baja la temperatura.
PRECAUCIÓN
• No fuerce la puerta del horno para abrirla
cuando vea el icono del candado. La puerta
permanece trabada hasta que baja la
Cavidad del
horno
Nivel de
suciedad
Número
Botón
Ciclo
Hora
Levemente
sucia
13horas
Moderadamen
te sucia
24horas
Muy sucia 3 5 horas
es-us_main.book.book Page 116 Friday, August 14, 2026 2:12 PM
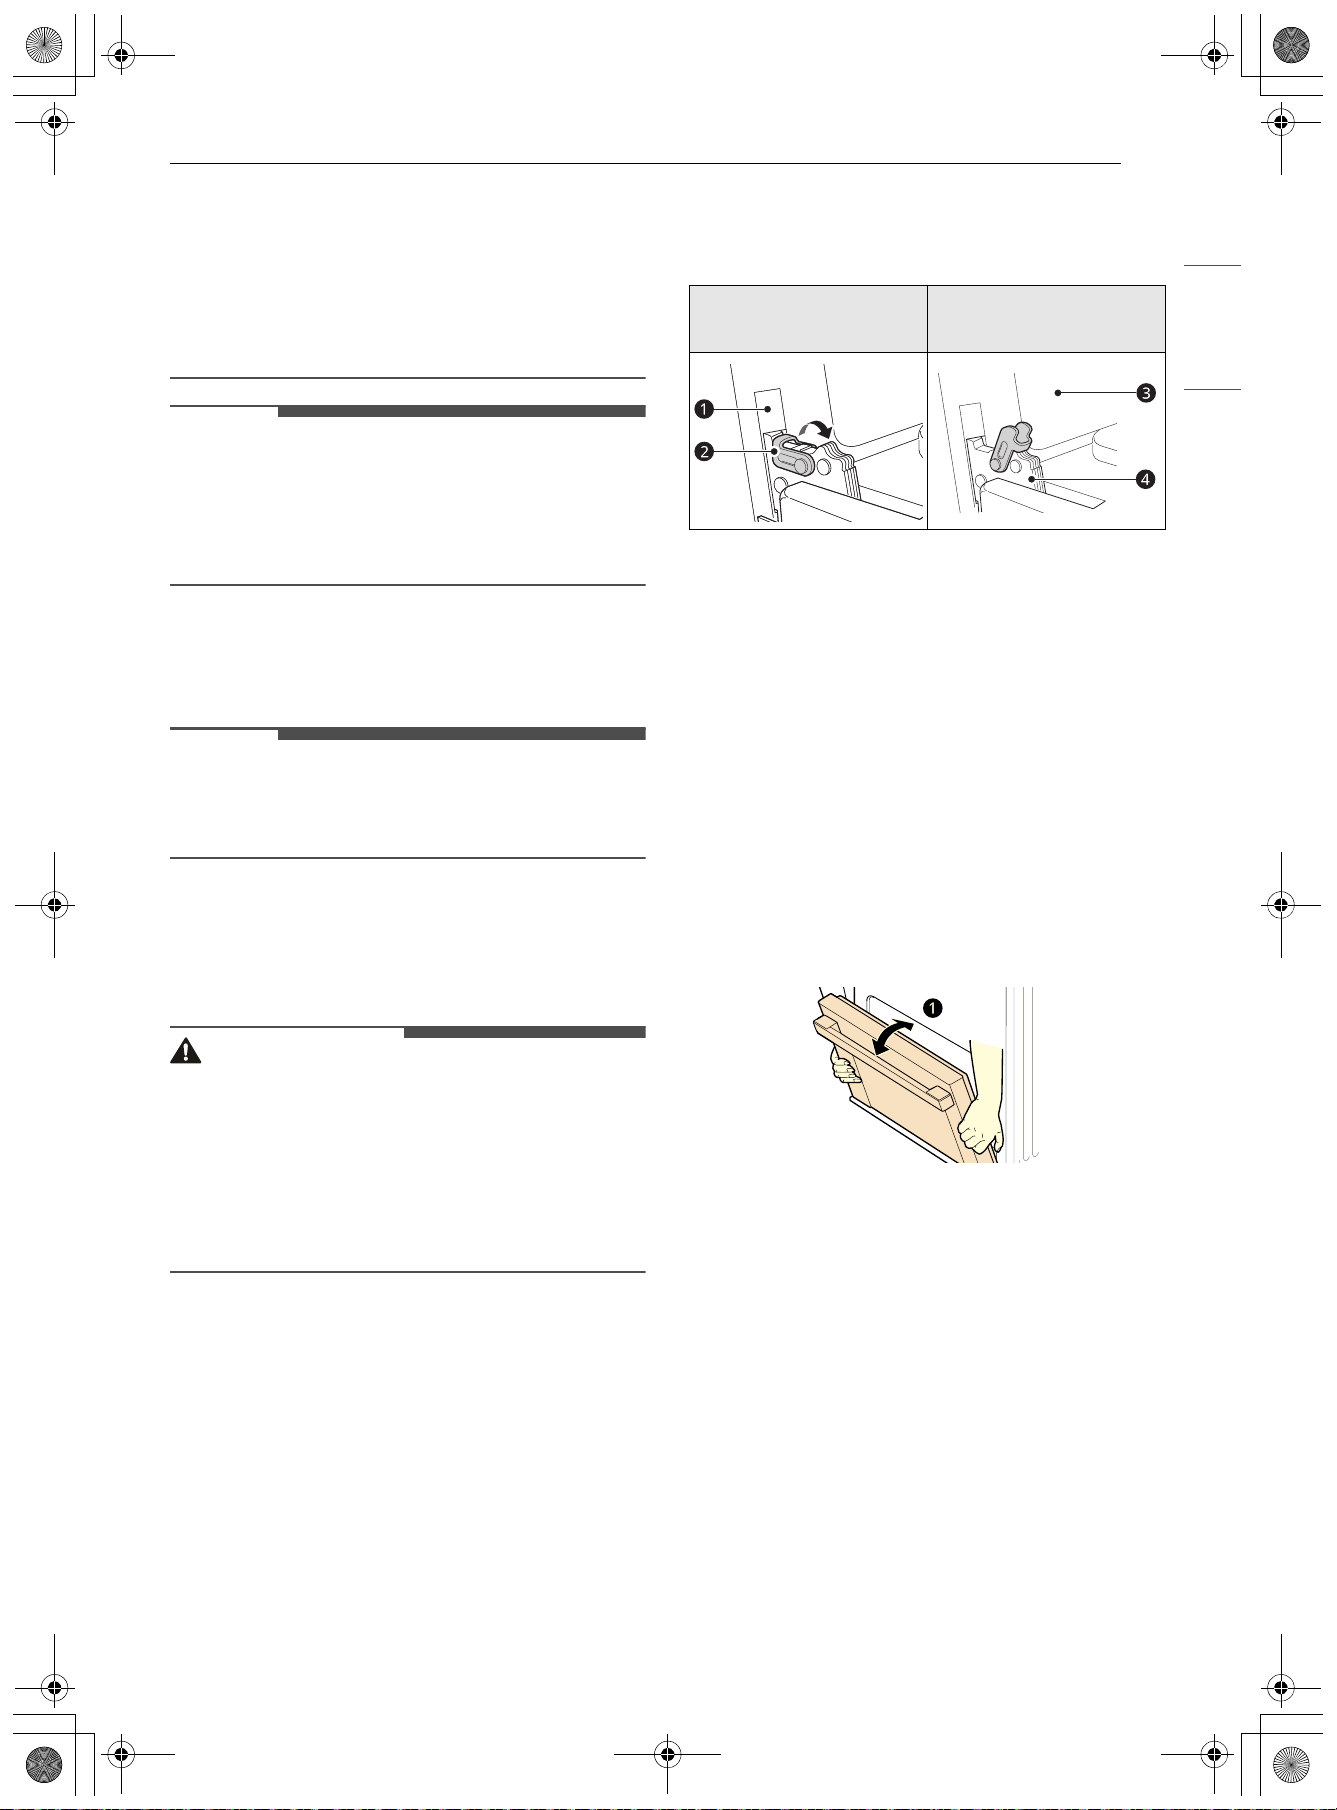
117MANTENIMIENTO
ESPAÑOL
temperatura del horno. Si abre la puerta a la
fuerza, se dañará.
• Tenga cuidado cuando abra la puerta del horno
después del ciclo Self Clean. Ubíquese al costado
del horno cuando abra la puerta para dejar que
salgan el aire y el vapor calientes. El horno
todavía puede estar MUY CALIENTE.
NOTA
• Es posible que deba cancelar o interrumpir el
programa Self Clean (Limpieza automática)
debido a un exceso de humo o la presencia de
fuego en el horno. Para cancelar la función Self
Clean, pulse Detener.
Remover/Ensamblar puertas
elevables de horno
NOTA
• Las piezas pueden ser modificadas debido a la
mejora del producto y pueden tener un aspecto
diferente al mostrado en las imágenes.
Instrucciones para el cuidado de las
puertas
La mayoría de las puertas contienen cristal que
puede romperse.
PRECAUCIÓN
• No cierre la puerta del horno hasta que todos los
estantes estén completamente colocados.
• No golpee el cristal con ollas, sartenes o
cualquier otro objeto.
• Rayar, golpear, sacudir o estresar el cristal
podría debilitar su estructura, provocando un
riesgo aumentado de rotura posterior.
Remover puertas
1 Abra la puerta totalmente.
2 Levante el bloqueo de la bisagra b y voltéela
hacia el brazo de la bisagra d
completamente. Repita en el otro lado.
a Ranura
b Bloqueo de la bisagra
c Marco del horno
d Brazo de la bisagra
3 Tome firmemente ambos lados de la puerta
desde la parte superior.
4 Cierre la puerta parcialmente hasta
aproximadamente 5 grados a. Si la posición
es la correcta, los brazos de la bisagra se
moverán con libertad.
a unos 5°
5 Eleve y jale de la puerta hacia usted hasta que
los pestillos de la bisagra esté completamente
sueltos.
Ensamblaje de las puertas
1 Tome firmemente ambos lados de la puerta
desde la parte superior.
2 Inserte completamente los brazos de la
bisagra a en las ranuras b hasta que las
hendiduras
c de los brazos de la bisagra
Posición bloqueada
Posición
desbloqueada
es-us_main.book.book Page 117 Friday, August 14, 2026 2:12 PM
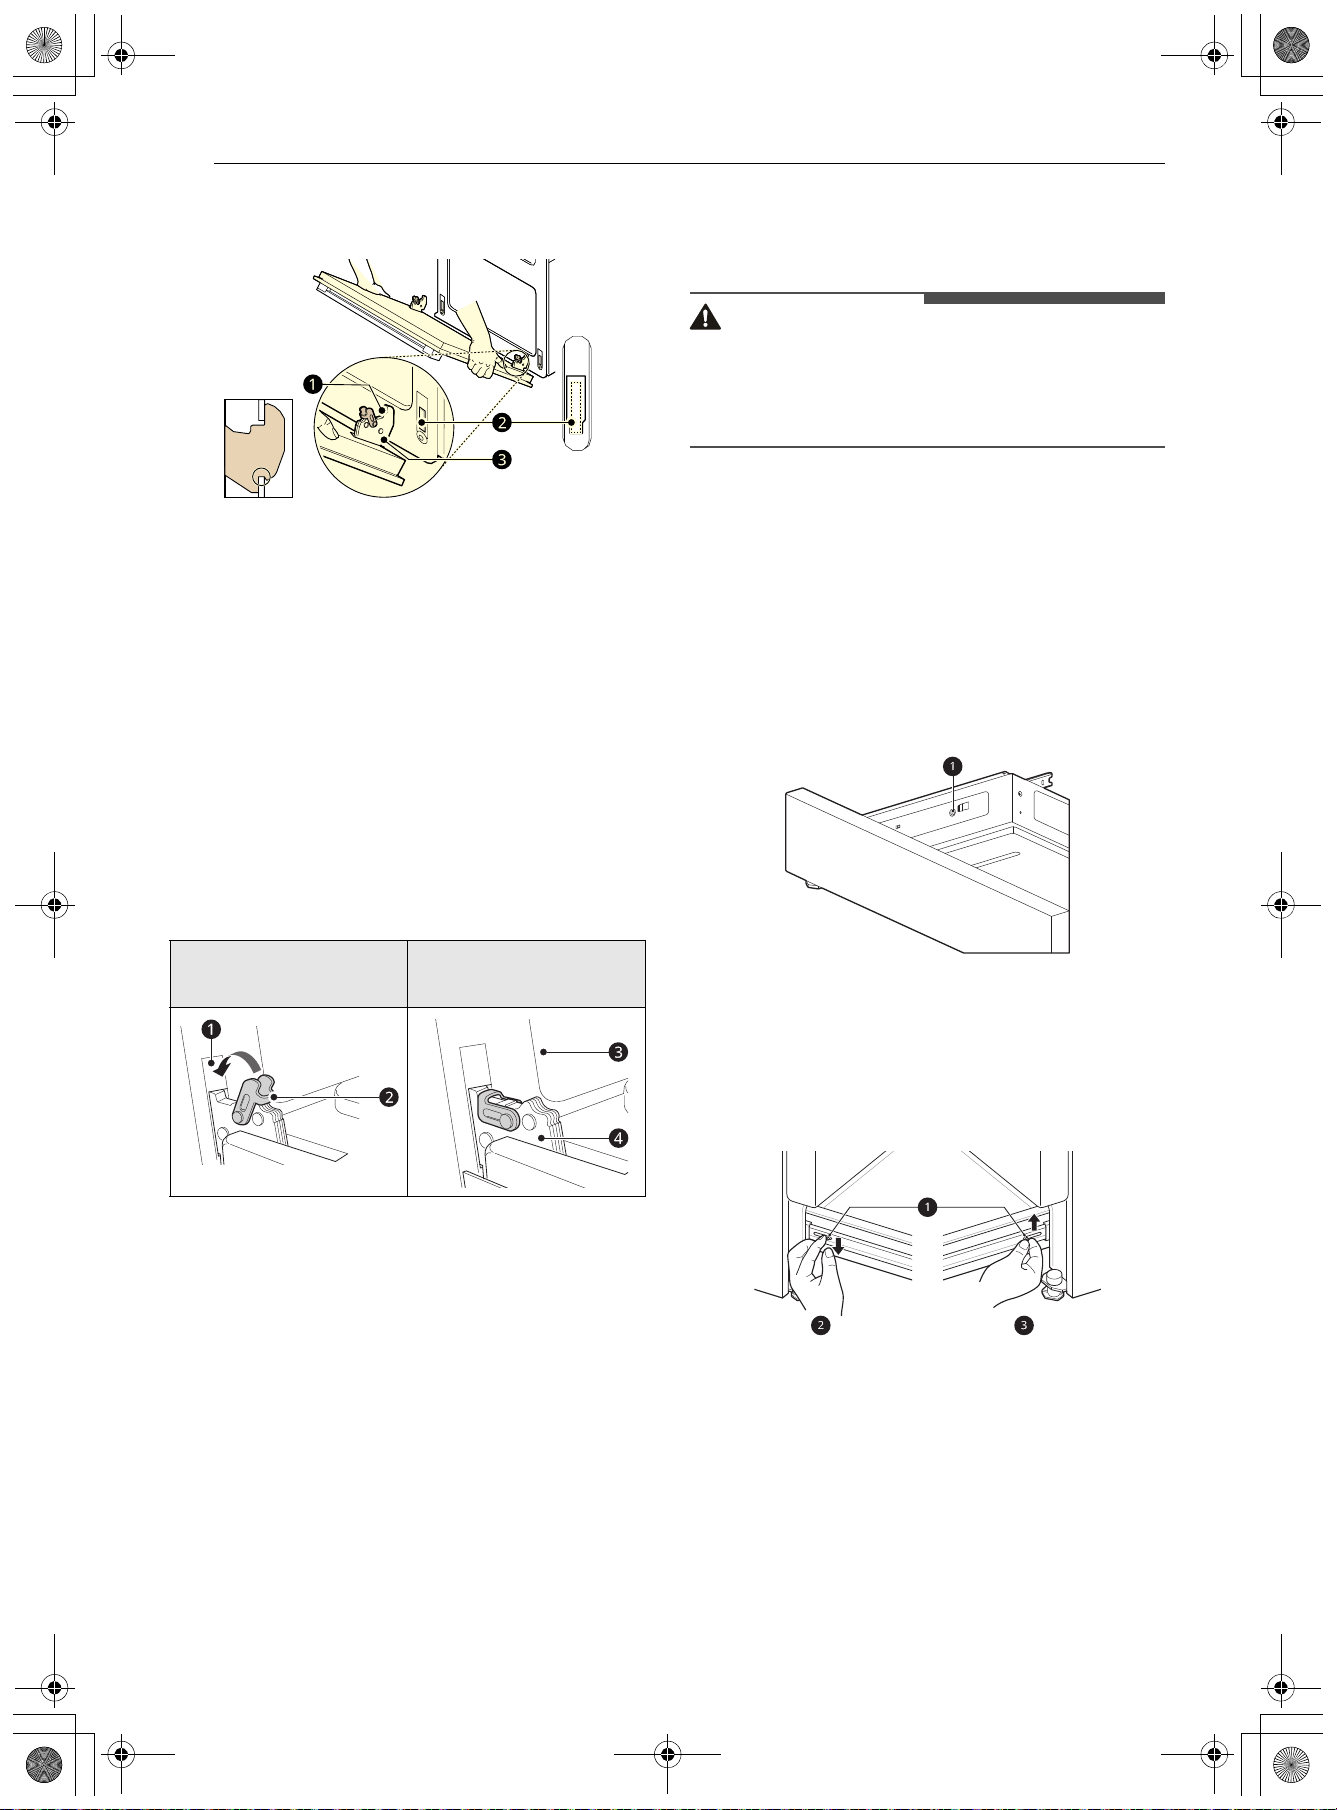
118 MANTENIMIENTO
descansen sobre los extremos inferiores de
las ranuras.
a Brazo de la bisagra
b Extremo inferior de ranura
c Hendidura
3 Abra la puerta lenta y completamente.
Asegúrese de que los brazos de la bisagra
estén completamente encajados en la
ranuras.
4 Eleve el bloqueo de la bisagra b y voltéela
hacia el horno c hasta que haga clic en su
posición. Repita en el otro lado.
a Ranura
b Bloqueo de la bisagra
c Marco del horno
d Brazo de la bisagra
5 Cierre la puerta del horno.
Extracción y colocación de cajones
Extracción de cajones
PRECAUCIÓN
• Desconecte la energía eléctrica de la estufa del
fusible principal o el panel disyuntor. Si no lo
hace, podría causar lesiones graves, descargas
eléctricas o la muerte.
La mayor parte de la limpieza se puede realizar
con el cajón en su lugar; sin embargo, el cajón
puede extraerse si se necesita realizar una
limpieza adicional. Use agua caliente para limpiar
a fondo.
1 Abra el cajón totalmente.
2 Desenrosque el tornillo a de cada lado en la
parte posterior del cajón.
3 Localice las palancas de deslizamiento a
ambos lados del cajón. Presione la palanca de
deslizamiento izquierda hacia abajo y tire
hacia arriba la palanca de deslizamiento
derecha.
a Palanca
b Empuje hacia abajo con el dedo
c Levante con el dedo
4 Retire el cajón de la estufa.
Posición
desbloqueada
Posición bloqueada
es-us_main.book.book Page 118 Friday, August 14, 2026 2:12 PM
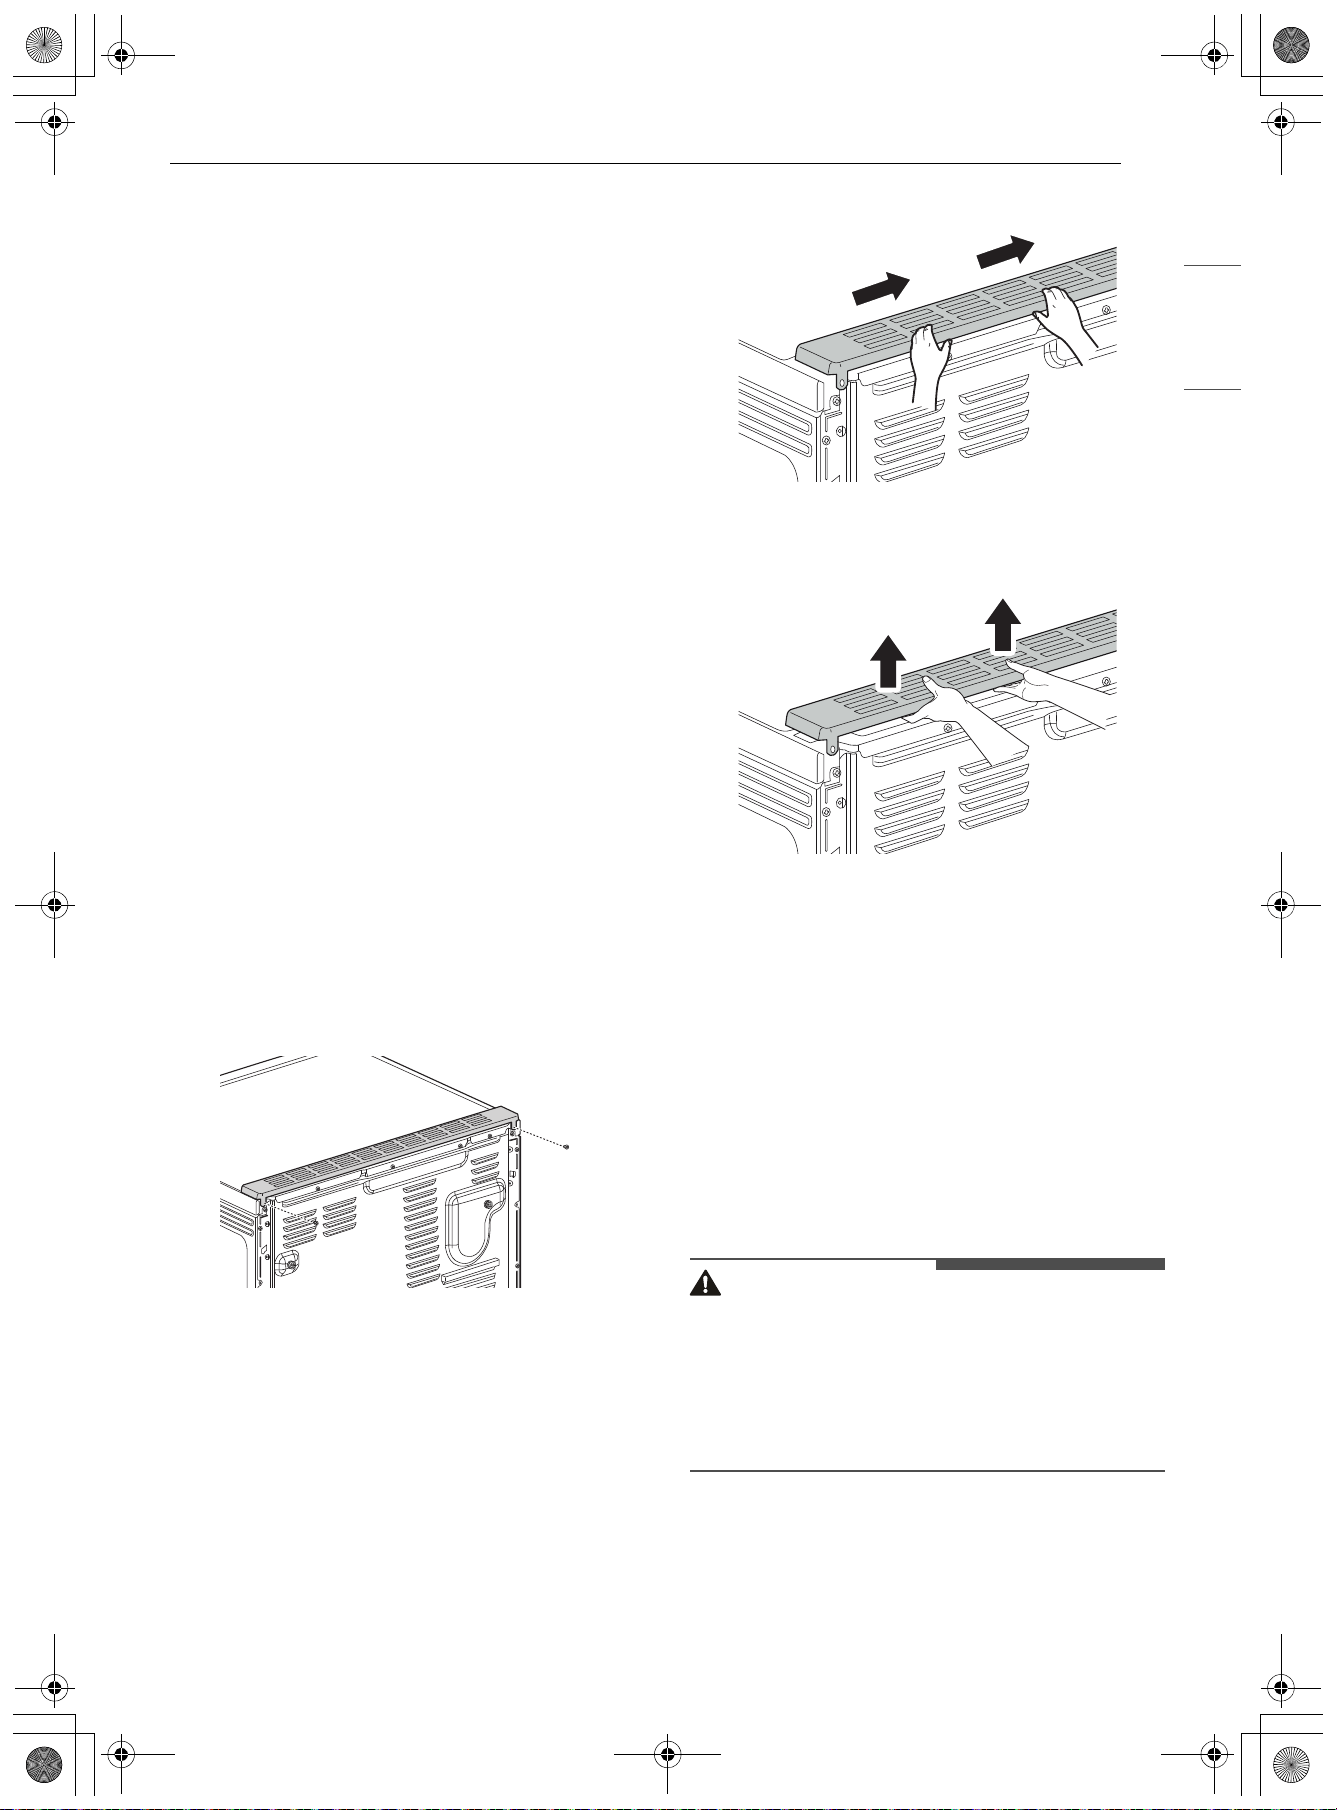
119MANTENIMIENTO
ESPAÑOL
Colocación de los cajones
1 Lleve las correderas de apoyo a la parte
delantera de la corredera del chasis.
2 Alinee las correderas de cada lado del cajón
con las ranuras de las correderas de la estufa.
3 Empuje el cajón en la estufa hasta que las
palancas hagan clic (aproximadamente 2
pulgadas).
4 Inserte y apriete los tornillos en cada lado de
la parte posterior del cajón.
5 Tire nuevamente del cajón para abrirlo y
encajar las correderas de apoyo en su lugar.
Extracción/montaje de la moldura
de ventilación
Extracción de la moldura de
ventilación
1 Con un destornillador, retire los dos tornillos
que sujetan la moldura de ventilación en su
lugar.
2 Mueva la moldura de ventilación en la
dirección indicada aproximadamente 1/4".
3 Levante la moldura de ventilación.
Montaje de la moldura de ventilación
Coloque la moldura de ventilación en la secuencia
inversa a la de su extracción.
Mantenimiento periódico
Cambio de la luz del horno
La luz del horno es una bombilla estándar
halógena para electrodomésticos de 40 vatios. Se
enciende cuando se abre la puerta del horno.
Cuando la puerta del horno está cerrada, presione
Light para encenderla o apagarla.
ADVERTENCIA
• Asegúrese de que el horno y la bombilla estén
fríos.
• Desconecte la energía eléctrica de la estufa del
fusible principal o el panel disyuntor. Si no lo
hace, podría causar lesiones graves, descargas
eléctricas o la muerte.
1 Desenchufe la estufa o desconéctela de la
corriente eléctrica.
es-us_main.book.book Page 119 Friday, August 14, 2026 2:12 PM
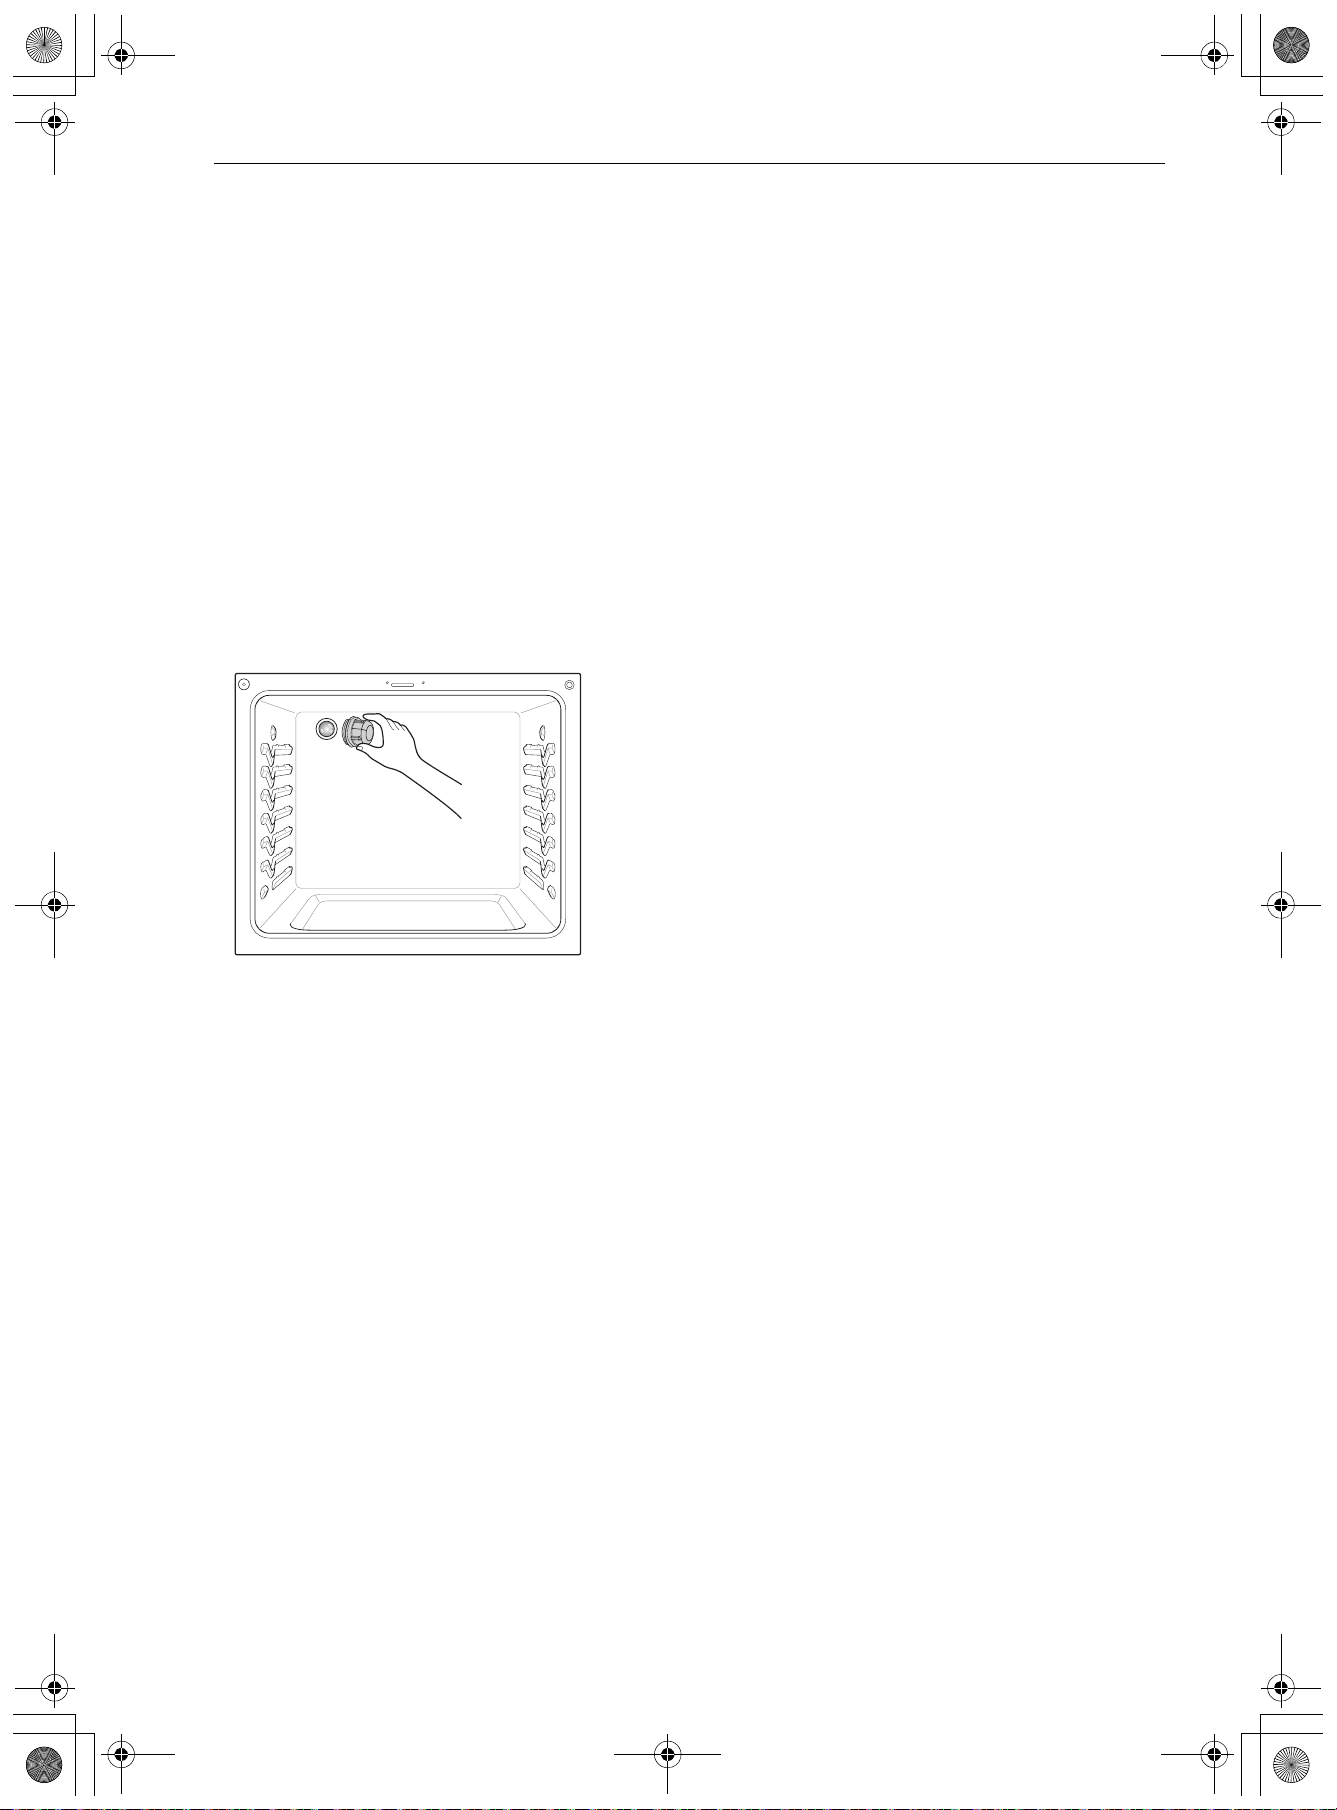
120 MANTENIMIENTO
2 Para quitar la tapa de vidrio de la bombilla
que se encuentra en la parte trasera del
horno, gírela hacia la izquierda.
3 Retire la bombilla halógena del enchufe.
4 Inserte la nueva bombilla halógena.
5 Inserte la tapa de vidrio de la bombilla y gírela
hacia la derecha.
6 Enchufe la estufa o reconecte la corriente
eléctrica.
es-us_main.book.book Page 120 Friday, August 14, 2026 2:12 PM

121SOLUCIÓN DE PROBLEMAS
ESPAÑOL
SOLUCIÓN DE PROBLEMAS
Preguntas Frecuentes
Preguntas frecuentes
P: ¿Qué tipo de utensilios cocina se recomienda usar con la placa de cocción?
R:
• Las bandejas deben tener fondo plano y laterales rectos.
• Use solamente bandejas gruesas.
• El tamaño de la bandeja debe coincidir con la cantidad de comida que se preparará y el
tamaño de la hornalla.
• Use tapas herméticas.
• Use solamente woks de fondo plano.
P: ¿Por qué los elementos calentadores parecen ENCENDERSE y APAGARSE durante el uso de la
placa de cocción o del horno?
R: Dependiendo del ajuste de los elementos de la placa de cocción o la temperatura seleccionada en el
horno es normal que los elementos calentadores se enciendan y se apaguen.
P: Mi nuevo horno no cocina como el que tenía antes. ¿Hay algún problema con los ajustes de
temperatura?
R: No, su horno se probó y calibró en la fábrica. Durante los primeros usos, siga cuidadosamente los
tiempos y las temperaturas de su receta. Si todavía piensa que el horno nuevo se calienta o enfría
demasiado, puede ajustar su temperatura para adecuarla a sus necesidades específicas de cocción.
Consulte la sección Cambio de configuración del horno de este manual para obtener instrucciones
fáciles sobre cómo ajustar el termostato.
P: ¿Es normal que se escuche un chasquido que proviene de la parte trasera del horno cuando lo
uso?
R: Su nueva estufa está diseñada para mantener un control más estricto de la temperatura del horno. Es
posible que escuche los elementos calentadores del horno hacer un chasquido al encenderse y
apagarse con más frecuencia en su horno nuevo. Esto es normal.
P: ¿Por qué parpadea el reloj?
R: Esto significa que el producto acaba de enchufarse o que hubo una interrupción del suministro
eléctrico. Para eliminar el parpadeo del reloj, toque cualquier botón y reinicie el reloj si es necesario.
P: Durante la cocción por convección, el ventilador se detiene cuando abro la puerta. ¿Es normal?
R: Sí, es normal. Cuando se abre la puerta, el ventilador de convección se detiene hasta que se cierra la
puerta.
P: ¿Puedo usar papel de aluminio para que recolecte el goteo en la cavidad del horno?
R: Nunca utilice papel de aluminio para revestir la base o los costados del horno o el cajón calentador
(en algunos modelos). El papel se derretirá y se pegará a la superficie del fondo del horno y no se
podrá quitar. En lugar de eso, coloque una bandeja forrada con papel de aluminio sobre un estante
inferior del horno y úsela para recolectar las gotas. (Si ya se ha derretido papel de aluminio en el
fondo del horno, esto no interferirá con el rendimiento del horno).
P: ¿Puedo usar papel de aluminio en los estantes?
R: No cubra los estantes con papel de aluminio. Cubrir estantes por completo con papel de aluminio
restringe el flujo de aire, generando resultados de cocción deficientes. Coloque una bandeja cubierta
con papel de aluminio debajo de tartas de frutas u otros alimentos ácidos o dulces para evitar que los
derrames dañen el acabado del horno.
es-us_main.book.book Page 121 Friday, August 14, 2026 2:12 PM
122 SOLUCIÓN DE PROBLEMAS
PRECAUCIÓN
• Se puede utilizar papel de aluminio para envolver los alimentos dentro del horno o el cajón de
calentamiento, pero no permita que el papel de aluminio entre en contacto con los elementos
calentadores o asaderas del horno expuestos. El papel de aluminio podría derretirse o prenderse fuego,
lo que ocasionaría humo, incendio o lesiones.
P: ¿Puedo dejar los estantes en el horno cuando ejecute un ciclo de autolimpieza? (En algunos
modelos)
R: No. Aunque no dañará los estantes, esto los decolorará y no se deslizarán bien cuando los use. Quite
todos los elementos del horno antes de comenzar un ciclo de autolimpieza.
P: ¿Qué debo hacer si los estantes están pegajosos y es difícil deslizarlos hacia dentro y hacia
fuera?
R: Con el tiempo, se puede hacer difícil deslizar los estantes. Aplique una pequeña cantidad de aceite de
oliva en los extremos de los estantes. Este actuará como lubricante para un mejor deslizamiento.
P: ¿Qué debo hacer para quitar manchas difíciles de la placa de cocción?
R: La placa de cocción debe limpiarse después de cada uso para evitar que queden manchas
permanentes. Cuando cocine alimentos con alto contenido de azúcar, como salsa de tomate, se
recomienda limpiar la mancha con una espátula mientras la placa de cocción todavía esté tibia. Use
un guante para horno cuando raspe para evitar quemarse. Consulte la sección MANTENIMIENTO del
presente manual del propietario para obtener más instrucciones.
P: ¿Por qué no se pueden operar los botones de función?
R:
Asegúrese de que la estufa no esté en modo Bloqueo de Control/Bloqueo. El icono del candado
k
aparecerá en la pantalla si el modo Bloqueo de Control/Bloqueo está activado. Para desactivarlo,
consulte la sección Bloqueo de Control/Bloqueo. Suena la melodía de desbloqueo y aparece Loc en la
pantalla hasta que los controles se desbloquean. En modelos con Modo Sabbath, asegúrese de que la
estufa no esté en Modo Sabbath. Consulte la sección Modo Sabbath del manual para obtener
instrucciones.
P: Mi estufa todavía está sucia después de ejecutar el ciclo EasyClean. ¿Qué más debo hacer?
R: El ciclo EasyClean solo ayuda a aflojar la suciedad leve de la estufa para ayudar en la limpieza manual
del horno. No quita automáticamente toda la suciedad después del ciclo. Es posible que necesite
fregar la estufa después de haber ejecutado el ciclo EasyClean.
P: Probé fregar el horno después de ejecutar EasyClean, pero queda suciedad. ¿Qué puedo hacer?
R: La función EasyClean tiene un mejor resultado cuando la suciedad se empapa y sumerge totalmente
en agua antes de ejecutar el ciclo y durante la limpieza manual. Si la suciedad no está muy empapada
en agua, puede tener un efecto negativo sobre el desempeño de la limpieza. Repita el proceso
EasyClean utilizando suficiente agua.
• Para modelos con función Self Clean:
La suciedad de azúcar y algunos residuos grasosos son particularmente difíciles de limpiar. Si
queda alguna suciedad rebelde, use la función Self Clean para limpiar bien el horno.
P: La suciedad de las paredes del horno no sale. ¿Cómo puedo dejar limpias las paredes?
R: La suciedad en las paredes laterales y traseras de su estufa con horno puede resultar más difícil de
empapar totalmente con agua. Intente repetir el proceso EasyClean con más de ¼ de taza (2 oz o 60
ml) del producto recomendado.
P: ¿EasyClean quita toda la suciedad y las manchas por completo?
es-us_main.book.book Page 122 Friday, August 14, 2026 2:12 PM

123SOLUCIÓN DE PROBLEMAS
ESPAÑOL
R: Depende del tipo de suciedad. Las manchas de azúcar y algunas de grasa son particularmente
difíciles de limpiar. Además, si las manchas no están muy empapadas en agua, esto puede tener un
efecto negativo en el desempeño de la limpieza.
• Para modelos con función Self Clean:
Si todavía quedan manchas rebeldes o acumulación, use la función Self Clean. Consulte la
sección Self Clean (Autolimpieza) del manual del propietario.
P: ¿Hay algún truco para eliminar algo de la suciedad rebelde?
R: Se recomienda raspar la suciedad con un raspador plástico antes de limpiar manualmente y mientras
limpia. También se recomienda saturar por completo con agua la suciedad.
• Para modelos con función Self Clean:
Hay suciedad que es más difícil de limpiar que otra. Para la suciedad rebelde, se recomienda
usar el ciclo Self Clean. Consulte la sección Self Clean (Autolimpieza) del manual del
propietario para obtener más detalles.
P: ¿Es seguro que el ventilador de convección o el elemento calentador se mojen durante la
función EasyClean?
R: Sí. Tanto el ventilador de convección como el elemento calentador pueden mojarse un poco durante
la limpieza. Sin embargo, no es necesario aplicar un rocío directo sobre el quemador del asador ni los
elementos calentadores porque se limpian automáticamente durante el uso regular.
P: ¿Debo usar toda el agua 1 ¼ tazas (10 oz o 300 ml) para la función EasyClean?
R: Sí. Se recomienda encarecidamente rociar o verter 1 taza (8 oz o 240 ml) de agua en la base y otro ¼
de taza (2 oz o 60 ml) de agua en las paredes y otras áreas sucias para saturar por completo la
suciedad a fin de lograr un mejor resultado de la limpieza.
P: Veo humo que sale de las ventilaciones de la placa de cocción de la estufa durante la función
EasyClean. ¿Es normal?
R: Esto es normal. No es humo. En realidad es vapor del agua que está en la cavidad del horno. Cuando
el horno se calienta brevemente durante la función EasyClean, el agua de la cavidad se evapora y sale
por las ventilaciones del horno.
P: ¿Con qué frecuencia debo usar EasyClean?
R: EasyClean se puede usar las veces que desee. EasyClean funciona mejor cuando el horno está
LEVEMENTE sucio, por ejemplo, con salpicaduras de grasa LEVES y gotitas de queso. Consulte la
sección EasyClean del manual del propietario para obtener más información.
P: ¿Qué se necesita para EasyClean?
R: Un envase rociador con 1¼ tazas (10 oz o 300 ml) de agua, un raspador plástico, una esponja que no
raye y una toalla. No debe usar esponjas abrasivas como las de trabajo pesado ni lana de acero.
P: ¿Cómo puedo mantener la seguridad de los niños alrededor de la estufa?
R: Los niños deben estar bajo supervisión cuando estén alrededor de la estufa en uso y hasta que las
superficies se hayan enfriado. También puede usar la función de Bloqueo de Control/Bloqueo para
evitar que los niños enciendan accidentalmente la placa de cocción o el horno. La función de Bloqueo
de Control/Bloqueo desactiva la mayoría de los botones del panel de control y las perillas de control
de la placa de cocción. En algunos modelos, también se puede trabar la puerta del horno. Consulte la
sección Bloqueo de Control/Bloqueo del manual del propietario para obtener más detalles. (En
modelos sin la opción de Self Clean (Autolimpieza), la función de Bloqueo de Control/Bloqueo
bloquea los controles, pero no traba la puerta del horno).
P: ¿Por qué no funciona Instaview? (Únicamente en algunos modelos)
R: Nivele la estufa ajustando las patas de nivelación con una llave.
es-us_main.book.book Page 123 Friday, August 14, 2026 2:12 PM
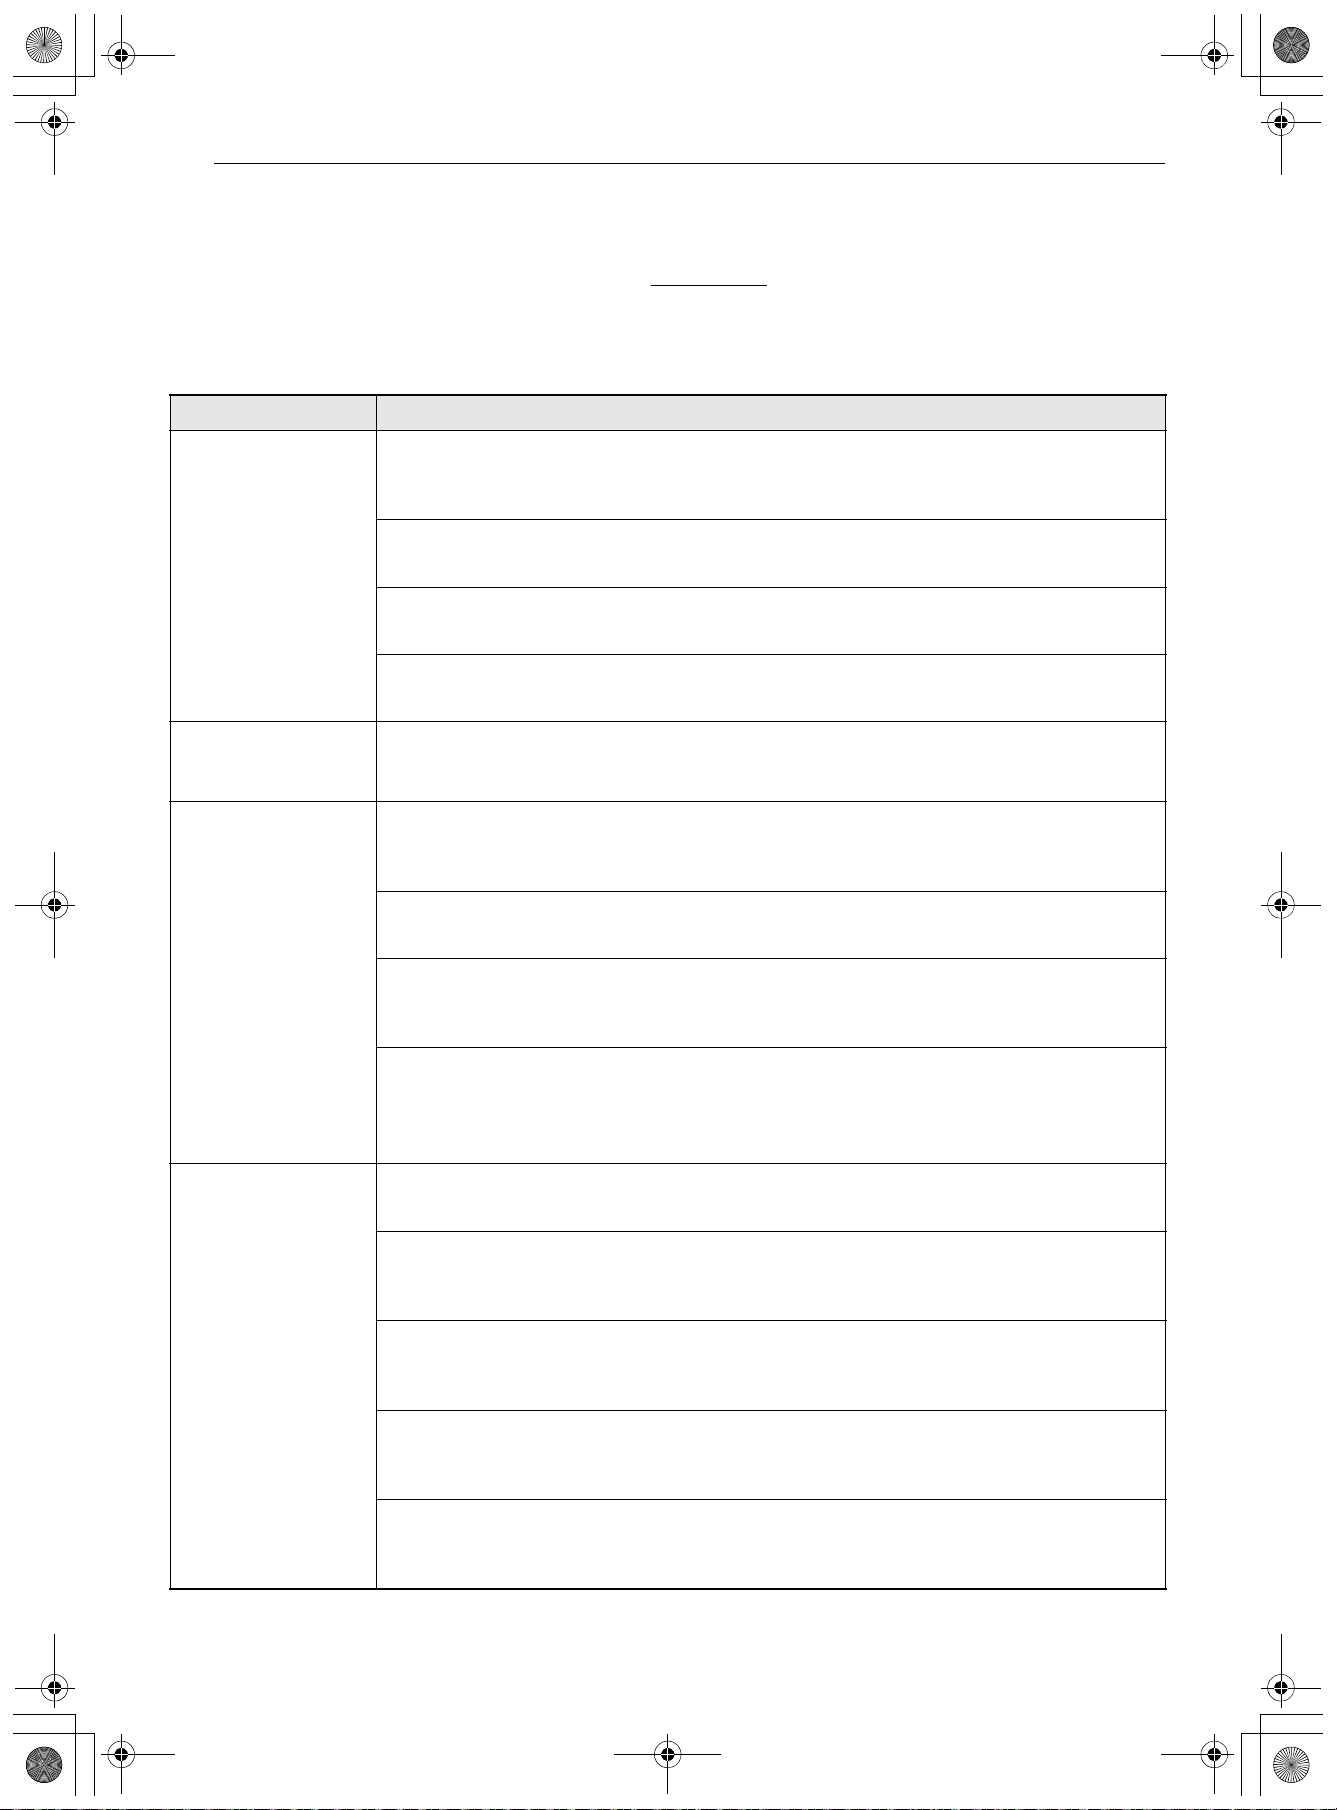
124 SOLUCIÓN DE PROBLEMAS
Antes de llamar al servicio técnico
Revise esta sección antes de llamar para servicio; hacerlo le ahorrará tiempo y dinero.
Para obtener información detallada o videos, visite www.lg.com
para consultar la página de resolución de
problemas.
Cocción
Problemas Causas posibles y solución
El horno no funciona El enchufe de la estufa no está introducido completamente en el tomacorriente.
• Verifique que el enchufe eléctrico esté conectado a un tomacorriente con tensión y
adecuada conexión a tierra.
Es posible que se haya quemado un fusible o saltado el disyuntor de la vivienda.
• Sustituya el fusible o restablezca el disyuntor.
Los controles del horno no se configuraron correctamente.
• Consulte la sección "Horno" en el capítulo Funcionamiento.
El horno está demasiado caliente.
• Deje enfriar el horno por debajo de la temperatura de bloqueo.
Sale vapor a través
de la ventilación del
horno.
Cocinar comidas muy húmedas produce vapor.
•Esto es normal.
El aparato no
funciona.
El cable no está enchufado correctamente.
• Asegúrese de que el cable esté enchufado correctamente al tomacorriente. Verifique los
disyuntores.
El cableado de servicio no está completo.
• Comuníquese con un electricista para obtener ayuda.
Corte de energía.
• Controle las luces de la vivienda para asegurarse. Llame a la compañía de servicio eléctrico
local para recibir mantenimiento.
El modo Sabbath está activado (en algunos modelos). En la pantalla aparece
sb y todos
los botones de función están inactivos.
• Mantenga presionado el botón de Configuración durante 3 segundos o hasta que
sb
desaparezca de la pantalla.
El horno hace
demasiado humo
durante el asado.
El control no está configurado correctamente.
• Siga las instrucciones de Configuración de los controles del horno.
La carne se encuentra muy cerca del elemento.
• Cambie la posición del estante para dejar un espacio adecuado entre la carne y el
elemento. Precaliente el elemento de asado para sellar los jugos.
No se ha preparado bien la carne.
• Quite el exceso de grasa de la carne. Corte los costados restantes de grasa para evitar que
se enrulen.
La asadera está mal colocada y no se escurre la grasa.
• Siempre coloque la rejilla sobre la asadera con las estrías hacia arriba y las ranuras hacia
abajo para que la grasa caiga dentro de la asadera.
Se ha acumulado grasa en las superficies del horno. La grasa antigua o las salpicaduras
de comida provocan humo excesivo.
• Es necesaria una limpieza regular cuando se asa frecuentemente.
es-us_main.book.book Page 124 Friday, August 14, 2026 2:12 PM
125SOLUCIÓN DE PROBLEMAS
ESPAÑOL
Los alimentos no se
hornean o rostizan
correctamente
Los controles del horno no se configuraron correctamente.
• Consulte la sección "Horno" en el capítulo Funcionamiento.
La posición del estante es incorrecta o está mal nivelado.
• Consulte la sección "Horno" en el capítulo Funcionamiento.
Se está utilizando un utensilio de cocina incorrecto o de un tamaño inapropiado.
• Consulte la sección "Horno" en el capítulo Funcionamiento.
Se debe ajustar el sensor del horno.
• Consulte la sección "Calibración de la temperatura del horno" en el capítulo
Funcionamiento.
Los alimentos no se
asan de manera
adecuada
Los controles del horno no se configuraron correctamente.
• Asegúrese de seleccionar el modo Asar correctamente.
Se está usando una posición de estante inadecuada.
• Consulte la Guía de asado.
Los utensilios de cocina no son los adecuados para asar.
• Use la asadera y la rejilla.
El papel metálico que se utiliza en la asadera y la rejilla no se colocó de manera correcta
y no se realizaron los cortes recomendados.
• Consulte la sección "Horno" en el capítulo Funcionamiento.
En algunas áreas puede haber baja tensión eléctrica.
• Precaliente el elemento de asado entre 5 y 7 minutos. Consulte la Guía de asado.
La temperatura del
horno es demasiado
alta o baja
Se debe ajustar el sensor del horno.
• Consulte la sección "Calibración de la temperatura del horno" en el capítulo
Funcionamiento.
Hay demasiado
humo durante el
ciclo SelfClean (En
algunos modelos)
Suciedad excesiva.
• Apague la función SelfClean. Abra las ventanas para que salga el humo. Espere hasta que
se cancele el modo de autolimpieza. Limpie el exceso de suciedad y vuelva a configurar el
ciclo de limpieza.
Un olor a quemado o
a aceite sale de la
ventilación
Esto es normal en un horno nuevo.
• Desaparecerá con el tiempo. Para acelerar el proceso, configure un ciclo Self Clean
durante un mínimo de 3 horas. Consulte la sección Self Clean (Autolimpieza). (En algunos
modelos)
Se junta humedad en
la ventana del horno
o sale vapor de la
ventilación del horno
Esto sucede al cocinar alimentos muy húmedos.
•Esto es normal.
Se usó demasiada agua para limpiar la ventana.
• No use demasiada agua para limpiar la ventana.
Problemas Causas posibles y solución
es-us_main.book.book Page 125 Friday, August 14, 2026 2:12 PM
126 SOLUCIÓN DE PROBLEMAS
Partes y Características
Problemas Causas posibles y solución
La estufa no está
nivelada.
Instalación deficiente.
• Coloque el estante en el centro del horno. Ubique un nivelador en el estante. Ajuste las
patas niveladoras en la base de la estufa hasta que el estante del horno esté nivelado.
• Asegúrese de que el piso esté nivelado y que sea lo suficientemente firme y estable para
soportar la estufa de manera adecuada.
• Si el piso está hundido o en pendiente, comuníquese con un carpintero para corregir la
situación.
La alineación del gabinete de la cocina puede hacer que la estufa parezca desnivelada.
• Asegúrese de que los gabinetes sean cuadrados y tengan espacio suficiente para la estufa.
No se puede mover
el aparato con
facilidad. El aparato
debe estar accesible
para el
mantenimiento.
Los gabinetes no son cuadrados o están instalados muy justos.
• Comuníquese con el fabricante o instalador para hacer que el aparato sea accesible.
La alfombra interfiere con la estufa.
• Deje espacio suficiente para elevar la estufa sobre la alfombra.
Dispositivo antivuelco conectado.
• Desinstale el dispositivo antivuelco para mover la estufa y vuelva a conectarlo después de
sacar la estufa para la limpieza, el mantenimiento o cualquier otro motivo.
Las unidades de la
superficie no
mantienen un hervor
fuerte o la cocción no
es suficientemente
rápida.
Se utilizan utensilios de cocina inapropiados.
• Utilice ollas que sean planas y se ajusten al diámetro de la unidad de superficie
seleccionada.
En algunas áreas puede haber baja potencia (tensión) eléctrica.
• Cubra la olla con una tapa hasta lograr el calor deseado.
Las unidades de
superficie no
funcionan
correctamente.
Es posible que se haya quemado un fusible o saltado el disyuntor de la vivienda.
• Sustituya el fusible o restablezca el disyuntor.
Los controles de la placa de cocción no se realizaron correctamente.
• Compruebe si se estableció el control correcto de la unidad de superficie que está usando.
La unidad de
superficie deja de
brillar cuando se
cambia a una
configuración más
baja.
La unidad todavía está encendida y caliente.
•Esto es normal.
Áreas de
descoloración en la
placa de cocción
Los alimentos derramados no se limpiaron antes del siguiente uso.
• Consulte la sección "Placa de cocción de vitrocerámica" en el capítulo MANTENIMIENTO.
Superficie caliente en un modelo con placa de cocción de color claro.
• Esto es normal. La superficie puede parecer descolorida cuando esté caliente. Esto es
temporal y desaparecerá a medida que se enfríe el vidrio.
es-us_main.book.book Page 126 Friday, August 14, 2026 2:12 PM
127SOLUCIÓN DE PROBLEMAS
ESPAÑOL
Las unidades de
superficie se
encienden y se
apagan con
frecuencia
El elemento se enciende y se apaga para mantener la configuración de calor.
•Esto es normal.
Rayas o abrasiones
en la superficie de la
placa de cocción
Las partículas gruesas como la sal o la arena entre la placa de cocción y los utensilios
pueden causar rayas.
• Asegúrese de que la superficie de la placa de cocción y la base de los utensilios estén
limpias antes de usarlas. Las rayas pequeñas no afectan la cocción y se verán menos con el
tiempo.
Se usaron materiales de limpieza no recomendados en la placa de cocción de
vitrocerámica.
• Consulte la sección "Placa de cocción de vitrocerámica" en el capítulo MANTENIMIENTO.
Se usaron utensilios de cocina con una base áspera.
• Use utensilios con base suave y plana.
Marcas de metal Hay rayas de utensilios de metal en la superficie de la placa de cocción.
• No deslice utensilios de metal sobre la superficie de la placa de cocción. Use una crema de
limpieza para placas de cocción de vitrocerámica para remover las marcas. Consulte la
sección "Placa de cocción de vitrocerámica" en el capítulo MANTENIMIENTO.
Rayas o manchas
marrones
Los derrames se cocinan en la superficie.
• Use una cuchilla raspadora para remover la suciedad. Consulte la sección "Placa de
cocción de vitrocerámica" en el capítulo MANTENIMIENTO.
Áreas de
descoloración en la
placa de cocción
Depósitos minerales de agua y comida.
• Remueva usando una crema de limpieza para placa de cocción de vitrocerámica. Use
utensilios de cocina con bases limpias y secas.
El control del horno
suena y aparece un
código de error F.
El control electrónico detectó una condición de falla.
• Apague la función del horno que está usando para borrar la pantalla y detener el pitido.
Reprograme el horno. Si la falla se repite, registre el número de falla y comuníquese con
un agente del servicio técnico.
- [Caso 1]
Código: F-3
Causa: clave de error de cortocircuito
- [Caso 2]
Código: F-9
Causa: el horno no calienta
El control del horno
aparece código de
error 'Sb', '5b', 'S6',
'56'.
Este código no es un código de error. Indica que el modo Sabbath
sb del producto está
activado.
• Consulte la sección "Uso del Modo Sabbath" en el capítulo Funcionamiento.
Los dos puntos del
reloj parpadean
Esto significa que el producto se ha enchufado recién o que se ha interrumpido el
suministro eléctrico.
• Esto es normal. Restablezca el reloj o presione cualquier botón para que deje de
parpadear.
CLEAN (LIMPIAR) y la
puerta parpadean en
la pantalla (En
algunos modelos)
Se ha seleccionado el ciclo Self Clean, pero la puerta no está cerrada.
• Cierre la puerta del horno.
Se enciende Loc en la
pantalla cuando
quiere cocinar (En
algunos modelos)
El horno está bloqueado por la función Bloqueo de Control/Bloqueo.
• Desactive la función Bloqueo de Control/Bloqueo.
Problemas Causas posibles y solución
es-us_main.book.book Page 127 Friday, August 14, 2026 2:12 PM
128 SOLUCIÓN DE PROBLEMAS
Ruidos
La luz del horno no
funciona.
Es hora de reemplazar la bombilla o la bombilla está suelta.
• Reemplace o ajuste la bombilla. Consulte la sección "Cambio de la luz del horno" en el
Manual del Propietario.
El ventilador de
convección se
detiene. (Durante el
modo Horneado por
convección)
El ventilador de convección se detiene durante un ciclo de horneado por convección.
Esto sucede para lograr un calor más parejo durante el ciclo.
• No es una falla de la estufa y debe considerarse un funcionamiento normal.
Funcionamiento del
ventilador (Durante
el modo Horneado)
Esto se realiza para garantizar resultados uniformes de horneado.
• Es normal que el ventilador funcione periódicamente durante un ciclo normal de
horneado en el horno.
El horno no realiza
Self Clean. (En
algunos modelos)
La temperatura del horno es demasiado elevada para establecer la operación Self
Clean.
• Deje enfriar la estufa y reinicie los controles.
Los controles del horno no se configuraron correctamente.
• Consulte la sección Self Clean (Autolimpieza).
No se puede iniciar un ciclo Self Clean (Autolimpieza) si está activa la función Bloqueo
de Control/Bloqueo del horno.
• Consulte "Bloqueo de Control/Bloqueo" en la sección "Cambio de configuración del
horno".
La puerta del horno
no se abre después
de un ciclo Self Clean
(En algunos modelos)
El horno está demasiado caliente.
• Deje enfriar el horno por debajo de la temperatura de bloqueo.
El control y la puerta pueden estar bloqueados.
• Deje enfriar el horno durante aproximadamente una hora después de completar un ciclo
Self Clean. Puede abrir la puerta cuando desaparezca el candado
k.
El horno no está
limpio después de un
ciclo Self Clean (En
algunos modelos)
Los controles del horno no se configuraron correctamente.
• Consulte la sección Self Clean (Autolimpieza).
El horno está muy sucio.
• Limpie los derrames difíciles antes de iniciar el ciclo de limpieza. Es posible que los hornos
con suciedad difícil necesiten otro ciclo Self Clean o durante más tiempo.
Los estantes del
horno no deslizan
correctamente (en
algunos modelos)
Los estantes brillantes de color plateado se limpiaron en un ciclo Self Clean
(Autolimpieza).
• Aplique una pequeña cantidad de aceite vegetal en una toalla de papel y limpie los bordes
de los estantes del horno con ella.
Problemas Causas posibles y solución
Ruido de crujidos o
chasquidos
Este es el sonido del calentamiento de metales y de enfriamiento durante la cocina. En
modelos con auto-limpieza, también ocurre durante la función de auto-limpieza.
•Esto es normal.
Ruido del ventilador Un ventilador de convección puede encenderse y apagarse automáticamente.
•Esto es normal.
Suena una
campanilla cuando
se encienden los
elementos de
superficie.
Cuando se activa cualquier hornalla de la estufa, suena una campanilla para indicar
que la placa de cocción está en uso.
•Esto es normal.
Problemas Causas posibles y solución
es-us_main.book.book Page 128 Friday, August 14, 2026 2:12 PM
129SOLUCIÓN DE PROBLEMAS
ESPAÑOL
Wi-Fi
Problemas Causas posibles y solución
Problema al conectar
el electrodoméstico
y el teléfono
inteligente a la red
Wi-Fi.
La contraseña de la red Wi-Fi no se ingresó correctamente.
• Elimine la red Wi-Fi doméstica y comience el proceso de conexión una vez más.
Están activados los datos móviles para su teléfono inteligente.
• Desactive la Red Móvil en su teléfono inteligente antes de conectar el electrodoméstico.
El nombre de la red inalámbrica (SSID) se ha configurado incorrectamente.
• El nombre de la red inalámbrica (SSID) debe ser una combinación de letras (A-Z) y números
(0-9). No utilice caracteres especiales.
La frecuencia del enrutador no es de 2.4 GHz.
• Sólo se admite una frecuencia de enrutador de 2.4 GHz. Configure el enrutador
inalámbrico a 2.4 GHz y conecte el electrodoméstico a éste. Para verificar la frecuencia del
enrutador, consulte con su proveedor de servicios de internet o con el fabricante del
enrutador.
El electrodoméstico y el enrutador están demasiado alejados.
• Si el electrodoméstico está muy lejos del enrutador, puede que la señal sea débil y que la
conexión no se configure correctamente. Reubique el enrutador para que esté más cerca
del electrodoméstico o adquiera e instale un repetidor Wi-Fi.
Durante la configuración de Wi-Fi, la aplicación requiere una contraseña para conectar
el producto (en determinados teléfonos).
• Ubique el nombre de la red que comienza con "LG" en Configuración > Redes. Anote la
última parte del nombre de la red.
- Si el nombre de la red se asemeja a LGE_Appliance_XX-XX-XX, ingrese lge12345.
- Si el nombre de la red se asemeja a LGE_Appliance_XXXX, ingrese XXXX dos veces como
su contraseña. Por ejemplo, si el nombre de la red aparece como LGE_Appliance_8b92,
debería ingresar 8b928b92 como su contraseña. En esta instancia, la contraseña detecta
mayúsculas y minúsculas, y los últimos 4 caracteres son únicos a su electrodoméstico.
es-us_main.book.book Page 129 Friday, August 14, 2026 2:12 PM
130 GARANTÍA LIMITADA
GARANTÍA LIMITADA
EE. UU.
TÉRMINOS Y CONDICIONES
AVISO DE ARBITRAJE: ESTA GARANTÍA LIMITADA INCLUYE UNA DISPOSICIÓN DE ARBITRAJE QUE LES
EXIGE A USTED Y LG ELECTRONICS (“LG”) RESOLVER LOS CONFLICTOS MEDIANTE ARBITRAJE
VINCULANTE EN LUGAR DE JUDICIALMENTE, A MENOS QUE USTED ELIJA EXCLUIRSE. EN EL ARBITRAJE,
NO ESTÁN PERMITIDAS LAS ACCIONES COLECTIVAS Y LOS JUICIOS CON JURADO. CONSULTE LA
SECCIÓN “PROCEDIMIENTO PARA RESOLVER CONFLICTOS” A CONTINUACIÓN.
Si su Estufa eléctrica LG (“Producto”) fallara debido a defectos de materiales o de fabricación en el uso
doméstico normal y correcto, durante el período de garantía que se establece a continuación, LG reparará
o reemplazará el Producto, según su criterio. Esta garantía limitada solo es válida para el comprador
minorista original del Producto (“Usted”), y solo se aplica cuando la compra es legal y cuando se utiliza
dentro de los Estados Unidos, incluidos los territorios estadounidenses.
• Los productos y las piezas de repuesto están garantizados durante el tiempo restante del período
original de garantía o noventa (90) días, lo que resulte mayor.
• Los productos y las piezas de repuesto pueden ser nuevos, reparados, reacondicionados o reconstruidos
por la fábrica.
• El Producto o las piezas reemplazados serán propiedad de LG.
• Es necesario presentar prueba de la compra minorista especificando el modelo del Producto y la fecha
de compra para obtener el servicio de garantía conforme a la presente garantía limitada.
SALVO LO PROHIBIDO POR LA LEY, TODA GARANTÍA DE COMERCIALIZACIÓN O IDONEIDAD
IMPLÍCITA, PARA UN PROPÓSITO PARTICULAR EN EL PRODUCTO, ESTÁ LIMITADA A LA DURACIÓN DE
LA GARANTÍA ARRIBA EXPRESADA. BAJO NINGUNA CIRCUNSTANCIA DEBERÁ LG O SUS
DISTRIBUIDORES/REPRESENTANTES SER RESPONSABLE POR CUALQUIER DAÑO INDIRECTO,
INCIDENTAL, CONSECUENTE, ESPECIAL, O PUNITIVO, LO CUAL INCLUYE PERO NO SE LIMITA A,
PÉRDIDA DE FONDOS DEL COMERCIO, GANANCIAS PERDIDAS, INTERRUPCIÓN DEL TRABAJO,
DETERIORO DE OTROS BIENES, COSTO DE REMOVER Y REINSTALAR EL PRODUCTO, PÉRDIDA DE USO, O
CUALQUIER OTRO DAÑO YA SEA BASADO EN CONTRATO, PERJUICIO, U OTROS. LA RESPONSABILIDAD
TOTAL DE LG, EN CASO EXISTA, NO EXCEDERÁ EL PRECIO QUE USTED PAGÓ POR ADQUIRIR EL
PRODUCTO.
ALGUNOS ESTADOS NO PERMITEN LA EXCLUSIÓN O LIMITACIÓN DE RESPONSABILIDAD POR DAÑOS
INCIDENTES O CONSECUENTES, NI LA LIMITACIÓN DE LA DURACIÓN DE UNA GARANTÍA IMPLÍCITA,
DE MODO QUE LAS EXCLUSIONES O LIMITACIONES ANTERIORES POSIBLEMENTE NO SE APLIQUEN A
SU SITUACIÓN. ESTA GARANTÍA LIMITADA LE OTORGA DERECHOS LEGALES ESPECÍFICOS Y TAMBIÉN
PUEDE TENER OTROS DERECHOS QUE VARÍAN DE UN ESTADO A OTRO.
ESTA GARANTÍA LIMITADA NO CUBRE LO SIGUIENTE:
• Viajes del servicio técnico para entregar, buscar o instalar el producto, instruir al cliente sobre la
operación del mismo, corregir el cableado o las reparaciones/instalaciones no autorizadas.
• Daño o fallo del producto al operar durante fallas e interrupciones del suministro eléctrico, o resultado
de un servicio eléctrico inadecuado.
Período de garantía Alcance de la garantía CÓMO SE MANEJA EL SERVICIO TÉCNICO
Dos (2) años a partir de la
fecha de compra
minorista original, o
desde la fecha de
entrega según la ley
aplicable
Piezas y mano de obra
(solo piezas internas /
funcionales)
LG suministrará toda la mano de obra y el
mantenimiento a domicilio sin cargo para reemplazar
las piezas defectuosas.
es-us_main.book.book Page 130 Friday, August 14, 2026 2:12 PM

131GARANTÍA LIMITADA
ESPAÑOL
• Daños o fallos del Producto causados por tuberías de agua rotas o con fugas, tuberías de agua
congeladas, líneas de desagüe obstruidas, suministro de agua inadecuado o interrumpido, o suministro
de aire inadecuado.
• Daño o fallo del producto resultantes de operar el producto en una atmósfera corrosiva o contraria a las
instrucciones detalladas en el manual del propietario del producto.
• Daños o fallos del producto causados por accidentes, pestes y alimañas, rayos, viento, incendios,
inundaciones o hechos de fuerza mayor o cualquier otra causa ajena al control de LG.
• Daños o fallos del Producto causados por modificaciones o alteraciones no autorizadas, o por utilizar el
Producto para fines distintos de lo previsto, o pérdida de agua cuando el Producto no se instaló
adecuadamente.
• Daños o fallos del Producto causados por corriente eléctrica o voltaje incorrectos, o códigos de cañería.
• Daños o fallos del producto causados por el transporte, almacenamiento y/o manejo, incluye rayas,
muescas, astillados y/u otros daños al acabado del producto, a menos que tales daños se informen
dentro del plazo de una (1) semana de la entrega.
• Daños o fallos del producto resultantes de mal uso, abuso, instalación, reparación o mantenimiento
incorrectos. Una reparación incorrecta incluye el uso de piezas no autorizadas, aprobadas o
especificadas por LG. La instalación o el mantenimiento inadecuados incluye aquellos contrarios a lo
especificado en el manual del usuario del producto.
• Daños o fallos del Producto causados por el uso de piezas, componentes, accesorios, productos de
limpieza consumibles, u otros productos o servicios no autorizados por LG.
• Daños o artículos faltantes con la caja abierta o que hayan estado en exhibición.
• Productos reacondicionados o cualquier producto vendido con los avisos "En el estado actual", "En el
sitio actual", "Con todos sus defectos" o similares.
• Productos cuyos números de serie originales hayan sido retirados, alterados o no se puedan determinar
fácilmente.
• Aumentos en los costos de los servicios públicos y otros gastos adicionales de dichos servicios.
• Cualquier ruido asociado con la operación normal.
• Productos utilizados para un uso distinto del habitual y adecuado del hogar (por ejemplo, entornos
comerciales, empresariales o industriales, incluidos establecimientos minoristas o de servicios
alimenticios o cualquier establecimiento de alojamiento comercial o alquiler transitorio) o cualquier uso
contrario al indicado en el manual del propietario del producto.
• Costos asociados con la remoción y reinstalación del Producto para reparaciones o la remoción y
reinstalación del Producto si está instalado en una ubicación inalcanzable o no está instalado de acuerdo
con el Manual del propietario del producto.
• Accesorios, componentes extraíbles o partes consumibles (por ejemplo, estantes, compartimentos de la
puerta, cajones, filtros de agua o aire, rejillas, bombillas, baterías, etc. según corresponda), excepto las
partes internas/funcionales cubiertas por esta garantía limitada.
es-us_main.book.book Page 131 Friday, August 14, 2026 2:12 PM
132 GARANTÍA LIMITADA
Esta garantía limitada no cubre
Problema Posible causa y prevención
Grietas de la placa
de cocción
Grietas de la placa de cocción causada por el impacto de un objeto
• A: No cubierto por la garantía
- a Roturas mecánicas
• B: Cubierto por la garantía
-
b Grieta primaria c Grieta secundaria
• NO apoye elementos pesados sobre la superficie de la placa de cocción; podrían
caerse y dañarla.
• NO raye la placa de cocción; si lo hace podría romperla.
• Limpie la placa de cocción antes y después de usarla.
NOTA
• Daños causados después de la entrega (No cubierto por la garantía)
Saltado del
esmalte de la
placa de cocción
Uso inadecuado
• No golpee la placa de cocción de cerámica.
Picado del vidrio
de la placa de
cocción
Si no se remueven de inmediato, los derrames de alimentos a base de azúcar
(como conservas, kétchup, salsa de tomate, gelatina, dulce, caramelo, almíbar o
chocolate), el plástico o el papel de aluminio derretido podrían provocar el picado
de la placa de cocción. (No cubierto por la garantía)
• Retire el material fundido DE INMEDIATO con un raspador de metal.
• Por seguridad, use un guante para horno o una esponja caliente cuando raspe la
superficie caliente.
AB
es-us_main.book.book Page 132 Friday, August 14, 2026 2:12 PM
133GARANTÍA LIMITADA
ESPAÑOL
La unidad no tiene
potencia.
1. La electricidad de la casa está cortada (suministro de energía).
• Controle la electricidad en el tablero principal antes de solicitar mantenimiento.
2. Corte de disyuntor.
• Haga coincidir el tipo de cable de electricidad con el tipo de tomacorriente.
3. El cable de alimentación no está instalado correctamente.
• Instale el cable de alimentación correctamente.
• A: CONEXIÓN DE 3 HILOS
• B: CONEXIÓN DE 4 HILOS
a Negro b Blanco c Rojo d Cable exterior
e Cable central (neutro) f Cable negro
g Cable a tierra verde h Cable blanco (neutro)
i Cable rojo j Correa a tierra k Retirar la correa a tierra
El horno o los
estantes están
manchados
después de usar
papel de aluminio
El papel de aluminio se derritió dentro del horno
• Nunca cubra la base del horno ni un estante completo con materiales como
papel de aluminio.
• Si ya se ha derretido papel de aluminio en el horno, esto no afectará su
rendimiento.
Problema Posible causa y prevención
<NEMA 10-50>
<NEMA 14-50>
AB
es-us_main.book.book Page 133 Friday, August 14, 2026 2:12 PM
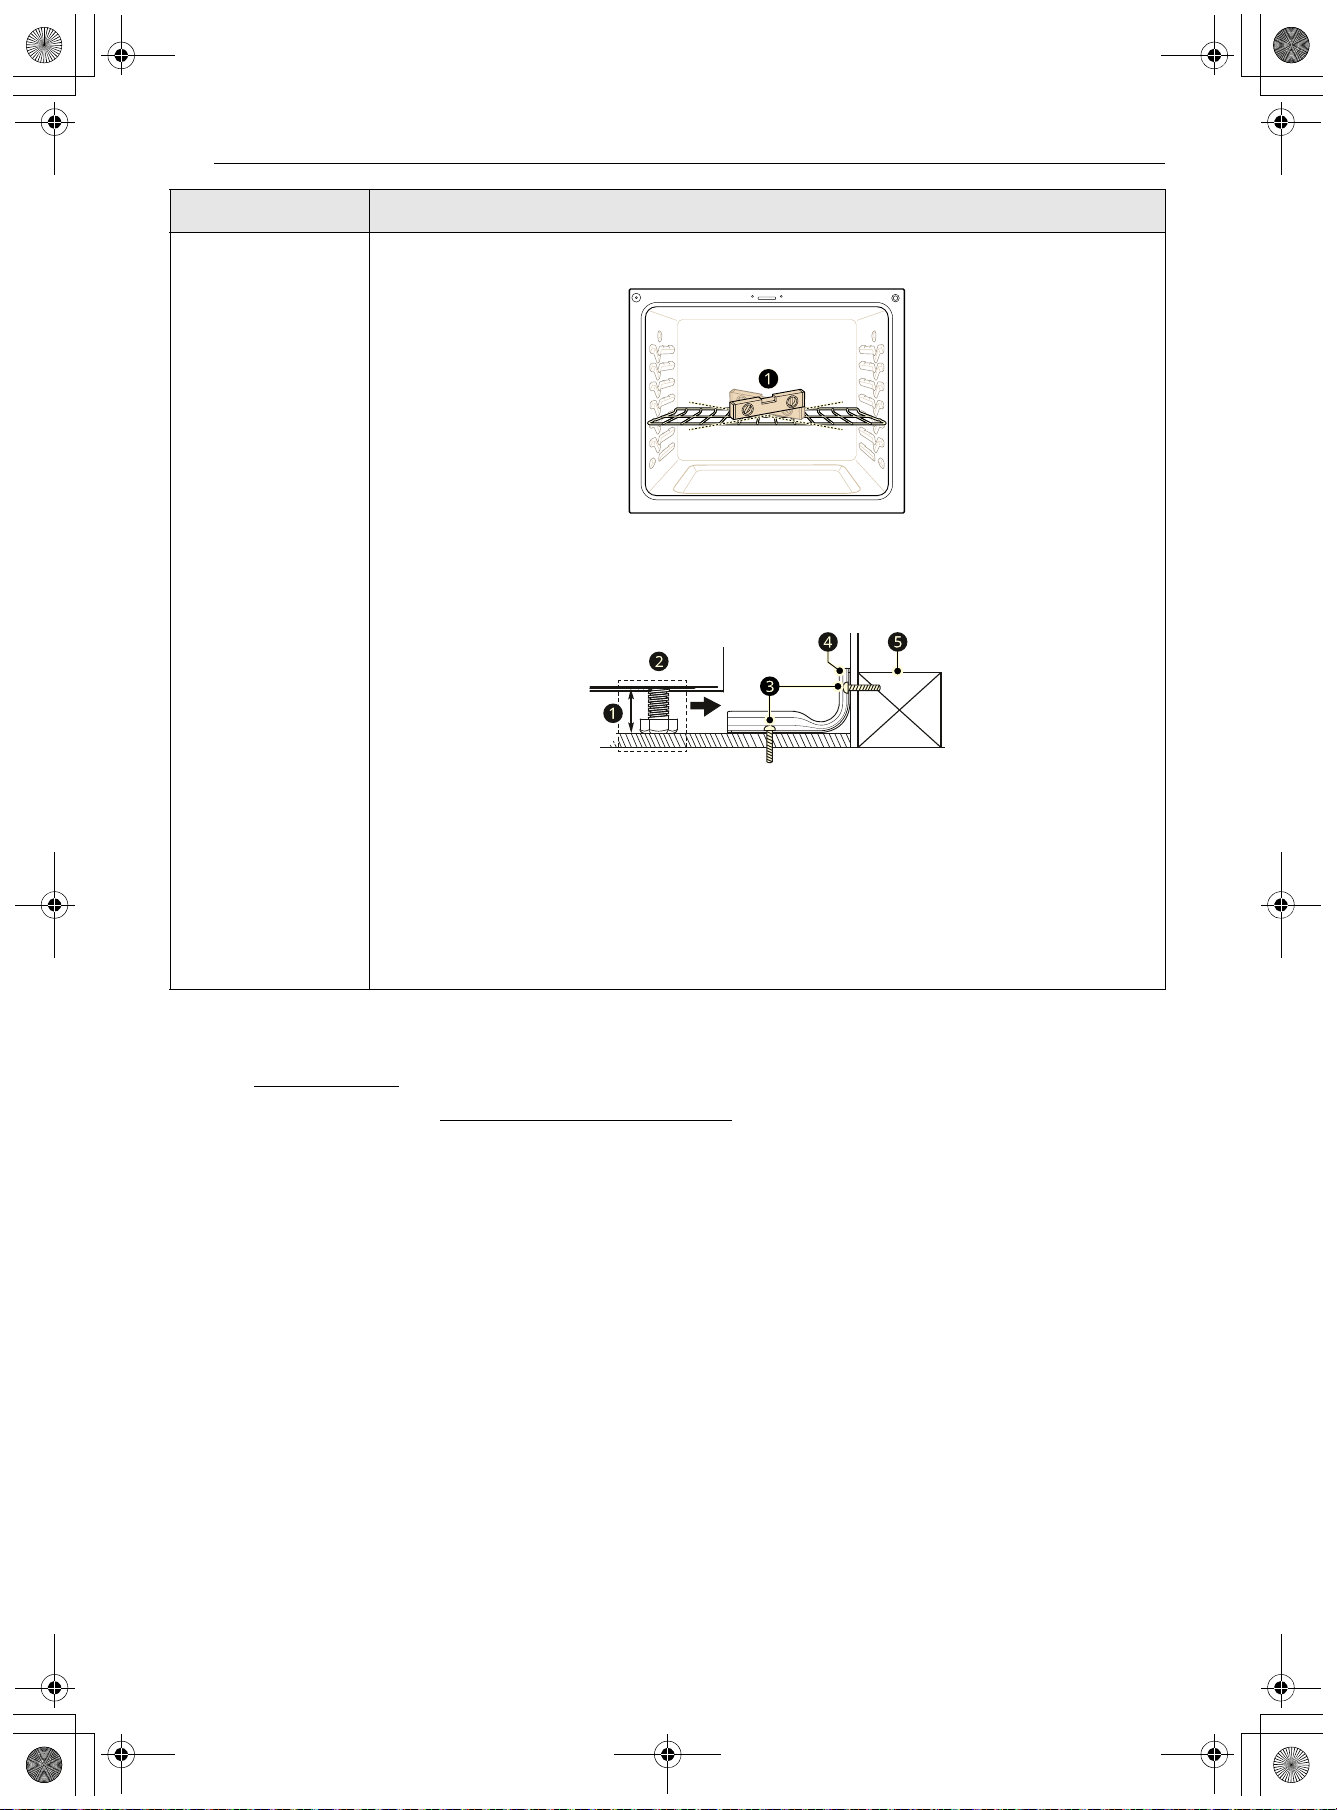
134 GARANTÍA LIMITADA
Usted será responsable del costo de la reparación o reemplazo en estas circunstancias excluidas.
PARA OBTENER SERVICIO EN GARANTÍA E INFORMACIÓN ADICIONAL
Llame al 1-800-984-6306
y seleccione la opción apropiada desde el menú.
O visite nuestro sitio web en http://www.LGSIGNATURE.com
O por correo: LG Electronics Customer Service P.O. Box 240007 Huntsville, AL 35813 ATTN: CIC
PROCEDIMIENTO PARA RESOLVER DISPUTAS:
TODOS LOS CONFLICTOS ENTRE USTED Y LG QUE SURJAN FUERA DE O RELACIONADOS DE ALGUNA
MANERA CON ESTA GARANTÍA LIMITADA O CON EL PRODUCTO, SE RESOLVERÁN EXCLUSIVAMENTE A
TRAVÉS DE UN ARBITRAJE VINCULANTE Y NO EN UNA CORTE DE JURISDICCIÓN GENERAL. ARBITRAJE
VINCULANTE SIGNIFICA QUE USTED Y LG RENUNCIAN AL DERECHO DE UN JUICIO CON JURADO Y A
REALIZAR O PARTICIPAR EN UNA DEMANDA COLECTIVA.
Definiciones. Para el propósito de esta sección, las referencias a “LG” significan: LG Electronics U.S.A., Inc.,
sus empresas matrices, subsidiarias y filiales y cada uno de sus directivos, directores, empleados, agentes,
beneficiarios, predecesores en interés, sucesores, cesionarios y proveedores; las referencias a “conflicto” o
“reclamación” incluirán cualquier conflicto, reclamo o controversia de cualquier tipo, sin importar (ya sea
basado en contrato, agravio, estatuto, regulación, ordenanza, fraude, falsa representación o cualquier
teoría legal o equitativa) que surja de o esté relacionada con cualquier forma de venta, condición o
desempeño del producto o de esta Garantía Limitada.
Aviso de disputa. En caso de que usted desee iniciar un procedimiento de arbitraje, primero debe
notificar a LG por escrito al menos 30 días antes de iniciar el arbitraje enviando una carta a LG a LG
Electronics, USA, Inc. Atención: Legal Department- Arbitration 111 Sylvan Avenue, Englewood Cliffs, NJ
La superficie no
está nivelada
El horno está
inclinado
La estufa no está nivelada
• Primero consulte al instalador.
• Use un nivelador de carpintero a para verificar la nivelación.
El dispositivo antivuelco no está instalado correctamente
a Aproximadamente 0.65" (16.5 mm)
b Nivele ambos lados de la estufa
c El tornillo debe ser apto para madera u hormigón
d Soporte antivuelco
e Placa de pared
• Primero consulte al instalador.
Problema Posible causa y prevención
es-us_main.book.book Page 134 Friday, August 14, 2026 2:12 PM
135GARANTÍA LIMITADA
ESPAÑOL
07632. Usted y LG aceptan participar en discusiones de buena fe en un intento de resolver su reclamo de
manera amistosa. En la carta debe proporcionar su nombre, dirección y número de teléfono; identificar el
producto que es objeto de la reclamación; y describir la naturaleza del reclamo y el remedio que busca. Si
usted y LG no pueden resolver la disputa dentro de 30 días, cualquiera de las partes puede proceder a
presentar una demanda de arbitraje.
Acuerdo de arbitraje vinculante y renuncia de demanda colectiva. En caso de no resolver la disputa
durante el período de 30 días después de enviar una notificación por escrito a LG, Usted y LG se
comprometen a resolver cualquier reclamo entre nosotros, solamente a través de arbitraje vinculante
sobre una base individual, a menos que usted se excluya, conforme a lo dispuesto a continuación.
Cualquier conflicto entre usted y LG no estarán combinados o consolidados con una controversia
relacionada con cualquier otro producto o reclamo de otra persona o entidad. Más específicamente y sin
prejuicio de lo anterior, no procederá bajo ninguna circunstancia cualquier disputa entre usted y LG como
parte de una acción colectiva o representativa. En lugar del arbitraje, cualquiera de las partes podrá iniciar
una acción individual en la corte de reclamos menores, pero tales acciones en la corte de reclamos
menores no podrán ser realizadas en una acción colectiva o representativa.
Normas y procedimientos de arbitraje. Para comenzar con el arbitraje de un reclamo, usted o LG deben
realizar una demanda escrita para arbitraje. El arbitraje será administrado por la Asociación Americana de
Arbitraje (AAA) y se llevará a cabo ante un árbitro único bajo las Normas de Arbitraje del Consumidor de la
AAA, que tienen efecto al momento de inicio del arbitraje (en adelante “Normas de la AAA”) y bajo los
procedimientos establecidos en esta sección. Las Normas de la AAA están disponibles en línea en
www.adr.org/consumer
. Envíe una copia de su solicitud de arbitraje por escrito, así como una copia de
esta disposición, a la AAA de la forma descrita en las Normas de la AAA. También debe enviar una copia de
su solicitud por escrito a LG en LG Electronics, USA, Inc. Atención: Legal Department- Arbitration 111
Sylvan Avenue, Englewood Cliffs, NJ 07632. Si hay un conflicto entre las Normas de la AAA y las reglas
establecidas en esta sección, prevalecerán dichas reglas de esta sección. Esta disposición de arbitraje se
rige por la Ley Federal de Arbitraje. El juicio se puede introducir en el laudo arbitral en cualquier tribunal
de jurisdicción competente. Todos son temas para que el árbitro tome sus decisiones, excepto aquellos
asuntos relativos al alcance y aplicabilidad de la cláusula de arbitraje y de la capacidad de arbitraje de la
controversia para que el tribunal decida. El árbitro se regirá por los términos de esta disposición.
Legislación vigente. La legislación del estado de su residencia regirá esta Garantía Limitada, así como
todas las disputas entre nosotros, salvo que sea invalidada o inconsistente con leyes federales aplicables.
Tarifas / Costos. Usted no debe pagar ninguna tarifa para comenzar un arbitraje. Al recibir su solicitud de
arbitraje por escrito, LG pagará todos los gastos administrativos rápidamente a la AAA, a menos que usted
solicite más de $25,000 por daños, en cuyo caso el pago de estos gastos se regirá por las Normas de la
AAA. Salvo disposición contraria prevista en el presente documento, LG pagará a la AAA todos los gastos
documentales, administrativos y de arbitraje para cualquier arbitraje iniciado, de conformidad con las
Normas de la AAA y esta disposición de arbitraje. Si usted prevalece en el arbitraje, LG pagará los
honorarios y gastos de sus abogados, siempre y cuando sean razonables, considerando factores que
incluyen, entre otros, el monto de la compra y el monto del reclamo. No obstante lo anterior, si la ley
aplicable permite una adjudicación de honorarios y gastos razonables de abogados, un árbitro puede
otorgarlos en la misma medida que lo haría un tribunal. Si el árbitro considera que la sustancia de su
reclamo o la reparación solicitada en la demanda es frívola o se utiliza para un propósito inadecuado
(calificado según las normas establecidas en la Norma Federal de Procedimiento Civil 11 (b)), el pago de
todos los honorarios de arbitraje se regirá por las Normas de la AAA. En tal situación usted se compromete
a reembolsar a LG todos los fondos erogados previamente por ella, cuyo pago es, por otra parte, su
obligación, según las Normas de la AAA. Salvo disposición contraria, LG renuncia a cualquier derecho que
pudiera tener para solicitarle los honorarios y gastos de sus abogados, si LG prevalece en el arbitraje.
Audiencias y ubicación. Si su reclamo es por $25,000 o menos, usted puede optar que el arbitraje sea
realizado únicamente sobre la base de: (1) documentos presentados al árbitro, (2) a través de una
audiencia telefónica o (3) por una audiencia en persona, según lo establecido por las Normas de la AAA. Si
su reclamo excede $25,000, el derecho a una audiencia estará determinado por las Normas de la AAA.
Cualquier audiencia de arbitraje en persona se realizará en un lugar dentro del distrito judicial federal en
el cual resida, a menos que ambos acuerden otra ubicación o estemos de acuerdo con el arbitraje
telefónico.
Exclusión voluntaria. Usted puede optar por no participar en este procedimiento de resolución de
disputas. Si opta por no participar, ni usted ni LG pueden exigir a la otra parte que participe en un
procedimiento de arbitraje. Para optar por no participar, usted debe enviar un aviso a LG a más tardar 30
es-us_main.book.book Page 135 Friday, August 14, 2026 2:12 PM

136 GARANTÍA LIMITADA
días calendario a partir de la fecha de compra del producto por parte del primer comprador consumidor ya
sea (i) enviando un correo electrónico a optou[email protected], con el asunto: “Exclusión voluntaria del arbitraje”
o (ii) llamando al 1-800-980-2973
. Debe incluir lo siguiente en el correo electrónico de exclusión voluntaria
o proporcionar por teléfono: (a) su nombre y dirección; (b) la fecha en la que se compró el producto; (c) el
nombre del modelo o el número de modelo del producto; y (d) el número de serie (el número de serie se
puede encontrar (i) en el producto; o (ii) en línea accediendo a https://www.lg.com/us/support
al hacer clic
en "How do I find my model number?”).
Usted sólo puede optar por no participar en el procedimiento de resolución de disputas de la manera
descrita anteriormente (es decir, por correo electrónico o por teléfono); ninguna otra forma de notificación
será efectiva para optar por no participar en este procedimiento de resolución de disputas. La exclusión
voluntaria de este procedimiento de resolución de disputas no afectará la cobertura de la Garantía
limitada de ninguna manera y usted seguirá disfrutando de todos los beneficios de la Garantía limitada. Si
conserva este producto y no opta por no participar, acepta todos los términos y condiciones de la
disposición de arbitraje descrita anteriormente.
es-us_main.book.book Page 136 Friday, August 14, 2026 2:12 PM
Memorándum
es-us_main.book.book Page 137 Friday, August 14, 2026 2:12 PM
Memorándum
es-us_main.book.book Page 138 Friday, August 14, 2026 2:12 PM
Memorándum
es-us_main.book.book Page 139 Friday, August 14, 2026 2:12 PM
Memorándum
es-us_main.book.book Page 139 Friday, August 14, 2026 2:12 PM
Memorándum
es-us_main.book.book Page 139 Friday, August 14, 2026 2:12 PM
es-us_main.book.book Page 137 Friday, August 14, 2026 2:12 PM