
SCG 5060BK
EN
ELECTRIC COFFEE GRINDER
WITH FLAT GRINDING BURRS
Translation of the original manual
SCG 5060BK
A
1
2
3
6
10
7
4
5
8
9
13
12
11
1514
D
B C

E1 E2
E3 E4
- 1 -
03/2025
2025, .
EN
Electric Coffee Grinder with Flat Grinding Burrs
User Manual
Important Safety Instructions
READ CAREFULLY AND STORE FOR FUTURE USE.
• This appliance is not to be used by children. Keep this
appliance and its power cable out of the reach of children.
• Appliances may be used by persons with reduced
physical, sensory or mental abilities or lack of experience
and knowledge, provided they are supervised or have
been instructed in the safe use of the appliance and
understand the potential hazards.
• Children must not play with the appliance.
• If the power cord is damaged, have it replaced in
aprofessional service centre in order to prevent
adangerous situation. It is forbidden to use the appliance
with the power cord damaged.
Warning:
Incorrect use may lead to injury.
• Take extra care when handling and cleaning the grinding
burrs. The grinding burrs are sharp and can cause serious
injury.
• Wipe the coffee bean hopper with aslightly dampened
sponge. Follow the cleaning instructions in this manual.
• Always disconnect the appliance from the power supply
when leaving it unattended and before assembly,
disassembly or cleaning.
- 2 -
03/2025
2025, .
• Always make sure the appliance is switched off and
disconnected from the mains socket before emptying the
hopper.
. . . . . . . . . . . . . . . . . . . . . . . . . . . . . . . . . . . . . . . . . . . . . . . . . . . . . . . . . . . . . . . . . . . . . . . . . . . . . . . . . . . . . . . . . . . . . . . . . . . . . . . . . . . . . . . . . . . . . . . . . . . . . . . . . . . . . . . . . . . .
Additional Important Safety Instructions forUse of the Appliance
• This appliance is intended for domestic use only. It is also suitable for personal non-commercial use in spaces such as:
– staff kitchens in stores, offices and other workplaces;
– hotel or motel rooms andother living areas;
– agricultural farms;
– bed and breakfast establishments.
• Keep packaging material (plastic bags, polystyrene mouldings, etc.) out of the reach of children.
• Wash the ground coffee hopper and lid in warm water with alittle neutral dishwashing liquid. Rinse in clean water and wipe dry. Wipe the coffee
bean hopper with asoft sponge. Follow the instructions in the Cleaning and Maintenance chapter.
• The appliance is used for grinding coffee beans. Do not use it for other purposes.
• Do not use the appliance for commercial purposes, in an industrial environment or outdoors. Do not place it on an electric or gas cooker, table edge,
window sills, sink draining board or unstable surfaces. Place it only on aflat, dry and stable surface.
• Before connecting the appliance to apower socket, make sure that its nominal voltage indicated on the rating plate matches the electrical voltage of
the socket. If you have any doubts about the voltage in your socket or the replacement of the socket, please contact your electrician.
• Do not overfill the coffee bean hopper, nor should you fill it with ground coffee, instant coffee, caramelised or otherwise specially treated coffee
beans, cocoa beans, or any other materials or objects. Otherwise the appliance may be damaged.
• Do not use this appliance to crush ice, nuts or other ingredients.
• Make sure that the appliance is correctly assembled before putting it into operation.
• Before filling the hopper with coffee beans, ensure that there are no foreign objects in the grinding chamber.
• Make sure that parts of clothing, hair, kitchen utensils or other objects do not get into the coffee bean hopper during operation. The hopper must
always be properly closed.
• Do not handle or shake the appliance while it is in operation.
• Regularly check the fill level of the ground coffee hopper. Do not exceed the marked maximum line.
• Do not operate the appliance continuously for more than 3 minutes. Let it cool for at least 10 minutes before using it again. Otherwise, there is arisk
of overheating and subsequent damage.
• The appliance is equipped with an overheating protection. Should the motor overheat, the appliance will stop running. In such case, unplug the
power cord from the mains socket and allow the appliance to cool down.
• Do not touch the appliance with wet hands.
• Keep the appliance clean. When cleaning, follow the instructions in the chapter "Cleaning and maintenance".
• Keep the appliance away from flammable, explosive or chemical substances. Do not use it in humid environments.
• Do not place any items on the top part of the appliance.
• To prevent the risk of electric shock, do not immerse the appliance, power cable, or plug into water or any other liquid.
• Do not place heavy objects on the power cord. Make sure that it does not hang over the edge of the table or touch ahot surface and that its fork does
not come into contact with water or moisture.
• Unplug the appliance from the power socket by pulling the plug, not the power cable. Otherwise, damage to the power cable or the socket may occur.
• The mains socket should remain freely accessible in the event of asudden disconnection of the mains cable.
• It is forbidden to use the appliance with the power cord damaged.
• Do not use the appliance if it is not working properly or shows signs of damage.
• To prevent dangerous situations, do not repair or modify the appliance yourself. All repairs should be carried out by an authorised service centre.
Tampering with the appliance may result in the loss of your legal rights regarding faulty performance or warranty for quality.
. . . . . . . . . . . . . . . . . . . . . . . . . . . . . . . . . . . . . . . . . . . . . . . . . . . . . . . . . . . . . . . . . . . . . . . . . . . . . . . . . . . . . . . . . . . . . . . . . . . . . . . . . . . . . . . . . . . . . . . . . . . . . . . . . . . . . . . . . . . .
EXPLANATION OF SYMBOLS PLACED ON THE PRODUCT OR INTHE ACCOMPANYING DOCUMENTATION
The product meets all the basic requirements of the applicable EU directives.
This symbol on products or original documents means that used electric or electronic products must not be added to ordinary municipal
waste.
Product with protection class II
. . . . . . . . . . . . . . . . . . . . . . . . . . . . . . . . . . . . . . . . . . . . . . . . . . . . . . . . . . . . . . . . . . . . . . . . . . . . . . . . . . . . . . . . . . . . . . . . . . . . . . . . . . . . . . . . . . . . . . . . . . . . . . . . . . . . . . . . . . . .
- 3 -
03/2025
2025, .
• Thank you for purchasing our SENCOR product; we hope it will serve
to your satisfaction.
• Prior to using this appliance, please read the user manual thoroughly,
even in cases when you are already familiar with the use of similar
types of appliances. Use the appliance only as described in this
user manual. Keep the manual for future reference. If you pass the
appliance on to another person, ensure that this user manual is
included.
• Carefully unpack the appliance and make sure not to discard any part
of the packaging material until you have found all its components. It
is recommended to keep the original packaging, packing material,
receipt and confirmation of the extent of the seller'sliability or warranty
certificate at least for the duration of the legal right of defective
performance or quality guarantee. When transporting the appliance,
we recommend packaging it again in the original box provided by the
manufacturer.
. . . . . . . . . . . . . . . . . . . . . . . . . . . . . . . . . . . . . . . . . . . . . . . . . . . . . . . . . . . . . . . . . . . .
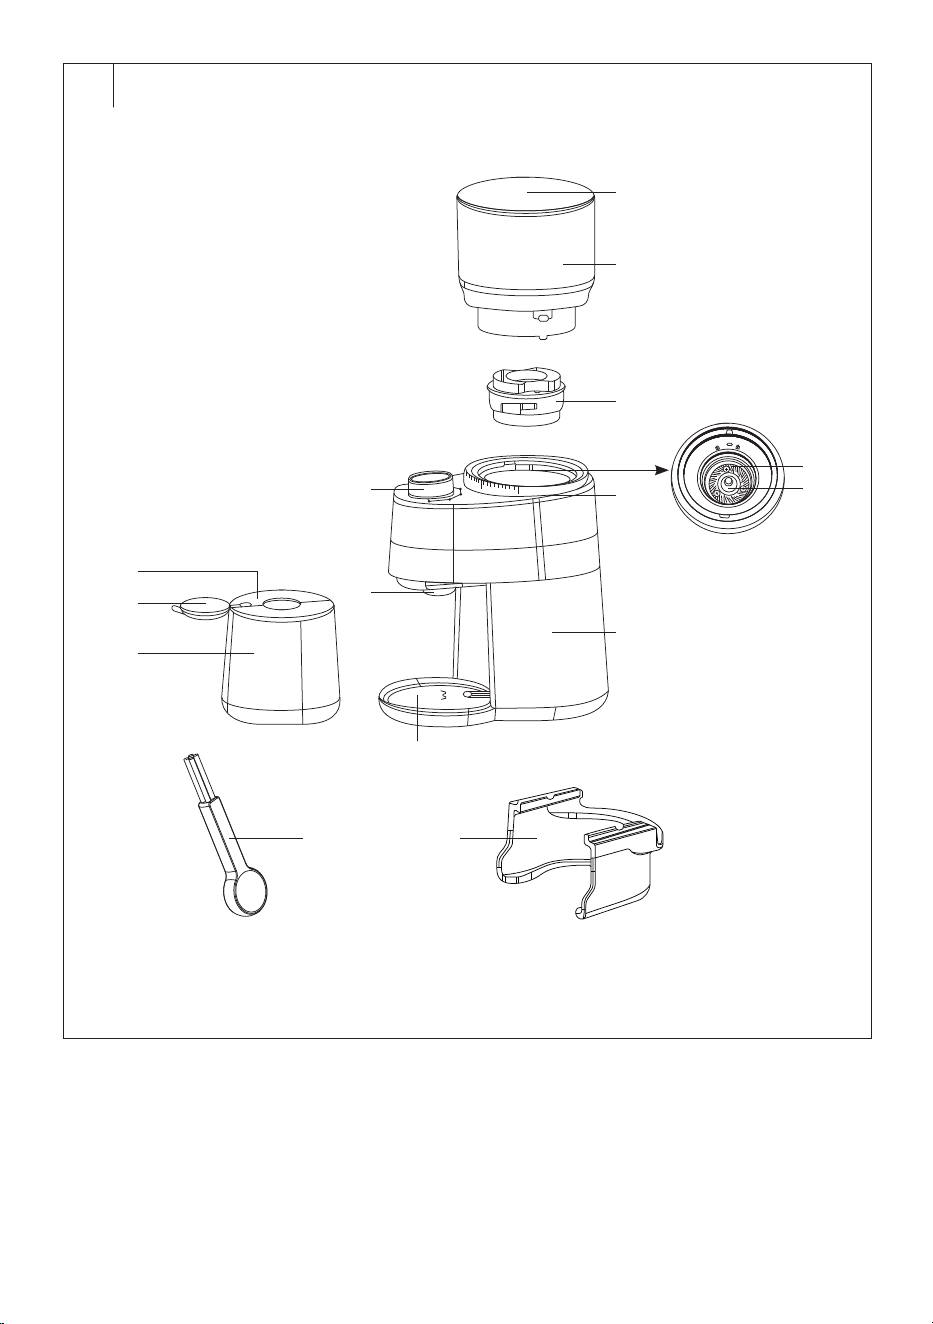
GRINDER DESCRIPTION
A1 Coffee bean hopper lid
A2 Coffee bean hopper
A3 Upper grinding burr
A4 Lower grinding burr
A5 Grinding chamber
A6 Grind size indicator
A7 Grinder body
A8
button to start the grinder
/ rotary dial for adjusting the
coffee quantity
A9 Ground coffee dispensing
outlet
A10 Area for placing the ground
coffee hopper
A11 Ground coffee hopper
A12 Removable inner lid
A13 Lid of the ground coffee
hopper
A14 Cleaning brush
A15 Portafilter holder
. . . . . . . . . . . . . . . . . . . . . . . . . . . . . . . . . . . . . . . . . . . . . . . . . . . . . . . . . . . . . . . . . . . .
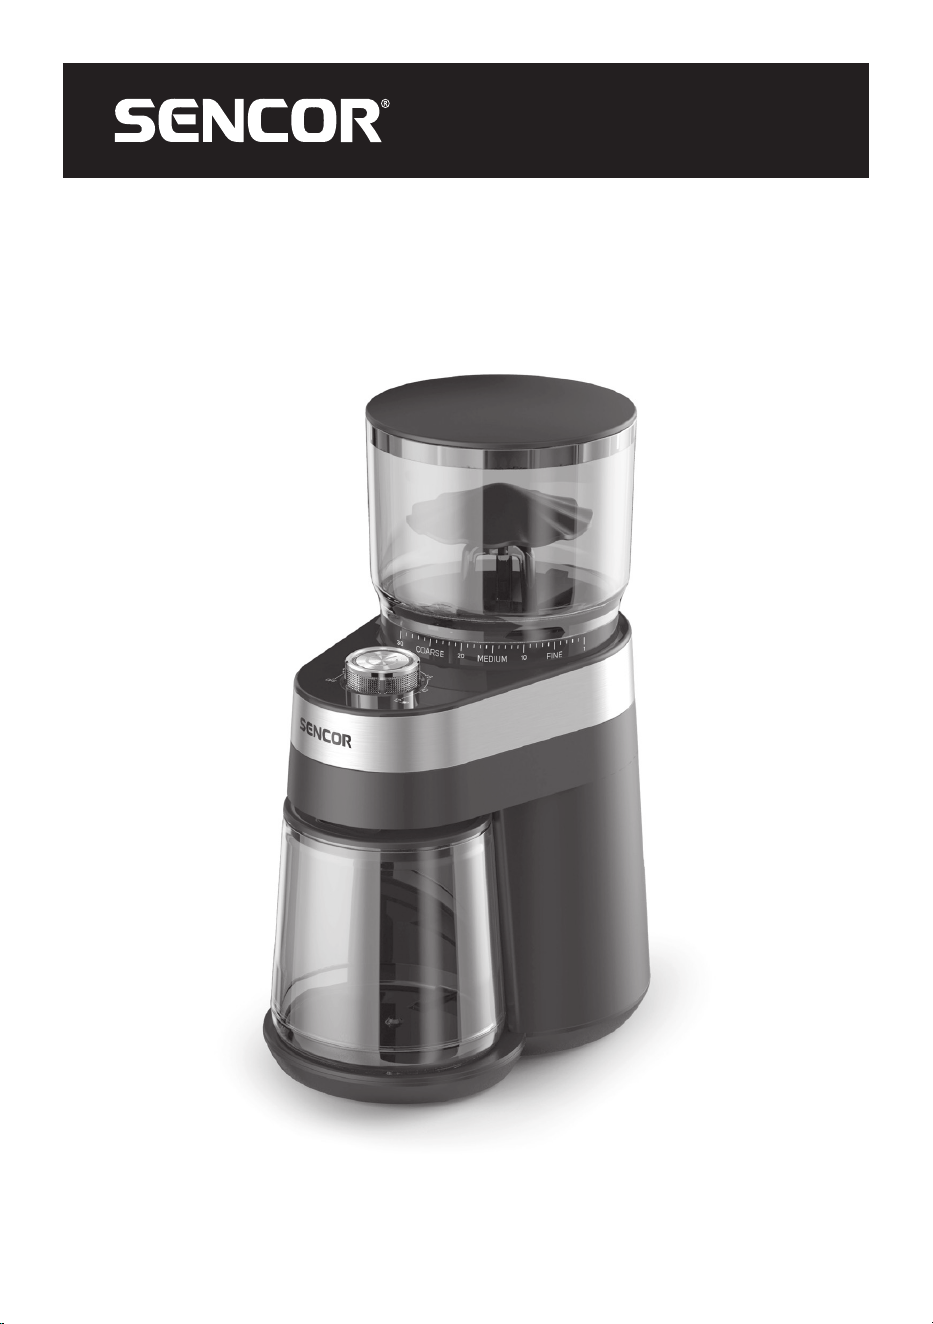
PURPOSE OF USE
• The Sencor SCG 5060BK coffee grinder is designed for grinding
roasted coffee beans either into the provided hopper or directly into
aportafilter (when the holder is attached).
. . . . . . . . . . . . . . . . . . . . . . . . . . . . . . . . . . . . . . . . . . . . . . . . . . . . . . . . . . . . . . . . . . . .
BEFORE FIRST USE
• Before first use, remove the appliance and its accessories form the
packaging and discard all promotional labels and tags. Check that
neither the appliance nor any of its components is damaged.
• Wash the coffee bean hopper lid, ground coffee container, ground
coffee container lid and portafilter holder in warm water with asmall
amount of neutral kitchen detergent. Then rinse thoroughly with clean
water and dry.
• Wipe the outer surface of the grinder, including the inside of the coffee
bean hopper, with aslightly dampened sponge and then wipe dry with
aclean cloth.
Warning:
Never wash the appliance under running water
or immerse it in water or another liquid. Underno
circumstances should you pour water or other liquids
into the coffee bean hopper to clean it.
. . . . . . . . . . . . . . . . . . . . . . . . . . . . . . . . . . . . . . . . . . . . . . . . . . . . . . . . . . . . . . . . . . . .
ASSEMBLY AND DISASSEMBLY OF GRINDER PARTS
Place the grinder on aflat, dry, and clean surface, and ensure that the
power cord plug is disconnected from the mains socket.
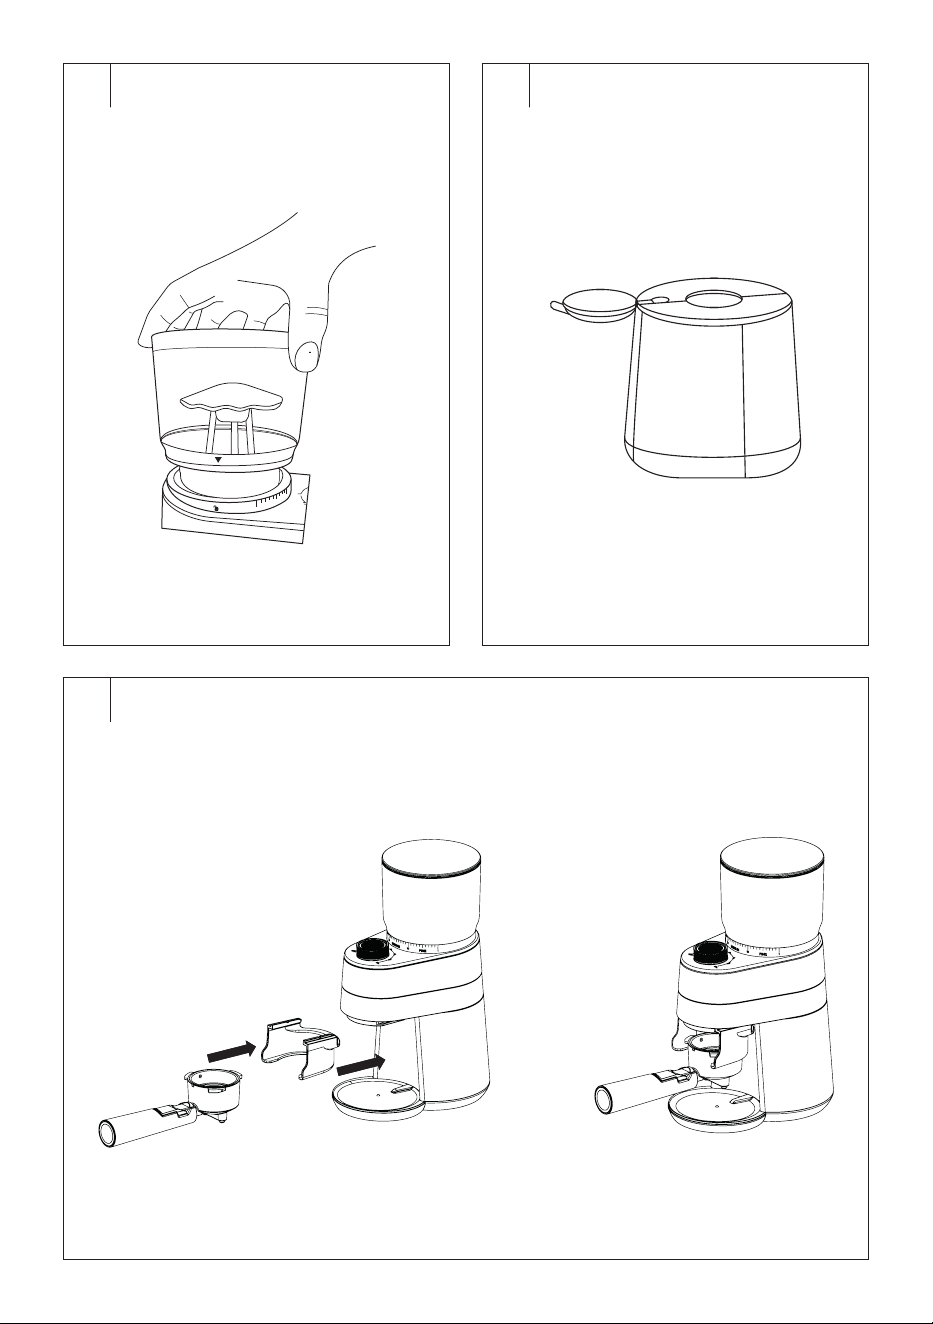
Coffee Bean Hopper
When removing the coffee bean hopper, proceed as follows:
1. Rotate the coffee bean hopper until the
on the hopper aligns with
the
symbol on the grind size indicator.
2. Pull the hopper upwards.
When installing the coffee bean hopper, proceed as follows:
1. Place the coffee bean hopper above the grinding chamber so that
the
on the hopper aligns with the symbol – see figure B. The
bottom of the hopper has protrusions that should fit into the slots in
the neck of the grinding chamber.
2. Insert the hopper into the grinding chamber andturn the hopper
anticlockwise.
Note:
The grinder is equipped with asafety switch that prevents
the coffee grinder from operating if the coffee bean hopper
is not installed or is incorrectly installed.
Ground Coffee Hopper
If you are grinding coffee into the hopper, attach the lid to the hopper,
release the inner lid, and slide it aside – see figure C.
Place the ground coffee hopper into the grinder body on the surface
below the dispensing outlet. The bottom of the ground coffee hopper
has arecess that fits into the groove on the surface below the dispensing
outlet. This ensures the ground coffee hopper is correctly inserted.
Note:
The dispensing outlet is equipped with asilicone funnel that
allows coffee to be ground directly into the opening in the
hopper lid or into aportafilter.
Portafilter Holder (Fig. D)
The portafilter holder allows coffee to be ground directly into the
portafilter.
On either side of the dispensing outlet, there are grooves. Attach the
holder to these grooves and push it all the way back until you feel
resistance.
Insert the portafilter into the holder.
. . . . . . . . . . . . . . . . . . . . . . . . . . . . . . . . . . . . . . . . . . . . . . . . . . . . . . . . . . . . . . . . . . . .
FILLING THE COFFEE BEAN HOPPER
Remove the coffee bean hopper lid.
Pour the roasted coffee beans into the coffee bean hopper and replace the
lid. Forsafety reasons, do not leave the hopper open. Coffee beans would
also lose their aroma.
Warning:
The maximum hopper capacity is approximately
200 g. Do not overfill. Never fill the coffee bean
hopper with ground or instant coffee, caramelised
or otherwise specially treated coffee beans, cocoa
beans or other items. Otherwise the appliance may
be damaged.
Note:
If you are not using the coffee beans immediately, remove
the hopper, transfer the beans to an airtight container, and
store them appropriately.
. . . . . . . . . . . . . . . . . . . . . . . . . . . . . . . . . . . . . . . . . . . . . . . . . . . . . . . . . . . . . . . . . . . .
COFFEE GRINDING
1. Insert the ground coffee hopper or the holder with the portafilter
under the dispensing outlet of the grinder.
2. Make sure the rotary dial is set to OFF.
3. Unwind the power cord completely andplug the power cord plug
into apower socket.
4. Select the amount of ground coffee with the rotary dial. If grinding
coffee into aportafilter, turn the dial to the
symbol (for
grinding coffee for 1 cup) or the
symbol (for grinding coffee
for 2 cups). If grinding coffee into the hopper, set the dial to the
desired amount of coffee, ranging from 4 to 12 cups.
5. Press the
button to start the grinder.
6. The grinder will automatically stop once the desired amount of
coffee has been ground into the portafilter or hopper.
7. If you need to stop the grinding process, press the button.
EN
Electric Coffee Grinder with Flat Grinding Burrs
User Manual
- 4 -
03/2025
2025, .
2. Wash the hopper, lid, and portafilter holder in warm water with
asmall amount of neutral kitchen detergent. Then rinse thoroughly
with clean water and dry.
Outer Surface of the Grinder
Wipe the outer surface of the grinder with aslightly dampened sponge
and then wipe dry.
Cleaning the Grinding Burrs
From time to time, it is necessary to clean the grinding burrs to remove
coffee grounds and coffee oils.
We particularly recommend cleaning the grinding burrs when you switch
to adifferent type of roasted coffee. This prevents the flavours of different
types of coffee from mixing.
Always clean the grinding burrs if the grinder will not be used for an
extended period.
1. Remove the coffee bean hopper.
2. Using the brush, remove any remaining coffee grounds before
loosening and removing the upper grinding burr.
3. Turn the upper grinding burr until the arrow on the upper burr points
to the symbol
– see figure E1.
4. Pull the upper grinding burr upwards.
5. Use the brush to clean the upper grinding burr, lower grinding burr,
and the grinding chamber – see figure E2.
6. Also use the brush to clean the ground coffee dispensing outlet –
see figure E3.
Note:
Use abrush, dry cloth, or kitchen paper towel to clean the
grinding burrs. Do not use water or adamp sponge or cloth.
Do not use cleaning agents under any circumstances.
7. Once the grinding burrs are clean, reassemble the grinder. Insert
the upper grinding burr into the grinding chamber so that the arrow
on the upper burr points to the symbol
– see figure E1. Then, turn
the upper grinding burr clockwise until the arrow on the upper burr
points to the symbol
– see figure E4.
8. Then insert the coffee bean hopper.
Warning:
Be extremely careful when handling the grinding
burrs. The grinding burrs are sharp and pose arisk
of injury.
. . . . . . . . . . . . . . . . . . . . . . . . . . . . . . . . . . . . . . . . . . . . . . . . . . . . . . . . . . . . . . . . . . . .
STORAGE
• If you are not going to use the appliance for an extended period of
time, disconnect the plug from the mains socket, allow the appliance
to cool down, and clean it according to the instructions in the
“Cleaning and Maintenance” section.
• Before storing, ensure that the appliance and all accessories are
thoroughly clean and dry.
• Store the appliance in adry, clean, and well-ventilated place away
from extreme temperatures and out of the reach of children or pets.
. . . . . . . . . . . . . . . . . . . . . . . . . . . . . . . . . . . . . . . . . . . . . . . . . . . . . . . . . . . . . . . . . . . .
TECHNICAL SPECIFICATIONS
Rated voltage range ..............................................................................220–240 V~
Rated frequency ..........................................................................................50–60 Hz
Rated input .............................................................................................................140 W
Power consumption in off mode .....................................................................0.4 W
Noise level .........................................................................................................75 dB(A)
After connecting to the mains socket or after the end of operation, the
appliance switches to the off state.
The declared noise emission level of the appliance is 75 dB(A), which
represents alevel Aof acoustic power with respect to areference acoustic
power of 1 pW.
We reserve the right to change the text and technical specifications.
. . . . . . . . . . . . . . . . . . . . . . . . . . . . . . . . . . . . . . . . . . . . . . . . . . . . . . . . . . . . . . . . . . . .
8. If you need to grind more coffee, repeat the whole process.
9. If you are no longer using the grinder, turn the dial to the OFF
position and unplug the power cord from the mains socket.
10. Clean the grinder according to the instructions in the “Cleaning and
Maintenance” section.
If the ground coffee container becomes full during grinding, or if you
run out of beans in the coffee bean hopper, always stop the grinder
first by pressing the
button, and then unplug the power cord
from the mains socket. Then empty the hopper or add coffee beans
andcontinuegrinding.
Note:
If you use the coffee grinder continuously for 3 minutes,
it is important to let it cool down for at least 30 minutes.
Disconnect the plug from the mains socket while the
grinder is cooling down. This is asafety recommendation to
prevent possible damage to the coffee grinder.
Recommendations forBuying andStoring Coffee
• To reduce storage time, buy coffee beans in smaller packages.
• Use freshly roasted coffee beans that have the date of roasting
marked on the package and consume them within 3 weeks from the
date of the roasting.
• Store coffee beans in acool, dark and dry place, preferably in an
airtight container.
• We recommend grinding the coffee beans just before preparing the
coffee drink. Coffee that is ground in advance loses its flavour and
aroma.
Recommended Grind Size Settings
• This coffee grinder is equipped with a30-step adjustment system,
allowing you to customise the grind size for various coffee preparation
methods. If you are using ground coffee in espresso machines, select
afiner grind size. For drip coffee preparation, choose acoarser grind
size instead.
• If you are using ground coffee in espresso machines and the coffee
flows very slowly during extraction with ataste that is overly bitter,
it may indicate that the coffee beans are ground too finely, and you
should adjust to acoarser grind. If the coffee flows too quickly and
the taste is weak, it may indicate that the coffee beans are ground too
coarsely, and you should adjust to afiner grind.
. . . . . . . . . . . . . . . . . . . . . . . . . . . . . . . . . . . . . . . . . . . . . . . . . . . . . . . . . . . . . . . . . . . .
CLEANING AND MAINTENANCE
• Before cleaning, disconnect the power plug from the mains socket
and allow the grinder to cool down. None of the components of this
appliance are dishwasher safe.
Warning:
To prevent the risk of electric shock, do not immerse
the appliance, power cable, or plug into water or any
other liquid.
Warning:
Do not use abrasive cleaning agents, solvents, etc.
to clean any parts of the appliance, as these could
damage the surface of the appliance. None of the
components of this appliance are dishwasher safe.
Coffee Bean Hopper
1. Remove the coffee bean hopper from the grinder body.
2. Remove the lid and transfer the grains into an airtight container.
3. You can remove dirt from the bottom of the hopper using abrush
withgentle bristles.
4. Wipe the inner and outer surfaces of the hopper with asoft sponge
slightly dampened in warm water. Wipe dry with aclean cloth.
5. Wash the lid in warm water with asmall amount of neutral kitchen
detergent. Then rinse thoroughly with clean water and dry.
Ground Coffee Hopper and Portafilter Holder
1. Remove the lid from the hopper and transfer the ground coffee into
an airtight container.

- 5 -
03/2025
2025, .
INSTRUCTIONS AND INFORMATION ON DISPOSAL OF USED
PACKAGING MATERIAL
Dispose of used packaging material at the location designated by the
municipality for waste disposal.
DISPOSAL OF USED ELECTRICAL AND ELECTRONIC EQUIPMENT
Used electrical andelectronic products must not be added to ordinary
municipal waste. For proper disposal and recycling of these products,
deliver them to designated collection points. Alternatively, in some
European Union states or other European countries the products can be
returned to the local retailer when buying an equivalent new product. By
properly disposing of this product, you help preserve valuable natural
resources and contribute to preventing potential negative impacts on the
environment and human health resulting from improper waste disposal.
For more details, contact your local authority or nearest collection point.
Fines may be imposed for improper disposal of this type of waste as per
national regulations.
For Business Entities in European Union States
To dispose of electric or electronic equipment, request necessary
information from your retailer or supplier.
Disposal in Other Countries Outside the European Union
To dispose of this product elsewhere, request necessary information on
the correct disposal method from local authorities or your retailer.
. . . . . . . . . . . . . . . . . . . . . . . . . . . . . . . . . . . . . . . . . . . . . . . . . . . . . . . . . . . . . . . . . . . .

- 6 -
03/2025
2025, .

www.sencor.com
info@sencor.cz