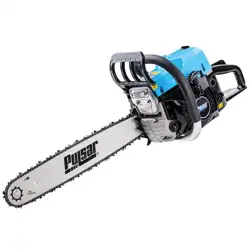
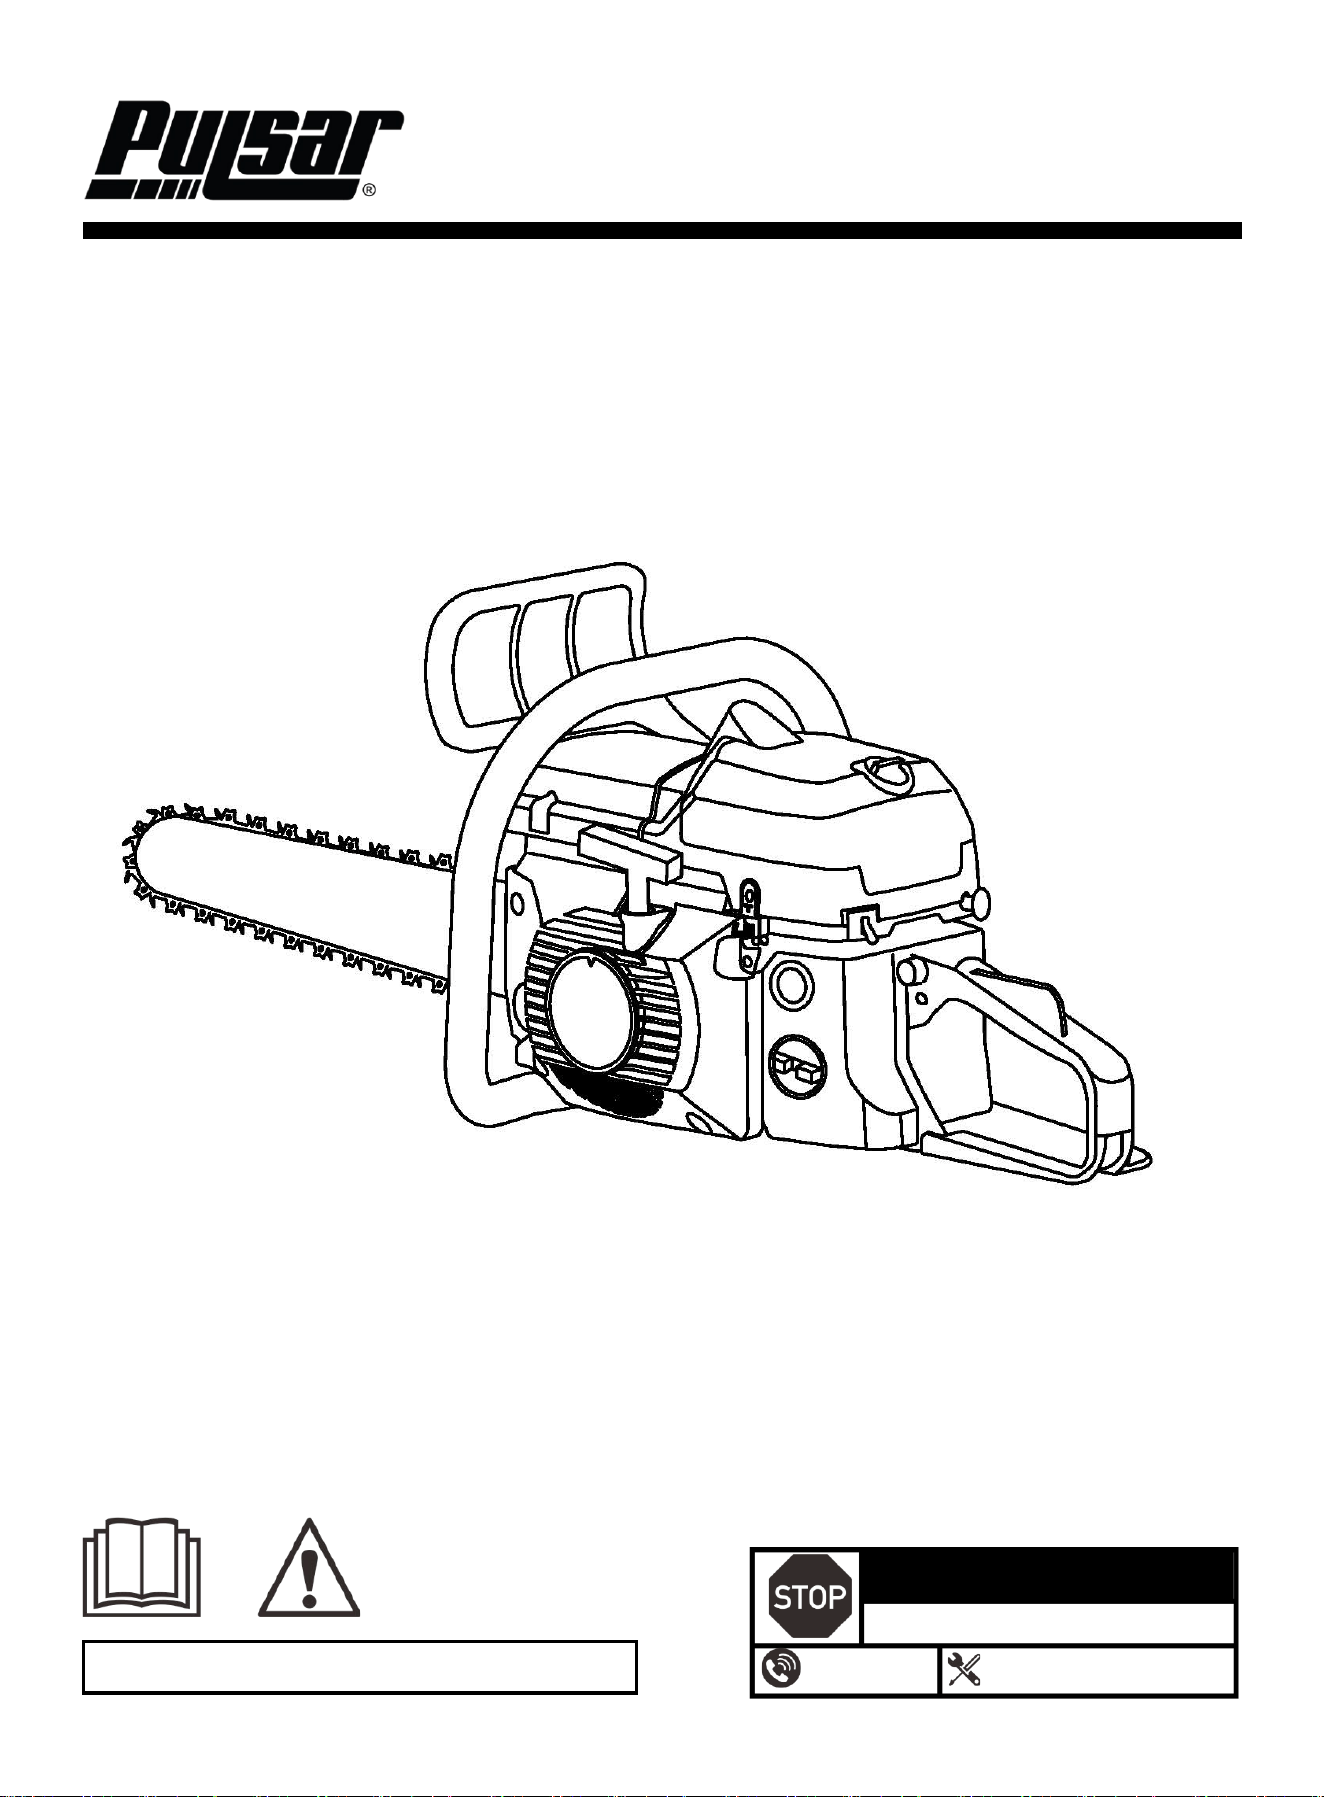
2-STROKE 20” CHAIN SAW
OPERATOR'S MANUAL
Warning: The Engine Exhaust from this product contains chemicals known to the
State of California to cause cancer, birth defects or other reproductive harm.
DO NOT RETURN TO STORE!
HAVE QUESTIONS OR NEED SERVICE?
866-591-8921
support@pulsar-products.com
Model: PTG14202
Caution:
Before using your chain saws, please read this manual carefully to understand the proper use of your unit
Keep this manual handy
1
Table of Contents
Table of Contents ………………………………….…...….1
Instruction …………………………………………….…….1
Safety Warnings and Notices ………………………...….1
Safety Instructions …………………………………………2
Preparation & Installation…………………………………4
Fuel And Chain Oil …………………………………………6
Engine…………………………………………………………….7
Operation………………………………………………….…….9
Maintenance ………………………………………….……….11
Specifications ……………………….………………......……14
Troubleshooting Guide ……………….……………….….…15
Introduction
Thank you for choosing Pulsar Products!
This manual provides instruction on how to operate and
use your chain saw safely and correctly; be sure to read
and understand this manual before using your chain saw. If
you have ANY questions, please phone 866.591.8921
M-F or support@pulsar-products.com BEFORE using
your chain saw.
All details and images in this User's Manual are believed to
be accurate at the time of publication.
Pulsar Products reserves the right to make updates to this
manual at any time.
Please contact Pulsar Support at 866.591.8921 or
support@pulsar-products.com for the latest updates.
This manual is a permanent part of the chain saw set. If the
chain saw is resold, kindly include this manual with the
chain saw.
DANGER
!
DANGER indicates an imminently hazardous
situation which, if not avoided, will result in death
or serious injury.
WARNING
!
WARNING indicates a potentially hazardous
situation which, if not avoided, could result in
death or serious injury.
CAUTION
!
CAUTION indicates a potentially hazardous situation
which, if not avoided, may result in minor or moderate
injury. It may also be used to alert against unsafe
practices.
NOTICE
Failure to follow the instruction may result in the
damage to your chain saw and other property.
Safety Warnings and Notices
WARNING: Save This Manual
for Future Reference
This manual contains important information regarding
the safety, operation, maintenance, and storage of this
product. Before use, read are fully and understand all
cautions, warnings, instructions, and product labels.
Failure to do so could result in serious personal injury
and/or property damage
Safety Definitions
This manual contains important information regarding
the safety, operation, maintenance, and storage of this
product. Before use, read are fully and understand all
cautions, warnings, instructions, and product labels.
Failure to do so could result in serious personal injury
and/or property damage.
!
This safety alert symbol appears with most safety
statements. It means to pay attention and be alert, your
safety is involved! Please read and abide by the
message that follows the safety alerts symbol.
2
Safety Instructions
Follow all safety information contained in this manual and
on the chain saw.
Before operating your chain saw, you must read and
understand the manual and familiarize yourself with the
safe operation practices.
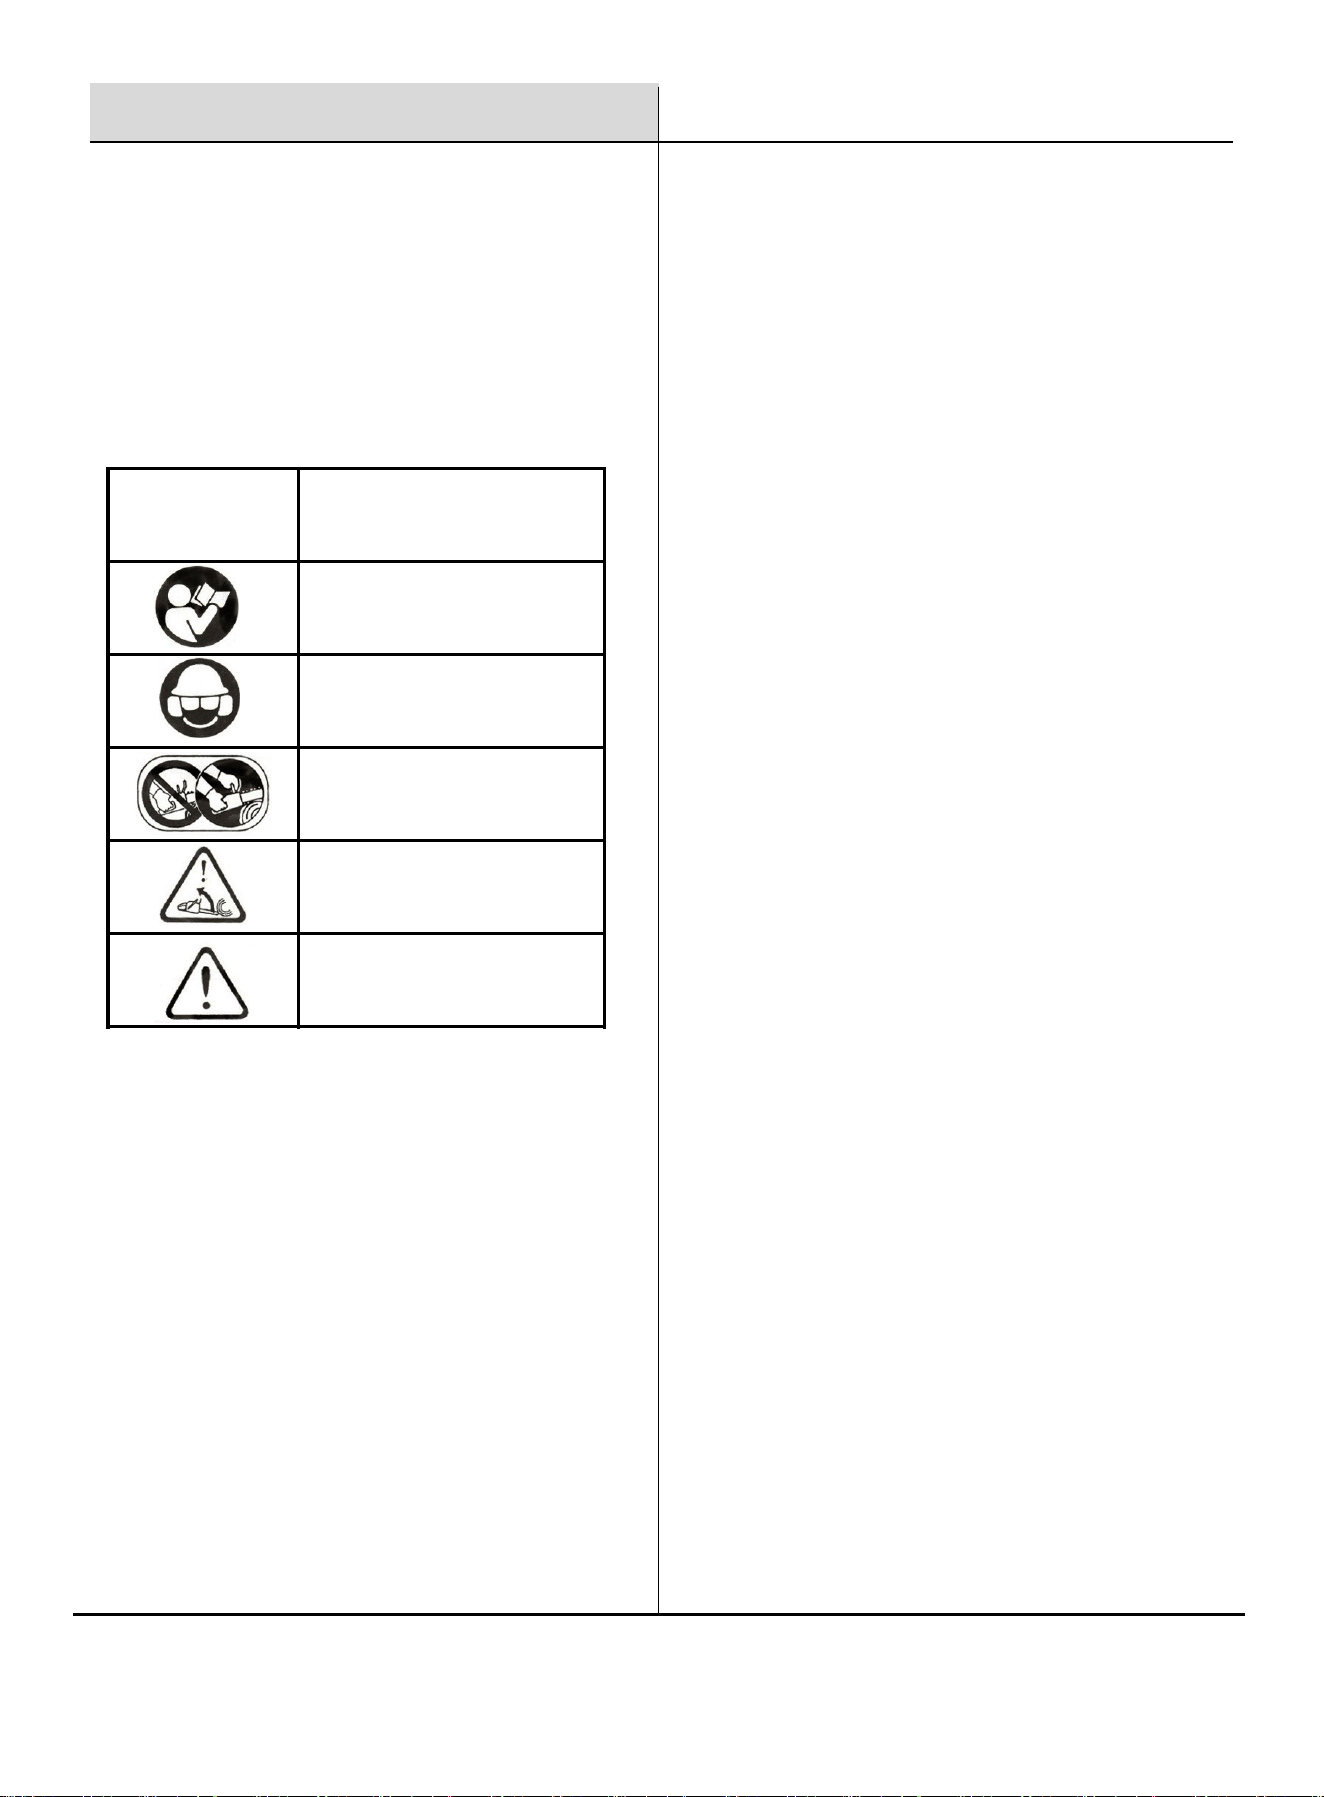
SYMBOL DESCRIPTION
Read owner's manual before
operating this machine
Wear head, eye and ear protection
Use the chain saw with two hands
Warning! Kickback is dangerous
Warning/Attention
Safety Precautions
Operate this product ONLY outside far away from
windows, doors and vents to reduce the risk of carbon
monoxide gas from accumulating and potentially being
drawn towards occupied spaces.
DO NOT run this product when under the influence of
alcohol, when suffering from exhaustion or lack of
sleep, when suffering from drowsiness as a result of
having taken cold medicine, or at any other time when a
possibility exists that your judgment might be impaired
or that you might not be able to operate the machine
properly and in a safe manner.
Never use the product under circumstances like those
described below:
1. When the ground is slippery or when other conditions
exist which might make it not possible to maintain a steady
posture.
2. At night, at times of heavy fog, or at any other times when
your field of vision might be limited, and it would be difficult
to gain a clear view of the area.
3. During rainstorms, during lighting storms, at times of
strong or gale-force winds, or at any other times when
weather conditions might make it unsafe to use this product.
Lack of sleep, tiredness, or physical exhaustion results
in lower attention spans, and this in turn leads to
accidents and injury. Limit the amount of time of using
the machine continuously to somewhere around 10
minutes per session and take 10~20 minutes of rest
between work sessions. Also try to keep the total
amount of work performed in a single day under 2 hours
or less.
POISONOUS GAS HAZARD: Engine exhaust
contains carbon monoxide, a poisonous gas that
could kill you in minutes. You CAN NOT smell it, see
it, or taste it. Even if you do not smell exhaust fumes,
you could still be exposed to carbon monoxide gas.
Safety Symbols
3
Working Equipment and Clothing
Safety Instructions
WARNING
!
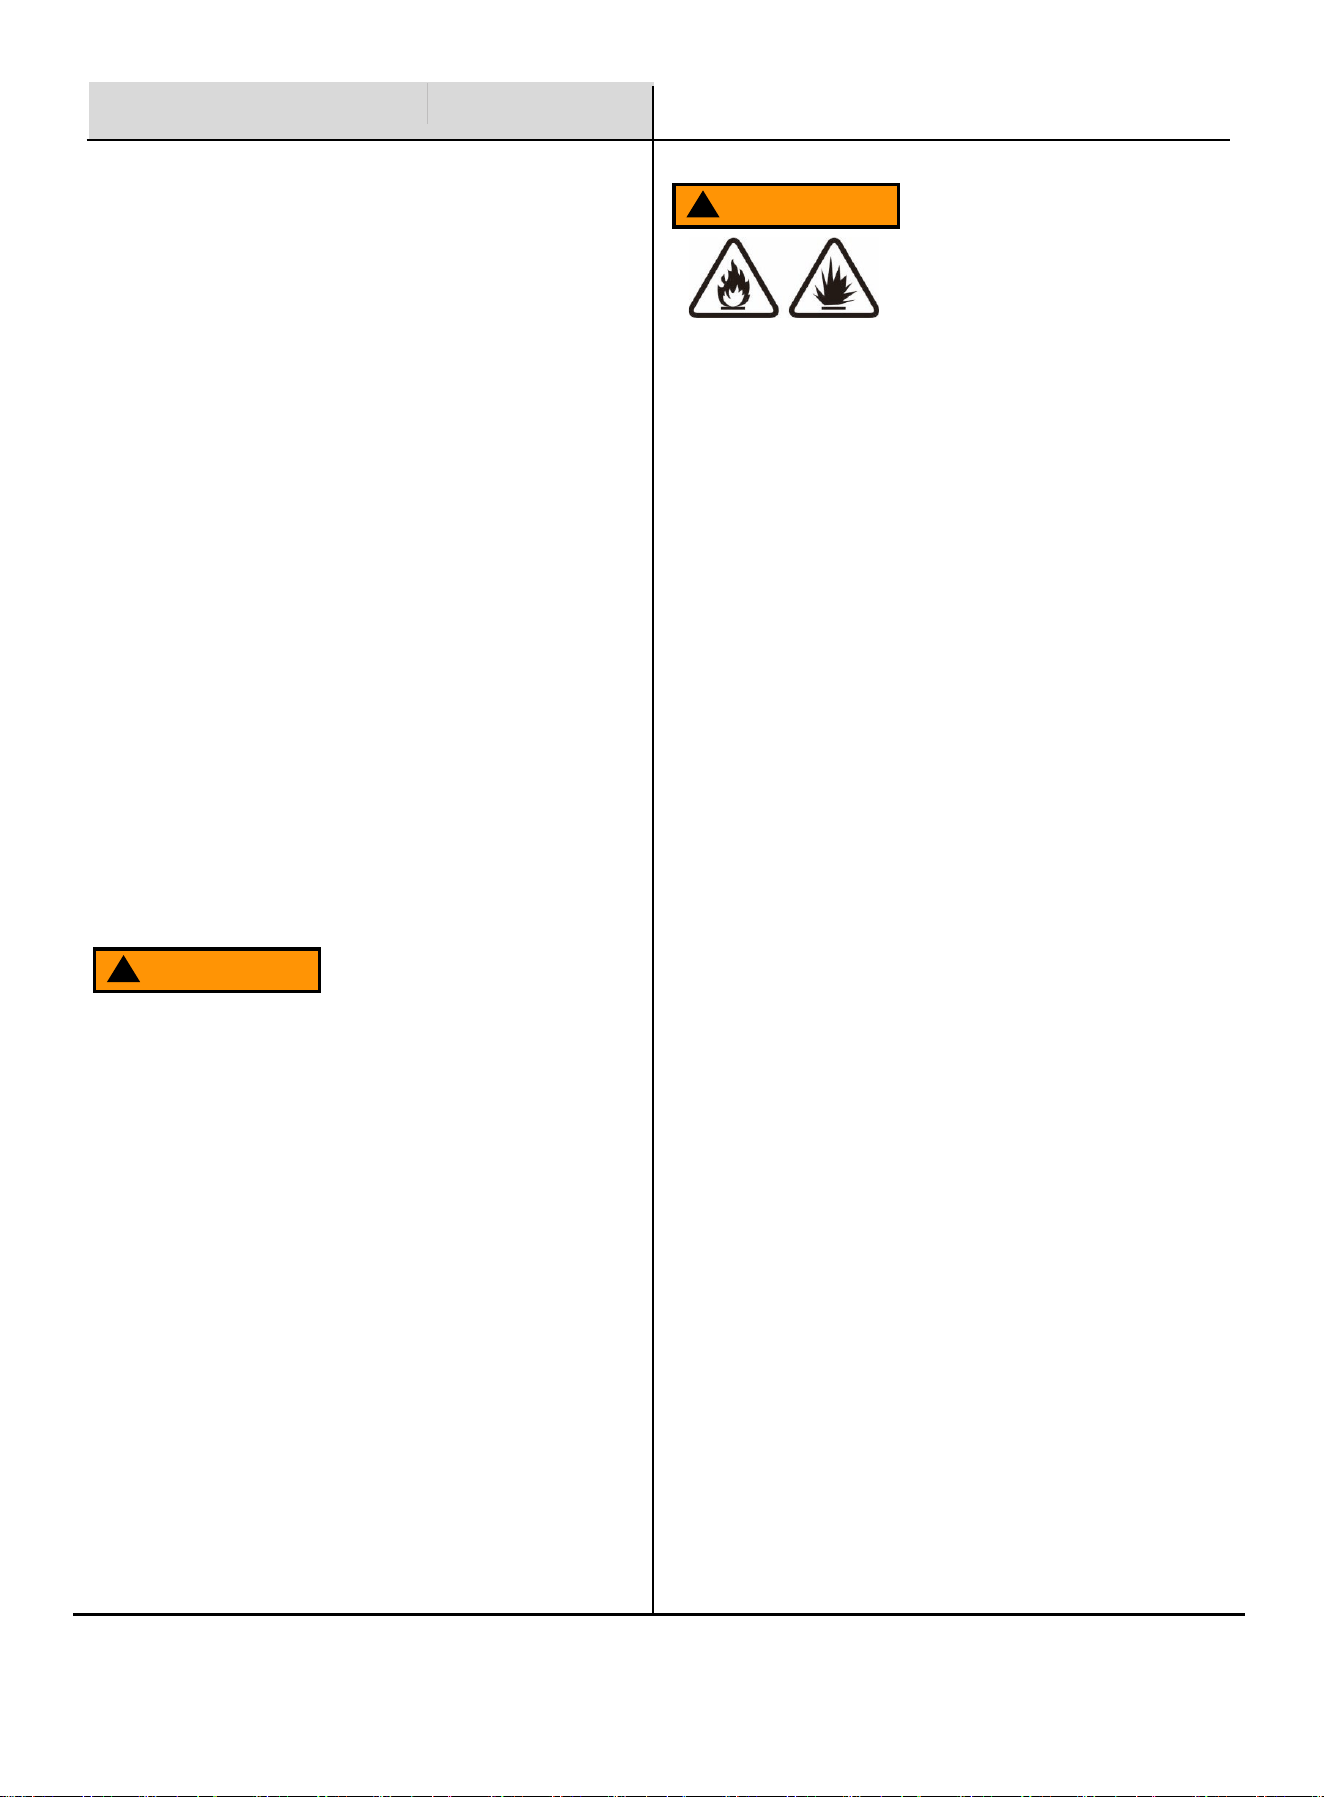
The engine of this product is designed to run on a
mixed fuel which contains highly flammable gasoline.
Never store cans of fuel or refill the fuel tank in any
place where there is a boiler, stove, wood fire,
electrical sparks, welding sparks, or any other source
of heat or fire which might ignite the fuel.
Smoking while operating the product or refilling its
fuel tank is extremely dangerous. Never smoke or
vape anything while working with your chain saw.
When refilling the fuel tank always turn off the engine
first and take a careful look around to make sure that
there are no sparks or open flames anywhere nearby
before refueling.
If any fuel spillage occurs during refueling, use a dry
rag to wipe up spills before restarting the engine.
After refueling, screw the fuel cap back tightly onto
the fuel tank and then carry the product to a spot 3m
(10 feet) or more away from where it was refueled
before restarting the engine.
WARNING
!
Turn the chain saw engine OFF and let it cool for at
least 2 minutes before removing the fuel cap.
Loosen the cap slowly to relieve pressure in the tank.
Fill or drain fuel tank outdoors.
DO NOT overfill the tank. Allow space for fuel
expansion.
If fuel spills, wipe it up and let the area dry before
starting the engine.
Keep fuel away from sparks, open flames, heat, and
other ignition sources.
Check fuel lines, tank, cap, and fittings frequently for
cracks or leaks; replace them if necessary.
DO NOT smoke or vape anything.
Fuel and its vapors are extremely flammable and
explosive which could cause burns, fire, or
explosion resulting in death or serious injury and/or
property damage.
When Adding or Draining Gasoline
When using the product, you should wear proper
clothing and protective equipment as follows:
Helmet
Protection goggles or face protector
Thick work gloves
Non-slip-sole work boots
Ear protectors
And you should carry with you:
Maintenance tools and files
Properly blended fuel and chain oil
Area Denial (Rope, warning signs)
Whistle (for help or emergency)
Hatchet or hand saw
Before Starting the Engine
Check working place, the object to be cut and
cutting direction. If there is obstacle, remove it.
Never start cutting unit you have a clear work area,
secure footing and a planned retreat path from the
falling tree.
Use caution and keep bystanders and animals out of
the working area with a diameter of 2.5 times the
cutting object.
Inspect the chain saw for worn, loose, or damaged
parts. Never operate the chain saw that is damaged,
improperly adjusted, or is not completely and
securely assembled. Make sure that the saw chain
stops moving when the throttle control trigger is
released.
4
SYMBOL DESCRIPTION
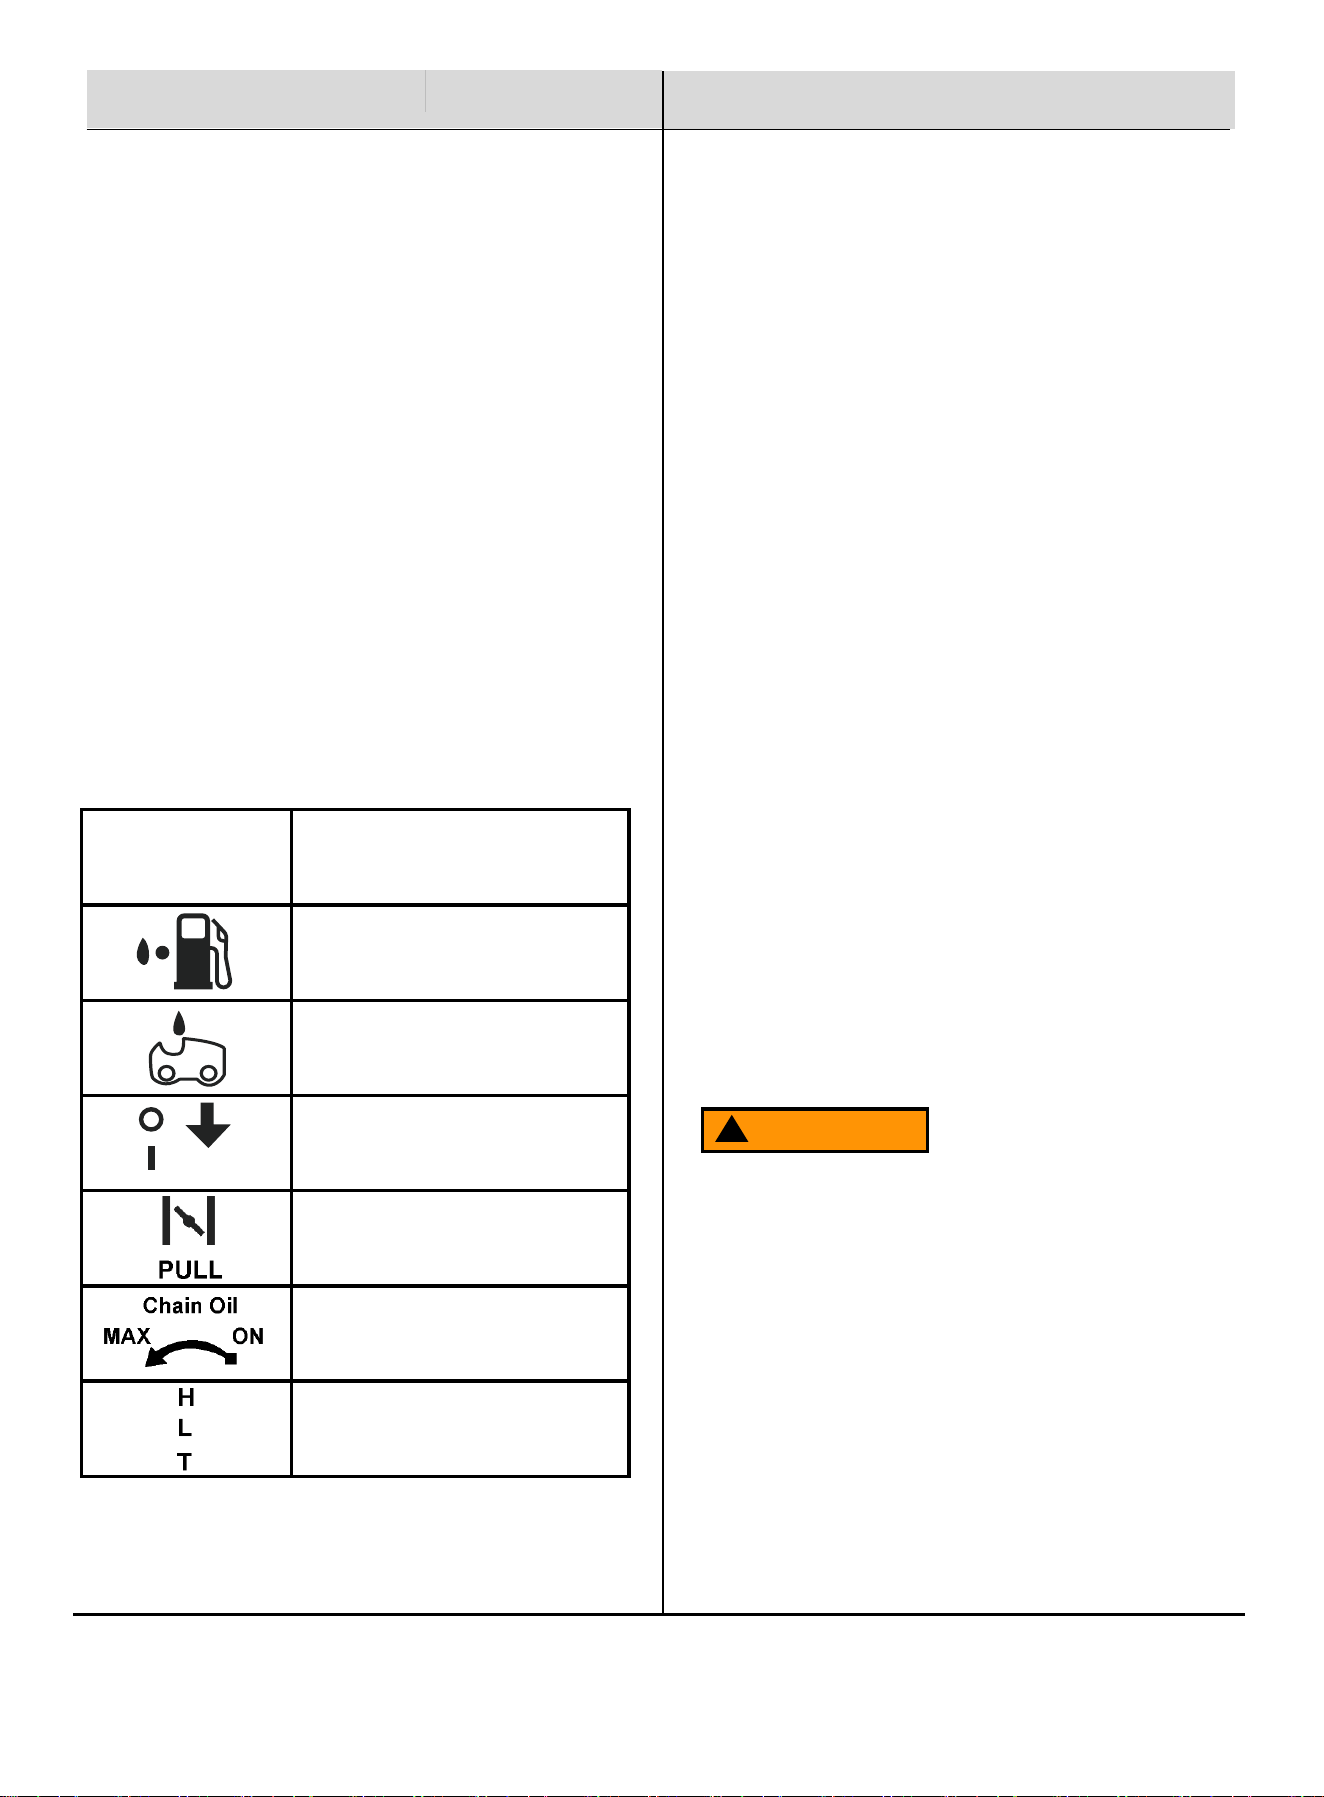
The port to refuel the “GASOLINE MIX”
The port to refuel the “CHAIN OIL”
Flipping the engine switch to the “I”
(stop) direction, stops the engine.
Pulling out the choke knob, closes the
choke.
“MIN direction”-decreases oil flow.
“MAX direction”-increases oil flow
The position of H-needle
The position of L-needle
The position of idle adjustment
Preparation & Installation
WARNING
!
Improper treatment of the chain saw could damage it
and shorten its life.
Keep the handles dry, clean and free of oil or fuel
mixture.
Never touch the muffler, spark plug or other metal
parts of the engine while the engine is running or
immediately after stopping the engine. Doing so could
result in serious burns or electrical shock.
Use extreme caution when cutting small size brush and
saplings because slender material may catch the saw
chain and be whipped toward you or pull you off
balance.
When cutting a limb that is under tension, be alert for
spring back so that you will not be struck when the
tension in the wood fibers is released.
Check the tree for dead branches that could fall during
the felling operation.
Always shut of the engine before setting it down.
Before operating your chain saw, you must read and
understand the manual and familiarize yourself with the
safe operation practices.
When Starting the Engine
Before Operating Equipment
Always hold the chain saw firmly with both hands
when the engine is running. Use a firm grip with
thumb and fingers encircling the handles.
Keep all parts of your body away from the chain saw
when the engine is running.
Before starting the engine, make sure the saw chain is
not contacting anything.
Symbols on the Machine
For safe operation and maintenance, symbols are molded
in relief on the machine. Follow these indications prevent
an accident.
Kickback may occur when the nose or tip of the guide
bar touches an object, or when the wood closes in and
pinches the saw chain in the cut.
Tip contact in some cases may cause a very fast
reverse reaction, kicking the guide bar up and back
towards the operator. Either of these reactions may
cause you to lose control of saw which could result in
serious personal injury.
Safety Instructions
STOP
5
Do not rely exclusively on the safety devices built into
your saw. As a chain saw user you should take
several steps to keep cutting jobs free from accident
or injury.
With a basic understanding of kickback, you can
reduce or eliminate the element of surprise. Sudden
surprise contributes to accidents.
Keep a good grip on the saw with both hands, the
right hand on the rear handle, and the left hand on
the front handle, when the engine is running. Use a
firm grip with thumbs and fingers encircling the chain
saw handles. A firm grip will help you reduce
kickback and maintain control of the saw.
Make certain that the area in which you are cutting is
free from obstructions. Don not let the nose of the
guide bar contact a log, branch, or any other
obstructions which could be hit while you are
operating the saw.
Cut at high engine speeds.
Do not overreach or cut above shoulder height.
WARNING
!
INSTALLING GUIDE BAR AND SAW CHAIN
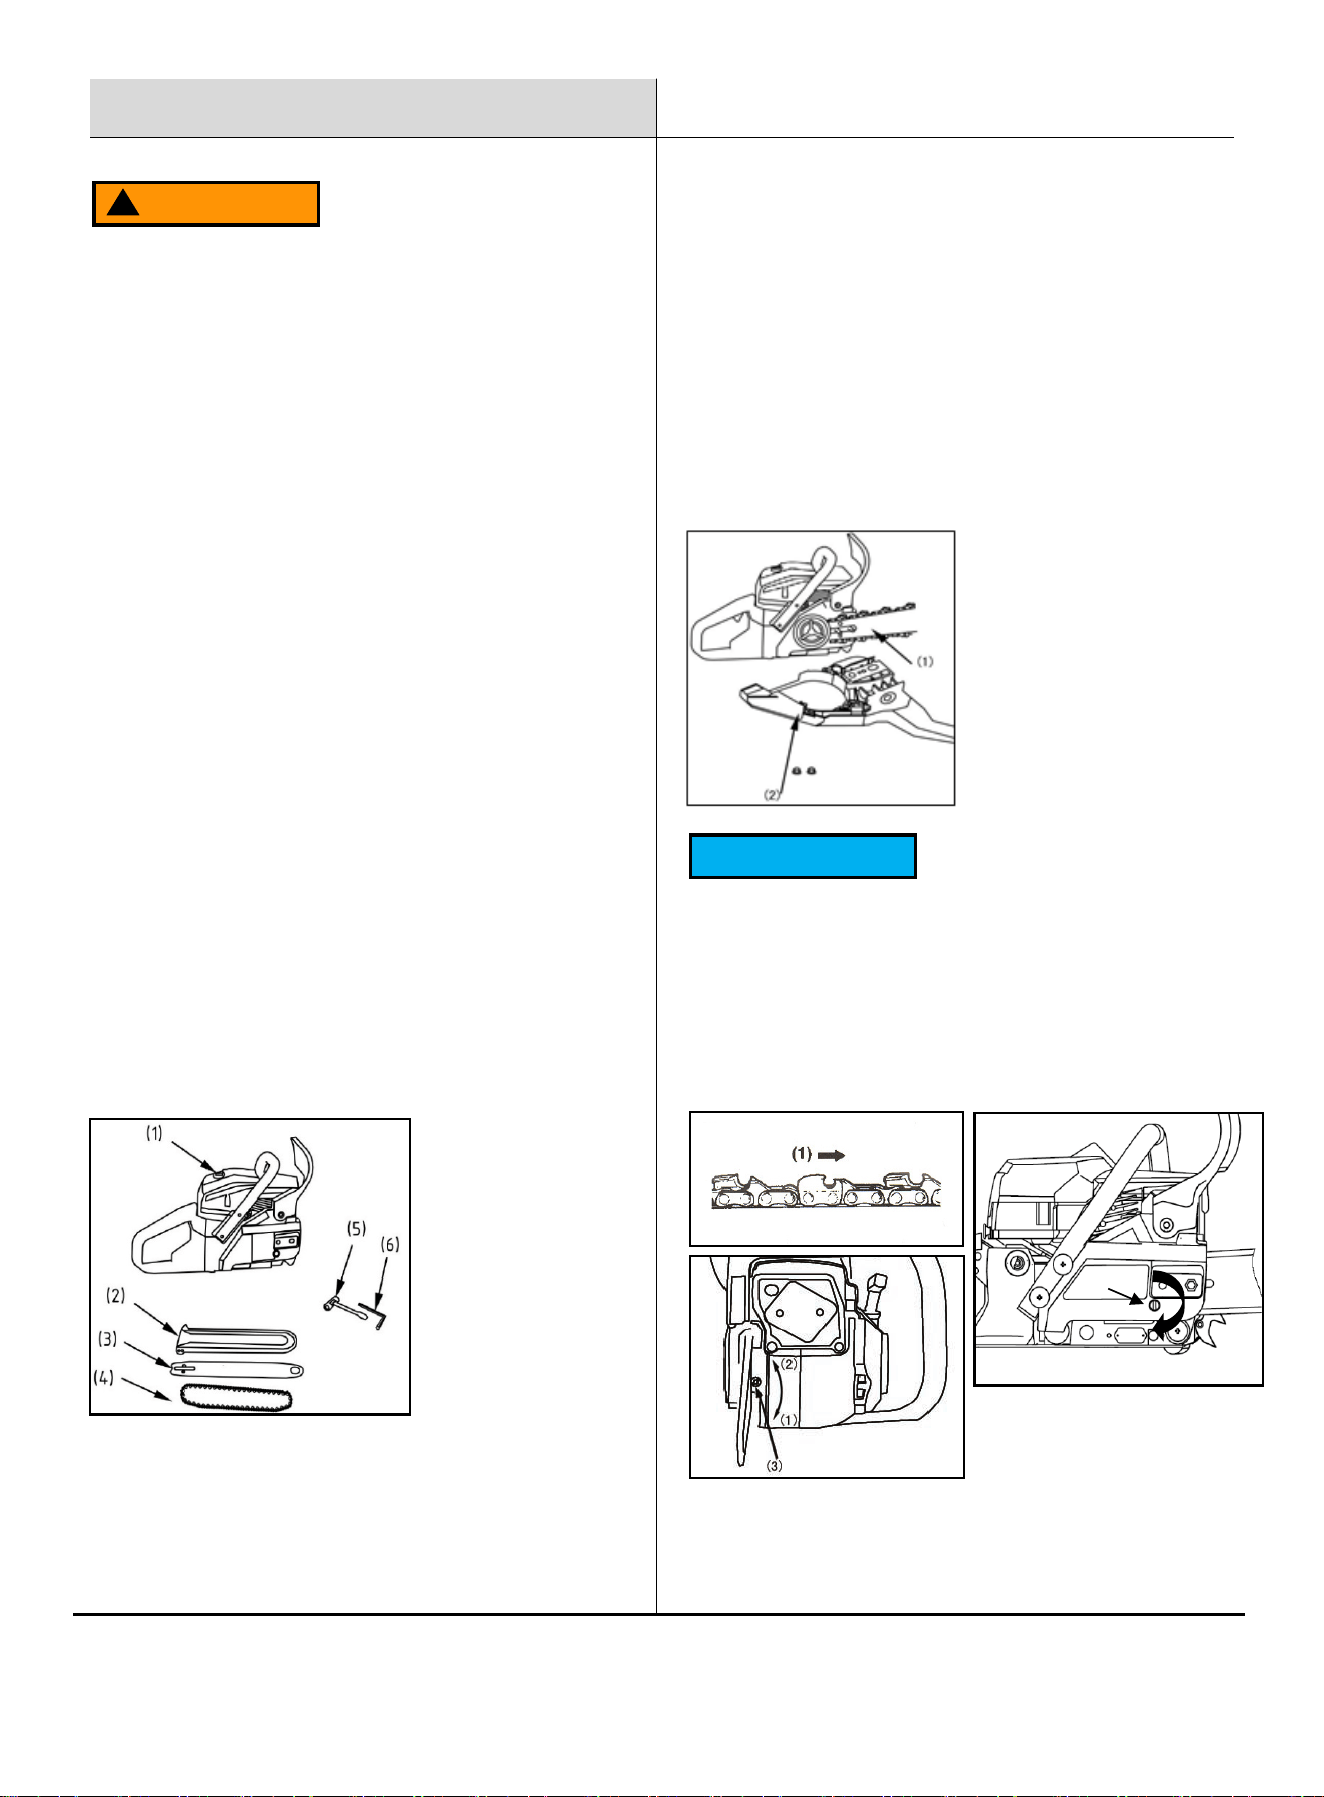
A standard saw unit package contains the
items as illustrated:
(1) Power Unit
(2) Bar Protector
(3) Guide Bar
(4) Saw Chain
(5) Plug Wrench
(6) Hexagon Wrench
Open the box and install the guide bar and the saw
chain on the power unit as follows:
Loosen two clamping nuts and remove the chain
cover.
Gear the chain to the sprocket and, while fitting the
saw chain around the guide bar, mount the guide bar
to the power unit. Adjust the position of chain
tensioner nut on the chain cover to the lower hole of
guide bar.
(1) Tensioner Nut
(2) Chain Cover
NOTICE
Pay attention to the correct direction of the saw chain:
Mount the bar to the studs of the power unit, and fit
the saw chain around the guide bar, Adjust the
position of chain tensioner nut on the chain.
Tighten the tensioner screw. (Style 1 or Style 2)
(1) Tighten
(2) Loosen
(3) Tensioner Screw
(3)
(1)
(2)
Style 1
Style 2
Preparation & Installation
6
NOTICE
A new chain will stretch a bit. Check and readjust the
tension frequently as a loose chain can easily derail or
cause rapid wear of the chain and guide bar.
Fuel and Chain Oil
Fuel
WARNING
!
Gasoline is very flammable. Never smoke or vape
anything near fuel. You must stop the engine and allow
it cool before refueling. Select outdoor bare ground for
fueling and move at least 3m (10 ft) away from the
fueling point before starting the engine.
You MUST mix fresh gasoline with 2-stroke oil at a 50:1
ratio (2.6 fl. oz per gallon).
Emission controls are set at the factory, never attempt
to adjust any part of the emission control system.
These engines are certified to operate on unleaded
gasoline.
Use regular 87 octane gasoline for best results.
Poor quality gasoline or oils may damage piston
rings, fuel lines, or the fuel tank.
How to Mix Fuel
CAUTION
!
Measure out the 2-stroke oil, 2.6 fl oz per gallon of
gasoline. (50:1 ratio)
Add the oil to an empty container, then fill it from a
gasoline pump, the mixture will be automatically
agitated.
If the gasoline can is already full of fresh gasoline,
you may add the correct amount of 2-stroke oil to the
gasoline, replace the cap tightly, then twist the
gasoline can back and forth a few times to mix well
the oil into the gasoline.
Fueling the Chain Saw
Remove the fuel cap and set it in a clean place.
Add fuel to the fuel tank not more than 80% full.
Replace the fuel cap securely and wipe up any fuel
spills.
Fuel And Chain Oil
CAUTION
!
NEVER USE
FUEL WITH NO OIL (RAW GASOLINE)-It will cause
severe damage to the internal engine parts very
quickly.
GASOHOL – It can cause deterioration of rubber
and/or plastic parts and disruption of engine
lubrication.
REGULAR ENGINE OIL –It will cause spark plug
fouling, exhaust port blocking, or stuck piston rings.
Chain Oil
Use engine oil 10w-30 or
10w-40 (hot weather), SAE 20 (cold weather).
7
Engine
Starting Engine
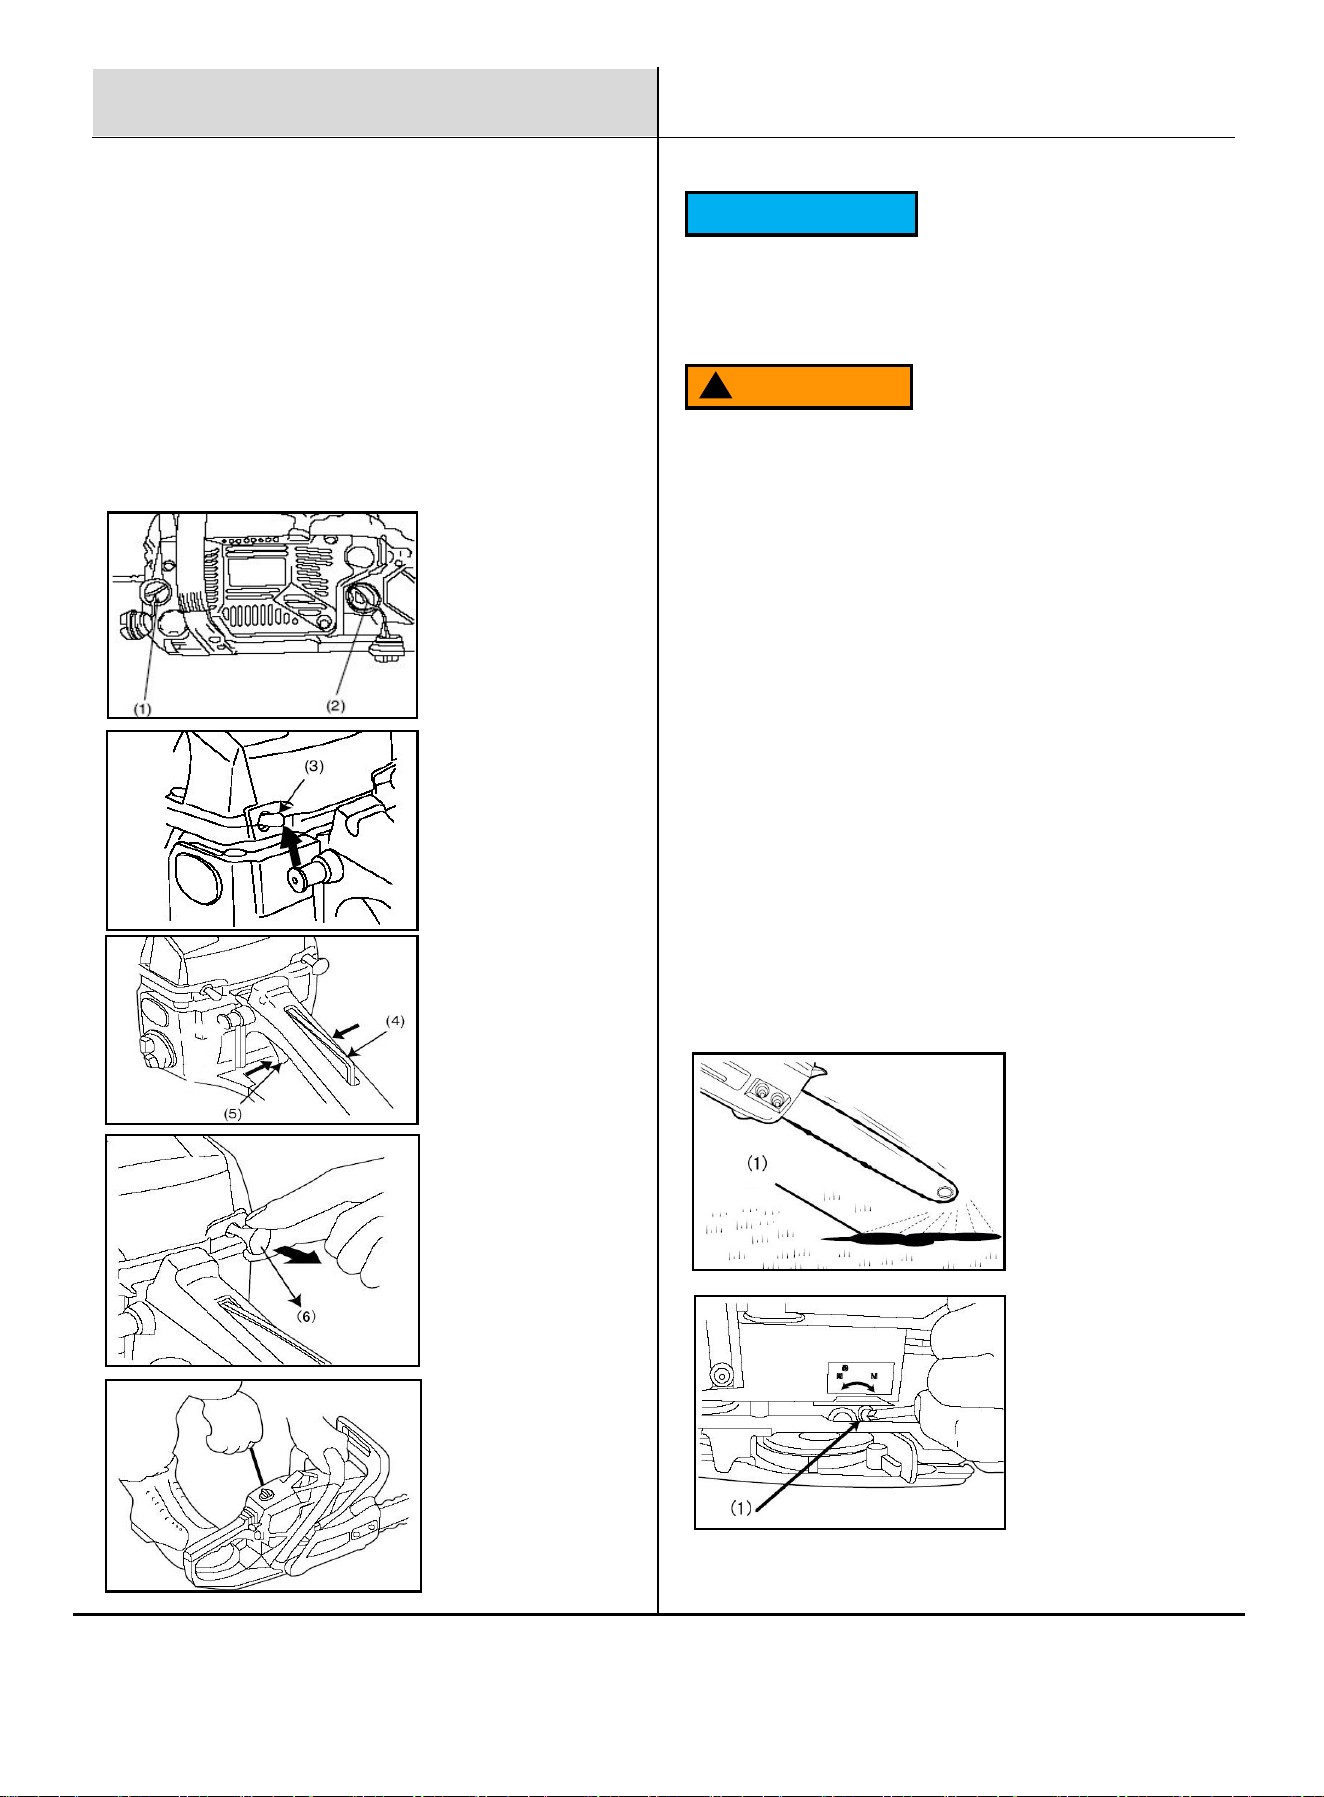
Fill fuel and chain oil tanks respectively, and tighten the
caps securely.
Put the switch to “ON” position.
Pull out the choke knob to the second position. The
choke will close, and the throttle lever will then be set in
the starting position.
(1) Chain Oil
(2) Fuel
(3) Switch
(4) Throttle Interlock
(5) Throttle Lever
(6) Choke Knob
NOTICE
While holding the saw unit securely on the ground, pull
the starter rope swiftly until the engine starts.
WARNING
!
NEVER start the engine while holding it with one hand.
The saw chain may touch your body. It’s very
dangerous.
Upon engine start, push in the choke knob gradually.
Allow the engine to warm up with the throttle lever
pulled slightly.
Keep clear of the saw chain as it will start rotating upon
engine start.
Checking Chain Oil Feed
After starting the engine, run the chain at medium
speed and see if chain oil is scattered off as shown
in the figure.
(1) Chain Oil
8
Adjusting Carburetor
The carburetor on your chain saw has been adjusted by
the factory but may require fine turning due to a change
in operating conditions.
Before adjusting the carburetor, make sure air and fuel
filters are clean and the fuel tank has fresh, properly
mixed fuel.
When adjusting, take the following steps:
Stop engine and screw in both H and L needles until
they stop. Never use force. Then set them back the
initial number of turns as show below.
H needle: 1 ±
⅜ turns
L needle: 1¼ ± ¼ turns
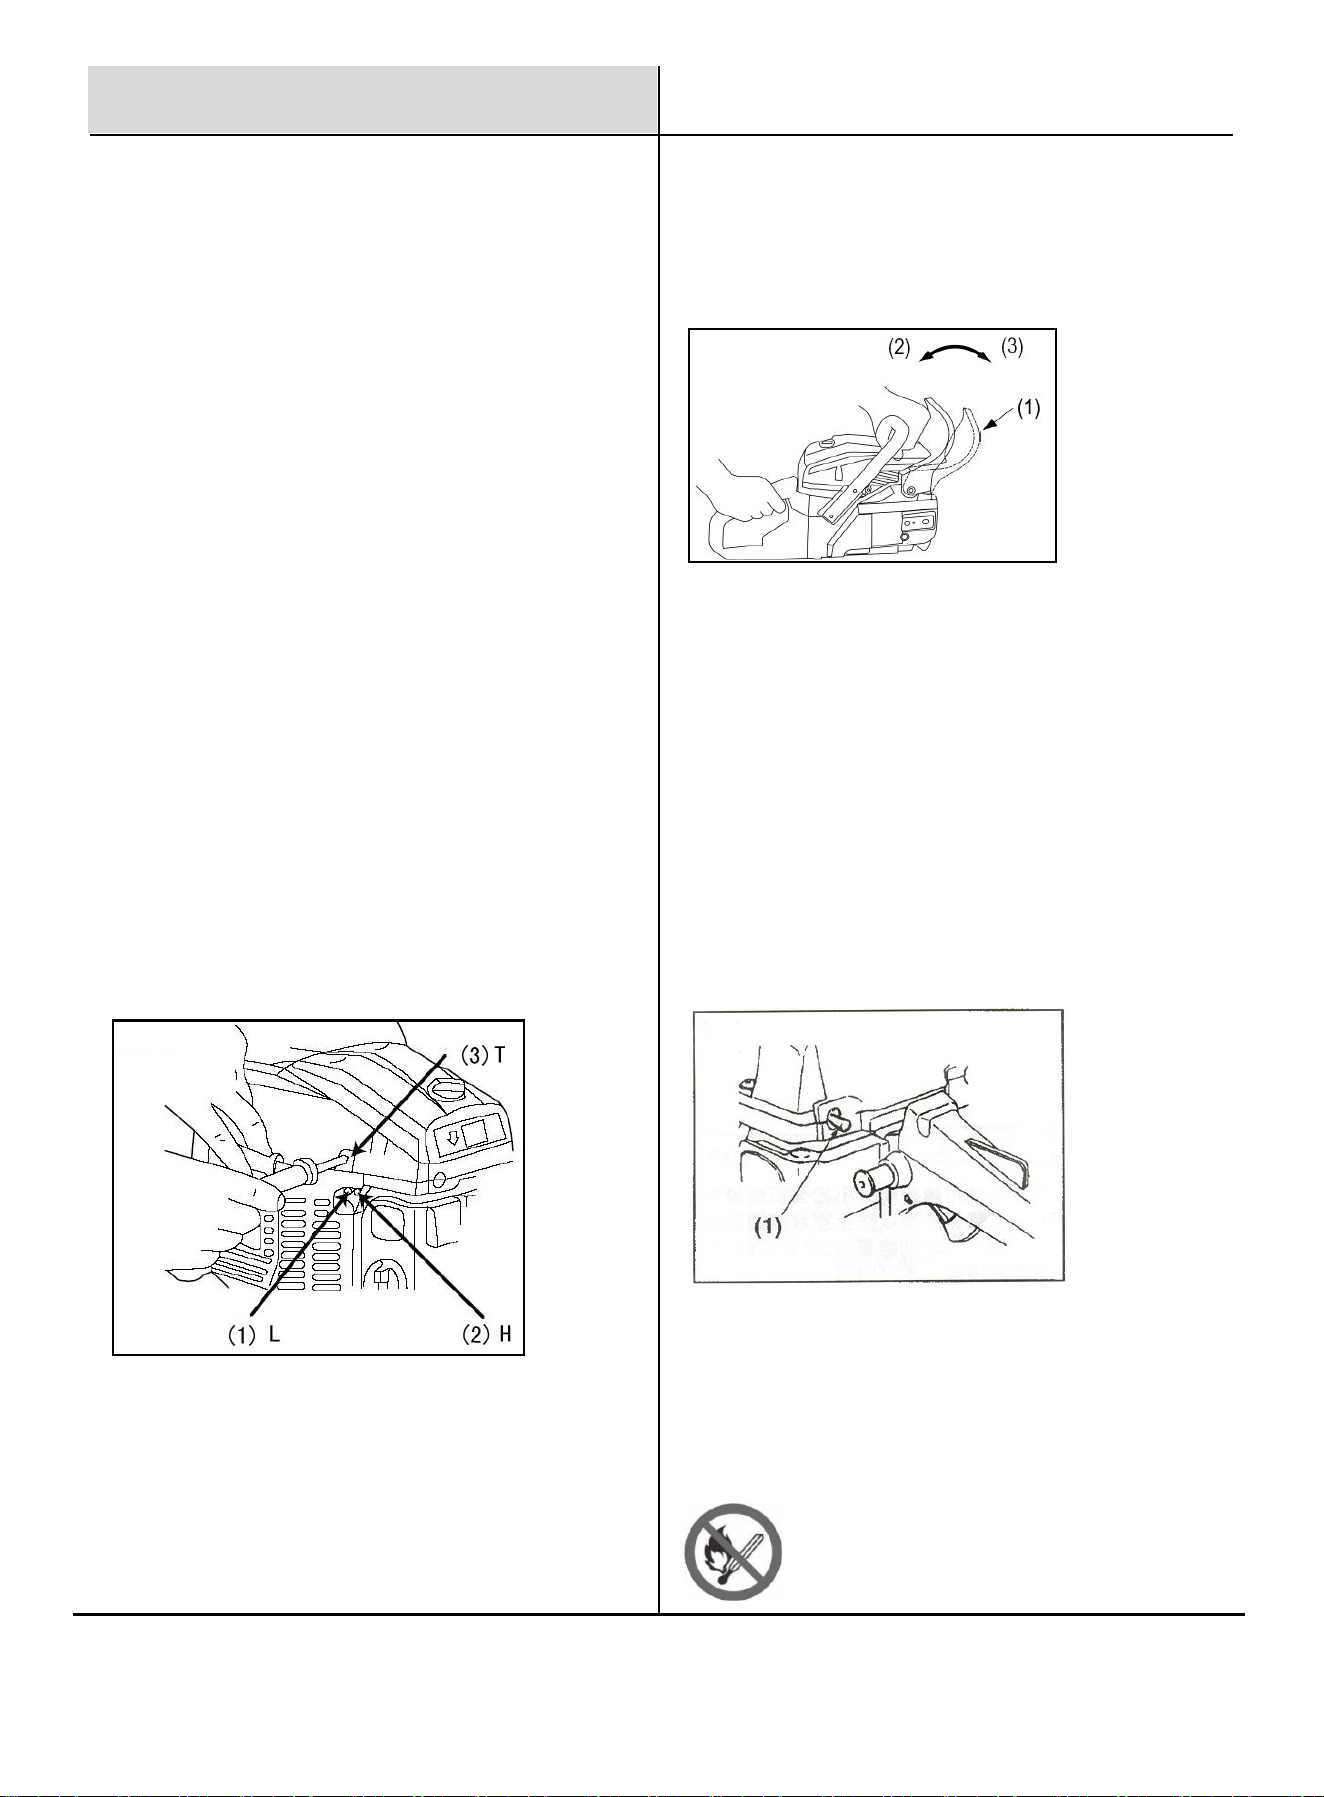
Start the engine and allow it to warm up at half-throttle.
Turn L needle slowly clockwise to maximum idle speed,
then set the needle back a 1/4 turn counterclockwise.
Turn idle adjusting screw (T) counterclockwise so that
the saw chain does not turn. If idle speed is too slow,
turn the screw clockwise.
Make a test cut and adjust the H needle for best cutting
power, not for maximum speed.
(1) L Needle
(2) H Needle
(3) Idle Adjusting Screw
Chain Brake
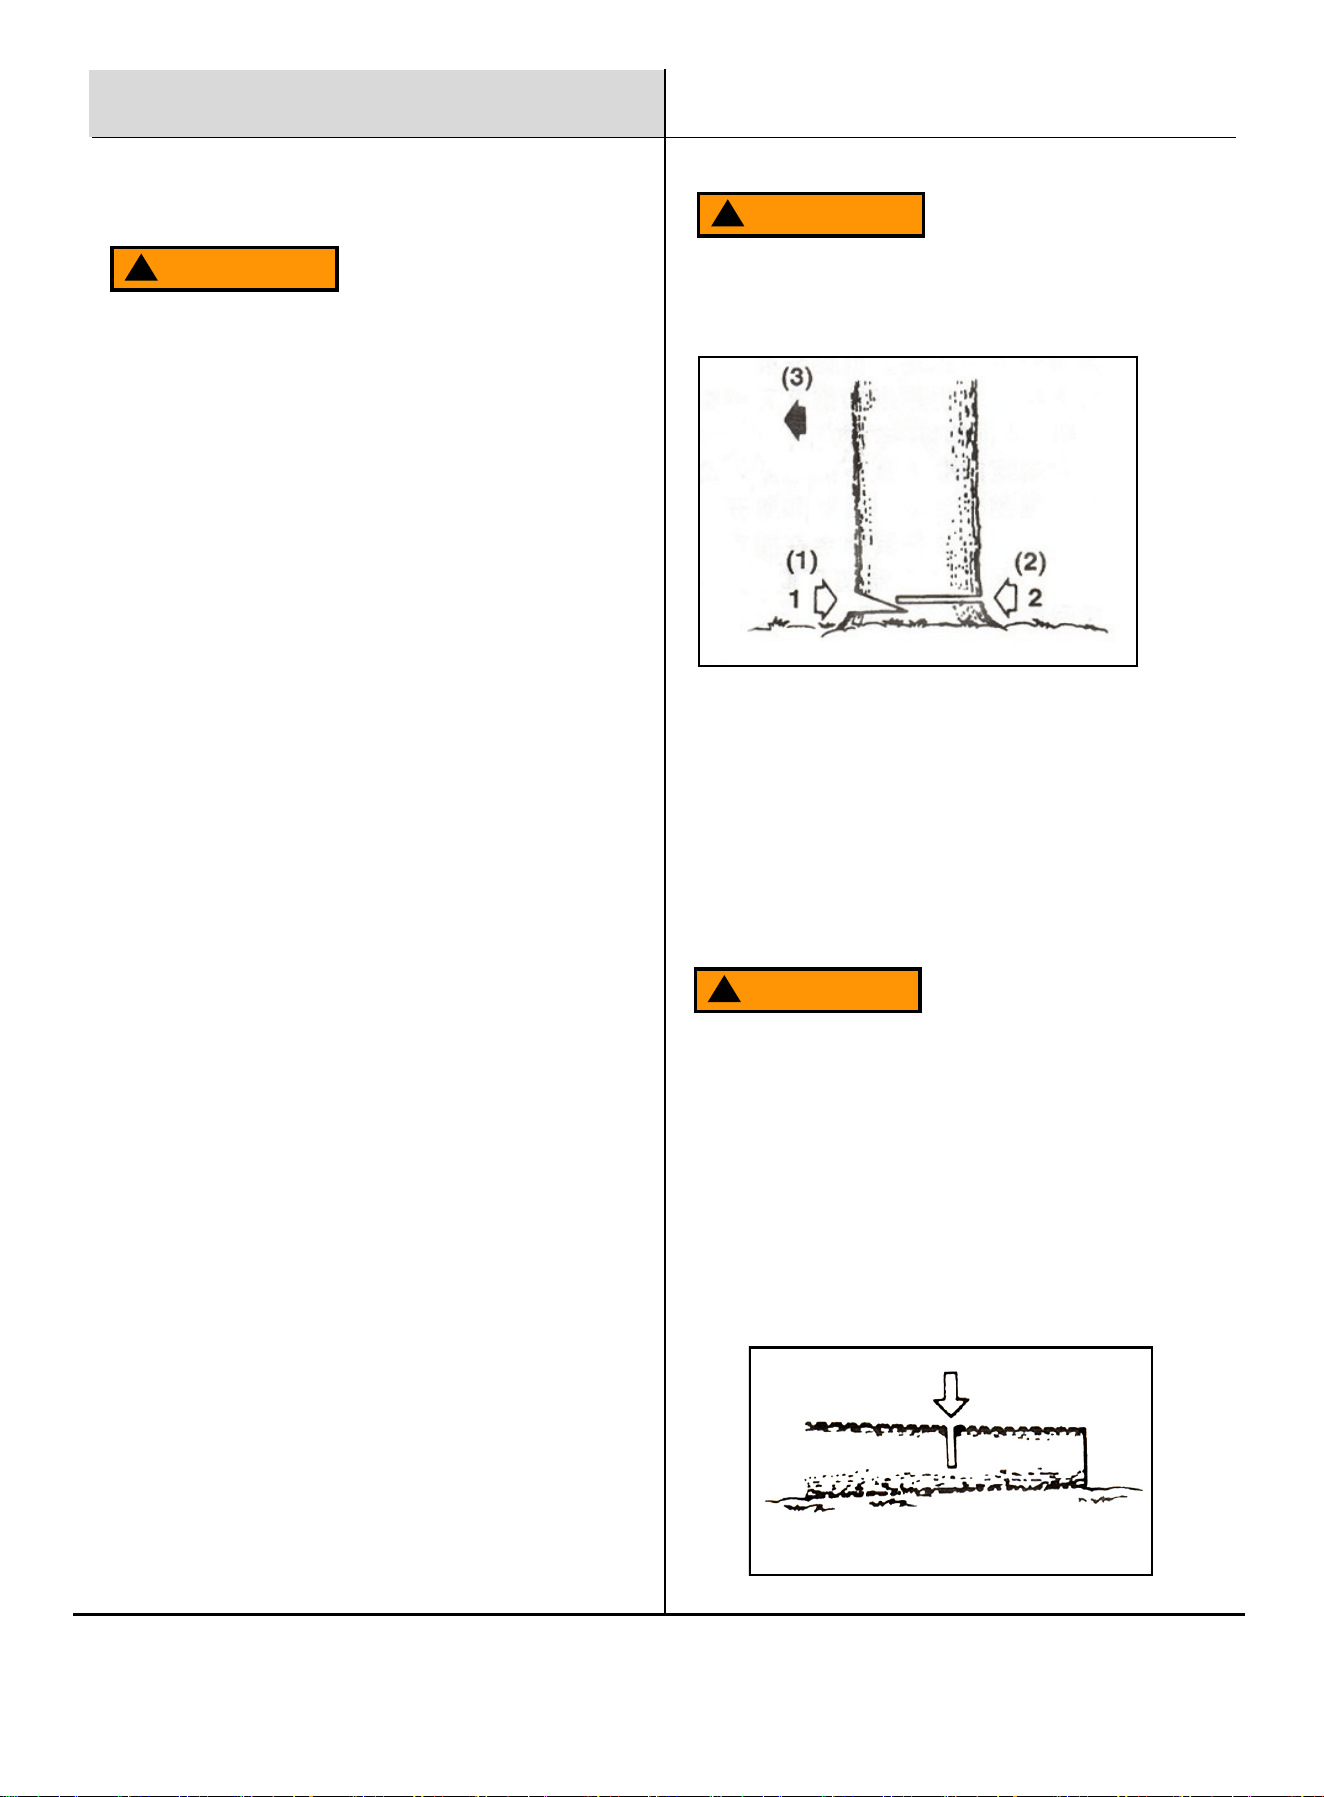
To release brake, pull up the front guard toward the front
handle until it clicks.
(1) Brake
(2) Released
(3) Operating
Stopping the Engine
Release the throttle lever and allow the engine to idle for
a few minutes.
Put the switch to the “0” (stop) position.
(1) Switch
TO PREVENT SERIOUS INJURY FROM FIRE:
Fill the gasoline tank in a well-ventilated area away from
ignition sources. If the engine is hot from use, shut the engine
off and wait for it to cool before adding gasoline. Do not smoke.
Engine
9
Operation
Sawing
Never force the saw into the cut.
Apply only light pressure while running the engine at
full throttle.
When the saw chain is caught in the cut, do not
attempt to pull it out by force, but use a wedge or a
lever to open the jammed material.
During operation, the muffler and exhaust will
become hot. If there is inadequate cooling space or if
the chain saw is blocked or enclosed, temperatures
can rise quickly and may lead to a fire.
WARNING
!
This chain saw is equipped with a chain brake that will stop
the chain in the event of kickback. You must check the chain
brake operation before each use by running the saw at full
the throttle for 1-2 seconds and pushing the front hand
guard forward.
The chain should stop immediately with the engine at full
speed. If the chain is slow to stop or does not stop, replace
the brake band and clutch drum before use.
It is extremely important that the chain brake is checked for
proper operation before each use and that the chain is sharp
to prevent kickback. Removal of the safety devices,
inadequate maintenance, or incorrect replacement of the bar
or chain may increase the risk of serious personal injury due
to kickback.
Preventing Kickback
Felling a Tree
Decide the felling direction considering the wind, lean of
the tree, location of heavy branches, ease of job after
falling and other factors.
While cleaning the area around the tree, arrange a good
foothold and retreat path.
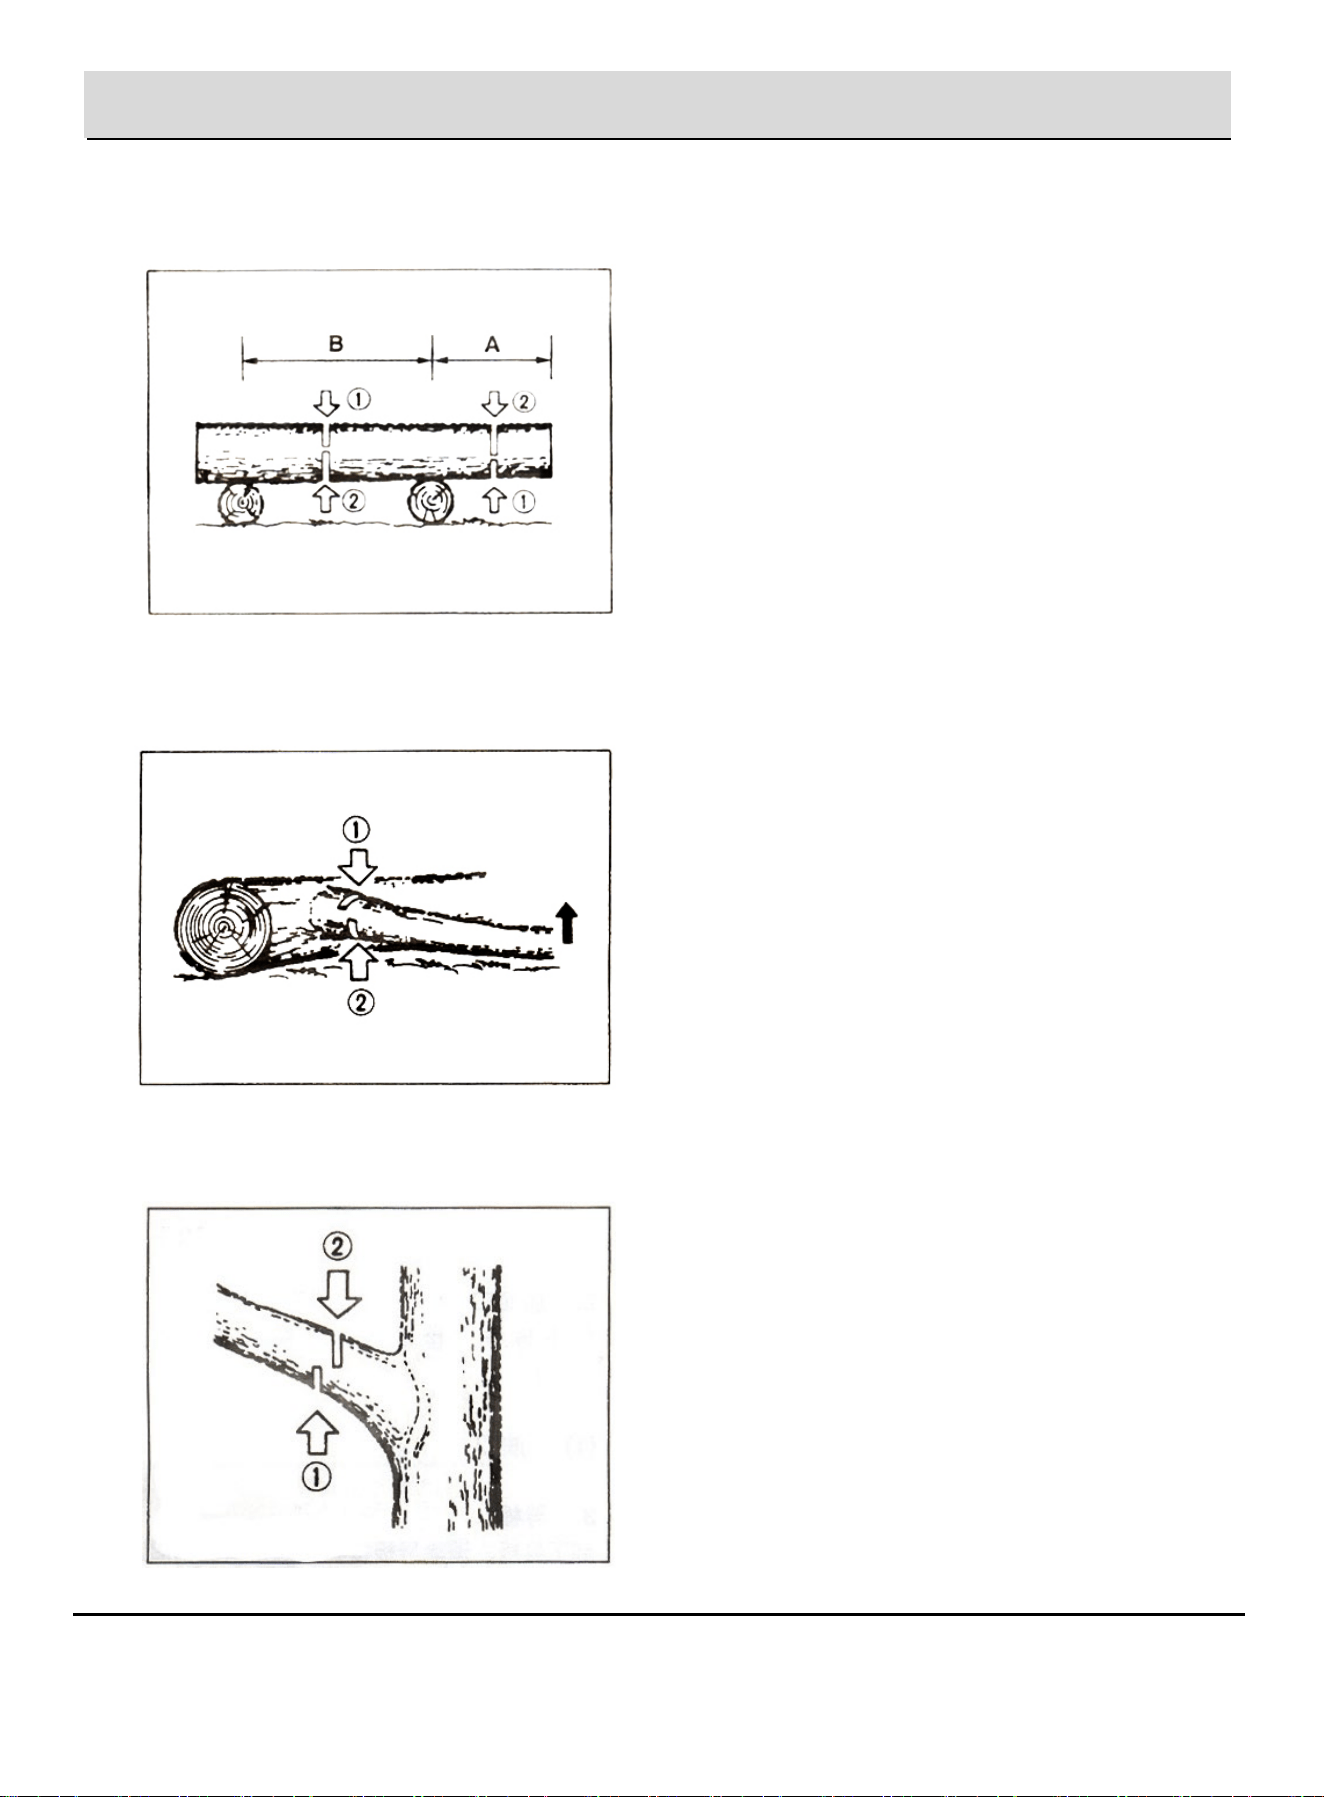
Make a notch cut one-third of the way into the wood on
the felling side.
Make a felling cut from the opposite side of the notch and
at a level slightly higher than the bottom of the notch.
WARNING
!
Before felling a tree, you must secure the area from
any bystanders and pets. Always warn nearby workers
of the danger.
(1) Notch Cut
(2) Felling Cut
(3) Felling Direction
Bucking and Limbing
WARNING
!
Always ensure your foothold. Never stand on a log.
Be alert to the rolling over of a cut log. Especially when
working on a slope, stand on the uphill side of the log.
Follow the instructions in “For Safe Operation” to avoid
kickback of the saw.
A log lying on the ground
Saw down halfway, then roll the log over and cut from
the opposite side.
10
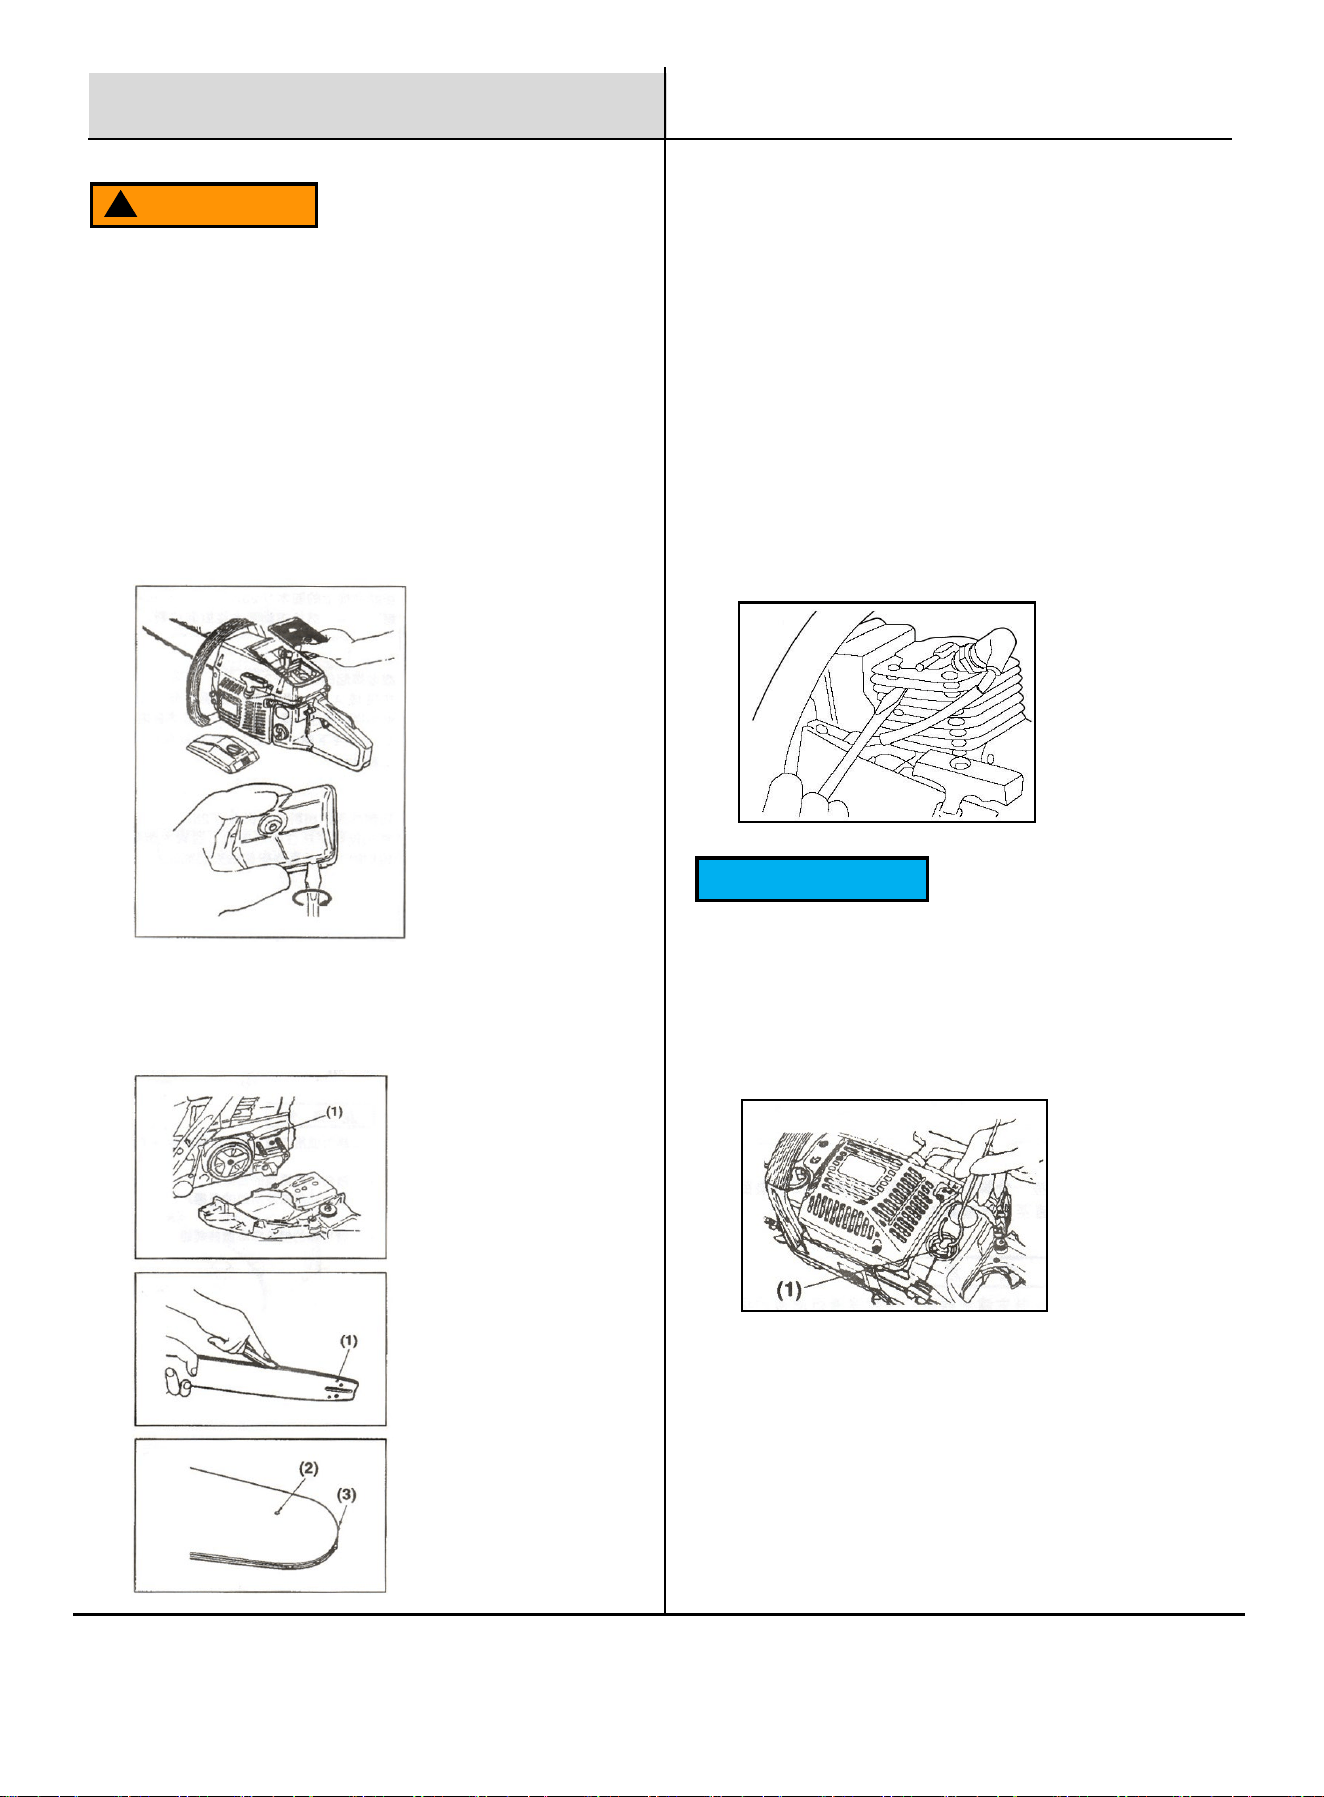
A Log off the ground
In area A, saw up from the bottom one-third and finish by sawing down from the top. In area B, saw down from the top
third and finish by sawing up from the bottom.
Cutting limb of Fallen Tree
First check to which side the limbs bent. Then make the initial cut from the bent side and finish by sawing from
the opposite side.
Pruning of Standing Tree
Cut up from the bottom, finish down from the top.
Operation
(1) Notch Cut
(2) Felling Cut
(1) Notch Cut
(2) Felling Cut
(1) Notch Cut
(2) Felling Cut
11
Maintenance
WARNING
!
Before cleaning, inspecting or repairing your chain saw,
make sure that engine has stopped and is cool.
Disconnect the spark plug to prevent accidental starting.
Maintenance After Each Use
Air Filter
To clean dirt from the meshes, split the cleaner into
halves and wash in hot, soapy water. When using
compressed air, blow from the inside.
Oiling Port
Dismount the guide bar and check the oiling port for
clogging.
(1) Oiling Port
(2) Grease Port
(3) Sprocket
Guide Bar
When the guide bar is dismounted, remove sawdust in
the bar groove and the oiling port. Grease the nose
sprocket from the feeding port on the tip of the bar.
Periodic Service Points
Cylinder Fins
Dust clogging between the cylinder fins will cause
overheating of the engine. Periodically check and
clean the cylinder fins after removing the air cleaner
and the cylinder cover.
NOTICE
Be sure to block the air intake hole.
Fuel Filter
Using a wire hook, remove the filter from the filler
port. Disassemble the filter and wash with carburetor
cleaner.
(1) Fuel Filter
12
(2) Oil Filter
Spark Plug
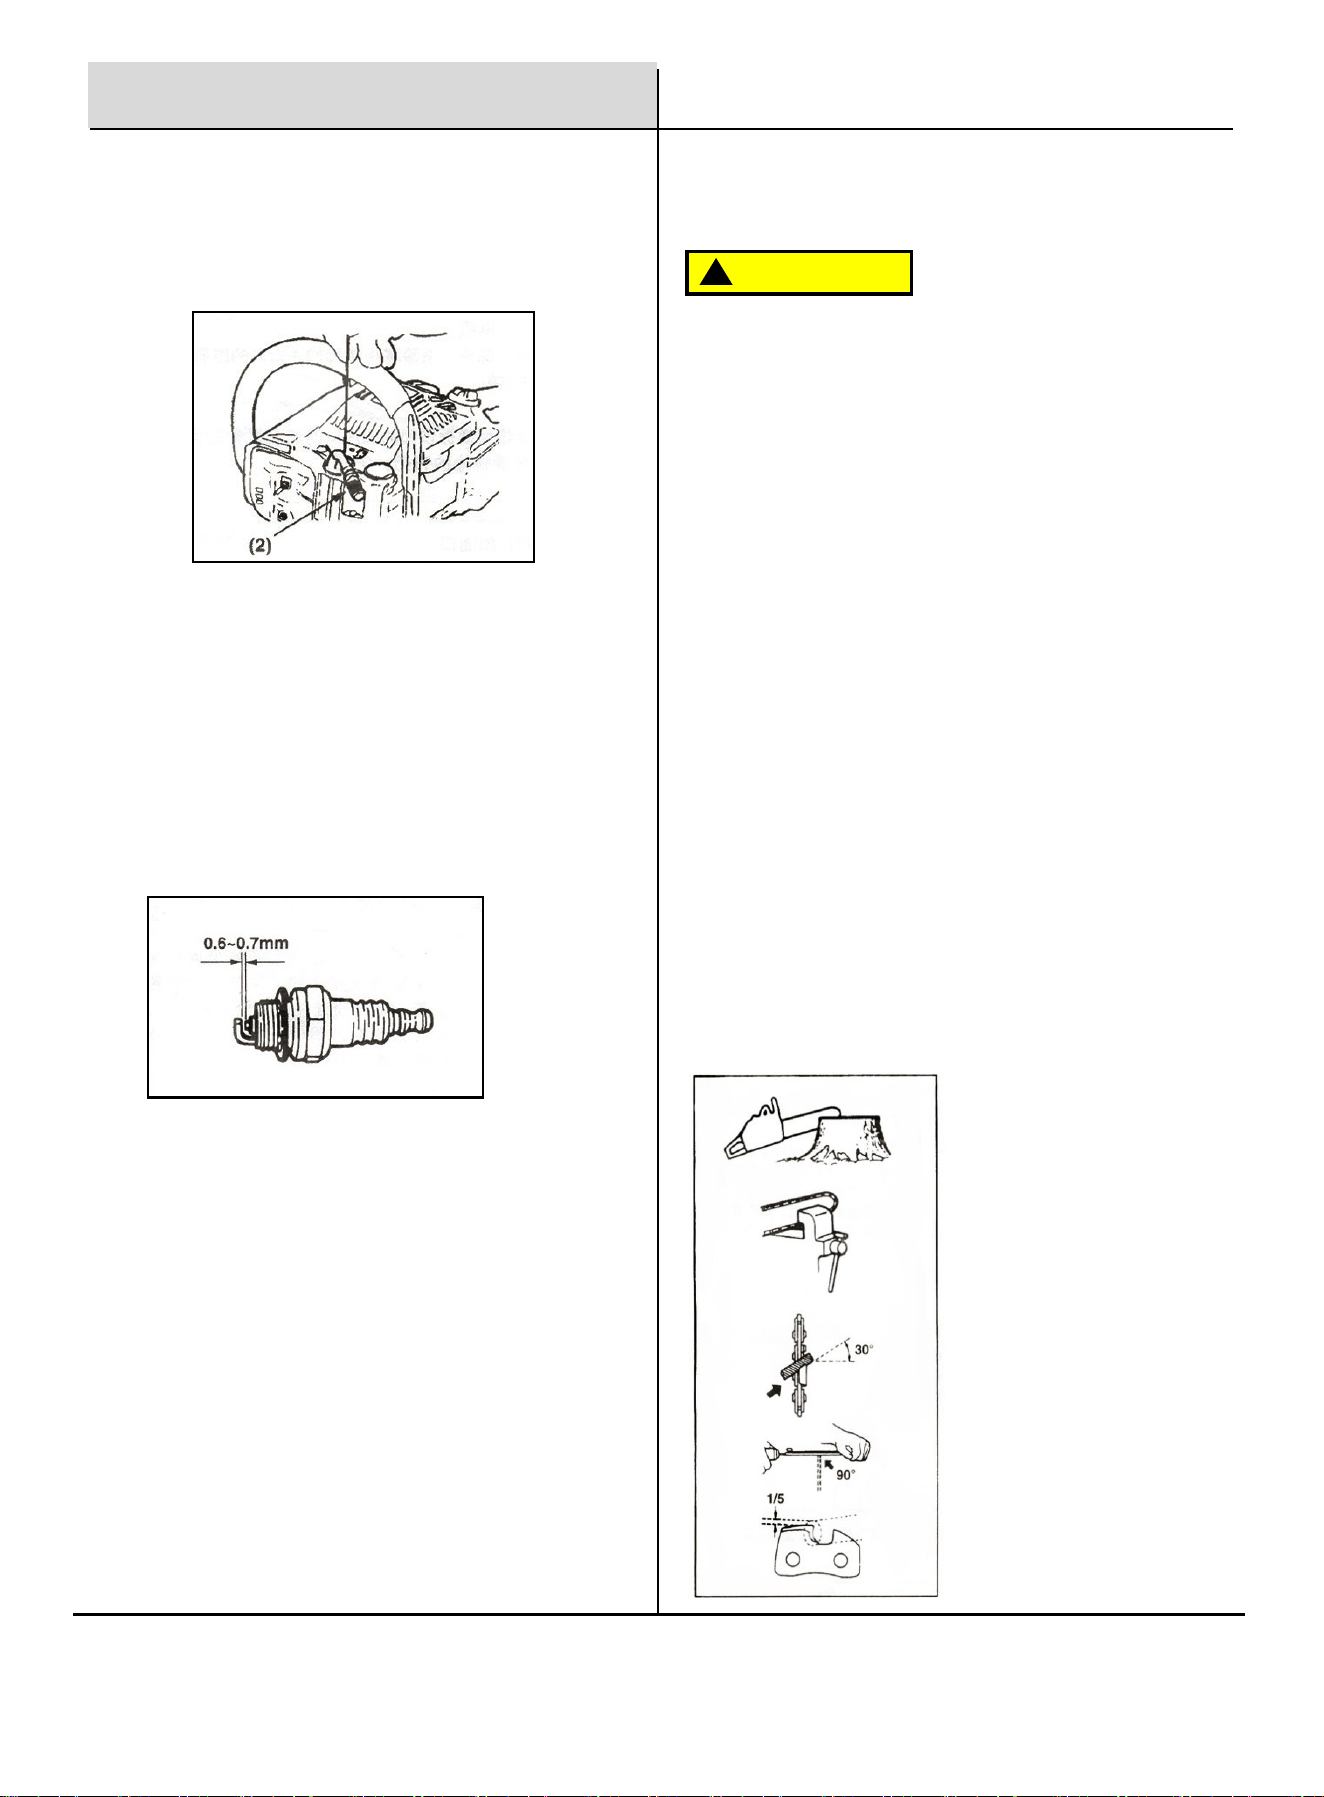
Disconnect Spark Plug Boot from the end of plug.
Clean out debris from around Spark Plug.
Using the Spark Plug Wrench, remove the Spark
Plug.
Clean the electrodes with a wire brush and reset the
gap to 0.6~0.7mm as necessary.
Sprocket
Check for cracks and for excessive wear interfering
with the chain drive. If excess wear is found, replace
with new parts. Never fit a new chain on a worn
sprocket, or a worn chain on a new sprocket.
Maintenance
of Saw Chain and
Guide Bar
CAUTION
!
It is very important for smooth and safe operation to
keep the cutters always sharp.
Your cutters need to be sharpened when:
Sawdust appears powdery.
Cuts require extra force.
Cuts are not straight.
Vibration increases.
Fuel consumption increases.
Cutter setting standards:
Make sure the saw chain is held securely.
Make sure the engine is stopped.
Use a round file of proper size for your chain.
Place your file on the cutter and push straight forward.
Keep the file position as illustrated. After every cutter
has been set, check the depth gauge and file it to the
proper level as illustrated.
Oil Tank
With a wire hook, take out the oil filter through the
filler port and clean with carburetor cleaner. When
putting the filter back into the tank, make sure that it
comes to the front right corner. Also clean off dirt in
the tank
Maintenance
13
Maintenance
WARNING
!
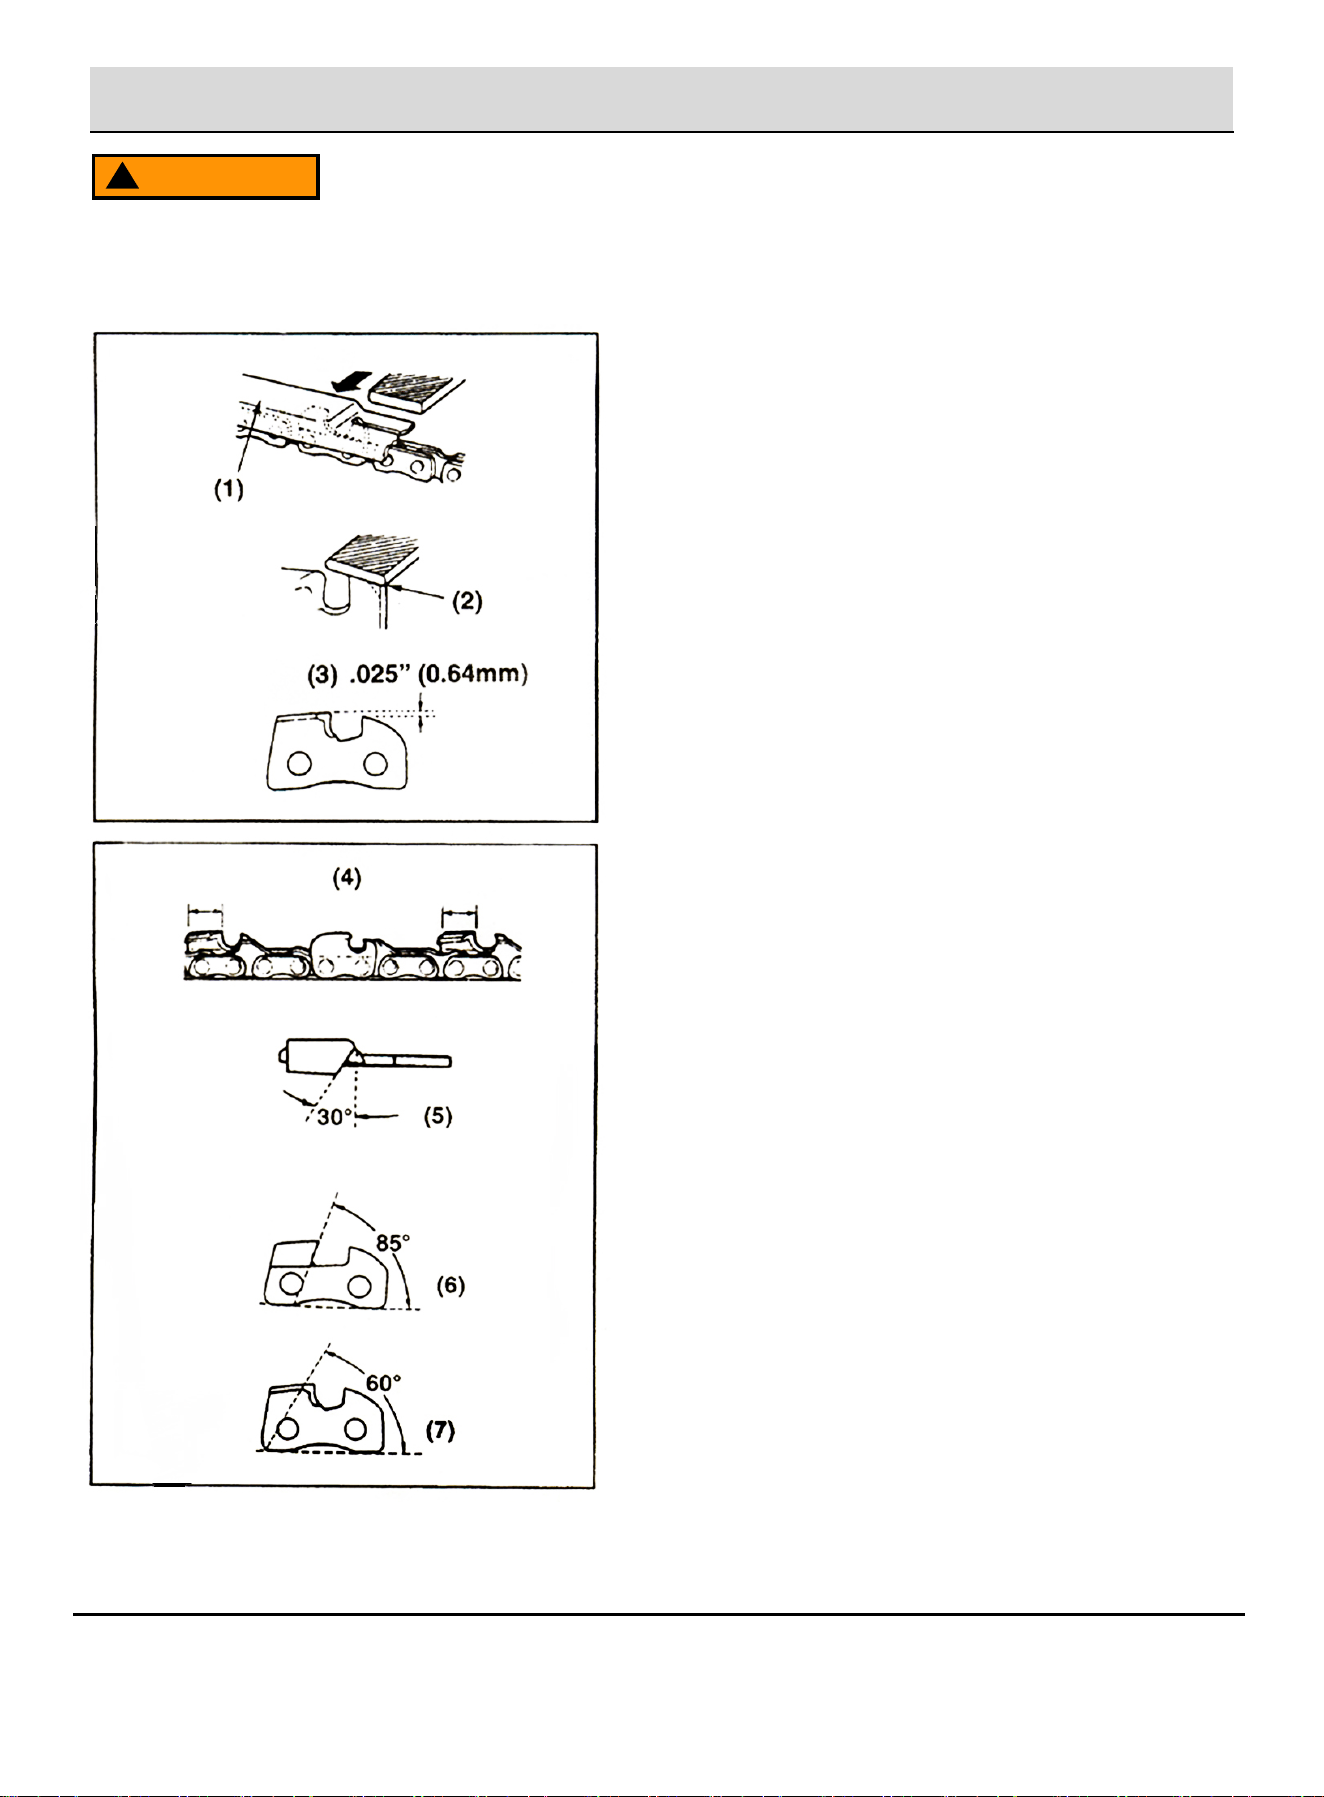
Using a flat file, deburr the front edge to reduce the chance of kickback or chain breakage.
Make sure every cutter has the same length and edge angles as illustrated.
(1) Appropriate Gauge Checker, Bar Protector
(2) Round off the Shoulder
(3) Depth Gauge Standard
(4) Cutter Length
(5) Filing Angle
(6) Side Plate Angle
(7) Top Plate Cutting Angle
Reverse the guide bar occasionally for even wear.

14
Product Description
2-Stroke 20-in Chain Saw
Engine Type
2-Stroke, Single Cylinder, Air Cooled
Maximum Power
2.0kW/8500RPM
Displacement (cc)
52
Idle Speed
3200 RPM
Wide open throttle Speed
13500 RPM
Fuel to oil mixture ratio
50:1
Fuel Tank Capacity
17.9 oz
Starting Mode
Recoil
Handle
D-Handle W/Safety Guard
Spark Plug
RCJ6Y
Sprocket
7*0.325
Chain Pitch
0.325
Chain Guage
0.058
Guide Bar Type
Sprocket Nose
Guide Bar Size
20 in
Oil Feed System
Adjustable Automatic Pump
Oil Volume
0.23 qtrs.
Pack dimensions (in)
21 x 6.1 x 12
Gross weight(lbs.)
12.1
Warranty
1 Year
Specifications

15
Troubleshooting Guide
Problem Possible Causes Probable Solutions
THE ENGINE WILL NOT START
Check fuel for water or
substandard mixture.
Replace with proper fuel.
Check for engine flooding.
Remove and dry the spark plug.
Then Pull the starter again with no
choke.
Check the spark.
Replace with a new plug.
LACK OF POWER/POOR
ACCELERATION/ROUGH
IDLING
Check fuel for water or
substandard mixture.
Replace with proper fuel.
Check air filter and fuel filter for
clogging.
Clean
Check carburetor for inadequate
adjustment.
Readjust speed needles

16
Troubleshooting Guide
Problem Possible Causes Probable Solutions
CHAIN OIL DOES NOT COME
OUT
Check oil for substandard quality.
Replace
Check oil passage and ports for
clogging.
Clean