
EN LAWN MOWER
OPERATOR MANUAL
LMB40001 www.greenworkstools.com


1 Introduction............................ 4
1.1 Product description......................... 4
1.2 Intended use................................... 4
1.3 Overview.........................................4
1.4 Symbols on the product.................. 4
1.5 California Proposition 65.................4
2 Safety...................................... 5
2.1 Safety definitions............................ 5
2.2 Lawnmower safety warnings.......... 5
2.3 Safety features on the product........7
2.4 Check the cutting deck................... 7
2.5 Grass catcher..................................7
2.6 Blade Activation Lever.................... 7
2.7 Battery safety..................................7
2.8 Battery charger safety.....................7
2.9 Safety instructions for
maintenance................................... 7
3 Operation................................ 7
3.1 Before using the product.................8
3.2 Adjust the Handlebar Position........ 8
3.3 Set the cutting height...................... 8
3.4 Use the product with grass
catcher............................................ 9
3.5 Switch to mulching mode................9
3.6 Switch to side discharging mode.. 10
3.7 Mowing without a grass
catcher or mulch door .................. 10
3.8 Connect the battery to the
product..........................................10
3.9 Start the product............................11
3.10 Activate Turbo Boost
(Temporarily Increased
Cutting Speed).............................. 11
3.11 Operate the self-propelled
drive system..................................11
3.12 LED Headlights............................. 11
3.13 Stop the product........................... 12
3.14 Recommendations for
Effective Lawn Mowing................. 12
4 Maintenance......................... 13
4.1 Maintenance schedule..................13
4.2 General inspection........................13
4.3 Clean the product......................... 13
4.4 Clean the battery and battery
charger..........................................14
4.5 Examine the cutting equipment.... 14
5 Transportation, storage,
and disposal.........................16
5.1 Set the product in
transportation position.................. 16
5.2 Transportation...............................16
5.3 Disposal of the battery,
battery charger, and product.........16
6 Troubleshooting...................18
7 Technical data...................... 18
8 Limited warranty.................. 19
3
English
EN
1 INTRODUCTION
1.1 PRODUCT DESCRIPTION
This product is a battery-powered self-propelled rotary
lawn mower that features a mulching function and is
equipped with a detachable grass catcher.
We are committed to continuously improving our
products, and reserve the right to modify the design
and appearance without prior notice.
1.2 INTENDED USE
This product is designed to cut and mulch different
kinds of grass and weeds. It should not be used for
any other tasks.
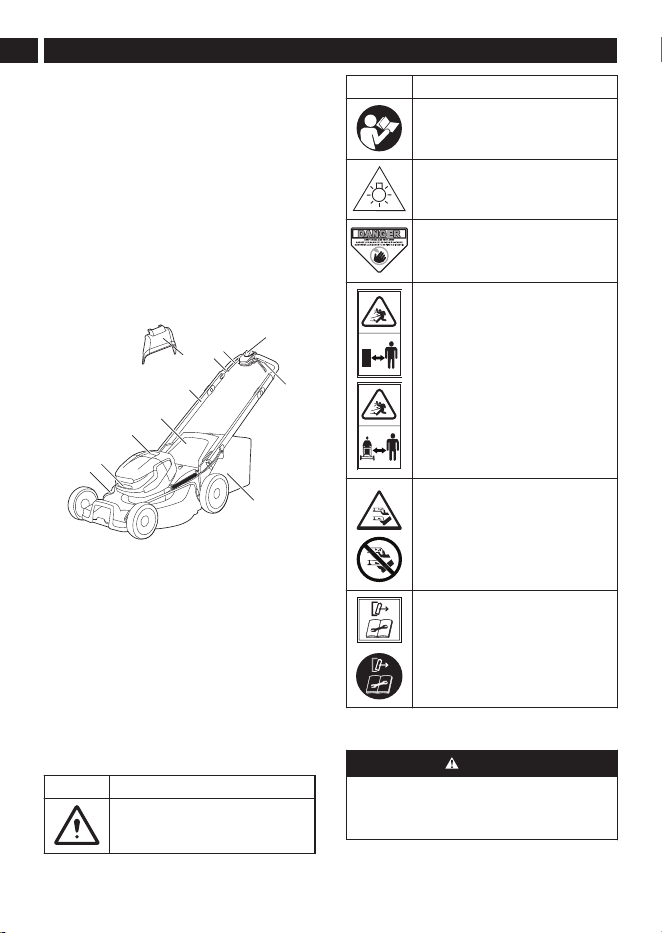
1.3 OVERVIEW
1
2
3
4
5
6
7
8
9
10
11
1
Blade activation lever
2
Upper handle
3
Lower handle
4
Rear door
5
Battery door
6
LED Headlight
7
Side discharge door
8
Grass catcher
9
Self-propelled drive lever
10
Power button
11
Side discharge chute
1.4 SYMBOLS ON THE PRODUCT
Symbol Explanation
Precautions that involve your safety.
Symbol Explanation
To reduce the risk of injury, user must
read instruction manual.
CAUTION — Do not stare at operating
lamp
Danger — Keep hands and feet away.
WARNING — Beware of thrown ob-
jects — keep bystanders away.
WARNING — Keep hand and feet
away from the blades.
WARNING — Disconnect all batteries
before maintenance.
1.5 CALIFORNIA PROPOSITION 65
WARNING
THIS PRODUCT CONTAINS OR EMITS A
CHEMICAL KNOWN TO THE STATE OF
CALIFORNIA TO CAUSE CANCER OR BIRTH
DEFECTS OR OTHER REPRODUCTIVE HARM.
4
English
EN
2 SAFETY
2.1 SAFETY DEFINITIONS
Warnings, cautions, and notes are used to point out
especially important parts of the manual.
WARNING
THERE IS A RISK OF INJURY OR DEATH FOR
THE OPERATOR OR BYSTANDERS, IF THE
INSTRUCTIONS IN THE MANUAL ARE NOT
OBEYED.
CAUTION
THERE IS A RISK OF DAMAGE TO THE
PRODUCT, OTHER MATERIALS, OR THE
ADJACENT AREA, IF THE INSTRUCTIONS IN
THE MANUAL ARE NOT OBEYED.
Note: Used to give more information that is
necessary in a given situation.
2.2 LAWNMOWER SAFETY WARNINGS
WARNING
Read all safety warnings, instructions,
illustrations and specifications provided with
this lawnmower. Failure to follow all instructions
listed below may result in electric shock, fire
and/or serious injury.
Save all warnings and instructions for future
reference.
1) Work area safety
a) To avoid bystander contact with the moving
blade or a thrown object injury, keep the area
of operation clear of all bystanders, particularly
small children. Stop the lawnmower and any
attachment(s) if anyone enters the area. Contact
with the moving blade or thrown objects may result
in serious personal injury or death.
b) Only operate the lawnmower in daylight or
good artificial light. Dark areas invite accidents.
c) Do not operate lawnmowers in explosive
atmospheres, such as in the presence of
flammable liquids, gases or dust. Lawnmowers
create sparks which may ignite the dust or fumes.
d) Do not use the lawnmower in bad weather
conditions, especially when there is a risk of
lightning. This decreases the risk of being struck
by lightning.
e) Thoroughly inspect the area where the
lawnmower is to be used and remove all stones,
sticks, wires, bones, and other foreign objects.
Thrown objects can cause personal injury.
2) Electrical safety
a) Do not expose the lawnmower to rain or
wet conditions. Water entering a lawnmower may
increase the risk of electric shock.
3) Personal safety
a) Use personal protective equipment. Always
wear eye protection. Protective equipment will
reduce personal injuries.
b) Dress properly. Do not wear loose clothing or
jewellery. Keep your hair and clothing away from
moving parts. Loose clothes, jewellery or long hair
can be caught in moving parts.
c) While operating the lawnmower, always
wear long trousers. Exposed skin increases the
likelihood of injury from thrown objects.
d) While operating the lawnmower, always wear
non-slip and protective footwear. Do not operate
the lawnmower when barefoot or wearing open
sandals. This reduces the chance of injury to the
feet from contact with the moving blade
e) Prevent unintentional starting. Ensure the
switch is in the off-position before connecting
to power source and/or batteries, picking up or
carrying the lawnmower. Carrying a lawnmower with
your finger on the switch or energising a lawnmower
that has the switch on invites accidents.
f) Remove any adjusting key or wrench before
turning the lawnmower on. A wrench or a key left
attached to a rotating part of the lawnmower may
result in personal injury.
g) Keep proper footing and balance at all
times.This enables better control of the lawnmower
in unexpected situations.
h) Stay alert, watch what you are doing and use
common sense when operating a lawnmower.
Do not use a lawnmower while you are tired
or under the influence of drugs, alcohol or
medication. A moment of inattention while operating
a lawnmower may result in serious personal injury.
i) Do not let familiarity gained from frequent use
of lawnmower allow you to become complacent
and ignore lawnmower safety principles.A
careless action can cause severe injury within a
fraction of a second.
j) To avoid operator blade contact or a thrown
object injury, stay in the operator zone behind
the lawnmower handles. Blade contact or thrown
objects may result in serious personal injury
k) Do not touch blades and other hazardous
moving parts while they are still in motion. This
reduces the risk of injury from moving parts..
4) Lawnmower use and care
a) Use the lawnmower and accessories in
accordance with these instructions, taking into
account the working conditions and the work to
5
English
EN

be performed. Use of the lawnmower for operations
different from those intended may result in a
hazardous situation.
b) Before using the lawnmower, always visually
inspect to see that the blade(s) and the blade(s)
assembly are properly secured and not worn
or damaged. Loose, worn, or damaged parts may
increase the risk of injury.
c) Keep guards and other safety devices in
place, properly mounted, and in working order. A
guard or other safety device that is loose, damaged,
or is not functioning correctly may result in personal
injury.
d) Keep all cooling air inlets clear of debris.
Blocked air inlets and debris may result in
overheating or risk of fire.
e) Do not use the lawnmower if the switch does
not turn it on and off. Any lawnmower that cannot
be controlled with the switch is dangerous and must
be repaired.
f) Do not operate the lawnmower in wet grass.
Walk, never run. This reduces the risk of slipping
and falling which may result in personal injury.
g) Do not operate the lawnmower on excessively
steep slopes. This reduces the risk of loss of
control, slipping and falling which may result in
personal injury.
h) Do not force the lawnmower. Use the correct
lawnmower for your application. The correct
lawnmower will do the job better and safer at the
rate for which it was designed.
i) Be aware of the mower and attachment
discharge direction and do not point the mower
discharge at anyone.Thrown objects can cause
personal injury.
j) Use extreme caution when reversing or pulling
the lawnmower towards you. Always be aware of
your surroundings.This reduces the risk of tripping
during operation.
k) When working on slopes, always be sure of
your footing, always work across the face of
slopes, never up or down and exercise extreme
caution when changing direction. This reduces
the risk of loss of control, slipping and falling which
may result in personal injury.
l) Operate the disabling device and/or remove all
battery packs, if removable, from the lawnmower
before making any adjustments, changing
accessories, or storing the lawnmower. Such
preventive safety measures reduce the risk of
starting the lawnmower accidentally.
m) Keep handles and grasping surfaces dry,
clean and free from oil and grease. Slippery
handles and grasping surfaces do not allow for
safe handling and control of the lawnmower in
unexpected situations.
n) Check the grass catcher frequently for wear
or deterioration. A worn or damaged grass catcher
may increase the risk of personal injury.
o) Before removing the grass catcher, turn off
the motor and wait until the blade(s) comes to
a complete stop. The cutting blade(s) continues
to rotate after the blade control is released. Never
place any part of the body in the blade(s) area until
you are certain the motor is off and the blade(s) has
stopped rotating. Contact with the moving cutting
blade(s) may result in serious personal injury.
p) Before unclogging the chute, turn off the
motor, wait until the blade(s) comes to a
complete stop, operate the disabling device
and/or remove all batteries, if removable. The
cutting blade(s) continues to rotate after the blade
control is released. Never place any part of the
body in the blade(s) area until you are certain the
motor is off and the blade(s) has stopped rotating.
Contact with the moving cutting blade(s) may result
in serious personal injury.
q) Before cleaning or inspecting the lawnmower,
turn off the motor, wait until the blade(s)
comes to a complete stop, operate the
disabling device and/or remove all batteries,
if removable.Accidental contact with the moving
blade and moving parts may result in personal
injury.
r) Maintain the lawnmower and accessories.
Check for misalignment or binding of moving parts,
breakage of parts and any other condition that may
affect the lawnmower’s operation. If damaged, have
the lawnmower repaired before use. Many accidents
are caused by poorly maintained lawnmowers.
s) Store idle lawnmowers out of the reach of
children and do not allow persons unfamiliar
with the lawnmower or these instructions
to operate the lawnmower.Lawnmowers are
dangerous in the hands of untrained users.
5) Battery lawnmower use and care
a) Use lawnmowers only with specifically
designated battery packs. Use of any other battery
packs may create a risk of injury and fire.
b) Recharge only with the charger specified by
the manufacturer.A charger that is suitable for one
type of battery pack(s) may create a risk of fire when
used with another battery pack(s).
c) Follow all charging instructions and do
not charge the battery pack(s) or lawnmower
outside the temperature range specified in
the instructions. Charging improperly or at
temperatures outside the specified range may
damage the battery and increase the risk of fire.
d) Do not use a battery pack or lawnmower that
is damaged or modified. Damaged or modified
batteries may exhibit unpredictable behaviour
resulting in fire, explosion or risk of injury.
6
English
EN

e) Do not expose a battery pack(s) or
lawnmower to fire or excessive temperature.
Exposure to fire or temperature above 130 °C
(
265°F
)
may cause explosion.
f) Under abusive conditions, liquid may be
ejected from the battery(ies); avoid contact. If
contact accidentally occurs, flush with water. If liquid
contacts eyes, additionally seek medical help. Liquid
ejected from the battery(ies) may cause irritation or
burns.
g) When battery packs are not in use, keep them
away from other metal objects, like paper clips,
coins, keys, nails, screws or other small metal
objects that can make a connection from one
terminal to another. Shorting the battery terminals
together may cause burns or a fire.
6) Service
a) Have your lawnmower serviced by a qualified
repair person using only identical replacement
parts. This will ensure that the safety of the
lawnmower is maintained. Use of parts which do not
meet the original equipment specifications may lead
to improper performance and compromise safety.
b) Never service damaged battery packs. Service
of battery packs should only be performed by the
manufacturer or authorized service providers.
2.3 SAFETY FEATURES ON THE PRODUCT
WARNING
CAREFULLY READ AND UNDERSTAND THE
SAFETY PRECAUTIONS BELOW BEFORE USING
THE PRODUCT.
• Ensure that the safety hardware on the product is
functioning properly before use.
• Regularly inspect the safety hardware, and if any
defects are found, please contact your nearest
service center immediately.
2.4 CHECK THE CUTTING DECK
The cutting deck is designed to reduce vibrations in
the product and minimize the risk of injury from the
blade.
• To ensure safe operation of the mower, it's important
to inspect the cutting deck for any damages, such
as cracks.
2.5 GRASS CATCHER
The grass catcher prevents injury to the operator from
the rotating blade. The grass catcher wears during
operation, so it is important to inspect it regularly
for damages such as tears or holes. If there is any
damage, replace it immediately with a grass catcher
approved by the manufacturer.
2.6 BLADE ACTIVATION LEVER
• The blade activation lever starts the motor. When
the lever is released, the motor stops.
• It's important to perform regular checks on the blade
activation lever. To do this, power on the motor and
then release the lever. If the motor doesn't stop
within 3 seconds, there may be an issue with the
lever. In this case, it's recommended to have an
approved service center adjust the lever.
2.7 BATTERY SAFETY
Refer to the Battery Operator Manual for warning
instructions before you use the product.
2.8 BATTERY CHARGER SAFETY
Refer to the Battery Charger Operator Manual for
warning instructions before you use the product.
2.9 SAFETY INSTRUCTIONS FOR
MAINTENANCE
• To prevent accidental start during maintenance,
always turn off the product and remove the battery.
Wait for at least 5 seconds before starting any
maintenance work.
• Follow the maintenance instructions correctly to
increase the product's lifetime and reduce the risk
of accidents. Professional repairs must be done by a
technician at an approved service center.
• Only perform the maintenance tasks listed in the
operator's manual. Any other maintenance work
should be done by a technician.
• Wear heavy-duty gloves when using the cutting
equipment to prevent injuries from the sharp blade.
• Keep the cutting edges clean and sharp for optimal
and safe performance.
• If you are experiencing difficulties with maintenance,
have a service technician conduct regular
inspections of the product and make any necessary
adjustments and repairs.
• Replace any damaged, worn, or broken parts
immediately.
• Follow the manufacturer's instructions when
changing accessories. Only use accessories
approved by the manufacturer.
• When not in use, store the product, battery, and
battery charger in a dry, indoor, and locked area.
Keep the product, battery, and battery charger out of
the reach of children and unauthorized persons.
Save these instructions
3 OPERATION
This section describes how to operate the product.
7
English
EN
WARNING
CAREFULLY READ AND UNDERSTAND
THE SAFETY CHAPTER AND OPERATION
INSTRUCTIONS BEFORE YOU OPERATE THE
PRODUCT.
3.1 BEFORE USING THE PRODUCT
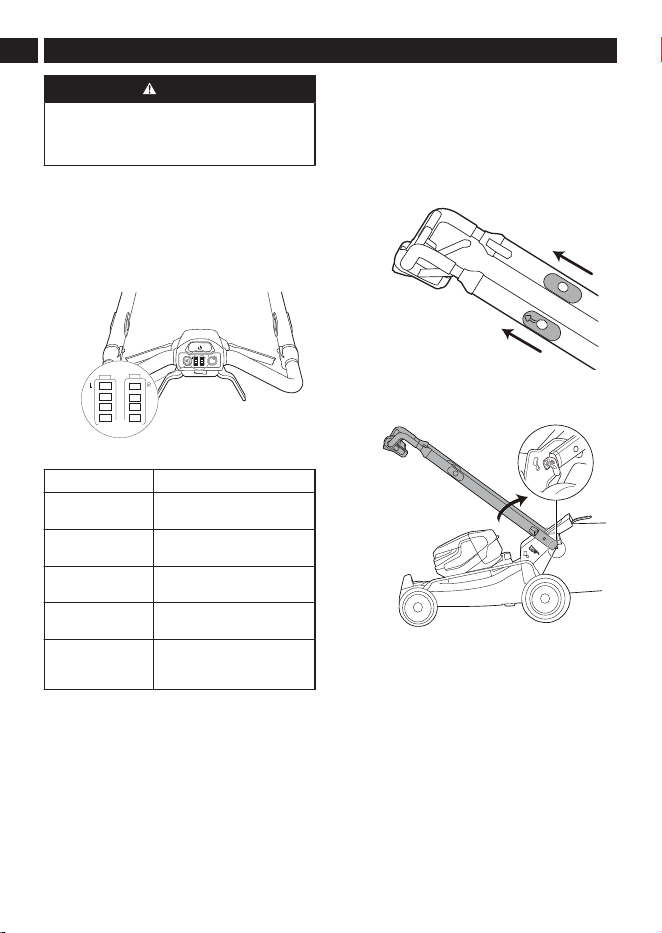
3.1.1 BATTERY CAPACITY INDICATOR
The product has LED lights to indicate the battery
level.
1. After installing the batteries, the display will show
the current battery level.
TURBO
DUAL DRAW
DUAL DRAW
2. Please refer to the table for battery capacity.
Lights Capacity
4 Green Lights The battery is above 80% ca-
pacity
3 Green Lights The battery is between 80%
and 60% capacity
2 Green Lights The battery is between 60%
and 40% capacity
1 Green Light The battery is between 40%
and 20% capacity
No Green Light. The battery is less than 20%
capacity and requires charging
immediately
3.1.2 CONNECT THE BATTERY CHARGER
1. Connect the battery charger to the proper voltage
and frequency that is specified on the rating plate.
2. Refer to the Battery Charger Operator Manual for
information about how to use the battery charger.
3.1.3 CHARGE THE BATTERY
Refer to the Battery Charger Operator Manual for
information about how to use the battery charger.
3.1.4 BATTERY INFORMATION
Refer to the Battery Operator Manual for information
about how to use the battery.
3.2 ADJUST THE HANDLEBAR POSITION
1. Simultaneously pull the 2 handlebar latches to
release the handlebar lock.
2. Lift the handlebar up until it locks into the
mounting holes. Adjust to the position that is best
suited to your height.
Note: Ensure that both handles are in the same
position.
3.3 SET THE CUTTING HEIGHT
This lawn mower has eight different cutting height
settings.
1. Move the cutting height lever out and backward to
increase the cutting height.
8
English
EN
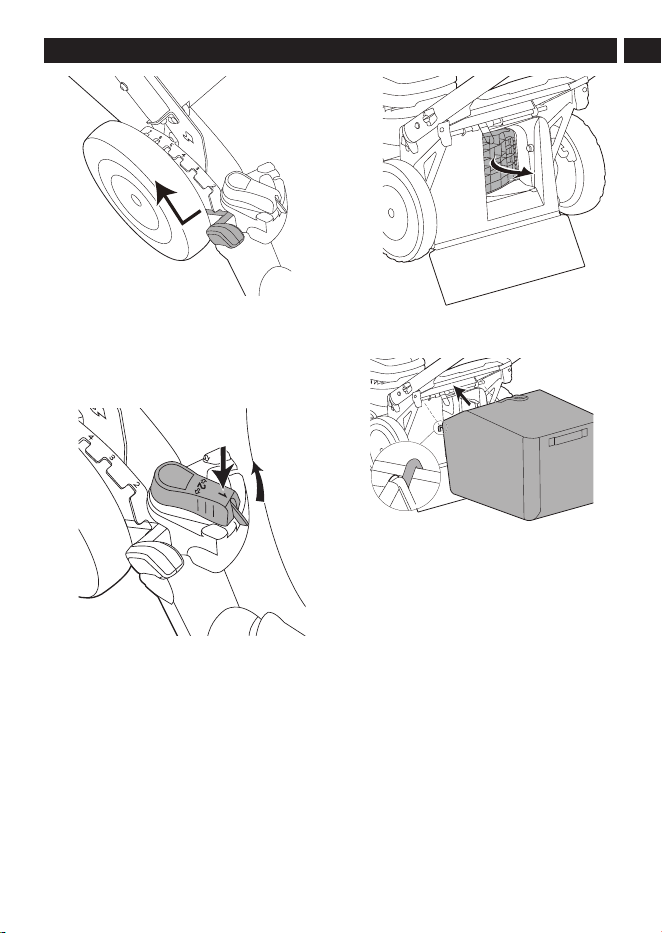
2. Move the cutting height lever out and forward to
decrease the cutting height.
3.4 USE THE PRODUCT WITH GRASS
CATCHER
1. Push and turn the mulch door switch
counterclockwise.
PRESS
1
2
2. The mulch door will swing open, directing grass
clippings rearward.
3. Hold the grass catcher with one hand, lift the rear
door with the other hand, and place the hooks
over the rear door rail.
4. Release the rear door, ensuring it rests on top of
the grass catcher.
3.5 SWITCH TO MULCHING MODE
Mulching mode cuts grass clippings into smaller pieces
and disperses them back onto the lawn. The smaller
grass clippings break down and provide natural
fertilizer for the lawn. This mode eliminates the need to
collect and dispose of grass clippings, making mowing
more efficient and environmentally friendly.
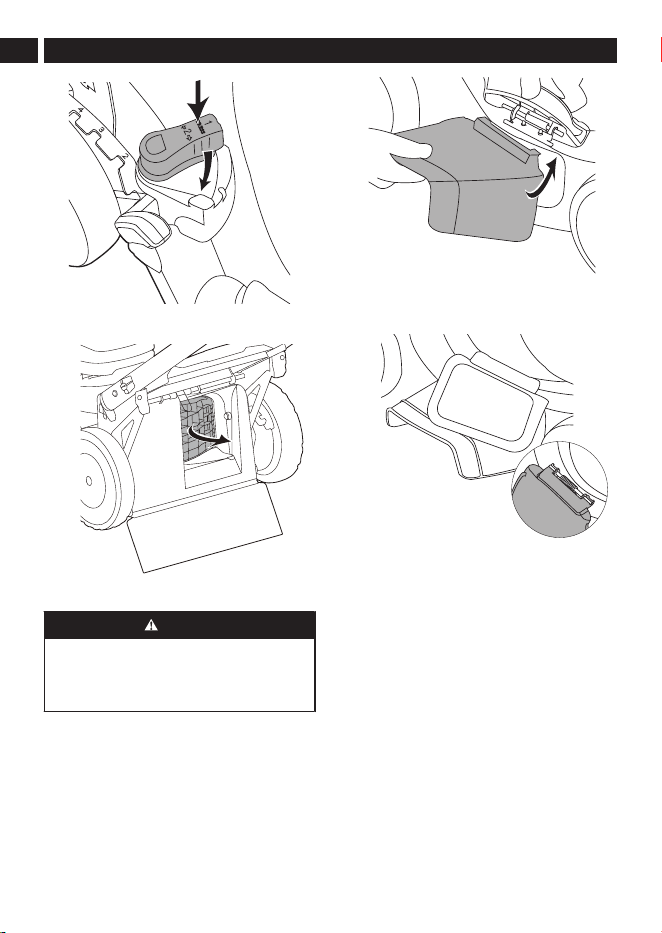
1. Lift the rear door with the other hand, and remove
the grass catcher.
2. Push and turn the mulch door switch clockwise.
9
English
EN
PRESS
1
2
3. The mulch door will close, directing grass
clippings back into the lawn.
3.6 SWITCH TO SIDE DISCHARGING MODE
CAUTION
WHEN USING THE SIDE DISCHARGE CHUTE:
• DO NOT ATTACH THE GRASS CATCHER.
• ENSURE THAT THE MULCH DOOR IS
CLOSED.
1. Locate the side discharge door and lift it open
with one hand.
2. With another hand, attach the side discharge
chute by lining up the grooves on the side
discharge chute with the pivot located on the
underside of the cover.
3. Lower the chute until the hooks on the mower
deck are secured in the openings of the chute.
4. Close the side discharge cover.
3.7 MOWING WITHOUT A GRASS CATCHER
OR MULCH DOOR
• Examine the rear door to make sure that there are
no damages, such as cracks.
• If a mulch door is closed, open it.
• Close the rear door before you operate the product.
When you operate the product, the grass clippings will
discharge below the rear cover.
3.8 CONNECT THE BATTERY TO THE
PRODUCT
Note: You can operate the product by installing
one battery, but can install two batteries for
extended runtime.
1. Open the battery door.
2. Align the ribs on the battery with the grooves in
the battery compartment.
3. Push the battery into the battery compartment
until the battery locks into place.
10
English
EN
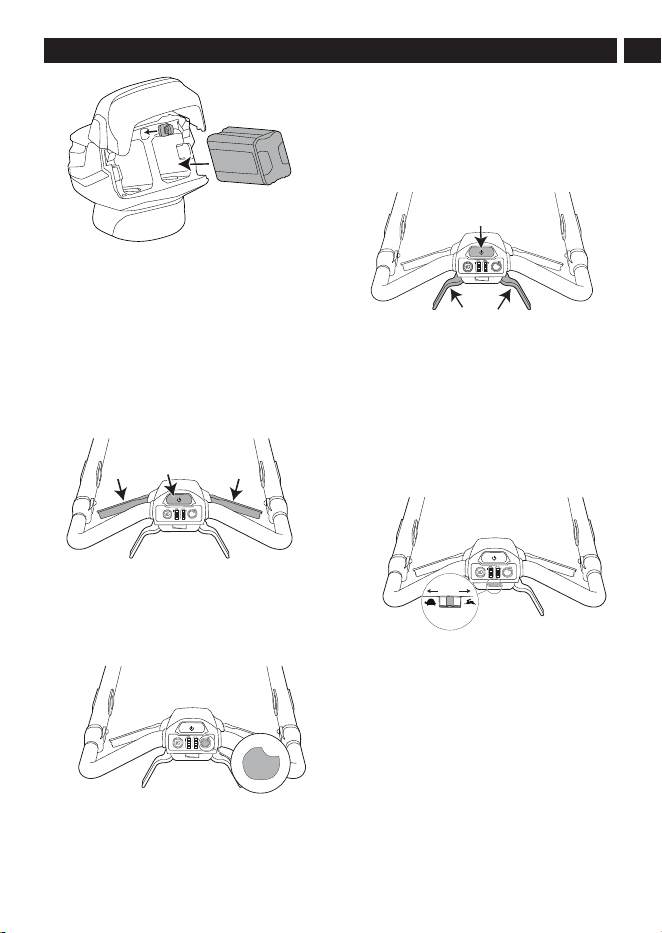
4. When you hear a click, the battery is installed.
5. Close the battery door.
Note: The motor will start only after inserting the
safety key.
3.9 START THE PRODUCT
1. Make sure safety key is inserted into the key slot.
2. Press and hold the power button. Then, grasp
either of the blade activation levers towards the
handle bar to engage the blades.
Note: Complete the two consecutive actions within
5 seconds.
1
2
DUAL DRAW
TURBO
3. Once the product has started, you can release
the power button.
3.10 ACTIVATE TURBO BOOST (TEMPORARILY
INCREASED CUTTING SPEED)
1. Press the turbo button to increase the speed up
to 3000 RPM.
TURBO
DUAL DRAW
TURBO
2. Release the turbo button to operate at the default
cutting speed.
Note: When using the turbo boost button,
the battery will drain faster. Therefore, it is
recommended to use the turbo boost button only
when necessary.
3.11 OPERATE THE SELF-PROPELLED DRIVE
SYSTEM
3.11.1 SELF-PROPELLED DRIVING SYSTEM
1. While holding the blade activation lever, pull
either of the drive levers towards the handlebar
to engage the self-propelled driving system.
TURBO
DUAL DRAW
1
2
2. Release either set of start handle and drive lever
from the same side.
3. Adjust the speed control with your free hand.
Note: To sustain self-propelled mowing,
continually hold the blade activation lever and
drive lever from either the left or right side at
the same time.
• To increase the speed, slide the speed control
switch towards the Rabbit Symbol.
• To decrease the speed, pull the speed control
switch towards the Turtle Symbol.
TURBO
DUAL DRAW
4. Release the drive lever to disengage the self-
propelled driving system.
3.11.2 OPERATE WITHOUT MOWING
To engage the self-propelled driving system while
the mower is not running:
• Press and hold the power button, then pull either of
the drive levers towards the handlebar.
Note: Complete the two consecutive actions within
5 seconds.
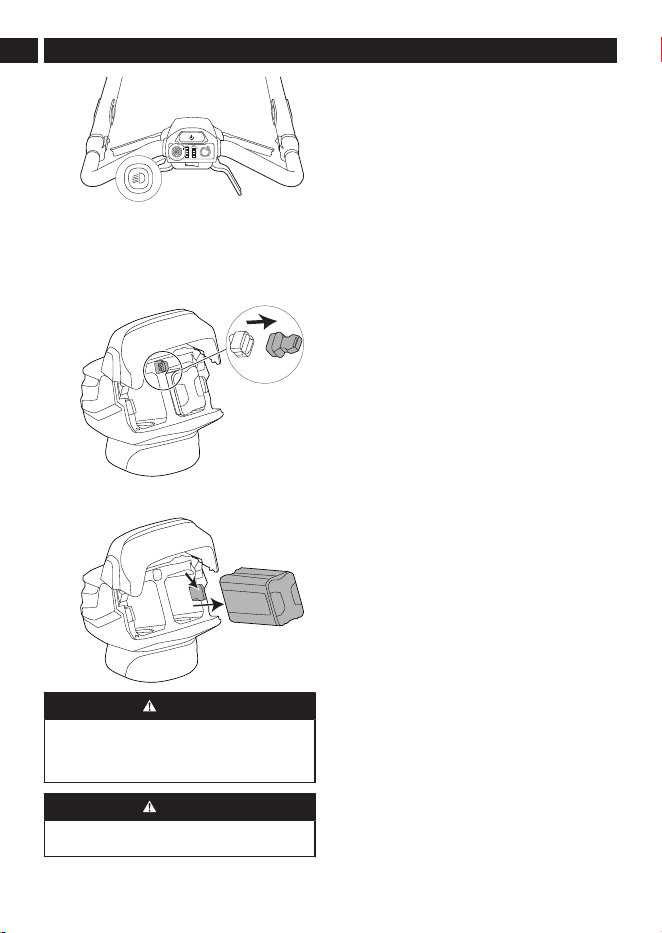
3.12 LED HEADLIGHTS
1. Press the LED button to turn on the LED
headlights.
11
English
EN
TURBO
DUAL DRAW
3.13 STOP THE PRODUCT
1. Release the blade activation lever(s) to stop the
product.
2. Open the battery door.
3. Remove the safety key.
4. Press the battery release button to remove the
battery.
1
2
WARNING
WAIT UNTIL THE BLADE HAS COMPLETELY
STOPPED BEFORE RESTARTING THE
PRODUCT. DO NOT QUICKLY TURN THE
PRODUCT OFF AND ON.
WARNING
ALWAYS TAKE OUT BATTERY AFTER FINISHING
THE TASK.
3.14 RECOMMENDATIONS FOR EFFECTIVE
LAWN MOWING
• Always use a sharp blade when mowing, as a dull
blade can result in an uneven cut and cause the
grass to turn yellow. Additionally, a sharp blade uses
less energy than a dull one.
• Limit the amount of grass you cut to no more than
one-third of its height. Start with a high cutting
height and adjust it lower as needed after examining
the results. If the grass is very long, mow slowly and
consider making 2 passes if necessary.
• Vary the cutting direction each time you mow to
prevent creating visible lines or stripes in the lawn.
• Keep the rear cover of the mower clean.
Accumulation of grass and dirt on the inner side of
the cutting cover can reduce the effectiveness of the
cut.
12
English
EN
4 MAINTENANCE
IMPORTANT
Carefully read and understand the safety regulations and the maintenance instructions before you clean, repair, or
do any maintenance on the product (Reference Safety regulations and maintenance instructions).
WARNING
• REMOVE BATTERY OR BATTERIES FROM THE PRODUCT BEFORE YOU DO ANY MAINTENANCE.
• FAILURE TO FOLLOW PROPER MAINTENANCE SERVICE, USING THIRD-PARTY REPLACEMENT
PARTS, OR MODIFYING/REMOVING COMPONENTS CAN RESULT IN INJURY TO THE USER.
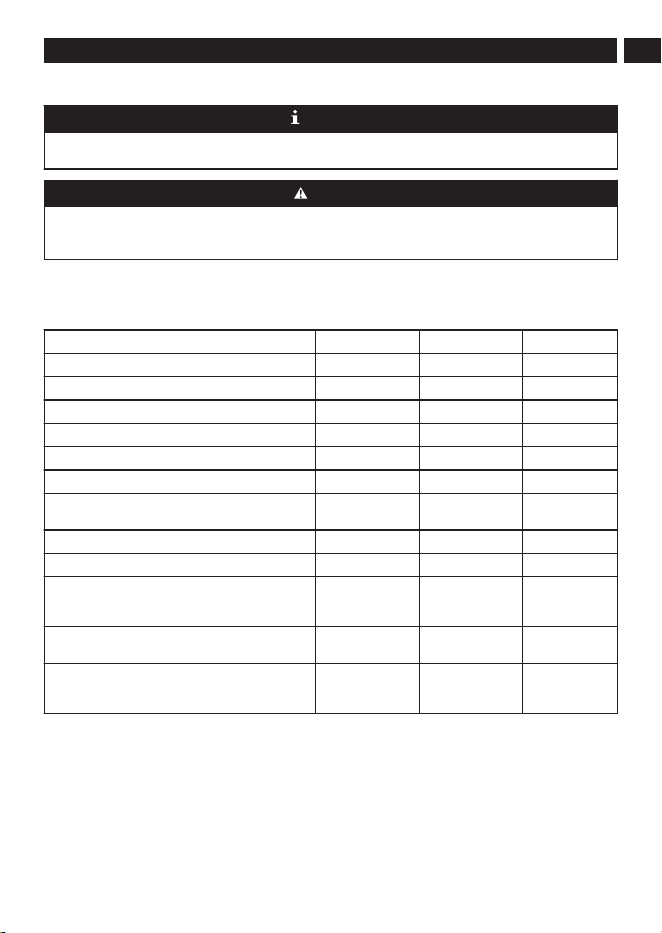
4.1 MAINTENANCE SCHEDULE
The maintenance intervals are calculated from daily use of the product. The intervals change if the product is not
used daily.
Each use Monthly Each season
Perform a general inspection of the product. ×
Clean the product. ×
Ensure that safety devices are not defective. ×
Inspect the cutting equipment. ×
Inspect the cutting deck. ×
Inspect the blade engagement lever. ×
Check that the power button is working correctly and
not defective.
×
Examine the battery for any damage. ×
Ensure that the battery is charging properly. ×
Check that the release buttons on the battery are
working properly and that the battery locks into the
product securely.
×
Inspect the battery charger for any damage and en-
sure it is operating correctly.
×
Check the connections between the battery and the
product, as well as the connection between the bat-
tery and the battery charger.
×
4.2 GENERAL INSPECTION
• Check and tighten all nuts and screws on the product.
• Make sure to properly route and secure all cables to prevent them from being damaged.
4.3 CLEAN THE PRODUCT
Clean the product after each use with water, neutral detergent, and a soft cloth.
13
English
EN

CAUTION
• KEEP WATER AWAY FROM BATTERY COMPARTMENT WHILE WASHING TO AVOID DAMAGING THE
ELECTRICAL COMPONENTS.
• DO NOT CLEAN WITH ALCOHOL, GASOLINE, ACETONE, OR OTHER CORROSIVE/VOLATILE
SOLVENTS. THESE SUBSTANCES MAY DAMAGE THE EXTERNAL AND INTERNAL STRUCTURE OF
YOUR MOWER.
• DO NOT RUB WITH SANDPAPER OR METAL BRUSH.
4.4 CLEAN THE BATTERY AND BATTERY CHARGER
WARNING
DO NOT CLEAN THE BATTERY OR THE BATTERY CHARGER WITH WATER.
• Make sure that the battery and the battery charger and battery compartment are all clean and dry before
you insert the battery into the battery charger.
• Clean the battery terminals with a soft and dry cloth.
• Clean the surface of the battery and the battery charger with a soft and dry cloth.
4.5 EXAMINE THE CUTTING EQUIPMENT
WARNING
TO PREVENT ACCIDENTAL START, ALWAYS REMOVE THE BATTERY AND WAIT FOR AT LEAST 5
SECONDS.
WARNING
WEAR HEAVY-DUTY PROTECTIVE GLOVES WHEN PERFORMING MAINTENANCE ON THE CUTTING
EQUIPMENT. THE BLADE IS SHARP AND INJURIES CAN EASILY OCCUR.
Note: Make sure that both handlebar shafts are properly inserted into the mounting holes at the base of the
mower. Ensure the shafts are in the same position.
• Examine the cutting equipment for damage or cracks. Always replace damaged cutting equipment.
• Inspect the blade to see if it is damaged or blunt.
4.5.1 REPLACE THE BLADES
WARNING
SECURELY LOCK THE BLADES IN PLACE USING A WOODEN BLOCK TO PREVENT ANY POTENTIAL
HARM TO YOUR FINGERS WHEN REPLACING THE BLADES. THE BLADES CAN BE MOVED WHEN THE
MOTOR IS OFF AND FINGERS CAN BECOME TRAPPED BETWEEN THE BLADES AND STATIONARY
PARTS.
Remove the Used Blades
1. Secure the blade using a wooden block for stabilization.
14
English
EN
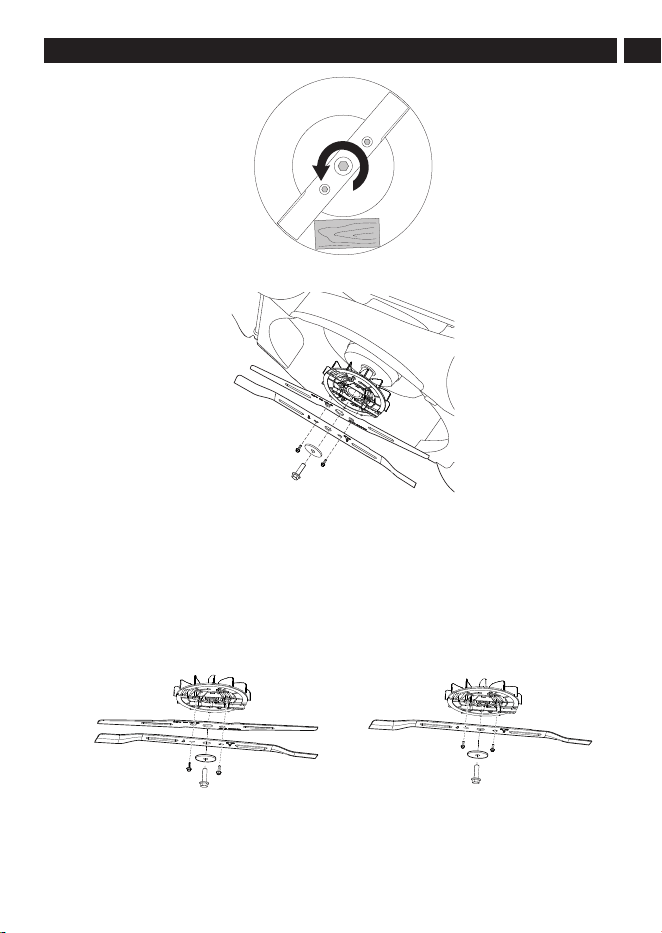
2. Remove the mounting screws and spacer with a 5/8 Inch (15mm) wrench or socket.
3. Carefully detach the blade(s) and fan.
4. Inspect the fan, blade bolts, and base for any damage.
5. Examine the motor shaft to ensure it is not bent or damaged.
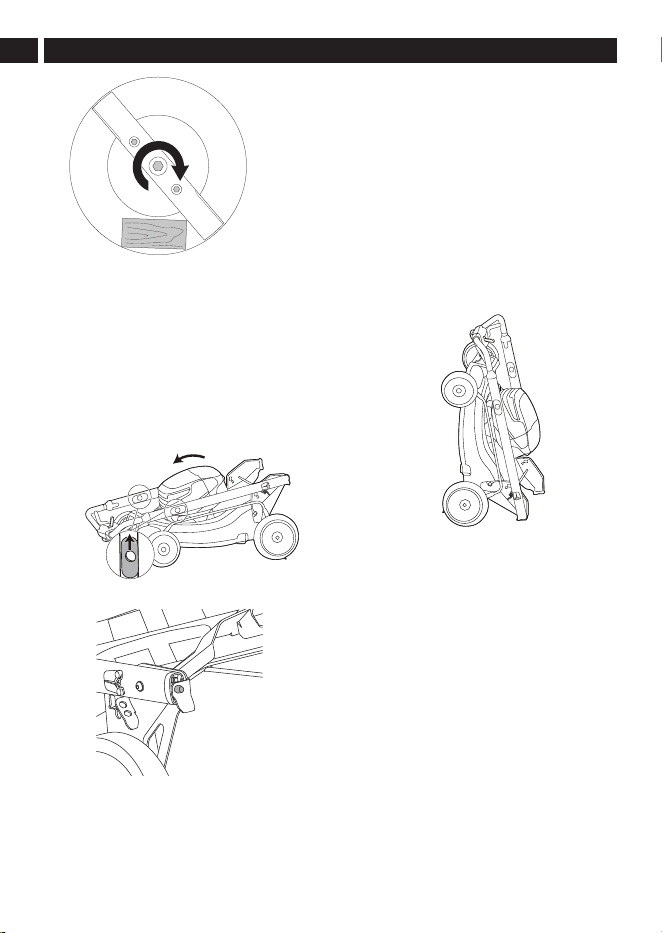
Install the New Blades
NOTE:The blade configuration of this mower is customizable. Dual blades provide the best cutting
performance, while single blade offers extended runtime.
1. Reinstall the fan, followed by the new blade(s) (Dual blade: upper blade followed by mulching blade) positioning
the angled ends of the mulching blade upward toward the cutting cover.
*Dual blade order: Install upper blade (flat) then mulching blade.
*Single blade order: Install the mulching bladeonly
2. Ensure that the keyed holes on the blade(s) align with the indentations on the fan.
3. Insert screws to tighten the blades.
4. Secure the blade using a wooden block for stabilization. Insert the spacer and tighten the mounting screws to
the recommended torque 25.8 ft.-lbs. (35 N.m.).
15
English
EN
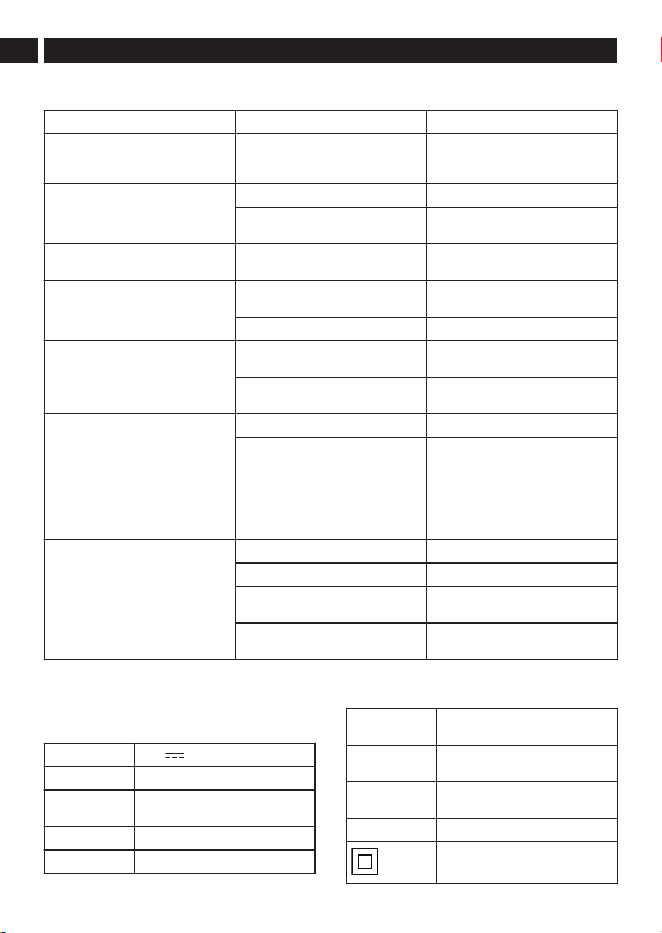
5. Carefully rotate the blade(s) manually to ensure smooth spinning.
6. Start the product and test the blade(s) to verify proper installation. Incorrect installation can result in vibrations
or unsatisfactory cutting performance.
5 TRANSPORTATION, STORAGE, AND
DISPOSAL
5.1 SET THE PRODUCT IN TRANSPORTATION
POSITION
1. Remove the grass catcher.
2. Remove the battery.
3. Pull the handlebar latch to fold the handles.
1
2
4. Lock the handles into position.
5. Position the mower in a vertical position and
make sure that the brackets touch the floor.
5.2 TRANSPORTATION
• Any removable (electronic) parts, such as the
charger and battery, should always be disconnected
before transport.
• Avoid transporting the product in bad weather
conditions when possible.
• Make sure to adequately cover any exposed
electronic parts if transportation in adverse weather
conditions is unavoidable.
• Use tape on open contacts of the battery and
ensure it is securely stowed to prevent movement.
• High speeds, along with wind, and rain may force
moisture into the electronic components, which
can lead to temporary malfunctions or permanent
defects.
• In case of malfunction occurring after transport in
such conditions, remove the battery and allow all
parts to air-dry when you reach your destination.
5.3 DISPOSAL OF THE BATTERY, BATTERY
CHARGER, AND PRODUCT
Symbols on the product or the package of the product
mean that the product is not domestic waste. Recycle
16
English
EN

it at a recycling station for electrical and electronic
equipment. This helps to prevent damage to the
environment and persons.
Get in touch with your local authorities, domestic waste
service, or your dealer for more information about how
to recycle your product.
17
English
EN
6 TROUBLESHOOTING
Problem Possible cause Solution
The handle is not in position. The bolts are not engaged correctly. Adjust the height of the handle and
make sure that the bolts and nuts
are aligned correctly.
The product does not start. The battery capacity is low. Charge the battery.
The blade engagement lever is de-
fective.
Replace blade engagement lever.
The product cuts grass unevenly. The blade height is too low. Move the wheels to a higher posi-
tion.
The product does not mulch correct-
ly.
Wet grass clippings become tangled
in the deck.
Wait until the grass dries before
mowing.
The mulch door is missing. Install the mulch door.
The product is hard to push. The grass is too tall, or the blade
height is too low.
Increase the blade height.
The grass catcher and the blade
drags in thick grass.
Empty the grass clippings from the
grass catcher.
There is a high vibration in the prod-
uct.
The blade is unbalanced and worn. Replace the blade.
The motor shaft is bent. 1. Stop the motor.
2. Remove the battery.
3. Disconnect the power source.
4. Inspect for damage.
5. Repair the product before you
start it again.
The product stops during mowing. The blade height is too low. Increase the blade height.
The battery is out of power. Charge the battery.
The grass clippings become tangled
in the deck or blade.
Remove the battery and check the
deck.
Operation temperature of the prod-
uct is too high.
Turn off and move to shaded area
for 10-15 minutes.
* If you cannot find the solution to these problems, consult your nearest service center.
7 TECHNICAL DATA
Voltage 80 V
Deck size 22" (55.9 cm)
Battery model BAB740 / BAB742 and other BAB
series
Charger model 2901402 and other CAB series
No load speed 2700 / 3000 RPM
Height adjust-
ments
1-4" (2.5-10.2 cm)
Self-propelled
speed
2.3-4.9 fps (0.7-1.5 m/s)
Functions 4-in-1 Mulch & Rear Bag & Side
discharge & Turbo
IPX IPX4
Double-insulated construction.
18
English
EN

8 LIMITED WARRANTY
ITEMS NOT COVERED BY WARRANTY:
1. Any part that has become inoperative due
to misuse, commercial use, abuse, neglect,
accident, improper maintenance, or alteration; or
2. The unit, if it has not been operated and/or
maintained in accordance with the operator
manual; or
3. Normal wear;
4. Routine maintenance items such as lubricants,
blade sharpening;
5. Normal deterioration of the exterior finish due to
use or exposure.
HELPLINE:
Warranty service is available by calling our toll-free
helpline, at 1-855-345-3934.
TRANSPORTATION CHARGES:
Transportation charges for the movement of any power
equipment unit or attachment are the responsibility of
the purchaser. It is the purchaser’s responsibility to
pay transportation charges for any part submitted for
replacement under this warranty unless such return is
requested in writing by Greenworks.
USA address:
Greenworks Tools
P.O. Box 1238, Mooresville, NC 28115
Canadian address:
Greenworks Tools Canada, Inc.
P.O. Box 93095, Newmarket, Ontario, L3Y 8K3
Mexico address:
TECNOLOGIA CAMPO Y JARDIN S.A. DE C.V.
ADMINISTRADORES No. 5336 A, COL. ARCOS DE
GUADALUPE, ZAPOPAN , JALISCO , C.P. 45037
19
English
EN
Renewed/Refurbished products and batteries are
protected against all defects in materials, parts or
workmanship under normal use for a period of 90 days
from the shipping date or in-store purchase date. All
sales are final, no returns.
90-Day Warranty

www.greenworkstools.com
Rev B1
P0805397-00