Installation Manual
IMPORTANT NOTE:
Read this manual carefully before installing
or operating your new air conditioning unit.
Make sure to save this manual for future
reference.
ROOM AIR CONDITIONER
SPLIT-TYPE


01
CONTENTS
SAFETY PRECAUTIONS
PRODUCT OVERVIEW
PRODUCT INSTALLATION
WIRING PRECAUTIONS
AIR EVACUATION
NOTE ON ADDING REFRIGERANT
ELECTRICAL AND GAS LEAK CHECKS
PANEL INSTALLATION
TEST RUN
REFRIGERANT PIPING CONNECTION
PACKING AND UNPACKING THE UNIT
02
10
11
27
30
31
32
33
36
24
37
02
SAFETY PRECAUTIONS
It is really important you read Safety Precautions Before Operation and Installation
Incorrect installation due to ignoring instructions can cause serious damage or injury.
The seriousness of potential damage or injuries is classified as either a WARNING
or CAUTION.
WARNING
CAUTION
Explanation of Symbols
WARNING
This appliance is not intended for use by persons(including children) with reduced
physical, sensory or mental capabilities, or lack of experience and knowledge, unless
they have been given supervision or instruction concerning use of the appliance by
a person responsible for their safety. Children should be supervised to ensure that
they do not play with the appliance.
This symbol indicates the possibility of personal injury or loss of
life.
This symbol indicates the possibility of property damage or serious
consequences.
ELECTRICAL WARNINGS
Only use the specified wire. If the wire is damaged, it must be replaced by the
manufacturer, its service agent or similarly qualified persons in order to avoid a
hazard.
The product must be properly grounded at the time of installation, or electric
shock may occur.
For all electrical work, follow all local and national wiring standards, regulations,
and the Installation Manual. Connect cables tightly, and clamp them securely to
prevent external forces from damaging the terminal. Improper electrical
connections can overheat and cause fire, and may also cause shock. All electrical
connections must be made according to the Electrical Connection Diagram
located on the panels of the indoor and outdoor units.
All wiring must be properly arranged to ensure that the control board cover can
close properly. If the control board cover is not closed properly, it can lead to
corrosion and cause the connection points on the terminal to heat up, catch fire,
or cause electrical shock.
Disconnection must be incorporated in the fixed wiring in accordance with the
wiring rules.
Do not share the electrical outlet with other appliances. Improper or insucient
power supply can cause fire or electric shock.
If connecting power to fixed wiring, an all-pole disconnection device which has
at least 3mm clearances in all poles, and have a leakage current that may exceed
10mA, the residual current device(RCD) having a rated residual operating current
not exceeding 30mA, and disconnection must be incorporated in the fixed wiring
in accordance with the wiring rules.
●
●
●
●
●
●
●
03
WARNINGS FOR PRODUCT INSTALLATION
Installation must be performed by an authorized dealer or specialist. Defective
installation can cause water leakage, electrical shock, or fire.
Installation must be performed according to the installation instructions.
Improper installation can cause water leakage, electrical shock, or fire.
Contact an authorized service technician for repair or maintenance of this unit.
This appliance shall be installed in accordance with national wiring regulations.
Only use the included accessories, parts, and specified parts for installation.
Using non-standard parts can cause water leakage, electrical shock, fire, and can
cause the unit to fail.
Install the unit in a firm location that can support the unit’s weight. If the chosen
location cannot support the unit’s weight, or the installation is not done properly,
the unit may drop and cause serious injury and damage.
Install drainage piping according to the instructions in this manual. Improper
drainage may cause water damage to your home and property.
For units that have an auxiliary electric heater, do not install the unit within 1
meter (3 feet) of any combustible materials.
For the units that have a wireless network function, the USB device access,
replacement, maintenance operations must be carried out by professional sta.
Do not install the unit in a location that may be exposed to combustible gas leaks.
If combustible gas accumulates around the unit, it may cause fire.
Do not turn on the power until all work has been completed.
When moving or relocating the air conditioner, consult experienced service
technicians for disconnection and reinstallation of the unit.
How to install the appliance to its support, please read the information for details
in "indoor unit installation" and "outdoor unit installation" sections.
●
●
●
●
●
●
●
●
●
●
●
●
●
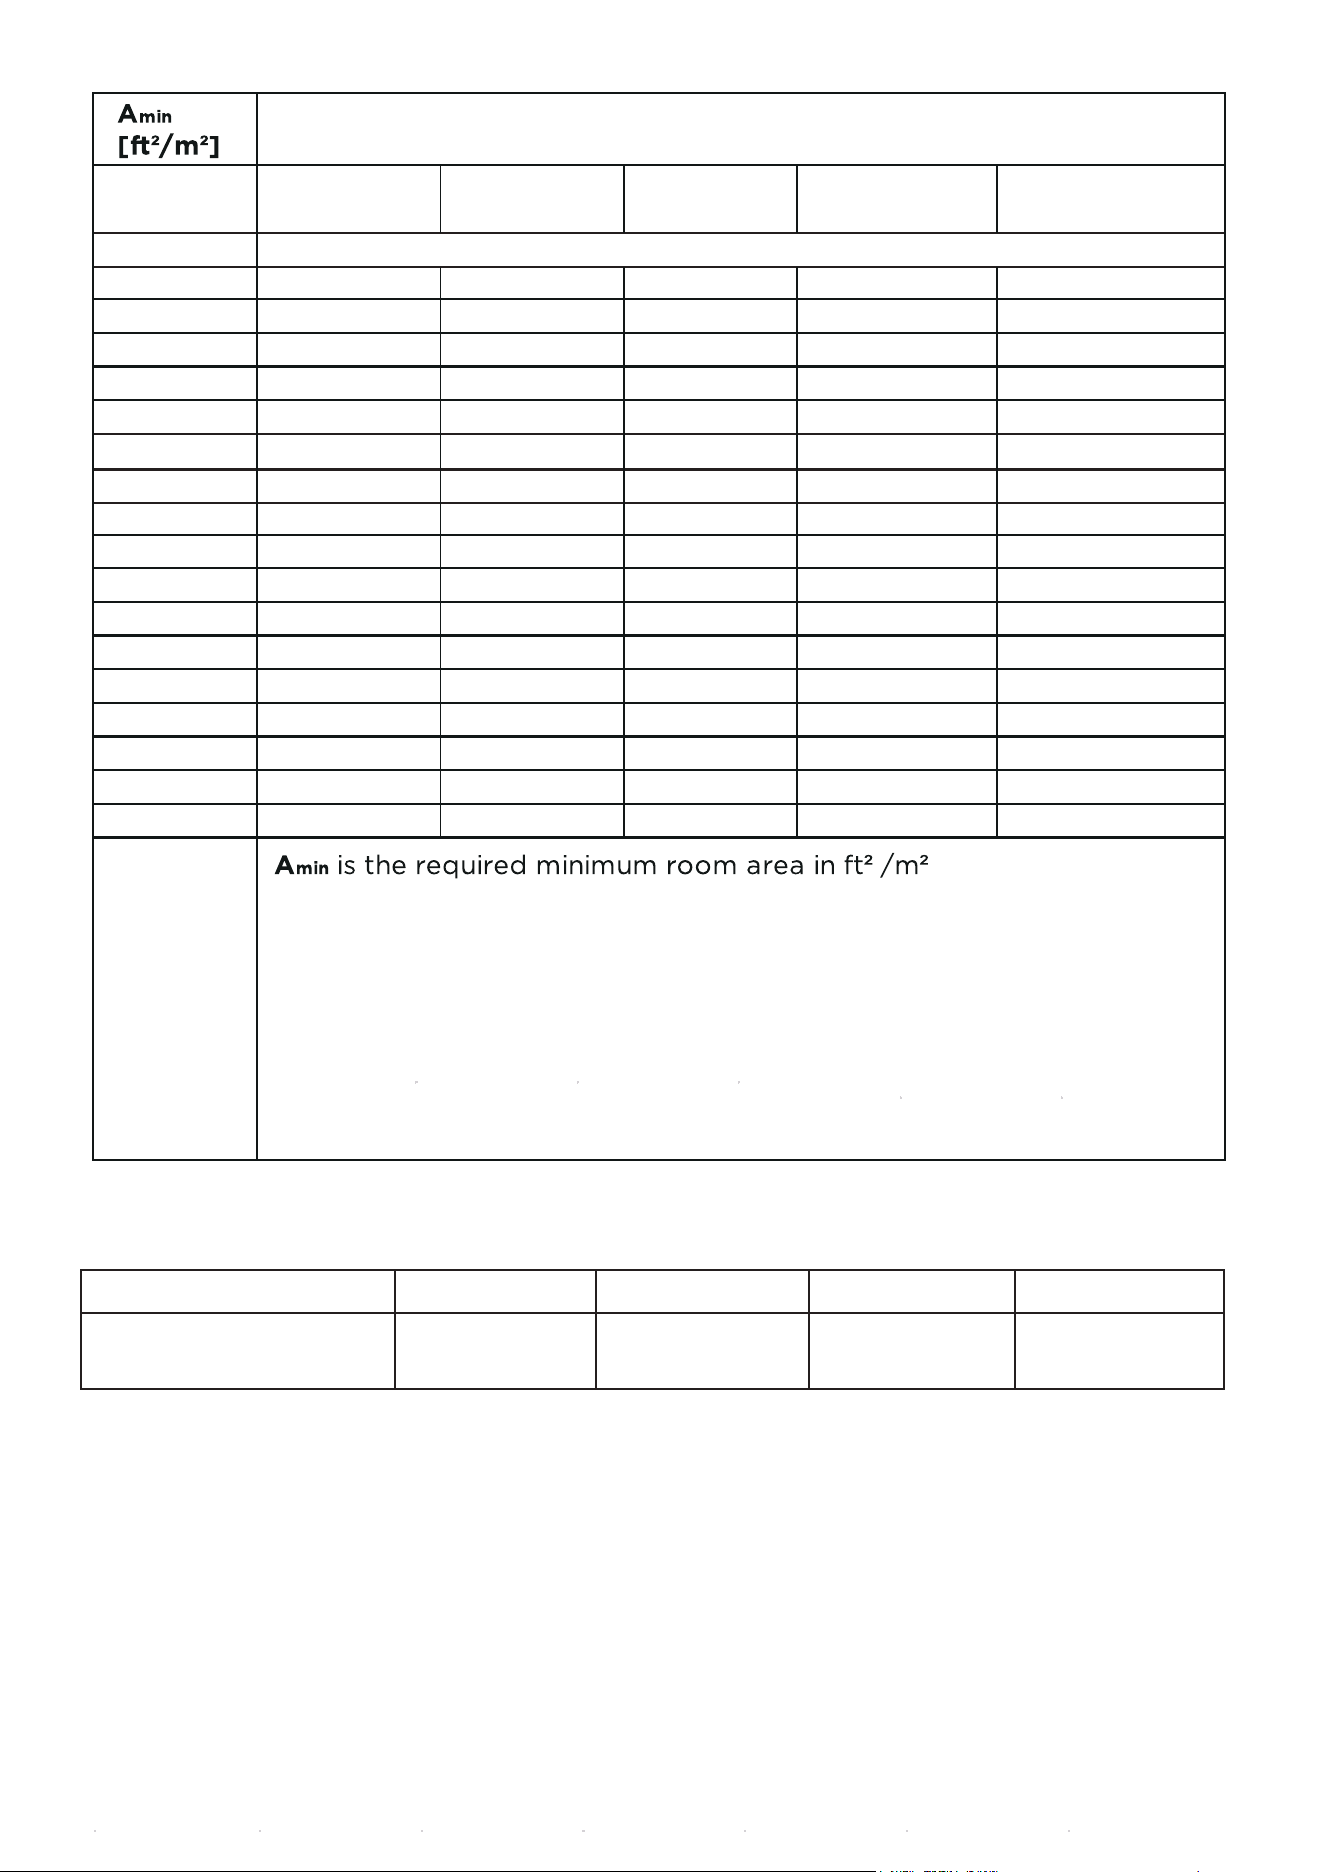
For R454B refrigerant charge amount and minimum room area:
●
●
●
●
WARNING FOR USING FLAMMABLE REFRIGERANTS
Do not use means to accelerate the defrosting process or to clean, other than
those recommended by the manufacturer.
The appliance shall be stored in a room without continuously operating ignition
sources (for example: open flames, an operating gas appliance or an operating
electric heater).
Do not pierce or burn.
Be aware that refrigerants may not contain an odour.
TAKE NOTE OF FUSE SPECIFICATIONS
The air conditioner’s circuit board (PCB) is designed with a fuse to provide
overcurrent protection. The specifications of the fuse are printed on the circuit board ,
for example : T3.15AL/250VAC, T5AL/250VAC, T3.15A/250VAC, T5A/250VAC,
T20A/250VAC, T30A/250VAC,etc.
NOTE: Only the blast-proof ceramic fuse can be used.
Turn o the air conditioner and disconnect the power before performing any
installation or repairing. Failure to do so can cause electric shock.
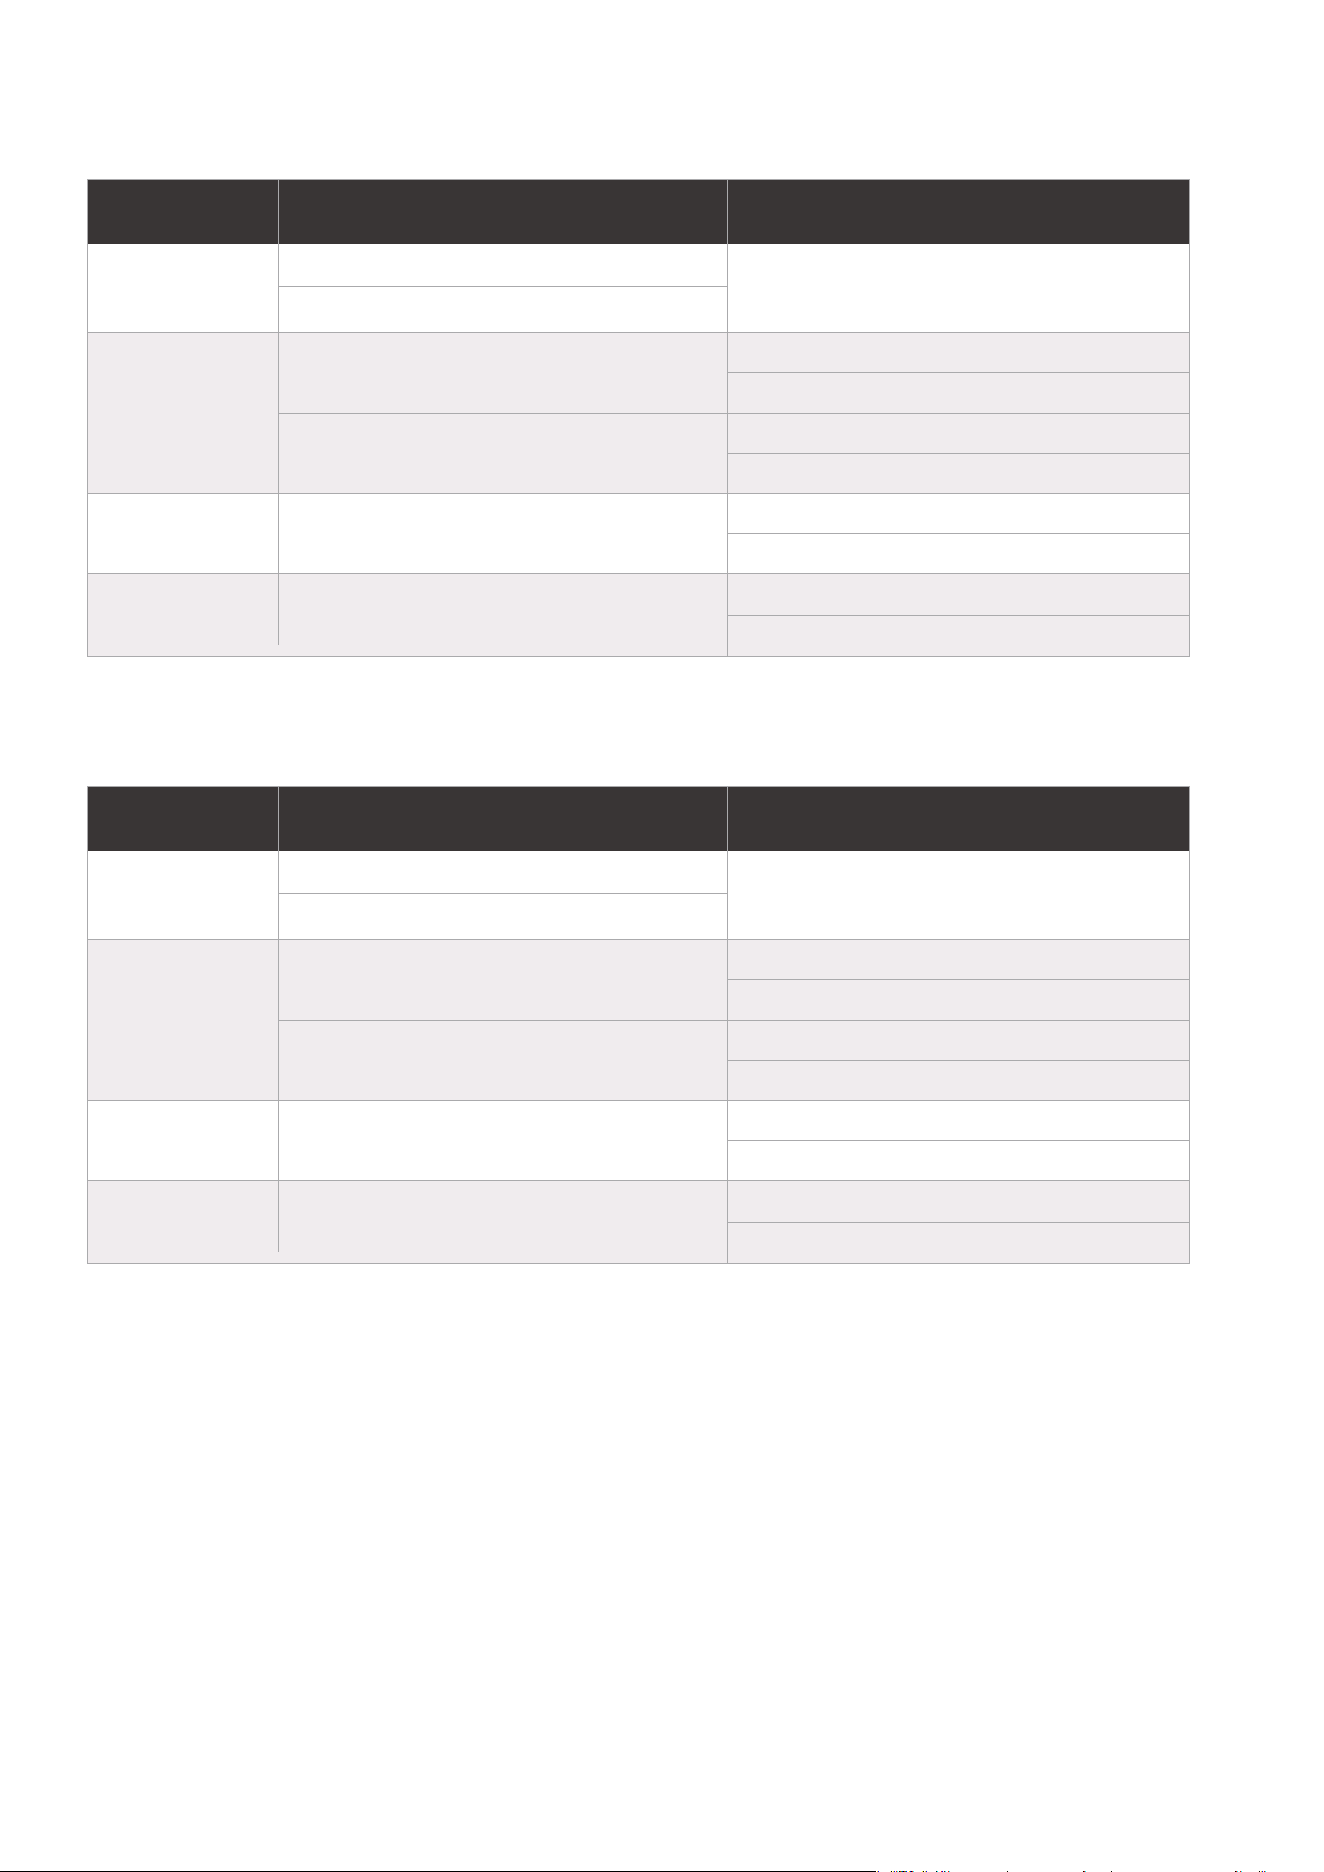
The machine you purchased may be one of the types in the table below. The indoor
and outdoor units are designed to be used together. Please check the machine you
purchased. The indoor unit should be installed at least 8.3ft/2.5m above from the
floor, the height of the room cannot be less then 7.3ft/2.2m, and the minimum room
area of operating or storage should be as specified in the following table:
04
Indoor unit Outdoor unit
6K MOX230-06HFN10-M1X
MCBM-12HRFN10-M1
MCB-18HRFN10-M1
MCB-09HRFN10-M1
MCBM-12HRFN10-M1
MOX330-09HFN10-M1X
MOX230-09HFN10-M1
MOX330-09HFN10-M1X
MOX230-09HFN10-M1
MOX430-18HFN10-M1
MOX430-18HFN10-M1X
MOX330-12HFN10-M1X
MOX230-12HFN10-M1
9K
12K
18K
Model
MCB-06HRFN10-M1
MCBM-12HRFN10-M1
For the units with refrigerant sensors, the minimum airflow of the indoor unit is as
follows:
Indoor unit Outdoor unit
6K MOX230-06HFN10-M1X
MCBM-12HRFN10-M1-A
MCB-18HRFN10-M1-A
MCB-09HRFN10-M1-A
MCBM-12HRFN10-M1-A
MOX330-09HFN10-M1X
MOX230-09HFN10-M1
MOX330-09HFN10-M1X
MOX230-09HFN10-M1
MOX430-18HFN10-M1
MOX430-18HFN10-M1X
MOX330-12HFN10-M1X
MOX230-12HFN10-M1
9K
12K
18K
Model
MCB-06HRFN10-M1-A
MCBM-12HRFN10-M1-A
The information in the following table is only applicable to models without
refrigerant sensors:
05
m
c or
mREL
[oz/kg]
6.0~7.3/
1.8~2.2
7.6/2.3 8.3/2.5 8.9/2.7 9.9/3.0
≤62.6/1.776
63.4/1.8 57/5.29 53/4.87 49/4.51 44/4.06
70.5/2.0 64/5.88 59/5.41 54/5.01 49/4.51
77.5/2.2 70/6.47 65/5.95 60/5.51 54/4.96
84.6/2.4 76/7.06 70/6.49 65/6.01 59/5.41
91.7/2.6 83/7.64 76/7.03 71/6.51 64/5.86
98.7/2.8 89/8.23 82/7.57 76/7.01 68/6.31
105.8/3.0 95/8.82 88/8.11 81/7.51 73/6.76
112.8/3.2 102/9.41 94/8.65 87/8.01 78/7.21
119.9/3.4 108/9.99 99/9.19 92/8.51 83/7.66
126.9/3.6 114/10.58 105/9.73 97/9.01 88/8.11
134/3.8 121/11.17 111/10.28 103/9.51 93/8.56
141.0/4.0 127/11.76 117/10.82 108/10.02 97/9.01
148.1/4.2 133/12.34 123/11.36 114/10.52 102/9.46
155.1/4.4 140/12.93 129/11.90 119/11.02 107/9.91
162.2/4.6 146/13.52 134/12.44 124/11.52 112/10.37
169.2/4.8 152/14.11 140/12.98 130/12.02 117/10.82
176.3/5.0 159/14.69 146/13.52 135/12.52 122/11.27
Area
formula
h
inst
[ft/m]
12/1.10
m
c
is the actual refrigerant charge in the system in oz/kg
m
REL is the refrigerant releaseable charge in oz/kg (Applicable to the
units with refrigerant sensors only)
h
inst
is the height of the bottom of the appliance relative to the floor of
the room after installation.
WARNING: The minimum room area or minimum room area of
conditioned space is based on releasable charge and total
system refrigerant charge.
60/5.53
67/6.15
73/6.76
80/7.38
86/7.99
93/8.60
100/9.22
106/9.83
113/10.45
120/11.06
126/11.68
133/12.29
139/12.90
146/13.52
153/14.13
159/14.75
166/15.36
When the unit detects a refrigerant leak, the minimum airflow of the indoor unit is
as follows
(Applicable to the units with refrigerant sensors only)
:
Model
Nominal air volume
9K 12K 18K
342CFM
(580m³/h)
6K
342CFM
(580m³/h)
353CFM
(600m³/h)
400CFM
(680m³/h)

06
1.
Installation(where refrigerant pipes are allowed)
- Any person who is involved with working on or breaking into a refrigerant
circuit should hold a current valid certificate from an industry-accredited
assessment authority, which authorises their competence to handle refrigerants
safely in accordance with an industry recognised assessment specification.
- Maintenance and repair requiring the assistance of other skilled personnel shall
be carried out under the supervision of the person competent in the use of
flammable refrigerants.
- That the installation of pipe-work shall be kept to a minimum.
- That pipe-work shall be protected from physical damage.
- Where refrigerant pipes shall be compliance with national gas regulations.
- That mechanical connections shall be accessible for maintenance purposes.
- Be more careful that foreign matter(oil, water,etc) does not enter the piping.
Also, when storing the piping, securely seal the opening by pinching, taping, etc.
- All working procedure that aects safety means shall only be carried by
competent persons.
- Appliance shall be stored in a well ventilated area where the room size
corresponds to the room area as specifiec for operation.
- Joints shall be tested with detection equipment with a capability of 5g/year of
refrigerant or better, with the equipment in standstill and under operation or
under a pressure of at least these standstill or operation conditions after
installation. Detachable joints shall NOT be used in the indoor side of the unit
(brazed, welded joint could be used).
- In cases that require mechanical ventilation, ventilation openings shall be kept
clear of obstruction.
- LEAK DETECTION SYSTEM installed. Unit must be powered except for service.
For the unit with refrigerant sensor, when the refrigerant sensor detects
refrigerant leakage, the indoor unit will display a error code and emit a buzzing
sound, the compressor of outdoor unit will immediately stop, and the indoor fan
will start running. The service life of the refrigerant sensor is 15 years. When the
refrigerant sensor malfunctions, the indoor unit will display the error code “FHCC”.
The refrigerant sensor can not be repaired and can only be replaced by the
manufacture. It shall only be replaced with the sensor specified by the
manufacture. (Applicable to the units with refrigerant sensors only)
2. When a FLAMMABLE REFRIGERANT is used, the requirements for installation
space of appliance and/or ventilation requirements are determined according to
- the mass charge amount(M) used in the appliance,
- the installation location,
- the type of ventilation of the location or of the appliance.
a. The minimum test pressure for the low side of the system shall be the low side
- piping material, pipe routing, and installation shall include protection from
physical damage in operation and service, and be in compliance with national
and local codes and standards, such as ASHRAE 15, IAPMO Uniform
Mechanical Code, ICC International Mechanical Code, or CSA B52. All field
joints shall be accessible for inspection prior to being covered or enclosed.
- that protection devices, piping, and fittings shall be protected as far as
possible against adverse environmental eects, for example, the danger of
water collecting and freezing in relief pipes or the accumulation of dirt and debris;
- that piping in refrigeration systems shall be so designed and installed to
minimize the likelihood of hydraulic shock damaging the system;
- that steel pipes and components shall be protected against corrosion with a
rustproof coating before applying any insulation;
- that precautions shall be taken to avoid excessive vibration or pulsation;
- the minimum floor area of the room shall be mentioned in the form of a table
or a single figure without reference to a formula;
- after completion of field piping for split systems, the field pipework shall be
pressure tested with an inert gas and then vacuum tested prior to refrigerant
charging, according to the following requirements:

07
design pressure and the minimum test pressure for the high side of the system
shall be the high side design pressure, unless the high side of the system cannot
be isolated from the low side of the system in which case the entire system
shall be pressure tested to the low side design pressure.
b. The test pressure after removal of pressure source shall be maintained for at
least 1 h with no decrease of pressure indicated by the test gauge, with test
gauge resolution not exceeding 5% of the test pressure.
c. During the evacuation test, after achieving a vacuum level specified in the
manual or less, the refrigeration system shall be isolated from the vacuum pump
and the pressure shall not rise above 1500 microns within 10 min. The vacuum
pressure level shall be specified in the manual, and shall be the lessor of 500
microns or the value required for compliance with national and local codes and
standards, which may vary between residential, commercial,and industrial
buildings.
- field-made refrigerant joints indoors shall be tightness tested according to the
following requirements: The test method shall have a sensitivity of 5 grams per
year of refrigerant or better under a pressure of at least 0,25 times the
maximum allowable pressure. No leak shall be detected.
3 . Qualification of workers
Any maintenance, service and repair operations must be required qualification
of the working personnel. Every working procedure that aects safety means
shall only be carried out by competent persons that joined the training and
achieved competence should be documented by a certificate. The training of
these procedures is carried out by national training organizations or
manufacturers that are accredited to teach the relevant national competency
standards that may be set in legislation. All training shall follow the ANNEX HH
requirements of UL 60335-2-40 4th Edition.
Examples for such working procedures are:
• breaking into the refrigerating circuit;
• opening of sealed components;
• opening of ventilated enclosures.
4. Ventilated area
Ensure that the area is in the open or that it it adequately ventilated before breaking
into the system or conducting any hot work. A degree of ventilation shall continue
during the period that the work is carried out. The ventilation should safely disperse
any released refrigerant and preferably expel it externally into the atmosphere.
5. Cabling
Check that cabling will not be subject to wear, corrosion, excessive pressure,
vibration, sharp edges or any other adverse environmental eects. The check shall
also take into account the eects of aging or continual vibration from sources such
as compressors or fans.
6. Detection of flammable refrigerants
Under no circumstances shall potential sources of ignition be used in the searching
for or detection of refrigerant leaks. A halide torch(or any other detector using a
naked flame) shall not be used.
The following leak detection methods are deemed acceptable for refrigerant
systems. Electronic leak detectors may be used to detect refrigerant leaks but, in
the case of FLAMMABLE REFRIGERANTS, the sensitivity may not be adequate, or
may need re-calibration. (Detection equipment shall be calibrated in a refrigerant-
free area.) Ensure that the detector is not a potential source of ignition and is
suitable for the refrigerant used. Leak detection equipment shall be set at a
percentage of the LFL of the refrigerant and shall be calibrated to the refrigerant
employed, and the appropriate percentage of gas (25% maximum) is confirmed.
Leak detection fluids are also suitable for use with most refrigerants but the use of
detergents containing chlorine shall be avoided as the chlorine may react with the
refrigerant and corrode the copper pipe-work.

08
7. Removal and evacuation
When breaking into the refrigerant circuit to make repairs - or for any other purpose
conventional procedures shall be used. However, for flammable refrigerants it is
important that best practice be followed, since flammability is a consideration.
The following procedure shall be adhered to:
safely remove refrigerant following local and national regulations;
evacuate;
purge the circuit with inert gas (optional for A2L);
evacuate (optional for A2L);
continuously flush or purge with inert gas when using flame to open circuit; and
open the circuit
The refrigerant charge shall be recovered into the correct recovery cylinders if
venting is not allowed by local and national codes. For appliances containing
flammable refrigerants, the system shall be purged with oxygen-free nitrogen to
render the appliance safe for flammable refrigerants. This process might need to
be repeated several times. Compressed air or oxygen shall not be used for purging
refrigerant systems.
For appliances containing flammable refrigerants, refrigerants purging shall be
achieved by breaking the vacuum in the system with oxygen-free nitrogen and
continuing to fill until the working pressure is achieved, then venting to atmosphere,
and finally pulling down to a vacuum (optional for A2L). This process shall be
repeated until no refrigerant is within thesystem (optional for A2L). When the final
oxygen-free nitrogen charge is used, the system shall be vented down to
atmospheric pressure to enable work to take place.
The outlet for the vacuum pump shall not be close to any potential ignition sources,
and ventilation shall be available.
8. Charging procedures
In addition to conventional charging procedures, the following requirements shall
be followed:
Works shall be undertaken with appropriate tools only (In case of uncertainty,
please consult the manufacturer of the tools for use with flammable refrigerants)
Ensure that contamination of dierent refrigerants does not occur when using
charging equipment. Hoses or lines shall be as short as possible to minimize the
amount of refrigerant contained in them.
Cylinders shall be kept upright.
Ensure that the refrigeration system is earthed prior to charging the system with
refrigerant.
Label the system when charging is complete(if not already).
Extreme care shall be taken not to overfill the refrigeration system.
Prior to recharging the system it shall be pressure tested with oxygen free nitrogen
(OFN). The system shall be leak tested on completion of charging but prior to
commissioning. A follow up leak test shall be carried out prior to leaving the site.
9. Recovery
When removing refrigerant from a system, either for servicing or decommissioning,
it is recommended good practice that all refrigerants are removed safely.
When transferring refrigerant into cylinders, ensure that only appropriate refrigerant
recovery cylinders are employed. Ensure that the correct number of cylinders for
holding the total system charge is available. All cylinders to be used are designated.
NOTE Examples of leak detection fluids are
- bubble method,
- fluorescent method agents.
If a leak is suspected, all naked flames shall be removed/extinguished.
If a leakage of refrigerant is found which requires brazing, all of the refrigerant shall
be recovered from the system, or isolated (by means of shut o valves) in a part of
the system remote from the leak. See the following instructions of removal of
refrigerant.
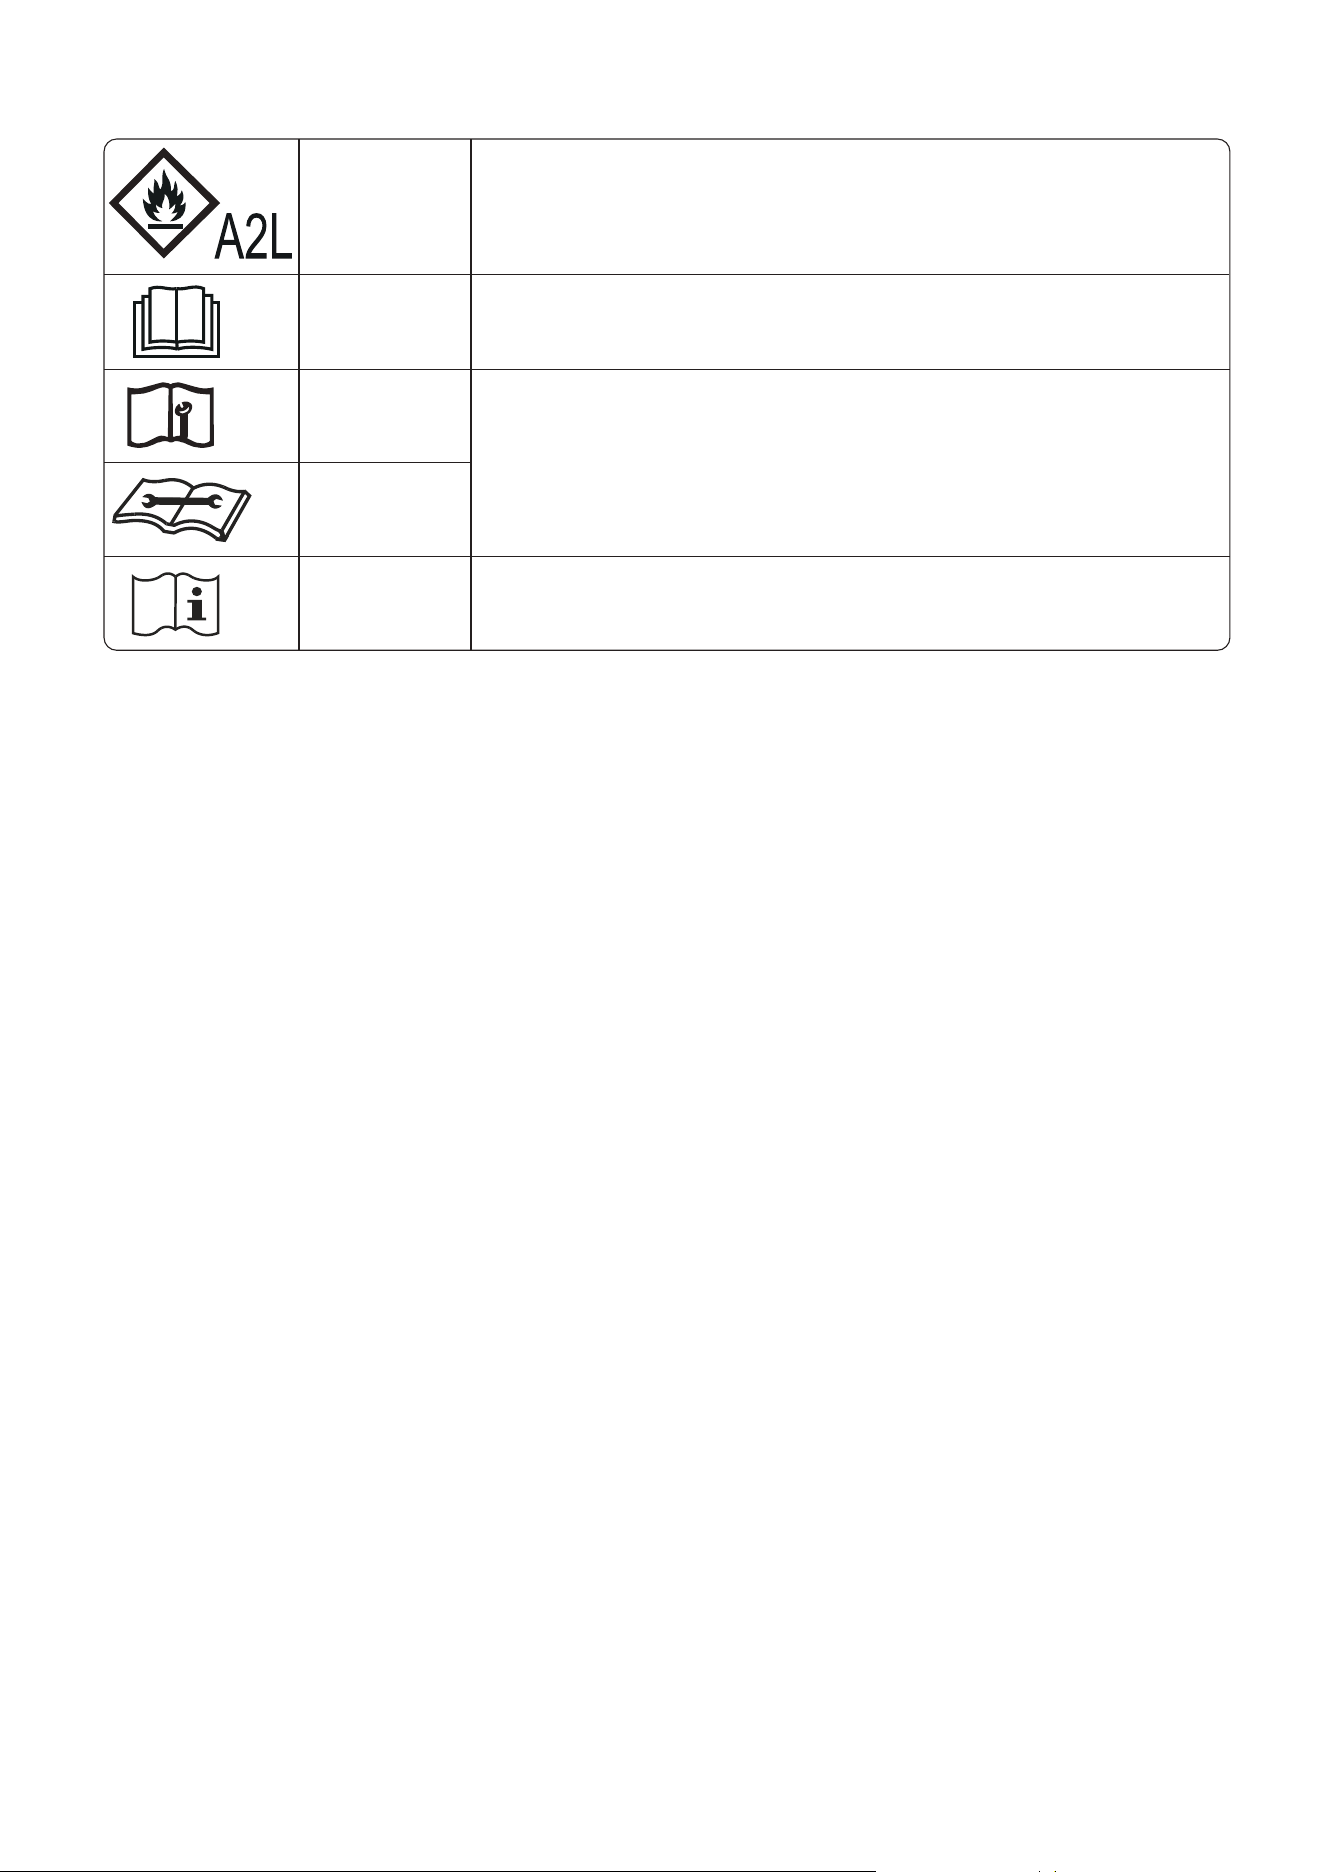
CAUTION
CAUTION
CAUTION
CAUTION
WARNING
This symbol shows that this appliance used a flammable
refrigerant. If the refrigerant is leaked and exposed to an
external ignition source, there is a risk of fire.
This symbol shows that the operation manual should be
read carefully.
This symbol shows that information is available such as
the operating manual or installation manual.
This symbol shows that a service personnel should be
handling this equipment with reference to the
installation manual.
Explanation of symbols displayed on the indoor unit or outdoor unit
09
10
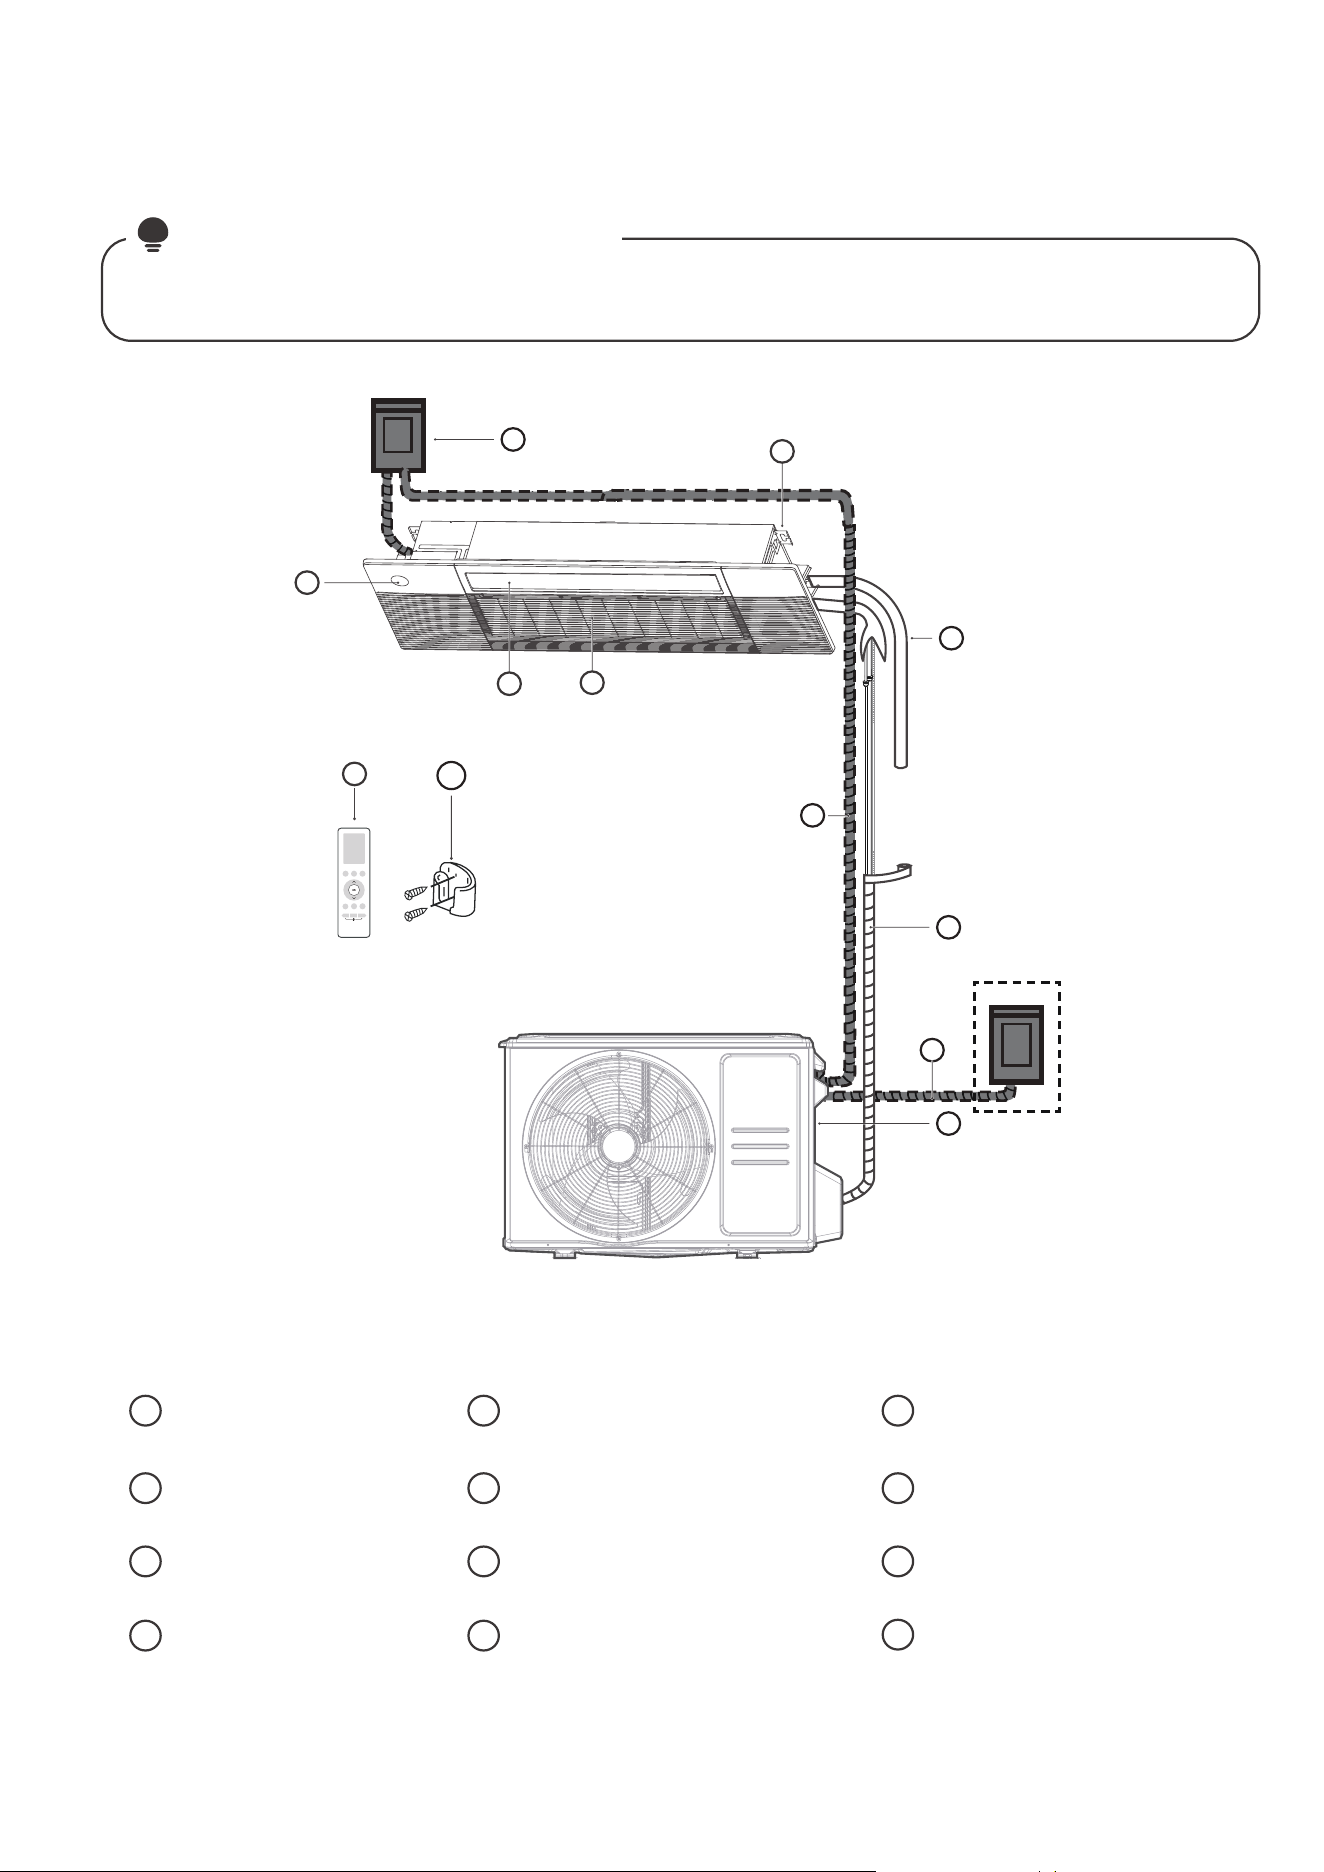
Illustrations in this manual are for explanatory purposes. The actual shape of your indoor unit may
be slightly dierent. The actual shape shall prevail.
NOTE ON ILLUSTRATIONS:
PRODUCT OVERVIEW
Outdoor unit
Installation part
1
4
7
2
5
8
3
6
Display panel
9
Remote controller
10
Circuit breaker
10
2
4
9
12
1
7
6
5
3
11
Outdoor unit power cable
(purchase separately)
11
12
Connection cable
(purchase separately)
Drain pipe
(purchase separately)
Refrigerant piping
(purchase separately)
Air outlet(Air flow louver)
Air inlet (with air filter in it)
8
Remote controller Holder
(purchase separately)
11
PRODUCT INSTALLATION
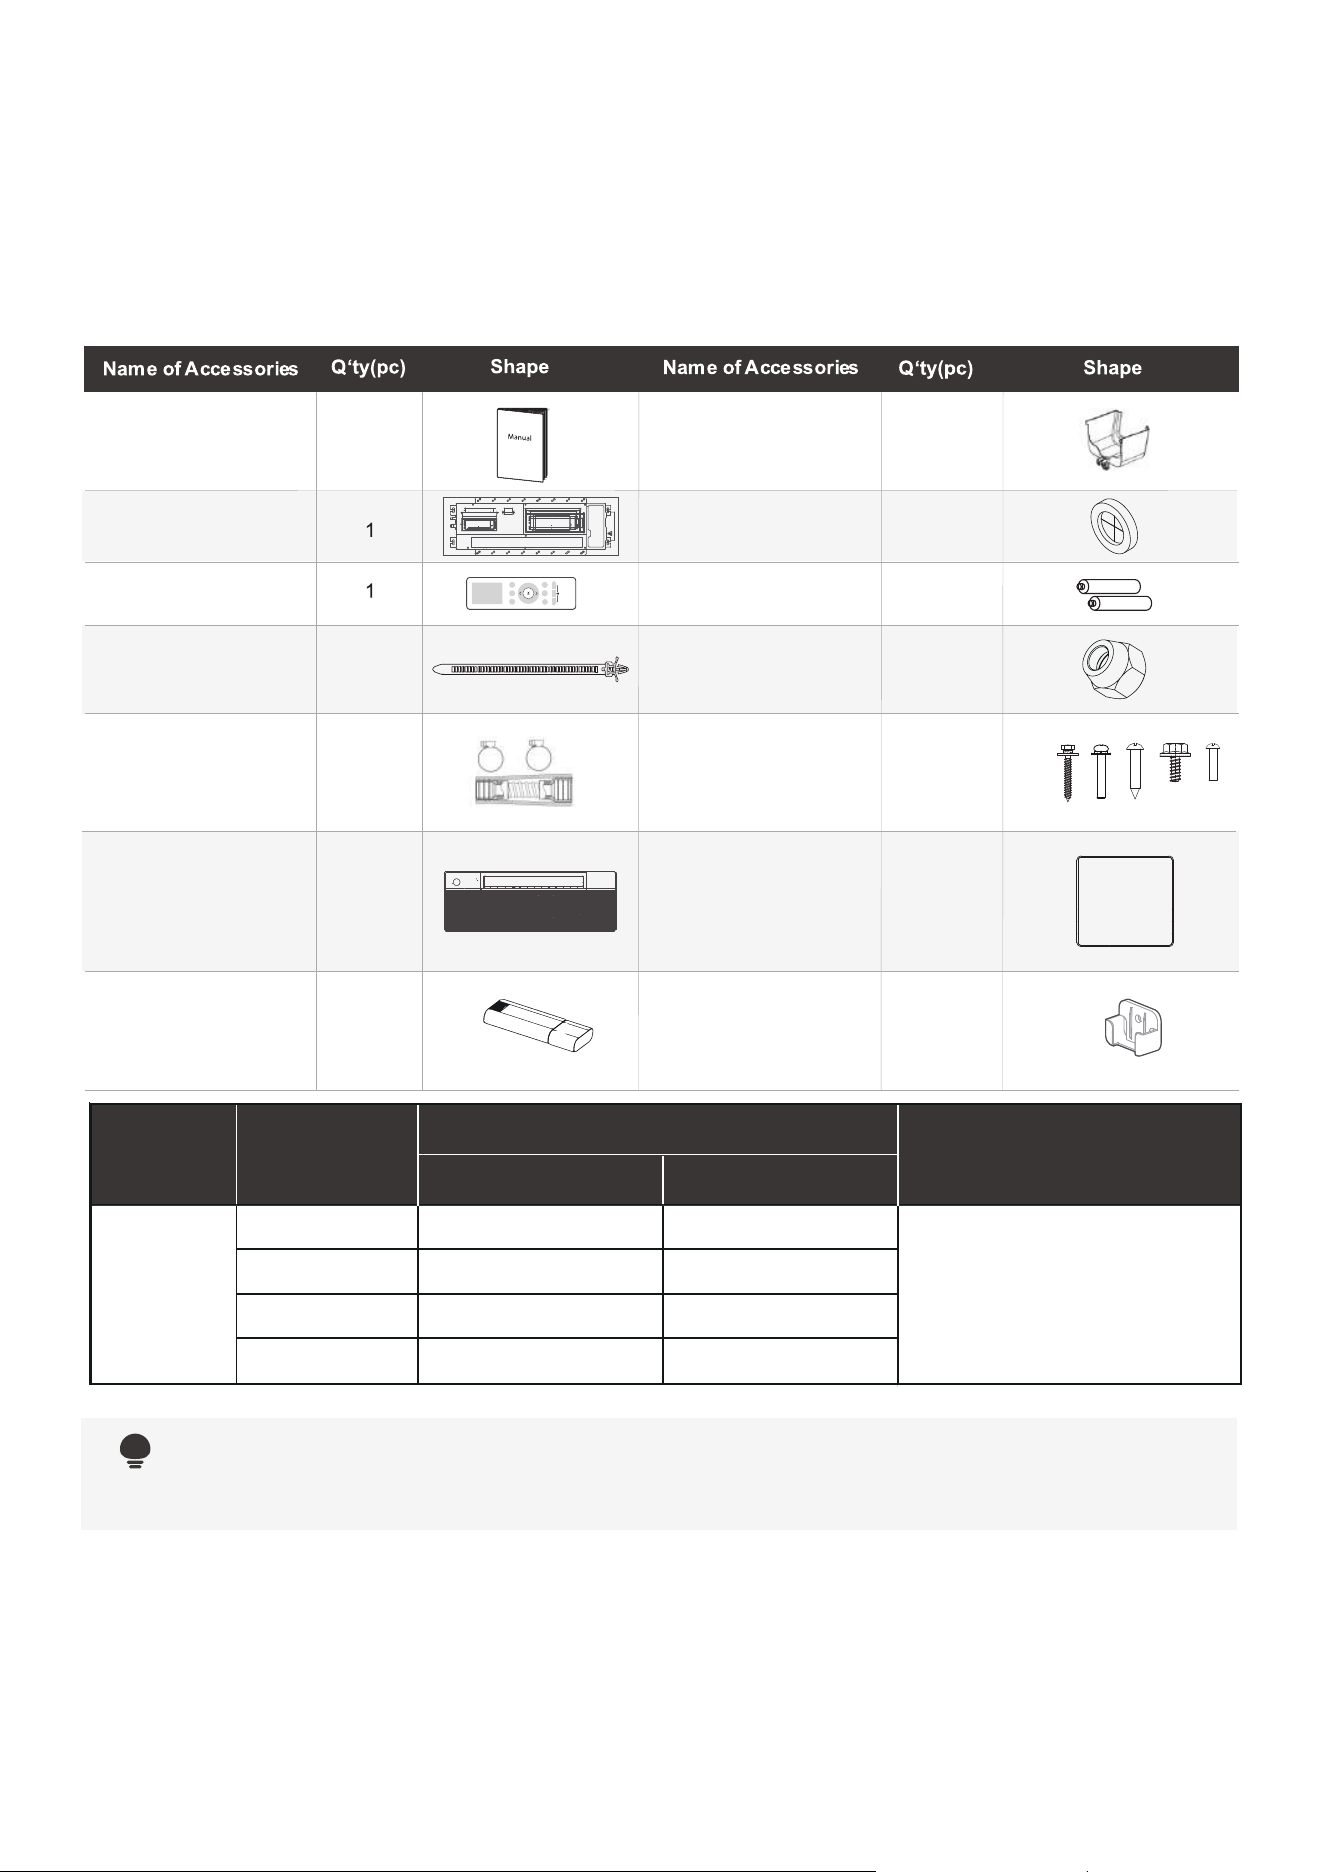
ACCESSORIES
The air conditioning system comes with the following accessories. Use all of the installation parts and
accessories to install the air conditioner. Improper installation may result in water leakage, electrical
shock and fire, or cause the equipment to fail. The items are not included with the air conditioner must
be purchased separately.
1
2
Manual
Installation
cardboard template
Remote controller
AAA Battery
1
Panel
1
Water receiver
Cable tie
Drainpipe adaptor
Screw kits
(ST8*50, M4*22,
ST3.9*16, ST4.8*12,
ST3.9*10)
1
6
1
1
(8,8,2,2,3)
Rubber ring
Copper nut
2
NOTE
Panel installation should be performed after wiring and piping have been completed.
1
1
Wired controller
(purchase separately)
Smart kit
(purchase separately)
1
Liquid Side Gas Side
9K
6K
12K
18K
Connecting
pipe
assembly
Name Model
Pipe specification
Remark
Pipes are not included in
the accessories and you
need to purchase it
separately from the local
dealer.
ΦΦ
1/4 i n( 6.35mm)
Φ Φ
3/8 i n( 9.52mm)
ΦΦ
1/4 i n( 6.35mm)
Φ Φ
3/8 i n( 9.52mm)
ΦΦ
1/4 i n( 6.35mm)
ΦΦ
1/4 i n( 6.35mm)
Φ Φ
3/8 i n( 9.52mm)
1/2 i n( 12.7mm)
Φ Φ
Remote controller
holder(purchase
separately)
12
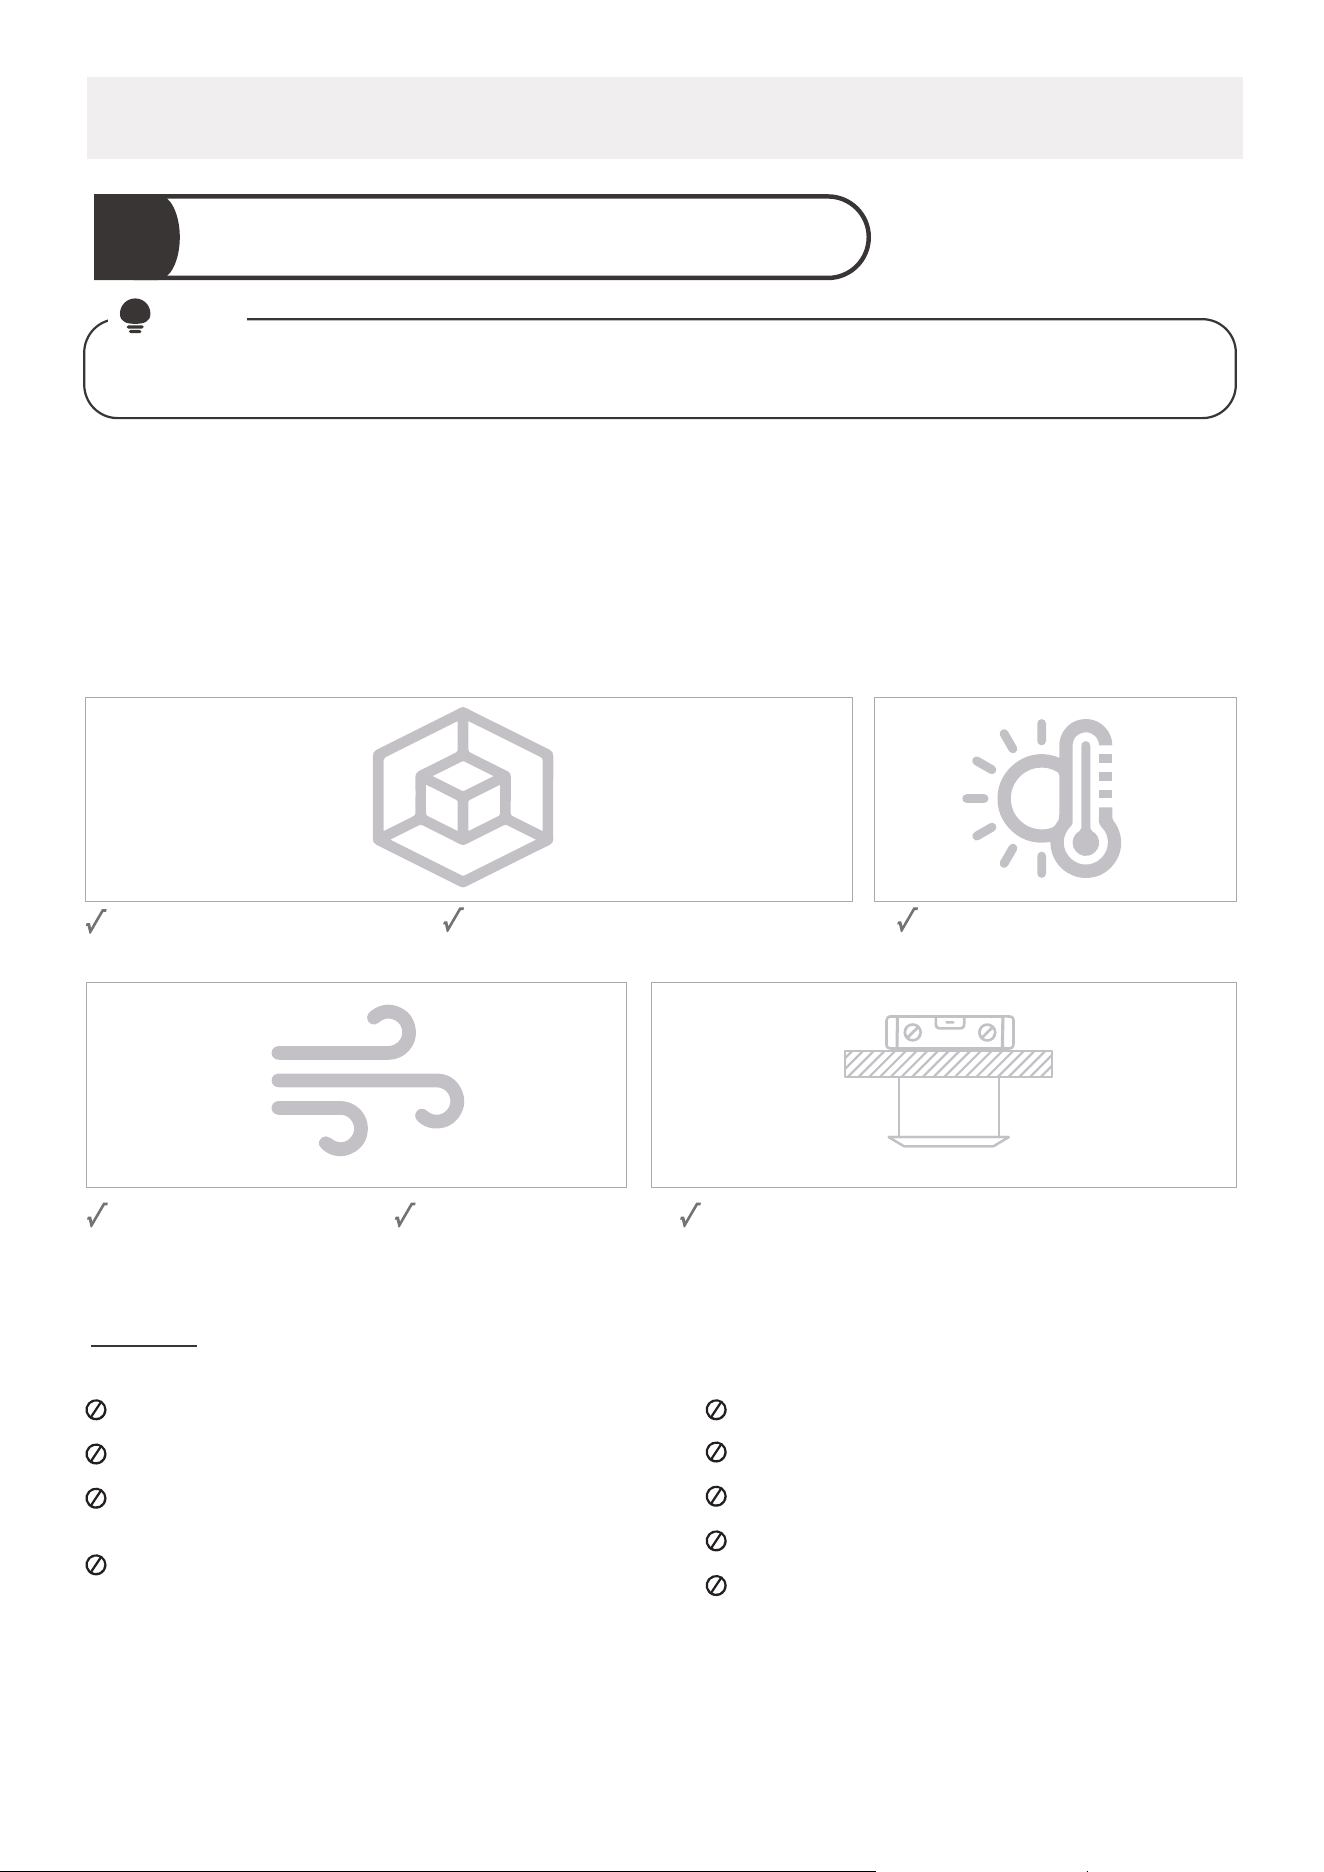
Proper installation locations meet the following standards:
Enough room exists for
installation and maintenance.
Enough room exists for the
connecting the pipe and drainpipe.
The ceiling is horizontal and its structure can
sustain the weight of the indoor unit.
The air inlet and outlet
are not blocked.
The airflow can fill
the entire room.
DO NOT
install unit in the following locations:
Areas with oil drilling or fracking
Coastal areas with high salt content in the air
Areas with caustic gases in the air, such as
hot springs
Areas that experience power fluctuations, such
as factories
Enclosed spaces, such as cabinets
Kitchens that use natural gas
Areas with strong electromagnetic waves
Areas that store flammable materials or gas
Rooms with high humidity, such as
bathrooms or laundry rooms
Install Your Indoor Unit
Select installation location1
NOTE
There is no direct radiation
from heaters.
Before Installation:
• Determine the route to move the unit to the installation site.
• First unseal and unpack the unit. Then, hold the seats of the hanger (4 pcs) to move the unit. Refrain from
exerting force on other parts of the unit, especially the refrigerant piping, water discharge piping, and the
plastic parts.
Before installing the indoor unit, you must choose an appropriate location. The following are
standards that will help you choose an appropriate location for the unit.
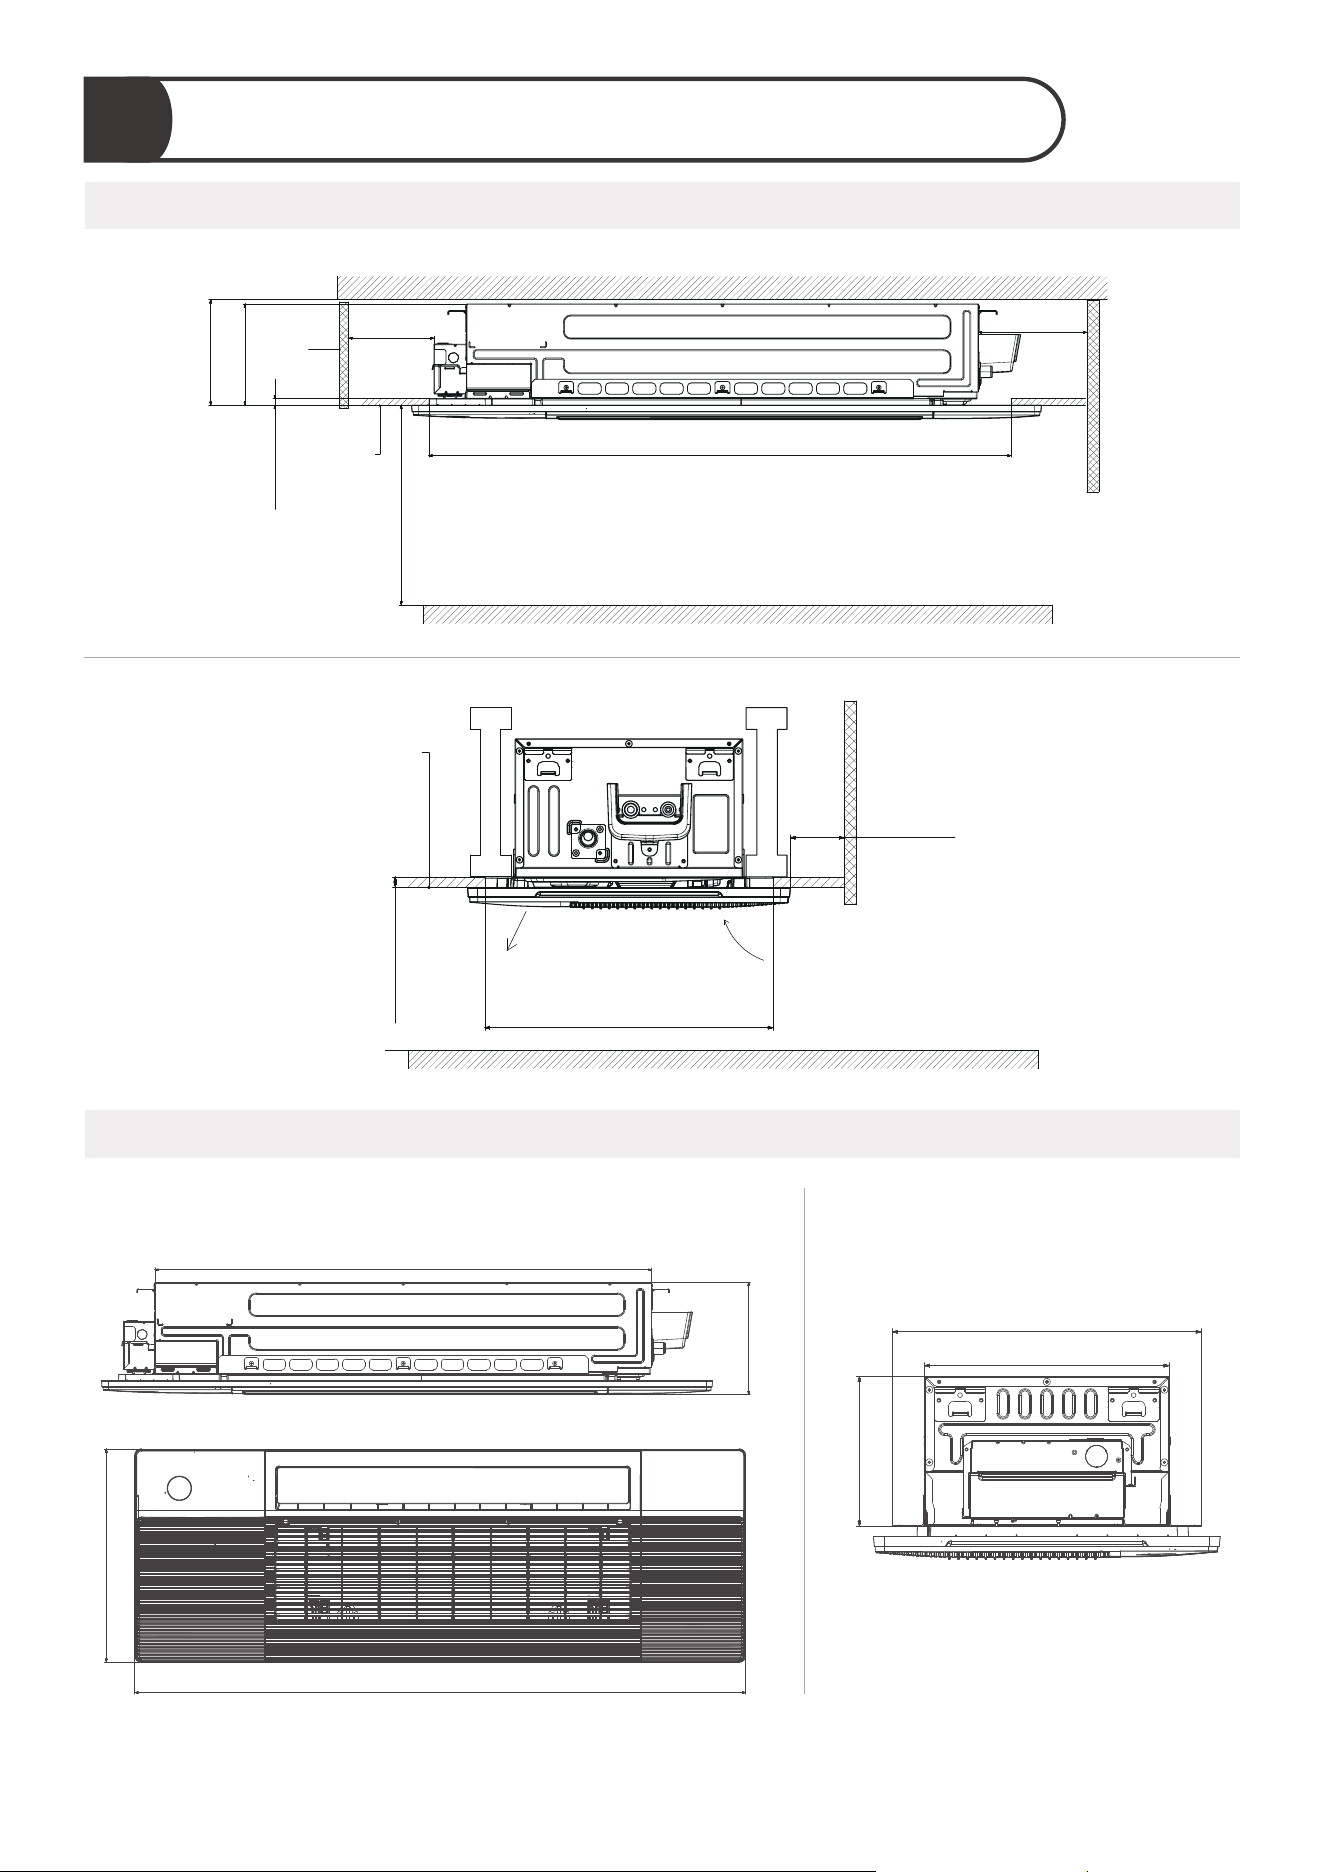
13
Confirm various sizes2
Installation place
≤0.63 in (16mm)
≤0.63 in (16mm)
>19.69 in
(500mm)
>19.69 in
(500mm)
>8.86 in
(225mm)
8.66 in
(220mm)
>98.43 in (2500mm)
Ceiling hole
Ceiling
Wall
Roof
Perspective A
Perspective B
(unit: inch/mm)
(unit: inch/mm)
>7.87 in (200mm)
Ceiling hole
air inlet
air outlet
Ceiling
Wall
GROUND
GROUND
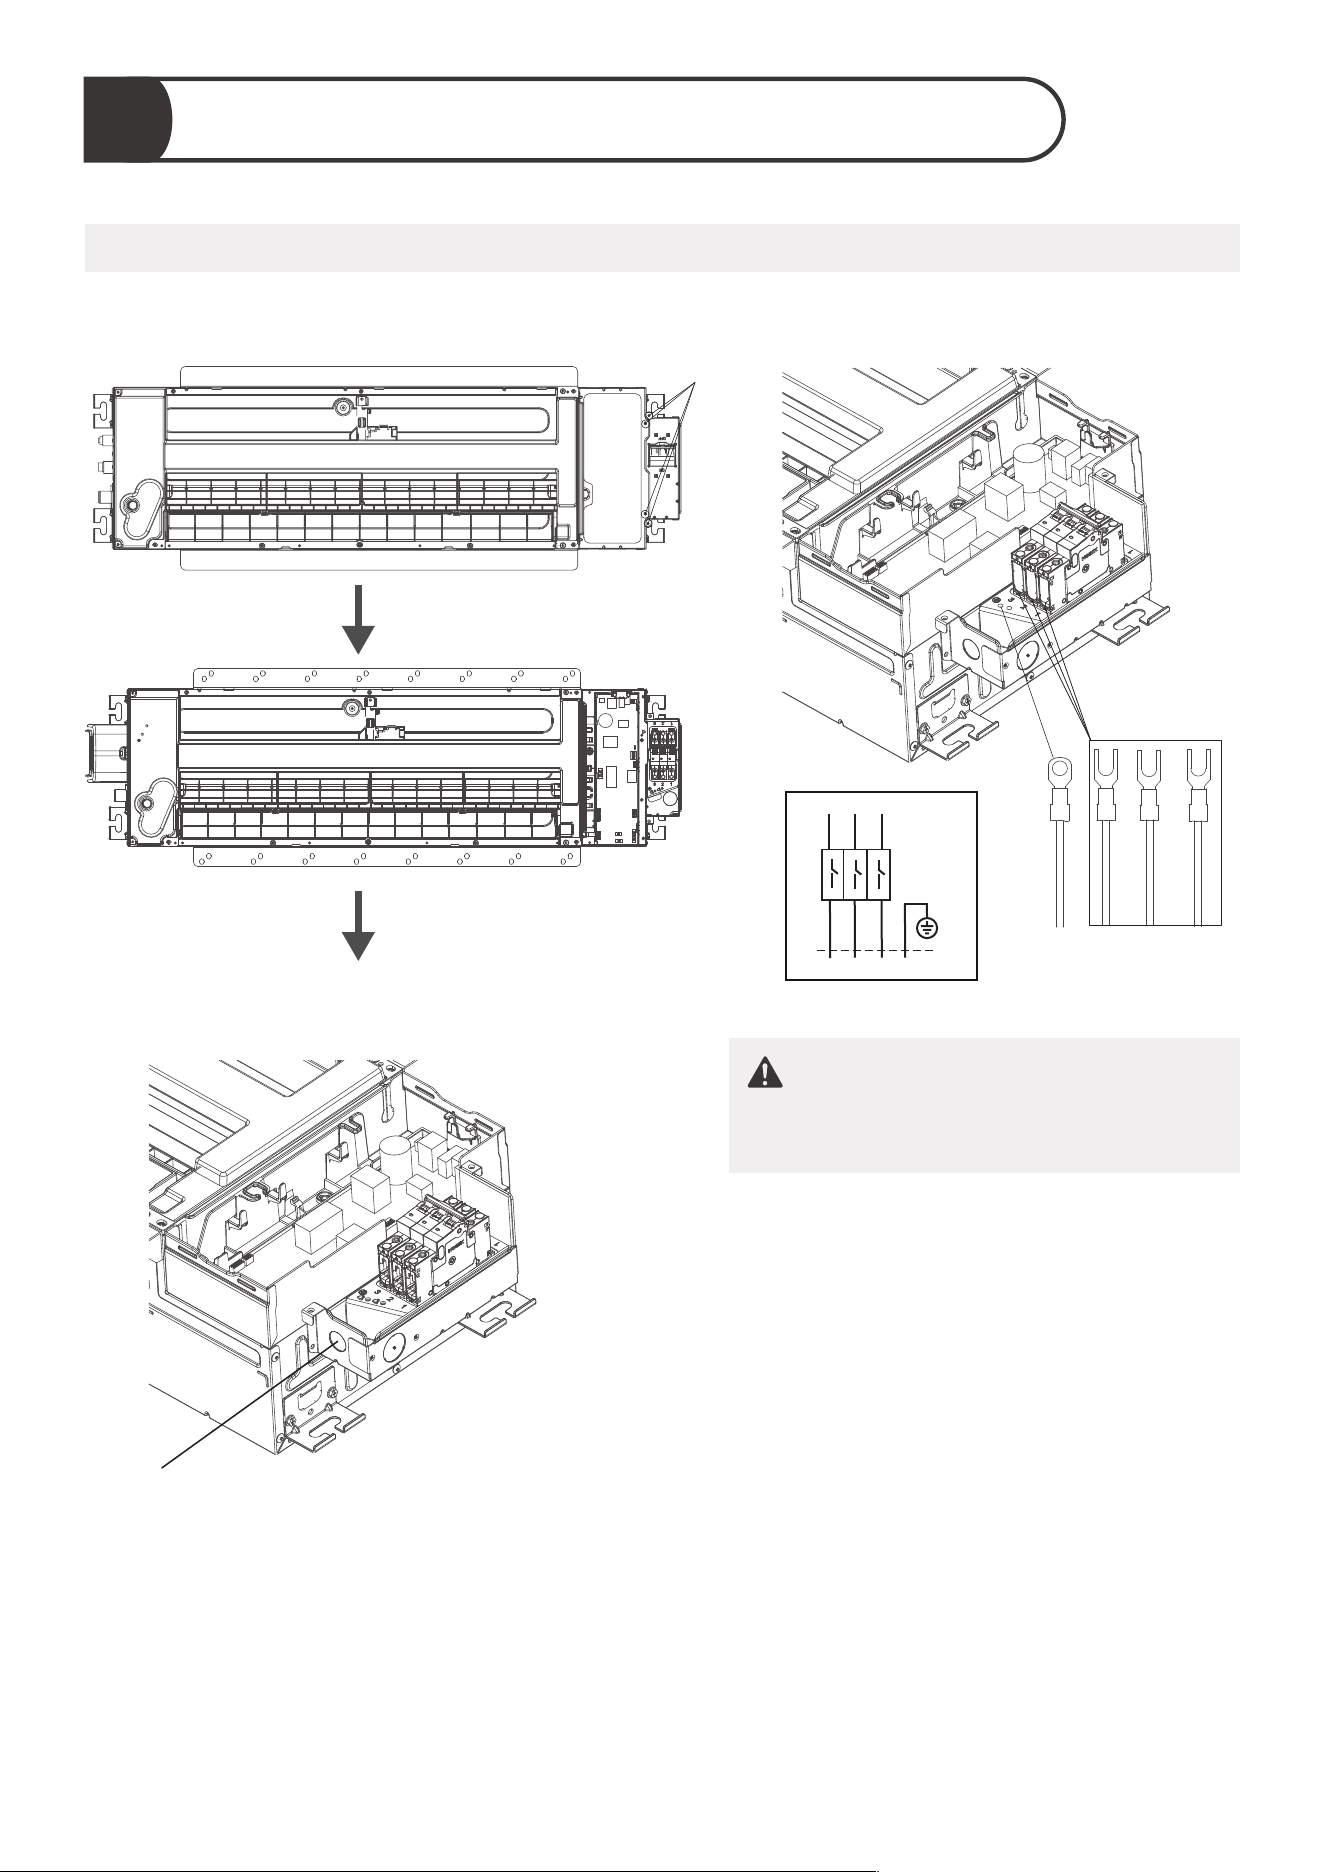
Indoor parts installation size
16.65in (423mm)
13.19in (335mm)
8.07in (205mm)
43.5in (1105mm)
9.84in (250mm)
53.54in (1360mm)
18.4in (475mm)
Perspective BPerspective A
14
3
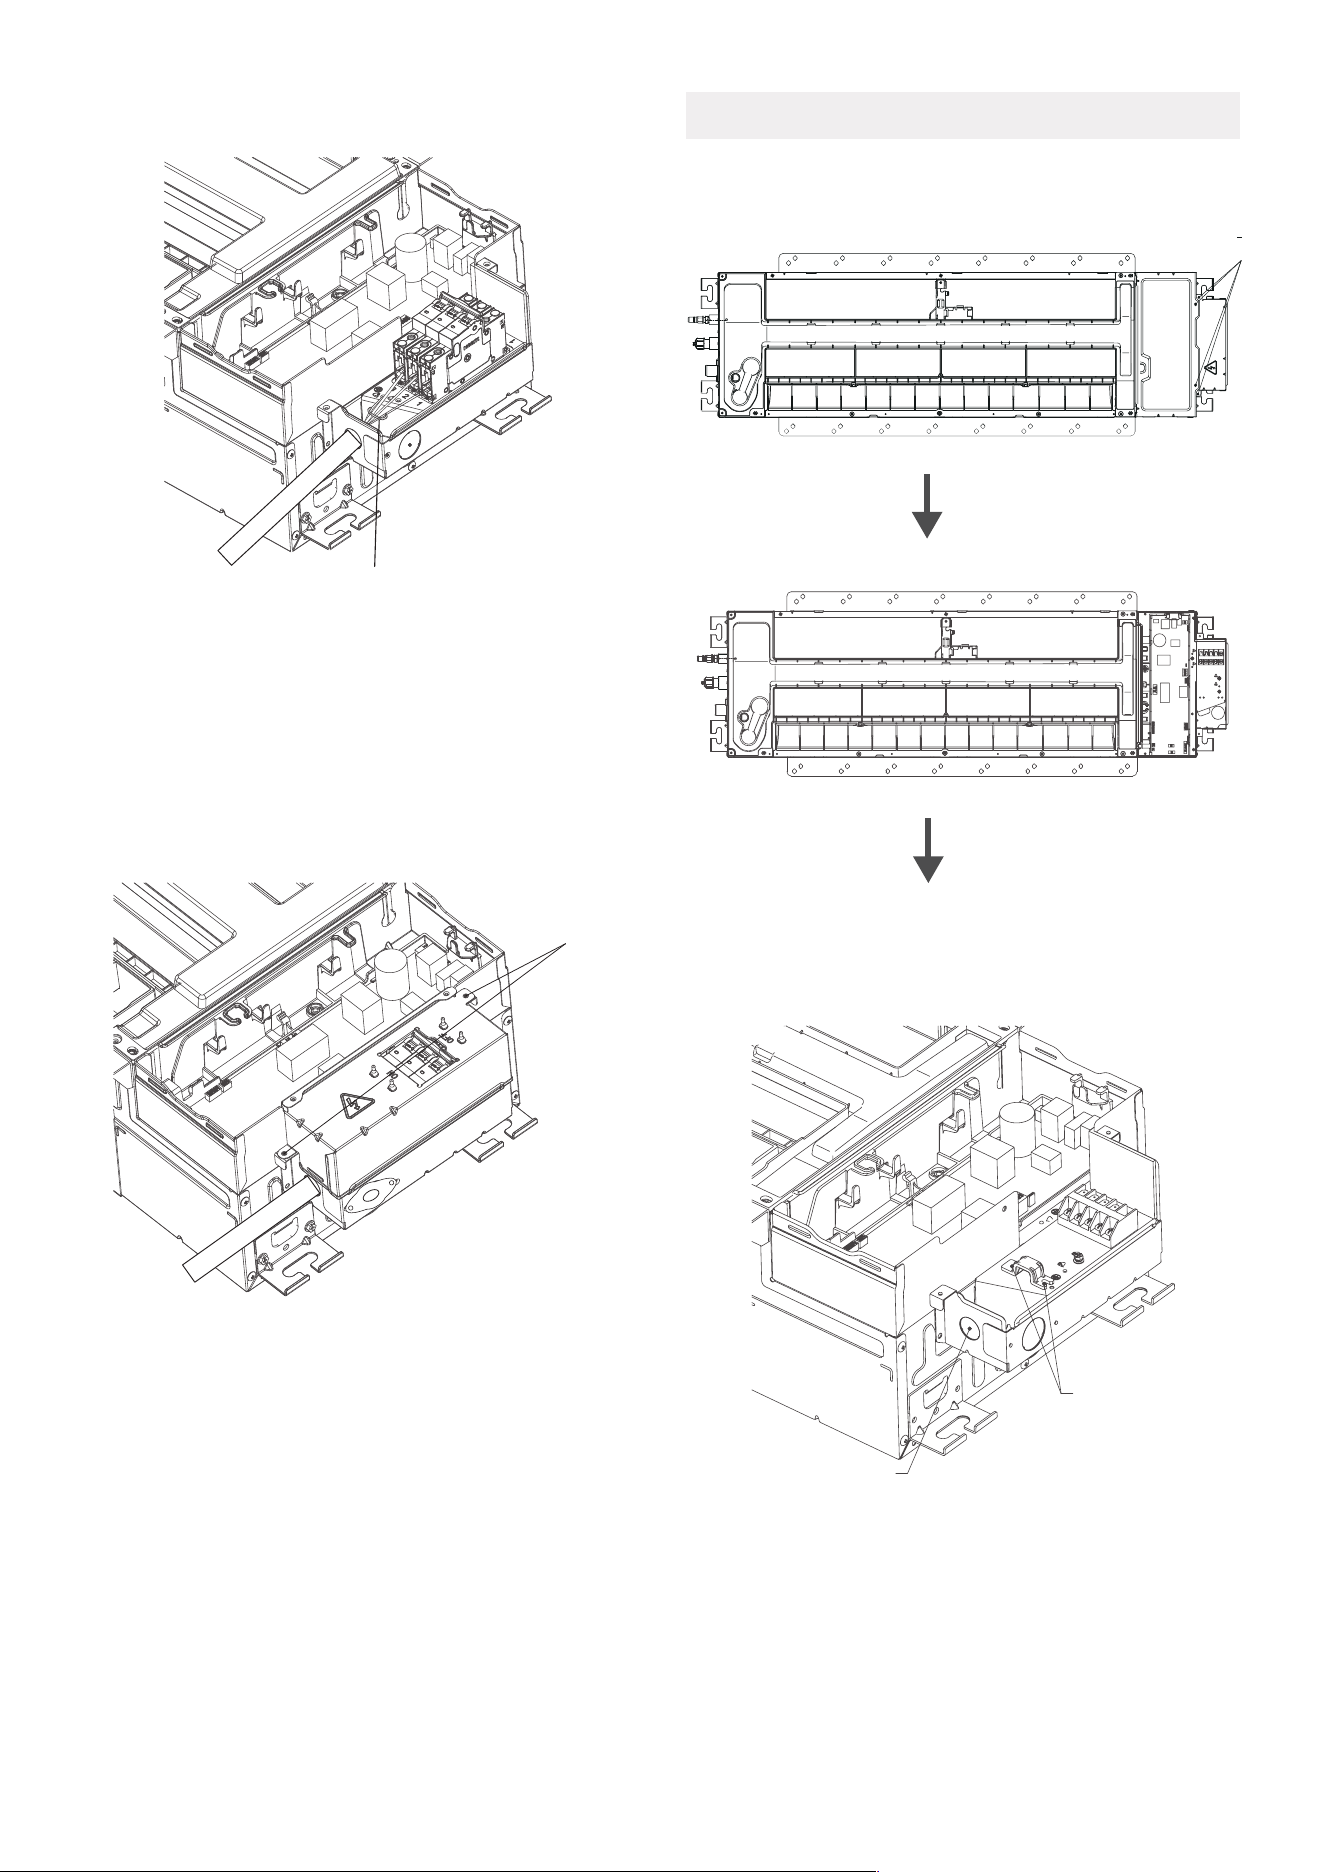
Indoor Unit Installation
Make sure that only specified components are used for the installation works.
Model A: with circuit breaker
●
Remove the four screws to open the indoor
control box and circuit breaker box.
Four
screws
●
Remove the pre-cutting cover on the circuit
breaker box.
Pre-cutting cover
●
Connect the wire to the air breaker according
to the wire connecting diagram.
WARNING
The ground wire should be tightened firmly
without loosening.
3
2
1
TO OUTDOOR UNIT
TO INDOOR UNIT MAIN BOARD
1
2
3
Y/G
Circuit
Breaker
15
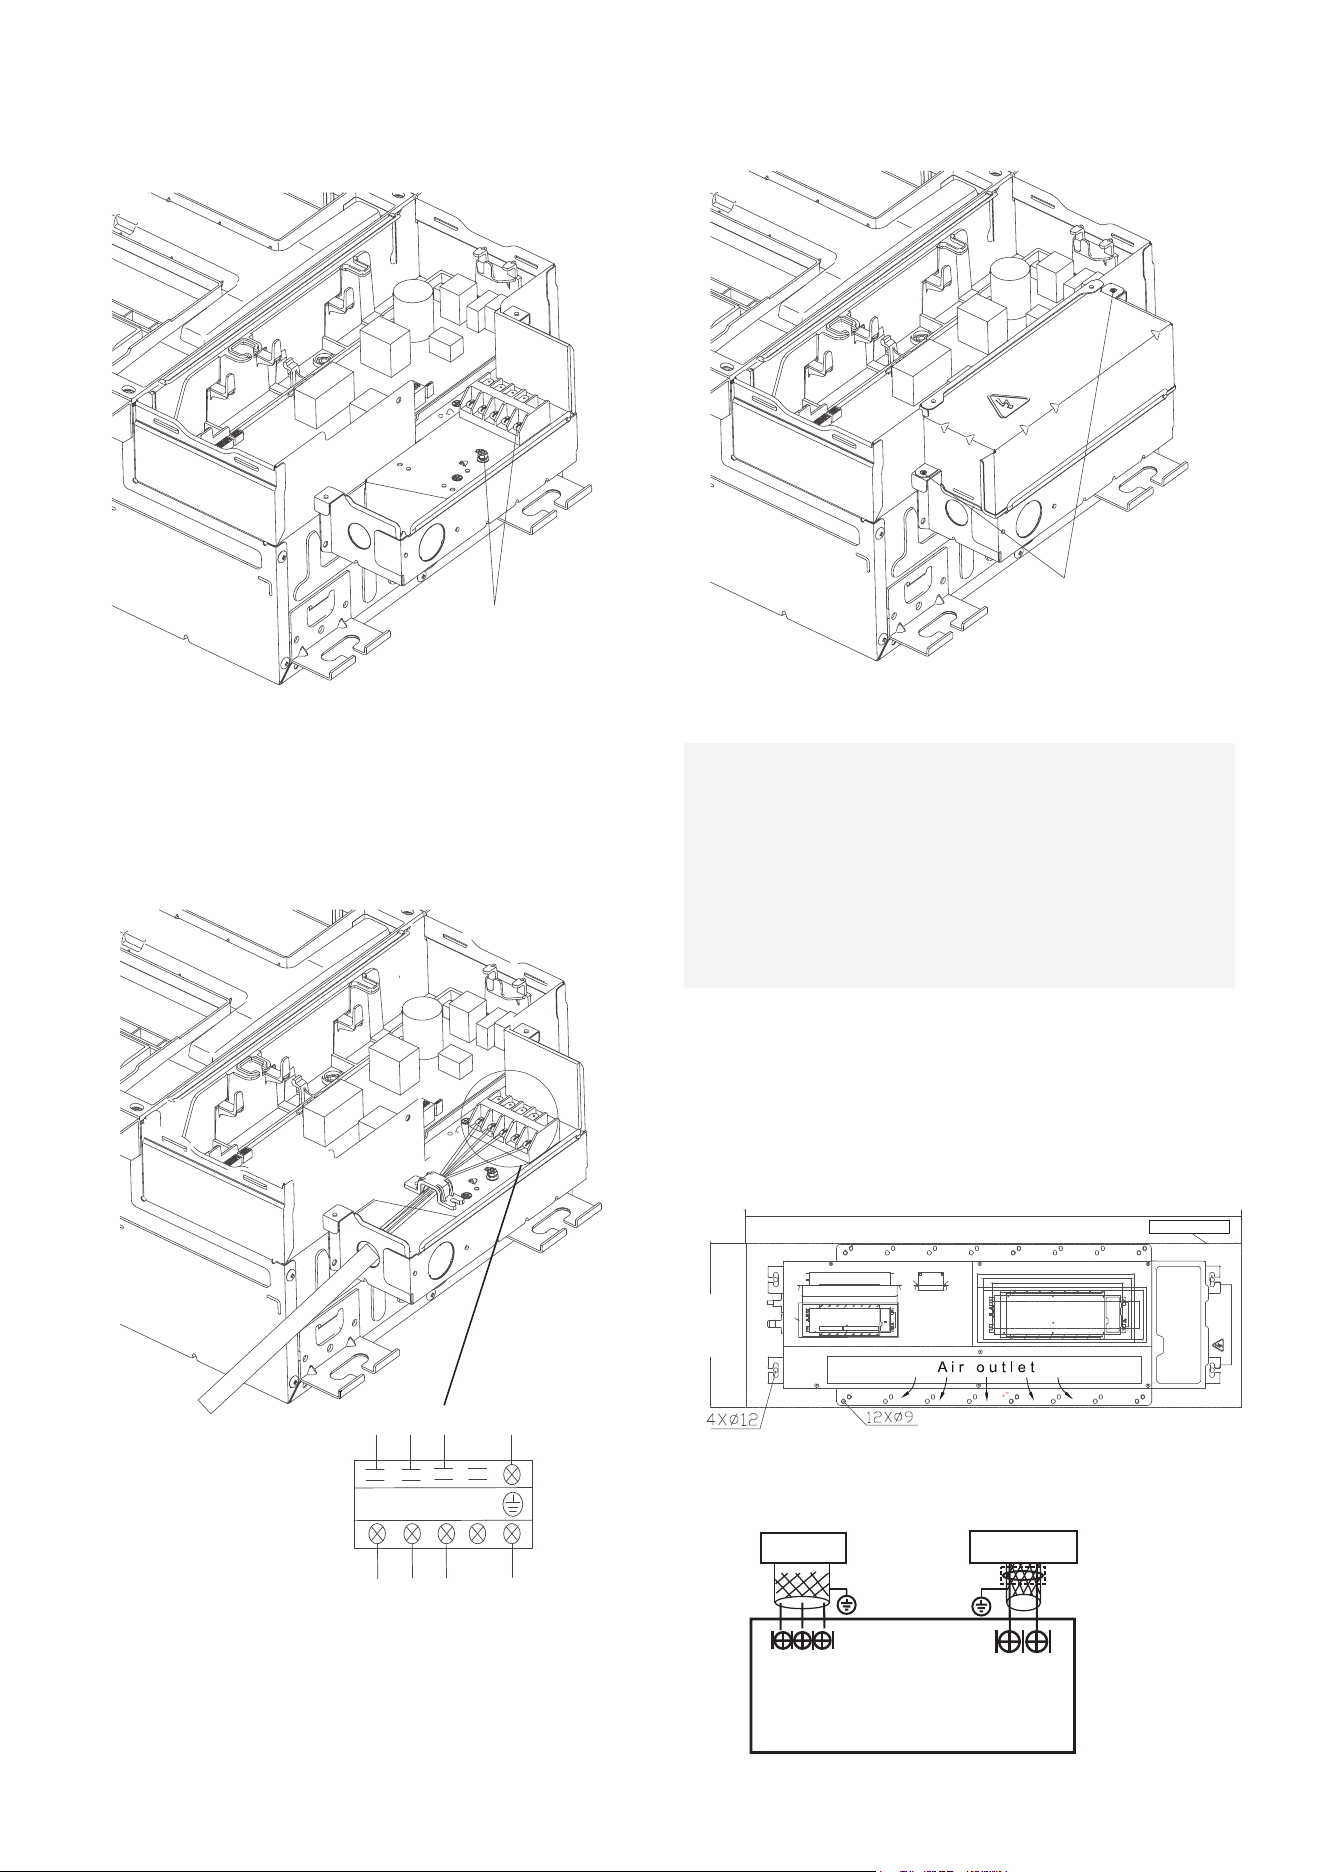
●
Fasten and fix the wire body with a tie.
Fasten and fix the wire body with a tie
●
Install the circuit breaker cover by fixing the
two screws.
Two screws
●
Remove the four screws to open the indoor
control box and terminal box.
●
Remove the pre-cutting cover on the terminal
box. Remove the two screws, then take out the clip.
Four screws
Pre-cutting cover
Two screws
Model B: with terminal
16
●
Connect the wire to the terminal according to
the wire connecting diagram.
Select one to
connect ground
wire
●
Fix the wire with the clip by using the two screws.
●
Install the terminal cover by fixing the two screws.
Two screws
1
2
3
TO OUTDOOR UNIT
TO INDOOR UNIT
●
Connecting the wire from the control box.
MAIN CONTROL
BOARD
E
Y X
CN 41
HB HA
MAGNETIC RING
NON-POLARITY
WIRED-CONTROLLER
To CCM
Comm.Bus
CN3
2. Install the indoor air handler
●
After you selecting an installation location, drill
a hole with the diameter of 6mm or less into
the roof beam based on the layout of the
installation board (accessory Installation
cardboard template). After drilling the hole,
remove the installation board.
NOTE:
After you have finished installing the main body,
when choosing where to start, determine the
direction of the pipes to be drawn out.
Especially in cases where there is a ceiling
involved, align the refrigerant pipes, drain pipes,
and indoor and outdoor lines with their
connection points before mounting the unit.
Installation cardboard template
16.93in
(430mm)
51.18in (1300mm)
CUTTING LINE
17
WARNING
NOTE:
Be sure to reserve a length of the connecting
wire for periodic maintenance. If there is a
connection lug at the end of shielded wire,
the connection lug should be properly
grounded.
Please follow local regulations and take mea-
sures to isloate high voltage and low voltage.
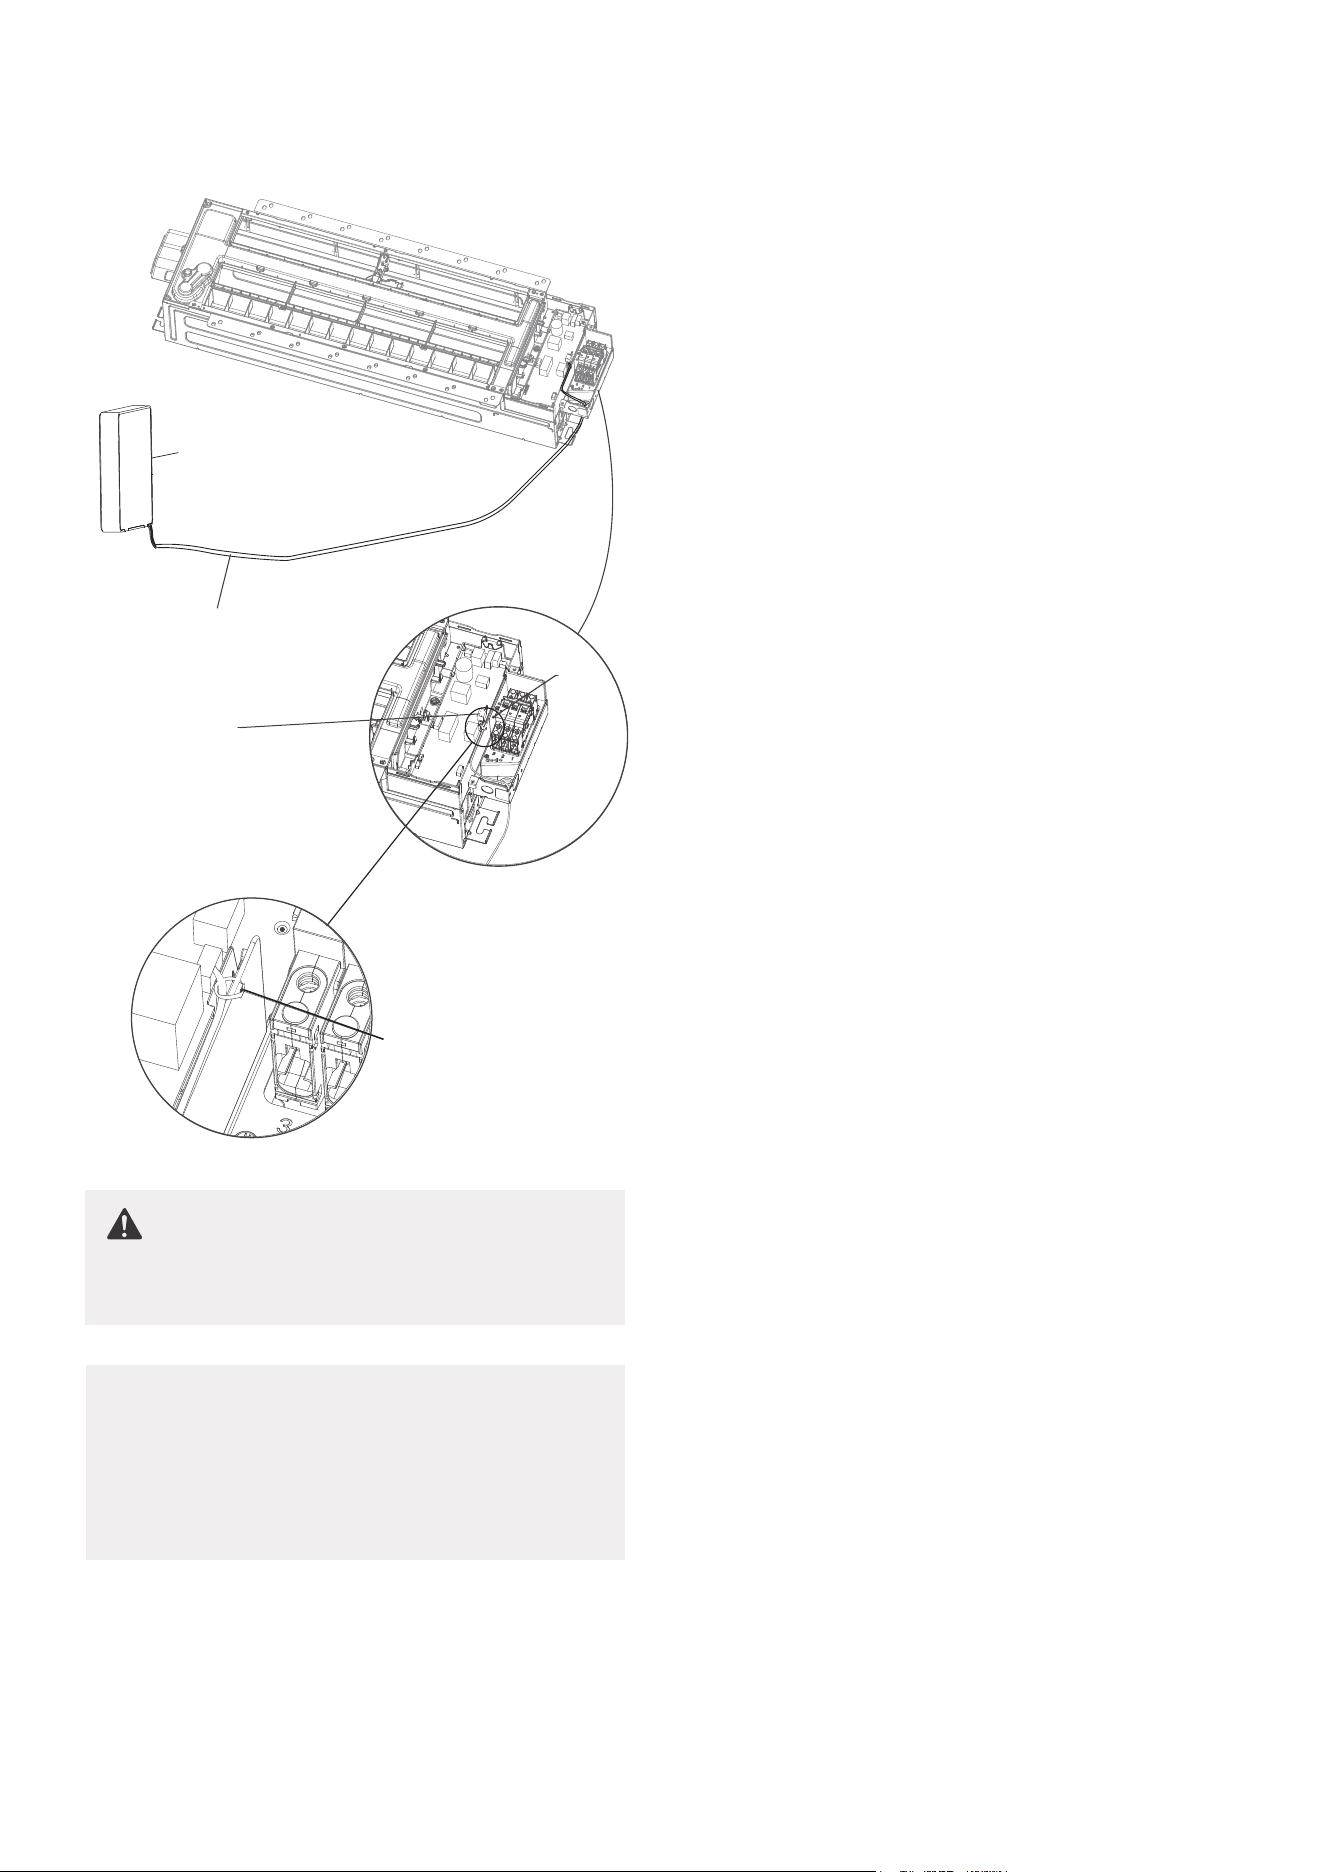
●
Connecting the other side of the connecting
cable to the wired controller.
For ground
wire
CN41 2-core wire
(purchase separately)
Purchase separately
Pass a tie through
the hole to fix wire
Wired
controller
18
Install Your Outdoor Unit
Select installation location
Before installing the outdoor unit, you must choose an appropriate location. The following are
standards that will help you choose an appropriate location for the unit.
Proper installation locations meet the following standards:
Firm and solid—the
location can support the
unit and will not vibrate.
Protected from prolonged periods
of direct sunlight or rain.
Where snowfall is anticipated, take
appropriate measures to prevent
ice buildup and coil damage.
DO NOT install unit in the following locations:
Near an obstacle that will
block air inlets and outlets.
Near a public street, crowded
areas, or where noise from
the unit will disturb others.
Near animals or plants
that will be harmed
by hot air discharge.
Near any source of
combustible gas.
In a location that is exposed to large
amounts of dust
In a location exposed to a excessive
amounts of salty air.
1
NOTE
Install the unit by following local codes and regulations, there may be dier slightly between
dierent regions.
NOTE
: PRIOR TO INSTALLATION
Good air circulation
and ventilation.
Meets all spatial requirements shown in Installation
Clearance Requirements above.
Noise from the unit
will not disturb other
people.
Long-term
Strong
wind
Strong
wind
Strong
wind
Wind Baffle
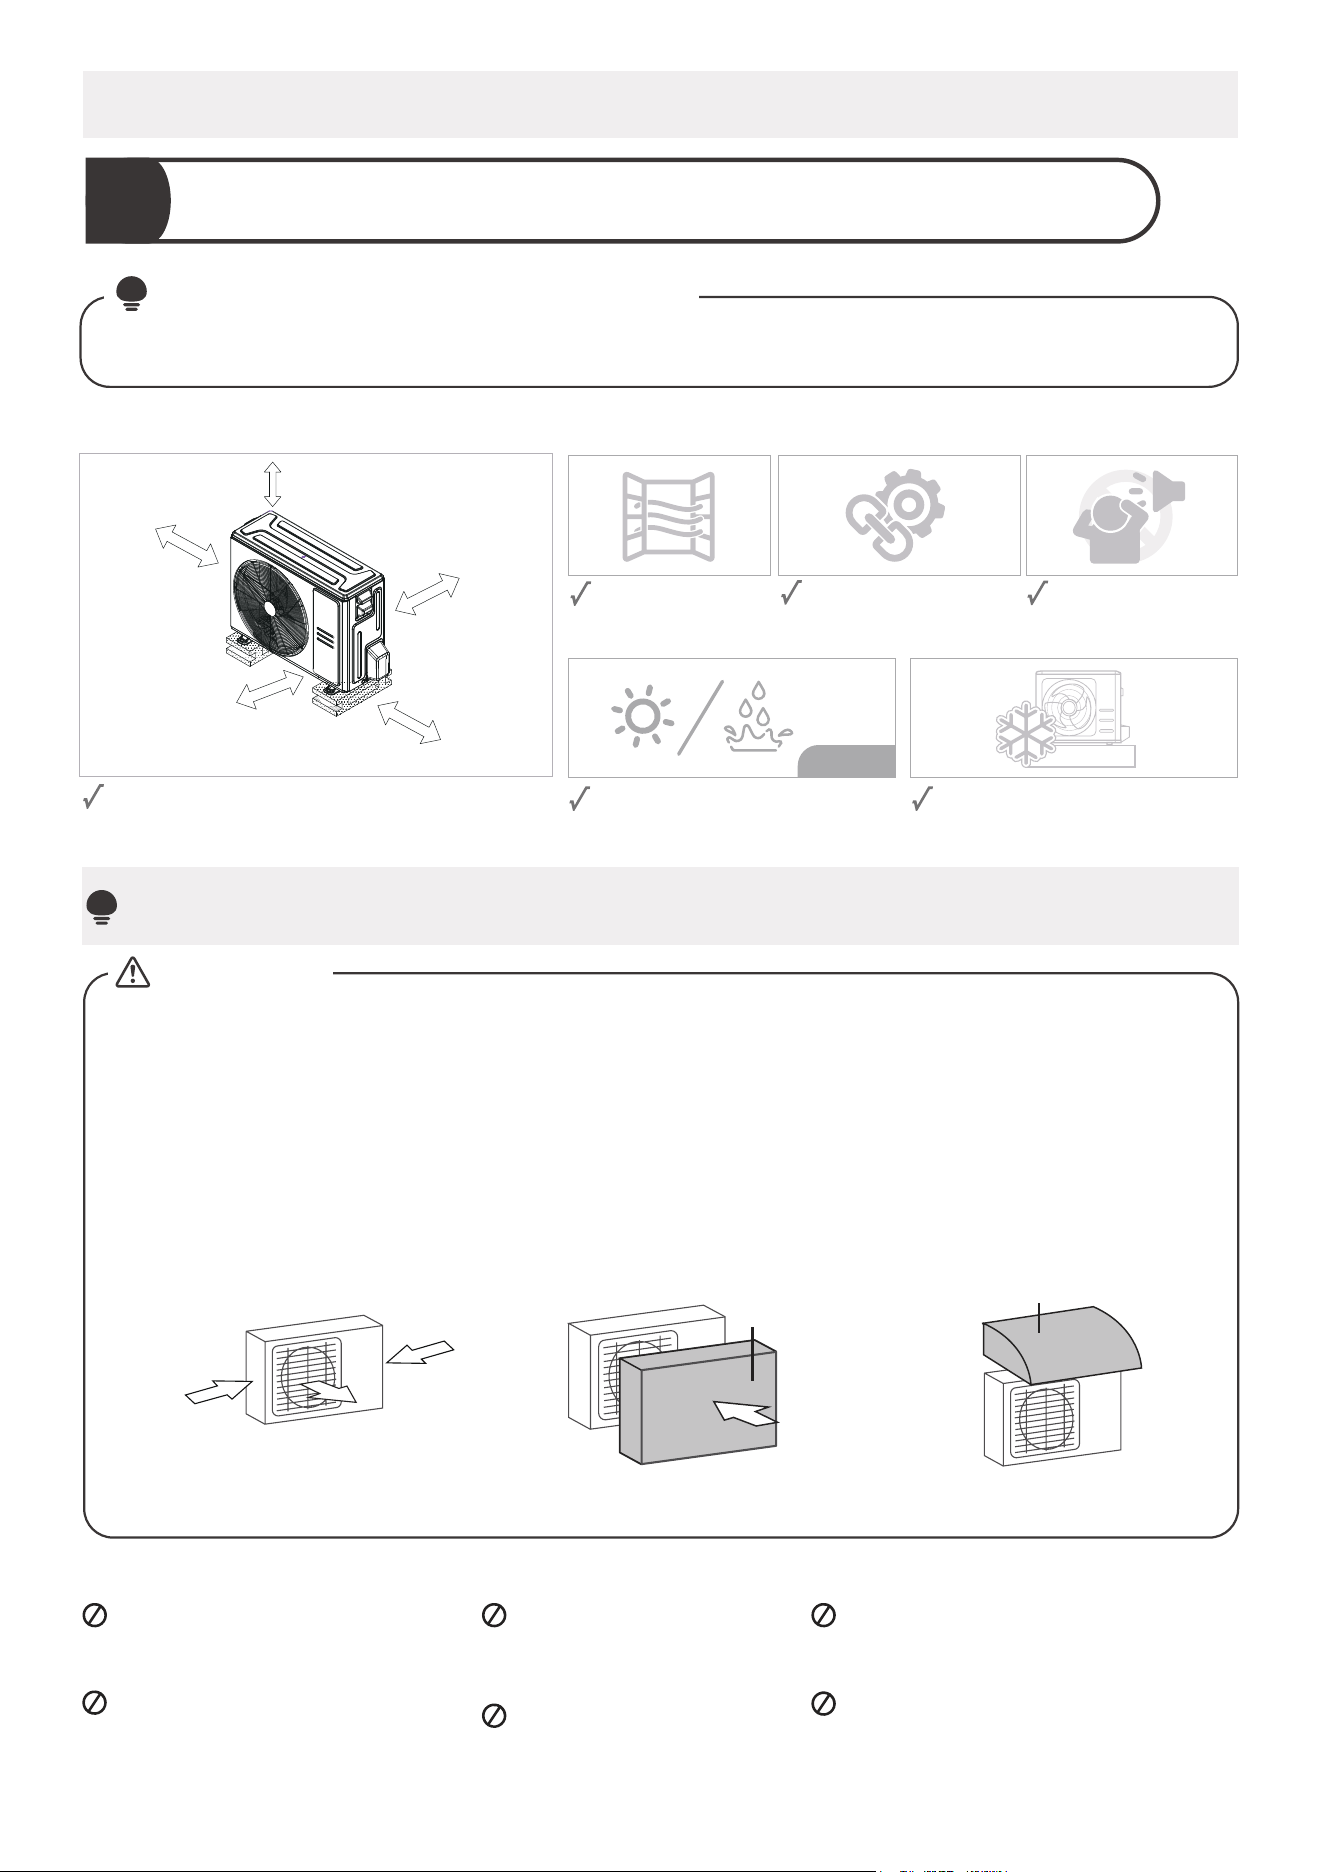
If the unit is frequently exposed to heavy rain or snow:
Build a shelter above the unit to protect it from the rain or snow. Be careful not to obstruct air flow
around the unit.
If the unit is frequently exposed to salty air(seaside):
Use outdoor unit that is specially designed to resist corrosion.
90° angle to the
direction of the wind
Build a wind Bae
to protect the unit
Build a shelter
to protect the unit
If the unit is exposed to heavy wind:
Install unit so that air outlet fan is at a 90° angle to the direction of the wind. If needed, build a barrier
in front of the unit to protect it from extremely heavy winds. See Figures below.
CAUTION:
SPECIAL CONSIDERATIONS FOR EXTREME WEATHER
Shelter
4in (100mm)
or more
20in (500mm) or more when front
and sides of the unit are clear
14in (350mm)
or more
4in (100mm)
or more
20in (500mm)
or more
when any 2
sides of left, right
and rear of the unit
are clear
19
IN COLD CLIMATES
In cold climates, make sure that the drain hose is as vertical as possible to ensure swift water drainage.
If water drains too slowly, it can freeze in the hose and flood the unit.
Install drain joint2
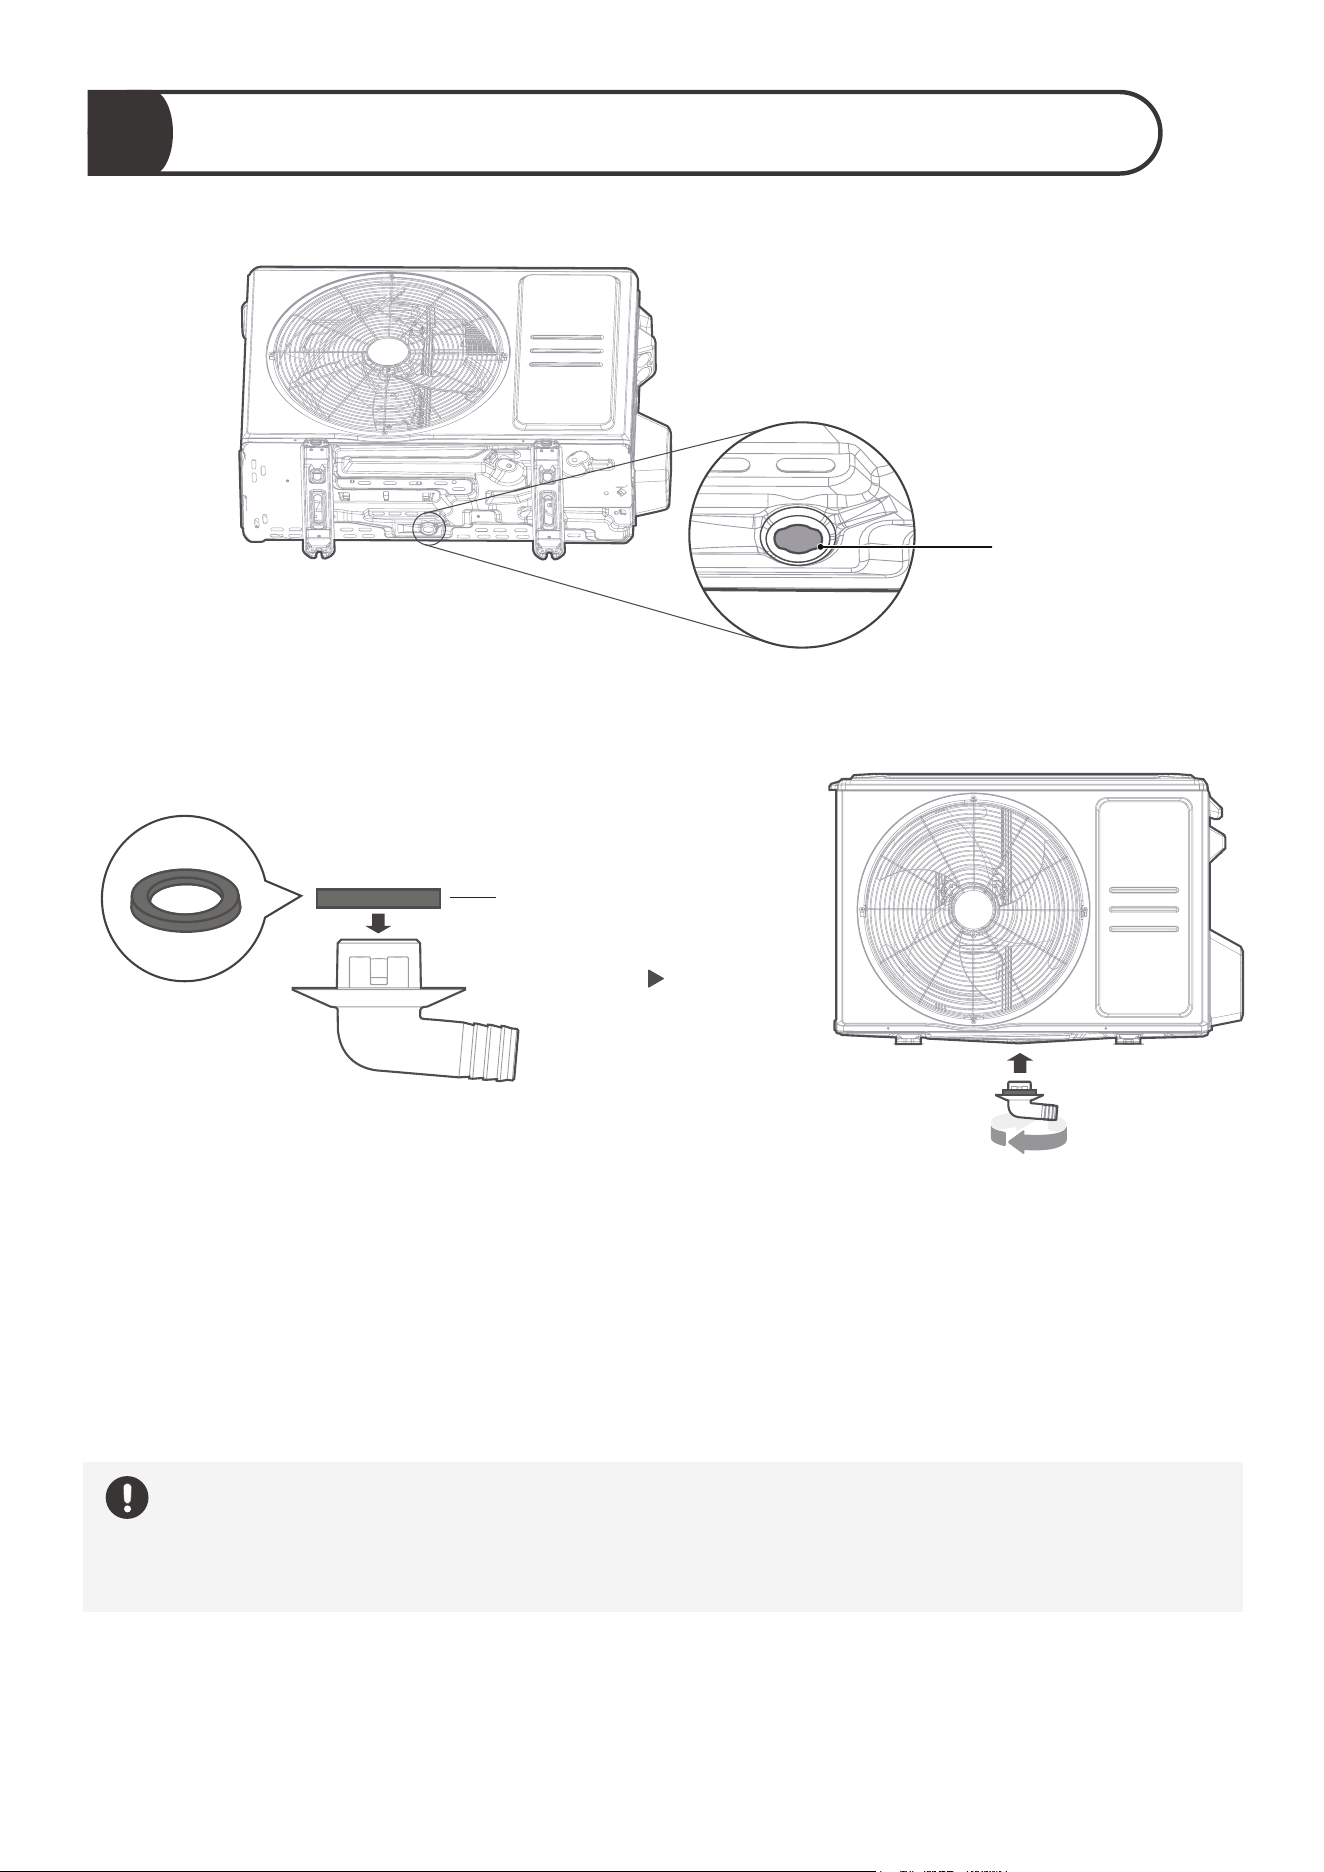
Seal
Base pan hole of
outdoor unit
Fit the rubber seal on the end of the drain joint that will connect to the
outdoor unit.
Insert the drain joint into the hole in the base pan of the unit. The drain joint
will click in place.
Connect a drain hose extension (not included) to the drain joint to redirect
water from the unit during heating mode.
●
●
●
Find out the base pan hole of outdoor unit.
Step 1:
Step 2:
20
Outdoor Unit Types and Specifications (Split Type Outdoor Unit)
Anchor Outdoor Unit
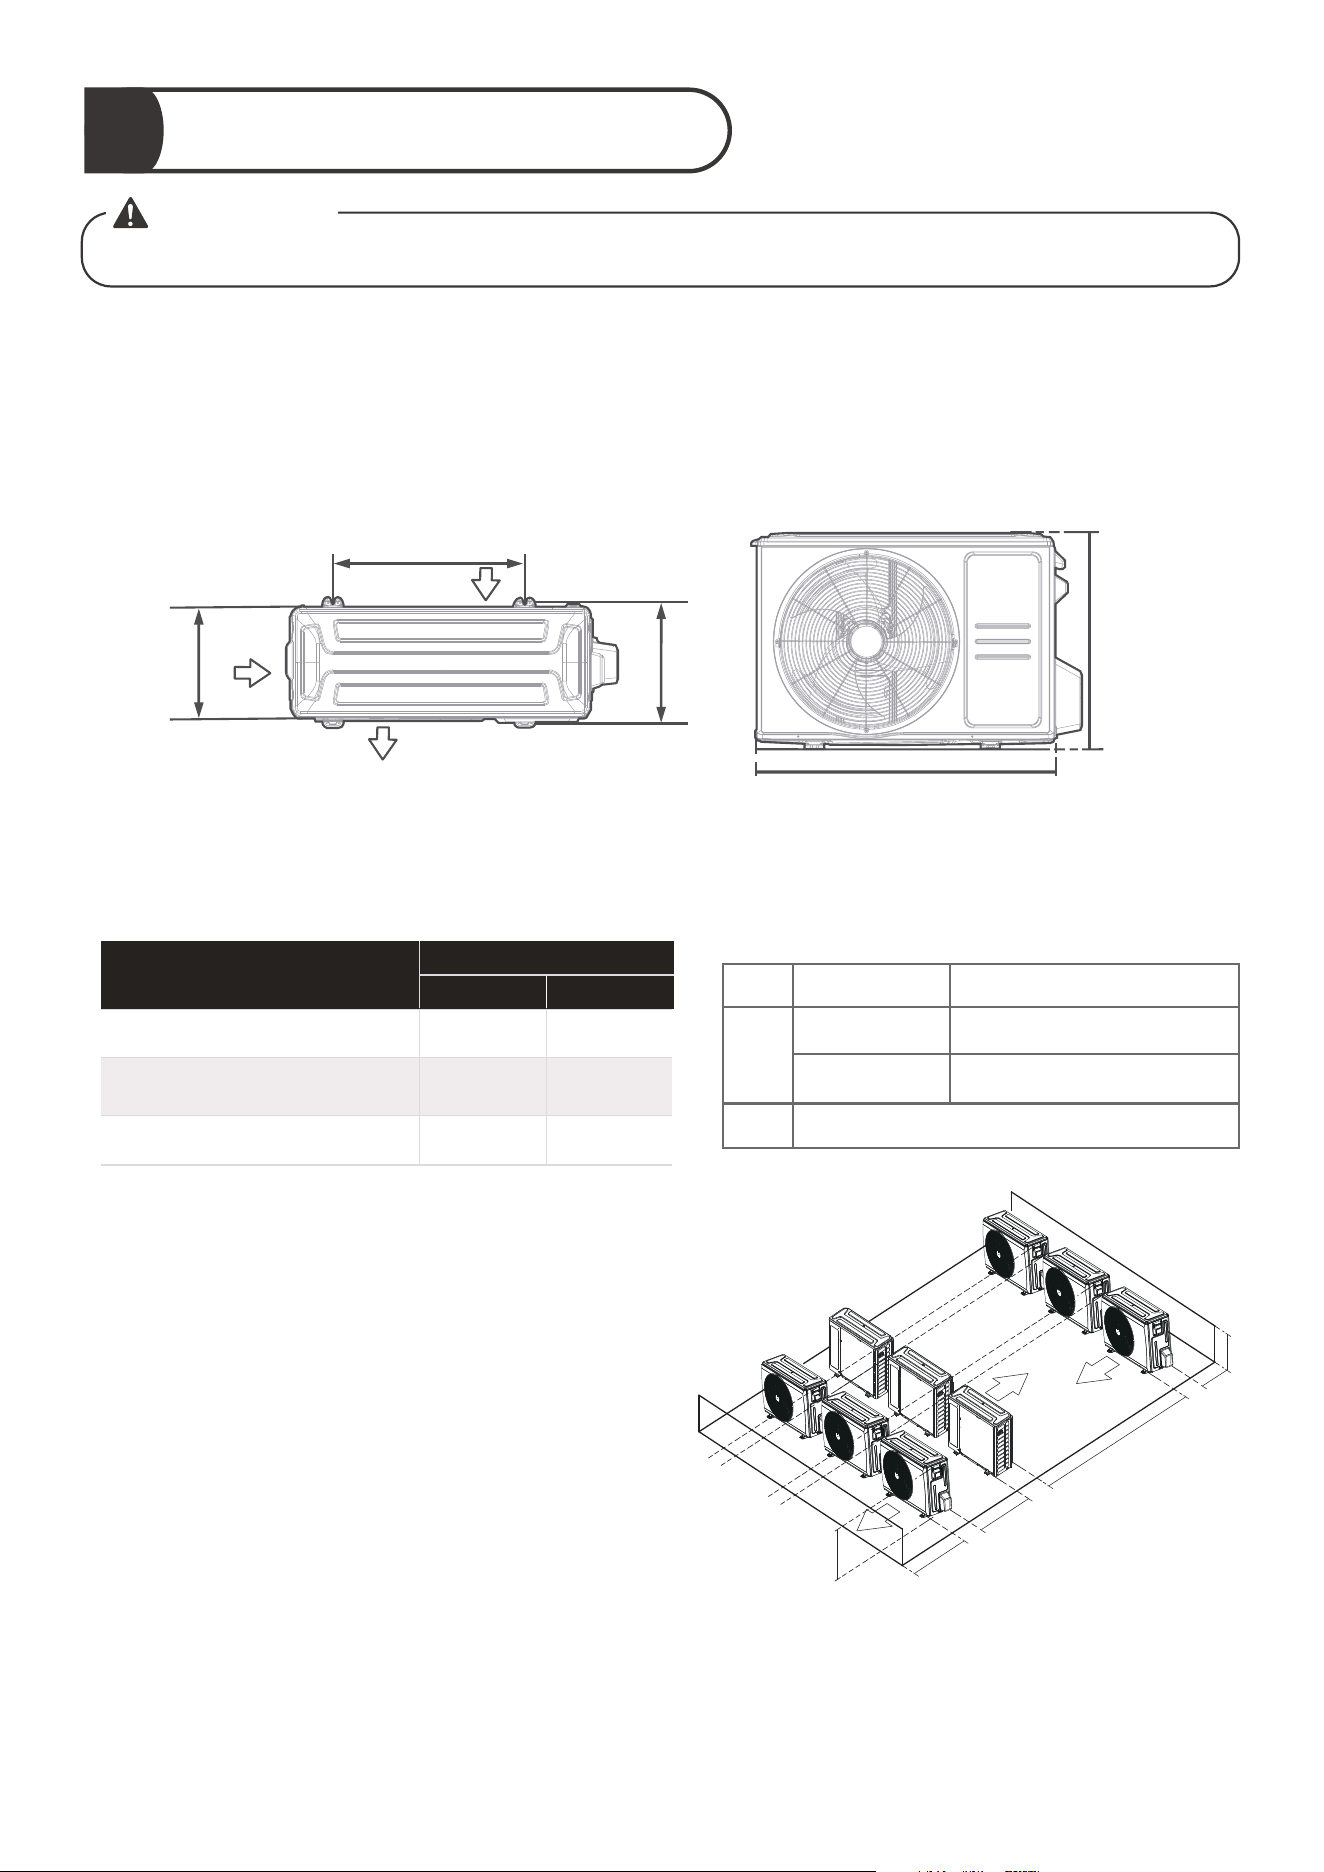
3
The outdoor unit can be anchored to the ground or to a wall-mounted bracket with bolt(M10). Prepare
the installation base of the unit according to the dimensions below.
The following is a list of dierent outdoor unit sizes and the distance between their mounting feet.
Prepare the installation base of the unit according to the dimensions below.
WARNING
WHEN DRILLING INTO CONCRETE, EYE PROTECTION IS RECOMMENDED AT ALL TIME.
●
●
W
H
Top view Front view
D
A
B
Air inlet
Air inlet
Air outlet
Rows of series installation
L ≤ H
L ≤ 1/2H
L A
9.8in (25cm) or more
1/2H < L ≤ H 11.8in (30cm) or more
L > H
Can not be installed
The relations between H, A and L are as follows.
L
H
118in(300 cm) or more
A
23.6in(60 cm)
or more
59in(150 cm)
or more
9.8in(25 cm)
or more
9.8in(25 cm)
or more
NOTE
H: Unit height
L: Height of the wall behind the unit
A: Distance between unit and wall
30.1inx21.8inx11.9in
(765mmx555mmx303mm)
17.8 in
(452mm)
11.3 in
(286mm)
31.7inx21.8inx12.9in
(805mmx554mmx330mm)
35.0inx26.5inx13.5in
(890mmx673mmx342mm)
20.1 in
(511mm)
12.5 in
(317mm)
Outdoor Unit Dimensions
W x H x D
Mounting Dimensions
Distance A Distance B
26.1 in
(663mm)
13.9 in
(354mm)
21
1. Mark the position of the bracket holes based on the dimensions in the Mounting Dimensions chart on the
previous page.
2.Pro-drill the holes for the expansion bolts.
3.Clean dust and debris away from the holes.
4.Place a washer and nut on the end of each expansion bolt.
5.Thread expansion bolts through the holes in the mounting brackets.Then,put the mounting brackets in
position and hammer the expansion bolts into the wall.
6.Check that the mounting brackets are level.
7.If the feet of the outdoor unit have rubber pads already installed , and you are using a local dealer’s
wall-mounting bracket,remove them before attempting to mount the condenser to the bracket.The
mounting bracket has rubber isolating pads on it that will take the place of these.
8.Carefully lift the unit and place its mounting feet on the brackets.
9.Then,bolt the unit firmly to the brackets.
If you are installing the outdoor unit on the ground,or a concrete mounting platform,use the
following steps:
1. Mark the positions for four expansion bolts based on dimensions in the Mounting Dimensions
chart and illustrations above.
2.Pre-drill holes for expansion bolts.
3.Clean concrete dust away from the holes.
4.Place a nut on the end of each expansion bolt.
5.Hammer expansion bolts into the pre-drilled holes.
6.Remove the nuts from the expansion bolts,and place outdoor unit on bolts.
7.Put a washer on each of the expansion bolts,then reinstall the nuts.
8.Using a wrench,tighten each nut until snug.
WARNING
WHEN DRILLING INTO CONCRETE,EYEPROTECTION IS RECOMMENDED AT ALL TIMES.
TO REDUCE VIBRATION OF WALL-MOUNTED UNIT
If allowed, you can install the wall-mounted unit with rubber gaskets to reduce
vibration and noise.
If you are installing the unit on a wall-mounted bracket, follow these steps:
Before installing a wall-mounted unit,make sure that the wall is made of solid brick, concrete,or a
similarly strong material. The wall must be able to support at least 4 times the weight of the unit.
CAUTION:
22
Drainpipe Installation
The drainpipe is used to drain water away from the unit. Improper installation may cause unit and
property damage.
•
Insulate all piping to prevent condensation, which could lead to water damage.
• If the drainpipe is bent or installed incorrectly, water may leak and cause a water-level switch
malfunction.
•
In HEAT mode, the outdoor unit will discharge water. Ensure that the drain hose is placed in an
appropriate area to avoid water damage and slippage.
• DO NOT pull the drainpipe forcefully. This could disconnect it.
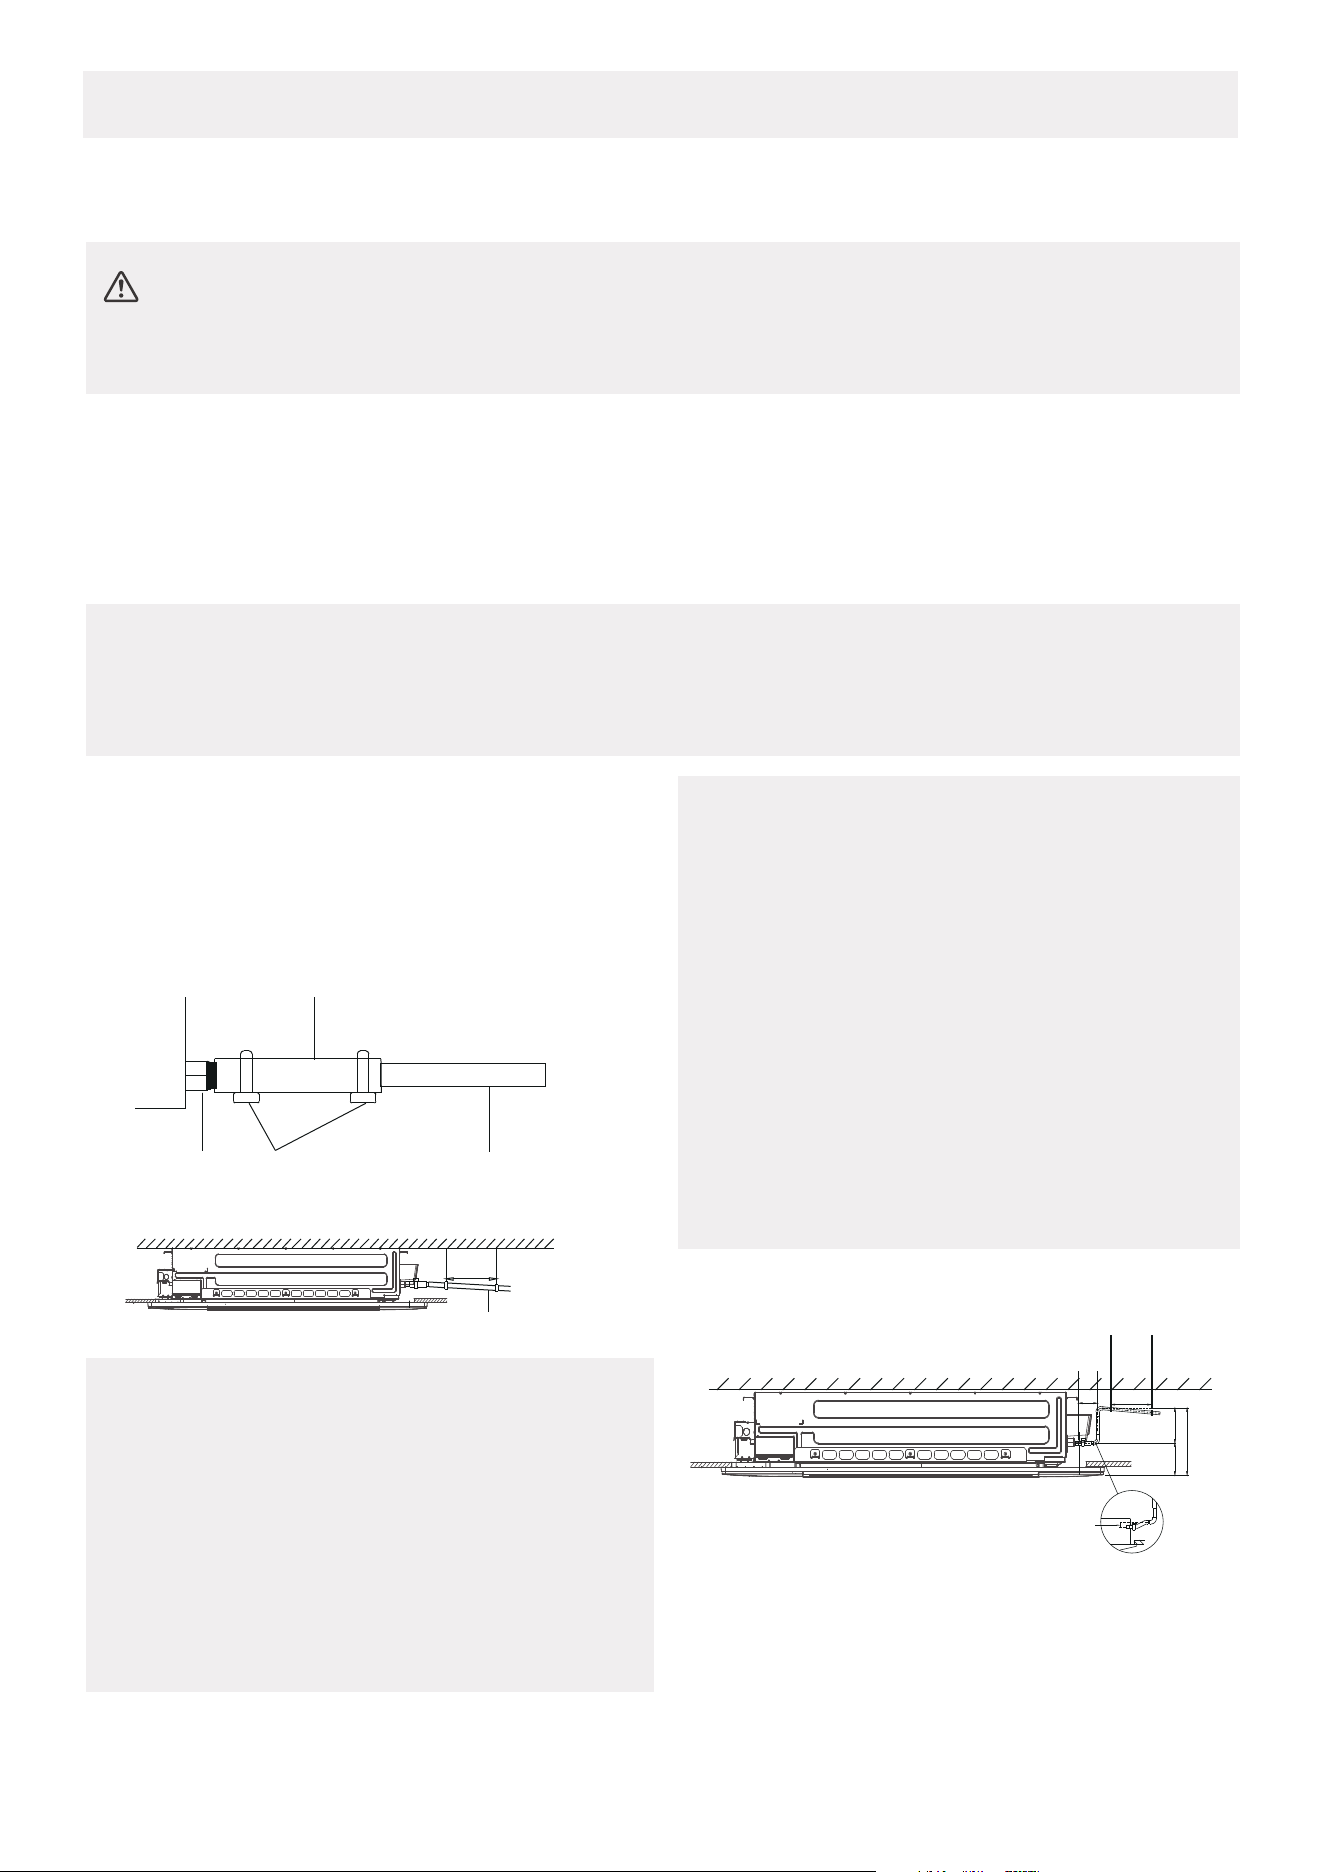
Indoor Drainpipe Installation
Install the drainpipe as illustrated in the
following Figure.
Connect drainpipe to the indoor unit via
drain adaptor.
≤29.5in
(75cm)
39-59in
(1 - 1.5m)
3in
(0 - 75mm )
≤11.8in
(30cm)
≤20.8in
(53cm)
8.6in (22cm)
Drainpipe
connecting port
Drainpipe
Drain adaptor
Metal clamp
Downward slope
1/100
1-1.5m
(39-59”)
Before installing a wall-mounted unit,make sure that the wall is made of solid brick, concrete, or a
similarly strong material. The wall must be able to support at least 4 times the weight of the unit.
CAUTION:
NOTE ON PURCHASING PIPES
Installation requires a PVC tube (exterior diameter = 1in (25mm) ) , which can be obtained at your
localhardware store or dealer.
•
•
•
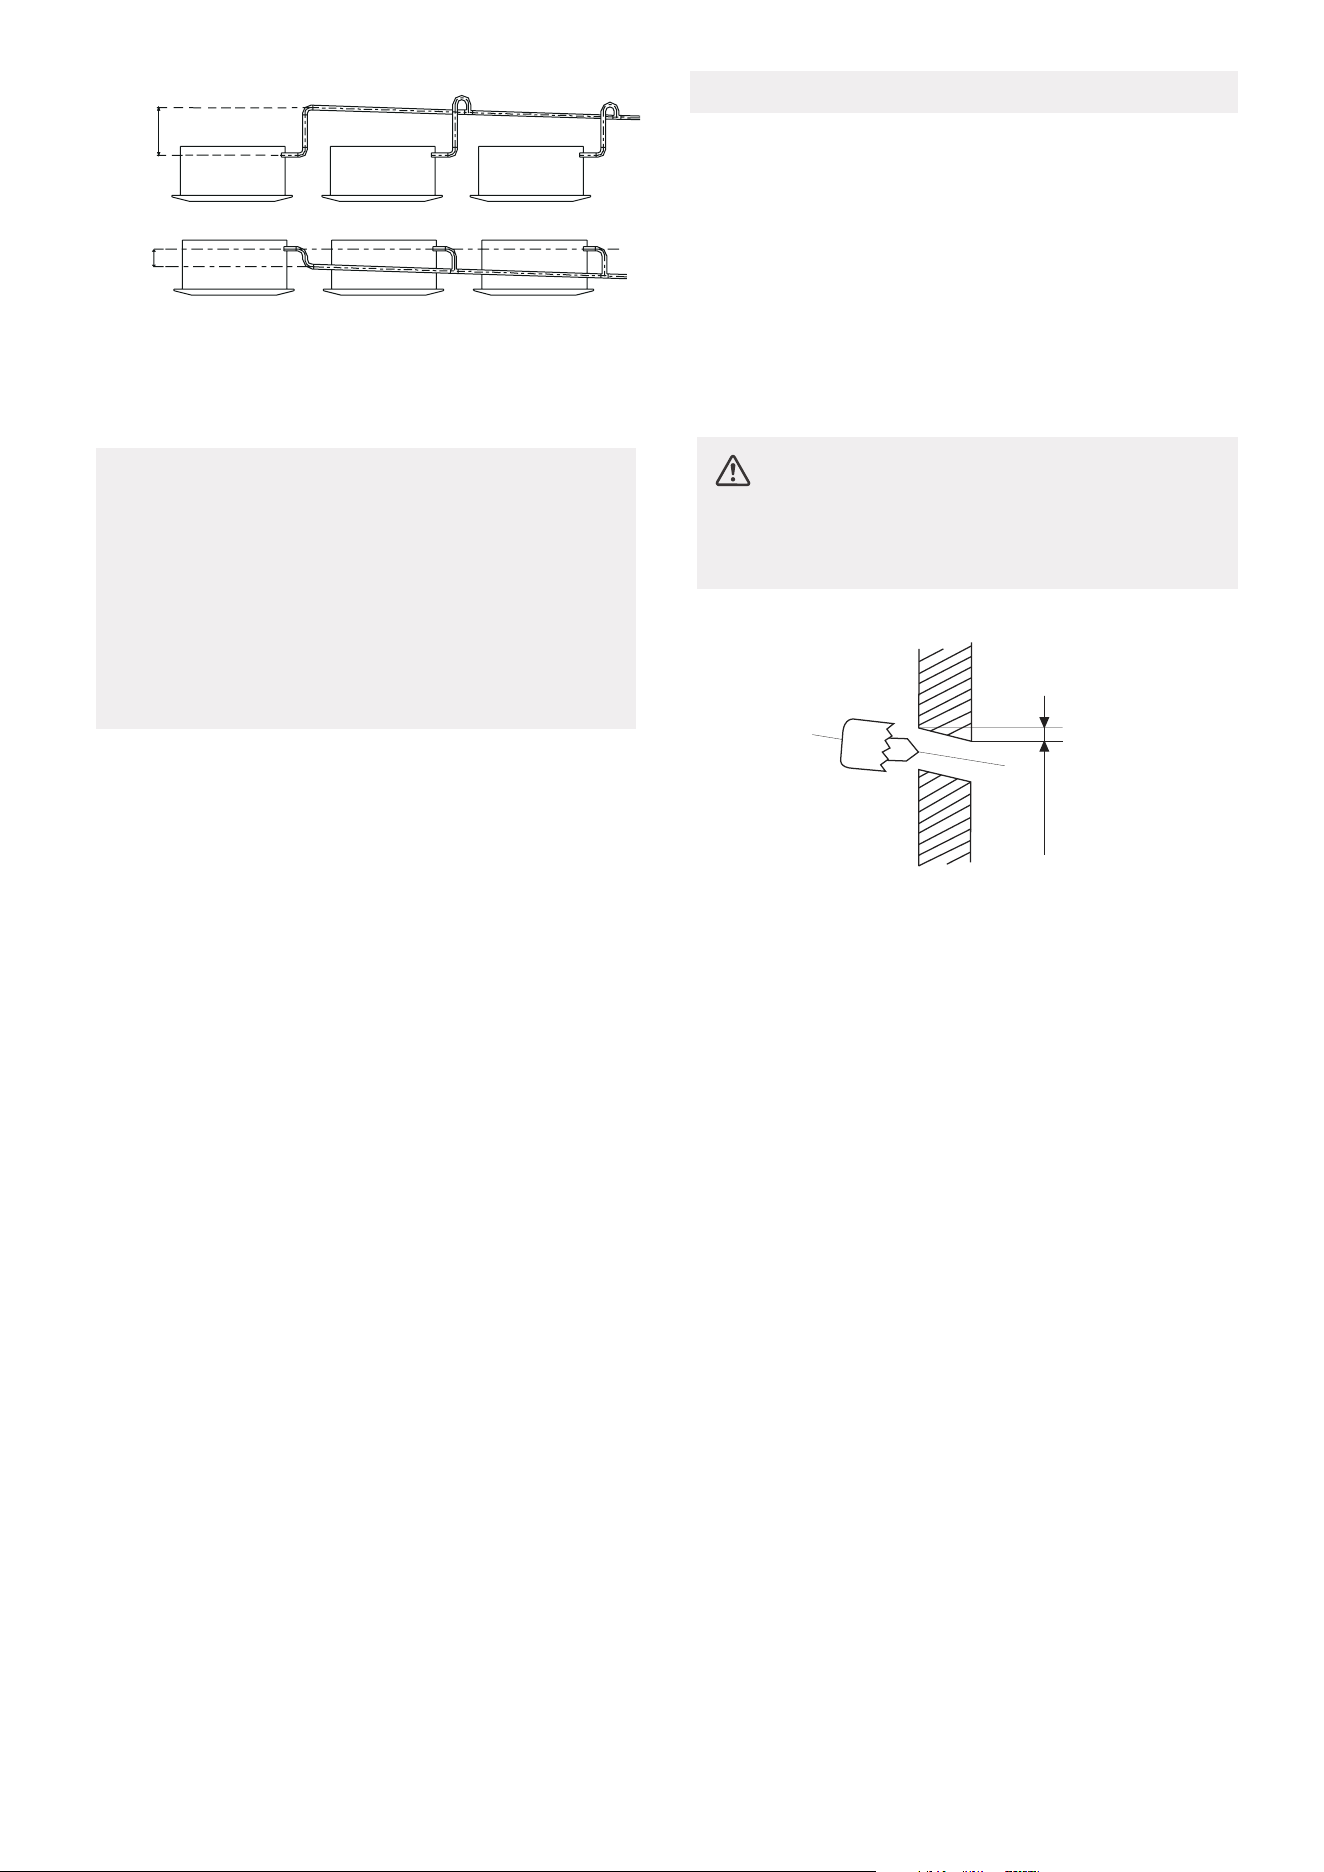
To prevent the pipe from sagging, space
hanging wires every 39-59in (1-1.5m).
If the outlet of the drainpipe is higher than
the body’s pump joint, provide a lift pipe for
the exhaust outlet of the indoor unit. The
lift pipe must be installed no higher than
29.5in (75cm) from the ceiling board and the
distance between the unit and the lift pipe
must be less than 11.8in (30cm) .
Incorrect installation could cause water to
flow back into the unit and flood.
To prevent air bubbles, keep the drain hose
level or slightly tiled up (<3in/75mm).
NOTE ON DRAINPIPE INSTALLATION
•
•
When using an extended drainpipe, tighten
the indoor connection with an additional
protection tube to prevent it from pulling
loose.
The drainpipe should slope downward at a
gradient of at least 1/100 to prevent water
from flowing back into the air conditioner.
23
NOTE
Pass the drain hose through the wall hole. Make
sure the water drains to a safe location where it
will not cause water damage or a slipping hazard.
The drainpipe outlet should be at least
1.9in (50mm) above the ground. If it touches
the ground, the unit may become blocked
and malfunction. If you discharge the water
directly into a sewer, make sure that the
drain has a U or S pipe to catch odors that
might otherwise come back into the house.
20.8in
(0-530mm)
≥4in
(100mm)
Wall
Indoor Outdoor
(5-7mm)
0.2-0.275in
Fig.3.2
1. Using a 2.5in (65mm) or 3.54in (90mm)
core drill, drill a hole in the wall. Make sure that
the hole is drilled at a slight downward angle,
so that the outdoor end of the hole is lower
than the indoor end by about 0.2-0.275in
(5mm-7mm). This will ensure proper water
drainage.
2.
Place the protective wall cu in the hole. This
protects the edges of the hole and will help
seal it when you finish the installation process.
CAUTION:
When drilling the wall hole, make sure to
avoid wires, plumbing, and other sensitive
components.
Drill wall hole
Φ
NOTE: When the gas side connective pipe is
5/8in (16mm) or more, the wall hole should be
3.54in (90mm).
Ensure that the length of the refrigerant pipe, the number of bends, and the drop height between the
indoor and outdoor units meets the requirements shown in the table next to it:
REFRIGERANT PIPING CONNECTION
24
When connecting refrigerant piping, DO NOT
let substances or gases other than the specified
refrigerant enter the unit. The presence of other gases or substances will lower the unit’s capacity,
and can cause abnormally high pressure in the refrigeration cycle. This can cause explosion and
injury.
Notes on pipe length and elevation
The maximum length and drop height based on models.
Model
Length of piping Maximum drop height
6K/9K/12K
18K
82ft/25m
98.4ft/30m
49.2ft/15m
65.6ft/20m
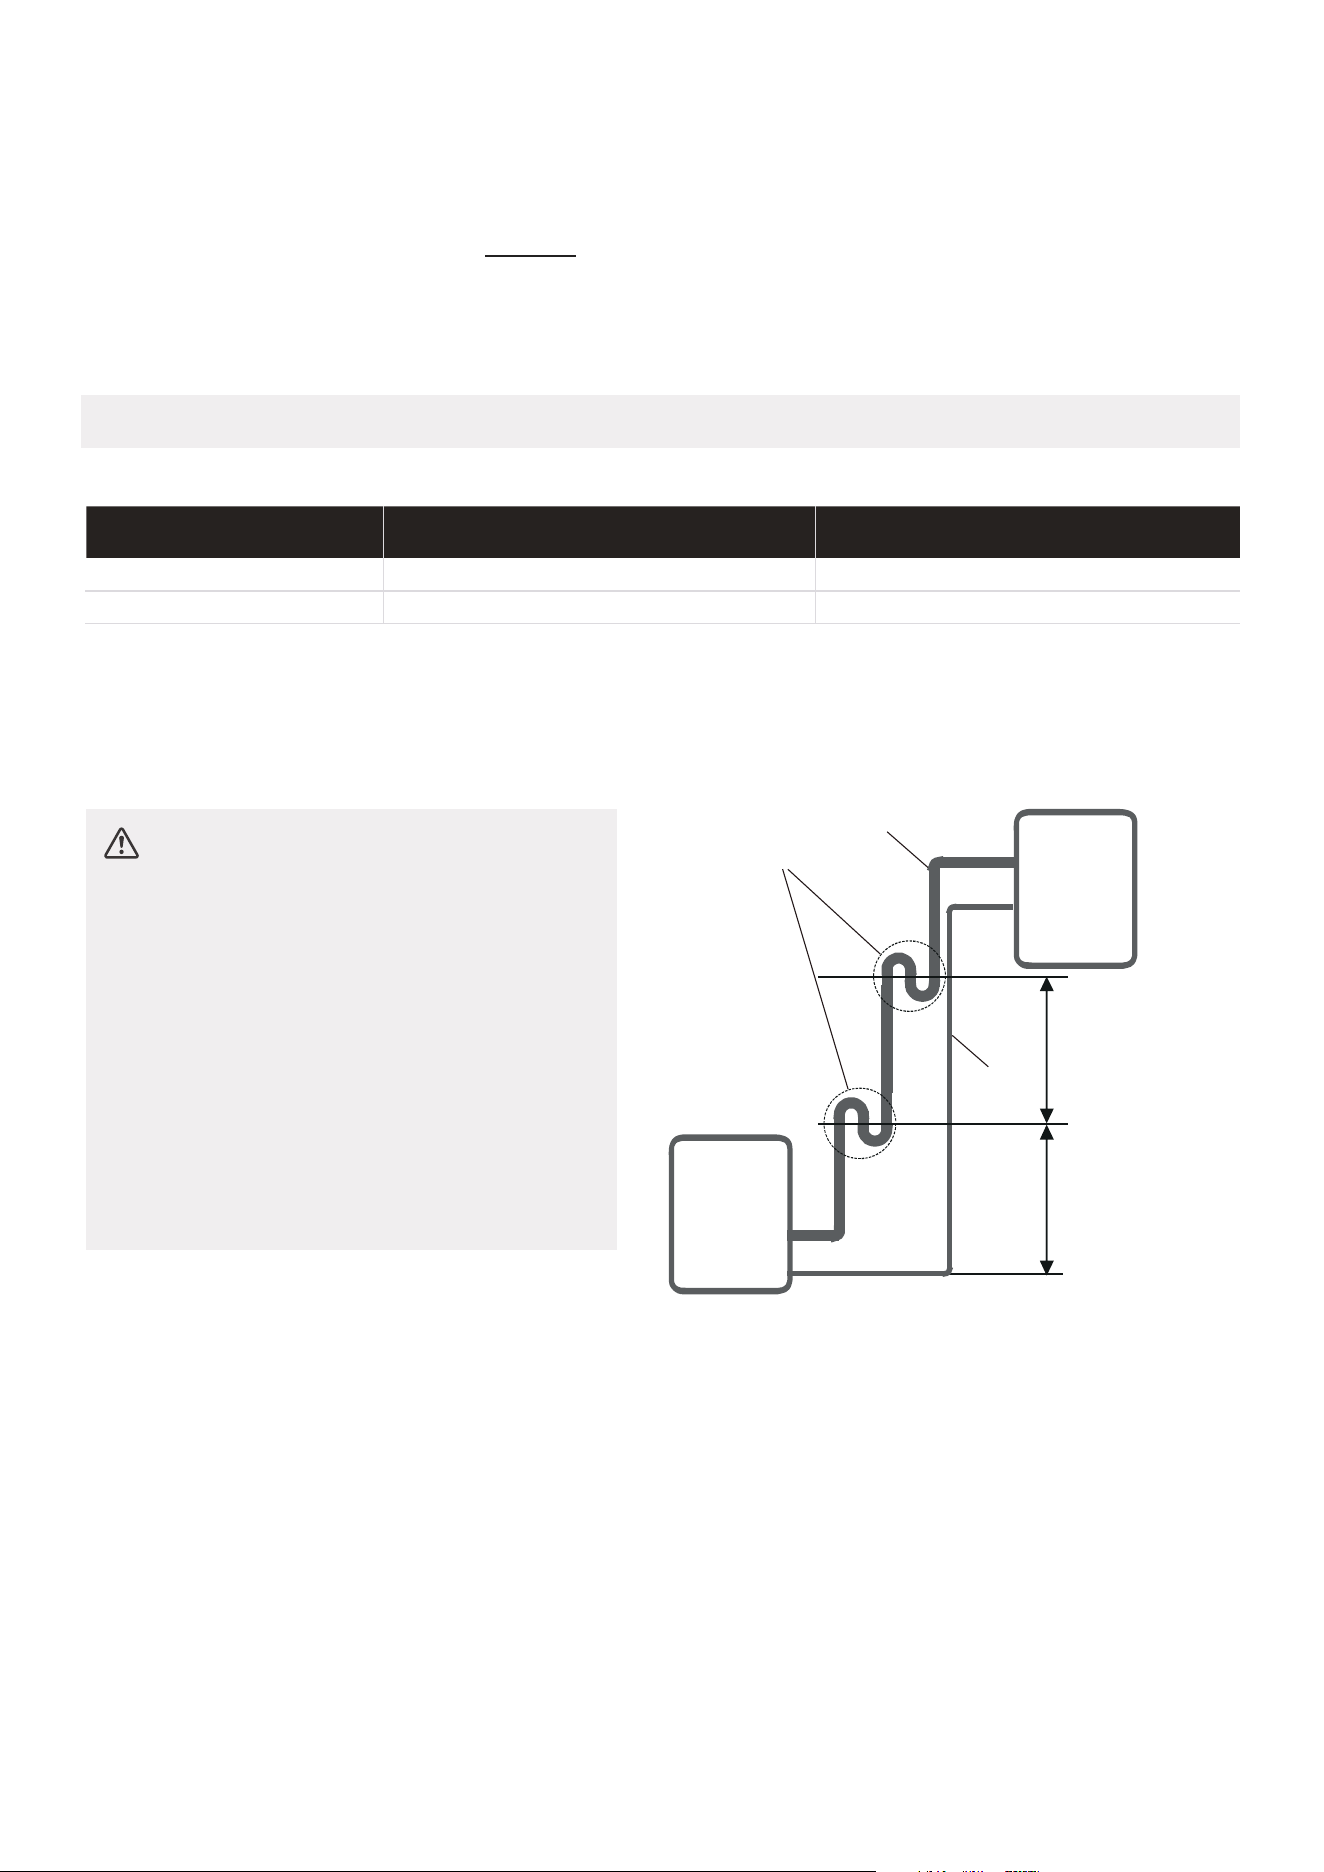
CAUTION
Oil traps
If oil flows back into the outdoor unit’s
compressor, this might cause liquid
compression or deterioration of oil return.
Oil traps in the rising gas piping can
prevent this.
An oil trap should be installed every
20ft(6m) of vertical suction line riser
(<36K). An oil trap should be
installed every 32.8ft(10m) of vertical
suction line riser (≥36K).
Oil trap
Liquid
piping
20ft/6m
(<36K)
32.8ft/10m
(≥36K)
20ft/6m
(<36K)
32.8ft/10m
(≥36K)
Gas piping
Indoor unit/
Outdoor unit
Indoor unit/
Outdoor unit
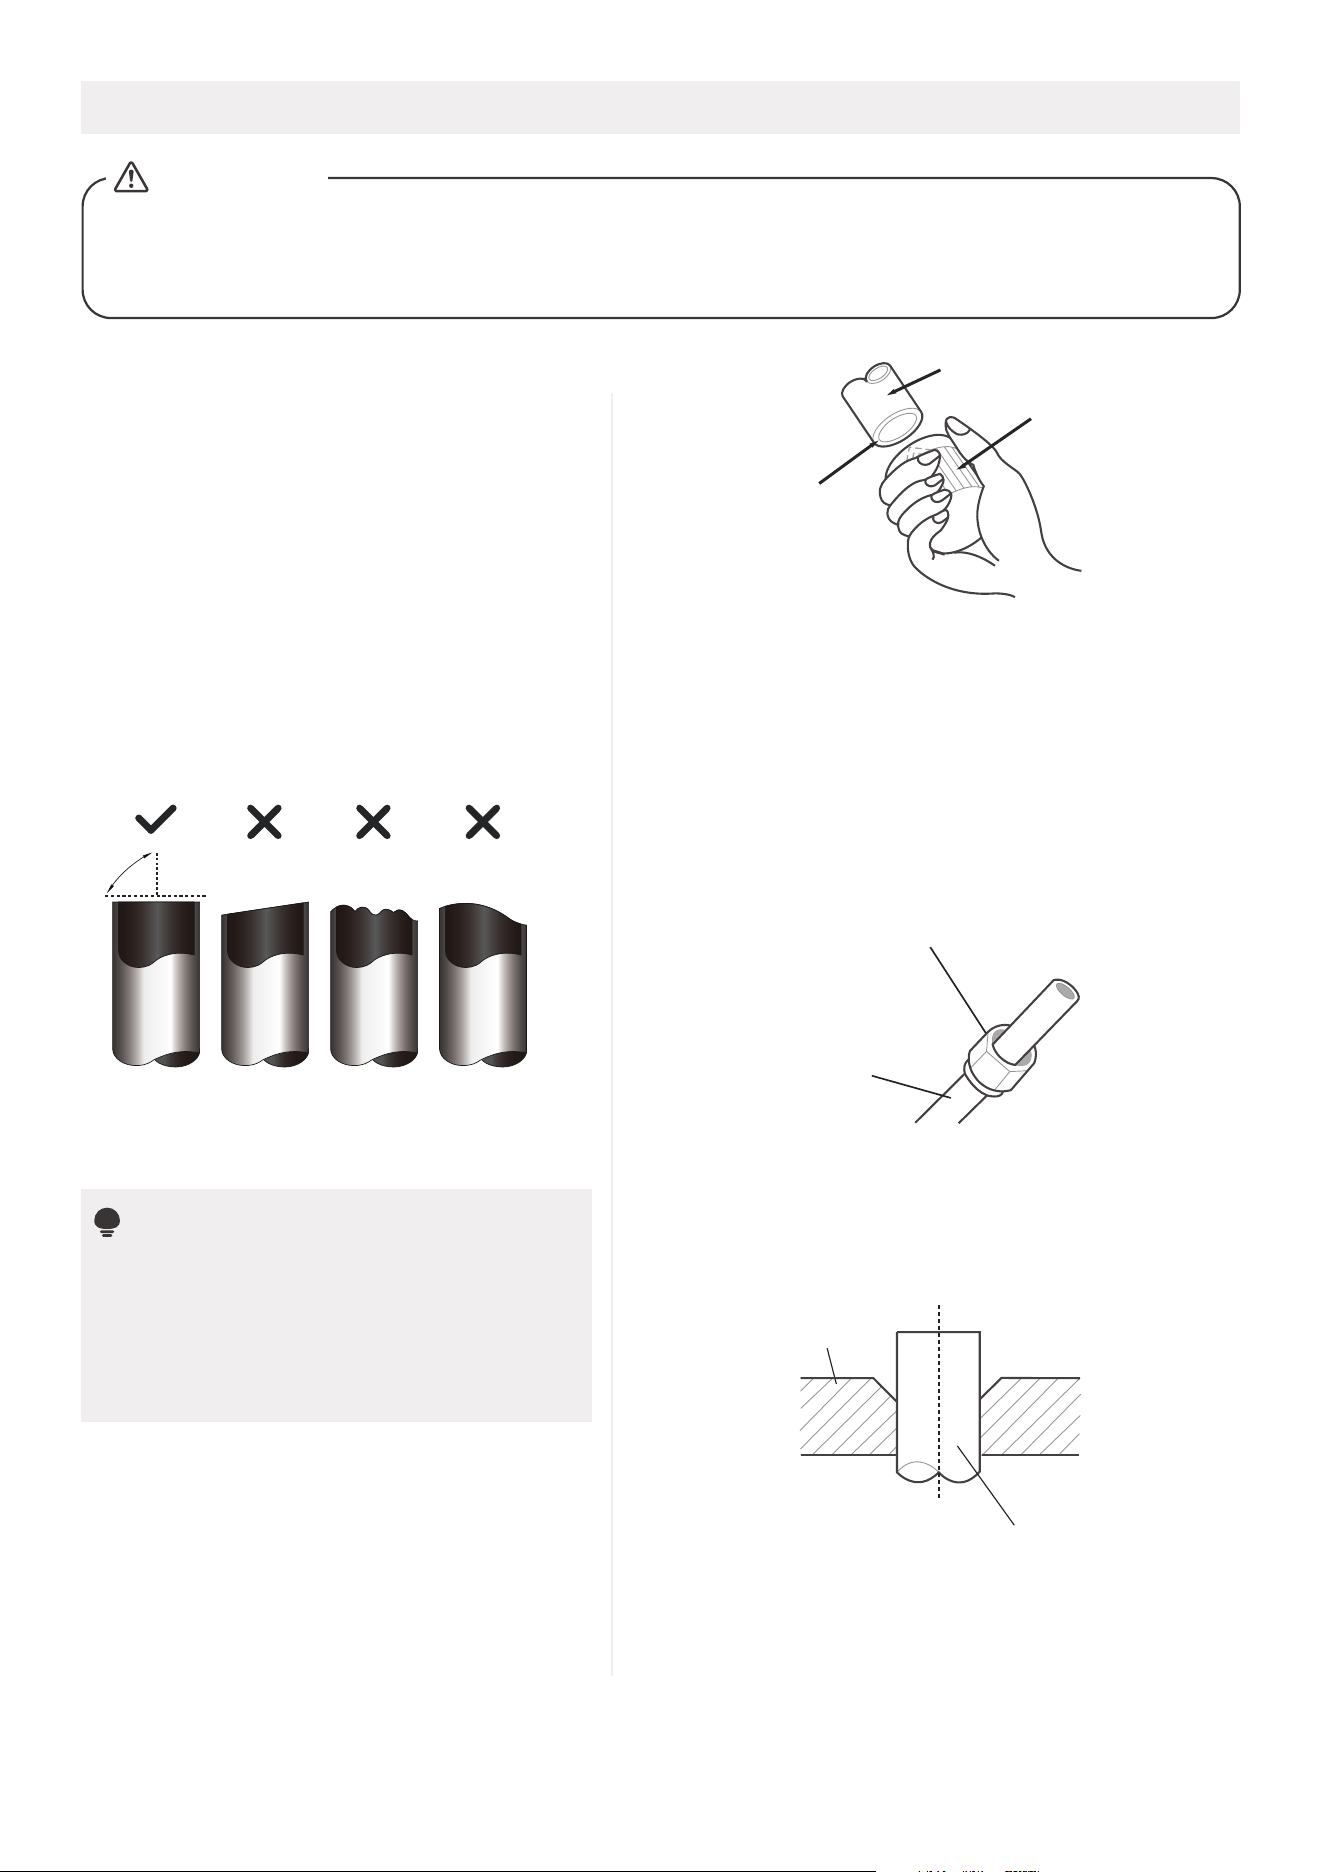
DO NOT DEFORM PIPE
WHILE CUTTING
Connection Instructions—Refrigerant Piping
CAUTION
The branching pipe must be installed horizontally. An angle of more than 10° may cause malfunction.
DO NOT install the connecting pipe until both indoor and outdoor units have been installed.
Insulate both the gas and liquid piping to prevent condensation.
•
•
•
Step 1: Cut pipes
When preparing refrigerant pipes, take
extra care to cut and flare them properly.
This will ensure ecient operation and
minimize the need for future maintenance.
Measure the distance between the
indoor and outdoor units.
Using a pipe cutter, cut the pipe a
little longer than the measured
distance.
Make sure that the pipe is cut at a
perfect 90° angle.
Step 3: Flare pipe ends
Be extra careful not to damage, dent, or
deform the pipe while cutting. This will
drastically reduce the heating
•
•
Proper flaring is essential to achieve an airtight seal.
After removing burrs from cut pipe, seal the ends
with PVC tape to prevent foreign materials from
entering the pipe.
Sheath the pipe with insulating material.
Place flare nuts on both ends of pipe. Make sure
they are facing in the right direction, because you
can’t put them on or change their direction after
flaring.
•
•
•
Remove PVC tape from ends of pipe when ready
to perform flaring work.
•
Step 2: Remove burrs
Burrs can aect the air-tight seal of refrigerant
piping connection. They must be completely
removed.
Hold the pipe at a downward angle to
prevent burrs from falling into the pipe.
Using a reamer or deburring tool, remove
all burrs from the cut section of the pipe.
•
•
•
Oblique Rough Warped
90°
Pipe
Reamer
Point down
Flare nut
Copper pipe
25
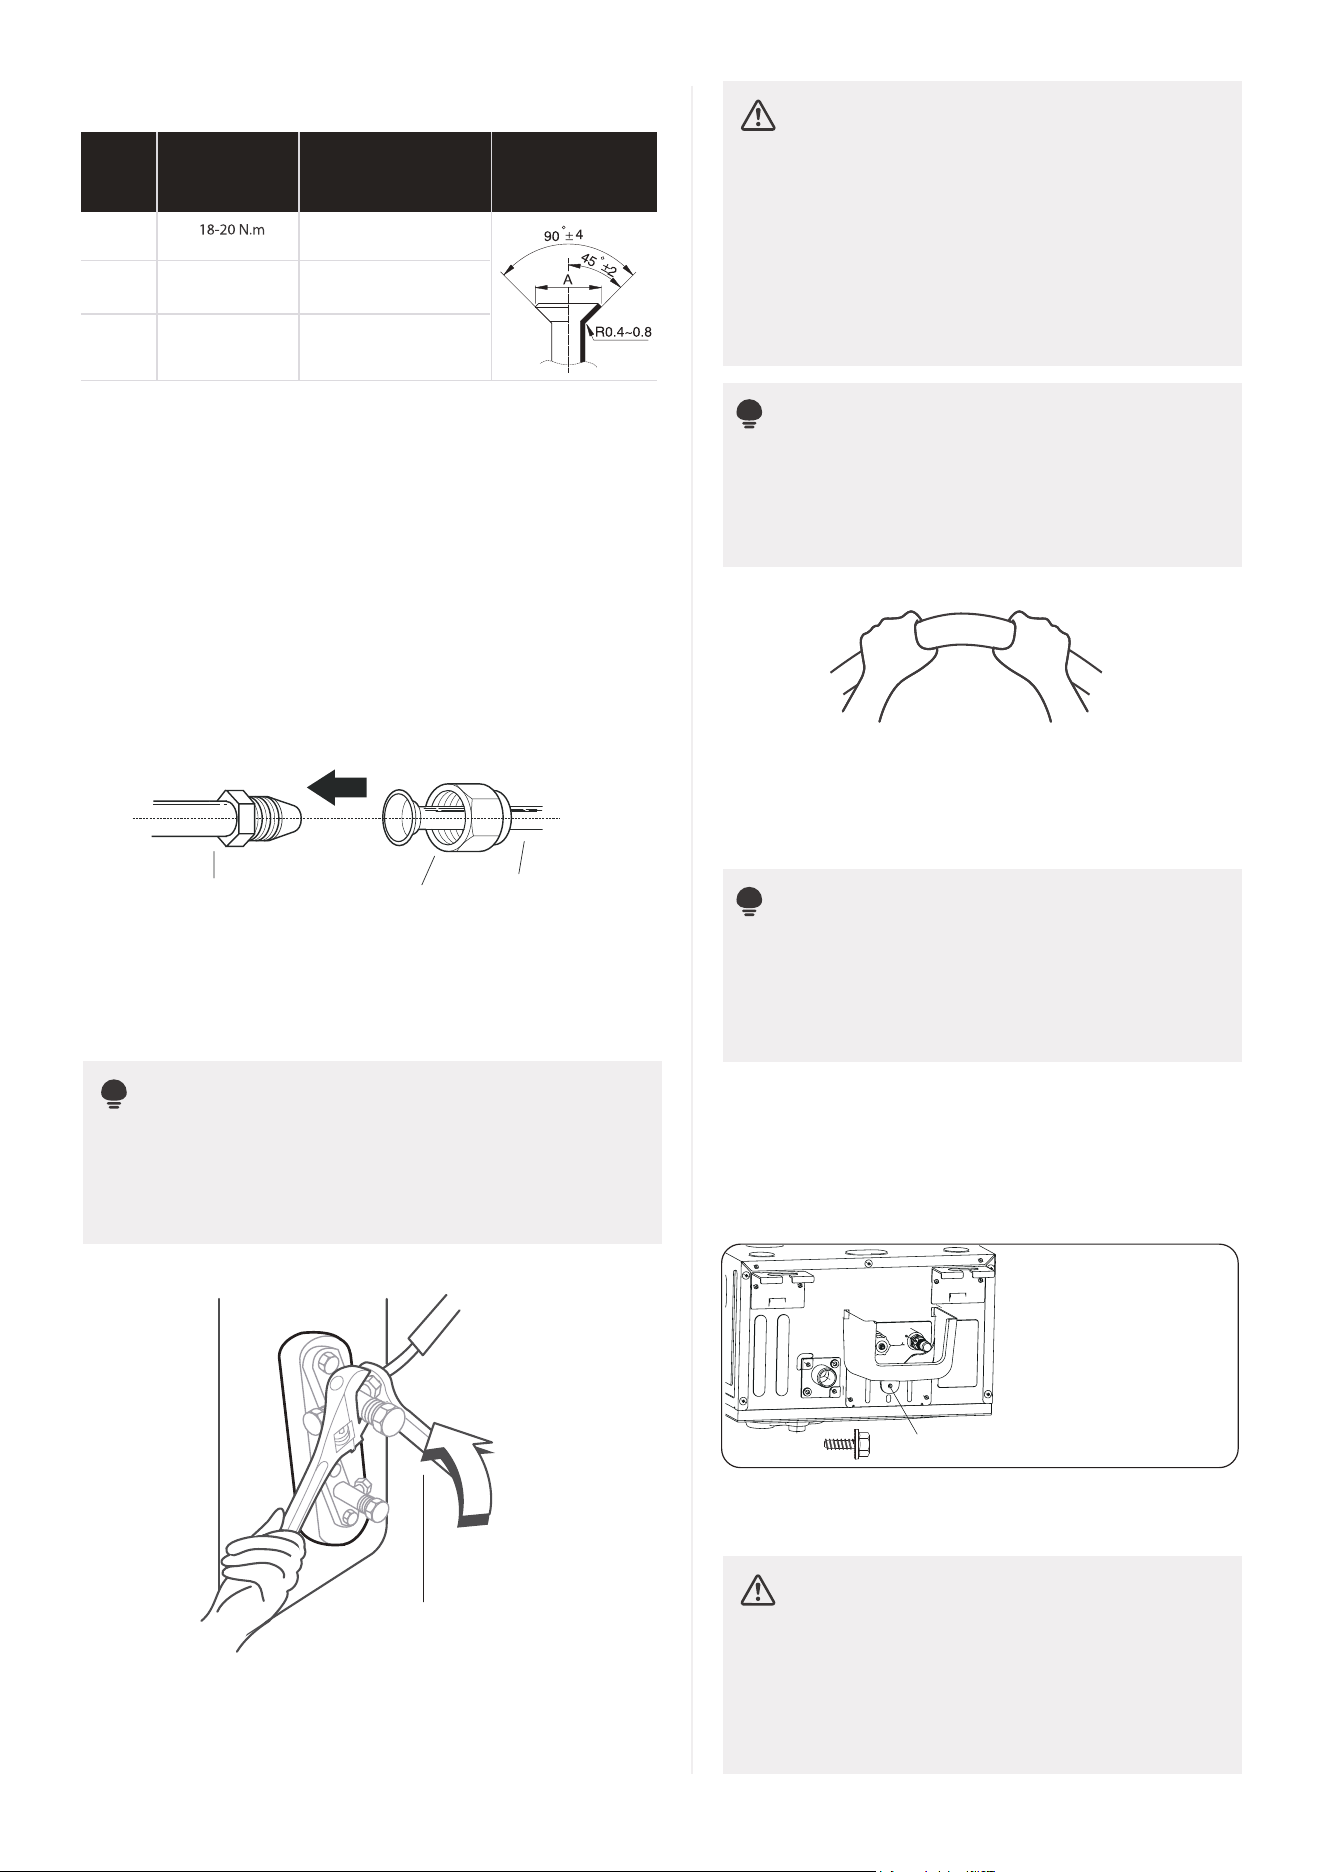
Clamp flare from on the end of the pipe. The end
of the pipe must extend beyond the flare form.
•
Place flaring tool onto the form.
Turn the handle of the flaring tool clockwise
until the pipe is fully flared.
•
•
Flare form
Pipe
26
min-radius 3.9in (100mm)
Outdoor unit
Liquid side piping
(Smaller diameter)
(Bigger
Torque wrench
Indoor unit tubing
Flare nut
Pipe
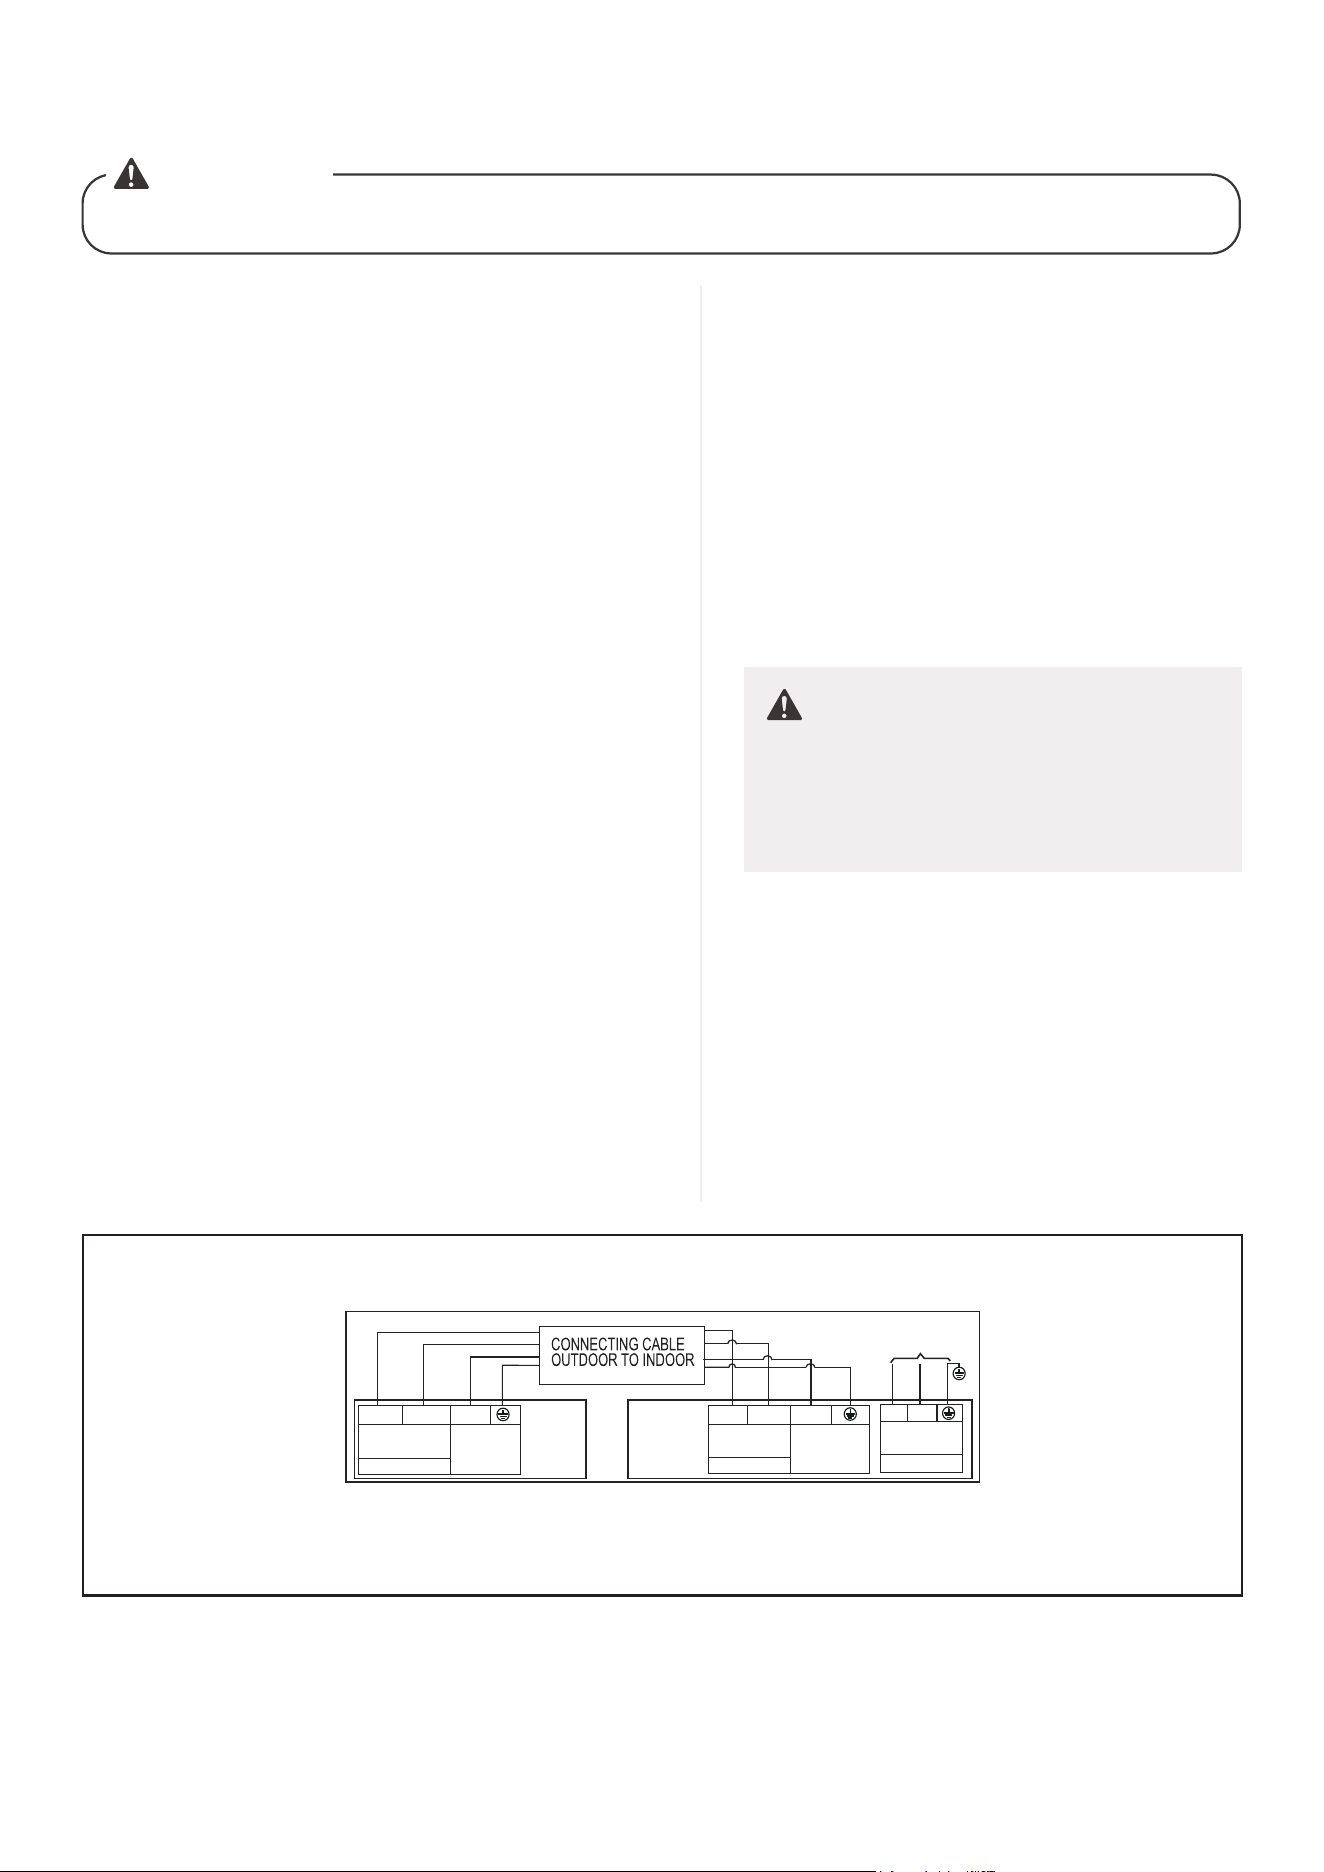
Connect the copper pipes to the indoor unit first,
then connect it to the outdoor unit. You should
first connect the low-pressure pipe, then the
highpressure pipe.
When connecting the flare nuts, apply a thin
coat of refrigeration oil to the flared ends of
the pipes.
Align the center of the two pipes that you will
connect.
Tighten the flare nut snugly by hand.
Using a wrench, grip the nut on the unit tubing.
While firmly gripping the nut, use a torque
wrench to tighten the flare nut according to
the torque values in above table.
PIPING EXTENSION BEYOND FLARE FORM
Step 4: Connect pipes
•
•
•
•
•
•Remove the flaring tool and flare form, then inspect
the end of the pipe for cracks and even flaring.
NOTE
Use both a spanner and a torque wrench
when connecting or disconnecting pipes to/from
the unit.
NOTE
MINIMUM BEND RADIUS
CAUTION
Ensure to wrap insulation around the piping.
Direct contact with the bare piping may
result in burns or frostbite.
• Make sure the pipe is properly connected.
Over tightening may damage the bell
mouth and under tightening may lead to
leakage.
CAUTION
Check to make sure there is no refrigerant
leak after completing the installation work.
If there is a refrigerant leak, ventilate the area
immediately and evacuate the system. (refer
to the Air Evacuation section of this manual)
After connecting the copper pipes to the
indoor unit, wrap the power cable, signal
cable and the piping together with
binding tape.
•
Carefully bend the tubing in the middle
according to the diagram below.
DO NOT bend the tubing more than 90°
or more than 3 times.
NOTE
DO NOT intertwine signal cable with other
wires. While bundling these items together.
DO NOT intertwine or cross the signal cable
with any other wiring.
Use appropriate tool
Thread this pipeline through the wall and
connect it to the outdoor unit.
Insulate all the piping , including the valves
of the outdoor unit.
Fix the water receiver (supplied in
Accessories box) to the indoor unit by
a screw.
NOTE:
Two ST4.8*12
screws are
supplied, one
of which is spare.
ST4.8*12 screw
•
•
•
•
Open the stop valves of the outdoor unit to
start the flow of the refrigerant between
the indoor and outdoor unit.
32-39 N.m
49-59 N.m
(180-200kgf.cm)
(320-390kgf.cm)
(490-590kgf.cm)
Flare shape
Tightening
torque
Pipe
gauge
Flare dimension(A)
0.33~0.34in (8.4~8.7mm)
Ø1/4in
Ø6.35mm
Ø3/8in
Ø9.52mm
Ø1/2in
Ø12.7mm
0.52~0.53in (13.2~13.5mm)
0.64~0.65in (16.2~16.5mm)
27
WIRING PRECAUTIONS
BEFORE PERFORMING ANY ELECTRICAL WORK, READ THESE WARNINGS.
WARNING
WARNING
●
●
●
●
●
●
●
●
●
●
●
●
●
●
●
●
All wiring must comply with local and national
electrical codes, regulations and must be installed
by a licensed electrician.
All electrical connections must be made according
to the Electrical Connection Diagramlocated on
the panels of the indoor and outdoor units.
If there is a serious safety issue with the power
supply, stop work immediately. Explain your
reasoning to the client, and refuse to install the
unit until the safety issue is properly resolved.
Power voltage should be within 90-110% of rated
voltage. Insucient power supply can cause
malfunction, electrical shock, or fire.
Installation of an external surge suppressor at the
outdoor disconnect is recommended.
If connecting power to fixed wiring, a switch or
circult breaker that disconnects all poles and
has a contact separation of at least 1/8in (3mm)
must be incorporated in the fixed wiring. The
qualified technician must use an approved
circuit breaker or switch.
Only connect the unit to an individual branch
circuit. Do not connect another appliance to that
outlet.
Make sure to properly ground the air conditioner.
Every wire must be firmly connected. Loose
wiring can cause the terminal to overheat,
resulting in product malfunction and possible fire.
Do not let wires touch or rest against
refrigerant tubing, the compressor, or any
moving parts within the unit.
If the unit has an auxiliary electric heater,
it must be installed at least 40in (1 meter)
away from any combustible materials.
To avoid getting an electric shock, never
touch the electrical components soon
after the power supply has been turned
o. After turning o the power, always
wait 10 minutes or more before you touch
the electrical components.
Make sure that you do not cross your
electrical wiring with your signal wiring.
This may cause distortion, interference or
possibly damage to circuit boards.
No other equipment should be connected
to the same power circuit.
Connect the outdoor wires before
connecting the indoor wires.
BEFORE PERFORMING ANY
ELECTRICAL OR WIRING WORK,
TURN OFF THE MAIN POWER TO
THE SYSTEM.
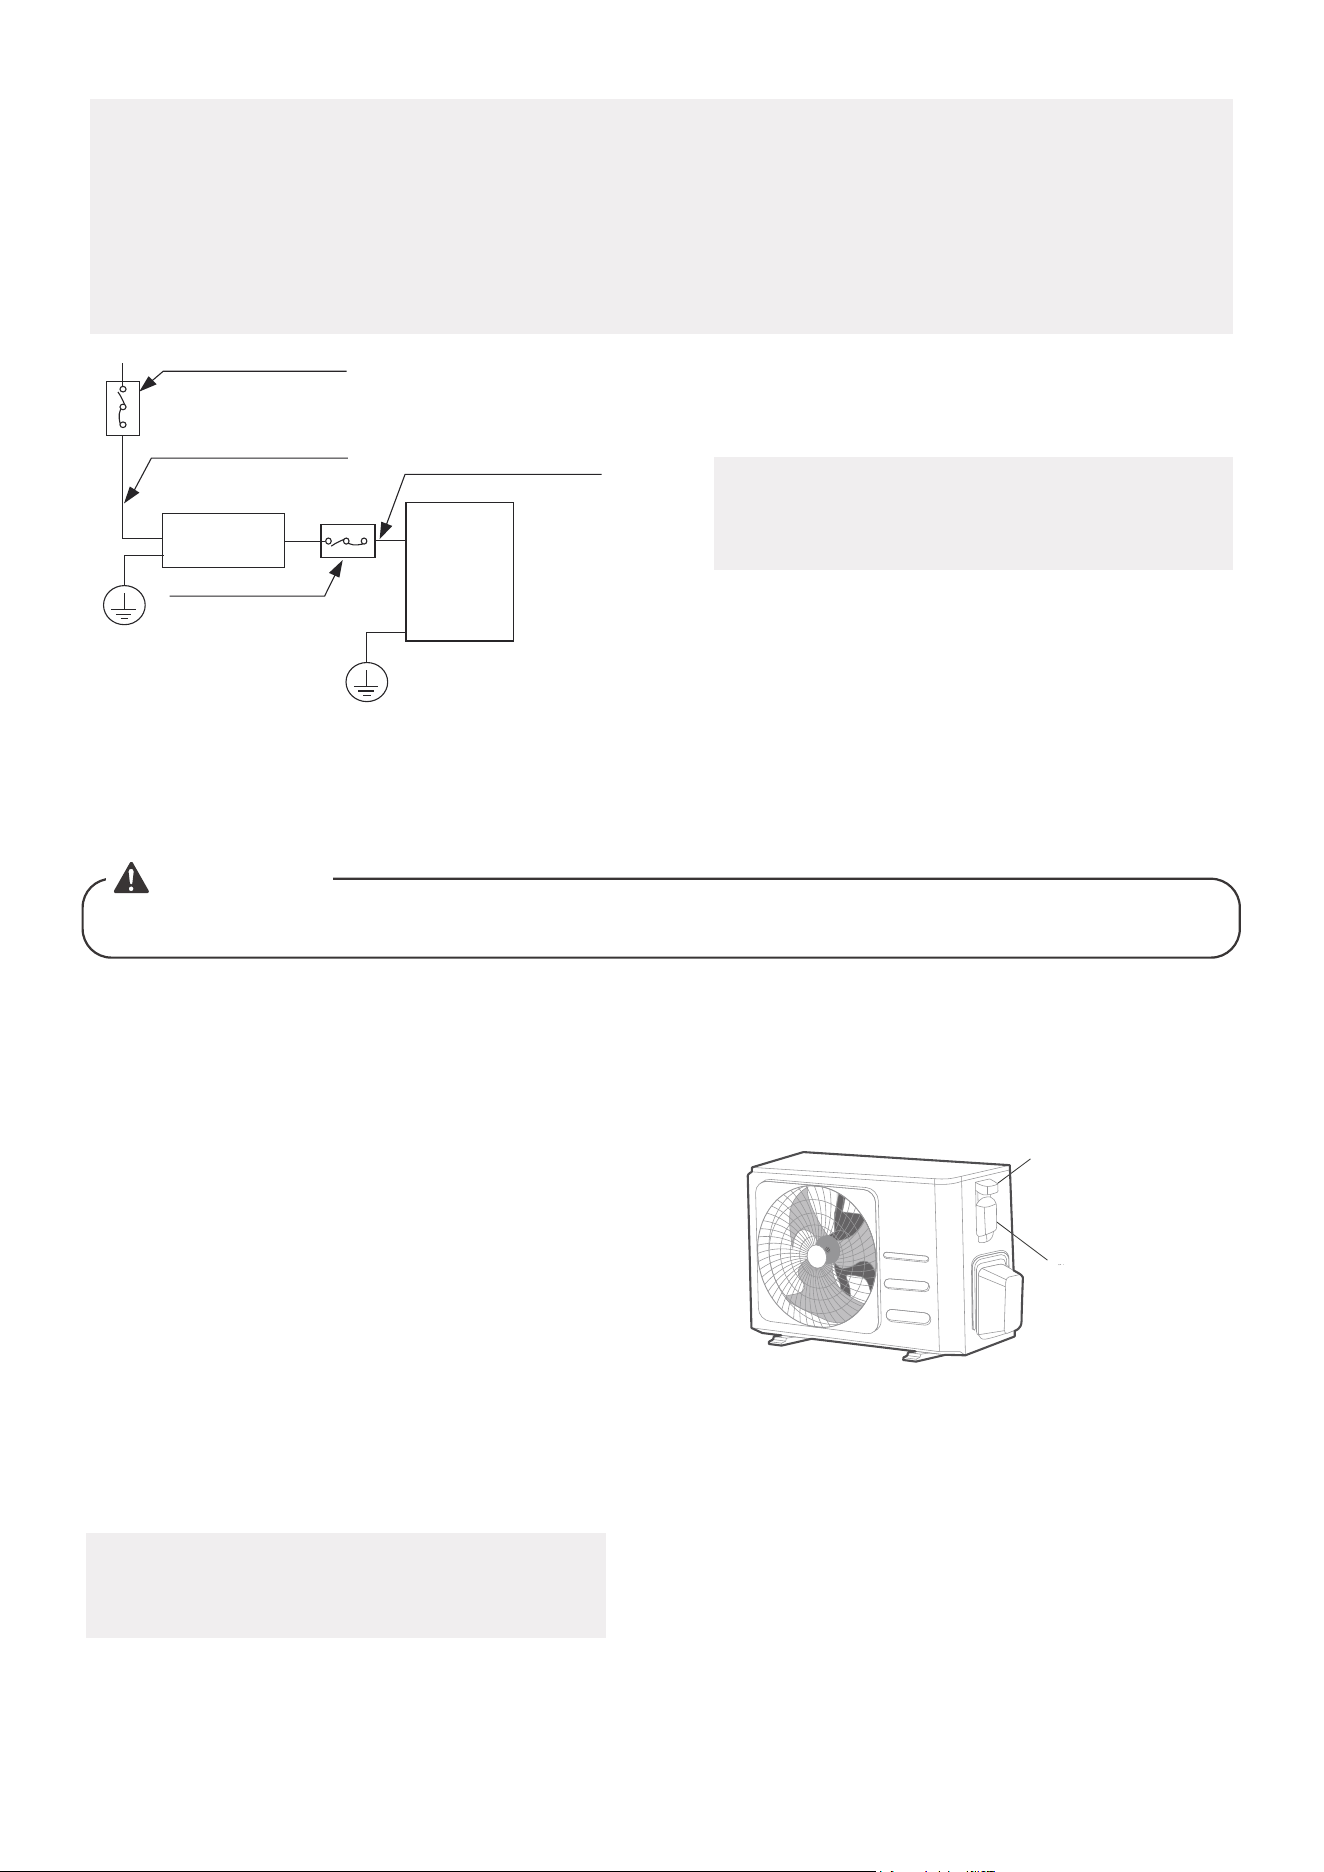
Connection Diagram (6K/9K/12K/18K)
208/230V
Main
INDOOR
UNIT
OUTDOOR
UNIT
Indoor Unit
Power Supply
L1
L2
208/230V
1
2
208/230V
208/230V~60Hz
PE
1
2
3
Signal High
Voltage
Power to
Indoor Unit
3
Signal High
Voltage
Power Supply
Power Supply
28
WARNING
OUTDOOR UNIT WIRING
Before performing any electrical or wiring work, turn o the main power to the system.
Prepare the cable for connection1.
a. You must first choose the right cable size.
Choose the cable type according to the
local electrical codes and regulations.
Using a wire crimper, crimp u-lugs on
the ends.
e.
NOTE: When connecting the wires, strictly
follow the wiring diagram found inside the
electrical box cover.
c. Using wire strippers, strip the rubber
jacketfrom both ends of the signal cable
to reveal approximately 5.9in (150mm) of
wire.
d.
Strip the insulation from the ends.
b. The size of the power supply cable, signal cable,
fuse, and switch needed is determined by the
Minimum Circuit Ampacity of the unit.
The Minimum Circuit Ampacity is indicated on
the nameplate located on the side panel of the
unit. Refer to this nameplate to choose the
right cable, fuse,or switch.
Remove the electric cover of the outdoor
unit. If there is no cover on the outdoor
unit, take o the bolts from the maintenance
boardand remove the protection board.
3.
2.
Connect the u-lugs to the terminals
Match the wire colors/labels with the labels
on the terminal block. Firmly screw the u-lug
of each wire to its corresponding terminal.
4. Clamp down the cable with the cable clamp.
5. Insulate unused wires with electrical tape.
Keep them away from any electrical or metal
parts.
6. Reinstall the cover of the electric control
box.
Cover
Screw
Indoor unit
Outdoor unit
Circuit breaker
Circuit breaker
(purchased seperately)
(purchased seperately)
(purchased seperately)
Outdoor unit power wires
Indoor & Outdoor
connective wires
NOTE ON CIRCUIT BREAKER
When the maximum current of the air conditioner is more than 16A, a circuit breaker or leakage
protection switch with protective device shall be used (purchased seperately). When the
maximum current of the air conditioner is less than 16A, the power cord of air conditioner shall
be equipped with plug (purchased seperately). In North America, the applicance should be
wired according to NEC and CEC requirements.
NOTE: The cographs are for explanation
purpose only. Your machine may be slightly
dierent. The actual shape shall prevail.
29
1. Prepare the cable for connection
a. Using wire strippers, strip the rubber jacket
from both ends of the signal cable to reveal
about 5.9in (150mm) of the wire.
b. Strip the insulation from the ends of the
wires.
c. Using a wire crimper, crimp the u-lugs to
the ends of the wires.
2. Open the front panel of the indoor unit. Using
a screwdriver,remove the cover of the electric
control box on your indoor unit.
3. Thread the power cable and the signal cable
through the wire outlet.
INDOOR UNIT WIRING
4. Connect the u-lugs to the terminals.
Match the wire colors/labels with the labels on
the terminal block. Firmly screw the u-lug of
each wire to its corresponding terminal. Refer
to the Serial Number and Wiring Diagram
located on the cover of the electric control box.
CAUTION
• While connecting the wires, please strictly
follow the wiring diagram.
• The refrigerant circuit can become very hot.
Keep the interconnection cable away from the
copper tube.
5. Clamp down the cable with the cable clamp.The
cable must not be loose or pull on the u-lugs.
6. Reattach the electric box cover.
30
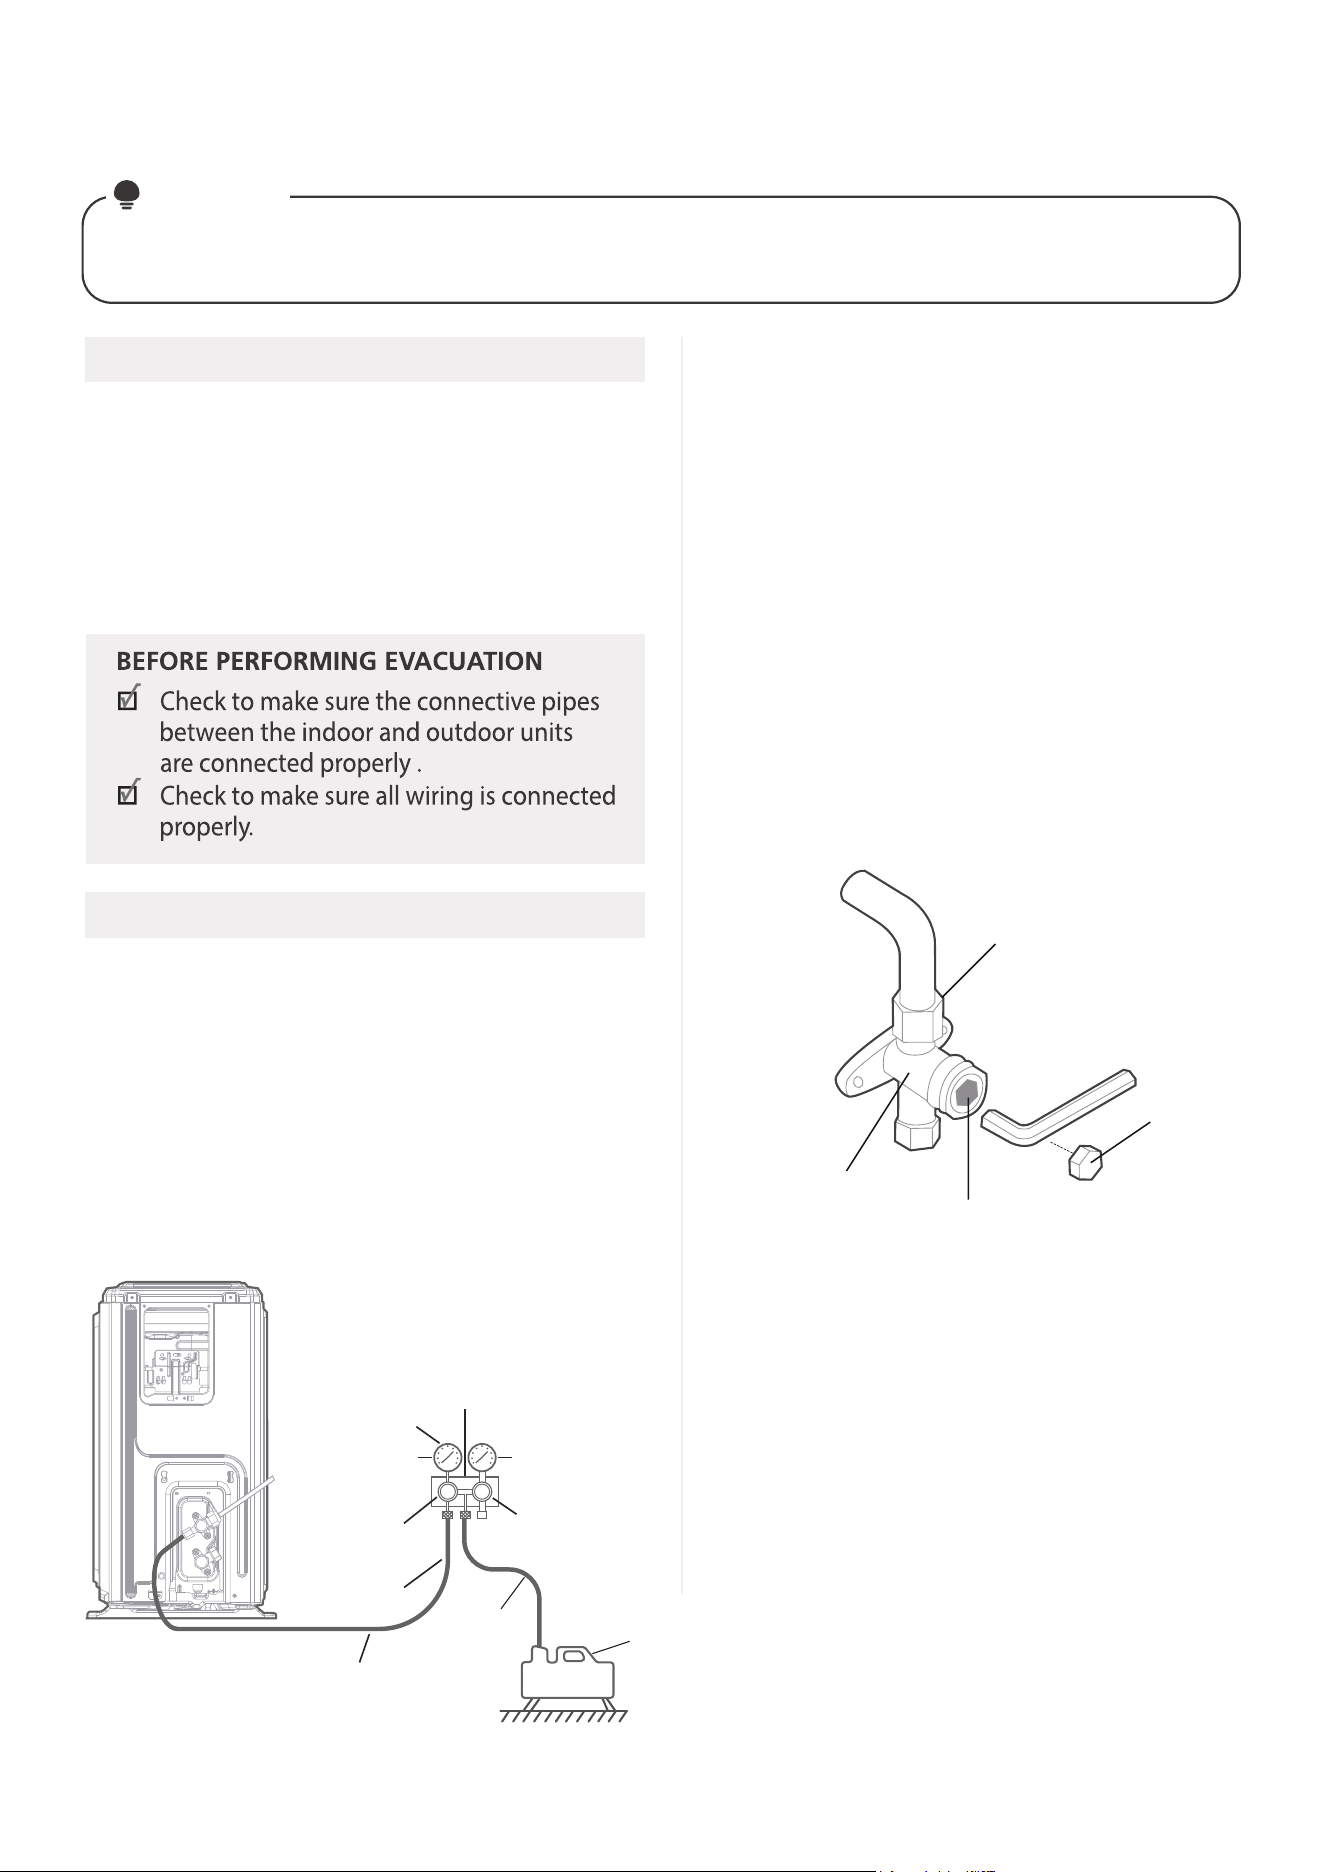
AIR EVACUATION
When opening valve stems, turn the hexagonal wrench until it hits against the stopper. Do not try to
force the valve to open further.
NOTICE
Preparations and precautions
Evacuation Instructions
Air and foreign matter in the refrigerant circuit
can cause abnormal rises in pressure, which can
damage the air conditioner, reduce its eciency,
and cause injury. Use a vacuum pump and manifold
gauge to evacuate the refrigerant circuit, removing
any non-condensable gas and moisture from the
system. Evacuation should be performed upon
initial installation and when unit is relocated.
Connect the charge hose of the manifold gauge
to service port on the outdoor unit’s low
pressure valve.
Connect another charge hose from the manifold
gauge to the vacuum pump.
Open the Low Pressure side of the manifold
gauge. Keep the High Pressure side closed.
Turn on the vacuum pump to evacuate the system.
Run the vacuum for at least 15 minutes, or until
the Compound Meter reads -76cmHG(-10
Pa).
5
Outdoor unit
Compound
gauge
-76cmHg
Low
pressure
valve
High
pressure
valve
Pressure hose
or
Charge hose
Vacuum
pump
Pressure
gauge
Low pressure
valve
Charge
hose
Manifold
Gauge
1.
2.
3.
4.
5.
Close the Low Pressure side of the manifold
gauge, and turn o the vacuum pump.
Wait for 5 minutes, then check that there
has been no change in system pressure.
If there is a change in system pressure, refer
to Gas Leak Check section for information
on how to check for leaks. If there is no
change in system pressure, unscrew the cap
from the packed valve (high pressure valve).
Insert hexagonal wrench into the packed valve
(high pressure valve) and open the valve by
turning the wrench in a 1/4 counterclockwise
turn. Listen for gas to exit the system, then
close the valve after 5 seconds.
Watch the Pressure Gauge for one minute
to make sure that there is no change in
pressure. The Pressure Gauge should read
slightly higher than atmospheric pressure.
Remove the charge hose from the service port.
6.
7.
8.
9.
10.
11.
12.
13.
Flare nut
Cap
valve body
valve stem
Using hexagonal wrench, fully open both the
high pressure and low pressure valves.
Tighten valve caps on all three valves (service
port, high pressure, low pressure) by hand.
You may tighten it further using a torque
wrench if needed.
31
NOTE ON ADDING REFRIGERANT
DO NOT mix refrigerant types.
CAUTION
Refrigerant
(Pipe length – standard
length) x 0.16oz/ft
(Pipe length – standard
length) x 15g/m
(Pipe length – standard
length) x 0.69oz/ft
(Pipe length – standard
length) x 65g/m
R454B
Ø1/4in (Ø6.35mm) Ø3/8in (Ø9.52mm) Ø1/2in (Ø12.7mm)
(Pipe length – standard
length) x 0.32oz/ft
(Pipe length – standard
length) x 30g/m
Some systems require additional charging depending on pipe lengths. In North America, the standard
pipe length is 25ft (7.5m). The refrigerant should be charged from the service port on the outdoor unit’s
low pressure valve. The additional refrigerant to be charged can becalculated using the following formula:
32
After installation is complete, confirm that all
electrical wiring has been installed in accordance
with local and national regulations, and
according to the installation manual.
There are two dierent methods to check for
Using a soft brush or spray bottle, apply a soapy
water solution to all of the pipe connection points
of the indoor and outdoor units, watching to see
if any bubbles form. The presence of bubbles
indicates there is a leak.
gaseous leaks. Use Fig. 8.1 below as a guide for
the critical points to check for leaks.
Soap and Water Method
Leak Detector Method
If using a leak detector, refer to the device’s
operation/instruction manual for proper usage
instructions.
IF ELECTRICAL LEAKAGE IS DETECTED
unit immediately and call a licensed
If electrical leakage is detected, turn o the
the leakage.
Check Grounding Work
resistance must be less than 0.1 Ω.
Measure grounding resistance by visual detection
and with a grounding resistance tester. Grounding
NOTE: This may not be required for some
locations in North America.
Check for Electrical Leakage
During the Test Run, use an electroprobe and
multimeter to perform a comprehensive electrical
leakage test.
NOTE: This may not be required for some
locations in North America.
Electrical Safety Checks
WARNING – RISK OF ELECTRICAL SHOCK
ALL WIRING MUST BE INSTALLED BY A LICENSED ELECTRICIAN AND COMPLY WITH LOCAL,
STATE, AND NATIONAL ELECTRICAL CODES.
Check-point of indoor unit
Check-point of outdoor unit
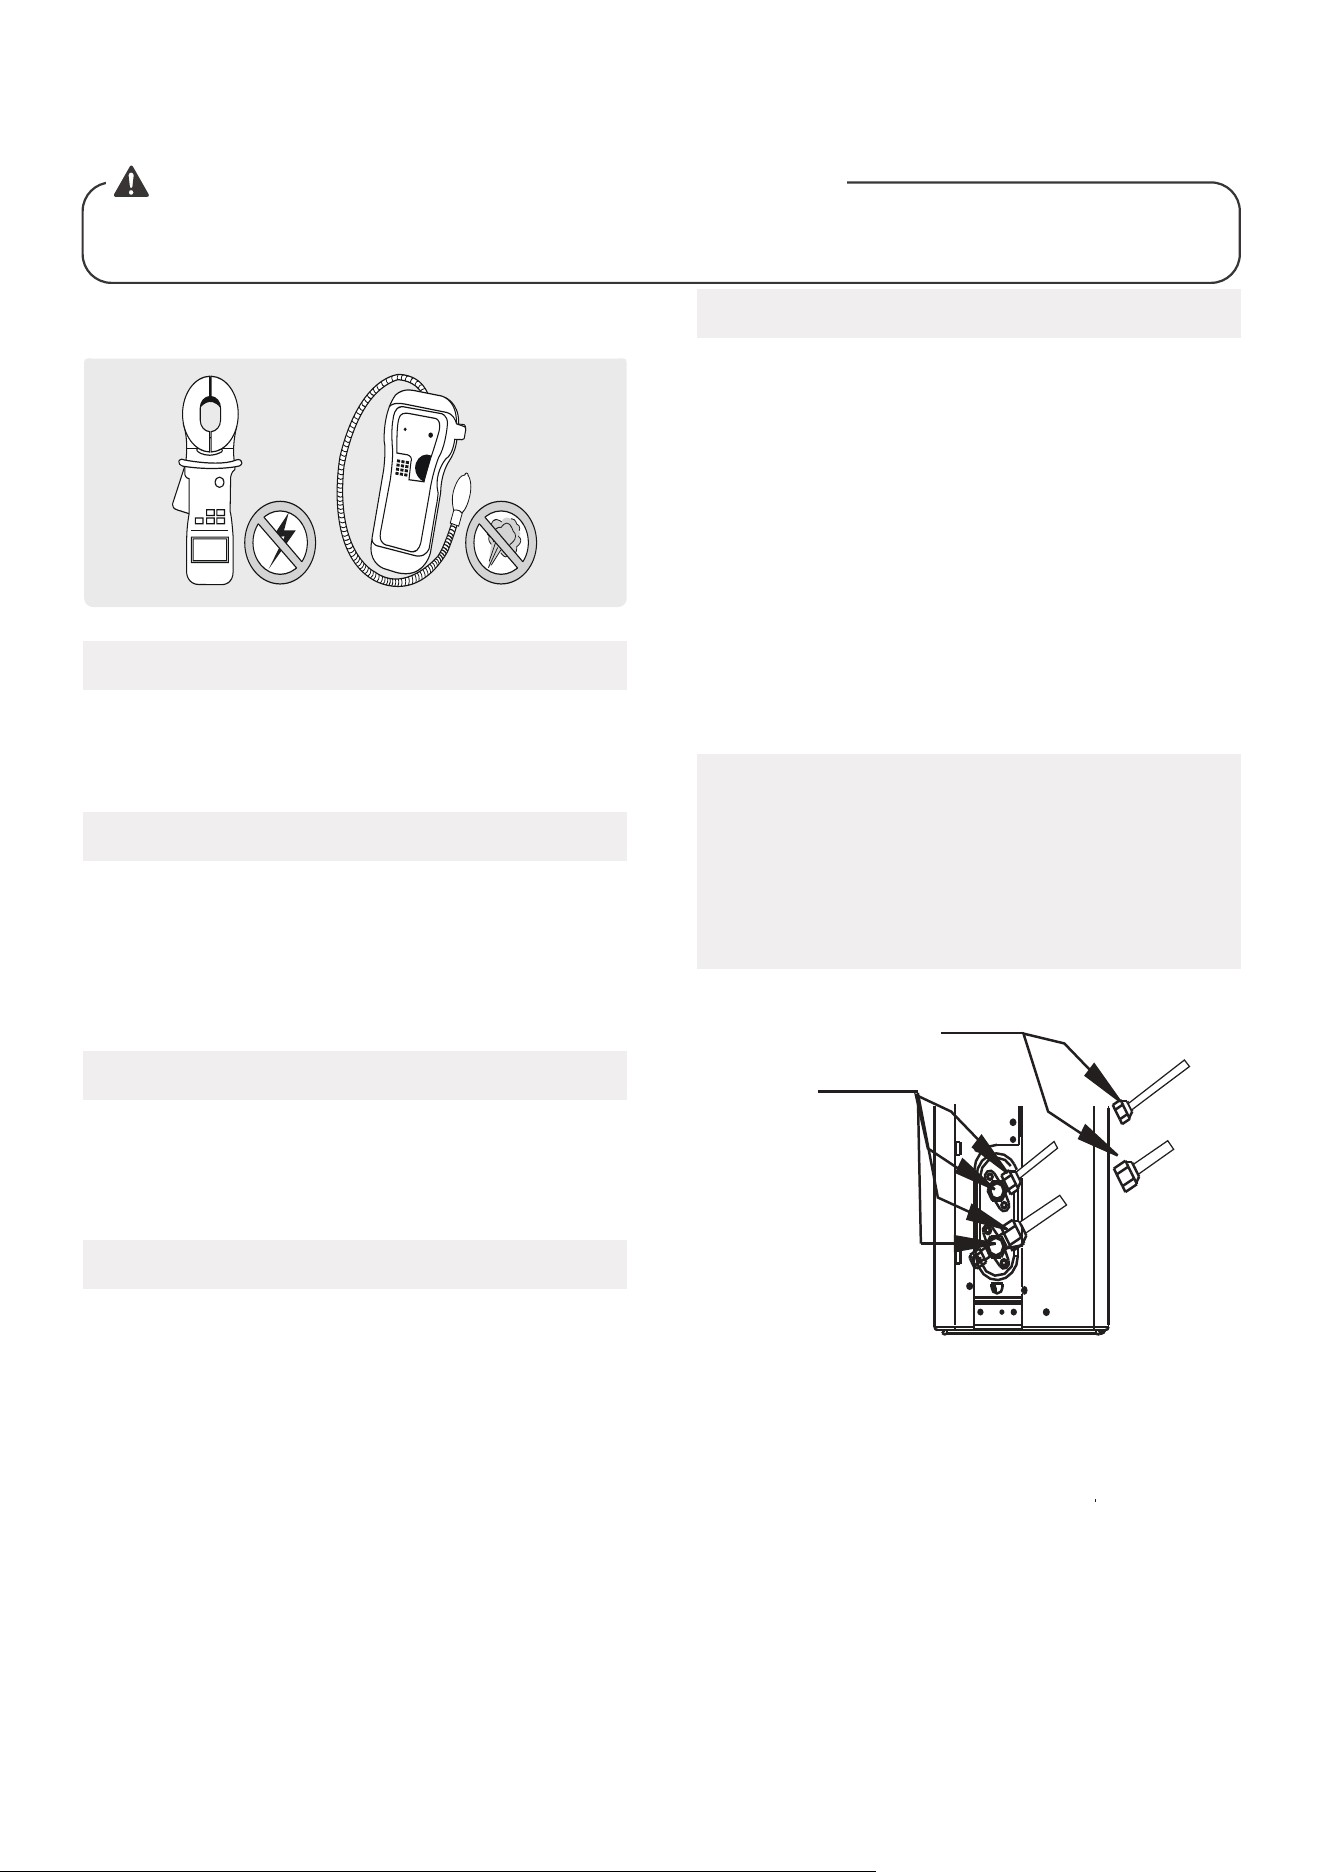
A
B
C
D
Fig. 8.1
ELECTRICAL AND GAS LEAK CHECKS
A: Low pressure stop valve
B: High pressure stop valve
C & D: Indoor unit flare nuts
electrician to find and resolve the cause of
BEFORE TEST RUN
DURING TEST RUN
Gas Leak Checks
After performing GAS leak checks
pipe connections points DO NOT leak, replace
the valve cover on the outside unit and wrap
and insulate the piping connections of the
indoor unit.
After confirming that all of the refrigerant
33
NOTE:
Wireless
CN38
CN14
CN10
CN55
The corresponding colors or corresponding pins
are connected each other.
when connection is completed, please clip
the wires to the buckle.
Before fixing this screw, you need to open the screw cover;
and after fixing screw, please close the cover.
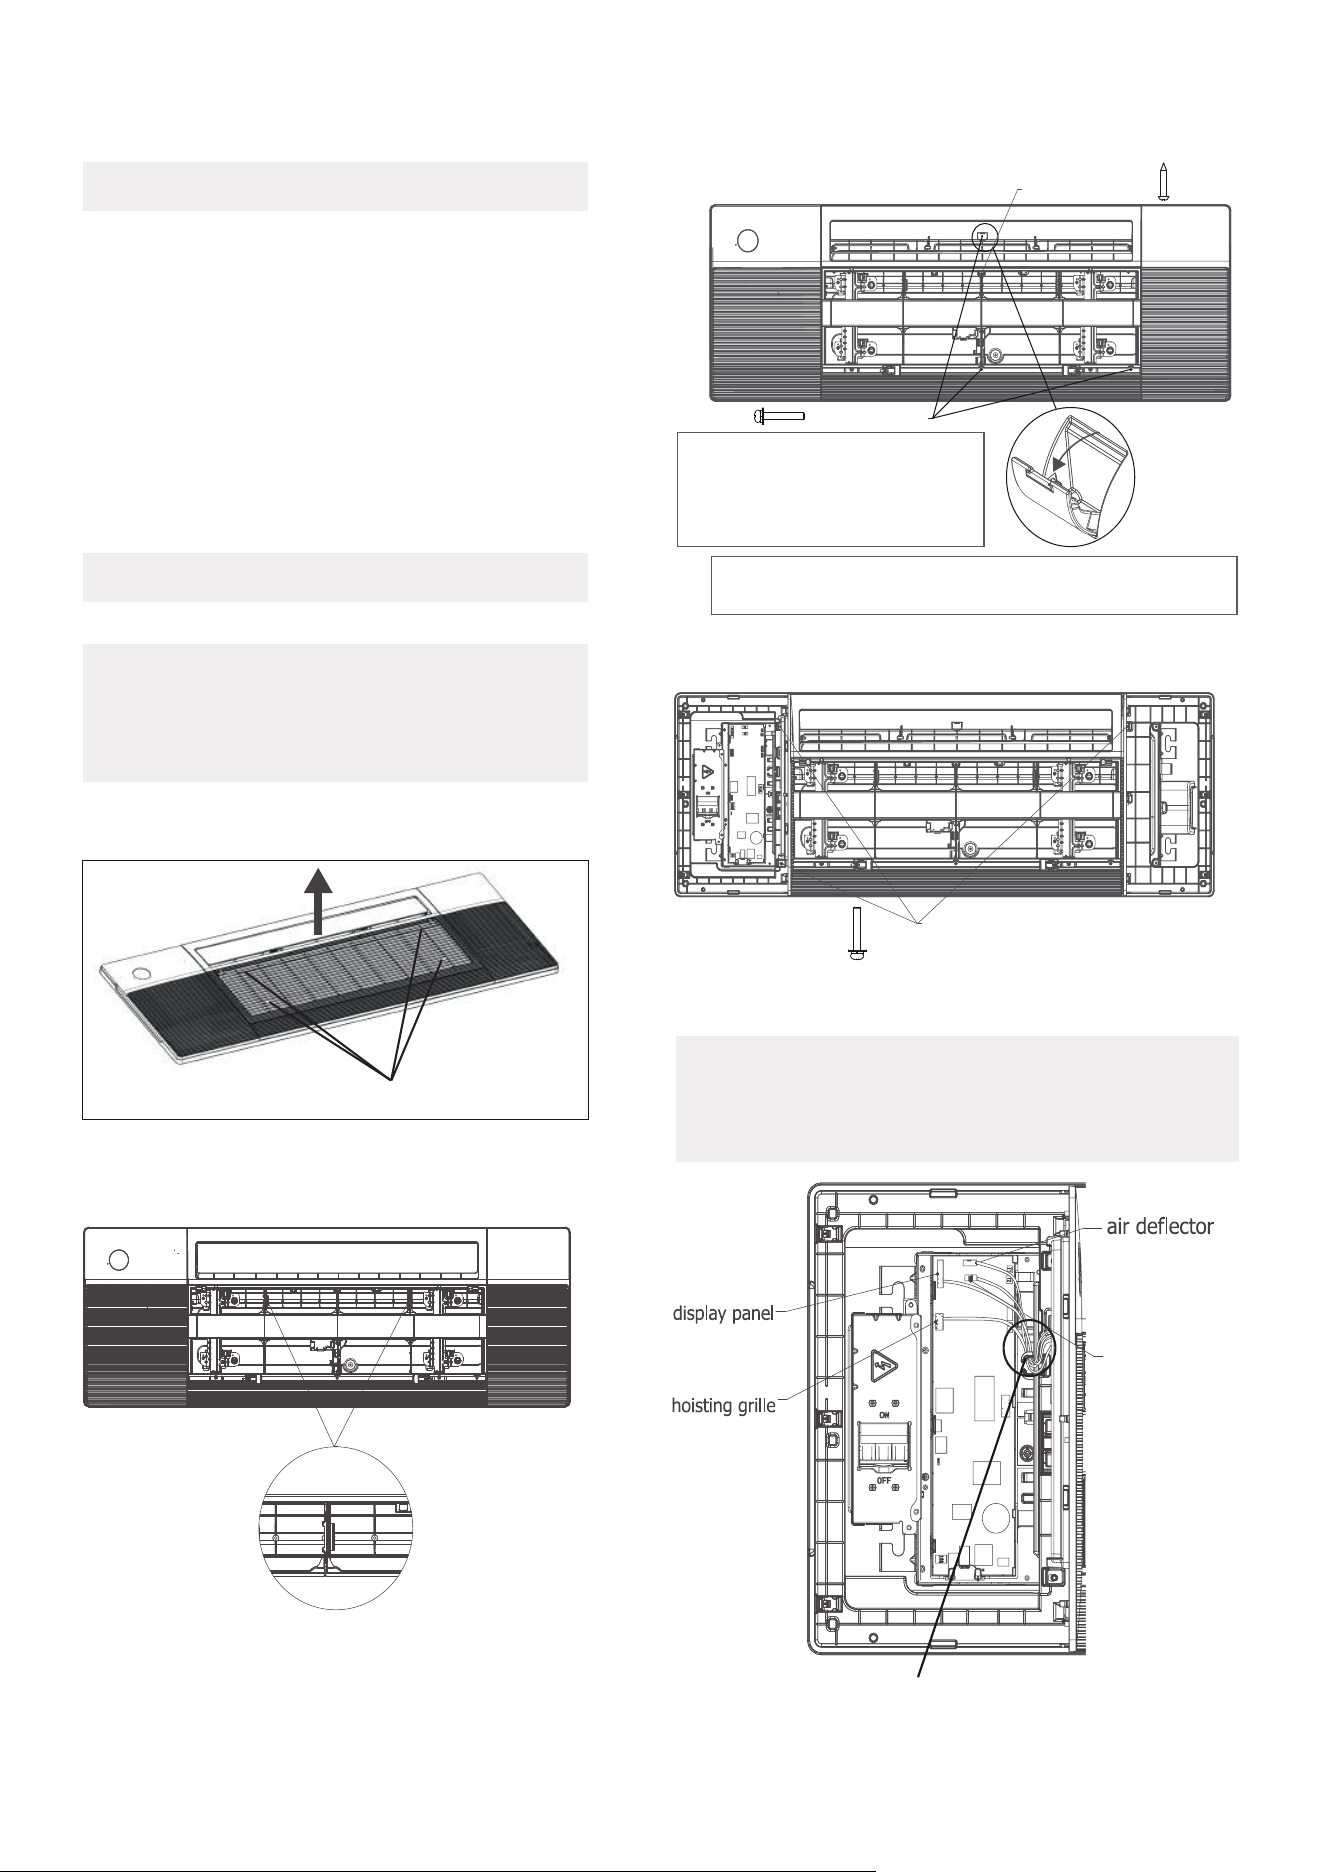
PANEL INSTALLATION
Connect the display board to the main control
board, up to four wires are required to connect.
Open the two covers on both sides of the panel, fix
the panel to the cassette by using 3× M4*22 screws.
M4*22 screw
(white 10-core)
(white 5-core)
(red 5-core)
(4 core)
NOTE:
Eight M4*22 screws are supplied,
two of which are spare. Two
ST3.9*16 screws are supplied, one
of which is spare.
M4*22 screw
ST3.9*16 screw
Pull the panel grille out of the panel, fix the
cassette panel to the one-way cassett by two
plastic buckles.
Grab air grille with your fingers and pull it out
slowly in the direction of the arrow.
Manually rotate the air deflector, fix the panel
to the cassette by using 3×M4*22 screws and
a ST3.9*16 screw.
Step1: Prepare and install ceiling
Step2: Panel Installation
NOTE:
Once the ceiling is cut, remove the
installation board. then install the ceiling.
In order to keep the ceiling level and
prevent vibrations, reinforce the strength
of the ceiling when necessary.
The air grille received by the customer is not
tightened by the wire rope,but is specially
designed to be loose for easy installation.
NOTE:
Model A
Grab at these locations
●
●
●
●
●
●
●
Drill 16.93in x51.18in (430 mm x 1300 mm )
hole into the ceiling based on the layout of
the installation board.
The centre of the ceiling opening should
match the centre of the body of the indoor
unit.
34
●
●
●
●
Install the control box cover and turn the
circuit breaker to ON, then close the two plastic
covers on both sides of the panel.
During the test-run process, the display wil be
lighted and the air griller will rise automatically.
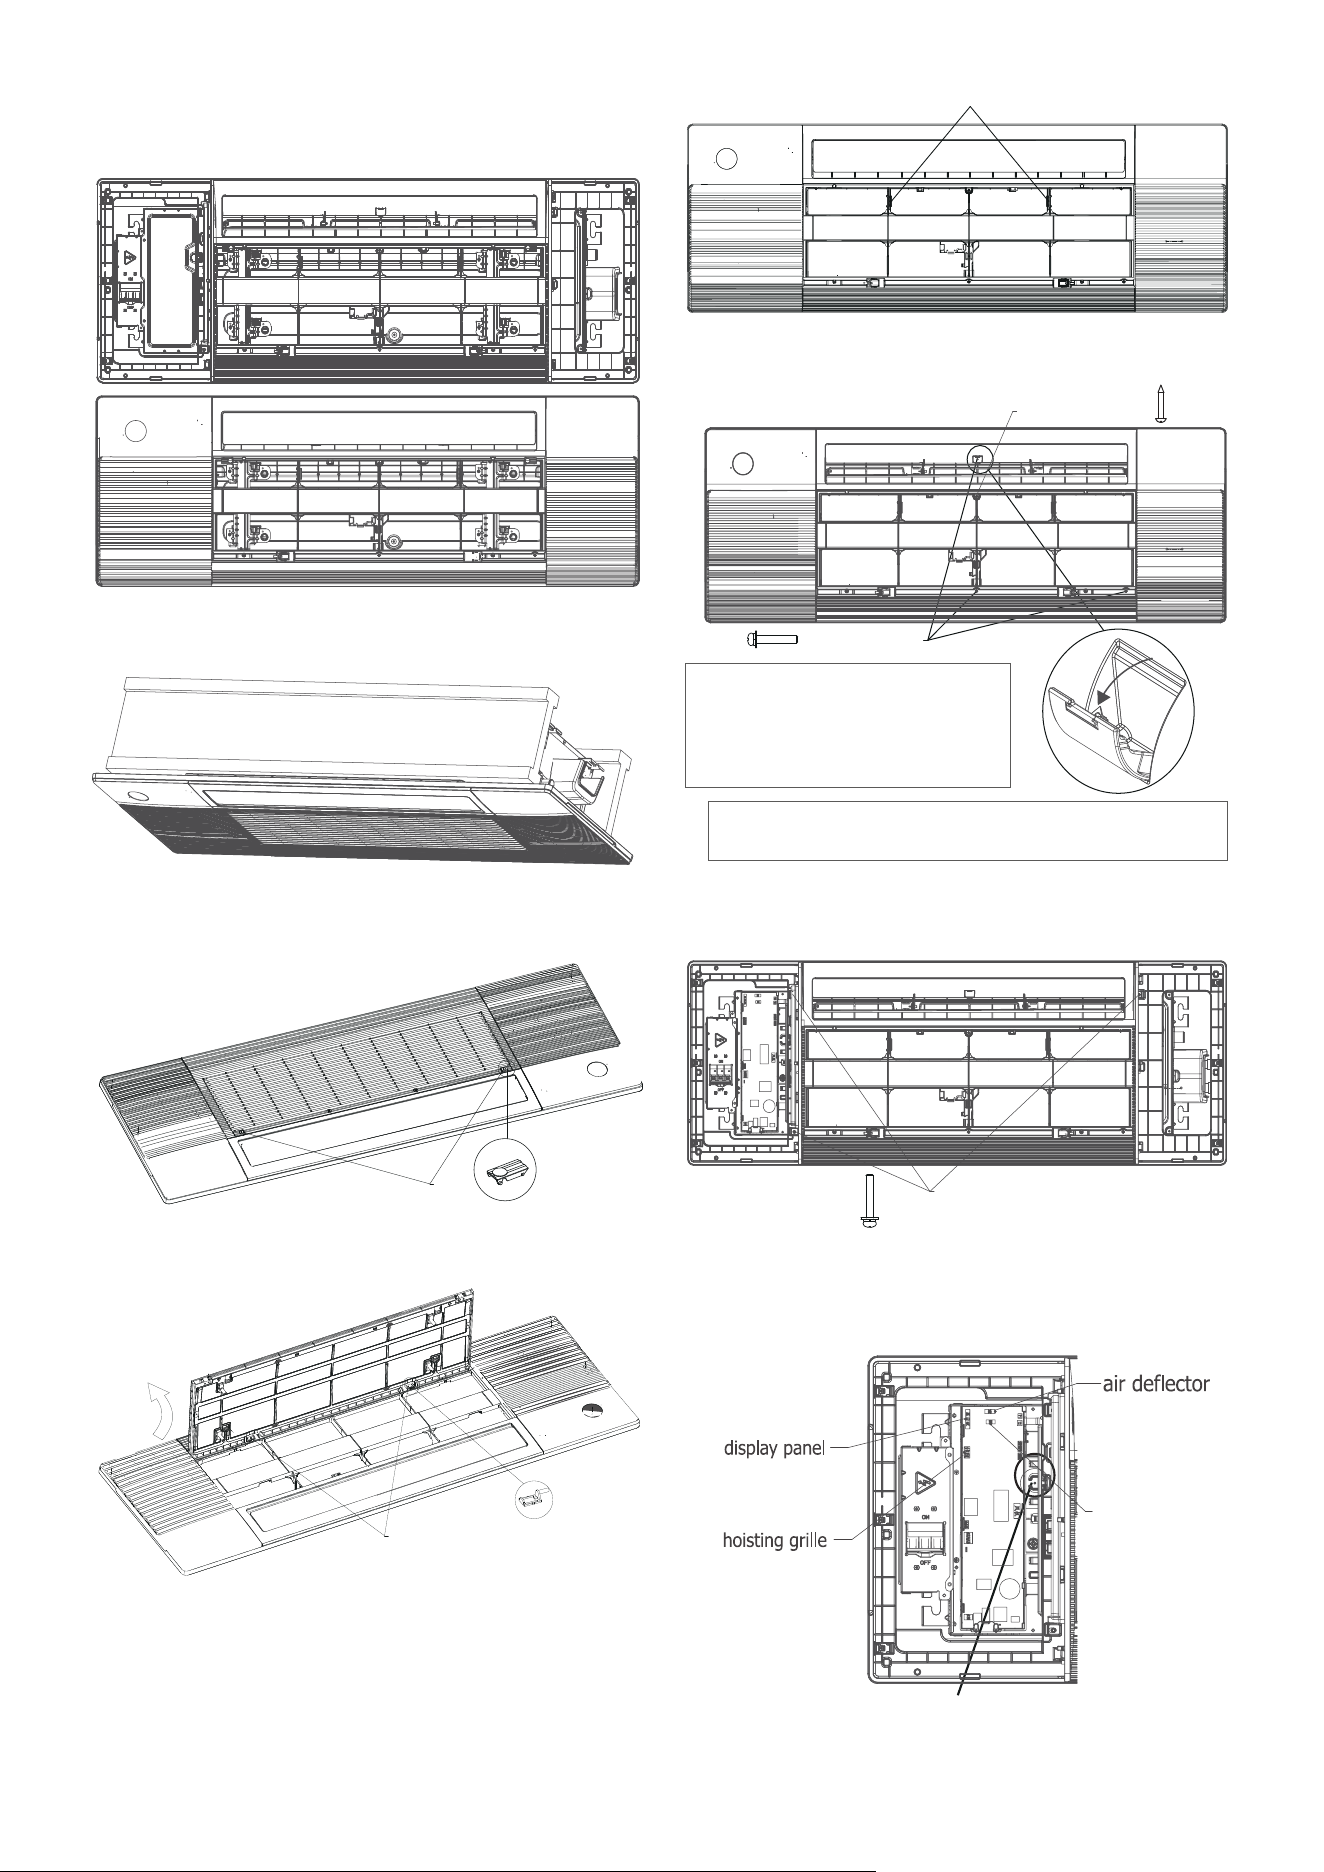
Model B
Press the circular positon to open the two screw
covers, then remove the two screws.
Screw Covers
Hold and open the air grille, then push both of the
latch to the middle to unlock the air grille.
●
Pull the panel grille out of the panel, fix the
cassette panel to the one-way cassett by two
plastic buckles.
Latch
●
●
●
Before fixing this screw, you need to open the screw
cover; and after fixing screw, please close the cover.
Open the two covers on both sides of the panel,
fix the panel to the cassette by using 3× M4*22
screws.
M4*22 screw
NOTE:
Eight M4*22 screws are supplied,
two of which are spare. Two
ST3.9*16 screws are supplied, one
of which is spare.
M4*22 screw
ST3.9*16 screw
Manually rotate the air deflector, fix the panel
to the cassette by using 3×M4*22 screws and a
ST3.9*16 screw.
palstic buckle
NOTE: The corresponding colors or corresponding
pins are connected each other.
Connect the display board to the main control
board, up to four wires are required to connect.
when connection is completed, please
clip the wires to the buckle.
CN10
CN55
(white 10-core)
(red 5-core)
Wireless
CN38
CN14
(white 5-core)
(4 core)
35
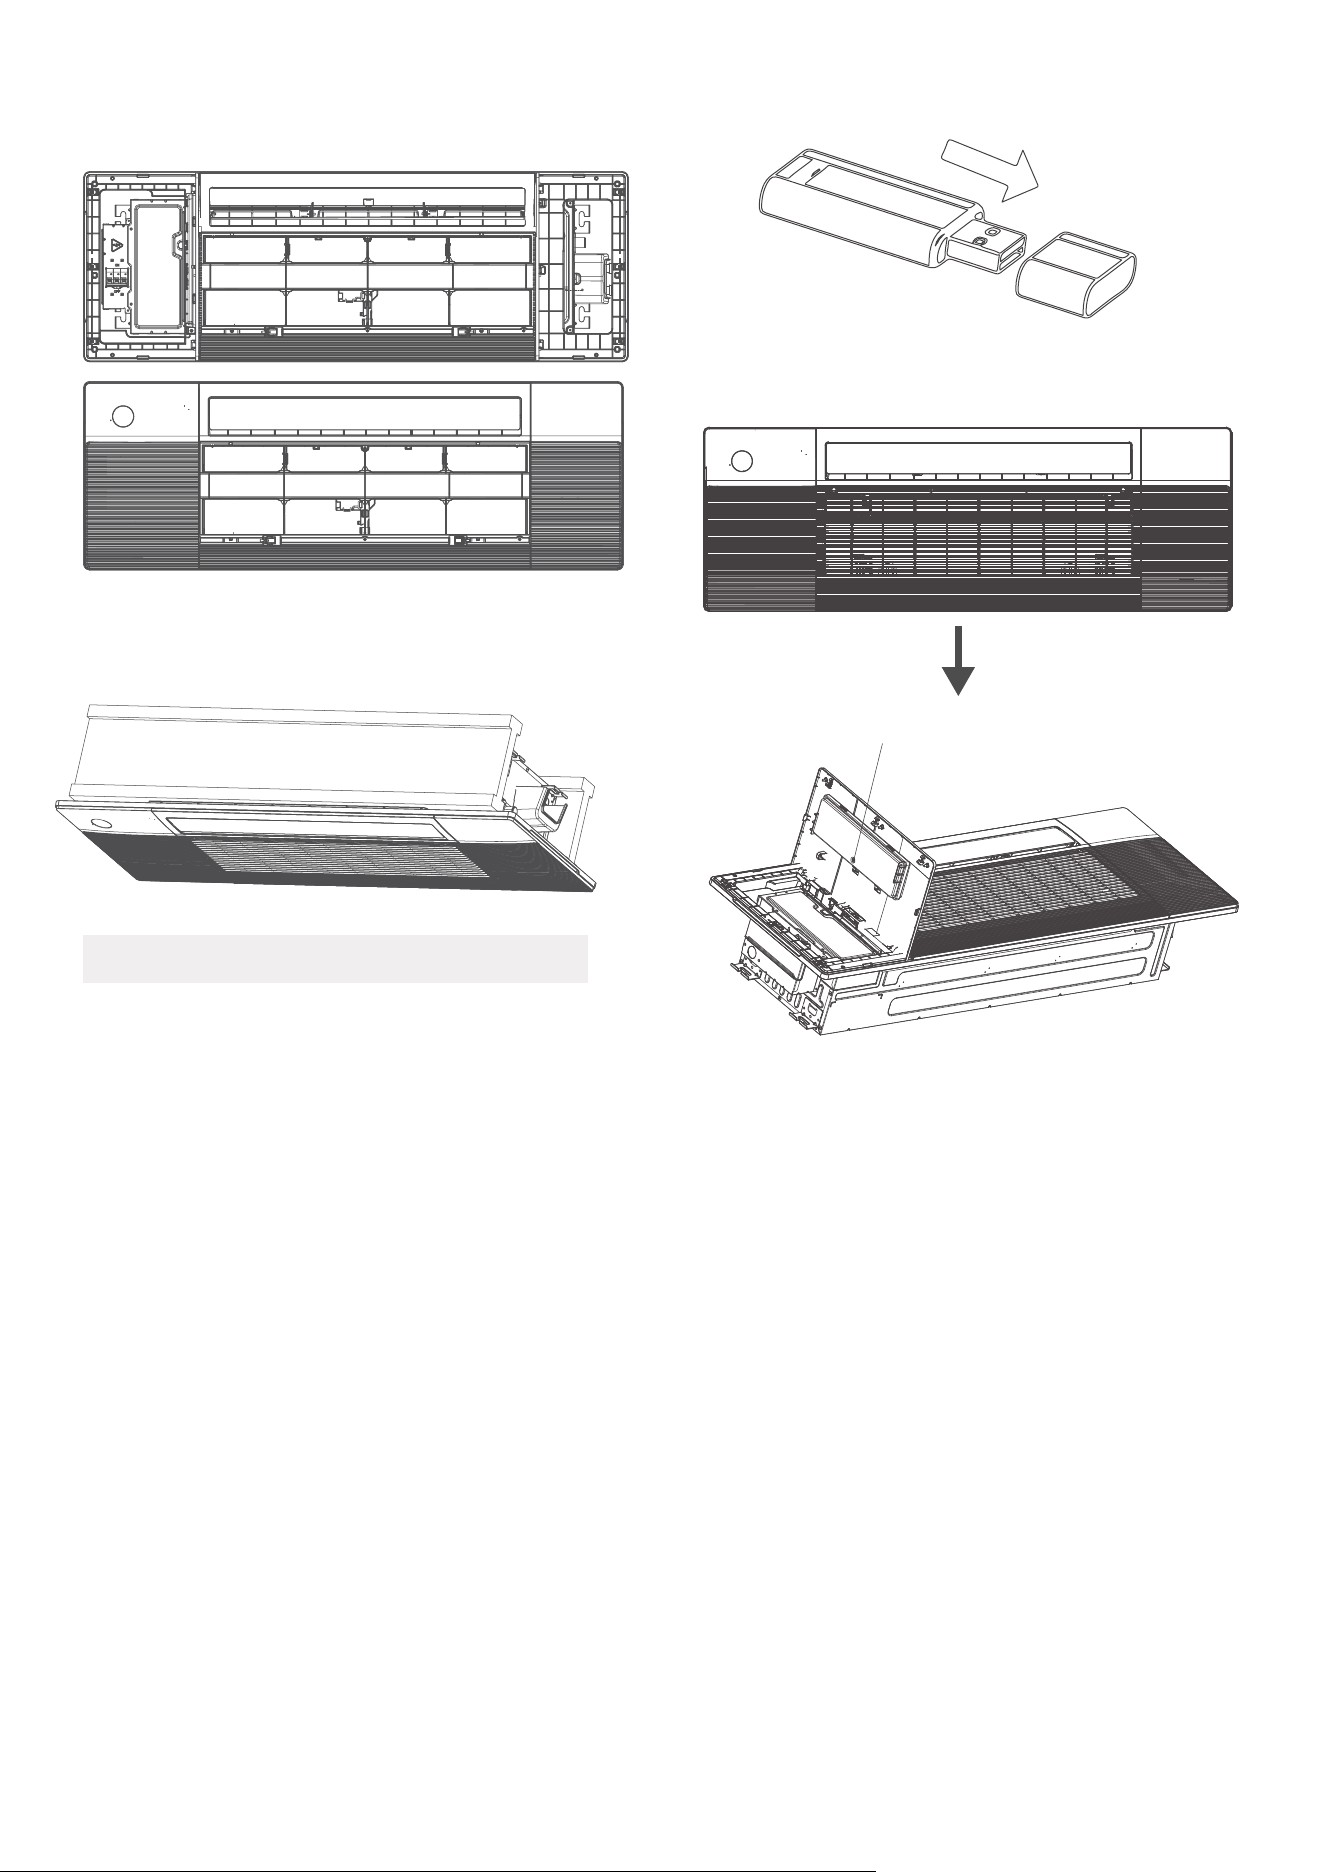
Open the cover with display panel, loosen the
screw and remove the cover.
Loosen the screw and remove the cover
NOTE:
If you choose this configuration, it is
recommended that installing this wireless
module during the step of panel installation.
Wireless module
Wireless module, or named smart kit, if you
choose this configuration, please follow the
steps below to install.
Remove the protective cap of the wireless
module (smart kit).
Re-install the air grille by pushing the latchto
lock it and fixing the two screws, then close the
two screw covers.
●
●
●
●
Install the control box cover and turn the
circuit breaker to ON, then close the two plastic
covers on both sides of the panel.
Step3: Optinal parts installation
36
TEST RUN
Failure to perform the test run may result in unit damage, property damage, or
personal injury.
CAUTION
Before test run
A test run must be performed after the entire
system has been completely installed. Confirm
the following points before performing the test:
a) Indoor and outdoor units are properly
installed.
b) Piping and wiring are properly connected.
c) No obstacles near the inlet and outlet of
the unit that might cause poor performance
or product malfunction.
d) Refrigeration system does not leak.
e) Drainage system is unimpeded and draining
to a safe location.
f) Heating insulation is properly installed.
g) Grounding wires are properly connected.
h) Length of the piping and additional refrigerant
capacity have been recorded.
i) Power voltage is the correct voltage for the
air conditioner
Test Run Instructions
1. Open both the liquid and gas stop valves.
2. Turn on the main power switch and allow the
unit to warm up.
3. Set the air conditioner to COOL mode.
4. For the Indoor Unit
a.
b.
c.
Double check to see if the room
temperature is being registered correctly.
d.
Ensure the manual buttons on the indoor
unit works properly.
Check to see that the drainage system is
unimpeded and draining smoothly.
Ensure there is no vibration or abnormal
noise during operation.
NOTE: If the unit malfunctions or does not
operate according to your expectations,
please refer to the Troubleshooting section
of the Owner’s Manual before calling
customer service.
5. For the Outdoor Unit
a. Check to see if the refrigeration system is
leaking.
b. Make sure there is no vibration or
abnormal noise during operation.
c. Ensure the wind, noise, and water
generated by the unit do not disturb your
neighbors or pose a safety hazard.
• Before the test, make sure that the water
discharge pipeline is smooth, and check that
each connection is sealed properly.
• Conduct the water discharge test in the new
room before the ceiling is paved.
1. Connect the power supply, and set the air
conditioner to operate in the cool mode.
Check the running sound of the drainage pump.
2. keep cool mode running at least 10 min.
3. Stop the air conditioner. Wait for three minutes,
and then check if there is anything unusual. If
the water discharge piping layout is not correct,
the excessive water flow will cause the water
level error and “EE” error code will be displayed
on the display panel. There may even be water
overflowing from the water pan.
4. Continue to add water until the alarm for
excessive water levels is triggered. Check if the
drainage pump drains water immediately. After
three minutes, if the water level does not fall
below the warning level, the unit will shut
down. At this time, you need to turn o the
power supply, and drain away the accumulated
water before you can turn on the unit normally.
5. Turn o the power supply, remove the water
manually using the drainage plug, and put
the test cap back to the original place.
Water Discharge Test
CAUTION
The drainage plug at the bottom of the unit
body is used to discharge accumulated water
from the drain pan when the air conditioner
malfunctions. When the air conditioner is
operating normally, make sure the drainage
plug is properly plugged to prevent water
from leaking.

Instructions for packing and unpacking the unit:
Unpacking:
Indoor unit:
1. Cut the sealing tape on the carton with a knife, one cut on the left, one cut in the middle and one
cut on the right.
2.Use the vice to take out the sealing nails on the top of the carton.
3.Open the carton.
4.Take out the middle support plate if it is included.
5.Take out the accessory package, and take out the connecting wire if it is included.
6.Lift the machine out of the carton and lay it flat.
7.Remove the left and right package foam or the upper and lower packaging foam, untie the
packaging bag.
Outdoor Unit
1.Cut the packing belt.
2.Take the unit out of the carton.
3.Remove the foam from the unit.
4.Remove the packaging bag from the unit.
Packing:
Indoor unit:
1.Put the indoor unit into the packing bag.
2.Attach the left and right package foam or the upper and lower packaging foam to the unit.
3.Put the unit into the carton, then put accessory package in.
4.Close the carton and seal it with the tape.
5.Using the packing belt if necessary.
Outdoor unit:
1.Put the outdoor unit into the packing bag.
2.Put the bottom foam into the box.
3.Put the unit into the carton, then put the upper packaging foam on the unit.
4.Close the carton and seal it with the tape.
5.Using the packing belt if necessary.
NOTE:
Please keep all packaging items if you may need in the future.
Packing and unpacking the unit
37

QS002I-T2(B)-FKJ(R454B)
16123000003793
20240601
The design and specifications are subject to change without prior notice for product improvement.
Consult with the sales agency or manufacturer for details. Any updates to the manual will be uploaded to
the service website, please check for the latest version.
备注说明(说明书中含有基准机型型号,制单不可直接使用):
1. 因为UL标准有要求,当说明书分开为两本时(北美客户要求,出货时必须是分开为
两本书), 每一本上都必须体现附录DD规定的安规内容。 详情请咨询认证。
2. 由于安规要求,R454B冷媒说明书中必须体现机型搭配有关系,所以
P4页的内外
机型号需要业务和制单工程师根据客户实际型号进行填写,基准上所列型号只是为了做个模板
而已,供制单参考用,不能直接使用。
3. 基准说明书不带商标和制造商,进口商信息。请咨询北美认证是否要添加,按客户信息进行
添加。
说明书技术条件:(此页无需印刷)
材质:80克双胶纸
颜色:黑白
尺寸:210*290
装订:骑马钉
更改版本A:P4页的5.9改为6.0
更改版本B:最小房间面积数据8.2改为8.3
更改版本C:兼容取消冷媒传感器 20240601