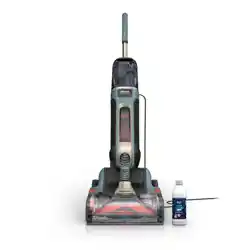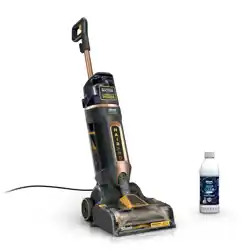
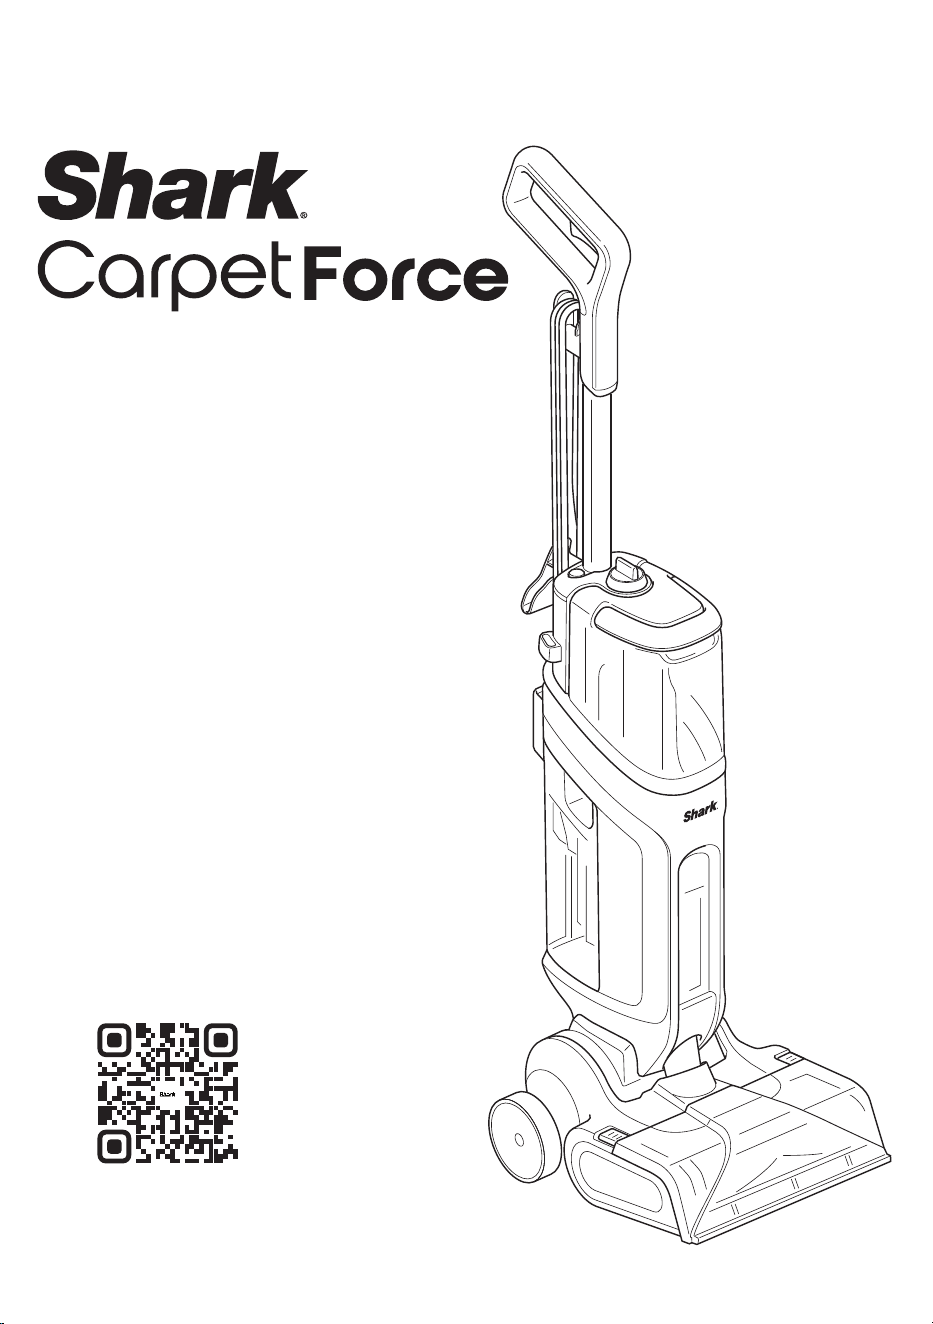
EX500ANZ
OWNER’S GUIDE
Scan QR code to view
HOW-TO VIDEOS
and more.
sharkclean.co.nzsharkclean.com.au
1. If the power cord plug does not fit fully into
the outlet, contact a qualified electrician.
DO NOT force into outlet or try to modify to fit.
2. To reduce the risk of shock and unintended
operation, unplug before servicing.
3. This carpet cleaner consists of a motorised
nozzle, main body, pole, handle, hose, and hand
tools. These components contain electrical
connections, electrical wiring, and moving
parts that potentially present risk to the user.
4. Before each use, carefully inspect all parts
for any damage. If a part is damaged,
discontinue use.
5. Use only identical Shark replacement parts.
6. DO NOT use the carpet cleaner for any
purpose other than those described in
this Guide.
7. DO NOT immerse or spray water on the
body of the carpet cleaner.
8. To clean the surface, wipe with a dry cloth.
9. Keep the carpet cleaner’s cord out of reach
of children.
10. DO NOT allow the appliance to be used by
children. DO NOT allow to be used as a toy.
Close supervision is necessary when used
near children.
11. This appliance can be used by persons with
reduced physical, sensory, or mental capabilities
or lack of experience or knowledge if they
have been given supervision or instruction
concerning use of the appliance in a safe
way and understand the hazards involved.
Cleaning and user maintenance shall not be
done by children.
12. DO NOT handle plug or carpet cleaner with
wet hands.
13. DO NOT use without the dirty water tank,
clean solution tank, filter, brushroll, diverter
valve, and brushroll cover in place.
14. Use only identical replacement parts. Only
use Shark® branded filters and accessories.
15. DO NOT put any objects into nozzle
opening. DO NOT use with any opening
blocked; keep free of dust, lint, hair, and
anything that may reduce airflow.
16. DO NOT use if nozzle airflow is restricted.
If the air paths or the motorised floor nozzle
become blocked, turn the carpet cleaner o.
Remove all obstructions before you turn on
the unit again. Keep nozzle and all carpet
cleaner openings away from hair, face,
fingers, uncovered feet, or loose clothing.
17. DO NOT use if carpet cleaner is not working
as it should, or has been dropped, damaged,
left outdoors, or dropped into water.
18. Use extra care when cleaning on stairs.
19. DO NOT leave the carpet cleaner
unattended while plugged in.
20. When using on any surface, always keep the
carpet cleaner moving to avoid damaging
the surface (e.g., carpet fibers).
21. DO NOT place carpet cleaner on
unstable surfaces such as chairs or tables.
The surrounding area may be slippery and
present a risk of injury.
22. DO NOT use to pick up:
a) Large objects.
b) Hard or sharp objects (glass, nails,
screws, or coins).
c) Large quantities of dust (e.g., drywall dust).
d) Smoking or burning objects (hot coals,
cigarette butts, or matches).
e) Flammable or combustible materials
(lighter fluid, gasoline, or kerosene).
f) Toxic materials (chlorine bleach,
ammonia, or drain cleaner).
23. DO NOT use in the following areas:
a) Poorly lit areas.
b) Outdoor areas.
c) Spaces that are enclosed and may
contain explosive or toxic fumes or
vapors (lighter fluid, gasoline, kerosene,
paint, paint thinners, mothproofing
substances, or flammable dust).
24. Turn o the carpet cleaner before any
adjustment, cleaning, maintenance,
or troubleshooting.
25. During cleaning or routine maintenance,
DO NOT cut anything other than hair, fibers,
or string wrapped around the brushroll.
WARNING
To reduce the risk of fire, electric shock, injury, or property damage:
IMPORTANT SAFETY INSTRUCTIONS
FOR HOUSEHOLD USE ONLY READ ALL INSTRUCTIONS BEFORE USING THIS
CARPET CLEANER
SAVE THESE INSTRUCTIONS
26. DO NOT modify or attempt to repair the
carpet cleaner yourself. DO NOT use the
carpet cleaner if it has been modified
or damaged.
27. Turn o all controls before unplugging.
28. To reduce the risk of fire or electric shock
due to internal component damage, use only
Shark® cleaning fluid. See the Cleaning Fluid
section of this Instruction Book.
29. DO NOT pull or carry by cord, use cord as
a handle, close a door on cord, or pull cord
around sharp edges or corners. DO NOT run
appliance over cord. Keep cord away from
heated surfaces.
30. DO NOT unplug by pulling on cord. To unplug,
grasp the plug, not the cord.
31. Use indoors only.
32. DO NOT use carpet cleaner on hard floors as
it may damage your floor. To avoid damage
to flooring and to avoid potential slip hazard,
after use:
a) move to a hard sealed surface (avoid
unsealed, wood and laminate).
b) place unit on absorbent material like a
towel to soak up any liquid.
33. DO NOT fill solution tanks while installed on
the appliance. Remove before filling.
34. The areas around where you are cleaning
may become wet. Use care to avoid slipping
and falling.
35. GROUNDING INSTRUCTIONS: This appliance
must be grounded. If it should malfunction or
break down, grounding provides a path of
least resistance for electric current to reduce
the risk of electric shock. This appliance’s cord
has an equipment-grounding conductor and a
grounding plug. The plug must be inserted
into an appropriate outlet that is properly
installed and grounded in accordance
with all local codes and ordinances.
36. WARNING: Improper connection of the
equipment grounding conductor can result
in a risk of electric shock. Check with a
qualified electrician or service person if
you are in doubt as to whether the outlet
is properly grounded. DO NOT modify the
plug provided with the appliance. If the plug
will not fit the outlet, have a proper outlet
installed by a qualified electrician.
37. This appliance is for use on a nominal V
circuit and has a grounding attachment plug
that looks like the plug illustrated above.
Make sure that the appliance is connected
to an outlet having the same configuration
as the plug. No adaptor should be used with
this appliance.
38. DO NOT immerse. To reduce risk of
electric shock, use only on carpet
moistened by cleaning.
39. DO NOT use vinegar in any tanks.
40. DO NOT run over edges of area rugs.
41. Stalling the brushroll may result in
premature failure.
42. Avoid repeated strokes over the same area
to help prevent damage to Berber carpets.
43. Check manufacturer’s tag prior to cleaning
area rugs for any specific cleaning guidelines.
We DO NOT recommend deep cleaning
delicate rugs (including wool, cotton, silk,
antique, or area rugs that DO NOT have a
manufacturer’s tag).
44. Always perform a small patch test on a small
hidden spot of the area rug or surface you
are cleaning to make sure it is ok to clean
with this product.
45. DO NOT store unit where temperatures
reach freezing levels to avoid damaging
internal parts.
46. FIRST AID Keep out of reach of children.
Causes skin and serious eye irritation.
IF IN EYES, rinse continuously with water for
minutes. Remove contact lenses if present
and easy to do so. Continue rinsing. IF ON
SKIN, wash with soap and water. If skin and
eye irritation persists, seek medical attention.
47. Please recycle container. Dispose of contents/
container with a licensed waste disposal site
in accordance with the requirements of the
local waste disposal authority.
48. DO NOT dispose in drains or watercourses in
concentrate form.
sharkclean.co.nzsharkclean.com.au
6
CONCEN TRATE
WATER
CONC E NTRAT E
WATE R
5
CONCEN TRATE
WATER
4
CONC E NTRAT E
WATE R
IMPORTANT: For best results, the CarpetForce tank must be filled with water and concentrate
up to the fill lines before starting a cleaning session.
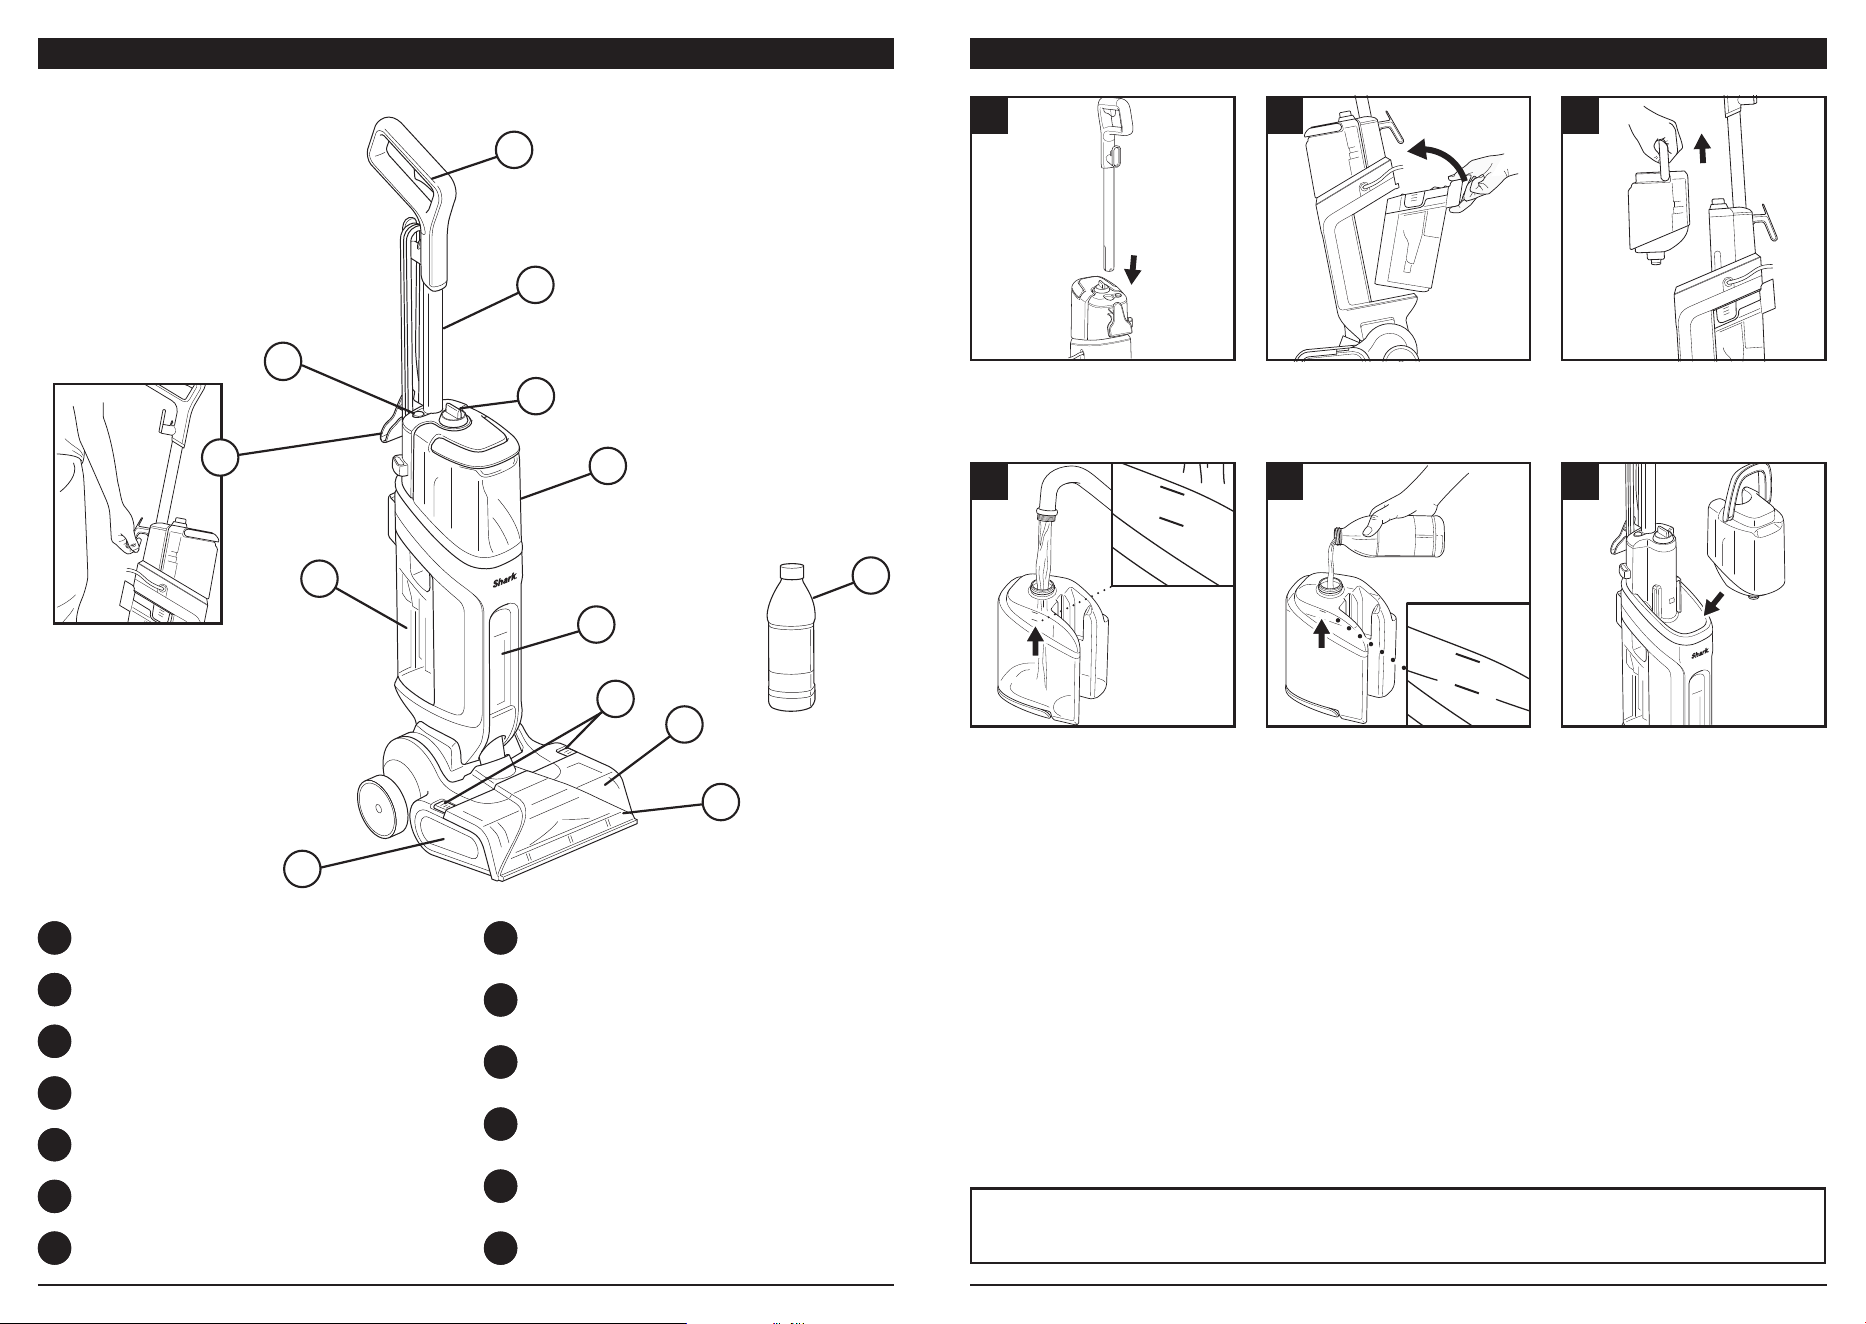
WHAT’S INCLUDED ASSEMBLY
WHAT’S INCLUDED: GETTING STARTED
A Wand
B Spray Trigger
C Wand Release Button
D Mode Select Dial
E CarpetForce™ Tank
F Dirty Water Tank
G Upduct Window
H Floor Nozzle
I Suction Inlet
J Brushroll
K Carry Handle
L Shark Solution
M Inlet Removal Tabs
Insert wand into the top of
unit until it clicks into place.
Unscrew the cap on the
bottom of tank, and add water
up to the WATER fill line.
Install the dirty water tank.
Insert the bottom first, then
tilt the tank forward until it
clicks into place.
Add Shark Solution up to the
CONCENTRATE fill line. For
best results, start with a full
tank.
Lift the CarpetForce Tank by
the handle to detach it.
Reattach cap, then reinstall
the CarpetXpert Tank until it
clicks into place. Insert the
plug into the outlet.
D
C
B
A
E
F
G
H
I
J
K
L
M
Lift the unit only by the
carry handle (K). Do not
lift it by the wand (A) or
by the dirty water tank
(F) handle.
321
sharkclean.co.nzsharkclean.com.au
Note: If you have a thick or long-fibered rugs or carpet, please check your manufacturer’s
care instructions. If the instructions allow for using a carpet cleaner, you may need to move
the unit over the surface faster to prevent it from automatically turning o. (Automatic
shuto is by design to protect the unit) To help ensure an even cleaning, avoid pulsing or
partially squeezing the trigger.
Tip: Push the unit back and forth at a slower pace than a traditional vacuum. Moving too fast
could cause suction power to turn o. If this happens, stand the unit upright and turn the dial to
O. Wait a few seconds, then choose a cleaning mode, recline the handle, and continue cleaning.
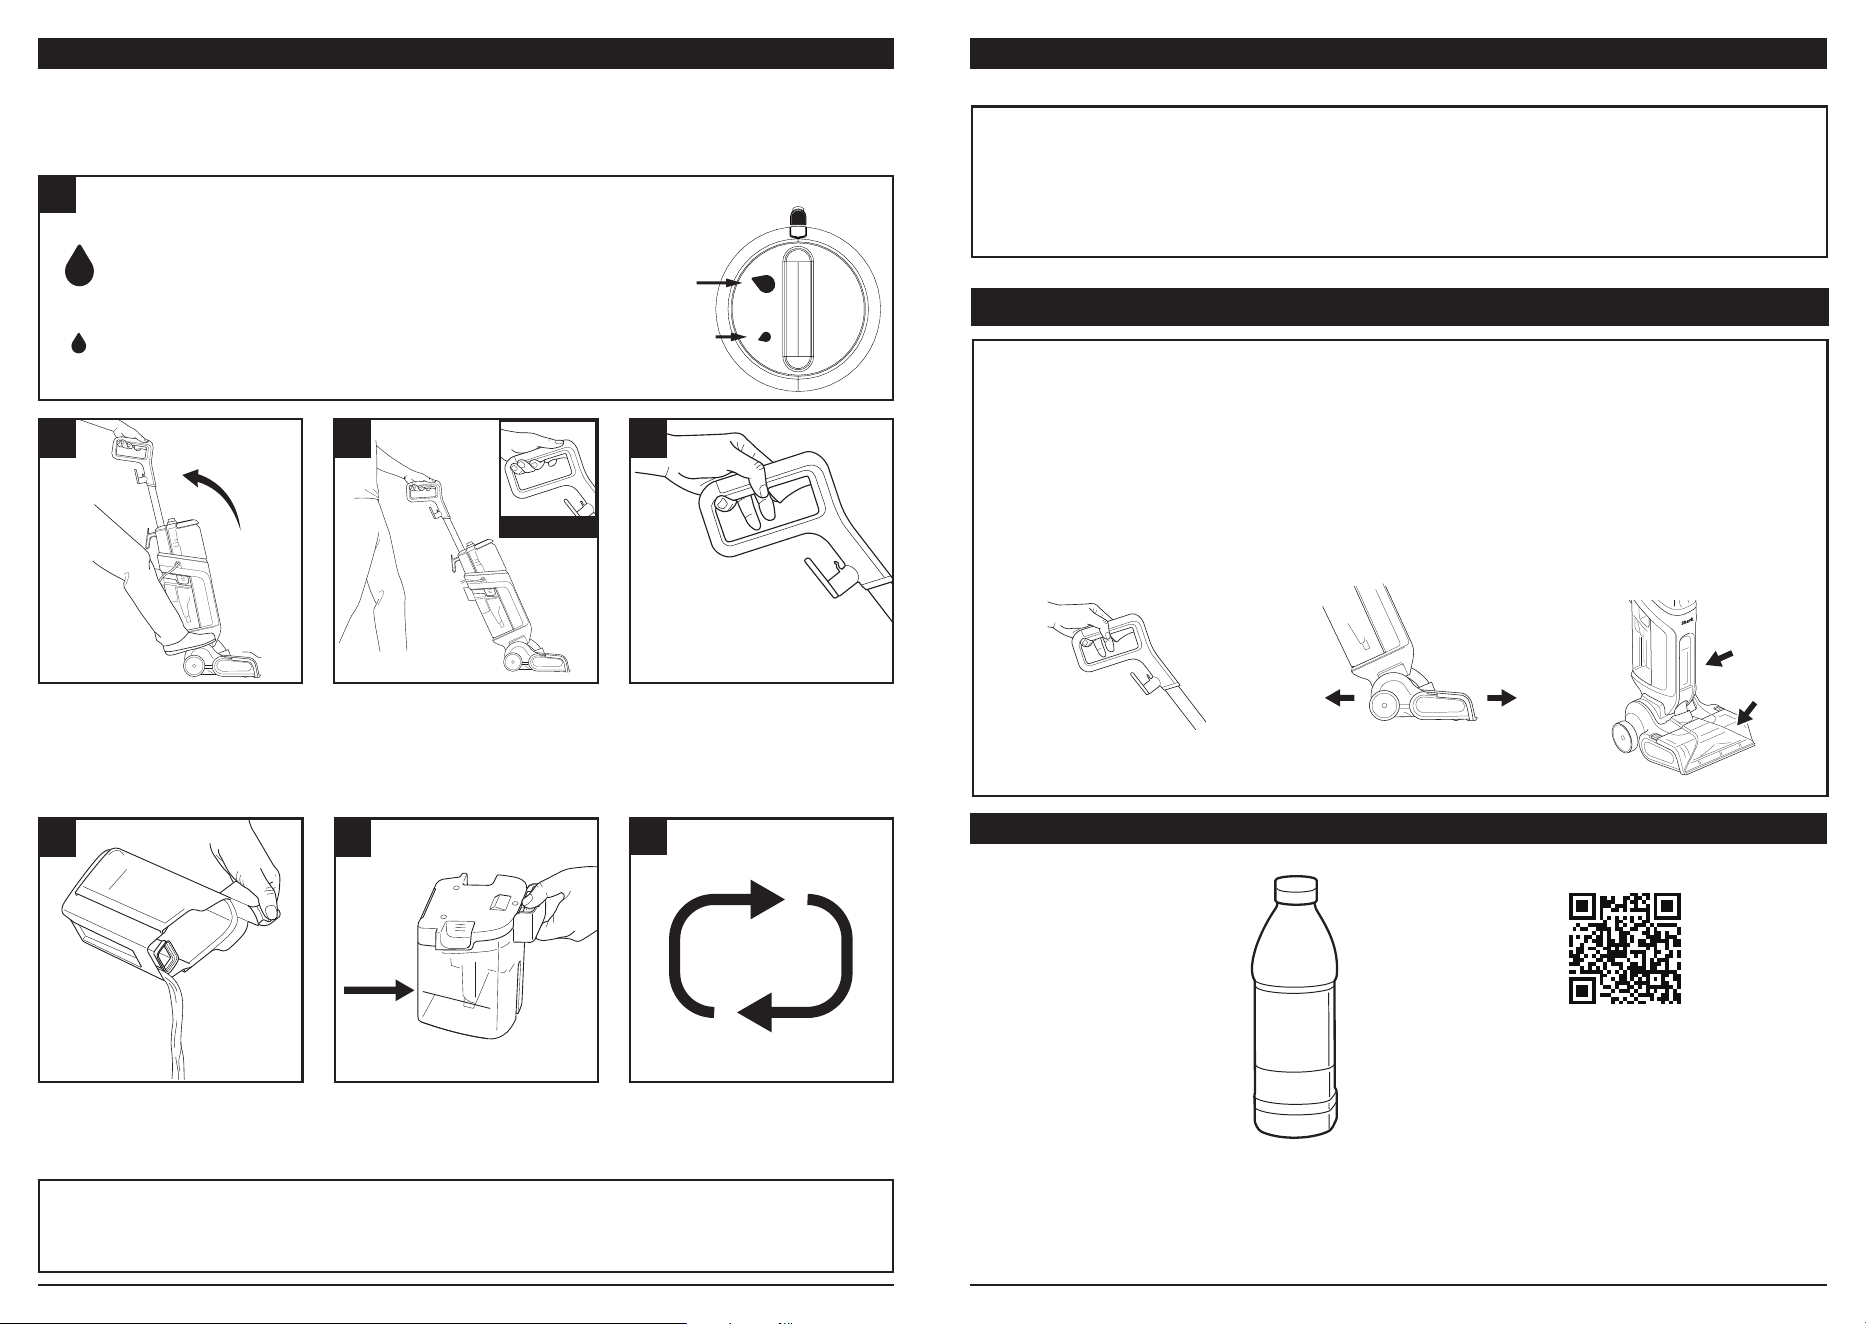
CLEANING WITH CARPETFORCE CLEANING TIPS
SHARK® CLEANING SOLUTIONS
IMPORTANT: For optimal performance, vacuum with a traditional vacuum cleaner BEFORE
using CarpetForce. This is especially important when removing PET HAIR from carpet.
Note: It is normal for some hair to remain after the first pass with CarpetForce. Try another
cleaning pass, or remove the hair manually.
Deep Clean: Uses more solution than Express Clean
Mode for a deeper wash with longer dry times and
shorter tank runtimes. A full CarpetForce tank should
provide at least 5 minutes of runtime.
Express Clean: Ideal for refreshing carpets that do not
require a deep clean. Uses less solution than Deep Clean
mode, meaning shorter dry times and longer-lasting solution
in the tank.
Scan the QR code above to
order refills and to explore
our complete range of
cleaning solutions.
Turn the Mode Select dial (D) to choose a cleaning mode.
Power the motor on by gently
stepping on the nozzle and
reclining the body back by the
handle. The suction motor will
start and the brushroll will spin.
When the dirty water tank is full, the motor noise will change
to a different pitch. Empty the tank when full.
Push unit forward, holding
down the trigger fully. Push
at a consistent, slow pace.
Repeat steps 2 and 3 until the
carpet is completely clean.
Make sure to completely
release the trigger before
moving backward. Move
straight backward at a
consistent pace.
DRY TIME TIPS
• Dry times range from about an hour to multiple hours. Factors that affect drying times include
the selected cleaning mode, climate, humidity, trigger usage, and carpet thickness.
• Always release the trigger before moving backward. Repeated passes over the same spot
with suction only (no trigger) will shorten dry times. Repeat cleaning passes until no more
extracted fluid appears in the nozzle or the upduct window.
• Deep Clean mode uses more solution than Express Clean. If the carpet to be cleaned is not
very dirty, use Express Clean for a shorter dry time.
• Try opening windows and interior doors to create airflow in the room and reduce dry times.
Shark Cleaning Solutions
Use ONLY Shark-branded
cleaning solutions. Make sure
to only add cleaning solution
to the CarpetForce tank. Unit
is not compatible with other
solutions or cleaners.
OFF
Deep
Clean
Express
Clean
Note: You do not need to
empty the CarpetForce tank
after each use. You can leave
remaining solution in the tank
for next time.
1
Move nozzle about 8 inches
per second.
Release trigger to clean
with suction only.
2
PULL TRIGGER
REPEAT
2 & 3
5
31
4a 4b
MAX
FILL LINE
sharkclean.co.nzsharkclean.com.au
Tabs
Window
Filter
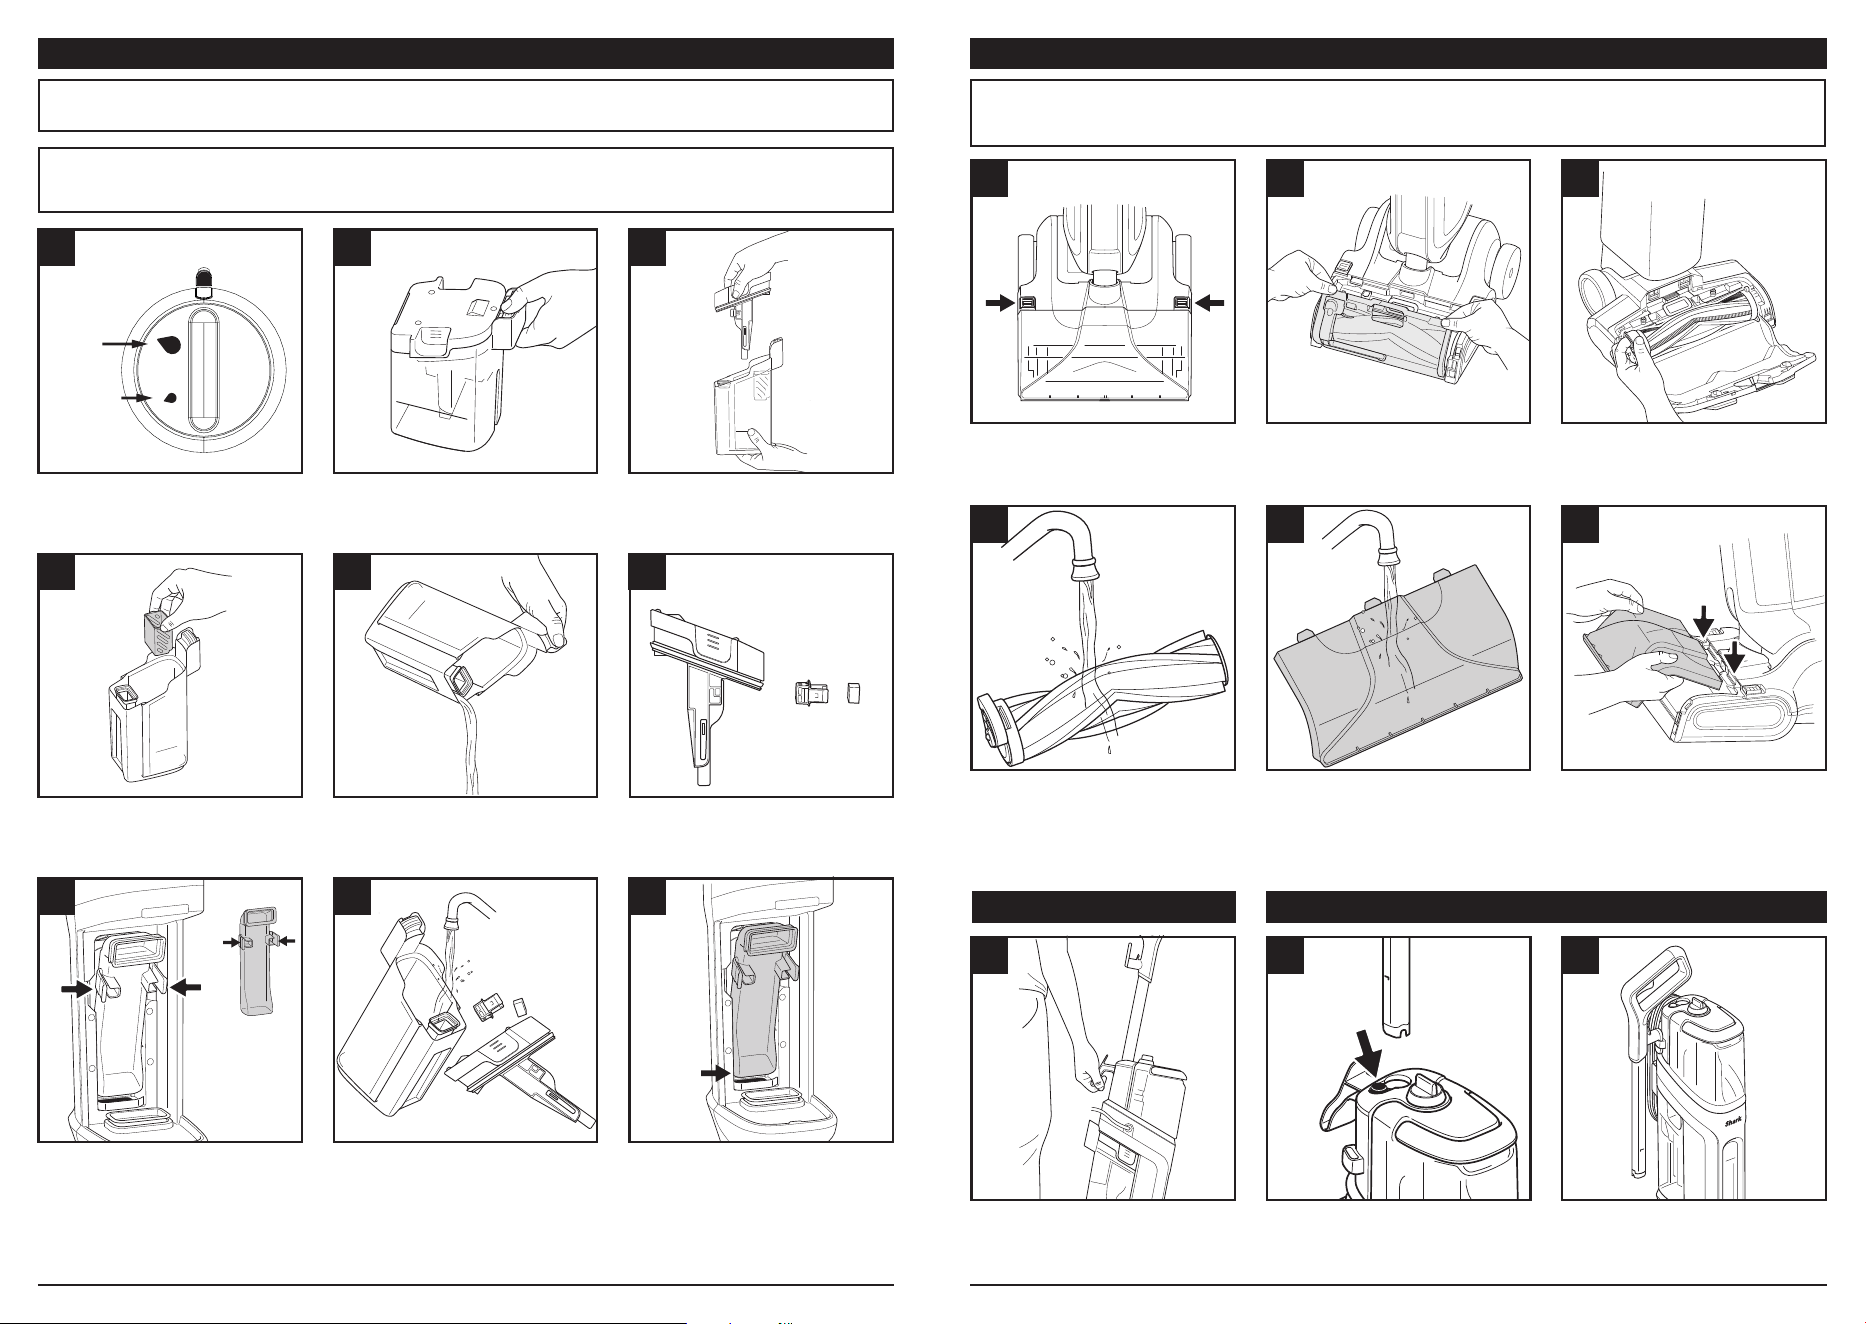
Note: Before performing any maintenance, make sure the unit is powered o and unplugged.
Note: Before performing any maintenance, make sure the unit is powered o and unplugged
from the wall outlet.
Note: After the power is turned o, it will take 2 to 3 seconds for the unit to clear the lines
and shut down completely. Tip: Clean unit after every use to prevent odours and mould.
DIRTY WATER TANK MAINTENANCE BRUSHROLL MAINTENANCE
Turn the dial to the OFF
position.
Lift the strainer out of the tank
by the tabs on the side, and
empty contents into the trash.
Remove the window by
pinching the tabs, then
wash the window with
soap and water.
Remove the dirty water tank
by pressing the release button
and lifting out the tank.
Dispose of the dirty water
from the tank into a toilet
or drain.
Lightly wash all parts,
and allow them to air-dry
completely before
reassembly.
Lift off the lid and set it aside.
DO NOT pour out dirty water
until lid is removed.
Remove the filter cover, then
lift out the filter. Wash the
filter with soap and water.
Insert the bottom of the
window into the frame of
the inlet. (Make sure it is not
resting on top of the frame.)
Pivot the window toward the
front of the product to click
the two tabs into place.
Detach the suction inlet
by sliding the tabs toward
the wheels.
Rinse the brushroll with soapy
water, and cut away any
wrapped hair with scissors.
Allow brushroll to air-dry
before reinstalling.
Lift the inlet cover by the
tabs on the top
Rinse the suction inlet with
clean water and allow it to
air-dry completely before
reinstalling.
Remove the brushroll by
pulling up on the side tab.
To reinstall the suction inlet,
insert the top two tabs into
the openings on the nozzle,
then push down until both
tabs click into place.
MOVING THE UNIT REMOVING THE WAND
ONLY lift the unit by the Carry
Handle on the back. Do NOT lift
the unit by the wand handle.
Remove the wand by
pressing the release button
and lifting up.
Insert the cord hook into the
holder, and place the wrapped
cord on the carry handle.
OFF
Deep
Clean
Express
Clean
1
1
4
7
4
7
2
2
5
8
5
8
3
3
6
9
6
9
sharkclean.co.nzsharkclean.com.au
TROUBLESHOOTING
Unit is leaking.
Be sure the cap is sealed tightly and the tank is firmly pressed down. A leak coming from the vents
on the bottom rear of the nozzle could be caused by using too much soap, over-cleaning the same
area, or shaking the dirty water tank. Make sure the strainer is installed in the dirty water tank to
prevent splashing.
Suction is weak.
Make sure all parts are correctly installed (dirty water tank, upduct window, brushroll, brushroll cover,
and nozzle). DO NOT check suction by putting your hand under the nozzle while it is running. Check
the filters: With the unit unplugged, press the tab at the rear of the nozzle to remove the filter door.
Clean any dust or debris o the foam filter, then reinstall. Check the filter inside the dirty water tank:
remove all dust and debris, then reinstall.
Solution is not dispensing.
Be sure the CarpetForce™ tank is full, and both tanks are attached securely. The mode dial needs to
be in the Deep or Express position, and the trigger needs to be pulled to dispense the solution. If it is
in the OFF position, and the trigger is pulled, no fluid will be dispensed.
Unit is leaving hair on the carpet.
It is normal for some hair to remain after the first pass with CarpetForce. Try another cleaning pass,
or remove the hair manually. For optimal performance, clean with a traditional vacuum cleaner
before using CarpetForce.
Carpets are oversaturated after cleaning.
If you don’t need to deep-clean, use Express Clean Mode to clean with less solution. Do not press
the trigger for too long while moving forward, and don’t use it at all when moving backward. If the
carpet is still wet after cleaning, try repeated suction-only cleaning passes without using the trigger
at all. Factors that aect drying times include the selected cleaning mode, climate, humidity, trigger
usage, and carpet thickness.
Unit starts unexpectedly or fails to shut o.
If CarpetForce is dropped or otherwise heavily impacted, it may start unexpectedly and continue to
run when the power switch is turned o. If this occurs, immediately unplug the unit. Do NOT plug
the vacuum back in. Do NOT attempt to operate, troubleshoot, or repair the unit. Contact support.
sharkclean.com.au | AU 02 8801 7666 or sharkclean.co.nz | NZ 0800 112 660
Note: Before performing any maintenance, make sure the unit is powered o and unplugged.
For warranty claims, you must submit proof of purchase in the form of a valid receipt that shows the date
and place of purchase. This 2-year manufacturer’s warranty is valid from the date of purchase and applies
where your product becomes defective due to faulty materials or workmanship.
Where an item or component is replaced, the replacement item will be covered for the remaining balance
of the original 2-year warranty period. Your statutory rights under the Australian Consumer Law (ACL) and
Consumer Guarantees Act 1993 (CGA) may apply beyond the 2-year period, and nothing in this warranty
limits those rights.
This warranty does not replace but is in addition to your statutory rights:
• For New Zealand Consumers: If your product is faulty, you are entitled to remedies under the Consumer
Guarantees Act 1993. Where a defect exists, we will repair or replace the faulty part free of charge, or,
where a repair or replacement is not reasonable or available, replace the unit with an equivalent or upgraded
model. CGA rights apply automatically and continue after this warranty expires.
• For Australian Consumers: Our goods come with guarantees that cannot be excluded under the Australian
Consumer Law. You are entitled to a replacement or refund for a major failure and compensation for any
other reasonably foreseeable loss or damage. You are also entitled to have the goods repaired or replaced
if the goods fail to be of acceptable quality and the failure does not amount to a major failure.
Nothing in this warranty excludes, restricts, or modifies any rights you may have to compensation for consequential
loss under the ACL or CGA. Attempts to exclude these rights may be misleading and are prohibited.
Your warranty is subject to the following conditions
• DO NOT operate the appliance with a damaged plug or cord, or if the unit has been dropped, damaged
or dropped in water.
• To avoid the risk of electric shock, do not disassemble or attempt to repair the appliance on your own.
If the supply cord is damaged, it must be replaced by a qualified electrician to avoid a hazard. Incorrect
re-assembly or repair can cause a risk of electric shock or injury to persons when the appliance is used.
• The item has not been misused, abused, neglected, altered, modified or repaired by anyone.
• The item has been subjected to fair wear and tear.
• The item has not been used for trade, professional or hire purposes.
• The item has not sustained damage through foreign objects, substances or accident.
• The item has not been subject to unauthorised/improper maintenance/handling or overload.
Customer costs within warranty
The customer is responsible for any inbound freight charges for returning a product for assessment and any
outbound freight charges for repair, warranty parts or replacement units.
This does not aect your rights under the ACL or CGA where the law requires us to bear reasonable costs
associated with a remedy.
Who is covered under the express manufacturer’s warranty?
This express warranty applies only to the original purchaser, who bought the product from an authorised
retailer and non-transferrable. Proof of purchase is required.
This warranty against defects is provided by:
SharkNinja Pty Ltd ABN 87 147 260 197
Address: Suite 23.03, Level 23, 45 Clarence Street, Sydney NSW 2000
Phone: (+61) 2 8801 7666
Email: customerservic[email protected]
We will assess the goods and provide a repair, replacement, or refund in accordance with this warranty and
your rights under the ACL or CGA.
How to make a claim
1. Contact us at customerservice@sharkclean.com.au
2. Provide proof of purchase and a description of the issue.
3. You may be asked for photos or to return the product for inspection.
4. We will assess whether the defect falls within this warranty and provide the appropriate remedy (repair,
replacement, or refund) according to the ACL or CGA.
TWO (2) YEAR LIMITED WARRANTY
© 2026 SharkNinja Operating LLC. SHARK is a registered trademark of SharkNinja Operating LLC.
CARPETFORCE is a trademark of SharkNinja Operating LLC.
EX500ANZ_IB_MP_Mv9
PLEASE READ CAREFULLY AND KEEP FOR FUTURE REFERENCE.
This Owner’s Guide is designed to help you get a complete understanding of your new Shark® CarpetForce.
SHARKNINJA PTY. LTD.
Suite 23.02, Level 23,
45 Clarence St, Sydney NSW 2000
AU sharkclean.com.au | NZ sharkclean.co.nz
Illustrations may dier from actual product. We are constantly striving to improve our products; therefore the
specifications contained herein are subject to change without notice.
This product may be covered by one or more U.S. patents. See sharkninja.com/patents for more information.
@sharkhomeau | @sharkhomenz
REGISTER YOUR PURCHASE
AU sharkclean.com.au
NZ sharkclean.co.nz
Scan QR code using
mobile device.
RECORD THIS INFORMATION
Model Number: ________________________
Serial Number: ________________________
Date of Purchase: ______________________
(Keep receipt)
Store of Purchase: ______________________
TECHNICAL SPECIFICATIONS
Voltage: 220-240V~, 50-60Hz
Watts: 780W
The power consumption in O mode: 0.4W
Benefits of registering your product and
creating an account:
• Get easier, faster product support and
access to warranty information.
• Access troubleshooting and product care
instructions.
• Be among the first to know about exclusive
product promotions.
TIP: You can find the model and serial
numbers on the QR code label on the bottom
of the back of the vacuum pod.