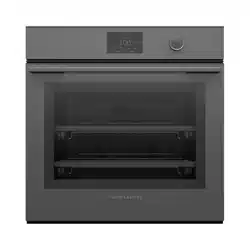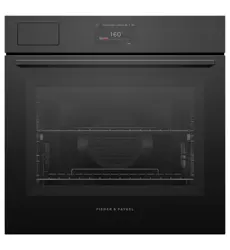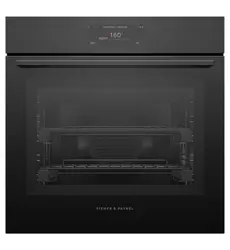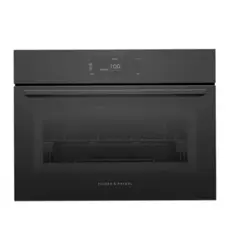

60CM
COMBI-STEAM
FIRST USE
Get to know your appliance 3
Set up the oven 7
Select a cooking method or function 8
Use Steam methods and functions 10
Fill the water tank 11
Set the timer 12
Set Delayed cook or Auto off 13
Use the temperature sensor 14
Use Multi shelf 15
Connect to Wi-Fi 16
Enable Remote mode 17
Turn Sabbath mode on 18
Enable Voice to open 19
Cooking methods and functions 20
Clean and maintain your oven 21
NZ AU UK IE SG

60CM COMBI-STEAM OVEN
COMBI-STEAM
OS60SAMHUNB5, OS60SAMHUNG5, OS60SAMHUB5,
OS60SAMHUG5, OS60SACHUDX5
COMPACT COMBI-STEAM
OS60NAMHUNB5, OS60NAMHUNG5, OS60NAMHUB5,
OS60NAMHUG5, OS60NACHUDX5
3
GET TO KNOW YOUR APPLIANCE
How to get the best results from your oven
z
Download the app to use remote mode and get updates.
z
Set up and condition the oven before you use it.
z
Run regular CLEAN cycles.
z
Register your product to get streamlined service support.
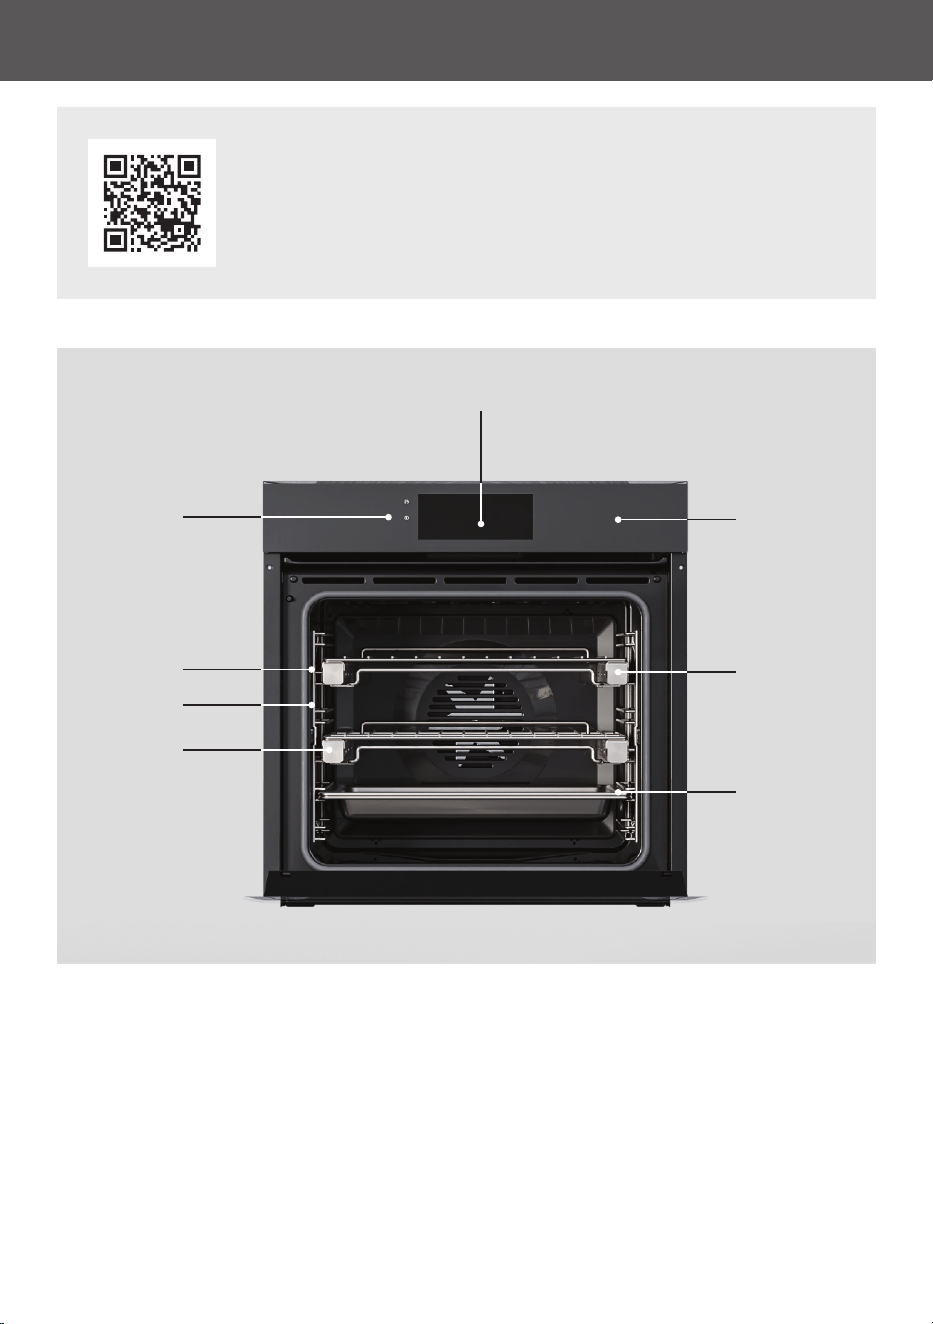
All imagery shown in this guide is representative. Your product may differ.
Touchscreen display
Controls
Sliding
shelf
Light
Side rack
Roast
dish
Sliding
shelf
Steam tank
(behind control
panel)
4
GET TO KNOW YOUR APPLIANCE
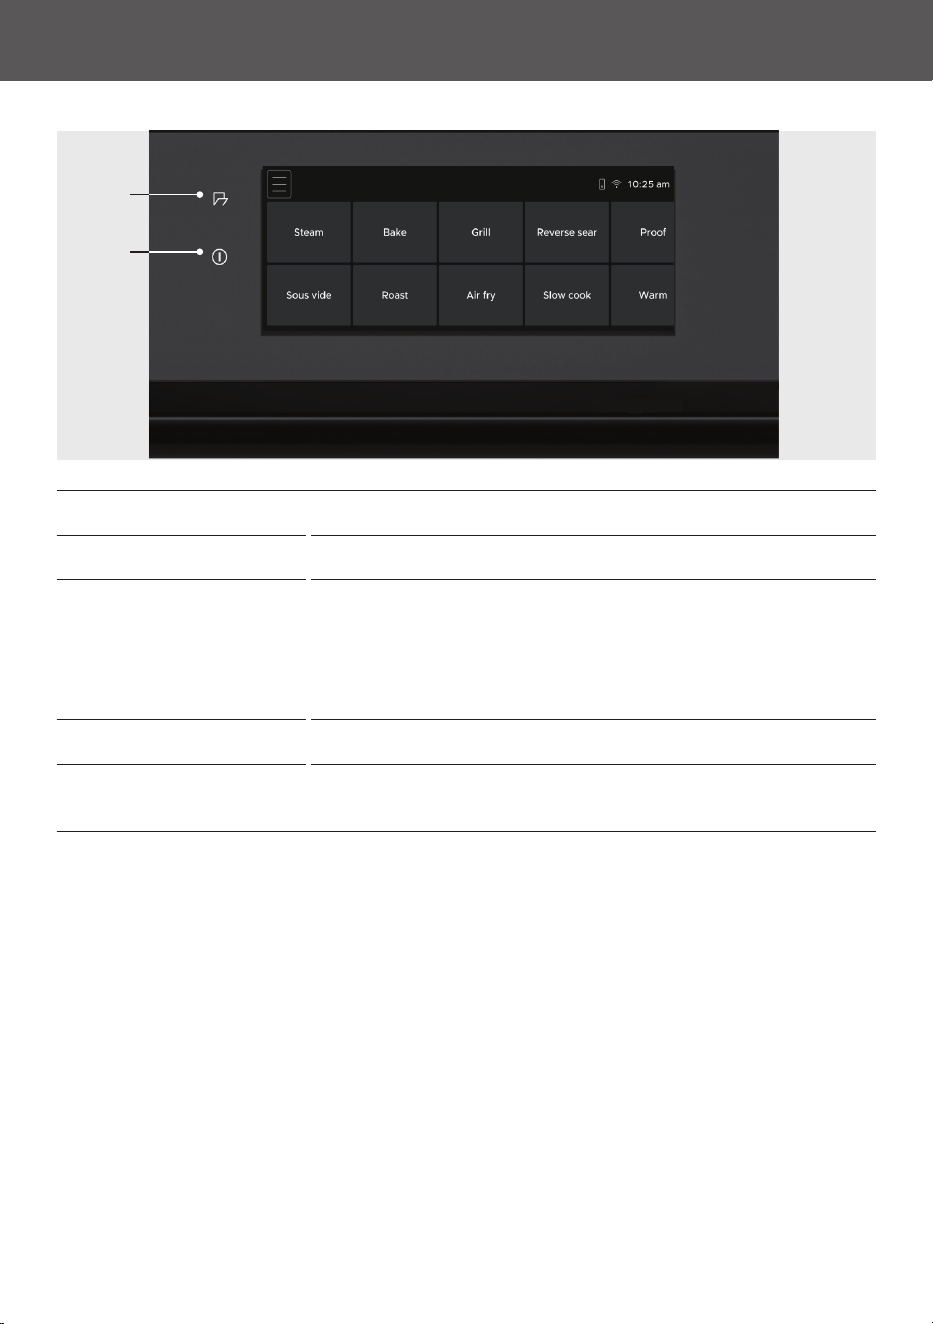
HOME SCREEN
Open Door button* Press and hold to open or close the oven door.
Power button Press and hold to turn the display on when oven is in standby.
The oven will go into standby after a period of inactivity, and the
display and clock will turn off.
If Remote Mode is enabled, the power button will pulse when oven
is in standby.
Menu Press to access additional features and settings.
Cooking methods Choose from a range of optimised cooking methods or traditional
functions.
Open
door
On/Off
*handleless models only
5
GET TO KNOW YOUR APPLIANCE
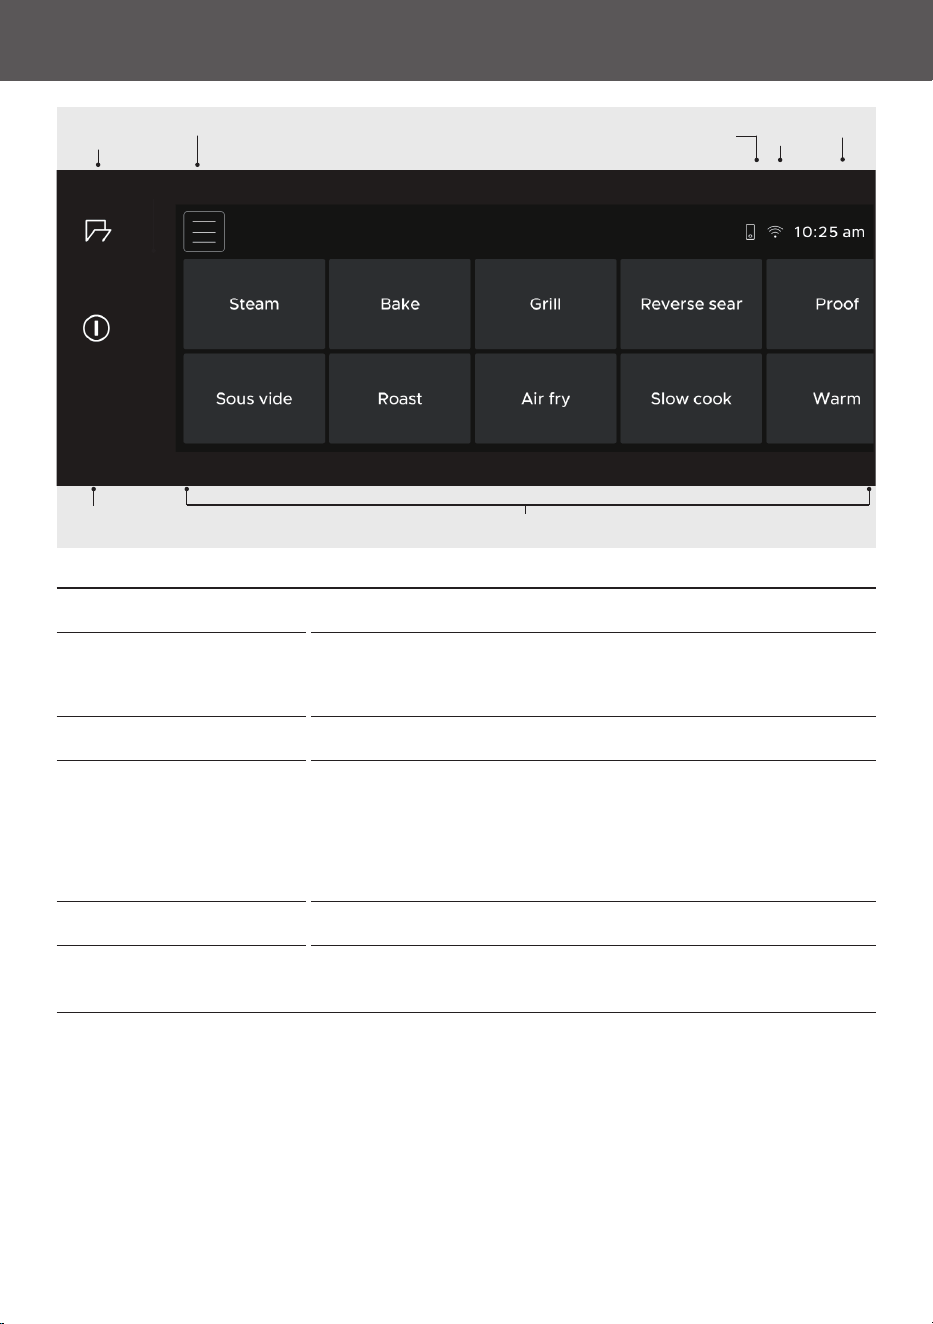
HOME SCREEN
Control dial*
z
Turn the dial to scroll.
z
Press to select.
z
Press and hold to go back.
Open Door button** Press and hold to open or close the oven door.
Power button Press and hold to turn the display on when oven is in standby.
The oven will go into standby after a period of inactivity, and the
display and clock will turn off.
If Remote Mode is enabled, the power button will pulse when oven
is in standby.
Menu Press to access additional features and settings.
Cooking methods Choose from a range of optimised cooking methods or traditional
functions.
Remote
mode
indicator
Wi-Fi
indicator
MenuOpen
Door
Power
button
Clock
Cooking methods
*Some models only
**Handleless models only
6
GET TO KNOW YOUR APPLIANCE
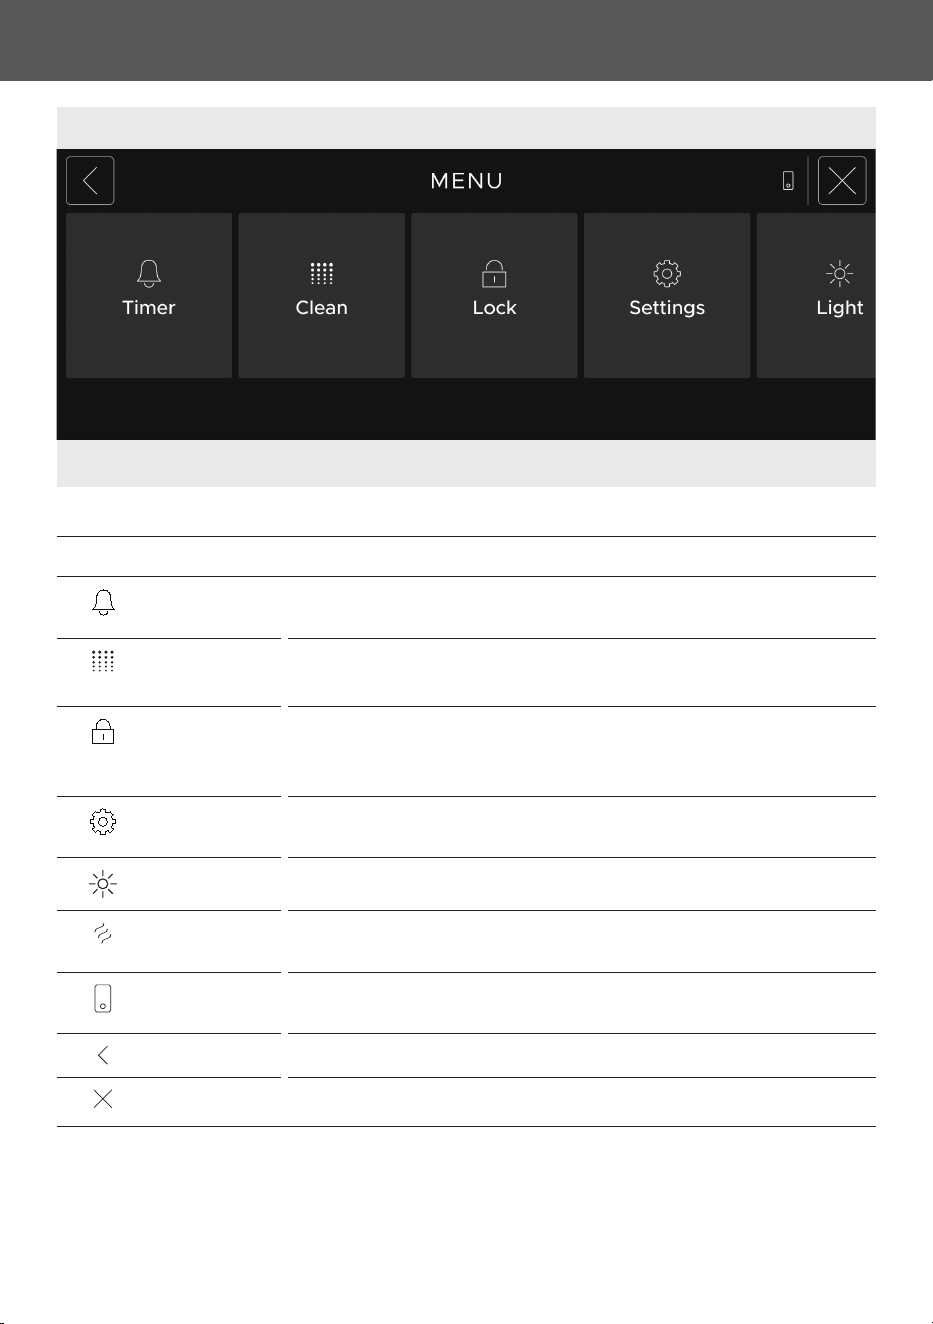
MENU
TIMER Set a timer to keep track of cooking times or as a general timer.
The timer does not turn the oven off.
CLEAN Set a CLEAN cycle to clean the inside of the oven.
Refer to Care and Maintenance guide for full instructions.
LOCK Lock the controls to prevent accidental use. When locked, the
controls will be unresponsive and the appliance will not turn on.
Press and hold the screen anywhere to unlock.
SETTINGS Adjust the settings to suit your preferences or set up a Wi-Fi
connection.
LIGHT Press LIGHT to turn the oven lights on or off.
DRY Set a DRY cycle to dry the inside of the oven after cooking with
steam.
REMOTE Connect appliance to your mobile device to operate it remotely via
the app.
BACK Go back one level.
EXIT Press to return to the home screen.
7
SET UP THE OVEN
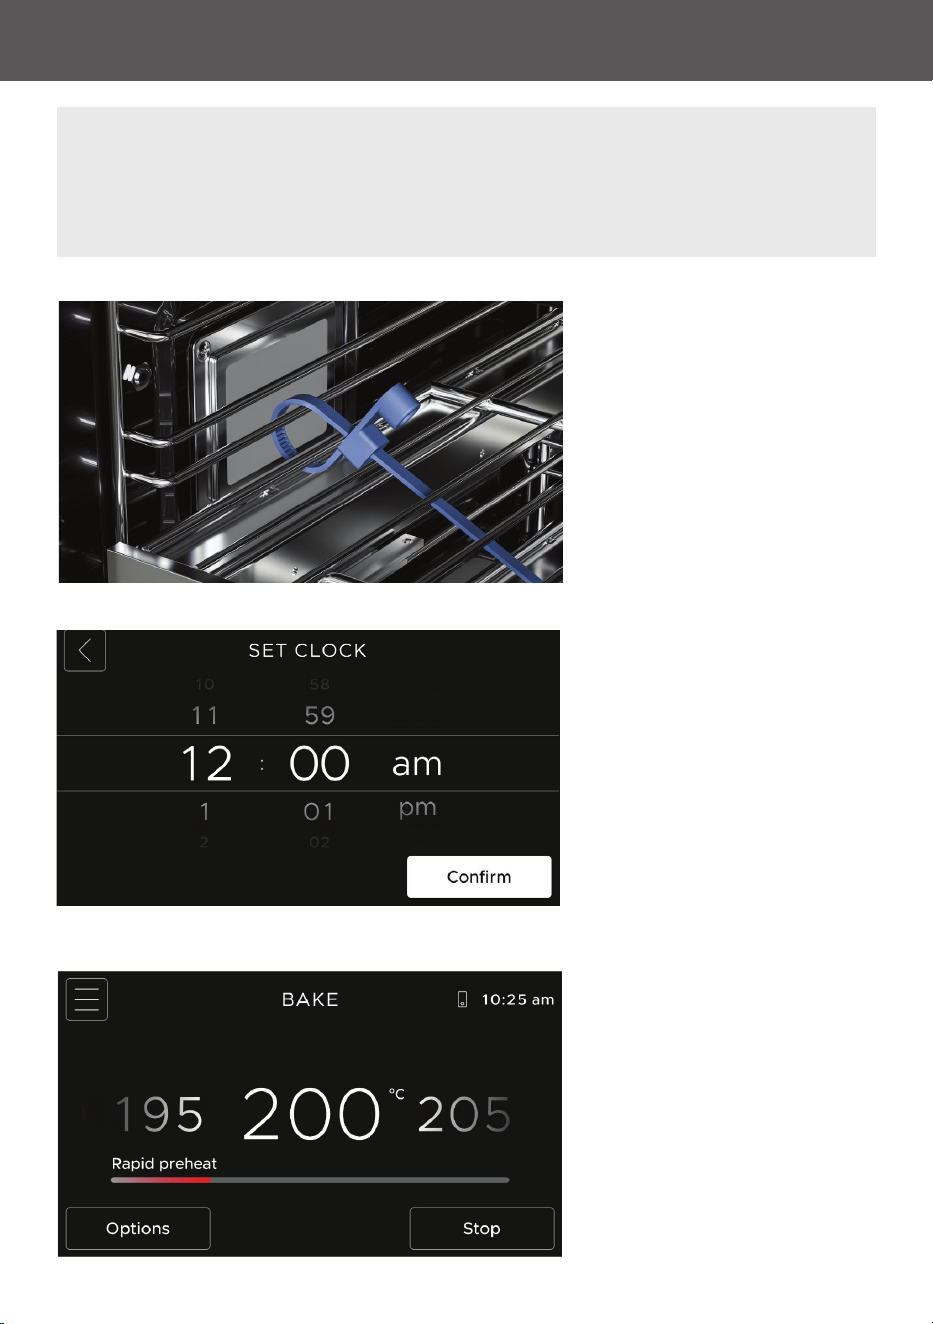
Remove cable ties
Remove any packaging and the
cable ties that are securing the
shelves and trays.
Before using your oven, check there is no plastic or cardboard left inside it, then set the
clock. We recommend conditioning your oven for 1 hour before initial use to remove
manufacturing residue. A small amount of smoke may be present. Ensure the kitchen is
well ventilated.
Condition the oven
Navigate to the
TRADITIONAL
FUNCTIONS
menu. Select BAKE,
then set the oven at 200°C for
30 minutes. Next, set to GRILL for
5 minutes, then FAN FORCED for
20 minutes.
Wipe clean once oven has
cooled.
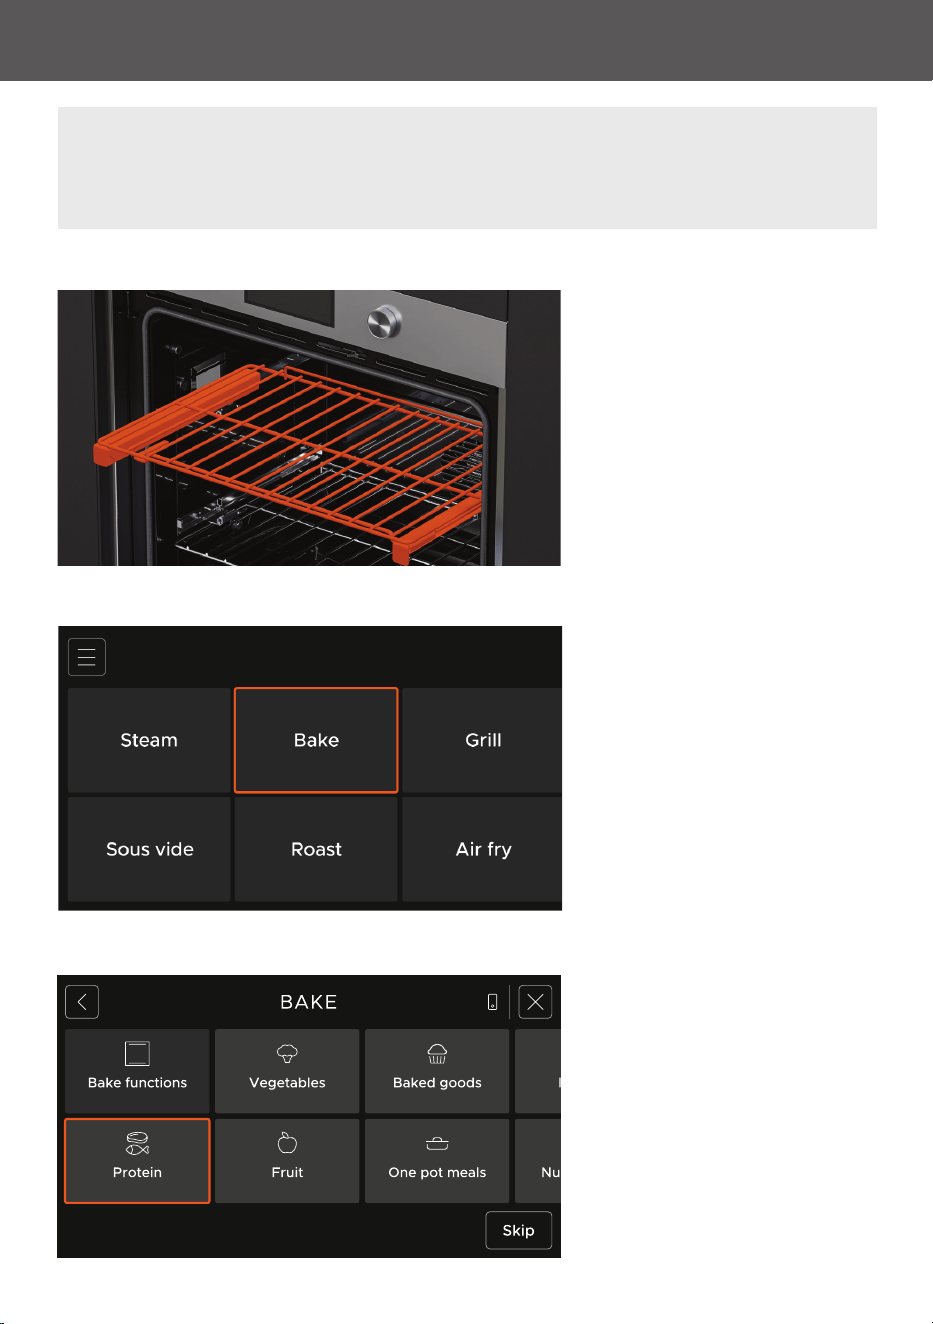
Set the clock
Swipe up or down to set the
time, then press confirm.
8
SELECT A COOKING METHOD OR FUNCTION
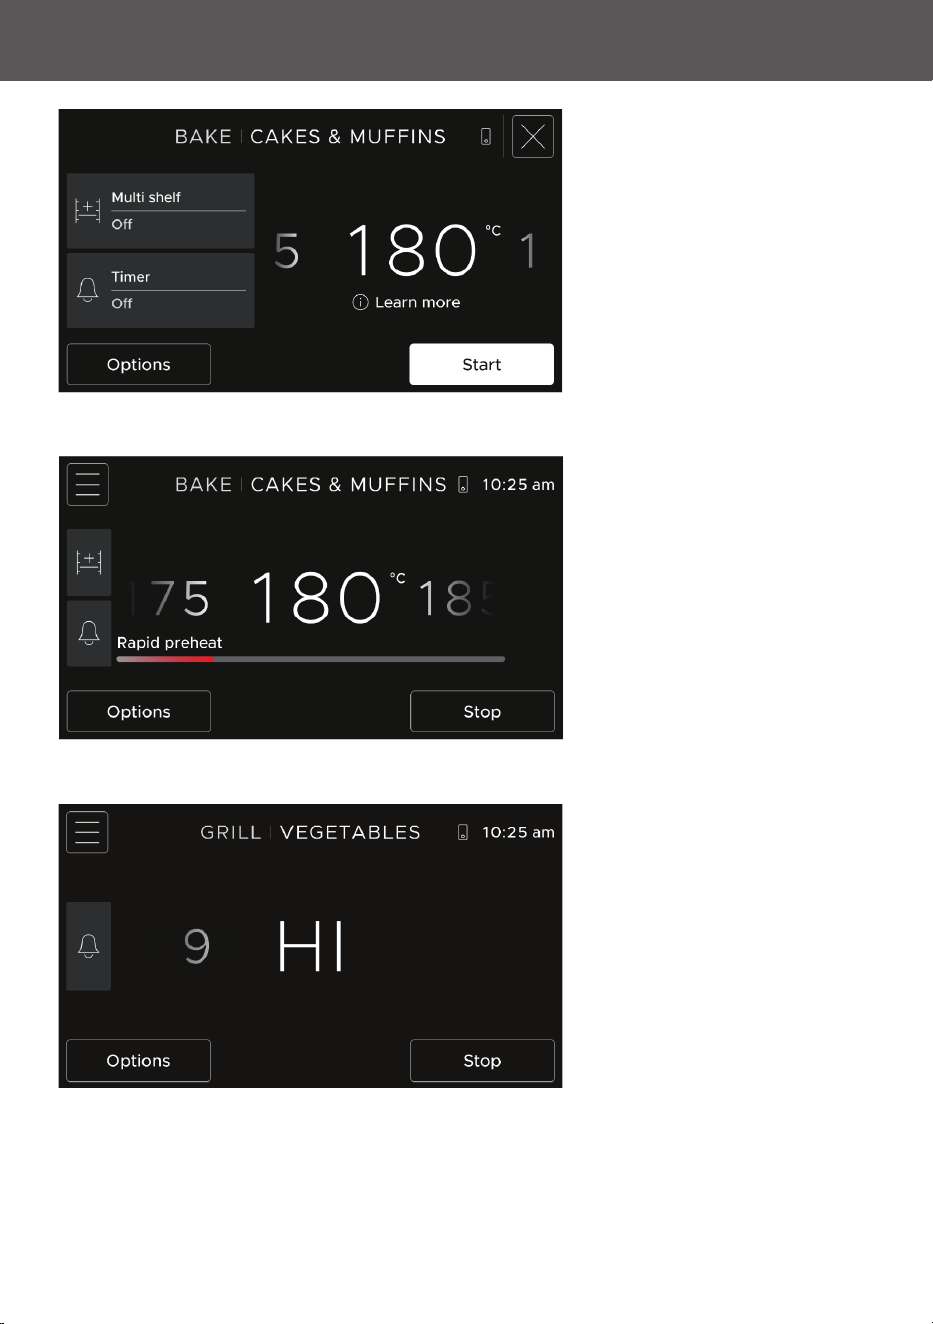
1. Position the shelves at the
desired height.
2. Select a cooking
method or scroll to select
TRADITIONAL FUNCTIONS.
For steam-based selections,
you'll be prompted to fill the
water tank.
3. Select a food category or
function as required.
Select a cooking method and follow on-screen prompts for an optimised cooking
environment, or choose from a range of traditional cooking functions.
9
SELECT A COOKING METHOD OR FUNCTION
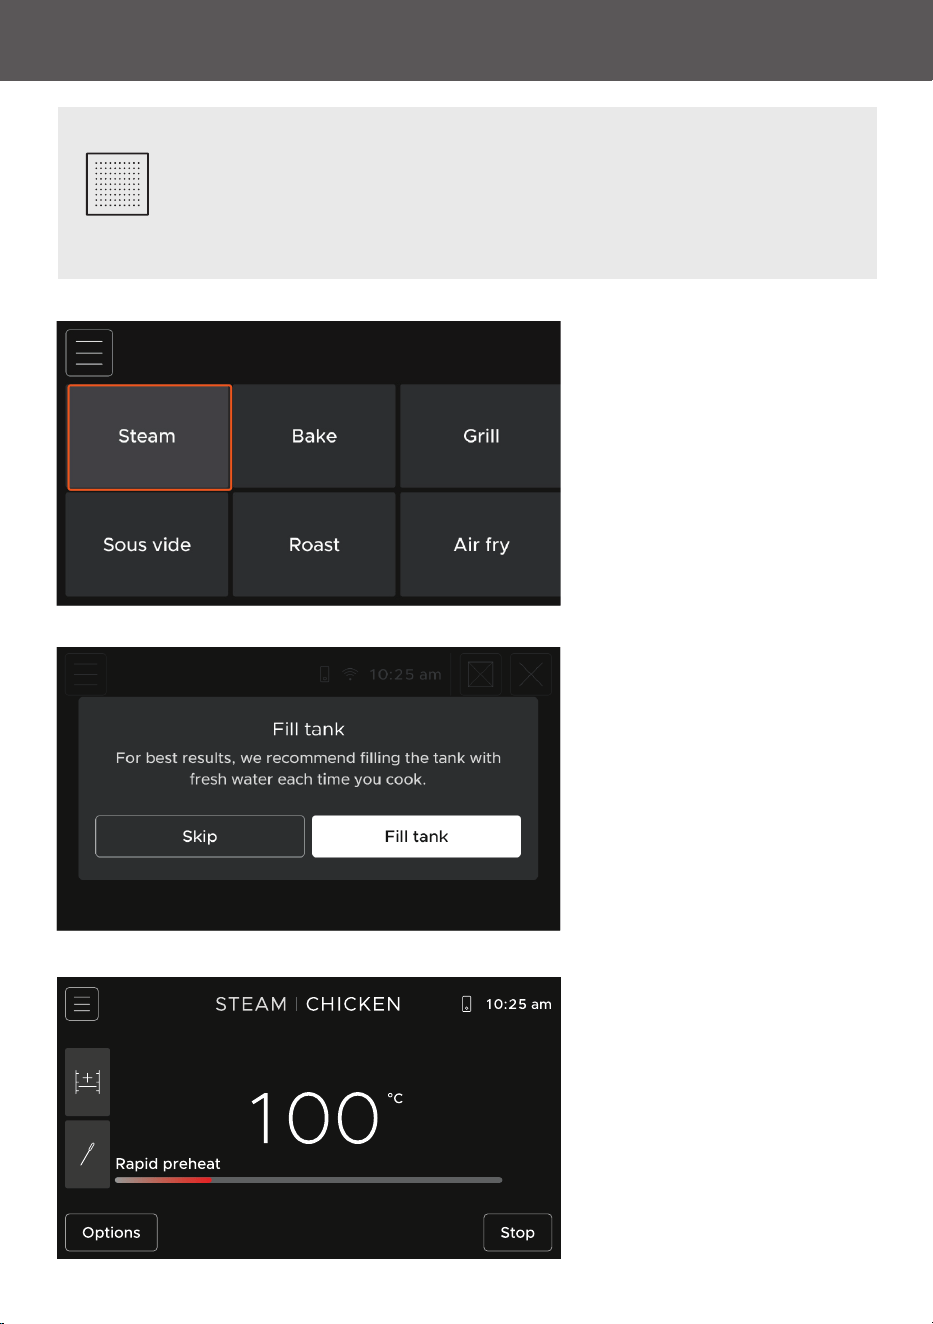
Methods with preheat
A progress bar will show while
the oven is heating. To prevent
burning, place food in oven once
oven reaches temperature.
Methods without preheat
If there is no progress bar, place
food in the oven when you start
the cook.
Press
STOP at any point to turn
the oven off.
4. Adjust the temperature if
needed and add any additional
timers or cooking options, then
press START.
Press
STOP at any point during
cooking to turn the oven off.
10
USE STEAM METHODS AND FUNCTIONS
Use STEAM cooking methods and functions to add moisture to the cooking
environment and retain nutrients, colour and texture.
Fill the tank with fresh water first. See 'Fill the water tank'.
1. Select a steam method or
steam function as desired.
2. Fill the water tank before
starting a steam-based cook or
when prompted.
3. Adjust the temperature if
needed and add any additional
timers or cooking options, then
press
START.
Press stop at any point during
cooking to turn the oven off.
11
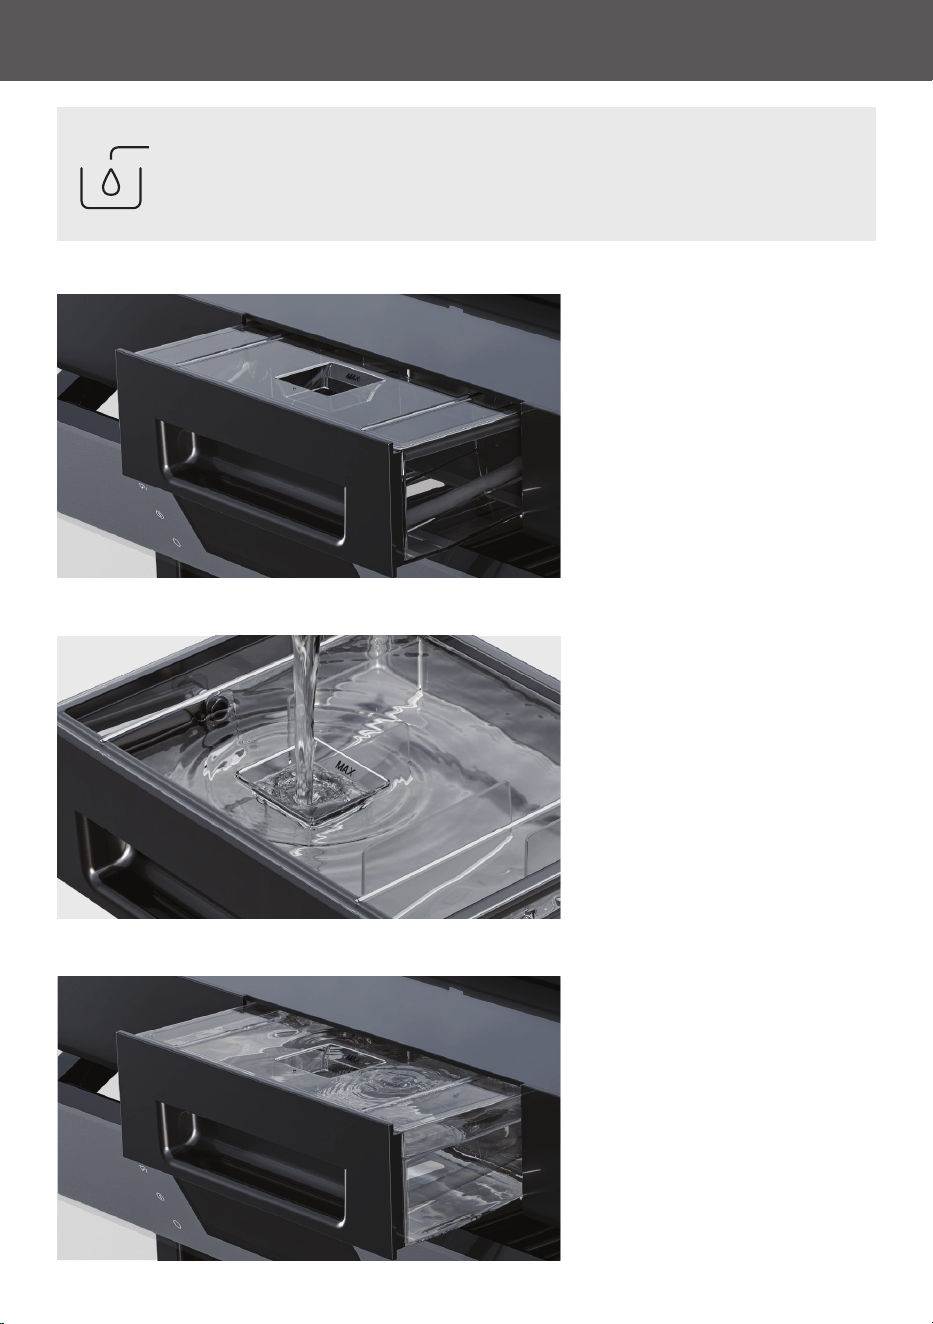
FILL THE WATER TANK
Before using any steam methods or functions, you’ll need to fill the water
tank. For best results, we recommend filling the tank with fresh water before
you cook.
1. Select 'Fill Tank' to move the
control panel. Pull the water tank
out of its compartment.
2. Fill with fresh water, taking
care not to fill past the MAX FILL
line.
3. Refit the tank in
the compartment and close
control panel.
12
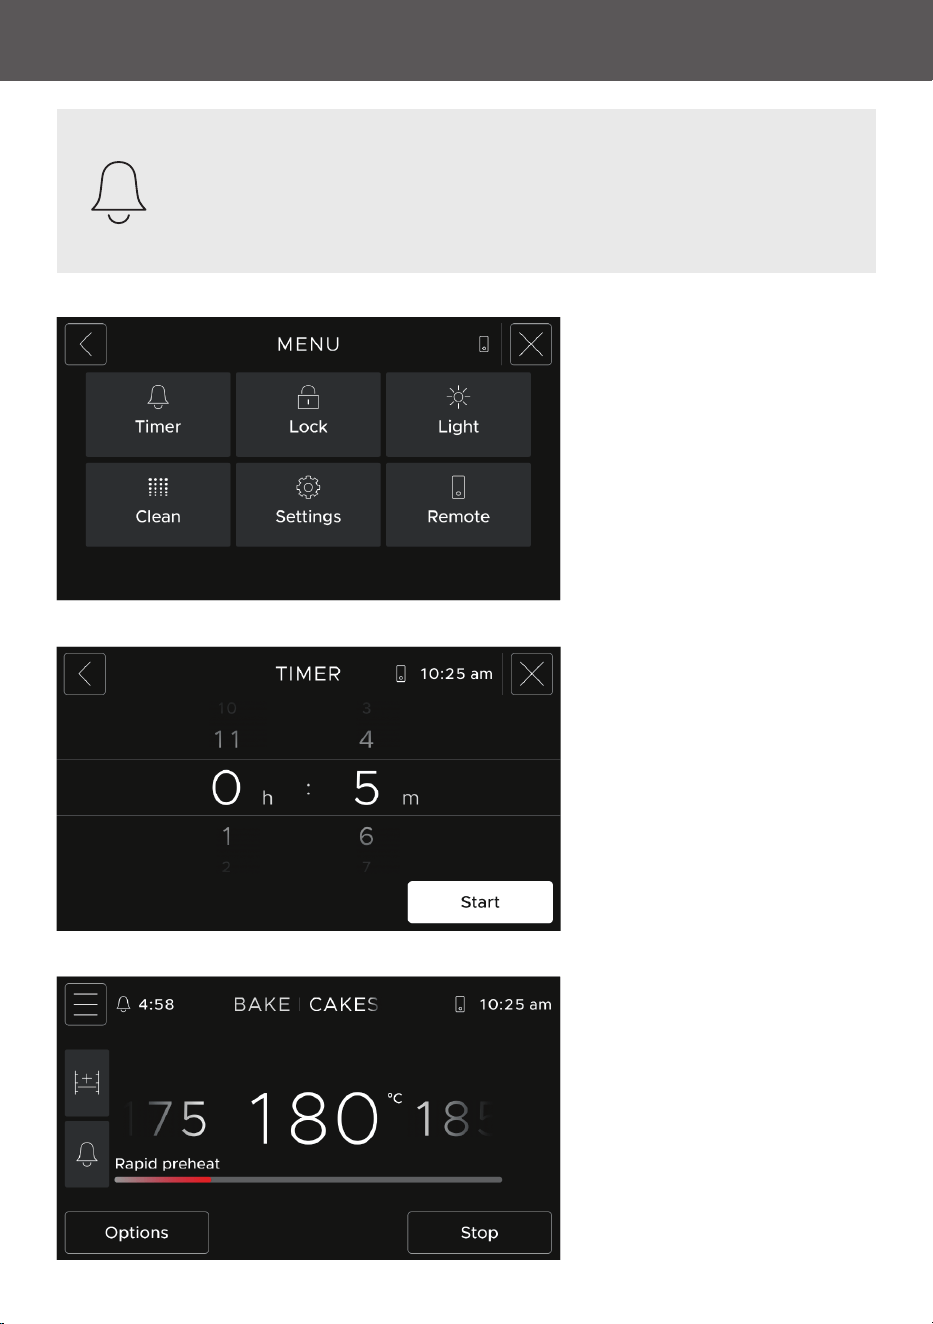
SET THE TIMER
Use the timer to keep track of cooking times or as a general timer. The timer
does not turn the oven off.
1. Select TIMER from the menu or
from the cooking screen.
2. Scroll to set the desired
duration, then press CONFIRM to
start the countdown.
3. The remaining time will show
on the screen. Press it to adjust
or cancel the timer.
When the timer is complete, an
alert will sound and a message
will show on the screen. Press
DONE to dismiss the message.
13
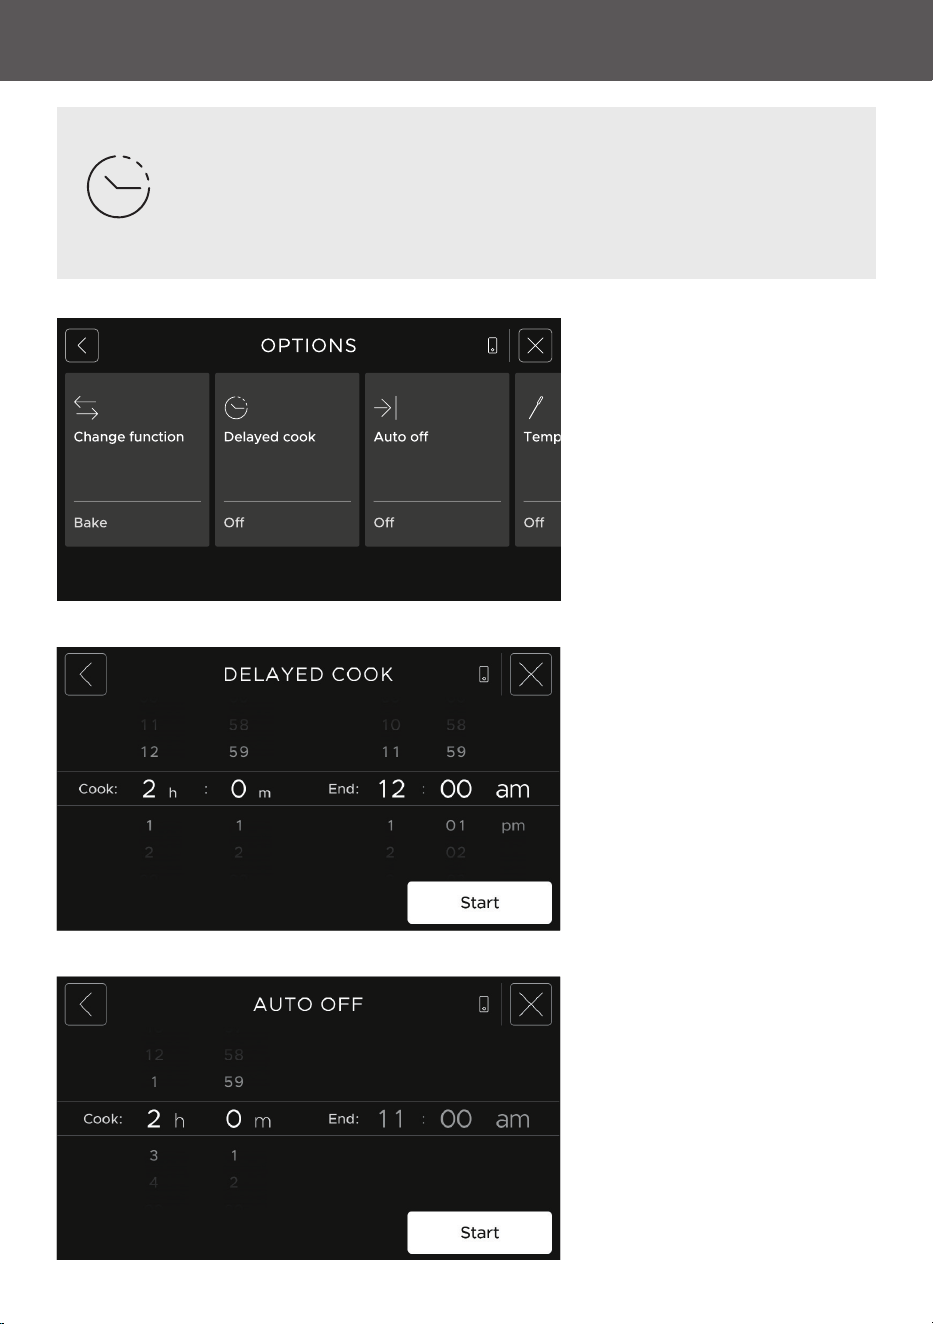
SET DELAYED COOK OR AUTO OFF
You can set DELAYED COOK or AUTO OFF when using most cooking methods
or functions. Use
DELAYED COOK to set the oven to turn on later, cook for a
set duration and turn off at a set time. Use AUTO OFF to set the oven to turn
off after a set duration.
Press OPTIONS on the cooking
screen, then select DELAYED
COOK
or AUTO OFF.
Delayed cook
Set a cook duration and a
cooking end time, and press
START.
Cover food or place it on a lower
shelf in oven to prevent burning
as the oven preheats.
Not recommended with
GRILL,
FAN GRILL, or DEFROST.
Auto off
Set a cook duration, and press
START.
The oven will turn off after the
set duration.
14
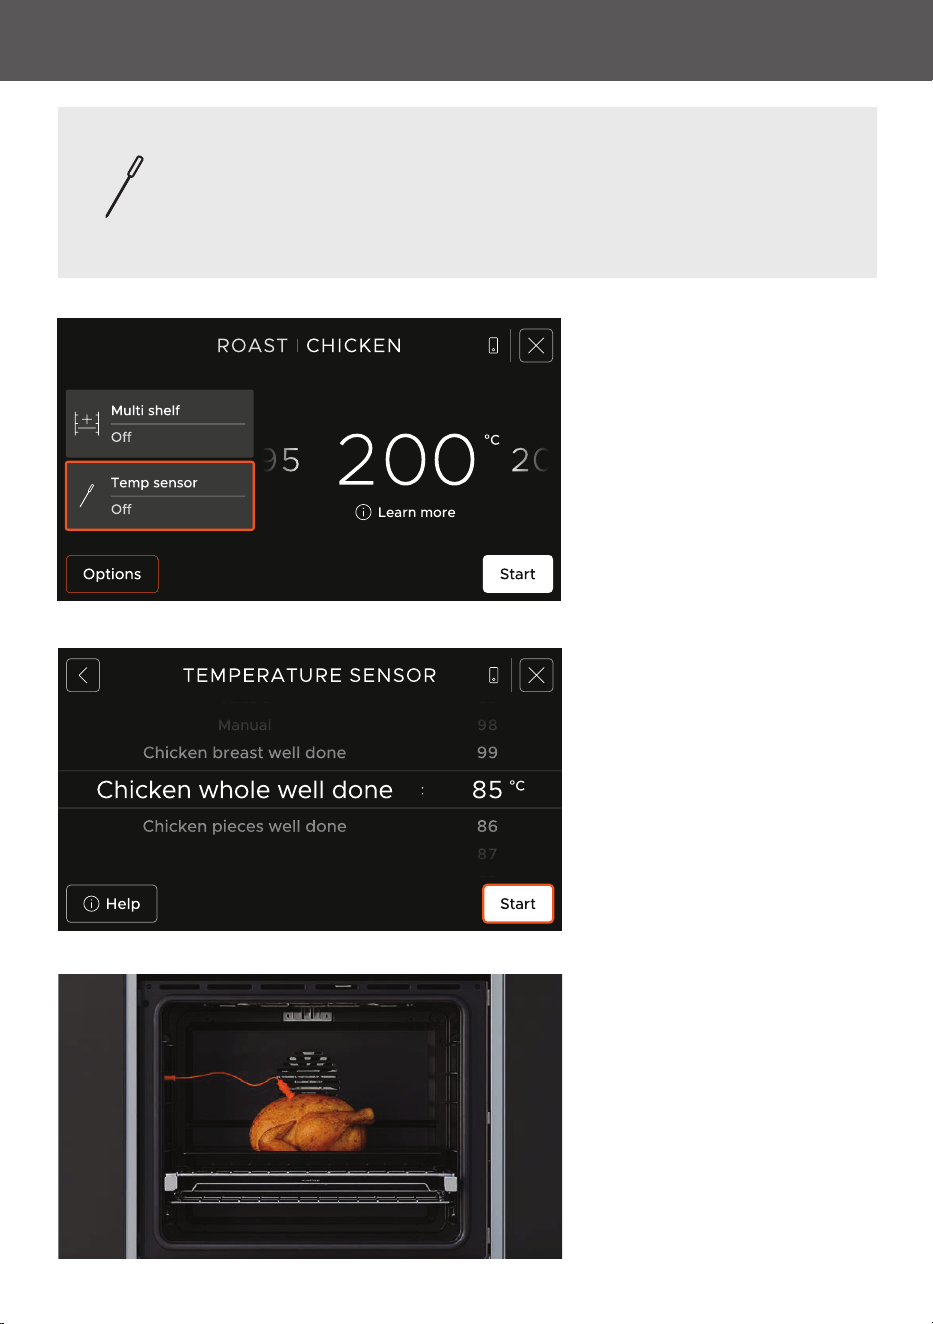
USE THE TEMPERATURE SENSOR
1. Select a cooking method or
function and press OPTIONS or
TEMP SENSOR.
2. Select the relevant protein and
desired doneness or removal
temperature, then press START.
Allow your oven to preheat if
necessary.
Use the wired temperature sensor or a compatible wireless sensor to monitor
your cook to achieve your desired doneness.
Insert the sensor into the thickest part of the protein, avoiding bone, and
ensure the tip doesn’t protrude or touch cookware.
3. Place food in the oven. If
using the wired sensor, plug it
into the socket on the inside-left
of the oven until it clicks into
place.
Rest meat before serving to
allow the internal temperature
to rise.
15
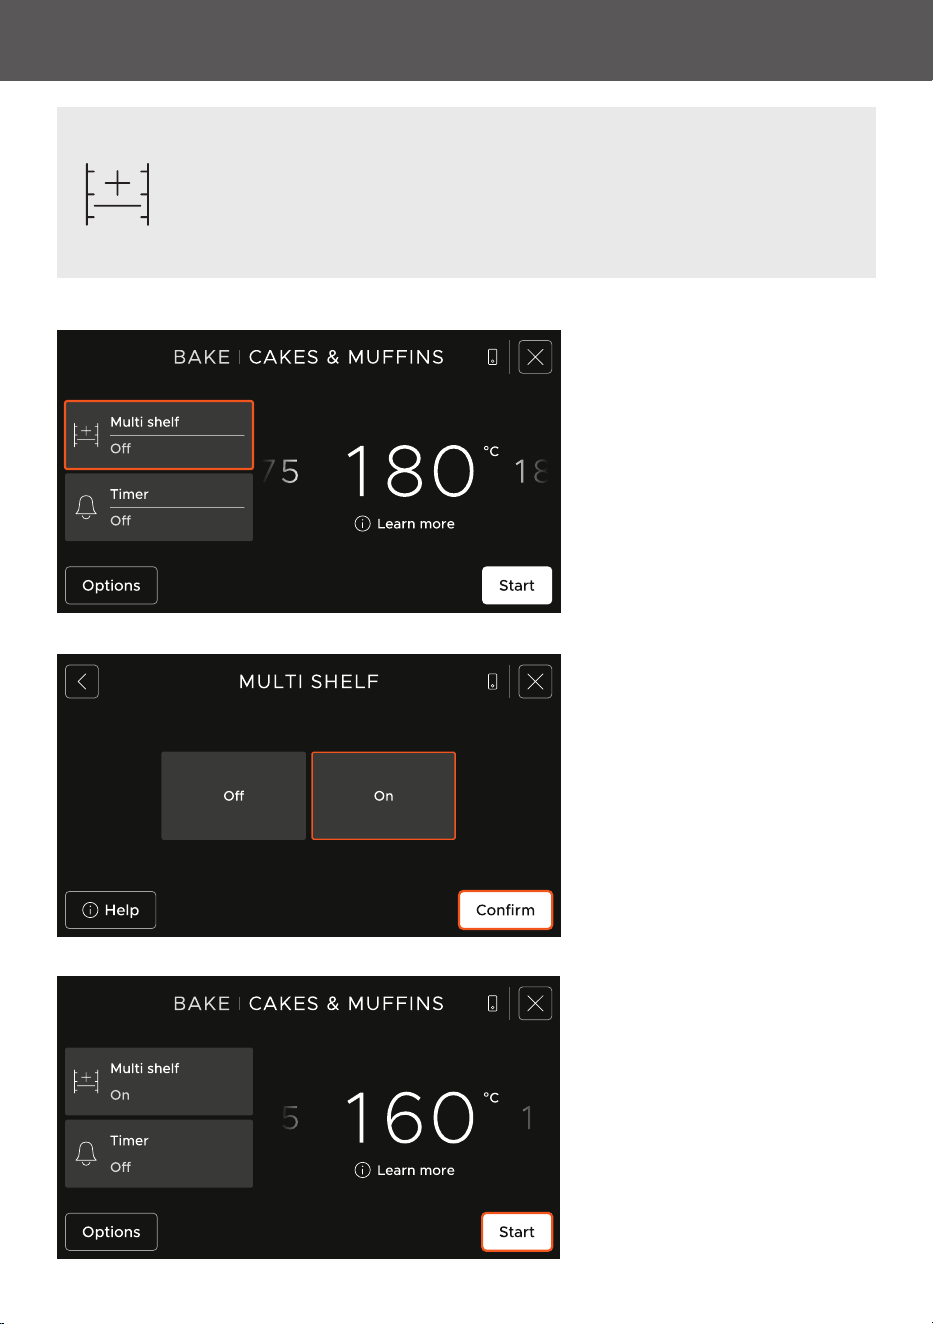
USE MULTI SHELF
Use the MULTI SHELF option so heat distributes evenly when you cook food
on more than one shelf at a time. You can turn it on or off before and during
cooking.
1. Select a cooking method or
function, and press MULTI SHELF.
2. Press
ON, then CONFIRM.
3. Press
START, and allow your
oven to preheat if necessary
before putting the food in.
Press
MULTI SHELF again to turn
it off.
16
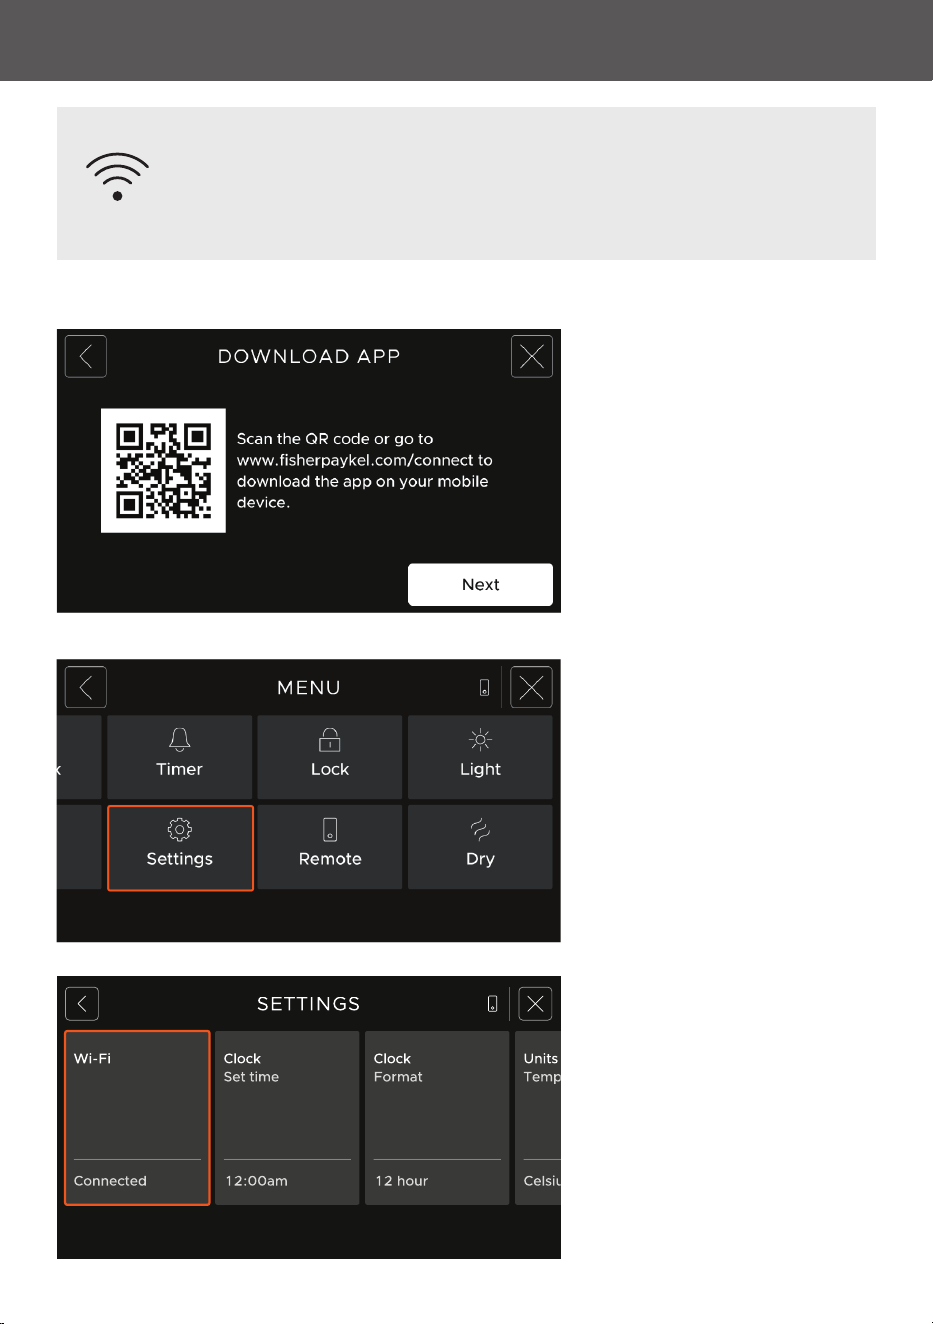
CONNECT TO WI-FI
On your appliance
1. Ensure your home Wi-Fi
network is on, then go to
MENU
and select SETTINGS.
2. Select WI-FI and follow the
onscreen instructions to connect.
Connect your appliance to your home wireless network to receive updates
and connect to the app.
It may take up to 10 minutes to connect your appliance.
On your mobile device
Scan the QR code to download
the app, then create an account
and add your appliance.
17
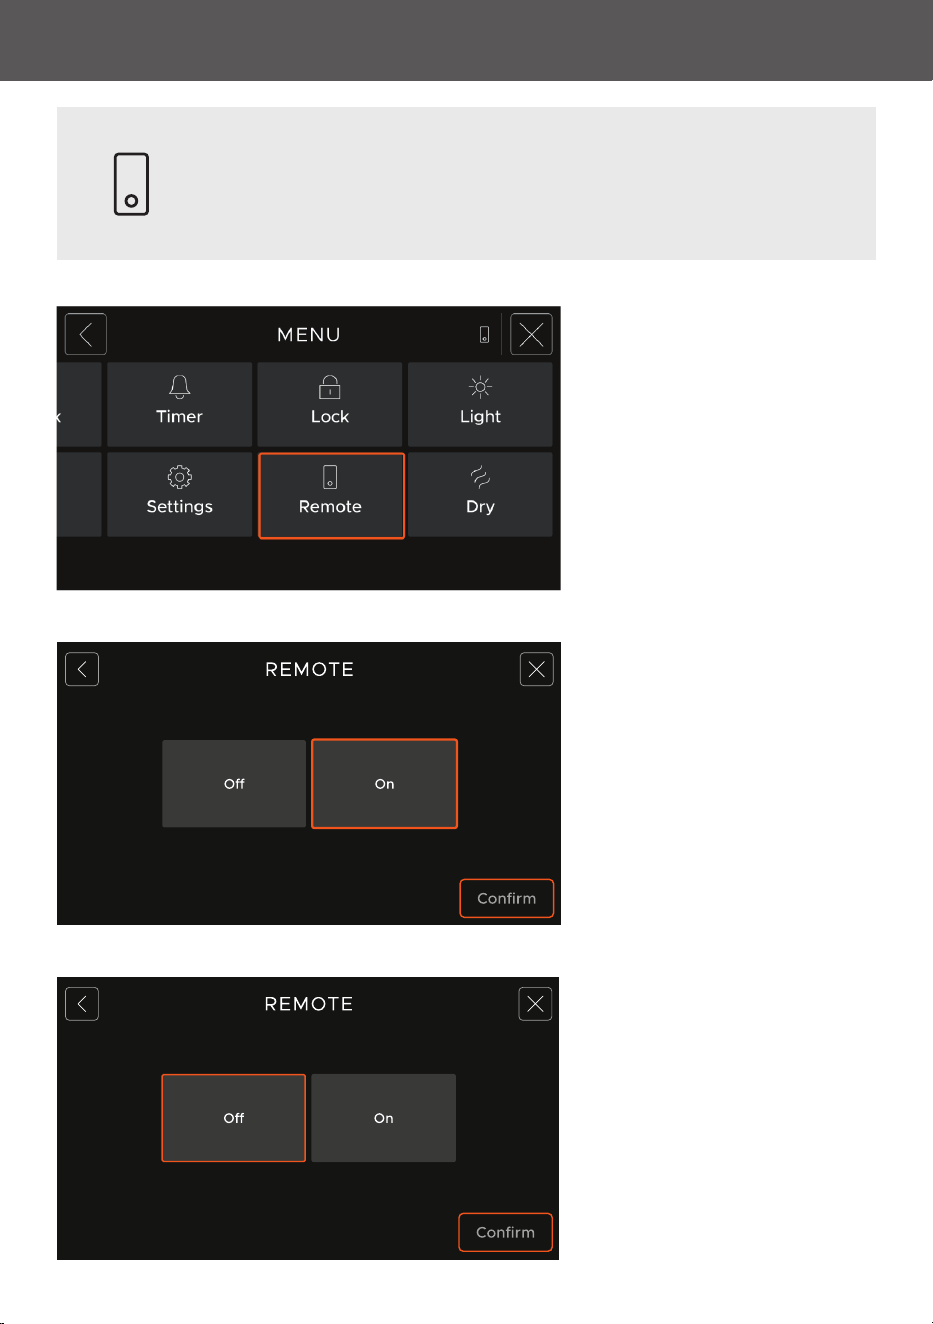
Enable REMOTE MODE to operate your appliance remotely via the app.
ENABLE REMOTE MODE
1. Go to MENU, and select
REMOTE.
2. Select ON, then press
CONFIRM.
Disable Remote Mode
Go to
MENU, and select REMOTE.
Select OFF, then press CONFIRM.
18
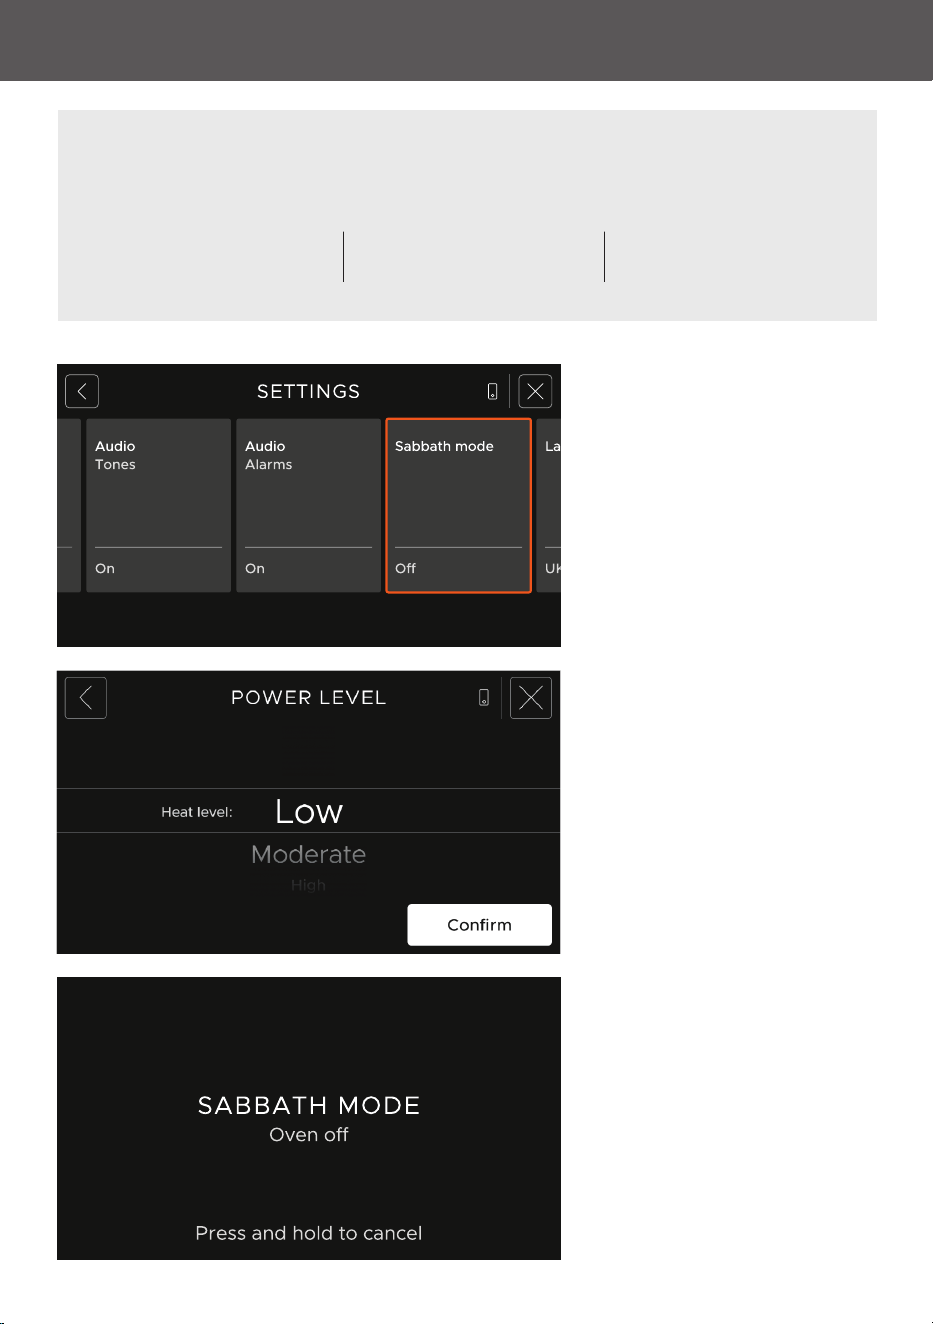
TURN SABBATH MODE ON
1. Go to SETTINGS and select
SABBATH MODE.
2. Set a heat level and press
CONFIRM. Follow the onscreen
instructions to set the oven light
on or off and to set a SABBATH
MODE
duration.
3. The oven will stay in SABBATH
MODE
until the set duration has
passed or until cancelled.
Press and hold the screen to
cancel
SABBATH MODE.
For the Sabbath observant. Sets your oven to heat continuously for as long as needed.
The display will be unresponsive and no tones or alerts will sound. Your oven will stay in
Sabbath mode until cancelled. Use the supplied door-opening tool to open handleless
models when Sabbath Mode is on.
LOW
Keep hot food warm
MODERATE
Reheat cold food
HIGH
Cook raw food
19
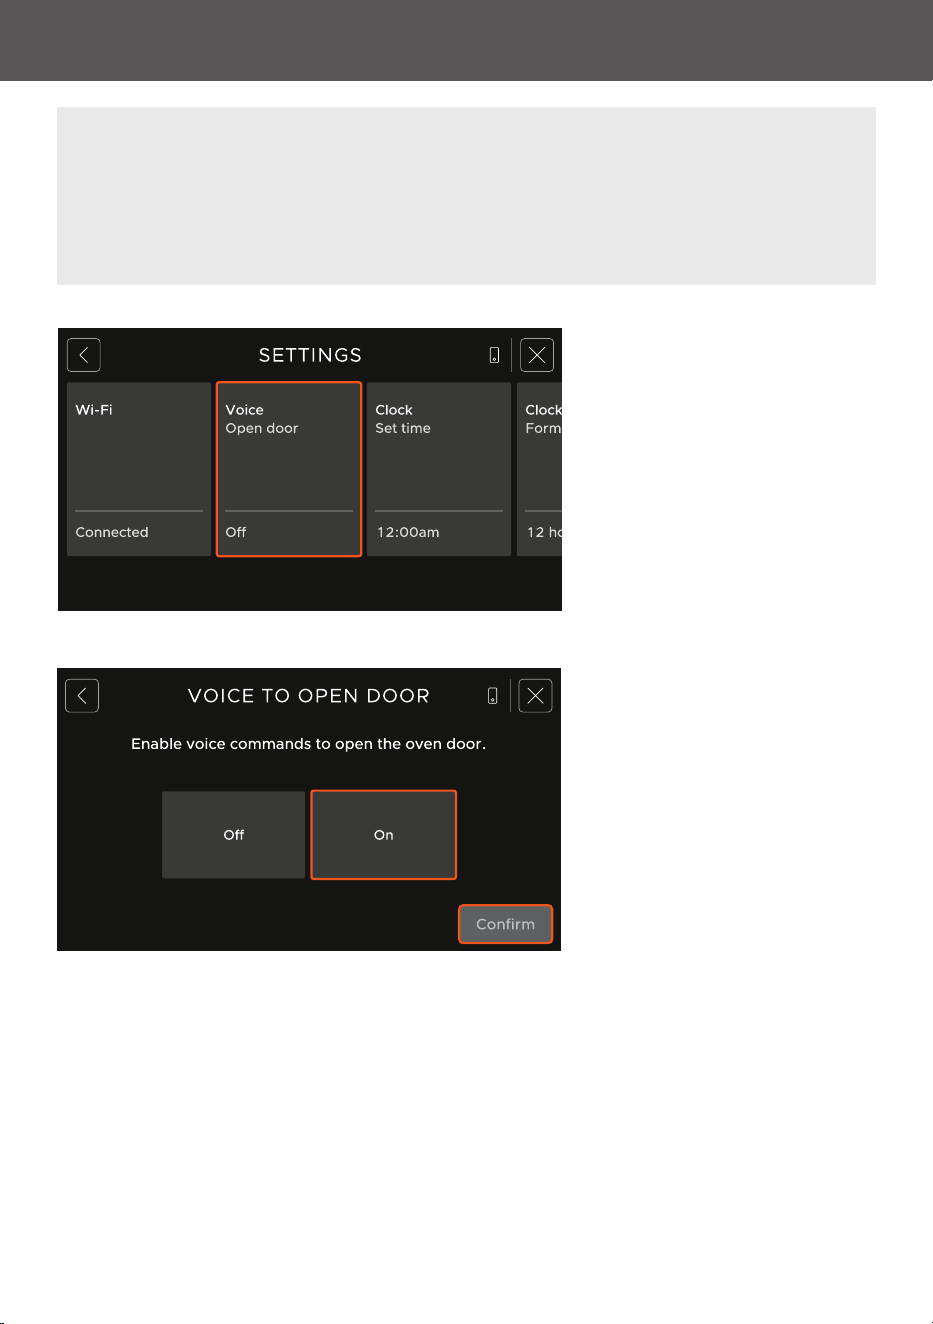
ENABLE VOICE TO OPEN
Enable 'Voice to open' on handleless models to open the oven door. Your appliance
must be connected to Wi-Fi and have Remote Mode enabled. Voice control also
requires a smart speaker or your mobile device to control the oven door.
Only use voice control when you can see the oven and it is safe to open the door.
1. Go to
SETTINGS and select
VOICE OPEN DOOR.
2. Select ON, then CONFIRM.
Follow the instructions on
the screen and in the app to
complete the setup.

20
COOKING METHODS AND FUNCTIONS
Method-led cooking lets you select what you want to cook and how you want to cook
it. Your oven will then recommend the optimal heat type and temperature for perfect
cooking results. Explore the full range of methods and functions available.
Air fry Regenerate
Bake Reverse sear
Defrost Roast
Grill Slow cook
Proof Sous vide
Steam Warm
Air fry Crisp regenerate
Bake Eco slow cook
Classic bake Fan bake
Classic fan Fan grill
Fan forced Grill
Fan forced + high steam Roast
Fan forced + low steam Slow cook
Fan forced + medium steam Steam regenerate
Sous vide Vent bake
Steam
Methods
Cooking methods support you to achieve your desired result across a range of food categories.
Each method may be supported by one or more functions.
Functions
Functions are specific cooking environments. They deliver heat in a fixed way and can involve
either a single step or a sequence of steps.

21
CLEAN AND MAINTAIN YOUR OVEN
Clean door glass after each use
Allow oven to cool, then wipe the door glass clean after each use to prevent stains becoming
baked on.
To remove the glass for cleaning, see 'Care and Maintenance Guide'.
Clean inside of the oven after each use
Allow oven to cool, then clean up any easy-to-reach spills, food or grease stains to prevent
them becoming baked on.
Wipe up excess water
Allow oven to cool, then wipe up any water remaining after a steam cook.
Run regular steam clean cycles
Run a
STEAM CLEAN cycle before wiping out the oven to help lift stubborn spills.
Run regular DRY cycles
Set a DRY cycle to dry the inside of the oven after cooking with steam.
Descale to remove mineral buildup
Run a steam descale cycle when prompted to clean mineral buildup from your oven and
maintain cooking performance.
Make these steps a regular part of your cleaning routine to get the best results from your
appliance.
Care, maintenance and troubleshooting information
Scan the QR code or visit fisherpaykel.com and search for your
model code.
OS60SAMHUNB5, OS60SAMHUNG5, OS60SAMHUB5, OS60SAMHUG5,
OS60SACHUDX5, OS60NAMHUNB5, OS60NAMHUNG5, OS60NAMHUB5,
OS60NAMHUG5 & OS60NACHUDX5



433553A 04.26
© Fisher & Paykel Appliances 2026. All rights reserved.
The models shown in this guide may not be available in all markets
and are subject to change at any time.
The product specifications in this guide apply to the specific products and models
described at the date of issue. Under our policy of continuous product improvement, these
specifications may change at any time.
For current details about model and specification availability in your country,
please go to our website or contact your local Fisher & Paykel dealer.
FISHERPAYKEL.COM