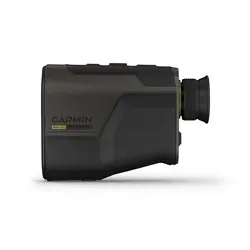
XERO
®
L60i
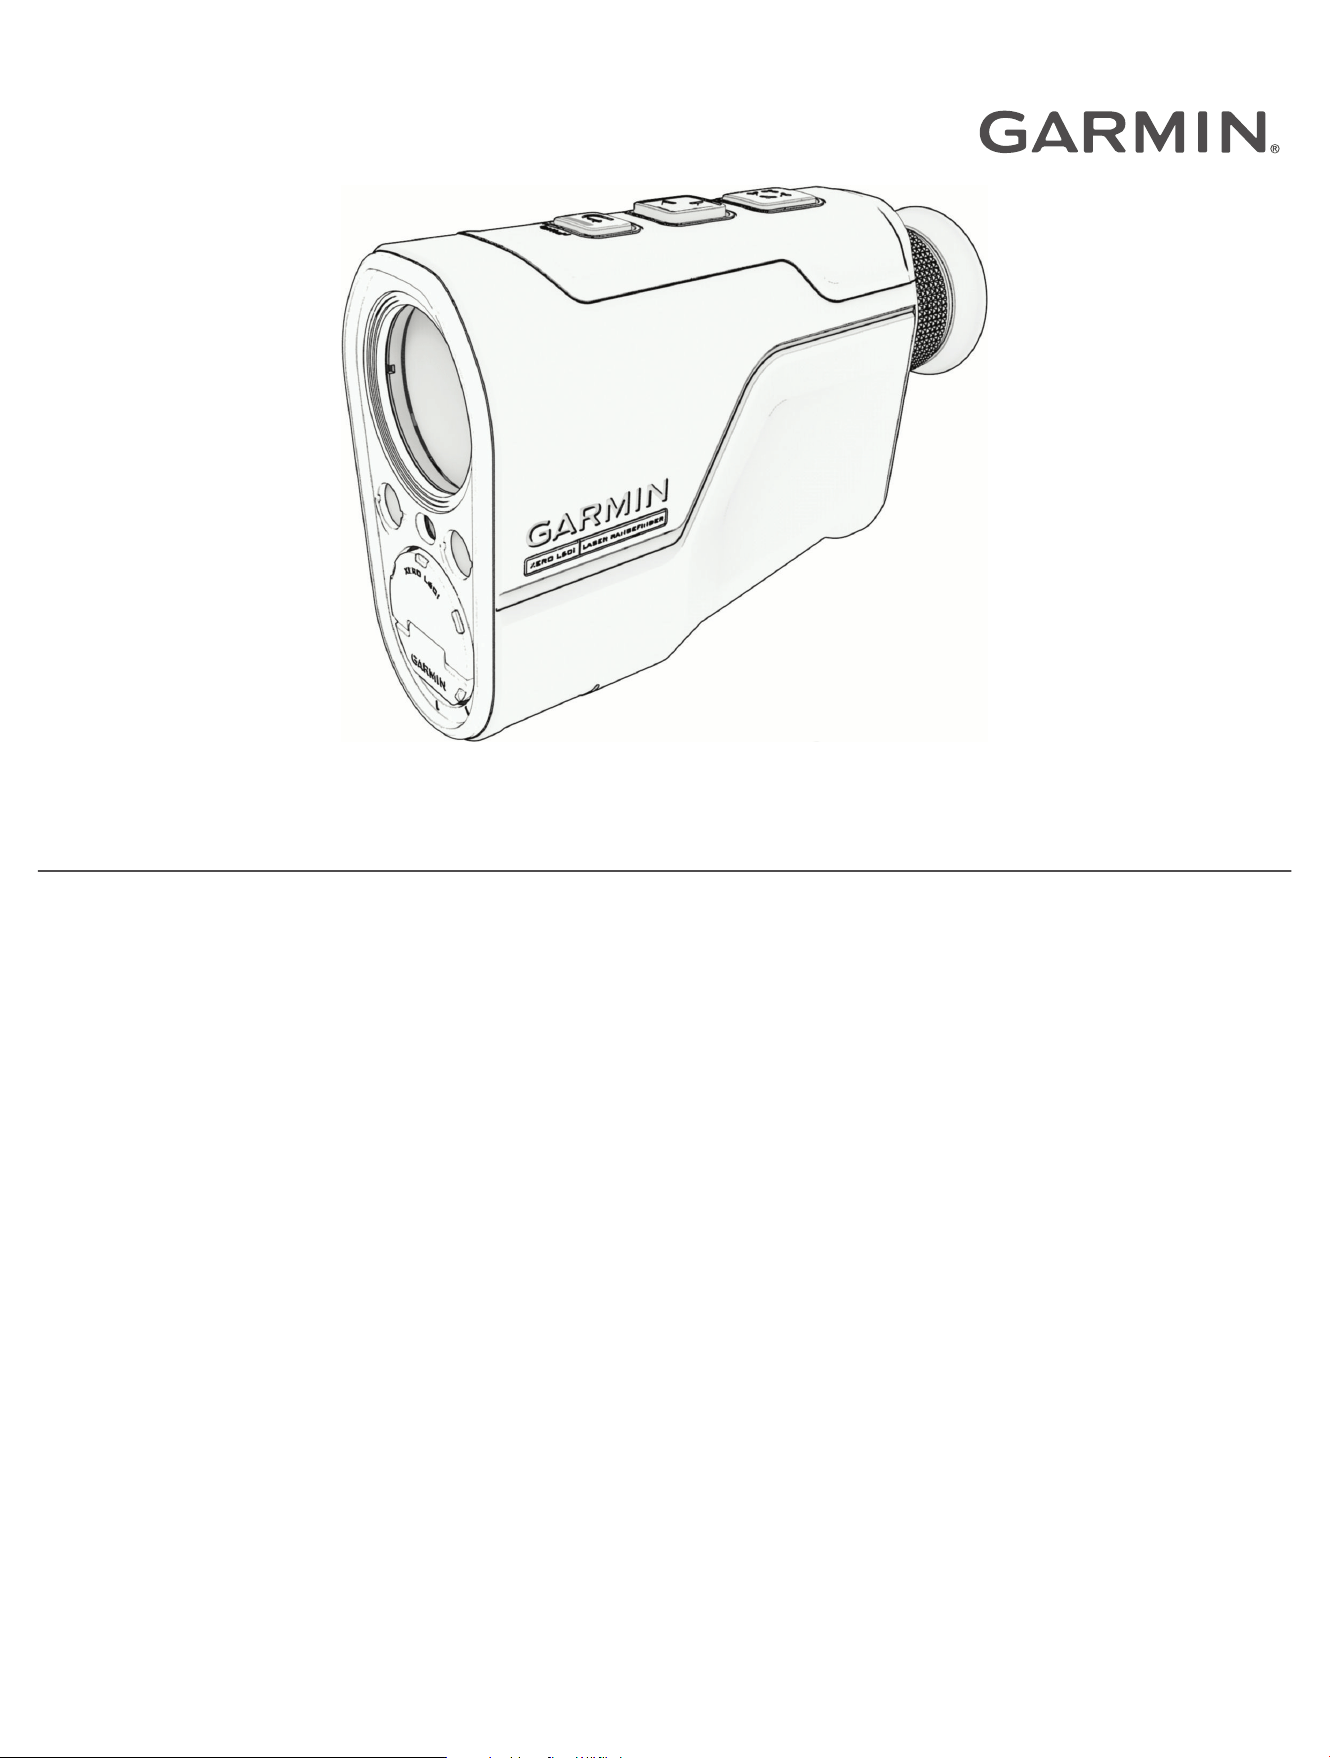
Owner’s Manual

© 2025 Garmin Ltd. or its subsidiaries
All rights reserved. Under the copyright laws, this manual may not be copied, in whole or in part, without the written consent of Garmin. Garmin reserves the right to change
or improve its products and to make changes in the content of this manual without obligation to notify any person or organization of such changes or improvements. Go to
www.garmin.com for current updates and supplemental information concerning the use of this product.
Garmin
®
, the Garmin logo, and Xero
®
are trademarks of Garmin Ltd. or its subsidiaries, registered in the USA and other countries. Garmin Explore
™
and Garmin Express
™
are
trademarks of Garmin Ltd. or its subsidiaries. These trademarks may not be used without the express permission of Garmin.
Apple
®
is a trademark of Apple Inc., registered in the U.S. and other countries. Applied Ballistics Quantum
™
is a trademark, and Applied Ballistics
®
is a registered trademark of Applied
Ballistics, LLC. The Bluetooth
®
word mark and logos are owned by the Bluetooth SIG, Inc. and any use of such marks by Garmin is under license. USB-C
®
is a registered trademark
of USB Implementers Forum. Wi‑Fi
®
is a registered mark of Wi-Fi Alliance Corporation. Windows
®
is a registered trademark of Microsoft Corporation in the United States and other
countries. Other trademarks and trade names are those of their respective owners.

Table of Contents
Introduction......................................1
Laser Warning......................................... 1
Device Overview...................................... 1
Status LEDs..........................................2
Installing AAA Batteries.......................... 3
Turning the Device On or Off.................. 3
Standby Mode......................................... 3
Adjusting the Eyepiece............................3
Bluetooth® Connected Features....... 3
Garmin Explore........................................ 3
Pairing Your Phone................................. 4
Point Ranging................................... 4
Ranging a Target..................................... 4
Saving a Ranged Location...................... 4
Navigating to a Ranged Location........... 4
Viewing a Previous Location.................. 5
Apps.................................................5
Viewing Saved Points............................. 6
Saving Your Current Location............. 6
Garmin Share........................................... 6
Sharing Data with Garmin Share........ 7
Receiving Data with Garmin Share..... 7
Creating and Navigating a Course......... 7
Measuring the Distance Between
Points....................................................... 8
Map..................................................8
Using the Map......................................... 8
HUD Profiles.....................................8
Hiking Profile........................................... 9
Archery Profile......................................... 9
Applied Ballistics Profile....................... 10
Applied Ballistics®......................... 11
Applied Ballistics Quantum App...........11
Applied Ballistics Options.....................11
Target Card........................................ 12
Adding a Target............................. 12
Editing the Target.......................... 12
Changing the Target...................... 12
Range Card........................................ 12
Customizing the Range Card
Fields.............................................. 12
Environment.......................................12
Editing the Environment................ 12
Profile................................................. 12
Adding a Profile............................. 12
Selecting a Different Profile.......... 13
Applied Ballistics Glossary of Terms... 14
Applied Ballistics App Settings............ 16
Customizing Your Device................16
Settings.................................................. 16
System Settings................................ 16
Satellite Settings............................17
Setting Your Device Passcode......17
Resetting All Default Settings....... 17
Opening the Quick Options Menu........ 17
Device Information......................... 18
Device Care............................................18
Cleaning the Device...........................18
Long-Term Storage........................... 18
Attaching a Lanyard.............................. 18
Specifications........................................18
Viewing Device Information................. 18
Viewing E-label Regulatory and
Compliance Information................... 19
Troubleshooting............................. 19
Troubleshooting Ranging Accuracy.....19
Acquiring Satellite Signals.................... 19
Disconnecting the USB Cable...............19
Product Updates................................... 20
Setting Up Garmin Express............... 20
Getting More Information..................... 20
Table of Contents i

Introduction
WARNING
See the Important Safety and Product Information guide in the product box for product warnings and other
important information.
Always inspect your equipment before using a bow or firearm. You are responsible for understanding and
complying with any applicable regulations for using a bow or firearm.
Always understand your target and what lies beyond your target before taking a shot. Failure to account for your
shooting environment could cause property damage, injury, or death.
Laser Warning
WARNING
This device requires no regular maintenance. In the event that the device becomes damaged or is inoperable,
repair or service must be handled by authorized, factory-trained technicians only. Attempting to repair or service
the unit on your own can result in direct exposure to laser radiation and the risk of permanent eye damage. For
repair or service, contact your dealer or Garmin
®
for more information.
This device has a protective housing which, when in place, prevents human access to laser radiation in excess
of the accessible emission limit (AEL) for Class 1 laser products. This device should not be modified or
operated without its housing or optics. Operating this device without a housing and optics, or operating this
device with a modified housing or optics that expose the laser source, may result in direct exposure to laser
radiation and the risk of permanent eye damage. Removal or modification of the diffuser in front of the laser
optic may result in the risk of permanent eye damage.
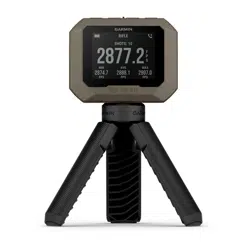
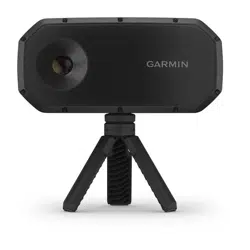
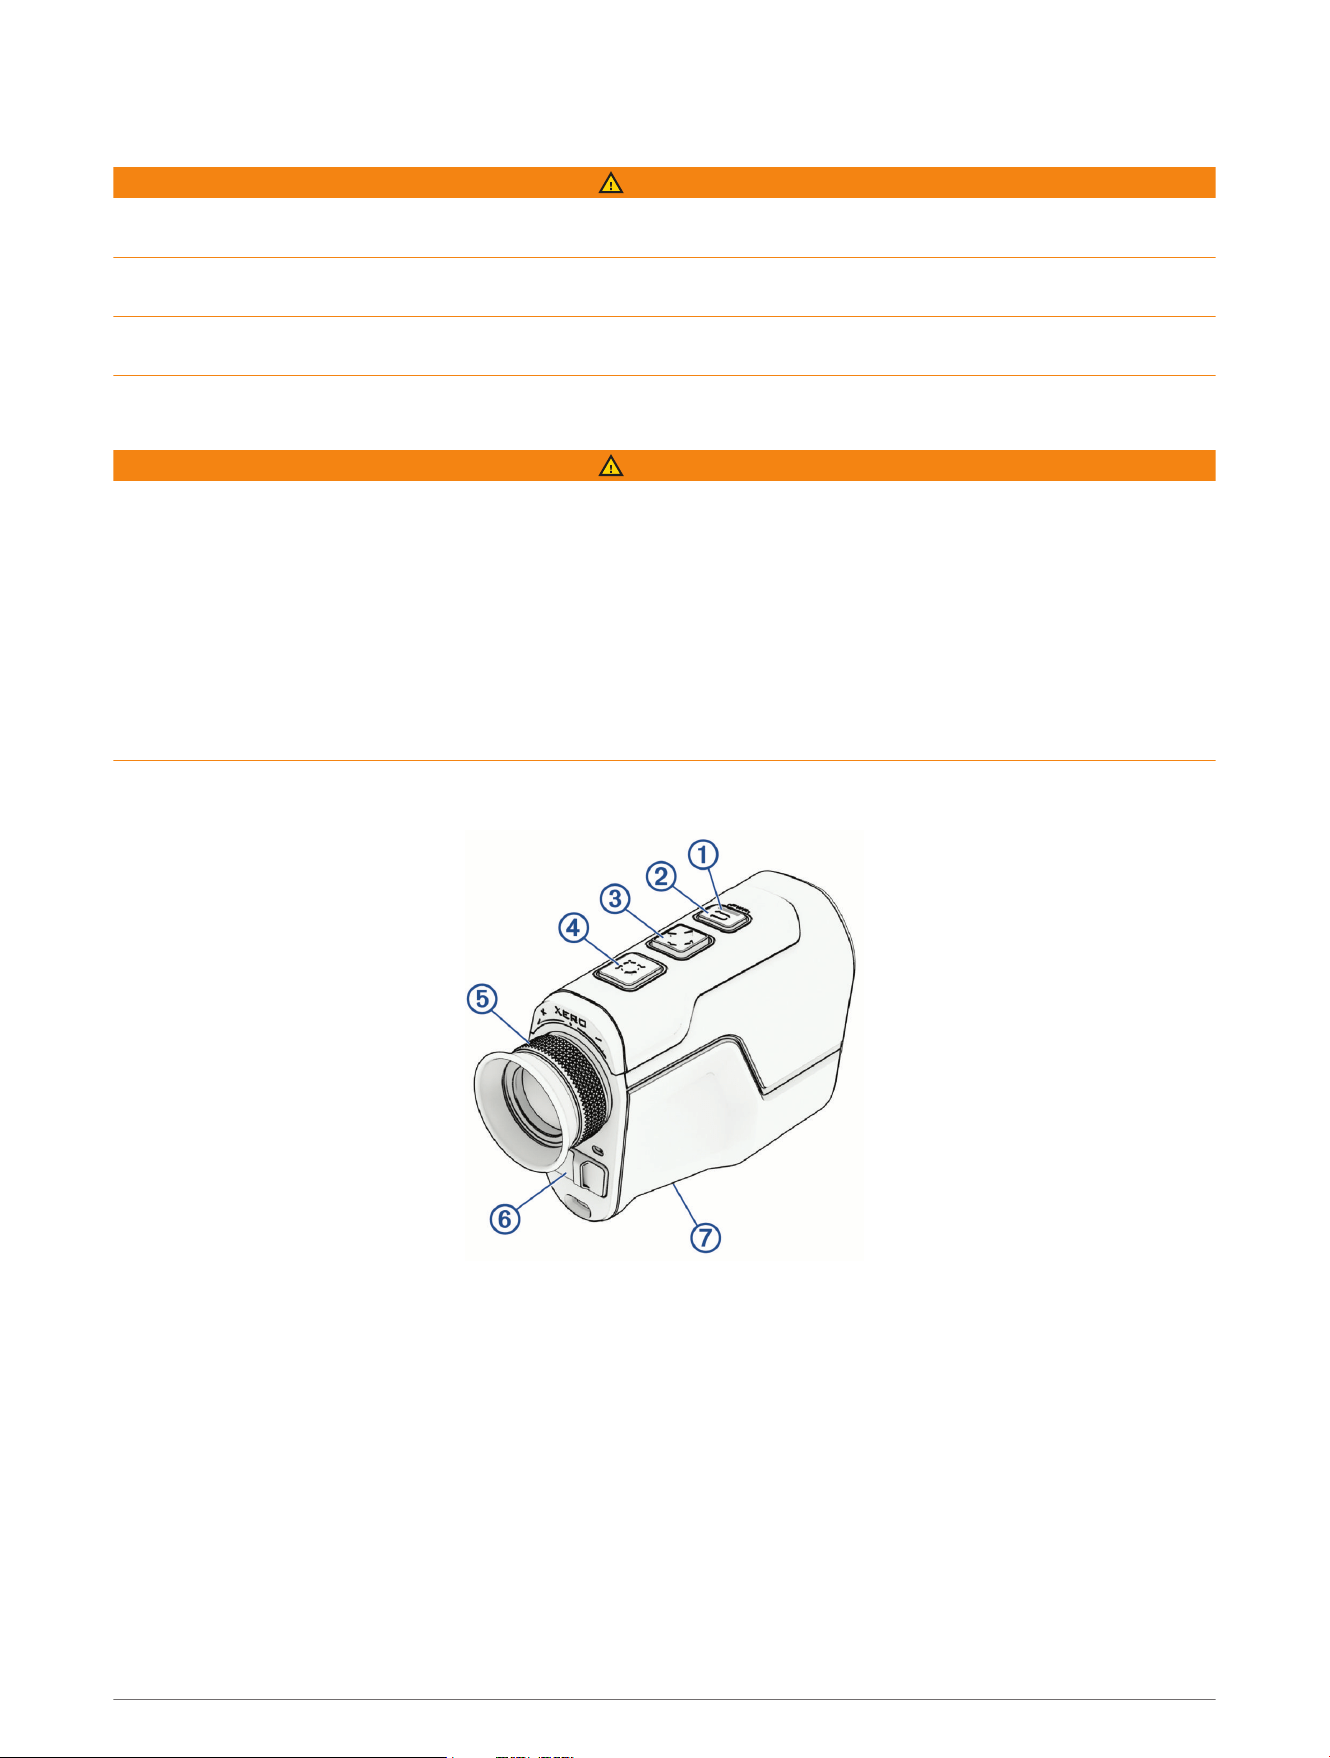
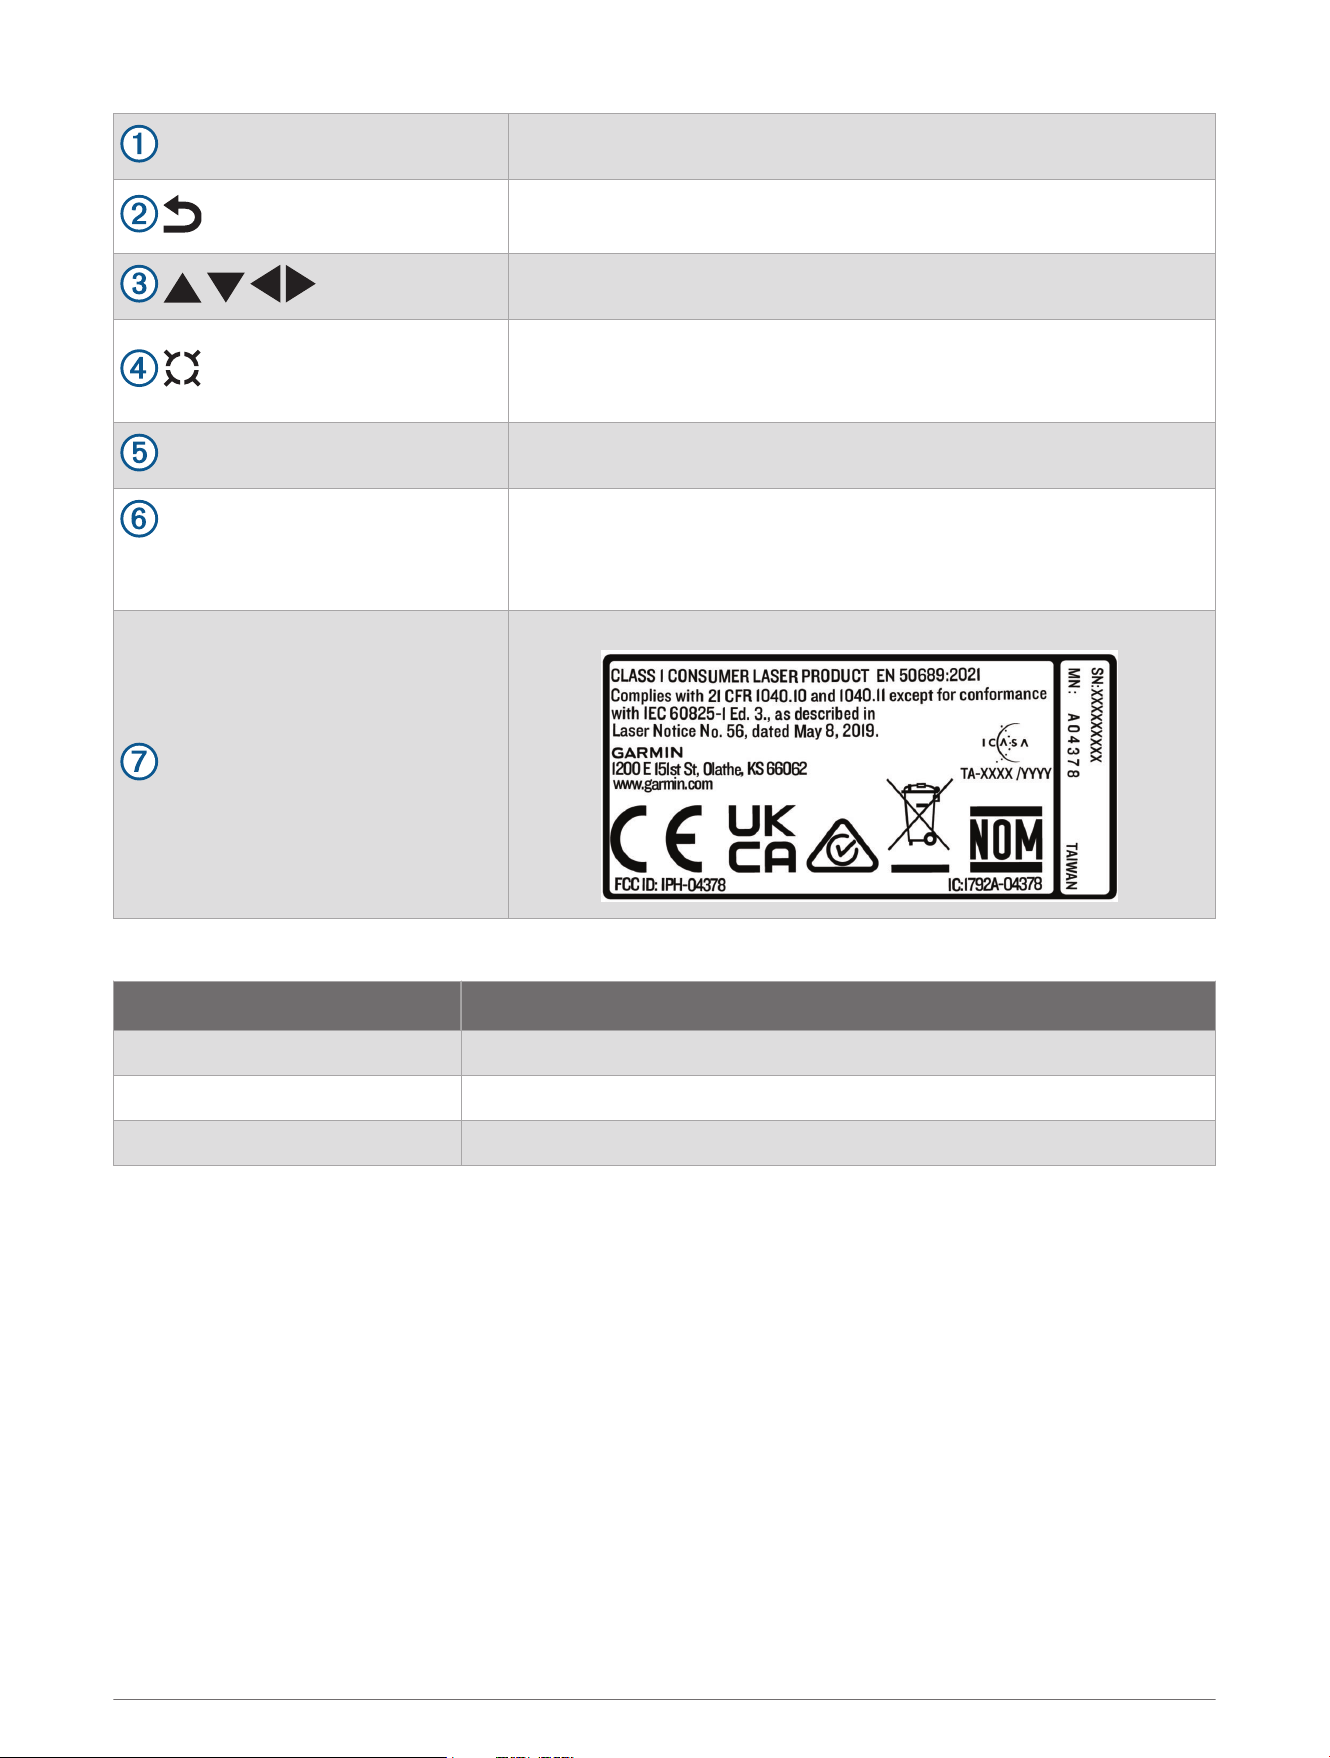
Device Overview
Introduction 1
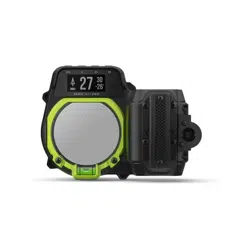
Status LED
View device status.
Hold to turn the rangefinder on or off.
Press to return to the previous screen.
Press to scroll through menu options.
Press to range with the laser.
Hold to scan with the laser.
Press to select menu options.
Adjustable diopter
Rotate the eyepiece to focus the image in the display.
Weather cap
USB-C
®
power and data port (under
weather cap)
Pull up to access the USB-C power and data port.
Connect a compatible USB cable to transfer data using your computer.
Device label
View manufacturer's identification and certification.
Status LEDs
LEDActivity Status
Blinking green The rangefinder is turned on and ready for use.
Alternating yellow and red The rangefinder failed to turn on due to low battery power.
Blinking yellow The rangefinder is busy.
2 Introduction
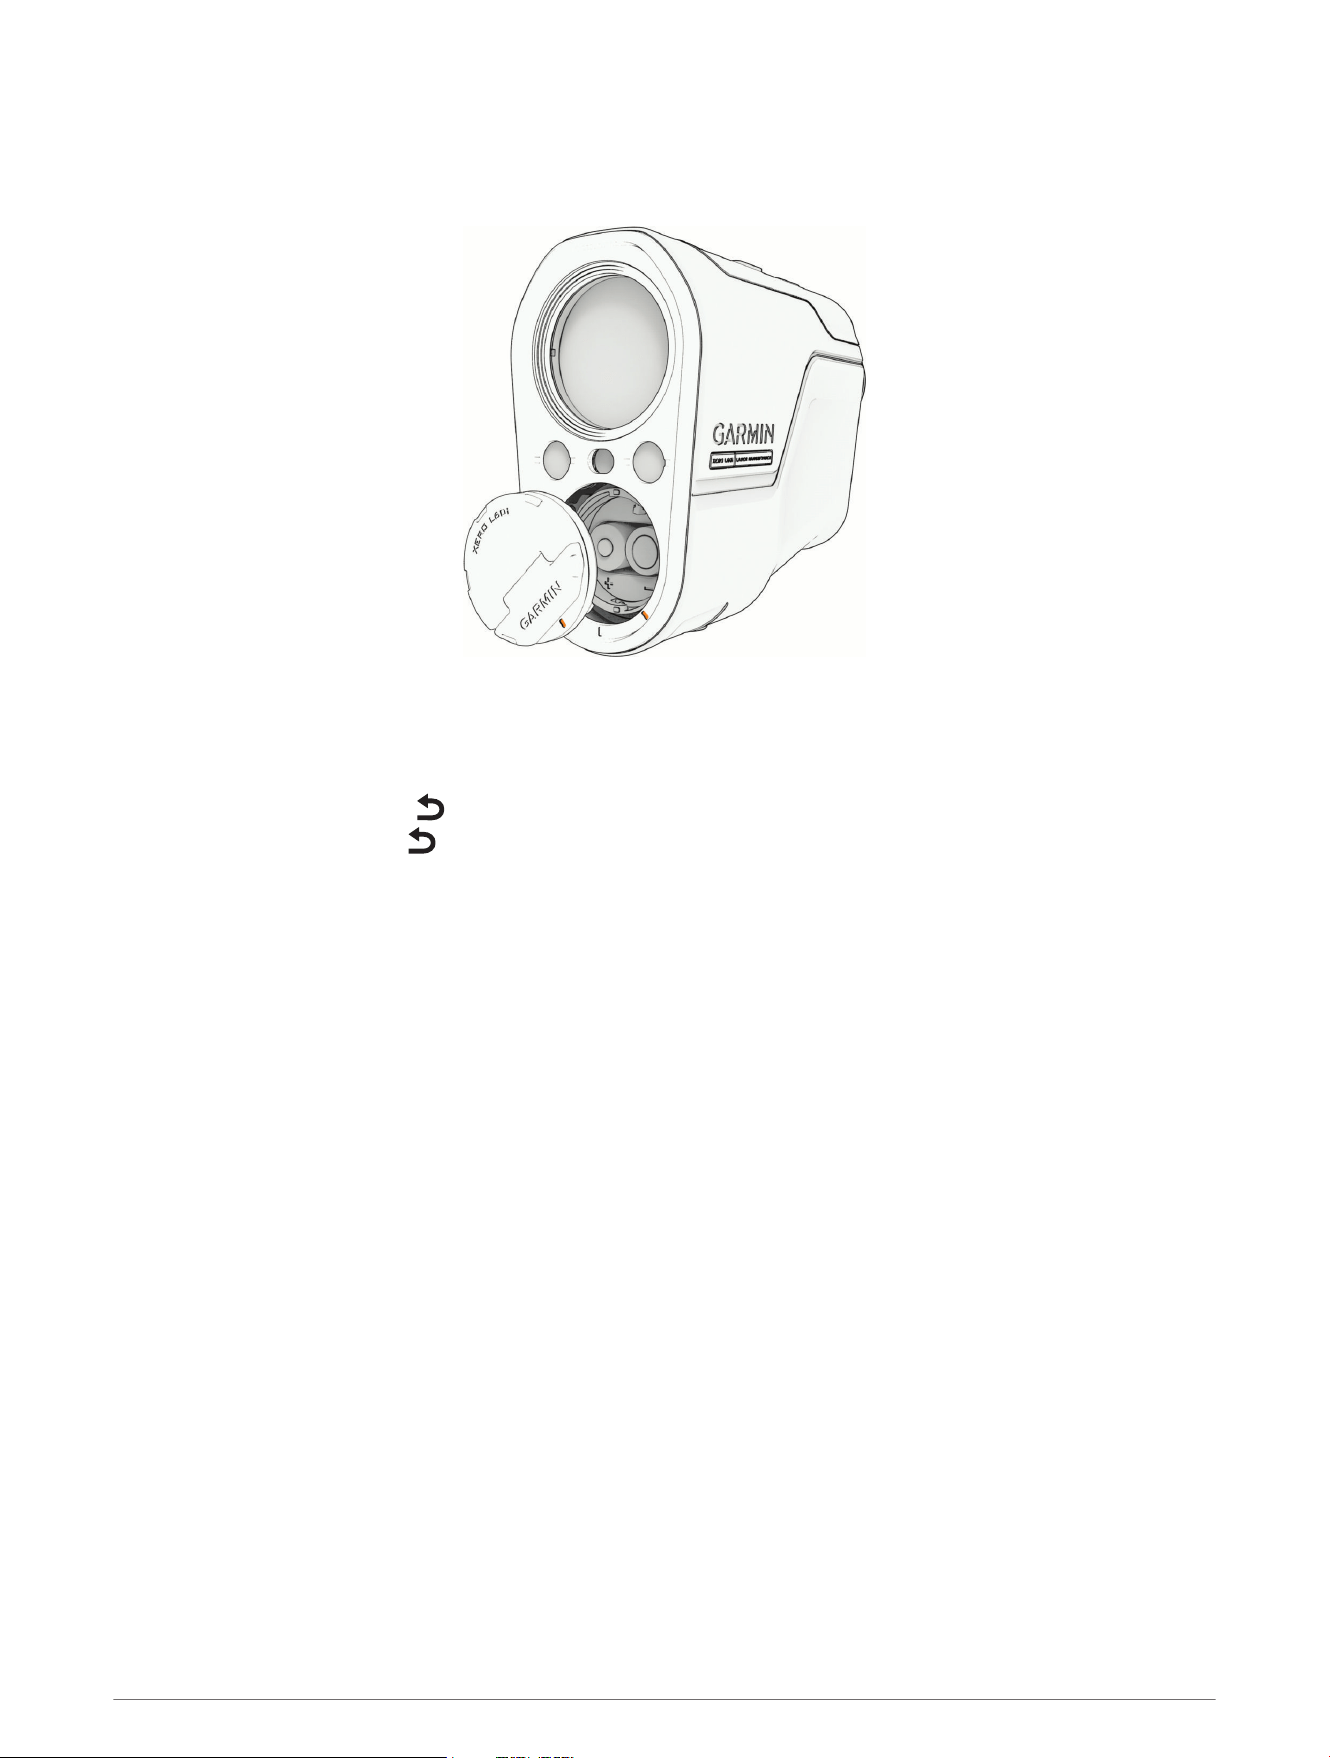
Installing AAA Batteries
The rangefinder operates on two AAA lithium batteries. Lithium batteries are required for this device.
1 Rotate the battery cover counter-clockwise to remove it.
2 Insert two AAA lithium batteries into the rangefinder, observing polarity.
3 Replace the battery cover.
Turning the Device On or Off
• To turn on the device, press .
• To turn off the device, hold for 2 seconds.
Standby Mode
To conserve battery life, the rangefinder goes into standby mode when not in use. It wakes up when you push
any button. The rangefinder fully powers off after 48 hours without use.
Adjusting the Eyepiece
The rangefinder features an adjustable eyepiece (+/- 4 diopter adjustment). This allows you to focus the image
in the display for your eyesight.
Rotate the eyepiece in or out to focus the display.
Bluetooth
®
Connected Features
The rangefinder includes Bluetooth connected features for your compatible mobile device using the Garmin
Explore
™
app.
Data uploads to Garmin Explore: Automatically sends saved locations and courses to the Garmin Explore app
when you sync your rangefinder. This allows you to share the data with other paired devices.
Software updates: Allows you to receive updates for your device software using the Garmin Explore app.
Improved GPS acquisition: Allows you to connect to satellite signals more quickly.
Garmin Explore
The Garmin Explore website and app allow you to create courses, waypoints, and collections, plan trips, sync
tracks, upload activities, and use cloud storage. They offer advanced planning both online and offline, allowing
you to share and sync data with your compatible Garmin device. You can use the app to download maps for
offline access, and then navigate anywhere without using your cellular service.
You can download the Garmin Explore app from the app store on your phone (garmin.com/exploreapp), or you
can go to explore.garmin.com.
Bluetooth
®
Connected Features 3
Pairing Your Phone
To use the connected features of your rangefinder, you must pair it using the Garmin Explore app, instead of
pairing it from the Bluetooth settings on your phone.
1 During the initial setup for your rangefinder, select YES when you are prompted to pair with your phone.
2 Bring your phone within 10m (33ft.) of your rangefinder.
3 From the app store on your phone, install and open the Garmin Explore app (garmin.com/exploreapp).
4 Follow the instructions in the app to complete the pairing and setup process.
Point Ranging
WARNING
Always inspect your equipment before using a bow or firearm. You are responsible for understanding and
complying with any applicable regulations for using a bow or firearm.
Always understand your target and what lies beyond your target before taking a shot. Failure to account for your
shooting environment could cause property damage, injury, or death.
Ranging a Target
You can use the rangefinder to measure the distance from your current position to a target. For targets that are
too far away for laser-ranging, the rangefinder uses the Sensor Locate feature, which uses GPS, along with its
compass, inclinometer, and onboard mapping to display an estimated distance.
1 Align the reticle on the rangefinder's display with the target.
2 Select an option:
• To quickly range the target, press .
• To range the target continuously or get a Sensor Located distance, hold , hold the rangefinder steady as
it lases the target, and release .
Saving a Ranged Location
1 After ranging a location, press .
2 Select SAVE.
3 Select an icon for the location.
4 Select DONE.
Navigating to a Ranged Location
1 After ranging a location, press .
2 Select GO.
3 Begin navigating to the destination.
represents your location on the map. Your route is marked with a colored line.
4 Point Ranging
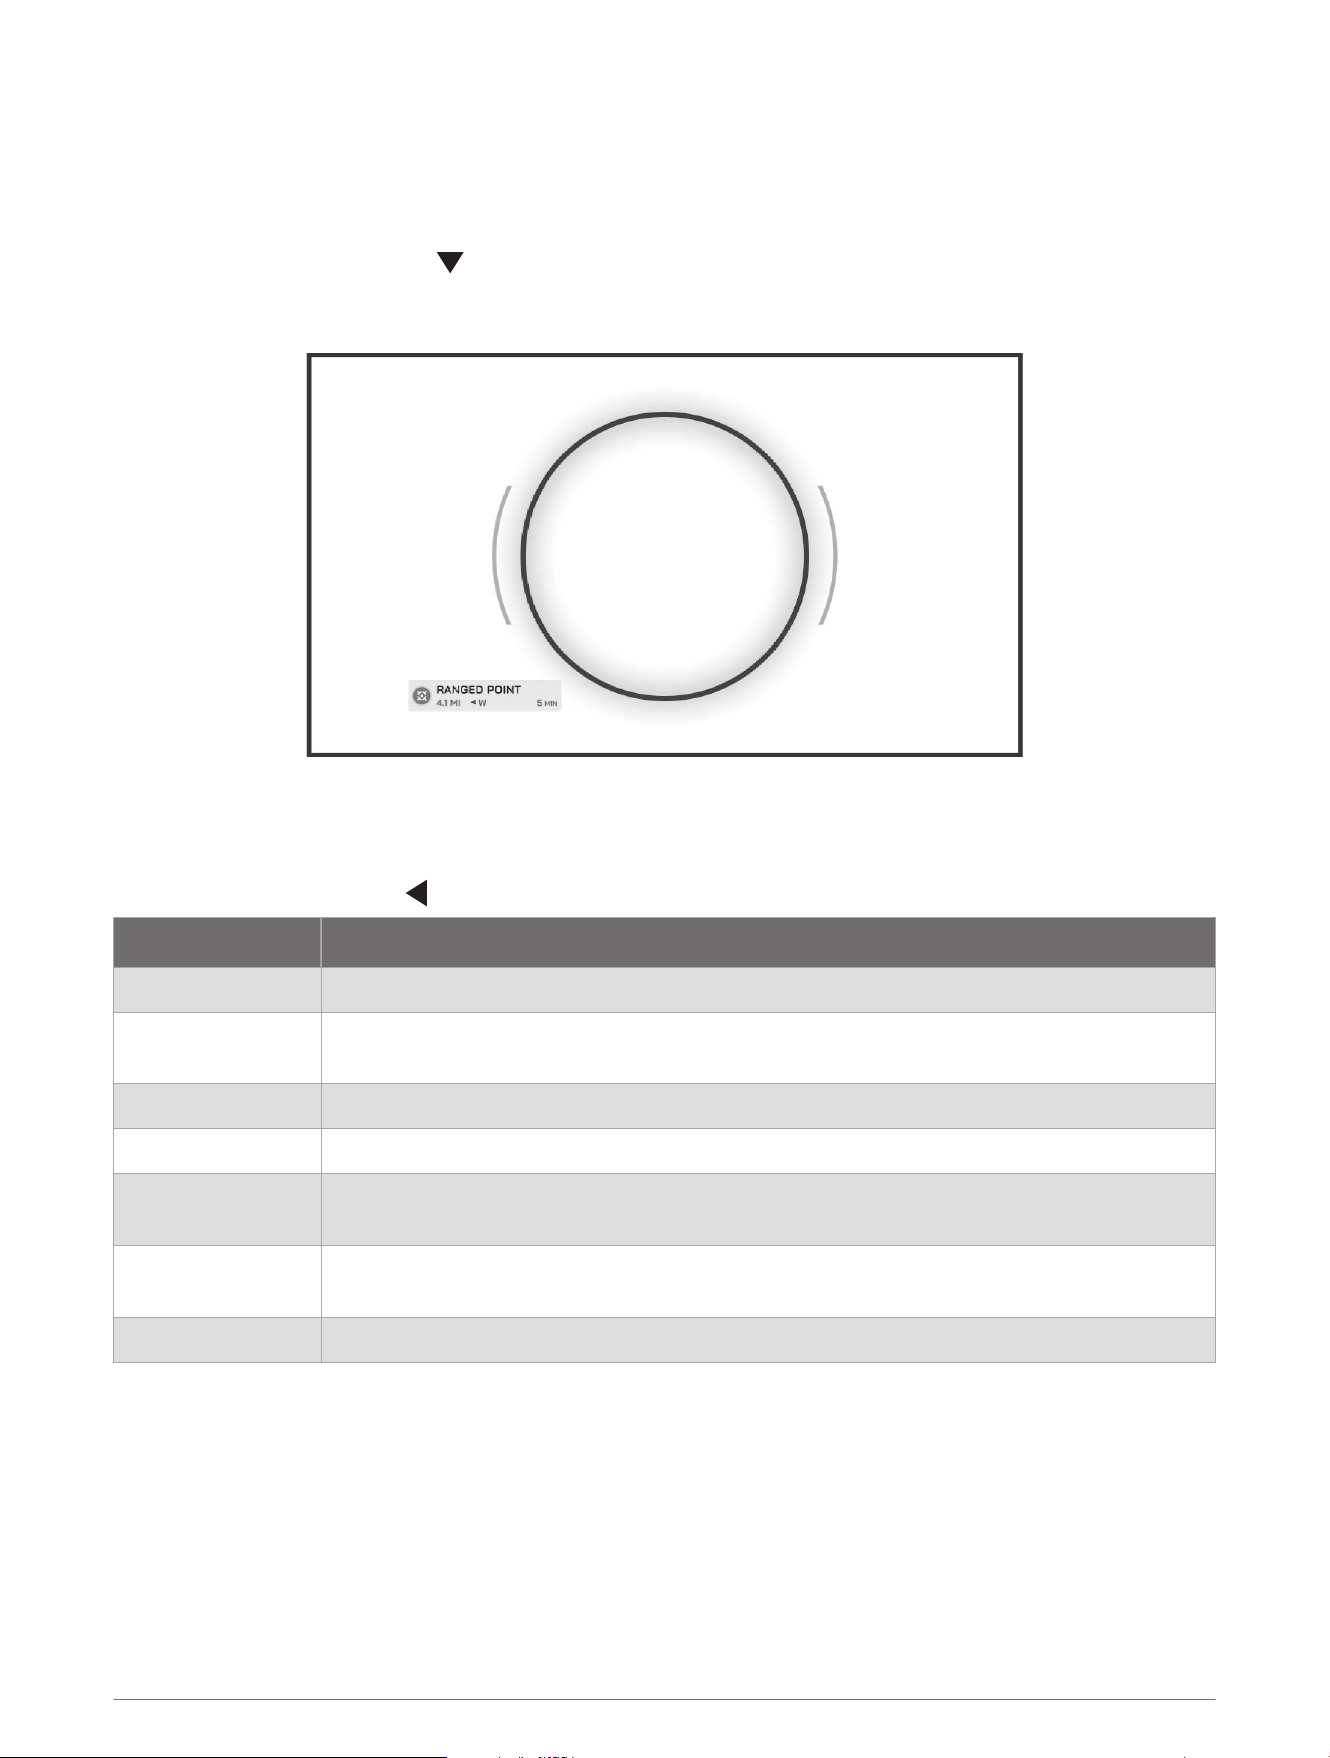
Viewing a Previous Location
The visual recall feature allows the rangefinder to guide your view back to a previously-ranged location in the
environment.
NOTE: Recent ranges are automatically stored for a limited time, even if you do not manually save them.
1 From the home screen, press .
2 Select RECALL LAST RANGE.
3 Follow the on-screen instructions to face in the direction of the ranged location.
A large circle appears on the display when the rangefinder is aligned with the ranged location.
Apps
From the home screen, press to open the apps list.
Name More Information
SETTINGS Customizes the device settings (Settings, page16).
SAVED POINTS
Displays saved waypoints (Saving a Ranged Location, page4), along with up to 20 of your
most recently ranged points (Viewing Saved Points, page6).
GARMIN SHARE Sends and receives data with other Garmin devices (Garmin Share, page6).
ELEVATION CHART Displays a chart of the altitude at your current location.
MEASURE
Measures the distance between ranged points (Measuring the Distance Between Points,
page8).
COURSE CREATOR
Creates courses with multiple points for you to navigate (Creating and Navigating a
Course, page7).
TIPS Displays tips for using your rangefinder.
Apps 5
Viewing Saved Points
You can view courses, ranged locations you have saved as waypoints, as well as the last 20 locations you have
ranged.
1 From the home screen, press .
2 Select SAVED POINTS.
3 If necessary, press to view your saved waypoints or courses.
4 Select a point or course from the list.
5 Press .
6 Select an option:
• Select GO to navigate to the point or course (Navigating to a Ranged Location, page4).
• Select RECALL to make the rangefinder guide your view to the location of the point in the environment
(Viewing a Previous Location, page5).
• Select SAVE to save the point (Saving a Ranged Location, page4).
This option appears only for points that have not already been saved.
• Select DELETE to remove the point or course from the list.
Saving Your Current Location
If you want to return to a certain spot, you can save your location as a waypoint.
1 From the home screen, press .
2 Select SAVE CURRENT LOCATION.
3 Select an icon for the location.
4 Select DONE.
Garmin Share
NOTICE
It is your responsibility to use discretion when sharing information with others. Always ensure you are aware of
and comfortable with the individual with whom you share information.
The Garmin Share feature allows you to use Bluetooth technology to wirelessly share your data with other
compatible Garmin devices. With Garmin Share enabled and compatible Garmin devices in range of each
other, you can select saved locations and courses to transfer to another device through a direct, secured
device-to-device connection, without the need for a phone or Wi‑Fi
®
connectivity.
6 Apps

Sharing Data with Garmin Share
Before you can use this feature, you must have Bluetooth technology enabled on both compatible devices, and
they must be within 3m (10 ft.) of each other. When prompted, you must also consent to share your data with
other Garmin devices using Garmin Share.
Your Xero
®
L60i rangefinder can send and receive data when connected to another compatible Garmin device
(Receiving Data with Garmin Share, page7). You can also transfer your data between different devices. For
example, you can share a favorite course from your rangefinder to your compatible Garmin watch.
1 From the home screen, press .
2 Select GARMIN SHARE.
3 Press .
4 Select SHARE.
5 Select a category, and select one or more items.
6 Select SHARE.
7 Wait while the device locates compatible devices.
8 Select a device.
9 If necessary, confirm the six-digit PIN matches on both devices, and select CONTINUE.
10 Wait while the devices transfer the data.
11 Select SHARE AGAIN to share the same items with another user (optional).
12 Select DONE.
Receiving Data with Garmin Share
Before you can use this feature, you must have Bluetooth technology enabled on both compatible devices, and
they must be within 3m (10 ft.) of each other. When prompted, you must also consent to share your data with
other Garmin devices using Garmin Share.
1 From the home screen, press .
2 Select GARMIN SHARE.
3 Wait while the device locates compatible devices in range.
4 Select ACCEPT.
5 If necessary, confirm the six-digit PIN matches on both devices, and select CONTINUE.
6 Wait while the devices transfer the data.
7 Select DONE.
Creating and Navigating a Course
You can use the course creator feature to navigate courses consisting of multiple ranged points.
1 From the home screen, press .
2 Select COURSE CREATOR.
3 Range the first point for the course (Ranging a Target, page4).
4 Range the second point.
5 If necessary, range additional points.
6 Select START NAVIGATION.
The device calculates your route and displays it on the map.
Apps 7
Measuring the Distance Between Points
You can use the device to measure the distance from your current position to a ranged or previously saved
point, as well as the distance between points.
1 Select an option:
• To measure the distance between your location and a target in the environment, align the rangefinder
reticle with the target, and range the point (Ranging a Target, page4).
• To measure the distance between your location and a saved waypoint, select ADD LOCATION > SAVED
POINTS, and select a waypoint.
The ranged distance appears.
2 Repeat the step to add a second point.
The ranged distance appears, along with the distance between the two points.
3 If necessary, add additional points.
The ranged distance appears, along with the combined distance between each of the ranged points.
Map
represents your location on the map. As you travel, moves and displays your path. Depending on your zoom
level, waypoint names and symbols may appear on the map. You can zoom in on the map to see more detail.
When you are navigating to a destination, your route is marked with a colored line on the map.
Using the Map
1 From the home screen, press to open the map.
2 If necessary, press or to zoom in or out.
3 Press to change to pan mode.
4 Use the directional pad to move the crosshairs.
5 Hold to select the area indicated by the crosshairs.
6 Select an option:
• Select GO to navigate to the location (Navigating to a Ranged Location, page4).
• Select RECALL to make the rangefinder guide your view to the location in the environment (Viewing a
Previous Location, page5).
• Select MARK WAYPOINT to save the location as a waypoint.
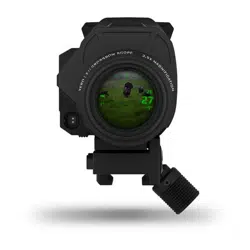
HUD Profiles
The HUD profile determines what data is displayed on the home screen after you range a point. You can change
the profile by pressing on the home screen, and selecting SETTINGS > HUD PROFILE.
8 Map
Hiking Profile
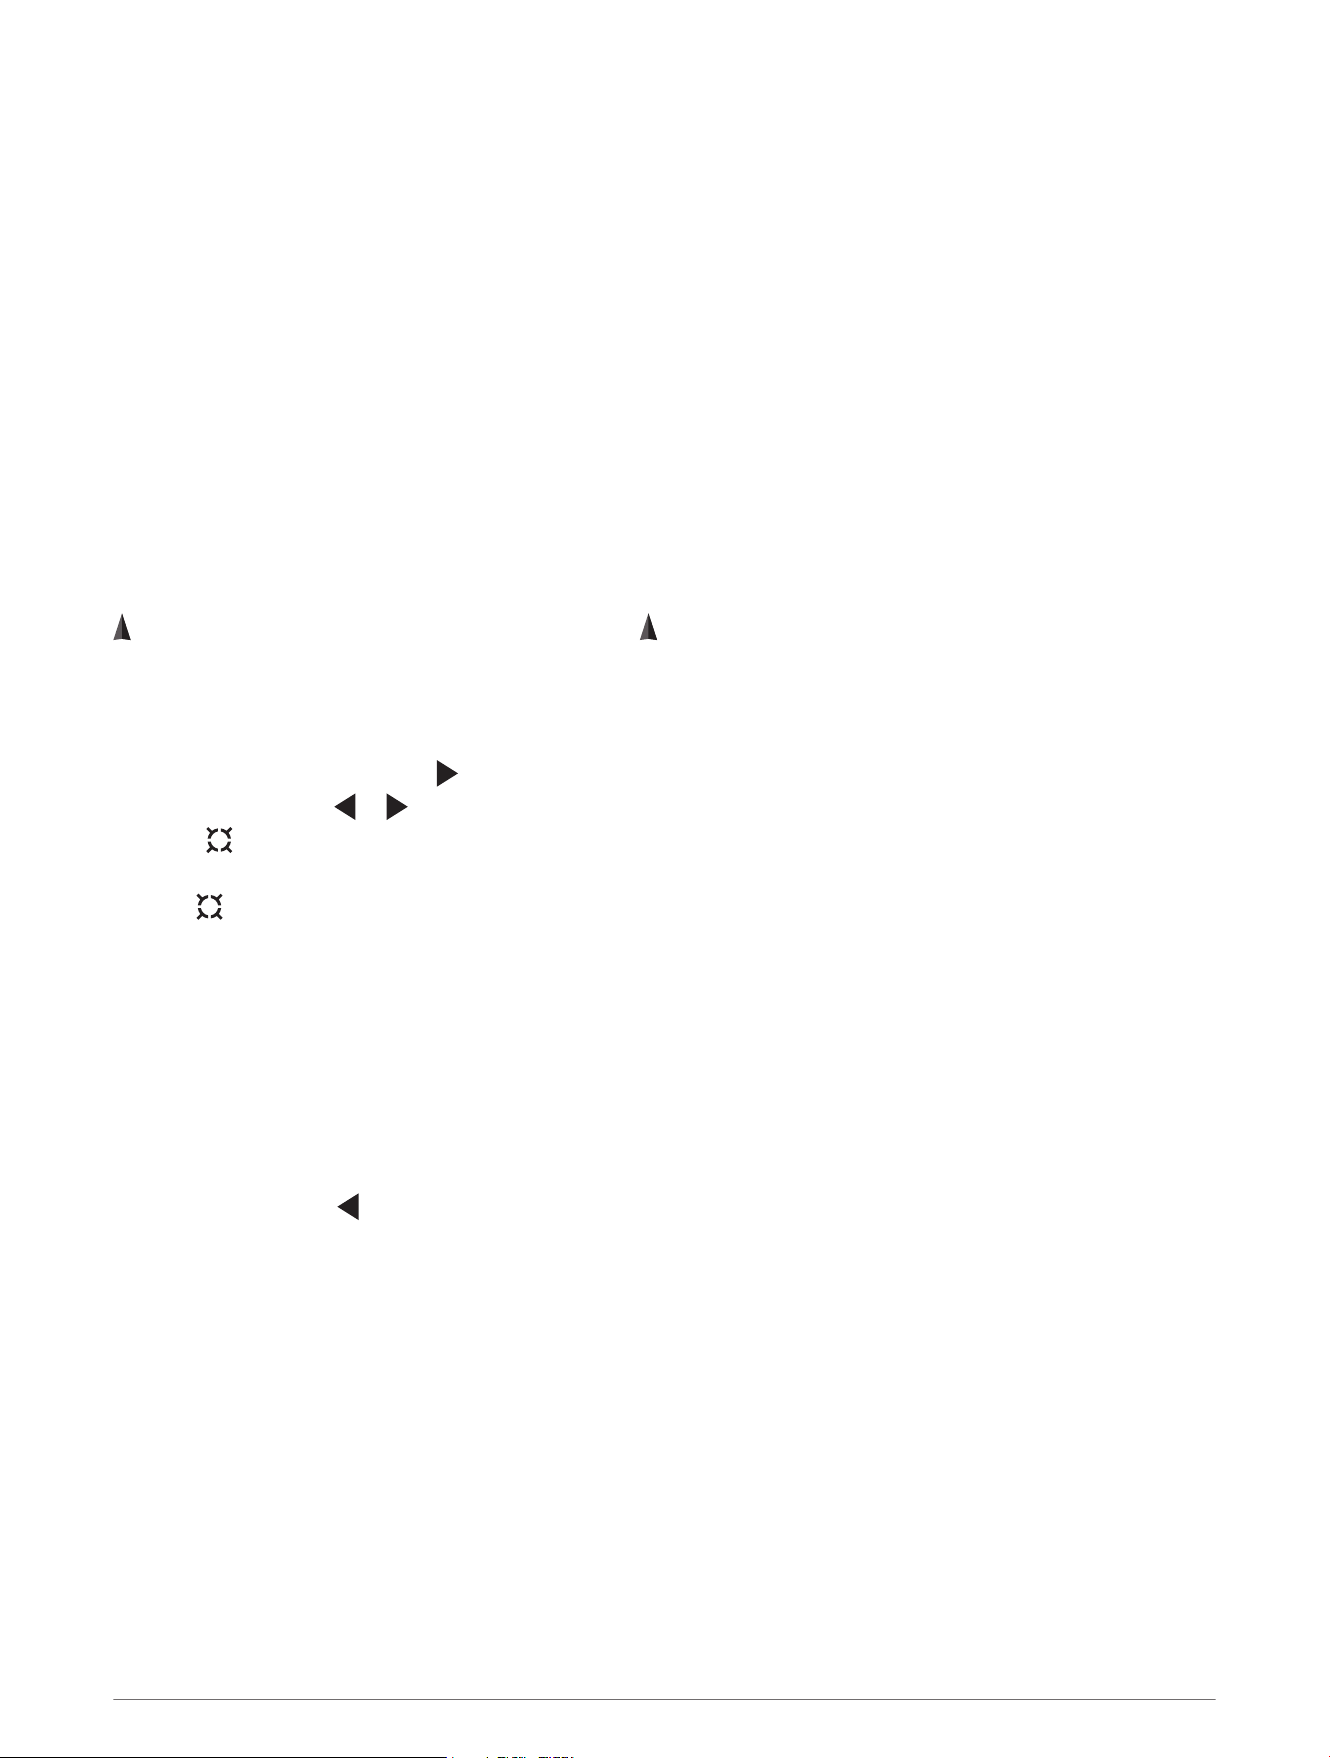
The distance from your location to the ranged point.
The location of the ranged point on the map.
Your current location on the map.
Archery Profile
The projected impact angle of an arrow to the ranged point.
The angle-compensated distance to the point.
The projected flight apex arc of the arrow.
The line of sight distance to the point.
The angle to the point.
HUD Profiles 9
Applied Ballistics Profile
WARNING
The Applied Ballistics feature is intended to provide accurate elevation and windage solutions based on gun and
bullet profiles and measurements of current conditions only. Depending on your environment, conditions may
change rapidly. Changes in environmental conditions, like wind gusts or downrange winds, may have an effect
on the accuracy of your shot. Elevation and windage solutions are suggestions only based upon your input into
the feature. Take readings often and carefully, and allow the readings to stabilize after significant changes in
environmental conditions. Always allow a margin of safety for changing conditions and reading errors.
Always understand your target and what lies beyond your target before taking a shot. Failure to account for your
shooting environment could cause property damage, injury, or death.
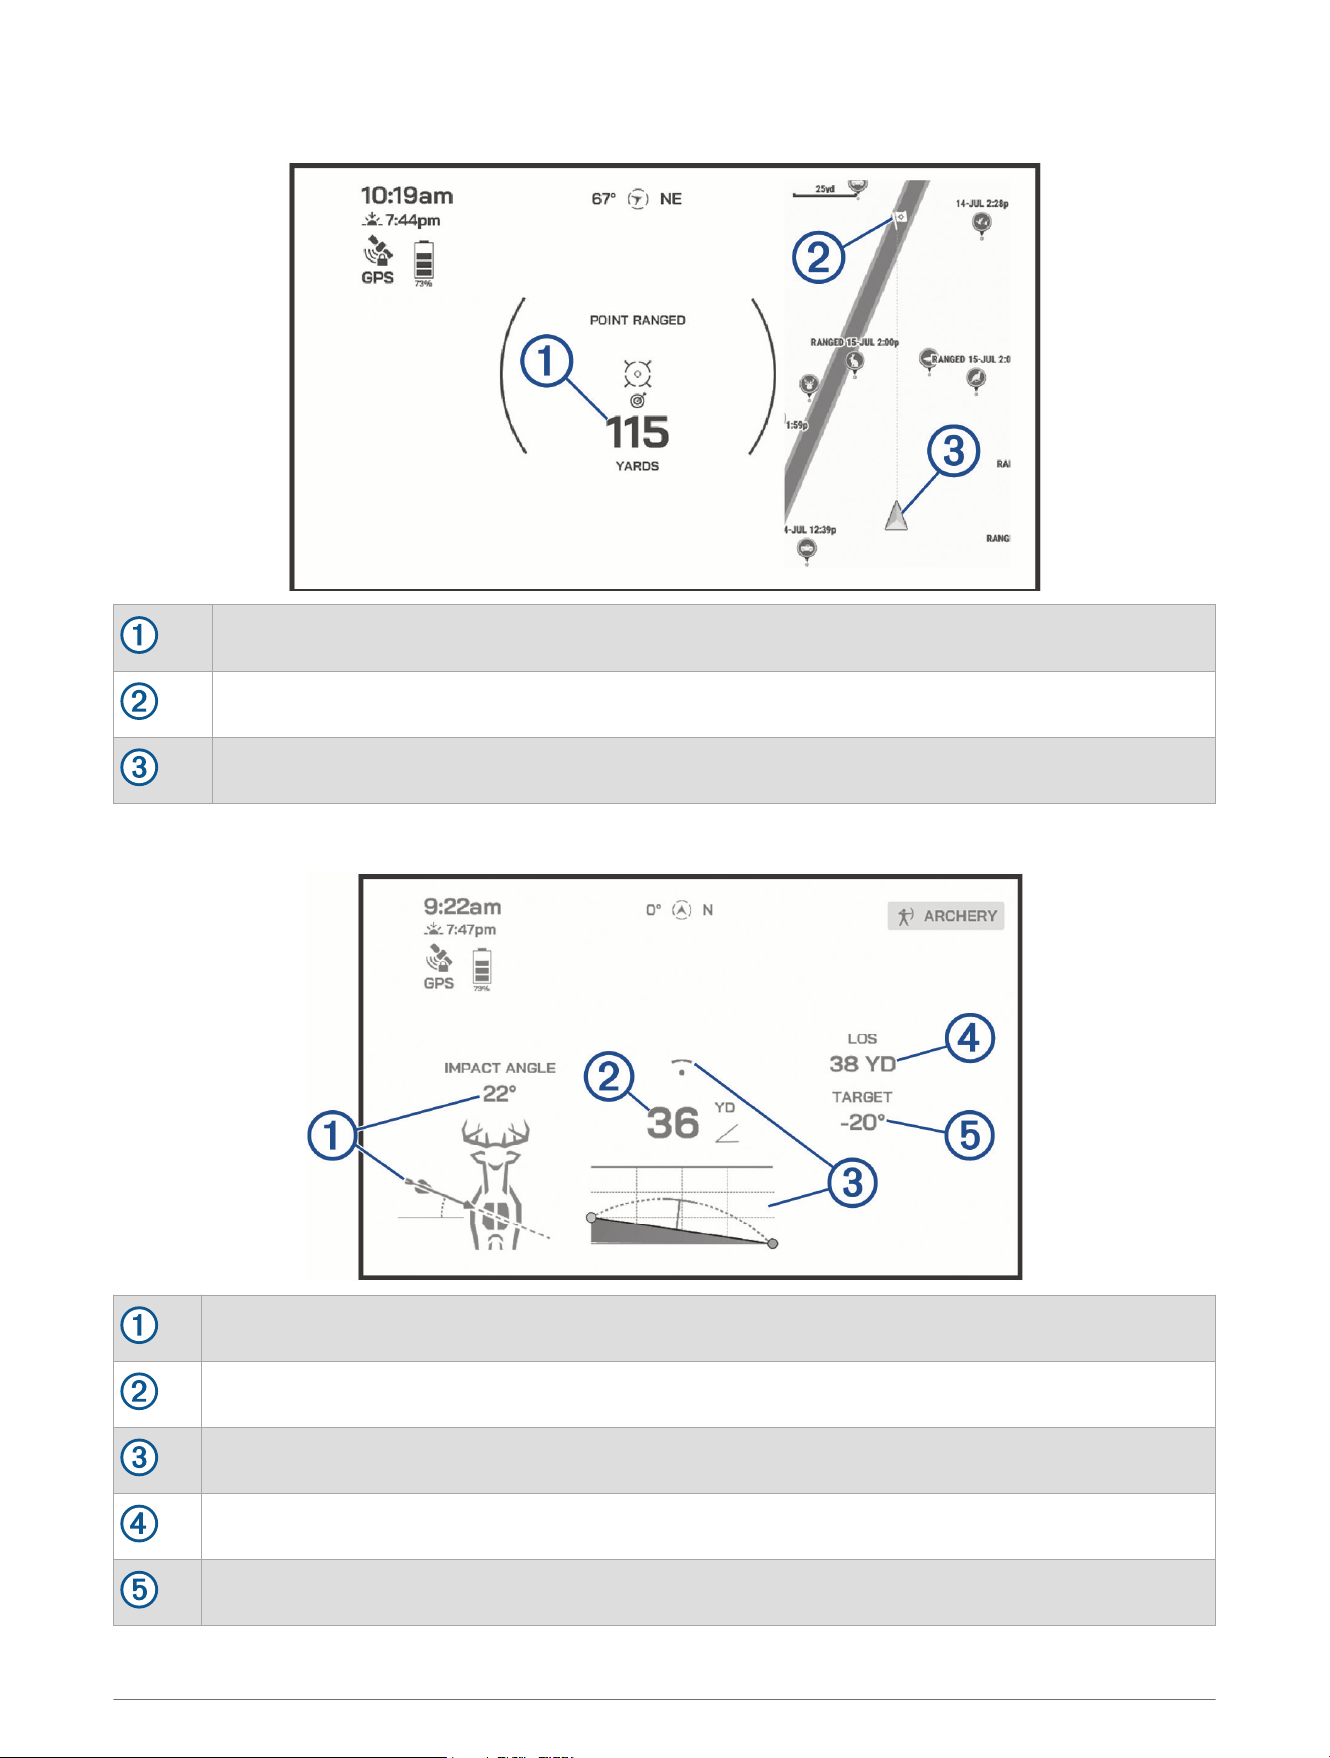
The name of the selected profile.
The distance from your current location to the ranged point.
The vertical portion of the aiming solution, displayed in milliradians (mil) or minute of angle (MOA).
The horizontal portion of the aiming solution based on the wind speed 1 and wind direction, displayed in
milliradians (mil) or minute of angle (MOA).
The horizontal portion of the aiming solution based on the wind speed 2 and wind direction, displayed in
milliradians (mil) or minute of angle (MOA).
The wind direction.
The wind speed used for windage 1 and windage 2.
The angle of inclination of the shot. A negative value indicates a downhill shot. A positive values
indicates an uphill shot. The shooting solution multiplies the vertical portion of the solution by the cosine
of the inclination angle to calculate the adjusted solution for an uphill or downhill shot.
The direction of fire, with north at 0 degrees and east at 90 degrees.
10 HUD Profiles

Applied Ballistics
®
WARNING
The Applied Ballistics feature is intended to provide accurate elevation and windage solutions based on gun and
bullet profiles and measurements of current conditions only. Depending on your environment, conditions may
change rapidly. Changes in environmental conditions, like wind gusts or downrange winds, may have an effect
on the accuracy of your shot. Elevation and windage solutions are suggestions only based upon your input into
the feature. Take readings often and carefully, and allow the readings to stabilize after significant changes in
environmental conditions. Always allow a margin of safety for changing conditions and reading errors.
Always understand your target and what lies beyond your target before taking a shot. Failure to account for your
shooting environment could cause property damage, injury, or death.
The Applied Ballistics feature offers customized aiming solutions for long-range shooting based on your
rifle characteristics, bullet characteristics, and various environmental conditions. You can enter parameters
including wind, temperature, humidity, range, and firing direction.
This feature provides the information you need to fire long-range projectiles, including elevation
holdover, windage, and time of flight. It also includes custom drag models for your bullet type. Go to
appliedballisticsllc.com for more details about this feature. See the Applied Ballistics Glossary of Terms,
page14 for descriptions of the terms and data fields.
NOTE: You may need to upgrade the ballistic solver in the Applied Ballistics Quantum
™
app to unlock all Applied
Ballistics features (Applied Ballistics Quantum App, page11).
Applied Ballistics Quantum App
The Applied Ballistics Quantum app allows you to manage ballistic profiles on your Xero L60i device, or upgrade
your ballistic solver, if necessary. You can download the Applied Ballistics Quantum app from the app store on
your phone.
Applied Ballistics Options
From the home screen, press , and select AB MENU.
TARGET CARD: Sets the long-range shooting conditions for your current target, including range, elevation, and
windage (Editing the Target, page12). You can change the selected target and customize conditions for up
to 26 targets (Changing the Target, page12).
RANGE CARD: Displays data for various ranges based on user input parameters (Range Card, page12). You
can customize the data fields (Customizing the Range Card Fields, page12).
ENVIRONMENT: Sets the atmospheric conditions for your current environment. You can enter custom values,
or use the pressure, latitude, and temperature values from the internal sensor in the device (Environment,
page12).
PROFILE: Sets the bullet and gun properties for your current profile (Editing a Profile, page13). You can change
the selected profile (Selecting a Different Profile, page13) and add additional profiles (Adding a Profile,
page12).
SETTINGS: Sets the units of measure and fire control options for windage and elevation (Applied Ballistics App
Settings, page16).
Applied Ballistics
®
11

Target Card
Adding a Target
You can add up to 26 targets.
1 From the home screen, press , and select AB MENU.
2 Select TARGET CARD > SET UP TARGETS.
3 Align the reticle on the rangefinder's display with the target.
4 Select an option:
• To quickly range the target, press .
• To range the target continuously, hold , hold the rangefinder steady as it lases the target, and release
.
The new target appears at the bottom of the list.
Editing the Target
1 From the home screen, press , and select AB MENU.
2 Select TARGET CARD.
3 Select a target.
4 Select an option to edit.
Changing the Target
1 From the home screen, press , and select AB MENU.
2 Select TARGET CARD.
3 Select a target.
4 Select SET AS CURRENT.
Range Card
Customizing the Range Card Fields
1 From the home screen, press , and select AB MENU.
2 Select RANGE CARD.
3 Press to select the first field.
4 Press or to change the field.
5 Repeat the steps to change the second field.
Environment
Editing the Environment
1 From the home screen, press , and select AB MENU.
2 Select ENVIRONMENT.
3 Select an option to edit.
Profile
Adding a Profile
You can add a .pro file that contains profile information by creating it using the Applied Ballistics Quantum app
and transferring the file to the AB folder on the device. You can also create a profile using your Garmin device.
1 From the home screen, press , and select AB MENU.
2 Select PROFILE > PROFILE > CREATE NEW PROFILE.
12 Applied Ballistics
®
Editing a Profile
1 From the home screen, press , and select AB MENU.
2 Select PROFILE > PROFILE.
3 Select a profile.
4 Select an option:
• To enter the bullet properties, select BULLET PROPERTIES, and select an option.
TIP: You can select BULLET DATABASE to automatically enter bullet properties from the Applied
Ballistics bullet database. If you manually enter the bullet properties, you can find the information on
the bullet manufacturer's website.
• To enter the gun and scope properties, select GUN PROPERTIES, and select an option.
• To calibrate the muzzle velocity to provide a more accurate solution in the supersonic range for your
firearm, select GUN PROPERTIES > CALIBRATE MUZZLE VELOCITY, select an option, and select DONE.
• To calibrate the drop scale factor to provide a more accurate solution at or beyond the transonic range for
your firearm, select GUN PROPERTIES > CALIBRATE DSF, select an option, and select DONE.
NOTE: Garmin recommends you calibrate the muzzle velocity prior to calibrating the drop scale factor.
After you calibrate the drop scale factor, you can select GUN PROPERTIES > VIEW DSF TABLE to view the
drop scale factor table. If necessary, you can press while viewing the drop scale factor table to reset it
to the default values.
• To edit the muzzle velocity temperature table, select GUN PROPERTIES > MV-TEMP TABLE, and select a
value to edit.
NOTE: If necessary, you can press when no value is highlighted to reset the muzzle velocity
temperature table back to the default values.
• To edit the units of measure for output fields, select OUTPUT UNITS.
Deleting a Profile
NOTE: You cannot delete your current profile.
1 From the home screen, press , and select AB MENU.
2 Select PROFILE > PROFILE.
3 Select a profile.
4 Select DELETE PROFILE.
Selecting a Different Profile
1 From the home screen, press , and select AB MENU.
2 Select PROFILE > PROFILE.
3 Select a profile.
4 Select SELECT PROFILE.
Applied Ballistics
®
13

Applied Ballistics Glossary of Terms
Target Card Fields
DIRECTION OF FIRE: The direction of fire, with north at 0 degrees and east at 90 degrees. Input field.
INCLINATION: The angle of inclination of the shot. A negative value indicates a downhill shot. A positive value
indicates an uphill shot. The shooting solution multiplies the vertical portion of the solution by the cosine of
the inclination angle to calculate the adjusted solution for an uphill or downhill shot. Input field.
RANGE: The distance to the target, displayed in yards or meters. Input field.
SPEED: The speed of a moving target, displayed in miles per hour (mph), kilometers per hour (km/h), or meters
per second (m/s). A negative value indicates a target moving to the left. A positive value indicates a target
moving to the right. Input field.
Range Card Fields
DROP: The total drop the bullet experiences along its flight path, displayed in inches or centimeters.
ELEVATION: The vertical portion of the aiming solution, displayed in inches, milliradians (mrad or mil), or minute
of angle (MOA).
ENERGY: The remaining energy of the bullet at target impact, displayed in foot-pounds of force (ft. lbf.) or joules
(J).
H COR: The horizontal Coriolis effect. The horizontal Coriolis effect is the amount of the windage solution
attributed to the Coriolis effect. This is always calculated by the device, although the impact may be minimal
if you are not shooting at extended range.
LEAD: The horizontal correction needed to hit a target moving left or right at a given speed.
TIP: When you enter the speed of your target, the device factors the necessary windage required into the total
windage value.
SPIN DRIFT: The amount of the windage solution attributed to the spin drift (gyroscopic drift). For example, in
the northern hemisphere, a bullet shot out of a right-hand twist barrel will always deflect slightly to the right
as it travels.
TOF: The time of flight, which indicates the time required for a bullet to reach its target at a given range.
V COR: The vertical Coriolis effect. The vertical Coriolis effect is the amount of the elevation solution attributed
to the Coriolis effect. This is always calculated by the device, although the impact may be minimal if you are
not shooting at extended range.
VEL MACH: The estimated velocity of the bullet when it impacts the target, displayed as a factor of mach speed.
VELOCITY: The estimated velocity of the bullet when it impacts the target.
WINDAGE 1: The horizontal portion of the aiming solution based on the wind speed 1 and wind direction,
displayed in inches, milliradians (mrad or mil), or minute of angle (MOA).
WINDAGE 2: The horizontal portion of the aiming solution based on the wind speed 2 and wind direction,
displayed in inches, milliradians (mrad or mil), or minute of angle (MOA).
Environment Fields
AMB/STN PRESS.: The ambient (station) pressure. Ambient pressure is not adjusted to represent sea level
(barometric) pressure. Ambient pressure is required for the ballistics shooting solution. Input field.
TIP: You can manually enter this value, or you can select the USE CURRENT AMB./STN. PRESS. option to use
the pressure value from the internal sensor in the device.
HUMIDITY: The percentage of moisture in the air. Input field.
LATITUDE: The horizontal location on the Earth's surface. Negative values are below the equator. Positive
values are above the equator. This value is used to calculate the vertical and horizontal Coriolis drift. Input
field.
TIP: You can select the USE CURRENT LATITUDE option to use the GPS coordinates from your device.
NOTE: The LATITUDE is used only for calculating the Coriolis effect. If you are shooting at a target less than
1,000 yards away, this input field is optional.
TEMPERATURE: The temperature at your current location, displayed in degrees Fahrenheit (F) or Celsius (C).
Input field.
14 Applied Ballistics
®

TIP: You can manually enter this value, or you can select the USE CURRENT TEMPERATURE option to use the
temperature value from the internal sensor in the device.
WIND DIRECTION: The direction from which the wind is coming. For example, a 9:00 wind blows from your left
to your right. Input field.
WIND SPEED 1: The wind speed used in the shooting solution, displayed in miles per hour (mph), kilometers per
hour (km/h), or meters per second (m/s). Input field.
WIND SPEED 2: An optional, additional wind speed used in the shooting solution, displayed in miles per hour
(mph), kilometers per hour (km/h), or meters per second (m/s). Input field.
TIP: You can use two wind speeds to calculate a windage solution that contains a high and low value. The
actual windage to apply for the shot should fall within this range.
Profile Fields: Bullet Properties
BALLISTIC COEFFICIENT: The manufacturer's ballistic coefficient for your bullet. Input field.
BULLET DIAMETER: The bullet diameter, displayed in inches or centimeters. Input field.
NOTE: The diameter of the bullet may vary from the common name of the round. For example, a 300 Win
Mag is actually .308 inches in diameter.
BULLET LENGTH: The length of the bullet, displayed in inches or centimeters. Input field.
BULLET WEIGHT: The bullet weight, displayed in grains (gr) or grams (g). Input field.
DRAG CURVE: The G1 or G7 standard projectile models for drag curve. Input field.
NOTE: Most long range rifle bullets are closer to the G7 standard.
Profile Fields: Gun Properties
MUZZLE VELOCITY: The speed of the bullet as it leaves the muzzle, displayed in feet per second (ft./sec.) or
meters per second (m/s). Input field.
NOTE: This field is required for accurate calculations by the shooting solution. If you calibrate the muzzle
velocity, this field may be updated automatically for a more accurate firing solution.
SIGHT HEIGHT: The distance from the center axis of the rifle barrel to the center axis of the scope, displayed in
inches or centimeters. Input field.
TIP: You can easily determine this value by measuring from the top of the bolt to the center of the windage
turret, and adding half of the diameter of the bolt.
SSF ELEVATION: A linear multiplier that accounts for vertical scaling. Not all rifle scopes track perfectly, so the
ballistics solution requires a correction to scale according to a particular rifle scope. For example, if a turret is
moved 10 mil but the impact is 9 mil, the sight scale is 0.9. Input field.
SSF WINDAGE: A linear multiplier that accounts for horizontal scaling. Not all rifle scopes track perfectly, so the
ballistics solution requires a correction to scale according to a particular rifle scope. For example, if a turret is
moved 10 mil but the impact is 9 mil, the sight scale is 0.9. Input field.
TWIST RATE: The distance it takes for the rifling of your barrel to make one full rotation, displayed in inches or
centimeters. Rifle twist is often provided by the gun or barrel manufacturer. Input field.
ZERO HEIGHT: An optional modification to impact elevation at zero range. This is often used when adding a
suppressor or using a subsonic load. For example, if you add a suppressor and your bullet impacts the target
1 inch higher than expected, your ZERO HEIGHT is 1 inch. You must set this to zero when you remove the
suppressor. Input field.
ZERO OFFSET: An optional modification to impact windage at zero range. This is often used when adding a
suppressor or using a subsonic load. For example, if you add a suppressor and your bullet impacts the target
1 inch to the left of the expected impact, your ZERO OFFSET is -1 inch. You must set this to zero when you
remove the suppressor. Input field.
ZERO RANGE: The range at which the rifle was zeroed, displayed in yards or meters. Input field.
Profile Fields: Calibrate Muzzle Velocity
RANGE: The distance from the muzzle to the target, displayed in yards or meters. Input field.
TIP: You should enter a value as close as possible to the range suggested in the shooting solution. This is the
range where the bullet slows to Mach 1.2 and begins to enter the transonic range.
Applied Ballistics
®
15

TRUE DROP: The actual distance the bullet falls while in flight to the target, displayed in milliradians (mrad or
mil) or minute of angle (MOA). Input field.
Profile Fields: Calibrate Drop Scale Factor
RANGE: The range from which you are shooting. Input field.
TIP: This range should be within 90% of the recommended range suggested in the shooting solution. Values
that are less than 80% of the recommended range will not provide a valid adjustment.
TRUE DROP: The actual distance the bullet falls when fired at a specific range, displayed in milliradians (mrad or
mil) or minute of angle (MOA). Input field.
Applied Ballistics App Settings
From the home screen, press , and select AB MENU > SETTINGS.
INPUT UNITS: Sets the units of measure used for input fields in the APPLIED BALLISTICS app.
WIND UNITS: Sets the units of measure used for wind fields in the APPLIED BALLISTICS app.
SPIN DRIFT: Enables or disables SPIN DRIFT in calculations.
CORIOLIS EFFECT: Enables or disables CORIOLIS EFFECT in calculations.
AERODYNAMIC JUMP: Enables or disables AERODYNAMIC JUMP in calculations.
Customizing Your Device
Settings
From the home screen, press , and select SETTINGS.
DISPLAY: Adjusts the display settings, such as brightness, color, and the amount of time the display is active
before it turns off.
HUD PROFILE: Sets the profile for the home screen data (HUD Profiles, page8).
MAP: Shows or hides detail relief on the map, and sets the level of detail for the map.
CALIBRATE COMPASS: Allows you to manually calibrate the compass if you experience irregular compass
behavior. For example, after moving long distances or after extreme temperature changes.
PHONE: Pairs your rangefinder to a compatible phone (Pairing Your Phone, page4).
RANGING: Sets the scan mode. When set to RECENT, the distance of the last object lased while is being held
appears. MAXIMUM displays the value of the farthest lased object, while MINIMUM displays the value of the
nearest.
SYSTEM: Sets the system settings, such as device language, units of measure, and satellite preferences
(System Settings, page16).
System Settings
From the home screen, press , and select SETTINGS > SYSTEM.
UNITS: Sets the units of measure for the device.
DISPLAY DECIMAL PRECISION: Displays the ranged value in decimal format.
LANGUAGE: Sets the language displayed on the rangefinder.
NAVIGATION SATELLITES: Sets the default satellite system (Satellite Settings, page17).
ENABLE STATUS LED: Enables the status LED (Status LEDs, page2).
PASSCODE: Sets a four-digit passcode to secure your personal information (Setting Your Device Passcode,
page17).
RESET OPTIONS: Deletes data and resets settings (Resetting All Default Settings, page17).
ABOUT: Displays device, software, license, and regulatory information.
16 Customizing Your Device
Satellite Settings
You can change the satellite systems used by the rangefinder. For more information about satellite systems, go
to garmin.com/aboutGPS.
From the home screen, press , and select SETTINGS > SYSTEM > NAVIGATION SATELLITES.
GPS ONLY: Enables the GPS satellite system.
ALL SYSTEMS: Enables multiple satellite systems. Using multiple satellite systems together offers increased
performance in challenging environments and faster position acquisition than using GPS only. However,
using multiple systems can reduce battery life more quickly than using GPS only.
Setting Your Device Passcode
NOTICE
If you enter your passcode incorrectly three times, the device locks temporarily. After five incorrect attempts,
the device deletes your data and resets to the factory default settings.
You can set up a device passcode to prevent unauthorized users from using your device. Once enabled, you
must enter the passcode immediately after you turn on the device.
1 Select an option:
• During the initial setup, select YES when prompted to enable a passcode.
• Press from the home screen, and select SETTINGS > SYSTEM > PASSCODE > ENABLE PASSCODE.
2 Enter a four-digit passcode.
Changing Your Device Passcode
NOTICE
You must know your existing device passcode to change it. If you enter your passcode incorrectly three times,
the device locks temporarily. After five incorrect attempts, the device deletes your data and resets to the factory
default settings.
1 From the home screen, press .
2 Select SETTINGS > SYSTEM > PASSCODE.
3 Enter your existing four-digit passcode.
4 Select CHANGE PASSCODE.
5 Enter a new four-digit passcode.
Resetting All Default Settings
The rangefinder offers options for deleting your user data and resetting all settings to the factory default values.
NOTE: If you clear data from the rangefinder after you sync with the Garmin Explore app, the data is not deleted
from the app.
1 From the home screen, press .
2 Select SETTINGS > SYSTEM > RESET OPTIONS.
3 Select an option:
• To delete all of your recorded sessions from the rangefinder, select CLEAR ALL SESSIONS.
• To reset all settings to factory default values, select RESTORE DEFAULT SETTINGS.
• To reset all settings to factory default values and delete all user data and sessions, select FACTORY
RESET.
Opening the Quick Options Menu
The quick options menu provides quick access to additional features and settings.
1 From the home screen, press .
2 Press or to cycle between the options.
Customizing Your Device 17
Device Information
Device Care
NOTICE
Do not store the device where prolonged exposure to extreme temperatures can occur, because it can cause
permanent damage.
Avoid chemical cleaners, solvents, and insect repellents that can damage plastic components and finishes.
Secure the weather cap tightly to prevent damage to the USB port.
Cleaning the Device
NOTICE
Do not use a dry cloth to clean the lens. Use of a dry cloth may damage the lens.
Avoid chemical cleaners and solvents that can damage plastic components.
1 Wipe the outer casing and lens with a soft, non-scratch cloth dampened with water or alcohol.
2 Wipe the outer casing dry, and allow the lens to air dry.
Long-Term Storage
When you do not plan to use the device for several months, remove the batteries. Stored data is not lost when
batteries are removed.
Attaching a Lanyard
1 Insert the loop of the lanyard through the slot in the device.
2 Thread the other end of the lanyard through the loop, and pull it tight.
Specifications
Battery type Replaceable 1.5 V AAA lithium
Battery life Up to 1400 ranges (one second range followed by 10 second display)
Water rating IEC 60529 IPX7
1
Operating temperature range
From -20° to 60°C (from -4° to 140°F)
NOTICE
Do not expose the device to temperatures above 60°C(140°F).
Wireless frequencies and transmit
power
M/N: A04378
2400 - 2483,5 MHz: < 20 dBm
SAR values
M/N: A04378
0,17 W/kg trunk; 0,17 W/kg limb; 0,01 W/kg head
Viewing Device Information
You can view device information, such as the unit ID, software version, regulatory information, and license
agreement.
1 From the home screen, press .
2 Select SETTINGS > SYSTEM > ABOUT.
1
The device withstands incidental exposure to water of up to 1m for up to 30min. For more information, go to www.garmin.com/waterrating.
18 Device Information

Viewing E-label Regulatory and Compliance Information
The label for this device is provided electronically. The e-label may provide regulatory information, such as
identification numbers provided by the FCC or regional compliance markings, as well as applicable product and
licensing information.
1 From the home screen, press .
2 From the settings menu, select SYSTEM.
3 Select ABOUT.
Troubleshooting
Troubleshooting Ranging Accuracy
External factors may affect ranging accuracy, such as ambient light, weather conditions, target reflectivity, and
target size.
• Larger objects are easier to target than smaller objects. If you are having trouble ranging a smaller target,
range a larger target that is nearby instead.
• The device can target longer ranges in lower light conditions, such as on overcast days. Bright sunlight
minimizes ranging ability.
• Rain minimizes ranging ability.
• The device can target longer ranges when measuring the distance to reflective or shiny objects.
• The device can target longer ranges when the angle to the target is closer to 90 degrees. A smaller angle to
the target limits ranging ability.
Acquiring Satellite Signals
The device may need a clear view of the sky to acquire satellite signals. The time and date are set automatically
based on the GPS position.
1 Go outdoors to an open area.
The top of the device should be oriented toward the sky.
2 Wait while the device locates satellites.
It may take 30–60 seconds to locate satellite signals.
Disconnecting the USB Cable
If your device is connected to your computer as a removable drive or volume, you must safely disconnect your
device from your computer to avoid data loss. If your device is connected to your Windows
®
computer as a
portable device, it is not necessary to safely disconnect the device.
1 Complete an action:
• For Windows computers, select the Safely Remove Hardware icon in the system tray, and select your
device.
• For Apple
®
computers, select the device, and select File > Eject.
2 Disconnect the cable from your computer.
Troubleshooting 19

Product Updates
Your device automatically checks for updates when paired with a phone using Bluetooth technology. You can
manually check for updates from the system settings (System Settings, page16). On your computer, install
Garmin Express
™
(garmin.com/express).
This provides easy access to these services for Garmin devices:
• Software updates
• Map updates
NOTE: Map updates are available through Garmin Express.
• Product registration
Setting Up Garmin Express
1 Connect the device to your computer using a USBcable.
2 Go to garmin.com/express.
3 Follow the on-screen instructions.
Getting More Information
You can find more information about this product on the Garmin website.
• Go to support.garmin.com for additional manuals, articles, and software updates.
• Go to buy.garmin.com, or contact your Garmin dealer for information about optional accessories and
replacement parts.


support.garmin.com
GUID-9258AC82-CE63-4DE9-84B7-473FEB0EA745 v1January 2026