XERO
®
X1i
Owner’s Manual

© 2020 Garmin Ltd. or its subsidiaries
All rights reserved. Under the copyright laws, this manual may not be copied, in whole or in part, without the written consent of Garmin. Garmin reserves the right to change or
improve its products and to make changes in the content of this manual without obligation to notify any person or organization of such changes or improvements. Go to
www.garmin.com for current updates and supplemental information concerning the use of this product.
Garmin
®
, the Garmin logo, ANT
®
, and Xero
®
are trademarks of Garmin Ltd. or its subsidiaries, registered in the USA and other countries. Garmin Express
™
and Laser Locate
™
are
trademarks of Garmin Ltd. or its subsidiaries. These trademarks may not be used without the express permission of Garmin.
Mac
®
is a trademark of Apple Inc, registered in the U.S. and other countries. Windows
®
is a registered trademarks of Microsoft Corporation in the United States and other countries.
Other trademarks and trade names are those of their respective owners.

Table of Contents
Getting Started................................. 1
Device Overview...................................... 2
Installing AAA Batteries.......................... 3
Mounting the Scope................................ 4
Installing the Remote Trigger Cable.......5
Turning the Device On or Off.................. 6
Adjusting the Eyepiece............................6
Setup Overview........................................ 7
Adjusting Windage and Elevation.......... 7
Using the Scope............................... 8
Display Overview..................................... 9
Opening the Quick Options Menu........ 10
Adjusting Brightness......................... 10
Setting the Ranging Mode................ 10
Setting a Manual Range.................... 10
Viewing Shot Dynamics.................... 10
Adding Bolt Profiles.............................. 10
Activating or Editing Bolt Profiles.... 11
Adding Aim Points.............................11
Laser Locations..................................... 11
Sending Locations to a Device......... 11
Measuring the Size of a Target............ 12
Using Stalk Mode.................................. 12
Settings..........................................12
Display Settings.....................................12
Color Settings.................................... 12
Data Fields......................................... 13
Setting the String Odometer................. 13
Resetting the String Odometer......... 13
Pro Settings........................................... 13
Device Alignment Settings................14
Level Settings........................................ 14
Xero Location Settings......................... 14
Shot Dynamics Settings....................... 14
Calibrating the Compass...................... 15
Adjusting the Focus.............................. 15
System Settings.................................... 15
Changing the Units of Measure........ 15
Device Information......................... 15
Device Specifications........................... 15
Viewing E-label Regulatory and
Compliance Information....................... 16
Product Updates................................... 16
Updating the Software Using a
Computer........................................... 16
Connecting the Device to Your
Computer........................................... 17
Device Care............................................17
Cleaning the Device...........................17
Getting More Information..................... 17
Troubleshooting.................................... 18
The point of impact moves between
shots.................................................. 18
My device displays only fixed aim
points................................................. 18
Resetting the Device......................... 18
Index.............................................. 19
Table of Contents i


Getting Started
WARNING
Always inspect your equipment prior to shooting a crossbow. Always understand your target and what lies
beyond your target before taking a shot. Failure to account for your shooting environment could cause property
damage, injury, or death. You are responsible for understanding and complying with any applicable regulations
for shooting a crossbow.
This device has a protective housing which, when in place, prevents human access to laser radiation in excess
of the accessible emission limit (AEL) for Class 1 laser products. This device should not be modified or
operated without its housing or optics. Operating this device without a housing and optics, or operating this
device with a modified housing or optics that expose the laser source, may result in direct exposure to laser
radiation and the risk of permanent eye damage. Removal or modification of the diffuser in front of the laser
optic may result in the risk of permanent eye damage.
See the Important Safety and Product Information guide in the product box for product warnings and other
important information.
1 Install two AAA lithium batteries in the device (Installing AAA Batteries, page 3).
2 Mount the device on your crossbow (Mounting the Scope, page 4).
3 Turn on the device (Turning the Device On or Off, page 6).
4 Adjust the eyepiece focus (Adjusting the Eyepiece, page 6).
5 Follow the on-screen instructions to calibrate the device for your crossbow (Setup Overview, page 7).
Getting Started 1

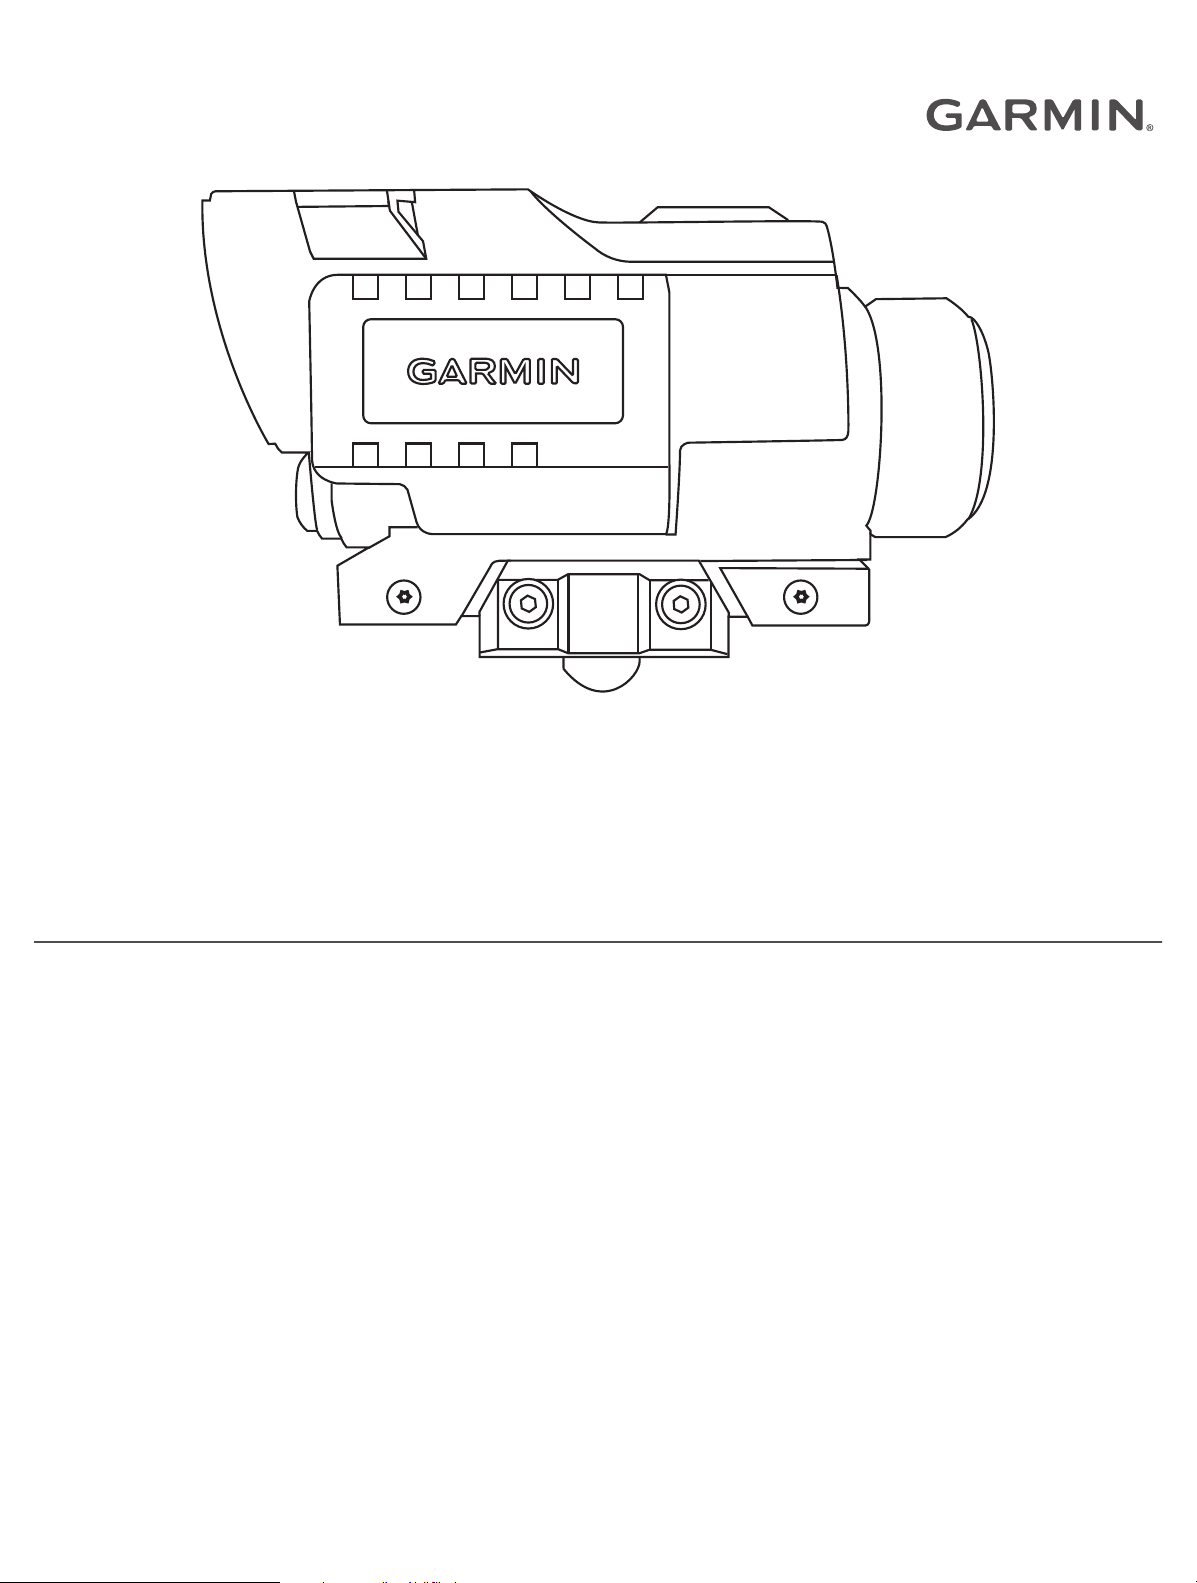
Device Overview
Ranging button
Hold to activate the laser range finder
Press to return to hunt mode
OK (PWR)
Press to turn on the device
Press to select options and configure the device
Press to decrease reticle brightness
Press to move through menu items
Hold to view the quick options menu
Press to increase reticle brightness
Press to move through menu items
Hold to view the quick options menu
Elevation mount adjustment
Turn to adjust the scope up or down by
1
/
2
MOA for each click
Windage mount adjustment
Turn to adjust the scope left or right by
1
/
2
MOA for each click
2 Getting Started

Adjustment lock knob
Loosen to make windage and elevation adjustments
Tighten to lock the adjustments
Battery cover
Remove to install batteries or access the micro-USB port
Battery cover latch
Move to release the battery cover
Remote trigger port
Connects to the remote trigger cable
Mount screws
Secures the scope to a Picatinny or Weaver rail
Laser compliance label
Contains manufacturer's identification and certification information
Installing AAA Batteries
The device operates on two AAA lithium batteries. Lithium batteries are required for this device.
1 Slide the battery cover latch toward the eyepiece.
The battery cover releases from the sight.
2 Insert two AAA lithium batteries into the device, observing polarity.
3 Replace the battery cover.
4 Verify the latch is fully in the locked position.
Getting Started 3

Mounting the Scope
The device mounts to a Picatinny or Weaver rail. The scope features a 62 mm (2.44 in.) eye relief. You should
mount the device in a position that gives you a clear view through the scope while your cheek is on the cheek
rest of the crossbow.
1 Place the device onto the rail.
TIP: You should make sure the lug on the bottom of the device is positioned between the grooves on the rail.
2 Using the included screws and washers , secure the mount clamp to the device.
3 Tighten the screws to a maximum torque specification of 2.5 N-m (22 lbf-in.).
4 Getting Started

Installing the Remote Trigger Cable
You can install a remote trigger cable to activate the range finder while your hand is near the crossbow trigger.
The remote trigger functions the same as the ranging button on the scope. If necessary, you can disconnect the
trigger cable from the trigger cable mount to cock your crossbow.
1 Connect the remote trigger cable to the remote trigger port.
2 Press the remote trigger cable into the port and rotate it clockwise until it locks into place.
3 Remove the adhesive backing from the trigger cable clip .
NOTE: The device includes two trigger cable clips for flat and curved mounting surfaces. You should select
the trigger cable clip that best fits your mounting surface.
4 Press the remote trigger cable clip onto the grip of your crossbow where you can comfortably activate it
while aiming.
Getting Started 5

NOTE: You should confirm the remote trigger cable is positioned so that it does not interfere with the
operation of the crossbow.
5 Slide the remote trigger cable into the trigger cable clip until it clicks.
6 Secure the cable to the crossbow using tape or cable ties.
TIP: If you have excess cable length, you can loop the cable or wrap it around the crossbow stock to tighten
the slack.
Turning the Device On or Off
1 To turn on the device, press and hold PWR.
2 To turn off the device, hold PWR for 3 sec.
Adjusting the Eyepiece
The device features an adjustable eyepiece. This allows you to focus the scope for your eyesight. You should
adjust the eyepiece so the image on the screen and the field of view are in focus at the same time.
Rotate the eyepiece to adjust the focus.
TIP: To obtain the nominal focus, rotate the eyepiece all the way in, and back it out one full turn.
6 Getting Started

Setup Overview
The first time you turn on your device, it walks you through using the windage and elevation adjustments on the
mount to set your first aim point. After you set the first aim point, you can add aim points for different distances
electronically. You can choose to calibrate your own aim points individually, or the scope can automatically
calibrate aim points out to 80 meters or 80 yards, based on the speed of your crossbow. You can add, delete, or
recalibrate aim points after completing the setup procedure.
If you auto-calibrate your aim points, you should validate your accuracy at 50 meters or 50 yards. It is especially
important to validate your accuracy if you enter the crossbow manufacturer's advertised speed.
Adjusting Windage and Elevation
The device mount includes a locking knob that prevents the mount from being adjusted unintentionally. You
must loosen the lock knob before making adjustments. You must tighten the lock knob before taking a shot to
prevent the mount from moving during use.
1 Using a 3.5 mm (
1
/
8
in.) hex wrench, loosen the lock knob.
2 Turn the dials to adjust windage or elevation .
3 Tighten the lock knob until it snaps over one time.
NOTE: Do not snap the lock knob more than once while locking the knob.
Getting Started 7

Using the Scope
Before you can use the scope, you must calibrate it for your crossbow and bolt.
1 Point the scope at your target.
2 Hold the ranging button until the measured range appears next to the reticle.
TIP: TARGET LOCKED appears below the reticle when range finder readings are consistently the same value.
3 Release the ranging button.
The device displays an aim point for the measured distance.
8 Using the Scope

Display Overview
Compass
Displays the direction in which you are pointing the device when you range the
target.
Aim point
Displays the aim point for the measured distance.
Aim point level
Indicates the crossbow is tilted.
Steady aim indicator
Indicates how steady you are holding the crossbow. The circle expands and
contracts with the crossbow motion while aiming.
Roll gauge
Displays the angle at which the crossbow is tilted, in degrees.
Line-of-sight distance
Displays the measured distance between the laser rangefinder and the target.
Adjusted distance
Displays the horizontal distance to the target, which is calculated using the angle
of measurement.
Angle of measurement
Displays the upward or downward angle from the rangefinder to the target.
Bubble level
Displays a digital level showing the angle at which the crossbow is tilted.
Displays the remaining battery power.
Displays the number of shots taken in the current shooting session.
Displays the impulse duration of the previous shot, in milliseconds.
Displays the roll measurement of the previous shot.
Displays the remote trigger cable connection status.
Using the Scope 9

Opening the Quick Options Menu
The quick options menu provides quick access to additional features and settings.
Hold or until the quick options menu appears.
Adjusting Brightness
You can adjust the screen brightness for your lighting conditions.
Select an option:
• To adjust the brightness while viewing the reticle, press or .
• To view the current brightness level, hold or until the quick options menu appears, and select
BRIGHTNESS.
Setting the Ranging Mode
You can adjust the ranging mode to work more effectively in your hunting environment. For the best results in
each ranging mode, you should hold the ranging button until TARGET LOCKED appears.
1 From the quick options menu, select RANGING MODE.
2 Select an option:
• To display the most recent value measured by the range finder, select RECENT. This option is ideal for
most environments.
• To display the closest range measured by the range finder, select MINIMUM. This option is useful when
the target is far away and positioned in front of a backdrop, such as a group of trees.
• To display the farthest range measured by the range finder, select MAXIMUM. This option is useful when
the target is in wooded conditions where the range finder might detect leaves or other interference.
Setting a Manual Range
You can set an aim point for a specific range manually. This can be useful if you are shooting at a known range.
You can set manual aim points only for distances closer than the maximum calibrated range.
1 From the quick options menu, select MANUAL RANGE.
The device changes to manual ranging mode.
2 Press or to enter a range.
3 Press OK.
The device displays the aim point for the selected range.
Viewing Shot Dynamics
The device records statistics about your shot dynamics. You can use this feature as a reference to help you
improve your accuracy.
From the quick options menu, select SHOT DYNAMICS.
The device displays recorded statistics from your current shooting session.
Adding Bolt Profiles
You can add bolt profiles for use with different bolt types and weights. You should set a different bolt profile for
each bolt type you use.
1 From the main menu, select PROFILE > ADD BOLT PROFILE.
2 Enter a name for the bolt profile.
TIP: You can press or to move through the menu. You can press OK to enter a letter.
3 Select to confirm the name.
4 Select YES to begin calibrating the arrow profile.
10 Using the Scope

Activating or Editing Bolt Profiles
1 From the main menu, select PROFILE.
2 Select a bolt profile.
3 Select an option:
• To activate a profile, select ACTIVATE.
• To adjust the aim points for the selected profile, select AIM POINTS.
• To change the bow speed, select BOW SPEED.
NOTE: The bow speed option appears only if you auto-calibrated aim points while creating the bolt profile.
• To validate aim points for an auto-calibrated profile, select VALIDATE.
• To edit the profile name, select EDIT NAME.
• To reset all calibration data for the current profile, select RESET PROFILE.
• To copy the profile data to a new profile, select COPY PROFILE.
• To delete the profile, select DELETE.
Adding Aim Points
You can add aim points to an existing bolt profile to calibrate it for a specific distance.
1 From the main menu, select PROFILE.
2 Select a bolt profile.
3 Select AIM POINTS > .
4 Select an option:
• To manually calibrate a new aim point, select CALIBRATED RANGE.
• To add a fixed aim point based on your calibrated ranges, select FIXED AIM POINT.
5 Follow the on-screen instructions to calibrate the aim point.
Laser Locations
While you are hunting with your device, it creates a record of the heading and ranged distance each time you
range a target. You can send this data to a compatible Garmin
®
watch or handheld device. This can be help you
to create waypoints or track game. Laser locations appear in the XERO Locations widget or app on your
compatible device. You can adjust the broadcast settings from the settings menu on your bow sight (Xero
Location Settings, page 14).
NOTE: You may need to update the software for your compatible watch or handheld device before you can use
the XERO Locations app (Product Updates, page 16).
Sending Locations to a Device
For wearable devices, before you can receive data from the scope, you must enable the Xero
®
widget. For more
information, see the owner's manual for your Garmin device.
You can manually send ranged locations to a compatible Garmin watch or handheld device.
1 From the main menu, select XERO LOCATIONS.
2 Select a ranged location.
3 Select YES.
The scope sends the selected location to your compatible Garmin device.
Using the Scope 11

Measuring the Size of a Target
Before you can use the meter stick or yardstick feature, you must enable it (Pro Settings, page 13).
You can use the meter stick or yardstick feature to measure the size of a target from a distance.
1 Range the target.
2 Tap the ranging button until the scale appears.
NOTE: If you have set fixed aim points, you must tap the button two times. If you have not set fixed aim
points, you must tap the button only once.
The device displays the scale measurement of one meter or one yard at the measured distance. You can use
the scale to estimate the size of your target.
Using Stalk Mode
Before you can use stalk mode, you must enable stalk mode (Pro Settings, page 13).
Stalk mode disables the remote trigger cable to prevent you from activating the rangefinder unintentionally.
1 Hold PWR until the prompt appears.
The device asks you if you want to enter stalk mode.
2 Select YES.
To wake the device from stalk mode, press OK. The remote trigger cable is unlocked until you reenter stalk
mode.
Settings
Display Settings
From the main menu, select > DISPLAY.
BRIGHTNESS: Shows and sets the display brightness.
COLOR: Sets options for the display color (Color Settings, page 12).
TIMEOUT: Sets the amount of time the display is active before it turns off.
NOTE: The display timeout automatically reduces to a maximum of 30 seconds while operating the device in
temperatures below 0°C (32°F).
AIM POINT SHAPE: Sets the shape of the ranged aim point.
STEADY AIM: Enables the steady aim feature on the device reticle (Display Overview, page 9).
RANGING ANGLE GAUGE: Sets the angle gauge to appear next to the reticle while ranging a target.
AIM POINT LEVEL: Sets a level indicator to appear with the measured aim point (Display Overview, page 9).
LEVEL GAUGE: Sets the level gauge to appear on the display.
BUBBLE LEVEL: Sets the bubble level to appear on the display. The bubble level provides a quick visual indicator
of how severely the crossbow is tilted. For best accuracy, you should always keep the bubble level centered
while shooting the crossbow.
COMPASS: Sets the compass to appear on the display (Display Overview, page 9).
TARGET LOCK: Sets the device to display TARGET LOCKED when range finder readings are consistently the
same value.
DATA FIELDS: Sets which indicators appear while viewing the reticle (Data Fields, page 13).
Color Settings
From the main menu, select > DISPLAY > COLOR.
AUTOMATIC DISPLAY COLOR: Sets the display and aim points to automatically change to red in low-light
conditions and green in bright conditions.
DISPLAY COLOR: Sets the primary color for the display.
AIM POINT COLOR: Sets the aim point color.
12 Settings

Data Fields
From the main menu, select > DISPLAY > DATA FIELDS.
IMPULSE DURATION: Displays the impulse duration of the previous shot, in milliseconds.
SHOT ROLL: Displays the roll measurement of the previous shot.
SHOT COUNTER: Displays the number of shots taken during the current shooting session.
REMOTE CABLE INDICATOR: Displays the remote trigger cable connection status.
Setting the String Odometer
You can use the string odometer to keep track of how many shots you have taken with your bow string. You
should reset the string odometer each time you replace the bow string.
1 From the main menu, select > STRING ODOMETER.
2 Select ENABLED.
3 Enter the maximum string shot count for your bow string.
The device keeps track of the number of shots you have taken and counts down the number of shots remaining
on your bow string.
Resetting the String Odometer
1 From the main menu, select > STRING ODOMETER > RESET.
2 Enter the maximum string shot count for the replacement bow string.
Pro Settings
From the main menu, select > PRO SETTINGS.
STALK MODE: Enables the option to enter a mode that prevents accidental key presses (Using Stalk Mode,
page 12).
AIM POINT POSITION: Displays the pixel position next to each aim point on the display.
DECIMAL PRECISION: Displays the ranged value in decimal format.
FLIGHT APEX: Displays an arc above the aim point that shows the highest estimated point the bolt reaches
during its flight.
AUTO BRIGHTNESS: Enables the device to set the display brightness automatically based on ambient lighting
conditions. This feature is enabled by default.
RANGE AND AIMPOINT ONLY MODE: Sets the device to display only the range and aim point after ranging the
target.
METER STICK: Enables a function that projects a scale measurement of one meter on the screen for the
distance measured by the range finder. This setting is available only when the unit of measure is set as
meters (Measuring the Size of a Target, page 12).
YARD STICK: Enables a function that projects a scale measurement of one yard on the screen for the distance
measured by the range finder. This setting is available only when the unit of measure is set as yards
(Measuring the Size of a Target, page 12).
DEVICE ALIGNMENT: Sets options to help you align the device on your crossbow.
SECOND AXIS CALIBRATION: Sets options to move the aim point left or right (Calibrating the Second Axis,
page 14).
Settings 13

Device Alignment Settings
You can use the device alignment settings to make advanced adjustments to your device alignment. These
settings can be useful to adjust for a tilted mounting rail.
From the main menu, select > PRO SETTINGS > DEVICE ALIGNMENT.
SHIM: Displays a vertical line on the screen to help you shim the mount. You should always verify the vertical
line aligns with a plumb reference point.
TARE LEVEL: Resets the level to the zero value.
SECOND AXIS CALIBRATION: Sets options to move the aim point left or right (Calibrating the Second Axis,
page 14).
Calibrating the Second Axis
You can use the second axis calibration setting to remove any angular offsets that may be present in your
crossbow rail to scope interface.
1 Select > PRO SETTINGS > DEVICE ALIGNMENT.
2 Verify the line on the display aligns with a plumb reference point, and press OK.
TIP: If the line does not align with a plumb reference point, you should shim and level the mount before
calibrating the second axis.
3 Select SECOND AXIS CALIBRATION.
4 Follow the on-screen instructions.
Level Settings
From the main menu, select > LEVEL.
TARE: Sets the level to zero for the current angle.
AIM POINT LEVEL: Sets the angle indicator to appear with the measured aim point (Display Overview, page 9).
LEVEL GAUGE: Sets the level gauge to appear on the display. The level gauge shows the angle at which the
crossbow is tilted, in degrees.
BUBBLE LEVEL: Sets the bubble level to appear on the display. The bubble level provides a quick visual indicator
of how severely the crossbow is tilted. For best accuracy, you should always keep the bubble level centered
while shooting the crossbow.
SENSITIVITY: Sets the level sensitivity to low, medium, or high. Low sensitivity sets the tilt indicators to appear
when the crossbow is tilted five degrees or more. Medium sensitivity sets the tilt indicators to appear when
the crossbow is tilted three degrees or more. High sensitivity sets the tilt indicators to appear when the
crossbow is tilted one degree or more.
RESET TARE: Resets the level calibration to the factory default value.
Xero Location Settings
From the main menu, select > XERO LOCATIONS.
BROADCAST MODE: Sets the security of laser location broadcasting. You can select PRIVATE to send locations
only to a paired device.
FORGET DEVICE: Removes the paired device so that you may pair with another device using private mode. You
do not need to use this feature while using the public broadcast mode.
Shot Dynamics Settings
From the main menu, select > SHOT DYNAMICS.
CLEAR SESSION SHOT ODOMETER: Clears the shot history for the current session.
CLEAR TOTAL SHOT ODOMETER: Clears the entire shot history stored on the device.
14 Settings

Calibrating the Compass
NOTE: You must calibrate the electronic compass outdoors. Do not stand near objects that influence magnetic
fields, such as cars, buildings, or overhead power lines.
Your device was already calibrated at the factory, and the device uses automatic calibration by default. If the
Laser Locate
™
feature is not working properly, for example, after moving long distances or after extreme
temperature changes, you can manually calibrate the compass.
1 From the main menu, select > CALIBRATE COMPASS.
2 Follow the on-screen instructions.
Adjusting the Focus
You should adjust the eyepiece so your field of view and the information on the display are both in focus at the
same time. You can use the focus adjustment page to help you adjust the focus.
1 From the main menu, select > FOCUS ADJUSTMENT.
2 Adjust the eyepiece until you clearly see the image on the display and in your field of view at the same time
(Adjusting the Eyepiece, page 6).
System Settings
From the main menu, select > SYSTEM.
UNITS: Sets the units of measure (Changing the Units of Measure, page 15).
LANGUAGE: Sets the device language.
RESET ALL SETTINGS: Resets all settings to factory default values.
ABOUT: Displays technical information about the device.
Changing the Units of Measure
You can customize units of measure displayed on the device.
1 Select > SYSTEM > UNITS.
2 Select measurement system.
Device Information
Device Specifications
Battery type Replaceable 1.5 V AAA lithium
Battery life
Up to 1,200 laser ranges while using a 20-second display timeout
Up to 1 year in standby mode
Operating/storage
temperature range
From -20° to 60°C (from -4° to 140°F)
NOTICE
Do not expose the device to temperatures above 60°C (140°F).
NOTE: The display timeout automatically reduces to a maximum of 30 seconds
while operating the device in temperatures below 0°C (32°F).
Water rating IEC 60529 IPX7
1
Wireless frequency/
protocol
ANT
®
2.4 GHz @ 4 dBm nominal
1
The device withstands incidental exposure to water of up to 1 m for up to 30 min. For more information, go to www.garmin.com/waterrating.
Device Information 15

Viewing E-label Regulatory and Compliance Information
The label for this device is provided electronically. The e-label may provide regulatory information, such as
identification numbers provided by the FCC or regional compliance markings, as well as applicable product and
licensing information.
1 From the settings menu, select SYSTEM.
2 Select ABOUT.
Product Updates
On your computer, install Garmin Express
™
(www.garmin.com/express).
This provides easy access to these services for Garmin devices:
• Software updates
• Product registration
Updating the Software Using a Computer
You can use Garmin Express software to download and install the latest software updates for your device.
Garmin Express is available for Windows
®
and Mac
®
computers.
1 On your computer, go to garmin.com/express.
2 Select an option:
• To install on a Windows computer, select Download for Windows.
• To install on a Mac computer, select Download for Mac.
3 Open the downloaded file, and follow the on-screen instructions to complete the installation.
4 Open the Garmin Express application.
5 Connect your Xero device to your computer using a micro-USB cable (Connecting the Device to Your
Computer, page 17).
6 From the Garmin Express application, click Add a Device.
The Garmin Express software detects your device.
7 Click Add Device.
8 Follow the on-screen instructions to register your device and add it to the Garmin Express software.
When setup is complete, the Garmin Express software searches for software updates for your device.
9 Select an option:
• To install all available updates, click Install All.
• To install a single update, click View Details, and select an update.
10 When the software update is complete, disconnect the device from your computer.
11 Reinstall the battery door.
The device installs the software update.
16 Device Information

Connecting the Device to Your Computer
1 Slide the battery cover latch toward the eyepiece.
2 Remove the battery door, and set it aside.
NOTE: Do not remove the batteries.
3 Plug the small end of the USB cable into the USB port on the device.
4 Plug the large end of the USB cable into a computer USB port.
5 If the scope is turned off, press PWR to turn on the device.
The scope enters USB mass storage mode.
Device Care
NOTICE
Avoid extreme shock and harsh treatment, because it can degrade the life of the product.
Do not use a sharp object to clean the device.
Avoid chemical cleaners, solvents, and insect repellents that can damage plastic components and finishes.
Do not store the device where prolonged exposure to extreme temperatures can occur, because it can cause
permanent damage.
Cleaning the Device
1 Dampen a soft, clean, lint-free cloth with fresh water.
2 Gently wipe the device.
Getting More Information
You can find more information about this product on the Garmin website.
• Go to support.garmin.com for additional manuals, articles, and software updates.
• Go to buy.garmin.com, or contact your Garmin dealer for information about optional accessories and
replacement parts.
Device Information 17

Troubleshooting
The point of impact moves between shots
Several factors can cause variations in the point of impact.
• Verify the mount screws are tightened to the maximum torque specification of 2.5 N-m (22 lbf-in.).
• Verify the lock knob is secure.
• Verify you are using the correct bolt profile for the bolt you are using.
• Inspect your crossbow and confirm all components are in good working condition.
My device displays only fixed aim points
When the batteries are low or do not meet the minimum power requirements for the laser rangefinder, the
device allows only fixed aim point sighting.
• Verify the battery level of the batteries you have installed.
• Verify you are using AAA lithium batteries.
Resetting the Device
If the device stops responding, you may need to reset it. This does not erase any of your saved data or settings.
1 Hold PWR for up to 30 seconds or until the device turns off.
2 Hold PWR for one second to turn on the device.
18 Device Information

Index
A
accessories 17
alignment 14
B
battery 15
installing 3
bolt profiles 10, 11
bow sight, using 8
brightness 10
C
calibrating the sight 7
cleaning the device 17
compass, calibrating 15
computer, connecting 17
D
data, transferring 17
device, cleaning 17
F
fixed pins 10
focus 6, 15
G
Garmin Express, updating software 16
I
initial setup 7
L
laser locations 11
level, settings 13, 14
locations, sending 11
M
measuring size 12
mounting the device 4, 5
P
power key 6
R
ranging mode 10
resetting the device 18
S
settings 10, 12–15
shot dynamics 10, 14
software, updating 16
specifications 15
stalk mode 12
storing data 17
string odometer 13
T
troubleshooting 15, 17, 18
U
units of measure 15
updating, software 16
W
water rating 15
Index 19

support.garmin.com
GUID-693FA105-1B57-421A-AFE2-6D258F86A8B3 v2December 2021