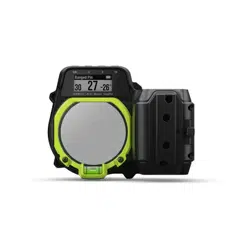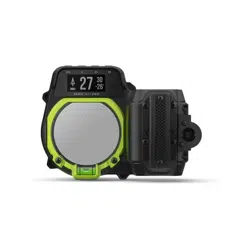

Xero
®
A1i Pro
Owner’s Manual

© 2021 Garmin Ltd. or its subsidiaries
All rights reserved. Under the copyright laws, this manual may not be copied, in whole or in part, without the written consent of Garmin. Garmin reserves the right to change or
improve its products and to make changes in the content of this manual without obligation to notify any person or organization of such changes or improvements. Go to
www.garmin.com for current updates and supplemental information concerning the use of this product.
Garmin
®
, the Garmin logo, ANT
®
, and Xero
®
are trademarks of Garmin Ltd. or its subsidiaries, registered in the USA and other countries. Garmin Express
™
is a trademark of Garmin
Ltd. or its subsidiaries. These trademarks may not be used without the express permission of Garmin.
Mac
®
is a trademark of Apple Inc, registered in the U.S. and other countries. Windows
®
is a registered trademarks of Microsoft Corporation in the United States and other countries.
Other trademarks and trade names are those of their respective owners.

Table of Contents
Getting Started................................. 1
Video Tutorials........................................ 1
Device Overview...................................... 2
Buttons................................................. 3
Installing AAA Batteries.......................... 4
Mounting the Sight on a Bow................. 5
Securing the Remote Trigger Cable....... 6
Turning the Device On or Off.................. 7
Using the Windage and Elevation
Adjustments..................................... 7
Using the RAV and RAH
Adjustments..................................... 8
Calibrating the Bow Sight................. 9
Torque Specifications............................. 9
Using the Bow Sight......................... 9
Rangefinder Measurements................. 10
Setting a Manual Range........................10
Dynamic Level....................................... 10
Enabling the Dynamic Level
Feature............................................... 11
Main Menu............................................. 11
Hunt Mode............................................. 11
Adjusting Brightness.............................11
Adding Arrow Profiles........................... 12
Managing Arrow Profiles.................. 12
Pin Calibration....................................... 12
Automatically Calibrating Pins......... 12
Calibrating Additional Ranges
Manually.............................................13
Fixed Pins.......................................... 13
Laser Locations..................................... 14
Sending Locations to a Device......... 14
Viewing Shot Dynamics........................ 14
Shot Dynamics.................................. 14
XD Mode................................................ 14
Configuring Extra Distance Mode.... 15
Using Stalk Mode.................................. 15
Device Settings.............................. 15
Pin Settings........................................... 15
Pro Settings........................................... 16
Moving the Calibrated Range
Stack.................................................. 16
Level Settings........................................ 16
Laser Location Settings........................ 16
Bow Configuration Settings..................17
Shot Dynamics Settings....................... 17
System Settings.................................... 17
Changing the Units of Measure........ 17
Calibrating the Compass.................. 17
Advanced Setup............................. 18
Adjusting the Roll Axis.......................... 18
Taring the Digital Level......................... 18
Adjusting the Bubble Level................... 19
Device Information......................... 19
Device Specifications........................... 19
Viewing E-label Regulatory and
Compliance Information....................... 19
Product Updates................................... 19
Updating the Software Using a
Computer........................................... 20
Connecting the Device to Your
Computer........................................... 21
Device Care............................................21
Cleaning the Device...........................21
Getting More Information..................... 21
Troubleshooting.................................... 22
The point of impact moves between
shots.................................................. 22
My device only displays fixed pins... 22
Tips for Consistent Ranging............. 22
Resetting the Device......................... 22
Index.............................................. 23
Table of Contents i


Getting Started
WARNING
See the Important Safety and Product Information guide in the product box for product warnings and other
important information.
Always inspect your equipment prior to shooting an arrow. Always understand your target and what lies beyond
your target before taking a shot. Failure to account for your shooting environment could cause property
damage, injury, or death. You are responsible for understanding and complying with any applicable regulations
for shooting a bow and arrow.
Always ensure that sufficient clearance exists between the arrow vanes and the sight housing. Without
adequate clearance, the arrow vanes may hit the sight housing, which could result in damage to the housing
and/or an erratic shot that may lead to personal injury or death.
This device has a protective housing which, when in place, prevents human access to laser radiation in excess
of the accessible emission limit (AEL) for Class 1 laser products. This device should not be modified or
operated without its housing or optics. Operating this device without a housing and optics, or operating this
device with a modified housing or optics that expose the laser source, may result in direct exposure to laser
radiation and the risk of permanent eye damage. Removal or modification of the diffuser in front of the laser
optic may result in the risk of permanent eye damage.
Video Tutorials
You can view video tutorials for installing and setting up your Xero bow sight at garmin.com/xerotutorials.
Getting Started 1
Device Overview
Buttons
Press to move through menus, select options, and configure the device (Buttons,
page 3)
LCD screen
Displays the target range and device settings
Optic
Displays the pins
Bubble level
Shows when the device is level
Battery door
Remove to install batteries or access the micro-USB port
Remote trigger
port
Connects to the remote trigger cable
Device label
Contains the manufacturer's identification and certification information
2 Getting Started
Laser emitter
Emits laser light for measuring the distance to a target
Laser receiver
Receives laser light for measuring the distance to a target
Buttons
• Press OK to open the main menu and select menu options.
• Press or to move through menus.
• Press or while using hunt mode to adjust the pin brightness.
• Hold or while using hunt mode to open the rangefinder menu.
• Press to return to a previous menu.
• Press to turn the device on.
• Hold to turn the device off.
Getting Started 3
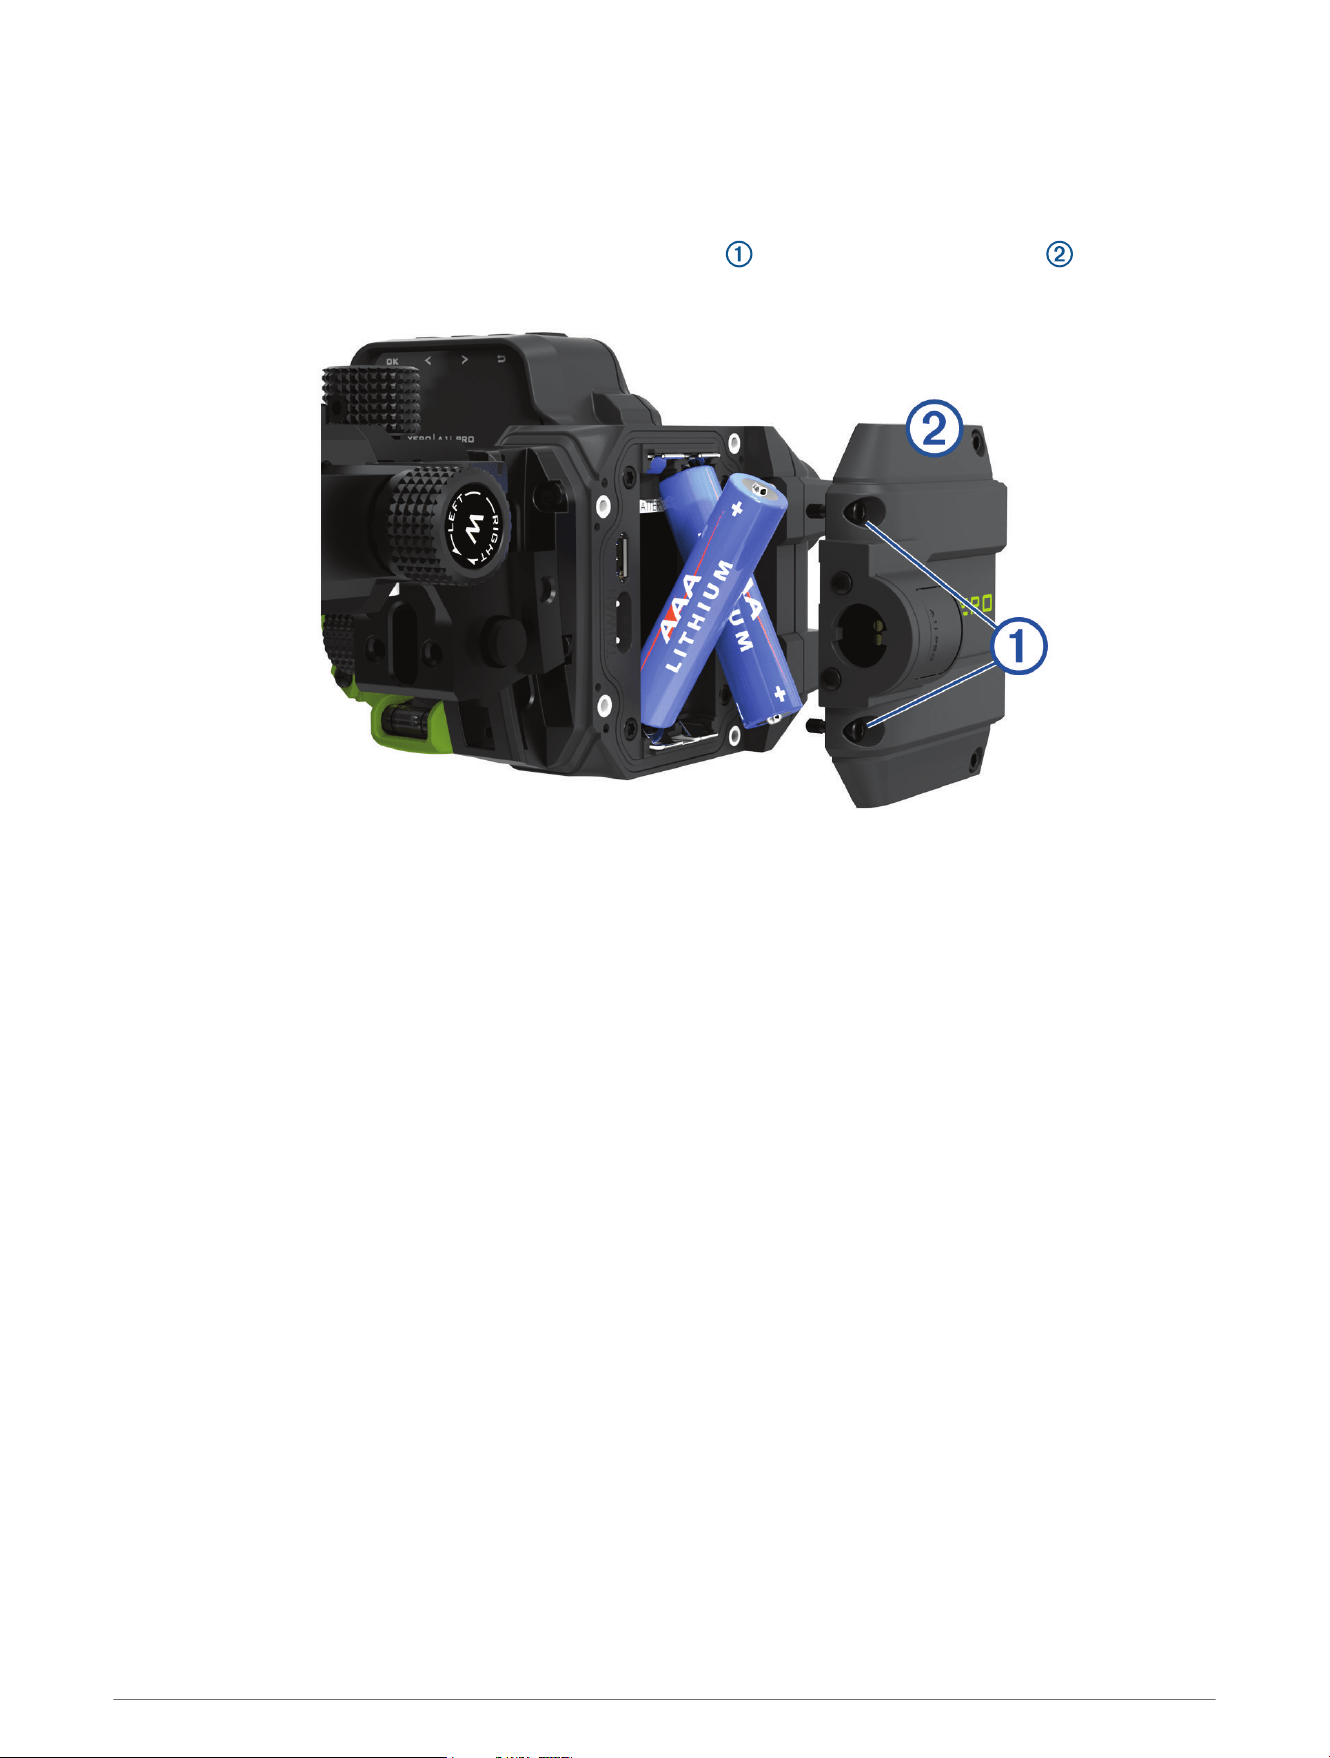
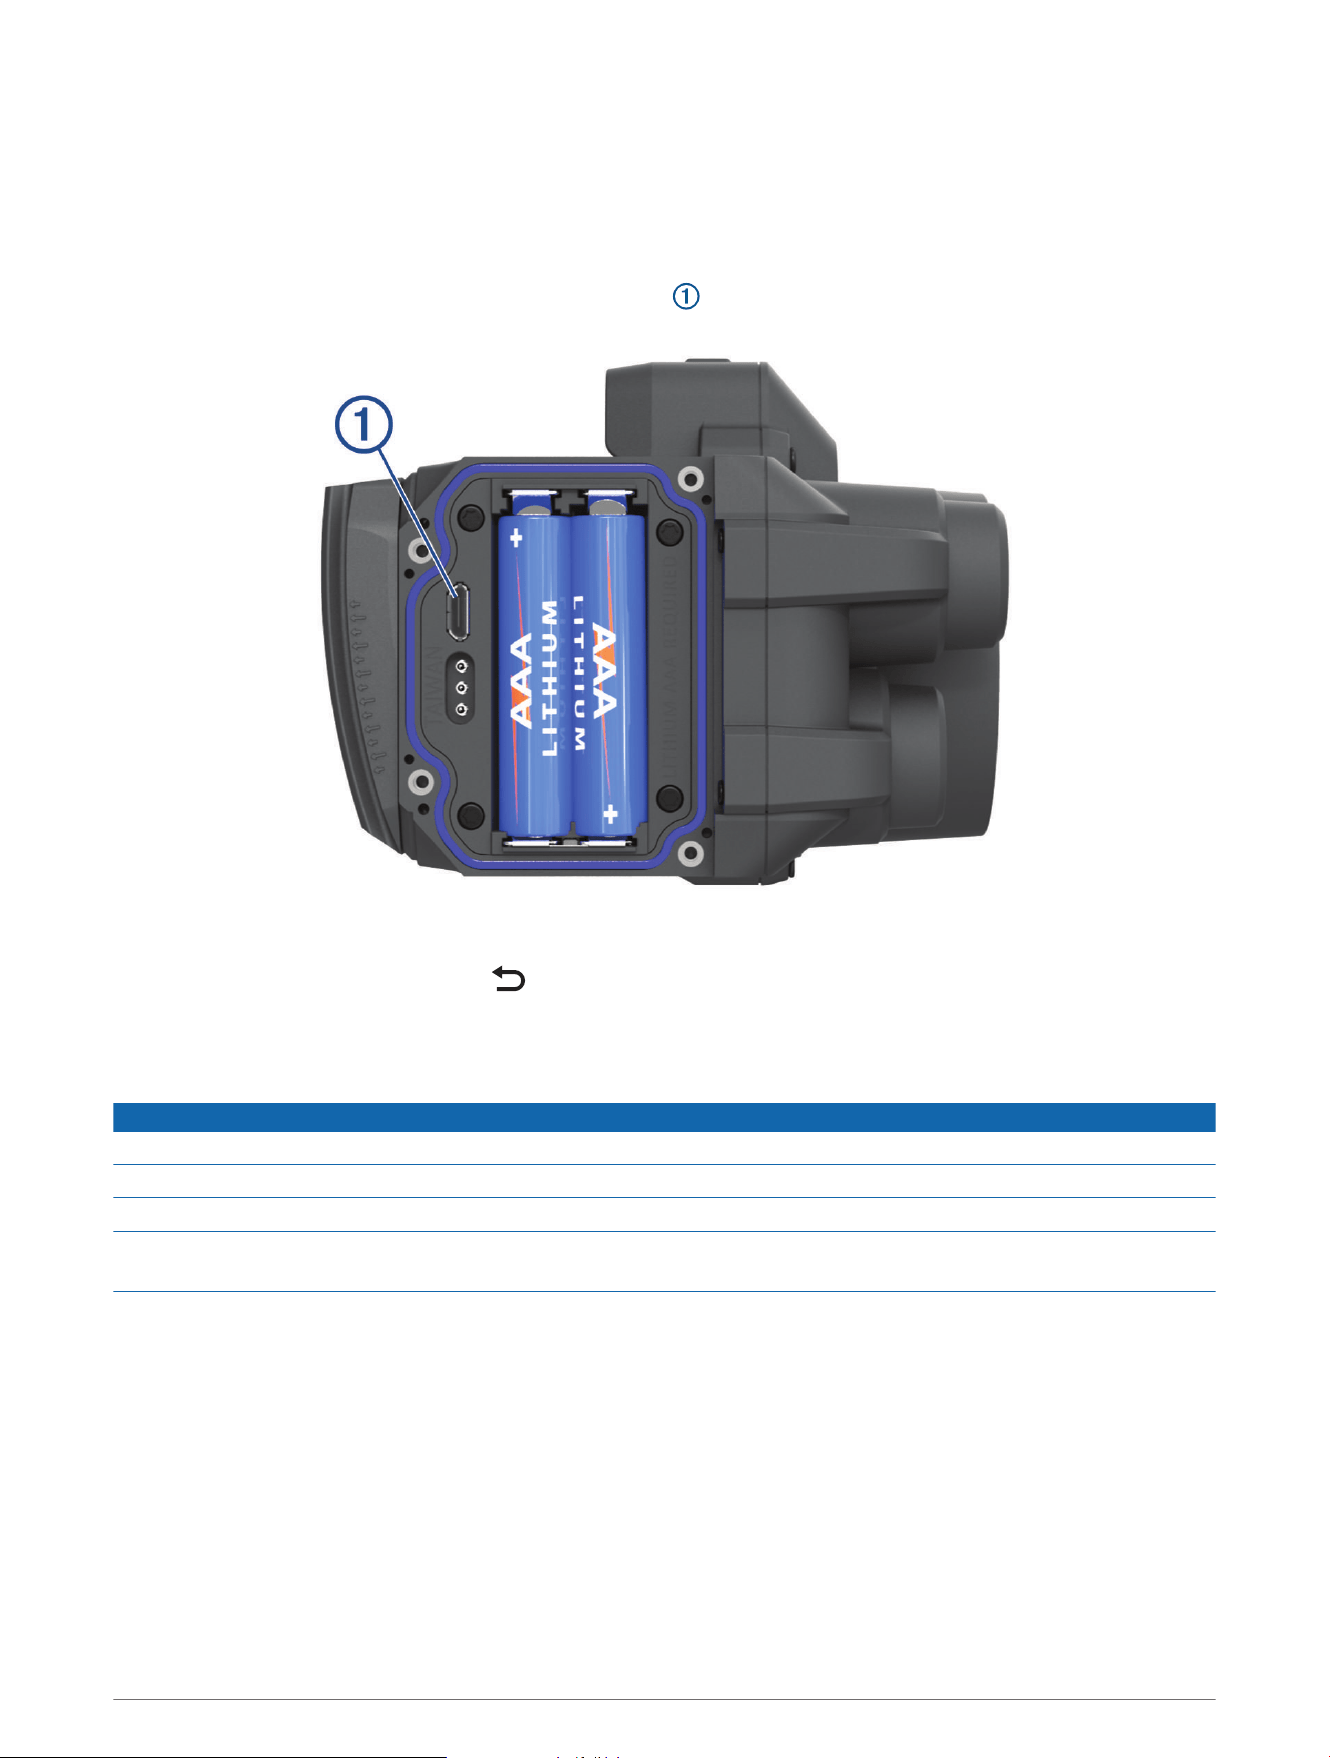
Installing AAA Batteries
The device operates on two AAA lithium batteries. Lithium batteries are required for this device. Alkaline and
NiMH batteries do not meet the power requirements for ranging functionality. When using alkaline or NiMH
batteries, the sight functionality may be reduced to standard fixed pin aiming only.
1 Using a 2 mm (
5
/
64
in.) hex wrench, loosen the four screws , and remove the battery door from the side
of the device.
2 Insert two AAA lithium batteries into the device, observing polarity.
3 Replace the battery cover, and secure the screws to a maximum torque specification of 0.5 N-m (4 lbf-in).
4 Getting Started
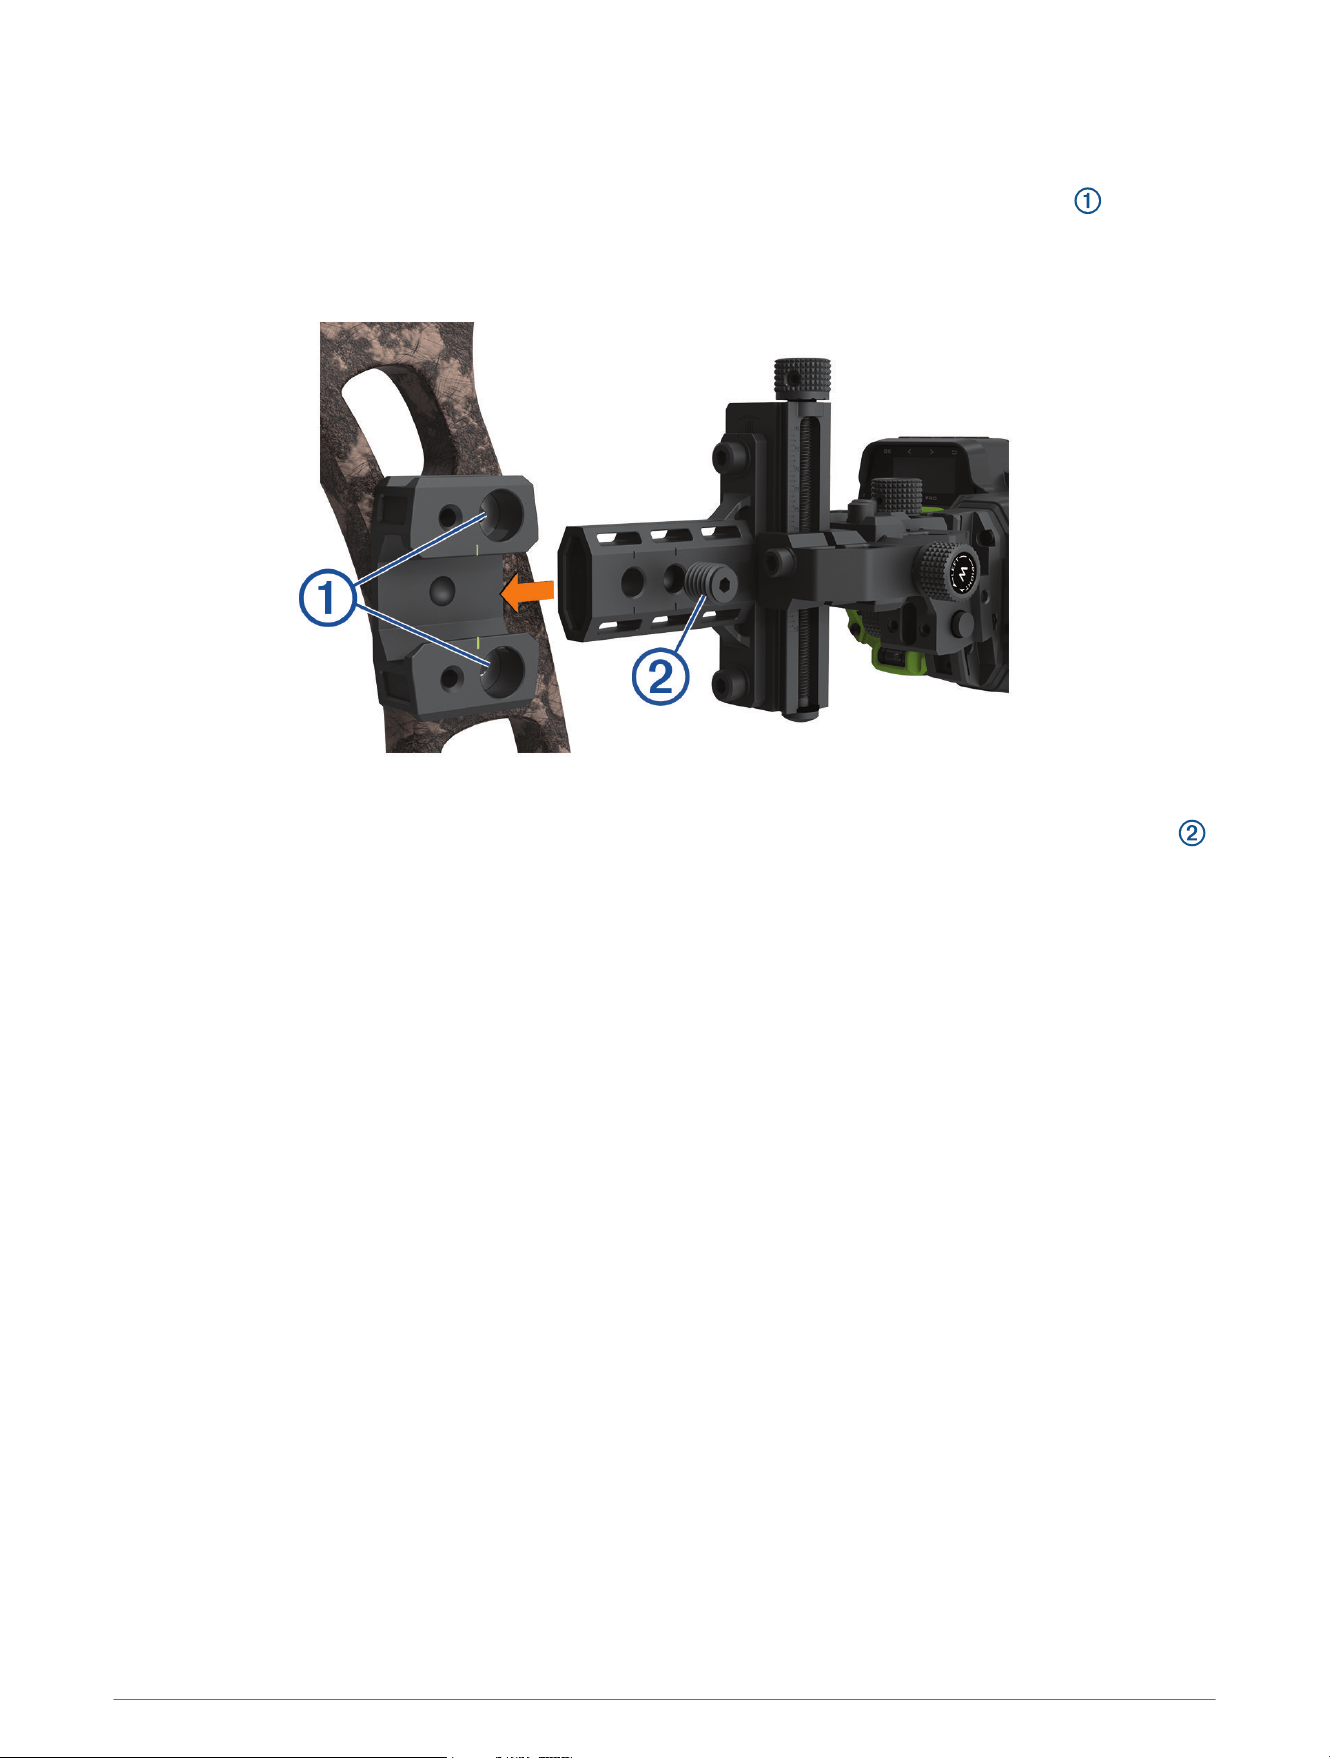
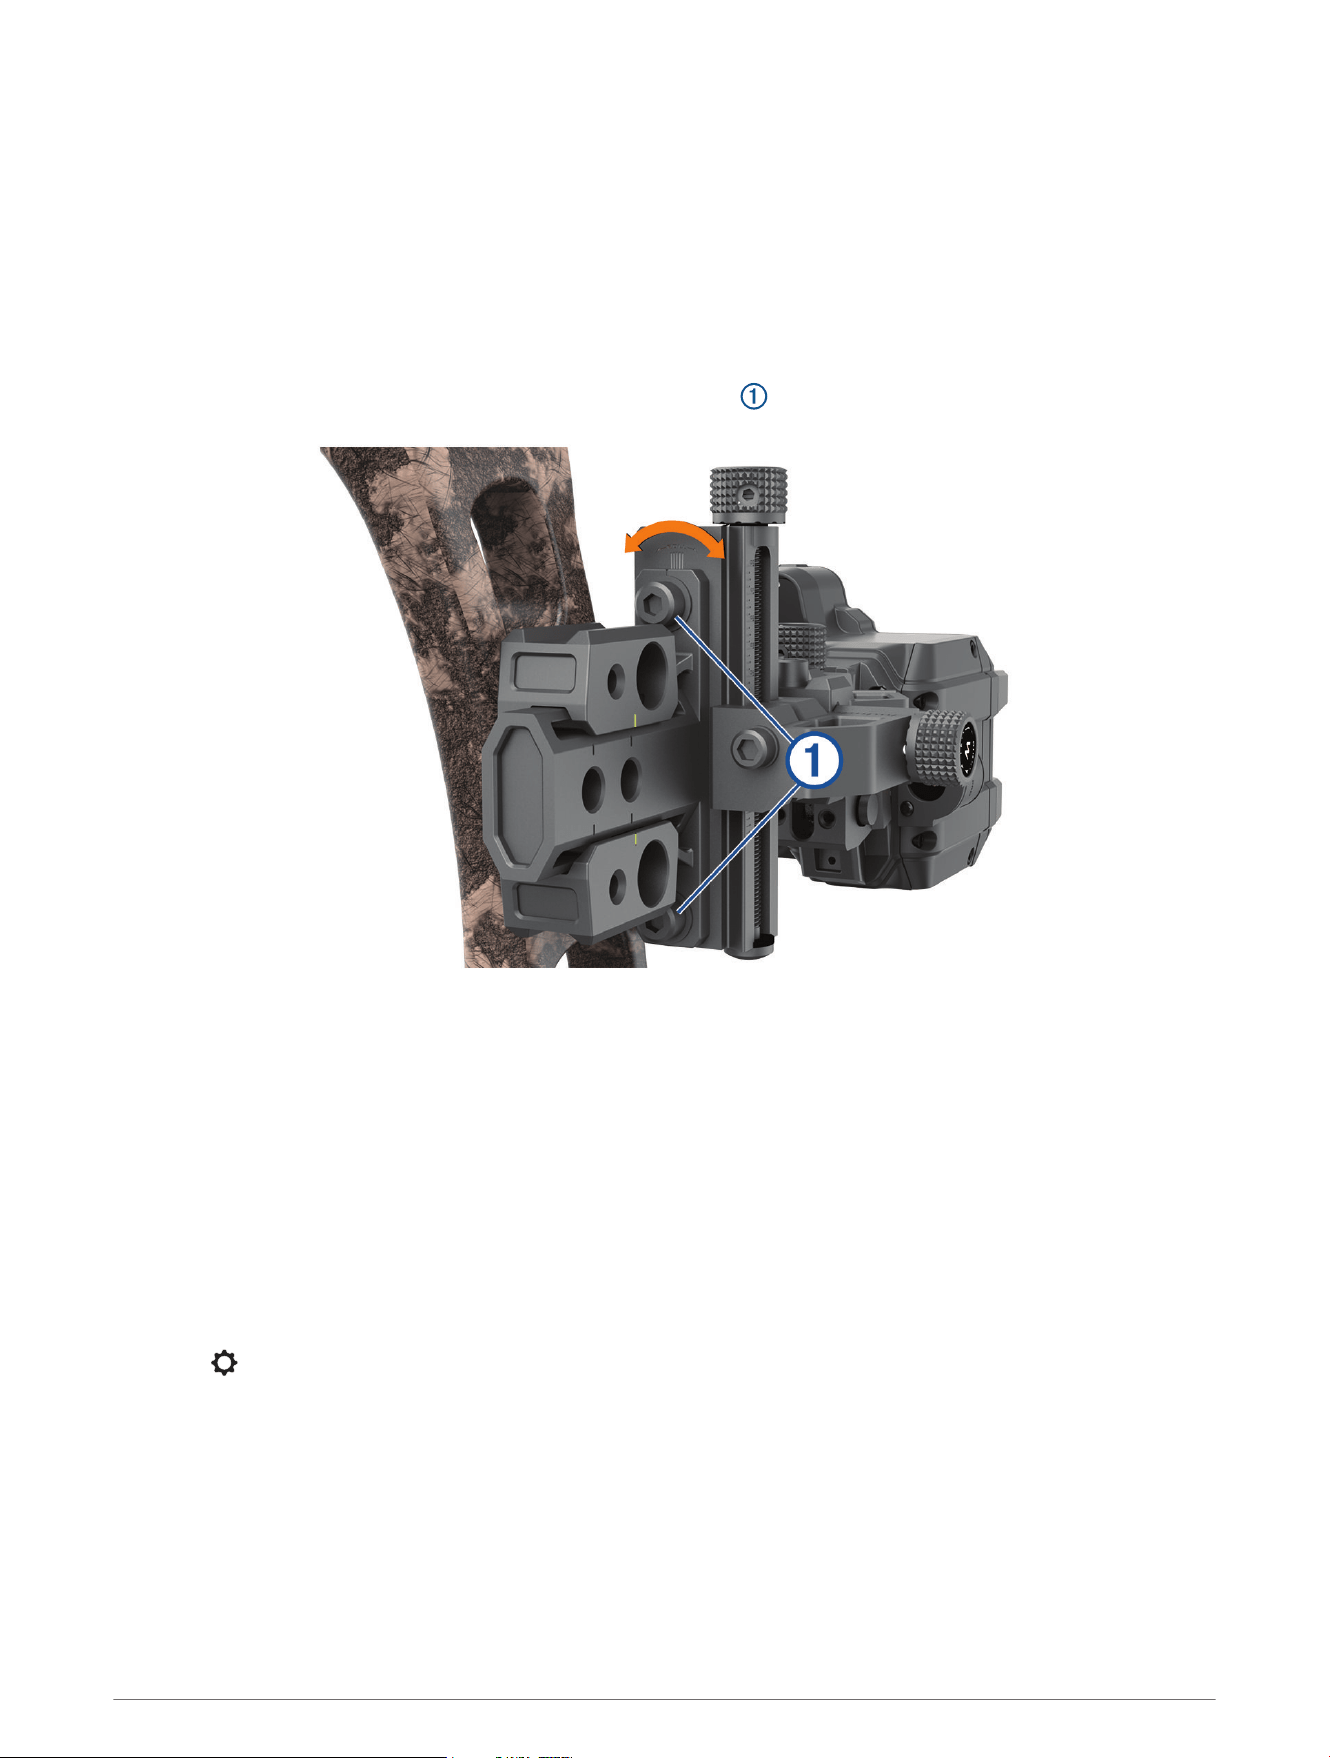
Mounting the Sight on a Bow
1 Align the large holes on the riser mount with the mounting holes on the side of your bow.
2 Using a 3 mm (
1
/
8
in.) hex wrench, secure the riser mount using the included mounting screws .
3 Tighten the mounting screws to a maximum torque specification of 6.7 N-m (60 lbf-in.).
NOTE: Do not exceed the bow manufacturer's recommended torque values.
4 Slide the bow sight dovetail into the riser mount.
5 Using a 3.5 mm (
9
/
64
in.) hex wrench, secure the bow sight to the riser mount with the included set screw .
TIP: The bow sight dovetail includes two holes for the set screw. Mount the bow sight using the hole that
functions best with your peep sight aperture. Mounting the sight closer to the bow may extend the sight
aiming range in some cases.
6 Tighten the set screw to a maximum torque specification of 3.9 N-m (35 lbf-in.).
Getting Started 5
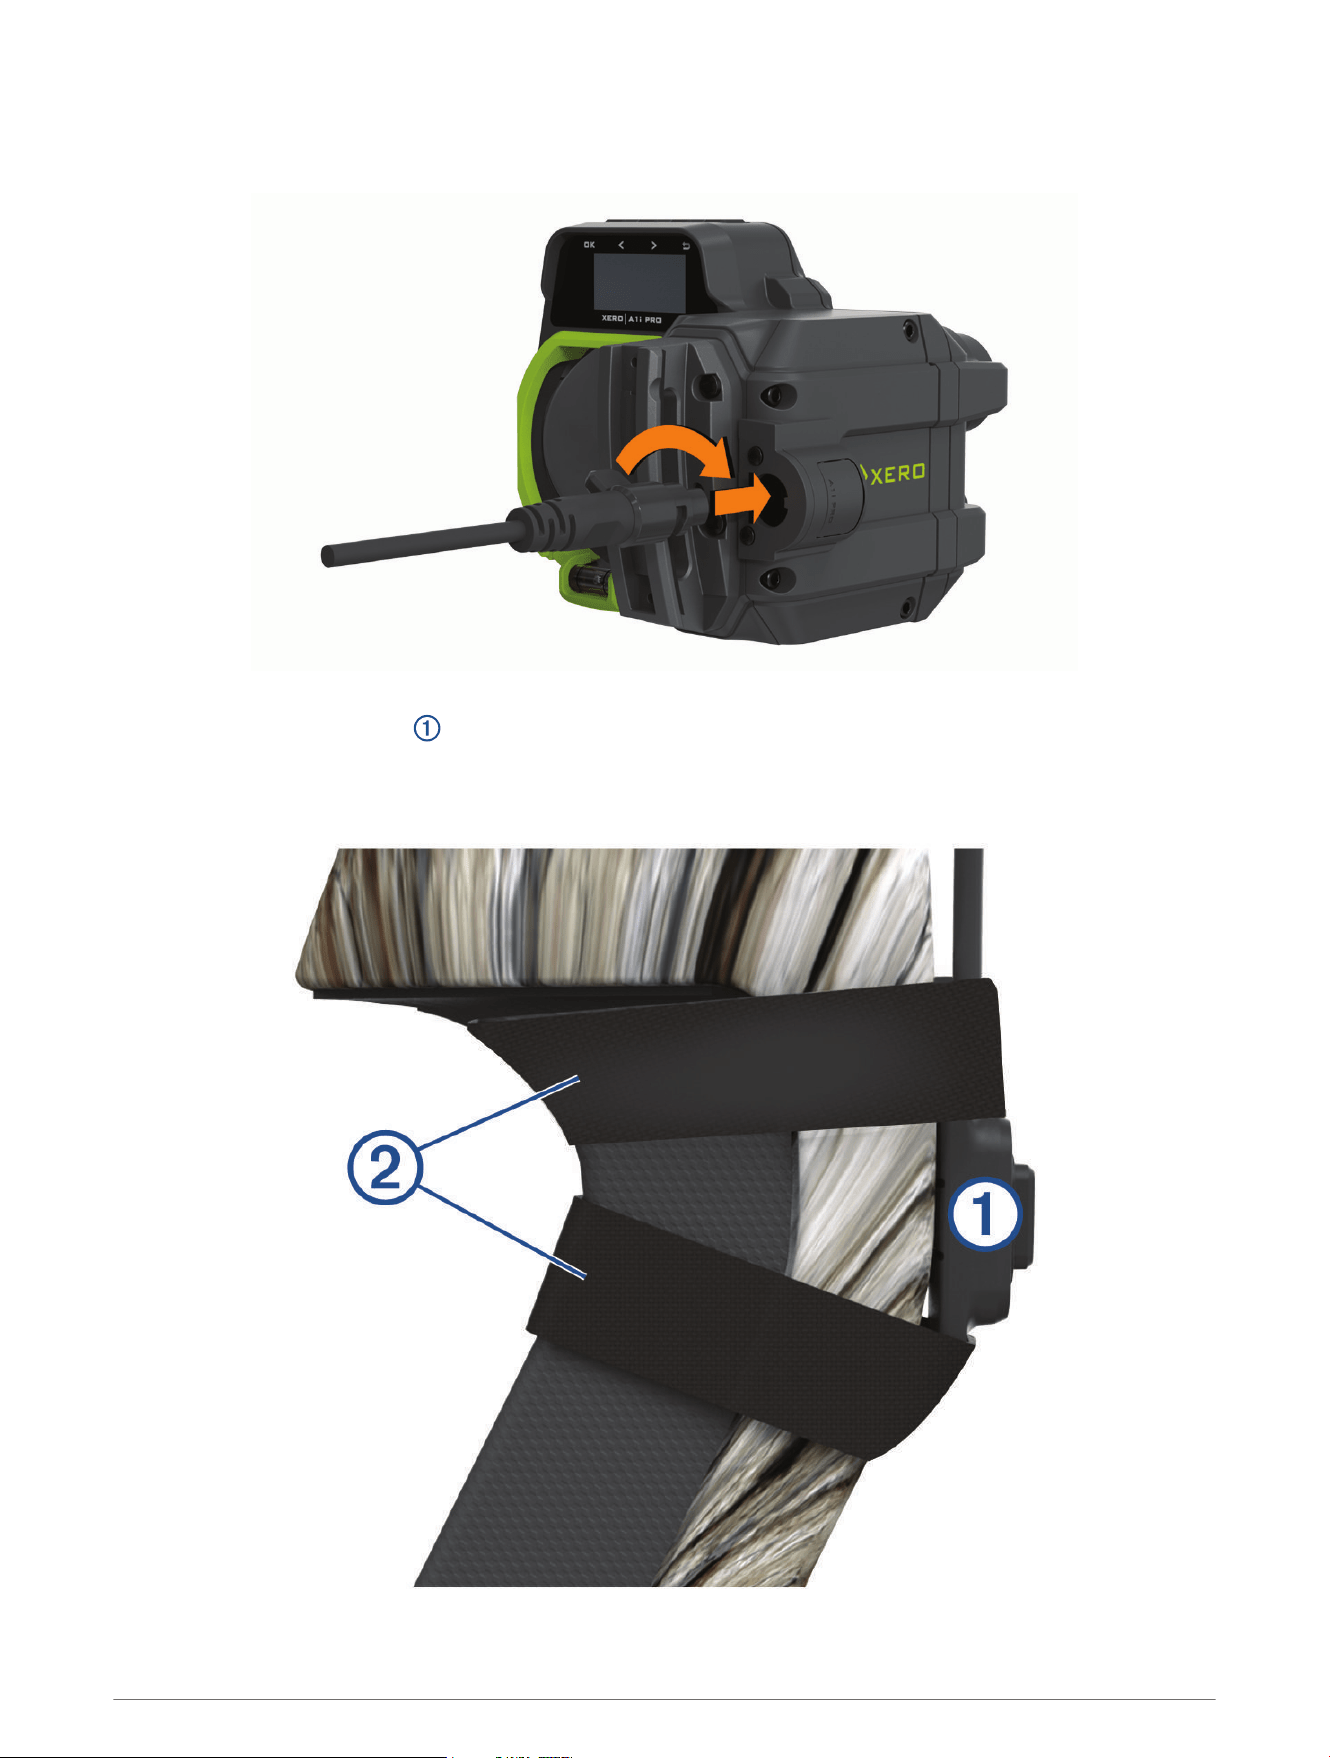
Securing the Remote Trigger Cable
1 Connect the remote trigger cable to the remote trigger port.
2 Press the remote trigger cable into the port and rotate it clockwise until it locks into place.
3 Position the remote trigger on the grip of your bow where you can comfortably activate it at full draw.
NOTE: You should confirm the trigger and the trigger cable are positioned so they do not interfere with the
operation of the bow.
6 Getting Started
4 Secure the trigger to the bow using the included tape .
TIP: You can use the extra piece of tape to secure the trigger cable to the riser.
Turning the Device On or Off
1 To turn on the device, press and hold .
2 To turn off the device, hold for 3 sec.
NOTE: The device will automatically power off after 24 hours if it does not detect any button or trigger
presses. While in standby mode, the device uses very little power.
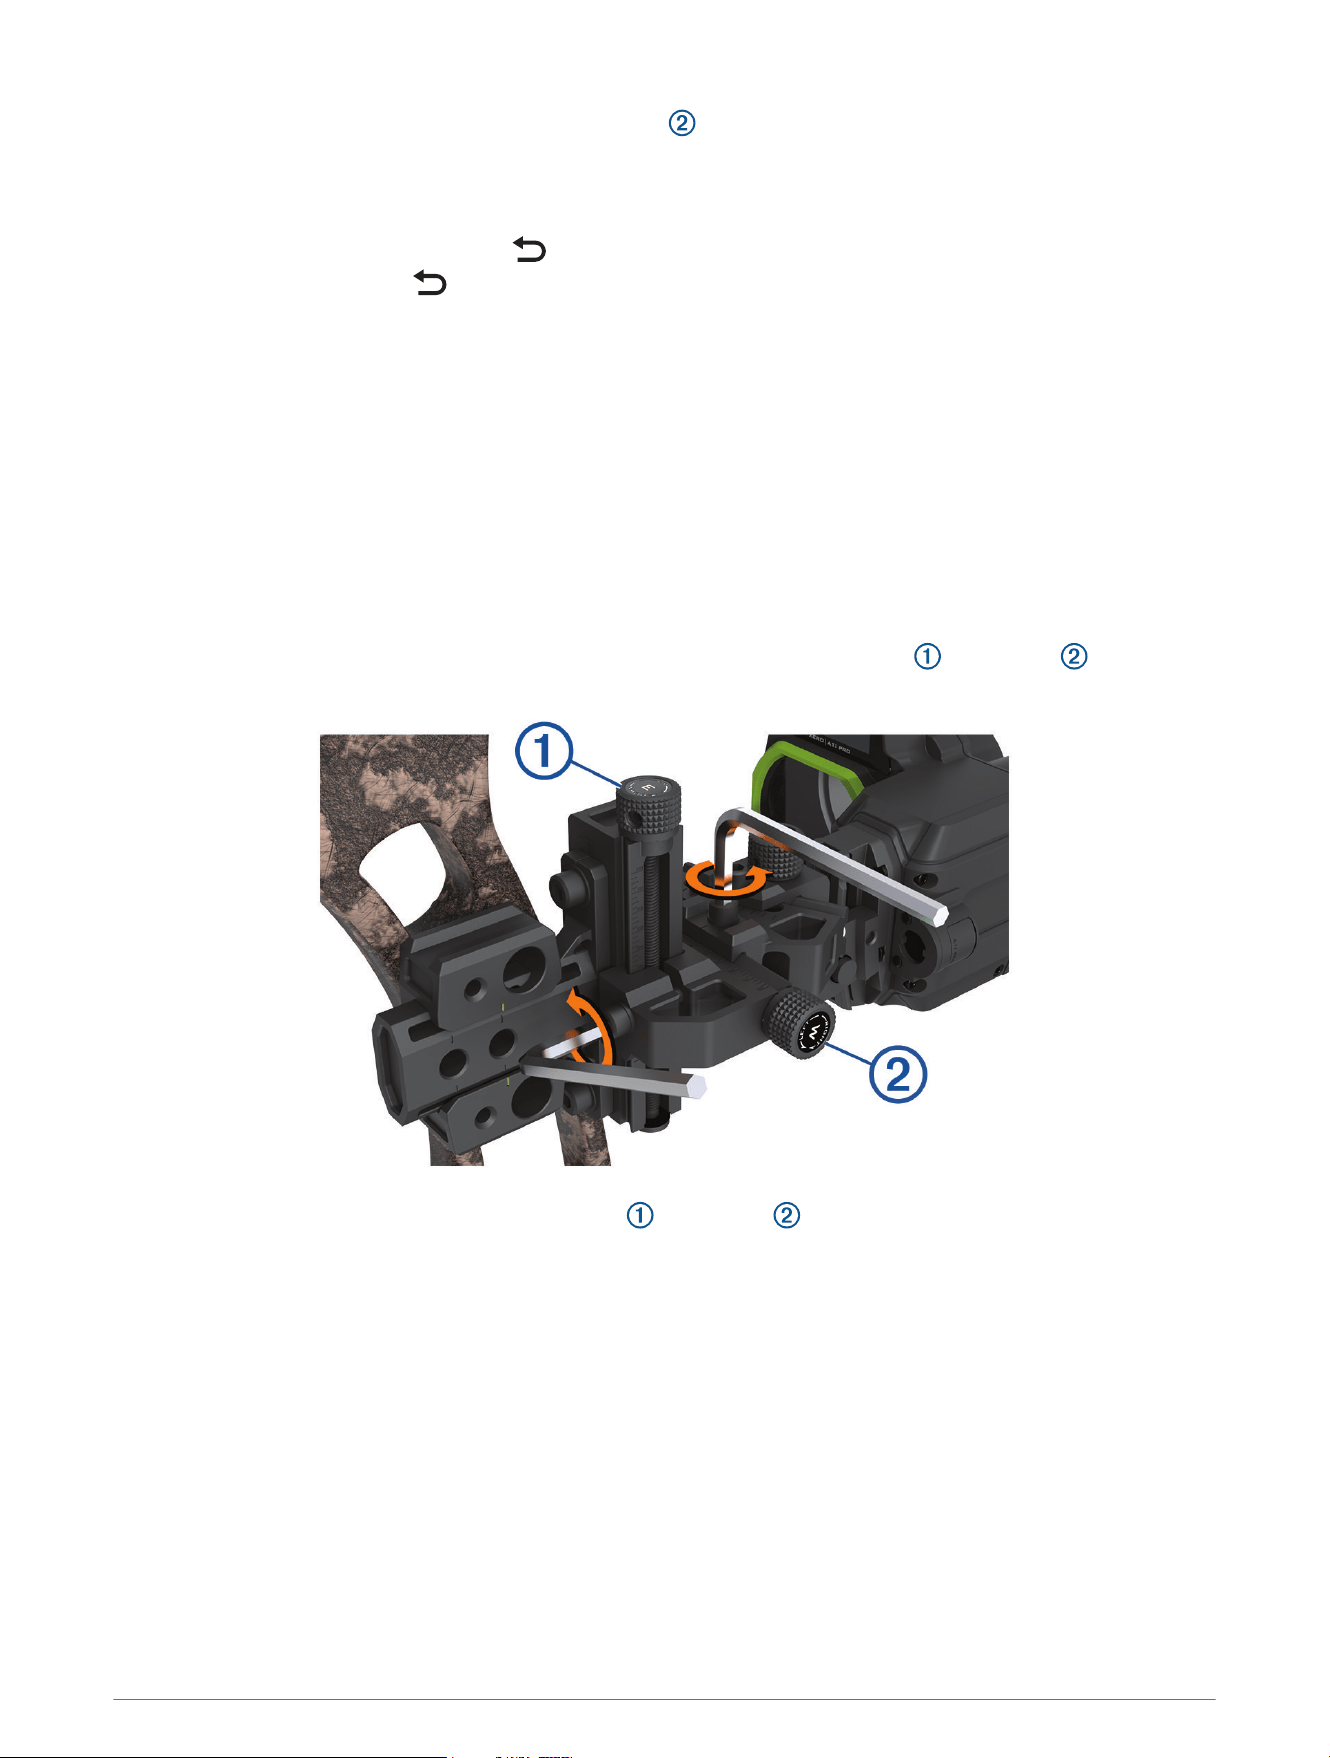
Using the Windage and Elevation Adjustments
The primary pin is a fixed point on the device optic that points along the same axis as the laser rangefinder. The
windage and elevation adjustments on the device are used to set the primary pin during initial setup (Calibrating
the Bow Sight, page 9).
NOTE: The device asks you to set the primary pin to 20 m (20 yd.) by default. You can set it to a different
distance if you prefer. If you set your primary pin for farther distances, you will have a farther maximum range,
but you will decrease the pin visibility for targets within 30 m (30 yd.). If you set your primary pin for shorter
distances, you will have greater pin visibility for close targets, but a shorter maximum range.
1 Using a 3.5 mm (
9
/
64
in.) hex wrench, loosen the lock screw near the elevation or windage adjustment
knob.
2 Turn the adjustment knob to adjust the elevation or windage .
NOTE: The adjustment knobs are marked to indicate the direction they move the sight. During calibration,
you should move the sight in the direction of the arrow's point of impact. For example, if the arrow hits low
and right, you should adjust the sight down and right.
3 Tighten the lock screw to 2.2 N-m (20 lbf-in.).
Using the Windage and Elevation Adjustments 7
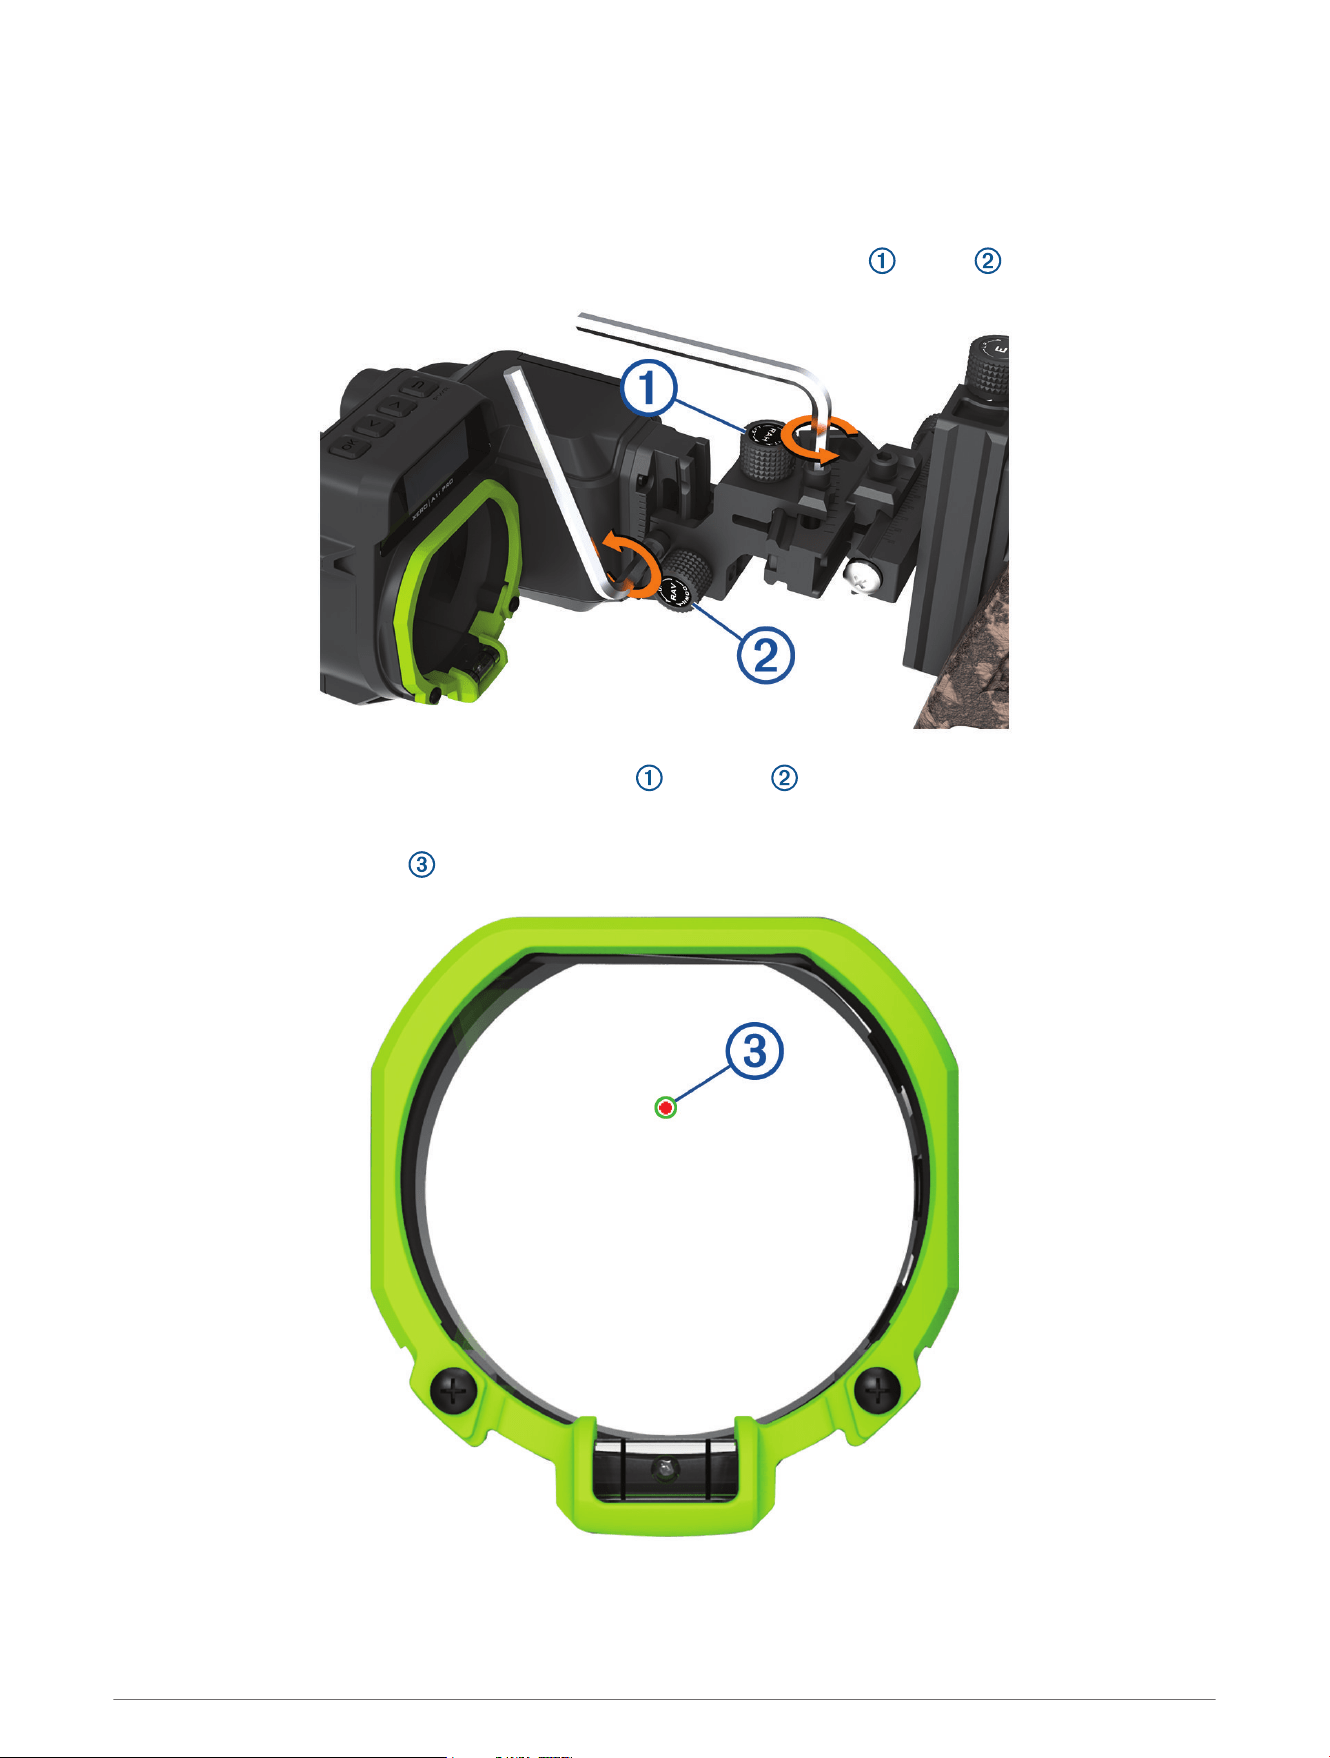
Using the RAV and RAH Adjustments
The green, circular rangefinder reticle indicates the direction the laser rangefinder is pointing. The RAV and RAH
adjustments are used to align the rangefinder reticle with the primary pin during the initial device setup
(Calibrating the Bow Sight, page 9).
1 Using a 3.5 mm (
9
/
64
in.) hex wrench, loosen the lock screw near the RAH or RAV adjustment knob.
2 Turn the adjustment knob to adjust the horizontal or vertical alignment for the reticle.
NOTE: The adjustment knobs are marked to indicate the direction they move the red primary pin in relation to
the rangefinder reticle. During calibration, you should adjust the knobs until the primary pin is centered in the
circular rangefinder reticle at full draw.
3 Tighten the lock screw to 2.2 N-m (20 lbf-in).
8 Using the RAV and RAH Adjustments

Calibrating the Bow Sight
The first time you turn on the Xero bow sight, you are prompted to go through initial setup steps. You can view
tutorial videos at garmin.com/xerotutorials.
1 Select a language.
2 Select a unit of measure.
3 Select Yes to start the pin calibration procedure.
4 Follow the on-screen instructions to set the primary pin and calibrate the pin stack.
Torque Specifications
When adjusting and tightening the adjustment knob lock screws, you should ensure the screws are always
tightened to a maximum torque specification of 2.2 N-m (20 lbf-in.). If you do not have a torque wrench, you can
tighten the screws until the screw head makes contact with the mount surface, and then tighten the screw an
additional one quarter turn.
The mounting screws securing the riser mount to your bow should always be tightened to a maximum torque
specification of 6.7 N-m (60 lbf-in.). If you do not have a torque wrench, you can tighten the screws until the
screw head makes contact with the mount surface, and then tighten the screw an additional one half turn.
The set screw securing the bow sight to the riser mount should always be tightened to a maximum torque
specification of 3.9 N-m (35 lbf-in.). If you do not have a torque wrench, you can tighten the set screw until it is
snug, and then tighten the screw an additional
1
/
8
turn.
Using the Bow Sight
Before you can use the bow sight, you must calibrate it for your bow and arrow combination (Calibrating the Bow
Sight, page 9).
1 Hold the laser rangefinder trigger.
TIP: You can range with the bow drawn or at rest.
2 Align the primary pin with the ranging reticle, and aim at the target.
3 While holding the reticle on the target, release the laser rangefinder trigger.
The bow sight displays the measured range and projects a new pin.
4 Using the new pin, aim at the target, and shoot the bow.
Calibrating the Bow Sight 9
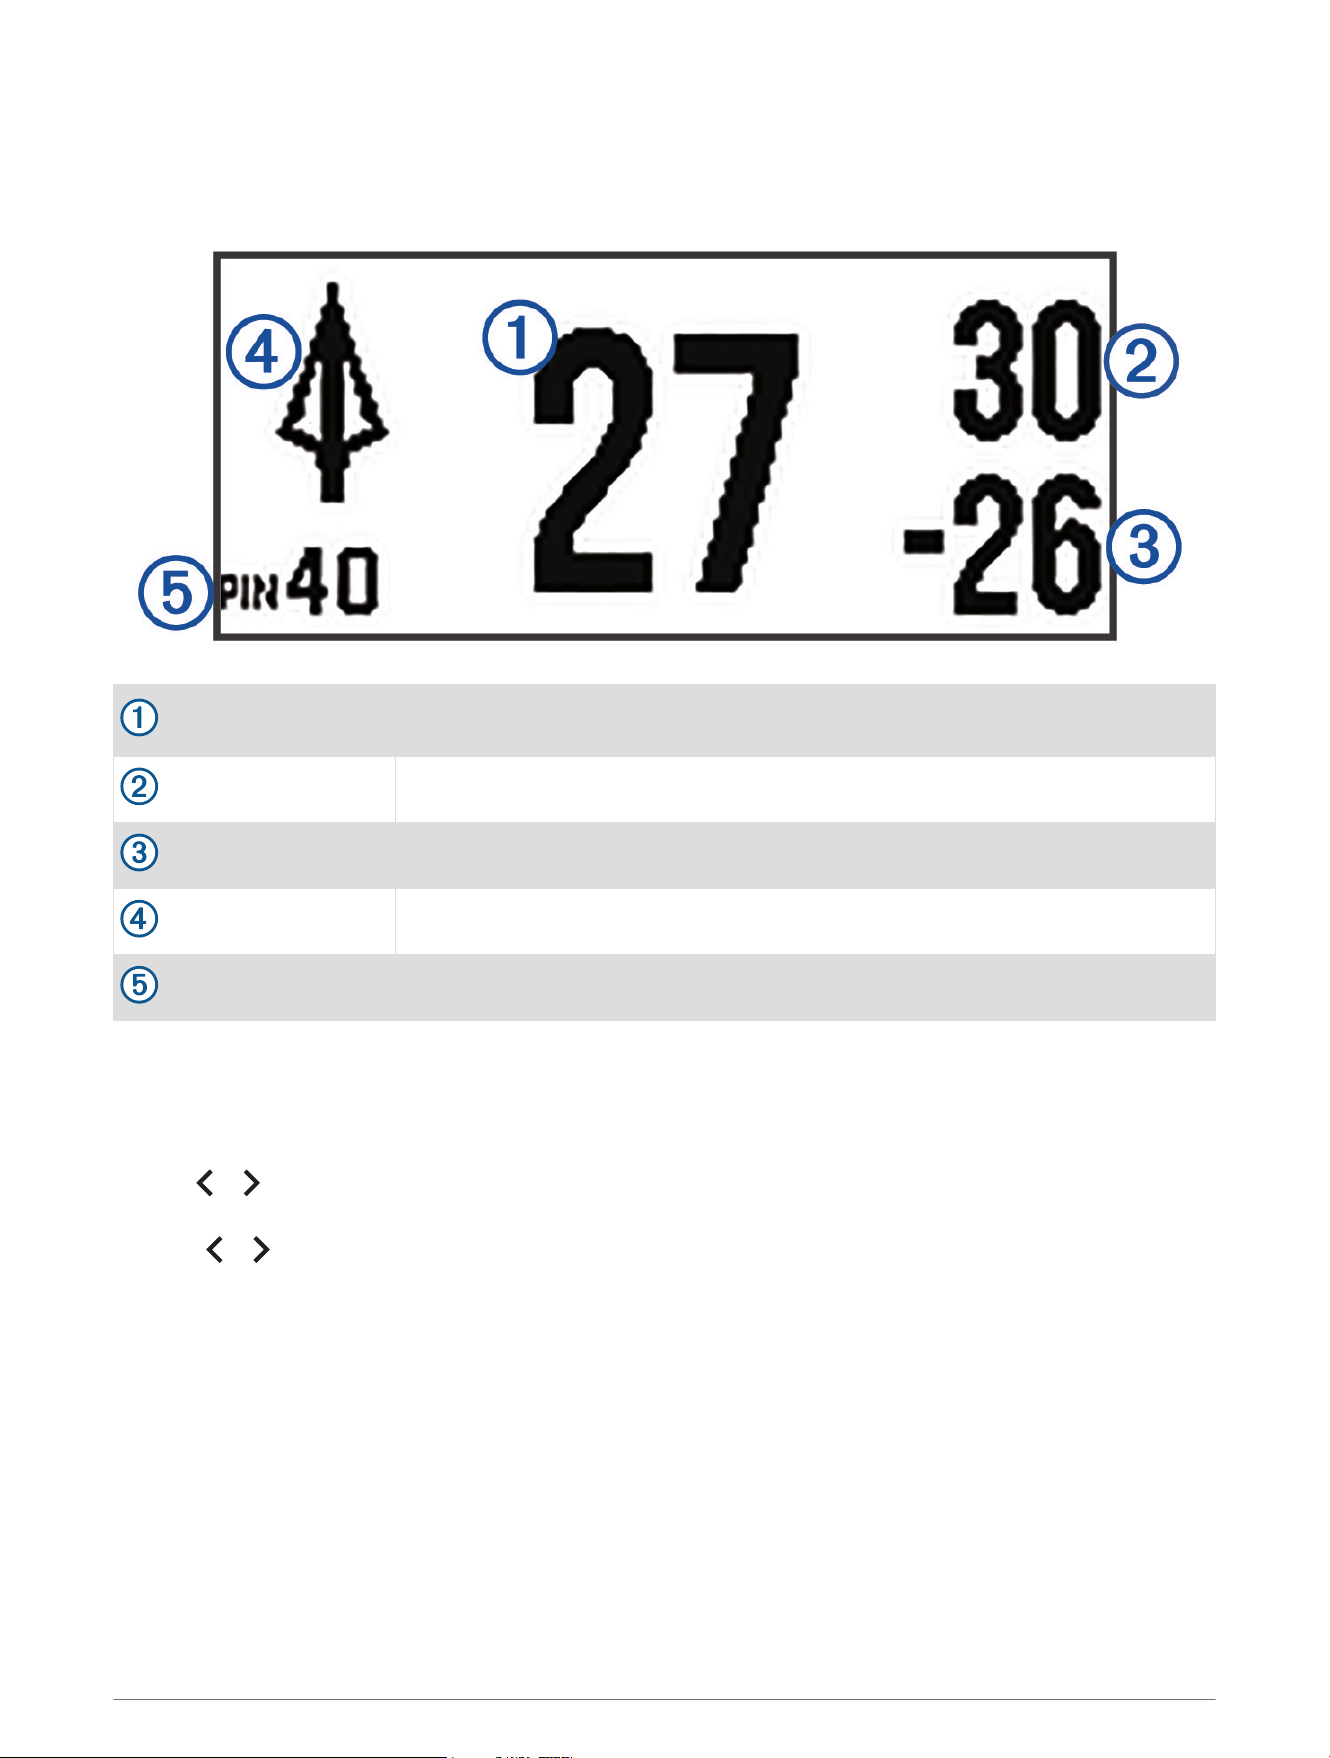
Rangefinder Measurements
When you activate the laser rangefinder, the device displays three measurements on the LCD display, along with
the arrow type and pin number. The device uses these measurements to adjust the position of the pin.
Adjusted distance
The horizontal distance to the target, which is calculated using the angle of meas
urement.
Line-of-sight distance
The measured distance between the laser rangefinder and the target.
Angle of measurement
The upward or downward angle from the rangefinder to the target.
Arrow tip
The type of arrow tip for the profile.
Pin number
The LED pin number of the ranged pin.
Setting a Manual Range
You can set a pin for a specific range manually. This can be useful if your bow sight has low battery power, or if
you plan to shoot at a specific range. You can set manual pins only for distances closer than the maximum
calibrated range.
1 Hold or while using hunt mode .
2 Select Manual Range.
3 Press or to select a range.
4 Press OK.
Dynamic Level
When enabled, the dynamic level shows when you are holding the bow level. Two indicator LEDs appear on the
device optic when the bow is canted. The top LED flashes while the bow is canted to the left. The bottom LED
flashes while the bow is canted to the right. The bow is level when the LEDs no longer appear. For longer ranges,
the sensitivity of the level increases.
10 Using the Bow Sight

Enabling the Dynamic Level Feature
1 From the main menu, select > Level > Dynamic Level.
2 Select an option:
• To display the indicator LEDs above and below the aiming pin and allow for more cant before they begin
flashing, select Inline - Standard.
• To display the indicator LEDs above and below the aiming pin and allow for less cant before they begin
flashing, select Inline - Pro.
• To display the indicator LEDs at the edge of the device optic and allow for more cant before they begin
flashing, select Offset - Standard.
• To display the indicator LEDs at the edge of the device optic and allow for less cant before they begin
flashing, select Offset - Pro.
NOTE: The dynamic level indicator LEDs do not appear while you are using fixed pins.
Main Menu
Press OK to open the main menu.
Enables hunt mode
Opens the arrow profile menu
Opens the Xero locations menu
Opens the device settings menu
Hunt Mode
Hunt mode is used for all ranging, aiming, and shooting of the bow. Hunt mode enables features to help you
make ranged shots more quickly. When hunt mode is enabled, shot locations are saved automatically using the
Xero locations feature. This can help you track game while using the bow sight with a compatible GPS device.
Adjusting Brightness
The bow sight contains an ambient light sensor to set your pin and reticle brightness automatically. You can
adjust your pin and reticle brightness preferences if you prefer a different level of brightness. You can also
adjust the pin brightness quickly by pressing or while using hunt mode.
1 From the main menu, select > Brightness.
2 Select an option:
• To adjust the pin brightness, select Pins.
• To adjust the rangefinder reticle brightness, select Reticle Brightness.
• To adjust the screen backlight brightness, select Backlight.
• To change the backlight timeout, select Backlight Timeout.
• To enable or disable the ambient light sensor, select Light Sensor.
Using the Bow Sight 11
Adding Arrow Profiles
You can add arrow profiles for use with different arrows or draw weights. You should set a different arrow
profile for each arrow type you use.
1 From the main menu, select > Add Arrow Profile.
2 Select an option:
• To create a new arrow profile, select New.
• To copy an existing arrow profile, select Copy, and select a profile.
3 Enter a name for the arrow profile.
TIP: You can press or to move through the menu. You can press OK to enter a letter.
4 Select to confirm the name.
5 If necessary, select Yes to begin calibrating the arrow profile.
Managing Arrow Profiles
1 From the main menu, select .
2 Select an arrow profile.
3 Select an option:
• To activate the profile, select Activate.
• To adjust the calibrated ranges for the profile, select Calibrated Ranges.
• To adjust the fixed pins for the profile, select Fixed Pins.
• To change the type of arrow tip for the profile, select Arrow Tip.
• To change the arrow diameter for the profile, select Arrow Diameter.
• To validate the pin stack, select Validate Stack or Validated Stack.
• To edit the profile name, select Edit Name.
• To reset all calibration data for the current profile, select Reset Profile.
• To delete the profile, select Delete.
Pin Calibration
Automatically Calibrating Pins
Using your bow configuration's draw length and chronograph speed, your Xero A1i Pro bow sight can predict the
ballistic profile of your arrow and automatically calibrate the pin stack. You can enter your sight height and grip
to sight measurements for more accurate results.
1 When prompted during setup for the arrow profile, enter the chronograph speed of your arrow.
2 Select Yes to auto-calibrate the pin stack.
3 Select your arrow diameter.
The pin stack is automatically created.
4 Follow the on-screen instructions to validate the pin stack.
NOTE: Validating the pin stack ensures you have tuned it to your arrow's true ballistic profile. The device
prompts you to validate the pin stack at 40 m (40 yd.) or farther. If you are a long distance shooter, you
should validate it at a longer range.
12 Using the Bow Sight
Validating the Pin Stack
The device prompts you to validate the pin stack after auto-calibration. If you choose to skip validation during
setup, you can validate the pin stack later through the arrow profile's settings. You can also re-validate a pin
stack that has been previously validated.
NOTE: You can also manually calibrate the ranges in your arrow profile. Manually calibrating ranges from an
auto-calibrated pin stack removes the validation option from the arrow profile and turns the profile into a
manual profile. You can recreate the original profile with auto-calibration, if necessary.
1 Select .
2 Select an arrow profile.
3 Select Validate Stack or Validated Stack.
4 Select Yes.
5 Follow the on-screen instructions to validate or re-validate the pin stack.
Calibrating Additional Ranges Manually
For manual calibration, Garmin
®
recommends calibrating a range for every 10 meters or yards. Calibrated ranges
apply only to the active arrow profile. The bow sight will not provide pins beyond the farthest calibrated range.
1 From the main menu, select .
2 Select an arrow profile.
3 Select Calibrated Ranges > Add Range.
4 Follow the on-screen instructions on your bow sight to calibrate the device for the new distance.
Fixed Pins
You can set the bow sight to use fixed pins for multiple ranges. This enables the bow sight to work like a
conventional fixed pin sight. The device automatically creates fixed pins in 10 m (10 yd.) increments for auto-
calibrated profiles. Fixed pins have a lower power requirement than the laser rangefinder, and you can use fixed
pins if your battery is too low to range. You can set fixed pins for any range between the highest and lowest
calibrated ranges.
When using hunt mode, you can press or quickly tap the ranging trigger to display fixed pins at any time.
Setting Fixed Pins
Before you can set fixed pins, you must calibrate the bow sight for your current bow and arrow combination
(Calibrating the Bow Sight, page 9).
1 From the main menu, select .
2 Select an arrow profile.
3 Select Fixed Pins > Add Pin.
4 Select a range.
5 Select a pin color.
6 If necessary, repeat steps 3 through 5 to add additional fixed pins.
Changing the Fixed Pin Color
There is a small offset between red and green pins. Most archers will not see changes in accuracy for shots
within 45 m (50 yd.). Garmin recommends choosing only one color of pin when setting fixed pins for distances
longer than 45 m (50 yd.).
1 From the main menu, select .
2 Select an arrow profile.
3 Select Fixed Pins.
4 Select a pin.
5 Select Color.
6 Select a color.
Using the Bow Sight 13
Deleting Fixed Pins
1 From the main menu, select .
2 Select an arrow profile.
3 Select Fixed Pins.
4 Select a pin.
5 Select Delete Pin.
Laser Locations
While you are hunting with your device, it creates a record of the heading and ranged distance each time you
range a target. You can send this data to a compatible Garmin watch or handheld device. This can be help you
to create waypoints or track game. Laser locations appear in the XERO Locations widget or app on your
compatible device. You can adjust the broadcast settings from the settings menu on your bow sight (Laser
Location Settings, page 16).
NOTE: You may need to update the software for your compatible watch or handheld device before you can use
the XERO Locations app (Product Updates, page 19).
Sending Locations to a Device
For wearable devices, before you can receive data from the bow sight, you must enable the Xero widget. For
more information, see the owner's manual for your Garmin device.
You can manually send ranged locations to a compatible Garmin watch or handheld device.
1 From the main menu, select .
2 Select a ranged location.
3 Select Yes.
The bow sight sends the selected location to your compatible Garmin device.
Viewing Shot Dynamics
The device records statistics about your shot dynamics. You can use this feature as a reference to help you
improve your accuracy.
1 Hold or while using hunt mode.
2 Select Shot Dynamics.
3 Press or to scroll through recorded shot statistics.
TIP: You can also enable shot dynamics notifications to appear after every shot (Shot Dynamics Settings,
page 17).
Shot Dynamics
Impulse Duration: The amount of time the bow sight detected measurable vibration from the bow after the shot.
Roll: A measurement in degrees of the bow's tilt when taking a shot.
Shots: The number of shots taken during the current shooting session.
Total Shots: The total number of shots taken.
XD Mode
WARNING
Always ensure that sufficient clearance exists between the arrow vanes and the sight housing. Without
adequate clearance, the arrow vanes may hit the sight housing, which could result in damage to the housing
and/or an erratic shot that may lead to personal injury or death.
The Extra Distance Mode (XD Mode) feature allows you to extend the bow sight's range by setting a secondary
position, called the extended position, on the elevation rail. When the XD Mode feature is enabled and you have
vane clearance under the sight housing, you can shoot longer distances. You can only range at rest while using
the extended position.
14 Using the Bow Sight

Configuring Extra Distance Mode
1 Select > Pro Settings > XD Mode.
2 Follow the on-screen instructions.
Using Stalk Mode
Before you can use stalk mode, you must enable stalk mode (Pro Settings, page 16).
Stalk mode disables the remote trigger cable to prevent you from activating the rangefinder unintentionally.
1 Hold until the prompt appears.
The device asks you if you want to enter stalk mode.
2 Select Yes.
To wake the device from stalk mode, either quickly tap the trigger five times or press any button on the bow
sight. The remote trigger cable is unlocked until you reenter stalk mode.
Device Settings
The device settings allow you to customize the device for your needs.
From the main menu, select .
Pins: Sets the appearance and timeout of the pins on your bow sight (Pin Settings, page 15).
Brightness: Allows you to adjust your pin and reticle brightness preferences (Adjusting Brightness, page 11).
Pro Settings: Allows you to configure the pro settings. (Pro Settings, page 16).
Level: Displays the angle of the bow and allows you to display a level indicator while shooting (Level Settings,
page 16).
Reticle: Allows you to turn on the rangefinder reticle and primary pin and to align them, as needed.
Laser Locations: Sets the broadcast mode for laser locations (Laser Location Settings, page 16).
Shot Dynamics: Enables or disables shot notifications and clears shot history (Shot Dynamics Settings,
page 17).
Bow Configuration: Allows you to enter the draw length, sight height, and sight length measurements for your
bow configuration (Bow Configuration Settings, page 17).
System Settings: Allows you to configure the system settings, calibrate the compass, and view regulatory and
compliance information.
Pin Settings
Pin settings allow you to customize the appearance of pins and the length of time pins are displayed on your
bow sight.
From the main menu, select > Pins.
Ranged Pin Color: Sets the color of the ranged pin.
Auto Fixed Pin Clr.: Automatically sets the color of fixed pins.
Hunt Timeout: Sets the length of time before a ranged pin disappears while using hunt mode.
Device Settings 15
Pro Settings
From the main menu, select > Pro Settings.
XD Mode: Enables a mode that allows you to extend the bow sight's range by setting an extended position on
the elevation rail (XD Mode, page 14).
Flight Apex: Displays a flashing LED above the aim point that shows the highest estimated position the arrow
reaches during its flight.
Pin Position: Displays the LED position next to each pin on the display.
Decimal Precision: Shows more precise measurements for the laser rangefinder. Measurements are rounded to
the nearest tenth of a meter or yard.
Stalk Mode: Enables the option to enter a mode that prevents accidental button presses (Using Stalk Mode,
page 15).
Move Calibrated Range Stack: Allows you to move the calibrated pins to allow more adjustment in the direction
of your choice (Moving the Calibrated Range Stack, page 16).
Competition File: Enables the device to record shot dynamics to a file stored on the device. This can be useful
to review shots taken during a tournament.
Moving the Calibrated Range Stack
You can move the calibrated pins up or down to allow more adjustment in the direction of your choice. For
example, if your primary pin is set at 20 yards, and your maximum pin is set at 70 yards, you can move the range
stack up so you can add pins for farther ranges. Alternatively, you can move the calibrated range stack down so
your pins are more centered within the device optic. You must adjust your mechanical alignment after moving
the calibrated range stack. Moving the calibrated range stack updates all arrow profile settings.
NOTE: The device stores pins that are positioned above or below the optic. These pins are still listed as
calibrated ranges, and can be moved back onto the optic at any time.
1 From the main menu, select > Pro Settings > Move Calibrated Range Stack.
2 Select Yes.
3 Press or to adjust the position of the range stack.
4 Press OK.
5 Follow the on-screen instructions to calibrate the device for the new stack position.
Level Settings
From the main menu, select > Level.
Dynamic Level: Sets level indicators to appear while aiming (Dynamic Level, page 10).
Indicator Color: Sets the color of the level indicator LEDs
View Gauge: Displays the angle of the bow. You can use this option to adjust the position of the bubble level.
Set Level to Zero: Sets the electronic level to zero. You can use this option if you have mechanically leveled your
bow but the digital level does not read zero.
Laser Location Settings
From the main menu, select > Laser Locations.
Broadcast Mode: Sets the security of laser location broadcasting. You can select Private to send locations only
to a paired device.
Forget Device: Removes the paired device so that you may pair with another device using private mode. You do
not need to use this feature while using the public broadcast mode.
16 Device Settings
Bow Configuration Settings
For more accurate results while using your bow sight, you can enter measurements for your bow configuration.
From the main menu, select > Bow Configuration.
Draw Length: Sets the draw length for your bow.
Sight Height: Sets the distance between the bottom of the bow sight and the top of a nocked arrow.
Grip to Sight: Sets the distance between the front of the green sight ring and the throat of the grip.
Shot Dynamics Settings
From the main menu, select > Shot Dynamics.
Shot Notifications: Enables or disables notifications after each shot.
Clear Session Shot Odometer: Clears the shot history for the current session.
Clear Total Shot Odometer: Clears the entire shot history stored on the device.
System Settings
From the main menu, select > System Settings.
Display Color: Sets the background color for the display to black or white.
Language: Sets the device language.
Units: Sets the units of measurement used by the device (Changing the Units of Measure, page 17).
Calibrate Compass: Allows you to calibrate the compass if you experience irregular compass behavior. For
example, after moving long distances or after extreme temperature changes (Calibrating the Compass,
page 17).
Reset All Settings: Resets all settings to factory default values.
About: Displays regulatory and compliance information.
Changing the Units of Measure
You can customize units of measure displayed on the device.
1 Select > System Settings > Units.
2 Select measurement system.
Calibrating the Compass
NOTE: You must calibrate the electronic compass outdoors. Do not stand near objects that influence magnetic
fields, such as cars, buildings, or overhead power lines.
Your device was already calibrated at the factory, and the device uses automatic calibration by default. If the
Xero locations feature is not working properly, for example, after moving long distances or after extreme
temperature changes, you can manually calibrate the compass.
1 From the main menu, select > Calibrate Compass.
2 Follow the on-screen instructions.
Device Settings 17
Advanced Setup
Adjusting the Roll Axis
For best results, you should adjust the roll axis on your bow sight after mounting it to your bow.
1 Using a bow vice, hold the bow in place vertically.
2 Attach a string level to the bow string.
3 Adjust the bow vice until the bow string is plumb.
4 Attach a torpedo level to the elevation block of your Xero A1i Pro bow sight.
5 Using a 3.5 mm (
9
/
64
in.) hex wrench, loosen the two screws at the back of the bow sight.
6 Adjust the roll axis until the torpedo level matches the string level.
7 Tighten the screws to 2.2 N-m (20 lbf-in).
8 If necessary, tare the bow sight's digital level (Taring the Digital Level, page 18).
9 If necessary, adjust the bow sight's bubble level (Adjusting the Bubble Level, page 19).
10 Remove the string and torpedo levels.
It is possible for your bow's sight plane to shift from vertical at rest to canted at full draw due to riser flex. If this
occurs, repeat this process with the bow safely at full draw using a draw board.
Taring the Digital Level
After you have mounted your bow sight to your bow, the digital level should display 0 when the bow is level. If it
does not display 0, you may need to tare the digital level.
1 Select > Level > Set Level to Zero.
2 Hold the bow level.
3 Press OK.
4 If necessary, adjust the bubble level so it is centered when the digital level reads 0 (Adjusting the Bubble
Level, page 19).
18 Advanced Setup
Adjusting the Bubble Level
The bow sight contains a built-in digital level and a clearly visible bubble level. If the digital level and the bubble
level do not match, you can adjust the position of the bubble level.
1 Select > Level > View Gauge.
2 Hold the bow sight level so the display shows 0.
3 Loosen the two screws located on each side of the bubble level by one quarter turn.
4 Adjust the bubble level until the bubble is centered and the digital display also reads 0.
5 Tighten the two screws.
Device Information
Device Specifications
Battery type Replaceable 1.5 V AAA lithium
Battery life
Up to 25,000 laser ranges
Up to 1 year in standby mode
Operating temperature range
From -20° to 60°C (from -4° to 140°F)
NOTICE
Do not expose the device to temperatures above 60°C (140°F).
Storage temperature range From -20° to 60°C (from -4° to 140°F)
Water rating IEC 60529 IPX7
1
Wireless frequency/protocol ANT
®
2.4 GHz @ 4 dBm maximum
Viewing E-label Regulatory and Compliance Information
The label for this device is provided electronically. The e-label may provide regulatory information, such as
identification numbers provided by the FCC or regional compliance markings, as well as applicable product and
licensing information.
1 Press OK to open the menu.
2 Select > System Settings.
3 Select About.
Product Updates
On your computer, install Garmin Express
™
(www.garmin.com/express).
This provides easy access to these services for Garmin devices:
• Software updates
• Product registration
1
The device withstands incidental exposure to water of up to 1 m for up to 30 min. For more information, go to www.garmin.com/waterrating.
Device Information 19

Updating the Software Using a Computer
You can use Garmin Express software to download and install the latest software updates for your device.
Garmin Express is available for Windows
®
and Mac
®
computers.
1 On your computer, go to garmin.com/express.
2 Select an option:
• To install on a Windows computer, select Download for Windows.
• To install on a Mac computer, select Download for Mac.
3 Open the downloaded file, and follow the on-screen instructions to complete the installation.
4 Open the Garmin Express application.
5 Connect your Xero device to your computer using a micro-USB cable (Connecting the Device to Your
Computer, page 21).
6 From the Garmin Express application, click Add a Device.
The Garmin Express software detects your device.
7 Click Add Device.
8 Follow the on-screen instructions to register your device and add it to the Garmin Express software.
When setup is complete, the Garmin Express software searches for software updates for your device.
9 Select an option:
• To install all available updates, click Install All.
• To install a single update, click View Details, and select an update.
10 When the software update is complete, disconnect the device from your computer.
11 Reinstall the battery door.
The device installs the software update.
20 Device Information
Connecting the Device to Your Computer
Before you can connect the device to your computer, you may need to remove optional mount accessories.
1 Using a 5/64 inch hex wrench, loosen the four screws securing the battery door.
2 Remove the battery door, and set it aside.
NOTE: Do not remove the batteries.
3 Plug the small end of the USB cable into the USB port on the device.
4 Plug the large end of the USB cable into a computer USB port.
5 If the bow sight is turned off, press to turn on the device.
The bow sight enters USB mass storage mode.
Device Care
NOTICE
Avoid extreme shock and harsh treatment, because it can degrade the life of the product.
Do not use a sharp object to clean the device.
Avoid chemical cleaners, solvents, and insect repellents that can damage plastic components and finishes.
Do not store the device where prolonged exposure to extreme temperatures can occur, because it can cause
permanent damage.
Cleaning the Device
1 Dampen a soft, clean, lint-free cloth with fresh water.
2 Gently wipe the device.
Getting More Information
You can find more information about this product on the Garmin website.
• Go to support.garmin.com.
• Go to www.garmin.com/outdoor.
• Go to http://buy.garmin.com, or contact your Garmin dealer for information about optional accessories and
replacement parts.
Device Information 21

Troubleshooting
The point of impact moves between shots
There are several factors that can cause variations in the point of impact.
• Verify the screws that connect the riser mount to the riser are tightened to the maximum torque specification
of 6.7 N-m (60 lbf-in) and the mount is securely attached to the bow.
NOTE: Do not exceed the bow manufacturer's recommended torque values.
• Verify each adjustment knob lock screw on the mount is tightened to the maximum torque specification of
2.2 N-m (20 lbf-in).
• Verify you are using the correct arrow profile for the type of arrow in use.
• Range your shots consistently at full draw or at rest.
• Inspect your bow and confirm all of its components are in good working condition.
• Always use consistent form when shooting a bow. Variations in stance, grip pressure, and peep sight
placement can affect accuracy.
My device only displays fixed pins
When the batteries are low or do not meet the minimum power requirements for the laser rangefinder, the
device allows only fixed pin sighting.
• Verify the battery level of the batteries you have installed.
• Verify you are using AAA lithium batteries.
Tips for Consistent Ranging
If you are a target shooter, consistent ranging can help to increase your accuracy.
• Use the rangefinder consistently while you are using the same form (at full draw or at rest).
• Enable decimal precision (Pro Settings, page 16).
• Verify you are aiming the reticle at the target when you release the ranging trigger.
Resetting the Device
If the device stops responding, you may need to reset it. This does not erase any of your saved data or settings.
1 Hold for up to 30 seconds or until the device turns off.
NOTE: If the device does not turn off, you can turn off the device by removing the batteries.
2 Hold for one second to turn on the device.
22 Device Information

Index
A
accessories 21
arrow profiles 12
B
backlight 11
battery 19
installing 4
bow sight, using 9
brightness 11
buttons 3
C
calibrating the sight 7, 9
cleaning the device 21
compass, calibrating 17
computer, connecting 21
D
data, transferring 21
device, cleaning 21
F
fixed pins 10, 13, 14
G
Garmin Express, updating software 19
H
hunt mode 11
L
laser locations 14
laser rangefinder 10
level 10, 11, 18
settings 16
locations, sending 14
M
main menu 11
mounting the device 5, 6
P
power key 7
R
resetting the device 22
S
settings 15–17
shot dynamics 14, 17
sighting in the device 8, 12–15, 18, 19
software, updating 19, 20
specifications 19
torque 9
stalk mode 15
storing data 21
T
troubleshooting 17, 21, 22
U
units of measure 17
updating, software 20
V
video tutorials 1
W
water rating 19
Index 23

support.garmin.com
GUID-4378DB68-8AE7-4523-866A-66DB070CBA65 v2January 2022