
July 2024
QSG1_A_EN
Item No. : F750W
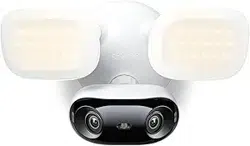
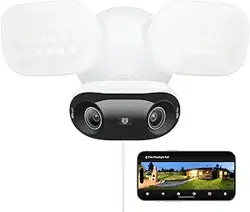
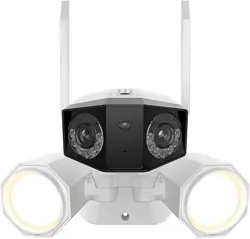
Apply to: Reolink Duo Floodlight WiFi
Operational Instructions
@ReolinkTech https://reolink.com
58.03.001.0836

English English1 2
Safety Instructions 02
What’s in the Box 03
Device Overview 05
Initial Setup 07
Device Assembly 09
Mounting Instructions 1
1
Angle Adjustment 20
Specications 21
Legal Disclaimer 2 1
NoticationofCompliance 2
3
EN
Contents
Safety Instructions
•
Local Law Compliance:
Complywithlocalinstallationlawsandregulations.Outside
NorthAmerica,installationandwiringmustbeperformedbyalicensedelectrician.
Please strictly adhere to all established codes and standards when performing
electricalinstallations.
•
Electrical Shock Warning:
Prior to installation, disconnect the power supply to the
installationareaatthecircuitbreakerorfusebox.Exerciseextremecautionwhen
handlingelectricalwires.
•
Fire Hazard Caution:
Avoidinstallingnearammableorcombustiblematerials.
Avoidusingthedeviceinenvironmentspronetoexcessiveheatorcold.Donot
exposethedevicetodirectsunlightorveryhumidconditions.
•
Installation Requirement:
Ensuretheoodlightcameraisafxedtoawall-mounted,
UL-approvedjunctionboxforsafetyandcompliance.
English English3 4
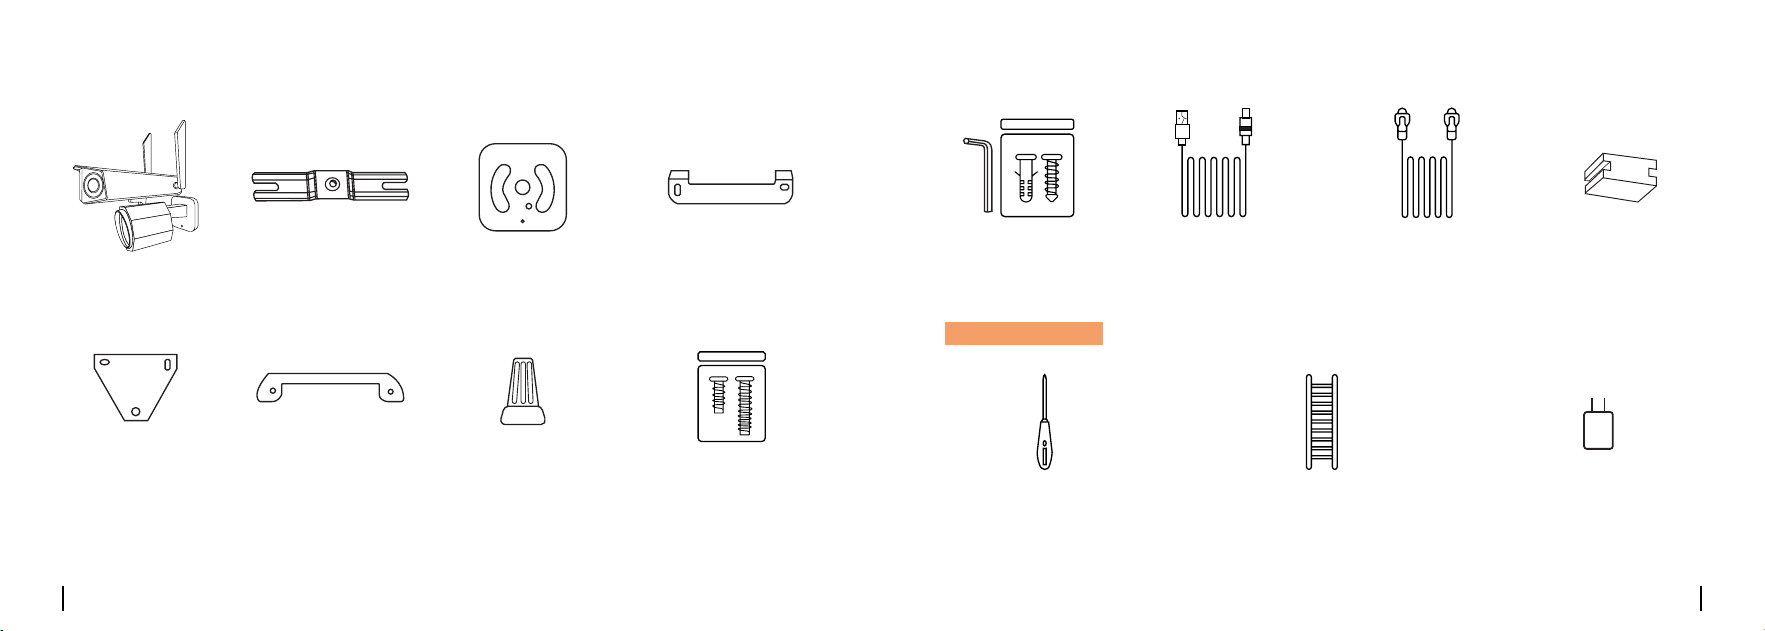
What's in the Box
Wall Screws
Camera
Ethernet Cable
Base Bracket U-Bracket
Mounting Hole
Template
Fixing Bracket Wire Nut Base and Bracket
Screws
DC Power Cord Silicone Plugs
You also need:
H-Supporting Bar
Crosshead Screwdriver Ladder 5V/2A USB Adapter
English English5 6
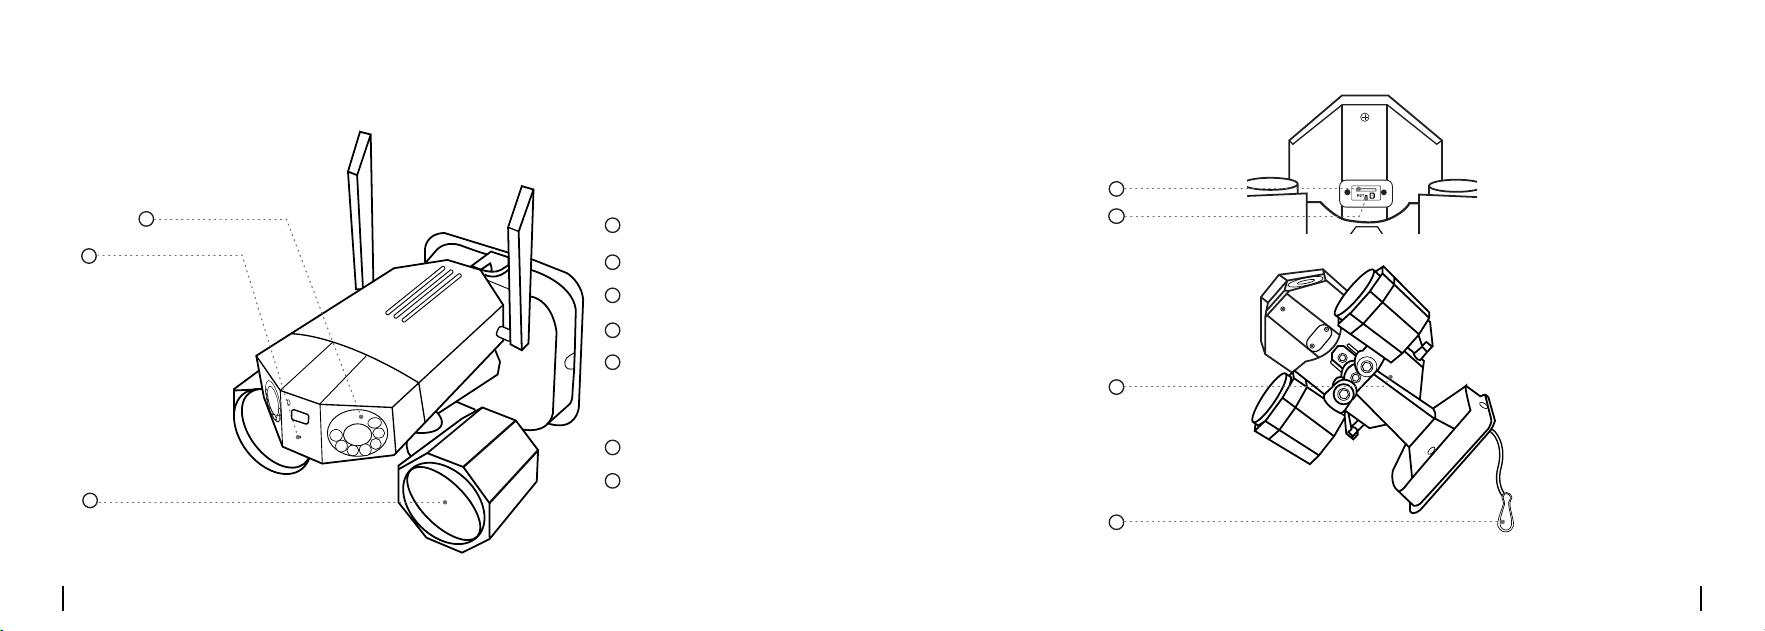
Device Overview
Microphone
Dual Panoramic Lens
*Press and hold for
5s to restore factory
settings)
Floodlight
microSD Card Slot
1
2
3
4
Reset Button
5
Speaker
6
Snap Hook
7
1
2
3
4
5
6
7
English English7 8
Initial Setup
Step 1
:
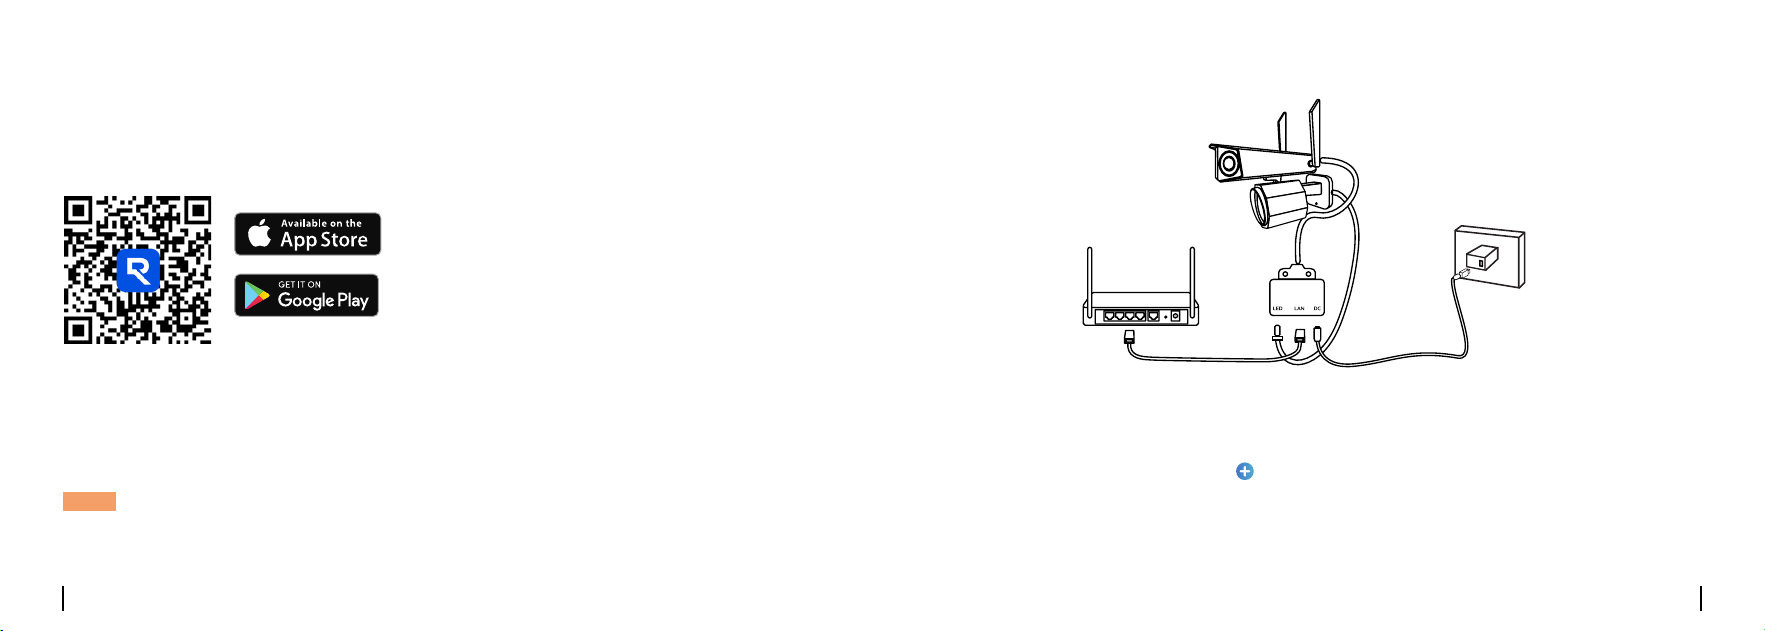
ScantheQRcodetodownloadtheReolinkAppfromtheAppStoreorGooglePlay.
Step 2:
PoweruptheoodlightcamerausingtheincludedDCchargingcableanda5V/2A
poweradapter(notincluded).Connectthecameratoyourrouter’sLANportviathe
providedEthernetcableforstableconguration.
NOTE:
Ensurethedeviceisconnectedtothesamerouterasyourmobiledevice.
Note: You can use a power adapter for initial setup, but some basic features
maybelimited.Forfullfunctionality,pleaseconnecttoACpower.
Step 3:
Launch the Reolink App, tap the “ ”iconinthetop-rightcornertoaddthecamera.
Scanthedevice’sQRcodeandfollowtheon-screeninstructionstocompletethe
initialsetup.
Step 4:
DisconnectboththepowerandEthernetcablesaftersetupiscompleted.
Router
Camera
NetworkCable PowerCable
Power Adapter
English English9 10
Device Assembly
Step 1:
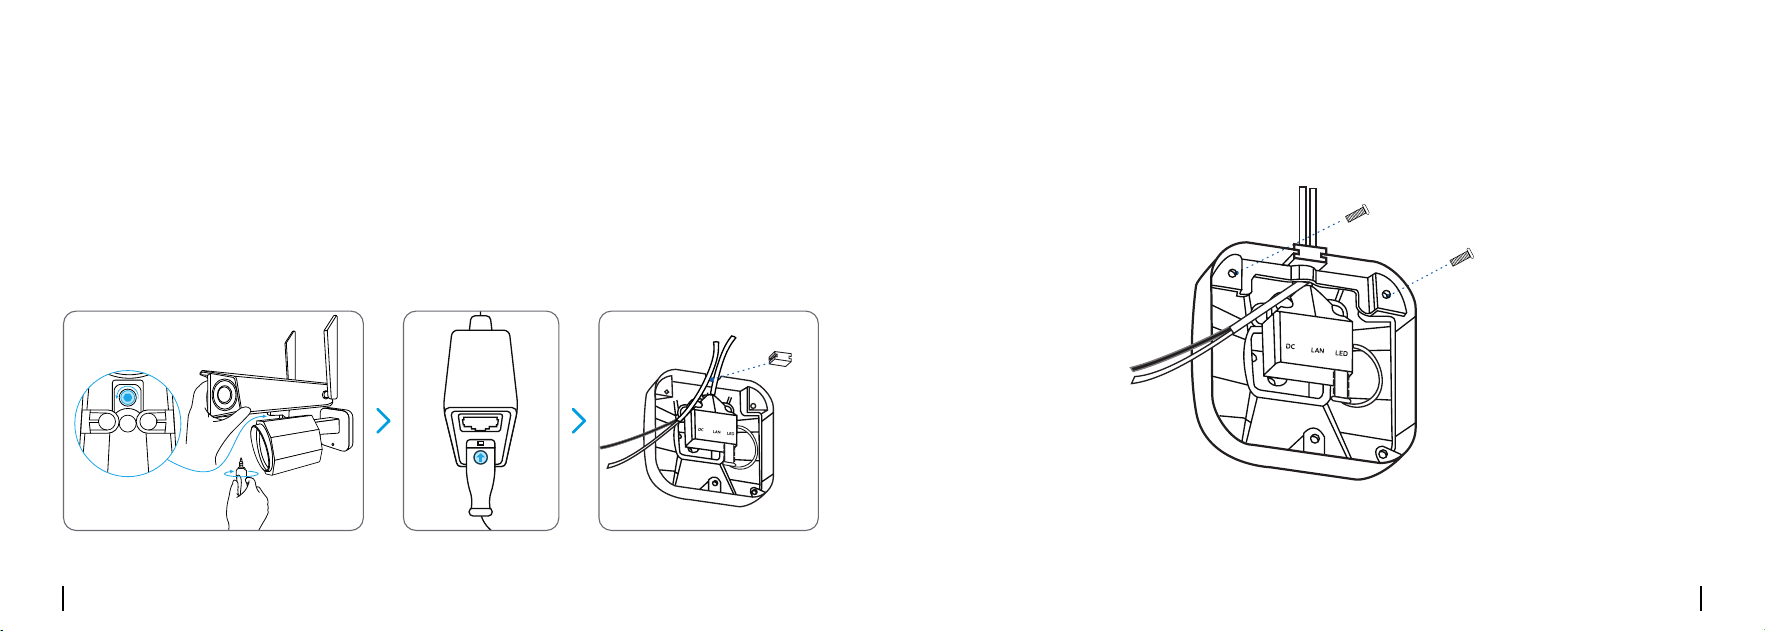
Securethecameratotheoodlightbaseusingahexkeyandattachtheantennasto
thecamera.
Step 2:
Plugthebase’scableintotheLEDportonthecamera.Ensurethearrowonthecable
faces the LAN port on the camera,
then insert the silicone plug into the slot above.
Step 3:
SecuretheFixingBrackettothebaseusingthescrewslabeled“A”fromtheBaseand
BracketScrewspack.
RST RST
RST
2
1
RST
RST
LED LAN DC
LED LAN DC
RST RST
RST
2
1
RST
RST
LED LAN DC
LED LAN DC
English English11 12
Mounting Instructions
Installation Tips
To avoid poor image quality, we recommend that you:
• Avoidfacingthecameratowardsanylightsource.
• Avoidpointingthecameratowardsaglasswindow.
• Avoidpointingthecameratowardsawell-litlocationifthecameraisplacedin
ashadedenvironment.Idealconditionsrequireconsistentlightingbetweenthe
cameraandthelmedsubject.
• Avoid direct water or moisture contact and blockages from dust or debris on power
ports.
• IP rated for outdoor use, the camera withstands rain and snow but is not intended
forunderwateruse.Avoiddirectexposuretorainorsnowonthelens.
• Useasoftclothtocleanthelensregularly.
• Keepbothlenseshorizontalforevenviews.
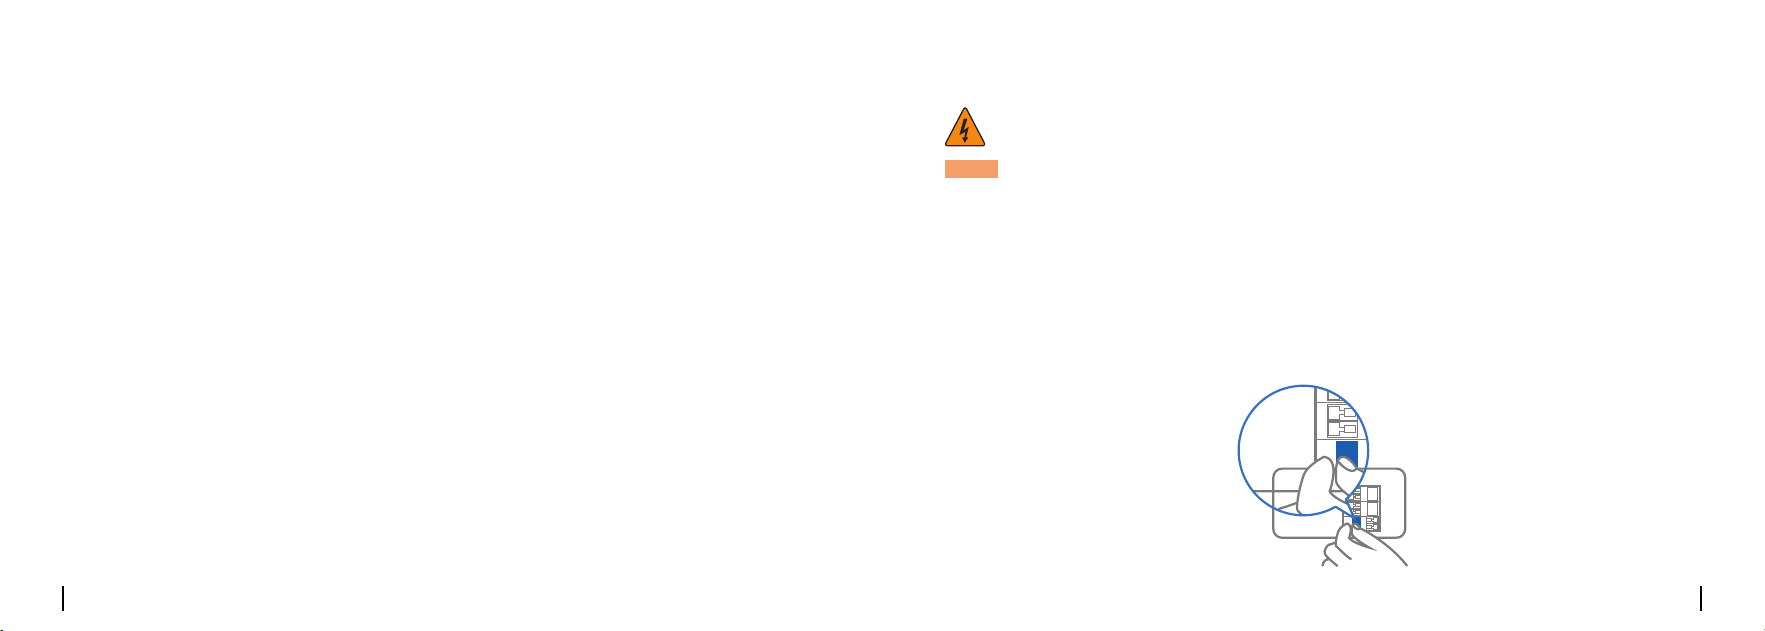
Step 1: Shut Off Power Supply at the Breaker
WARNING: Risk of Electrical Shock
NOTE:
Check local laws before installation.
If you are outside North America,
installationandwiringmustbeperformedbyalicensedelectrician.Makesureto
adheretoallestablishedcodesandstandards.wheninstallingwiredconnections.
• Duringinstallation,you'llbeworkingwithelectricalwires.Ifyoudonotknowwhere
thecircuitbreakerorfuseboxis,orhowtoturnoffthepowertotheoodlightcircuit,
weadvisehiringalicensedelectrician.
• Turnoffthecircuitbreakerduringinstallation.
• Donotuseadimmerswitchortimerwiththisproduct.
• Ensurethepowersupplyiswithin100~240VAC,50/60Hz.
OFF
OFF
English English13 14
Step 2: Install Mounting Brackets
1. Select One Mounting Method
Method 1
:
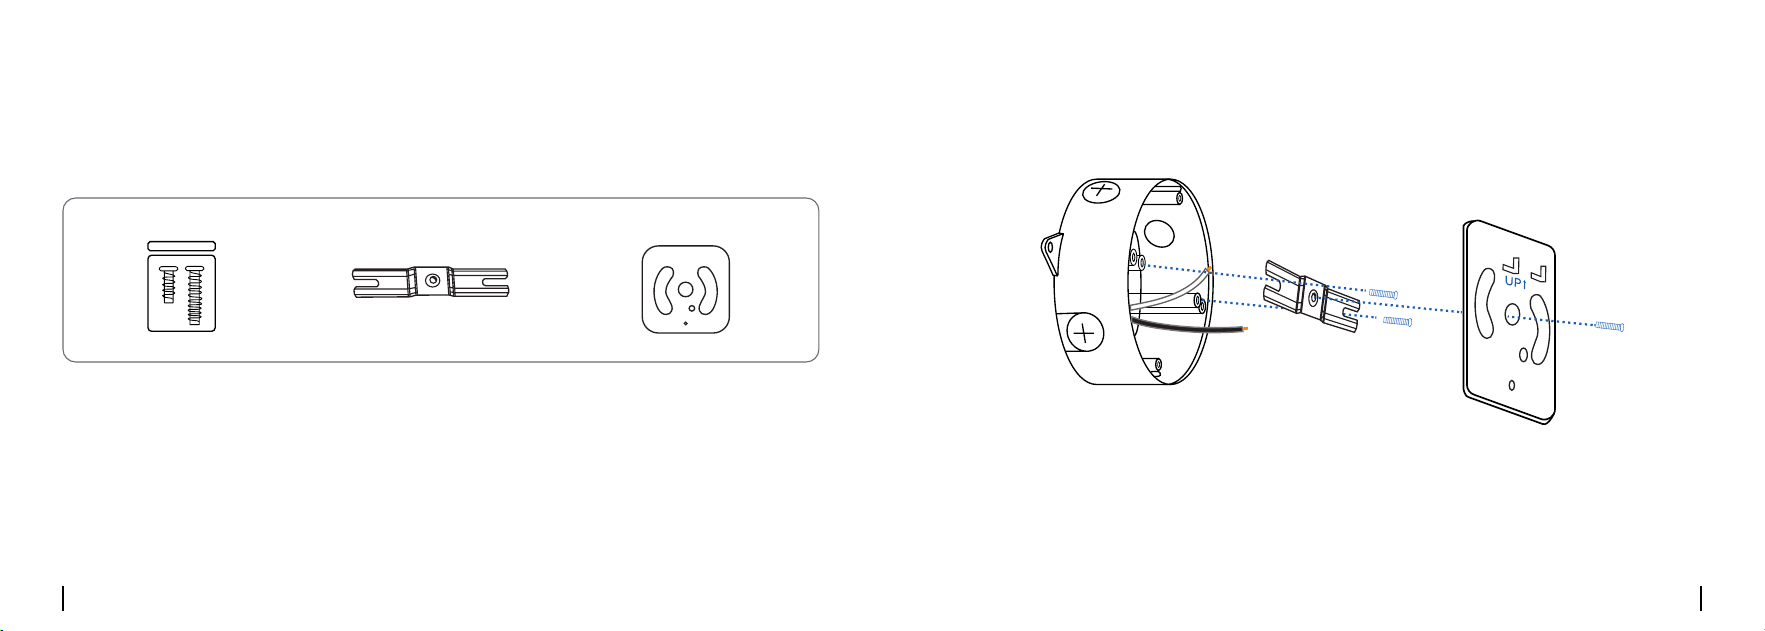
Junction Box Installation
• Place the
H-shaped supporting bracket
on the junction box, align the 2 screw
holes, and secure the bracket using
screws labeled “B”.
• Next, secure the
Base Bracket
to the junction box, ensuring the central screw
holeisalignedandthearrowontheBaseBracketpointsupwards.Gentlypullthe
wires through the Base Bracket, then secure the bracket using
screws labeled “C”.
H-SupportingBar Base Bracket
Base and Bracket Screws
Required Accessories :
H-SupportingBar Base Bracket
English English15 16
Method 2
:
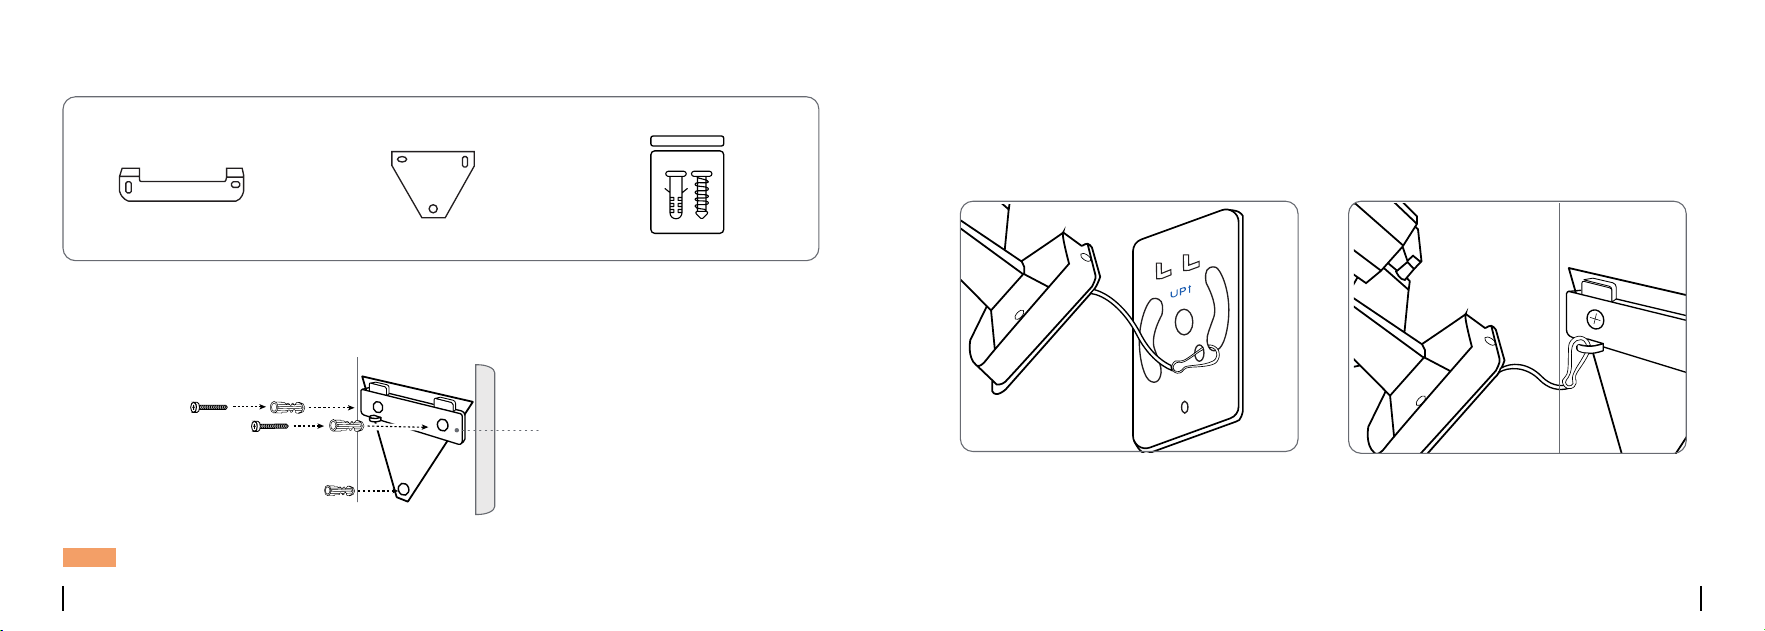
Wall Installation (Without Junction Box):
• Drill holes in the wall using a drill bit (not included), following the
template
provided.
• Fastenthe
U-Bracket
tothewallwithtwoscrews.
NOTE:Wheninstallingondrywall,brick,orconcrete,utilizetheincludedwallanchors.
2. Hook the Camera Before Wiring
Utilizethebuilt-insnaphookonthecamerabodytohangthecameraontothe
bracket,andthenproceedtoconnectthewires.
U-Bracket
Junction Box Installation Wall Installation
Mounting Hole
Template
U-Bracket
Required Accessories :
MountingHoleTemplate Wall Screws
English English17 18
Step 3: Connect Wires
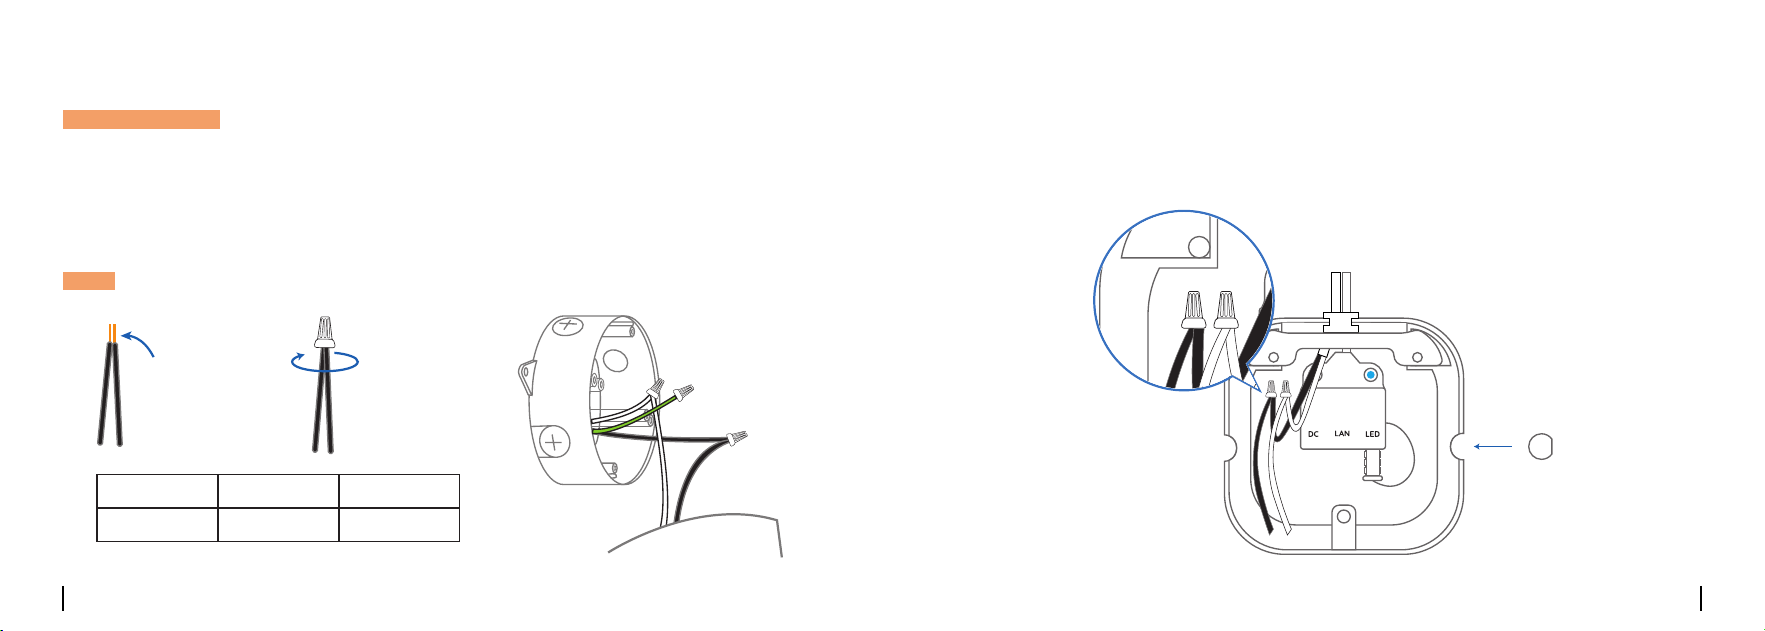
Connectthelivewire(black)andtheneutralwire(white)fromthejunctionboxtothe
correspondinglive(black)andneutral(white)wiresoftheoodlightcamera.Cover
thewireswithwiresnutandtwistthemaboutvetimes.Gentlytugonthewirenuts
toensureasecureconnection.
Important Notice: Avoid crossover connections. Wire colors vary by region.If you are
unsure and cannot distinguish the wires, consult an electrician to ensure safety.
Holdthewires
together
Twist the wire
nut5-10times
Step 4: Secure the Camera
1.
Insert the silicone plugs into the notches
on both sides before snapping the
mountingbasermlyontothebracket.Pleaseensurethat
the wire nuts are oriented
upward
forwaterproongandtopreventshortcircuits.
LIVE(HOT) NEUTRAL GROUND
Black White Green
NOTE:CovertheGroundwire(usuallygreen/greenandyellow)withthewirenut.
English English19 20
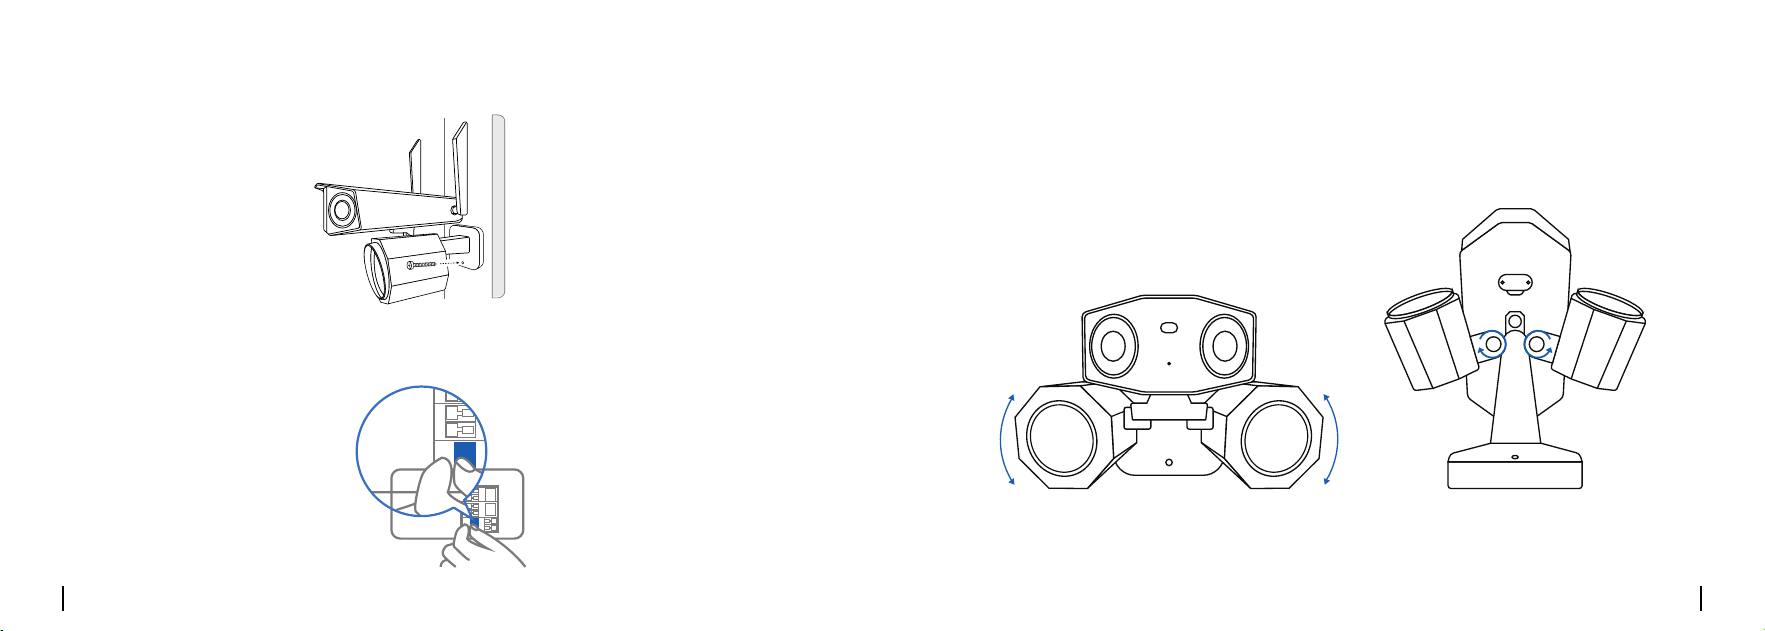
2.Use"D"screwsorwallscrewstosecurethebracketbydrillingthemthroughthe
holeatthebottomofthebracket.
Angle Adjustment
Youcanadjustthedirectionoftheoodlightandcamerausingahexkeytotighten
orloosenthescrews,eitherpriortooraftermountingthecamera.Ensuretormup
thescrewsonceyou'vesetthedesiredangle.
Step 5: Turn on the Circuit Breaker
ON
ON

English English21 22
Specications
OperatingTemperature:-10°Cto+55°C(14°Fto131°F)
OperatingHumidity:10%to90%
Dimensions:195mmx103mmx56mm
Weight:1.25kilograms
Foradditionalspecications,pleasevisithttps://reolink.com/.
Legal Disclaimer
To the maximum extent permitted by applicable law, this document and the
productdescribed,withitshardware,software,rmware,andservices,aredelivered
onan"as-is"and"as-available"basis,withallfaultsandwithoutwarrantyofany
kind.Reolinkdisclaimsallwarranties,expressorimplied,includingbutnotlimited
to,warrantiesofmerchantability,satisfactoryquality,tnessforaparticular
purpose,accuracy,andnon-infringementofthird-partyrights.Innoeventwill
Reolink,itsdirectors,ofcers,employees,oragentsbeliabletoyouforanyspecial,
consequential, incidental or indirect damages, including but not limited to damages
forlossofbusinessprots,businessinterruption,orlossofdataordocumentation,
in connection with the use of this product, even if Reolink has been advised of the
possibilityofsuchdamages.
To the extent permitted by applicable law, your use of the Reolink products and
servicesisatyoursoleriskandyouassumeallrisksassociatedwithinternetaccess.
Reolink does not take any responsibilities for abnormal operation, privacy leakage
or other damages resulting from cyber attacks, hacker attacks, virus inspections, or
otherinternetsecurityrisks.However,Reolinkwillprovidetimelytechnicalsupportif
required.
Thelawsandregulationsrelatedtothisproductvarybyjurisdiction.Pleasecheck
all relevant laws and regulations in your jurisdiction before using this product to
ensurethatyouruseconformstotheapplicablelawandregulation.Duringtheuse
oftheproduct,youmustcomplywithrelevantlocallawsandregulations.Reolinkis
notresponsibleforanyillegalorimproperuseanditsconsequences.Reolinkisnot
liableintheeventthatthisproductisusedwithillegitimatepurposes,suchasthird-
party rights infringement, medical treatment, safety equipment, or other situations
where the product failure could lead to death or personal injury, or for weapons of
mass destruction, chemical and biological weapons, nuclear explosion, and any
unsafenuclearenergyusesoranti-humanitypurposes.Intheeventofanyconicts
betweenthismanualandtheapplicablelaw,thelatterprevails.

English English23 24
NoticationofCompliance
FCC Statement
ThisdevicecomplieswithPart15oftheFCCRules.Operationissubjecttothe
following two conditions:
(1) This device may not cause harmful interference, and (2) This device must accept
any interference received, including interference that may
causeundesiredoperation.Changesormodicationsnotexpresslyapprovedby
the party responsible for compliance could void the user's authority to operate the
equipment.
ThisequipmenthasbeentestedandfoundtocomplywiththelimitsforaClassB
digitaldevice,pursuanttoPart15oftheFCCRules.Theselimitsaredesigned
to provide reasonable protection against harmful interference in a residential
installation.Thisequipmentgeneratesusesandcanradiateradiofrequencyenergy
and, if not installed and used in accordance with the instructions, may cause
harmfulinterferencetoradiocommunications.However,thereisnoguaranteethat
interferencewillnotoccurinaparticularinstallation.Ifthisequipmentdoescause
harmful interference to radio or television reception, which can be determined
by turning the equipment off and on, the user is encouraged to try to correct the
interference by one or more of the following measures:
•Reorientorrelocatethereceivingantenna.
•Increasetheseparationbetweentheequipmentandreceiver.
•Connecttheequipmentintoanoutletonacircuitdifferentfromthattowhichthe
receiverisconnected.
•Consultthedealeroranexperiencedradio/TVtechnicianforhelp.
FCC Statement
ThisequipmentcomplieswithFCCradiationexposurelimitssetforthforan
uncontrolledenvironment.Thisequipmentshouldbeinstalledandoperatedwith
minimumdistance20cmbetweentheradiator&yourbody.
ISED Statement
ThisdevicecomplieswithIndustryCanadalicence-exemptRSSstandard(s).
Operation is subject to the following two conditions:
(1) this device may not cause interference, and (2) this device must accept any
interference, including interference that may cause undesired operation of the
device."
This equipment should be installed and operated with a minumum distance of 20
cmbetweentheradiatorandyourbody.

English English25 26
LeprésentappareilestconformeauxCNRd'IndustrieCanadaapplicablesaux
appareilsradioexemptsdelicence.L'exploitationestautoriséeauxdeuxconditions
suivantes :
(1) l'appareil nedoit pas produire de brouillage, et
(2) l'utilisateur de l'appareil doit accepter tout brouillage radioélectrique subi, même
silebrouillageestsusceptibled'encompromettrelefonctionnement."
Cetéquipementdoitêtreinstalléetutiliséavecunedistanceminimalede20cm
entreleradiateuretvotrecorps.
MODIFICATION:Anychangesormodicationsnotexpresslyapprovedbythegrantee
ofthisdevicecouldvoidtheuser’sauthoritytooperatethedevice.
Toutemodicationnonapprouvéexplicitementparlefournisseurdelicencede
l’appareilpeutentraînerl’annulationdudroitdel’utilisateuràutiliserl’appareil.
ThisClassBdigitalapparatuscomplieswithCanadianICES-003.
CetappareilnumériquedelaclasseBestconformeàlanormeNMB-003duCanada
Operationof5150-5350MHzisrestrictedtoindooruseonly.
Lefonctionnementde5150-5350MHzestlimitéàuneutilisationenintérieur
uniquement.
CE SIMPLIFIED EU AND UK DECLARATION OF CONFORMITY
CESIMPLIFIEDEUANDUKDECLARATIONOFCONFORMITY
Hereby,REOLINKINNOVATIONLIMITEDdeclaresthattheradioequipmenttype[refer
tothecoveroftheOperationalInstructions]isincompliancewithDirective2014/53/
EU.ThefulltextoftheEUandUKdeclarationofconformityisavailableatthefollowing
internet address: https://support.reolink.com/hc/en-us/articles/36788378727065/
RFexposureinformation:TheMaximumPermissibleExposure(MPE)levelhasbeen
calculatedbasedonadistanceof20cmbetweenthedeviceandthehumanbody.
TomaintaincompliancewithRFexposurerequirement,useproductthatmaintaina
20cmdistancebetweenthedeviceandhumanbody.
WiFi Operating Frequency
OPERATINGFREQUENCY:
2412~2472MHzRFPower:≤20dBm(EIRP)
5150~5250MHzRFPower:≤23dBm(EIRP)
5250~5350MHzRFPower:≤23dBm(EIRP)
5470~5725MHzRFPower:≤23dBm(EIRP)
5725~5875MHzRFPower:≤14dBm(EIRP)
English English27 28
The functions of Wireless Access Systems including Radio Local Area
Networks(WAS/RLANs)withintheband5150-5350MHzforthisdeviceare
restrictedtoindooruseonlywithinallEuropeanUnioncountries
(BE/BG/CZ/DK/DE/EE/IE/EL/ES/FR/HR/IT/CY/LV/LT/LU/HU/MT/NL/AT/PL/PT/RO/SI/SK/FI/
SE/TR/NO/CH/IS/LI/UK(NI)
Correct Disposal of This Product
This marking indicates that this product should not be disposed with other household
wastesthroughouttheEU.Topreventpossibleharmtotheenvironmentorhuman
health from uncontrolled waste disposal, recycle it responsibly to promote the
sustainablereuseofmaterialresources.Toreturnyouruseddevice,pleaseuse
the return and collection systems or contact the retailer where the product was
purchased.Theycantakethisproductforenvironmentallysaferecycling.
Limited Warranty
Thisproductcomeswitha2-yearlimitedwarrantythatisvalidonlyifpurchased
fromReolinkOfcialStoreoraReolinkauthorizedreseller.Learnmore:
https://reolink.com/warranty-and-return/.
NOTE:Wehopethatyouenjoythenewpurchase.Butifyouarenotsatisedwiththe
product and plan to return, we strongly suggest that you reset the camera to factory
defaultsettingsandtakeouttheinsertedSDcardbeforereturning.
Terms and Privacy
Use of the product is subject to your agreement to the Terms of Service and Privacy
Policy at reolink.com
Terms of Service
By using the Product Software that is embedded on the Reolink product, you agree to
theterms&conditionsbetweenyouandReolink.Learnmore:
https://reolink.com/terms-conditions/
Technical Support
Ifyouneedanytechnicalhelp,pleasevisitourofcialsupportsiteand
contact our support team before returning the products, https://support.reolink.com.
English English29 30
For more information, go to
www.P65Warnings.ca.gov
WARNING
This product can expose you to the
chemical lead, which is known to the
state of California to cause cancer.
REOLINK INNOVATION LIMITED
FLAT/RM 705 7/F FA YUEN COMMERCIAL BUILDING 75-77 FA YUEN STREET MONG KOK KL
HONG KONG