EN Digital TENS/EMS unit
Instruction for Use .............................................. 3
EM 80
1A-2A/1B-2B
1A-1B/2A-2B
1A-2A/1B-2B
1A-1B/2A-2B
1A-1B/2A-2B 1A-1B/2A-2B
1A-1B/2A-2B
1A-1B/2A-2B
1A-2A/1B-2B
1A-1B/2A-2B
1A-2A/1B-2B
1A-1B/2A-2B
2A-1B/1A-2B
1A-1B/2A-2B
1A-2B/2A-1B
1A-2A/1B-2B
1A-1B/2A-2B
1A-2A/1B-2B
1A-1B/2A-2B
2A-1B/1A-2B
1A-2A/1B-2B
1A-1B/2A-2B
1A-2A/1B-2B
1A-1B/2A-2B
1A-2B/2A-1B
1A-2A/1B-2B
1A-1B/2A-2B
1A-2B/2A-1B
1A-2A/1B-2B
1A-1B/2A-2B
1A-2A/1B-2B
1A-1B/2A-2B
1A-2A/1B-2B
1A-1B/2A-2B
1A-1B/2A-2B
1A-2A/1B-2B
1A-1B/2A-2B
1A-2B/2A-1B
1A-1B/2A-2B
1A-2A/1B-2B
1A-1B/2A-2B
1A-2B/2A-1B
1A-2A/1B-2B
1A-1B/2A-2B
1A-2A/1B-2B
1A-1B/2A-2B
1A-2B/2A-1B
1A-2A/1B-2B
1A-1B/2A-2B
1A-1B/2A-2B
1A-2B/2A-1B
1A-1B/2A-2B
1A-2A/1B-2B
1A-1B/2A-2B
1A-2B/2A-1B
1A-1B/2A-2B
CH1
CH2
CH3
CH4
3
Table of Contents
ENGLISH
Read these instructions for use carefully. Observe the warnings and safety
notes. Keep these instructions for use for future reference. Make the instruc-
tions for use accessible to other users. If the device is passed on, provide the
next user with these instructions for use.
Warning
Warning notice indicating a risk of injury or damage to health.
Observe the instructions for use
Disposal in accordance with the Waste Electrical and
Electronic Equipment EC Directive – WEEE
B
A
Marking to identify the packaging material.
A = Material code, B = Material number:
1-6 = Plastics, 20-22 = Paper and cardboard
Table of Contents .................................................................................. 3
1. Getting to know your device.....................................................................4
1.1 What is Digital TENS/EMS and what can it do? ............................. 4
1.2 Scope of supply .............................................................................. 5
2. Important Information ...............................................................................5
3. Current parameters ...................................................................................7
3.1 Pulse shape ..................................................................................... 7
3.2 Pulse frequency............................................................................... 7
3.3 Pulse width ...................................................................................... 8
3.4 Pulse intensity ................................................................................. 8
3.5 ON and OFF time ............................................................................ 8
3.6 Cycle-controlled pulse parameter variation .................................... 8
4. Unit description ........................................................................................8
4.1 Description of components ............................................................. 8
4.2 Key functions .................................................................................. 9
5. Start-up .....................................................................................................9
6. Programme overview ................................................................................9
6.1 Basic information ............................................................................ 9
6.2 TENS programmes ....................................................................... 10
6.3 EMS-Programme........................................................................... 11
6.4 MASSAGE programmes ................................................................ 12
6.5 Information on placing the electrodes .......................................... 12
7. Application ...............................................................................................13
7.1 Advice on application .................................................................... 13
7.2 Procedure for TENS, EMS and MASSAGE programmes 01-10
(quick start) ................................................................................... 13
7.3 Procedure for TENS/EMS programmes 11 to 20 (individual pro
-
grammes) ...................................................................................... 13
7.4 Changes to the settings ................................................................ 14
7.5 Doctor’s Function ......................................................................... 14
8. Cleaning and storage ..............................................................................14
9. Disposal .................................................................................................... 15
10. Problems and solutions ........................................................................15
11. Technical details ....................................................................................16
12. Notes on electromagnetic compatibility .............................................16
13. Replacement parts and wearing parts ................................................17
14. W
arranty/service ...................................................................... 17
4
Separate the packaging elements and dispose of them in
accordance with local regulations.
Separate the product and packaging elements and dispose
of them in accordance with local regulations.
Manufacturer
CE labelling
This product satisfies the requirements of the applicable
European and national directives.
Temperature limits
Humidity limits
The device must not be used by persons with medical
implants (e.g. heart pacemakers). Otherwise their func-
tion could be impaired.
Item number
Importer symbol
Storage / Transport
Permissible storage and transport temperature and humidity
Operating
Permissible operating temperature and humidity.
Do not dispose of batteries containing hazardous substances
with household waste
Isolation of applied parts Type BF
Galvanically isolated applied part (F stands for “floating”);
meets the requirements for leakage currents for type B
1. Getting to know your device
1.1 What is Digital TENS/EMS and what can it do?
Digital TENS/EMS belongs to the group of electrical stimulation systems. It
has three basic functions, which can be used in combination:
1. Electrical stimulation of nerve tracts (TENS).
2. Electrical stimulation of muscle tissue (EMS).
3. A massage effect generated by electrical signals.
For this, the device has four independent stimulation channels and eight self-
adhesive electrodes. It has various versatile functions in order to increase ge-
neral wellbeing, alleviate pain, maintain physical fitness, relaxation, revitalise
muscles and combat fatigue. You can either select these functions from pre-
set programmes or determine them yourself according to your requirements.
The operating principle of electrical stimulation equipment is based on
simulating the body’s own pulses which are transmitted transcutaneously to
nerve or muscle fibres by means of electrodes. The electrodes can thereby
be attached to many parts of the body, whereby the electrical stimuli are
safe and practically painless. You merely feel a gentle prickling or vibrating in
some applications. The electrical pulses transmitted to the tissue affect the
transmission of stimulation in nerve conductions as well as neural nodes and
muscle groups in the field of application.
The effect of electrical stimulation is generally only recognisable after regularly
repeated application. Electrical stimulation does not replace regular exercising
of the muscle, but is able to reasonably supplement the effect thereof.
TENS, transcutaneous electrical nerve stimulation, means electrical stimu-
lation of nerves through the skin. TENS is recognised as a clinically proven,
effective, non-medication method of treating pain from certain causes. It is
free from side-effects when used properly, and can also thereby be used as
a simple meeans of self-treatment. The pain-alleviating or suppressing effect

5
is also achieved by preventing pain from being passed on into nerve fibres
(above all through high-frequency pulses) and increasing the secretion of the
body’s own endorphines which reduce awareness of pain through their effect
on the central nervous system. The method is scientifically underpinned and
medically approved.
Any symptoms indicating TENS application must be clarified with the doctor
in charge of your treatment. The latter will also give you information on the
respective benefits of TENS self-treatment.
TENS is clinically tested and approved with the following applications:
• Back pain, particularly also lumbar and cervical spine problems.
• Joint pain (e.g. knee joint, hip joint, shoulder).
• Neuralgia.
• Headaches.
• Women’s period pains.
• Pain after injuries to musculoskeletal system.
• Pain with circulatory problems.
• Chronic pain through various causes.
Electrical muscle stimulation (EMS) is a widespread and generally recogni
-
sed method and has been used for years in sports and rehabilitation medicine.
In the sports and fitness field, one of the uses of EMS is as a supplement to
conventional muscle training, in order to increase the efficiency of muscle
groups and adapt physical proportions to the desired aesthetic results. EMS
application goes in two directions. On the one hand, a targeted strengthening
of musculature can be produced (activating application) and on the other hand
a relaxing, resting effect can also be achieved (relaxing application).
Active application includes the following:
• Muscle training to improve endurance performance and/or
• Muscle training to support the strengthening of certain muscles or muscle
groups in order to achieve desired changes to body proportions.
Relaxing application includes the following:
• Muscle relaxation in order to loosen up muscular tension.
• Improving muscular fatigue symptoms.
• Accelerating muscle regeneration after high muscular performance (e.g. after
a marathon).
Through integrated massage technology, Digital TENS/EMS also offers the
possibility of reducing muscular tension and combating fatigue symptoms
using a programme based on real massage in terms of sensation and effect.
Using the positioning suggestions and programme charts in this manual, you can
determine the device setting fast and easily for the respective application (depen-
ding on the region of the body affected) in order to ensure the desired effect.
Through the four separately adjustable channels, the Digital TENS/EMS has
the advantage of adapting pulse intensity independently to several parts of
the body to be treated, for example in order to cover both sides of the body
or ensure even stimulation of larger areas of tissue. The individual intensity
setting of each channel also allows you to treat up to four different parts of
the body at the same time, making for a time saving compared with individual
sequential treatment.
1.2 Scope of supply
– 1x Digital TENS/EMS device
– 2x connecting cable
– 8x adhesive electrodes (45 x 45 mm)
– 3x AA batteries
– these instructions for use
– 1x brief instructions (suggestions on placing electrodes and fields of ap
plication)
– 1x storage bag
Subsequent purchase articles
8x adhesive electrodes (45 x 45 mm), Art. no. 661.02
4x adhesive electrodes (50 x 100 mm), Art. no. 661.01
2. Important Information
Use of the device does not replace medical consultation and treatment.
In the event of any type of pain or illness, you must therefore always first
ask your doctor.
WARNING!
In order to prevent any damage to health, we would urgently advise
against using the Digital TENS/EMS in the following cases:
• With any implanted electrical devices (such as pacemakers).
• If there are any metal implants.
• When using an insulin pump.
6
• In case of high fever (e.g. > 39°C).
• In case of known or acute cardiac arrhythmias and other disorders in
stimulus formation and conduction of the heart.
• If suffering from attacks (e.g. epilepsy).
• If pregnant.
• In case of cancer.
• After operations where increased muscle contractions might impair the
healing process.
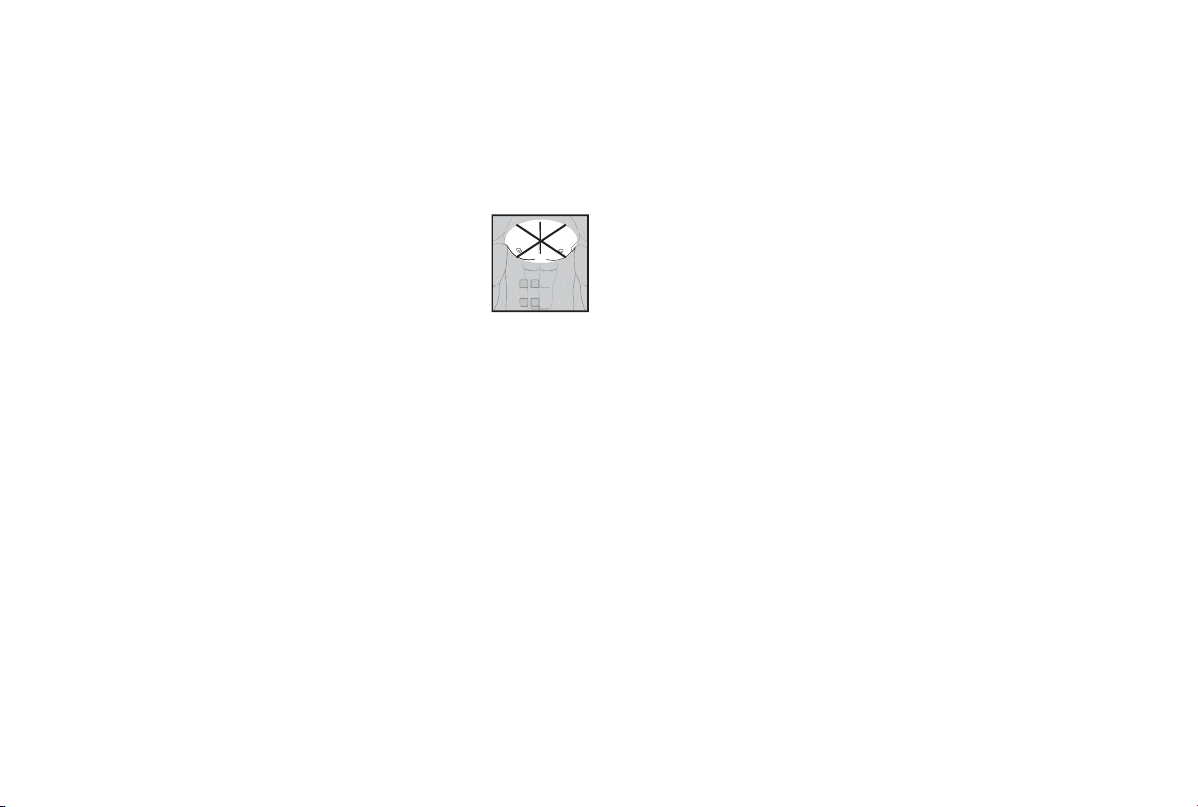
• Never use near the heart. Stimulation electrodes should
never be placed anywhere on the front of the thorax (marked
by ribs and breastbone), but above all not on the two large
pectoral muscles. Here it can increase the risk of ventricular
fibrillation and lead to cardiac arrest.
• On the bony part of the cranium, near the mouth, throat or
larynx.
• Near the throat / carotid artery.
• Near the genitals.
• On acutely or chronically diseased (injured or inflamed) skin (e.g. in the
event of painful and painless inflammation, reddening, skin rashes (e.g. al
-
lergies), burns, bruises, swellings, open wounds and wounds in the process
of healing, on operation scars in the process of healing).
• In environments with high humidity such as in the bathroom or when having
a bath or shower.
• In the case of acute or chronic diseases of the gastrointestinal tract.
• Stimulation should not be carried out around or on the head, directly over
the eyes, on the mouth, the throat (the cartoid artery in particular) or using
electrodes placed on the chest, the upper back or over the heart.
• Do not use after consuming alcohol.
• When a high frequency surgical device is connected at the same time.
Before using the device, you should consult with the doctor in charge of
your treatment in the event of the following:
• Acute diseases, especially if hypertension is suspected or actually exists, or
blood-clotting disorders, tendency to thromboembolic diseases or in case
of malignant new masses.
• All skin diseases.
• Chronic pain disorders which have not been clarified, regardless of the
region of the body.
• Diabetes.
• All sensitivity disorders with reduced pain awareness (such as metabolic
disturbances).
• Medical treatments carried out simultaneously.
• Complaints arising as a result of the stimulation treatment.
• Constant skin irritation as a result of prolonged stimulation at the same
electrode point.
IMPORTANT!
Use the Digital TENS/EMS solely:
• On humans.
• For the purpose for which it was developed and in the manner specified in
these instructions for use. Any improper use can be hazardous.
• For external application.
• With the original accessory parts which are supplied and can be re ordered,
otherwise the warranty becomes null and void.
PRECAUTIONARY MEASURES:
• Always remove the electrodes from the skin with a moderate pull in order to
avoid injury in the event of highly sensitive skin.
• Keep the device away from heat sources and never use it near (~1 m)
short-wave or microwave equipment (e.g. mobile phones), as this may lead
to unpleasant current spikes.
• Do not expose the device to direct sunlight or high temperatures.
• Protect the device from dust, dirt and humidity. Never submerge the device
in water or other liquids.
• The device is suitable for private use.
• For reasons of hygiene, the electrodes should only be used on one person.
• If the device is not functioning properly, or if you start feeling unwell or
there is any pain, stop the application immediately.
• To remove or move the electrodes, first switch off the device or the appro
-
priate channel in order to avoid unwanted irritation.
• Never modify any electrodes (e.g. by cutting). This leads to a higher cur
-
rent density and can be dangerous (max. recommended output value for
electrodes: 9 mA/cm
2
, an effective current density over 2 mA/cm² requires
greater attention).
7
• Do not use when asleep, when driving a vehicle or at the same time as
operating devicery.
• Never use with any activities where an unforeseen reaction (e.g. increased
muscle contraction despite low intensity) may be dangerous.
• Make sure that no metallic objects such as belt buckles or necklaces can
come in contact with the electrodes during stimulation. If you wear any
jewellery or piercings (e.g. belly piercing) near the application site, you must
remove these before using the device as burning may otherwise occur at
some points.
• Keep the device away from children to prevent any hazards.
• Do not confuse the electrode cables and contacts with your headphones or
other devices, and do not connect the electrodes to other devices.
• Do not use this device at the same time as other equipment which sends
electrical pulses to your body.
• Do not use it near any highly flammable substances, gases or explosives.
• Never use accumulators, always use the same types of battery.
• In the initial minutes, carry out the application sitting or lying down in order
to avoid any unnecessary risk of injury in the rare event of a vagal reaction
(feeling of weakness). If you start feeling weak, switch the device off im
-
mediately and put your legs up (approx. 5-10 minutes).
• It is not advisable to apply any enriching creams or ointments to the skin
beforehand, as this greatly increases electrode wear or else unpleasant
current spikes may occur here.
Damage:
• If the device is damaged, do not use it if you are in any doubt but rather
contact your dealer or the customer service address indicated.
• Check the device at regular intervals for signs of wear or damage. If you
find any such signs or if the device was used improperly, you must bring it
to the manufacturer or dealer before it is used again.
• Switch off the device immediately if it is defective or if is not working
properly.
• Do not, under any circumstances, attempt to open or repair the device
yourself! Only have repairs carried out by the customer service department
or an authorized dealer. If these instructions are not heeded, the warranty
becomes null and void.
• The manufacturer assumes no liability for damage caused through impro
-
per or wrong use.
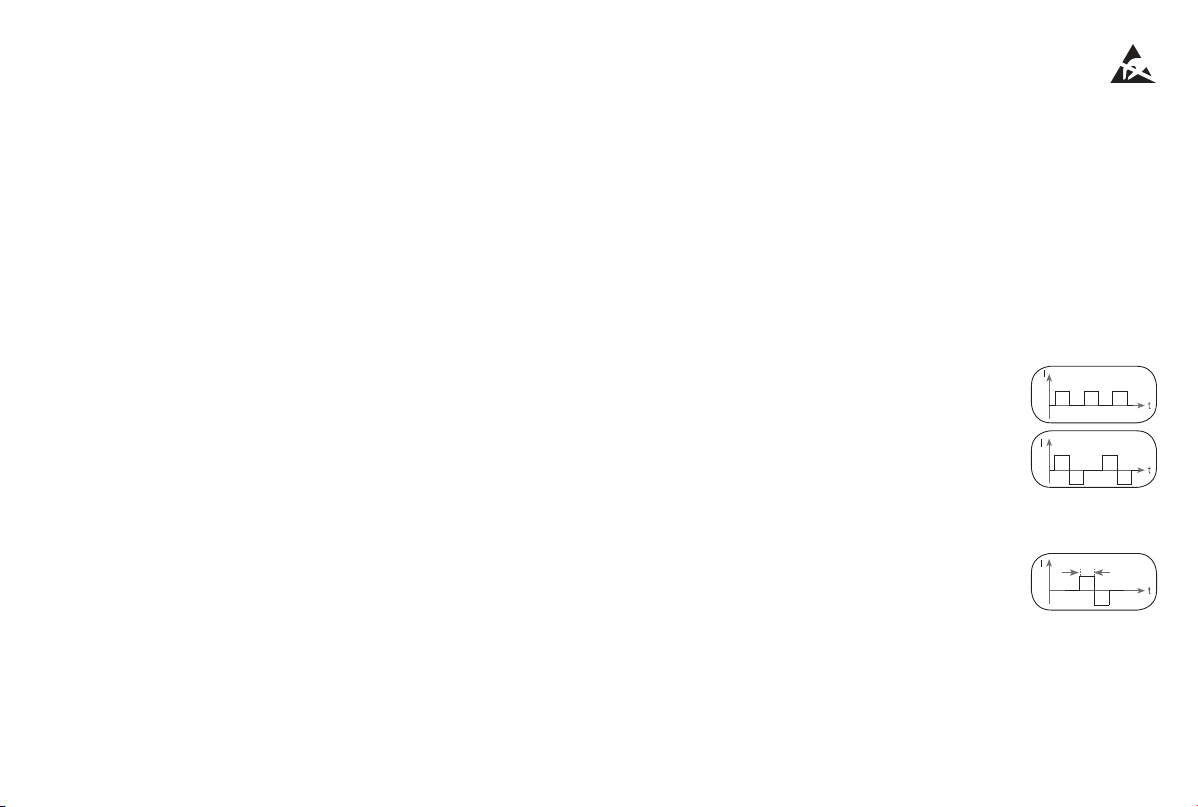
Information on ESD (Electrostatic Discharge)
Please note that jacks marked with the ESD warning label must not
be touched.
ESD protective measures:
– Do not touch plugs/jacks marked with the ESD warning label with fingers!
– Do not touch plugs/jacks marked with the ESD warning label with handheld
tools!
Further explanations on the ESD warning label, as well as possible training
courses and their contents, are available on request from the customer
service department.
3. Current parameters
Electrical stimulation devices operate with the following current settings,
which will alter the stimulation effect depending on the setting.
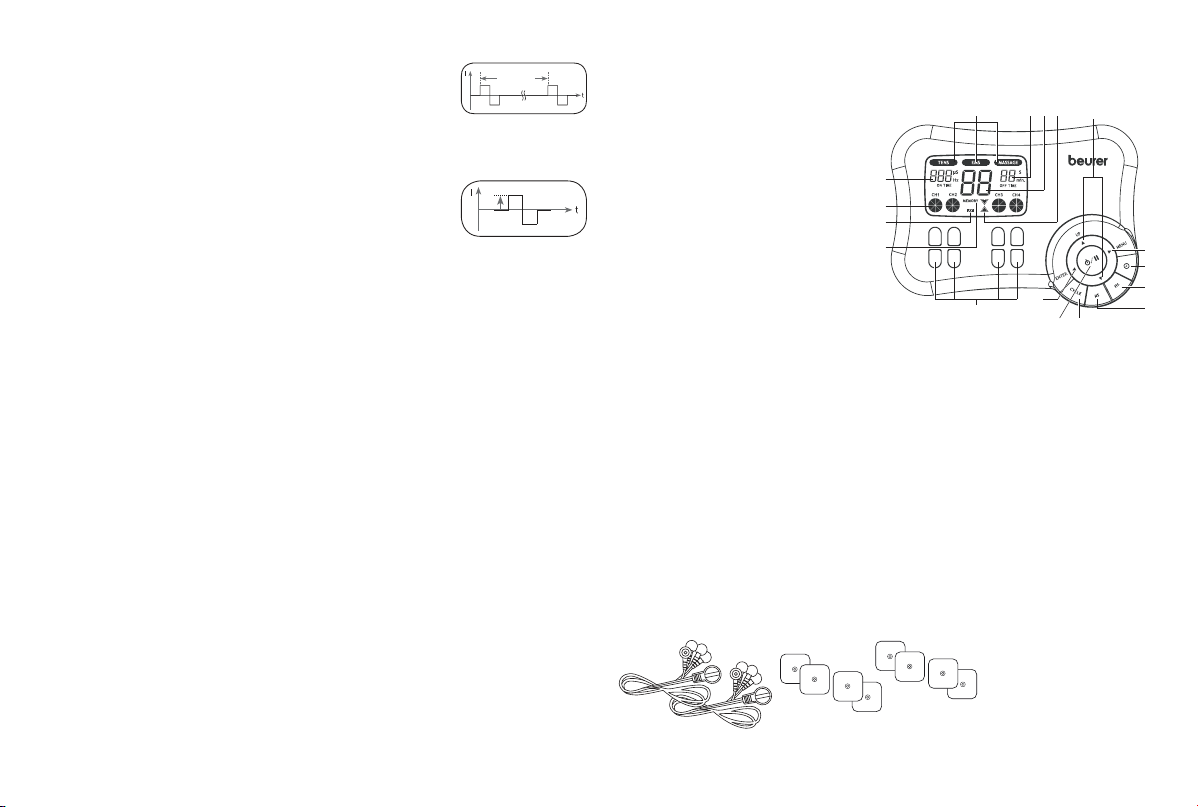
3.1 Pulse shape
This describes the time function of the excitation current,
whereby monophase pulse trains are differentiated from
biphase. With monophase pulse trains, the current flows
in one direction. With biphase pulses, the excitation cur-
rent alternates its direction.
In the Digital TENS/EMS unit, there are only biphase pulse
trains, as they reduce the strain on the muscle, leading to
less muscle fatigue as well as safer application.
3.2 Pulse frequency
Frequency indicates the number of individual pulses per
second, and is indicated in Hz (Hertz). It can be calcu-
lated by working out the inverse value of the periodic
time. The respective frequency determines which types
of muscle fibre preferably react.
Slow-response fibres tend to react to lower pulse frequencies up to 15 Hz,
while fast-response fibres only respond to frequencies over approx. 35 Hz.
With pulses of approx. 45-70 Hz, there is permanent tension in the muscle
combined with premature muscle fatigue. Higher pulse frequencies can the-
refore preferably be used for elasticity and maximum strength training.
pulse
intensity
monophase pulses
time
biphase pulses
Pulse width
8
3.3 Pulse width
Pulse width is used to indicate the duration of an indivi-
dual pulse in microseconds. Pulse width also determines
the pene tration depth of the current whereby in general,
the following applies: a greater muscle mass requires a greater pulse width.
3.4 Pulse intensity
Setting the degree of intensity is individually dependent
on the subjective feeling of each individual user and is
determined by a number of parameters such as application
site, skin circulation, skin thickness as well as quality of
electrode contact. The actual setting should be effective but should never
produce any unpleasant sensations such as pain at the site of application.
While a slight tingling sensation indicates sufficient stimulation energy, any
setting which leads to pain must be avoided.
With prolonged application, readjustment may be necessary due to time
adjustment processes at the site of application.
3.5 ON and OFF time
ON time describes the stimulation time of the cycle in seconds, i.e. the length
of the cycle in which pulses are delivered to the body. OFF time, on the other
hand, indicates the length of the cycle (in seconds) which is stimulation-free.
3.6 Cycle-controlled pulse parameter variation
In many cases it is necessary to cover the entirety of tissue structures at the
site of application by using several pulse parameters. With the Digital TENS/
EMS unit, this is done by the existing programmes automatically making a
cyclical pulse parameter change. This also prevents individual muscle groups
at the site of application from getting tired.
With the Digital TENS/EMS unit there are useful presettings for current para
meters. During the application, however, you do have the possibility of
changing pulse intensity at any time and, with individual programmes, you
can also alter pulse frequency beforehand in order implement the application
which is the most comfortable or promises the most success for you.
4. Unit description
4.1 Description of components
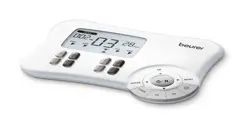
Display (main menu):
A TENS/EMS/MASSAGE submenus
B Frequency (Hz); ON time; pulse
width
C Pulse intensity
D Low battery
E MEMORY display
F Timer function (residual time
display); OFF time
G Programme/cycle numbers
H Operating status display
Keys:
a MENU key
b CYCLE TIMER key
c FREQUENCY SETTING key
d PULSE WIDTH SETTING key
e CYCLE SETTING key
f ON/OFF key
g ▲ UP and ▼ DOWN selection keys
h ENTER key
i CH1
±
, CH2
±
, CH3
±
, CH4
±
keys
Accessories:
• 2x connection cable (with 2 separately controllable channels, recognisable
by their difference in colour)
• 8x adhesive electrodes
(45 x 45 mm)
periodic
time
B
A
C
D
F G H
E
g
a
b
c
d
e
h
i
f
9
4.2 Key functions
Every time a key is pressed, this is acknowledged by a signal tone in order to
ensure that any unintentional pressing of a key is detected. This signal tone
cannot be switched off.
(ON/OFF)
(1) Hit briefly to switch on the device. If the key is held down for 10 seconds
when switching on, the unit automatically switches off again.
(2) Press once (= pause mode) to interrupt and continue stimulation treat-
ment.
(3) Hold ON/OFF key down (approx. 3 seconds) to switch off the device.
▲ and ▼
(1) Select (A) treatment programme, (B) treatment time and (C) frequency,
pulse width, number of cycles, ON/OFF time.
(2) The DOWN key ▼ is used to reduce pulse intensity for all channels during
stimulation.
MENU
(1) Navigation between the submenus TENS, EMS and MASSAGE.
(2) Return to (A) programme selection window or (B) main menu.
ENTER
(1) Menu selection.
(2)
To confirm a selection made with UP/ DOWN, apart from channel intensity.
CH1
±
, CH2
±
, CH3
±
, CH4
±
Setting pulse intensity.
Cycle
Setting, changing and confirming the number of cycles.
μs (microseconds)
Setting, changing and confirming pulse width of the individual cycles.
Hz (Hertz)
Setting, changing and confirming pulse frequency of the individual cycles.
(cycle timer)
Setting, changing and confirming ON/OFF times of the individual cycles.
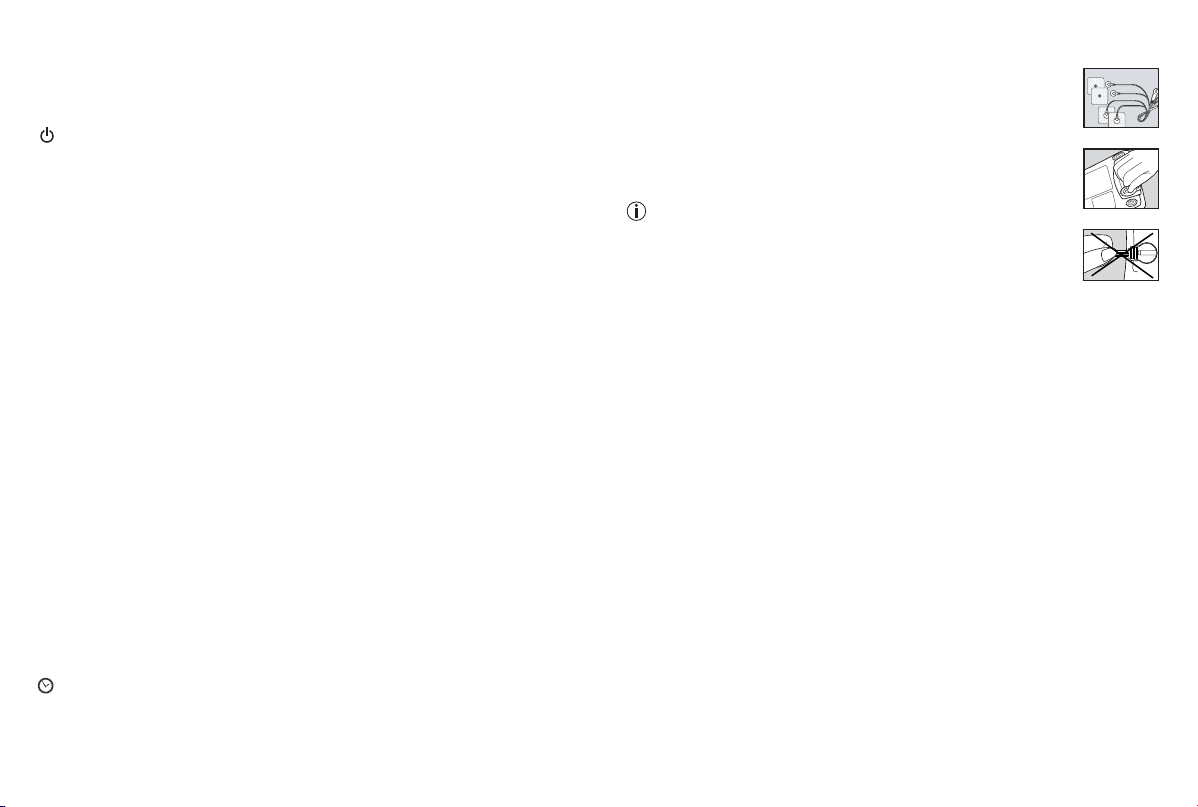
5. Start-up
1. Remove the battery cover from the base of the monitor by
undoing the catch.
2. Insert three AA 1.5 V alkaline batteries. Make absolutely
sure that you insert the batteries with the correct polarity as
marked.
3. Replace the battery cover carefully.
4. Attach the connecting cable to the electrodes (Fig. 1).
Note: The electrodes have a clip fastener to ensure easy
connection.
5. Insert the connecting cable connector into the socket at the
back of the device (Fig. 2).
6. Do not pull, twist or make any sharp kinks in the cables
(Fig. 3).
6. Programme overview
6.1 Basic information
The Digital TENS/EMS unit has a total 50 programmes:
• 20 TENS programmes
• 20 EMS programmes
• 10 MASSAGE programmes
With all programmes, you can set the length of application and (for each of the
four channels) pulse intensity separately.
Besides this, with TENS and EMS programmes 11-20, in order to physically
adapt the stimulation effect to the structure of the site of application, you can
also change both the pulse frequency, pulse width, ON and OFF times of the
individual cycles as well as the number of cycles.
Cycles are the different sequences making up the programmes. They automati
-
cally run one after the other and increase the efficacy of stimulation on different
types of muscle fibre and combat premature muscle fatigue.
You will find the standard stimulation parameter settings and information on
placing the electrodes in the following programme charts for TENS, EMS and
MASSAGE.
Fig. 1
Fig. 2
Fig. 3

10
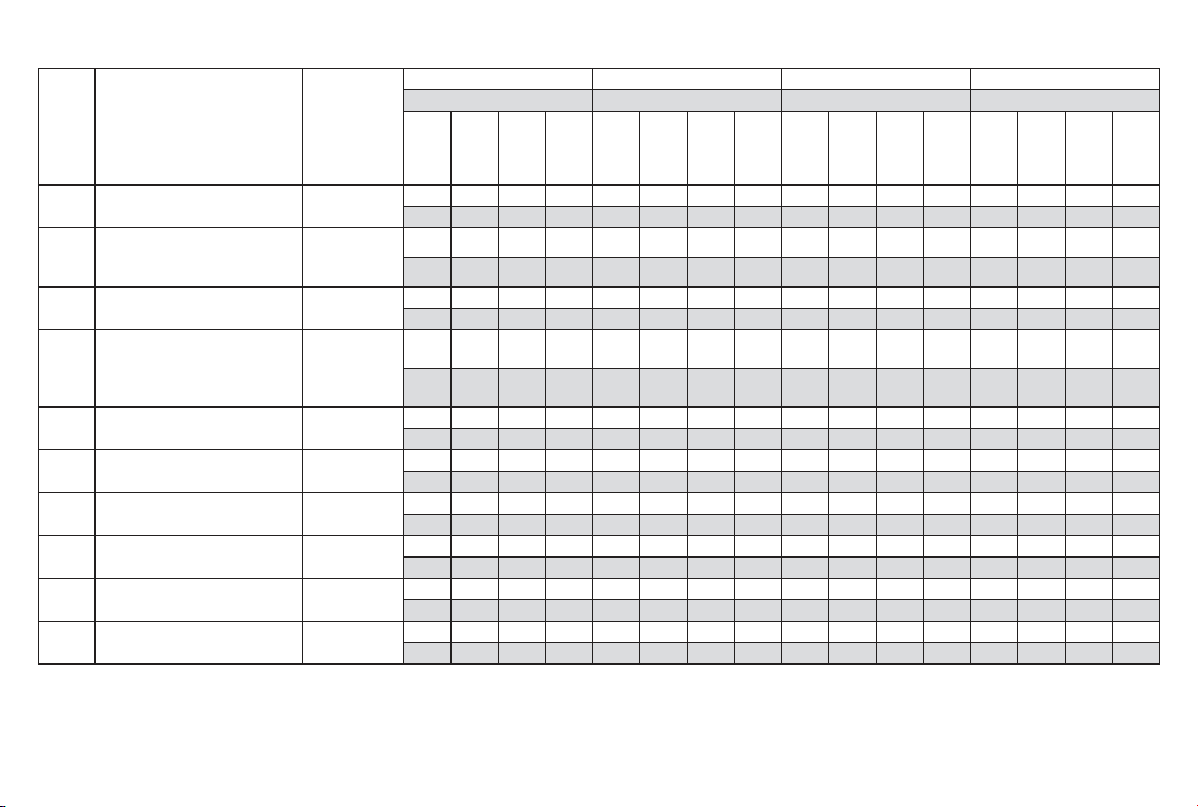
Prog.
No.
Reasonable areas of
application
Indications
Possible
electrode
position
Cycle 1 Cycle 2 Cycle 3 Cycle 4
Cycle 5 Cycle 6 Cycle 7 Cycle 8
Width
(µs)
Fre
-
quen-
cy
(Hz)
On
Time
(sec.)
Off
Time
(sec.)
Width
(µs)
Fre
-
quen-
cy
(Hz)
On
Time
(sec.)
Off
Time
(sec.)
Width
(µs)
Fre
-
quen-
cy
(Hz)
On
Time
(sec.)
Off
Time
(sec.)
Width
(µs)
Fre
-
quen-
cy
(Hz)
On
Time
(sec.)
Off
Time
(sec.)
1 + 11 Neck pain, tension
headache
01, 02, 13 250 4 30 0 250 4 30 0 250 5 30 0 250 5 30 0
250 6 20 0 250 6 20 0 250 8 30 0 250 8 30 0
2 + 12 Back pain 03, 04, 05, 06,
15, 23
250 6 30 0 250 6 30 0 250 8 20 0 250 8 20 0
250 10 20 0 250 10 20 0
3 + 13 Shoulder pain 07, 14 250 2 10 0 250 4 8 0 250 6 6 0
4 + 14 Pain as a result of
rheumatoid arthritis
See note 250 60 20 0 250 70 20 0 250 80 30 0 250 80 30 0
5 + 15 Lumbar pain 22 250 80 20 0 250 80 20 0 250 75 4 0 250 10 20 0
250 70 4 0 250 65 4 0
6 + 16 Menstrual pain 08 250 40 30 0 250 45 30 0 250 55 30 0 250 60 30 0
7 + 17 Pain programme I See note 250 4 30 0 250 4 20 0 250 6 30 0 250 6 20 0
250 8 30 0 250 8 20 0 250 10 30 0 250 10 20 0
8 + 18 Knee pain
Ankle joint pain,
capsular injuries
09, 10 250 40 5 0 250 6 10 0 250 50 5 0
9 + 19
(Burst)
Pain programme II
See note 250 75 0,25 0,25 250 2 0,5 0
10 + 20
(Burst)
Pain programme III See note 250 100 0,25 0,25
On Time (sec.) = Cycle switch-on time in seconds (contraction) – Off Time (sec.) = Cycle switch-off time in seconds (relaxation)
Note: Electrode position is supposed to surround the painful area. With painful muscle groups, the electrodes are grouped round the muscle affected. In case of joint pain, the
joint on the front/rear side of the joint and, if electrode distances permit, on the right and left sides of the joint, should be surrounded with electrodes.
Minimal electrode distance should not be less than 5 cm and not exceed 15 cm. See figure no. 9 an 10 for knee and ankle joint.
Burst programmes are suitable for all sites which should be treated with an alternating signal pattern (to ensure minimum habituation).
6.2 TENS programmes
11
6.3 EMS-Programme
Prog.
No.
Reasonable areas of
application
Indications
Possible
electrode
position
Cycle 1 Cycle 2 Cycle 3 Cycle 4
Cycle 5 Cycle 6 Cycle 7 Cycle 8
Width
(µs)
Fre
-
quen-
cy
(Hz)
On
Time
(sec.)
Off
Time
(sec.)
Width
(µs)
Fre
-
quen-
cy
(Hz)
On
Time
(sec.)
Off
Time
(sec.)
Width
(µs)
Fre
-
quen-
cy
(Hz)
On
Time
(sec.)
Off
Time
(sec.)
Width
(µs)
Fre
-
quen-
cy
(Hz)
On
Time
(sec.)
Off
Time
(sec.)
1 + 11 Shoulder muscles 07, 14 250 30 5 1 250 10 15 1 250 50 5 1
2 + 12 Middle and lower trapezius
muscle, lattisimus dorsi
muscle, neck muscles
01, 02, 03, 04,
05, 12, 15
250 4 30 1 250 4 20 1 250 5 30 1 250 5 20 1
250 6 30 1 250 6 20 1
3 + 13 Back musculature near spinal
column, Prog. I
03, 06, 22, 23 250 2 10 1 250 4 10 1 250 6 10 1
4 + 14 Front and back upper arm
musculature (including
biceps), front and back lower
arm musculature
16, 17, 18, 19 250 4 30 1 250 4 30 1 250 4 30 1 250 5 30 1
250 5 30 1
5 + 15 Straight and transverse
abdominal musculature
11, 20, 21 250 6 15 1 250 8 15 1 250 10 15 1
6 + 16 Back musculature near spinal
column, Prog. II
03, 06, 22, 23 250 2 20 1 250 2 20 1 250 1 30 1 250 1 30 1
7 + 17 Back musculature near spinal
column, Prog. III
03, 06, 22, 23 250 4 30 1 250 4 20 1 250 6 30 1 250 6 20 1
250 8 30 1 250 8 20 1
8 + 18 Posterior musculature 24 250 20 5 1 250 6 5 1 250 30 5 1
9 + 19 Front and back upper thigh
musculature
25, 26 250 20 5 1 250 6 8 1 250 25 5 1
10 + 20 Front and back lower thigh
musculature
27, 28 250 25 5 1 250 6 8 1 250 35 5 1
On Time (sec.) = Cycle switch-on time in seconds (contraction) – Off Time (sec.) = Cycle switch-off time in seconds (relaxation)
12
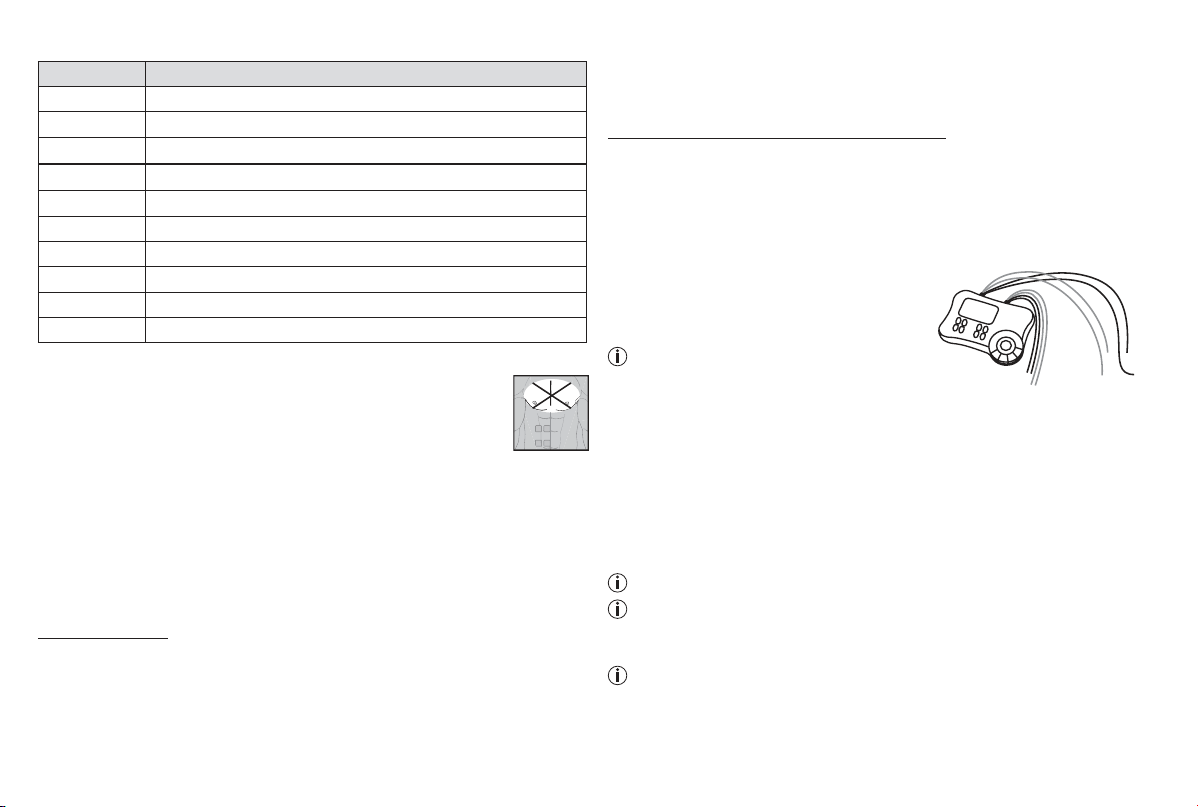
6.4 MASSAGE programmes
Prog. no. Massage form
1 Tap and grasp massage
2 Knead and grasp massage
3 Tap massage
4 Side of hand/pressing massage
5 Side of hand/pressing massage
6 Vibratory massage
7 Tap massage (switch between electrodes)
8 Massage jet (switch between electrodes)
9 Pressure massage jet (switch between electrodes)
10 Combination programme (switch between electrodes)
Electrodes must be placed so that they surround the muscle segments in
question. For optimal effect, electrode distance must not be
greater than approx. 15 cm.
The electrodes should not be applied to the anterior wall of the
thorax, i.e. never massage the left or right large pectoral muscle.
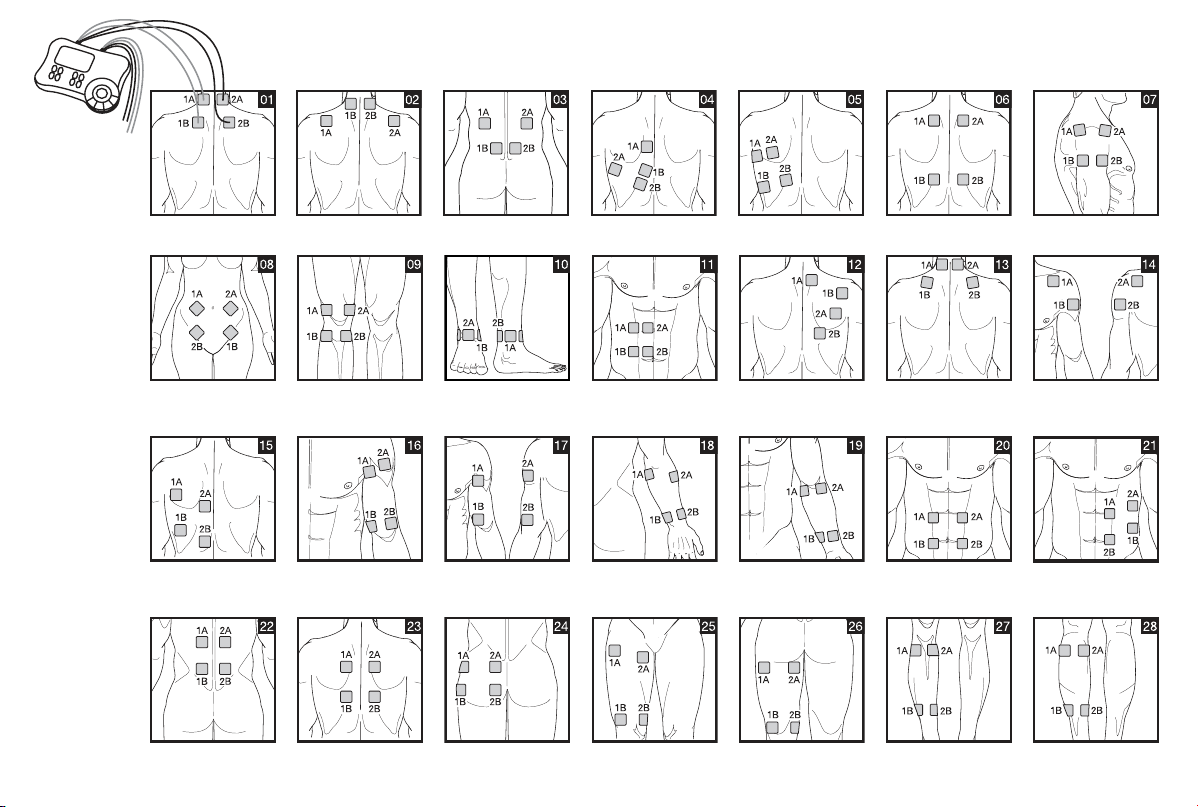
6.5 Information on placing the electrodes
For the desired success of any stimulation application, it is important that
electrodes are placed sensibly.
We advise you to coordinate with your doctor regarding the best electrode
positions for your intended field of application.
The electrode positions suggested inside the cover (Figs. 1-28) serve as a
guide. The following applies when choosing electrode positions:
Electrode distance
The greater the electrode distance which is selected, the greater will be the
volume of tissue that is stimulated. This applies to the area and the depth of
the tissue volume. At the same time, however, the strength of tissue stimulation
decreases as the electrode distance becomes greater, which means that, if a
greater electrode distance is chosen, a greater volume is stimulated, but stimu-
lation is weaker. To increase stimulation, pulse intensity must then be increased.
The following guideline holds when selecting electrode distances:
• most reasonable distance: approx. 5-15 cm.
• below 5 cm, it is mainly surface structures which are strongly stimulated.
• over 15 cm, large-area and deep structures are stimulated very weakly.
Electrode relationship to muscle fibre orientation
Choice of current flow direction must be adapted to the muscle fibre orien
-
tation according to the desired muscle layer. If surface muscles are to be
reached, the electrodes must be placed parallel to the fibre orientation (p. 2,
fig. 16; 1A-1B/2A-2B). If deep tissue layers are to be reached, the electrodes
must be placed crosswise to the fibre orientation (p. 2, fig. 16; 1A-2A/1B-2B).
The latter arrangement can, for example, be achieved via the cross electrode
arrangement, e.g. p. 2, fig. 16; 1A-2B/2A-1B.
Note the colour-codes of the cables and the
channels. The white cable belongs to channel
CH1/3 and the grey cable to channel CH2/4.
In the treatment of pain (TENS) using the
Digital TENS/EMS device with its 4 separa-
tely controllable channels and in each case
2 adhesive electrodes, it is advisable to either position the electrodes of
one channel so that the pain spot lies between the electrodes or else you
can position one electrode directly on the pain spot and the other at least
2-3 cm away.
The electrodes of the other channels can be used to treat other pain spots
simultaneously or else, however, together with the electrodes of the first
channel, to surround the pain area (opposite). A cross arrangement is again
advisable here.
Massage function tip: use all electrodes to ensure optimal treatment.
In order to extend the service life of the electrodes, use them on clean skin
which is as free as possible of hair and grease. If necessary, clean the skin
with water before use and remove any hair.
If an electrode becomes detached during the application, the pulse inten-
sity of this channel goes back to the lowest setting. Press the ON/OFF key
to enter pause mode, reposition the electrode and continue application by
pressing the ON/OFF key again and setting the required pulse intensity.
CH1
CH2
CH3
CH4
13
7. Application
7.1 Advice on application
• If the device is not used within 3 minutes, it switches off automatically
(automatic switch-off function). When it is switched on again, the LCD main
menu screen appears, with the last used submenu flashing.
• If an admissible key is pressed, there is one short beep. If an inadmissible
key is pressed, there are two short beeps.
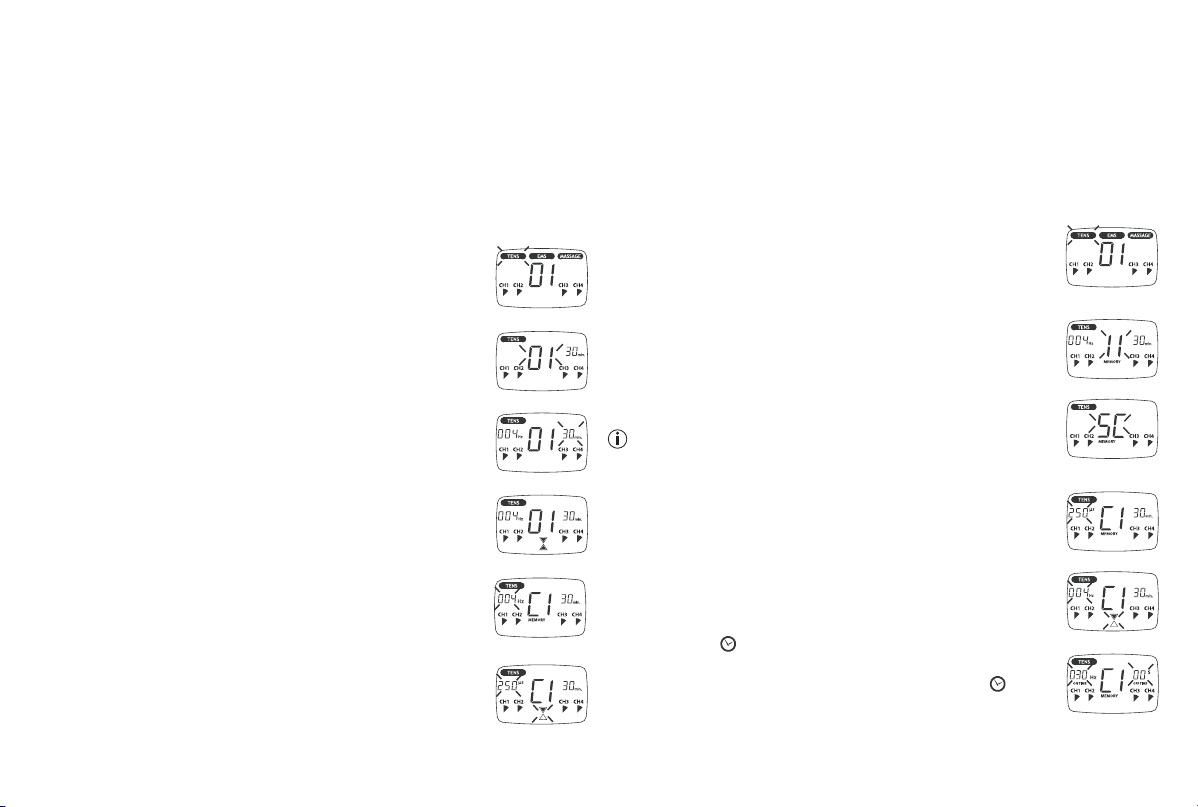
7.2 Procedure for TENS, EMS and MASSAGE programmes 01-10
(quick start)
• From the programme charts, select a programme that is
suitable for your purpose.
• Place the electrodes in the area selected and connect these
to the device. The corresponding positioning suggestions
may help you here.
• Press the ON/OFF key in order to switch on the device.
• Press MENU and navigate through the sub-menus (TENS/
EMS/MASSAGE) and confirm your selection with ENTER.
(Fig. 1, example of TENS display).
• Using the UP/DOWN keys, select the programme you want
and confirm with ENTER (Fig. 2, example of display for No. 1
TENS programme).
• Using the UP/DOWN keys, select the total treatment time and
confirm with ENTER (Fig. 3, example of 30-minute treatment
duration).
The device is in wait status (Fig. 4).
• Press ON/OFF to start stimulation treatment. Operating
status starts to change and pulse frequency is displayed
alternately with pulse width (Figs. 5 and 6).
• Select the pulse intensity which is the most comfortable for
you by pressing keys CH1
±
, CH2
±
, CH3
±
, CH4
±
.
The pulse intensity display adapts accordingly.
7.3 Procedure for TENS/EMS programmes 11 to 20 (individual
programmes)
Programmes 11 to 20 are preset programmes which you can also individualise.
Here you can set pulse frequency, pulse width as well as the ON and OFF
time of the individual cycles.
• From the programme charts, select a programme that is suitable for your
purpose.
• Place the electrodes in the area selected and connect these to the device.
The corresponding positioning suggestions may help you here.
• Press the ON/OFF key in order to switch on the device.
• Press MENU and navigate through the sub-menus (TENS/
EMS/MASSAGE) and confirm your selection with ENTER.
(Fig. 1, example of TENS display).
• Using the UP/DOWN keys, select the programme you want
and confirm with ENTER (Fig. 2, example of display for No.
11 TENS programme).
• The number of cycles is displayed (C) (Fig. 3, e.g. 5 cycles).
To change this, press the UP/DOWN key and confirm by
pressing CYCLE or ENTER.
You can also change the number of cycles during the other
programming stages by pressing the CYCLE key, selecting
the required number of cycles with UP/DOWN and confir-
ming with CYCLE or ENTER.
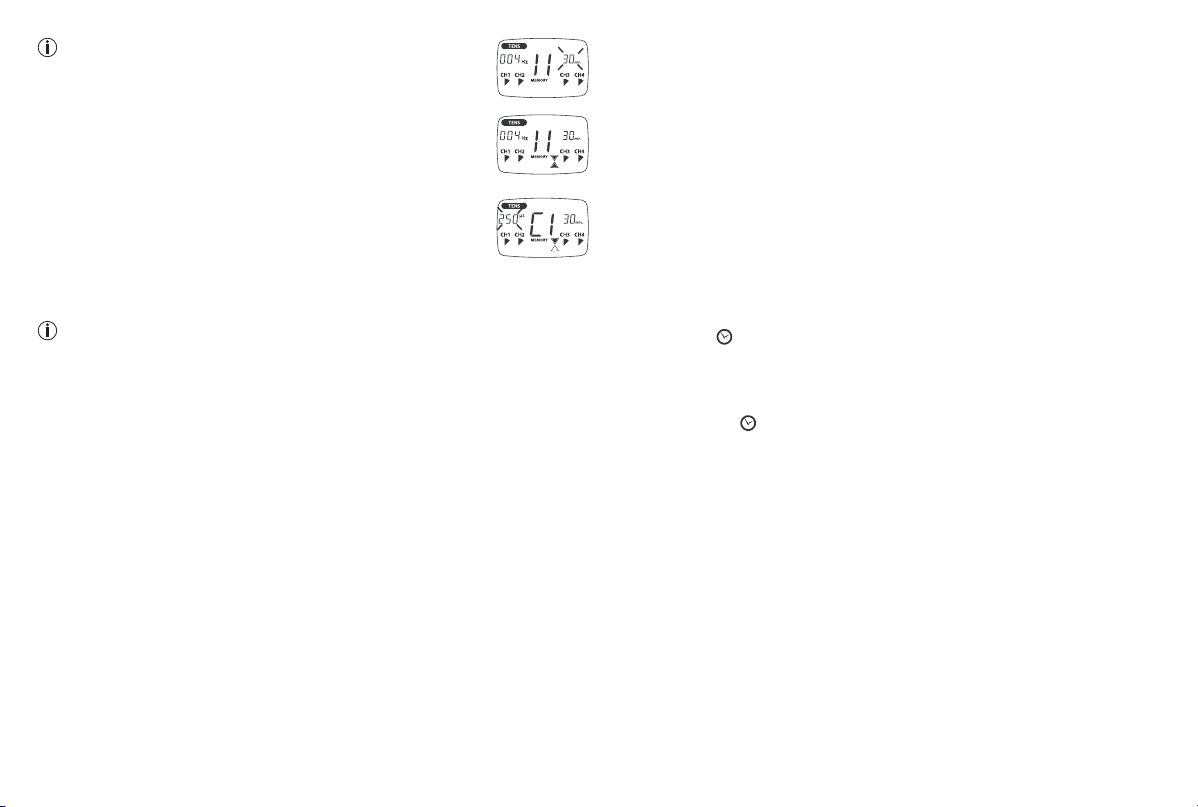
• To set pulse width, press the key ‘μs’, choose your setting
with UP/DOWN and confirm by once again pressing the key
‘μs’. Repeat for each cycle (Fig. 4).
• Set pulse frequency by pressing the ‘Hz’ key. Choose your
setting with UP/DOWN and confirm by once again pressing
‘Hz’. Repeat for each cycle (Fig. 5).
• Press the key
in order to set the respective ON and OFF
times of the individual cycles. Choose the duration with UP/
DOWN and confirm by once again pressing the key . Re-
peat for each cycle (Fig. 6).
Fig. 1
Fig. 2
Fig. 3
Fig. 4
Fig. 5
Fig. 6
Fig. 6
Fig. 1
Fig. 2
Fig. 3
Fig. 4
Fig. 5
14
Note: Setting OFF time to ‘00’ ensures that there is no
period of relaxation between the individual cycles.
• Hold ENTER depressed for approx. 2 seconds to advance to
the treatment time.
Using the UP/DOWN keys, select the desired treatment time
and confirm with ENTER (Fig. 7, Example of 30-minute treat-
ment duration).
• The device is in wait status (Fig. 8).
• Press ON/OFF to start stimulation treatment. Operation
status starts to change and pulse frequence is displayed
alternately with pulse width (Fig. 9).
• Select the pulse intensity which is the most comfortable for
you by pressing keys CH1
±
, CH2
±
, CH3
±
, CH4
±
.
The pulse intensity display adapts accordingly.
Note: Your individualised programme settings are stored and automati-
cally retrieved when you select it next.
7.4 Changes to the settings
Changing intensity (during application)
• CH1±, CH2±, CH3±, CH4±: Changing the intensity for each channel.
• DOWN key ▼ : the intensity of all channels is reduced.
Interrupting stimulation
Press the ON/OFF button.
If you press it again, the application is resumed.
Switching off a complete channel
Press the CH- key until the channel reaches the lowest intensity, then hold
the key depressed until the channel no longer appears in the display.
Hold down the corresponding key CH+ to reactivate the channel.
Changing application (completely or single parameters)
• ON/OFF: to interrupt stimulation.
• MENU: back to program selection window or main menu.
• Set required parameters. Confirm with ENTER. Press ON/OFF to continue
application.
7.5 Doctor’s Function
Doctor’s Function is a specific setting to allow you to call up your specific
personal programme even more easily.
Your individual programme setting is immediately retrieved in wait status
when you switch on and is activated by simply pressing the ON/OFF key.
Settings for this individual programme may, for example, be on the advice of
your doctor.
With the Doctor’s Function, only pulse intensity can be changed during
stimulation treatment. All other parameters and programmes of the Digital
TENS/EMS are blocked in this case and cannot be modified or called up.
Setting the Doctor’s Function:
• Select your programme and appropriate settings as described under 7.2
or 7.3.
• Before you activate the programme by pressing the ON/OFF key, hold
ON/OFF and
keys down simultaneously for approximately 5 seconds.
Storage in Doctor’s Function is confirmed by a long signal tone.
Cancelling Doctor’s Function:
To clear the device again and access other programmes, hold down the two
keys ON/OFF and
once again for approximately 5 seconds (not possible
during stimulation). Cancelling of the Doctor’s Function is confirmed by a
long signal tone.
8. Cleaning and storage
Adhesive electrodes:
• In order to ensure that the electrodes adhere for as long as possible, they
should be cleaned carefully with a damp, lint-free cloth.
• After use, stick the electrodes onto the backing film.
Cleaning the unit:
• Remove the batteries from the device every time you clean.
• Clean the unit after use with a soft, slightly moistened cloth. In case of
more extreme soiling you can also moisten the cloth with mild soapy water.
• Ensure that no water penetrates into the device. If this should ever happen,
only use the device again once it is completely dry.
• Do not use any chemical cleaners or abrasive agents for cleaning.
Fig. 7
Fig. 8
Fig. 9
15
Storage:
• Remove the batteries from the unit if you are not going to use it for a longer
period. Leaking batteries can damage the unit.
• Do not make any sharp kinks in the connecting leads or electrodes.
• Detach the connecting cable from the electrodes.
• After use, stick the electrodes onto the backing film.
• Store the device in a cool, well-ventilated place.
• Never place any heavy objects on the device.
9. Disposal
Notes on handling batteries
• If your skin or eyes come into contact with battery fluid, flush out the af
-
fected areas with water and seek medical assistance.
•
Choking hazard! Small children may swallow and choke on batteries.
Store the batteries out of the reach of small children.
• Observe the plus (+) and minus (-) polarity signs.
• If a battery has leaked, put on protective gloves and clean the battery
compartment with a dry cloth.
• Protect the batteries from excessive heat.
•
Risk of explosion! Never throw batteries into a fire.
• Do not charge or short-circuit batteries.
• If the device is not to be used for a long period, take the batteries out of
the battery compartment.
• Use identical or equivalent battery types only.
• Always replace all batteries at the same time.
• Do not use rechargeable batteries.
• Do not disassemble, split or crush the batteries.
Battery disposal
• The empty, completely flat batteries must be disposed of through spe
-
cially designated collection boxes, recycling points or electronics retailers.
You are legally required to dispose of the batteries.
• The codes below are printed on batteries containing harmful substances:
Pb = Battery contains lead,
Cd = Battery contains cadmium,
Hg = Battery contains mercury.
General disposal
For environmental reasons, do not dispose of the device in the household
waste at the end of its useful life. Dispose of the unit at a suitable local
collection or recycling point. Dispose of the device in accordance
with EC Directive – WEEE (Waste Electrical and Electronic
Equipment). If you have any questions, please contact the local
authorities responsible for waste disposal.
10. Problems and solutions
The device does not switch on when the ON/OFF button is pressed.
What should I do?
(1) Make sure that the batteries have been inserted correctly and have
contact.
(2) Change the batteries if necessary.
(3) Contact customer service.
The electrodes are detaching themselves from the body. What should I do?
(1) Clean the adhesive surface of the electrodes with a damp, lint-free cloth.
Then let them dry in the air and attach them again. Should the electrodes
still not adhere firmly, they must be replaced.
(2) Before each application, clean the skin, avoiding using any skin cream or
oils before treatment. Shaving can increase adhesion of the electrodes.
The device is giving out abnormal signal tones during treatment. What
should I do?
(1) Look at the display. Is any channel flashing? Interrupt the programme
by pressing the ON/OFF button. Make sure that the connecting leads
are properly connected to the electrodes. Make sure that there is a firm
contact between the electrodes and the treatment area.
(2) Make sure that the plug of the connecting lead is firmly connected to the
device.
(3) If the signal tones do not stop and the channel is flashing, change the
connecting cable.
(4) The display shows a flashing battery signal. Renew the batteries.
There is no noticeable stimulation. What should I do?
(1) If a warning signal sounds, go through the steps described above.
(2) Press the ON/OFF key to start the programme again.
16
(3) Check that the electrodes are positioned properly and make sure that the
adhesive electrodes are not overlapping.
(4) Increase pulse intensity in stages.
(5) The batteries are almost empty. Replace these.
You are aware that the electrodes feel uncomfortable. What should I do?
(1) The electrodes are badly positioned. Check positioning and if necessary
reposition the electrodes.
(2) The electrodes are worn. Due to the fact that current distribution can no
longer be guaranteed evenly over the entire surface, these may lead to
skin irritation. You must therefore replace these.
The skin in the treatment area becomes red. What should I do?
Stop treatment immediately and wait until the skin has returned to normal. If
any redness beneath the electrode soon disappears, this is not dangerous
and is due to the increased circulation which has been stimulated locally.
If, however, the skin irritation remains and there is possibly itching or inflam
-
mation, please consult your doctor before further use. It may possibly be
caused by an allergy to the adhesive surface.
11. Technical details
Name and model: EM80
Initial curve shape: biphase square-wave pulse
Pulse duration: 40-250 μs
Pulse frequency: 1-120 Hz
Output voltage: max. 90 Vpp (at 500 Ohm)
Output current: max. 180 mApp (at 500 Ohm)
Power supply: 3x AA batteries
Treatment time: adjustable from 5 to 90 minutes
Intensity: adjustable from 0 to 15
Operating conditions: 5°C-40°C (41°F-104°F) with a relative humidity
of 40-70 %
Storage conditions: 0°C-40°C (32°F-104°F) with a relative humidity
of ≤ 90 %
Transportation conditions: -25 °C - 70 °C (-13 °F 158 °F), with a relative
humidity of ≤ 90 %
Dimensions: 170 x 125 x 48 mm
Weight: 235 g (without batteries) , 310 g (incl. batteries)
Explanation of symbols: Application part type BF
Caution! Read the instructions for Use.
The device can emit effective output values
above 10 mA, averaged over every five second
interval.
The serial number is located on the device or in the battery compartment.
Note: If the device is not used according to these specifications, perfect
functioning is not guaranteed.
We reserve the right to make any technical alterations that are necessary in
order to improve and develop the product further.
This unit is in line with European Standards EN 60601-1, EN 60601-1-2and
EN 60601-2-10 (In accordance with IEC 61000-4-2, IEC 61000-4-3, IEC
61000-4-4, IEC 61000-4-5, IEC 61000-4-6, IEC 610004-8 and IEC 610004-
11) and is subject to particular precautions with regard to electromagnetic
compatibility (EMC). Please note that portable and mobile HF communication
systems may interfere with this unit. For more details, please contact custo
-
mer service at the address indicated.
The device meets the requirements of the European Medical Products
Directive 93/42/EEC and the German Medical Products Act. For this device,
a functional test and instruction in accordance with Section 5 of the Medical
Devices Operator Ordinance (MPBetreibV) is not required. It is also not neces
-
sary to carry out safety checks in accordance with Section 6 of the Medical
Devices Operator Ordinance (MPBetreibV).
12. Notes on electromagnetic compatibility
WARNING!
•
The device is suitable for use in all environments listed in these instructions
for use, including domestic environments.
•
The use of the device may be limited in the presence of electromagnetic dis-
turbances. This could result in issues such as error messages or the failure
of the display/device.
•
Avoid using this device directly next to other devices or stacked on top of other
devices, as this could lead to faulty operation. If, however, it is necessary to
use the device in the manner stated, this device as well as the other devices
must be monitored to ensure they are working properly.

17
Subject to errors and changes
•
The use of accessories other than those specified or provided by the manu-
facturer of this device can lead to an increase in electromagnetic emissions
or a decrease in the device’s electromagnetic immunity; this can result in
faulty operation.
•
Failure to comply with the above can impair the performance of the device.
13. Replacement parts and wearing parts
Replacement parts and wearing parts are available from the corresponding
listed service address under the stated material number.
Designation Item number and/or order number
8x adhesive electrodes
(45 x 45 mm)
661.02
4x adhesive electrodes
(50 x 100 mm)
661.01
14. Warranty/service
Further information on the guarantee and guarantee conditions can be found
in the guarantee leaflet supplied.

18

19

20
662.00_EM80_2022-08-18_06_IM2_BEU_EN
Beurer GmbH • Söflinger Straße 218 • 89077 Ulm, Germany • www.beurer.com
www.beurer-gesundheitsratgeber.com • www.beurer-healthguide.com
Beurer UK Ltd., Suite 16, Stonecross Place, Yew Tree Way, WA3 2SH Golborne, United Kingdom