
Technical Support and E-Warranty Certificate www.vevor.com/support
WALL MOUNT
SERVER ENCLOSURE
USER MANUAL
We continue to be committed to provide you tools with competitive price.
"Save Half", "Half Price" or any other similar expressions used by us only represents an estimate
of savings you might benefit from buying certain tools with us compared to the major top brands
and does not necessarily mean to cover all categories of tools offered by us. You are kindly
reminded to verify carefully when you are placing an order with us if you are actually saving half
in comparison with the top major brands.

- 1 -
Have product questions? Need technical support? Please feel free to
contact us:
Technical Support and E-Warranty Certificate
www.vevor.com/support
NEED HELP? CONTACT US!
This is the original instruction, please read all manual instructions
carefully before operating. VEVOR reserves a clear interpretation of our
user manual. The appearance of the product shall be subject to the
product you received. Please forgive us that we won't inform you again if
there are any technology or software updates on our product.
WALL MOUNT
SERVER ENCLOSURE

- 2 -
Thank you for purchasing the Performance Series Wall Mount Cabinet
from VEVOR.
Every effort has been made to ensure the accuracy of the information in
this product manual.
IMPORTANT SAFETY INSTRUCTIONS
Keep the enclosure free from moisture, extremes of temperature, com-
bustible substances and gases, conductive pollutants, dust, and direct
sunlight in a controlled indoor environment. Allow sufficient room for
appropriate ventilation at the front and back of the enclosure. The
enclosure's external ventilation openings must not be blocked, covered,
or inserted with items.
Please call or email us if you have any concerns about the installation or
use of your product. Please inspect the product for any missing or
defective components. Ask VEVOR for help if any component is broken
or missing. If the product has been affected, do not try to install or use it.
To prevent harm during assembly, place the product contents on card-
board or another safe surface. Improper installation or use of this prod-
uct can result in product damage, other damage to equipment, or
personal injury.
It is advised that the installation be performed by a professional installer.
VEVOR cannot be held liable for equipment damage or physical injuries
resulting from inappropriate product usage or installation. Please ensure
that the equipment stored/mounted should not exceed the stated weight
capacity.
Use of Trademarks, Registered Trademarks, and other Protected
Names and Symbols
This manual may make reference to trademarks, registered trademarks,
and other protected names and/or symbols of third-party companies not
related in any way to VEVOR. These references are provided for infor-
mational purposes only and do not represent an endorsement of a

- 3 -
product or service by VEVOR, or an endorsement of the product(s) to
which this manual applies by the third-party company in question.
Regardless of any direct acknowledgment elsewhere in the body of this
document, VEVOR hereby acknowledges that all trademarks, registered
trademarks, service marks, and other protected names and/or symbols
contained in this manual and related document are the property of their
respective holders.
Limitations of Liability: VEVOR will not be responsible for any injury or
damage, whether direct or indirect, special, punitive, incidental, or
consequential damages (including, but not limited to, lost profits or
revenue, loss of use, lost business opportunities, or loss of goodwill), or
the costs of procuring substitute products, arising out of or in connection
with the use of the product. In no case can seller's gross accumulated
liability, arising from all causes of action and theories of liability, exceed
the total sums actually charged by customer to seller under the order
giving rise to any liability here under.
- 4 -
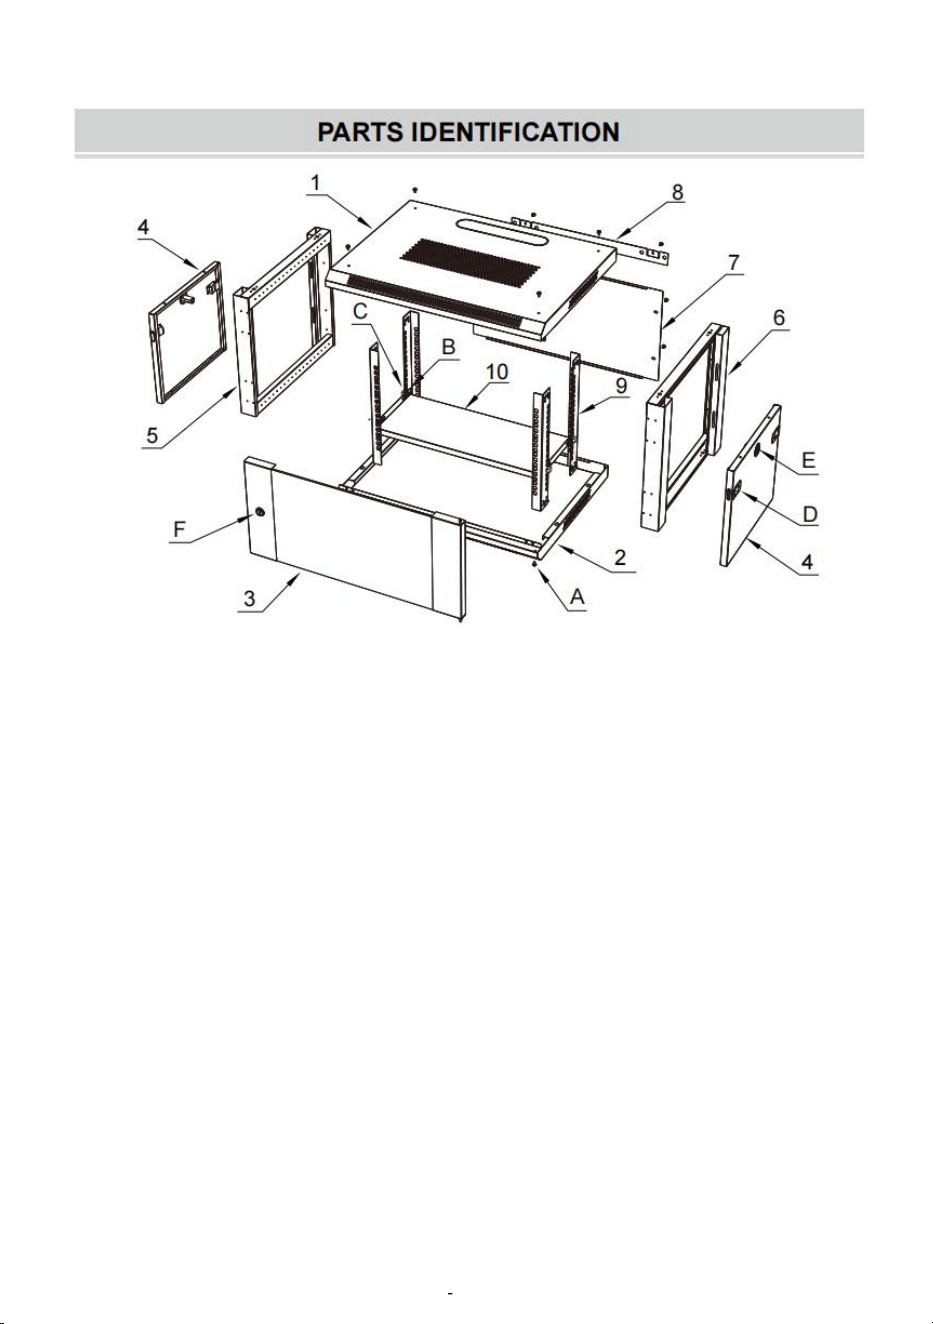
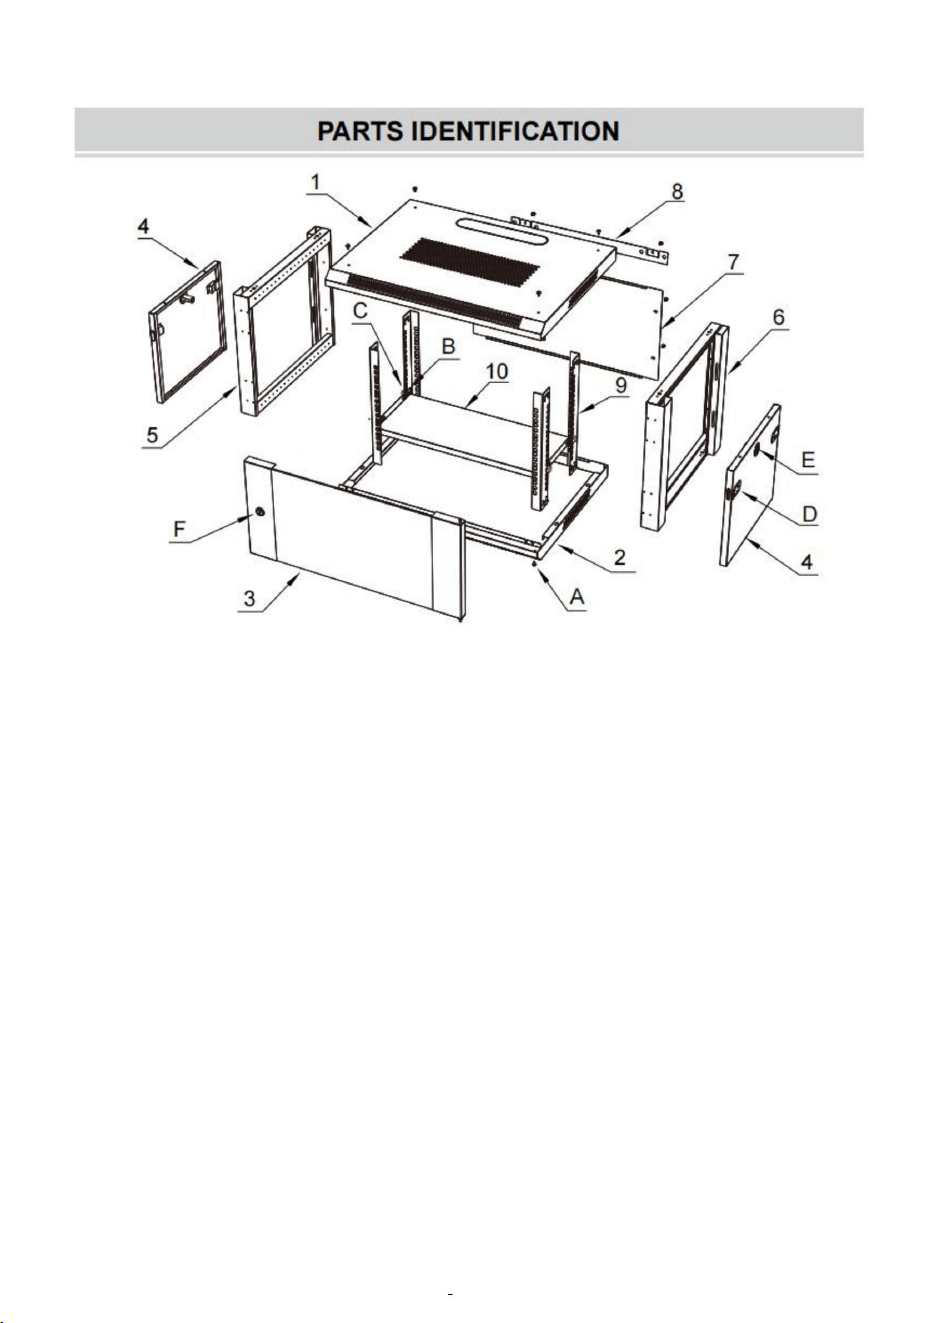
1. Top Panel x1 A: M5*10 Cross head Screws x40
2. Bottom Panel x1 B: M6*12 Hex Head Screws x12
3. Front Door x1
C: M6 Cage Nuts
x12
4. Side Panels x2 D: Side Panel Latches x4
5. Left Frame x1 E: Side Panel Lock Kit x2
6. Right Frame
x1 F: Front Door Lock Kit x1
7. Rear panel
x1
G: M10*70mm Expansion
screws
x4
8. Rear suspension
x1
H:Grounding wire
x1
9. Vertical Mounting Rails
x4
10. Pallet
x1
- 5 -
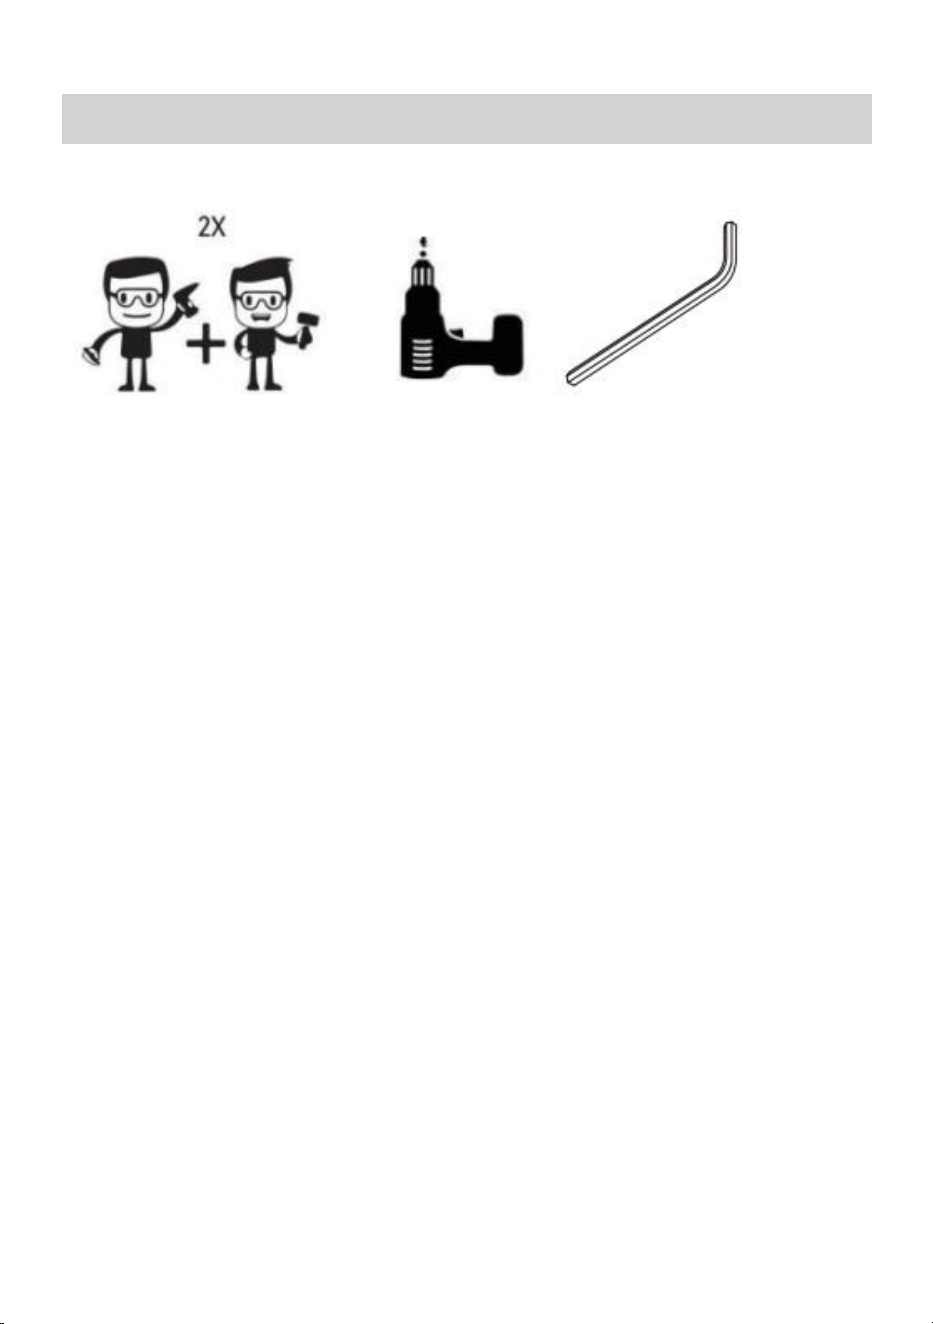
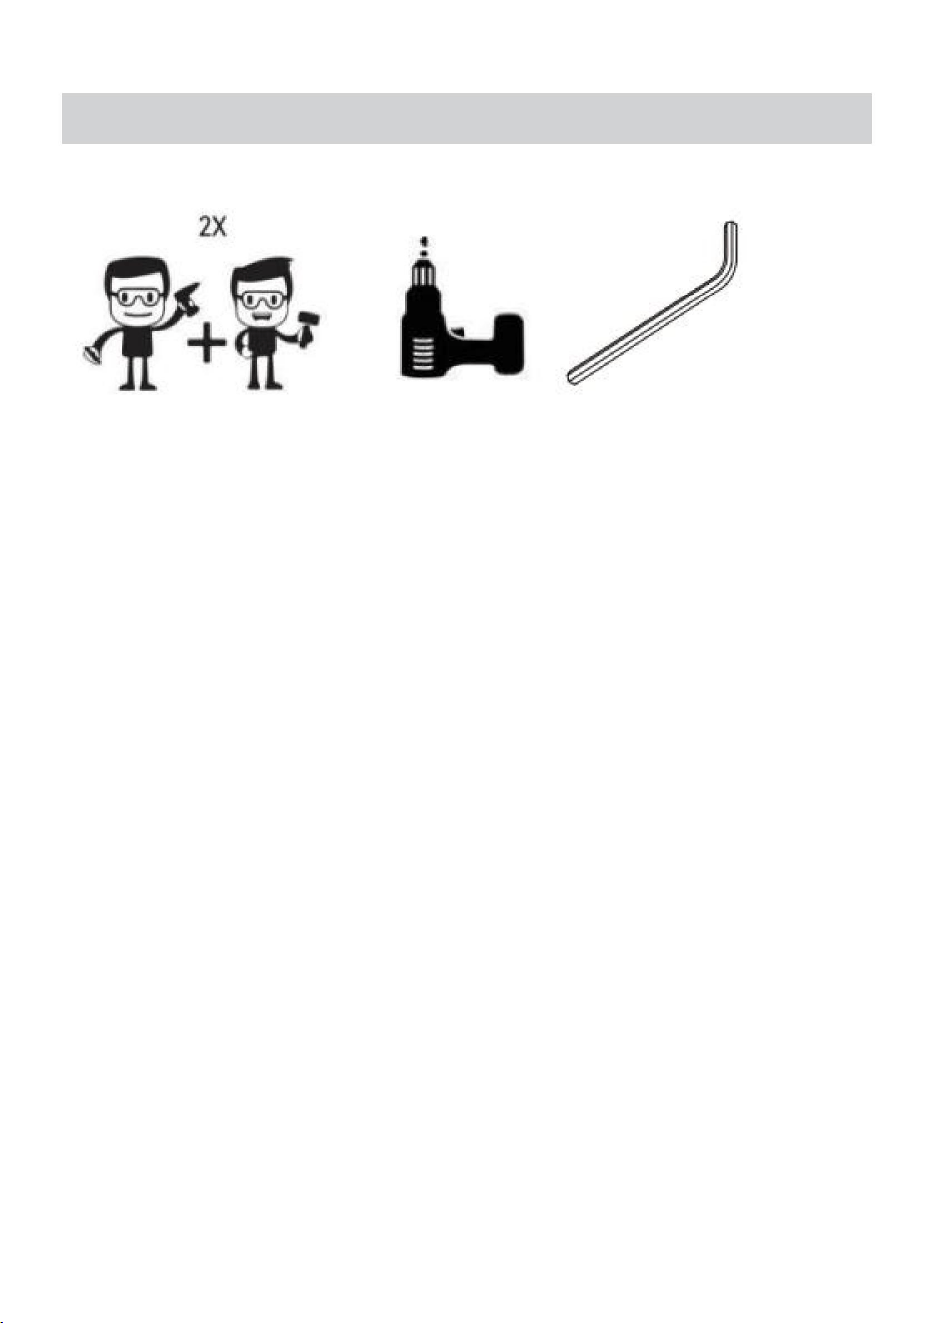
REQUIREMENTS
• Electric screwdriver (sold separately)
• Two People (for assembly)
• Allen key (parts package has included)
Note: Two people are required for the Rack assembly.
- 6 -
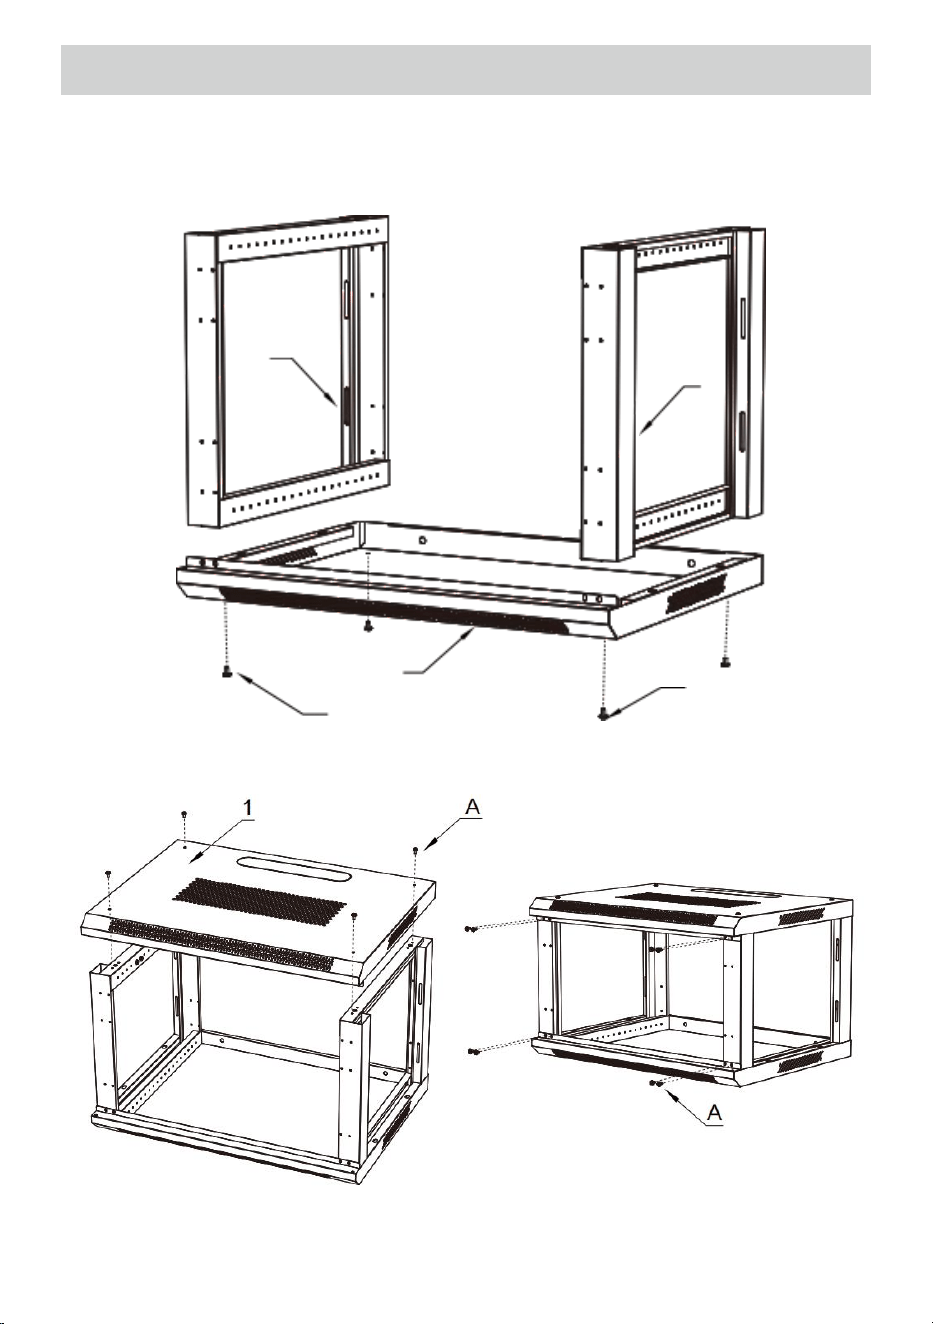
ENCLOSURE INSTALLATION
1: Insert the Left Frame (#5) and the Right Frame (#6) into the Bottom
Panel (#2), Secure with 4pcs M5*10 Cross Head Screws (A) .
5
6
2
A
2: Place the Top Panel (#1) onto the Left Frame (#5) and the Right
Frame (#6). Secure with 12pcs M5*10 Cross Head Screws (A) .
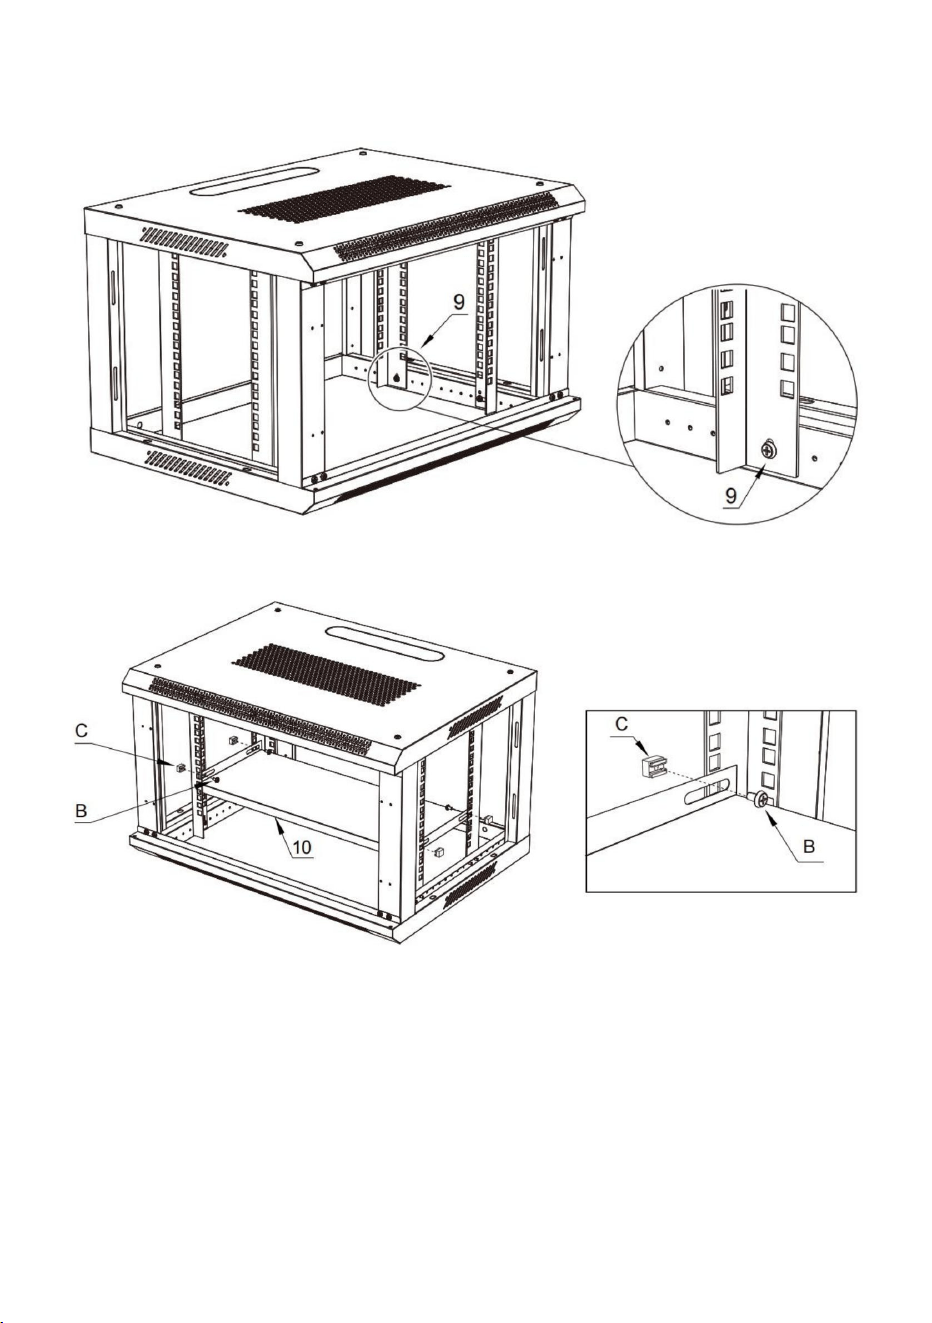
3: Install the 4 Vertical Mounting Rails (#9) into place at the desired depth
Secure with 8pcs M5*10 Cross Head Screws(A) .
A

- 7 -
Note: Please consider the equipment you plan to install within the enclosure
while deciding the appropriate mounting depth. Make sure the rail depth on
both sides of the cabinet is the same.
4: Install the Pallet (#10) into place at the desired height ,Secure with
M6*12 Hex Head Screws (B) and M6 Cage Nuts (C).
- 8 -
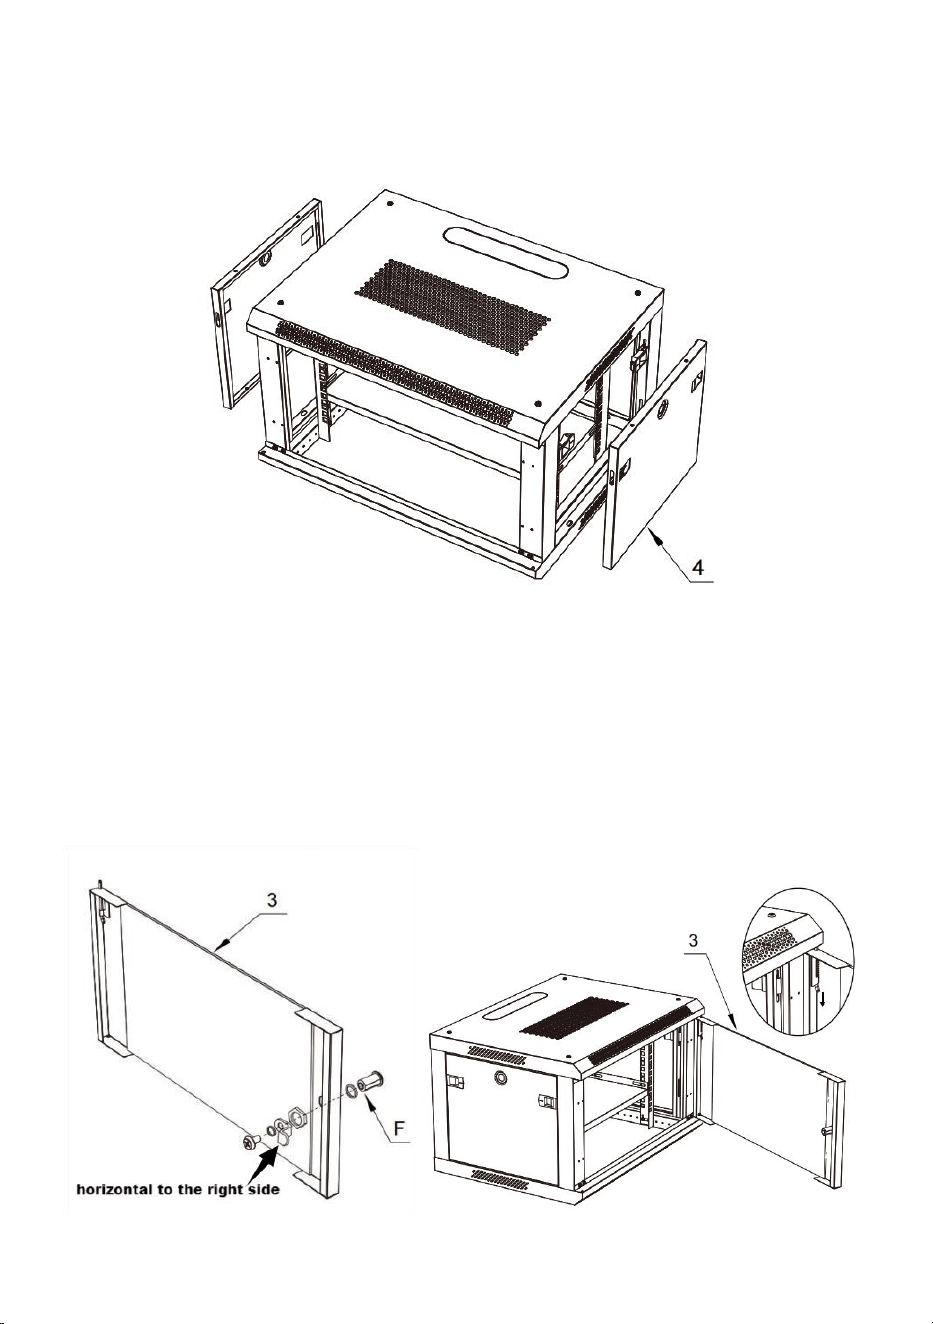
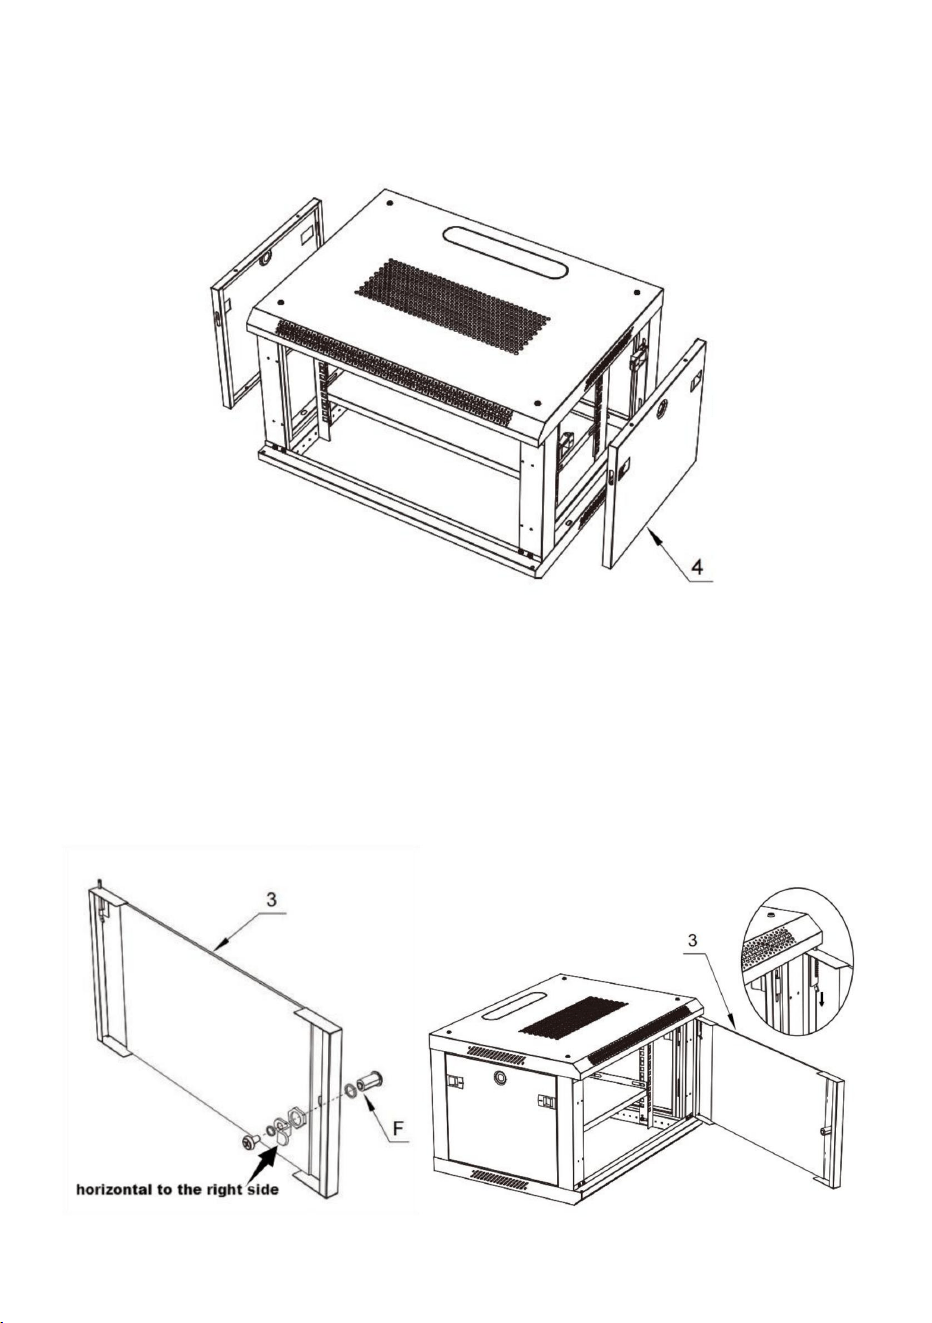
5: Install the two Side Panels (#4) into the Left Frame (#5) and the Right
Frame (#6).Once each Side Panel (#4) is in place, check to see whether
the Side Panel Latches(D) and the Side Panel Lock Kits(E) works
properly.
6: Install the Front Door Lock (F) on the Front Door (#3).
7: Position the Front Door (#3) so that the top and bottom pins are aligned
with the hinge hole located in the enclosure. Insert the bottom fixed pin
into the bottom hinge hole. Pull the top spring pin down into the hole in the
top corner and release it.
Note:make sure the lock pieces mounted as the following photo showed
direction(horizontal to the right side)
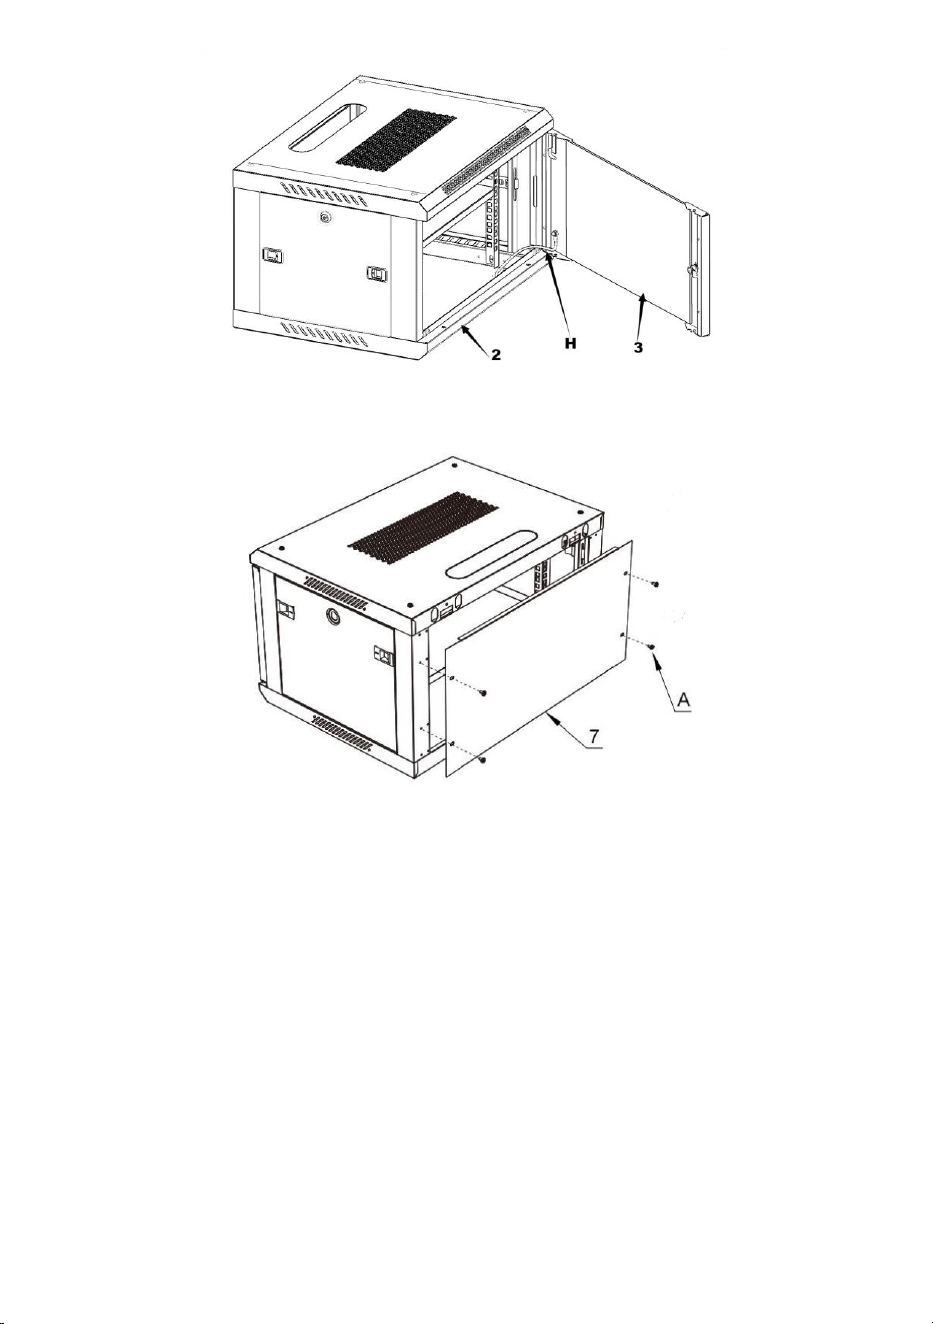
8:Install the Grounding Wire(H),Connect Front Door(#3) and Bottom
Panel(#2).
- 9 -
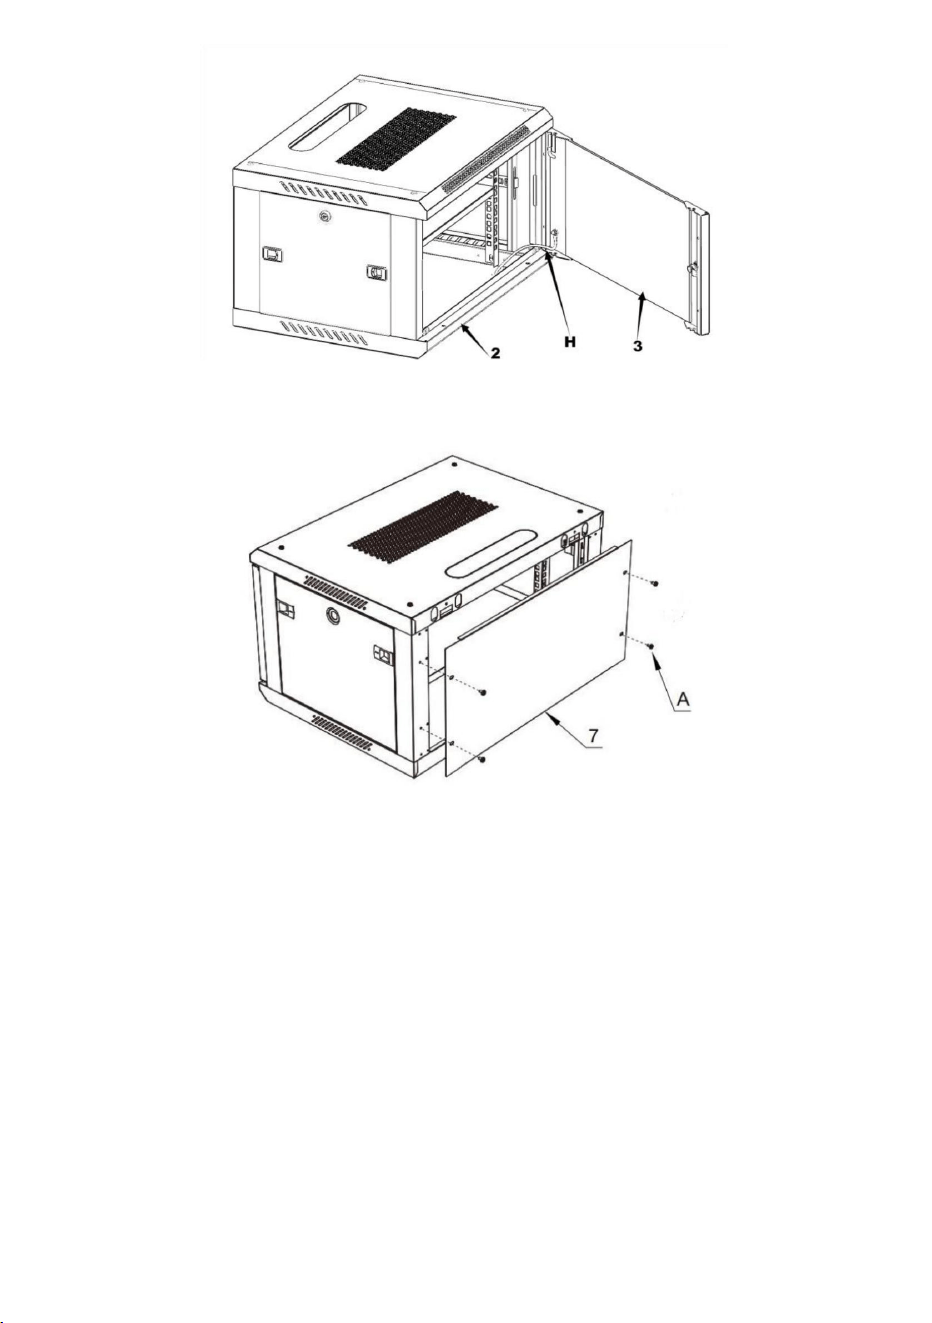
9: Install the Rear panel ( #7),Secure with 4/6pcs M5*10 Cross Head
Screws(A) .

- 10 -
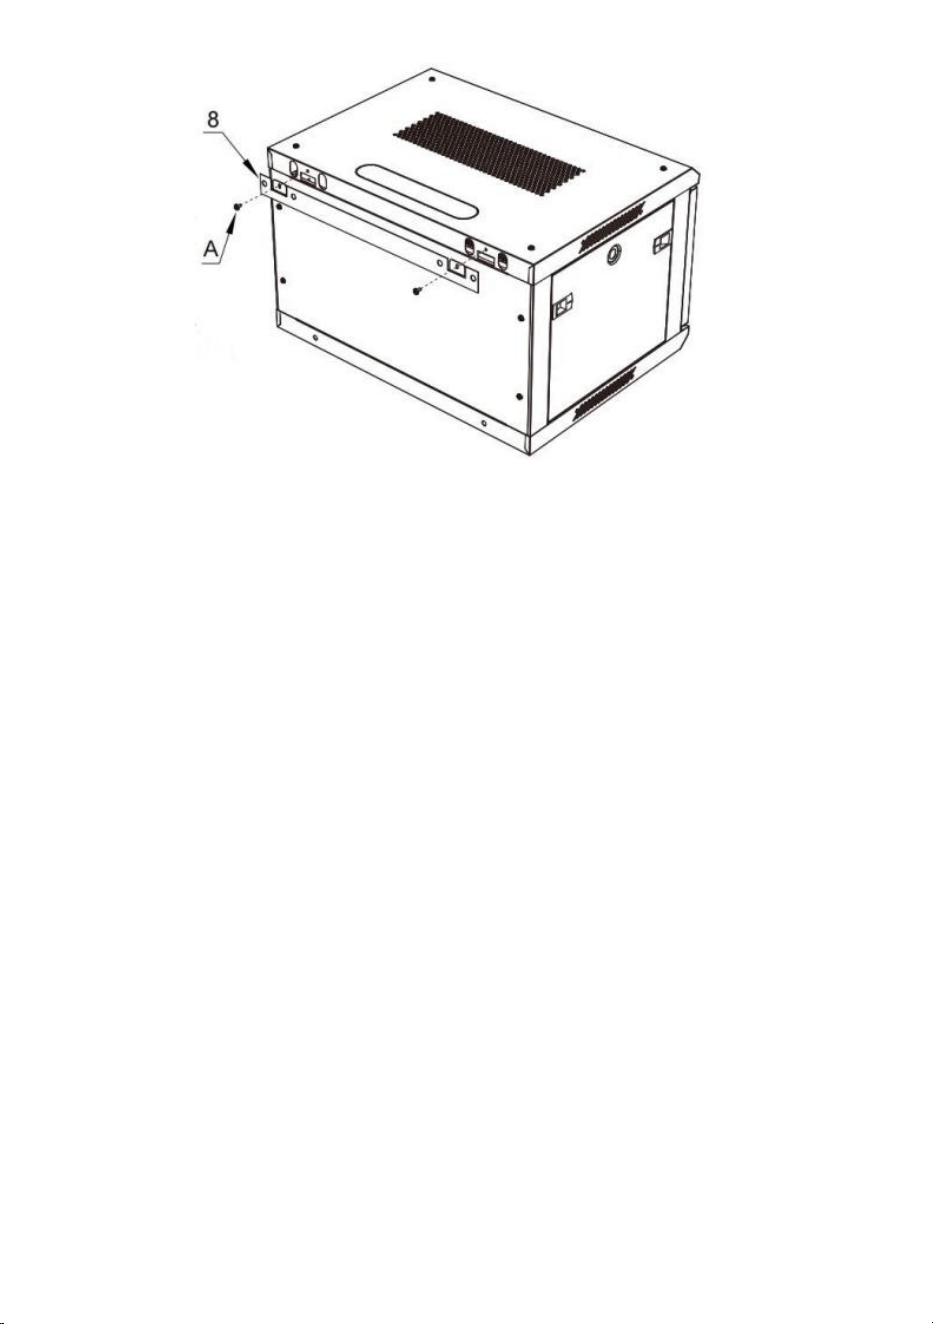
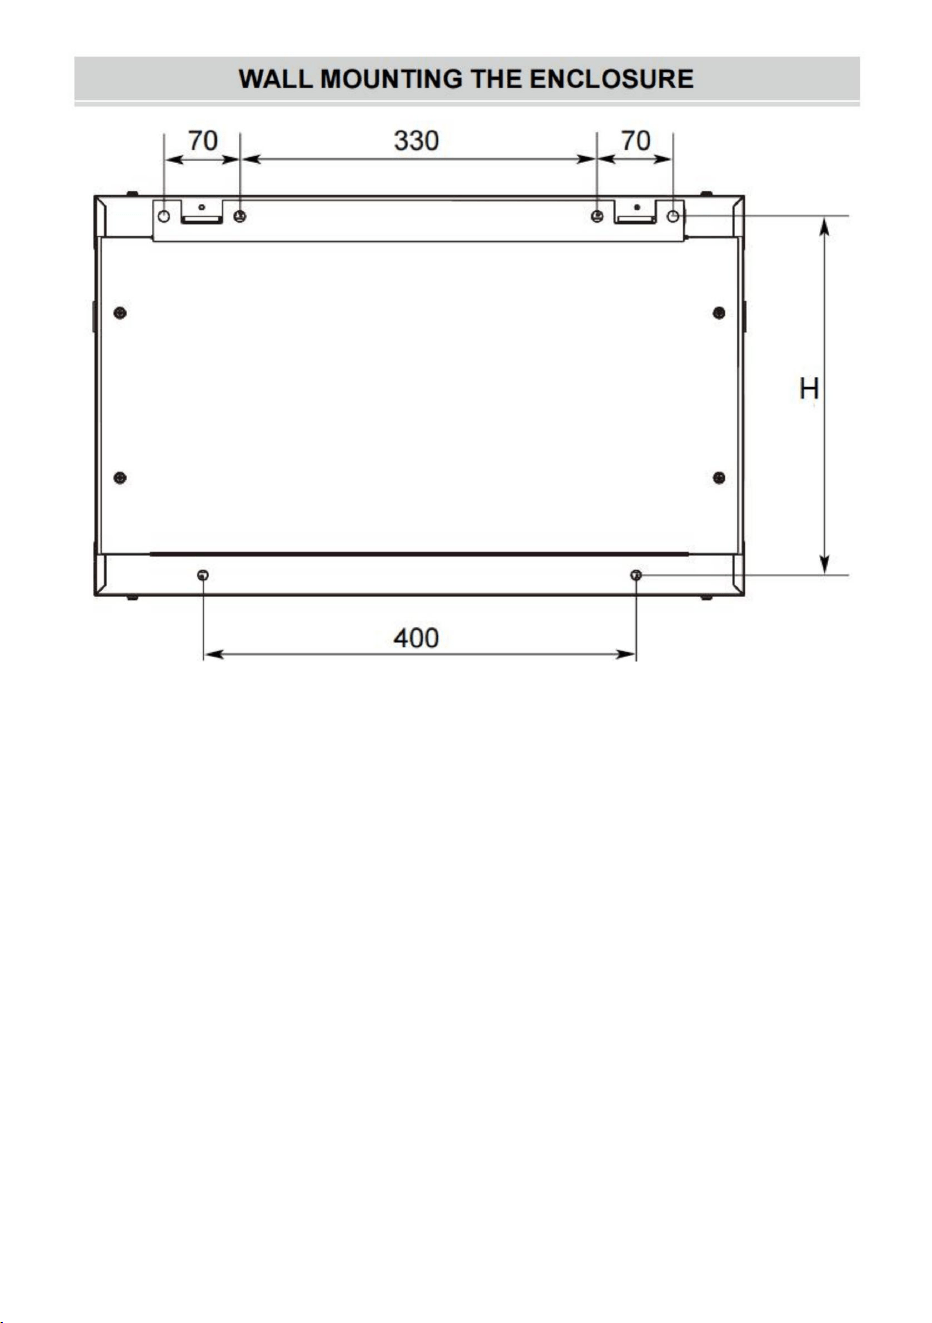
1:First put the Rear suspension (#8)on the wall or other suitable
mounting surface,on the suitable position to mark mounting holes
position by colored pen,then measure the above figure showed hole
distance to mark the bottom two mounting holes position.
The mounting hole distance is shown in the above figure, apart to
accommodate standard stud placement as reflected in the diagram.
SPT-604-06 6U Server Enclosure,H=300mm;
SPT-604-09 9U Server Enclosure,H=480mm;
SPT-604-12 12U Server Enclosure,H=620mm;
SPT-604-12W 12U Server Enclosure,H=620mm.
2:Adopts electric drill to drill marked 4pcs diameter 10mm holes,then
mounting and fix the M10 Expansion screws(G) into the holes.
3:Fix the Rear suspension (#8) on the enclosure,Secure with 2pcs M5*10
Cross Head Screws(A) .
- 11 -
4:Fix the enclosure on the the M10 Expansion screws(G),tight the
expansion screw’s nut.
Warning: Do not attempt to mount to wall when equipment is mount-
ed inside the enclosure. The enclosure has a weight capacity of 200
pounds. Make sure the type of wall structure and mounting hardware
that you are using will properly support the weight of the enclosure
and equipment.

- 12 -
- 13 -
Manufacturer: Shanghaimuxinmuyeyouxiangongsi
Address: Shuangchenglu 803nong11hao1602A-1609shi, baoshanqu,
shanghai 200000 CN.
Imported to AUS: SIHAO PTY LTD. 1 ROKEVA STREETEASTWOOD NSW
2122 Australia
Imported to USA: Sanven Technology Ltd. Suite 250, 9166 Anaheim Place,
Rancho Cucamonga, CA 91730
EC REP
E-CrossStu GmbH
Mainzer Landstr.69, 60329 Frankfurt am Main.
UK REP
YH CONSULTING LIMITED.
C/O YH Consulting Limited Office 147, Centurion House,
London Road, Staines-upon-Thames, Surrey, TW18 4AX


Technical Support and E-Warranty Certificate
www.vevor.com/support

BOÎTIERDESERVEUR
MONTAGEMURAL
MANUELD'UTILISATION
Assistancetechniqueetcertificatdegarantieélectroniquewww.vevor.com/support
Lesexpressions«MoitiéÉconomisez»,«MoitiéPrix»outouteautreexpressionsimilairequenousutilisonsne
représententqu'uneestimationdeséconomiesquevouspourriezréaliserenachetantcertainsoutilscheznous
parrapportauxgrandesmarquesetnecouvrentpasnécessairementtouteslescatégoriesd'outilsquenous
proposons.Nousvousinvitonsàvérifierattentivement,lorsdevotrecommande,sivouséconomisezréellement
lamoitiéduprixparrapportauxgrandesmarques.
Nouscontinuonsànousengageràvousfournirdesoutilsàdesprixcompétitifs.

Ceciestlemoded'emploid'origine.Veuillezlireattentivementtouteslesinstructions
dumanuelavantutilisation.VEVORseréserveledroitd'interpréterclairementcemanuel
d'utilisation.L'apparenceduproduitdépendduproduitquevousavezreçu.Veuillez
nousexcuserpourleretarddanslapublicationdetoutemiseàjourtechnologiqueoulogicielle
concernantnotreproduit.
Desquestionssurnosproduits?Besoind'assistancetechnique?N'hésitezpasànous
contacter:
Assistancetechniqueetcertificatdegarantieélectronique:
www.vevor.com/support
1
BESOIND'AIDE?CONTACTEZNOUS!
MONTAGEMURAL
BOÎTIERDESERVEUR

CONSIGNESDESÉCURITÉIMPORTANTES
Tousleseffortsontétéfaitspourgarantirl'exactitudedesinformationscontenuesdanscedocument.
quel'équipementstocké/monténedoitpasdépasserlepoidsindiqué
deVEVOR.
l'utilisationdevotreproduit.Veuillezinspecterleproduitpourdécelertoutélémentmanquantou
capacité.
Lesouverturesdeventilationexternesdel'enceintenedoiventpasêtrebloquées,couvertes
ouinséréesavecdesobjets.
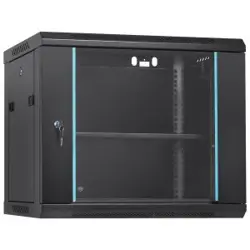
Mercid'avoirachetél'armoiremuraledelasériePerformance
Veuilleznousappelerounousenvoyerunemailsivousavezdesquestionsconcernantl'installationou
VEVORnepeutêtretenuresponsabledesdommagesmatérielsoudesblessurescorporelles.
ventilationappropriéeàl'avantetàl'arrièredel'enceinte.
résultantd'uneutilisationoud'uneinstallationinappropriéeduproduit.Veuillezvousassurer
Utilisationdesmarquescommerciales,desmarquesdéposéesetd'autresmarquesprotégées
lumièredusoleildansunenvironnementintérieurcontrôlé.Prévoyezsuffisammentd'espacepour
Ilestconseilléquel'installationsoiteffectuéeparuninstallateurprofessionnel.
Maintenezleboîtieràl'abridel'humidité,destempératuresextrêmes,dessubstanceset
gazcombustibles,despolluantsconducteurs,delapoussièreetdelalumièredirectedusoleil.
préjudicecorporel.
liésdequelquemanièrequecesoitàVEVOR.Cesréférencessontfourniesàtitreinformatif
uniquementetneconstituentpasuneapprobationd'un
Pourévitertoutdommagelorsdel'assemblage,placezlecontenuduproduitsuruncarton
ouuneautresurfacesûre.Uneinstallationouuneutilisationincorrectedeceproduitpeut
entraînerdesdommagesauproduit,d'autresdommagesàl'équipementou
Cemanuelpeutfaireréférenceàdesmarquescommerciales,desmarquesdéposéeset
d'autresnomset/ousymbolesprotégésdesociétéstiercesnon
Nomsetsymboles
cemanuelduproduit.
oumanquant.Sileproduitestconcerné,n'essayezpasdel'installeroudel'utiliser.
Composantsdéfectueux.ContactezVEVORsiuncomposantestcassé.
2

3
Indépendammentdetoutereconnaissancedirecteailleursdanslecorpsdecedocument,
VEVORreconnaîtparlaprésentequetouteslesmarquescommerciales,marques
déposées,marquesdeserviceetautresnomset/ousymbolesprotégéscontenusdans
cemanueletledocumentassociésontlapropriétédeleursdétenteursrespectifs.
produitouservicedeVEVOR,ouuneapprobationduoudesproduitsauxquels
s'appliquecemanuelparlasociététierceenquestion.
Limitationsderesponsabilité:VEVORneserapasresponsabledespréjudicescorporels
oumatériels,directsouindirects,spéciaux,punitifs,accessoiresouconsécutifs(y
compris,maissanss'ylimiter,lapertedeprofitsouderevenus,laperted'utilisation,
laperted'opportunitéscommercialesoulapertedeclientèle),nidescoûts
d'approvisionnementdeproduitsdesubstitution,découlantdel'utilisationduproduitouen
rapportaveccelleci.Enaucuncas,laresponsabilitébrutecumuléeduvendeur,
découlantdetouteslescausesd'actionetthéoriesderesponsabilité,nepeutexcéderle
totaldessommeseffectivementfacturéesparleclientauvendeurautitredela
commandedonnantlieuàunequelconqueresponsabilitéenvertudesprésentes.
4
F:Kitdeverrouillagedeported'entrée
x1
1.Panneau
supérieur2.Panneauinférieur B:VisàtêtehexagonaleM6*12x12
vis
G:ExtensionM10*70mm
x1
H:Fildeterre
4.Panneauxlatéraux
x1
D:Loquetsdupanneaulatéral
10.Palette
6.Cadredroit7.
Panneauarrière
x1
E:Kitdeverrouillagedupanneaulatéral
x1
x2
8.Suspensionarrière9.
Railsdemontageverticauxx4
x1
A:ViscruciformesM5*10x40
x1
C:ÉcrouscageM6
x4
x1
3.Ported'entrée
x1
x12
x1
x4x2
5.Cadredegauche

Remarque:deuxpersonnessontnécessairespourl’assemblagedurack.
•Tournevisélectrique(venduséparément)•Deux
personnes(pourl'assemblage)•Clé
Allen(lepaquetdepiècesestinclus)
EXIGENCES
5

2
6
5
UN
UN
6
3:Installezles4railsdemontageverticaux(#9)enplaceàlaprofondeur
souhaitée.Fixezlesavec8visàtêtecruciformeM5*10(A).
1:Insérezlecadregauche(#5)etlecadredroit(#6)danslepanneau
inférieur(#2),fixezlesavec4visàtêtecruciformeM5*10(A).
2:Placezlepanneausupérieur(n°1)surlecadregauche(n°5)etle
cadredroit(n°6).Fixezleavec12viscruciformesM5x10(A).
INSTALLATIONDUBOÎTIER

7
4:Installezlapalette(#10)enplaceàlahauteursouhaitée,fixezlaavecdesvisà
têtehexagonaleM6*12(B)etdesécrousàcageM6(C).
Remarque:Pourdéterminerlaprofondeurdemontageappropriée,tenezcomptede
l'équipementquevousprévoyezd'installerdansleboîtier.Assurezvousquelaprofondeur
desrailsestidentiquedechaquecôtédel'armoire.

7:Positionnezlaporteavant(n°3)demanièreàcequelesaxessupérieuretinférieursoient
alignésavecletroudecharnièreduboîtier.Insérezl'axefixeinférieurdansletroudecharnière
inférieur.Tirezl'axeélastiquesupérieurverslebas,dansletrouducoinsupérieur,puisrelâchezle.
6:Installezleverroudeporteavant(F)surlaporteavant(#3).
5:Installezlesdeuxpanneauxlatéraux(#4)danslecadregauche(#5)etlecadredroit(#6).Une
foisquechaquepanneaulatéral(#4)estenplace,vérifiezsilesloquetsdupanneaulatéral(D)
etleskitsdeverrouillagedupanneaulatéral(E)fonctionnentcorrectement.
8:Installezlefildeterre(H),connectezlaporteavant(n°3)etlepanneauinférieur(n°2).
Remarque:assurezvousquelespiècesdeverrouillagesontmontéescommeindiquésurla
photosuivante(horizontalementsurlecôtédroit)
8

9:Installezlepanneauarrière(#7),fixezleavec4/6visàtêtecruciforme
M5*10(A).
9

10
Ladistancedestrousdemontageestindiquéedanslafigurecidessus,àpart
distancepourmarquerlapositiondesdeuxtrousdemontageinférieurs.
s'adapterauplacementstandarddesgoujonscommeindiquédansleschéma.
Boîtierdeserveur12USPT60412,H=620mm;
positionnezleavecunstylodecouleur,puismesurezletrouindiquésurlafigurecidessus
Boîtierdeserveur6USPT60406,H=300mm;
surfacedemontage,surlapositionappropriéepourmarquerlestrousdemontage
1:Placezd'abordlasuspensionarrière(#8)surlemurouunautresupportapproprié
Boîtierdeserveur12USPT60412W,H=620mm.
2:Adoptezuneperceuseélectriquepourpercer4trousmarquésde10mmdediamètre,puis
montageetfixationdesvisd'expansionM10(G)danslestrous.
3:Fixezlasuspensionarrière(#8)surleboîtier,fixezlaavec2piècesM5*10
Visàtêtecruciforme(A).
Boîtierdeserveur9USPT60409,H=480mm;

livres.Vérifiezletypedestructuremuraleetlematérieldemontage.
quevousutilisezsupporteracorrectementlepoidsduboîtier
Avertissement:Nepastenterdefixerl'appareilaumursil'équipementestinstallé
àl'intérieurduboîtier.Leboîtieraunecapacitédepoidsde200
écroudevisd'expansion.
etl'équipement.
4:Fixezleboîtiersurlesvisd'extensionM10(G),serrezles
11
12

REPRÉSENTANTDELACE
ReprésentantduRoyaumeUni
ECrossStuGmbH
ImportéauxÉtatsUnis:SanvenTechnologyLtd.Suite250,9166AnaheimPlace,Rancho
Cucamonga,CA91730
MainzerLandstr.69,60329FrancfortsurleMain.
A/SYHConsultingLimitedBureau147,CenturionHouse,
ImportéenAustralie:SIHAOPTYLTD.1ROKEVASTREET,ASTWOODNSW
YHCONSULTINGLIMITÉE.
2122Australie
Fabricant:ShanghaimuxinmuyeyouxiangongsiAdresse:
Shuangchenglu803nong11hao1602A1609shi,baoshanqu,shanghai200000CN.
LondonRoad,StainesuponThames,Surrey,TW184AX
13


Assistancetechniqueetcertificatdegarantie
électroniquewww.vevor.com/support

SERVERGEHÄUSE
WANDMONTAGE
BENUTZERHANDBUCH
Technischer Support und E-Garantie-Zertifikat www.vevor.com/support
„Sparen Sie die Hälfte“, „Halber Preis“ oder ähnliche Ausdrücke stellen lediglich eine Schätzung der Ersparnis dar, die
Sie beim Kauf bestimmter Werkzeuge bei uns im Vergleich zu den großen Top-Marken erzielen können, und decken
nicht unbedingt alle von uns angebotenen Werkzeugkategorien ab. Bitte prüfen Sie bei Ihrer Bestellung sorgfältig,
ob Sie im Vergleich zu den großen Top-Marken tatsächlich die Hälfte sparen.
Wir sind weiterhin bestrebt, Ihnen Werkzeuge zu wettbewerbsfähigen Preisen anzubieten.

Haben Sie Fragen zum Produkt? Benötigen Sie technischen Support? Kontaktieren Sie uns
gerne:
Technischer Support und E-Garantie-Zertifikat www.vevor.com/
support
Dies ist die Originalanleitung. Bitte lesen Sie alle Anweisungen sorgfältig durch, bevor
Sie das Gerät in Betrieb nehmen. VEVOR behält sich das Recht vor, die Bedienungsanleitung
klar und deutlich zu interpretieren. Das Aussehen des Produkts hängt vom gelieferten
Produkt ab. Bitte haben Sie Verständnis dafür, dass wir Sie nicht erneut über Technologie- oder
Software-Updates informieren.
- 1 -
Brauchen Sie Hilfe? Kontaktieren Sie uns!
SERVERGEHÄUSE
WANDMONTAGE

- 2 -
dieses Produkthandbuch.
Bitte rufen Sie uns an oder senden Sie uns eine E-Mail, wenn Sie Fragen zur Installation haben oder
oder fehlt. Wenn das Produkt betroffen ist, versuchen Sie nicht, es zu installieren oder zu verwenden.
aufgrund unsachgemäßer Verwendung oder Installation des Produkts. Bitte stellen Sie sicher
Es wurden alle Anstrengungen unternommen, um die Richtigkeit der Informationen in
defekte Komponenten. Bitten Sie VEVOR um Hilfe, wenn eine Komponente defekt ist
Verwendung von Warenzeichen, eingetragenen Warenzeichen und anderen geschützten
Namen und Symbole
in irgendeiner Weise mit VEVOR verbunden. Diese Verweise dienen ausschließlich
Informationszwecken und stellen keine Billigung eines
Halten Sie das Gehäuse frei von Feuchtigkeit, extremen Temperaturen, brennbaren Stoffen und
Gasen, leitfähigen Schadstoffen, Staub und direkter
Um Schäden während der Montage zu vermeiden, legen Sie den Produktinhalt auf Karton oder
eine andere sichere Oberfläche. Eine unsachgemäße Installation oder Verwendung dieses Produkts
kann zu Produktschäden, anderen Schäden an der Ausrüstung oder
Personenschäden.
Dieses Handbuch kann auf Marken, eingetragene Marken und andere geschützte Namen und/oder
Symbole von Drittunternehmen verweisen, die nicht
ausreichende Belüftung an Vorder- und Rückseite des Gehäuses. Die
VEVOR kann nicht für Geräteschäden oder Personenschäden haftbar gemacht werden.
Sonnenlicht in einem kontrollierten Innenraum. Lassen Sie ausreichend Platz für
Es wird empfohlen, die Installation von einem professionellen Installateur durchführen zu lassen.
von VEVOR.
Verwendung Ihres Produkts. Bitte überprüfen Sie das Produkt auf fehlende oder
dass die gelagerte/montierte Ausrüstung das angegebene Gewicht nicht überschreiten darf
Kapazität.
Vielen Dank für den Kauf des Wandmontageschranks der Performance-Serie
Die externen Belüftungsöffnungen des Gehäuses dürfen nicht blockiert, abgedeckt oder mit
Gegenständen gefüllt werden.
WICHTIGE SICHERHEITSHINWEISE

Ungeachtet jeglicher direkter Anerkennung an anderer Stelle im Text dieses Dokuments
erkennt VEVOR hiermit an, dass alle in diesem Handbuch und dem zugehörigen
Dokument enthaltenen Marken, eingetragenen Marken, Dienstleistungsmarken und
anderen geschützten Namen und/oder Symbole Eigentum ihrer jeweiligen Inhaber sind.
Produkt oder Service von VEVOR oder eine Billigung des/der Produkte(s), auf die
sich dieses Handbuch bezieht, durch das betreffende Drittunternehmen.
Haftungsbeschränkungen: VEVOR haftet nicht für direkte oder indirekte Schäden,
besondere Schäden, Straf-, Neben- oder Folgeschäden (einschließlich, aber
nicht beschränkt auf entgangene Gewinne oder Einnahmen, Nutzungsausfall,
entgangene Geschäftsmöglichkeiten oder Verlust von Geschäftswert) oder die Kosten
für die Beschaffung von Ersatzprodukten, die aus oder im Zusammenhang mit der
Nutzung des Produkts entstehen. In keinem Fall kann die Gesamthaftung des
Verkäufers, die sich aus allen Klagegründen und Haftungstheorien ergibt, die
Gesamtsumme übersteigen, die der Kunde dem Verkäufer im Rahmen der
Bestellung, die hiermit eine Haftung begründet, tatsächlich in Rechnung gestellt hat.
- 3 -

x1
C: M6-Käfigmuttern
x4
x1
x1
A: M5*10 Kreuzschlitzschrauben x40
8. Hinterradaufhängung
9. Vertikale Montageschienen x4
x1
x2
x4
5. Linker Rahmen
x2
x1
x12
3. Haustür
x1
x1
G: M10 x 70 mm Erweiterung
B: M6*12 Sechskantschrauben x12
1. Oberes
Panel 2. Unteres Panel
x1
F: Vordertürschloss-Kit
Schrauben
6. Rechter
Rahmen 7. Rückwand
x1
E: Seitenwand-Schlosssatz
x1
D: Seitenwandriegel4. Seitenwände
10. Palette
H: Erdungskabel
- 4 -

Hinweis: Für die Rack-Montage sind zwei Personen erforderlich.
• Akkuschrauber (separat erhältlich) • Zwei
Personen (für die Montage) •
Inbusschlüssel (im Teilepaket enthalten)
ANFORDERUNGEN
- 5 -

6
A
2
5
A
- 6 -
2: Platzieren Sie die obere Platte (#1) auf dem linken Rahmen (#5) und dem
rechten Rahmen (#6). Befestigen Sie sie mit 12 Kreuzschlitzschrauben M5*10 (A).
1: Setzen Sie den linken Rahmen (#5) und den rechten Rahmen (#6) in die Bodenplatte
(#2) ein und befestigen Sie sie mit 4 Kreuzschlitzschrauben M5*10 (A).
3: Installieren Sie die 4 vertikalen Montageschienen (Nr. 9) in der gewünschten Tiefe und
befestigen Sie sie mit 8 Kreuzschlitzschrauben M5 x 10 (A).
GEHÄUSEINSTALLATION

- 7 -
4: Installieren Sie die Palette (Nr. 10) in der gewünschten Höhe und befestigen Sie sie
mit M6*12-Sechskantschrauben (B) und M6-Käfigmuttern (C).
Hinweis: Berücksichtigen Sie bei der Wahl der passenden Einbautiefe die Geräte, die Sie im
Gehäuse installieren möchten. Achten Sie darauf, dass die Schienentiefe auf beiden Seiten
des Schranks gleich ist.

- 8 -
7: Positionieren Sie die Vordertür (Nr. 3) so, dass die oberen und unteren Stifte mit dem Scharnierloch
im Gehäuse ausgerichtet sind. Stecken Sie den unteren festen Stift in das untere Scharnierloch.
Ziehen Sie den oberen Federstift in das Loch in der oberen Ecke und lassen Sie ihn los.
Hinweis: Stellen Sie sicher, dass die Verriegelungsteile in der auf dem folgenden Foto gezeigten
Richtung montiert sind (horizontal zur rechten Seite).
6: Installieren Sie das Vordertürschloss (F) an der Vordertür (#3).
5: Installieren Sie die beiden Seitenwände (#4) im linken Rahmen (#5) und im rechten Rahmen (#6).
Sobald jede Seitenwand (#4) an ihrem Platz ist, überprüfen Sie, ob die Seitenwandriegel (D) und die
Seitenwandverriegelungssätze (E) ordnungsgemäß funktionieren.
8: Installieren Sie das Erdungskabel (H), verbinden Sie die Vordertür (Nr. 3) und die Bodenplatte
(Nr. 2).

- 9 -
9: Installieren Sie die Rückwand (Nr. 7) und befestigen Sie sie mit 4/6 Kreuzschlitzschrauben
M5*10 (A).

- 10 -
Der Abstand der Befestigungslöcher ist in der obigen Abbildung dargestellt, abgesehen von
Passen Sie die Standardbolzenplatzierung an, wie im Diagramm dargestellt.
SPT-604-06 6U-Servergehäuse, H=300 mm;
SPT-604-09 9U-Servergehäuse, H=480 mm;
Position mit einem farbigen Stift, dann messen Sie das oben gezeigte Loch
Abstand, um die Position der beiden unteren Montagelöcher zu markieren.
Montagefläche, an der geeigneten Stelle, um die Befestigungslöcher zu markieren
1:Befestigen Sie zuerst die hintere Aufhängung (#8) an der Wand oder an einem anderen geeigneten
Montage und befestigen Sie die M10-Expansionsschrauben (G) in den Löchern.
2: Nimmt eine elektrische Bohrmaschine an, um markierte 4 Löcher mit einem Durchmesser von 10 mm zu bohren, dann
3: Befestigen Sie die hintere Aufhängung (Nr. 8) am Gehäuse. Sichern Sie sie mit 2 Stück M5 x 10
Kreuzschlitzschrauben (A) .
SPT-604-12W 12U-Servergehäuse, H=620 mm.
SPT-604-12 12U-Servergehäuse, H=620 mm;

Pfund. Stellen Sie sicher, dass die Art der Wandstruktur und die Montagehardware
dass Sie das Gewicht des Gehäuses ausreichend tragen
Warnung: Versuchen Sie nicht, das Gerät an der Wand zu befestigen, wenn
sich das Gerät im Gehäuse befindet. Das Gehäuse hat eine Tragfähigkeit von 200
Mutter der Dehnschraube.
und Ausrüstung.
4: Befestigen Sie das Gehäuse mit den M10-Expansionsschrauben (G), ziehen Sie die
- 11 -

- 12 -

Britische Republik
EG-Vertreter
YH CONSULTING LIMITED.
Mainzer Landstr.69, 60329 Frankfurt am Main.
Importiert in die USA: Sanven Technology Ltd. Suite 250, 9166 Anaheim Place,
Rancho Cucamonga, CA 91730
2122 Australien
E-CrossStu GmbH
Importiert nach AUS: SIHAO PTY LTD. 1 ROKEVA STREETEASTWOOD NSW
Hersteller: Shanghaimuxinmuyeyouxiangongsi
Adresse: Shuangchenglu 803nong11hao1602A-1609shi, baoshanqu,
Shanghai 200000 CN.
C/O YH Consulting Limited, Büro 147, Centurion House,
London Road, Staines-upon-Thames, Surrey, TW18 4AX
- 13 -


Technischer Support und E-Garantie-Zertifikat
www.vevor.com/support

CASSA PER SERVER
MONTAGGIO A PARETE
MANUALE D'USO
Supporto tecnico e certificato di garanzia elettronica www.vevor.com/support
"Risparmia la metà", "Metà prezzo" o qualsiasi altra espressione simile da noi utilizzata rappresenta
solo una stima del risparmio che potresti ottenere acquistando determinati utensili da noi rispetto ai
principali marchi e non significa necessariamente coprire tutte le categorie di utensili da noi
offerte. Ti ricordiamo di verificare attentamente quando effettui un ordine con noi se stai effettivamente
risparmiando la metà rispetto ai principali marchi.
Continuiamo a impegnarci per fornirvi strumenti a prezzi competitivi.

Queste sono le istruzioni originali, si prega di leggere attentamente tutte le istruzioni
del manuale prima di utilizzare il prodotto. VEVOR si riserva la piena interpretazione del
manuale utente. L'aspetto del prodotto dipenderà dal prodotto ricevuto. Vi preghiamo di
non informarvi ulteriormente in caso di aggiornamenti tecnologici o software relativi al nostro
prodotto.
Hai domande sui prodotti? Hai bisogno di supporto tecnico? Non esitare a contattarci:
Assistenza
tecnica e certificato di garanzia elettronica www.vevor.com/
support
- 1 -
HAI BISOGNO DI AIUTO? CONTATTACI!
CASSA PER SERVER
MONTAGGIO A PARETE

IMPORTANTI ISTRUZIONI DI SICUREZZA
È stato fatto ogni sforzo per garantire l'accuratezza delle informazioni in
che l'attrezzatura immagazzinata/montata non superi il peso dichiarato
da VEVOR.
utilizzo del prodotto. Si prega di ispezionare il prodotto per eventuali parti mancanti o
capacità.
Le aperture di ventilazione esterne del contenitore non devono essere bloccate, coperte o
riempite con oggetti.
Grazie per aver acquistato il mobiletto da parete Performance Series
Per qualsiasi dubbio sull'installazione o
VEVOR non può essere ritenuta responsabile per danni alle apparecchiature o lesioni fisiche
un'adeguata ventilazione nella parte anteriore e posteriore del contenitore.
derivanti da un utilizzo o un'installazione inappropriati del prodotto. Assicurarsi
Utilizzo di marchi, marchi registrati e altri marchi protetti
luce solare in un ambiente interno controllato. Lasciare spazio sufficiente per
Si consiglia di far eseguire l'installazione da un installatore professionista.
Mantenere l'involucro libero da umidità, temperature estreme, sostanze e gas
combustibili, inquinanti conduttivi, polvere e luce diretta.
lesioni personali.
in alcun modo correlato a VEVOR. Questi riferimenti sono forniti solo a scopo informativo
e non rappresentano un'approvazione di un
Per evitare danni durante il montaggio, posizionare il contenuto del prodotto su cartone
o su un'altra superficie sicura. L'installazione o l'uso improprio di questo prodotto può
causare danni al prodotto, ad altri danni alle apparecchiature o
Il presente manuale può fare riferimento a marchi, marchi registrati e altri nomi e/o
simboli protetti di società terze non
Nomi e simboli
questo manuale del prodotto.
o mancanti. Se il prodotto è stato interessato, non tentare di installarlo o utilizzarlo.
componenti difettosi. Chiedi assistenza a VEVOR se un componente è rotto.
- 2 -

- 3 -
Limitazioni di responsabilità: VEVOR non sarà responsabile per alcun danno o
lesione, diretto o indiretto, speciale, punitivo, incidentale o consequenziale
(inclusi, a titolo esemplificativo ma non esaustivo, mancati profitti o ricavi, perdita
di utilizzo, perdita di opportunità commerciali o perdita di avviamento), né per i costi di
approvvigionamento di prodotti sostitutivi, derivanti da o in connessione con l'utilizzo
del prodotto. In nessun caso la responsabilità lorda accumulata del venditore,
derivante da tutte le cause di azione e le teorie di responsabilità, potrà superare gli
importi totali effettivamente addebitati dal cliente al venditore in base all'ordine che
dà origine a qualsiasi responsabilità ai sensi del presente contratto.
prodotto o servizio di VEVOR, o un'approvazione del/i prodotto/i a cui si applica il
presente manuale da parte della società terza in questione.
Indipendentemente da qualsiasi riconoscimento diretto altrove nel corpo di questo
documento, VEVOR riconosce che tutti i marchi commerciali, marchi registrati, marchi
di servizio e altri nomi e/o simboli protetti contenuti nel presente manuale e nei
documenti correlati sono di proprietà dei rispettivi titolari.

- 4 -
x1
E: Kit di bloccaggio del pannello laterale
6. Telaio destro 7.
Pannello posteriore
4. Pannelli laterali
x1
D: Chiusure del pannello laterale
H:Filo di messa a terra
10. Pallet
G: Espansione M10*70mm
x1
1. Pannello
superiore 2. Pannello inferiore B: Viti a testa esagonale M6*12 x12
F: Kit serratura porta anteriore
x1
viti
x2 x4
5. Cornice sinistra
x12
3. Porta d'ingresso
x1
x1
x1
C: Dadi in gabbia M6
x4
A: Viti a testa a croce M5*10 x40
x1
x1
x1
x2
8. Sospensione posteriore
9. Guide di montaggio verticali x4

Nota: per il montaggio del Rack sono necessarie due persone.
• Cacciavite elettrico (venduto separatamente)
• Due persone (per il montaggio) •
Chiave a brugola (il pacchetto dei pezzi è incluso)
REQUISITI
- 5 -

2
6
5
UN
UN
- 6 -
3: Installare le 4 guide di montaggio verticali (#9) in posizione alla profondità
desiderata. Fissare con 8 viti a testa a croce M5*10 (A).
1: Inserire il telaio sinistro (#5) e il telaio destro (#6) nel pannello inferiore
(#2), fissare con 4 viti a croce M5*10 (A).
2: Posizionare il pannello superiore (n. 1) sul telaio sinistro (n. 5) e sul
telaio destro (n. 6). Fissare con 12 viti a croce M5*10 (A).
INSTALLAZIONE DEL RECINTO

- 7 -
4: Installare il pallet (n. 10) in posizione all'altezza desiderata, fissarlo con viti a testa
esagonale M6*12 (B) e dadi a gabbia M6 (C).
Nota: si prega di considerare l'apparecchiatura che si intende installare all'interno dell'armadio
quando si decide la profondità di montaggio appropriata. Assicurarsi che la profondità delle
guide su entrambi i lati dell'armadio sia la stessa.
- 8 -
7: Posizionare lo sportello anteriore (n. 3) in modo che i perni superiore e inferiore siano allineati
con il foro della cerniera situato nell'involucro. Inserire il perno fisso inferiore nel foro della
cerniera inferiore. Tirare il perno a molla superiore verso il basso nel foro nell'angolo superiore e
rilasciarlo.
6: Installare la serratura della porta anteriore (F) sulla porta anteriore (#3).
5: Installare i due pannelli laterali (n. 4) nel telaio sinistro (n. 5) e nel telaio destro (n. 6). Una
volta posizionato ciascun pannello laterale (n. 4), verificare che i fermi del pannello laterale (D)
e i kit di bloccaggio del pannello laterale (E) funzionino correttamente.
8: Installare il filo di messa a terra (H), collegare la porta anteriore (#3) e il pannello
inferiore (#2).
Nota: assicurarsi che i pezzi della serratura siano montati nella direzione indicata nella foto
seguente (orizzontale sul lato destro)

- 9 -
9: Installare il pannello posteriore (#7), fissare con 4/6 viti a testa a
croce M5*10 (A).

- 10 -
La distanza del foro di montaggio è mostrata nella figura sopra, a parte
distanza per contrassegnare la posizione dei due fori di montaggio inferiori.
accogliere il posizionamento standard dei perni come indicato nel diagramma.
SPT-604-09 Contenitore per server 9U, altezza 480 mm;
posizione con penna colorata, quindi misurare il foro mostrato nella figura sopra
SPT-604-06 Contenitore per server 6U, altezza = 300 mm;
superficie di montaggio, nella posizione adatta per contrassegnare i fori di montaggio
1: Per prima cosa, posizionare la sospensione posteriore (#8) sul muro o su un altro supporto adatto
montare e fissare le viti ad espansione M10 (G) nei fori.
SPT-604-12W Contenitore per server 12U, altezza 620 mm.
SPT-604-12 Contenitore per server 12U, altezza 620 mm;
3: Fissare la sospensione posteriore (#8) sul contenitore, fissare con 2 pezzi M5*10
Viti con testa a croce (A).
2: Adotta un trapano elettrico per praticare 4 fori contrassegnati da 10 mm di diametro, quindi

libbre. Assicurarsi che il tipo di struttura della parete e l'hardware di montaggio
che stai utilizzando sosterrà adeguatamente il peso del recinto
Attenzione: non tentare di montare a parete quando l'apparecchiatura è
montata all'interno dell'involucro. L'involucro ha una capacità di peso di 200
dado della vite di espansione.
e attrezzature.
4: Fissare la custodia sulle viti di espansione M10 (G), stringere
- 11 -

- 12 -

- 13 -
E-CrossStu GmbH
Importato negli USA: Sanven Technology Ltd. Suite 250, 9166 Anaheim Place,
Rancho Cucamonga, CA 91730
Mainzer Landstr.69, 60329 Francoforte sul Meno.
C/O YH Consulting Limited Ufficio 147, Centurion House,
2122 Australia
YH CONSULTING LIMITED.
Importato in AUS: SIHAO PTY LTD. 1 ROKEVA STREETEASTWOOD NSW
Produttore: Shanghaimuxinmuyeyouxiangongsi
Indirizzo: Shuangchenglu 803nong11hao1602A-1609shi, baoshanqu,
shanghai 200000 CN.
London Road, Staines-upon-Thames, Surrey, TW18 4AX
RAPPRESENTANTE DEL REGNO UNITO
Rappresentante della CE


Supporto tecnico e certificato di garanzia
elettronica www.vevor.com/support

GABINETEDESERVIDOR
MONTAJEENPARED
MANUALDELUSUARIO
Soportetécnicoycertificadodegarantíaelectrónicawww.vevor.com/support
"Ahorralamitad","Mitaddeprecio"ocualquierexpresiónsimilarqueutilicemossolorepresentauna
estimacióndelahorroquepodríaobteneralcomprarciertasherramientasconnosotrosencomparación
conlasprincipalesmarcasynonecesariamenteabarcatodaslascategoríasdeherramientasque
ofrecemos.Lerecordamosque,alrealizarunpedido,verifiquecuidadosamentesirealmenteestá
ahorrandolamitadencomparaciónconlasprincipalesmarcas.
Seguimoscomprometidosabrindarleherramientasaprecioscompetitivos.

Estassonlasinstruccionesoriginales;leaatentamentetodaslasinstruccionesdel
manualantesdeutilizarlo.VEVORsereservaelderechodeinterpretarsumanualdeusuario.
Laaparienciadelproductodependerádelproductoquehayarecibido.Lerogamosque
nosdisculpesinoleinformamosdenuevosihayactualizacionestecnológicasodesoftware
ennuestroproducto.
¿Tienepreguntassobreelproducto?¿Necesitaasistenciatécnica?Contáctenos:Soporte
técnicoy
certificadodegarantíaelectrónicawww.vevor.com/support
1
¿NECESITASAYUDA?¡CONTÁCTANOS!
MONTAJEENPARED
GABINETEDESERVIDOR

INSTRUCCIONESDESEGURIDADIMPORTANTES
Componentesdefectuosos.Sialgúncomponenteestároto,soliciteayudaaVEVOR.
queelequipoalmacenado/montadonodebeexcederelpesoindicado
UsodeMarcasComerciales,MarcasRegistradasyotrasProtegidas
deVEVOR.
Lasaberturasdeventilaciónexternasdelrecintonodebenbloquearse,cubrirseniinsertarse
conelementos.
usodesuproducto.Inspeccioneelproductoparaversifaltanpiezaso
resultantesdelusoolainstalacióninapropiadosdelproducto.Porfavor,asegúrese
GraciasporadquirirelgabinetedemontajeenpareddelaseriePerformance
Ventilaciónadecuadaenlapartedelanteraytraseradelrecinto.
Llámenosoenvíenosuncorreoelectrónicositienealgunainquietudsobrelainstalacióno
VEVORnosehaceresponsablededañosalequiponidelesionesfísicas.
capacidad.
luzsolarenunambienteinteriorcontrolado.Dejesuficienteespaciopara
Serecomiendaquelainstalaciónlarealiceuninstaladorprofesional.
Mantengaelgabinetelibredehumedad,temperaturasextremas,sustanciasygases
combustibles,contaminantesconductores,polvoyluzdirecta.
lesionespersonales.
relacionadodeningunamaneraconVEVOR.Estasreferenciasseproporcionansoloconfines
informativosynorepresentanunrespaldodeun
Paraevitardañosduranteelmontaje,coloqueelcontenidodelproductosobrecartónuotra
superficiesegura.Lainstalaciónoelusoincorrectosdeesteproductopuedenprovocar
dañosalproducto,otrosdañosalequipoo
Estemanualpuedehacerreferenciaamarcascomerciales,marcasregistradasyotros
nombresy/osímbolosprotegidosdeempresasdetercerosno
Estemanualdelproducto.
ofalta.Sielproductosehavistoafectado,nointenteinstalarloniutilizarlo.
Nombresysímbolos
Sehahechotodoloposibleparagarantizarlaexactituddelainformaciónen
2

3
Independientementedecualquierreconocimientodirectoenotrapartedelcuerpode
estedocumento,VEVORreconoceporlapresentequetodaslasmarcascomerciales,
marcascomercialesregistradas,marcasdeservicioyotrosnombresy/osímbolos
protegidoscontenidosenestemanualydocumentorelacionadosonpropiedaddesus
respectivospropietarios.
productooserviciodeVEVOR,ounarecomendacióndelproducto(s)alosquese
aplicaestemanualporpartedelaempresaexternaencuestión.
Limitacionesderesponsabilidad:VEVORnoseráresponsabledeningunalesióno
daño,yaseadirectooindirecto,especial,punitivo,incidentaloconsecuente
(incluyendo,entreotros,lucrocesante,pérdidadeuso,pérdidadeoportunidades
denegocioopérdidadeprestigio),nideloscostesdeadquisicióndeproductos
sustitutos,derivadosdelusodelproductoorelacionadosconél.Enningúncasola
responsabilidadbrutaacumuladadelvendedor,derivadadetodaslascausasde
acciónyteoríasderesponsabilidad,podráexcederlassumastotalesefectivamente
cobradasporelclientealvendedorenvirtuddelpedidoquedélugaracualquier
responsabilidadaquíestablecida.

4
x1
E:Kitdebloqueodelpanellateral
6.Marcoderecho7.
Paneltrasero
H:Cabledepuestaatierra
4.Paneleslaterales
x1
D:Pestillosdelpanellateral
10.Palet
1.Panelsuperior
2.Panelinferior B:TornillosdecabezahexagonalM6*12x12
G:ExpansiónM10*70mm
x1
F:Kitdecerraduradepuertadelantera
x1
tornillos
x2 x4
5.Marcoizquierdo
3.Puertadeentrada
x1
x12
x1
x1
A:TornillosdecabezacruzadaM5*10x40
x1
x1
C:TuercasenjauladasM6
x4
x1
x2
8.Suspensióntrasera9.
Rielesdemontajeverticalesx4

Nota:SenecesitandospersonasparaelmontajedelRack.
•Destornilladoreléctrico(sevendepor
separado)•Dospersonas(parael
montaje)•LlaveAllen(elpaquetedepiezasestáincluido)
REQUISITOS
5

2:Coloqueelpanelsuperior(#1)sobreelmarcoizquierdo(#5)yelmarco
derecho(#6).Fíjelocon12tornillosdecabezacruciformeM5*10(A).
1:Inserteelmarcoizquierdo(#5)yelmarcoderecho(#6)enelpanelinferior(#2),
asegúreloscon4tornillosdecabezacruzadaM5*10(A).
3:Instalelos4rielesdemontajeverticales(#9)ensulugaralaprofundidaddeseada.
Asegúreloscon8tornillosdecabezacruzadaM5*10(A).
6
2
6
5
A
A
INSTALACIÓNDELGABINETE

4:Instalelapaleta(#10)ensulugaralaalturadeseada.Asegúrelacontornillosde
cabezahexagonalM6*12(B)ytuercasenjauladasM6(C).
Nota:Tengaencuentaelequipoqueplaneainstalardentrodelgabinetealdeterminarla
profundidaddemontajeadecuada.Asegúresedequelaprofundidaddelosrielesaambos
ladosdelgabinetesealamisma.
7

7:Coloquelapuertafrontal(#3)demodoquelospasadoressuperioreinferiorquedenalineados
conelorificiodelabisagraenlacaja.Inserteelpasadorfijoinferiorenelorificiodelabisagra
inferior.Tiredelpasadorderesortesuperiorhaciaabajo,introdúzcaloenelorificiodelaesquina
superiorysuéltelo.
6:Instalelacerraduradelapuertadelantera(F)enlapuertadelantera(#3).
5:Instalelosdospaneleslaterales(#4)enelmarcoizquierdo(#5)yelmarcoderecho(#6).Una
vezquecadapanellateral(#4)estéensulugar,verifiquesilospestillosdelpanellateral(D)y
loskitsdebloqueodelpanellateral(E)funcionancorrectamente.
8:Instaleelcabledeconexiónatierra(H),conectelapuertafrontal(#3)yelpanelinferior
(#2).
Nota:asegúresedequelaspiezasdebloqueoesténmontadascomosemuestraenlasiguiente
fotografía(horizontalhaciaelladoderecho).
8
9:Instaleelpaneltrasero(n.°7),asegúrelocon4/6tornillosdecabeza
cruzadaM5*10(A).
9
10
Ladistanciadelorificiodemontajesemuestraenlafiguraanterior,además
Distanciaparamarcarlaposicióndelosdosorificiosdemontajeinferiores.
acomodarlacolocaciónestándardepernoscomosereflejaeneldiagrama.
SPT60412Gabinetedeservidor12U,alto=620mm;
Coloqueconunbolígrafodecoloryluegomidaelorificioquesemuestraenlafiguraanterior.
SPT60406Gabinetedeservidor6U,alto=300mm;
Superficiedemontaje,enlaposiciónadecuadaparamarcarlosorificiosdemontaje.
1:Primerocoloquelasuspensióntrasera(#8)enlapareduotrolugaradecuado.
GabineteparaservidorSPT60412W12U,alto=620mm.
2:Adoptauntaladroeléctricoparaperforaragujerosmarcadosde4piezasde10mmdediámetro,luego
MonteyfijelostornillosdeexpansiónM10(G)enlosorificios.
3:Fijelasuspensióntrasera(#8)enlacarcasa,asegúrelacon2piezasM5*10
Tornillosdecabezacruzada(A).
SPT60409Gabinetedeservidor9U,alto=480mm;

libras.Asegúresedeltipodeestructuradelaparedylosherrajesdemontaje.
queestáutilizandosoportaráadecuadamenteelpesodelgabinete
Advertencia:Nointentemontarloenlaparedcuandoelequipoestémontado
dentrodelgabinete.Elgabinetetieneunacapacidaddepesode200
tuercadeltornillodeexpansión.
yequipo.
4:FijelacarcasaenlostornillosdeexpansiónM10(G)yaprietelos
11

12
REPRESENTANTEDELREINOUNIDO
RepresentantedelaCE
ECrossStuGmbH
ImportadoaEE.UU.:SanvenTechnologyLtd.Suite250,9166AnaheimPlace,
RanchoCucamonga,CA91730
MainzerLandstr.69,60329FráncfortdelMeno.
ImportadoaAUS:SIHAOPTYLTD.1ROKEVASTREET,EASTWOOD,NSW
YHCONSULTINGLIMITADA.
2122Australia
Fabricante:Shanghaimuxinmuyeyouxiangongsi
Dirección:Shuangchenglu803nong11hao1602A1609shi,baoshanqu,
shanghai200000CN.
C/OYHConsultingLimitedOficina147,CenturionHouse,
LondonRoad,StainesuponThames,Surrey,TW184AX
13


Soportetécnicoycertificadodegarantía
electrónicawww.vevor.com/support

INSTRUKCJA OBSŁUGI
MONTAŻ NA ŚCIANIE
OBUDOWA SERWERA
Wsparcie techniczne i certyfikat gwarancji elektronicznej www.vevor.com/support
„Oszczędź połowę”, „Połowa ceny” lub inne podobne wyrażenia używane przez nas stanowią jedynie
szacunkowe oszczędności, jakie możesz uzyskać, kupując u nas określone narzędzia w porównaniu z
głównymi markami i niekoniecznie oznaczają one objęcie wszystkich kategorii narzędzi oferowanych
przez nas. Uprzejmie przypominamy, aby dokładnie sprawdzić, czy składając u nas zamówienie faktycznie
oszczędzasz połowę w porównaniu z głównymi markami.
Nadal staramy się oferować Państwu narzędzia w konkurencyjnych cenach.

To jest oryginalna instrukcja, przed użyciem należy uważnie przeczytać wszystkie
instrukcje. VEVOR zastrzega sobie jasną interpretację naszej instrukcji obsługi. Wygląd produktu
będzie zależał od produktu, który otrzymałeś. Prosimy o wybaczenie, że nie poinformujemy
Cię ponownie, jeśli w naszym produkcie pojawią się jakiekolwiek aktualizacje technologiczne lub
oprogramowania.
Masz pytania dotyczące produktu? Potrzebujesz wsparcia technicznego? Skontaktuj się z
nami: Wsparcie
techniczne i certyfikat E-Gwarancji www.vevor.com/support
- 1 -
POTRZEBUJESZ POMOCY? SKONTAKTUJ SIĘ Z NAMI!
OBUDOWA SERWERA
MONTAŻ NA ŚCIANIE

- 2 -
niniejszą instrukcję obsługi produktu.
Jeśli masz jakiekolwiek pytania dotyczące instalacji lub
lub brakuje. Jeśli produkt został uszkodzony, nie próbuj go instalować ani używać.
wynikające z niewłaściwego użytkowania lub instalacji produktu. Upewnij się,
Dołożyliśmy wszelkich starań, aby zapewnić dokładność informacji zawartych w niniejszym dokumencie.
uszkodzone komponenty. Poproś VEVOR o pomoc, jeśli jakikolwiek komponent jest uszkodzony
Korzystanie ze znaków towarowych, zarejestrowanych znaków towarowych i innych chronionych znaków towarowych
Nazwy i symbole
w jakikolwiek sposób powiązane z VEVOR. Odniesienia te są udostępniane wyłącznie w celach
informacyjnych i nie stanowią poparcia dla
Utrzymuj obudowę w miejscu wolnym od wilgoci, skrajnych temperatur, substancji i gazów
palnych, zanieczyszczeń przewodzących prąd, kurzu i bezpośredniego
Aby zapobiec uszkodzeniom podczas montażu, umieść zawartość produktu na tekturze lub
innej bezpiecznej powierzchni. Nieprawidłowa instalacja lub użytkowanie tego produktu może
spowodować uszkodzenie produktu, inne uszkodzenia sprzętu lub
obrażenia ciała.
W niniejszej instrukcji mogą znajdować się odniesienia do znaków towarowych, zarejestrowanych
znaków towarowych i innych chronionych nazw i/lub symboli firm zewnętrznych, które nie są
odpowiednia wentylacja z przodu i z tyłu obudowy.
VEVOR nie ponosi odpowiedzialności za uszkodzenia sprzętu lub obrażenia ciała
światło słoneczne w kontrolowanym środowisku wewnętrznym. Pozostaw wystarczająco dużo miejsca na
Zaleca się, aby instalację wykonał profesjonalny instalator.
od VEVOR.
użytkowania produktu. Proszę sprawdzić produkt pod kątem braków lub
że sprzęt przechowywany/montowany nie powinien przekraczać podanej wagi
pojemność.
Dziękujemy za zakup szafki ściennej Performance Series
Zewnętrzne otwory wentylacyjne obudowy nie mogą być blokowane, zakrywane ani wkładane
do nich przedmiotów.
WAŻNE INSTRUKCJE BEZPIECZEŃSTWA

Niezależnie od bezpośredniego odniesienia w treści niniejszego dokumentu, VEVOR
niniejszym potwierdza, że wszystkie znaki towarowe, zarejestrowane znaki towarowe, znaki
usługowe i inne chronione nazwy i/lub symbole zawarte w niniejszym podręczniku i
powiązanym dokumencie są własnością ich odpowiednich właścicieli.
produktu lub usługi firmy VEVOR lub rekomendacji produktu(ów), do których odnosi się
niniejsza instrukcja, przez daną firmę zewnętrzną.
Ograniczenia odpowiedzialności: VEVOR nie ponosi odpowiedzialności za jakiekolwiek
obrażenia lub szkody, czy to bezpośrednie, czy pośrednie, szczególne, karne,
przypadkowe lub wynikowe (w tym, ale nie wyłącznie, utracone zyski lub dochody,
utratę użytkowania, utracone możliwości biznesowe lub utratę dobrej woli) lub koszty
zakupu produktów zastępczych, wynikające z lub w związku z użytkowaniem produktu. W
żadnym wypadku skumulowana odpowiedzialność brutto sprzedawcy, wynikająca ze
wszystkich przyczyn powództwa i teorii odpowiedzialności, nie może przekroczyć
całkowitych kwot faktycznie naliczonych przez klienta sprzedawcy na mocy zamówienia
powodującego jakąkolwiek odpowiedzialność na mocy niniejszego dokumentu.
- 3 -

- 4 -
x1
E: Zestaw zamka panelu bocznego
8. Zawieszenie tylne 9.
Pionowe szyny montażowe x4
x1
x2
A: M5*10 Śruby z łbem krzyżakowym x40
x1
x1
x1
C: Nakrętki klatkowe M6
x4
x1
x12
3. Drzwi wejściowe
x1
x4
5. Lewa ramka
x2
x1
F: Zestaw zamka drzwi przednich
śruby
1. Panel górny
2. Panel dolny B: Śruby z łbem sześciokątnym M6*12 x12
x1
G: Rozszerzenie M10*70mm
H: Przewód uziemiający
x1
D: Zatrzaski panelu bocznego4. Panele boczne
10. Paleta
6. Rama prawa 7.
Panel tylny

Uwaga: Do montażu stojaka potrzebne są dwie osoby.
• Wkrętarka elektryczna (sprzedawana
oddzielnie) • Dwie osoby (do
montażu) • Klucz imbusowy (w zestawie z częściami)
WYMAGANIA
- 5 -

2
A
6
5
A
- 6 -
3: Zamontuj 4 pionowe szyny montażowe (#9) na żądanej głębokości.
Zabezpiecz je 8 śrubami krzyżakowymi M5*10 (A).
1: Włóż lewą ramę (#5) i prawą ramę (#6) do dolnego panelu (#2),
zabezpiecz 4 śrubami krzyżakowymi M5*10 (A).
2: Umieść panel górny (#1) na lewej ramie (#5) i prawej ramie (#6).
Zabezpiecz za pomocą 12 śrub krzyżakowych M5*10 (A).
INSTALACJA OBUDOWY

- 7 -
4: Zamontuj paletę (#10) na żądanej wysokości, zabezpieczając ją śrubami sześciokątnymi
M6*12 (B) i nakrętkami klatkowymi M6 (C).
Uwaga: Należy wziąć pod uwagę sprzęt, który planujesz zainstalować w obudowie, decydując
o odpowiedniej głębokości montażu. Upewnij się, że głębokość szyny po obu stronach szafy
jest taka sama.

- 8 -
7: Umieść drzwi przednie (#3) tak, aby górne i dolne kołki były wyrównane z otworem zawiasu
znajdującym się w obudowie. Włóż dolny stały kołek do dolnego otworu zawiasu. Pociągnij
górny kołek sprężynowy w dół do otworu w górnym rogu i zwolnij go.
8: Zainstaluj przewód uziemiający (H), podłącz przednie drzwi (#3) i dolny panel (#2).
6: Zamontuj zamek drzwi przednich (F) na drzwiach przednich (#3).
5: Zamontuj dwa panele boczne (#4) w lewej ramie (#5) i prawej ramie (#6). Po zamontowaniu
każdego panelu bocznego (#4) sprawdź, czy zatrzaski panelu bocznego (D) i zestawy blokad
panelu bocznego (E) działają prawidłowo.
Uwaga: upewnij się, że elementy zamka są zamontowane zgodnie z kierunkiem pokazanym
na poniższym zdjęciu (poziomo do prawej strony)

- 9 -
9: Zamontuj tylny panel (#7), zabezpiecz go 4/6 śrubami krzyżakowymi
M5*10 (A).

- 10 -
Obudowa serwerowa SPT-604-06 6U, wys.=300mm;
dostosować standardowe rozmieszczenie kołków zgodnie z diagramem.
odległość do oznaczenia pozycji dwóch dolnych otworów montażowych.
2: Używając wiertarki elektrycznej wywierć oznaczone 4 otwory o średnicy 10 mm, a następnie
położenie za pomocą kolorowego długopisu, następnie zmierz powyższy rysunek pokazujący otwór
Odległość między otworami montażowymi jest pokazana na powyższym rysunku, z wyjątkiem
powierzchnia montażowa, w odpowiednim miejscu do zaznaczenia otworów montażowych
1: Najpierw zamontuj tylne zawieszenie (#8) na ścianie lub innym odpowiednim miejscu
Obudowa serwerowa SPT-604-09 9U, wys.=480mm;
Obudowa serwerowa SPT-604-12 12U, wys.=620mm;
Obudowa serwerowa SPT-604-12W 12U, wys. = 620 mm.
montaż i zamocowanie śrub rozporowych M10 (G) w otworach.
3: Zamocuj tylne zawieszenie (#8) na obudowie, zabezpiecz 2 śrubami M5*10
Śruby z łbem krzyżakowym (A).

funtów. Upewnij się, że rodzaj konstrukcji ściany i osprzęt montażowy
którego używasz będzie odpowiednio podtrzymywał ciężar obudowy
Ostrzeżenie: Nie próbuj montować na ścianie, gdy sprzęt jest zamontowany
wewnątrz obudowy. Obudowa ma nośność 200
nakrętka śruby rozprężnej.
i sprzęt.
4: Przymocuj obudowę za pomocą śrub rozporowych M10 (G), dokręć
- 11 -

- 12 -

REP WIELKIEJ BRYTANII
Przedstawiciel UE
YH CONSULTING LIMITED.
Mainzer Landstr.69, 60329 Frankfurt nad Menem.
Importowane do USA: Sanven Technology Ltd. Suite 250, 9166 Anaheim Place,
Rancho Cucamonga, CA 91730
C/O YH Consulting Limited Biuro 147, Centurion House,
Importowane do AUS: SIHAO PTY LTD. 1 ROKEVA STREETEASTWOOD NSW
E-CrossStu GmbH
2122 Australia
Producent: Shanghaimuxinmuyeyouxiangongsi Adres:
Shuangchenglu 803nong11hao1602A-1609shi, baoshanqu, szanghaj
200000 CN.
London Road, Staines-upon-Thames, Surrey, TW18 4AX
- 13 -


Wsparcie techniczne i certyfikat gwarancji
elektronicznej www.vevor.com/support

SERVERBEHUIZING
MUURBEVESTIGING
GEBRUIKERSHANDLEIDING
Technische ondersteuning en e-garantiecertificaat www.vevor.com/support
"Bespaar de helft", "halve prijs" of andere soortgelijke uitdrukkingen die wij gebruiken, geven slechts een schatting van de
besparingen die u kunt behalen door bepaalde gereedschappen bij ons te kopen in vergelijking met de grote topmerken en
betekenen niet per se dat alle categorieën gereedschappen die wij aanbieden, hieronder vallen. Wij verzoeken u
vriendelijk om bij het plaatsen van een bestelling zorgvuldig te controleren of u daadwerkelijk de helft bespaart in vergelijking
met de grote topmerken.
Wij streven er voortdurend naar om u gereedschappen te leveren tegen concurrerende prijzen.
Dit is de originele handleiding. Lees alle instructies zorgvuldig door voordat u het
product gebruikt. VEVOR behoudt zich het recht voor om de gebruiksaanwijzing duidelijk te
interpreteren. Het uiterlijk van het product is afhankelijk van het product dat u hebt
ontvangen. Neemt u het ons niet kwalijk dat we u niet meer op de hoogte stellen van eventuele
technologische of software-updates voor ons product.
Heeft u vragen over het product? Heeft u technische ondersteuning nodig? Neem dan gerust
contact met
ons op: Technische ondersteuning en e-garantiecertificaat
www.vevor.com/support
- 1 -
HULP NODIG? NEEM CONTACT MET ONS OP!
SERVERBEHUIZING
MUURBEVESTIGING

- 2 -
Neem contact met ons op via telefoon of e-mail als u vragen heeft over de installatie of
als gevolg van onjuist gebruik of installatie van het product. Zorg ervoor
Namen en symbolen
deze producthandleiding.
of ontbreekt. Als het product is aangetast, probeer het dan niet te installeren of te gebruiken.
Defecte componenten. Vraag VEVOR om hulp als een component kapot is.
Er is alles aan gedaan om de juistheid van de informatie in deze website te garanderen.
Houd de behuizing vrij van vocht, extreme temperaturen, brandbare stoffen en gassen, geleidende
verontreinigingen, stof en direct zonlicht.
persoonlijk letsel.
Gebruik van handelsmerken, geregistreerde handelsmerken en andere beschermde
op enigerlei wijze verband houden met VEVOR. Deze verwijzingen zijn uitsluitend ter informatie en
vormen geen goedkeuring van een
Om schade tijdens de montage te voorkomen, plaatst u de inhoud van het product op karton of
een ander veilig oppervlak. Onjuiste installatie of onjuist gebruik van dit product kan leiden tot
productschade, andere schade aan de apparatuur of
VEVOR kan niet aansprakelijk worden gesteld voor schade aan apparatuur of lichamelijk letsel
voldoende ventilatie aan de voor- en achterkant van de behuizing. De
In deze handleiding kan worden verwezen naar handelsmerken, geregistreerde handelsmerken en
andere beschermde namen en/of symbolen van derde partijen die niet onder deze voorwaarden vallen.
zonlicht in een gecontroleerde binnenomgeving. Zorg voor voldoende ruimte voor
Wij adviseren u de installatie door een professionele installateur te laten uitvoeren.
dat de opgeslagen/gemonteerde apparatuur het aangegeven gewicht niet mag overschrijden
van VEVOR.
gebruik van uw product. Controleer het product op ontbrekende of
capaciteit.
De ventilatieopeningen aan de buitenkant van de behuizing mogen niet worden geblokkeerd, afgedekt of
met voorwerpen worden gevuld.
Bedankt voor uw aankoop van de Performance Series Wandmontagekast
BELANGRIJKE VEILIGHEIDSINSTRUCTIES

Ongeacht enige directe erkenning elders in dit document, erkent VEVOR hierbij dat alle
handelsmerken, geregistreerde handelsmerken, dienstmerken en andere beschermde
namen en/of symbolen in deze handleiding en het bijbehorende document het eigendom
zijn van hun respectievelijke eigenaren.
product of dienst van VEVOR, of een aanbeveling van het/de product(en) waarop deze
handleiding van toepassing is door het betreffende externe bedrijf.
Beperking van aansprakelijkheid: VEVOR is niet aansprakelijk voor enig letsel of schade,
direct of indirect, speciaal, punitief, incidenteel of gevolgschade (inclusief, maar niet
beperkt tot, winstderving of omzetderving, verlies van gebruik, gemiste zakelijke
kansen of verlies van goodwill), of de kosten van het aanschaffen van vervangende
producten, voortvloeiend uit of in verband met het gebruik van het product. In geen geval
kan de bruto geaccumuleerde aansprakelijkheid van de verkoper, voortvloeiend uit alle
rechtsgronden en aansprakelijkheidstheorieën, de totale bedragen overschrijden die de
klant daadwerkelijk aan de verkoper in rekening heeft gebracht voor de bestelling die
aanleiding geeft tot enige aansprakelijkheid onder deze overeenkomst.
- 3 -

x1
E: Zijpaneelvergrendelingsset
6. Rechterframe 7.
Achterpaneel
H: Aardingsdraad
4. Zijpanelen
x1
D: Sluitingen zijpaneel
10. Pallet
1. Bovenpaneel
2. Onderpaneel B: M6*12 zeskantschroeven x12
G: M10*70mm Uitbreiding
x1
F: Voordeurvergrendelingsset
x1
schroeven
x2 x4
5. Linkerframe
x12
x1
3. Voordeur
x1
x1
A: M5*10 kruiskopschroeven x40
x1
x4
x1
x1
x2
8. Achtervering 9.
Verticale montagerails x4
C: M6 kooimoeren
- 4 -
Let op: Voor het monteren van het rack zijn twee personen nodig.
• Elektrische schroevendraaier (apart
verkrijgbaar) • Twee personen
(voor montage) • Inbussleutel (onderdelenpakket is inbegrepen)
VEREISTEN
- 5 -

2
A
6
5
A
- 6 -
3: Plaats de 4 verticale montage rails (#9) op de gewenste diepte en
zet ze vast met 8 M5*10 kruiskopschroeven (A).
1: Plaats het linkerframe (#5) en het rechterframe (#6) in het onderste
paneel (#2), bevestig met 4 M5*10 kruiskopschroeven (A).
2: Plaats het bovenpaneel (#1) op het linkerframe (#5) en het
rechterframe (#6). Bevestig met 12 M5*10 kruiskopschroeven (A).
INSTALLATIE VAN DE BEHUIZING

4: Plaats de pallet (#10) op de gewenste hoogte en zet hem vast met M6*12
zeskantschroeven (B) en M6 kooimoeren (C).
Let op: Houd bij het bepalen van de juiste montagediepte rekening met de apparatuur die u
in de behuizing wilt installeren. Zorg ervoor dat de raildiepte aan beide zijden van de kast
gelijk is.
- 7 -

- 8 -
6: Installeer het voordeurslot (F) op de voordeur (#3).
7: Plaats de voordeur (#3) zo dat de bovenste en onderste pennen uitgelijnd zijn met
het scharniergat in de behuizing. Steek de onderste vaste pen in het onderste
scharniergat. Trek de bovenste veerpen naar beneden in het gat in de bovenhoek en
laat hem los.
5: Plaats de twee zijpanelen (#4) in het linkerframe (#5) en het rechterframe (#6).
Zodra elk zijpaneel (#4) op zijn plaats zit, controleer dan of de zijpaneelvergrendelingen
(D) en de zijpaneelvergrendelingssets (E) goed werken.
Let op: zorg ervoor dat de slotstukken worden gemonteerd zoals op de volgende
foto is aangegeven (horizontaal naar rechts)
8: Installeer de aardingsdraad (H), sluit de voordeur (#3) en het onderste paneel
(#2) aan.

- 9 -
9: Plaats het achterpaneel (#7) en bevestig het met 4/6 M5*10
kruiskopschroeven (A).

- 10 -
De afstand tussen de montagegaten wordt in de bovenstaande afbeelding weergegeven, afgezien van
afstand om de positie van de onderste twee bevestigingsgaten te markeren.
geschikt zijn voor de standaard plaatsing van de staanders, zoals weergegeven in het diagram.
2: Gebruik een elektrische boor om 4 gemarkeerde gaten van 10 mm diameter te boren,
positie met gekleurde pen, meet vervolgens het bovenstaande figuur dat het gat laat zien
SPT-604-06 6U serverbehuizing, H=300 mm;
montageoppervlak, op de geschikte positie om montagegaten te markeren
1: Plaats eerst de achtervering (#8) aan de muur of een andere geschikte
SPT-604-12 12U serverbehuizing, H=620 mm;
SPT-604-12W 12U serverbehuizing, H=620mm.
3: Bevestig de achterste ophanging (#8) aan de behuizing, bevestig met 2 stuks M5*10
SPT-604-09 9U serverbehuizing, H=480 mm;
Monteer en bevestig de M10 expansieschroeven (G) in de gaten.
Kruiskopschroeven (A).

pond. Zorg ervoor dat het type muurconstructie en bevestigingsmateriaal
die u gebruikt, het gewicht van de behuizing goed zal ondersteunen
Waarschuwing: Probeer niet aan de muur te monteren wanneer er apparatuur
in de behuizing is gemonteerd. De behuizing heeft een draagvermogen van 200 kg.
moer van de expansieschroef.
en uitrusting.
4: Bevestig de behuizing op de M10-expansieschroeven (G), draai de
- 11 -

- 12 -

- 13 -
Geïmporteerd naar de VS: Sanven Technology Ltd. Suite 250, 9166 Anaheim
Place, Rancho Cucamonga, CA 91730
E-CrossStu GmbH
YH CONSULTING LIMITED.
C/O YH Consulting Limited Kantoor 147, Centurion House,
2122 Australië
Mainzer Landstr.69, 60329 Frankfurt am Main.
Geïmporteerd naar AUS: SIHAO PTY LTD. 1 ROKEVA STREETEASTWOOD NSW
Fabrikant: Shanghaimuxinmuyeyouxiangongsi Adres:
Shuangchenglu 803nong11hao1602A-1609shi, baoshanqu, shanghai
200000 CN.
London Road, Staines-upon-Thames, Surrey, TW18 4AX
VK REP
EC REP


Technische ondersteuning en e-
garantiecertificaat www.vevor.com/support

SERVERHÅLL
VÄGGMONTERING
ANVÄNDARMANUAL
Teknisk support och e-garanticertifikat www.vevor.com/support
"Spara hälften", "Halv priset" eller andra liknande uttryck som används av oss representerar endast en
uppskattning av de besparingar du kan göra genom att köpa vissa verktyg hos oss jämfört med de stora
toppmärkena och betyder inte nödvändigtvis att det täcker alla kategorier av verktyg som vi erbjuder.
Vi påminner dig om att noggrant kontrollera när du gör en beställning hos oss om du faktiskt sparar
hälften jämfört med de stora toppmärkena.
Vi fortsätter att sträva efter att erbjuda dig verktyg till konkurrenskraftiga priser.

Har du frågor om produkten? Behöver du teknisk support? Kontakta oss gärna: Teknisk
support och
e-garanticertifikat www.vevor.com/support
Detta är originalinstruktionerna, vänligen läs alla instruktioner noggrant innan du
använder produkten. VEVOR förbehåller sig en tydlig tolkning av vår användarmanual.
Produktens utseende ska vara beroende av den produkt du mottagit. Vi ber om ursäkt för
att vi inte kommer att informera dig igen om det finns några teknik- eller programuppdateringar
för vår produkt.
BEHÖVER DU HJÄLP? KONTAKTA OSS!
SERVERHÅLL
VÄGGMONTERING
- 1 -

VIKTIGA SÄKERHETSINSTRUKTIONER
från VEVOR.
användning av din produkt. Kontrollera produkten för eventuella saknade eller
Alla ansträngningar har gjorts för att säkerställa att informationen är korrekt i
defekta komponenter. Be VEVOR om hjälp om någon komponent är trasig
kapacitet.
Användning av varumärken, registrerade varumärken och andra skyddade
denna produktmanual.
eller saknas. Om produkten har påverkats, försök inte installera eller använda den.
Namn och symboler
För att förhindra skador under montering, placera produktens innehåll på kartong eller
annan säker yta. Felaktig installation eller användning av denna produkt kan leda till
produktskador, andra skador på utrustningen eller
Denna manual kan hänvisa till varumärken, registrerade varumärken och andra skyddade
namn och/eller symboler som tillhör tredjepartsföretag som inte
Håll höljet fritt från fukt, extrema temperaturer, brännbara ämnen och gaser, ledande
föroreningar, damm och direkt strålning.
personskada.
på något sätt relaterat till VEVOR. Dessa referenser tillhandahålls endast i
informationssyfte och utgör inte ett godkännande av en
solljus i en kontrollerad inomhusmiljö. Se till att det finns tillräckligt med utrymme för
Det rekommenderas att installationen utförs av en professionell installatör.
lämplig ventilation framtill och baktill på höljet.
VEVOR kan inte hållas ansvarigt för skador på utrustning eller fysiska skador.
Höljets externa ventilationsöppningar får inte blockeras, täckas över eller stoppas in med föremål.
till följd av felaktig produktanvändning eller installation. Se till
Tack för att du köpte väggmonteringsskåpet i Performance-serien
Ring eller maila oss om du har några frågor om installationen eller
att den lagrade/monterade utrustningen inte får överstiga den angivna vikten
- 2 -

- 3 -
Oavsett eventuella direkta erkännanden någon annanstans i detta dokument
bekräftar VEVOR härmed att alla varumärken, registrerade varumärken,
servicemärken och andra skyddade namn och/eller symboler som finns i denna
manual och relaterade dokument tillhör sina respektive innehavare.
produkt eller tjänst från VEVOR, eller ett godkännande av den/de produkt(er)
som denna manual gäller från det berörda tredjepartsföretaget.
Ansvarsbegränsningar: VEVOR ansvarar inte för någon skada eller skada, vare
sig direkt eller indirekt, särskilda, straffrättsliga, oförutsedda eller följdskador
(inklusive, men inte begränsat till, utebliven vinst eller intäkt, förlust av
användning, förlorade affärsmöjligheter eller förlust av goodwill), eller kostnader
för att anskaffa ersättningsprodukter, som uppstår på grund av eller i samband
med användningen av produkten. Säljarens ackumulerade bruttoansvar, som
härrör från alla orsaker till talan och ansvarsteorier, får under inga omständigheter
överstiga de totala belopp som kunden faktiskt debiterat säljaren enligt den
beställning som ger upphov till något ansvar härunder.

- 4 -
x1
E: Låssats för sidopanel
x1
x2
8. Bakre fjädring 9.
Vertikala monteringsskenor x4
A: M5*10 Stjärnskruvar x40
x1
x1
x1
x4
C: M6 korgmuttrar
x1
x12
3. Ytterdörr
x1
x4
5. Vänster ram
x2
x1
F: Låssats för framdörr
skruvar
1. Övre panel 2.
Nedre panel B: M6*12 Sexkantsskruvar x12
x1
G: M10*70mm expansion
H: Jordningstråd
x1
4. Sidopaneler D: Sidopanelspärrar
10. Pall
6. Höger ram 7.
Bakpanel

- 5 -
KRAV
Obs: Två personer krävs för montering av racket.
• Elektrisk skruvmejsel (säljs separat) •
Två personer (för montering)
• Insexnyckel (delpaketet ingår)

2
En
6
5
En
- 6 -
3: Montera de 4 vertikala monteringsskenorna (#9) på plats på önskat
djup. Fäst med 8 st. M5*10 kryssskruvar (A).
1: Sätt i den vänstra ramen (#5) och den högra ramen (#6) i
bottenpanelen (#2). Fäst med 4 st. M5*10 kryssskruvar (A).
2: Placera topppanelen (#1) på vänster ram (#5) och höger ram
(#6). Fäst med 12 st M5*10 kryssskruvar (A).
INSTALLATION AV HÅLLNING
- 7 -
Obs: Tänk på den utrustning du planerar att installera i skåpet när du bestämmer lämpligt
monteringsdjup. Se till att skenans djup på båda sidor av skåpet är detsamma.
4: Montera pallen (#10) på plats på önskad höjd. Fäst den med M6*12 sexkantsskruvar
(B) och M6 korgmuttrar (C).

- 8 -
7: Placera framdörren (#3) så att de övre och nedre stiften är i linje med
gångjärnshålet som sitter i höljet. Sätt i den nedre fasta stiften i det nedre
gångjärnshålet. Dra den övre fjäderstiftet ner i hålet i det övre hörnet och
släpp den.
Obs: Se till att låsdelarna är monterade enligt följande bild (horisontellt till
höger)
6: Montera ytterdörrlåset (F) på ytterdörren (#3).
5: Montera de två sidopanelerna (#4) i den vänstra ramen (#5) och den
högra ramen (#6). När varje sidopanel (#4) är på plats, kontrollera om
sidopanelspärrarna (D) och sidopanellåssatserna (E) fungerar korrekt.
8: Installera jordkabeln (H), anslut ytterdörren (#3) och bottenpanelen
(#2).

- 9 -
9: Montera bakpanelen (#7), fäst med 4/6 st M5*10 kryssskruvar
(A).

- 10 -
anpassa dig till standardplacering av reglar enligt diagrammet.
SPT-604-06 6U serverkabinett, H=300 mm;
Avståndet mellan monteringshålen visas i figuren ovan, med avstånd till
SPT-604-09 9U serverkabinett, H=480 mm;
position med färgpenna, mät sedan ovanstående figur visade hålet
avstånd för att markera de två nedre monteringshålens position.
monteringsyta, på lämplig plats för att markera monteringshål
1: Fäst först bakfjädringen (#8) på väggen eller annan lämplig
SPT-604-12 12U serverkabinett, H=620 mm;
2: Använder en elektrisk borr för att borra markerade 4 st hål med en diameter på 10 mm, sedan
montering och fäst M10 expansionsskruvarna (G) i hålen.
3: Fäst bakre upphängningen (#8) på höljet, säkra med 2 st M5*10
SPT-604-12W 12U serverkabinett, H=620 mm.
Stjärnskruvar (A).

- 11 -
4: Fäst höljet med M10-expansionsskruvarna (G), dra åt
pund. Se till att typen av väggkonstruktion och monteringsdetaljer är korrekt.
Varning: Försök inte montera på väggen när utrustningen är monterad
inuti höljet. Höljet har en viktkapacitet på 200
expansionsskruvens mutter.
och utrustning.
som du använder kommer att bära upp höljets vikt ordentligt

- 12 -

Storbritanniens republikaner
EG-representant
Mainzer Landstr.69, 60329 Frankfurt am Main.
YH CONSULTING LIMITED.
E-CrossStu GmbH
C/O YH Consulting Limited Kontor 147, Centurion House,
2122 Australien
Importerad till USA: Sanven Technology Ltd. Suite 250, 9166 Anaheim Place,
Rancho Cucamonga, CA 91730
Importerad till Australien: SIHAO PTY LTD. 1 ROKEVA STREETEASTWOOD NSW
Tillverkare: Shanghaimuxinmuyeyouxiangongsi
Adress: Shuangchenglu 803nong11hao1602A-1609shi, baoshanqu,
shanghai 200000 CN.
London Road, Staines-upon-Thames, Surrey, TW18 4AX
- 13 -


Teknisk support och e-garanticertifikat
www.vevor.com/support
