
Dear customer,
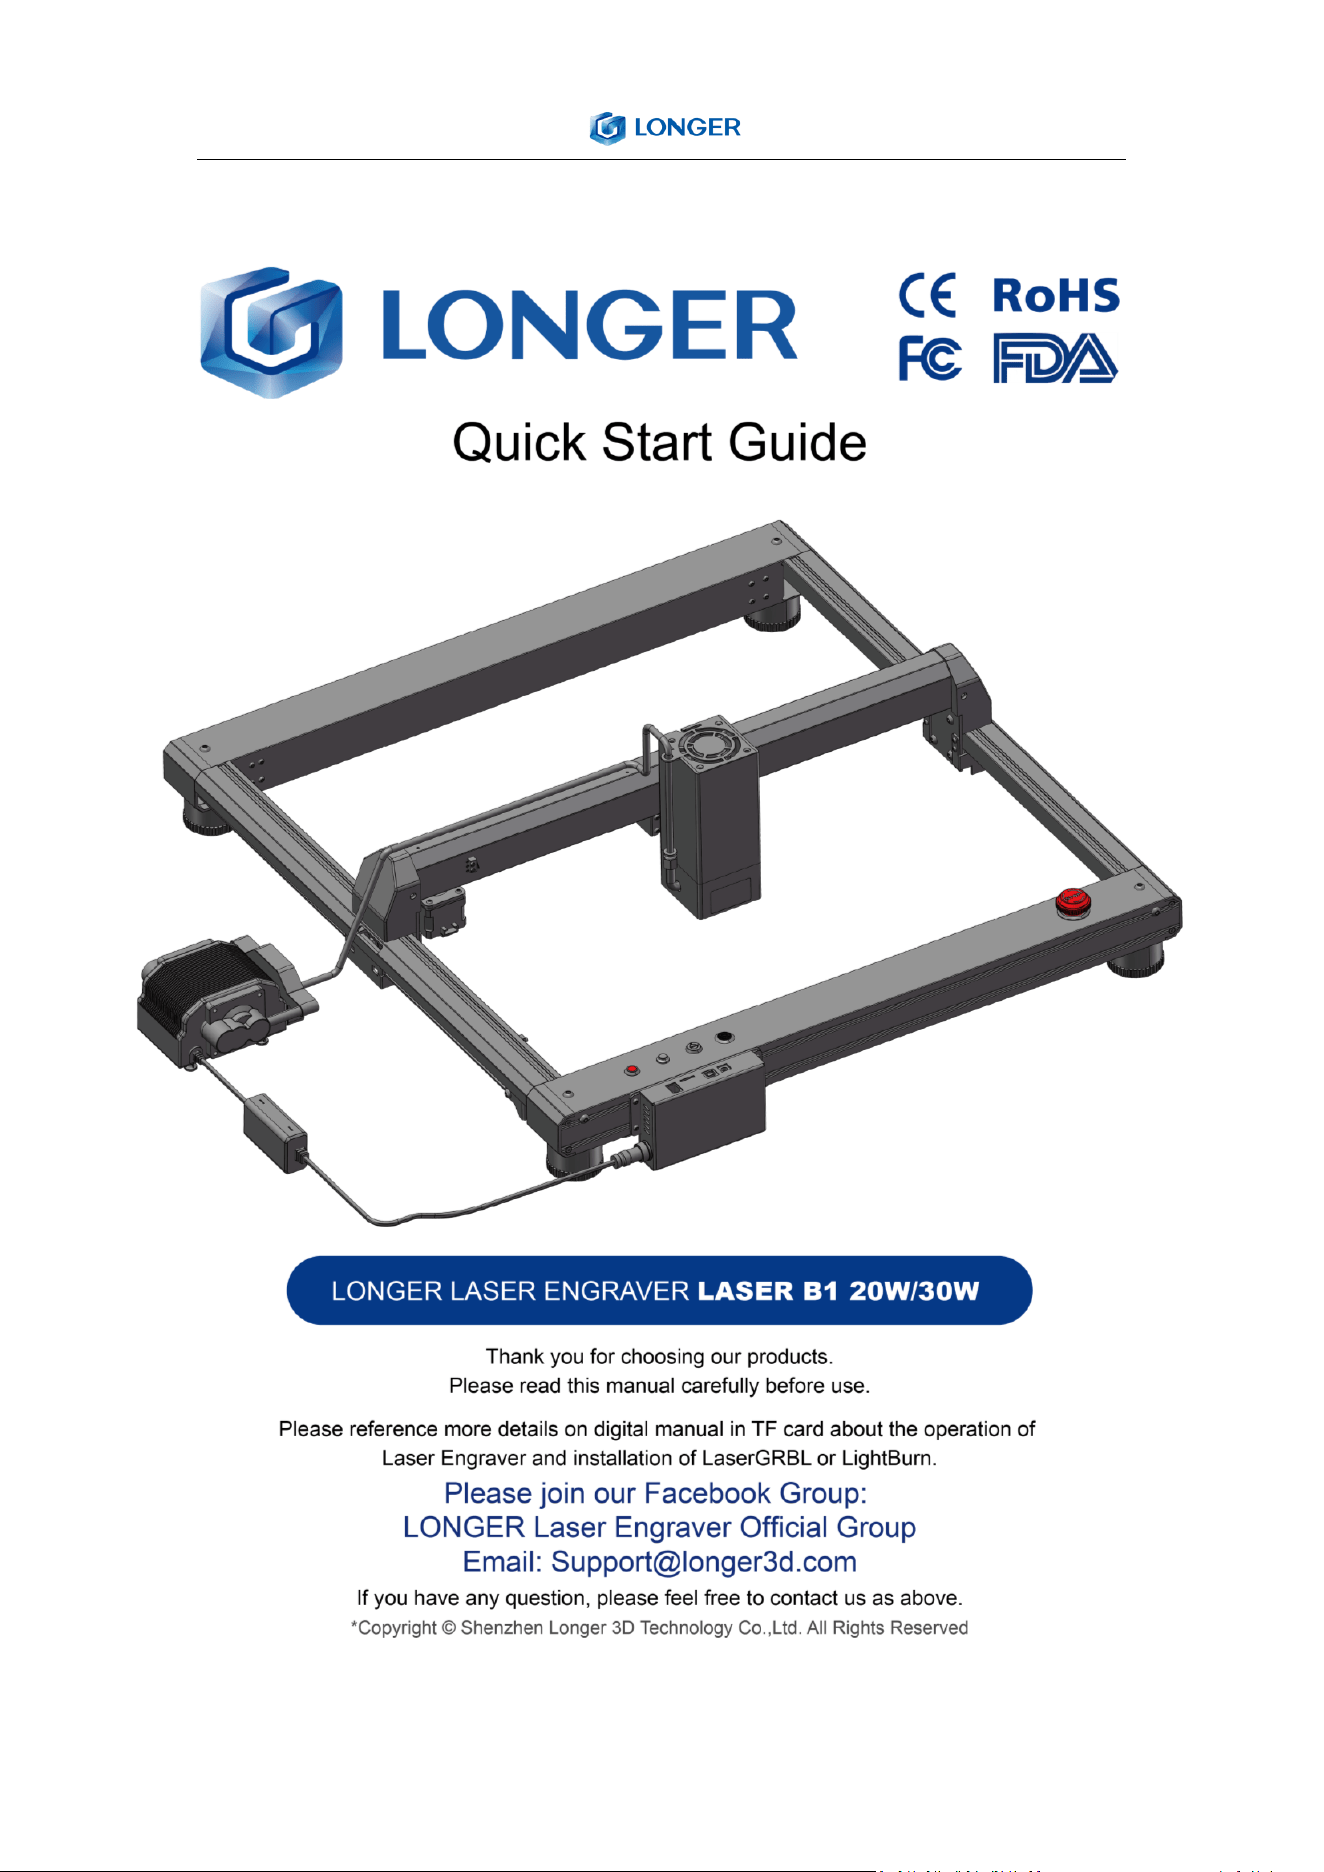
Thank you for choosing LONGER products LASER B1.
Maybe you are familiar with the engraving machine or have bought
a similar engraving machine before, we still highly recommend that
you read this manual carefully. The installation techniques and
precautions in this manual can help you avoid any unnecessary
damage or frustration.

Contents
A. Safety Precautions ............................................................................................................. 1
B. Product Information .......................................................................................................... 8
(1) Specifications ........................................................................................................ 8
(2) Components Introduction ................................................................................... 10
(3) Packing List .......................................................................................................... 11
(4) Machine assembly ............................................................................................... 12
C. Machine Operation ......................................................................................................... 17
(1) Power On ............................................................................................................. 17
(2) LaserGRBL Software Operation ........................................................................... 18
(3) LightBurn Software Operation ............................................................................ 21
(4) Firmware Upgrading ............................................................................................ 30
(5) APP Operation ..................................................................................................... 32
(6) Air valve instructions ........................................................................................... 41
D. FAQ .................................................................................................................................. 46
Question 1: Are there recommended engraving and cutting parameters? .................... 46
Question 2: The engraved pattern appears vibration, or is not closed? ......................... 46
Question 3: How about the warranty policy? ................................................................. 46
Question 4: How to maintain LASER B1 laser module?................................................... 49
Question 5: How to solve alarm 2 error or hard limit? ................................................... 51
Question 6: How to solve the upload error of the APP? ................................................. 51

1
1
A. Safety Precautions
(1) The LASER B1 engraves and cuts materials by the means of a
high-energy diode laser beam.
The hazards associated with a high-energy diode laser beam
include the possibility of fires, generation of hazardous and/or
irritating toxic fumes, but more importantly damage to eyes and
skin.
(2) Laser engravers are divided into several internationally valid
classes based on their performance and the risk of injury. The
LASER B1 falls into the Class IV (Class 4 IEC standard focus on the
American FDA classification).
Laser class Class Definition
Class I Class I laser radiation is not considered hazardous.
Class IIa Class IIa laser radiation is not considered
hazardous if viewed for any period of time less
than or equal to 1x10
3
seconds but is considered a
chronic viewing hazard for any period of time
greater than 1x10
3
seconds.
Class II Class II laser radiation is considered a chronic
viewing hazard.
Class IIIa Class IIIa laser radiation is, depending upon the
irradiance, either an acute in-trabeam viewing
hazard or chronic viewing hazard. If viewed
directly with optical instruments, Class IIIa laser
radiation is classified as an acute viewing hazard.

2
2
Class IIIb Direct Class IIIb laser radiation is considered an
acute hazard to the skin and
eyes.
Class IV Class IV laser radiation is considered an acute
hazard to the skin and eyes from
both direct and scattered radiation.
The high energy laser beam can cause severe eye damage, including
blindness and serious skin burns.
Improper use of the controls and modification of the safety
features may cause serious eye injury and burns.
Please wear Personal Protective Equipment (PPE, Safety Glasses are
designed to filter specific ranges of laser wavelength. The LASER B1
Safety Glasses provided are specific for LONGER Laser Module;)
when using the machine.
• DO NOT look directly into the laser beam.
• DO NOT aim the laser beam at reflective surfaces.
• DO NOT operate the laser without PPE protection for all persons
nearby in the proximity of the LASER B1.
• DO NOT allow unsupervised access to the LASER B1 to children.
• DO NOT allow access near the LASER B1 to pets.
• DO NOT modify or disable any safety features of the laser
system.
• DO NOT touch the high energy laser beam.

3
3
(3) We strongly recommend placing the machine in a well-ventilated
room, and at the same time, the door of the room has a sealing
effect, and the windows have curtains, to effectively avoid
looking directly at the laser beam and some smoke and steam ,
Particles, and other highly toxic substances. At the same time,
you can pay attention to the LONGER products (cover) in the
follow-up.
(4) The high-energy diode laser beam can produce extremely high
temperatures and significant amounts of heat as the substrate
material is burned away while engraving and cutting. Some
materials are prone to catch fire during cutting operations
creating flame, fumes, and smoke.
(5) Although the LASER B1 has a built-in flame sensor, this
technology should NOT be considered 100% accurate and should
be seen only as a warning system.
During the working process of LASER B1, if a flame is found, the
machine will stop the laser and make a sound to indicate
abnormal conditions. Please pay attention to the working status
of the machine.
during operation to ensure that any flare ups/ flame is properly
contained and extinguished.
It is strongly recommended that a Fire Extinguisher should be

4
4
located within proximity to the LASER B1. Extinguishers should
be halogen or multi-purpose dry chemical. Alternatively, or in
conjunction with the Fire Extinguisher it is recommended a “Fire
Extinguisher Ball” is positioned beside the LASER B1.
• DO NOT use materials that are highly flammable, explosive or
produce toxic by-products.
• DO NOT remove material from the cutting bed before it has
cooled.
• DO NOT leave the LASER B1 operating unattended.
• ALWAYS clean up clutter, debris, and flammable materials in the
laser LASER B1 bed after use.
• ALWAYS keep a properly maintained fire extinguisher nearby.
• DO NOT allow the USB cable to contact with the laser Beam.
• DO NOT allow the 24V power cable to contact with the laser
Beam.
(6) During the engraving process of the LASER B1 laser engraving
machine, different materials may produce different pungent
odors. Always use LASER B1 laser engravers in open and
well-ventilated areas.
(7) Environmental requirements
Temperature requirement: 10°C~30°C, humidity requirement:
20%~50%, this LASER B1 laser engravers can work normally
5
5
within this range; beyond this range, this laser engravers will be
unable to achieve the best engraving results.
(8) Below a list of some of the most known hazardous materials that
the user SHOULD NOT attempt to engrave or cut on. If a material
is not in this list, do not consider it to be safe to use. Obtain the
Safety Data Sheet (SDS) from the material’s manufacturer when
handling unknown materials.
Material Reason to avoid engraving / cutting it
PVC (Poly
Vinyl
Chloride)
PVC will emit Chlorine gas when laser cut, or laser engraved. This
toxic gas can ruin the optics and motion control system of the
laser engraver, in fact, engraving or cutting PVC is a sure way of
voiding the warranty of your laser engraver
Lexan / Thick
Poly-
carbonate
Lexan not only cuts poorly but it also catches on fire very easily.
The window of the laser engraving machine is usually made from
polycarbonate because it does a very good job of attracting
infrared radiation., which is the frequency of light the engraver
uses when cutting and engraving materials. This makes the laser
cutter quite ineffective in cutting polycarbonate materials
ABS
ABS melts upon exposure to a laser beam as opposed to
vaporizing which would be the ideal reaction needed for laser
engraving. Instead of leaving a crisp image, ABS will melt and
leave a gooey deposit on the surface.
HDPE HDPE melts and catches on fire easily upon exposure to a laser
beam.

6
6
Polystyrene
Foam
Only very thin pieces can be laser cut but for the most part,
polystyrene catches
on fire and melts when exposed to a laser beam
Fiberglass
Fiberglass is made from two materials: glass and epoxy resin. The
best method of marking glass is etching while epoxy resin can
emit toxic fumes upon laser engraving. These two reasons make
fiberglass a bad choice for a laser engraving material
Polypropylene
polypropylene melts and catches on fire easily and then the
melted material continues to burn thereby forming pebble-like
drips that harden on the surface
Coated Carbon
Fiber
Coated carbon fiber emits noxious fumes. Additionally, carbon
fiber can be cut
albeit with some fraying but this is not the case when it is coated.
(9) The LASER B1 has built in technology and algorithms to keep its
users and the surrounding environment safe. This said it is
important to understand the LASER B1 is not a toy and should be
operated with care and respect.
(10) Important information regarding your LASER B1
LASER B1 use 24V DC power system:
• Never Use a different voltage Power Adapter.
Make sure to use DC 24V 5A and 7.5A adapters for 20
W and 30W respectively.
• When using an alternative Power Adapter, the Voltage
should always be 24V, Make sure to use DC 24V 5A

7
7
and 7.5A adapters for 20W and 30W respectively.
Higher amperage output Power Adapter can be used
without risk of damage to your LASER B1.On inserting
the power barrel into your motherboard, it is possible
that a small spark is visible. This is NOT hazardous to
your machine and is caused by the 24V power inrush. If
you prefer to avoid this, connect the power barrel to
your motherboard first, then connect your power
adapter to the mains electricity plug.
• Once the LASER B1 detects 24V present you will see the
motherboard emit a light red glow on the LED of the
Motherboard. This mean the motherboard is powered.
• If when plugging your Power Adapter barrel to your
Motherboard and the Power adapter to mains power a
green LED does not turn on, please verify your power
adapter is receiving Mains Power.
8
8
B. Product Information
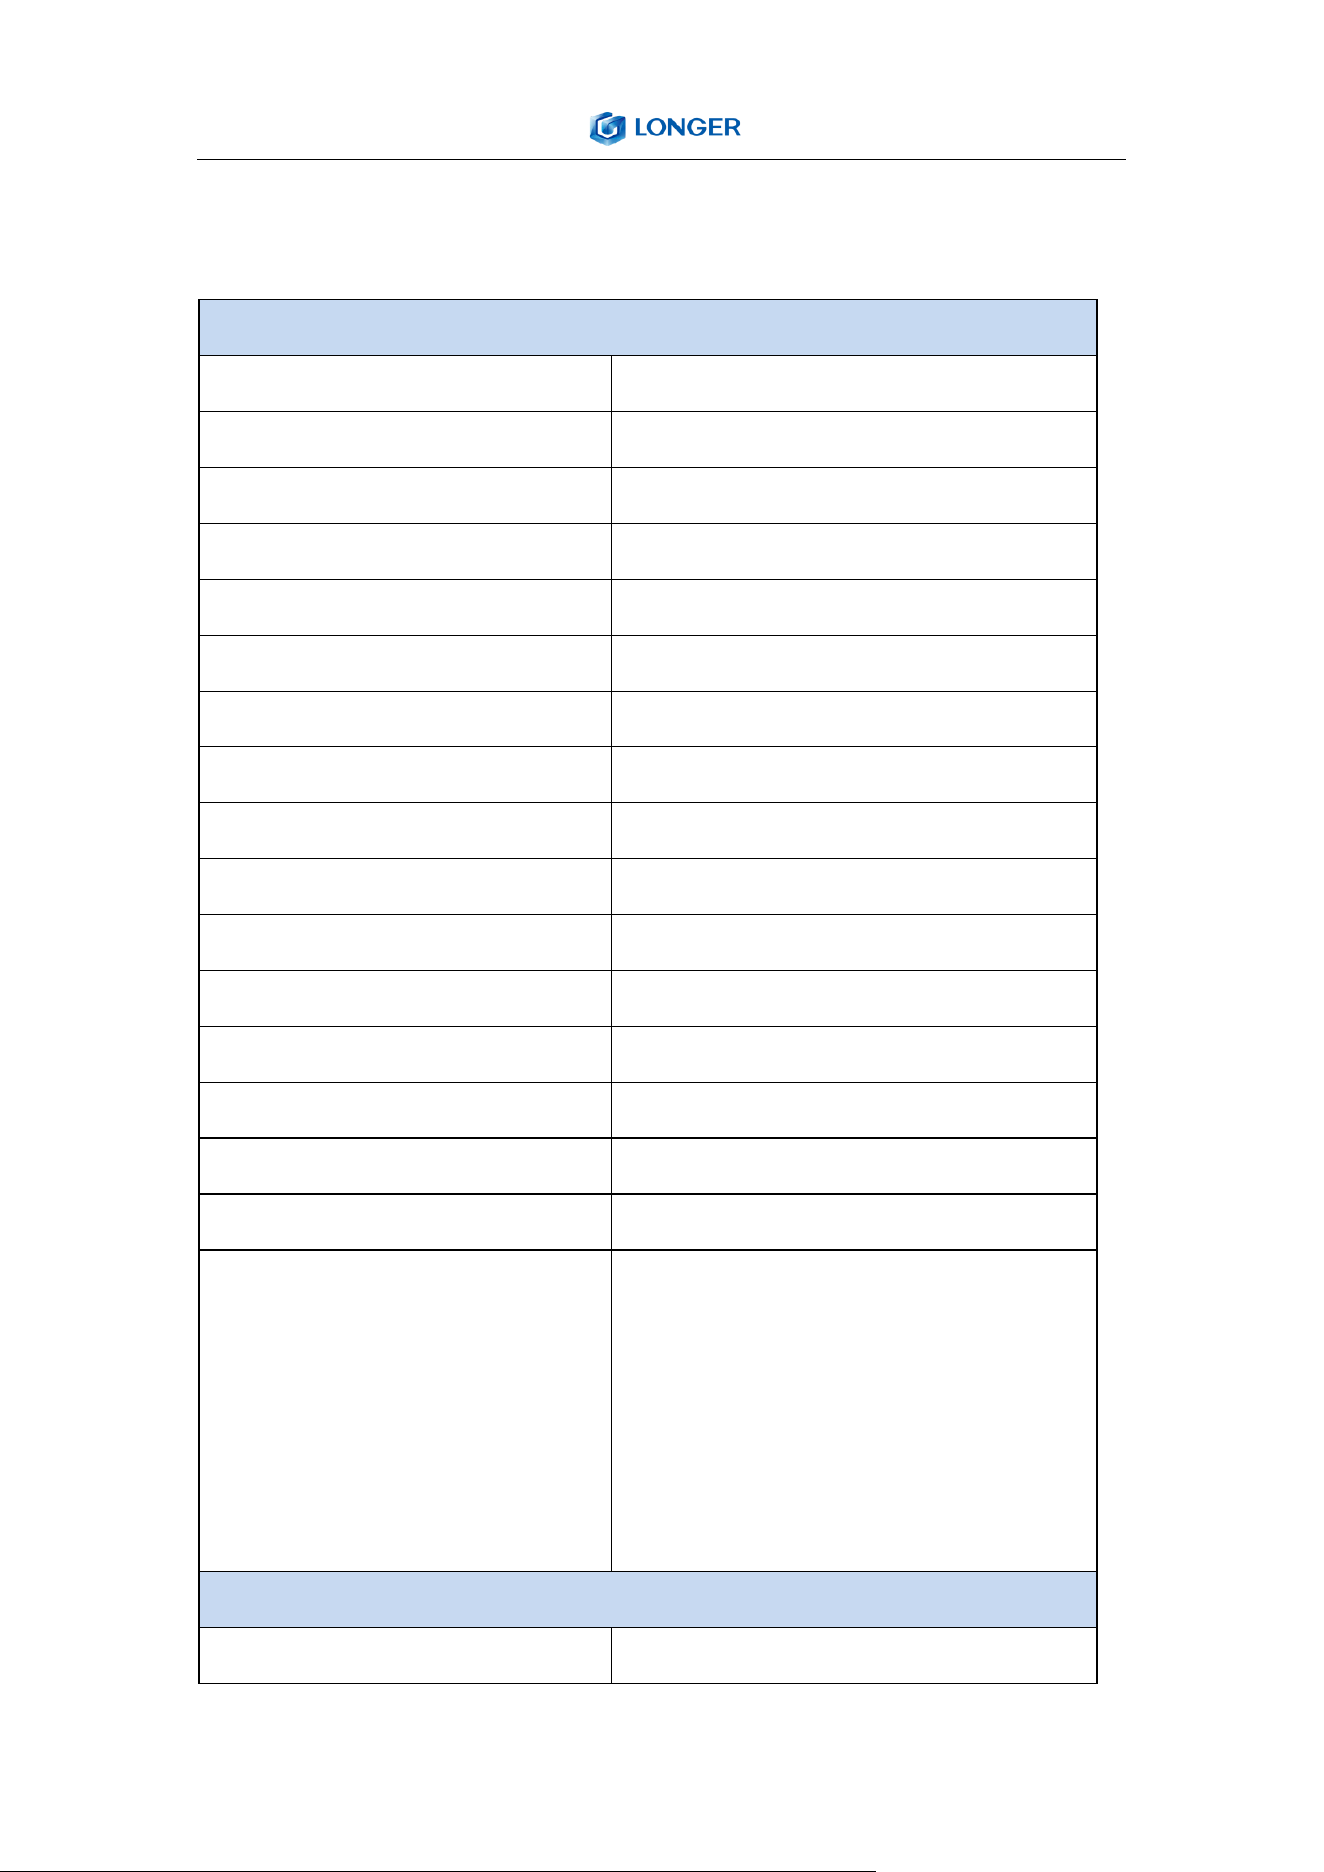
(1) Specifications
Laser B1 20W
Working Area 450x440mm(17.72x17.32inch)
Power Adapter Input Voltage (AC)
AC110 - 240V 50/60Hz
Power Adapter Output Voltage (DC) DC 24V 5A
Power Max Consumption 120W
Packaging Size 742x557x124 mm (29.2x21.9 x4.9 in)
Packaging Weight 9.6kg
Machine Size Assembled 727x668x239 mm (28.6x26.3x9.4 in)
Operating Temperature
-20 – 50℃
Laser Module Model
Laser B1 20W
Laser Technology
Four Diode Laser with FAC
Wavelength 450 - 460 nm
Max Power Input DC 24V 3.2 A
Optical Power Output 20-22W
Focus Type
50mm Fixed Focus
Dot Size at Optimal Focus
0.08 x 0.15mm
Laser Class FDA Class IV, or Class 4 IEC standard
Applicable Material
Engraving:
Plywood, Basswood, Hardwood,
Pinewood, Acrylic, Kraft paper, Stainless
steel, Aluminum alloy, Ceramics, etc.
Cutting: Basswood, Acrylic, Bamboo, Kraft
paper, etc.
Laser B1 30W
Working Area 450x440mm(17.72x17.32inch)
9
9
Power Adapter Input Voltage (AC)
AC110 - 240V 50/60Hz
Power Adapter Output Voltage (DC) DC 24V 7.5 A
Power Max Consumption 180W
Packaging Size 742x557x124 mm (29.2x21.9x4.9 in)
Packaging Weight 9.7kg
Machine Size Assembled 727x668x244 mm (28.6x26.3x 9.7 in)
Operating Temperature
-20 – 50℃
Laser Module Model
Laser B1 30W
Laser Technology
Six Diode Laser with FAC
Wavelength 450 - 460 nm
Max Power Input DC24V 4.5 A
Optical Power Output 33-36W
Focus Type
50mm Fixed Focus
Dot Size at Optimal Focus
0.08 x 0.15mm
Laser Class FDA Class IV, or Class 4 IEC standard
Applicable Material
Engraving:
Plywood, Basswood, Hardwood,
Pinewood, Acrylic, Kraft paper, Stainless
steel, Aluminum alloy, Ceramics, etc.
Cutting: Basswood, Acrylic, Bamboo, Kraft
paper, etc.
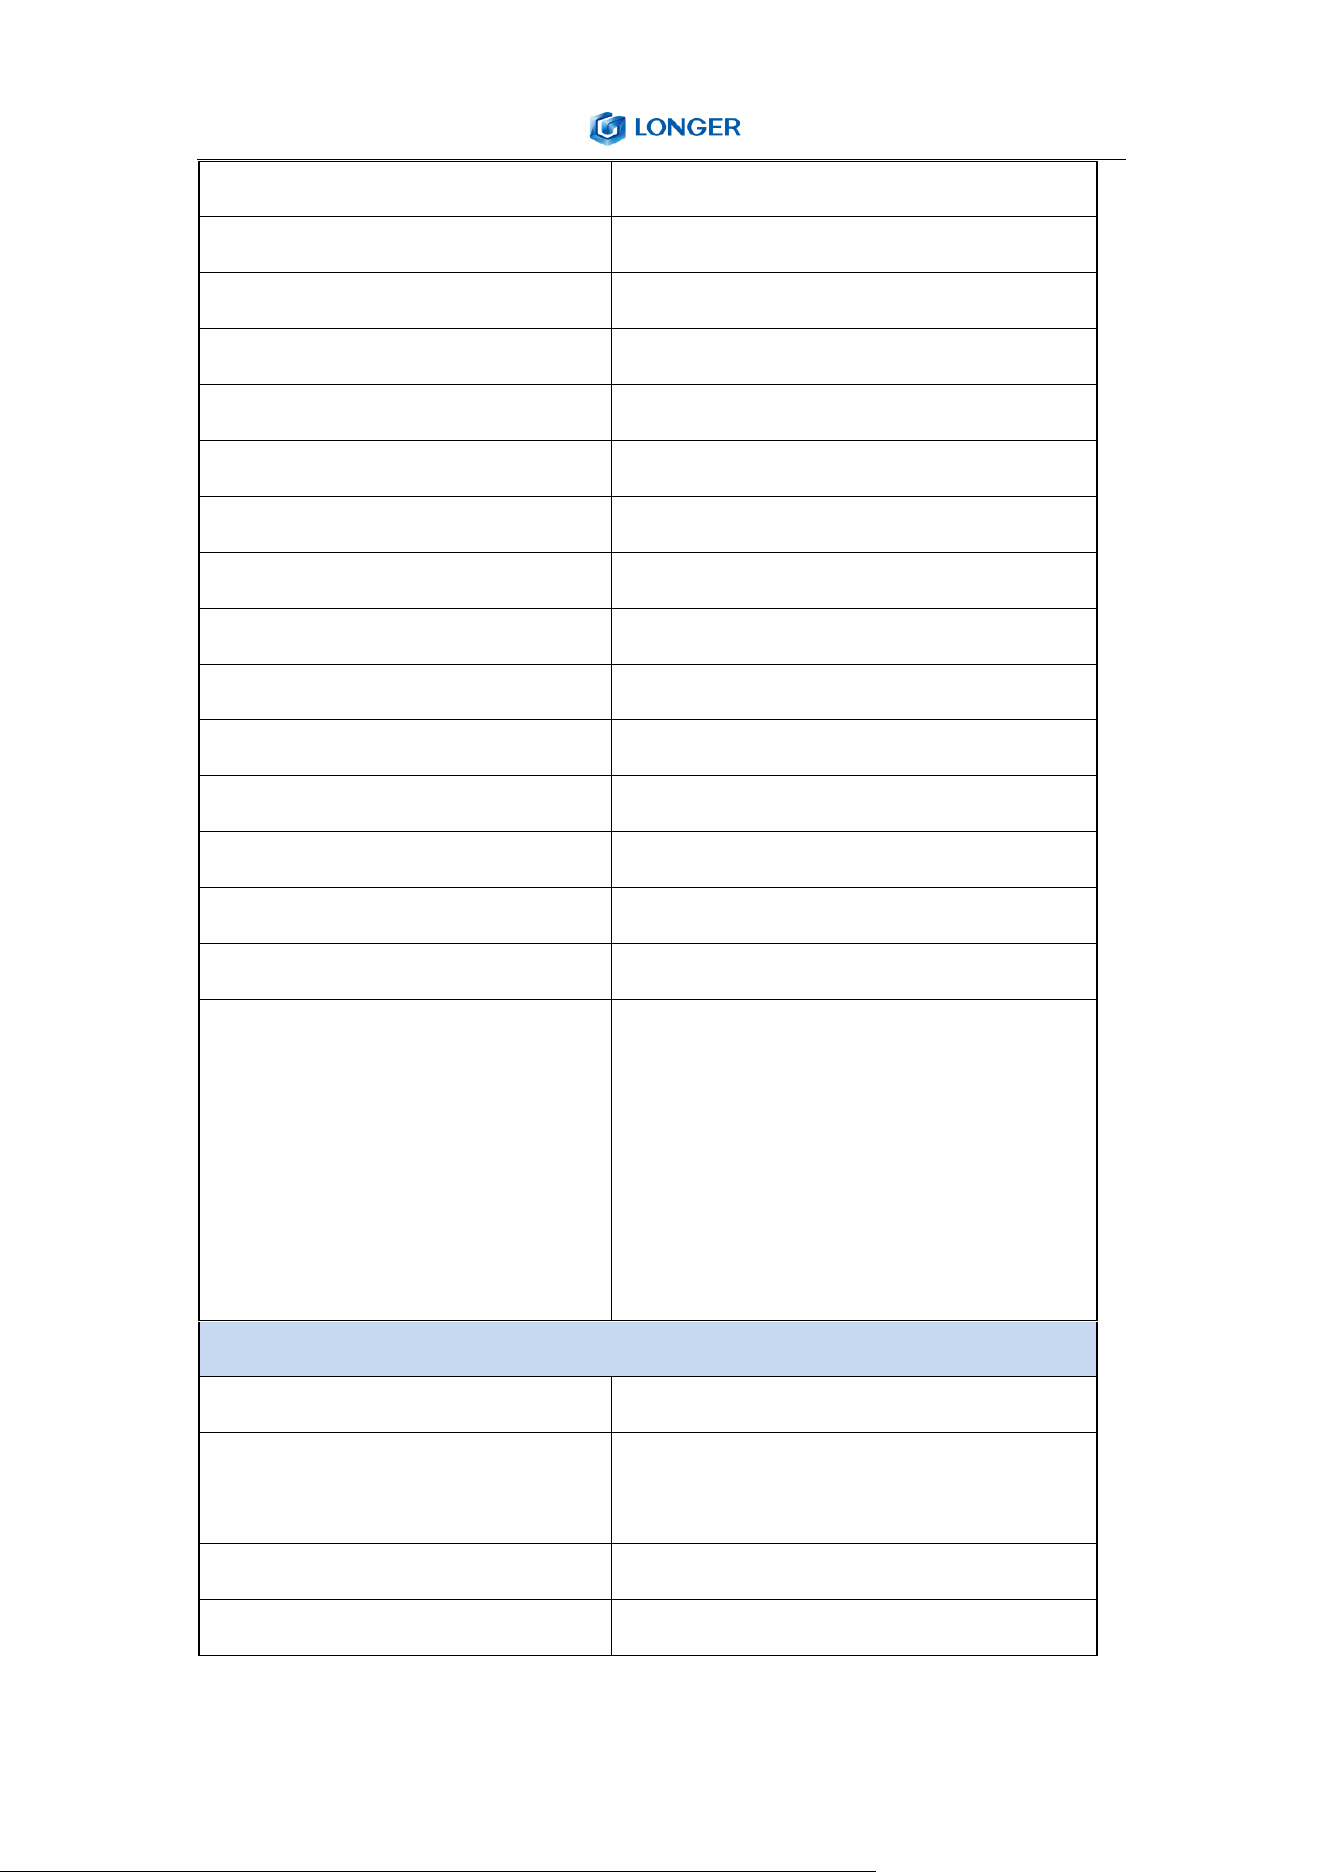
Software
Software LaserGRBL (free), LightBurn (paid)
Operating System
LaserGRBL: Windows
Lightburn: Windows, MacOS, Linux
Input Image Format jpg,bmp,png,dxf,svgai,tiff,etc
Connection type USB cable, Micro SD Card, Wi-Fi
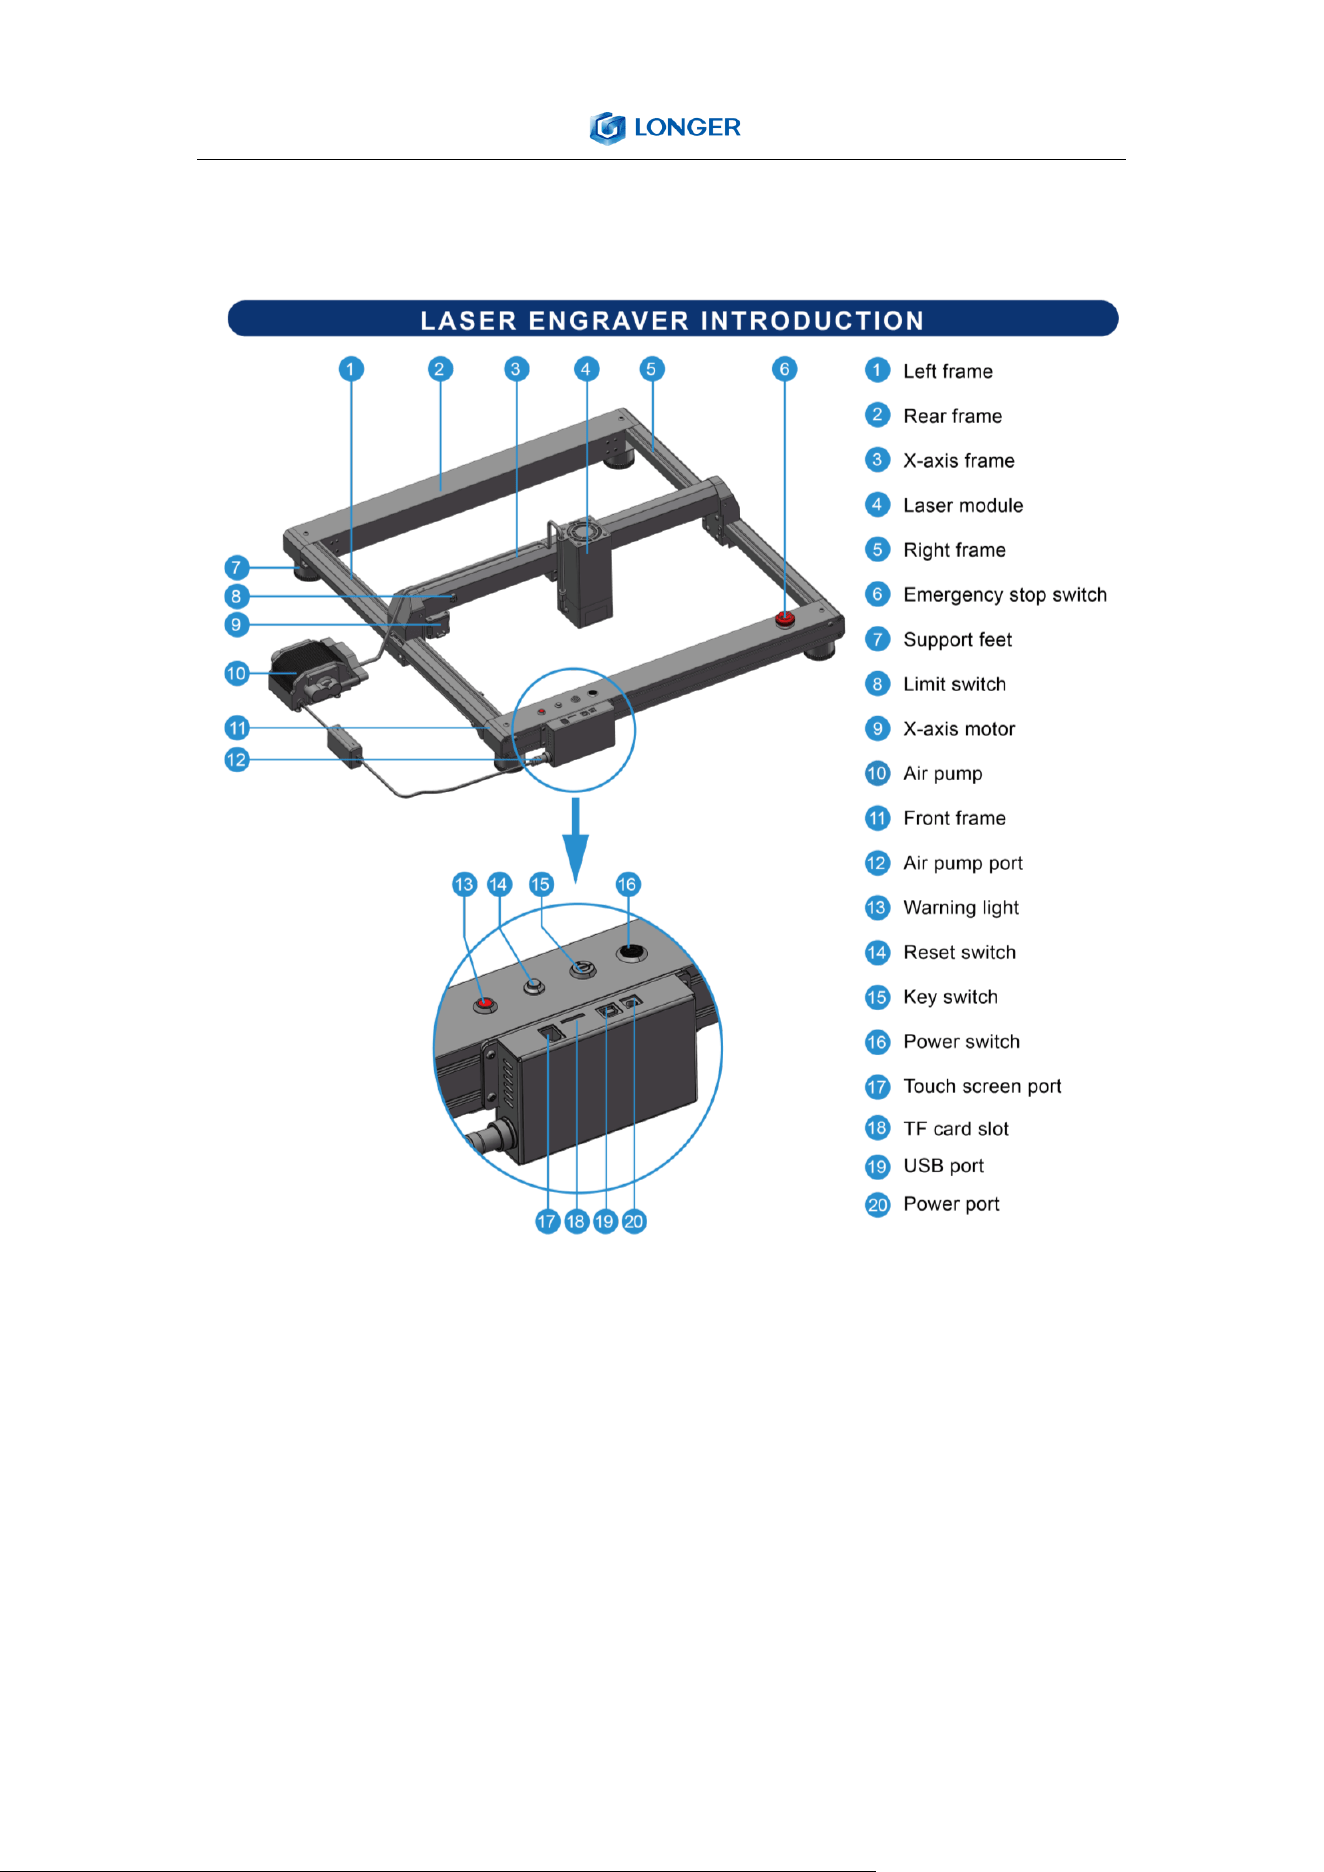
(2)
10
Components Introduction
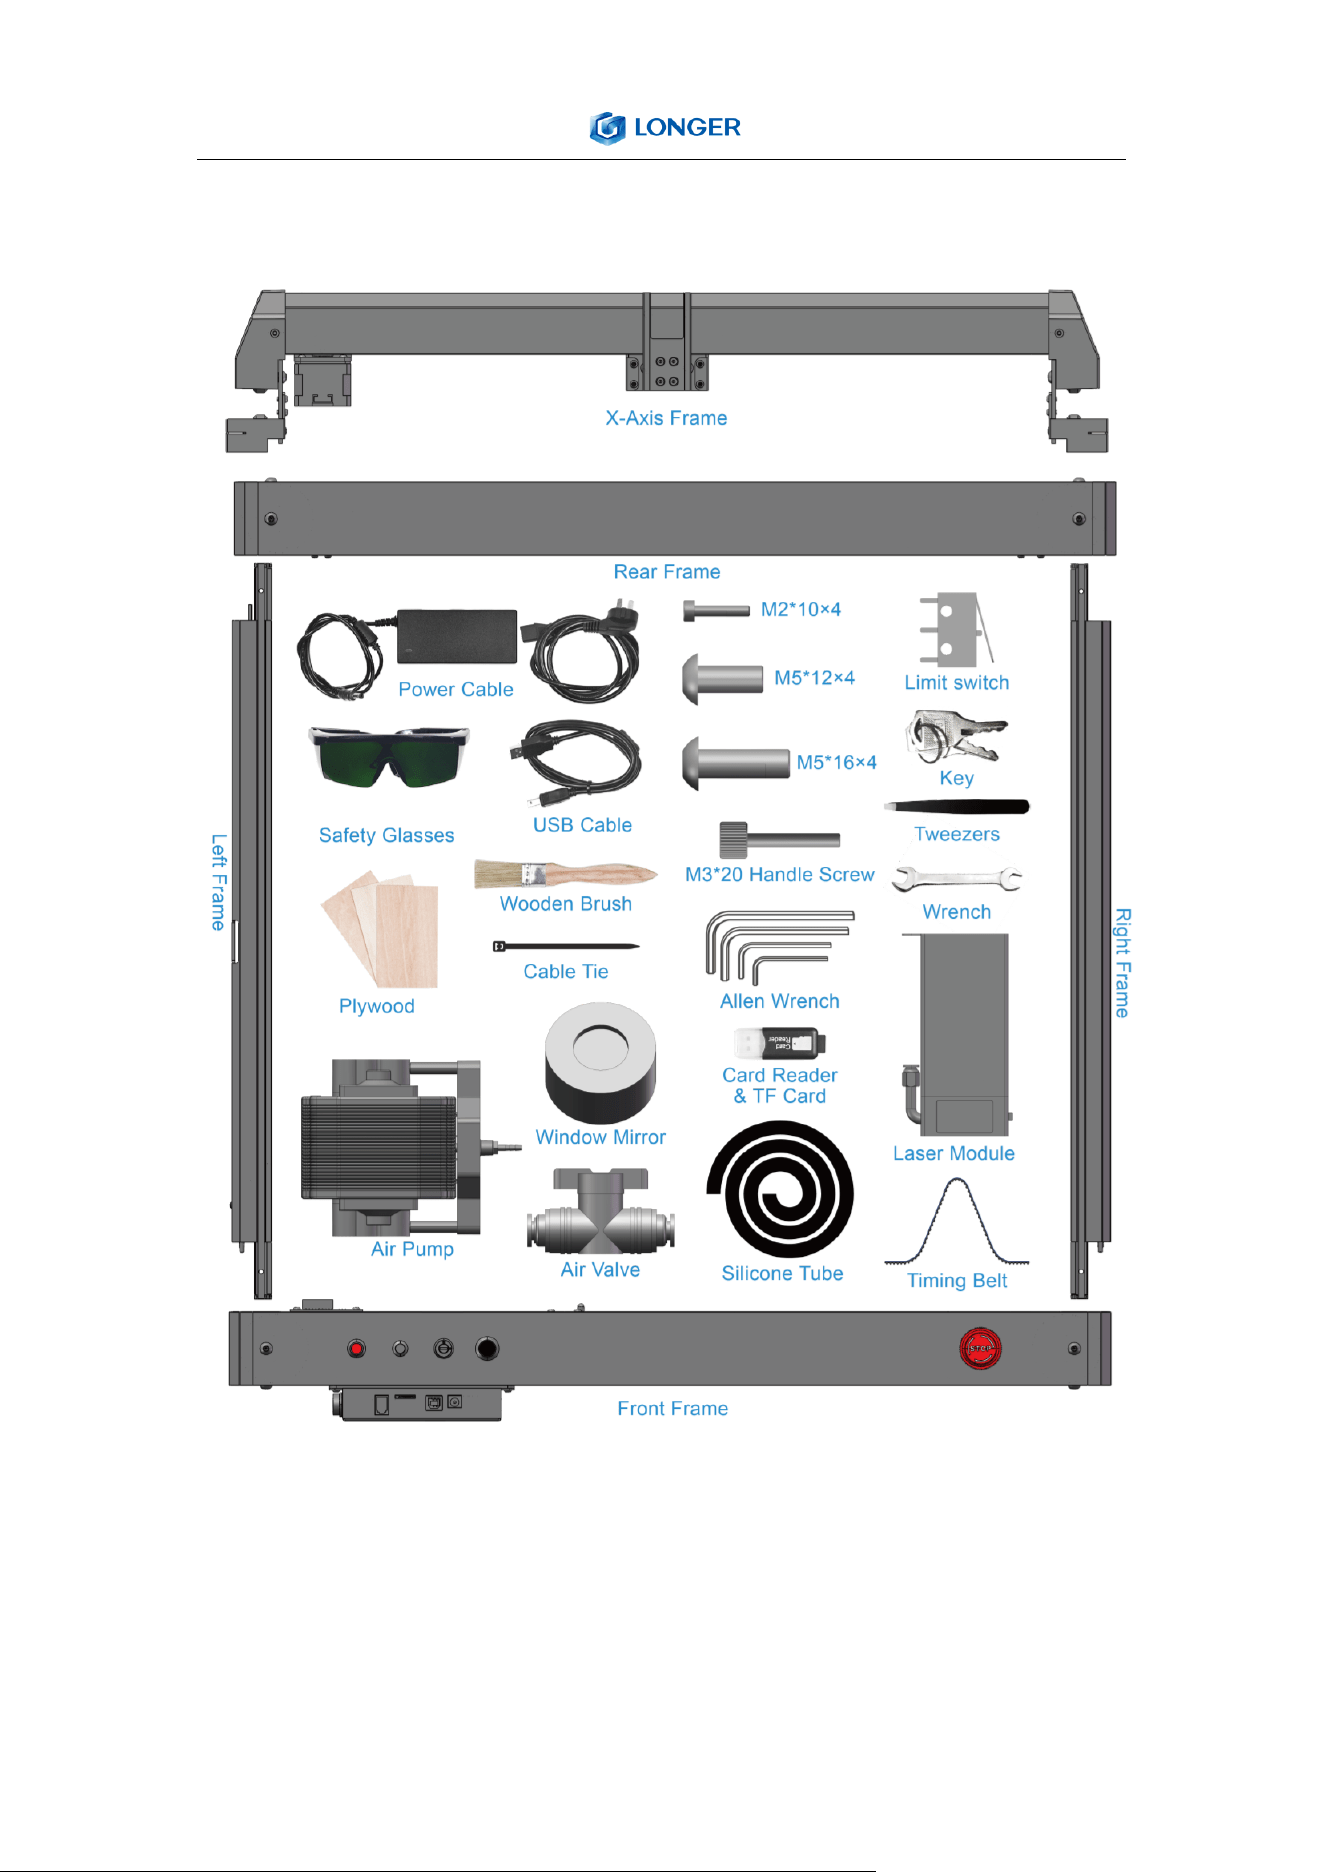
(3)
11
Packing List

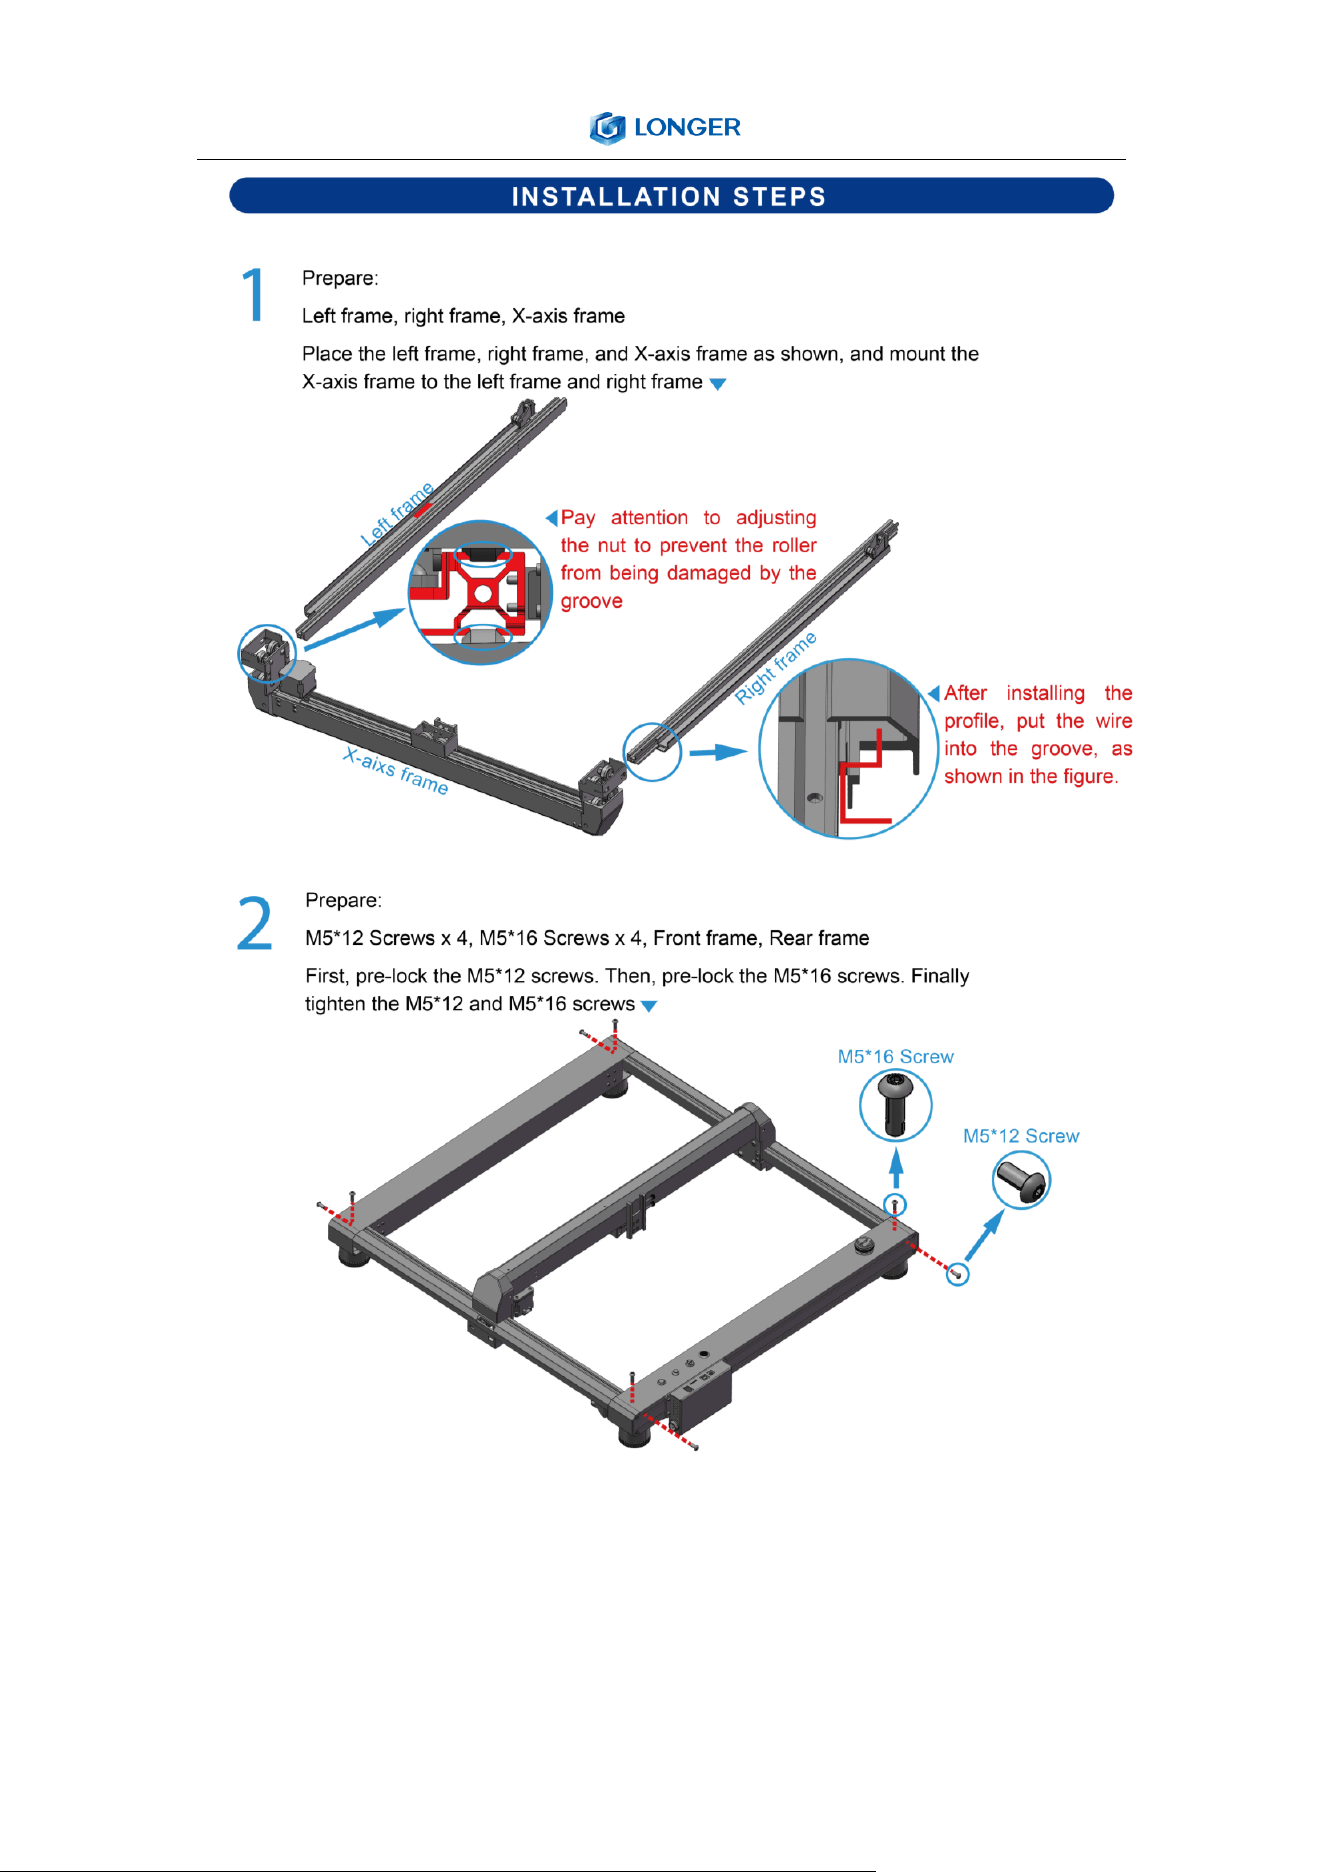
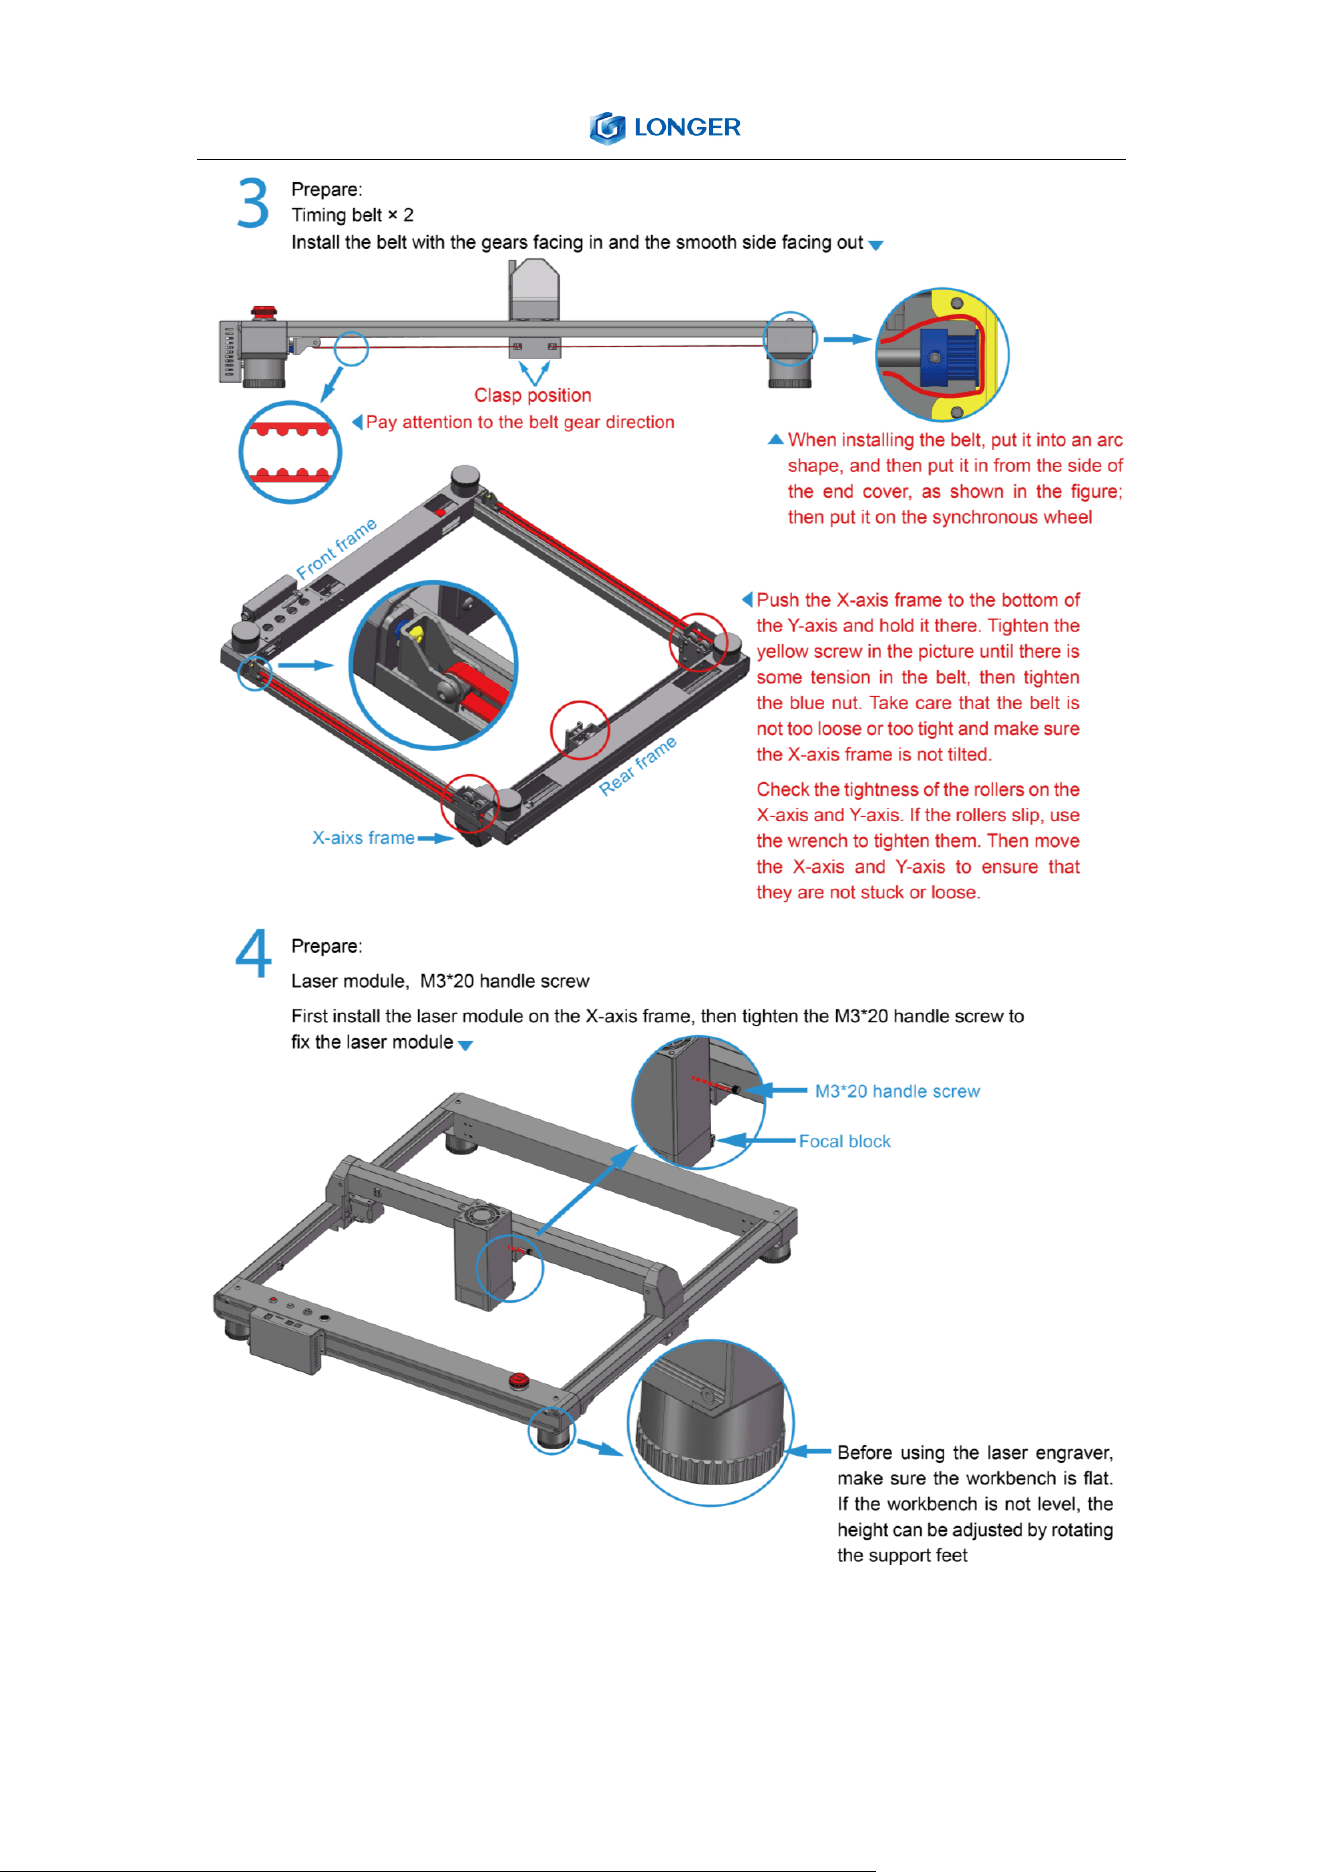
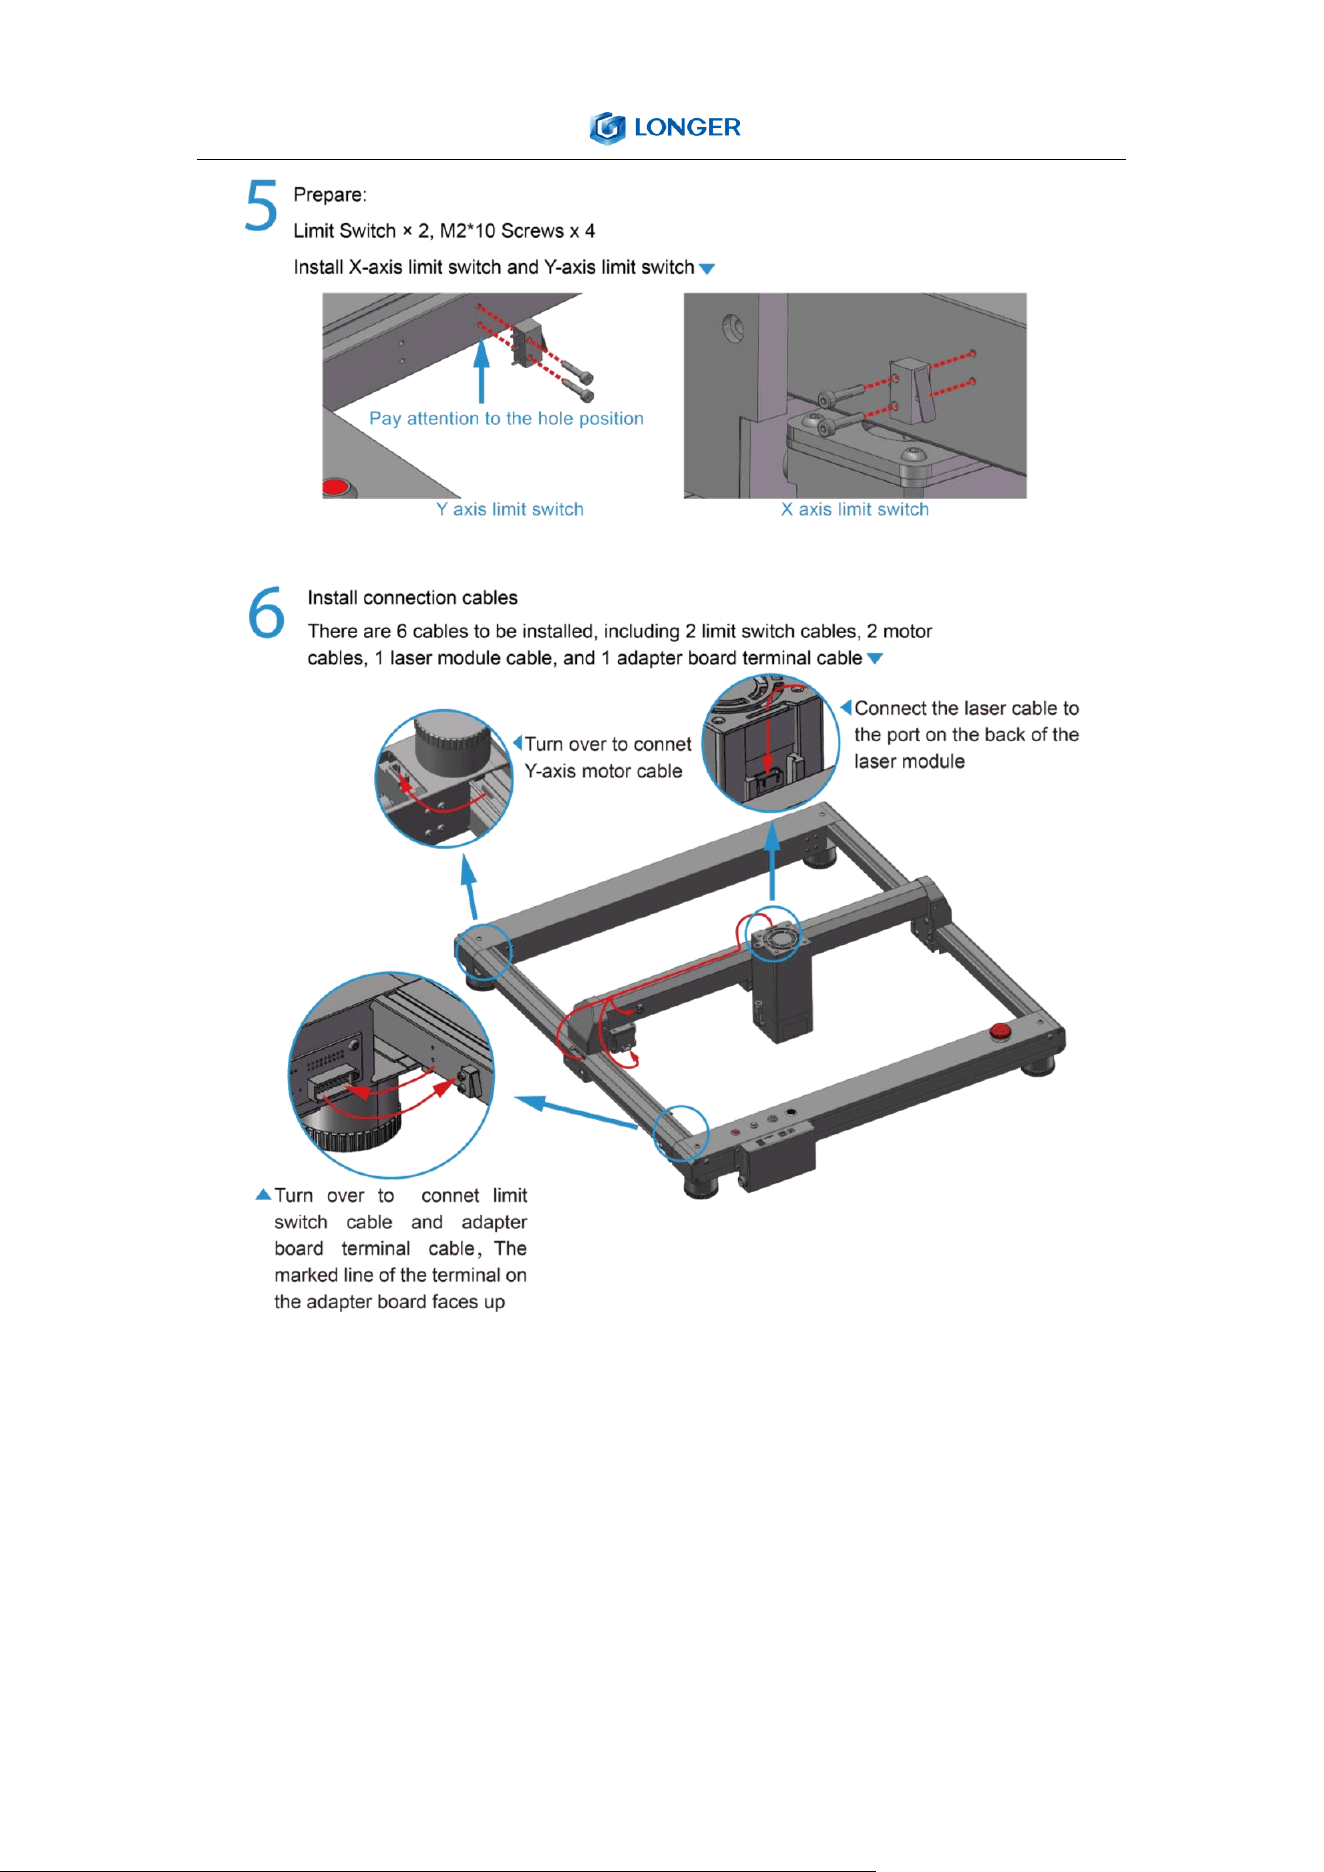
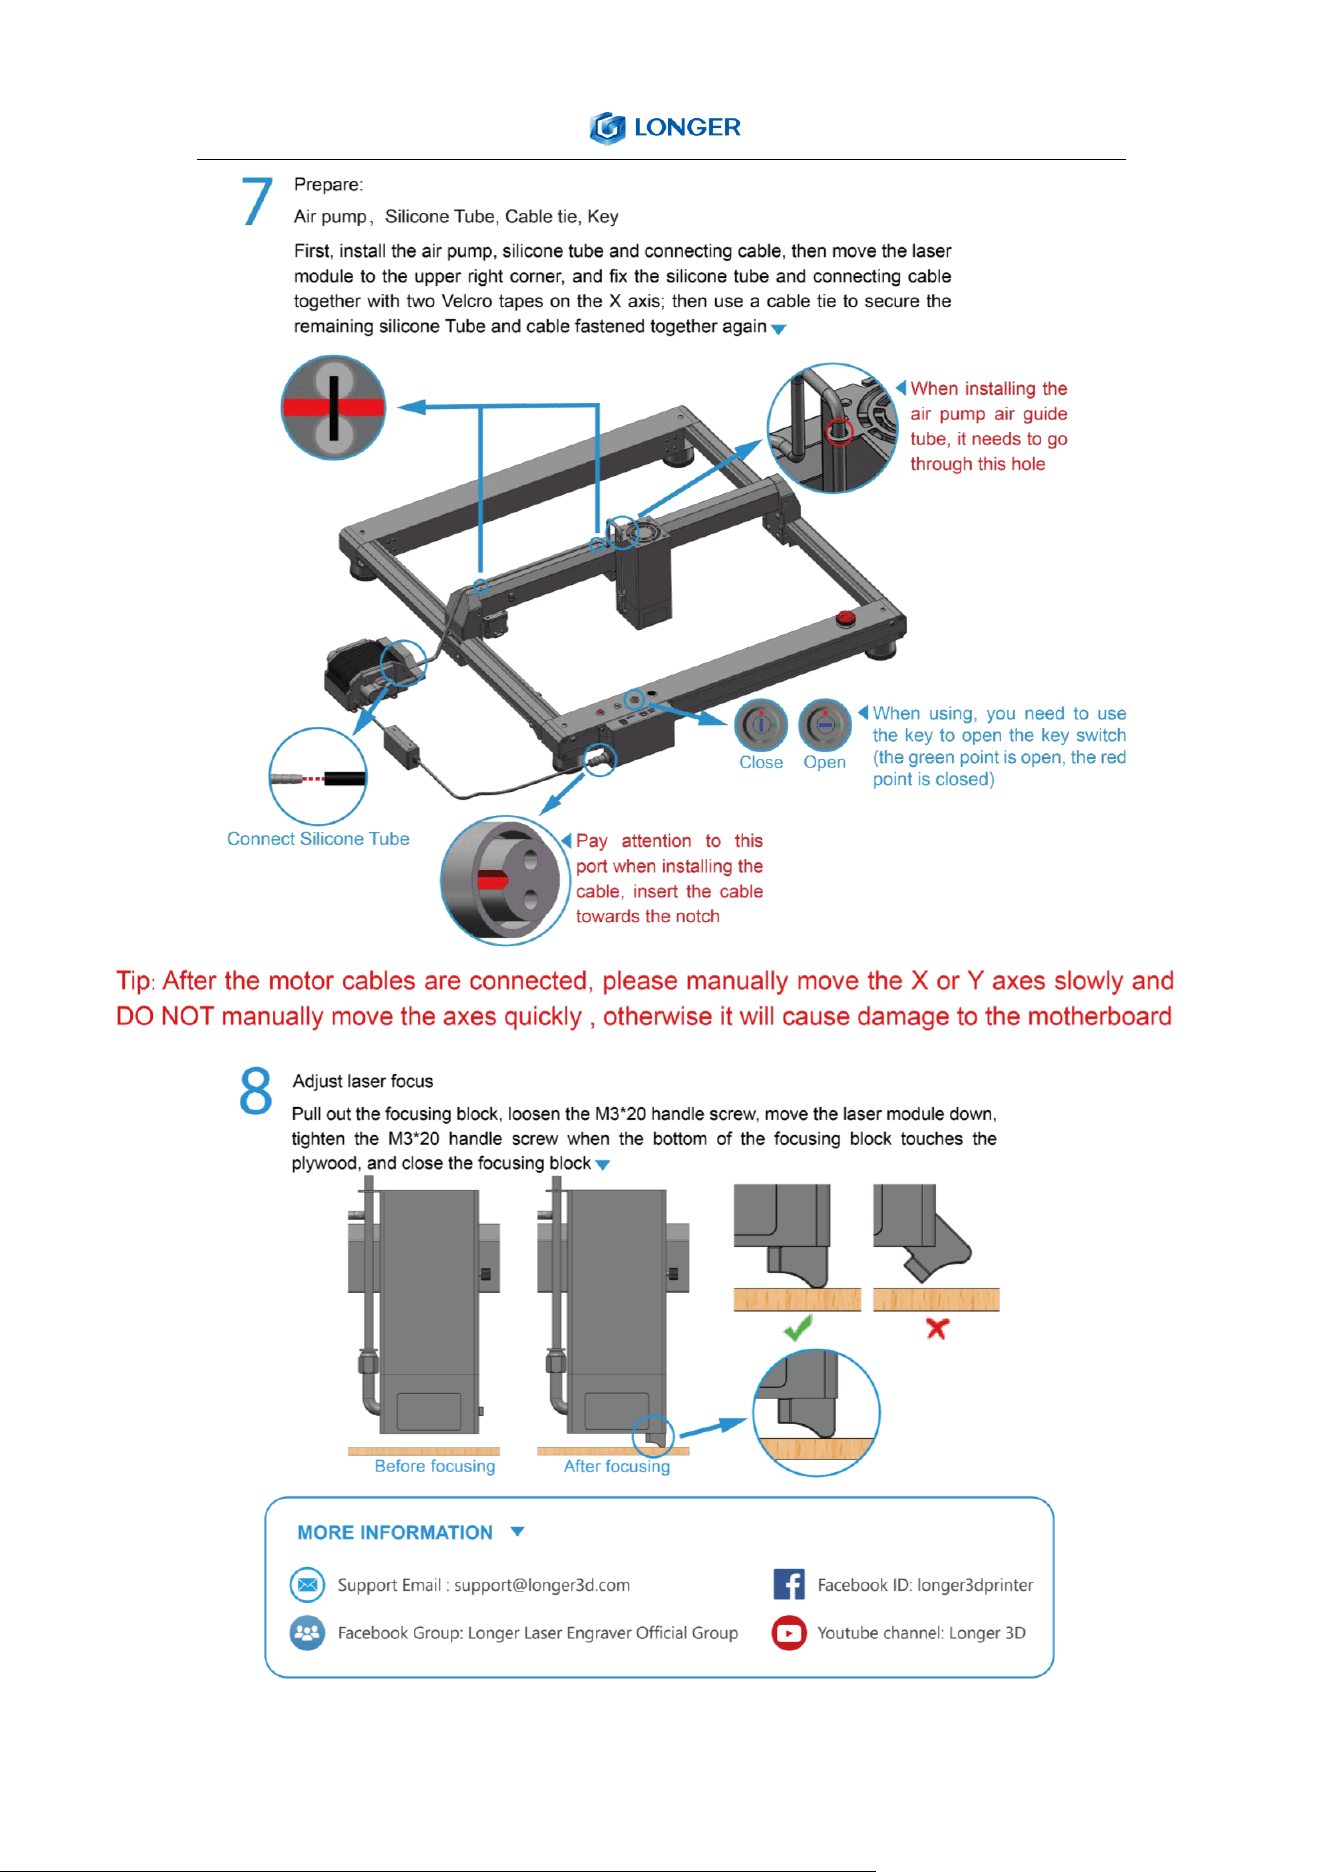
(4) Machine assembly
The machine step-by-step assembly process is described in the
document “LASER B1 Quick Start Guide”. Please follow the guide to
12
assemble machine.
• During the machine assembly, if there is any unclear place,
please refer to the video “LASER B1 Quick Start Guide”.
• Each unit of the engraving machine has been inspected and
tested. Therefore, in some cases, very small traces may be
left on the profile and the metal shell. These will not affect
the quality. It is normal that it does not affect normal
engraving. Thank you very much for your understanding.
• Be cautious during assembly as some parts may have sharp
edges.
• If you have any questions after receiving the product, please
contact our customer service first.
13
14
15
16

C. Machine Operation
(1) Power
17
On
a) Find the adapter and power cable and connect them. Please
Make sure to use DC 24V 5A and 7.5A adapters for 20W and
30W respectively.
b) Connect the power cord to the power supply and connect
the other end of the adapter to the power port of the
motherboard.
c) Connect the computer and the engraving machine through a
USB computer (or insert a Micro SD card).
d) Turn ON your LASER B1 by press the power switch (To Turn
OFF your LASER B1 by press the power switch once again.)
18
(2) LaserGRBL Software Operation
LaserGRBL is an easy-to-use and fully free software for laser
engraver only running on Windows.
Download
a) Find LaserGRBL software in attached SD card(path:
/software), Or download from the link:
https://lasergrbl.com/download/
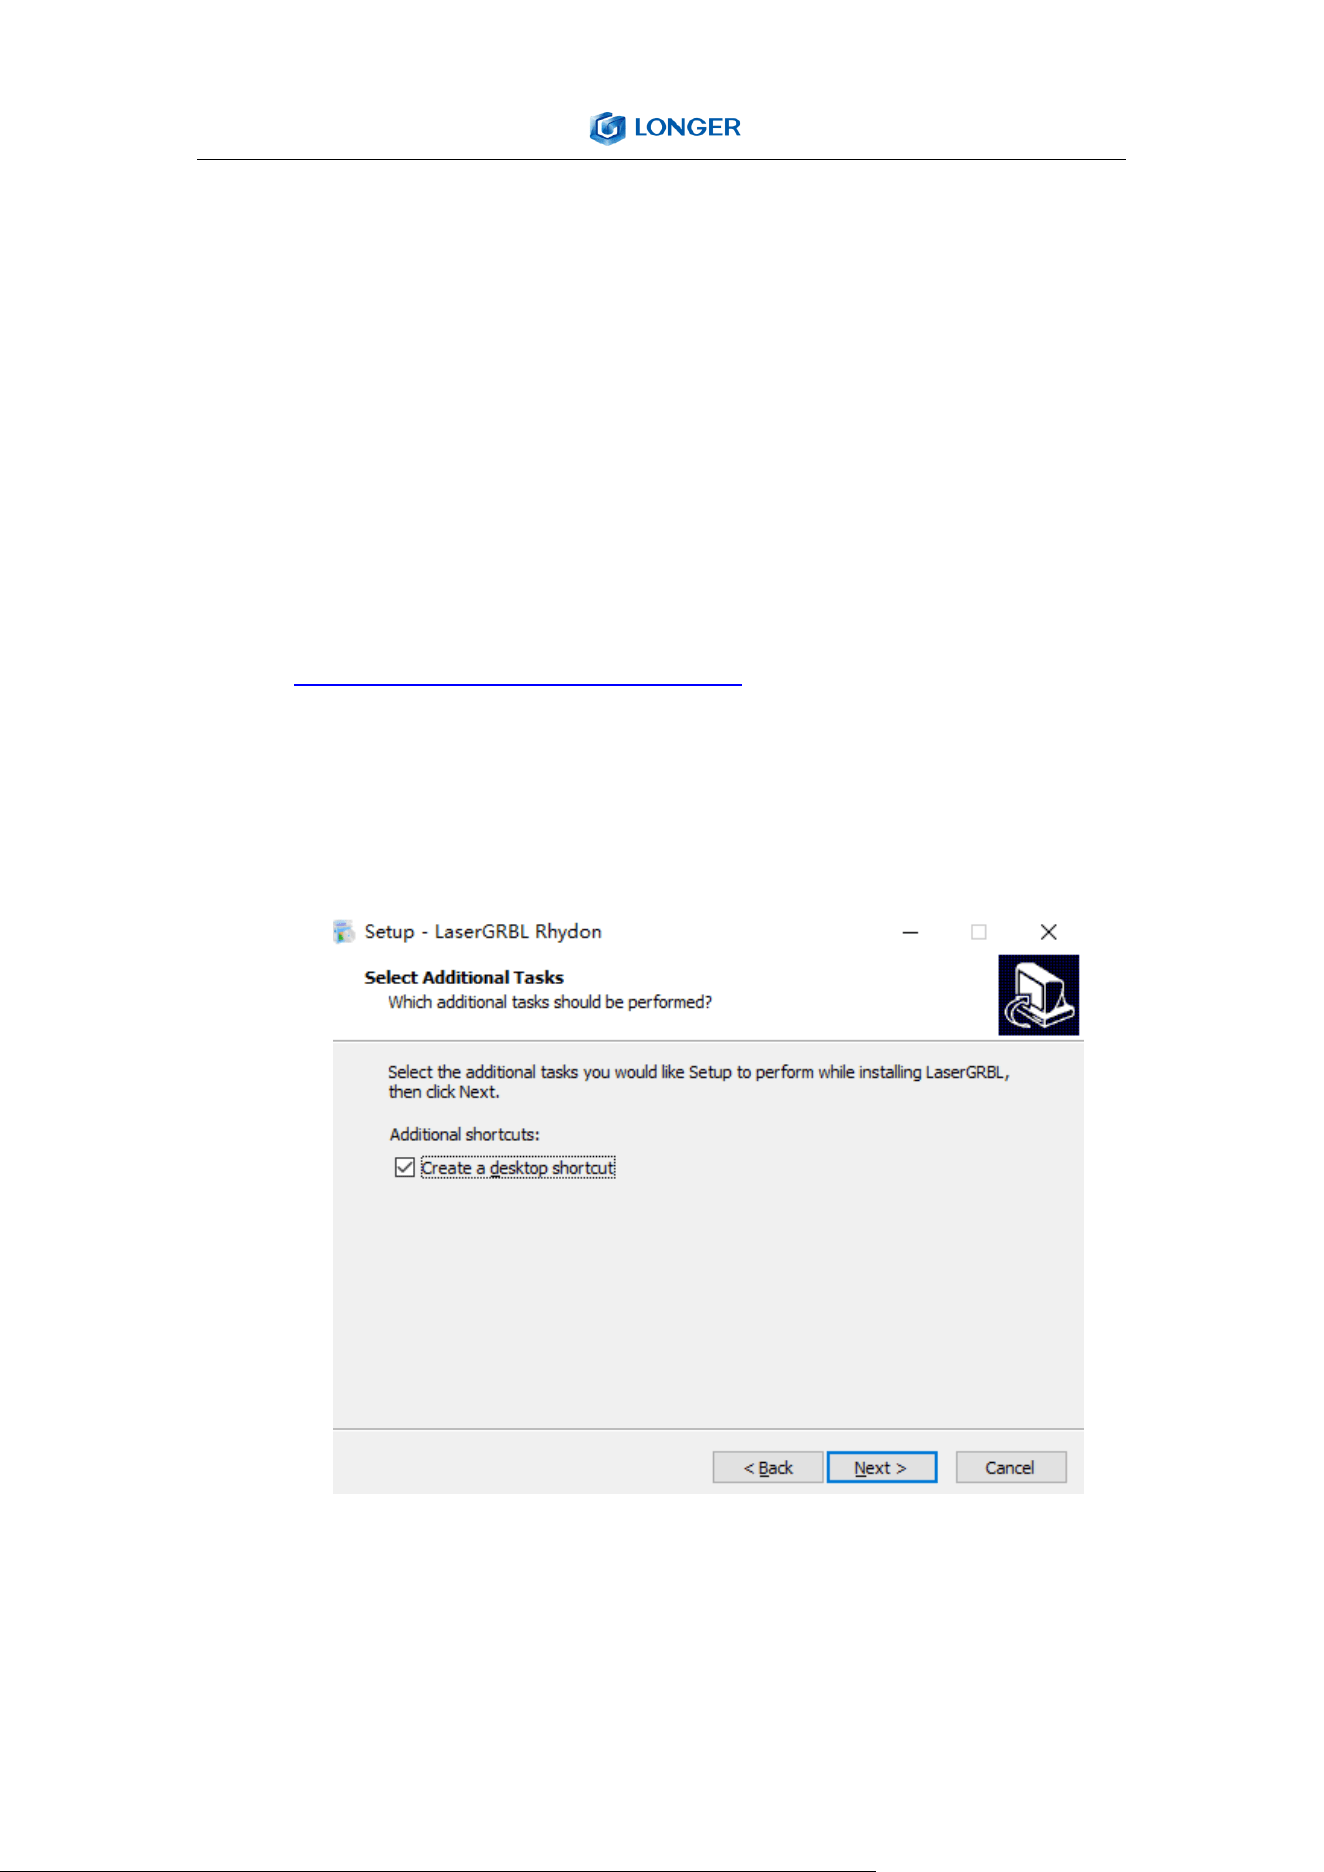
b) Double-click the software installation package to start the
software instalation, and keep clicking Next>until
theinstallation is complete.
c) After installing laserGRBL, power up the LASER B1, press the
power switch button, and connect the laser engraver and
computer via USB cable.
19
Usage
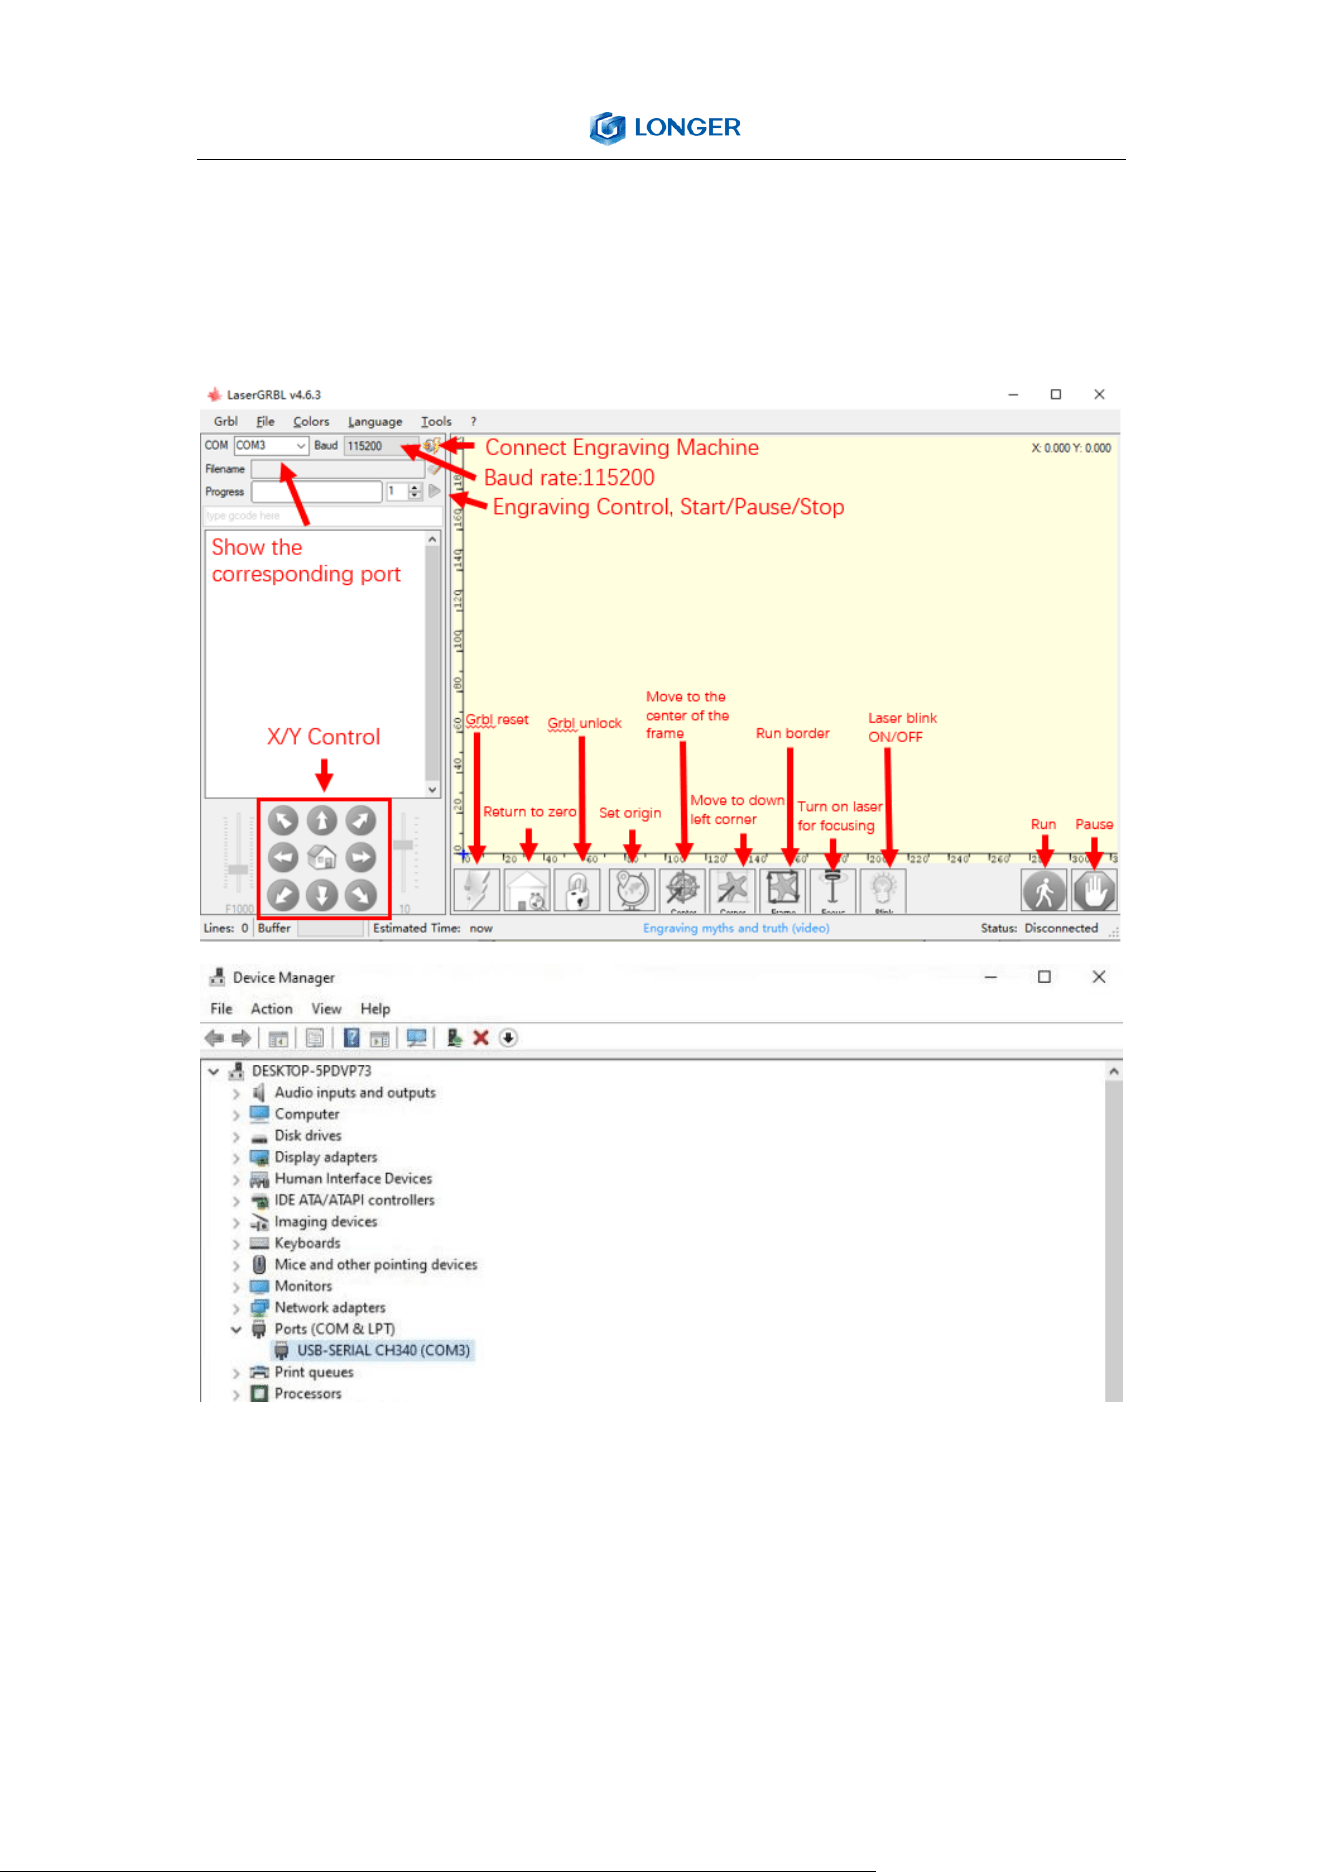
a) Open LaserGRBL, select correct port(depend on your PC), baud
rate: 115200. Then click connect button.
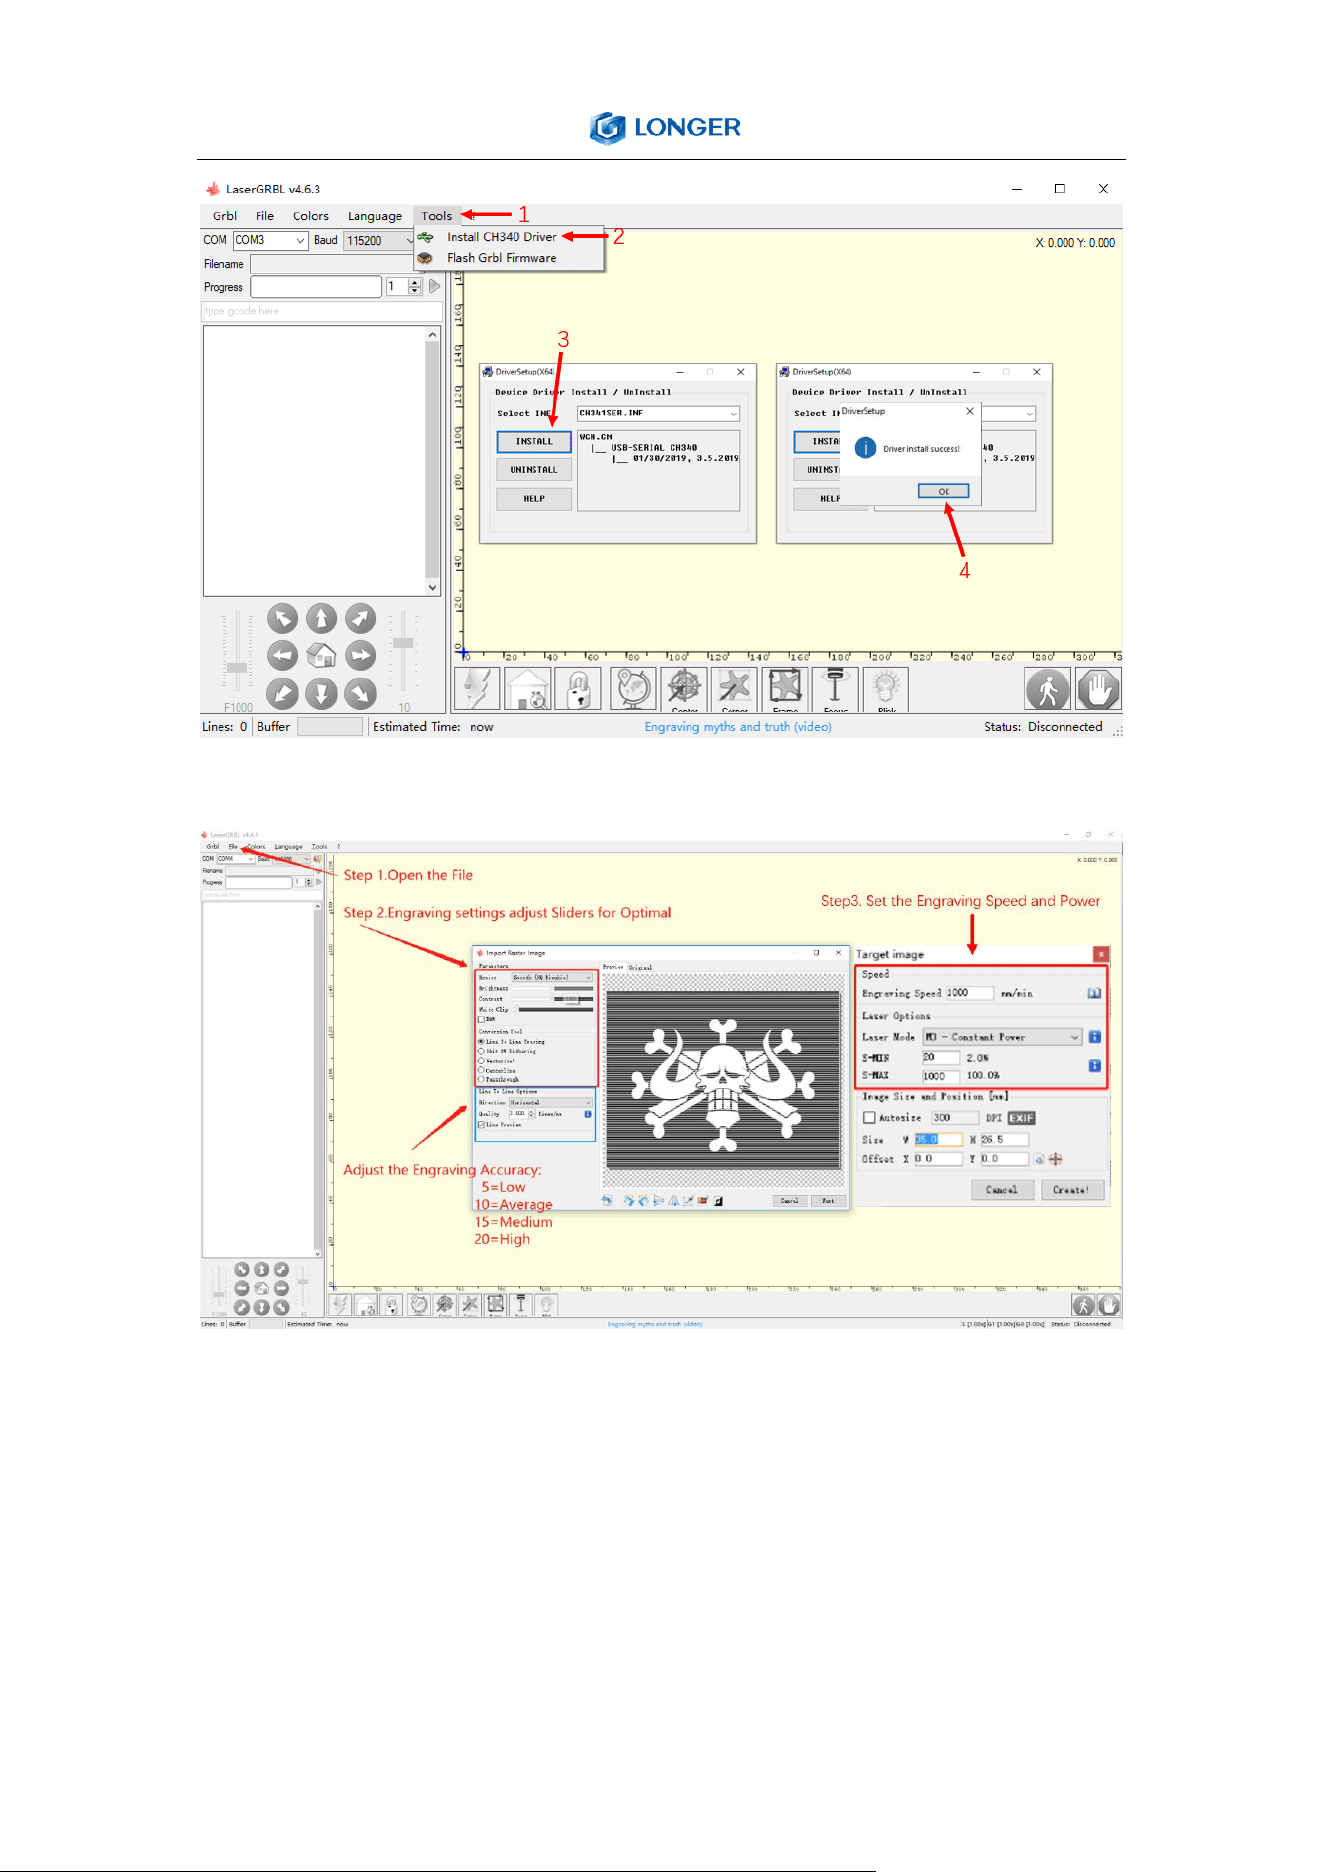
b) If you cannot find correct port, please install CH340 driver
manually by click Menu >> Tools >> install CH340 Driver to
install the driver, and restart the computer after installation
to connect.
20
c) Open file and set parameters
d) Start to engrave
i. Place a board under the laser, then calibrate the laser.
ii. Move the laser head to the place you want.
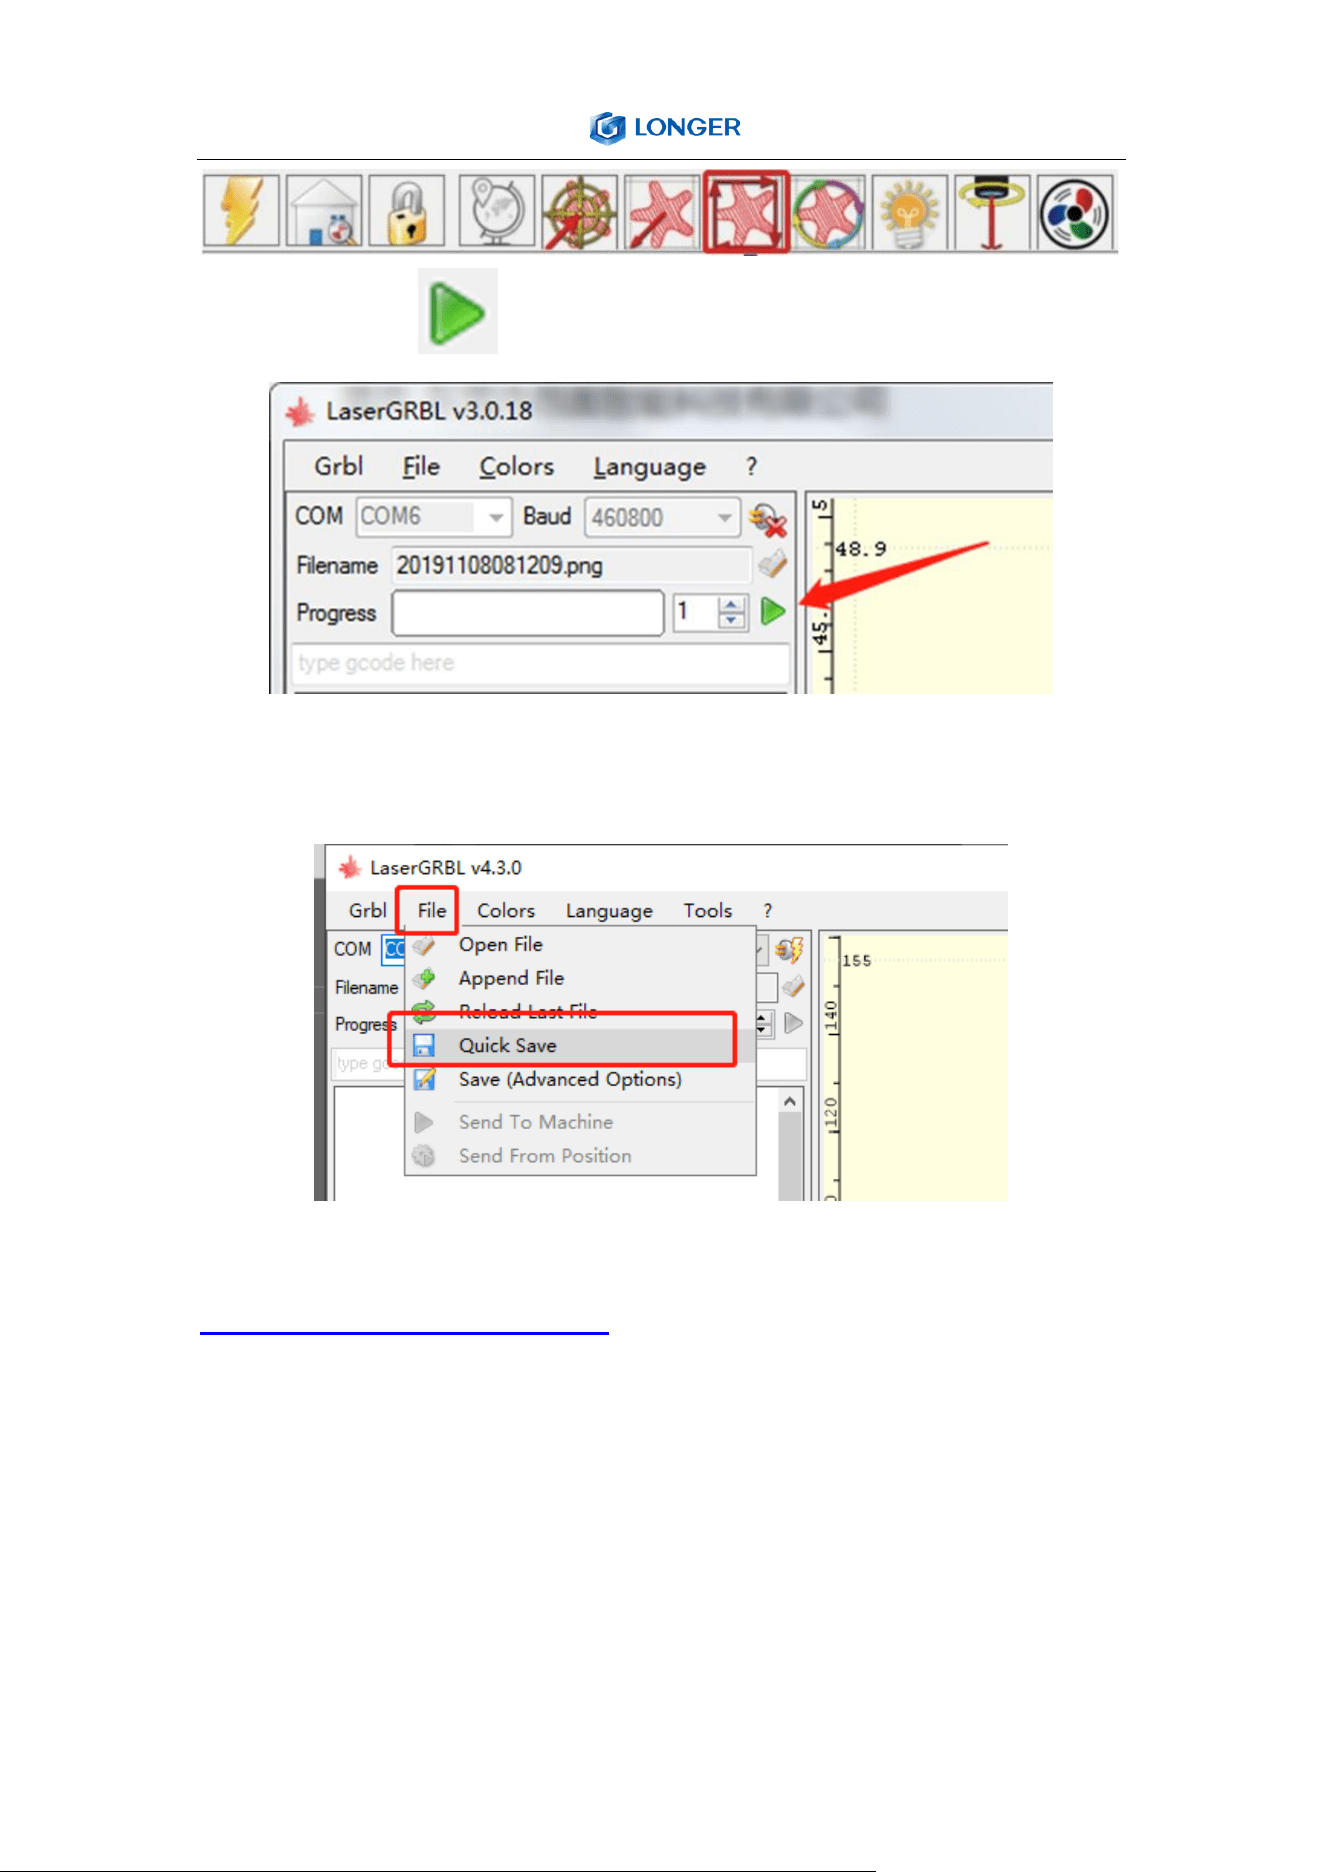
iii. Click “Run frame” button to check the work frame.
21
iv. Click button to start engraving.
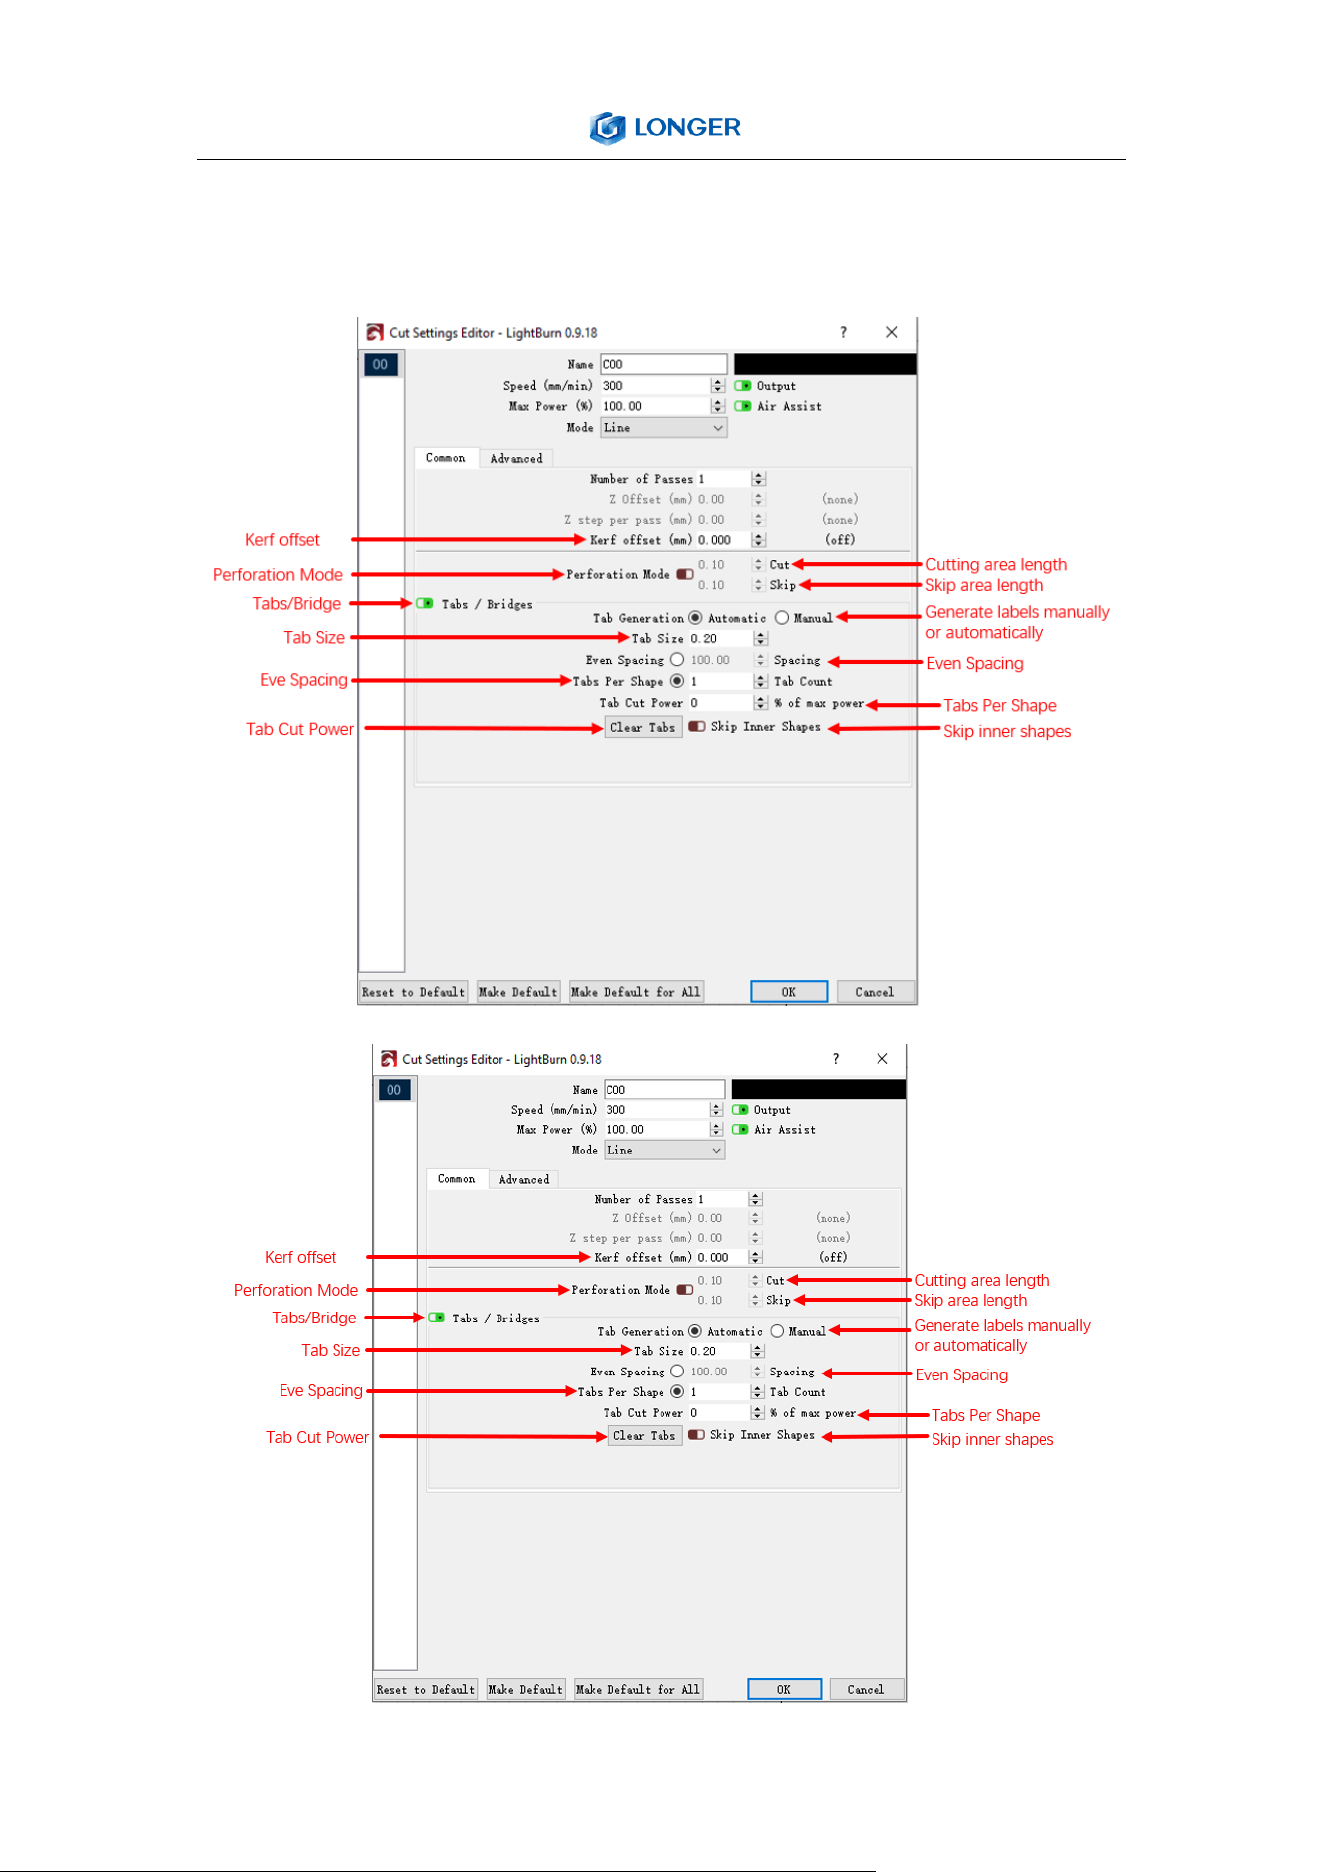
v. Or you can save gcode file to SD card by click “File” >>
“Quick Save” for offline working.
More help information about LaserGRBL, please refer to the link:
https://lasergrbl.com/usage/0
(3) LightBurn Software Operation
LightBurn is professional software for engraver, a charging software
running on Windows, MacOS, and Linux. It provides a trial period.
22
You could pay for it afterward if you like it.
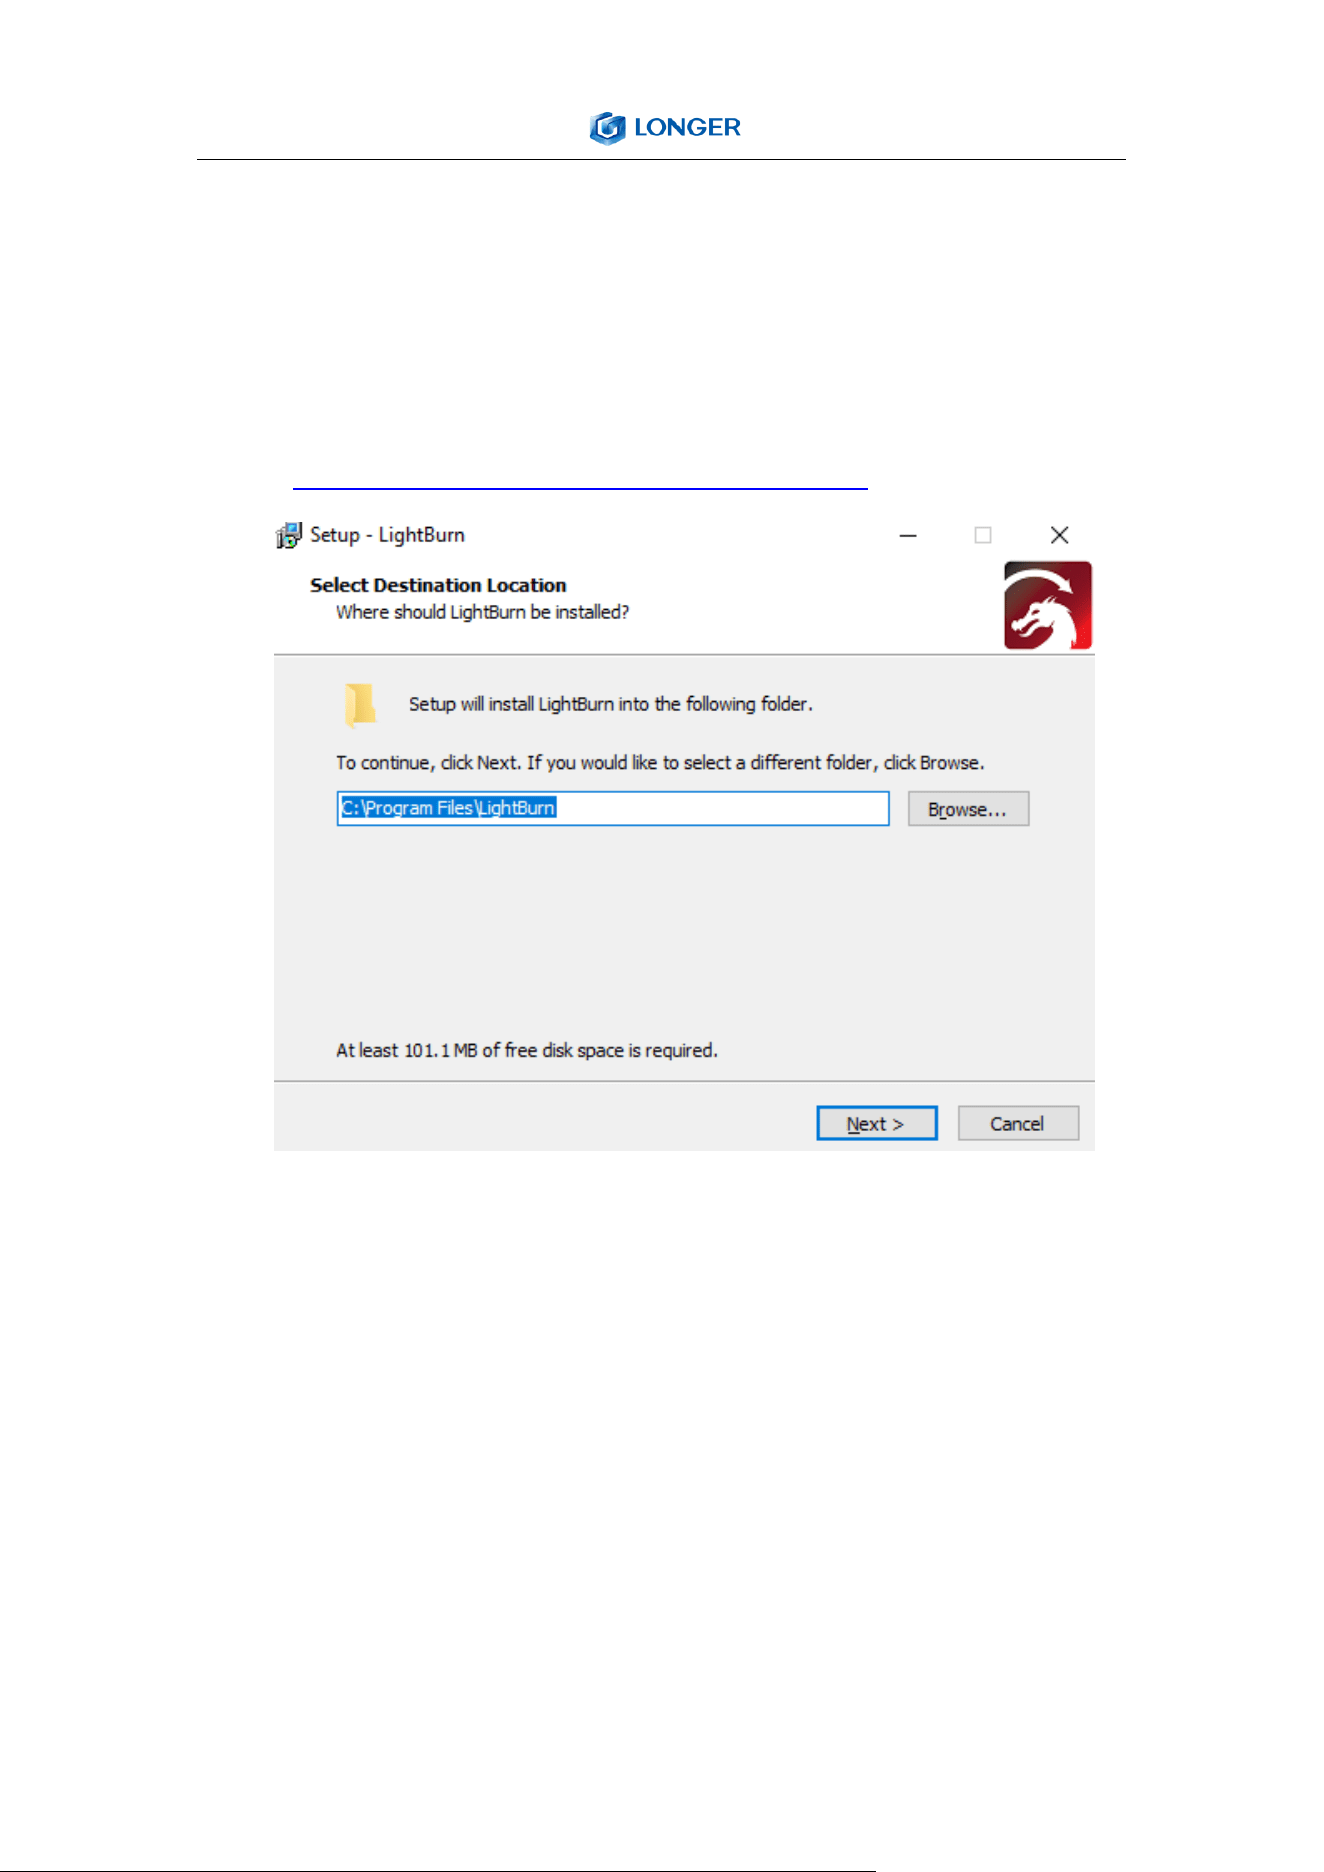
Setup
a) Find Lightburn software in SD card(path: /software) came
with the package. Or just download from the link:
https://lightburnsoftware.com/download/
b) After installing Lightburn, power up the LASER B1, press the
Power Switch button, and connect the laser engraver and
computer via USB cable.
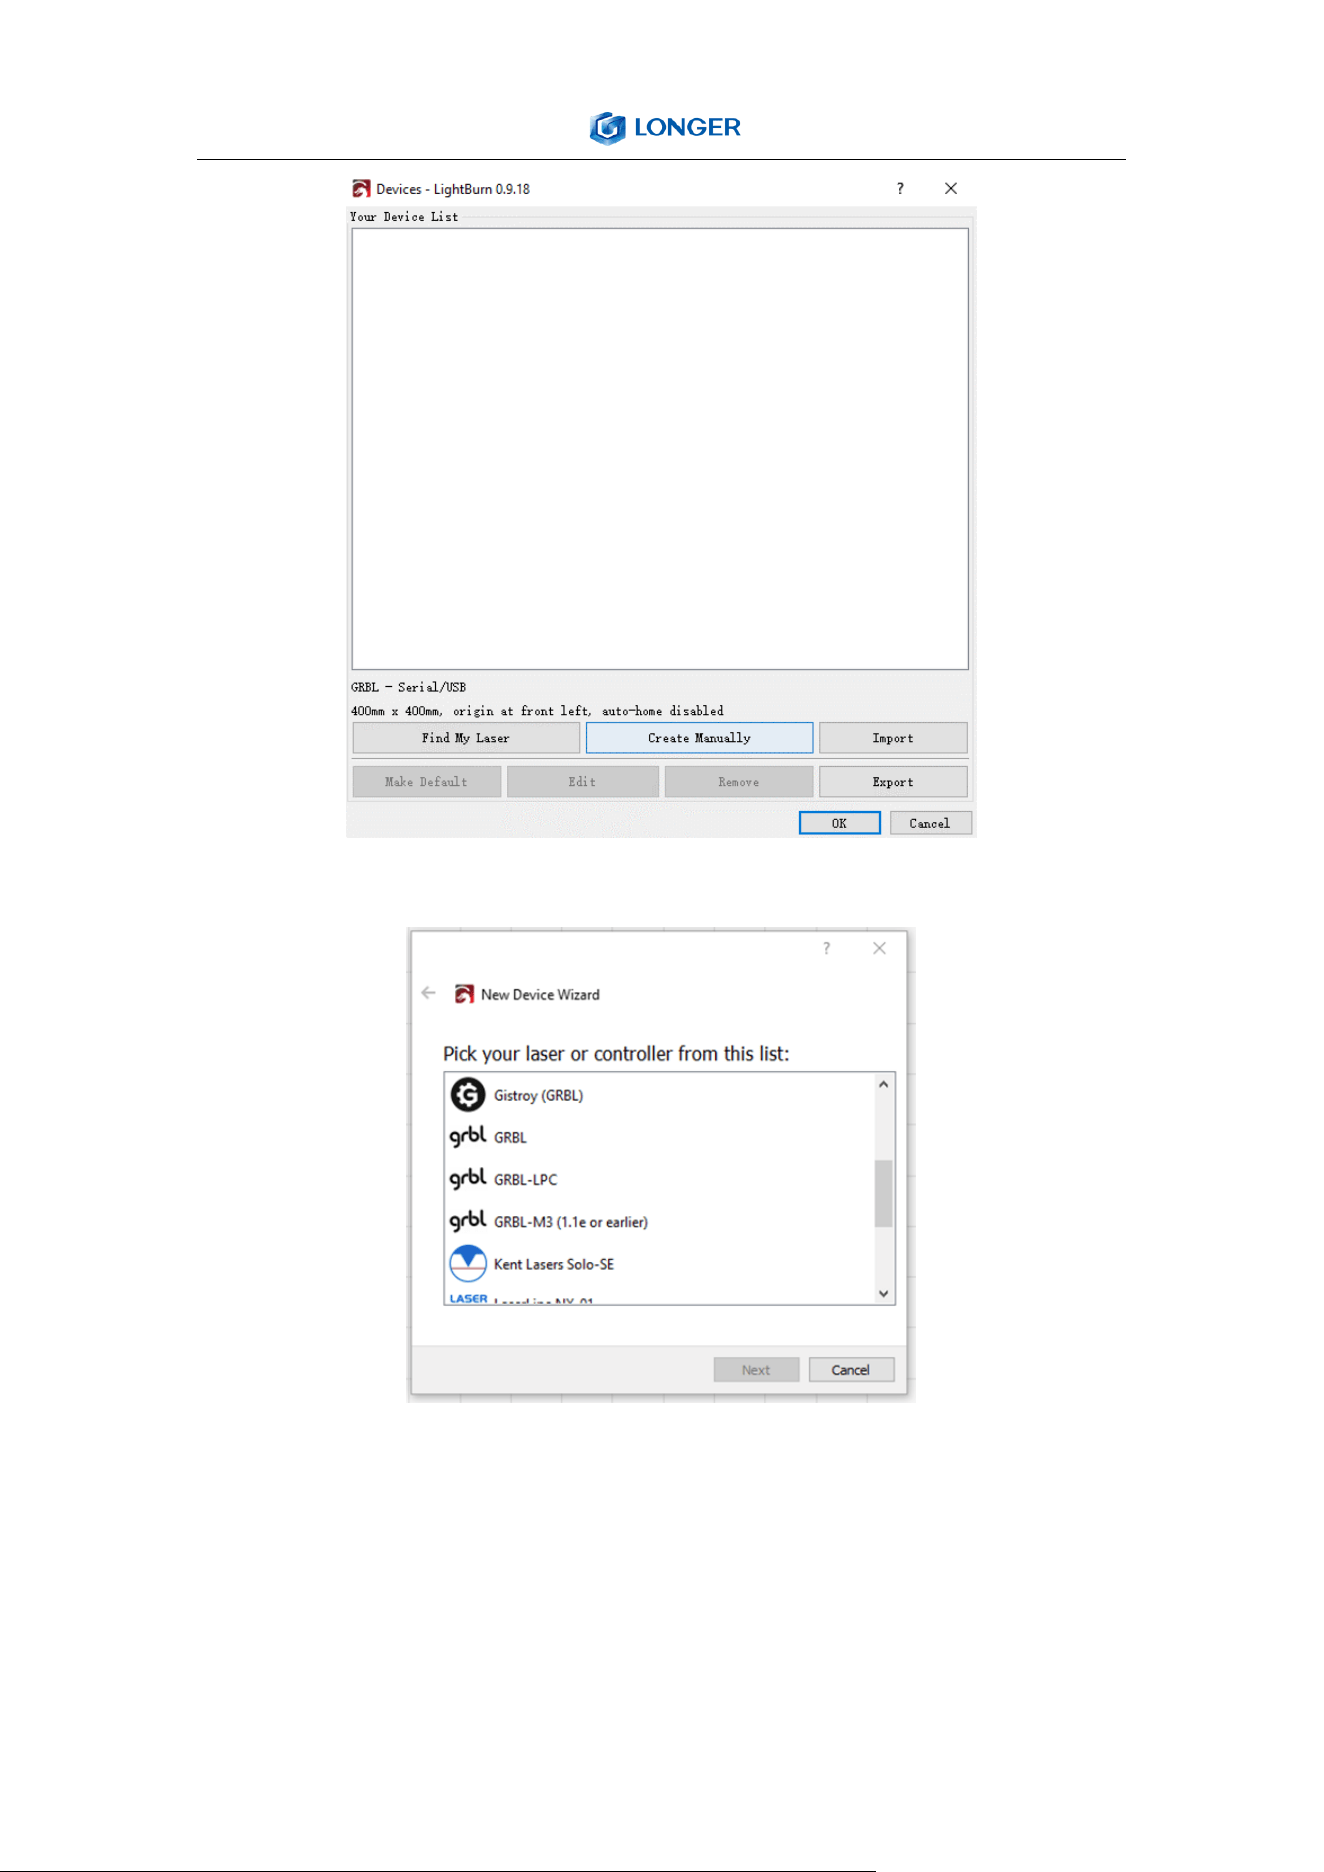
c) For the first time launching LightBurn, it will prompt a “New
Device Wizard” for help you setup machine.
Click “Create Manually”
23
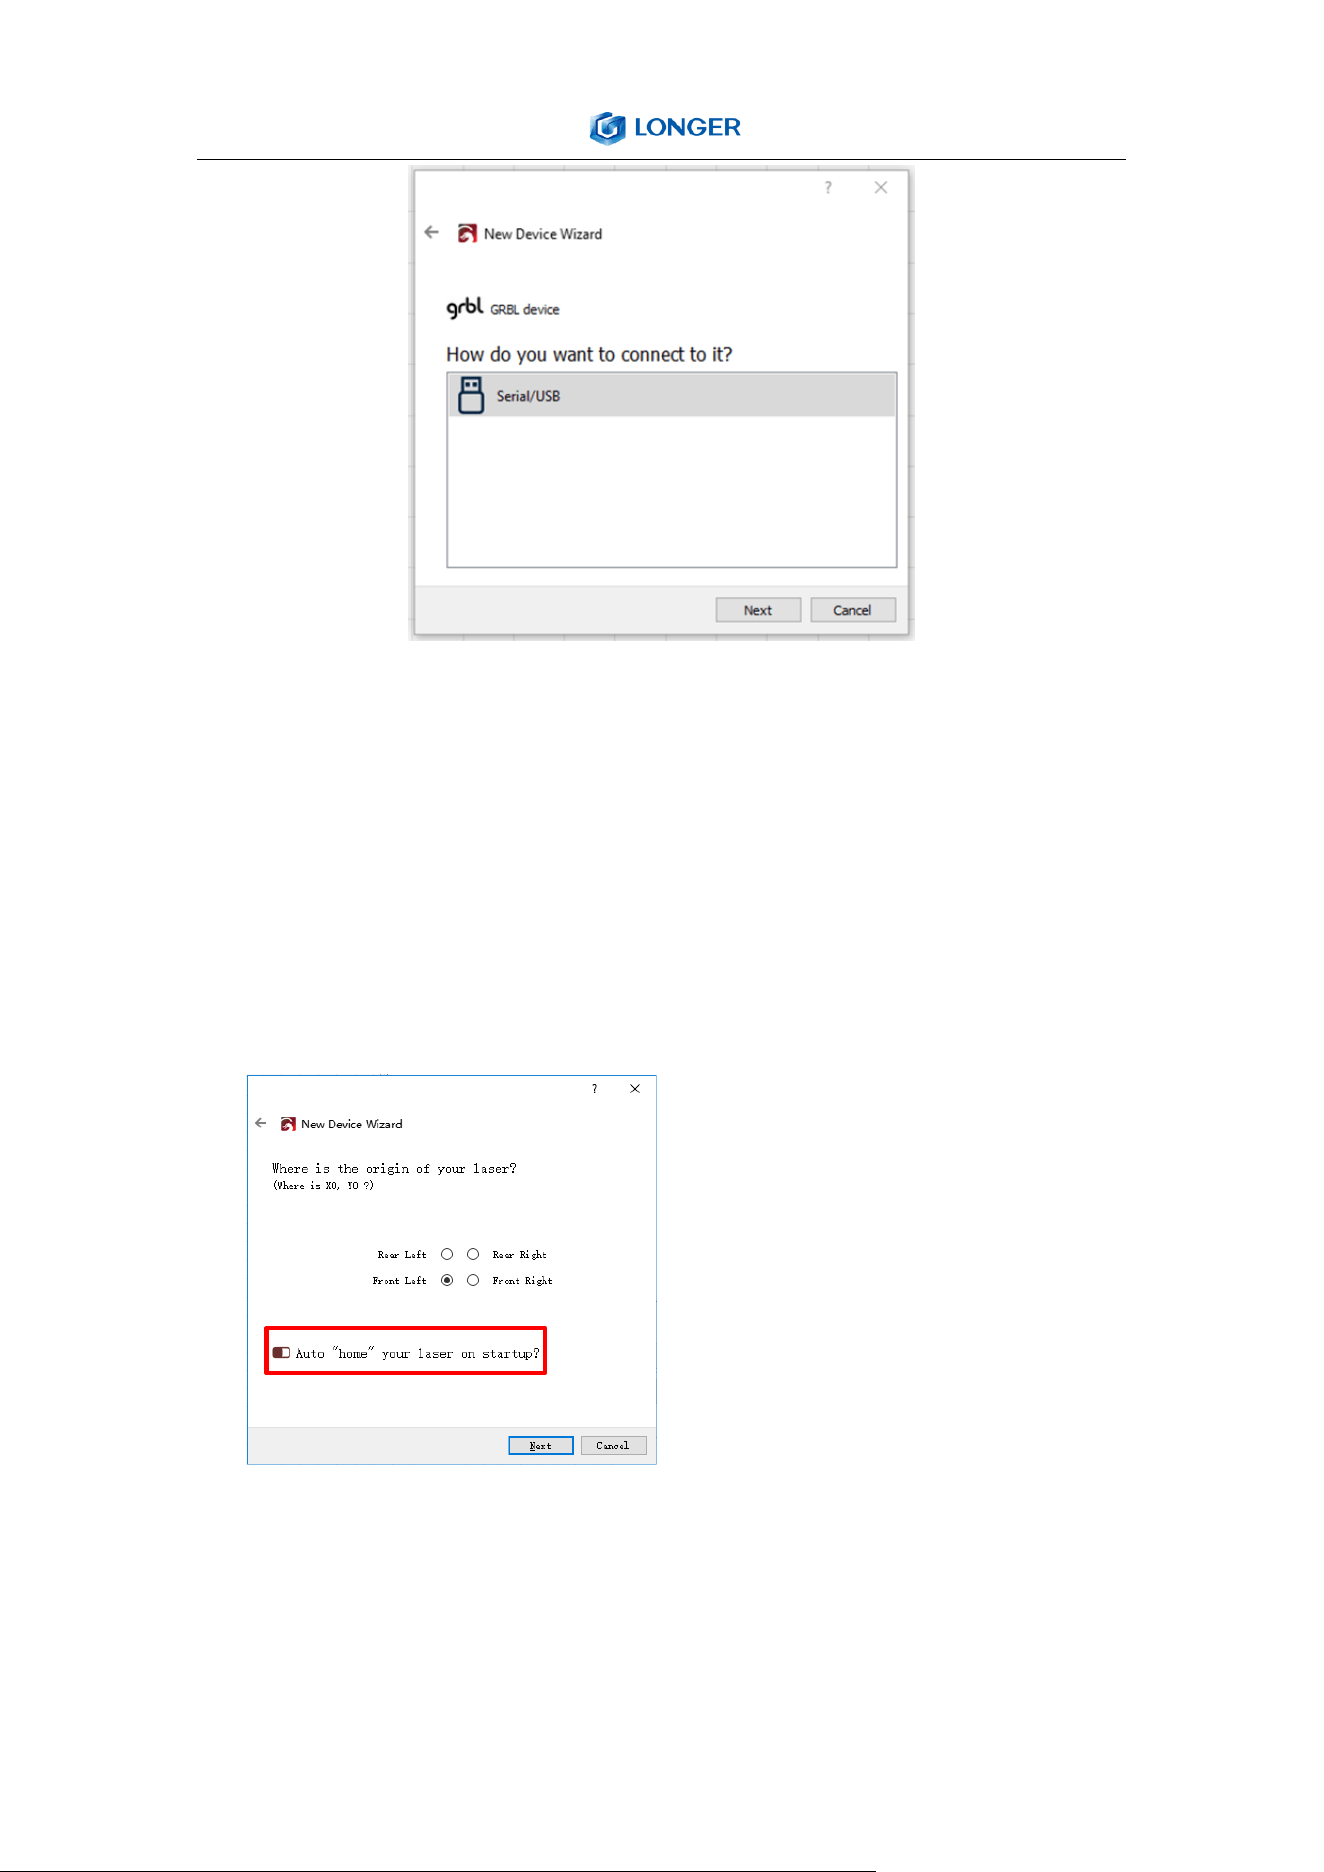
d) Select GRBL form the list, then click “Next” button
e) Select Serial/USB and press “Next” button.
24
f) Fill your Device Name, X, Y axis, then click “Enter” button
Name: LASER B1
X = 450
Y = 440
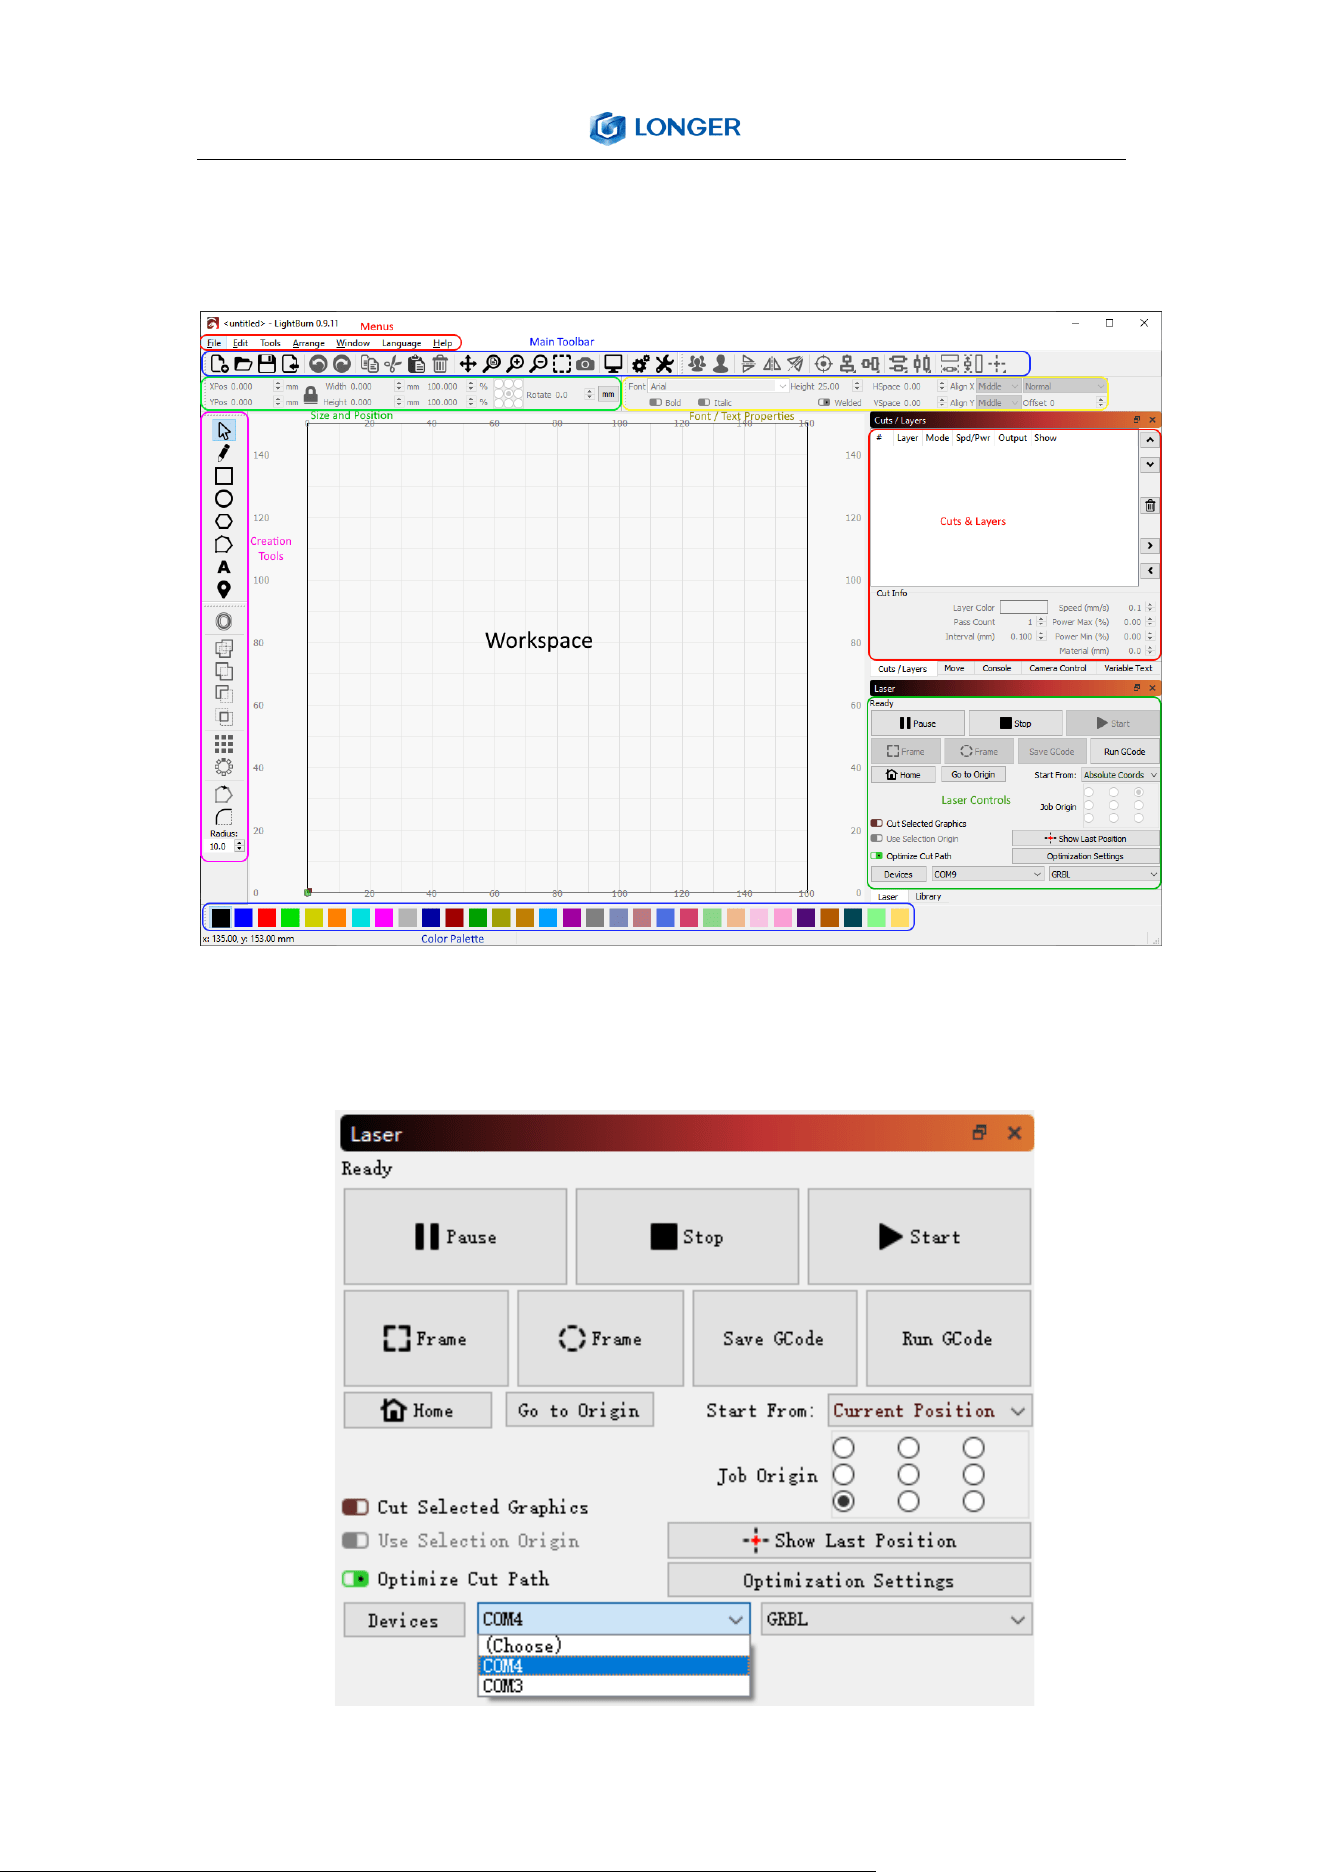
g) Select “Front Left” as your Origin X,Y and activate “Auto
‘Home’”, then click “Next” button.
The automatic home function is
turned on by default, if you do
not want the engraver to
automatically home when
power on, it is recommended to
turn off this function.
h) Select LASER B1 and press Make Default. Your LASER B1 is
ready to be used in LightBurn software.
25
Usage
a) Main interface
b) Select correct port (depends on your PC), then the LASER B1
is connected to the computer.
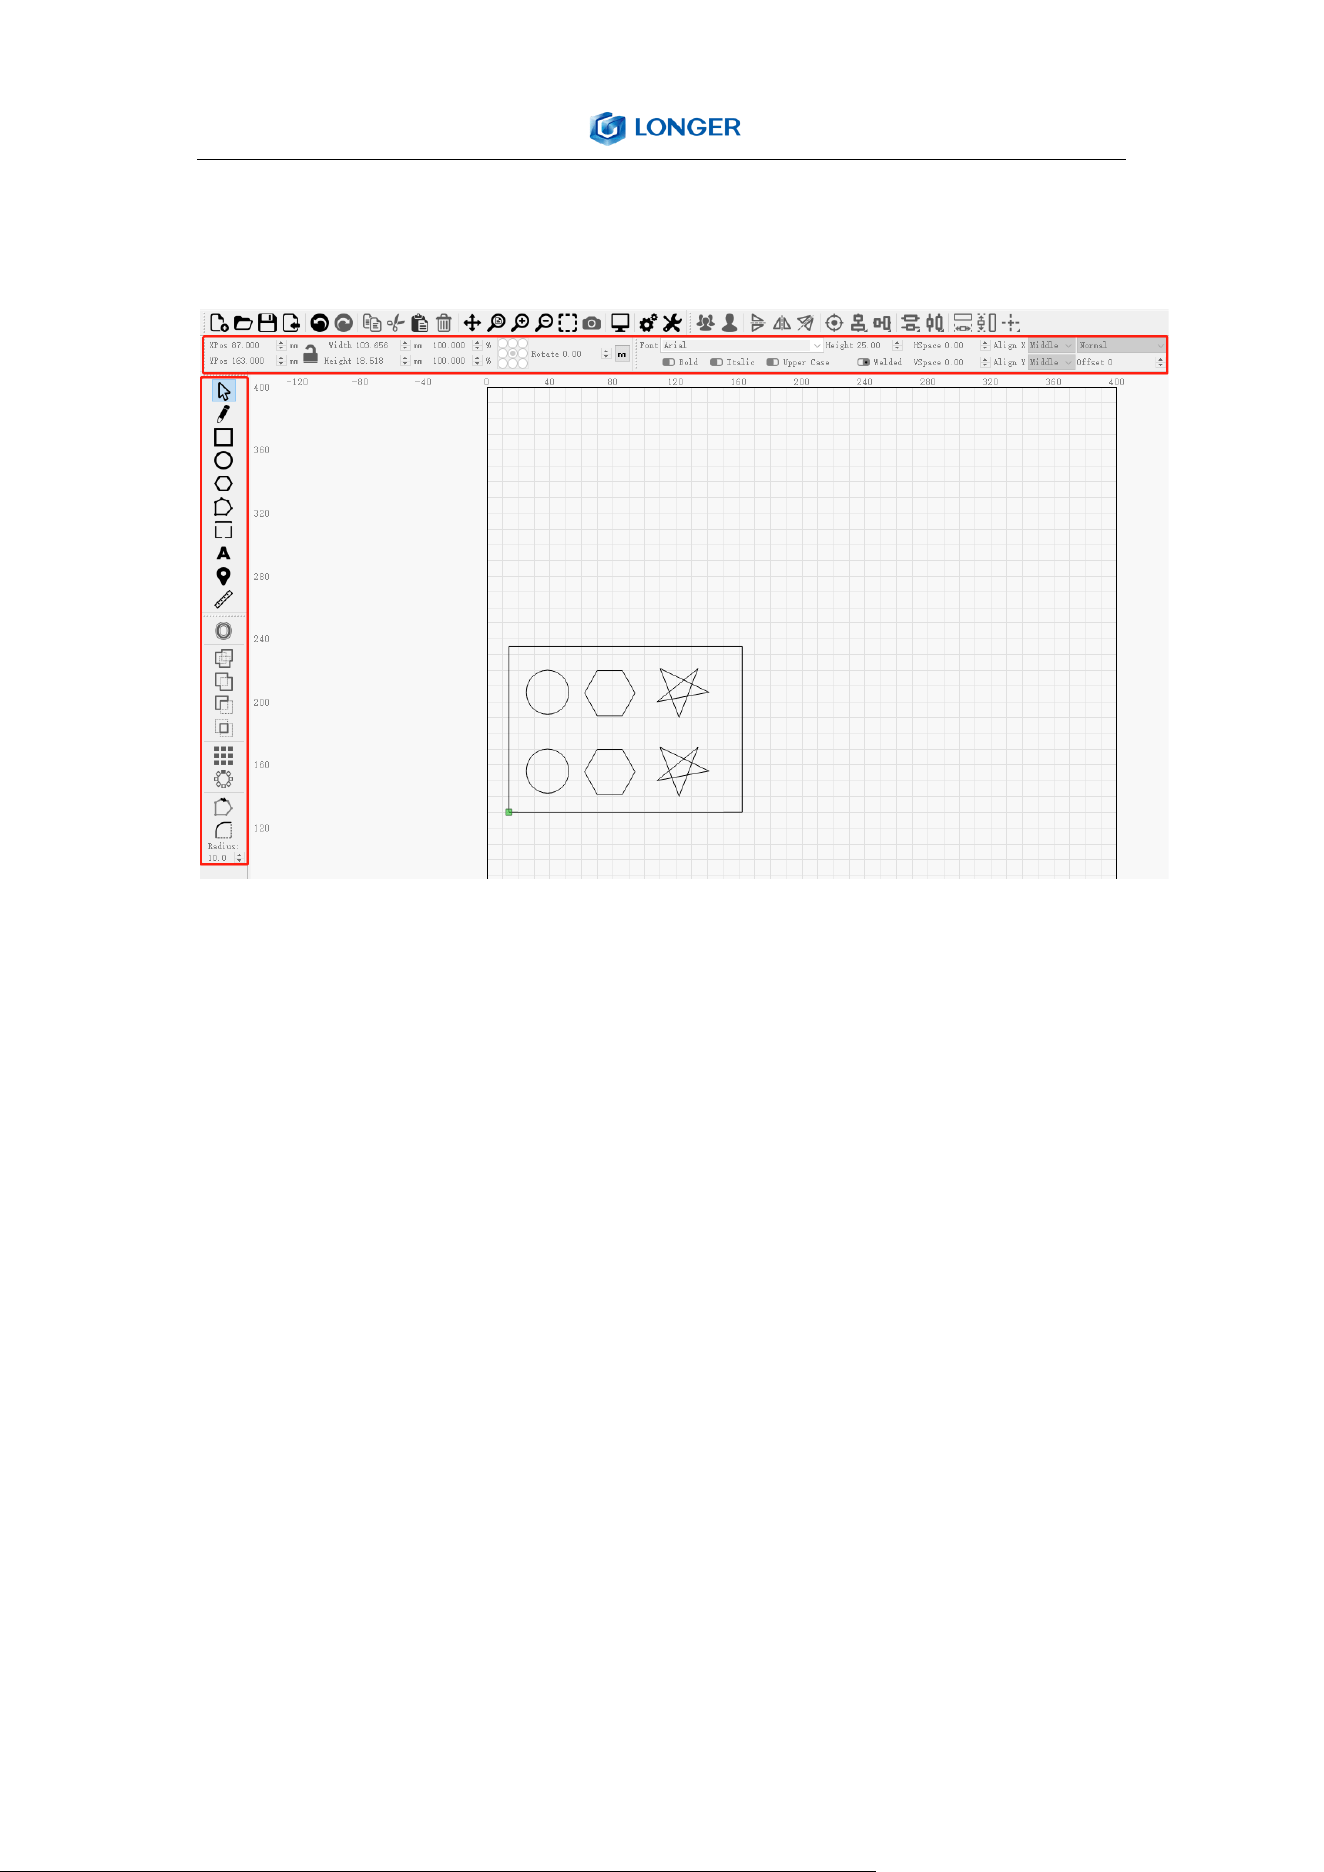
26
c) Click Menu “File” >> “Import image from disk.” Or just use
draw tool on left column to design your own pattern.
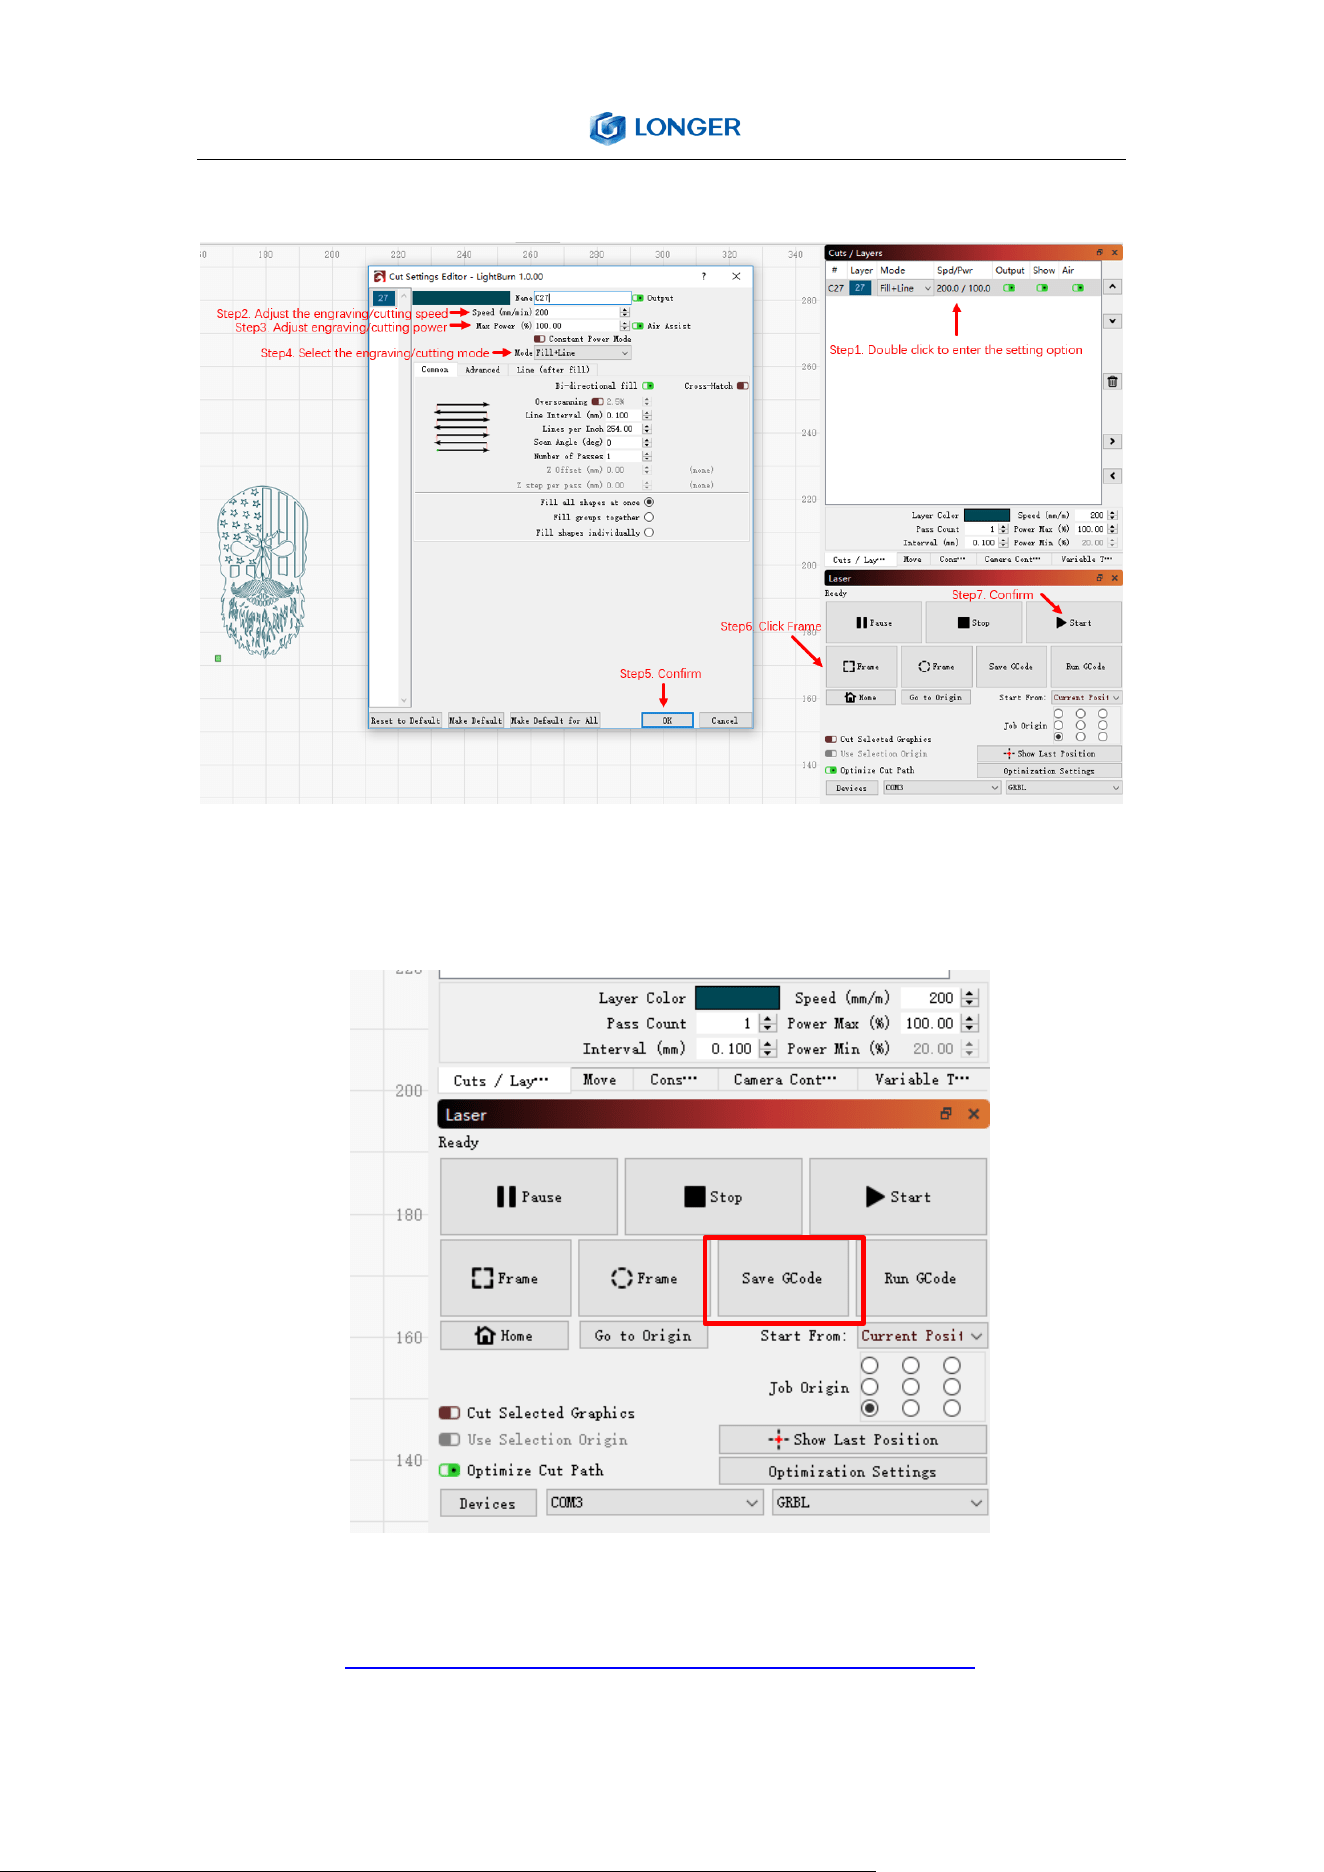
d) Set the name, speed, maximum power, mode, and other
parameters in the cutting/layer; (engraving function and
cutting function are only different in speed, power. Normally,
the cutting speed parameter is slower).
e) After placing the board under the laser, click Frame to check
the laser path whether is completely inside of the board.
28
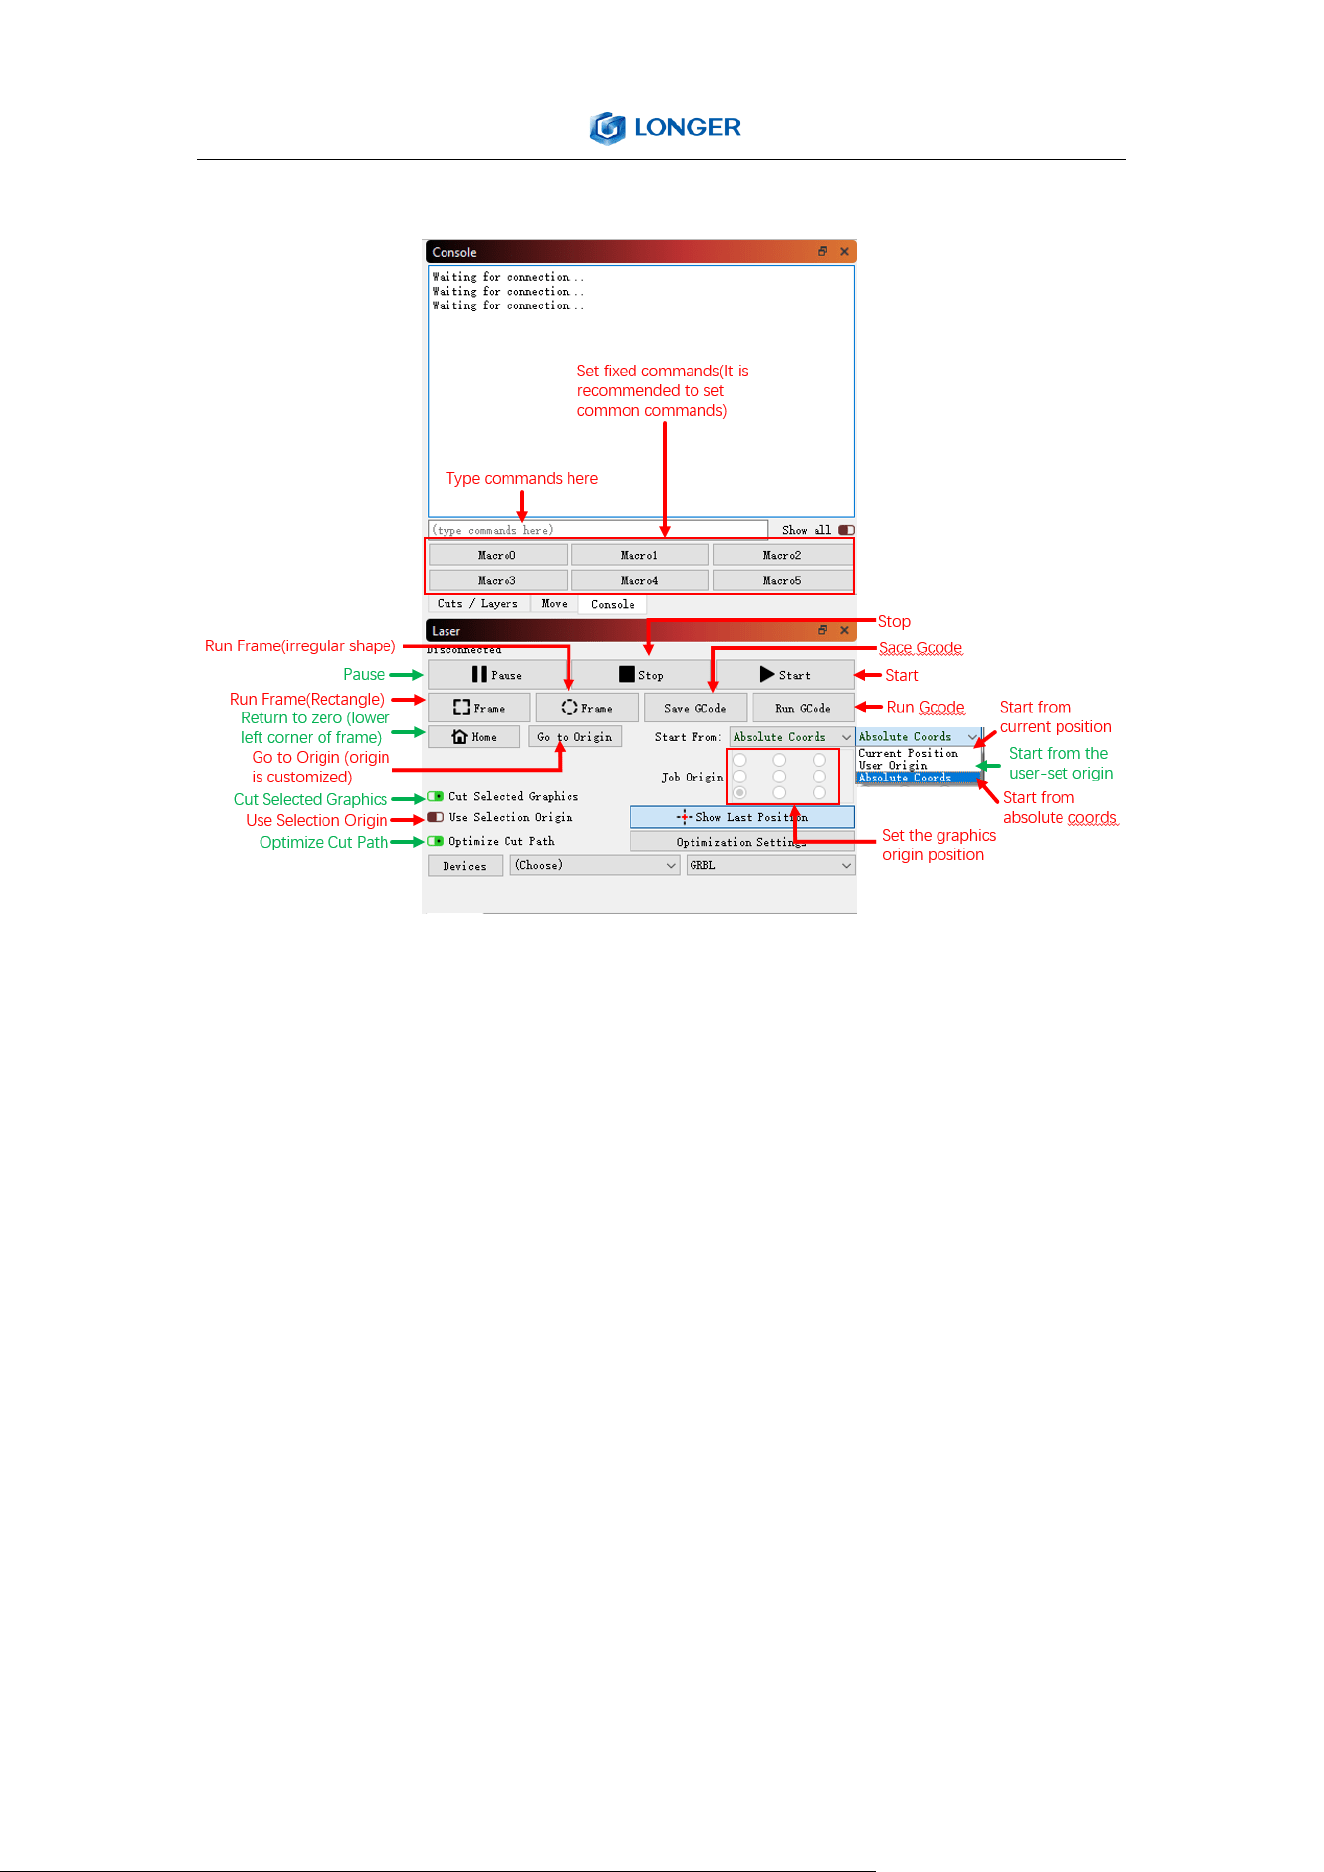
h) Function description
Cut Setting Editor
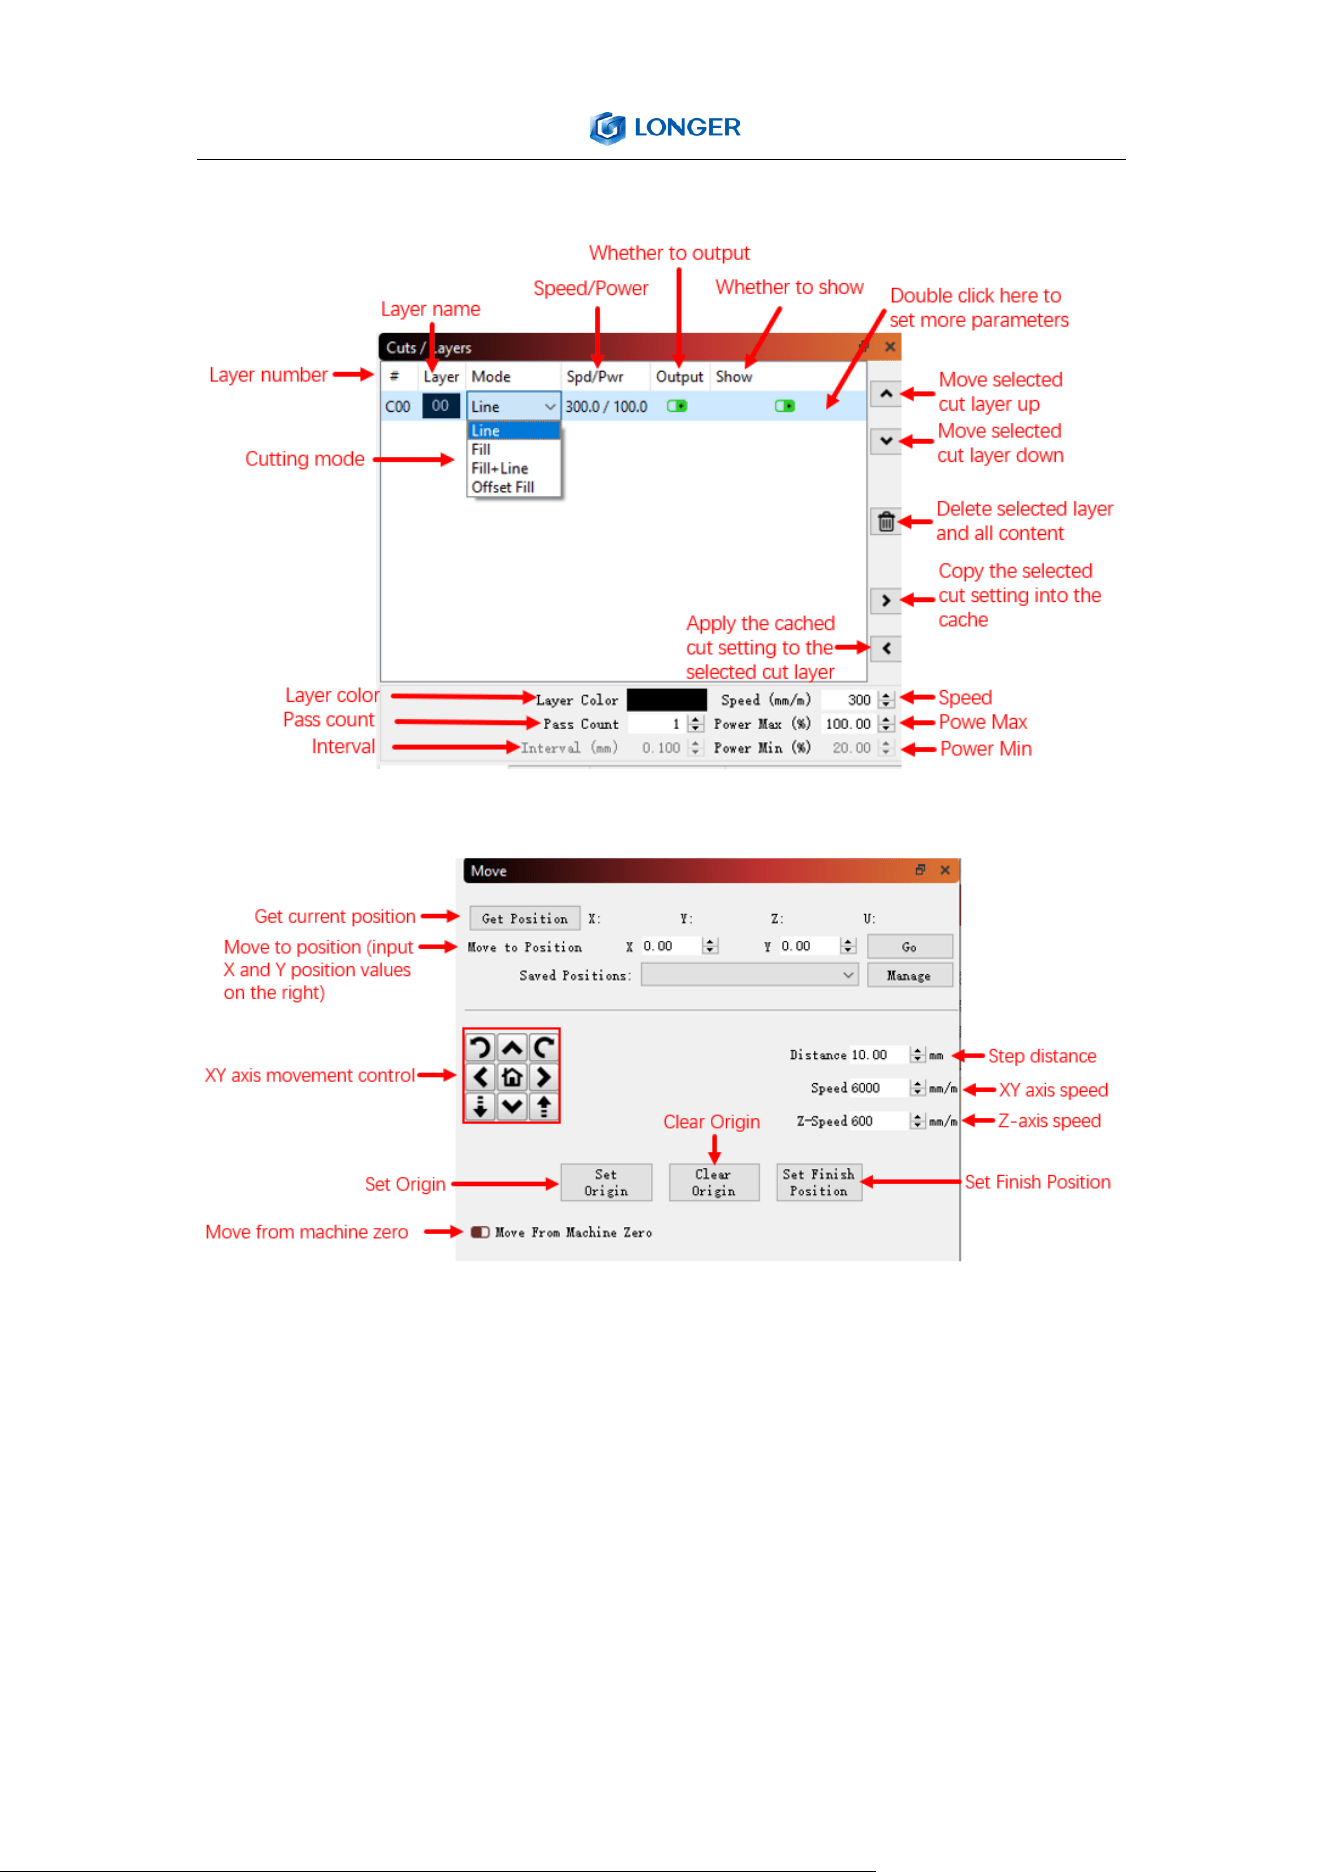
29
Cuts/Layers
Move
30
Console and Laser
(4) Firmware Upgrading
The Firmware of LASER B1 is continuously updated for fixing bugs
and add new features. The firmware upgrade operations are
different for different systems. The detailed tutorial about firmware
upgrading is contained in the firmware package.
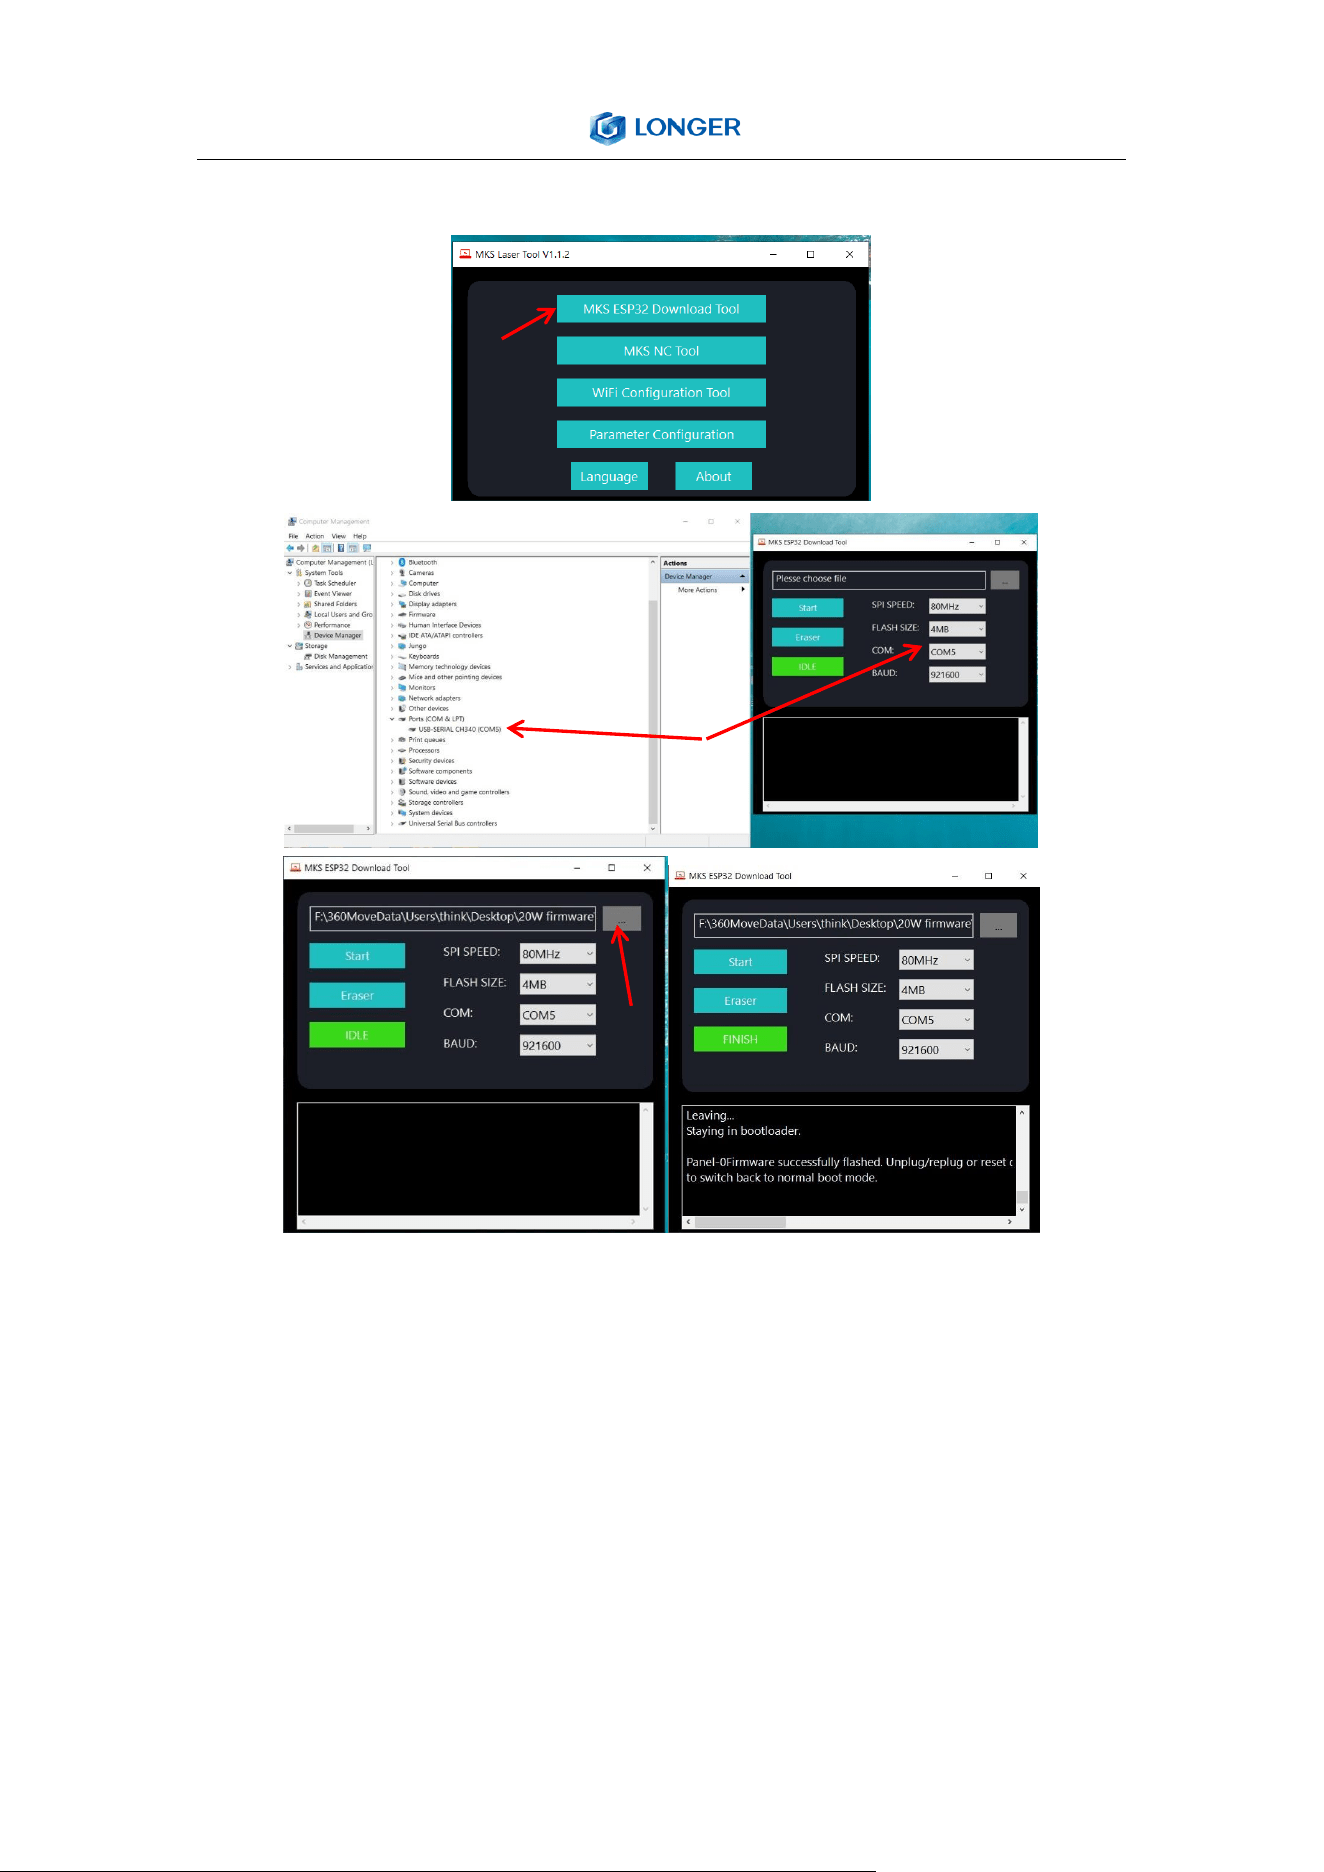
Install the MKSLaserTool_setup V1.1.2.exe file, click MKS ESP32
Download Tool, select the right port and .bin update firmware, and
click Start, it will prompt firmware successfully flashed after the
update is completed.
31
Copy the dlc_cfg.txt file from the configuration folder to the root
directory of the SD card, insert the SD card into the main board of
the engraver, restart the engraver, and the configuration file update
will be completed automatically.
32
(5) APP Operation
LASER B1 can be controlled or engraved through MKSLaser APP
when the engraver and APP are connected to the same WIFI.
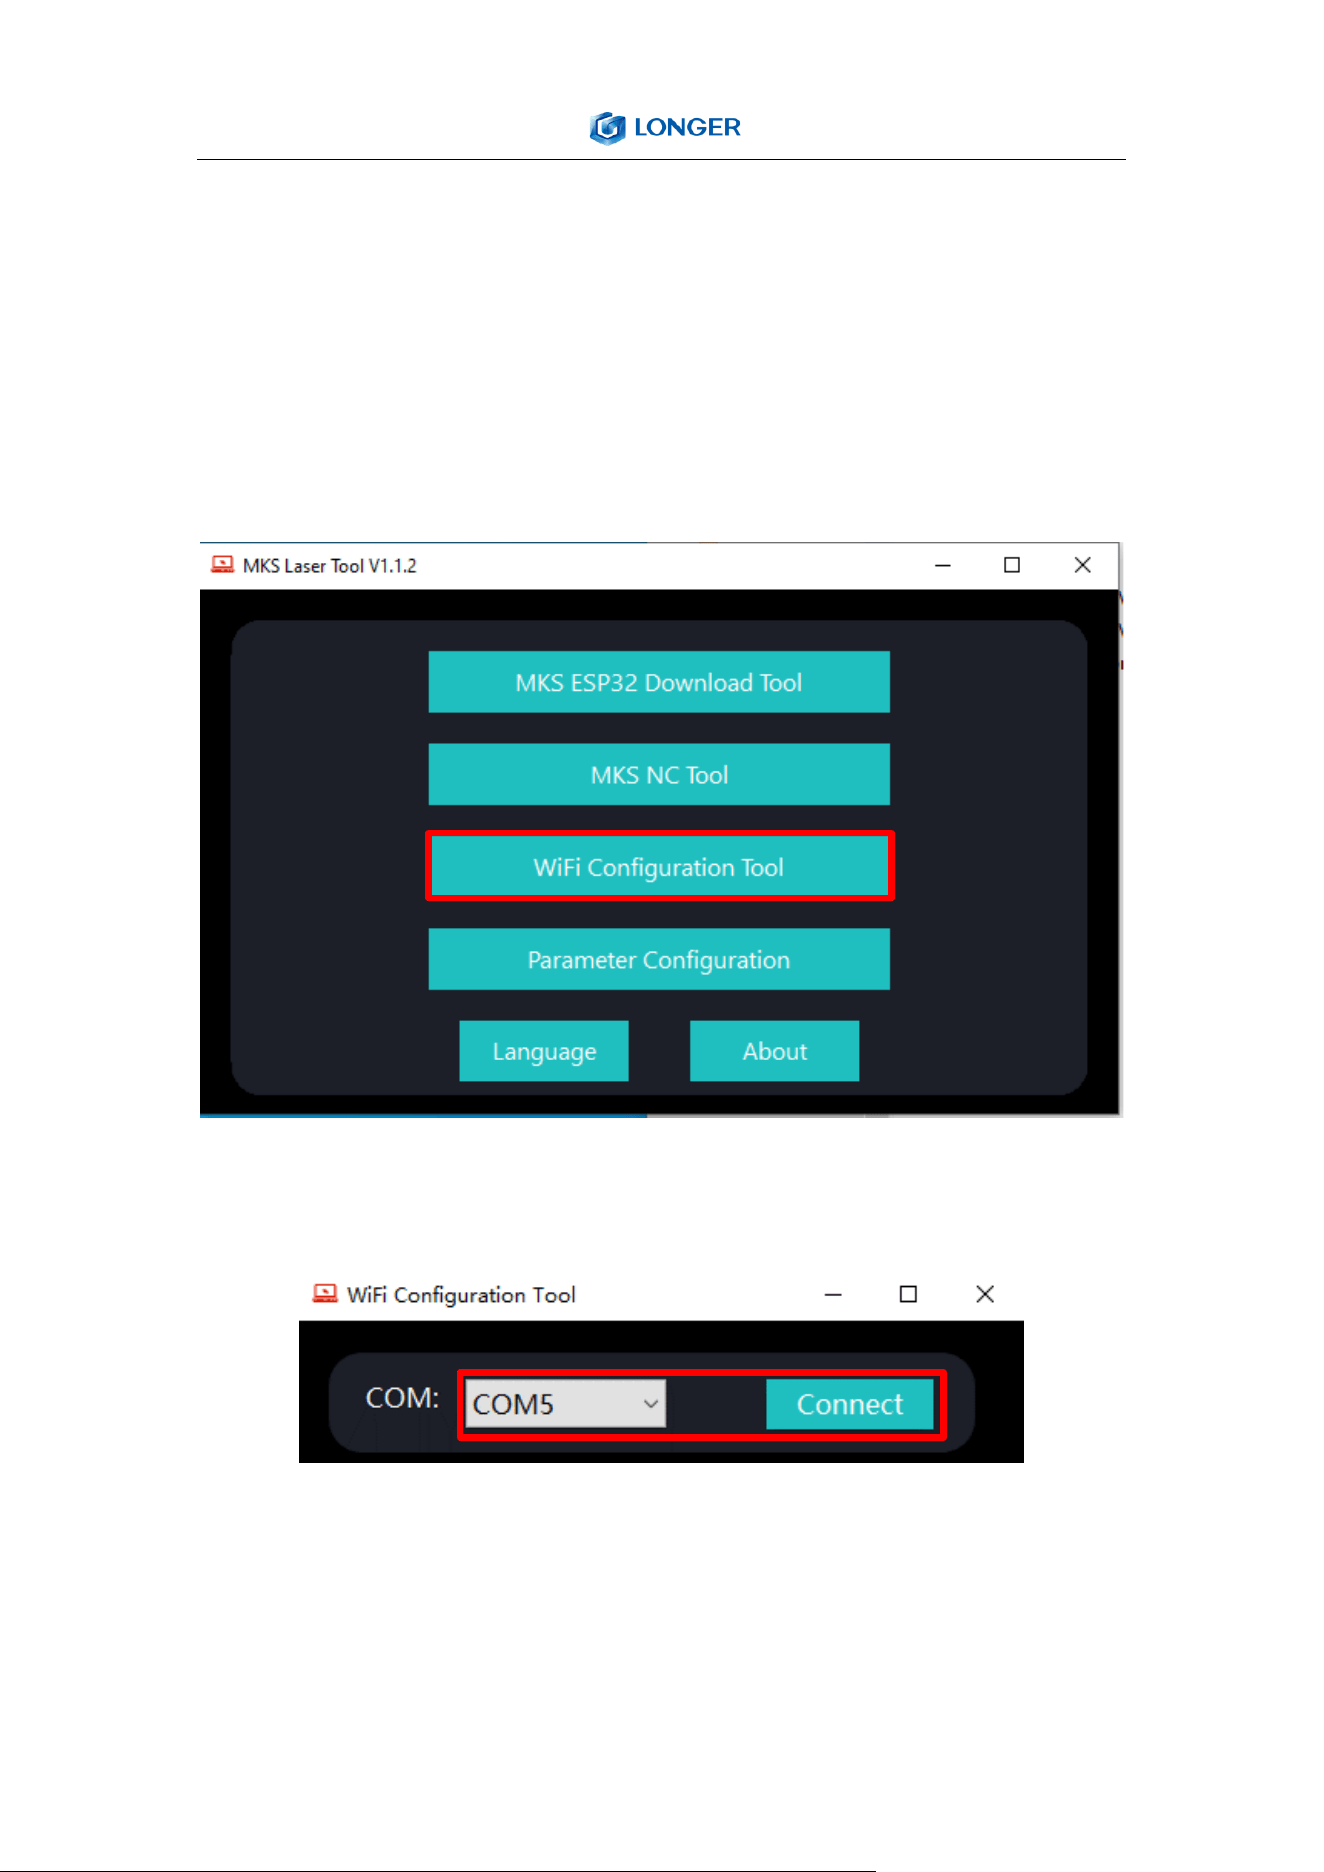
Open the MKSLaserTool file. Click on the WiFi configuration tool.
Select the correct port. Click connect.
33
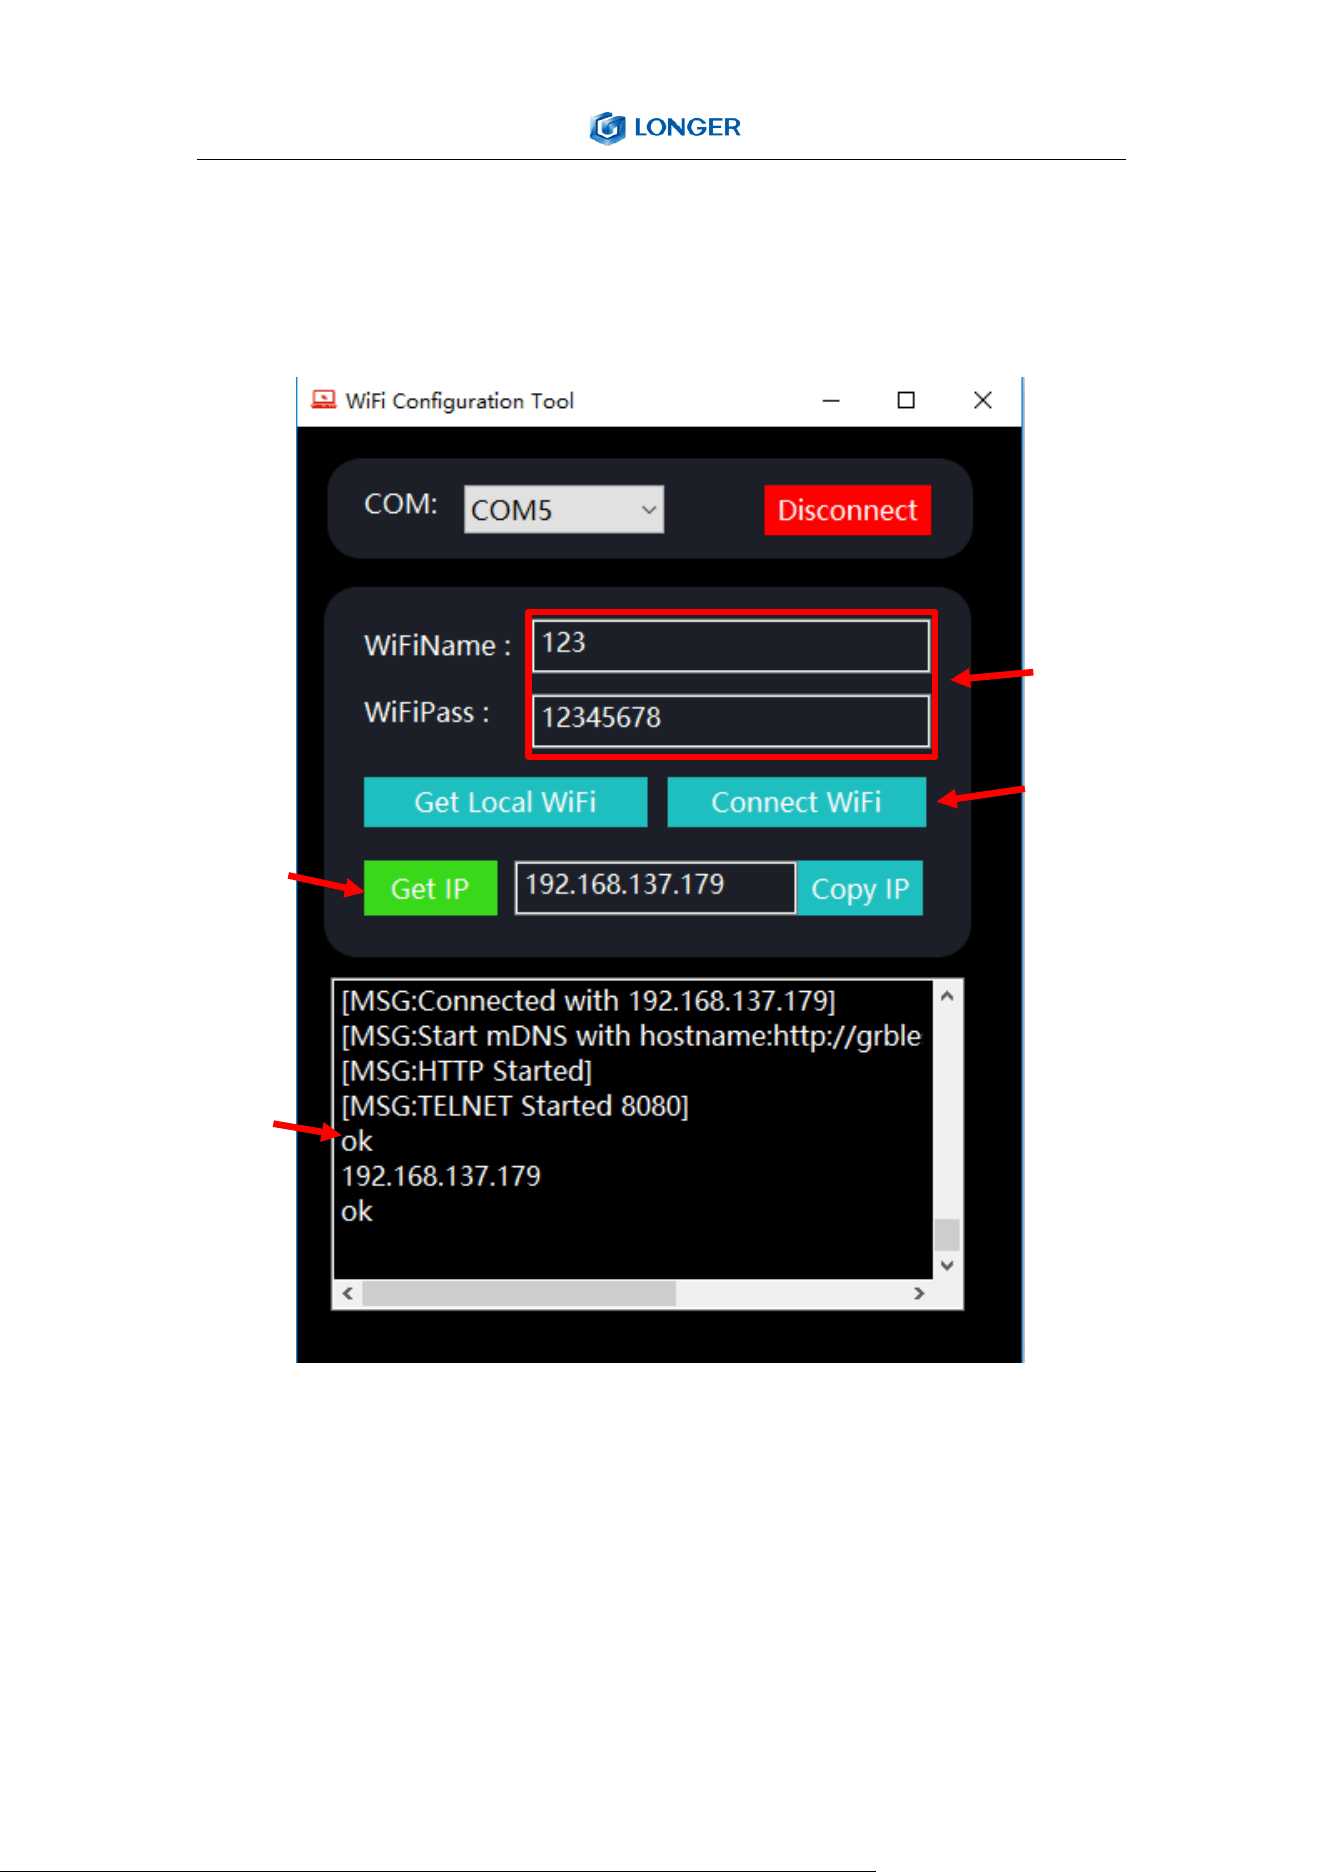
Click Connect and enter the WiFi account and password. Click
Connect WiFi. Wait for the word 'ok' to appear in the log below, and
click Get IP.
a) How to download the MKSLaser APP
Please search for "MKSLaser" in Google play or app store or visit the
address below to download Android system
https://play.google.com/store/apps/details?id=makerbase.com.mks
1
2
3
4
34
laser
Please search for "MKSLaser" in the app store or visit the address
below to download
https://apps.apple.com/us/app/mkslaser/id1542756280?uo=4&at=
11l6hc&app=itunes&ct=fnd for Apple system
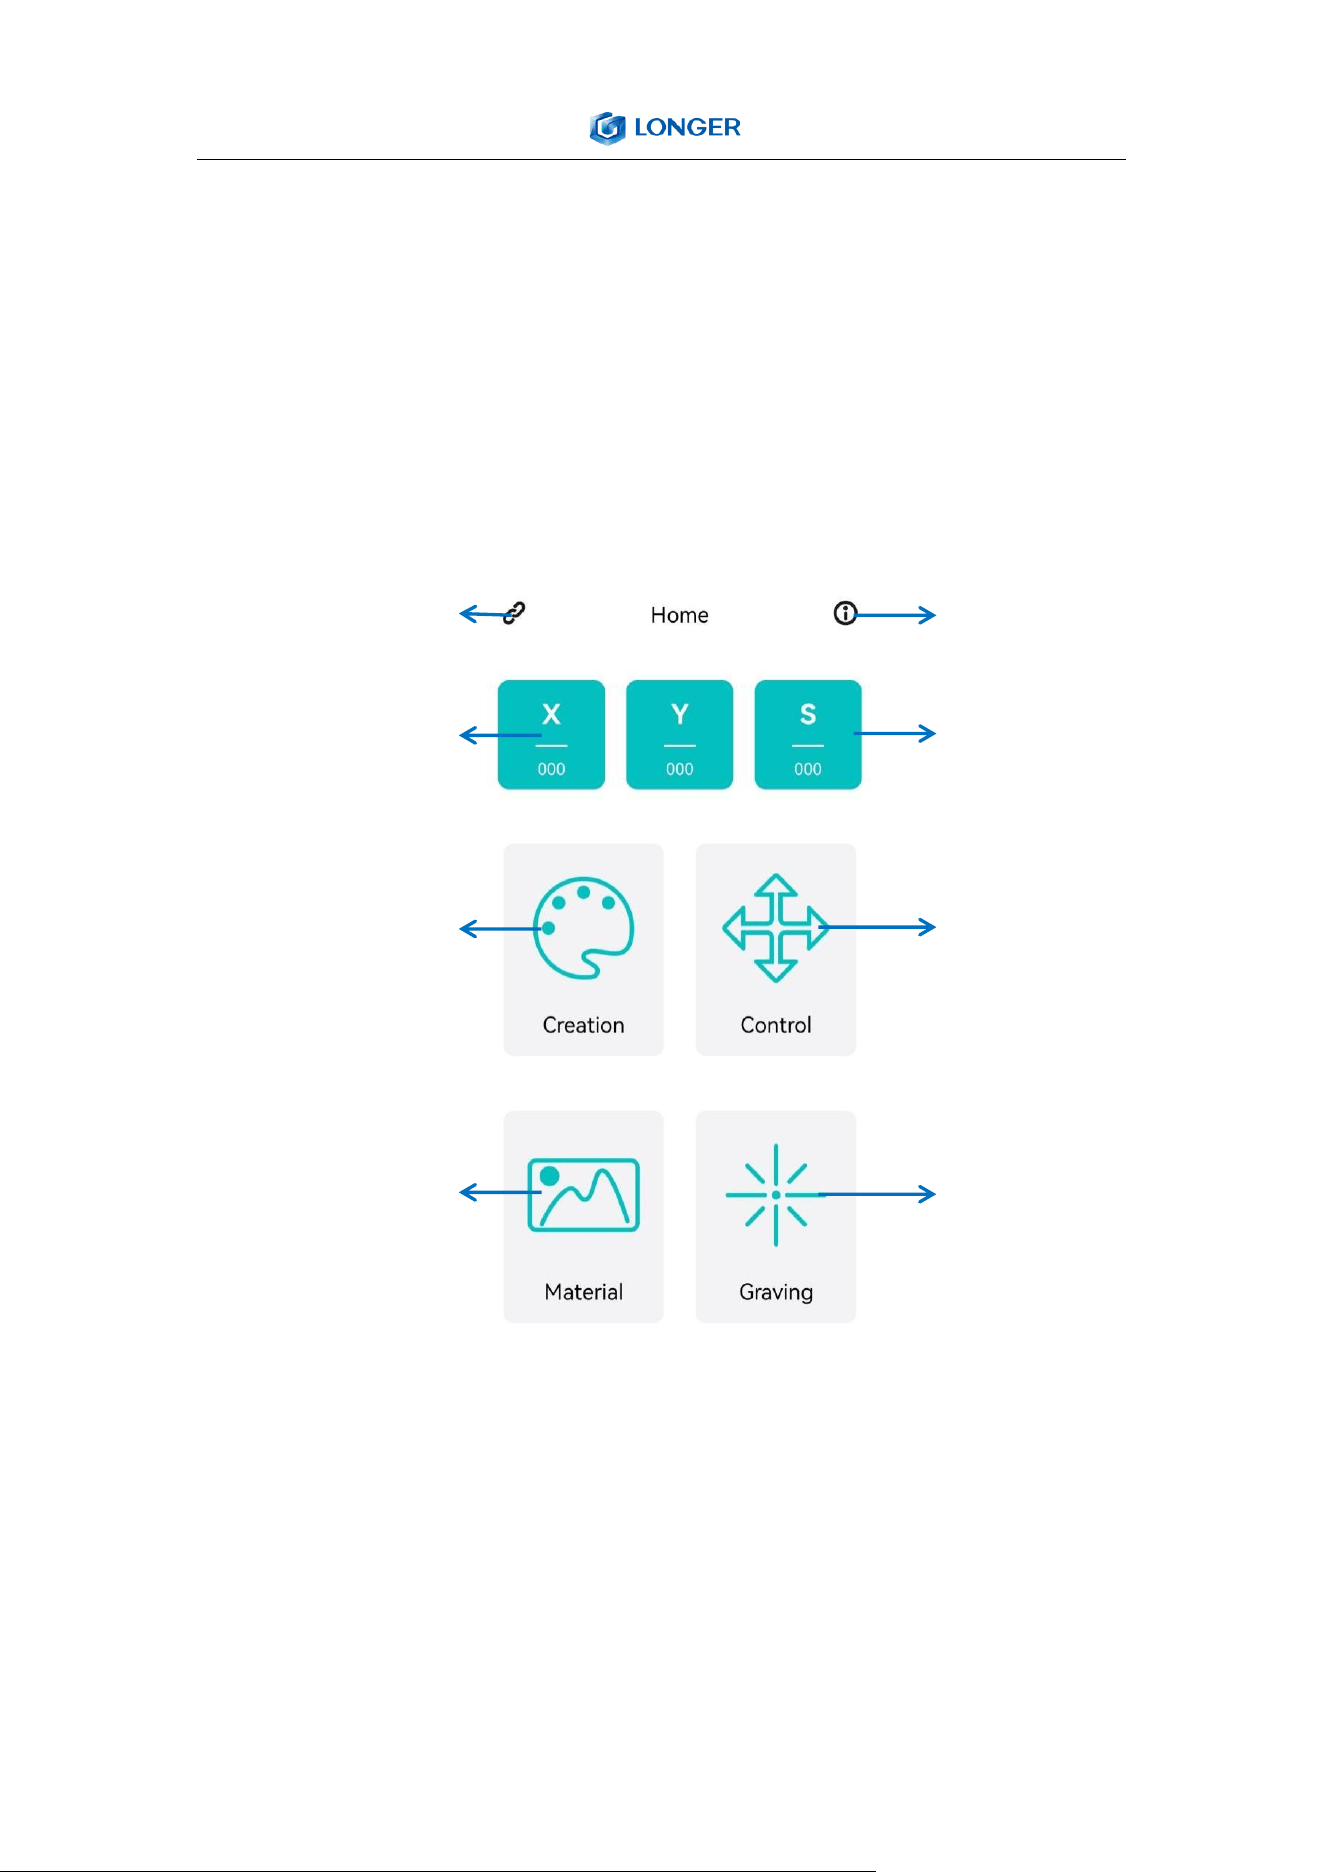
b) Home page about the APP
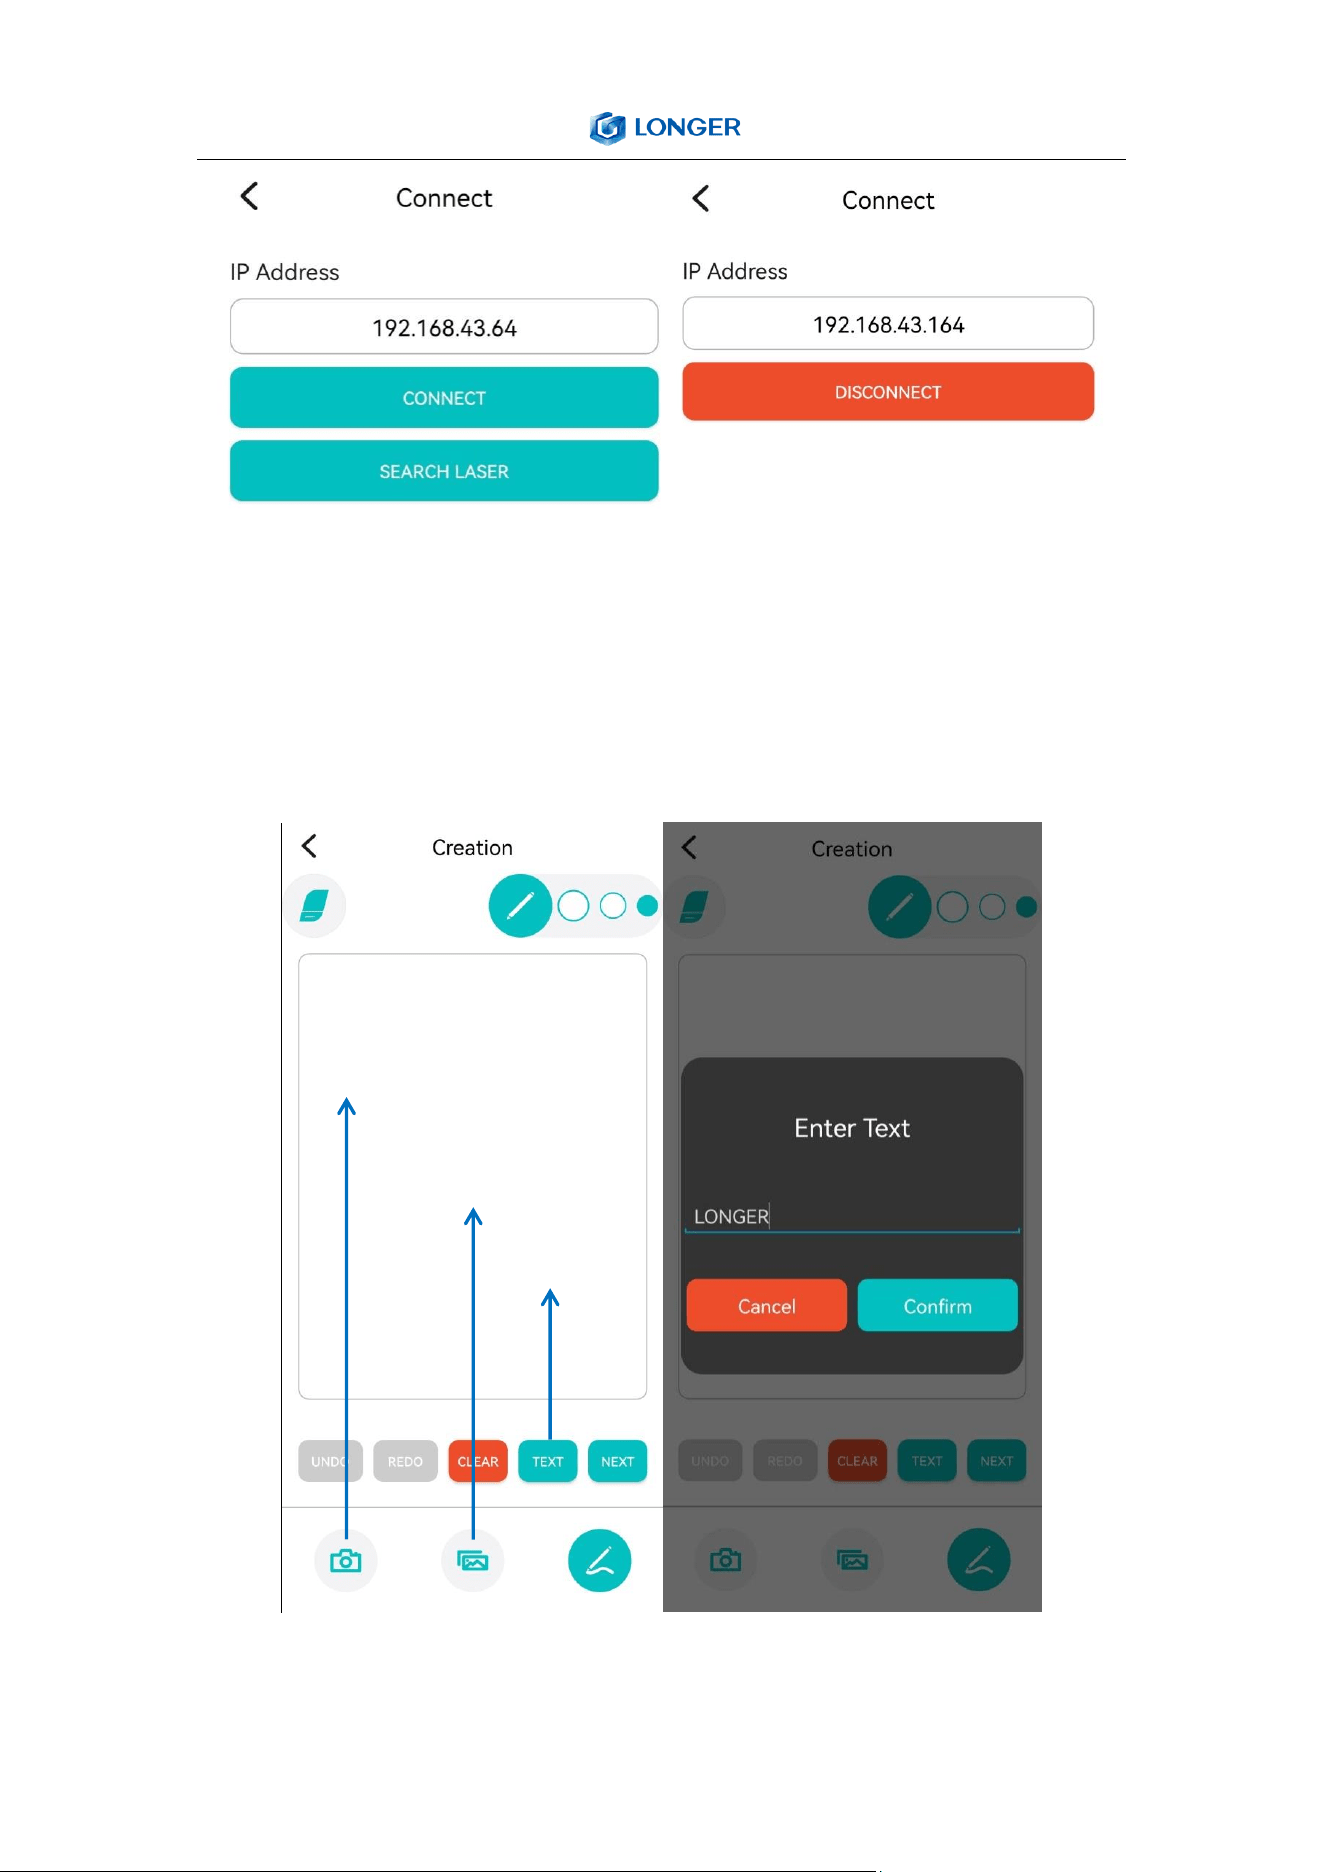
c) Connect APP to WIFI
Connect to the
engraver
Position of X and Y
axis
Select a photo
from album or take
a photo or enter
text to engrave
Select a file from
database to engrave
Information
about the APP
Power of laser
module
Control the
laser module
Engrave from
SD files
35
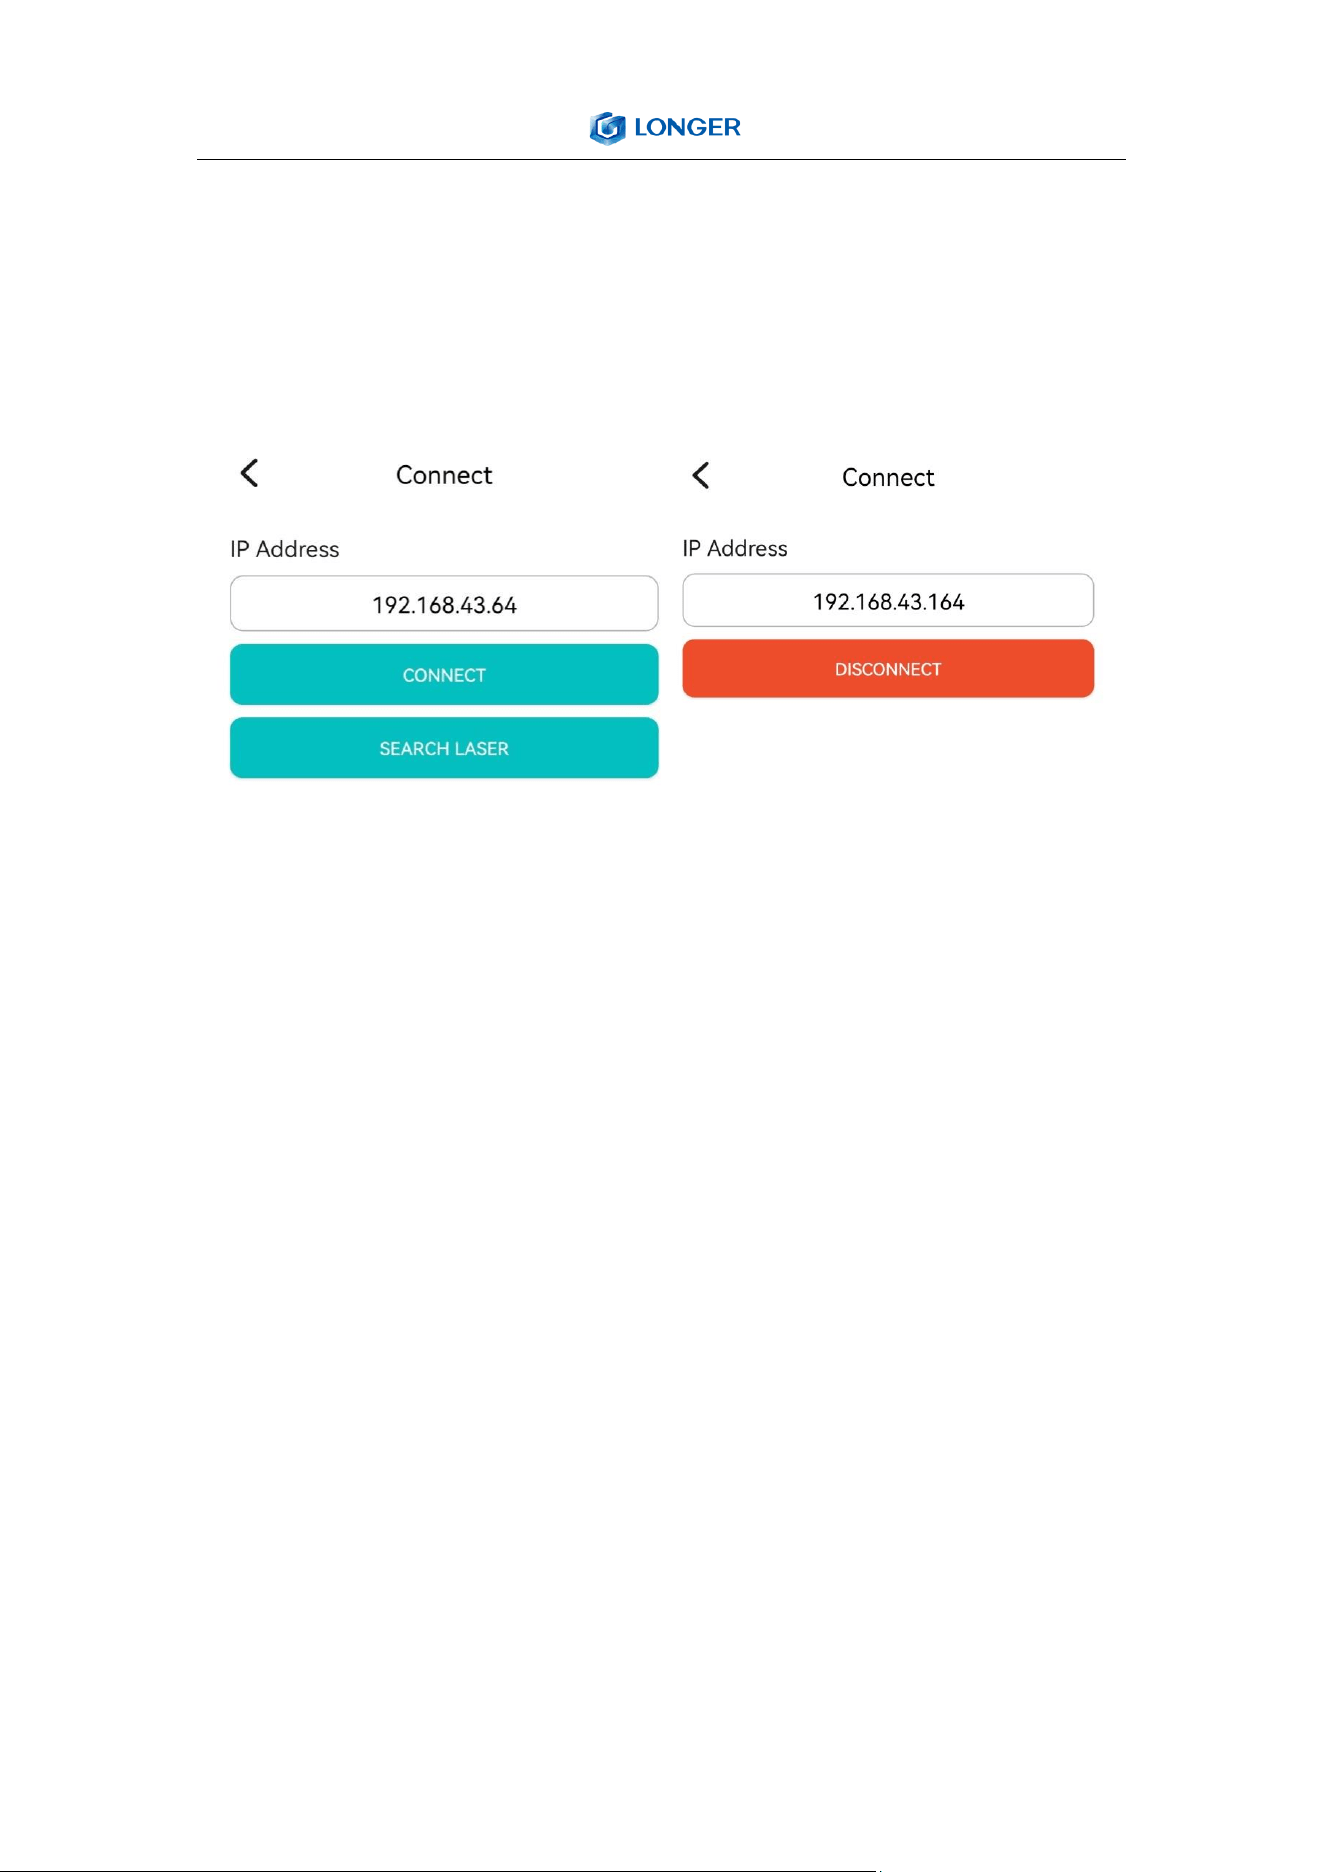
When the LASER B1 engraver is connected to wifi, we will get an IP
address, click the connect button in the upper left corner of the APP,
enter the IP address, and click CONNECT.
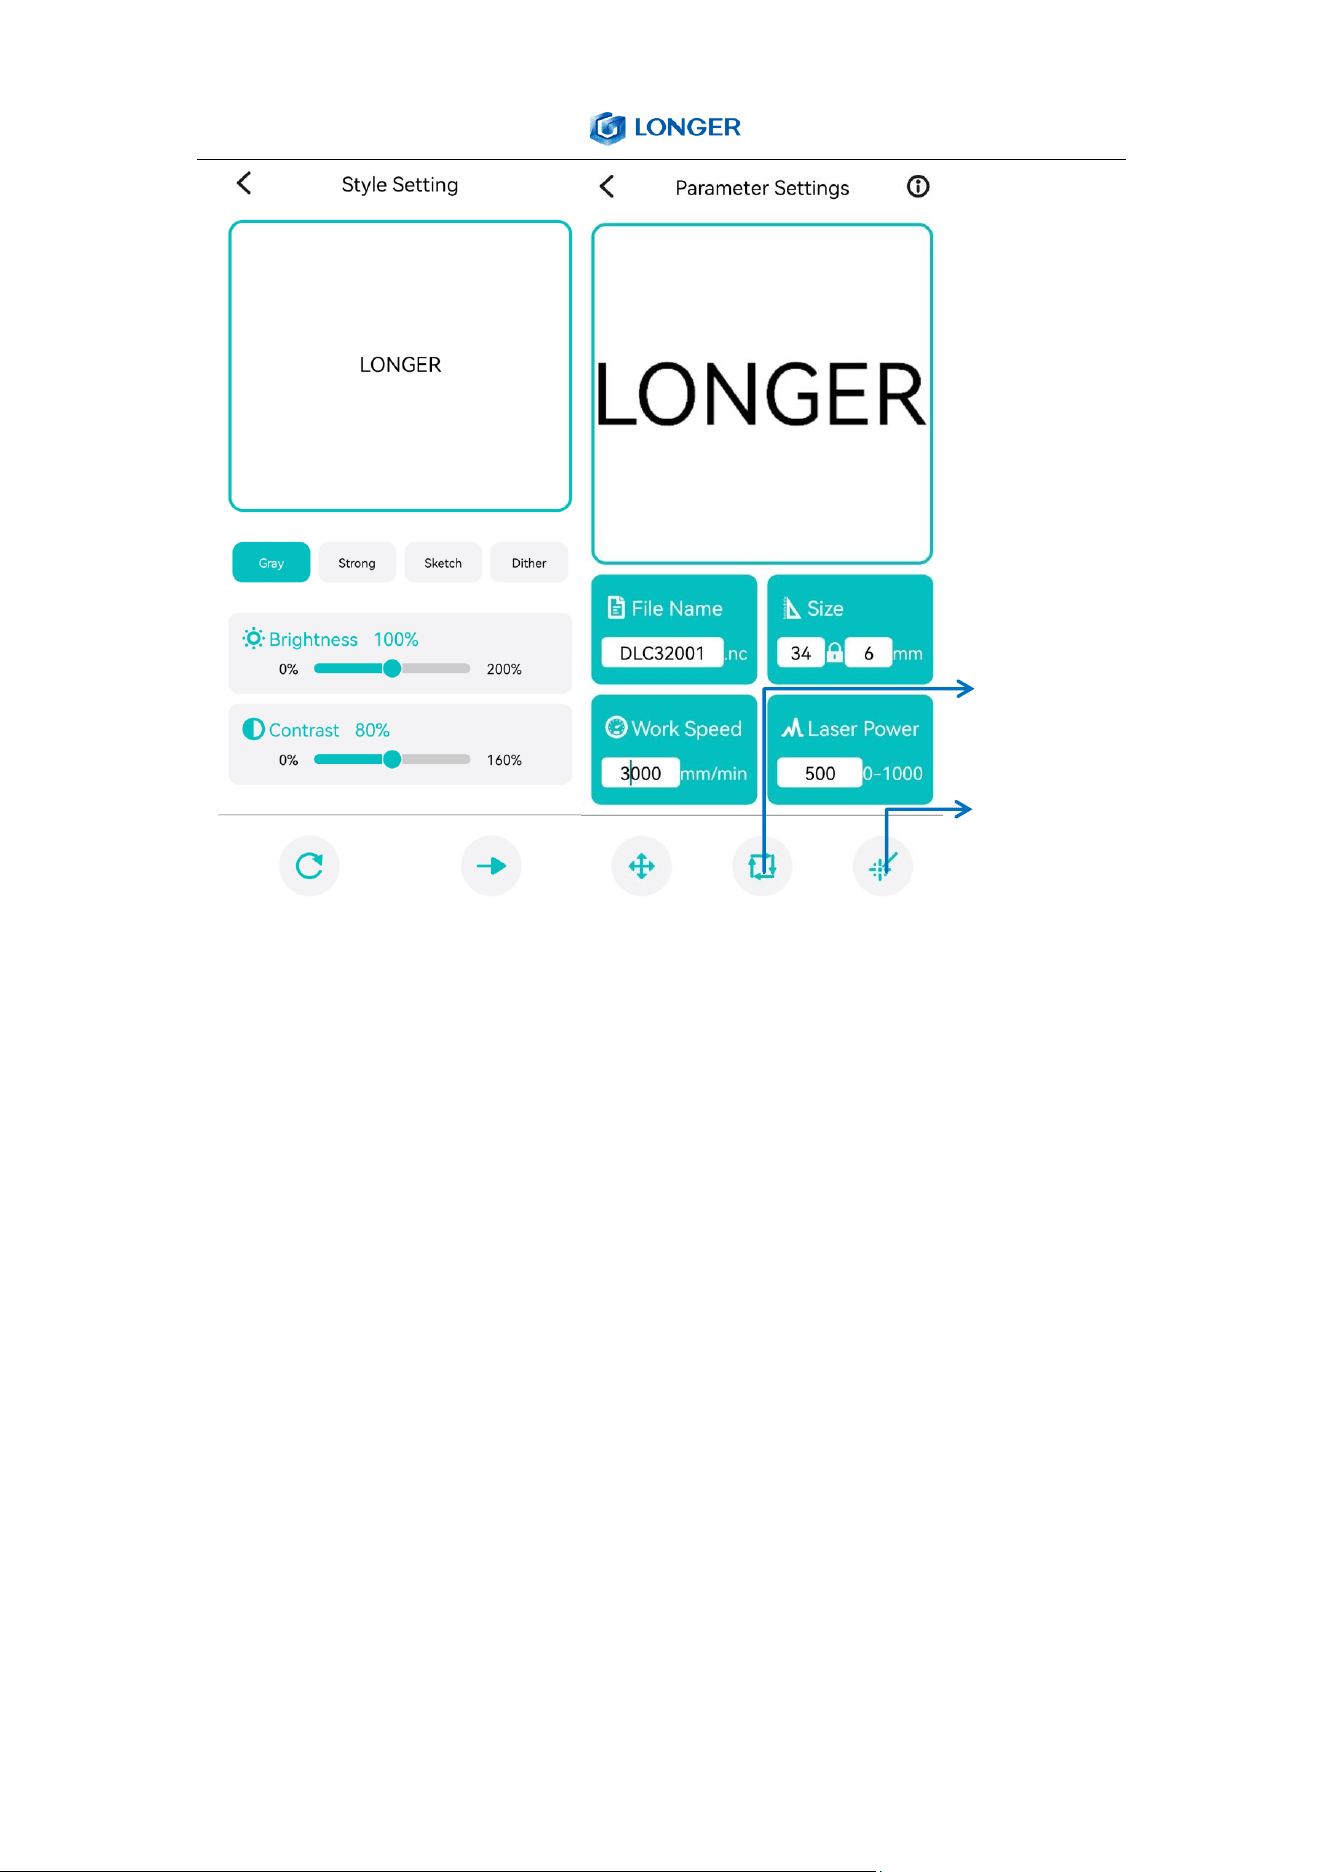
d) Enter text or take a photo to engrave
Take a photo
Select photo
from album
Enter a text
36
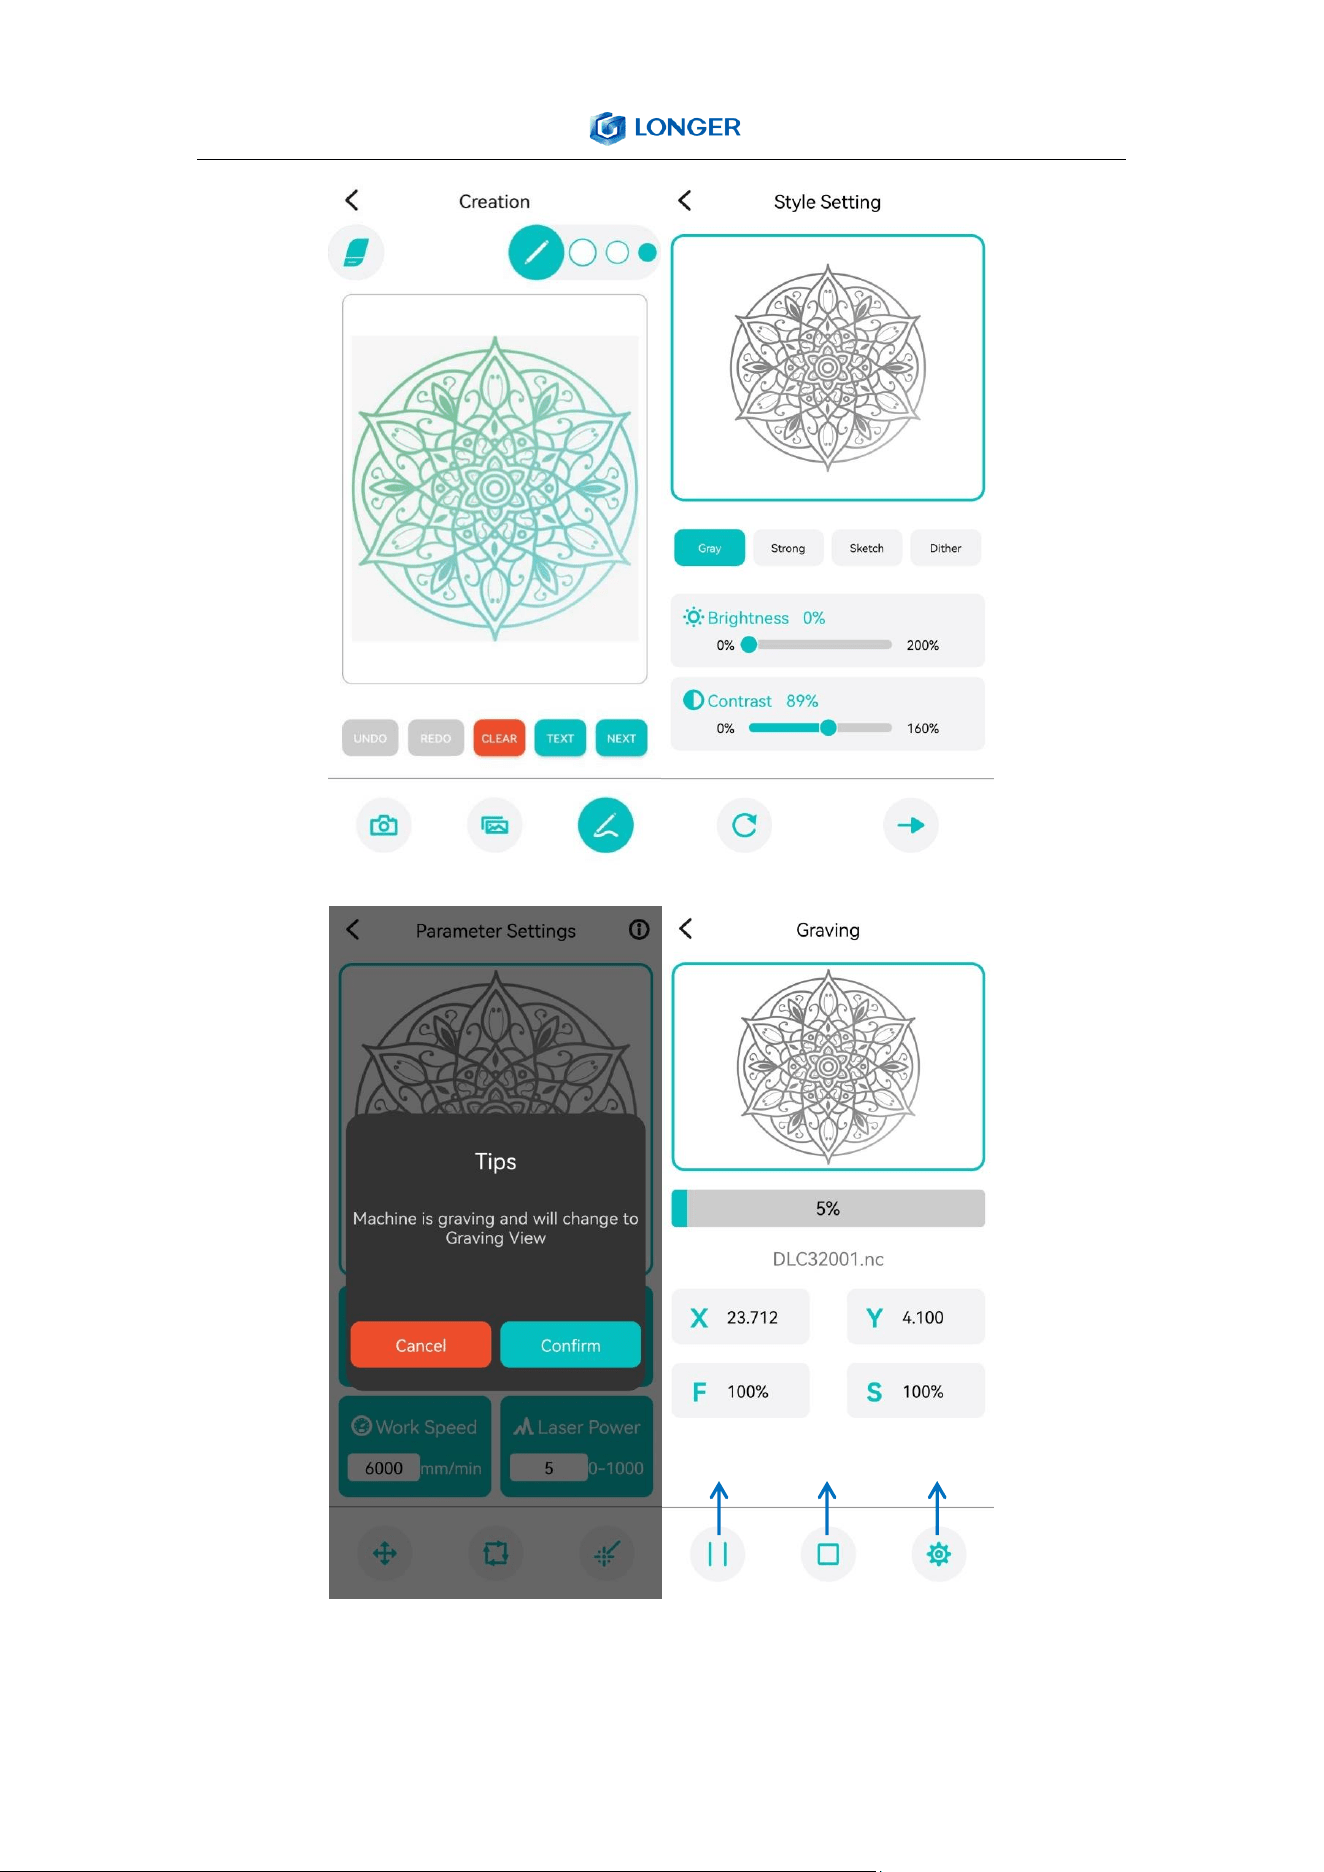
Click Creation, choose free drawing or input text, click Next, adjust
the brightness and contrast, click Next, set the size, engraving speed,
laser power (such as input 1000 for 100% power, and so on), click
Frame to confirm the engraving range, click Engrave for working.
For picture, it can click Creation, choose camera or album to take or
select a photo, click Next, adjust the brightness and contrast, click
Next, set the size, engraving speed, laser power (such as input 1000
for 100% power, and so on), click Frame to confirm the engraving
range, click Engrave for working. After engraving, click Confirm to
enter the Graving View to check the engraving progress, adjust
parameters, pause or cancel the engraving process.
Frame
Engrave
37
e) Control the engraver from APP
Pause Cancel Set
38
f) Engrave from SD files
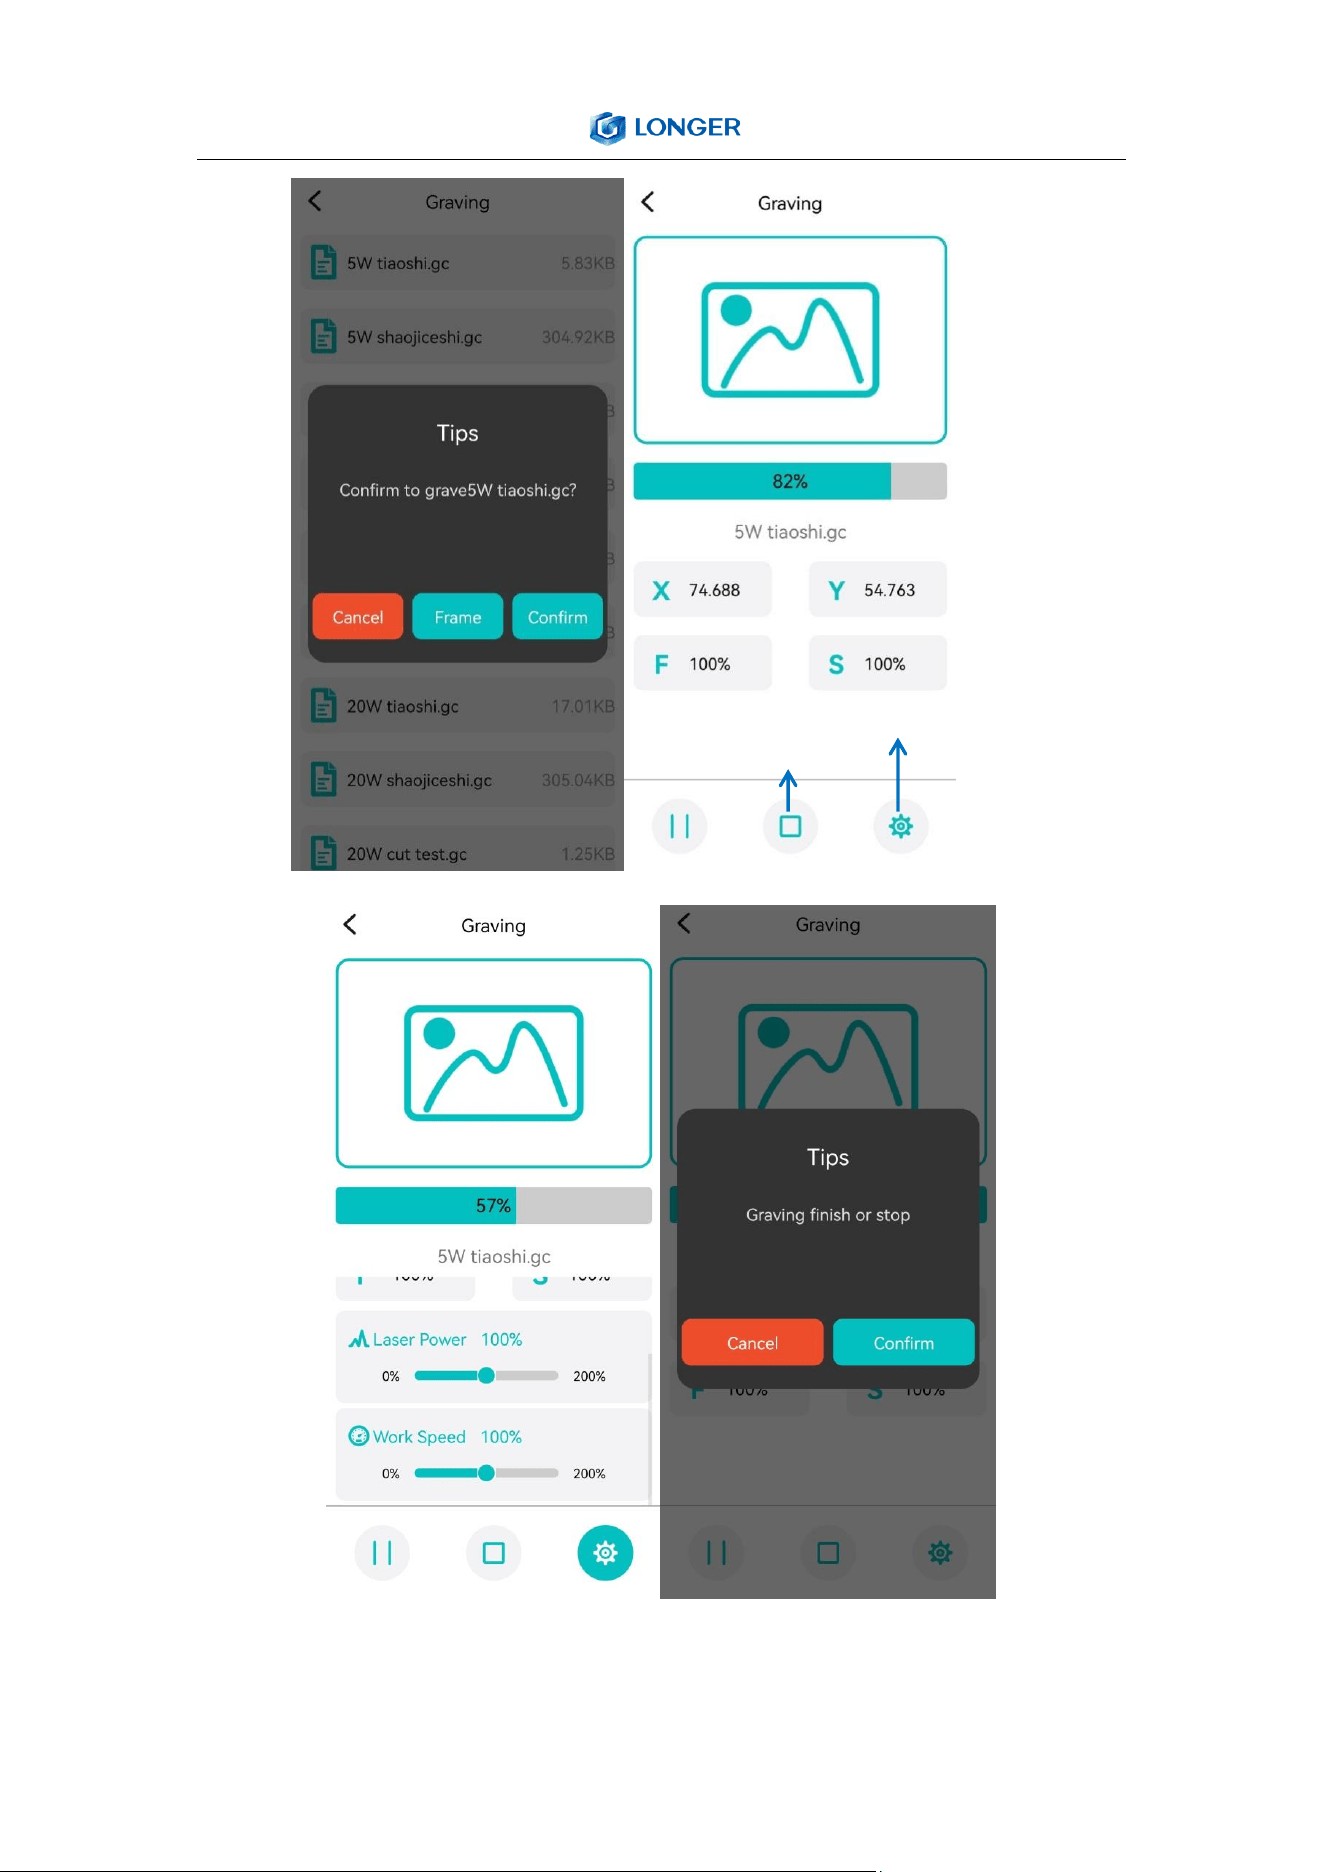
Click Graving on the home UI, the APP will read the engraving file in
the SD card, select the engraving file, click Frame to determine the
engraving range, and click Confirm to start engraving.
In the Graving View UI, it can check the engraving progress, adjust
speed and laser power, pause or cancel the engraving process.
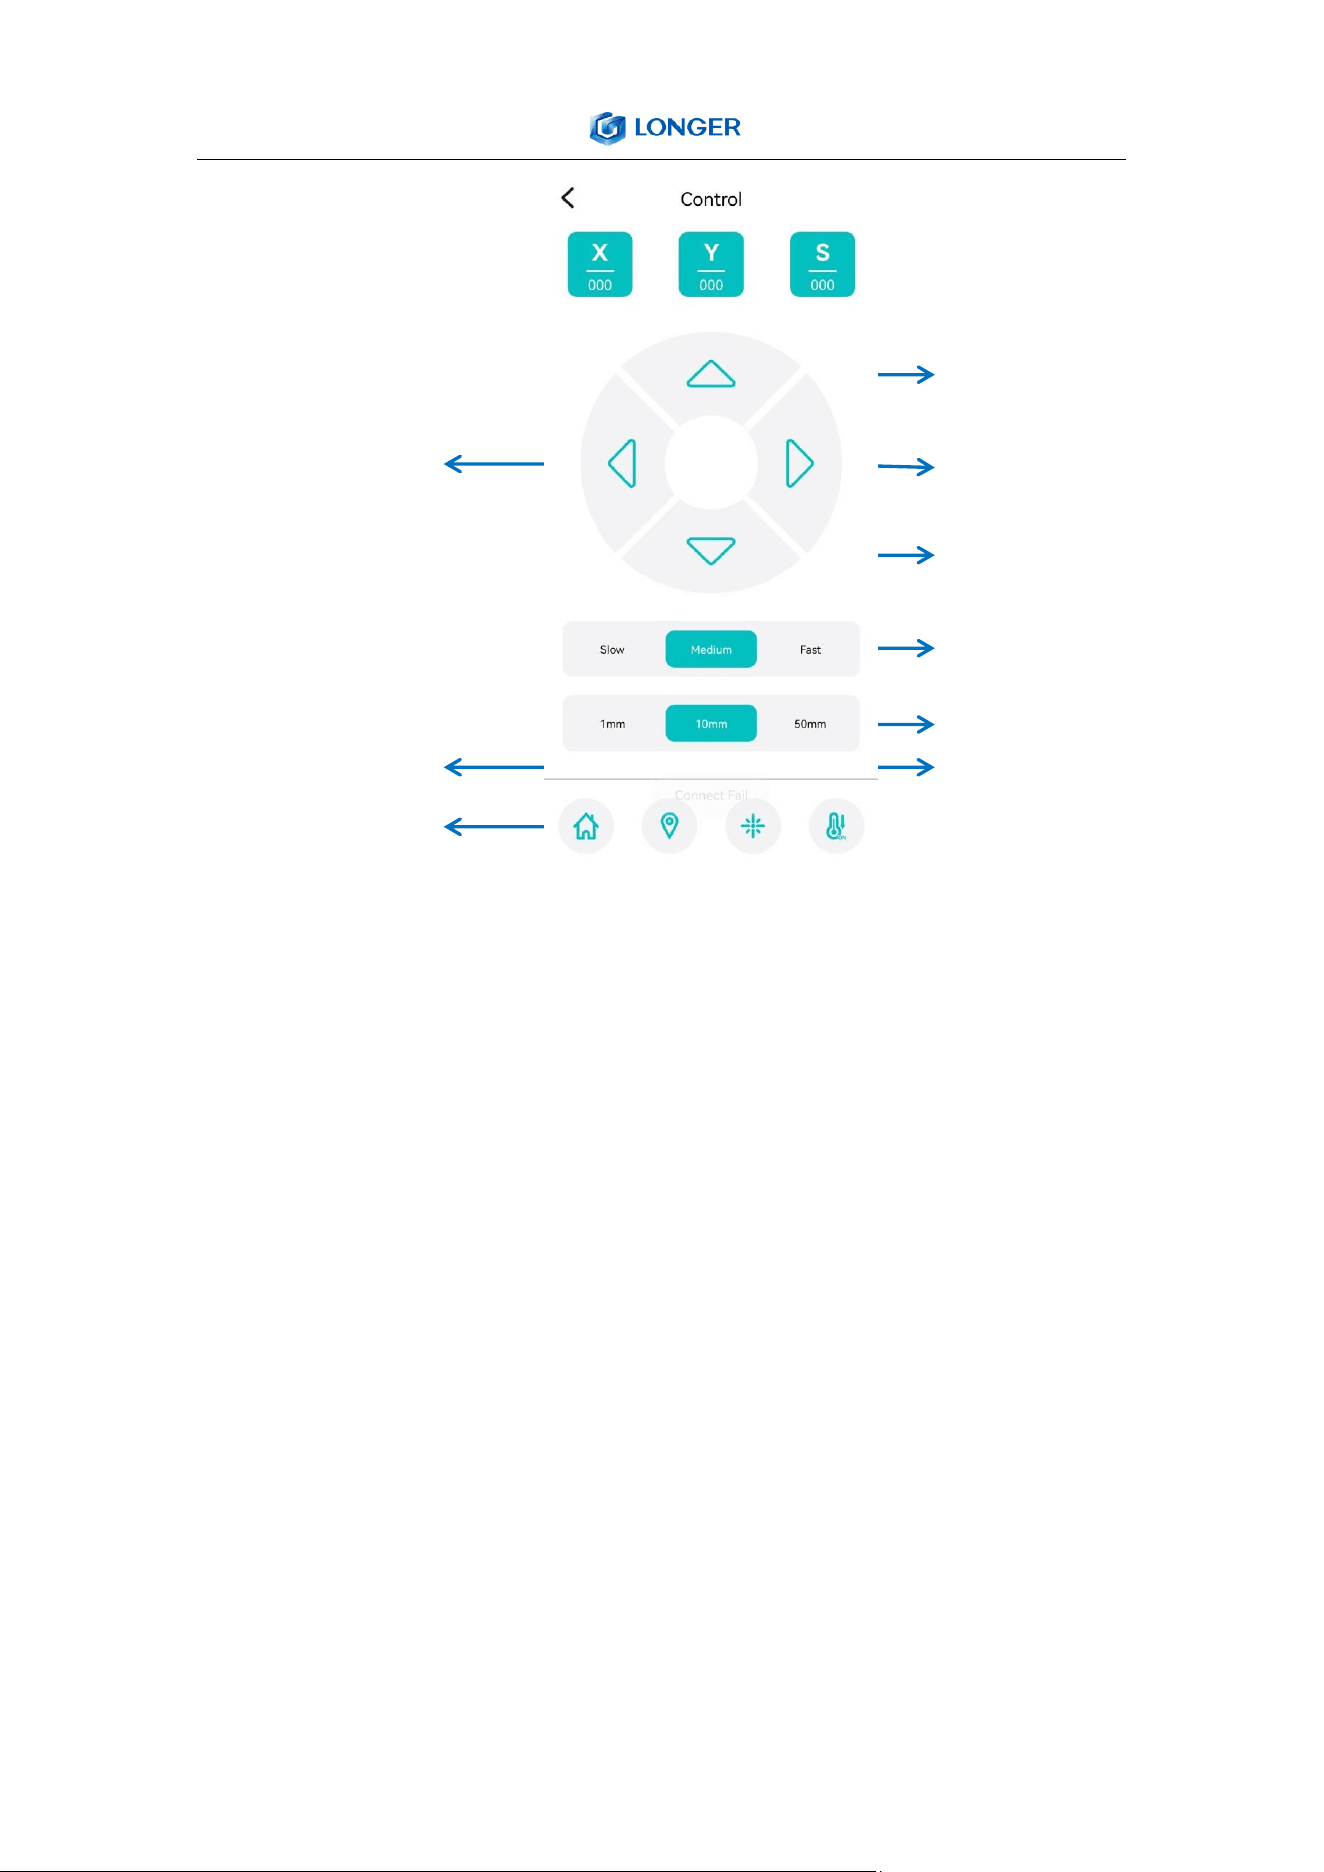
Move to the positive
direction of the Y axis
Move to the positive
direction of the X axis
Move to the negative
direction of the Y axis
Move to the negative
direction of the X axis
Set move speed
Choose the distance
to move per step
Turn on the laser
Set user zero point
Home to user
zero point
39
Set speed and power
Cancel
40
Note: To use APP for engraving, it needs to insert the SD card into
the motherboard firstly to ensure that the data can be received
normally; otherwise it will prompt upload error.
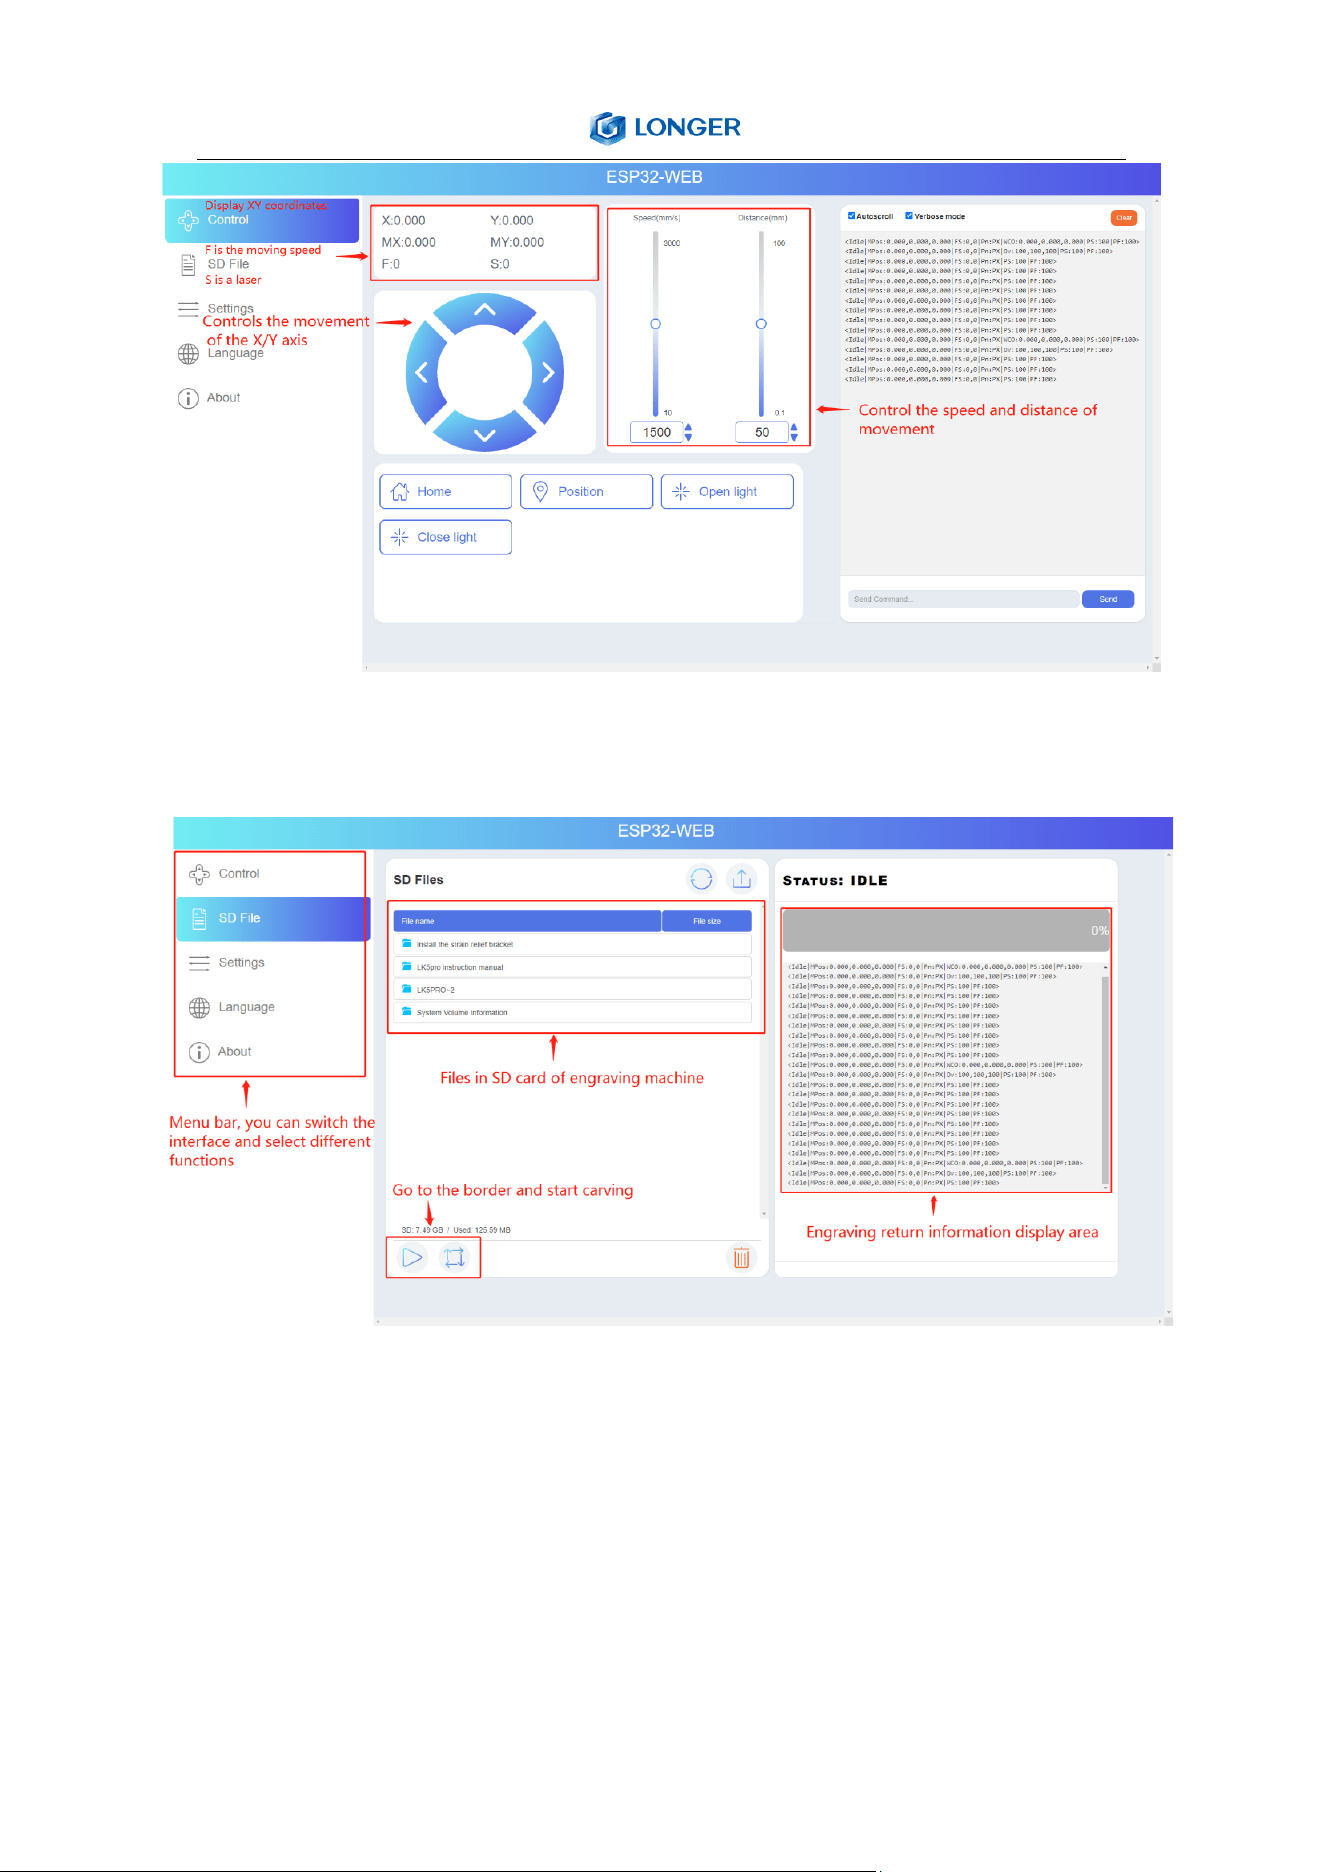
g) Control the engraving machine through the web page
When the LASER B1 engraver is connected to wifi, we will get an IP
address, click the connect button in the upper left corner of the APP,
enter the IP address, and click CONNECT.
41
Enter the IP address in the browser of mobile phone or computer,
then the control interface will pop up.
Click SD File tag, it will change to SD file page.Upload “.gcode/.nc”
files generated by “LaserGRBL” or “LightBurn” software.
(6) Air valve instructions
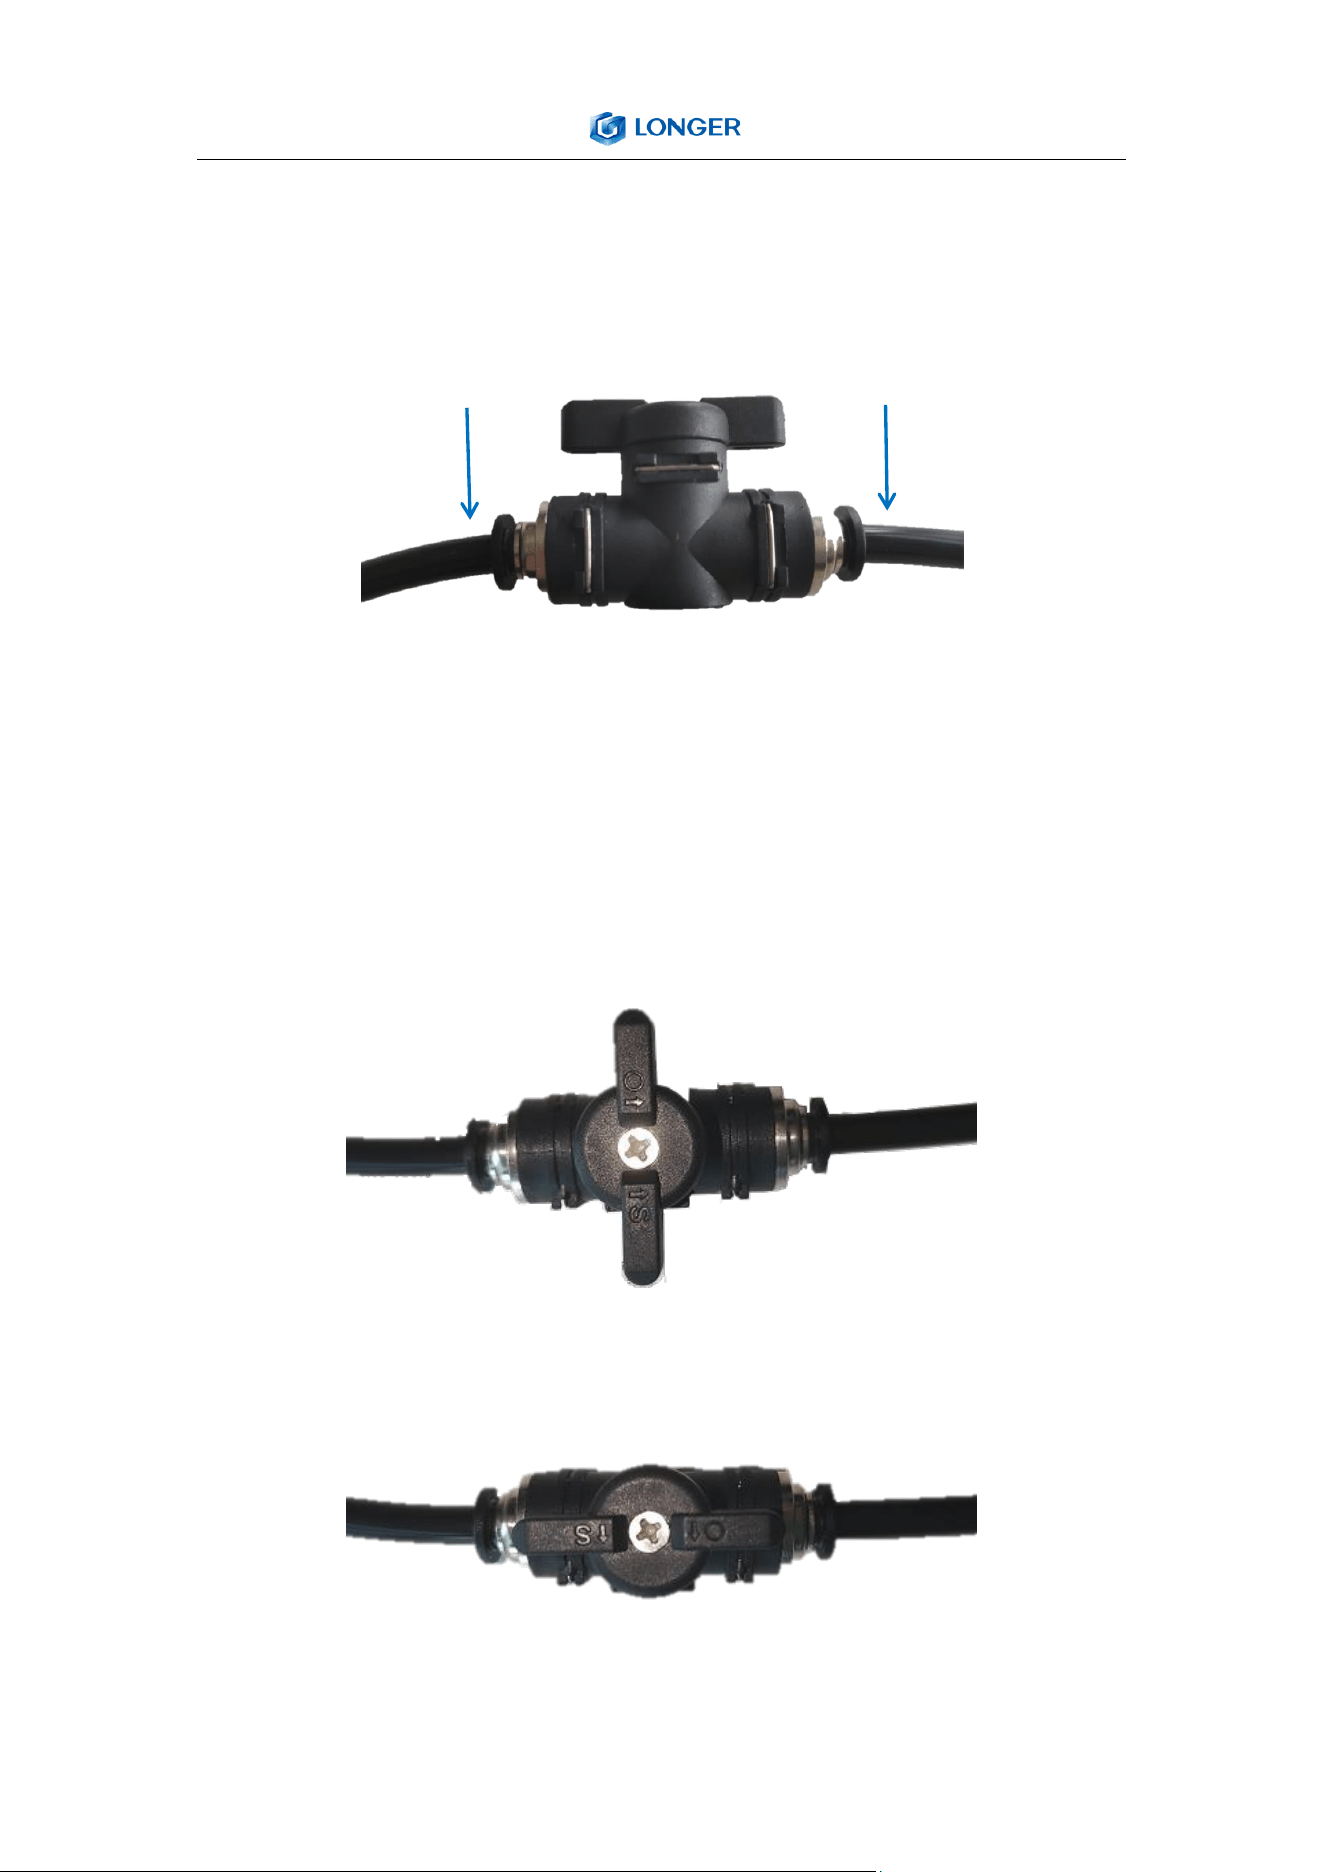
Please note that when the air pump starts, please do not
42
completely close the air valve switch, otherwise it will damage the
equipment.
a) Installation and use of air valve
1. The silicone tube pointed by the first arrow connects the air
pump to the air valve.
2. The silicone tube pointed by arrow No.2 connects the air assist
nozzle to the air valve.
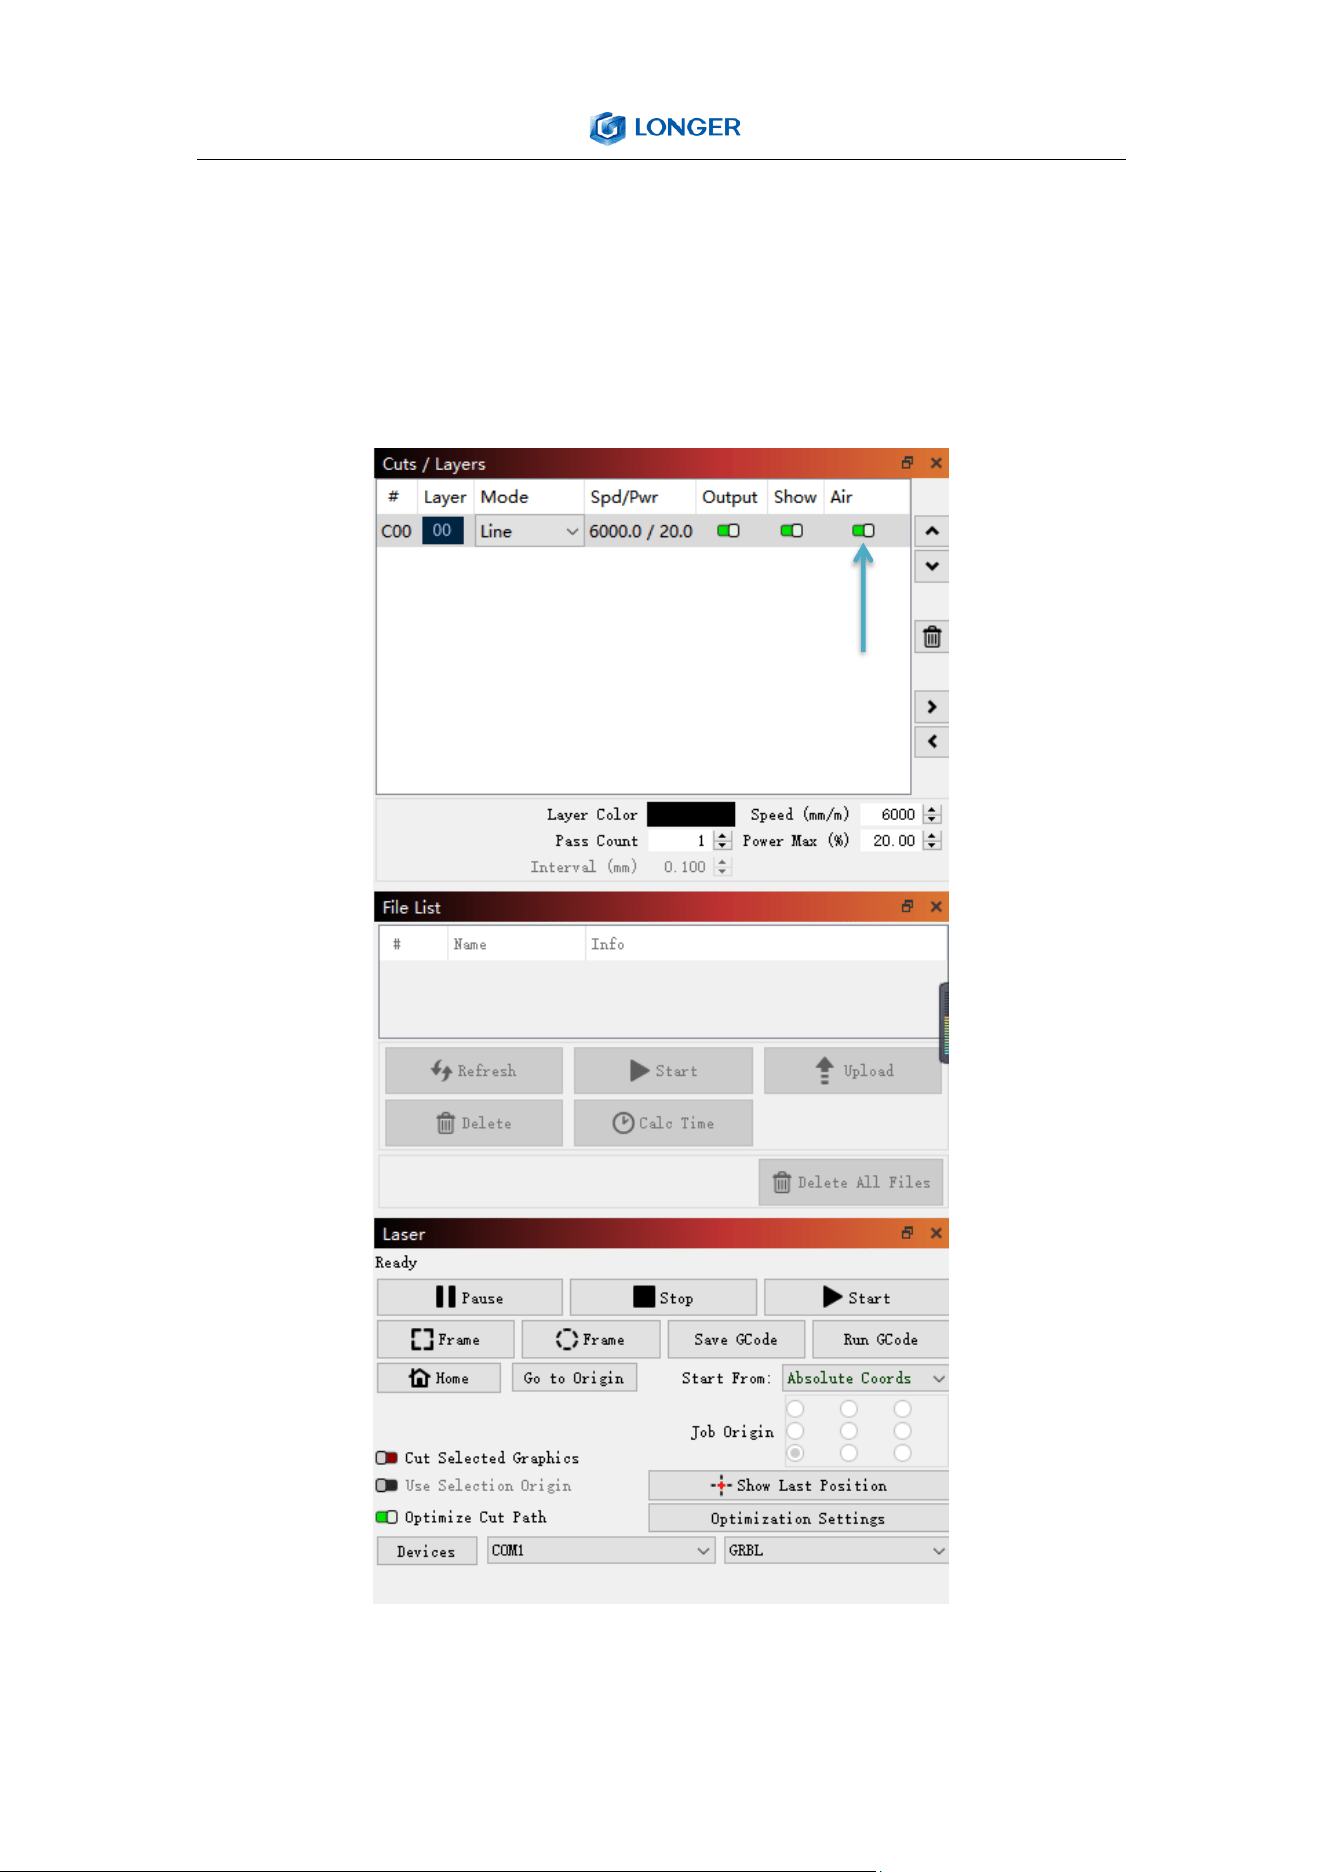
b) The air valve in the picture is closed
c) Turn the valve switch clockwise 90° to open the valve (as shown
below)
43
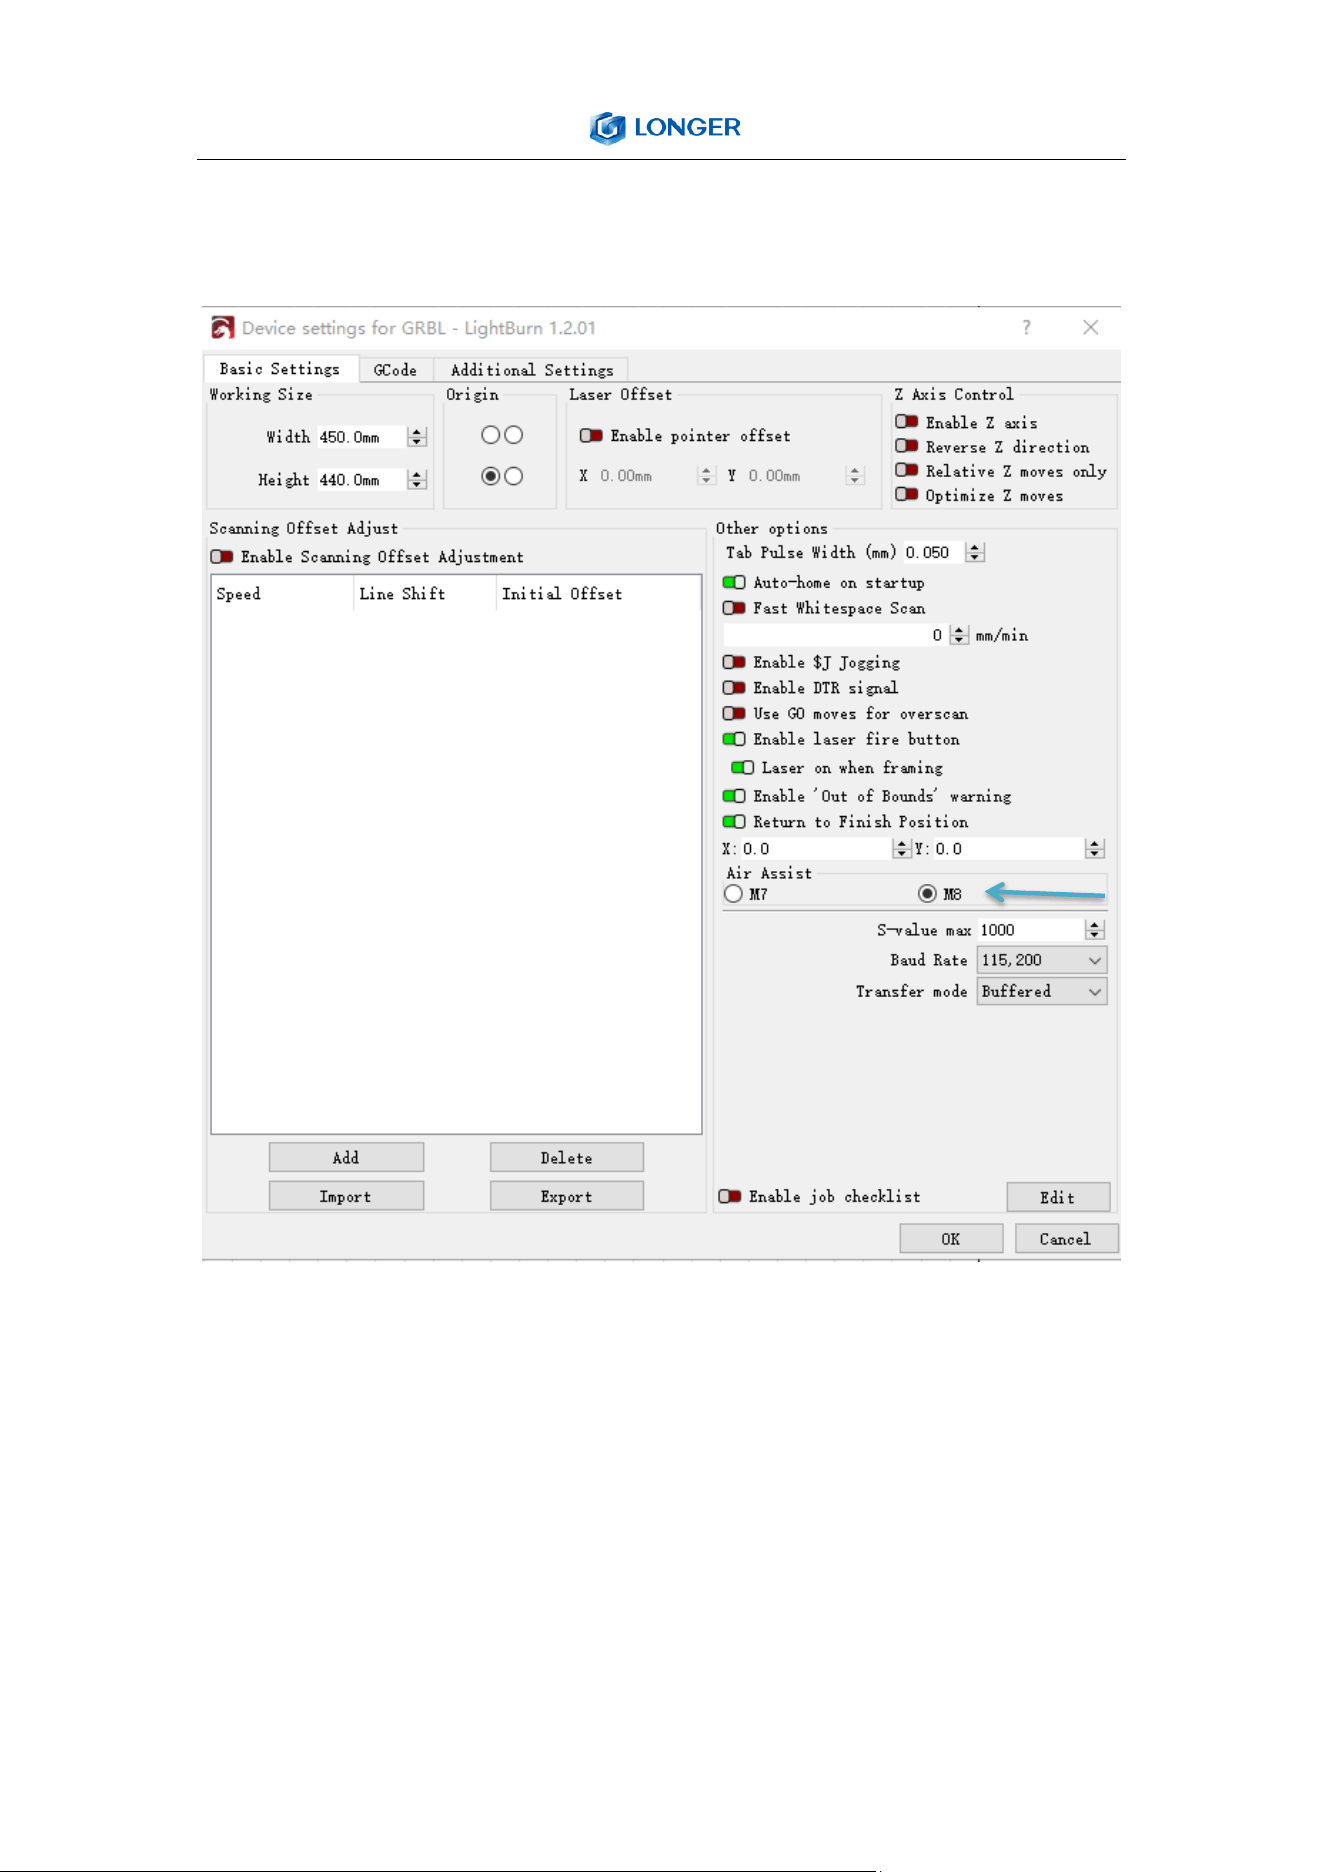
Lightburn Software sets air assist method
a) In the Cut / Layers control bar on the right, turn on the Air Assist
indicated by the blue arrow (green means on, red means off, as
shown below).
44
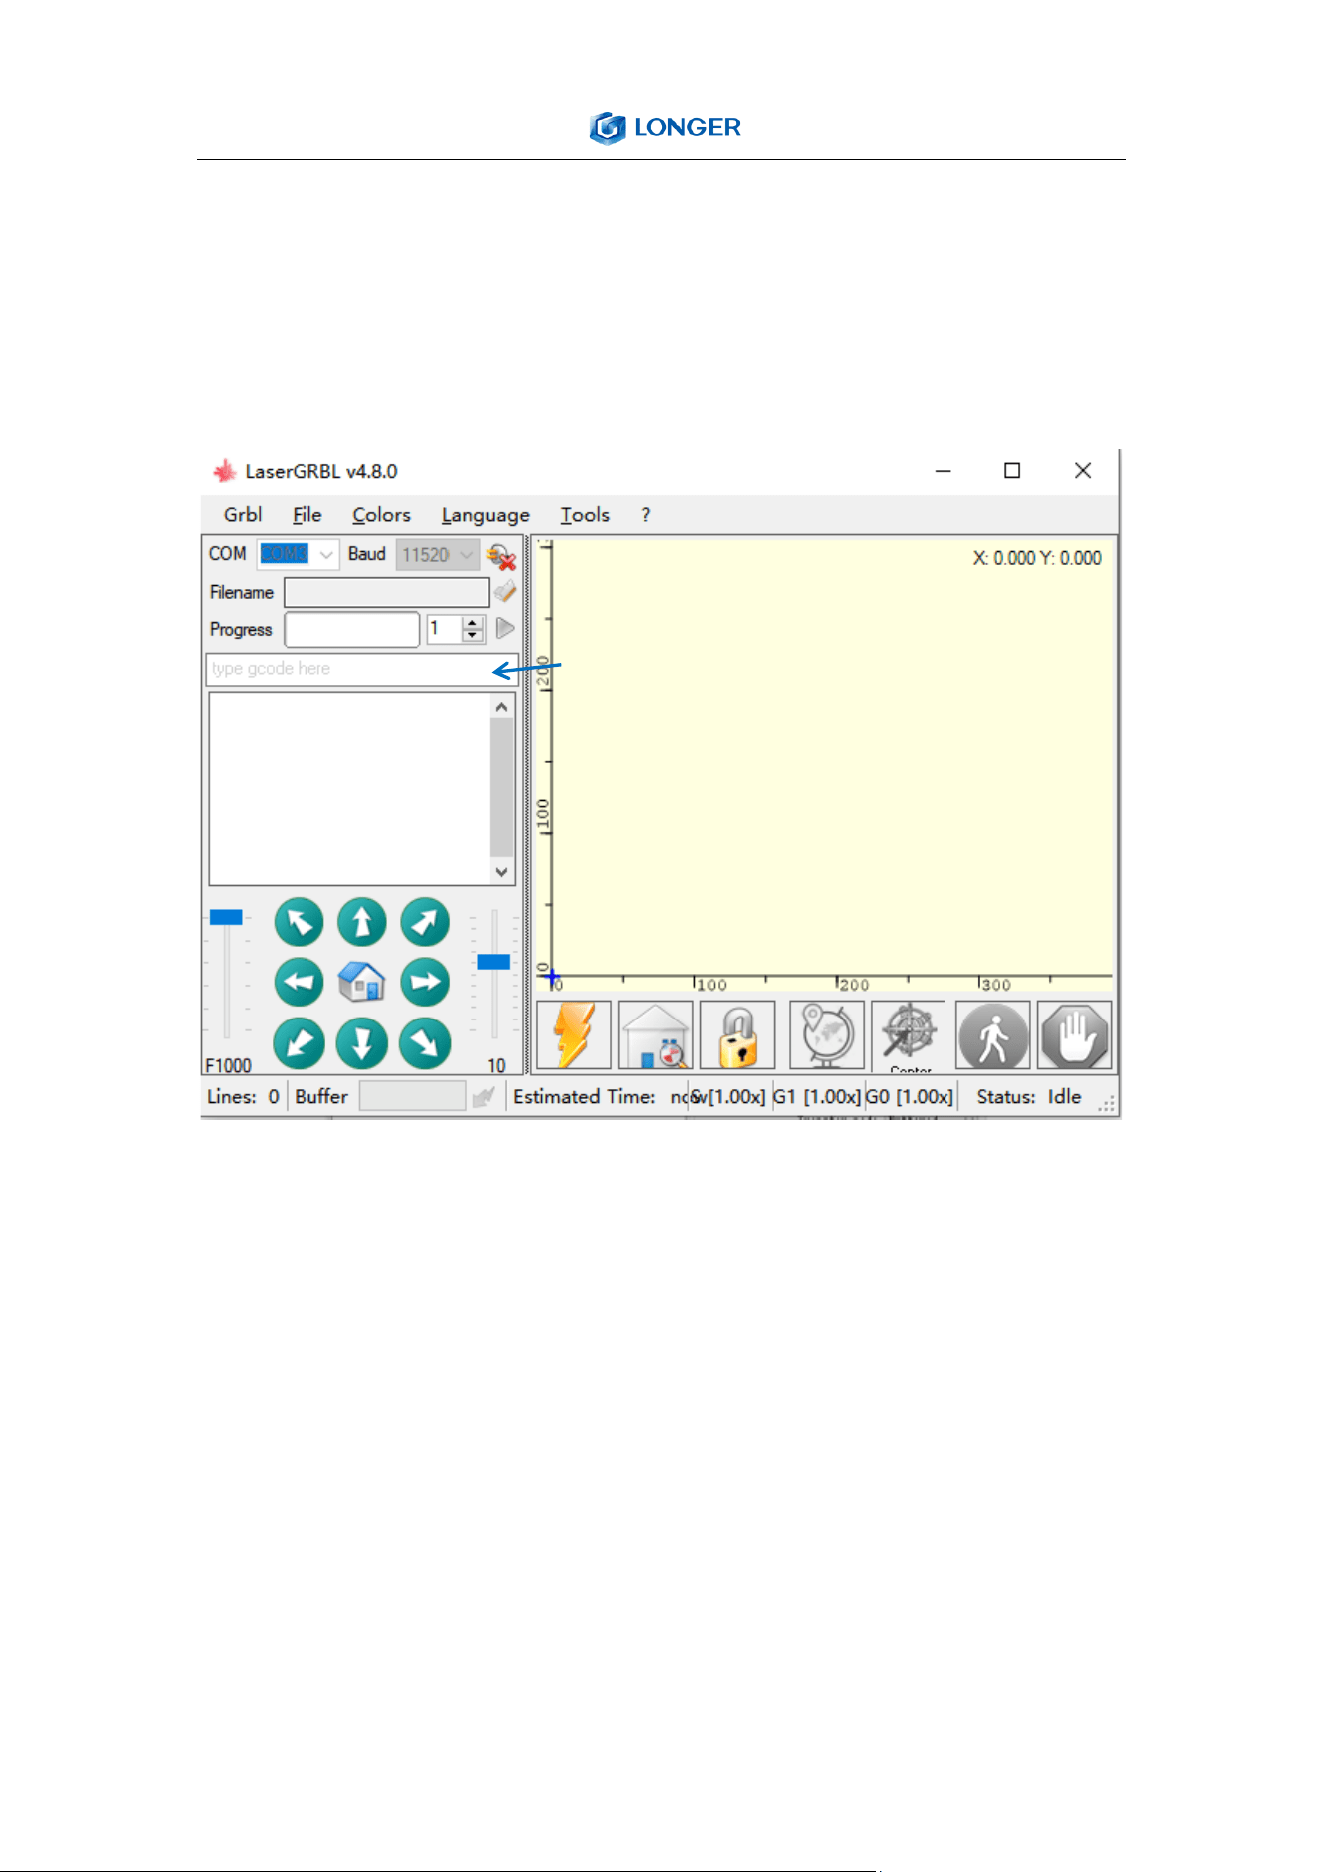
b) Click Edit to enter device Settings and select M8 (as shown in the
picture below).
45
LaserGRBL Software sets air assist method
a) Before cutting, enter "M8" in the left control column to turn on
the air pump, and after cutting, enter "M9" in the left control
column to turn off the air pump.
‘M8’ Turn on the air pump
‘M9’ Turn off the air pump

46
D. FAQ
Question 1: Are there recommended engraving and cutting
parameters?
Please refer to the table “LONGER Laser Engraver Material Profiles”
which describes the common materials engraving and cutting
parameters for LASER B1.
If there is no information you need. Please wait for our updates in
the future.
Question 2: The engraved pattern appears vibration, or is not
closed?
· Adjust the eccentric nut to make the parts move smoothly
without shaking.
· Re-tension the timing belt.
· Adjust the synchronous wheel to prevent the synchronous belt
from rubbing against the side of the synchronous wheel during
movement.
Question 3: How about the warranty policy?
For LONGER official stores and LONGER designated distributors,
LASER B1 has a One-year International Limited Manufacturer
warranty from the date of purchase of LASER B1.

47
Please note the following warranty terms. One-year International
Limited Manufacturer Warranty means that LONGER will provide
the following free warranty services:
• Diagnostics and Evaluation.
• Technical Support.
• Replacement Parts under Warranty terms.
How to handle a warranty case:
Any warranty case must be submitted to our official support
channels (Email: suppor[email protected]). In case the product was
bought from a reseller, contact us first so that we can help you
diagnose the problem, then turn to your reseller for spare parts if
needed.
Documentation needed for a warranty case:
1. Machine purchase order number and channel, nameplate
number on the machine.
2. A brief description of the problem along with the clear evidence
of its presence (e.g., photos or videos).
3. On the initial contact for customer support further tests and
diagnostic steps might be required to identify the cause of the
problem.
4. Some parts of the LASER B1 inevitably “get used up” over time.
For these parts, specific conditions apply, unless failure has
48
occurred due to a defect in materials or workmanship.
Part Warranty Limitation
Motherboard One-year International Limited Manufacturer Warranty
Motor One-year International Limited Manufacturer Warranty
LONGER Laser Module One-year International Limited Manufacturer Warranty
Touch Screen One-year International Limited Manufacturer Warranty
Power Adapter One-year International Limited Manufacturer Warranty
Air Pump One-year International Limited Manufacturer Warranty
Chrome-Plated Rod Warranty does not apply on normal wear and tear
2020 Profile Warranty does not apply on normal wear and tear
Coupling Warranty does not apply on normal wear and tear
Eccentric Nut Warranty does not apply on normal wear and tear
Bearing Warranty does not apply on normal wear and tear
L-Shaped Right-Angle Foot Slot Warranty does not apply on normal wear and tear
Goggles Warranty does not apply on normal wear and tear
Brush Warranty does not apply on normal wear and tear
Board\ Acrylic Board\ Stainless Steel
Plate
Warranty does not apply on normal wear and tear
Linear Bearing Wheels Warranty does not apply on normal wear and tear
GT2 Timing Belts Warranty does not apply on normal wear and tear
Powder-Coated Aluminum Extrusion Warranty does not apply on normal wear and tear
Cables & Drag Chain Warranty does not apply on normal wear and tear
Cosmetic Appearance & Logos Warranty does not apply on normal wear and tear
Note:
· The warranty does not cover normal, expected wear and tear
caused by using the LASER B1 for its intended purpose.

49
· In case we have provided a free replacement part, the warranty
does not reset. The original warranty period still applies.
This warranty is voided by:
· Any damages caused by improper assembly of the product.
· Any damage caused by improper use, maintenance, or operation
of the engraver.
· Any damage caused by long-term lack of maintenance.
· Using the LASER B1 in improper conditions (temperature,
dustiness...).
· Upgrades, modifications, or add-ons that are not officially
supported.
Our Technical Support Team is always available to help you
out under any circumstances, even if the issue is not covered
under warranty.
Question 4: How to maintain LASER B1 laser module?
LASER B1's lasers are carefully designed to resist stains, but after
long-term use, there may still be dust and grease on the laser hood,
air guide, and even the lens. This will affect the appearance and
performance. It is recommended to clean the laser regularly to keep
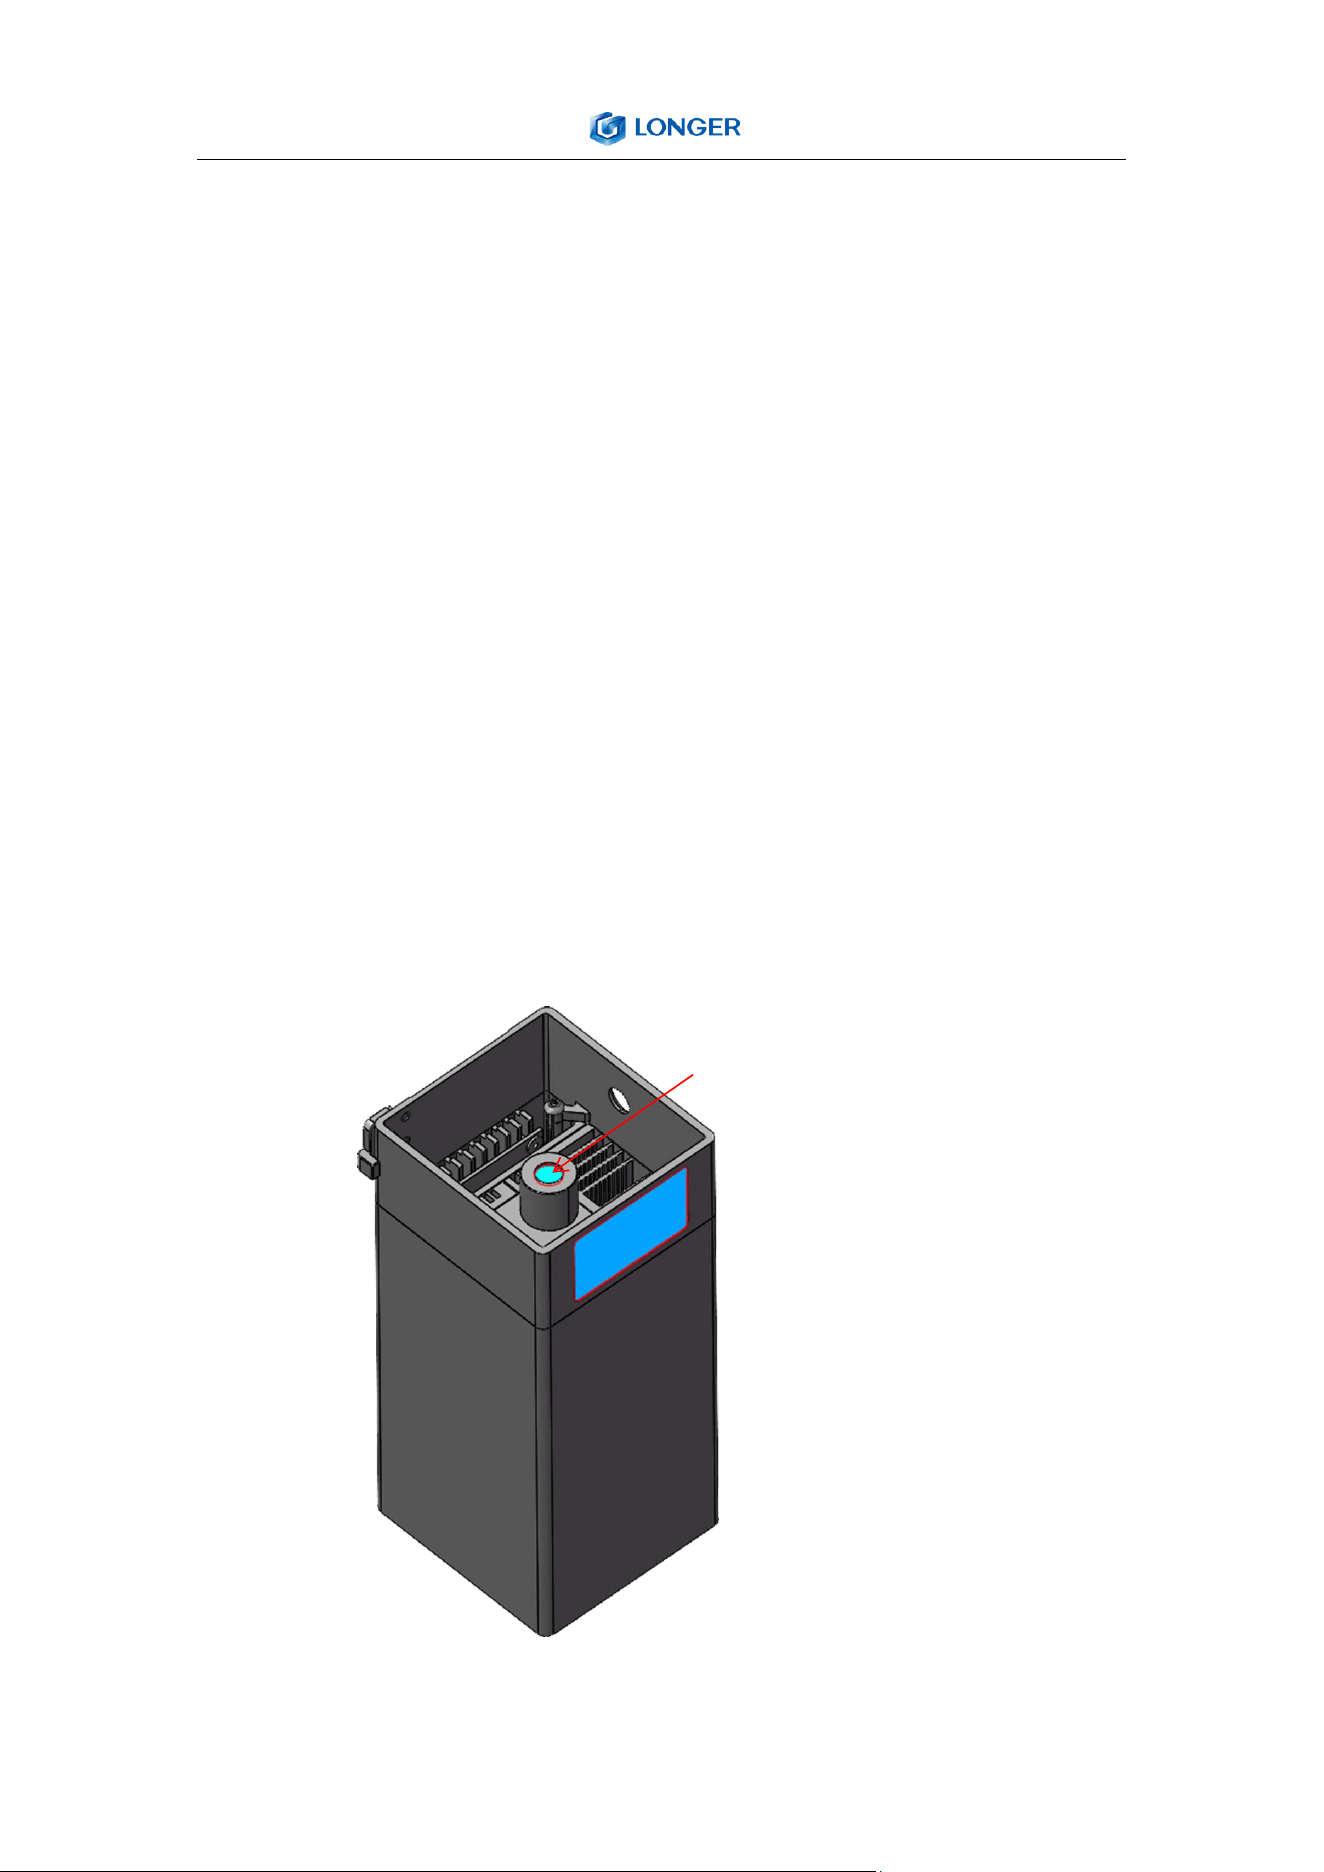
50
it in good performance. You need to perform the following steps to
clean the laser.
Preparation: hex wrench, non-woven fabric, alcohol/isopropanol
solution.
Start:
1. Remove the laser hood and air guide
2. Dip a little alcohol/isopropyl alcohol solution with a non-woven
fabric
3. Carefully wipe the laser lens with a non-woven fabric
4. Reinstall the laser hood and air guide
Warning: Excess solution may immerse inside the laser and cause
damage to the laser.
LASER B1 laser module
Windows lens
51
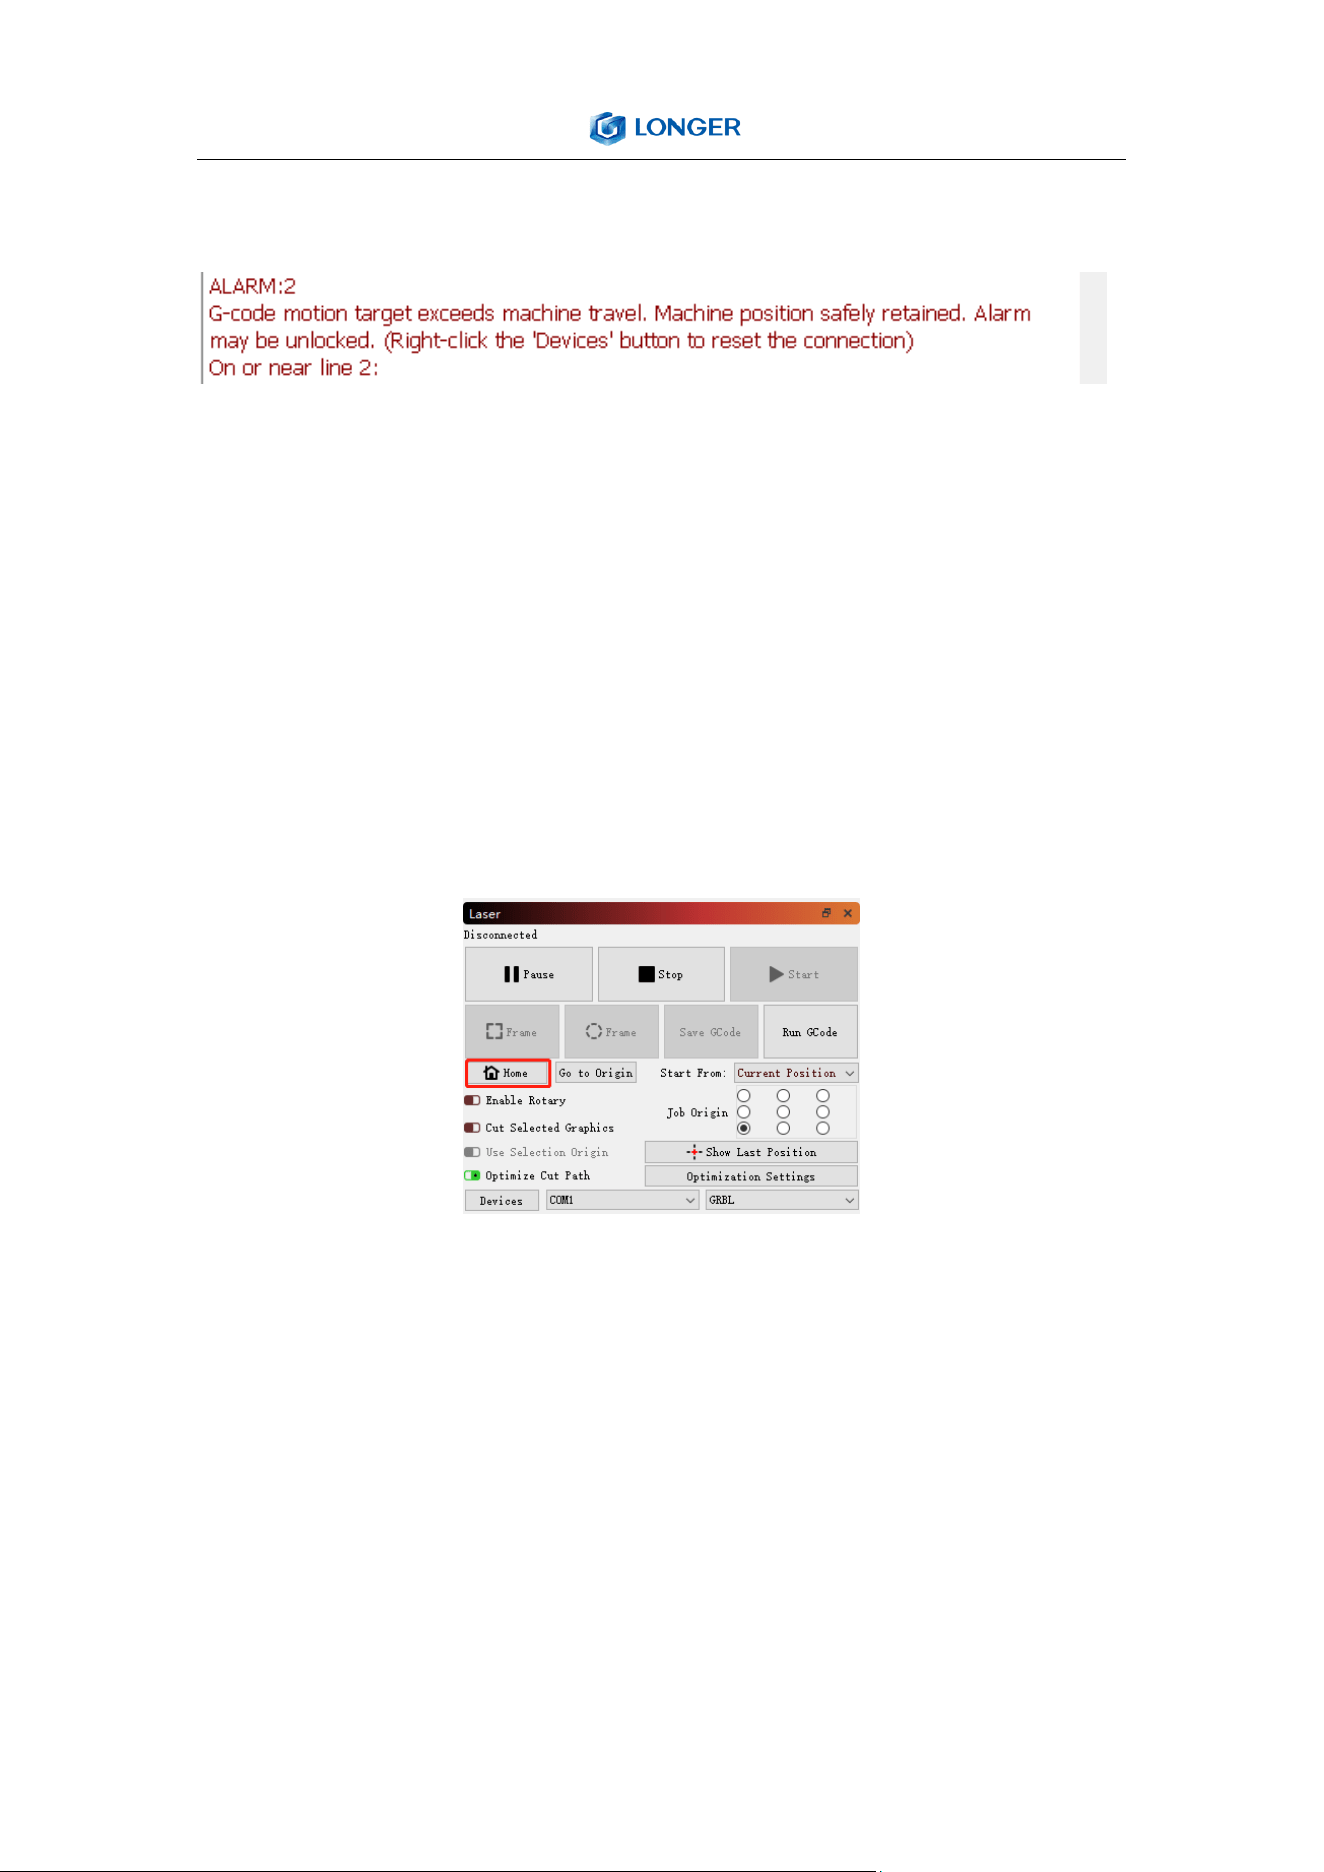
Question 5: How to solve alarm 2 error or hard limit?
It adds two limit switch in LASER B1 laser engraver, the firmware has
hard limit and soft limit features to locate the laser module position
precisely. The position of the laser module is assumed to be the
home position by default when powered on. So the engraver will
trigger the alarm 2 or hard limit error if the laser head is moved in
the X or Y negative direction at this time. Then it needs to home the
engraver as shown in the picture below.
Question 6: How to solve the upload error of the APP?
To use APP for engraving, it needs to insert the SD card into the
motherboard firstly to ensure that the data can be received
normally; otherwise it will prompt upload error.

52
Thank you for purchasing LONGER products! Under normal usage
and service, the products and its parts have a warranty period up to
one year. Our professional after-sale service would respond within
24 hours and help you to solve the issues.