
1EASTOAK.COM OWNER’S MANUAL
30” Digital
Electric Smoker
Owner’s Manual
MODEL:
PES23002

21 EASTOAK.COM30” DIGITAL ELECTRIC SMOKER OWNER’S MANUAL
eastoak.com/warranty
3-Y
Unlock all the perks! Register now to activate your
3-year warranty.
Scan the QR code within 90 days to visit our registration page.
Fill in the Unique Product ID and required information as
instructed.
Complete the registration!
Need help starting?
Scan the QR code to watch our installation video.
installation video
Scan the QR code to access our official recipe collection.
Uncover New Tricks & Join the Conversation!
Electric Smoker
Recipes
Questions? Comments?
Reach out to us for expert support!
Welcome to the East Oak family!
support@eastoak.com
eastoak.com
1-833-EAST-OAK (
USA
)
Stay updated with our latest news and exclusive
discounts by following us on social media!
(1-833-327-8625) 9am-7pm EST Mon-Fri
43 EASTOAK.COM30” DIGITAL ELECTRIC SMOKER OWNER’S MANUAL
Please check all parts and components to ensure there is no damage or missing
items before beginning assembly. If you encounter any issues or discover missing
parts, contact our customer service at
support@eastoak.com.
• Some parts may have sharp edges. Wear protective gloves if necessary during
assembly.
• When using power tools, always set the gear to the lowest setting to avoid
damaging components.
• Assemble on a soft surface such as a drop cloth or rug to prevent scratching.
• The handle screws are pre-installed on the smoker body. Please check carefully
when unpacking. If any screws are missing, contact customer service immediately.
IMPORTANT INFORMATION
• Burning wood releases carbon monoxide, which can be fatal.
• DO NOT burn wood chips indoors, including in homes, tents, garages, or other
enclosed spaces.
• Use outdoors only, in a well-ventilated area.
DANGER
CARBON MONOXIDE HAZARD
• Do not use sharp or pointed tools to clean the smoker.
• Avoid abrasive cleaners, steel wool, or metal brushes on porcelain grates or
smoker surfaces — these will damage the nish.
• Replace damaged parts only with components provided by the manufacturer. Do
not attempt to repair damaged parts.
CAUTION
Setup
• Do not plug in the smoker until it is fully assembled and ready for use.
• Do not use the smoker during an electrical storm.
• Keep children and pets away from the smoker at all times.
• Do not use accessories not recommended by the manufacturer — doing so may
cause injury.
• Use the smoker only for its intended purpose. This unit is for outdoor household use
only and is not for commercial use.
• This unit is not a space heater. (See carbon monoxide warning on page 2.)
• The smoker box is designed for wood chips only. Do not use wood chunks or
pellets. Never use charcoal in the smoker or smoker box — this may cause re, unsafe
conditions, and damage the unit.
WARNINGS AND IMPORTANT SAFEGUARDS
READ ALL INSTRUCTIONS BEFORE USE
General Safety Precautions
Use
• Surfaces may become hot. Avoid direct contact with your body.
• Use long barbecue utensils and heat-resistant gloves when adding or removing
food.
• Never leave the smoker unattended while in operation.
Positioning
• Do not place the smoker on or near hot gas or electric burners or in a heated oven.
• Do not use the smoker within 10 feet (3 meters) of a pool, pond, or other body of
water.
• Never use indoors or in enclosed spaces such as garages or tents.
• Do not use under overhead structures like roof coverings, awnings, or carports.
• Always operate on a level, stable, non-combustible surface like concrete, dirt, or
brick.
• Always keep the smoker on the ground. Do not place on tables or counters. Avoid
rolling over uneven surfaces.
• Maintain at least 36 inches (92 cm) of clearance from walls or railings.
• Do not use or store gasoline, kerosene, or other ammable liquids within 20 feet (6
meters) of the unit.
• Keep the smoker and its electrical components dry and out of the rain at all times.
65 EASTOAK.COM30” DIGITAL ELECTRIC SMOKER OWNER’S MANUAL
DO NOT USE 16 OR 18 GAUGE EXTENSION CORDS.
MISUSE MAY DAMAGE HOUSEHOLD WIRING OR CAUSE A FIRE.
For best smoker performance, using an extension cord is not recommended. If you
must use an extension cord, the following is required for your safety:
• Use only an outdoor type with a 3-prong grounding plug, rated for 15 amperes or
more, approved by UL, marked with a W-A, and a tag stating "Suitable for Use with
Outdoor Appliance".
• Use the shortest length extension cord required. Never connect multiple extension
cords together.
• Keep connections dry and off the ground.
• Do not let the cord hang over the edge of a table top or other items where it can be
pulled by children or tripped over.
Ground Fault Interrupter:
• Since 1971 the National Electric Code (NEC) has required Ground Fault Interupter
devices on all outdoor circuits.
• If your residence was built before 1971, check with a qualied electrician to determine
if a Ground Fault Interrupter protector exists.
• Do not use this appliance if the circuit does not have GFl protection.
• Do not use this appliance with indoor-only circuits.
DANGER
Extension Cord Use
• This manual contains important information necessary for the proper and safe use
of this unit.
• Read and follow all warnings and instructions before using smoker and during use.
• Keep the manual for future reference. Some parts may have sharp edges. Handle
with care and wear protective gloves if needed.
• Failure to follow all manufacturer's safeguards could result in serious personal
injury and property damage.
• Read and follow all the information and safeguards in this product guide before
attempting to assemble or operating this smoker.
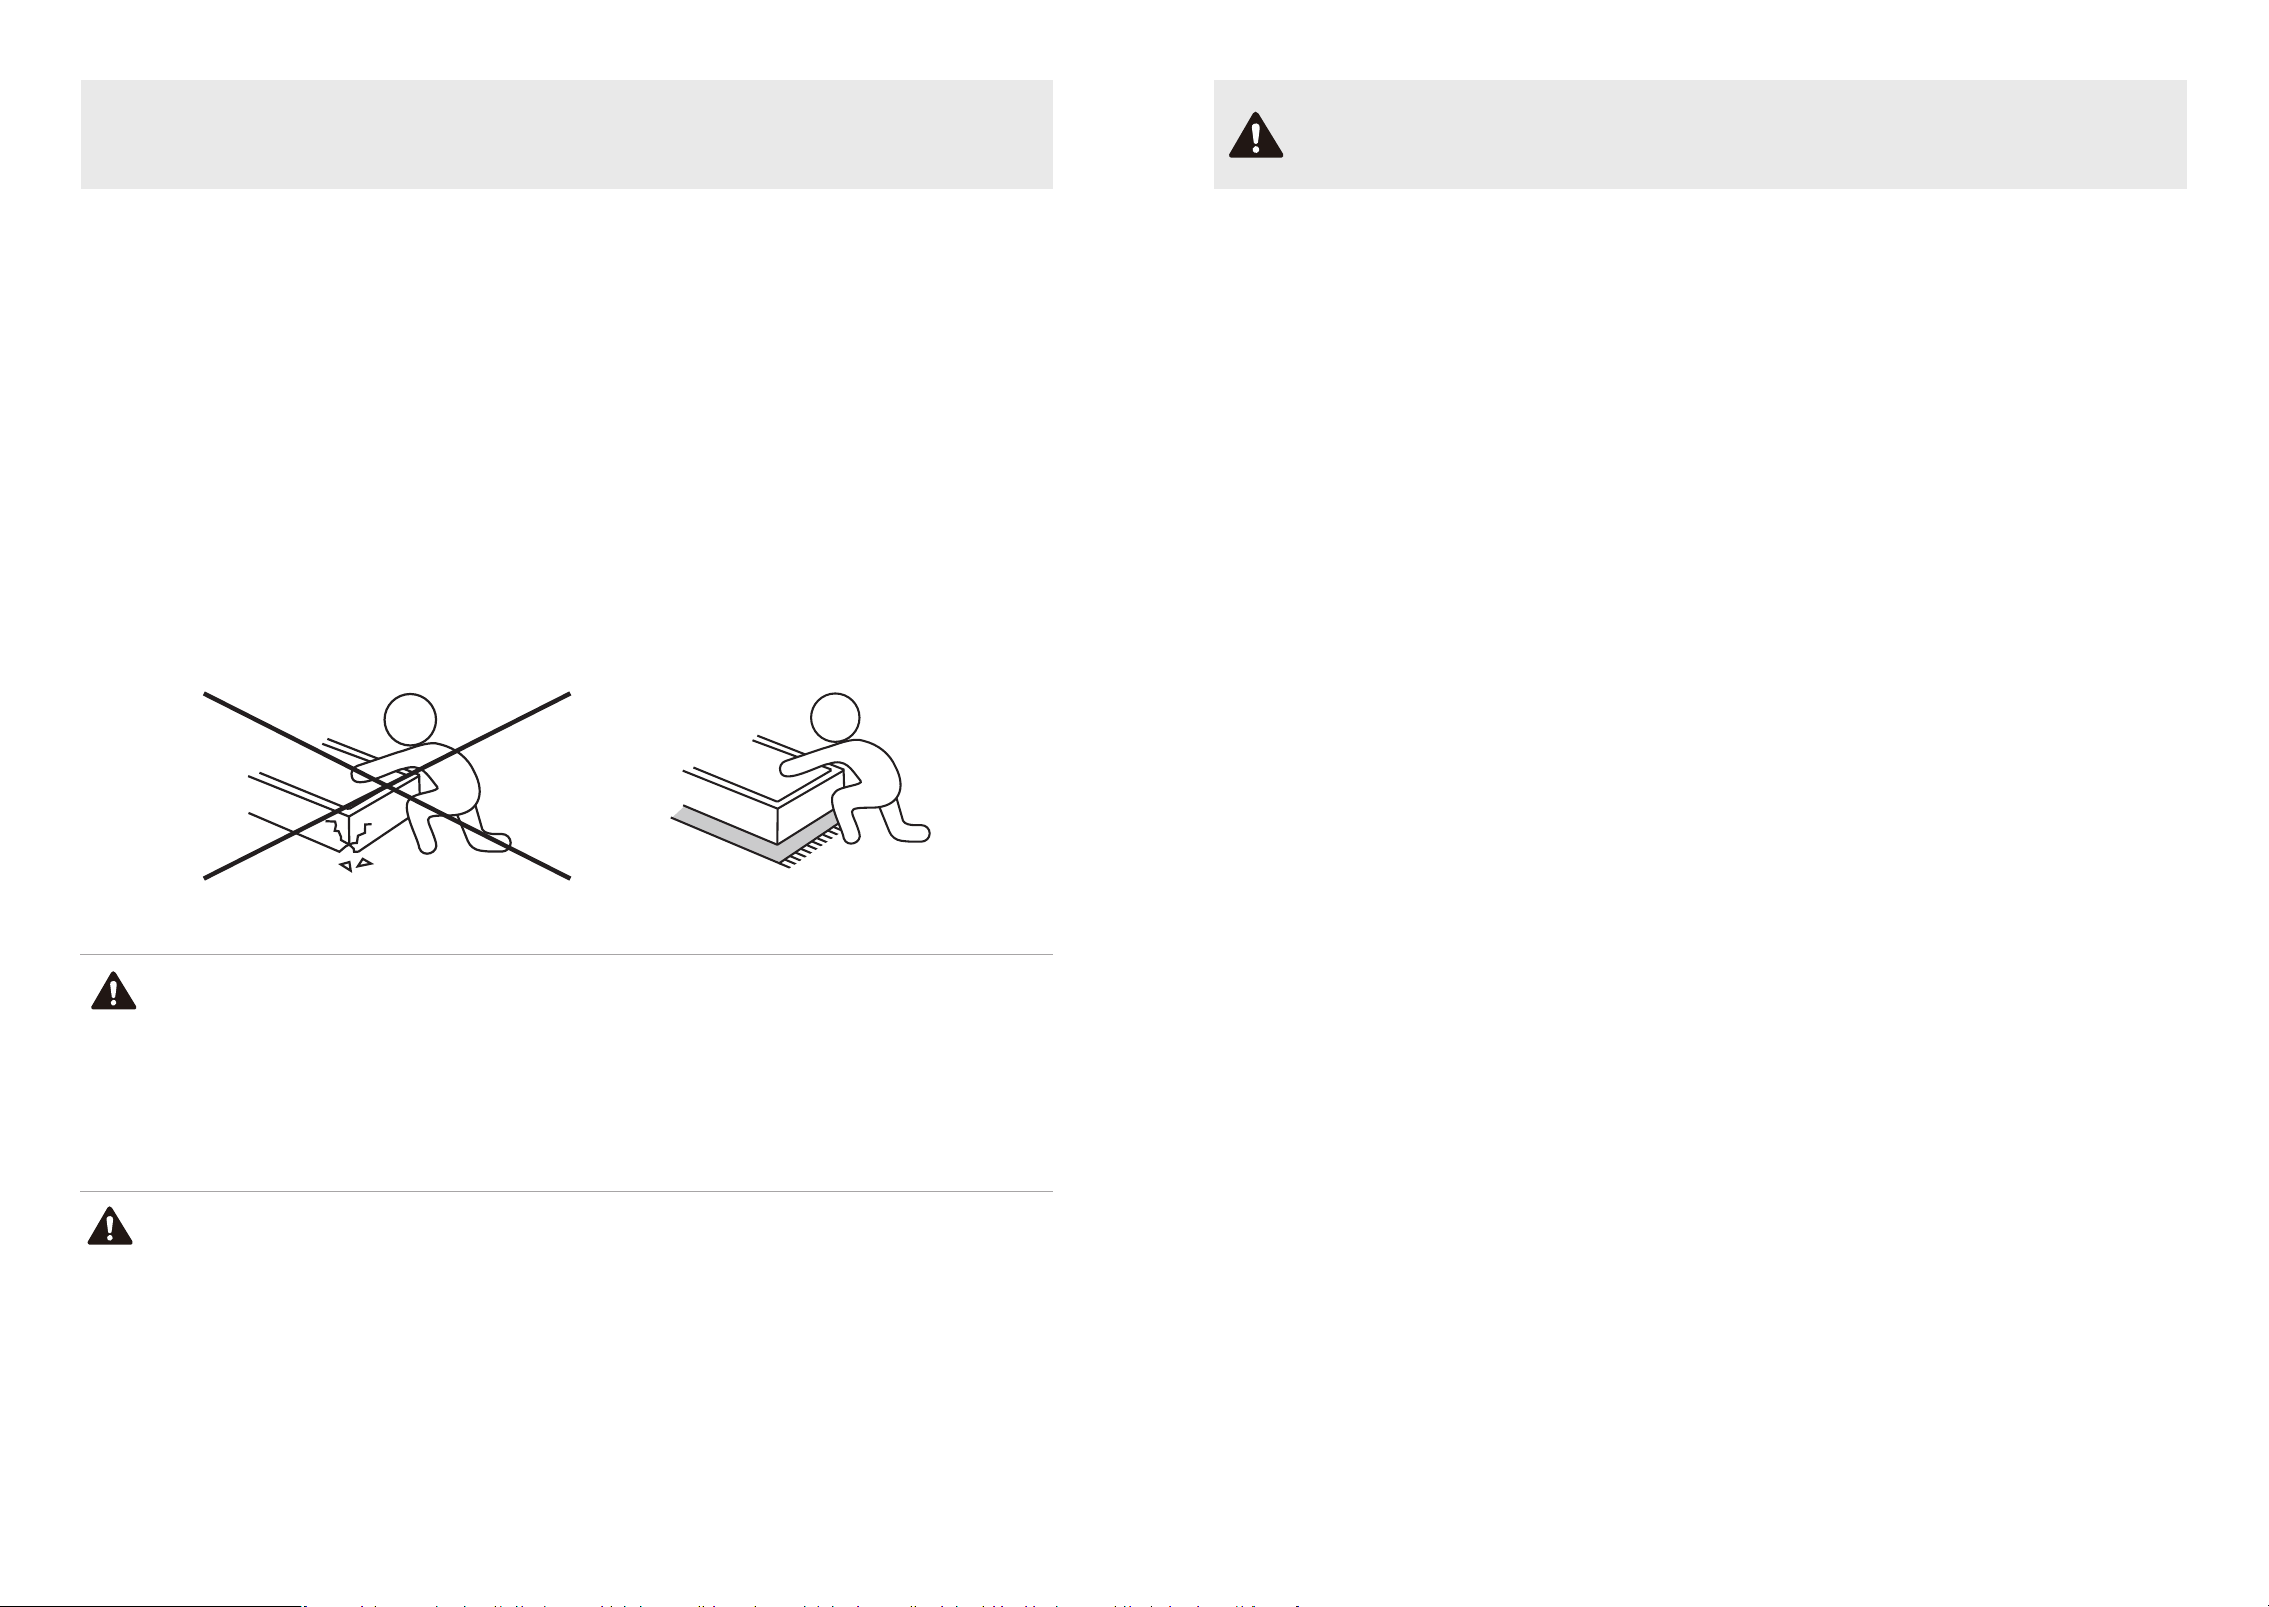
• The smoker should only be rolled on a smooth surface. Never roll the smoker up or
down stairs or on uneven surfaces, as this could potentially damage the smoker and
hurt the user.
WARNING
WARNINGS AND IMPORTANT SAFEGUARDS
Cords
• Use only with a GFI (Ground Fault Interrupter) protected circuit, and use only on a
properly grounded outlet.
• Do not operate any appliance with a damaged cord or plug or after the appliance
malfunctions or has been damaged in any manner.
• To protect against electrical shock, do not immerse the cord, plugs, controller, or
heating element in water or any other liquid. Keep the plug off the ground and dry.
• Do not let the cord hang over the edge of a table or counter, and do not let it touch
hot surfaces.
• Never remove the grounding plug or use it with an adapter having only two prongs.
• To disconnect, turn the control panel "OFF" and remove the plug from the outlet.
• If a longer detachable power-supply cord or extension cord is used: (1) the marked
electrical rating of the cord set or extension cord should be at least as great as the
electrical rating of the appliance, and (2) the cord should be arranged so that it will not
drape over the counter or portable top where it can be pulled by children or tripped
over unintentionally. The extension cord must be a grounding-type 3-wire cord.
General Use
• Do not use glass, plastic, or ceramic cookware inside the smoker.
• Do not leave wood ashes in the smoker box. Empty it after each use and dispose
of cold ashes by placing them in aluminum foil, soaking them with water, and
discarding them in a non-combustible container.
Other
• Do not use water or other liquid sprays to clean the product without rst unplugging
the electric controller and removing the heating element.
• Keep a re extinguisher accessible during operation.
• Allow it to cool before putting on or taking off parts.
• This is a smoker, so there will be a lot of smoke produced when using wood chips.
Smoke will escape through seams and turn the inside of the smoker black. This is
normal. To minimize smoke loss around the door, you can adjust the door latch to
further tighten the seal. Loosen the hex nut or latch, turn the hook clockwise to
tighten, then re-tighten the hex nut rmly.
87 EASTOAK.COM30” DIGITAL ELECTRIC SMOKER OWNER’S MANUAL
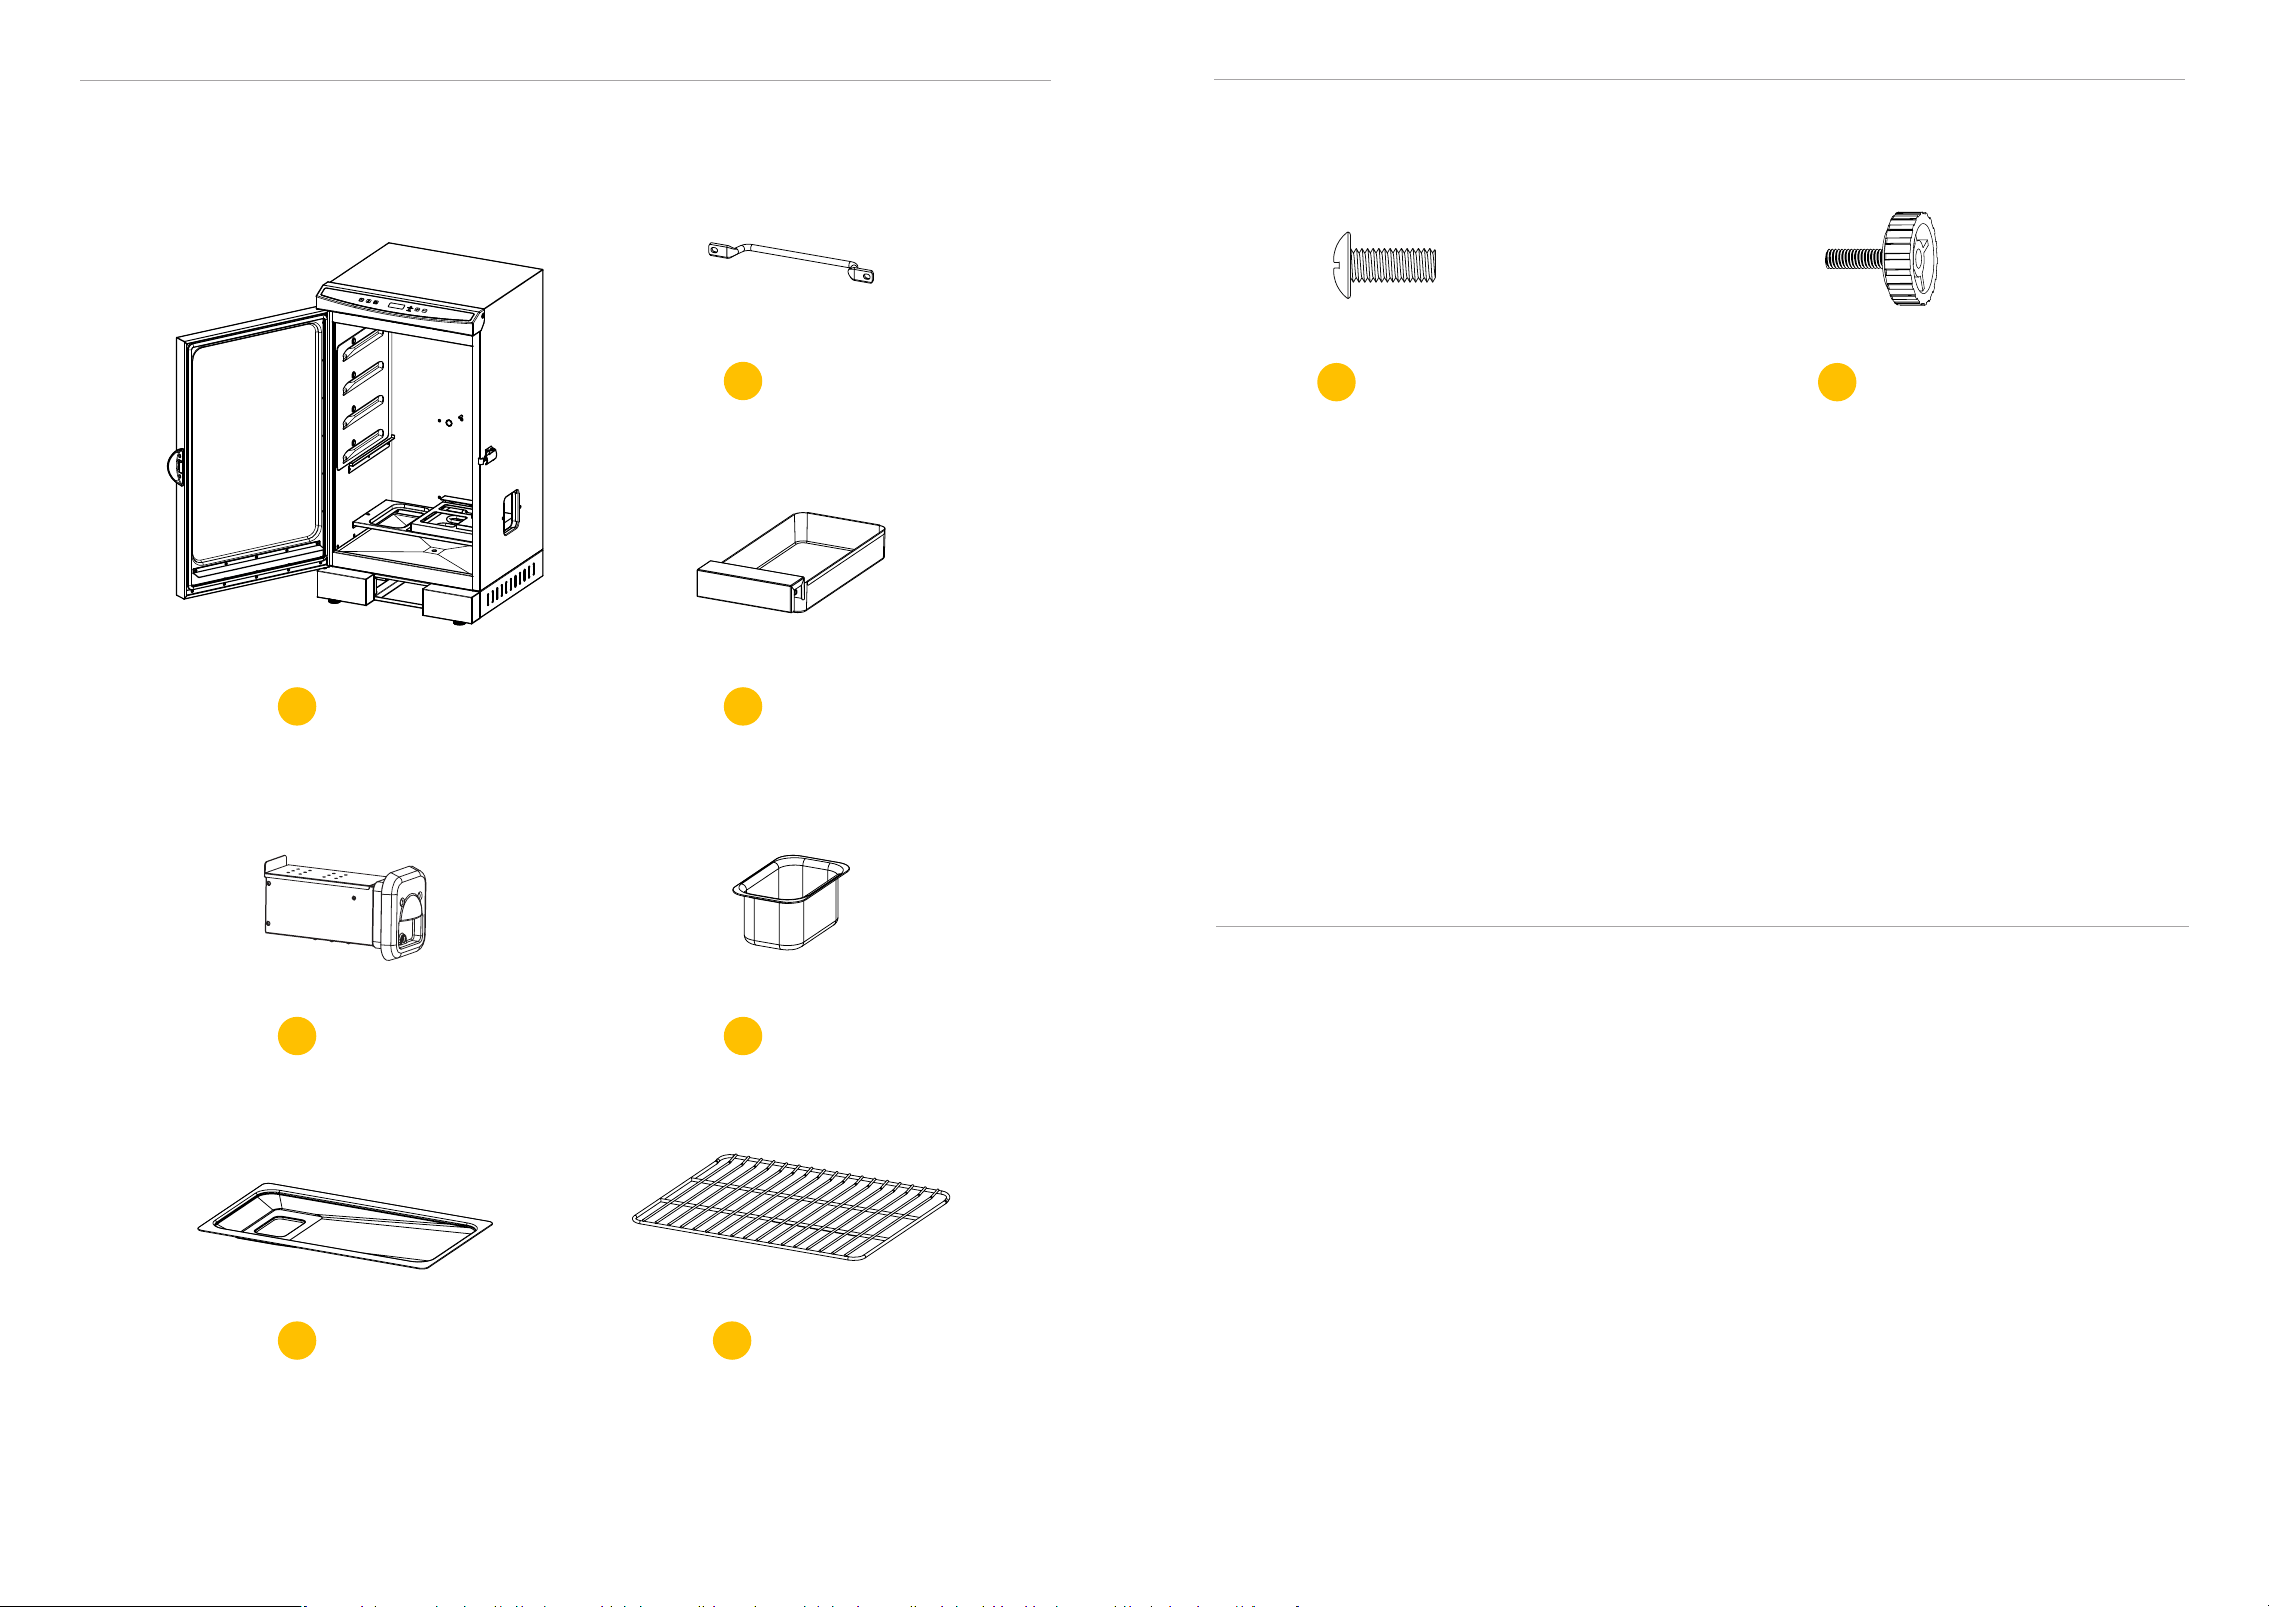
PARTS LIST
Smoker Assembly
Back Handle
Grease Tray
Smoker Box
Drip Pan
Water Pan
Cooking Rack
X 1 PC
A
X 1 PC
B
X 1 PC
C
X 1 PC
D
X 1 PC
G
X 1 PC
E
X 4 PCS
F
PARTS LIST
M6*15 Screws Leg Boots
X 2 PCS
L
X 4 PCS
H
WHAT’S IN THE BOX
• 1 X Smoker Assembly
• 1 X Back Handle
• 1 X Grease Tray
• 1 X Smoker Box
• 1 X Water Pan
• 1 X Drip Pan
• 4 X Cooking Racks
• 2 X Screws
• 4 X Leg Boots
• 1 X Owner’s Manual
109 EASTOAK.COM30” DIGITAL ELECTRIC SMOKER OWNER’S MANUAL
H
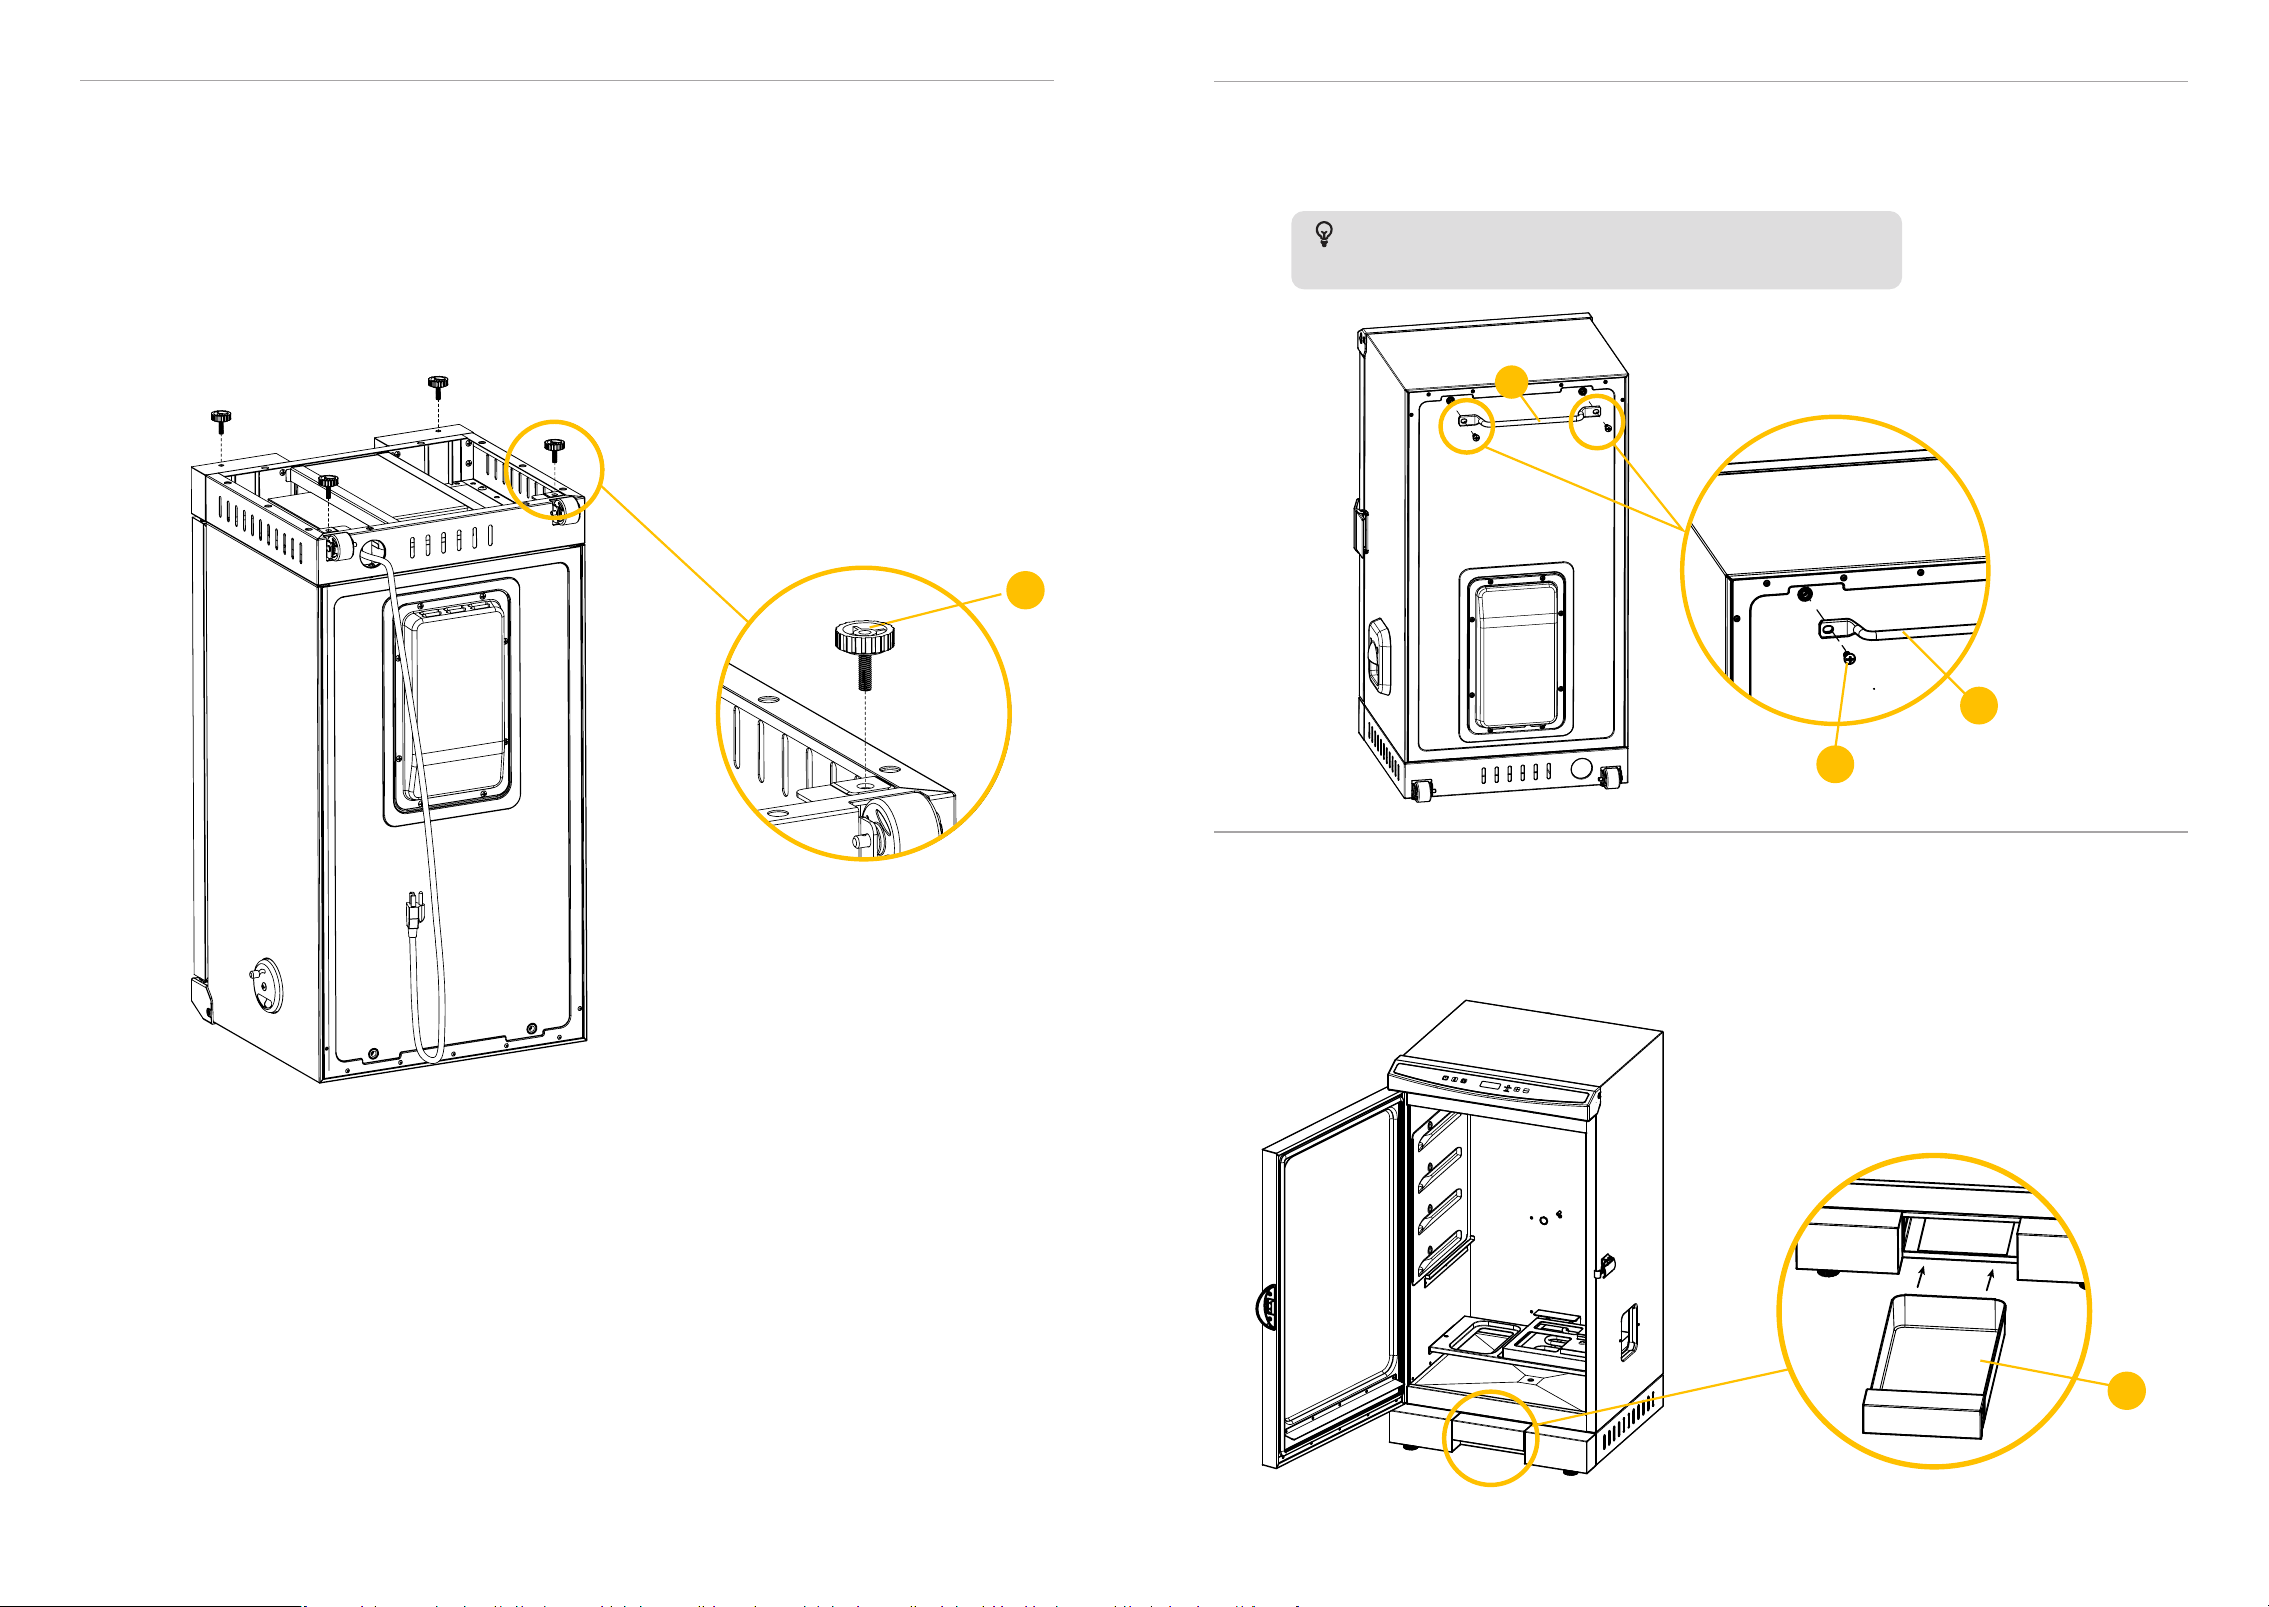
ASSEMBLY INSTRUCTIONS
1
Turn the smoker upside down and install the four leg boots (H) onto
the base.
C
B
B
L
3
2
Push the grease tray (C) between the right and left decorative plates.
It should snap into place when fully inserted.
Stand the smoker upright and install the handle (B) on the back of
the smoker using the two M6*15 screws (L).
TIP: The two M6*15 screws (L) are pre-installed in the handle.

1211 EASTOAK.COM30” DIGITAL ELECTRIC SMOKER OWNER’S MANUAL
5
Place the drip pan (G) into the brackets on both sides of the smoker
chamber.
4
Place the water pan (E) and smoker box (D) into their designated
positions inside the smoker.
E
6
Insert the cooking racks (F) into the brackets on both sides of the smoker.
F
F
TIP: The raised end of the cooking racks
should face inward to help prevent food
from sliding off when the racks are pulled
out.
Inwards
D
G
1413 EASTOAK.COM30” DIGITAL ELECTRIC SMOKER OWNER’S MANUAL
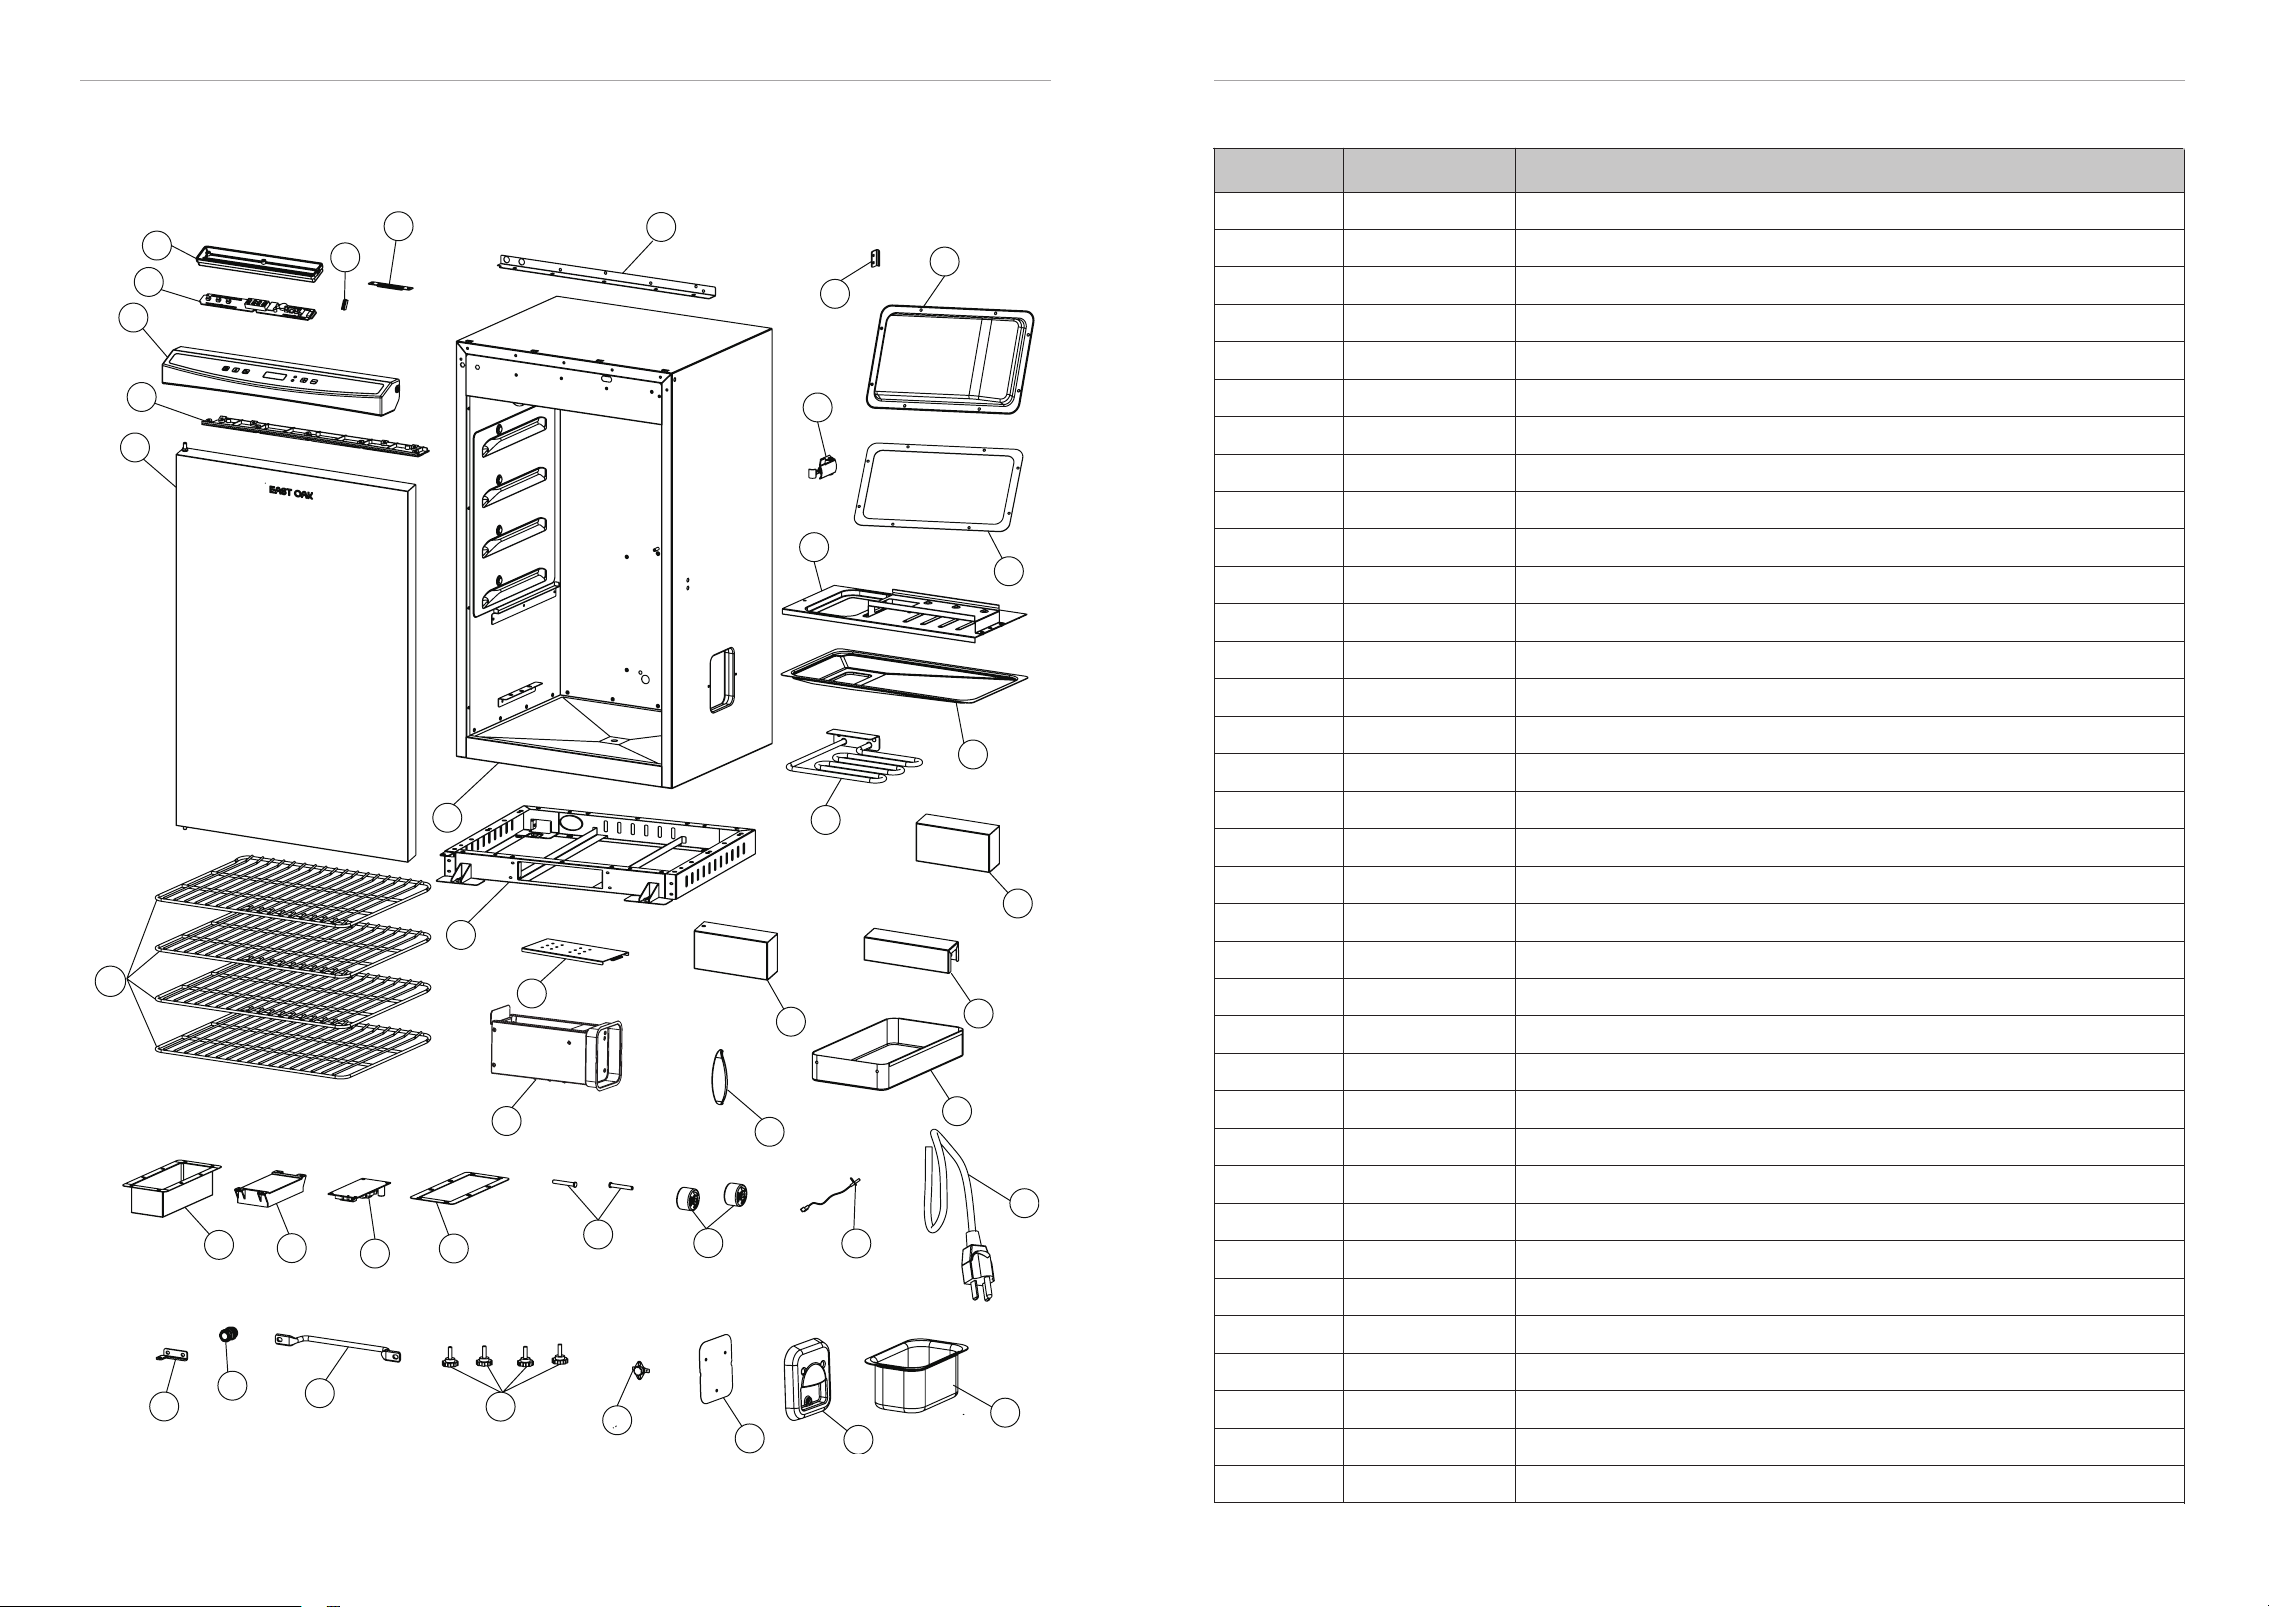
PARTS DIAGRAM
PARTS LIST
DESCRIPTION
SMOKER BODY ASSEMBLY
CONTROL PANEL HOUSING OUTLET SEALING
DOOR TOP HINGE BRACKET KIT
GASKET
POWER SUPPLY CORD KIT
DOOR HANDLE
HEATING ELEMENT REFLECTOR
POWER BOARD GASKET
HEATING ELEMENT
BASE WELDING ASSEMBLY
BACK HANDLE
POWER BOARD HOUSING GASKET
THERMOSTAT KIT
LEG BOOT
RIGHT DECORATIVE PANEL
CONTROL PANEL FRAME BRACKET
POWER CORD METAL LOCK
POWER BOARD KIT
WHEEL KIT
CONTROL PANEL FASCIA KIT
REAR HEATING ELEMENT COVER
CONTROL PANEL DISPLAY KIT
AXLE KIT
COOKING RACK
CONTROL PANEL BOTTOM PLATE
REAR HEATING ELEMENT COVER GASKET
CHAMBER TEMPERATURE PROBE KIT
LEFT DECORATIVE PANEL
WATER PAN
DOOR ASSEMBLY
LIGHT COVER
DOOR LATCH KIT
CONTROL PANEL HOUSING
ITEM NO. QUANTITY
1
1
1
1
1
2
1
1
1
1
1
1
1
1
1
1
1
1
1
1
1
1
1
1
1
1
4
1
4
1
1
1
2
1
9
5
13
20
24
3
11
18
7
15
22
26
31
28
33
2
10
17
6
14
21
25
30
4
12
19
8
16
23
27
32
29
34
35
DRIP PAN
GREASE TRAY
1
1
3
6
7
9
23
11
10
31
30
36
25
35
19
40
38
39
37
16
13
14
22
15
20
34
32
26
12
24
4
27
28
29
18
21
33
41
1
2
5
8
17
1615 EASTOAK.COM30” DIGITAL ELECTRIC SMOKER OWNER’S MANUAL
PARTS LIST
DESCRIPTION
GREASE TRAY HANDLE
SMOKER BOX
RIGHT END HEAT INSULATION COVER
SMOKER BOX LID
SMOKER BOX HANDLE
DOOR LATCH BRACKET KIT
ITEM NO. QUANTITY
36
1
1
1
1
1
1
40
38
37
41
39
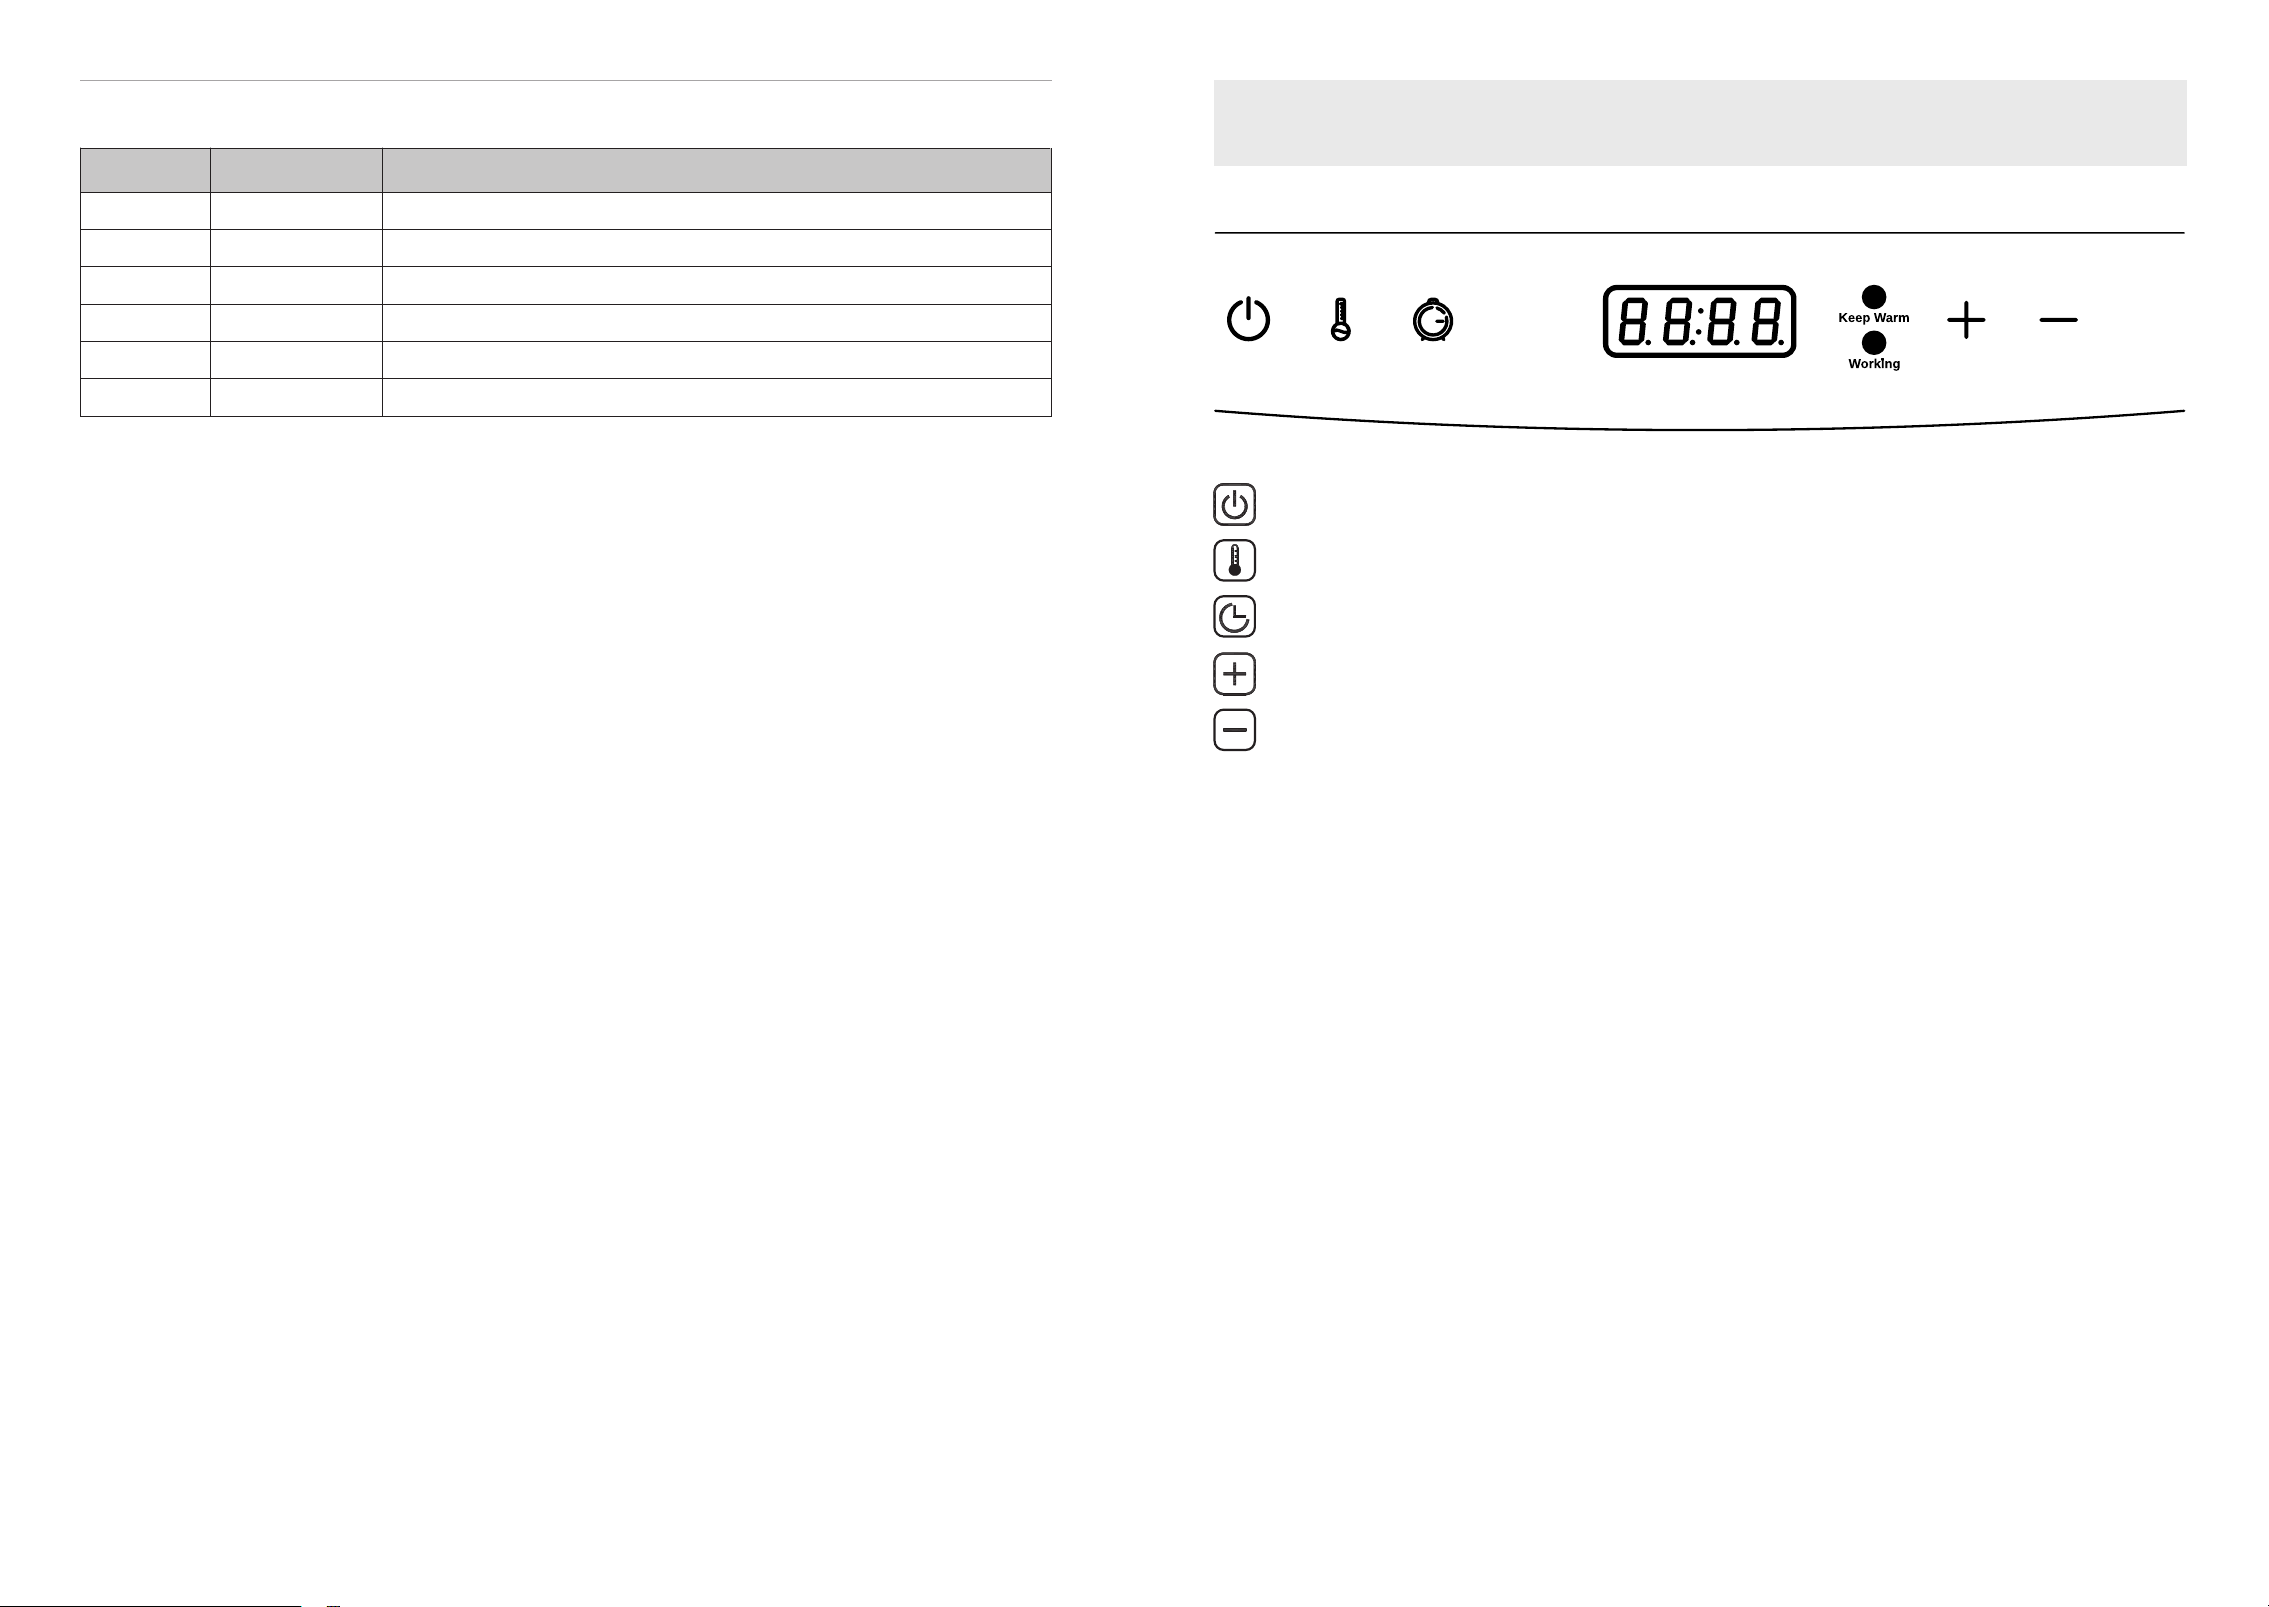
Display: The digital control panel shows the set temperature, the actual
temperature inside the chamber, the set cooking time, the remaining countdown
time, and any error codes.
Keep Warm indicator light: This green LED light turns on when the smoker
enters the “heat preservation and temperature control” mode.
Working indicator light: This red LED light turns on when the smoker enters the
active “heating” state.
CONTROL PANEL OPERATING INSTRUCTIONS
Power Button - Turns smoker on and off
Temp Button - Adjusts Cooking temperature
Time Button - Adjusts Cooking time
Up Button - Increases time or temperature
Down Button - Decreases time or temperature

1817 EASTOAK.COM30” DIGITAL ELECTRIC SMOKER OWNER’S MANUAL
GENERAL OPERATION INSTRUCTIONS
Insert the power plug into a properly rated socket, then turn on the power. The
controller on the smoker will power on immediately and emit a long beep, indicating
that it has entered standby mode. You can now operate the control panel.
ON/OFF Operation
a. Press the “power on/off” button once to turn on the control panel. The display
will show its initial state: the screen will alternate between 00:00 and the internal
temperature reading.
• A 12-hour auto-shutdown timer will begin counting down.
• If there is no user input within 12 hours, the unit will shut off automatically and the
display will turn off.
b. At any time while the unit is powered on, press the “power on/off” button again to
shut it down.
Temperature Unit Conversion
By default, temperature is shown in Fahrenheit (°F). To switch to Celsius (°C):
• Press and hold both the “+” and “–” buttons for more than 3 seconds while in the
initial state after powering on.
• Press them again to switch back from °C to °F.
This setting must be changed before adjusting any other function.
Cooking Temperature Setting
a. When powered on and in the initial state, press the “Temperature Setting” button.
The display will flash, showing the current set temperature (default: 210°F / 99°C).
b. Use the “+” or “–” buttons to adjust the temperature. Once set, press the
“Temperature Setting” button again to confirm.
Timing Setting
a. Press the “Timing Setting” button to enter the hour selection mode.
The display will ash and show the default hour value (00:00).
b. Use the “+” or “–” buttons to set the hour value.
Press “Timing Setting” again to move to the minute setting.
• The display will ash the minutes; use “+” or “–” to adjust.
• Press “Timing Setting” once more to conrm and exit.
Once conrmed, the unit will begin heating.
The heating indicator will turn on, and the timer will start.
Working State and Keep Warm Mode
When heating, the display will alternate every 5 seconds between the real-time internal
temperature and the remaining countdown timer.
After the timer reaches 00:00:
1. The smoker automatically reduces its set temperature to 120°F (49°C) for warming.
2. The Keep Warm indicator turns on.
3. The buzzer will beep every 30 seconds for 5 minutes, unless you press a button.
4. The smoker will automatically shut off after 12 hours if no action is taken.
Buzzer
a. A beep sounds whenever the unit powers on or a valid input is registered.
b. When the timer reaches 00:00, the buzzer will beep every 30 seconds until the power
is turned off or 12 hours have elapsed.
c. If the heating system fails, the buzzer will emit a fault alarm sound (see
troubleshooting section for details).
Smoker Box
The Smoker Box is where wood chips are added to infuse smoky avor.
1. Only use wood chips. Do not use wood chunks or pellets.
Never use charcoal — it can cause a re or damage the unit.
2. Even if you’re not adding chips, the Smoker Box must remain inserted throughout
the entire cooking process.
3. Always wear heat-resistant gloves when adding wood chips to avoid burns.
2019 EASTOAK.COM30” DIGITAL ELECTRIC SMOKER OWNER’S MANUAL
Cleaning the Smoker (First-Time Use)
1. Using a damp sponge and mild detergent, carefully wipe down all interior surfaces
of your smoker, including trays and racks, ensuring not to scratch any surfaces.
Rinse off any soapy residue with water and allow the unit to air dry with the
smoker door open.
2. Apply a light coating of cooking oil spray or a small amount of cooking oil on a
cloth and wipe down the inside of the smoker, excluding the smoker box, heating
element, grease tray, and water pan.
3. Ensure the water pan is in place without water and the smoker box is in place
without wood chips. Open the vent fully and keep it open during the cleaning
process.
4. Plug in the appliance; the display will power up immediately and emit a beep sound.
5. Press the Power Button once to activate the control unit.
6. Press the Temp Button and set the temperature to 275°F (135°C), the maximum
setting.
7. Press the Time Button and set the time to two hours.
8. Once two hours have passed, power off the smoker and allow it to cool down.
9. After completing the cleaning process and and once the smoker has cooled down,
it’s ready to use.
Prior to the smoker’s rst use, and after completion of the Assembly Instructions, the smoker
must be seasoned to remove any residue: (such as oil and dust) which may have been left
over from the manufacturing process. Please follow the instructions below:
Water Pan
1. Fill the Water Pan with warm water to the max line prior to pre-heating and cooking.
Do not overll the Water Pan. Never remove or rell the Water Pan while cooking.
2. It is very important not to let any liquid come into contact with the heating element
to avoid serious damage including injury, are ups, and electrical failure. ALWAYS
wear anti-scalding gloves when opening and working in the smoker after it is
turned on.
The Water Pan helps keep meat moist by retaining moisture inside the smoker during
cooking. It is not required to add extra water during a smoke. If not using water, it is still
required to have the water pan in place while cooking.
The smoker is TOO HOT to touch during use. Please remember to wear
protective gloves before use.
Cooking With the Smoker
1. After cleaning (if rst-time use) and preheating the smoker as described above, it
is now ready for use. Remember, as part of the preheating setup, ensure that
wood chips and water are already inserted into the Smoker Box and Water Pan.
2. Carefully insert the meat into the preheated smoker, using protective gloves and
ensuring not to overll the space. Maintaining space between the meat and
around the edges of the racks ensures proper air circulation.
3. Set the temperature at which to cook by using the Temp Button and then choose
to either cook by Time function. Refer to the operating instructions in the related
sections on page 16 for each function.
4. Once the internal temperature of the meat meets or exceeds the recommended
USDA guidelines displayed earlier in this manual, power off the device. Remove
the meat from the smoker and enjoy your perfectly cooked meal! Reminder:
Never rely solely on cooking time. Always ensure food reaches the minimum
internal temperature recommended by the USDA for safe consumption.
Food Safety
Safe handling, cooking, and storage steps are vital for preventing foodborne illness.
Harmful bacteria that can cause illness are invisible, odorless, and tasteless. At every
stage of food preparation, it’s crucial to follow the four guidelines to keep food safe:
• Clean — Wash hands and surfaces often.
• Separate — Keep raw meat separate from other foods.
• Cook — Ensure food is cooked to the right temperature.
• Chill — Refrigerate food promptly.
Preheating the Smoker
1. Press the Temp Button and set the temperature to 275°F (135°C), the max setting.
2. Press the Time Button and set the time to 60-75 minutes.
3. After the Smoker has reached the max temperature, it is ready for use.
Preheat the smoker for 60-75 minutes (to max temp) before cooking. Always
make sure the water pan is lled before preheating.
2221 EASTOAK.COM30” DIGITAL ELECTRIC SMOKER OWNER’S MANUAL
Care Instructions
• Clean rack supports, racks, water bowl, and drip pan with mild dish detergent. Rinse
and dry thoroughly.
• Clean the interior frame, door glass (if present), meat probe, and exterior of the
smoker with a damp cloth only. If necessary, you can use a neutral and mild cleaning
agent and then rinse off any soapy residue with water and allow the unit to air dry
with the smoker door open. Dry thoroughly.
• Meat and poultry cooked on a grill may brown quickly on the outside but could
remain undercooked inside. Avoid partially grilling meat or poultry with the
intention of nishing cooking later. Color alone is not a reliable indicator of safety
and doneness. Always use a food thermometer to ensure the food reaches a safe
minimum internal temperature. Insert the thermometer into the thickest part of
the food, avoiding contact with fat, gristle, or bone. Remember to wash the food
thermometer thoroughly with hot, soapy water before and after each use.
• When checking the temperature of ground beef or poultry burgers, insert the food
thermometer through the side of the patty until the probe reaches the center to
detect any cold spots. Ground beef burgers should reach 160°F, while ground poultry
burgers should reach 165°F for safe consumption.
• Cook all food to these minimum internal temperatures as measured with a food
thermometer before removing food from the heat source. For reasons of personal
preference, consumers may choose to cook food to higher temperatures.
• THE FOOD THERMOMETER IS NOT INCLUDED. IF YOU NEED ONE, PLEASE PURCHASE IT
SEPARATELY.
USDA Recommended Internal Cooking Temperatures
MINIMUM INTERNAL TEMPERATURE & REST TIME
165°F(73.9°C)
165°F(73.9°C)
160°F(71.1°C)
145°F(62.8°C)
165°F(73.9°C)
165°F(73.9°C)
145° F(62.8° C) and allow to rest for at least 3 minutes
145° F(62.8° C) and allow to rest for at least 3 minutes
160°F(71.1°C)
PRODUCT
Beef, Pork, Veal & Lamb Steaks, Chops, Roasts
Fully Cooked Ham (to reheat)
Ground Meats
All Poultry (breasts, whole bird, legs, thighs,
wings,ground poultry, giblets, and stufng)
Reheat cooked hams packaged in USDA-inspected plants
to 140°F(60’C) and all others to 165°F(73.9°C)
Ground Poultry
Fish & Shellsh
Leftovers
Casseroles
Ham, fresh or smoked (uncooked)
Eggs
Visit https://www.fsis.usda.gov for more information on Food Safety.
• After each use, clean the door seal and the corresponding inside seam with a damp
cloth to preserve the life of the seal.
• Always take care not to scratch any surfaces inside or outside the unit to reduce the
chance of rust or corrosion.
• Avoid cleaning any of the smoker surfaces while hot.
• The Smoker Box should be cleaned frequently to remove ash, residue, and dust.
• Avoid covering racks with aluminum foil, as it may inhibit proper heat circulation.
• Both dry and pre-soaked chips are suitable for use in the smoker. Dry chips are
preferred as they burn faster, producing a more intense smoke. Pre-soaked chips
(approx. 30 min) burn slower and produce milder smoke.
• In cooler outside temperatures below 65°F (18°C) and/or at altitudes above 3,500
feet (1,067m), additional cooking time may be necessary.
• Avoid overloading the smoker with food. Ensure there is space between the food
items and around the edges of the rack to facilitate heat circulation.
• Refrain from overpacking the Smoker Box with wood chips, and do not exceed the
max ll line when lling the Water Pan.
• Always use the Water Pan and Smoker Box, regardless of whether they are lled,
during cooking.
• Minimize opening the smoker door during operation, as it can lead to heat loss and
prolong cooking times.
• Excessive food in the smoker can disrupt heat convection due to the bottom
placement of the heat source. This may lead to uneven heat distribution within the
chamber, causing the actual temperature to deviate from the set temperature. To
ensure proper heat circulation and convection, it’s advisable to use an appropriate
amount of food, allowing sufcient space between items.
HELPFUL TIPS

2423 EASTOAK.COM30” DIGITAL ELECTRIC SMOKER OWNER’S MANUAL
Note: Occasionally, condensation may accumulate on the door, which is a normal
occurrence. Factors such as smoker placement, outdoor temperature, water levels in
the pan, venting, and lower cooking temperatures can contribute to this effect. If you
notice liquid seeping from the bottom of the unit, it’s likely just condensation, not
oil or grease. Please remember to use this appliance only outdoors in a secure area
away from children and animals.
Note: You have the option to use either dry or pre-soaked wood chips in your smoker.
Dry chips will burn faster, resulting in a more intense smoke avor. On the other
hand, chips that have been pre-soaked in water for approximately 30 minutes will
burn more slowly, producing a milder smoke avor.
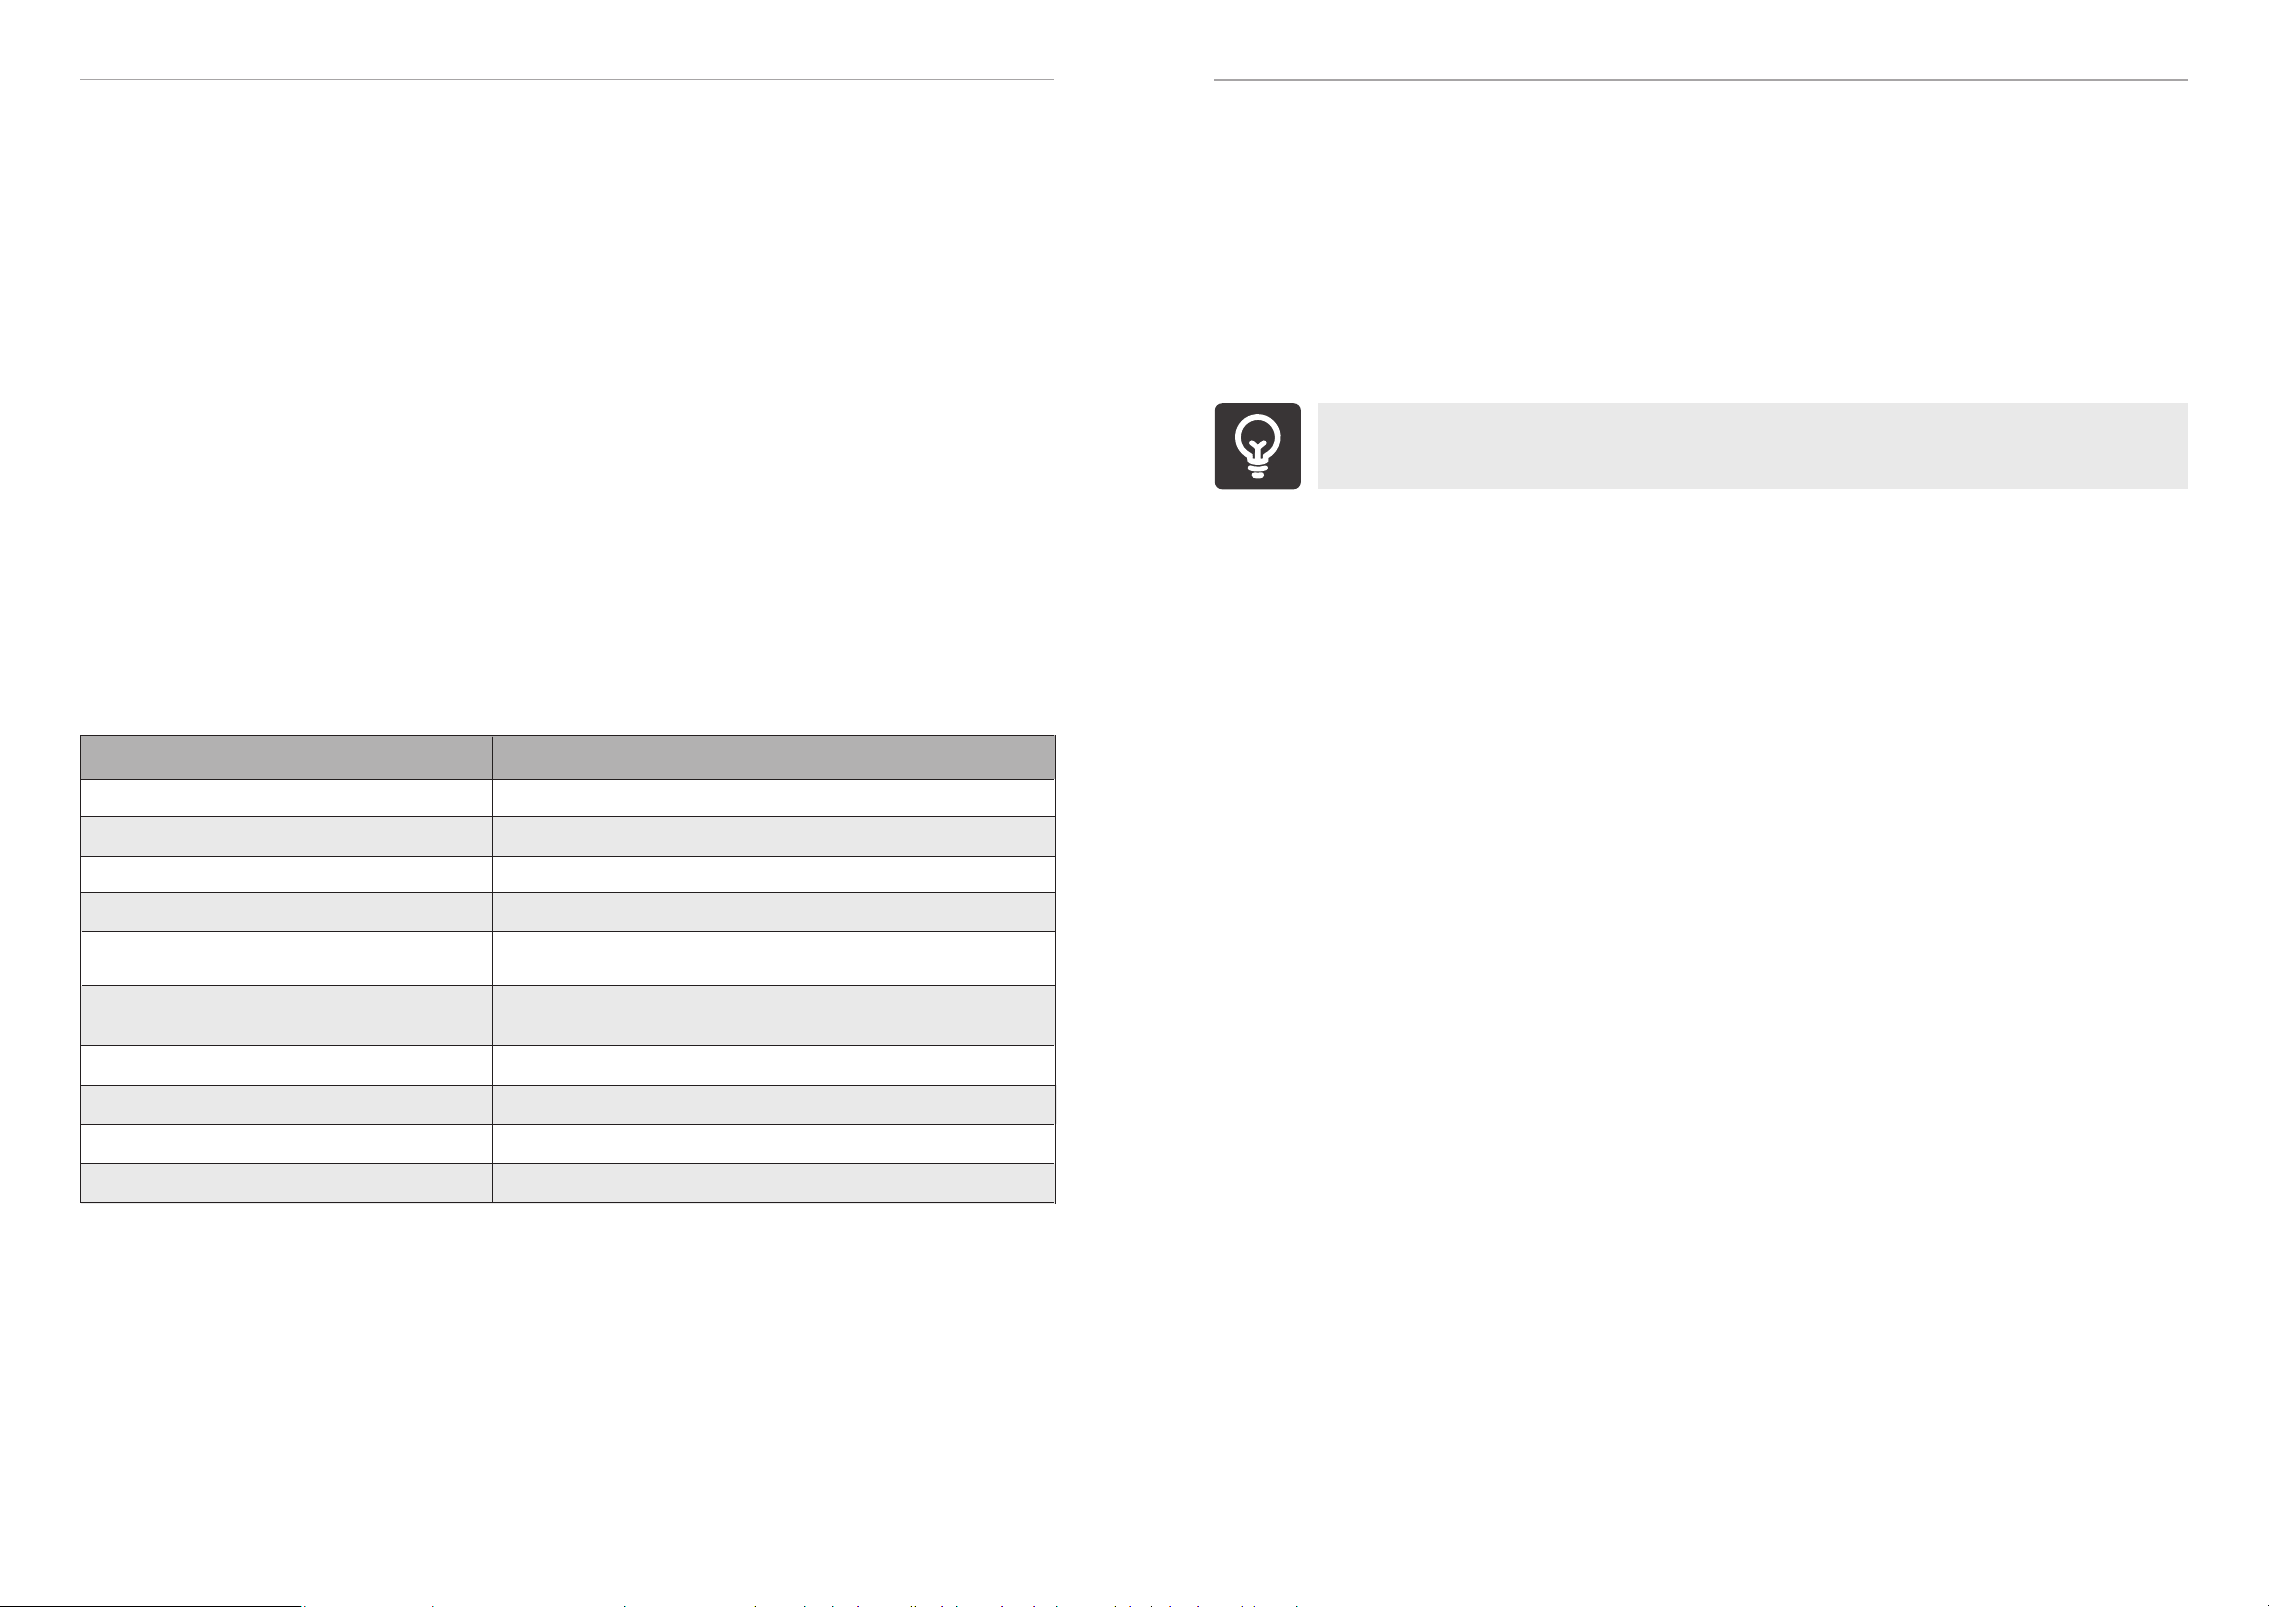
Meat Smoking Flavor Proles & Pairings
RECOMMENDED PAIRING
Pork, Beef, Poultry
Pork, Poultry, Fish
Pork, Poultry, Beef, Lamb, Duck
Poultry, Vegetables, Cheese
Beef, Pork
Beef, Pork
WOOD
STRENGTH
Hickory Intense
Mesquite Intense
Oak Medium
Cherry Mild
Maple Mild
Apple Mild
RECOMMENDED PAIRING
TROUBLESHOOTING
Smoker not heating
Circuit breaker
trips or fuse blows
No display
Smoker will not
cook properly
Flare-ups
Persistent
grease re
Smoker is not plugged in fully. Remove plug from outlet and plug in again.
Turn the Smoker OFF and unplug from outlet. Check or replace in this
order:
• Unplug heating element connections and reconnect.
• Replace the heating element.
• Replace the Thermostat kit.
• Replace the Control Panel Display Kit.
• Replace the Power Board Kit.
Turn the Smoker OFF and unplug from outlet. Check or replace in the
following this order:
• Unplug thermostat connections and reconnect. Replace the
Thermostat Kit if necessary.
• Replace the Power Supply Cord Kit.
Turn the Smoker OFF and unplug from outlet. Check or replace in the
following this order:
• Unplug the smoker and plug it back into the outlet (a beep will sound
when plugged in).
• Unplug thermostat connections and reconnect. Replace Thermostat Kit
if necessary.
• Unplug control panel connections and reconnect, Replace the Control
Panel Display Kit if necessary.
• Unplug power board connections and reconnect. Replace the Power
Board Kit if necessary.
No power.
Faulty heating element.
Remove all other electrical appliances on the same circuit, then try again.
Keep the smoker door closed while cooking to prevent rapid heat loss.
Opening the door allows heat to escape quickly, which can prolong the
cooking time needed to properly cook your food.
Use only outdoor extension cords with a 3-prong grounding plug that are
rated for 15 amperes or more and approved by UL. Look for cords marked
with a "W-A" and a tag stating "Suitable for Use with Outdoor Appliance."
Use the shortest length extension cord necessary and avoid connecting
two or more cords together. For optimal safety, use a 12 or 14 gauge
extension cord that is 50ft. or shorter.
Remove all other electrical appliances on the same circuit, then try again.
Another appliance plugged into
same circuit as the smoker.
Faulty control panel.
Door of smoker is left open.
Insufcient preheat.
Excessive cooking temperature.
Grease build up.
Grease trapped by food build up.
Excess fat in meat.
Inappropriate extension cord.
Always use controller PH (preheat) setting before starting a cooking.
Adjust (lower) temperature as needed.
After smoker cools, clean smoker, cooking grates, drip pan, grease tray
and watelpan.
Clean smoker, cooking grates, drip pan, grease tray and water pan.
Do not apply water to grease re. Doing so may cause the re to spread or
result in injury.
Turn the Smoker OFF and unplug from outlet, Keep door open and let
re burn out.
Trim fat from meat before cooking.
Faulty heating element.
Poor electrical connections.
ISSUE
POSSIBLE CAUSE
Turn the Smoker OFF and unplug from outlet, Check or replace in this
order:
• Check for tripped household circuit breakers or Ground Fault Circuit
Interrupter (GFCI). Reset or replace if necessary using a GFCI rated for 15
amperes or more.
• Test a known, working appliance in the outlet to ensure there is no issue
with the outlet itself.
• Try using a different outlet, preferably on a different circuit, to rule out
electrical issues.
• Disconnect and reconnect the thermostat connections. Replace the
Thermostat Kit if needed.
• Disconnect and reconnect the control panel connections. Consider
replacing the Control Panel Display Kit if the issue persists.
• If necessary, disconnect and reconnect the power board connections.
Replace the Power Board Kit if the problem persists.

2625 EASTOAK.COM30” DIGITAL ELECTRIC SMOKER OWNER’S MANUAL
RECOMMENDATION
ERROR CODES
ERROR CODES
ISSUE
Err1
Err2
Er°F orEr°C
Turn Smoker OFF and unplug from outlet, Replace
Thermostat Kit.
Turn Smoker OFF and unplug from outlet
Check or replace in this order
1. Replace Thermostat Kit.
2. Replace Control Panel Display Kit.
3. Replace Power Board Kit.
Turn Smoker OFF and unplug from outlet
Check or replace in this order
1. Replace Thermostat Kit.
2. Replace Control Panel Display Kit.
3. Replace Power Board Kit.
Alarm sounding with 3 beeps every 30
seconds and will only stop when the Power
Button is turned to off.
Blinking "Err1" appears when you press the
Power Button when starting your smoker.
The "Err1" code blinks when pressing the
Temp Button on your smoker.
Blinking "Err1" appears when you press any
buttons on your smoker.
Refer to online Electrical Replacement
Manual for instructionson removal and
replacement.
Alarm sounding with 3 beeps every 30
seconds and will only stop when the Power
Button is pressed Blinking "Err2" appears
when you press the Power Button when
starting your smoker.
Blinking "Err2" appears when you preheat
your smoker.
Blinking Er °F (or Er °C) appears in the Set
Chamber Temperature bar of your remote
control.
FCC Notice
This device complies with Part 15 of the FCC and RSS Rules.
Operation is subject to the following two conditions:
1. This device is designed not to generate harmful interference.
2. This device is required to accept any interference received, including interference
that may cause undesired operation.
WARNING:
• Any alterations or modications to this unit that have not been expressly approved
by the responsible party for compliance may void the user’s authority to operate this
equipment.
• This equipment has undergone testing and complies with the standards for a
Class B digital device, as outlined in Part 15 of the FCC Rules. These standards are
intended to offer reasonable protection against harmful interference in residential
installations.
• This equipment utilizes and emits radio frequency energy, and if not installed
and operated in accordance with the manufacturer’s instructions, it may cause
interference that disrupts radio communications.
• While efforts have been made to minimize interference, there is no guarantee that
interference will not occur in certain installations. If this equipment disrupts radio or
television reception, the user is advised to attempt corrective measures, including:
- Adjusting or relocating the receiving antenna.
- Increasing the distance between the equipment and receiver.
- Connecting the equipment to a different electrical circuit than the one used by the
receiver.
- If issues persist, it is recommended to seek assistance from the dealer or a
qualied radio or TV technician.

2827 EASTOAK.COM30” DIGITAL ELECTRIC SMOKER OWNER’S MANUAL
LIMITED WARRANTY
• • The manufacturer warrants to the original consumer-purchaser that this product
will be free from defects in workmanship and materials after proper assembly and
under normal use, for the period specied below, beginning on the date of purchase.
The manufacturer reserves the right to require that defective parts be returned—
postage and/or freight prepaid by the consumer—for review and examination.
• The original recipient is responsible for all shipping charges for parts replaced under
the terms of this limited warranty.
• This warranty is valid only in the United States and Canada and applies only to the
original owner. It is not transferable.
• Proof of purchase is required.
• This limited warranty covers only the product’s functionality. It does not cover
cosmetic issues such as scratches, dents, corrosion, or discoloration caused by
heat, abrasives, or chemicals used during assembly or installation. Surface rust and
stainless steel discoloration are also excluded. Paint and rust are not covered.
Rust is not considered a manufacturing or materials defect.
• This limited warranty does not cover inconvenience, food loss, personal injury, or
property damage.
ITEMS NOT COVERED BY WARRANTY:
1. Shipping costs (standard or expedited) for warranty or replacement parts.
2. Service calls to your home.
3. Repairs when the product is used outside of normal, single-family household
use.
4. Damage or failure caused by accident, alteration, careless handling, misuse,
abuse, re, oods, acts of God, improper installation or maintenance, or
installation not in line with local electrical or plumbing codes or manufacturer
instructions.
5. Food loss due to product failure.
6. Replacement parts or labor for units used outside the U.S. or Canada.
7. Pickup and delivery of the product.
8. Repairs to parts or systems altered or modied in any way.
9. Removal and/or reinstallation of your product.
• • Under this limited warranty, the replacement or repair of defective parts is your
sole remedy. If identical parts are unavailable, substitutes of equal value may be
provided.
• The manufacturer is not responsible for any incidental or consequential damages,
including but not limited to those caused by acts of God, misuse, abuse, commercial
use, improper installation or maintenance, tampering, or use in hostile environments
(e.g., severe weather). Damage from non-compliance with local codes or manufacturer
instructions is also excluded.
• This is the only express warranty provided by the manufacturer. No performance
specications or product descriptions, whether oral or written, shall be considered a
warranty unless specically stated herein.
• Neither dealers nor retailers selling this product have the authority to offer additional
warranties or alter these terms.
Manufacturer’s maximum liability shall not exceed the purchase price paid by the
original buyer.
NOTE:
Some states do not allow exclusions or limitations on incidental or consequential
damages, so these limitations may not apply to you. This warranty grants you
specic legal rights, but you may also have additional rights that vary by state.
In California:
• If the product is not commercially practical, the manufacturer will refund the
purchase price (less any amount attributable to the consumer’s use) prior to
discovering the issue.
• Alternatively, you may return the product to the retailer to obtain performance
under this warranty.
Returns will only be accepted with a valid Return Authorization (RA) number. Write
the RA number clearly on the outside of the package. Shipments must be prepaid.
Returns that do not meet these standards will be refused.
DISCLAIMER OF IMPLIED WARRANTIES AND LIMITATION OF
REMEDIES

3029 EASTOAK.COM30” DIGITAL ELECTRIC SMOKER OWNER’S MANUAL
FEATURES
• Features an exclusive patented exterior design optimized for low-temperature
smoking. Assembly takes just minutes.
• The digital control board prominently displays cooking temperature and time,
enhancing convenience and control.
• With an 800W heating tube and a temperature range from 100°F to 275°F (38°C
to 135°C), the spacious interior can accommodate 2 turkeys, 4 pork shoulders, 4
racks of ribs, or 6 chickens.
• A side wood chip loading box allows this smoker to produce steady smoke for
4–6 hours without relling, ensuring rich avor throughout.
• The double-layer iron plate and internal foam insulation help retain heat and
minimize smoke loss.
• Four chrome-plated grill racks offer a generous 725 square inches of cooking
space — perfect for all your barbecue needs.
WARRANTY POLICY
GUARANTEED 3-YEAR WARRANTY
Thank you for choosing East Oak. This product is backed by our company warranty
for up to 3 years from the original purchase date.
CLAIM WARRANTY
To claim your warranty, register your new product at: www.eastoak.com/warranty.
WARNING
Cancer and reproductive harm:
www.P65Warnings.ca.gov.

31 30” DIGITAL ELECTRIC SMOKER
support@eastoak.com
eastoak.com
1-833-EAST-OAK (USA)
100504010001-M-2.1.20250612