Instruction
& Recipe
Booklet
ITM. / ART. 1733533
For your safety and continued enjoyment
of this product, always read the instruction
book carefully before using.
PrecisionPrep
3-in-1 Immersion
Blending System
HB-650PC SERIES
C
U
I
S
I
N
A
R
T
-
T
H
R
E
E
Y
E
A
R
W
A
R
R
A
N
T
Y
-
3
YEAR
*

2
IMPORTANT SAFEGUARDS
When using an electrical appliance, especially when children are present, basic
safety precautions must be taken, including the following:
1. READ ALL INSTRUCTIONS.
2. Turn the appliance OFF, then unplug from the outlet before assembling or
disassembling parts and before cleaning. To unplug, grasp the plug and pull
from the outlet. Never pull from the power cord.
3. To protect against electric shock, do not put the motor housing, cord, or
electrical plug of this immersion blender in water or other liquids. Only the
detachable blending shaft, whisk, and prep-and-go container have been
designed for immersion into water or other liquids. Never submerge any
other portion of this unit. If motor housing falls into liquid, unplug unit and
remove immediately. Do not reach into the liquid without unplugging the
unit rst.
4. This appliance is not intended for use by children or by persons with
reduced physical, sensory, or mental capabilities, or lack of experience and
knowledge. Close supervision is necessary when any appliance is used near
children. Children should be supervised to ensure that they do not play with
the appliance.
5. Avoid contact with moving parts. Do not attempt to defeat any safety
interlock mechanisms.
6. During operation keep hands, hair, clothing, spatulas, and other utensils
away from attachments, any mixing container, and the cutting blade while
processing food, blending, slicing, or shredding to reduce risk of injury to
persons and/or damage to the appliance. A spatula may be used, but only
when the unit is not operating.
7. Do not operate any appliance with a damaged cord or plug or after the
appliance malfunctions or is dropped or damaged in any manner. Contact
the manufacturer at their customer service 1-800-726-0190 for information
on examination, repair, or adjustment. Customer Service support is available
in English and Spanish, Monday-Friday, 8:00 AM - 10:00 PM EST, and
Saturday and Sunday, 9:00 AM - 5:30 PM EST.
8. Remove the detachable blending shaft from the immersion blender before
washing the blades or shaft.
9. Blades are SHARP. Handle carefully when removing, inserting, or cleaning.
Exercise the same care when removing or inserting the blade or disc for the
food processor attachment.
10. When mixing liquids, especially hot liquids, use a tall container or mix small
quantities in separate batches to reduce spillage, splattering, and possibility
of injury from burning.
11. Check work bowl for presence of foreign objects before using.
12. To reduce the risk of injury, make sure the food processor attachment work
bowl is on a at surface before adding the chopping/mixing blade or the
slicing/shredding disc.
13. The use of attachments or accessories not recommended by Cuisinart may
cause re, electric shock, or risk of injury.
14. Be certain the food processor attachment work bowl cover is securely
locked in place before operating appliance. Do not attempt to remove cover
until blade has stopped rotating.
15. When using the feed tube to slice or shred, never feed food by hand.

3
Always use the pusher.
16. Do not ll the food processor attachment work bowl above the MAX ll line
to avoid risk of injury due to damage to the cover or work bowl.
17. Do not use outdoors or for other than its intended use.
18. Do not let any cord hang over the edge of the table or counter. Do not let
cord contact hot surfaces, including stovetop.
19. DO NOT use blade guard when blending.
20. Always unplug unit before attaching/detaching the blending shaft or
attaching/removing the blade guard.
21. Do not operate your appliance in an appliance garage or under a wall
cabinet. When storing in an appliance garage, always unplug the unit from
the electrical outlet. Not doing so could create a risk of re, especially if
the appliance touches the walls of the garage or the door touches the unit
as it closes.
SAVE THESE
INSTRUCTIONS
Retain for Future Reference: Read Carefully
FOR HOUSEHOLD
USE ONLY
Notice
This appliance has a polarized plug (one blade is wider than the other). As a
safety feature, this plug will t in a polarized outlet only one way. If the plug
does not t fully in the outlet, reverse the plug. If it still does not t, contact a
qualied electrician. Do not attempt to override this safety feature.
Note: Rated to 3.5A MAX with a peak of 550W depending on attachments and
certain food loads.
Contents
Important Safeguards 2
Unpacking Instructions 4
Parts and Features 4
Assembly 6
Operation 7
Cleaning and Maintenance 9
Blending Tips and Hints 10
Whisk Tips and Hints 11
Food Processing Tips and Hints 11
Troubleshooting 12
Frequent Uses for Food Processor Attachment 12
Recipes 14
Warranty 27

4
Unpacking Instructions
Place the package containing the Cuisinart
®
PrecisionPrep 3-in-1 Immersion
Blender on a sturdy surface. Open the box and remove the upper protective
insert. Unpack the immersion blender motor housing, blending shaft, detachable
gearbox, storage cup with lid, chef's whisk, food processor attachment with
chopping/mixing blade and reversible slicing/shredding disc with stem, and
blade storage cover. Save packaging for possible repacking of the unit.
Warning: The blending blade is extremely sharp.
Before using the Cuisinart
®
PrecisionPrep 3-in-1 Immersion Blender for the rst
time, we recommend cleaning all parts thoroughly. Dry it thoroughly with a soft,
absorbent cloth. To clean all parts, see instructions on page 9. Read all
instructions completely for detailed operating procedures.
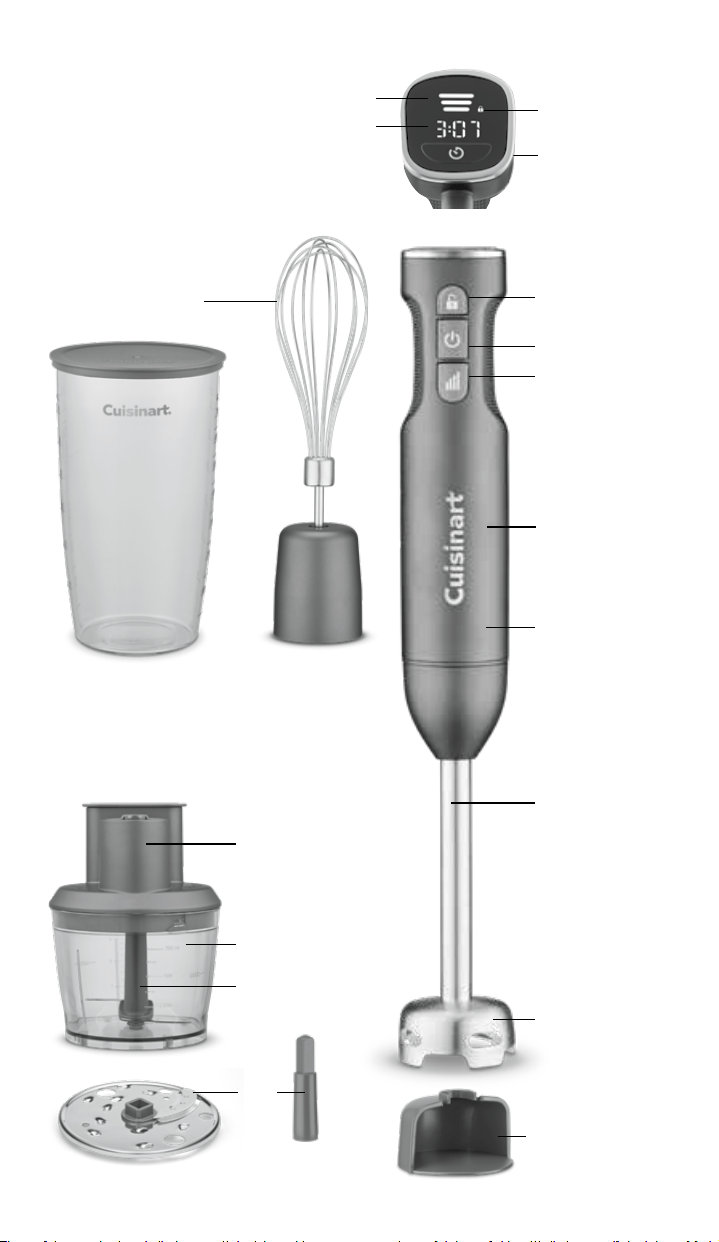
Parts and Features
1. Variable Speed Button: Lets you control speed from Low to High for
blending ingredients.
2. Unlock Button: Must be pressed to unlock before blender will operate.
3. On Button: Press and hold to power Immersion Blender within 3 seconds of
releasing Unlock Button.
4. Motor Housing with Comfort Grip: Allows for single-handed use.
5. Attachment Release Button: Release button makes it easy to attach and
detach blending shaft, chef's whisk, and food processor attachment.
6. Detachable Blending Shaft
7. Blade Bell: keeps splashing to a minimum.
8. Chef’s Whisk: The chef’s whisk attachment snaps into the gearbox, which
connects to the motor housing. The full-size chef’s whisk is great for
whipping cream, egg whites, and other delectable treats.
8a. Detachable Gearbox: Whisk attaches to it.
9. 3-Cup (24 oz.) Prep-and-Store Cup with Lid: Use this container to blend and
store drinks, shakes, salad dressings, and more. Designed for easy gripping
and drip-free pouring.
10. 4-Cup Food Processor Attachment: Slice, shred, and chop with the
Cuisinart
®
food processor attachment. Food processor attaches to the
blender motor housing in place of the blending shaft or whisk attachment.
10a. Chopping/Mixing Blade
10b. Reversible Slicing/Shredding Disc and Stem
10c. Lid with Feed Tube and Pusher
10d. Work Bowl
11. LED Display:
11a. LED Variable Speed Display
11b. Integrated Timer
11c. Lock/Unlock Indicator
12. Blade Storage Cover: Snaps into the blade bell to ensure safety and extend
the life of the blade.
5
8. Chef’s Whisk
Attachment
11a.
11b.
11. LED
Display
11c.
1. Variable
Speed Button
3. On Button
2. Unlock
Button
4. Motor Housing
with Comfort
Handle
5. Attachment
Release
Button
(not shown)
6. Detachable
Blending
Shaft
7.
Blade
Bell
12. Blade
Storage
Cover
8a. Detachable
Gearbox
9. Prep-and-Store
Cup with Lid
10. 4-Cup Food
Processor Attachment
10c.
10d.
10a.
10b.
6
Assembly
Blending Attachment
Align the motor housing with the blending shaft, and push the pieces together
until you hear and feel them click and connect. If they don't easily connect, just
pull the housing and blending shaft slightly apart, rotate the shaft a little, push
the pieces together again, and listen for the click.
Chef’s Whisk Attachment
1. Align the whisk shaft (A) with the small opening
of the whisk gearbox (B).
2. Push shaft into opening until it locks
into position (C).
3. Align the motor housing with the gearbox, and
push the gearbox and motor housing together
until you hear and feel them click and connect. If
they don’t easily connect, just pull the housing
and gearbox slightly apart, rotate the gearbox a
little, push the pieces together again, and listen
for the click.
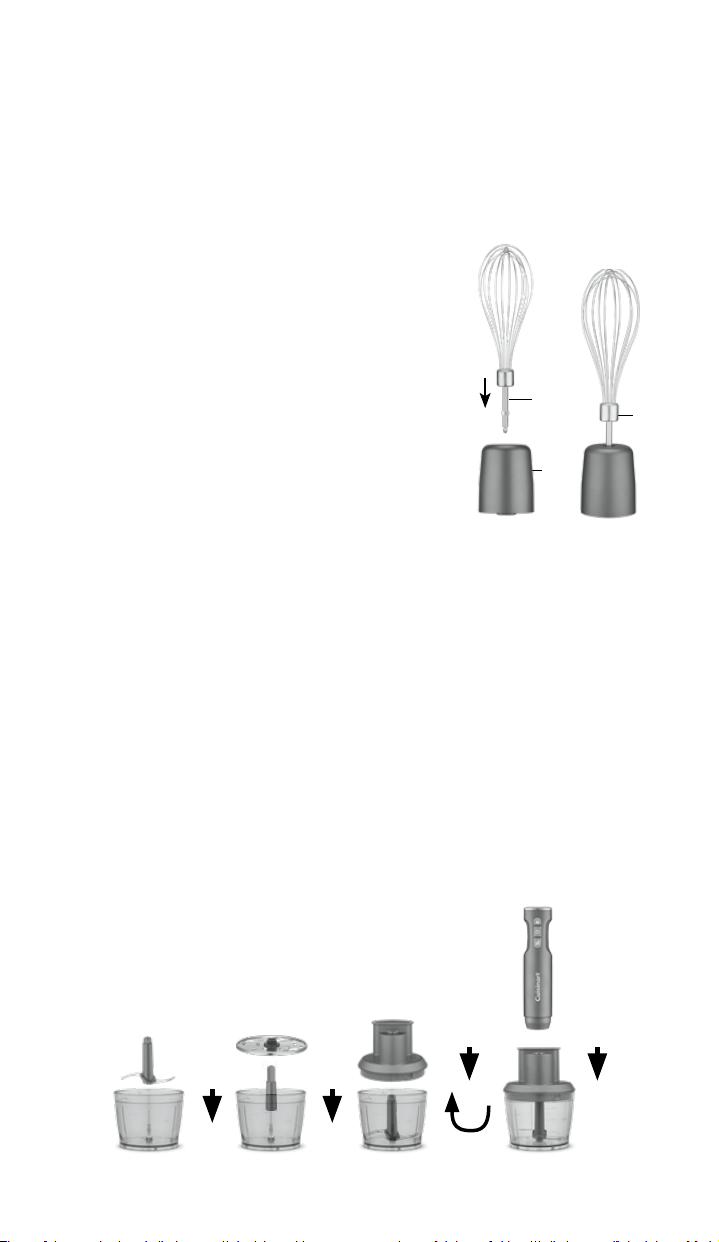
Food Processor Attachment
1. If using the chopping/mixing blade, place in the center of
the work bowl over the metal blade shaft (Fig. 1). If using the slicing/
shredding disc, place the stem in center of work bowl, over the metal blade
shaft. Place the disc over the stem with the desired side facing up (Fig. 2).
Note: Chopping/mixing blade should not be used with slicing/shredding disc.
2. Place the food processor lid onto the work bowl (Fig. 3). Align the chopping/
mixing blade or the slicing/shredding disc stem with the bottom of the food
processor lid and turn the lid clockwise to lock into place. You will feel and
hear a slight click. Make sure the lid is locked into place.
3. Place the motor housing on top of the food processor bowl lid and lock into
place by pressing down on the motor housing (Fig. 4). You will feel and hear
a slight click, which means the unit is ready for operation.
4. Plug the power cord of the hand blender into an electrical outlet.
5. To remove the motor housing from the work bowl lid, unplug from electrical
outlet, then press the release button on the back of the motor housing and
pull up at the same time.
Fig. 1 Fig. 3
Fig. 4
Fig. 2
B
C
A

7
Operation
There is no need to hold down the Unlock Button during blending.
Blending
The specially designed blending shaft is for mixing and puréeing all kinds of
foods, including salad dressings, powdered drink products, soups, sauces, and
blended drinks like milkshakes or smoothies.
This blade mixes and stirs while adding only a minimum amount of air.
A gentle up-and-down motion is all you need to create smooth purées for
soups, dressings, sauces, and more. Be careful never to remove the blending
shaft from the liquid while in operation.
1. Connect the blending shaft to the motor housing and remove blade cover.
2. Plug electrical cord into an appropriate electrical outlet.
3. To turn the blender on:
a. Press and release the Unlock button.
b. Then press and hold the On button to power on.
Note: At Speed 1 (default) there is a 3 second time limit to press the On
button before immersion blender returns to locked/o position.
Note: No need to continue to press the Variable Speed Control button once
desired speed is achieved.
Note: Once all buttons are released, Immersion blender will return to lock/
O mode in 3 seconds
Note: Last used speed will remain in memory until unit is unplugged
c. While pressing the On button, press and release the Variable Speed Control
button until desired speed is reached.
Note: Integrated timer will start counting up once power is on.
Note: Immersion blender will automatically start at Speed 1 and integrated
timer will start counting up.
d. There is no need to hold down the Unlock button during the blending.
Note: Do not continuously blend for longer than 60 seconds.
See Operation Illustrations 1, 2, and above.
4. Unplug immediately after use.
1. Press and release the
UNLOCK button
.
Note: Illuminated
Lock icon on control
panel will go out.
2. Press and hold the
ON button within
3 seconds of
releasing the UNLOCK
button.
3. While holding the
ON button, press and
release the Variable
Speed Control button
until desired speed
is reached. Note:
Speed will be
displayed on
control panel.

8
Pulsing
1. Immerse blending shaft in liquid.
2. Press and release Unlock button.
3. Press and hold the On button.
4. While holding the On button, press and release the Variable Speed Control
button until desired speed.
5. To pulse, press and release On button as desired. Do not release for more
than 3 seconds, as unit will return to lock condition.
Note: Pulse can be used with any of the attachments: blending shaft,
chef's whisk, or food processor.
Whisking
1. Insert the chef's whisk assembly into the motor housing. (See assembly for
chef's whisk attachment, page 6.)
2. Plug electrical cord into an appropriate electrical outlet.
3. Put the chef's whisk into a bowl or container.
4. To begin whisking, follow the instructions in #3 under Blending above.
5. Unplug immediately after use.
Chopping
1. Place the food processor attachment work bowl on a at, sturdy surface,
such as a countertop.
2. Insert the chopping/mixing blade in the work bowl as shown in Fig. 1 on
page 6, holding it by the upper plastic area of the blade.
3. Put food in the work bowl. Be sure the food is cut into small pieces (½-inch
cubes). Reference chart on page 12 for work bowl capacities.
4. Attach the lid to the food processor attachment work bowl, and turn it
clockwise until it locks in position. To remove lid, turn counterclockwise.
5. Connect the motor housing to the food processor work bowl lid.
(See Fig. 3, page 6.)
6. Press and release the Unlock button. Then press and hold the On button to
power on. While pressing the On button, press and release the Variable
Speed Control button until desired speed is reached.
Note: There is no need to hold down the Unlock Button during the blending.
Note: Due to the powerful motor provided with this unit, Cuisinart
recommends using one hand to steady the work bowl during operation.
Note: Do not continuously process for more than 1 minute, and let the unit
rest for 3 minutes between consecutive cycles.
7. When you have nished processing the food, stop the blending unit by
taking your nger o the On button.
8. When the blade stops moving, unplug the unit.
9. Remove the motor housing from the food processor lid by turning it
counterclockwise.
10. Carefully remove the chopping/mixing blade, holding it by the upper plastic
area of the blade. Turn clockwise a little bit and gently pull out. Never touch
the blade itself.

9
11. Remove food with a spatula.
Note: Do not operate the food processor attachment without food in
the work bowl.
Slicing and Shredding
1. Place the food processor attachment work bowl on a at, sturdy surface,
such as a countertop.
2. Place the stem in center of work bowl, over the metal blade shaft. Choose
desired side of the disc, slice or shred.
3. Holding disc by outer edges, carefully place it over the stem, with the side
being used facing up. Disc can also be placed over the stem by grasping the
center hub on the disc.
4. Attach the lid to the food processor attachment work bowl, and turn it
clockwise until it locks in position.
5. Connect the motor housing to the food processor attachment work bowl lid.
(See Fig. 3, page 6.)
6. Evenly pack food in the feed tube for slicing and shredding. Insert the
pusher into the feed tube. The food to be processed will dictate the
amount of pressure: Use light pressure for soft foods, medium pressure for
medium foods, and rm pressure for harder foods. Always process with
even pressure.
7. Press the Unlock button, and then press the Variable Speed Control Button
to start slicing/shredding. For most foods, a medium to high speed is best.
Caution:
• Be sure the food processor attachment lid is securely locked in place before
operating the appliance.
• As a safety precaution, when chopping, slicing, or shredding is complete,
rst unplug the unit, then disassemble the motor housing from the food
processor attachment lid, then remove the food processor attachment lid.
Never remove the food processor attachment lid with the motor housing
in place.
Cleaning and Maintenance
Blending Shaft
Clean all parts thoroughly after each use.
Press the attachment release button to remove the blending shaft from the
motor housing. Clean the motor housing only with a sponge or damp cloth.
Do not use abrasive cleaners that could scratch the surface.
To clean the blending shaft, wash by hand in hot water using mild detergent.
Be mindful of the xed-mount, razor-sharp blade edges.
Never immerse the motor housing in water. The unit must be thoroughly dry
before operation.
All servicing should be performed by an authorized service representative.

10
Attachments
The chef's whisk, food processor attachment bowl, pusher, chopping/
mixing blade, slicing/shredding disc, and prep-and-store cup and lid are
dishwasher safe.
Chef’s Whisk Attachment
To clean your whisk assembly, press the attachment release button to
release the gearbox from the motor housing. Detach the chef's whisk from the
gearbox by pulling the pieces apart. To clean the gearbox, simply wipe with a
damp cloth. To clean the chef's whisk, wash with warm, soapy water or put in
the dishwasher. Do not submerge the gearbox in water or any other liquids.
Food Processor Attachment
To simplify cleaning, rinse the work bowl, blade, disc, and stem immediately
after use so that food won’t dry on them. To clean the lid with gear box, simply
wipe with a damp cloth. Wash chopping/mixing blade, slicing/shredding disc,
stem, and work bowl in warm, soapy water. Rinse and dry. Wash the blade
carefully. Avoid leaving it in soapy water where it may disappear from sight. You
can wash the work bowl, chopping/mixing blade, stem, and slicing/shredding
disc on the upper shelf of your dishwasher. Unload the dishwasher carefully to
avoid contact with the sharp blade. Wipe the motor housing with a damp
sponge or cloth. Dry immediately. Never submerge the lid with gear box in water
or other liquids. The food processor attachment is intended for household use
only.
Blending Tips and Hints
• Liquid should not come closer than 1 inch from where the blending shaft
attaches to the motor housing.
• Do not immerse motor housing or whisk gearbox in water or any
other liquids.
• Cut solid foods into ¼- to ½-inch pieces for easier blending.
• When blending in the 3-cup prep-and-store cup, add hardest ingredients
rst, followed by softer foods and liquids last.
• Never operate the hand blender continuously for longer than 1 minute. For
best results, allow 20 to 30 seconds of rest time between 1-minute cycles.
• To avoid splashing, don’t turn the hand blender on until the blade guard is
submerged beneath the surface of the mixture, and do not pull the hand
blender out until the blade has completely stopped.
• Do not let hand blender stand in a hot pot on stove while not in use.
• Do not put fruit pits, bones, or other hard material into the blending
mixture, as these are liable to damage the blade.
• Do not ll mixing containers too full. The level of the mixture will rise when
blending and can overow.
• Adding liquids that are warm, not cold, facilitates blending solids
with liquids.
• Using a gentle up-and-down motion is the best way to blend and
incorporate ingredients uniformly.
• To whip air into a mixture, hold the blade just under the surface.
• Use the blending shaft to blend soup solids to the desired consistency with

11
a gentle up-and-down motion right in the saucepan or pot. You can quickly
change chunky ingredients and stock into thick and creamy soup.
• The hand blender is the ideal tool for frothing milk for cappuccinos
or lattes.
• Use the immersion blender to make smooth gravies and pan sauces.
Whisking Tips and Hints
Use the chef's whisk attachment for whipping heavy cream or egg whites. It may
also be used for anything that you would normally whisk by hand, like crêpe
batters or eggs for omelets.
Whipping Egg Whites
When whipping egg whites, use a very clean metal or glass bowl, never plastic.
Plastic can contain hidden oils and fats that can ruin the delicate egg white
foam. To help stabilize the egg whites, add a pinch of cream of tartar per egg
white prior to beating them. (If using a copper bowl, omit the cream of tartar.)
Beat the egg whites, starting on low speed and gradually increasing to high
speed, just until soft peaks form rmly enough not to droop over. Beating the
egg whites longer will cause them to dry out and become less stable. When
adding sugar to beaten egg whites, start adding it slowly just as soft peaks begin
to form. Continue beating until peaks are rm enough not to droop.
Whipping Heavy Cream
When whipping heavy cream, if possible and time allows, use a chilled bowl and
chill the chef's whisk attachment. The best-shaped bowl for whipping cream is
one that is deep with a rounded bottom. The cream should come out of the
refrigerator just before whipping. Whipped cream may be used at either soft or
rm peaks, depending on preference. It may be avored as desired. For best
results, start whipping on low speed and gradually increase to high speed. Whip
cream just before using.
Food Processing Tips and Hints
• Liquids in work bowl should not exceed 1½ cups. Use quantities given in the
recipe section as a guide.
• Do not overload the work bowl. For best results, most foods should not
reach more than two-thirds of the way up the work bowl. Reference chart
on page 12 for work bowl capacities.
• Do not attempt to chop fruit pits, bones, or other hard materials, as these
are liable to damage the blade.
• Do not operate food processor attachment for more than 30 seconds
continuously.
• Food pieces should be cut about the same size to achieve even results
when chopping.
• Peel, core, and/or remove seeds and pits. Food pieces should be between
¼ and ½ inch, depending on hardness of the food.
• Pulse food in 1-second increments to chop. For the nest chop, process
continuously. Watch ingredients closely to achieve desired consistency,
and scrape the work bowl as necessary.
• When making compound butters, remove the butter from the refrigerator
and let it come to room temperature before blending the ingredients.
• Some spices may scratch the work bowl.

12
Troubleshooting
To Reset the Unit
Your hand blender is equipped with a Resettable Thermal Protector to protect
the motor. If the motor shuts down, a light on the control panel will start
ashing. Unplug the hand blender. Let the hand blender rest for approximately
15 minutes. Once the resting period has elapsed, plug the power cord back into
the outlet and continue blending. If your hand blender does not function
properly following this procedure, discontinue use and contact a certied
Cuisinart
®
Consumer Service Center.
Frequent Uses for Food Processor
Ingredient Attachment Comments
Baby Foods
(always consult
a pediatrician or
family physician
for appropriate
food recom-
mendations)
Chopping/Mixing
Blade
Place small amounts (no more than 2 cups) of
cooked foods into work bowl. Add small amount of
appropriate liquid. Pulse to chop, then process at
high speed if a smoother consistency is desired.
Breadcrumbs
(from fresh or
dry bread)
Chopping/
Mixing Blade
Pulse to chop, then process at high speed until
desired consistency is reached.
Hard Cheese
(Asiago,
Locatelli,
Parmesan,
Romano)
Chopping/
Mixing Blade
Cut into ¼-inch pieces. Pulse to chop, then process
at high speed until desired consistency is reached.
Grate up to 3 ounces.
Shredding Disc
For shredded cheese: Be sure cheese is chilled (not
frozen) rst and then cut to t the feed tube. Place
cheese in feed tube with pusher in place and turn
unit on. Use very light to no pressure while
processing at high speed, letting the pusher almost
naturally guide the cheese through the shredding
disc. Stop as soon as cheese has nished shredding.
Medium-Firm
Cheese
(Cheddar,
Monterey Jack,
Gruyére)
Shredding Disc
Be sure cheese is chilled (not frozen) and cut to t
the feed tube. Place cheese in feed tube with
pusher in place and turn unit on. Use very light to no
pressure while processing on High, letting the
pusher almost naturally guide the cheese through
the shredding disc. Stop as soon as cheese has
nished shredding.
Chocolate
Chopping/
Mixing Blade
Cut into ½-inch pieces; may chill in freezer for 3
minutes before chopping. Pulse to chop, then
process at high speed, no more than 1 ounce at a
time, until desired texture is reached.
Shredding Disc
Larger chocolate pieces work best; may chill in
freezer for 3 minutes before shredding. Process at
high speed, using medium pressure. Results are a
nely grated product.
Creamy
Dressings
and Dips
Chopping/
Mixing Blade
Place ingredients in work bowl; do not cover or spill
on stem. Pulse to chop, then process at low to
medium speed to blend to desired consistency.
Dressings can also easily be made in the mixing cup
with the blending shaft.

13
Ingredient Attachment Comments
Garlic
Chopping/
Mixing Blade
Peel up to 12 cloves. Pulse to roughly chop. Process
at high speed to nely chop.
Ginger Root
(fresh)
Chopping/
Mixing Blade
To nely chop: Peel, cut into ½-inch pieces. Pulse or
process to chop, up to 2 ounces at a time.
Shredding Disc
To slice or shred: Peel and cut to t the feed tube;
using light to medium pressure on the pusher, turn
the unit on. Process at high speed, stopping as soon
as ginger is completely shredded/sliced.
Herbs (fresh)
Chopping/
Mixing Blade
Chop no more than 1 cup at a time. Herbs must be
clean and dried well. Pulse to chop.
Nuts
Chopping/
Mixing Blade
Shelled; toast rst for best avor. Pulse to chop, or
process up to ¹/3 cup at a time, until desired
consistency is reached.
Vegetables
(cooked)
Chopping/
Mixing Blade
Cut into 1-inch pieces; pulse to chop, up to 1/2 cup at
a time. Add cooking liquid, stock, or milk to process
to a purée. Not recommended for making mashed
potatoes.
Vegetables
(uncooked)
Chopping/
Mixing Blade
To process: Peel as needed, cut into ½-inch pieces.
Peel celery with peeler to remove tough strings.
Pulse to chop up to 2 cups at a time.
Shredding Disc
To slice or shred: Cut vegetables to t the feed tube.
Using medium pressure on the pusher, turn the unit
on. Process at high speed, stopping immediately
when all food has been sliced or shredded.
Raw Meat (beef,
lamb, poultry,
pork)
Chopping/
Mixing Blade
Maximum 6 oz., cut into 1/2-inch pieces. Pulse until
desired consistency.
Cooked Meat
Chopping/
Mixing Blade
Cut into 1/2-inch pieces. Pulse until desired
consistency.

14
Recipes
Smoothies and Shakes
Nutty Chocolate Protein Shake 15
Vitamin Blast Smoothie 15
Antioxidant Berry Smoothie 15
Golden Anti-Inflammatory Shake 16
Banana Split Shake 16
Salads, Dressings, Sauces, and Breads
Zucchini Spice Bread 16
Tapenade 17
Hummus 18
Classic Caesar Salad 18
Simple Cucumber Salad 19
Creamy Champagne Vinaigrette 20
Romesco Sauce 20
Soups
Summer Zucchini Soup 21
Loaded Sweet Potato Soup 22
Creamy Tomato Soup 23
Autumn Carrot-Ginger Soup 24
Desserts
Blackberry Cheesecake Bars 24
Quick Blackberry Jam 26
Berry Fool 26

15
Nutty Chocolate Protein Shake
An easy shake for the morning using staple ingredients!
Makes about 1 cup
1 frozen or fresh banana*, cut or broken into 2-inch pieces
1 tablespoon almond butter
1 tablespoon protein powder
1 teaspoon unsweetened cocoa powder
¾ cup almond milk
1. Put all ingredients into the cup in the order listed.
2. Place the blending shaft into the mixture, being sure that the bell is
submerged to avoid any splatter.
3. In a gentle up and down motion, blend at high speed for 30 to 45 seconds,
or until smooth and homogenous.
4. Serve immediately.
*A frozen banana will give a colder smoothie with a richer texture. If a fresh
banana is used, serve over ice if a colder smoothie is desired.
Vitamin Blast Smoothie
A sweet way to get your ll of vitamins for the day.
Makes about 2 cups
½ cup frozen mixed berries
½ cup frozen peaches
1 cup fresh strawberries, hulled and quartered
½ cup baby spinach
1 teaspoon greens powder (optional)
¾ cup orange peach mango juice
1. Put all ingredients into the cup in the order listed.
2. Place the blending shaft into the mixture, being sure that the protective
blade guard is submerged to avoid any splatter.
3. In a gentle up and down motion, blend at high speed for 30 to 45 seconds,
or until smooth and homogenous.
4. Serve immediately.
Antioxidant Berry Smoothie
Berries alone are antioxidant powerhouses – adding greens
and açai powder really takes this smoothie to the next level.
Makes about 2 cups
½ cup frozen wild blueberries
½ cup blackberries (or fresh berries)
1 banana or ½ avocado
½ cup baby kale
1 teaspoon chia seeds
1 teaspoon açai powder

16
1 tablespoon coconut oil
¾ cup nondairy milk
1. Put all ingredients into the cup in the order listed.
2. Place the blending shaft into the mixture, being sure that the protective
blade guard is submerged to avoid any splatter.
3. In a gentle up and down motion, blend at high speed for 30 to 45 seconds,
or until smooth and homogenous.
4. Serve immediately.
Golden Anti-Inflammatory Shake
Turmeric, a spice known for its anti-inammatory properties,
gives this shake its pleasant golden hue.
Makes about 2 cups
1 cup frozen pineapple
½ cup orange segments
½ banana, cut into 2-inch pieces
1 ½-inch piece fresh ginger, peeled
½ teaspoon ground turmeric
¾ cup coconut milk
1. Put all ingredients into the cup in the order listed.
2. Place the blending shaft into the mixture, being sure that the bell is
submerged to avoid any splatter.
3. In a gentle up and down motion, blend at high speed for 30 to 45 seconds,
or until smooth and homogenous.
4. Serve immediately.
Banana Split Shake
A blended sweet dessert guaranteed to please every banana split lover!
Makes about 2 cups
1½ cups vanilla ice cream
1 ripe banana, cut into 2-inch pieces
2 tablespoons chocolate syrup
½ cup whole milk
1. Put all ingredients into the cup in the order listed.
2. Place the blending shaft into the mixture, being sure that the protective
blade guard is submerged to avoid any splatter.
3. In a gentle up and down motion, blend at high speed for 30 to 45 seconds,
or until smooth and homogenous.
4. Serve immediately.
Zucchini Spice Bread
This moist quick bread is perfect for breakfast or for an afternoon snack.
Makes one 2-pound loaf (16 servings)

17
Nonstick cooking spray
2¼ cups unbleached all-purpose our
1½ teaspoons ground cinnamon
¾ teaspoon ground allspice
¼ teaspoon ground nutmeg
1 teaspoon kosher salt
1½ teaspoons baking powder
½ cup walnuts, lightly toasted
1 zucchini (8 to 10 ounces), cut in half lengthwise to t the feed tube
½ cup vegetable oil
1 cup granulated sugar
2 large eggs
½ cup dried cherries or cranberries
1. Preheat oven to 325°F. Coat a 9 x 5 x 3-inch loaf pan with cooking spray.
2. In a large mixing bowl, stir together the our, spices, salt, and baking powder.
Reserve.
3. Insert the chopping/mixing blade into the work bowl. Add the walnuts
and chop using 3 to 5 pulses. Leaving the nuts in the work bowl, remove
the chopping blade and secure the shredding disc. Shred the zucchini.
Transfer the walnuts and zucchini to the bowl with the dry ingredients.
Stir to combine.
4. Put the vegetable oil, sugar, and eggs into the cup. Using the blending shaft,
blend the ingredients at high speed for 5 to 10 seconds until combined. Add
to the mixing bowl with the dry ingredients, along with the dried fruit, and
stir until just combined.
5. Pour the batter into the prepared pan and bake in the middle of the oven for
1 hour and 15 minutes, or until a toothpick or cake tester comes out clean.
6. Cool on a wire rack for 5 minutes, and then turn the loaf out onto a wire rack
to cool completely.
Tapenade
A traditional French condiment. Serve alongside crackers or a nice crusty bread.
Makes about 1 cup
1 large garlic clove, peeled
3 tablespoons packed fresh parsley
1½ cups pitted black olives (such as Kalamata or Niçoise)
1
∕
3
cup pitted green olives
¼ cup capers, drained and rinsed
1½ teaspoons fresh lemon juice
1½ teaspoons Dijon mustard
½ teaspoon freshly ground black pepper
2 tablespoons extra-virgin olive oil
1. Insert the chopping/mixing blade into the work bowl of the food processor
attachment. Add the garlic and parsley; process at high speed for 5 to 10
seconds to chop. Scrape the work bowl. Add the olives and capers; pulse 12

18
to 15 times to chop. Add the lemon juice, mustard, and pepper; process
at high speed for 10 to 15 seconds, stopping to scrape down the sides of the
bowl as necessary.
2. With the unit running at medium speed, add the olive oil through the feed
tube and process until a thick, homogenous paste forms, about 20 seconds.
Hummus
Serve this brightly avored dip with warm pita for a satisfying snack.
Makes about 2 cups
1 garlic clove, peeled
1 can (15.5 ounces) chickpeas, drained and rinsed
2 tablespoons tahini
3 tablespoons fresh lemon juice
¾ teaspoon kosher salt, or to taste
¼ teaspoon ground cumin
Pinch freshly ground black pepper
¼ cup extra-virgin olive oil
¼ cup water, plus more if needed
1. Insert the chopping/mixing blade into the work bowl of the food
processor attachment.
2. Add garlic to bowl and process until nely chopped, 10 to 15 seconds; scrape
bowl.
3. Add chickpeas, tahini, lemon juice, salt, cumin, and pepper; pulse 10 to 12
times. Add the oil and process at high speed until almost completely
combined. Add the water and process for 30 to 40 seconds, until very
smooth. If a thinner consistency is desired, add more water.
4. Taste and adjust seasoning according to preference.
Classic Caesar Salad
An old favorite made fresh at home.
Makes 4 to 6 servings
Croutons
2 cups crusty bread, cut into ½-inch cubes
1 tablespoon extra-virgin olive oil
1 garlic clove, crushed
¼ teaspoon kosher salt
Salad and Dressing
1 head romaine lettuce
2 ounces Parmigiano Reggiano, cut into ½-inch cubes
1 small garlic clove, peeled
3-4 anchovy llets
1 egg yolk (or substitute 2 tablespoons mayonnaise)
1 teaspoon Dijon mustard
2 teaspoons fresh lemon juice

19
2 teaspoons red wine vinegar
1 teaspoon Worcestershire sauce
¼ teaspoon freshly ground black pepper
¹/3 cup extra-virgin olive oil
1. Preheat oven to 350°F. Line baking tray with aluminum foil. Toss bread cubes
with olive oil, crushed garlic, and salt. Pour onto prepared baking tray and
bake for 10 to 12 minutes, tossing croutons once during bake time. Croutons
should be evenly golden. Remove and reserve.
2. Clean lettuce and tear each leaf into bite-size pieces. Dry well and reserve in
large salad bowl.
3. Insert the chopping/mixing blade into the work bowl of the food processor
attachment. Add the Parmesan. Process at high speed until fully grated.
Remove and reserve.
4. Add the garlic clove, anchovies, yolk/mayonnaise, mustard, lemon juice,
vinegar, Worcestershire sauce, and pepper to the cup. Using the hand
blender attachment, blend at medium to high speed until well blended.
Slowly add the olive oil, while blending at low speed, until all is added and
emulsied.
5. Toss lettuce with the croutons, Parmesan, and dressing. Serve immediately.
Simple Cucumber Salad
The cucumbers bring a welcome cooling eect for when the weather
or the food is too warm to handle!
Makes 4 servings
1 small shallot, halved
½ cup fresh dill
1 tablespoon white vinegar
½ teaspoon honey
¼ teaspoon kosher salt
2 tablespoons olive oil
1 English cucumber, halved lengthwise
1. Put the halved shallot into the work bowl of the food processor attachment
tted with the chopping/mixing blade. Process the shallot at high speed until
nely chopped, about 8 seconds.
2. Add the dill and pulse to evenly chop. Scrape the sides of the work bowl and
add the vinegar, honey, and salt. Process at high speed to evenly blend. With
the unit running, add the olive oil through the drizzle hole.
3. Replace the chopping/mixing blade with the slicing disc. Slice the cucumber
halves at high speed.
4. Pour the contents of the work bowl into a serving bowl. Taste and adjust
seasoning according to preference.

20
Creamy Champagne Vinaigrette
This delicious all-purpose vinaigrette will become a favorite
after the rst taste.
Makes about 1 cup
1 garlic clove, peeled
1 small shallot, cut into ½-inch pieces
1 tablespoon Dijon mustard
¼ teaspoon kosher salt
Pinch freshly ground black pepper
2½ tablespoons champagne vinegar
¾ cup extra-virgin olive oil
1. Put all ingredients in the cup except for the olive oil. Process at high speed
to break up the garlic and shallot. Add oil, ¼ cup at a time, and blend on low
for 20 seconds to emulsify.
2. Blend an additional 30 seconds after all ingredients have been added.
Romesco Sauce
You can thank Spain for this smoky, robust sauce.
Delicious with grilled meat and sh but heaping it on roasted cauliower steaks
comes highly recommended.
Makes 2 cups
1 dried ancho chile pepper, rinsed, stemmed, and seeded
1 ½-inch slice sourdough or country-style bread (about 2 ounces)
1 large red bell pepper
1 large ripe tomato, cored
½ cup blanched raw almonds
1 garlic clove
1 teaspoon smoked paprika
Pinch crushed red pepper akes
½ teaspoon kosher salt
2 tablespoons sherry vinegar
¼ cup loosely packed parsley leaves
½ cup extra-virgin olive oil
1. Place the ancho chile in a bowl and cover with hot water. Let soak for
15 minutes until softened.
2. Preheat the broiler on high with a rack positioned in the upper third of the
oven. Place the bread onto the rack and broil 2 to 3 minutes on each side
until toasted. Remove crust and tear into 1-inch pieces. Reserve.
3. Put the pepper and tomato on a baking sheet and broil, turning frequently
until all sides are charred. Place in a mixing bowl and cover with plastic
wrap in order to loosen the skins.
4. Turn the oven from broil to 350°F. Put the almonds on a sheet pan and roast
for 8 to 10 minutes until fragrant.
5. When the pepper and tomato are cool enough to handle, peel and discard
the seeds and skins. Roughly chop both into about 2-inch pieces with a

21
knife. Scrape the ancho esh from the skin, discarding skin. Reserve
peppers and tomato.
6. Insert the chopping/mixing blade into the work bowl of the food processor
attachment. Add the garlic clove and process at high speed to nely chop.
Add the almonds and pulse to chop.
7. Add the reserved peppers, tomato, and toasted bread and continue to pulse
until mostly incorporated.
8. Scrape the bowl and add the paprika, crushed red pepper, salt, vinegar, and
parsley leaves. With the unit running at high speed, add the olive oil in a
steady stream.
9. Scrape the bowl and process until desired consistency. The almonds will
give the sauce some texture.
10. Taste and adjust seasoning according to preference.
Summer Zucchini Soup
A great way to use up that surplus of summer garden zucchini –
serve cold or warm!
Makes about 6 cups
2 leeks, halved lengthwise, white and light green parts only
1 celery stalk
1 tablespoon unsalted butter or extra-virgin olive oil
2 garlic cloves, crushed
4 medium zucchini (about 2 pounds), halved lengthwise
8 ounces white (waxy) potatoes, peeled and cut into 2-inch pieces
1½ teaspoons kosher salt, divided
¼ teaspoon freshly ground black pepper
½ cup dry white wine
3½ cups low-sodium chicken broth
2 tablespoons fresh mint leaves (about 6 medium leaves)
2 tablespoons fresh basil leaves (about 3 to 4 large leaves)
¼ cup heavy cream (optional)
1. Insert the slicing disc into the work bowl of the food processor attachment.
Slice the leeks and celery at high speed.
2. Put the butter or olive oil into a large saucepan over medium to medium-low
heat. Once hot, add the leeks, celery, and garlic. Stir until vegetables are
fragrant and softened, 8 to 10 minutes.
3. While the vegetables are cooking, slice the zucchini at high speed.
Once the leeks and celery are soft, add the zucchini and potato with
1 teaspoon of the salt and the pepper; stir ingredients together until well
coated. Once coated, add the wine. Simmer until wine is just about
evaporated. Add the broth and turn the heat up to bring mixture to a boil.
Once the soup comes to a boil, reduce the heat in order to maintain a
steady simmer. Simmer until the vegetables are tender, 20 to 25 minutes.
4. Once all vegetables are tender, add the herbs. Using the blending shaft,
begin blending starting at low speed and then gradually increasing the speed
to high. To help facilitate blending, tilt pot to the side away from you to
ensure that the bell of the blending shaft is completely submerged. Blend
for 1 minute, or until the mixture is completely puréed.

22
5. Taste and adjust seasoning, adding remaining salt to taste.
6. If using optional cream, add at the very end of blending. Stir in cream and
simmer soup for an additional 5 to 10 minutes before seasoning.
Loaded Sweet Potato Soup
Time to get warm and cozy–the perfect rainy-day soup!
Makes about 10 cups
1 garlic clove, peeled
1 1½-inch piece fresh ginger, peeled
1 leek, washed, trimmed, and cut into 1-inch pieces
2 tablespoons unsalted butter
½ teaspoon kosher salt, divided
Pinch freshly ground black pepper
2 medium sweet potatoes (about 1 pound), peeled and cut into 2-inch cubes
(reserve in cold water if not using immediately)
¼ teaspoon ground cinnamon
Pinch cayenne
2 cups low-sodium chicken or vegetable broth
3 tablespoons sliced scallions
1 3-ounce block white Cheddar cheese
4 strips cooked bacon
¼ cup sour cream or plain Greek yogurt
1 lemon, zested and juiced
½ cup heavy cream
1. Put the garlic, ginger, and leek into the work bowl of the food processor
attachment tted with the chopping/mixing blade. Pulse until nely chopped.
2. Put the butter in a medium pot and place over medium-low heat. Add the
chopped aromatic vegetables with a pinch of the salt and pepper. Sauté
until softened, about 8 minutes (you want the heat to be low so the
vegetables do not pick up any color).
3. Add the potatoes to the softened vegetables in the pot and stir to fully coat.
Add the cinnamon, cayenne, and broth and raise heat to bring the mixture to
a boil. Once boiling, reduce heat to maintain a steady simmer. Allow to
simmer until potatoes are tender, about 15 minutes.
4. While potatoes are cooking, prepare the soup toppings. Insert the slicing
disc in the work bowl. Pack the scallions vertically in the feed tube and slice
using medium pressure to keep the onions in contact with the disc. Reserve
the scallions. Flip the disc to the shredding side and secure the lid. Shred
the cheese, using medium pressure to keep the cheese in contact with the
disc. Reserve the cheese separately. Insert the chopping blade and add the
cooked bacon. Pulse to roughly chop. Reserve the bacon separately.
5. Add the Greek yogurt, lemon juice, lemon zest, a pinch of salt, and a pinch
of pepper to a large bowl. Using the chef's whisk attachment, mix on
medium speed until well combined. Reserve.
6. Once the potatoes are tender, use the blending shaft to blend the soup,
starting at low speed and gradually increasing the speed to high for 1 to 11/2
minutes, or until completely smooth. To help facilitate blending, tilt pot to

23
the side away from you to ensure that the bell of the blending shaft is
completely submerged. Blend until mixture is completely puréed.
7. Add ½ cup cream and continue to blend until smooth and creamy. If a
thinner soup is desired, add the remaining ¼ cup.
8. Taste and adjust seasoning as desired. To serve: Ladle soup into individual
serving bowls and top with Greek yogurt, Cheddar, bacon, and scallions.
Creamy Tomato Soup
This childhood classic is pure comfort food.
Makes about 6 cups
2 garlic cloves, peeled
1 onion, cut into 1-inch pieces
1 celery stalk
1 small carrot, halved lengthwise
2 tablespoons unsalted butter
1 tablespoon olive oil
1 teaspoon kosher salt
1 teaspoon fresh thyme leaves
2 tablespoons tomato paste
1 can (28 ounces) whole plum tomatoes
4 cups vegetable broth
1. Insert the chopping/mixing blade into the work bowl of the food processor
attachment. Finely chop the garlic at high speed. Add the onion to the bowl
and pulse 6 to 8 times to chop. Transfer to a medium bowl and reserve.
2. Replace the chopping/mixing blade with the slicing disc. Slice the celery and
carrot at high speed. Reserve with the onion and garlic.
3. Put the butter and oil into a small to medium stockpot and place over
medium heat. Once the butter melts, add the vegetables to the pot with a
teaspoon of salt and the thyme. Sauté until softened, 5 to 6 minutes. Stir in
the tomato paste and cook for an additional minute or two.
4. Add the tomatoes to the pot, and gently break up with a wooden spoon.
Add the vegetable broth and increase the heat to bring the mixture to a boil.
Once boiling, reduce the heat to maintain a steady simmer. Simmer for 20 to
25 minutes for all of the avors to develop and meld together.
5. Using the blending shaft, blend the soup, starting at low speed and then
gradually increasing the speed to high for 1 minute, or until desired
consistency. To help facilitate blending, tilt pot to the side away from you to
ensure that the bell of the blending shaft is completely submerged. Blend
until mixture is completely puréed.

24
Autumn Carrot-Ginger Soup
The ginger gives this soothing soup a nice kick.
Makes about 5 cups
1 1-inch piece fresh ginger, peeled
2 small shallots, halved
2 pounds carrots, peeled
2 tablespoons extra-virgin olive oil
¾ teaspoon kosher salt
½ teaspoon freshly ground black pepper
½ teaspoon ground cumin
Pinch ground cloves
¼ teaspoon ground cinnamon
5 cups low-sodium vegetable or chicken broth
½ teaspoon fresh lemon juice
1. Insert the chopping/mixing blade into the work bowl of the food processor
attachment. Add the ginger and shallots. Process at high speed to nely
chop. Remove the chopping/mixing blade and insert the slicing disc.
Slice the carrots at high speed.
2. Put the oil into a small to medium stockpot and place over medium-low
heat. Once hot, add the ginger, shallots, carrots, salt, pepper, and the spices
and stir to fully coat the carrots.
3. Add the broth and increase the heat to bring the mixture to a boil. Once
boiling, reduce heat to maintain a steady simmer. Cook until the carrots are
completely tender, 25 to 30 minutes.
4. Stir in the lemon juice. Using the blending shaft, blend the soup starting on
low speed and gradually increasing the speed to high for 1 to 11/2 minutes, or
until completely smooth. To help facilitate blending, tilt pot to one side away
from you so the bell of the blending shaft is fully submerged until fully
blended. Taste and adjust seasonings as desired.
Blackberry Cheesecake Bars
Impressive and easy to make, these cheesecake bars
are a lovely balance of sweet and tart.
Makes 16 servings
Softened butter, for greasing pan
Graham Cracker Crust:
9 full graham cracker sheets
2 tablespoons granulated sugar
Pinch ground cinnamon
Pinch kosher salt
4 tablespoons unsalted butter, melted and cooled slightly
Filling:
8 ounces cream cheese (1 standard package), cut into 4 pieces,
room temperature
1
⁄
3
cup granulated sugar
¼ teaspoon kosher salt

25
1 large egg, room temperature
¼ cup sour cream or full-fat plain Greek yogurt
1 tablespoon fresh lemon juice
¼ teaspoon pure vanilla extract
¼ cup Quick Blackberry Jam (recipe follows)
Whipped Cream Topping:
1 cup chilled heavy cream
1 tablespoon instant vanilla pudding mix
2 teaspoons powdered sugar
¼ teaspoon pure vanilla extract
1. Preheat oven to 300°F with the rack in the middle of the oven. Lightly grease
a 9-inch square baking pan with butter and then line with parchment paper.
2. Prepare the crust. Put the graham crackers into the work bowl of the food
processor attachment. Process at high speed for 10 seconds to nely chop.
Add the remaining crust ingredients and pulse at high speed until well
combined. Transfer the crumb crust to the prepared baking pan, pressing
down with your ngers or a spoon to evenly cover the bottom of the pan.
Bake for 10 minutes and then set aside to cool while preparing lling.
3. Put the cream cheese into the clean work bowl. Process the cream cheese
at high speed until very smooth – absolutely no lumps (pause to scrape
down the cup as often as necessary), 15 to 20 seconds. When the cream
cheese is smooth, add the sugar and salt through the feed tube, and
process at high speed until very smooth. Scrape down the bowl and process
for additional time if necessary.
4. While processing at low speed, add the egg and fully incorporate into batter.
Add the sour cream, lemon juice, and vanilla extract. Process at low speed
until creamy, about 1 minute. Pour the batter on top of the crust. Tap the
pan a few times to remove air bubbles. Dollop the blackberry jam on top of
the cream cheese batter and with the tip of a knife or a chopstick, make a
decorative swirl pattern.
5. Transfer the lled pan to the preheated oven and bake for 20 to 25 minutes,
until the edges are set but the center is still jiggly. Remove from oven
and set aside to cool to room temperature. Cover well and refrigerate to
fully chill.
6. While cheesecake is chilling, make the whipped cream topping. Put the
heavy cream, pudding mix, powdered sugar, and vanilla in a large bowl. Using
the chef's whisk attachment, begin to whip on Low, being sure the whisk
just skims the surface of the cream. Continue blending at low speed until
cream begins to thicken, then gradually increase speed to High and move
whisk in an up-and-down motion throughout the bowl for 40 to 60 seconds,
or until desired stiness is achieved.
7. When cheesecake is chilled, evenly spread the whipped cream over the
cheesecake. Cut into 16 bars and serve or cover tightly and keep refrigerated
until ready to serve.

26
Quick Blackberry Jam
Blackberries are naturally high in pectin, making it incredibly easy
to make this blackberry jam at home with no added pectin.
Makes ¾ cup
12 ounces fresh blackberries, rinsed and drained
½ cup granulated sugar
2 teaspoons fresh lemon juice
1. Put all ingredients in a 2½-quart saucepan. Over medium heat bring mixture
to a simmer and cook until thick and bubbly. Carefully transfer the jam to
the cup. Insert the blending attachment into cup, making sure the bell is
submerged. Blend at low speed, using an up-and-down motion, for 30
seconds, or until the ingredients are well combined. Strain the jam through
a ne-mesh strainer. Let cool and store in a jar in the refrigerator for up to
2 weeks.
Berry Fool
A traditional British dessert, fool is great any time of the year,
but is a real treat when summer berries are at their peak.
Makes 4 to 5 cups
2 cups mixed berries (strawberries, raspberries, blueberries)
1 tablespoon granulated sugar
2 cups heavy cream, chilled
2 tablespoons confectioners’ sugar
½ teaspoon pure vanilla extract
1 . Put the berries and granulated sugar into the cup. Using the blending shaft,
blend, using an up-and-down motion, until almost fully puréed; reserve.
2. Put the remaining ingredients into a medium to large mixing bowl. Using the
whisk attachment, whisk for 30 to 40 seconds, or until medium peaks form.
Fold in berry mixture.
3. Serve immediately for the best texture (fool will only stay in good form for
about 1 hour maximum).

27
Limited Warranty
Subject to the exclusions and limitations contained herein, Conair LLC dba
Cuisinart (“Cuisinart”) warrants that the Cuisinart
®
PrecisionPrep 3-in-1
Immersion Blender (“Product”) will be free from material defects in materials
and workmanship under normal home use conditions for a period of THREE (3)
years beginning on the date the Product was purchased in its original, sealed
packaging, unless otherwise specied in this Limited Warranty. This Limited
Warranty is only for U.S. consumers (dened herein as purchasers at retail for
personal, family, or household use) who originally purchase the Product from
Cuisinart or an authorized Cuisinart
®
reseller (if you are unsure whether a
retailer or other point of sale is an authorized or unauthorized Cuisinart reseller,
contact Cuisinart).
This Limited Warranty does NOT cover:
• Normal wear and tear;
• Any Product purchased by commercial purchasers or for commercial or
nonhousehold uses;
• Accessories, parts, or software added to the Product after the system is
shipped from Cuisinart;
• Any costs associated with the replacement or repair of the Product,
including labor, installation, or other costs incurred by you without prior
Cuisinart approval;
• Damage to the Product, defective conditions, or nonconformities due to: (1)
external causes, including shipping, accidents, problems with electrical
power (Product designed only for use with 120-volt outlets), abnormal
conditions (such as mechanical or environmental); (2) usage not in
accordance with Product instructions; (3) misuse, neglect, unauthorized
alteration, unauthorized repair; and (4) acts of God or other events beyond
Cuisinart’s control;
• Damage caused by you or any nonauthorized third party, even though
necessary repairs and maintenance might be performed by any company;
• Damage caused by accessories or replacement parts not specically
authorized by Cuisinart may void this Limited Warranty; and
• Any Product where the original Product identication markings (trademark
or serial number) have been removed, altered, or obliterated.
It is recommended that you visit the website, https://www.cuisinart.com/
register-your-product.html, for a fast, ecient way to complete your product
registration. However, product registration does not eliminate the need for the
consumer to maintain the original proof of purchase in order to obtain the
warranty benets. In the event that you do not have proof of purchase date, the
purchase date for purposes of this Limited Warranty will be the date of
manufacture.
Hassle-free warranty
If the Product that is the subject of this Limited Warranty fails during the
warranty period for reasons covered by this Limited Warranty, Cuisinart will, at
its option, repair the Product, replace the Product with another identical or
reasonably equivalent product, or if Cuisinart is unable to repair or replace the
Product, refund the purchase price, less the amount directly attributable to the
consumer’s prior usage of the Product. To obtain a return shipping label, email
us at https://www.cuisinart.com/customer-care/product-assistance/product-

28
inquiry/, or call our Consumer Service Center toll-free at 1-800-726-0190 to
speak with a representative.
Upon receipt of the Product, Cuisinart will inspect the Product and, if required
under this Limited Warranty, attempt to repair, replace, or refund the Product
within thirty (30) days. However, there may be delays beyond Cuisinart’s control,
in which case that time period may be extended as reasonably necessary.
IMPORTANT: If the nonconforming Product is to be serviced by someone other
than Cuisinart’s Authorized Service Center, please remind the servicer to call our
Consumer Service Center at 1-800-726-0190 to ensure that the problem is
properly diagnosed, the Product is serviced with the correct parts, and the
product is still under warranty. Customer Service support is available in English
and Spanish, Monday-Friday, 8:00 AM - 10:00 PM EST, and Saturday and Sunday,
9:00 AM - 5:30 PM EST.
California Residents Only
The THREE (3) year Limited Warranty period begins on the date the Product was
delivered, which may be dierent than the date the Product was purchased.
California residents also have the option of obtaining the benets of this
Limited Warranty by bringing the Product to (A) the store where it was
purchased or (B) another retail store that sells Cuisinart products of the same
type. The retail store shall then, according to its preference, either repair the
Product, refer the consumer to an independent repair facility, replace the
Product with another identical or reasonably equivalent product, or refund the
purchase price less the amount directly attributable to the consumer’s prior
usage of the Product. California residents may also, according to their
preference, return nonconforming products directly to Cuisinart for repair or, if
necessary, replacement with another identical or reasonably equivalent product
by calling our Consumer Service Center toll-free at 1-800-726-0190. Cuisinart
will be responsible for the cost of such repair, replacement, and/or shipping and
handling for such nonconforming products under warranty.
THIS LIMITED WARRANTY GIVES YOU SPECIFIC LEGAL RIGHTS, AND YOU MAY
ALSO HAVE OTHER RIGHTS THAT VARY FROM STATE TO STATE OR BY
JURISDICTION. IN THE EVENT THIS LIMITED WARRANTY IS BREACHED, YOU MAY
HAVE CLAIMS FOR REPLACEMENT, DAMAGES, OR OTHER PENALTIES.
LIMITATIONS OF LIABILITY/ADDITIONAL LIMITATIONS AND EXCLUSIONS
ALL EXPRESS AND IMPLIED WARRANTIES ARE LIMITED IN DURATION TO THE
LIMITED WARRANTY PERIOD. NO WARRANTIES APPLY AFTER THAT PERIOD.
SOME STATES (OR JURISDICTIONS) DO NOT ALLOW LIMITATIONS ON HOW
LONG AN IMPLIED WARRANTY LASTS, SO THIS LIMITATION MAY NOT APPLY TO
YOU. CUISINART’S RESPONSIBILITY UNDER THIS OR ANY OTHER WARRANTY,
IMPLIED OR EXPRESS, IS LIMITED TO REPAIR, REPLACEMENT, OR REFUND, AS
SET FORTH ABOVE. THESE REMEDIES ARE THE SOLE AND EXCLUSIVE
REMEDIES FOR ANY BREACH OF WARRANTY. TO THE MAXIMUM EXTENT
PERMITTED BY LAW, CUISINART IS NOT RESPONSIBLE FOR ANY DIRECT,
INDIRECT, SPECIAL, INCIDENTAL, OR CONSEQUENTIAL DAMAGES RESULTING
FROM ANY BREACH OF WARRANTY OR UNDER ANY OTHER LEGAL THEORY
(INCLUDING, BUT NOT LIMITED TO, LOST PROFITS, DOWNTIME, LOSS OF
GOODWILL, DAMAGE TO OR REPLACEMENT OF EQUIPMENT AND PROPERTY,
AND ANY COSTS OF RECOVERING, REPROGRAMMING, OR REPRODUCING ANY
PROGRAM OR DATA STORED IN OR USED WITH A SYSTEM CONTAINING THE
PRODUCT), EVEN IF CUISINART HAS BEEN ADVISED OF THE POSSIBILITY OF
SUCH DAMAGES. SOME STATES DO NOT ALLOW THE EXCLUSION OR LIMITATION
OF INCIDENTAL OR CONSEQUENTIAL DAMAGES, SO THE ABOVE LIMITATIONS

29
OR EXCLUSIONS MAY NOT APPLY TO YOU. ALL EXPRESS AND IMPLIED
WARRANTIES ARE LIMITED IN DURATION TO THE LIMITED WARRANTY PERIOD.
NO WARRANTIES APPLY AFTER THAT PERIOD. SOME STATES (OR
JURISDICTIONS) DO NOT ALLOW LIMITATIONS ON HOW LONG AN IMPLIED
WARRANTY LASTS, SO THIS LIMITATION MAY NOT APPLY TO YOU.
This Limited Warranty is issued by:
Conair LLC
1 Cummings Point Road
Stamford, CT 06902
1-800-726-0190

30
Notes:

31
Notes:

©2026 Cuisinart,
a division of Conair LLC
7475 North Glen Harbor Boulevard
Glendale, AZ 85307
26CE201898
X IB-19357
Costco Wholesale Corporation
P.O. Box 34535
Seattle, WA 98124-1535
USA
1-800-774-2678
www.costco.com

Job Number:
IB Size:
Total Pages:
Die Cut:
Material:
Coating:
Color(Front):
(INSIDE):
Date: Apr/22/2026
Remark: Operator: Gerry Gu
Co-ordinator: Sharon Xu
HB650PC IB-19357
32pp
114 MM (W) X 197 MM (H)
New
105gsm gloss artpaper for whole book
GLOSS VARNISHING IN COVER
COVER: 4C + 1C (BLACK)
INSIDE: 1C + 1C (BLACK)
FDS Part NO: