USER GUIDE
69-2201EF-08
RLV450
PROGRAMMABLE THERMOSTAT
READ BEFORE INSTALLING
DESCRIPTION
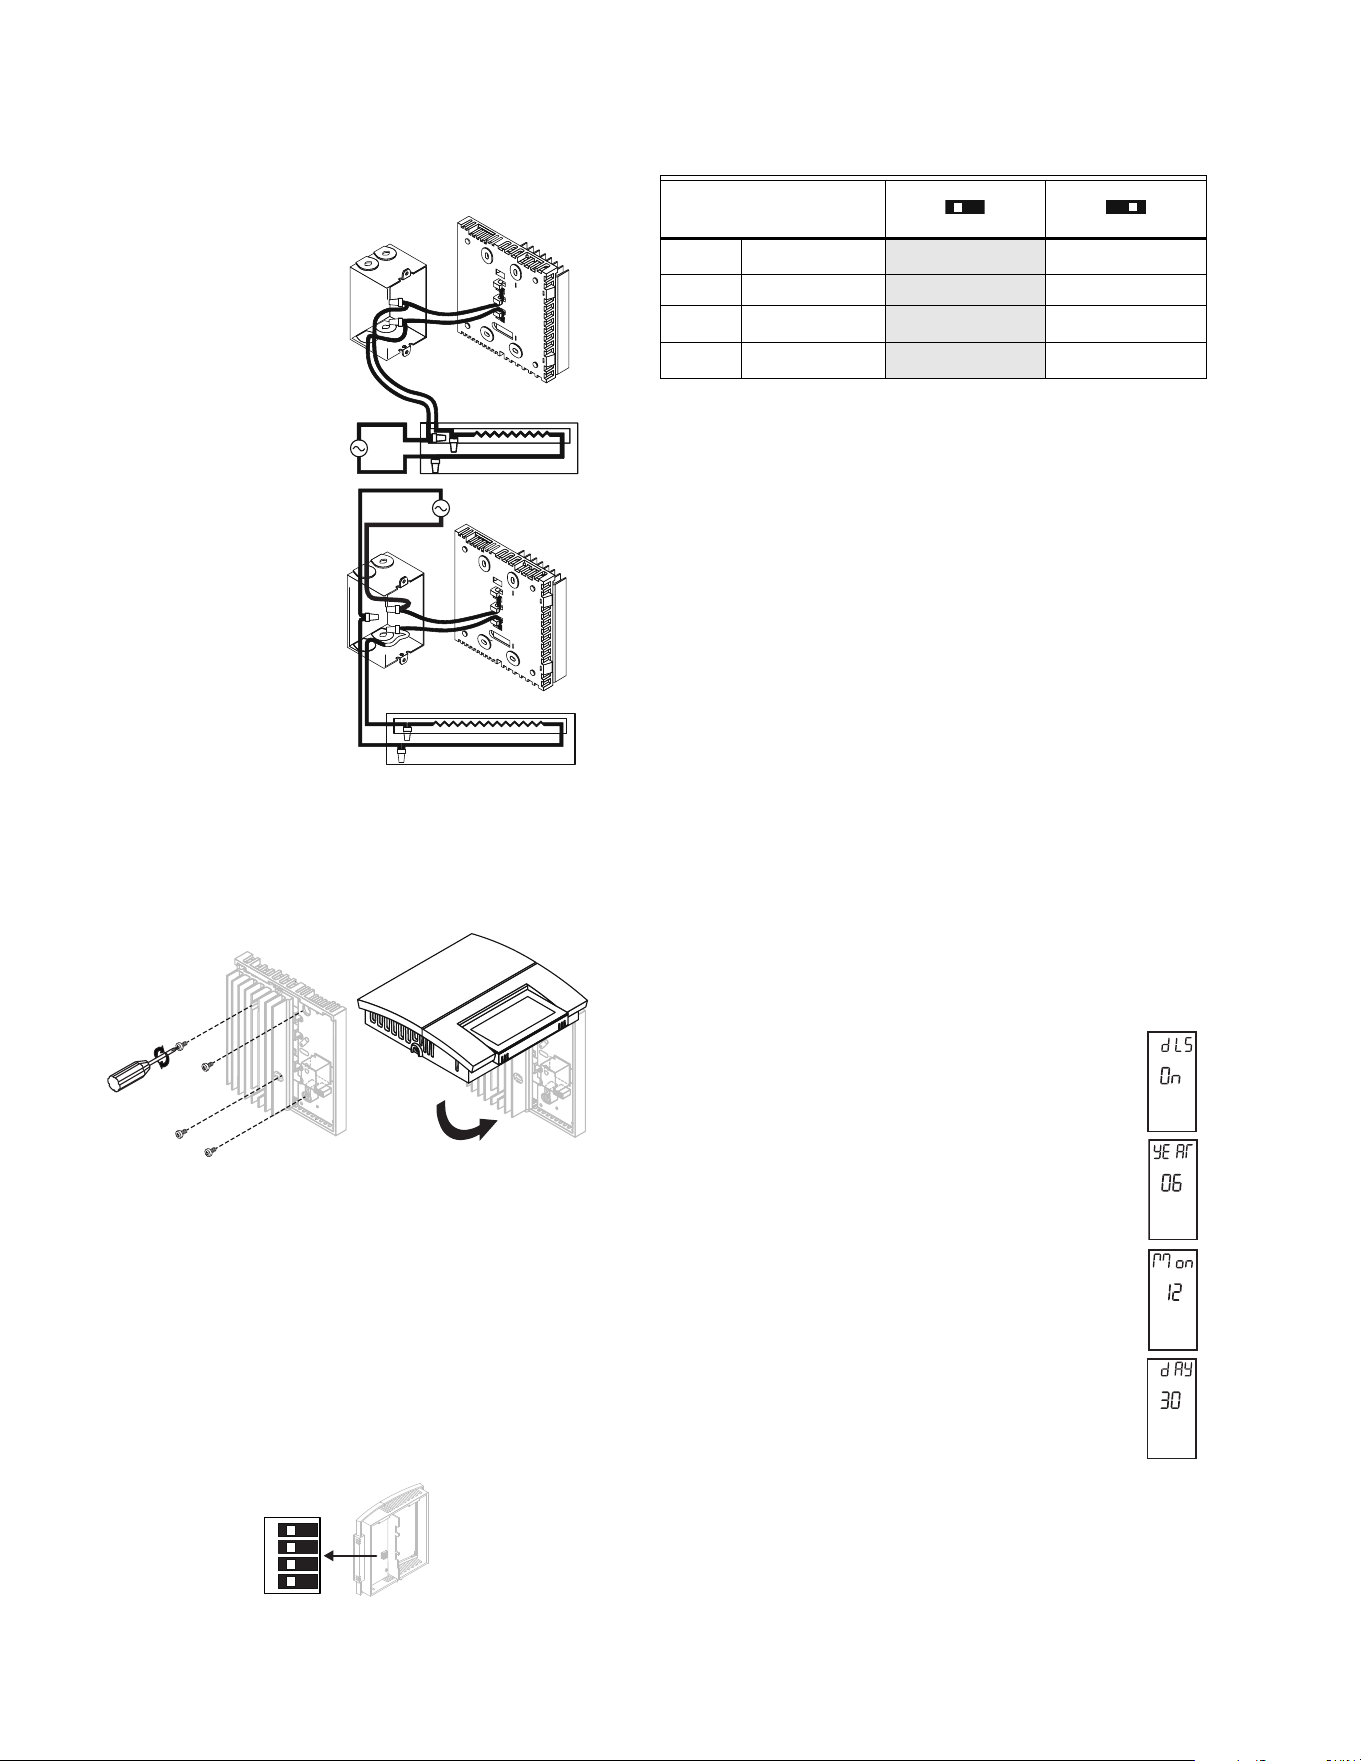
* LP appears only for the first two minutes when the thermostat is without
power. This can occur during a power outage or when the thermal protection
device inside the baseboard heater is opened.
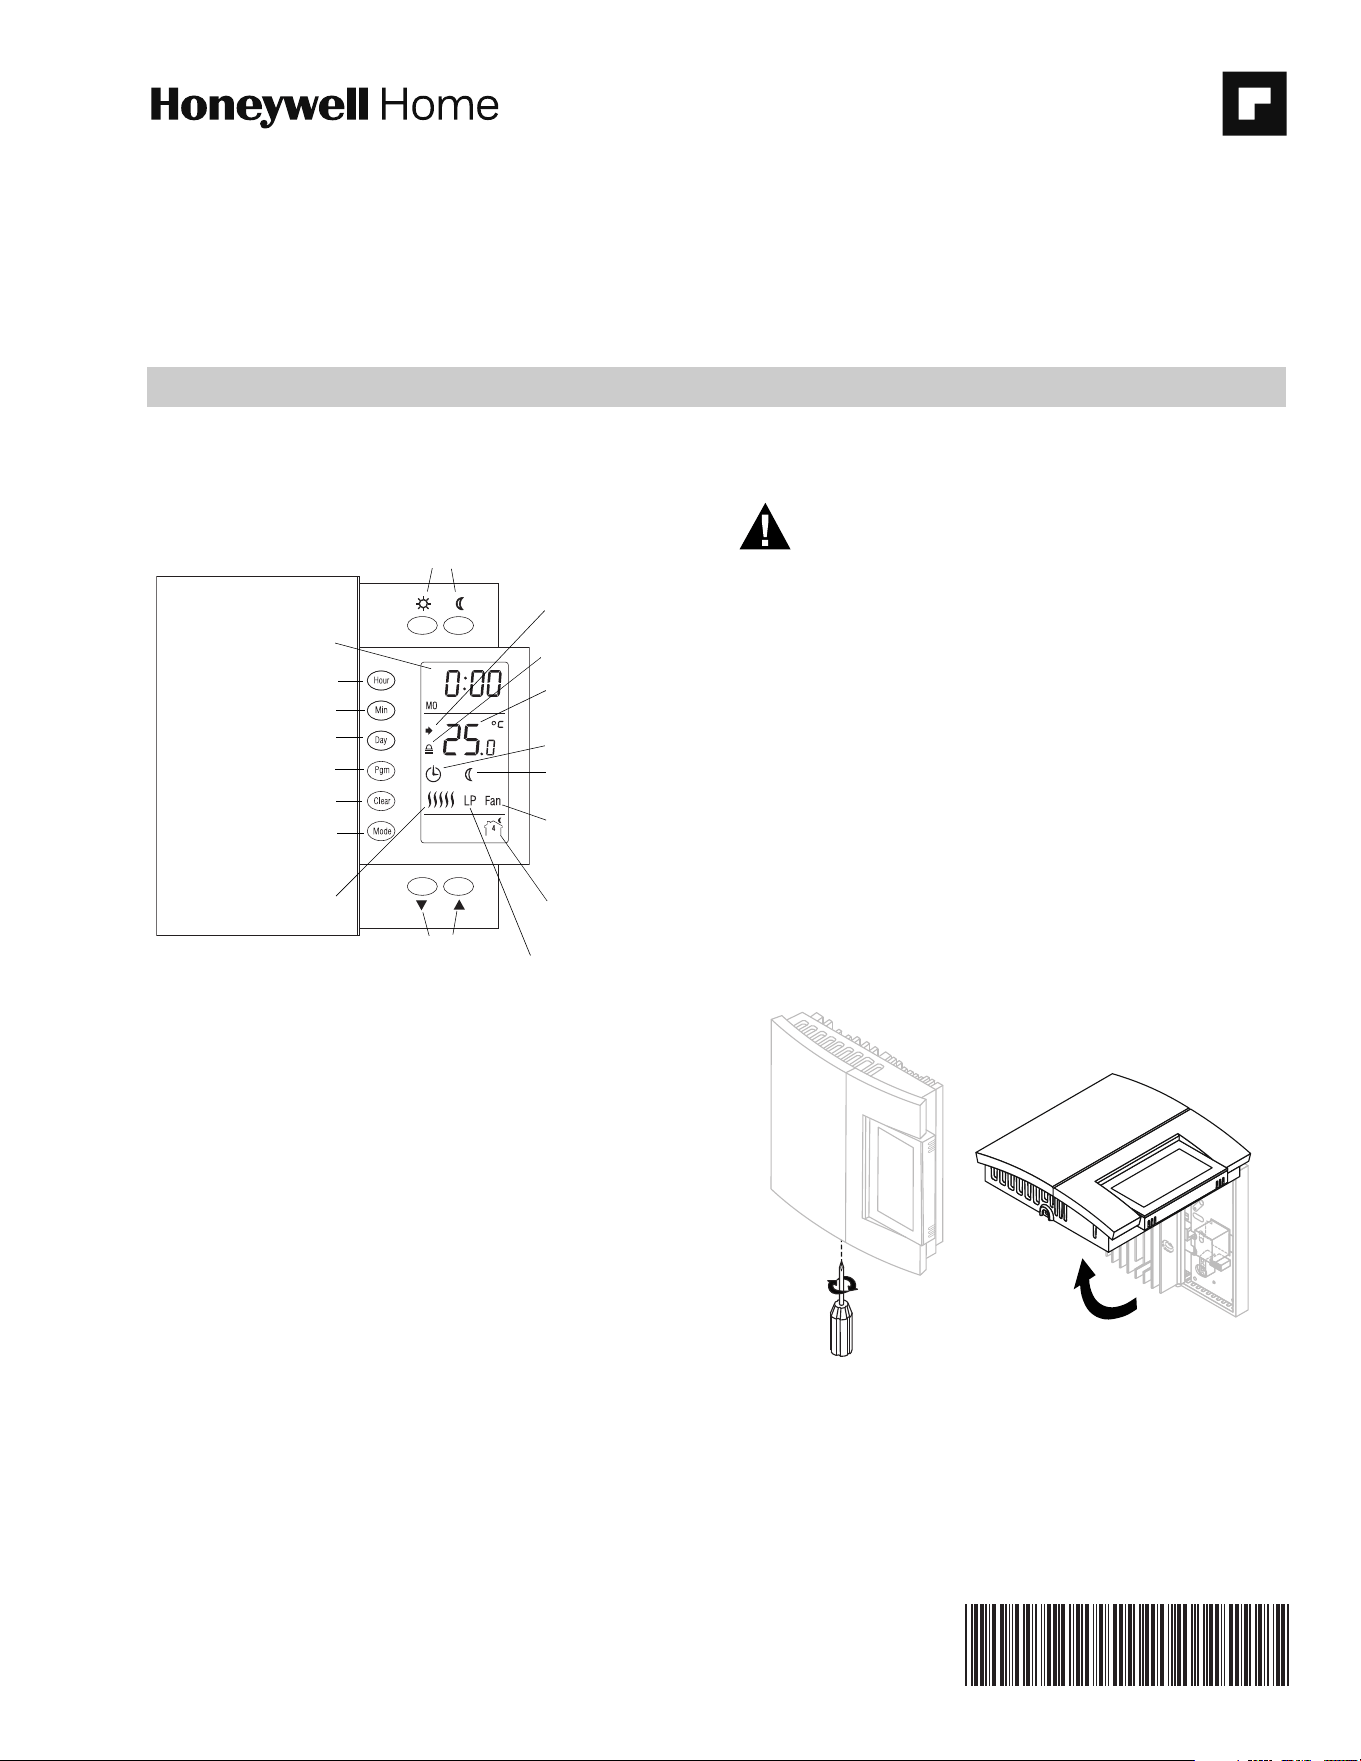
Fig. 1.
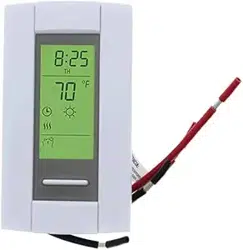
This programmable thermostat can be used to control an electric heating
system such as an electric baseboard heater, a radiant ceiling, a radiant floor,
a convector or a fan-forced heater.
The thermostat cannot be used with:
• a resistive load over 16.7 A
• a resistive load under 2 A
• a system driven by a contactor or relay (inductive load)
• a central heating system
SUPPLIED PARTS:
• One (1) thermostat
• Two (2) 6-32 screws
• Two (2) solderless connectors
INSTALLATION
WARNING
TURN OFF POWER TO THE HEATING SYSTEM AT THE MAIN
POWER PANEL TO AVOID ELECTRICAL SHOCK. THE
INSTALLATION MUST BE PERFORMED BY AN ELECTRICIAN.
All cables and connections must conform to the local electrical
code.
Special CO/ALR solderless connectors must be used when
connecting with aluminum conductors.
Install the thermostat onto an electrical box.
Install the thermostat about 5 feet high, on an inside wall facing the
heater.
Avoid locations where there are air drafts (such as the top of a
staircase or an air outlet), dead air spots (such as behind a door),
or direct sunlight.
Do not install the thermostat on a wall that conceals chimney or
stove pipes.
The thermostat wires are not polarized; either wire can be
connected to the load or to the power supply.
NOTE: Always keep the thermostat's vents clean and unobstructed.
1.
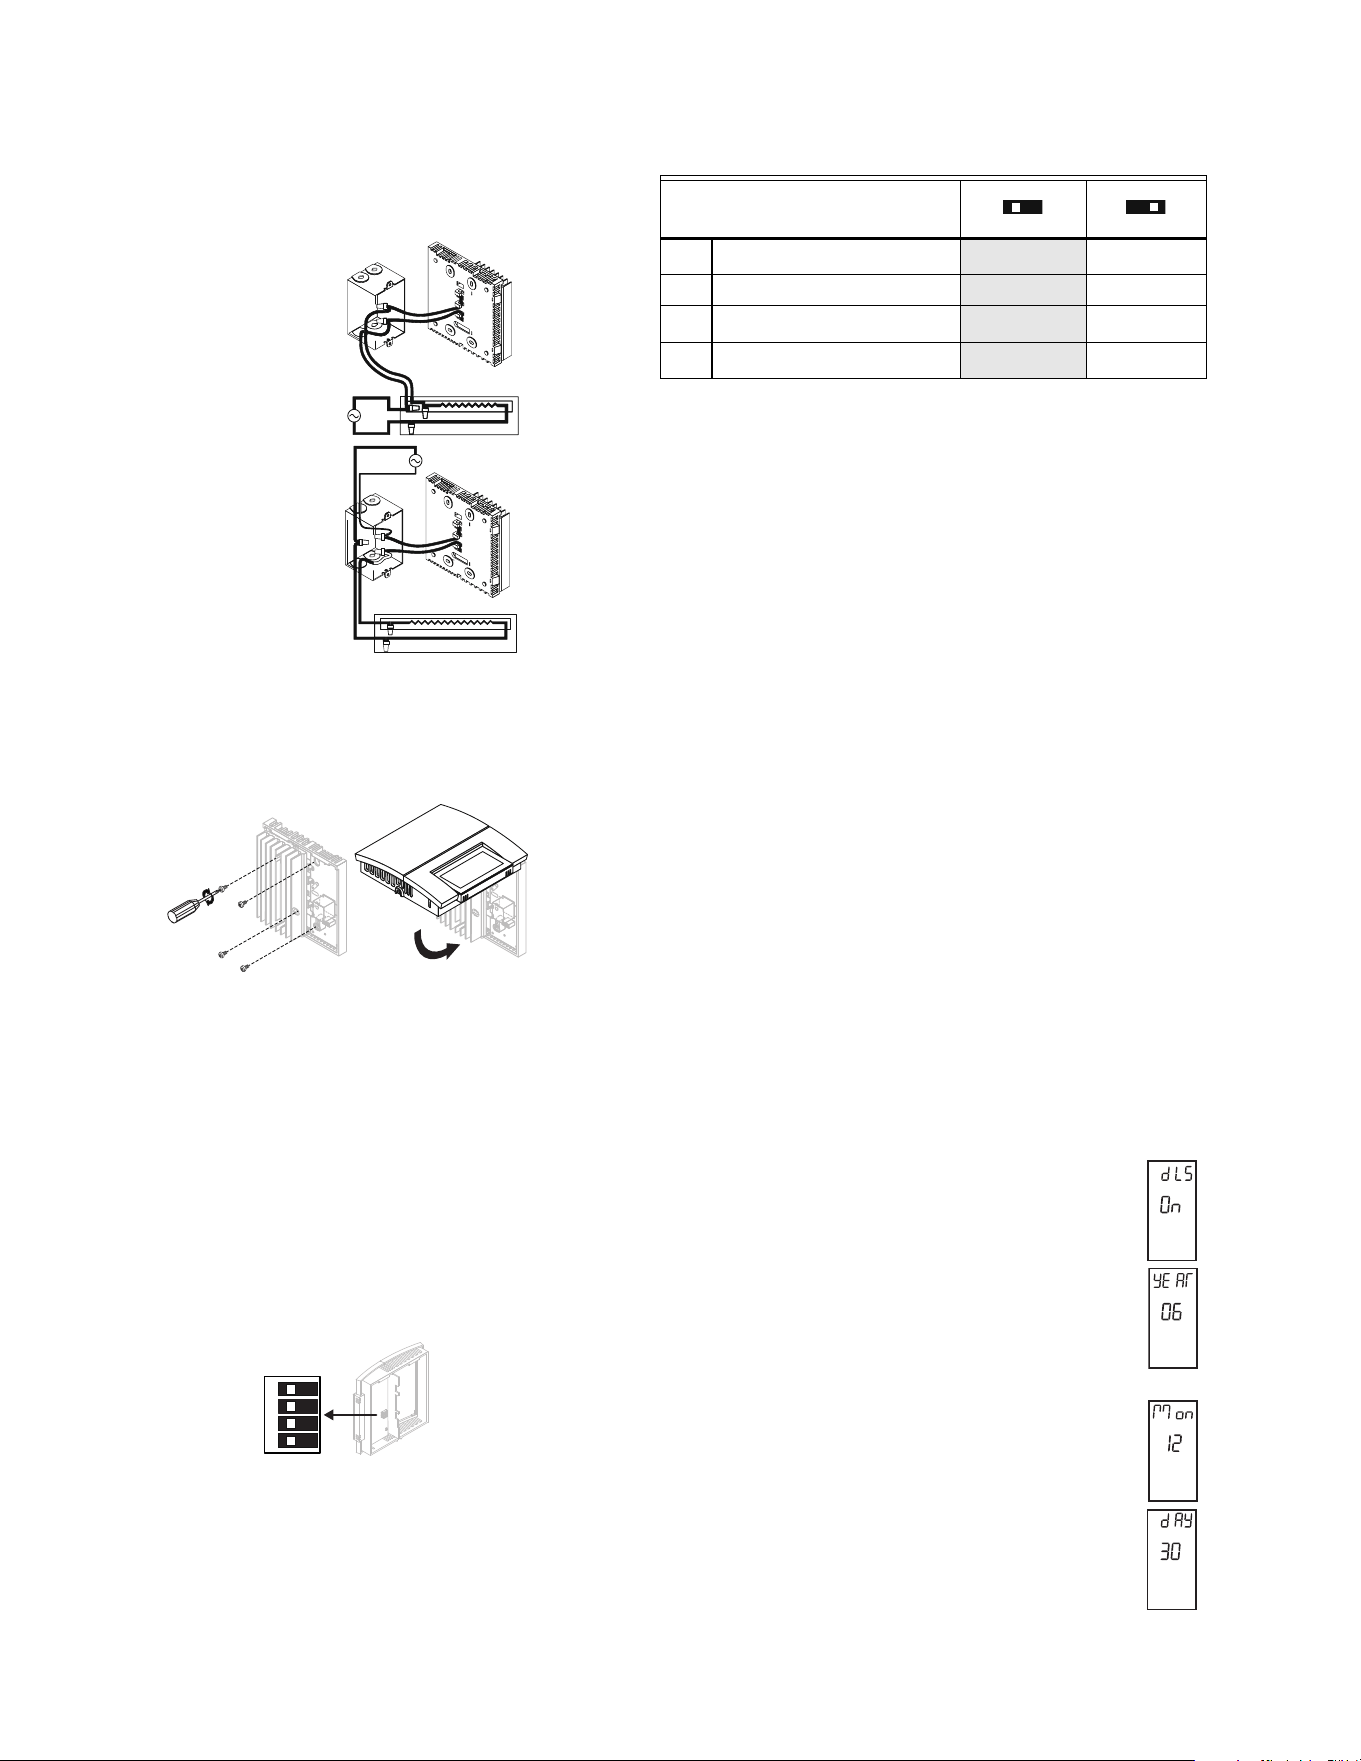
Fig. 2.
Select the mode of
operation
Set the minute
Time and day
Temperature
Indicates the current
mode of operation
Skip a period
Program the schedule
Temperature pre-
set icon
Temperature
adjustment but-
tons
Temperature pre-
set buttons
Indicates the
heating power
Indicates the current
period (appears in auto-
matic mode only)
Indicates that the tem-
perature setpoint is dis-
played
Set the hour
Indicates that the
thermostat is configured
for a fan-forced heater
Indicates that the thermostat
is without power *
Indicates that the set-
tings are locked
Set the day
M38000
RLV450
69-2201EF—08 2
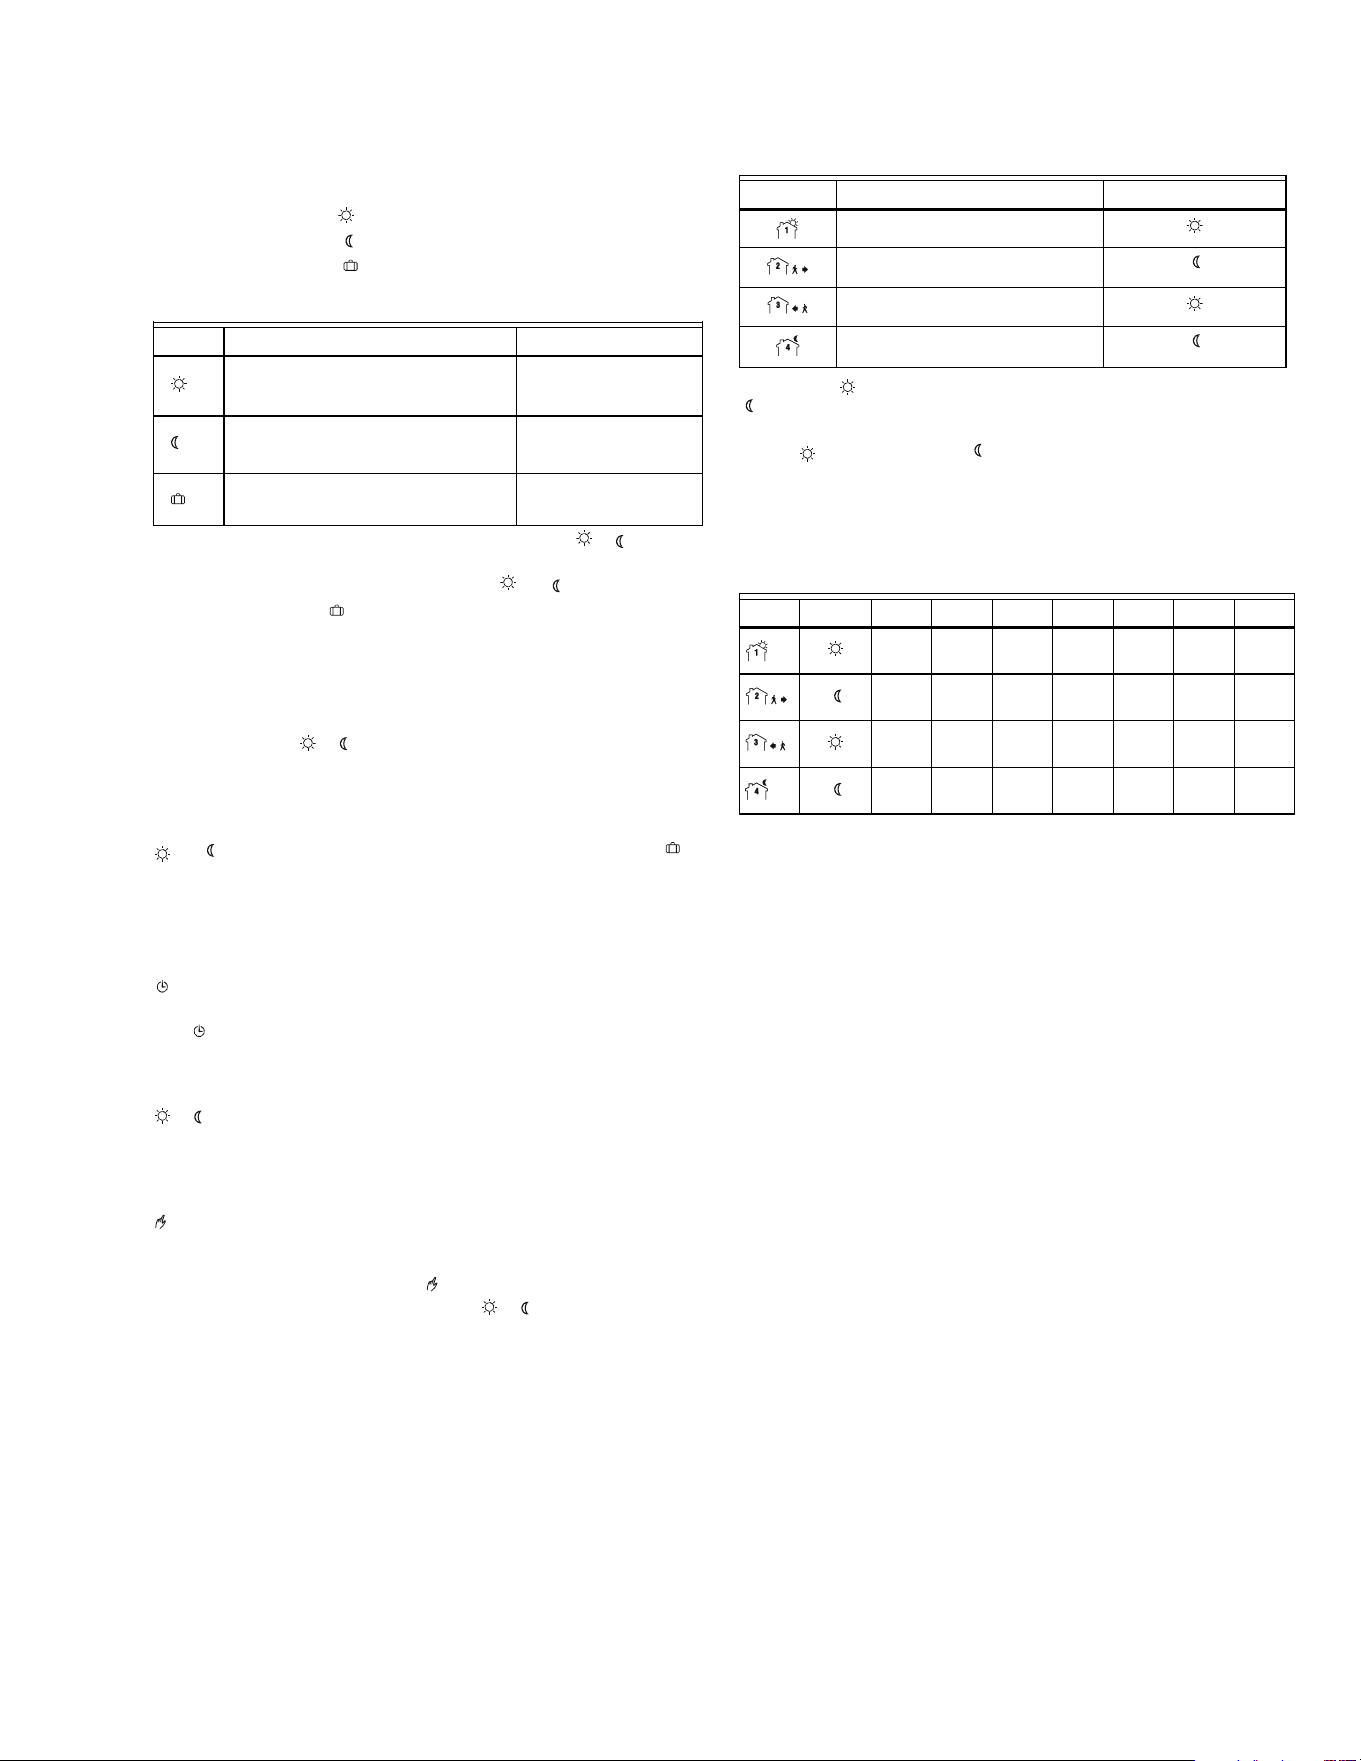
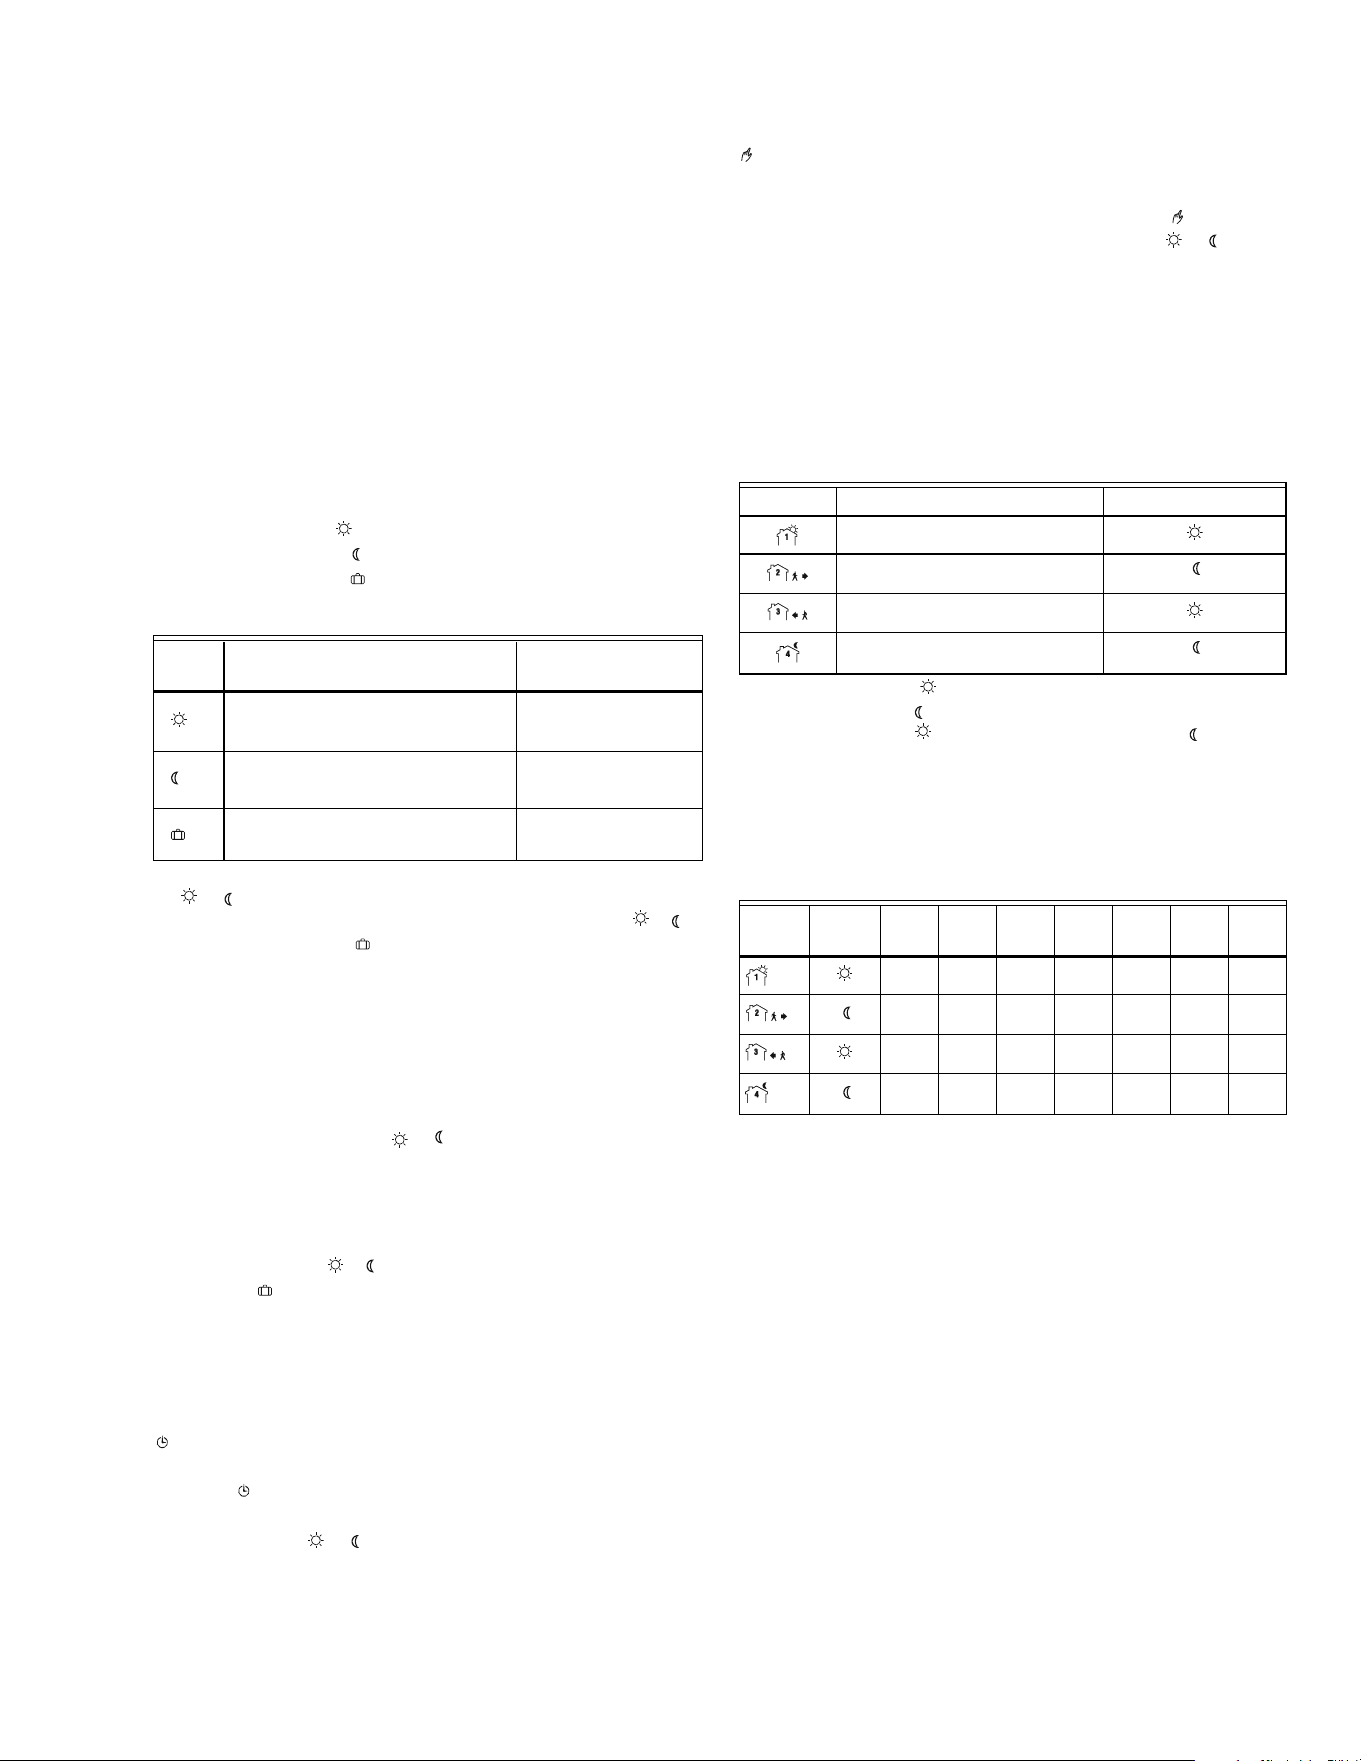
2. Connect the thermostat wires to the line wires and to the load wires
using solderless connectors for copper wires.
Fig. 3.
3. Push any excess wire back into the electrical box.
Fig. 4.
NOTE: If necessary, before re-installing the front component, configure
the thermostat (see “Configuration” on page 2).
4. Return power to heating system.
CONFIGURATION
The configuration switches are on the back of the thermostat. The factory
settings are indicated by the gray cells in the following table.
Fig. 5.
Table 1.
a. Early Start can be used in Automatic mode only. When this function is
enabled, the thermostat calculates the optimal time to start heating in
order to obtain the desired temperature by the set time. The thermostat re-
assesses the start time daily based on the previous day’s performance.
b. Select 15-second cycles in most cases as it provides better temperature
control. However, you must select 15-minute cycles if you have a fan-
forced heater. The word FAN is displayed when 15-minute cycles are
selected.
c. The settings are locked. The temperature adjustment buttons only allow
you to view the temperature setpoint.
CLOCK AND DAY SETTING
1. Press the Hour button to set the hour.
2. Press the Min button to set the minutes.
3. Press the Day button to set the day.
4. Press the Mode button to end.
Daylight Savings Time
The thermostat can automatically re-adjust its clock at Daylight Savings
Time changeover. When this function is enabled (On), the thermostat
switches to Daylight Savings Time on the second Sunday of March and to
normal time on the first Sunday of November.
NOTE: The function is disabled (default setting) when the clock loses its
setting.
1. Press the Day button (3 seconds) until DLS appears on
the screen.
2. Press either of the VW buttons to toggle between On
(enabled) and Off (disabled).
3. Press the Day button briefly. The year setting is dis-
played.
4. Press either of the VW buttons to set the current year.
5. Press the Day button briefly. The month setting is dis-
played.
6. Press either of the VW buttons to set the current month.
7. Press the Day button briefly. The date setting is dis-
played.
8. Press either of the VW buttons to set the current date.
9. Press the Mode button to end.
TEMPERATURE SETTING
Setpoint
The thermostat normally displays the actual temperature. To view the
setpoint, press the V or W button briefly. The setpoint will appear for the
next 5 seconds.
To change the setpoint, press the V or W button until the desired
temperature is displayed. To scroll faster, hold the button.
2-WIRE INSTALLATION
4-WIRE INSTALLATION
M38001
NOTE: VERIFY THIS COMPLIES WITH LOCAL CODE.
M38002
1 2 3 4
M38003
SW1
Early Start
a
Off On
SW2 Display format °C / 24-hour °F / 12-hour
SW3
Cycle length
b
15 seconds 15 minutes
SW4
Keypad lock
c
Off On
RLV450
3 69-2201EF—08
Using a preset temperature
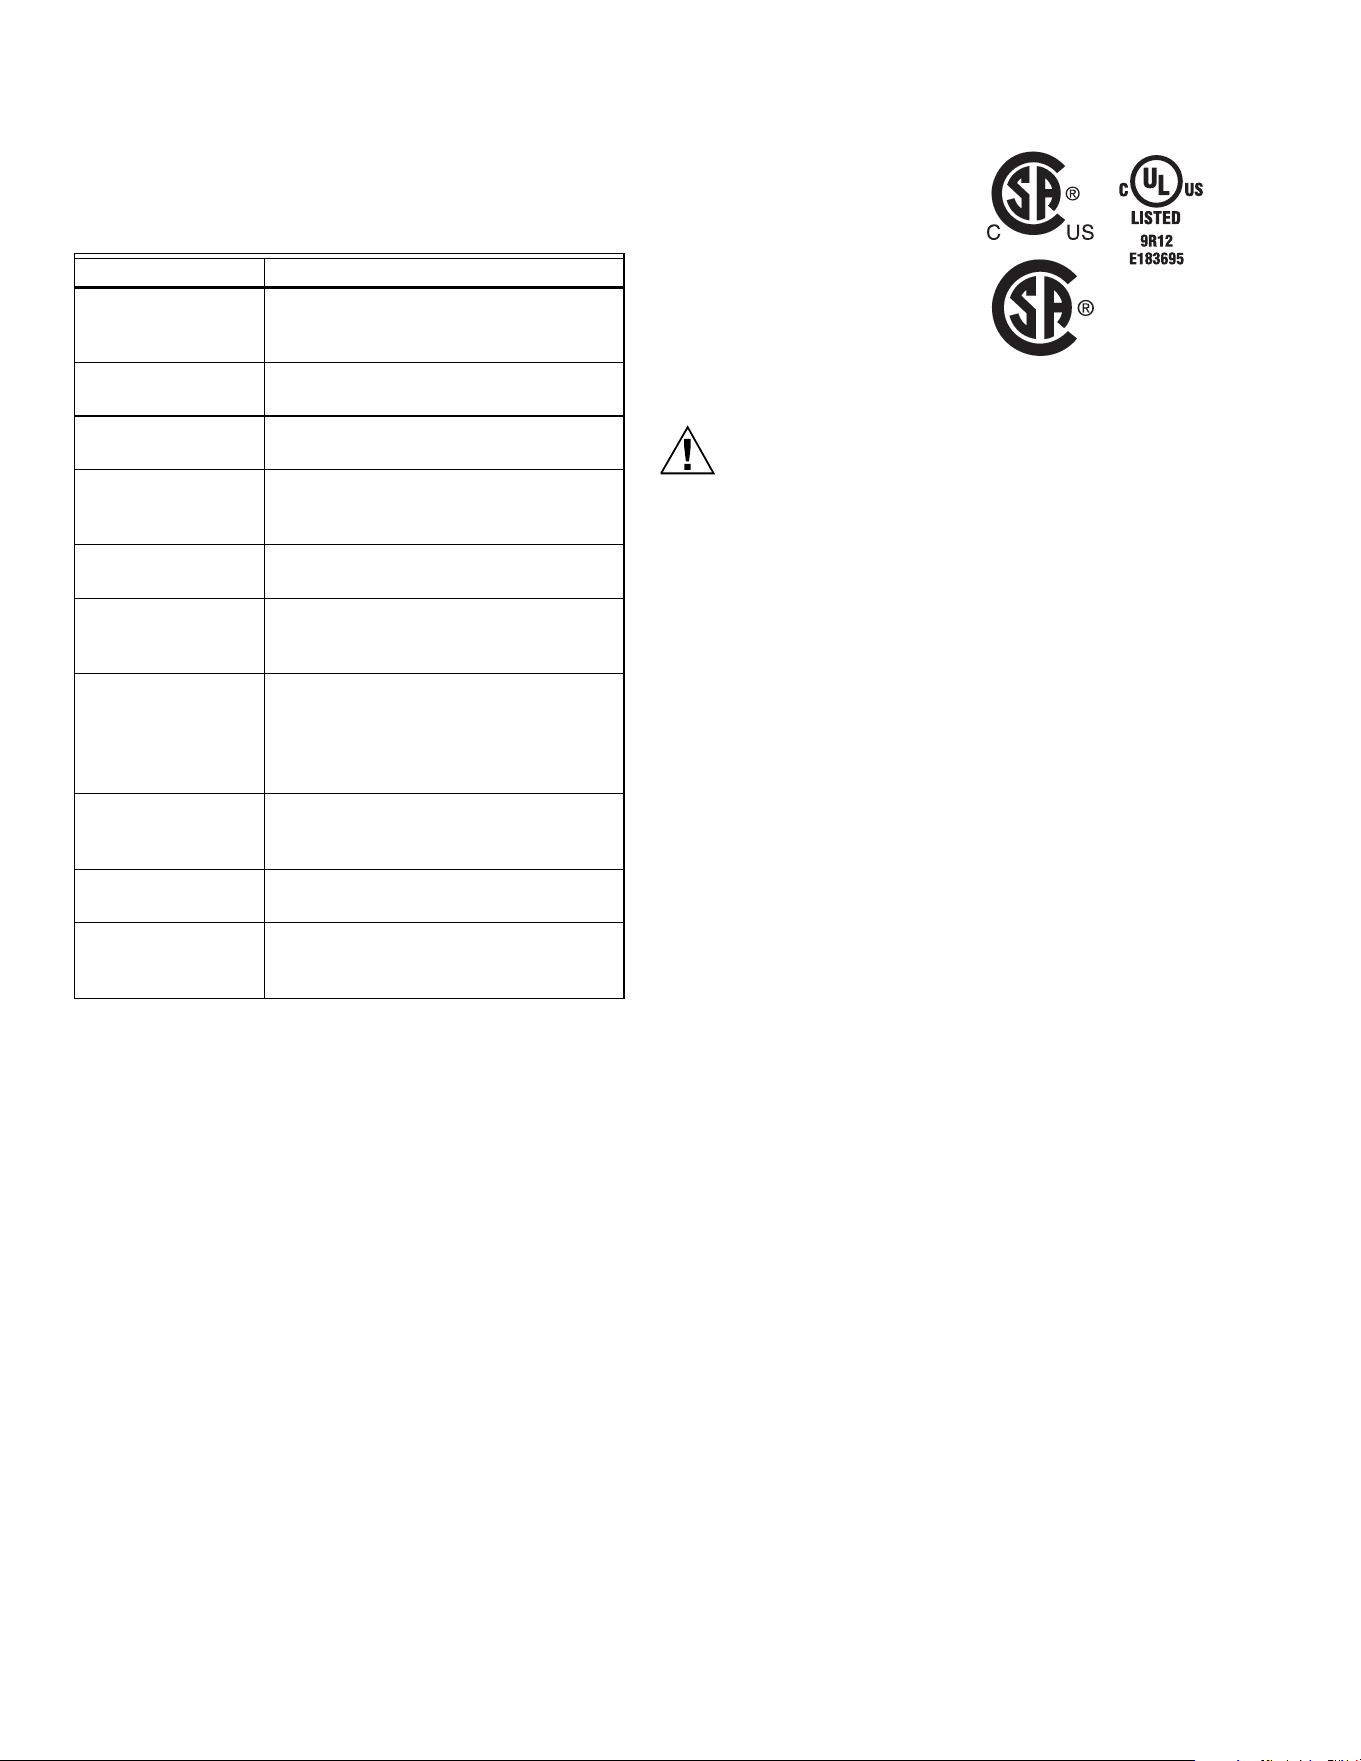
The thermostat has 3 preset temperatures:
• Comfort temperature
• Economy temperature
• Vacation temperature
Table 2.
• To use the Comfort or Economy temperature, press the or button
respectively. The corresponding icon will be displayed.
• To use the Vacation temperature, press both and buttons
simultaneously. The icon will be displayed.
Storing a preset temperature
To store the Comfort or Economy temperature:
Set the desired temperature using the V or W button. Press and hold the
appropriate button ( or ) for approximately 3 seconds until the
corresponding icon is displayed.
To store the Vacation temperature:
Set the desired temperature using the V or W button. Press and hold both
and buttons simultaneously for approximately 3 seconds until the
icon is displayed.
MODES OF OPERATION
Automatic - The temperature is set according to the programmed
schedule. To place the thermostat in this mode, press the Mode button
until is displayed. The icons of the current period and preset temperature
are also displayed.
Temporary Bypass - If you modify the setpoint (by pressing the V, W
or button) when the thermostat is in automatic mode, the new setpoint
will be used until the end of the current period. When the next period starts,
the temperature set for that period becomes the new setpoint. To cancel the
bypass, press the Mode button.
Manual - The programmed schedule is not used. The temperature must
be set manually. To place the thermostat in this mode:
1. Press the Mode button until is displayed.
2. Set the temperature using the V, W or button.
SCHEDULE
The schedule consists of 4 periods per day which represents a typical
weekday. You can program the thermostat to skip the periods that do not
apply to your situation. For example, you can skip periods 2 and 3 for the
weekend.
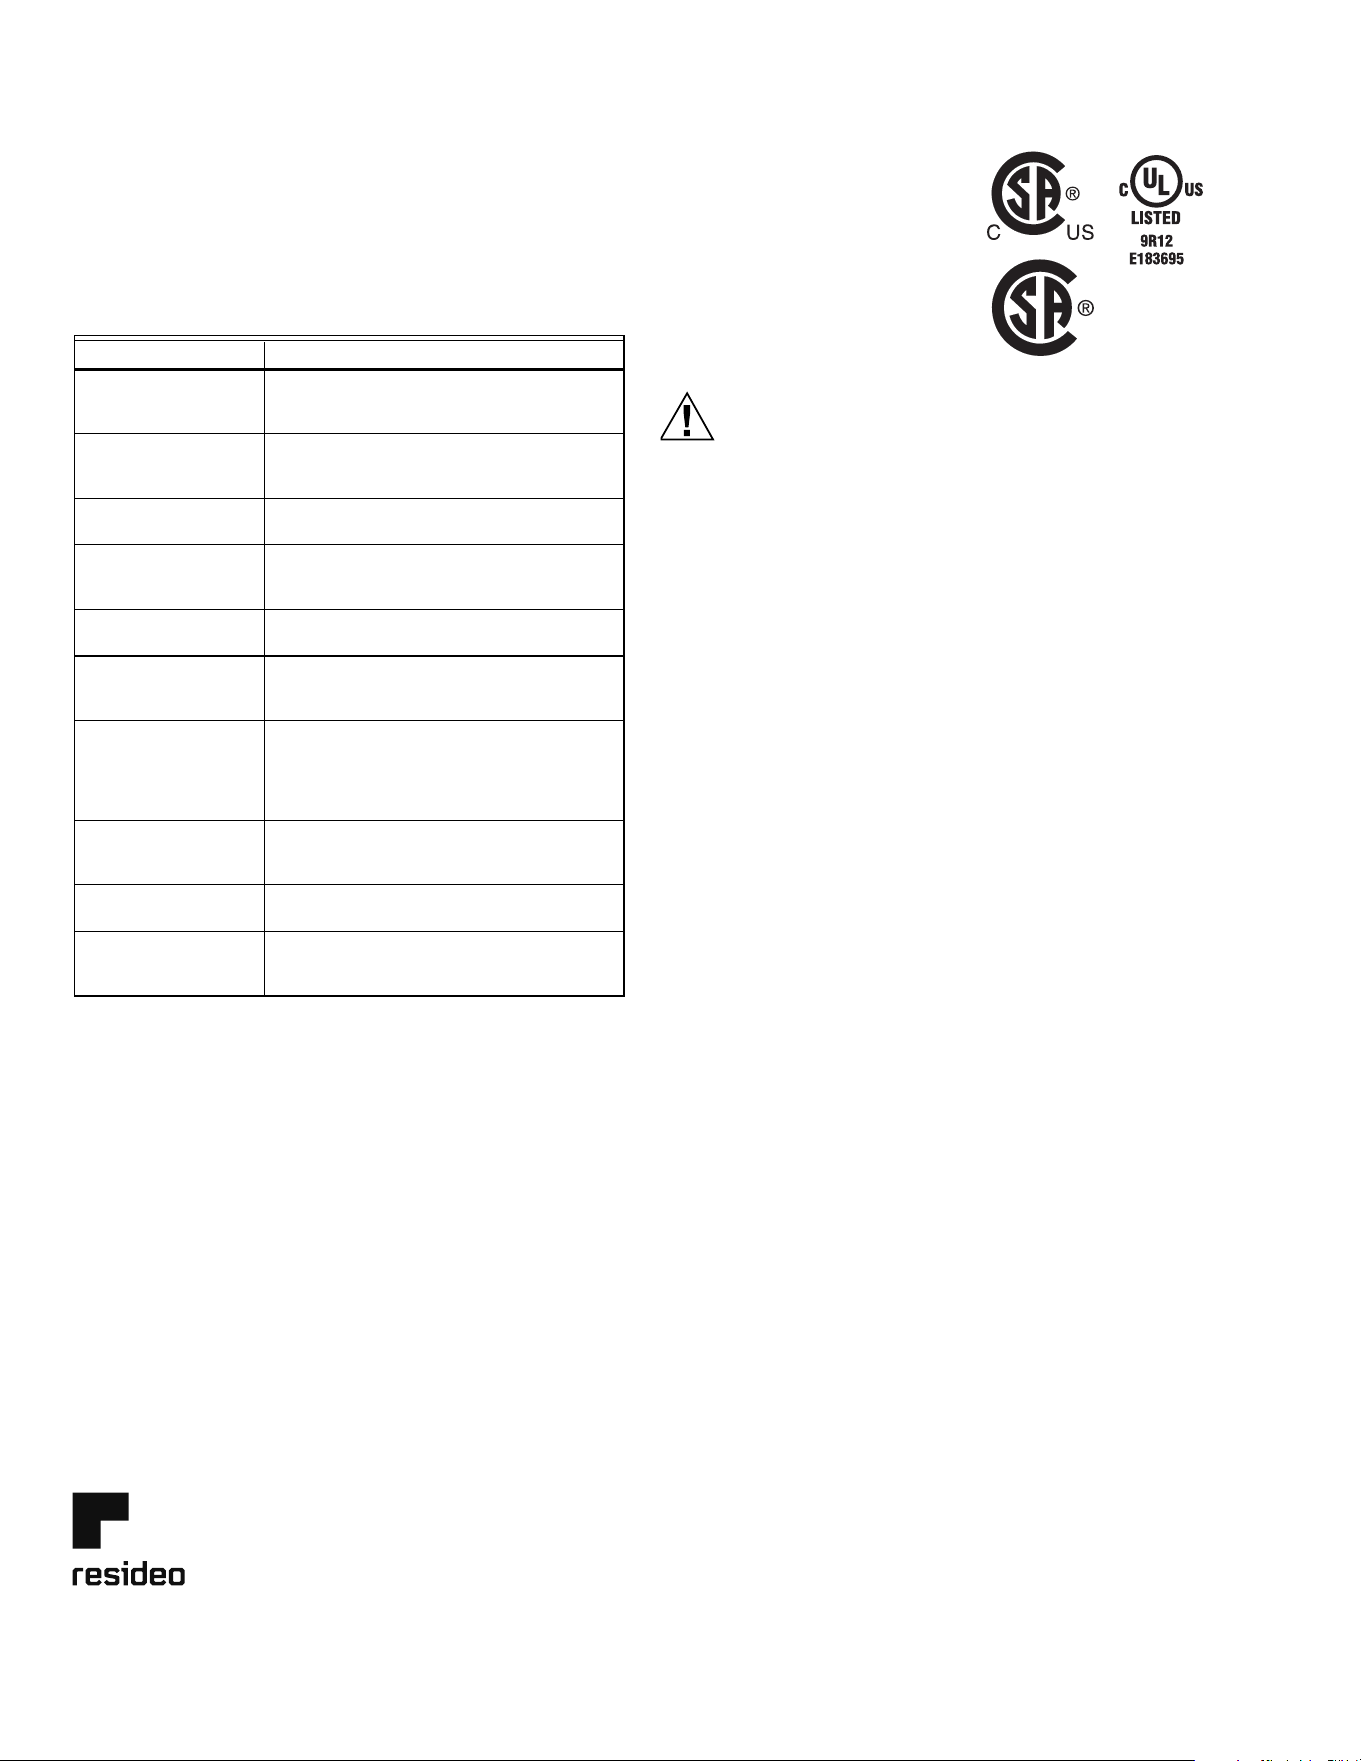
Table 3.
The Comfort ( ) temperature is used in periods 1 and 3 and the Economy
( ) temperature is used in periods 2 and 4. For example, when the period
changes from 1 to 2, the setpoint automatically changes from Comfort
setting ( ) to Economy setting ( ).
You can have a different program for each day of the week; i.e., each period
can start at different time for each day of the week. The thermostat has been
programmed with the following schedule.
Table 4.
To modify the schedule:
1. Press Pgm to access the programming mode. Period 1 is selected.
2. Press Day to select the day to program (hold for 3 seconds to select
the entire week).
3. Press Hour and Min to set the start time of the selected period, or
press Clear if you want to skip the period (--:-- is displayed).
4. Press Pgm to select another period, or press Day to select another
day. Then repeat step 3.
5. Press Mode to exit the programming mode.
NOTE: If no button is pressed for 60 seconds, the thermostat will auto-
matically exit the programming mode.
POWER OUTAGE
During a power outage, LP (Low Power) appears for the first minute. Then
the screen becomes blank. The settings are stored in memory. After initial
installation, product must be connected to power for a minimum of two hours
to enable the power outage feature. However, if the power failure exceeds 4
hours, only the thermostat’s clock must be re-adjusted. When power returns,
the thermostat will return to the mode of operation active prior to the power
failure.
Icon Intended use Factory setting
Comfort (when at home) 21°C (70°F)
Economy (when asleep or away from
home)
16.5°C (62°F)
Vacation (during prolonged absence) 10°C (50°F)
Period Description Setting
Wake
Leave
Return
Sleep
Period Setting MO TU WE TH FR SA SU
6:00
AM
6:00
AM
6:00
AM
6:00
AM
6:00
AM
6:00
AM
6:00
AM
8:00
AM
8:00
AM
8:00
AM
8:00
AM
8:00
AM
--:-- --:--
6:00
PM
6:00
PM
6:00
PM
6:00
PM
6:00
PM
--:-- --:--
10:00
PM
10:00
PM
10:00
PM
10:00
PM
10:00
PM
10:00
PM
10:00
PM
RLV450
69-2201EF—08 4
TROUBLESHOOTING
TECHNICAL SPECIFICATIONS
Power:
120/240 VAC, 50/60 Hz
Minimum load:
2 A (resistive only)
250 W @ 120 VAC
500 W @ 240 VAC
Maximum load:
16.7 A (resistive only)
2000 W @ 120 VAC
4000 W @ 240 VAC
Display range:
0°C to 60°C (32°F to 140°F)
Display resolution:
0.5°C (1°F)
Setpoint range:
5°C to 30°C (40°F to 86°F)
Setpoint interval:
0.5°C (1°F)
Storage:
-20°C to 50°C (-4°F to 120°F)
Approval:
CSA / UL
ICES-003 Class B Notice:
This Class B digital apparatus complies
with Canadian ICES-003.
CAUTION
ELECTRONIC WASTE NOTICE
The product should not be disposed of with other household waste.
Check for the nearest authorized collection centers or authorized
recyclers. The correct disposal of end-of-life equipment will help
prevent negative consequences for the environment and human
health.
WARRANTY
Resideo warrants this product, excluding battery, to be free from defects in
workmanship or materials, under normal use and service, for a period of one (1) year
from the date of first purchase by the original purchaser. If at any time during the
warranty period the product is determined to be defective due to workmanship or
materials, Resideo shall repair or replace it (at Resideo’s option).
If the product is defective,
(i) return it, with a bill of sale or other dated proof of purchase, to the place from which
you purchased it; or
(ii) call Resideo Customer Care at 1-800-468-1502. Customer Care will make the
determination whether the product should be returned to the following address:
Resideo Return Goods, 1985 Douglas Dr. N., Golden Valley, MN 55422, or whether a
replacement product can be sent to you.
This warranty does not cover removal or reinstallation costs. This warranty shall not
apply if it is shown by Resideo that the defect was caused by damage which occurred
while the product was in the possession of a consumer.
Resideo’s sole responsibility shall be to repair or replace the product within the terms
stated above. RESIDEO SHALL NOT BE LIABLE FOR ANY LOSS OR DAMAGE OF ANY
KIND, INCLUDING ANY INCIDENTAL OR CONSEQUENTIAL DAMAGES RESULTING,
DIRECTLY OR INDIRECTLY, FROM ANY BREACH OF ANY WARRANTY, EXPRESS OR
IMPLIED, OR ANY OTHER FAILURE OF THIS PRODUCT.
Some states do not allow the exclusion or limitation of incidental or consequential
damages, so this limitation may not apply to you.
THIS WARRANTY IS THE ONLY EXPRESS WARRANTY RESIDEO MAKES ON THIS
PRODUCT. THE DURATION OF ANY IMPLIED WARRANTIES, INCLUDING THE
WARRANTIES OF MERCHANTABILITY AND FITNESS FOR A PARTICULAR PURPOSE,
IS HEREBY LIMITED TO THE one YEAR DURATION OF THIS WARRANTY. Some states
do not allow limitations on how long an implied warranty lasts, so the above limitation
may not apply to you.
This warranty gives you specific legal rights, and you may have other rights which vary
from state to state. If you have any questions concerning this warranty, please write
Resideo Customer Care, 1985 Douglas Dr, Golden Valley, MN 55422 or call 1-800-
468-1502.
CUSTOMER ASSISTANCE
If you have any questions about the operation of your thermostat, please go
to resideo.com.
Table 5.
Problem Solutions
Thermostat is hot. Under normal operation, the thermostat housing
can reach a temperature between 35°C (95°F)
and 40°C (104°F).
LO is displayed. The measured temperature is below the display
range. Heating is activated.
HI is displayed. The measured temperature is above the display
range.
Wrong temperature is
displayed.
The thermostat is exposed to air draft. Eliminate
the draft. Verify the sticker on the thermostat
screen has been removed.
Wrong time is displayed. The thermostat was without power for more than
4 hours.
Temperature does not
change according to the
programmed schedule.
Check that the thermostat is in Automatic mode.
Check the schedule and clock settings.
LP appears on the
screen or the screen is
blank despite there is no
power outage.
The thermal circuit breaker in the heater is
opened. This can happen if the heater is
obstructed by furniture or curtain and has
overheated, or if the thermal circuit breaker is
defective.
Display looks faded when
heating is activated
The heating system is less than the required
minimum load. This thermostat cannot be used
below that rating.
The settings cannot be
changed.
The settings are locked (see “Configuration” on
page 2).
E1 or E2 is displayed. The thermostat performance is reduced due to a
sensor error. Please contact technical support for
more information.
273699
Energy Verified
Only
GUIDE DE L’UTILISATEUR
RLV450
THERMOSTAT PROGRAMMABLE
LIRE AVANT L’INSTALLATION
DESCRIPTION
* LP apparaît seulement pendant les deux premières minutes lorsque le
thermostat est hors tension. Ceci peut se produire durant une panne de
courant ou lorsque le disjoncteur thermique de la plinthe électrique est
ouvert.
Fig. 1.
Ce thermostat programmable peut servir à commander un appareil de
chauffage électrique tel qu’une plinthe électrique, un plafond radiant, un
plancher chauffant, un convecteur ou un ventiloconvecteur.
Le thermostat ne peut être utilisé avec :
• une charge résistive supérieure à 16,7 A.
• une charge résistive inférieure à 2 A.
• un système muni d’un contacteur ou un relais (charge inductive).
• un système de chauffage central.
PIÈCES FOURNIES :
• Un (1) thermostat
• Deux (2) vis de montage 6-32
• Deux (2) connecteurs sans soudure
INSTALLATION
AVERTISSEMENT
COUPER L'ALIMENTATION DU SYSTÈME DE CHAUFFAGE AFIN
D'ÉVITER TOUT RISQUE DE CHOC ÉLECTRIQUE.
L’INSTALLATION DOIT ÊTRE EFFECTUÉE PAR UN
ELECTRICIEN.
Tous les câbles et les raccordements doivent être conformes au
code d’électricité local.
Pour le raccordement à des fils d’aluminium, utiliser des raccords
identifiés CO/ALR.
Installer le thermostat sur une boîte électrique.
Installer le thermostat à environ 1,5 mètres du sol, sur une cloison
intérieure faisant face à l’appareil de chauffage.
Éviter les endroits où il y a des courants d’air (comme le haut d’un
escalier ou une sortie d’air), des points d’air stagnant (comme
derrière une porte), des rayons de soleil.
Ne pas installer le thermostat sur un mur qui dissimule des
conduits d’air ou d’une cheminée.
Les fils du thermostat ne sont pas polarisés; le sens du
branchement n’a donc aucune importance.
REMARQUE : S’assurer que les ouvertures d'aération du thermostat
soient propres et dégagées.
1.
Fig. 2.
Boutons d’ajustement de
température
Indique la puissance de
chauffage
Indique que le thermostat
est configuré pour un venti-
loconvecteur
Indique la période en
cours (apparaît en mode
automatique seulement)
Indique que le thermostat
est hors tension *
Sélectionner le mode
Sauter une période
Programmer l’horaire
Icône de préréglage
Indique le mode en cours
Température
Régler les minutes
Régler l’heure
Indique que la tempéra-
ture de consigne est affi-
chée
Boutons de préréglage de
température
Heure et jour
Indique que les réglages
sont verrouillés
Régler le jour
M38000
RLV450
69-2201EF—08 6
2. Raccorder les fils du thermostat aux fils du système de chauffage
électrique et de l'alimentation au moyen de connecteurs sans
soudure pour fils de cuivre.
Fig. 3.
3. Insérer les excès de fils dans la boîte électrique.
Fig. 4.
REMARQUE : Au besoin, configurer le thermostat
(consulter « Configuration » à la page 6) avant de réin-
staller la façade.
4. Mettre le système sous tension.
CONFIGURATION
Les commutateurs de configuration sont à l’arrière du thermostat. Les
préréglages en usine sont indiqués par les cases grises dans le tableau
suivant.
Fig. 5.
Tableau 1.
a. Le démarrage anticipé fonctionne dans le mode automatique seulement.
Quand cette fonction est permise, le thermostat calcule l'heure optimale
pour débuter le chauffage afin d'obtenir la température désirée à l’heure
réglée. Le thermostat réévalue l'heure de début quotidiennement basée
sur la performance de la veille.
b. Sélectionner les cycles de 15 secondes dans la majorité des cas pour une
meilleure régulation de température. Cependant, vous devez sélectionner
les cycles de 15 minutes si vous utiliser un ventiloconvecteur. Le mot
FAN est affiché lorsque les cycles de 15 minutes sont sélectionnés.
c. Les réglages ne peuvent être modifiés. Les boutons d’ajustement de
température permettent seulement d’afficher la température de consigne.
RÉGLAGES DE L’HEURE ET DU
JOUR
1. Appuyer sur le bouton Hour pour régler l’heure.
2. Appuyer sur le bouton Min pour régler les minutes.
3. Appuyer sur le bouton Day pour régler le jour.
4. Appuyer sur le bouton Mode pour terminer.
Heure avancée
Le thermostat peut passer automatiquement à l’heure avancée et à l’heure
normale. Lorsque cette fonction est activée, le thermostat passe à l’heure
avancée le deuxième dimanche de mars et à l’heure normale le premier
dimanche de novembre.
REMARQUE : Le thermostat peut passer automatiquement à l’heure
avancée et à l’heure normale. Lorsque cette fonction est
activée, le thermostat passe à l’heure avancée le deux-
ième dimanche de mars et à l’heure normale le premier
dimanche de novembre.
1. Appuyer sur le bouton Day (3 secondes) jusqu’à ce que
DLS apparaisse à l’écran.
2. Appuyer sur l’un des boutons VW pour basculer entre
On (fonction activée) et Off (fonction désactivée).
3. Appuyer brièvement sur le bouton Day. L’année est
affichée.
4. Appuyer sur l’un des boutons VW pour régler l’année
courante.
5. Appuyer brièvement sur le bouton Day. Le mois est
affiché.
6. Appuyer sur l’un des boutons VW pour régler le mois
courant.
7. Appuyer brièvement sur le bouton Day. Le jour du mois
est affiché.
8. Appuyer sur l’un des boutons VW pour régler le jour
courant.
9. Appuyer sur le bouton Mode pour terminer.
INSTALLATION À 2 FILS
INSTALLATION À 4 FILS
MF38001
REMARQUE : CONFIRMEZ LA CONFORMITÉ AUX
CODES LOCAUX EN VIGUEUR.
M38002
1 2 3 4
M38003
SW1
démarrage anticipé
a
désactivé activé
SW2 format d’affichage °C / 24 heures °F / 12 heures
SW3
durée des cycles
b
15 secondes 15 minutes
SW4
verrouillage des réglages
c
désactivé activé
RLV450
7 69-2201EF—08
RÉGLAGE DE LA
TEMPÉRATURE
Consigne
Le thermostat affiche normalement la température mesurée. Pour voir la
consigne, appuyer sur le bouton V ou W brièvement. La consigne sera
affichée pendant les 5 prochaines secondes.
Pour changer la consigne, appuyer sur le bouton V ou W jusqu’à ce que la
température désirée soit affichée. Pour faire défiler la consigne plus
rapidement, maintenir le bouton enfoncé.
Utilisation des préréglages de température
Le thermostat a 3 préréglages de température :
• Température Confort
• Température Économie
• Température Vacances
Tableau 2.
• Pour utiliser la température Confort ou Économie, appuyer sur le bouton
ou L’icône correspondante sera affichée.
• Pour utiliser la température Vacances, appuyer sur les boutons et
simultanément. L’icône sera affichée.
Enregistrement des préréglages de
température
Pour enregistrer le préréglage de température Confort
ou Économie :
Régler la température désirée à l'aide du bouton V ou W Appuyer sur le
bouton de préréglage approprié ( ou ) pendant 3 secondes jusqu’à ce
que l’icône correspondante soit affichée.
Pour enregistrer le préréglage de température
Vacances :
Régler la température désirée à l'aide du bouton V ou W. Appuyer sur les
boutons de préréglages et simultanément pendant 3 secondes jusqu’à
ce que l’icône soit affichée.
MODES DE
FONCTIONNEMENT
Automatique - le thermostat utilise les réglages de l’horaire. Pour
placer le thermostat dans ce mode, appuyer sur le bouton Mode jusqu’à ce
que l’icône soit affichée. La période courante est aussi affichée.
Dérogation temporaire - si vous modifiez la consigne (en appuyant
sur le bouton V, W ou ) lorsque le thermostat est en mode
automatique, la nouvelle consigne sera utilisée jusqu'à la fin de la période
courante. Lors du début de la prochaine période, la température réglée pour
la période en question devient la nouvelle consigne. Pour annuler la
dérogation, appuyer sur le bouton Mode.
Manuel - l’horaire n’est pas utilisé. Le réglage de la température doit
être fait manuellement. Pour placer le thermostat dans ce mode :
1. Appuyer sur le bouton Mode jusqu’à ce que l’icône soit affichée.
2. Régler la température en utilisant le bouton V, W ou .
HORAIRE
L’horaire comprend 4 périodes par jour. Vous pouvez programmer le
thermostat pour sauter les périodes qui ne sont pas applicables à votre
situation. Par exemple, vous pouvez sauter les périodes 2 et 3 pour la fin de
semaine.
Tableau 3.
La température Confort ( ) est utilisée dans les périodes 1 et 3 et la
température Économie ( ) est utilisée dans les périodes 2 et 4. Par exemple,
la température Confort ( ) passe à la température Économie ( ) lorsque la
période 1 passe à la période 2.
Vous pouvez avoir un programme différent pour chaque jour de la semaine,
c.-à-d. chaque période peut commencer à une heure différente pour chaque
jour de la semaine. Le thermostat a été programmé avec l’horaire suivant.
Tableau 4.
Pour modifier l’horaire :
1. Appuyer sur Pgm pour accéder au mode de programmation. La
période 1 est sélectionnée.
2. Appuyer sur Day pour sélectionner le jour à programmer (appuyer
pendant 3 secondes pour sélectionner la semaine entière).
3. Appuyer sur Hour et Min pour régler l’heure du début de la péri-
ode sélectionnée, ou appuyer sur Clear pour sauter la période (--:--
est affiché).
4. Appuyer sur Pgm pour sélectionner une autre période ou appuyer
sur Day pour sélectionner un autre jour. Ensuite répéter l’étape 3.
5. Appuyer sur Mode pour sortir du mode de programmation.
REMARQUE : Si on n’appuie sur aucun bouton pendant 60 secondes, le
thermostat sortira automatiquement du mode de pro-
grammation.
PANNE DE COURANT
Lors d'une panne de courant, la mention LP (Low Power) s’affiche pendant
la première minute. Ensuite l’écran s’éteint. Les réglages sont sauvegardés.
Après l’installation initiale, le produit doit être raccordé à une alimentation
électrique pendant au moins deux heures pour activer la fonction de
Icône Utilisation prévue
Préréglages
en usine
Confort (l’occupant est à la maison) 21°C (70°F)
Économie (l’occupant est absent
durant le jour ou couché)
16.5°C (62°F)
Vacances (absence prolongée) 10°C (50°F)
Période Description Réglage
Réveil
Départ
Retour
SCoucherleep
Période Réglage
LU
(MO)
MA
(TU)
ME
(WE)
JE
(TH)
VE
(FR)
SA
(SA)
DI
(SU)
6:00 6:00 6:00 6:00 6:00 6:00 6:00
8:00 8:00 8:00 8:00 8:00 --:-- --:--
18:00 18:00 18:00 18:00 18:00 --:-- --:--
22:00 22:00 22:00 22:00 22:00 22:00 22:00
RLV450
© 2021 Resideo Technologies, Inc. All rights reserved.
The Honeywell Home trademark is used under license from Honeywell International, Inc. This product is manufactured by Resideo Technologies, Inc. and its affiliates.
Tous droits réservés. La marque de commerce Honeywell Home est utilisée avec l’autorisation d’Honeywell International, Inc.
Ce produit est fabriqué par Resideo Technologies, Inc. et ses sociétés affiliées.
www.resideo.com
Resideo Technologies, Inc.
1985 Douglas Drive North, Golden Valley, MN 55422
69-2201EF—08 M.S. Rev. 06-21 | Printed in United States | Imprimé aux États-Unis
sauvegarde en cas de panne de courant. Cependant, si la panne dure plus de
4 heures, seule l’horloge du thermostat devra être rajustée. Au retour du
courant, le thermostat retournera au mode actif précédant la panne.
PROBLÈMES ET SOLUTIONS
Tableau 5.
FICHE TECHNIQUE
Alimentation :
120/240 VCA, 50/60 Hz
Charge minimale :
2 A (résistive seulement)
250 W @ 120 VCA
500 W @ 240 VCA
Charge maximale :
16,7 A (résistive seulement)
2000 W @ 120 VCA
4000 W @ 240 VCA
Plage d’affichage :
0°C à 60°C (32°F à 140°F)
Résolution d’affichage :
0,5°C (1°F)
Plage de réglage :
5°C à 30°C (40°F à 86°F)
Intervalle de réglage :
0,5°C (1°F)
Entreposage :
-20°C à 50°C (-4°F à 120°F)
Homologation :
CSA / UL
Avis ICES-003 de classe B:
Cet appareil numérique de classe B est conforme
à la norme ICES-003
(Canada).
MISE EN GARDE
AVIS DE DÉCHETS ÉLECTRONIQUES
Ne disposez pas ce produit avec les autres ordures ménagères. Recherchez
les centres de collecte ou de recyclage accrédités les plus proches. La mise
au rebut appropriée de l’équipement en fin de vie aidera à prévenir tout
effet potentiellement nuisible à l’environnement et à la santé humaine.
GARANTIE
Resideo garantit ce produit, à l’exception des piles, contre tout défaut de pièce ou de
main-d’oeuvre, durant une période pour un (1) an à partir de la date d’achat par le
consommateur d’origine si le produit est utilisé et entretenu convenablement. En cas
de défaillance ou de mauvais fonctionnement pendant la période de garantie, Resideo
remplacera ou réparera le produit, à sa discrétion.
Si le produit est défectueux
(i) renvoyez-le avec la facture ou une autre preuve d’achat date au lieu d’achat; ou
(ii) appelez le service à la clientèle de Resideo en composant le 1-800-468-1502. Le
service à la clientèle déterminera si le produit doit être retourné à l’adresse suivante :
Resideo Return Goods, 1985 Douglas Dr. N., Golden Valley, MN 55422, ou si un
produit de remplacement peut vous être expédié.
La présente garantie ne couvre pas les frais de retrait ou de réinstallation. La présente
garantie ne s’applique pas s’il est démontré par Resideo que la défaillance ou le
mauvais fonctionnement sont dus à un endommagement du produit alors que le
consommateur l’avait en sa possession.
La responsabilité exclusive de Resideo se limite à réparer ou à remplacer le produit
conformément aux modalités susmentionnées. RESIDEO N’EST EN AUCUN CAS
RESPONSABLE DES PERTES OU DOMMAGES, Y COMPRIS LES DOMMAGES
INDIRECTS OU ACCESSOIRES DÉCOULANT DIRECTEMENT OU INDIRECTEMENT
D’UNE VIOLATION QUELCONQUE D’UNE GARANTIE, EXPRESSE OU TACITE,
APPLICABLE AU PRÉSENT PRODUIT, OU TOUTE AUTRE DÉFAILLANCE DU PRÉSENT
PRODUIT. Certaines provinces ne permettent pas l’exclusion ou la restriction des
dommages indirects ou accessoires et, par conséquent, la présente restriction peut ne
pas s’appliquer.
CETTE GARANTIE EST LA SEULE GARANTIE EXPRESSE FAITE PAR RESIDEO POUR
CE PRODUIT. LA DURÉE DE TOUTE GARANTIE IMPLICITE, INCLUANT LES
GARANTIES DE QUALITÉ MARCHANDE OU D’ADAPTATION À UNE UTILISATION
PARTICULIÈRE, EST LIMITÉE PAR LES PRÉSENTES À LA PÉRIODE DE UN AN DE LA
PRÉSENTE GARANTIE. Certaines provinces ne permettent pas de limiter la durée des
garanties tacites et, par conséquent, la présente limitation peut ne pas s’appliquer.
La présente garantie donne au consommateur des droits spécifiques et certains
autres droits qui peuvent varier d’une province à l’autre.
Pour toute question concernant la présente garantie, prière d’écrire aux Services à la
clientèle de Resideo à l’adresse suivante : Resideo Customer Relations, 1985 Douglas
Dr, Golden Valley, MN 55422 ou composer le 1-800-468-1502.
SERVICE À LA CLIENTÈLE
Si vous avez des questions sur le fonctionnement de votre thermostat,
veuillez consulter resideo.com.
Problèmes Solutions
Le thermostat est chaud. En fonctionnement normal, le boîtier du thermostat
peut atteindre une température entre 35°C (95°F) et
40°C (104°F).
Le thermostat affiche LO. La température mesurée est inférieure à la plage
d’affichage. Le chauffage est
activé.
Le thermostat affiche HI. La température mesurée est supérieure à la plage
d’affichage.
La température affichée est
erronée.
Il y a un courant d’air à proximité. Éliminer le courant
d’air. Assurez-vous que l’autocollant de l’écran du
thermostat a bien été retiré.
L’heure affichée est erronée. Le thermostat était hors tension pendant plus de 4
heures.
Le réglage de température
ne change pas selon
l’horaire.
S’assurer que le thermostat est en mode automatique.
Vérifier les réglages de l’horaire et de l’horloge du
thermostat.
LP apparaît à l’écran ou
l’écran est vide malgré qu’il
n’y a pas de panne de
courant.
Le disjoncteur thermique dans la plinthe est
temporairement ouvert. Ceci peut se produire suite à
une surchauffe lorsque la plinthe est obstruée par un
meuble ou un rideau, ou si le disjoncteur thermique est
défectueux.
L’affichage est pâle lorsque
le chauffage est activé.
Le système de chauffage est inférieur à la charge
minimale. Ce thermostat ne peut pas être utilisé en
dessous de cette valeur.
Les réglages ne peuvent
être modifiés.
Les réglages sont verrouillés (consulter «
Configuration » à la page 6).
E1 ou E2 est affiché.
Le rendement du thermostat est réduit en raison d’une
erreur de capteur. Veuillez communiquer avec le
soutien technique pour en savoir plus.
273699
Energy Verified
Only