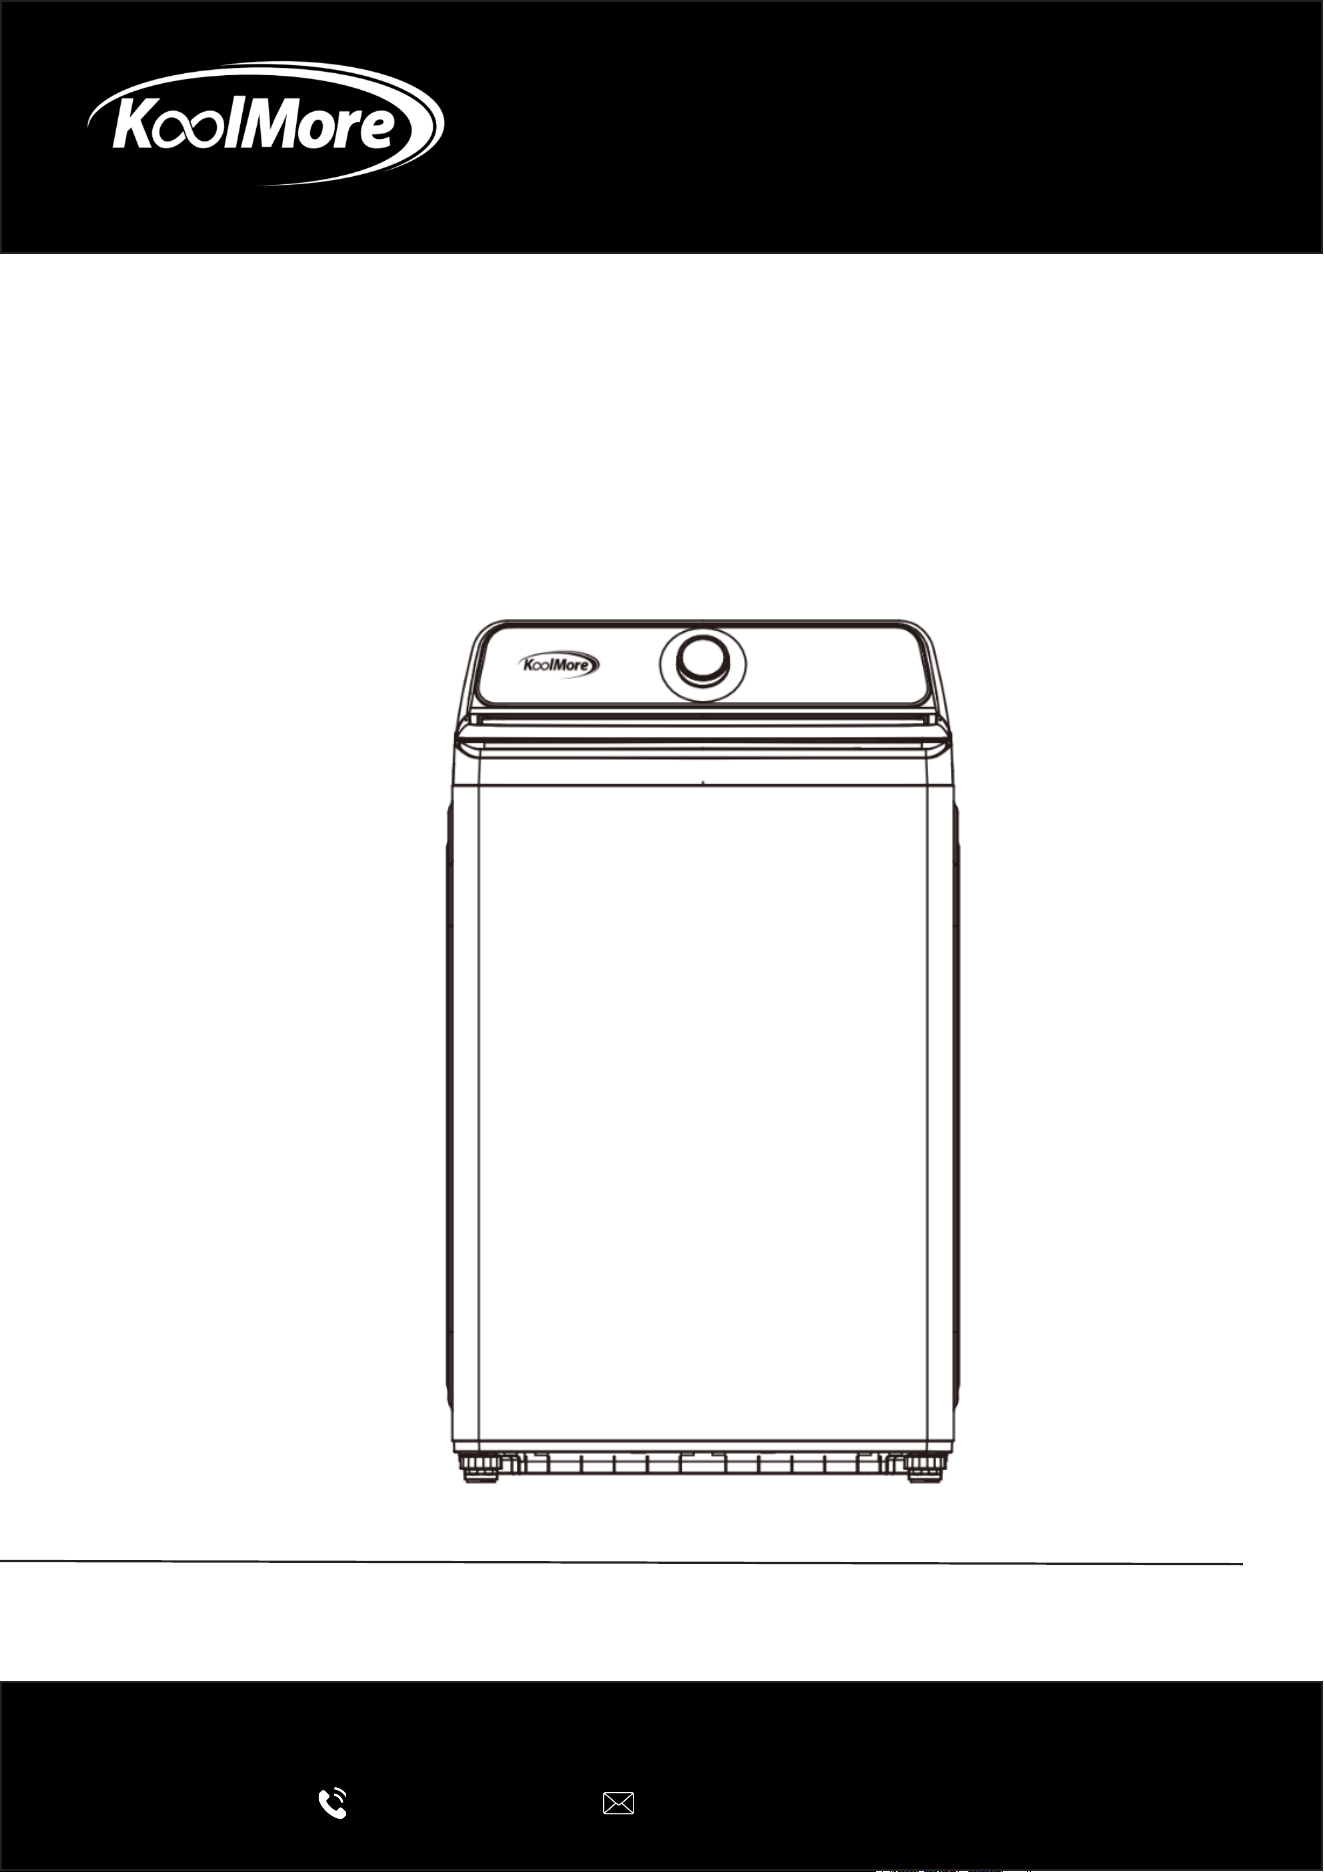
TOP-LOAD WASHER
25 Inch 4.1 Cu. Ft. Top Load Washer with
Agitator
USER MANUAL
Before use, please read these instructions carefully to ensure proper
operation and optimal performance.
For any service related issues, please contact us:
718-576-6342
suppor[email protected]
Model: KM-TLW-4CW
Stay informed with the latest information for your
KoolMore appliance.
Scan the QR code below to access the most up-to-date user manual.
If you need any assistance or have questions, our customer support
team is here to help.
Phone: 718-576-6342 Email: suppor[email protected]
Please write down the model number and serial number below for future reference. Both numbers are located on the
rating label on the back of your unit or inside the unit and are needed to obtain warranty service. You may also want
to staple your receipt to this manual as it is your proof of purchase and may also be needed for service
under warranty.
Model Number:
Serial Number:
Date of Purchase:
To better serve you, please do the following before contacting customer service:
If you received a damaged product, immediately contact the retailer or dealer that sold you the product.
Read and follow this User Manual carefully to help you install, use, and maintain your unit.
Refer to the Troubleshooting section of this manual as it will help you diagnose and solve many common issues.

3
Contents
Safety ............................................................................................. 4
Product Overview ........................................................................... 7
Installation ..................................................................................... 9
Operation ....................................................................................... 18
Cleaning and Maintenance ............................................................. 25
Troubleshooting ............................................................................. 27
Warranty ......................................................................................... 29

4
Important Safety Instructions
READ AND SAVE THESE INSTRUCTIONS
Your safety and the safety of others are very important.
This manual contains important safety information. Read and follow all instructions before install-
ing, operating, or servicing this appliance.
Failure to follow these instructions may result in personal injury, property damage, electric shock,
re, or death.
Safety Symbols
WARNING
Indicates a hazardous situation that could result in serious injury or death.
CAUTION
Indicates a hazardous situation that could result in minor injury or product or property damage.
NOTICE
Indicates important installation, operation, or maintenance information.
California Proposition 65 Warning
WARNING
This product may expose you to chemicals including benzene, formaldehyde, and carbon monox-
ide, which are known to the State of California to cause cancer, birth defects, or other reproductive
harm.
For more information, visit:
www.P65Warnings.ca.gov
General Safety Precautions
WARNING
• Read all instructions before using the appliance.
• Use this appliance only for its intended purpose as described in this manual.
• The washer must be properly installed and grounded in accordance with the installation in-
structions before use.
• Do not install or store this appliance where it will be exposed to weather, moisture, or freezing
temperatures.
• Do not tamper with controls or safety devices.
Safety

5
• Do not repair or replace any part of the appliance unless specically recommended in this man-
ual.
• Disconnect power before servicing, cleaning, or performing maintenance.
• Do not operate the washer if it is damaged, malfunctioning, partially disassembled, or missing
components.
• Keep the area around the appliance free of combustible materials, gasoline, and other amma-
ble vapors or liquids.
• Do not add gasoline, dry-cleaning solvents, or other ammable substances to the wash water.
• Do not use an extension cord or adapter plug.
• Plug the power cord into a properly grounded 120V/60Hz outlet rated for 15 amps or greater.
• Do not remove the grounding prong from the power cord.
• Do not pull the power cord to unplug the appliance. Always grasp the plug rmly.
• Do not use a damaged power cord or loose electrical outlet.
• Do not excessively bend, twist, pinch, or place heavy objects on the power cord.
• If the power cord is damaged, it must be replaced by the manufacturer, service agent, or simi-
larly qualied technician.
• Keep packaging materials away from children. Plastic bags and foam materials may cause
suffocation.
Child Safety
WARNING
• Close supervision is necessary when the appliance is used near children.
• Do not allow children to play on, inside, or around the washer.
• Do not allow children to operate the appliance without supervision.
• Before discarding or removing the washer from service, remove the lid or door.
• Keep laundry products out of the reach of children.
Installation Safety
WARNING
• Install the washer on a solid, level oor capable of supporting the appliance when fully loaded.
• Do not install the appliance on carpet or unstable ooring.
• The washer is heavy. Two or more people may be required for installation or moving.
• Position the appliance so the power plug remains easily accessible.
• Do not install the washer near heat sources, open ames, or ammable materials.
• Do not install the appliance in areas where gas leaks may occur.
• If relocating the washer, have the unit inspected and reinstalled by qualied service personnel.
Operating Safety
WARNING
• Do not place hands inside the washer while the tub is moving.
• Before loading, unloading, or adding items, press Start/Pause and allow the tub to stop com-
pletely.
• Do not force the lid open while the washer is operating.
• Do not operate the washer with wet hands.

6
• Do not spray water directly onto the appliance.
• Do not stand on top of the appliance or place heavy objects on it.
• Do not place non-laundry items, pets, or food products inside the washer.
• Do not wash items contaminated with gasoline, solvents, oils, waxes, or ammable chemicals.
• Do not wash waterproof mats, rugs, or rubber-backed materials unless specically approved by
the manufacturer.
• Ensure all pockets are empty before washing. Sharp objects may damage the washer or laun-
dry.
• Open the water faucet slowly after long periods of non-use.
• Ensure water supply hoses are properly connected and free from leaks before operation.
• Turn off water faucets when the washer is not in use.
Electrical Safety
WARNING
• This appliance must be properly grounded.
• Never connect the ground wire to a gas pipe, plastic water pipe, or telephone line.
• Failure to properly ground the appliance may result in electric shock, re, or explosion.
• Do not use electric transformers or unapproved electrical devices with this appliance.
• Disconnect the appliance from the power supply before attempting maintenance or cleaning.
• The Power button does not disconnect the appliance from the electrical supply.
Maintenance and Cleaning Safety
CAUTION
• Use only mild detergents and non-abrasive cleaning products.
• Do not use benzene, thinner, alcohol, or harsh solvents to clean the appliance.
• Do not use metal brushes, steel wool, or abrasive pads.
• Keep the washer clean and dry to prevent odors, mold, and residue buildup.
• If the appliance is ooded, disconnect power immediately and contact qualied service person-
nel.
• If the washer emits smoke, unusual odors, or abnormal noise, unplug the unit immediately and
contact service.
SAVE THESE INSTRUCTIONS
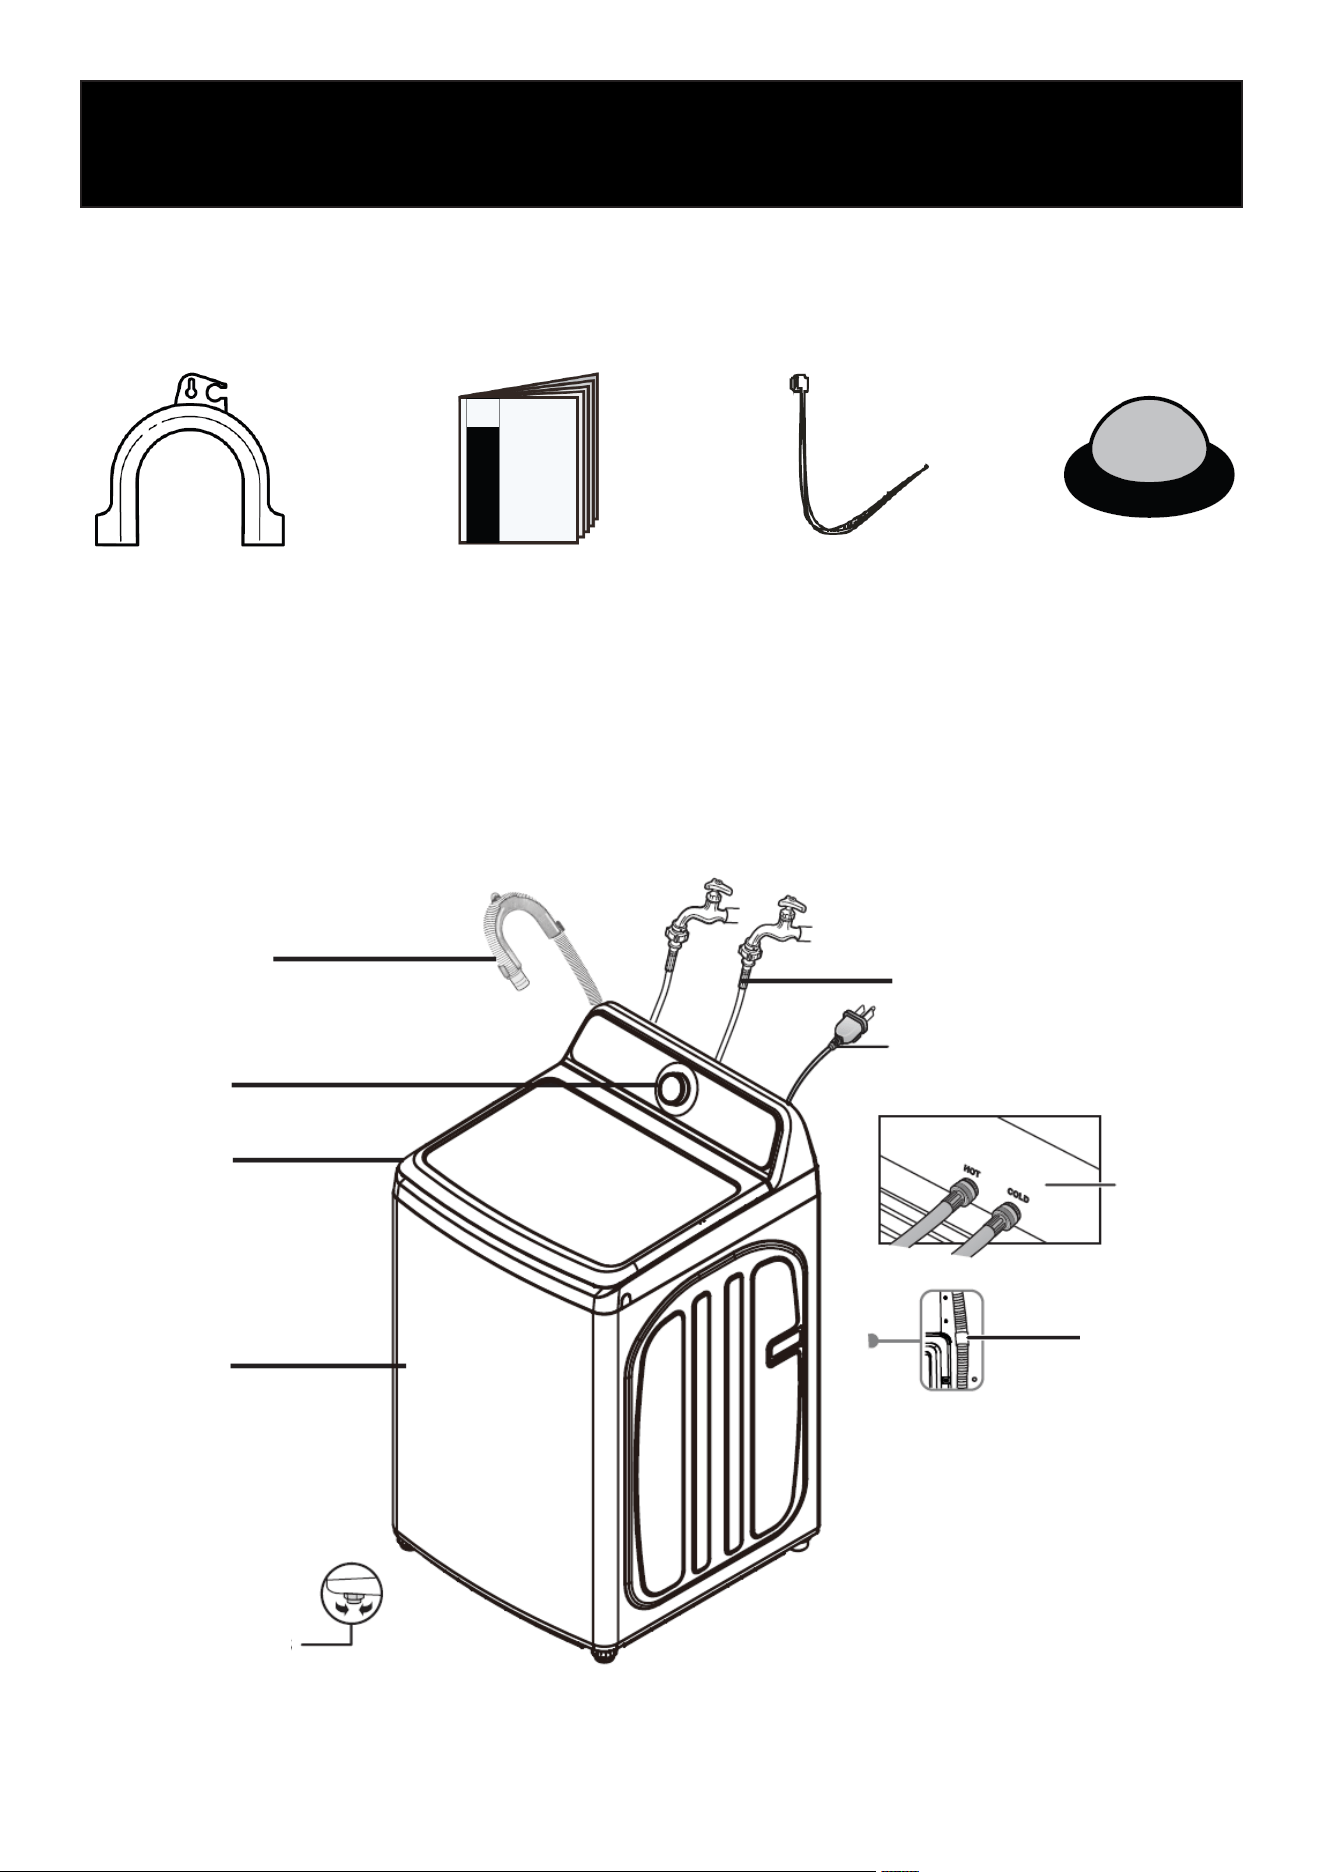
Drain Hose Guide (x1)
7
Product Overview
NOTE:
Install the supplied inlet lters into the water inlet hose connections on the faucet side before con-
necting the hoses.
Main Components
Package Contents
Verify that all parts listed below are included with your washer before installation:
Drain Hose Guide (x1) User Manual Hose Tie (x1) Water Inlet Filters (x2)
Drain Hose and
Hose Guide
Hot Water Inlet Connection
Cold Water Inlet Connection
Water Inlet
Valves (rear
of unit)
Hose Clamp
Mounting
Holes
Adjustable Leveling
Legs
Cabinet
Top Lid
Control Panel
Power Cord
NOTE:
Faucets and water supply hoses are not included unless otherwise specied. Use new water supply hoses for installa-
tion.
8
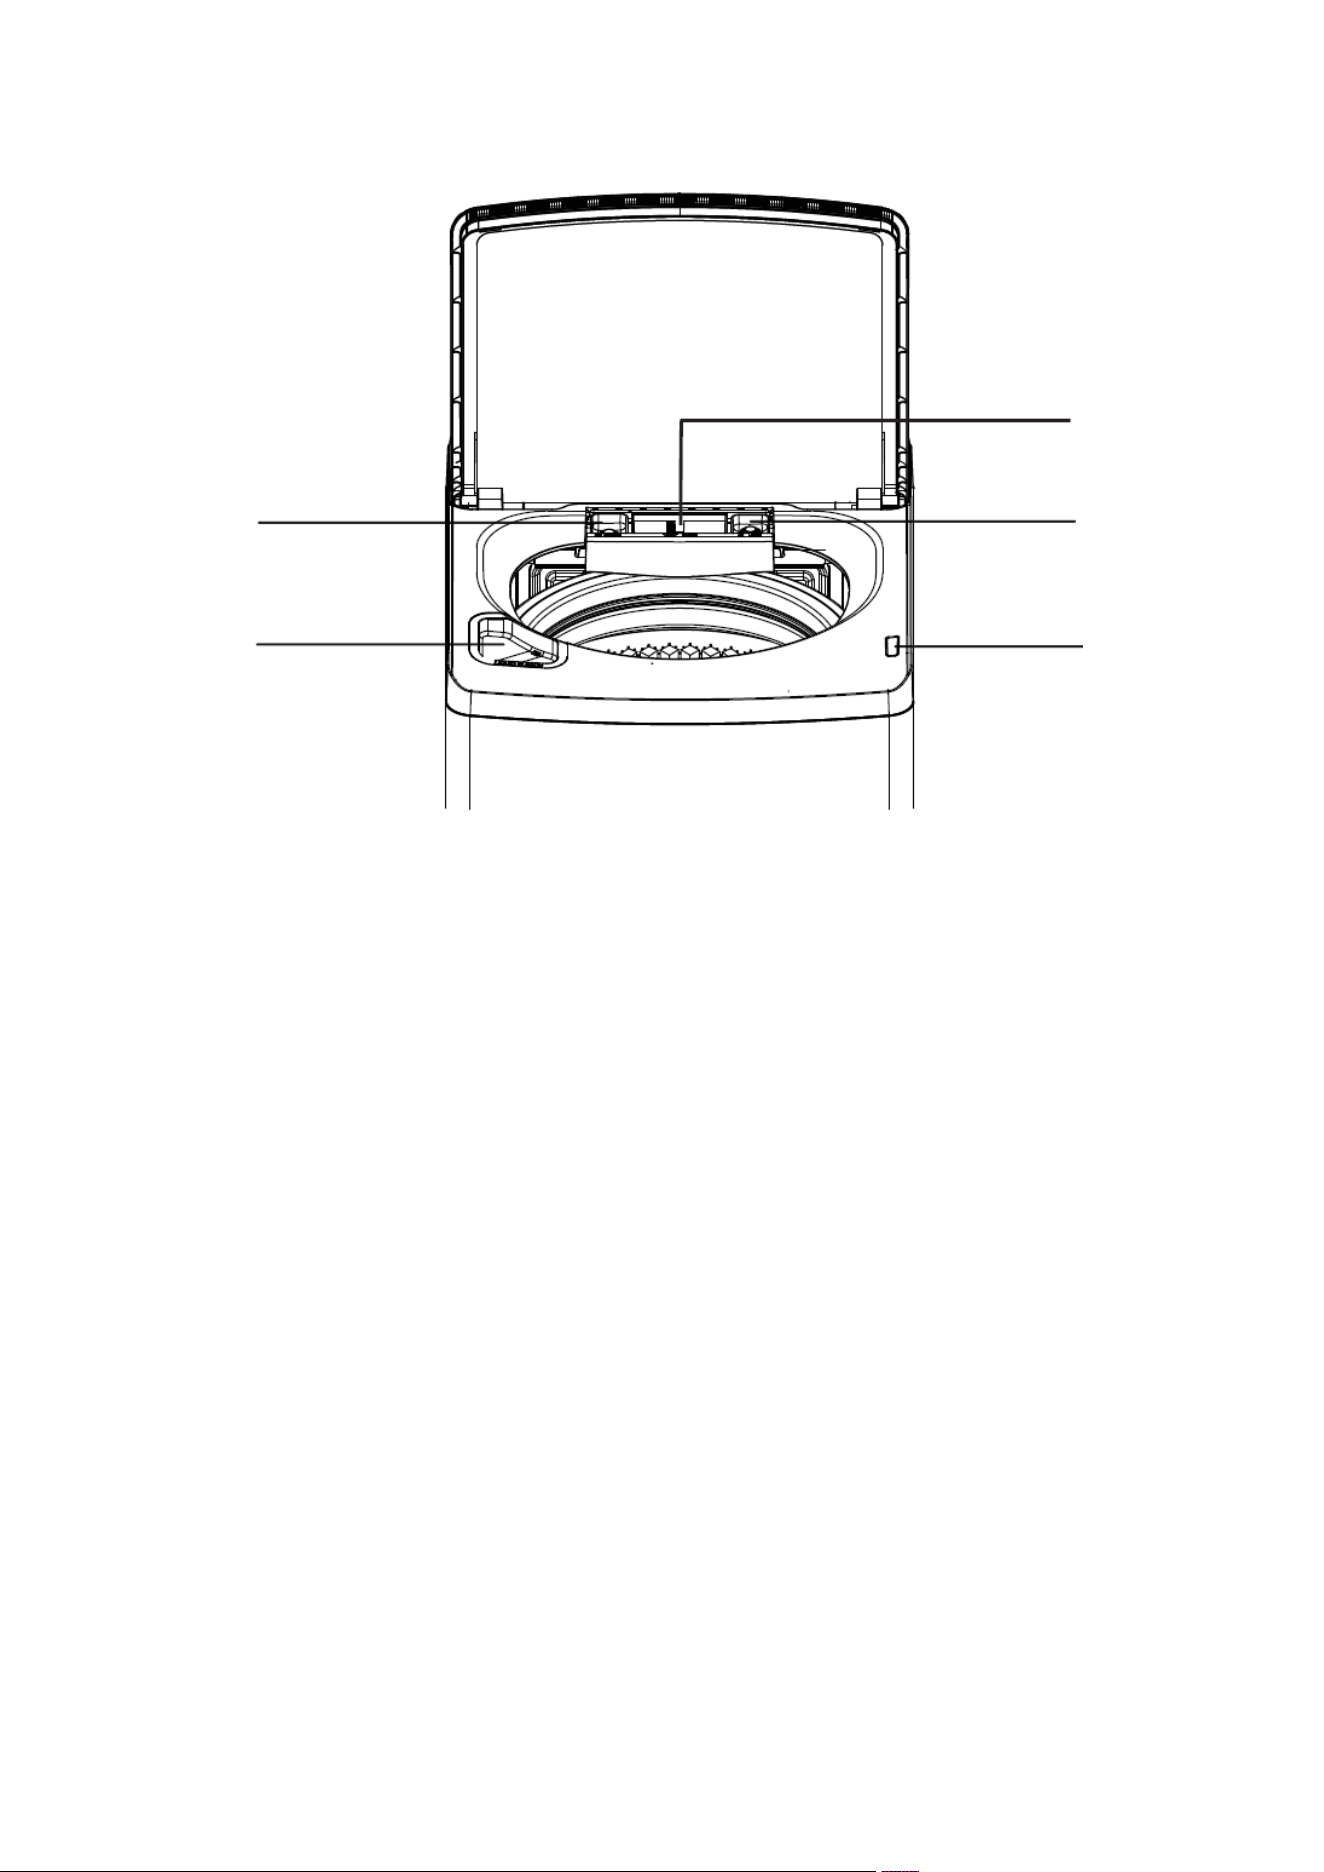
Internal Components
Fabric Softener
Compartment
Powder Detergent
Compartment
Bleach
Compartment
Detergent
Compartment
Lid Lock
Mechanism
NOTE:
Only use HE (High Eciency) detergent in the detergent compartments. Follow detergent manufacturer recommenda-
tions for proper usage and quantity.
9
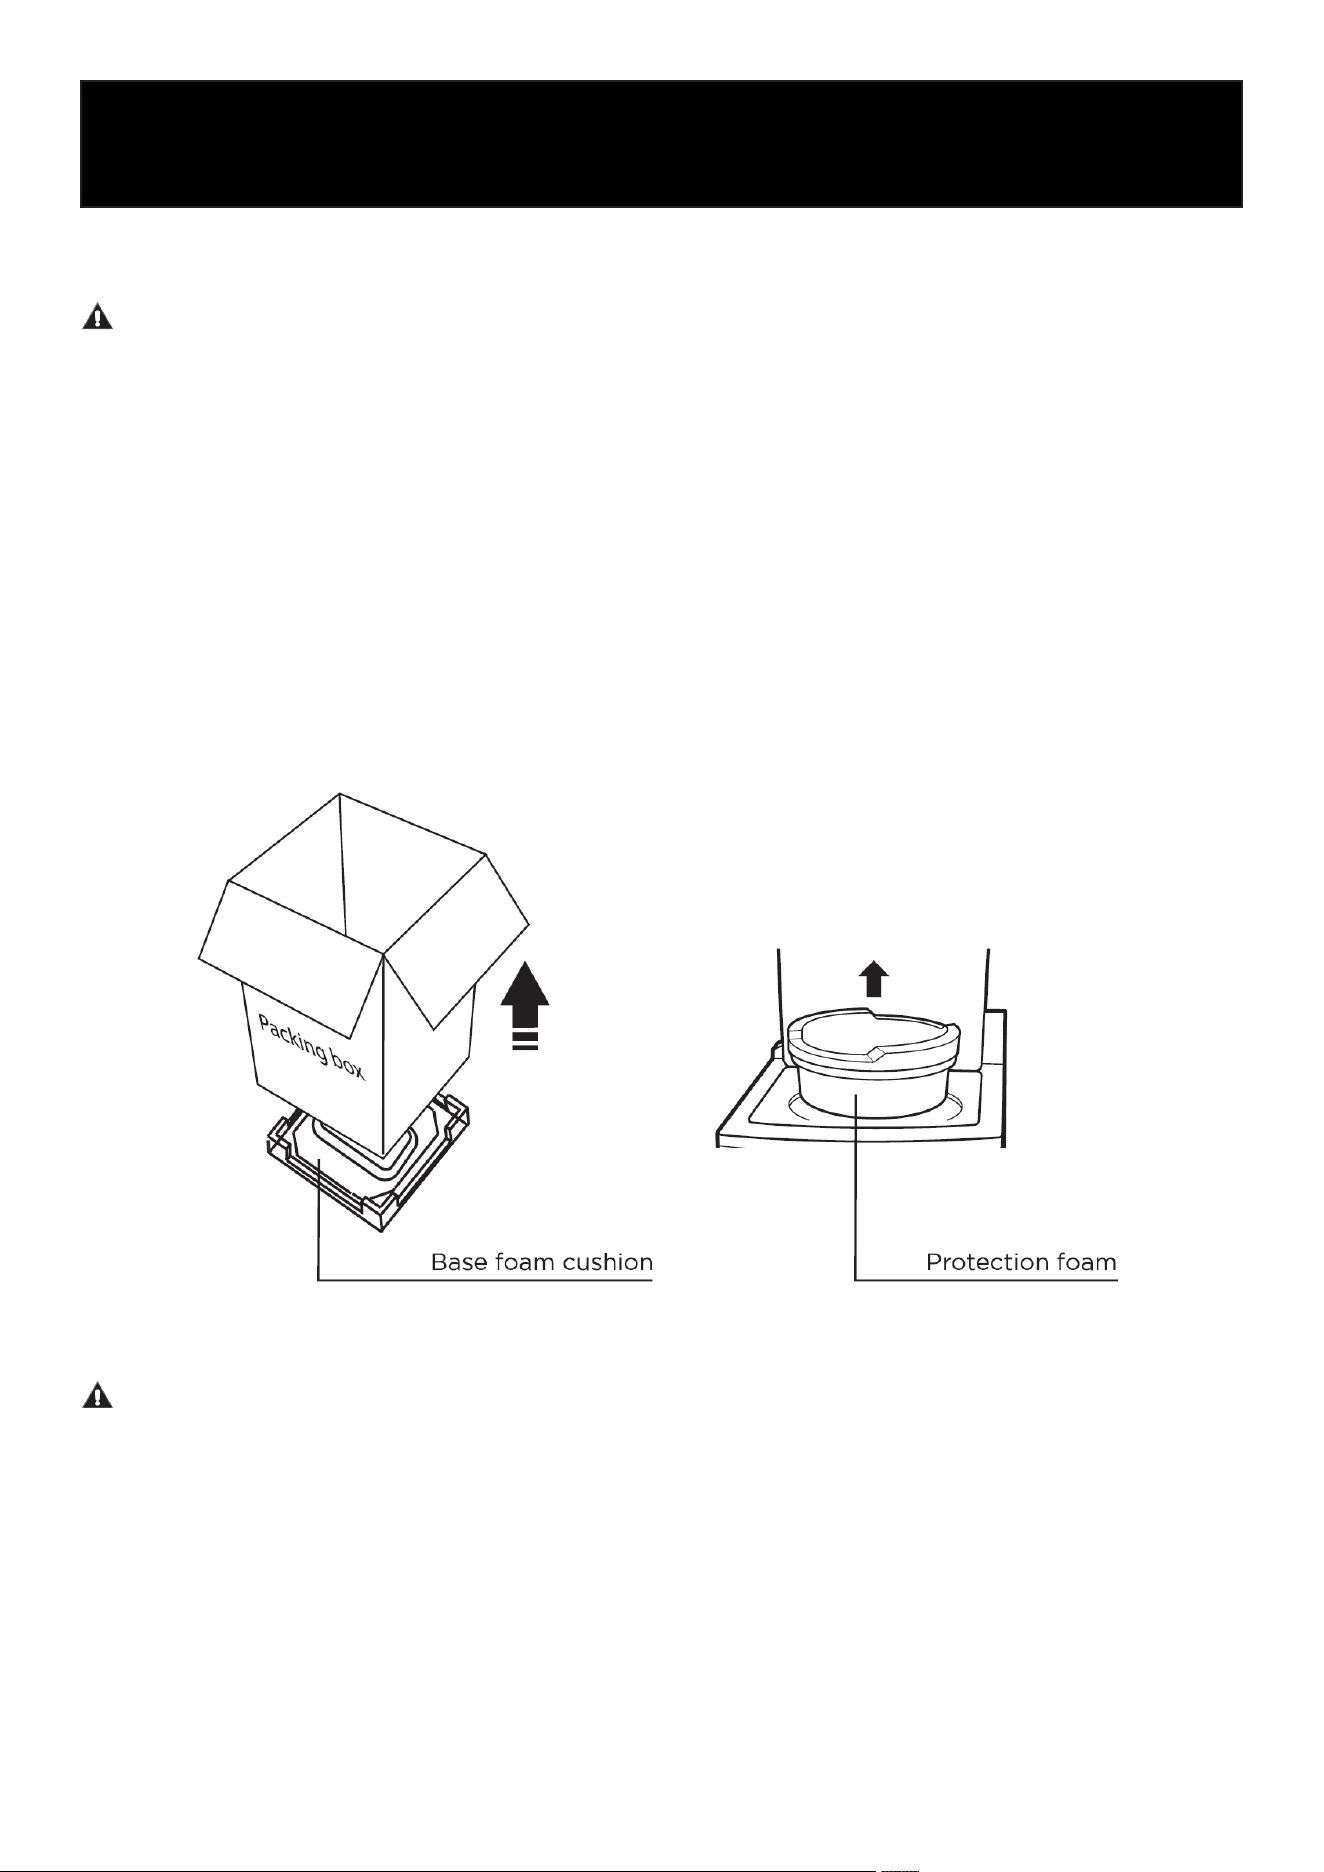
Unpacking Your Washer
WARNING
• Packaging materials can be dangerous to children. Keep all plastic bags, foam, and packaging
materials out of the reach of children.
• Do not operate the washer while it is attached to the foam base. Operating the unit without
removing the shipping materials may result in excessive vibration, damage, or injury.
Unpacking Instructions
1. Remove the outer packaging carton from the washer.
2. Lift the washer off the foam base cushion.
3. Open the washer lid and remove all internal packaging materials and accessories, including
protective foam inserts.
4. Inspect the unit for shipping damage before installation.
Installation
Choosing a Location
WARNING
• Do not install the washer in areas exposed to freezing temperatures. Residual water inside the
valves, pump, or hoses may freeze and cause damage.
• Do not install the washer on weak, unstable, or uneven ooring.
Installation Requirements
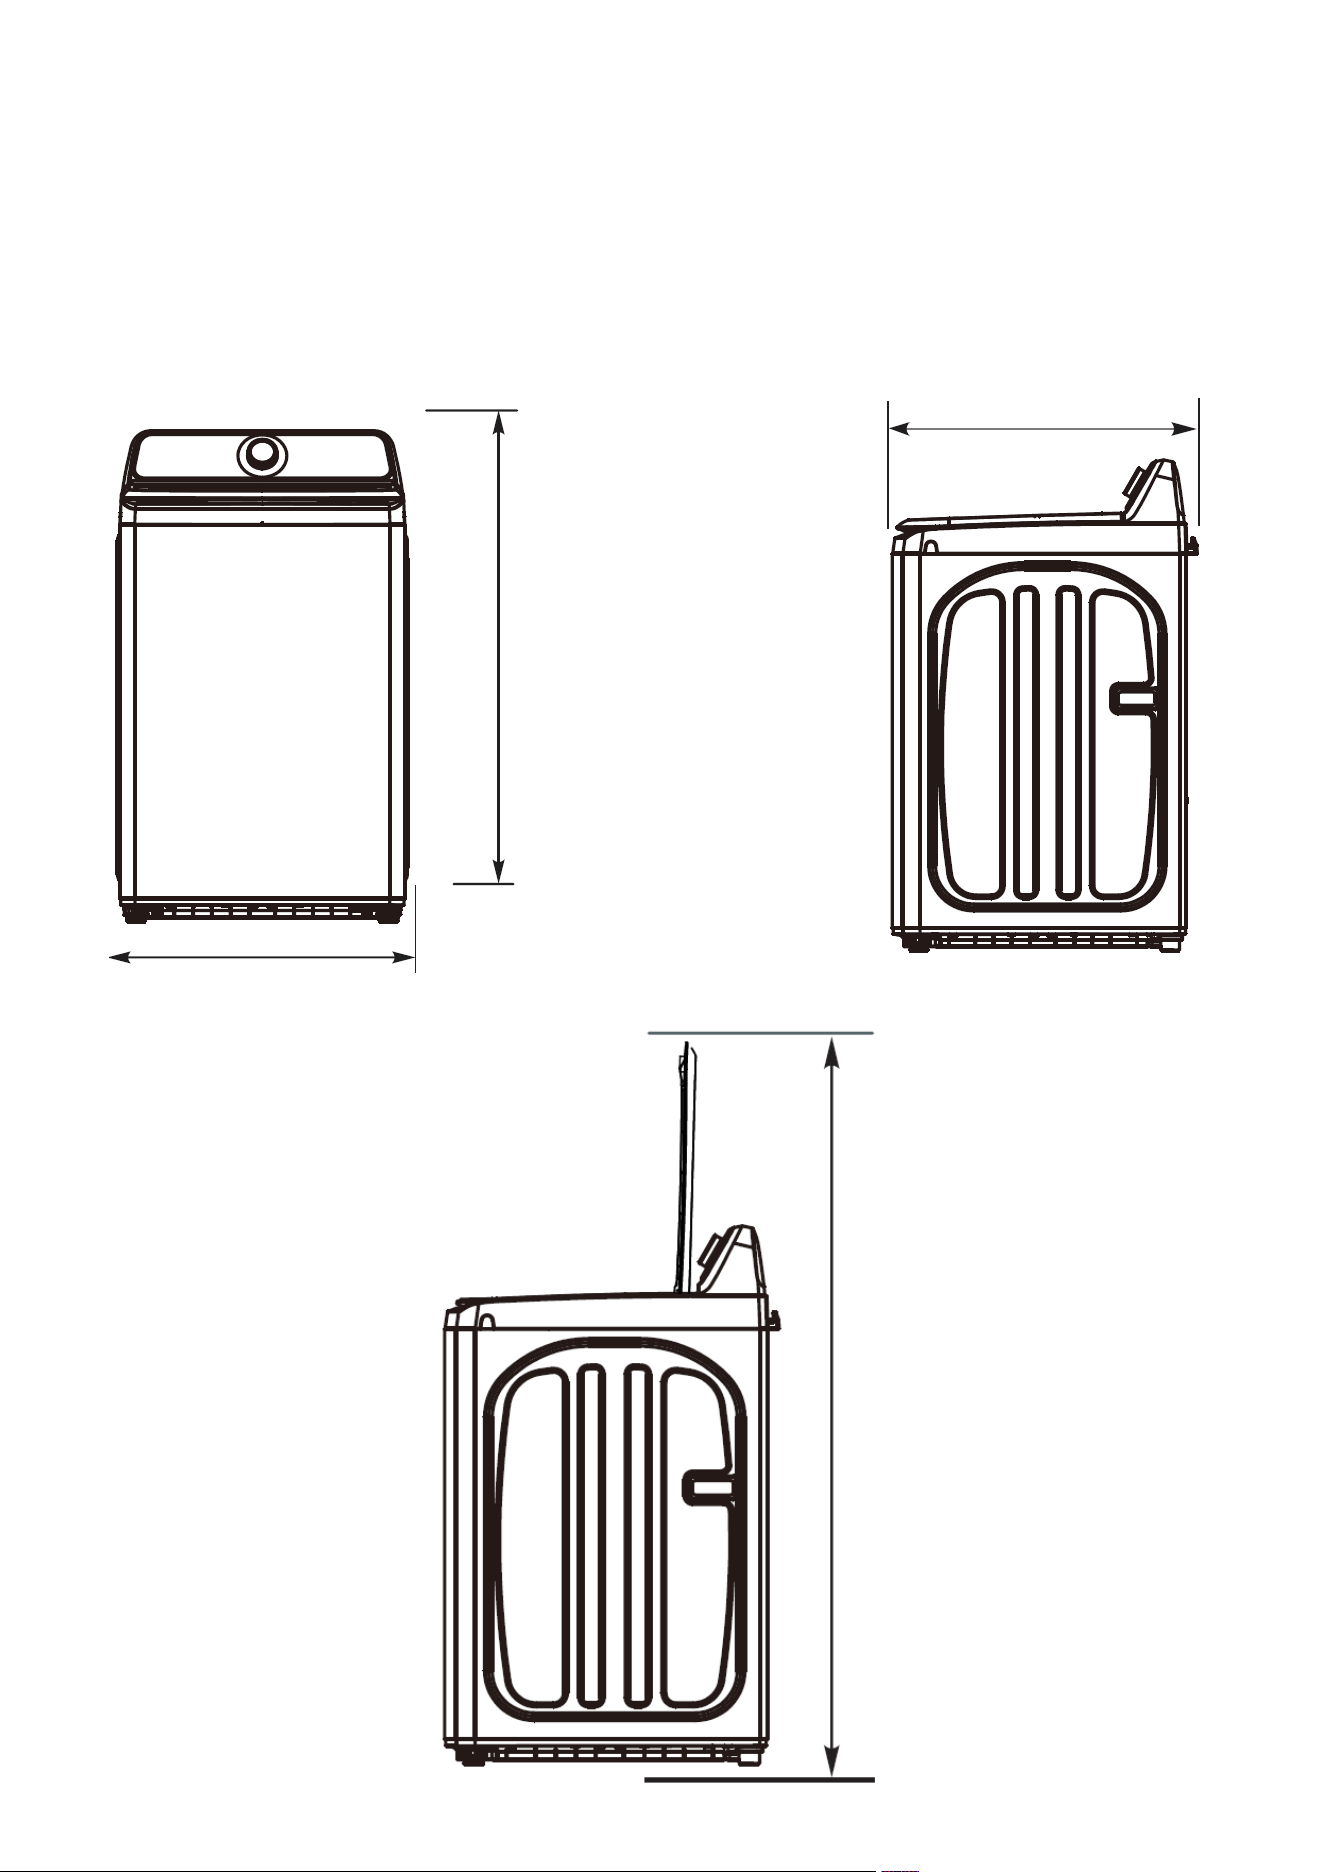
For best performance, install the washer on a solid, level oor capable of supporting the unit when
fully loaded.
• Wood ooring may require reinforcement to reduce vibration or movement during spin cycles.
10
• Soft ooring materials, including carpet, may increase vibration and are not recommended.
• Install the washer in a dry indoor location with adequate ventilation.
• Allow sucient space around the appliance for water connections, drainage, and servicing.
• Keep the washer away from direct sunlight, excessive heat sources, and moisture.
IMPORTANT:
Proper leveling helps reduce vibration, noise, and washer movement during operation.
25.75 in.
43.5 in.
27 in.
58 in.
11
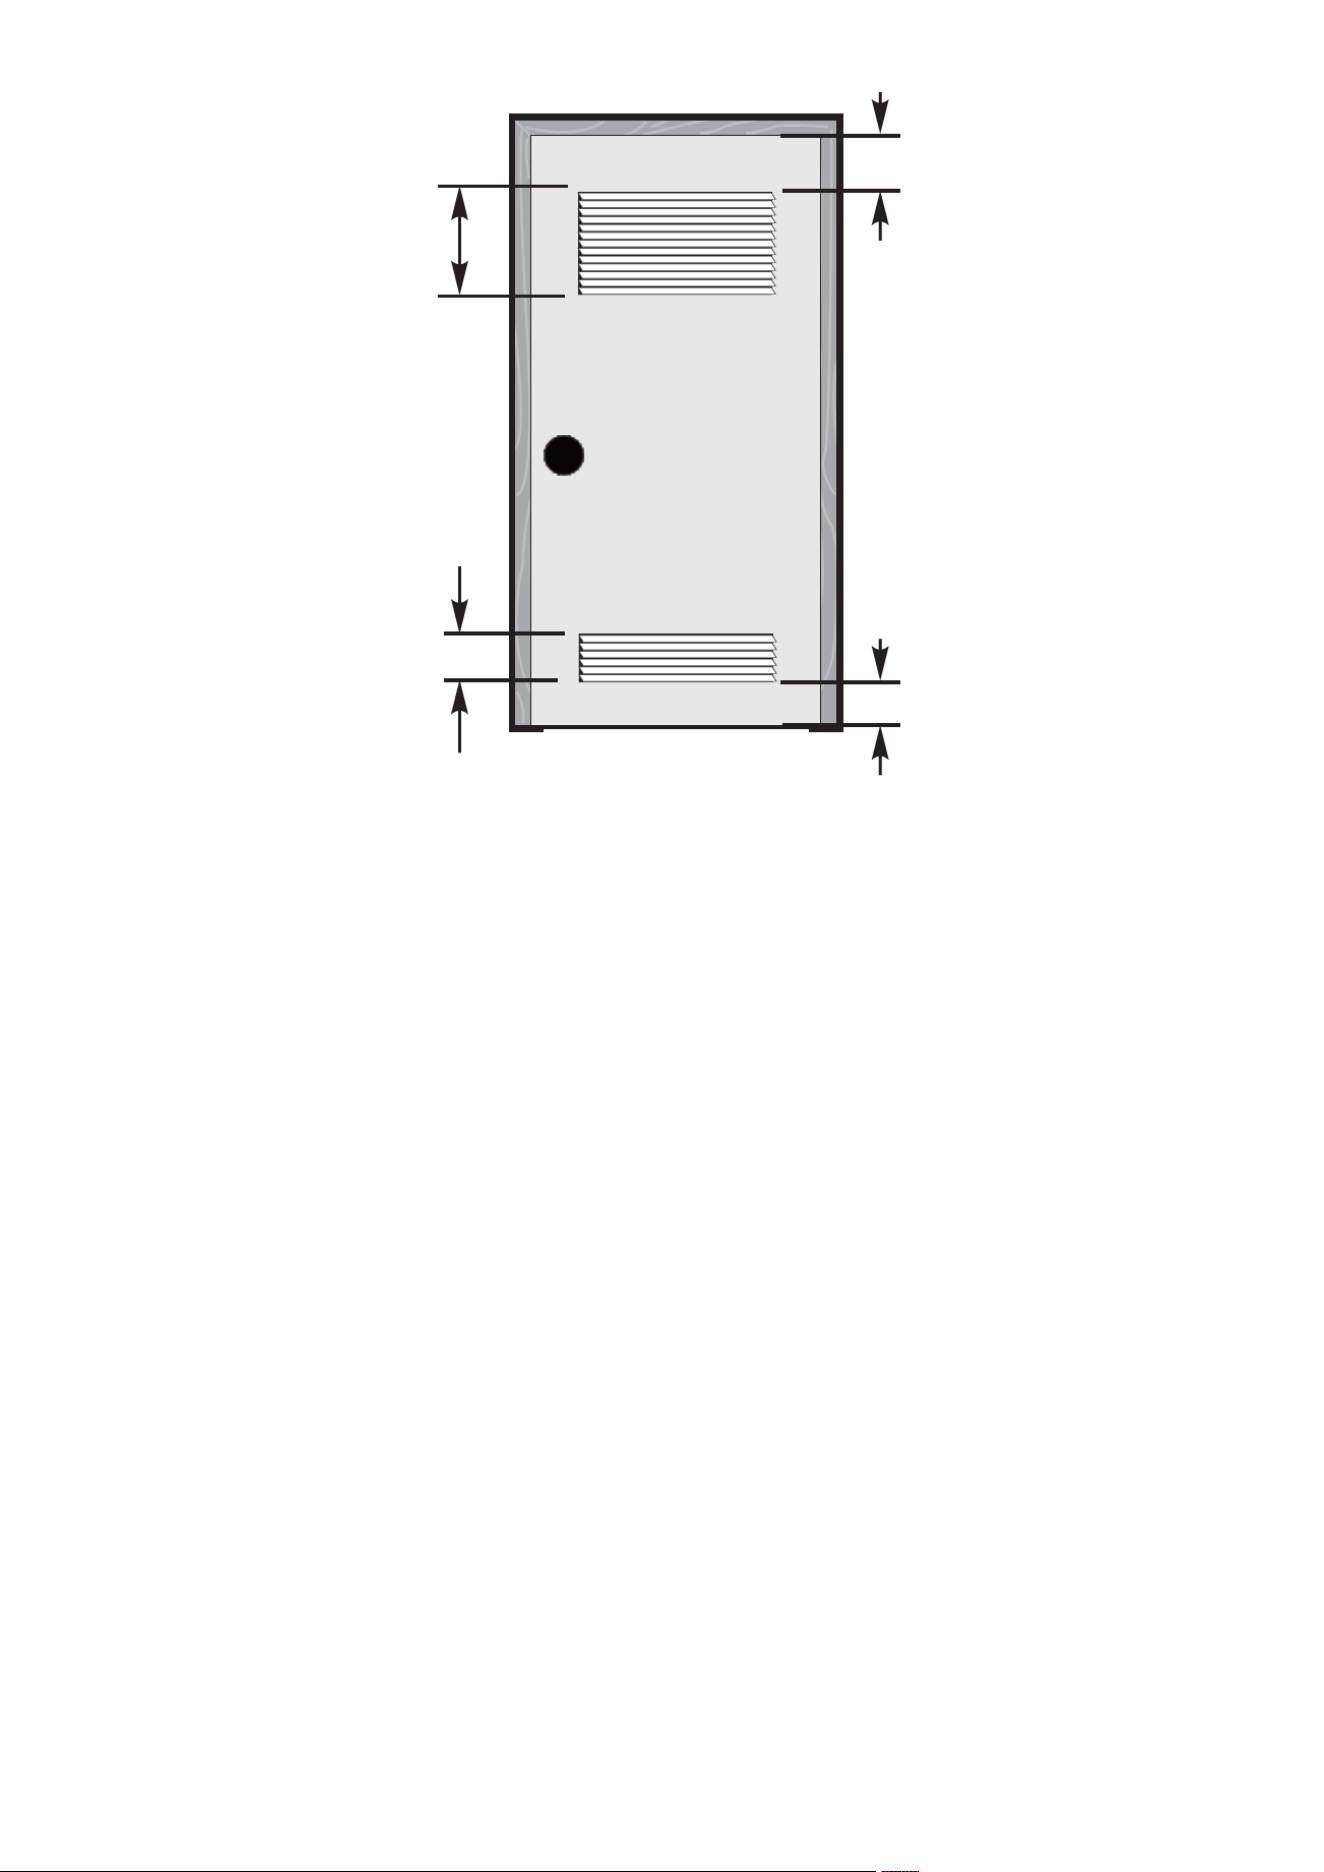
48 in.²*
24 in.²*
3 in.
3 in.
Installing in an Alcove or Closet
If the washer is installed in an alcove or closet, the installation area must provide adequate airow
for safe and proper operation.
The closet door must include two unobstructed air openings with a combined minimum area of 72
sq. in.
Recommended ventilation openings:
• Upper Opening: 48 sq. in. minimum
• Lower Opening: 24 sq. in. minimum
A louvered or slotted door with equivalent ventilation openings is acceptable.
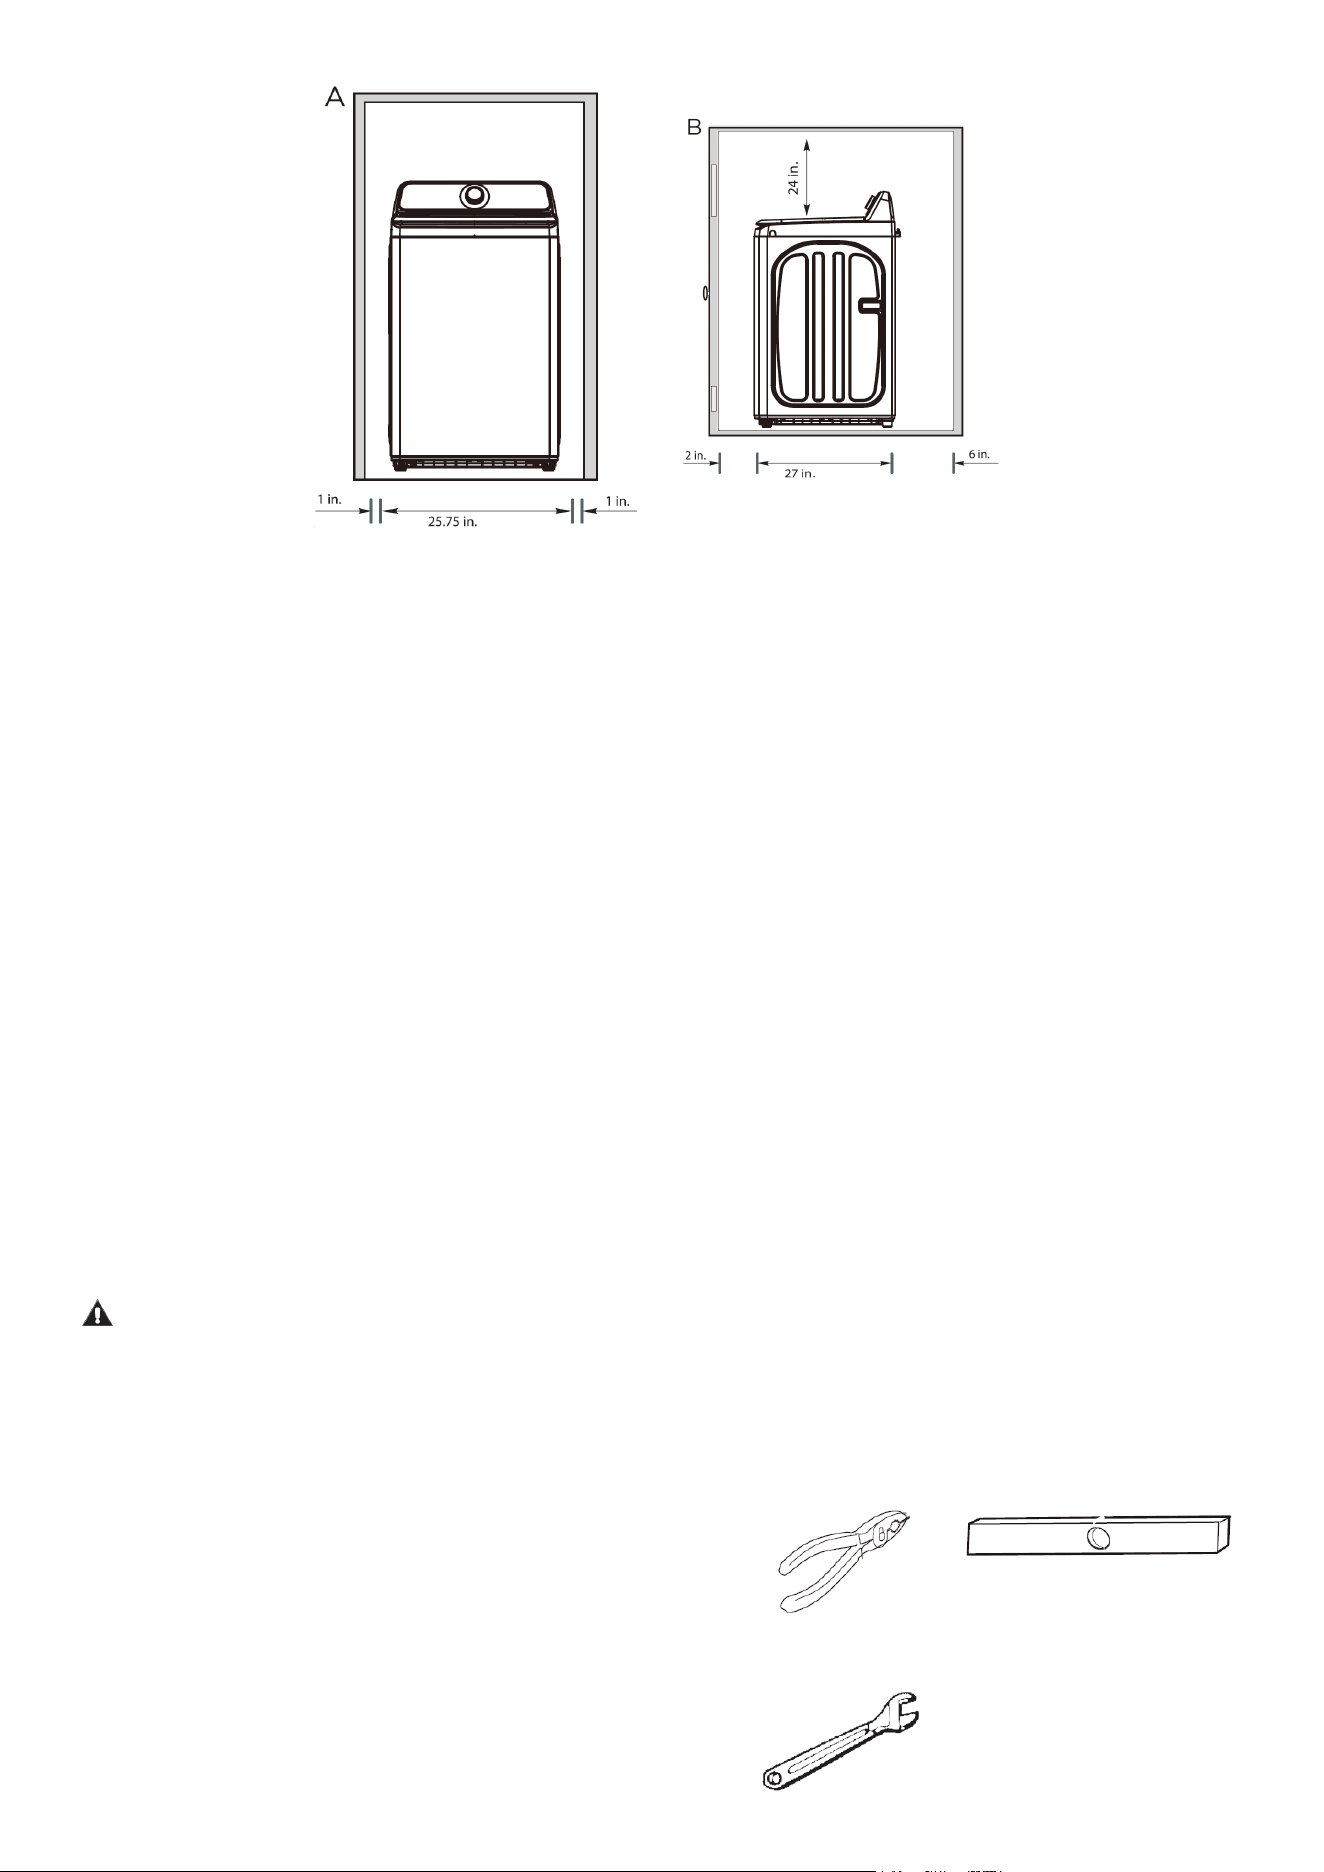
Maintain the following minimum clearances between the washer and surrounding surfaces:
• Each Side: 1 in. (2.5 cm)
• Rear: 6 in. (15.2 cm)
• Front: 2 in. (5.1 cm)
• Top: 24 in. (61 cm)
• Water Valve Clearance to Wall: 6 in. (15.2 cm)
If installing a washer and dryer side-by-side in a closet, the closet must maintain a minimum unob-
structed air opening area of 72 sq. in. (465 cm²).
IMPORTANT
• Do not block ventilation openings.
• Adequate airow is required for proper washer operation and heat dissipation.
• Install the appliance on a level surface capable of supporting the unit when fully loaded.
Location Requirements
Install the washer in a location that:
• Has a solid, level oor capable of supporting the washer when fully loaded
• Is free of carpet or soft ooring that may obstruct ventilation
• Is protected from direct sunlight
• Provides adequate ventilation
• Is not exposed to freezing temperatures below 32°F (0°C)
• Is away from heat sources such as gas appliances, heaters, or oil burners
• Provides sucient space so the washer does not rest on the power cord or water hoses
Installation Clearances
A. Recessed Area
Minimum side clearance:
• Left side: 1 in. (2.5 cm)
• Right side: 1 in. (2.5 cm)
Minimum installation width:
• 25.75 in. (65.4 cm)
12
Pliers
Level
Adjustable wrench
that opens to 1”
(25 mm)
B. Closet or Conned Area
Minimum installation clearances:
• Front clearance: 2 in. (5.1 cm)
• Rear clearance: 6 in. (15.2 cm)
• Top clearance: 24 in. (61 cm)
• Minimum depth: 27 in. (68.6 cm)
WARNING
• Do not install the washer on carpet or unstable ooring.
• Do not block ventilation openings.
• Improper installation may result in vibration, noise, or product damage.
• Install the washer only in indoor locations protected from weather and moisture.
Tools Required
The following tools are recommended for installation:
• Pliers
• Level
• Adjustable wrench (1 in. / 25 mm opening)
13
Connecting the Water Hoses
NOTE: Water supply hoses are not included with the washer and must be purchased separately.
CAUTION
• Use new water supply hoses. Old hoses may leak or burst and cause water damage.
• Do not connect multiple hoses together to extend hose length. Use a longer high-pressure hose
if additional length is required.
• Do not overtighten ttings or apply tape or sealant to the water valves or hose connections.
Damage to the ttings may result.
Connecting the Inlet Hoses
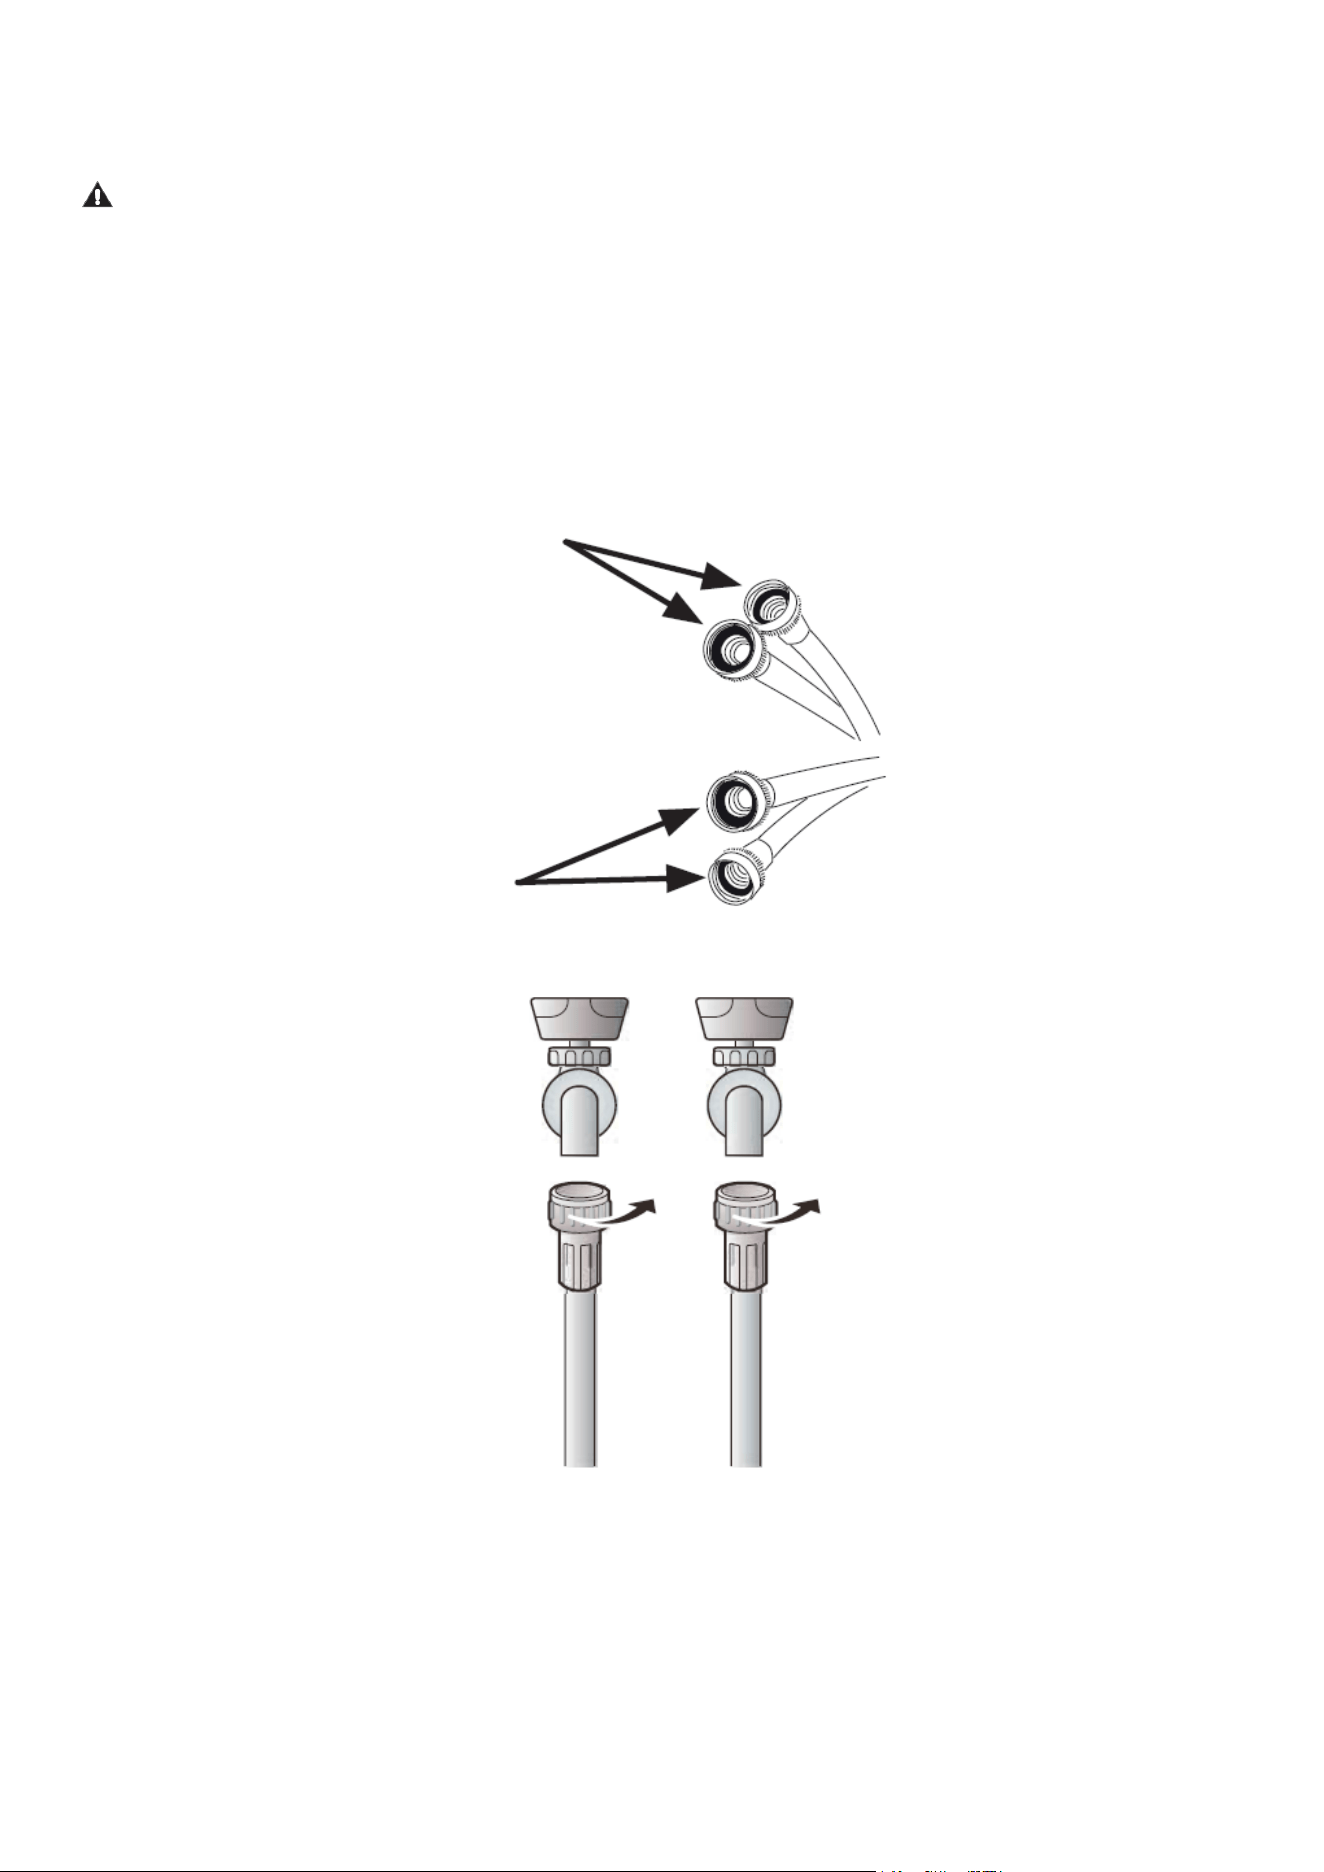
1. Verify that rubber washers are installed inside both ends of each water supply hose.
2. Remove the faucet-side rubber washers and install the supplied inlet lters in their place.
3. Connect the water hoses to the hot and cold water faucets.
• Tighten the ttings by hand until snug.
• Using pliers or a wrench, tighten an additional 2/3 turn.
• Do not overtighten.
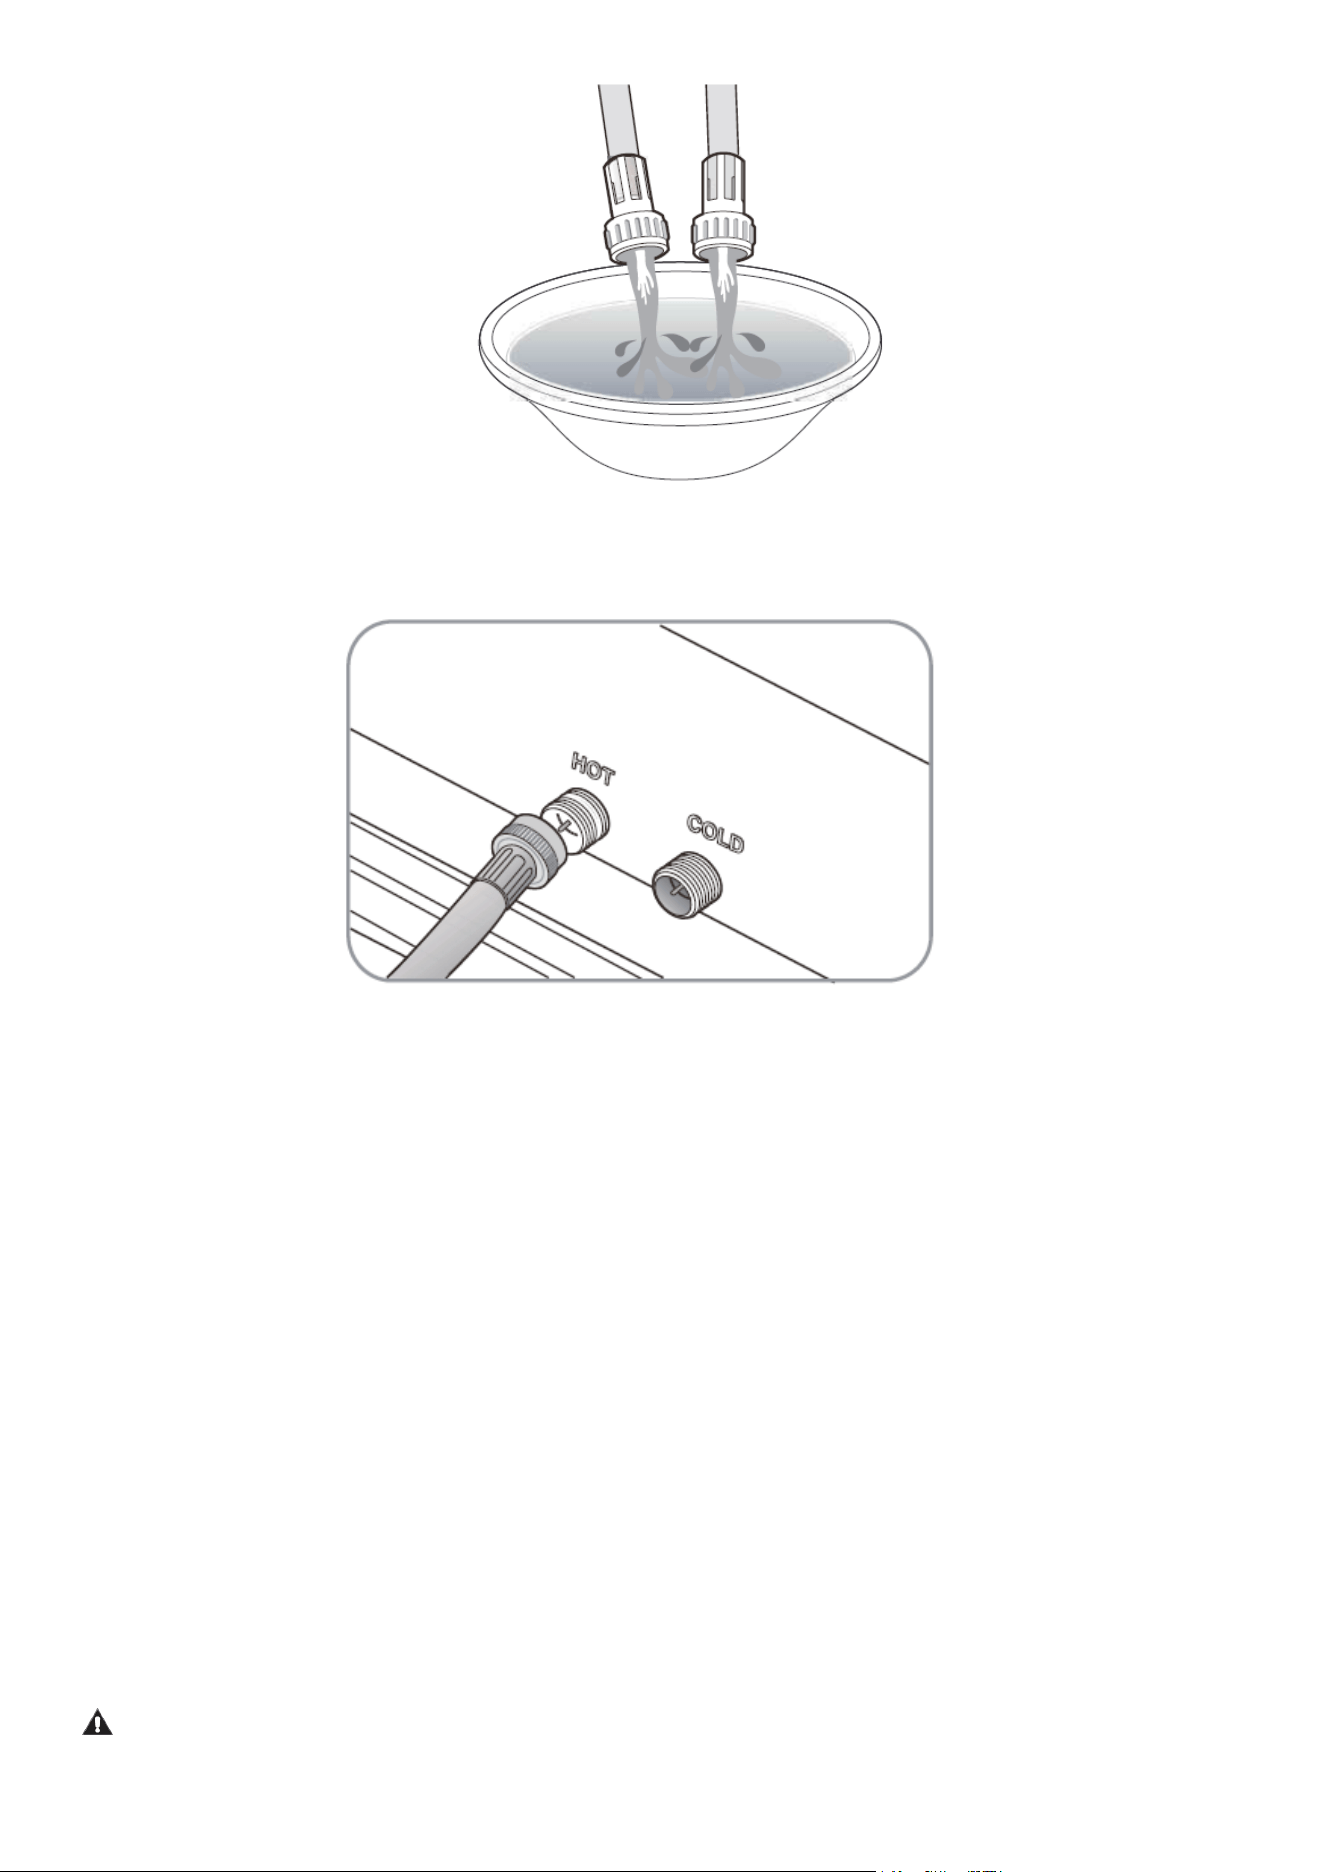
14
4. Place the opposite ends of the hoses into a bucket or drain and briey turn on both water fau-
cets for 10–15 seconds to ush debris from the water lines. Turn the faucets off afterward.
5. Connect the hoses to the washer water inlet valves located on the rear of the unit.
• Connect the hot water hose to the HOT inlet.
• Connect the cold water hose to the COLD inlet.
6. Tighten the hose ttings by hand until snug, then tighten an additional two-thirds turn with pli-
ers.
7. Ensure the hoses are not kinked, twisted, or bent.
8. Turn on both water faucets and inspect all connections for leaks.
NOTE
• If hot water will not be used, install a water inlet cap on the hot water inlet and select the Tap
Cold setting during operation.
• Water inlet caps are not included and must be purchased separately.
Connecting the Drain Hose
1. Remove the drain hose from the hose clamp.
2. Position the drain hose according to the installation type.
CAUTION
• Do not create an airtight seal between the drain hose and the drain system.
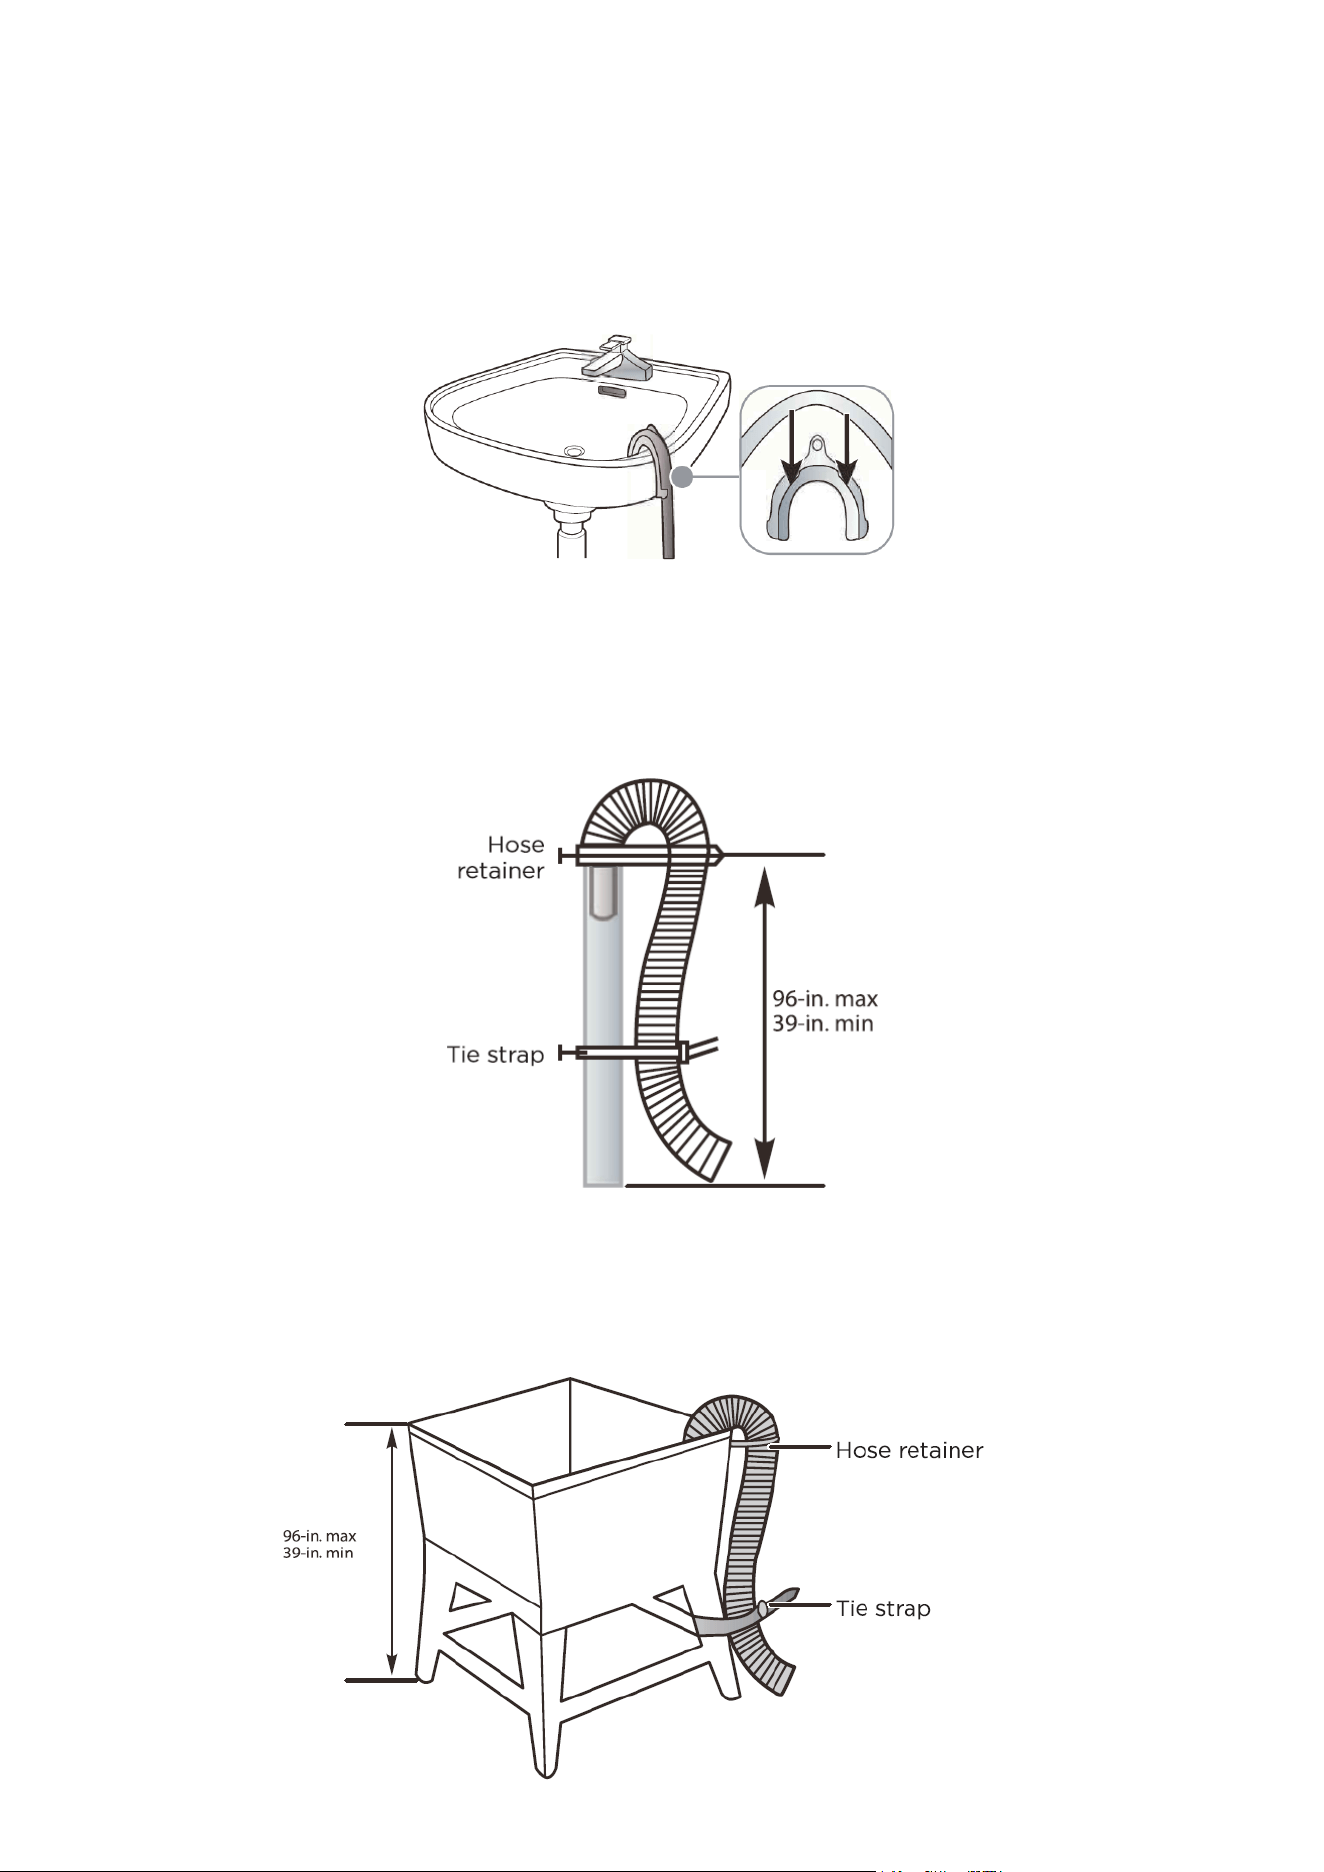
15
• Secure the drain hose to prevent movement during operation.
Drain Hose Installation Options
Over the Edge of a Wash Basin
1. Attach the drain hose guide to the side of the basin using a hook, tie strap, or tape.
2. Ensure the hose cannot move during draining.
Standpipe Installation
• The standpipe must be:
• Minimum height: 39 in. (99 cm)
• Maximum height: 96 in. (244 cm)
• Secure the drain hose using the supplied hose retainer and tie strap.
• The laundry tub height must be:
• Minimum: 39 in. (99 cm)
• Maximum: 96 in. (244 cm)
• Secure the hose to prevent movement during draining.
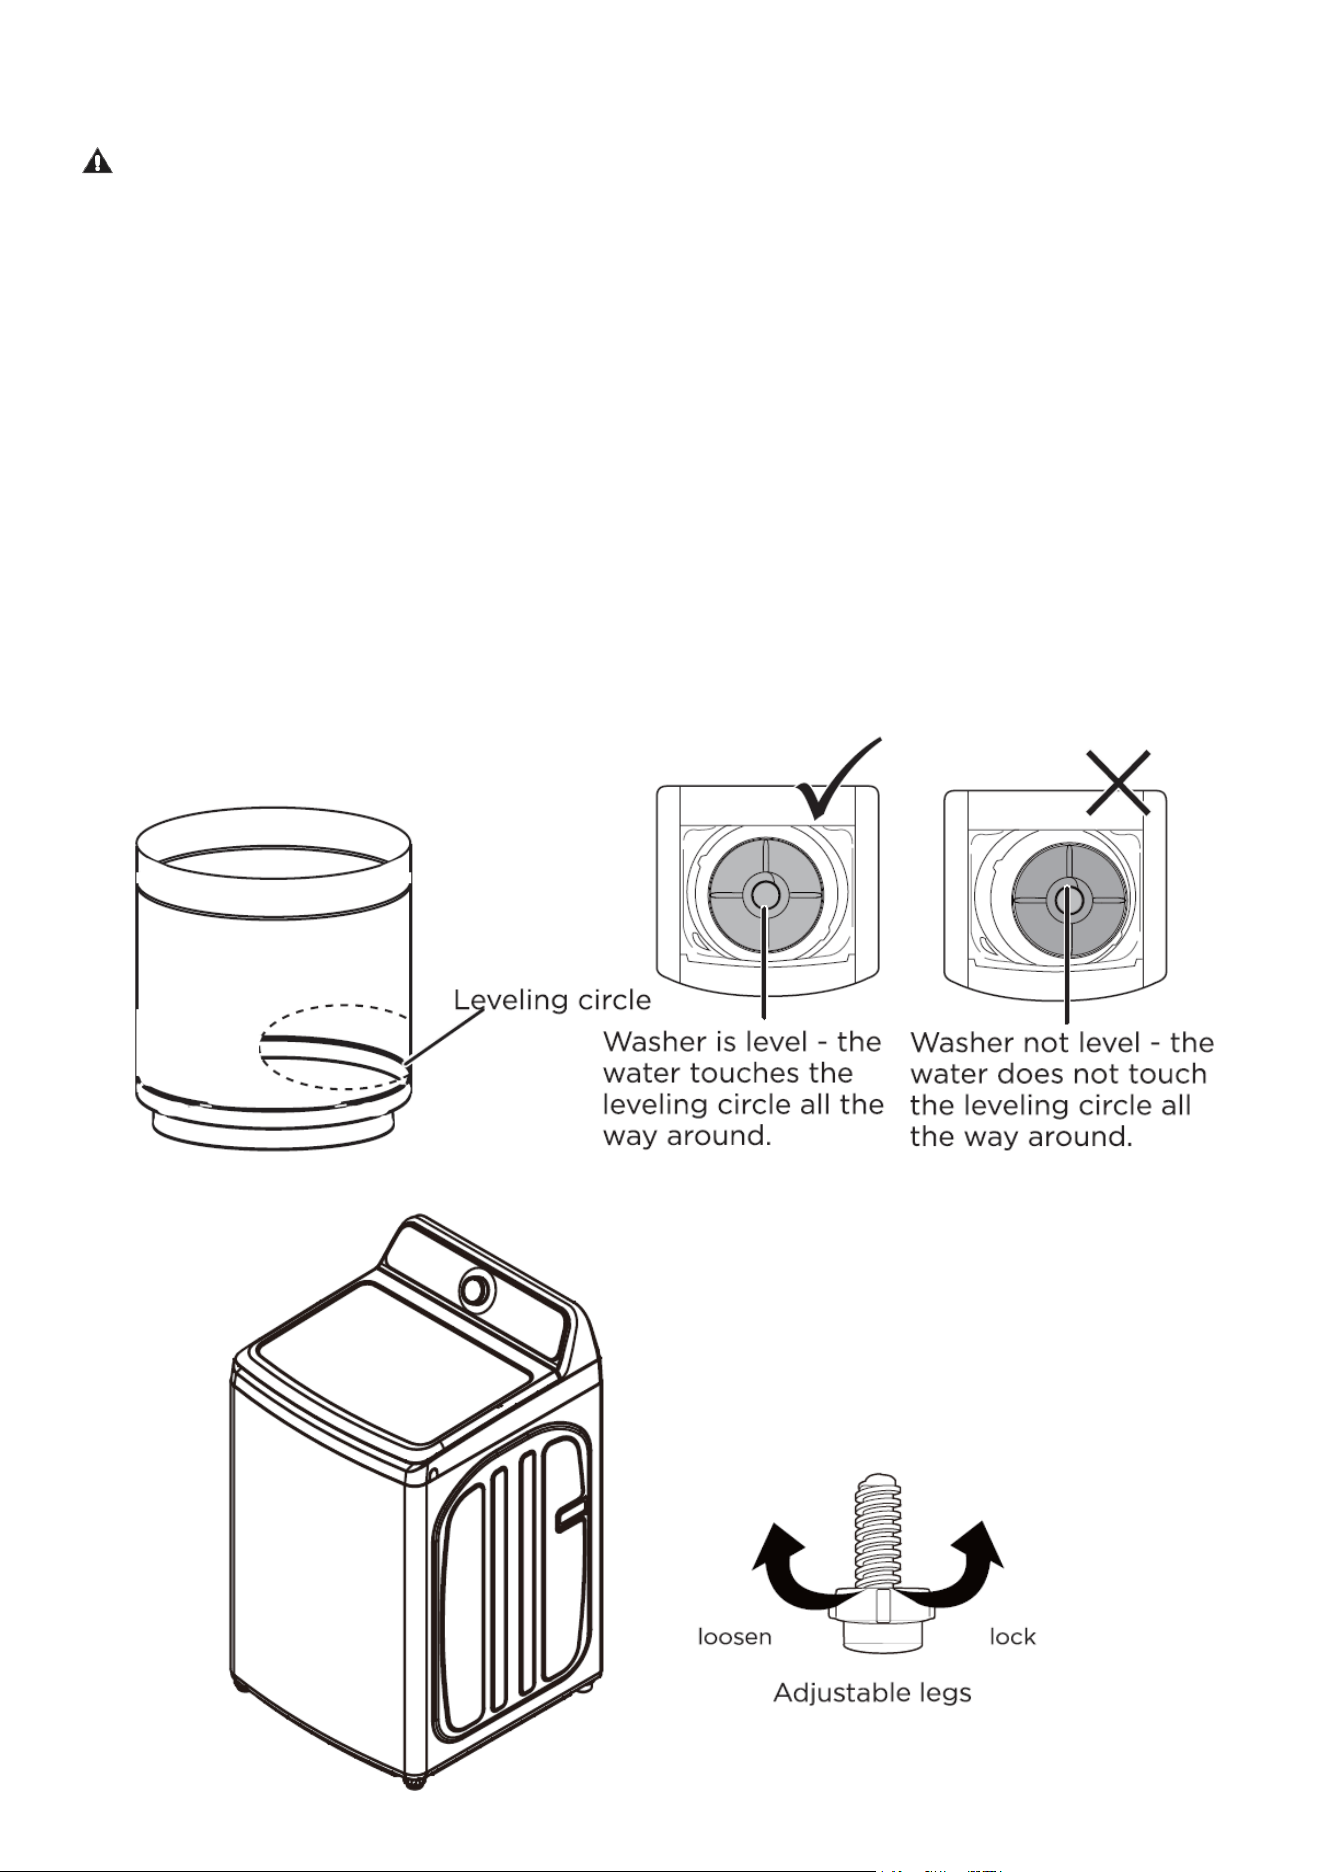
16
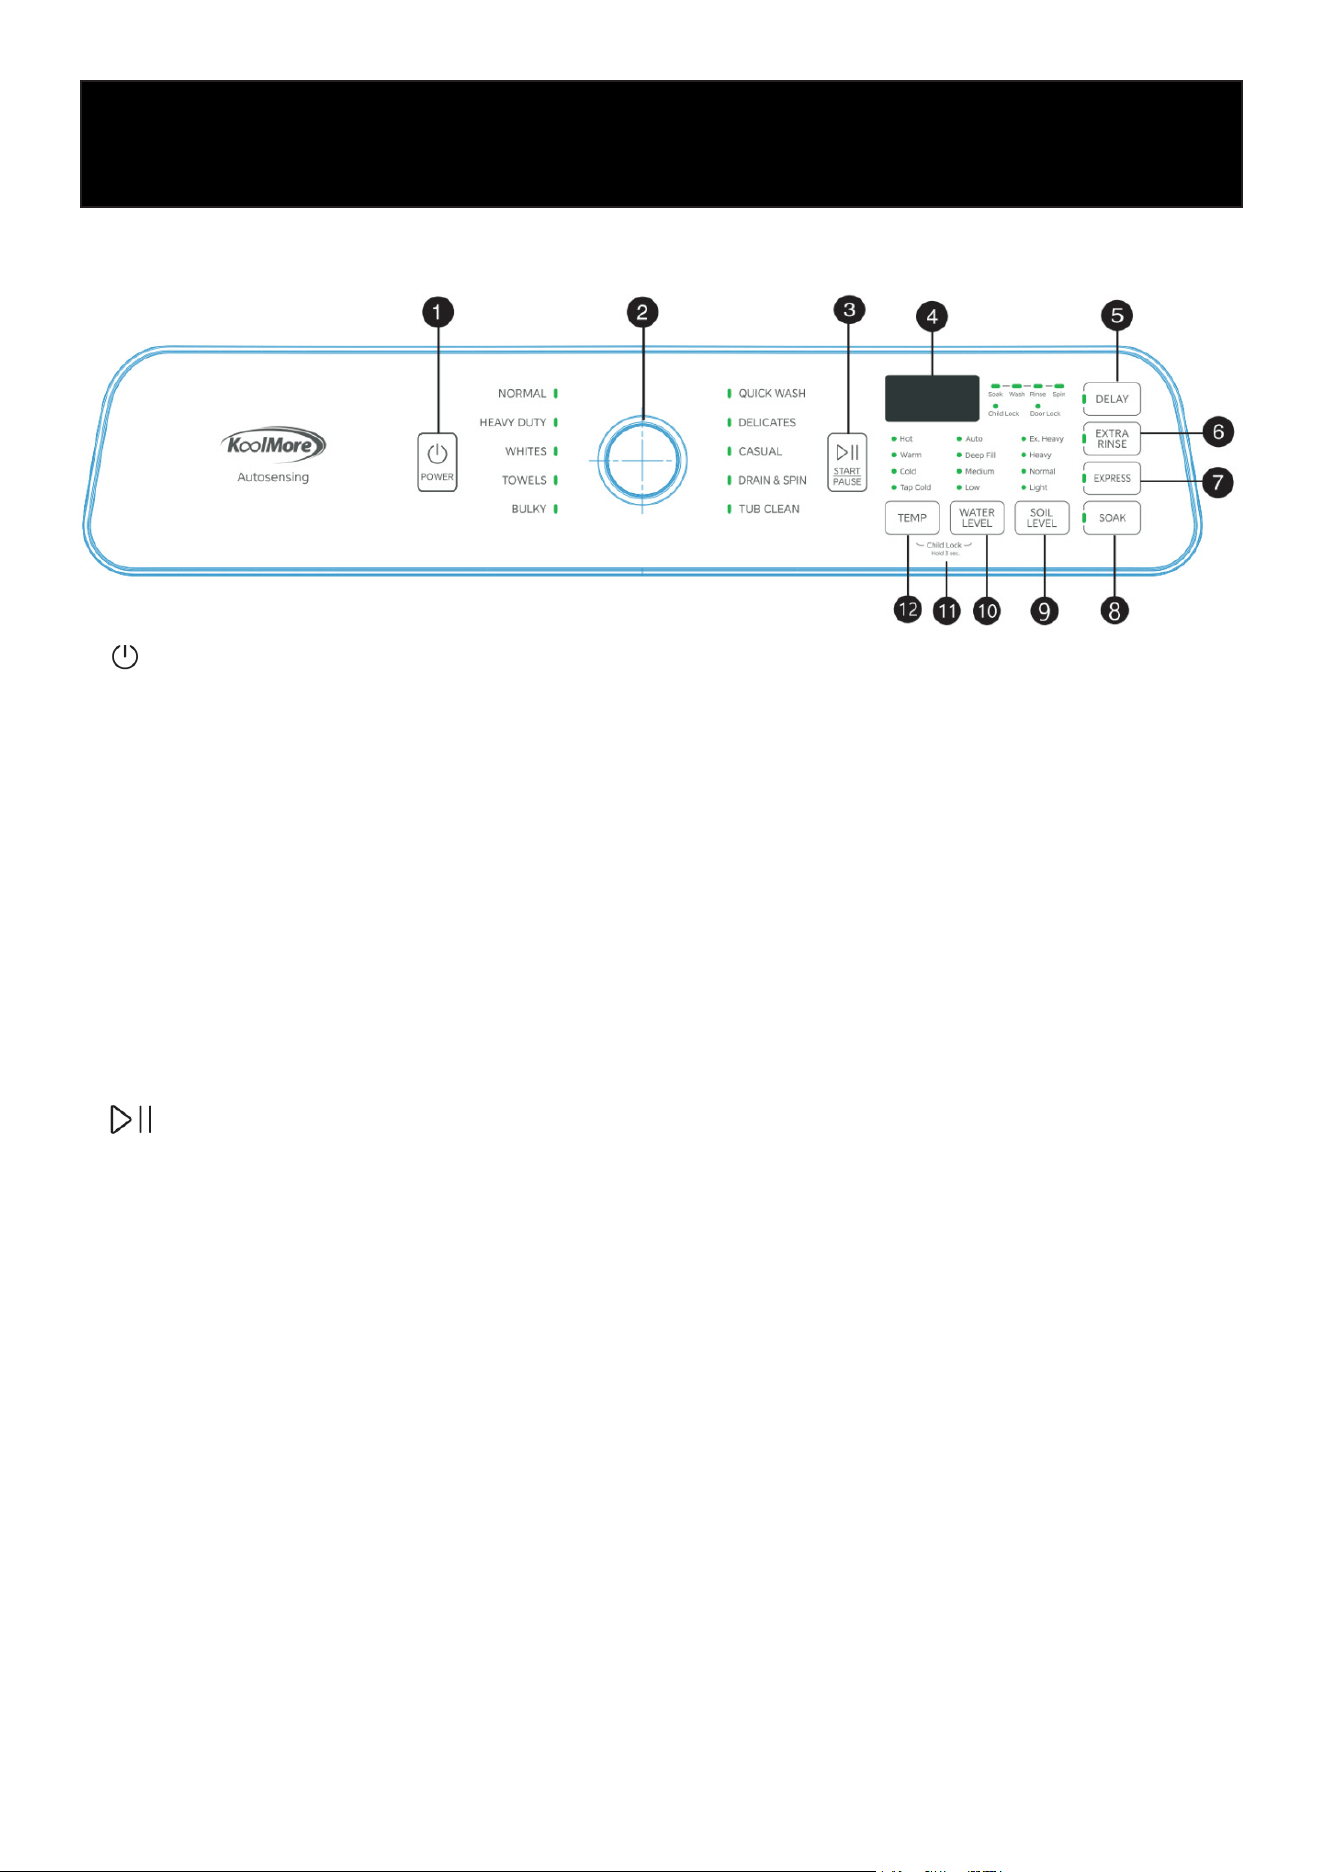
Leveling the Washer
CAUTION
Do not operate the washer unless it is properly leveled. Improper leveling may result in:
• Excessive vibration
• Excessive noise
• Washer movement during operation
• Unbalanced loads
• Error codes
1. Move the washer into its nal installation position.
2. Check that the washer is level using a carpenter’s level or by observing the tub leveling indica-
tor.
3. If adjustment is required, carefully tilt the washer and adjust the front leveling feet.
• Extend the leveling feet only as much as necessary.
• Overextending the feet may increase vibration.
4. Tighten the locknuts after leveling is complete.

17
Power Connection
Plug the washer into a properly grounded 3-prong 120V / 60Hz outlet protected by a 15-amp fuse
or circuit breaker.
• Do not use an extension cord or adapter.
• The washer must be properly grounded in accordance with local electrical codes.
Running a Test Cycle
Run a test cycle to verify proper installation.
1. Place a small load of laundry (approximately 6 lb. / 2.7 kg).
2. Press the Power button to turn the washer on.
3. Select the Rinse & Spin cycle.
4. Press Start/Pause to begin the cycle.
During the test cycle, conrm that:
• The washer lls properly
• Water connections do not leak
• The washer drains correctly
• The washer does not excessively vibrate or move during spin operation
CAUTION
• If leaks are detected, stop the washer immediately and inspect all hose connections.
• If excessive vibration occurs, recheck washer leveling and oor stability.
• Do not touch internal electrical components while the washer is energized.
18
Operation
Control Panel Overview
1. POWER
Press the POWER button to turn the washer on
or off.
Note: If the washer remains idle for 10 minutes
without any operation, it will automatically shut
off.
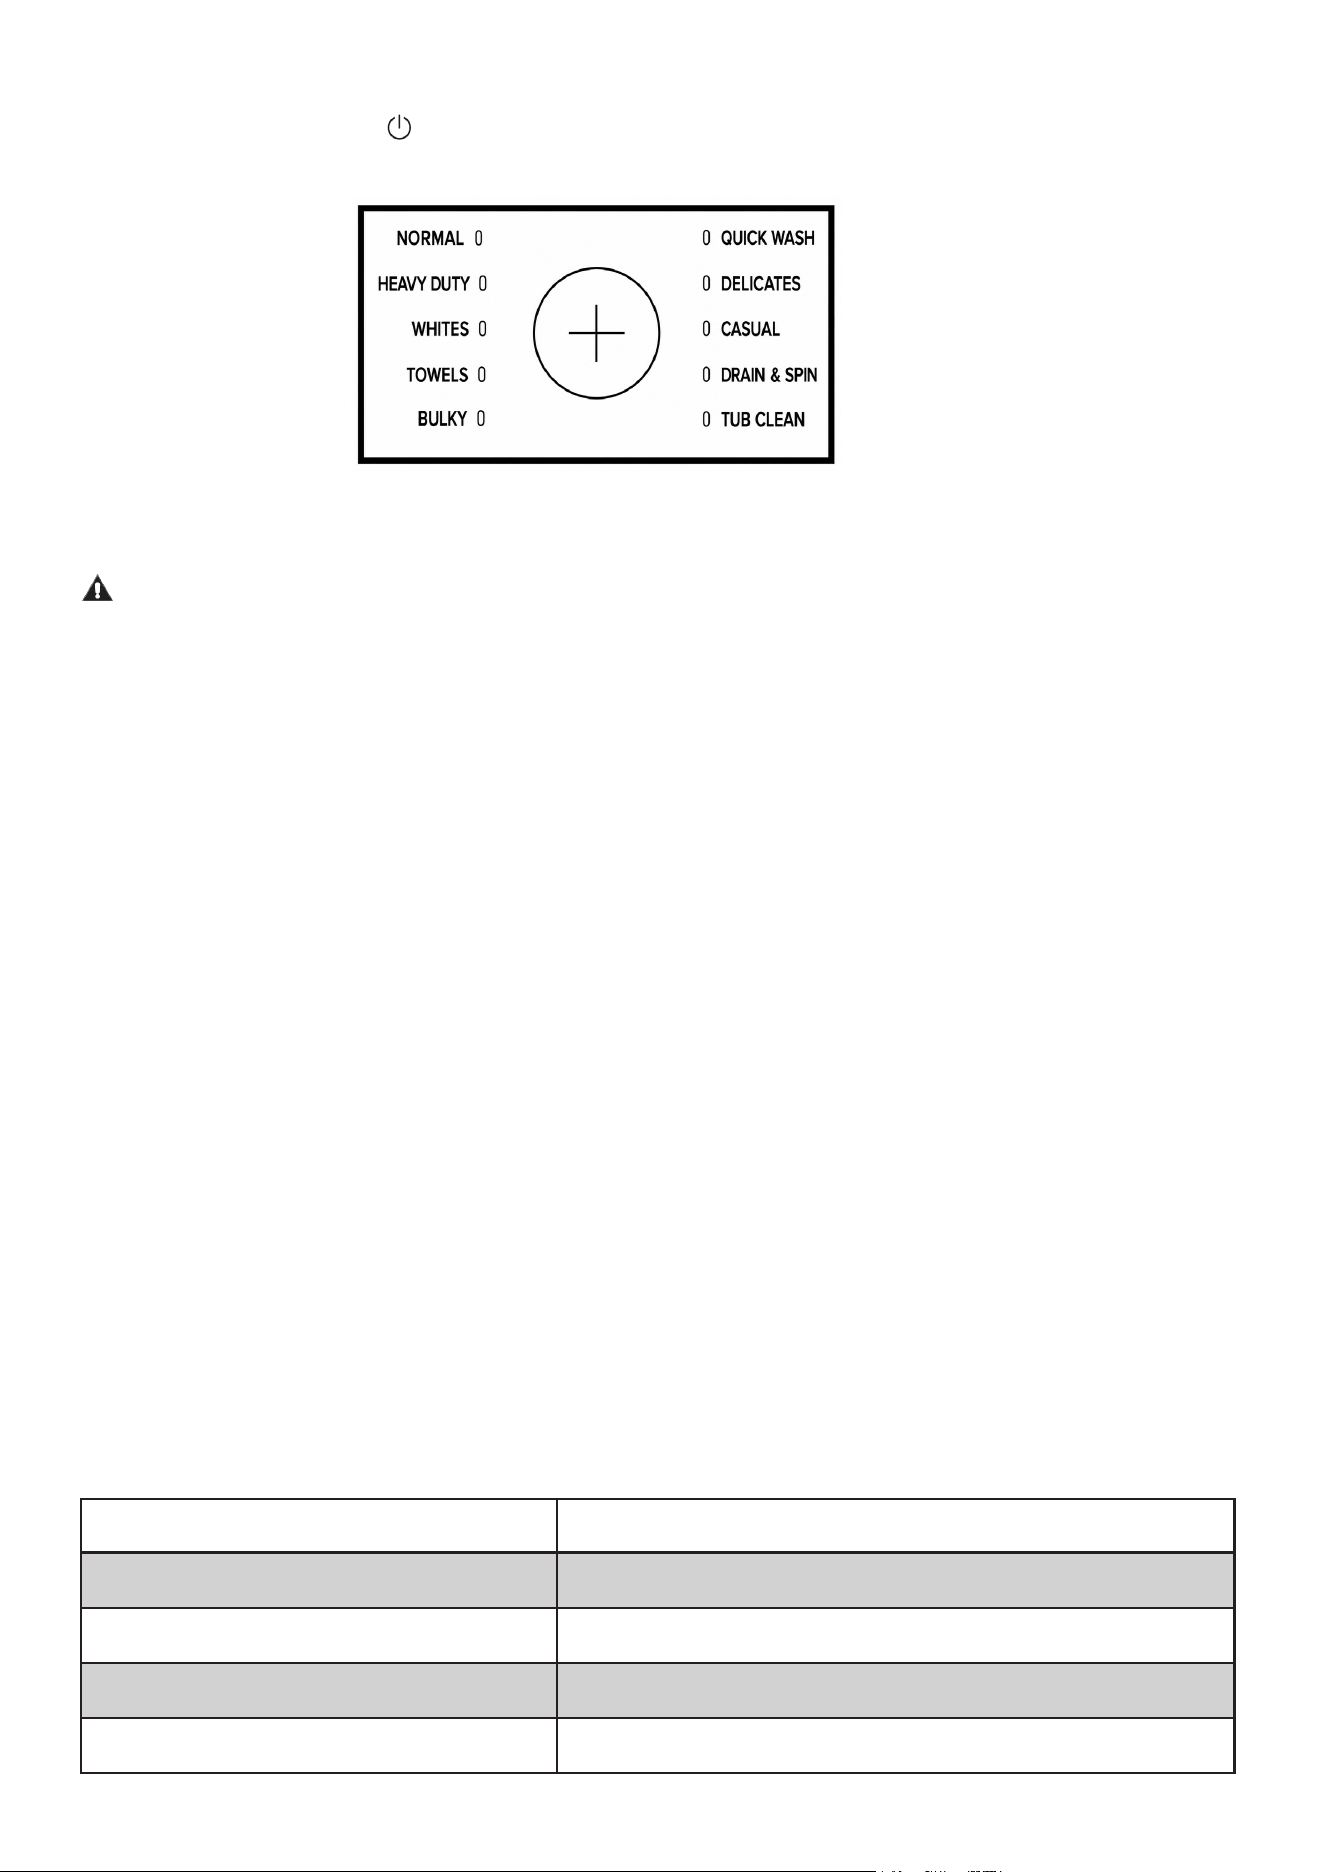
2. CYCLE SELECTOR
Turn the cycle selector knob to choose the
desired wash cycle.
The selected cycle determines the wash pat-
tern and operating settings for the load.
3. START/PAUSE
Press START/PAUSE to begin the selected
cycle.
To temporarily stop the cycle, press START/
PAUSE again. While paused, you may add or
remove laundry items; however, cycle settings
cannot be changed.
Press START/PAUSE once more to resume
operation.
4. DIGITAL DISPLAY
The digital display shows the estimated re-
maining cycle time.
During operation, the display updates to in-
dicate the current cycle status and the time
remaining until completion.
5. DELAY
Press DELAY to postpone the start of the wash
cycle.
Select the desired delay time before the cycle
begins automatically.
6. EXTRA RINSE
Press EXTRA RINSE to add an additional rinse
cycle for improved detergent removal.
7. EXPRESS
Press EXPRESS to shorten the wash cycle time
for lightly soiled loads.
Cycle duration reduction may vary depending
on the selected program.
8. SOAK
Press SOAK to add a soaking period before the
wash cycle begins.
This feature is recommended for heavily soiled
items or garments with stubborn stains.
9. SOIL LEVEL
Press SOIL LEVEL to adjust the wash intensity
based on the level of soil in the load.
Select from available soil level settings to opti-
mize washing performance.

19
10. WATER LEVEL
Press WATER LEVEL to select the appropriate water level for the load size.
Available settings include:
• Auto – Automatically determines the water level based on the load size and weight.
• Deep Fill – Provides the maximum water level for large loads.
• Medium – Recommended for medium-sized loads.
• Low – Recommended for small loads.
Note: The rinse water level will match the selected wash water level.
11. CHILD LOCK
The Child Lock feature prevents accidental changes to the control settings during operation.
To activate Child Lock:
• Press and hold the WATER LEVEL and TEMP buttons simultaneously for 3 seconds.
• The Child Lock indicator will illuminate.
To deactivate Child Lock:
• Press and hold the WATER LEVEL and TEMP buttons simultaneously for 3 seconds again.
• The Child Lock indicator will turn off.
When Child Lock is activated, all controls are disabled except the buttons used to deactivate the
feature.
12. TEMP
Press TEMP to select the desired wash water temperature.
Available temperature options vary by cycle.
Note: The rinse cycle always uses cold water.
Washing a Load of Laundry
CAUTION
To reduce the risk of re, electric shock, or personal injury, read all safety instructions before oper-
ating this appliance.
Selecting Detergent
This washer is designed for use with High-Eciency (HE) detergent only.
For best results:
• Use HE detergent according to the detergent manufacturer’s instructions.
• Do not use excessive detergent.
• Pre-treat stains before washing.
• Sort laundry by fabric type, color, and soil level.
• Avoid overloading the washer.
20
Step 1: Turn On the Washer
Press the POWER button.
The control panel indicators will illuminate based on the selected cycle and options.
Step 2: Load the Washer
CAUTION
Before loading laundry:
• Remove coins, keys, pins, and other hard objects.
• Close all zippers and fasteners.
Failure to do so may damage clothing or the washer.
Loading Guidelines
• Load laundry loosely and evenly around the tub.
• Do not overload the washer.
• Overloading may reduce cleaning performance and increase wrinkling.
• Wash delicate items such as bras, hosiery, and lingerie using the Delicates cycle.
Load Recommendations
Bulky Items
When washing bulky items such as blankets, rugs, or pillows:
• Use the Bulky cycle.
• Add several towels when washing small bulky loads to improve balance during spin cycles.
Heavy Soil Loads
Do not overload heavily soiled loads to maintain proper wash performance.
Suggested Load Types
Load Type Recommended Items
Normal T-shirts, jeans, casual clothing, mixed fabrics
Heavy Duty Workwear, heavy cottons, heavily soiled garments
Whites White cotton garments, underwear, socks
Towels Bath towels, washcloths, hand towels
21
Load Type Recommended Items
Bulky Blankets, jackets, comforters, pillows
Delicates Lingerie, hosiery, lightweight fabrics
Quick Wash Small lightly soiled loads
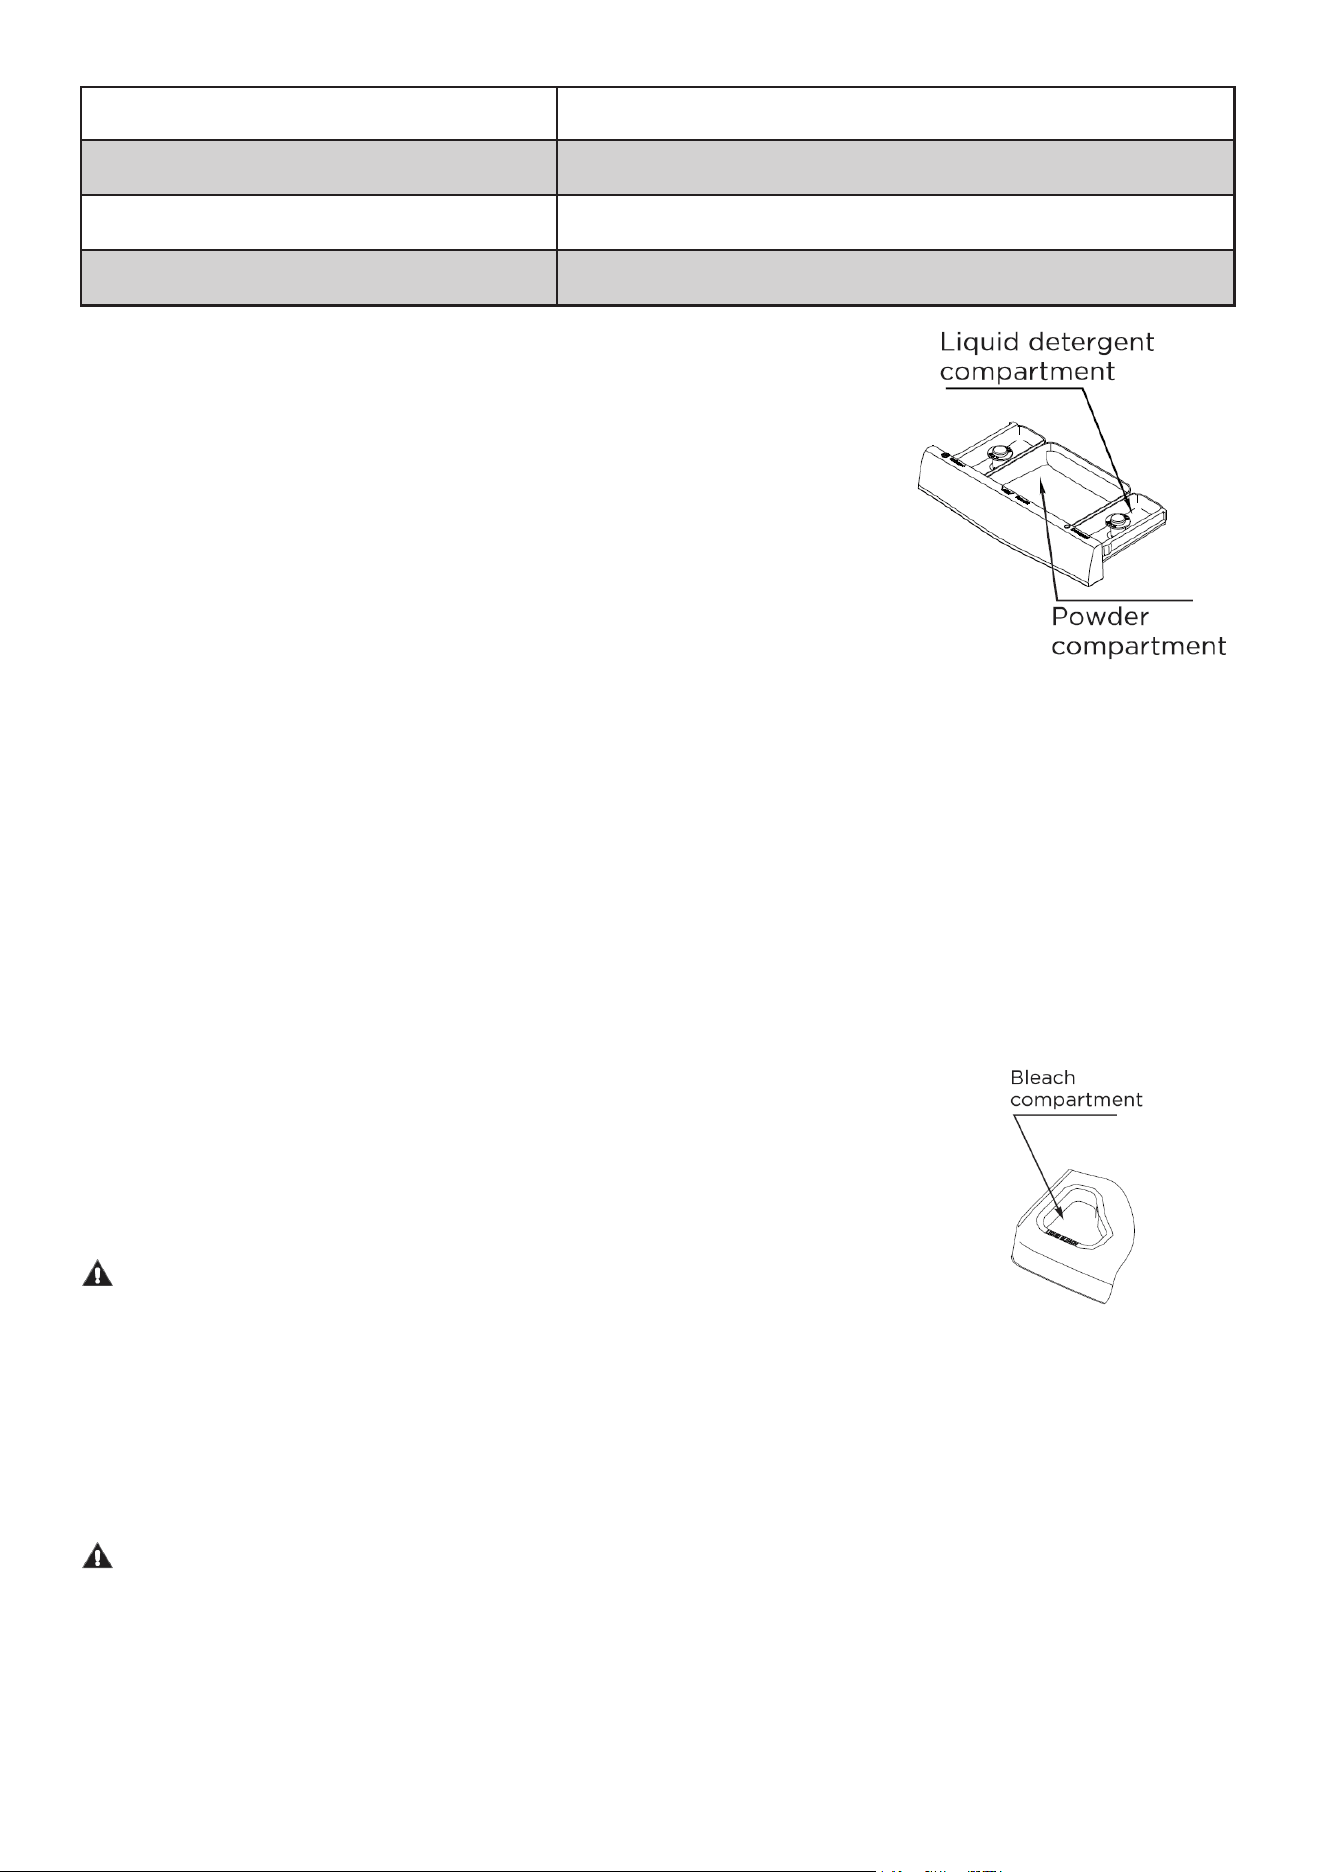
Step 3: Add Detergent and Laundry Additives
Detergent Compartment
• Add liquid or powder detergent to the designated detergent com-
partment.
• Follow detergent manufacturer recommendations for quantity.
Color-Safe Bleach
• Add color-safe bleach together with detergent.
• Both products should be the same type (liquid or powder).
NOTE
If the washer does not include a detergent compartment, add detergent directly into the tub before
loading laundry.
Using Laundry Detergent Pods
1. Place Laundry Detergent Pods directly into the bottom of the empty wash tub.
2. Add laundry on top of the detergent pods.
NOTE
Placing detergent pods at the bottom of the tub improves detergent dissolution and wash perfor-
mance.
Bleach Compartment (Liquid Bleach Only)
• Add liquid chlorine bleach to the bleach compartment only.
• Do not overll the compartment.
CAUTION
• Do not use color-safe bleach in the bleach compartment.
• Overlling may cause damage to fabrics.
Fabric Softener Compartment
• Add liquid fabric softener to the designated compartment.
• The washer automatically dispenses softener during the rinse cycle.
CAUTION
• Use liquid fabric softener only.
• Do not use thickened or concentrated softeners that may not dissolve properly.
Step 4: Select a Wash Cycle
Turn the cycle selector knob to choose the desired wash cycle.
Step 6: Unload Laundry
When the cycle is complete:
1. Wait until the washer has fully stopped.
2. Open the lid.
3. Remove laundry promptly to reduce wrinkling and odors.
22
Available cycles may include:
• Normal
• Heavy Duty
• Whites
• Towels
• Bulky
• Quick Wash
• Delicates
• Casual
• Drain & Spin
• Tub Clean
Adjust cycle options such as:
• Water Level
• Temperature
• Soil Level
• Extra Rinse
• Soak
• Express
Depending on the selected cycle.
Step 5: Start the Washer
Press the START/PAUSE button to begin operation.
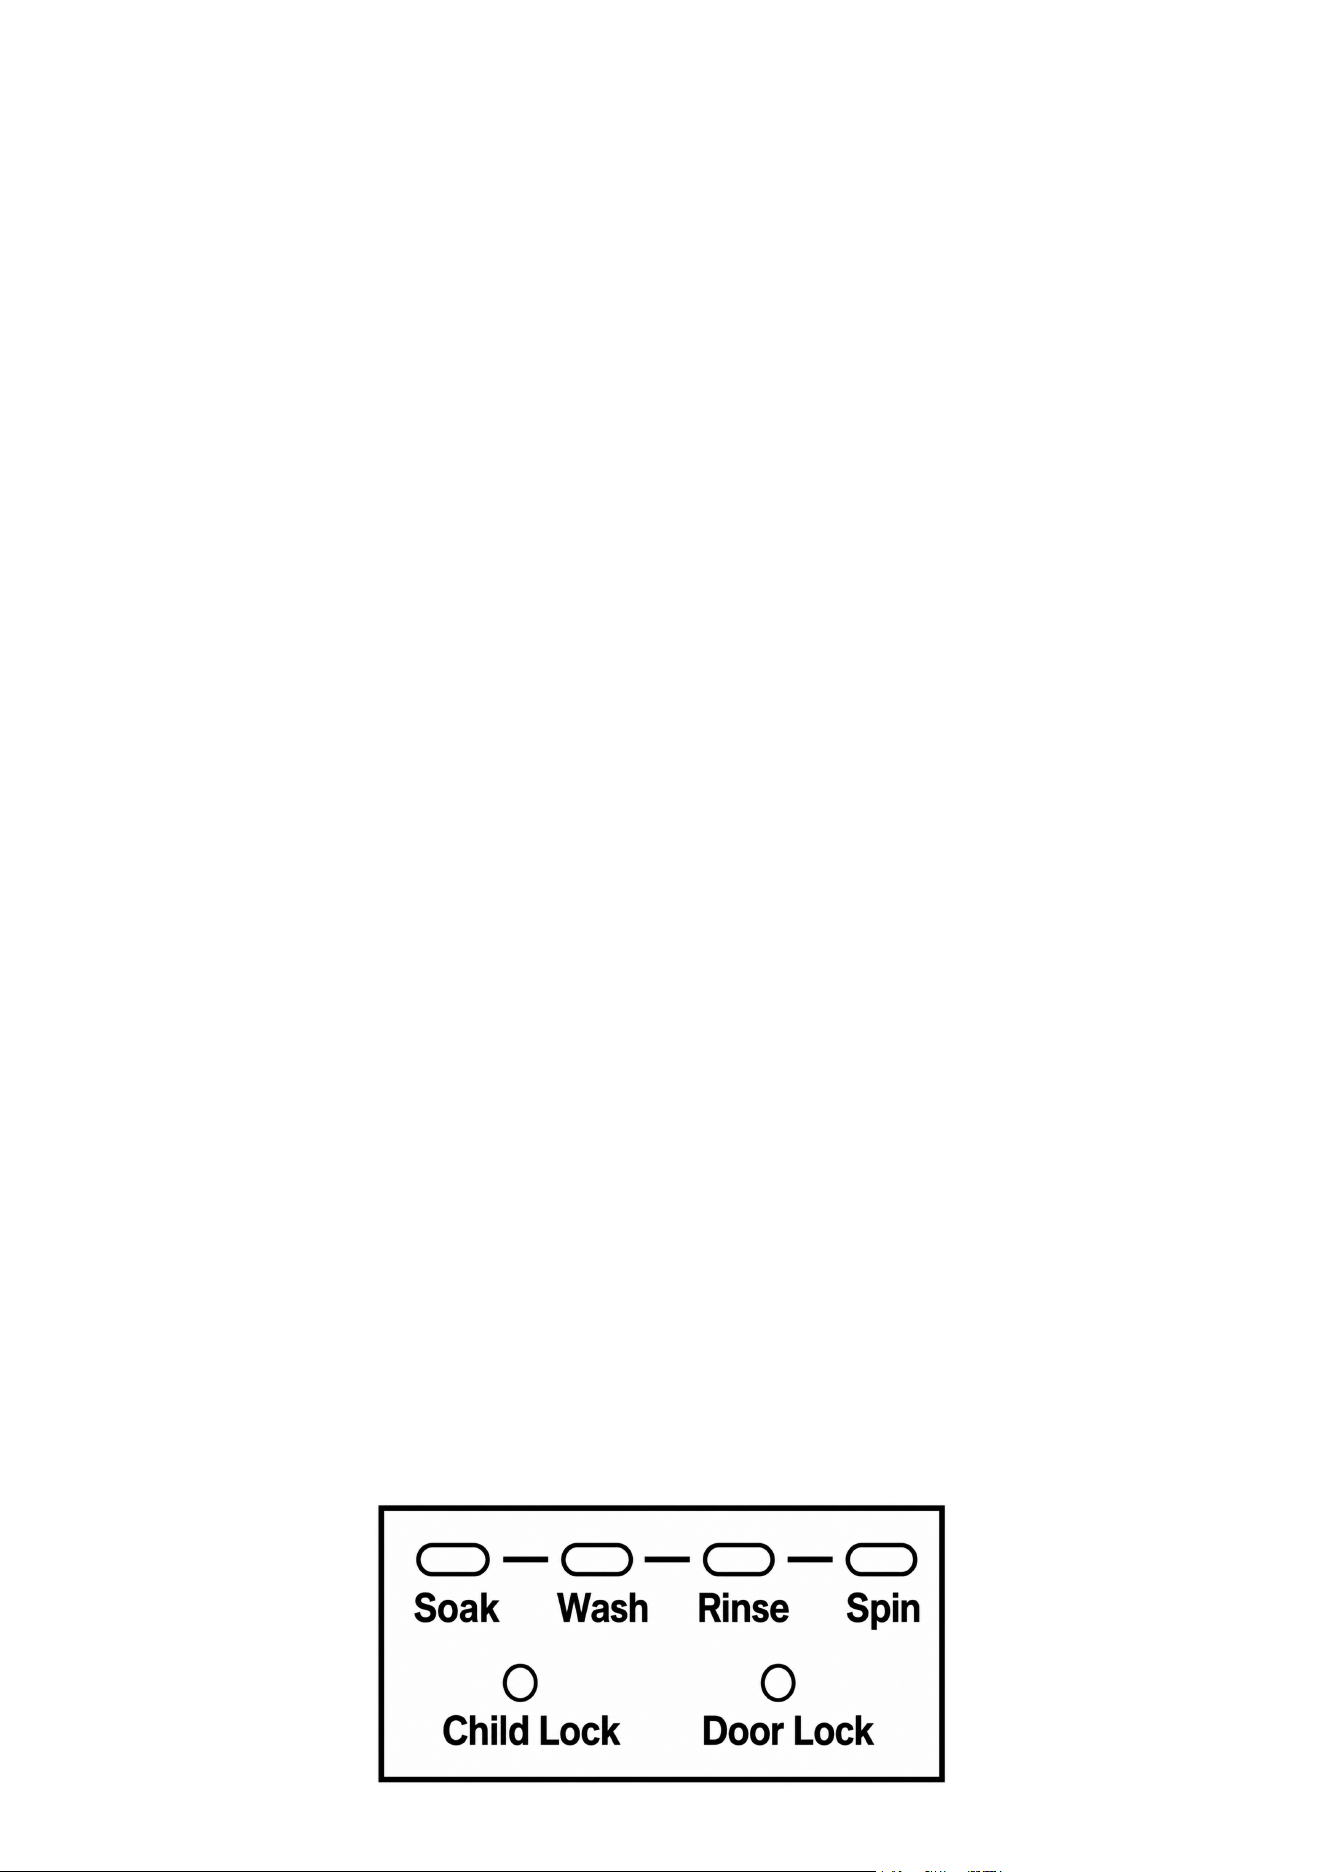
During operation:
• Cycle indicator lights illuminate as the washer advances through each stage.
• The washer may pause briey between cycle stages. This is normal operation.
To pause the cycle:
1. Press START/PAUSE.
2. Wait for the tub to stop completely.
3. Open the lid if necessary.
4. Close the lid and press START/PAUSE again to resume.
23
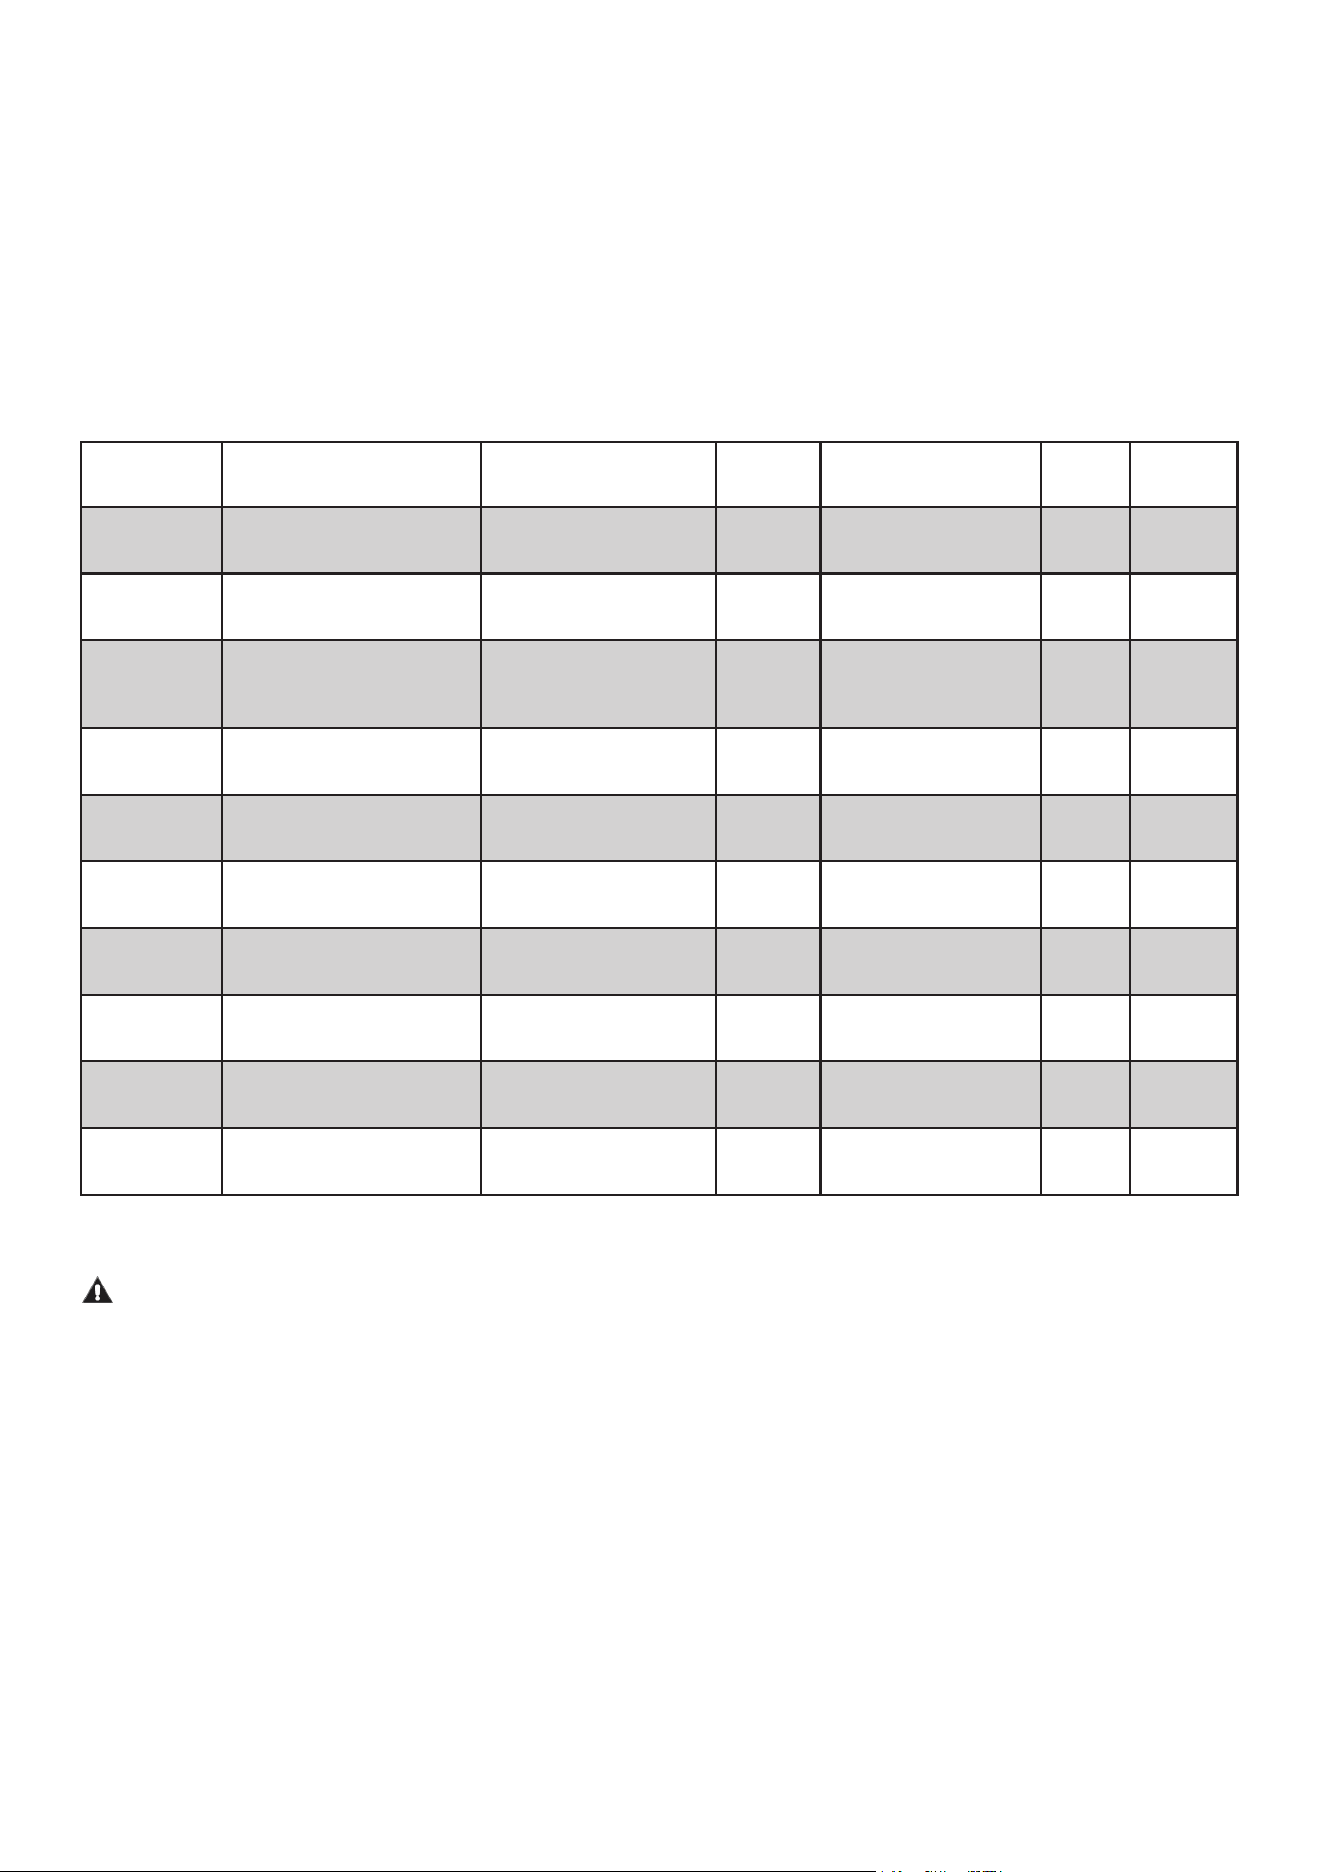
Program Water Level Water Temperature
Extra
Rinse
Soil Level Soak Express
Normal
Auto / Deep Fill / Medi-
um / Low
Hot / Warm / Cold /
Tap Cold
Yes
Ex. Heavy / Heavy /
Normal / Light
Yes Yes
Quick Wash
Auto / Deep Fill / Medi-
um / Low
Hot / Warm / Cold /
Tap Cold
- Normal / Light Yes -
Delicates Medium / Low
Hot / Warm / Cold /
Tap Cold
Heavy /
Normal
/ Light
Heavy / Normal /
Light
Yes Yes
Casual
Auto / Deep Fill / Medi-
um / Low
Hot / Warm / Cold /
Tap Cold
Yes
Heavy / Normal /
Light
Yes Yes
Drain & Spin
- -
-
-
- -
Tub Clean Deep Fill Hot - Ex. Heavy - -
Bulky
Auto / Deep Fill / Medi-
um / Low
Hot / Warm / Cold /
Tap Cold
Yes
Ex. Heavy / Heavy /
Normal / Light
Yes Yes
Towels
Auto / Deep Fill / Medi-
um / Low
Hot / Warm / Cold /
Tap Cold
Yes
Heavy / Normal /
Light
Yes Yes
Whites
Auto / Deep Fill / Medi-
um / Low
Hot / Warm / Cold /
Tap Cold
Yes
Ex. Heavy / Heavy /
Normal / Light
Yes Yes
Heavy Duty
Auto / Deep Fill / Medi-
um / Low
Hot / Warm / Cold /
Tap Cold
Yes
Ex. Heavy / Heavy /
Normal / Light
Yes Yes
Washer Options and Settings
NOTE
• A double beep indicates that the selected option is unavailable for the current cycle.
• Available settings vary by wash cycle.
For best washing performance:
• Recommended maximum dry load: 17.64 lb. (8.0 kg)
Cycle Options
Electrical Requirements
WARNING
• Use a properly grounded 120V, 60Hz outlet protected by a 15-amp fuse or circuit breaker.
• Do not use an extension cord or adapter.
• The washer must be properly grounded in accordance with local electrical codes.
Improper grounding may result in electric shock, re, or equipment damage.
Water Requirements
Proper water pressure is required for correct washer operation.
Recommended water pressure range:
• 14 psi to 116 psi (100–800 kPa)

24
If water pressure is too low:
• Fill times may increase.
• The washer may display an error code.
• Water valves may not operate correctly.
Drainage Requirements
• Recommended standpipe height: 48 in. (122 cm)
• The standpipe must be large enough to accept the drain hose diameter.
• Route the drain hose through the supplied hose retainer.

25
Cleaning Your Washer
WARNING
To reduce the risk of electric shock, disconnect the power supply before cleaning or performing
maintenance on the washer.
Cleaning the Exterior
• Wipe the cabinet and control panel with a soft, damp cloth.
• Dry surfaces with a clean cloth after cleaning.
• Do not use abrasive cleaners, steel wool, or harsh chemicals.
• Immediately wipe away detergent, bleach, or other spills.
Cleaning the Interior
• Clean the washer tub periodically to help prevent odors, residue buildup, mold, or mildew.
• Leave the lid open after use to allow the interior to dry.
• Use only cleaners labeled safe for washing machines.
NOTE
Failure to maintain the washer properly may result in odors, residue buildup, or reduced perfor-
mance.
Cleaning the Control Panel
• Use a soft damp cloth only.
• Do not spray water or cleaning products directly onto the control panel.
• Avoid abrasive pads or powdered cleaners, which may damage the nish.
Cleaning the Detergent, Bleach, and Softener Compartments
• Remove any detergent or softener residue regularly.
• Clean compartments using warm water and a soft cloth.
• Do not use abrasive cleaning tools or harsh chemicals.
Tub Clean Cycle
The Tub Clean cycle is designed to remove detergent residue and odors from the washer tub. Run-
ning this cycle monthly is recommended for optimal performance.
CAUTION
Do not place laundry in the washer during the Tub Clean cycle.
To Run the Tub Clean Cycle
1. Ensure the washer is empty.
2. Add one cup of liquid chlorine bleach to the bleach compartment.
3. Press the Power button.
4. Select the Tub Clean cycle.
5. Press Start/Pause to begin the cycle.
Care and Maintenance
26
WARNING
Electrical components inside the washer may retain electrical charge during servicing. Disconnect
power before performing maintenance.
Storing the Washer
If the washer will not be used for an extended period:
1. Run a Tub Clean or Quick Wash cycle without laundry.
2. Turn off the water supply faucets.
3. Disconnect the water inlet hoses.
4. Unplug the power cord from the electrical outlet.
5. Leave the lid open to allow the interior to dry completely.
CAUTION
If the washer has been stored in temperatures below freezing, allow all remaining water inside the
washer to thaw completely before operating the appliance.
Maintenance Tips
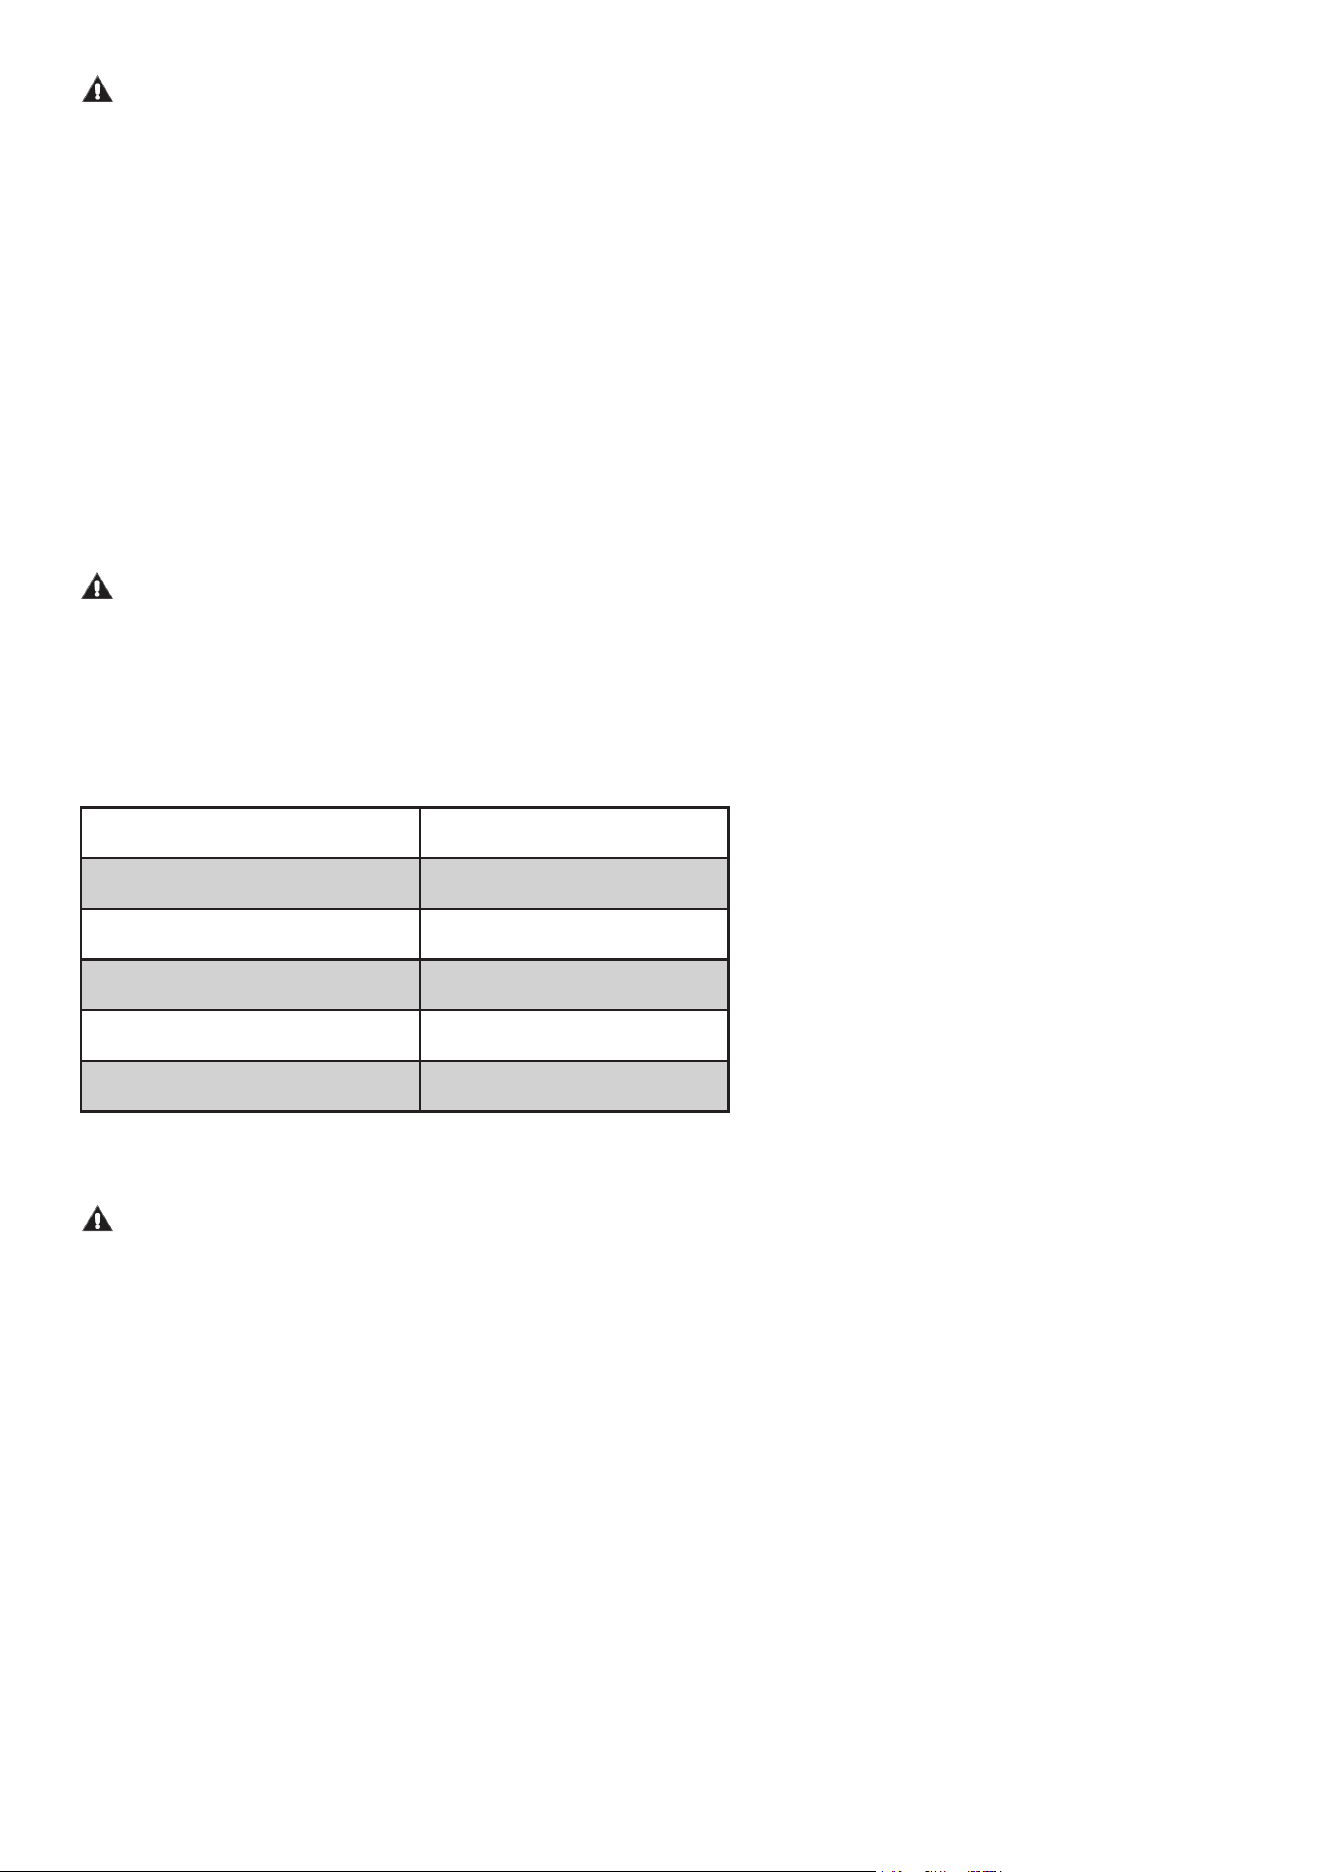
Maintenance Item Recommended Frequency
Clean Exterior As needed
Clean Detergent Compartments Monthly
Run Tub Clean Cycle Monthly
Inspect Water Hoses Every 6 months
Replace Water Hoses Every 5 years
Water Hose Inspection
WARNING
Check water supply hoses regularly for signs of wear, cracking, bulging, or leakage. Replace dam-
aged hoses immediately to reduce the risk of water damage or ooding.
Long-Term Care
• Keep the washer installed in a dry, indoor location.
• Do not expose the washer to freezing temperatures.
• Use only manufacturer-recommended replacement parts.
• Disconnect power before servicing the appliance.
27
Troubleshooting
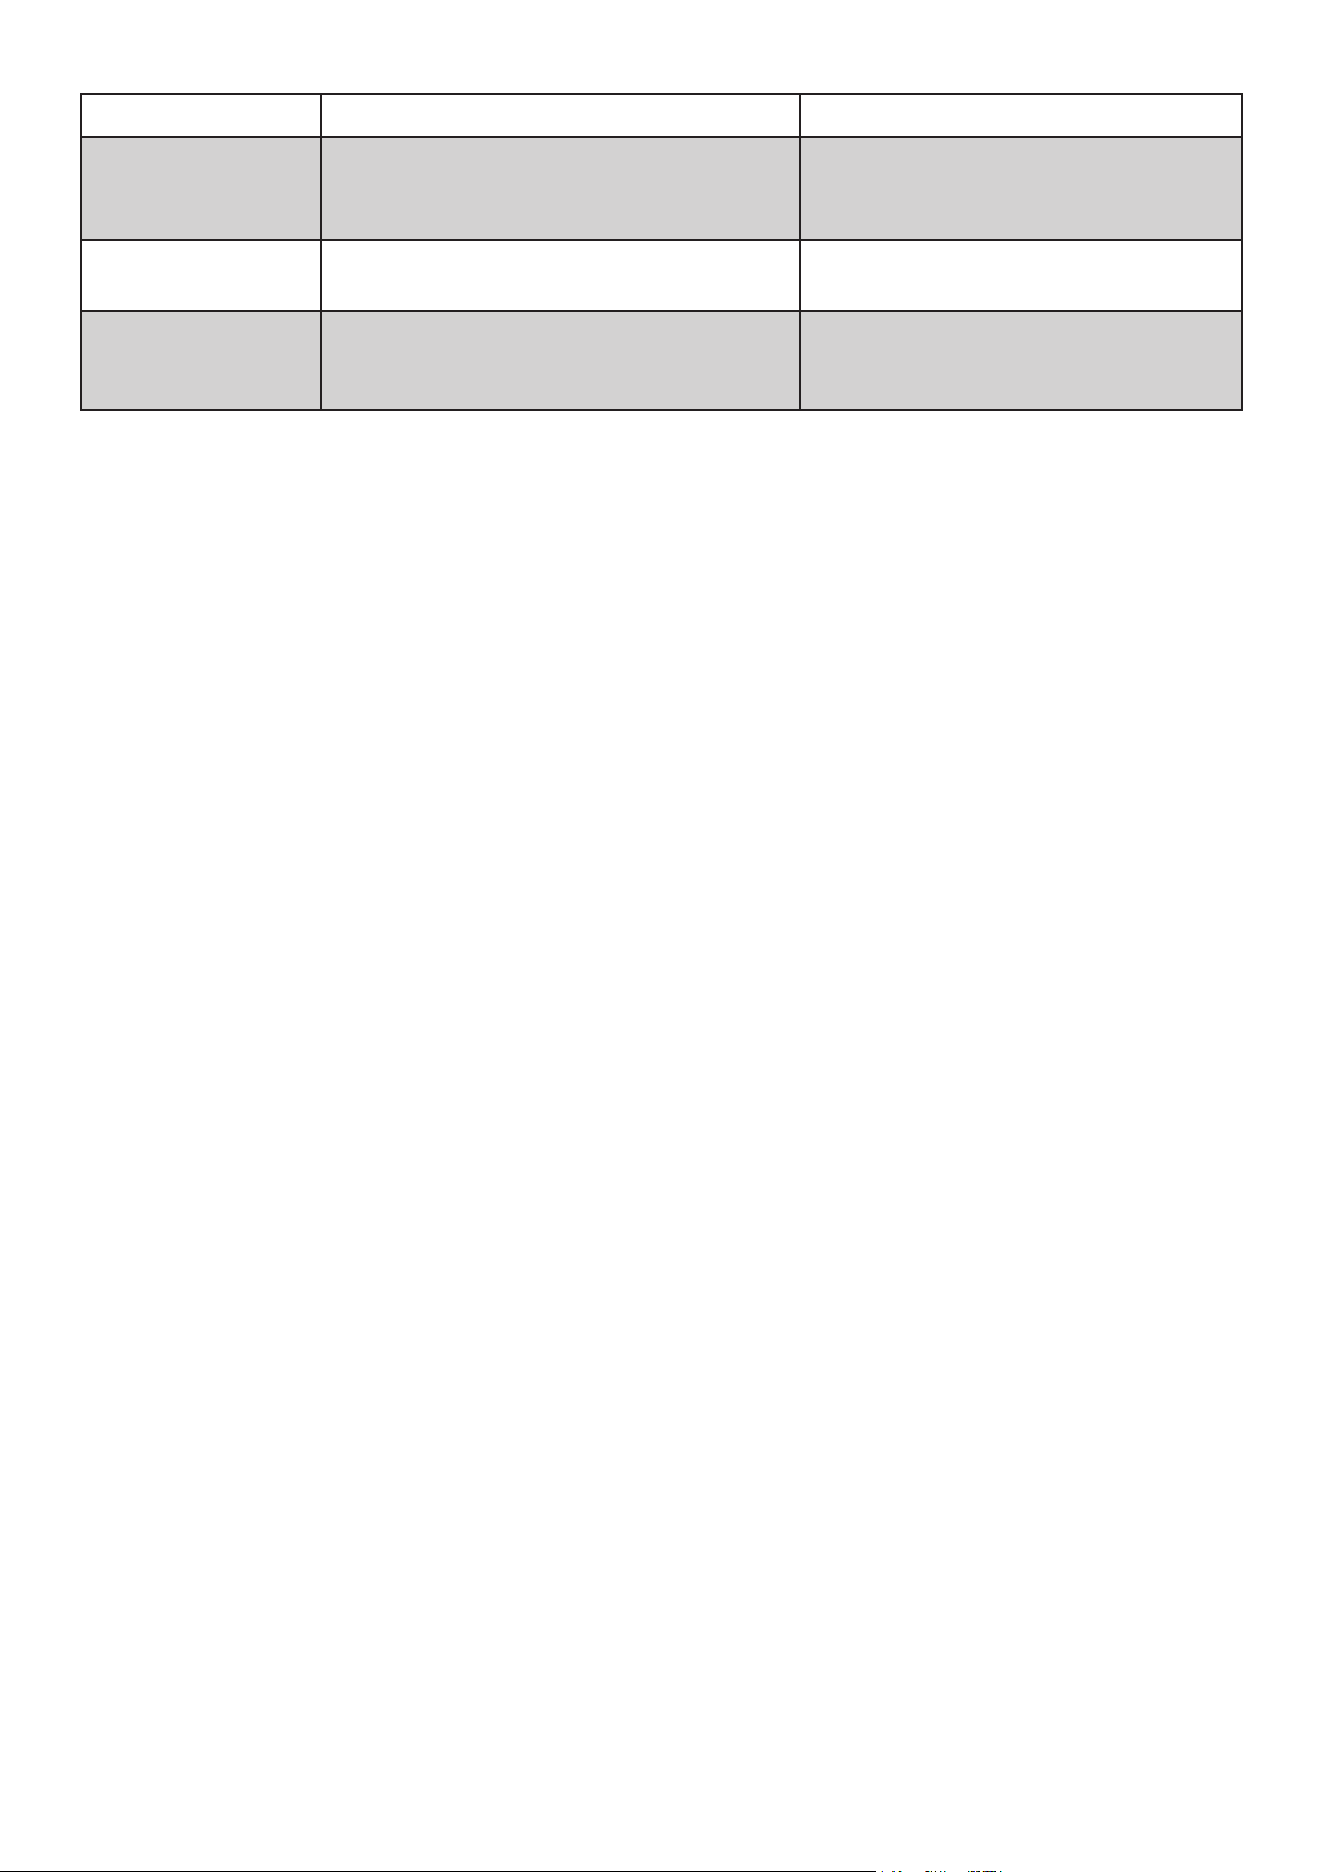
Problem Possible Cause Recommended Solution
Washer does not start
• Power cord is unplugged
• Lid is open
• Water faucets are turned off
• Start/Pause button was not pressed
• Circuit breaker is tripped or fuse is blown
• Washer is performing lid-lock safety check
• Plug the washer into a properly
grounded outlet
• Close the lid securely
• Fully open hot and cold water faucets
• Press the Start/Pause button
• Reset breaker or replace fuse
• Wait briey for the washer to complete
the lid-lock sequence
No water or insu-
cient water supply
• Water faucets are not fully open
• Water inlet hoses are kinked
• Water inlet screens are clogged
• Low household water pressure
• Water level appears low
• Fully open both water supply faucets
• Straighten the hoses
• Disconnect hoses and clean inlet
screens
• Verify water pressure is within speci-
cations
• High-eciency washers use lower
water levels during operation
Excessive vibration or
noise
• Washer is not level
• Floor is unstable
• Laundry load is unbalanced
• Shipping materials remain installed
• Adjust leveling feet until washer is
level
• Move washer to a rm, level surface
• Redistribute laundry evenly in the tub
• Remove all shipping and packaging
materials
Washer stops during
cycle
• Power interruption
• Lid opened during operation
• Washer paused between cycle stages
• Water inlet screens clogged
• Verify electrical supply and restart
cycle
• Close lid and press Start/Pause
• Normal operation — wait for cycle to
continue
• Clean water inlet screens
Lid is locked or will
not open
• Cycle is running
• Lid lock delay
• Power interruption during operation
• Press Start/Pause and wait for lid to
unlock
• Wait several seconds after cycle com-
pletion
• Lid may remain locked temporarily
until washer resets
Washer does not drain
or spin
• Drain hose is kinked or blocked
• Lid is open
• Drain standpipe height incorrect
• Household drain is clogged
• Straighten or clear the drain hose
• Close lid securely
• Verify drain installation requirements
• Contact a qualied plumber
Washer does not ll
properly
• Incorrect temperature selection
• Water supply hoses connected incorrectly
• Water inlet screens clogged
• Select the appropriate water tempera-
ture
• Verify hot and cold hose connections
• Clean inlet screens
Laundry too wet after
cycle
• Load is too small or unbalanced
• Excess detergent causing oversudsing
• Add or redistribute laundry
• Use HE detergent and reduce deter-
gent amount
Before contacting KoolMore Customer Support, review the troubleshooting information below.
Many common issues can be resolved by following these recommendations.
28
Problem Possible Cause Recommended Solution
Water leaks
• Loose hose connections
• Drain hose improperly installed
• Excess detergent or oversudsing
• Tighten all hose connections
• Secure drain hose properly
• Reduce detergent usage
Oversudsing
• Too much detergent used
• Non-HE detergent used
• Reduce detergent amount
• Use high-eciency (HE) detergent only
Odor inside washer
• Washer tub requires cleaning
• Moisture trapped inside washer
• Run the Tub Clean cycle
• Leave lid open after use to allow ven-
tilation
Service Warning
Repairs should only be performed by qualied service personnel. Unauthorized repairs may result
in personal injury, electrical shock, re, or damage to the appliance.
If the issue cannot be resolved using this troubleshooting guide, disconnect power to the washer
and contact KoolMore Customer Support or an authorized service technician for assistance.
29
LIMITED WARRANTY
KoolMore Supply Inc. extends a limited warranty to the original purchaser, guaranteeing that this KoolMore product is
free from manufacturing defects in material or workmanship for one year from the date of purchase.
Should you discover any such defect within the warranty period, KoolMore Supply Inc. reserves the right to repair or re-
place the product without charge, or to cover the cost of replacement parts and repair labor needed to correct defects
present at the time of purchase or resulting from regular usage, when the appliance has been installed, operated, and
maintained as per the instructions provided.
At its sole discretion, KoolMore Supply Inc. may decide to replace the product. In such an event, your replacement
appliance will carry the warranty for the remaining term of the original unit’s warranty period.
This warranty is valid exclusively to the original purchaser of the product and only applicable within the United States.
The warranty commences from the date of original consumer purchase. Proof of the original purchase date will be
required to obtain service under this warranty.
Under this limited warranty, your sole and exclusive remedy will be product repair, as outlined above. All services must
be provided by a KoolMore designated service company.
KoolMore shall not be responsible or liable for any loss, spoilage, or damage to food, beverages, pharmaceuticals,
medical supplies, or any other contents stored in the unit resulting from failure, malfunction, defects, improper instal-
lation, improper use, power interruption, or any other cause. Any such losses are expressly excluded from coverage
under this warranty.
To claim warranty or request repair service:
Email [email protected]. Please include your name, address, phone number, warranty repair request, and a copy
of your proof of purchase receipt. Alternatively, visit koolmore.com and use the Contact Us page. A KoolMore custom-
er service representative will promptly arrange service for your appliance.
We thank you for choosing KoolMore.
WARRANTY EXCLUSIONS
This limited warranty will not cover:
1. Failure of the product to perform during power failures or interruptions, or due to inadequate electrical service.
2. Damage incurred during transportation or handling.
3. Damage caused by accidents, vermin, lightning, winds, re, oods, or acts of God.
4. Damage resulting from accidents, alterations, misuse, abuse, improper installation, repair, or maintenance. This
includes using any external device that alters or converts the voltage or frequency of electricity.
5. Unauthorized product modications, repairs by unauthorized centers, or use of non-approved replacement parts.
6. Abnormal cleaning and maintenance not aligned with the user’s manual.
7. Use of incompatible accessories or components.
8. Any costs associated with repairs or replacements under these excluded circumstances shall be the responsibility
of the consumer.
WARRANTY