English
DIGITAL MEDIA RECEIVER
MVH-S14BT
Operation Manual
Important (Serial number)
The serial number is located on the bottom of this unit. For your own security and convenience, be sure to
record this number on the warranty card.

- 2 -
English
Getting Started ........................................................................................ 3
Radio .......................................................................................................... 6
USB ............................................................................................................. 7
Bluetooth® ................................................................................................ 8
Settings .................................................................................................. 10
FUNCTION settings ............................................................................... 11
AUDIO settings ...................................................................................... 11
SYSTEM settings .................................................................................... 12
Additional Information ....................................................................... 14
About this manual:
• In the following instructions, a USB memory or USB audio player are referred to as
“USB device”.
Table of Contents
- 3 -- 3 -
English
Frequently used operations
Getting Started
Basic operation
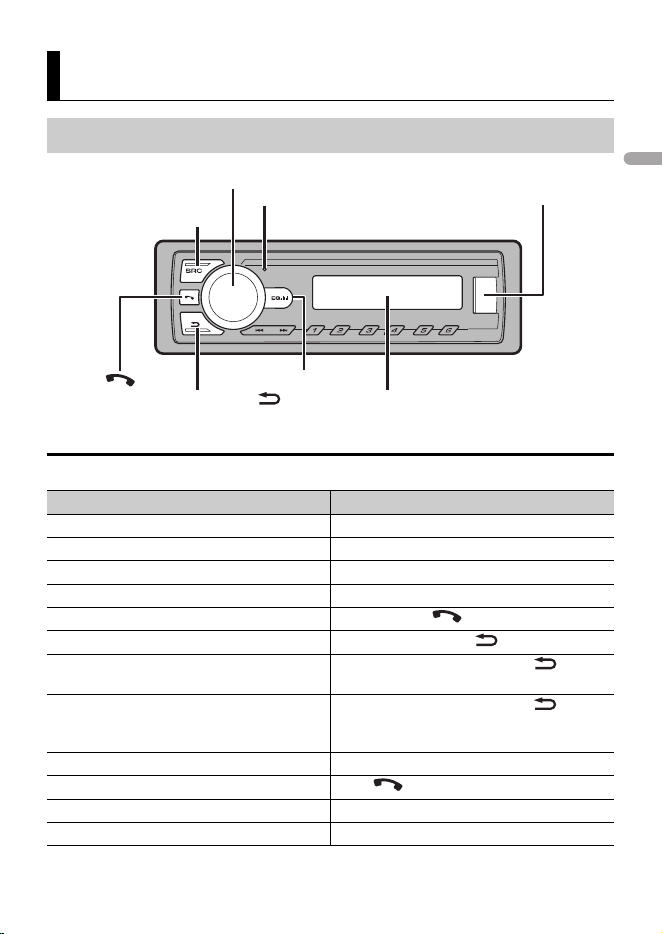
Purpose Operation
Turn on the power* Press SRC/OFF.
Turn off the power* Press and hold SRC/OFF.
Adjust the volume Turn the M.C. dial.
Select a source Press SRC/OFF repeatedly.
Change the display information Press and hold repeatedly.
Return to the previous display/list Press BAND/DIMMER .
Return to the normal display from the menu Press and hold BAND/DIMMER while
the menu screen is displayed.
Change the display brightness Press and hold BAND/DIMMER .
• [DIMMER] needs to be set to [MANUAL] in
the INITIAL settings (page 5).
Answer a call Press any button.
End a call Press .
Switch the equalizer setting Press EQ repeatedly.
Search for a file from the list Press and hold EQ to display a list.
SRC (source)/OFF
USB port
M.C. (multi-control) dial/MUTE
BAND/DIMMER Display window
Microphone
EQ
- 4 -
English
* When this unit’s blue/white lead is connected to the vehicle’s auto-antenna relay control terminal,
the vehicle’s antenna extends when this unit’s source is turned on. To retract the antenna, turn the
source off.
Display indication
When you turn the ignition switch to ON after installation, [SETUP:YES] appears in the
display.
1 Press the M.C. dial.
The setup menu disappears after 30 seconds of no operation. If you prefer not to set
at this time, turn the M.C. dial to select [NO], then press to confirm.
2 Turn the M.C. dial to select the options, then press to confirm.
To proceed to the next menu option, you need to confirm your selection.
Mute or unmute sound Press and hold the M.C. dial to mute.
Press and hold the M.C. dial again to
unmute.
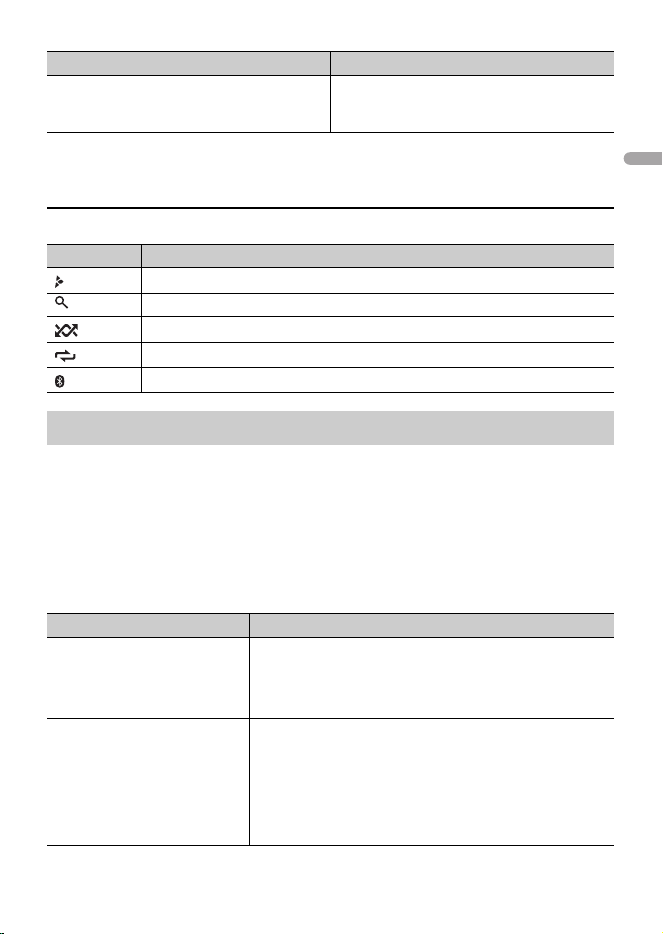
Indication Description
Appears when a lower tier of the menu or folder exists.
Appears when the EQ button is pressed and held.
Appears when random play is set.
Appears when repeat play is set.
Appears when a Bluetooth connection is made (page 8).
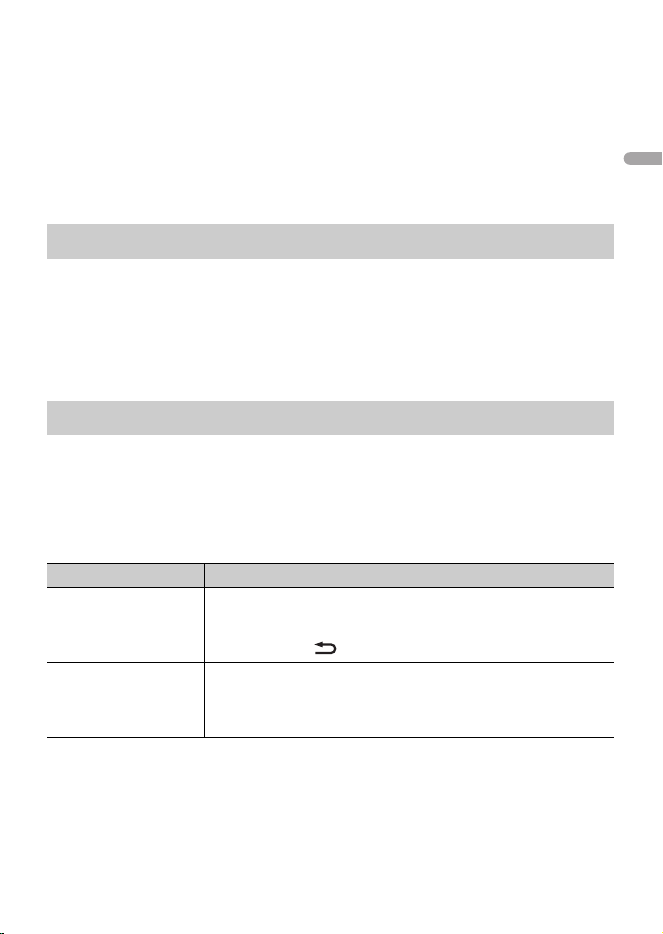
Setup menu
Menu Item Description
LANG Select the language to display.
[ENG](English),
[ESP](Spanish),
[FRA](Canadian French)
CLOCK Set the clock.
1 Turn the M.C. dial to adjust the hour, then press to
confirm.
The indicator moves to the minute setting
automatically.
2 Turn the M.C. dial to adjust the minute, then press to
confirm.
Purpose Operation
- 5 -- 5 -
English
3 [QUIT :YES] appears when all the settings have been made.
To return to the first item of the setup menu, turn the M.C. dial to select [QUIT :NO],
then press to confirm.
4 Press the M.C. dial to confirm the settings.
NOTES
• You can cancel the menu setting by pressing SRC/OFF.
• These settings can be made at any time from the SYSTEM settings (page 12).
1 Press the M.C. dial to display the main menu.
2 Turn the M.C. dial to select [SYSTEM], then press to confirm.
3 Turn the M.C. dial to select [DEMO OFF], then press to confirm.
4 Turn the M.C. dial to select [YES], then press to confirm.
1 Press and hold SRC/OFF until the unit turns off.
2 Press the M.C. dial to display the main menu.
3 Turn the M.C. dial to select [INITIAL], then press to confirm.
4 Turn the M.C. dial to select an option, then press to confirm.
Canceling the demonstration display (DEMO OFF)
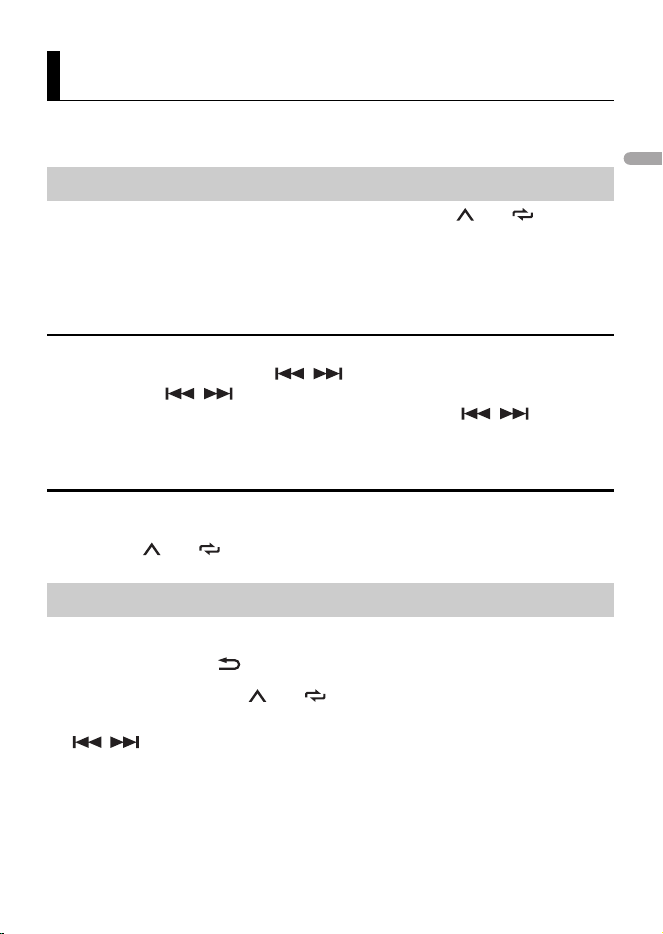
INITIAL settings
Menu Item Description
DIMMER Change the display brightness.
Select [SYNC CLK] to set the duration of activating dimmer.
Select [MANUAL] to turn on/off dimmer by a press and hold of
BAND/DIMMER button.
[SYNC CLK],
[MANUAL]
RESET Select [YES] to initialize the unit settings. The unit will be
restarted automatically.
(Some of the settings may be retained even after resetting the
unit.)
[YES], [NO]
- 6 -
English
The RDS (radio data system) function only works in areas that broadcast RDS signals for
FM stations.
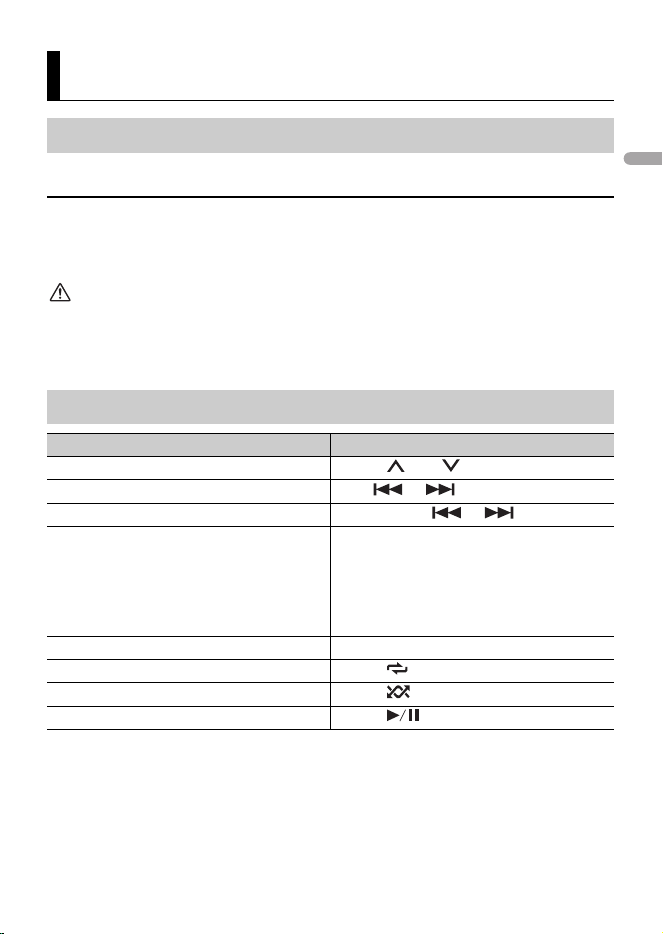
The six strongest stations are stored on the number buttons (1/ to 6/).
1 After selecting the band, press the M.C. dial to display the main menu.
2 Turn the M.C. dial to select [FUNCTION], then press to confirm.
3 Turn the M.C. dial to select [BSM], then press to confirm.
To seek a station manually
1
After selecting the band, press / to select a station.
Press and hold / then release to seek an available station. Scanning stops
when the unit receives a station. To cancel seek tuning, press / .
NOTE
[SEEK] needs to be set to [MAN] in the FUNCTION settings (page 11).
To store stations manually
1
While receiving the station you want to store, press and hold one of the number
buttons (1/ to 6/ ) until it stops flashing.
1 Press SRC/OFF to select [RADIO].
2 Press BAND/DIMMER to select the band from [F1], [F2], [F3] or [AM].
3 Press a number button (1/ to 6/).
TIP
The / buttons can be also used to select a preset station when [SEEK] is set to [PCH] in the
FUNCTION settings (page 11).
Radio
Best stations memory (BSM)
Receiving preset stations
- 7 -- 7 -
English
Disconnect headphones from the device before connecting it to the unit.
USB device
1
Open the USB port cover.
2 Plug in the USB device using an appropriate cable.
CAUTION
Use a USB cable (sold separately) to connect the USB device as any device connected directly to the
unit will protrude out from the unit, which could be dangerous.
Before removing the device, stop playback.
USB
Playing back
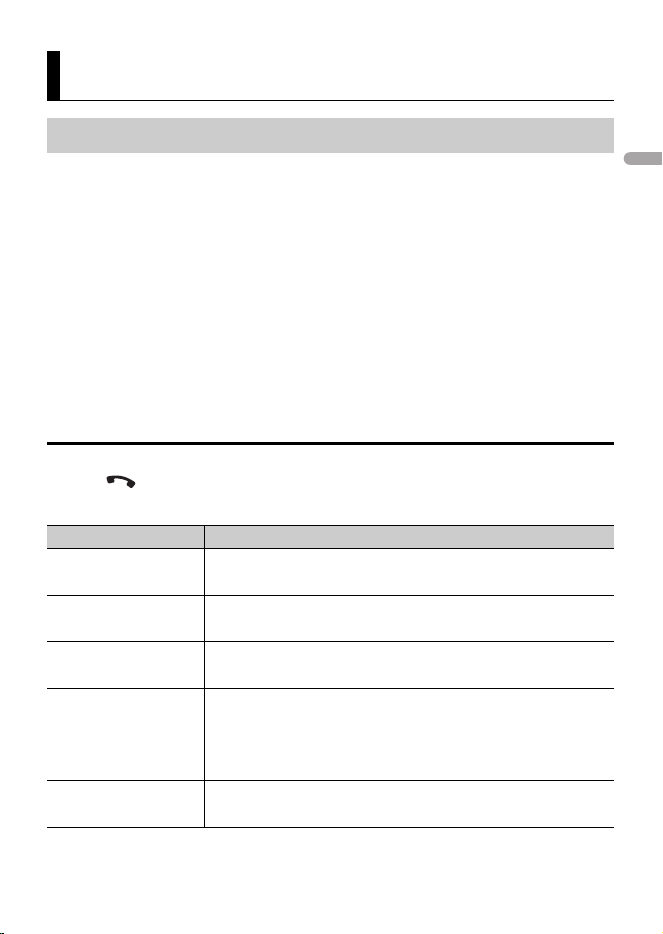
Operations
Purpose Operation
Select a folder Press 1/ or 2/.
Select a track Press or .
Fast forward or reverse Press and hold or .
Search for a file from a list 1 Press and hold EQ to display the list.
2 Turn the M.C. dial to select the desired
file (folder) name, then press to confirm.
3 Turn the M.C. dial to select the desired
file, then press to confirm.
Playback starts.
View a list of the files in the selected folder Press the M.C. dial when a folder is selected.
Repeat play Press 6/.
Random play Press 5/.
Pause/resume playback Press 4/.
- 8 -
English
1 Turn on the Bluetooth function of the device.
2 Select the unit name shown in the device display.
3 Make sure the same 6-digit number appears on this unit and the device.
4 Select “Yes” on the device.
TIP
To detect the unit from the Bluetooth device, [VISBL] in the Bluetooth settings needs to be set to [ON].
For details on Bluetooth device operations, refer to the operating instructions supplied with the
Bluetooth device.
NOTES
• Depending on the device, the PIN code is required in step 7. In this case, input [0000].
• Only one single device can be paired/registered at any one time.
• Disconnect a registered device in the [PHONE:CON] menu when you register a new device.
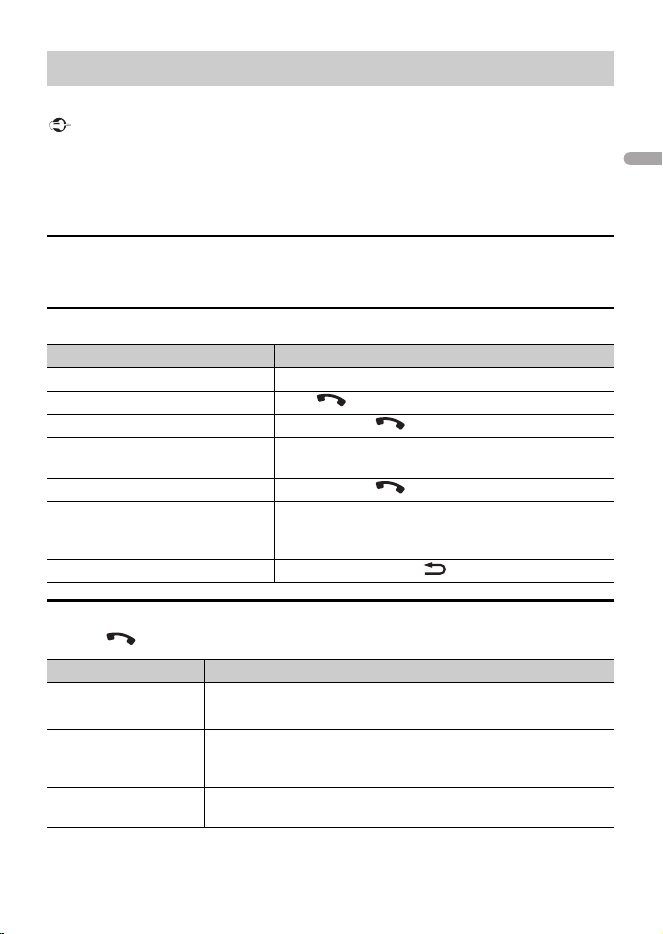
Bluetooth settings
1
Press to display the phone menu.
2 Turn the M.C. dial to select [PHONE:SET], then press to confirm.
Bluetooth®
Bluetooth connection
Menu Item Description
PHONE:CON Display the paired Bluetooth devices. “*” appears on the device
name when the Bluetooth connection is established.
[ON], [OFF]
A CON Select [ON] to connect to a Bluetooth device automatically.
[ON], [OFF]
VISBL Select [ON] so that a Bluetooth device can detect the unit.
[ON], [OFF]
PIN CODE Change the PIN code.
1 Press the M.C. dial to display the setting mode.
2 Turn the M.C. dial to select a number.
3 Press the M.C. dial to move the cursor to the next position.
4 After inputting the PIN code, press and hold the M.C. dial.
DEV. INFO Switch the device information on the display between the
device name and Bluetooth device address.
- 9 -- 9 -
English
First, make a Bluetooth connection with the Bluetooth telephone (page 8).
Important
• The Bluetooth microphone is built in the grill of the product.
• Speak toward the microphone when you make a call.
• Leaving the unit on standby to connect to your phone via Bluetooth while the engine is not running
can drain the vehicle’s battery.
• Be sure to park your vehicle in a safe place and apply the parking brake before operation.
To answer an incoming call
1
Press any button when a call is received.
Basic operations
Phone menu
1
Press to display the phone menu.
Bluetooth telephone
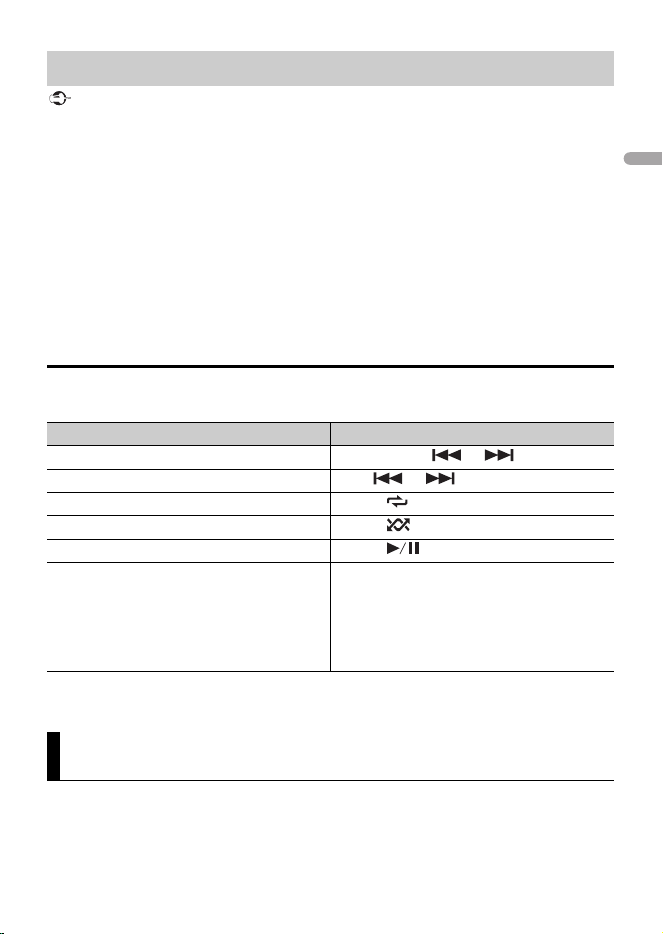
Purpose Operation
Adjust the ringtone volume Turn the M.C. dial during an incoming call.
End a call Press .
Reject an incoming call Press and hold when a call is received.
Switch between the current caller
and a caller on hold
Press the M.C. dial.
Cancel a caller on hold Press and hold .
Adjust the volume of the caller’s
voice (When private mode is on,
this function is not available.)
Turn the M.C. dial during the call.
Turn the private mode on or off Press BAND/DIMMER/ during the call.
Menu Item Description
ANSR Select [ON] to answer an incoming call automatically.
[ON], [OFF]
RING Select [ON] if the ring tone does not come out from the car
speakers. Depending on the connected phone, this function
may not work.
[ON], [OFF]
PHONE:SET You can adjust various settings for Bluetooth connections. For
details on Bluetooth settings, see page 8.
- 10 -
English
Important
• Depending on the Bluetooth audio player connected to this unit, the available operations will be
limited to the following two levels:
– A2DP (Advanced Audio Distribution Profile) can only play back songs on your audio player.
– AVRCP (Audio/Video Remote Control Profile) can perform functions such as playback, pause, select
song, etc.
• The sound of the Bluetooth audio player will be muted when the phone is in use.
• When the Bluetooth audio player is in use, you cannot connect to a Bluetooth telephone
automatically.
• Depending on the type of Bluetooth audio player you have connected to this unit, operation and
information displayed may vary based on availability and functionality.
1 Make a Bluetooth connection with the Bluetooth audio player.
2 Press SRC/OFF to select [BLUETOOTH AUDIO] as the source.
Playback starts automatically.
Basic operations
You can make various adjustments in the FUNCTION settings (page 11).
* Depending on the connected device, these operations may not be available.
You can adjust various settings in the main menu.
1 Press the M.C. dial to display the main menu.
Bluetooth audio
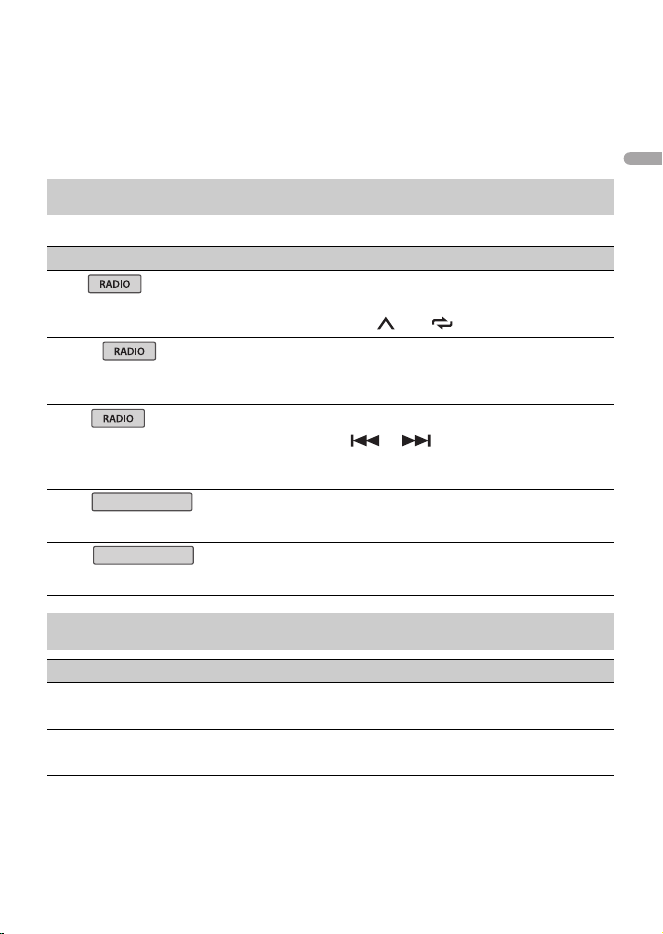
Purpose Operation
Fast forward or reverse* Press and hold or .
Select a track Press or .
Repeat play* Press 6/.
Random play* Press 5/.
Pause/resume playback Press 4/.
Search for a file from a list* 1 Press and hold EQ to display a list.
2 Turn the M.C. dial to select the desired
folder name, then press to confirm.
3 Turn the M.C. dial to select the desired
file, then press to confirm.
Playback starts.
Settings
- 11 -- 11 -
English
2 Turn the M.C. dial to select one of the categories below, then press to confirm.
• FUNCTION settings (page 11)
• AUDIO settings (page 11)
• SYSTEM settings (page 12)
3 Turn the M.C. dial to select the options, then press to confirm.
The menu items vary according to the source.
FUNCTION settings
Menu Item Description
BSM
Store the six strongest stations on the number
buttons (1/ to 6/ ) automatically.
LOCAL
FM: [OFF], [LV1], [LV2], [LV3], [LV4]
AM: [OFF], [LV1], [LV2]
Restrict the tuning station according to the
signal strength.
SEEK
[MAN], [PCH] Assign or buttons to seek the stations
one by one (manual tuning) or select a station
from the preset channels.
PLAY
Start playback.
STOP
Stop playback.
AUDIO settings
Menu Item Description
FAD ER
Adjust the front and rear speaker balance.
BALANCE
Adjust the left and right speaker balance.
BLUETOOTH AUDIO
BLUETOOTH AUDIO
- 12 -
English
You can also access to these menus when the unit is turned off.
BASS&TRE
[FLAT], [CUSTOM], [EQ : 1], [EQ : 2],
[EQ : 3]
Select bass or treble and level to
customize sound.
Tone control: [BASS], [TRE]
Equalizer level: [+6] to [–6]
Select the bass & treble setting.
LOUD
[ON], [OFF] Compensate for clear sound at low volume.
SLA
[2] to [–1] Adjust the volume level for each source except
RADIO.
SYSTEM settings
Menu Item Description
LANG
[ENG](English), [ESP](Spanish),
[FRA](Canadian French)
Select the language to display.
CLOCK
Set the clock (page 4).
12/24
[12H], [24H] Select the time notation.
AUDIO
[ON], [OFF] Set to [ON] when using the Bluetooth audio
player connected to the unit.
PHONE:CLR
[YES], [CANCEL] Clear the Bluetooth device data (device
information, PIN code) stored in the unit.
[CLEARED] appears when data is successfully
deleted.
Menu Item Description

- 13 -- 13 -
English
SCRL
[ONE], [YES], [NO] Select the auto text scroll setting for text
information.
[ONE] is to scroll text information only once.
Menu Item Description
- 14 -
English
The display automatically returns to the
normal display.
No operations have been made for
about 30 seconds.
– Perform an operation.
The repeat play range changes
unexpectedly.
Depending on the repeat play range,
the selected range may change when
another folder or track is being selected
or during fast forwarding/reversing.
– Select the repeat play range again.
A subfolder is not played back.
Subfolders cannot be played when
[FLD] (folder repeat) is selected.
– Select another repeat play range.
The sound is intermittent.
You are using a device, such as a cellular
phone, that may cause audible
interference.
– Move electrical devices that may be
causing the interference away from
the unit.
The sound from the Bluetooth audio
source is not played back.
There is a call in progress on a
Bluetooth-connected cellular phone.
– The sound will be played back when
the call is terminated.
A Bluetooth-connected cellular phone
is currently being operated.
– Stop using the cellular phone.
The connection between the unit and
the cellular phone is not established
correctly after a call made by a
Bluetooth-connected cellular phone.
– Make a Bluetooth connection
between the unit and the cellular
phone again.
Common
NO XXXX (NO TITLE, for example)
There is no embedded text information.
– Switch the display or play another
track/file.
USB device
READING
Sometimes there is a delay between the
start of playback and when you start to
hear any sound.
– Wait until the message disappears and
you hear sound.
NO AUDIO
There are no songs.
– Transfer the audio files to the USB
device and connect.
The connected USB device has security
enabled.
– Follow the USB device instructions to
disable the security.
SKIPPED
The connected USB device contains
DRM protected files.
– The protected files are skipped.
PROTECT
All the files on the connected USB
device are embedded with DRM.
–Replace the USB device.
N/A USB
The connected USB device is not
supported by this unit.
Additional Information
Troubleshooting
Error messages
- 15 -
English
– Disconnect your device and replace it
with a compatible USB device.
Communication failed.
– Perform one of the following
operations, then return to the USB
source.
• Turn the ignition switch OFF and
back to ON.
• Disconnect the USB device.
• Change to a different source.
USB device was not formatted properly.
– Format the USB device with FAT12,
FAT16 or FAT32.
HUB ERR
The USB device connected via a USB
hub is not supported by this unit.
– Connect the USB device directly to this
unit using a USB cable.
CHECK:USB
The USB connector or USB cable has
short-circuited.
– Check that the USB connector or USB
cable is not caught in something or
damaged.
The connected USB device consumes
more than maximum allowable current.
– Disconnect the USB device and do not
use it. Turn the ignition switch OFF
and back to ACC or ON. Connect only
compliant USB devices.
USB storage device
• Connections via USB hubs are not
supported.
• Firmly secure the USB storage device
before driving. Do not let the USB storage
device fall onto the floor, where it may
become jammed under the brake or
accelerator pedal.
• Depending on the USB storage device,
the following problems may occur.
–Operations may vary.
–The storage device may not be
recognized.
– Files may not be played back properly.
– The device may cause audible
interference when you are listening to
the radio.
• Only the first 32 characters can be
displayed as a file name (including the file
extension) or a folder name.
• The unit may not work properly
depending on the application used to
encode WMA files.
• There may be a slight delay at the start of
the playback of audio files embedded
with image data, or audio files stored on a
USB device with numerous folder
hierarchies.
CAUTION
• Pioneer cannot guarantee compatibility
with all USB mass storage devices, and
assumes no responsibility for any loss of
data on media players, smartphones, or
other devices while using this product.
• Do not leave a USB storage device in any
place that is subject to high
temperatures.
Handling guidelines
Compressed audio
compatibility
- 16 -
English
WMA files
MP3 files
WAV files
FLAC files
• FLAC files may not be playable,
depending on the encoder.
USB device
• There may be a slight delay when starting
playback of audio files on a USB storage
device with numerous folder hierarchies.
The user cannot assign folder numbers and
specify playback sequences with this unit.
Sequence of audio file depends on the
connected device.
Note that the hidden files in a USB device
cannot be played back.
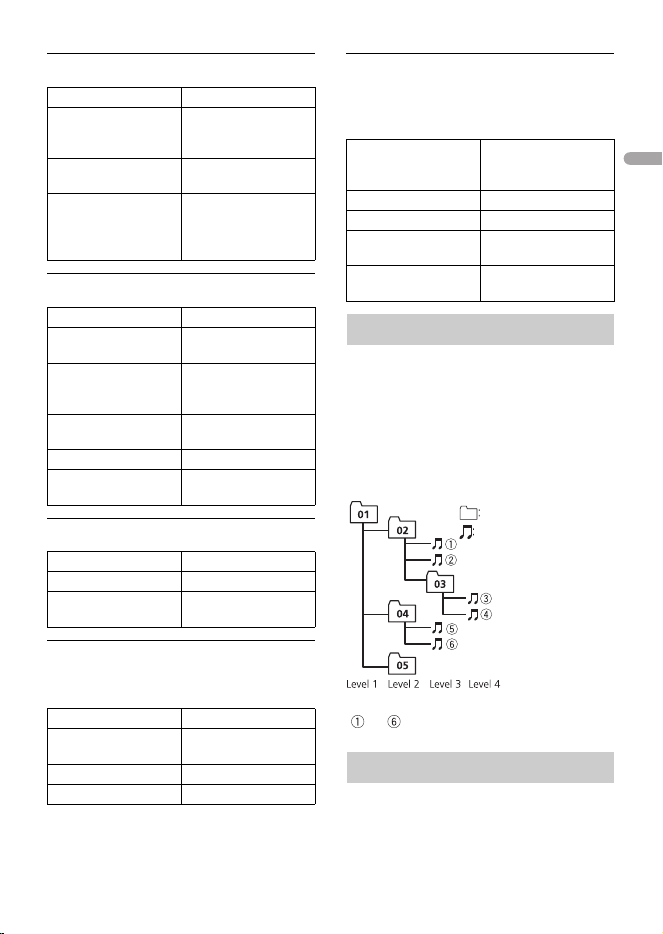
Example of a hierarchy
Bluetooth
The Bluetooth® word mark and logos are
registered trademarks owned by Bluetooth SIG,
File extension .wma
Bit rate 48 kbps to 320 kbps
(CBR), 48 kbps to 384
kbps (VBR)
Sampling frequency 32 kHz, 44.1 kHz, 48
kHz
Windows Media Audio
Professional, Lossless,
Voice/DRM Stream/
Stream with video
Not compatible
File extension .mp3
Bit rate CBR (8 kbps to 320
kbps)/VBR
Sampling frequency 16 kHz to 48 kHz (32
kHz, 44.1 kHz, 48 kHz
for emphasis)
Compatible ID3 tag
version
2.2, 2.3, 2.4
M3u playlist Not compatible
MP3i (MP3
interactive), mp3 PRO
Not compatible
File extension .wav
Quantization bits 8 and 16 (LPCM)
Sampling frequency 16 kHz to 48 kHz
(LPCM)
File extension .flac
Sampling frequency 8/11.025/12/16/22.05/
24/32/44.1/48 kHz
Quantization bit rate 16 bit
Channel mode 1/2 ch
Playable folder
hierarchy
Up to eight tiers (A
practical hierarchy is
less than two tiers.)
Playable folders Up to 500
Playable files Up to 15 000
Playback of copyright-
protected files
Not compatible
Partitioned USB
device
Only the first partition
can be played.
Sequence of audio files
Copyright and trademark
Folder
Compressed
audio file
to : Playback sequence
01 to 05: Folder number

- 17 -
English
Inc. and any use of such marks by PIONEER
CORPORATION is under license. Other
trademarks and trade names are those of their
respective owners.
WMA
Microsoft and Windows Media are
trademarks of the Microsoft group of
companies.
This product includes technology owned
by Microsoft Corporation and cannot be
used or distributed without a license from
Microsoft Licensing, Inc.
FLAC
Copyright © 2000-2009 Josh Coalson
Copyright © 2011-2013 Xiph.Org
Foundation
Redistribution and use in source and
binary forms, with or without modification,
are permitted provided that the following
conditions are met:
– Redistributions of source code must
retain the above copyright notice, this list
of conditions and the following
disclaimer.
– Redistributions in binary form must
reproduce the above copyright notice,
this list of conditions and the following
disclaimer in the documentation and/or
other materials provided with the
distribution.
– Neither the name of the Xiph.org
Foundation nor the names of its
contributors may be used to endorse or
promote products derived from this
software without specific prior written
permission.
THIS SOFTWARE IS PROVIDED BY THE
COPYRIGHT HOLDERS AND
CONTRIBUTORS “AS IS” AND ANY EXPRESS
OR IMPLIED WARRANTIES, INCLUDING, BUT
NOT LIMITED TO, THE IMPLIED
WARRANTIES OF MERCHANTABILITY AND
FITNESS FOR A PARTICULAR PURPOSE ARE
DISCLAIMED. IN NO EVENT SHALL THE
FOUNDATION OR CONTRIBUTORS BE
LIABLE FOR ANY DIRECT, INDIRECT,
INCIDENTAL, SPECIAL, EXEMPLARY, OR
CONSEQUENTIAL DAMAGES (INCLUDING,
BUT NOT LIMITED TO, PROCUREMENT OF
SUBSTITUTE GOODS OR SERVICES; LOSS OF
USE, DATA, OR PROFITS; OR BUSINESS
INTERRUPTION) HOWEVER CAUSED AND
ON ANY THEORY OF LIABILITY, WHETHER
IN CONTRACT, STRICT LIABILITY, OR TORT
(INCLUDING NEGLIGENCE OR OTHERWISE)
ARISING IN ANY WAY OUT OF THE USE OF
THIS SOFTWARE, EVEN IF ADVISED OF THE
POSSIBILITY OF SUCH DAMAGE.
General
Power source:
14.4 V DC (allowable voltage range
10.8 V to 15.1 V DC)
Grounding system: Negative type
Maximum current consumption:
10.0 A
Dimensions (W × H × D):
DIN
Chassis: 178 mm × 50 mm × 79 mm (7
in. × 2 in. × 3-1/8 in.)
Nose: 188 mm × 58 mm × 17 mm
(7-3/8 in. × 2-1/4 in. × 5/8 in.)
D
Chassis: 178 mm × 50 mm × 79 mm (7
in. × 2 in. × 3-1/8 in.)
Nose: 170 mm × 46 mm × 17 mm
(6-3/4 in. × 1-3/4 in. × 5/8 in.)
Weight: 0.45 kg (1 lbs)
Audio
Maximum power output:
50 W × 4
Continuous power output:
22 W × 4 (50 Hz to 15 000 Hz, 5 %
THD, 4 Ω load, both channels driven)
Load impedance:
4 Ω (4 Ω to 8 Ω allowable)
Preout maximum output level: 1.0 V
Specifications

- 18 -
English
Loudness contour:
+10 dB (100 Hz), +2 dB (10 kHz)
(volume: –20 dB)
Equalizer (2-Band Graphic Equalizer):
Frequency: 100 Hz/10 kHz
Equalization range:
±12 dB (2 dB step)
USB
USB standard specification:
USB 2.0 full speed
Maximum current supply: 0.5 A
USB Protocol:
MSC (Mass Storage Class)
File system: FAT12, FAT16, FAT32
MP3 decoding format:
MPEG-1 & 2 Audio Layer 3
WMA decoding format:
Ver. 7, 8, 9, 9.1, 9.2 (2 ch audio)
FLAC decoding format: v1.3.0 (Free
Lossless Audio Codec)
WAV signal format: Linear PCM (Non-
compressed)
FM tuner
Frequency range:
87.9 MHz to 107.9 MHz
Usable sensitivity:
12 dBf ± 5 dBf (1.0 μV/75 Ω, mono, S/
N: 30 dB)
Signal-to-noise ratio: 50 dB (IEC-A network)
AM tuner
Frequency range: 530 kHz to 1 710 kHz
Usable sensitivity: 28 dB μV ± 8 dB μV (S/N:
20 dB)
Signal-to-noise ratio:
45 dB (IEC-A network)
Bluetooth
Version: Bluetooth 5.4 + EDR certified
Output power:
+4 dBm Maximum (Power class 2)
Frequency band(s):
2 402 MHz to 2 480 MHz
Bluetooth profiles:
GAP (Generic Access Profile)
HFP (Hands Free Profile) 1.8
A2DP (Advanced Audio Distribution
Profile)
AVRCP (Audio/Video Remote Control
Profile) 1.6.2
NOTE
Specifications and the design are subject
to modifications without notice.
©2025 PIONEER CORPORATION
<OPM_MVHS14BTUC_EN_A> UC
Register your product at
in Canada
https://usa.pioneer
https://ca.pioneer