– Some of the settings and recorded contents will not be reset.
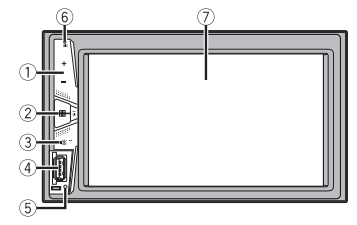
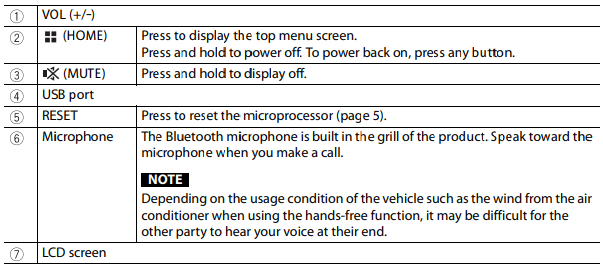
• The microprocessor must be reset under the following conditions:
– Prior to using this product for the first time after installation.
– If this product fails to operate properly.
– If there appears to be problems with the operation of the system.
1. Turn the ignition switch OFF.
2. Press RESET with a pen tip or other pointed tools.
Settings and recorded contents are reset to the factory settings.
Remote control
The remote control is sold separately. For details concerning operations, see the remote control manual
Starting up the unit
1. Start the engine to boot up the system.
The [Select Program Language] screen appears.
NOTE From the second time on, the screen shown will differ depending on the previous conditions.
2. Touch the language.
3. Touch .
The top menu screen appears
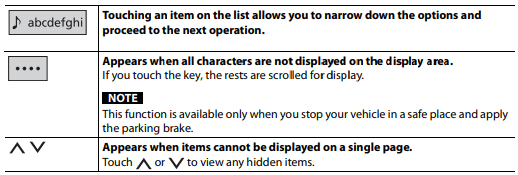
Using the touch panel
You can operate this product by touching the keys on the screen directly with your fingers.
NOTE To protect the LCD screen from damage, be sure to touch the screen only with your finger gently
Common touch panel keys
Operating list screens
Operating the time bar
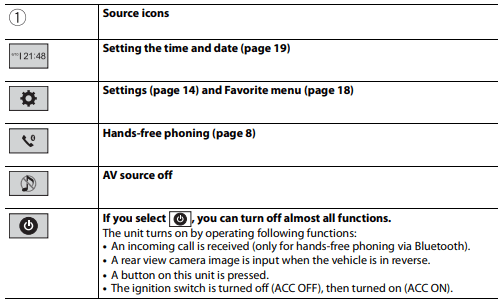
Top menu screen
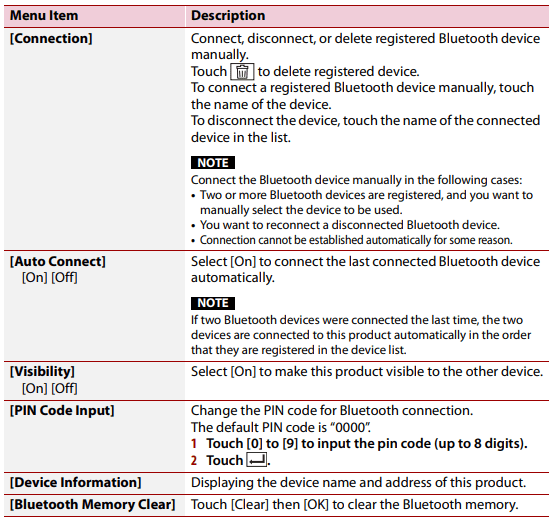
Bluetooth
Bluetooth connection
1. Turn on the Bluetooth function on the device.
2. Press .
3. Touch then .
The Bluetooth menu screen appears.
4. Touch [Connection].
5. Touch .
The unit starts to search for available devices, then displays them in the device list.
6. Touch the Bluetooth device name.
After the device is successfully registered, a Bluetooth connection is established by the system. Once the connection is established, the device name is displayed on the list
NOTES
• If three devices are already paired, [Memory Full] is displayed. Delete a paired device first (page 8).
• If your device supports SSP (Secure Simple Pairing), a six-digit number appears on the display of this product. Touch [Yes] to pair the device
• is invalid when the device is already connected, during connection or disconnected.
• Before connecting from the Bluetooth device, make sure that the connection of this product and other Bluetooth device is disconnected.
TIP The Bluetooth connection can also be made by detecting this product from the Bluetooth device. Before registration, make sure that [Visibility] in the [Bluetooth] menu is set to [On] (page 8). For details on Bluetooth device operations, refer to the operating instructions supplied with the Bluetooth device.
Bluetooth settings
1. Press .
2. Touch then .
CAUTION Never turn this product off and disconnect the device while the Bluetooth setting operation is being processed
Switching the connected Bluetooth device
You can switch among the connected Bluetooth devices using the switch devices key in the Bluetooth menu.
• You can register up to three Bluetooth devices on this product (page 7).
• The Bluetooth audio player can be switched to other Bluetooth devices on the Bluetooth audio playback screen.
• Only one device can be connected as a hands-free phoning.
• The hands-free phoning is also switched when the connected device via Bluetooth is switched.
Hands-free phoning
To use this function you need to connect your cellular phone to this product via Bluetooth in advance (page 7).
CAUTION For your safety, avoid talking on the phone as much as possible while driving.
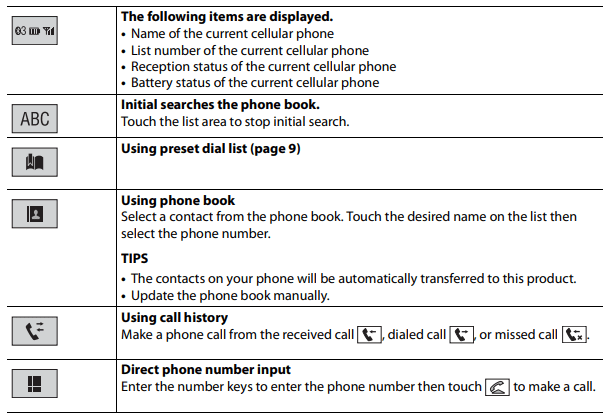
Making a phone call
1. Press , then touch .
The phone menu screen appears.
2. Touch one of the call icons on the phone menu screen.
▶To end the call 1. Touch .
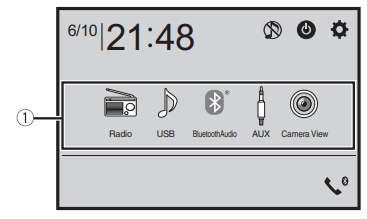
AV source
Supported AV source
You can play or use the following sources with this product.
• Radio
• USB
The following sources can be played back or used by connecting an auxiliary device.
• Bluetooth® audio
• AUX
Selecting a source
Source on the AV source selection screen
1. Press .
2. Touch the source icon.
When you select , the AV source is turned off.
Source on the source list
1. Touch on the AV Source screen
2. Touch the source key. When you select [Source OFF], the AV source is turned off.
Smartphone connection for AV source
When using a smartphone with this product, the settings are automatically configured according to the device to be connected.
NOTES
• Operation methods may vary depending on the smartphone and its software version.
• Depending on the version of smartphone OS, it may not be compatible with this unit.
Smartphone (Android™ device)
These are the methods to connect a smartphone to this product. The available sources vary depending on the connection method.
• Connecting via Bluetooth (page 11)
• Connecting via USB (page 11)
Compatible smartphones
Compatibility with all smartphones is not guaranteed. For details about smartphone
compatibility with this product, refer to the information on our website.
Connecting via Bluetooth
The following sources are available when a smartphone is connected to the unit via Bluetooth.
• Bluetooth audio
1. Connect a smartphone with this product via Bluetooth (page 7).
2. Press.
3. Touch compatible desired source.
Connecting via USB
The following sources are available when a smartphone is connected to the unit via USB.
• USB storage device
1. Connect a smartphone with this product via USB (page 21)
2. Press .
3. Touch compatible desired source
Radio
Starting procedure
1. Press .
2. Touch [Radio].
The Radio screen appears.
Basic operation
Description of Radio screen
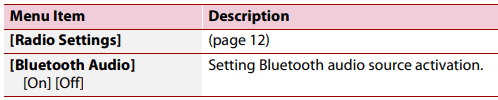
Storing the strongest broadcast frequencies (BSM)
The BSM (best stations memory) function automatically stores the six strongest broadcast frequencies under the preset channel keys [1] to [6].
NOTES
• Storing broadcast frequencies with BSM may replace those you have already saved.
• Previously stored broadcast frequencies may remain stored if the number of frequencies stored has not reached the limit.
1. Touch to begin search.
While searching, the six strongest broadcast frequencies will be stored under the preset channel keys in the order of their signal strength.
To cancel the storage process
1. Touch [Cancel].
Settings
You can adjust various settings in the main menu.
Displaying the setting screen
1. Press .
2. Touch .
3. Touch one of the following categories, then select the options
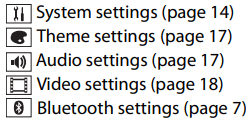
System settings
The menu items vary according to the source.
[AV Source Settings]
[AUX Input]
[Camera Settings] A separately sold rear view camera (e.g. ND-BC8) is required for utilizing the rear view camera function. (For details, consult your dealer.)
▶Rear view camera
This product features a function that automatically switches to the full-screen image of the rear view camera installed on your vehicle when the shift lever is in the REVERSE (R) position.
Camera View mode also allows you to check what is behind you while driving.
▶Camera for Camera View mode
Camera View can be displayed at all times. Note that with this setting, the camera image is not resized to fit, and that a portion of what is seen by the camera is not viewable.
To display the camera image, touch [Camera View] on the AV source selection screen (page 10).
NOTE To set the rear view camera as the camera for Camera View mode, set [Back Camera Input] to [On] (page 15)
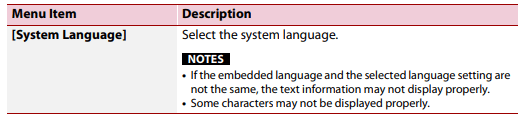
[System Language]
[Restore Settings]
[Beep Tone]
[Touch Panel Calibration] If you feel that the touch panel keys on the screen deviate from the actual positions that respond to your touch, adjust the response positions of the touch panel screen.
NOTES
• Do not use sharp pointed tools such as ballpoint or mechanical pens. They may damage the screen.
• Do not turn off the engine while saving the adjusted position data.
• This setting is available only when you stop your vehicle in a safe place and apply the parking brake
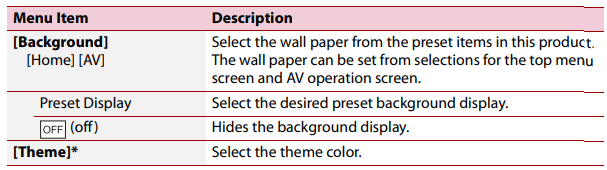
Theme settings
* You can preview the top menu screen or the AV operation screen by touching [Home] or [AV] respectively.
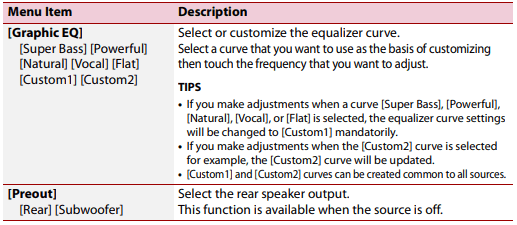
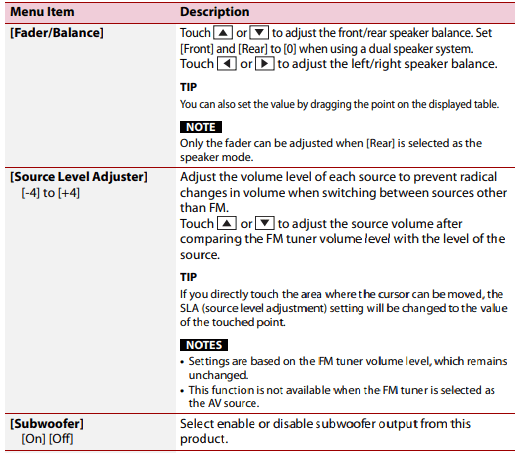
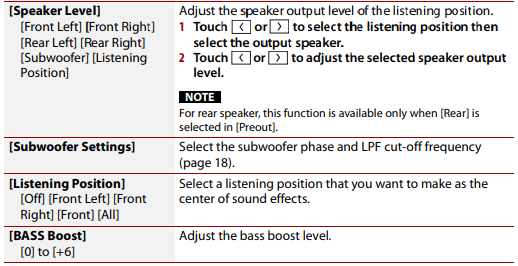
Audio settings
The menu items vary according to the source. Some of the menu items become unavailable when the volume is set to mute.
Appendix
Troubleshooting
If you have problems operating this product, refer to this section. The most common problems are listed below, along with likely causes and solutions. If a solution to your problem cannot be found here, contact your dealer or the nearest authorized Pioneer service facility.
Common problems
A black screen is displayed, andoperation is not possible using the touchpanel keys.
→ Power off mode is on.
– Press any button on this product to release the mode.
Problems with the AV screen
The screen is covered by a cautionmessage and the video cannot be shown.
→ The parking brake lead is not connected or the parking brake is not applied.
– Connect the parking brake lead correctly, and apply the parking brake.
→ The parking brake interlock is activated.
– Park your vehicle in a safe place and apply the parking brake.
The icon is displayed, and operation is impossible.
→ The operation is not compatible with the video configuration.
No back camera image when the vehicleis in reverse.
→ The back camera input setting on the receiver is set to Off.
– Change the back camera setting to On in the settings menu. (Refer to the System Settings section of this manual to adjust.)
→ The camera input may be loose or not connected.
– Check the connection and make sure the male end of the camera is connected to the brown input on the back of the receiver. Refer to Camera (page 22).
→ The reverse lead on the receiver may not be connected to the proper wire at the reverse lamp.
– Check the connection and make sure that the violet/white lead of the receiver is connected to the lead whose voltage changes when the shift lever is put in reverse. Refer to Camera (page 22)
Black screen displayed when the vehicleis in reverse, with no camera installed.
→ Back camera input is set to On.
– Turn the setting to Off in the settings menu. (Refer to the System Settings section of this manual to adjust.)
Back image displayed when vehicle is notin reverse.
→ The camera polarity is not set properly in the Camera settings menu.
– Review System Settings section of this manual for steps to switch the camera polarity. Park in a safe place, then while keeping your foot firmly on the brake, put the vehicle in reverse, access the System Settings menu, and change the camera polarity setting. Put vehicle back in park. (Refer to the System Settings section of this manual to adjust.)
Problems with the phone screen
Dialing is impossible because the touchpanel keys for dialing are inactive.
→ Your phone is out of range for service.
– Retry after re-entering the range for service.
→ The connection between the cellular phone and this product cannot be established.
– Perform the connection process.
→ Of the two cellular phones connected to this product at the same time, if the first phone is dialing, ringing or a call is in progress, dialing cannot be performed on the second phone.
– When the operation on the first of the two cellular phones is completed, use the switch devices key to switch to the second phone and then dial.
Error messages
When problems occur with this product, anerror message appears on the display.Refer to the table below to identify theproblem, then take the suggestedcorrective action. If the error persists,record the error message and contact yourdealer or your nearest Pioneer servicecenter.
Common
AMP Error
→ This product fails to operate or the speaker connection is incorrect; the protective circuit is activated.
– Check the speaker connection. If the message fails to disappear even after the engine is switched off/on, contact your dealer or an authorized Pioneer Service Station for assistance.
USB storage device
Error-02-9X/-DX
→ Communication failed.
– Turn the ignition switch OFF and back ON.
– Disconnect the USB storage device.
– Change to a different source. Then, return to the USB storage device.
Skipped
→ The connected USB storage device contains DRM protected files.
– The protected files are skipped.
Protect
→ All the files on the connected USB storage device are embedded with DRM.
– Replace the USB storage device.
Bluetooth
Error-10
→ The power failed for the Bluetooth module of this product.
– Turn the ignition switch to OFF and then to ON.
If the error message is still displayed after performing the above action, please contact your dealer or an authorized Pioneer Service Station
Detailed information for playable media
Compatibility
Common notes about the USB storage device
• Do not leave the USB storage device in any location with high temperatures.
• Depending on the kind of the USB storage device you use, this product may not recognize the storage device or files may not be played back properly.
• The text information of some audio and video files may not be correctly displayed.
• File extensions must be used properly.
• There may be a slight delay when starting playback of files on an USB storage device with complex folder hierarchies.
• Operations may vary depending on the kind of an USB storage device.
• It may not be possible to play some music files from USB because of file characteristics, file format, recorded application, playback environment, storage conditions, and so on.
USB storage device compatibility
• For details about USB storage device compatibility with this product, refer to Specifications (page 26).
• Protocol: bulk
• You cannot connect a USB storage device to this product via a USB hub.
• Partitioned USB storage device is not compatible with this product.
• Firmly secure the USB storage device when driving. Do not let the USB storage device fall onto the floor, where it may become jammed under the brake or gas pedal.
• There may be a slight delay when starting playback of audio files encoded with image data.
• Some USB storage devices connected to this product may generate noise on the radio.
• Do not connect anything other than the USB storage device.
The sequence of audio files on USB storage device.
For USB storage device, the sequence is different from that of USB storage device.
Handling guidelines and supplemental information
• This product is not compatible with the Multi Media Card (MMC).
• Copyright protected files cannot be played back.
Common notes about DivX files
Notes specific to DivX files
• Only DivX files downloaded from DivX partner sites are guaranteed for proper operation. Unauthorized DivX files may not operate properly.
• This product corresponds to a DivX file display of up to 1 590 minutes 43 seconds. Search operations beyond this time limit are prohibited.
• For details on the DivX video versions that can be played on this product, refer to Specifications (page 26).
DivX subtitle files
• Srt format subtitle files with the extension ".srt" can be used.
• Only one subtitle file can be used for each DivX file. Multiple subtitle files cannot be associated.
• Subtitle files that are named with the same character string as the DivX file before the extension are associated with the DivX file. The character strings before the extension must be exactly the same. However, if there is only one DivX file and one subtitle file in a single folder, the files are associated even if the file names are not the same.
• The subtitle file must be stored in the same folder as the DivX file.
• Up to 255 subtitle files may be used. Any more subtitle files will not be recognized.
• Up to 64 characters can be used for the name of the subtitle file, including the extension. If more than 64 characters are used for the file name, the subtitle file may not be recognized.
• The character code for the subtitle file should comply with ISO-8859-1. Using characters other than ISO-8859-1 may cause the characters to be displayed incorrectly.
• The subtitles may not be displayed correctly if the displayed characters in the subtitle file include control code.
• For materials that use a high transfer rate, the subtitles and video may not be completely synchronized.
• If multiple subtitles are programmed to display within a very short time frame, such as 0.1 seconds, the subtitles may not be displayed at the correct time.
Bluetooth
The Bluetooth word mark and logos are registered trademarks owned by Bluetooth SIG, Inc. and any use of such marks by PIONEER CORPORATION is under license. Other trademarks and trade names are those of their respective owners.
WMA
Windows Media is either a registered trademark or trademark of Microsoft Corporation in the United States and/or other countries.
• This product includes technology owned by Microsoft Corporation and cannot be used or distributed without a license from Microsoft Licensing, Inc.
DivX
DivX® Home Theater Certified devices have been tested for high-quality DivX Home Theater video playback (including .avi, .divx). When you see the DivX logo, you know you have the freedom to play your favorite videos.
DivX®, DivX Certified® and associated logos are trademarks of DivX, LLC and are used under license.
This DivX Certified® device can play DivX® Home Theater video files up to 576p (including .avi, .divx).
Download free software at www.divx.com to create, play and cast digital videos.
AAC
AAC is short for Advanced Audio Coding and refers to an audio compression technology standard used with MPEG-2 and MPEG-4. Several applications can be used to encode AAC files, but file formats and extensions differ depending on the application which is used to encode. This unit plays back AAC files encoded by iTunes.
Notice regarding video viewing
Remember that use of this system for commercial or public viewing purposes may constitute an infringement on the author's rights as protected by the Copyright Law.
#1 Is this stereo Bluetooth compatible with LG phones? Also is it compatible with Google Play Music?
The unit has Bluetooth capabilities so you can play music if your phone has Bluetooth.
#2 How do I pair my iPod because every time I try it says memory full
You have to access the Bluetooth menu and delete a device or clear the memory. The Bluetooth menu won’t activate unless the green wire in the back is connected to the parking brake (per instructions) but any ground should work. I didn’t hook mine up initially, then had the same problem you did. I the parking brake wires were hard to access so I connected it to the ground side of an after market auxiliary light switch.
#3 Anyone know how to make the videos play with a usb keeps telling me unplayable file?
The video feed is not for video files. It is for a backup camera.
The button will not work to reset Bluetooth, if you didn’t hook up the parking brake wire. When you initially installed it. Parking brake wire goes to ground.
 .
.

 .
. then
then  .
. .
.
 .
.
 .
. , the AV source is turned off.
 on the AV Source screen
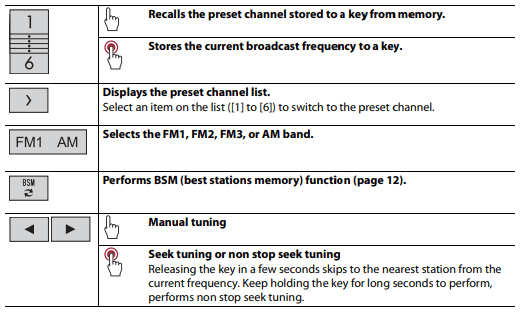
 to begin search.
 .
.


 is displayed, and operation is impossible.