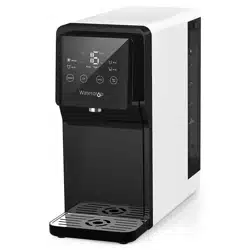
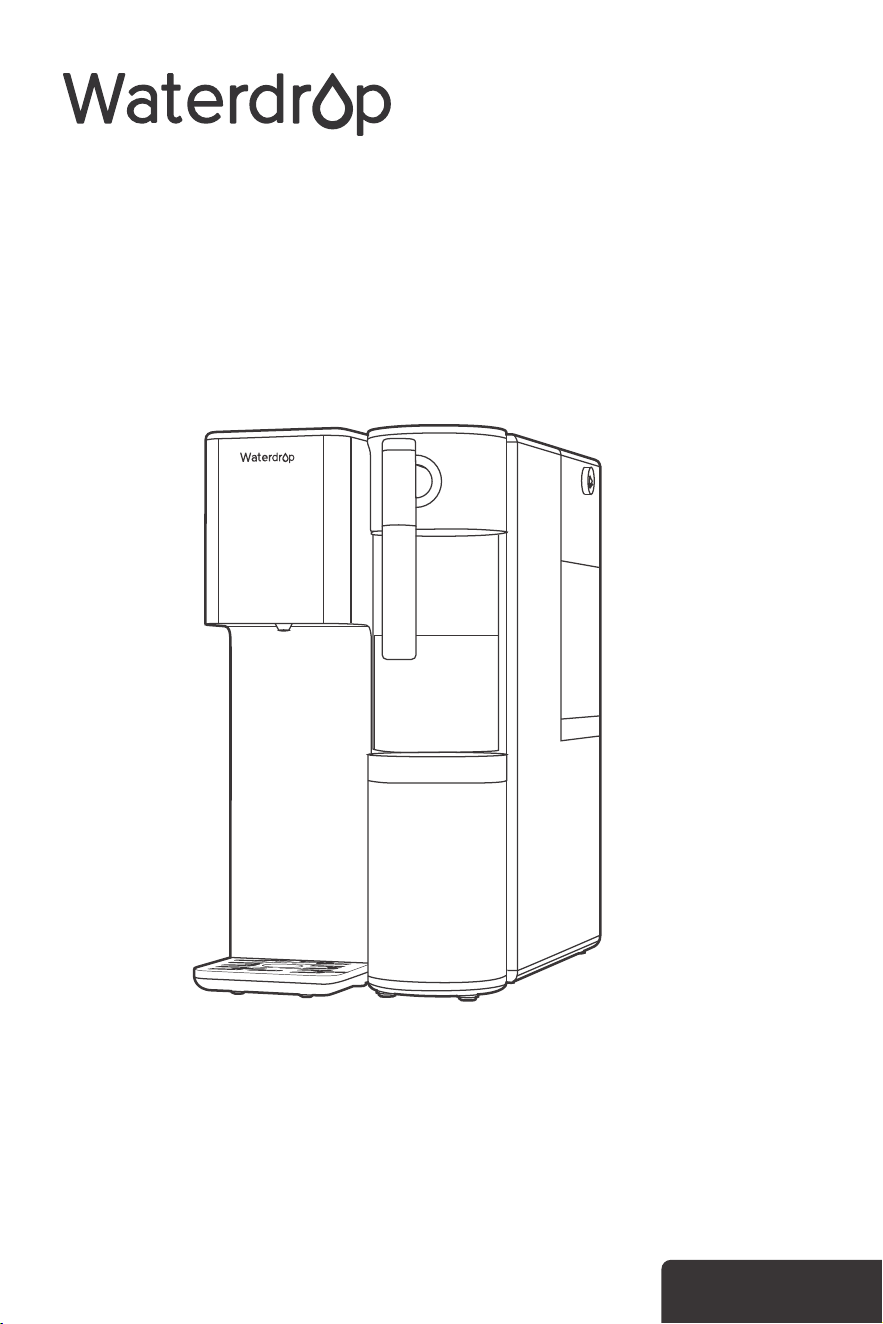
WD-A2
Please read and save these instructions
Instruction Manual
Reverse Osmosis
Hot Cold Water Dispenser


Contents
1. User Guide
2. Product Information
Installation Instructions
Specifications
Main Parts
User Interface
3. Quick Start Guide
Installing the Filter
4. Operating Instructions
Water Dispensing
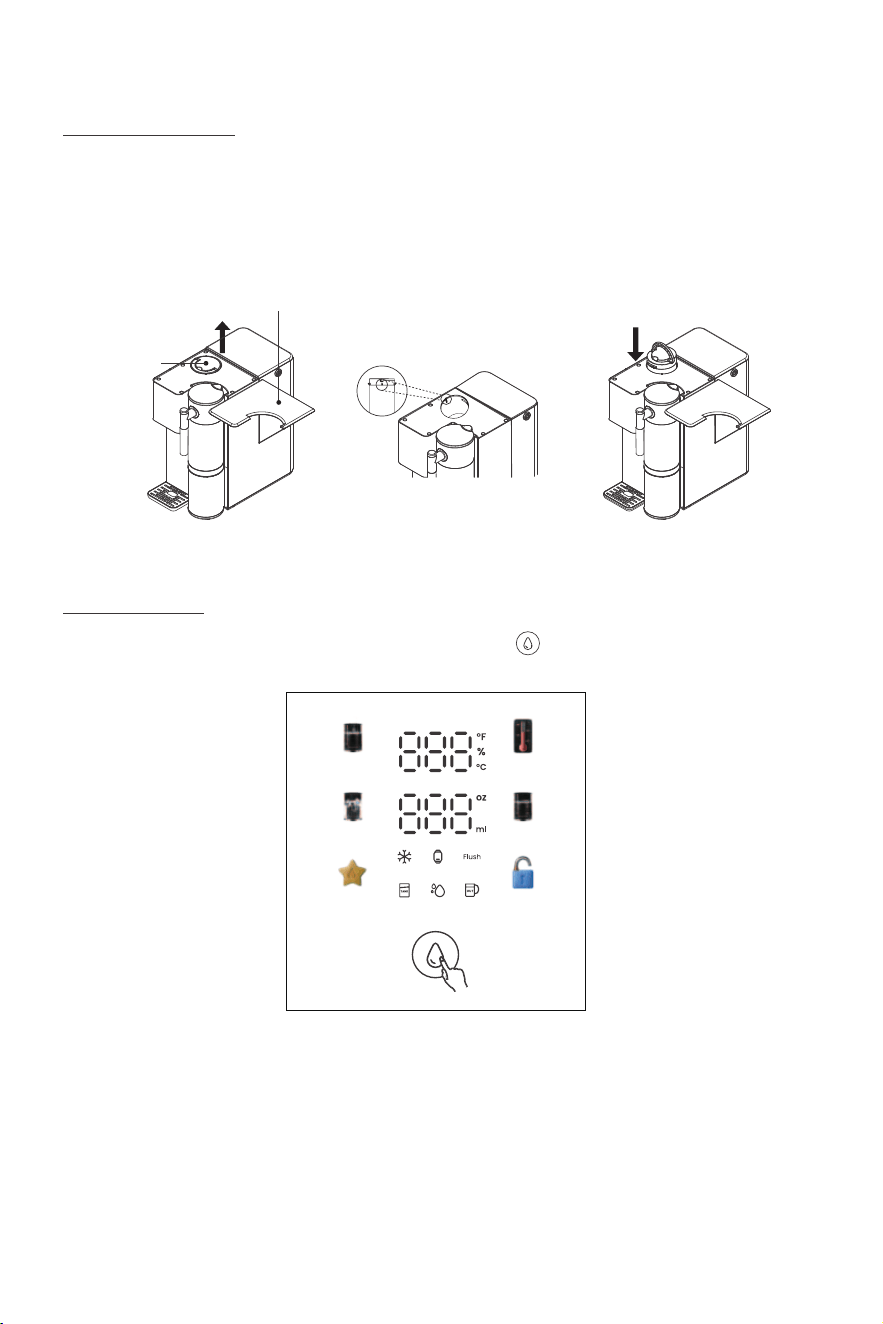
Adding Water to the Tank
Flushing the New Dispenser
Child lock operation
5. Additional Functions
Routine Flushing
Filter Resetting
Boiling Point Correction
6. Troubleshooting
7. Cleaning & Maintenance
8. Safety Precautions
9. Warranty & Service
1
1
1
1
2
2
4
5
7
7
5
6
8
8
9
9
10
12
12
14
...............................................................................................................................
..........................................................................................................
.....................................................................................................................................................................
..............................................................................................................................................................................................
.......................................................................................................................................................................................................
...............................................................................................................................................................................................
................................................................................................................
.................................................................................................................................................................................
.....................................................................................................
....................................................................................................................................................................................
..............................................................................................................................................................
........................................................................................................................................................
.............................................................................................................................................................................
.........................................................................................................
......................................................................................................................................................................................
...........................................................................................................................................................................................
...................................................................................................................................................................
...................................................................................................................
..................................................................................................
..............................................................................................................
.............................................................................................................
8
1. User Guide
1
2. Product Information
Installation Instructions
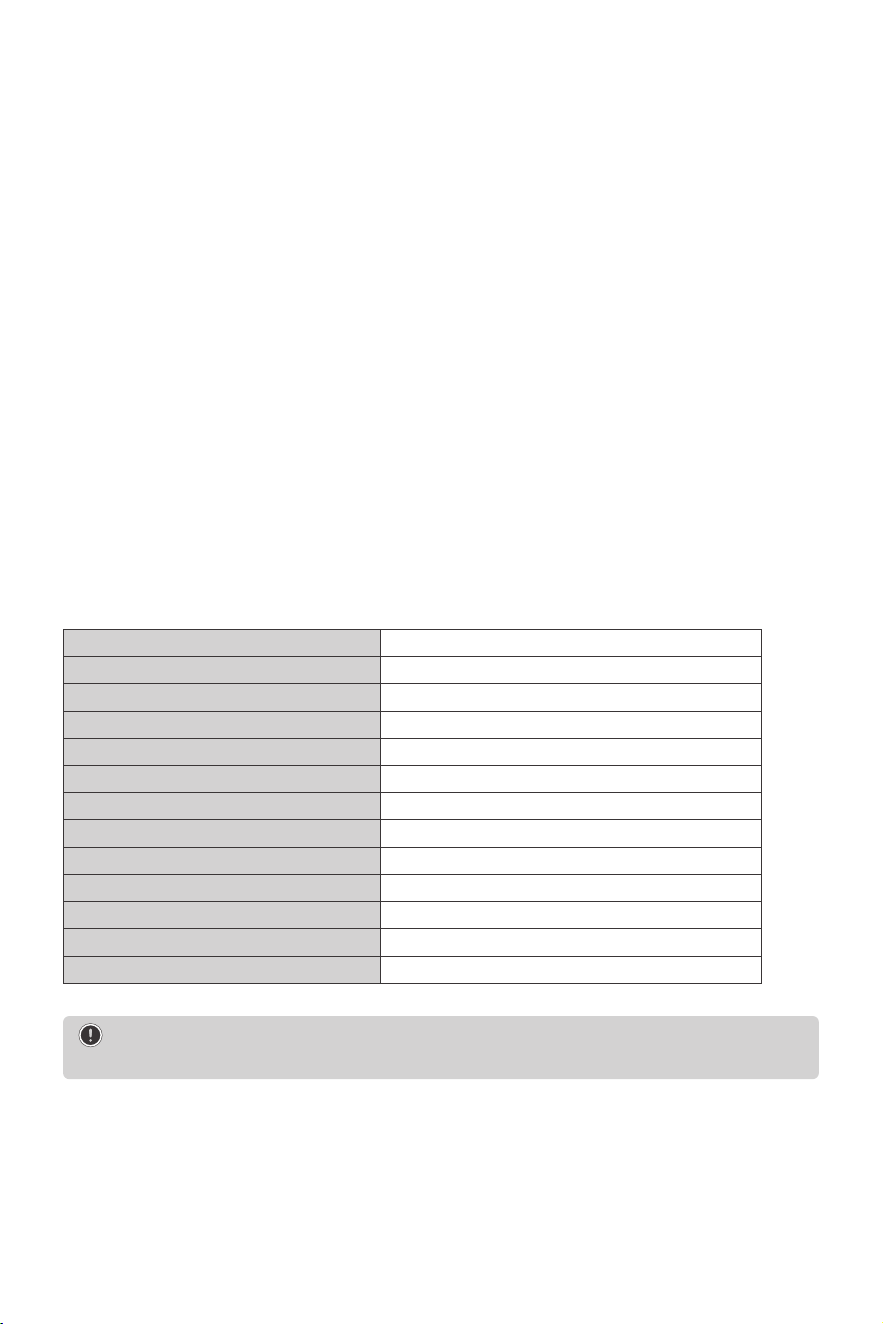
Specifications
TEL: +1-888-352-3558 (U.S.)
E-mail: service@waterdropfilter.com
Specifications:
For optimal performance, it is recommended to use the dispenser within the operating
parameters.
Before installation, Installation Instructions and the dispenser to ensure that there is nothing left
out or damaged during shipping. If any part is cracked or damaged, please contact our customer
service for assistance at any time. Connect only to a circuit that is protected by a ground-fault
circuit-interrupter (GFCI).
NOTE: Do not use this dispenser with microbiologically unsafe water or water of unknown
quality if there is insufficient disinfection before or after use.
Product model
Dimensions (L*W*H)
Feed water tank volume
Pure water pitcher volume
Rated voltage
Rated frequency
Rated power
Heating power
Refrigeration power
Feed water requirement
Water temperature requirement
Daily production rate
TDS requirement for feed water
WD-A2
15.9" 8.2" 15.7"
1.25G/4.7L
0.26G/1L
120V
60Hz
1530W
1530W
60W
Municipal tap water
41-100°F/5-38°C
100GPD
TDS<500
* *
2
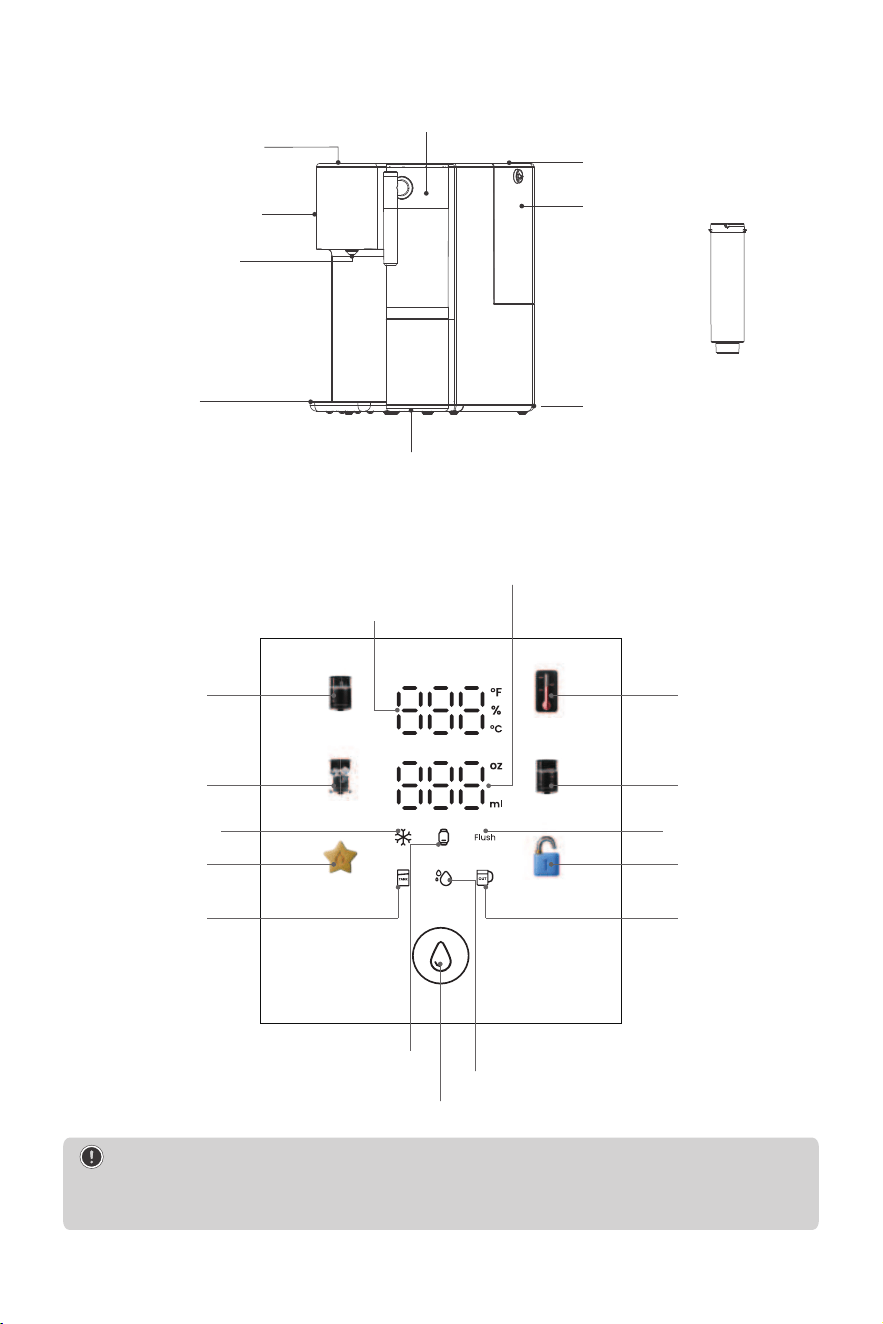
Main Parts
User Interface (Water Dispensing Interface)
Temp
Volume
Lock
Cold
Set
Hot
Hot Water Key
Cold Water Key
Cold Water Indicator
Favorite Mode Key
Water Tank
Status Indicator
Temperature Key
Temperature indicator
Water volume indicator
Cup Volume Key
Child Lock Key
Purified Water
Pitcher Status
Indicator
Flush Indicator
Water Dispensing Key/Filter Resetting Key
Filter Life Indicator
Water Filtering Indicator
Body cover plate
Display screen
Water outlet
Drip tray
Feed water tank
Water tank cover plate
Pure water pitcher
Ice pack drain outlet
RO filter×1
Heat dissipating ports
TIPS: The dispenser accessories, user interface are schematic diagrams, for reference only.
Due to the update and upgrade of the product, the actual product is slightly different from the
schematic diagram,please refer to the actual product.
3
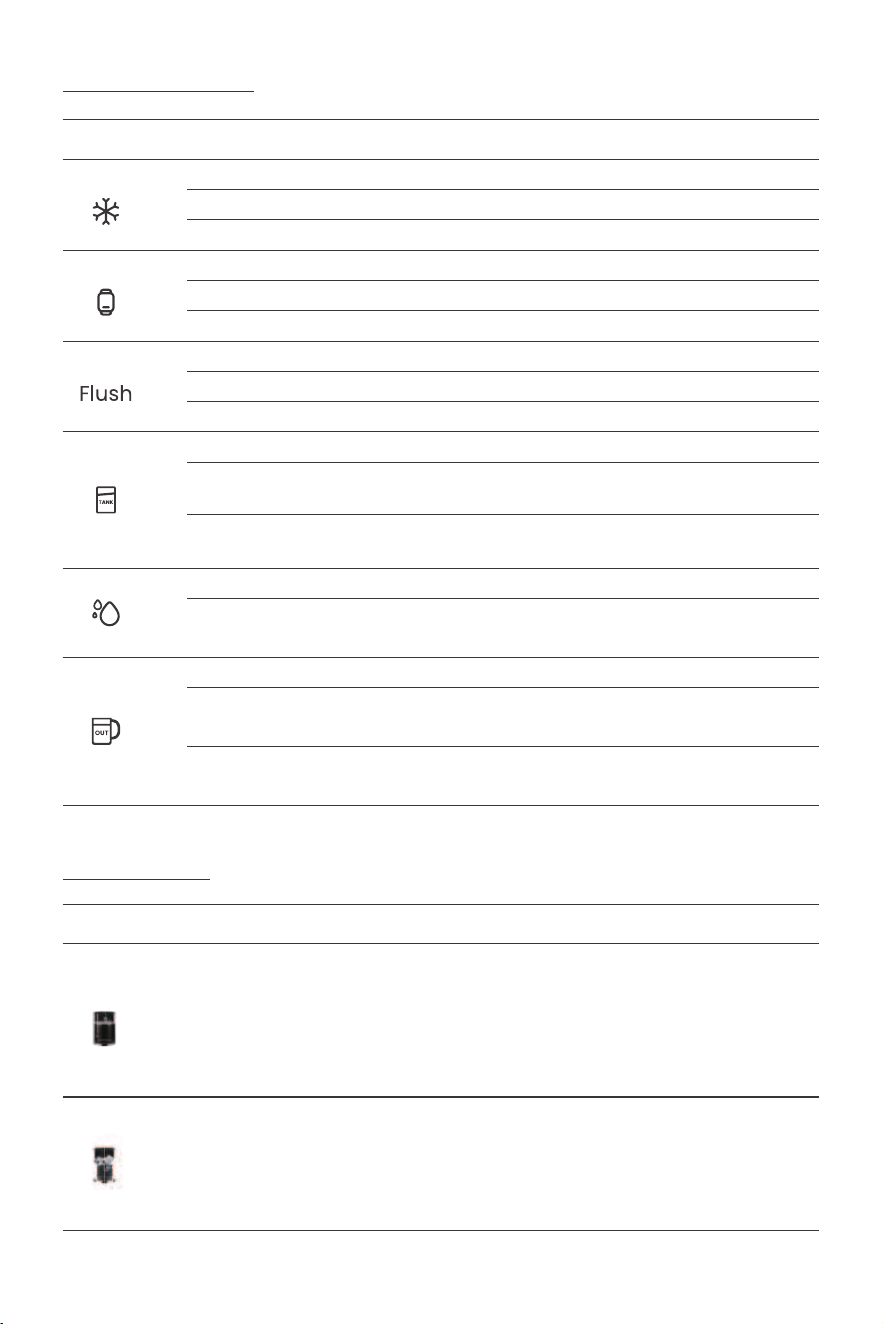
Key & Functions
b.Key Instructions
Icon
Hot Water Key
In screen-on mode (except in the event of a malfunction), pressing the hot water
button quickly selects boiling water (203°F) and activates the child lock. The cup
volume setting remains unchanged. Pressing the water dispensing button again
dispenses hot water. The dispensing will stop if any button is pressed or if the pure
water pitcher triggers a low water level alert.
Cold Water Key
While the screen is awake, pressing the ice water button quickly selects ice water
(59°F); Set the finished water output. Pressing the water dispenser button again
dispenses ice water. Pressing any button or triggering the low water level sensor in
the pure water pitcher will stop dispensing water.
a.Indicator Instructions
Indicator Status
Flashes
Stays on
Off
Dispenser Status
Water cooling is in progress.
Cold water is available for dispensing.
Flashes
Stays on
Off
The filter is near expiration.
The filter has expired.
The filter is in normal use.
Flashes
Stays on
Off
Need to enter flush but conditions are not met.
Enter flush state.
Flush complete.
Flashes
Stays on
Off
Water tank not placed or not positioned properly.
The dispenser is functioning normally, and there is no need
to change water.
Need to change the water in water tank, please discard the
waste water and refill the water tank.
Turn off the cooling function.
Stays on
Off
The dispenser is filtering water.
There is sufficient water, and the dispenser can dispense
water as expected.
Flashes
Stays on
Off
Pure water pitcher is not placed or not positioned properly.
When the water level in the pure water pitcher is above the
low water mark and is properly placed.
The water level in the pure water pitcher is below the low
water level or there is a shortage of water.
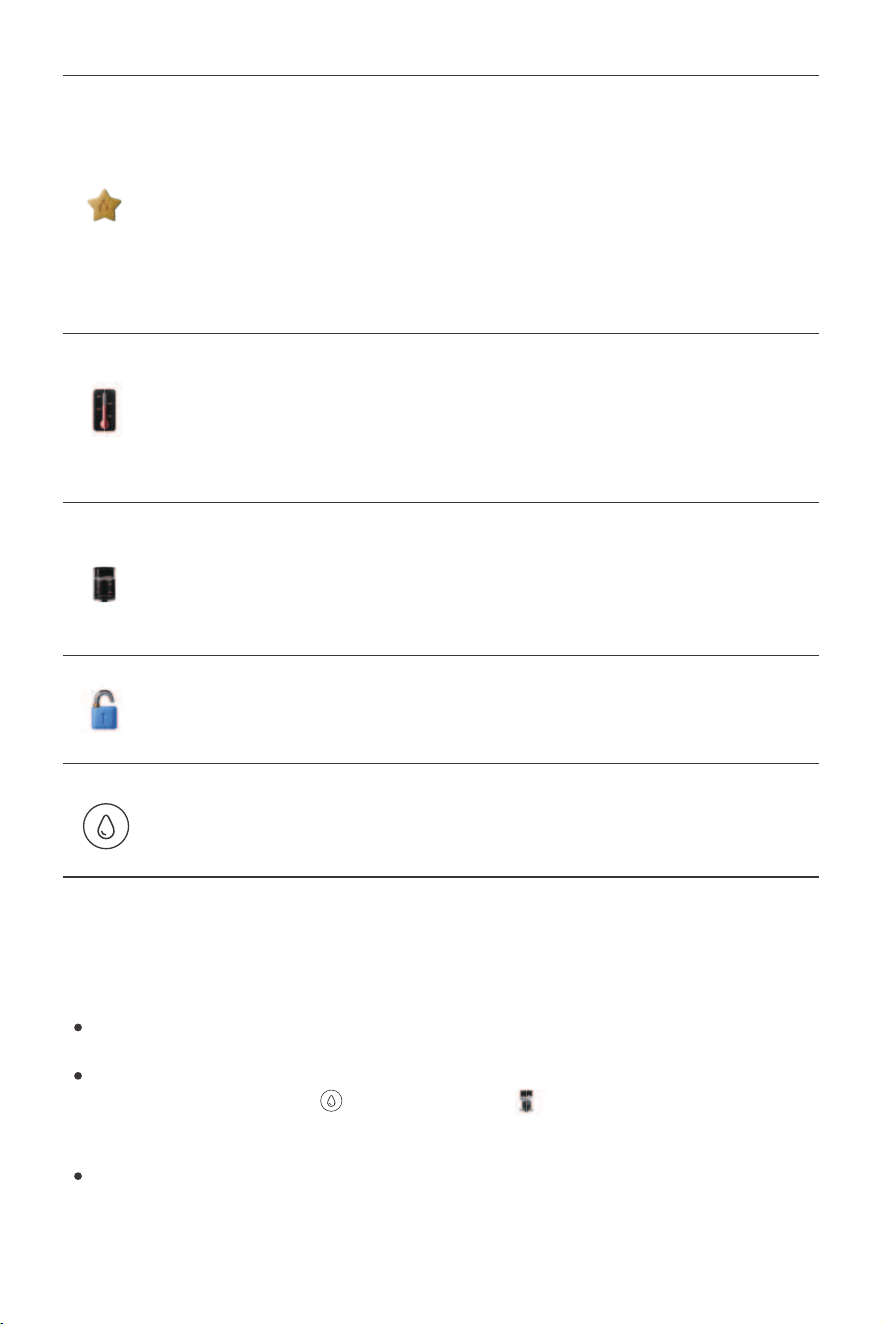
Favorite Mode Key
With the screen on and not in a malfunction state, long-press the favorite mode button
for 2 seconds to enter the favorite mode editing function. The favorite mode button will
blink.
Tap the temperature button to set the temperature, with a range from 59°F for ice water,
77°F for room temperature, and adjustable from 59-203°F in 9°F increments, the
temperature unit will flash. Press the water volume button to set the desired volume,
ranging from 4-32oz, adjustable in 2oz increments, the volume unit will flash. Press and
hold the favorite button for 2 seconds or wait for 10 seconds of inactivity, or press the
dispense button to automatically lock in the settings successfully and return to the
normal standby interface with the favorite setting displayed.
Child Lock Key
Tap this key for a second to disable the child lock and dispense hot water with a
temperature of 113°F or above. Press and hold this key for 5 seconds to cancel the
child lock. Press and hold it for another 5 seconds to recover it.
Temperature Key
Tap the temperature button on the water dispensing interface to cycle and select
different water temperatures: 59°F(Cold water), 77°F(Ambient water), 113°F, 149°F,
185°F, and 203°F.
Long-press the temperature button to customize the temperature settings. The
temperature unit blinks, starting at 59°F, then 77°F, 113°F, and then increases in
increments of 9°F up to 203°F.
Cup Volume Key
Tap the cup volume button to switch cup volume levels. At this time, the 3-digit display
will show the cup volume value. The default cup volumes are: 4/8/16/20oz/max (unlimit-
ed).
Long-press the water volume button to customize water volume settings. The water
volume unit will flash, starting at 4oz and increasing in 2oz increments up to 32oz.
4
Water Dispensing Key/Filter Restting Key
Tap this button on the water dispensing interface to start or stop dispensing water.
Hold the water button for 5 seconds to reset the filter.
The product contains an instant heating and cooling system; please maintain a space of
20 cm (8 inches) behind the machine for heat dissipation.
Upon first powering on the appliance, the cooling function is enabled by default. Long
press the water dispensing “ ” and cold water key “ ” together for 5 seconds on the
display interface to turn off the iced water function; you can use the same method to
turn it back on.
Once the cold water function is activated, to ensure optimal energy efficiency and a
continuous supply of cold water, the machine will operate intermittently. It is normal to
hear noise during operation.
3. Quick Start Guide
5
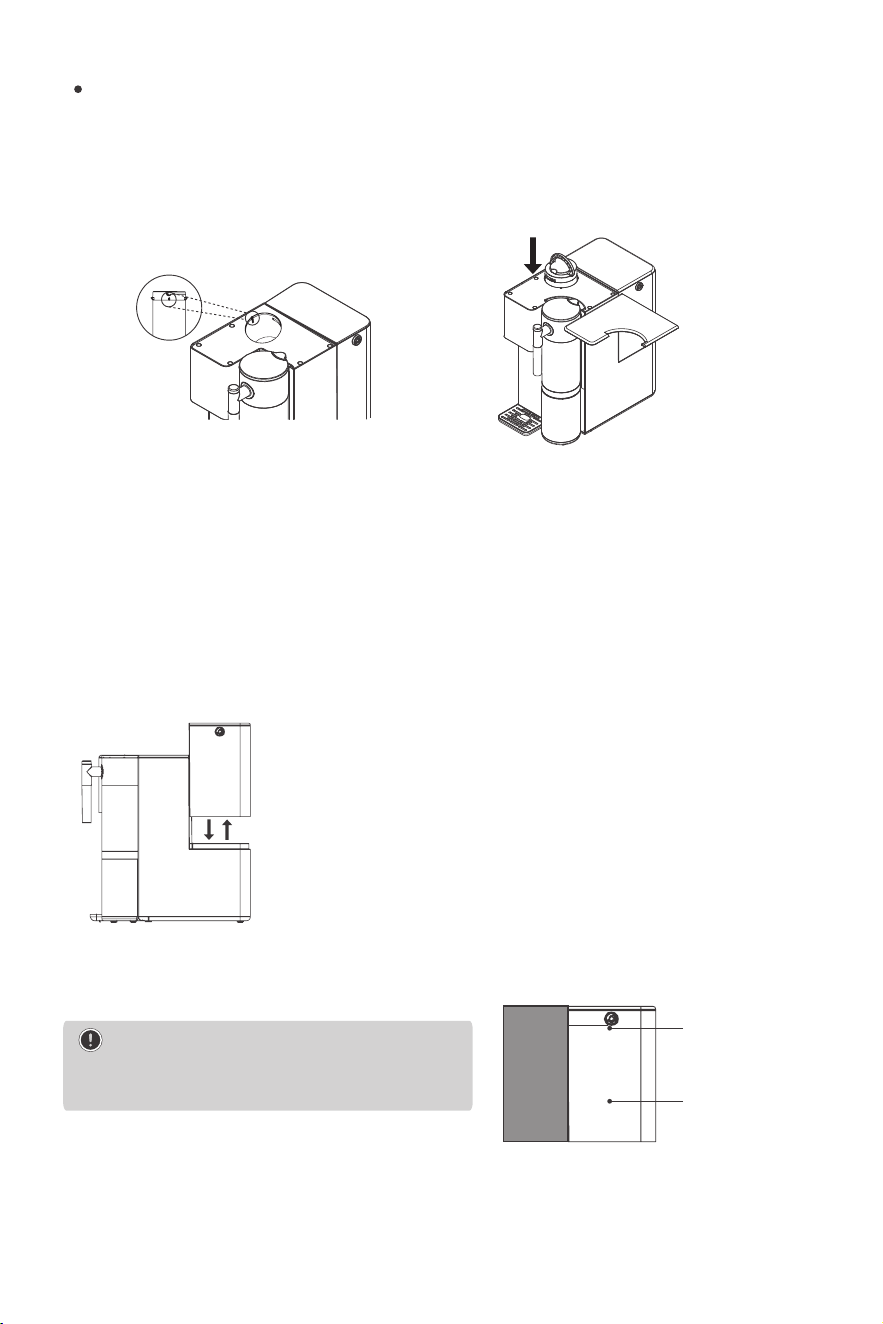
Installing the Filter
Step 1 : Take out filters from package and remove the wrapping.
Step 2: Install the new filter, align the filter position marker with the machine marker, and
gently press the filter until a “click” sound indicates successful installation.
Adding Water to the Tank
Step 1: Remove the water tank cover plate, and pick up the
water tank in an upward direction.
Step 2: Fill the feed water tank with tap water.
Step 3: Place the water tank back into the dispenser, and cover
it with the plate.
Step 4: Push down on the water tank to secure it in place.
NOTE: When adding water, ensure it does not
exceed the maximum water mark to prevent
overflow.
Max
Feed water tank
After the new dispenser has been powered on for the first time,needs to wait for 30 minutes
before the cold water function becomes available.
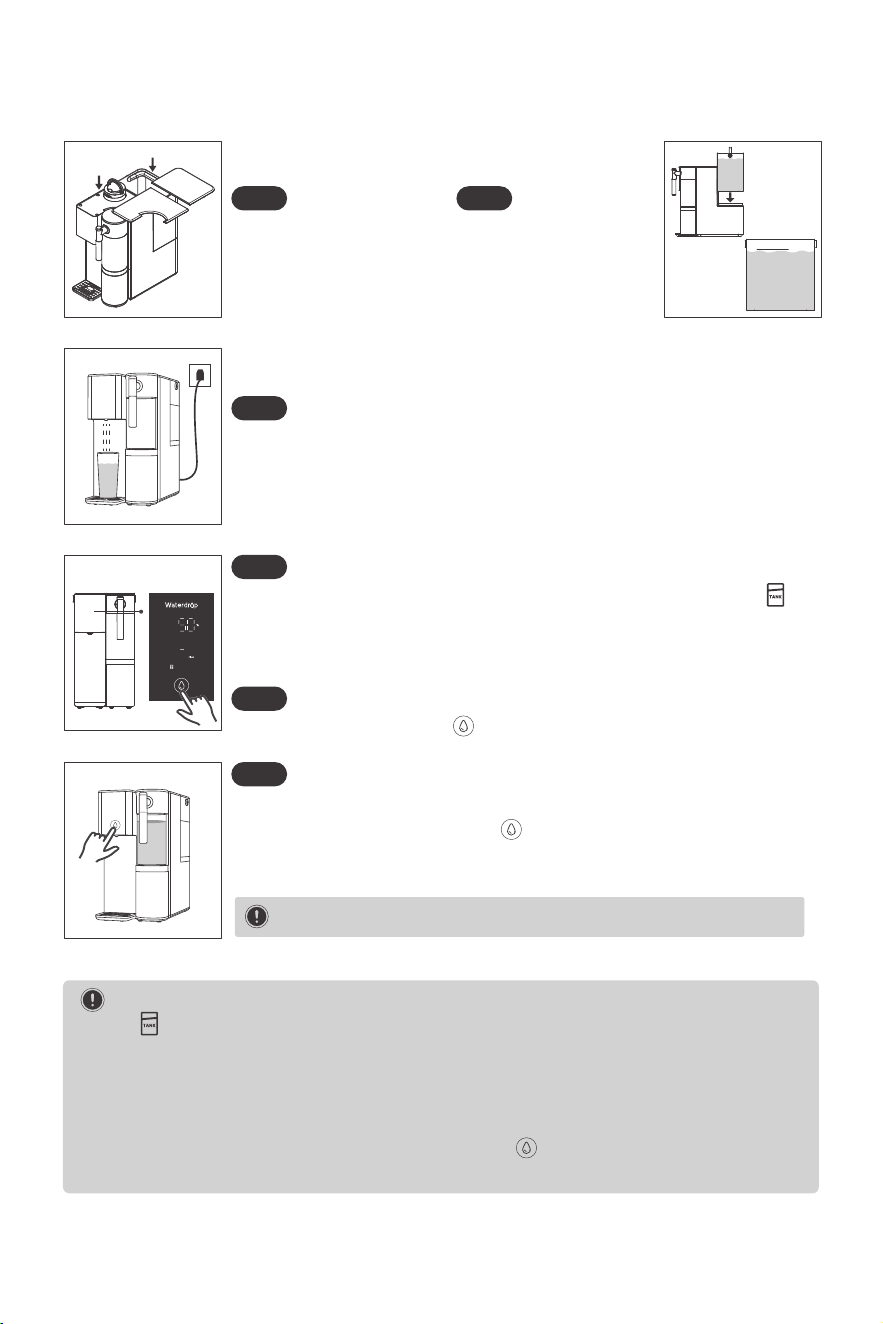
When the feed water tank is low or the flushing progress reaches 50%, the “ ”
will light on, prompting you to change the water.
Please completely empty the feed water tank, even if there’s a lot of water left, and
then refill it with fresh tap water.
Fill the feed water tank.
Don't exceed the maximum
water level line.
6
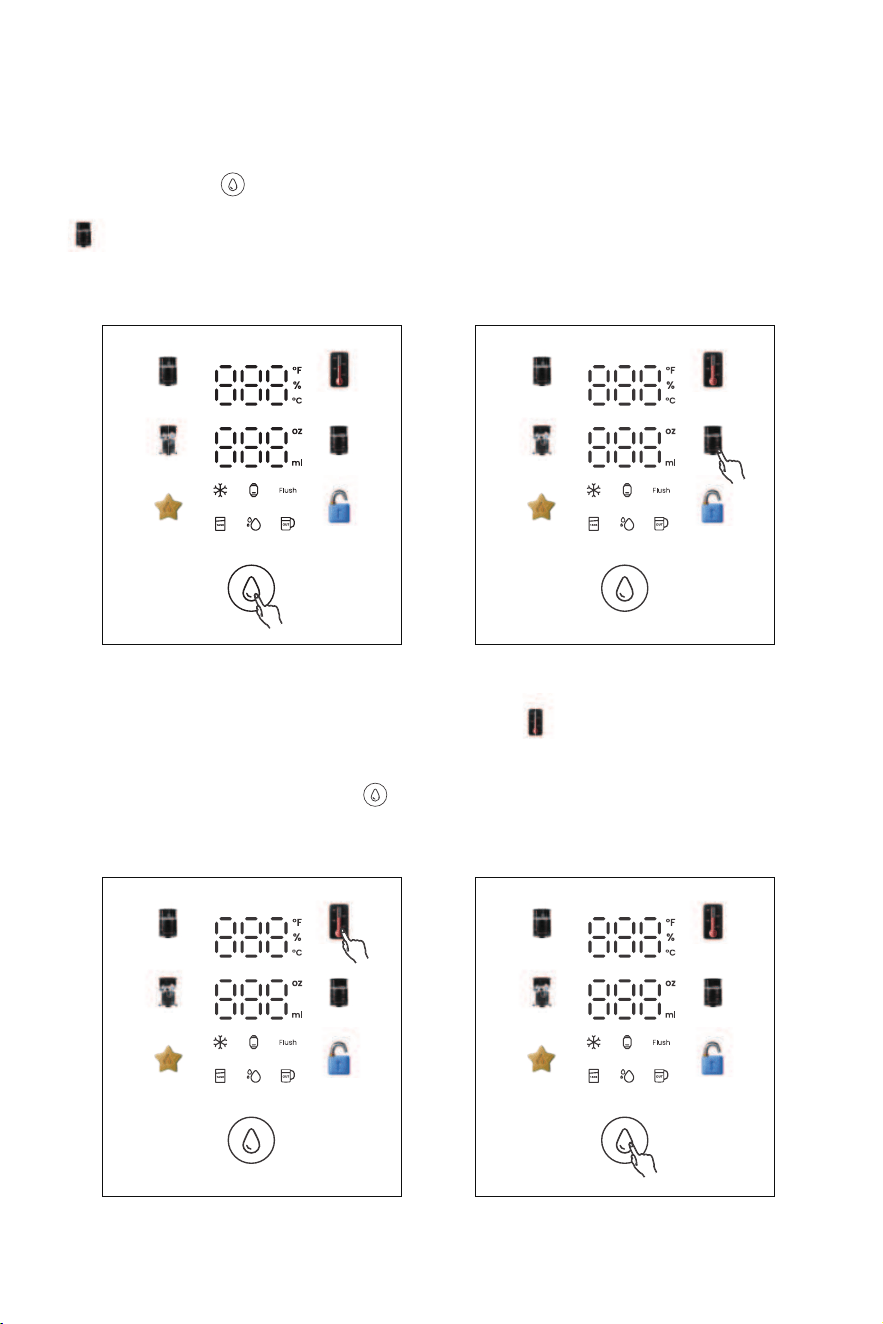
Flushing the New Dispenser
Step 1
Step 2
Step 3
Step 4
NOTE: It is not recommended to drink water obtained during this step.
MAX
Tip:
- If the “ ” light on, it means feed water tank is too low, refill it. Repeat 3-4 times until the progress
reaches 100%, and the unit is ready for use.
- Moving the any water tanks or filter will stop the flushing process until they are back in place. When
the flushing progress hits 50%, the machine will flush with purified water. Please be patientd, as this
may take some time.
- When the flushing progress has reached 100%, clicking the “ ”, exceeding 30 minutes, removing
the feed water tank or pure water tank and putting it back will all exit the flush mode.
Step 5
After changing the water, the “ ” will flash. Tap it to resume flushing.
Remove the filter packaging.
Install the new filter.
Connect the power, place a container (over 52 oz) under the outlet,
and the unit will start flushing automatically.
Step 6
This flushing process will filter purified water to fill the pure water tank.
When the pure water tank is full, the “ ” will flash. Tap it to continue, repeat this
step. (The filtered water will then flow back into the machine for internal flushing,
and finally drain out from the outlet. )
7
4. Operating Instructions
Water Dispensing
Step 1: Touch the “ ” button while the screen is off to wake up the display.
Step 2: Cup Volumn Selection: Place a container below the spout. Tap the cup volume Key
“ ” to switch and select the required water volume setting: 4, 8, 16, 20, 999 (max) OZ. Tap
and hold for continuous cup volume adjustment. (Continuous watering until the feed water
tank water runs out)
Step 3: Temperature selection: Tap the temperature key “ ” to switch and select the
required temperature setting: cold water(59°F), ambient water(77°F), 113°F, 149°F, 185°F,
203°F.
Step 4: Press the take water button “ ” to dispense water; during water dispensing,
pressing any key can pause the operation.The water output stops automatically when it
reaches the set cup size.
Step 1 Step 2
Temp
Volume
Lock
Cold
Set
Hot
Temp
Volume
Lock
Cold
Set
Hot
Step 3
Temp
Volume
Lock
Cold
Set
Hot
Step 4
Temp
Volume
Lock
Cold
Set
Hot

8
Child lock operation
When the temperature selection is hotter than or equal to 113°F, press and hold the child
lock button “ ” for 1 second to disable the child lock before pressing the water button
“ ” to dispense water.
Hold the child lock key for 5 seconds to turn off the child lock function; this operation will
cancel the hot water safety feature, so please proceed with caution.
After turning off, press and hold the child safety lock button for 5 seconds again to
reactivate the child lock feature.
NOTE: Due to the heating power limitations and the temperature of the feed water, incre-
asing the desired dispensed water temperature will result in a lower flow rate.
The temperature of the feed water tank directly impacts the dispensing temperature of room
temp water and the flow rate of hot water.
5. Additional Functions
Routine Flushing
Continuous Standby Flush: When the machine is in standby mode for 24 hours continu-
ously, it will automatically flush for 30 seconds, during which the water-filtering indicator
will flash. After finishing the flush, the machine will return
to standby mode.
Accumulative Water Production Flush: Once the machine has accumulated 25 minutes of
water production, it will flush for 10 seconds. The water-filtering indicator will flash during
this process.
In flush state, if the feed water tank is out of water or is not installed, the machine will not
enter the flush mode. It will wait until the flushing conditions are met to proceed.
Power-on Flush: 30 seconds.
Post Water Production Flush: 20 seconds.
Boiling Point Correction
Considering that the boiling point of water decreases with increasing altitude, it is advisable to
adjust the boiling point at high altitudes to prevent scalding from boiling steam. However, the
default setting is calibrated for low-altitude regions, so you need no adjustment if you are at
lower altitudes.
9
Temp
Volume
Lock
Cold
Set
Hot
b.Filter Resetting
After replacing the filter, hold the water dispensing key “ ” for five seconds to reset.
RO Filter
a.Filter Replacement
Filter Resetting
WD-A2RF filter: Waterdrop Reverse Osmosis Membrane Filter
Service life: ≤12 months
Step 1 : Lift the filter handle upwards to remove the old filter.
Step 2: Install the new filter, align the filter position marker with the machine marker, and
gently press the filter until a “click” sound indicates successful installation.
Body cover plate
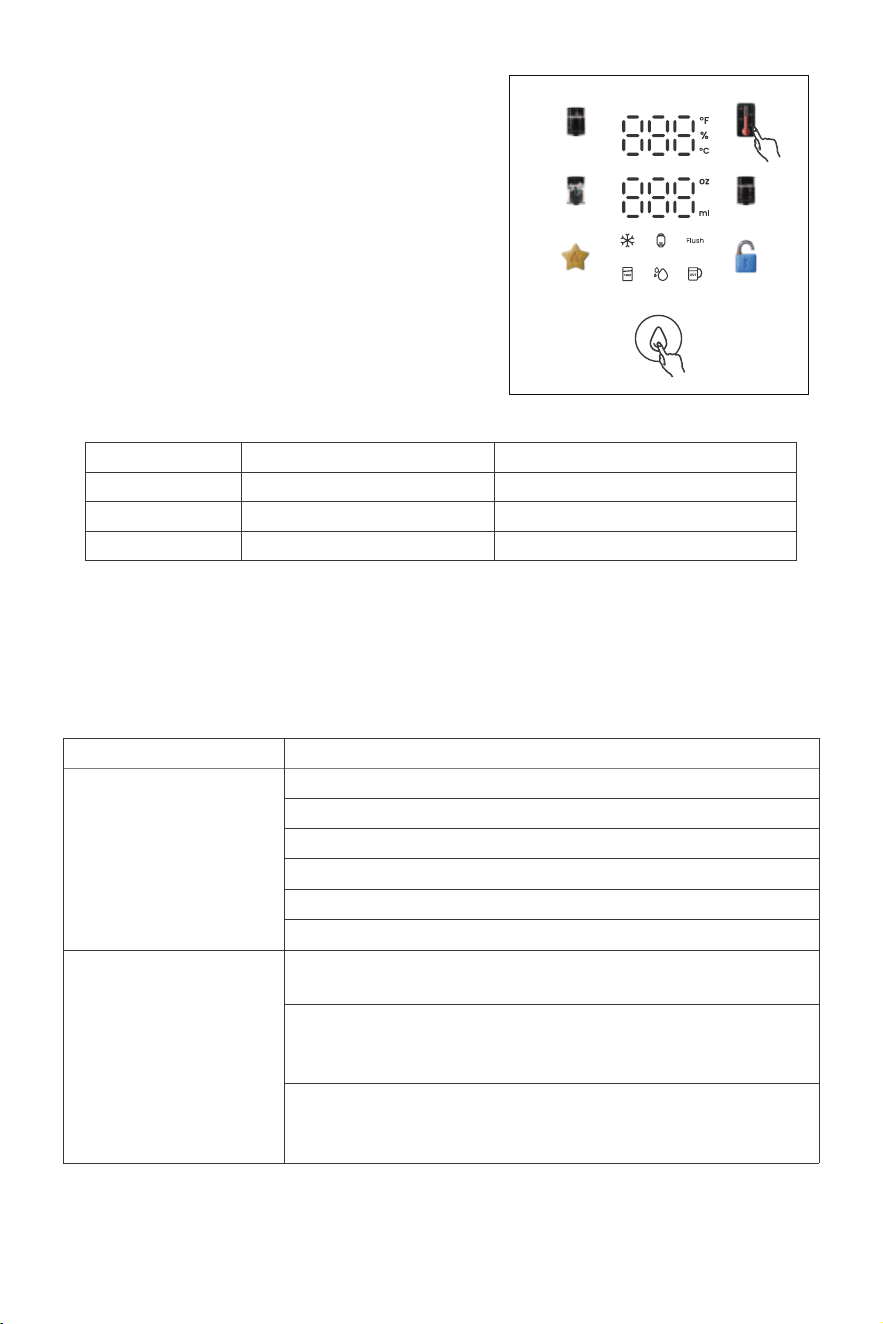
Step 1: Press and hold both the temperature and
water volume buttons for 5 seconds to enter the
boiling point adjustment mode.
Step 2: The temperature section flashes at 203°F.
Press the hot water button to cycle through
settings with a step of 9°F. The adjustable range
is 176°F/185°F/194°F/203°F.
Step 3: Press the water dispensing key or if there
is no operation for 10 seconds, the system will exit
and save the boiling point data, which is remem-
bered even if the power is disconnected.
Altitude Boiling point setting value
206°F-212°F
201°F-206°F
194°F-200°F
198°F-203°F
192°F-197°F
185°F-190°F
0~500m
500~1,500m
1,500~2,000m
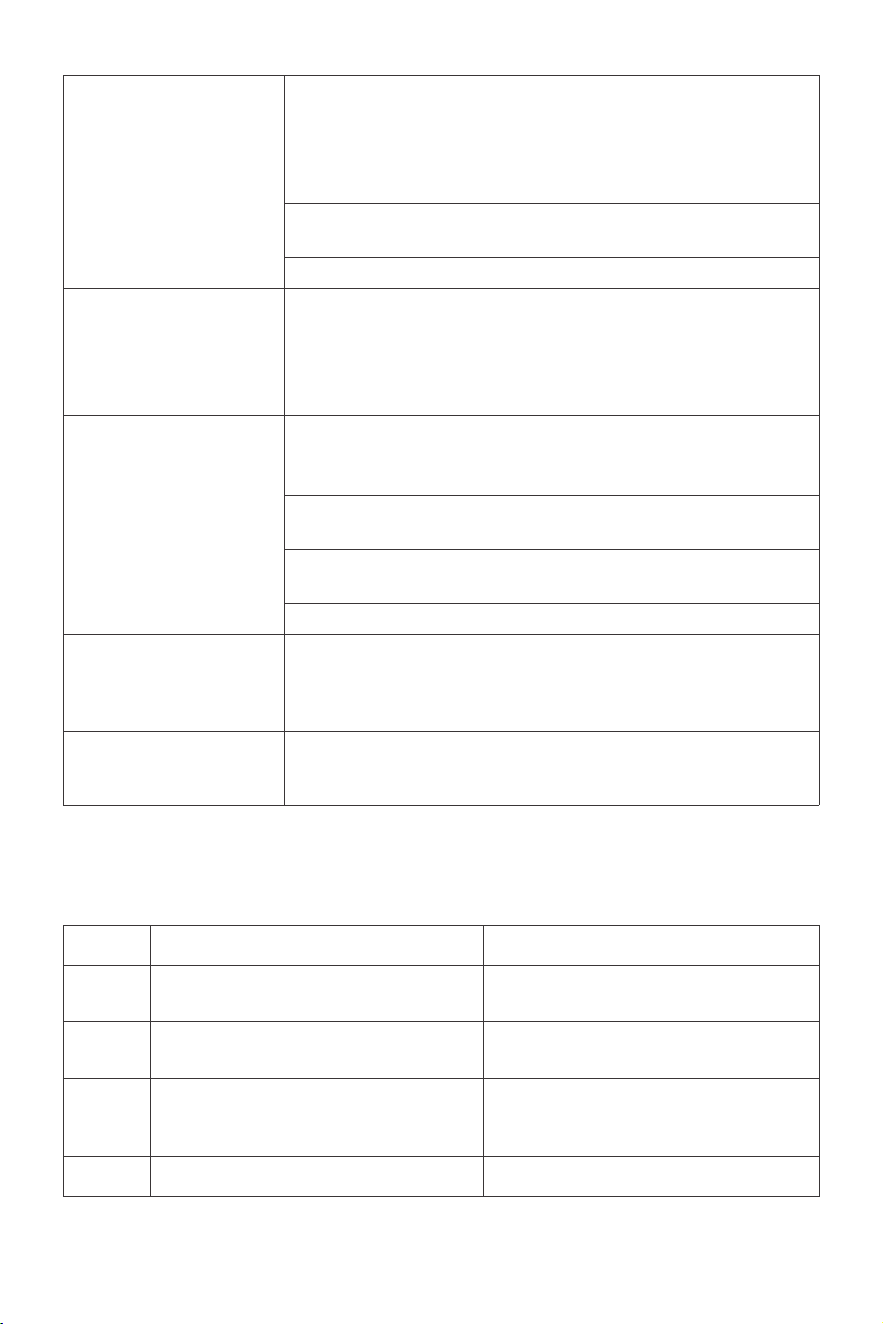
Common Issues and Solutions
6. Troubleshooting
10
Temp
Volume
Lock
Cold
Set
Hot
Maximum heating temperature
Issues
Please check if the feed water tank is low on water.
Please check if the filters of your new dispenser have been thor-
oughly flushed.
Please check if the filters have been flushed thoroughly after
being replaced.If not,please follow the steps in the Instruction
Manual to flush the new filters.
Please check if the dispenser was unused for a long time. If it
was, please flush following the prompts in the daily flushing
process.
The dispenser fails to
produce purified water.
The filtered water
tastes bad.
Please check if the power cord is plugged in.
Please check if the water tank is installed properly.
Please check if the filters are installed correctly.
Please check if the filters have expired.
Please check if there are any error prompts displayed.
Possible Causes
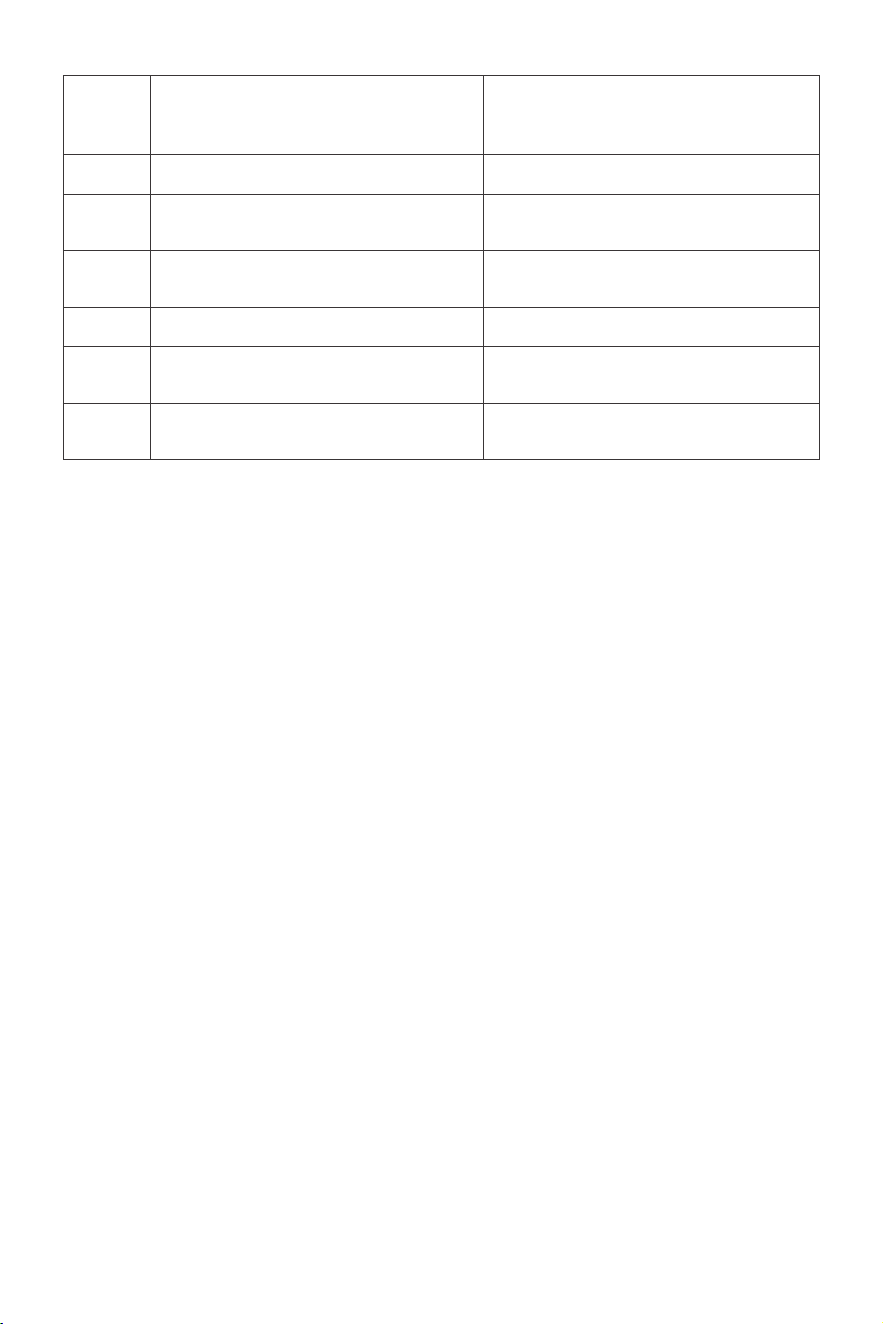
Error Codes
E0
Communication failure between display
board and power board.
Communications automatically restored
after reboot.
E1
Water outlet temperature sensor open
circuit or short circuit.
NTC normalizes and automatically resets
after reboot.
E2
E4
Automatically reset after power loss.
Automatically reset after power loss.Heating circuit malfunction.
DescriptionsDisplay Solutions
Water shortage alarm, no water produ-
ced after 10 mins of system running, tri-
ggers an alarm.
11
Please check if the refrigeration function has been enabled and
if the dispenser prompts water shortage.
The hot water will lose part of the heat from the water outlet to
the container.
There will be deviation in components such as pumps in the dis-
penser, and the deviation of -10% to 10% is normal.
The container is too low at temperature, thereby absorbing part
of heat.
The dispenser cannot
dispense cold water.
The actual temperature
does not reach the set
temperature.
There is a deviation
between the actual water
output and the set water
output?
Please check if the dispenser has an abnormal prompt.
Raw water temperature is too low.
It is normal. After the water flows to the heating element and there
is contact,part of it will be vaporized to generate bubbles. These
bubbles float on the surface of the water until they are dissolved.
There are white bubbles
in the water.
Please check if a large amount of cold water has been dispensed
continuously.
If yes, the dispenser may be undergoing the refrigeration process.
The dispensed water is
not cold enough.
The heating part needs to be preheated, and the set temper-
ature cannot be reached immediately within the first few
seconds.
Please check if the new dispenser has been powered on for the
first time.
After the new dispenser has been powered on for the first time,
needs to wait for 30 minutes before the cold water function
becomes available.
Automatically reset after temperature
rise.
Freezing (inlet water temperature below
33.8°F), the entire system cannot
operate.
E6
Automatically reset after power loss.Hot water circulation pump short circuit.
H2
Automatically reset after power loss.Voltage sensor malfunction.
E7
Ice core NTC open circuit or short
circuit.
NTC normalizes and automatically resets
after reboot.
H3
Over-temperature alarm.
H1
Inlet water temperature sensor open
circuit or short circuit.
NTC normalizes and automatically resets
after reboot.
NTC normalizes and automatically resets
after reboot.
NTC normalizes and automatically resets
after reboot.
Excessive high-temperature alarm.
H4
E5
7. Cleaning and Maintenance
1. Use a brush or a mild detergent to gently clean all stains.Ensure you wipe off any detergent
residue and avoid cleaning with tools with rough surfaces or abrasive detergents.
2. Clean the drip tray frequently using a soft sponge dipped in water.
8. Safety Precautions
The use of this product by children and individuals with physical, mental, sensory, and in-
tellectual disabilities must be under supervision or guidance of competent persons.
This product is intended for filtering municipal tap water for daily drinking purposes only.
Please do not use it for any other purposes.
The recommended operating altitude range for this product is between 0 and 2000 meters.
Avoid storing or exposing the product to temperatures below 5°C/39°F.
Avoid squeezing, folding, knotting,or twisting the power cord to prevent damage.
If the power cord is damaged,for safety reasons, it must be replaced by a professional from
the manufacturer,the repairs department,or a similar department.Please contact our
customer service to arrange for a replacement if the power cord is accidentally damaged.
Do not unplug the power cord by pulling it directly.This may damage the cord.
Please keep the power plug clean and avoid plugging or unplugging it with wet hands.
Please ensure that the dispenser is placed in a secure location where pests cannot damage
the power cord or pipes.
Do not expose the dispenser to heat sources or open flames.
Do not expose the dispenser to flammable,explosive, volatile,or strongly magnetic materials.
Do not invert or tilt the dispenser at an angle greater than 15°.
Remove all obstructions around the dispenser or inside the embedded structure where it is
placed, and maintain proper ventilation.
Do not cause any damage to the refrigeration circuit.
Allow the dispenser to rest for 2 hours after transportation or movement before using it.
12

Avoid using or storing the dispenser in the following locations:
Areas exposed to strong sunlight;it can lead to component aging and the growth of
microorganisms in the water tank.
Areas with temperatures below 5°C/39°F or above 40°C/104°F; it can damage the filters
and other components.
Areas near high-temperature or strong magnetic appliances; it can cause fire or circuit
failure.
Damp or dusty areas;it can damage the circuit.
Do not place heavy objects or liquids on the dispenser.
1.
2.
Storage Requirements:
Usage Requirements:
Maintenance Requirements:
The dispenser undergoes a water test to ensure its quality before leaving the factory.When
you first unpack it,there may be a small amount of residual water. This is normal;you can
proceed to setup and use the dispenser.
The foam material used in this dispenser is flammable polyurethane.Please keep it away
from high temperatures and fire during use and storage.
When disposing of the dispenser,ensure to hand it over to a specialized recycling company
to prevent any potential accidents.
Please hand it over to a professional and qualified recycling company to prevent any harm
to the environment or other hazards.
The calculation of the filter's lifespan begins from the moment it is installed and used,includ -
ing periods when no water is dispensed.
To ensure user safety and proper functioning of the dispenser,please use only the accesso-
ries and filters provided by our company.
Additional Notes:
13
The first thing to do if and when the dispenser encounters a malfunction is to disconnect the
power supply immediately.
When moving or transporting the dispenser, please drain the water inside it and follow the
instructions on the packaging to prevent damage from improper handling.
When cleaning the dispenser,be cautious not to let water flow into the dispenser from the
filter bucket. This can cause odors,bacterial growth, and water accumulation leading to
leakage on base.
Avoid washing the exterior or interior of the dispenser with water to prevent water accumula-
tion, odors,and bacterial growth.
When the filter life indicator flashes, it means the filter is about to expire and needs to be
replaced.Please purchase the appropriate filter and replace the expired filter promptly.
The dispenser should not be submerged in water.

This device complies with part 15 of the FCC Rules. Operation is subject to the
following two conditions: (1) This device may not cause harmful interference,
and (2) this device must accept any interference received, including interfer-
ence that may cause undesired operation. Any changes or modifications not
expressly approved by the party responsible for compliance could void the
user's authority to operate the equipment.
14
9.Warranty & Service
This product comes with one-year warranty.The warranty of our product covers defects in
materials and workmanship from the original date of purchase.During the warranty
period,we will replace or repair any part which is deemed to be defective,if the product has
not been subjected to tampering,alteration,lack of regular maintenance or improper use
after delivery.The cost of repair or replacement under those excluded circumstances shall be
borne by the consumer.This limited warranty does not cover the following items:filters and
all other parts or components that require regular replacement as a result of ordinary
usage.This limited warranty only applies if the dispenser is installed,used,and maintained in
compliance with all instructions and requirements enclosed with the dispenser.
This limited warranty shall only be valid if:
Working conditions are 5-38°C/40-100°F.
The feed water must have a pH between 6.5 and 8.5.
Turbidity must be less than 1.0 NTU.
The TDS of feed water must be less than 500 ppm.
Any information or suggestion with respect to our product concerning applications,
specifications or standards is provided solely for your convenience.
The quality of water supplies may vary seasonably or over a period of time.Your water usage
may vary as well.The manufacturer shall assume no liability for the determination of the
proper equipment necessary to meet your requirements,and we do not authorize others to
assume such obligation on our behalf. You must verify and test the suitability of any informa-
tion with respect to the product for your specific application.
This limited warranty shall be void if:
The cartridge filters are not replaced on the recommended maintenance schedule.
The product is purchased from someone other than our official website or our authorized
dealers, as we cannot verify or guarantee the integrity or authenticity of the product.
Our sole obligation under this warranty shall be repair or replacement of a non-conforming
product or parts of this product,or at our option,return of the product and a refund of the
purchase price. Our obligation does not include the cost of transportation.We are not
responsible for damage in transit,and claim that such damage should be presented to the
carrier by the customer.
NOTE: In case some states do not allow limitations on how long an implied warranty lasts,
you may choose to return the dispenser. If you choose to keep it, you agree that the above
limitations still apply to you.

GROUNDING INSTRUCTIONS:
This appliance must be grounded. In the event of a malfunction or breakdown, grounding
will reduce the risk of electric shock by providing a path of least resistance for electric
current.
This appliance is equipped with a cord having an appliance-grounding conductor and a
grounding plug.
The plug must be plugged into an appropriate outlet that is installed and grounded in
accordance with all local codes and ordinances.
WARNING
Improper connection of the appliance-grounding conductor can result in a risk of electric
shock.
Check with a qualified electrician or service representative if you are in doubt whether the
appliance is properly grounded.
Do not modify the plug provided with the appliance; if it will not fit the outlet, have a proper
outlet installed by a qualified technician
WARNING:
This appliance contains two UV-C emitters.
Unintended use of the appliance or damage to the housing may result in the escape of
dangerous UV-C radiation. UV-C radiation may, even in little doses, cause harm to the eyes
and skin.
Appliances that are obviously damaged must not be operatedd.
Replacement of the UV-C emitter by the user is not allowed.
15
Reverse Osmosis
Hot Cold Water Dispenser
Qingdao Ecopure Filter Co., Ltd.
Tel: 1-888-352-3558 (U.S.)
E-mail: service@waterdropfilter.com
Add.: No.13, Yishengbai Road, Jimo, Qingdao, China
V001