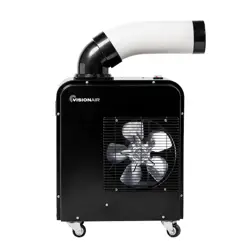
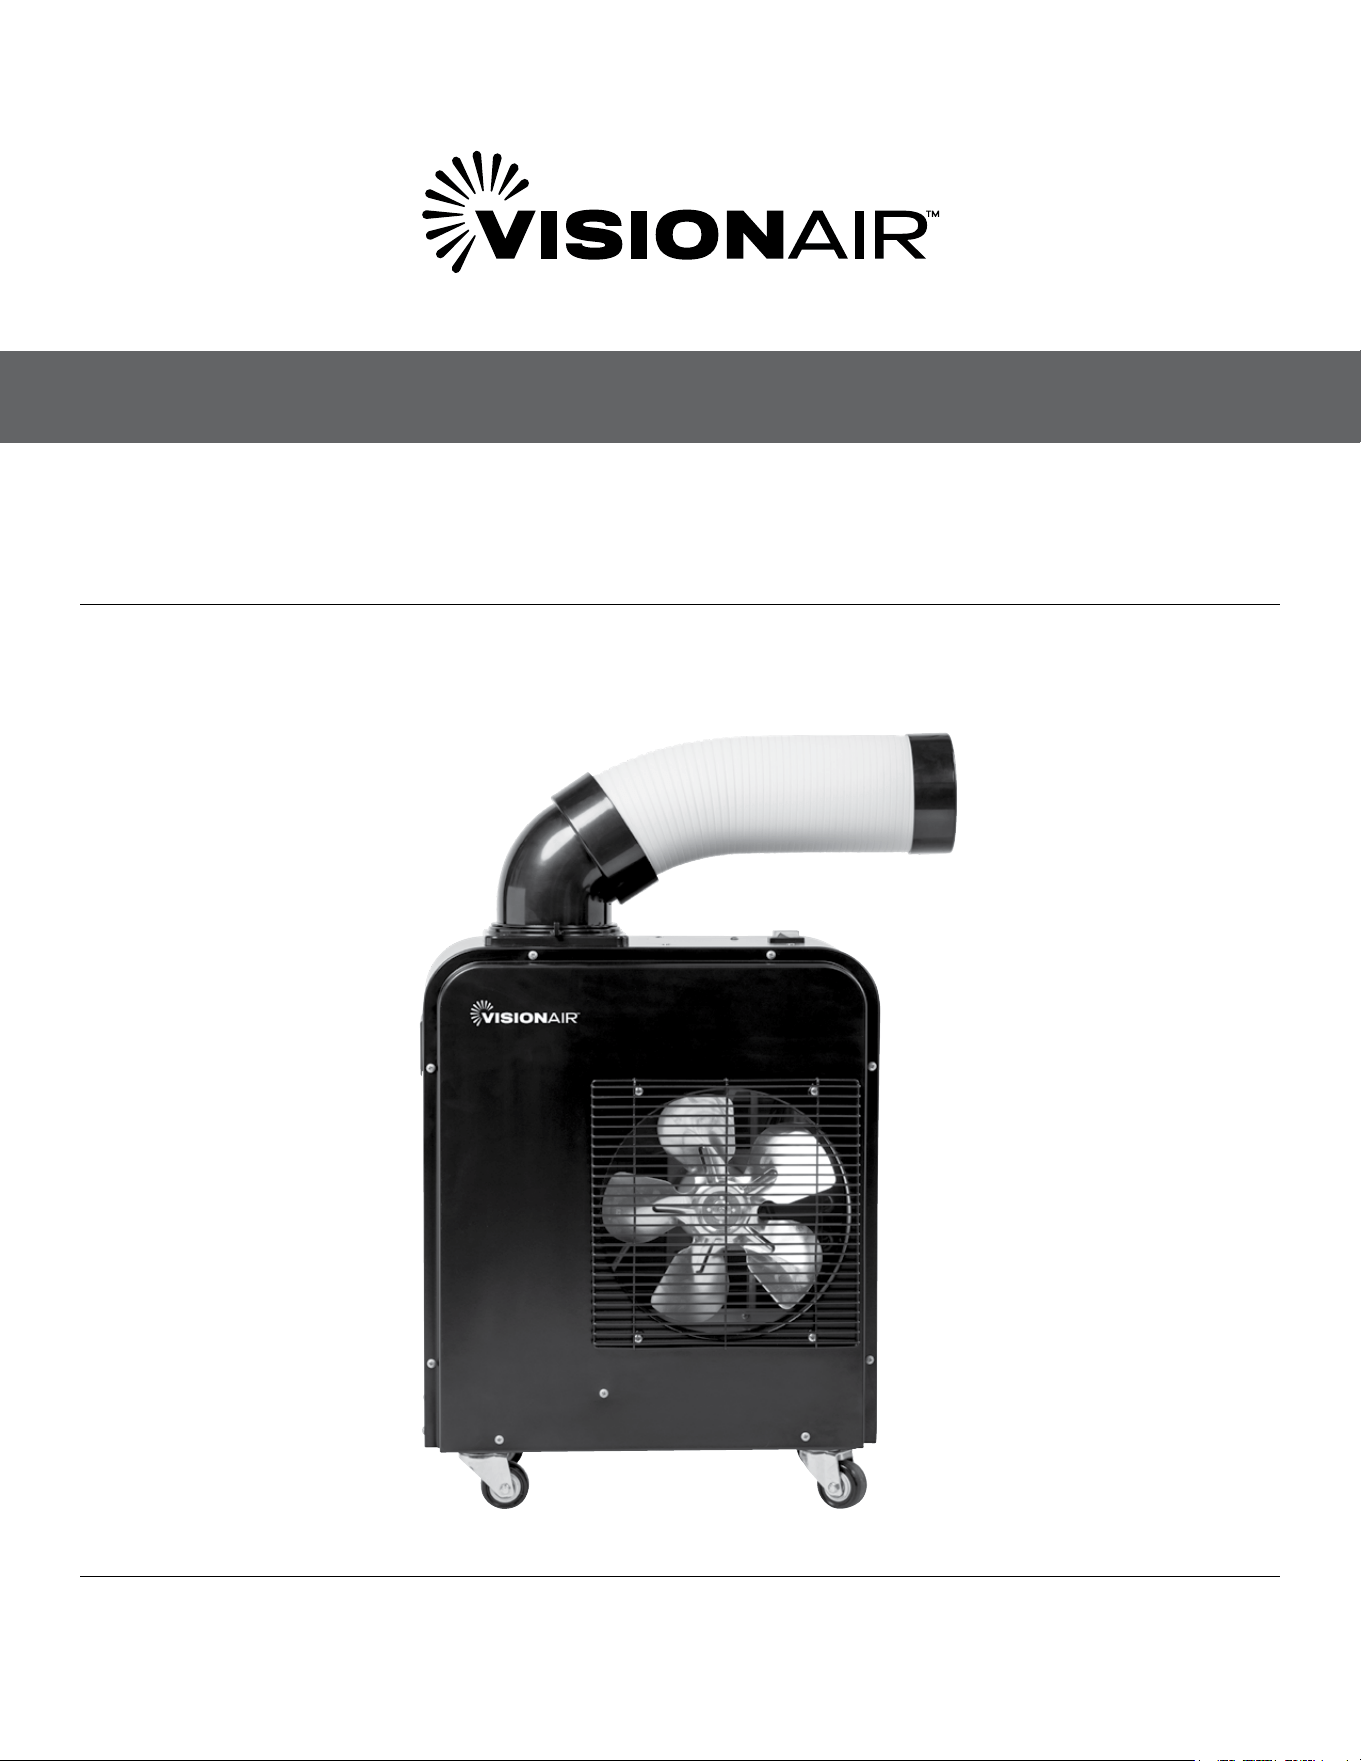
SPOT COOLER
MODEL: 2VASPOT5300
OWNER’S MANUAL


1
CONTENTS
SAFETY AND PRECAUTIONS ...................................................................................................................................... 2
TECHNICAL SPECIFICATIONS .................................................................................................................................... 9
ELECTRICAL SCHEMATIC DIAGRAM ....................................................................................................................... 9
PRODUCT STRUCTURE ...............................................................................................................................................10
INSTALLATION INSTRUCTIONS ...............................................................................................................................11
OPERATION INSTRUCTIONS .....................................................................................................................................12
CONDENSATE TANK .....................................................................................................................................................13
USAGE REQUIREMENTS .............................................................................................................................................14
MAINTENANCE AND CARE GUIDE ..........................................................................................................................14
CORRECT DISPOSAL OF THIS PRODUCT ............................................................................................................ 14
TROUBLESHOOTING .................................................................................................................................................... 15
IMPORTANT NOTE:
•
This spot cooler MUST be installed in accordance to all local governing codes and ordinances
• This spot cooler MUST be installed as specied by these instructions
• Installing this spot cooler requires basic mechanical and electrical skills and should be
installed by a qualied professional.
This User Manual provides specic instructions on the installation and operation of your air conditioner.
It is important that all SAFETY AND INSTALLATIONS instructions below are followed.
2
SAFETY & PRECAUTIONS
CONTINUEDCONTINUED
SAFETY & PRECAUTIONS
• Do NOT store unit with condensate in the condensate tank.
• Do not drink any water that is drained from the air conditioner.
• Use a dry and clean cloth to clean any dust or debris on the power plug.
• This unit is not intended to be operated on a boat or vehicle.
Failure to follow guidelines may result in safety hazards.
• Please do not stick ngers or hands in the vent.
• This appliance is not intended for use by children. Children should be supervised
and should not play on or around the appliance.
• DO NOT operate or install your unit in a potentially explosive,combustible,
or corrosive gas environment.
• Keep your unit away from ammable materials and open ame.
• DO NOT move the unit while it is operating. Before moving the unit, rst turn o the power,
then unplug the system from the power source.
• DO NOT tilt or operate the unit on its side or back. This will damage the compressor.
• DO NOT place objects on top of your unit.
• DO NOT insert your hand or any other object into the cold air supply duct(s).
• If repair is needed, please contact the after-sales service department at the place of purchase.
CAUTION
BEFORE YOU BEGIN: READ THESE INSTRUCTIONS CAREFULLY AND COMPLETELY
3
(Continued)
SAFETY & PRECAUTIONS
WARNING
For using R32 refrigerant
• Do not use means to accelerate the
defrosting process or to clean, other than
those recommended by the manufacturer.
• The appliance shall be stored in a room
without continuously operating ignition
sources (for example: open ames, an
operating gas appliance or an operating
electric heater).
• Do not pierce or burn.
• Be aware that the refrigerants may not
contain an odor.
• Appliance should be installed, operated and
stored in a room with a oor area according
to the amount of refrigerant to be charged.
For specic information on the type of gas
and the amount, please refer to the relevant
label on the unit itself. When there are
dierences between the label and the manual
on the Min. room area description, the
description on label shall prevail.
• Appliance shall be installed, operated and
stored in a room with a oor area larger
than 43 sq. ft. (4 m
2
). Appliance shall not be
installed in an unventilated space, if that space
is smaller than 43 sq. ft. (4 m
2
).
• Any open re or device like switch which
may generate spark/arcing shall be around
appliance to avoid causing ignition of the
ammable refrigerant used. Please follow
the instructions carefully when storing
or maintaining the appliance to prevent
mechanical damage from occurring.
• Servicing should only be performed
as recommended by the equipment
manufacturer. Maintenance and repair
requiring the assistance of other skilled
personnel shall be carried out under the
supervision of the person competent in
the use of ammable refrigerants.
• DO NOT modify the length of the power cord
or use an extension cord to power the unit.
• DO NOT share a single outlet with other
electrical appliances. Improper power supply
can cause re or electrical shock. When
maintaining or disposing the appliance, the
refrigerant shall be recovered properly, shall
not discharge to air directly.
• Compliance with national gas regulations
shall be observed.
• Keep ventilation openings clear of obstruction.
• The appliance shall be stored so as to prevent
mechanical damage from occurring.
• A warning that the appliance shall be
stored in a well-ventilated area where the
room size corresponds to the room area
as specied for operation.
• Any person who is involved with working on
or breaking into a refrigerant circuit should
hold a current valid certicate from an
industry-accredited assessment authority,
which authorizes their competence to handle
refrigerants safely in accordance with an
industry recognized assessment specication.
All training shall follow the ANNEX HH
requirements of UL 60335-2-40 4th Edition
Examples for such working procedures are:
– breaking into the refrigerating circuit;
– opening of sealed components;
– opening of ventilated enclosures.
4
SAFETY & PRECAUTIONS
CONTINUEDCONTINUED
(Continued)
SAFETY & PRECAUTIONS
WARNING
For using R32 refrigerant
TRANSPORT OF EQUIPMENT CONTAINING
FLAMMABLE REFRIGERANTS
• See transport regulations.
MARKING OF EQUIPMENT USING SIGNS
• See local regulations.
DISPOSAL OF EQUIPMENT USING
FLAMMABLE REFRIGERANTS
• See national regulations.
STORAGE OF EQUIPMENT/APPLIANCES
• The storage of the appliance should be in
accordance with the applicable regulations or
instructions, whichever is more stringent.
STORAGE OF PACKED (UNSOLD)
EQUIPMENT
• Storage package protection should be
constructed such that mechanical damage
to the equipment inside the package will not
cause a leak of the refrigerant charge.
• The maximum number of pieces of equipment
permitted to be stored together will be
determined by local regulations.
INFORMATION ON SERVICING
1. Checking the area: Prior to beginning work on
systems containing ammable refrigerants,
safety checks are necessary to ensure that the
risk of ignition is minimized. For repair to the
refrigerating system, the following precautions
shall be complied with prior to conducting
work on the system.
2. Work procedure: Work shall be undertaken
under a controlled procedure so as to minimize
the risk of a ammable gas or vapor being
present while the work is being performed.
3. General work area: All maintenance sta
and others working in the local area shall be
instructed on the nature of work being carried
out. Work in conned spaces shall be avoided.
The area around the workspace shall be
sectioned o. Ensure that the conditions
within the area have been made safe by
control of ammable material.
4. Checking for presence of refrigerant:
The area should be checked with an
appropriate refrigerant detector prior to and
during work, to ensure the technician is aware
of potentially ammable atmospheres. Ensure
that the leak detection equipment being used
is suitable for use with ammable refrigerants,
i.e. non-sparking, adequately sealed or
intrinsically safe.
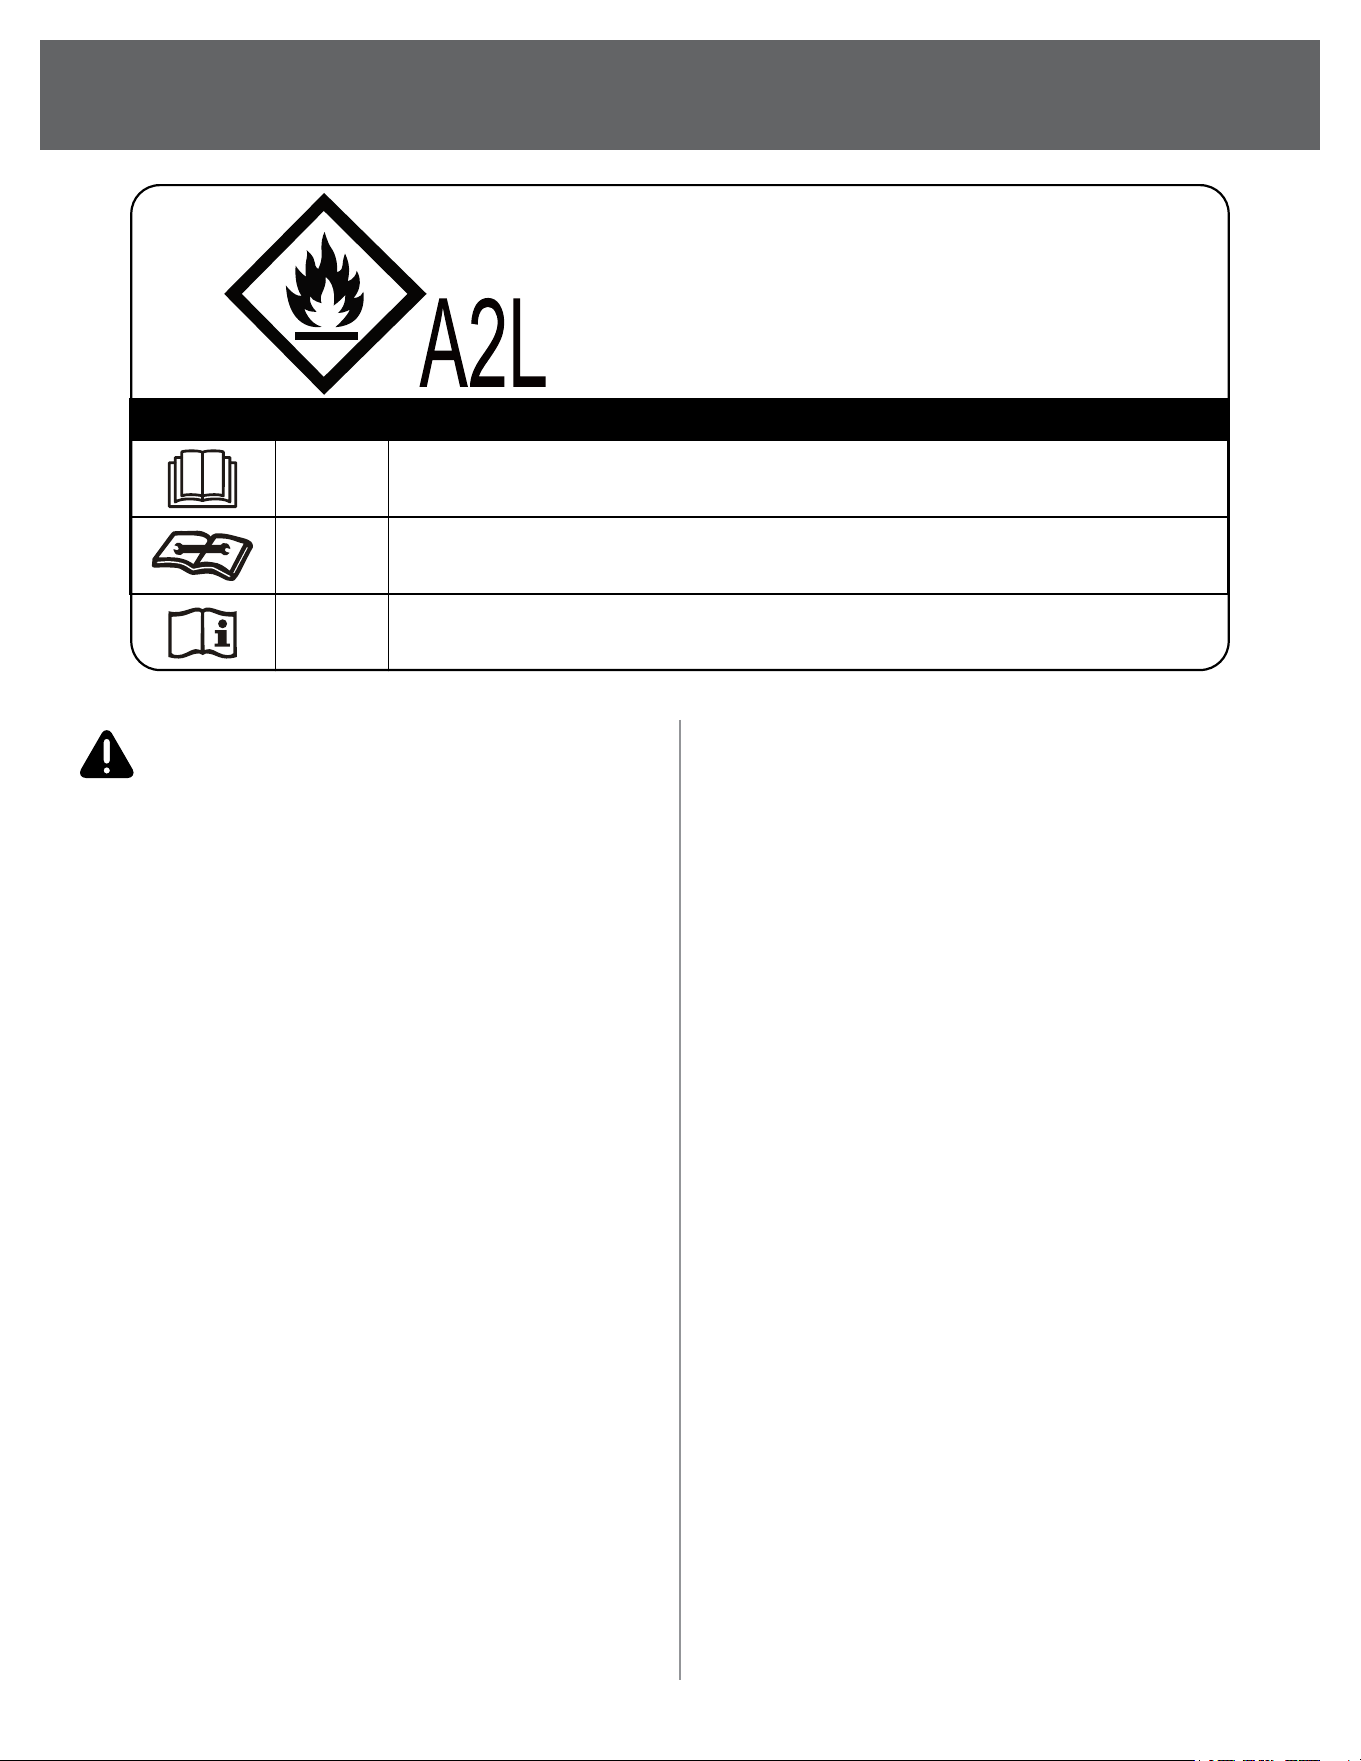
Explanation of symbols displayed on the unit
CAUTION
This symbol shows that the operation manual should be read carefully.
CAUTION
This symbol shows that a service professional should be handling this equipment
with reference to the installation manual.
CAUTION
This symbol shows that information is available such as the operation manual or
installation manual.
CAUTION:
Risk of re
ammable materials
5
(Continued)
SAFETY & PRECAUTIONS
WARNING
For using R32 refrigerant
5. Presence of a re extinguisher: If any hot
work is to be conducted on the refrigeration
equipment or any associated parts,
appropriate re extinguishing equipment shall
be available to hand. Have a dry powder or
CO2 re extinguisher adjacent to the charging
area.
6. No ignition sources: No person carrying out
work in relation to a refrigeration system which
involves exposing any pipe work that contains
or has contained ammable refrigerant shall
use any sources of ignition in such a manner
that it may lead to the risk of re or explosion.
All possible ignition sources, including
cigarette smoking, should be kept suciently
far away from the site of installation, repairing,
removing and disposal, during which
ammable refrigerant can possibly be released
to the surrounding space. Prior to work taking
place, the area around the equipment is to
be surveyed to make sure that there are
no ammable hazards or ignition risks. No
Smoking signs shall be displayed.
7. Ventilated area: Ensure that the area is in the
open or that it is adequately ventilated before
breaking into the system or conducting any
hot work. A degree of ventilation shall continue
during the period that the work is carried out.
The ventilation should safely disperse any
released refrigerant and preferably expel it
externally into the atmosphere.
8. Checks to the refrigeration equipment:
Where electrical components are being
changed, they shall be t for the purpose
and to the correct specication. At all times
the manufacturer’s maintenance and service
guidelines shall be followed. If in doubt
consult the manufacturer’s technical
department for assistance.
The following checks shall be applied to
installations using ammable refrigerants:
• The charge size is in accordance with the
room size within which the refrigerant
containing parts are installed.
• The ventilation machinery and outlets are
operating adequately and are not obstructed.
• If an indirect refrigerating circuit is being
used, the secondary circuit shall be checked
for the presence of refrigerant.
• Marking to the equipment continues to be
visible and legible. Markings and signs that
are illegible should be corrected.
• Refrigeration pipe or components are
installed in a position where they are unlikely
to be exposed to any substance which may
corrode refrigerant containing components,
unless the components are constructed of
materials which are inherently resistant to
being corroded or are suitably protected
against being so corroded.
9. Checks to electrical devices:
• Repair and maintenance to electrical
components should include initial safety
checks and component inspection
procedures. If a fault exists that could
compromise safety, then no electrical supply
shall be connected to the circuit until it is
satisfactorily dealt with. If the fault cannot be
corrected immediately but it is necessary to
continue operation, an adequate temporary
solution should be used. This should be
reported to the owner of the equipment,
so all parties are advised.
• Initial safety checks should include:
• That capacitors are discharged: this
shall be done in a safe manner to
avoid possibility of sparking.
• That there no live electrical components
and wiring are exposed while charging,
recovering or purging the system.
• That there is continuity of earth bonding.
SEALED ELECTRICAL COMPONENTS
SHALL BE REPLACED
INTRINSICALLY SAFE COMPONENTS
MUST BE REPLACED
6
SAFETY & PRECAUTIONS
CONTINUEDCONTINUED
(Continued)
SAFETY & PRECAUTIONS
CABLING
• Check that cabling will not be subject to wear,
corrosion, excessive pressure, vibration, sharp
edges or any other adverse environmental
eects. The check shall also take into account
the eects of aging or continual vibration from
sources such as compressors or fans.
DETECTION OF FLAMMABLE
REFRIGERANTS
• Under no circumstances, should potential
sources of ignition be used in the searching for
or detection of refrigerant leaks. A halide torch
(or any other detector using a naked ame)
should not be used.
• The following leak detection methods are
deemed acceptable for systems containing
ammable refrigerants. Electronic leak detectors
shall be used to detect ammable refrigerants, but
the sensitivity may not be adequate, or may need
re-calibration. (Detection equipment should be
calibrated in a refrigerant-free area.) Ensure that
the detector is
not a potential source of ignition and is suitable for
the refrigerant used. Leak detection equipment
should be set at a percentage of the LFL of the
refrigerant and shall be calibrated to the refrigerant
employed and the appropriate percentage of gas
(25% maximum) is conrmed.
• Leak detection uids are suitable for use with
most refrigerants but the use of detergents
containing chlorine shall be avoided as the
chlorine may react with the refrigerant and
corrode the copper pipework.
• If a leak is suspected, all naked ames should be
removed/ extinguished. If a leakage of refrigerant is
found which requires brazing, all of the refrigerant
should be recovered from the system, or isolated
(by means of shut o valves) in a part of the system
remote from the leak. Removal of refrigerant shall
be according to Removal and evacuation.
REMOVAL AND EVACUATION
• When breaking into the refrigerant circuit to make
repairs—or for any other purpose - conventional
procedures shall be used. However, for ammable
refrigerants it is important that best practice is
followed since ammability is a consideration.
• The following procedure shall be adhered to:
• Remove refrigerant
• Safely remove refrigerant following
local and national regulations;
• Evacuate;
• Purge the circuit with inert gas
(optional for A2L);
• Evacuate (optional for A2L);
• continuously ush or purge with inert gas
when using ame to open circuit; and
• open the circuit.
• The refrigerant charge should be recovered
into the correct recovery cylinders, if venting
is not allowed by local and national codes. For
appliances containing ammable refrigerants,
the system shall be purged with oxygen-free
nitrogen to render the appliance safe for
ammable refrigerants. This process might
need to be repeated several times. Compressed
air or oxygen shall not be used for purging
refrigerant systems.
• For appliances containing ammable
refrigerants, refrigerants purging shall be
achieved by breaking the vacuum in the system
with oxygen-free nitrogen and continuing to
ll until the working pressure is achieved, then
venting to atmosphere, and nally pulling down
to a vacuum (optional for A2L).
• This process shall be repeated until no
refrigerant is within the system (optional for A2L).
When the nal oxygen-free nitrogen charge
is used, the system shall be vented down to
atmospheric pressure to enable work to take
place. The outlet for the vacuum pump shall not
be close to any potential ignition sources, and
ventilation shall be available.
WARNING
For using R32 refrigerant
7
(Continued)
SAFETY & PRECAUTIONS
CHARGING PROCEDURES
• In addition to conventional charging procedures,
the following requirements should be followed.
• Ensure that contamination of dierent
refrigerants does not occur when using
charging equipment.
• Hoses or lines should be as short as
possible to minimize the amount of
refrigerant contained in them.
• Cylinders should be kept upright.
• Ensure that the refrigeration system is
earthed prior to charging the system with
refrigerant.
• Label the system when charging is
complete (if not already).
• Extreme care should be taken not to
overll the refrigeration system.
• Prior to recharging the system, it should
be pressure tested with OFN.
• The system should be leak tested on
completion of charging but prior to
commissioning.
• A follow up leak test should be carried out
prior to leaving the site.
DECOMMISSIONING
• Before carrying out this procedure, it is essential
that the technician is completely familiar with the
equipment and all its detail. It is recommended
good practice that all refrigerants are recovered
safely. Prior to the task being carried out, an oil
and refrigerant sample should be taken in case
analysis is required prior to re-use of reclaimed
refrigerant. It is essential that electrical power is
available before the task is commenced.
• Become familiar with the equipment and
its operation.
• Isolate the system electrically.
• Before attempting the procedure ensure that:
• When breaking into the refrigerant circuit
to make repairs or for any other purpose,
conventional procedures should be used.
• Mechanical handling equipment is available,
if required, for handling refrigerant cylinders.
• Personal protective equipment is available
and being used correctly.
• The recovery process is supervised at all
times by a competent person.
• Recovery equipment and cylinders conform
to the appropriate standards.
• Pump down refrigerant system, if possible.
• If a vacuum is not possible, make a manifold so
that refrigerant can be removed from various
parts of the system.
• Make sure that cylinder is situated on the scales
before recovery takes place.
• Start the recovery machine and operate in
accordance with manufacturer’s instructions.
• Do not overll cylinders. (No more than 80%
volume liquid charge).
• Do not exceed the maximum working pressure
of the cylinder, even temporarily.
• When the cylinders have been lled correctly
and the process is completed, make sure that
the cylinders and the equipment are removed
from the site promptly and all isolation valves on
the equipment are closed o.
• Recovered refrigerant should not be charged
into another refrigeration system unless it has
been cleaned and checked.
LABELING
• Equipment should be labeled stating that it
has been de-commissioned and emptied of
refrigerant. The label should be dated and
signed. Ensure that there are labels on the
equipment stating the equipment contains
ammable refrigerant.
WARNING
For using R32 refrigerant
8
SAFETY & PRECAUTIONS
CONTINUEDCONTINUED
(Continued)
SAFETY & PRECAUTIONS
RECOVERY
• When removing refrigerant from a system,
either for servicing or decommissioning, it
is recommended good practice that all
refrigerants are removed safely.
• When transferring refrigerant into cylinders,
ensure that only appropriate refrigerant recovery
cylinders are employed. Ensure that the correct
number of cylinders for holding the total system
charge is available. All cylinders to be used are
designated for the recovered refrigerant and
labeled for that refrigerant (i.e. special cylinders
for the recovery of refrigerant). Cylinders shall
be complete with pressure relief valve and
associated shut-o valves in good working
order. Empty recovery cylinders are evacuated
and, if possible, cooled before recovery occurs.
• The recovery equipment shall be in good
working order with a set of instructions
concerning the equipment that is at hand and
shall be suitable for the recovery of ammable
refrigerants. If in doubt, the manufacturer should
be consulted. In addition, a set of calibrated
weighing scales shall be available and in good
working order.
• Hoses shall be complete with leak-free
disconnect couplings and in good condition.
• The recovered refrigerant shall be processed
according to local legislation in the correct
recovery cylinder, and the relevant waste
transfer note arranged. Do not mix refrigerants
in recovery units and especially not in cylinders.
If compressors or compressor oils are to be
removed, ensure that they have been evacuated
to an acceptable level to make certain that
ammable refrigerant does not remain within
the lubricant. The compressor body shall not
be heated by an open ame or other ignition
sources to accelerate this process. When oil
is drained from a system, it shall be carried
out safely.
WARNING
For using R32 refrigerant
9
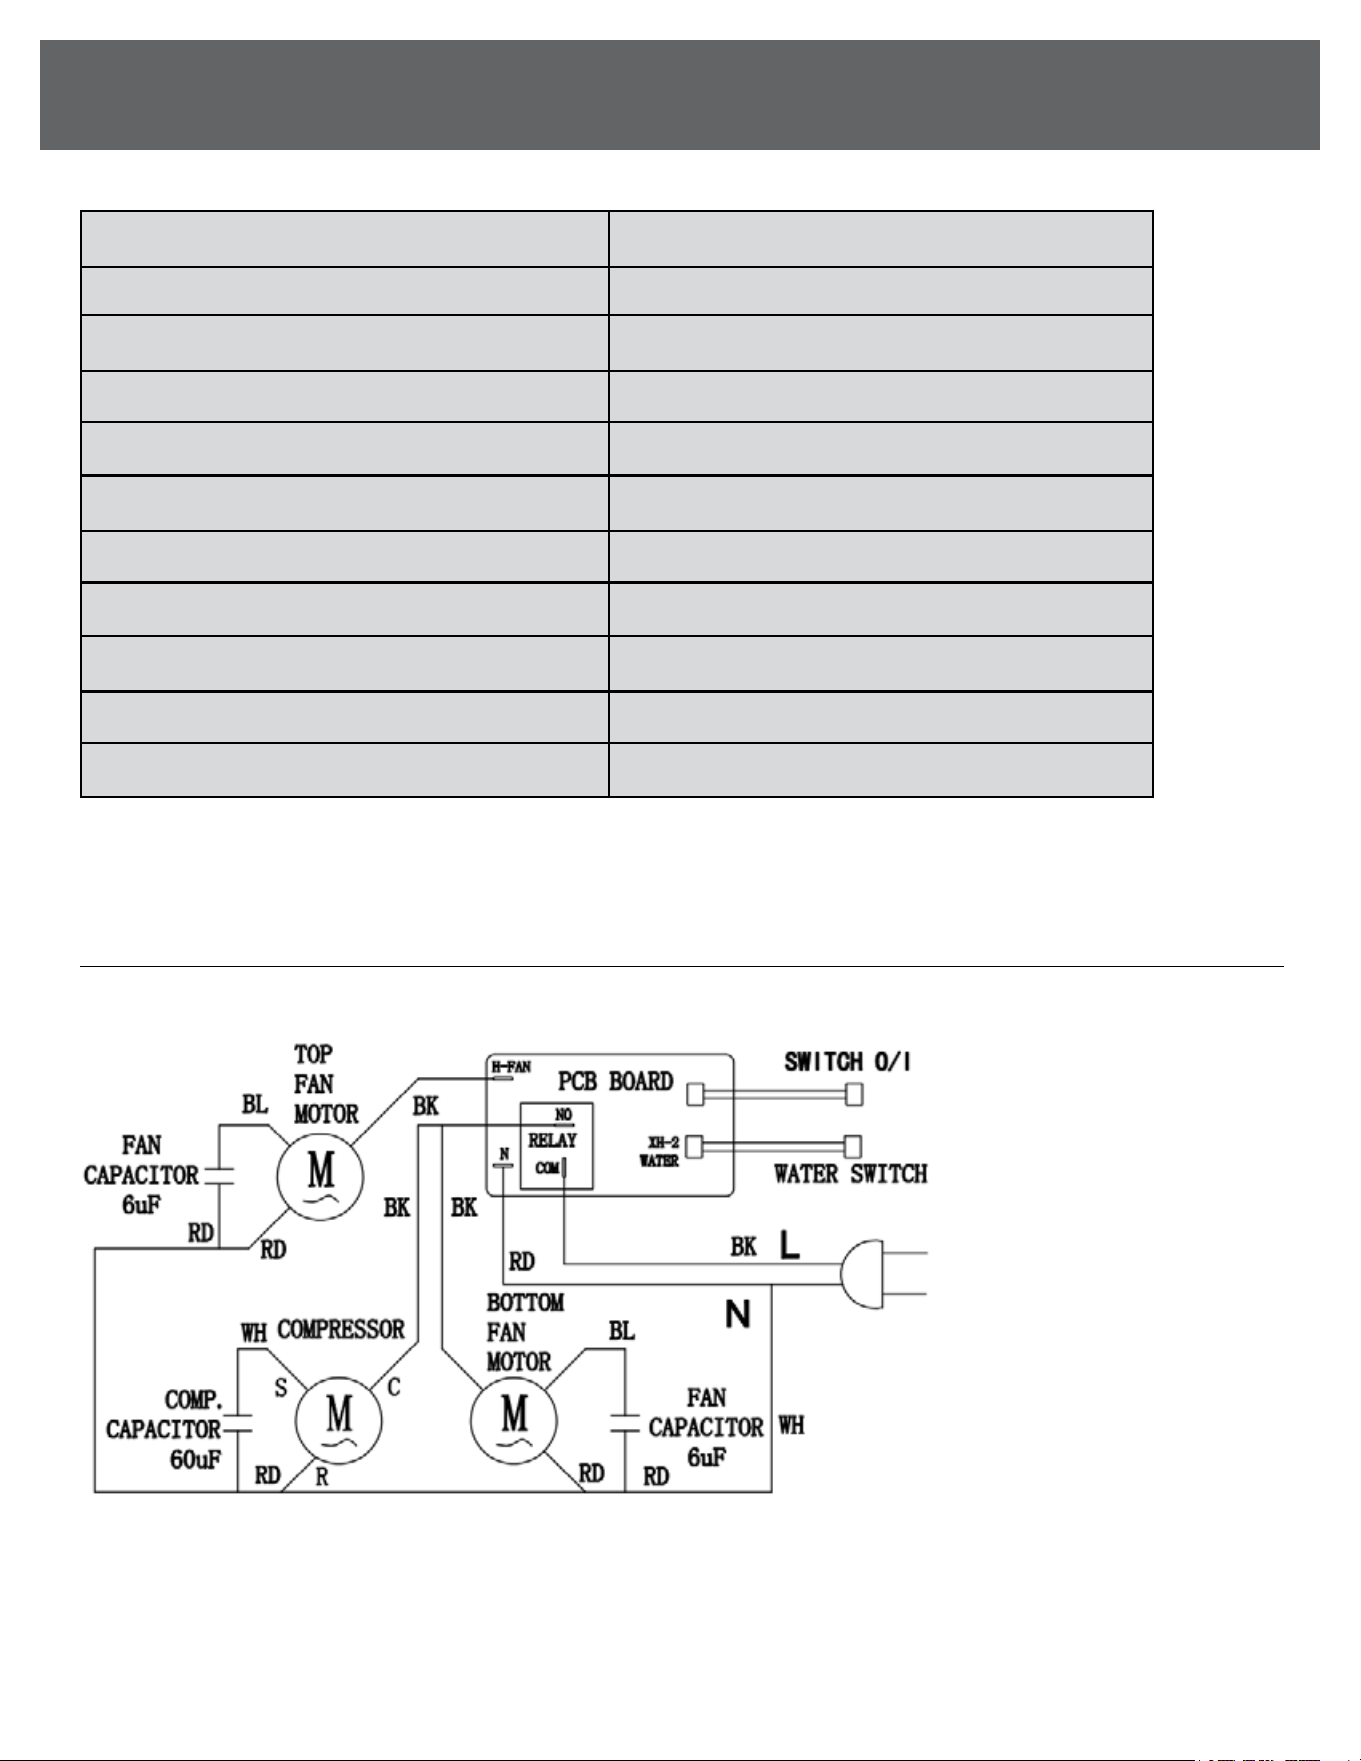
TECHNICAL SPECIFICATIONS
Model Number 2VASPOT5300
Cooling Capacity 7000 Btu/hr
Voltage/Phase/Hz 115V/1Ph/60Hz
Rated Current 8 A
Indoor Air Flow 135 ft3/min. (230m3/h)
Refrigerant Type R32
Refrigerant Amount 10.3 oz. (290g)
Ambient Temperature Range 68 °F – 109 °F (20 °C – 43 °C)
Net Weight 56 lbs (25.5 kg)
Gross Weight 62 lbs (28.3 kg)
Product Dimension (Width/Depth/Height) 18.3 in/11.3 in/23.1 in (465*287*586)mm 5
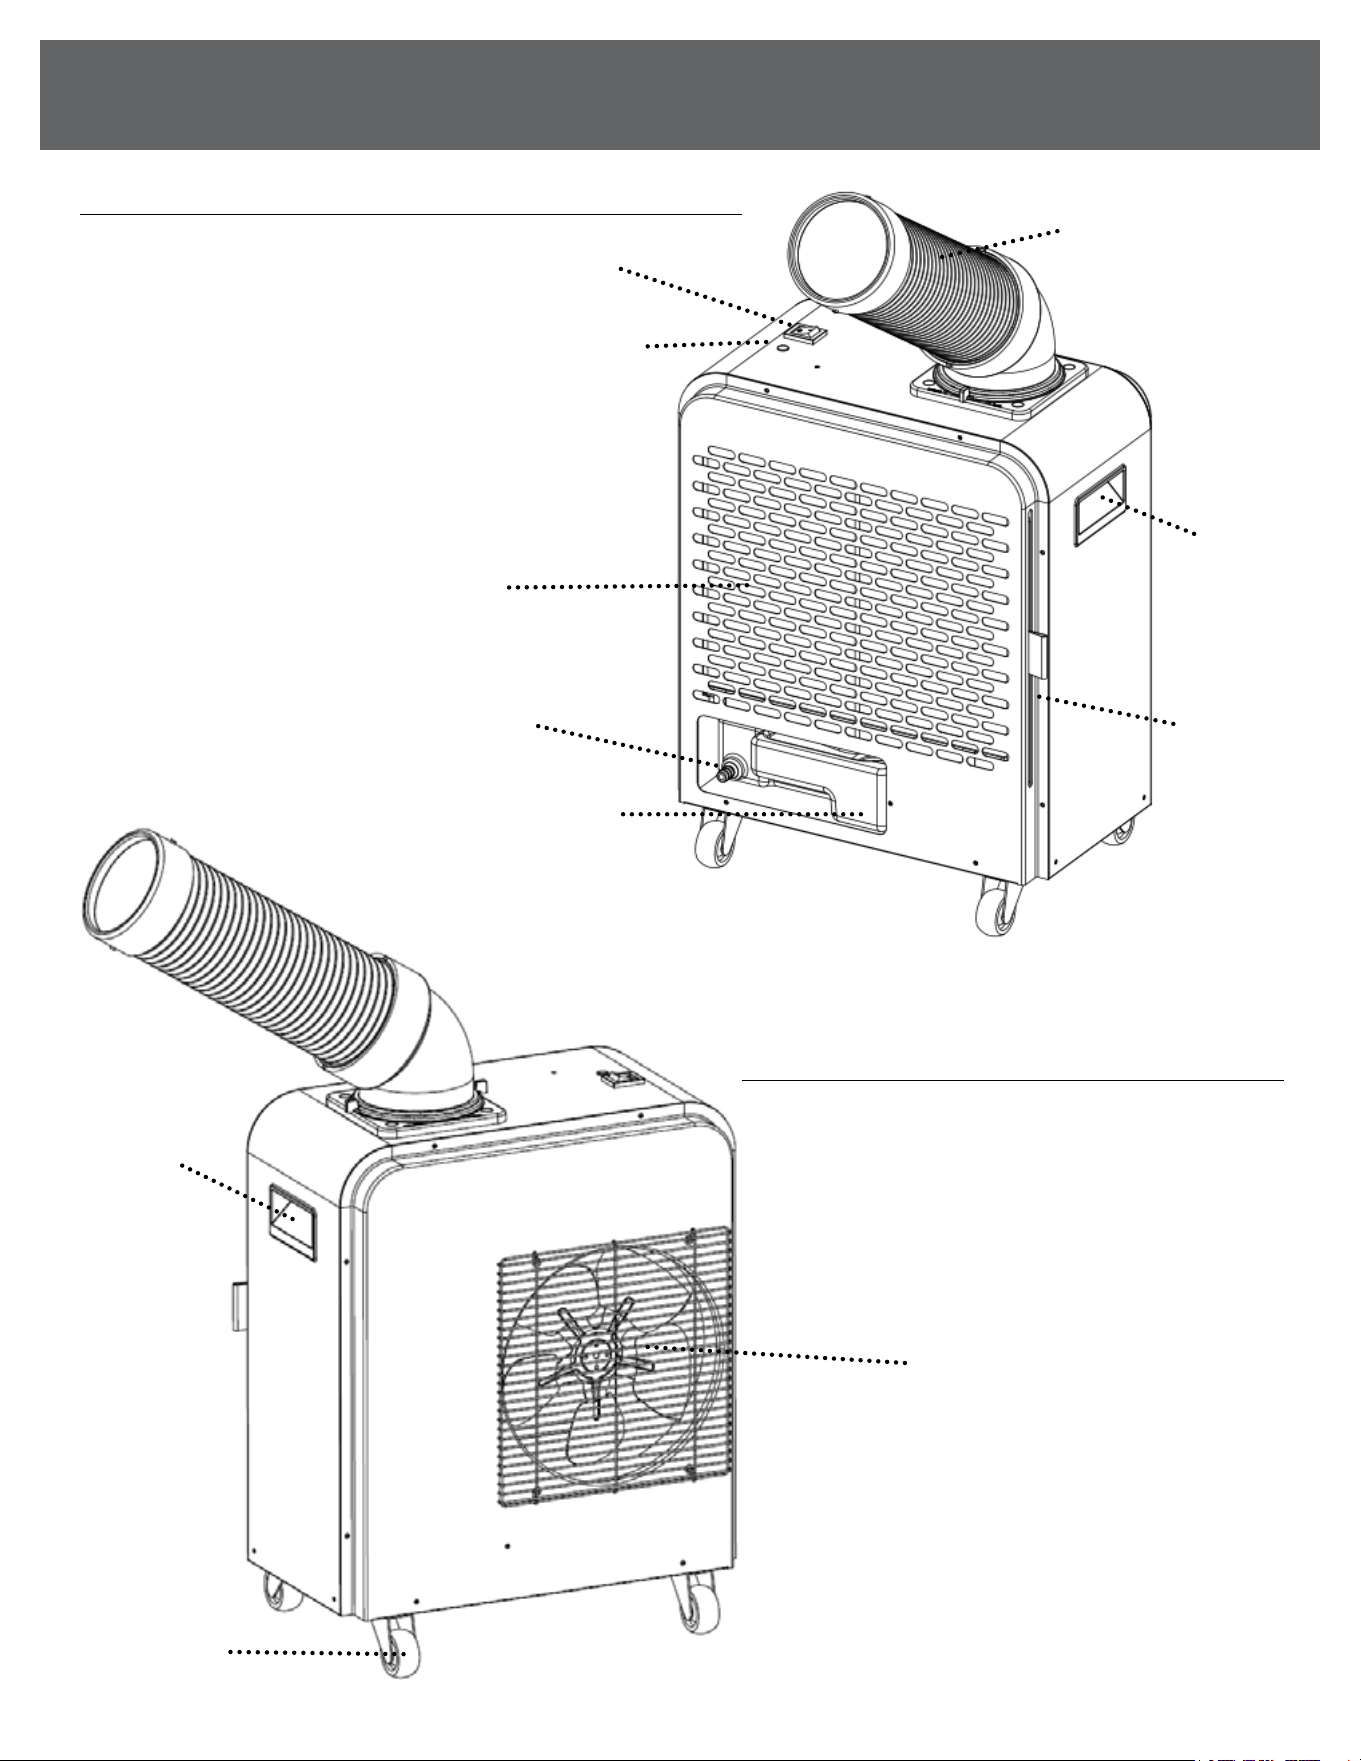
ELECTRICAL SCHEMATIC DIAGRAM
10
SAFETY & PRECAUTIONS
CONTINUEDCONTINUED
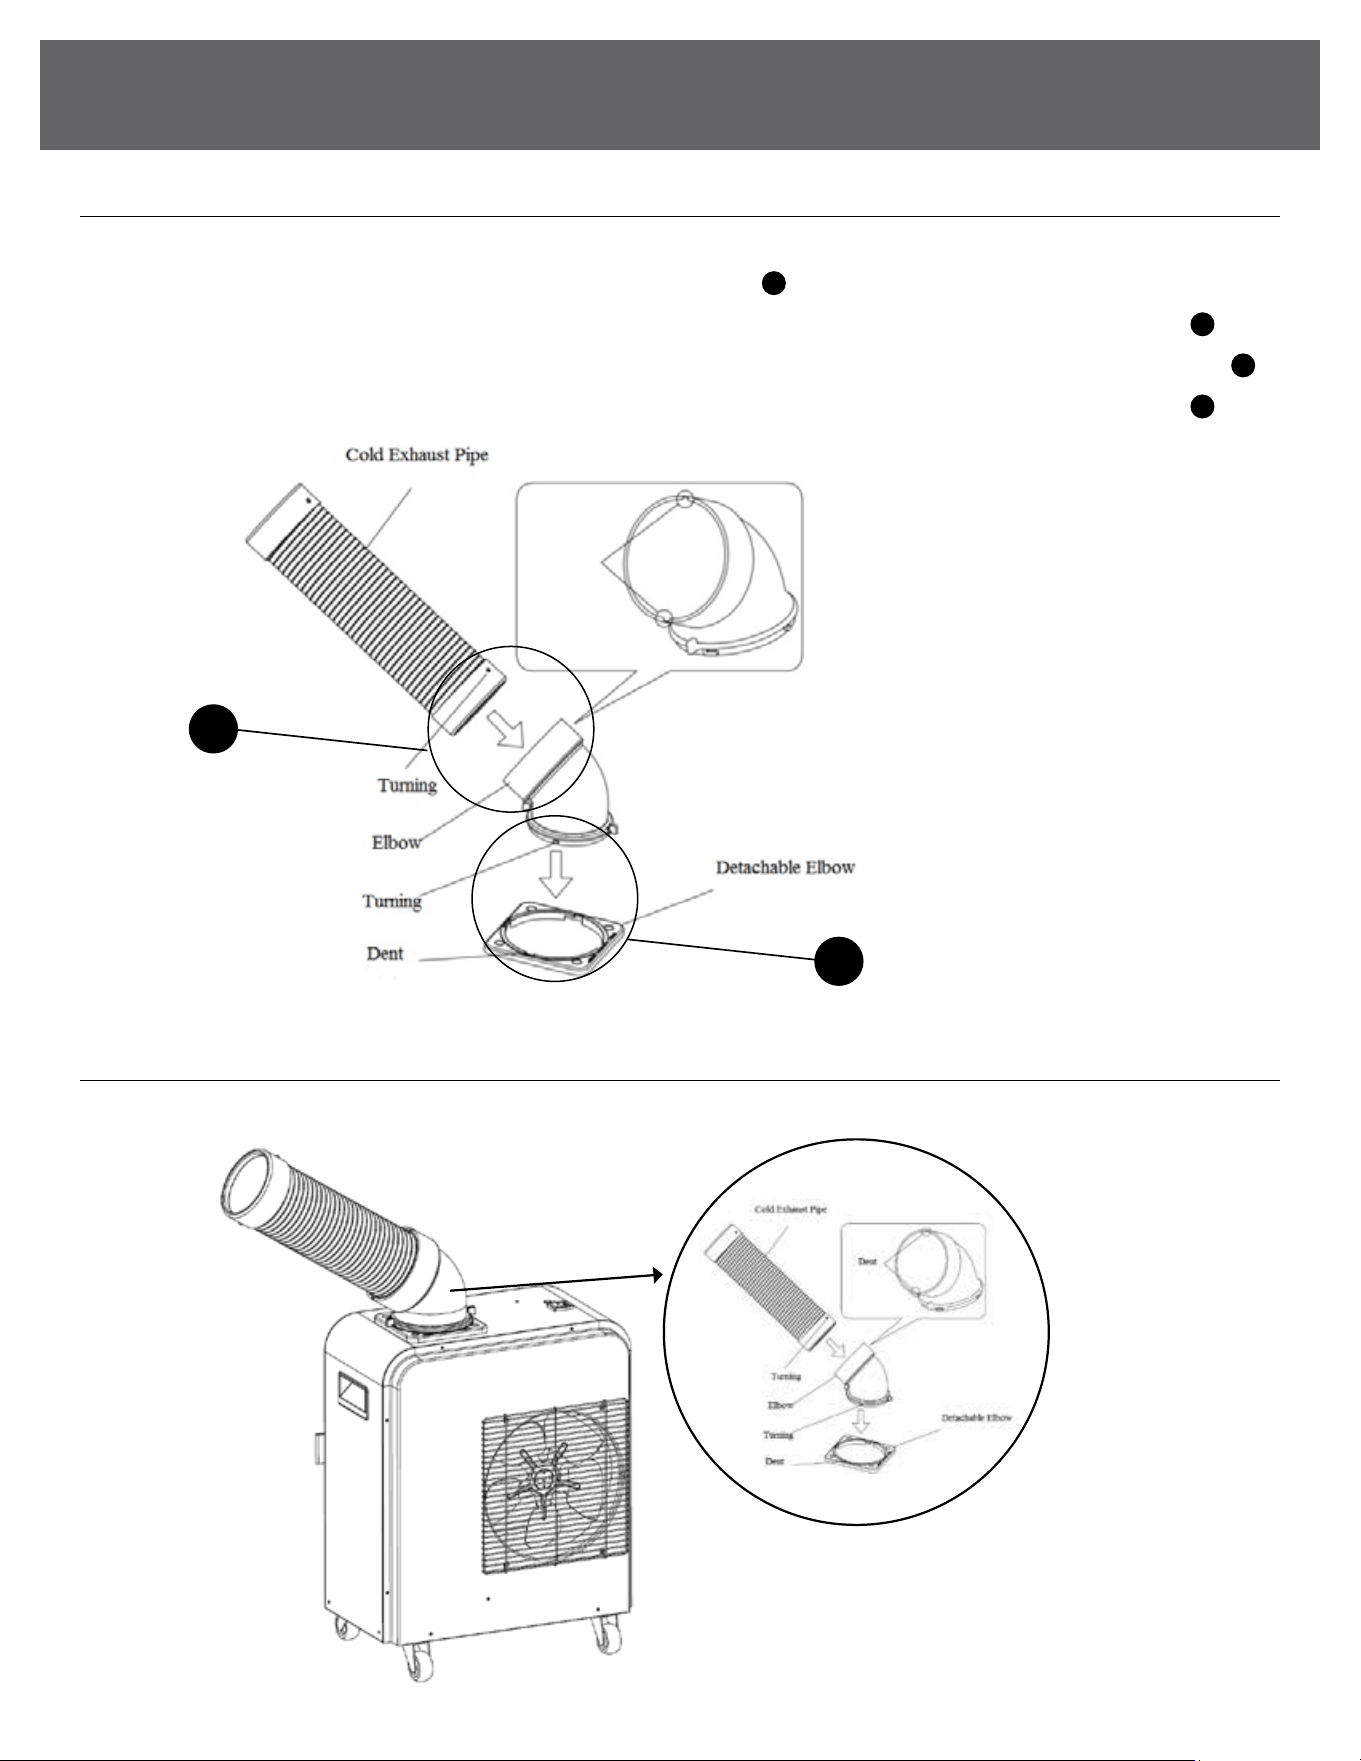
PRODUCT STRUCTURE
FRONT
BACK
POWER SWITCH
CONDENSATE FULL INDICATOR
COLD AIR
OUTLET HOSE
ASSEMBLY
FILTER SCREEN
DRAIN PORT
HOT AIR EXHAUST
HANDLE
HANDLE
CASTER
FILTER
CONDENSATE TANK
11
INSTALLATION INSTRUCTIONS
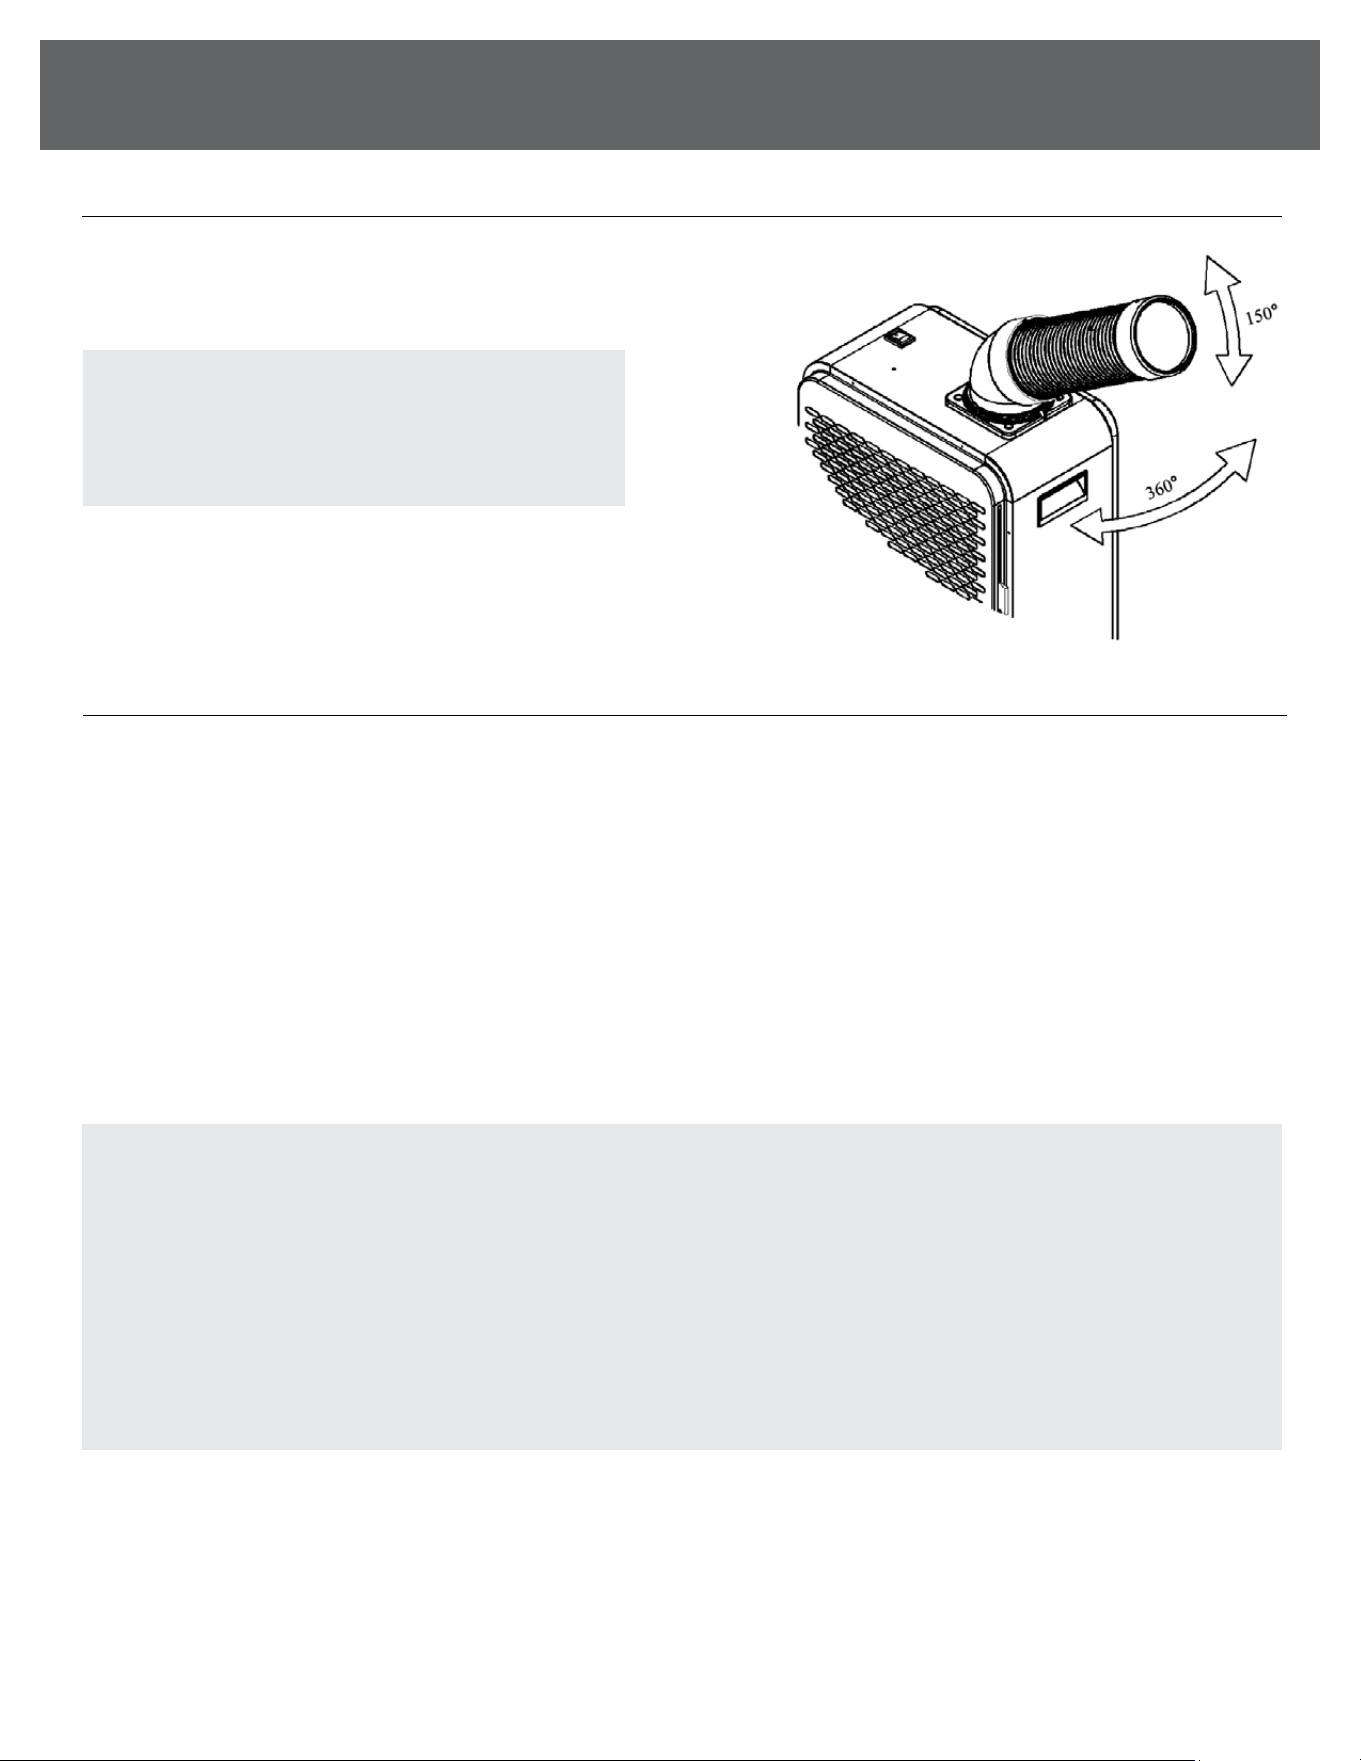
COLD AIR EXHAUST HOSE ASSEMBLY
1. Align the locking tabs of the Cold Exhaust Pipe to the attachment channels (Dent) located
on the exhaust elbow as shown in the diagram below (Fig. 1).
A
2. Insert the locking tabs into the attachment channels (Dent) and turn until they lock into place (Fig. 1).
A
3. Align the locking tabs on the elbow with the attachment channels (Dent) on the connection plate (Fig. 1).
B
4. Insert the locking tabs into the attachment channels (Dent) and turn until they lock into place (Fig. 1).
B
ATTACH COLD AIR EXHAUST HOSE ASSEMBLY TO UNIT
1. Using the supplied screws, attach the connection plate to the cabinet (Fig.2).
FIG 1
FIG 2
Dent
B
A

12
SAFETY & PRECAUTIONS
CONTINUEDCONTINUED
OPERATION INSTRUCTIONS
OPERATION INSTRUCTIONS
• To power ON the unit: press the power switch to the “I” position. On initial startup the, compressor
and fan motor will start immediately. It may take a few minutes for the air to start feeling cold.
• To power OFF the unit: press the power switch (rocker) to the “O” position. The compressor and
fan motor will stop.
COMPRESSOR OVERHEAT PROTECTION
This unit is equipped with an overload protector that is designed to shut down the unit temporarily if the
compressor overheats. This overheating can be caused by extremely high or low voltage or by excessively
high ambient temperature.
When the overload protection device is activated, the machine will continue to blow air but the compressor
will not be operational and the air will not be cold. If the thermal overload protection is frequently activated,
please nd and eliminate the cause before using the machine.
WATER ALARM
When the volume of condensate in the tank reaches approximately 75% of its ll capacity, the “Condensate
Full” sound buzzer will activate. The compressor and fan motor will stop once this occurs.
When the condensate tank is full, turn o the unit by pressing the power switch to the “O” position.
The “Water Full” indicator sound buzzer will stop. Remove the condensate tank and dump the contents.
Re-insert the empty tank into the unit and power on the air conditioner. The unit should start up normally
after a 3-minute delay (Additional instructions in section “VII Condensate Tank.”)
ATTENTION: If the unit is powered o or if there is an electrical interruption, there is a minimum
three-minute delay after which, the unit will begin to operate again.
13
(Continued)
OPERATION INSTRUCTIONS
Emptying the condensate tank:
1. Shut o the air conditioner by pressing the power switch to the “O” position.
2. Locate the condensate tank.
3. Remove the condensate tank and empty the contents.
4. Re-install the condensate tank after emptying, making sure it is properly aligned.
5. Power on the unit. There is a 3-minute delay for the compressor to start.
Normal operation will resume after time delay has ended.
6. Empty the condensate tank before moving the air conditioner to avoid any spills.
ADJUSTMENT RANGE AND OPERATION OF THE AIR DIRECTION
• The cold air duct can rotate around 360 degrees
• The cold air duct can be moved up and down by about 150 degrees.
CONDENSATE TANK
ATTENTION: When adjusting the air outlet
angle of the cold air duct, please hold the
elbow for adjustment. Do not directly hold
the cold air duct for adjustment.
ATTENTION: The compressor has a 3-minute safety delay function. After emptying the tank,
there will be a 3-minute delay where only the fan will operate. After the 3-minutes have expired,
the compressor will activate and normal operation will resume.
• If the unit has not been operated for a long time, check the condensate tank before operating:
• Remove the condensate tank from the air conditioner and conrm the oat device inside the tank
is intact. If no issues are found with the oat device, re-install the condensate tank into the air
conditioner, making sure everything is aligned.
• Improper installation of the condensate tank may trigger the condensate alarm, unit malfunction,
or condensate leakage.

14
SAFETY & PRECAUTIONS
CONTINUEDCONTINUED
(Continued)
USAGE REQUIREMENTS
CORRECT DISPOSAL OF THIS PRODUCT
This marking on the product, accessories or literature indicates that the product and its electronic accessories
should not be disposed of with other household waste at the end of their working life. To prevent possible harm
to the environment or human health from uncontrolled waste disposal, please separate these items from other
types of waste and recycle them responsibly to promote the sustainable reuse of material resources.
SPECIAL USER REMINDERS
• When using the air conditioner, the air inlet and cold air duct should be away from walls
and other obstacles by at least 12in.
• The hot air outlet should be at least 32in away from any walls or obstacles.
• The air conditioner should be placed on a at and level surface. Operating the unit on slopes
or uneven surfaces may cause safety hazards and condensate leakage.
• Do not operate this machine in wet or damp places.
• Do not place obstacles in the front of the air inlet, cold air duct and hot air exhaust.
MAINTENANCE & CARE GUIDE
Periodically clean the screen lter on this unit. Dust and debris buildup will not allow
proper airow and may cause frosting and malfunction of the heat exchanger.
FILTER CLEANING
1. Shut o the air conditioner.
2. Use a vacuum to remove any dust and dirt accumulated on the lter screen.
3. Use clean water to rinse o the remaining particles on the lter screen.
4. Once dry, re-install the lter screen into the air conditioner.
ATTENTION:
• Unplug the power cord from the machine when conducting maintenance or checks.
• When cleaning the exterior of the machine, do not use chemical agents or other
cleaning solutions that may damage the surfaces.
• Check if the power cord is damaged or broken. If so, replace it immediately.
• Check if any screws are loose. If so, tighten the screws.
• Before long-term storage, check condensate tank and empty any remaining condensate.
• The air conditioner must be stored upright.
• Do not lay the machine horizontally or upside down.
• Avoid storing the machine in locations with high temperature, rain, or direct sunlight.
15
(Continued)
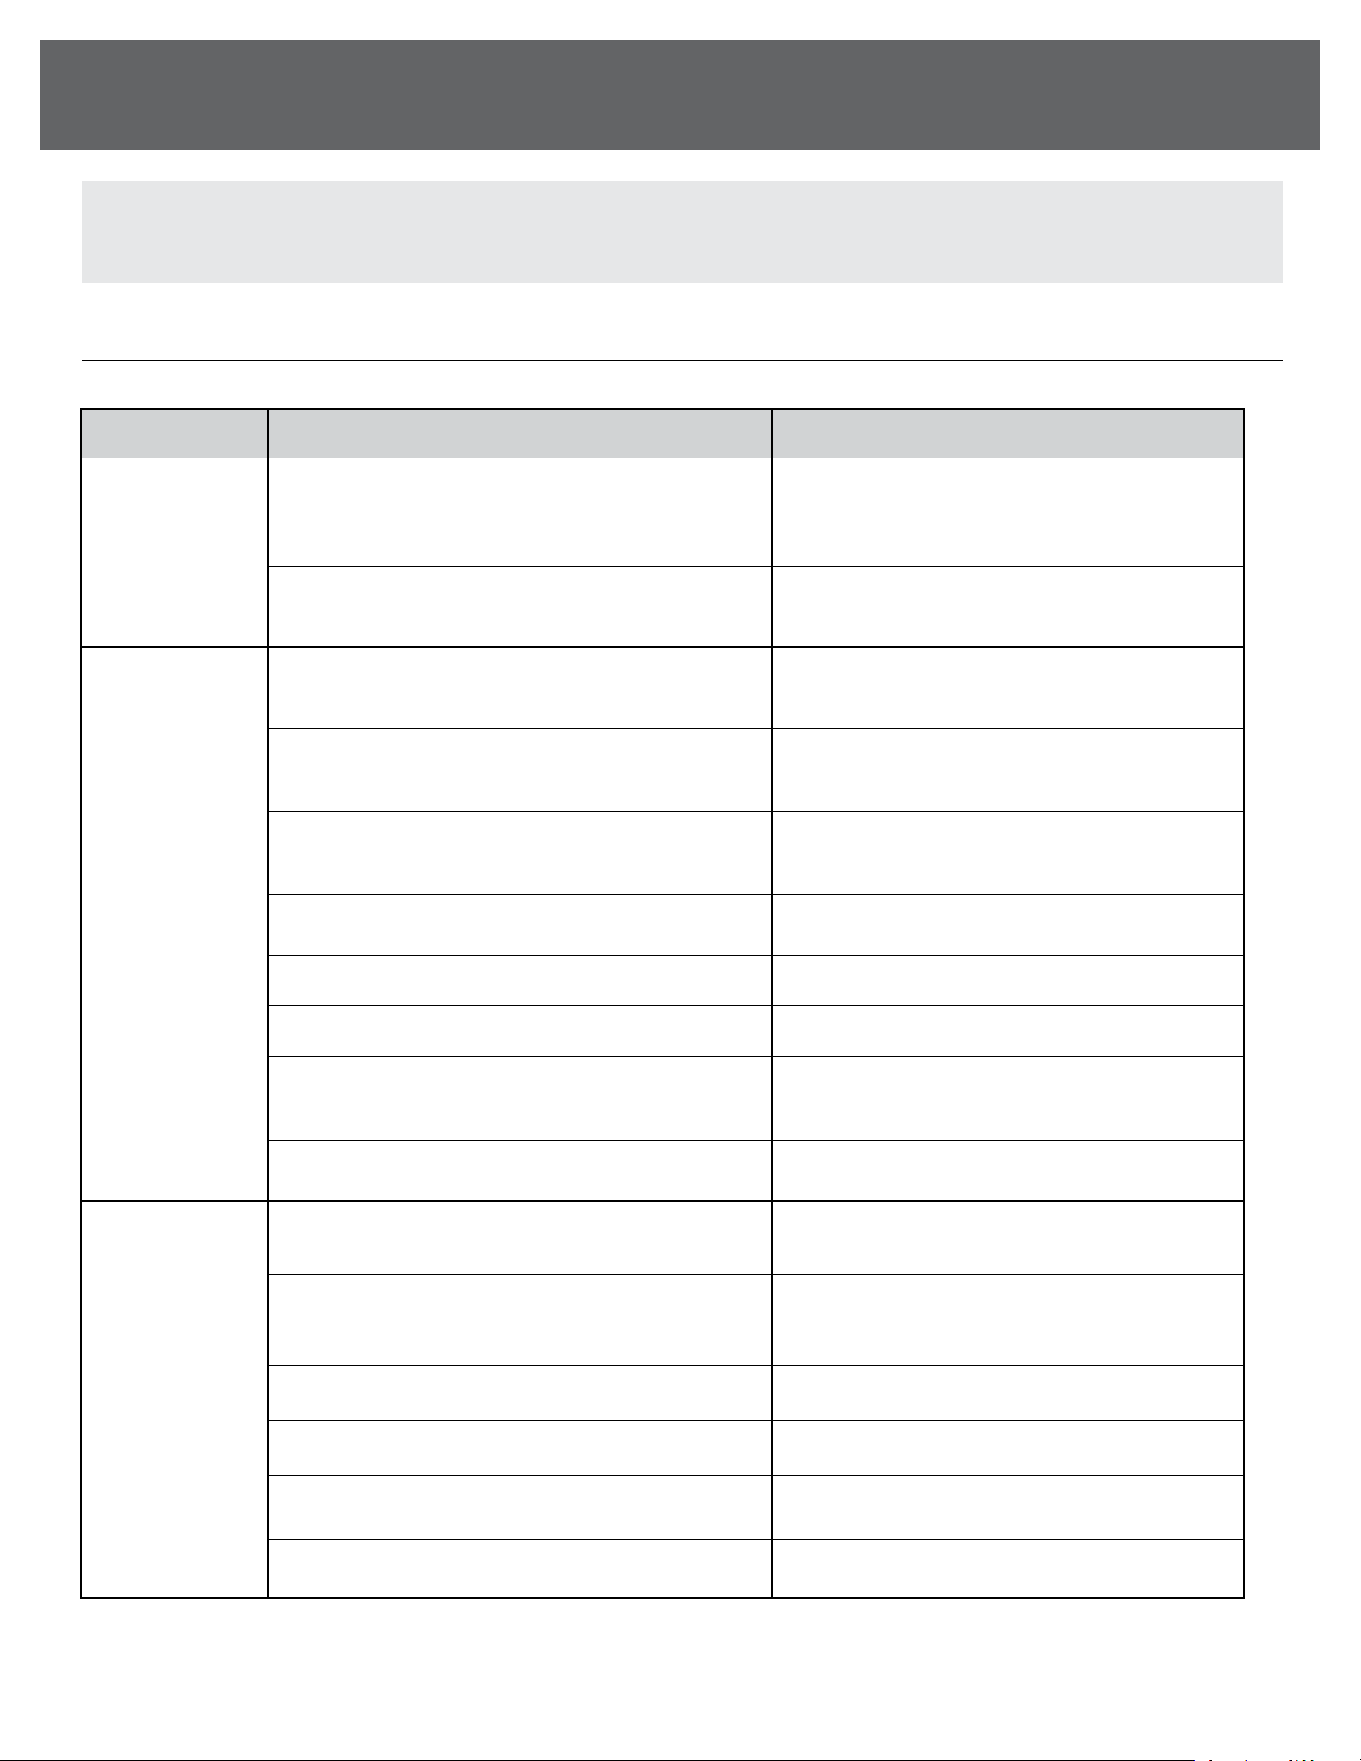
TROUBLESHOOTING
CHECK THE FOLLOWING ITEMS FOR TROUBLESHOOTING
Problem
Unit is not
Operating
Unit is not
cooling
Condensate
Leakage
Reason
The power cord is loose or unplugged
Dirty heat exchanger
Hot exhaust fan failure
Ambient temperature is too high
Compressor capacitor is damaged
Blocked refrigerant tubing
Overly high or low input voltage
Compressor overload protection triggered
Compressor motor failure
Drainpipe opening is clogged
Condensate tank position is
not installed properly
Filter screen has dust and lth
Condensate oat switch is stuck
Condensate tank is full
Damaged condensate tank
Troubleshooting
Securely plug the unit into the wall outlet.
Ensure there is sucient power at the
wall outlet.
Have a professional or certied technician
replace the fuse.
Clean the heat exchanger surface
to allow for proper airow.
Repair or replace hot exhaust fan
or blower.
Do not operate the unit in areas with
excessively high ambient temperatures.
Replace compressor capacitor.
Replace blocked refrigerant tubing.
Use correct voltage.
Unit will restart after the compressor
has suciently cooled.
Repair or replace compressor.
Clean out any residue or debris in the
drain pipe.
Remove the condensate tank and
re-install properly.
Remove lter and clean.
Shut o the unit and empty condensate
tank before use.
Gently shake the tank to dislodge
the oat switch.
Repair or replace the condensate tank.
ATTENTION: If the air conditioner malfunctions or stops operating, shut o the machine
immediately and disconnect it from the wall outlet.


833-950-1185 | support@visionairproducts.com | www.visionairproducts.com
4560 West 160th Street
Cleveland, OH 44135
Printed in China | 0924_M156