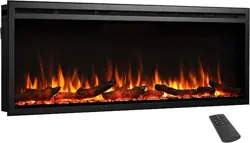
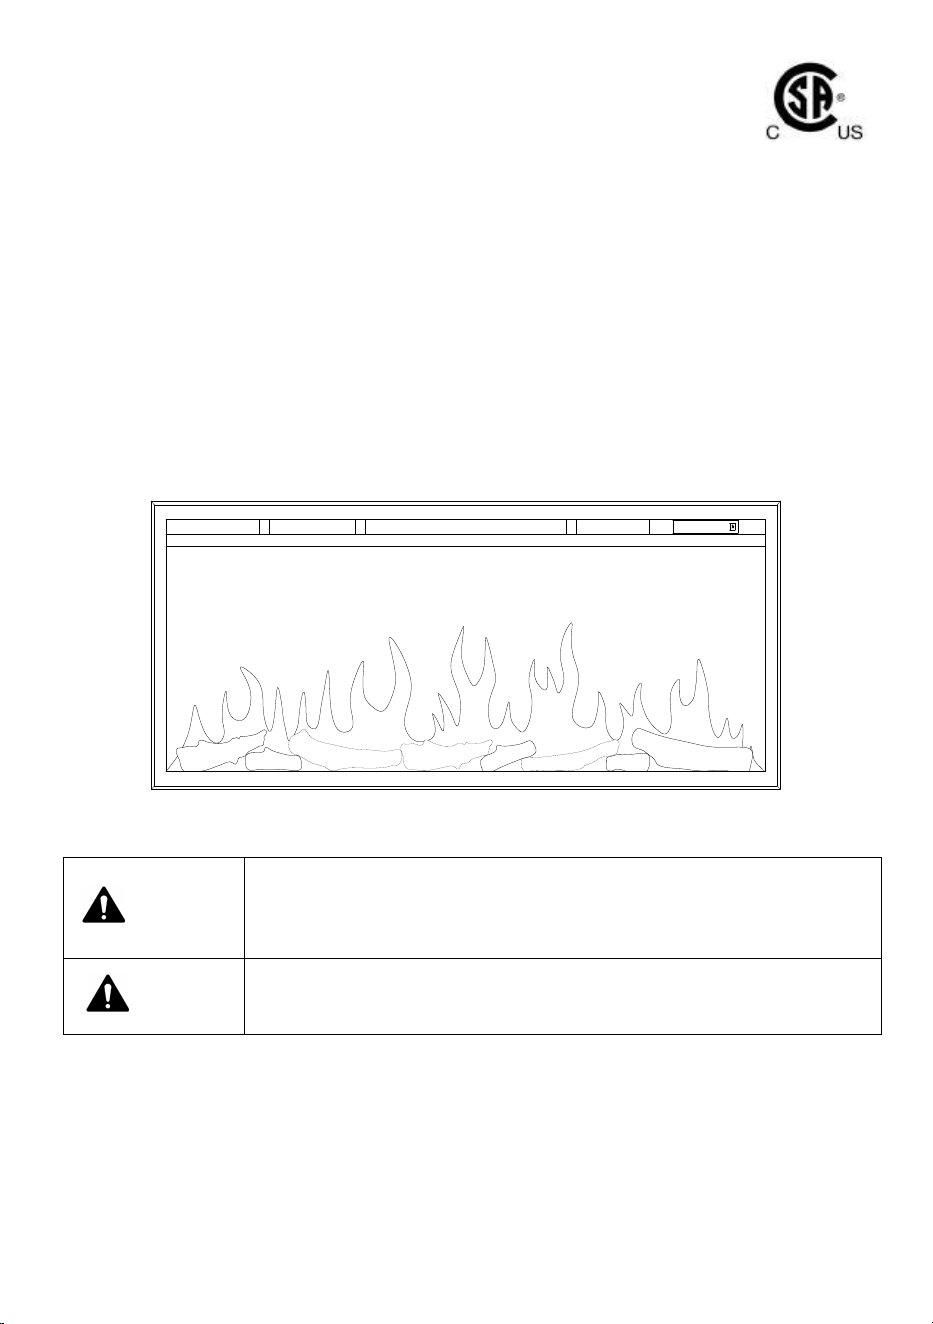
In Wall Recessed and Wall Mounted Electric
Fireplace
EF286A-289A
OWNER’S MANUAL
WARNING
Read and understand this entire owner’s manual, including all safety
information, before plugging in or using this product. Failure to do so
could result in fire, electric shock, or serious personal injury.
CAUTION
Keep this owner’s manual for future reference. If you sell or give this
product away, make sure this manual accompanies this product.
DO NOT RETURN!
Contact our customer service team for help first.
service5@fireandfireplaceservice.com
Call
:
949-385-6588


CONTENT
1. Important Safety Information …………………………………..………...........
1
2. Technical Specifications ………………………….…………………………………...
4
3. Before Installation …………..…………………………….…………....................
5
4. Installation Instruction ………………………...........................................
7
4a. Recessed into the Wall ……………………….....................................
8
4b. Hang on the Wall ………………………..............................................
13
5. Operation Instruction ……………………………………................................
17
5a. Manual Control Panel ……………..………………………….……...............
18
5b. Remote Control ……………………………….........................................
18
6. Care and Maintenance …………………….……….....................................
20
7. Limited Warranty …………………...……………………................................
21
8. Troubleshooting Guide ....................................................................
22
9. Schematic Diagram …………………………………......................................
25

1
1. IMPORTANT SAFETY INFORMATION
WARNING
Read all instructions before using this appliance.
Use this appliance only as described in this manual. Any other use
not recommended by the manufacturer may cause fire, electric
shock, or injury to persons.
DO NOT use outdoors.
NEVER use this appliance in bathrooms, laundry rooms, or any other
location where the appliance could fall into a bathtub or pool,
become damp, or come in contact with water.
For residential use only. NOT for commercial use! Any commercial or
public use of this appliance voids all warranties, and could cause
injury.
This product is not intended to be a primary heat source. It is for
supplemental heat only.
DO NOT locate the appliance immediately below a fixed socket outlet.
This appliance must be grounded.
DO NOT operate any appliance with a damaged cord or plug or after
the appliance malfunctions, has been dropped or damaged in any
manner. Discard appliance, or return to authorized service facility for
examination and/or repair.
This appliance is hot when in use. To avoid burns, DO NOT let bare
skin touch hot surfaces. Keep combustible materials, such as furniture,
pillows, bedding, papers, clothes, and curtains at least 3 feet (0.9m)
from the front of the appliance.
Extreme caution is necessary when any appliance is used by or near
children or invalids and whenever the appliance is left operating and
unattended.
DO NOT insert or allow foreign objects to enter any ventilation or
exhaust opening, as this may cause electric shock or fire, or damage
the appliance.

2
To prevent a possible fire, DO NOT block air intakes or exhaust in any
manner. Doing so could cause a fire. DO NOT use on soft surfaces, like
a bed, where openings may become blocked.
As the appliance has hot and arcing or sparking parts inside. DO NOT
use it in areas where gasoline, paint, or flammable liquids are used or
stored.
AVOID FIRE! Regularly inspect all air vents to make sure they are free
from dust, lint, or other blockage. Unplug the unit and clean with a
vacuum ONLY. DO NOT rinse or get wet.
DO NOT USE this appliance with any solid state speed control devices.
Risk of electric shock! DO NOT OPEN! No user-serviceable parts inside!
NEVER modify this appliance. Doing so could result in personal injury
or property damage. Modification of this fireplace completely voids
all warranties.
NEVER leave this appliance unattended. To disconnect appliance,
ALWAYS turn controls to “OFF” then remove plug from outlet or turn
off circuit when not in use.
ALWAYS turn this appliance off before unplugging it from the outlet.
To prevent a possible fire, do not burn wood or other materials in
this appliance.
ALWAYS disconnect this unit from the power supply before
performing any assembly or cleaning, or before relocating the electric
fireplace.
Always use properly grounded, fused and polarized outlets.
Always use ground fault protection where required by electrical code.
Avoid use of an extension cord because an extension cord may
overheat and cause a fire. However if you have to use an extension
cord, the cord should be No.14 AWG minimum size and rated to not
less than 1875watts.
NEVER plug this appliance into an outlet that is old, cracked, or has
any loose wires or connections. Plugging this appliance into a faulty
outlet could result in electric arcing within the outlet that could cause
the outlet to overheat or catch fire.
3
DO NOT run power cord under carpeting. DO NOT cover power cord
with throw rugs, runners, or similar coverings. DO NOT route power
cord under furniture or appliances. Arrange power cord away from
traffic area, and where it will not be tripped over.
ALWAYS check your appliance cord and plug connections with each
use!
A. MAKE SURE the plug fits tight in the outlet! Faulty wall outlet
connections or loose plugs can cause the outlet to overheat.
B. Appliances draw more current than small appliances. Overheating
may occur even if it has not occurred with the use of other
appliances.
C. During use check frequently to see if the plug outlet is HOT! If the
outlet or faceplate is HOT, discontinue use immediately and have
a qualified electrician inspect and/or replace the faulty outlets.
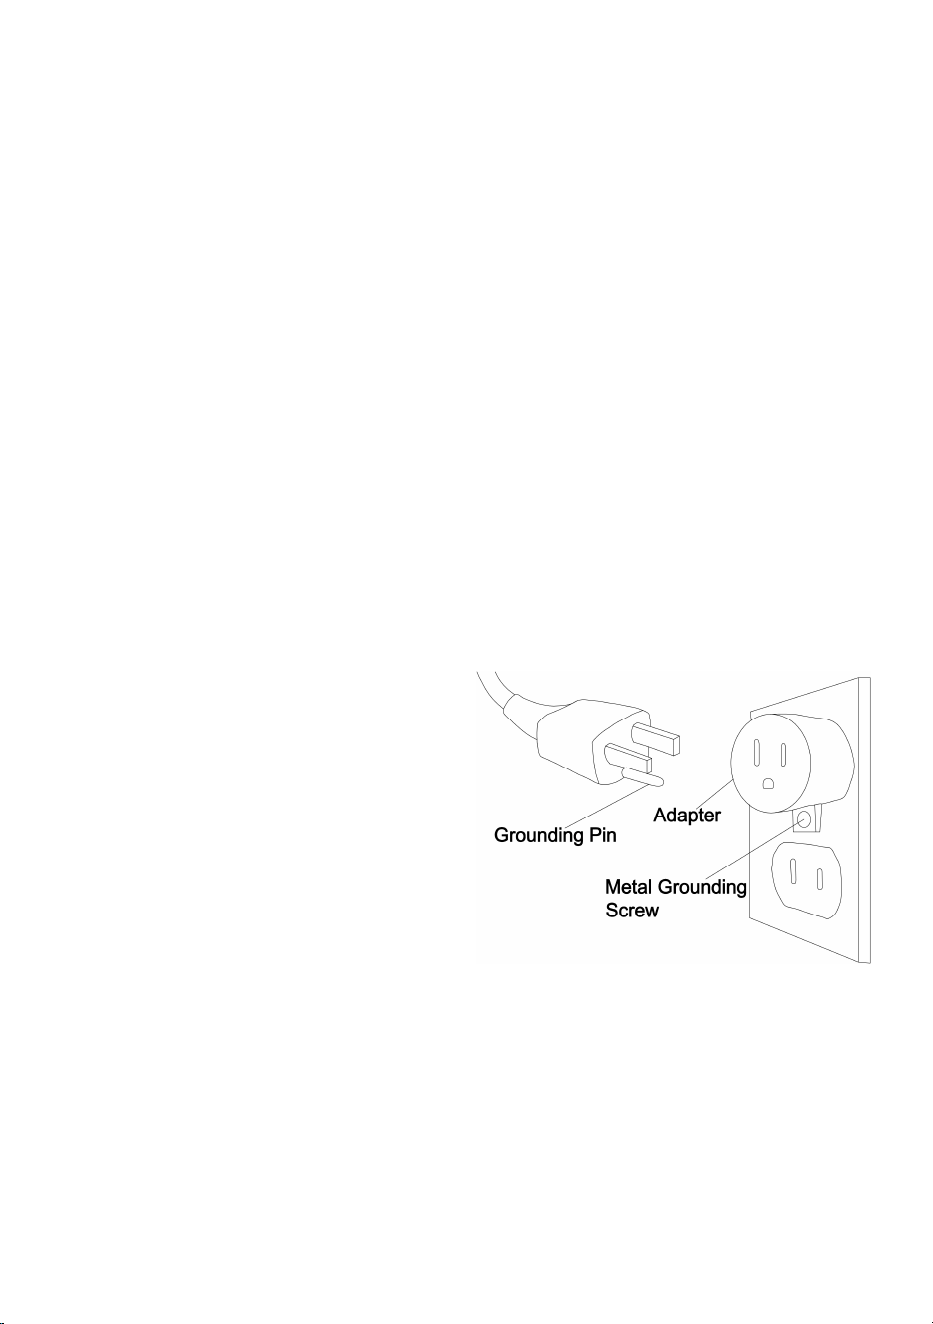
This heater has a three-blade grounding type plug as show in below
picture. If there is a two-slot receptacles only, an adapter should be used
for connecting three-blade
grounding type plugs. The
grounding lug extending from the
adapter must be connected to a
permanent ground such as a
properly grounded outlet box by a
metal screw. The adapter should
not be used if a three-slot grounded
receptacle is available.
SAVE THESE INSTRUCTIONS!
4
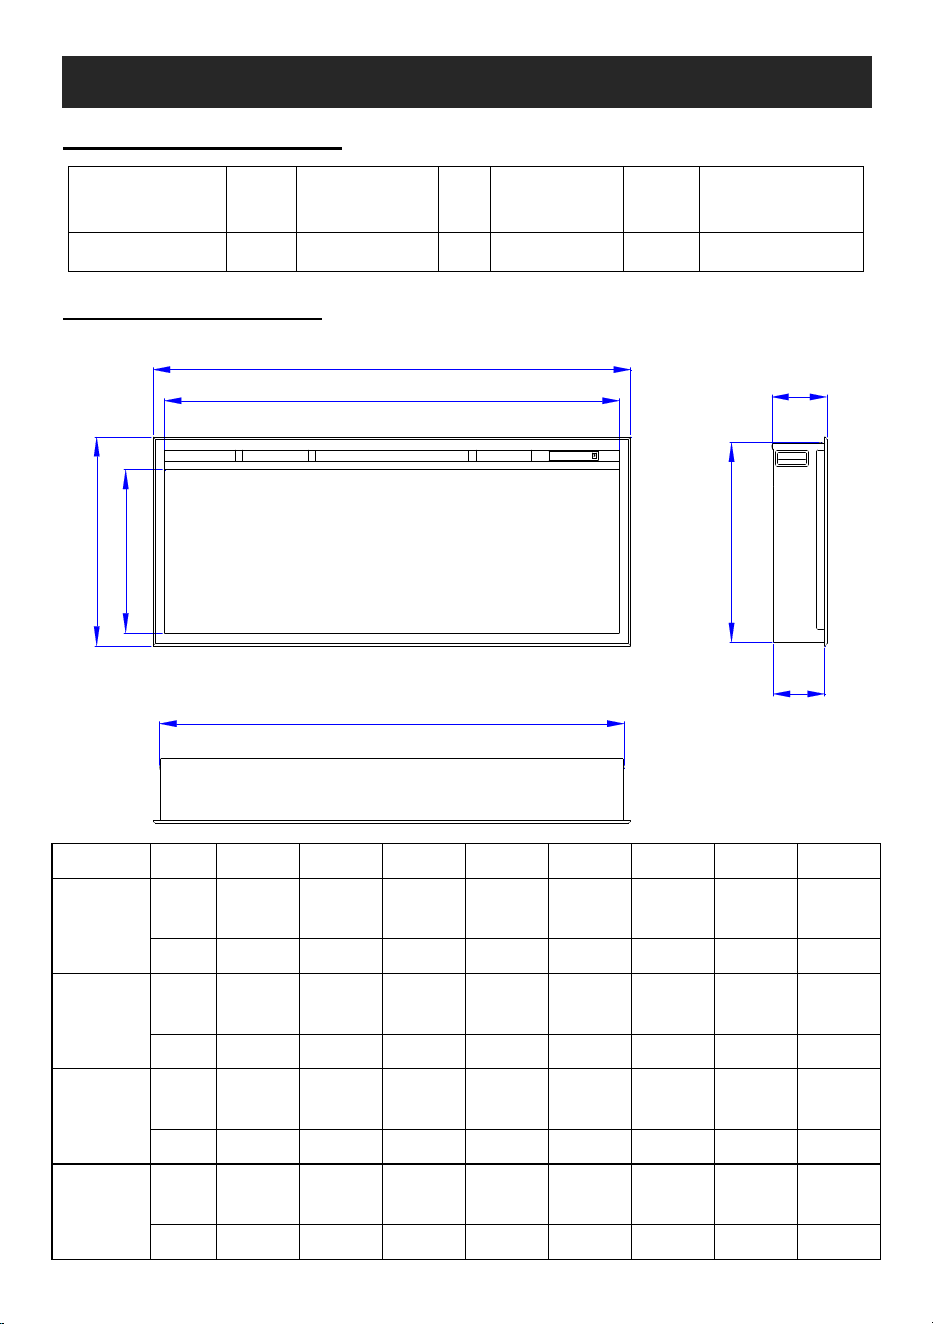
2. TECHNICAL SPECIFICATIONS
Electric Specifications
Model Volt
Watt
(min/max)
Hz
BTU(max)
Amp
Heating
Area(max)
EF286-289A
120
750/1500
60
5100 12.5
400 sq. ft.
Product Dimensions
A
C
E
F
H
D
B
G
Model
unit
A B C D E F G H
EF286A
Inch
40
37
5/8
18
29/32
14
3/4
5
25/32
18
7/64
5
19/32
38
37/64
mm
1016
956 480 375 147 460 142
980
EF287A
Inch
50
47
5/8
18
29/32
14
3/4
5
25/32
18
7/64
5
19/32
48
37/64
mm
1270
1210
480 375 147 460 142
1234
EF288A
Inch
60
57
5/8
18
29/32
14
3/4
5
25/32
18
7/64
5
19/32
58
37/64
mm
1524
1464
480 375 147 460 142
1488
EF289A
Inch
72
69
5/8
18
29/32
14
3/4
5
25/32
18
7/64
5
19/32
70
37/64
mm
1830
1770
480 375 147 460 142
1793
5
3. BEFORE INSTALLATION
Note:
Keep the packaging (carton, rapping bag, etc.) for future
transportation and/or storage.
If there is any problem or question, please contact the service team.
If the unit needs to be returned, please make sure all the spare parts
are packed inside, and packing as the same as the original packing.
Check Spare Parts
Open the packaging carefully and remove the polystyrene.
Check all the spare parts are fully received.
Carefully check if any damages that may have for the spare parts.
NOTE: Contact service team for help if there is any part missing or
385-6588.
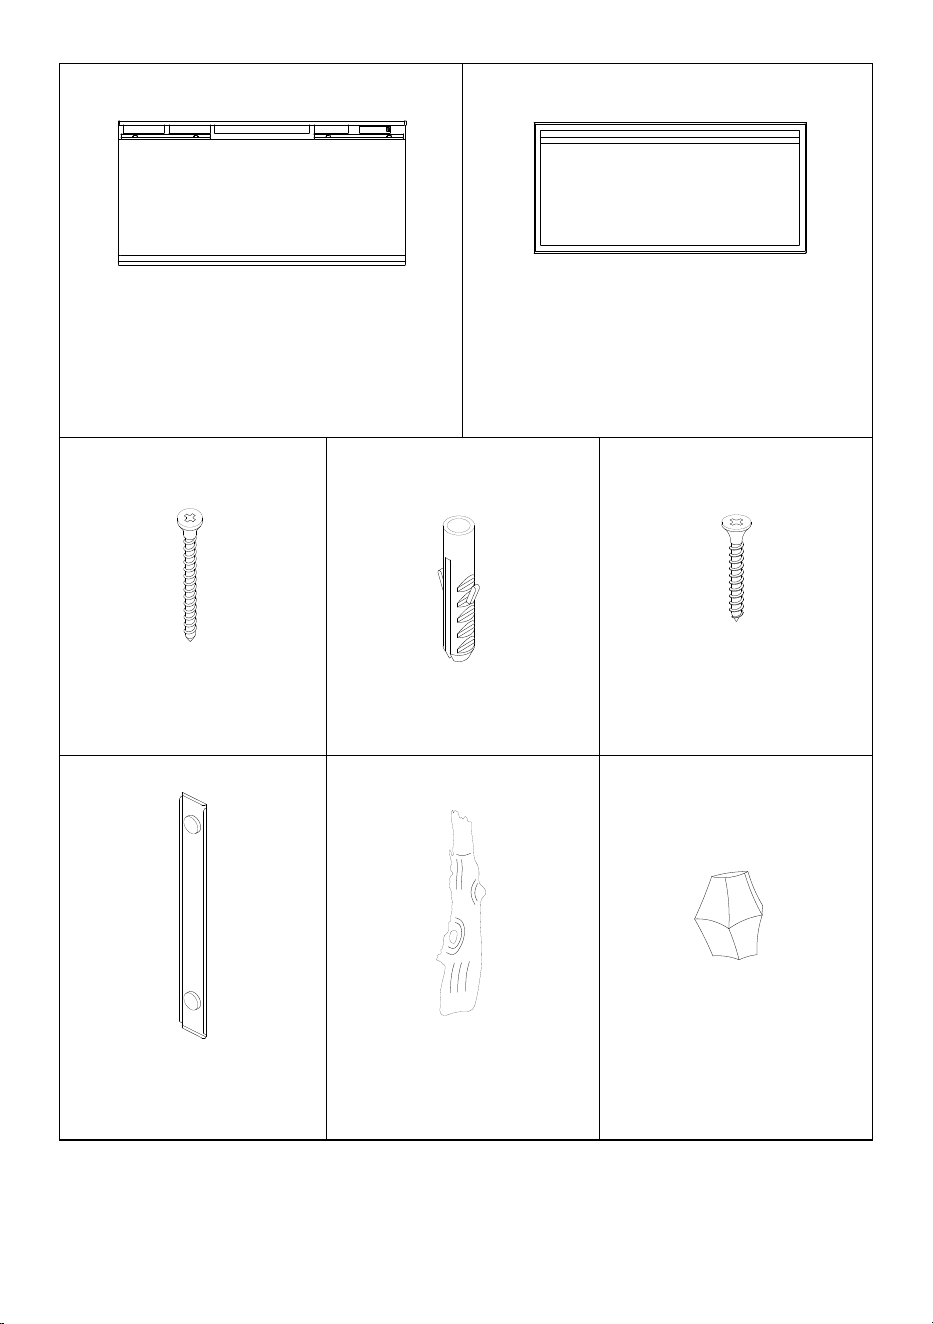
Spare Part (C,D,E,F,L,M,N)
Trim
Firebox
Spare Part (G)
Spare Part (H,I,J,K)
6
A.
B.
Firebox (1 pc)
NOTE: The wall mount bracket is
attached to the back of the firebox
by 4 screws.
Trim (1 pc)
C.
D.
E.
ST5x40 Wood Screw
(5 pcs)
Φ8x40 Plastic Wall
Plug (5 pcs)
ST4*40 Screw (4 pcs)
F.
G.
H.
Side screen panel
with magnets (2 pcs)
Logs (1 set) Large Crystals (1 set)
7
I.
J.
K.
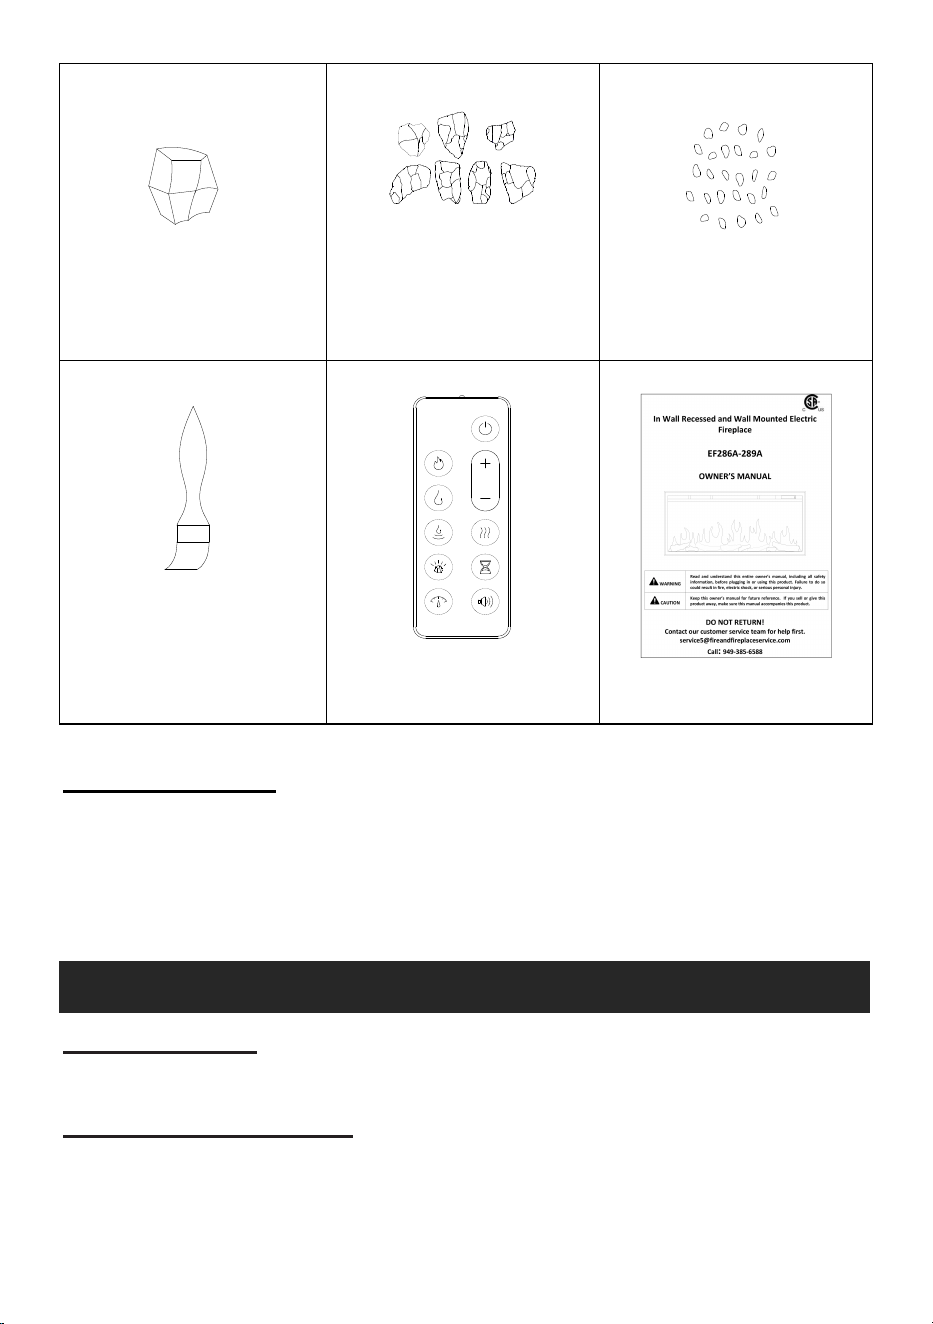
Small Crystals (1 set)
Black Glass Chips
(1 set)
Small pumice stone
(1 set)
L.
M.
POWE R
FLAM ES
PRA MERY F LAME
SEC ONDARY FLAME HEA TER
EMB ER BED TIMER
SPEE D CRA CKLING
N.
Small brush (1 pc)
Remote Handset
(1 pc)
Owner’s Manual (1 pc)
Function Testing
Please refer to section 5a. Manual Control Panel and 5b. Remote Control
to test the appliance first before installation. Should any defects found,
please contact service team for help. E-mail
[email protected] or call 949-385-6588.
4. INSTALLATION INSTRUCTIONS
Tools Required
A Phillips screwdriver, a drill and a hammer
Locating the appliance
Your new electric fireplace may be installed virtually anywhere in your
home. However, when choosing a location, ensure that the general
instructions for safety are followed.
8
For best results, install out of direct sunlight, water or very damp air.
Power supply service must be installed within proximity of electric
fireplace prior to finishing avoiding reconstruction.
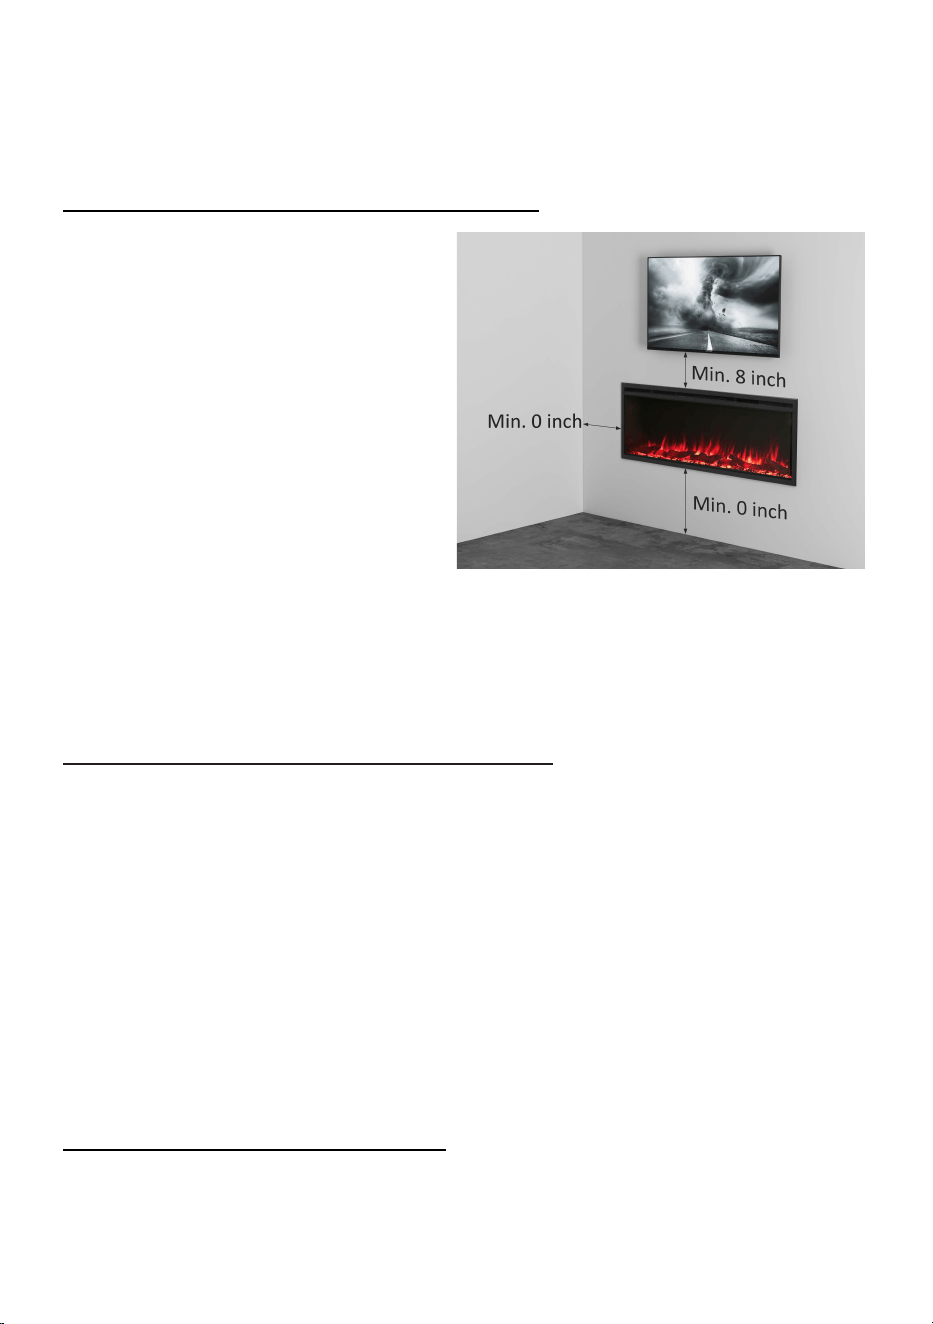
Minimum Cle
arance to Combustibles
Sides............................0 inch
Floor............................0 inch
Back.............................0 inch
Top (shelf or TV)..........8 inch min
Front...........................36 inch
WARNING! Risk of Fire! Keep electrical cords, drapery, furnishings or
other combustibles at least 3ft. (0.9 m) from the front of the electric
fireplace.
Electrical Sup
ply Circuit Requirements
Plan the location of the appliance so that it will have adequate electric
power. A 15AMP, 120V/60Hz circuit is required. Additional appliances on
the same circuit as this appliance may exceed the current rating of that
circuit. A dedicated circuit is not required, but is preferred to prevent
circuit breaker or fuse failure.
Prepare the outlet close to the right side of appliance. Make sure the
outlet is in good condition and the plug must be plugged tightly in the
outlet.
For hard wiring, please refer to page 17.
4a. Recessed
into the wall
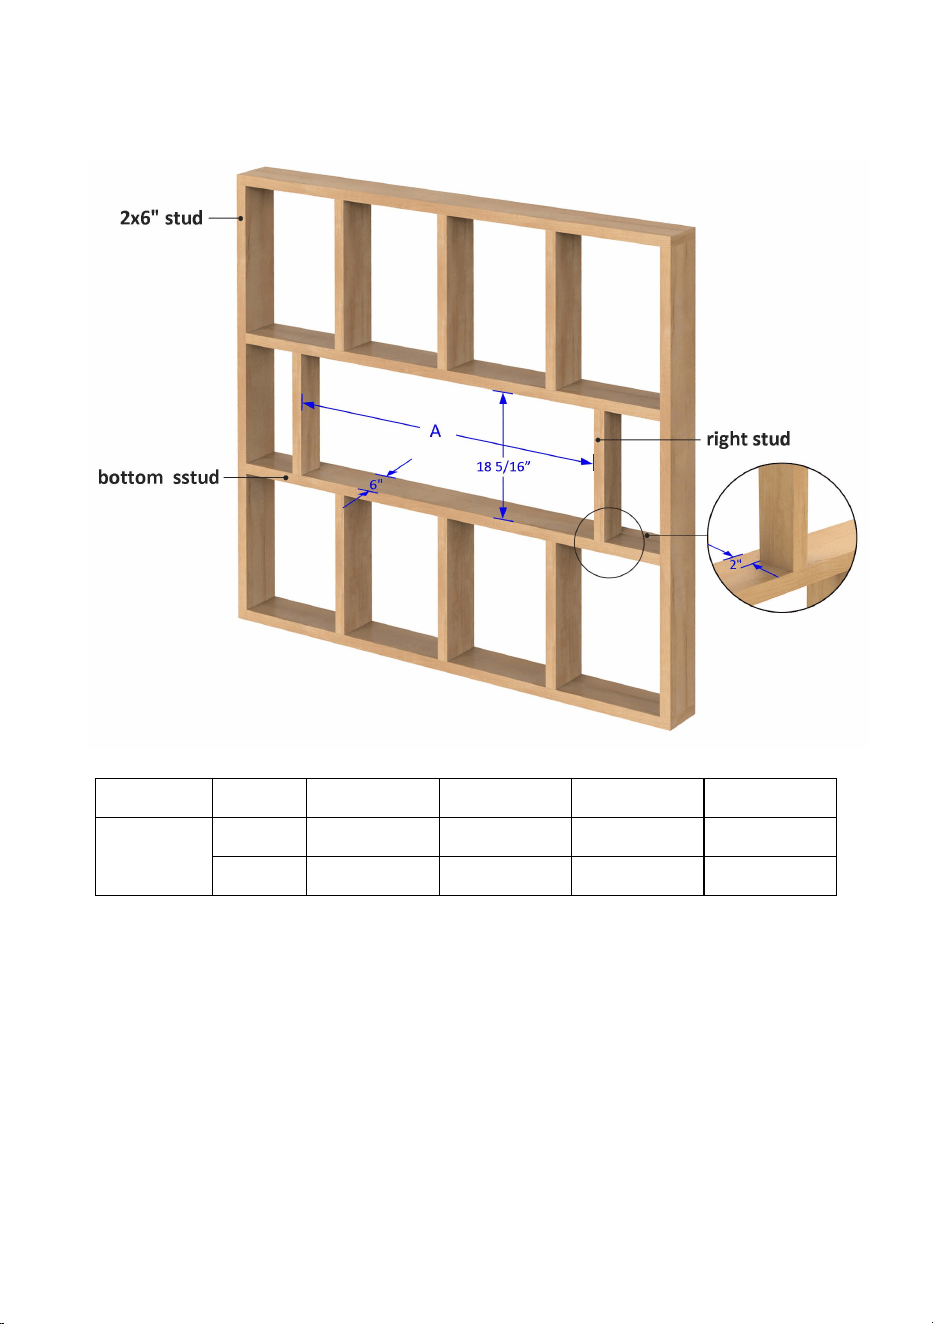
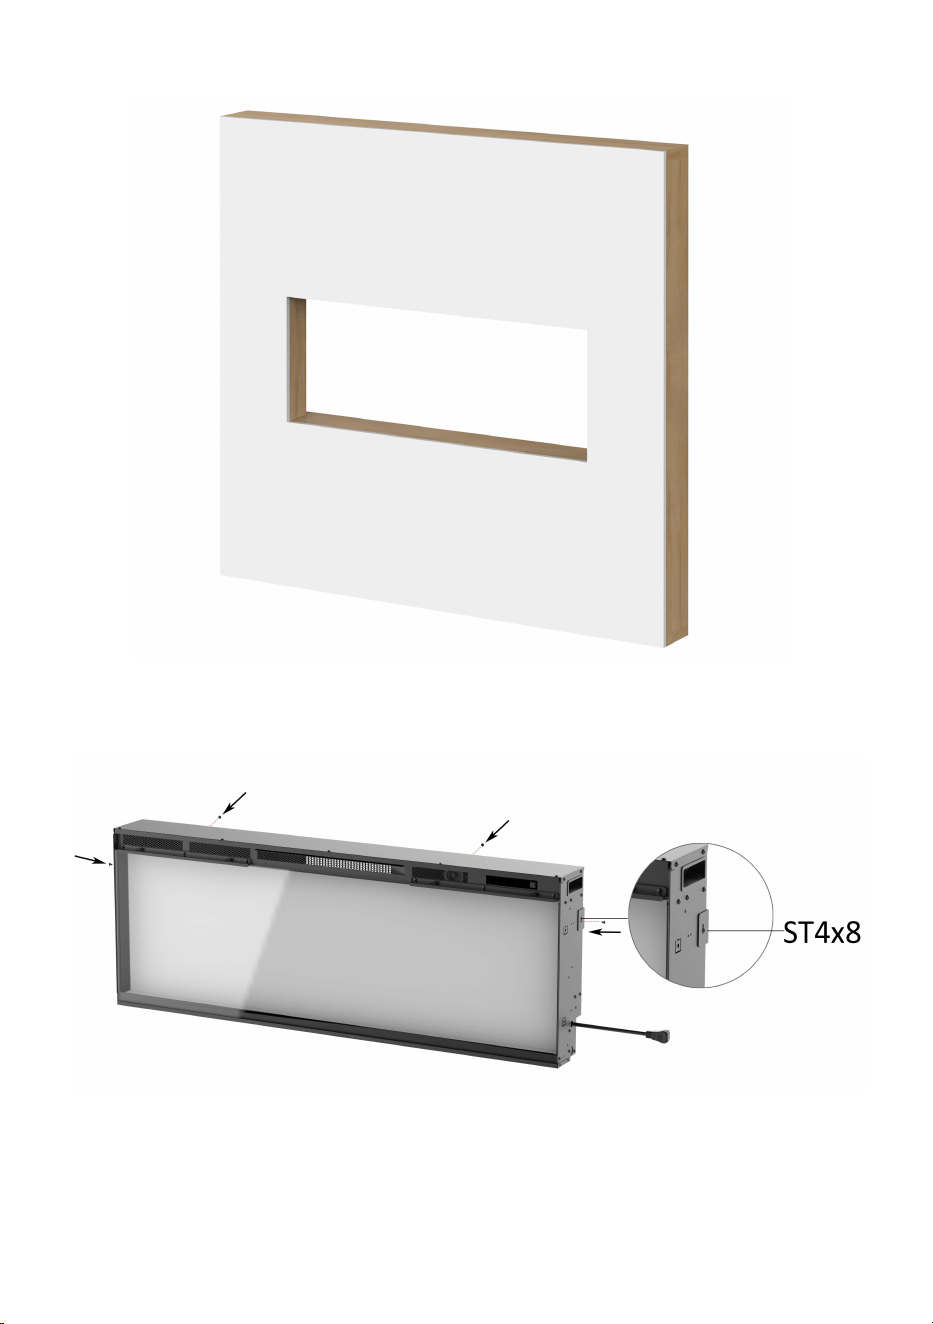
4a.1. Build the framing by 2x6” stud, below picture of 50” as an example.
Dimensions for all sizes are listed below. The appliance will be
9
supported by the bottom framing, make sure the bottom framing it
solid and level. Leave some gap behind the right stud for electrical
supply.
Model unit EF286A EF287A EF288A EF289A
A
Inch 38 13/16
48 13/16
58 13/16
70 55/64
mm 986 1240 1494 1800
4a.2. Prepare electrical supply.
4a.3. Fix the plasterboard to edge of the framed opening. Paint it or cover
it with wall paper to finish the wall. BUT ledger stone is NOT suitable.
10
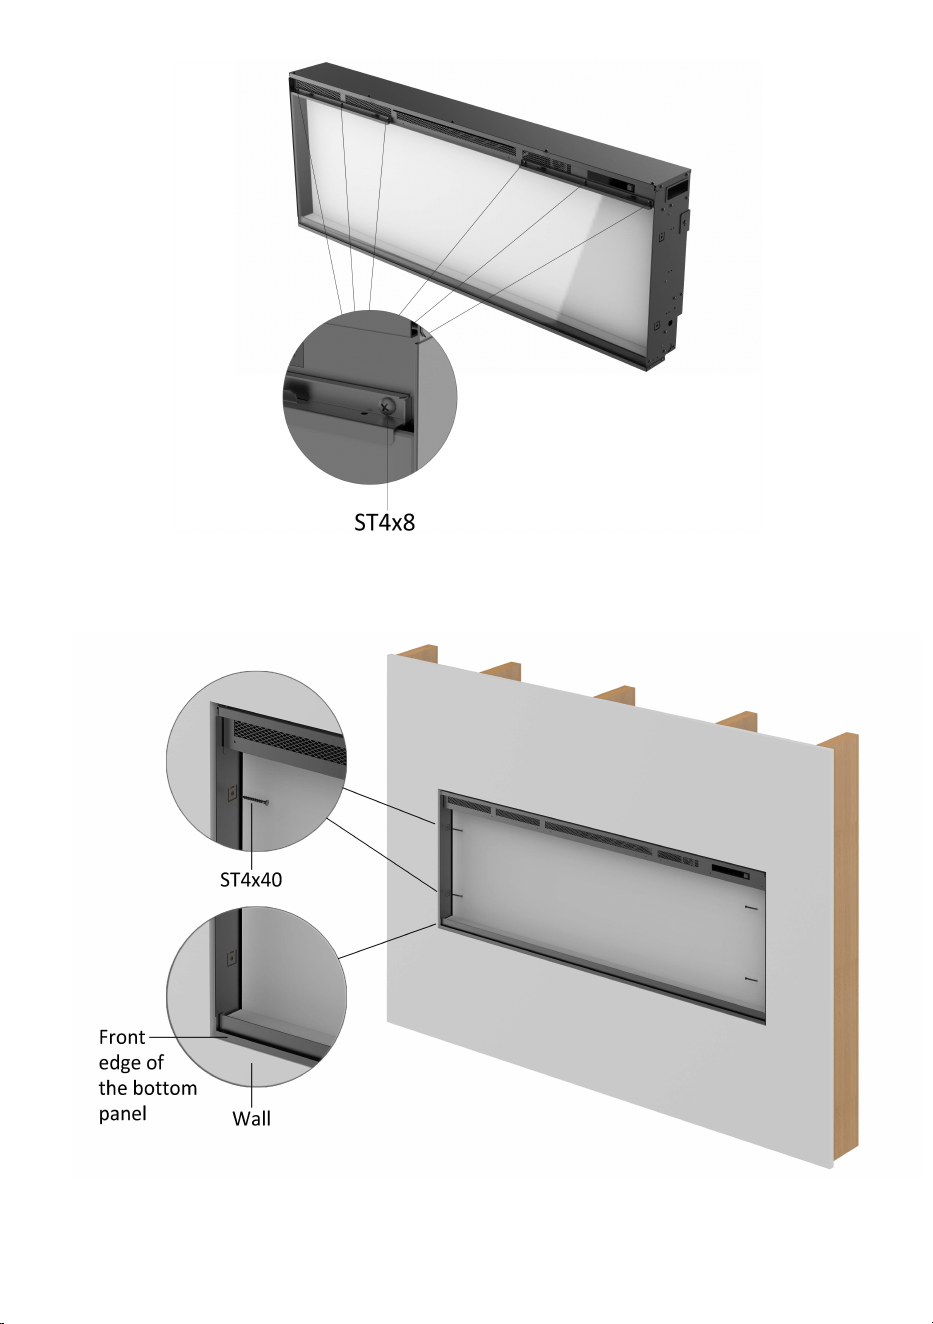
4a.4. Unscrew at two sides and rear panel. Remove the wall mount
bracket from the firebox.
4a.5. Unscrew the glass fixing brackets and take the brackets and the glass
out.
11
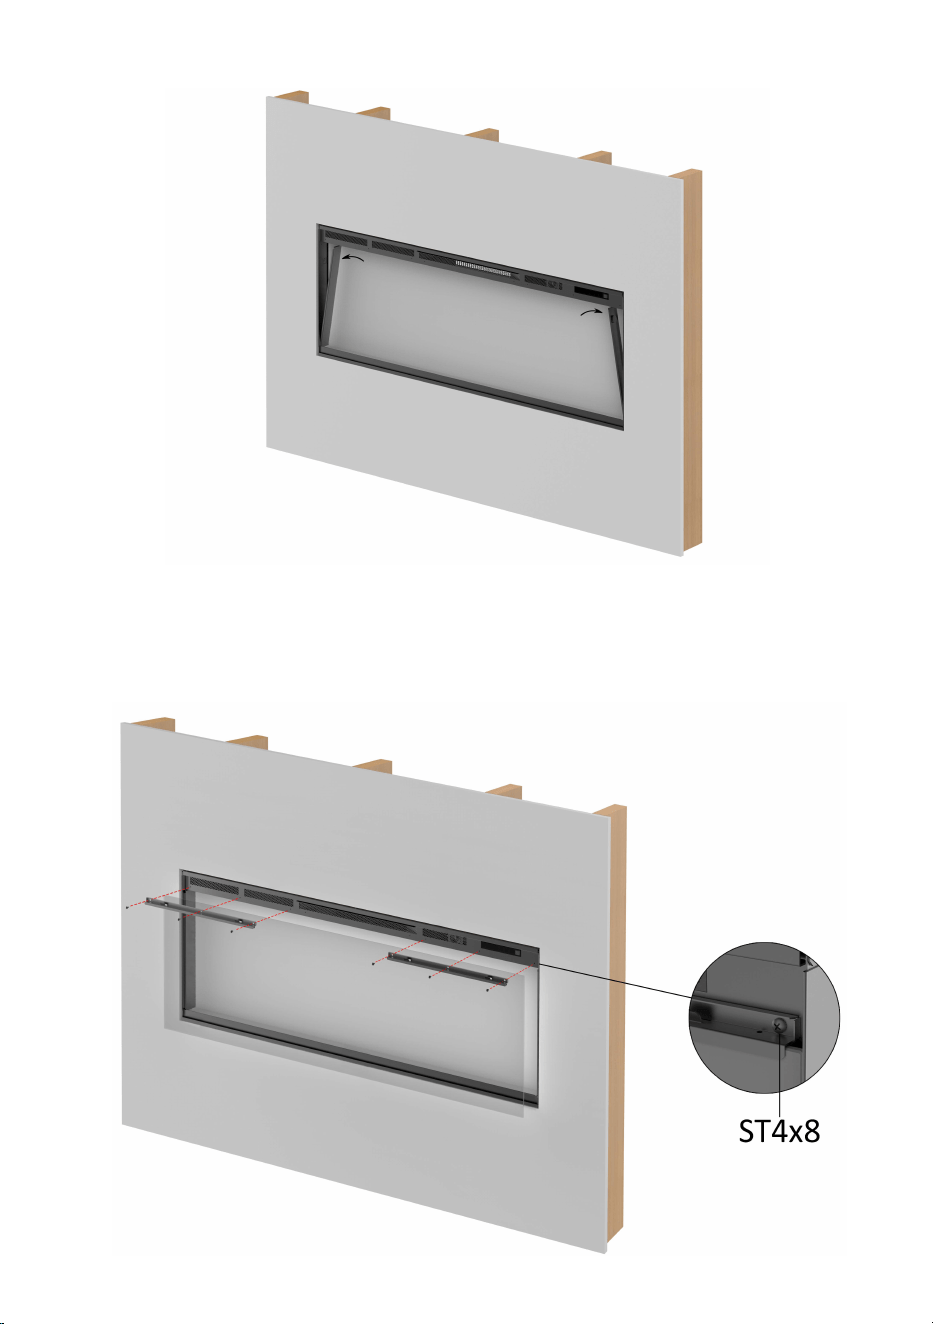
4a.6. Insert the firebox into the opening gently, make sure the front
surface of the bottom is at the same level of the surface of the
finishing wall. Use 4pcs ST4x8 screws to fix the firebox on the stud.
4a.7. Attach the side panel on both sides.
12
4a.8. Set the fuel bed. Reference to Section Fuel Bed Setting.
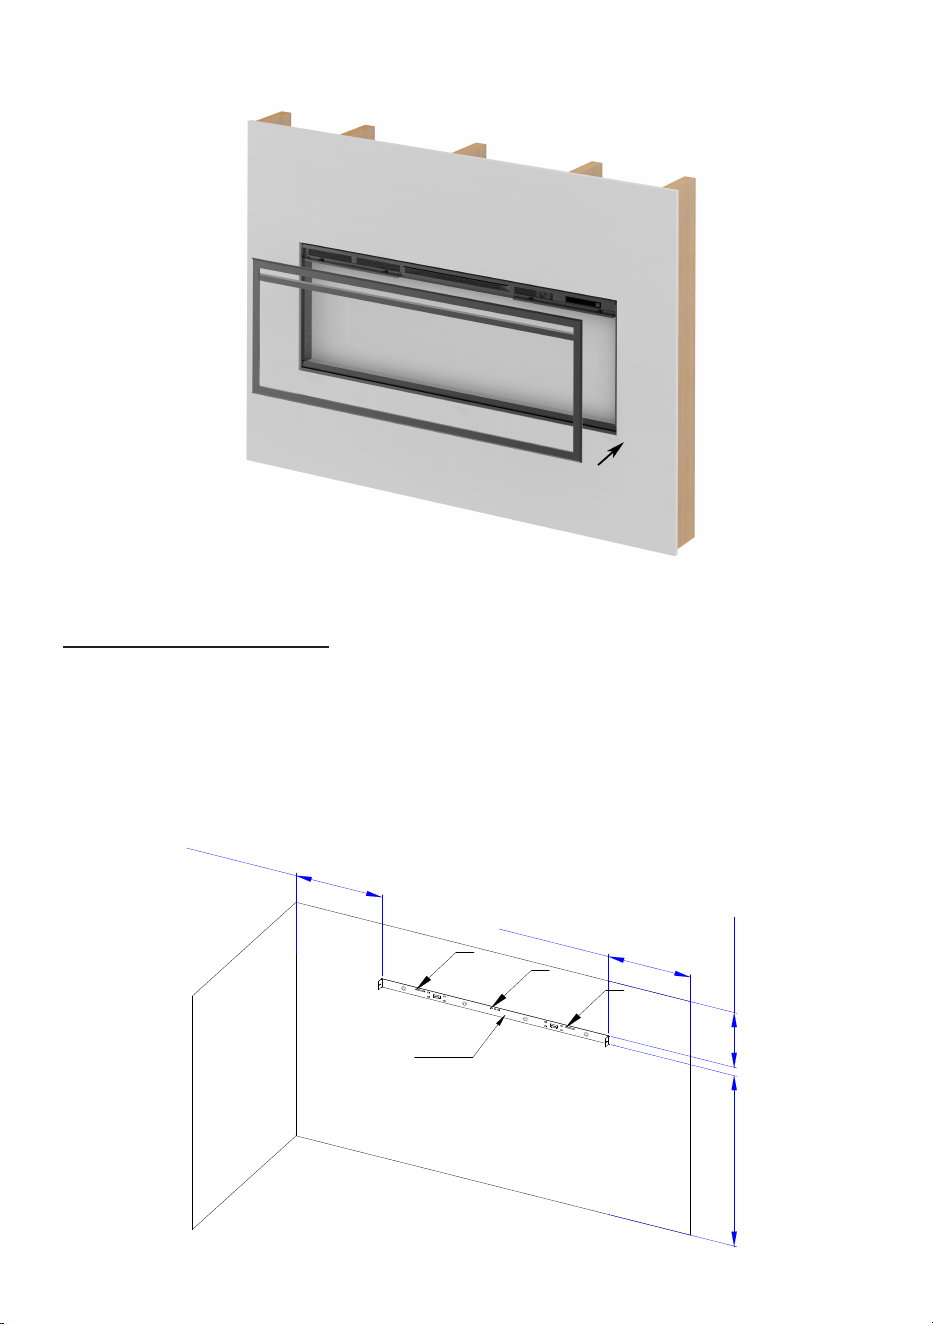
4a.9. Install the glass back and fix the glass fixing brackets. If there are
some pumice stone fallen into the groove for the glass, use the
small brush to clean them out first.
13
4a.10. Attach the trim on firebox.
4a.11. Fully assembled.
4b. Hang
on the wall
4b.1. Unscrew at two sides and rear panel. Remove the wall mount
bracket from the firebox like 4a.4.
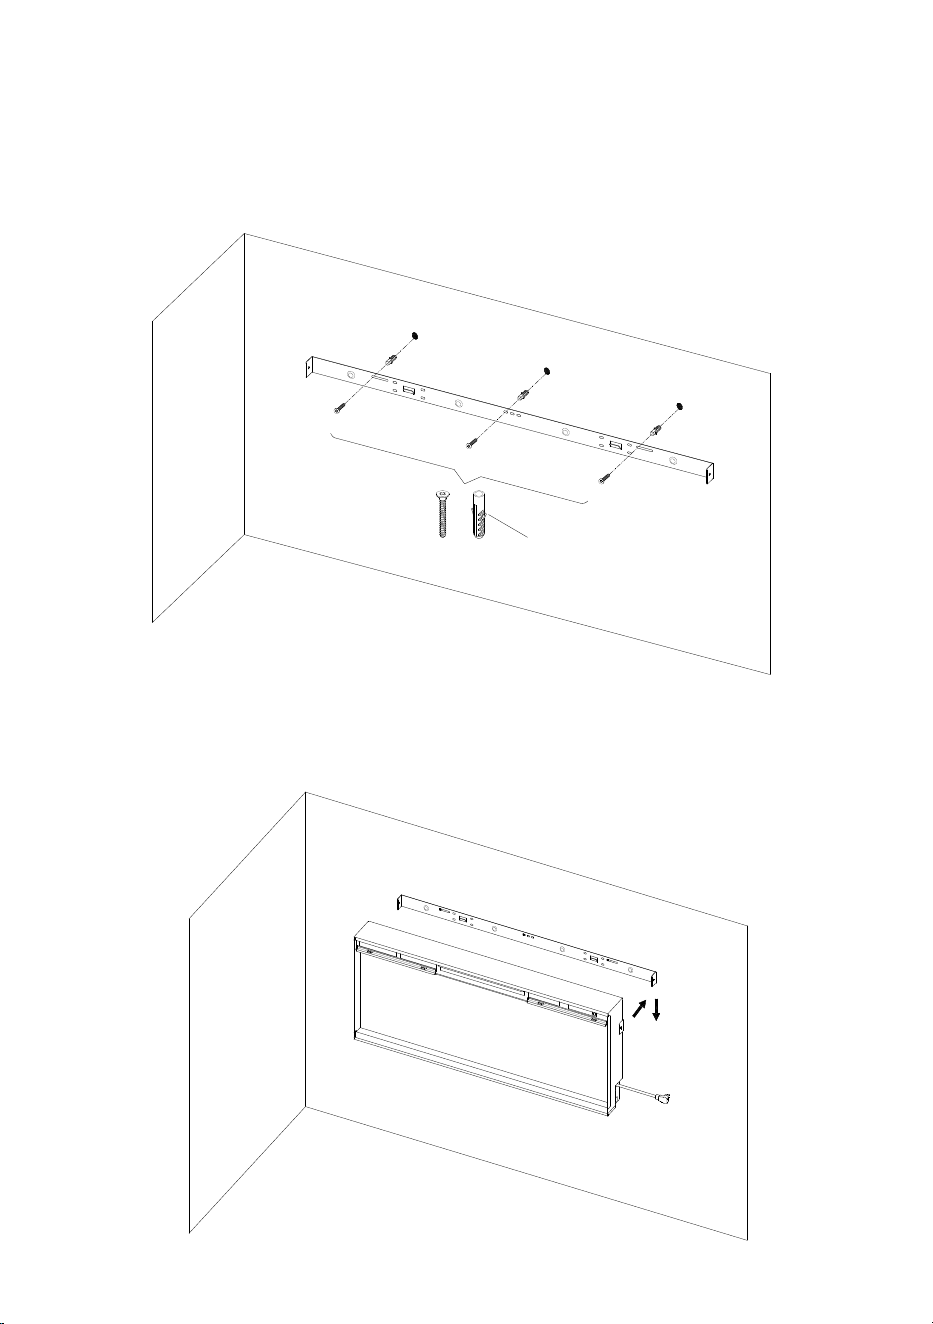
4b.2. Choose a wall, put the bracket on the position where you want to
install the fireplace and mark the positions need to be drilled on the
wall.
Wa
ll
Fl
oor
Ce
iling
m
i
n
1
0
i
n
c
h
m
i
n
1
0
i
n
c
h
mi
n 13 inch
min 6 inch
Br
acket
1
2
3
14
4b.3. Take away the bracket and drill 3pcs 40mm deep, Φ8 holes on the
wall. Tap the plastic wall plugs into the holes. Secure the bracket by
3pcs ST5X40 screws.
If the wall is solid wood, it is no need to drill the holes on the wood
and use plastic wall plugs.
Wall
Floor
Ceiling
for concrete wall only
4b.4. Fit the slots in the back of firebox over the hooks on the bracket,
and carefully hang the firebox on the bracket. Then secure the
screws on both sides.
Wall
Floor
Ceiling

15
4b.5. Unscrew the glass fixing brackets and take the brackets and the glass
out as step 4a.5.
4b.6. Same installation steps as 4a.6 to 4a.10.
Electrical Connection
WARNING: Do not attempt to wire your own new outlets or circuits. To
reduce the risk of fire, electric shock or injury to persons, the hard wiring
must be supplied with a qualified electrician.
WARNING: Ensure that the circuit on which the fireplace is to be installed
has the power cut off at the service panel until installation is complete.
The fireplace is packaged with a three prong plug installed for plug-in
convenience. Hard wiring the fireplace is also an option for any
installation.
a Plug in (the power cord is 6ft (1.8m) long and on the right of the
fireplace, you may run the power cord out of the framed wall opening
to an existing outlet or install an outlet on a nearby wall stud within the
wall). If the cord is not long enough to reach the outlet, a grounded
extension cord minimum AWG No. 14 wiring and rated to a minimum
or 1875 watts may be used.
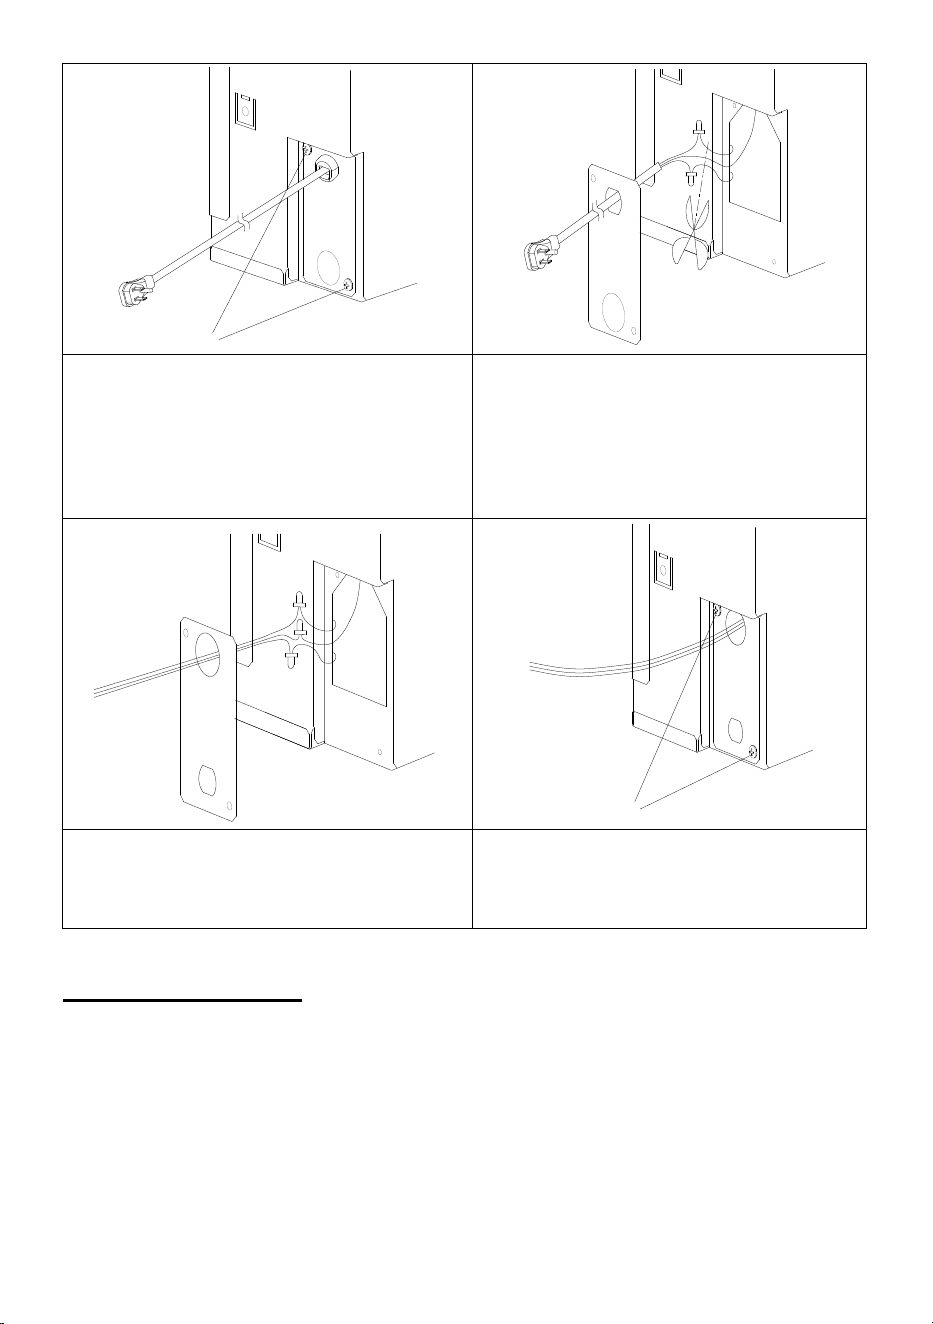
b Hard wire the fireplace. A qualified electrician may remove the cord
connection, and wire the appliance directly to the house hold wiring.
The appliance must be electrically connected and grounded in
accordance with local codes.
16
ST4*8
Remove 2pcs ST4*8 screws to
release the cover of the junction
box and take it out, use a plier to
take the wire clip off and move
away the power cord
Cut the lines at the position
showing in picture above and
save the power cord.
ST4*8
Lead the wires through the hole of
the cover and connect with the
wire from the fireplace by cables.
Fix the cover back by 2 ST4*8
screws.
Fuel Bed Setting
The appliance is supplied with 2 fuel effect options: a. Crystal Effect. b.
Log Effect
a Crystal Effect
a1 Evenly spread the small clear crystals across the fuel bed. It is not
necessary to use all of the effect supplied.
a2 Randomly space the large crystals throughout the fuel bed.
17
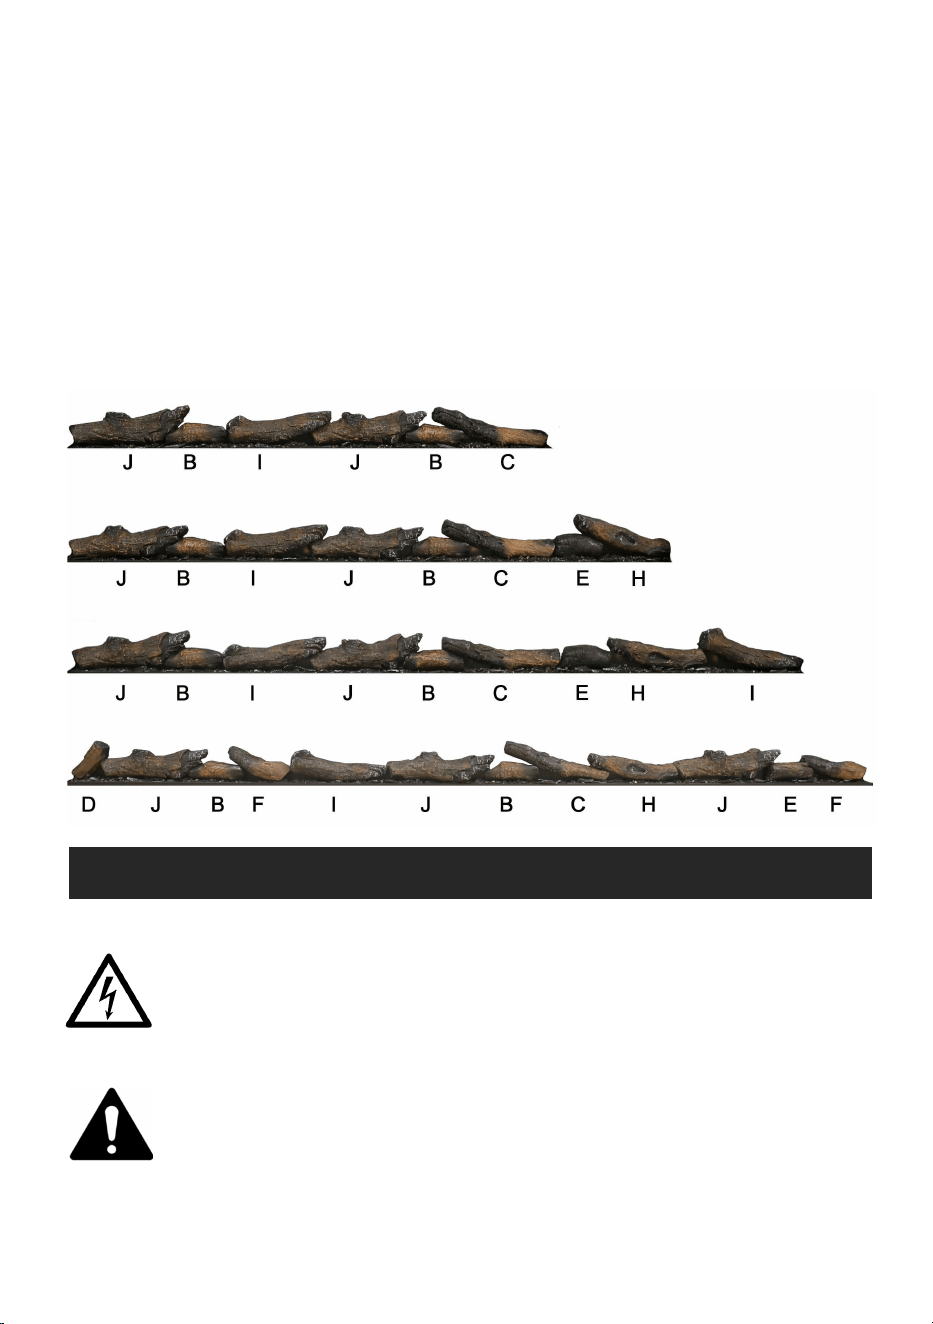
b Log Effect
Logs must be positioned according to the following instructions to give
the correct flame effect. Every log has a number on its back to be
identified.
The log layouts below cover all models. Please refer to Diagram below to
identify the logs for specific models. The logs for the fuel bed are NOT
individually labeled; the numbers are for reference information only.
b1 Fully place the black glass chips on the fuel bed.
b2 Place the logs on the black glass chips as shown below.
b3 Place the small pumice stones at the edge of the fuel bed.
5. OPERATING INS
TRUCTIONS
WARNING! Do not operate the unit if it is damaged or has
malfunctioned. If you suspect the unit is damaged, call a
qualified service technician to inspect and replace any part of
the electrical system if necessary.
Read and understand this entire owner’s manual, including all
safety information, before plugging in or using this product.
Failure to do so could result in electric shock, fire, serious
injury, or death.
18
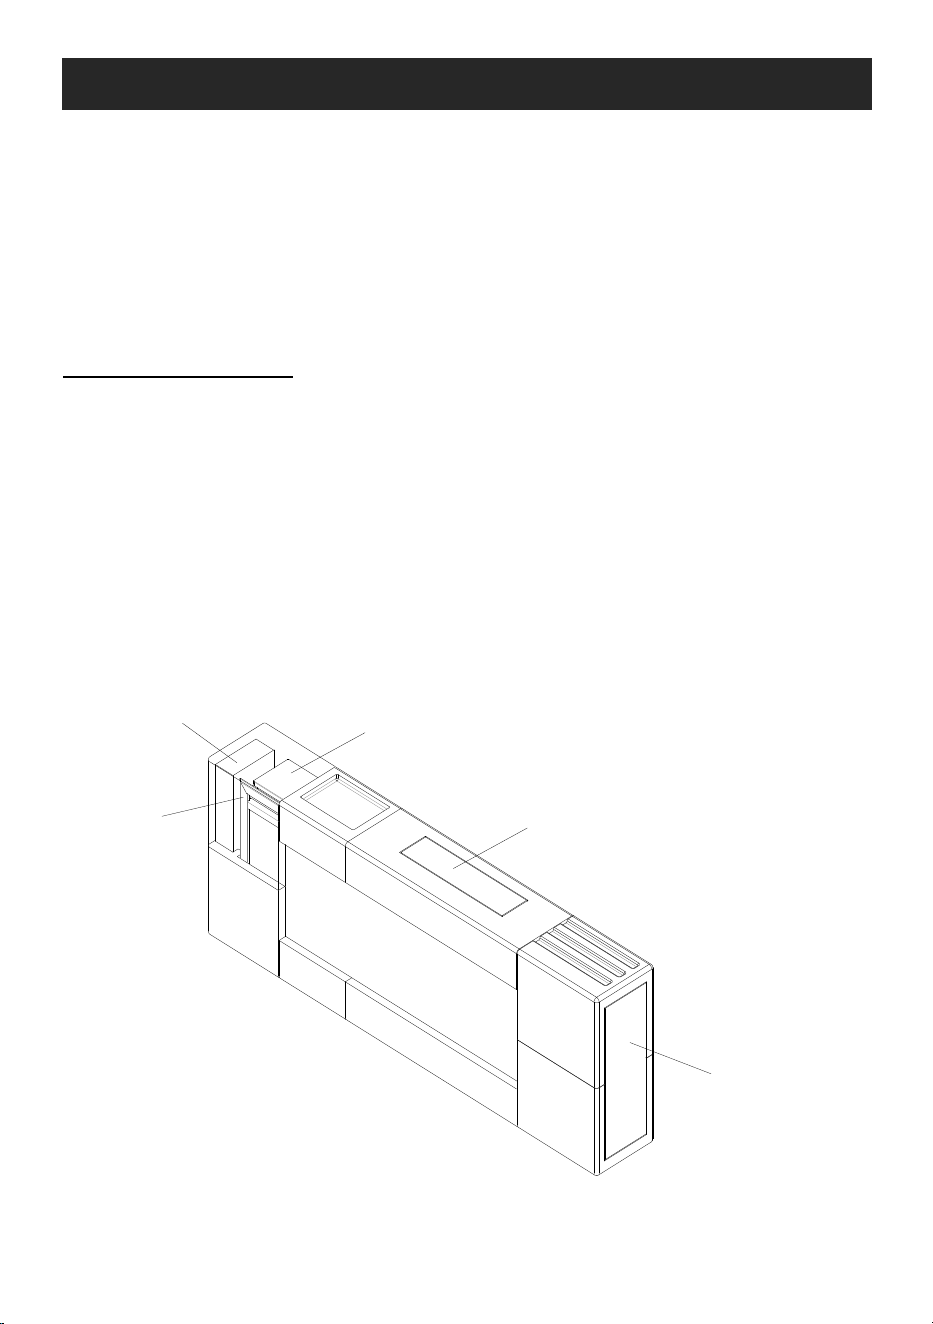
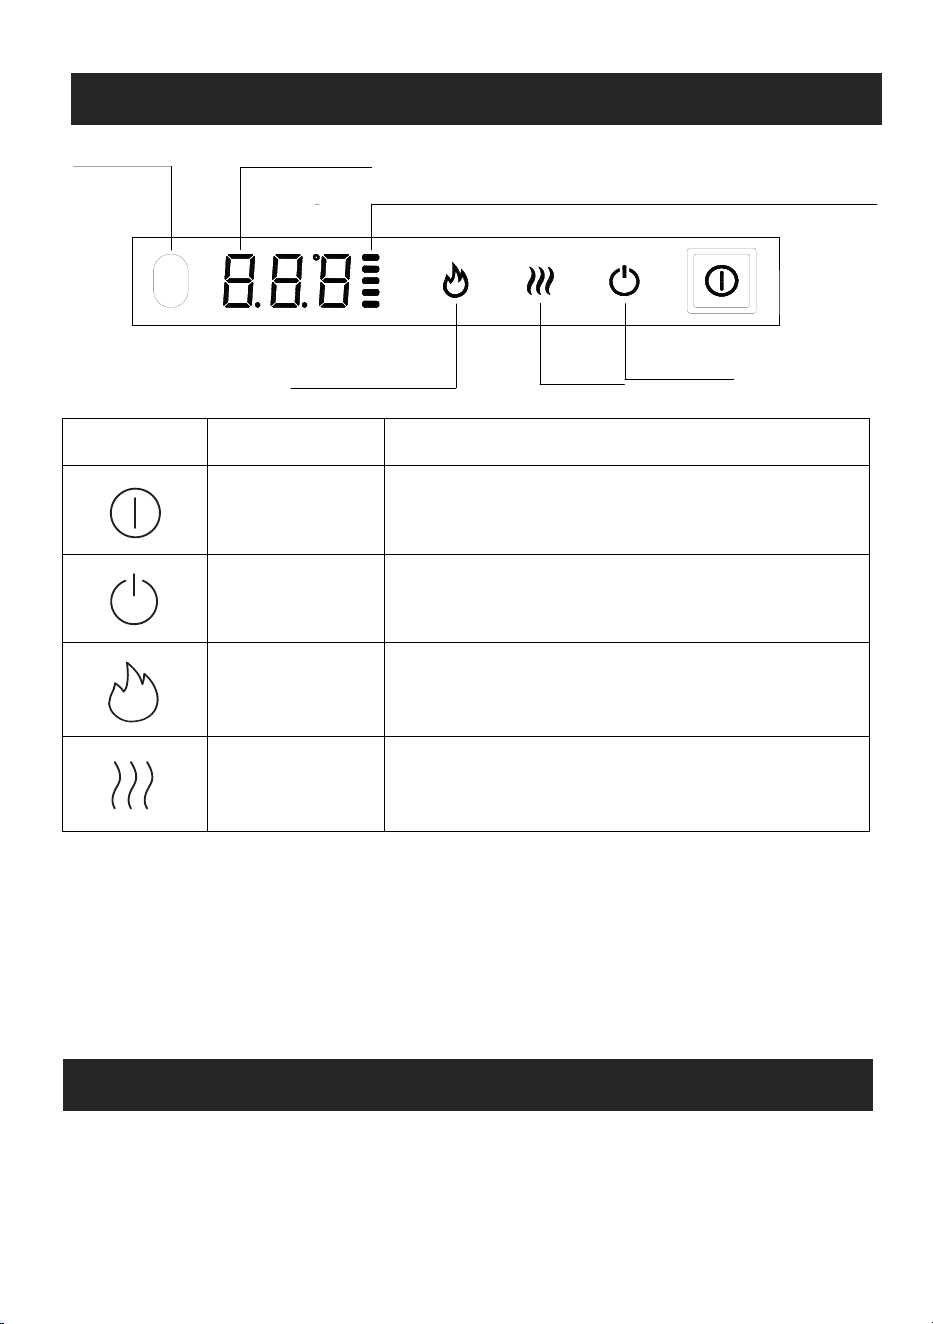
Indicator of Brightness/Volume/Flame Speed
LED Display
Receiver
Default Flame
Heater
Standby
BUTTON NAME FUNCTION
Manual
Switch
Press to power the fireplace on or off.
Standby
Press to turn on the flame, fuel bed, crackling
and heater.
Default Flame
Press to cycle through 9 default flames and
off.
Heater
Press to cycle through Low – High – Off.
Heater will work regardless of the room
temperature.
Note: When the heater is first turned on, a slight odor may be present. This is
normal and should not occur again unless the heater is not used for a long
period of time.
NOTE: Keep pressing the Default Flame button on the control panel for 3
seconds to turn off the “beep” sound.
5b. Remote Control
Note: Remote control can be used only when the main power switch is on.
Aim the remote control at the remote receiver (see last picture) which
is on the top right of the firebox.
5a.
Manual Control Panel
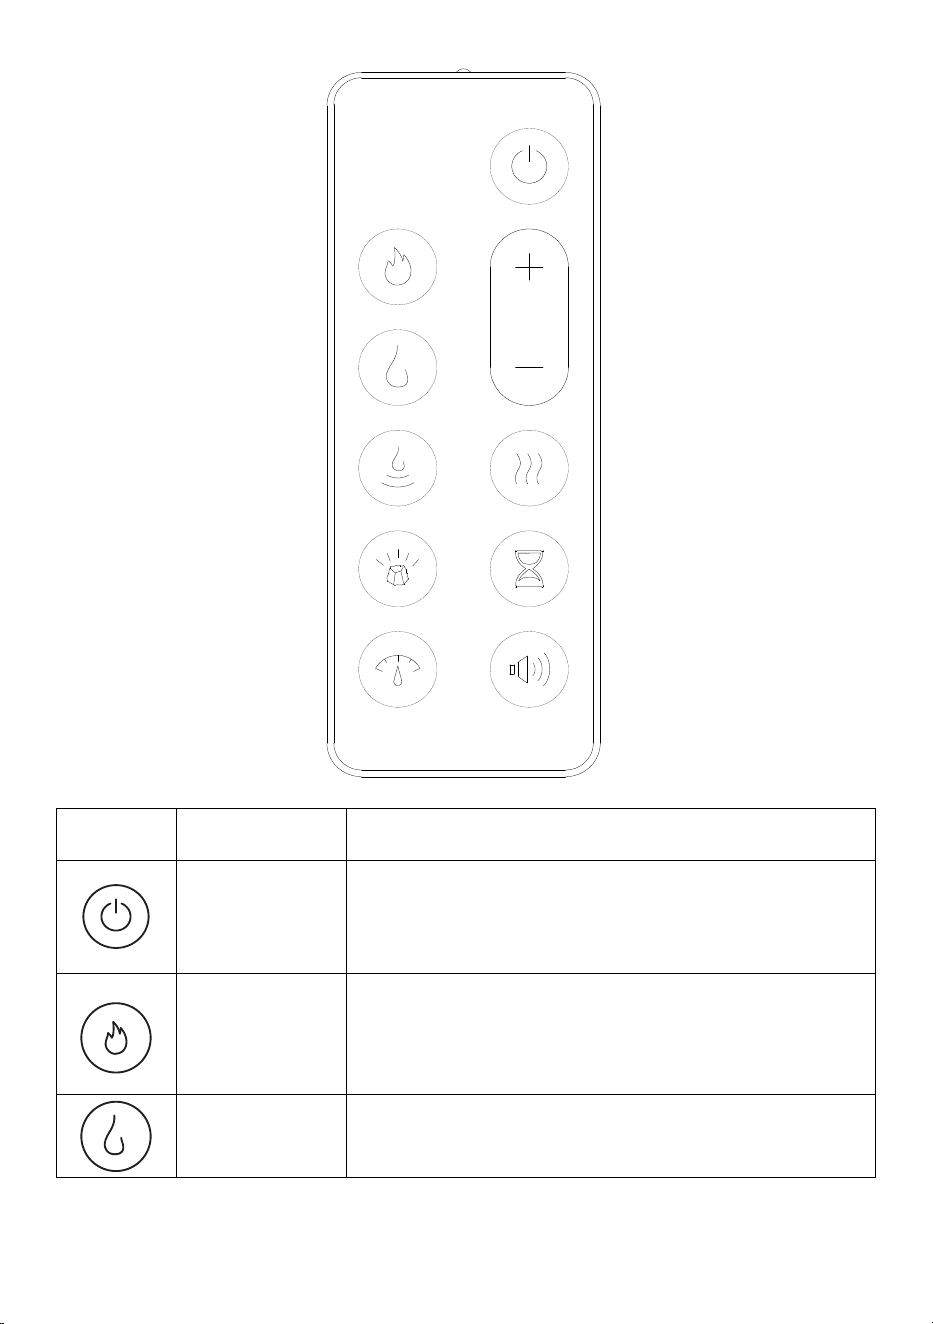
19
POWER
FLAMES
PRAMERY FLAME
SECONDARY FLAME HEATER
EMBER BED
TIMER
SPEED CRACKLING
BUTTO
N
TITLE FUNC
TION
Stand
by
Press to turn the flame, fuel bed and heater on/
off.
Default
Flames
Press to cycle through 9 default flames and off.
Prim
ary Flame
Press
to turn on/off the primary flame.
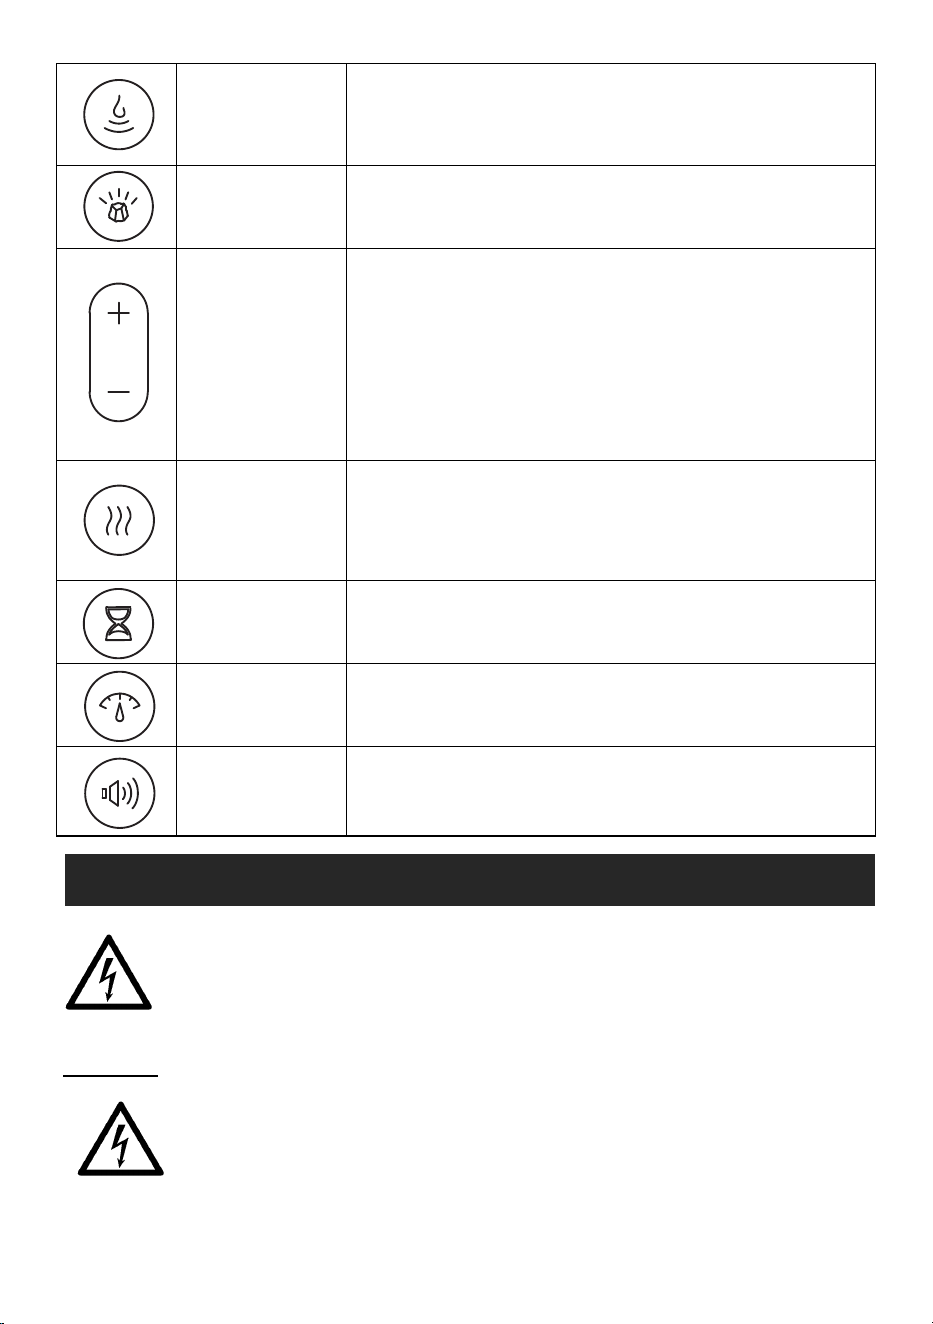
20
Seco
ndary
Flame
Press to cycle through secondary flame 1, 2, ..., 9
and off.
Em
ber Bed Press to cycle through ember bed 1, 2, ... 9, off.
+/-
Pres
s to adjust
the brig
htness, volume, speed and
tim
e after pressing the Default Flames/Primary
Flame/Secondary flame/Fuel bed/Flame
Speed/Crackling/Timer button once;
Press directly to set the temperature;
Press +/- for 3s to change the temperature unit
between ℃ and ℉.
Heater
Press
to
c
ycle through
Low-High-Off
Note: if the thermostat is on and room temp is
higher than temperature set, the heater will not
work.
Tim
er
Press to cycle through 0.5H, 1H, 2H, 3H, 4H, 5H,
6H, 7H, 8H, 9H, 10H and off
Speed Press
to cycle through speed 1, 2, ... 5, off.
Crackling Pres
s to cycle through crackling 1, 2 and off.
6. CARE AND MAINTENANCE
Cleaning
NEVE
R immerse in water or spray with water. Doing so could result in
electric shock, fire, or personal injury.
Metal:
Buff usin
g a soft cloth, slightly dampened with a citrus oil-based product.
AL
WAYS turn the heater OFF and unplug the power cord from the
outlet before cleaning, performing maintenance, or moving this
fireplace. Failure to do so could result in electric shock, fire, or personal
injury.
21
DO NOT use brass polish or household cleaners as these products will damage the
metal trim.
Glass:
Use a good quality glass cleaner and dry thoroughly with a paper towel or lint-free
cloth.
NEVER use abrasive cleansers, liquid sprays, or any cleaner that could scratch the
surface.
Plastic:
Wipe gently with a slightly damp cloth and a mild solution of dish soap and warm
water.
NEVER use abrasive cleansers, liquid sprays, or any cleaner that could scratch the
surface.
Vents:
Use a vacuum or duster to remove dust and dirt from the heater and vent areas.
Clean the exterior of the fireplace with a slightly damp cloth or duster.
Maintenance
Risk of electric shock! DO NOT OPEN! No user-serviceable parts
inside!
ALWAYS turn the heater OFF and unplug the power cord from the
outlet before cleaning, performing maintenance, or moving this
fireplace. Failure to do so could result in electric shock, fire, or
personal injury.
Electrical and Moving Parts:
The fan motors are lubricated at the factory and will not require lubrication.
Electrical components are integrated in the fireplace and are not serviceable by the
consumer.
Storage:
Store heater in a clean dry place when not in use.
Replacement parts:
Use only replacement parts supplied by the manufacturer. Use of any other parts,
or modifying the fireplace in any way, will void all warranties.
7. LIMITED WARRANTY
This warrants to the original purchaser that this product is free from defects in
material and workmanship as of the date of purchase and that it will, under normal
use and proper care, remain so for one year from the date of purchase. Missing or
initially defective parts will be replaced free of charge during the period of this
limited warranty. If parts are unavailable, comparable replacement of refund will be
22
given. The original dated sales receipt is required for all warranty claims. This
warranty does not cover damage which has occurred during transport from the
point of purchase to the consumer’s home. This warranty does not cover glass, light
bulbs, batteries, transportation, labor, or other issues not associated with the
manufacture of the product.
This product is for residential use only. Any and all commercial use of this product
voids all warranties, and frees the manufacturer from all liability.
Read and understand all assembly and operating instructions, and all safety
information and warnings, before use. The following will void this warranty: Damage
caused from tampering with, modifying, or altering the fireplace insert in any
manner; Damage due to incorrect assembly, improper care, misuse, or abuse;
Damage from being used with the wrong power source; Water damage; Damage
caused from this insert being used outdoors; Damage caused from this insert being
used for excessive periods of time; Damage caused by the insert being used in a
commercial application; Damage from use as a primary heat source; Other misuse or
abuse not specifically listed herein.
This product is not intended to be used as a primary heat source. It is for
supplemental heating purposes only.
8. TROUBLESHOOTING GUIDE
PROBLEM
SOLUTION
There is no power to
the fireplace, or it
does not turn on.
1. Make sure the power cord is plugged into a
functioning and properly grounded 15 Amp 120V
AC electrical outlet.
2. Make sure the ON/OFF switch on the control
panel is ON.
3. If the unit had been working, but then turned off
by itself, the temperature limiting control may
need to be reset.
4. Check for damage to the power cord or plug. If
damaged, DO NOT USE.
The control panel
functions do not work.
1. Make sure the ON/OFF switch on the control
panel is turned on. If it is OFF, the functions will
not work.
2. If the ON/OFF switch is ON, and the functions do
not work, please call 949-385-6588 or email
service5@fireandfireplaceservice.com.

23
The FLAME button
doesn’t work.
1. Make sure the ON/OFF switch on the control
panel is ON.
2. If the ON/OFF switch is ON, and the functions do
not work, please call 949-385-6588 or email
service5@fireandfireplaceservice.com.
The flame effect does
not turn off when I
press the flame
button.
1. Make sure the batteries are installed properly.
If it still cannot work, please call 949-385-6588 or
email service5@fireandfireplaceservice.com.
The heater does not
work.
1. Make sure the ON/OFF switch on the control
panel is turned on.
2. Control Panel: Press the heater button on the
control panel to override the thermostat at any
time.
3. Remote control: Make sure the thermostat is not
set too low. If the thermostat is set lower than
the room temperature, the heater will not turn
on. Or try to turn off the thermostat on the
remote control.
4. If none of these solutions work, please call 949-
385-6588 or email
service5@fireandfireplaceservice.com.
The heater does not
blow hot air when it
turns on and off.
This is normal. The fans blow cool air while the
heater gradually heat up. The fans blow after the
heater turn off to cool the heater and prevent
overheating.

24
The remote control
does not work.
1. Make sure the battery is properly installed.
2. Make sure the ON/OFF switch on the control
panel is turned on. The remote control will not
work unless the ON/OFF switch on the control
panel is turned off.
3. Aim the remote control at the receiver.
4. Remove objects that may be in the way. Items
between the remote control and the remote
control receiver will block the signal.
5. Don’t press the remote control buttons too
quickly. Give the unit time to respond to your
commands.
The thermostat (TEMP
button) does not
work.
1. Make sure the heater is turned on. The
thermostat will not work unless the heater is
turned on.
2. Make sure the thermostat is not set too low. If
the thermostat is set lower than room
temperature, the heater will not turn on.
25
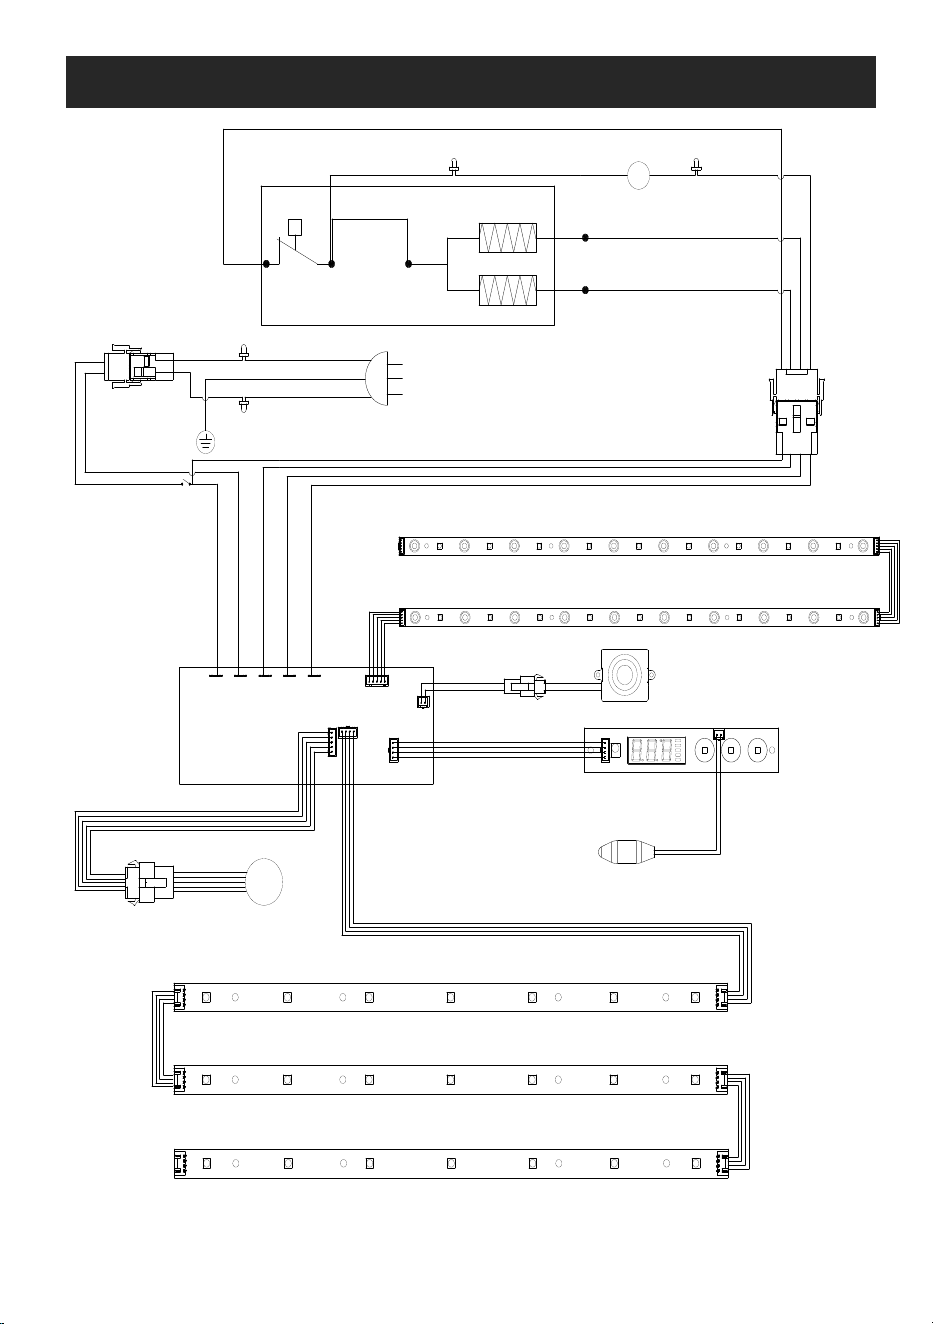
9. SCHEMATIC DIAGRAM
2
1
M
~
M
RC07-137A
RC07-137A
RC07-137A
θ
3
4
5
Main PCB
RC01-060A01
ACL ACN
HEAT2 HEAT1 FAN
Speaker
Button
panel
Flame
motor
Sensor
SIREN
Heater
motor
Heat
element
Power
cord
L
N
E
AC120V/60Hz
Flame LED board
Fuel bed LED board
CN4
CN2
CN1
CN3




3.EF.286.05.006 A0
Legend Flame Group LLC
Address: 92 Corporate Park, Ste. C655 Irvine, CA 92606, United States