13
16
18
8
Fuel Mixer
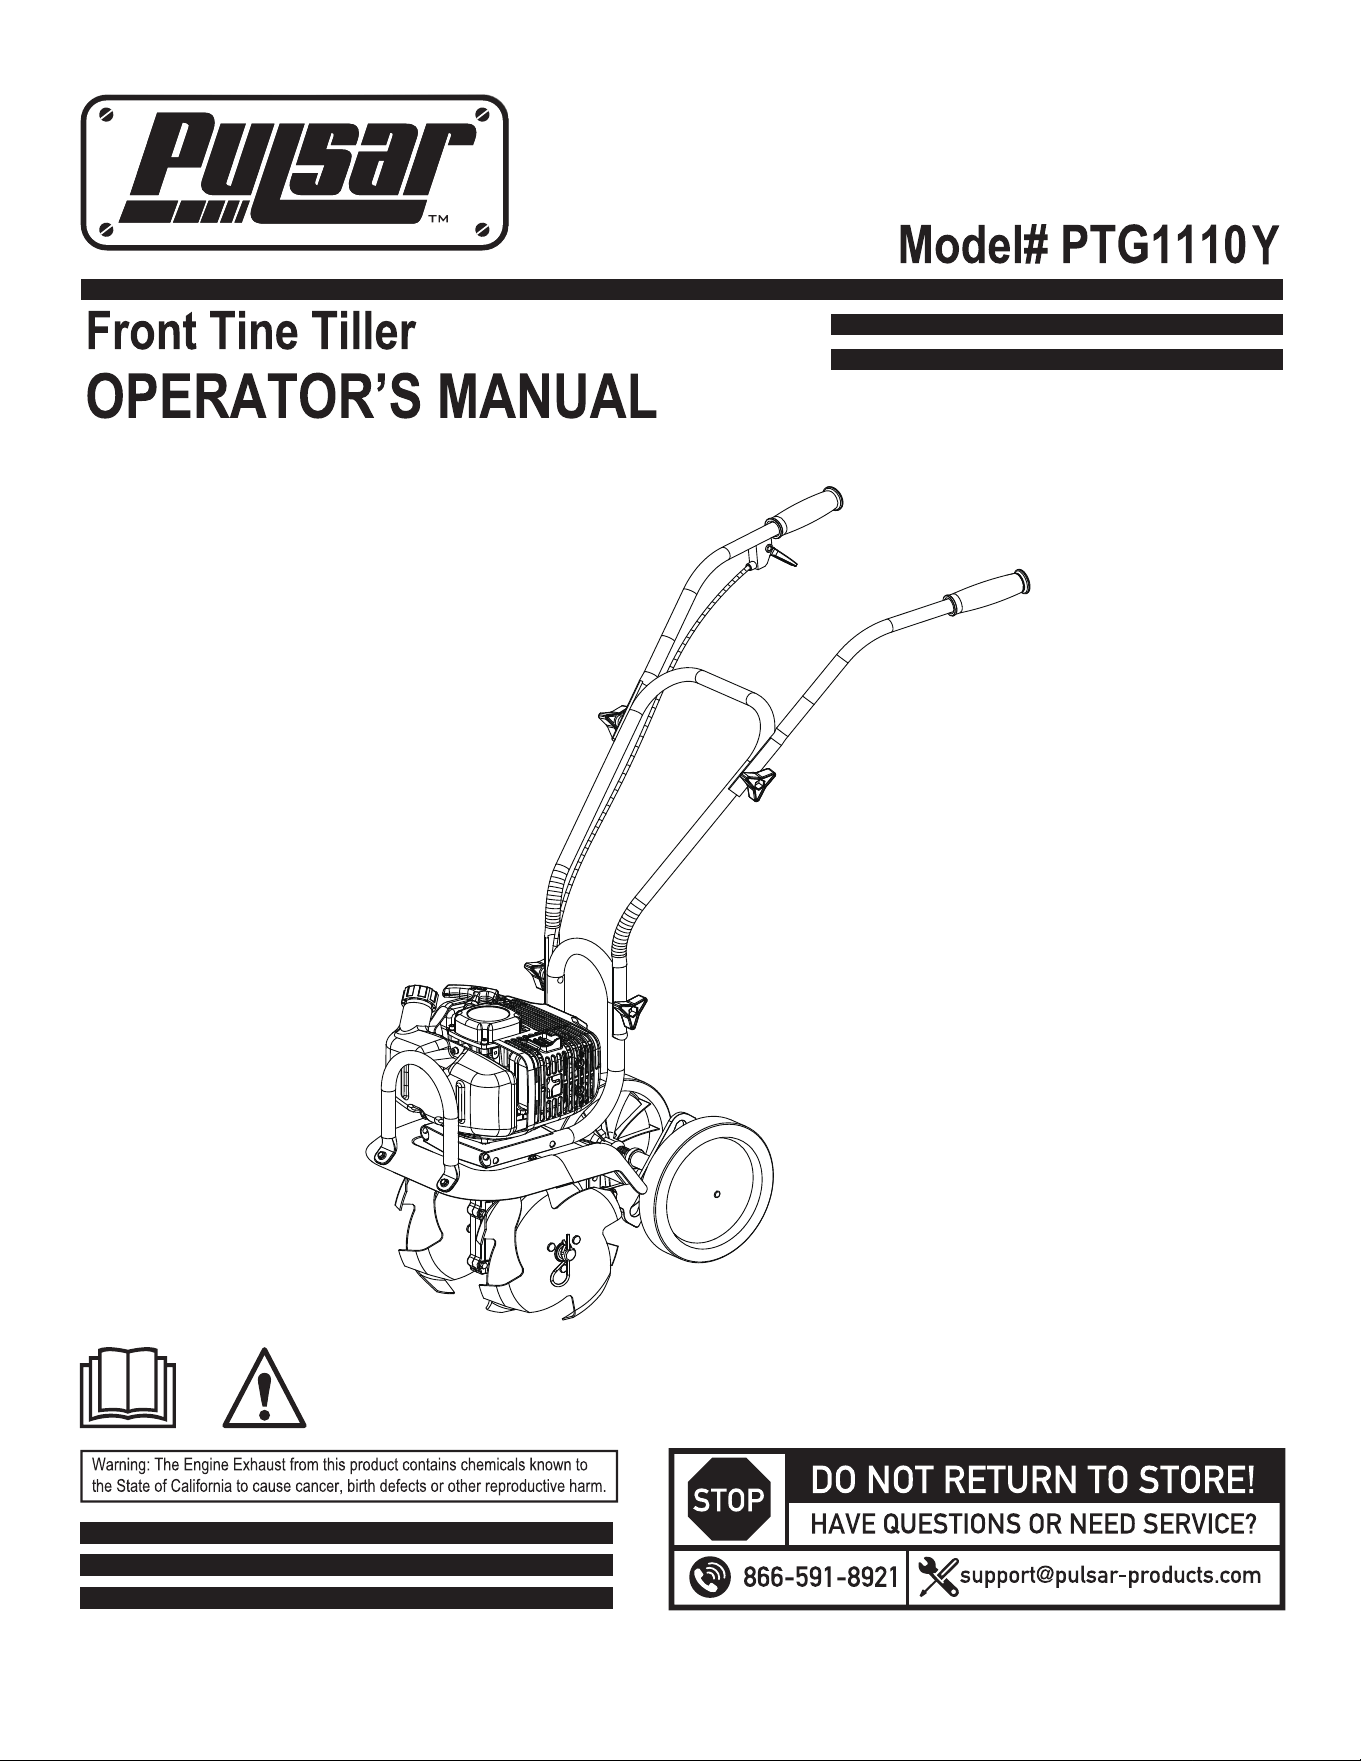
4
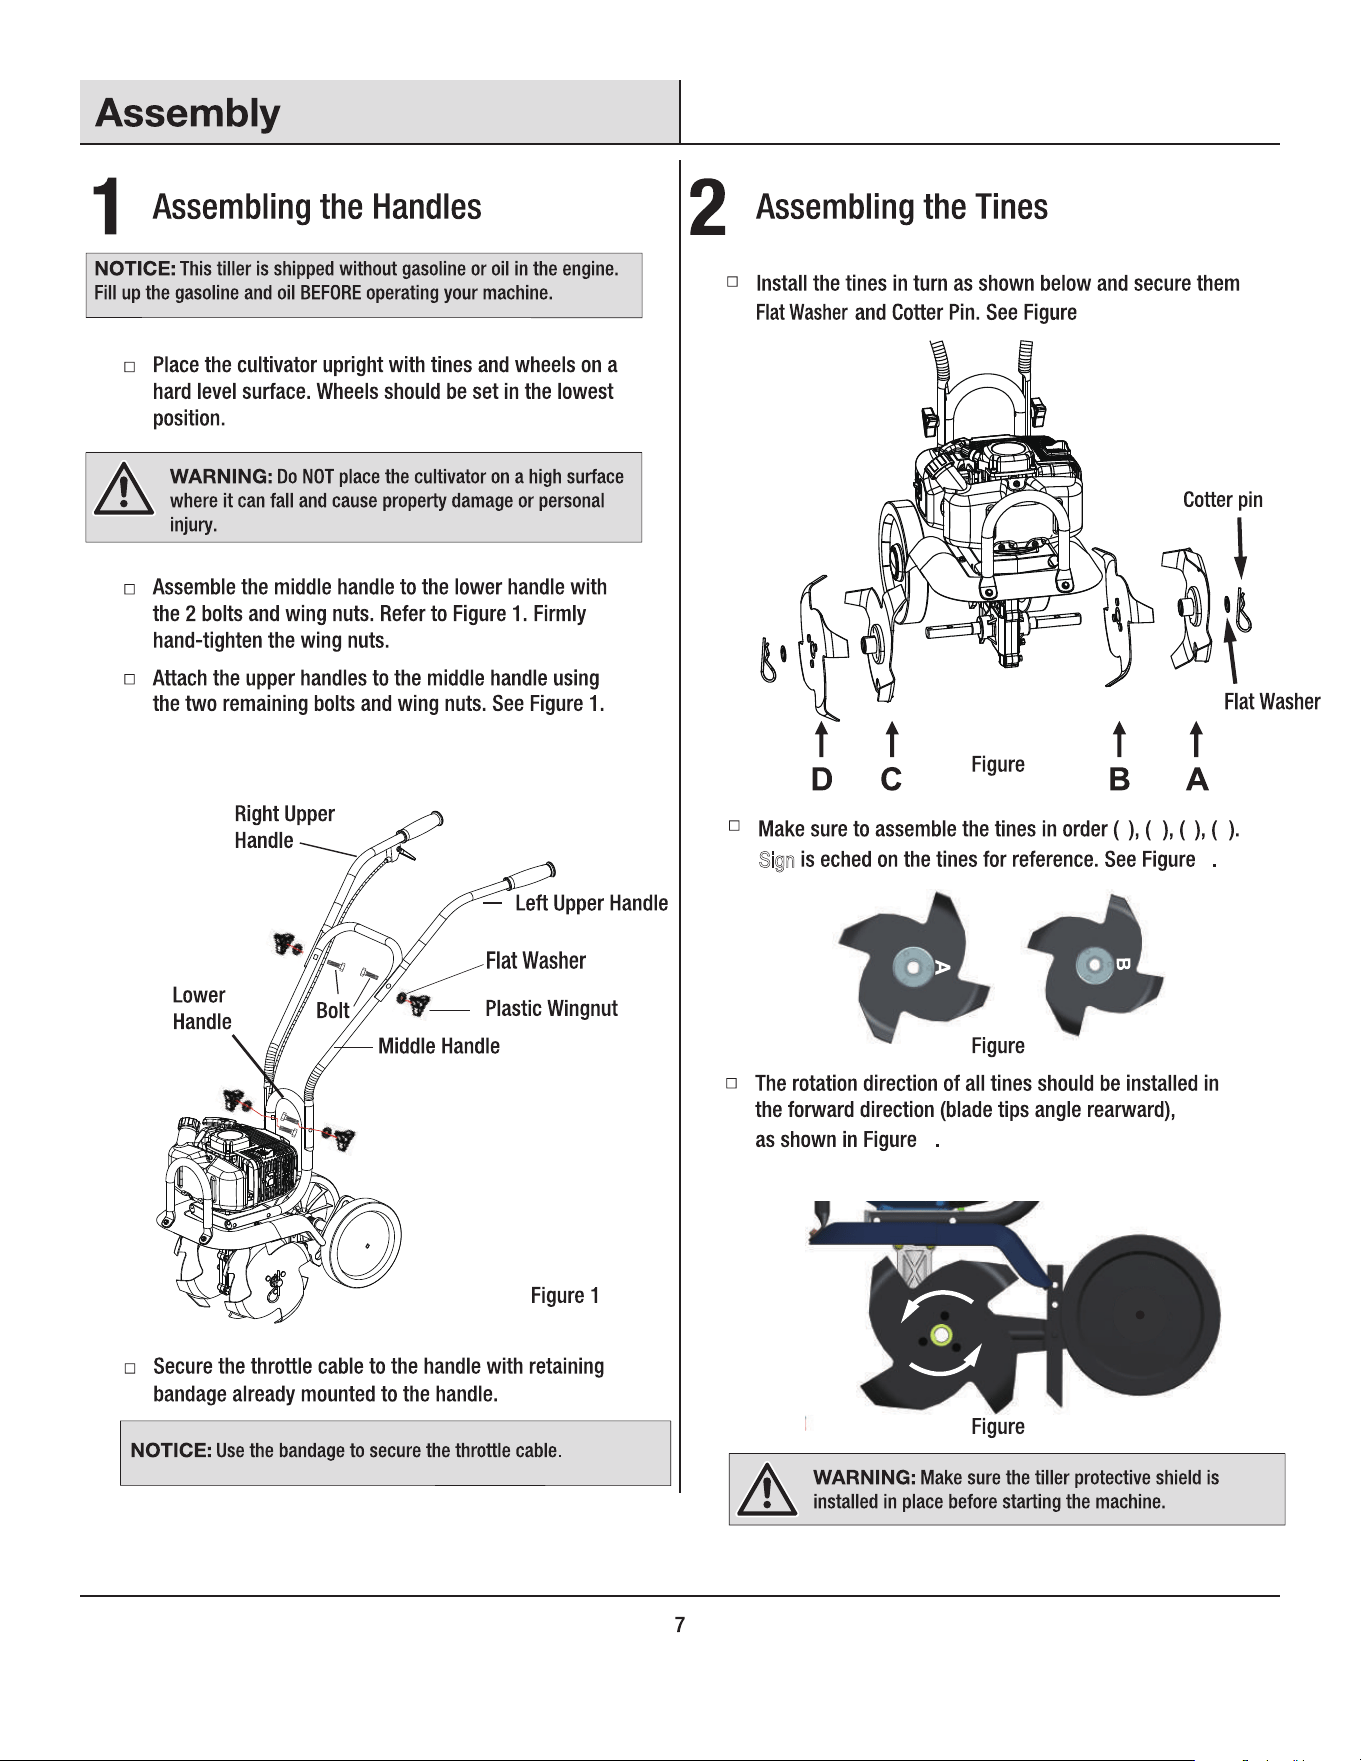
A
Sign
B
C
D
2
2
3
3
4
5
8
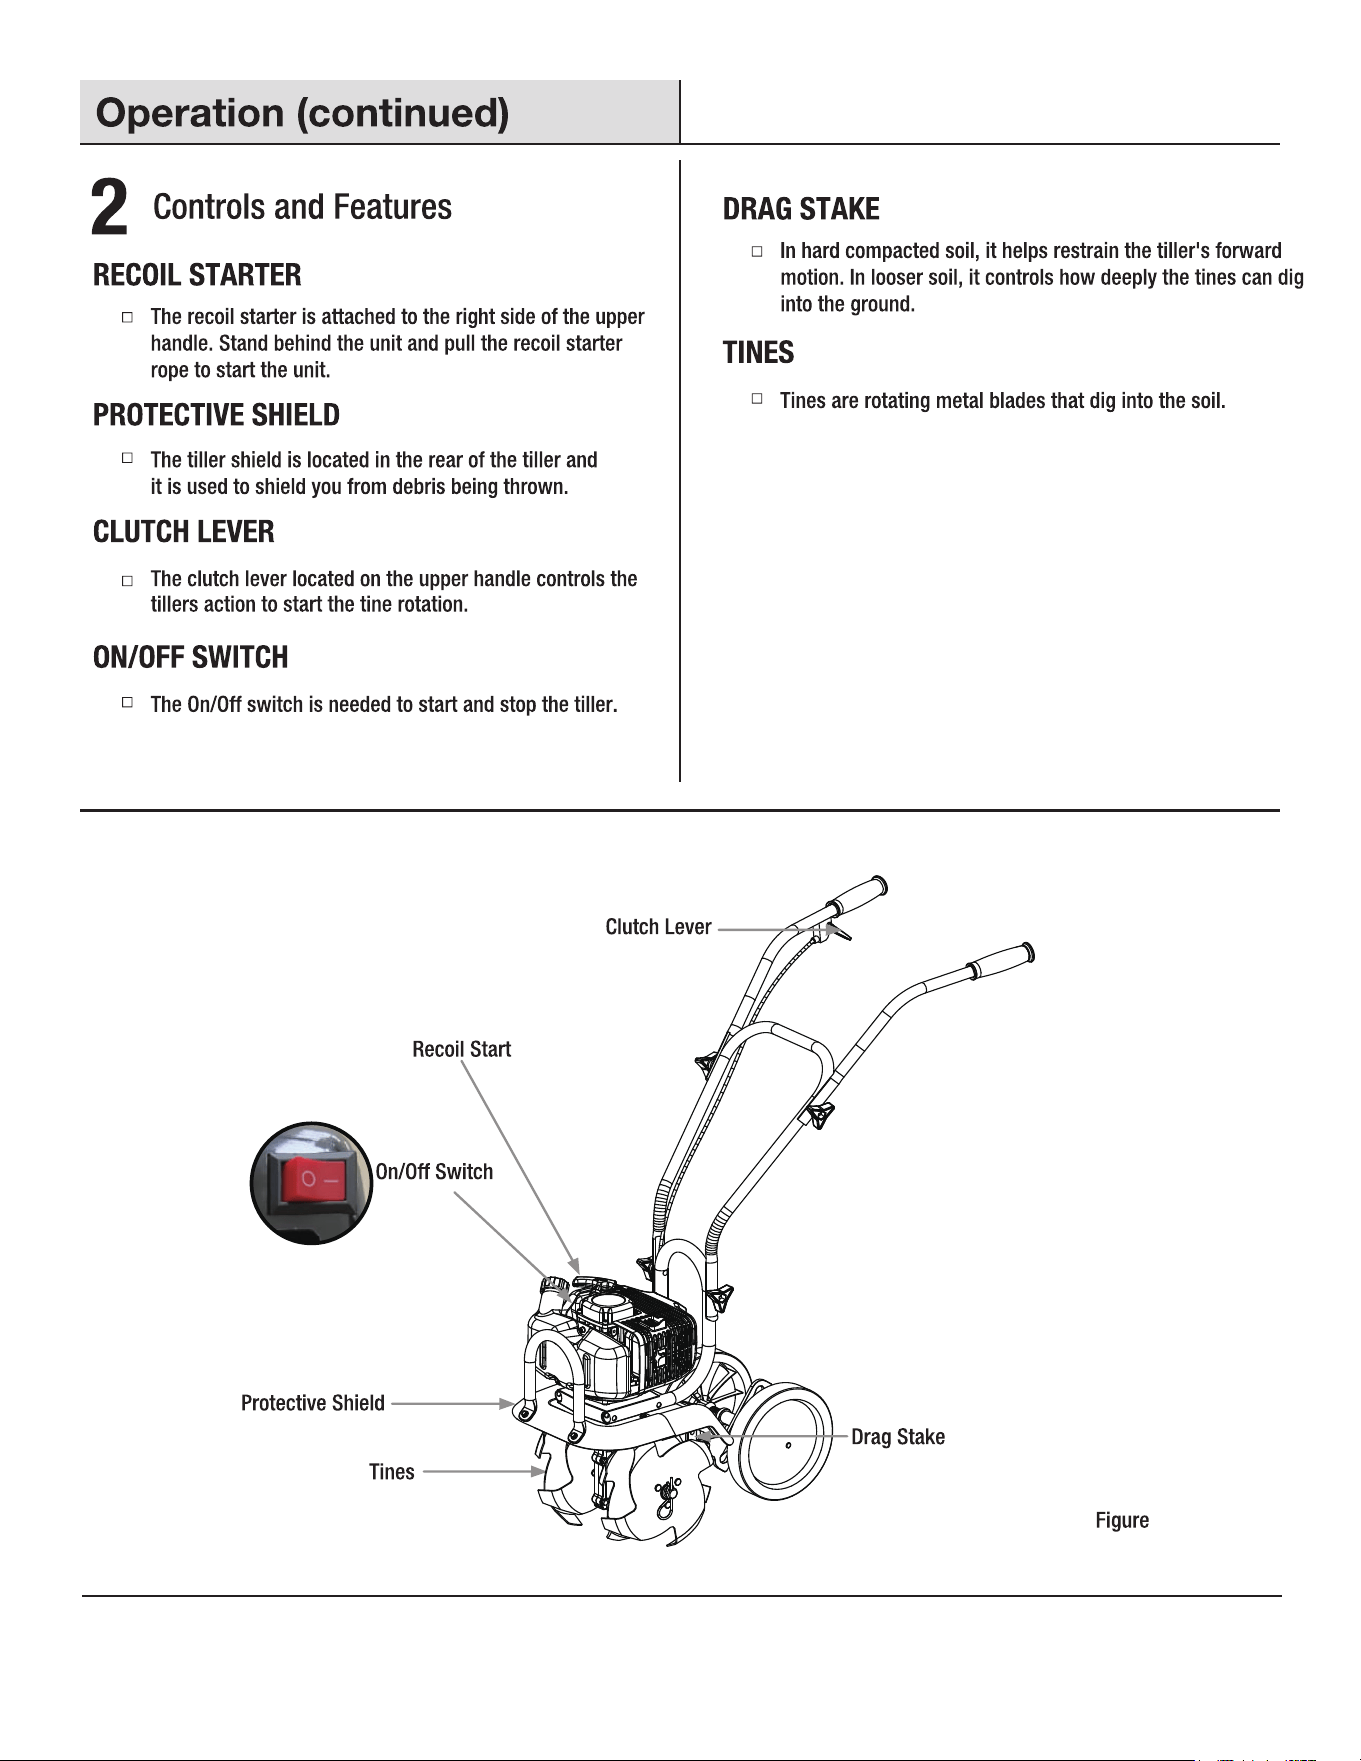
6
9

7
8
7
7
7
8
10
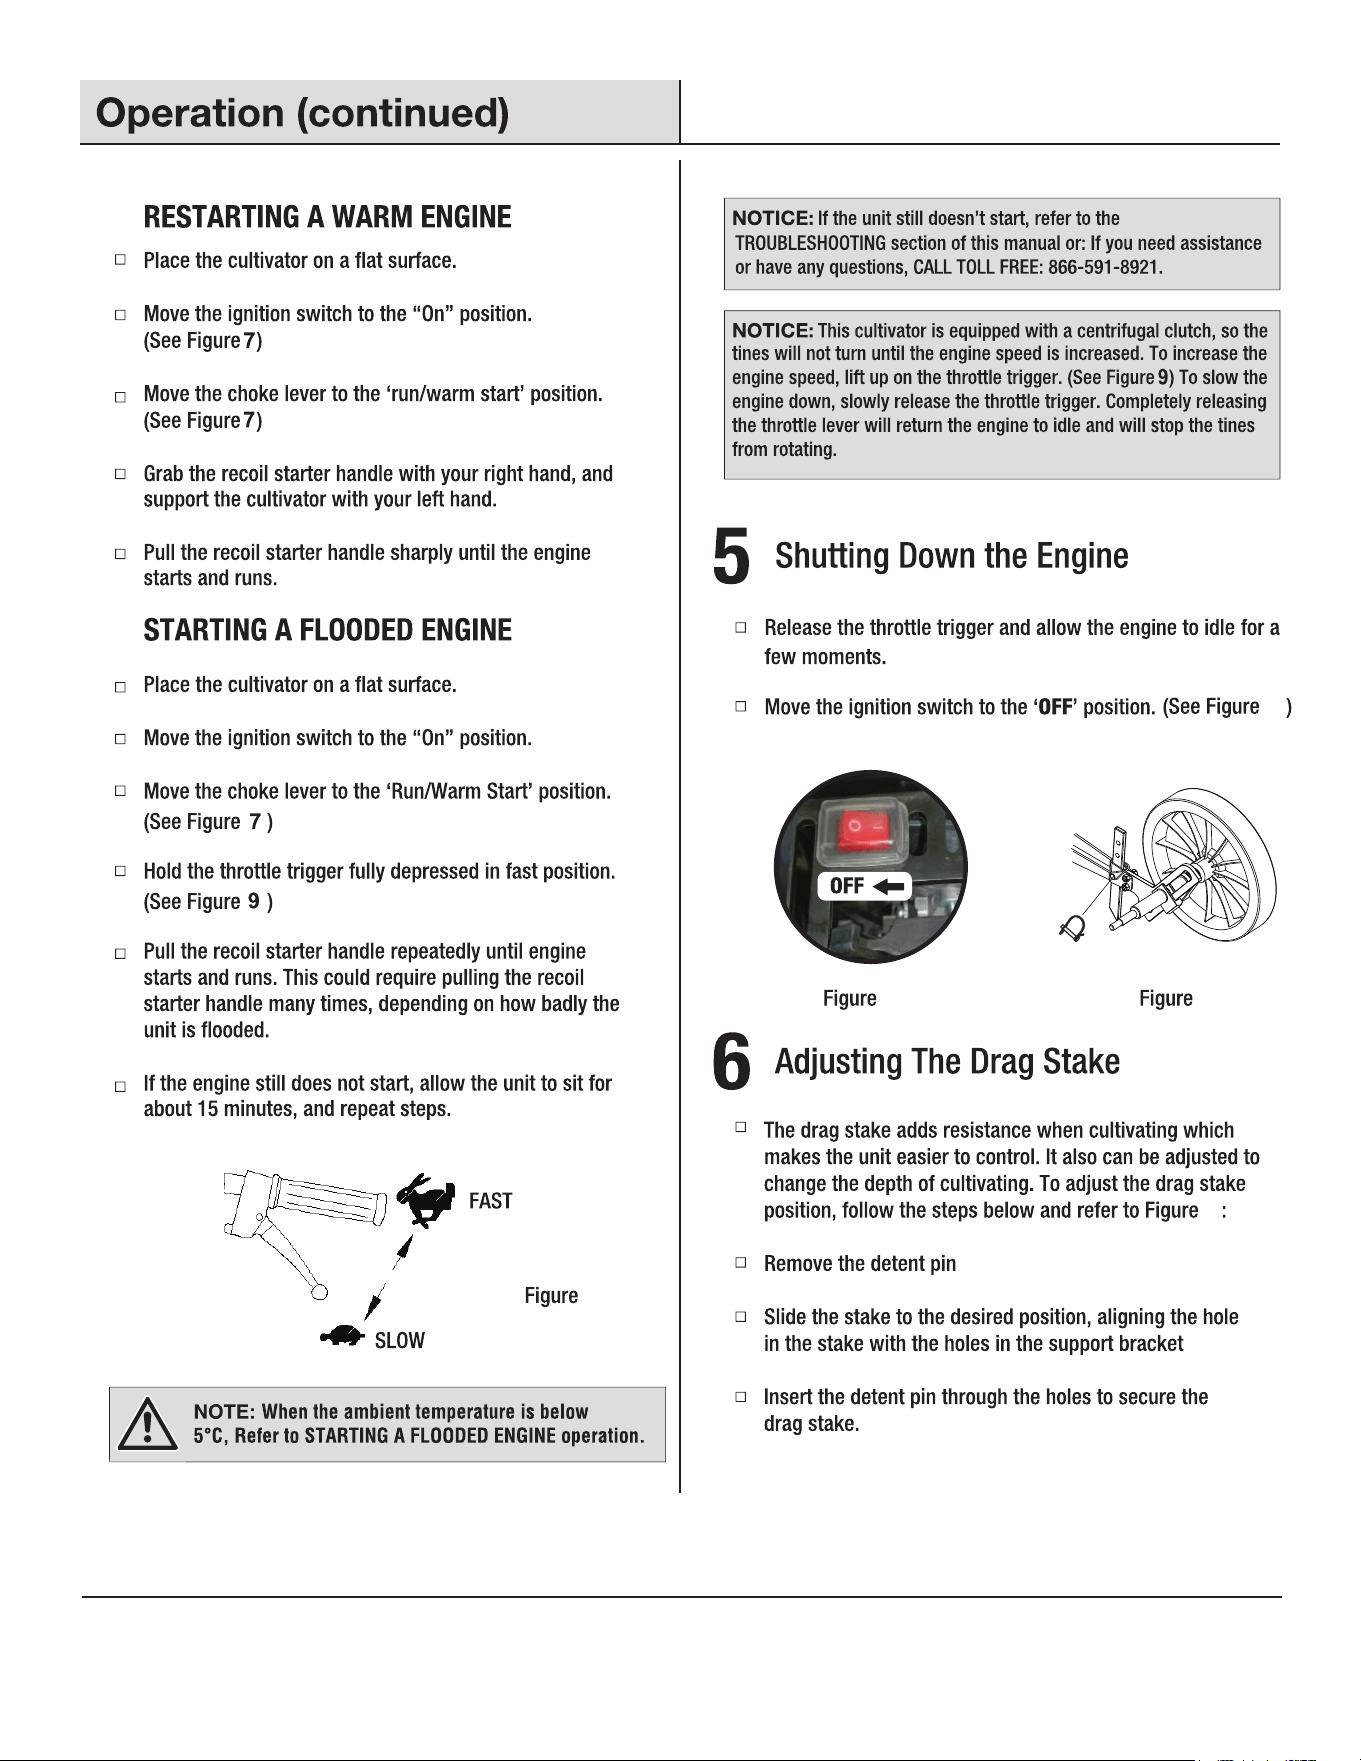
9
10
10
11
11
11
13
13
12
13
Adjustment Handle
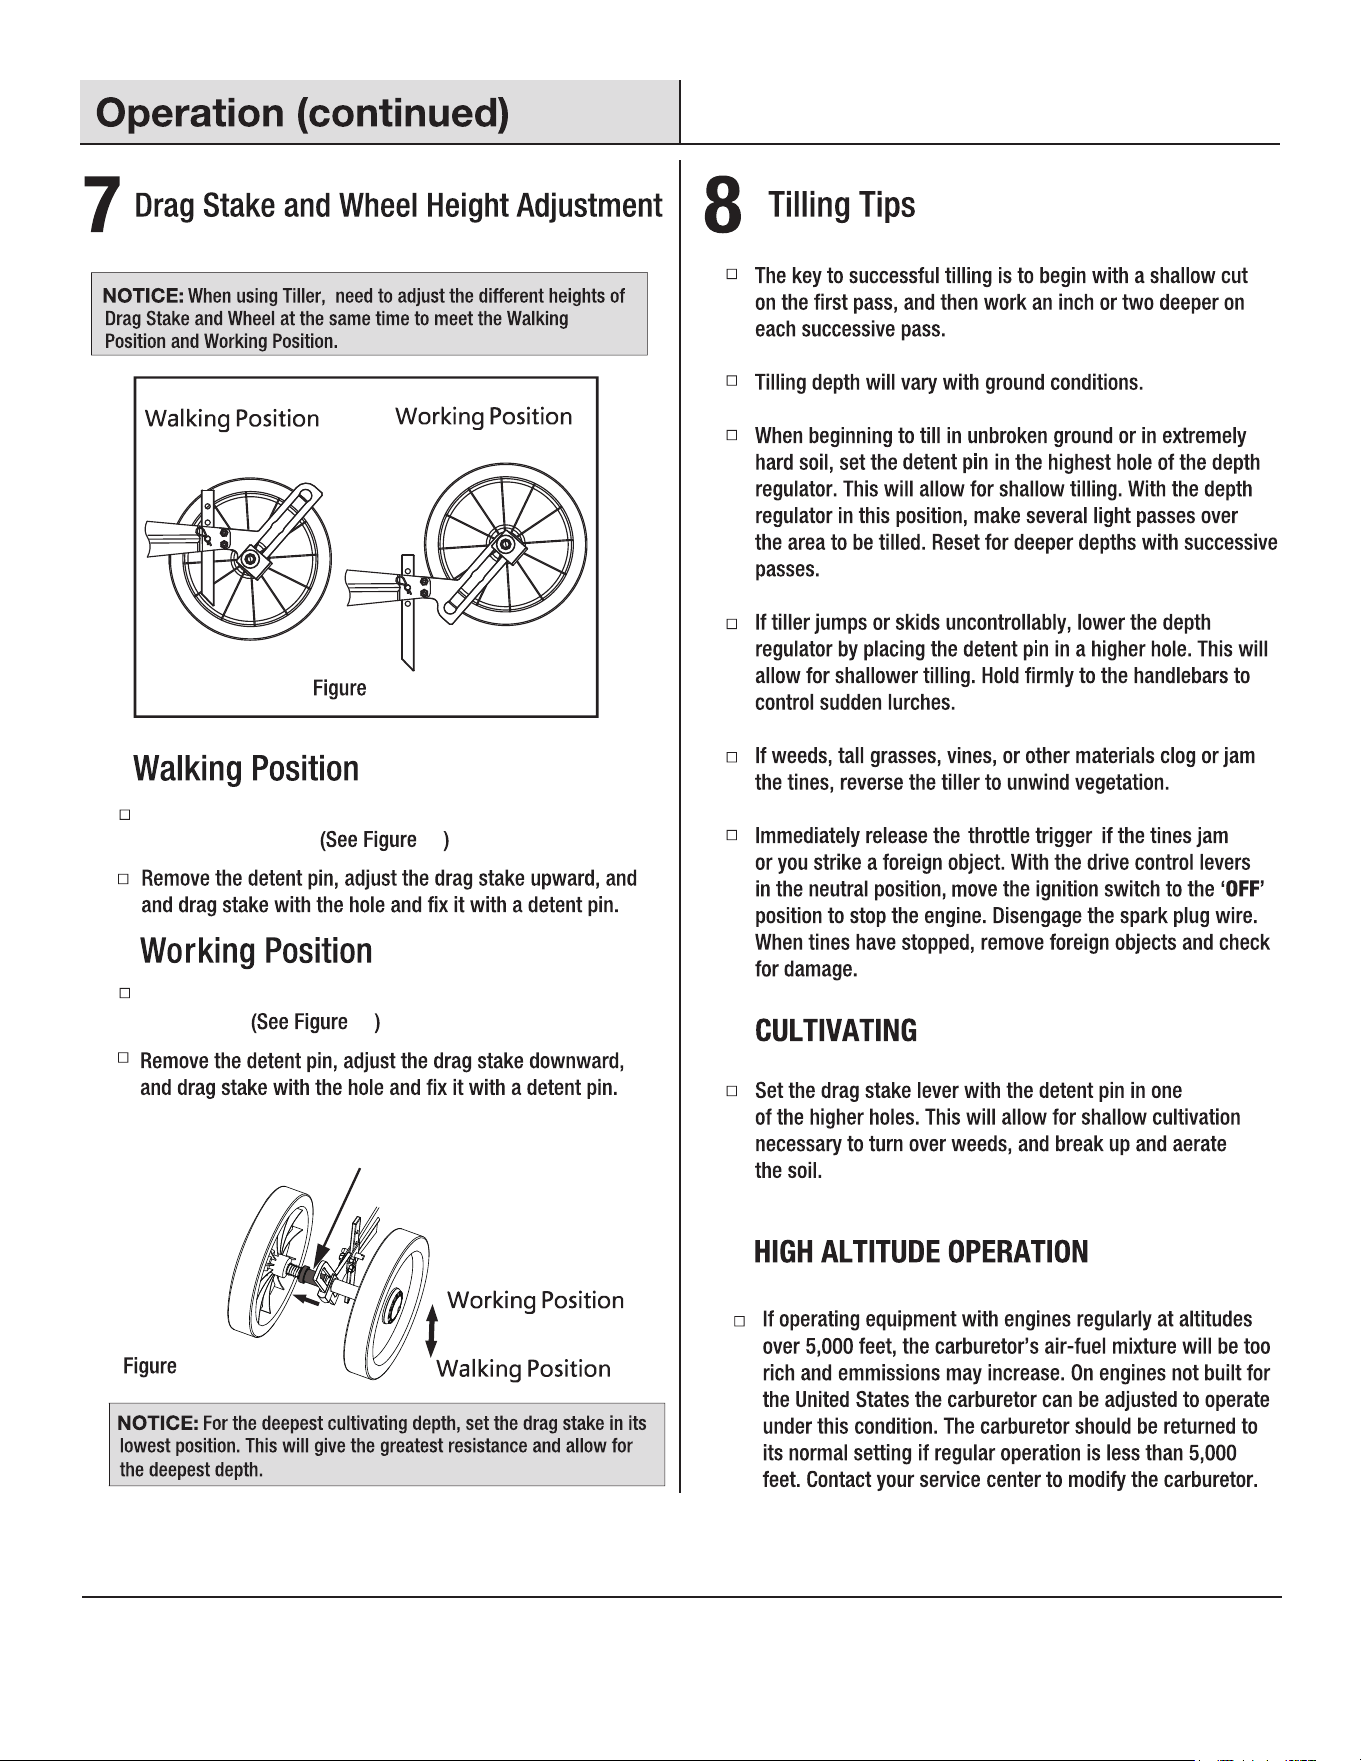
Slide the adjustment handle to the left and move the
wheels downwards.
Slide the adjustment handle to the left and move the
wheels up.
12
13
14
15
14
15
14
15

16
17
18
WARNING Read this operator manual carefully before the first use.
1
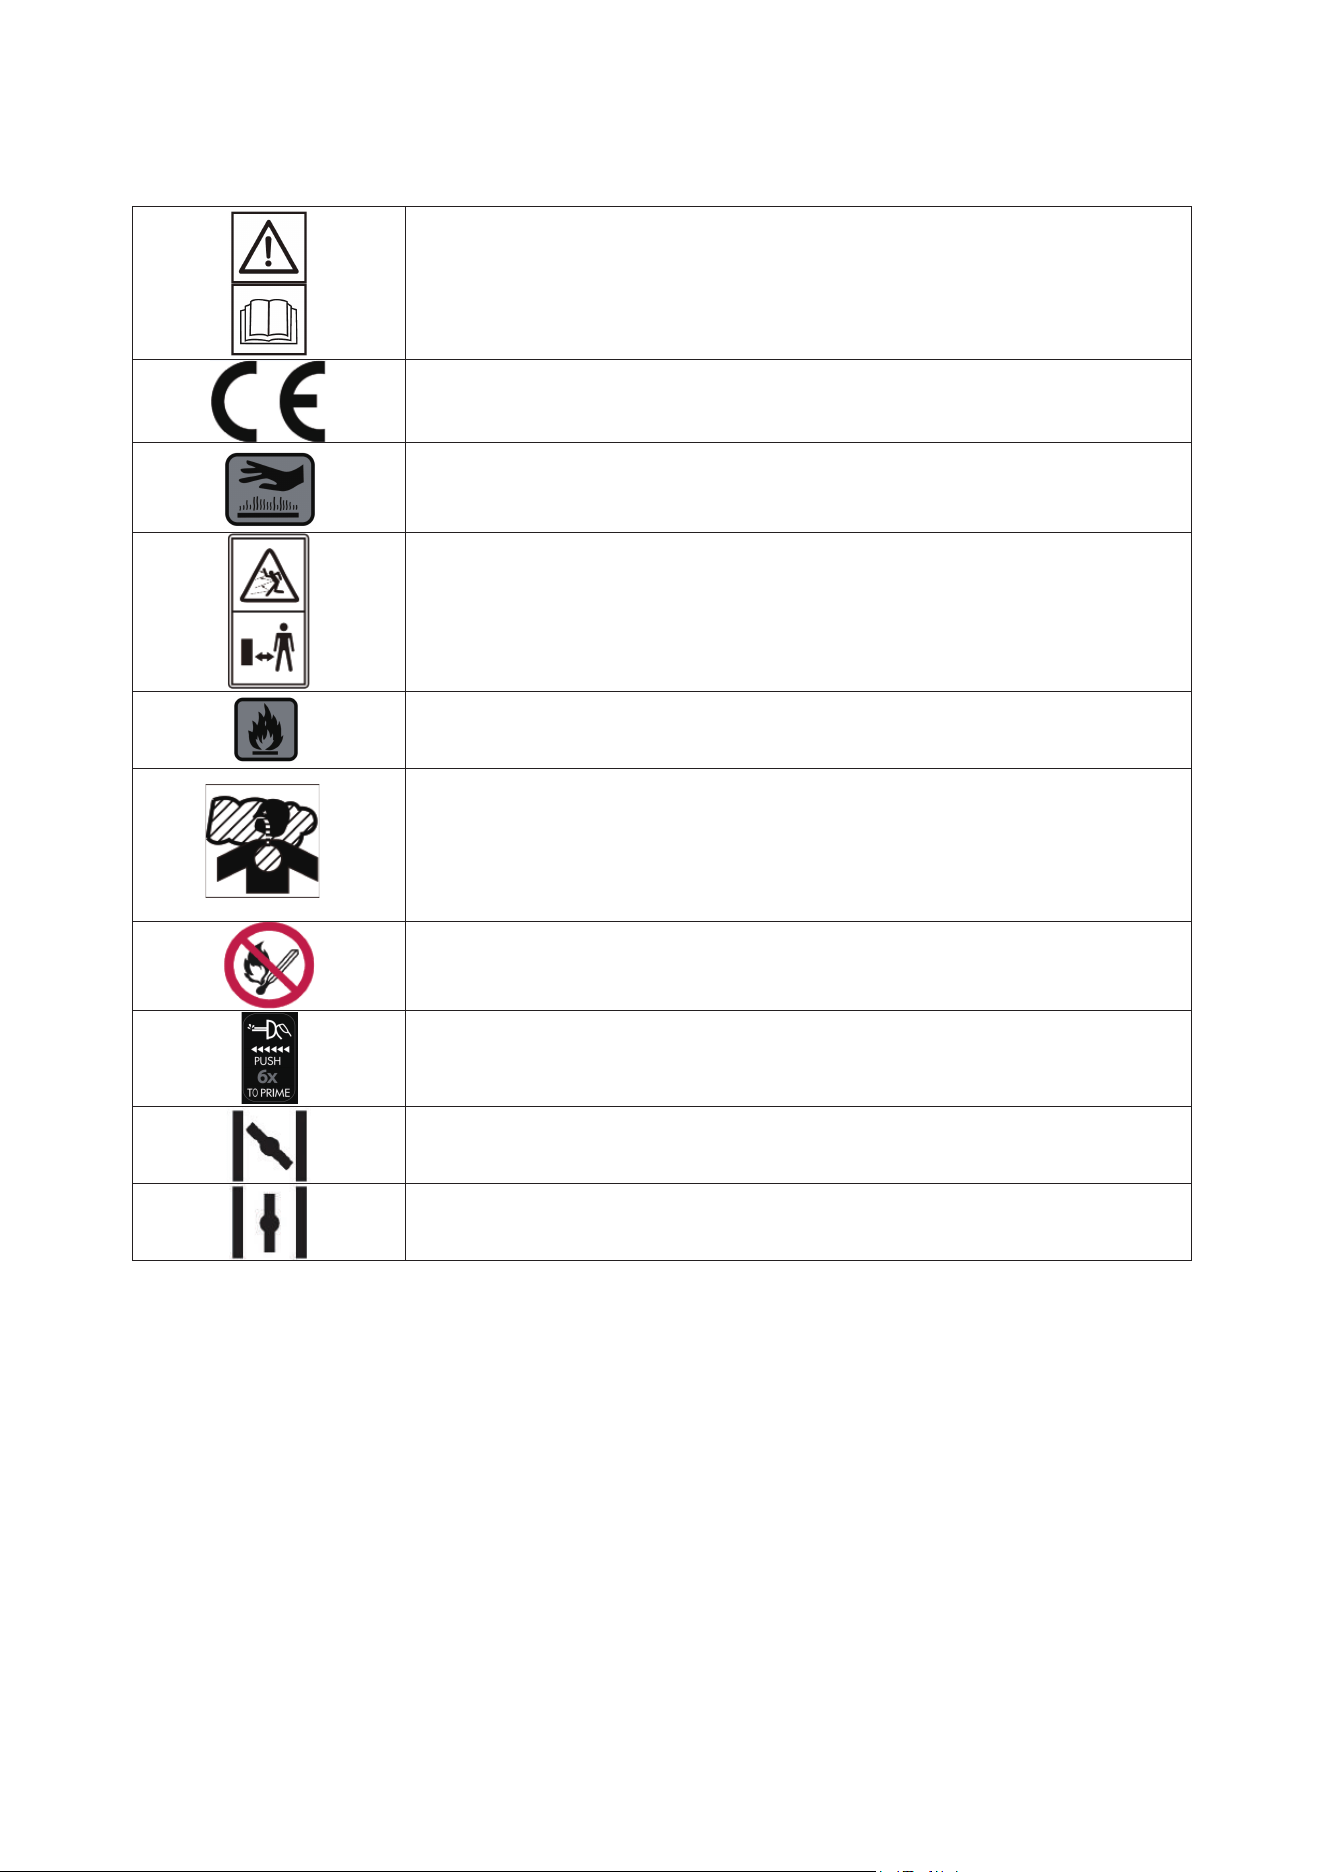
DESCRIPTION OF THE SYMBOLS
Read the instrucon handbook and follow all warning and
safety instrucons
Before any use, refer to the corresponding paragraph in the
present manual.
Complies with European regulaons applicable to this
product.
The exhaust and exhaust gases are hot.
Danger of injury from flying parts! Always maintain a
sufficiently safe distance. Beware of thrown objects. The
distance between the machine and bystanders should be at
least 15 meters.
Start engine creates sparking.
Sparking can ignite nearby flammable gases.
Engines give off carbon monoxide, an odorless, colorless,
poison gas.
Breathing carbon monoxide can cause nausea, fainng or
death.
Strictly no naked flames or smoking near the appliance!
Push the bubble 6mes before use to make sure the fuel full
of the oil way
Choke closed.
Choke open
SAFETY WARNINGS
Training
a) Read the instrucon carefully. Be familiar with the controls and proper use of
the equipment.
b) Never allow children or people unfamiliar with these instrucons to use the
machine. Local regulaons can restrict the age of the operator.
c) Never work while people, especially children, or pets are nearby.
d) Keep in mind that the operator or user is responsible for accidents or hazards
occurring to other people or th
eir property.

2
e) Major repair work shall be carried out only by specifically trained personnel.
f) All persons and animals must be kept at least 15 meters from the machine
while it is working
Preparaon
a) WARNING-Petrol is highly flammable:
- store fuel in containers specifically designed for this purpose;
- refuel outdoors only and do not smoke while refueling;
- add fuel before starng the engine. Never remove the cap of fuel tank or
add petrol while the engine is running or when the engine is hot;
- if petrol is spilled, do not aempt to start the engine but move the machine
away from the area of spillage and avoid creang any source of ignion unl
petrol vapors have dissipated;
- replace all fuel tank and container caps securely.
b) Replace faulty silencers;
c) Before using, always visually inspect to see that the tools are not worn or
damaged. Replace worn or damaged elements and b
olts in sets to preserve
balance.
d) Do not smoke near the machine.
e) Do not wear loose clothing, jewellery, or similar items that could be caught in
the starter or other moving parts.
f) Never put any items into the venlaon openings. Non-observance may lead
to injury, or damage to the machine.
Operaon
a) Do not operate the engine in a confined space where dangerous carbon
monoxide fumes can collect.
b) Keep the machine free of oil, dirt and ot
her impuries.
c) Please always place the appliance on even and stable surfaces.
d) Never operate the appliance inside buildings or in an environment without
proper venlaon. Pay aenon to air flow and temperature.
e) Do not operate or store the appliance in wet or humid surroundings.
f) Ensure the sound absorber and air filter work properly. These parts serve as
flame protecon in case of misfire.
g) To avoid possible burn injuries, do not touch the exhaust
system or other
parts that become hot during operaon. Pay aenon to the warnings on the

3
machine.
h) The engine must not be operated with excessive rotary speed. The operaon
of the engine with excessive rotary speed raises the risk of injury. Parts which
affect the rotary speed must not be altered or replaced.
i) Regularly check for leakage or traces of abrasion in the fuel system, such as
porous pipes, loose or missing clamps and damage to the tank or tank cap.
Before use all defects must be repaired.
j) Work
only in daylight or in good arficial light.
k) Never pick up or carry a machine while the engine is running
l) Stop the engine:
- whenever you leave the machine.
- before refueling.
m) Before checking or adjusng the machine, the ignion plug and the ignion
wire respecvely must be removed to prevent accidental starng.
n) Do not use of the machine when the operator is red, ill or under the
influence of alcohol or the drugs.
Maintenance and st
orage
a) Keep all nuts and screws ght to be sure the equipment is in safe working
condion.
b) Never store the equipment with petrol in the tank inside a building where
fumes can reach an open flame or spark.
c) Allow the engine to cool before storing in any enclosure.
d) To reduce the fire hazard, keep the engine, silencer and petrol storage area
free of vegetave material and excessive grease.
e) Replace worn or damaged parts for safety.
f) If the fuel tank has to be drained, thi
s should be done outdoors.
g) Always clean and maintenance before storage.
h) Never disassembly the guards for cung aachments.
i) Always store the metal blade in cool and dry place, never use rusted blade. It
may cause serous injure during working.
4
TECHNICAL SPECIFICATIONS
Engine model
Type
Air-cooled, 2-stroke single cylinder, gasoline engine
Ignion System
Flywheel magneto with CDI
Starng system
Recoil starter
Bore x Stroke
(
mm
)
44*33
Displacement
(
cm
3
)
50
Maximum net power
(
kW
)
1.5/7500
Volumes of fuel tank
(
gal
)
0.3
Weight
(
kg
)
4
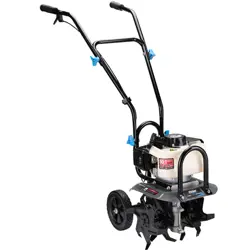
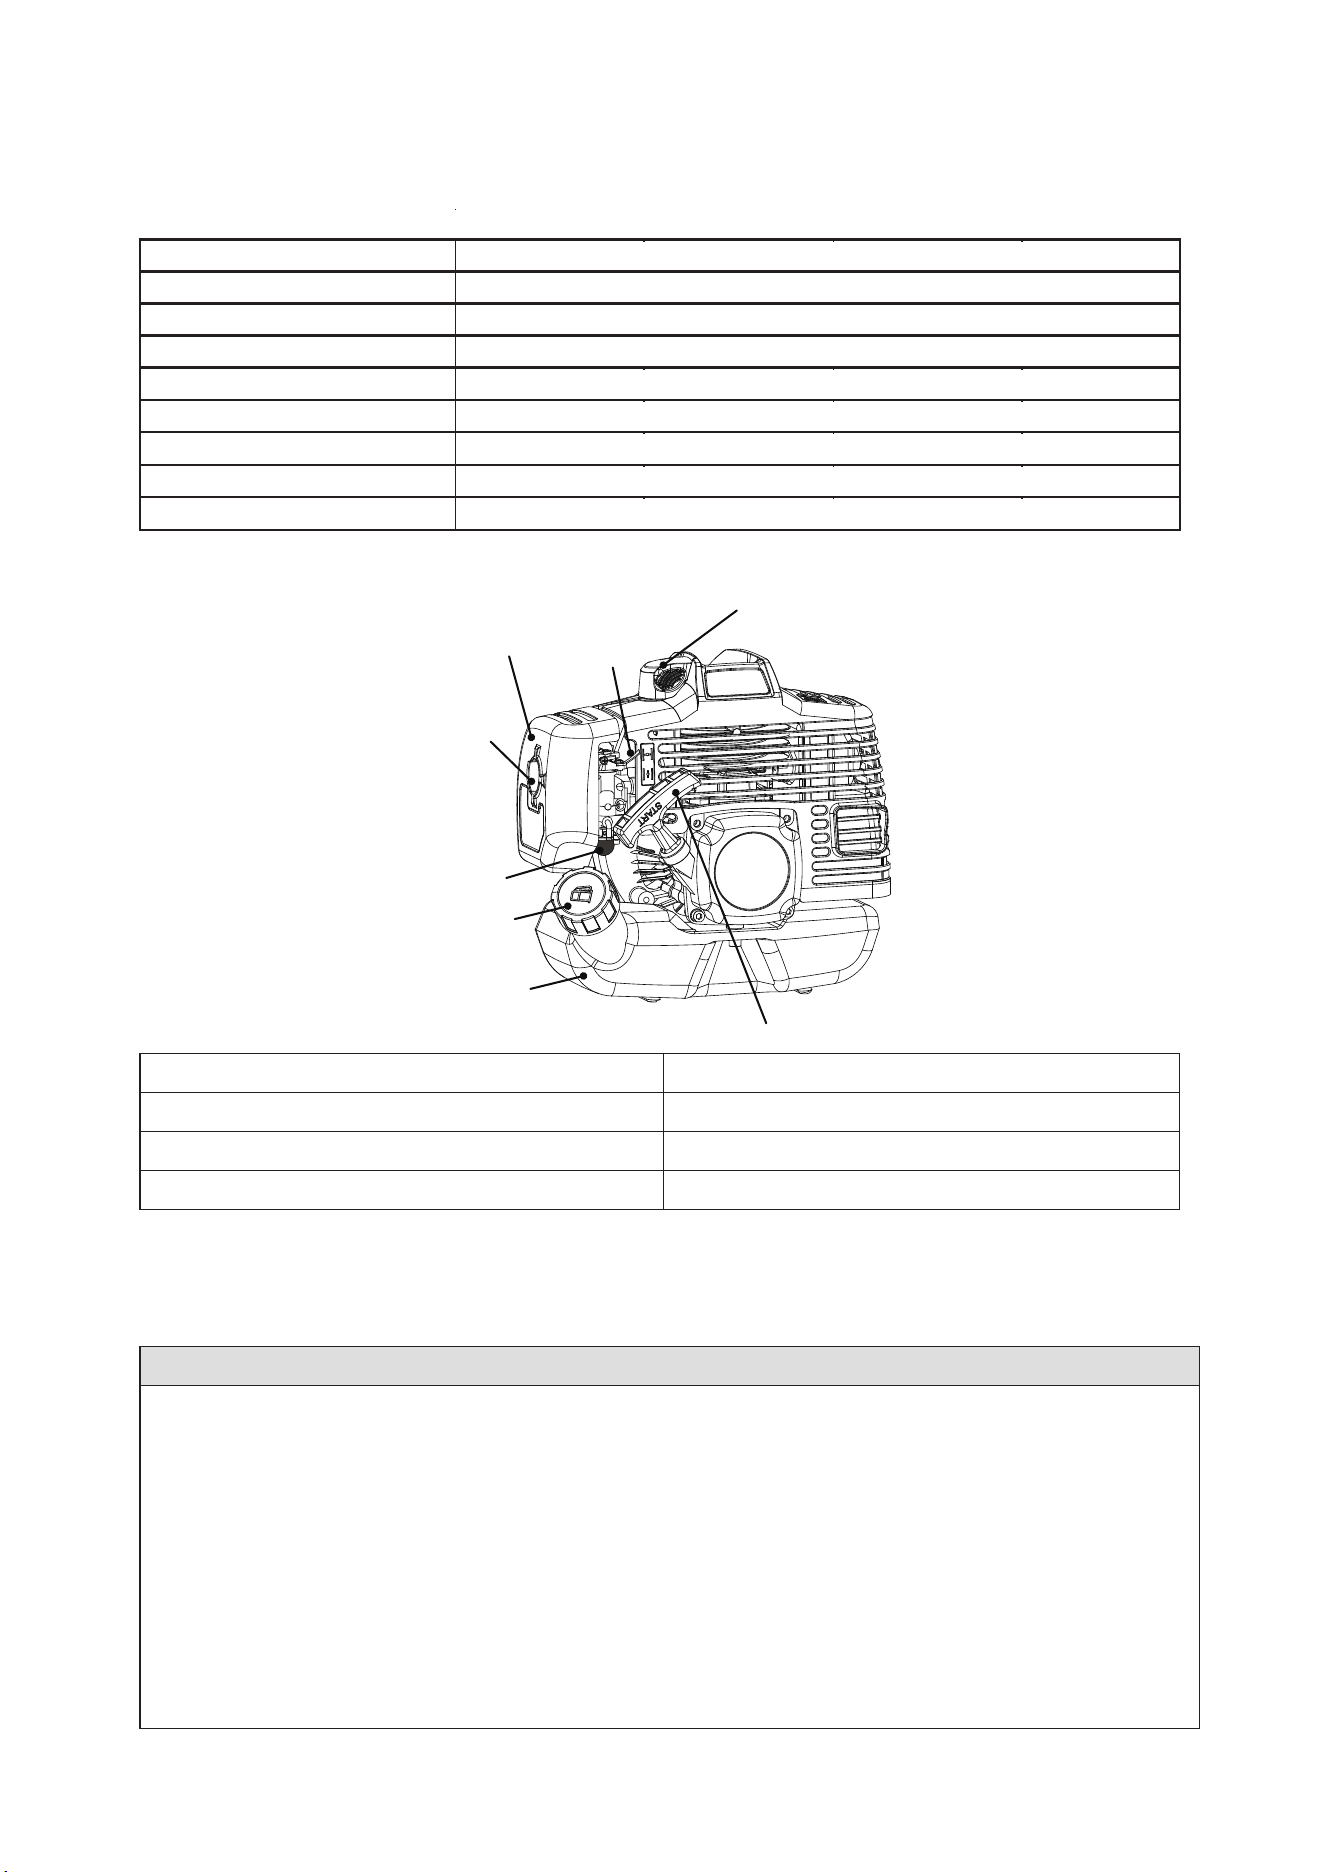
LIST OF MAIN PART
Fig.1
1. Starter handle
2. Spark plug
3. Air choke
4. Air filter cover
5. Knob
6. Primer
7. Fuel tank cap
8. Fuel tank
OPERATION
FUEL AND OIL RECOMMENDATIONS
WARNING!
Gasoline is extremely flammable and can be explosive under certain condions,
creang the potenal for serious burns.
Turn the ignion switch to “O ”.
Do not smoke. Make sure the area is wellvenlated and free from any source of
flame or sparks; this includes any appliance with a pilot light.
Never fill the tank completely to the top.
If the tank is filled completely to the top, heat may cause the fuel to expand and
overflow through the vents in the tank cap.
Aer refueling, make sure the tank cap is closed securely.
YJ1E44FN
1
2
3
4
5
6
7
8

5
If gasoline is spilled on the fuel tank, wipe it off immediately.
WARNING!
2 STROKE GASOLINE ENGINE
,
use fuel mixed with oil only. 2 % oil (20 gr) per
liter of green gas. Use only 2-strkoe synthec oil (type
API-TC/JASO-FD/ISO-L-EGD/TISI) .Make sure fuel is mixed well before refueling.
Always use fresh mixture.
Only fuel the machine in well-lit areas. Avoid fuel spillage. Never refuel the
machine during operaon. Let the engine cool down for about two minutes before
refueling.
Refueling must not be carried out near naked flames, control lamps or spark
producing electrical equipment such as electric tools, welders or sanders.
1. Make sure the machine is turned off, by turn the engine switch to the “O”
posion.
2. Check the fuel by a visual check , remove
the fuel cap and reviewing the fuel
level.
3. Full unleaded fuel mixed with oil from an approved fuel container into the fuel
tank, because of fuel expands, please fill the tank to the neck of tank only.
4. Turn the fuel cap clockwise to assembly it in posion.
WARNING
!
● Do not refill fuel while engine is running or hot.
● Make sure fuel is not leaking.
Use quality two-stroke oil and make a mixture of 50 parts petrol to one part oil
only (2% oil mixed in fuel).
Never use two-stroke oil intended for water-cooled engines.
Never use oil intended for four-stroke engines.
A poor oil quality and/or too high oil/fuel rao may jeopardise funcon and
decrease the life me of catalyc converters.
Shake the container well to obtain a correct mixture before filling the tank.
T
hrole Cable Adjustment
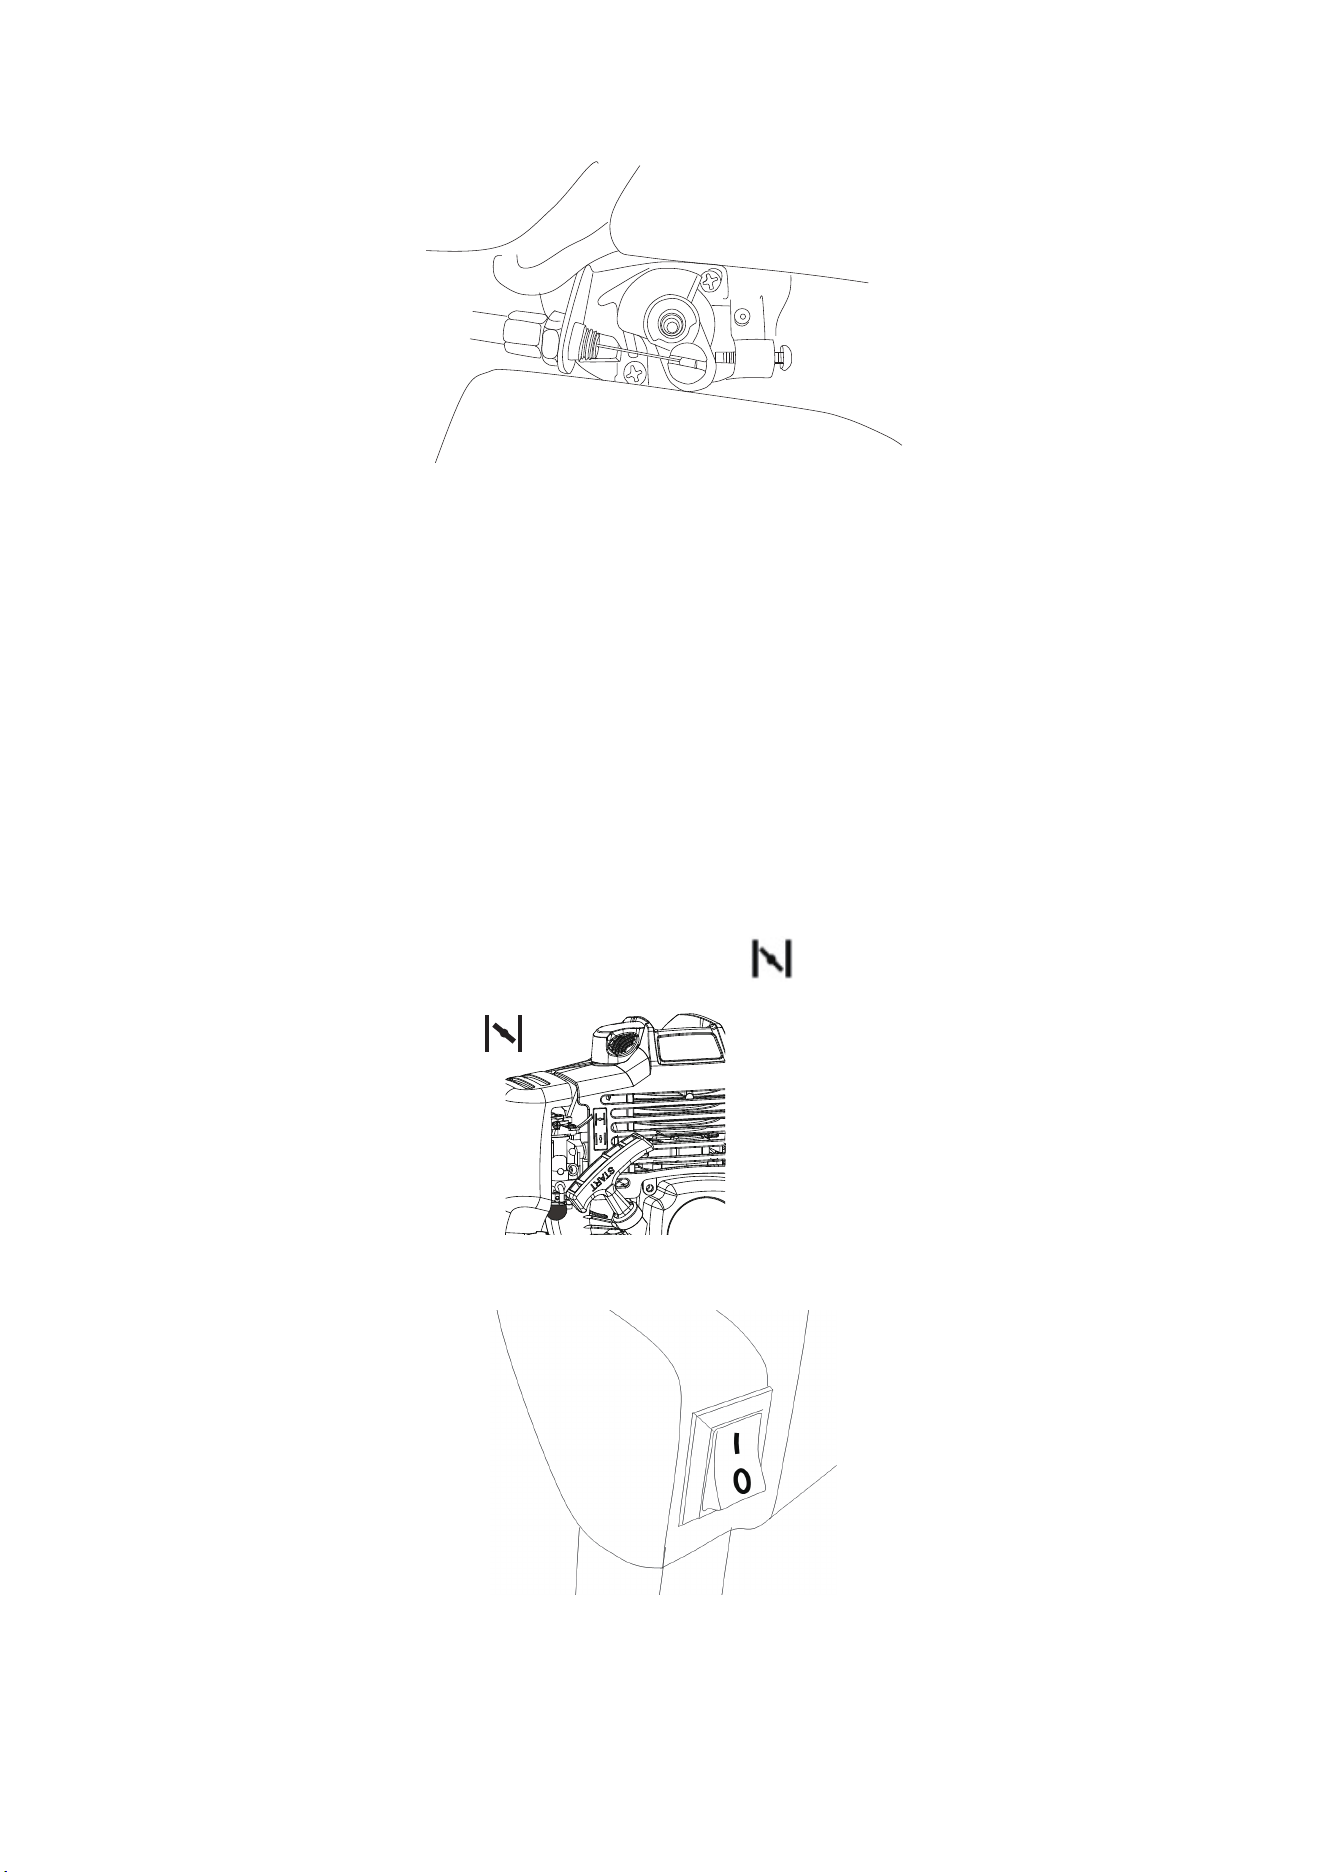
6
When seng the engine to equipment (brush cuer. etc.), adjust the throle
cable in the following procedures:
1. Remove the air cleaner cap. Loose the lock nut.
2. Turn the adjusng screw. Be sure that the Idle screw touches throle plate at
the swivel and the play of the throle cable is around 2 mm.
3. Squeeze the throle lever. Be sure that throle plate touches the stopper.
4. Tighten the lock nut.
Starng the engine
To start a cold engine:
1) Move the air lever to the cold start posion.
2) Place the switch in the posion “I” (start)
3) Press the primer bulb several mes (7to10 mes) unl the fuel reaches the
carburetor.
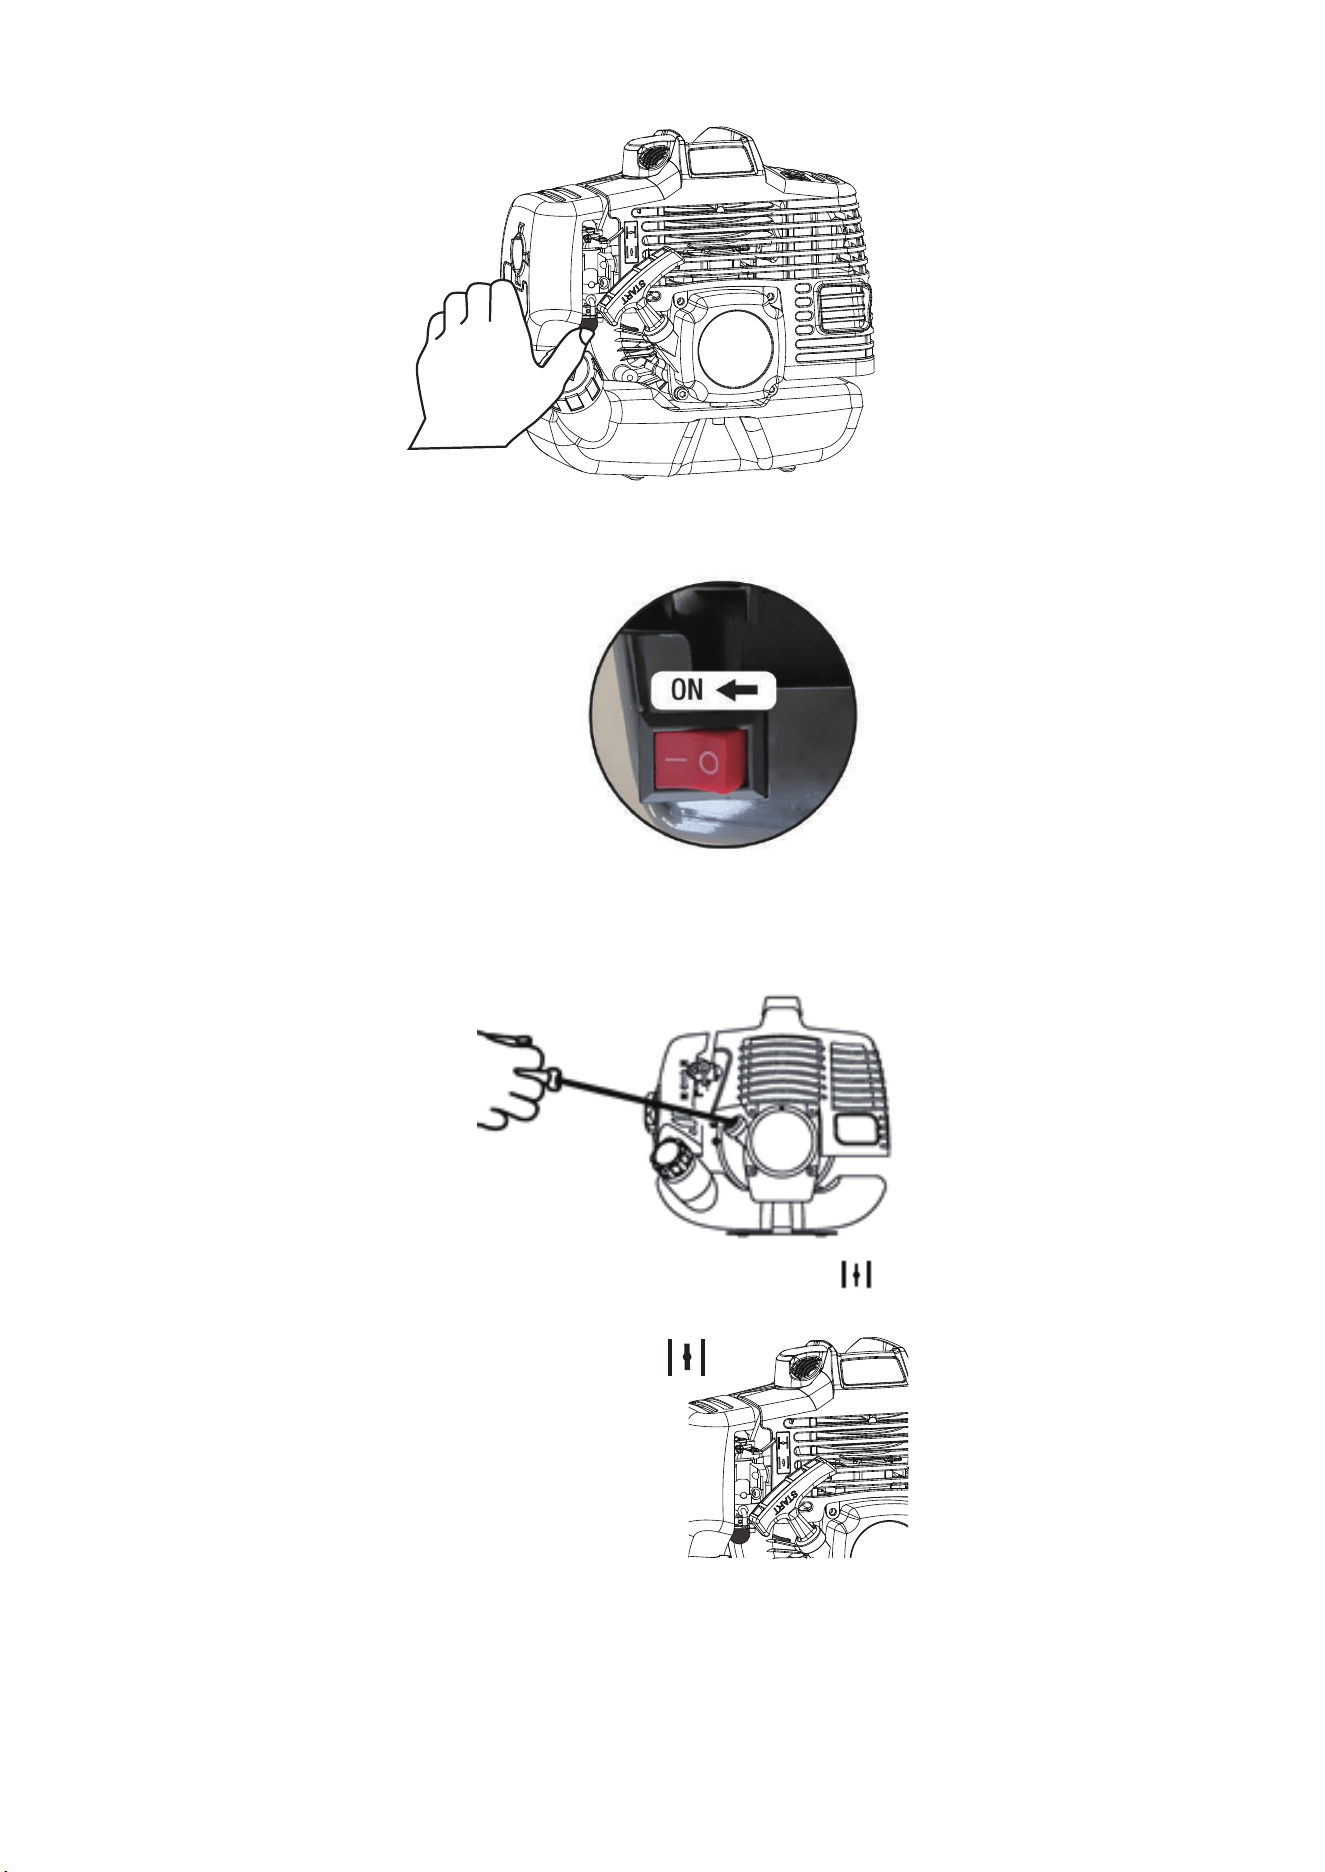
7
4) Move the ignion switch to the “On”posion
5) Pull the starter rope unl you hear the engine start.
6) Move the air lever to the normal working posion.
7) If the engine exploded but did not actually start running, pull the start rope
again unl it starts.
Allow the engine to warm up for approximately one minute before starng to work

8
with the machine.
To start a warm engine:
1. Move the switch to the “I” posion.
2. Move the lever to the
posion
3. Pull the start rope unl the machine starts.
If the machine does not start aer pulling at the rope a few mes, please refer to
the cold start up secon.
To stop the engine:
1. Let go of the accelerator and let the engine run at idle speed for a few seconds.
2. Stop the engine by displacing the switch from the posion to the “O” posion
(stoppage)
MAINTENANCE
WARNING !Prevent accidental starng during engine service by removing the
spark plug cap.
Maintenance
Daily
First 20
hours
Every 20
hours
Every 50
hours
Every 100
hours
Check and replenish fuel
X
Check for fuel leakage
X
Check bolts, nuts and
screws for looseness and
loss
X
Clean fuel filter
X
Clean fuel tank cap
X
Clean air filter element
X
Tighten bolts, nuts and
screws
X
X
Clean spark plug and adjust
electrode gap
X
Remove dust and dirt from
cylinder fins
X
Remove carbon deposits on
piston head and inside
cylinder
X
Remove carbon deposits in
the exhaust pipe of
muffler
X
Clean screen of spark
arrester
X
Check the sliding poron of
cranksha, connecng rod
etc.
X

9
• The service intervals indicated are to be used as a guide. Service to be
performed more frequently as necessary by operang condion.
• When damage or defect occurs in checked parts, replace with a new one.
Replacing and cleaning air filter
For proper performance and long life, keep air filter clean.
Remove the air filter cover by unscrewing the screw on the air filter cover.
Remove the filter, clean it in warm soapy water. Rinse and let dry completely.
For best performance, replace annually.
WARNING:
The use o
f petrol or combusble solvents for cleaning can cause fire or explosion.
Therefore only use soap water or non-combusble solvent. Never operate the
machine without the air filter.
Spark plug
To ensure proper engine operation, the spark plug must be properly gapped and
free of deposits.
1. Remove the spark plug cap.
2. Clean any dirt from around the spark plug base.
3. Use the socket spanner which provided to remove the spark plug.
4. Visually inspect the spark plug. Remove carbon deposits
using a wire brush.
5. Check for discoloraon on the top of the spark plug. The standard color should
be a tan color.
6. Check the spark plug gap. The acceptable gap should be between 0,6-0,7mm.
7. Install /reinstall the spark plug carefully by hand.
8. Once the spark plug has been seated, ghten it with a spark plug wrench.
9. Reinstall the spark plug cap on top of the spark plug.

10
Adjusng of carburetor
The carbureor is tuned by the manufacturer to achieve maximum performance
in all situaons, with a minimum emission of toxic gas in compliance with the
regulaons in force. In the case of poor performance contact your Dealer for a
check of the carbureon and engine.
TROUBLESHOOTING GUIDE
Symptom
Probable Cause
Remedy
Engine won’t start or
output is low
Insufficient
compression
Fault Piston, Cylinder
or Piston ring
Ask your distributor
for advice
Loose spark plug
Tighten properly.
Loose cylinder bolts
No fuel to combuson
chamber
No Fuel in fuel tank
Fill fuel tank.
Blocked fuel filter or
tube
Clean.
Blocked air vent in
tank cap
Faulty carburetor
Ask your distributor
for advice
Spark plug fouled by
fuel
Over-rich fuel/air
mixture
Clean spark plug.
Clogged air cleaner
Clean
Faulty carburetor
Ask your distributor
for advice
Incorrect grade/type
of fuel
Change gasoline.
Water in fuel
No spark or weak park
Faulty spark plug
Replace spark plug.
Faulty ignion coil
Ask your distributor
for advice
Engine switch le in
“STOP” posion
Turn engine switch to
“START” posion.
Low output
Engine overheats
Clogged air cleaner
Clean
Recoil starter or
cooling air path
clogged with dirt.
Carbon built-up in
combuson chamber
Ask your distributor
for advice
Poor venlaon
around engine
Select a beer
locaon.

11
STORAGE
Empty the fuel
Engine to be stored over 30 days should be completely drained of fuel to prevent
gum deposits forming on essenal carburetor parts fuel filter and fuel tank.
• Clean the engine.
• Remove all the fuel from the tank and run the engine at idling to use up the
fuel in the carburetor.
• Remove the spark plug, pour in 0.5 mL of new 2- stroke engine oil through
the plug hole, pull the recoil starter grip several mes, and reinstall the
spark plug.
• Slowly pull the recoil starter grip unl resistance is fe
lt.
• Store the engine in a clean and dry place.