1
USER
MANUAL
Essential Care Kit
CONGRATULATIONS!
Thank you for your purchase. It is important that you read these instructions
carefully before installing and using your Nomo Essential Care Kit. Please keep this
User Manual for future reference.
2
Need assistance?
Please visit www.nomosmartcare.com, contact Nomo Smart Care customer support at (844) 888-8854,
or email us at customerservice@nomosmartcare.com.
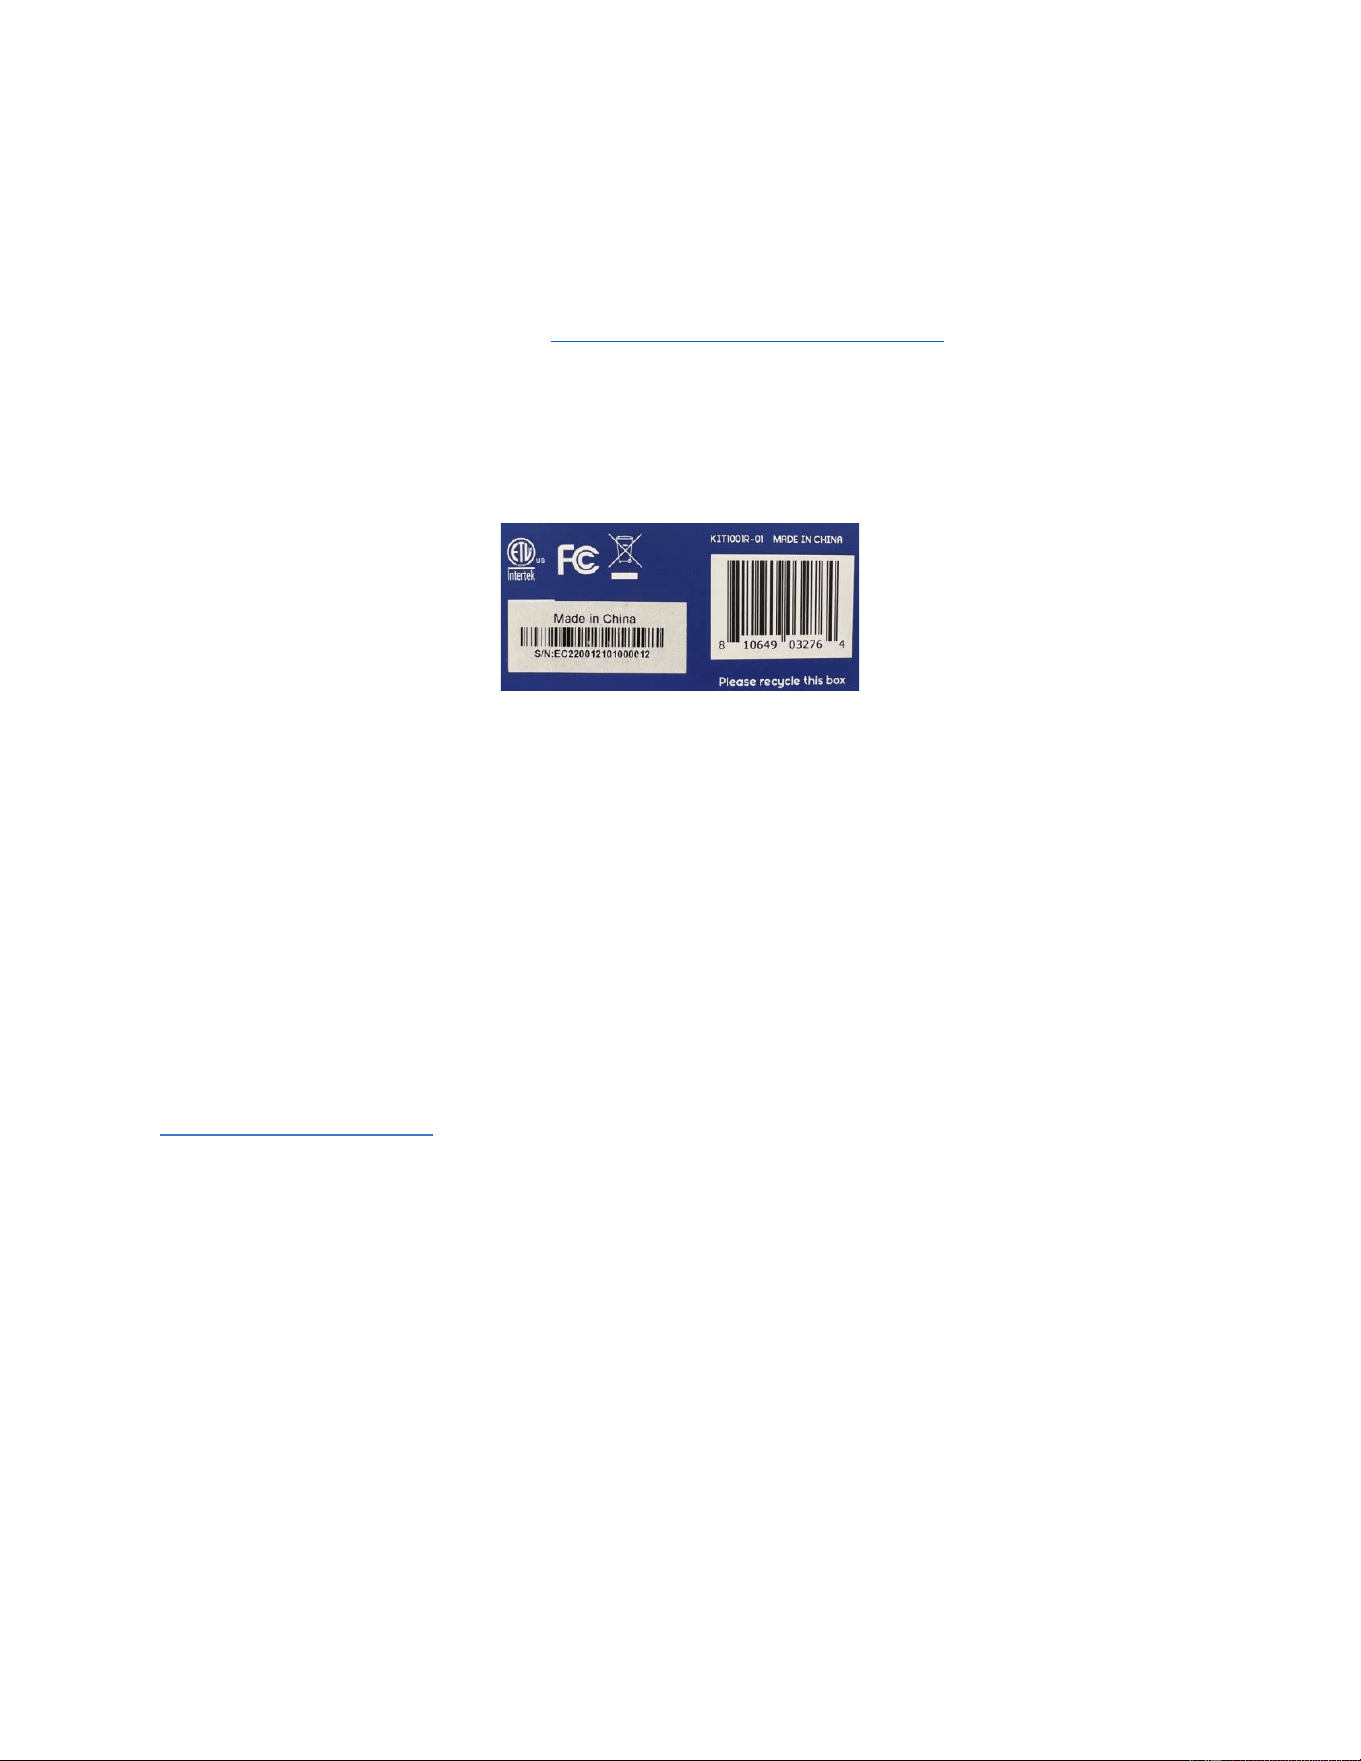
It is recommended that you record the model and serial number of your Nomo Smart Care system
for future reference. The serial number (S/N) can be found on the side of your inner box below the
bar code on the left. The model number is located on the same panel above the bar code on the
right. Please see the image below:
Product Name: Nomo Smart Care Essential Care Kit
Model #: KIT1001R-01
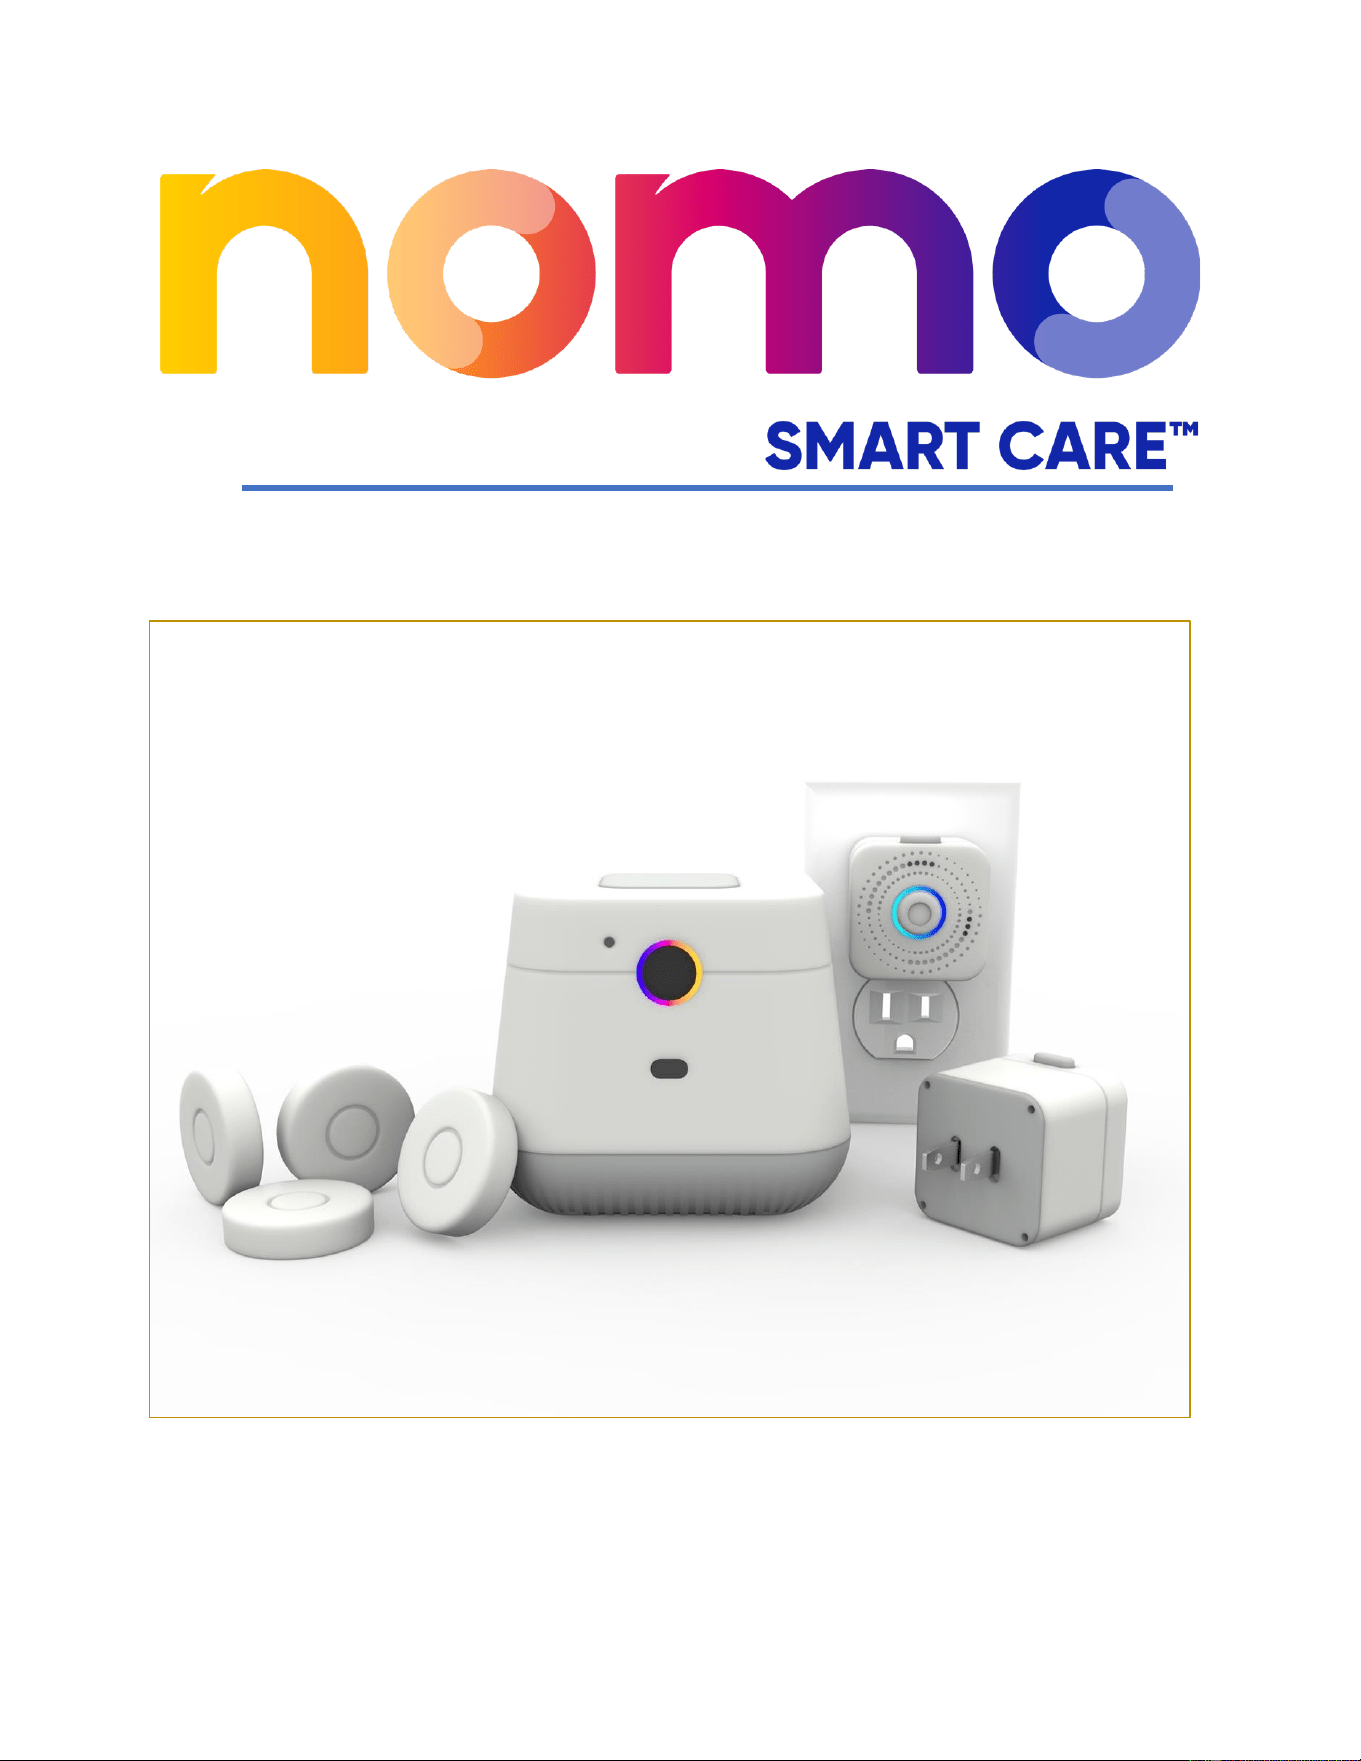
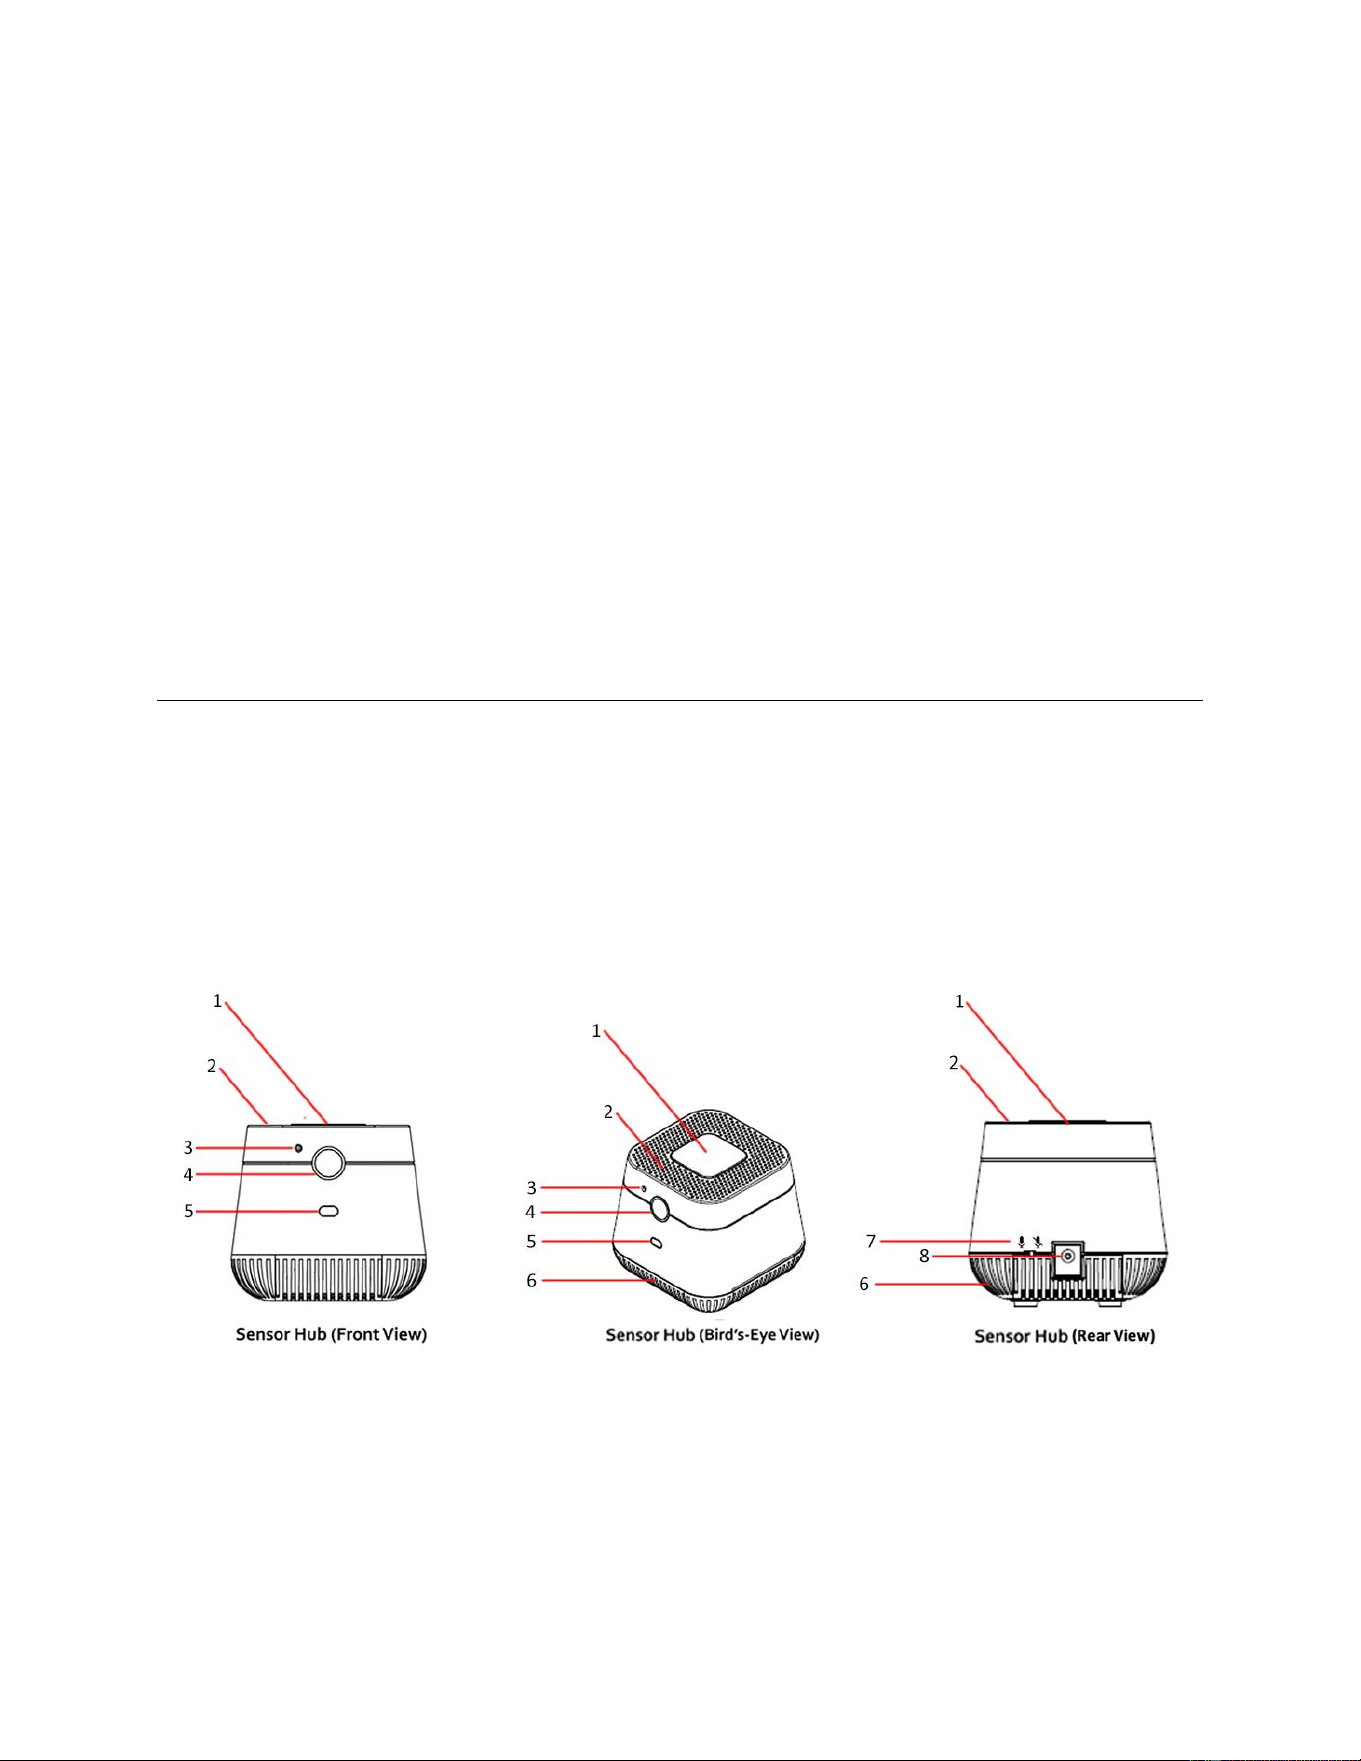
Included in your Essential Care Kit: One (1) hub, Two (2) satellites, and Four (4) tags.
Copyright & Trademark Specifications are subject to change without notice. Nomo and Nomo Smart
Care are trademarks of Nomo International, LLC. Other brands and product names are trademarks or
registered trademarks of their respective holders. No part of the specifications may be reproduced in
any form or by any means or used to make any derivative such as translation, transformation, or
adaptation without express permission from Nomo International, LLC.
© 2023 Nomo International, Inc. All rights reserved.
www.nomosmartcare.com
Google Play and the Google Play logo are registered trademarks of Google LLC.
Apple and the Apple logo are registered trademarks of Apple Inc.
Select Wi-Fi brands and logos are offered license free and intended to be used widely throughout the
Wi-Fi ecosystem by Wi-Fi Alliance members, non-members, industry partners, media, and analysts to
describe products, technology, network deployments, and operating system support.
All company, product and service names used herein are for identification purposes only. The use of
these names, trademarks and brands does not imply endorsement.
3
Table of Contents
I. IMPORTANT SAFETY INSTRUCTIONS .............................................................................................4
II. ADDITIONAL SAFETY INSTRUCTIONS ............................................................................................5
III. PRODUCT OVERVIEW .................................................................................................................6
IV. NOMO SMART CARE APP AND DEVICE OVERVIEW ......................................................................8
V. NOMO SMART CARE APP AND DEVICE SET UP ............................................................................ 10
1. HOW TO FIND AND INSTALL THE NOMO SMART CARE APP ....................................................................... 11
2. HOW TO SET UP YOUR ACCOUNT ....................................................................................................... 11
3. HOW TO ADD YOUR DEVICES ............................................................................................................ 12
4. HOW TO CONNECT TO YOUR CARE CIRCLE............................................................................................. 14
5. HOW TO USE OTHER FUNCTIONS OF THE APP ........................................................................................ 15
VI. TESTING, CERTIFICATIONS, & STATEMENTS ............................................................................... 22
FCC .................................................................................................................................................. 23
VII. COLOR-RING ANIMATION GUIDE FOR TROUBLESHOOTING...... ERROR! BOOKMARK NOT DEFINED.
4
I. IMPORTANT SAFETY INSTRUCTIONS
•
Read these instructions
–
All the safety and operating instructions should be read before this
product is used.
•
Keep these instructions
–
The safety and operating instructions should be saved for future
reference
.
•
Heed all warnings
–
All warnings on the devices and in the operating instructions should be
followed.
•
Do not use this product near water
– The device should not be used near water or moisture – for
example, in a wet basement or near a swimming pool.
•
Wipe or clean only with a dry cloth.
•
Install in accordance with the instructions set forth in this User Manual.
•
Do not install near any heat sources such as radiators, stoves, or other appliances (including
amplifiers) that produce heat.
•
If the provided plug does not fit
in
your electrical outlet, consult an electrician for replacement of
the incompatible outlet.
•
Protect the power cord from being walked on or pinched particularly at the electrical outlet or the
point where they exit from the hub.
•
Only use attachments/accessories supported by the manufacturer.
•
Unplug hubs and satellites during lightning storms or when not used for extended periods of time.
•
Refer all servicing to qualified service personnel. Servicing is required when the product has been
damaged in any way, such as the power-supply cord or plug is damaged, liquid has been spilled or
objects have fallen into the product, the product has been exposed to rain or moisture, does not
operate normally, or has been dropped.
•
Please keep the unit in a well-ventilated environment.
WARNING: To reduce the risk of fire or electric shock, do not expose this product to rain or moisture. The
product should not be exposed to dripping or splashing. Objects filled with liquids, such as vases, should not
be placed on the product.
WARNING: The batteries cannot be exposed to excessive heat such as sunshine, fire or the like.
WARNING: The main plug is used as a disconnect device, the disconnect device should remain readily
operable.
WARNING: To reduce the risk of electric shock, do not remove cover (or back) as there are no user-
serviceable parts inside. Refer servicing to qualified personnel.
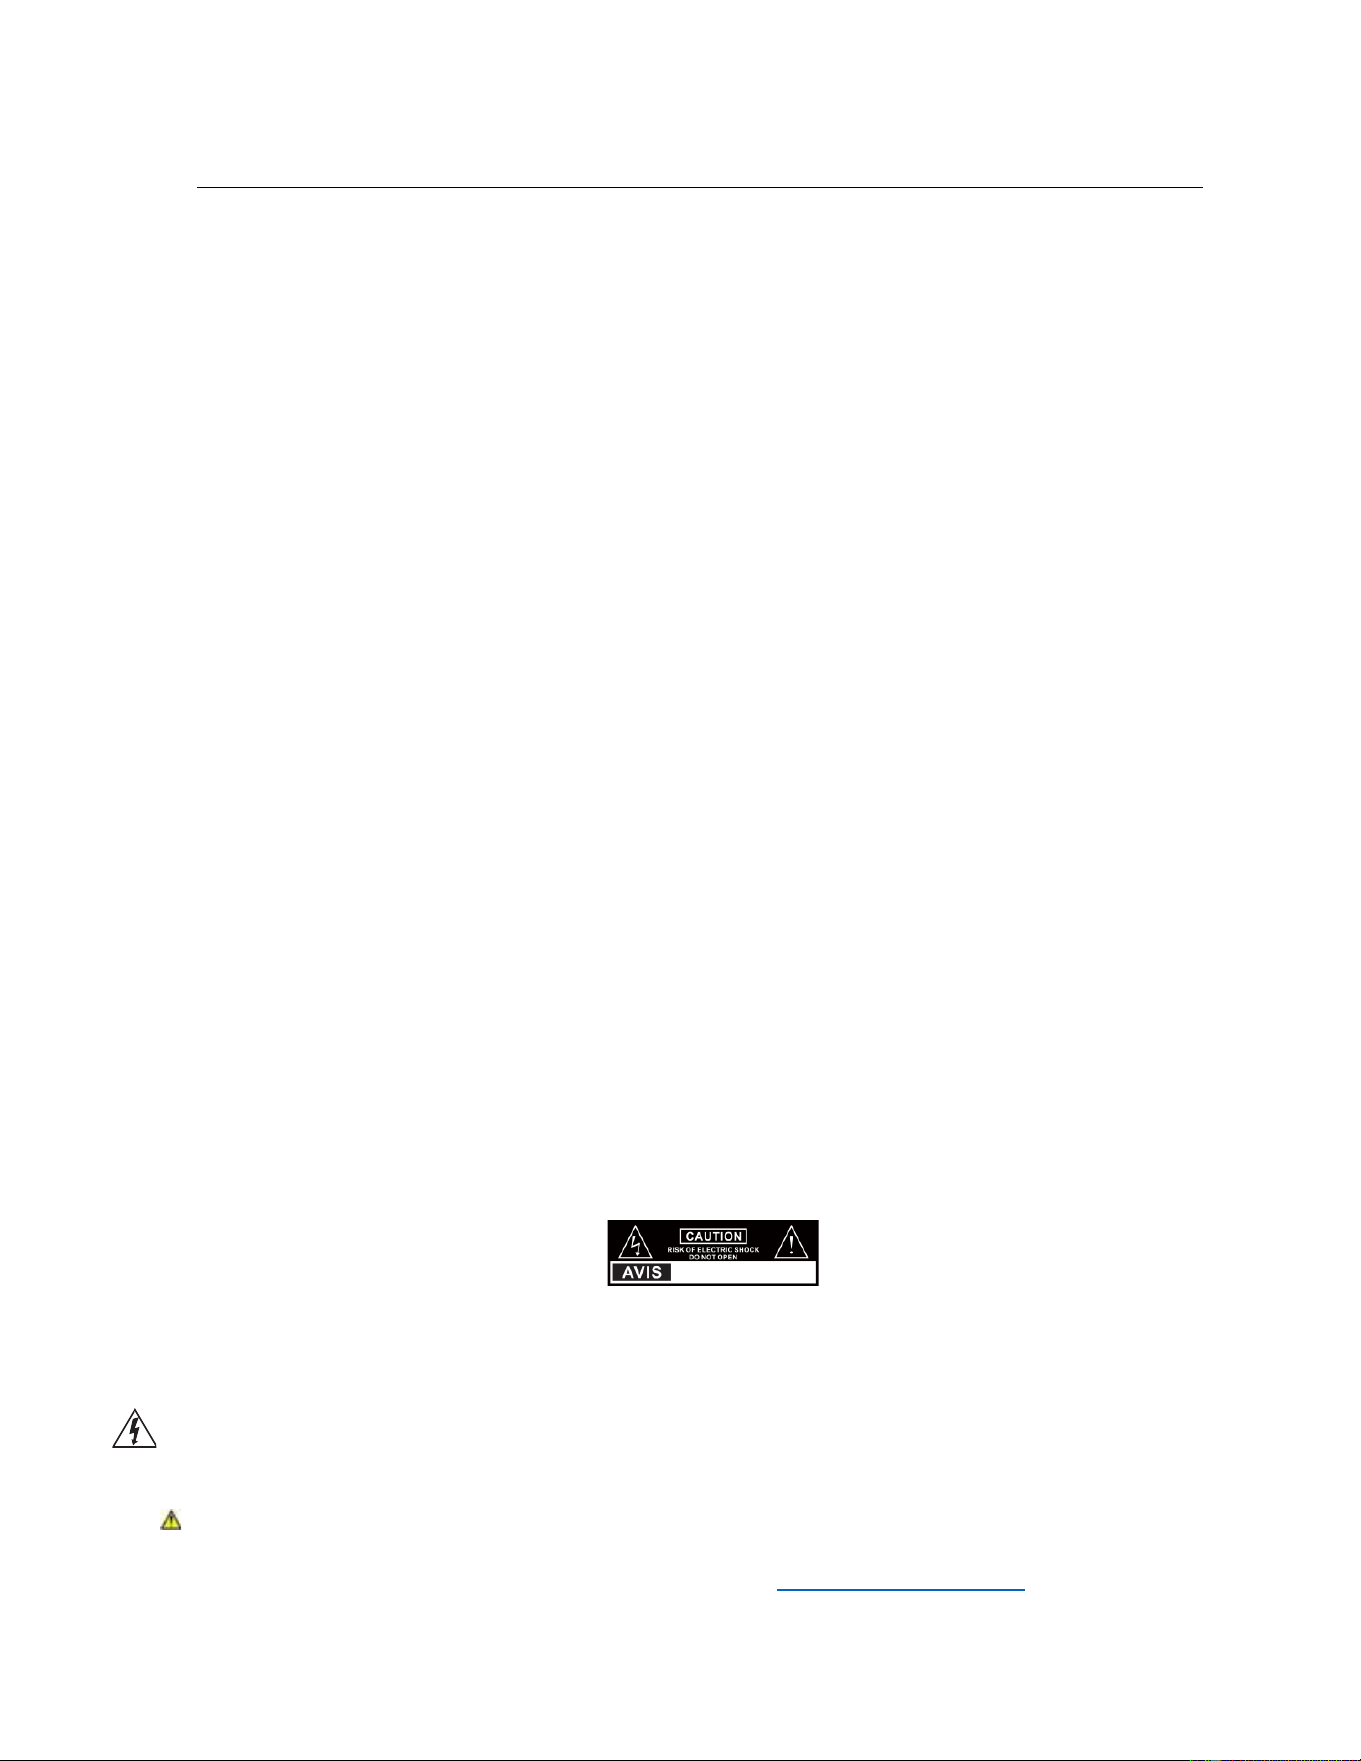
This lightning flash with arrowhead symbol within an equilateral triangle is intended to alert the user to
the presence of non-insulated “dangerous voltage” within the product’s enclosure that may be of sufficient
magnitude to constitute a risk of electric shock.
The exclamation point within an equilateral triangle is intended to alert the user to the presence of important
operating and maintenance instructions in the literature accompanying the appliance.
WARNING: This product can expose you to chemicals including styrene, which is known to the State of
California to cause cancer and Bisphenol A (BPA), which is known to the State of California to cause birth
defects or other reproductive harm. For more information, go to www.P65Warnings.ca.gov.
RISQUE DE CHOC ELECTRIQUE NE
PAS OUVRIR
5
ADDITIONAL SAFETY INSTRUCTIONS
To ensure reliable and safe operation of this equipment, please carefully read all the instructions in this
user guide, especially the safety information below.
Electrical Safety
• This product is made for indoor use only.
• These devices should only be connected to a main power supply with a voltage that matches the
label at the rear of the product.
• To prevent overload, do not share the same power supply socket with too many other electronic
components.
• Do not place any connecting wires where they may be stepped on or tripped over.
• Do not place heavy items on them, which may damage the leads.
• Hold the main plug, not the wires, when removing from a socket.
• Do not allow water or moisture to enter the devices or power adapter.
• Pull the plug out immediately and seek professional help if the main plug or cable is damaged,
liquid is spilt onto the set, if accidentally exposed to water or moisture, if anything accidentally
penetrates the ventilation slots or if the set does not work normally.
• Do not remove the safety covers. There are no user serviceable parts inside. Trying to service the
unit yourself is dangerous and may invalidate the product’s warranty. Qualified personnel must
only service this product.
• Do not attempt to replace the tag battery because it is permanently affixed to the
hardware—opening the tag will damage the hardware. Opening the tag will void your
warranty.
o Please contact customer service if your tag malfunctions or the battery loses power
before the warranty period ends.
• Do not break open or throw used batteries on a fire.
• Do not throw device(s) in household garbage or recycling bins.
o Device(s) should be taken to separate recycling or household hazardous waste collection
points. Find a recycling center near you by visiting:
▪ https://search.earth911.com/?what=Lithium-ion+Batteries
• Please recycle the tag with other hazardous waste as a battery containing device.
o If the tag is not effectively managed, is damaged, or put in the wrong equipment, the
embedded battery can cause a fire.
6
Product Specifications
Specifications
hub
satellite
tag
Model #:
HUB1001
SAT1001
TAG1001
Width (mm)
98.3
41.5
38.6
Height (mm)
91.6
41.5
38.6
Depth (mm)
98.3
37.7
9.9
Weight (grams)
233
49
12
Power Supply
AC 100V-240V / DC 5V 4A
Switching Supply
AC 100-240 /
DC 5V 1A USB Power Supply
CR2430 3V/
230mAh
Battery
Operating Temperature
0°C to +40°C
0°C to +40°C
0°C to +40°C
Storage Temperature
-20°C to +60°C
-20°C to +60°C
-20°C to
+60°C
Speakers
4ohm speaker
N/A
N/A
Speaker Volume
64.5dB
N/A
N/A
Wireless Connectivity speed
minimum
802.11b 3Mbps/1Mbps
802.11b/g/n
(3Mpbs/1Mbps)
N/A
Additional Wireless
Connectivity
< 1GHz
< 1GHz
< 1GHz
Motion Sensing Range
N/A
5m (15ft)
N/A
Image Sensor Distance Range
300 cm / 118 in / 9.84252 ft
300 cm / 118 in / 9.84252 ft
N/A
7
II. PRODUCT OVERVIEW
System requirements not included within this Essential Care Kit:
1. Private Wireless Internet Connection
a. Username
b. Password
2. Mobile phone or tablet with either:
a. iOS version 14.1 or newer
b. Android
TM
8.0 - Oreo or newer
What is included?
The Essential Care Kit is a collection of devices that works with the Nomo Smart Care mobile app.
The devices work with the app to provide peace of mind to family, friends, and professionals who
care for independent seniors.
NOTE: The Essential Care Kit includes three Nomo Smart Care devices — one (1) hub with separate
power supply cord, two (2) satellites, and four (4) tags. The kit also includes a wearable lanyard with
a custom plate to attach one tag and use as a wearable pendant, if desired. It may also be placed in
a pocket. The wearable may only be used in the home. Three help documents are packaged with the
Essential Care kit to support set up and overall use. They include a Quick Start Guide, Warranty Card,
and Registration Guide.
8
Nomo Smart Care Essential Care Kit:
● hub: Wi-Fi enabled motion and humidity sensor with call conferencing abilities.
● satellite: Motion sensor with an LED indicator that plugs into standard home electrical
outlets; The satellite uses Wi-Fi technology to connect with your Nomo Smart Care system.
● tag: Movement and temperature-sensing device with an alert button that can be attached to
moving objects, such as doors, drawers, and windows in the home. It can also be affixed to
non-moving surfaces when an alert button needs to be within reach of a high-risk area (e.g.,
Shower, bathtub). The tag may also be used as a wearable when provisioned as such in the
mobile app. When used as a wearable, the tag does not sense regular movement or motion but
acts as a panic button and potential fall detection device. It may be attached to the lanyard
provided in the kit, which can be worn around the neck or carried in a pocket.
● Nomo Smart Care Mobile App: Provides instant alerts in case of emergency and non-
emergencies for caregivers and allows easy communication and monitoring of in-home care
recipient events. The app is available on both iOS and Android devices.
III. Nomo Smart Care App and Kit Overview
The Nomo Smart Care mobile app is available in an iOS and Android version. The mobile applications
share significant similarities and utilize identical features to operate. User instructions are below.
The hub is the central device in the care recipient’s home. The hub connects to a private wireless
internet network and is designed to be placed centrally in the home, typically in the room where your
loved one spends most of their time during the day.
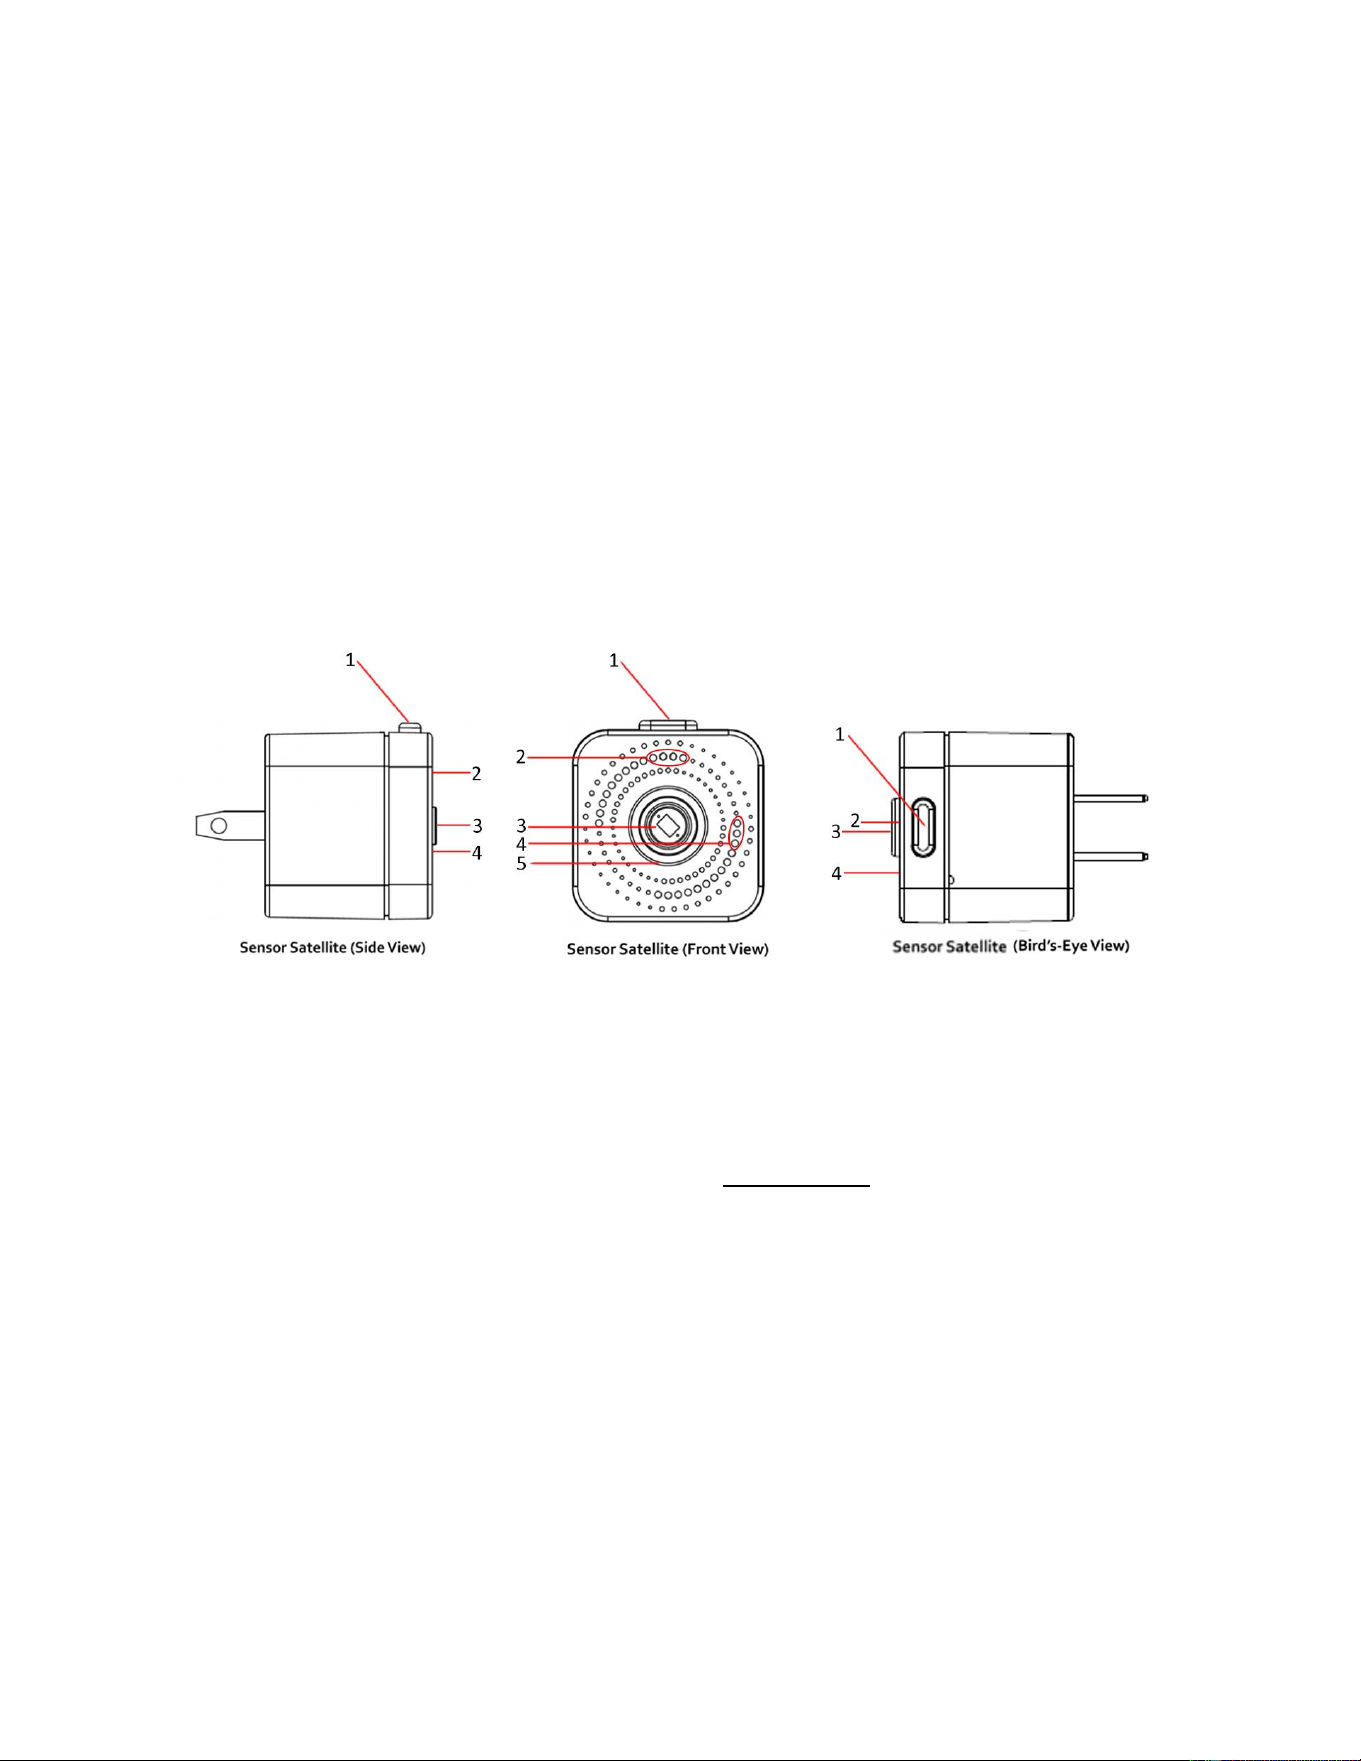
The hub features a:
1. Multi-use button is located on the top of the hub, allowing the care recipient to alert the care
circle if help is needed in the home.
2. Microphone that allows the care recipient to communicate with their care circle or others
through Nomo’s private phone network.
9
3. Motion-detector that senses general motion in the room.
4. Colored led light ring used for notifications with the Nomo app.
5. Time-of-flight sensor (Coming soon).
6. Speaker used for audio communication.
7. Privacy switch located on the back side of the hub used to switch modes.
8. Power supply that powers the hub.
Note: Firmware updates are pushed to devices automatically from the Nomo Smart Care team.
The satellite is designed to be plugged into a standard wall electrical outlet in the home with an
unobstructed view of the area to be monitored. Nomo Smart Care users are not limited on the number
of satellites that can be added to their Essential Care kit.
The satellite features a:
1. Button on the top of the device, used to connect the satellites to the Nomo Smart Care System.
2. Light sensor detecting when the lights are on or off.
3. Motion-detector sensing general motion in the room.
4. Microphone that detects environmental sounds (Coming soon).
5. LED ring that displays custom animations.
Note: System Updates are pushed to all devices automatically from Nomo.
10
Tags are battery-operated wireless movement and temperature sensors with an alert button. Tags are
designed to be placed on any surface in the home or worn by the care recipient around their neck as a
pendant or in a pocket. Tags have an alert button on their face that when pressed will notify the care
circle. The tag is the only device in the Essential Care Kit that may be near or around water (e.g., near
showers, bathtubs, sinks, etc.). Nomo Smart Care users are not limited on the number of tags that can
be added to their Essential Care kit.
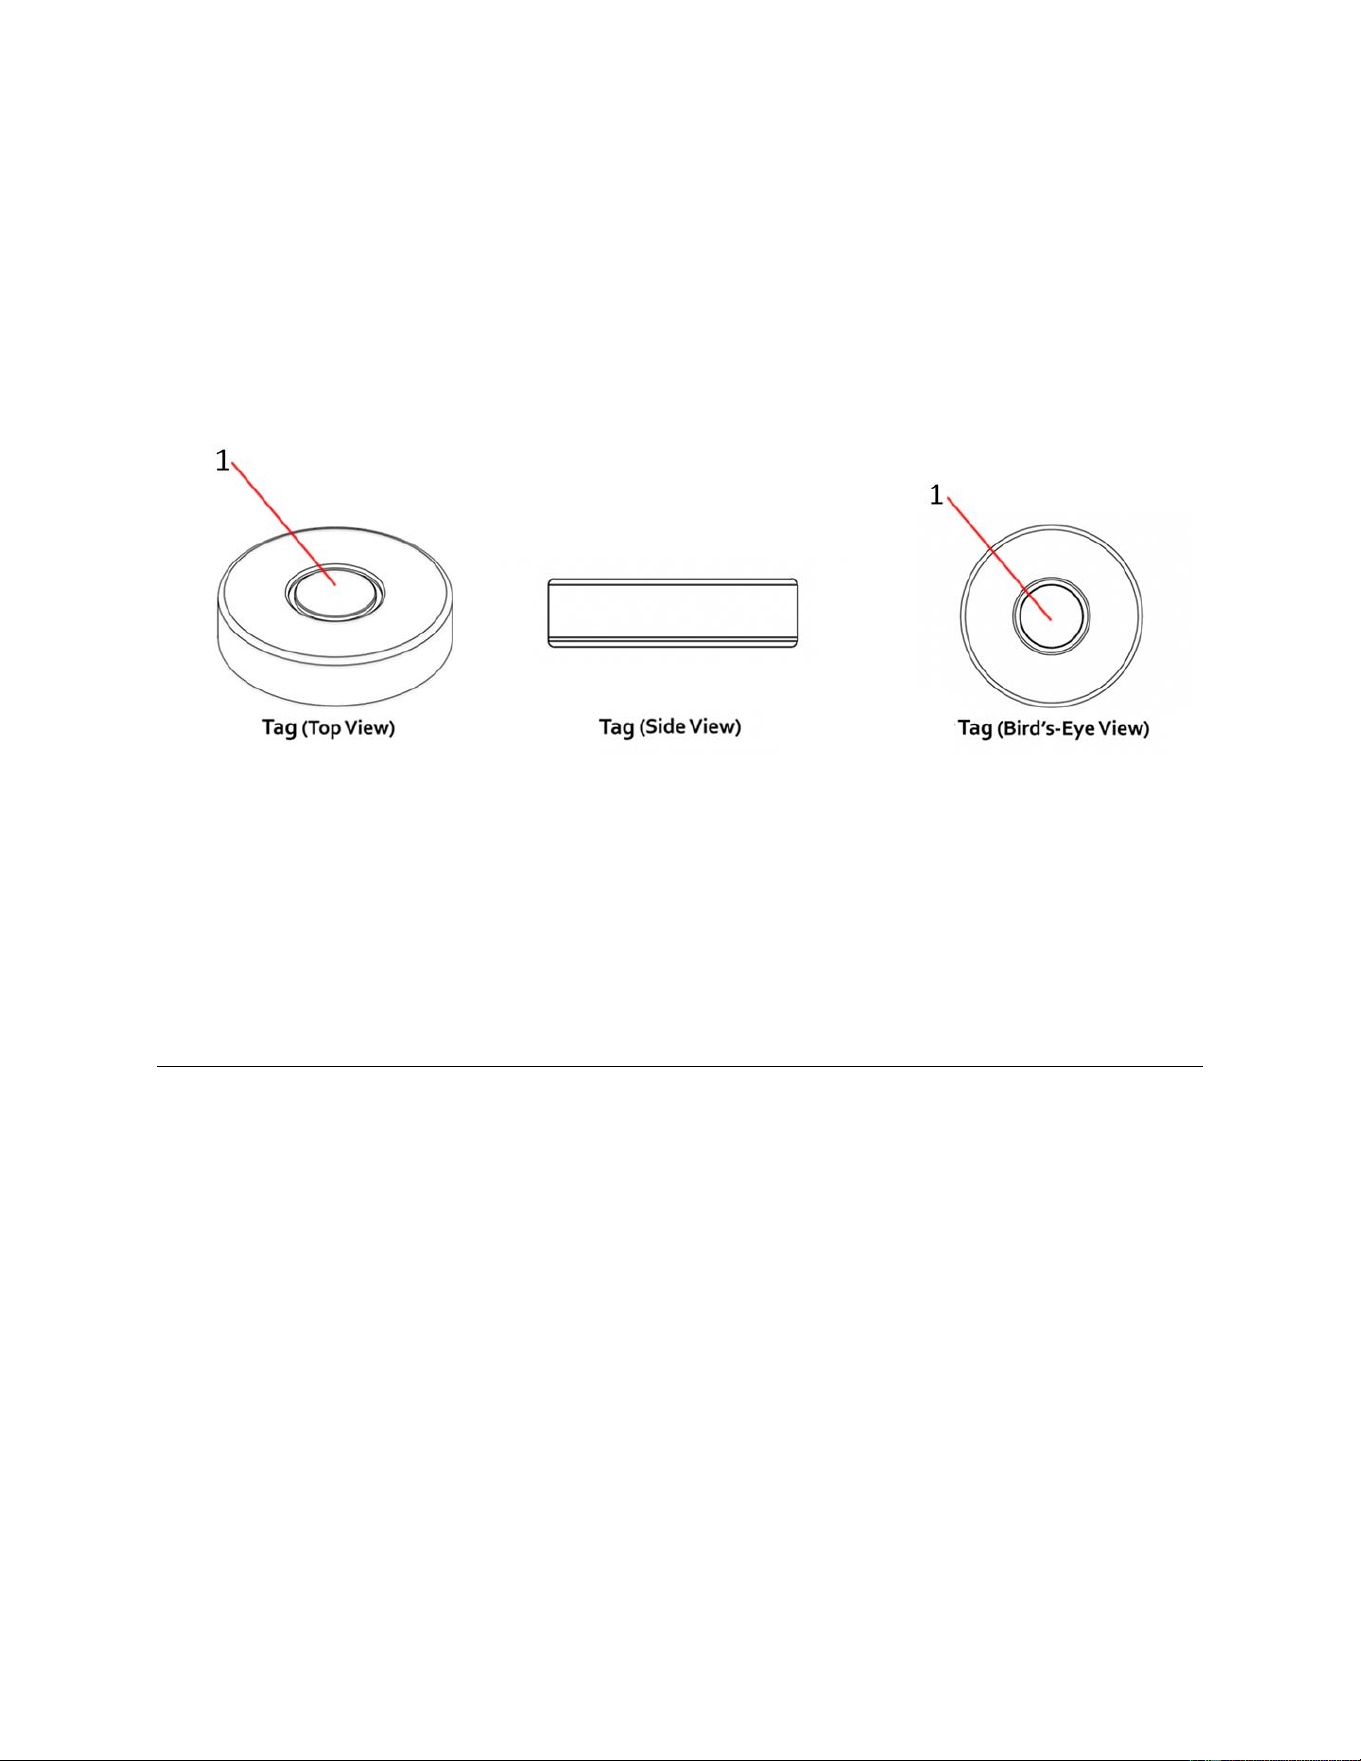
The tag features:
1. Alert button that can be pressed to notify the care circle when help is needed. The alert button
is also used initially to connect the tag to the Nomo Smart Care System.
IV. Glossary/Terms
- Care recipient: The person who is receiving care.
- Caregiver: The person who is providing care.
- Care circle: The person or people who are monitoring the care recipient’s home and status.
- Goals: The care recipient and care circle can set an objective number of times for the care
recipient to complete an activity. They can be set up in the app.
- Poke: Pokes can be scheduled to provide instant or scheduled communications via the Nomo
system. They can be set up on the app by the care circle.
- Trigger: Triggers can be set up on the app. They generate a “Warning” or “Emergency”
notification for the care circle when certain conditions are met. They can also be set for
“absence” of activities.
11
V. Nomo Smart Care App and Device Set Up
1. How to find and install the Nomo Smart Care app
1.1 In the search bar in the Apple App Store or Google Play Store on your phone, enter “Nomo
Smart Care.”
1.2 Select the "Nomo Smart Care" app from the search results page.
1.3 Download the Nomo Smart Care App to your mobile device and follow standard installation
procedure.
2. How to set up your Nomo Smart Care account and app
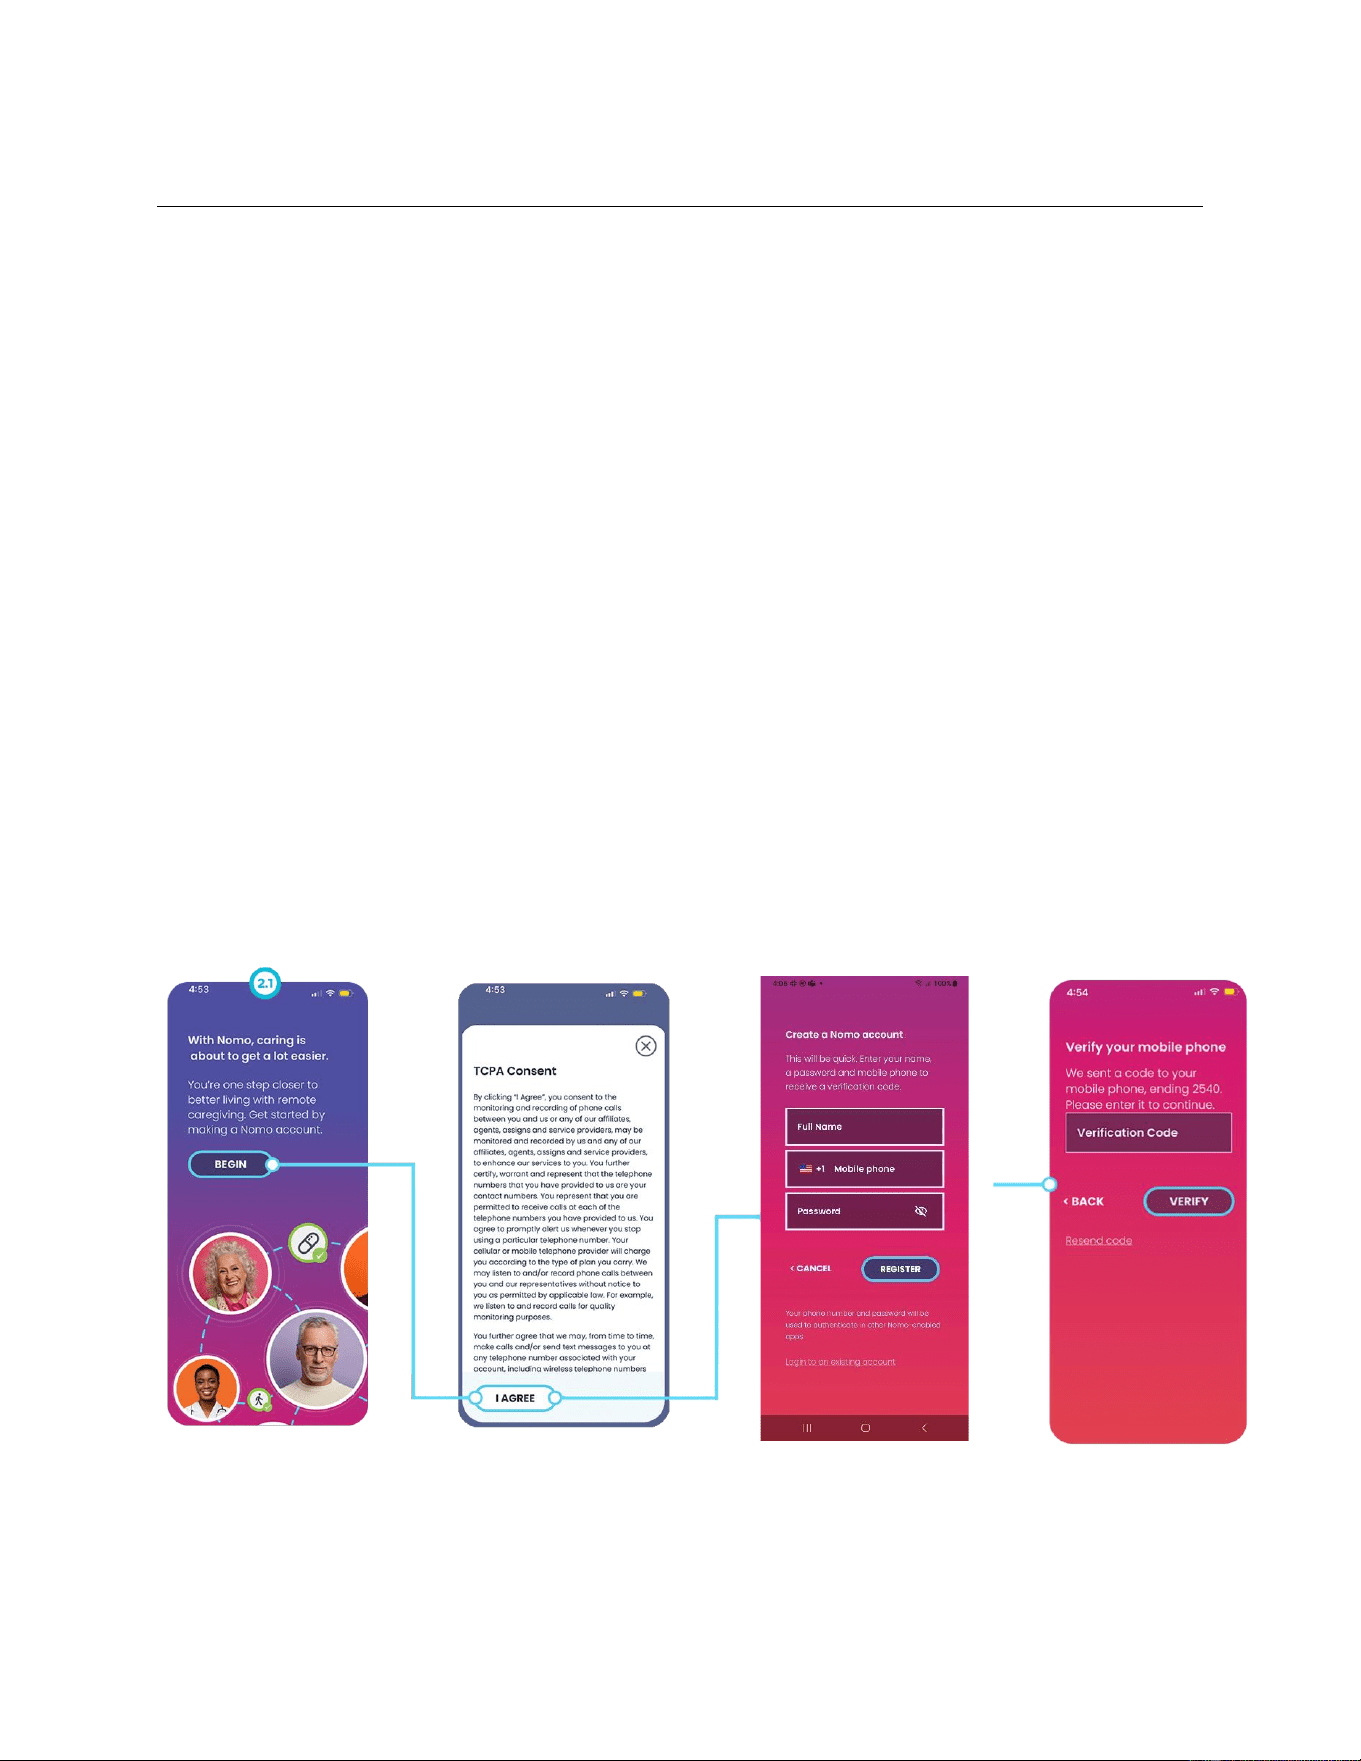
2.1 On the Welcome Screen:
a. Tap “Begin” to start your account setup.
b. Follow the prompts in the app to proceed to activation.
2.2 Create or join a Nomo Smart Care Network.
a. If you already have an account, scroll to the bottom, tap “Login to an existing account.”
i. Enter your phone number and your password, then tap “Log In.”
b. Or create a new Nomo Account:
i. Enter your name, mobile phone number, and desired password.
ii. Then, tap “Register.”
iii. You will receive a verification code at the phone number entered. Type or paste
the verification code received and tap “Verify.”
• Tip: Make sure your phone’s Wi-Fi, Bluetooth and location services are on.

12
2.3 Setting up your app’s services
a. Once you have successfully created your account and added your care recipient, you will
see a screen that reads “You’re ready to install a new Nomo system.” Tap “Continue” to begin.
b. You will be asked to give Nomo permission to improve your experience by enabling both
Bluetooth and Location services. Press the toggle button to turn these on. If you do not enable
these services now, you can enable them later in your phone’s “Settings.”
Tip: You can follow this procedure when Nomo asks you for other permissions, such as
enabling calls and texts and push notifications, and access to your phone’s microphone.
2.4 Add the Care Recipient
a. When prompted, enter the information for the Care Recipient, including their name,
phone number, email (optional), and home address.
b. Customize the profile by selecting the “+” circle at the top of the page.
i. On the left, select a desired color.
ii. On the right, tap the rainbow “Photos” icon and allow Nomo access to your photos,
then select the desired photo for your avatar.
c. Then tap “Continue.”
3. How to add Nomo Smart Care devices to your system
3.1 To set up your hub:
a. Tap “Continue” when you are ready to proceed to the next step in-app.
b. Plug in the hub’s power supply.
• Tip: Hub should be in the room with the most activity. Ensure that the power outlet
your hub is plugged into is not controlled by a light switch, as this could
unintentionally cut power to the hub.
c. Follow the in-app instructions to activate the hub.
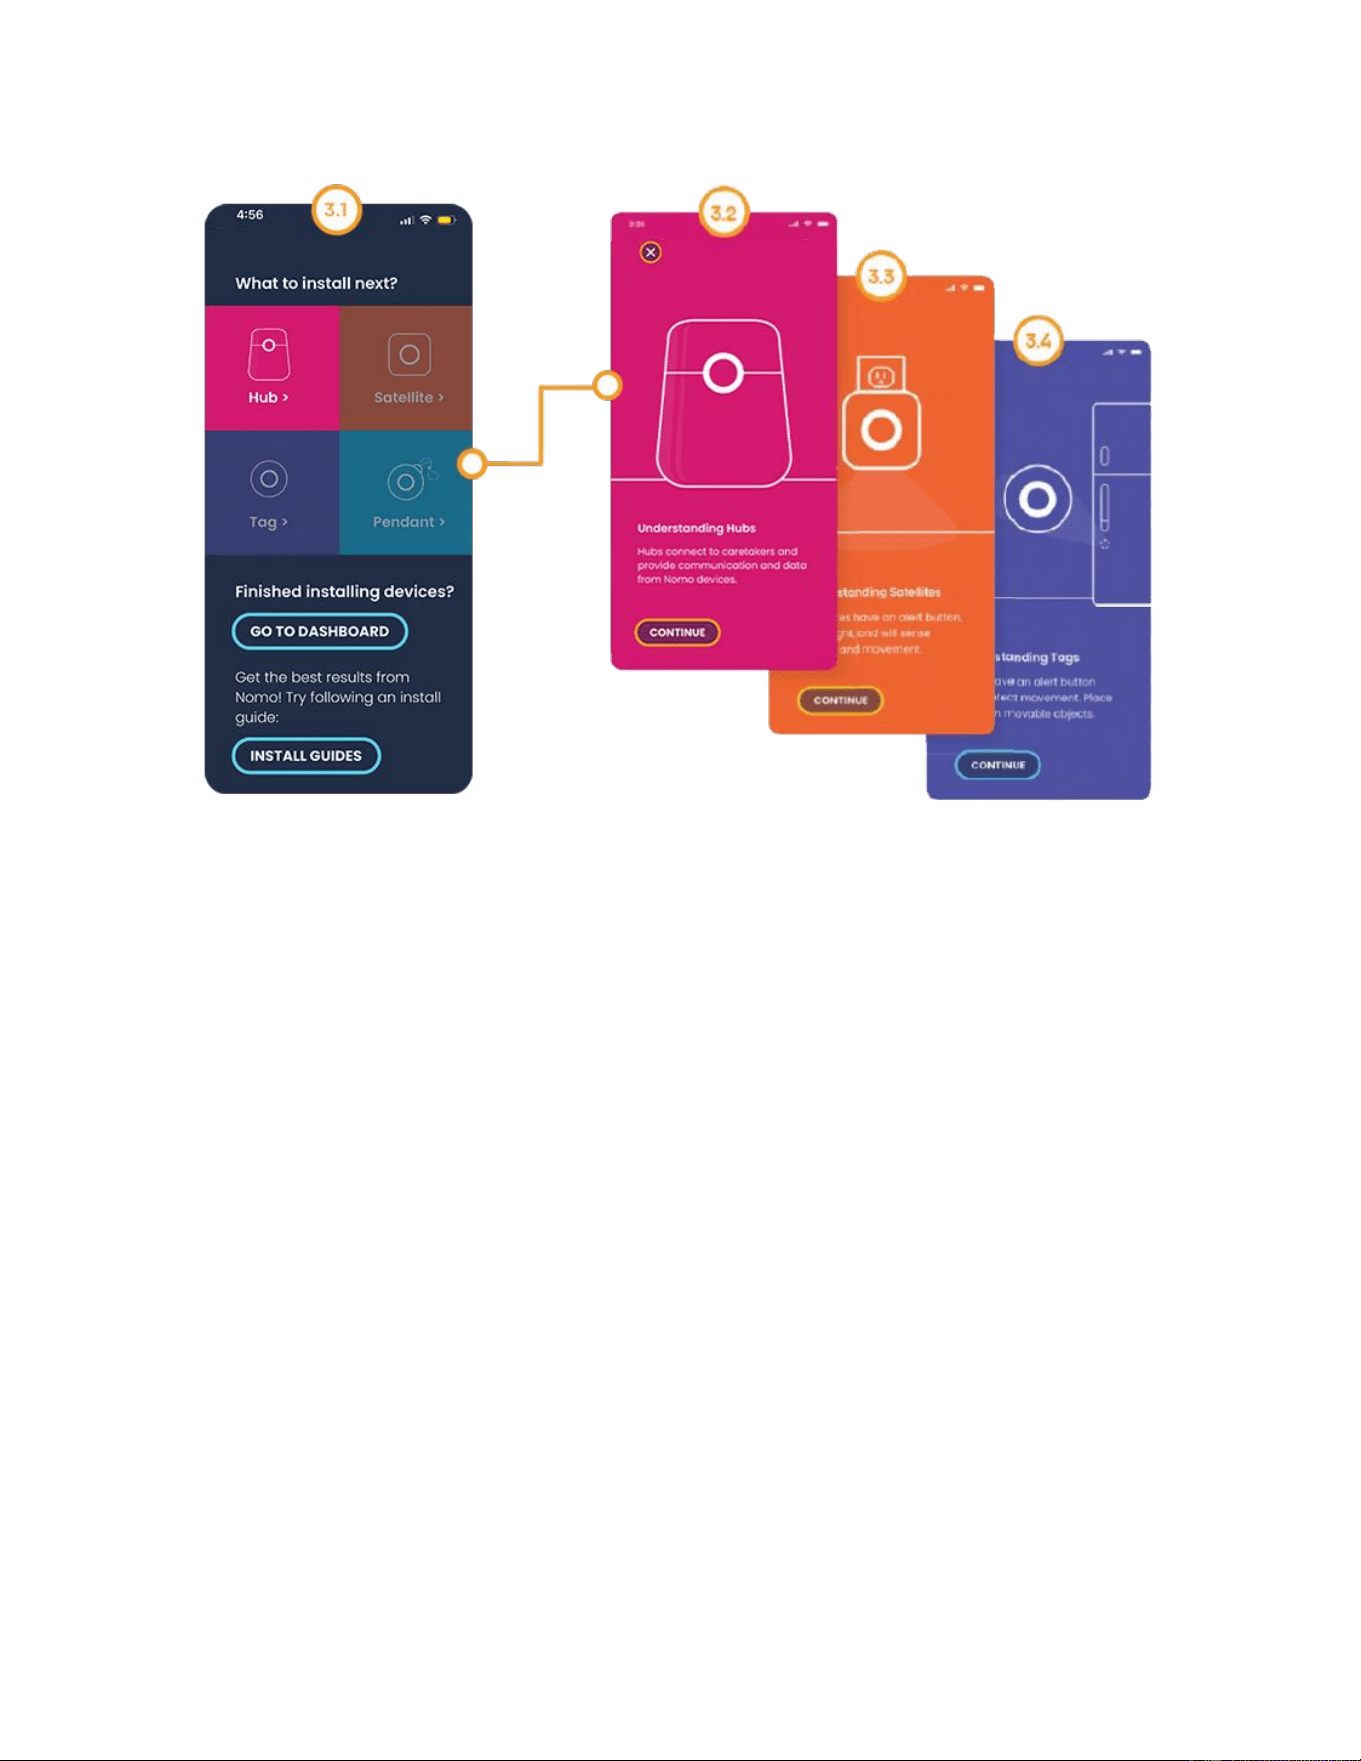
3.2 You will see a page that reads “What to Install Next?” with the devices you can install. Tap on
the icon of the Nomo Smart Care device you want to install.
Tip: If you bypassed this page, you will still be able to add and install devices by going to the
“Settings” page, in the app. Under “System,” tap “Add & Manage Devices.
3.3 To set up your satellites after you have set up the hub:
a. Tap the top right satellite icon.
b. The hub will announce that it is ready to setup a new sensor satellite.
c. Review the information and tips on the satellite landing page. Tap “Continue” when you
are ready to proceed to the next step.
3. Plug the satellite into a wall outlet in the desired location, ideally with visibility to high traffic
areas such as hallways or adjacent rooms. You must choose the room and give a short name to
the satellite.
Tip: Name it something easy to remember (e.g.: Bedroom, Main Bedroom or Kitchen, Main
Kitchen).

13
a. When prompted by the App the user will press the button on the satellite for at least six
seconds which will move the satellite into activation mode which will enable connection
to the hub.
b. The hub will announce when the satellite has been activated.
c. Tap “Finish” and you should see the newly added satellite in the list of ‘installed
devices.’
d. Follow the in-app instructions to activate additional satellites.
Note: To factory reset your satellite hold down the button for 10 to 15 seconds. The user is given a visual
indication that the device is resetting properly with a red pulsing indicator light. Upon reset the device
will be ready for a new activation.
3.4 To set up your tags:
a. Tap the bottom left tag icon.
b. The hub will announce that it is ready to setup a new tag.
c. You must choose the room and give a short name to the tag.
d. Tap “Continue” when you are ready to proceed to the next step.
e. Place the tag to your desired clean flat surface by removing the adhesive backing and
attaching it.
f. When activating the tag, press and hold the button for about six seconds. The lights will
initially be red, then flash green when activated.
g. The hub will announce when the tag has been activated.
h. Tap “Finish” and you should see the newly added tag in the list of ‘installed devices.’
3.5 To add new devices once you have already set up your main Nomo Smart Care kit:
a. Tap the “Settings” tab on the bottom of the app screen.
b. Under the “System” section, tap “Add & Manage Devices.”
c. Follow the in-app instructions to add more devices.
Tip: Tap the button marked “Install Guides” or “Improve My Nomo” to learn best practices for setting up
your Nomo devices.
14
4. How to connect to your care circle
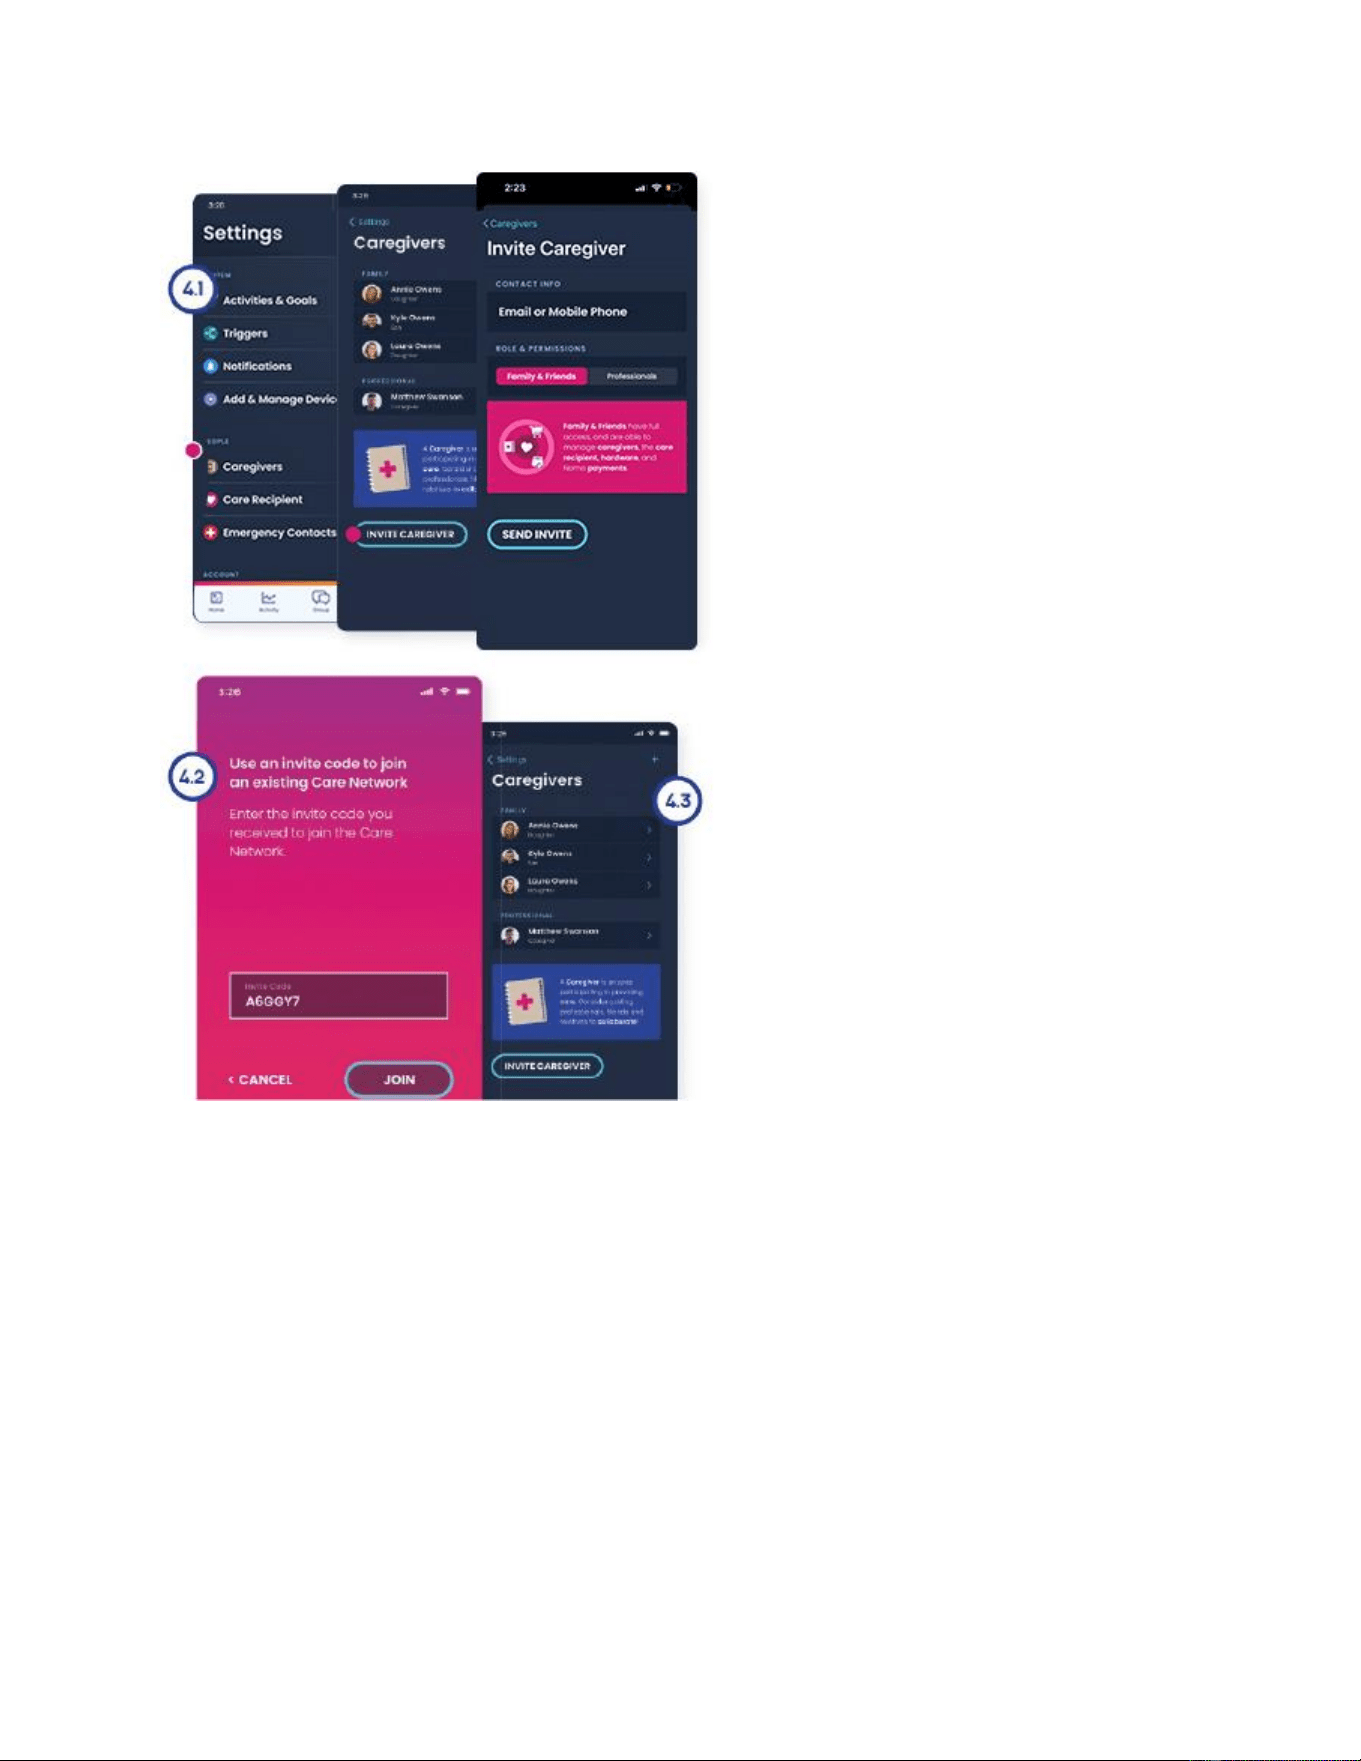
4.1 If you are adding new caregivers:
a. Tap on “Settings,” then tap on “Caregivers.”
b. Tap “Invite Caregiver.”
c. Enter the new caregiver’s phone number under Contact Info.
d. Designate the caregiver’s role and permissions by tapping either “Family & Friends” or
“Professionals.”
e. Tap “Send Invite.”
4.2 If you have been invited as a caregiver to an existing Nomo Smart Care Network:
a. Tap the link in the text message you have been sent.
Note: This link will only be accessible for 48 hours. If you are trying to access the Nomo Smart
Care Network beyond 48 hours, you will have to request a new link.
4.3 Confirm the new caregiver’s addition to the care network by going to the “Settings” page, then
tapping on “Caregivers” in your app. Repeat step 4.1 to add more family, friends, and
professionals to your care circle.
15
5. How to use other functions of the app
5.1 How to set goals:
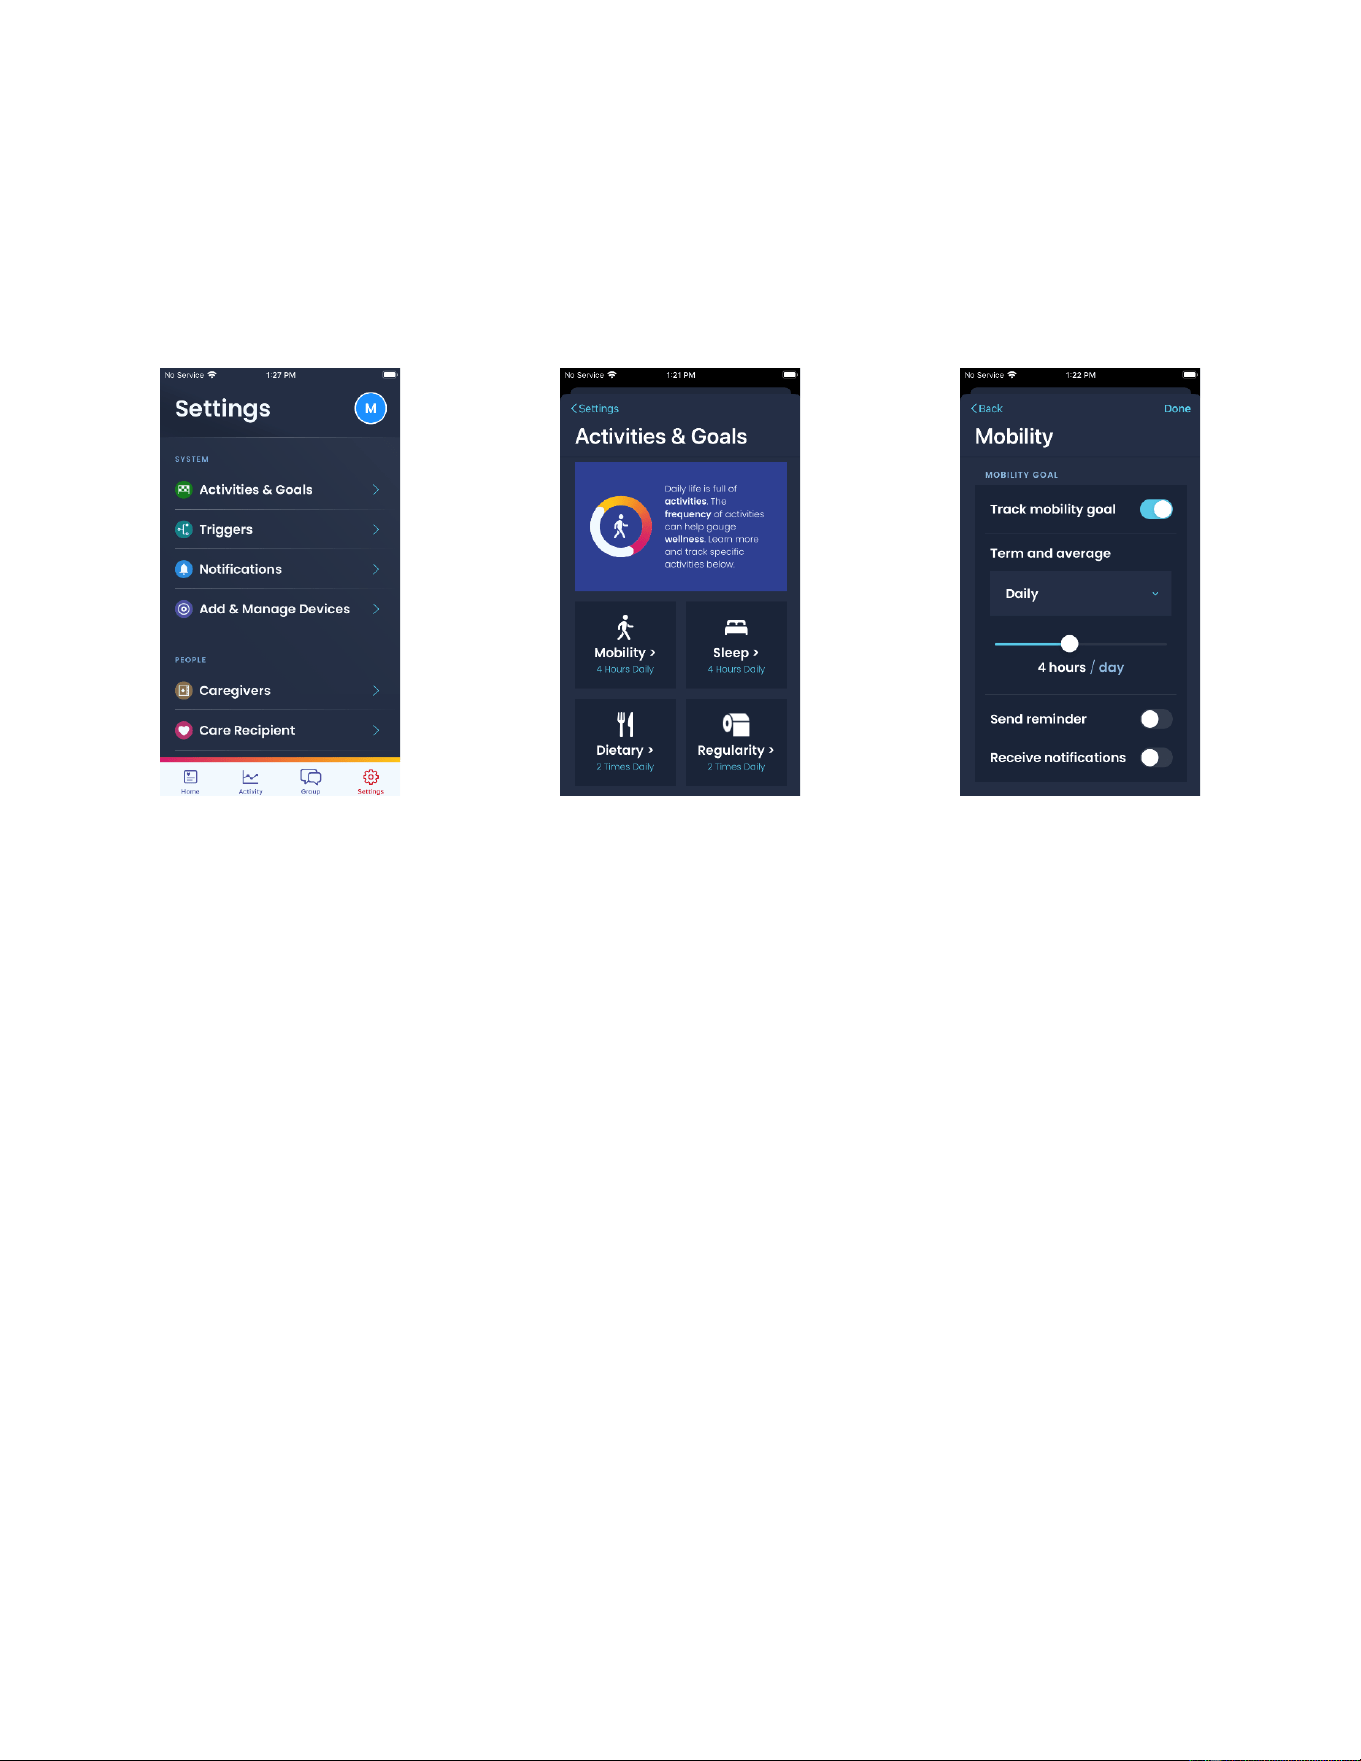
5.1.1 On the “Home” page you will find a section for goals. Tapping the button that reads “Goals” will
bring you to the page where you can set long and short-term goals for your care recipient. (You
can also find this on the “Settings” page under “Activities & Goals.”)
e. Select an activity on the page by tapping on it. You can choose “Mobility,” “Sleep,”
“Dietary,” or “Regularity,”
i. If you are setting up “Mobility” or “Sleep” as a goal, tap the icon then follow the
instructions below.
1. Use the toggle button to enable “Track [Mobility or Sleep] Goal” Under
“Term & Average, tap the drop-down and choose the desired time
frame.
16
2. For average, use the slider to choose the desired amount of activity per
timeframe.
3. Use the toggle button to enable or disable “send reminders” and
“receive notifications.”
4. Once you have customized the activity goals to your preferences on the
page, tap the “Done” button in the top right to save the new goal.
Note: You can scroll down and tap “View Help” for tips.
ii. For “Dietary” and “Regularity,” follow the below instructions.
1. For time frame, which is under the “Term” section,” select a time frame
from the drop down: daily, weekly, or monthly.
2. For per-term average, select the desired number of “visits” or “uses” by
tapping the minus button (on the left) to decrease the number of visits,
or the plus button (on the right) to increase the number of visits.
3. For options, use the toggle button to set “send reminders” and “receive
notifications” to off (left) or on (right)
4. Once you have customized the activity goals to your preferences on the
page, tap the “Done” button in the top right.
Note: You can scroll down and tap “View Help” for tips.
f. To share information with your Care Circle, tap on Group / Notes, or in the specific
activity click ‘Post in Notes.’ Notes, click the plus in the bottom right hand. A new note
is created. Title the note and write your information there. Tap the button that reads
“post note” to share when you are ready.
5.1.2 If you have already set up your goals and are looking to add more or update your goals, you will
be able to change them in the same “Goals” section on the “Home” page (or on the “Settings”
page under “Activity & Goals.”)
a. If you have already set up a goal for an activity but want to change it, tap on
that icon in that section. You will then follow the steps in 5.1.1.b to do this.
b. If you wish to add a new goal for an activity you have not yet set up goals for,
you will follow the steps in 5.1.1.b to set a new goal for the desired activity.
17
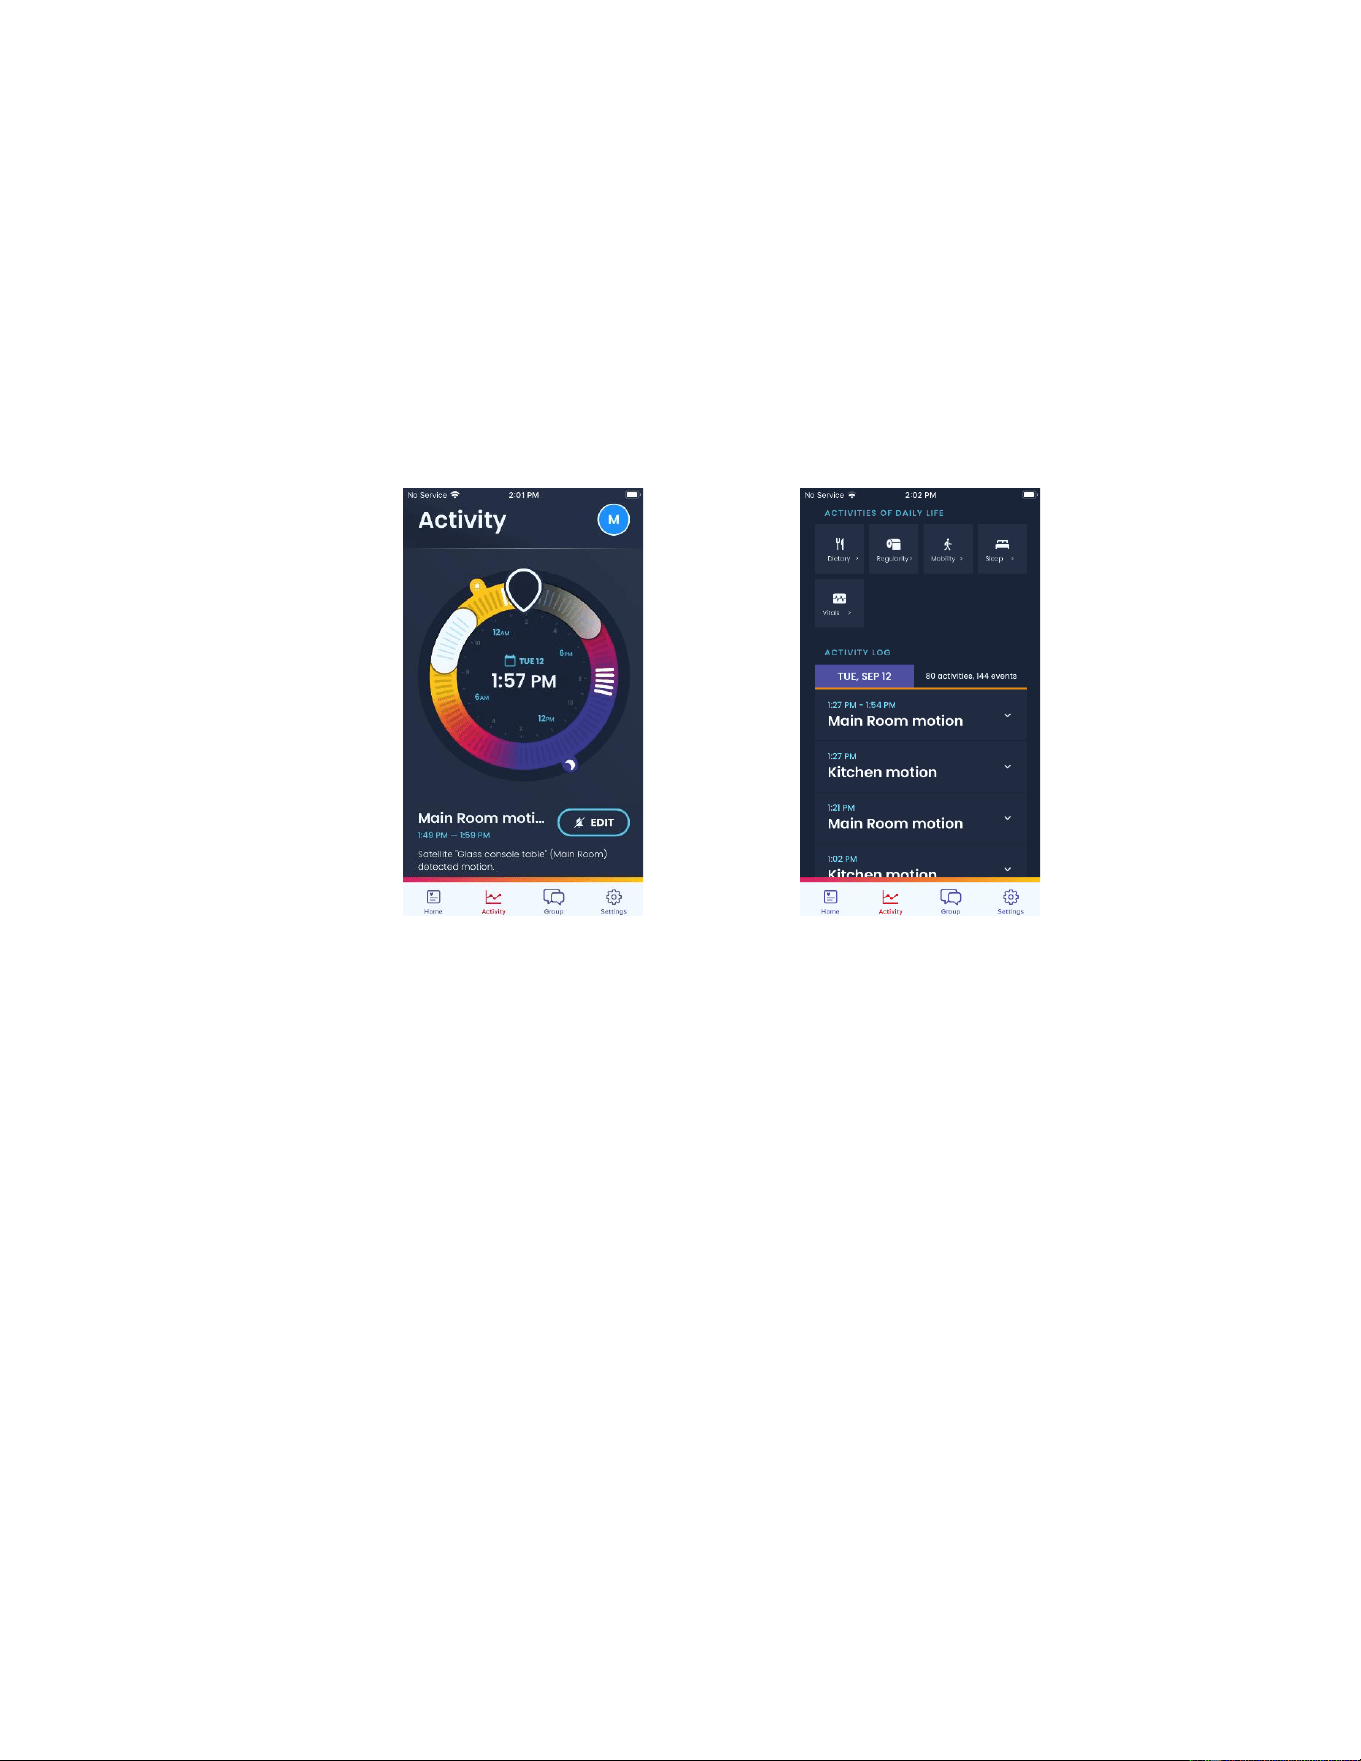
5.2 How to track activity
a. Tap on the “Activity” from the menu at the bottom of the app.
b. Under Activities of Daily Life sub-header, tap on the activity you would like to view, from
“Eating,” “Regularity,” “Mobility,” “Sleep.”
c. To share activity with your Care Circle scroll to “Share & Discuss.”
d. Tap the button that reads, “Post in notes.”
e. A prewritten message will appear with a link to the activity. This can be left as is or edited. Tap
the button that reads, “Post note” to share when you are ready.
Note: Your message will be visible to everyone in the Care Circle.
5.3 How to communicate with your care circle
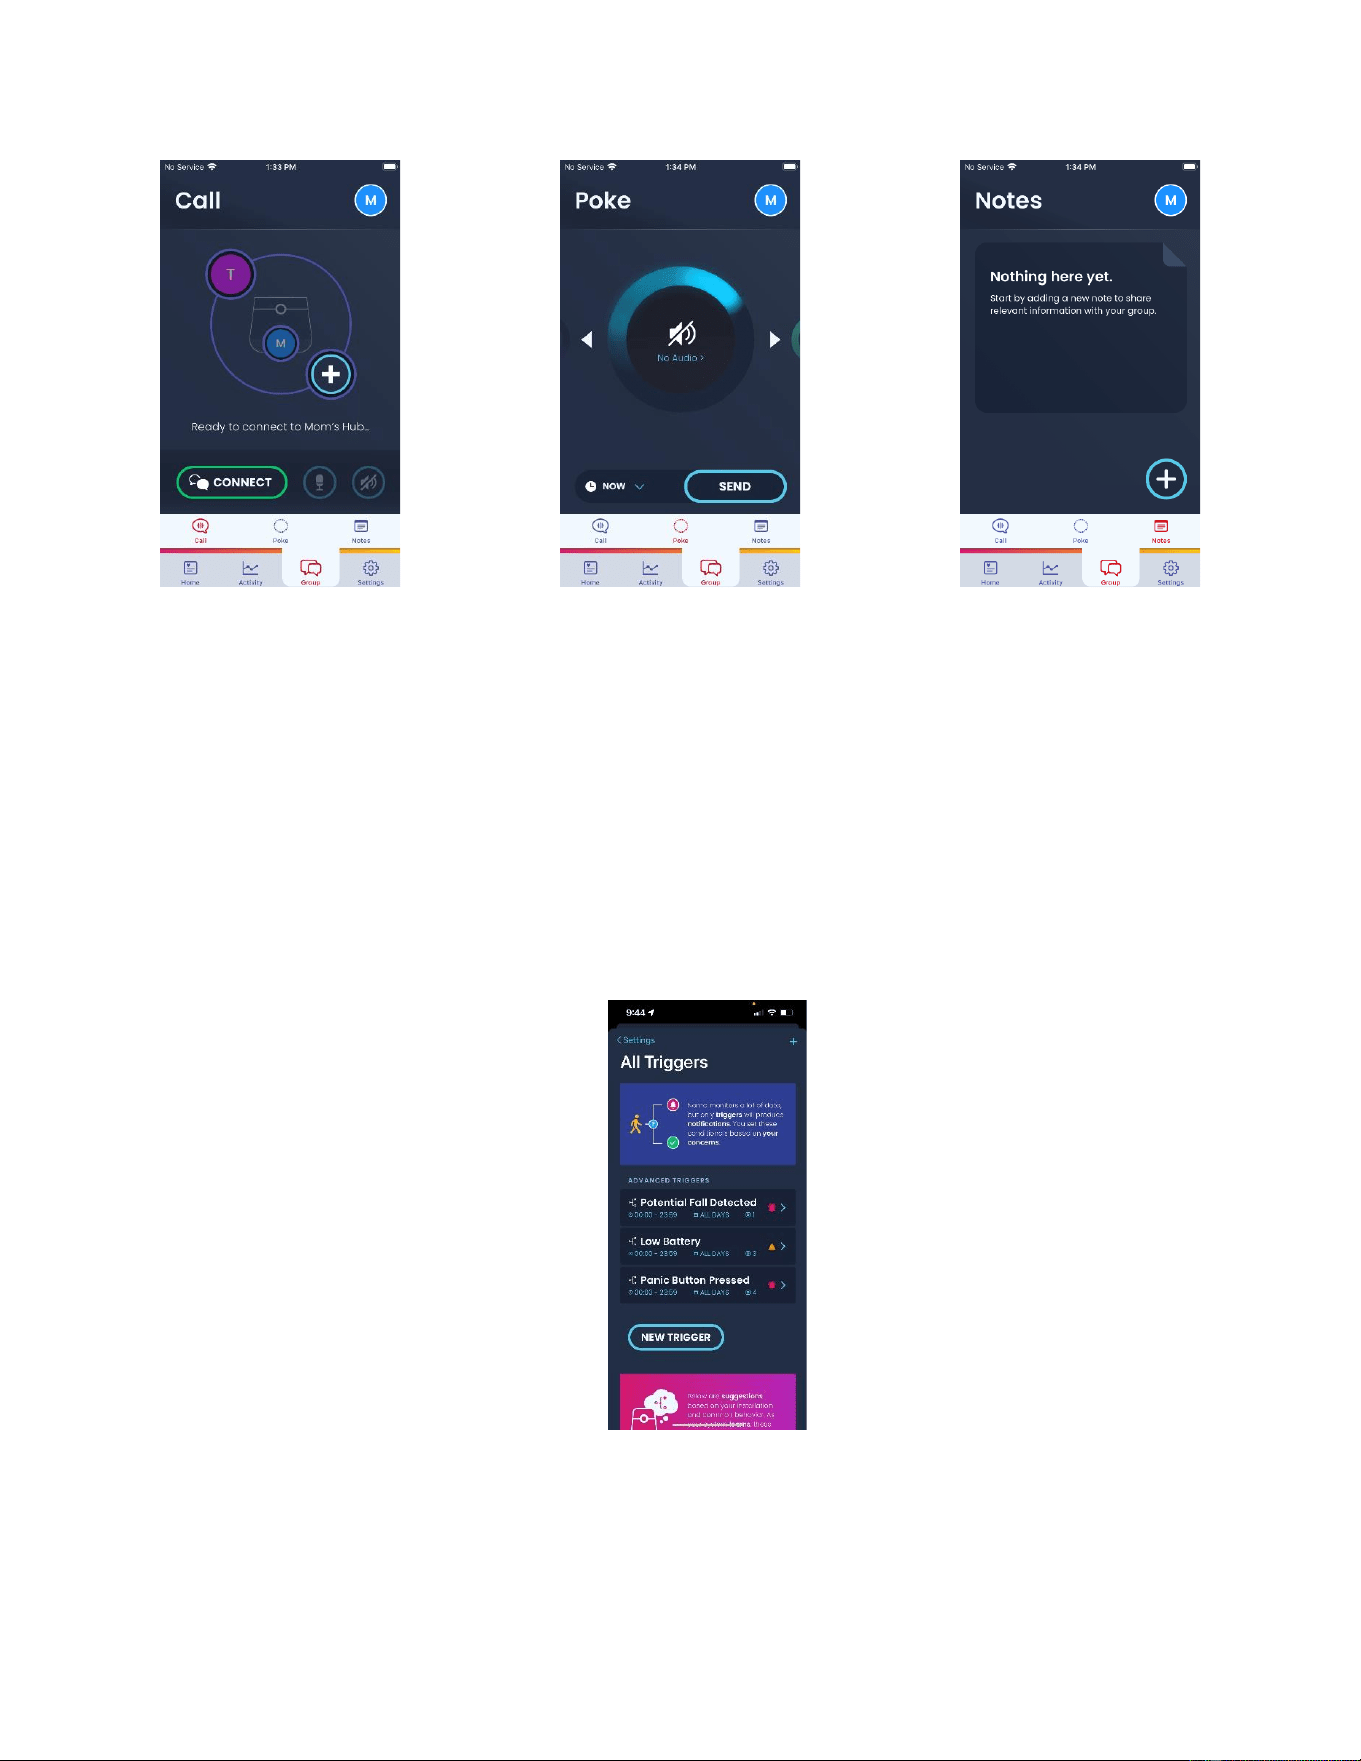
a. Tap on "Group” in the footer menu at the bottom of the app.
a. To make calls, tap the “Call” button in the footer sub-menu.
b. To call the hub, tap the “Connect” button. You may add others to the call using the ‘+’
button.
c. To send a “Poke,” tap the “Poke” button. Tap the microphone to begin.
i. Record an audio message by tapping the red circle.
ii. You can schedule a “Poke” or send one immediately. When you are ready, tap
the button marked “Send.”
d. To view “Notes,” tap the “Notes” button. You can add a note by pressing the blue “+”
button and following the in-app instructions.
Note: Make sure that the Nomo app has Microphone access. You can edit this in your phone’s App
Permissions settings.
18
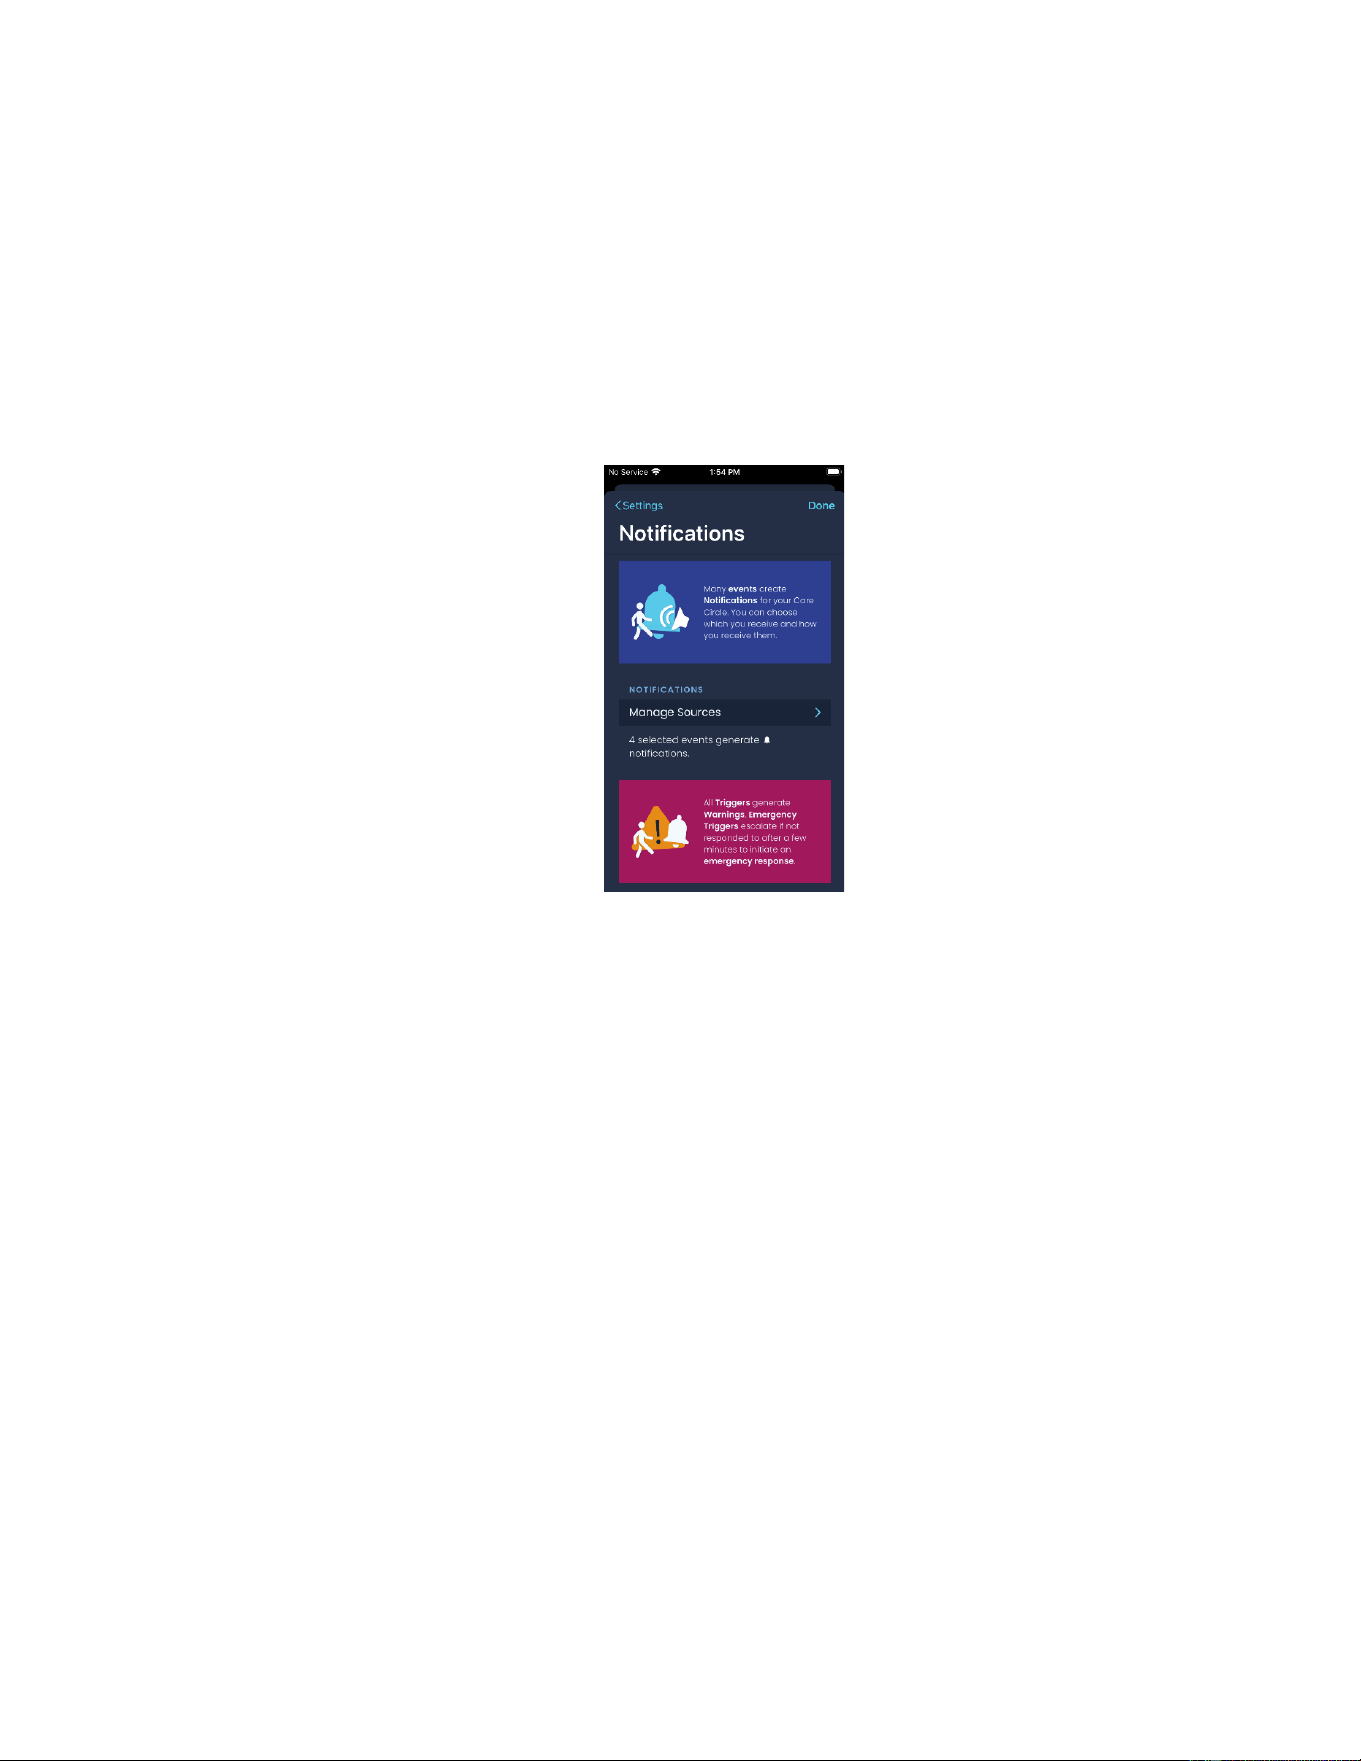
5.4 How to manage triggers and notifications
a. Tap the “Settings” tab on the bottom of the screen.
b. Tap the “Triggers” category.
i. To create a new trigger, tap the “New Trigger” button.
ii. Follow the in-app instructions to customize a new trigger for a care recipient’s
activities at a certain time of day. For example, you can set a “Late Night
Motion” trigger or “Morning Motion Absence” trigger.
iii. Tap “Done” in the top right corner when you are finished to save the new
trigger.
c. Tap On the “Settings” page, Tap the “Notifications” category.
19
i. To customize the events notifications, tap “Manage Sources.” On the page of
options, tap the activities you want to be notified of. Tap “Notifications” in the
top left corner when you are done.
ii. To customize how you are notified, scroll down to “Trigger Warning Response.”
Tap each of the notification option (“App Push Notification,” “Text Message,”
and/or “Automated Voice Call”) to indicate the type of notification you want to
receive. Follow the in-app instructions to customize notifications.
iii. Tap “Done” in the top right corner when you are finished.
5.5 How to manage your care circle.
a. In the “Settings” tab on the bottom of the screen, scroll down to find the “People”
section.
b. Tap “Caregivers” to view your care circle.
c. To add a new caregiver, tap “Invite Caregiver” and follow the in-app instructions to
generate an invite.
d. Tap Emergency contacts to view your Care recipients’ local emergency numbers.
e. Tap “Care Recipient” to review contact information and location.
20
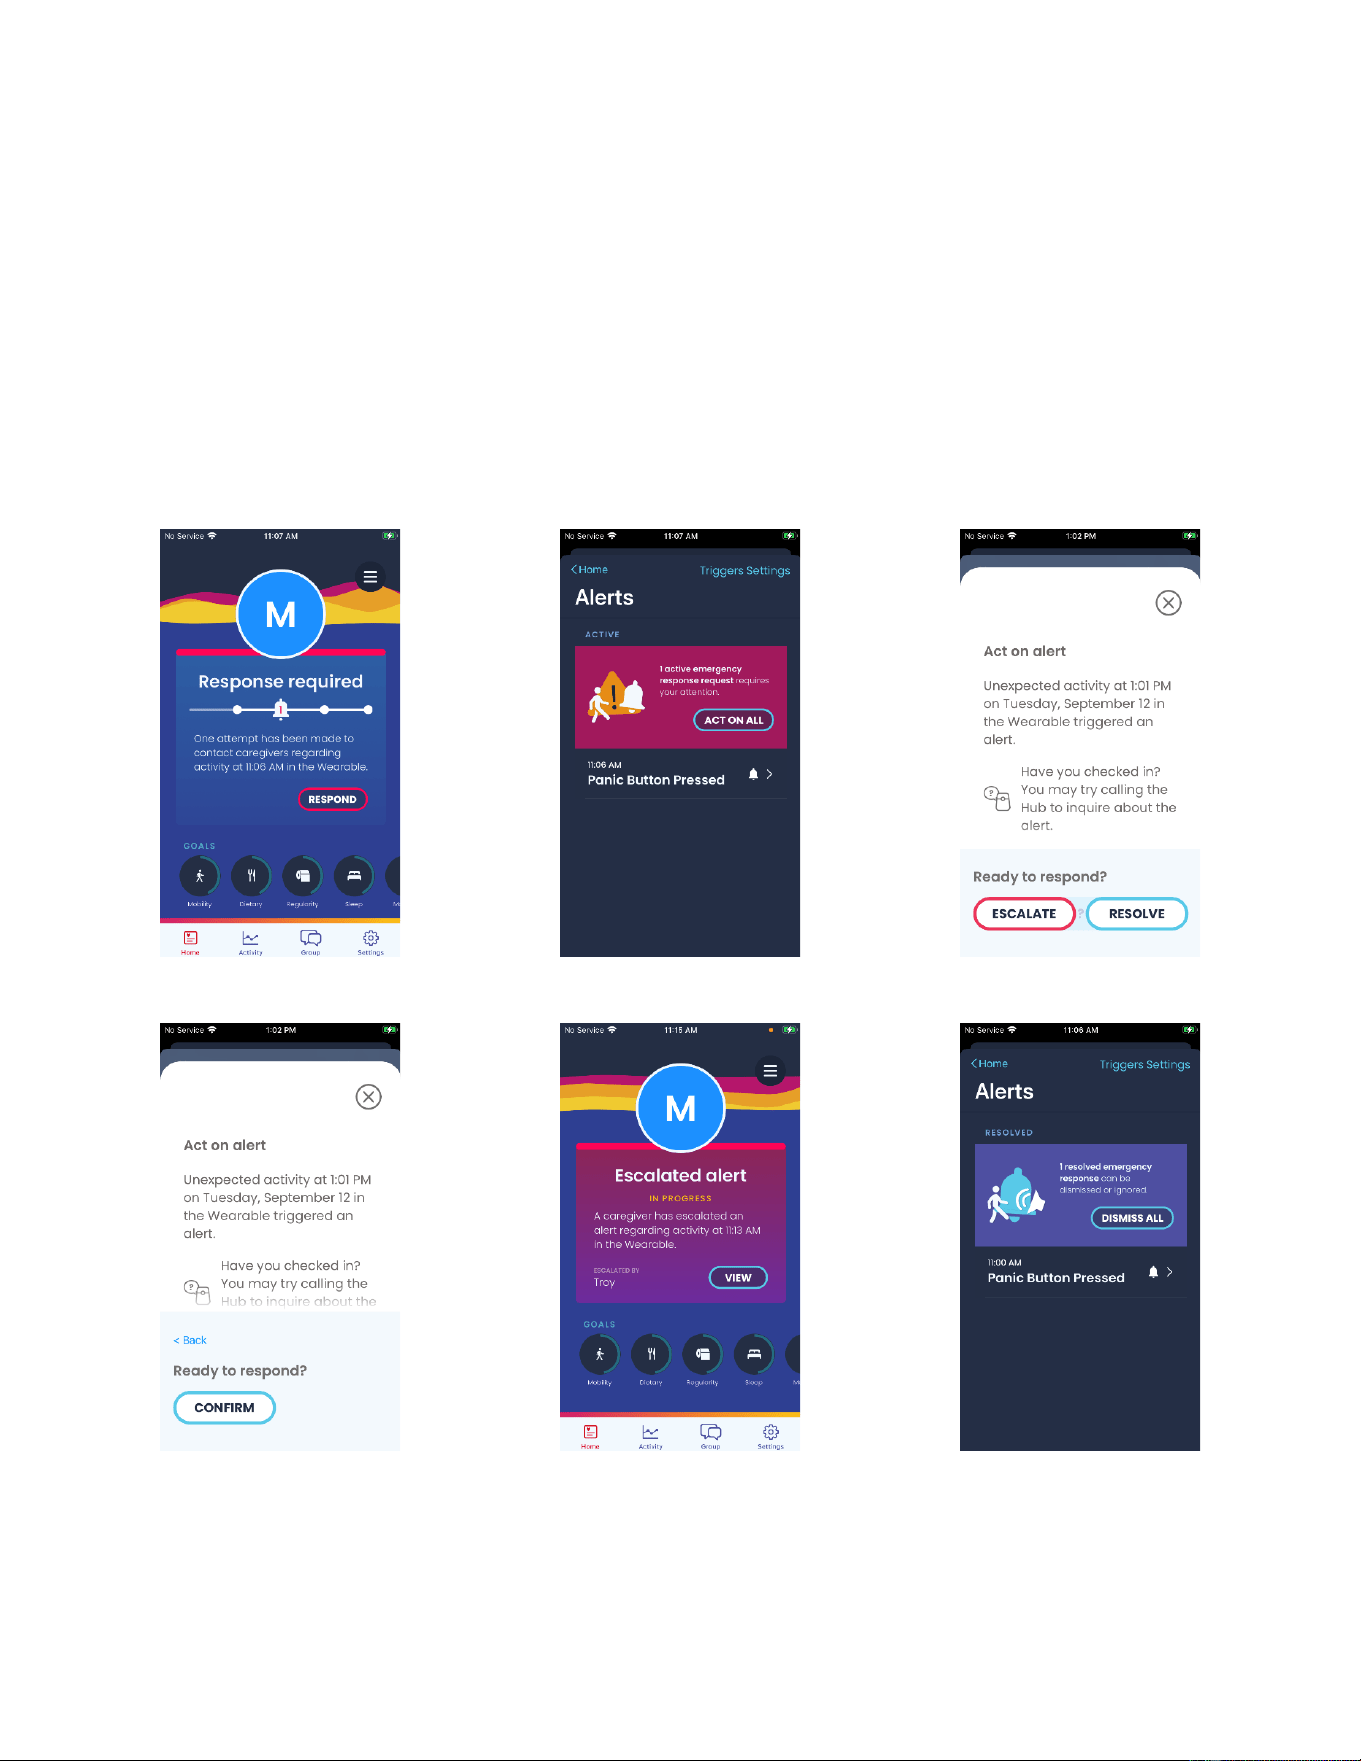
5.6 How to Manage Emergency Alerts
a. When an emergency response is activated, you will receive the following emergency
notifications if enabled:
i. App push notice
ii. Text message
iii. Automated voice call
b. To act on the alert:
i. Open the Nomo Smart Care app, click on the “home” tab in the lower left corner
of the app. The home screen will display the alert, click “respond” and follow the
in-app instructions.
ii. Or answer the call and speak into the phone. The automated voice call will
announce that “This is the Nomo Home Monitoring service…”.

21
1. The automated system will also ask you one-by-one how you’d
like the system to manage the emergency call.
2. You must answer with an affirmative response like “Yes’ or a
non-affirmative response like “No” to manage these call
options:
a. “Can I connect you right now?”
b. “Would you like me to cancel this alert?”
c. “Would you like me to escalate the call?”
Tip: Save the following numbers in your contact list to ensure you receive important and timely
communication from the Nomo Smart Care Team: (888) 486-3083 and (612) 491-7899
Note: If no one responds to the alert on the home screen after receiving the push notification or seeing
the activity log event, Nomo will continue with the following notifications.
Warning: Caregivers are responsible for escalating alerts to 9-1-1 on the Essential subscription level. If a
caregiver in the care circle does not respond to one of the alerts, the notifications will discontinue.
At the Essential subscription level, the caregiver may escalate the call to the local 911 call center related
to the home address entered at account setup. With the Essential Plus subscription, the Nomo Home
monitoring service may escalate to our 24/7 professionally monitored call center without caregivers
escalating the call. If no caregivers respond to the emergency alerts, our 24/7 call center will intervene
for users at the Essential plus subscription level.
22
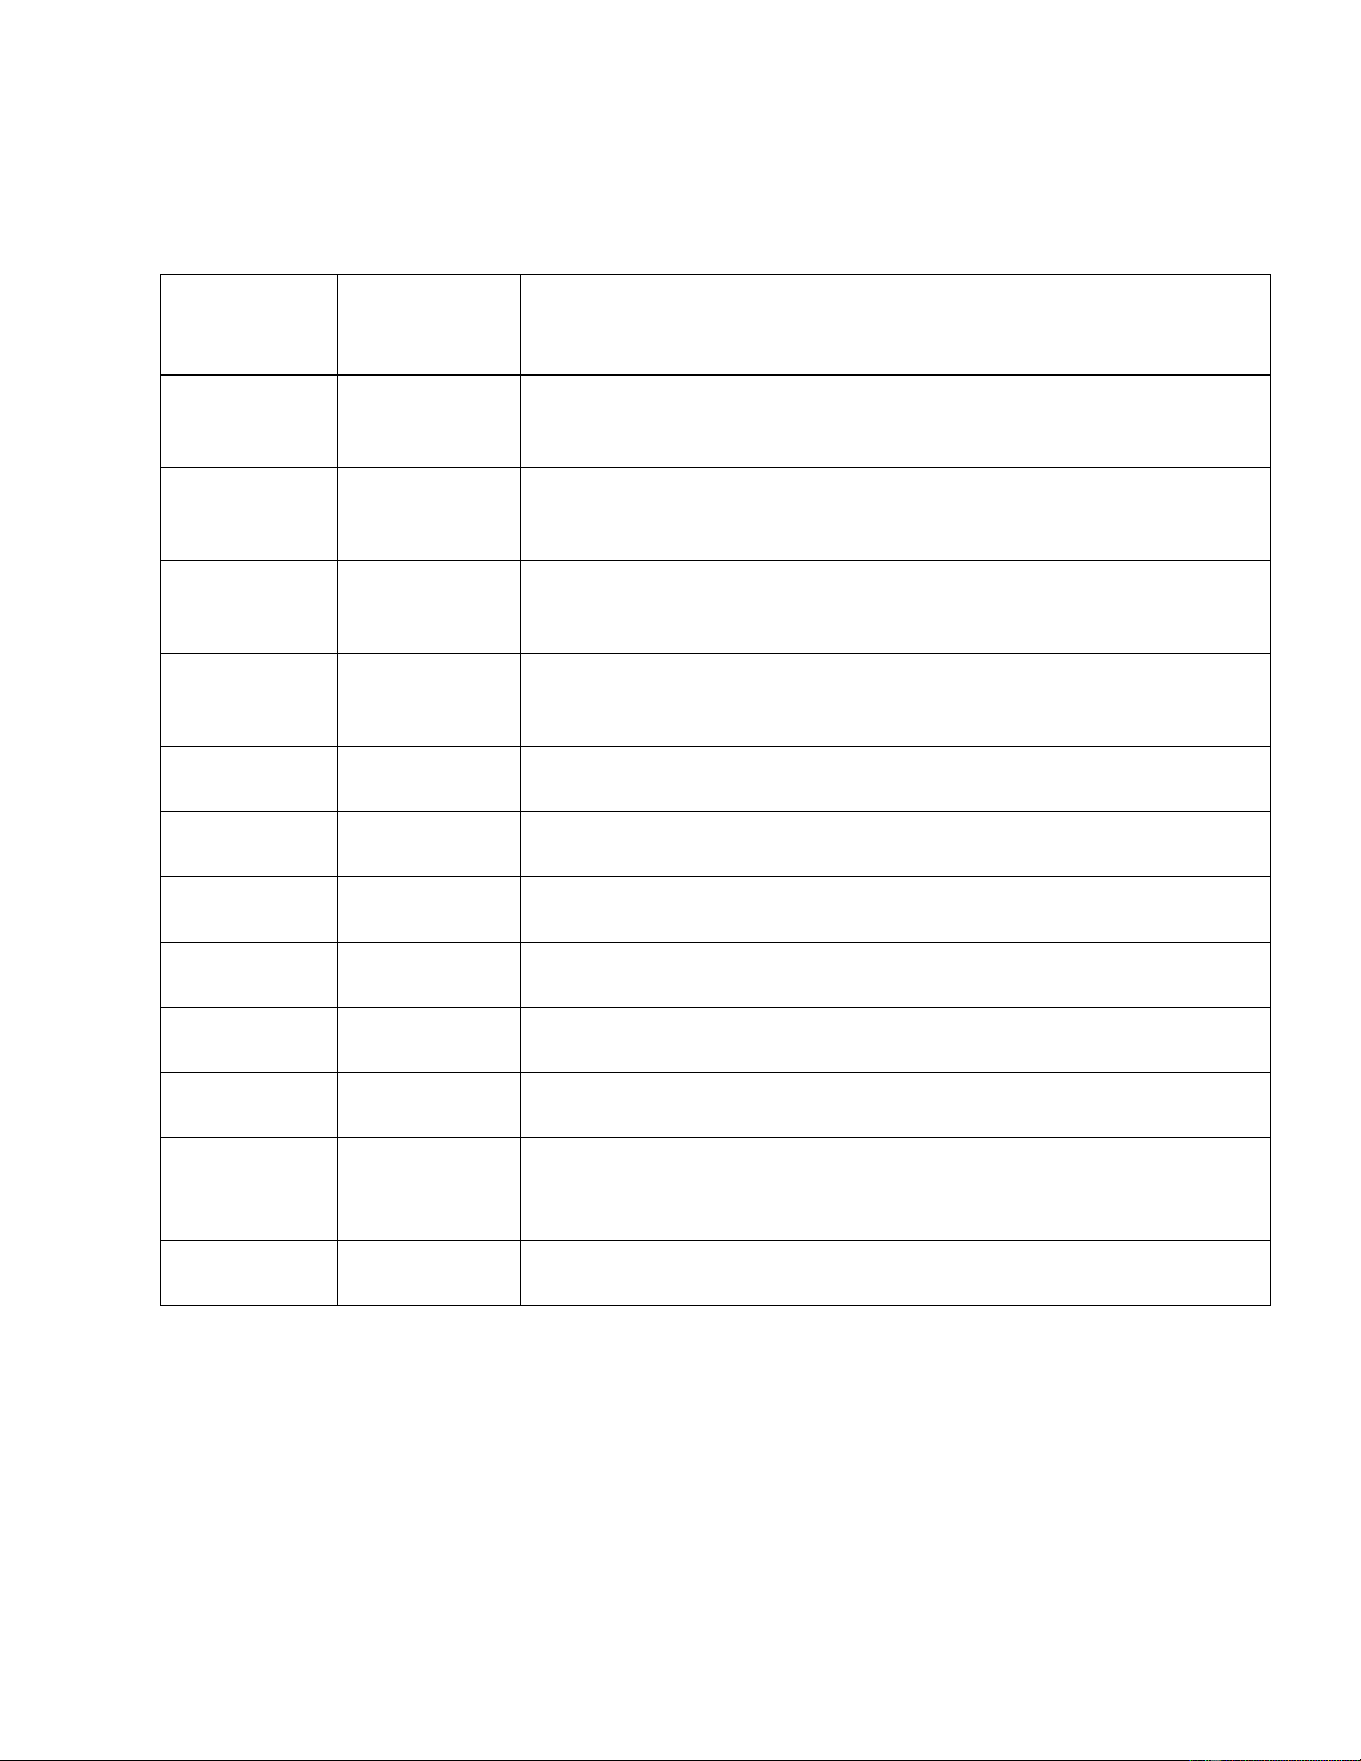
6 Color-Ring Animation Guide for Troubleshooting (for LED Ring
Lights in Hub and Satellite)
Animation
Devices
Event
Spinning
Rainbow
hub
Active call in-progress
Orange
Comet
satellite
Waiting for Wi-Fi Credentials from hub
Orange Fade
Up
satellite
User holding button for device activation
Pulsing
Orange
hub/satellite
Device is searching for the Nomo network
Pulsing Green
hub/satellite
Device successfully connected to the Nomo network
Pulsing Red
hub/satellite
Device did not successfully connect to the Nomo network
Blue Comet
hub/satellite
Device is trying to connect to the Wi-Fi network
Red Comet
hub/satellite
Device was unable to connect to the Wi-Fi network
Bright White
satellite
The device detected activity
Pulsing Blue
hub/satellite
Device is checking for updates
Fast Red
Pulse
hub/satellite
Button has been held long enough to initiate a factory reset of the
device
Green Comet
hub/satellite
Device is trying to connect to the Nomo network

23
7 Testing, Certifications, & Statements
7.1 FCC
7.1.1 FCC Statements
(1) This device may not cause harmful interference, and (2) this device must accept any
interference received, including interference that may cause undesired operation.
(2) Warning: Changes or modifications to this unit not expressly approved by the party
responsible for compliance could void the user authority to operate the equipment.
a. To comply with FCC RF exposure compliance requirements, a separation distance of at
least 20 cm must be maintained between the antenna of this device and all persons.
b. This Transmitter must not be co-located or operating in conjunction with any other
antenna or transmitter.
(3) This Transmitter must not be co-located or operating in conjunction with any other antenna
or transmitter.
(4) This equipment has been evaluated and found to comply with the limits for a Class B digital
device, pursuant to Part 15 of the FCC Rules. These limits are designed to provide
reasonable protection against harmful interference in a residential installation. This
equipment generates, uses, and can radiate radio frequency energy and, if not installed and
used in accordance with the instructions, may cause harmful interference to radio
communications.
However, there is no guarantee that interference will not occur in a particular installation. If
this equipment does cause harmful interference to radio or television reception, which can
be determined by turning the equipment off and on, the user is encouraged to try to correct
the interference by one or more of the following measures:
• Reorient or relocate the receiving antenna.
• Increase the separation between the equipment and receiver.
• Connect the equipment into an outlet on a circuit different from that to which the
• receiver is needed.
• Consult the dealer or an experienced radio/TV technician for help.