Operator’s Manual
www.mechmaxx.com
WARRANTY

TABLE OF CONTENTS
TABLE OF CONTENTS 1
FOREWORD 2
ABNORMAL DRAINAGE
11
CAN NOT RUN
12
NORMAL OPERATION BUT POOR EFFECT (OUTLET
AIR NOT DRY ENOUGH)
13
ABNORMALLY OPERATION
14
AUTO DRAIN NOT OPERATING PROPERLY
15
INSTALLATION NOTICE
INSTALLATION SITE
BASIC REQUIREMENTS
FOREWORD 2
2GENERAL WARNING
2TRANSPORTATION AND HANDLING
11
3
3
3
4
PIPELINE
INSTALLATION OF WATER COOLED DRYER
4
4
PIPELINE CONNECTING FOR THE WATER-COOLED
DRYER
WATER PIPELINE OF THE CONDENSER
INSTALL OF THE COOLING PIPE
5
5
5
INSTALL OF THE COOLING TOWER
POWER SUPPLY
5
5
WIND DIRECTION OF FAN 6
COMPONENTS 8
INSPECTION BEFORE RUNNING THE DRYER 9
RUN THE DRYER 9
STOP THE DRYER 9
RESTART THE DRYER 9
INSPECTION IN EVERY DAY 9
INSPECTION IN EVERY MONTH 9
INSTALLATION DIAGRAM OF ELECTRONIC AUTO
DRAIN.
9
7
INSTALLATION
TROUBLESHOOTING
USING NOTICE OF AUTO DRAIN
OVERLOAD STATE
10
10
ELECTRIC CONTROL PRINCIPLE DIAGRAM
8FLOW CHART
9INSPECTION AND MAINTENANCE
1
www.mechmaxx.com
TABLE OF CONTENTS
FOREWORD
2
www.mechmaxx.com
FOREWORD
GENERAL WARNING
TRANSPORTATION AND HANDLING
Thank you for choosing MechMaxx Refrigerated Air Dryer.
This dryer has passed the strict test before leaving the
factory. However you are still required to read this user
manual carefully and thoroughly to ensure safe and
reliable operation of the dryer.
We are continuously improving our product. If you have
any quality problem or dissatisfaction when you use our
machine, please put forward your suggestion for our
improvement.
Before operating the machine, user should check the
Installation Notice first. This machine, if not install and
operate properly, may result in malfunction. Therefore, if
any problem occurs, please check first if you have install
and operate the equipment correctly, or check the overall
condition of dryer carefully. If still cannot solve the
problems by yourself, please contact us for the necessary
service.
We will not be responsible for any failure due to improper
installation, operation or maintenance.
Notice: Failure and accident could be prevented if you
follow the user manual accordingly.
1.Avoid throwing, impacting and vibrating violently when
transport and handling the air dryer.
2.The dryer can be slanted to angle of below 45°for a
short time transportation. If transport the dryer for long
distance in large-angle position or in horizontal position,
it is very likely to damage the refrigerant compressor of
the dryer.
3.Used forklift or elevator to transport an air dryer is
permitted. However, please make sure not to damage the
casing of the dryer.
4.In order to protect the components of the air dryer,
please be careful when handling.
5.Drag the equipment by force is not allowed.
6.Use overhead crane to, if required, to lift or lower a
heavy dryer.
7.Wherever necessary, please use cushion pads to avoid
damage of dryer casing due to impact.
FOREWORD
3
www.mechmaxx.com
INSTALLATION
INSTALLATION
INSTALLATION NOTICE INSTALLATION SITE
1.Read and understand the user manual carefully, please
note that accident may occur if operator do not follow the
operating procedure and caution as stated in the manual.
2.Operator must adhere to the proper operation and
safety rule as per the user manual during installation and
use of the dryer. Only competent technician is allowed to
maintain and repair the dryer, we suggest each factory to
have a professional person to take care of the dryer.
3.Remove, change and attention at the warning and
safety signs are not allowed.
4.During operation of the dryer, remove of any protection
and safety equipments are strictly prohibited.
5.Before installation, open the casing, inspect and tighten
all fasteners and connector.
6.Keep your body, hand and other parts of body away from
running fan and high temperature component.
7.Never start the air dryer in any unsafe condition. Do not
operate the dryer if you suspect there is some fault.
8.Keep working pressure below the rated pressure of the
dryer (please refer to the rated pressure indicator on the
nameplate attached to the dryer).
9.Do not inflow of compressed air to the dryer when it is
not in operation, otherwise moisture will accumulate on
the downstream of the air dryer, that will affect the quali-
ty of the compressed air. The best method is to start the
air dryer first, wait for 3 minutes before allowing wet air
compressed to go through the dryer.
10.Never operate a 3-phase air dryer when there is a
phase failure (please check incoming power supply for
proper voltage at all 3 phase) otherwise will occur serious
accident.
Notice: Do not operate the dryer if it is in improper condi-
tion! Correct the fault by referring to the trouble shooting
chart in this manual. Please get the help of our distributor
technician if you can not able to fix the problem. Please
keep the user manual properly.
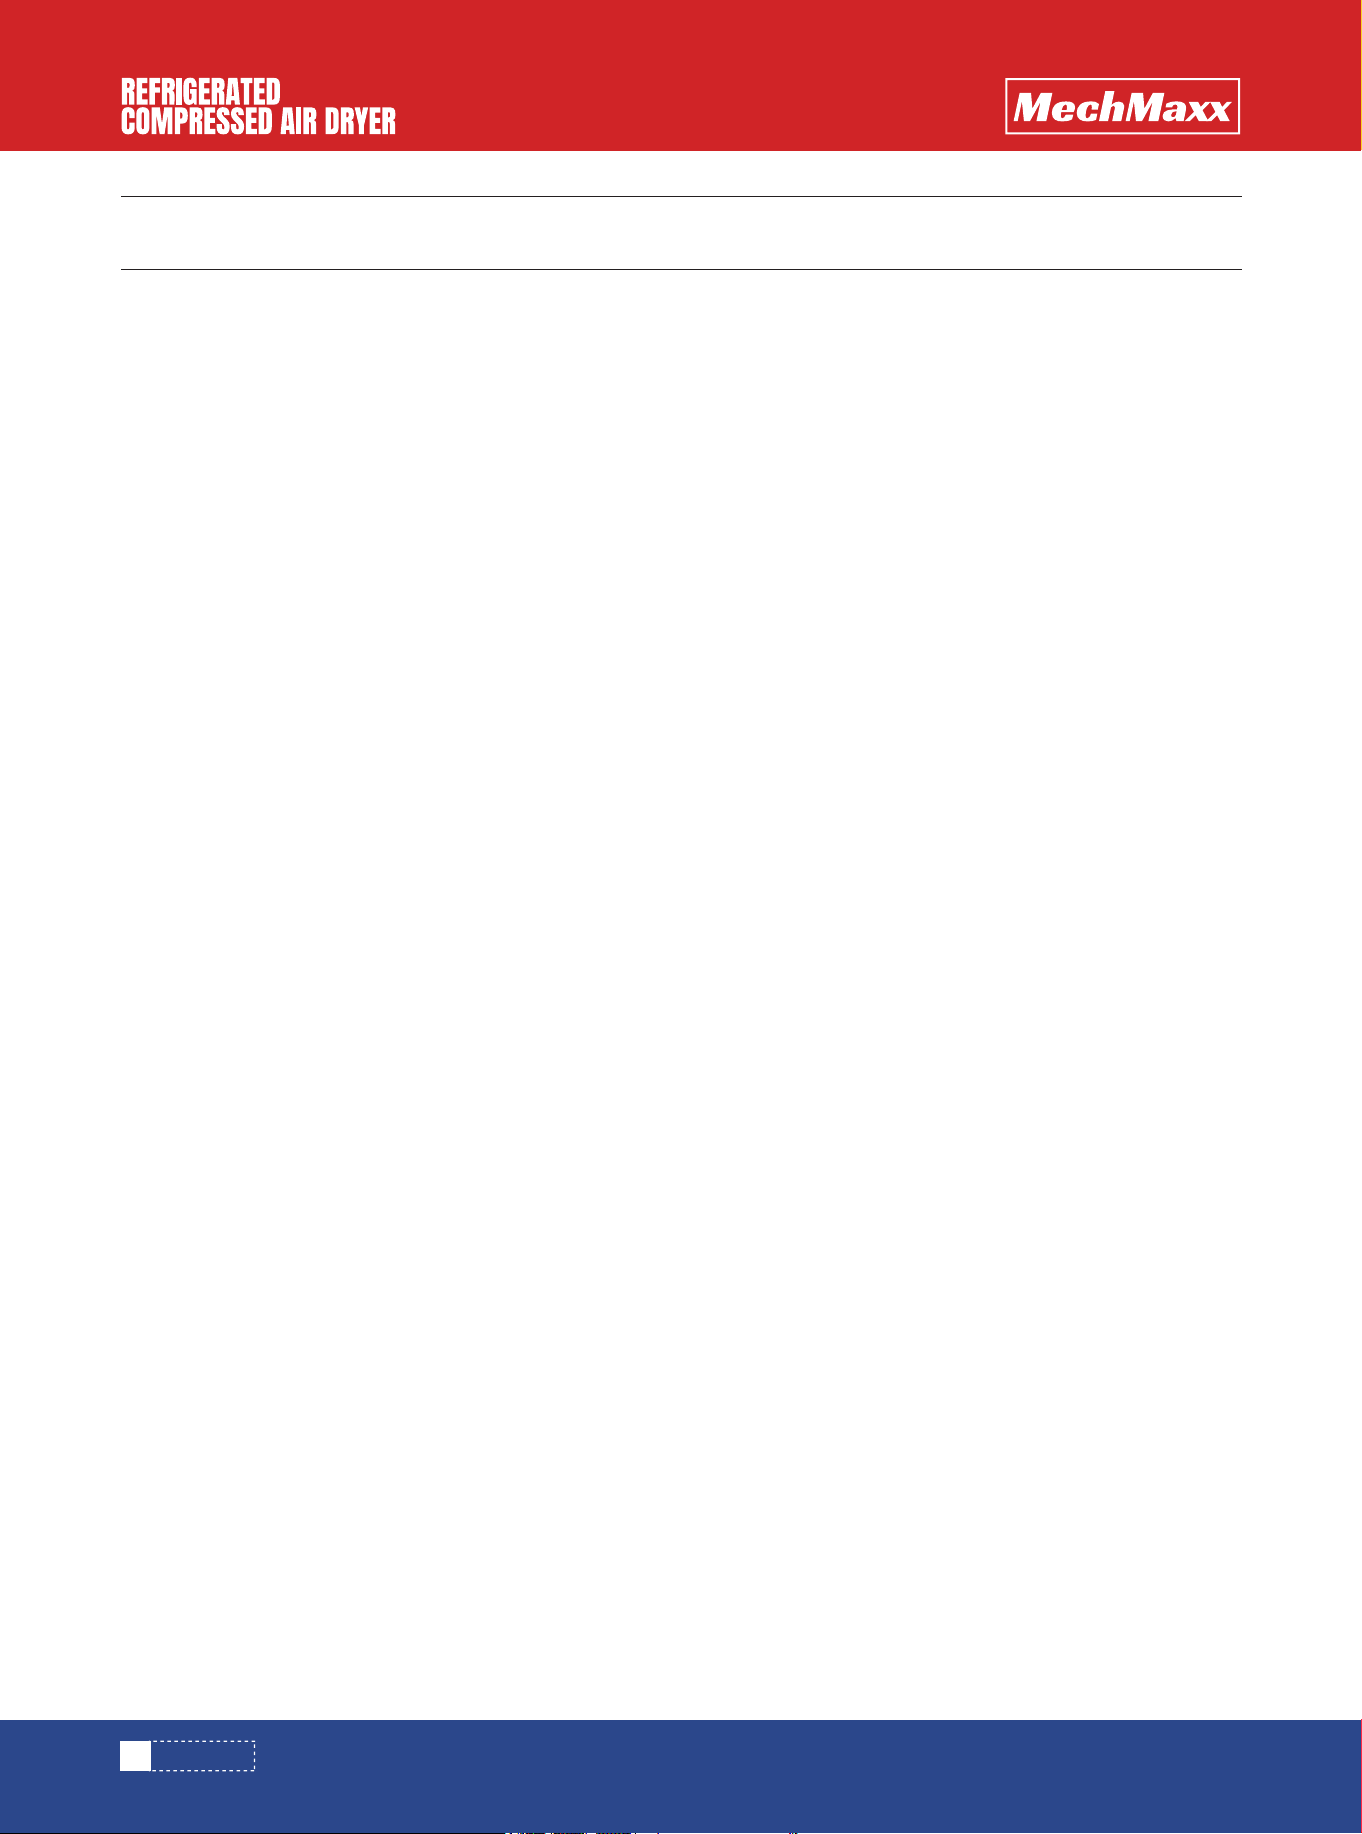
1.The site must be free from inflammable, explosive and
volatile materials such as paint thinner, or it may cause
fire or an explosion!
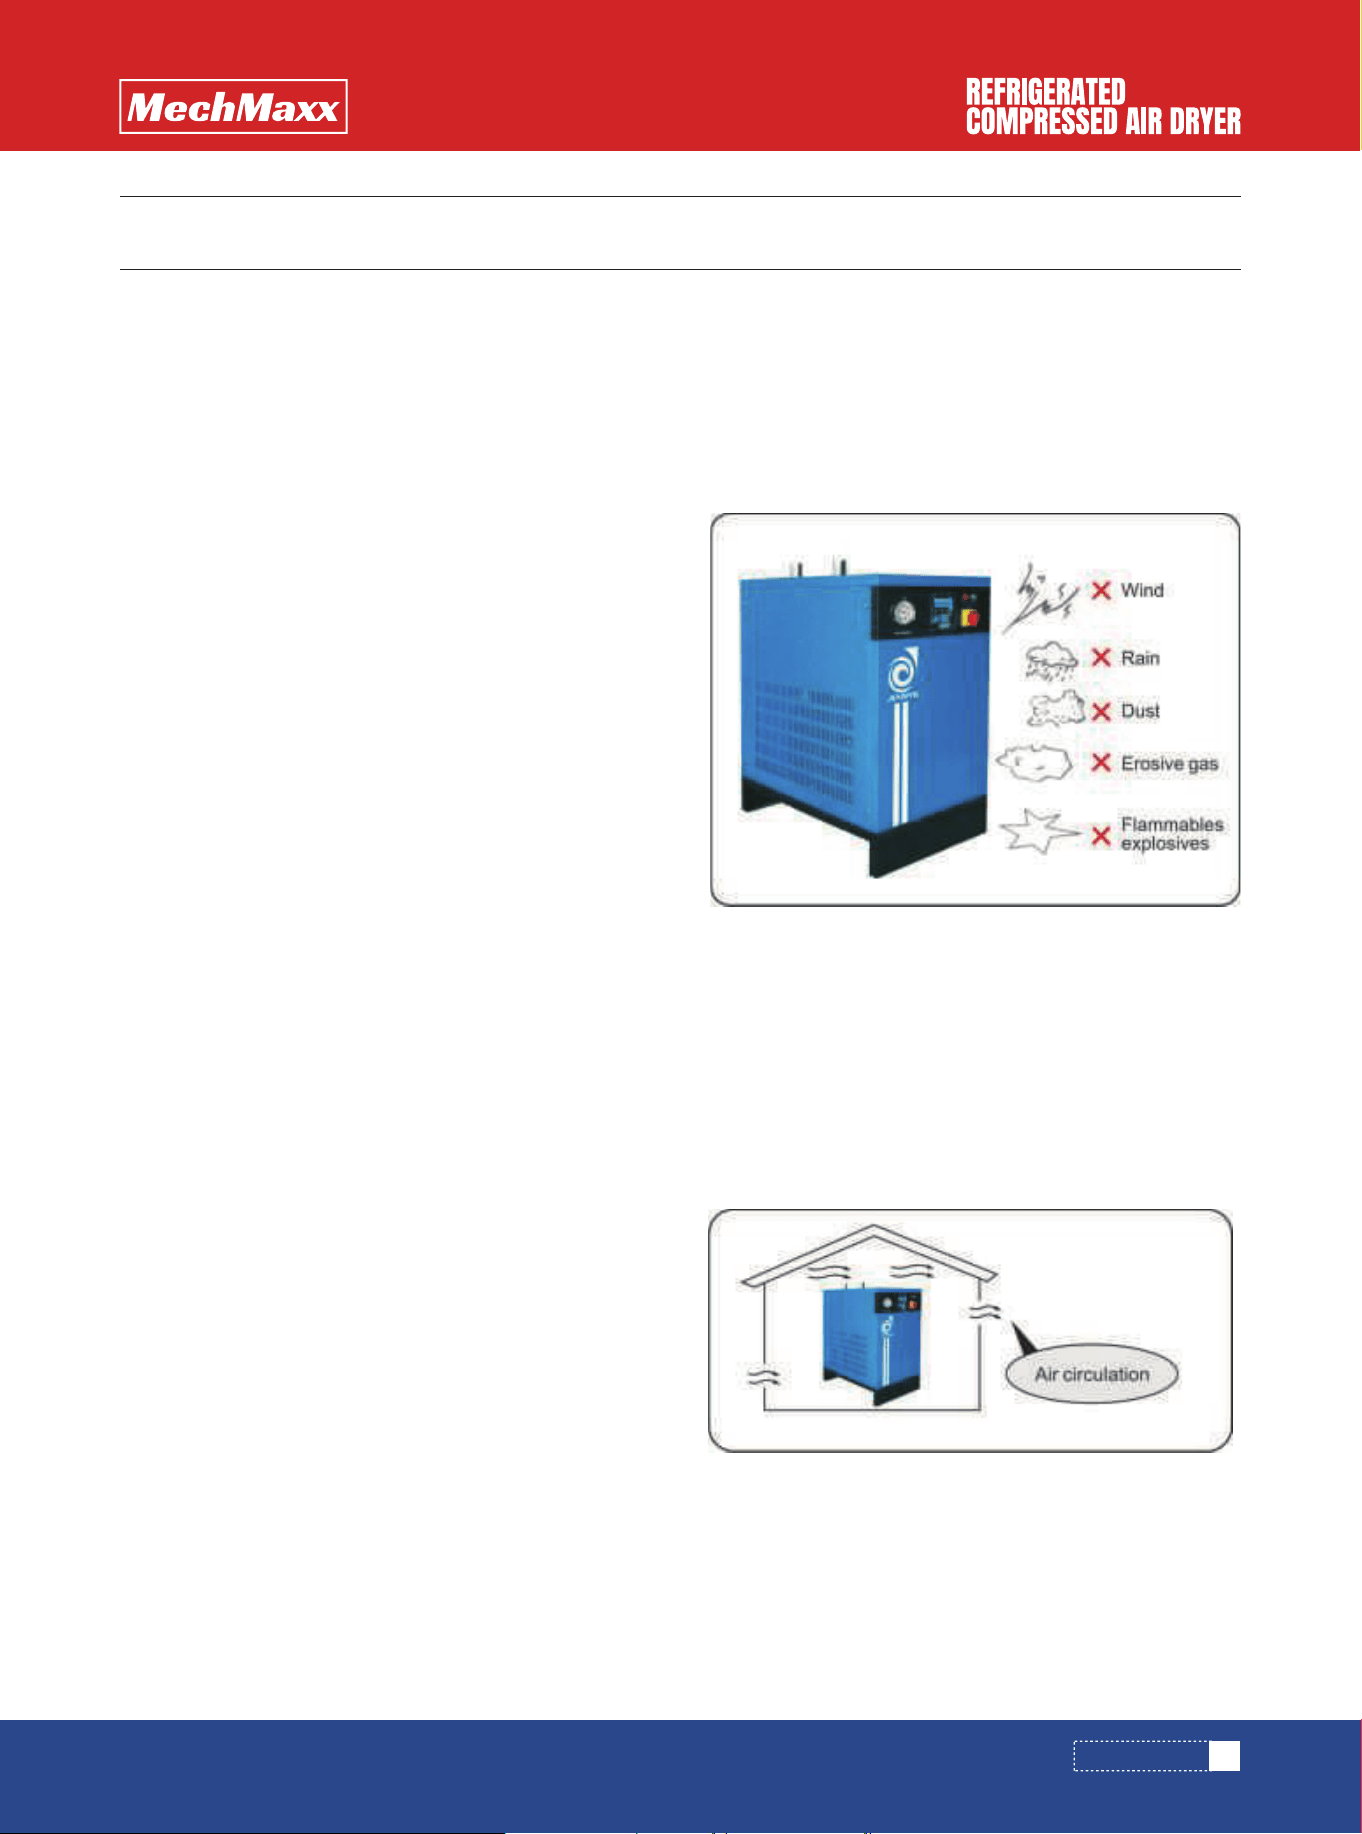
The site shall be a dry and clean place with good ventila-
tion
2.The ambient temperature at the site shall be no higher
than 38℃and no lower than 2℃. (The dryer may not be
damaged if operates occasionally at first, but it will affect
the refrigerating capacity and the dew point. So we need
to avoid running the dryer at higher than 38℃。The dryer
will stop at ambient temperature higher than 38℃. The
dryer will be damaged below 2℃.If we use the dryer below
0℃,the auto drain will be frozen and blocked up. Please
warm-up the ambient environment when below 0℃.)
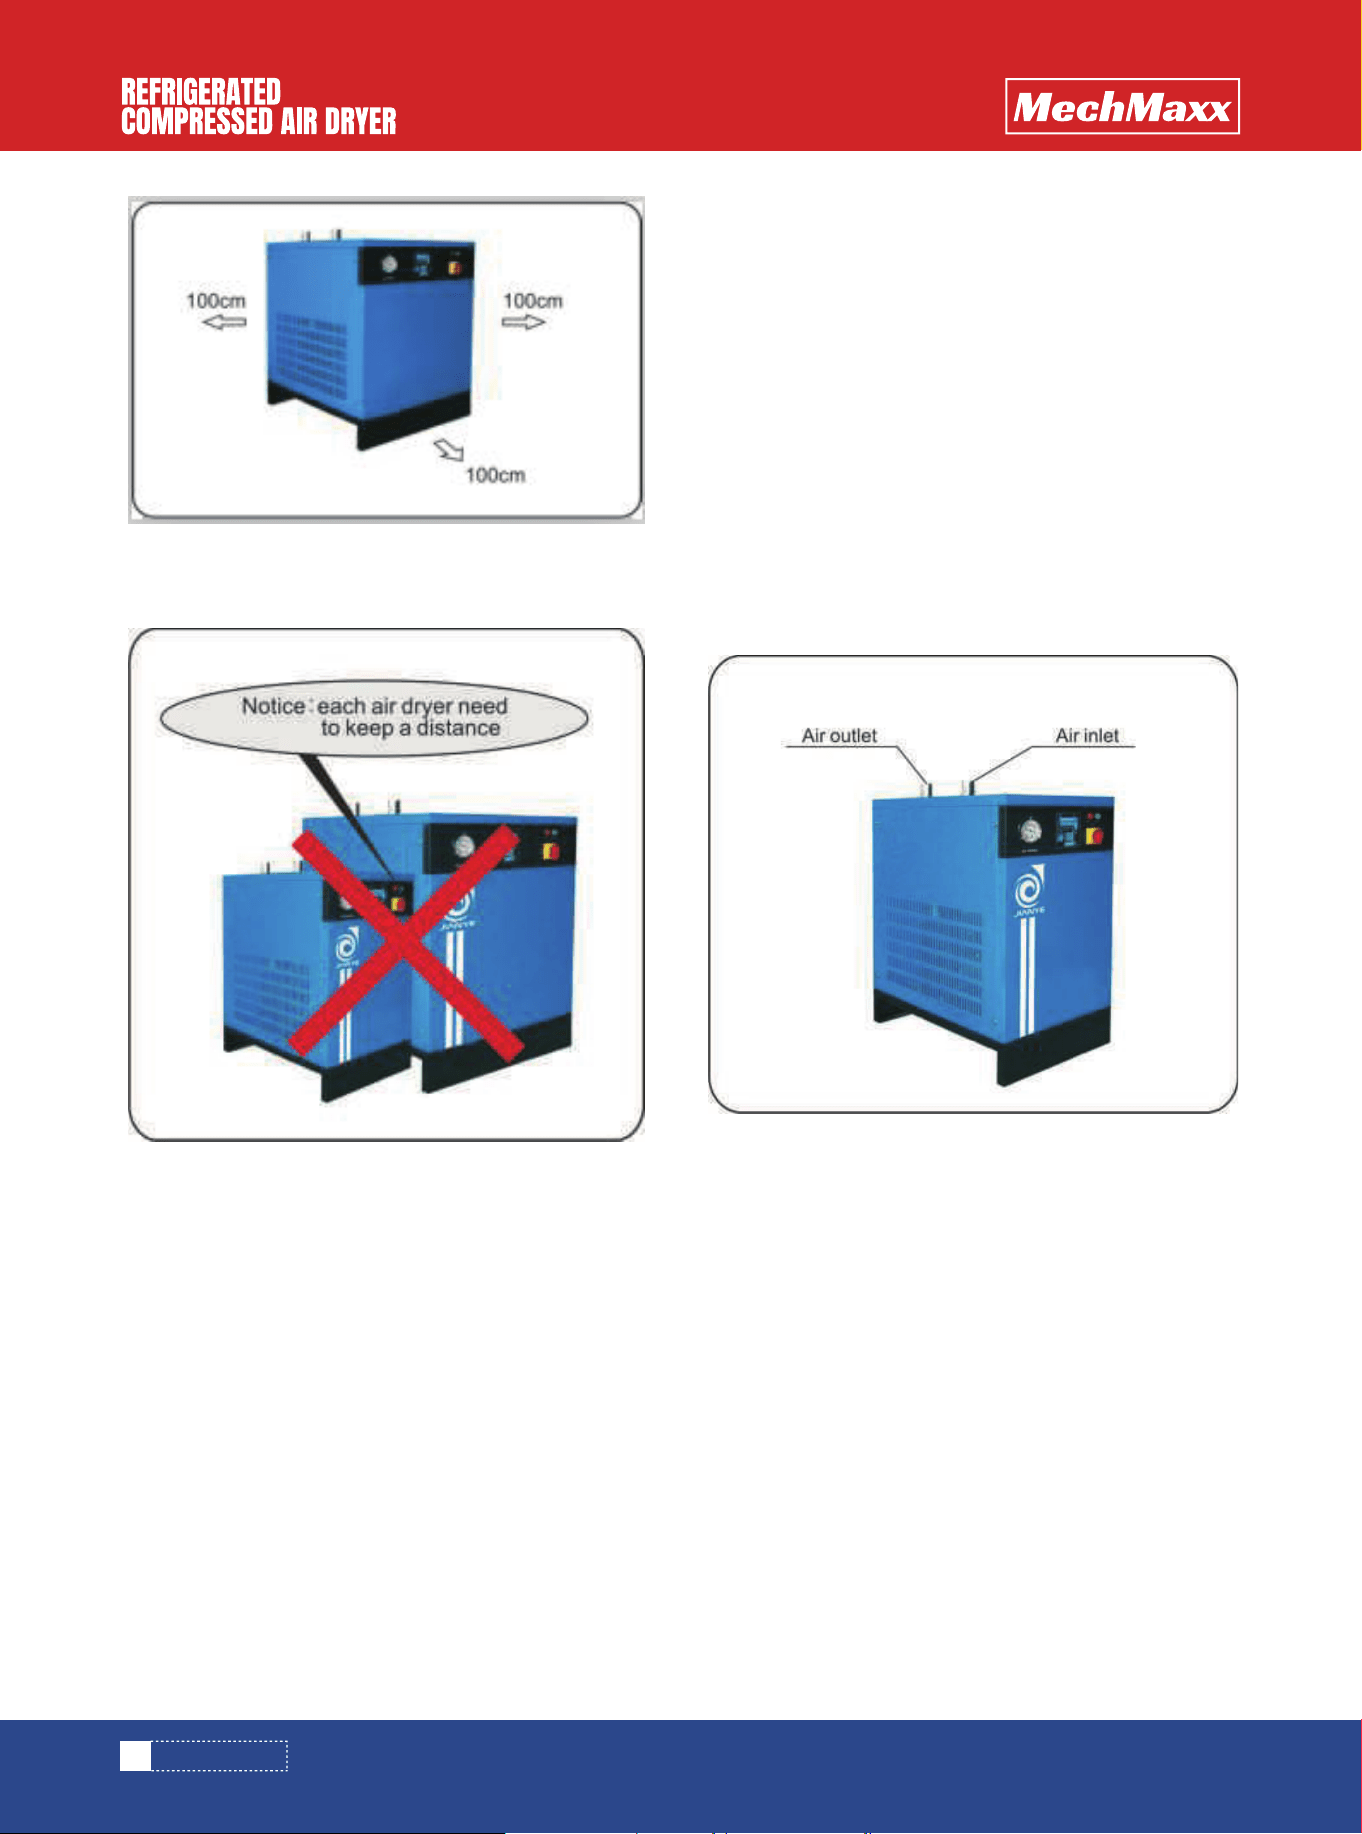
3.Surrounding the air dryer, a space of over 100 centime-
ters shall be reserved for proper ventilation and mainte-
nance.
4
www.mechmaxx.com
INSTALLATION
BASIC REQUIREMENTS
INSTALLATION OF WATER COOLED DRYER
PIPELINE
4.Pay attention to the distance between dryers when you
install 2 or more dryers side by side.
5.It is strongly recommended to install an air receiver
before the air dryer. Direct blowing hot air front a
compressor and other equipments must strictly prohibit-
ed! Failing to do so will result in overloading of air dryer
resulting “auto-tripping” of the dryer.
1.Please use flexible connecting to connect the air inlet
and air outlet pipes.
2.Please install a bypass pipeline. (We need to use the
bypass pipeline during maintenance.)
3.Properly the pipeline must be used to avoid excessive
pressure drop. Too small elbow or bend must be avoided.
4.The pipeline for the dryer cannot be too heavy.
5.Please clean the pipeline before connecting.
6.Please note that the resonance from the air compressor
must be avoided.
7.A main line air filter before the air dryer must be used to
ensure longtime trouble free operation of the dryer.
1.When the water flow is too high or the water tempera-
ture is too low, it may lead to the surface of evaporator
frosting.
2.When the water flow is too high or the water tempera-
ture is too low, The dryer will stop as the pressure exceed
2.3MPa.
3.The dryer can not install in the out door without the
cover.
4.Need to according to the following requires when install
the dryers,
a. Must abide by the local government and relevant
departments of the corresponding provisions
b. When distribution, the installation personal must be
familiar with the local laws and regulations can be quali-
fied.
1.An air dryer vibrates very little, as a result, no need to
install any anchor bolts. The only requirement is the floor
must be level and hard with sufficient load-bearing capa-
bility. It is strongly recommended that the dryer be
installed on a 2 inches height plinth above the floor level
to avoid condensate wetting the floor according the dyer
base,
2.Pay attention to the height of the drain system and
confirm whether there is need to make the drain trench
before installing the air dryer.
5
www.mechmaxx.com
INSTALLATION
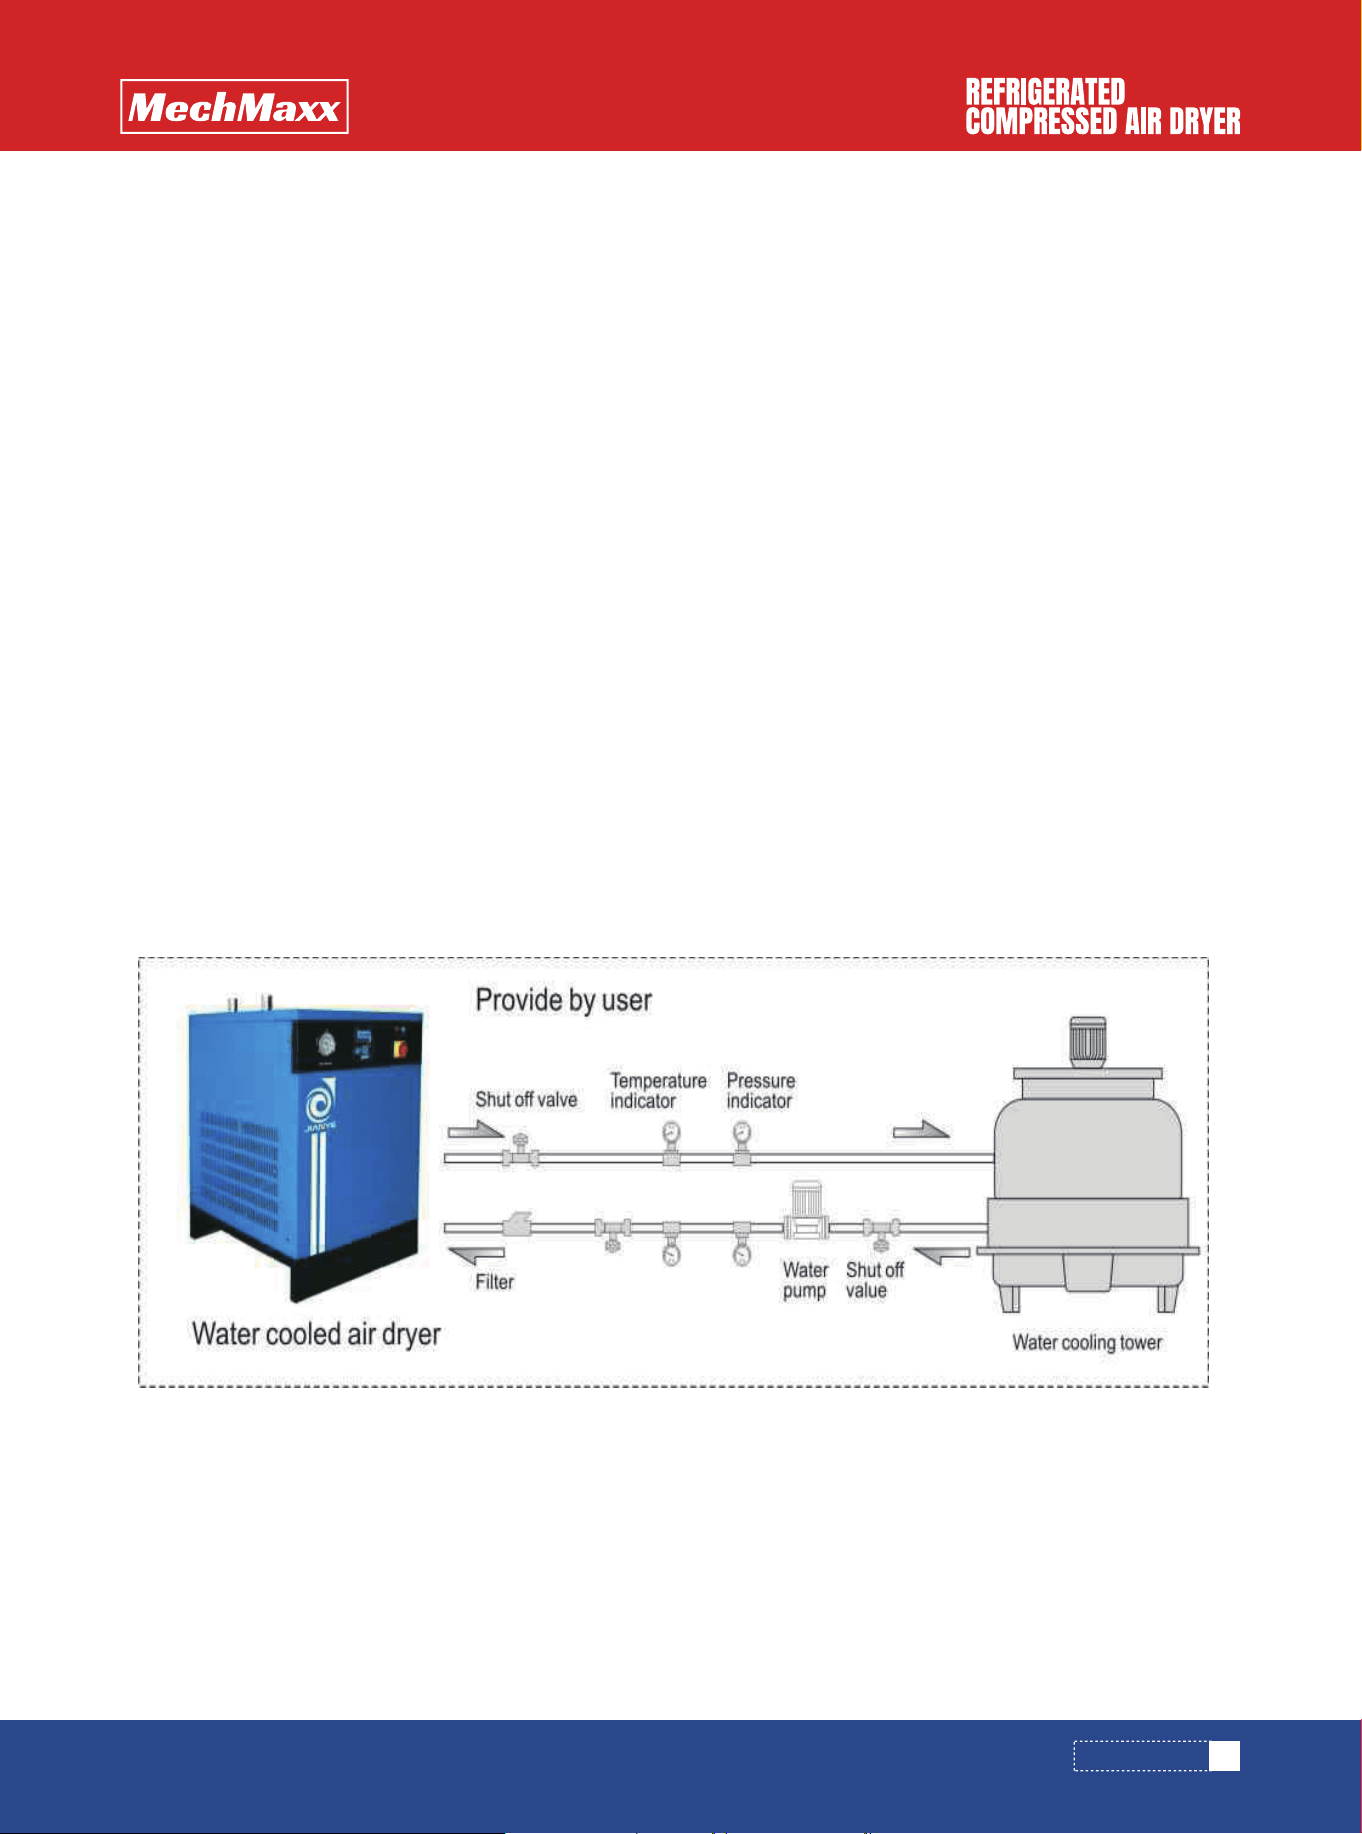
PIPELINE CONNECTING FOR THE WATER-COOLED DRYER
WATER PIPELINE OF THE CONDENSER
All the pipe systems should follow the local regulations. The design of the pipe must reduce the bend and high/low
remove, which can save money and keep best function.
The correct installation is as follow:
1.During maintain, close the ball valve to separate the dryer from the pipe system.
2.On the top of the pipe system, need to set the manual or automatic air outlet valve
3.Keep sufficient water pressure in the system( such as control valve) , and the pressure of cooled water or the circu-
late cooled water must ≥0.15Mpa, the water temperature ≤32℃ and go through softening.
4.Convenient to service and maintain, should install the pressure meter and temperature meter.
5.Need to install the filter to clean the impurity of the water in front of the water pump ,
6.The diameter of the pipe should be configurated according to the distance and pressure of the machines.
The pipeline of condenser has been equipped before out of the factory, the site pipe should be connected to the pipe on
the equipment. The intake and outlet water pipe shall be connected with the marked pipe before out of the factory.
INSTALL OF THE COOLING PIPE
INSTALL OF THE COOLING TOWER
POWER SUPPLY
Ensure the certain water pressure when connect the dryer with the cooling tower. The water capacity flowing through the
cooling tower should be stable. Meanwhile, whatever the load and outside temperature change or not ,the water capacity
through the condenser can be adjusted, in order to keep a stable cooling pressure and make sure the thermostatic expan-
sion valve and other elements can be running normally.
1.Please adhere to load safety rules when using any electric power supply.
2.Please use the appropriation power outlet corrects for AC110/220v.
3.Please ensure an approved earth leakage breaker is installed in your supply system.
4.Power supply should be circuit 110V, 60Hz.
5.Be sure to connect to the ground wire before using.
Notice: The electrical installation should be according to the relative electrical regulations. Any change of the basic
connection diagram will not inform. The correct phase sequence in the electrical diagram must be observed absolutely.
6
www.mechmaxx.com
INSTALLATION
The wind of the fan should be come from the condenser.
The 3 phase power air dryer is starting, it should cut off
the power and exchange the two wire in three when the
compressor and the fan are not working. And then you can
open the machine again.
The control power wire and wiring of the single phase
power air dryer has been equipped before leaving the
factory. The user can operate the machine by offering the
specified nameplate.
Ensure the safety. The machine must be connected with
the ground wire.
WIND DIRECTION OF FAN
7
www.mechmaxx.com
ELECTRIC CONTROL PRINCIPLE DIAGRAM
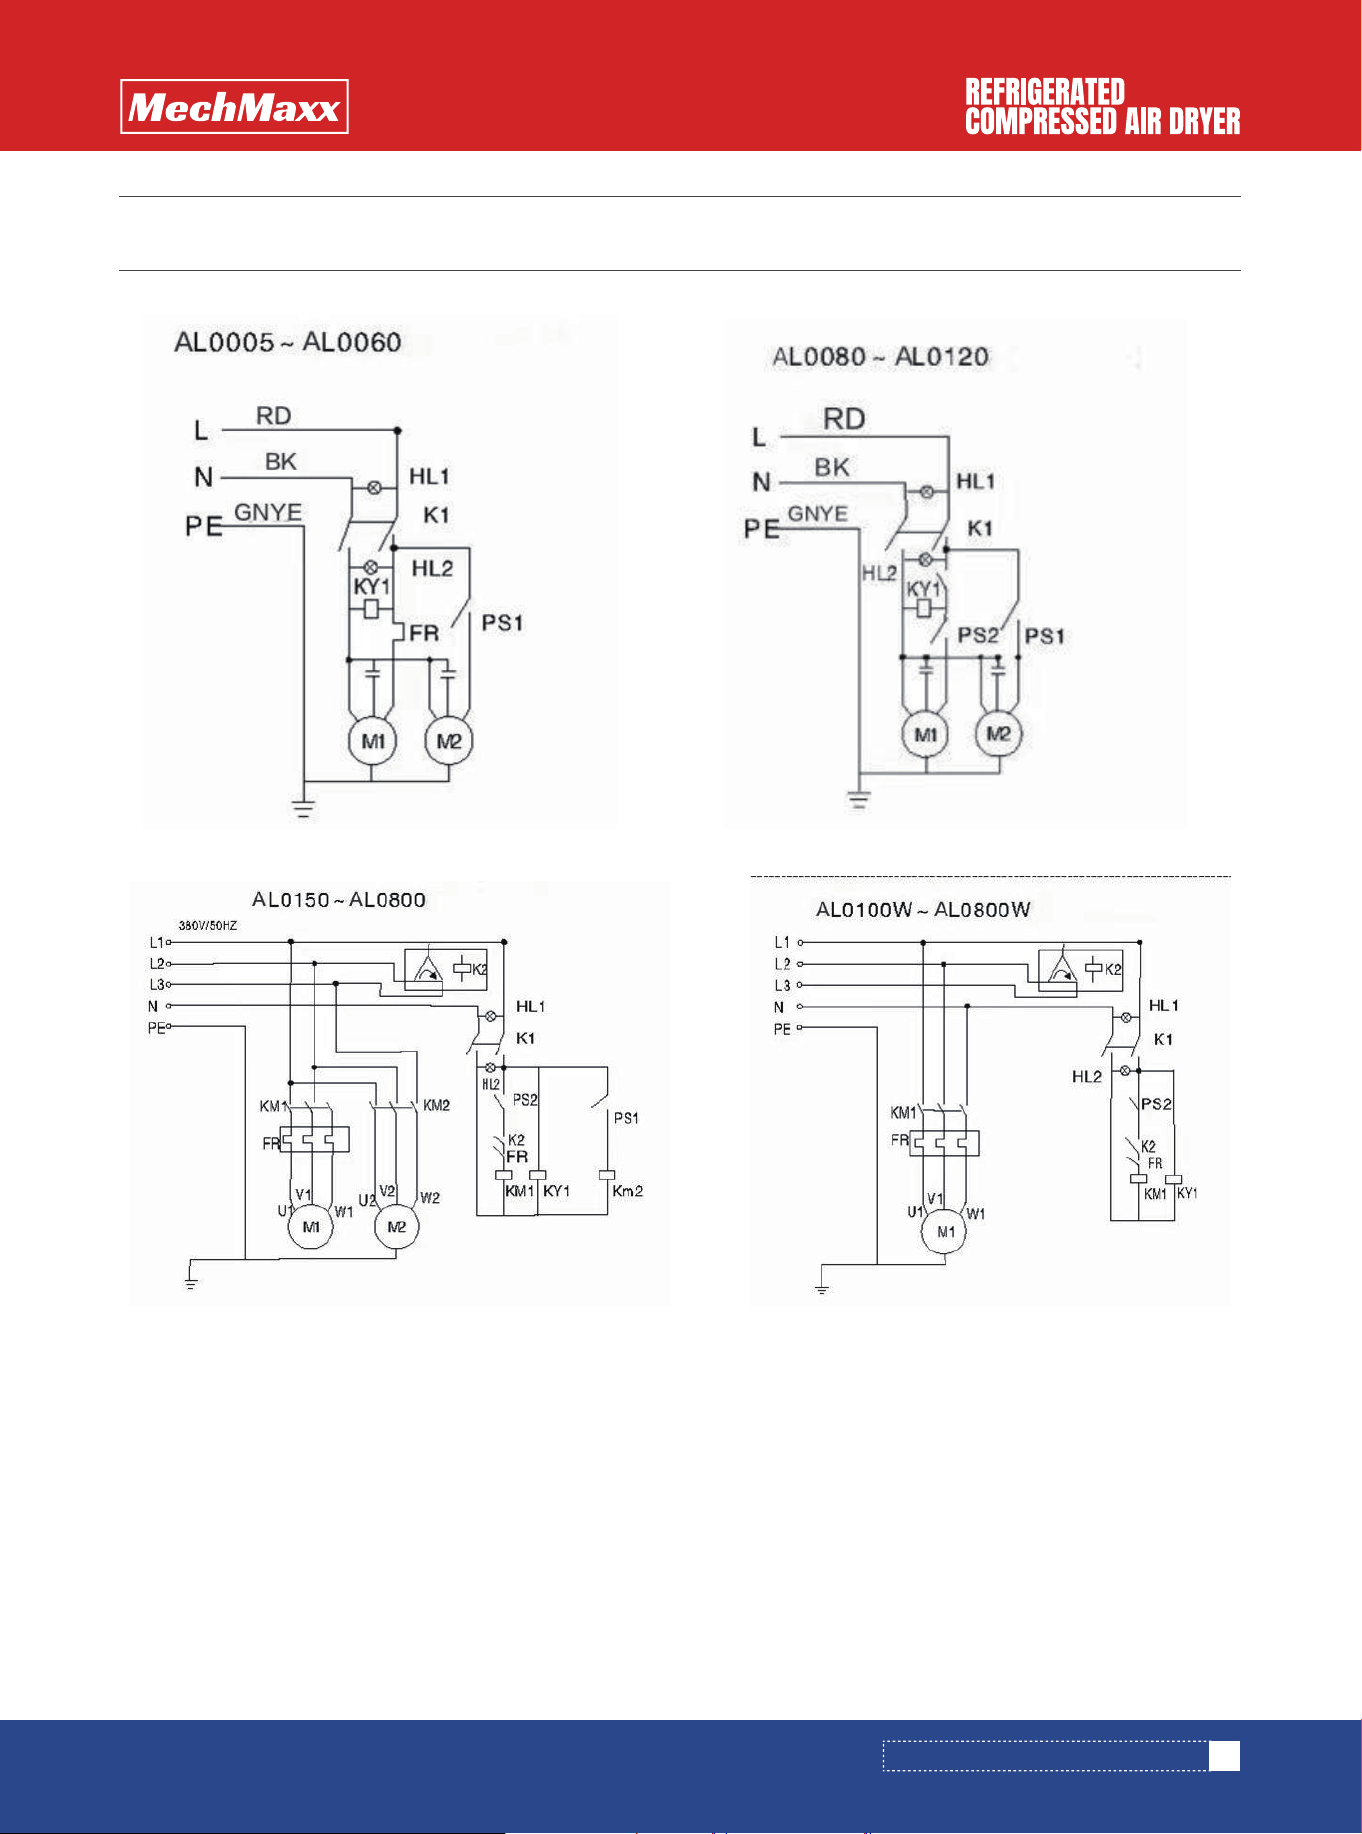
ELECTRIC CONTROL PRINCIPLE DIAGRAM
K1 switch
K2 phase sequence protect
M1 refrigerant compressor
M2 fan
KY1 electric auto-drain
FR thermal relay
KM1/KM2 contactor
PS2 high-low pressure switch
PS1 high pressure switch
HL1 power lamp
KL2 running lamp
8
www.mechmaxx.com
FLOW CHART
FLOW CHART
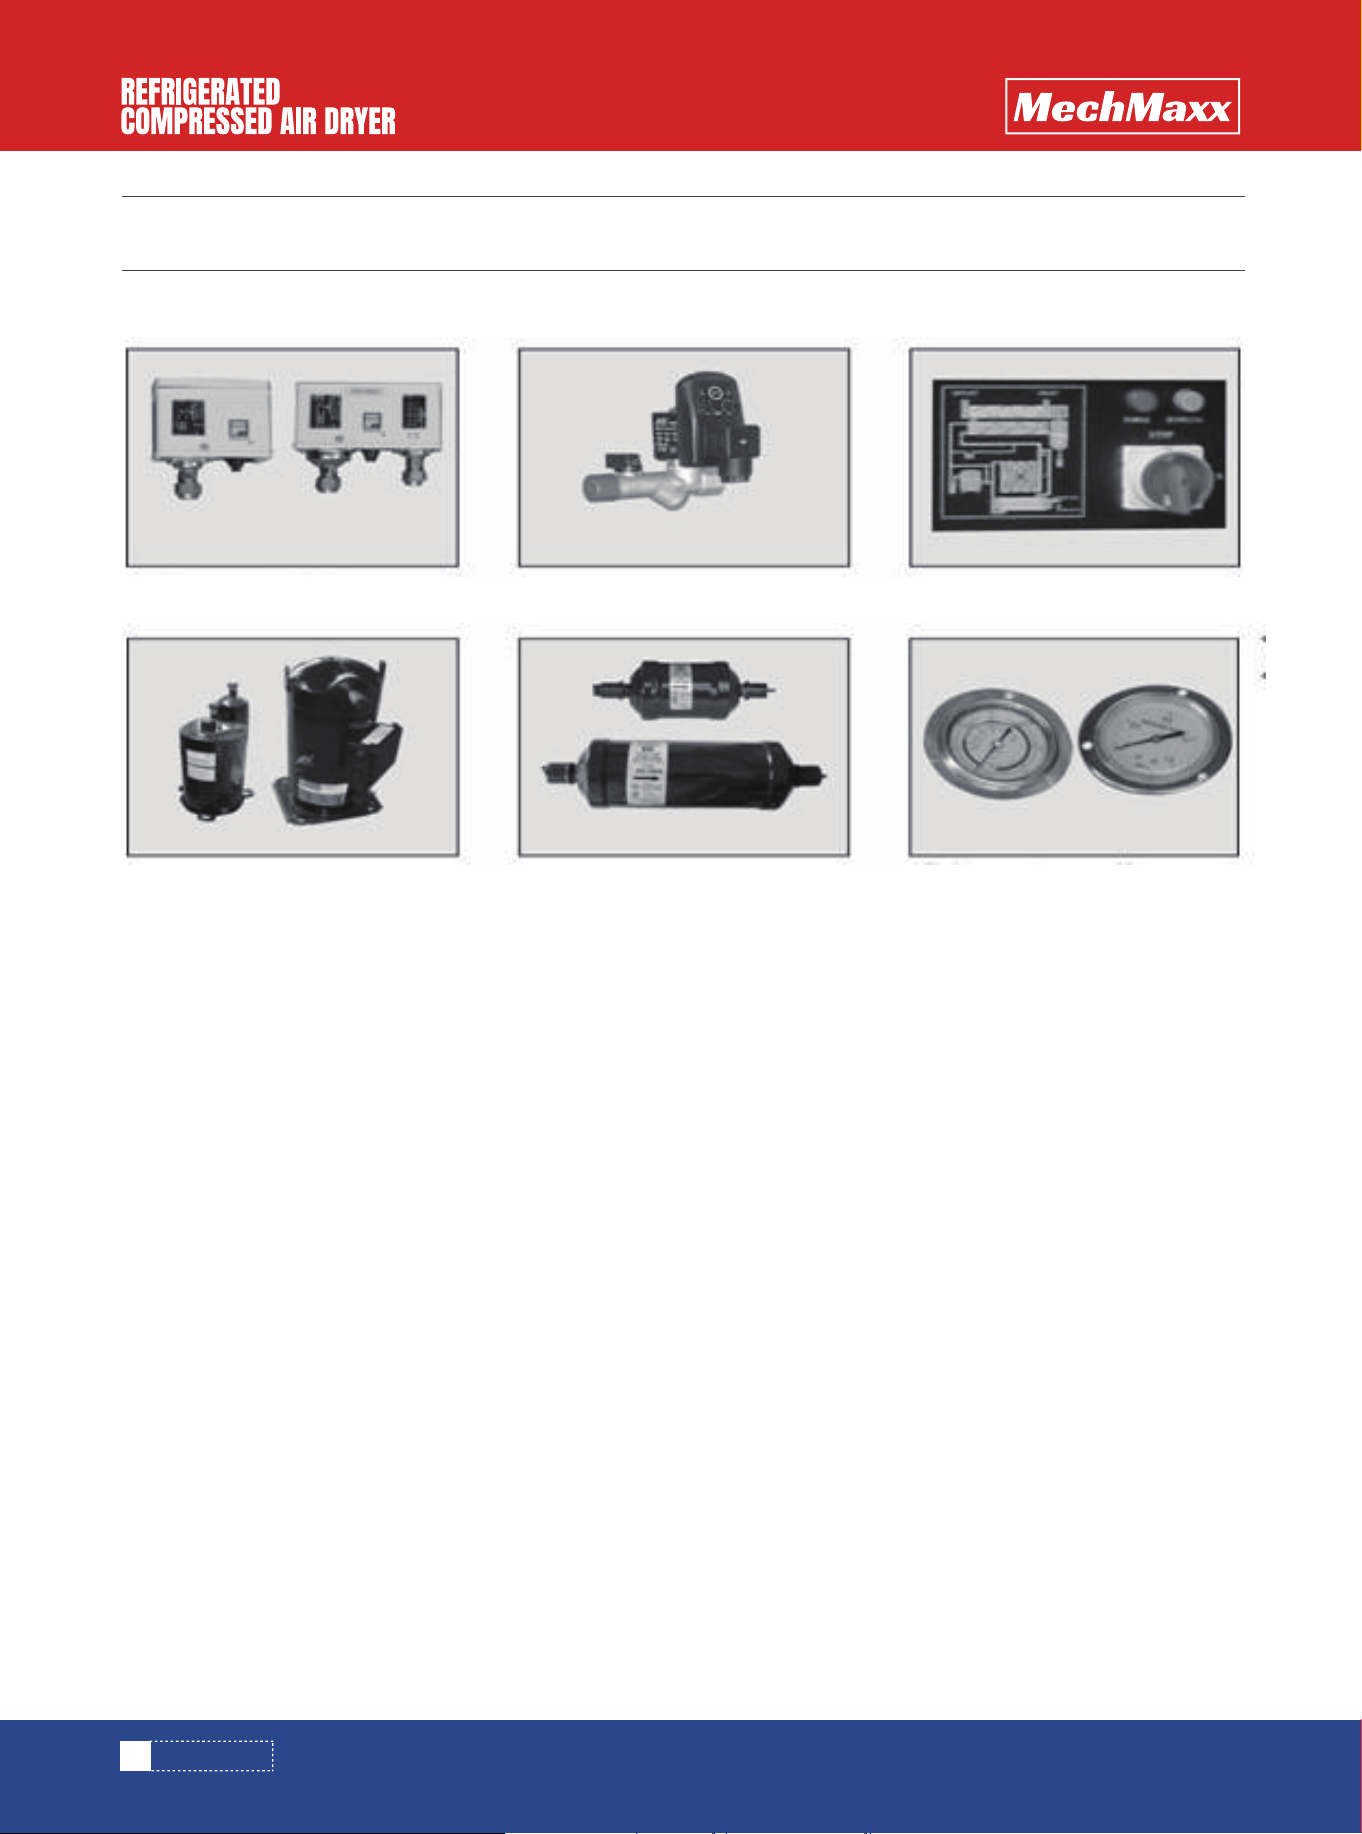
Refrigerant Compressor Dryer Filter Controller Panel
High Pressure Switch
High-low Pressure Switch
Electronic Auto-drain
Refrigerant Pressure Indicator
Air Pressure Indicator
COMPONENTS
9
www.mechmaxx.com
INSPECTION AND MAINTENANCE
INSPECTION AND MAINTENANCE
Inspection before running the dryer
1.Check the power supply
Single Phase, AC110V
2.Check the cooling system
Inspect the refrigerant high, low indicator. The two indica-
tors are in a balanced value when in a certain pressure.
This balanced value will be changed according the ambient
temperature. Usually, this balanced value is in
0.5MPa--1.2MPa.
3.Check the air pine. The pressure of the air inlet can not
higher than 1.0MPa.
Be sure the temperature of the air inlet can not higher than
the maximum temperature.
4.If you choose the water cooled dryer, please check the
cooling water. The water pressure is in 0.15MPa-0.4MPa.
The water temperature is not higher than 32 ℃.
1.Ensure the install site. Check the power connecting, the
connecting between auto drain and the water tube.
2.Turn the BUTTON to run site.
3.The running lamp will be on a litter later. The fan will
work and it will blow the heat wind from the side net.
4.Check the compressed air and the ambient temperature,
the motor of the fan will run again and again. And the air
dryer work continuity. If the indicator is higher than 0.6
MPa, it means the air dryer is in over load.
INSPECTION BEFORE RUNNING THE DRYER
RUN THE DRYER
1.Turn the button to stop site.
2.The running lamp will be off. The compressor also stops
working.
STOP THE DRYER
Just allow restart the dryer after stop it 3 minutes.
RESTART THE DRYER
1.lamp — the lamp will be on when the button is turned to
RUN site.
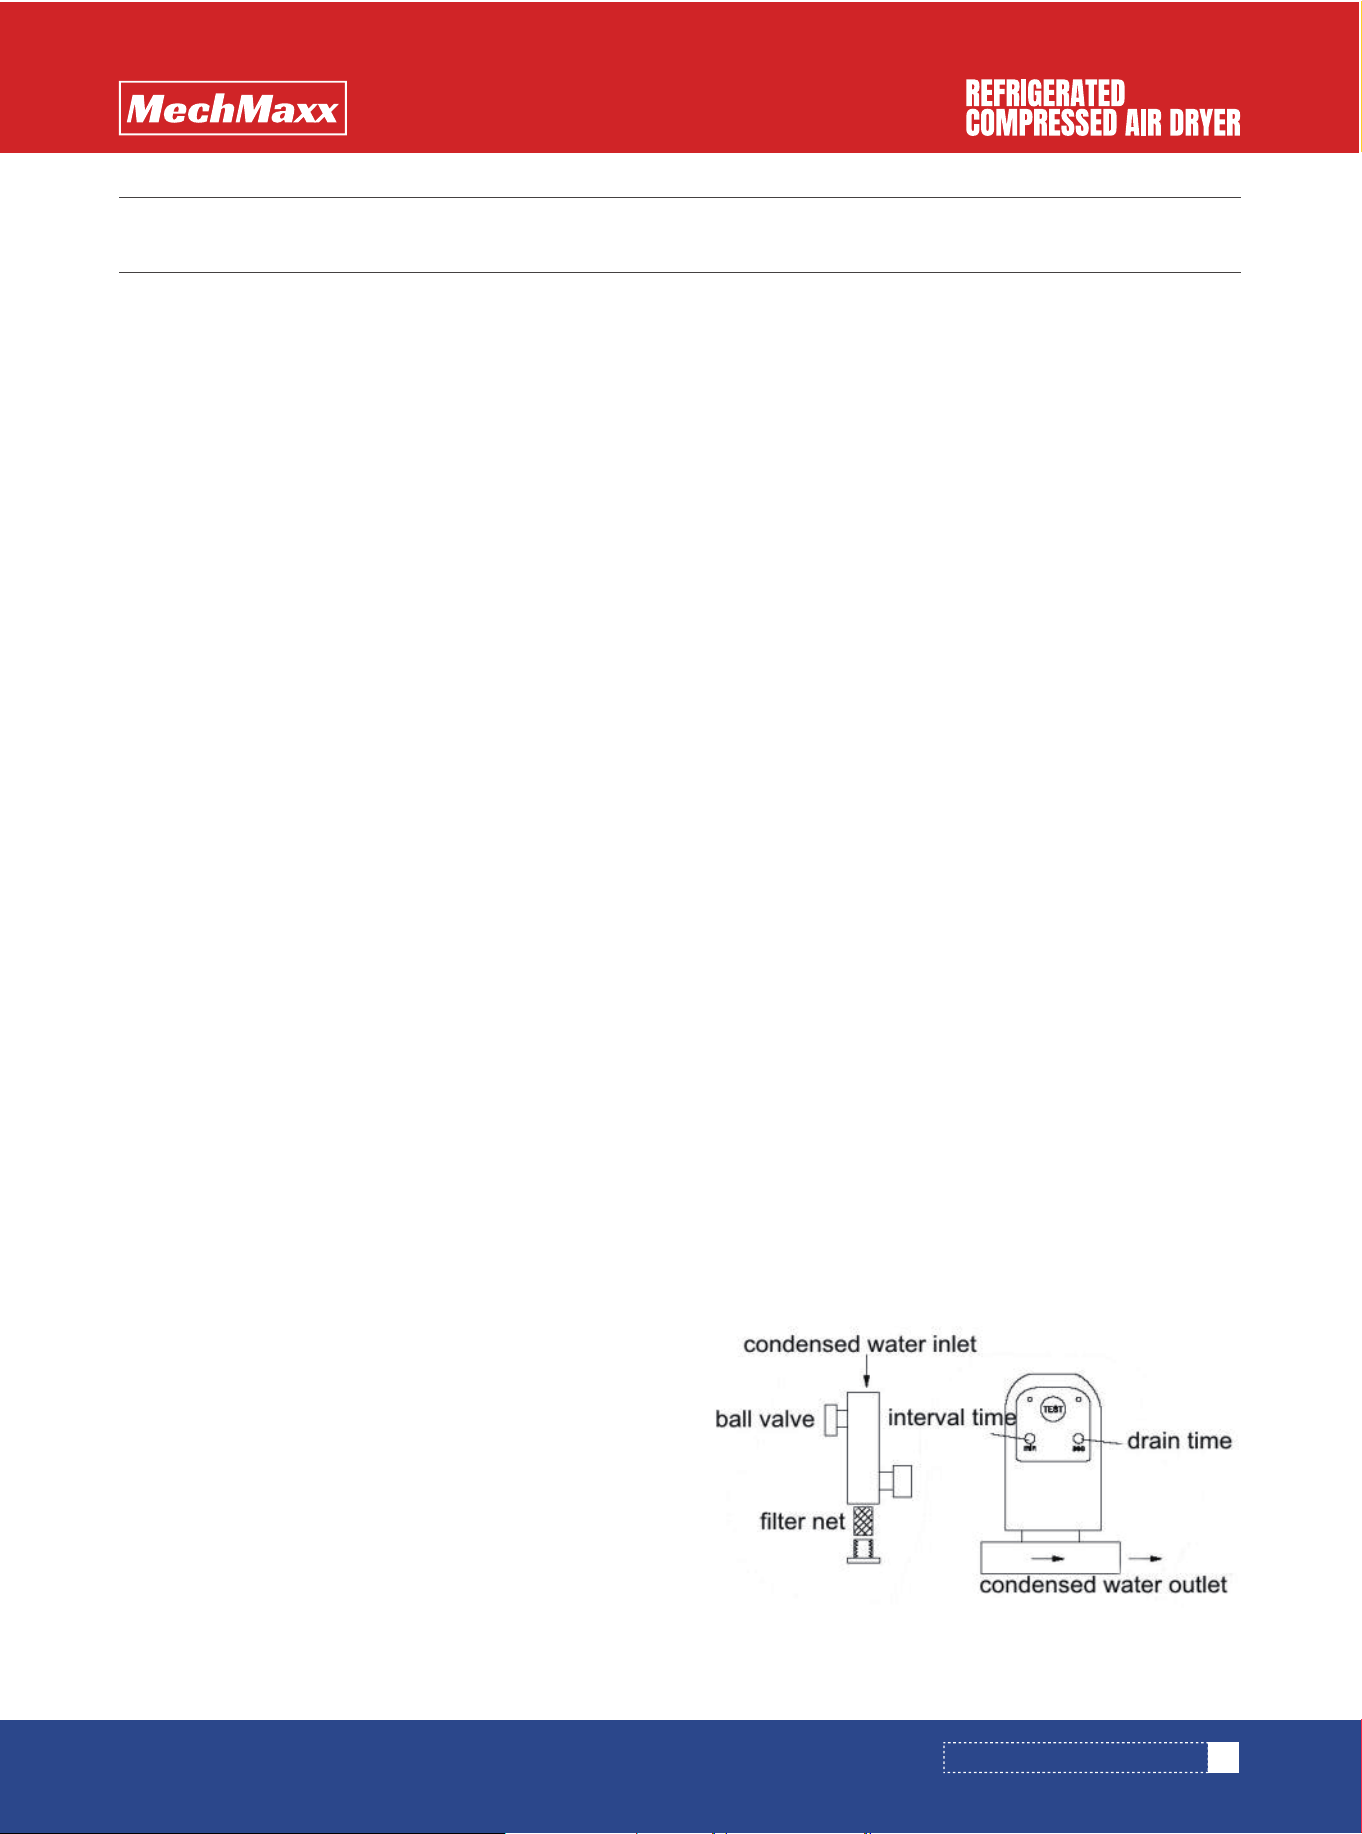
2.Auto drain— Please check whether the auto drain can
drain off water regular or not. You can press the “TEST” key
to confirm it, Open the manual drain valve often, and
discharge inside impurity that can avoid auto-drainer
blocking. If the drainer working not smoothly, please clean
the auto-drainer according to below “cleaning of
auto-drain”.
3.Refrigerant pressure Indicator — During running, it is
the best working condition when the Refrigerant pressure
indicator value is in the 0.3~0.6MPa.
4.Cooling water — Please check whether the cooling
water in a normal condition during running? The water
pressure should be in 2~4g/cm2, the max. Temperature of
water can not exceed 35℃. (this item suit for water
cooled air dryer)
1.Clean the auto drain
Need to clean the auto drain every month. It can avoid the
error.
2.Clean the side net
Use pure compressed air to blow the side net every week.
3.Clean the condenser
Due to condenser’s structure, It can not manual cleaning,
just for chemical cleaning.
INSPECTION IN EVERY DAY
INSPECTION IN EVERY MONTH
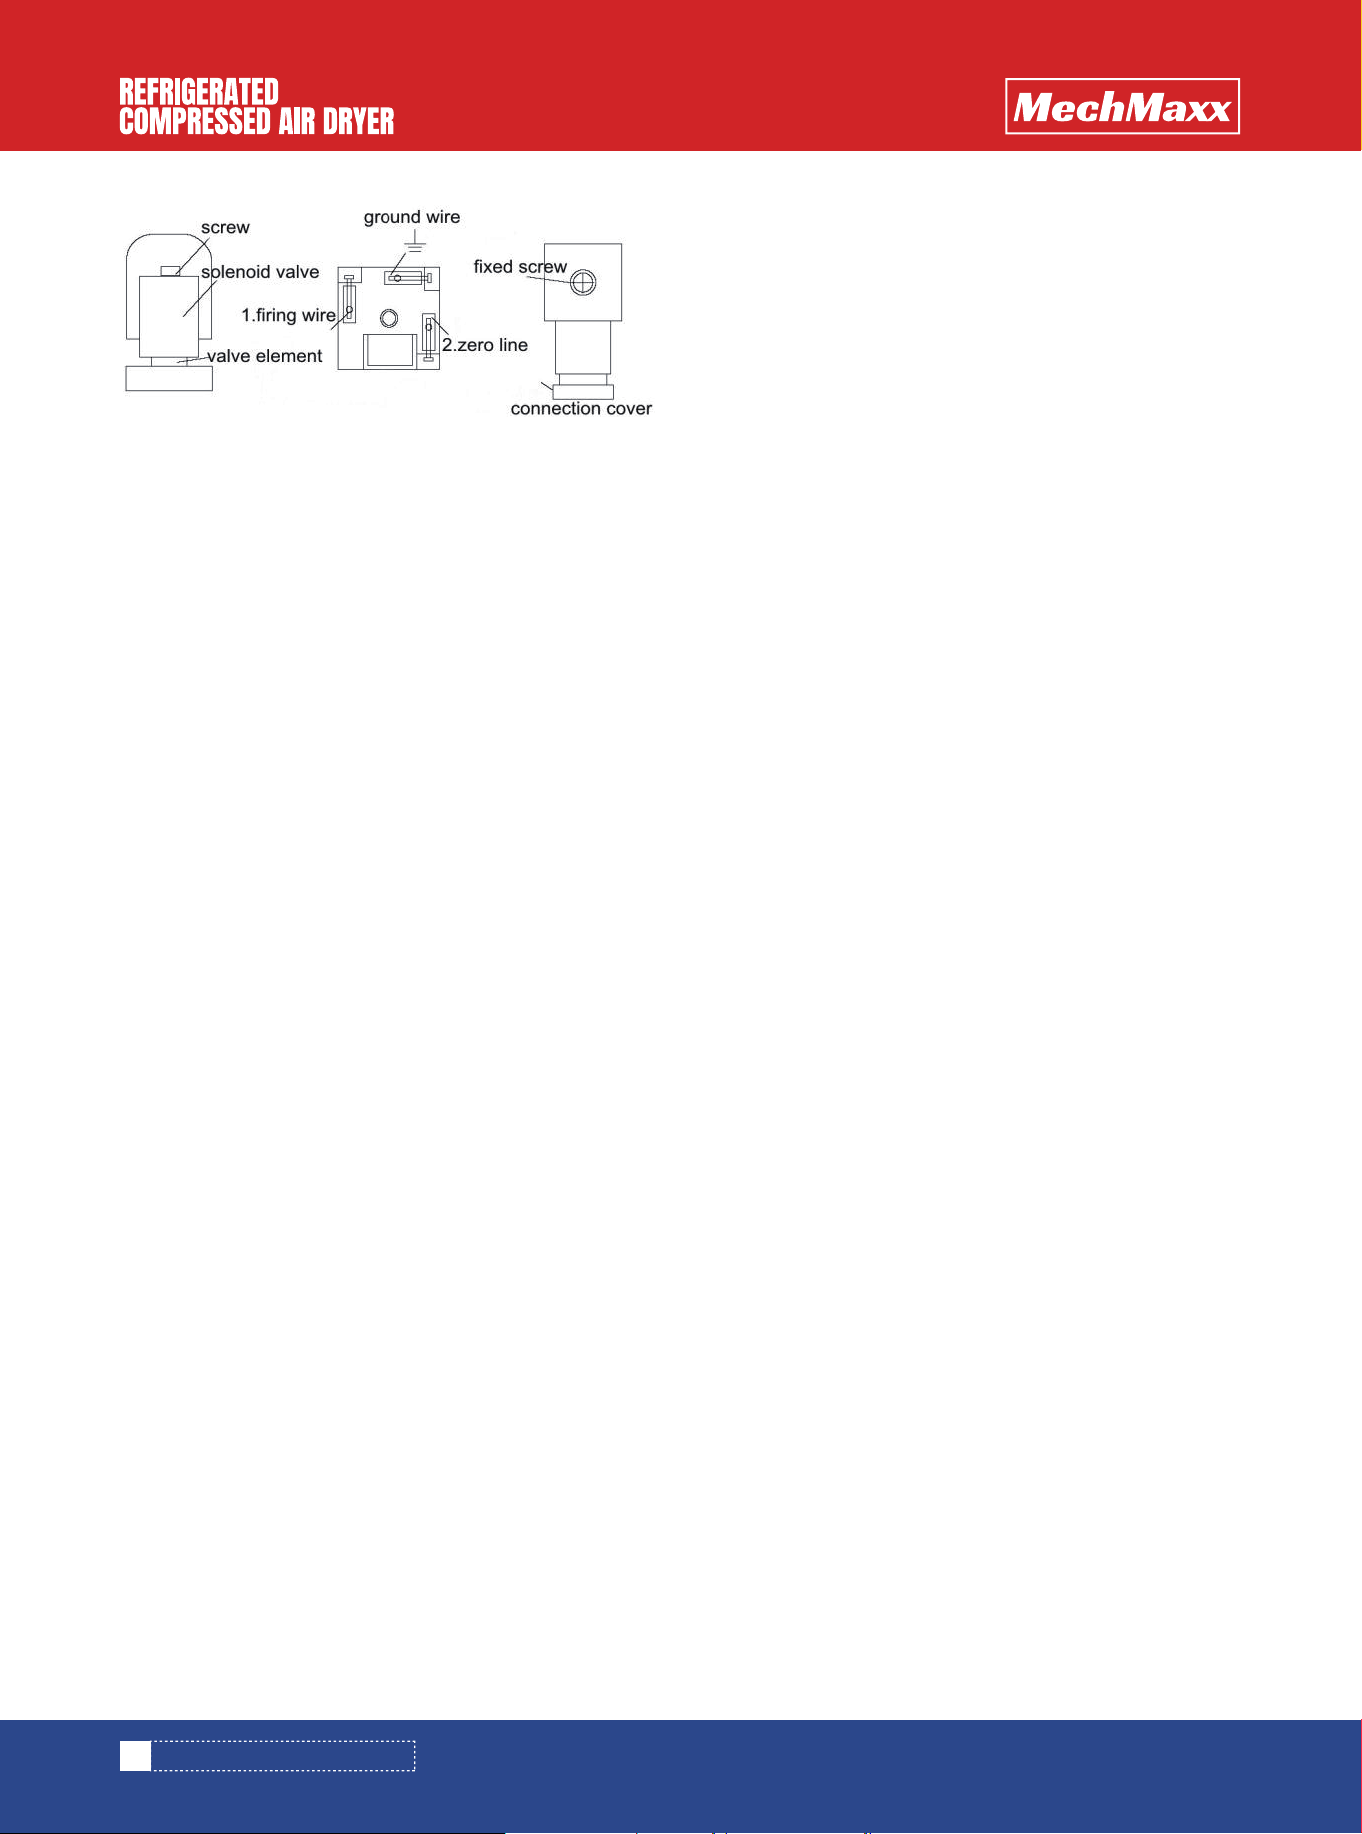
INSTALLATION DIAGRAM OF ELECTRONIC
AUTO DRAIN.
INSPECTION AND MAINTENANCE
10
www.mechmaxx.com
1.Please use three core circular cable as connection
cable, make sure cable connect with ground reliably, also
please check the power, whether it can meet the require-
ments.
2.Before install the drainer, please clean the fouling, weld-
ing slag and rust in the compressed air system. For new
machines, we suggest clean the drainer filter net weekly
(turn off the ball valve), because condensed water is very
dirty, particle will blocking the valve element. When occur
this condition, you can solve the problems by following
below methods:
* Press the “TEST” key again and again until solve the
problem ( this method is effective on valve element block-
ing )
* If press the “TEST” key repeatedly, drainer still not work,
please take apart the solenoid valve and clean the valve
element. Procedure as below:
1.Turn off isolating valve, press the “TEST” key to exhaust
air, ensure electronic drainer is separate with compressed
system, it is mean that drainer under no pressure condi-
tion.
2.Cut off the drainer’s power.
3.Take off the coil (before taking off it, please make sure
the electronic drain had already without electricity, other-
wise electrify coil will be burn up), take apart the solenoid
valve, and take off the valve element and spring , and then
wash the valve, valve element and spring by water, after
that install them again, the trouble can be solved.
Notice:
While Refrigeration Air Dryer is running, evaporation
thermometer value ≥0.6MPa, it maybe in the overload
state. Please check the below “overload state” condition:
Air dryer running under following state will cause overload
(forced running), this moment, protection equipment will
take action and stop the dryer.
1.The inlet temperature of compressed air is too high.
2.The capacity of compressed air is too large.
3.Ambient temperature is too high(above 45℃)
4.Intake is blocked by wall or dust.
USING NOTICE OF AUTO DRAIN
OVERLOAD STATE
11
www.mechmaxx.com
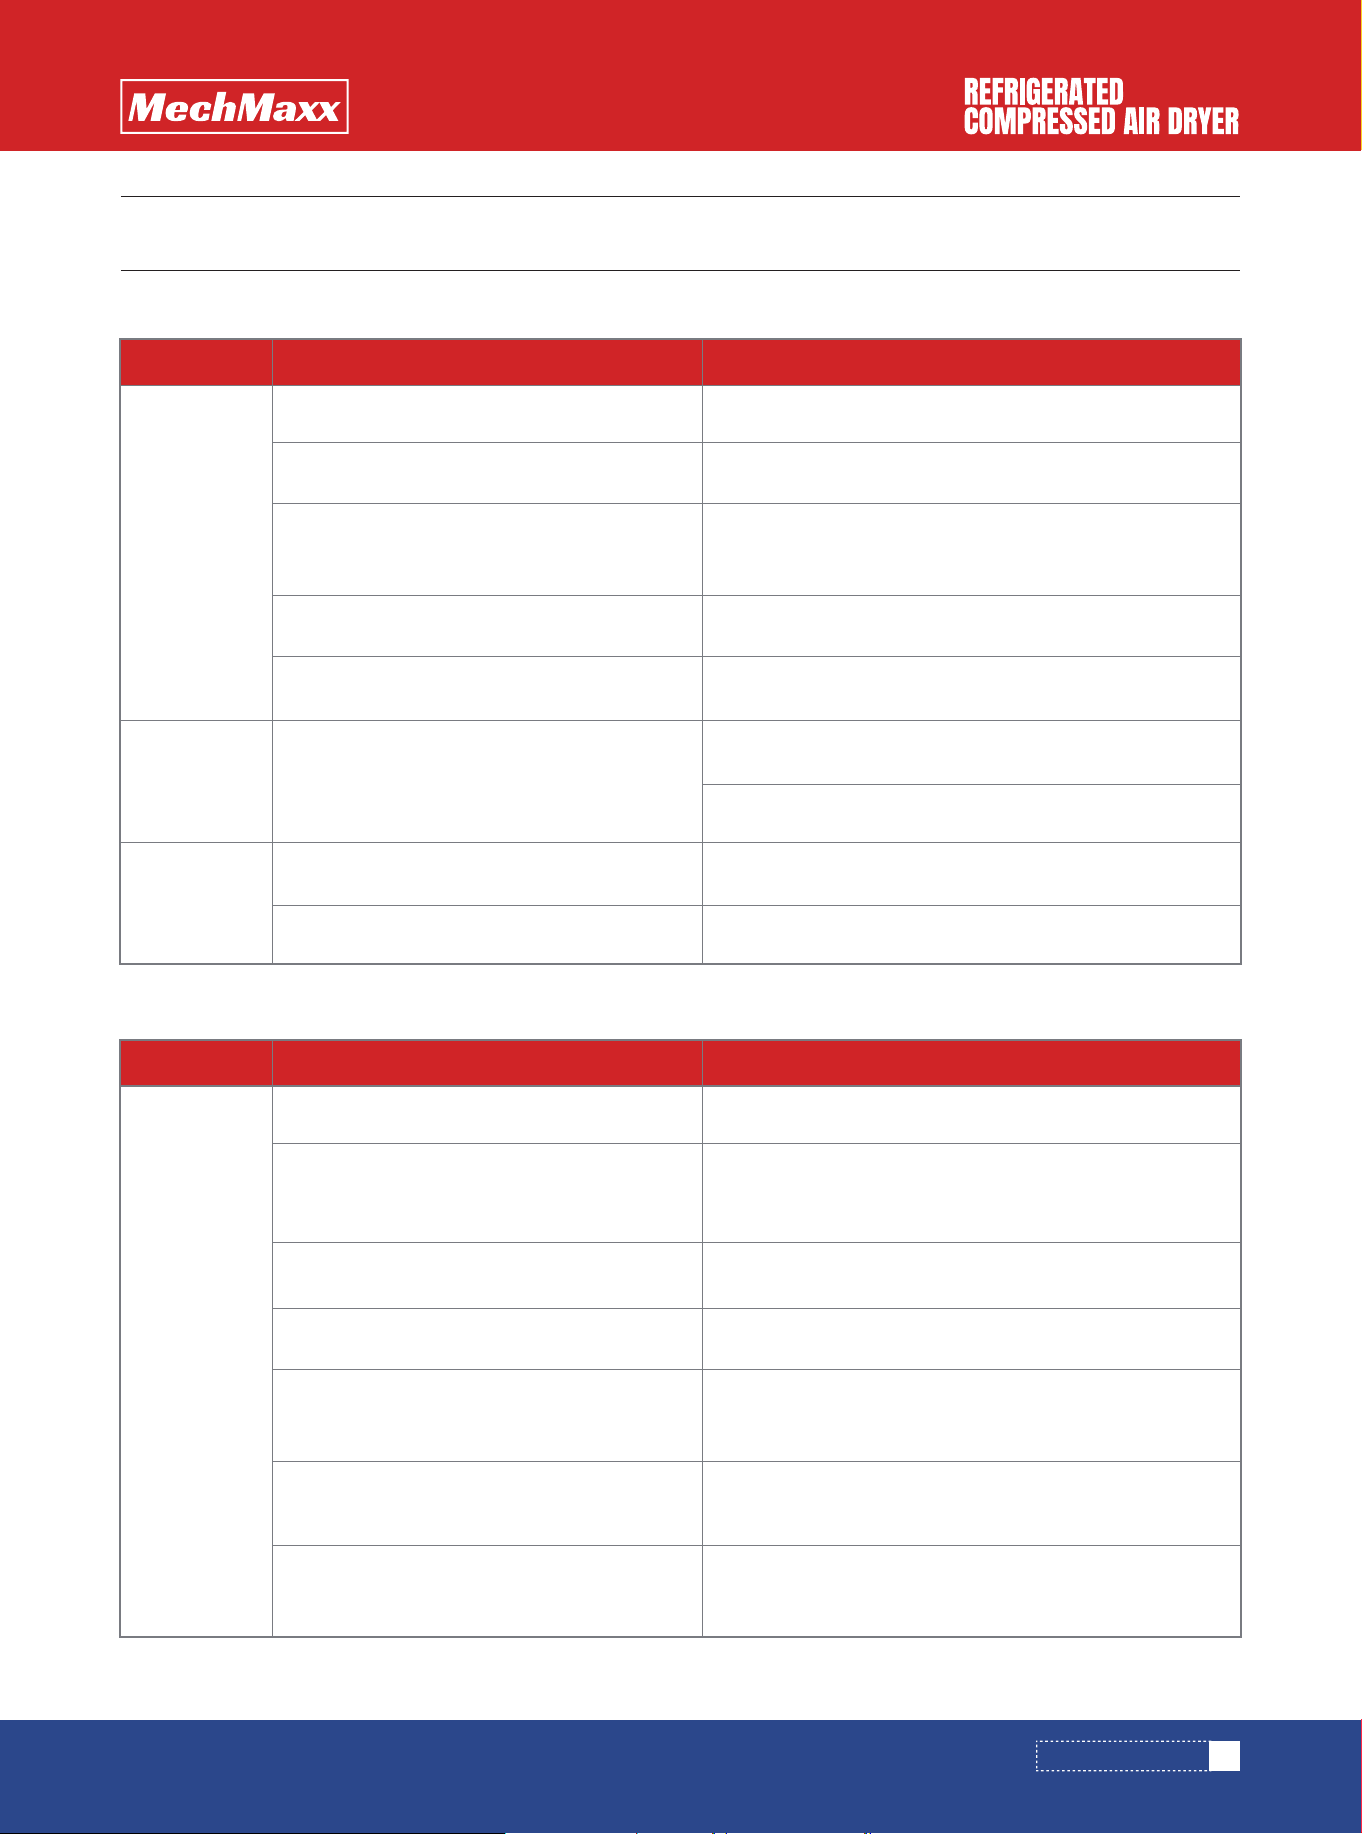
ABNORMAL DRAINAGE
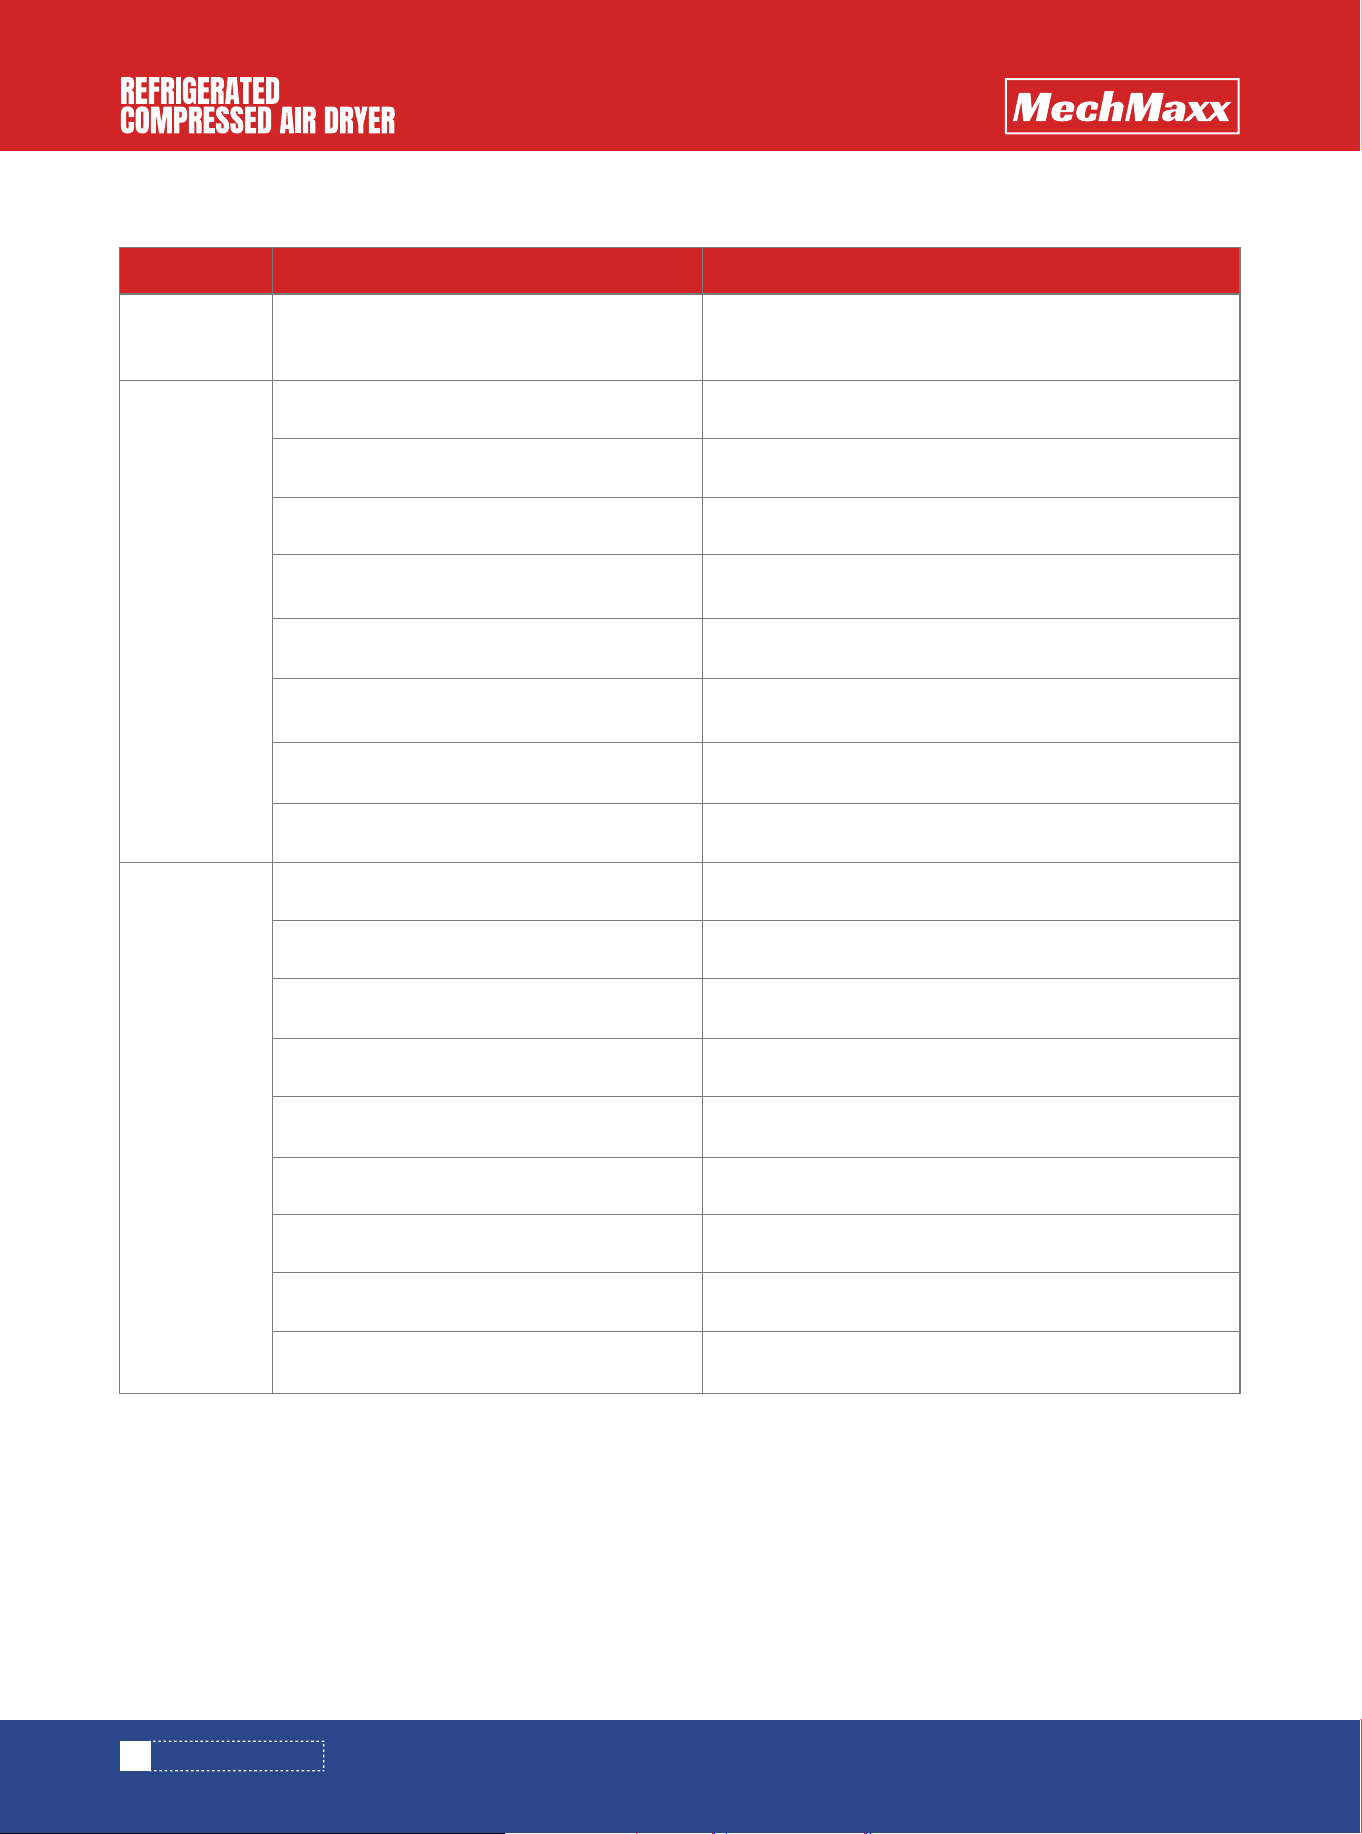
TROUBLESHOOTING
TROUBLESHOOTING
Differential
pressure is
too big
Not enough
air supply
Evaporator
frozen
We can check the failure of the dryer when encountering the 6 problem as follows
Open the valve fullypipeline valve is not fully opened
Enlarge the pipe diameterPipeline diameter is too small
Design the pipeline system again
Replace a larger capacity air compressor
Reduce the capacity of air dryer
Replace the temperature switch
Replace the solenoid valve
Pipeline is too long and with too many elbow,
bend and connection
Capacity of air dryer exceeds the rated flow
rate of air compressor.
Some problem with the temperature switch
Solenoid valve failure
Check the leakage and repairToo many connection leakage
Clean or replace the elementAir line filter is blocked
Solution
Failure
Reason
Com-
pressed air
with
moisture at
the down-
stream
Close the air bypass valve fullyAir bypass valve is not closed properly
open air inlet & outlet valves fully
Compressed air does not pass through the
refrigerated air dryer
Position of Drain-pipe is higher than the
automatic drain
Air flow rate of Air compressor is much bigger
than air capacity of refrigeration dryer.
Compressed air inlet and compressed air
outlet are in an opposite position.
Replace with an appropriate size dryerAir flow too large and pressure drop is too big
Clean or replace auto drain
Re-position the drain pipeline
Re-match air compressor-air dryer size
Reposition
Auto drain not draining
Solution
Failure
Reason
12
www.mechmaxx.com
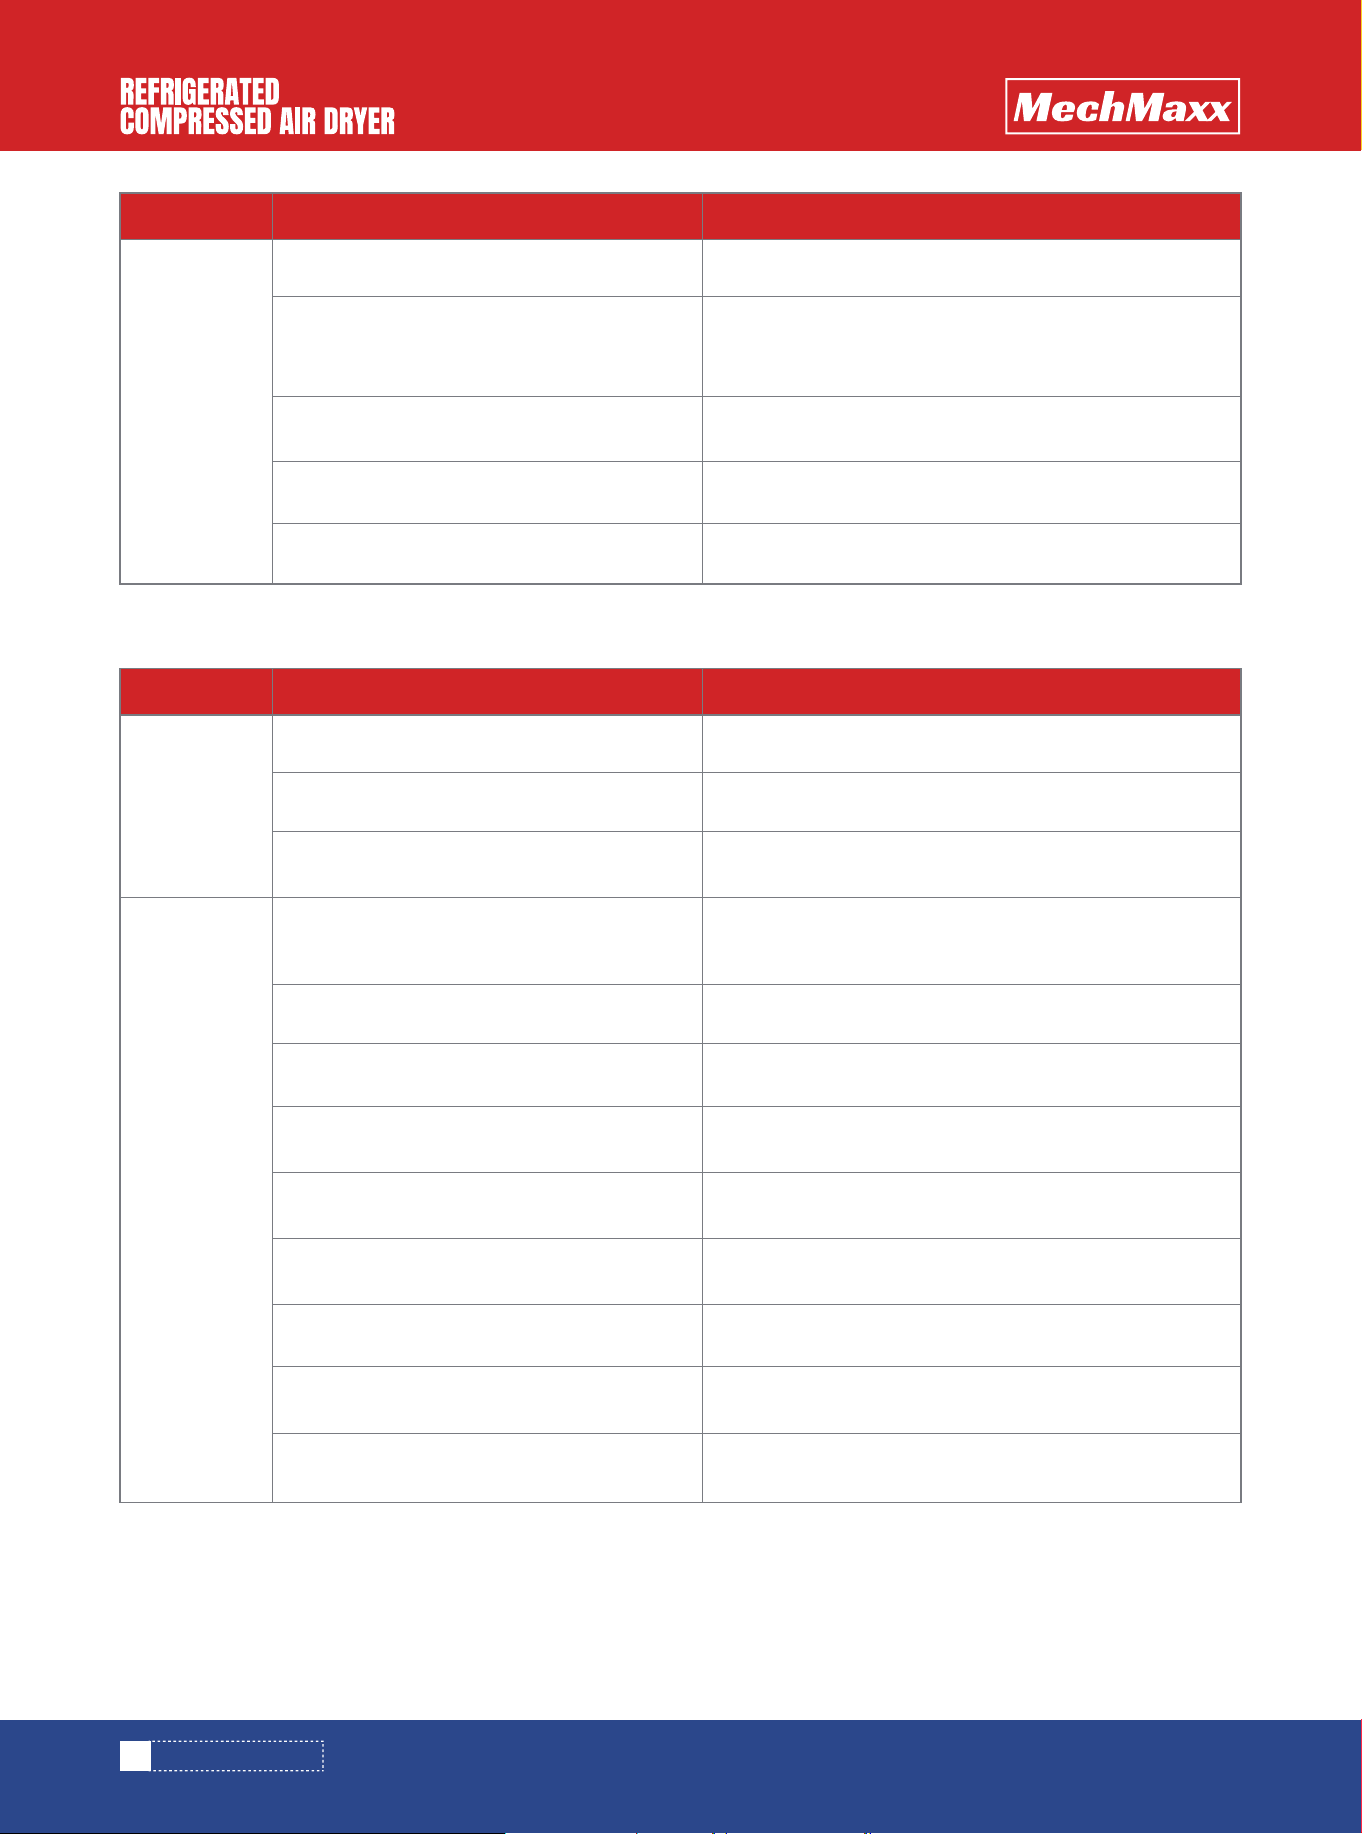
CAN NOT RUN
TROUBLESHOOTING
Evaporation
tempera-
ture
indicated
abnormal
Check the air compressor loadEvaporation temperature is too high
Select clean location and improve the ventilation
Environment air is polluted and ventilation is
abnormal
Instrument damage
Replace the solenoidSolenoid failure
Check the refrigerant and re-fill refrigerant if necessary.
Replace instrument
Refrigerant leakage
Solution
Failure
Reason
No power
supply
Have power
but can not
run
Ensure if there is short or short circuit of power supplyFuse broken or on-off switch tripping
Check the fuse or fuse switchCircuit broken
Replace the transformerTransformer failure
Please select according to the rated voltage on the
nameplate
Voltage abnormal or power line is too small
Replace any two of three line of power supplyPhase sequence protection
Replace contactorContactor is damaged
Replace the thermal overload relaythermal overload relay is damaged
Replace a new capacitorcapacitor is abnormal
Replace high/low pressure switchHigh/low pressure switch is abnormal
Replace temperature switchtemperature switch is abnormal
Replace a new compressorCompressor is abnormal
Repair or replace time relaytime relay is abnormal
Solution
Failure
Reason
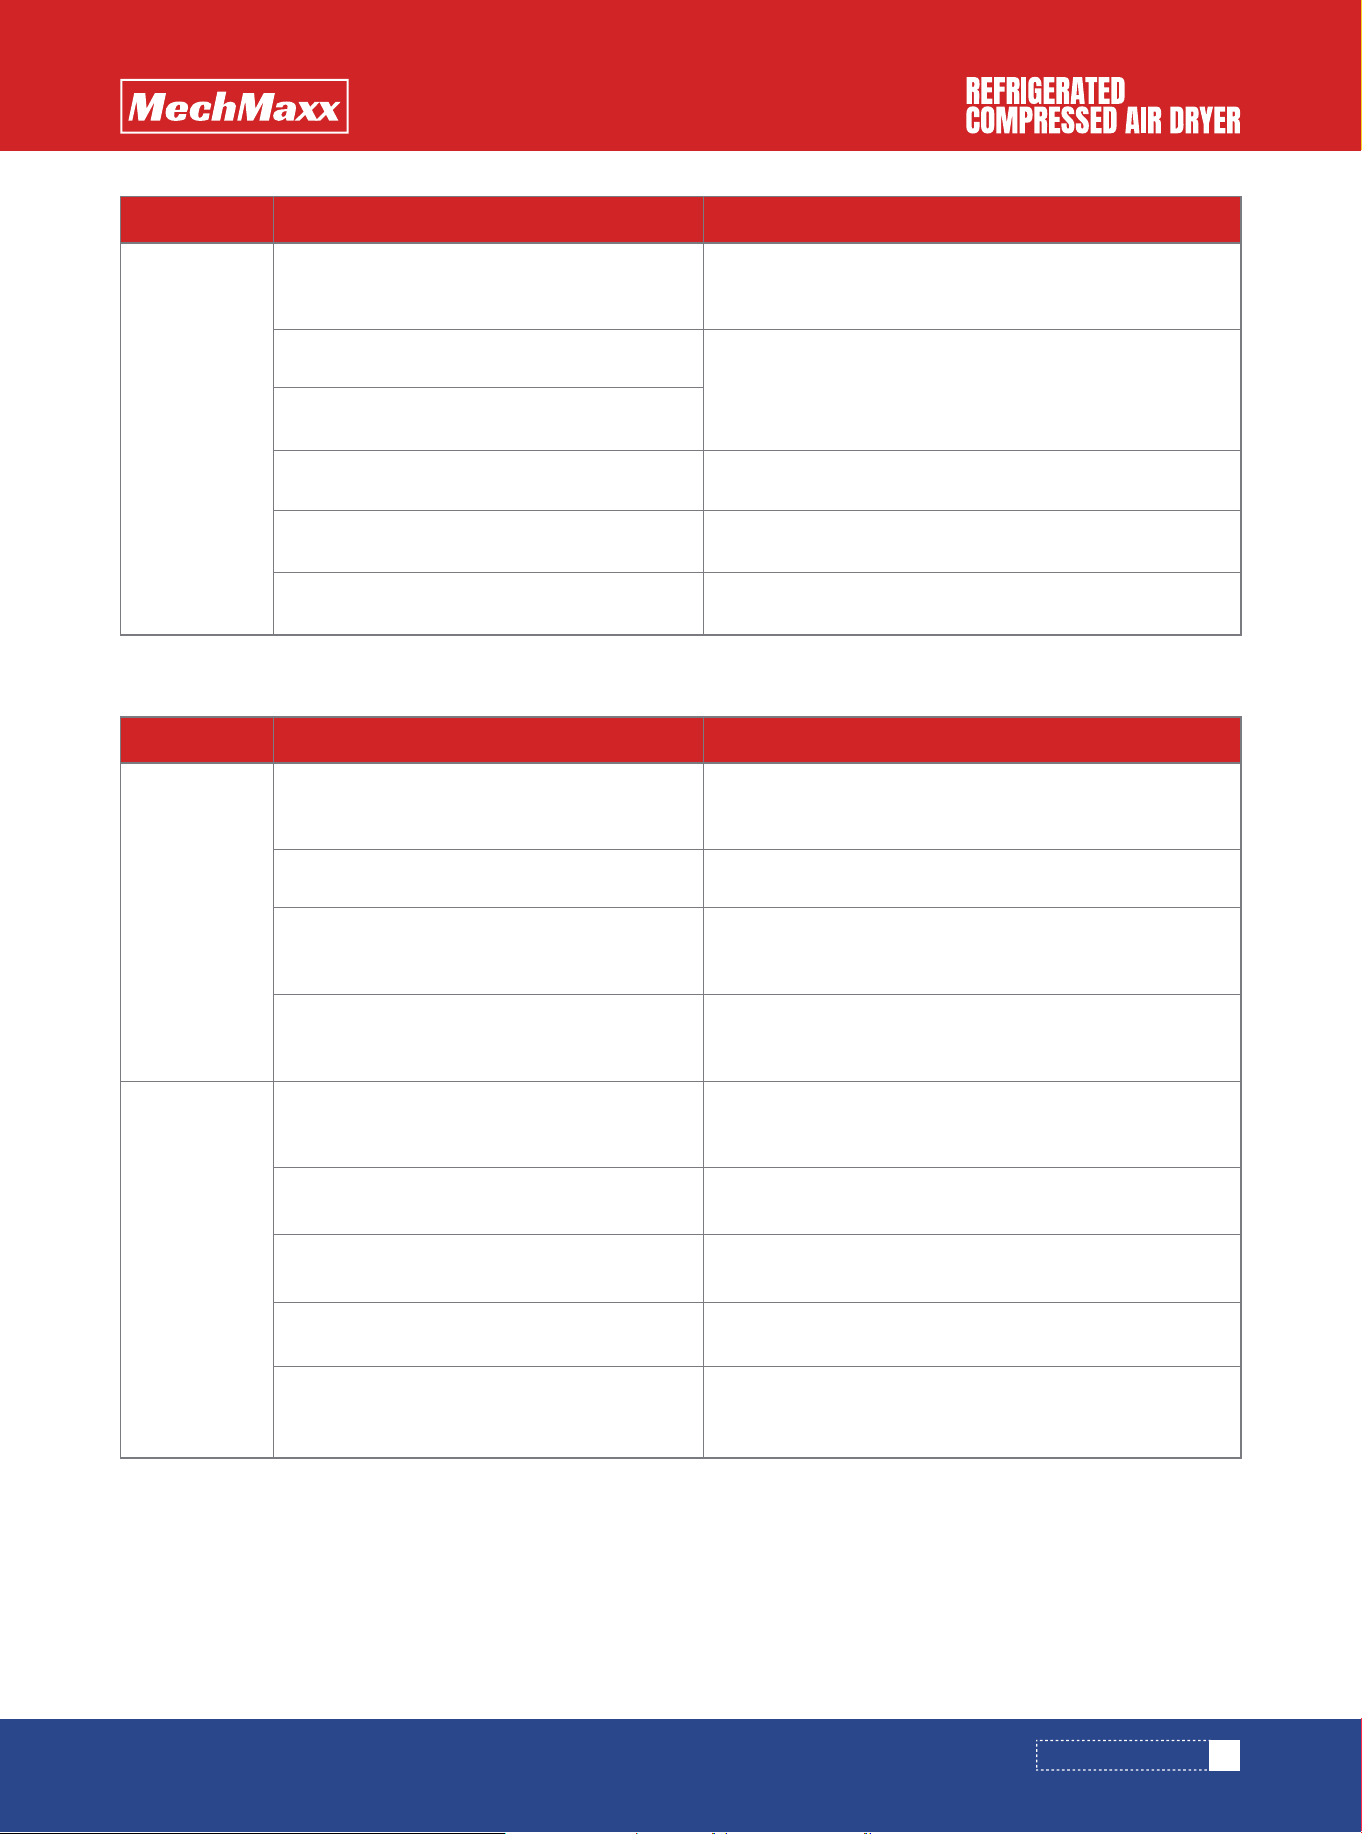
NORMAL OPERATION BUT POOR EFFECT (OUTLET AIR NOT DRY ENOUGH)
13
www.mechmaxx.com
Switches
are all
normal but
can not run
After finding out the reason of skipping, reset the switch
High/low pressure switch tripped but not
reset
After finding out the reason, accordingly reset
Solenoid switch O.L not reset
High pressure switch not reset
Re-set or replace a new temperature switchWrong setting of temperature switch
Replace a new compressorcompressor is abnormal
Repair or replace intermediary relayIntermediately relay is abnormal
Solution
Failure
Reason
Too low
evaporation
tempera-
ture
Too high
evaporation
tempera-
ture
Replace a new evaporation temperature meter.
Evaporation temperature meter is abnor-
mal(low pressure meter)
Temperature switch or pressure switch is
set too low
Replace solenoid valve
Re-set up
Solenoid valve blocking
Check out where to leakage point and re-fill up refriger-
ant
Improve the surrounding temperature with good ventila-
tion
Refrigerant leaking
Surrounding temperature is too high
Adjust or replace new hot gas bypass valve Hot gas bypass valve failure
Cleaning with air dusterCondenser blocking
Re-design the matching
Replace a new refrigerant compressor
Air capacity is too large
The inlet/outlet valve-plates of Refrigeration
compressor are worn
Solution
Failure
Reason
TROUBLESHOOTING
14
www.mechmaxx.com
ABNORMALLY OPERATION
Unusual
Voltage
Dryer tripped
on high
pressure,
difficult to
reset and
start
Overload
Breaks
Re-install the wire Short circuit after running the dryer
Abnormal fan
Change the pressure switch
Change the motor of the fan
Abnormal pressure switch
Check and find the cause
Clean the condenser
Overload break
Dirty condenser
Reduce the refrigerantToo much refrigerant
Reduce the ambient temperatureToo hot ambient temperature
Change the solenoid valveSolenoid valve damaged
Change the starting capacitorAbnormal starting capacitor
Ensure correct voltageAbnormal voltage
Change the pressure switchAbnormal pressure switch
Reduce the air flowThe compressor over load
Reduce the ambient temperatureAmbient temperature too high
Adjust the settingToo low overload current setting
Tighten all connectionsconnection
Find the reason of loss phasePhase failure
Clean change or retighten the contractorFaulty or loose contactor
Change the filterBlocked refrigerant filter
Solution
Failure
Reason
TROUBLESHOOTING
15
www.mechmaxx.com
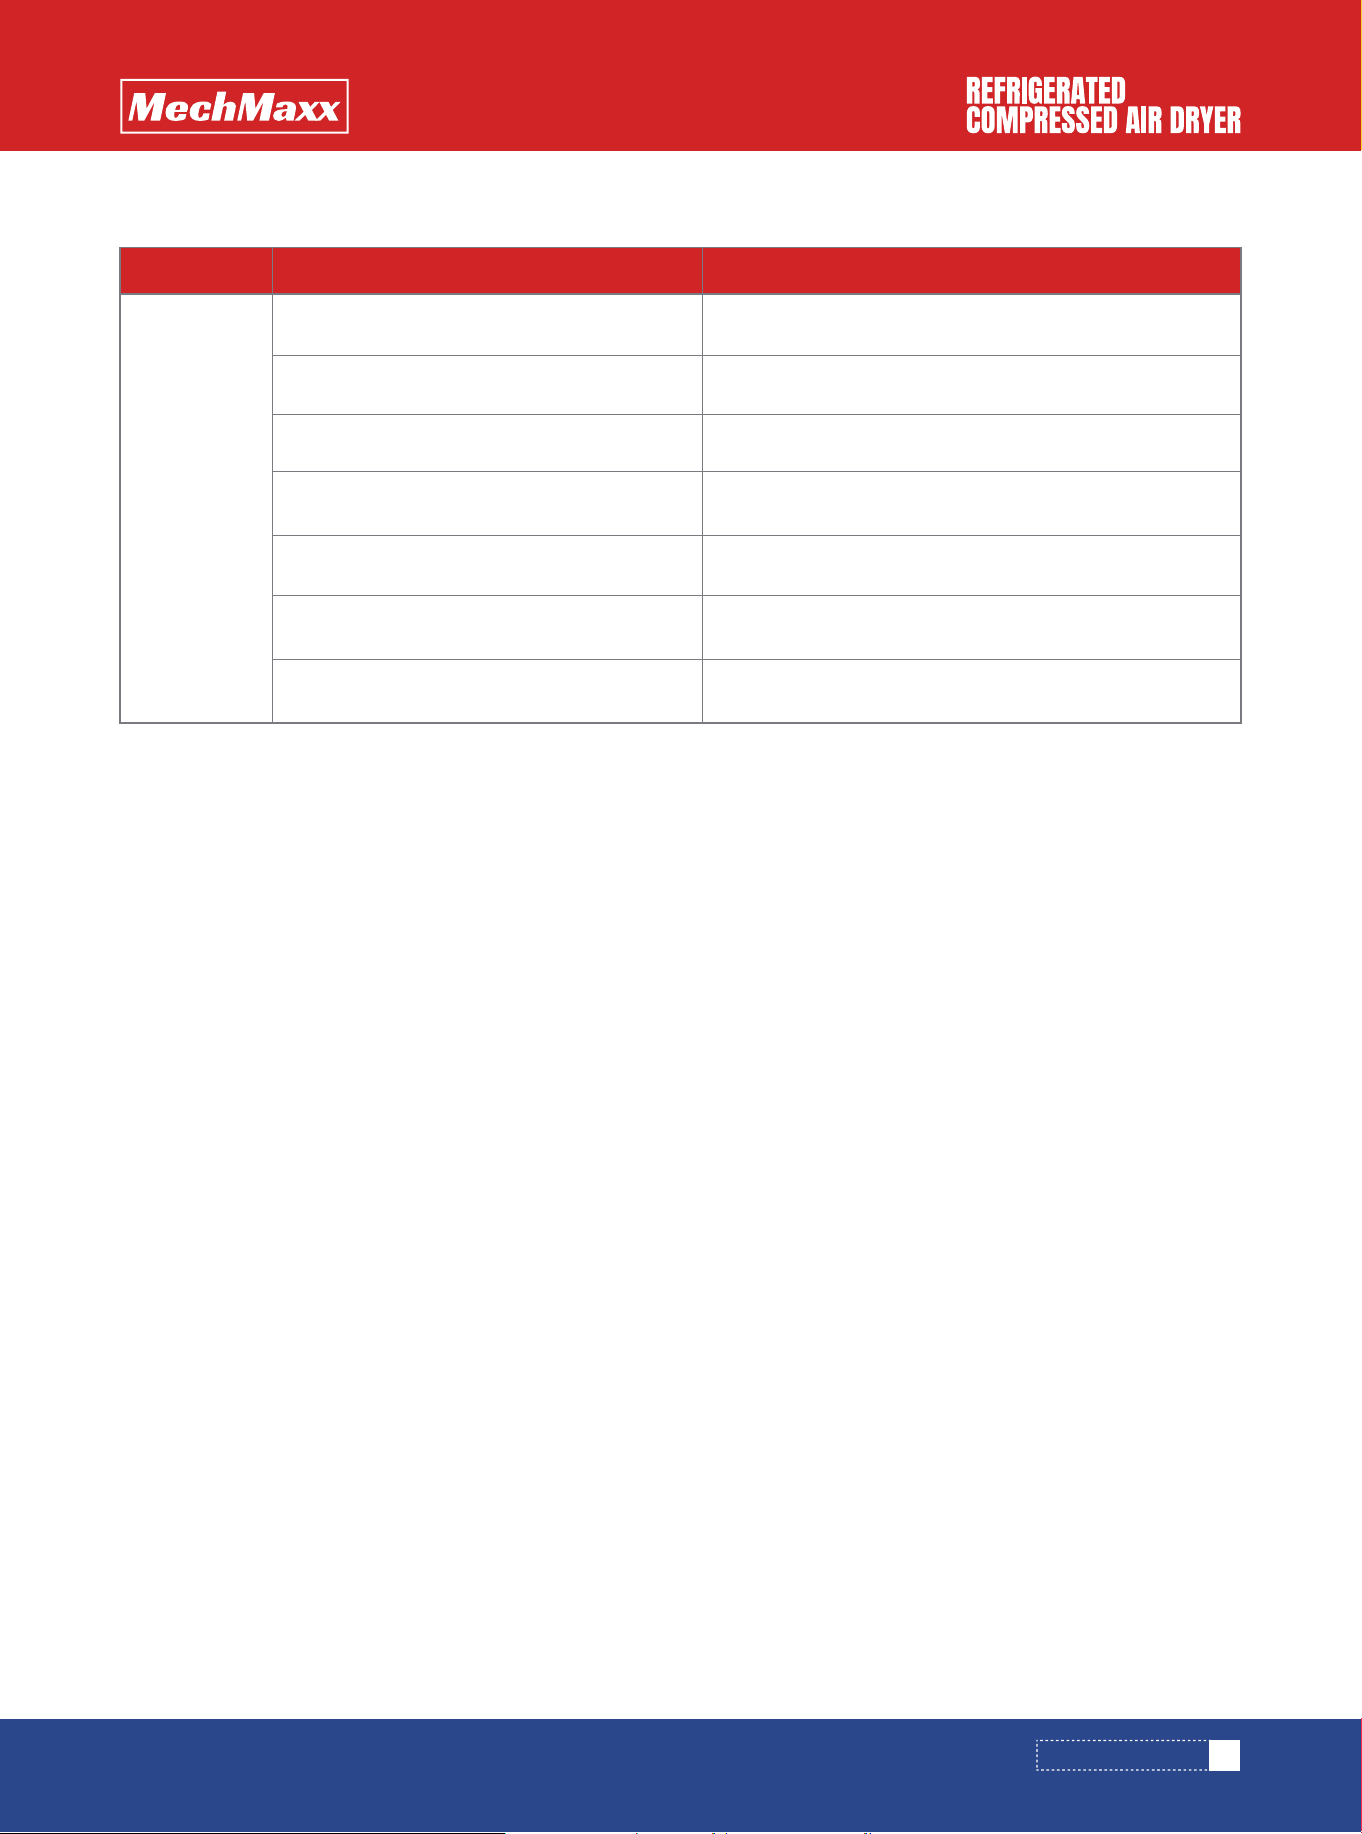
AUTO DRAIN NOT OPERATING PROPERLY
Improper or
unable to
drain
completely
The normal pressure should be 2-40 barLine pressure below 1.5 bar
Drain valve damaged
Change the drain valve
Replace the auto drain unit
Clean the auto drain
Damage timer unit
The blocking of filter of the auto drain
Reduce the operation pressureToo high operation pressure
Clean the drain valveDrain valve blocked
Use the manual water drain valveToo much water in the system
Solution
Failure
Reason
TROUBLESHOOTING