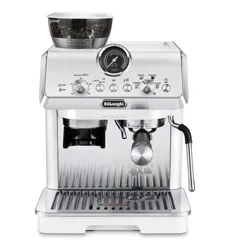
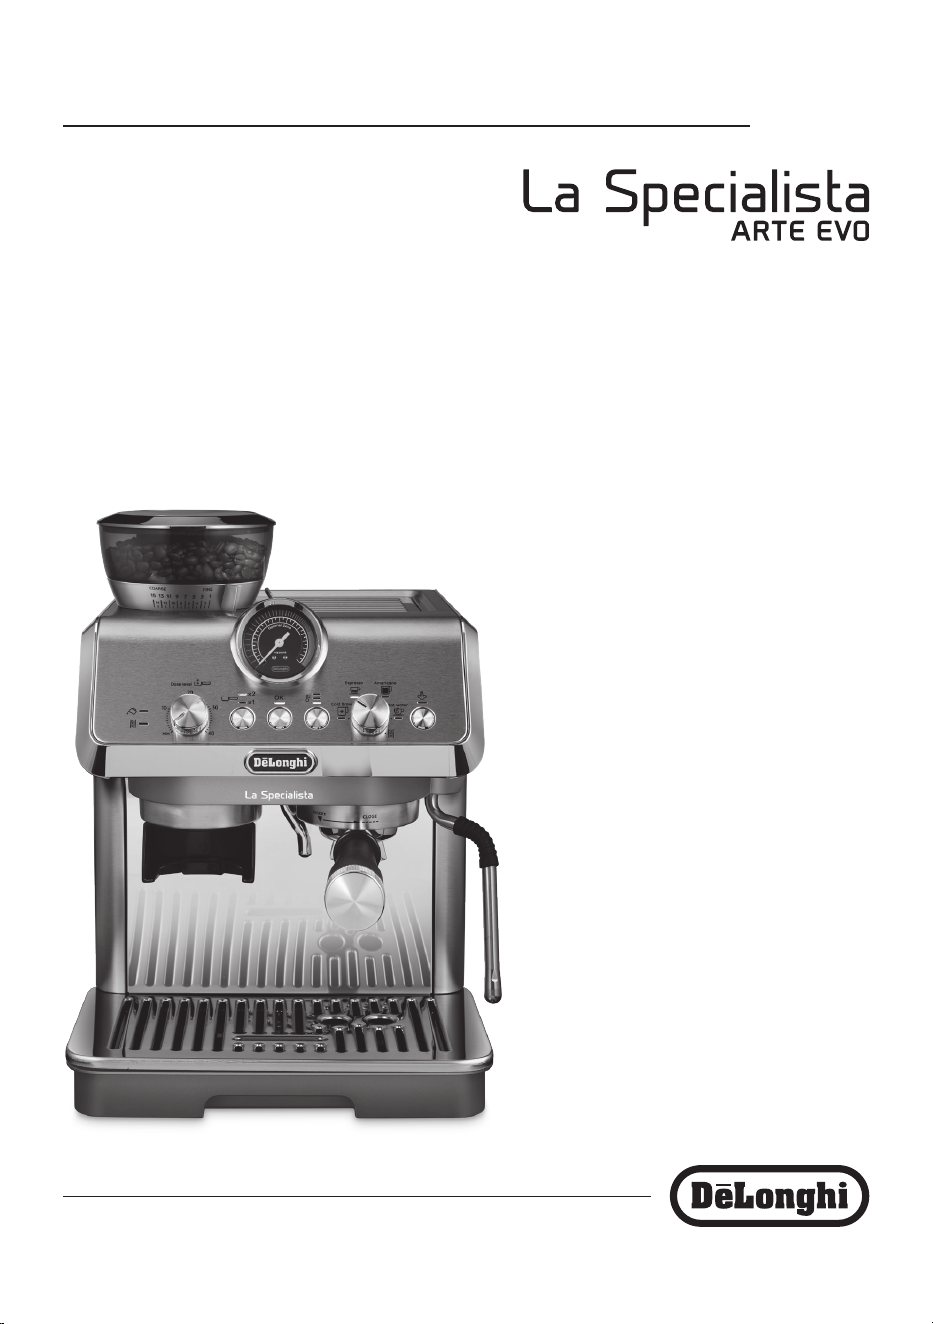
EC9250
COFFEE MAKER
Instructions for use. Keep these instructions
Visit delonghi.com for a list of service centers near you.
ELECTRIC CHARACTERISTICS
120 V~ 60 Hz 1600 W
MACHINE À CAFÉ
Mode d’emploi . Conservez cette notice
Visitez delonghi.com pour y voir une liste des centres de
réparation proches de chez vous.
CARACTÉRISTIQUES ÉLECTRIQUES
120 V~ 60 Hz 1600 W
CAFETERA
Repase y guarde estas instrucciones.
Lea cuidadosamente este instructivo antes de usar su
aparato.
Visite delonghi.com para ver la lista de centros de servicios
cercanos a usted.
CARACTERISTICAS ELECTRICAS:
120 V~ 60 Hz 1600 W
2
A1
A2
A3 A4
A7
A5
A6
A8
A14
A16
A17
A19
A15
A9
A18
A10
A11
A12
A13
3
B4B3
B2
B1
B5 B6 B7 B8 B9
C4
C3
C7
C1
C2
C8
C6
C9*
C10*
C5
4
1 2 3 4
5 6 7
9 10 11 12
13 14 15 16
MAX
8
8
1
2
(*)
5
17 18 19 20
21 22 23 24
25 26 27 28
29 30 31 32
1
2
5°C

6
IMPORTANT SAFEGUARDS
When using electrical appliances, basic safety precautions should always be followed, including the following.
• Read all instructions carefully.
•
Make sure the voltage of your electrical system corresponds to the voltage shown on the bottom of the machine.
• Do not touch hot surfaces. Use handles or knobs.
• To protect against re, electrical shock and personal injury, do not immerse cord, plug or appliance in
water or other liquid.
• Keep the appliance out of the reach of children and do not leave appliance unattended while in operation.
• Close supervision is necessary when any appliance is used by or near children
• Unplug from the outlet when not in use and before cleaning.
•
Do not operate with a damaged cord or plug, or after the appliance malfunctions, or has been damaged in any
manner. Return the appliance to the nearest authorized service facility for examination, repair or adjustment.
• The use of accessory attachments not recommended by the manufacturer may result in re, electrical
shock, or personal injury.
• Do not use outdoors.
• Make sure the power cord does not hang over the edge of the table or counter-top to avoid getting acci-
dentally caught or entangled.
•
Do not place the appliance or its electrical parts on or near electric stoves, cooking surfaces, or gas burners.
• Plug cord into the wall outlet. To disconnect, rst turn machine “o”, then remove plug from wall outlet.
• Do not use the appliance for other than the intended use. This appliance is to be utilized for domestic use
only. It is not intended to be used in: sta kitchen areas in shops, oces and other working environments;
farm houses; by clients in hotels, motels and other residential type environments; bed and breakfast
type environments. The manufacturer declines all responsibility for any damage caused by improper,
incorrect, or irresponsible use.
• This appliance is not intended for use by persons (including children) with reduced physical, sensory or
mental capabilities, or lack of experience and knowledge, unless they have been given supervision or
instruction concerning use of the appliance by a person responsible for their safety.
• Children should be supervised to ensure that they do not play with the appliance.
• If the SUPPLY CORD is damaged, it must be replaced by the manufacturer, its service agent or similarly
qualied person in order to avoid a hazard.
• WARNING: To avoid the risk of injury, do not open the brewing chamber during the brewing process.
• The surface of the heating element remains hot after use and the outside of the appliance may retain the
heat for several minutes depending on use.
• Clean all the components thoroughly, taking particular care with parts in contact with the milk.
• IMPORTANT: to prevent damage to the appliance, do not clean with alkaline detergents; use a soft cloth
and, where applicable, neutral detergent.
• Appliances with removable cord: avoid splashes of water on the power cord connector or socket at the
back of the appliance.
• IMPORTANT: Models with glass surfaces: do not use the appliance if the surface is cracked.
• The coee maker must not be placed inside a cabinet or kitchen unit during use.
• The cleaning and user maintenance shall not be made by children without supervision.
WARNING: To reduce the risk of re or electric shock, do not remove the cover or the exterior of
the unit. Don’t attempt to repair or modify the machine, doing so will void the warranty. Repair
should be done by authorized service personnel only!
SAVE THESE INSTRUCTIONS
THIS APPLIANCE IS FOR HOUSEHOLD USE ONLY

7
1. GENERAL INFORMATION
1.1 Instructions for use
Read all the instructions for use carefully before using the appli-
ance. Failure to follow these instructions may result in burns or
damage to the appliance.
The manufacturer is not liable for damage deriving from failure
to respect these instructions for use.
Please note:
These safety warnings are valid for all De’Longhi coee
machines.
Keep this leaet carefully together with the appliance.
If the appliance is passed to other persons, they must also be
provided with these instructions for use.
1.2 What water to use
• Use only potable fresh water.
• Do not use sparkling (carbonated) or distilled water.
1.3 What milk/plant-based beverage to use
• The machine can be used both with cow’s milk and plant-
based beverages.
• Do not use raw milk.
• Use only pasteurized or UHT milk or plant-based beverages
stored according to the manufacturer’s instructions.
• The cleaning methods described in the instructions do not
guarantee the complete removal of allergens.
• In case of allergies or suspected allergies and/or intoleranc-
es, make sure that your machine has not already been used
with types of milk or plant-based beverages that contain
allergens you are allergic to or substances to which you are
intolerant.
2. BEFORE USE
2.1 Checking the appliance
After removing the packaging, make sure the product is com-
plete and undamaged and that all accessories are present. Do
not use the appliance if it is visibly damaged. Contact De’Longhi
Customer Services.
2.2 Installing the appliance
When you install the appliance, you should respect the following
safety warnings:
• The appliance gives o heat. After positioning the appli-
ance on the worktop, leave a space of at least 3 cm/ 1.18
in between the surfaces of the appliance and the side and
rear walls and at least 15 cm/ 5.90 above the coee maker.
• Water penetrating the appliance could cause damage. Do
not place the appliance near taps or sinks.
• The appliance could be damaged if the water it contains
freezes. Do not install the appliance in a room where the
temperature could drop below freezing point.
• Arrange the power cord in such a way that it cannot be
damaged by sharp edges or contact with hot surfaces (e.g.
electric hot plates).
2.3 Connecting the appliance
Check that the mains power supply voltage corresponds to that
indicated on the rating plate on the bottom of the appliance.
Connect the appliance to an eciently earthed and correctly in-
stalled socket with a minimum current rating of 13 A only.
If the power socket does not match the plug on the appliance,
have the socket replaced with a suitable type by a qualied
professional.
SHORT CORD INSTRUCTIONS
- A short power cord is provided to reduce risks resulting from becoming entangled in or tripping over a
longer cord.
- Longer, detachable power supply cords or extension cords are available and may be used if care is exer-
cised in their use.
- If an extension cord is used, the marked electrical rating should be at least as great as the electrical rating
of the appliance. If the appliance is provided with 3- wire, grounding type cord, the extension should be
a GROUNDING TYPE 3 - WIRE CORD. The longer cord should be arranged so that it will not drape over the
counter-top or table top where it can be pulled on by children or tripped over.
- Your product is equipped with a polarized alternating current line plug (a plug having one blade wider
than the other). This plug will t into the power outlet only one way. This is a safety feature. If you are
unable to insert the plug fully into the outlet, try reversing the plug. If the plug should still fail to t,
contact your electrician to replace your obsolete outlet. Do not defeat the safety purpose of the polarized
plug.

8
2.4 Setting up the appliance
The rst time the machine is used, the water circuit will be
empty and operation could be very noisy. The noise becomes
less as the circuit lls.
3. CLEANING AND MAINTENANCE
• Carefully perform the regular cleaning of the machine and
its accessories as indicated in the instructions for use pro-
vided and/or prompted by the display or warning lights of
the appliance itself
• Do not use solvents, abrasive or alkaline cleaners, or alcohol
to clean the appliance, as they could damage it: use a soft
cloth and, where applicable, neutral detergent.
• Do not use metal objects to remove encrustations or coee
deposits as they could scratch metal or plastic surfaces.
3.1 Cleaning before rst use
• When using for the rst time, clean the appliance and the
removable accessories that come into contact with water,
coee and milk/plant-based beverages, as indicated in the
instructions for use provided. Check in the instructions pro-
vided the washing procedure for the accessories, including
which of them are dishwasher safe.
• When using the machine for the rst time, 4-5 preparations
will need to be made before it gives satisfactory results.
3.2 Cleaning and maintenance of the water
tank.
• Regular cleaning: Clean the water tank every 30 days
following the instructions provided.
• Beverages served hot: The water in the tank should be
changed at least every 3 days.
• Cold extraction technology (if included in the
model): Before making cold extraction drinks, empty out
the water tank, rinse thoroughly and rell with fresh pota-
ble water.
3.3 Descaler
• To perform the required descaling process (see dedicated
section “Descaling” on page <?>) use only De’Longhi Eco-
Decalk, available at delonghi.com. The use of unsuitable
descalers may result in defects not covered by the manu-
facturer’s warranty.
• Before use, carefully read the safety warnings provided
with the descaler and the instructions on the packaging
• Perform descaling according to the frequency and methods
outlined in the instructions provided, or indicated by the
user interface
• Failure to follow the descaling instructions may result in
defects not covered by the manufacturer’s warranty.
• The descaler could damage delicate surfaces. If the product
is accidentally spilt, dry immediately.
4. DESCRIPTION
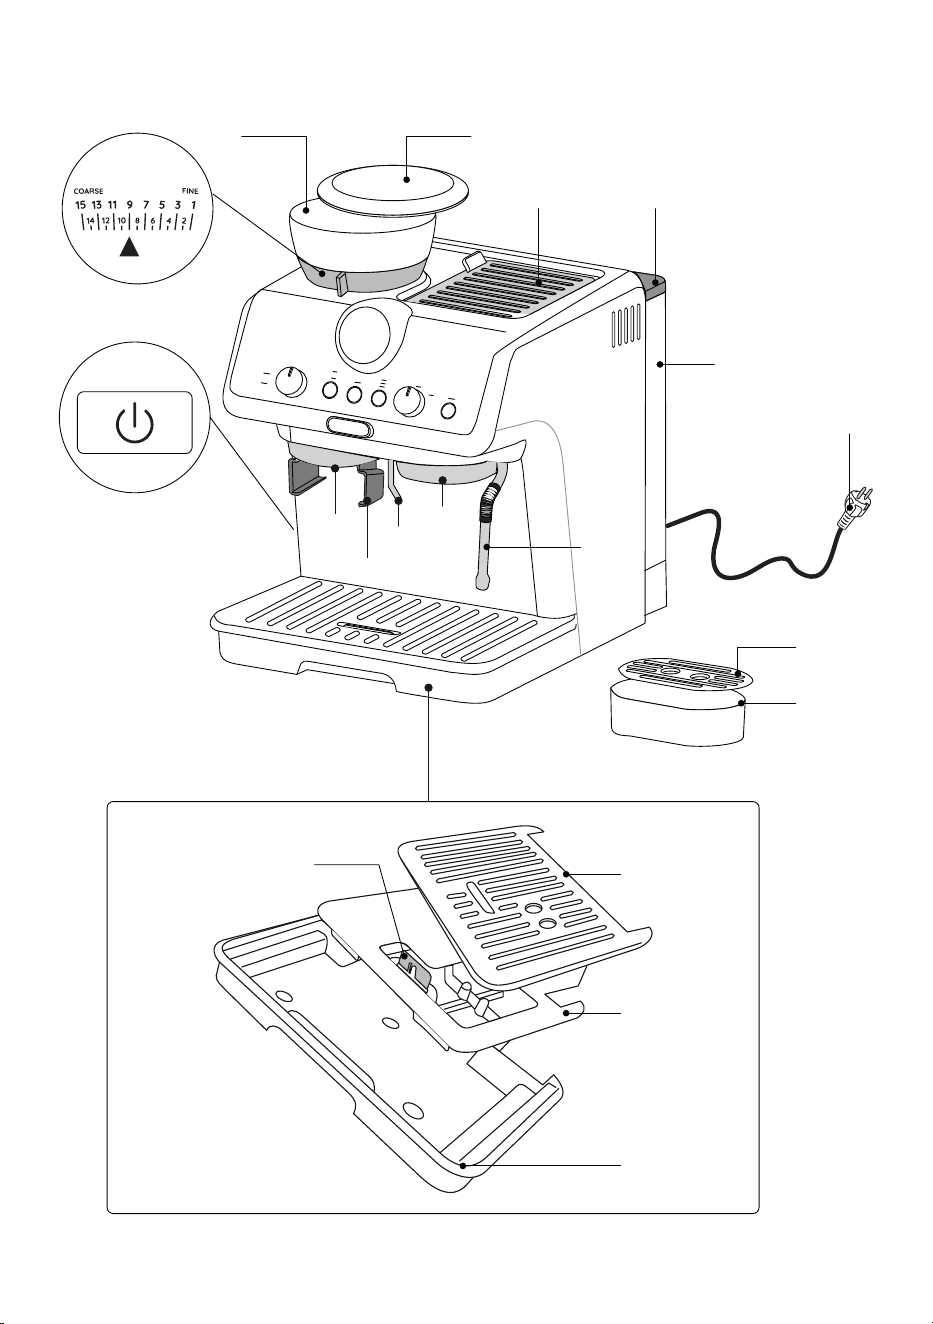
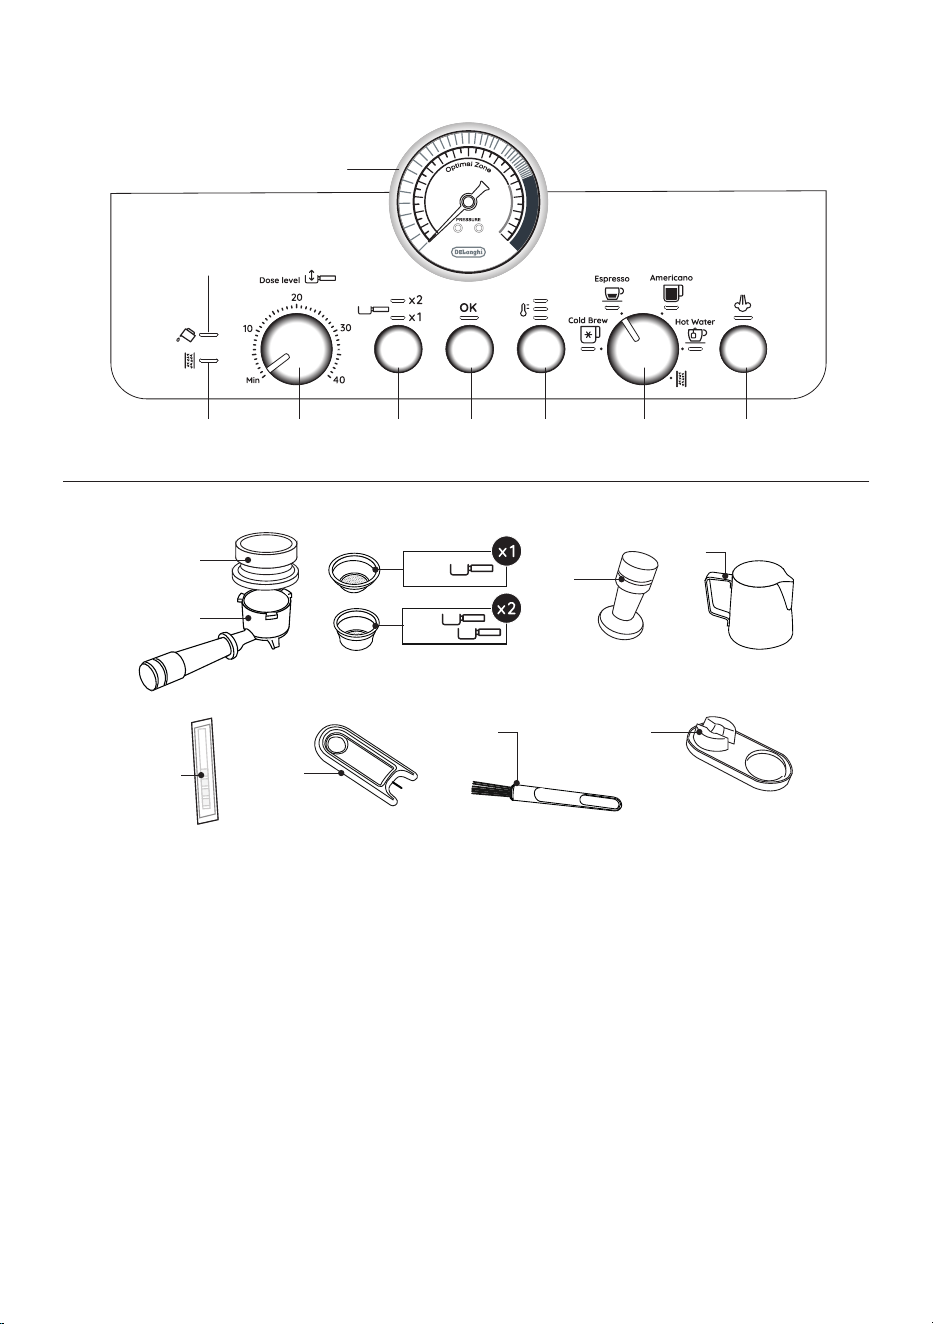
4.1 Description of appliance - A
A1. Main switch (ON/OFF)
A2. Grinding level selector
A3. Beans container
A4. Beans container lid
A5. Accessory door
A6. Water tank lid
A7. Water tank
A8. Power cord
A9. Steam wand
A10. Coee spout
A11. Hot water spout
A12. Coee grinder portalter bracket
A13. Coee grinder outlet
A14. Small cup drip tray
A15. Small cup grille
A16. Cup/mug grille
A17. Cup/mug grille support
A18. Drip tray water level indicator
A19. Drip tray
4.2 Description of control panel - B
B1. Pressure gauge
B2. "No water" indicator
B3. "Descale" indicator
B4. Ground coee quantity dial
B5. 1 or 2 cup button (to use the corresponding coee lter)
B6. "OK" button: deliver drink/conrm
B7. “Coee temperature” button
B8. Function selector dial
• Cold Brew
• Espresso
• Americano
• Hot water
• Descaling
B9. “Steam” button: to deliver steam
4.3 Description of accessories - C
(* Accessories dierent for type and number upon model)
C1. Portalter
C2. Dosing and tamping guide
C3. 1 cup lter
C4. 2 cup lter
C5. Tamper
C6. Milk pitcher
C7. "Total Hardness Test" paper
C8. Steam wand cleaning needle
C9. Cleaning brush (*certain models only)
C10. Tamping mat (*certain models only)
9
4.4 Optional cleaning accessories recommended
by the manufacturer
For more information, visit www.delonghi.com.
Cleaner
EAN: 8004399333307
Descaler
5. PREPARING THE APPLIANCE
Wash all accessories with warm water and washing-up liquid,
then proceed as follows:
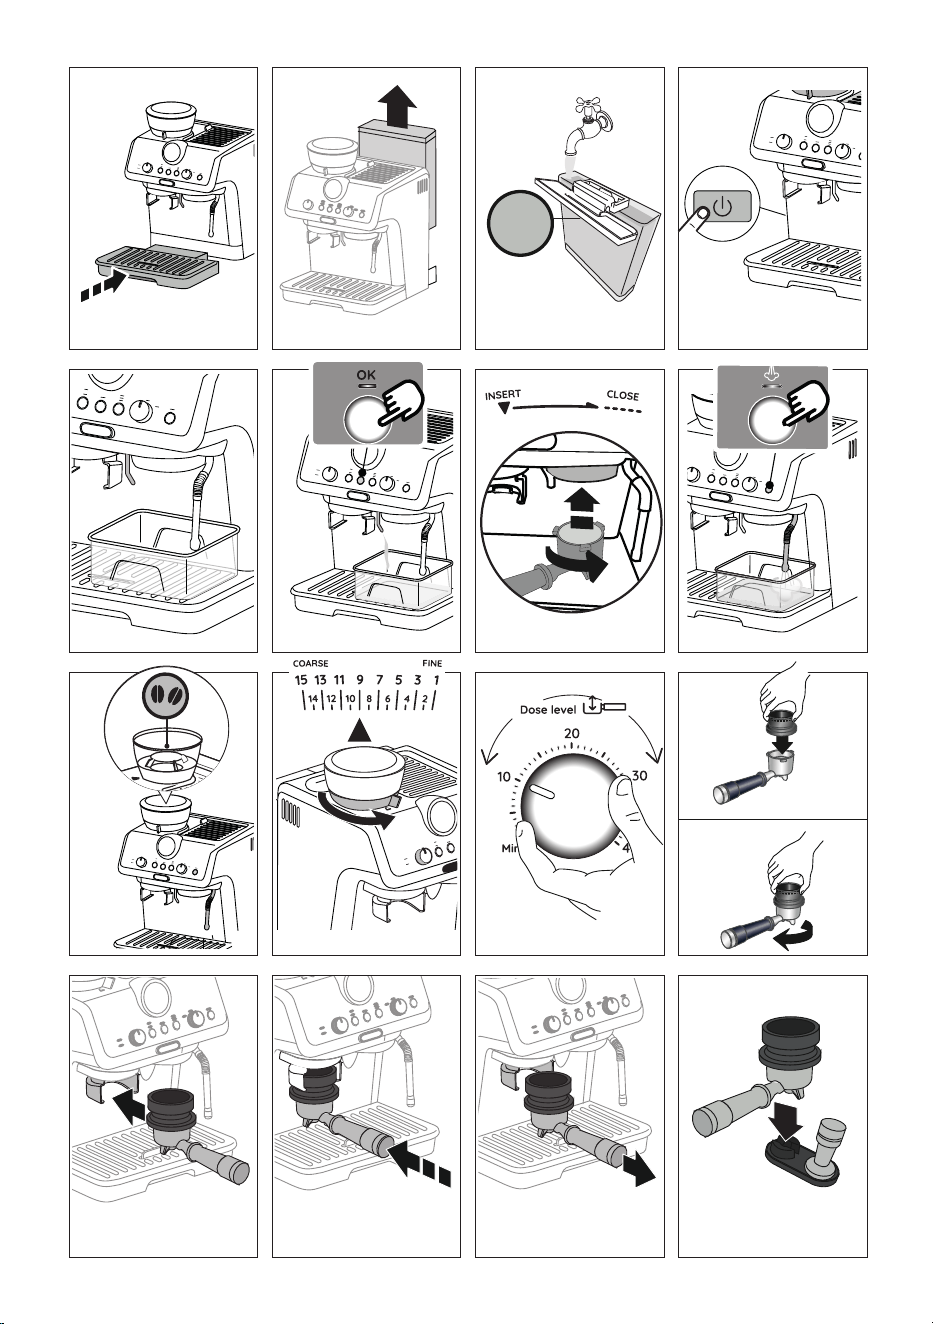
1. Insert the drip tray (A19) complete with cup grille (A16)
and relative support (A17) (g. 1);
2. Extract the water tank (A7) (g. 2) and ll with fresh clean
water, taking care not to exceed the MAX level (g. 3).
3. Put the tank back in the appliance.
Important: Never operate the appliance without water in the tank or without the
tank.
Please note: You should customise water hardness as soon as possible following the
instructions in section “9. Settings menu”.
6. SETTING UP THE APPLIANCE
1. Plug into the mains socket. Press the main switch (A1) (g.
4).
2. Place a container of at least 100ml/3.38 oz capaci-
ty under the hot water spout (A11) (g. 5).
3. Press the OK button (B6) (g. 6). Delivery begins and stops
automatically. Empty the container.
Before using the coee maker, the internal circuits of the ma-
chine must be rinsed. Proceed as follows:
4. Place the coee lter (C3) or (C4) in the portalter (C1).
5. Attach the portalter (C1) complete with lter to the appli-
ance: to ensure it is attached correctly, align the handle of
the portalter with "INSERT" (g. 7), then turn the handle to
the right until it is aligned in the "CLOSE" position.
6. Place a container under the portalter and the steam wand
(A9).
7. Press the OK button (B6): delivery will begin.
8. When delivery has nished, press the steam button (B9)
(g. 8) and release the jet for a few seconds so as to rinse
the steam circuit; to ensure best possible results, this op-
eration should be repeated 3 or 4 times. The purpose of
this procedure is to purge any water from the circuit before
using steam to prepare a drink.
The appliance is ready for use.
Please note: We also recommend rinsing the internal circuits if the appliance is
not used for a long period.
When using the machine for the rst time, 4-5 cups of coee
will need to be made before it gives satisfactory results. Pay
particular attention to the quantity of ground coee in the lter
((C3) or (C4)) (see instructions in section “4.1 Step 1 - Grinding”).
Proceed as described in section “The “perfect dose””.
ECO MULTICLEAN
7. MAKING COFFEE
7.1 Step 1 - Grinding
1. Put coee beans in the container (A3) (g. 9). It is best to
grind only a quantity of beans sucient for immediate use,
so that the coee will always be fresh.
2. The default grinding setting is 9 (medium ground). If this is
too ne or too coarse, adjust the level according to personal
taste and the type of coee used (adjust only when the cof-
fee grinder is in operation (g. 10).
Please note: Adjust the level according to the ow. If the ow is
too slow, increase the grinding setting; if it is too fast, reduce it. Se-
lecting levels between 3 and 1 will result in the beans being ground
very ne. This kind of setting is suitable only for very special coee
(light roast) or when the quality of the ground coee is less than
ideal, and attributable to worn burrs (grinding too coarse).
3. Place one of the coee lters (C3) or (C4) in the portalter
(C1). Press (B5) to select preparation of 1 or 2 cups.
This also doubles the quantity of espresso delivered.
4. Set the quantity by adjusting the dial (B4), starting from
the minimum position (g. 11).
The rst time you use it, leave the dial in the Min. position. In
the beginning, it is normal to make a few attempts before nd-
ing the optimal setting. We suggest you start with the default
values, then modify them if necessary following the suggestions
in section “Adjusting the quantity of ground coee in the lter”.
5. Attach the dosing and tamping guide (C2) to the portal-
ter: 1 press; 2 rotate to lock (g. 12).
6. Insert the portalter in the coee grinder outlet (A13) (g.
13).
7. Press the portalter until you hear a “click” (g. 14), then
release. Grinding starts and stops automatically.
Please note: To manually stop grinding, just press the portal-
ter again (until you hear a click).
Adjusting the quantity of ground coee in the lter
5
X
-
l
i
g
h
t
l
i
g
h
t
m
e
d
i
u
m
m
e
d
i
u
m
-
d
a
r
k
d
a
r
k
E
X
T
R
A
d
a
r
k
Extra
grinding
range
10
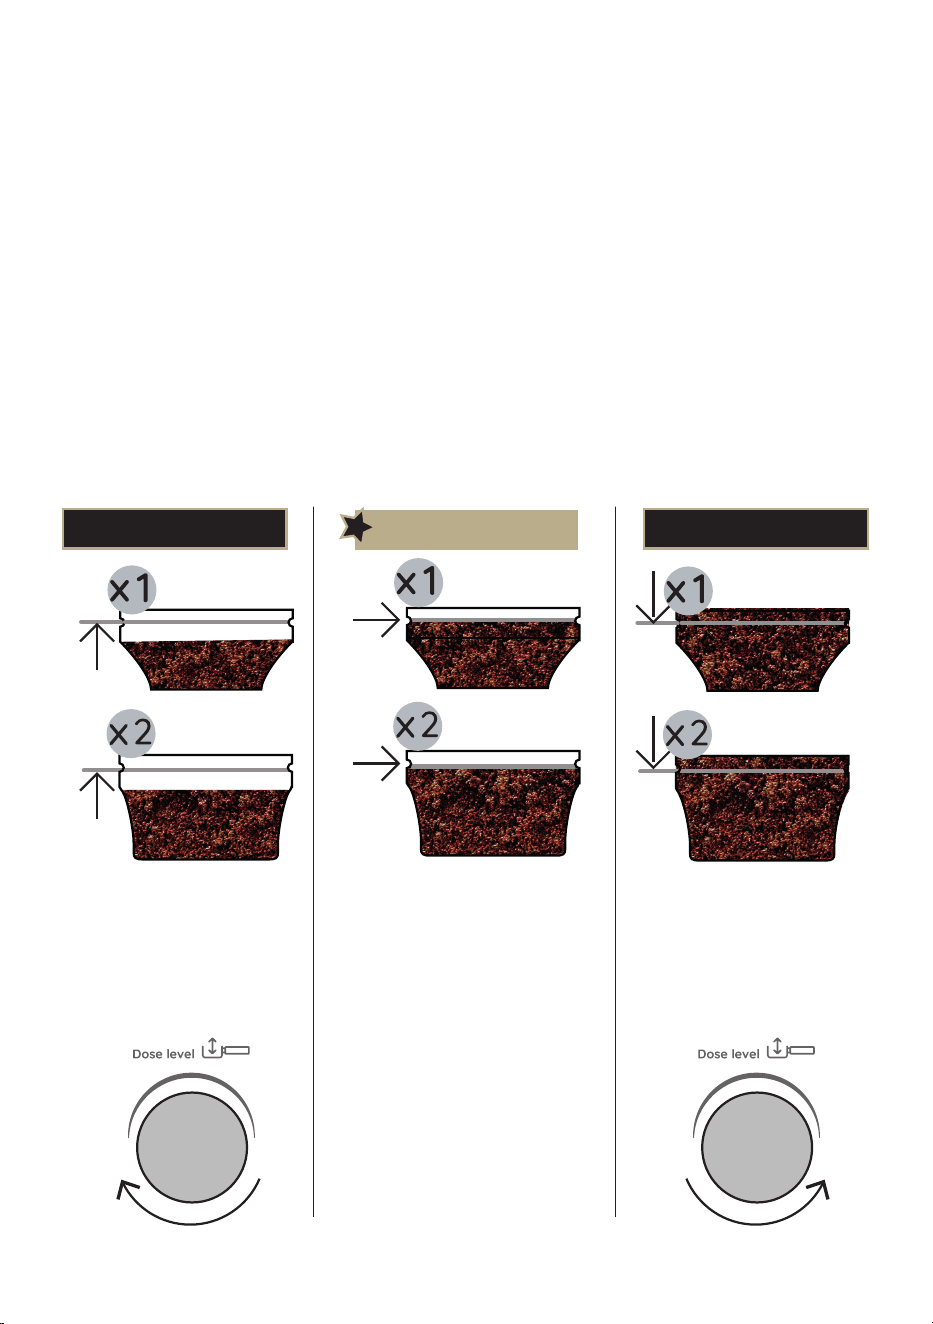
PERFECT DOSE
• The lter is lled up to the level
of the mark
• The coee dose dial (B4) is cor-
rectly set
• The coee ground quantity in the
lter is not enough.
• To encrease coee quantity, turn
clockwise the coee dose dial
(B4) to increase the number one
by one.
Under dose Over dose
• Too much ground coee in the
lter.
• Next grinding, reduce the coee
quantity by turning anti-clockwise
the coee dose dial (B4) to decrea-
se the number one by one.
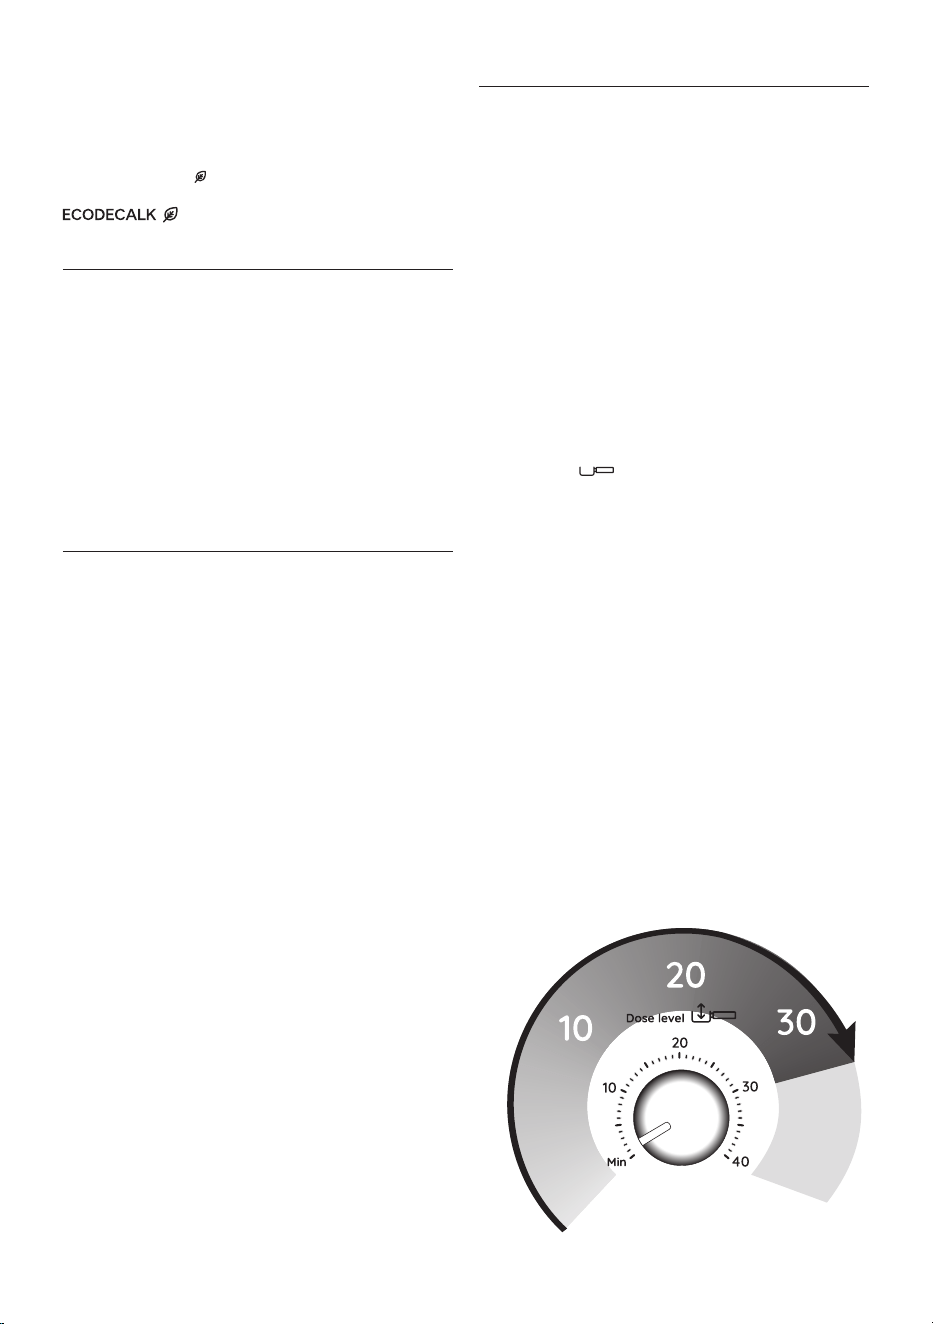
7.3 Achieve perfect dose
Dierent varieties of coee bean give dierent results when
ground: consequently, the initial adjustment of the dosage re-
quires special care.
This illustration shows how to regulate the dosage, based on the
roast colour: this should be taken as a general guide, given that
in practice, the nal adjustment can vary according to the com-
position of the beans.
1. Set the quantity (to the raised mark inside the coee lter),
starting from the minimum position. The numbers on the
dial are a handy reference to note down once the quanti-
ty in the lter is ideal. The numbers do not correspond to
the coee grinder settings, measurement units (g/oz) or
grinding time.
2. Looking at the roast colour of your particular beans, turn
the dial slowly to nd the right adjustment.
7.2 Step 2 - Tamping
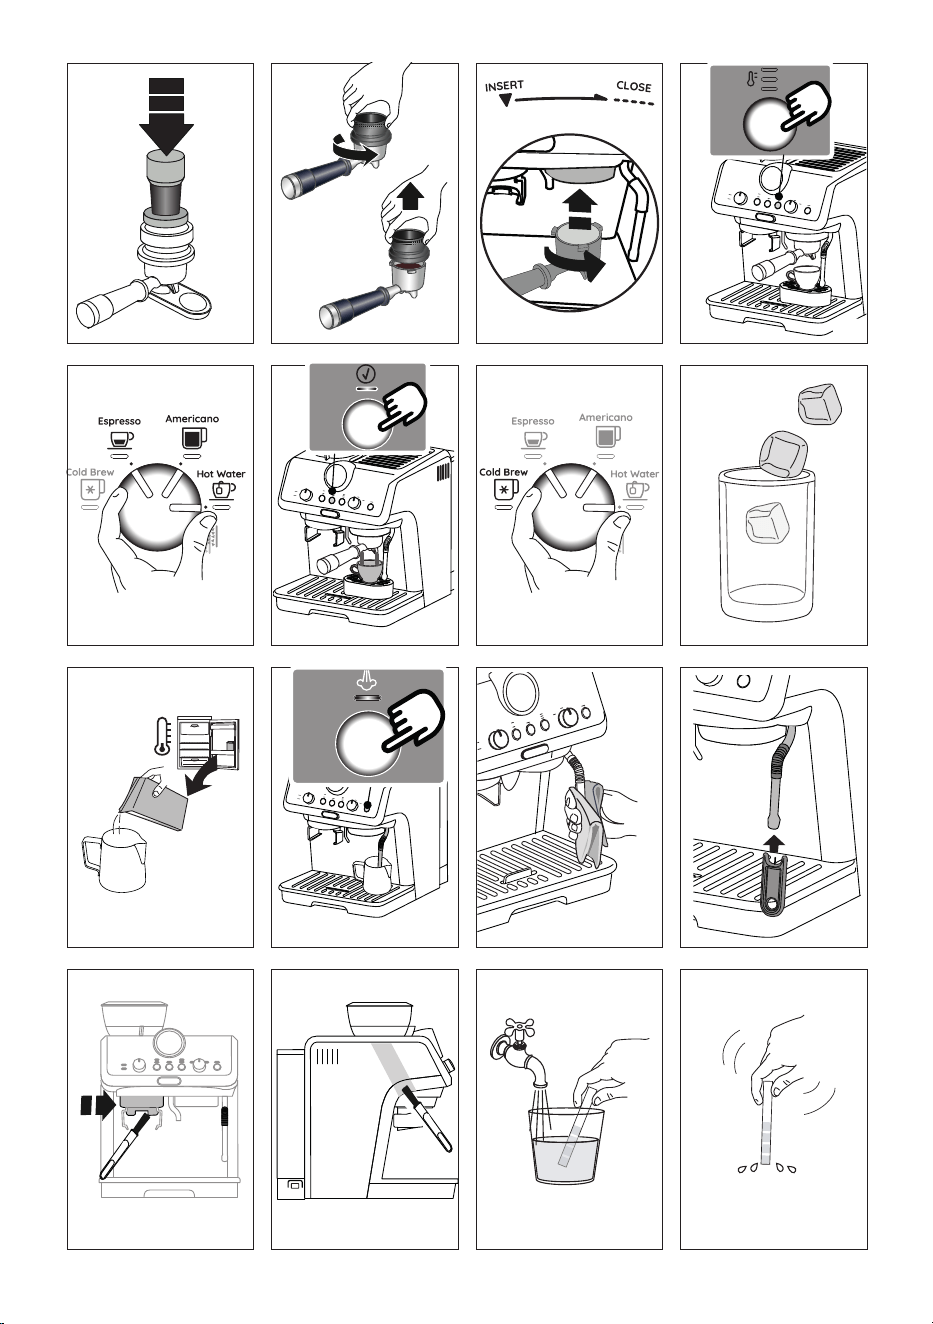
1. After grinding, remove the portalter (g. 15).
2. Tap the dosing and tamping guide (C2) to level the ground
coee.
3. (Certain models only): rest the portalter in the housing on
the tamping mat (C12) (g. 16).
4. Press the coee using the tamper (C5) (g. 17).
5. Remove the dosing and tamping guide by turning it anti-
clockwise and pulling upwards (g. 18), and check that the
quantity is correct (see “The “perfect dose””).
6. Attach the portalter to the coee outlet (A10) (g. 19).
Please note: Coee left on the edges of the lter after pressing
does not in any way compromise the quality of the brewing and
therefore the end result.
The “perfect dose”
See next paragraph.
11
7.4 Step 3 - Brewing
1. Select the temperature (g. 20) (see “Coee preparation
temperature”).
2. Select the desired drink (g. 21). If the drink has been pro-
grammed (see section “8. Programming drink quantities”),
the drink light blinks briey.
3. Press OK (B6) to start brewing (g. 22) (pre-infusion and
infusion). Delivery of the coee will stop automatically.
Coee preparation temperature
The water temperature is controlled during the entire prepara-
tion process to ensure its stability during the extraction step. The
machine has 3 infusion temperatures* in a range between 92/
197.6 and 96/ 204.8 °C/°F.
The temperature eectively utilized will depend typically on
the variety of been and the roast: Robusta beans require a lower
temperature, and Arabica beans a higher temperature. The
same applies for dark roasted beans or for light roasted beans,
respectively.
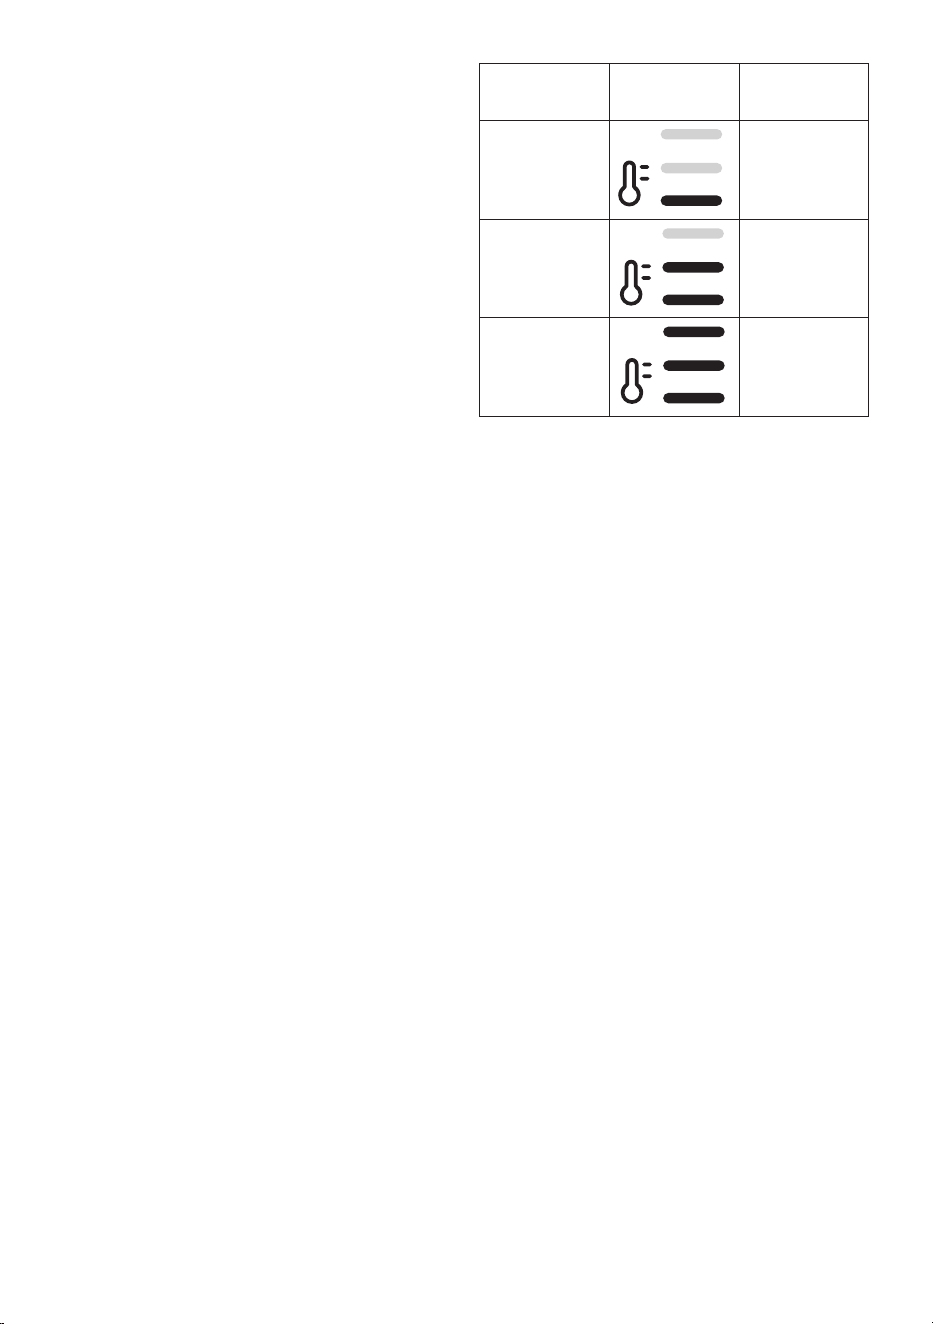
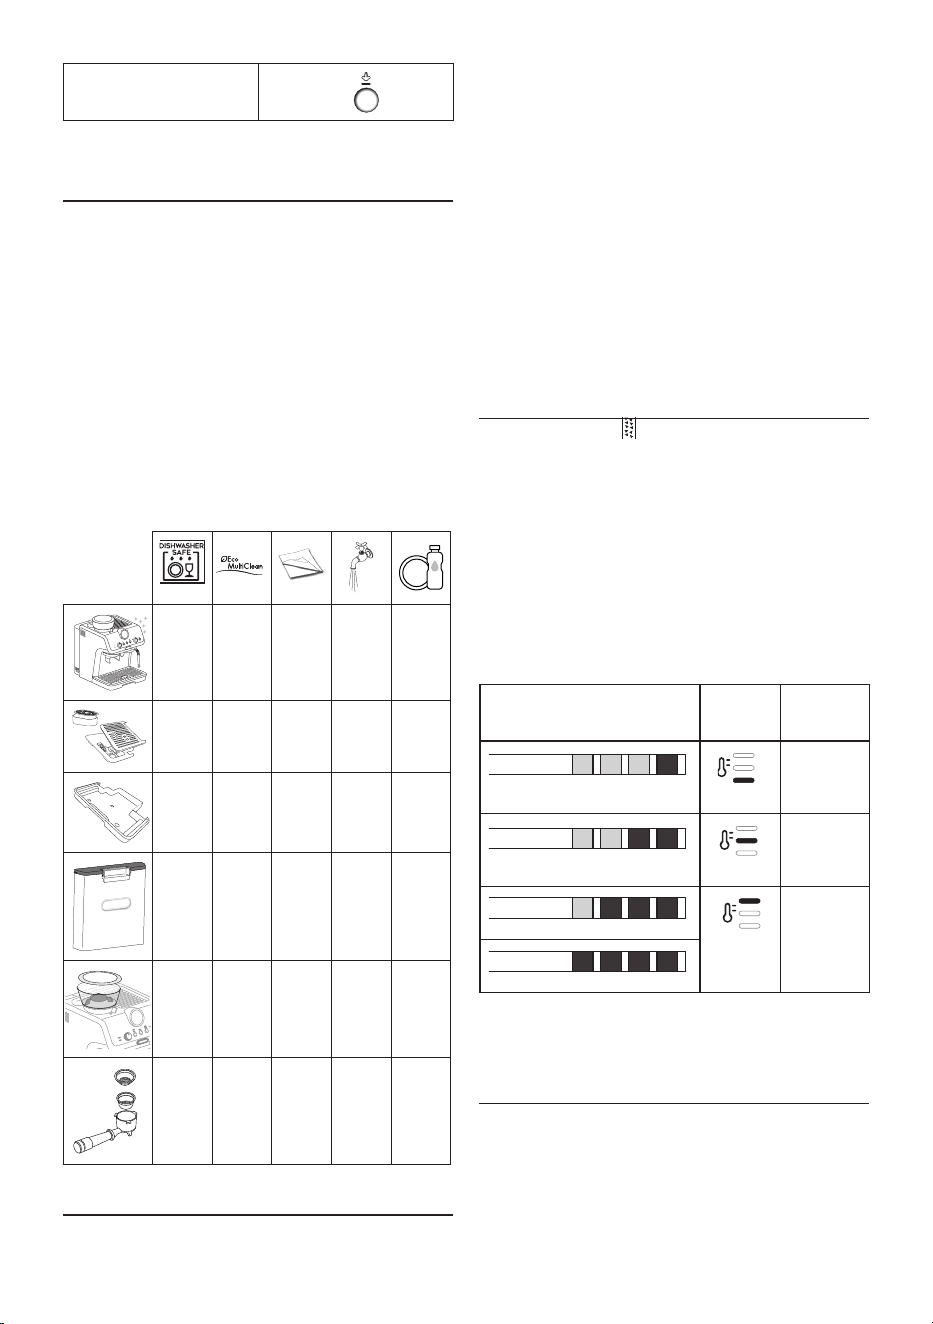
Temperature level Corresponding
indicator light
Roast colour
MIN Dark
MED Medium-dark
MAX Light - medium
* This is the temperature of the water in the thermoblock. It is therefore dif-
ferent to the temperature of the drink in the cup or the temperature of the
drink at the moment of release from the outlets of the portalter.
12
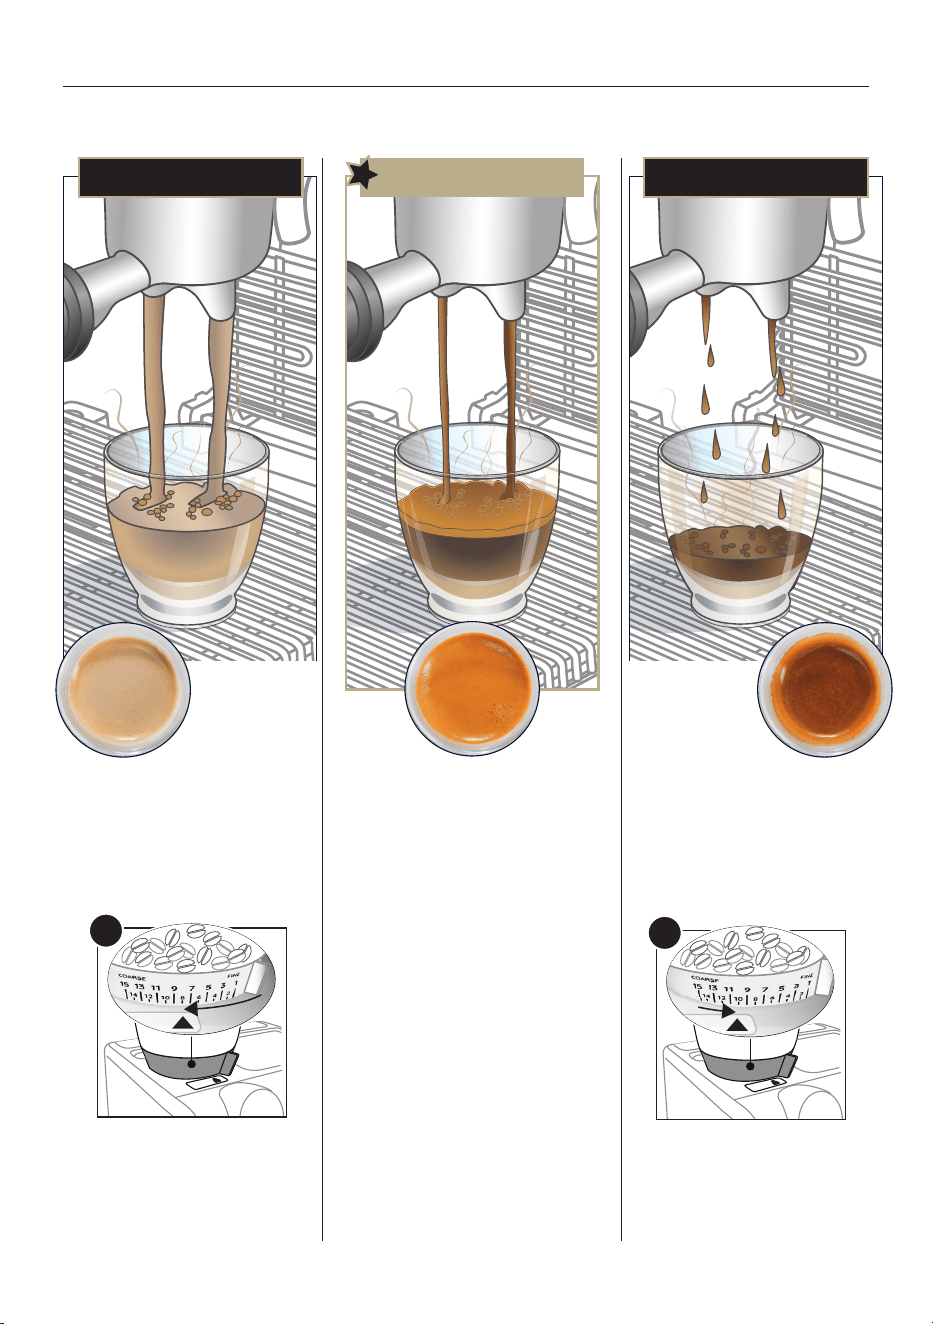
PERFECT ESPRESSO
Over extracted
(pouring too
slowly) needs
coarser grind
Under extracted
(pouring too fast)
needs ner grind
• Flowing fast like water
• Light and pale Crema
To make it perfect:
• Adjust grinding setting to a ner set-
ting 1 step at time.
-1
• Make sure ground coee quantity
reaches the “perfect dose”: if not,
adjust the coee dose dial (B4) (see
“4.3 Achieve perfect dose”).
• Flowing in drips or not at all
• Crema very dark and not uniformed
To make it perfect:
• Adjust grinding setting to a coar-
ser setting 1 step at time.
+1
• Make sure ground coee quantity
reaches the “perfect dose”: if not,
adjust the coee dose dial (B4)
(see “4.3 Achieve perfect dose”).
8. ACHIEVE ESPRESSO PERFECTION
Extracting the perfect espresso is an art and might take a couple of tries. Be ready to adjust the coarseness of the grind and always
make sure to have the tamped ground coee at the indicator line in the lter (perfect dose) to be able to reach perfect extraction.
13
4. Keep the steam wand in contact with the surface, taking
care not to let in too much air and create excessively large
bubbles.
5. Immerse the steam wand below the surface of the milk,
this creates a vortex in the liquid. Once the milk is heated
to the desired temperature, press the steam button again
and wait for the ow of steam to stop completely before
removing the milk carafe from the machine.
Barista tips:
• Fresh milk is best. Always use fresh milk straight from
the fridge.
• For best results, always replace the milk carafe in the fridge
when not in use.
• Whole milk ensures optimum results. The appearance and
texture of froth depending on the nature of the dairy milk
or vegetable drinks utilized.
• After frothing the milk, eliminate unwanted bubbles by
swirling the pitcher gently.
Cleaning the steam wand
1. Following use, always wipe the steam wand (g. 27) with a
cloth to remove residual deposits of milk. The recommend-
ed procedure for in-depth cleaning is to use Eco MultiClean:
this product ensures maximum hygiene by removing milk
proteins and fats, and can be used for cleaning the entire
machine.
2. Release steam for a few seconds to clean the wand (g. 8).
3. Wait until the steam wand has cooled down. To ensure the
wand works eciently over time, use the special cleaning
tool (C10) to free the holes (g. 28) of any obstruction.
11. PROGRAMMING DRINK QUANTITIES
1. Prepare the appliance to deliver 1 or 2 cups of the drink you
want to make, as far as attaching the portalter (C1) com-
plete with the (C3) or (C4) lter and ground coee.
2. Turn the dial (B8) to select the drink being programmed.
3. Press the OK button (B6) and hold for a least 3 seconds,
until the indicator relative to the selected drink starts
to blink, indicating that the machine is in programming
mode.
4. When the desired quantity has been reached, press the OK
button again: the quantity is programmed.
Please note:
• You can programme drinks, but not steam delivery.
• Programming changes the quantity of drink delivered, but not
the quantity of ground coee
• When a programmed drink is selected, the corresponding
light blinks briey.
• “2x” drinks can be programmed separately.
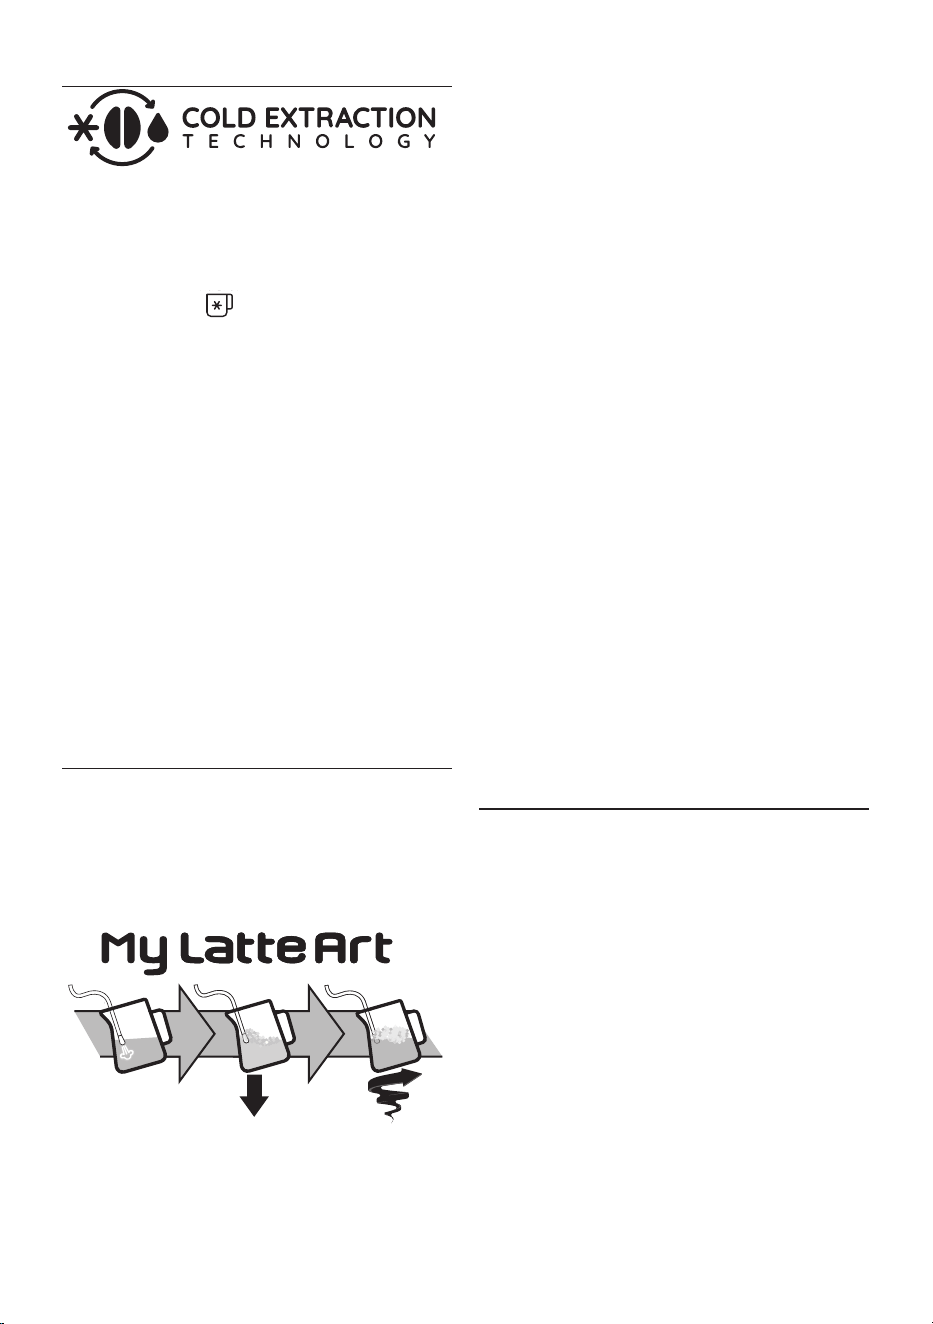
9. PREPARATION OF COLD BREW BEVERAGES
Cold Extraction Technology provides a method of preparing cof-
fee that uses cold water, or water at room temperature. Instead
of heat, a longer period of infusion is used to extract the proper-
ties of the coee beans.
Proceed as follows:
1. Select Cold Brew (g. 23). The indicator light of the
OK button turns blue.
2. To ensure the coee circuit is cold, it will be advisable to run
a trial delivery rst: accordingly, place a container under
the coee spout (A10) and press OK: press OK again after
a few seconds to stop the delivery;
3. Remove and empty the container
, then attach the portal-
ter, with the appropriate dose, to the coee spout;
4. Prepare a glass with 2-3 ice-cubes and position it under the
coee spouts (g. 24);
5. Press OK (indicator light blue): delivery will begin.
6. Delivery stops automatically.
Please note:
• Cold Extraction is a pressureless technology: consequently, the
pressure gauge does not move during delivery.
• Make certain that the water in the tank is fresh. If the water
is one or two days old, empty the tank and rinse thoroughly.
Keep the water tank clean at all times.
10. MAKING MILK DRINKS
10.1 Frothing the milk
1. Fill the pitcher (C6) with the amount of milk to be warmed/
frothed, bearing in mind that the volume of the milk will
increase 2- or 3-fold (g. 25). For a denser and more evenly
distributed froth, best results will be achieved using whole
cow's milk at refrigerator temperature (about 5°C/ 41°F).
2. Place the pitcher under the steam wand and press the
steam button (B9) (g. 26).
3. To froth the milk, rest the steam wand (A9) on the surface
of the liquid. This mixes air with the milk and steam.
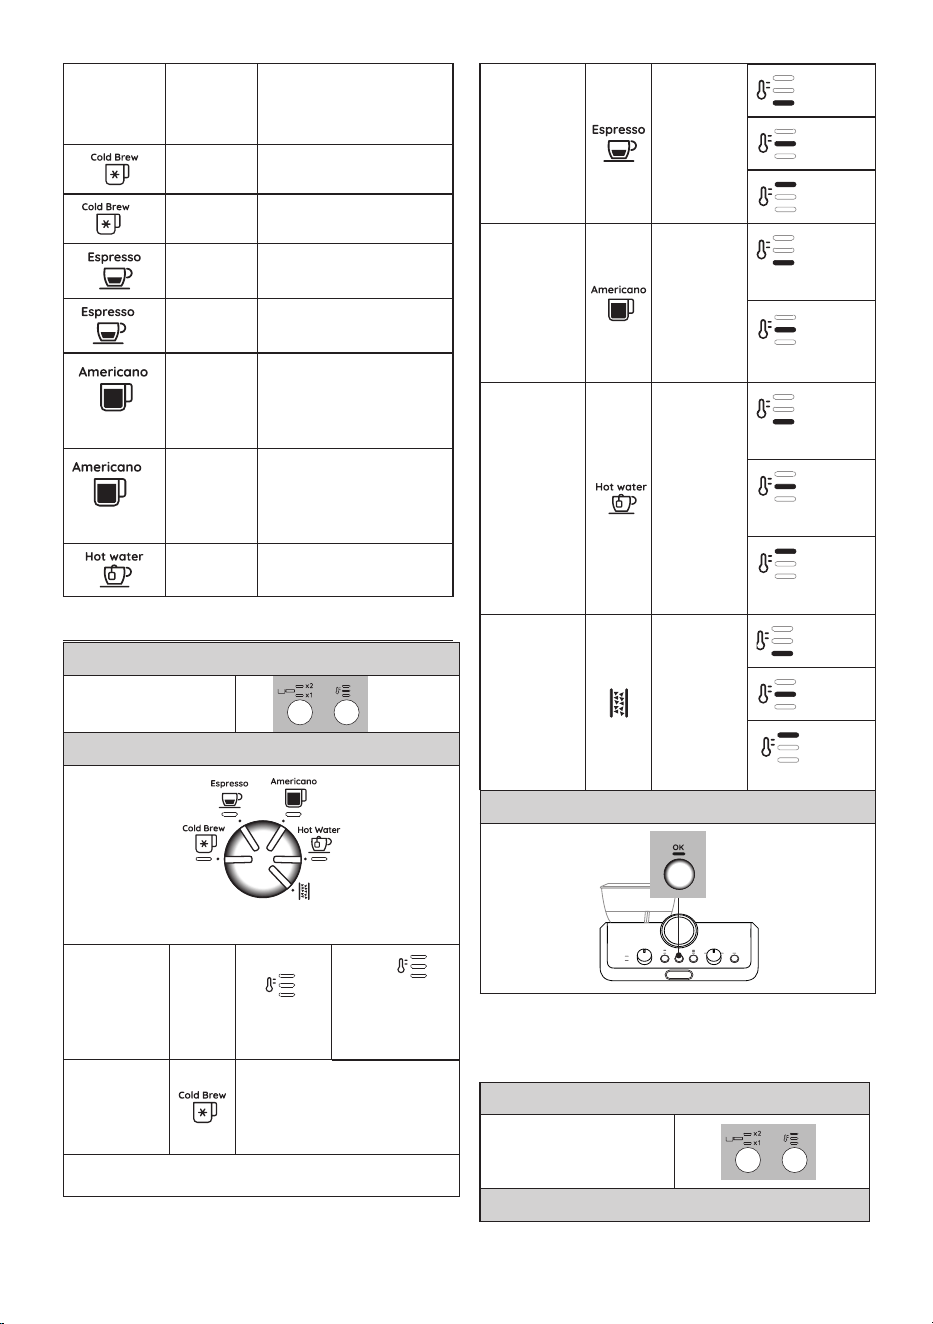
14
Coee
recipe
Default
quantity
(ml/ oz)
Programmable quantity
(ml/ oz)
≃ 110/3.72 ≃ 90/3.04 to ≃130/4.39
2x
≃ 180/6.09 ≃ 160/5.41 to ≃ 220/7.44
≃ 35/1.18 ≃15/0.51 to ≃90/3.04
2x
≃ 70/2.37 ≃30/1.01 to ≃180/6.09
≃ 120/4.06
• espresso:
≃
20/0.68 to
≃
90/3.04
• water: ≃25/0.84 to
≃150/5.07
2x
≃ 240/8.11 • espresso: ≃30/1.01 to
≃180/6.09
• water: ≃50/1.69 to
≃240/8.11
≃ 250/8.45 from ≃65/2.20 to ≃300/10.14
12. SETTINGS MENU
1. Access the menu:
Press together and hold
for 3 seconds
+
2. Select the setting to be adjusted
Correspond-
ing setting
Turn
to
Press
Press
again to
change the
setting
Statistics
(info useful
for assistance
purposes)
See section “16.1 Statistics”
→
Pre-infusion
pause
The indicator
light corre-
sponding to
the setting
currently
selected
comes on
➡ No
➡
1 sec
➡
2 sec
Extra grinding
adjustment
The indicator
light corre-
sponding to
the setting
currently
selected
comes on
➡ 1
st
range
➡ 2
nd
range
Auto-o
The indicator
light corre-
sponding to
the setting
currently
selected
comes on
➡ 9
minutes
➡ 1.5
hours
➡ 3
hours
Water
hardness
The indicator
light corre-
sponding to
the setting
currently
selected
comes on
➡ soft
➡
medium
➡ water
/very hard
3. Save the new settings by pressing OK (B6)
Please note: The appliance exits the settings menu automati-
cally if there is no activity for 30 seconds.
12.1 Reset default settings
1. Access the menu:
Press together and hold for
3 seconds
+
2. Reset to default values
15
Press and hold the steam
button (B9) for 3 seconds.
x3 sec
The OK light (B6) blinks briey to conrm the reset.
13. CLEANING THE APPLIANCE
Important!
• Do not use solvents, abrasive detergents or alcohol to clean
the coee machine.
• Do not use metal objects to remove encrustations or coee
deposits as they could scratch metal or plastic surfaces.
• Should the machine remain idle for more than a week, it
is advisable to carry out a rinse cycle before preparing any
drinks.
Danger!
• Never immerse the coee maker in water when cleaning: it
is an electrical appliance.
• Before commencing any cleaning operation on the outside
of the machine, turn it o, unplug it from the mains socket
and wait for it to cool down.
✕
✓ ✓
✕ ✕
✓
✕ ✕
✓ ✓
✕
✓ ✓ ✓ ✓
✕ ✕ ✕
✓ ✓
✕ ✕
✓
✕ ✕
✕ ✕ ✕
✓ ✓
14. CLEANING THE COFFEE GRINDER
1. Clean the attachment area with the brush (C11) (g. 29).
2. Use the brush to clean the coee guide (g. 30).
Ecient grinding
The burrs are subject to wear over time. As time goes by, to
achieve the perfect quantity, you need to turn the dial (B4)
towards the highest numbers. When you reach a setting of be-
tween 30 and 40, you need to set the extra grinding range (see
section “9. Settings menu” - “Extra grinding range”).
When the quantity of ground coee becomes less than expect-
ed, contact a service centre to have the burrs replaced. With the
new burrs tted, adjust the coee grinder by accessing the set-
tings menu and selecting the rst range of the “extra grinding
adjustment” setting. Next, turn the ground coee quantity dial
(B4) to the Min position and set the quantity as for rst-time use
(see “The “perfect dose””).
15. WATER HARDNESS
The descale indicator
(B3) lights up following a predeter-
mined period of operation that depends on the hardness of the
water. The machine can also be programmed according to the
actual hardness of the local water supply, in which case des-
caling may be required less frequently (see section “9. Settings
menu”).
1. Remove the "TOTAL HARDNESS TEST" indicator strip (C7)
from its pack.
2. Immerse the strip completely in a glass of water for about
one second (g. 31).
3. Remove the strip from the water and shake lightly (g. 32).
Water Hardness Test Result (B7)
button
Level
1
soft water
2
medium
water
3
hard or
very hard
water
4. Set the machine accordingly, as indicated in the section “9.
Settings menu”.
16. DESCALING
Important!
• Before using the descaler, (C8) read the instructions and the
labelling on the pack.
• Use De’Longhi descaler only. Using unsuitable descaler
and/or performing descaling incorrectly may result in
faults not covered by the manufacturer’s guarantee.
16
• Descaler can cause damage to delicate surfaces. If the prod-
uct is accidentally spilt, dry immediately.
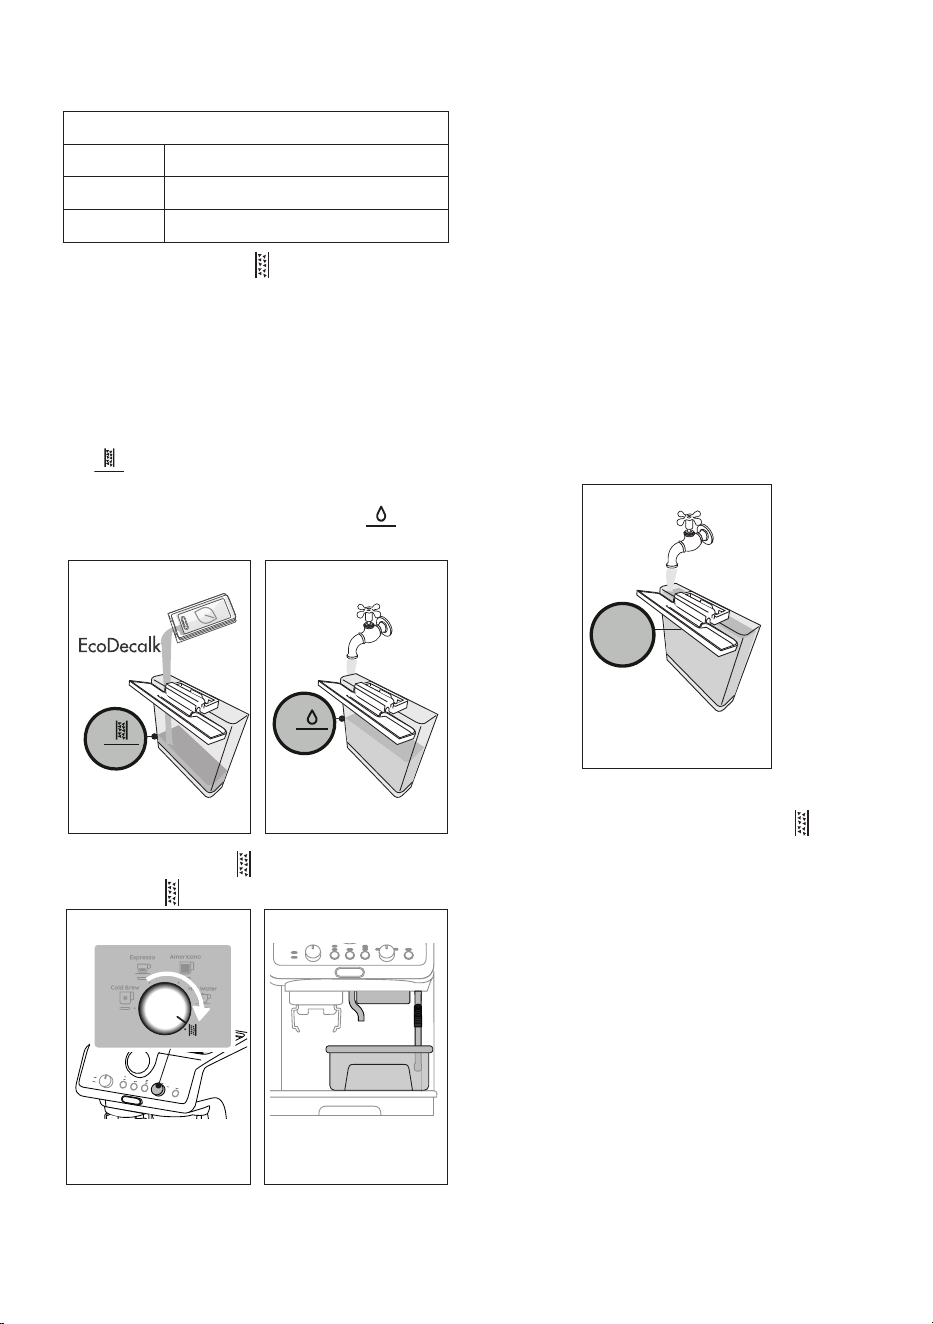
To descale
Descaler De’Longhi descaler
Container Capacity 2 litres / 67.63 oz
Time ~20min
1. When the indicator light (B3) comes on, you need to
descale the appliance. You can start descaling at any time.
2. Remove and empty the drip tray (A19), then reposition it in
the machine.
3. Empty the water tank
(A7)
.
(If present, remove the softballs
and place in a glass of water until they can be re-inserted at
the end of the descaling process.)
4. Pour the descaler into the water tank (C8) up to the level A
marked on the inside of the tank (corresponding to the
contents of one single pack or 100 ml/3.38 oz) (g. 37).
5. Add water (1 litre/33.81 oz.) up to level B (g. 38).
Now reposition the water tank in the machine.
37 38
A
B
6. Turn the knob (B8) to (g. 39): the OK indicator lights
up and the indicator blinks.
4039
37
7. Make sure the portalter (C1) is not attached. Position a
container under the coee spouts (A10) and hot water
spout (A11) and another under the steam wand (A9) (g.
40).
8. Press the hold the OK button (B6) for at least 3 seconds. The
OK light blinks.
9. The descaling programme starts and the descaler liquid
comes out of the spouts. The descale programme removes
limescale deposits from inside the appliance by automati-
cally performing a series of rinses and pauses until the tank
is empty.
Descaling ceases and the OK light turns blue. This means that a
rinse cycle must be carried out:
10. Empty the containers used to collect the descaler solution
and reposition them under the spouts.
11. Remove the water tank, empty out any residual descaler
solution, rinse under running water and ll with fresh
water up to the MAX level (g. 41). Put the tank back in
its housing.
41
MAX
12. Press the
OK button: the rinse cycle will start.
13. When rinsing is complete, delivery stops: the indicator
blinks and the OK indicator extinguishes.
14. Empty the recipient used to collect the rinse water.
15. Remove and empty the drip tray (A19), then reposition it in
the machine.
16. Remove the tank, ll with fresh water and reposition in the
machine. (If present, rinse the softballs with running water
and put back in the tank).
17. Turn the function selection dial (B8) to one of the drinks.
The machine is now ready for use.
Please note:
• The descaling cycle can be started up at any time (even if
the relative light has not yet come on).
• Should descaling be started up by mistake, it can be
stopped by pressing the OK button and holding for 10 sec-
onds; the rinse cycle cannot be stopped.
17
White
Blue
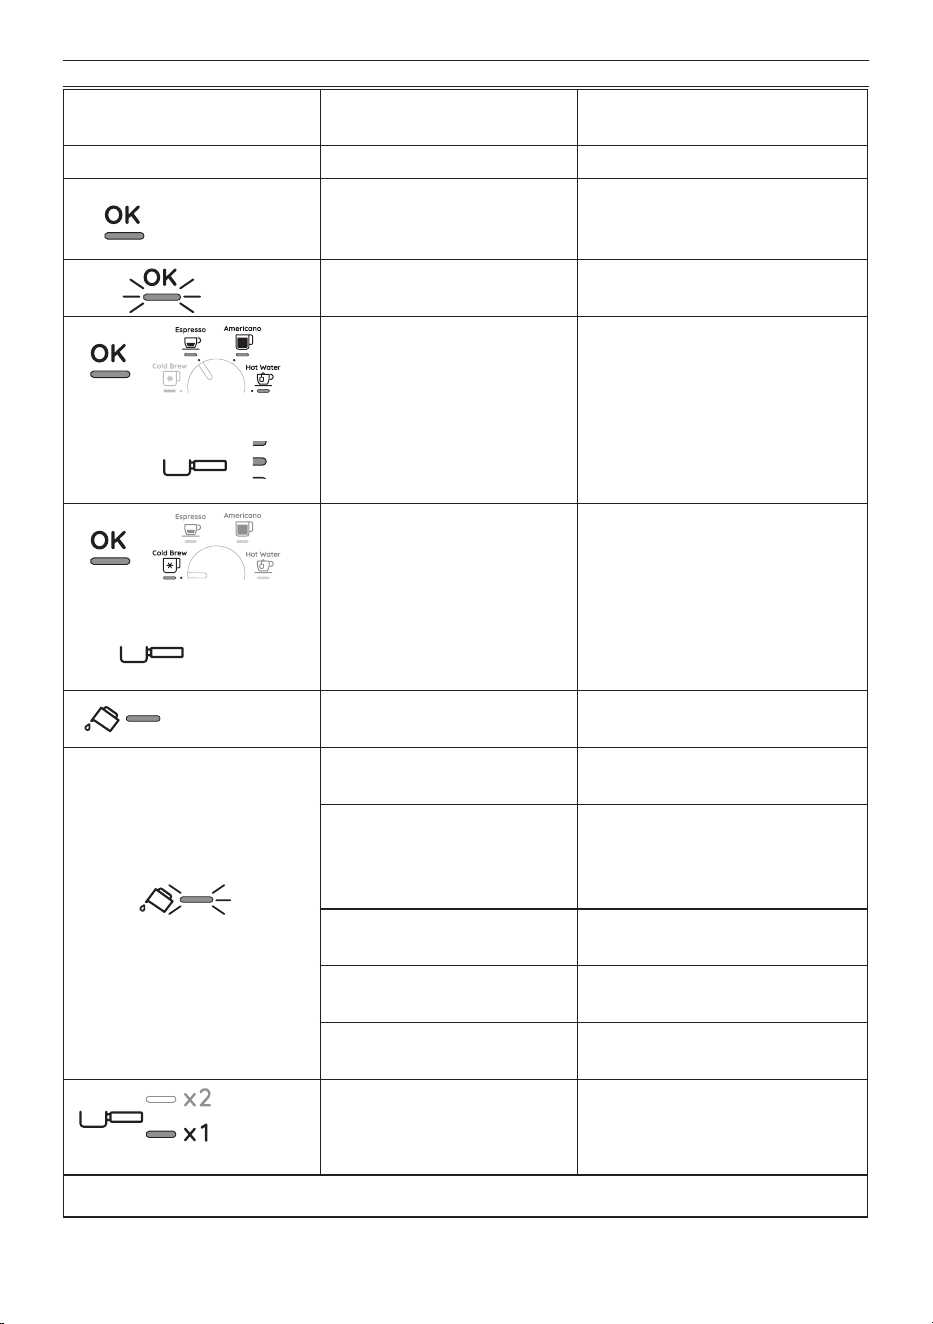
17. EXPLANATION OF INDICATOR LIGHTS
LIGHTS EXPLANATION OF INDICATOR
LIGHTS
OPERATION
All lights blink briey Turning the appliance on Self-diagnosis
Permanently alight
The machine has been turned on for the
rst time and the water circuit must be
lled
Proceed as indicated in section “3. Setting up
the appliance”
Blinking
The machine is warming up
Wait until the ideal delivery temperature has
been reached
+
-
Permanently alight
(The indicators and show
the respective selections)
The machine is ready for delivery Set up the machine and proceed with prepa-
ration of the drink
+
-
Permanently alight
(The indicator shows the
selection in progress)
The machine is ready for delivery Set up the machine and proceed with prepa-
ration of the drink
Permanently alight
There is not enough water in the tank (A7)
or the tank is not correctly in place
Fill the tank with water, or remove the tank
and reposition it correctly
Blinking
An attempt is being made to deliver a bev-
erage, but with water tank (A7) empty
Fill the tank with water
Because the beans are too nely
ground, the coee is delivered too
slowly or not at all
Remove the portalter (C1) and repeat the
coee-making steps, bearing in mind the
indications given in sections “4.1 Step 1 -
Grinding” and “4.2 Step 2 - Tamping”
The coee lter (C3) or (C4) is
obstructed
Rinse the lters under running water
The tank (A7) is not properly in place
and the relative valves are not open
Press down lightly on the tank to open the
valves
Limescale in the water circuit Descale as described in section “14.
Descaling”
Permanently
alight
1 cup preparation is selected The entire preparation procedure (from
grinding to delivery) is set to make 1 cup
→
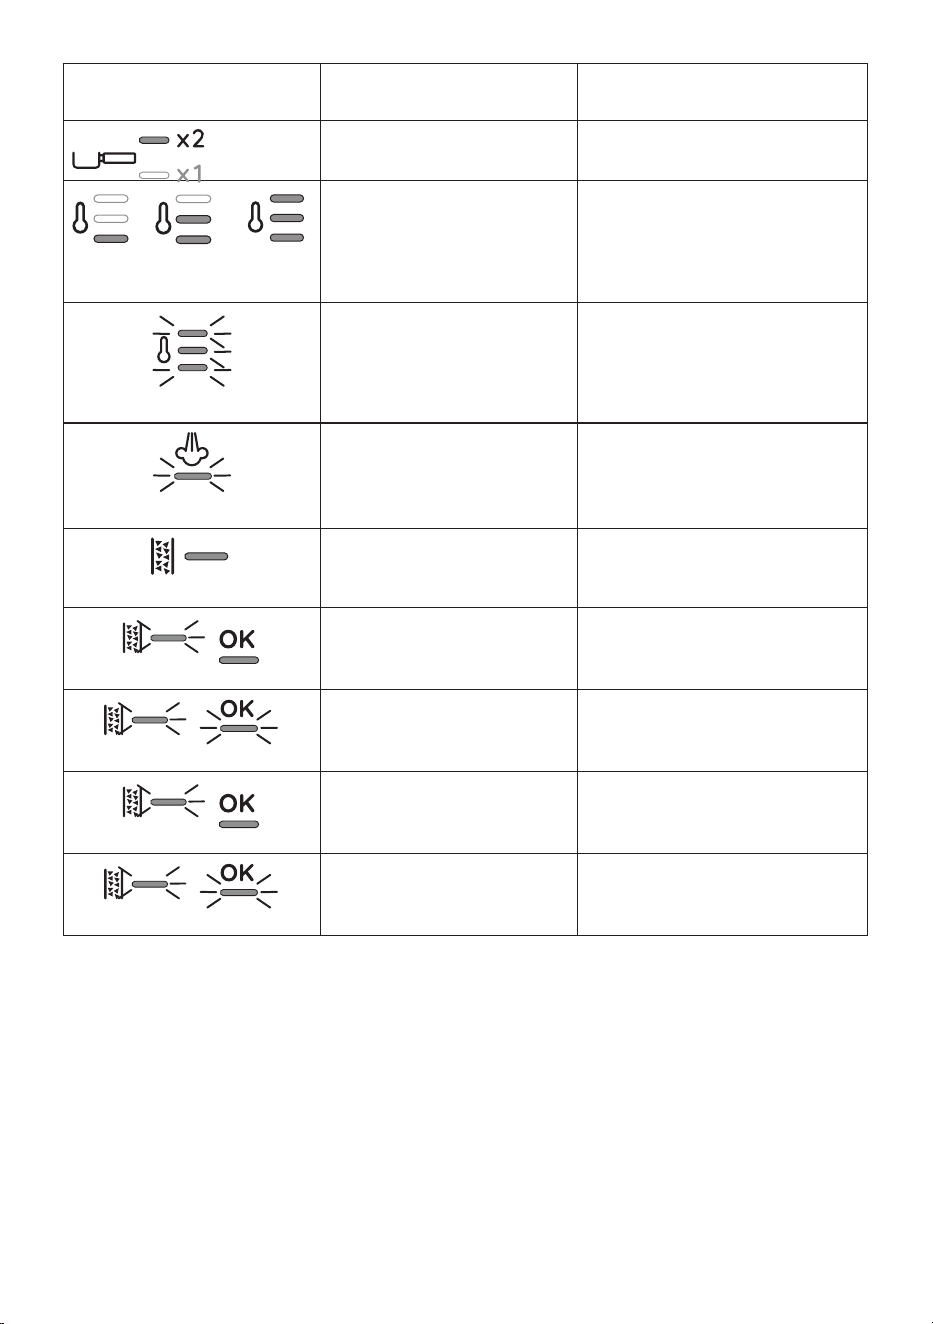
18
LIGHTS EXPLANATION OF INDICATOR
LIGHTS
OPERATION
Permanently
alight
2 cup preparation is selected The entire preparation procedure (from
grinding to delivery) is set to make 2 cups
MIN MED MAX
Permanently alight
Select one of the available
temperatures
See “Coee preparation temperature”
Blinking
General alarm Turn the machine o and wait 10 minutes
before turning on again. If the problem con-
tinues, contact customer services.
Blinking
The steam function is selected and in
use
After a few seconds, the machine starts deliv-
ering steam
Permanently alight - red
Descaling is required Carry out descaling as described in section
“14. Descaling”
Blinking - Permanently alight
Descaling is selected Press OK to start descaling or turn the dial to
a drink
Flashing
Descaling proceeds. The machine deliv-
ers descaling solution
Proceed by completing the descaling cycle
(see “14. Descaling”)
Blinking - Permanently alight
The rst step of the descaling cycle is
complete: the next step required is a
rinse.
Press OK to start rinsing.
Flashing
The machine proceeds with the rinse to
complete the descaling process
Proceed by completing the descaling cycle
(see “14. Descaling”)
Red
Red
White
White
Red
Red
Blue
Blue
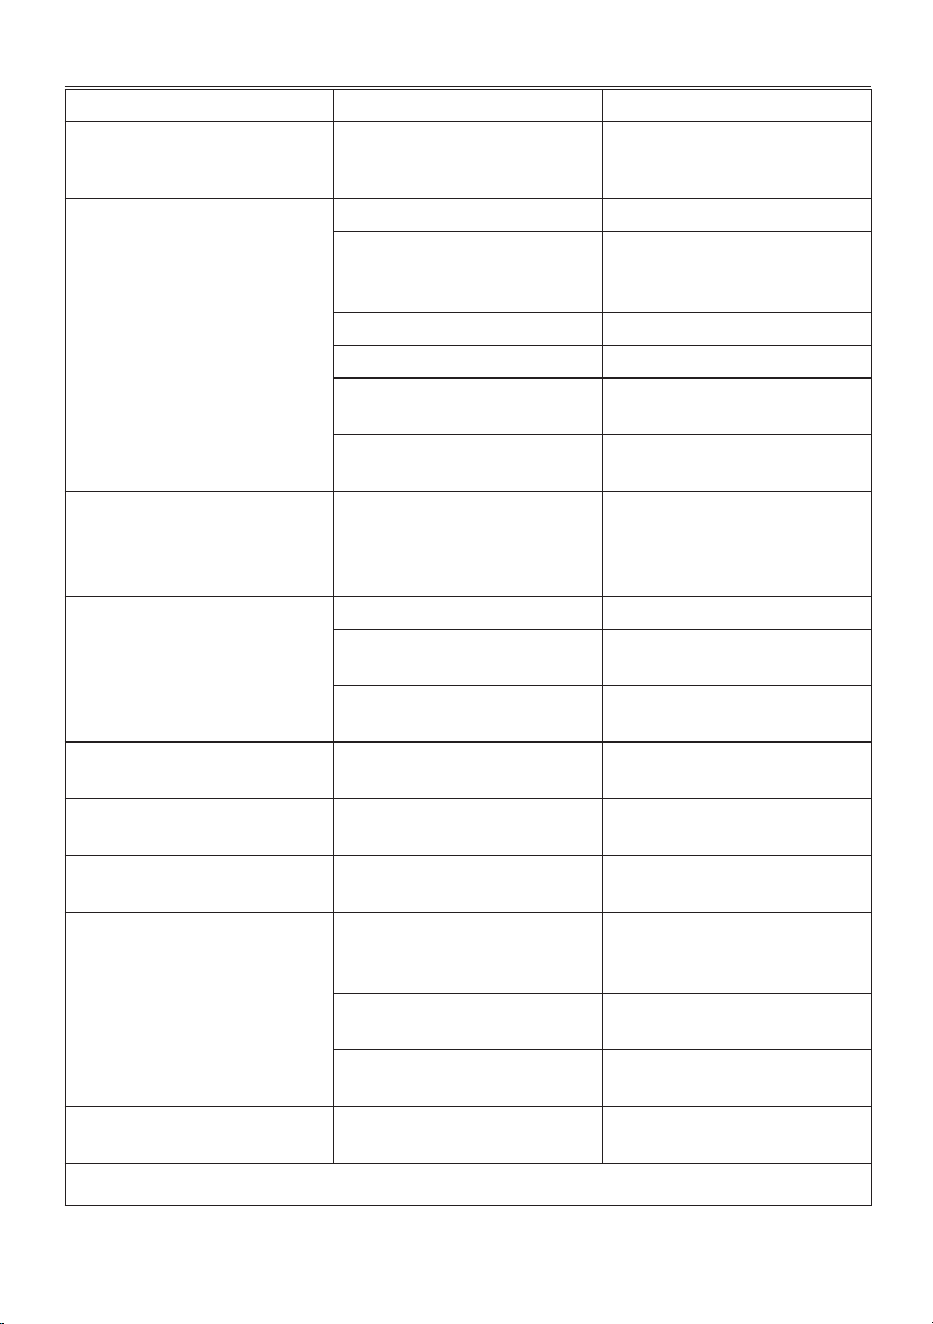
19
18. TROUBLESHOOTING
PROBLEM CAUSE SOLUTION
There is water in the drip tray (A19) This water comes from the internal cir-
cuits of the machine and is a normal con-
sequence of their operation
Empty and clean the drip tray on a reg-
ular basis
The machine fails to produce espresso
coee
No water in the tank (A7) Fill the tank
The OK indicator
(B6)
is alight, meaning
that the coee circuit or the steam circuit
is empty
Press the button associated with the OK
indicator
to ll the circuit
Blockage in the coee lter (C3) or (C4) Rinse the lters under running water
Coee ground too nely Adjust the quantity and grinding level
The tank (A7)is not properly in place and
the valves at the bottom are not open
Press down lightly on the tank to open
the valves at the bottom
Limescale in the water circuit Descale as described in section “14.
Descaling”
The portalter (C1) cannot be attached to
the appliance
The ground coee has not been tamped
or the quantity is excessive
Repeat phase 1 (section “4. Making cof-
fee”) using less coee. If you are using
the 1 cup lter, make sure the 1X light
(B5) is on.
The espresso coee drips from the edges
of the portalter (C1) instead of from the
holes
The portalter is not correctly in place Attach the portalter correctly (g. 19)
The coee spout gasket has lost exibility
or is dirty
Contact a customer services centre to
have it replaced
Blockage in the coee lter (C3) or (C4) • Rinse the lters under running water
• Adjust the grinding settings
The espresso cream is too light (delivered
from the spout too fast)
The machine settings need to be
reappraised
See instructions in section “The “perfect
dose””
The espresso cream is too dark (delivered
from the spout too slowly)
The machine settings need to be
reappraised
See instructions in section “The “perfect
dose””
The coee is cold A Cold Brew drink has been made
When the OK indicator is blue, Cold Brew
Technology is selected
The Cold Brew drink is warm A hot drink was delivered shortly before
the Cold Brew
Before preparing the beverage, it is advis-
able to cool the coee circuit by running a
trial Cold Brew delivery for a few seconds
There water in the tank is not fresh
Empty the water tank, rinse and ll with
fresh water
No ice in the glass
Put 3-4 ice-cubes in the glass as described
for the preparation of Cold Brew drinks
On completion of the descale cycle, the
machine calls for a further rinse
During the rinse cycle, the water tank
(A7) has not been lled to the MAX level
Repeat the rinse cycle (see section “14.
Descaling”)
→
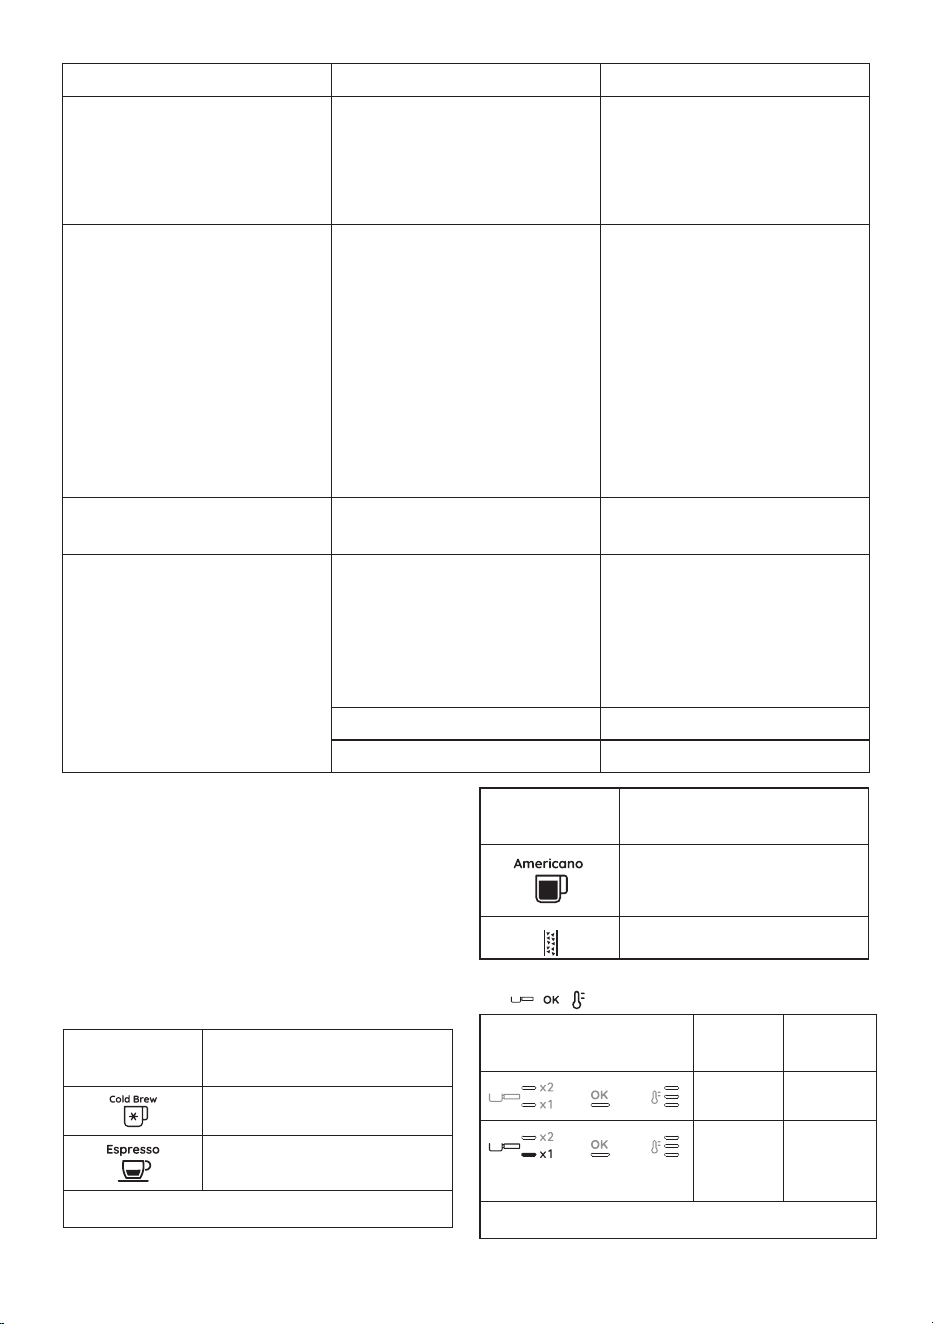
20
PROBLEM CAUSE SOLUTION
The machine does not grind the coee Foreign matter has found its way into the
coee grinder
Turn the selector (A2) to 8 and remove
all beans with a vacuum cleaner until
the beans container (A3) is empty and
clean. If the problem continues, contact
customer services
Changing to a dierent type of coee • You are recommended to pour only the
amount of beans to be used into the
beans container (A3)
• To empty the container, vacuum out
the contents with a vacuum cleaner
or grind all the beans in the container
until completely empty.
• Add new type of coee beans
• If the amount of ground coee does
not give the perfect dose, proceed to
set up the machine as for rst-time use
After grinding, the coee lter (C3) or
(C4) is empty
The funnel of the coee grinder is
clogged
Clean as described in section “11. Cleaning
the coee grinder”.
After grinding, the amount of coee in
the lter (C3) or (C4) does not give the
“perfect dose”
The quantity of ground coee needs
adjusting
Adjust the quantity with the relative dial
(B4), following the indications given in
section “The “perfect dose””. If the dial is
already in the max. position, proceed as
described in section “9. Settings menu” -
“Extra grinding adjustment”
You are using the 2 cup lter (C4) Make sure the 2X light is on
Over time the burrs wear down
Contact Customer Services
18.1 Statistics
Machine statistics are useful in the event of service being need-
ed. Proceed as follows:
• Access the menu by pressing buttons (B5) and (B7) simul-
taneously and holding for 3 seconds;
• Turn the dial (B8) to select “Cold Brew”;
• Press the temperature button (B7);
• Once inside the settings menu, bring up the required sta-
tistical information by positioning the selector dial as illus-
trated in the following table:
Positioning of
dial
Counter
Total count of cold drinks
Total count of hot drinks
…
→
Positioning of
dial
Counter
Total count of steam deliveries
Total count of descale cycles
• The numbers are shown alongside the relative indicators
, , :
Control panel indicators Drinks
count
Descale
count
up to 100 up to 1
between
100 and
1000
between 2
and 10
…
→
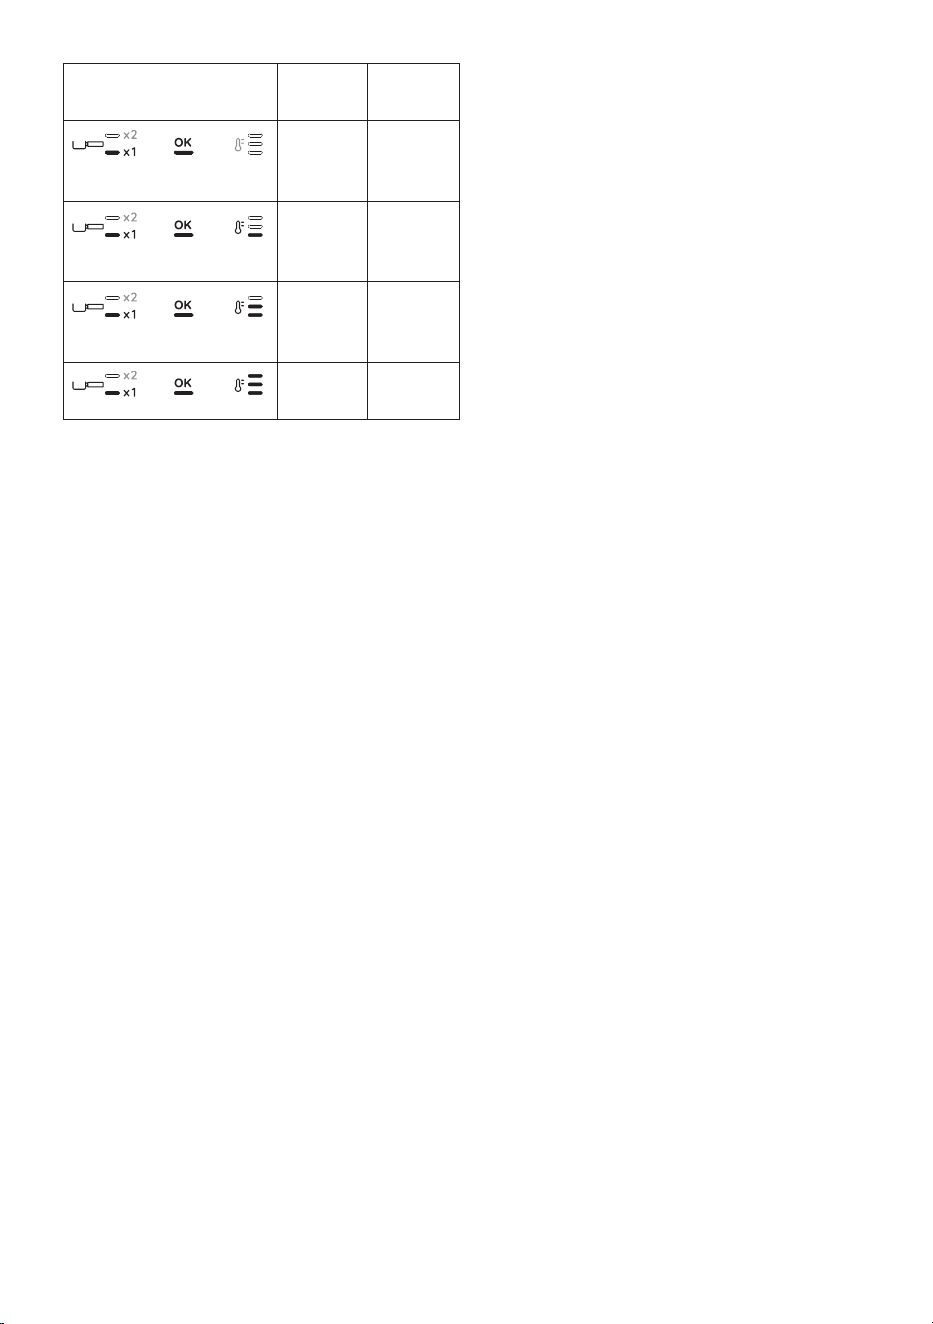
21
Control panel indicators Drinks
count
Descale
count
between
1000 and
3000
between 10
and 30
between
3000 and
6000
between 30
and 60
between
6000 and
11000
between 60
and 110
more than
11000
more than
110
• The machine comes out of the settings menu automatically
if 30 seconds elapse without any activity.

De’Longhi Appliances via Seitz, 47 31100 Treviso Italia www.delonghi.com
57132C9845_00_0126