home.liebherr.com/
fridge-manuals
Instructions for
use and installa‐
tion
ORIGINAL OPERATOR'S MANUAL
Contents
1 Safety information and warnings......................... 3
1.1 Proper use..................................................................... 3
1.2 Climate classes............................................................ 3
1.3 User group..................................................................... 3
1.4 Installation and commissioning................................ 3
1.5 Safely working with the appliance............................ 3
1.6 Cleaning......................................................................... 4
1.7 Faults, damage and repairs........................................ 4
1.8 Disposal......................................................................... 4
1.9 Conformity..................................................................... 4
1.10 SVHC substances in accordance with the REACH
Regulation..................................................................... 4
1.11 EPREL Database........................................................... 4
1.12 Open-source licenses.................................................. 4
1.13 Spare parts.................................................................... 4
1.14 Symbols on the appliance.......................................... 4
1.15 Warning levels.............................................................. 5
2 The appliance at a glance..................................... 5
2.1 Delivered contents....................................................... 5
2.2 Overview of appliances and equipment................... 5
2.3 SmartDevice.................................................................. 5
3 Setting up and connecting.................................... 5
3.1 Installation conditions................................................ 5
3.2 Appliance dimensions................................................. 6
3.3 Ventilation requirements............................................ 7
3.4 Connection dimensions for the power supply........ 7
3.5 Transporting the appliance........................................ 7
3.6 Unpacking the appliance............................................ 8
3.7 Explanation of the symbols used.............................. 8
3.8 Setting up the device.................................................. 9
3.9 Setting up the appliance level................................... 9
3.10 After setup.................................................................... 10
3.11 Setting up several appliances................................... 10
3.12 Fitting the appliance in a kitchen unit..................... 10
3.13 Disposal of packaging................................................. 11
3.14 Connecting the appliance to the power supply...... 11
4 Functionality of the display.................................. 12
4.1 Navigation using touch button and symbol
explanation................................................................... 12
4.2 Menus............................................................................. 12
5 Start-up................................................................. 13
5.1 Switching on the appliance (first use)..................... 13
6 Storage.................................................................. 14
6.1 Information regarding storage................................... 14
6.2 Freezer compartment.................................................. 14
6.3 Storage times............................................................... 14
7 Energy saving........................................................ 15
8 Use......................................................................... 15
8.1 Operating and display elements................................ 15
8.1.1 Temperature display/status display......................15
8.1.2 LED behavior..............................................................15
8.1.3 Acoustic signals........................................................ 15
8.2 Appliance functions..................................................... 15
8.2.1 Notes on the appliance functions..........................15
Switching appliance off and on.............................16
Temperature..............................................................16
SuperFrost.................................................................16
SabbathMode............................................................17
Input lock................................................................... 17
WLAN..........................................................................17
Start defrost cycle................................................... 18
Demo mode............................................................... 19
Resetting to factory settings................................. 19
8.3 Messages...................................................................... 19
8.3.1 Ending messages...................................................... 19
9 Equipment............................................................. 20
9.1 Drawers.......................................................................... 20
9.2 Glass shelves................................................................ 21
9.3 VarioSpace.................................................................... 22
10 Maintenance.......................................................... 22
10.1 Disassembling / assembling pull-out systems...... 22
10.2 Defrosting the appliance............................................ 23
10.3 Cleaning the appliance............................................... 23
11 Customer support................................................. 23
11.1 Technical specifications............................................. 23
11.2 Operating noises.......................................................... 24
11.3 Technical faults............................................................ 24
11.4 Customer Service......................................................... 25
11.5 Rating plate................................................................... 26
12 Decommissioning.................................................. 26
13 Disposal................................................................. 26
13.1 Prepare the appliance disposal................................. 26
13.2 Dispose of the appliance in an environmentally
friendly way................................................................... 26
The manufacturer is constantly working to improve all types
and models. Therefore, please be aware that we reserve the
right to make changes to the shape, equipment and tech‐
nology.
Symbol
Explanation
Read instructions
Please read the information in these instruc‐
tions carefully to understand all of the benefits
of your new appliance.
Additional information online
The digital manual with supplemental informa‐
tion and in additional languages can be found
online by scanning the QR code on the front
page of this manual or by entering the service
number at home.liebherr.com/fridge-
manuals.
The service number can be found on the serial
tag:
Fig.Example illustration
Check appliance
Check all parts for transport damage. If you
have any complaints, please contact your
agent or customer service.
2 * Depending on model and options
Symbol Explanation
Differences
These instructions apply to a range of models,
so there may be differences. Sections that
apply to certain models only are indicated by
an asterisk (*).
Instructions and results
Instructions are marked with a .
Results are marked with a .
Videos
Videos about the appliances are available on
the YouTube channel of Liebherr-Hausgeräte.
Open-source licenses:
The appliance includes software components that make
use of open-source licenses. You can find information on
the open-source licenses to be used here:
home.liebherr.com/open-source-licenses
These operating instructions apply to:
FNX..
46..i / 52..i
Note
If your appliance has an N in its appliance designation, it is
a NoFrost appliance.
1 Safety information and warnings
Keep this user information in a safe place so that you can
access it at any time.
If you hand the appliance on to someone else, give this user
information to the next owner.
To use the appliance properly and safely, read this user
information carefully before installation and use. Always
follow the instructions, safety instructions and warnings
contained in it. The information is important and ensures
that you install and operate the appliance safely and
correctly.
1.1 Proper use
-
This appliance is designed for use in a household and in
similar areas of application, e.g.:
•
in staff kitchen areas in stores, offices and other work
areas
•
in agricultural environments and in hotels, motels and
other accommodation
•
in bed and breakfast locations
•
in catering and related wholesale use
-
Other uses:
•
No other application types are permitted.
1.2 Climate classes
The appliance is designed for operation at limited ambient
temperatures depending on climate class. The climate class
that applies to your appliance is printed on the type plate.
Note
► To ensure flawless operation, observe the specified
ambient temperatures.
Climate class for ambient temperatures of
SN 10°C to 32°C
N 16°C to 32°C
ST 16°C to 38°C
T 16°C to 43°C
SN-ST 10°C to 38°C
SN-T 10°C to 43°C
If your appliance does not feature a fixed water connection,
it is guaranteed to function flawlessly at an ambient
temperature of as low as -15°C.
1.3 User group
-
This appliance is suitable for use by children ages 8 and
older and by persons with reduced physical, sensory or
mental capacities or lack of experience and skills
provided they are supervised or have been instructed on
the safe use of the appliance and understand the
hazards involved.
-
Children must not play with the appliance.
-
Do not allow children to clean the appliance or perform
user maintenance without supervision.
-
Children between the ages of 3-8 must not load or unload
the appliance.
1.4 Installation and commissioning
-
Only set up and connect the appliance in accordance
with the instructions in the user information.
-
Before opening the door, set up the appliance in accord‐
ance with the instructions in the user information first.
This will prevent the appliance from tipping over while
the door is open.
-
Do not block the ventilation openings in the appliance
housing or in the installation housing.
-
Do not damage the power cable. Do not operate the
appliance with a defective power cable.
-
Do not position portable multiple sockets or power
adapters on the rear of the appliance.
-
The outlet must be easily accessible so that the appli‐
ance can be quickly disconnected from the power supply
in an emergency. It must be located away from the rear of
the appliance.
1.5 Safely working with the appliance
-
Never store explosive substances, such as aerosol
containers with flammable propellant gas, in the appli‐
ance. The printed content information or a flame symbol
can identify such aerosol cans. Any leaking gases may be
ignited by electrical components.
-
To avoid the appliance catching fire, keep lighted
candles, lamps and other objects with open flames away
from the appliance.
-
Make sure that alcoholic beverages or other containers
with alcohol are stored tightly sealed. Any leaking alcohol
may be ignited by electrical components.
-
Avoid prolonged skin contact with cold surfaces or refri‐
gerated/frozen food. For protection, wear e. g gloves.
-
The refrigerant inside (information on the type plate) is
environmentally friendly but flammable. Any leaking
refrigerant may ignite.
•
Do not damage the refrigeration circuit.
•
Do not use any ignition sources inside the appliance.
Safety information and warnings
* Depending on model and options 3
•
Do not use any electrical devices inside the appliance
(e. g. steam cleaners, heaters).
•
If refrigerant leaks: Remove any open flames or
sources of ignition near the exit point. Ventilate the
room well. Notify customer service.
-
Only open the door for a short time. This helps you
prevent the temperature from increasing in the applian‐
ce’s interior.
-
Do not reach between the door and the appliance when
opening and closing. Fingers may get jammed in.
-
The temperature value in the warmest area of the appli‐
ance may exceed the set temperature value.
1.6 Cleaning
-
Regularly clean surfaces that come into contact with
food.
-
Do not use electric heaters, steam cleaners, an open
flame or defrosting sprays to accelerate the defrosting
process.
-
Never use sharp objects to remove ice.
1.7 Faults, damage and repairs
-
If the power cable of the appliance is damaged, replace
the power cable.
-
Repairs and work on the appliance are only to be under‐
taken by customer service or other trained specialists.
-
Pull the power plug or switch off the fuse in the event of
faults and appliance errors. Always hold it by the plug
when pulling out the power plug. Do not pull on the cord.
1.8 Disposal
-
The appliance contains value materials and is marked
with a symbol accordingly. (see 1.14Symbols on the
appliance)
•
Do not dispose of the appliance with household waste.
•
Dispose of the appliance free of charge at local recy‐
cling and recovery centers using the class1 collection
containers.
•
When purchasing a new appliance, return the old
appliance to a retailer free of charge.
•
Ask for information about return options.
-
There may be personal data on your appliance.
•
Delete any personal data before disposal.
-
The appliance contains refrigerant (details on the type
plate) and oil. The refrigerant inside the appliance is envi‐
ronmentally friendly, but flammable. The oil used is also
flammable. If the refrigerant and oil escape in high
concentrations and come into contact with an external
heat source, they can ignite.
•
Do not damage the refrigeration circuit.
•
Only dispose of the appliance in accordance with the
user information.
-
Your appliance is a BlueRox appliance:
•
Observe further information on recycling.
home.liebherr.com/bluerox
1.9 Conformity
The refrigerant circuit has been tested for leaks. The appli‐
ance complies with the relevant safety regulations as well
as the corresponding directives.
For the EU
market:
The appliance complies with Directive
2014/53/EU.
For the GB
market:
The appliance complies with Radio
Equipment Regulations 2017 SI 2017 No.
1206.
The complete text of the EU Declaration of Conformity is
available online at: www.Liebherr.de
1.10 SVHC substances in accordance
with the REACH Regulation
-
Use the link below to check whether you appliance
contains SVHC substances in accordance with the REACH
Regulation:
https://go.liebherr.com/z3eewm
1.11 EPREL Database
-
Information on energy consumption labeling and ecode‐
sign requirements has been available in the European
Product Database (EPREL) since March 1, 2021. Use the
following link to access the product database https://
eprel.ec.europa.eu/. There, you will be prompted to enter
the model ID. You can find the model ID on the type plate.
1.12 Open-source licenses
-
The appliance includes software components that make
use of open-source licenses. You can find information
about the open-source licenses to be used here:
home.liebherr.com/open-source-licenses
1.13 Spare parts
-
Spare parts for functional and storable parts of the
equipment are available for 15 years.
1.14 Symbols on the appliance
This symbol may be on the compressor. It
relates to the oil in the compressor and indi‐
cates the following danger: May be fatal if
swallowed and if it enters the respiratory
tract. This note is only important for recy‐
cling. There is no danger in normal opera‐
tion. Do not remove this symbol.
Warning: Risk of fire due to flammable
substances. You can find this symbol on the
compressor and it may also be on other
places on the appliance. The symbol warns
of flammable substances. Do not remove
this symbol.
This or a similar symbol may be on the rear
of the appliance. It denotes that there are
vacuum insulation panels (VIP) or perlite
panels in the door and/or housing. This note
is only important for recycling. Do not
remove this symbol.
This symbol can be found on the type plate.
It indicates that the appliance contains
value materials and that you must not
dispose of it with household waste.
(see1.8Disposal)
Safety information and warnings
4 * Depending on model and options
1.15 Warning levels
DANGER
Indicates an immediately
dangerous situation with, if not
avoided, potentially fatal conse‐
quences, or which might result in
severe injuries.
WARNING
Indicates a dangerous situation
with, if not avoided, potentially
fatal consequences, or which
might result in a severe injury.
CAUTION
Indicates a dangerous situation,
which, if not avoided, might result
in minor or medium injuries.
ATTENTION Indicates a dangerous situation,
which, if not avoided, might result
in property damage.
Note Refers to useful information and
tips.
2 The appliance at a glance
2.1 Delivered contents
Check all parts for transport damage. If you have any
complaints, please contact the retailer or customer service.
(see11.4 Customer Service)
Delivery contains the following parts:
-
Standalone appliance
-
Equipment (depending on your model)
-
Installation parts (depending on your model)
-
“Quick Start Guide”
-
“Installation Guide”*
-
Service brochure
2.2 Overview of appliances and equip‐
ment
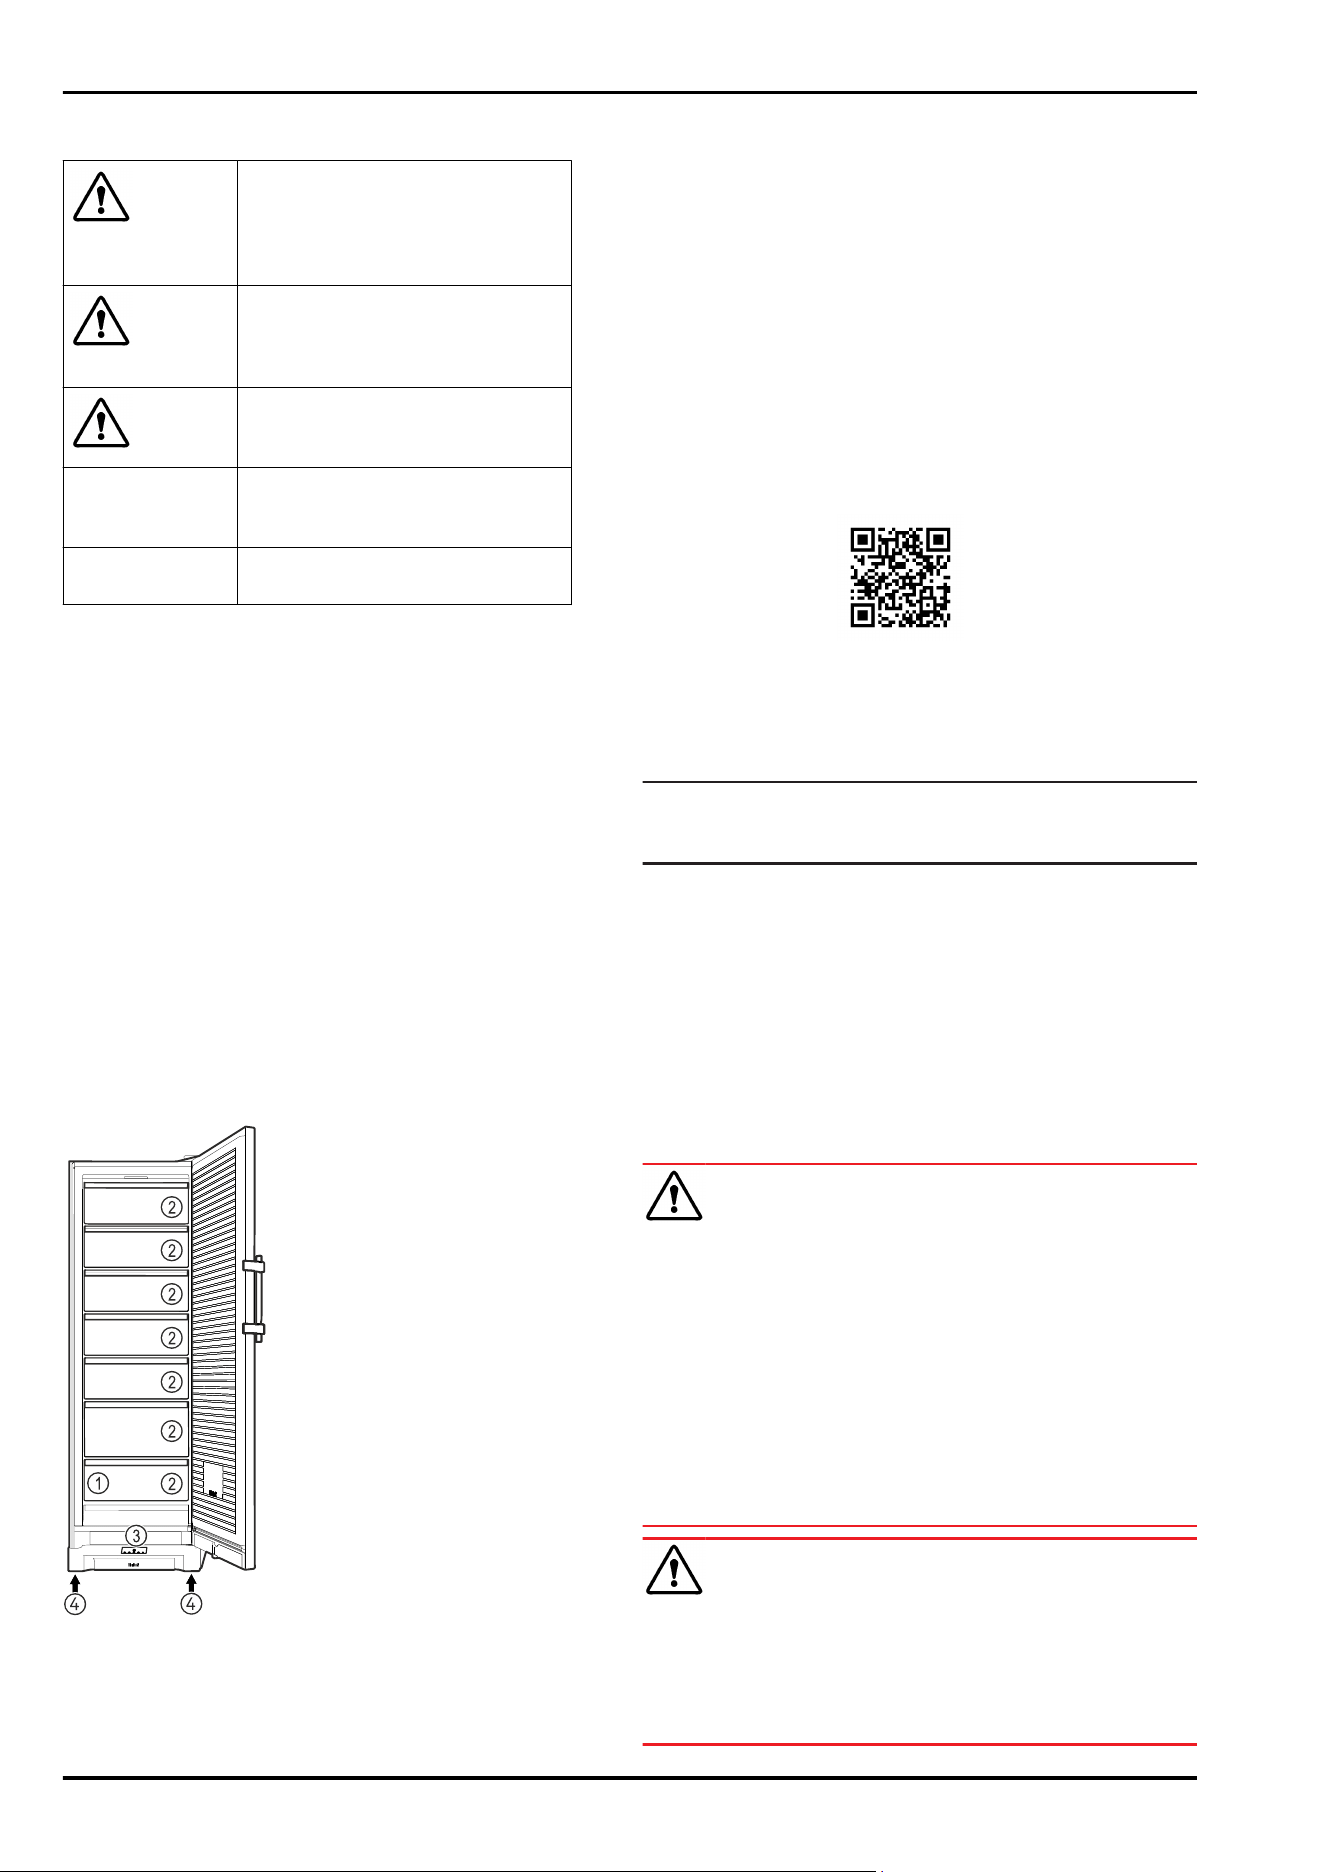
Fig. 1 Example illustration
(1)
Type plate (3) Controls
(2) Drawer (4) Adjustable foot
2.3 SmartDevice
SmartDevice is the networking solution for your freezer.
You can quickly and easily connect your SmartDevice-
enabled appliance to your WiFi. With the SmartDevice app,
you can operate your appliance from a mobile device. Addi‐
tional functions and setting options are available in the
SmartDevice app.
SmartDevice-
enabled appliance:
Your appliance is capable of being a
SmartDevice. To be able to connect
your device to WiFi, you need to
download the SmartDevice app.
More information
about SmartDe‐
vice:
smartdevice.liebherr.com
Downloading the
SmartDevice app:
After you have installed and config‐
ured the SmartDevice app, you can
connect your appliance to your WLAN
using your SmartDevice app the
WLAN device function (seeWLAN) .
Note
The SmartDevice function is not available in the following
countries: Russia, Belarus, Kazakhstan.
3 Setting up and connecting
3.1 Installation conditions
The installation conditions are crucial to ensure that you
can operate your appliance safely, efficiently, and trouble-
free.
-
Observe all safety instructions.
-
Observe the installation location and position in the
room.
WARNING
Danger of fire due to incorrect positioning!
If the power supply cable or plug touches the back of the
appliance, the vibration can damage the power supply cable
or the plug resulting in a short circuit.
► Make sure the power supply cable is not trapped under
the appliance when you position the appliance.
► Install the appliance so that it does not touch any plugs
or power cables.
► Do not connect any appliances to sockets in the area of
the back of the appliance.
► Do not place and operate power strips/power distribu‐
tors and other electronic devices (such as halogen trans‐
formers) at the back of the appliances.
WARNING
Risk of fire due to moisture!
If live parts or the power cord get wet, this can cause a
short circuit.
► The appliance is designed for use in enclosed spaces. Do
not operate the appliance in open space or in damp areas
or where there is spray.
The appliance at a glance
* Depending on model and options 5
WARNING
Leaking refrigerant and oil!
Fire. The refrigerant contained within the appliance is envi‐
ronmentally friendly, but flammable. The oil contained
within the appliance is flammable. Escaping refrigerant and
oil can ignite if they are of high enough concentration and
are exposed to an external heat source.
► Do not damage the pipelines of the coolant circuit and
the compressor.
3.1.1 Installation location
-
Only set up and used the appliance in enclosed spaces.
-
The optimum installation location is a dry and well-venti‐
lated space.
-
If the appliance is set up in a very humid environment,
condensation may form on the outside of it.
Always ensure good ventilation at the installation loca‐
tion.
-
The more refrigerant there is in the appliance, the larger
the room in which the appliance is installed must be. If
the room is too small, a flammable gas/air mixture may
form in the event of a leak. Per 8g refrigerant, the instal‐
lation space must be at least 1m
3
in size. Information on
the refrigerant contained can be found on the type plate
inside the appliance.
-
The floor at the installation location must be horizontal
and level.
3.1.2 Position in the space
-
Do no set up the appliance in an area with direct sunlight,
next to a heating unit or similar.
-
You can set up the appliance directly next to an oven.
-
If you set up the appliance directly next to an oven, its
energy consumption may increase slightly. This depends
on the service life and how often the oven is used.
-
Always place the rear of the appliance directly against
the wall.
-
Use in potentially explosive atmospheres is not
permitted.
3.1.3 Fitting into a kitchen unit
-
You can convert the appliance with kitchen cabinets.
(see 3.12 Fitting the appliance in a kitchen unit)
3.2 Appliance dimensions
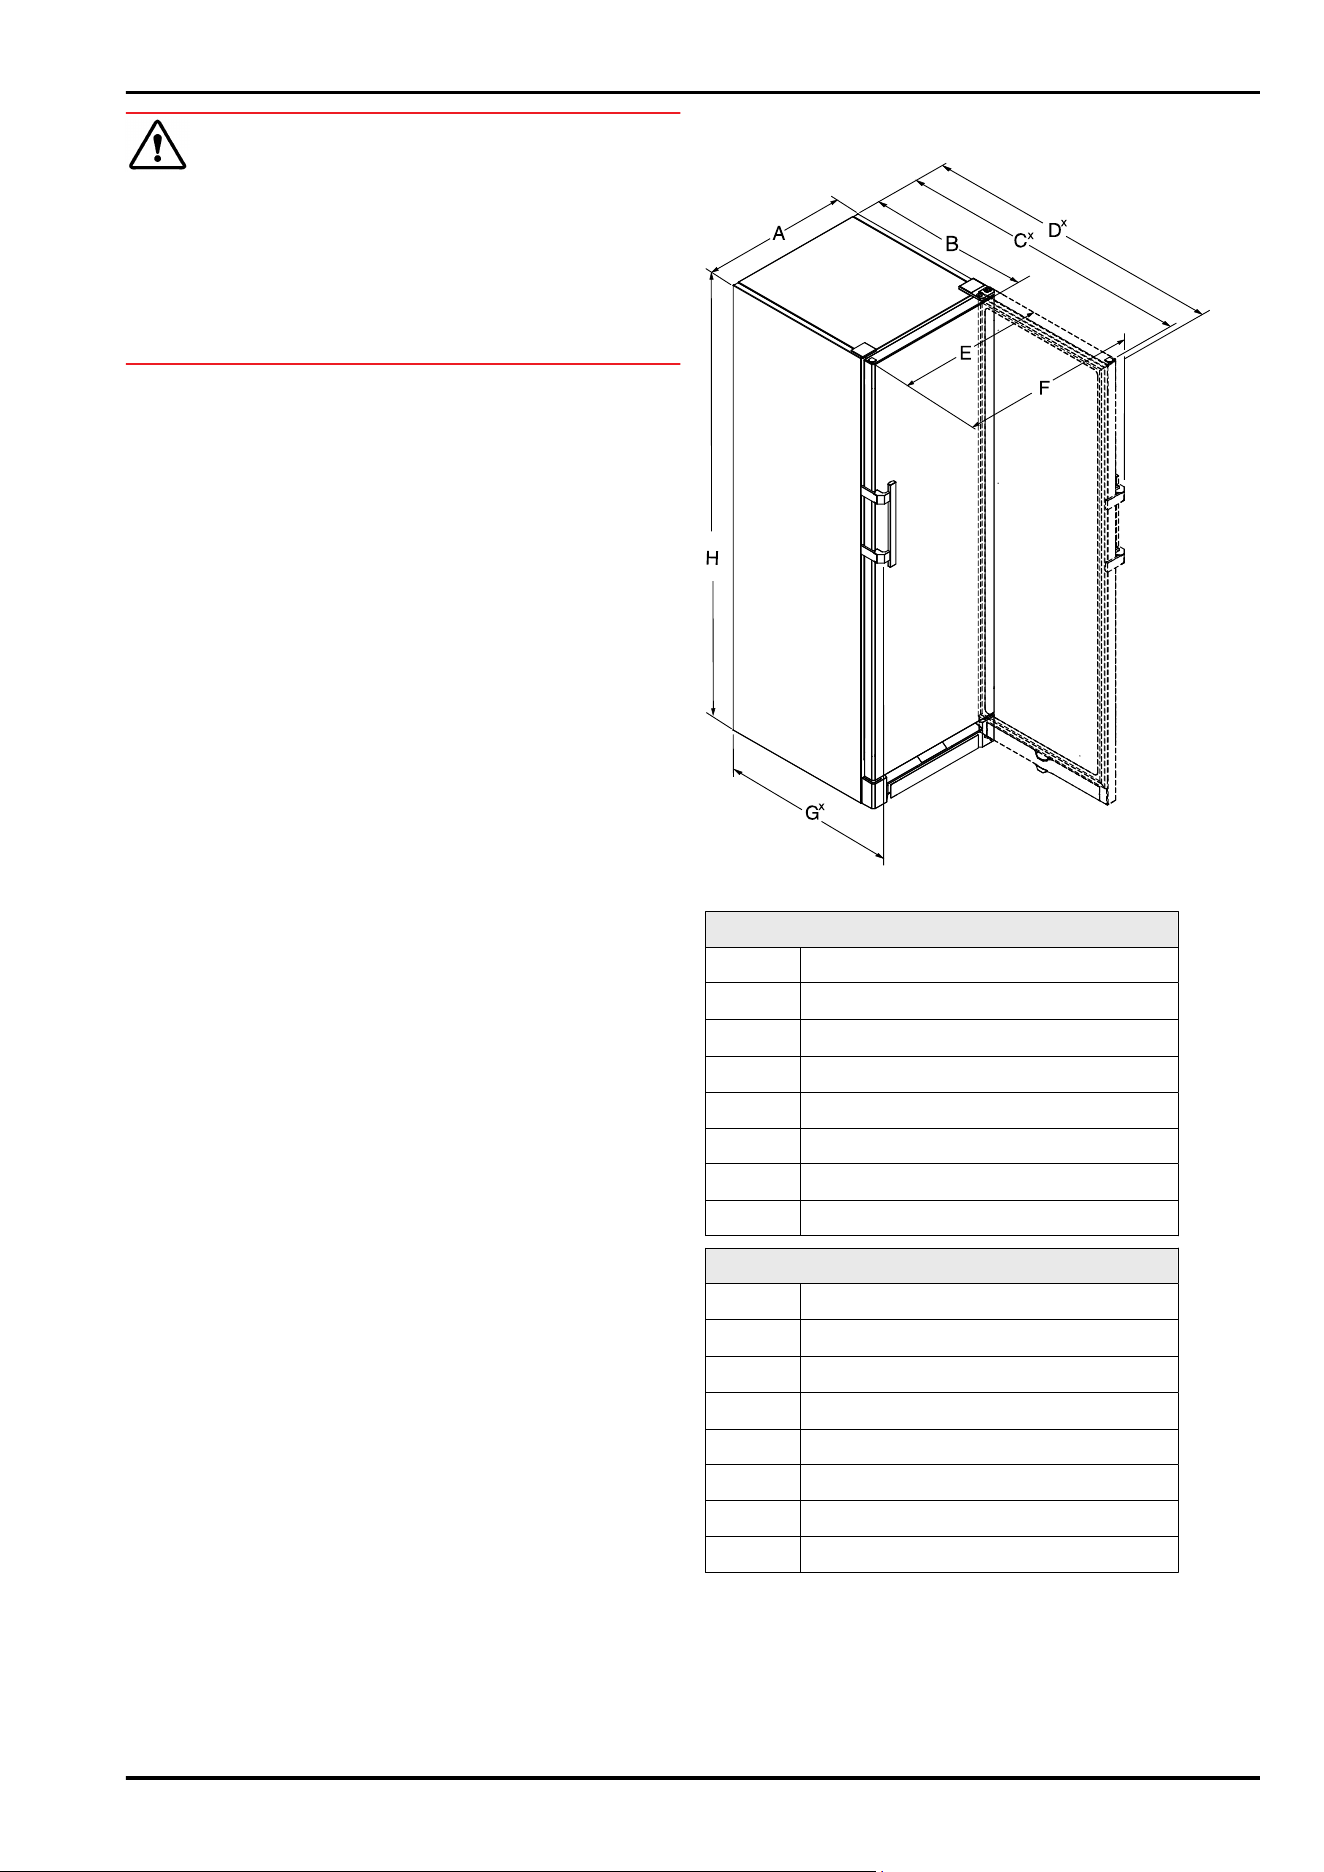
Fig.2
FNX..46..i
A (mm) 597
B (mm)
x
675
C (mm)
x
1226
D (mm)
x
1233
E (mm) 601
F (mm) 644.5
G (mm)
x
717.5
H (mm) 1455
FNX.. 52..i
A (mm) 597
B (mm)
x
675
C (mm)
x
1226
D (mm)
x
1233
E (mm) 601
F (mm) 644.5
G (mm)
x
717.5
H (mm) 1855
Setting up and connecting
6 * Depending on model and options
3.3 Ventilation requirements
NOTICE
Risk of damage due to overheating in the case of insuffi‐
cient ventilation!
In the case of insufficient ventilation, the compressor can
be damaged.
► Make sure there is sufficient ventilation.
► Observe the ventilation requirements.
If the appliance is integrated into the kitchen cabinet,
observe the following ventilation requirements:*
-
As a general rule, the larger the ventilation cross-section,
the more energy-efficient the appliance operates.*
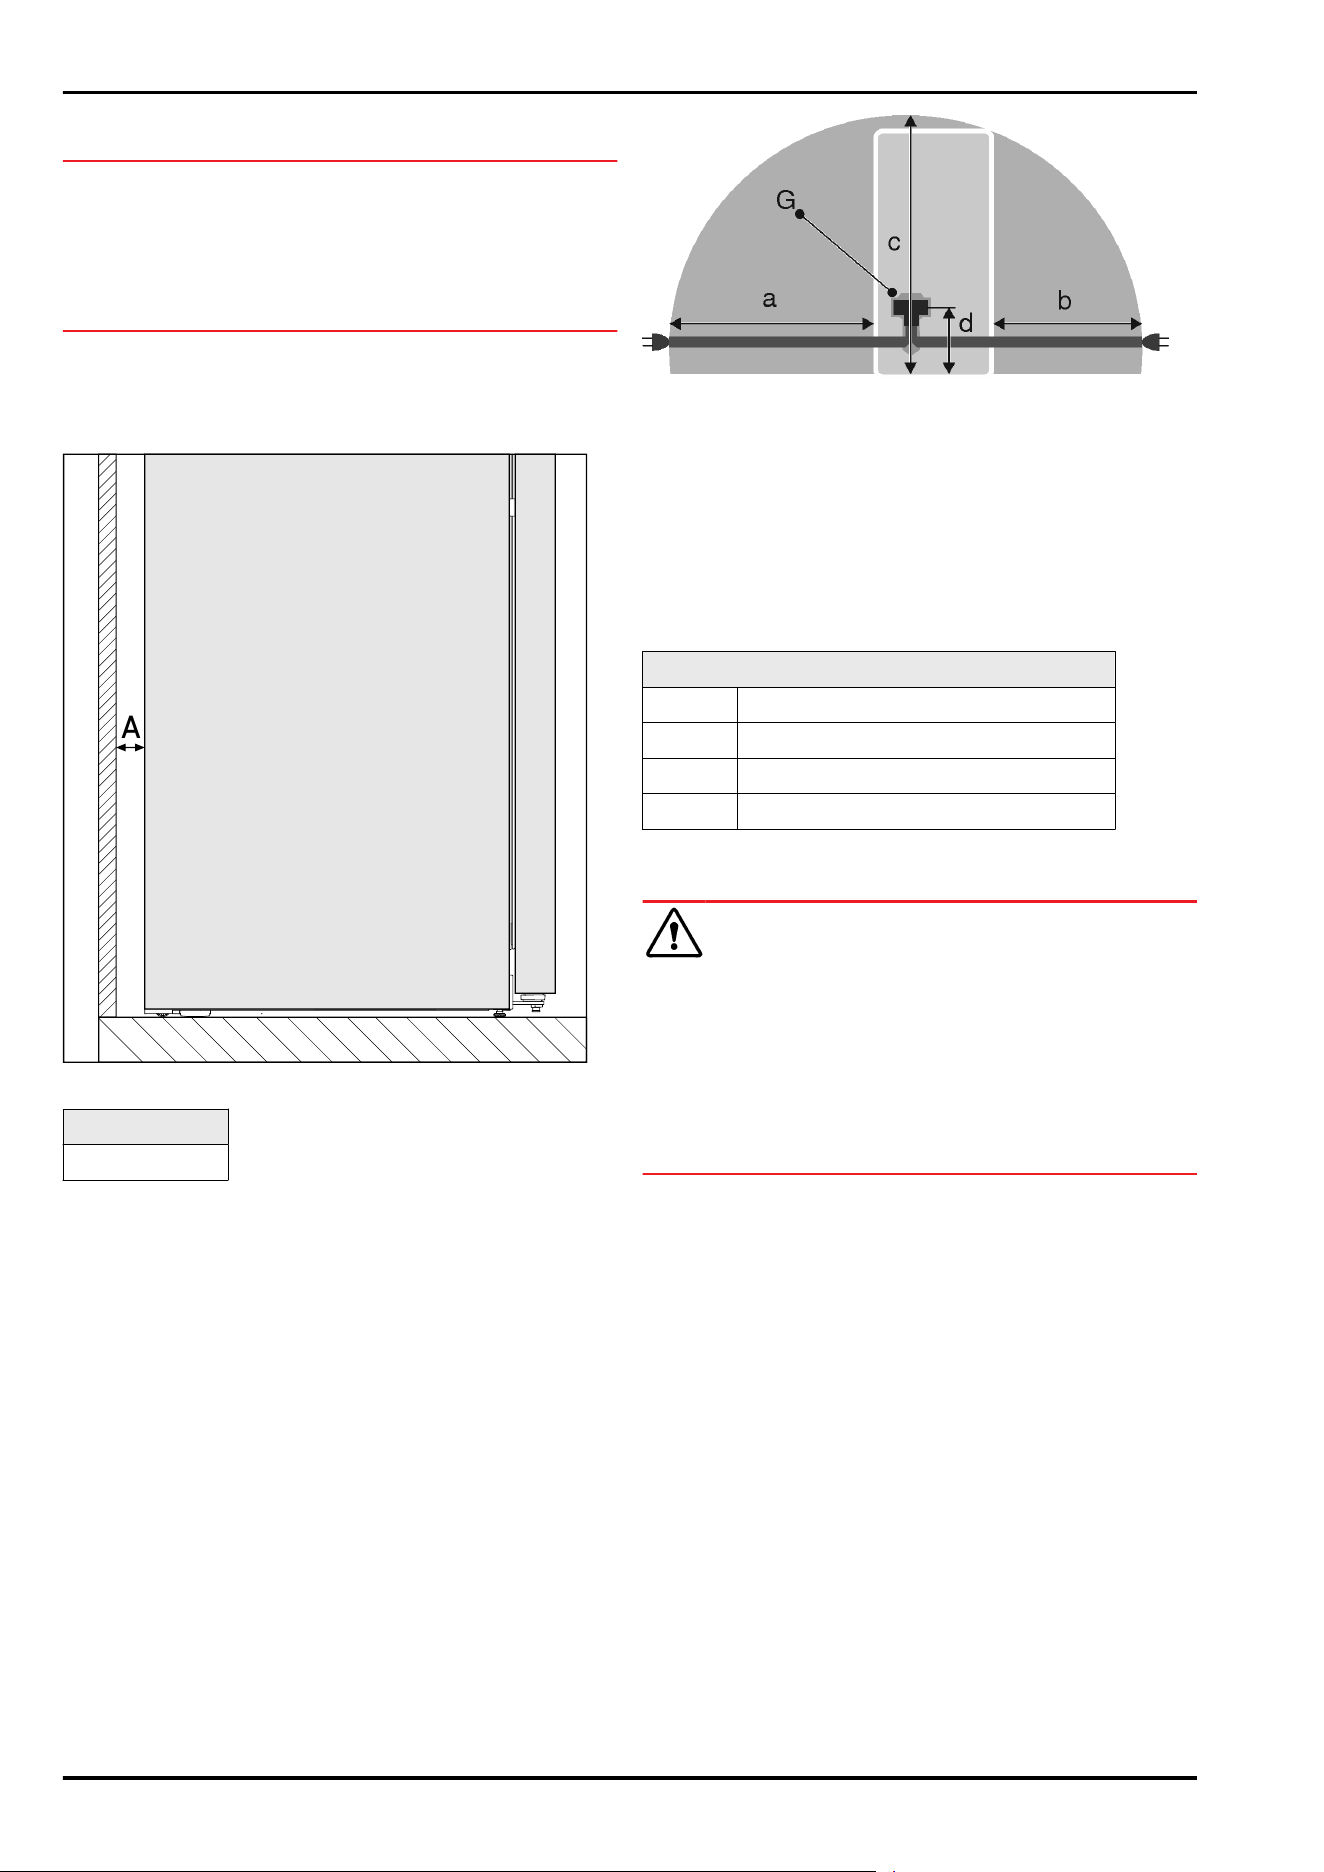
A
Fig.3*
Wall distance A*
25mm*
The energy consumption was determined with a wall
distance Fig.3(A) between the rear of the appliance and the
wall. If the wall distance is less than Fig.3(A), this has no
effect on the functionality of the appliance, but energy
consumption increases slightly when the distance to the
wall is smaller.*
3.4 Connection dimensions for the
power supply
The connection for the power supply is on the rear of the
appliance. In order for you to be able to safely connect your
appliance, make sure that the following requirements are
met:
❑
Dimensions for the power supply connection are known
and observed. See the table below.
❑
The connection to the power supply is made according to
the instructions. (see 3.14 Connecting the appliance to
the power supply)
Fig. 4 Fridge/freezer combinations/freezers/full-capacityBio‐
Fresh appliances
(a)
Maximum available
length of the power
cable
(d) Distance of the appli‐
ance plug to the floor
(b) Maximum available
length of the power
cable
(G) Appliance plug
(c) Maximum available
vertical length of the
power cable
For 600mm wide appliances:
a ~ 1800mm
b ~ 1400mm
c ~ 2100mm
d ~ 200mm
3.5 Transporting the appliance
DANGER
Danger of injury and damage due to a heavy appliance!
Crushing, fractures, severe injuries. Damage to appliance
and premises. If you are transporting the appliance, e.g.
carrying it up a staircase, and the appliance slips from your
hand, it may cause injury or damage to property due to its
weight.
► Always transport the appliance with the help of four
people.
► Use carrying straps.
3.5.1 Transporting the appliance for initial
installation
Make sure that the following requirements are fulfilled:
❑
Appliance is packaged.
❑
The appliance is upright.
Setting up and connecting
* Depending on model and options 7
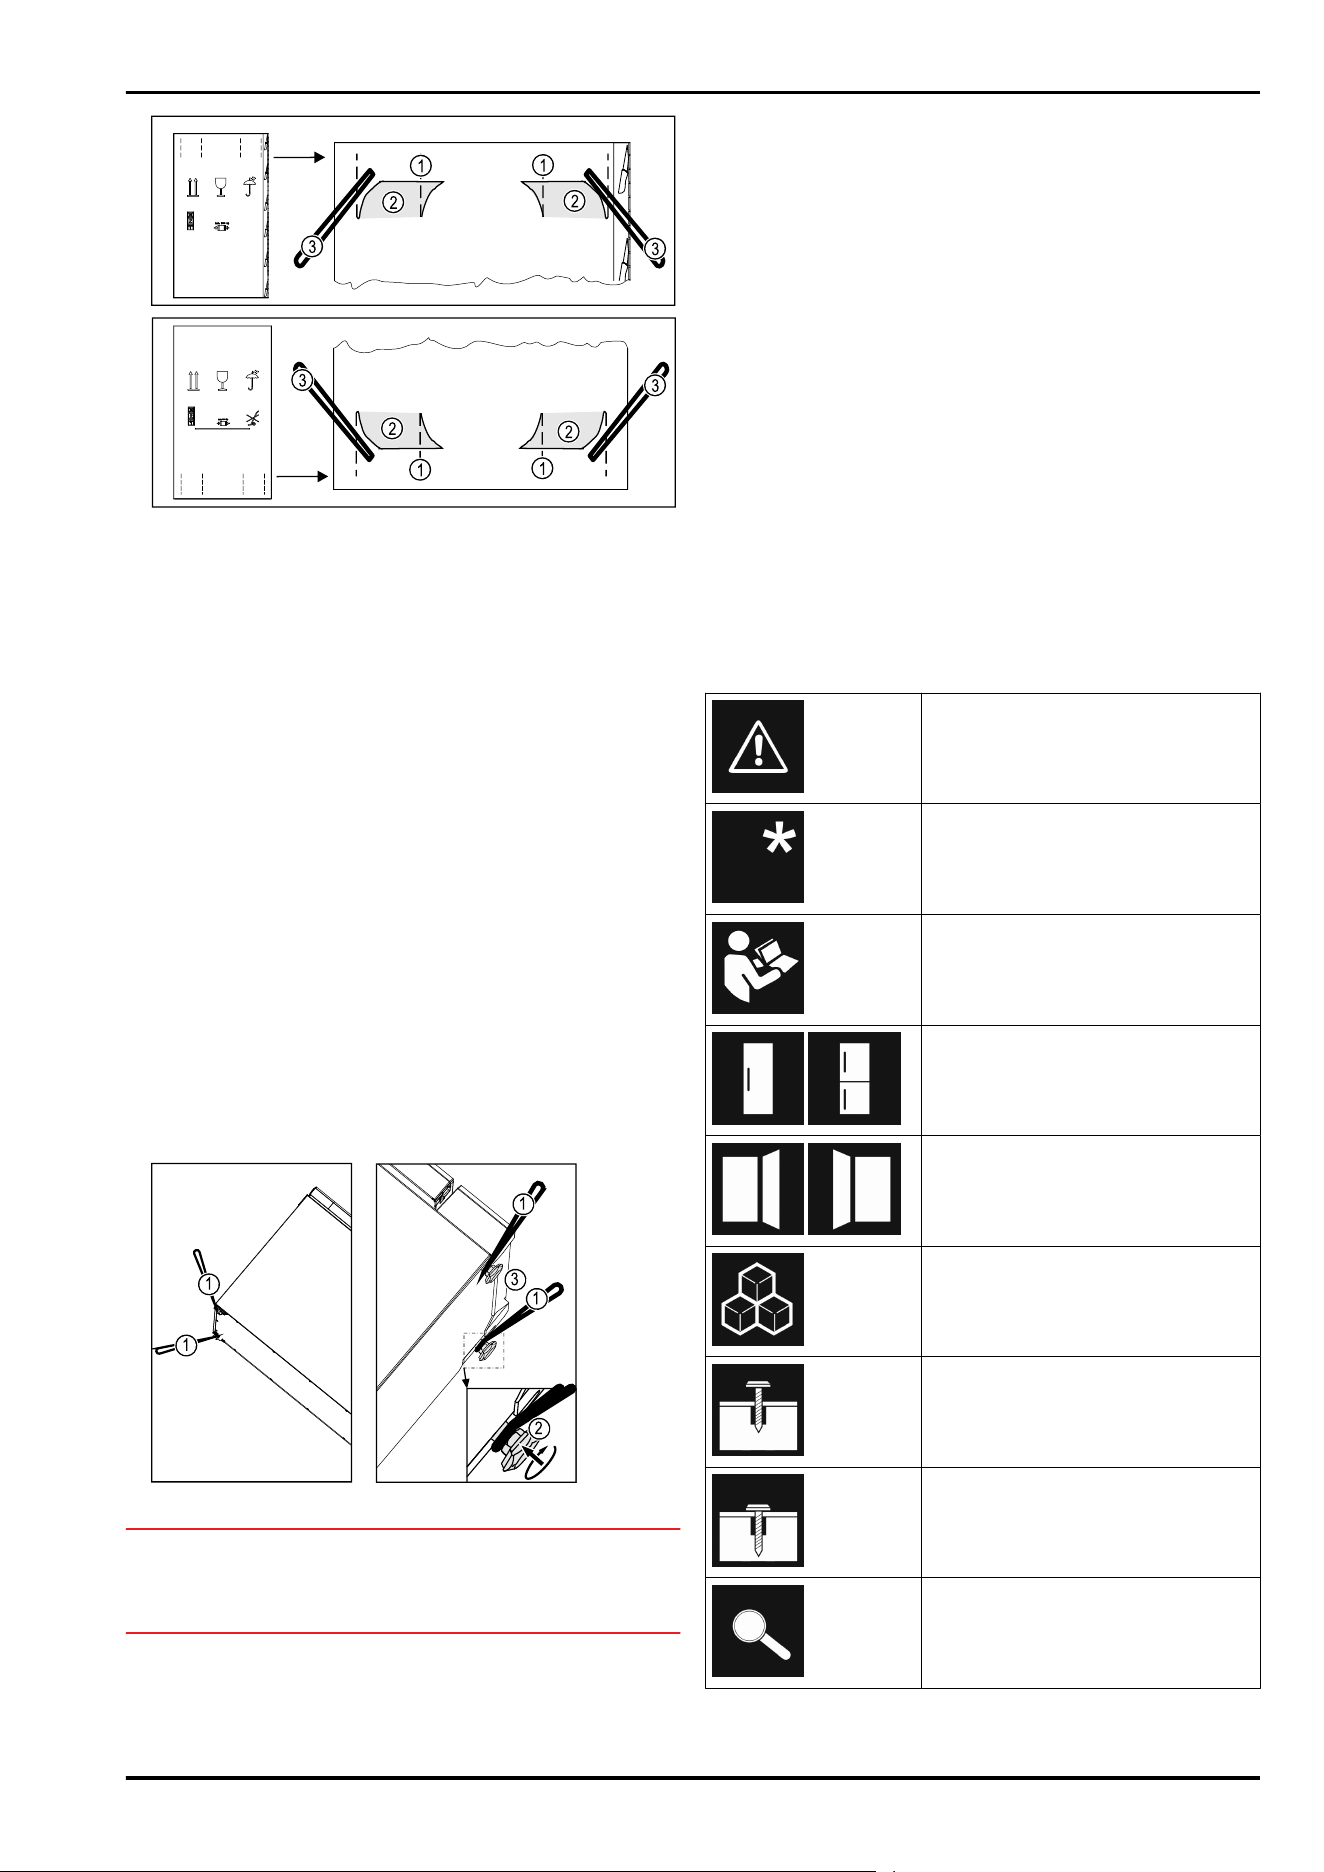
Fig.5
► Press in the packaging carton at the top and bottom of
the perforation Fig.5(1).
► Pull out the pressed-in flaps Fig.5(2).
▷ The carrying straps Fig.5(3) are visible.
► Pull out all four carrying straps Fig.5(3).
► Hold the appliance by all four carrying straps Fig.5(3).
► Transport the appliance with the help of four people.
► Do not remove the carrying straps.
► Unpack the appliance. (see 3.6 Unpacking the appliance)
► After unpacking the appliance, push the carrying straps
behind and under it.
3.5.2 Transporting the appliance after initial
installation
Observer the following instructions if you want to transport
or move the appliance after initial installation.
Make sure that the following requirements are fulfilled:
❑
Appliance is empty.
❑
The appliance is upright.
❑
Appliance with door(s): The door is secured against unde‐
sired opening.
❑
Appliance with pull-out cart: The pull-out cart is secured
against undesired opening.
❑
Appliance with adjustable feet: Adjustable feet are
turned in.
Fig.6
NOTICE
Risk of damage as a result of improper transport!
► Always lift up the appliance using the carrying straps.
► Do not lift up the appliance at the base panel.
► Turn in the adjustable feet Fig.6(2) on the appliance in
order to be able to use the lower transport straps.
► Pull out the carrying straps at the bottom front of the
appliance.
►
Pull out the carrying straps at the top back of the appli‐
ance.
► Use all four carrying straps Fig.6(1).
► Transport the appliance with the help of four people.
After transporting it:
► Turn out the adjustable feet on the appliance.
► Align the appliance. (see 3.9 Setting up the appliance
level)
► Push the carrying straps behind and under the appliance.
3.6 Unpacking the appliance
If the appliance is damaged check with the supplier immedi‐
ately before connecting it.
► Check the appliance and packaging for damage during
transport. If you suspect any damage, please contact
your supplier immediately.
► Remove all materials that could prevent it from being
installed properly or prevent proper ventilation from the
back or the side panels of the appliance.
► Remove all protective films from the appliance. Do not
use sharp or pointed objects for this.
3.7 Explanation of the symbols used
There is a risk of injury when
performing this step! Observe the
safety instructions!
The instructions apply to several
models. Only do this step if it
applies to your appliance.
Please refer to the detailed
description in the text section of
the instructions for installation.
This section applies either to a
single-door appliance or a two-
door appliance.
Choose between the alternatives:
Appliance with door hinge on the
right or appliance with door hinge
on the left.
Installation step necessary for
IceMaker and/or InfinitySpring.
Only loosen the screws or slightly
tighten them.
Tighten the screw.
Check whether the following step
is necessary for your model.
Setting up and connecting
8 * Depending on model and options
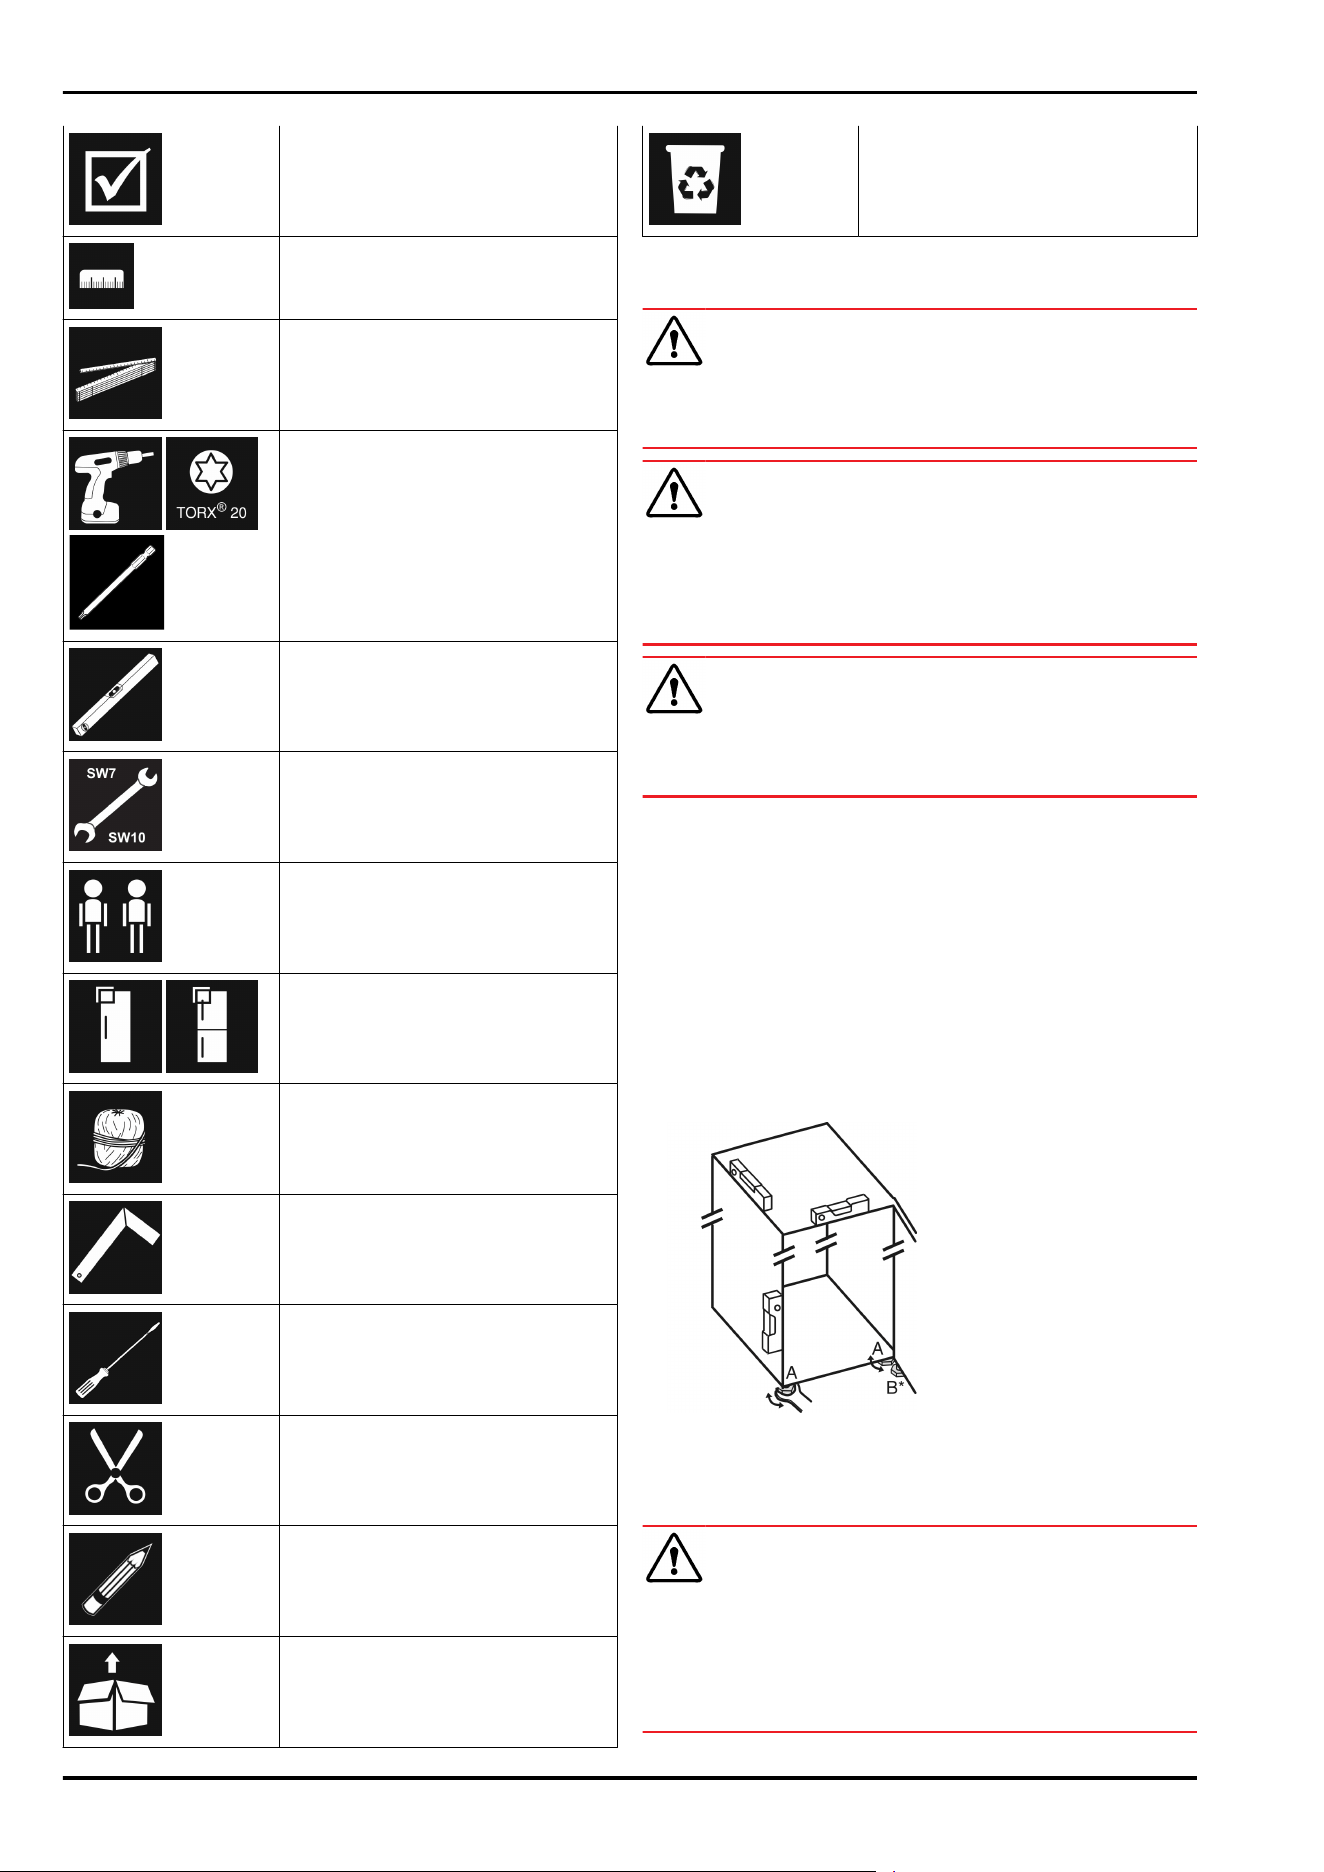
Check to ensure the right installa‐
tion/the correct fit of the compo‐
nents used.
Re-measure the specified dimen‐
sion and correct if necessary.
Tools for installation: Measuring
rod
Tools for installation: Electric
screwdriver and insert
We recommend a longer bit insert
to reach the screws better.
Tools for installation: Level
Tools for installation: Open-end
wrench with wrench sizes 7 and 10
Two people are required for this
step.
This step is performed at the
marked spot on the appliance.
Aids needed for installation: String
Aids needed for installation:
Angular measure
Aids needed for installation:
Screwdriver
Aids needed for installation: Scis‐
sors
Aids needed for installation:
Marker, erasable
Enclosure: Remove components
Properly dispose of components no
longer needed.
3.8 Setting up the device
CAUTION
Risk of injury due to heavy appliance!
► Have two people transport the appliance to its installa‐
tion site.
WARNING
Risk of fire from short circuit!
► When setting up the appliance: Do not kink, trap, or
damage the power cable.
► Do not operate the appliance with a defective power
cable.
WARNING
Danger of fire and damage!
► Do not place devices that give off heat, e.g. microwaves,
toasters, etc. on the appliance.
Make sure that the following requirements are fulfilled:
❑
Only move the appliance when it is not loaded.
❑
Always have someone to help when installing the appli‐
ance.
► Remove the power cable from the enclosed package.
► Fully insert the IEC socket of the power cable completely
into the appliance plug on the rear side of the appliance.
Ensure the IEC socket is firmly in place.
► If necessary, use a string to route the power plug to a
socket outlet that is freely accessible.
3.9 Setting up the appliance level
Fig.7
► Unscrew the adjustable feet Fig.7(A) using the open-end
wrench provided and a spirit level until the appliance is
firmly aligned and level.
CAUTION
Danger of injury and damage if the appliance tips over!
The appliance may tip over if the additional adjustable foot
on the bottom swap bearing block does not rest properly on
the floor. This may result in damage or injuries.
► Unscrew the additional adjustable foot on the swap
bearing block as per the instructions.
Setting up and connecting
* Depending on model and options 9
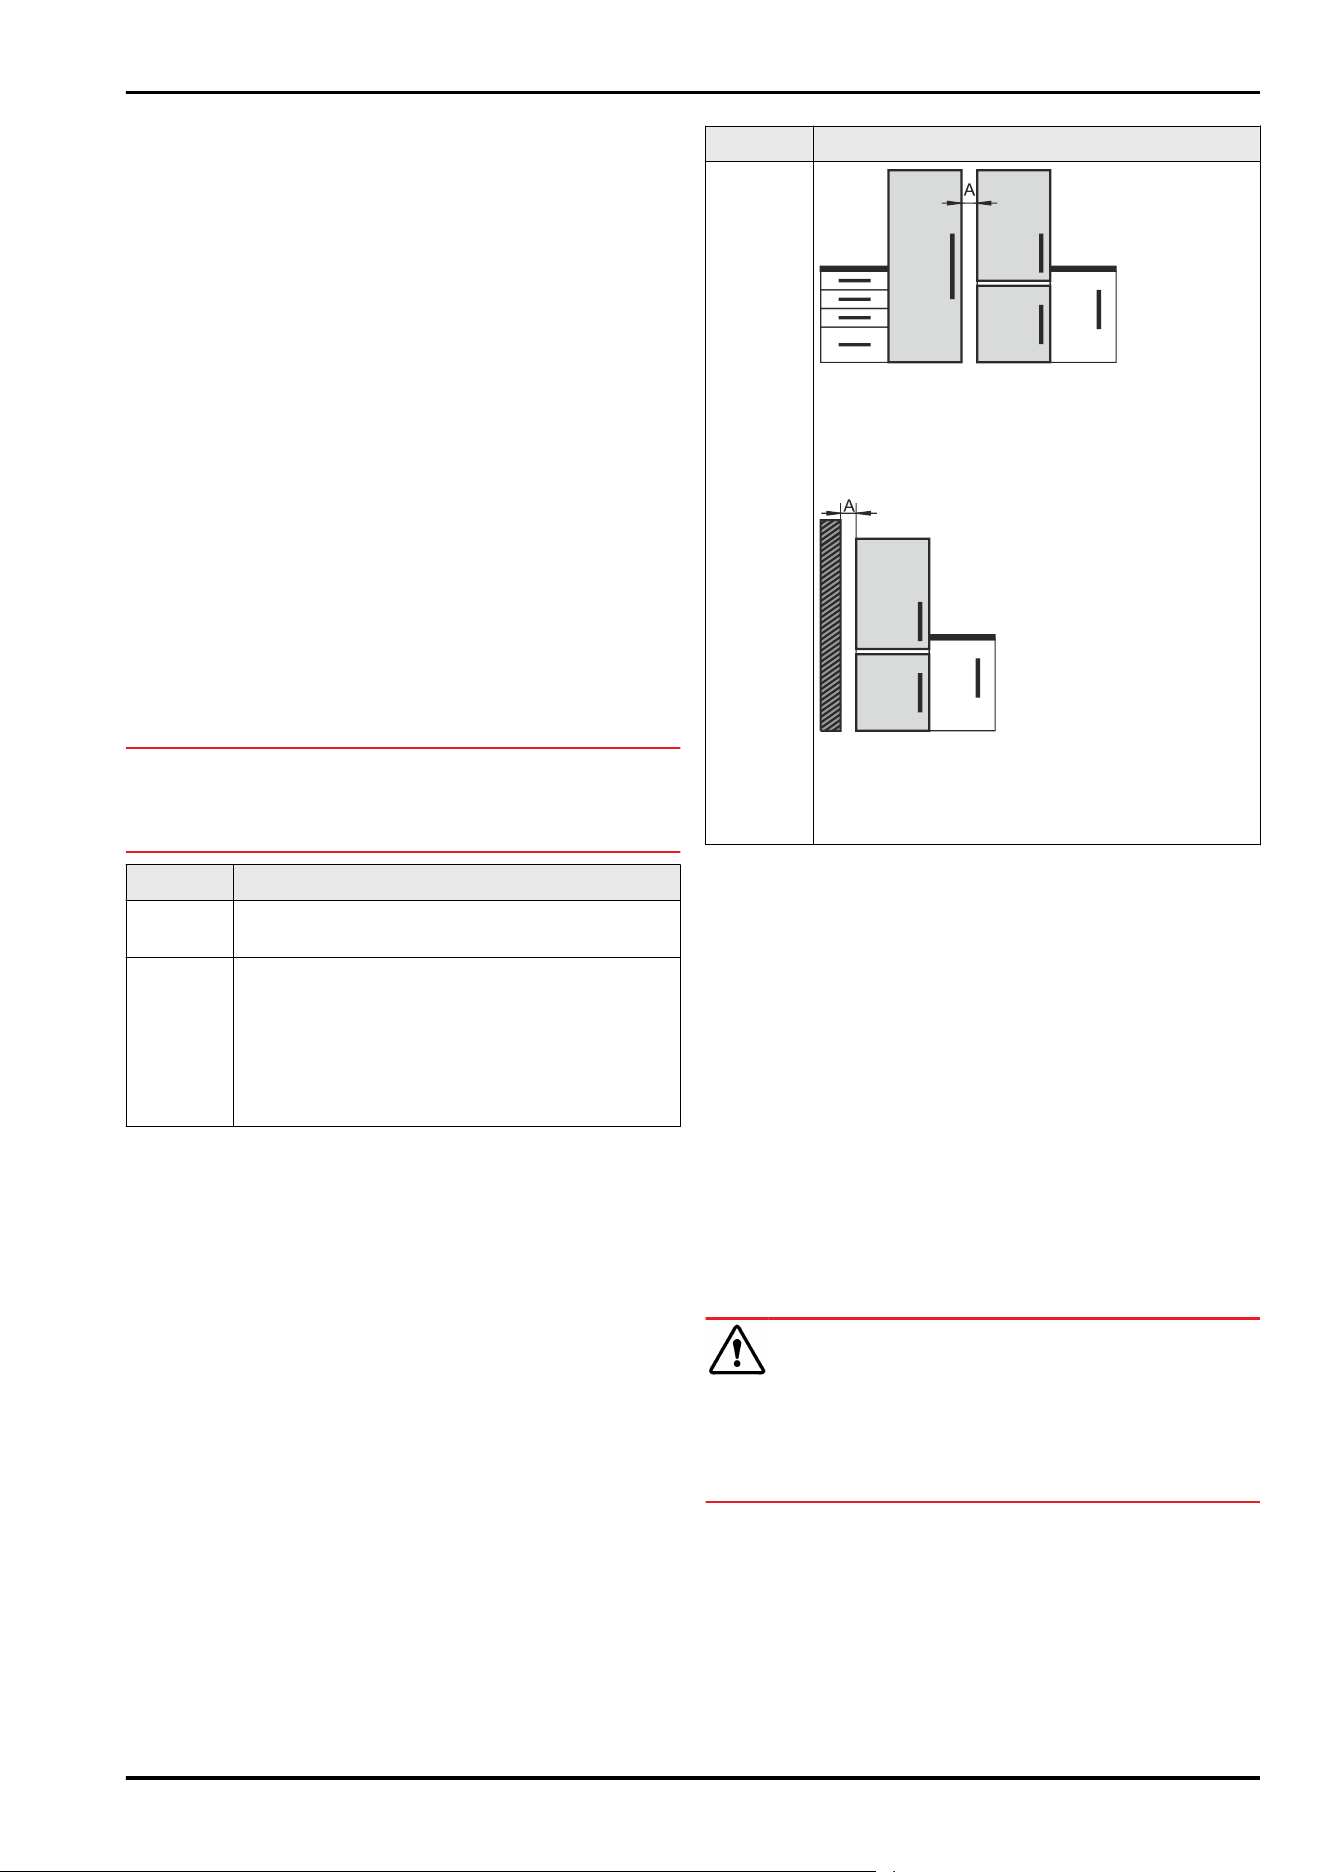
► Unscrew the adjustable foot Fig.7(B) at the swap bearing
block using the open-end wrench provided until it rests
on the floor.
► Turn the adjustable foot Fig.7(B) another 90°.
▷ Appliance is aligned.
3.10 After setup
► Remove all transport packaging.
► Pull off the protective film from the outside of the
housing.
► Pull off the protective film from the trim strips and
drawer fronts.*
► Clean the appliance. (see operating instructions)
► Note the type (model, number), appliance designation,
appliance/serial number, purchase date and dealer’s
address.
3.11 Setting up several appliances
The appliances were developed for different installation
options. If you want to install several appliances side by
side or on top of each other, make sure that the following
requirements are met:
❑
Only install those appliances side by side or on top of
each other that were developed for the purpose.
❑
Observe the instructions and the following table.
NOTICE
Risk of damage caused by water condensate!
► Do no set up the appliance next to another refrigeration/
freezer unit.
Model Installation type
All
models
individually
Models
with a
model
designa‐
tion that
starts
with S....
Side-by-side (SBS)
Model Installation type
Models
without
side wall
heating
Next to each other: Install with a distanceA
from 70mm between the appliances.
If you do not keep this distance, condensate
can form on the side walls between the appli‐
ances.
At an outside wall: Install with a distanceA as
for a side-by-side installation.
If you do not keep this distance, condensate
can form on the side wall of the appliance.
Models and their installation type
Assemble the appliances according to the separate
assembly instructions.
3.12 Fitting the appliance in a kitchen
unit
You can fit the appliance in a kitchen unit. Observe the
following installation conditions:
-
If you install a top-mounted cabinet above the appliance,
you must allow for a ventilation cross-section with the
depth at the rear of the top-mounted cabinet accordingly.
-
If you install the appliance with the hinges next to a wall,
you must account for the distance to the side of the
appliance.
-
To ensure that the door can be opened completely, the
appliance must protrude by the thickness of the front.
Depending on the depth of the niche depth, the appliance
may protrude further.
WARNING
Risk of fire from short circuit!
► When setting up the appliance: Do not kink, trap, or
damage the power cable.
► Do not operate the appliance with a defective power
cable.
Make sure that the following requirements are fulfilled:
❑
Outlet is easily accessible and is not behind the appli‐
ance.
❑
Ventilation requirements are observed. (see 3.3 Ventila‐
tion requirements)
❑
Connection dimensions are taken into account.
(see 3.14 Connecting the appliance to the power supply)
Setting up and connecting
10 * Depending on model and options
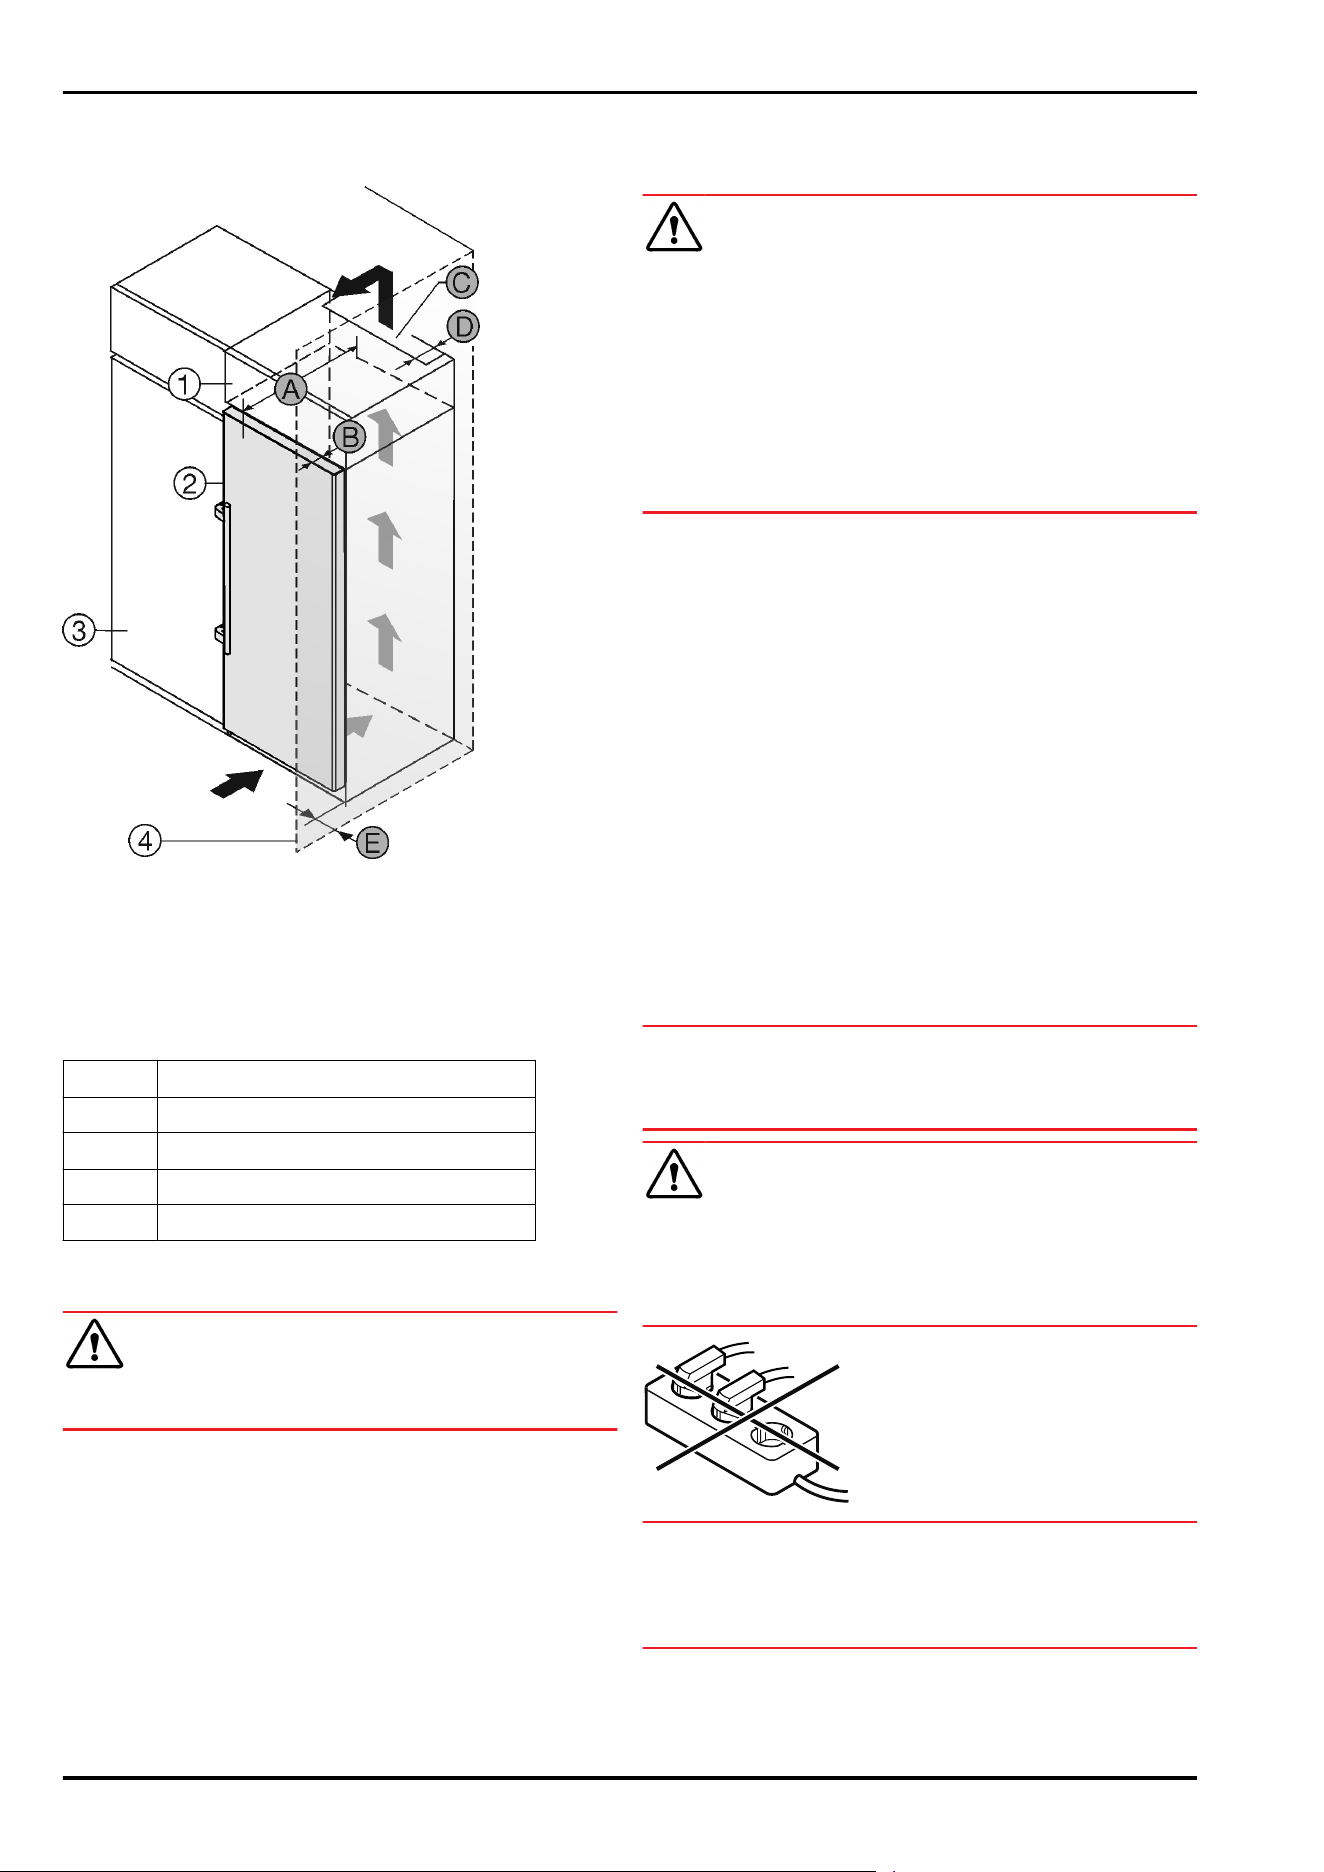
3.12.1 Niche dimensions for appliances with a
handle
Fig.8
(1)
Top-mounted cabinet (B) Door depth
(2) Appliance (C) Ventilation cross-section
(3) Kitchen cabinet (D) Distance of the rear of
the appliance
(4) Wall (E) Distance to the side of
the appliance
(A) Appliance depth
A
675mm
x
B 54mm
C
at least 300cm
2
D at least 50mm
E at least 50mm
3.13 Disposal of packaging
WARNING
Danger of suffocation from packaging materials and films!
► Do not allow children to play with packaging materials.
The packaging is made from recyclable materials:
-
Corrugated card/cardboard
-
Parts made of foamed polystyrene
-
Films and bags from polyethylene
-
Packing bands from polypropylene
-
Wood frame nailed together with a polyethylene window*
► Take the packaging material to an official collection
point.
3.14 Connecting the appliance to the
power supply
WARNING
Danger of electric shock and injury due to damaged appli‐
ance or damaged mains cable!
Cuts and fatal injury. If the appliance or the mains cable is
damaged during transport, you may be electrocuted. You
could also cut yourself on damaged parts of the appliance
housing.
► Check the appliance and the mains cable for damage
after transport.
► Never put the appliance into operation if the appliance or
the mains cable are damaged.
► Contact Customer Service.
You can connect your appliance to the mains using the
power cable supplied separately. The mains power cable
has an appliance coupler at one end and a mains plug at the
other end.
Make sure that the following requirements are fulfilled:
-
The appliance and power cable are undamaged.
-
The appliance is set up in accordance with the regula‐
tions. (see 3.8 Setting up the device)
-
Requirements for the electrical connection are met.
-
Dimensions for connection in accordance with regula‐
tions are known and observed. (see 3.4Connection
dimensions for the power supply)
-
Mains voltage and frequency correspond to the specifica‐
tions on the type plate.
-
The socket is grounded and fused in accordance with
regulations.
-
The tripping current for the fuse is between 10A and
16A.
-
Outlet is easily accessible and is not behind the appli‐
ance. (see 3.4 Connection dimensions for the power
supply)
NOTICE
Danger of damage to incorrect operation!
Damage to the electrical components of the appliance.
► Only use the supplied power cable.
WARNING
Danger of fire due to incorrect connection!
Burns.
Damage to the appliance.
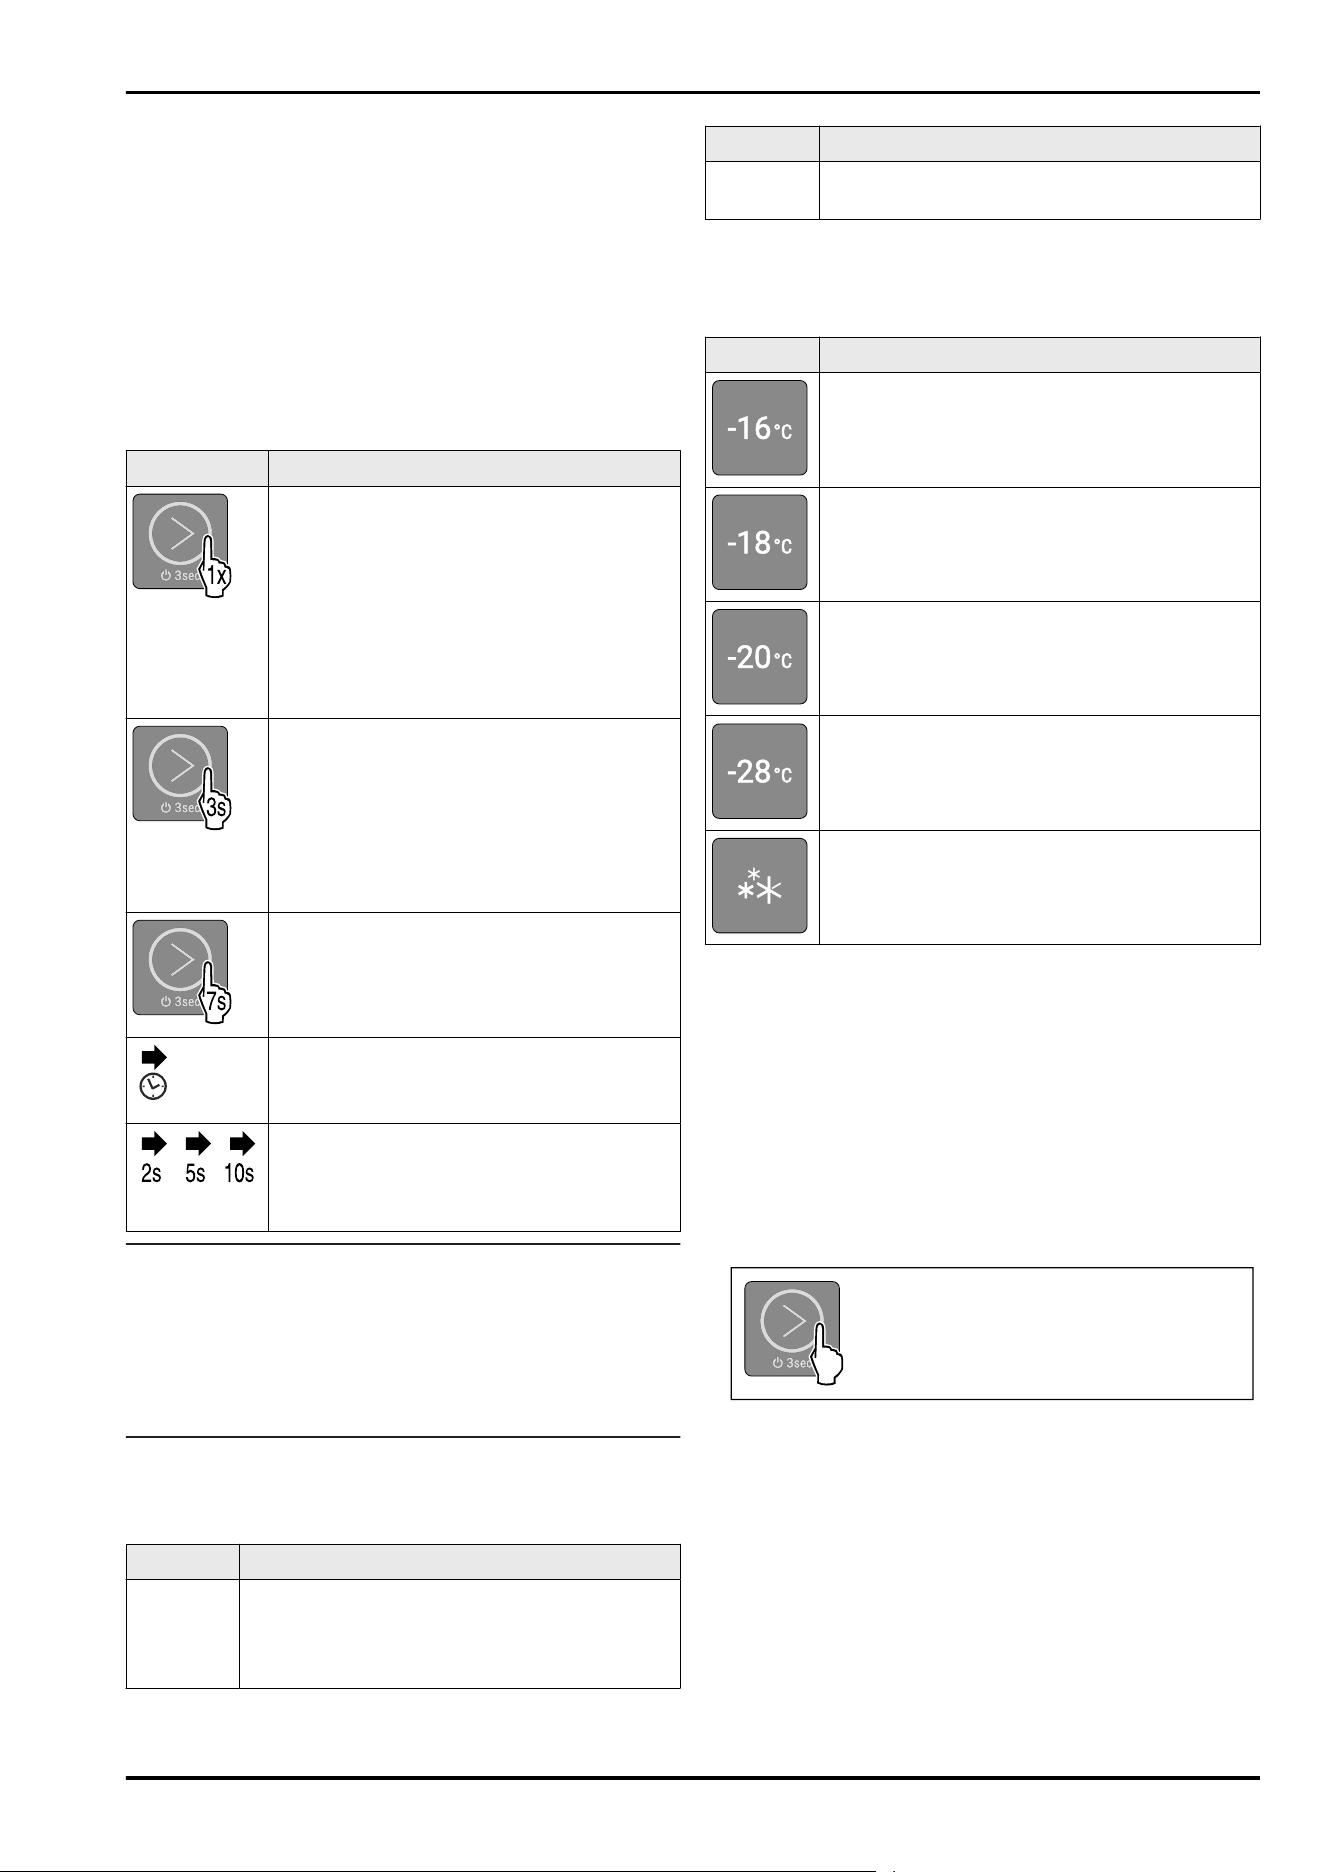
► Do not use an extension cord.
► Do not use a multipoint connector strip.
NOTICE
Danger of damage to incorrect connection!
Damage to the appliance.
► Do not connect the appliance to a stand-alone inverter,
e.g. solar power systems and petrol generators.
► Connect the mains plug of the power cord to the power
supply. Ensure the main plug is firmly plugged into the
outlet.
Setting up and connecting
* Depending on model and options 11
▷ Appliance is connected. For initial commissioning, see
the next chapter or the operating instructions.
4 Functionality of the display
You operate your appliance using the touch button.
4.1 Navigation using touch button and
symbol explanation
In the illustrations, different symbols are used for naviga‐
tion using the touch button. The following table describes
these symbols.
Symbol
Description
Touch the touch button briefly with your
finger:
Navigate through the main menu and
submenu.
If a number is depicted in the hand:
The number tells you how many times you
have to briefly touch the touch button in
succession to navigate to a specific func‐
tion.
Touch the touch button with your finger
for 3seconds:
Switch on appliance.
In the main menu: Switch off appliance.
In the submenu: Switch to the main menu.
Deactivate the active function of the
submenu.
Touch the touch button with your finger
for 7seconds:
In the main menu: Open submenu.
Arrow with clock:
It takes more than 10 seconds for the
following message to appear in the display.
Arrow with a time indication:
It takes the specified amount of time until
the following message appears in the
display.
Note
If you touch the touch button for 15seconds, the service
menu is opened. The service menu can be recognized by the
flashing of LED 5 and the WLAN LED. This menu is espe‐
cially for service technicians.
► Exit the service menu: Touch the touch button for
3 seconds or perform no action on the display for 5
minutes.
4.2 Menus
The appliance functions can be found in various menus.
Menu
Description
Main menu When you switch the appliance on, you are
automatically in the main menu.
From here you can navigate to the appliance
functions and to the submenu.
Menu Description
Submenu The submenu contains additional appliance
functions for setting up your appliance.
4.2.1 Main menu
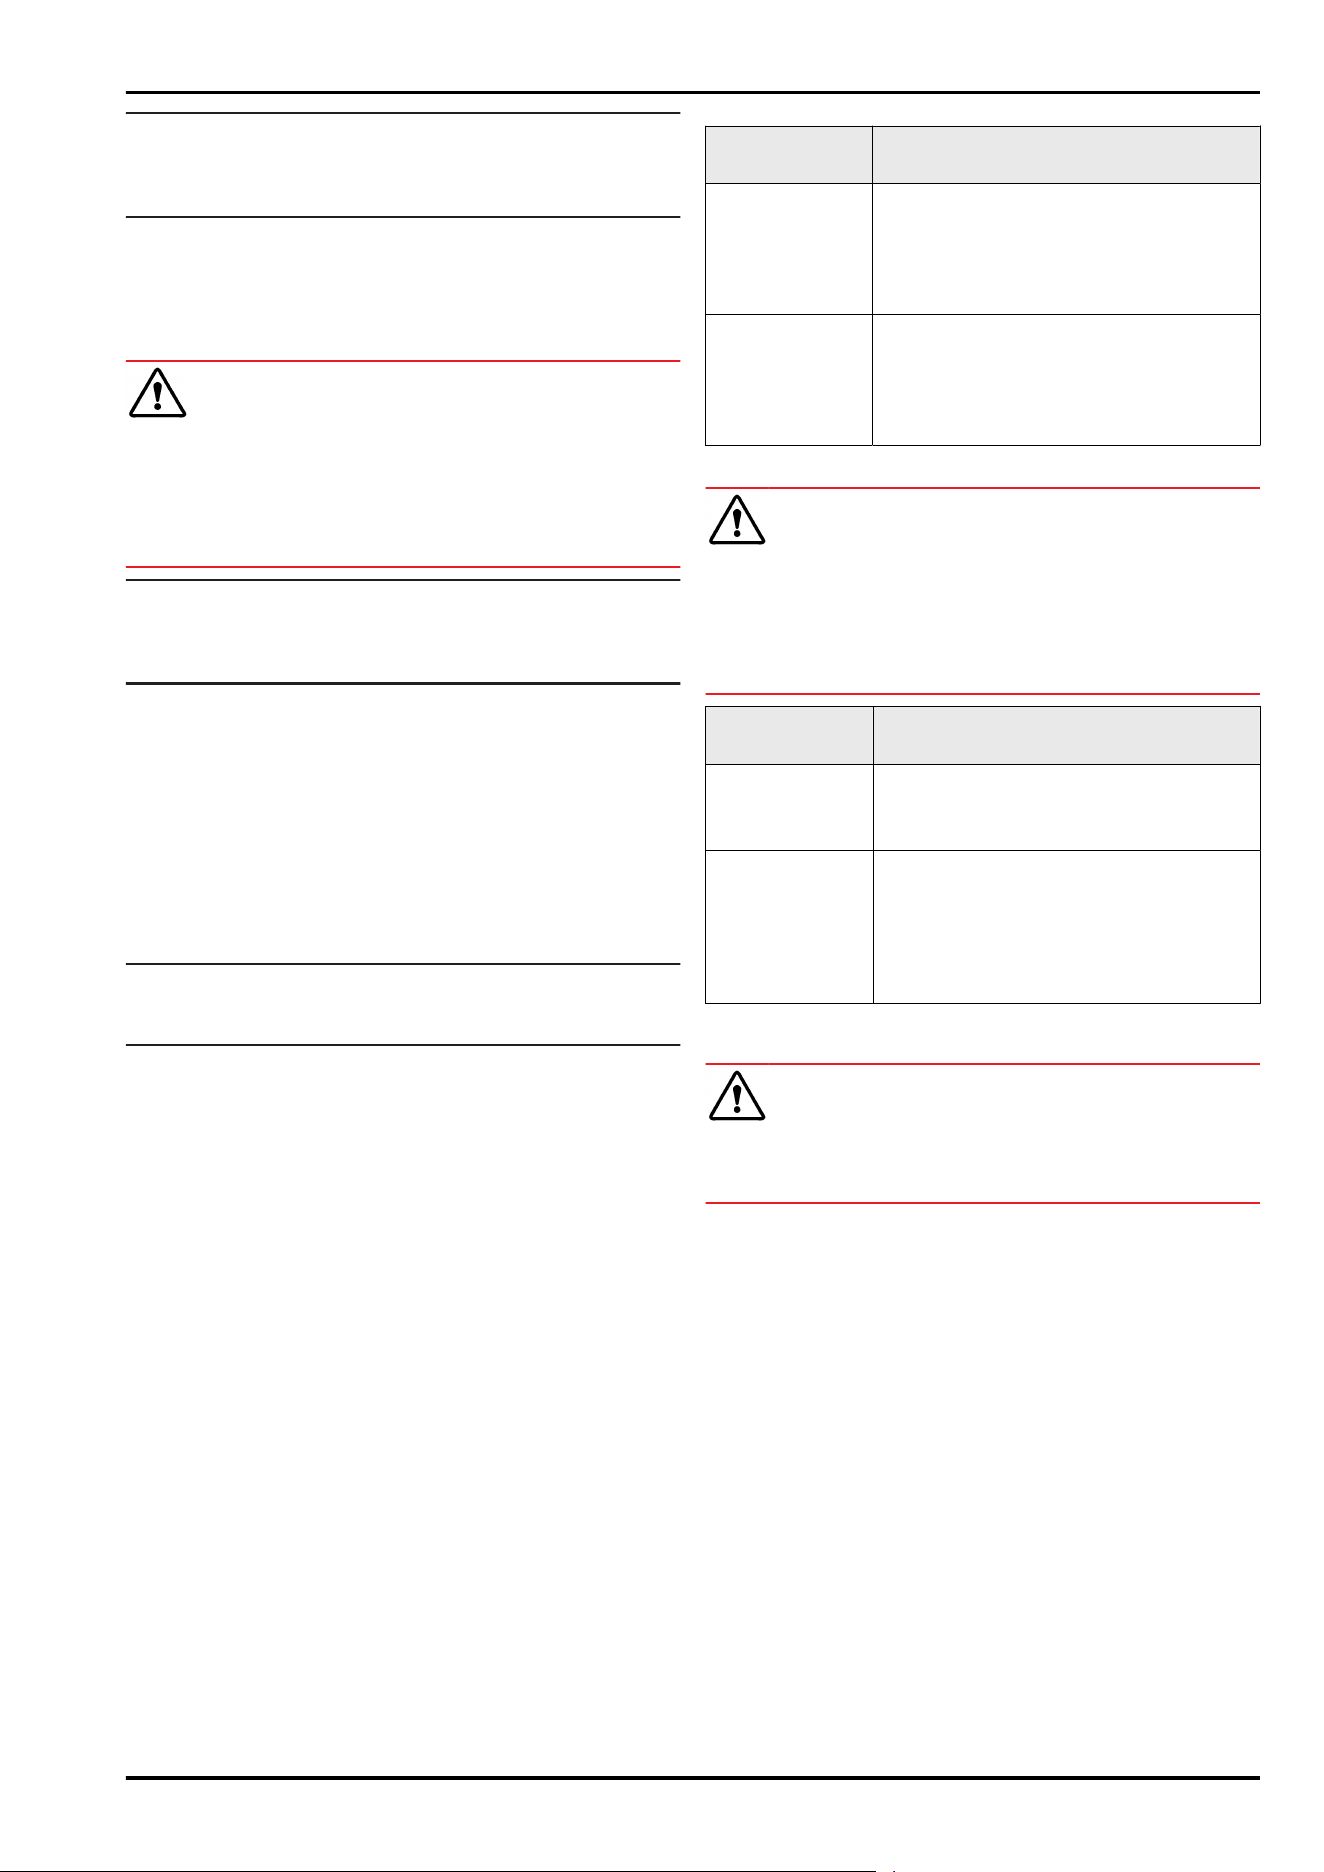
The following functions can be activated/deactivated in the
main menu:
LED Description
Temperature -16°C
Temperature -18°C
Temperature -20°C
Temperature -28°C
SuperFrost
Meaning of the LEDs in the main menu
4.2.1 Opening the main menu
When you switch the appliance on, you are automatically in
the main menu.
If you are in the submenu and want to switch to the main
menu:
► Carry out action steps (see4.2.2Exiting the submenu) .
4.2.1 Navigating in the main menu
If you navigate in the main menu, LED 5 is followed by LED1
again.
Fig.9
► Briefly touch the touch button repeatedly until the LED of
the desired function lights up.
▷ Function is activated.
4.2.1 Sleep mode of thedisplay
If you do not touch the touch button in the main menu for
10 seconds, the display switches to sleep mode. Sleep mode
prevents you from adjusting the temperature by accidentally
touching the touch button.
Ending sleep mode:
Functionality of the display
12 * Depending on model and options
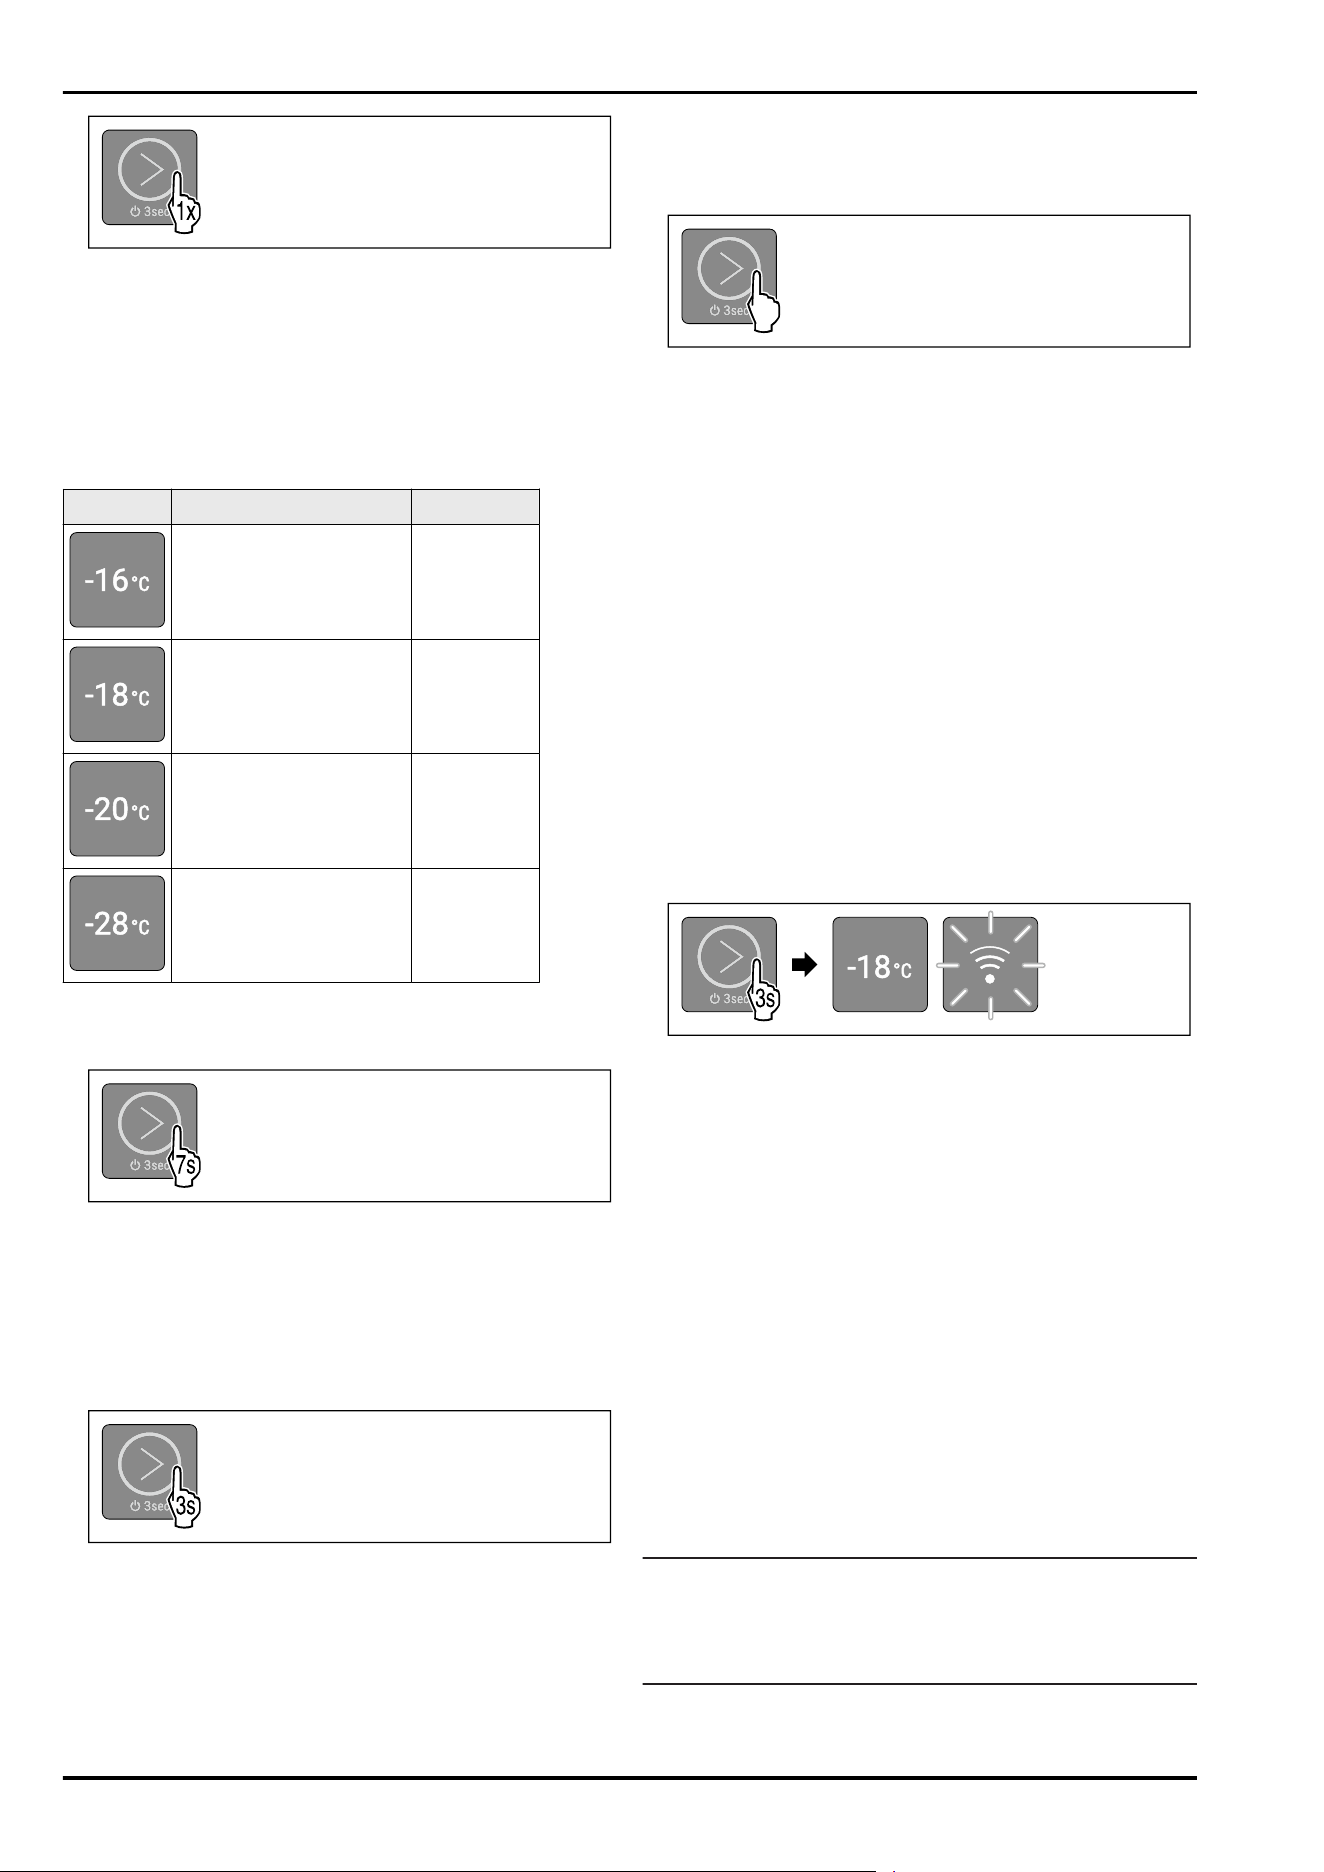
Fig. 10
► Briefly touch the touch button.
▷ Confirmation tone sounds.
▷ Set temperature flashes once.
▷ Sleep mode is ended.
4.2.2 Submenu
The following functions can be activated/deactivated in the
submenu:
LED
Description LED position
Input lock LED 1
SabbathMode LED 2
Reset to factory settings LED 3
Start defrost cycle LED 4
Meaning of the LEDs in the submenu
4.2.2 Opening the submenu
Fig.11
► Carry out action steps according to the illustration until a
double confirmation tone sounds after 7seconds.
▷ LEDs 1-5 light up: You are in the submenu.
▷ If you do not perform any action on the display for
5 seconds, the display jumps back to the main menu.
4.2.2 Exiting the submenu
Fig.12
► Carry out action steps according to the illustration.
-or-
► Do not touch the touch button for 5seconds.
▷ You are in the main menu.
4.2.2 Navigating in the submenu
If you navigate in the submenu, LED 1 is followed by the LED
of the last function in the submenu.
Fig.13
► Briefly touch the touch button repeatedly until the LED of
the desired function lights up.
▷ After 5 seconds without interaction, the selected func‐
tion is automatically activated.
5 Start-up
5.1 Switching on the appliance (first
use)
Make sure that the following requirements are fulfilled:
❑
The appliance has been set up and connected according
to the installation instructions.
❑
All adhesive strips, adhesive and protective films and
transport locks are removed from inside and on the appli‐
ance.
❑
All marketing leaflets are removed from the drawers.
❑
You are familiar with the functionality of the display.
(see4 Functionality of the display)
Switch on the appliance:
Fig. 14
► Touch the touch button according to the illustration for
3 seconds until the confirmation tone sounds.
▷ Appliance is switched on.
▷ Interior lighting is activated.
▷ LED 2 light ups: Temperature is set to -18°C at the
factory.
▷ The appliance cools to the target temperature set at the
factory.
▷ WLAN LED is flashing: WLAN access point is open for
15 minutes. (see Establishing the WLAN connection)
Appliance starts in demo mode:
If the appliance starts in demo mode:
► Deactivate demo mode. (see Deactivating demo mode)
Display switches to sleep mode:
If the display switches to sleep mode:
► Briefly touch the touch button. (see4.2.1 Sleep mode of
thedisplay)
More information:
-
Start the SmartDevice for the first time. (see 2.3 Smart‐
Device) and (seeWLAN)
Note
The manufacturer recommends:
► Store frozen foods at -18°C or colder.
► Observe the notes on storing food. (see6.1 Information
regarding storage)
Start-up
* Depending on model and options 13
Note
Accessories can be purchased from the Liebherr-Hausg‐
eräte store at home.liebherr.com/shop/de/deu/
zubehor.html.
6 Storage
6.1 Information regarding storage
WARNING
Risk of fire from electrical appliances!
If you use electrical devices in the food area of your appli‐
ance, they may case a fire.
► Do not use electrical devices in the food area of the
appliance if they have not been recommended by the
manufacturer.
Note
Insufficient ventilation results in an increase in energy
consumption and reduction of the refrigerating performance
► Always keep the air slots unobstructed.
Observe the following specifications for storage:
-
Package food properly.
-
Package raw meat or fish in clean, closed containers.
This will prevent meat or fish from touching or dripping
onto other food.
-
Leave space between goods to ensure good air circula‐
tion.
-
Store food according to the instructions on the pack‐
aging.
-
Always observe the best-before date indicated on the
packaging.
Note
Failure to follow these guidelines can lead to foodstuffs
spoiling.
6.2 Freezer compartment
Here, a dry, frosty storage climate is created at -18°C. The
frosty storage climate is suitable for storing frozen food for
several months, for making ice cubes or freezing fresh food.
6.2.1 Freezing food
Freezing quantity
The maximum amount of fresh food that you can freeze
within 24 hours is specified on the type plate
(see 11.5 Rating plate) under “Freezing capacity ... kg/24h.”
To ensure that food quickly freezes through, adhere to the
following quantities per package:
-
Fruit and vegetables up to 1 kg
-
Meat up to 2.5 kg
Freezing food using SuperFrost
Depending on the amount of food to be frozen, you can acti‐
vate SuperFrost before freezing to reach lower freezing
temperatures. (see SuperFrost)
► Activate SuperFrost if the amount of food you have to
freeze is more than approx. 2 kg.
The time at which you activate SuperFrost depends on the
amount of food you have to freeze:
Freezing quan‐
tity
Time at which you should activate
SuperFrost
Small amount of
food to freeze
Activate SuperFrost about 6 hours
before freezing.
As soon as the appliance automatically
deactivates SuperFrost you can begin
rearranging your food items.
Maximum
amount of food
to freeze
Activate SuperFrost about 24 hours
before freezing.
As soon as the appliance automatically
deactivates SuperFrost you can begin
rearranging your food items.
Arranging your food properly
CAUTION
Risk of injury from broken glass!
Bottles and cans with beverages can burst during freezing.
This applies in particular to carbonated beverages.
► Only freeze bottles and cans with beverages if you have
activated the BottleTimer function in the SmartDevice
app.
Freezing quan‐
tity
Arranging your food properly
Small amount of
food to freeze
Place packaged food in the top drawer.
If possible, place groceries at the back
of the drawer near the rear wall.
Maximum
amount of food
to freeze
Distribute packaged groceries
throughout all drawers, but only store
food that is already deep frozen in the
bottom drawer.
If possible, place groceries at the back
of the drawer near the rear wall.
6.2.2 Defrosting food
WARNING
Danger of food poisoning!
► Do not re-freeze defrosted food.
► Use defrosted foodstuff as quickly as possible.
You can defrost food in several ways:
-
In a refrigeration unit
-
In the microwave
-
In the oven/fan-assisted oven
-
At room temperature
► Take out only as much food as necessary.
6.2.3 Freezer tray
You can freeze berries, herbs, vegetables and other small
frozen food in the freezer tray without it all freezing
together. The frozen food is less likely to get squashed and
subsequent portioning is easier.
► Distribute food on the freezer tray without packaging and
well spaced out.
6.3 Storage times
The storage times given are guidelines
Food with a “use by” date must still be consumed by the
date indicated on the package
Storage
14 * Depending on model and options
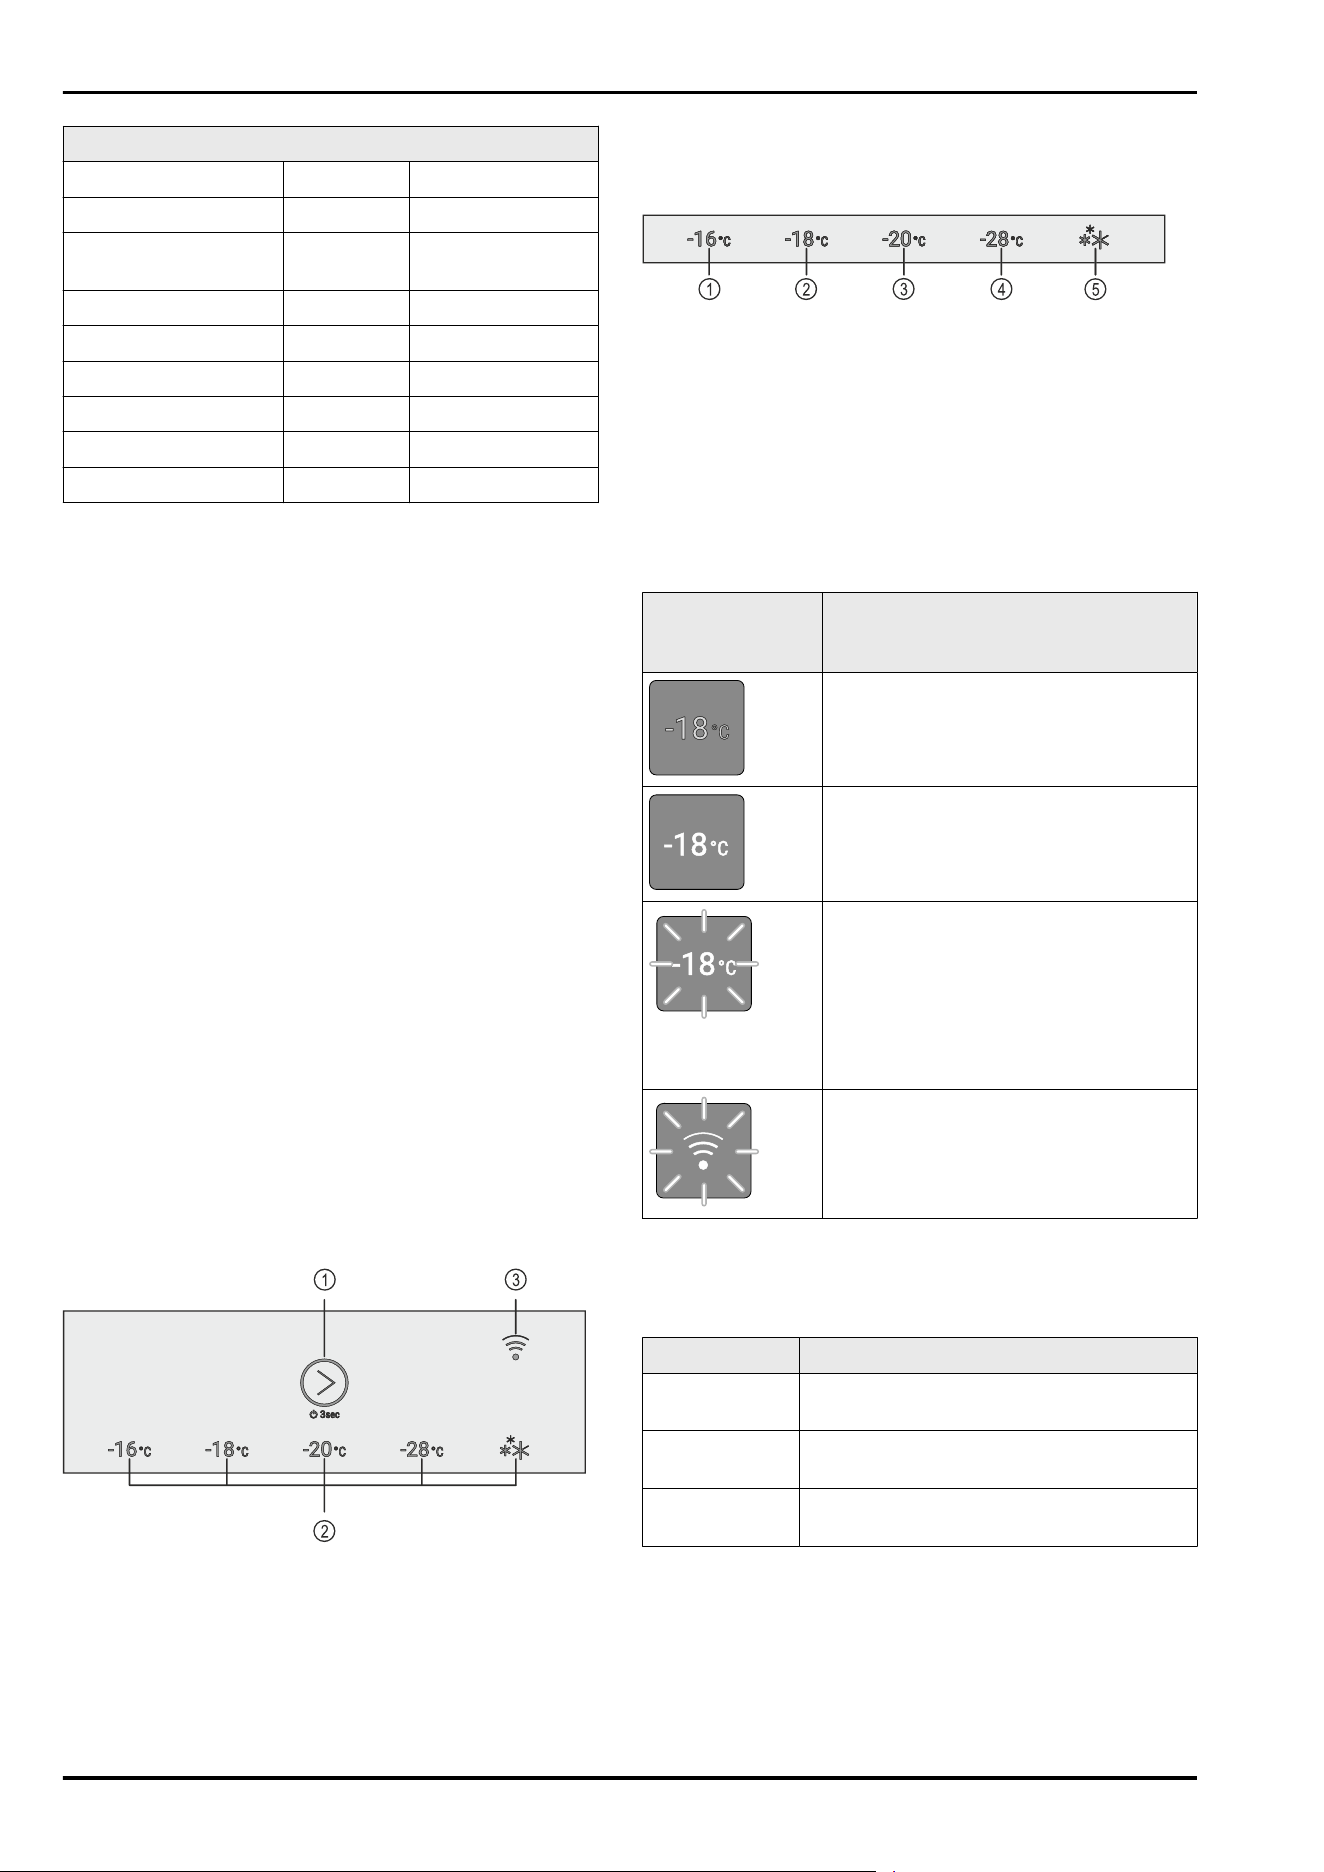
Guidelines for storage periods for various foods
Ice cream at -18°C 2 to 6 months
Sausage, ham at -18°C 2 to 3 months
Bread, bakery prod‐
ucts
at -18°C 2 to 6 months
Game, pork at -18°C 6 to 9 months
Fish, fatty at -18°C 2 to 6 months
Fish, lean at -18°C 6 to 8 months
Cheese at -18°C 2 to 6 months
Poultry, beef at -18°C 6 to 12 months
Vegetables, fruit at -18°C 6 to 12 months
7 Energy saving
-
Always ensure good ventilation. Do not obstruct ventila‐
tion openings or grilles.
-
Never block air slits in the fan.
-
Do no set up the appliance in an area with direct sunlight,
next to a heating unit or similar.
-
If you set up the appliance directly next to an oven, its
energy consumption may increase slightly. This depends
on the service life and how often the oven is used.
-
Energy consumption depends on installation conditions
such as the ambient temperature . A warmer ambient
temperature can increase the energy consumption.
-
Avoid opening the appliance door for any longer then
necessary
-
The lower the temperature is set the higher the energy
consumption.
-
All food stored in the appliance should be well wrapped
and covered. This prevents frost buildup.
-
Insertion of warm foods: first let the food cool down to
room temperature.
8 Use
8.1 Operating and display elements
The display enables a quick overview of the current appli‐
ance status, the temperature setting, the status of func‐
tions and messages.
You operate your appliance using the touch button.
Fig. 15 Example illustration: Display
(1)
Touch button (oper‐
ating element)
(3) WLAN LED
(2) Temperature display/
status display
8.1.1 Temperature display/status display
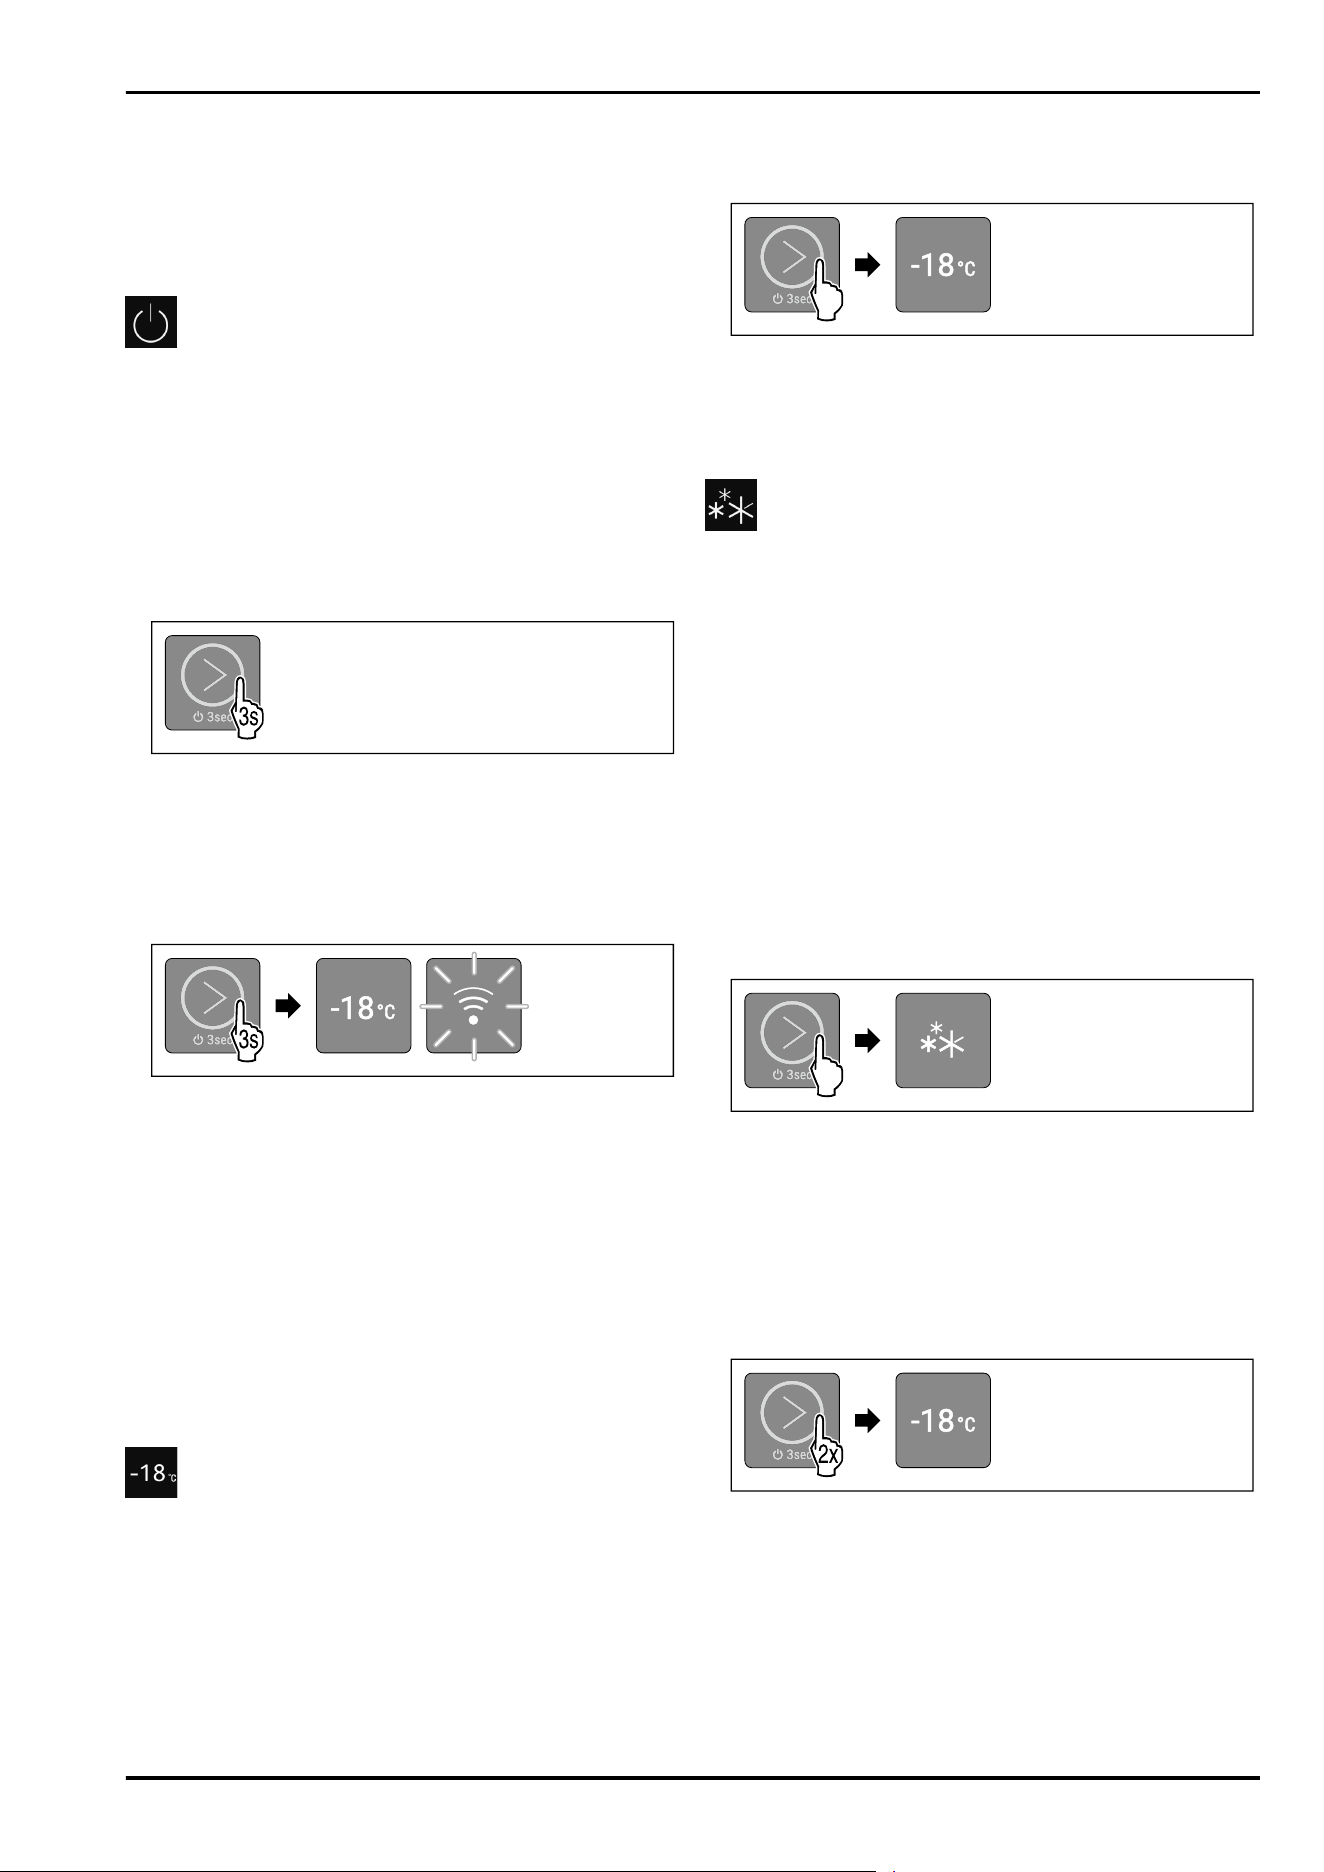
The temperature display/status display consists of five
LEDs:
Fig. 16 Example illustration
(1) LED1 (4) LED4
(2) LED2 (5) LED5
(3) LED3
The LEDs indicate temperature settings in the main menu
(see4.2.1Main menu) and functions in the submenu
(see4.2.2Submenu) .
8.1.2 LED behavior
The appliance status can be recognized by the lighting or
flashing of the LEDs:
LED behavior
(example illustra‐
tion)
Description
LED does not light up:
LED is not selected. Function is not
active.
LED light ups:
LED is selected or function is active.
LED for the temperature display/
status display flashes:
LED flashes after a power failure or
temperature alarm until the set
temperature is reached.
Multiple LEDs flash simultaneously:
Error has occurred. (see 8.3Messages)
WLAN LED flashes:
WLAN access point is open or WLAN
connection is being established.
LED behavior
8.1.3 Acoustic signals
An acoustic signal sounds in the following cases:
Acoustic signal
Description
Confirmation
tone
Sounds when you touch the touch
button.
Alarm tone Sounds when an error occurs.
(see 8.3Messages)
Error tone Sounds when you touch the touch button,
but the interaction is not possible.
8.2 Appliance functions
8.2.1 Notes on the appliance functions
The appliance functions are set at the factory so that your
appliance is fully functional.
Energy saving
* Depending on model and options 15
Before you alter, activate or deactivate the appliance func‐
tions, make sure that the following requirements are met:
❑
You have read and understood the descriptions of how
the display works. (see4 Functionality of the display)
❑
You have familiarized yourself with the operating and
display elements of your appliance. (see8.1 Operating
and display elements)
Switching appliance off and on
This function switches the entire appliance on and off.
Switching off the appliance
If you switch off the appliance, the settings that were made
before remain stored.
Make sure that the following requirements are fulfilled:
❑
Handling instructions (see12Decommissioning) have
been completed.
❑
You are in the main menu. (see4.2.2Exiting the
submenu)
Fig.17
► Carry out action steps according to the illustration until a
confirmation tone sounds.
▷ LEDs of the display no longer light up.
▷ Interior lighting is deactivated.
▷ Appliance is switched off.
Switching on the appliance
Fig. 18 Example illustration: For appliances with installed/
inserted SmartModule
► Carry out action steps according to the illustration until a
confirmation tone sounds.
▷ Appliance is switched on.
▷ Interior lighting is activated.
▷ During the first use: The appliance cools to the target
temperature set at the factory.
▷ If the appliance was previously in operation: The appli‐
ance cools to the target temperature set earlier.
▷ During the first use or if appliance was not previously
connected to the WLAN: WLAN access point is open for
30 minutes. (see Establishing the WLAN connection)
▷ If the appliance has already been connected to the
WLAN: Appliance connects to the WLAN automatically.
Temperature
Use this function to set the temperature.
The temperature depends on the following factors:
-
How often the door is opened
-
How long the door is open
-
The room temperature of the installation site
-
Type, temperature and amount of food
Recommended setting: -18°C
Setting the temperature
The function is located in the main menu at the positions of
LEDs 1-4.
Fig. 22 Example illustration
► Briefly touch the touch button according to the illustra‐
tion repeatedly until the desired temperature lights up.
▷ Temperature is set.
▷ The appliance cools to the set target temperature.
SuperFrost
This function activates or deactivates SuperFrost. Activating
SuperFrost the appliance increases the freezing capacity.
This allows you to achieve lower freezer temperatures.
Application:
-
Quickly freezing fresh food through to the core.
This ensures that the nutrition value, look, and taste of
the food is preserved.
-
Increasing cold reserves in stored frozen food before
defrosting the appliance.
Activating SuperFrost
The function is located in the main menu at the position of
LED 5.
Make sure that the following requirements are fulfilled:
❑
The freezing volume and time for SuperFrost activation
are taken into account. (see Freezing food using
SuperFrost)
Fig. 24
► Briefly touch the touch button according to the illustra‐
tion repeatedly until LED 5 lights up.
▷ LED 5 light ups: SuperFrost is activated.
▷ The appliance cools to the target temperature.
Deactivating SuperFrost
SuperFrost is automatically deactivated after 56 to 72 hours.
However, you can also manually deactivate SuperFrost at
any time by setting a temperature:
Fig. 25 Example illustration
► Briefly touch the touch button according to the illustra‐
tion repeatedly until the desired temperature lights up.
▷ Temperature is set and SuperFrost is deactivated.
▷ Appliance continues to run in normal operation.
▷ The appliance cools to the set target temperature.
Use
16 * Depending on model and options
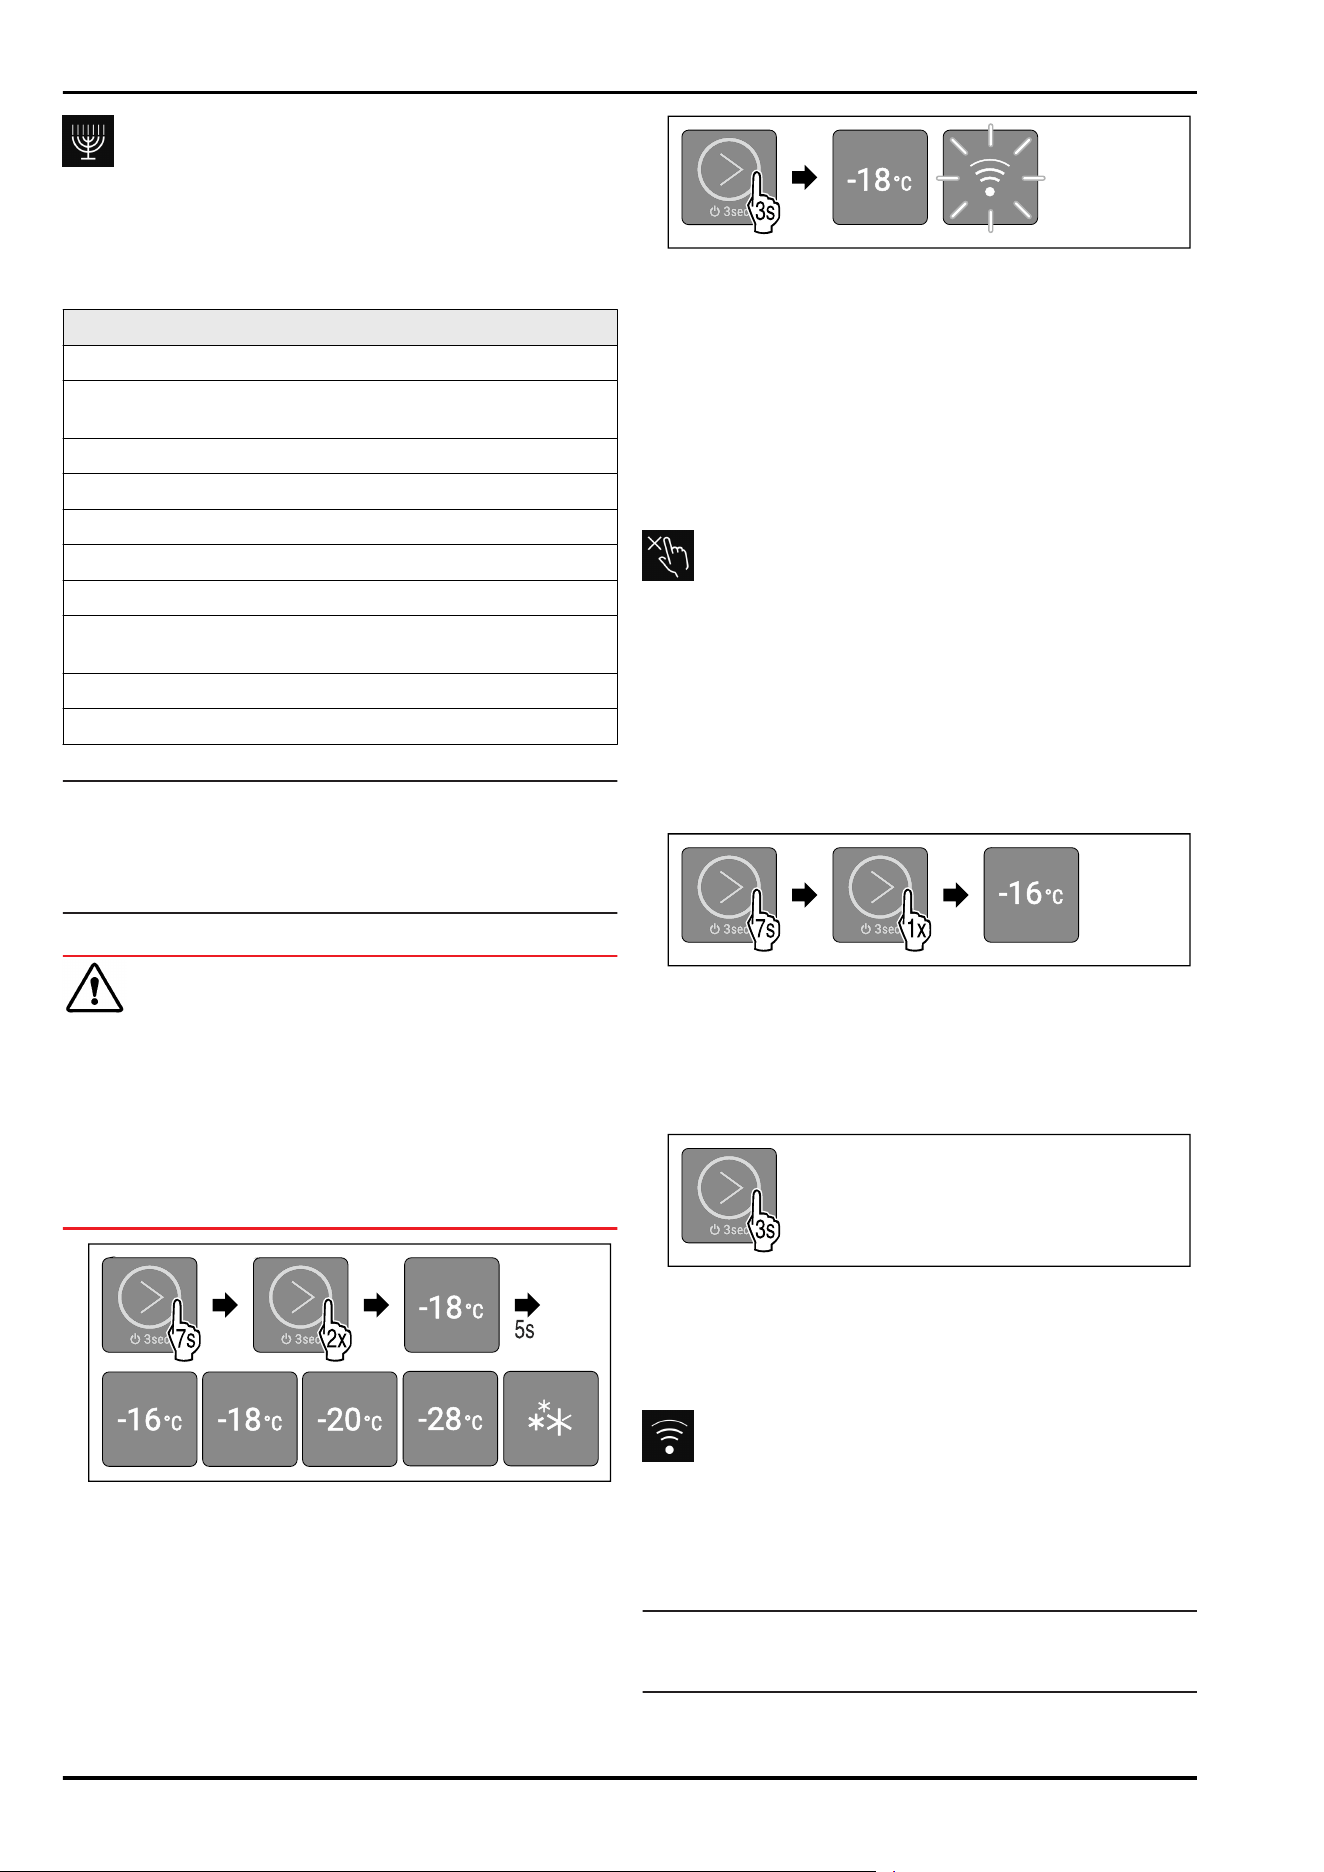
SabbathMode
This function activates and deactivates the SabbathMode. If
you activate this function, some electronic functions are
switched off. Your appliance thereby meets the religious
requirements of Jewish holidays such as the Sabbath and
complies with STAR-K Kosher certification.
Appliance status with active SabbathMode
LEDs 1-5 light up.
All functions in the display except the Deactivating
SabbathMode function are disabled.
Active functions remain active.
The interior lighting is deactivated.
Messages are not displayed.
There is no door alarm.
There is no temperature alarm.
The defrost cycle operates only for the specified time
without taking into account the appliance usage.
After a power failure, the device returns to SabbathMode.
The WLAN connection is disconnected.
Appliance status
Note
This appliance has certification from the “Institute for
Science and Halacha”. (www.machonhalacha.co.il)
You can find a list of STAR-K-certified appliances at
www.star-k.org/appliances.
Activating SabbathMode
WARNING
Danger of poisoning from spoiled food!
If you have SabbathMode activated and a power failure
occurs, no message appears in the status display about the
power failure. Once the power is restored, the appliance
continues to operate in SabbathMode. The power failure
may mean that food spoils and the consumption of this food
could lead to food poisoning.
After a power failure:
► Do not consume food that has been frozen and thawed.
Fig. 26
► Carry out action steps according to the illustration.
▷ LED 2 light ups.
▷ After 5 seconds without interaction, SabbathMode is
activated. LEDs 1-5 light up.
Deactivating SabbathMode
SabbathMode is automatically deactivated after 80 hours.
However, you can also manually deactivate SabbathMode at
any time:
Fig. 27 Example illustration depending on the previously
set temperature
► Carry out action steps according to the illustration until a
confirmation tone sounds.
▷ SabbathMode is deactivated.
▷ Interior lighting is activated.
▷ Appliance continues to run in normal operation. LED of
the previously set temperature lights up.
▷ If the appliance has already been connected to the
WLAN: Appliance connects to the WLAN automatically.
▷ You are in the main menu.
Input lock
This function activates and deactivates the input lock. The
input lock prevents the appliance from being operated acci‐
dentally, e. g. by children.
Application:
-
Prevent unintentional changes of functions.
-
Prevent switching off of the appliance.
-
Prevent unintentional temperature setting.
Activating the input lock
Fig.28
► Carry out action steps according to the illustration.
▷ LED 1 light ups.
▷ After 5 seconds without interaction, the input lock is acti‐
vated.
Deactivating the input lock
Fig.29
► Carry out action steps according to the illustration until a
confirmation tone sounds.
▷ Input lock is deactivated.
▷ You are in the main menu.
WLAN
Use this function to connect your appliance to WLAN. You
can then operate it via the SmartDeviceapp on a mobile
device. You can also use this function to disconnect or reset
the WLAN connection.
More information on the SmartDevice: (see 2.3 SmartDevice)
Note
The SmartDevice function is not available in the following
countries: Russia, Belarus, Kazakhstan.
Use
* Depending on model and options 17
Establishing the WLAN connection
In order to connect the appliance to the WLAN, the WLAN
access point of the appliance must be open. When you use
the appliance for the first time, open the WLAN access point
by switching on the appliance. If the appliance was already
in operation without a WLAN connection, open the WLAN
access point by switching the appliance off and on again.
Make sure that the following requirements are fulfilled:
❑
SmartDevice app is installed (see
apps.home.liebherr.com).
❑
Registration in the SmartDevice app is complete.
Switching on the appliance (first use):
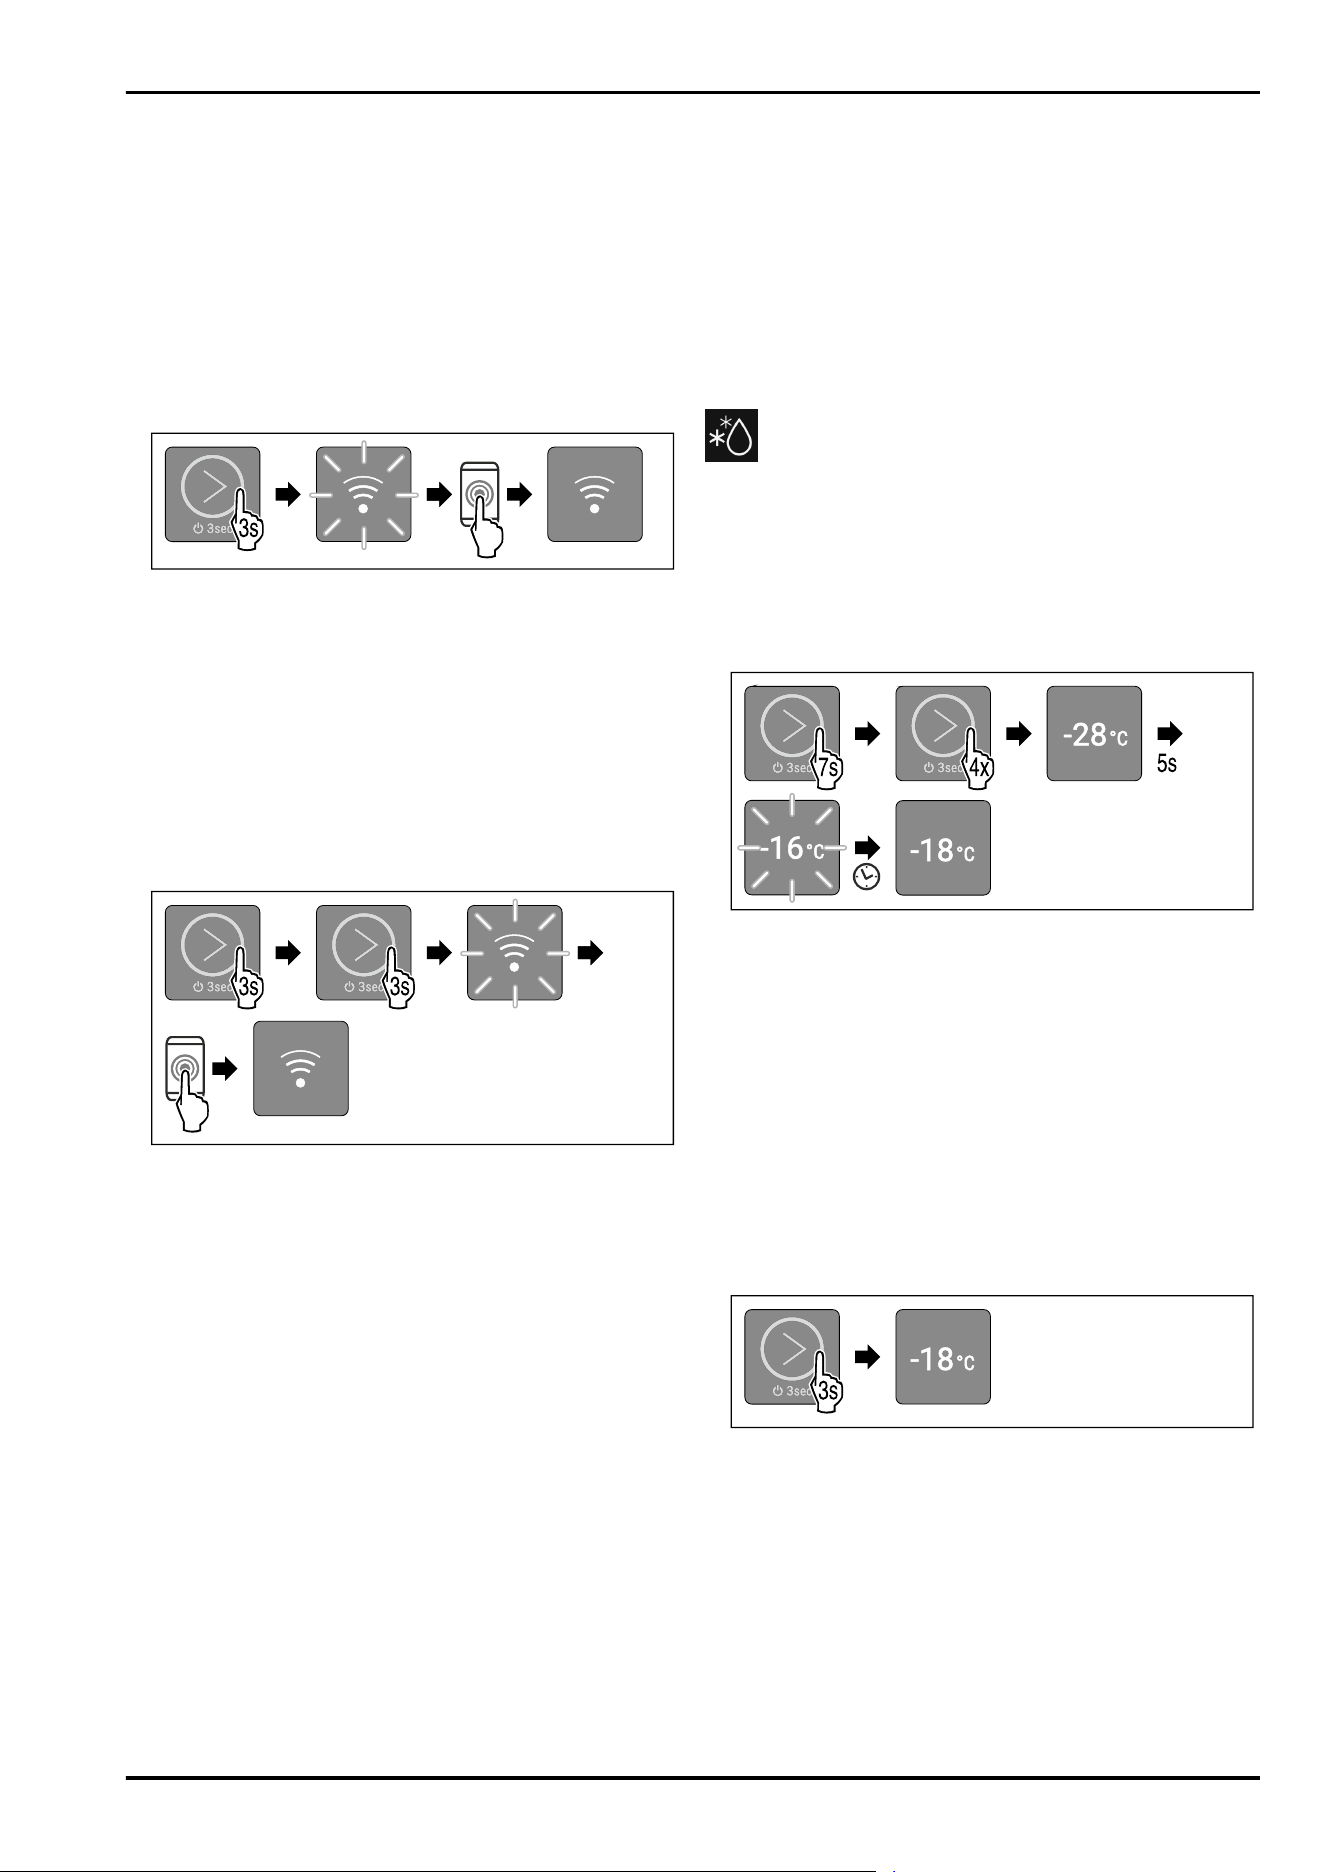
Fig.30
► Switch on the appliance: Touch the touch button
according to the illustration for 3 seconds until the
confirmation tone sounds.
▷ Appliance is switched on.
▷ WLAN LED flashes: WLAN access point is open for
30 minutes.
► Connect the appliance to the WLAN via the SmartDevice
app.
▷ If the appliance is connected to the WLAN: WLAN LED
lights up continuously.
Switch the appliance off and on again (appliance is already
in operation):
Fig.31
► Switch off the appliance in the main menu: Touch the
touch button according to the illustration for 3seconds
until the confirmation tone sounds.
▷ Appliance is switched off.
► Switch the appliance on again: Touch the touch button
according to the illustration for 3 seconds until the
confirmation tone sounds.
▷ Appliance is switched on.
▷ WLAN LED flashes: WLAN access point is open for
30 minutes.
► Connect the appliance to the WLAN via the SmartDevice
app.
▷ If the appliance is connected to the WLAN: WLAN LED
lights up continuously.
Disconnecting the WLAN connection
To disconnect the WLAN connection, the entire appliance
must be reset to factory settings.
► Carry out action steps. (see Resetting to factory
settings)
▷ Appliance is reset.
▷ WLAN LED flashes: WLAN access point is open for
30 minutes.
▷ The WLAN connection is deactivated after 30 minutes.
Resetting the WLAN connection
To reset the WLAN connection, the entire appliance must be
reset to factory settings.
► Carry out action steps. (see Resetting to factory
settings)
▷ Appliance is reset.
▷ WLAN LED flashes: WLAN access point is open for
30 minutes.
► Connect the appliance to the WLAN again. (see Estab‐
lishing the WLAN connection)
-or-
► Use the appliance without a WLAN connection.
Start defrost cycle
Use this function to start the automatic defrost cycle
manually if the defrost cycle does not start automatically in
case of an error.
Starting the defrost cycle
When the defrost cycle is started, all functions except the
Canceling the defrost cycle function are disabled during
the defrosting.
Fig. 32 Example illustration depending on the previously
set temperature
► Carry out action steps according to the illustration.
▷ LED 4 light ups.
▷ After 5 seconds without interaction, the defrost cycle
starts. LED 1 flashes until the defrost cycle is automati‐
cally completed.
▷ When the defrost cycle is completed: Appliance
continues to run in normal operation. LED of the previ‐
ously set temperature lights up.
▷ You are in the main menu.
Canceling the defrost cycle
The defrost cycle is automatically completed. However, you
can also cancel the defrost cycle at any time during the
defrosting:
Fig. 33 Example illustration depending on the previously
set temperature
► Carry out action steps according to the illustration until a
confirmation tone sounds.
▷ Defrost cycle is canceled.
▷ Appliance continues to run in normal operation. LED of
the previously set temperature lights up.
▷ You are in the main menu.
Use
18 * Depending on model and options
Demo mode
Demo mode is a special feature for dealers who want to
demonstrate appliance features. If you activate demo mode,
all refrigeration functions are deactivated and you cannot
open the submenu.
If you activate and then deactivate demo mode, the appli‐
ance will be reset to factory settings. (see Resetting to
factory settings)
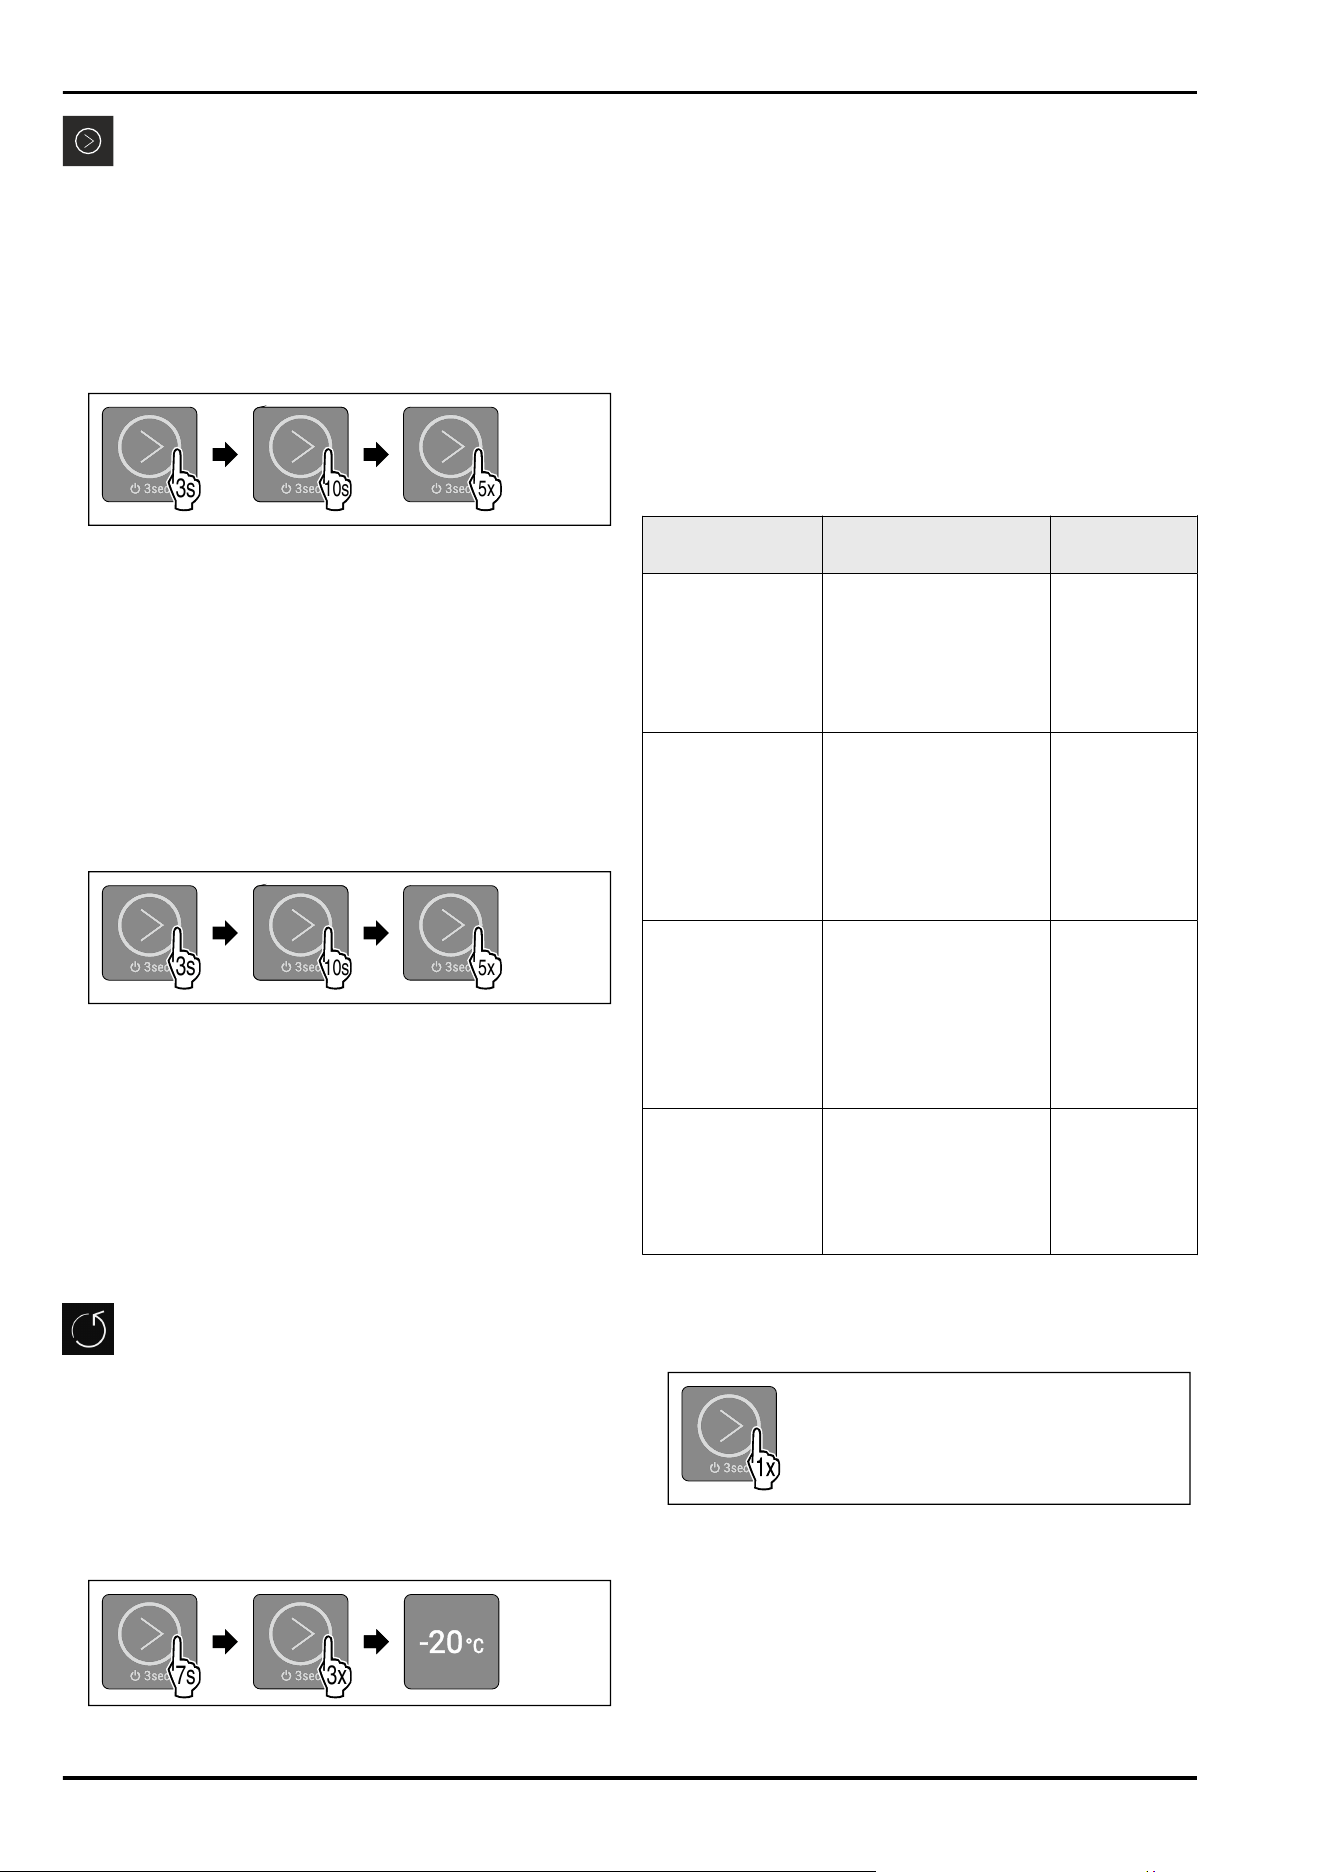
Activating demo mode
4x
3s
10s 5x
Fig.34
► Touch the touch button according to the illustration for
3 seconds until the confirmation tone sounds.
▷ Appliance is switched off.
► Touch the touch button according to the illustration for
10 seconds until the confirmation tone sounds after
10seconds.
► Briefly touch the touch button five times.
▷ All temperature LEDs briefly light up twice: Demo mode is
activated.
▷ Appliance is switched off.
► Switch on appliance. (see Switching on the appliance)
▷ Appliance is in demo mode.
Deactivating demo mode
4x
3s
10s 5x
Fig.35
► Touch the touch button according to the illustration for
3 seconds until the confirmation tone sounds.
▷ Appliance is switched off.
► Touch the touch button according to the illustration for
10 seconds until the confirmation tone sounds after
10seconds.
► Briefly touch the touch button five times.
▷ All temperature LEDs light up four times: Demo mode is
deactivated.
▷ Appliance is switched off.
► Switch on appliance. (see Switching on the appliance)
Resetting to factory settings
Use this function to reset all settings to factory settings. All
settings you have made so far (such as login data) are reset
to their original settings.
Application:
-
Resetting the appliance
-
Resetting the WLAN connection
Performing a reset
3x
7s
Fig. 36 Example illustration
►
Carry out action steps according to the illustration.
▷ LED 3 light ups.
▷ After 5 seconds without interaction, the appliance is
reset.
▷ Appliance is switched off.
► Switch on the appliance. (see 5.1 Switching on the appli‐
ance (first use))
▷ You can reset login data.
8.3 Messages
Messages are indicated acoustically by an alarm tone and
visually by a flashing of the LEDs in the display. Different
LEDs flash depending on the type of message.
You can end the following messages yourself. For all other
messages, you must contact Customer service.
(see11.4 Customer Service)
Message
Cause Ending the
message
Alarm sounds in
increasing
volume.
Interior lighting
pulses.
Door alarm
The message appears
if the door is open for
more than 60seconds.
Carry out
action steps
(seeDoor
alarm) .
LEDs 1-5 flash.
Alarm tone
sounds.
Interior lighting
pulses.
Power failure
alarm
The message appears
when a power failure
has occurred and the
freezer temperature
has changed.
Carry out
action steps
(see Power
failure alarm) .
LEDs 1-5 flash.
Alarm tone
sounds.
Interior lighting
pulses.
Temperature
alarm
The message appears
if the temperature
does not correspond to
the set temperature.
Carry out
action steps
(see Tempera‐
ture alarm) .
LED2, LED4 and
WLAN LED flash.
WLAN error
The message appears
if the appliance could
not be connected to
the WLAN or if the
WLAN connection is
interrupted.
Carry out
action steps
(seeWLAN
error) .
Overview of messages
8.3.1 Ending messages
Door alarm
Fig.37
► End alarm: Carry out action steps according to the
illustration.
-or-
► Close the door.
▷ Alarm is ended.
▷ If you do not close the door: Message will appear again
after 3 minutes.
Use
* Depending on model and options 19
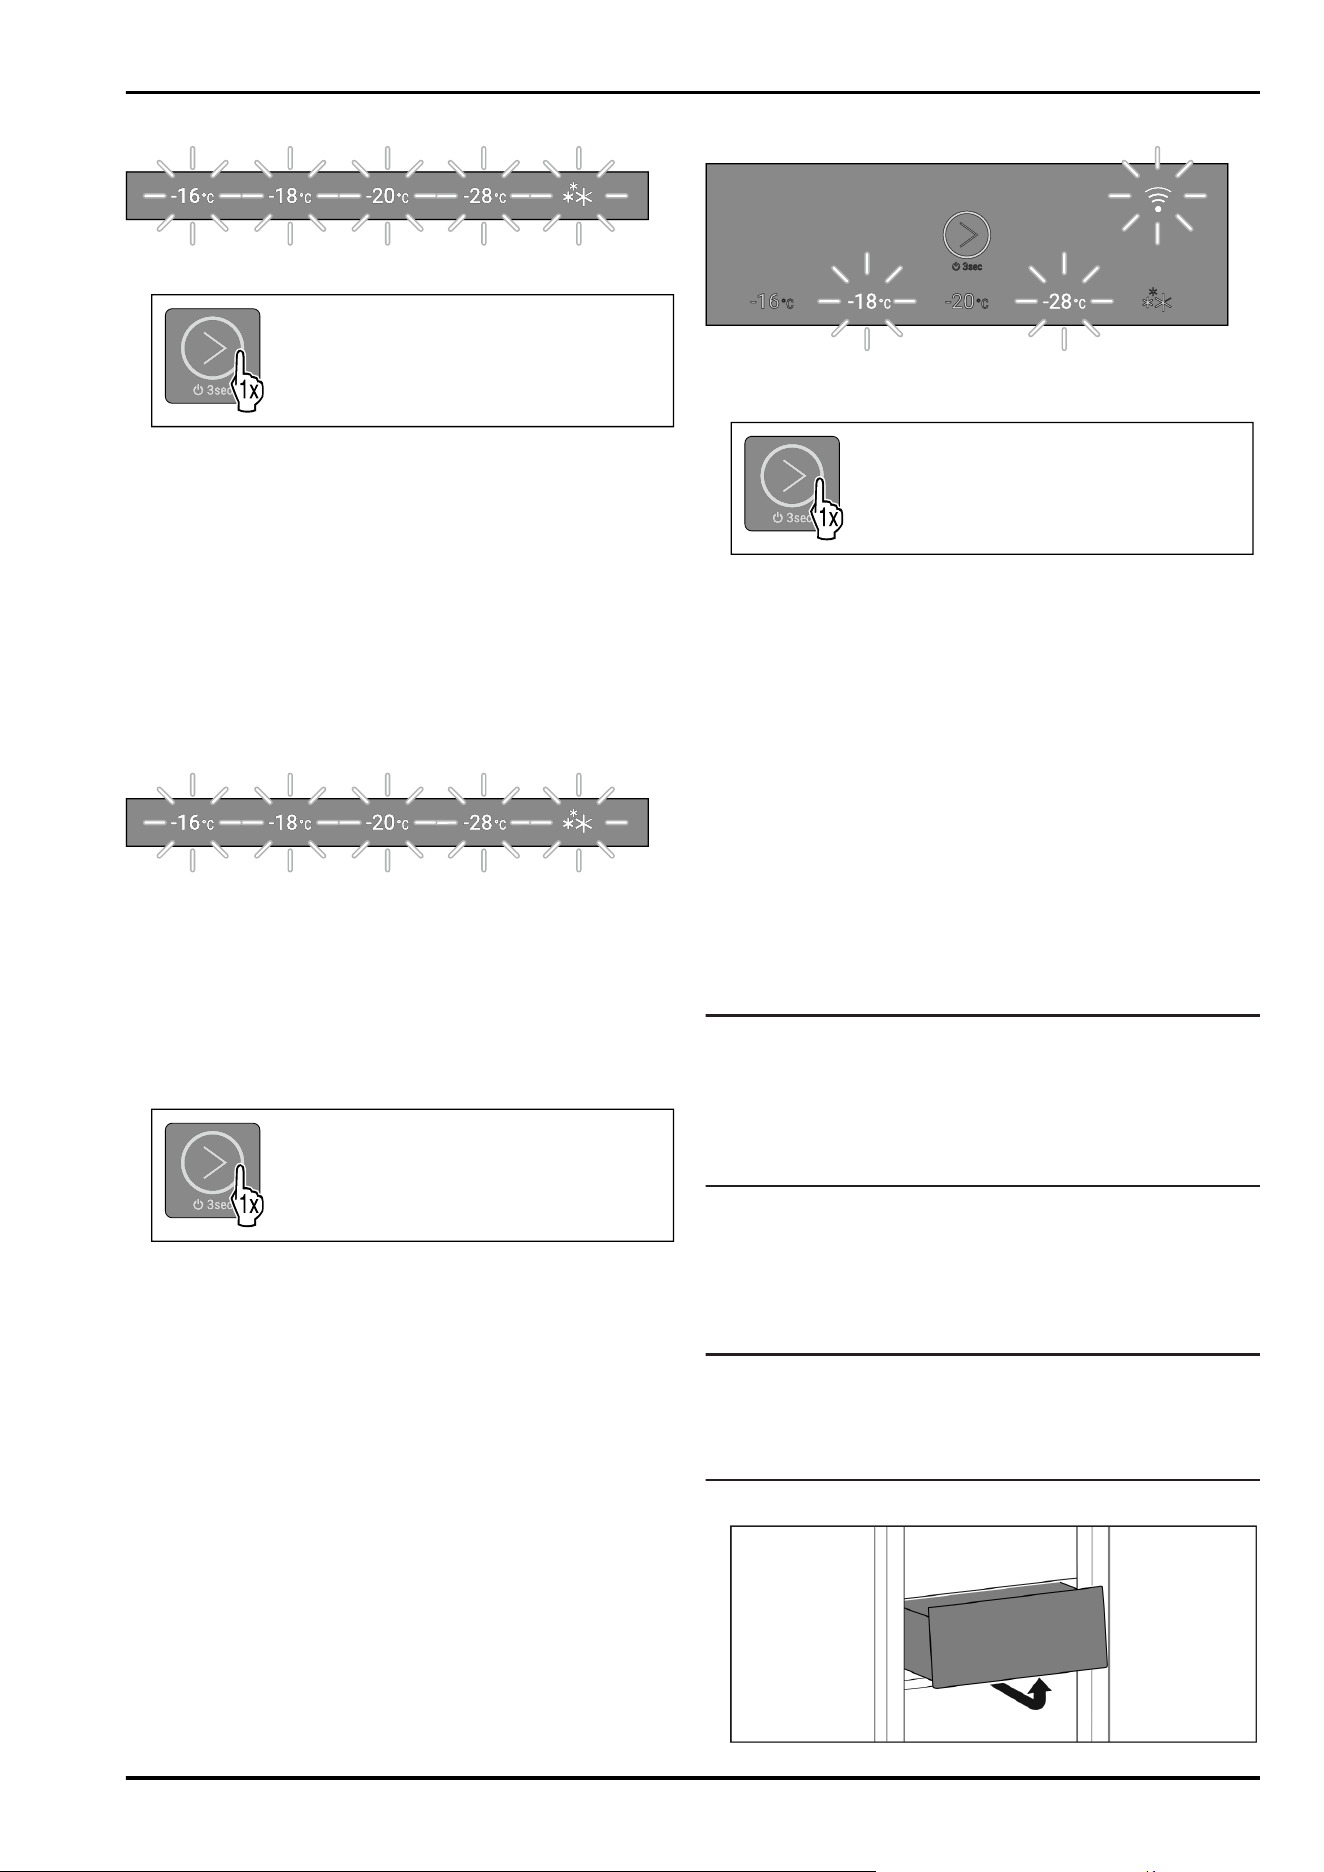
Power failure alarm
Fig. 38 Display in the event of a power failure
Fig. 39
► End alarm: Carry out action steps according to the
illustration.
▷ Appliance continues to run in normal operation.
▷ LED of the previously set temperature flashes until
temperature is reached.
▷ LED flashes once per second: Freezer temperature was
below -9°C during the power failure. Food can still be
consumed.
▷ LED flashes twice per second: Freezer temperature has
risen above -9°C during the power failure.
If LED flashes twice per second:
► Check the food.
Temperature alarm
Fig. 40 Display in the event of a temperature alarm
Possible causes for temperature differences:
-
You have put in warm, fresh food.
-
Too much warm room air has flowed in during the rear‐
rangement and removal of food.
-
The power has been out for a longer period of time.
-
The appliance is defective.
► Remedy the cause.
Fig. 41
► End alarm: Carry out action steps according to the
illustration.
▷ Appliance continues to run in normal operation.
▷ LED of the previously set temperature flashes until
temperature is reached.
▷ LED flashes once per second: Freezer temperature was
below -9°C during the temperature alarm. Food can still
be consumed.
▷ LED flashes twice per second: Freezer temperature has
risen above -9°C during the temperature alarm.
If LED flashes twice per second:
► Check the food.
WLAN error
Fig. 42 Display in the event of a WLAN error
► Check the WLAN connection.
Fig.44
► End alarm: Carry out action steps according to the
illustration.
-or-
► Reestablish the WLAN connection.
▷ Appliance continues to run in normal operation. LED of
the previously set temperature lights up.
9 Equipment
9.1 Drawers
You can remove the drawers for cleaning.
You can remove the drawers to use VarioSpace.
The way to remove/insert the drawers varies depending on
the pull-out system. Your appliance can contain a variety of
pull-out systems.
Note
Insufficient ventilation results in an increase in energy
consumption and reduction of the refrigerating perform‐
ance.
► Leave the bottom drawer in the appliance.
► Always keep the fan air slots on the inside of the rear
wall clear.
9.1.1 Drawer on appliance base or glass shelf
The drawer runs directly on the appliance base or on a glass
shelf. There are no rails.
When you remove the drawers, you can use the glass
shelves below them as storage shelves.
Note
In freezer appliances, the bottom drawer does not run on
the appliance floor directly, but instead on the support rib.*
► Removing and inserting the bottom drawer: Carry out
action steps (see 9.1.3 Bottom drawer) .
Removing drawer
Equipment
20 * Depending on model and options
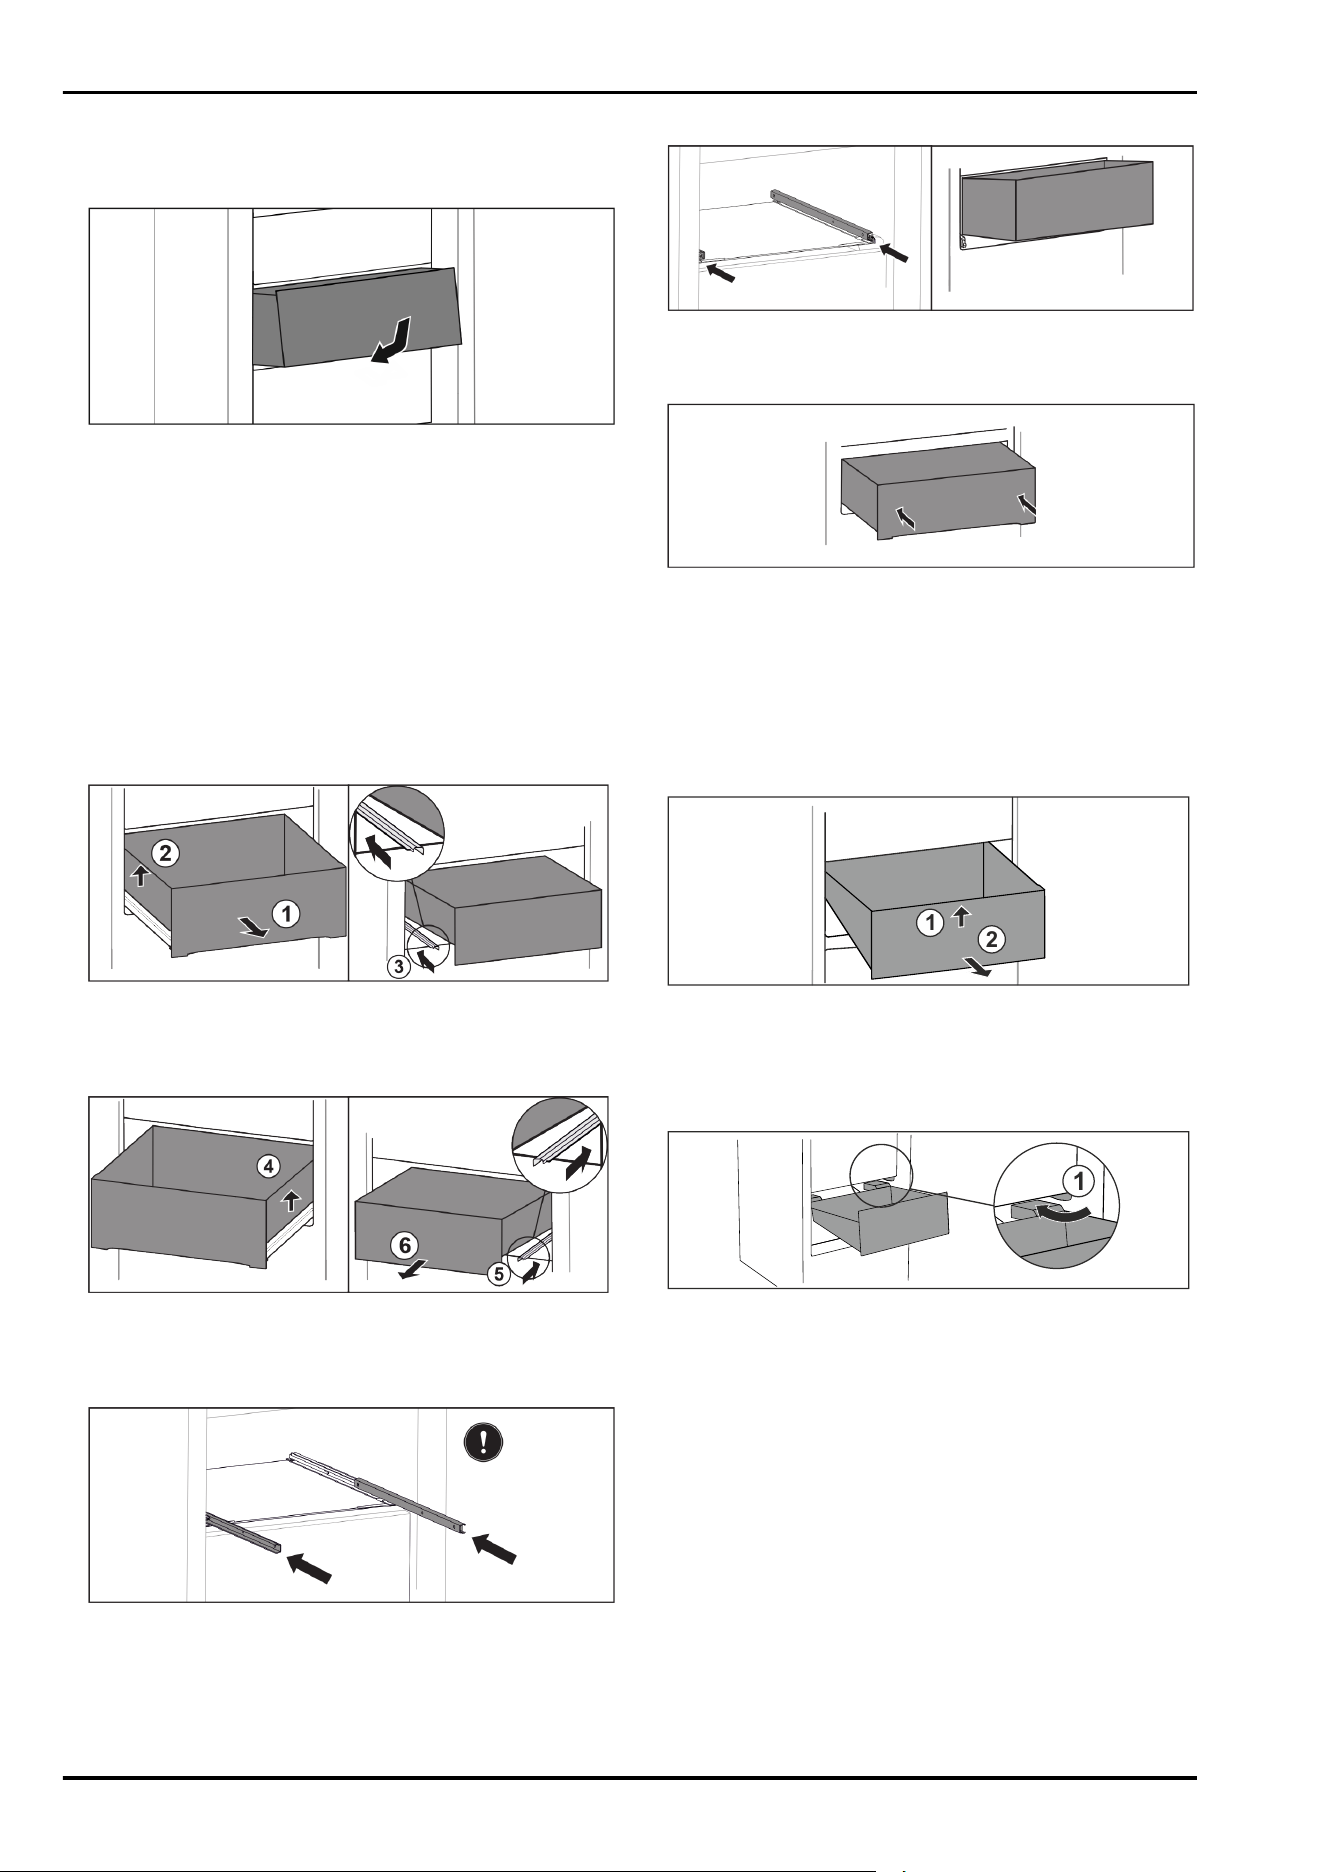
Fig.45
► Remove drawer as shown in the diagram.
Inserting drawer
Fig.46
► Insert drawer as shown in the diagram.
9.1.2 Drawer on telescopic rails*
The drawer runs on full-extension rails (telescopic rails).
There are full-extension telescopic rails and telescopic rails
with partial pull-out. Drawers which are full extension can
be pulled out fully from the appliance. Drawers with partial
pull-out cannot be pulled out fully from the appliance. The
system in your appliance depends on the type of appliance.
Drawer on glass shelf*
The drawer guided on a glass shelf is a partial pull-out.
Removing drawer
Fig. 47
► Pull out drawer as far as it will go. Fig. 47(1)
► Lift drawer on the left. Fig. 47(2)
► Slide in left rail. Fig. 47(3)
Fig.48
► Lift drawer on the right. Fig.48(4)
► Slide in right rail. Fig.48(5)
► Remove drawer to the front. Fig.48(6)
Fig. 49
If the rails are not yet fully pushed in after removing the
drawer:
► Push the rails in completely.
Inserting drawer
Fig.50
► Slide rails in.
► Place drawer on rails at an angle.
Fig.51
► Lower drawer.
► Slide in drawer to the back.
9.1.3 Bottom drawer
The drawer is the lowest drawer in the appliance. It runs
directly on the molded rib. There are no rails.
Removing drawer
1
2
Fig.52
► Pull out drawer as far as it will go.
► Lift up drawer at the front. Fig.52(1)
► Remove drawer to the front. Fig.52(2)
Inserting drawer
1
Fig.53
► Guide drawer in at an angle around the stoppers
Fig.53(1).
► Lower the drawer.
► Slide in drawer to the back.
9.2 Glass shelves
You can remove the glass shelf under the drawers for
cleaning.
You can remove the glass shelf under the drawers to use
VarioSpace.
9.2.1 Removing / inserting the glass shelf
Make sure that the following requirements are fulfilled:
❑
Glass shelf under the drawer: Drawer has been removed.
(see 9.1 Drawers)
Equipment
* Depending on model and options 21
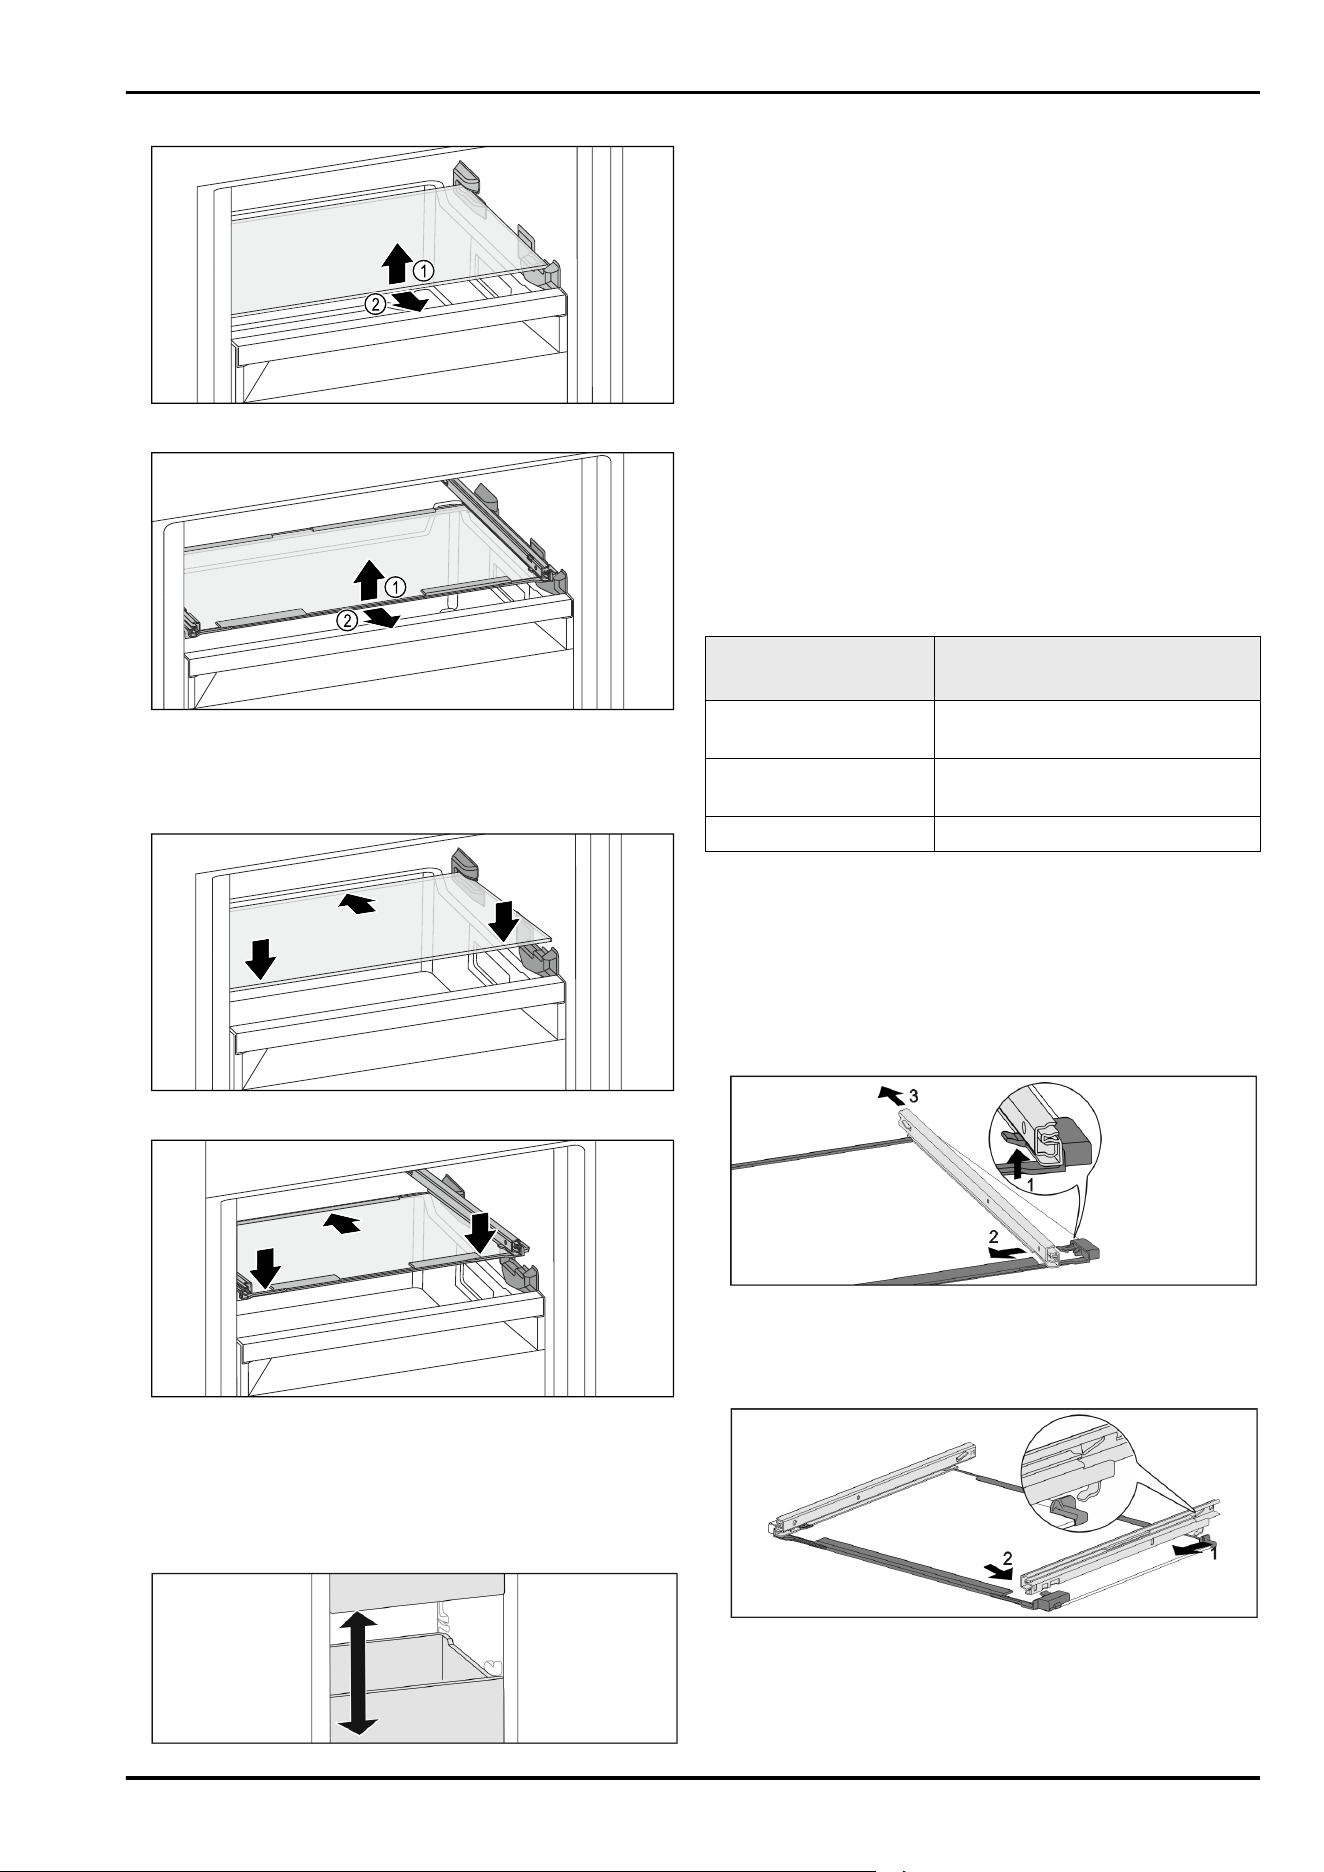
Removing glass shelf
Fig. 54 Example illustration of the glass shelf*
Fig. 55 Example illustration of the glass shelf*
► Lift the front of the glass shelf.
► Remove the glass shelf from the front.
Inserting the glass shelf
Fig. 56 Example illustration of the glass shelf*
Fig. 57 Example illustration of the glass shelf*
► Set down the glass shelf diagonally behind the stoppers.
► Lower glass shelf.
► Slide in glass shelf to the back.
9.3 VarioSpace
Fig.58
You can remove drawers and glass panels from your appli‐
ance. This provides more room for large food items such as
poultry, joints of meat, large game and bulky baked goods.
You can then freeze these items whole for later preparation.
► Note the load limits on the drawers and glass panels
(see11.1 Technical specifications) .
10 Maintenance
10.1 Disassembling / assembling pull-
out systems
10.1.1 Notes on disassembly
You can disassemble some of the pull-out systems for
cleaning. Your appliance can contain a variety of pull-out
systems.
The following pull-out systems can be disassembled or
cannot be disassembled:
Pull-out system
can be disassembled/
cannot be disassembled
Drawer on appliance
base or glass shelf*
cannot be disassembled*
Drawer guided on glass
shelf*
can be disassembled (see Drawer
on glass shelf*) *
Bottom drawer cannot be disassembled
10.1.2 Drawer on telescopic rails*
Drawer on glass shelf*
Disassembling pull-out system
Make sure that the following requirements are fulfilled:
❑
Drawer has been removed.
❑
Glass shelf has been removed. (see 9.2 Glass shelves)
Fig. 59 Glass shelf with rails
► Push up front click-in hooks. (1)
► Slide pull-out rails to the side (2) and backwards (3).
Installing pull-out system
Fig. 60 Glass shelf with rails
► Hook in rail at the back. (1)
► Hook in rail at the front. (2)
Maintenance
22 * Depending on model and options
10.2 Defrosting the appliance
10.2.1 Defrosting with NoFrost
Defrosting is performed automatically by the NoFrost
system. The moisture condenses on the evaporator and is
periodically defrosted and evaporated.
The appliance does not need to be defrosted.
10.3 Cleaning the appliance
10.3.1 Preparation
WARNING
Danger of electric shock.
► Unplug refrigerator or disconnect power.
WARNING
Danger of fire
► Do not damage the refrigerant circuit.
► Empty appliance.
► Pull out the power plug.
10.3.2 Cleaning the housing
NOTICE
Improper cleaning!
Damage to the appliance.
► Only use soft cleaning cloths and ph-neutral all-purpose
cleaners.
► Do not use steel wool or sponges that scour or scratch.
► Do not use caustic or abrasive cleaning materials or
those containing sand, chloride, or acids.
WARNING
Risk of injury or damage due to hot steam.
Hot steam can cause scalding/burns and damage to
surfaces.
► Do not use steam cleaners.
► Wipe the housing down with soft, clean cloth. If very
dirty, use lukewarm water with a neutral cleaner. Glass
surfaces can also be cleaned with glass cleaner.
10.3.3 Cleaning the interior
NOTICE
Improper cleaning!
Damage to the appliance.
► Only use soft cleaning cloths and ph-neutral all-purpose
cleaners.
► Do not use steel wool or sponges that scour or scratch.
► Do not use caustic or abrasive cleaning materials or
those containing sand, chloride, or acids.
► Plastic surfaces: clean by hand with a soft clean cloth,
lukewarm water and a little detergent.
► Metal surfaces: clean by hand with a soft clean cloth,
lukewarm water and a little detergent.
10.3.4 Cleaning the equipment
NOTICE
Improper cleaning!
Damage to the appliance.
► Only use soft cleaning cloths and ph-neutral all-purpose
cleaners.
► Do not use steel wool or sponges that scour or scratch.
► Do not use caustic or abrasive cleaning materials or
those containing sand, chloride, or acids.
Clean with a soft, clean cloth, lukewarm water and a little
washing up liquid:
- Drawer
- Freezer tray
Clean with a damp cloth:*
- Retracting rails*
Please note: the grease in the tracks is there for lubrica‐
tion purposes and must not be removed!*
Clean in the dishwasher up to 60°C:
- Ice cube tray
► Disassemble the equipment: see the relevant section.
► Clean the equipment.
10.3.5 After cleaning
► Wipe dry the appliance and items of equipment
► Connect and switch on the appliance.
► Activate SuperFrost (see8.2Appliance functions) .
When the temperature is sufficiently cold
► Place the food inside.
► Repeat cleaning regularly.
11 Customer support
11.1 Technical specifications
Temperature zone
Freezing -28°C to -16°C
Maximum amount of food to freeze / 24 hours
Freezer See type plate under “freezer
capacity …/ 24 h”
Maximum load weight of equipment
Equipment Appliance width
600mm (see instal‐
lation instructions,
appliance dimen‐
sions)
Drawer on glass shelf*
(see 9.1.1 Drawer on appliance base
or glass shelf) *
22 kg*
Drawer on glass shelf*
(see 9.1.2 Drawer on telescopic
rails*) *
22 kg*
Bottom drawer
(see 9.1.3 Bottom drawer)
19 kg
Customer support
* Depending on model and options 23
Lighting
Energy efficiency class
1
Light source
This product contains one or more energy
efficiency class G light sources.
LED
1
The appliance may contain light sources with different
energy efficiency classes. The lowest energy efficiency class
is indicated.
For appliances with a WiFi connection:
Frequency specification
Frequency band 2.4GHz
Maximum radiated
power
< 100 mW
Purpose of the
wireless equipment
Integration in the local WiFi network
for data communication
11.2 Operating noises
The appliance makes noises while in operation.
-
At less cooling output the appliance saves energy but
takes longer to cool items. The volume is lower.
-
At a higher cooling output the food cools more quickly.
The volume is higher.
Examples:
•
Activated functions (see8.2Appliance functions)
•
Running fan
•
Freshly sorted food
•
High ambient temperature
•
Door opened for long periods
Noise
Possible cause Type of noise
Bubbling and
splashing
Coolant is flowing
into the cooling
circuit.
Normal noise
Spitting and
hissing
Coolant is spraying
into the cooling
circuit.
Normal noise
Humming The appliance
cools. The volume
depends on the
cooling output.
Normal noise
Noise Possible cause Type of noise
Whirring and
murmuring
The fan is running. Normal operating
noise
Clicking Components are
being switched on
and off.
Normal switching
noise
Rattling or
humming
Valves are active. Normal switching
noise
Faint knocking,
humming or
buzzing*
The valve is active. Normal operating
noise
Noise Possible
cause
Type of noise How to
resolve
Vibration Unsuitable
setup
Error noise Adjust the
feet to make
sure the
appliance is
horizontal.
Clattering Equipment,
Objects
inside the
appliance
Error noise Secure
equipment
parts.
Leave a gap
between
items.
11.3 Technical faults
Your appliance is designed and manufactured for reliable
operation and a long service life. If a malfunction nonethe‐
less occurs during operation, please check whether the
malfunction is due to an operating error. In this case, you
will have to be charged for the costs incurred, even during
the warranty period.
You may be able to rectify the following faults yourself.
11.3.1 Appliance function
Defect
Cause Remedy
The appliance does
not work.
→ The appliance is not switched on. ► Switch on the appliance.
→ The power plug is not properly
inserted in the wall socket.
► Check the power plug.
→ The powerfuse in the wall socket is
not OK.
► Check the fuse.
→ Power failure. ► Keep the appliance closed.
► Protect food: Place cold storage batteries on the food or
use another freezer appliance if the power failure lasts
longer.
► Do not re-freeze defrosted food.
→ The IEC socket is not correctly
plugged into the appliance.
► Check the IEC socket.
Customer support
24 * Depending on model and options
Defect Cause Remedy
The temperature is
not cold enough
→ This means that the door of the
appliance is not closed properly
► Close the appliance door
→ The ambient temperature is too
high
► Problem solution: (see1.2 Climate classes)
→ The appliance was opened too
frequently or for too long
► Wait to see if the required temperature corrects itself. If
not, contact Customer Service. (see11.4 Customer
Service)
→ Too much fresh food was placed
inside without SuperFrost.
► Solution: (see SuperFrost)
→ The temperature is incorrectly set ► Set to a colder temperature and check after 24 hours.
→ The appliance is too near to a heat
source (stove, heater etc).
► Change location of appliance or the heat source.
The temperature
shown on the
display is higher
than the actual
temperature inside
the appliance.*
→ The appliance door was open too
long, which automatically triggered
the door alarm. The appliance
cools more intensively as a result.
► Close the appliance door.
The door seal is
defective or should
be replaced for
other reasons.
→ The door seal is interchangeable.
You can replace it without the use
of any special tools.
► Contact Customer Service. (see11.4 Customer Service)
The appliance is
iced up or conden‐
sation is building.
→ The door seal may have slipped out
of its groove.
► Check the door seal is well placed in the groove.
The appliance is
warm on the exte‐
rior surfaces.*
→ The heat of the refrigerant circuit is
used to prevent condensate from
forming
► This is normal.
11.3.2 Equipment
Defect Cause Remedy
The interior light
does not turn on.
→ The appliance is not switched on. ► Switch on the appliance.
→ The door was open for more than
15 minutes.
► If the door is open, the interior lighting switches off
automatically after about 15 minutes.
→ The LED interior light is faulty or
the lid is damaged.
► Contact Customer Service. (see11.4 Customer Service)
11.4 Customer Service
First check whether you can rectify the fault yourself
(see11 Customer support) . If you cannot rectify the
problem, contact Customer Service.
You can find the address in the enclosed brochure “Liebherr-
Service” or at home.liebherr.com/service.
WARNING
Unprofessional repair!
Injuries.
► Repairs and work on the appliance and the power supply
cable not described in the Manual (see 10 Maintenance)
should only be carried out by a qualified service provider.
► A damaged power cable may only be replaced by the
manufacturer, the manufacturer’s Customer Service or a
similarly qualified person.
► For appliances with an IEC connector, the change can be
made by the customer.
Customer support
* Depending on model and options 25
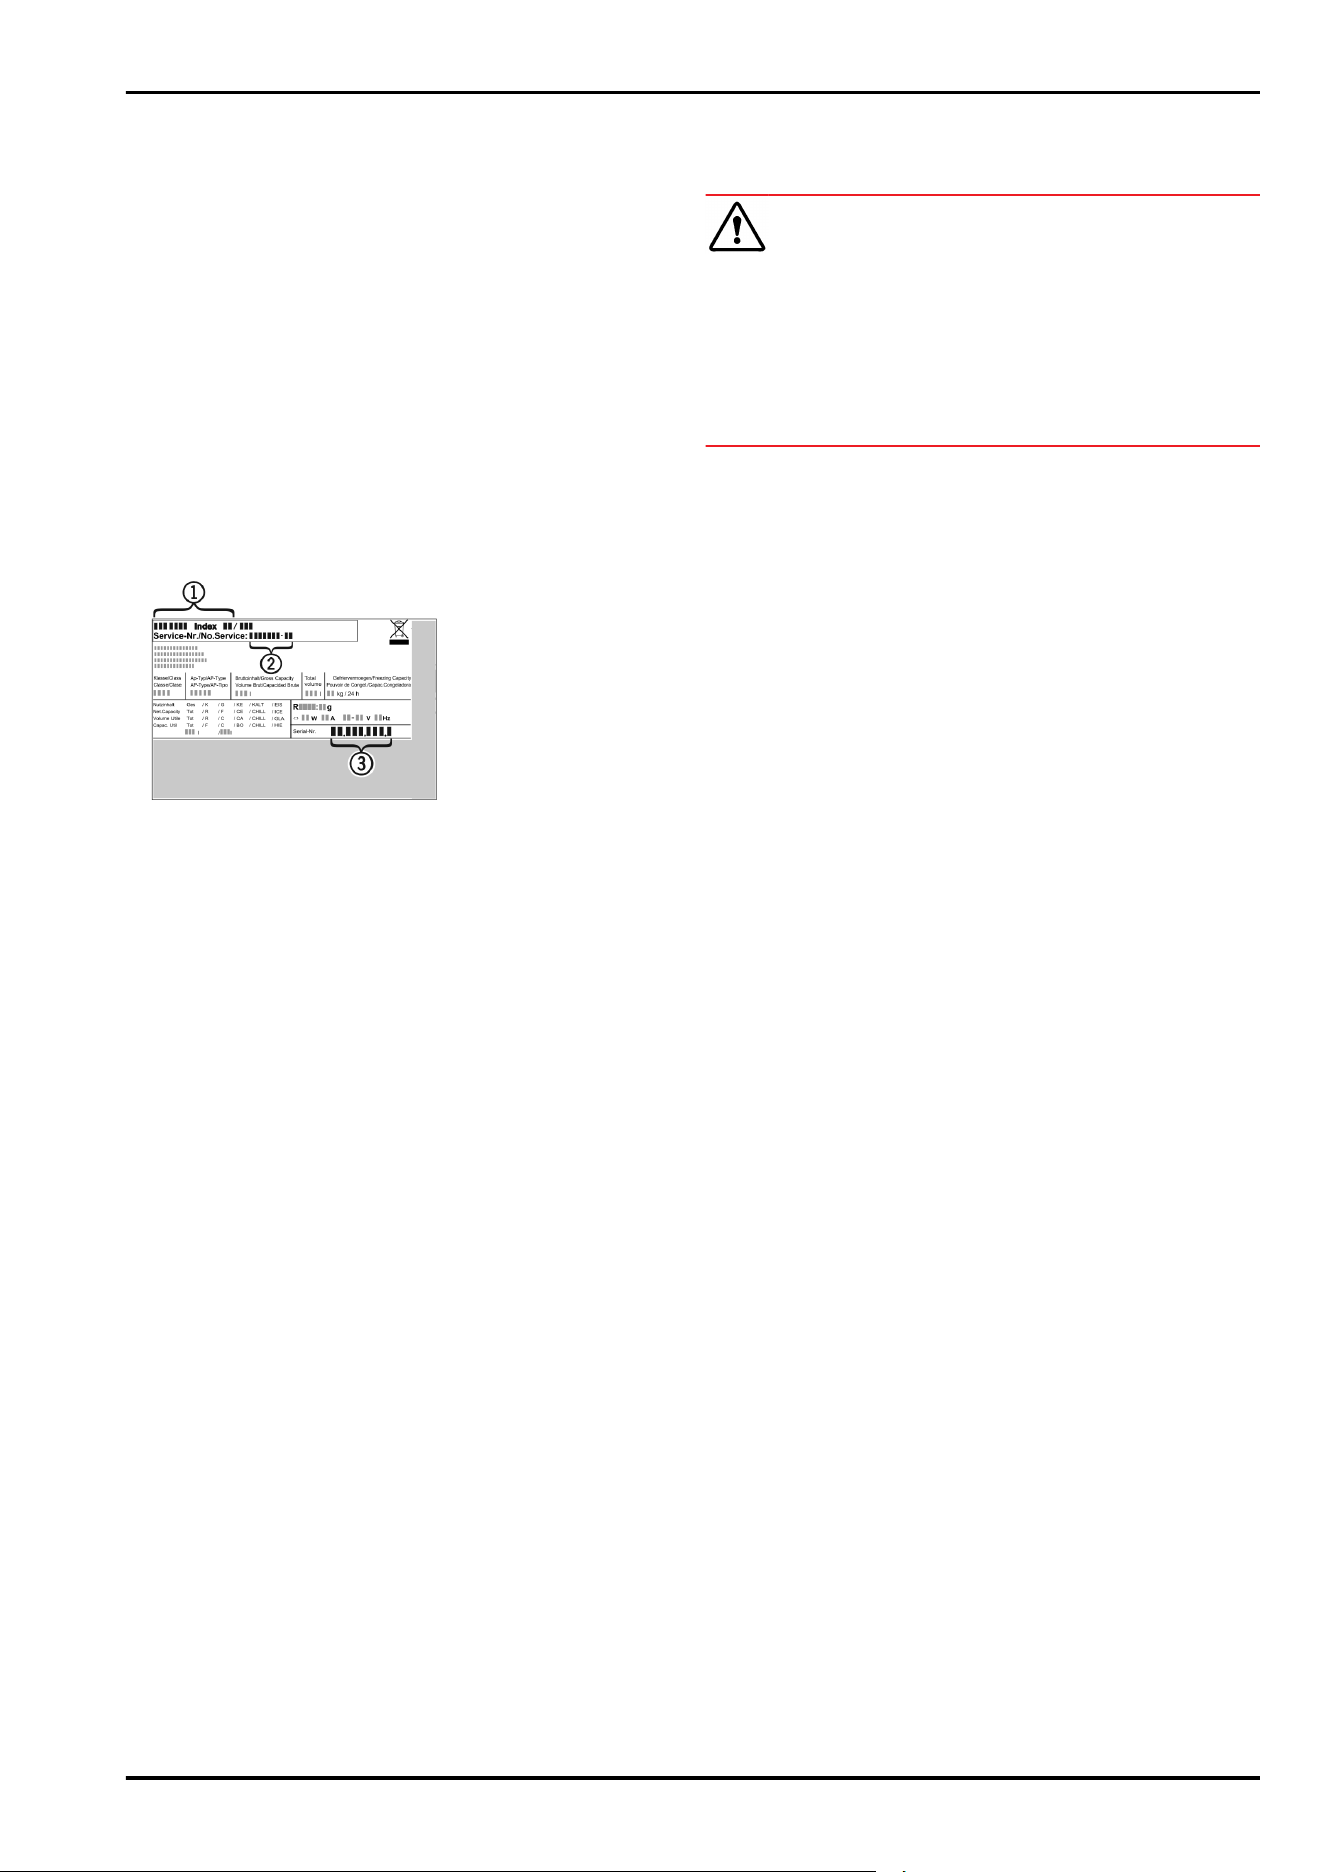
11.4.1 Contacting Customer Service
Make sure that the following appliance information is avail‐
able:
❑
Appliance name (model and index)
❑
Service no. (service)
❑
Serial no. (S no.)
► Refer to the type plate for appliance information.
(see 11.5 Rating plate)
► Take note of the appliance information.
► Notify customer service: Report errors and the appliance
information.
▷ This will help us give you fast and accurate support.
► Follow further instructions from Customer Service.
11.5 Rating plate
The nameplate is located behind the drawers on the inside
of the appliance.
Fig.61
(1)
Appliance name (3) Serial no.
(2) Service no.
► Information from the nameplate.
12 Decommissioning
► Empty appliance.
► Switch off appliance. (see Switching appliance off and
on)
► Pull the power plug from the outlet.
► If necessary, remove the IEC socket: Pull the IEC socket
out of the appliance plug while turning it to the left and
right at the same time.
► Clean appliance. (see 10.3Cleaning the appliance)
► Leave the door open to prevent unpleasant odors.
13 Disposal
Make sure that the following requirements are fulfilled:
❑
The meaning of the symbols on the appliance is known.
(see 1.14Symbols on the appliance)
❑
The information about disposal is known.
(see1.8Disposal)
13.1 Prepare the appliance disposal
► Take the appliance out of operation. (see12Decommis‐
sioning)
13.2 Dispose of the appliance in an envi‐
ronmentally friendly way
WARNING
Leaking refrigerant and oil!
Fire. The refrigerant contained within the appliance is envi‐
ronmentally friendly, but flammable. The oil contained
within the appliance is flammable. Escaping refrigerant and
oil can ignite if they are of high enough concentration and
are exposed to an external heat source.
► Do not damage the pipelines of the coolant circuit and
the compressor.
► Observe the notes on appliance transport. (see 3.5 Trans‐
porting the appliance)
► Transport the appliance away without damaging it.
► Dispose of the appliance as specified.
Decommissioning
26 * Depending on model and options

Disposal
* Depending on model and options 27
Scan QR Code and find
digital operating and
installation instructions.
⸺
home.liebherr.com
1 2 3
20260401
7088642-00
Liebherr-Hausgeräte GmbH
Memminger Straße 77-79
88416Ochsenhausen
Deutschland