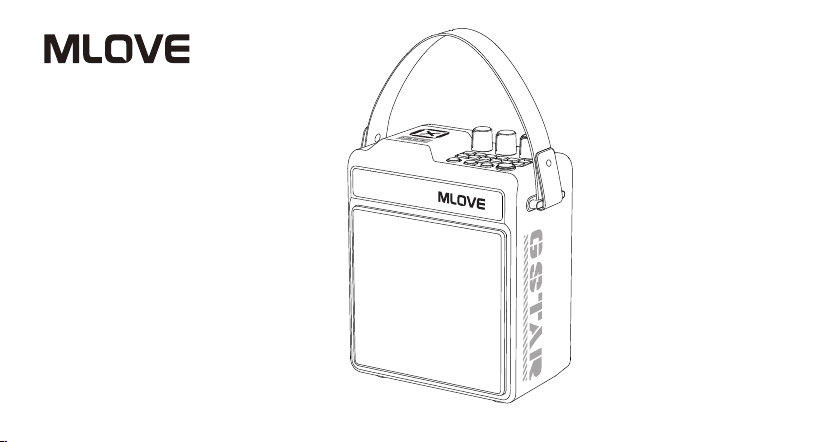
USER MANUAL
N5
Multifunctional Amplified
Karaoke Speaker

Warning
01
English
◆ Please read the instructions first.
◆ Please follow the instructions carefully.
◆ Please store and use this product at room temperature.
◆ Do not use this product near heat sources such as radiators, heat registers, stoves, or other apparatuses (including amplifiers) that produce heat.
◆ Do not block the opening of the speaker, and do not insert objects into the vents or slots of the speaker.
◆ Do not throw or drop the product to avoid damage.
◆ Please charge the speaker with the product-rated voltage.
◆ If the connection line does not match your device, please contact the dealer.
◆ Please keep the speaker volume at a moderate level to avoid temporary or permanent hearing impairment.
◆ If the equipment is damaged for any reason, it must be repaired by professional maintenance personnel in a timely manner. Unauthorized
disassembly will invalidate the warranty.
◆ If the battery is not properly replaced, there may be a risk of explosion. It must only be replaced with the same type of battery.
◆ Do not disassemble, impact, squeeze, or throw the battery into fire. If severe swelling occurs, stop using it immediately. Do not place it in a
high-temperature environment, and do not use it after the battery has been soaked in water.
◆ The battery (battery pack or combined battery) must not be exposed to conditions such as direct sunlight, fire, or other overheating environments.
◆ If consumers use a power adapter to charge, they should use a certified power adapter that has obtained CCC certification and meets standard
requirements.
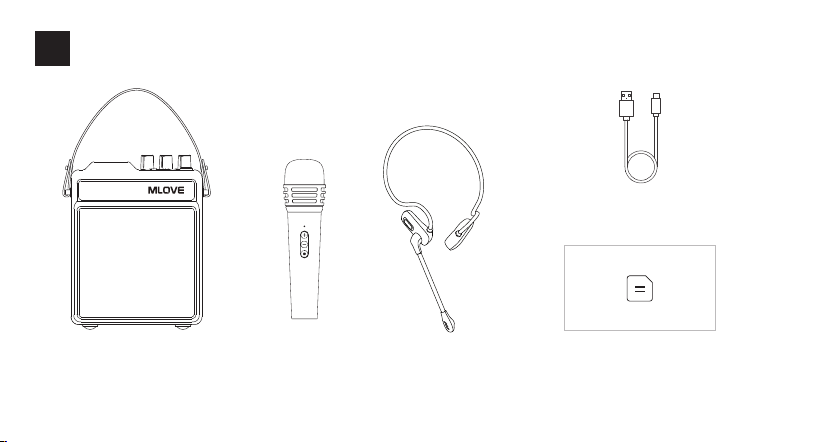
Packing list
02
English
Speaker Wireless Microphone Wireless Headset
Actual packing contents depend on the purchased version. Product images are for reference only.
User Manual
USB Type-C Charging Cable
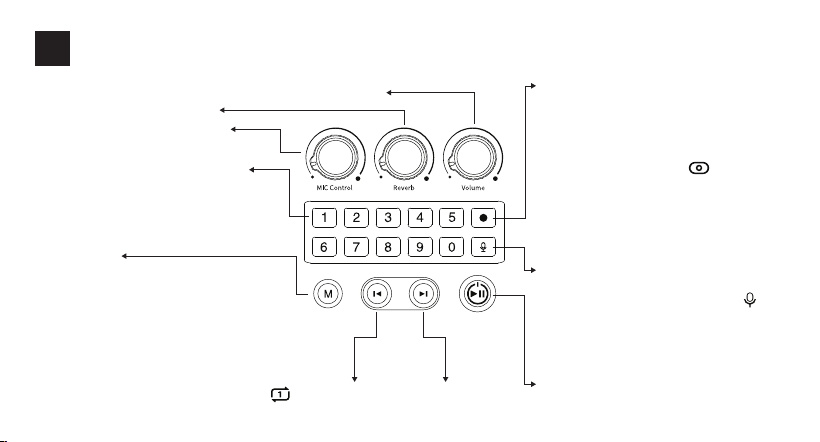
Single Track Loop: During TF card/U-disk playback, long
press the M button to enable single-track loop. The will
light up when activated.
Volume Adjustment: Rotate to increase or decrease the volume.
Short Press:
Previous Track
Record Key
Short Press:
Next Track
Power Key: Long press to turn on/off
Play Button: Short press to play/pause
Microphone Reverb Adjustment
0‒9 Numeric Song Selection Keys:
Mode Button
Microphone Volume Adjustment:
Rotate to increase or decrease the volume.
Button Function Indicator
03
English
Mode Switching: Short press to switch modes: U-disk
mode / Bluetooth mode / TF card mode / AUX mode.
Note: The device defaults to Bluetooth mode when
powered on.
Local Recording: Short press to enter recording mode.
Short press again to stop, save, and exit the recording.
Long press to enter recording playback mode.
Mic Button
Wireless Microphone Pairing: Long press to enter
microphone pairing mode. The microphone icon
flashes. When connected successfully, the icon remains
lit. Long press again to exit pairing mode.
Microphone Priority: Short press to enable
microphone priority. When speaking, music volume is
automatically reduced.
1. The operation is effective only when a U-disk or TF card
is inserted.
2. If both a U-disk and TF card are present, recording will
be prioritized to the U-disk.
3. During recording, the recording icon on the screen
will flash.
4. During playback, the recording icon on the screen will
remain steadily lit.
Delete Recording: During recording playback, long
press the Record button to delete the currently playing
recording file.
TF Card/U-Disk Playback Mode: Enter the numbers
directly to quickly play the corresponding track in
sequence. If the entered number exceeds the total
number of songs in the current folder of the TF
card/U-disk, the input will be invalid.
Bluetooth Disconnection: Long press the M button for 2
seconds to disconnect from the current device and enter
pairing mode. Press the Play button again to reconnect.
MICRO
SD
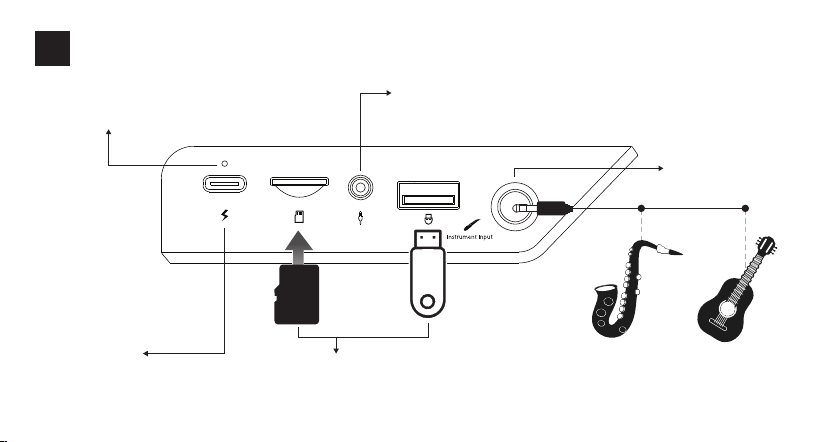
Charging Indicator Light:
Red light stays on while charging.
Red light turns off when fully charged.
AUX External Audio Input:
Connect the audio cable to switch the speaker to AUX mode.
The device has a built-in reset button; press it using a thin tool.
TF Card / USB Flash Drive Playback:
Insert a TF card or USB flash drive while the speaker is
powered on, and it will automatically play the audio
files stored on the TF card or USB drive.
Power Charging:
Connect a 5V DC, 1‒3A USB power
adapter for charging.
Electronic Wind
Instrument (EWI)
Acoustic Guitar
Interface Function Indicators
04
English
6.35 mm
Instrument Input
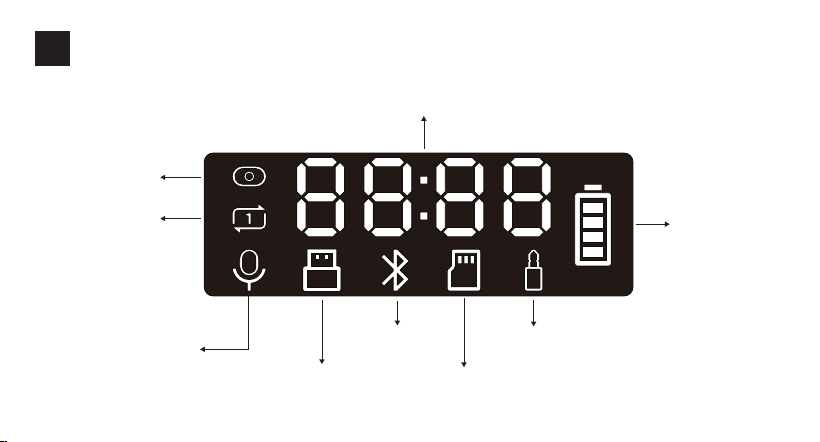
Mode Indicator / Time Display
Battery
Level Indicator
Local Recording
Single Track Repea
Wireless
Microphone Pairing
USB Flash
Drive Mode
Bluetooth
Mode
TF Card Mode
AUX Mode
Screen Display Instructions
05
English
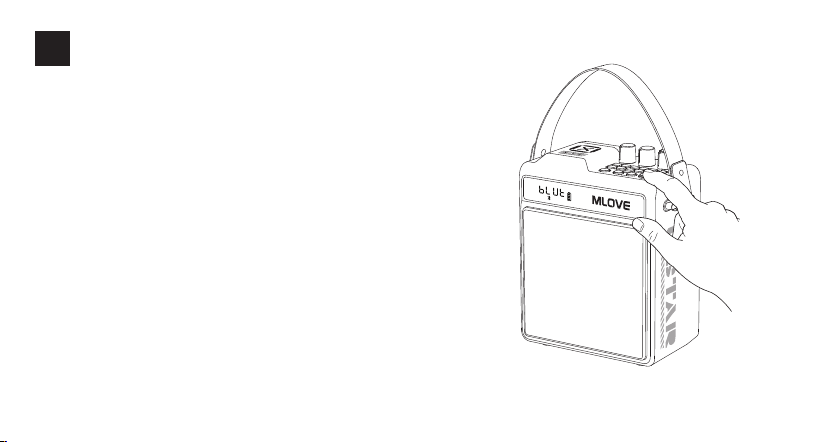
1. Power On the Speaker:
Press and hold the power button to turn on the speaker.
After the startup prompt sound, the LED Bluetooth icon
will flash, indicating it is ready for Bluetooth pairing.
2. Connect to a Mobile Device:
Turn on the Bluetooth function on your mobile device.
In the list of available Bluetooth devices, select "Mlove N5."
Once successfully connected, you will hear a prompt sound,
and the Bluetooth indicator will remain steadily lit.
For future use:
As long as the Bluetooth on your mobile device remains turned on,
the connection will be established automatically.
Bluetooth Disconnection:
Press and hold the M button for 2 seconds to disconnect from the current device.
The speaker will enter pairing mode and wait for a new connection.
Bluetooth Audio Connection
06
English
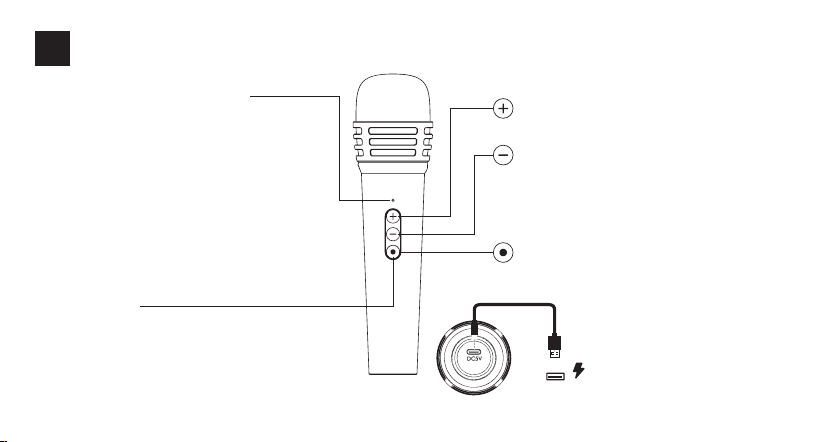
Microphone Indicator Light
Short Press / Long
Press to Increase Microphone Volume
Short Press / Long
Press to Decrease Microphone Volume
Power Button:
Press and hold for 2 seconds to turn the
wireless microphone on/off.
Reverb Adjustment:
Short press to switch the reverb level.
Three levels are available.
Charging Port:
Connect to a USB power source
with an output of DC 5V 1A to charge.
USB
Wireless Microphone Function Indicator
07
English
Wireless Microphone Connection Indicator:
When powered on and connecting, the green light
flashes (slow flash for paired devices, fast flash for
unpaired devices). Once connected successfully, the
green light stays on. If no connection occurs for 30
minutes, the microphone will automatically power off.
Low Battery Indicator:The red light flashes when the
battery level drops below 15%
Charging Indicator:The red light stays on while
charging. The green light stays on when fully charged.
Microphone Lock
After a successful connection, press the power button
three times to lock the device.
(Once locked, the microphone will only reconnect to
the locked device.Double-press the power button to
unlock.)
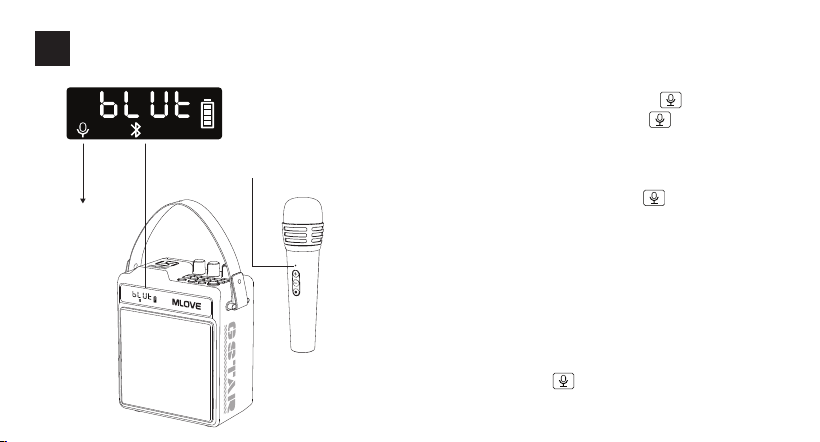
Press and hold the microphone power button for 2 seconds to turn it on. The
microphone indicator will flash, and it will automatically pair with the speaker
shortly. Once paired successfully, the microphone icon on the speaker
display and the microphone indicator will both remain solid.
Turn on the speaker and press and hold the microphone key to enter the
wireless microphone pairing mode. The microphone icon on the speaker
display will flash, indicating that it is waiting to pair with a wireless handheld
microphone or wireless headset microphone.
Wireless Microphone
Pairing Indicator
Microphone
Indicator Light
Using the Wireless Microphone Connection
08
English
Wireless Microphone and Speaker Pairing
Additional Instructions
The speaker supports connecting two wireless microphones. To connect the second
microphone, simply turn it on, and it will automatically pair with the speaker shortly.
After a successful connection, the microphone will automatically attempt to
reconnect for 30 seconds each time it is powered on. If reconnection fails within 30
seconds, it will enter pairing mode.
When in microphone pairing mode, if no microphone is paired within 10 minutes,
the pairing mode will automatically turn off. To continue using the pairing mode,
press and hold the microphone button to enable wireless microphone
pairing again.
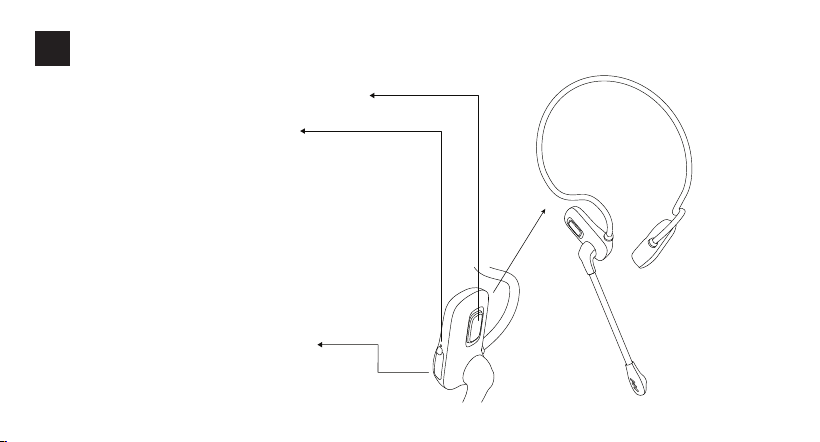
Wireless Headset Microphone Function Indicators
09
English
Power Button: Press and hold to turn on/off; triple-press to lock
the device; double-press to unlock.
Low Battery Indicator:The red light flashes when the battery level
drops below 15%.
Charging Indicator:The red light stays on while charging. It turns
off when fully charged.
Charging Port: Connect to a USB power adapter
with DC 5V 1A output for charging.
Microphone Indicator Light
Microphone Indicator Light Connection Status:
When powered on and connecting, the white light flashes (slow flash
for locked devices, fast flash for unlocked devices). Once connected
successfully, the indicator stays solid. If no connection occurs within
30 minutes, the microphone will automatically power off.
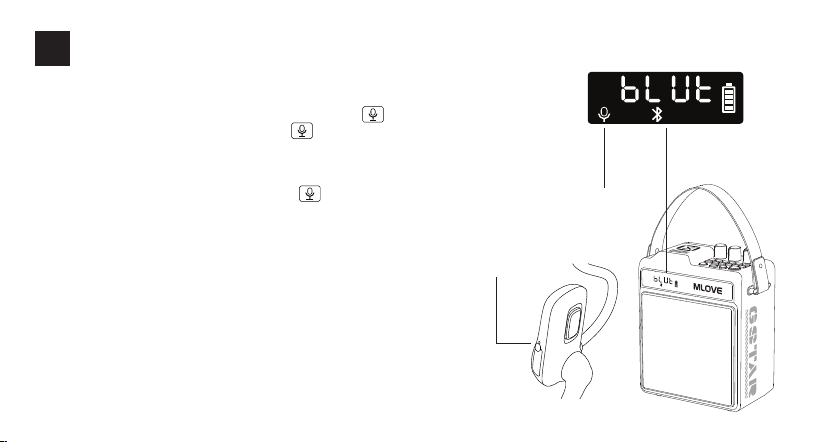
Microphone
Indicator Light
Wireless Microphone
Pairing Indicator
Press and hold the power button on the wireless headset microphone to turn it on. The
microphone indicator will flash, and it will automatically pair with the speaker shortly.
Once connected successfully, the microphone icon on the speaker display and the
microphone indicator light will both remain solid.
Microphone Lock:
After a successful connection, triple-press the microphone power button to lock
the device. Once locked, the microphone will only reconnect to the locked device.
Double-press the power button to unlock.
Turn on the speaker and press and hold the microphone button to enter wireless
microphone pairing mode. The microphone icon on the speaker display will flash,
waiting to pair with a wireless handheld microphone or wireless headset microphone.
Wireless Headset Microphone and Speaker Pairing
Additional Instructions
The speaker supports connecting two wireless headset microphones. To connect the
second headset microphone, simply turn it on, and it will automatically pair with the
speaker shortly.
After a successful connection, the wireless microphone will automatically attempt to
reconnect for 30 seconds each time it is powered on. If reconnection fails within 30
seconds, it will enter pairing mode.
Using the Wireless Headset Microphone Connection
10
English
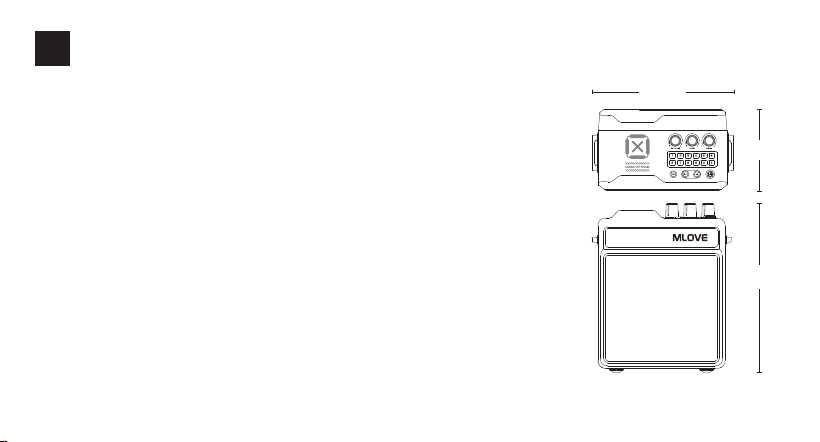
Speaker Specifications
Speaker System: 4-inch full-range speaker
Bass Enhancement: 106×122mm passive radiator
Playback Function: Bluetooth wireless playback, TF card/USB plug-and-play
Input Ports: 3.5mm AUX-IN, 6.35mm instrument input
Supported Formats: MP3, WMA, WAV, FLAC, APE (Micro SD Card/USB)
Special Features: Local recording, digital karaoke, single-track repeat,
microphone priority, wireless karaoke performance
Battery Type: Lithium-ion battery 14.8Wh
Charging Method: DC 5V 1~3A USB Type-C
Charging Time: Approximately 2 hours (adapter ≥5V/3A)
Product Dimensions: 170mm × 207mm × 98mm
Product Weight: Approx. 1350g (excluding microphone)
Microphone Specifications
Charging Port: USB Type-C
Charging Method: DC 5V-1A
Charging Time: Approximately 3.5 hours
Microphone Dimensions: 178 × 46.8 × 46.8 mm
Microphone Weight: Approximately 160 g
Wireless Headset Microphone Specifications
Charging Port: USB Type-C
Charging Method: DC 5V-1A
Charging Time: Approximately 3 hours
Microphone Dimensions: 252 × 105 × 40 mm
Microphone Weight: Approximately 26 g
Technical Specifications
11
English
170mm
207mm
98
mm

MANUFACTURER:
Manufacturer: Shenzhen See Me Here Electronic Co., Ltd.
Address: 1st Floor, 2nd Floor, 3rd Floor, 5th Floor, Building B, TongFuYu
Industrial Park, No.32 Hangkong Road, Sanwei Community, Hangcheng
Street, Baoan district, Shenzhen, China
[email protected] www.mlovelife.net

FCC Caution
This device complies with part 15 of the FCC Rules. Operation is subject to the following
two conditions:
(1) This device may not cause harmful interference, and
(2) this device must accept any interference received, including interference that may
cause undesired operation.
Any Changes or modifications not expressly approved by the party responsible for
compliance could void the user's authority to operate the equipment.
Note: This equipment has been tested and found to comply with the limits for a Class B
digital device, pursuant to part 15 of the FCC Rules. These limits are designed to provide
reasonable protection against harmful interference in a residential installation. This
equipment generates uses and can radiate radio frequency energy and, if not installed
and used in accordance with the instructions, may cause harmful interference to radio
communications. However, there is no guarantee that interference will not occur in a
particular installation. If this equipment does cause harmful interference to radio or
television reception, which can be determined by turning the equipment off and on, the
user is encouraged to try to correct the interference by one or more of the following
measures:
-Reorient or relocate the receiving antenna.
-Increase the separation between the equipment and receiver.
-Connect the equipment into an outlet on a circuit different from that to which the receiver
is connected.
-Consult the dealer or an experienced radio/TV technician for help.
The device has been evaluated to meet general RF exposure requirement. The device
can be used in portable exposure condition without restriction.