USER GUIDE AND MANUAL
EN DE IT
ES
FR
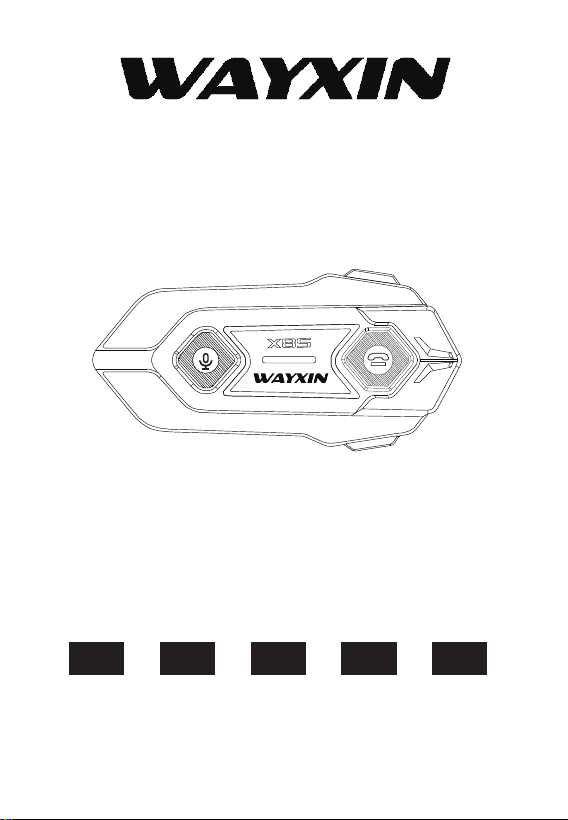
Motorcycle Helmet Headset -X8S

CONTENTS
English -------
Deutsch -------
Italiano -------
Español -------
Français -------

CAUTION
1. Please use a standard USB charger with 5V/1A power for charging.
(This product does not include a charging AC adapter.) Do not charge in wet areas.
2. Before installing the Headset, please connect your phone according to the
instructions and test the volume and sound. If there is a significant difference in
volume when installed on the helmet, adjust the position of the helmet's
internal speakers.
3.This product is an electronic product for motorcycles. When using this
product on the road, please comply with local traffic laws.
4.Please turn off the product near medical equipment. Do not use near medical
devices such as pacemakers.
5.Please pay attention to the volume while driving. When using this product for calls,
pay attention to your surroundings and keep the call time as short as possible.
6.When driving, do not turn the volume up louder than the surrounding environment
to avoid causing harm to others and yourself.
7. Please do not attempt to disassemble this product without authorization.
There are many electronic components inside the product, and non-professionals
should not attempt to do so.
8.Do not put metal, liquids, flammable substances, medicines, etc., inside this product.
support@wayxinmoto.com
Customer Support
*If you encounter any issues during use, please contact our support email.
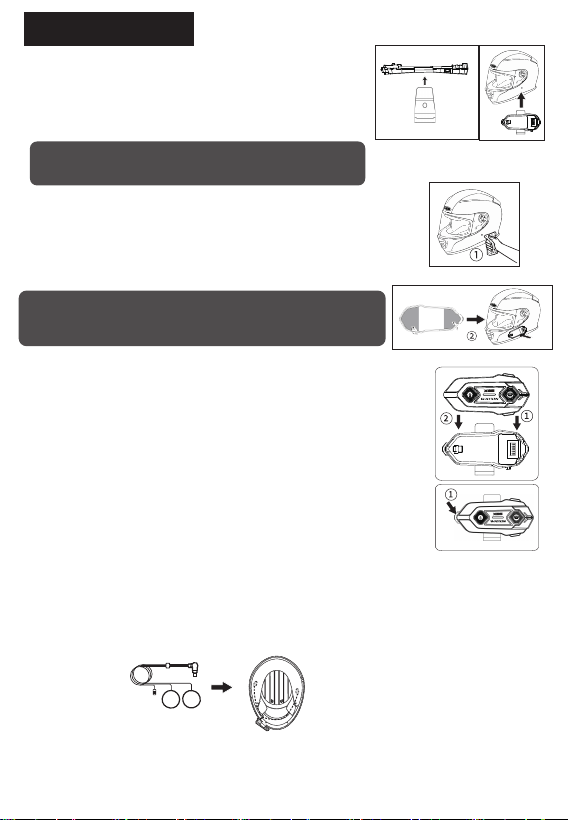
Installation
②. For adhesive-type mounting brackets,
1.Wipe off any dirt or oil stains from the helmet installation area.
2.Peel off the film on the back of the mounting bracket.
3.Stick it firmly to the installation area of the helmet and press firmly.
Note: Do not apply pressure to the bracket within 24 hours after
sticking. Damage, loss, or malfunction due to detachment is not
covered by the warranty, so please install carefully.
※ Installation and removal of the main unit
Installation
① Insert the rear of the main unit into the rear of the base.
② Press the main unit down firmly until you hear a click.
Removal
① Press the button on the front to detach the main unit.
① Select the installation position inside the helmet and stick
The fluffy Velcro sticker at that position.
② Stick the speaker to the position of the fluffy Velcro sticker.
※ Installation of speakers and microphone
※Before installing the bracket, please select a suitable position.
①. For the clip-on mounting bracket: insert the clip into the base
and attach the anti-slip silicone pad to the bottom;
position the clip near the edge of the helmet, spread it open, a
nd slide it onto the side of the helmet.
Note: Damage, loss, or malfunction due to detachment is
Not covered by the warranty, so please install carefully.
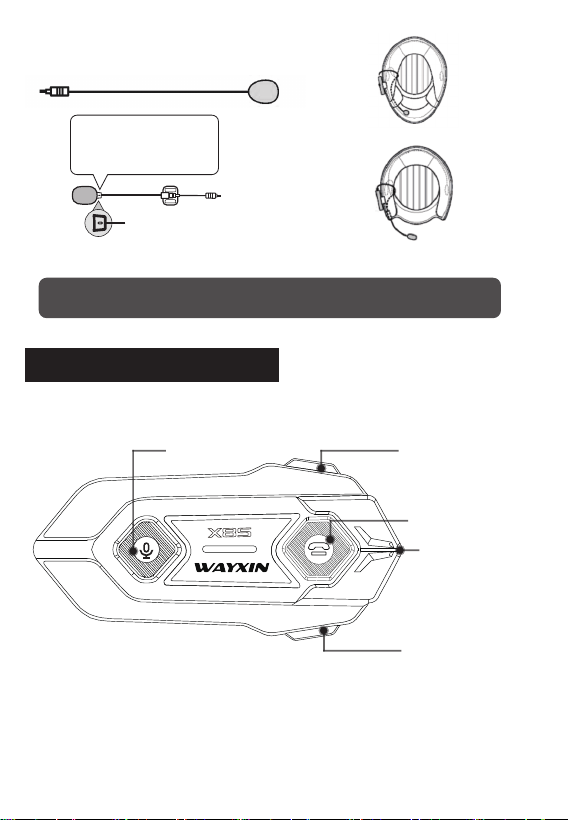
Button Instruction
※Microphone installation
Full-face helmet microphone
Stick the microphone near the inner side of the helmet's mouth area.
Note: For flip-face helmet microphones, please ensure the white arrow faces
your mouth. Please do not remove the foam windscreen from The microphone.
Flip-face helmet microphone
Please point the raised part
Of the microphone
towards your mouth.
Power/Phone Button
Volume +
Volume -
Intercom Button
Charging port
Note: Even a slight adjustment in speaker placement can significantly affect the audio experience.
We recommend connecting to your phone and testing the volume to find the
most comfortable position before final installation.
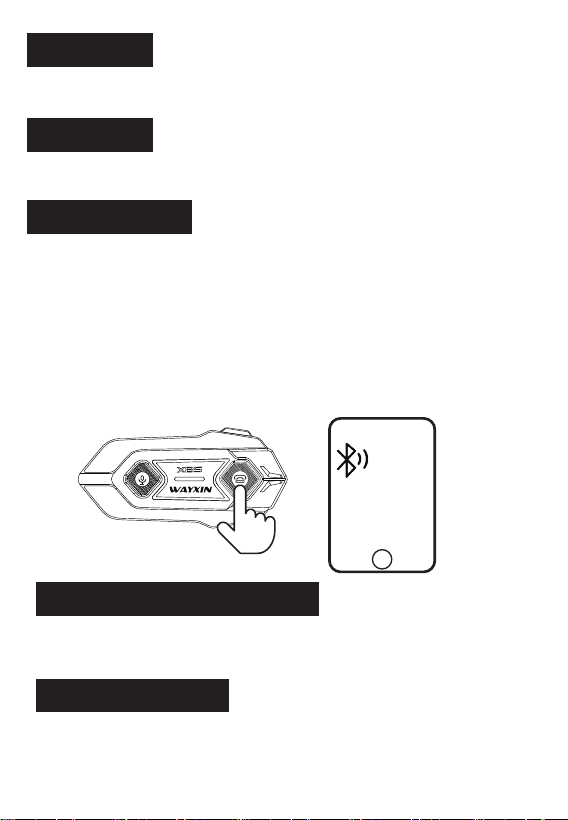
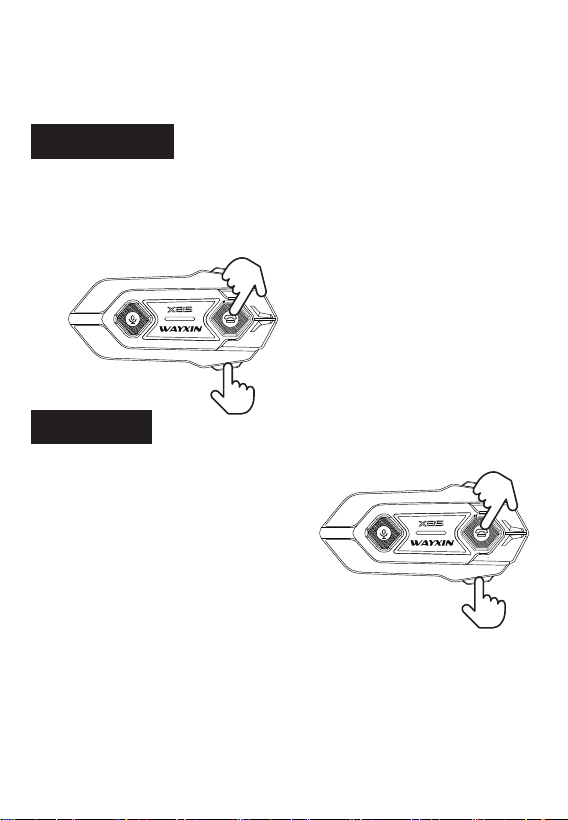
Power ON
Power OFF
Long press the Power button for 3 seconds to power on
(blue light flashing, voice prompt indicating the battery power remaining).
Long press the Power button for 4 seconds to power off
(red light flashing for 1 second)
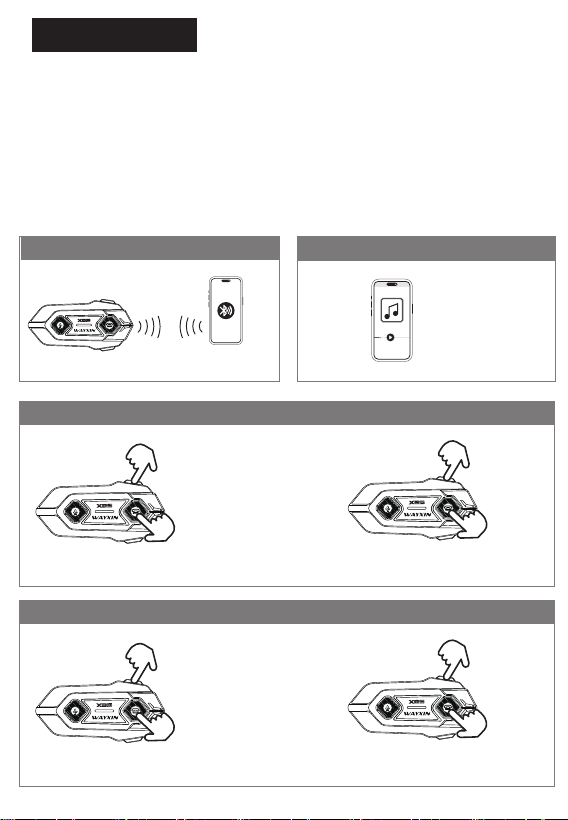
Phone Pairing
When the device is powered off, long press the phone button for 5 seconds to enter
Bluetooth pairing mode (red and blue lights flashing).
Open your phone's Bluetooth settings,
Tap on the Bluetooth name: WAYXIN X8S
Successfully connected if the blue light is flashing
(If your phone prompts you to enable Bluetooth permissions, please grant Bluetooth permissions).
Reconnect to your phone
When the device and phone are disconnected,
single-click the phone button to reconnect.
Factory Reset
After powering on the device, Press and hold both the Volume + and Volume - buttons
simultaneously for 4 seconds; The purple indicator light will flash,
And the device will power off.
Bluetooth
Pairing
WAYXIN X8S
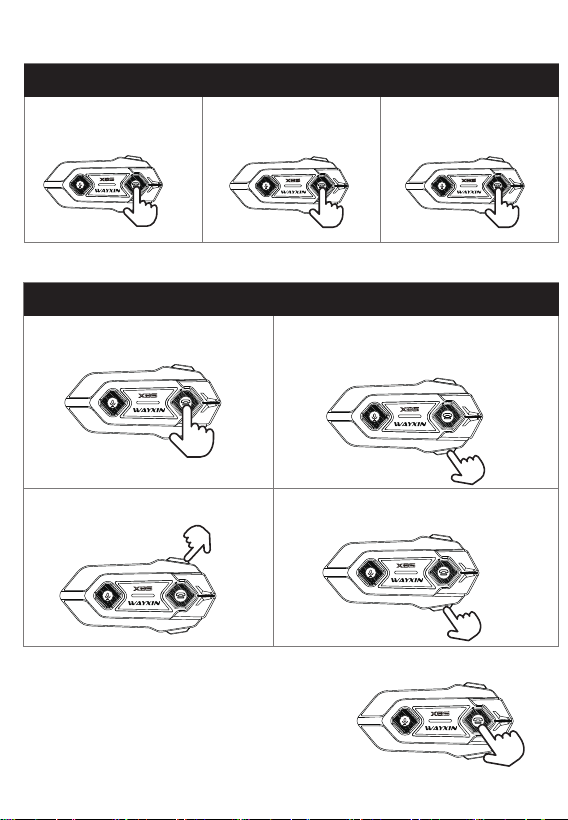
Make a call / Answer a call
Start Call:
Press the power button once
End call:
Press the power button once
Reject call:
Press the power button twice
Play music from your smartphone
Phone calls on a smartphone
Listen to music
Play/Pause:
Press the power button once
Adjusting the music volume:
Press the volume button once.
Next track:
Press the volume button twice.
Previous track:
Press the volume button twice.
·Voice assistant function
If the device is already paired with your smartphone,
press the power button twice.
(Launch Siri or Google Assistant)
Once
Once
Twice
Once
Once
Twice
Twice
Twice
FM Radio
Radio On/Off: Press the [Phone button] and [Volume -] simultaneously
Next channel: Double-click the [volume+]
Previous channel: Double-click the [volume-]
Volume: Single-click the [volume+]/[volume-]
EQ Sound Effects
In addition, you can switch between four sound effects whilst playing music:
Direct (default), Bass, Rock and Pop.
While playing music, press and hold the [Phone Button] and [Volume -] for 4 seconds.
but this may be drowned out if the music is too loud.
·Auto-answer On/Off (This feature is disabled by default)
With the device powered off, Press and hold both the [Phone Button] and [Volume -]
simultaneously for 4 seconds to enable or disable the auto-answer function.
(On: Blue light constant for 2 seconds; Off: Red light constant for 2 seconds)
press and hold the for 4 seconds.
4S
4S
Once
Once
Music Sharing
(Note: This feature works between two units of the same model.)
Create a Sharing Link:
On both devices, simultaneously press and hold the
[Phone button] and the [Volume +] for 4 seconds.
Connect/Disconnect Music Sharing
Press the [Phone button] and [Volume +] simultaneously once.
1. Operating the X8S
2. Operation of the Equipment
Create a Sharing Link:
Unit A Unit B
Connect to devices such as smartphones
Play music
press and hold for 4 seconds.
Connect/Disconnect Music Sharing
Unit A Unit B
Press the [Phone button] and [Volume +] simultaneously once.
※ Once the device has established a music-sharing connection,
subsequent use requires only connecting and disconnecting.
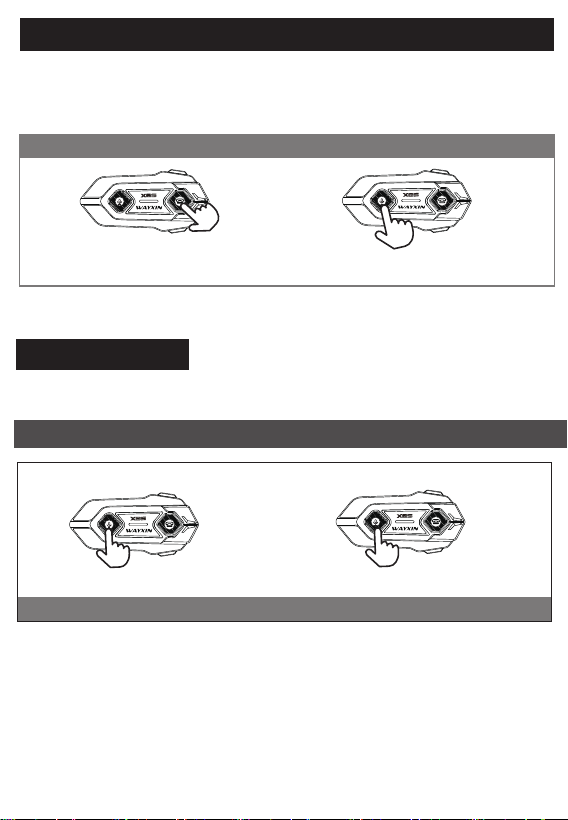
Switching Intercom modes: MESH Mode / Two Persons Mode
With the power on and the intercom turned off, Press the
‘Intercom button’ twice to switch between
MESH Mode / Two Persons Mode
Switching Intercom modes
Power ON
twice
Twice To Switch Modes
※"Two Persons Mode":
Can be used for pairing with compatible third-party products.
Two Persons Mode
Two-way intercom : Press and hold the ‘Intercom button’ to enter
Two-way intercom pairing mode, and the devices will pair automatically.
*If you need to pair with a third-party product, please follow these steps
Unit A Unit B
Press and hold the ‘intercom button’ Press and hold the ‘intercom button’
Pairing: Green light flashing rapidly Paired: Green light flashing slowly
Pairing with other companies’ Intercom
1. Press and hold the ‘Power button’ for 2 seconds to switch the device on.
2. Press the ‘Intercom button’ twice to enter Two Persons Mode.
3. Press and hold the ‘Intercom button’for 2 seconds to search for other devices.
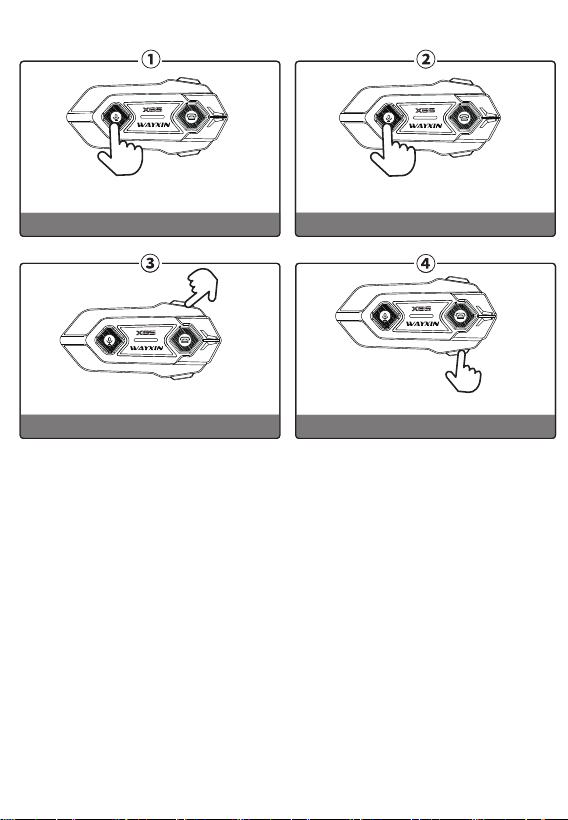
Examples of other operations
Press the ‘Intercom button’ once
Press and hold the ‘Intercom button’
Start/End Intercom Call
Exit Intercom Mode
Press and hold the volume+ to go up
Press and hold the volume- to go up
Turn up the volume
Turn down the volume
When you adjust the volume to the maximum or minimum level, will hear two beeps.
once
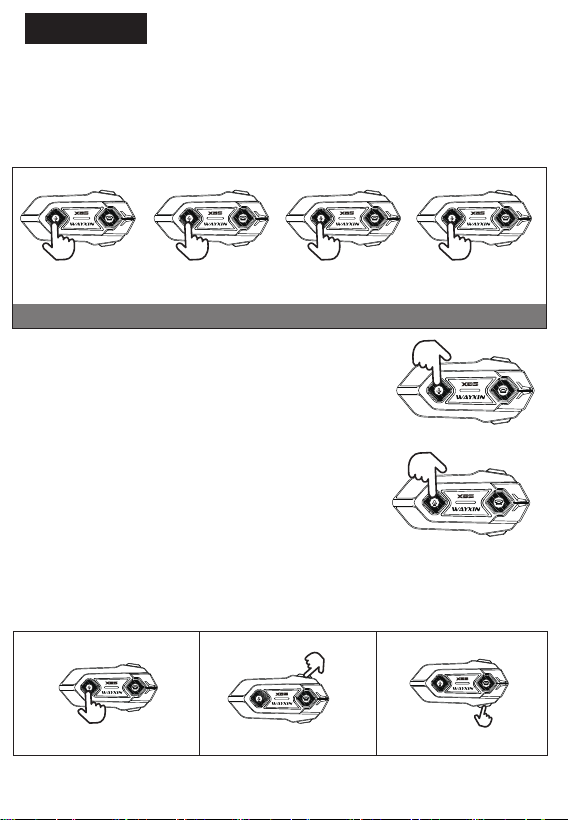
MESH Mode
Example of 4 Devices
※ MESH Public Intercom Call
Select MESH mode, press and hold the ‘Intercom button’ to enter the public channel,
and the call will begin once pairing is complete.
Please Note: Once pairing is complete, if you wish to add other intercom,
switch to MESH mode, enable the Intercom function, and then add them directly.
Unit A Unit B Unit C Unit D
Pairing: Green light flashing rapidly Paired: Green light flashing slowly
Press and hold the
‘intercom button’
Press and hold the
‘intercom button’
Press and hold the
‘intercom button’
Press and hold the
‘intercom button’
※ Enabling a private channel
During a MESH Intercom call,
pressthe ‘Intercom button 'Twice to enter a
private channel.
Please note: While the private channel is active,
other devices will be unable to join it.
※ Leaving a private channel
Whilst in a private channel,
press the ‘Intercom button’ twice to leave
The private channel
※Intercom Participant and Location Inquiry:
Press the [Intercom Button] once while in intercom mode to hear a voice
announcement of the current number of participants and your location.
※ Other examples of operations
When you adjust the volume to the maximum or minimum level, will hear two beeps.
Press and hold the ‘Intercom button’
Turn off Mesh Mode
Press and hold the volume+ to go up
Turn down the volumeTurn up the volume
Twice
Twice
Press and hold the volume- to go up

Notes:
1. During a MESH call, the MESH intercom call cannot be interrupted;
Press and hold the “Intercom Button” to exit MESH intercom mode.
2. Private channels do not have a memory function; when a private
channel is closed and then reopened, the previous private channel will
be deleted and the device will switch to the public channel.
3. To confirm the number of group members and their locations:
press the “Intercom Button” once, and the system will announce the
current number of participants and their locations.
4. Intercom channels are numbered sequentially from 1 to 4.
When one unit leaves a channel, the next unit in sequence will take its place.
5.Even if the master device goes offline, other Intercom can continue to
communicate. The MESH network remains fully operational, recognising
location IDs and adding other Intercom.
6. Any Intercom can be set to offline status; upon reconnection,
it will join the end of the group without affecting MESH operation.
7. Even if one or more Intercom are disconnected simultaneously,
this will not affect communication between the remaining devices.
※
How to pair this product with the R16
1. Press and hold the R16’s ‘Power button’ for 2 seconds to Power on,
then press and hold the ‘Intercom button’ for 3 seconds to Intercom mode.
2. Press and hold the “Power button” on the X8S for 2 seconds to Power on.
Press the “Intercom button” twice to switch to Two Persons Mode,
then press and hold the “Intercom button” for 2 seconds to search for other devices.
3. Once the connection is established, the device will enter intercom mode.
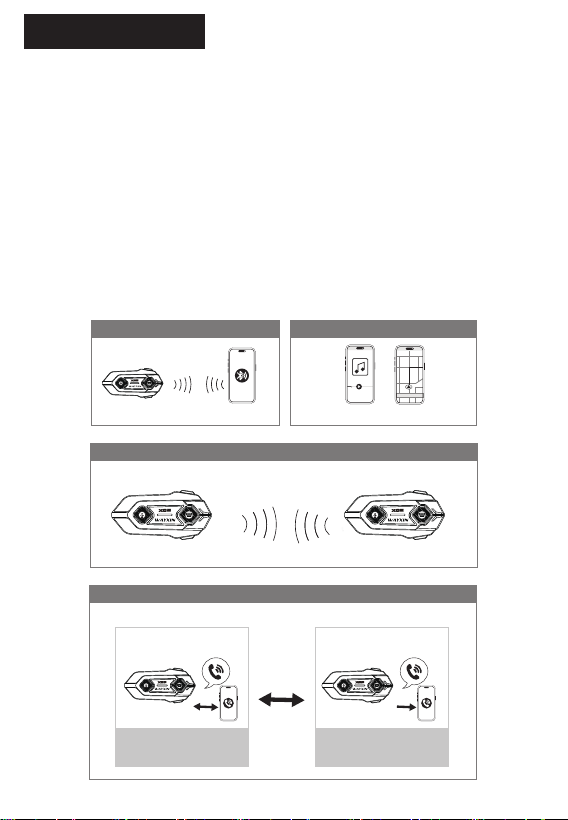
The X8S’s ‘Audio Multitasking’ feature allows you to make Intercom calls
whilst listening to music or navigation voice prompts.
Even if the connection is lost whilst driving due to distance, the device will
automatically re-establish the connection when you return to a range
where communication is clear (within a short period).
1. If you initiate a Intercom call whilst audio is playing from a device such
as a smartphone, the system will enter ‘Listening’ mode.
2. In “Audio Multitasking” mode, Intercom calls can continue as
normal on other devices even if you answer a phone call.
3. Phone calls will not be transmitted via the Intercom;
The device will automatically return to Intercom mode once the call ends.
Audio Multitasking
1. Operating the X8S
2. Operation of the Equipment
3. Operating the X8S
4. Status of the X8S
Connect to devices such as smartphones
Play music or navigation instructions
Start a Intercom call
Whilst listening to music or navigation instructions,
you can switch to ‘Intercom mode’ to make a Intercom call.
Unit A Unit B
Intercom call
Rider A smartphone voice
(audible only to Rider A)
Rider B smartphone voice
(audible only to Rider B)
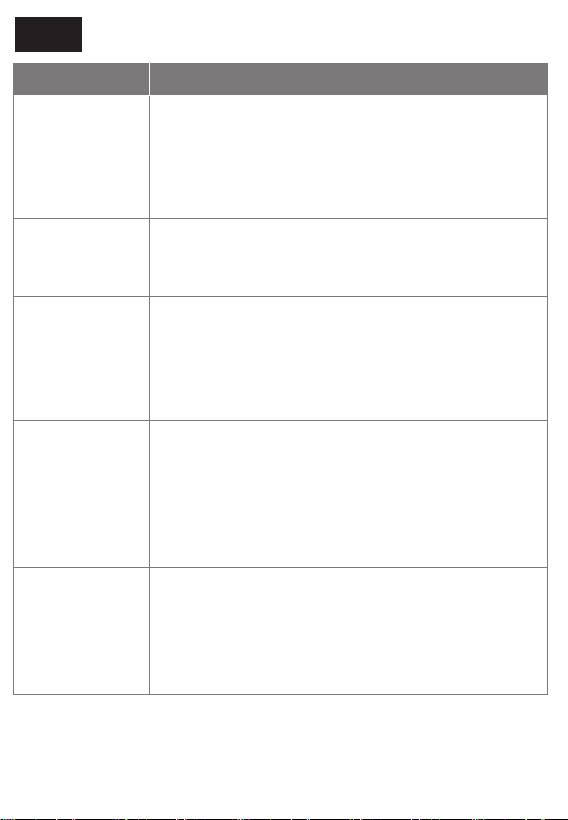
FAQ
Questions
Solution
No Sound
Unable to charge
Power will
not turn on
No sound
After pairing
Unable to pair
with intercoms
from other
manufacturers
Please check that the speaker and microphone jacks
are correctly connected, ensure the plugs are firmly inserted,
and adjust the volumeas required.Please note that the
controls for adjusting the phone volume
and the intercom volume are different.
Please check that the charging connector is properly
connected and that there is no damage to the connector.
We recommend using the supplied charging cable.
As the connection method may differ from intercoms
produced by othermanufacturers, we recommend that you
contact the retailer where you purchased the
product for further details regarding the pairing function.
Please charge the device; the battery may be flat.
Please check whether the device has been exposed to rain or
submerged in water. If this is the case, water may have
entered the device;
please wait until it has dried completely before
attempting to switch it on again.
Please check that the speaker and microphone jacks
are correctly connected.
Please check that the pairing procedure was carried
out correctly. Please reset the Intercom,
remove the device from your smartphone,
and then try pairing again.

Industry Canada (ISED) Compliance
This device contains licence-exempt transmitter(s)/receiver(s) that comply
with Innovation, Science and Economic Development Canada’s licence-exempt RSS(s).
Operation is subject to the following two conditions:
1. This device may not cause interference.
2 .This device must accept any interference, including interference that may
cause undesired operation of the device.
L’émetteur/récepteur exempt de licence contenu dans le présent appareil est
conforme aux CNR d’Innovation, Sciences et Développement économique Canada
applicables aux appareils radio exempts de licence. L’exploitation est autorisée aux
deux conditions suivantes :
1. L’appareil ne doit pas produire de brouillage;
2. L’appareil doit accepter tout brouillage radioélectrique subi, même si le brouillage
est susceptible d’en compromettre le fonctionnement.
-----------------------------------------------------------------------------------------
RF Exposure Information (SAR)
This EUT (Equipment Under Test) complies with SAR limits for general
population/uncontrolled exposure in ISED RSS-102 and has been tested in
accordance with the measurement methods and procedures specified in IEEE 1528
and IEC 62209. This equipment should be installed and operated with a minimum
distance of 0 mm between the radiator and your head. This device and its
antenna(s) must not be co-located or operating in conjunction with any other a
ntenna or transmitter.
* This device is intended for use only when mounted on a motorcycle helmet.

FCC Compliance Statement
This device complies with part 15 of the FCC Rules. Operation is subject to the following two
conditions: (1) this device may not cause harmful interference, and (2) this device must accept
any interference received, including interference that may cause undesired operation.
Note: This equipment has been tested and found to comply with the limits for a Class Digital
device, pursuant to part 15 of the FCC Rules. These limits are designed to provide reasonable
protection against harmful interference in a residential installation. This equipment generates,
uses, and can radiate radio frequency energy and, if not installed and used in accordance with
the instructions, may cause harmful interference to radio communications. However, there is
no guarantee that interference will not occur in a particular installation. If this equipment does
cause harmful interference to radio or television reception, which can be determined by
turning the equipment off and on, the user is encouraged to try to correct the interference
by one or more of the following measures:
● Reorient or relocate the receiving antenna.
● Increase the separation between the equipment and receiver.
● Connect the equipment to an outlet on a circuit different from that to which the receiver
is connected.
● Consult the dealer or an experienced radio/TV technician for help.
Caution: Any changes or modifications not expressly approved by the party responsible for
compliance could void the user's authority to operate the equipment.
RF Exposure Information
This equipment complies with FCC radiation exposure limits set forth for an uncontrolled
environment.
The warranty period for this product is one year from the date of purchase.
Specifications of this product are subject to change without prior notice
We apologize for any inconvenience. Due to the discontinuation of electronic
component manufacturing, production and sales of this product may cease.
To ensure prompt response to customer inquiries,
please confirm the following information before contacting us:
1、Product name
2、Purchase address and order number
3、Manufacturing serial number on the label attached to the back of the main body
4、Description of the issue (please provide detailed information, and when contacting us via email,
Please attach photos or videos of the malfunction symptoms)
Warranty Period and Customer Support
Email: support@wayxinmoto.com
Made in China
Model: X8S
support@wayxinmoto.com
Customer Support
*If you encounter any issues during use, please contact our support email.
ShenZhen City Xingyaoda Technology Co., Limited
Room 303, 3rd Floor, Xuchong Industrial Park, No. 8,
Road 7, Yangyong Industrial Zone, Songgang Street,
Bao'an District, Shenzhen,Guangdong,China