
Technical Support and E-Warranty Certificate www.vevor.com/support
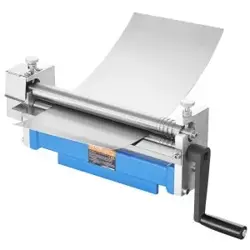
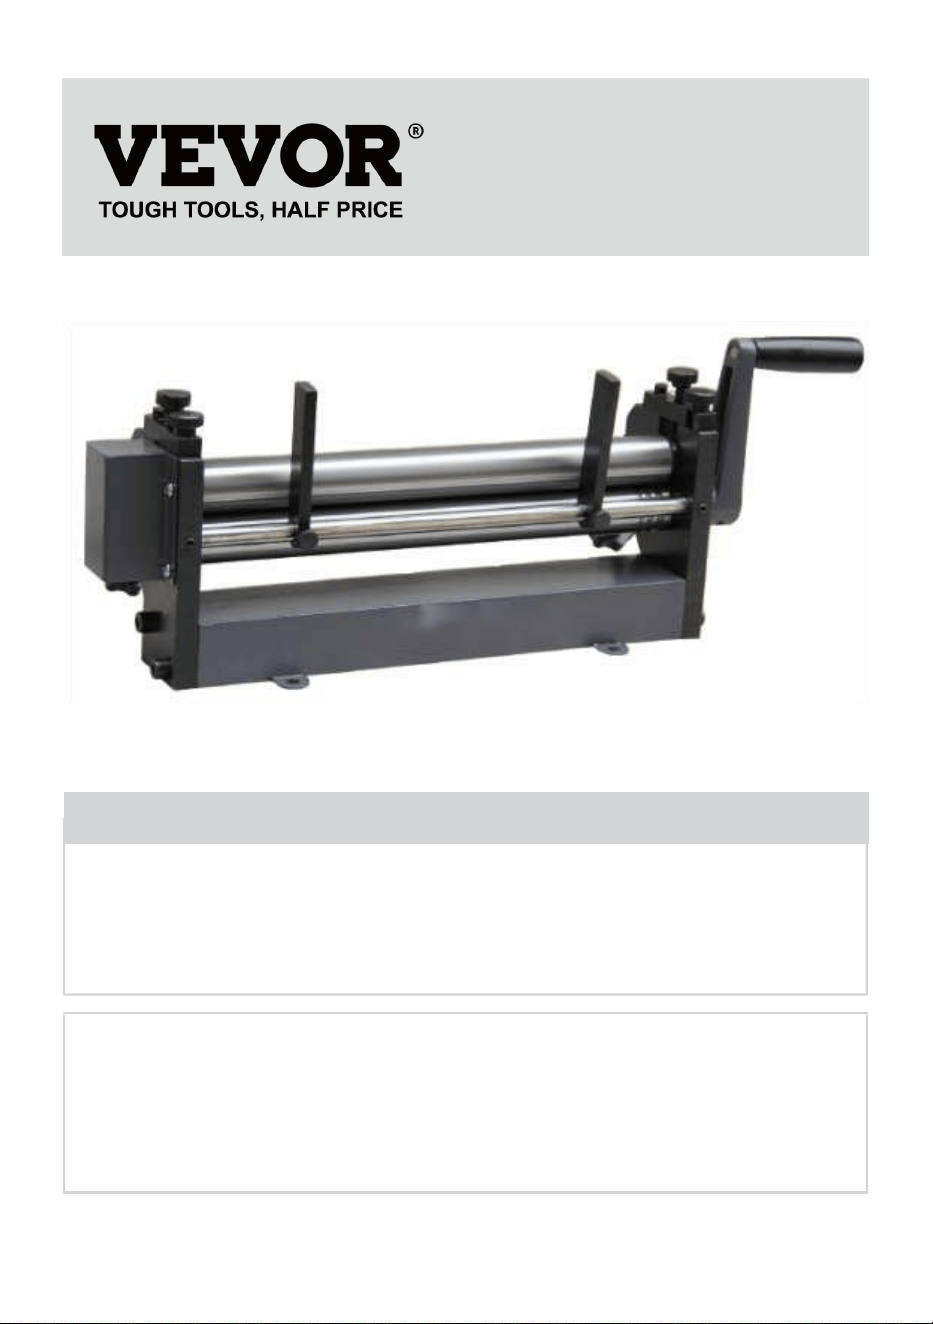
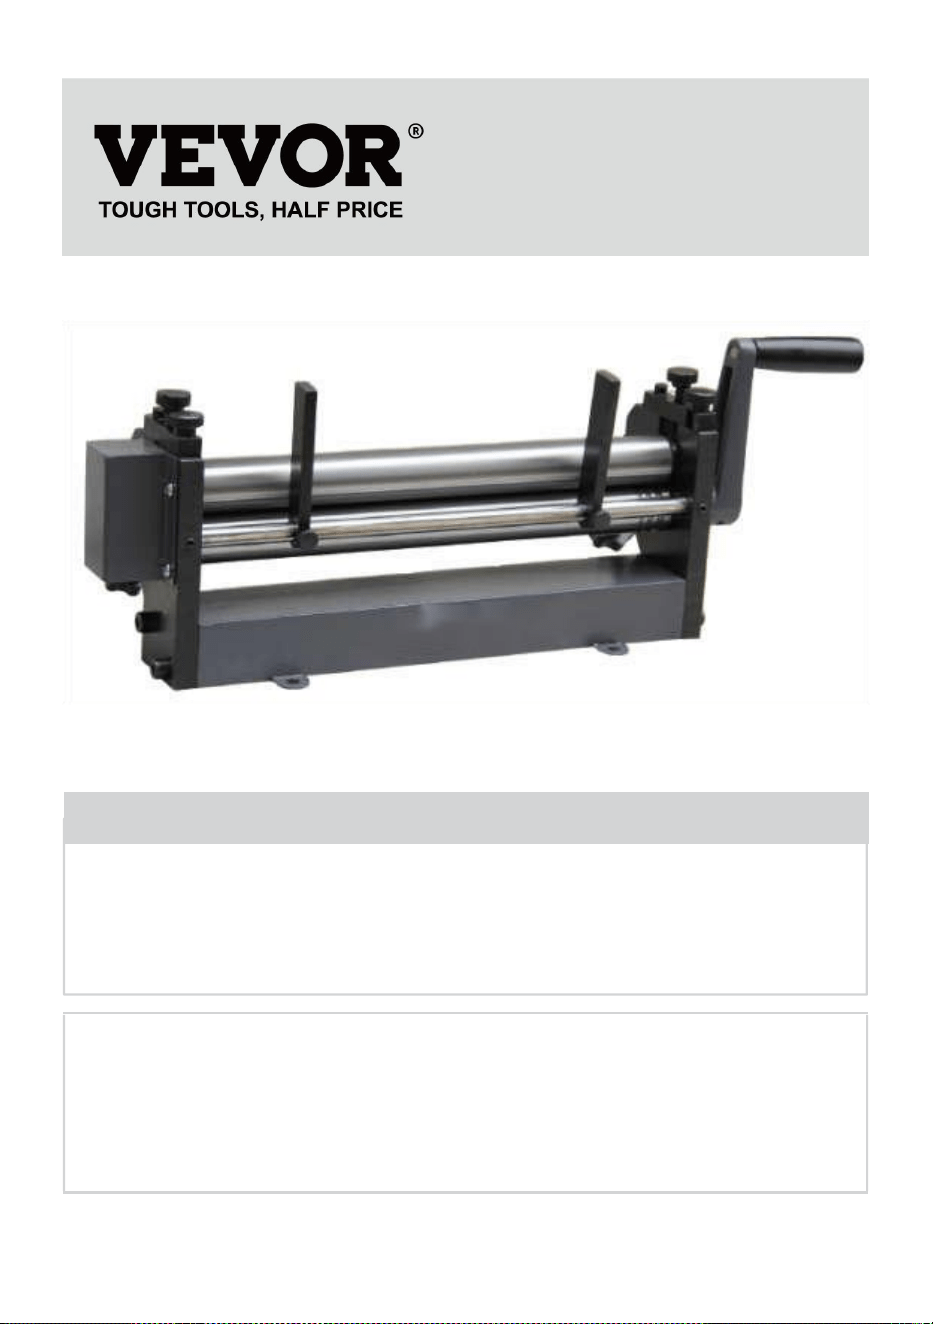
VENEER REELING MACHINE
OPERATION MANUAL
MODEL:W01-1.0X320
We continue to be committed to provide you tools with competitive price.
"Save Half", "Half Price" or any other similar expressions used by us only represents an
estimate of savings you might benefit from buying certain tools with us compared to the major
top brands and does not necessarily mean to cover all categories of tools offered by us. You
are kindly reminded to verify carefully when you are placing an order with us if you are
actually saving half in comparison with the top major brands.
- 1 -
MODEL:W01-1.0X320
Have product questions? Need technical support? Please feel free to
contact us:
Technical Support and E-Warranty Certificate
www.vevor.com/support
NEED HELP? CONTACT US!
This is the original instruction, please read all manual instructions
carefully before operating. VEVOR reserves a clear interpretation of our
user manual. The appearance of the product shall be subject to the
product you received. Please forgive us that we won't inform you again if
there are any technology or software updates on our product.
VENEER REELING
MACHINE

- 2 -
Warning-To reduce the risk of injury, user must read
instructions manual carefully.
SPECIFICATIONS
Model......................................................................................W01-1.0X320
Minimum Roll Diameter......................................................................45mm
Maximum Roll Length.......................................................................320mm
Max. Thickness.....................................................................................1mm
Standard accessories
UNPACKING
The SLIP ROLL is shipped from the manufacture in a carefully packed
Carton box. Thoroughly inspect the product upon opening the package.
After unpacking the unit, carefully inspect for any damage that may have
occurred during transit.If damage has occurred, shipping damage claims
must be filed with the carrier and are the responsibility of the user.Check
for completeness. Immediately report missing parts to dealer.Carefully
open crate and unbolt brake from shipping pallet and remove from crate
using heavy duty lifting equipment such as an overhead crane.
PART NO.
DESCRIPTION
QTY
1
Planker
1
2
Adjusting bolt
4
3
Handle
1
WARNING
The warnings, cautions and instructions discussed in this
instructions or situations that could occur. It must be
understood by the operator that common sense and
caution are factors which cannot be built into this product,
but must be supplied by the operator.

- 3 -
Save this manual
You will need this manual for the safety instruction,assembly
instruction,operating procedures, parts list, and diagram. Write your invoice
number on the inside front cover. Put both your manual and invoice in a
safe, dry place for future reference.
Important safety precautions
1.Keep work area clean. Cluttered area sinvite injuries.
2.Observe work area conditions. Do not use machines or power tools in
damp or wet locations. Don’t expose to rain. Keep work area well lighted.
Do not use electrically powered tools in the presence of flammable gases
or liquids.
3.Keep children away. Children must ever be allowed in the work area. Do
not let them handle machines, tools, or extension cords.
4.Store idle equipment. When not in use,tools must be stored in a dry
location to inhibit rust. Always lock up tools and keep them out of reach of
children.
5.Do not force tool. It will do the job better and more safety at the rate for
which it was intended. Do not use in appropriate attachments in an attempt
to exceed the tool capacity.
6.Use the right tool for the job. Do not attempt to force a small tool or
attachment to do the work of a large industrial tool. Do not use a tool for a
purpose for which it was not intended.
7.Dress properly. Do not wear loose clothing of jewelry as they can be
caught in moving parts. Protective, electrically non-conductive clothes and
non-skid footwear are recommended when working.Wear restrictive hair
covering to contain long hair.
8.Use eye and ear protection. Always wear ISO approved impact safety
goggles.Wear a full-face shield if you are producing metal filings or wood
chips.Wear an ISO approved dust mask or respirator when working around
metal,and chemical dusts and mists.
9.Do not overreach. Keep proper footing and balance at all times. Do not
reach over or across running machine.
10.Maintain tools with care. Keep tools sharp and clean for better and safer

- 4 -
performance. Follow instructions for lubricating and changing
accessories.The handles must be kept clean, dry, and free from oil and
grease at all times.
11.Stay alert. Watch what you are doing;use common sense. Do not
operate any tool when you are tried.
12.Check for damaged parts. Before using any tool, any part that appears
damaged should be carefully checked to determine that it will operate
properly and perform its intended function. Check for alignment and
binding of moving parts;any broken parts or mounting fixtures;and any
other condition that may affect proper operation. Any part that is damaged
should be properly repaired or replaced by a qualified technician.
13.Guard against electric shock. Prevent body contact with grounded
surfaces such as pipes, radiators, ranges, and refrigerator enclosures.
14.Replacement parts and accessories.When servicing, use only identical
replacement parts. Use of any other parts will void the warranty. Only use
accessories intended for use with this tool.Approved accessories are
available from the distributor.
15.Do not operate tool if under the influence of alcohol or drugs. Read
warning labels on prescriptions to determine if your judgment of reflexes
are impaired while taking drugs. If there is any doubt, do not operate the
tool.
OPERATION
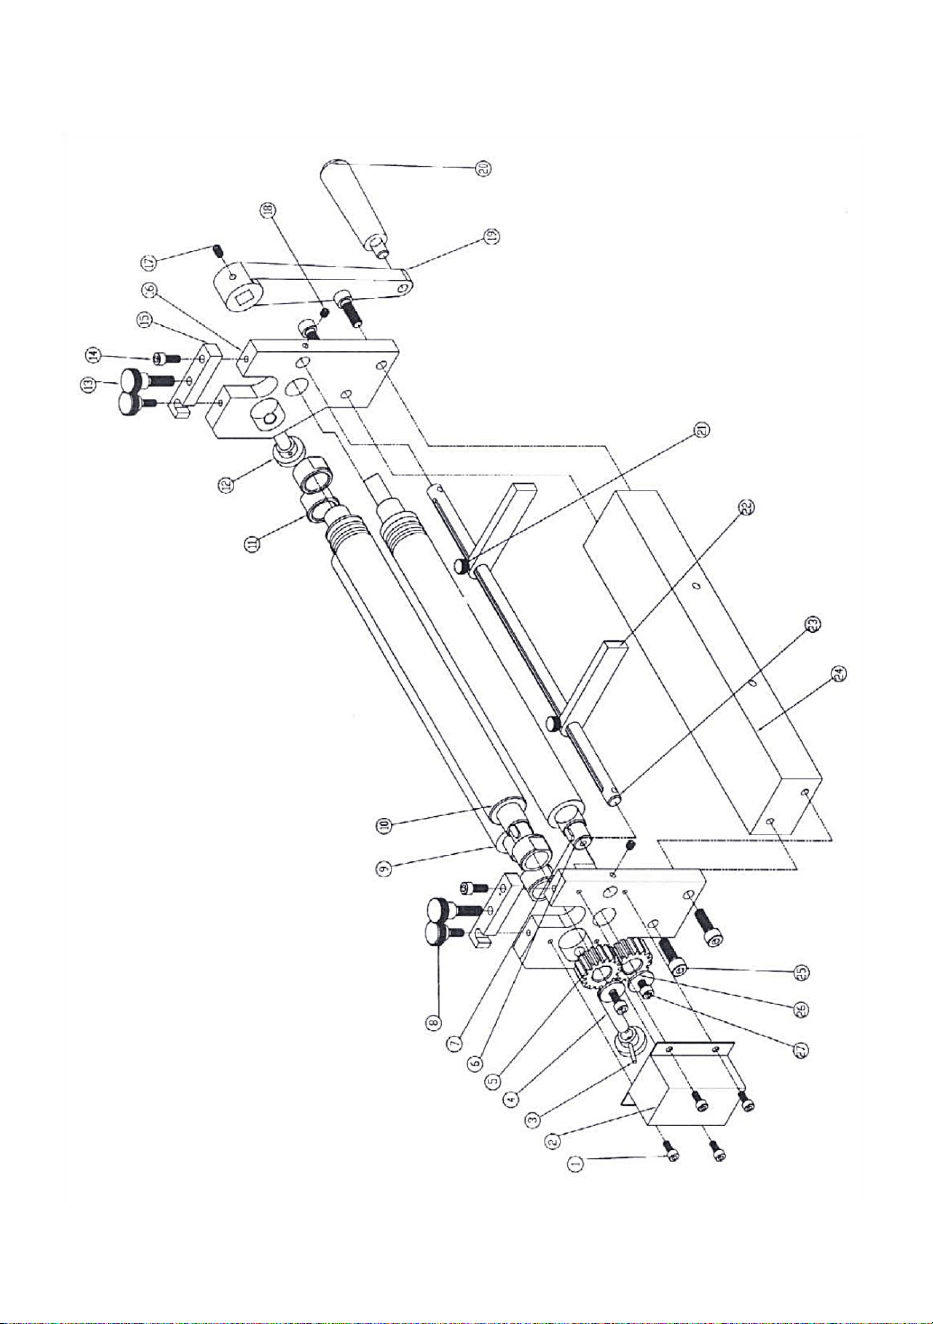
1. Mount the Slip Roll machine to a bench by bolting the base of the
machine(#24) to the bench. Refer to the Parts Diagram.
2. Before using, check the mounting and adjustment of this machine.
Rotate the Handle (#19/#20) and check whether the two gears (#5) have
good, firm contact with each other. Shafts 1, 2 and 3 should be clean and
free of metal debris. Refer to the Parts Diagram.
3. Adjust distance between Shaft 1 (#6)and Shaft 2 (#10) if
necessary.b.The distance between Shaft 2 (#10) and Shaft 1 (#6) can be
adjusted by turning the Adjusting Bolts (#12) and (#4)c.To decrease the
distance between the two shafts, turn the Adjusting Bolt (#12)and (#4)

- 5 -
clockwise.d.To increase the distance, turn the Adjusting Bolt (#12) and
(#4)counterclockwise.
4. Insert the steel plate between Shaft 1(#6) and Shaft 3 (#9). Tighten
Fixing bolt(#8), Adjusting bolt(#13), Screw M6X22(#14), Pressing plate
(#15). Rotate the handle (#19/#20), meanwhile screw down the Nut 3X12
(#3), pole (#4), knob 10X40(#12) inside, push the Shaft2 (#10) higher
according to the diameter of the roll.
5. After finished the rolling. Loosen the Fixing bolt (#8), Adjusting bolt
(#13),Screw M6X22 (#14), circumgy rate the pressing plate (#15) for
semicircle, push the Shaft1 (#6) up, remove the steel plate from the right.
WARNING: Keep the hands away from the shafts and metal plate during
operation. Do not attempt to form rolls from materials other than those
specified.
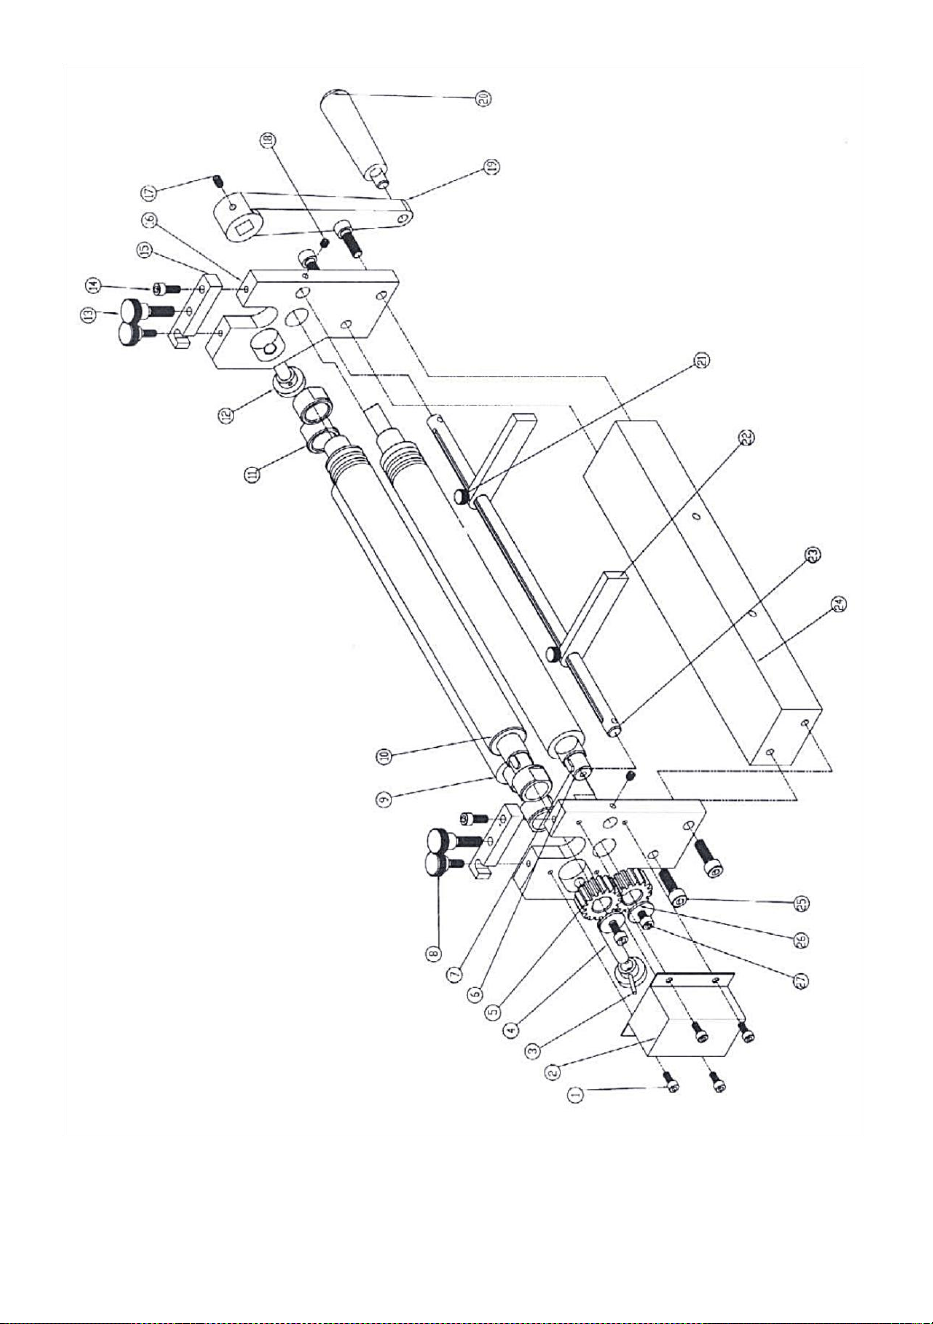
PARTS LIST
Item
Description
Qty
Item
Description
Qty
1
Screw M5X12
4
15
Pressing plate
2
2
Shield
1
16
Wall
2
3
Nut 3X22
2
17
Screw M6X12
1
4
Pole
2
18
Fixing bolt M6X8
2
5
Gear
2
19
Handle
1
6
Shaft1
1
20
Turning gripe M10X80
1
7
Key 5X12
2
21
Fixing bolt
2
8
Fixing bolt
2
22
baffle
2
9
Shaft3
1
23
Shaft
1
10
Shaft2
1
24
Base
1
11
Bushing
4
25
Screw M8X25
4
12
Knob 10X40
2
26
Washer
2
13
Adjusting Bolt
2
27
Screw M6X12
2
14
Screw M6X12
2
- 6 -
Diagram:


- 2 -
Technique Certificat d'assistance et de garantie électronique
www.vevor.com/support
MACHINE À DÉVIDER LE PLACAGE
MANUEL D'UTILISATION
MODÈLE : W01-1.0X320
We continue to be committed to provide you tools with competitive price.
"Save Half", "Half Price" or any other similar expressions used by us only represents an
estimate of savings you might benefit from buying certain tools with us compared to the major
top brands and does not necessarily mean to cover all categories of tools offered by us. You
are kindly reminded to verify carefully when you are placing an order with us if you are
actually saving half in comparison with the top major brands.

- 3 -
- 1 -
MODÈLE : W01-1.0X320
Have product questions? Need technical support? Please feel free to
contact us:
Technical Support and E-Warranty Certificate
www.vevor.com/support
NEED HELP? CONTACT US!
This is the original instruction, please read all manual instructions
carefully before operating. VEVOR reserves a clear interpretation of our
user manual. The appearance of the product shall be subject to the
product you received. Please forgive us that we won't inform you again if
there are any technology or software updates on our product.
VENEER REELING
MACHINE

- 2 -
Avertissement - Pour réduire le risque de blessure,
l'utilisateur doit lire attentivement le manuel d'instructions.
SPECIFICATIONS
Modèle....................................................................................... ..
W01-1.0X320
Diamètre minimal du rouleau .................................................................. .....
45 mm
Longueur maximale du
roulea
u..........
............
............
............
................... ..320 mm
Épaisseur max ............................................................................... .......1
mm
Accessoires standards
UNPACKING
Le SLIP ROLL est expédié depuis le fabrication dans un carton
soigneusement emballé boîte. Inspectez soigneusement le produit
ouverture du colis. Après avoir déballé le unité, inspectez soigneusement
tout dommage qui peut avoir eu lieu pendant le transport. Si des
dommages se sont produits, l'expédition les réclamations pour dommages
doivent être déposées auprès du transporteur et sont sous la
PIÈCE N°
DESCRIPTION
Qté
1
Planeur
1
2
Boulon de réglage
4
3
Poignée
1

- 3 -
responsabilité du utilisateur.Vérifiez l'exhaustivité. Immédiatement signaler
les pièces manquantes au concessionnaire.Ouvrez soigneusement la
caisse et dévissez le frein de la palette d'expédition et retirer de caisse
utilisant un équipement de levage robuste comme un pont roulant.
Conservez ce manuel
Vous aurez besoin de ce manuel pour la sécurité instructions, instructions
de montage, procédures d'utilisation, liste des pièces et diagramme.
Écrivez votre numéro de facture sur la couverture intérieure. Mettez vos
deux manuel et facture dans un endroit sûr et sec pour référence future.
Précautions de sécurité importantes
1. Gardez la zone de travail propre. Zone encombrée blessures graves.
2. Observez les conditions de la zone de travail. Ne utiliser des machines
ou des outils électriques dans des endroits humides ou endroits humides.
Ne pas exposer à la pluie. Conserver zone de travail bien éclairée. Ne pas
utiliser outils électriques en présence de gaz ou de liquides inflammables.
3. Gardez les enfants à l'écart. Les enfants doivent ne sera jamais autorisé
dans la zone de travail. Ne laissez-les manipuler des machines, des outils
ou rallonges.
4. Rangez l'équipement inutilisé. Lorsqu'ils ne sont pas utilisés, les outils
doivent être stockés dans un endroit sec pour éviter toute détérioration.
inhibe la rouille. Verrouillez toujours les outils et conservez-les les garder
hors de portée des enfants.
5. Ne forcez pas l'outil. Il fera mieux le travail et plus de sécurité au rythme
auquel il était prévu. Ne pas utiliser dans approprié pièces jointes dans le
but de dépasser les capacité de l'outil.
AVERTISSEMENT
Les avertissements, précautions et instructions discuté dans
ces instructions ou situations qui pourrait se produire. Il doit
être compris par l'opérateur qui a du bon sens et
la prudence sont des facteurs qui ne peuvent pas être
construits dans ce produit, mais doit être fourni par
l'opérateur.

- 4 -
6. Utilisez l'outil adapté au travail. Ne tenter de forcer un petit outil ou un
accessoire pour faire le travail d'un gros outil industriel. ne pas utiliser un
outil à des fins pour lesquelles il n'était pas prévu.
7. Habillez-vous correctement. Ne portez pas de vêtements amples.
vêtements de bijoux car ils peuvent être attrapés dans les pièces mobiles.
Protection, électriquement vêtements non conducteurs et antidérapants
des chaussures sont recommandées pour travailler. Portez une couverture
de cheveux restrictive pour contenir cheveux longs.
8. Utilisez une protection pour les yeux et les oreilles. portez des lunettes
de protection contre les chocs homologuées ISO. Portez un écran facial
complet si vous êtes produire de la limaille de métal ou des copeaux de
bois. Portez un masque anti-poussière approuvé ISO ou respirateur
lorsque vous travaillez à proximité de métaux, de poussières et de
brouillards chimiques.
9. Ne vous penchez pas trop en avant. Gardez une bonne position et
l'équilibre à tout moment. Ne pas atteindre sur ou à travers une machine
en marche.
10. Entretenez les outils avec soin. Gardez les outils net et propre pour un
meilleur et plus sûr performances. Suivez les instructions pour lubrification
et changement des accessoires. Les poignées doivent être maintenues
propres, sèches et exempt d’huile et de graisse à tout moment.
11. Restez vigilant. Surveillez ce que vous faites, faites preuve de bon
sens. N'utilisez aucun outil lorsque vous êtes éprouvé.
12.Vérifiez les pièces endommagées. Avant en utilisant n'importe quel outil,
n'importe quelle pièce qui apparaît endommagé doit être soigneusement
vérifié pour déterminer qu'il fonctionnera correctement et remplir sa
fonction prévue. Vérifiez l'alignement et la liaison des pièces mobiles ;
toute pièce ou tout dispositif de montage cassé ; et toute autre condition
pouvant affecter bon fonctionnement. Toute pièce qui est endommagé doit
être correctement réparé ou remplacé par un technicien qualifié.
14.Protégez-vous contre les chocs électriques. Prévenez contact du corps
avec des surfaces au sol tels que les tuyaux, les radiateurs, les cuisinières
et enceintes de réfrigérateur.
14. Pièces de rechange et accessoires. Lors de l'entretien, utilisez

- 5 -
uniquement des pièces identiques. pièces de rechange. Utilisation de toute
autre pièce annulera la garantie. Utilisez uniquement accessoires destinés
à être utilisés avec cet outil. Des accessoires approuvés sont disponibles
auprès de le distributeur.
15. N'utilisez pas l'outil s'il est sous influence de l'alcool ou de drogues. Lire
étiquettes d'avertissement sur les ordonnances déterminer si votre
jugement des réflexes est affaibli par la prise de drogues. S'il y a des En
cas de doute, n'utilisez pas l'outil.
OPERATION
6. Monter la machine Slip Roll sur un établi en boulonnant la base de la
machine (#24) à le banc. Reportez-vous au schéma des pièces.
7. Avant utilisation, vérifiez le montage et réglage de cette machine. Faites
tourner le Manipulez (#19/#20) et vérifiez si le deux engrenages (#5) ont
un bon contact ferme les uns avec les autres. Les arbres 1, 2 et 3 doivent
être propre et exempt de débris métalliques. Reportez-vous à le schéma
des pièces.
8. Ajustez la distance entre l'arbre 1 (#6) et l'arbre 2 (#10) si
nécessaire.b.La distance entre l'arbre 2 (#10) et L'arbre 1 (#6) peut être
ajusté en tournant les boulons de réglage (#12) et (#4)c.Pour diminuer la
distance entre les deux arbres, tournez le boulon de réglage (#12) et (#4)
dans le sens des aiguilles d'une montre. d. Pour augmenter la distance,
tournez le Réglage du boulon (#12) et (#4) dans le sens inverse des
aiguilles d'une montre.
9. Insérez la plaque d'acier entre l'arbre 1 (#6) et l'arbre 3 (#9). Serrez le
boulon de fixation (#8), le boulon de réglage (#13), la vis M6X22 (#14), la
plaque de pression (#15). Faites tourner le poignée (#19/#20), en
attendant visser l'écrou 3X12 (#3), le poteau (#4), le bouton 10X40 (#12) à
l'intérieur, poussez l'arbre 2 (#10) plus haut selon le diamètre du rouleau.
10.Après avoir terminé le roulage. Desserrez le Boulon de fixation (#8),
boulon de réglage (#13), vis M6X22 (#14), circumgy évaluer le plaque de
pression (#15) pour demi-cercle, pousser l'arbre 1 (#6) vers le haut, retirez
la plaque d'acier de la droite.

- 6 -
AVERTISSEMENT : Gardez les mains éloignées les arbres et la plaque
métallique pendant opération. N'essayez pas de former des rouleaux à
partir de matériaux autres que ceux spécifiés.
PARTS LIST
Article
Description
Quan
tité
Article
Description
Quan
tité
1
Vis M5X12
4
15
Plaque de pressage
2
2
Bouclier
1
16
Mur
2
3
Écrou 3X22
2
17
Vis M6X12
1
4
Pôle
2
18
Boulon de fixation
M6X8
2
5
Engrenage
2
19
Poignée
1
6
Arbre 1
1
20
Tournevis à griffes
M10X80
1
7
Clé 5X12
2
21
Boulon de fixation
2
8
Boulon de fixation
2
22
baffle
2
9
Arbre 3
1
23
Arbre
1
10
Arbre 2
1
24
Base
1
11
Bague
4
25
Vis M8X25
4
12
Bouton 10X40
2
26
Rondelle
2
13
Boulon de réglage
2
27
Vis M6X12
2
14
Vis M6X12
2
Diagramme:

- 7 -


- 2 -
Technisch Support und E-Garantie-Zertifikat www.vevor.com/support
FURNIERHASPELMASCHINE
BEDIENUNGSANLEITUNG
MODELL: W01-1.0X320
We continue to be committed to provide you tools with competitive price.
"Save Half", "Half Price" or any other similar expressions used by us only represents an
estimate of savings you might benefit from buying certain tools with us compared to the major
top brands and does not necessarily mean to cover all categories of tools offered by us. You
are kindly reminded to verify carefully when you are placing an order with us if you are
actually saving half in comparison with the top major brands.

- 1 -
MODELL: W01-1.0X320
Have product questions? Need technical support? Please feel free to
contact us:
Technical Support and E-Warranty Certificate
www.vevor.com/support
NEED HELP? CONTACT US!
This is the original instruction, please read all manual instructions
carefully before operating. VEVOR reserves a clear interpretation of our
user manual. The appearance of the product shall be subject to the
product you received. Please forgive us that we won't inform you again if
there are any technology or software updates on our product.
VENEER REELING
MACHINE

- 2 -
Warnung: Um das Verletzungsrisiko zu verringern, muss
der Benutzer die Bedienungsanleitung sorgfältig lesen.
SPECIFICATIONS
Modell................................................................................... ..
W01-1.0x320
Minimaler Rollendurchmesser.............. ..................................... ..... 45 mm
Maximale
Rollenlänge.................. ................................................... ..320mm
Max.
Dicke...
............
............
........ ...
.................................................. .......1mm
Standardzubehör
UNPACKING
Der Versand der SLIP ROLL erfolgt ab Herstellung in einem sorgfältig
verpackten Karton Karton. Überprüfen Sie das Produkt gründlich, wenn
Öffnen der Verpackung. Nach dem Auspacken des Überprüfen Sie das
Gerät sorgfältig auf etwaige Schäden, Transportschäden auftreten. Bei
Transportschäden ist der Versand Schadensersatzansprüche sind geltend
zu machen bei der Träger und liegen in der Verantwortung des
Benutzer.Auf Vollständigkeit prüfen. Sofort Fehlende Teile dem Händler
melden.Kiste vorsichtig öffnen und Bremse abschrauben von der
TEIL NR.
BESCHREIBUNG
Menge
1
Planker
1
2
Einstellschraube
4
3
Handhaben
1

- 3 -
Versandpalette und entfernen Sie Kiste mit Schwerlasthebezeugen wie
beispielsweise ein Brückenkran.
Bewahren Sie dieses Handbuch auf
Sie benötigen dieses Handbuch zur Sicherheit Anleitung,
Montageanleitung, Betriebsanleitung, Teileliste und Diagramm. Schreiben
Sie Ihre Rechnungsnummer auf die Innenseite des vorderen Umschlags.
Legen Sie beide Handbuch und Rechnung an einem sicheren, trockenen
Ort für zukünftige Bezugnahme.
Wichtige Sicherheitsvorkehrungen
1. Halten Sie den Arbeitsbereich sauber. Unordentlicher Bereich zu
Verletzungen führen.
2.Beachten Sie die Bedingungen am Arbeitsplatz. Benutzen Sie
Maschinen oder Elektrowerkzeuge in feuchten oder feuchten Orten. Nicht
dem Regen aussetzen. Arbeitsbereich gut beleuchtet. Verwenden Sie nicht
Elektrowerkzeuge in der Gegenwart von brennbaren Gasen oder
Flüssigkeiten.
3. Halten Sie Kinder fern. Kinder müssen dürfen sich niemals im
Arbeitsbereich aufhalten. lassen Sie sie mit Maschinen, Werkzeugen oder
Verlängerungskabel.
4. Lagern Sie ungenutzte Geräte. Wenn sie nicht verwendet werden,
müssen die Werkzeuge an einem trockenen Ort aufbewahrt werden, um
Rost vorbeugen. Werkzeuge immer wegschließen und aufbewahren
Bewahren Sie sie außerhalb der Reichweite von Kindern auf.
5. Wenden Sie keine Gewalt an. Das wird die Arbeit besser erledigen und
WARNUNG
Die Warnungen, Hinweise und Anweisungen in dieser
Anleitung besprochenen Situationen das könnte passieren.
Es muss verstanden werden von der Betreiber, dass
gesunder Menschenverstand und
Vorsicht sind Faktoren, die nicht gebaut werden können in
dieses Produkt, sondern muss geliefert werden durch der
Betreiber.

- 4 -
mehr Sicherheit bei dem Tempo, für das es nicht verwenden in geeignet
Anhänge in dem Versuch, die Werkzeugkapazität.
6.Verwenden Sie das richtige Werkzeug für die jeweilige Aufgabe.
Versuchen Sie, ein kleines Werkzeug oder einen Aufsatz mit Gewalt
einzusetzen die Arbeit eines großen Industriewerkzeugs zu erledigen.
Verwenden Sie ein Werkzeug nicht für einen Zweck, für den es war nicht
beabsichtigt.
7. Kleiden Sie sich angemessen. Tragen Sie keine weite Kleidung oder
Schmuck, da diese sich verfangen können in beweglichen Teilen. Schutz,
elektrisch nichtleitende Kleidung und rutschfeste Bei der Arbeit werden
Schuhe empfohlen. Tragen Sie eine einschränkende Haarbedeckung, um
lange Haare.
8.Verwenden Sie Augen- und Gehörschutz. Tragen Sie eine ISO-geprüfte
Schutzbrille. Tragen Sie einen Vollgesichtsschutz, wenn Sie Metallspäne
oder Holzspäne produzieren. Tragen Sie eine ISO-geprüfte Staubmaske
oder Atemschutzmaske bei der Arbeit mit Metall, chemischem Staub und
Nebel.
9. Überstrecken Sie sich nicht. Achten Sie auf einen sicheren Stand. und
das Gleichgewicht zu halten. Greifen Sie nicht über oder quer zur
laufenden Maschine.
10.Pflege der Werkzeuge mit Sorgfalt. Bewahren Sie Werkzeuge scharf
und sauber für bessere und sicherere Leistung. Befolgen Sie die
Anweisungen für Schmieren und Wechseln von Zubehör. Die Griffe
müssen sauber, trocken und stets frei von Öl und Fett.
11. Bleiben Sie wachsam. Achten Sie darauf, was Sie tun, und verwenden
Sie Ihren gesunden Menschenverstand. Werkzeug, wenn Sie ausprobiert
werden.
12.Überprüfen Sie, ob Teile beschädigt sind. mit jedem Werkzeug, jedem
Teil, das erscheint beschädigt sollten sorgfältig überprüft werden, um
sicherzustellen, dass es ordnungsgemäß funktioniert und seine
beabsichtigte Funktion erfüllen. Überprüfen Sie Ausrichtung und
Blockierung beweglicher Teile; defekte Teile oder Montagevorrichtungen;
und alle anderen Bedingungen, die sich auswirken können
ordnungsgemäßen Betrieb. Alle Teile, die beschädigte Teile müssen

- 5 -
ordnungsgemäß repariert werden oder von einem qualifizierten Techniker
ausgetauscht werden.
15.Schützen Sie sich vor Stromschlägen. Körperkontakt mit geerdeten
Oberflächen wie Rohre, Heizkörper, Herde und Kühlschrankgehäuse.
14.Ersatzteile und Zubehör.Verwenden Sie bei der Wartung nur identische
Ersatzteile. Die Verwendung anderer Teile führen zum Erlöschen der
Garantie. Verwenden Sie nur Zubehör, das für die Verwendung mit diesem
Werkzeug vorgesehen ist. Zugelassenes Zubehör ist erhältlich bei der
Verteiler.
15. Betreiben Sie das Werkzeug nicht unter Einfluss von Alkohol oder
Drogen. Lesen Warnhinweise auf Rezepten Bestimmen Sie, ob Ihre
Beurteilung der Reflexe beeinträchtigt durch die Einnahme von Drogen.
Wenn es Im Zweifelsfall nehmen Sie das Gerät nicht in Betrieb.
OPERATION
11.Befestigen Sie die Slip-Roll-Maschine an einer Werkbank durch
Anschrauben der Maschinenbasis (#24) an die Werkbank. Siehe
Teilediagramm.
12.Vor dem Gebrauch die Montage und Einstellung dieser Maschine.
Drehen Sie den Griff (#19/#20) und prüfen Sie, ob die zwei Zahnräder (#5)
haben guten, festen Kontakt miteinander. Die Wellen 1, 2 und 3 sollten
sauber und frei von Metallresten sein. Siehe das Teilediagramm.
13.Passen Sie den Abstand zwischen Welle 1 (#6) und Welle 2 (#10) bei
Bedarf an.b.Der Abstand zwischen Welle 2 (#10) und Die Welle 1 (#6)
kann durch Drehen eingestellt werden die Einstellschrauben (#12) und
(#4)c.Um den Abstand zwischen den Um die beiden Wellen zu verbinden,
drehen Sie die Einstellschrauben (#12) und (#4) im Uhrzeigersinn.d.Um
den Abstand zu vergrößern, drehen Sie die Einstellschraube (#12) und (#4)
gegen den Uhrzeigersinn.
14.Setzen Sie die Stahlplatte zwischen Welle 1 (#6) und Welle 3 (#9) ein.
Ziehen Sie die Befestigungsschraube (#8), die Einstellschraube (#13), die
Schraube M6x22 (#14) und die Druckplatte (#15) fest. Drehen Sie die Griff
(#19/#20), in der Zwischenzeit festschrauben die Mutter 3X12 (#3), Stange

- 6 -
(#4), Knopf 10X40(#12) innen, schieben Sie die Welle2 (#10) höher je
nach Durchmesser der Rolle.
15.Nach dem Rollen lösen Sie die Befestigungsbolzen (#8), Einstellbolzen
(#13), Schraube M6x22 (#14), Circumgy bewerten Sie die Druckplatte (#15)
für Halbkreis, drücken die Welle1 (#6) nach oben, entfernen Sie die
Stahlplatte von rechts.
WARNUNG: Halten Sie die Hände fern von die Wellen und Metallplatten
während Versuchen Sie nicht, Rollen zu formen aus anderen als den
angegebenen Materialien.
PARTS LIST
Artikel
Beschreibung
Men
ge
Artikel
Beschreibung
Meng
e
1
Schraube M5X12
4
15
Pressplatte
2
2
Schild
1
16
Wand
2
3
Mutter 3X22
2
17
Schraube M6X12
1
4
Pole
2
18
Befestigungsschraube
M6X8
2
5
Gang
2
19
Handhaben
1
6
Welle1
1
20
Drehgriff M10X80
1
7
Schlüssel 5X12
2
21
Befestigungsbolzen
2
8
Befestigungsbolzen
2
22
Schallwand
2
9
Welle3
1
23
Welle
1
10
Welle2
1
24
Base
1
11
Buchse
4
25
Schraube M8X25
4
12
Knopf 10X40
2
26
Waschmaschine
2
13
Einstellschraube
2
27
Schraube M6X12
2
14
Schraube M6X12
2
Diagramm:

- 7 -


- 2 -
Tecnico Supporto e certificato di garanzia elettronica www.vevor.com/support
MACCHINA AVVOLGITRICE PER
IMPIALLACCIATURA
MANUALE OPERATIVO
MODELLO: W01-1.0X320
We continue to be committed to provide you tools with competitive price.
"Save Half", "Half Price" or any other similar expressions used by us only represents an
estimate of savings you might benefit from buying certain tools with us compared to the major
top brands and does not necessarily mean to cover all categories of tools offered by us. You
are kindly reminded to verify carefully when you are placing an order with us if you are
actually saving half in comparison with the top major brands.

- 3 -
- 1 -
MODELLO: W01-1.0X320
Have product questions? Need technical support? Please feel free to
contact us:
Technical Support and E-Warranty Certificate
www.vevor.com/support
NEED HELP? CONTACT US!
This is the original instruction, please read all manual instructions
carefully before operating. VEVOR reserves a clear interpretation of our
user manual. The appearance of the product shall be subject to the
product you received. Please forgive us that we won't inform you again if
there are any technology or software updates on our product.
VENEER REELING
MACHINE

- 2 -
Attenzione: per ridurre il rischio di lesioni, l'utente deve
leggere attentamente il manuale di istruzioni.
SPECIFICATIONS
Modello.................................................................................... ..
W01-1.0X320
Diametro minimo del rotolo............. .................................................... .....
45 mm
Lunghezza massima del
rotolo ..
............
............
............
............
................... ..320mm
Spessore
massimo..................................... ................................................................ ..
.....1mm
Accessori standard
UNPACKING
Il SLIP ROLL viene spedito dal produzione in un cartone accuratamente
imballato scatola. Ispezionare attentamente il prodotto su aprendo la
confezione. Dopo aver disimballato il unità, ispezionare attentamente per
eventuali danni che potrebbe essersi verificato durante il trasporto. Se si è
verificato un danno, la spedizione le richieste di risarcimento danni devono
N. PARTE
DESCRIZIONE
Quantità
1
Pianista
1
2
Bullone di regolazione
4
3
Maniglia
1

- 3 -
essere presentate all' vettore e sono di responsabilità del
utente.Controllare la completezza. Immediatamente segnalare le parti
mancanti al rivenditore. Aprire con attenzione la cassa e svitare il freno dal
pallet di spedizione e rimuovere da cassa utilizzando attrezzature di
sollevamento per carichi pesanti come una gru a ponte.
Salva questo manuale
Questo manuale ti servirà per la sicurezza istruzioni, istruzioni di
montaggio, procedure operative, elenco delle parti e diagramma. Scrivi il
numero della tua fattura su la copertina anteriore interna. Metti entrambi i
tuoi manuale e fattura in un luogo sicuro e asciutto per riferimento futuro.
Importanti precauzioni di sicurezza
1. Mantenere pulita l'area di lavoro. Area disordinata lesioni gravi.
2. Osservare le condizioni dell'area di lavoro. Non utilizzare macchine o
utensili elettrici in ambienti umidi o luoghi umidi. Non esporre alla pioggia.
Tenere area di lavoro ben illuminata. Non utilizzare utensili elettrici in
presenza di gas o liquidi infiammabili.
3.Tenere i bambini lontani. I bambini devono essere mai ammessi nell'area
di lavoro. Non lasciarli maneggiare macchine, utensili o prolunghe.
4. Conservare l'attrezzatura inutilizzata. Quando non vengono utilizzati, gli
utensili devono essere conservati in un luogo asciutto per inibire la ruggine.
Bloccare sempre gli utensili e tenerli tenerli fuori dalla portata dei bambini.
5. Non forzare l'utensile. Farà meglio il lavoro e più sicurezza al ritmo a cui
è era previsto. Non utilizzare in appropriato allegati nel tentativo di
superare il capacità dell'utensile.
6.Utilizzare lo strumento giusto per il lavoro. Non tentare di forzare un
piccolo utensile o accessorio per fare il lavoro di un grande strumento
AVVERTIMENTO
Le avvertenze, le precauzioni e le istruzioni discusso in
queste istruzioni o situazioni che potrebbe verificarsi. Deve
essere compreso da l'operatore che il buon senso e
la cautela sono fattori che non possono essere costruiti in
questo prodotto, ma deve essere fornito da l'operatore.

- 4 -
industriale. non utilizzare uno strumento per uno scopo per cui è stato
progettato non era previsto.
7.Vestiti in modo appropriato. Non indossare abiti larghi abbigliamento o
gioielli in quanto possono essere catturati nelle parti mobili. Protettivo,
elettricamente indumenti non conduttivi e antiscivolo si raccomandano
calzature adatte durante il lavoro.Indossare una copertura restrittiva per
contenere i capelli capelli lunghi.
8. Utilizzare protezioni per occhi e orecchie. Sempre indossare occhiali di
sicurezza antiurto approvati ISO. Indossare una visiera completa se si è
produzione di limatura di metallo o trucioli di legno.Indossare una
maschera antipolvere approvata ISO o respiratore quando si lavora in
presenza di metalli, polveri e nebbie chimiche.
9. Non sporgerti troppo. Mantieni un appoggio corretto e l'equilibrio in ogni
momento. Non raggiungere sopra o attraverso la macchina in funzione.
10. Mantieni gli utensili con cura. Tieni gli utensili affilato e pulito per un
migliore e più sicuro prestazioni. Seguire le istruzioni per lubrificazione e
sostituzione degli accessori. Le maniglie devono essere mantenute pulite,
asciutte e sempre privo di olio e grasso.
11. Resta vigile. Guarda cosa stai facendo; usa il buon senso. Non
azionare alcun strumento quando sei provato.
12. Controllare eventuali parti danneggiate. Prima utilizzando qualsiasi
strumento, qualsiasi parte che appare danneggiato deve essere
attentamente controllato per determinare che funzionerà correttamente e
svolgere la sua funzione prevista. Controllare per allineamento e legatura
delle parti mobili; eventuali parti rotte o dispositivi di montaggio; e qualsiasi
altra condizione che possa influire corretto funzionamento. Qualsiasi parte
che è danneggiato deve essere riparato correttamente o sostituito da un
tecnico qualificato.
16.Proteggersi dalle scosse elettriche. Prevenire contatto del corpo con
superfici messe a terra come tubi, radiatori, cucine e involucri per
frigoriferi.
14. Parti di ricambio e accessori. Durante la manutenzione, utilizzare solo
parti identiche parti di ricambio. Utilizzo di altre parti invaliderà la garanzia.
Utilizzare solo accessori destinati all'uso con questo strumento. Gli

- 5 -
accessori approvati sono disponibili presso il distributore.
15. Non utilizzare l'utensile se sotto la influenza di alcol o droghe. Leggi
etichette di avvertenza sulle prescrizioni per determinare se il tuo giudizio
sui riflessi è alterata durante l'assunzione di farmaci. Se c'è qualche In
caso di dubbi, non utilizzare l'utensile.
OPERATION
16.Montare la macchina Slip Roll su un banco imbullonando la base della
macchina (#24) a la panca. Fare riferimento allo schema delle parti.
17.Prima dell'uso, controllare il montaggio e regolazione di questa
macchina. Ruotare la Maniglia (#19/#20) e controllare se il due ingranaggi
(#5) hanno un contatto buono e saldo tra loro. Gli alberi 1, 2 e 3
dovrebbero essere pulito e privo di detriti metallici. Fare riferimento a lo
schema delle parti.
18.Se necessario, regolare la distanza tra l'albero 1 (#6) e l'albero 2
(#10).b. La distanza tra l'albero 2 (#10) e L'albero 1 (#6) può essere
regolato ruotando i bulloni di regolazione (#12) e (#4)c.Per diminuire la
distanza tra i due alberi, ruotare il bullone di regolazione (#12) e (#4) in
senso orario.d. Per aumentare la distanza, ruotare il Bullone di regolazione
(#12) e (#4) in senso antiorario.
19.Inserire la piastra in acciaio tra l'albero 1 (#6) e l'albero 3 (#9). Serrare il
bullone di fissaggio (#8), il bullone di regolazione (#13), la vite M6X22
(#14), la piastra di pressione (#15). Ruotare la maniglia (#19/#20), nel
frattempo avvitare il dado 3X12 (#3), il palo (#4), la manopola 10X40 (#12)
all'interno, spingere l'albero 2 (#10) più in alto in base al diametro del
rotolo.
20.Dopo aver terminato la laminazione, allentare il Bullone di fissaggio (#8),
Bullone di regolazione (#13), Vite M6X22 (#14), Circonferenza Valuta il
piastra di pressione (#15) per semicerchio, spingere l'albero 1 (#6) verso
l'alto, rimuovere la piastra in acciaio da destra.
ATTENZIONE: tenere le mani lontane da gli alberi e la piastra metallica
durante operazione. Non tentare di formare rotoli da materiali diversi da

- 6 -
quelli specificati.
PARTS LIST
Articolo
Descrizione
Quan
tità
Articol
o
Descrizione
Quan
tità
1
Vite M5X12
4
15
Piastra di pressatura
2
2
Scudo
1
16
Parete
2
3
Dado 3X22
2
17
Vite M6X12
1
4
Palo
2
18
Bullone di fissaggio
M6X8
2
5
Ingranaggio
2
19
Maniglia
1
6
Albero1
1
20
Maniglia girevole
M10X80
1
7
Chiave 5X12
2
21
Bullone di fissaggio
2
8
Bullone di fissaggio
2
22
deflettore
2
9
Albero3
1
23
Lancia
1
10
Albero2
1
24
Base
1
11
Boccola
4
25
Vite M8X25
4
12
Manopola 10X40
2
26
Rondella
2
13
Bullone di regolazione
2
27
Vite M6X12
2
14
Vite M6X12
2
Diagramma:

- 7 -


- 2 -
Técnico Soporte y certificado de garantía electrónica www.vevor.com/support
MÁQUINA DE BOBINADO DE CHAPA
MANUAL DE OPERACIÓN
MODELO: W01-1.0X320
We continue to be committed to provide you tools with competitive price.
"Save Half", "Half Price" or any other similar expressions used by us only represents an
estimate of savings you might benefit from buying certain tools with us compared to the major
top brands and does not necessarily mean to cover all categories of tools offered by us. You
are kindly reminded to verify carefully when you are placing an order with us if you are
actually saving half in comparison with the top major brands.

- 1 -
MODELO: W01-1.0X320
Have product questions? Need technical support? Please feel free to
contact us:
Technical Support and E-Warranty Certificate
www.vevor.com/support
NEED HELP? CONTACT US!
This is the original instruction, please read all manual instructions
carefully before operating. VEVOR reserves a clear interpretation of our
user manual. The appearance of the product shall be subject to the
product you received. Please forgive us that we won't inform you again if
there are any technology or software updates on our product.
VENEER REELING
MACHINE

- 2 -
Advertencia: Para reducir el riesgo de lesiones, el usuario
debe leer atentamente el manual de instrucciones.
SPECIFICATIONS
Modelo.................................................................................. ..
W01-1.0X320
Diámetro mínimo del rollo............. ................................................... ..... 45
mm
Longitud máxima del
rollo.....
...........
...........
............
............
............
...... ..320 mm
Grosor máximo............................. ..................................................... .......1
mm
Accesorios estándar
UNPACKING
El SLIP ROLL se envía desde el Fabricación en una caja de cartón
cuidadosamente embalada. caja. Inspeccione minuciosamente el producto
al abriendo el paquete. Después de desembalar el unidad, inspecciónela
cuidadosamente para detectar cualquier daño que Puede haber ocurrido
durante el tránsito. Si se ha producido algún daño, el envío Las
NÚMERO
DE PIEZA
DESCRIPCIÓN
CANTIDA
D
1
Planificador
1
2
Perno de ajuste
4
3
Manejar
1

- 3 -
reclamaciones por daños deben presentarse ante la transportista y son
responsabilidad del Usuario.Verifique que esté completo. Inmediatamente
Informe al concesionario sobre las piezas faltantes. Abra la caja con
cuidado y desatornille el freno. del palé de envío y retirarlo de Caja
utilizando equipo de elevación de alta resistencia como por ejemplo una
grúa aérea.
Guarde este manual
Necesitará este manual por motivos de seguridad. instrucciones,
instrucciones de montaje, procedimientos de operación, lista de piezas y
Diagrama. Escriba su número de factura en la portada interior. Coloque
ambos manual y factura en un lugar seguro y seco. referencia futura.
Precauciones de seguridad importantes
1. Mantenga limpia el área de trabajo. Área desordenada Provoca
lesiones.
2. Observe las condiciones del área de trabajo. No utilizar máquinas o
herramientas eléctricas en ambientes húmedos o Lugares húmedos. No
exponer a la lluvia. Mantener Área de trabajo bien iluminada. No utilizar
herramientas accionadas eléctricamente en presencia de gases o líquidos
inflamables.
3. Mantenga a los niños alejados. Los niños deben Nunca se permitirá la
presencia de personas en el área de trabajo. dejarles manipular máquinas,
herramientas o cables de extensión.
4. Almacene el equipo que no utilice. Cuando no se utilice, las
herramientas deben almacenarse en un lugar seco. inhibe la oxidación.
Guarde siempre las herramientas bajo llave y manténgalas Manténgalos
fuera del alcance de los niños.
ADVERTENCIA
Las advertencias, precauciones e instrucciones discutido en
estas instrucciones o situaciones que podría ocurrir. Debe
ser comprendido por El operador que tiene sentido común y
La precaución son factores que no se pueden construir. en
este producto, pero debe ser suministrado por El operador.

- 4 -
5. No fuerce la herramienta. Hará mejor el trabajo. y más seguridad al
ritmo al que va. Fue previsto. No utilizar en adecuado adjuntos en un
intento de exceder el Capacidad de la herramienta.
6. Utilice la herramienta adecuada para el trabajo. No Intente forzar una
herramienta o accesorio pequeño. Realizar el trabajo de una herramienta
industrial de gran tamaño. No utilizar una herramienta para un propósito
para el cual no fue diseñada. No fue intencionado.
7.Vístase adecuadamente. No use ropa suelta. Ropa o joyas ya que
pueden quedar atrapadas en partes móviles. Protector, eléctricamente
Ropa no conductora y antideslizante. Se recomienda usar calzado
adecuado para trabajar. Usar una cubierta para el cabello restrictiva para
contener pelo largo
8. Utilice protección para los ojos y los oídos. Siempre Use gafas de
seguridad contra impactos aprobadas por la ISO. Use una pantalla facial
completa si está producir virutas de metal o virutas de madera. Use una
máscara antipolvo aprobada por ISO o Respirador cuando se trabaja
cerca de metales y polvos y nieblas químicas.
9. No se estire demasiado. Mantenga una posición adecuada. y mantener
el equilibrio en todo momento. No alcanzar sobre o a través de una
máquina en funcionamiento.
10. Cuide las herramientas. Mantenga las herramientas Afilado y limpio
para un trabajo mejor y más seguro. Rendimiento. Siga las instrucciones
para lubricación y cambio de accesorios. Los mangos deben mantenerse
limpios, secos y Libre de aceite y grasa en todo momento.
11. Manténgase alerta. Preste atención a lo que hace; use el sentido
común. No opere ningún vehículo. herramienta cuando estés probado.
12. Compruebe si hay piezas dañadas. Antes utilizando cualquier
herramienta, cualquier pieza que aparezca Los dañados deben revisarse
cuidadosamente. determinar que funcionará correctamente y realizar su
función prevista. Compruebe si alineación y unión de partes móviles;
cualquier pieza rota o accesorio de montaje; y cualquier otra condición que
pueda afectar funcionamiento correcto. Cualquier pieza que esté Los
dañados deben ser reparados adecuadamente o reemplazado por un
técnico calificado.

- 5 -
17.Protéjase contra descargas eléctricas. Prevenir contacto del cuerpo
con superficies conectadas a tierra tales como tuberías, radiadores,
estufas y recintos frigoríficos.
14. Piezas de repuesto y accesorios. Al realizar el mantenimiento, utilice
únicamente piezas idénticas. piezas de repuesto. Uso de otras piezas
anulará la garantía. Utilice únicamente Accesorios diseñados para su uso
con esta herramienta. Los accesorios aprobados están disponibles en El
distribuidor.
15. No utilice la herramienta si se encuentra bajo influencia del alcohol o
las drogas. Leer etiquetas de advertencia en las recetas para Determinar
si su juicio de reflejos es deteriorada mientras se toman drogas. Si hay
alguna En caso de duda, no opere la herramienta.
OPERATION
21.Monte la máquina Slip Roll en un banco atornillando la base de la
máquina (#24) a el banco. Consulte el diagrama de piezas.
22.Antes de usar, verifique el montaje y Ajuste de esta máquina. Gire el
Manejar (#19/#20) y verificar si Dos engranajes (#5) tienen un contacto
bueno y firme. entre sí. Los ejes 1, 2 y 3 deben Estar limpio y libre de
restos metálicos. Consultar Diagrama de piezas.
23.Ajuste la distancia entre el eje 1 (n.º 6) y el eje 2 (n.º 10) si es
necesario.b.La distancia entre el eje 2 (n.º 10) y El eje 1 (#6) se puede
ajustar girándolo los pernos de ajuste (#12) y (#4)c.Para disminuir la
distancia entre los dos ejes, gire el perno de ajuste (#12) y (#4) en el
sentido de las agujas del reloj.d.Para aumentar la distancia, gire el Ajuste
los pernos (#12) y (#4) en sentido antihorario.
24.Inserte la placa de acero entre el eje 1 (n.° 6) y el eje 3 (n.° 9). Apriete el
perno de fijación (n.° 8), el perno de ajuste (n.° 13), el tornillo M6X22 (n.°
14) y la placa de presión (n.° 15). Gire la placa de acero entre el eje 1 (n.°
6) y el eje 3 (n.° 9). manija (#19/#20), mientras tanto atornille la tuerca
3X12 (#3), el poste (#4), la perilla 10X40 (#12) hacia adentro, empuje el
eje 2 (#10) más arriba según el diámetro del rollo.
25.Después de terminar de enrollar, afloje el Perno de fijación (#8), Perno

- 6 -
de ajuste (#13), Tornillo M6X22 (#14), circumgy califica el Placa de presión
(#15) para semicírculo, empuje el Eje 1 (#6) hacia arriba, retire la placa de
acero desde la derecha.
ADVERTENCIA: Mantenga las manos alejadas de los ejes y la placa
metálica durante Operación. No intente formar rollos. de materiales
distintos a los especificados.
PARTS LIST
Artículo
Descripción
Canti
dad
Artícul
o
Descripción
Canti
dad
1
Tornillo M5X12
4
15
Placa de prensado
2
2
Blindaje
1
16
Muro
2
3
Tuerca 3X22
2
17
Tornillo M6X12
1
4
Polo
2
18
Perno de fijación
M6X8
2
5
Engranaje
2
19
Manejar
1
6
Eje 1
1
20
Llave de vaso giratoria
M10X80
1
7
Llave 5X12
2
21
Perno de fijación
2
8
Perno de fijación
2
22
deflector
2
9
Eje3
1
23
Eje
1
10
Eje 2
1
24
Base
1
11
Cojinete
4
25
Tornillo M8X25
4
12
Perilla 10X40
2
26
Arandela
2
13
Perno de ajuste
2
27
Tornillo M6X12
2
14
Tornillo M6X12
2
Diagrama:

- 7 -


- 2 -
Techniczny Wsparcie i certyfikat gwarancji elektronicznej www.vevor.com/support
MASZYNA DO NAWIJANIA FORNIRU
INSTRUKCJA OBSŁUGI
MODELE: W01-1.0X320
We continue to be committed to provide you tools with competitive price.
"Save Half", "Half Price" or any other similar expressions used by us only represents an
estimate of savings you might benefit from buying certain tools with us compared to the major
top brands and does not necessarily mean to cover all categories of tools offered by us. You
are kindly reminded to verify carefully when you are placing an order with us if you are
actually saving half in comparison with the top major brands.

- 1 -
MODELE: W01-1.0X320
Have product questions? Need technical support? Please feel free to
contact us:
Technical Support and E-Warranty Certificate
www.vevor.com/support
NEED HELP? CONTACT US!
This is the original instruction, please read all manual instructions
carefully before operating. VEVOR reserves a clear interpretation of our
user manual. The appearance of the product shall be subject to the
product you received. Please forgive us that we won't inform you again if
there are any technology or software updates on our product.
VENEER REELING
MACHINE

- 2 -
Ostrzeżenie: Aby zminimalizować ryzyko obrażeń,
użytkownik powinien uważnie przeczytać instrukcję
obsługi.
SPECIFICATIONS
Modele................................................................................................... ..
W01-1.0X320
Minimalna średnica rolki ................................................................... ..... 45
mm
Maksymalna długość rolki ..................................................................
320m
m
Maksy
malna
gruboś
ć......................... ........................................................... .......1mm
Akcesoria standardowe
UNPACKING
ROLKA SLIP jest wysyłana z wyprodukować w starannie zapakowanym
kartonie pudełko. Dokładnie sprawdź produkt po otwierając opakowanie.
Po rozpakowaniu dokładnie sprawdź, czy jednostka nie ma żadnych
uszkodzeń mogło dojść podczas transportu. Jeśli doszło do uszkodzenia,
należy skontaktować się z firmą kurierską. roszczenia o odszkodowanie
należy składać przewoźnika i są jego odpowiedzialnością
użytkownik.Sprawdź kompletność. Natychmiast zgłoś brakujące części
dealerowi.Ostrożnie otwórz skrzynię i odkręć hamulec z palety
NR CZĘŚCI
OPIS
ILOŚĆ
1
Planista
1
2
Śruba regulacyjna
4
3
Uchwyt
1

- 3 -
transportowej i usuń z skrzynia z użyciem ciężkiego sprzętu podnoszącego
takie jak suwnica.
Zapisz tę instrukcję
Ta instrukcja będzie Ci potrzebna ze względów bezpieczeństwa instrukcja,
instrukcja montażu, procedury operacyjne, lista części i diagram. Napisz
numer swojej faktury na wewnętrzna strona przedniej okładki. Umieść oba
instrukcję i fakturę w bezpiecznym, suchym miejscu odniesienie do
przyszłości.
Ważne środki ostrożności
1. Utrzymuj czystość w miejscu pracy. Zagracone miejsce nie zadawaj
obrażeń.
2. Obserwuj warunki w miejscu pracy. Nie używać maszyn lub
elektronarzędzi w wilgotnych lub wilgotnych miejscach. Nie wystawiać na
deszcz. Trzymać dobrze oświetlone miejsce pracy. Nie używać narzędzia
zasilane elektrycznie w obecności gazów lub cieczy łatwopalnych.
3. Trzymaj dzieci z daleka. Dzieci muszą nigdy nie wolno przebywać w
miejscu pracy. Nie niech obsługują maszyny, narzędzia lub przedłużacze.
4. Przechowuj nieużywany sprzęt. Gdy nie jest używany, narzędzia muszą
być przechowywane w suchym miejscu, aby zapobiegać rdzewieniu.
Zawsze zamykaj narzędzia i trzymaj je przechowywać je poza zasięgiem
dzieci.
5. Nie używaj narzędzia na siłę. Wykona ono zadanie lepiej. i większe
bezpieczeństwo w tempie, w jakim to możliwe było zamierzone. Nie
używać w odpowiedni załączniki w celu przekroczenia pojemność
narzędzia.
6. Używaj właściwego narzędzia do pracy. Nie spróbuj wcisnąć małe
OSTRZEŻENIE
Ostrzeżenia, przestrogi i instrukcje omówione w tej instrukcji
lub sytuacjach co mogłoby się zdarzyć. Należy to zrozumieć
operator, który zdrowy rozsądek i
ostrożność to czynniki, których nie da się zbudować do tego
produktu, ale musi zostać dostarczony przez operator.

- 4 -
narzędzie lub element mocujący wykonywać pracę dużego narzędzia
przemysłowego. nie używać narzędzia do celu, do którego jest
przeznaczone nie było zamierzone.
7.Ubierz się odpowiednio. Nie zakładaj luźnych ubrań. odzież z biżuterii,
ponieważ mogą zostać złapane w ruchomych częściach. Ochronne,
elektryczne ubrania nieprzewodzące prądu i antypoślizgowe Podczas
pracy zaleca się noszenie obuwia. Noś nakrycie głowy, które ogranicza
wypadanie włosów. długie włosy.
8. Używaj ochrony oczu i uszu. Zawsze należy nosić okulary ochronne z
atestem ISO. W razie wypadku należy nosić osłonę twarzy.
wytwarzających opiłki metalu lub wióry drewniane. Należy nosić maskę
przeciwpyłową zgodną z normą ISO lub stosować respirator podczas
pracy w pobliżu metali, pyłów i mgieł chemicznych.
9. Nie wychylaj się za daleko. Utrzymuj odpowiednią postawę. i
równowaga przez cały czas. Nie sięgaj nad lub w poprzek pracującej
maszyny.
10. Dbaj o narzędzia. Przechowuj narzędzia ostre i czyste dla lepszego i
bezpieczniejszego wydajność. Postępuj zgodnie z instrukcjami dla
smarowanie i wymiana akcesoriów. Uchwyty muszą być czyste, suche i
zawsze wolne od oleju i smaru.
11. Zachowaj czujność. Uważaj, co robisz; stosuj zdrowy rozsądek. Nie
obsługuj żadnych narzędzie, gdy jesteś wypróbowany.
12.Sprawdź, czy części nie są uszkodzone. Przed używając dowolnego
narzędzia, dowolnej części, która się pojawi uszkodzone należy dokładnie
sprawdzić określić, czy będzie działać prawidłowo i wykonywać swoją
zamierzoną funkcję. Sprawdź, czy wyrównanie i wiązanie ruchomych
części; wszelkie uszkodzone części lub elementy montażowe; oraz
wszelkie inne warunki, które mogą mieć wpływ prawidłowe działanie.
Każda część, która jest uszkodzone należy odpowiednio naprawić lub
wymieniony przez wykwalifikowanego technika.
18.Chroń się przed porażeniem prądem. Zapobiegaj kontakt ciała z
uziemionymi powierzchniami takie jak rury, grzejniki, kuchenki i obudowy
lodówek.
14. Części zamienne i akcesoria. Podczas serwisowania należy używać

- 5 -
wyłącznie identycznych części. części zamienne. Użycie jakichkolwiek
innych części unieważni gwarancję. Używaj tylko akcesoria przeznaczone
do stosowania z tym narzędziem. Zatwierdzone akcesoria są dostępne w
dystrybutor.
15. Nie używaj narzędzia, jeżeli znajdujesz się pod wpływ alkoholu lub
narkotyków. Przeczytaj etykiety ostrzegawcze na receptach określ, czy
twoja ocena odruchów jest upośledzony podczas przyjmowania
narkotyków. Jeśli istnieje jakiekolwiek W razie wątpliwości nie należy
używać narzędzia.
OPERATION
26.Zamontuj maszynę Slip Roll na stole warsztatowym poprzez
przykręcenie podstawy maszyny (#24) do ławka. Zobacz schemat części.
27.Przed użyciem należy sprawdzić mocowanie i regulacja tej maszyny.
Obróć Uchwyt (#19/#20) i sprawdź, czy dwa biegi (#5) mają dobry, mocny
kontakt ze sobą. Wały 1, 2 i 3 powinny być czysty i wolny od metalowych
resztek. Zobacz Schemat części.
28.W razie potrzeby dostosuj odległość między wałem 1 (#6) a wałem 2
(#10). b. Odległość między wałem 2 (#10) a Wał 1 (#6) można regulować
poprzez obrót Śruby regulacyjne (#12) i (#4)c. Aby zmniejszyć odległość
między dwa wałki, obróć śrubę regulacyjną (#12) i (#4) zgodnie z ruchem
wskazówek zegara.d.Aby zwiększyć odległość, obróć śrubę regulacyjną
(#12) i (#4) zgodnie z ruchem wskazówek zegara. Śruba regulacyjna (#12)
i (#4) w kierunku przeciwnym do ruchu wskazówek zegara.
29.Włóż stalową płytkę pomiędzy wał 1 (#6) i wał 3 (#9). Dokręć śrubę
mocującą (#8), śrubę regulacyjną (#13), śrubę M6X22 (#14), płytkę
dociskową (#15). Obróć uchwyt (#19/#20), w międzyczasie przykręć
nakrętka 3X12 (#3), drążek (#4), pokrętło 10X40 (#12) wewnątrz, pchnij
wałek 2 (#10) wyżej w zależności od średnicy rolki.
30.Po zakończeniu wałkowania. Poluzuj Śruba mocująca (#8), Śruba
regulacyjna (#13), Śruba M6X22 (#14), obwód Oceń płytka dociskowa
(#15) do półkola, dociskowa Wał 1 (#6) w górę, zdejmij płytę stalową od
prawej.

- 6 -
OSTRZEŻENIE: Trzymaj ręce z dala od wałów i płyt metalowych podczas
operacja. Nie próbuj formować rolek z materiałów innych niż określone.
PARTS LIST
Przedmi
ot
Opis
Ilość
Przed
miot
Opis
Ilość
1
Śruba M5X12
4
15
Płyta dociskowa
2
2
Tarcza
1
16
Ściana
2
3
Nakrętka 3X22
2
17
Śruba M6X12
1
4
Polak
2
18
Śruba mocująca
M6X8
2
5
Bieg
2
19
Uchwyt
1
6
Wał 1
1
20
Uchwyt obrotowy
M10X80
1
7
Klucz 5X12
2
21
Śruba mocująca
2
8
Śruba mocująca
2
22
przegroda
2
9
Wał 3
1
23
Wał
1
10
Wał 2
1
24
Opierać
1
11
Tuleja
4
25
Śruba M8X25
4
12
Gałka 10X40
2
26
Pralka
2
13
Śruba regulacyjna
2
27
Śruba M6X12
2
14
Śruba M6X12
2
Diagram:

- 7 -


- 2 -
Technisch Ondersteuning en E-garantiecertificaat www.vevor.com/support
FINEER AFROLMACHINE
GEBRUIKSAANWIJZING
MODEL: W01-1.0X320
We continue to be committed to provide you tools with competitive price.
"Save Half", "Half Price" or any other similar expressions used by us only represents an
estimate of savings you might benefit from buying certain tools with us compared to the major
top brands and does not necessarily mean to cover all categories of tools offered by us. You
are kindly reminded to verify carefully when you are placing an order with us if you are
actually saving half in comparison with the top major brands.

- 1 -
MODEL: W01-1.0X320
Have product questions? Need technical support? Please feel free to
contact us:
Technical Support and E-Warranty Certificate
www.vevor.com/support
NEED HELP? CONTACT US!
This is the original instruction, please read all manual instructions
carefully before operating. VEVOR reserves a clear interpretation of our
user manual. The appearance of the product shall be subject to the
product you received. Please forgive us that we won't inform you again if
there are any technology or software updates on our product.
VENEER REELING
MACHINE

- 2 -
Waarschuwing: om het risico op letsel te verkleinen, moet
de gebruiker de gebruiksaanwijzing zorgvuldig lezen.
SPECIFICATIONS
Model.................................................................................. .. W01-1.0X320
Minimale roldiameter............. .................................................... ..... 45 mm
Maximale rollengte................ ..................................................... ..320mm
Maximale
dikte.................................. ..................................................... .......1mm
Stand
aard
acces
soires
UNPACKING
De SLIP ROLL wordt verzonden vanuit de Vervaardigd in een zorgvuldig
verpakte doos doos. Controleer het product grondig op het openen van het
pakket. Na het uitpakken van de eenheid, controleer zorgvuldig op
eventuele schade die kan tijdens het transport zijn ontstaan. Als er schade
is opgetreden, moet de verzending worden geannuleerd. Schadeclaims
moeten worden ingediend bij de vervoerder en vallen onder de
verantwoordelijkheid van de gebruiker.Controleer op volledigheid.
Onmiddellijk Meld ontbrekende onderdelen aan de dealer. Open de krat
voorzichtig en maak de rem los van de verzendpallet halen en verwijderen
krat met behulp van zware hefapparatuur zoals een bovenloopkraan.
ONDERDEE
LNR.
BESCHRIJVING
Hoeveelh
eid
1
Plank
1
2
Stelbout
4
3
Hendel
1

- 3 -
Bewaar deze handleiding
U hebt deze handleiding nodig voor de veiligheid instructie,
montage-instructie, bedieningsprocedures, onderdelenlijst en diagram.
Schrijf uw factuurnummer op de binnenkant van de voorkant. Zet beide uw
handleiding en factuur op een veilige, droge plaats bewaren toekomstige
referentie.
Belangrijke veiligheidsmaatregelen
1. Houd de werkplek schoon. Rommelige werkplek uitnodigende
verwondingen.
2. Let op de omstandigheden op het werkgebied. Niet machines of
elektrisch gereedschap gebruiken in vochtige of natte locaties. Niet
blootstellen aan regen. Houd werkgebied goed verlicht. Niet gebruiken
elektrisch aangedreven gereedschappen in de aanwezigheid van
brandbare gassen of vloeistoffen.
3. Houd kinderen uit de buurt. Kinderen moeten ooit in het werkgebied
worden toegelaten. Doe niet laat ze machines, gereedschappen of
verlengsnoeren.
4. Berg ongebruikte apparatuur op. Wanneer u deze niet gebruikt, moet u
gereedschap op een droge plaats opbergen om roestvorming voorkomen.
Gereedschappen altijd op slot doen en bewaren buiten bereik van kinderen
houden.
5. Forceer het gereedschap niet. Het zal het werk beter doen en meer
veiligheid in het tempo waarin het was bedoeld. Niet gebruiken in gepast
bijlagen in een poging om de gereedschapscapaciteit.
WAARSCHUWING
De waarschuwingen, voorzorgsmaatregelen en instructies
besproken in deze instructies of situaties dat zou kunnen
gebeuren. Het moet begrepen worden door de operator die
gezond verstand en
voorzichtigheid zijn factoren die niet kunnen worden
opgebouwd in dit product, maar moet worden geleverd door
de exploitant.

- 4 -
6. Gebruik het juiste gereedschap voor de klus. probeer een klein
gereedschap of hulpstuk te forceren om het werk van een groot industrieel
gereedschap te doen. een gereedschap niet gebruiken voor een doel
waarvoor het bedoeld is was niet de bedoeling.
7.Kleed je goed. Draag geen losse kleding. kleding van sieraden omdat ze
gevangen kunnen worden in bewegende delen. Beschermend, elektrisch
niet-geleidende kleding en antislip schoeisel wordt aanbevolen tijdens het
werk. Draag een beperkende haarbedekking om lang haar.
8. Gebruik altijd oog- en gehoorbescherming. Draag een
ISO-goedgekeurde veiligheidsbril tegen impact. Draag een volledig
gezichtsscherm als u het produceren van metaalvijlsel of houtsnippers.
Draag een ISO-goedgekeurd stofmasker of Draag een
ademhalingsmasker bij het werken in de buurt van metaal en chemische
stoffen en nevels.
9. Reik niet te ver. Zorg voor een goede basis en te allen tijde in evenwicht.
Reik niet over of over een draaiende machine.
10. Onderhoud gereedschap met zorg. Houd gereedschap scherp en
schoon voor beter en veiliger prestaties. Volg de instructies voor het
smeren en vervangen van accessoires. De handgrepen moeten schoon,
droog en te allen tijde vrij van olie en vet.
11. Blijf alert. Let op wat u doet; gebruik uw gezonde verstand. Bedien
geen gereedschap als je beproefd wordt.
12. Controleer op beschadigde onderdelen. Voor met behulp van elk
gereedschap, elk onderdeel dat verschijnt beschadigd moet zorgvuldig
worden gecontroleerd bepalen dat het goed zal functioneren en zijn
beoogde functie uitvoeren. Controleer op uitlijning en binding van
bewegende delen; gebroken onderdelen of montage-inrichtingen; en elke
andere toestand die van invloed kan zijn juiste werking. Elk onderdeel dat
beschadigd moet goed gerepareerd worden of vervangen door een
gekwalificeerde technicus.
19.Bescherm uzelf tegen elektrische schokken. Voorkom lichaamscontact
met geaarde oppervlakken zoals leidingen, radiatoren, fornuizen en
koelkastbehuizingen.
14. Vervangende onderdelen en accessoires. Gebruik bij onderhoud

- 5 -
uitsluitend identieke onderdelen en accessoires. vervangende onderdelen.
Gebruik van andere onderdelen maakt de garantie ongeldig. Gebruik
alleen accessoires die bedoeld zijn voor gebruik met dit gereedschap.
Goedgekeurde accessoires zijn verkrijgbaar bij de distributeur.
15. Gebruik het gereedschap niet als het zich onder de invloed van alcohol
of drugs. Lees waarschuwingslabels op recepten voor bepaal of uw
oordeel over reflexen verminderd tijdens het gebruik van drugs. Als er
sprake is van Bij twijfel mag u het gereedschap niet gebruiken.
OPERATION
31.Monteer de Slip Roll-machine op een werkbank door de basis van de
machine (#24) vast te bouten de bank. Raadpleeg het onderdelendiagram.
32.Controleer voor gebruik de montage en afstelling van deze machine.
Draai de Handvat (#19/#20) en controleer of de twee tandwielen (#5)
hebben goed, stevig contact met elkaar. Assen 1, 2 en 3 moeten schoon
en vrij van metaalresten zijn. Raadpleeg het onderdelenoverzicht.
33.Pas indien nodig de afstand tussen as 1 (#6) en as 2 (#10) aan.b.De
afstand tussen as 2 (#10) en As 1 (#6) kan worden versteld door te draaien
de afstelbouten (#12) en (#4)c.Om de afstand tussen de twee assen, draai
de afstelbout (#12) en (#4) met de klok mee.d.Om de afstand te vergroten,
draai de Stelbout (#12) en (#4) tegen de klok in draaien.
34.Plaats de stalen plaat tussen as 1 (#6) en as 3 (#9). Draai de
bevestigingsbout (#8), de afstelbout (#13), de schroef M6X22 (#14) en de
drukplaat (#15) vast. Draai de handvat (#19/#20), ondertussen
vastschroeven de moer 3X12 (#3), paal (#4), knop 10X40 (#12) binnenin,
duw de schacht 2 (#10) hoger afhankelijk van de diameter van de rol.
35.Nadat het rollen is voltooid. Maak de Bevestigingsbout (#8), afstelbout
(#13), schroef M6X22 (#14), rond beoordeel de drukplaat (#15) voor halve
cirkel, druk de Shaft1 (#6) omhoog, verwijder de stalen plaat van rechts.
WAARSCHUWING: Houd uw handen uit de buurt van de assen en de
metalen plaat tijdens werking. Probeer geen rollen te vormen van andere
materialen dan de gespecificeerde.

- 6 -
PARTS LIST
Item
Beschrijving
Hoev
eelhe
id
Item
Beschrijving
Hoev
eelhe
id
1
Schroef M5X12
4
15
Drukplaat
2
2
Schild
1
16
Muur
2
3
Moer 3X22
2
17
Schroef M6X12
1
4
Pool
2
18
Bevestigingsbout
M6X8
2
5
Versnelling
2
19
Hendel
1
6
Schacht1
1
20
Draai grip M10X80
1
7
Sleutel 5X12
2
21
Bevestigingsbout
2
8
Bevestigingsbout
2
22
verbijsteren
2
9
Schacht3
1
23
Schacht
1
10
Schacht2
1
24
Baseren
1
11
Bus
4
25
Schroef M8X25
4
12
Knop 10X40
2
26
Wasmachine
2
13
Stelbout
2
27
Schroef M6X12
2
14
Schroef M6X12
2
Diagram:
- 7 -


- 2 -
Teknisk Support och e-garanticertifikat www.vevor.com/support
FANERUPPRULLNINGSMASKIN
BRUKSANVISNING
MODELL: W01-1.0X320
We continue to be committed to provide you tools with competitive price.
"Save Half", "Half Price" or any other similar expressions used by us only represents an
estimate of savings you might benefit from buying certain tools with us compared to the major
top brands and does not necessarily mean to cover all categories of tools offered by us. You
are kindly reminded to verify carefully when you are placing an order with us if you are
actually saving half in comparison with the top major brands.

- 1 -
MODELL: W01-1.0X320
Have product questions? Need technical support? Please feel free to
contact us:
Technical Support and E-Warranty Certificate
www.vevor.com/support
NEED HELP? CONTACT US!
This is the original instruction, please read all manual instructions
carefully before operating. VEVOR reserves a clear interpretation of our
user manual. The appearance of the product shall be subject to the
product you received. Please forgive us that we won't inform you again if
there are any technology or software updates on our product.
VENEER REELING
MACHINE

- 2 -
Varning - För att minska risken för skada måste
användaren läsa instruktionerna noggrant.
SPECIFICATIONS
Modell................................................. ................................... ..
W01-1.0X320
Minsta rulldiameter ................................................... ..................... 45
mm
Maximal
rullelä
ngd .....
............
............
............
............... ...................... ..320mm
Max.
Tjocklek ........................................................... ............................ .......1mm
Standardtillbehör
UNPACKING
SLIP ROLL skickas från tillverkas i en noggrant förpackad kartong låda.
Inspektera produkten noggrant öppna paketet. Efter att ha packat upp
enhet, inspektera noggrant för eventuella skador som kan ha inträffat
under transporten. Om skada har uppstått, frakt skadeståndsanspråk
måste lämnas in till transportören och ansvarar för användare. Kontrollera
att den är fullständig. Omedelbart rapportera saknade delar till
DELNR.
BESKRIVNING
ANTAL
1
P lanker
1
2
Justerbult
4
3
Hantera
1

- 3 -
återförsäljaren. Öppna lådan försiktigt och lossa bromsen från fraktpallen
och ta bort från låda med tung lyftutrustning till exempel en traverskran.
Spara denna manual
Du behöver denna manual för säkerheten instruktion,
monteringsinstruktion, driftprocedurer, reservdelslista och diagram. Skriv
ditt fakturanummer på främre omslagets insida. Lägg båda dina manual
och faktura på en säker, torr plats för framtida referens.
Viktiga säkerhetsåtgärder
1. Håll arbetsområdet rent. Rörigt område sinvite skador.
2.Observera arbetsområdets förhållanden. Gör inte det använda maskiner
eller elverktyg i fuktig eller våta platser. Utsätt inte för regn. Hålla
arbetsområdet väl upplyst. Använd inte elektriskt drivna verktyg i närvaro
av brandfarliga gaser eller vätskor.
3. Håll barn borta. Barn måste någonsin tillåtas i arbetsområdet. Gör inte
det låt dem hantera maskiner, verktyg eller förlängningssladdar.
4. Förvara inaktiv utrustning. När verktygen inte används måste de
förvaras på en torr plats förhindra rost. Lås alltid in verktyg och förvara dem
utom räckhåll för barn.
5.Tvinga inte verktyget. Det kommer att göra jobbet bättre och mer
säkerhet i den takt som det var tänkt. Använd inte i lämplig bilagor i ett
försök att överskrida verktygskapacitet.
6.Använd rätt verktyg för jobbet. Gör inte det försök att tvinga fram ett litet
verktyg eller tillbehör att göra arbetet med ett stort industriverktyg. Do inte
använda ett verktyg för ett ändamål för vilket det var inte avsett.
7. Klä dig ordentligt. Bär inte löst kläder av smycken som de kan fångas i
rörliga delar. Skyddande, elektriskt icke-ledande kläder och halkfria skor
VARNING
Varningarna, varningarna och instruktionerna diskuteras i
dessa instruktioner eller situationer som kan inträffa. Det
måste förstås av operatören att sunt förnuft och
försiktighet är faktorer som inte kan byggas i denna produkt,
men måste levereras av operatören.

- 4 -
rekommenderas när du arbetar. Bär restriktiva hårskydd för att hålla långt
hår.
8.Använd ögon- och hörselskydd. Alltid använd ISO-godkända
skyddsglasögon. Bär en helskärm om du är det producerar metallspån
eller träflis.Bär en ISO-godkänd dammmask eller andningsskydd när du
arbetar runt metall, och kemiskt damm och dimma.
9.Träck inte för mycket. Håll rätt fotfäste och balans hela tiden. Nå inte över
eller tvärs över maskinen som körs.
10. Underhåll verktyg med omsorg. Behåll verktyg skarp och ren för bättre
och säkrare prestanda. Följ instruktionerna för smörjning och byte av
tillbehör. Handtagen ska hållas rena, torra och fri från olja och fett hela
tiden.
11.Var alert. Se vad du gör, använd sunt förnuft. Använd inga verktyg när
du är prövad.
12.Kontrollera för skadade delar. Före med vilket verktyg som helst, vilken
del som helst som visas skadade bör kontrolleras noggrant avgöra att den
kommer att fungera korrekt och utföra sin avsedda funktion. Kolla efter
inriktning och bindning av rörliga delar; eventuella trasiga delar eller
monteringsfixturer; och alla andra tillstånd som kan påverka korrekt drift.
Vilken del som helst skadade bör repareras ordentligt eller ersättas av en
kvalificerad tekniker.
20.Skydda mot elektriska stötar. Förhindra kroppskontakt med jordade ytor
såsom rör, radiatorer, serier och kylskåpsskåp.
14.Reservdelar och tillbehör.Använd endast identiska vid service
reservdelar. Användning av andra delar kommer att ogiltigförklara garantin.
Använd endast tillbehör avsedda att användas med detta verktyg.
Godkända tillbehör finns tillgängliga från distributören.
15. Använd inte verktyget om det är under påverkan av alkohol eller droger.
Läsa varningsetiketter på recept till avgöra om din bedömning av reflexer
är nedsatt när du tar droger. Om det finns någon tvivlar, använd inte
verktyget.
OPERATION

- 5 -
36.Montera Slip Roll-maskinen på en bänk genom att skruva fast
maskinens bas (#24) till bänken. Se deldiagrammet.
37.Innan du använder, kontrollera monteringen och justering av denna
maskin. Vrid på Hantera (#19/#20) och kontrollera om två växlar (#5) har
bra, fast kontakt med varandra. Skaft 1, 2 och 3 ska vara ren och fri från
metallskräp. Referera till Delardiagrammet.
38.Justera avståndet mellan Axel 1 (#6) och Axel 2 (#10) om nödvändigt.b.
Avståndet mellan Axel 2 (#10) och Axel 1 (#6) kan justeras genom att vrida
justeringsbultarna (#12) och (#4)c. För att minska avståndet mellan de två
axlar, vrid justeringsbulten (#12) och (#4) medurs.d. För att öka avståndet,
vrid Justeringsbult (#12) och (#4) moturs.
39.Sätt in stålplåten mellan axel 1(#6) och axel 3 (#9). Dra åt fixeringsbult
(#8), justerbult (#13), skruv M6X22(#14), pressplatta (#15). Vrid på
handtag (#19/#20), skruva under tiden ner muttern 3X12 (#3), stång (#4),
knopp 10X40(#12) inuti, tryck axeln 2 (#10) högre beroende på rullens
diameter.
40.Efter avslutad rullning. Lossa på Fästbult (#8), Justerbult (#13), Skruv
M6X22 (#14), omslutande betygsätta tryckplatta (#15) för halvcirkel, tryck
skaft1 (#6) upp, ta bort stålplåten från höger.
VARNING: Håll händerna borta från axlarna och metallplattan under drift.
Försök inte att forma rullar från andra material än de angivna.
PARTS LIST
Punkt
Beskrivning
Antal
Punkt
Beskrivning
Antal
1
Skruv M5X12
4
15
Pressplatta
2
2
Skydda
1
16
Vägg
2
3
Mutter 3X22
2
17
Skruv M6X12
1
4
Pole
2
18
Fästbult M6X8
2
5
Redskap
2
19
Hantera
1
6
Skaft1
1
20
Turning gripe M10X80
1

- 6 -
7
Nyckel 5X12
2
21
Fästbult
2
8
Fästbult
2
22
trotsa
2
9
Skaft 3
1
23
Axel
1
10
Skaft 2
1
24
Bas
1
11
Bussning
4
25
Skruv M8X25
4
12
Vred 10X40
2
26
Bricka
2
13
Justerbult
2
27
Skruv M6X12
2
14
Skruv M6X12
2
Diagram:

- 7 -

