RAMJOY Air Fryer 6.8-Quart
Model: RAF-650
INSTRUCTION BOOKLET
2
Table of Contents
Package Contents
Specifications
Important Safeguards
Getting to Know Your Air Fryer
Air Fryer Diagram
Display Messages
Before First Use
Using Your Air Fryer
Care & Maintenance
Troubleshooting
Warranty Information
Package Contents
Specifications
1 x 6.8-Quart Air Fryer
1 x Instruction Booklet
2
2
3-4
5-6
5
6
7
8-12
12
13
14
Model
RAF-650
100~400°F /1min~24Hour6.8 Quart120V 60Hz 1600W
Volume Temperature /Time RangeRating

3
IMPORTANT SAFEGUARDS
HOUSEHOLD USE ONLY • READ ALL INSTRUCTIONS BEFORE USE
Read all instructions before using your RAMJOY Air Fryer.
When using electrical appliances, basic safety precautions should always be
followed, including the following:
WARNING
1. A short power-supply cord is
used to reduce the risk of children
grabbing the cord or becoming
entangled and to reduce the risk of
people tripping over a longer cord.
2. This appliance has a polarized
plug (one blade is wider than
the other). To reduce the risk
of electric shock, this plug is
intended to fit into a polarized
outlet only one way. If the plug
does not fit fully into the outlet,
reverse the plug. If it still does not
fit, contact a qualified electrician.
DO NOT attempt to modify the
plug in any way.
3. To eliminate a choking hazard
for young children, remove and
discard the protective cover
fitted on the power plug of this
appliance.
4. ALWAYS ensure the appliance is
properly assembled before use.
5. DO NOT touch hot surfaces.
Appliance surfaces are hot
during and after operation. To
prevent burns or personal injury,
ALWAYS use protective hot pads
or insulated oven mitts and use
available handles and knobs.
6. Intended for countertop use only.
DO NOT place the appliance near
the edge of a countertop during
operation. Ensure the surface is
level, clean, and dry.
7. DO NOT place on or near a hot
gas or electric burner or in a
heated oven.
8. Extreme caution must be used
when moving an appliance
containing hot oil or other hot
liquids.
9. To protect against electrical shock
DO NOT immerse cord, plugs,
or main unit housing in water or
other liquid.
10. Unplug from outlet when not in
use and before cleaning. Allow to
cool before putting on or taking
o parts.
11. Extreme caution must be used
when the appliance contains hot
food. Improper use may result in
personal injury.
12.
13.
DO NOT use this appliance for
deep-frying with oil.
14.
ALWAYS ensure basket is
properly closed before operating.
15.
DO NOT allow young children to
operate the appliance or use as a
toy. Close supervision is necessary
when any appliance is used by or
near children.
Regularly inspect the appliance
and power cord. DO NOT use
the appliance if there is damage
to the power cord or plug. If
the appliance malfunctions or
has been damaged in any way,
immediately stop use and call
Customer Service. Return the
appliance to the nearest authorized
service facility RAMJOY for examination,
repair, or adjustment.

4
16. The use of accessory attachments
not recommended or sold by
RAMJOY may cause fire,
electric shock, or injury.
17. This appliance is for household
use only. DO NOT use this
appliance for anything other than
its intended use. DO NOT use
in moving vehicles or boats. DO
NOT use outdoors. Misuse may
cause injury.
18. DO NOT clean with abrasive
cleaners, steel wool, or
scouring pads.
19. Spilled food can cause serious
burns. Keep appliance and cord
away from children. DO NOT let
cord hang over edges of tables
or counters or touch hot surfaces.
NEVER use an outlet below
counter, and NEVER use with an
extension cord.
20. To prevent food contact with the
heating elements, DO NOT overfill
the basket.
21. DO NOT cover the air intake vent
or air outlet vent while unit is
operating. Doing so will prevent
even cooking and may damage
the unit or cause it to overheat.
22. The crisper plate becomes
extremely hot during the cooking
process. Avoid hot steam and air
while removing the basket from
the appliance. ALWAYS place
plate on a heat-resistant surface
after removing. DO NOT touch
accessories during or immediately
after cooking.
23. NEVER connect this appliance
to an external timer switch or
separate remote-control system.
24. Should the unit emit black smoke,
unplug immediately and wait for
smoking to stop before removing
the cooking basket
25. Let the appliance cool for
approximately 30 minutes before
handling, cleaning, or storing.
26. When using this appliance,
provide adequate space above
and on all sides for air circulation.
27. Make sure the unit is clean
before using.
28. Please refer to the Cleaning &
Maintenance section for regular
maintenance of the appliance.
Return the appliance to
RAMJOY for any other servicing.
29. Outlet voltages can vary, aecting
the performance of your product.
To prevent possible illness, use
a thermometer to check that
your food is cooked to the
temperatures recommended
by the Food and Drug
Administration
30. Always attach plug to appliance first, then
plug cord into the wall outlet. To disconnect,
turn any control to "o", then remove plug
from wall outlet.
31. Use extreme caution when removing tray or
disposing of hot grease.
32. Do not clean with metal scouring pads.
Pieces can break o the pad and touch
electrical parts, creating a risk of electric
shock.
33. Longer extension cords are available and may
be used if care is exercised in their use.
If extension cord is used:
1) The marked electrical rating of the cord set
or extension cord should be at least as great
as the electrical rating of the appliance;
2) The cord should be arranged so that it will
not drape over the countertop or tabletop
where it can be pulled on by children or
tripped over unintentionally.
SAVE THESE INSTRUCTIONS
5
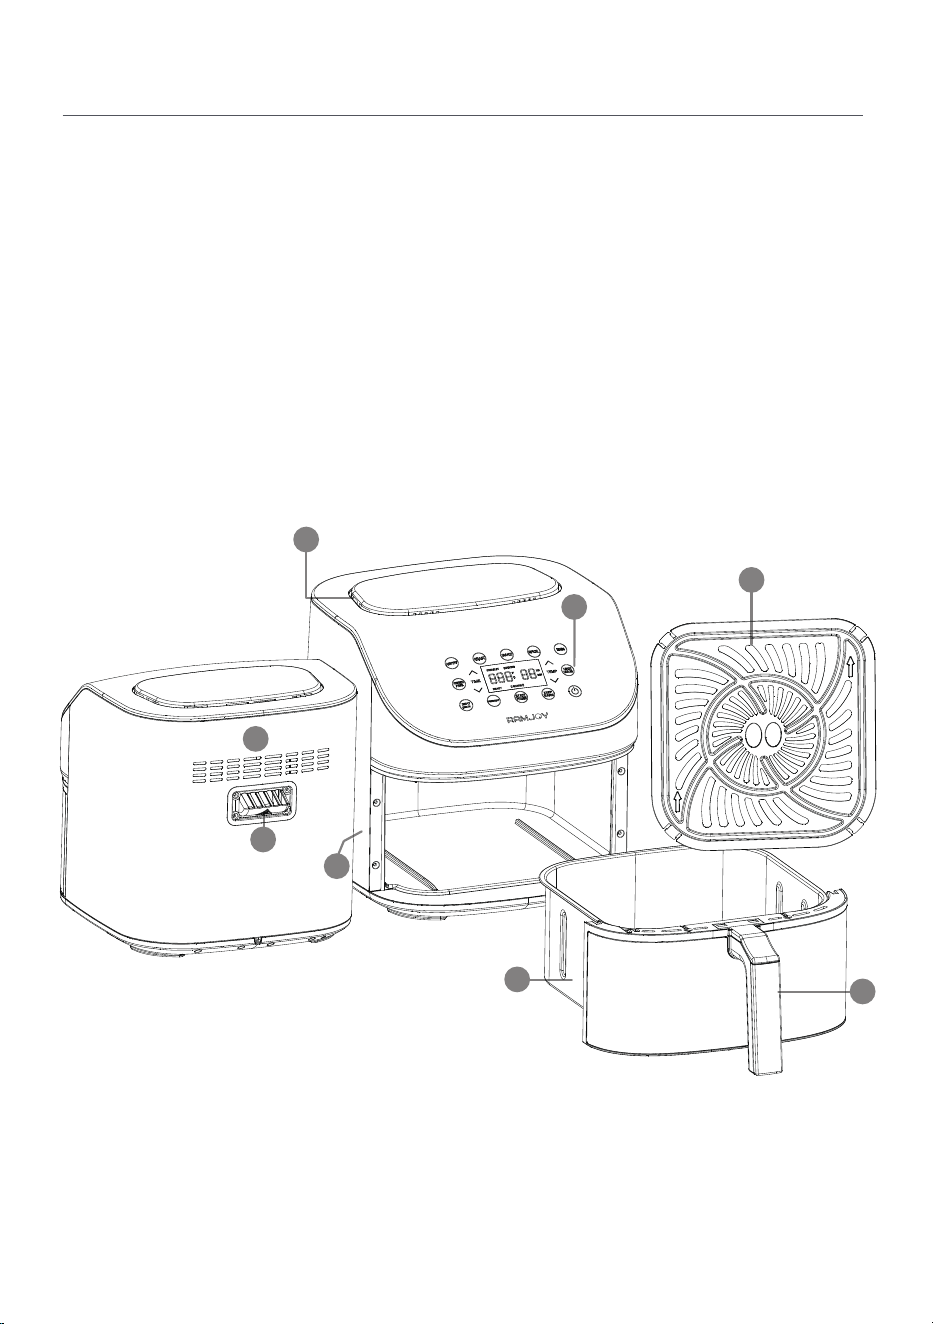
GETTING TO KNOW YOUR AIR FRYER
Air Fryer Diagram
Your RAMJOY Air Fryer uses rapid 360° air circulation technology to cook with little to no oil for
quick, crispy, delicious food with up to 85% fewer calories than deep fryers. With user-friendly,
one-touch controls, a nonstick basket, and an intuitive, safe design, the RAMJOY Air Fryer is
the better choice of your kitchen.
A. Air Inlet
B. Control Panel
C. Crisper Plate
D. Basket
E. Basket Handle
F. Main Unit
G. Air Outlet
H. Air Outlet Spacer
FRONT
B
C
F
E
BACK
D
A
Note:
• Do not try to open the top of the air fryer. This is not a lid.
• The basket and crisper plate are made of metal with nonstick coating.
G
H
6
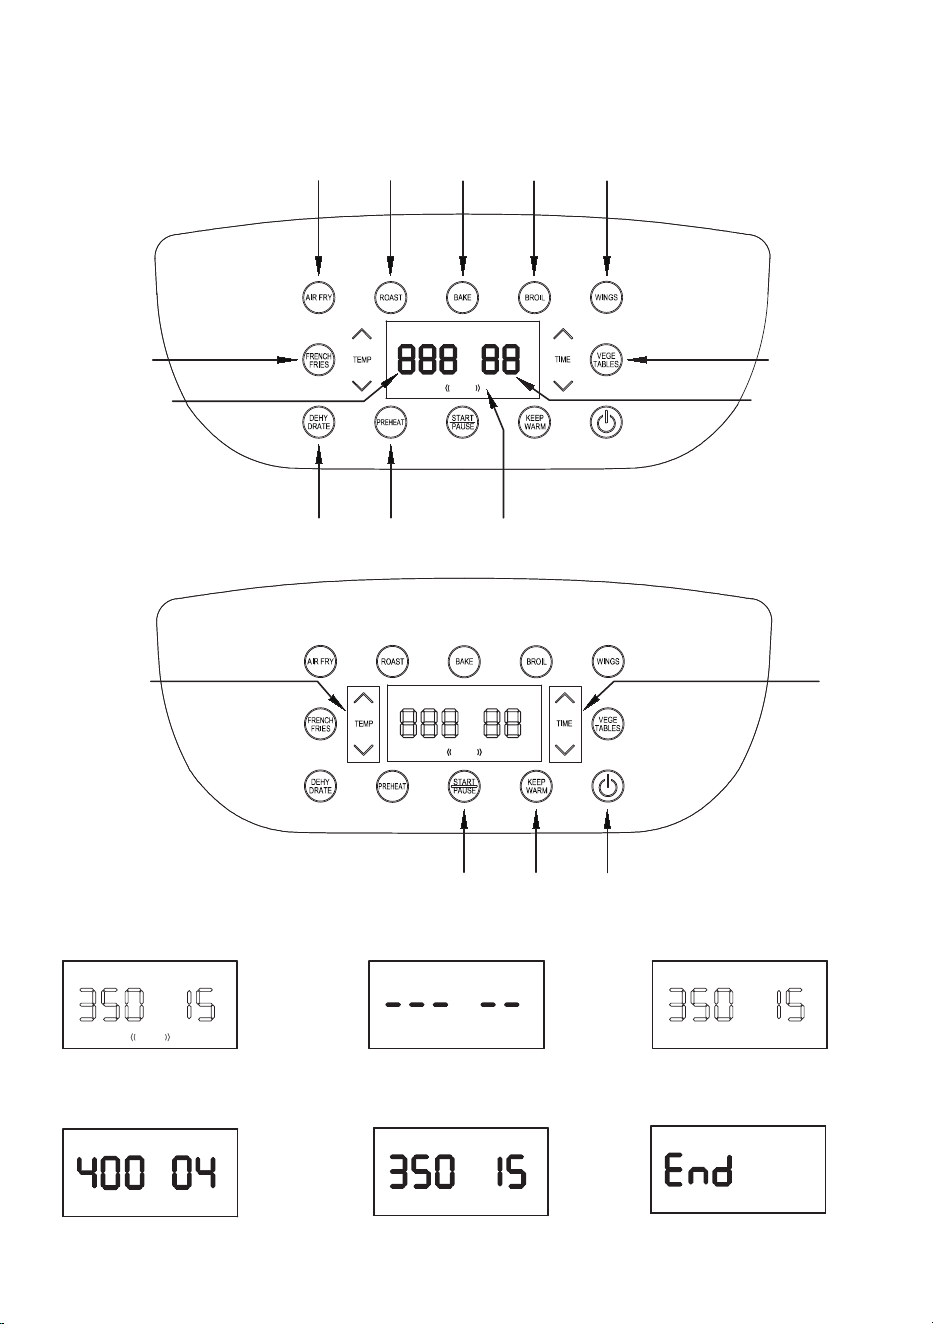
Note: When you press a button to use a function or program, it will become flashing to show that it’s active.
Note: This shows the Shake Reminder on/of.
(Note: when HR shows
and MIN o mean
the timer is Hours)
GETTING TO KNOW YOUR CONTROL PANEL
Control Panel
Air fry Roast
Dehydrate
Shake
Preheat
Broil
Time display
French Fries
Bake Wings
Temperature
display
Vegetables
Display Messages
COOKING
READY SHAKE
。
F
。
C
MIN
HR
PREHEAT
COOKING
READY SHAKE
。
F
。
C
MIN
HR
PREHEAT
Increase/
decrease
temperature
Increase/
decrease
time
On/O
Keep
Warm
Start
Pause
SHAKE
。
F
MIN
Rerninder to shake or flip food
Note: before starting cooking, the “SHAKE” show on display mean
this function is on, the “SHAKE” flashing during cooking to reminder
user to shake
Note: press the START/PAUSE button when cooking, the unit will
pause and “COOKING” turn o on display.
Air fryer is preheated and
ready to start cooking
Air fryer is cooking
COOKING
PREHEAT
。
F
MIN
Cooking is paused
Cooking program has
ended
。
F
MIN
READY
。
F
MIN
Air Fryer is preheating
。
F
MIN

7
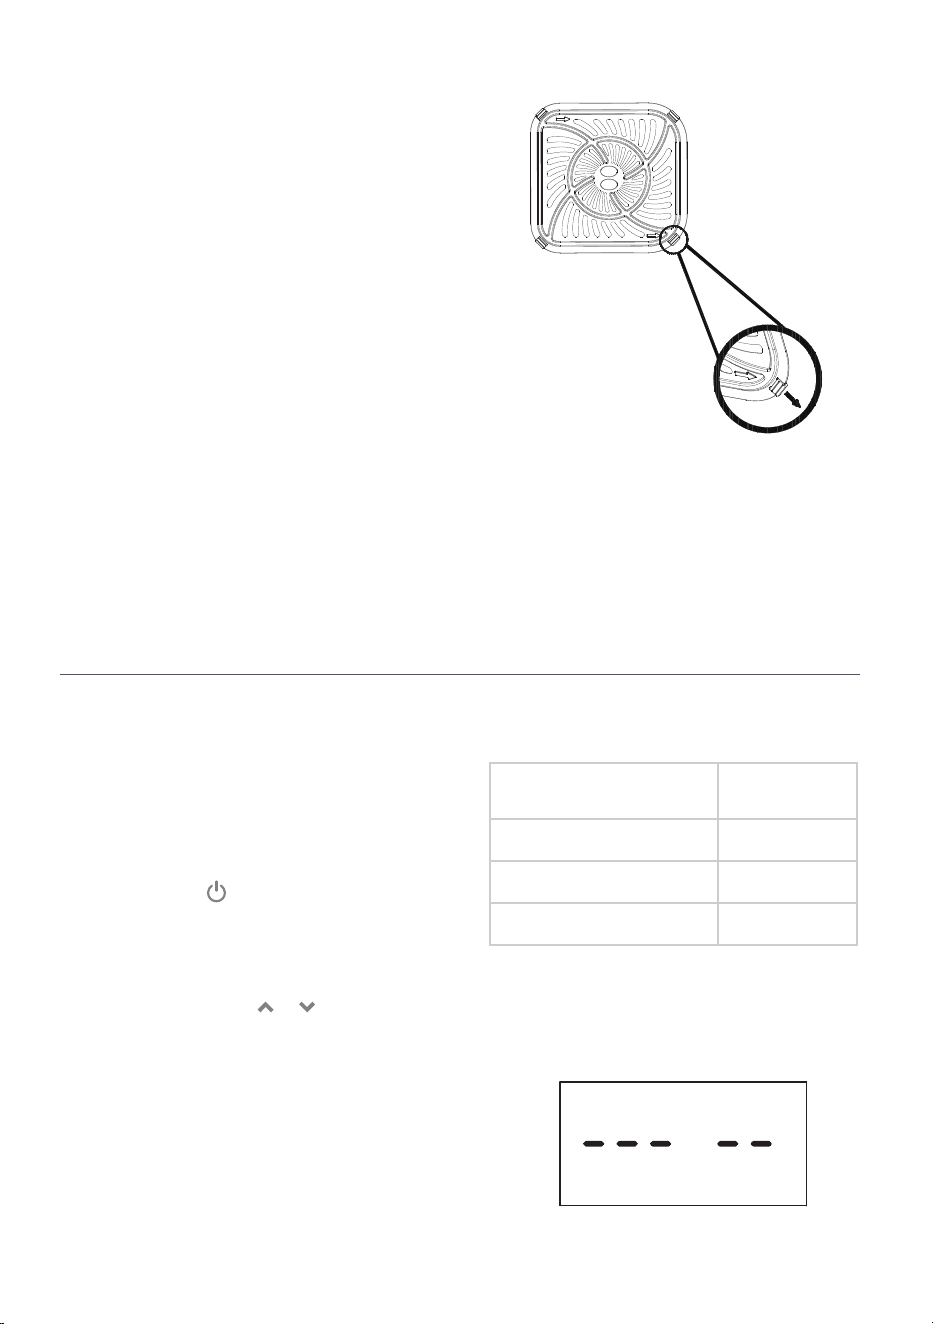
BEFORE FIRST USE
1. Remove all packaging from the air fryer,
including any temporary stickers and
protective film.
2. Place the air fryer on a stable, level, heat-
resistant surface. Keep away from areas
that can be damaged by steam (such as
walls or cupboards).
1. Make sure the air fryer basket is empty
and plug in the air fryer.
2. Press PREHEAT. The display will show
“400°F” and “04 MIN”.
3. Press START/PAUSE to begin preheating.
When preheating is done, the air fryer
will beep.
4. Pull out the basket and let it cool about for
4 minutes. Then place the basket back
into the air fryer.
5. Press BROIL to select the BROIL function.
The display show “400F” and “07 MIN”.
6. Press once. The time will change
to 6 minutes.
7. Press START/PAUSE button to begin.
When finished, the air fryer will beep.
8. Remove the basket. This time, let the
basket cool completely for 10–30
minutes.
Setting Up Test Run
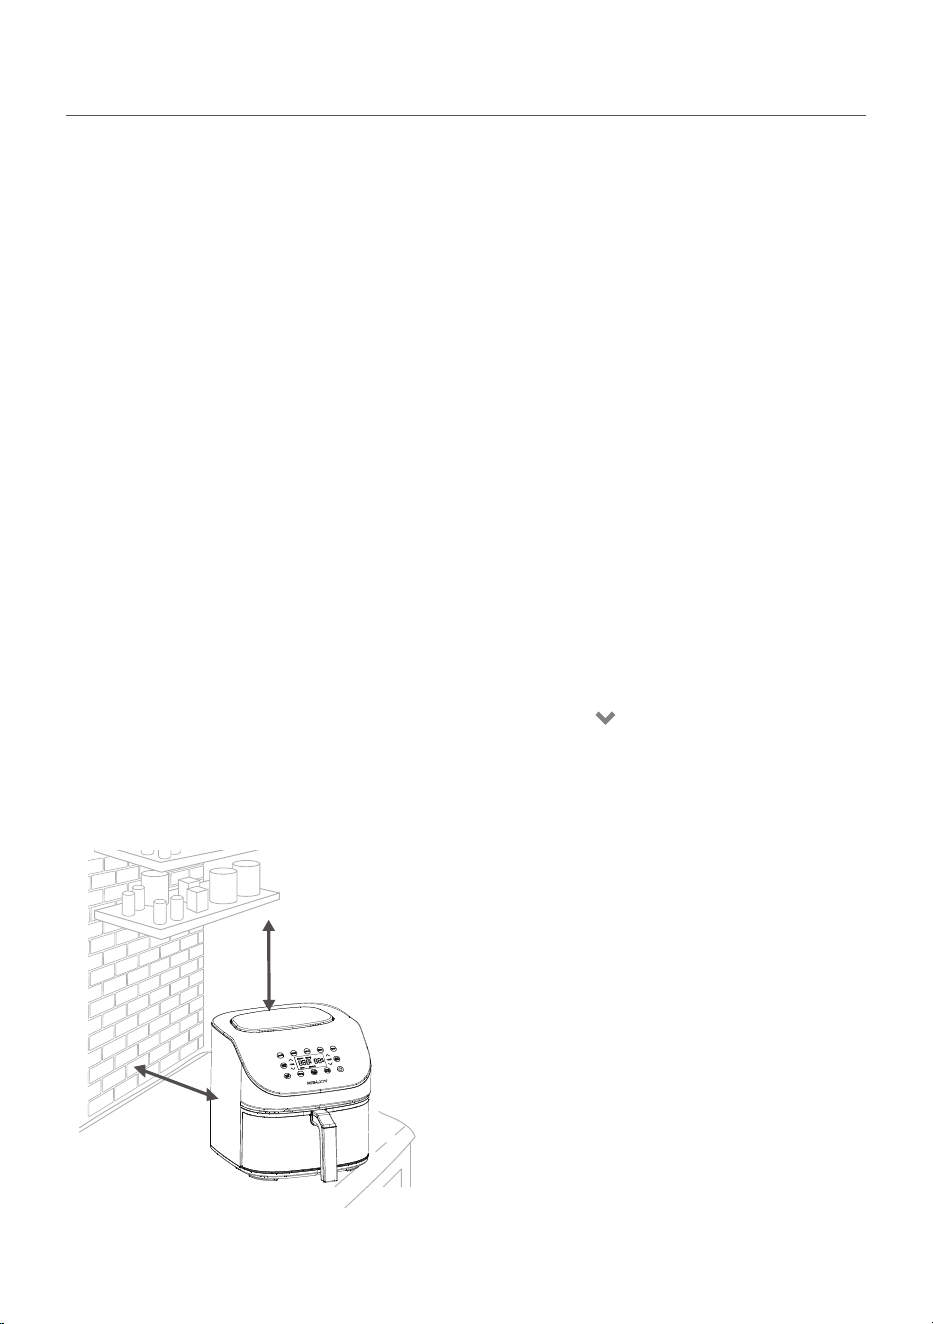
Note: Leave 5 inches / 13 cm of space behind and
above the air fryer. [Figure 1.1] Leave enough room
in front of the air fryer to remove the basket.
3. Hold the handle to take out the basket
from unit.
4. Wash both the basket and crisper plate
thoroughly, using either a dishwasher or
a non-abrasive sponge.
5. Wipe the inside and outside of the air
fryer with a slightly moist cloth. Dry with
a towel.
6. Insert the crisper plate back into the
basket, and place the basket inside the
air fryer.
Note:
• Use caution when turning the basket over after
cooking, as the hot crisper plate may fall out
and create a safety hazard.
A test run will help you become familiar
with your air fryer, make sure it’s working
correctly, and clean it of possible residues in
the process.
Figure 1.1
5 inch/
13 cm
5 inch/
13 cm
•
•
•
8
USING YOUR AIR FRYER
1. Plug in. Press to turn on the air fryer
display.
2. Press PREHEAT. The display will show
“400°F” and “4 MIN”.
3. Optionally, press the or buttons to
change the temperature. The time will
adjust automatically.
4. Press START/PAUSE to begin preheating.
5. When preheating is done, the air fryer
will beep 3 times. The display will show
“READY”, you can take out basket to fill
food, after retrun the basket into unit, to
select the function that you want then
start cooking. [Figure 2.1]
Preheating
Figure 1.2
Figure 2.1
The crisper plate contains 4 rubber
stoppers made of safe, FDA-approved
material. These stoppers keep the crisper
plate fitted to the bottom of the basket,
prevent the crisper plate from directly
touching the basket, and in rare cases,
to prevent damage the nonstick coating
on the basket
Only remove the rubber stoppers for cleaning
purposes. Just start from the outside of crisper
plate and pull out of stopper.
[Figure 1.2]
To place the rubber stoppers back into the
crisper plate, just aim at the sheet on crisper
plate then push stopper in.
Rubber Stoppers
We recommend preheating before placing
food inside the air fryer, unless your air fryer
is already hot. Food will not cook thoroughly
without preheating.
Temperature Time
400° – 380°F 4 minutes
370° – 280°F 3 minutes
270° – 170°F 2 minutes
Note: If no buttons are pressed for 5 minutes, the
air fryer will clear all settings and go into standby
READY
。
F
MIN
•
•
•
•
•
9
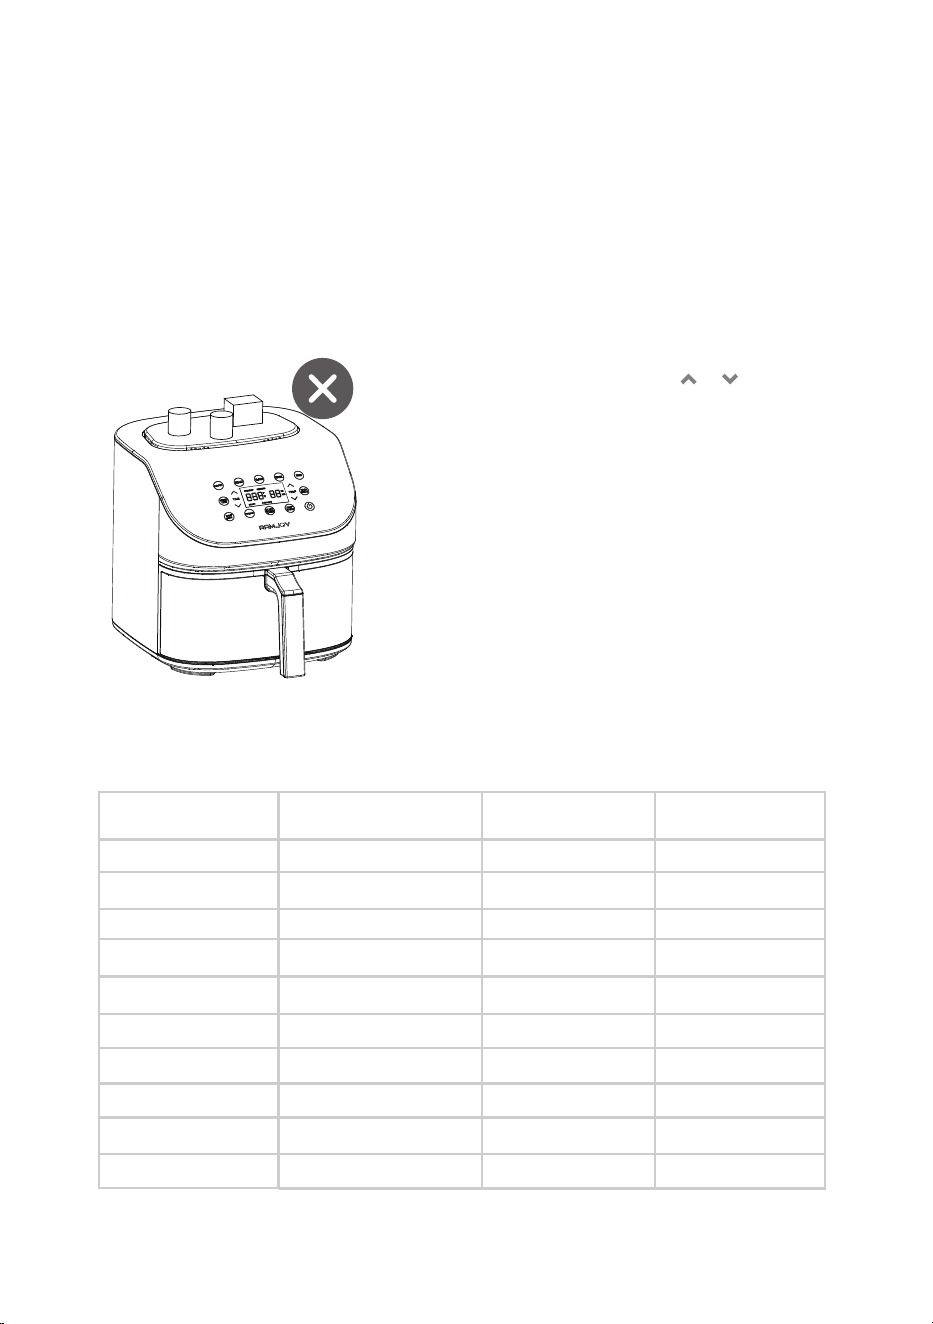
Air Frying
Figure 2.1
Using a cooking function is the easiest
way to air fry. Cooking functions are
programmed with an ideal time and
temperature for cooking certain foods.
Note:
Do not place anything on top of your air fryer.
This will disrupt airflow and cause poor air
frying results. [Figure 2.1]
An air fryer is not a deep fryer. Do not fill the
basket with oil, frying fat, or any liquid.
When taking the basket out of the air fryer, be
careful of hot steam.
Cooking Functions
* See Shaking Food (page 10)
** See Cooking Guide (page 11) for more tips on air frying French fries.
1. Press the function’s button to select the
function. The air fryer will automatically
change to the function’s default settings.
2. You can change a function’s time (1–60
minutes), temperature (170°–400°F), and
Shake Reminder.
3. Press and hold the or button to
rapidly increase or decrease the time or
temperature.
4. Add or remove a Shake reminder by press
& hold function button for 3 seconds, when
“SHAKE” shows on the display, it mean the
shake reminder is open.For example: press
and hold “AIR FRY” button for 3 seconds,
the SHAKE will shows on display.
5. To go back to a function’s default settings,
press the function’s button
again.
Function Default Temperature
Default Time
(minutes)
Shake Reminder?*
Air Fry 400°F 16 minutes -
Roast 390°F 25 minutes
((SHAKE))
Bake 350°F 30 minutes -
Broil 400°F 7 minutes
Wings 400°F 19 minutes
((SHAKE))
((SHAKE))
French Fries 400°F 18 minutes
((SHAKE))
((SHAKE))
Vegetables 320°F 18 minutes
Dehydrate 140°F 6 Hours -
Preheat
Keep Warm
400°F 4 minutes -
170°F 30 minutes -
Note:
Result may vary based on the size of foods, to adjust
the cooking time base on actual food size.
The timer for Keep Warm function is 1minutes-12hours,
for Dehydrate function is 1 hours-24hours.
•
•
•
•
•
10
Note: See Shaking Food (page 9)
Air Frying
1. Preheat your air fryer (see page 8)
2. When your air fryer displays “READY”,
add food to the basket.
For the best results, add the crisper plate
into the basket to allow excess oil to drip
down to the bottom of the basket.
3. Select a cooking function (see page 9)
Note: Cooking functions are programmed
with an ideal time and temperature for cooking
certain foods. You can also set a custom time and
temperature without choosing a cooking function.
4. Optionally, change the temperature and
time, and add or remove a Shake reminder.
You can do this anytime during cooking.
a. Press the or buttons to change
the temperature (170°–400°F) or time
(1–60 minutes, 1-24 hours).
Note:
To rapidly increase or decrease time or
temperature, press and hold the
or
buttons.
Press & hold function button for 3 seconds
to add or remove Shake reminder.
5. Press START/PAUSE to begin air frying.
6. When the Shake Reminder is turned on,
it will appear halfway through cooking
time. The air fryer will beep 5 times, and
(SHAKE) will become blink from solid on
the display
a. Hold the handle to take the basket out
of the air fryer the basket out of the air
fryer, being careful of hot steam. The
air fryer will pause cooking automatically,
and the display will turn o until the
basket is replaced.
b. Shake or flip the food.
c. Put the basket back into the air fryer.
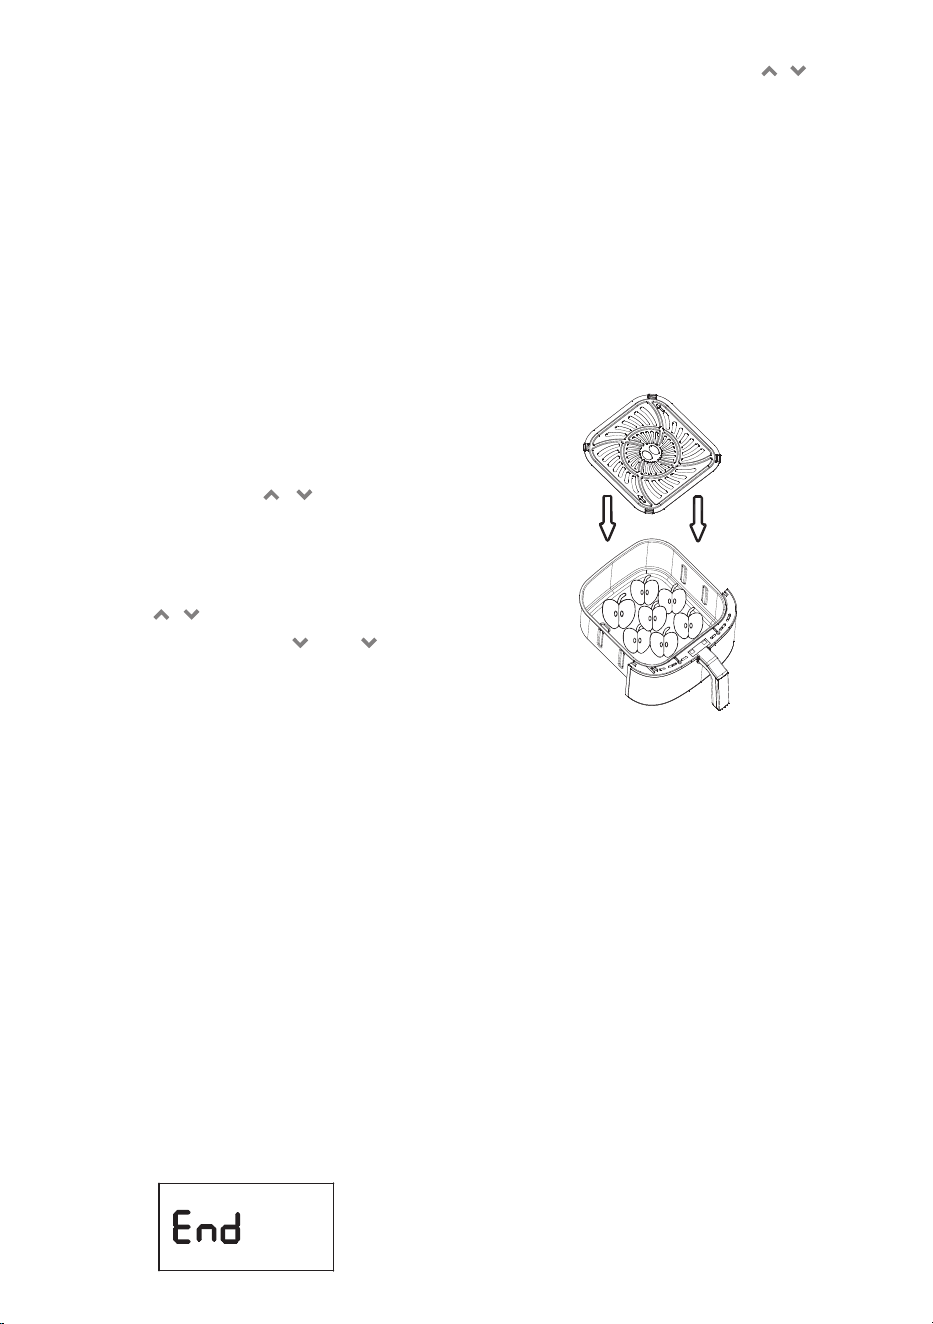
7. The air fryer will Beep 5 times. The display
will show “End”:
8. Optionally, press KEEP WARM. Press the
or buttons to change the time
(1minutes – 12hours).Can set the keep warm
temperature that you want as well.
9. Hold the handle to take the basket out of the
air fryer, being careful of hot steam.
10. Allow to cool before cleaning.
Shaking Food
During cooking, hold the handle to take the
basket out of the air fryer, and shake,mix,
or flip the food.
How to Shake
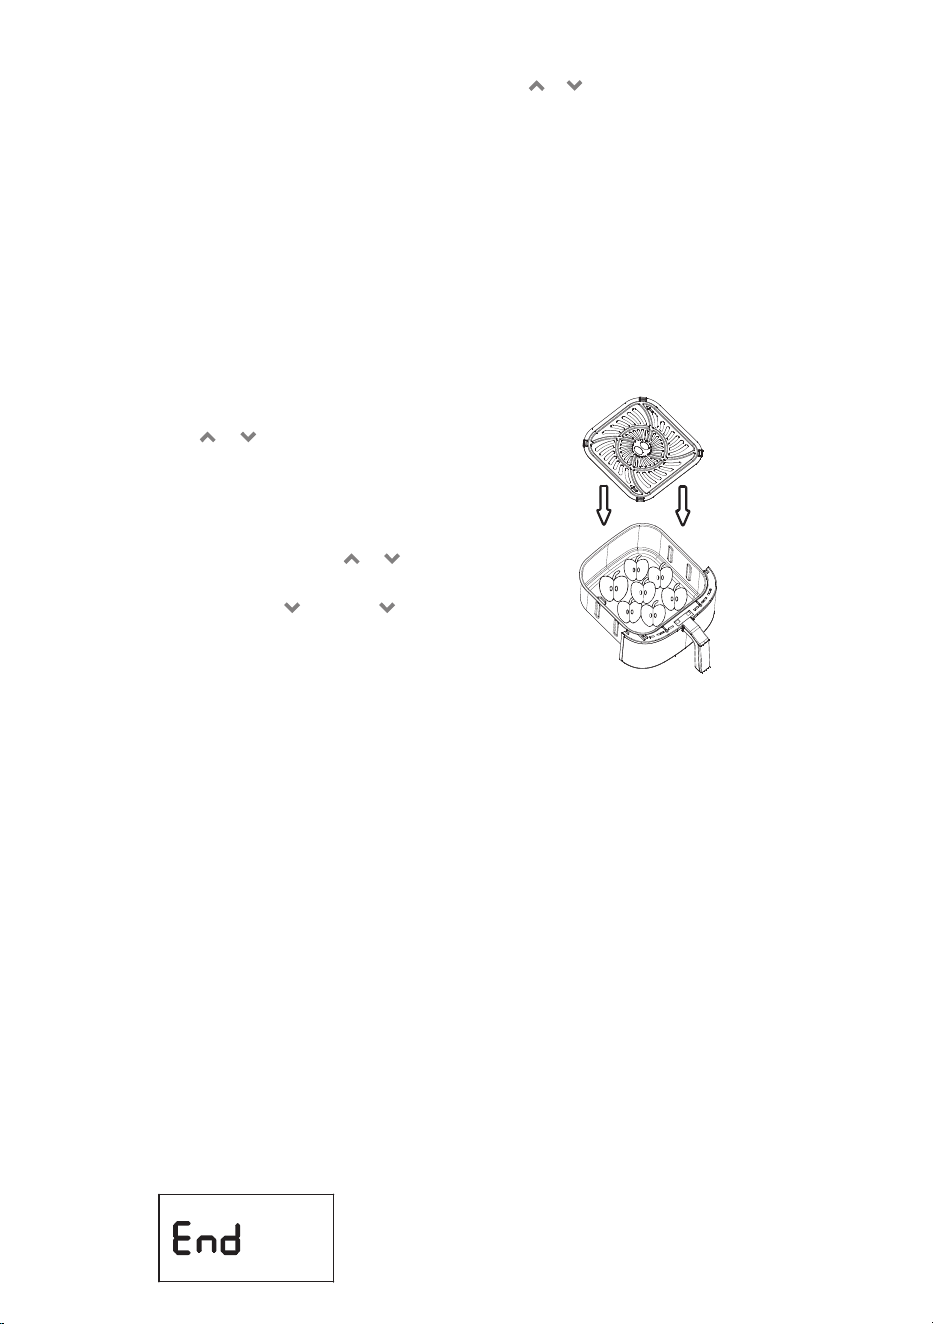
Dehydrate
1. Place your first layer of ingredients in the
bottom of the basket. Then install the
crisper plate inside the basket and set
a second layer of ingredients on the
crisper plate.
2. Insert the basket in the unit.
3. Press the DEHYDRATE button. The
default temperature and time (140F,
6Hours) will display. Use the TEMP up
and down arrow buttons to set your
desired temperature.
4. Press the TIME up and down arrow
buttons to set your desired cook time.
NOTE: You can increase your dehydrating
capacity with the multilayer rack. If the rack
is not included with your model, it is
available for purchase at RAMJOY.
5. Press the START/PAUSE button to start
dehydrating.
6. When dehydrating is complete, the unit
will make 5 beep sound and END will
appear on the control panel display.
Press and Hold TEMP and TIME
for 3 seconds, to change the temperature
from Fahrenheit to Celsius degree, display
will show “C” from “F”. (Default is
Fahrenheit).

•
•
•
•
•
•
•
•
•
•
•
•
•
•
•
•
•
a. To shake food:
1. Hold the basket just above a
heat-resistant surface for safety
purposes.
2. Shake the basket.
Note: Do not use this method if there is a
risk of hot liquids splashing
b. If the basket is too heavy to shake and
there are hot liquids present:
1. Place the basket on a heat-resistant
holder or surface.
2. Use tongs to mix or flip the food.
When you take the basket out, the air
fryer will pause cooking automatically. As
a safety feature, the display will turn o
until the basket is replaced.
When you replace the basket, cooking will
automatically resume.
Avoid shaking longer than 60 seconds, as
the air fryer may start to cool down.
11
Small foods that are stacked will usually
need shaking, such as fries or nuggets.
Without shaking, foods may not be crispy
or evenly cooked.
You can flip other foods, such as steak, to
ensure even browning.
Shake or flip food once halfway through
cooking, or more if desired.
The Shake Reminder is designed to
remind you to check on your food. To
press and hold function button for 3
seconds to turn on the Shake reminder.
Certain cooking functions use the Shake
Reminder automatically (see Cooking
Functions, page 9).
The Shake Reminder will alert you with
5 beeps, and (SHAKE) will blink on the
display.
The Shake Reminder will go away once
•
If you do not remove the basket, the
Shake Reminder will beep again after 1
minute and the display will show a solid
(SHAKE).
you take out the basket.
What to Shake
When to Shake
Shake Reminder
Cooking Guide
More Functions
If the basket is overfilled, food will cook
unevenly.
Adding a small amount of oil to your food
will make it crispier. Use no more than
2 US tbsp / 30 mL of oil.
Oil sprays are excellent for applying small
amounts of oil evenly to all food items.
You can air fry any frozen foods or goods
that can be baked in an oven.
To make cakes, hand pies, or any food
with filling or batter, place food in a
heat-safe container before placing in the
basket.
Overfilling
Switching Temperature Units
Using Oil
Food Tips
Add ½–1 US tbsp / 8–15 mL oil for
crispiness.
When making fries from raw potatoes,
soak uncooked fries in water for 15
minutes to remove starch prior to frying.
Pat dry with a towel before adding oil.
Cut uncooked fries smaller for crispier
results. Try cutting fries into
¼- by 3-inch / 0.6- by 7.6-cm strips.
French Fries
Air frying high-fat foods will cause fat to
drip to the bottom of the basket. To avoid
excess smoke while cooking, pour out fat
drippings after cooking.
Liquid-marinated foods create splatter
and excess smoke. Pat these foods dry
before air frying.
1. Press and hold (TEMP “ ” and TIME “ ”)
for 3 seconds.
2. The temperature unit will change from
Fahrenheit to Celsius.
3. Repeat to switch back to Fahrenheit.

•
•
•
•
•
•
•
1. Press PAUSE button to pause cooking.
The air fryer will stop heating, and return
back to preset mode, to press START
to cooking again, or re-select other function
to start cooking.
Pausing
12
CARE & MAINTENANCE
Note:
Always clean the air fryer basket and crisper
plate after every use.
Lining the basket with foil (except the crisper
plate) may make cleanup easier.
1.
Turn o and unplug the air fryer. Allow it
to cool completely before cleaning. Pull
out the basket for faster cooling.
2. Wipe the outside of the air fryer with a
moist cloth, if necessary.
3. The basket and crisper plate are
dishwasher safe. You can also wash the
basket and crisper plate with hot, soapy
water and a non-abrasive sponge. Soak
if necessary.
Note: The basket and crisper plate have a nonstick
coating. Avoid using metal utensils and abrasive
cleaning materials.
Any other servicing should be performed
by an authorized service representative.
Note: Make sure the heating coil is completely dry
before turning on the air fryer.
b. Use a sponge to spread the paste
on the basket and crisper plate and
scrub. Let the basket and crisper
plate sit for 15 minutes before
rinsing.
c. Wash basket with soap and water
before using.
5. Clean the inside of the air fryer with a
slightly moist, non-abrasive sponge or
cloth. Do not immerse in water.
[Figure 3.1] If needed, clean the heating
coil to remove food debris.
6. Dry before using.
Figure 3.1
2. After 5 minutes of inactivity, the air
fryer will turn o.
3. This function allows you to pause the
cooking program without removing the
basket from the air fryer.
If you pull out the basket, the air fryer
will pause cooking automatically. The
display will turn o temporarily as a safety
feature.
When you return the basket, the air fryer
will automatically resume cooking based
on your previous settings.
If the air fryer has no active cooking
programs, the air fryer will clear all
settings and turn o after 5 minutes of
inactivity.
If the air fryer overheats (display E3),
it will automatically shut down as a safety
feature.
Let the air fryer cool down completely
before using it again.
Automatically Resume Cooking
Automatically Shuto
Overheat Protection
4. For stubborn grease:
a. In a small bowl, mix 2 US tbsp / 30
mL of baking soda and 1 US tbsp /
15 mL of water to form a spreadable
paste.

13
Problem Possible Solution
The air fryer will not turn
on.
Make sure the air fryer is plugged in.
Push the basket securely into the air fryer.
Foods are not completely
cooked.
Place smaller batches of food items into the basket. If the basket is
overstued, then foods will be undercooked.
Increase cooking temperature or time.
Foods are cooked unevenly.
Foods that are stacked on top of each other or close to each other need to
be shaken or flipped during cooking (see Shaking Food, page 10).
Foods are not crispy after air
frying.
Spraying or brushing a small amount of oil on foods can increase
crispiness (see page 9)
French fries are not cooked
correctly.
See French Fries, page 11
Basket will not slide into the
air fryer securely.
Make sure the basket is not overfilled with food.
White smoke or steam is
coming out of the air fryer.
The air fryer may produce some white smoke or steam when you use it for
the first time or during cooking. This is normal.
Make sure the basket and the inside of the air fryer are cleaned properly
and not greasy.
Cooking greasy foods will cause oil to collect beneath the crisper plate.
This oil will produce white smoke, and the basket may be hotter than
usual. This is normal, and should not aect cooking. Handle the basket
with care.
Dark smoke is coming out of
the air fryer.
Immediately unplug your air fryer. Dark smoke means that food is burning
or there is a circuit problem. Wait for smoke to clear before pulling the
basket out. If the cause was not burnt food, contact Customer Support.
The air fryer has a plastic
smell.
Any air fryer may have a plastic smell from the manufacturing process.
This is normal. Follow the instructions for a Test Run (page 7) to get rid of
the plastic smell. If a plastic smell is still present, please contact Customer
Support.
Display shows Error Code
“E1”.
There is an open circuit in the temperature monitor. Contact Customer
Support.
There is an shorted circuit in the temperature monitor. Contact Customer
Support.
Display shows Error Code
“E2”.
Display shows Error Code
“E3”.
The air fryer’s overheat protection has activated. Turn o and unplug the
air fryer and allow it to cool completely. If the display continues to show
“E3”, contact Customer Support.
TROUBLESHOOTING
If your problem is not listed, please contact RAMJOY Customer Support.

WARRANTY INFORMATION
Warranty card
Dear Customer,
Thank you so much for your purchase! The product comes with a TWO-YEAR warranty.
Should you ever needs one, please have the following information handy when
contacting us:
Please feel free to email us if have any questions or concerns.
Customer service email:
Product Model No.:
Date Code:
Order ID:
Customer Phone:
Product Name:
Order Date:
Customer Name:
Customer Email:
14

100~400°F /
1minutos~24Hours
15
Índice
Contenido del paquete
Especificaciones
Instrucciones importantes de seguridad
Descripción de la freidora de aire
Diagrama de la freidora de aire
Mensajes en la pantalla
Antes del primer uso
Uso de la freidora de aire
Cuidado y mantenimiento
Solución de problemas
Información de la garantía
Contenido del paquete
Especificaciones
1 x Freidora de aire 6.8-Quart
1 x Manual de instrucciones
15
15
16-17
18-19
18
19
20
21-25
25
26
27
Modelo
RAF-650
6.8 Quart120V 60Hz 1600 W
Volumen
Rango de
temperatura/tiempo
Clasificación

16
INSTRUCCIONES IMPORTANTES DE SEGURIDAD
SOLO PARA USO DOMÉSTICO • LEA TODAS LAS INSTRUCCIONES ANTES DE USAR
Lea todas las instrucciones antes de usar su freidora de aire RAMJOY.
Cuando se usen aparatos eléctricos, siempre se deben seguir precauciones
básicas de seguridad, incluyendo las siguientes:
ADVERTENCIA
1. Se utiliza un cable de alimentación corto
para reducir el riesgo de que los niños
agarren el cable o se enreden y para
reducir el riesgo de que las personas
tropiecen con un cable más largo.
2. Este aparato tiene un enchufe polarizado
(uno de los contactos es más ancho que el
otro). Para reducir el riesgo de choque
eléctrico, este enchufe está diseñado para
entrar en una toma polarizada de una sola
manera. Si el enchufe no entra completa-
mente en la toma, inviértalo. Si aún no
entra, consulte a un electricista calificado.
NO intente modificar el enchufe de ninguna
manera.
3. Para evitar un riesgo de asfixia para los
niños pequeños, retire y deseche la
cubierta protectora del enchufe de
alimentación de este aparato.
4. Asegúrese SIEMPRE de que el aparato
esté correctamente ensamblado antes de
usarlo.
5. NO toque las superficies calientes. Las
superficies del aparato están calientes
durante y después del funcionamiento.
Para evitar quemaduras o lesiones
personales, SIEMPRE use agarraderas
protectoras o guantes de horno aislados y
utilice las manijas y perillas disponibles.
6. Diseñado solo para uso en la encimera. NO
ponga el aparato cerca del borde de una
encimera durante el funcionamiento.
Asegúrese de que la superficie esté
nivelada, limpia y seca.
7. NO coloque el aparato sobre o cerca de
una hornilla de gas o eléctrica caliente o en
un horno caliente.
8. Se debe tener extrema precaución al mover
un aparato que contiene aceite caliente u
otros líquidos calientes.
9. Para protegerse contra choques eléctricos,
NO sumerja el cable, los enchufes ni la
carcasa de la unidad principal en agua ni
en ningún otro líquido.
10. Desconéctelo de la toma cuando no esté en
uso y antes de limpiarlo. Permita que se
enfríe antes de colocar o quitar piezas.
11. Deben tomarse precauciones extremas
cuando el aparato contiene alimentos
calientes. Un uso incorrecto puede
provocar lesiones personales.
12. NO use este aparato para freír con aceite.
13. Asegúrese de que la cesta SIEMPRE esté
cerrada correctamente antes de usarla.
14. NO permita que los niños pequeños operen
el aparato ni lo utilicen como juguete. Se
requiere una buena supervisión al utilizar
aparatos peligrosos con niños cerca.
15. Inspeccione regularmente el aparato y el
cable de alimentación. NO use el aparato si
el cable de alimentación o el enchufe están
dañados. Si el aparato funciona mal o ha
sido dañado, deje de usarlo de inmediato y
llame al Servicio al Cliente. Devuelva el
aparato a La instalación de servicio
autorizado más cercana RAMJOY para su
examen, reparación o ajuste.

17
16. El uso de accesorios no recomendados o
vendidos por RAMJOY puede provocar
incendios, choques eléctricos o lesiones.
17. Este aparato es solo para uso doméstico.
NO use este aparato para nada más que
para su uso previsto. NO lo use en
vehículos en movimiento o en
embarcaciones. NO lo use al aire libre. Un
uso indebido puede causar lesiones.
18. NO lo limpie con limpiadores abrasivos,
lana de acero ni estropajos.
19. Los alimentos derramados pueden causar
quemaduras graves. Mantenga el aparato y
el cable alejados de los niños. NO permita
que el cable cuelgue sobre los bordes de
mesas o mostradores ni toque superficies
calientes. NUNCA use una toma por debajo
del mostrador NI con un cable de
extensión.
20. Para evitar que los alimentos entren en
contacto con los elementos calefactores,
NO llene demasiado la cesta.
21. NO cubra la entrada de aire ni la salida de
aire mientras la unidad esté en
funcionamiento. Hacerlo evitará una
cocción uniforme y puede dañar la unidad o
hacer que se sobrecaliente.
22. El plato para dorar se calienta mucho
durante el proceso de cocción. Evite el
vapor caliente y el aire al quitar la cesta del
aparato. Coloque SIEMPRE la placa en
una superficie resistente al calor después
de quitarla. NO toque los accesorios
durante o inmediatamente después de la
cocción.
23. NUNCA conecte este aparato a un
temporizador externo o a un sistema de
control remoto separado.
24. Si la unidad emite humo negro,
desenchúfela de inmediato y espere a que
deje de humear antes de quitar la cesta de
cocción.
25. Deje que el aparato se enfríe durante
aproximadamente 30 minutos antes de
usarlo, limpiarlo o guardarlo.
26. Cuando use este aparato, proporcione
suficiente espacio arriba y a los lados para
la circulación de aire.
27. Asegúrese de que la unidad esté limpia
antes de usarla.
28. Consulte la sección de Limpieza y
Mantenimiento para el mantenimiento
regular del aparato. Devuelva el aparato a
RAMJOY para cualquier otro servicio.
29. Los voltajes de las tomas pueden variar, lo
que afecta el rendimiento del producto.
Para prevenir posibles enfermedades, use
un termómetro para verificar que sus
alimentos estén cocidos a las temperaturas
recomendadas por la Administración de
alimentos y Medicamentos.
Los cables de extensión más largos están
disponibles y pueden usarse si se tiene cuidado
en su uso. Si se utiliza cable de extensión:
1) la potencia eléctrica marcada del conjunto de
cables o del cable de extensión debe ser al
menos igual a la potencia eléctrica del aparato;
2) el cordón debe estar dispuesto de tal
manera que no se cubra sobre la mesada o
mesa donde puede ser tirado por los niños o
tropeinvoluntari.
GUARDE ESTE MANUAL DE
INSTRUCCIONES

18
DESCRIPCIÓN DE LA FREIDORA DE AIRE
Diagrama de la freidora de aire
La freidora de aire RAMJOY utiliza tecnología de circulación de aire rápida de 360° para cocinar
con muy poco o ningún aceite, resultando en alimentos rápidos, crujientes y deliciosos con
hasta un 85% menos de calorías que las freidoras tradicionales. Con controles sencillos de un
solo paso, una cesta antiadherente y un diseño intuitivo y seguro, la freidora de aire RAMJOY
es la mejor elección para su cocina.
A. Entrada de aire
B. Panel de control
C. Plato para dorar
D. Cesta
E. Asa de la cesta
F. Unidad Principal
G. Salida de aire
H.
Escape del aire
PARTE FRONTAL
B
C
F
E
PARTE TRASERA
D
A
Nota:
• No intente abrir la parte superior de la freidora de aire. Esto no es una tapa.
• La cesta y el plato para dorar están hechas de metal con revestimiento antiadherente.
G
H

19
Nota: Cuando presione un botón para usar una función o programa, parpadeará para mostrar que está activo.
Nota: Muestra la activación/desactivación del
recordatorio de agitación.
(Nota: cuando aparezca HR y
MIN esté apagado, significará
que el temporizador está en
horas)
DESCRIPCIÓN DEL PANEL DE CONTROL
Panel de control
Freír al aire Asar
Desecar
Agitar
Precalentar
Gratinar
Visualización
de tiempo
Patatas fritas
Hornear Alitas
Visualización
de temperatura
Vegetales
Mensajes en la pantalla
COOKING
READY SHAKE
。
F
。
C
MIN
HR
PREHEAT
COOKING
READY SHAKE
。
F
。
C
MIN
HR
PREHEAT
Aumentar/di
sminuir la
temperatura
Aumentar
/disminuir
el tiempo
Encendido /
Apagado
Mantener
caliente
Iniciar/
Pausar
SHAKE
。
F
MIN
Recordatorio para agitar o
voltear los alimentos
Nota: Antes de comenzar la cocción, si la función de "AGITAR" aparece
en la pantalla, significa que está activada; durante la cocción, el
"AGITAR" parpadeará para recordar al usuario que debe agitar.
Nota: Presione el botón INICIAR/PAUSAR durante la cocción para
pausar la unidad y apagar "COCINA" en la pantalla.
La freidora de aire está
precalentada y lista para
comenzar a cocinar.
La freidora de aire está
cocinando.
COOKING
PREHEAT
。
F
MIN
Cocción pausada.
El programa de
cocción ha finalizado.
。
F
MIN
READY
。
F
MIN
La freidora de aire está
precalentando.
。
F
MIN
20
ANTES DEL PRIMER USO
Configuración Prueba de funcionamiento
Nota: Deje 5 pulgadas / 13 cm de espacio detrás y
encima de la freidora de aire. [Imagen 1.1] Deje
suficiente espacio frente a la freidora de aire para retirar
la cesta.
Nota:
• Tenga precaución al dar la vuelta a la cesta
después de cocinar, ya que el plato para dorar
caliente podría caer y ser peligroso para la
seguridad.
Una prueba de funcionamiento le ayudará a
familiarizarse con su freidora de aire,
asegurarse de que funcione correctamente y
limpiarla de posibles residuos en el proceso.
Imagen 1.1
5 pulgadas
/ 13 cm
5 pulgadas
/ 13 cm
1. Retire todo el embalaje de la freidora de
aire, incluyendo cualquier etiqueta temporal
y película protectora.
2. Coloque la freidora de aire en una
superficie estable, nivelada y resistente al
calor. Manténgala alejada de áreas que
puedan dañarse por el vapor (como
paredes o armarios).
3. Sujete el asa para sacar la cesta de la
unidad.
4. Lave tanto la cesta como el plato para dorar
a fondo, ya sea en un lavavajillas o con una
esponja no abrasiva.
5. Limpie el interior y el exterior de la freidora
de aire con un paño ligeramente húmedo.
Seque con una toalla.
6. Inserte el plato para dorar de nuevo en la
cesta y coloque la cesta dentro de la
freidora de aire.
1. Asegúrese de que la cesta de la freidora de
aire esté vacía y enchufe la freidora de aire.
2. Presione PRECALENTAR. La pantalla
mostrará "400°F" y "04 MIN".
3. Presione INICIAR/PAUSAR para comenzar
el precalentamiento. Cuando termine el
precalentamiento, la freidora de aire emitirá
un pitido.
4. Saque la cesta y déjela enfriar durante unos
4 minutos. Luego, coloque la cesta de
nuevo en la freidora de aire.
5. Presione GRATINAR para seleccionar la
función de gratinado. La pantalla mostrará
"400°F" y "07 MIN".
6. Presione una vez. El tiempo cambiará a
6 minutos.
7. Presione el botón INICIAR/PAUSAR para
comenzar. Cuando termine, la freidora de
aire emitirá un pitido.
8. Retire la cesta. Esta vez, deje que la cesta
se enfríe completamente durante 10-30
minutos.

21
USO DE LA FREIDORA DE AIRE
1. Enchufe la freidora. Presione para
encender la pantalla de la freidora de aire.
2. Presione PRECALENTAR. La pantalla
mostrará "400°F" y "4 MIN".
3. Si lo desea, presione los botones o
para cambiar la temperatura. El tiempo se
ajustará automáticamente.
4. Presione INICIAR/PAUSAR para
comenzar el precalentamiento.
5. Cuando el precalentamiento haya
terminado, la freidora de aire emitirá 3
pitidos. La pantalla mostrará "LISTO".
Puede sacar la cesta para llenarla de
alimentos, después vuelva a colocar la
cesta en la unidad, seleccione la función
que desee y luego comience la cocción.
[Imagen 2.1]
Precalentamiento
Imagen 1.2
Imagen 2.1
• El plato para dorar contiene 4 retenedores
de goma hechos de un material seguro y
aprobado por la FDA. Estos retenedores
mantienen el plato para dorar ajustado en el
fondo de la cesta, evitan que el plato para
dorar toque directamente la cesta y, en
casos raros, evitan dañar el revestimiento
antiadherente de la cesta.
• Quite los retenedores de goma solo para la
limpieza. Comience desde el exterior del
plato para dorar y tire hacia afuera del
retenedor. [Imagen 1.2]
• Para volver a colocar los retenedores de
goma en el plato para dorar, apunte hacia la
lámina en el plato para dorar y luego empuje
el retenedor.
Retenedores de goma
Recomendamos precalentar antes de colocar
alimentos dentro de la freidora de aire, a
menos que su freidora de aire ya esté caliente.
Los alimentos no se cocinarán completamente
sin precalentar.
Temperatura Tiempo
400° – 380°F 4 minutos
370° – 280°F 3 minutos
270° – 170°F 2 minutos
Nota: Si no se presionan botones durante 5 minutos,
la freidora de aire borrará todas las configuraciones y
entrará en modo LISTO.
READY
。
F
MIN

• No coloque nada encima de la freidora de aire.
Interrumpiría el flujo de aire y resultaría en una mala
cocción. [Imagen 2.1]
• Una freidora de aire no es una freidora de capacidad
profunda. No llene la cesta con aceite, grasa para
freír ni ningún líquido.
• Cuando saque la cesta de la freidora de aire, tenga
cuidado con el vapor caliente.
22
Freír al aire
Imagen 2.1
Utilizar una función de cocción es la forma más
sencilla de freír con aire. Las funciones de
cocción están programadas con un tiempo y
temperatura ideales para cocinar ciertos
alimentos.
Nota:
• Los resultados pueden variar según el tamaño de los alimentos,
ajuste el tiempo de cocción según el tamaño real de los alimentos.
• El temporizador para la función de Mantener Caliente es de 1
minuto a 12 horas, para la función de Deshidratar es de 1 hora a
24 horas.
Nota:
Funciones de cocción
* Consulte Agitar los alimentos (página 10)
** Consulte la Guía de Cocción (página 11) para obtener más consejos sobre cómo freír con aire las patatas fritas.
Función
Temperatura
predeterminada
Tiempo predeterminado
(minutos)
Recordatorio de agitar*
Freír al Aire
Asar
Hornear
Gratinar
Alitas
Patatas fritas
Vegetales
Desecar
Precalentar
Mantener caliente
400°F 16 minutos
25 minutos
30 minutos
7 minutos
19 minutos
18 minutos
18 minutos
6 Horas
4 minutos
30 minutos
-
((AGITAR))
-
((AGITAR))
((AGITAR))
((AGITAR))
((AGITAR))
-
-
-
390°F
350°F
400°F
400°F
400°F
320°F
140°F
400°F
170°F
1. Presione el botón de la función para
seleccionarla. La freidora de aire cambiará
automáticamente a la configuración
predeterminada de la función.
2. Puede cambiar el tiempo (1–60 minutos), la
temperatura (170°–400°F) y el Recordatorio
de agitar de una función.
3. Presione y mantenga presionado el botón o
para aumentar o disminuir rápidamente el
tiempo o la temperatura.
4. Agregue o elimine un recordatorio de agitar
presionando y manteniendo presionado el
botón de la función durante 3 segundos;
cuando "AGITAR" aparezca en la pantalla,
significa que el recordatorio de agitar está
activado. Por ejemplo: presione y mantenga
presionado el botón "FREÍR AL AIRE" durante
3 segundos, la palabra AGITAR aparecerá en
la pantalla.
5. Para volver a las configuraciones
predeterminadas de una función, presione
nuevamente el botón de la función.
• Para aumentar o disminuir rápidamente el tiempo o la
temperatura, presione y mantenga presionados los
botones o .
• Mantenga presionados TEMP y TIME
durante 3 segundos para cambiar la temperatura
de grados Fahrenheit a grados Celsius, la
pantalla mostrará "C" de "F". (El valor
predeterminado es Fahrenheit).
• Presione el botón de la función durante 3 segundos
para agregar o eliminar un recordatorio de agitar.
Nota: Las funciones de cocción están programadas con un
tiempo y temperatura ideales para cocinar ciertos alimentos.
También puede configurar manualmente el tiempo y la
temperatura sin elegir una función de cocción.
Nota:
23
Nota: Consulte Agitar los alimentos (página 9)
Freír al aire
a. Presione los botones o para
cambiar la temperatura (170°–400°F) o
el tiempo (1–60 minutos, 1-24 horas).
a. Sujete el asa para sacar la cesta de la
freidora de aire, teniendo cuidado con el
vapor caliente. La freidora de aire
pausará la cocción automáticamente y
la pantalla se apagará hasta que la
cesta se reemplace.
b. Agite o voltee los alimentos.
c. Vuelva a colocar la cesta en la freidora
de aire.
• Para obtener mejores resultados, coloque
el plato para dorar en la cesta para permitir
que el exceso de aceite gotee hacia la
parte inferior de la cesta.
Agitar los alimentos
Cómo Agitar
1. Precaliente su freidora de aire (consulte la
página 8)
2. Cuando su freidora de aire muestre "LISTO",
agregue alimentos a la cesta.
3. Seleccione una función de cocción (consulte la
página 9)
4. Si lo desea, cambie la temperatura y el tiempo,
y agregue o elimine un recordatorio de agitar.
Puede hacer esto en cualquier momento
durante la cocción.
5. Presione INICIAR/PAUSAR para comenzar la
fritura al aire.
6. Cuando el recordatorio de agitar está activado,
aparecerá a la mitad del tiempo de cocción. La
freidora de aire emitirá 5 pitidos y (AGITAR)
parpadeará en la pantalla.
7. La freidora de aire emitirá 5 pitidos. La pantalla
mostrará "Fin":
8. Si lo desea, presione MANTENER
CALIENTE. Presione los botones o para
cambiar el tiempo (1 minuto – 12 horas).
También puede configurar la temperatura de
mantener caliente que desee.
9. Sujete el asa para sacar la cesta de la freidora de
aire, teniendo cuidado con el vapor caliente.
10. Permita que se enfríe antes de limpiar.
1. Coloque su primera capa de ingredientes en el
fondo de la cesta. Luego, instale el plato para
dorar dentro de la cesta y coloque una segunda
capa de ingredientes en el plato para dorar.
2. Inserte la cesta en la unidad.
3. Presione el botón DESHIDRATAR. La
temperatura y el tiempo predeterminados (140F, 6
horas) se mostrarán en la pantalla de control.
Utilice los botones de flecha TEMP hacia arriba y
hacia abajo para establecer la temperatura
deseada.
4. Presione los botones de flecha de TIEMPO hacia
arriba y hacia abajo para configurar el tiempo de
cocción deseado.
5. Presione el botón INICIAR/PAUSAR para
comenzar la deshidratación.
6. Cuando la deshidratación esté completa, la unidad
emitirá 5 pitidos y aparecerá "FIN" en la pantalla
del panel de control.
Desecar
NOTA: Puede aumentar su capacidad de
deshidratación con el soporte multicapa. Si el
soporte no se incluye con su modelo, está
disponible para su compra en RAMJOY.
• Durante la cocción, sostenga el asa para
sacar la cesta de la freidora de aire y agite,
mezcle o voltee los alimentos.

a. Para agitar los alimentos:
b. Si la cesta es demasiado pesada para
agitar y hay líquidos calientes presentes:
Nota: No utilice este método si existe riesgo
de salpicaduras de líquidos calientes.
24
Qué se debe agitar
Cuándo se debe agitar
Recordatorio de agitar
Guía de cocción
Más funciones
Sobrecarga
Cambiar las unidades de temperatura
Uso de aceite
Consejos para la cocción de alimentos
Agregue 1 cucharada de entre 8 y 15 mL de
aceite para que sea más crujiente.
Ante de hacer las patatas fritas, remoje las
patatas sin cocinar en agua durante 15
minutos para eliminar el almidón. Séquelas
con una toalla antes de agregar el aceite.
Trocee las patatas crudas a tamaño
pequeño para obtener resultados más
crujientes. Corte las patatas en tiras de ¼
por 3 pulgadas / 0,6 por 7,6 cm.
Patatas fritas
1. Coloque la cesta en un soporte o superficie
resistente al calor.
2. Use pinzas para mezclar o voltear los
alimentos.
1. Sostenga la cesta justo encima de una
superficie resistente al calor por razones
de seguridad.
2. Agite la cesta.
1. Presione y mantenga presionados (TEMP " " y
TIEMPO " ") durante 3 segundos.
2. La unidad de temperatura cambiará de fahrenheit
a Celsius.
3. Repita para volver a cambiar a Fahrenheit.
• El Recordatorio de agitar desaparecerá una
vez que saque la cesta.
• Cuando saque la cesta, la freidora de aire
pausará la cocción automáticamente. Como
medida de seguridad, la pantalla se
apagará hasta que se reemplace la cesta.
• Cuando vuelva a colocar la cesta, la
cocción se reanudará automáticamente.
• Evite agitar durante más de 60 segundos,
ya que la freidora de aire podría empezar a
enfriarse.
• Si la cesta está sobrecargada, los alimentos
no se cocerán homogéneamente.
• Agregar una pequeña cantidad de aceite a
sus alimentos los hará más crujientes.
Poner menos de 2 cucharadas de 15 mL
(30 mL) de aceite.
• Los aerosoles de aceite son excelentes
para aplicar pequeñas cantidades de aceite
de manera uniforme a todos los alimentos.
• Puede freír con aire cualquier alimento
congelado o productos que puedan
hornearse en un horno.
• Para hacer pasteles, empanadas o
cualquier alimento con relleno o masa,
coloque los alimentos en un recipiente
resistente al calor antes de colocarlos en la
cesta.
• Freír al aire alimentos con alto contenido de
grasa hará que la grasa gotee hacia la parte
inferior de la cesta. Para evitar el exceso de
humo durante la cocción, vierta las grasas
goteadas después de cocinar.
• Los alimentos marinados en líquidos crean
salpicaduras y exceso de humo. Seque
estos alimentos antes de freír con aire.
• Por lo general, los alimentos pequeños que
están apilados necesitarán ser agitados,
como patatas fritas o nuggets.
• Sin agitar, los alimentos puede que no
queden crujientes ni cocidos de manera
uniforme.
• Puede voltear otros alimentos, como bistec,
para asegurar un dorado uniforme.
• Agite o voltee los alimentos una vez a la
mitad de la cocción, o más si lo desea.
• El Recordatorio de agitar está diseñado para
recordarle que verifique sus alimentos. Para
activar el recordatorio de agitar, presione y
mantenga presionado el botón de función
durante 3 segundos. Ciertas funciones de
cocción utilizan el Recordatorio de agitar
automáticamente (consulte Funciones de
cocción, página 9).
• El Recordatorio de agitar le alertará con 5
pitidos, y (AGITAR) parpadeará en la
pantalla.
• Si no retira la cesta, el Recordatorio de
agitar volverá a sonar después de 1 minuto
y la pantalla mostrará (AGITAR) sólido.

• Limpie siempre la cesta de la freidora de aire y el
plato para dorar después de cada uso.
• Forrar la cesta con papel de aluminio (excepto el
plato para dorar) puede facilitar la limpieza.
Nota: La cesta y el plato para dorar tienen un revestimien-
to antiadherente. Evite usar utensilios metálicos y
materiales de limpieza abrasivos.
Nota:
a. En un bol pequeño, mezcle 2
cucharadas de 15 mL (30 mL) de
bicarbonato de sodio y 1 cucharada de
15 mL de agua para formar una pasta
que se pueda extender.
b. Use una esponja para extender la pasta
en la cesta y el plato para dorar y frote.
Deje reposar la cesta y el plato para
dorar durante 15 minutos antes de
enjuagar.
c. Lave la cesta con agua y jabón antes de
usarla.
Pausa
25
CUIDADO Y MANTENIMIENTO
Nota: Asegúrese de que la bobina calefactora esté
completamente seca antes de encender la freidora
de aire.
Imagen 3.1
Reanudación automática de la cocción
Apagado automático
Protección contra sobrecalentamiento
1. Presione el botón de PAUSA para pausar la
cocción. La freidora de aire dejará de
calentarse y volverá al modo preestablecido,
presione INICIAR para continuar cocinando o
seleccione otra función para comenzar a
cocinar.
2. Después de 5 minutos de inactividad, la
freidora de aire se apagará.
3. Esta función le permite pausar el programa de
cocción sin sacar la cesta de la freidora de aire.
1. Apague y desenchufe la freidora de aire.
Permita que se enfríe por completo antes de
limpiarla. Saqué la cesta para que se enfríe
más rápido.
2. Siempre que sea necesario, limpie el exterior
de la freidora de aire con un paño húmedo.
3. La cesta y el plato para dorar se pueden lavar
en el lavavajillas. También puede lavar la cesta
y el plato para dorar con agua caliente y jabón
y una esponja no abrasiva. Si es necesario,
deje en remojo.
4. Para la grasa persistente:
5. Limpie el interior de la freidora de aire con una
esponja o paño ligeramente húmedo y no
abrasivo. No sumerja en agua. [Imagen 3.1] Si
es necesario, limpie la bobina calefactora para
eliminar restos de alimentos.
6. Seque antes de usar.
• Si retira la cesta, la freidora de aire pausará
la cocción automáticamente. La pantalla se
apagará temporalmente como medida de
seguridad.
• Cuando vuelva a colocar la cesta, la
freidora de aire reanudará automáticamente
la cocción según la configuración anterior.
• Si la freidora de aire no tiene programas de
cocción activos, se borrarán todos los
ajustes y se apagará después de 5 minutos
de inactividad.
• Si la freidora de aire se sobrecalienta
(muestra E3 en la pantalla), se apagará
automáticamente como medida de
seguridad.
• Permita que la freidora de aire se enfríe
completamente antes de volver a usarla.

26
Problema Posible solución
La freidora de aire no se
enciende.
Los alimentos no están
cocidos por completo.
Los alimentos están cocidos
de manera desigual.
Los alimentos no quedan
crujientes después de freír
con aire.
Las patatas fritas no se
cocinan correctamente.
La cesta no se desliza de
manera segura en la freidora
de aire.
Sale humo blanco o vapor de
la freidora de aire.
Sale humo oscuro de la
freidora de aire.
La freidora de aire tiene un
olor a plástico.
La pantalla muestra el
Código de Error "E1".
La pantalla muestra el
Código de Error "E2".
La pantalla muestra el
Código de Error "E3".
Asegúrese de que la freidora de aire esté enchufada.
Empuje la cesta firmemente en la freidora de aire.
Coloque lotes más pequeños de alimentos en la cesta. Si la cesta está
demasiado llena, los alimentos quedarán crudos.
Rociar o pincelar una pequeña cantidad de aceite en los alimentos puede
aumentar la crujiente (consulte la página 9).
La freidora de aire puede producir algo de humo blanco o vapor cuando la
usa por primera vez o durante la cocción. Esto es normal.
Asegúrese de que la cesta y el interior de la freidora de aire estén limpios
adecuadamente y no grasientos.
Hay un circuito en cortocircuito en el monitor de temperatura. Póngase en
contacto con el Servicio de atención al Cliente.
Hay un circuito abierto en el monitor de temperatura. Póngase en contacto
con el Servicio de atención al Cliente.
Cocinar alimentos grasientos hará que el aceite se acumule debajo del plato
para dorar. Este aceite producirá humo blanco y la cesta puede estar más
caliente de lo habitual. Esto es normal y no debería afectar la cocción.
Maneje la cesta con cuidado.
Desenchufe inmediatamente su freidora de aire. El humo oscuro significa
que los alimentos se están quemando o que hay un problema en el circuito.
Espere a que se disipe el humo antes de sacar la cesta. Si la causa no fue
alimentos quemados, póngase en contacto con el Servicio de atención al
Cliente.
Cualquier freidora de aire puede tener un olor a plástico debido al proceso de
fabricación. Esto es normal. Siga las instrucciones para una Prueba de
funcionamiento (página 7) para eliminar el olor a plástico. Si aún persiste el
olor a plástico, póngase en contacto con el Servicio de atención al Cliente.
La protección contra el sobrecalentamiento de la freidora de aire se ha
activado. Apague y desenchufe la freidora de aire y permita que se enfríe por
completo. Si la pantalla sigue mostrando "E3", póngase en contacto con el
Servicio de atención al Cliente.
Los alimentos apilados unos encima de otros o cerca unos de otros deben
agitarse o voltearse durante la cocción (consulte Agitar los alimentos, página 10).
Aumente la temperatura o el tiempo de cocción.
Consulte Patatas fritas, página 11.
Asegúrese de que la cesta no esté demasiado llena de alimentos.
RESOLUCIÓN DE PROBLEMAS
Si su problema no está en la lista, póngase en contacto con el Servicio
de atención al Cliente de RAMJOY.

27
INFORMACIÓN DE LA GARANTÍA
Tarjeta de garantía
Estimado cliente,
¡Muchas gracias por su compra! El producto tiene una garantía de DOS AÑOS.
Si alguna vez necesita una, tenga a mano la siguiente información cuando se
comunique con nosotros:
No dude en enviarnos un correo electrónico si tiene alguna pregunta o inquietud.
Correo electrónico de servicio al cliente: [email protected]
Número de modelo
del producto:
Código de fecha:
ID de pedido:
Teléfono del cliente:
Nombre del producto:
Fecha de pedido:
Nombre del cliente:
Correo electrónico
del cliente:

We hope this has been helpful to you. We can’t wait to see your beautiful
results, and we think you’ll want to share glam shots! Our community
awaits your uploads—just pick your platform of choice below.
SHOW US WHAT YOU’RE MAKING

