Scan to register
bellakitchenware.com
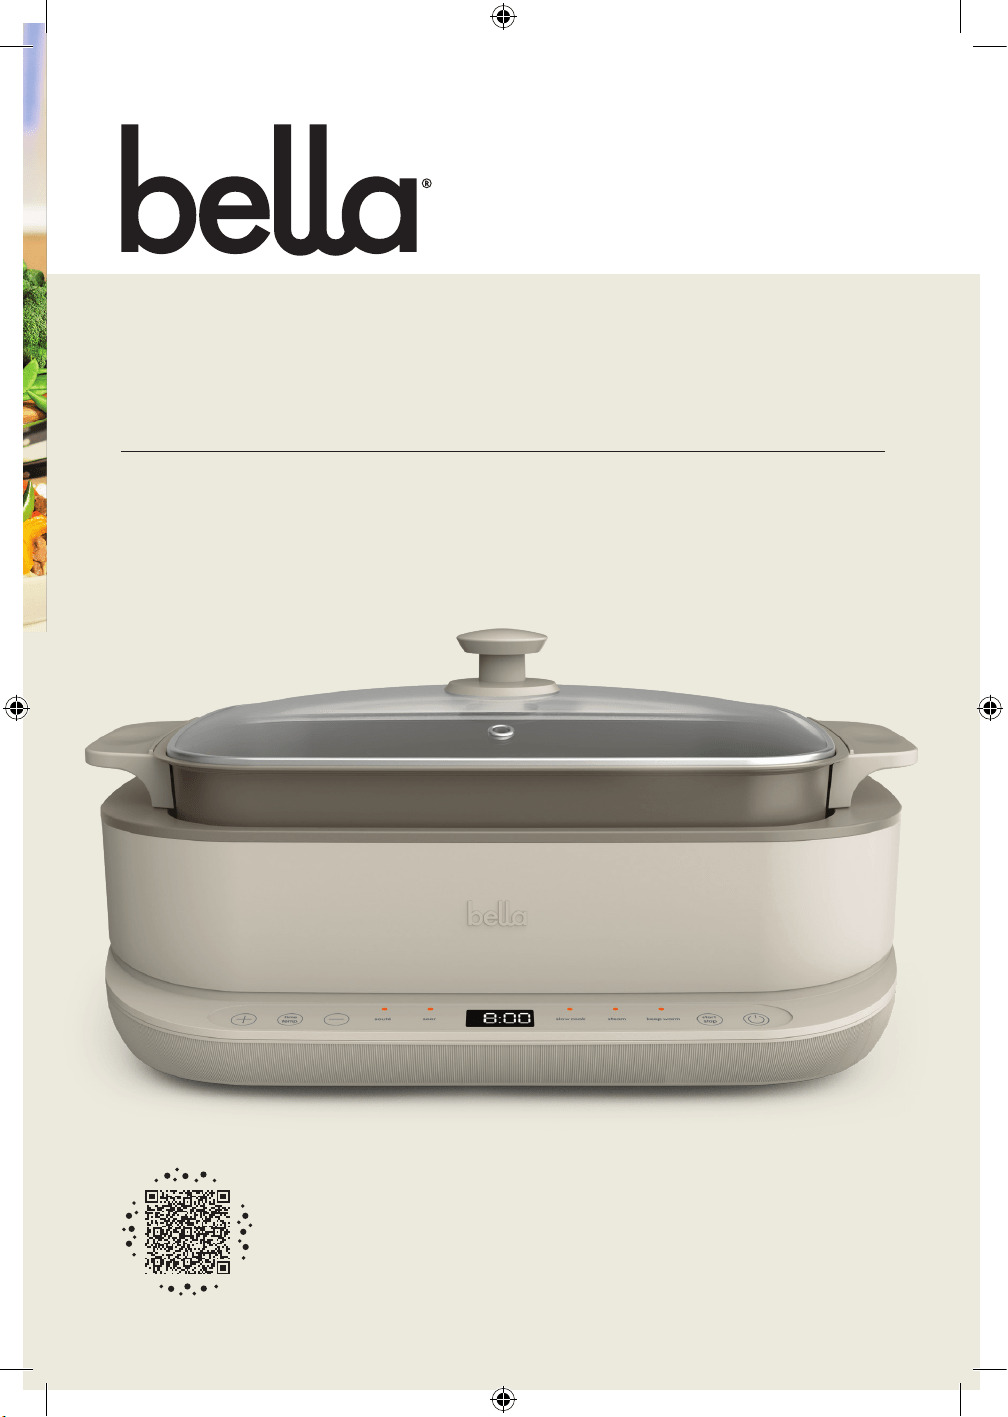
6qt Multicooker
with Sear Function
Instruction Manual
Olla multifunción de 6 cuartos de galón
con función de sellado
Manual de instrucciones
bella_Amazon_6.0 QT_MultiCooker_IM_V6_R0.indd 1bella_Amazon_6.0 QT_MultiCooker_IM_V6_R0.indd 1 2025-09-03 3:56 PM2025-09-03 3:56 PM

bella_Amazon_6.0 QT_MultiCooker_IM_V6_R0.indd 2bella_Amazon_6.0 QT_MultiCooker_IM_V6_R0.indd 2 2025-09-03 3:56 PM2025-09-03 3:56 PM

1
TABLE OF CONTENTS
IMPORTANT SAFEGUARDS ....................................................................................................................................................2
ADDITIONAL IMPORTANT SAFEGUARDS ........................................................................................................................3
NOTES ON THE CORD.............................................................................................................................................................4
NOTES ON THE PLUG ..............................................................................................................................................................4
ELECTRIC POWER ......................................................................................................................................................................4
GETTING TO KNOW YOUR MULTI COOKER ..................................................................................................................5
BEFORE USING FOR THE FIRST TIME ................................................................................................................................ 6
OPERATING INSTRUCTIONS ............................................................................................................................................... 6
CONTROL PANEL FUNCTIONS ........................................................................................................................................... 6
PRESET MODE ............................................................................................................................................................................ 7
FUNCTION TIME REFERENCE TABLE ..................................................................................................................................8
USER MAINTENANCE INSTRUCTIONS ............................................................................................................................8
CARE & CLEANING INSTRUCTIONS ..................................................................................................................................8
WARRANTY ................................................................................................................................................................................ 9
ÍNDICE
PROTECCIONES IMPORTANTES ........................................................................................................................................10
PROTECCIONES IMPORTANTES ADICIONALES ...........................................................................................................11
NOTAS SOBRE EL CABLE ..................................................................................................................................................... 12
NOTAS SOBRE EL ENCHUFE ..............................................................................................................................................12
ENERGÍA ELÉCTRICA..............................................................................................................................................................12
CONOZCA SU OLLA MULTIFUNCIÓN ............................................................................................................................13
ANTES DE USAR POR PRIMERA VEZ .................................................................................................................................14
INSTRUCCIONES DE FUNCIONAMIENTO .................................................................................................................... 14
FUNCIONES DEL PANEL DE CONTROL ...........................................................................................................................14
MODO PREDETERMINADO .................................................................................................................................................15
TABLA DE REFERENCIA DEL TIEMPO DE FUNCIONAMIENTO ............................................................................... 16
INSTRUCCIONES DE MANTENIMIENTO PARA EL USUARIO..................................................................................16
INSTRUCCIONES DE CUIDADO Y LIMPIEZA ................................................................................................................16
GARANTIA ................................................................................................................................................................................17
bella_Amazon_6.0 QT_MultiCooker_IM_V6_R0.indd 1bella_Amazon_6.0 QT_MultiCooker_IM_V6_R0.indd 1 2025-09-03 3:56 PM2025-09-03 3:56 PM
2
IMPORTANT SAFEGUARDS
When using electrical appliances, basic safety precautions shouldalways
be followed, including the following:
1. READ ALL THE INSTRUCTIONS.
2. Do not touch hot surfaces. Use handles or knobs.
3. To protect against electrical shock, do not immerse cord, plugs or base unit in
water or other liquid.
4. This appliance is not intended for use by people (including children) with
reduced physical, sensory or mental capabilities, or lack of experience and
knowledge, unless they have been given supervision or instruction concerning
use of the appliance by a person responsible for their safety.
5. Close supervision is necessary when any appliance is used by or near children.
6. To disconnect, press
button to turn it off, then remove plug from the wall
outlet.
7. Unplug from outlet when not in use and before cleaning. Allow it to cool
before cleaning or storing this appliance.
8. Do not operate any appliance with a damaged cord or plug or after the
appliance malfunctions or has been damaged in any manner.
9. The use of accessory attachments not recommended by the appliance
manufacturer may cause injuries.
10. Do not use outdoors.
11. Do not let the cord hang over the edge of table or counter, or touch hot
surfaces, as you may trip and fall or cause the hot contents of the rice cooker
to spill and possibly cause burns or injuries.
12. Do not place the unit on or near a hot stove, a cooktop, an electric burner, or
in a heated oven as this may cause damage or malfunction.
13. Extreme caution must be used when moving an appliance containing hot oil or
other hot liquids.
WARNING: Use caution when opening the lid. Steam escapes as soon as the lid is
opened. Never place your face or hands over the Multi Cooker when opening the
lid. Always hold cook pot handles when moving a hot cooking pot.
14. Never yank the cord to disconnect the appliance from the outlet, it could
damage the cord. Instead, grasp the plug and pull it to disconnect.
15. Do not use the appliance for other than intended use.
16. Intended for countertop use only.
17. It is recommended to use a heat-resistant trivet or cutting board underneath
this appliance to avoid possible heat damage to the countertop.
WARNING: Spilled food can cause serious burns. Keep the appliance and cord
away from children. Never drape the cord over the edge of the counter, never use
an outlet below the counter, and never use an extension cord.
FOR HOUSEHOLD USE ONLY
SAVE THESE INSTRUCTIONS
bella_Amazon_6.0 QT_MultiCooker_IM_V6_R0.indd 2bella_Amazon_6.0 QT_MultiCooker_IM_V6_R0.indd 2 2025-09-03 3:56 PM2025-09-03 3:56 PM

3
ADDITIONAL IMPORTANT
SAFEGUARDS
CAUTION HOT SURFACES: This appliance generates heat and escaping steam
during use.
Proper precautions must be taken to prevent the risk of burns, fires or other
injuries to people or damage to property.
1. A person who has not read and understood all operating and safety
instructions is not qualified to operate this appliance. All users of this
appliance must read and understand this instruction manual before operating
or cleaning this appliance.
2. If this appliance falls or accidentally becomes immersed in water, unplug it
from the wall outlet immediately. Do not reach into the water!
3. Unplug from the outlet when not in use and before cleaning. To avoid electric
shock, never immerse or rinse this appliance in water or any other liquid.
4. When using this appliance, provide adequate air space above and on all
sides for air circulation. Do not operate this appliance while it is touching
or near curtains, wall coverings, clothing, dishtowels or other flammable
materials.
5. Do not place this Multi Cooker directly under the kitchen wall cabinets when
in use as it produces steam. Avoid reaching over the steam valve while in use.
6. To reduce the risk of fire, do not leave this appliance unattended during use.
7. If this appliance begins to malfunction during use, press
, then immediately
unplug the cord. Do not use or attempt to repair the malfunctioning appliance!
8. The cord to this appliance should only be plugged into a 120V AC electrical outlet.
9. Do not use this appliance in an unstable position.
10. Do not use the cooking pot if dented, bent, or damaged.
11. Avoid electric shock by unplugging the Multi Cooker before washing or
adding water.
12. Never use the cooking pot on a gas or electric cooktop or on an open flame.
13. CAUTION: Never operate the Multi Cooker when the cooking pot is empty.
14. Do not leave any plastic accessories in the cooking pot while the Multi Cooker
is in use.
15. To avoid burns, stay clear of the steam vent during cooking.
16. WARNING: Use caution when opening the lid. Steam escapes as soon as the
lid is opened. Never place your face or hands over the Multi Cooker when
opening the lid. Always use oven mitts when handling the hot cooking pot.
17. To reduce the risk of electric shock, cook only in the cooking pot. Do not pour
liquid directly into the Multi Cooker body.
18. Do not use it while standing in a damp area.
19. Never use sharp objects inside the cooking pot as this will damage the
ceramic coating.
bella_Amazon_6.0 QT_MultiCooker_IM_V6_R0.indd 3bella_Amazon_6.0 QT_MultiCooker_IM_V6_R0.indd 3 2025-09-03 3:56 PM2025-09-03 3:56 PM

4
NOTES ON THE CORD
A short power-supply cord (or detachable power-supply cord) is to be provided to
reduce the risk resulting from becoming entangled in or tripping over a longer cord.
Do not use an extension cord with this product.
NOTES ON THE PLUG
This appliance has a polarized plug (one blade is wider than the other). To reduce
the risk of electric shock, this plug will fit in a polarized outlet only one way. If the
plug does not fit fully into the outlet, reverse the plug. If it still does not fit, contact a
qualified electrician. Do not modify the plug in any way.
ELECTRIC POWER
If the electrical circuit is overloaded with other appliances, your appliance may not
operate properly. It should be operated on a separate electrical circuit from other
appliances.
bella_Amazon_6.0 QT_MultiCooker_IM_V6_R0.indd 4bella_Amazon_6.0 QT_MultiCooker_IM_V6_R0.indd 4 2025-09-03 3:56 PM2025-09-03 3:56 PM
5
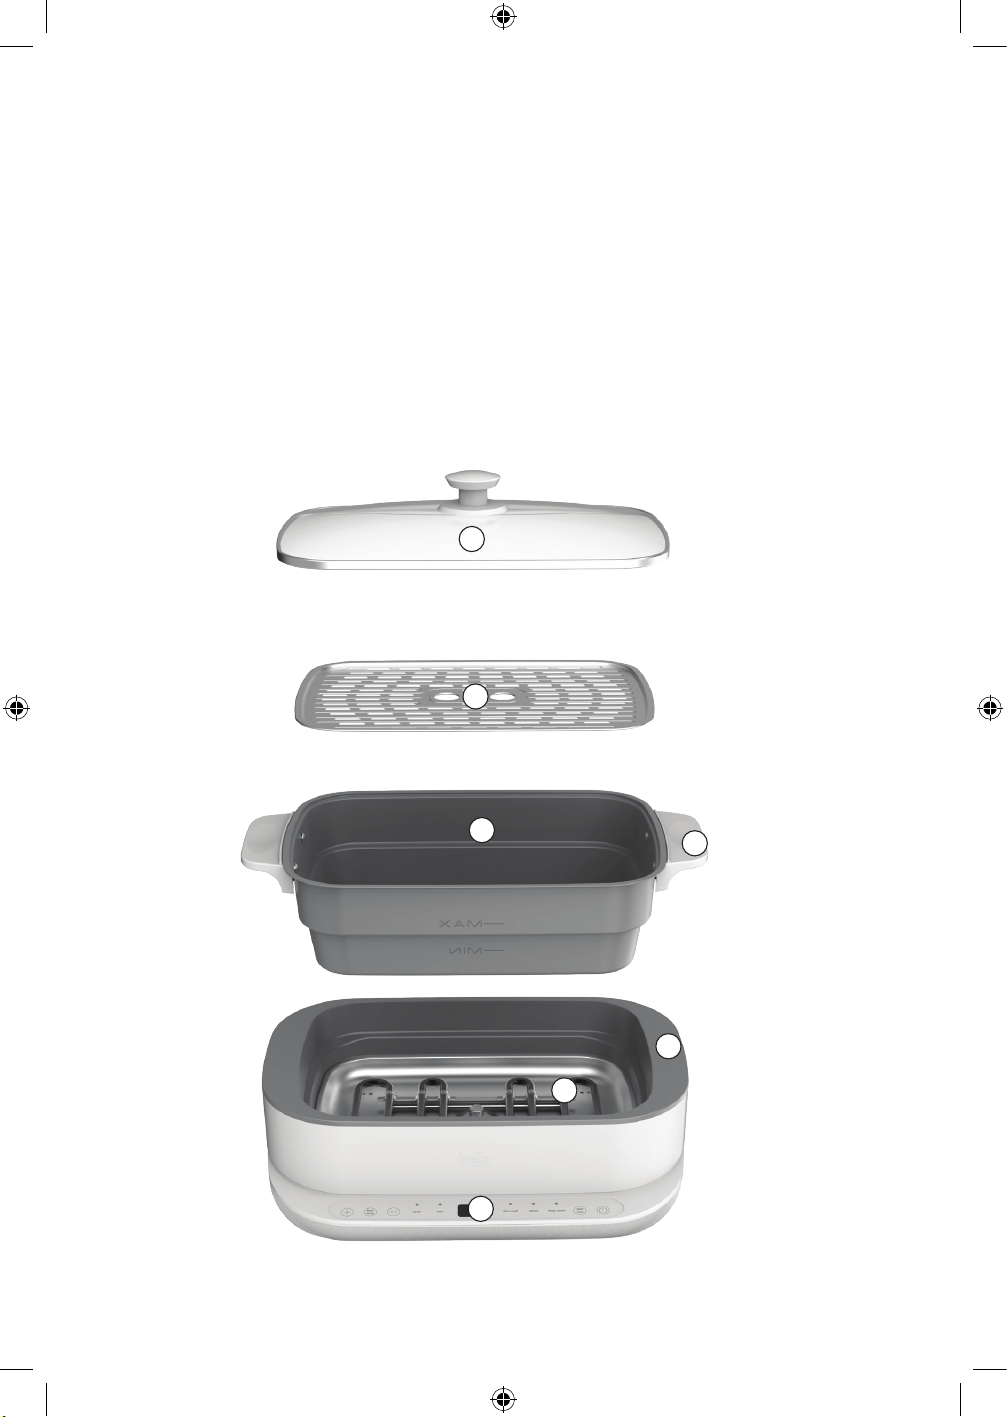
GETTING TO KNOW YOUR MULTI COOKER
Product may vary slightly from illustration.
1. Glass Lid
2. Steamer Tray
3. Cooking Pot
4. Cook Pot Handle
5. Multi Cooker Body
6. Heater
7. Control Panel
1
2
4
5
6
7
3
bella_Amazon_6.0 QT_MultiCooker_IM_V6_R0.indd 5bella_Amazon_6.0 QT_MultiCooker_IM_V6_R0.indd 5 2025-09-03 3:56 PM2025-09-03 3:56 PM
6
BEFORE USING FOR THE FIRST TIME
1. Remove all packaging from the Multi Cooker. Remove any labels from the outer surfaces.
2. Be aware of the glass lid. Remove and discard packaging.
3. Wash the cooking pot and steamer tray in warm, soapy water. Never use abrasive cleansers or scouring pads
as they can damage the finish of both the cooking pot and base unit. Rinse and dry well.
DO NOT IMMERSE THE BASE UNIT OF THE MULTI COOKER IN WATER OR ANY OTHER LIQUID!
IMPORTANT: Be careful not to dent the bottom of the cooking pot. To work properly and produce the best
cooking results, the cooking pot must fit snugly on top of the thermostat.
4. Never place liquid in the base unit. Place liquids into the cooking pot only.
5. Never plug in the Multi Cooker without first placing the cooking pot inside the base unit.
NOTE: Do not use metal spatulas inside the pot, use silicon or wood spatulas to avoid damage to ceramic coating pot.
NOTE: During initial use of this appliance, some slight vapor and/or odor may be detected. This is normal with many
heating appliances and will not recur after a few uses.
OPERATING INSTRUCTIONS
1. Open the Multi Cooker lid.
2. Following recipe directions, add ingredients to the cooking pot. Make sure the cooking pot is well seated on the
thermostat.
3. Close the lid.
4. Plug the Multi Cooker into a 120V AC electrical outlet. The Multi Cooker will sound 1 tone, the control panel
indicator lights will illuminate briefly, then darken. 4 dashes (-- --) appear and remain on the digital display
until further action.
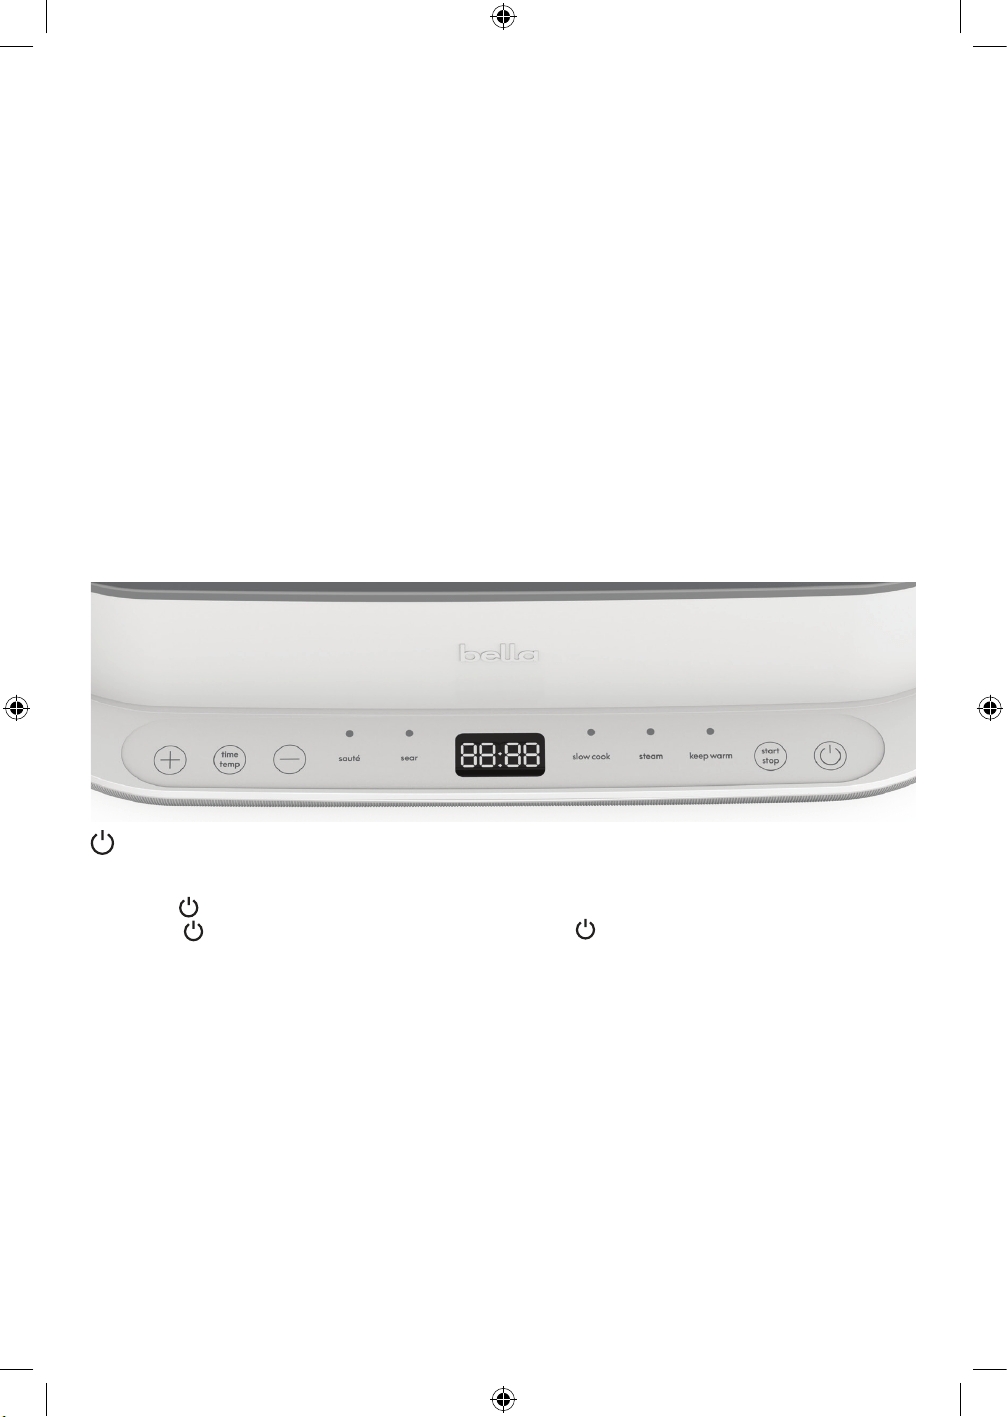
CONTROL PANEL FUNCTIONS
POWER
1. Plug in and 1 beep will sound, LED will display -- --, function buttons will turn on for 1 second. Then all turn off
except the LED display.
2. Press the
button, default selection of SEAR light on and LED will display default time 00:05 and temperature 450°F.
3. Press the
button again to turn off all other functions. Press the button to turn off power anytime.
START/STOP
After selecting the function, press START/STOP to confirm or to stop.
SEAR, SAUTÉ, SLOW COOK, STEAM
Press the button of the desired function.
KEEP WARM
1. After SLOW COOK is completed, it will automatically enter to the keep warm function. Press START/STOP
button to stop the keep warm function.
2. Press KEEP WARM, the indicator light will flash and all other functions will turn off. Press START/STOP to start
or stop the KEEP WARM function.
TIME/TEMP
Press TIME button, the LED will flash and display the time, which can be adjusted by pressing the + and - buttons.
NOTE: Cooking time can be adjusted during cooking mode. The cooker will enter new time after flashing 5 times and a beep.
NOTE: Temperature can be adjusted during cooking mode for SAUTE. The cooker will enter desired temperature after
flashing 5 times and a beep.
PLUS
When adjusting time and temperature, increase the time or temperature by pressing plus button.
MINUS
When adjusting time and temperature, decrease the time or temperature by pressing minus button.
bella_Amazon_6.0 QT_MultiCooker_IM_V6_R0.indd 6bella_Amazon_6.0 QT_MultiCooker_IM_V6_R0.indd 6 2025-09-03 3:56 PM2025-09-03 3:56 PM
7
PRESET MODE
SEAR/SAUTÉ/STEAM preset mode
ATTENTION: Preheat is needed in SEAR, SAUTÉ and STEAM. The Multi Cooker will 1 beep as soon as it reaches the
preset temperature and begins to countdown.
SEAR preset mode
1. Press on the SEAR button.
2. Adjust to the desired time, detailed instructions in the TIME/TEMP section. SEAR time can be adjusted from
5 min to 30 min.
3. Press the START/STOP button to start the cooking. The LED screen will display PRE.
4. Once the preheating temperature is reached, 1 beep will sound, and the timer will start counting down.
5. Once the cooking is completed, 3 beeps will sound and the Multi Cooker will advance to a standby mode.
NOTE: You can press the START/STOP button at any time to stop the SEAR function.
SAUTÉ preset mode
1. Press the SAUTÉ button.
2. Adjust to the desired time and temperature, detailed instructions in the TIME/TEMP section. SAUTÉ time can be
adjusted from 10 min to 2:30 hours. Temperature for SAUTÉ function can be adjusted from 150°F to 450°F.
3. Press the START/STOP button to start the cooking. The LED screen will display PRE.
4. Once the preheating temperature is reached, 1 beep will sound, and the timer will start counting down.
5. Once the cooking is completed, 3 beeps will sound and the Multi Cooker will advance to standby mode.
NOTE: You can press the START/STOP button at any time to stop the SAUTÉ function.
STEAM preset mode
IMPORTANT NOTE: When operating the STEAM function, the maximum water volume must not exceed 1.2L.
1. Press the STEAM button.
2. Adjust to the desired time, detailed instructions in the TIME/TEMP section. Steam time can be adjusted from 10
minutes to 1 hour.
3. Press the START/STOP button to start the cooking. The LED screen displays a moving graphic
4. Once the preheating temperature is reached, 1 beep will sound, and the timer will start counting down.
5. Once the cooking is completed, 3 beeps will sound and the Multi Cooker will advance to standby mode.
NOTE: You can press the START/STOP button at any time to stop the STEAM function.
SLOW COOK preset mode:
1. Press the SLOW COOK button. The LED screen will display the default time of 04:00.
2. Adjust to the desired time, detailed instructions in the TIME/TEMP section. Slow cooking time can be adjusted
from 30 min to 12 hours.
3. Press the START/STOP button to start the cooking. The timer will start counting down.
4. Once slow cooking is completed, the Multi Cooker will beep 3 times and will automatically advance to KEEP
WARM for 4 hours. KEEP WARM light will turn on, and the timer will countdown from 04:00. Once the KEEP
WARM is completed, 3 beeps will sound and the Multi Cooker will advance to standby mode.
NOTE: The KEEP WARM time can be adjusted, detailed instructions in the TIME/TEMP section.
NOTE: You can press the START/STOP button at any time to stop the SLOW COOKER function
KEEP WARM function:
1. Press the KEEP WARM, the KEEP WARM light will flash and display the default time of 02:00.
2. Adjust to the desired time, detailed instructions in the TIME/TEMP section. KEEP WARM time can be adjusted
from 30 min to 12 hours. The maximum KEEP WARM time is 12 hours. If the time exceeds 12 hours, it will enter to
standby mode.
3. Press the START/STOP button. The timer will start counting down.
4. Once the KEEP WARM is completed, 3 beeps will sound and the Multi Cooker will advance to standby mode.
NOTE: You can press the START/STOP button at any time to stop the KEEP WARM function.
TIME/TEMP working mode:
TIME:
Time adjustment, after the function is selected, press the TIME/ TEMP button once, then press the +/- buttons.
Time can be adjusted by 1 minute within 1 hour and by 10 minutes when over 1 hour. The maximum adjustable
time is 12 hours.
TEMP:
Temperature adjustment, after the function is selected, press the TIME/TEMP button twice, then press the
+/- buttons. Temperature can be adjusted by 10 degrees Fahrenheit. During the cooking process, time and
temperature can be adjusted at any time.
NOTE: During the cooking process, time and temperature can be adjusted at any time.
bella_Amazon_6.0 QT_MultiCooker_IM_V6_R0.indd 7bella_Amazon_6.0 QT_MultiCooker_IM_V6_R0.indd 7 2025-09-03 3:56 PM2025-09-03 3:56 PM
8
FUNCTION TIME REFERENCE TABLE
Function Default Time Default
Temperature
Temperature
Adjustable Range
Adjustable Time
SEAR 5 minutes 450°F / 00:05-00:30
SAUTÉ 20 minutes 400°F 150-450°F 00:10-02:30
SLOW COOK 4 hours / / 00:30-12:00
STEAM 45 minutes / / 00:10-01:00
KEEP WARM Countdown from
02:00
/ / 00:30-12:00
USER MAINTENANCE INSTRUCTIONS
This appliance requires little maintenance. It contains no user serviceable parts. Do not try to repair it yourself. Any
service requiring disassembly other than cleaning, must be performed by a qualified appliance repair technician.
1. Be careful not to dent the cooking pot, especially the bottom. To work properly and produce the best cooking
results, the cooking pot must fit snugly on top of the thermostat.
2. DO NOT let any food particles fall into the bottom of the base unit because they might prevent the thermostat
from fitting tightly against the bottom of the cooking pot and cause inadequate cooking.
3. Use plastic rice paddle or wooden spoon to stir and remove food from the cooking pot. NEVER use any metal
utensils.
4. Never use abrasive cleansers or scouring pads because they can damage the finish of both the cooking pot and
base unit.
5. Never pour liquid into the base unit or immerse it in water.
CARE & CLEANING INSTRUCTIONS
CAUTION: NEVER IMMERSE THE RICE COOKER BODY OR CORD IN WATER OR OTHER LIQUID.
1. Unplug the Multi Cooker from the wall outlet. Allow the unit to cool before cleaning or storing.
2. Clean the Multi Cooker after every use. NEVER immerse the base unit or power cord in water.
3. Fill the cooking pot with warm water and allow it to soak. Wash the cooking pot and steamer tray in warm,
soapy water.
4. Rinse and dry well.
5. Wipe the Multi Cooker base unit with a soft, slightly damp cloth or sponge.
bella_Amazon_6.0 QT_MultiCooker_IM_V6_R0.indd 8bella_Amazon_6.0 QT_MultiCooker_IM_V6_R0.indd 8 2025-09-03 3:56 PM2025-09-03 3:56 PM
9
SENSIO Inc. dba Made by Gather™ hereby warrants that for a period of TWO YEARS
from the date of delivery, this product will be free from mechanical defects in material and
workmanship, and for 90 days in respect to non-mechanical parts. At its sole discretion,
SENSIO Inc. dba Made by Gather™ will either repair or replace the product found to be
defective, or issue a refund on the product during the warranty period.
The warranty is only valid for the original retail purchaser from the date of the initial
delivery and is not transferable. Keep the original sales receipt, as proof of purchase
is required to obtain warranty validation, which commences on the date of delivery. Retail
stores selling this product do not have the right to alter, modify, or in any way revise the
terms and conditions of the warranty
.
EXCLUSIONS:
The warranty does not cover normal wear of parts or damage resulting from any
of thefollowing: negligent use of the product, use of improper voltage or current, improper
routine maintenance, use contrary to the operating instructions, disassembly, repair, or
alteration by anyone other than qualified SENSIO Inc. dba Made by Gather™ personnel.
Also, the warranty does not cover Acts of God such as fire, floods, hurricanes, or tornadoes.
SENSIO Inc. dba Made by Gather™ shall not be liable for any incidental or consequential
damages caused by the breach of any express or implied warranty. Apart from the extent
prohibited by applicable law, any implied warranty
of merchantability or fitness for a particular purpose is limited in time to the duration
of the warranty. Some states, provinces or jurisdictions do not allow the exclusion
or limitation of incidental or consequential damages, or limitations on how long an implied
warranty lasts, and therefore, the above exclusions or limitations may not apply to you. The
warranty covers specific legal rights which may vary by state, province
and/or jurisdiction.
HOW TO OBTAIN WARRANTY SERVICE:
You must contact Customer Service at our toll-free number: 1-866-832-4843.
A Customer Service Representative will attempt to resolve warranty issues over thephone.
If the Customer Service Representative is unable to resolve the problem,
you will be provided with a case number and asked to return the product to SENSIO Inc.
dba Made by Gather™. Attach a tag to the product that includes: your name, address,
daytime contact telephone number, case number, and description of the problem.
Also, include a copy of the original sales receipt. Carefully package the tagged product
with the sales receipt, and send it (with shipping and insurance prepaid) to SENSIO Inc.
dba Made by Gather™’s address. SENSIO Inc. dba Made by Gather™ shall bear no
responsibility or liability for the returned product while in transit to SENSIO Inc. dba
Made by Gather™ Customer Service Center.
LIMITED TWO-YEAR WARRANTY
bella_Amazon_6.0 QT_MultiCooker_IM_V6_R0.indd 9bella_Amazon_6.0 QT_MultiCooker_IM_V6_R0.indd 9 2025-09-03 3:56 PM2025-09-03 3:56 PM
10
PROTECCIONES IMPORTANTES
Al usar electrodomésticos, siempre deben seguirse las precauciones básicas de
seguridad, incluidas las siguientes:
1. LEA TODAS LAS INSTRUCCIONES.
2. No toque las superficies calientes. Use manijas o perillas.
3. Para protegerse contra descargas eléctricas, no sumerja el cable, los enchufes
ni la unidad base en el agua u otros líquidos.
4. Este aparato no está diseñado para ser utilizado por personas (incluidos niños)
con capacidades físicas, sensoriales o mentales reducidas, o falta de experiencia
y conocimiento, a menos que una persona responsable de su seguridad les haya
proporcionado supervisión o instrucciones sobre el uso de los aparatos.
5. Es necesaria una supervisión estrecha cuando un electrodoméstico es
utilizado por niños o cerca de ellos.
6. Para desconectar, presione el botón
para apagarlo y luego retire el
enchufe del tomacorriente de pared.
7. Desenchufe del tomacorriente cuando no esté en uso y antes de limpiarlo.
Deje enfriar el electrodoméstico antes de limpiarlo o guardarlo.
8. No opere ningún aparato con un cable o enchufe dañados o después de que
el aparato funcione mal o se haya dañado de alguna manera.
9. El uso de accesorios no recomendados por el fabricante del electrodoméstico
puede causar lesiones.
10. No lo use al aire libre.
11. No deje que el cable cuelgue sobre el borde de la mesa o encimera, ni toque
superficies calientes, ya que puede tropezar y caer o hacer que el contenido
caliente de la olla arrocera se derrame y posiblemente cause quemaduras
o lesiones.
12. No coloque la unidad sobre o cerca de una estufa caliente, una placa de
cocción, un quemador eléctrico o un horno caliente, ya que esto puede
ocasionar daños o mal funcionamiento.
13. Se debe tener extrema precaución al mover un aparato que contenga aceite
caliente u otros líquidos calientes.
ADVERTENCIA: Tenga cuidado al abrir la tapa. El vapor se escapa tan pronto
como se abre la tapa. Nunca coloque la cara o las manos sobre la olla multifunción
cuando abra la tapa. Siempre sostenga la olla por las manijas cuando mueva una
olla caliente.
14. Nunca tire del cable para desconectar el aparato del tomacorriente, ya que
podría dañarlo. En su lugar, tome el enchufe y tire para desconectarlo.
15. No utilice el electrodoméstico para otro uso que no sea el previsto.
16. Para uso exclusivo en encimeras.
17. Se recomienda usar un posafuentes resistente al calor o una tabla de cortar debajo
de este electrodoméstico para evitar posibles daños por calor en la encimera.
ADVERTENCIA: Los alimentos derramados pueden causar quemaduras graves.
Mantenga el aparato y el cable alejados de los niños. Nunca deje el cable colgando
sobre el borde de la encimera, nunca use un tomacorriente debajo de la encimera y
nunca use un cable de extensión.
bella_Amazon_6.0 QT_MultiCooker_IM_V6_R0.indd 10bella_Amazon_6.0 QT_MultiCooker_IM_V6_R0.indd 10 2025-09-03 3:56 PM2025-09-03 3:56 PM

11
SOLO PARA USO DOMÉSTICO
GUARDE ESTAS INSTRUCCIONES
PROTECCIONES IMPORTANTES
ADICIONALES
PRECAUCIÓN SOBRE SUPERFICIES CALIENTES: Este aparato genera calor y
deja escapar vapor durante el uso. Se deben tomar las precauciones adecuadas
para evitar el riesgo de quemaduras, incendios u otras lesiones a las personas o
daños a la propiedad.
1. Una persona que no ha leído y comprendido todas las instrucciones de
operación y seguridad no está calificada para operar este aparato. Todos
los usuarios de este aparato deben leer y comprender este manual de
instrucciones antes de operar o limpiar este aparato.
2. Si este aparato se cae o sumerge accidentalmente en agua, desenchúfelo del
tomacorriente de inmediato. ¡No meta la mano en el agua!
3. Desenchufe del tomacorriente cuando no esté en uso y antes de limpiarlo.
Para evitar descargas eléctricas, nunca sumerja ni enjuague este aparato en
agua ni en ningún otro líquido.
4. Cuando utilice este aparato, proporcione un espacio de aire adecuado por
encima y por todos los lados para la circulación de aire. No opere este
aparato mientras esté en contacto o cerca de cortinas, revestimientos de
paredes, ropa, toallas u otros materiales inflamables.
5. No coloque esta olla multifunción directamente debajo de los gabinetes de
pared de la cocina cuando esté en uso, ya que produce vapor. Evite colocar
las manos u otras partes del cuerpo sobre la válvula de vapor durante el
funcionamiento.
6. Para reducir el riesgo de incendio, no deje este aparato sin supervisión
durante el uso.
7. Si este aparato comienza a funcionar mal durante el uso, presione , y luego
desenchufe el cable de inmediato. ¡No utilice ni intente reparar un aparato
que no funcione correctamente!
8. El cable de este electrodoméstico debe enchufarse únicamente a un
tomacorriente de 120 V CA.
9. No utilice este aparato en una posición inestable.
10. No use la olla de cocción si está abollada, doblada o dañada.
11. Para evitar descargas eléctricas, desenchufe la olla multifunción antes de
lavarla o agregar agua.
12. Nunca use la olla de cocción sobre una placa de cocción eléctrica o a gas o
sobre una llama abierta.
13. PRECAUCIÓN: No haga funcionar la olla multifunción cuando esté vacía.
14. No deje ningún accesorio de plástico en el interior mientras la olla
multifunción esté en uso. 15. Para evitar quemaduras, manténgase alejado de
la ventilación de vapor durante la cocción.
bella_Amazon_6.0 QT_MultiCooker_IM_V6_R0.indd 11bella_Amazon_6.0 QT_MultiCooker_IM_V6_R0.indd 11 2025-09-03 3:56 PM2025-09-03 3:56 PM

12
16. ADVERTENCIA: Tenga cuidado al abrir la tapa. El vapor se escapa tan
pronto como se abre la tapa. Nunca coloque la cara o las manos sobre la olla
multifunción cuando abra la tapa. Siempre use guantes para horno cuando
manipule la olla de cocción caliente.
17. Para reducir el riesgo de descarga eléctrica, cocine solo en la olla. No vierta
líquido directamente en el cuerpo de la olla multifunción.
18. No lo use mientras esté de pie en un área húmeda.
19. Nunca use objetos filosos dentro de la olla, ya que esto dañará el
recubrimiento de cerámica.
NOTAS SOBRE EL CABLE
Se proporciona un cable corto de suministro de energía (o un cable de suministro
de energía desmontable) para reducir el riesgo de enredarse o tropezar con un
cable más largo. No utilice un cable de extensión con este producto.
NOTAS SOBRE EL ENCHUFE
Este aparato tiene un enchufe polarizado (una cuchilla es más ancha que la
otra). Para reducir el riesgo de descarga eléctrica, este enchufe encajará en
un tomacorriente polarizado de una sola manera. Si el enchufe no encaja
completamente en el tomacorriente, invierta el enchufe. Si aún no encaja,
comuníquese con un electricista calificado. No modifique el enchufe de ninguna
manera.
ENERGÍA ELÉCTRICA
Si el circuito eléctrico está sobrecargado con otros aparatos, es posible que
su aparato no funcione correctamente. Debe operarse en un circuito eléctrico
separado de otros aparatos.
bella_Amazon_6.0 QT_MultiCooker_IM_V6_R0.indd 12bella_Amazon_6.0 QT_MultiCooker_IM_V6_R0.indd 12 2025-09-03 3:56 PM2025-09-03 3:56 PM

13
CONOZCA SU OLLA MULTIFUNCIÓN
El producto puede variar ligeramente de la ilustración.
1. Tapa de vidrio
2. Bandeja del vaporizador
3. Olla de cocina
4. Manija de la olla de cocción
5. Cuerpo de la olla multifunción
6. Calentador
7. Panel de control
1
2
4
5
6
7
3
bella_Amazon_6.0 QT_MultiCooker_IM_V6_R0.indd 13bella_Amazon_6.0 QT_MultiCooker_IM_V6_R0.indd 13 2025-09-03 3:56 PM2025-09-03 3:56 PM
14
ANTES DE USAR POR PRIMERA VEZ
1. Retire todo el material de embalaje de la olla multifunción. Retire las etiquetas de las superficies exteriores.
2. Tenga cuidado con la tapa de vidrio. Retire y deseche el material de embalaje.
3. Lave la olla y la bandeja del vaporizador con agua tibia y jabón. Nunca use limpiadores abrasivos ni almohadillas
de limpieza, ya que pueden dañar el acabado de la olla de cocción y la unidad base. Enjuague y seque bien.
¡NO SUMERJA LA UNIDAD BASE DE LA OLLA MULTIFUNCIÓN EN AGUA NI EN NINGÚN OTRO LÍQUIDO!
IMPORTANTE: Tenga cuidado de no abollar el fondo de la olla. Para trabajar correctamente y producir los mejores
resultados de cocción, la olla debe ajustarse perfectamente en la parte superior del termostato.
4. Nunca coloque líquido en la unidad base. Coloque los líquidos solo en la olla de cocción.
5. Nunca enchufe la olla multifunción sin colocar primero la olla dentro de la unidad base.
NOTA: No use espátulas de metal dentro de la olla, use espátulas de silicona o madera para evitar daños en el
revestimiento de cerámica de la olla.
NOTA: Durante el uso inicial de este aparato, se puede detectar un poco de vapor y/u olor leve. Esto es normal con
muchos aparatos que emiten calor, y no se repetirá después de algunos usos.
INSTRUCCIONES DE FUNCIONAMIENTO
1. Abra la tapa de la olla multifunción.
2. Siga las instrucciones de la receta y agregue los ingredientes a la olla. Asegúrese de que la olla esté bien
asentada sobre el termostato.
3. Cierre la tapa.
4. Enchufe la olla multifunción en un tomacorriente de 120 V CA. La olla multifunción emitirá 1 tono, las luces indicadoras
del panel de control se iluminarán brevemente y luego se oscurecerán. Aparecen 4 guiones (-- --) que permanecen en
la pantalla digital hasta que se realice una nueva acción.
FUNCIONES DEL PANEL DE CONTROL
ENERGÍA
1. Enchufe y sonará 1 pitido, la pantalla LED mostrará -- --, los botones de función se encenderán durante 1
segundo. Luego, todos se apagarán, excepto la pantalla LED.
2. Presione el botón
la selección predeterminada de la luz SELLADO se encenderá y la pantalla LED mostrará la hora
predeterminada 00:05 y la temperatura 450°F.
3. Presione el botón
nuevamente para apagar todas las demás funciones. Presione el botón para apagar el
equipo en cualquier momento.
INICIAR/DETENER
Después de seleccionar la función, presione INICIAR/DETENER para confirmar o para detener.
SELLAR, SALTEAR, COCCIÓN LENTA, VAPOR
Presione el botón de la función deseada.
MANTENER CALIENTE
1. Después de completar la COCCIÓN LENTA, se ingresará automáticamente a la función de mantener caliente.
Presione el botón SINICIAR/DETENER para detener la función de mantener caliente.
2. Presione MANTENER CALIENTE. La luz indicadora parpadeará y todas las demás funciones se apagarán.
Presione INICIAR/DETENER para iniciar o detener la función MANTENER CALIENTE.
TIEMPO/TEMPERATURA
Presione el botón TIEMPO, la pantalla LED parpadeará y mostrará la hora, que se puede ajustar presionando los
botones + y -.
NOTA: El tiempo de cocción se puede ajustar durante el modo de cocción. Se ingresará el nuevo tiempo en la olla
después de parpadear 5 veces y emitir un pitido.
NOTA: La temperatura se puede ajustar durante el modo de cocción para SALTEAR. Se ingresará la temperatura
deseada en la olla después de parpadear 5 veces y emitir un pitido.
bella_Amazon_6.0 QT_MultiCooker_IM_V6_R0.indd 14bella_Amazon_6.0 QT_MultiCooker_IM_V6_R0.indd 14 2025-09-03 3:56 PM2025-09-03 3:56 PM

15
MÁS
Al ajustar el tiempo y la temperatura, puede aumentar el tiempo o la temperatura presionando el botón más.
MENOS
Al ajustar el tiempo y la temperatura, puede disminuir el tiempo o la temperatura presionando el botón menos.
MODO PREDETERMINADO
Modo predeterminado de SELLAR/SALTEAR/VAPOR
ATENCIÓN: Se necesita precalentar en modo SELLAR, SALTEAR y VAPOR. La olla multifunción emitirá 1 pitido tan
pronto como alcance la temperatura preestablecida y comience la cuenta regresiva.
Modo predeterminado SELLAR
1. Presione el botón SELLAR.
2. Ajuste el tiempo deseado; las instrucciones detalladas están en la sección TIEMPO/TEMPERATURA. El tiempo
de SEAR se puede ajustar de 5 min. a 30 min.
3. Presione el botón INICIAR/DETENER para comenzar la cocción. La pantalla LED mostrará PRE.
4. Una vez alcanzada la temperatura de precalentamiento, sonará 1 pitido y el temporizador comenzará la
cuenta regresiva.
5. Una vez finalizada la cocción, sonarán 3 pitidos y la olla multifunción pasará al modo de espera.
NOTA: Puede presionar el botón INICIAR/DETENER en cualquier momento para detener la función SELLAR.
Modo predeterminado SALTEAR
1. Presione el botón SALTEAR.
2. Ajuste el tiempo y la temperatura deseados; las instrucciones detalladas están en la sección TIEMPO/
TEMPERATURA. El tiempo de SAUTE se puede ajustar de 10 min. a 2:30 horas. La temperatura para la función
SALTEAR puede ajustarse de 150 °F a 450 °F.
3. Presione el botón INICIAR/DETENER para comenzar la cocción. La pantalla LED mostrará PRE.
4. Una vez alcanzada la temperatura de precalentamiento, sonará 1 pitido y el temporizador comenzará la
cuenta regresiva.
5. Una vez finalizada la cocción, sonarán 3 pitidos y la olla multifunción pasará al modo de espera.
NOTA: Puede presionar el botón INICIAR/DETENER en cualquier momento para detener la función SALTEAR.
Modo predeterminado VAPOR
NOTA IMPORTANTE: Al operar la función VAPOR, el volumen máximo de agua no debe exceder 1,2 l.
1. Presione el botón VAPOR.
2. Ajuste el tiempo deseado; las instrucciones detalladas están en la sección TIEMPO/TEMPERATURA. El tiempo
del modo VAPOR se puede ajustar de 10 minutos a 1 hora.
3. Presione el botón INICIAR/DETENER para comenzar la cocción. La pantalla LED muestra un gráfico en
movimiento
4. Una vez alcanzada la temperatura de precalentamiento, sonará 1 pitido y el temporizador comenzará la
cuenta regresiva.
5. Una vez finalizada la cocción, sonarán 3 pitidos y la olla multifunción pasará al modo de espera.
NOTA: Puede presionar el botón INICIAR/DETENER en cualquier momento para detener la función VAPOR.
Modo predeterminado COCCIÓN LENTA:
1. Presione el botón COCCIÓN LENTA. La pantalla LED mostrará la hora predeterminada de 04:00.
2. Ajuste el tiempo deseado; las instrucciones detalladas están en la sección TIEMPO/TEMPERATURA. El tiempo
de cocción lenta se puede ajustar de 30 min. a 12 horas.
3. Presione el botón INICIAR/DETENER para comenzar la cocción. El temporizador comenzará la cuenta regresiva.
4. Una vez que se completa la cocción lenta, la olla multifunción emitirá un pitido 3 veces y pasará
automáticamente a MANTENER CALIENTE durante 4 horas. La luz de MANTENER CALIENTE se encenderá
y el temporizador empezará la cuenta regresiva desde 04:00. Una vez que se haya completado la función
MANTENER CALIENTE, sonarán 3 pitidos y la olla multifunción pasará al modo de espera.
NOTA: Se puede ajustar el tiempo para MANTENER CALIENTE; las instrucciones detalladas están en la sección
TIEMPO/TEMPERATURA.
NOTA: Puede presionar el botón INICIAR/DETENER en cualquier momento para detener la función de COCCIÓN LENTA.
Función MANTENER CALIENTE:
1. Presione MANTENER CALIENTE, la luz de KEEP WARM parpadeará y mostrará la hora predeterminada de 02:00.
2. Ajuste el tiempo deseado; las instrucciones detalladas están en la sección TIEMPO/TEMPERATURA. El tiempo
de MANTENER CALIENTE se puede ajustar de 30 min. a 12 horas. El tiempo máximo para MANTENER
CALIENTE es de 12 horas. Si el tiempo supera las 12 horas, entrará en modo de espera.
3. Presione el botón INICIAR/DETENER. El temporizador comenzará la cuenta regresiva.
4. Una vez que se haya completado la función MANTENER CALIENTE, sonarán 3 pitidos y la olla multifunción
pasará al modo de espera.
bella_Amazon_6.0 QT_MultiCooker_IM_V6_R0.indd 15bella_Amazon_6.0 QT_MultiCooker_IM_V6_R0.indd 15 2025-09-03 3:56 PM2025-09-03 3:56 PM
16
NOTA: Puede presionar el botón INICIAR/DETENER en cualquier momento para detener la función MANTENER CALIENTE.
Modo de trabajo TIEMPO/TEMPERATURA:
TIEMPO:
Para ajustar el tiempo, después de seleccionar la función, presione el botón TIEMPO/TEMPERATURA una vez,
luego presione los botones +/-.
El tiempo se puede ajustar en 1 minuto dentro de 1 hora y en 10 minutos cuando es más de 1 hora. El tiempo
máximo ajustable es de 12 horas.
TEMPERATURA:
Ajuste de temperatura, después de seleccionar la función, presione el botón TIEMPO/TEMPERATURA dos
veces, luego presione los botones +/-. La temperatura se puede ajustar de a 10 grados Fahrenheit.
Durante el proceso de cocción, el tiempo y la temperatura se pueden ajustar en cualquier momento.
NOTA: Durante el proceso de cocción, el tiempo y la temperatura se pueden ajustar en cualquier momento.
TABLA DE REFERENCIA DEL TIEMPO DE FUNCIONAMIENTO
Función Tiempo
predeterminado
Temperatura
predeterminada
Rango de
temperatura
ajustable
Tiempo ajustable
SELLAR 5 minutos 450°F / 00:05-00:30
SALTEAR 20 minutos 400°F 150-450°F 00:10-02:30
COCCIÓN LENTA 4 horas / / 00:30-12:00
VAPOR 45 minutos / / 00:10-01:00
MANTENER
CALIENTE
Cuenta regresiva
desde 02:00
/ / 00:30-12:00
INSTRUCCIONES DE MANTENIMIENTO PARA EL USUARIO
Este electrodoméstico requiere poco mantenimiento. No contiene piezas que el usuario pueda reparar. No intente
repararlo usted mismo. Cualquier servicio que requiera desmontaje que no sea limpieza debe ser realizado por un
técnico calificado en reparación de electrodomésticos.
1. Tenga cuidado de no abollar la olla, especialmente la parte inferior. Para trabajar correctamente y obtener los
mejores resultados de cocción, la olla debe ajustarse perfectamente en la parte superior del termostato.
2. NO permita que ninguna partícula de alimento caiga en el fondo de la unidad base porque podría impedir
que el termostato se ajuste firmemente contra el fondo de la olla de cocción y causar una cocción inadecuada.
3. Use una paleta para arroz de plástico o una cuchara de madera para revolver y retirar los alimentos de la olla.
NUNCA use utensilios metálicos.
4. Nunca use limpiadores abrasivos ni almohadillas de limpieza porque pueden dañar el acabado de la olla de
cocción y la unidad base.
5. Nunca vierta líquido en la unidad base ni la sumerja en agua.
INSTRUCCIONES DE CUIDADO Y LIMPIEZA
PRECAUCIÓN: NUNCA SUMERJA EL CUERPO O EL CABLE DE LA OLLA ARROCERA EN AGUA U OTROS LÍQUIDOS.
1. Desenchufe la olla multifunción del tomacorriente. Deje enfriar la unidad antes de limpiarla o guardarla.
2. Limpie la olla multifunción después de cada uso. NUNCA sumerja la unidad base o el cable de alimentación en
agua.
3. Llene la olla con agua tibia y deje que se remoje. Lave la olla y la bandeja del vaporizador con agua tibia y jabón.
4. Enjuague y seque bien.
5. Limpie la unidad base de la olla multifunción con un paño o esponja suave y ligeramente húmeda.
bella_Amazon_6.0 QT_MultiCooker_IM_V6_R0.indd 16bella_Amazon_6.0 QT_MultiCooker_IM_V6_R0.indd 16 2025-09-03 3:56 PM2025-09-03 3:56 PM

17
Mediante la presente, SENSIO Inc. dba Made by Gather™ garantiza que, durante el plazo
de DOS AÑOS a partir de la fecha de entrega, este producto no presentará defectos
mecánicos en el material ni en la mano de obra, y durante 90 días, no los presentará
en las piezas no mecánicas. A su entera discreción, SENSIO Inc. dba Made by Gather™
reparará o reemplazará el producto que resulte defectuoso, o emitirá un reembolso
por el producto durante el plazo de garantía.
Esta garantía es válida únicamente para el comprador minorista original a partir de la fecha
de la entrega inicial y no es transferible. Conserve el recibo de compra original, ya que
se exige una prueba de compra para obtener la validación de la garantía, que comienza
en la fecha de entrega. Las tiendas minoristas no tienen derecho a alterar, modificar
ni corregir de ninguna manera los términos y condiciones de la garantía.
EXCLUSIONES:
La garantía no cubre el desgaste normal de las piezas ni el daño ocasionado por cualquiera
de las siguientes causas: uso negligente del producto, uso de un voltaje o corriente
incorrectos, mantenimiento de rutina inadecuado, uso contrario al de las instrucciones
de funcionamiento, desarmado, reparación o alteración a cargo de personas que no sean
miembros del personal calificado de SENSIO Inc. dba Made by Gather™.
Asimismo, la garantía no cubre actos de la naturaleza, como incendios, inundaciones,
huracanes o tornados.
SENSIO Inc. dba Made by Gather™ no asumirá responsabilidad por daños incidentales
o resultantes ocasionados por la violación de cualquier garantía expresa o implícita.
Salvo en la medida en que lo prohíban las leyes aplicables, cualquier garantía implícita
de comerciabilidad o aptitud para un propósito particular se limita temporalmente
a la duración de la garantía. Algunos estados, provincias o jurisdicciones no permiten
la exclusión ni la limitación de daños incidentales o resultantes, o limitaciones sobre la
duración de una garantía implícita y, por lo tanto, es posible que las exclusiones
o limitaciones mencionadas no le correspondan. La garantía cubre derechos legales
específicos que pueden variar de un estado, una provincia o una jurisdicción a otros.
CÓMO OBTENER EL SERVICIO DE GARANTÍA:
Debe comunicarse con el Servicio de atención al cliente a nuestro número telefónico gratuito:
1-866-832-4843. Un representante del Servicio de atención al cliente intentará resolver los
problemas referidos a la garantía por teléfono. Si este no puede resolver el problema,
le proporcionarán un número de caso y le solicitarán que devuelva el producto a SENSIO Inc.
dba Made by Gather™. Adhiera una etiqueta al producto que incluya: su nombre, dirección,
número telefónico de contacto durante el día, número de caso y descripción del problema.
Además, incluya una copia del recibo de compra original. Envuelva cuidadosamente el
producto etiquetado con el recibo de compra, y envíelo (con el envío y el seguro prepagados)
a la dirección de SENSIO Inc. dba Made by Gather™. SENSIO Inc. dba Made by Gather™
no asumirá obligación ni responsabilidad alguna por el producto devuelto que esté
en el trayecto hacia el Centro de servicio al cliente de SENSIO Inc. dba Made by Gather™.
GARANTÍA LIMITADA DE DOS AÑOS
bella_Amazon_6.0 QT_MultiCooker_IM_V6_R0.indd 17bella_Amazon_6.0 QT_MultiCooker_IM_V6_R0.indd 17 2025-09-03 3:56 PM2025-09-03 3:56 PM
Sensio Inc.
dba Made by Gather
TM
New York, NY 10016/USA
35428 R0
For customer service questions or comments
Dudas o comentarios contactar el departamento de servicio al cliente
1-866-832-4843 / help@bellahousewares.com
bella_Amazon_6.0 QT_MultiCooker_IM_V6_R0.indd 18bella_Amazon_6.0 QT_MultiCooker_IM_V6_R0.indd 18 2025-09-03 3:56 PM2025-09-03 3:56 PM