Instruction Manual
S10C


CONTENTS
1
11
21
31
41
English
Français
Deutsch
Italiano
Español
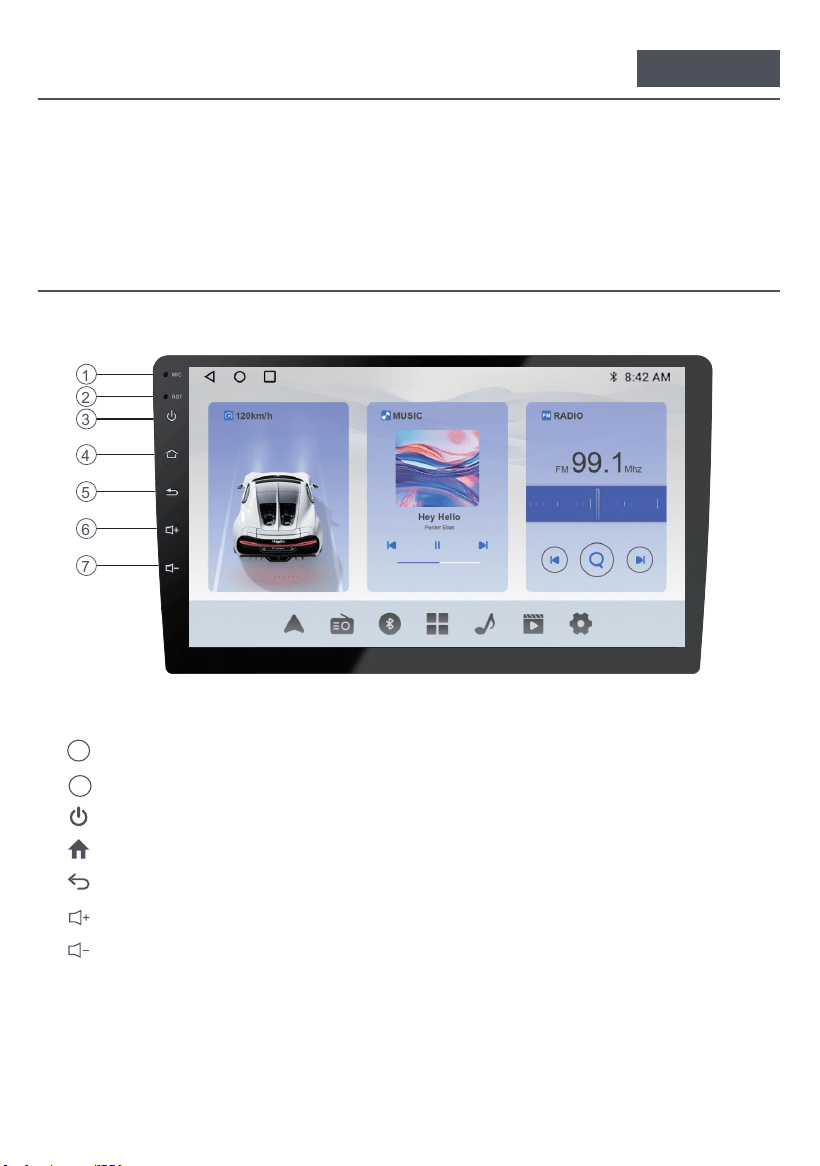
RST
Working voltage: 11V-16V
Working current: 0.8A-1.2A
Working temperature: -20°C-+60°C
Storage temperature:-30°C-+80°C
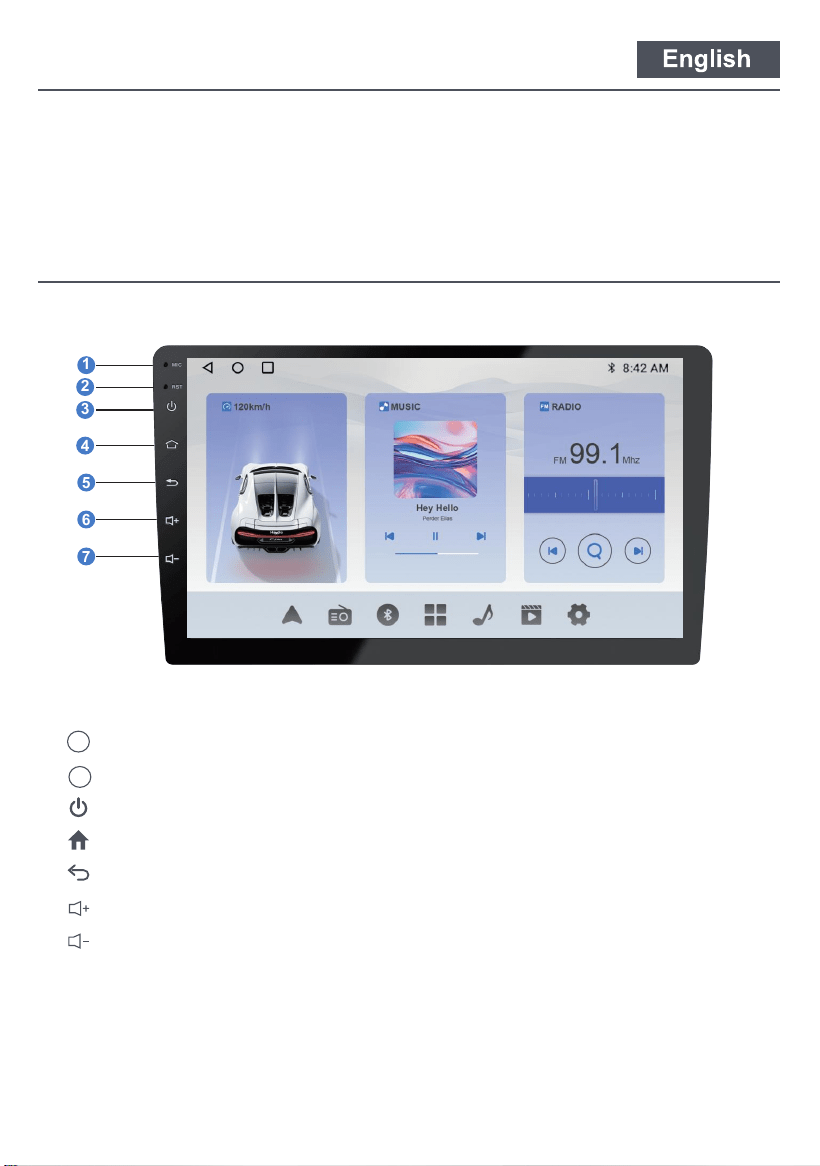
General
Specification
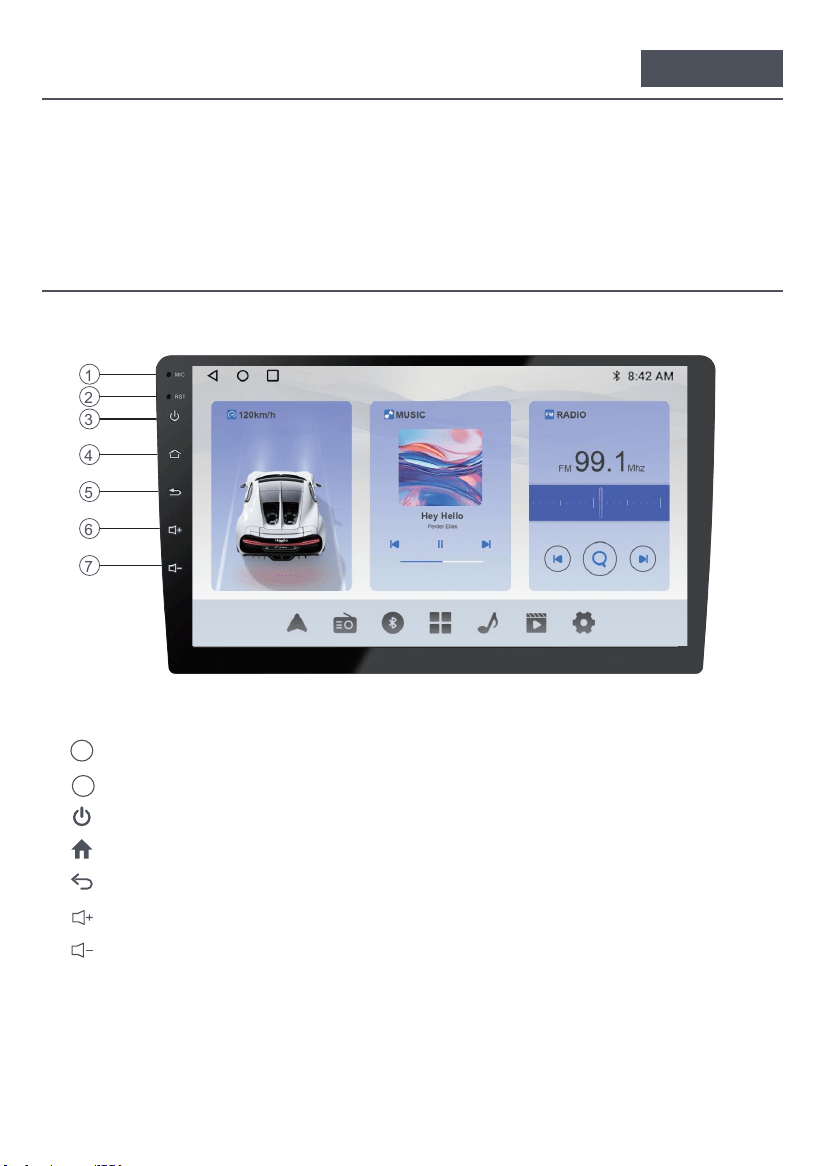
Functional Description
1. Built-in microphone hole
2. Reset (press with a sharp object)
3. Long Press (2 seconds): Turns the screen off. / Clic: Turn off the sound.
To main menu4.
5. Return to the previous interface
6. Turn up the volume
7. Turn down the volume
MIC
1
2
3
4
5
6
7
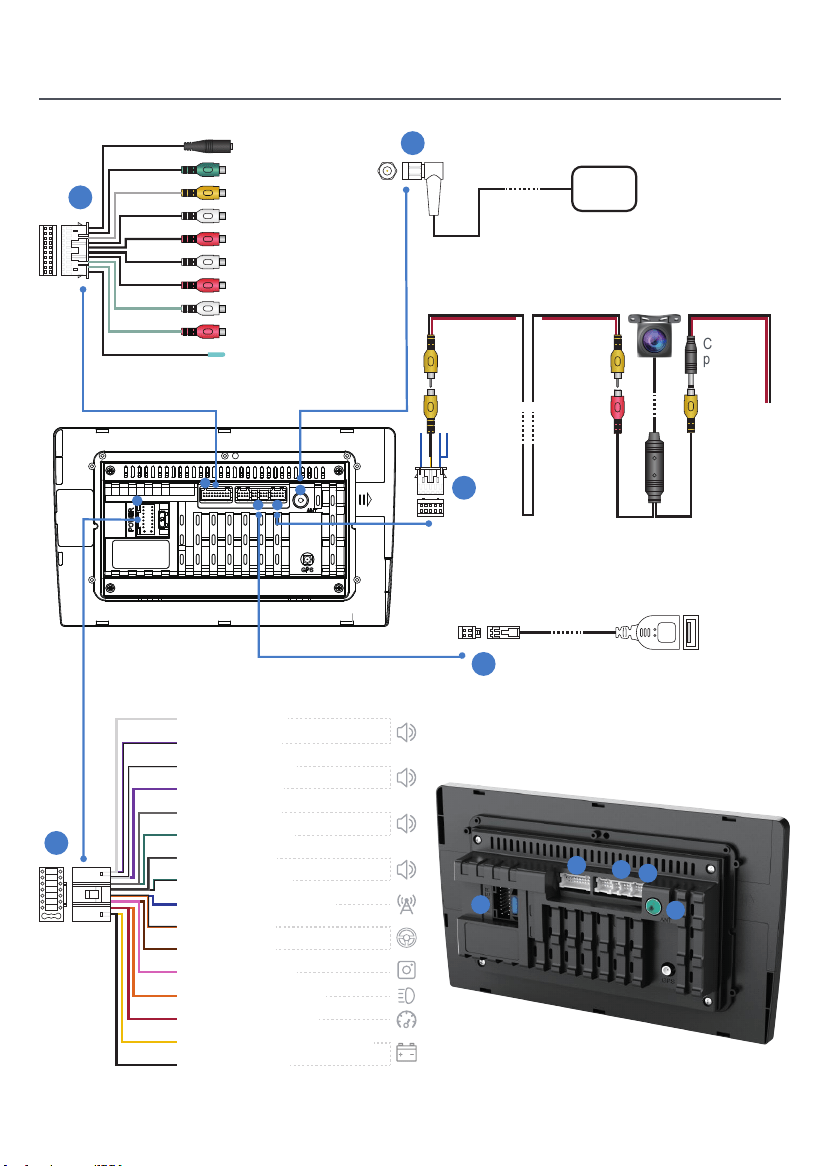
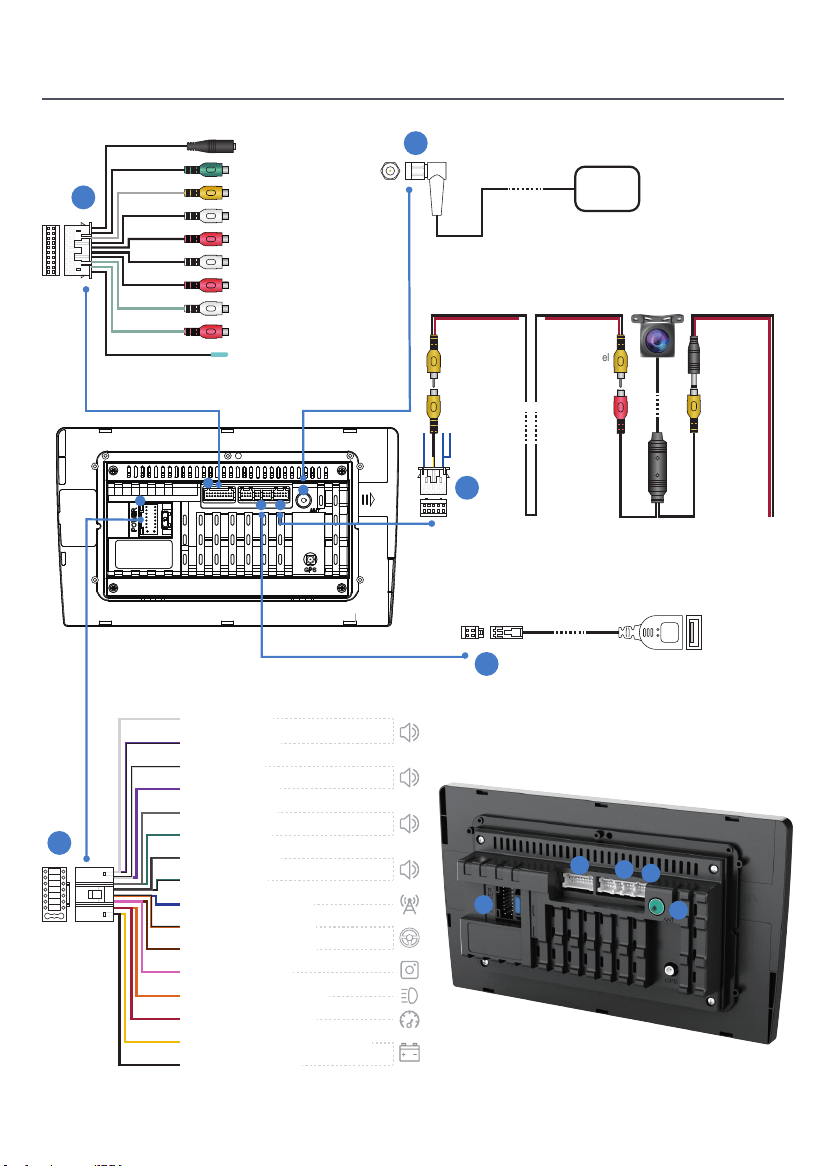
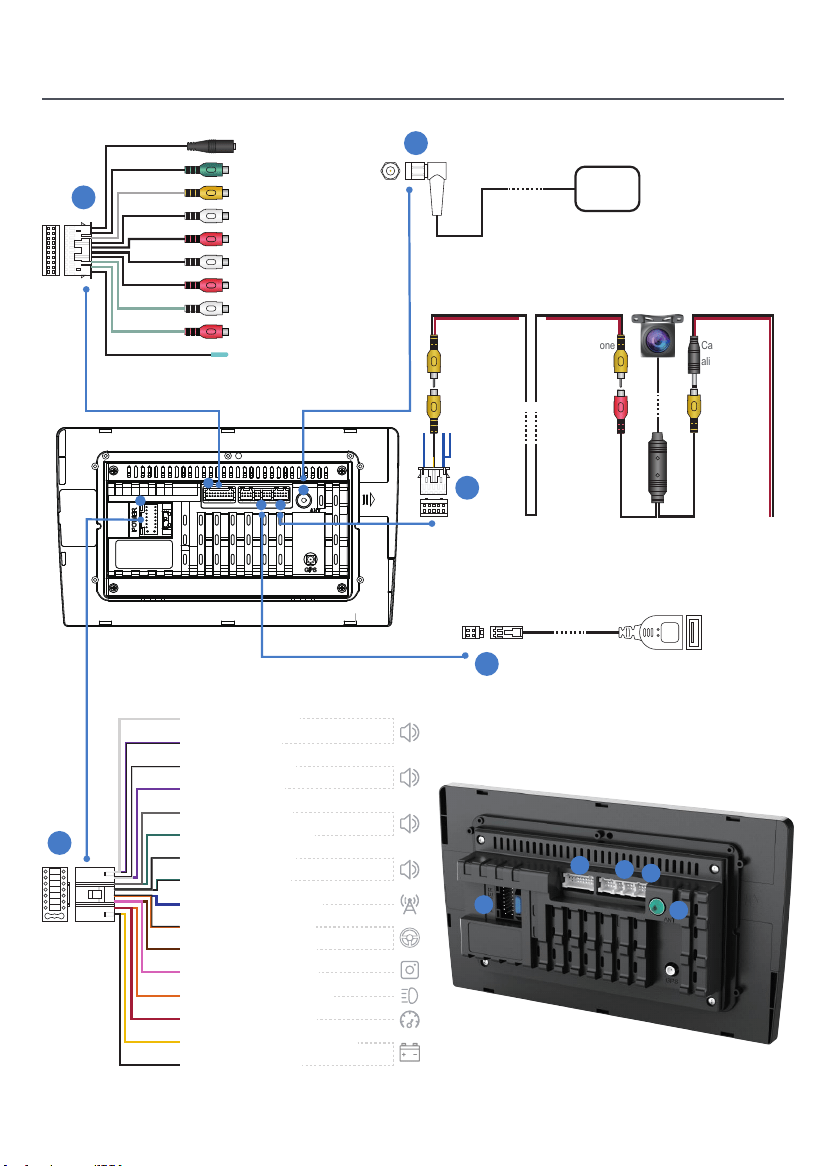
01

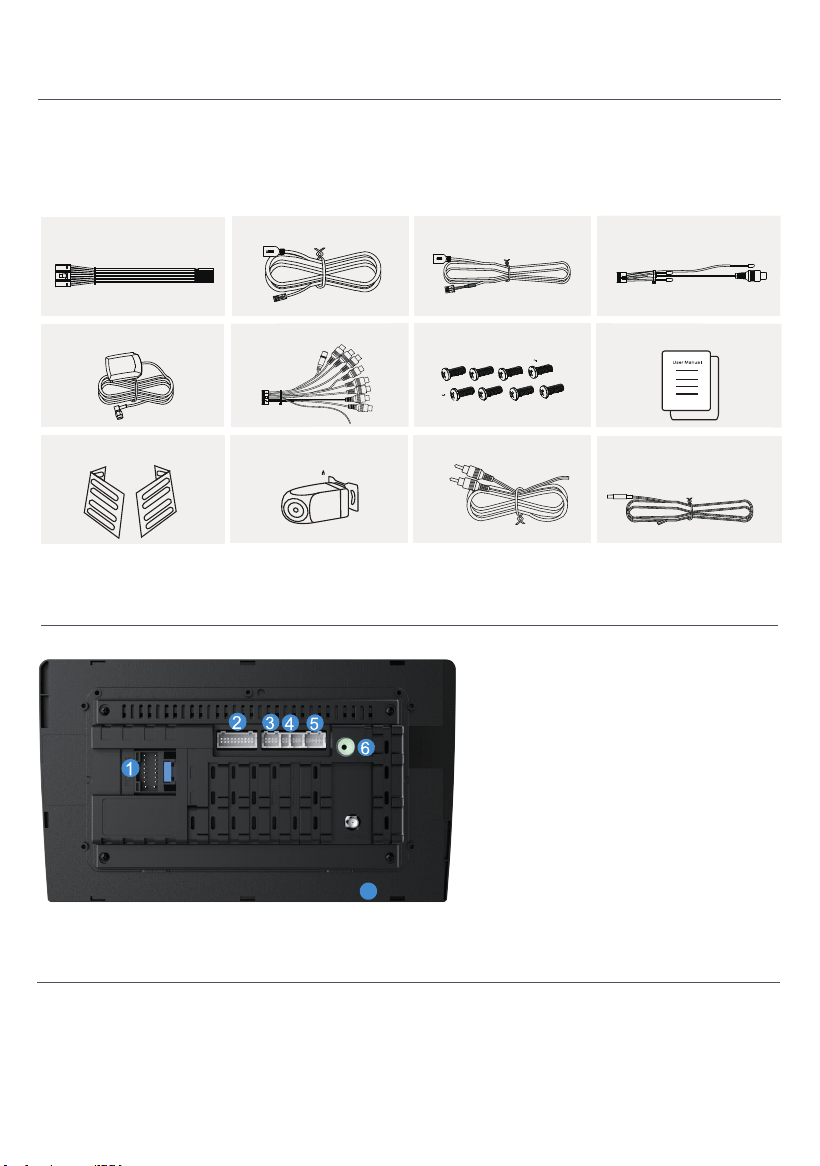
1. Power Cable
2. RCA Input/Output
3. CAN Bus
4. USB Cable x 2
5. Camera Input
6. GPS Antenna
7. Radio Antenna
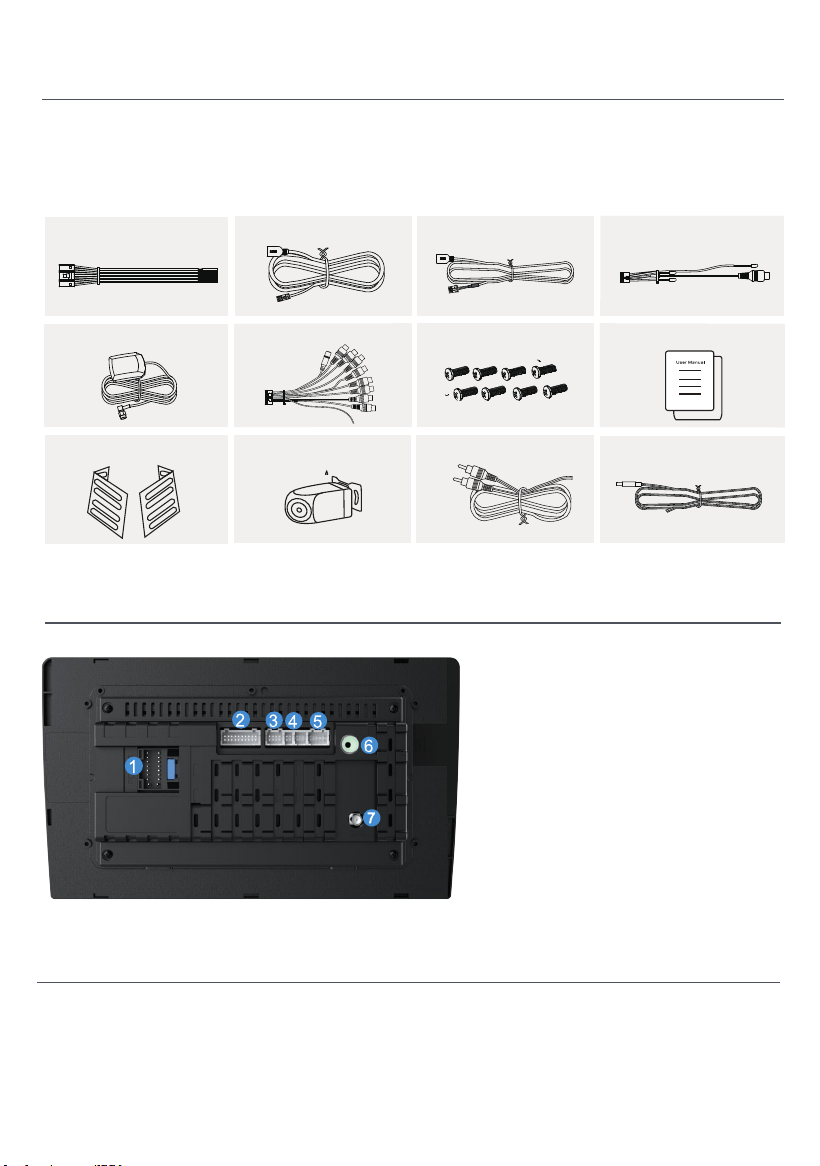
Backinterface Diagram
Please check the following accessories after opening the
package.
Accessory List
Power Cable x1
4P-USB Wire x1 6P-USB Wire x1 Rear View Interface Wire x1
GPS Antenna ×1
20P-RCA Wire x1
Installaon Screw x8
User Manual x1
Brackets x 2 Rear View Camera x1
Reversing camera cable x 1
Camera power cable x 1
02
Installation
Follow the Haudio community.A place where you can share and discuss.
Keep in touch with Haudio users.Get the installation tutorial video.
Installation
5
1
1
2
4 5
3
USB
GPS
Camera
input
1.5-meter
extension
cord
Camera
power
cord
1.5-meter
extension
cord
Power
supply
port
Image
signal
port
MIC
Line out sub woofer
AVIN VIDEO
Line Out Rear L
Line Out Rear R
AVIN L
AVIN R
Line Out Front L
Line Out Front R
PWR CON
3
2
4
1
2
4
5
3
Front Left (+)
Rear Right (-)
Front Left (-)
Rear Right (+)
Front Right (+)
Rear Left (+)
Front Right (-)
Rear Left(-)
Power Antenna(+)
Steering Wheel Key 1
Steering Wheel Key 2
Rear Camera (+)
Dimmer/Lllumination (+)
Accessory/lgnition (+)
Constant/Battery Power(+)
Chassis Ground (-)
03
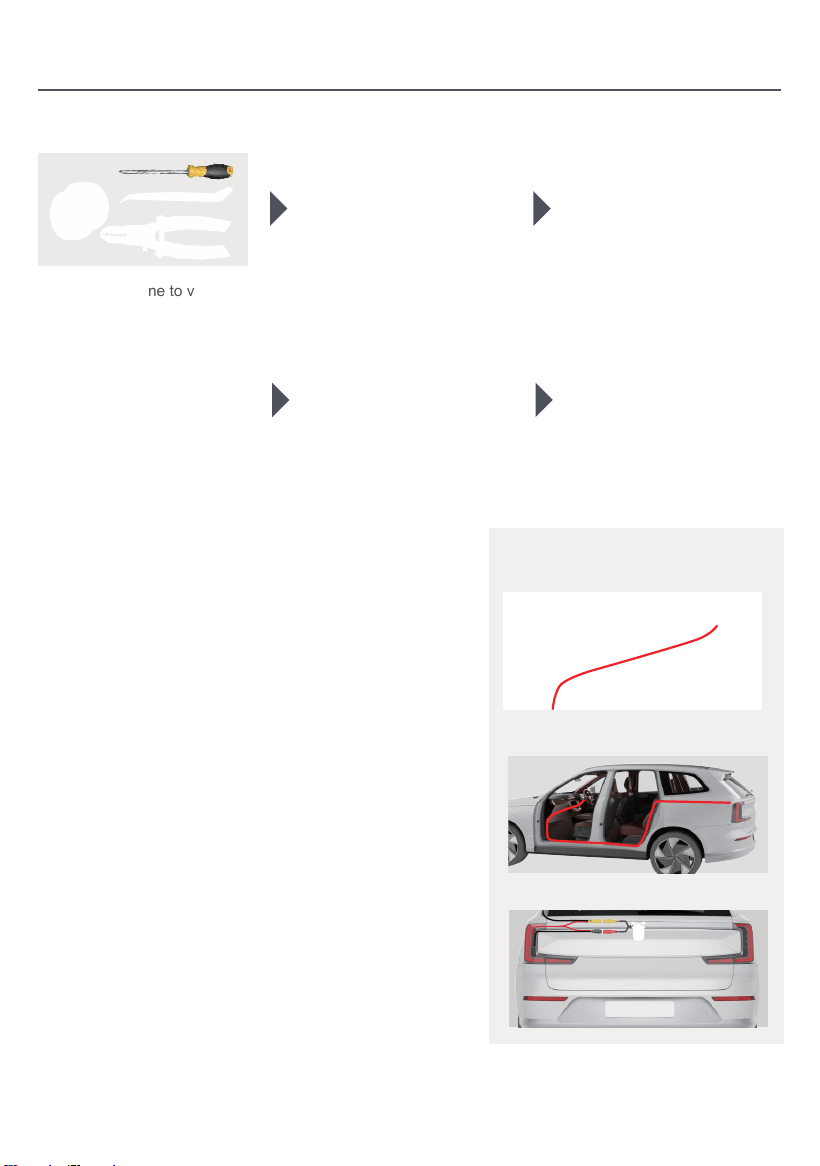
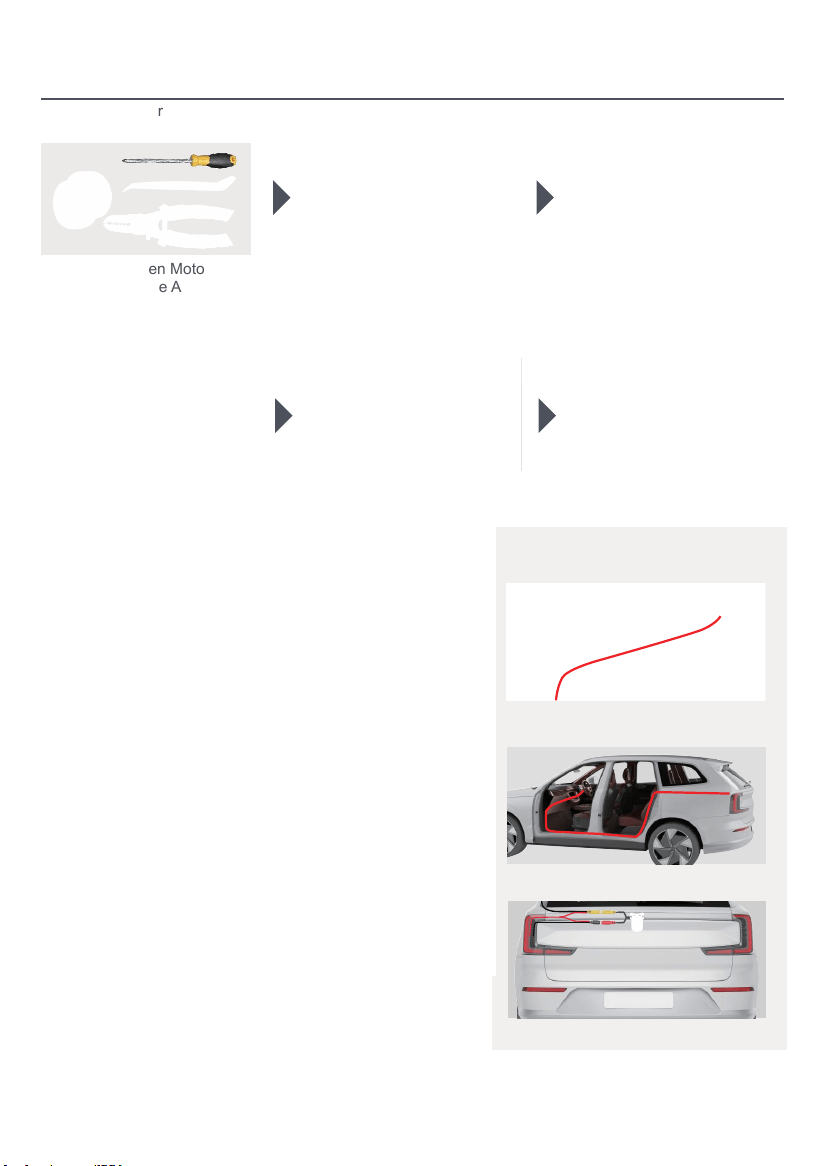
Installation
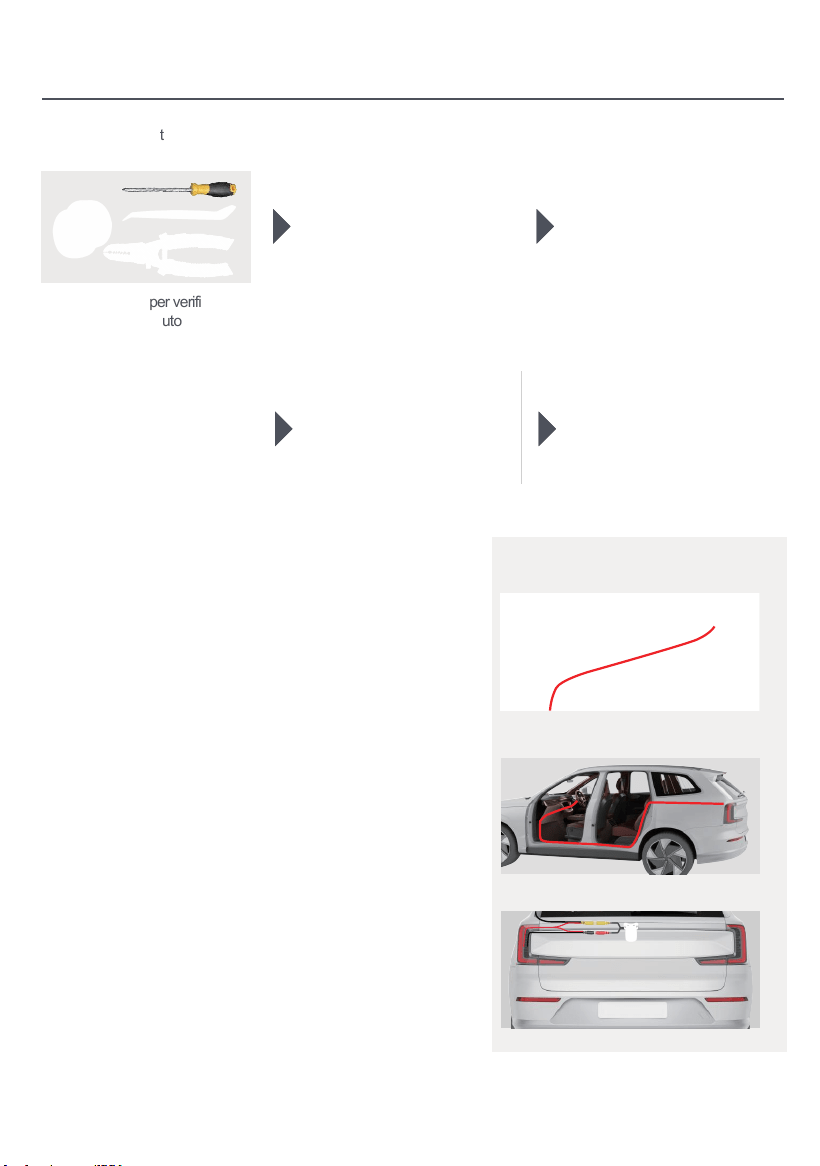
1. Prepare tools: 2. Remove the original vehicle
head unit.
5. After wiring, start the vehicle to
verify normal power-on of the
unit and proper camera operation.
6. Assembly completed.
Rear view camera wiring(optional)
Monitor
1. NTSC FORMAT
2. PAL/NTSC Auto
Switch Ligh
3. Disconnect the wiring of the
original head unit.
4. Start the engine to verify
whether the car stereo and
camera can work properly.
1.Monitor (Not induded in the Package)
2.Camera Power Source
3.Camera (Optional)
Connect this wire to the reversing line in the power
harness, ie: Back(A6)
Red: Connect to the positive
poleof the Reverse light
Reversing trigger line
Camera Power Cable
Video Cable 26ft
Back to GND
-
+
Reversing light Cable
Back(A6)
Video(out)
1.Pass the camera wiring harness through the storage
compartment and connect it to the head unit.
2. Conceal the camera signal wire under the edge of the
door and route it to the trunk entrance.
3. The power supply for the camera comes from the
vehicle's taillights
You can reach the power supply in the trunk by going
under the original car door,along the edge above the
door, or along the wiring on the roof.
04
Product Introduction
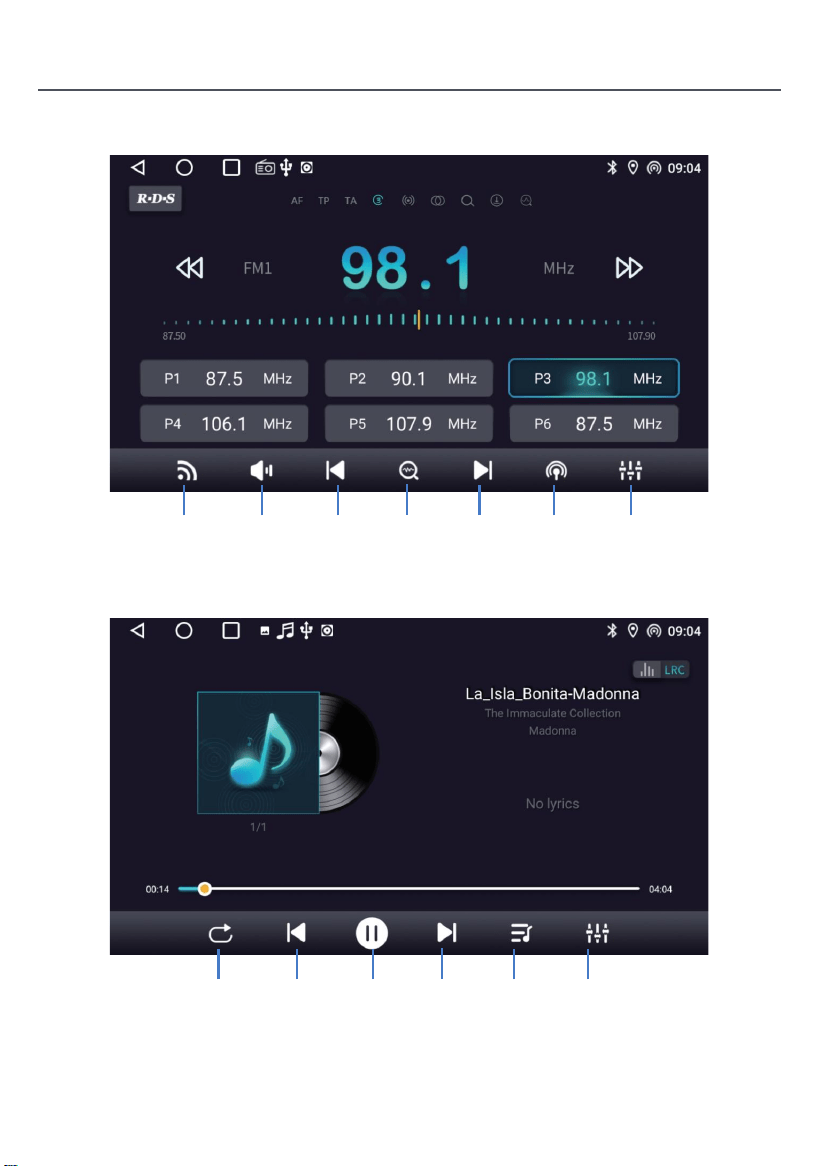
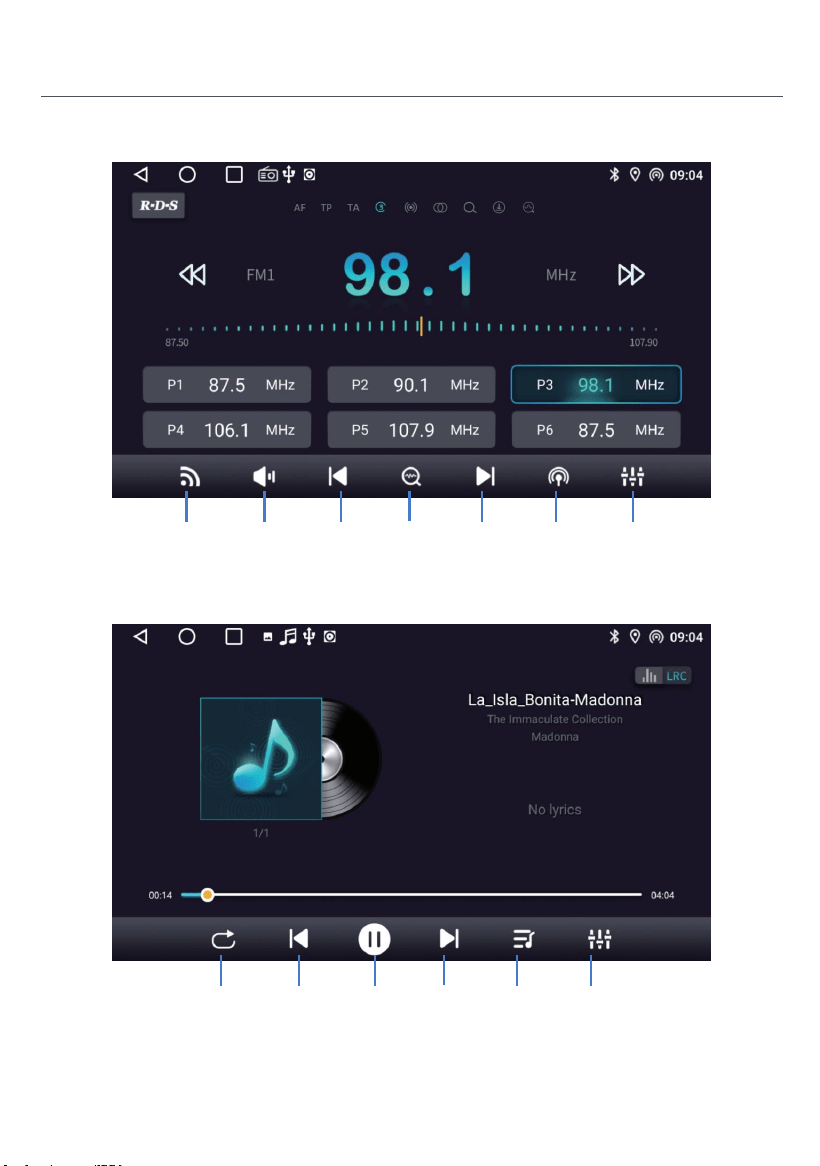
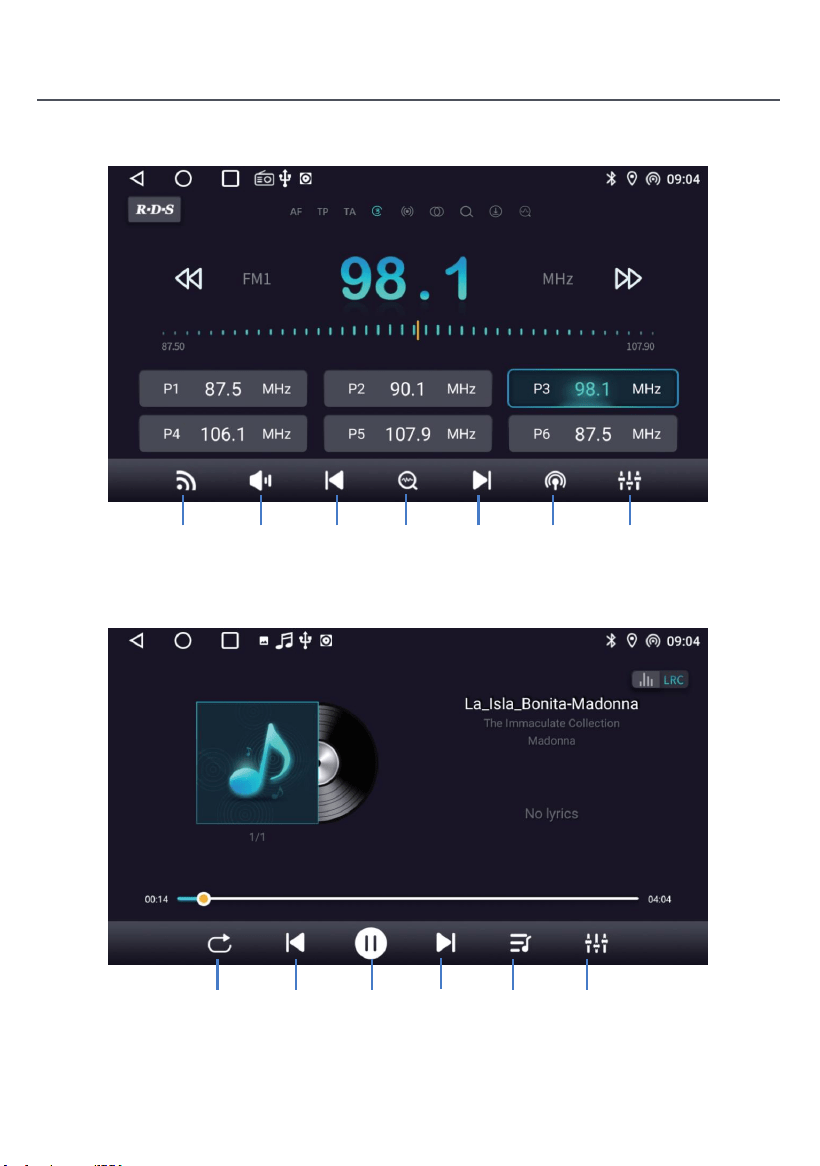
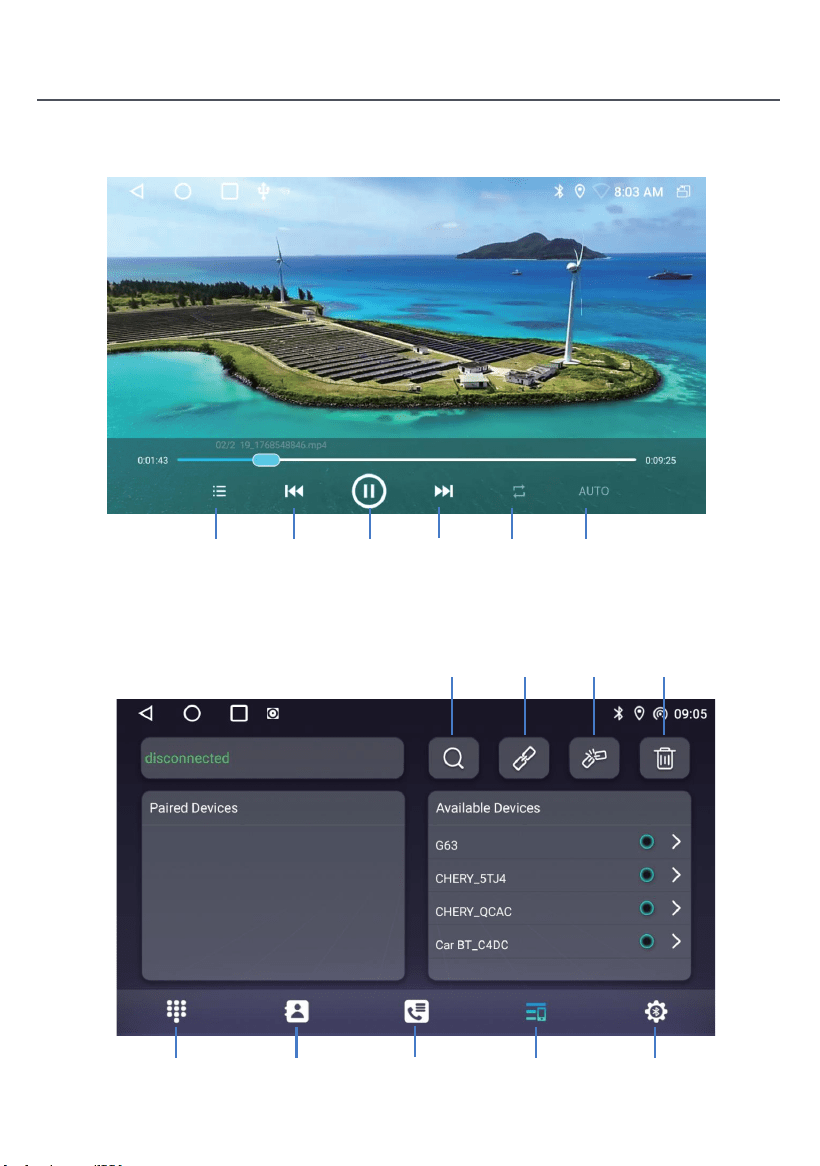
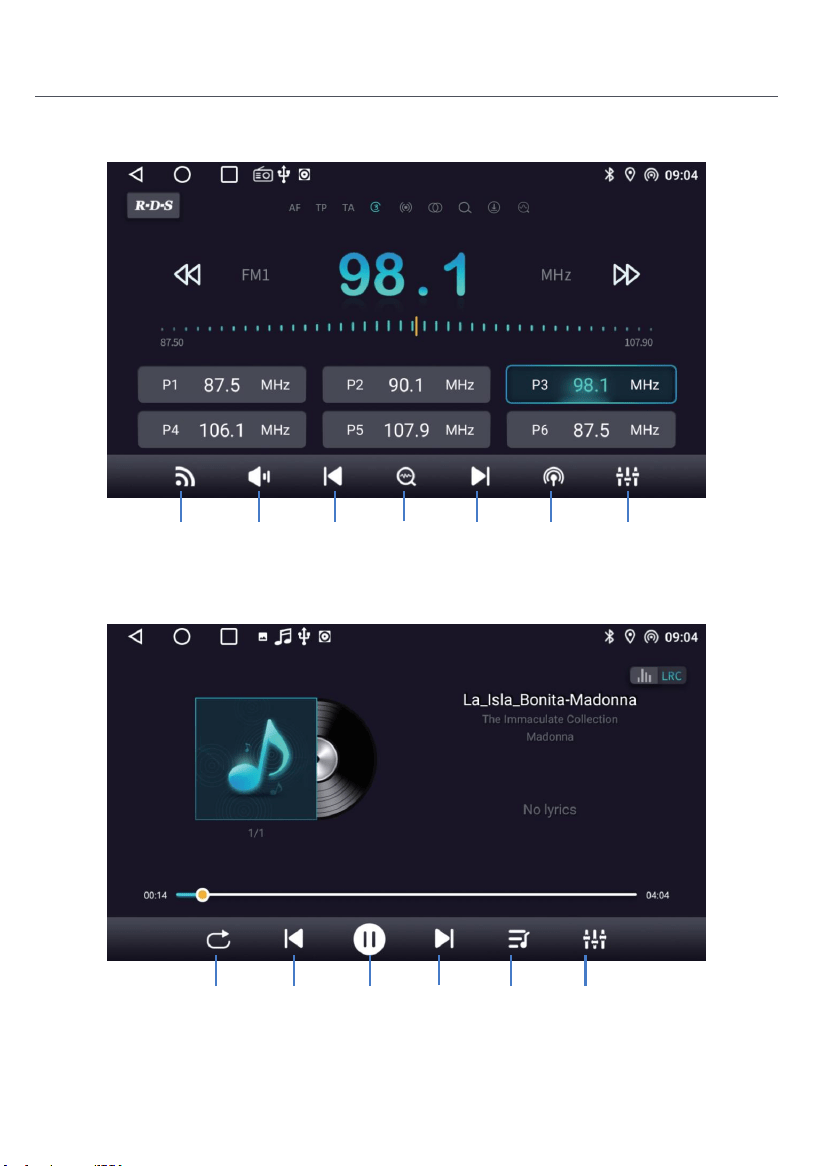
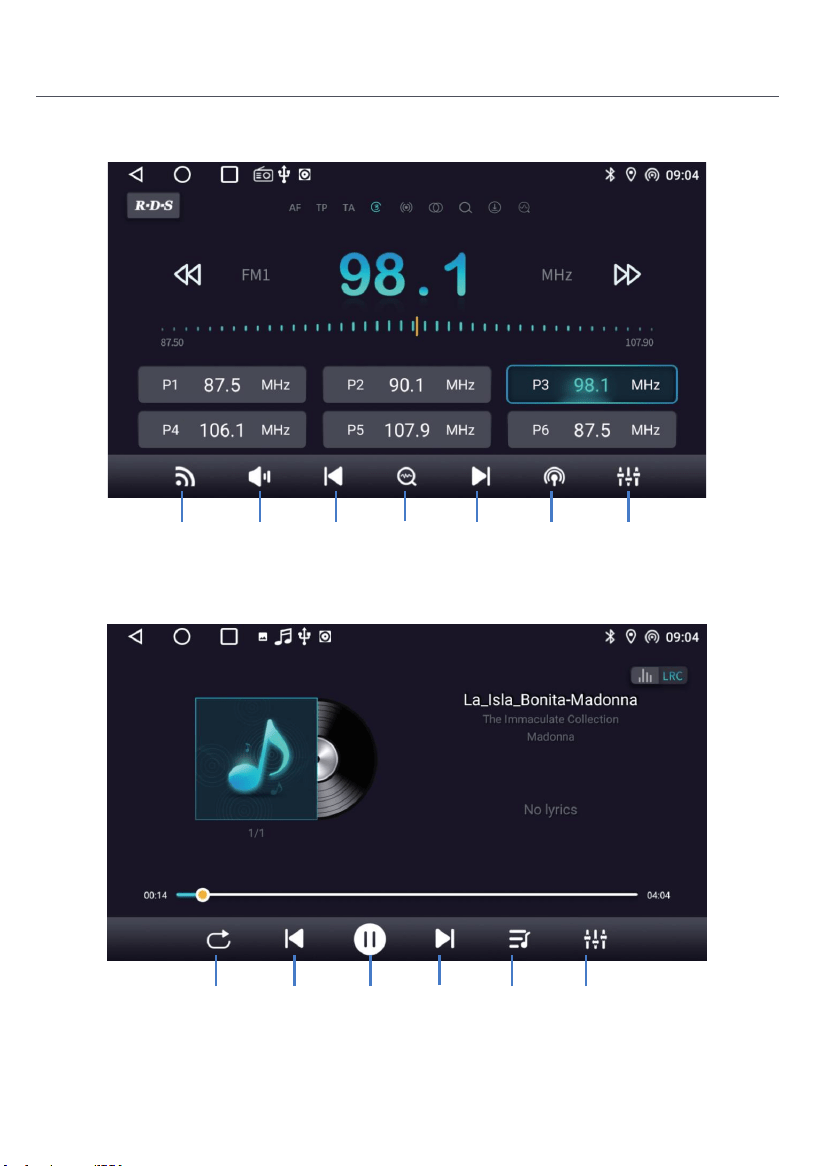
Radio
Search for
Radio
During music playback, slide the playback progress bar to drag
to the specified playback node.
Music
Tap to
search
up
Tap to
search
down
Turn on/off
the audio
Switch
bands
Switch
range
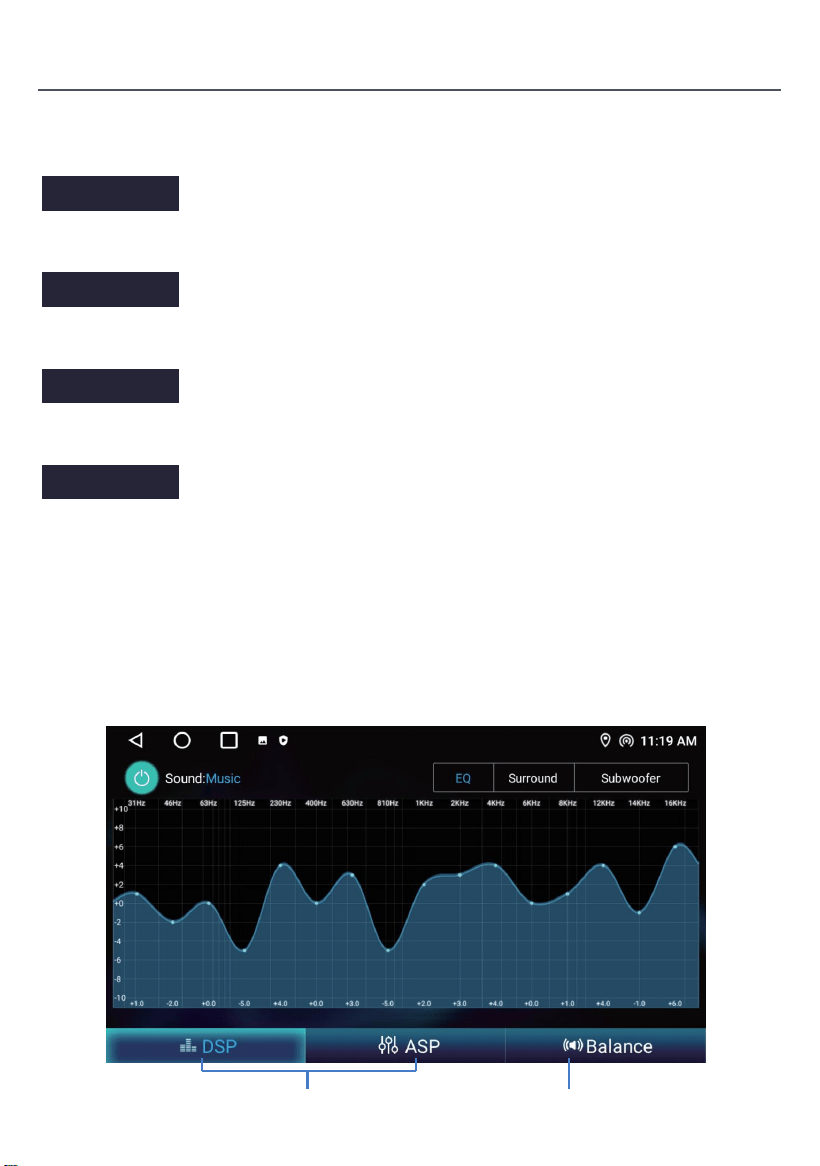
Sound
effect
settings
Next
song
Pause Music
list
Previous
song
Play
mode
Sound
effect
settings
05

Product Introduction
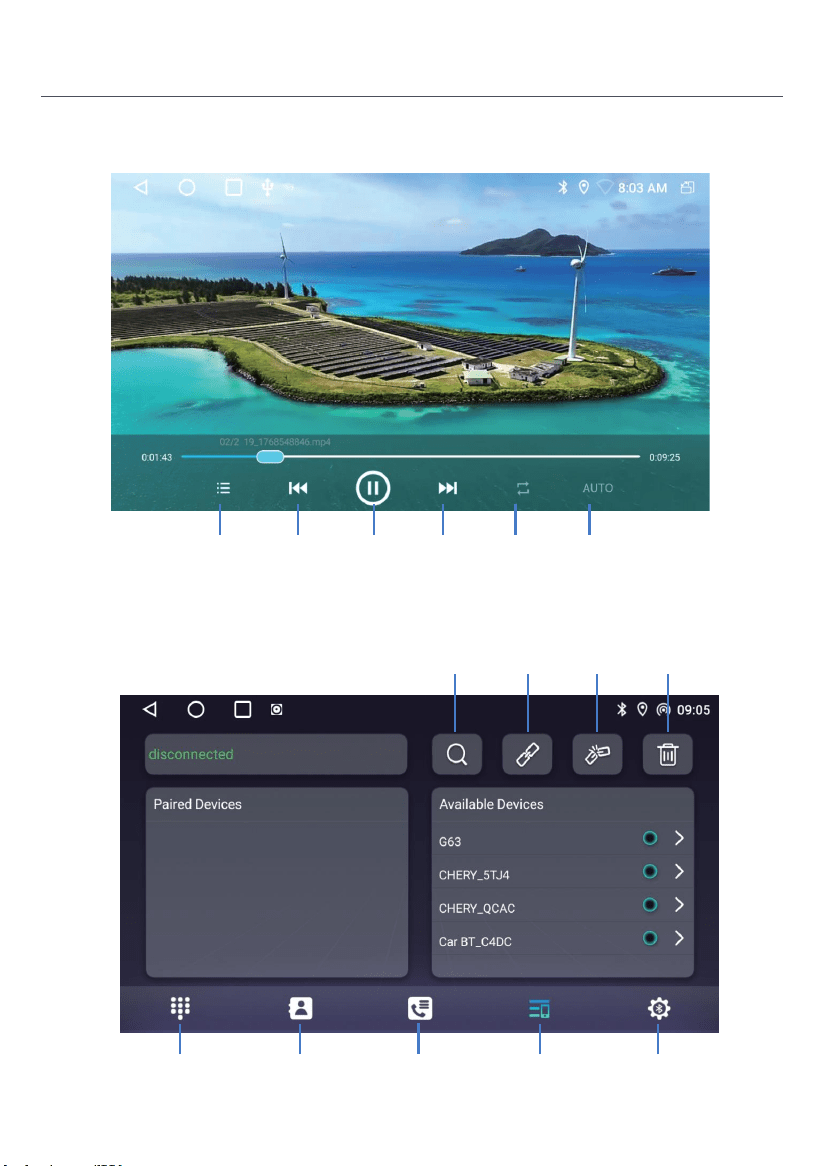
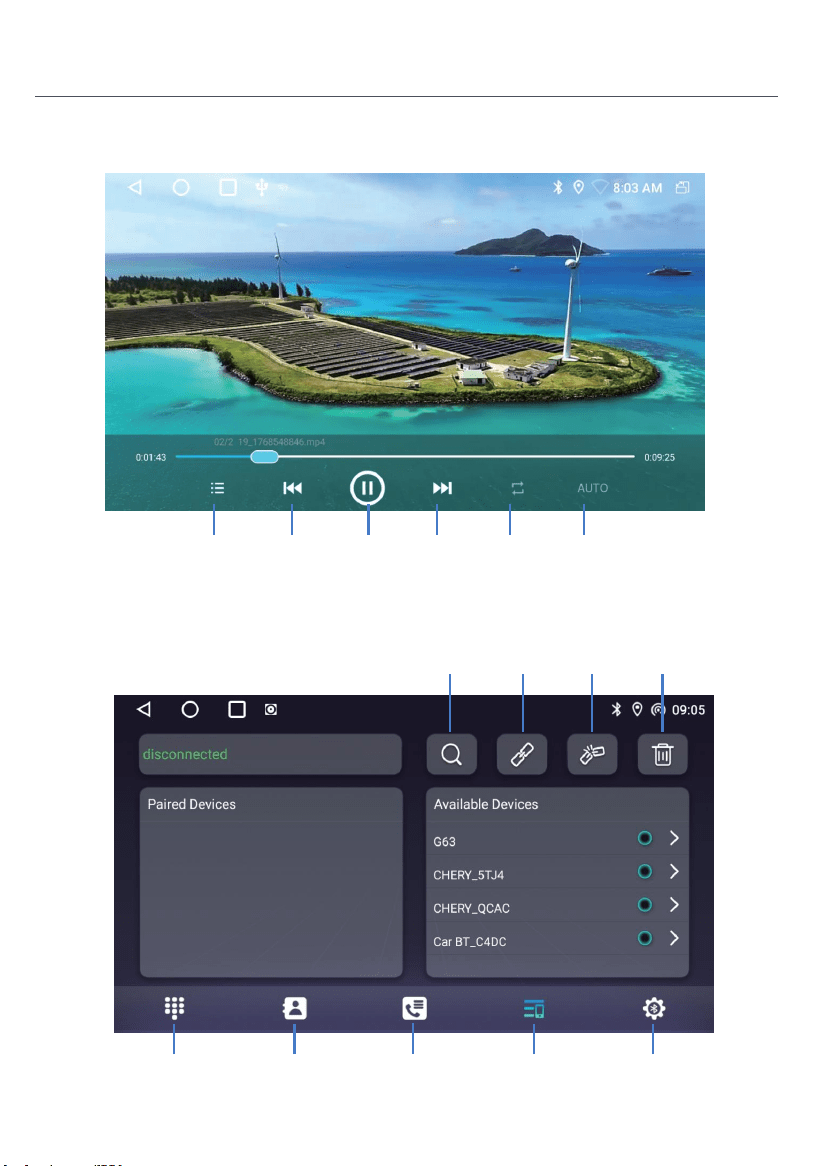
Video
Bluetooth
Next
video
Pause Play
mode
Evious
video
Video
list
AUTO
Call log Device
list
Phonebook
Bluetooth
phonedialing
Settings
Delete the
paired
device
Disconnect
Bluetooth
device
Connect
Bluetooth
device
Searching
Bluetooth
devices
06
Product Introduction
Bluetooth setting
Turn on this power switch to enable Bluetooth.
Turn on this switch, after the mobile phone is connected to the car Bluetooth, when
your mobile phone rings for 5 seconds, it will automatically answer the call.
When this switch is turned on, the phone will automatically answer the call after
connecting the Bluetooth of the car and the phone.
Turn on this switch, after the mobile phone is connected to the Bluetooth of the car, and
turn on Bluetooth sharing network switch on the mobile at the same time, the car can
access the Internet through the network shared by the mobile. Refer to the detailed
introductions on the mobile terminal operation method.
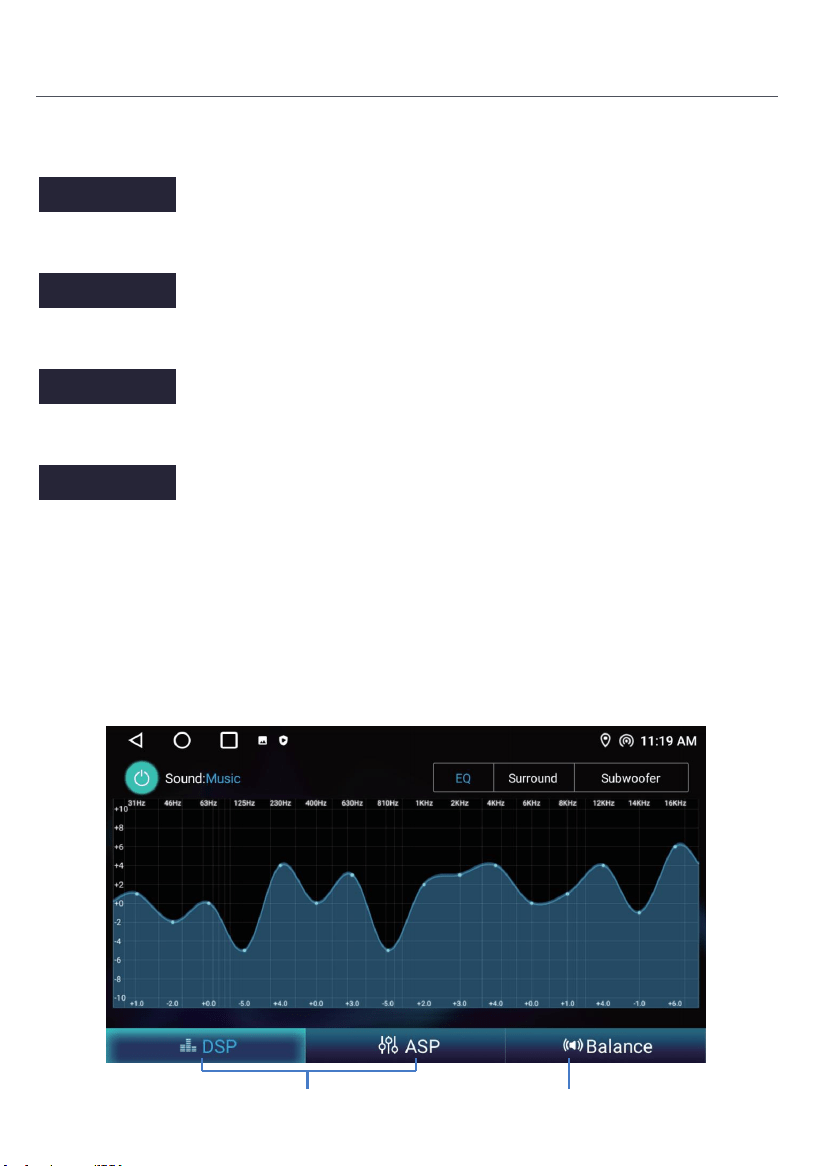
ASP
Operating instructions.
Sound effect adjustment Balance adjustment
07
Restart BT power
Auto Answer
Auto Connect
Bluetooth net

Wireless connection
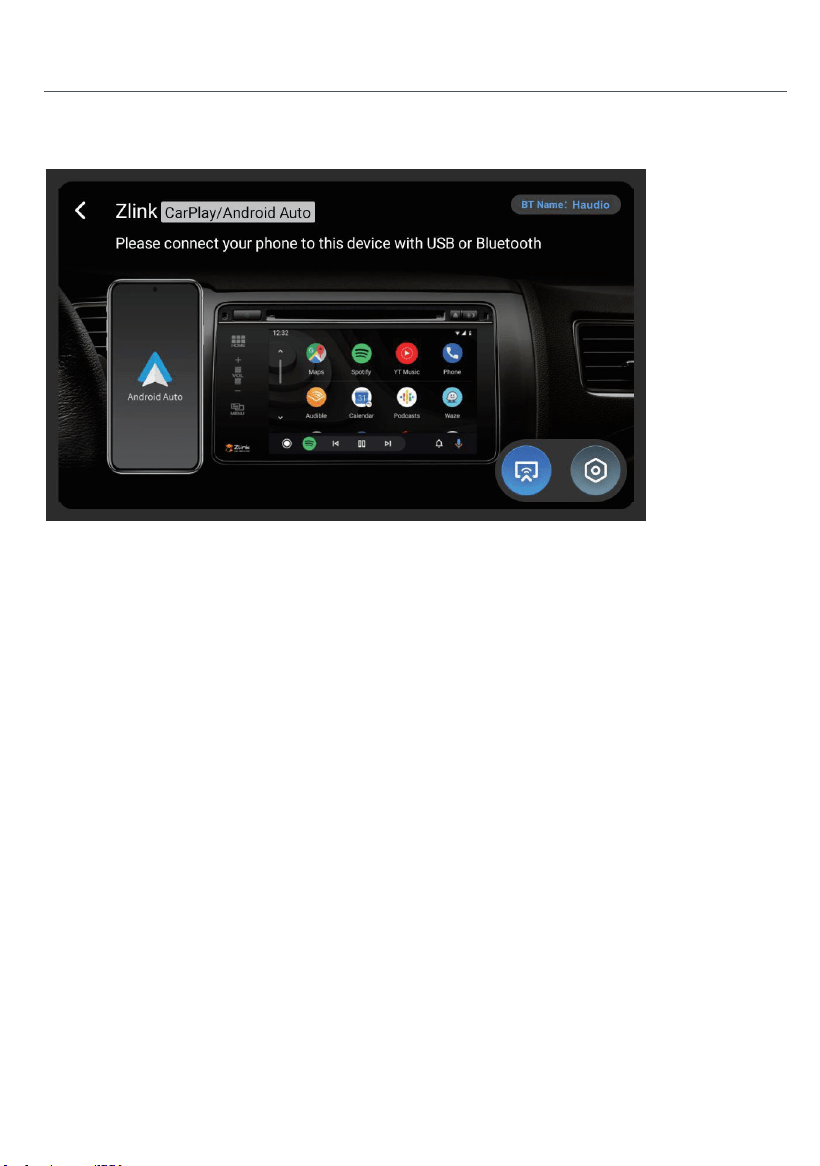
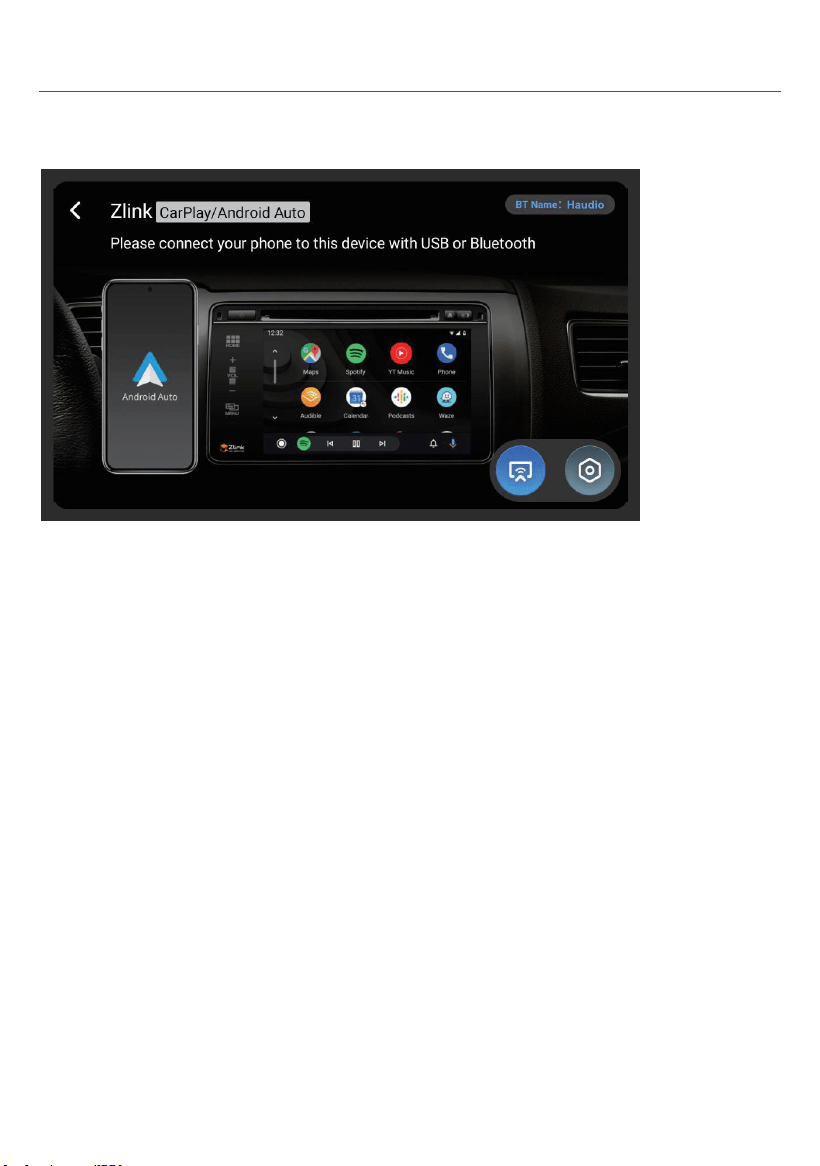
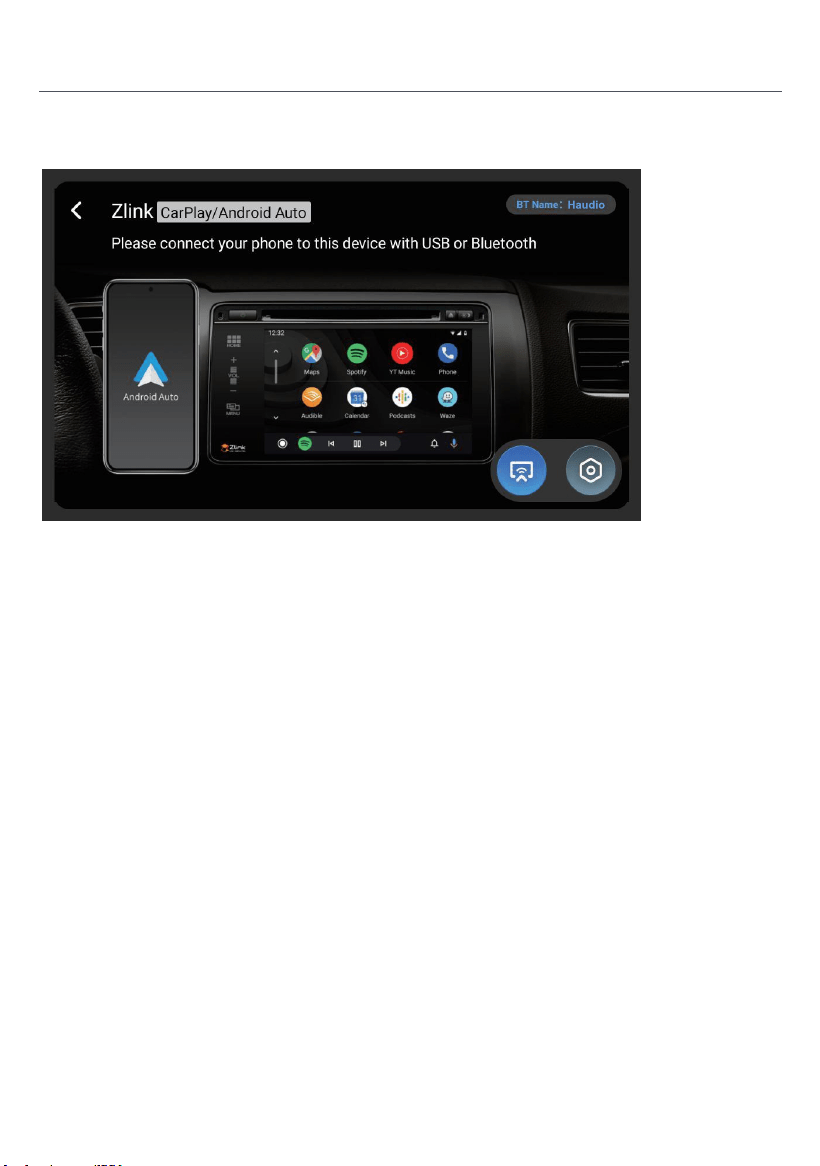
1. Press to enter Zlink5, the mobile phone can be connected to the in-vehicleinfotainment device through
Android USB and iPhone Wi-Fi.
2. Wireless Zlink5:I-phone connects the car navigation through BT, click Zlink5 to enter the pop-up dialogbox,
and click use Zlink5.
Zlink:(Connection instructions for some iOS mobile phones)
1. Turn on the BT of the mobile phone to connect the BT of the head unit. After the BTconnection of the car,
the ZLink connection interface will pop up automatically.
2. Confirm using CarPlay on mobile.
3. If the above steps cannot be connected, you need to connect the mobile phone WiFihotspot.
Product Introduction
08
Click to CarPlay/Android Auto/Phone Link
Click to switch between Carplay/Android Auto and Mirroring

This public version description is subject to the actual product configuration.
Warning:
The ANT interface is a dedicated RF signal interface and must not be used as a power input port.
Any unauthorized connection of external power sources will result in severe degradation of the signal system
or permanent hardware damage to the equipment. All consequences and losses resulting from such
unauthorized operations shall be borne by the user themselves and are not covered by the product warranty.
If the product voltage is lower than 12V, the working condition is not guaranteed.
Common troubleshooting guidelines
FAULT
CE
REASON SOLUTION
Can not power on
Check fuse
Some factors
cause MPU wrong
operation
Change battery
or fuse
After ignitions
with off, setting
information all lose
Poor performanc
eof radio station
Weak signal
Change fuse same as the old one
Maximum current of fuse:15A
Press RESET button on the panel by
penpoint,then, power on
Reset information and save
Move the car to another
location,then research
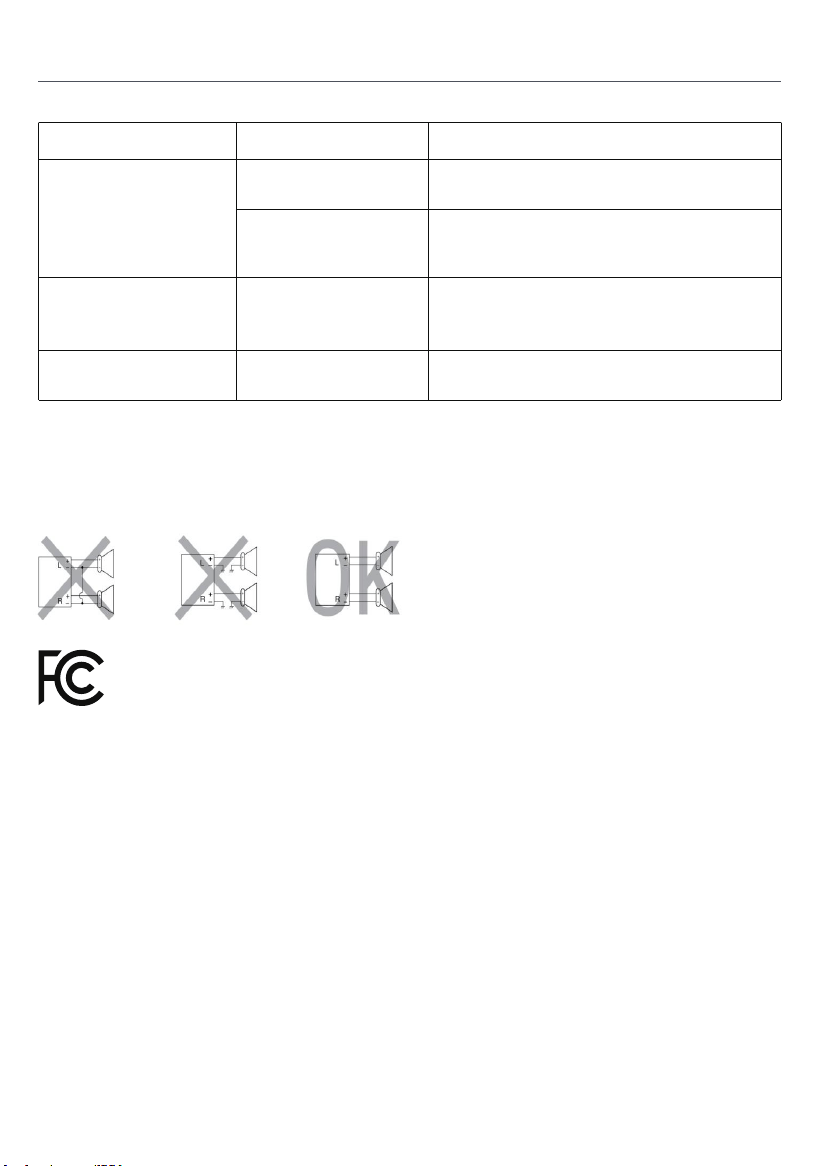
Do not connect the speaker leads of the power cord to the car battery;
otherwise,the unit will be seriously damaged.
BEFORE connecting the speaker leads of the power cord to the speakers,
check the speaker wiring in your car.
The maximum SAR value is 2W/kg when the device used Omm close to user.
THIS DEVICE COMPLIES WITH PART 15 OF THE FCC RULES AND REGULATIONS.
OPERATION IS SUBJECT TO THE FOLLOWING TWO CONDITIONS:
1)THE DEVICE MAY NOT CAUSE HARMFUL INTERFERENCE, AND
2)THE DEVICE MUST ACCEPT ANY INTERFERENCE RECEIVED, INCLUDING
INTERFERENCE THAT MAY CAUSE UNDESIRED OPERATION
09

Product Warranty Card
Warranty Period:
This product is entitled to 12 months of free repair service from the effective date of purchase.
Warranty Scope:
Under the premise of complying with the usage regulations, any performance failure caused
by manufacturing defects of the product itself can enjoy free repair services.
Disclaimer Clause:
The following situations are not within the scope of warranty liability:
1. Damage caused by force majeure (such as earthquakes, fires, floods, typhoons, etc.);
2. Malfunctions caused by improper use, maintenance, and storage by consumers;
3. Damage caused by unauthorized personnel dismantling, repairing, or modifying
without the authorization of our company;
4. The warranty certificate does not match the product information or the certificate has been
altered or missing;
5. The product has exceeded the agreed warranty period;
6. Appearance wear and natural aging of consumables caused by normal use.
Service Channels:
If you need technical support or warranty services, please contact us
Through the following methods:
Customer Service Email: [email protected]
Service website: https://tianshi-digital.com
We suggest that you prioritize initiating service requests through the official customer
service channel of the original purchasing platform.
Purchase Date Serial Number
Product Model Contact Email
10
RST
Tension de travail: 11V-16V
Courant de travail: 0.8A-1.2A
Température de travail: -20°C-+60°C
Température de stockage: -30°C-+80°C
Général
Spécification
Français
Description fonctionnelle
1. Trou de microphone intégré
2. Réinitialiser (appuyer avec un objet pointu)
3. Presse longue (2 secondes) : éteint l'écran. / Clic : éteint le son.
Vers le menu principal4.
5. Revenir à l'interface précédente
6. Augmenter le volume
7. Réduire le volume
MIC
1
2
3
4
5
6
7
11
1. Câble d'alimentation
2. Entrée/sortie RCA
3. Bus CAN
4. Câble USB x 2
5. Entrée de caméra
6. Antenne GPS
7. Antenne radio
Diagramme de l'interface arrière
Veuillez vérifier les accessoires suivants après avoir ouvert
le paquet.
Liste des accessoires
Câble d'alimentaon x1
Fil 4P-USB x1 Fil 6P-USB x1 Fil d'interface de vue
arrière x1
Antenne GPS ×1
Fil 20P-RCA x1
Vis d'installaon x8
Manuel de l'ulisateur x1
Supports x 2 Caméra de vue arrière x1
Câble de caméra inverse x 1
Câble d'alimentaon de
la caméra x 1
12
Installation
Suivez la communauté Haudio. Un endroit où vous pouvez partager et discuter.
Restez en contact avec les utilisateurs Haudio. Obtenez la vidéo tutoriel d'installation.
Installation
5
1
1
2
4 5
3
USB
GPS
Caméra
entrée
1.5 mètres
extension
cordon
Caméra
puissance
cordon
1.5 mètres
extension
cordon
Port
d'alimentation
Image
Signal
port
MIC
Line out sous-woofer
AVIN VIDEO
Line Out arrière L
Line Out arrière R
Avin L
Avin R
Ligne avant L
Line Out Avant R
PWR CON
3
2
4
1
2
4
5
3
Avant gauche (+)
Droite arrière (-)
Avant à gauche (-)
Droite arrière (+)
Avant Droite (+)
Arrière gauche (+)
Avant droite (-)
Arrière gauche (-)
Antenne de puissance (+)
Clé du volant 1
Clé du volant 2
Caméra arrière (+)
Dimmer/Llumination (+)
Accessoire/ignition (+)
Puissance constante/batterie (+)
Chassis au sol (-)
13
Installation
1. Préparer les outils : 2. Retirez l'unité de commande
originale du véhicule.
5. Après le câblage, démarrez le
véhicule pour vérifier que l'unité
s'allume normalement et que la
caméra fonctionne correctement.
6. Assemblage terminé.
Moniteur
1. FORMAT NTSC
2. PAL/NTSC Auto
Commutateur Ligh
3. Débranchez le câblage de
l'unité audio d'origine.
4. Démarrer le moteur pour vérifier
si le système audio et la caméra de
la voiture fonctionnent correctement.
Connectez ce fil à la ligne d'inversion dans le
harnais électrique, c'est-à-dire: Retour (A6)
Rouge : Se connecter au
pôle positif de la lumière
Inverser la ligne de déclenchement
Câble d'alimentation
caméra
Câble vidéo 26ft
Retour à GND
-
+
Câble de lumière
inverse
Retour(A6)
Vidéo (out)
Vous pouvez atteindre l'alimentation électrique dans le
coffre en allant sous la porte d'origine de la voiture, le
long du bord au-dessus de la porte, ou le long du câblage
sur le toit.
1.Monitor (non inclus dans l'emballage)
Source d'alimentation 2.Camera
3.Camera (facultatif)
Câblage de caméra de vue arrière
(facultatif)
1. Faire passer le câble de la caméra par le compartiment
de stockage et le connecter à l'unité centrale.
2. Cachez le câble du signal de la caméra sous le bord
de la porte et dirigez-le vers l'entrée du coffre.
3. L'appareil photo est alimente par les feux
arriere du vehicule.
14
15
Introduction du produit
La radio
Rechercher
Radio
Pendant la lecture de musique, faites glisser la barre de progression
de lecture pour faire glisser vers le nœud de lecture spécifié.
Musique
Tapez
pour
rechercher
Tapez
pour
rechercher
Activer
désactiver
l'audio
Bandes de
commutation
Gamme de
commutateurs
Paramètres
d'effet
sonore
Suivant
chanson
Pause Liste de
musique
Chanson
précédente
Mode de
lecture
Paramètres
d'effet
sonore
16
Introduction du produit
Vidéo
Bluetooth
Vidéo
suivante
Pause Mode de
lecture
idéo
méchante
Liste des
vidéos
AUTO
Journal des
appels
Liste des
appareils
Livre
téléphonique
Téléphonie
Bluetooth
Paramètres
Supprimer
les appareils
jumelés
Déconnecter
l'appareil
Bluetooth
Connecter un
appareil
Bluetooth
Rechercher
un appareil
Bluetooth

17
Introduction du produit
Paramètres Bluetooth
ASP
Instructions d'utilisation.
Ajustement des effets sonores Ajustement du solde
Activez cet interrupteur d'alimentation pour activer le Bluetooth.
Activez cet interrupteur, après que le téléphone mobile est connecté à la voiture
Bluetooth, lorsque votre téléphone mobile sonne pendant 5 secondes, il répondra
automatiquement à l'appel.
Lorsque cet interrupteur est activé, le téléphone répondra automatiquement à l'appel
après avoir connecté le Bluetooth de la voiture et du téléphone.
Activez ce commutateur, après que le téléphone mobile est connecté au Bluetooth de
la voiture, et activez le commutateur de réseau Bluetooth sur le mobile en même temps,
la voiture peut accéder à Internet via le réseau partagé par le mobile. Se référer aux
introductions détaillées sur la méthode de fonctionnement du terminal mobile.
Restart BT power
Auto Answer
Auto Connect
Bluetooth net
18
Connexion sans fil
1. Appuyez pour entrer Zlink5, le téléphone mobile peut être connecté au dispositif d'infotainment à
l'intérieur du véhicule via Android USB et iPhone Wi-Fi.
2. Zlink5 sans fil: I-phone connecte la navigation de voiture à travers BT, cliquez sur Zlink5 pour entrer dans
la boîte de dialogue pop-up et cliquez sur utiliser Zlink5.
Zlink:(Instructions de connexion pour certains téléphones mobiles iOS)
1. Mettez en marche le BT du téléphone mobile pour connecter le BT de l'unité de tête. Après la connexion
BT de la voiture, l'interface de connexion ZLink s'affichera automatiquement.
2. Confirmez l'utilisation de CarPlay sur mobile.
3. Si les étapes ci-dessus ne peuvent pas être connectées, vous devez connecter le téléphone mobile
WiFihotspot.
Introduction du produit
Cliquez sur le lien CarPlay/Android Auto/Phone
Cliquez pour passer entre Carplay/Android Auto et Mirroring

Cette description de la version publique est soumise à la configuration réelle du produit.
Avertissement :
L'interface ANT est une interface de signal RF dédiée et ne doit pas être utilisée comme port d'entrée
d'alimentation. Toute connexion non autorisée de sources d'alimentation externes entraînera une
grave dégradation du système de signal ou des dommages matériels permanents à l'équipement.
Toutes les conséquences et pertes résultant de telles opérations non autorisées sont à la charge de
l'utilisateur lui-même et ne sont pas couvertes par la garantie du produit.
Si la tension du produit est inférieure à 12V, l'état de travail n'est pas garanti.
Directives de depannage courantes
FAUTE
CE
RAISON SOLUTION
lmpossibled'allumer
Vérifier le fusible
Certains facteurs
provoquent un
dysfonctionnement
du microprocesseur
Changer la batterie
ou le fusible
Après avoir coupéle
contact, toutesles
informations der
églage sont perdues.
Mauvaise performance
de la station de radio
Signal faible
Remplacer le fusible comme l'ancien.
Intensité maximale du fusible : 15 A
Appuyez sur le bouton RESET du panneau avec
la pointe du stylo, puis allumez l'appareil.
Réinitialiser les informationset
enregistrer
Déplacez la voiture vers un autre endroit,
puis effectuez des recherches.
Ne connectez pas les cables d'alimentation des haut-parleurs à la batterie du véhicule ;
cela pourrait endommager gravement l'appareil.
AVANT de connecter les cables d'alimentation aux haut-parleurs,
vérifiez le cablage des haut-parleurs de votre véhicule.
The maximum SAR value is 2W/kg when the device used Omm close to user.
CET APPAREIL EST CONFORME Ã LA PARTIE 15 DES RÈGLES ET RÉGLEMENTATIONS DE
LA FCC. SON FONCTIONNEMENT EST SOUMIS AUX DEUX CONDITIONS SUIVANTES :
1) L'APPAREIL NE DOIT PAS PROVOQUER D'INTERFÉRENCES NUISIBLES, ET
2) L'APPAREIL DOIT ACCEPTER TOUTE INTERFÉRENCE RECUE, Y COMPRIS CELLE
POUVANT ENTRAINER UN FONCTIONNEMENT INDÉSIRABLE.
19

Carte de garantie du produit
Période de garantie :
Ce produit a droit à un service de réparation gratuit de 12 mois à compter de la date d'achat.
Portée de la garantie:
Sous la prémisse du respect des règlements d'utilisation, toute défaillance de performance causée par des
défauts de fabrication du produit lui-même peut bénéficier de services de réparation gratuits.
Clause d'exclusion de responsabilité :
Les situations suivantes ne sont pas couvertes par la garantie:
1. Dégâts causés par la force majeure (tels que tremblements de terre, incendies, inondations, typhons, etc.);
2. Malfonctionnements causés par une utilisation, une maintenance et un stockage inappropriés par les
consommateurs;
3. Dommages causés par le démontage, la réparation ou la modification du personnel non autorisé sans
l'autorisation de notre société;
4. Le certificat de garantie ne correspond pas aux informations du produit ou le certificat a été modifié ou
manquant;
5. Le produit a dépassé la période de garantie convenue;
6. Apparence usure et vieillissement naturel des consommables causés par l'utilisation normale.
Chaînes de service :
Si vous avez besoin d'assistance technique ou de services de garantie, veuillez nous contacter par les
méthodes suivantes:
Courriel du service à la clientèle : [email protected]
Site Web de service: https://tianshi-digital.com
Nous vous suggérons de prioriser l'initiation des demandes de service par l'intermédiaire du client officiel.
canal de service de la plateforme d'achat originale.
Date d'achat Numéro de série
Modèle de produit Contact Email
20

RST
Arbeitsspannung: 11V-16V
Arbeitsstrom: 0.8A-1.2A
Arbeitstemperatur: -20°C-+60°C
Lagertemperatur: -30°C-+80°C
Allgemein
Spezifikation
Funktionale Beschreibung
1. Eingebautes Mikrofonloch
2. Reset (mit einem scharfen Objekt drücken)
3. Langdrücken (2 Sekunden): Schaltet den Bildschirm aus. / Klick: Schaltet den Ton aus.
Zum Hauptmenü4.
5. Zurück zur vorherigen Schnittstelle
6. Die Lautstärke erhöhen
7. Die Lautstärke senken
MIC
1
2
3
4
5
6
7
Deutsch
21

1. Stromkabel
2. RCA-Eingang/Ausgang
3. CAN Bus
4. USB-Kabel x 2
5. Kameraeingang
6. GPS-Antenne
7. Radioantenne
Backinterface Diagramm
Bitte überprüfen Sie das folgende Zubehör nach dem
Öffnen der Verpackung.
Zubehörliste
Stromkabel x1
4P-USB-Kabel x1 6P-USB-Kabel x1
Rücksicht Schnistelle
Draht x1
GPS-Antenne ×1
20P-RCA Kabel x1
Installaonsschraube x8
Bedienungsanleitung x1
Halterungen x 2 Rücksichtskamera x1
Umkehrkabel x 1
Câble d'alimentaon de
la caméra x 1
22
Installation
Folgen Sie der Haudio Community. Ein Ort, an dem Sie teilen und diskutieren können.
Bleiben Sie in Kontakt mit Haudio-Nutzern. Holen Sie sich das Installations-Tutorial-Video.
Installation
5
1
1
2
4 5
3
USB
GPS
Kameraeingang
1.5-Meter
-Extensionskabel
1.5-Meter
-Extensionskabel
Kamera
Netzkabel
Stromversorgung
sanschluss
Bildsignalanschluss
MIC
Line out sub woofer
AVIN VIDEO
Linie hinten L
Linie hinten R
AVIN L
AVIN R
Linie vorne L
Linie vorne R
PWR CON
3
2
4
1
2
4
5
3
Vorne links(+)
Hinter rechts (-)
Vorne links(-)
Hinter rechts(+)
Vorne rechts(+)
Hinter links(+)
Vorne rechts (-)
Hinter links(-)
Leistungsantenne (+)
Lenkrad Schlüssel 1
Lenkrad Schlüssel 2
Hinterkamera (+)
Dimmer/Llumination (+)
Zubehör/Ignition(+)
Konstante / Batterie Leistung (+)
Fahrwerk Boden (-)
23
Installation
1. Werkzeuge vorbereiten: 2. Entfernen Sie die ursprüngliche
Fahrzeug-Headunit.
5. Nach der Verkabelung starten Sie
das Fahrzeug, um die normale
Stromversorgung der Einheit und die
ordnungsgemäße Funktion der
Kamera zu überprüfen.
6. Montage abgeschlossen.
Rücksicht Kamera Verkabelung
(optional)
Überwachung
1. NTSC-FORMAT
2. PAL / NTSC
Auto Schalter Licht
3. Trennen Sie die Verkabelung
der ursprünglichen Headunit.
4. Starten Sie den Motor, um zu
überprüfen, ob die Autowerkstatt
und die Kamera ordnungsgemäß
funktionieren.
1.Monitor (nicht im Paket enthalten)
2.Kamera Stromquelle
3.Kamera (optional)
Anschließen Sie diesen Draht an die Umkehrlei-
tung im Stromgerät, d.h.: Zurück (A6)
Rot: Anschließen Sie an den
positiven Pol des UmkehrlichtsCable
Umkehrline Triggerlinie
Kamera Netzkabel
Videokabel 26ft
Zurück zu GND
-
+
Umkehrlicht Kabel
Zurück(A6)
Video(out)
Sie können die Stromversorgung im Kofferraum erreichen,
indem Sie unter der ursprünglichen Autotür gehen, entlang
des Randes über der Tür oder entlang der Verkabelung auf
dem Dach.
1. Schieben Sie das Kamerenkabel durch den Stauraum
und verbinden Sie es mit der Head Unit.
2. Verstecken Sie das Kamerensignalsignal unter den
Türkanten und führen Sie es zum Kofferraum-Einstieg.
3. Die Kamera bezieht ihre Stromversorgung
von den Rucklichtern des Fahrzeugs.
24
25
Produkteinführung
Radio
Suche
nach
Radio
Schieben Sie während der Musikwiedergabe die Fortschrittsleiste
der Wiedergabe, um den angegebenen Wiedergabeknoten zu ziehen.
Musik
Tippen Sie
um zu suchen
Tippen Sie,
um nach unten
zu suchen
Ein-
Ausschalten
des Audios
Schalt
bänder
Schalt
bereich
Sound
effekt
einstellungen
Nächster
Song
Pause Musik
liste
Vorheriger
Song
Spiel
modus
Sound
effekt
einstellungen
26
Produkteinführung
Videos
Bluetooth
Nächstes
Video
Pause SpielmodusÜbelhaftes
Video
Videoliste AUTO
Anrufprotokoll GerätelisteTelefonbuchBluetooth
Telefonnummer
Einstellungen
Löschen
der gepaarten
Geräte
Bluetooth
Gerät
trennen
Bluetooth
Gerät
anschließen
Bluetooth
Gerät
suchen

27
Produkteinführung
Bluetooth-Einstellung
ASP
Betriebsanweisungen
Schalleffekteinstellung Gleichgewichtsanpassung
Schalten Sie diesen Stromschalter an, um Bluetooth zu aktivieren.
Schalten Sie diesen Schalter an, nachdem das Handy mit dem Auto Bluetooth
verbunden ist, wenn Ihr Handy für 5 Sekunden klingelt, wird es den Anruf automatisch
beantworten.
Wenn dieser Schalter eingeschaltet ist, beantwortet das Telefon automatisch den Anruf
nach dem Anschluss des Bluetooth des Autos und des Telefons.
Schalten Sie diesen Schalter ein, nachdem das Handy mit dem Bluetooth des Autos
verbunden ist und gleichzeitig den Bluetooth-Sharing-Netzwerkschalter auf dem Handy
einschalten, kann das Auto über das vom Handy geteilte Netzwerk auf das Internet
zugreifen. Siehe die detaillierten Einführungen zum Betriebsverfahren des mobilen
Terminals.
Restart BT power
Auto Answer
Auto Connect
Bluetooth net

28
Drahtlose Verbindung
1. Drücken Sie, um Zlink5 einzugeben, kann das Handy über Android USB und iPhone Wi-Fi an das
Fahrzeuginfotainment-Gerät angeschlossen werden.
2. Wireless Zlink5: I-phone verbindet die Autonavigation durch BT, klicken Sie auf Zlink5, um das
Pop-up-Dialogfeld einzugeben, und klicken Sie auf Zlink5 verwenden.
Zlink:(Verbindungsanweisungen für einige iOS-Handys)
1. Schalten Sie den BT des Handys ein, um den BT der Kopfeinheit anzuschließen. Nach dem BTconnection
des Autos erscheint automatisch die ZLink-Anschlussschnittstelle.
2. Bestätigen Sie die Verwendung von CarPlay auf Mobilgeräten.
3. Wenn die oben genannten Schritte nicht angeschlossen werden können, müssen Sie das Handy
WiFihotspot anschließen.
Produkteinführung
Klicken Sie auf CarPlay/Android Auto/Phone Link
Klicken Sie, um zwischen Carplay/Android Auto und Mirroring zu wechseln
Diese öffentliche Versionsbeschreibung richtet sich nach der tatsächlichen
Produktausstattung.
Warnung:
Die ANT-Schnittstelle ist eine dedizierte HF-Signalschnittstelle und darf nicht als Leistungseingangsanschluss
verwendet werden. Jede unbefugte Verbindung externer Stromquellen führt zu einer schweren
Verschlechterung des Signalsystems oder dauerhaften Hardwareschäden an der Ausrüstung. Alle Folgen und
Verluste, die sich aus solchen unbefugten Vorgängen ergeben, tragen der Nutzer selbst und sind nicht von
der Produktgarantie abgedeckt.
Wenn die Produktspannung unter 12V liegt, ist der Arbeitszustand nicht garantiert.
Allgemeine Fehlersuche-Anleitungen
FEHLER
CE
GRUNDE LÖSUNG
Kann nicht
eingeschaltet
werden
Sicherung
überprüfen
Einige Faktoren
Ursache MPU
falsch
Batterie wechseln
oder Sicherung
Nach der Zündung
abschalten, einstellen
Informatlonen verlieren
alle
Schlechte Leistung
des Radiosenders
Schwaches Signal
Wechseln Sie die Sicherung wie die alte
Maximaler Strom der Sicherung: 15A
Drücken Sie die RESET-Taste auf
dem Panel durchpenpoint,then,
power on
Informationen zurücksetzen
und speichern
Verschieben Sie das Auto zu einem
anderen Standort, dann Forschung
SchlieBen Sie die Lautsprecherkabel des Netzkabels nicht an die Autobatterie an.
Andernfalls wird das Gerät ernsthaft beschädigt.
VOR AnschlieBen der Lautsprecherkabel an die Lautsprecher,
Überprüfen Sie die Lautsprecherverkabelung in lhrem Auto.
Der maximale SAR-Wert beträgt 2W/kg, wenn das Gerät Omm nahe am Benutzer verwendet.
DIESES GERÄT STIMMT MIT TEIL 15 DER FCC-REGULIERUNGEN ÜBEREIN.
DER BETRIEB IST DER FOLGENDEN ZWEI BEDINGUNGEN GENEHMIGT:
1) DIE VORRICHTUNG DARF KEINE GEFAHRLICHEN STÖRUNGEN VERURSACHEN, UND
2) DIE VORRICHTUNG MUSS JEGEINE EMPFANGENE STÖRUNG AKZEPTIEREN,
EINSCHLIEßLICH STÖRUNG, DIE ZU UNBEWUNSCHTEN AUSLAUFSFOLGEN FÜHREN KANN
29

Produktgarantiekarte
Garantiefrist:
Dieses Produkt hat Anspruch auf 12 Monate kostenlosen Reparaturservice ab dem Wirkungsdatum des
Kaufs.
Warranty Scope:
Under the premise of complying with the usage regulations, any performance failure caused
by manufacturing defects of the product itself can enjoy free repair services.
Garantiebereich:
The following situations are not within the scope of warranty liability:
Folgende Situationen fallen nicht im Rahmen der Gewährleistungshaftung:
1. Schäden durch höhere Gewalt (wie Erdbeben, Brände, Überschwemmungen, Taifun usw.);
2. Fehlfunktionen durch unsachgemäße Verwendung, Wartung und Lagerung durch Verbraucher verursacht;
3. Schäden, die durch unbefugtes Personal verursacht werden, demontiert, repariert oder modifiziert ohne
Genehmigung unseres Unternehmens;
4. Das Garantiezertifikat entspricht nicht den Produktinformationen oder das Zertifikat wurde geändert oder
fehlt;
5. Das Produkt hat die vereinbarte Garantiefrist überschritten;
6. Aussehen Verschleiß und natürliche Alterung von Verbrauchsmaterialien durch normale Verwendung
verursacht.
Servicekanäle:
Wenn Sie technischen Support oder Garantiedienstleistungen benötigen, kontaktieren Sie uns bitte über die
folgenden Methoden:
Kundendienst Email: [email protected]
Service-Website: https://tianshi-digital.com
Wir empfehlen Ihnen, die Initiation von Serviceanfragen über den offiziellen Kunden zu priorisieren.
Service-Kanal der ursprünglichen Einkaufsplattform.
Kaufdatum Seriennummer
Produkt Modell Kontakt E-Mail
30
RST
Tensione di lavoro: 11V-16V
Corrente di lavoro: 0.8A-1.2A
Temperatura di lavoro: -20°C-+60°C
Temperatura di conservazione: -30°C-+80°C
Generale
Specificazione
Descrizione funzionale
1. Foro microfono incorporato
2. Reset (premere con un oggetto tagliente)
3. Long Press (2 secondi): Spegne lo schermo. / Clic: Spegne il suono.
Al menu principale4.
5. Torna all'interfaccia precedente
6. Aumentare il volume
7. Ridurre il volume
MIC
1
2
3
4
5
6
7
Italiano
31

1. Cavo di alimentazione
2. Ingresso/uscita RCA
3. Può autobus
4. Cavo USB x 2
5. Ingresso della fotocamera
6. Antenna GPS
7. Antenna radio
Diagramma dell'interfaccia posteriore
Si prega di controllare i seguenti accessori dopo aver
aperto il pacchetto.
Elenco degli accessori
Cavo di alimentazione x 1
Cavo 4P-USB x 1 Cavo 6P-USB x 1
Cavo di interfaccia
posteriore x 1
Antenna GPS × 1
20P-RCA Filo x 1
Vite di installazione x8
Manuale utente x 1
Suppor x 2 Camera posteriore x 1
Cavo della fotocamera
inversa x 1
Cavo di alimentazione
della camera x 1
32
Installazione
Segui la comunità Haudio. Un luogo dove condividere e discutere.
Rimani in contatto con gli utenti Haudio. Ottieni il video tutorial di installazione.
Installazione
5
1
1
2
4 5
3
USB
GPS
Ingresso della
fotocamera
Cavo di estensione
di 1,5 metri
Cavo di estensione
di 1,5 metri
Cavo di
alimentazione
della fotocamera
Porta di
alimentazione
Porta segnale
immagine
MIC
Linea fuori subwoofer
AVIN VIDEO
Linea fuori posteriore L
Linea fuori posteriore R
AVIN L
AVIN R
Linea fuori anteriore L
Linea fuori anteriore R
PWR CON
3
2
4
1
2
4
5
3
Frontale sinistra(+)
Dietro destra (-)
Frontale sinistra(-)
Dietro destra (+)
Frontale destra(+)
Posteriore sinistra (+)
Frontale destra (-)
Indietro sinistra(-)
Antenna di potenza (+)
Chiave del volante 1
Chiave del volante 2
Camera posteriore (+)
Dimmer/Lluminazione (+)
Accessori/Ignition(+)
Potenza costante/batteria (+)
Terreno del telaio (-)
33
Installazione
1. Preparare gli strumenti: 2. Rimuovere l'unità audio
originale del veicolo.
5. Dopo il cablaggio, avviare il veicolo
per verificare il normale accensione
dell'unità e il corretto funzionamento
della telecamera.
6. Montaggio completato.
Cablaggio della fotocamera posteriore
(opzionale)
Monitoraggio
1. Formato NTSC
2. PAL/NTSC Auto
Switch Ligh
3. Disconnettere il cablaggio
dell'unità principale originale.
4. Avvia il motore per verificare se il
sistema audio dell'auto e la
telecamera funzionano correttamente.
1.Monitor (non incluso nel pacchetto)
2.Camera fonte di alimentazione
3.Camera (facoltativo)
Collegare questo filo alla linea di inversione nel
cablaggio di alimentazione, cioè: Back (A6)
Rosso: collegarsi al polo positivo
della luce inversa
Linea di scateno inversa
Cavo di alimentazione
della fotocamera
Cavo video 26ft
Torna a GND
-
+
Cavo di luce inversa
Indietro (A6)
Video(out)
È possibile raggiungere l'alimentatore nel bagaglio
andando sotto la porta originale dell'auto, lungo il
bordo sopra la porta o lungo il cablaggio sul tetto.
1. Passa il cavo della telecamera attraverso lo scomparto
di stoccaggio e collegalo all'unità principale.
2. Nascondi il cavo del segnale della telecamera sotto
il bordo della porta e dirigilo verso l'ingresso del bagagliaio.
3. La fotocamera ottiene I'alimentazione dalle luci
posteriori del veicolo.
34
35
Introduzione del prodotto
Radio
Cerca
Radio
Durante la riproduzione della musica, scorrere la barra di progresso
della riproduzione per trascinare al nodo di riproduzione specificato.
Musica
Tocca
per
cercare
Tocca per
cercare
Attivare
disattivare
l'audio
Bande di
interruttore
Gamma
di
interruttori
Impostazioni
degli effetti
sonori
Successiva
canzone
Pausa Lista
musicale
Canzone
precedente
Modalità di
riproduzione
Impostazioni
degli effetti
sonori
36
Introduzione del prodotto
Video
Bluetooth
Video
successivo
Pausa Modalità di
riproduzione
Video
malvagio
Elenco dei
video
AUTO
Registro delle
chiamate
Elenco dei
dispositivi
Libro telefonicoTelefonica
Bluetooth
Impostazioni
Elimina i
dispositivi
accoppiati
Sconnettere il
dispositivo
Bluetooth
Collegare
dispositivo
Bluetooth
Cerca
dispositivo
Bluetooth

37
Introduzione del prodotto
Impostazione Bluetooth
ASP
Istruzioni operative.
Regolazione dell'effetto sonoro Regolazione dell'equilibrio
Attiva questo interruttore di alimentazione per abilitare Bluetooth.
Attiva questo interruttore, dopo che il telefono cellulare è collegato al Bluetooth dell'auto,
quando il telefono cellulare suona per 5 secondi, risponderà automaticamente alla
chiamata.
Quando questo interruttore è attivato, il telefono risponderà automaticamente alla
chiamata dopo aver collegato il Bluetooth dell'auto e del telefono.
Attivare questo interruttore, dopo che il telefono cellulare è collegato al Bluetooth dell'auto,
e attivare lo interruttore di rete di condivisione Bluetooth sul cellulare allo stesso tempo,
l'auto può accedere a Internet attraverso la rete condivisa dal cellulare. Fai riferimento
alle introduzioni dettagliate sul metodo di funzionamento del terminale mobile.
Restart BT power
Auto Answer
Auto Connect
Bluetooth net
38
Connessione wireless
1. Premere per inserire Zlink5, il telefono cellulare può essere collegato al dispositivo di infotainment
in-vehicle tramite Android USB e iPhone Wi-Fi.
2. Wireless Zlink5: I-phone collega la navigazione dell'auto attraverso BT, fare clic su Zlink5 per entrare nella
finestra di dialogo pop-up e fare clic su utilizzare Zlink5.
Zlink:(Istruzioni di connessione per alcuni telefoni cellulari iOS)
1. Accendere il BT del telefono cellulare per collegare il BT dell'unità di testa. Dopo la connessione BT
dell'auto, l'interfaccia di connessione ZLink apparirà automaticamente.
2. Conferma l'utilizzo di CarPlay sul cellulare.
3. Se i passaggi sopra non possono essere collegati, è necessario collegare il telefono cellulare WiFihotspot.
Introduzione del prodotto
Clicca sul collegamento CarPlay/Android Auto/Phone
Clicca per passare tra Carplay/Android Auto e Mirroring

Esta descripción de la versión pública está sujeta a la configuración real del producto.
Avvertimento:
L'interfaccia ANT è un'interfaccia di segnale RF dedicata e non deve essere utilizzata come porta di ingresso
di potenza.Qualsiasi connessione non autorizzata di fonti di alimentazione esterne comporterà un grave
degrado del sistema di segnale o danni permanenti all'apparecchiatura. tutte le conseguenze e le perdite
derivanti da tali Le operazioni non autorizzate sono a carico dell’utente stesso e non sono coperte dalla
garanzia del prodotto.
Se la tensione del prodotto è inferiore a 12V, le condizioni di lavoro non sono garantite.
Orientamenti comuni per la risoluzione dei problemi
FAULT
CE
REASON SOLUZIONE
Non si può
accendere
Controlla il fusibile
Alcuni fattori
causa MPU sbagliato
operazione
Cambiare la batteria
o fusione
Dopo le accensioni
con off, impostazione
tutte le informazioni perse
Pessimo rendimento
Stazione radioeof
Segnale debole
Cambia la fusibile come quella vecchia
Corrente massima dell'interruttore: 15A
Premere il pulsante RESET sul pannello
penpoint, poi, accendi la potenza
Reimposta le informazioni e salva
Sposta l'auto in un altro
posizione, la ricerca
Non collegare i conduttori dell’altoparlante del cavo di alimentazione alla batteria della
macchina;In caso contrario, l’unità sarà gravemente danneggiata.
Prima di collegare il cavo di alimentazione agli altoparlanti,
Controlla il cablaggio dell’altoparlante nella tua macchina.
Il valore massimo di SAR è di 2 w /kg quando il dispositivo è usato Omm vicino all’ utente.
Questo dispositivo è conforme alla parte 15 delle norme e dei regolamenti dell’fcc.
L’operazione è soggetta alle due condizioni seguenti:
1) il dispositivo non deve causare interferenze dannose, e
2) il dispositivo deve accettare qualsiasi interferenza ricevuta, ivi compresa
Interferenze che possono causare operazioni indesiderate
39

Carta di garanzia del prodotto
Período de garantía:
Este producto tiene derecho a 12 meses de servicio de reparación gratuito a partir de la fecha efectiva de
compra.
Ambito di applicazione della garanzia:
Sotto la premissa del rispetto delle normative di utilizzo, qualsiasi guasto di prestazione causato da difetti di
fabbricazione del prodotto stesso può beneficiare di servizi di riparazione gratuiti.
Clausula di esclusione di responsabilità:
Le seguenti situazioni non rientrano nell'ambito della garanzia:
1. danni causati da forza maggiore (come terremoti, incendi, inondazioni, tifoni, ecc.);
2. Malfunzioni causate da uso improprio, manutenzione e stoccaggio da parte dei consumatori;
3. danni causati da personale non autorizzato smontaggio, riparazione o modifica senza l'autorizzazione della
nostra società;
4. Il certificato di garanzia non corrisponde alle informazioni del prodotto o il certificato è stato modificato o
mancante;
5. Il prodotto ha superato il periodo di garanzia concordato;
6. L'usura dell'aspetto e l'invecchiamento naturale dei consumabili causati dal normale uso.
Canali di servizio:
Se avete bisogno di supporto tecnico o servizi di garanzia, contattateci tramite i seguenti metodi:
Servizio clienti Email: [email protected]
Sito web del servizio: https://tianshi-digital.com
Ti suggeriamo di dare la priorità all'avvio delle richieste di servizio tramite il cliente ufficiale
canale di servizio della piattaforma di acquisto originale.
Data di acquisto Numero di serie
Modello prodotto Contatto Email
40

RST
Voltaje de trabajo: 11V-16V
Corriente de trabajo: 0.8A-1.2A
Temperatura de trabajo: -20°C-+60°C
Temperatura de almacenamiento: -30 ° C - + 80 ° C
General
Especificación
Descripción funcional
1. Agujero de micrófono incorporado
2. Restablecer (presionar con un objeto afilado)
3. Presión prolongada (2 segundos): Apaga la pantalla. / Clic: Apaga el sonido.
Al menú principal4.
5. Volver a la interfaz anterior
6. Aumentar el volumen
7. Bajar el volumen
MIC
1
2
3
4
5
6
7
Español
41
1. Cable de alimentación
2. Entrada/salida RCA
3. CAN Bus
4. Cable USB x 2
5. Entrada de cámara
6. Antena GPS
7. Antena de radio
Diagrama de interfaz trasera
Compruebe los siguientes accesorios después de abrir el
paquete.
Lista de accesorios
Cable de alimentación x1
Cable 4P-USB x1 Cable 6P-USB x1
Cable de interfaz de vista
trasera x1
Antena GPS ×1
Cable de 20P-RCA x1
Tornillo de instalación x8 Manual del usuario x1
Soportes x 2 Cámara de vista trasera x1
Cable de cámara inversa x 1
Cable de alimentación de
la cámara x 1
42
Instalación
Sigue a la comunidad Haudio. Un lugar donde puedes compartir y discutir.
Manténgase en contacto con los usuarios de Haudio. Obtenga el video tutorial de
instalación.

Instalación
5
1
1
2
4 5
3
USB
GPS
Entrada de
cámara
Cable de
extensión
de 1.5 metros
Cable de
extensión
de 1.5 metros
Cable de
alimentación
de la cámara
Puerto de
alimentación
Puerto
de señal
de imagen
MIC
Subwoofer en línea
AVIN VIDEO
Salida trasera L
Salida trasera R
AVIN L
AVIN R
Línea de salida delantera L
Línea de salida delantera R
PWR CON
3
2
4
1
2
4
5
3
Frente a la izquierda (+)
Trasera derecha (-)
Frente a la izquierda (-)
Trasera derecha (+)
Frente a la derecha (+)
Trasera izquierda (+)
Frente a la derecha (-)
Trasera izquierda (-)
Antena de potencia (+)
Llave del volante 1
Llave del volante 2
Cámara trasera (+)
Dimmer/Lluminación (+)
Accesorio/Ignition(+)
Potencia constante/batería (+)
Chasis tierra (-)
43

Instalación
1. Preparar herramientas: 2. Retire la unidad de
infoentretenimiento original del
vehículo.
5. Después de conectar los cables,
encienda el vehículo para verificar
el encendido normal de la unidad
y el funcionamiento adecuado de la
cámara.
6. El ensamblaje está completado.
Cableado de cámara de vista trasera
(opcional)
Monitor
1. FORMATO NTSC
2. PAL / NTSC Auto
Interruptor Ligh
3. Desconecta el cableado de
la unidad principal original.
4. Arranca el motor para verificar si
el radio del coche y la cámara
funcionan correctamente.
1.Monitor (no incluido en el paquete)
Fuente de alimentación 2.Camera
3.Camera (opcional)
Conecte este cable a la línea de inversión en el
arnés de alimentación, es decir: Back(A6)
Rojo: Conecte al polo
positivo de la luz inversa
Invertir la línea de gatillo
Cable de alimentación
de cámara
Cable de vídeo 26ft
Volver a GND
-
+
Cable de luz inversa
Atrás(A6)
Video(out)
Puede llegar a la fuente de alimentación en el maletero
pasando por debajo de la puerta original del coche, a lo
largo del borde por encima de la puerta, o a lo largo del
cableado en el techo.
1.Pasa el arnés de cables de la cámara por el
compartimento de almacenamiento y conéctalo a la
unidad principal.
2. Oculta el cable de señal de la cámara bajo el borde de
la puerta y guíalo hacia la entrada del maletero.
3. La camara obtiene energia de las luces
traseras del vehiculo.
44
45
Introducción del producto
Radio
Buscar
Radio
Durante la reproducción de música, desliza la barra de progreso
de reproducción para arrastrar al nodo de reproducción especificado.
Música
Toque
para
buscar
Toque para
buscar abajo
Activar
apagar
el audio
Bandas de
conmutación
Gama de
interruptores
Configuración
de efectos
de sonido
Siguiente
canción
Pausa Lista de
música
Canción
anterior
Modo de
reproducción
Configuración
de efectos
de sonido

46
Vídeo
Bluetooth
Siguiente
video
Pausa Modo de
reproducción
Vídeo
Evioso
Lista de
vídeos
AUTO
Registro de
llamadas
Lista de
dispositivos
Libro telefónicoComunicación
telefónica
Bluetooth
Configuración
Eliminar los
dispositivos
emparejados
Desconectar
dispositivo
Bluetooth
Conectar
dispositivo
Bluetooth
Buscando
un dispositivo
Bluetooth
Introducción del producto
47
Introducción del producto
Configuración de Bluetooth
ASP
Instrucciones de funcionamiento.
Ajuste del efecto de sonido
Ajuste del equilibrio
Enciende este interruptor de alimentación para habilitar Bluetooth.
Enciende este interruptor, después de que el teléfono móvil esté conectado al Bluetooth
del coche, cuando su teléfono móvil suene durante 5 segundos, responderá
automáticamente a la llamada.
Cuando este interruptor está encendido, el teléfono responderá automáticamente a la
llamada después de conectar el Bluetooth del coche y el teléfono.
Enciende este interruptor, después de que el teléfono móvil esté conectado al Bluetooth
del coche, y encienda el interruptor de red de compartir Bluetooth en el móvil al mismo
tiempo, el coche puede acceder a Internet a través de la red compartida por el móvil.
Consulte las introducciones detalladas sobre el método de operación del terminal móvil.
Restart BT power
Auto Answer
Auto Connect
Bluetooth net
48
Conexión inalámbrica
1. Presione para entrar en Zlink5, el teléfono móvil se puede conectar al dispositivo de información en el
vehículo a través de Android USB y iPhone Wi-Fi.
2. Zlink5 inalámbrico: el teléfono I conecta la navegación del coche a través de BT, haga clic en Zlink5 para
entrar en el cuadro de diálogo emergente y haga clic en usar Zlink5.
Zlink:(Instrucciones de conexión para algunos teléfonos móviles iOS)
1. Enciende el BT del teléfono móvil para conectar el BT de la unidad de cabeza. Después de la conexión
BT del coche, la interfaz de conexión ZLink aparecerá automáticamente.
2. Confirme el uso de CarPlay en móvil.
3. Si los pasos anteriores no se pueden conectar, necesita conectar el WiFihotspot del teléfono móvil.
Introducción del producto
Haga clic en el enlace CarPlay/Android Auto/Phone
Haga clic para cambiar entre Carplay/Android Auto y Espejo
Esta descripción de la versión pública está sujeta a la configuración real del producto.
Advertencia:
La interfaz ANT es una interfaz de señal RF dedicada y no debe usarse como puerto de entrada de potencia.
Cualquier conexión no autorizada de fuentes de energía externas dará lugar a una grave degradación del
sistema de señal. o daños permanentes al equipo. Todas las consecuencias y pérdidas derivadas de tales
Las operaciones no autorizadas serán soportadas por el propio usuario y no están cubiertas por la garantía
del producto.
Si el voltaje del producto es inferior a 12V, no se garantiza la condición de trabajo.
Directrices comunes de solución de problemas
FAULTO
CE
RAZÓN SOLUCIÓN
No se puede encender
Compruebe el fusible
Algunos factores
causa MPU sbagliato
operación
Cambiar batería
o fusible
Después de las igniciones
con apagado, ajuste
toda la información pierde
Pobre rendimiento
estación de radio eof
Señal débil
Cambiar fusible igual que el antiguo
Corriente máxima del fusible: 15A
Pulse el botón RESET en el panel por
penpoint, entonces, potencia encendida
Restablecer la información y guardar
Mover el coche a otro
ubicación, luego investigación
No conectar los conductores del altavoz del cable de alimentación a la batería de la
máquina; De lo contrario, la unidad será gravemente dañada.
Antes de conectar el cable de alimentación a los altavoces,
Controle el cableado del altavoz en su máquina.
El valor máximo de SAR es de 0,712W/kg cuando el dispositivo utilizó Omm cerca del usuario.
Este dispositivo cumple con la parte 15 de las normas y reglamentos de la FCC.
La operación está sujeta a las dos condiciones siguientes:
1) el dispositivo no debe causar interferencias dañinas, y
2) el dispositivo debe aceptar cualquier interferencia recibida, incluyendo
Interferencias que pueden causar operaciones no deseadas
49

Tarjeta de garantía del producto
Período de garantía:
Este producto tiene derecho a 12 meses de servicio de reparación gratuito a partir de la fecha efectiva de
compra.
Ámbito de la garantía:
UBajo la premisa de cumplir con las normas de uso, cualquier falla de rendimiento causada por defectos de
fabricación del propio producto puede disfrutar de servicios de reparación gratuitos.
Disclaimer Clause:
Las siguientes situaciones no están dentro del ámbito de responsabilidad de la garantía:
1. Daños causados por fuerza mayor (como terremotos, incendios, inundaciones, tifones, etc.);
2. Malfunciones causadas por el uso inadecuado, mantenimiento y almacenamiento por los consumidores;
3. Daños causados por personal no autorizado desmontar, reparar o modificar sin la autorización de nuestra
empresa;
4. El certificado de garantía no coincide con la información del producto o el certificado se ha alterado o falta;
5. El producto ha superado el período de garantía acordado;
6. Desgaste de apariencia y envejecimiento natural de los consumibles causados por el uso normal.
Canales de servicio:
Si necesita soporte técnico o servicios de garantía, póngase en contacto con nosotros a través de los
siguientes métodos:
Correo electrónico de servicio al cliente: [email protected]
Sitio web de servicio: https://tianshi-digital.com
Le sugerimos que priorice la iniciación de solicitudes de servicio a través del cliente oficial.
canal de servicio de la plataforma de compra original.
Fecha de compra Número de serie
Modelo de producto Contacto Email
50

51


26DSH0004-IM-V1.1
CVD1661-AJ
Haudio
130*185mm,56P
陈大夫
张欢
封面彩色印刷过光油,内页彩色印刷,骑马钉册子
2026.03.11
V1.1