HUMIDIFIER
USER MANUAL
Item #1013989389
Model #VK-8529A
We appreciate the trust and condence you have placed in Vissani through the purchase of this humidier.
We strive to continually create quality products designed to enhance your home. Visit us online to see our full
line of products available for your home improvement needs. Thank you for choosing Vissani!
THANK YOU
Questions, problems, missing parts? Before returning to the store,
call Vissani Customer Service
9 a.m. – 7 p.m., EST, Monday-Friday, 9 a.m. – 6 p.m., EST, Saturday
1-855-VISSANI (1-855-847-7264)
HOMEDEPOT.COM

Table of Contents
Safety Information
2
Only use the humidier as described in this manual.
Place the humidier and adapter properly so that it will not be knocked over.
Do not place humidier near to large pieces of furniture or in high-trafc areas.
Turn off humidier if do not use it. And disconnect from power by removing the plug from the outlet.
Do not use the humidier in wet environments.
Keep the humidier away from children.
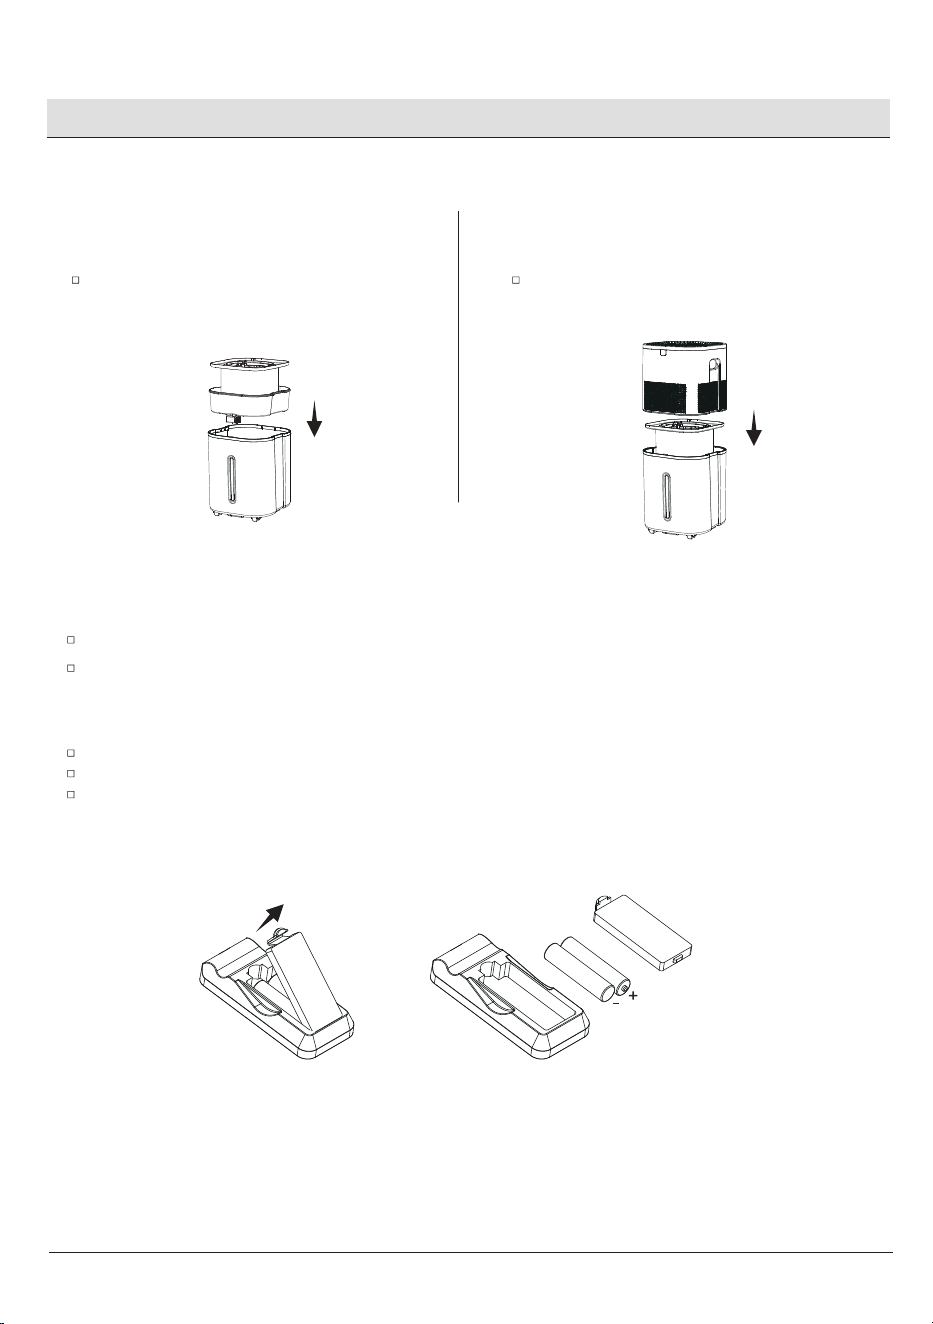
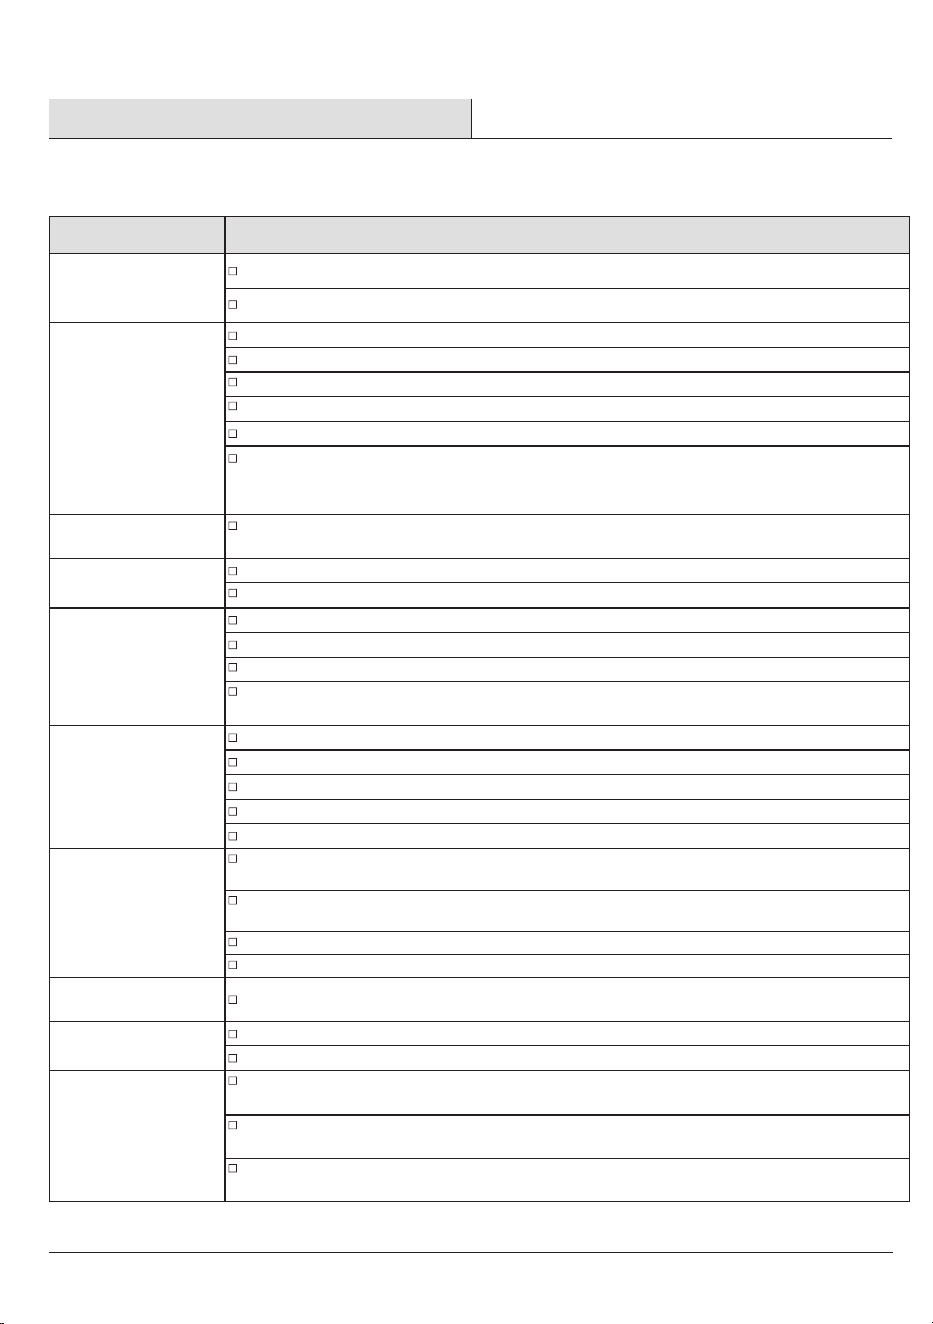
Do not disassemble the humidier top or remove the water pump for self-servicing.
Always unplug your humidier from the power outlet before cleaning your humidier or detaching the humidier top
from water tank.
Always make sure to place the humidier on a at area before operation.
Only ll the water tank with clean water. Never ll the water tank with any other liquids.
Do not place the humidier near to heat source, such as stovetops, ovens or radiators.
Do not use other items as replacement parts for this product.
Do not cover the air outlet while the humidier is working, otherwise, it may damage the humidier.
Do not ll water from air outlet, it may damage the humidier.
Do not immerse the humidier top, power cord or plug in water.
If the humidier is damaged or is not functioning properly, stop using it and contact Customer Service immediately
(see page 1).
Children should not clean or perform maintenance on the humidier without supervision. Supervise children when
they are near to the humidier.
Children should be supervised to ensure that they do not frolic with the humidier.
This humidier should not to be used by persons (including children) with reduced physical, sensory or mental
capacities or lack of experience and knowledge, unless they have been given supervision or instruction concerning
the use of the appliance by a person responsible for the safety.
READ AND SAVE THESE INSTRUCTIONS
GENERAL SAFETY
Different types of batteries or new and used batteries are not to be mixed.
BATTERY
Safety Information .......................................................
General Safety .........................................................
Battery......................................................................
Power Adapter and Power Cord ...............................
Warranty ......................................................................
What Is Covered .....................................................
What Is Not Covered ...............................................
Specifications ..............................................................
Specications .........................................................
Package Contents ....................................................
Parts Description ....................................................
Operation .....................................................................
Control Panel Introduction ......................................
Remote Control Introduction...................................
Getting Started .......................................................
Filling & Relling.....................................................
Using The Aroma Tray .............................................
Change The Filter ..................................................
Assembling Casters ...............................................
Care and Maintenance ................................................
Cleaning .................................................................
Cleaing The Aroma Pad ...........................................
Reassembling ..........................................................
Storing .....................................................................
Replacing The Remote Control Battey ....................
Trouble Shooting .........................................................
Safety Information (continued)
3
HOMEDEPOT.COM
Please contact 1-855-VISSANI (1-855-847-7264) for further.
Warranty
WHAT IS COVERED
Contact the Customer Service Team at 1-855-VISSANI (1-855-847-7264) or visit www.homedepot.com.
This product is warranted for two year from the date of purchase (24 months, 730 days). The warranty is limited to
defects in the materials of the product and manufacturing defects.
WHAT IS NOT COVERED
This product has exceeded the "24-month warranty".
Failure to provide valid purchase receipts; or altered valid purchase receipts without authorization; or the model and
serial numbers of the product in receipt do not match the actual product.
The label or serial number of the product is damaged or has been tampered, or the identity of this product cannot be
proved effectively.
Unexpected factors, improper use or other human factors (including water ingress, moisture, fall down, user
operation errors, transportation, bumps, etc.) caused a defect or damage; failure or damage caused by natural
disasters and force majeure and so on (such as earthquakes, res, etc.)
Disassembled, retted or repaired by user or an unauthorized third party.
Not following the instructions in this manual, or damage caused by not using the original parts of the product.
The purchaser has clearly been informed that the product is a disposed product, or samples that serve as
commercial listings, or products that have been subjected to performance overload tests.
Wear of any part, or damage to plastics and other accessories.
□
□
□
□
□
□
□
□
Not for commercial use. Household use only.
Turn off the humidier before removingthe adapter from the outlet.
To unplug, grab the adapter and pull from the outlet. Never pull from the power cord.
Do not grab the power adapter and power cord with wet hands. Keep the power adapter and power cord away
from liquids.
keep the humidier near the outlet when it is plugged into. Using extensions cord is not recommended.
This is a safety feature to reduce the risk of electric shock.
If the adapter plug does not t, reverse the plug. If it still does not t, do not use the plug in that outlet.
Do not bypass this safety feature.
Please use the original adapter only; do not use any other adapters. If other adapters are used, the machine will
not work or even be damaged.
If the power adapter and power cord is damaged, please unplug it and contact Customer Service (see page 1).
Unplugging the power adapter will disable remote control of the humidier.
Do not add essential oils, other treatment liquids, or water lters into the water tank or lter. This will damage
the humidier. Only add essential oils to the aroma pad.
POWER ADAPTER AND POWER CORD
Do not mix alkaline, standard (carbon-zinc), or rechargeable batteries.
Alkaline batteries are recommended.Use only the specied voltage.
Insert batteries using the correct polarity. Always use, replace, and recharge (if applicable) batteries under adult
supervision.
Do not short-circuit the battery supply terminals.
Do not dispose of batteries in re, batteries may explode or leak.
Remove batteries before storing.
Exhausted batteries are to be removed from the appliance and safely disposed off.
Warranty (continued)
4
SPECIFICATIONS
All air freight and transportation costs are not covered by the warranty and must be undertaken by the customer.
In any case, the company or its authorized distributors will not grant any guarantee on time if it is beyond the control,
or any special or indirect damage occurs, the company or its authorized distributors will not be responsible for it.
In addition to the above-mentioned clear warranty provisions, the company is not required to assume other forms of
warranty responsibilities.
Contact the Customer Service Team at 1-855-VISSANI (1-855-847-7264) or visit www.homedepot.com.
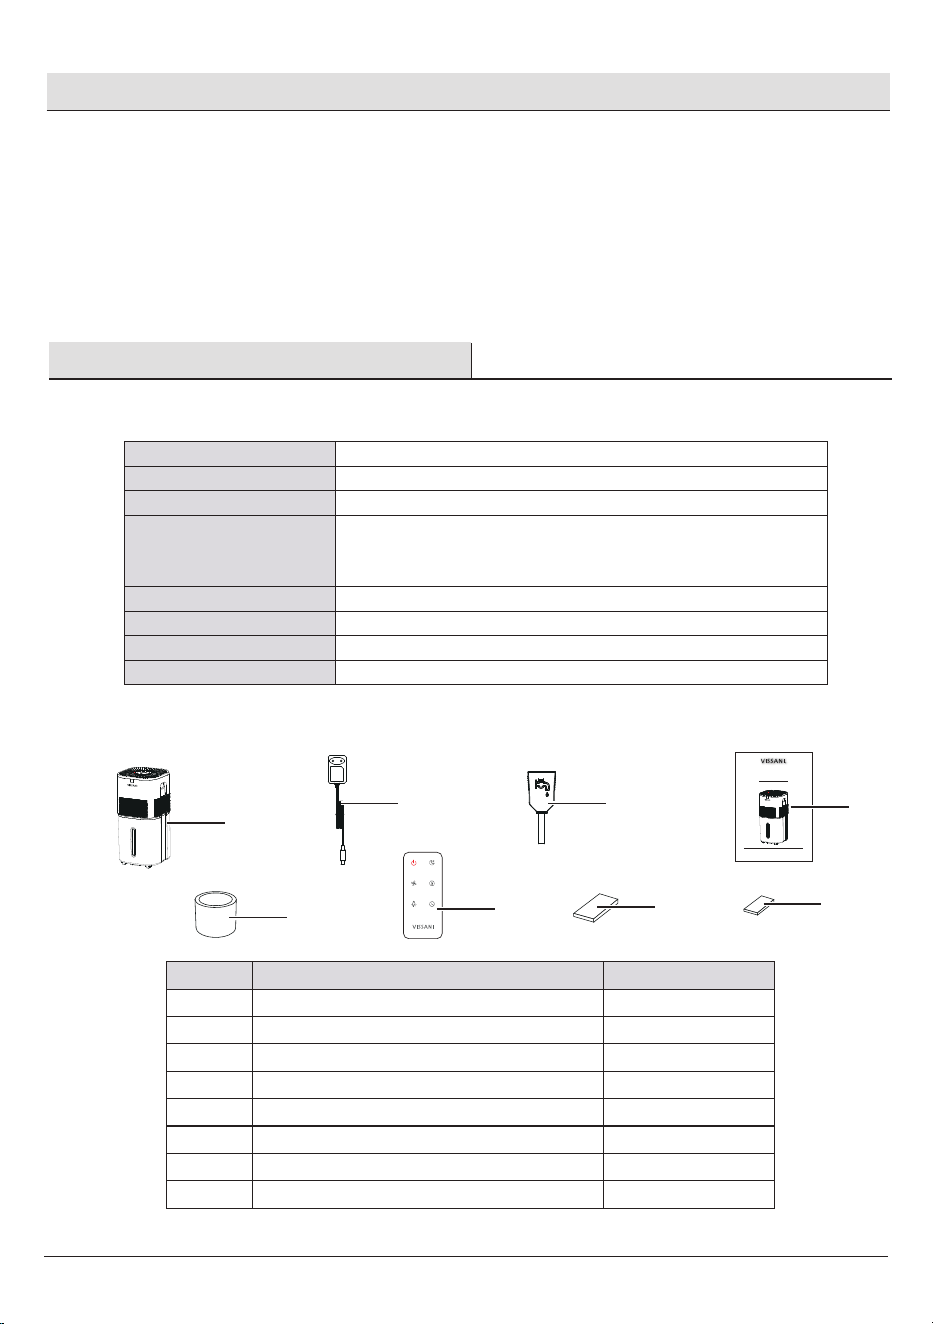
PACKAGE CONTENTS
A
B
F
G
HUMIDIFIER
USER MANUAL
C E
D
H
Item Quantity
Humidier
Filter
Power Adapter
Remote Control
Water Filling Tube
A
B
C
D
E
1
1
1
1
1
Aroma Pad
User Manual
F
G
4
1
Water Pump SpongeH 5
Part
Specications
Power Supply
Rated Power
Water Tank Capacity
Max Runtime
Noise Level
COVERAGE
Dimensions
Weight
DC 24V-1.5A
30W
6Gallon/22.7L
Up to 70 hours on low mist setting Note: The humidier may run for a
longer or shorter time depending on the environmental temperature
and humidity.
≤50dB(High set), ≤28dB(sleep mode)
2010 ft²/187㎡
12.8in W x12.8in D x 26.4in H/ 32.5cm AN x 32.5cm PR x 67cm AL
11.57lbs /5.25kg
Pre-Installation (continued)
5
HOMEDEPOT.COM
Please contact 1-855-VISSANI (1-855-847-7264) for further.
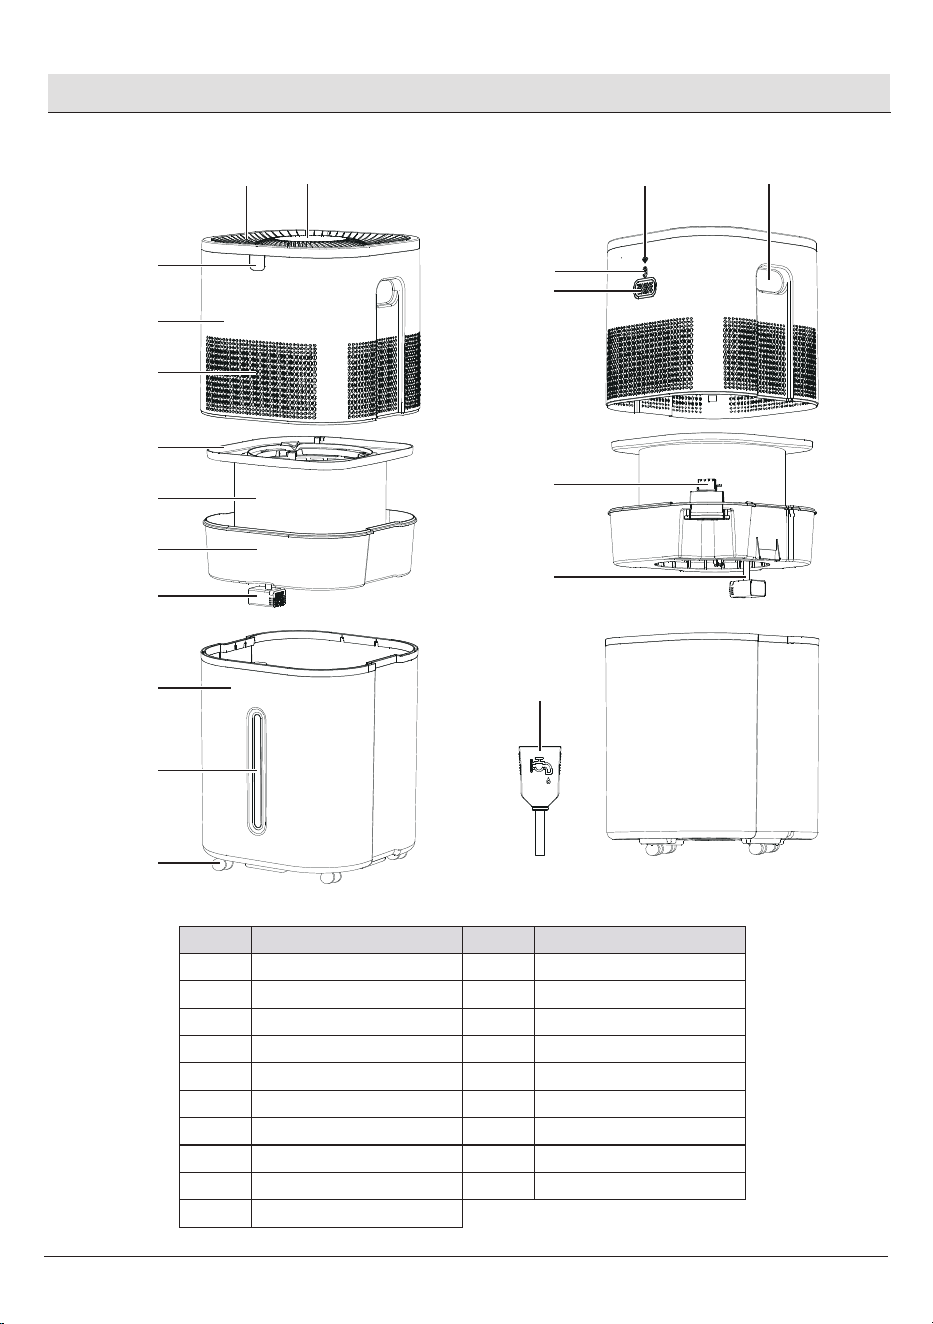
PARTS DESCRIPTION
1
2
3
4
5
6
7
8
9
10
11
12
13
14
15
16
17
18
19
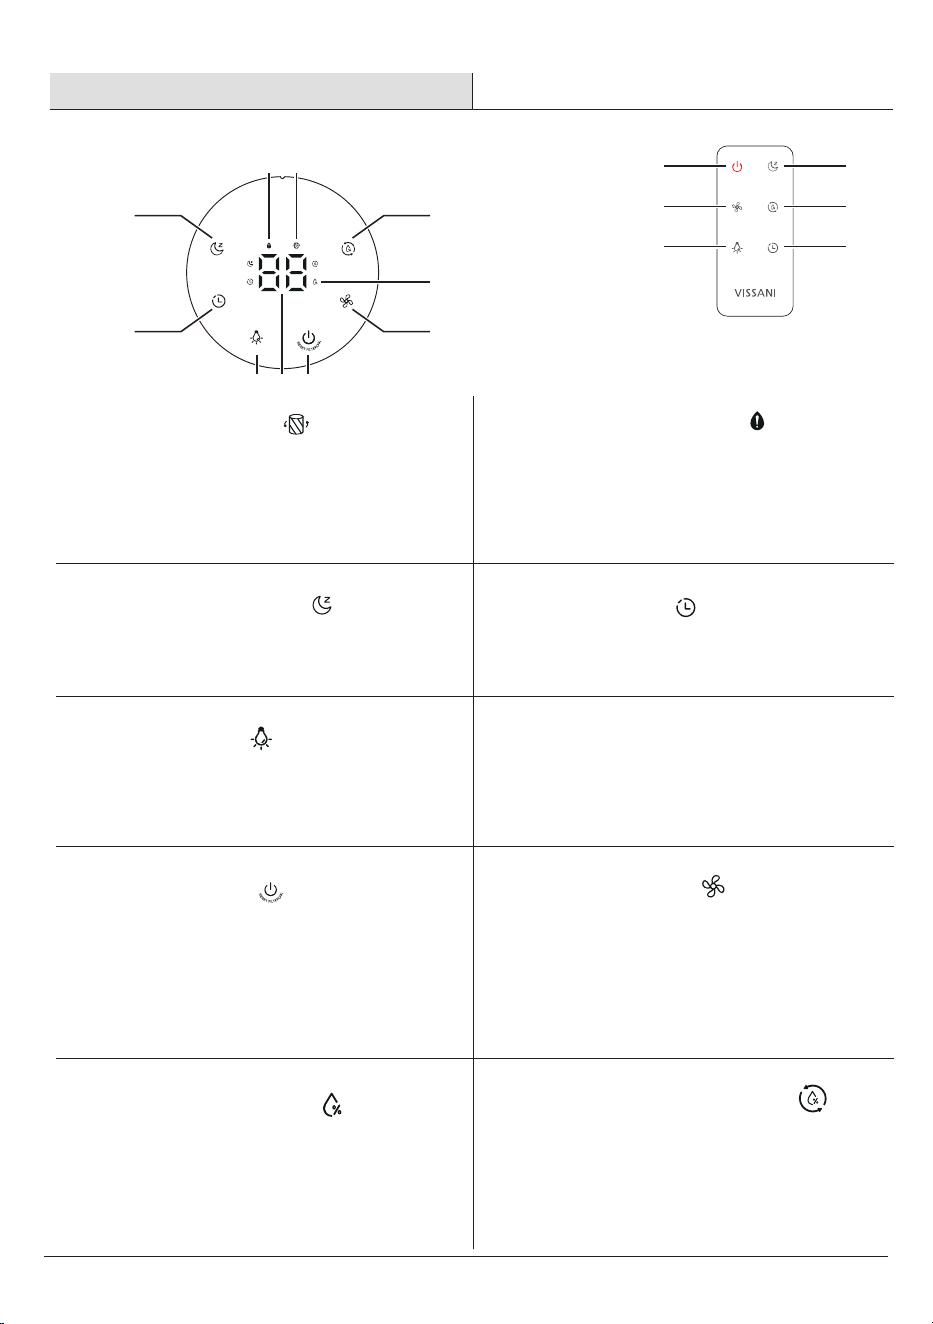
Control Panel
Air Outlet
Remote Receive Window
Humidier Top
Air Inlet
Drip Tray
Filter
Filter Bracket
Pump
Water Tank
Water Level Window
Wheel
Handle
Humidity Sensor
DC Connector
Aroma Tray
Coupler
Pump Tube
Water Filling Tube
Part Item Part Item
12
11
10
9
8
7
6
5
4
3
1
2
19
18
17
16
15
13
14
Operation
6
When drying the lter, the lter indicator is steady
on. When the lter's lifespan is reached, the
indicator light will ash to remind user to replace
the lter.
A
Filter Indicator
□ □
When the water level is low the red light will
ash for 30 mins and then power off if no
water is added.
B
Low Water Indicator
Tap to turn Sleep Mode on/off.
C
Sleep Mode Button
□
C
CONTROL PANEL INTRODUCTION REMOTE CONTROL INTRODUCTION
D
D
J
Function on remote control buttons are
same as the control panel.
E G
G
H
J
I
H
C
E
F
B A
□
Tap repeatedly to cycle through timer setting:
0 - 14 hours, add time by 2 hours each touch.
D
Timer Button
Tap to turn the all light off /return to current display.
E
Light Button
□
Tap to turn the humidier on/off. When turn off the
humidier, drying mode is auto on. Tap one more
time, cancel the drying mode and turn off the
humidier.
Press power button for 3s to reset the lter lifespan
timing.
G
Power Button
□
□
□
When set the mist level or the timer, the digital
display show the mist level or time level, then turn
back to show humidity level after 3s not setting.
F
Digital Display
□
Tap repeatedly to cycle through Fan speed level
settings: 01 – 02 - 03.
H
Fan Speed Level
Shows the humidity percentage level
I
Humidity Indicator
□
Tap repeatedly to cycle through the humidity
setting: 50% (default) > 60% > 70% > 80% >
30% > 40% >50%.
J
Humidity Setting Button
□
7
HOMEDEPOT.COM
Please contact 1-855-VISSANI (1-855-847-7264) for further.
Operation (continued)
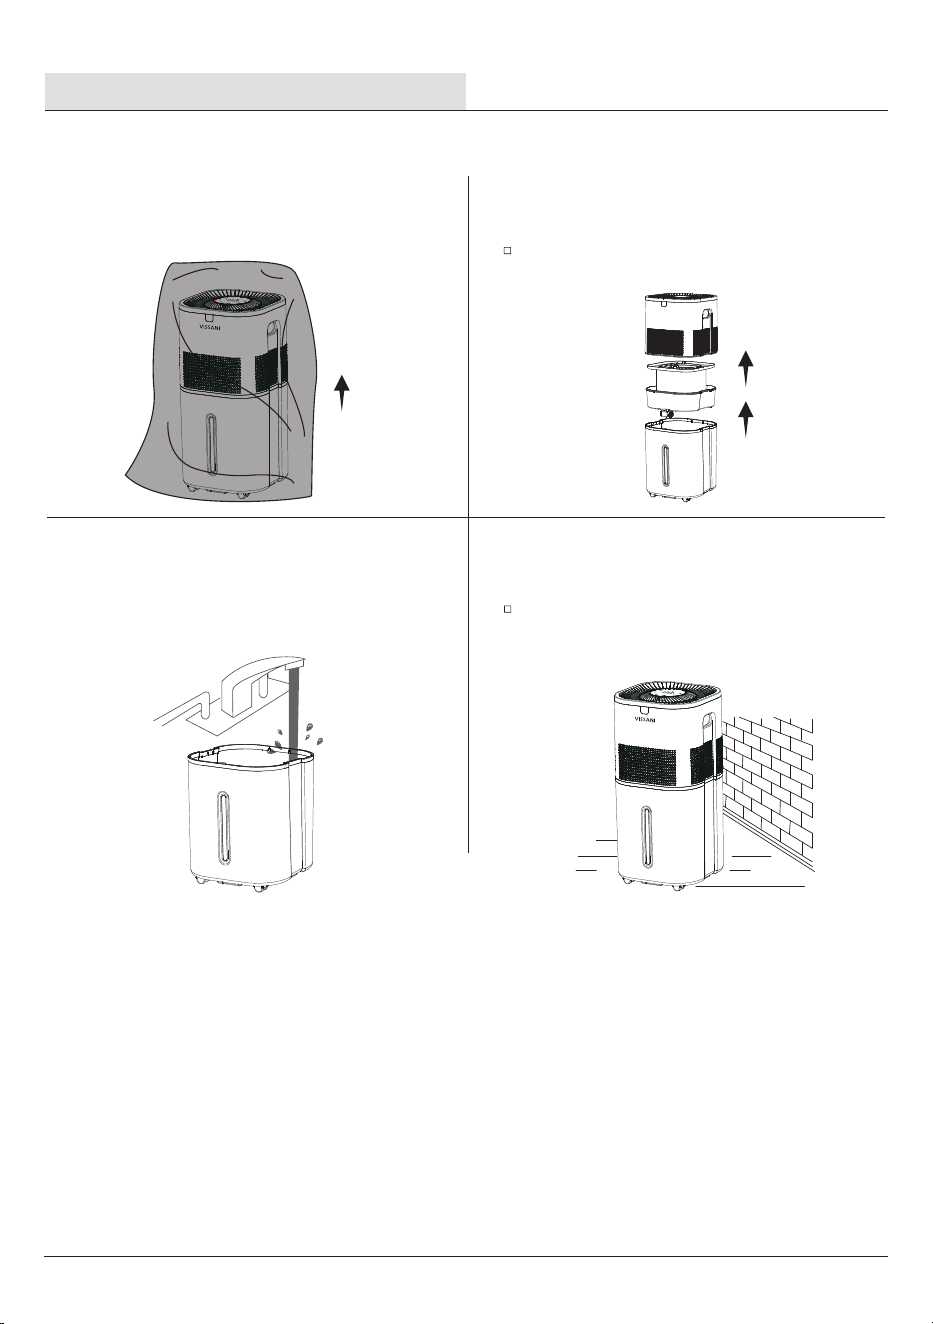
GETTING STARTED
1 Remove all packaging
2 Remove all packaging
Remove all tape and take the humidier top off ,
and take the lter bracket out of the water tank.
3
Clean the water tank before first
use.
4 Choose a flat location
Choose a stable, at surface for the humidier at
least 12 inches /30 cm away from any walls for
accurate humidity measurements. The surface must
be water-resistant.
12in/
30cm
8
NOTE: We recommend using puried or
distilled water to ll the tank.
NOTE: Do not ll past the tank's max
waterline.
NOTE: Do not add water directly through
air outlet .
NOTE: Do not add essential oils into the
water tank.
NOTE: Only add essential oils to the aroma
pad.
NOTE: Do not use water treatment liquids
in this humidlier.
NOTE: Suggest to put lter and lter
bracket near sink.
Operation (continued)
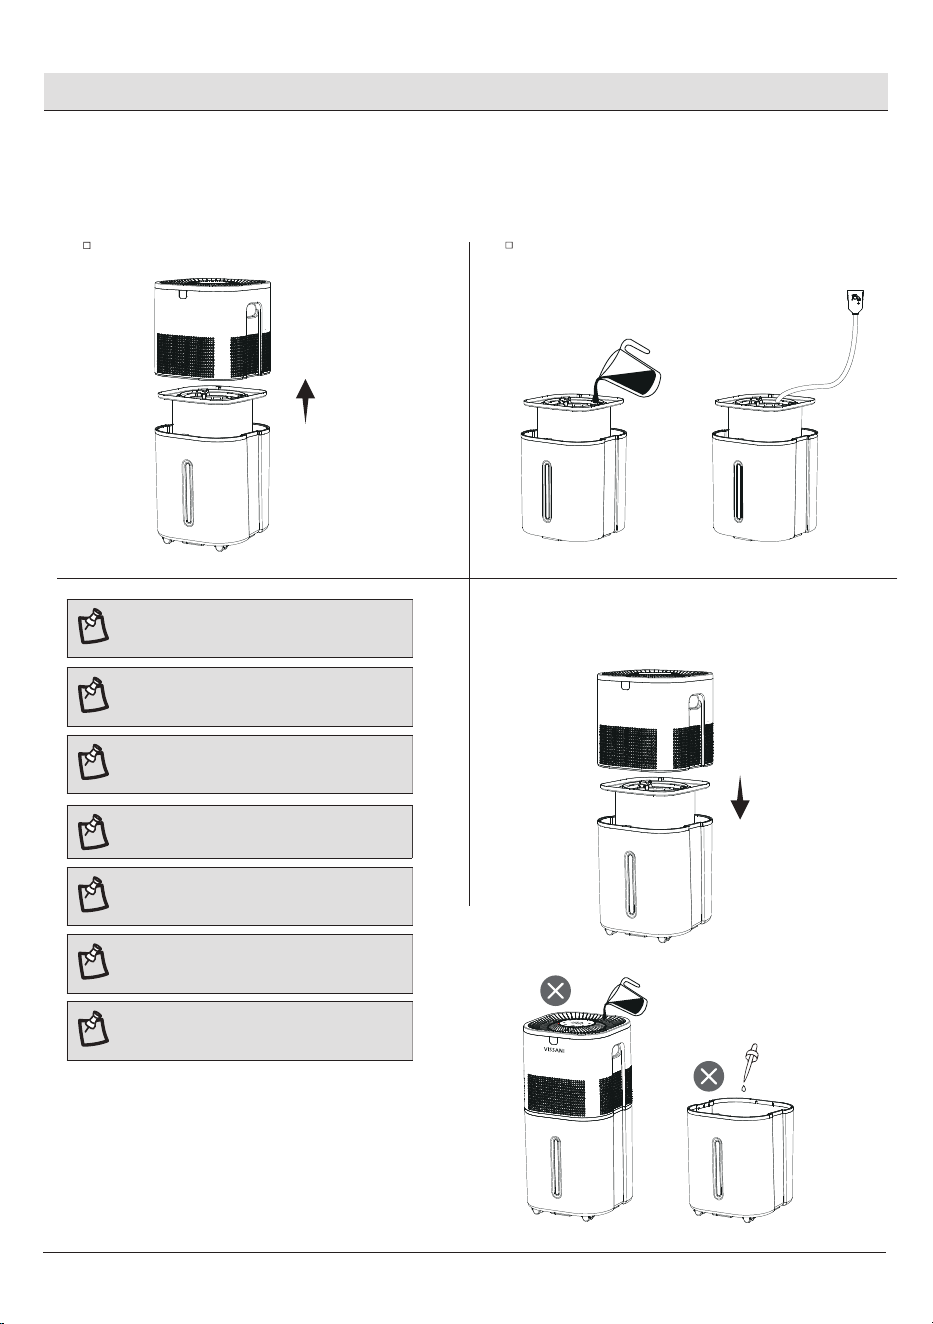
FILLING & REFILLING
1Open the tank cover
2 Fill water
Fill the tank with faucet directly. If the faucet is too
far away from the humidier, use the water lling
tube to ll the tank.
Remove humidier top from the tank.
3Place humidier top on the tank.
HOMEDEPOT.COM
Please contact 1-855-VISSANI (1-855-847-7264) for further.
Operation (continued)
9
USING THE AROMA TRAY
1Open the aroma tray
2 Adding aroma
Put 8-10 drops of essential oil on the aroma pad.Push the aroma tray at the back of the base and
pull it out.
3 Close the aroma tray
4 Start the humidifier
Turn on the humidier. The humidier will
automatically diffuse aroma when used.
Place the aroma tray into the humidier.
Your humidier can be used for aromatherapy
NOTE: Do not add essential oils,water
treatment liquids into the water tank.
NOTE: Only add essential olls to the
aroma pad.
NOTE: The aroma pads can be cleaned
and reused after diffusing essential oils.
NOTE: The aroma is intended to be light.
This humidier is not an aroma diffuser.
NOTE: Plug in the humidier.Tap Power
Button to turn your humidier on.
10
Operation (continued)
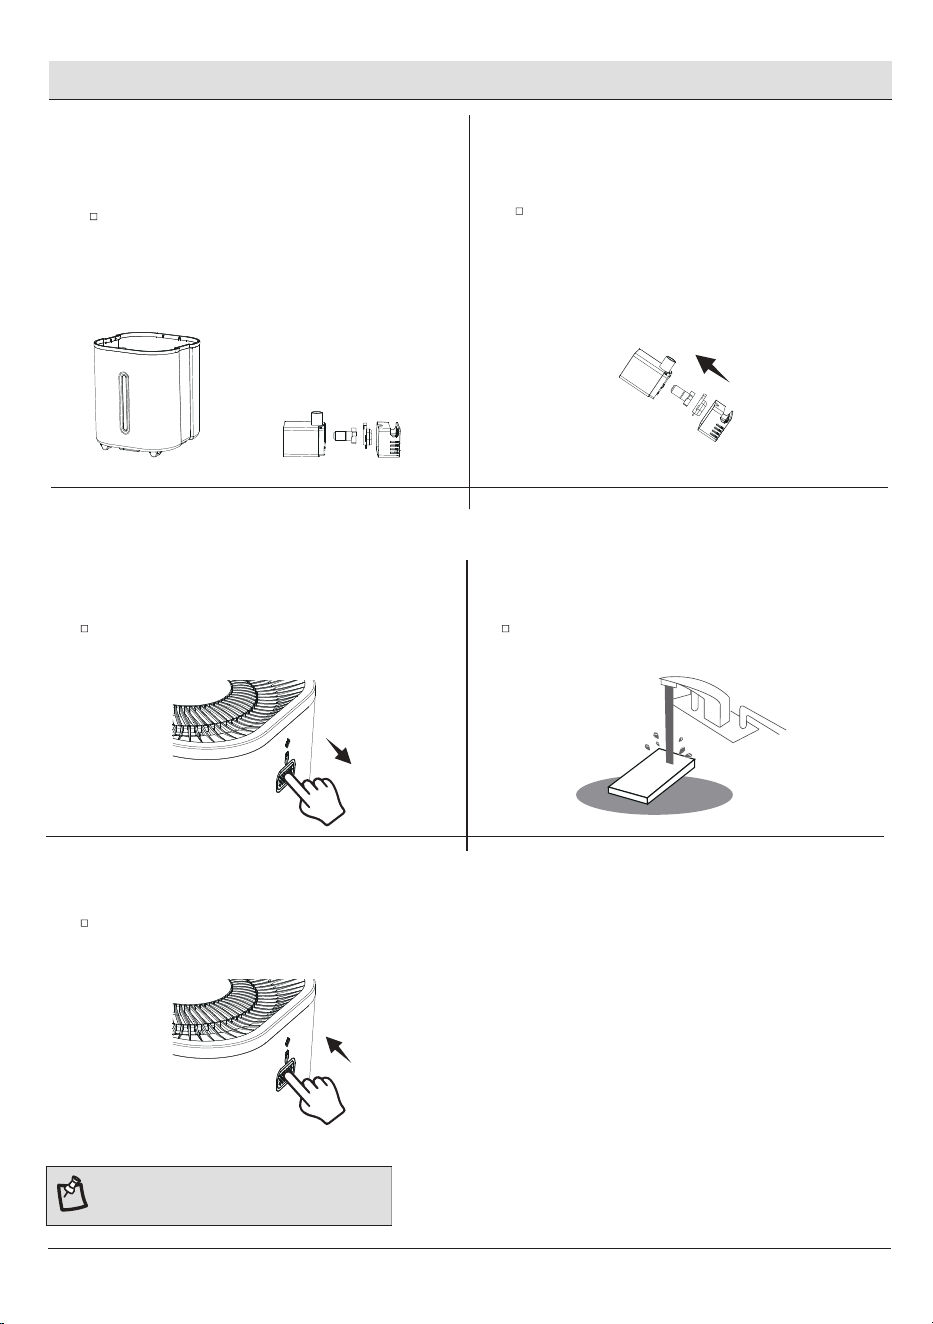
CHANGING THE FILTER
1Turn off the humidifier
2 Rotary Unlocking
Rotate the water drip tray clockwise, triangle mark
align to unlock position.
Turn off the humidier, remove the humidier
top from the tank.
3
Change a new filter
4 Rotary lock
Place the water drip tray on the lter brackect and
rotate it anticlockwise, triangle mark align to lock
position.
Remove the water drip tray off from lter bracket.
Remove the lter from the lter bracket,change a
new lter.
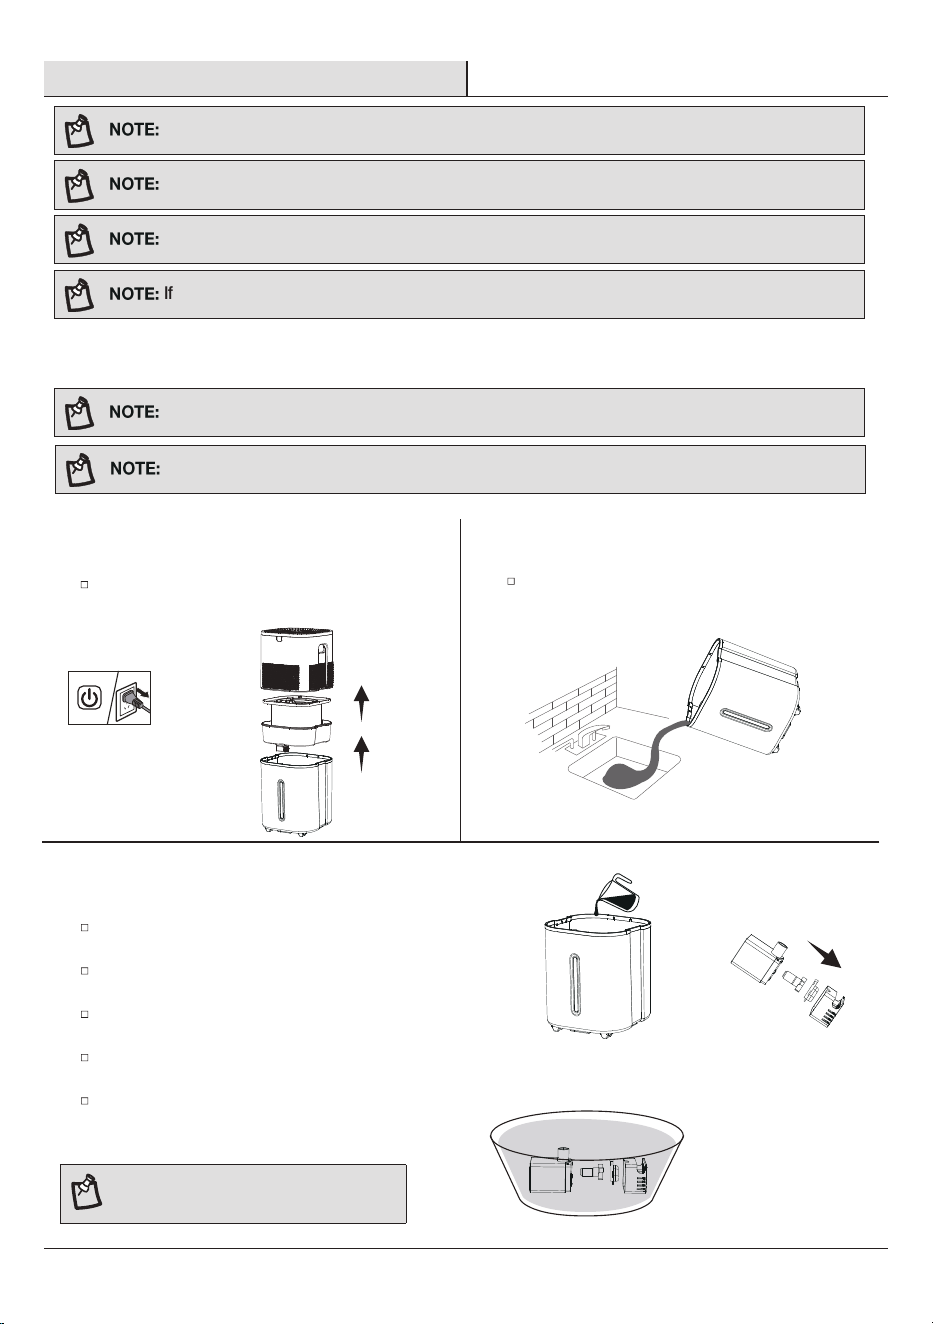
ASSEMBLING CASTERS
1Remove casters
2 Assemble casters
Turn the water tank upside down, press casters into
the holes one by one.
Turn the water tank upside down, pull out
casters from the holes.
Replace lter with Best Air H75 found on homedepot.com.
HOMEDEPOT.COM
Please contact 1-855-VISSANI (1-855-847-7264) for further.
Care & Maintenance
11
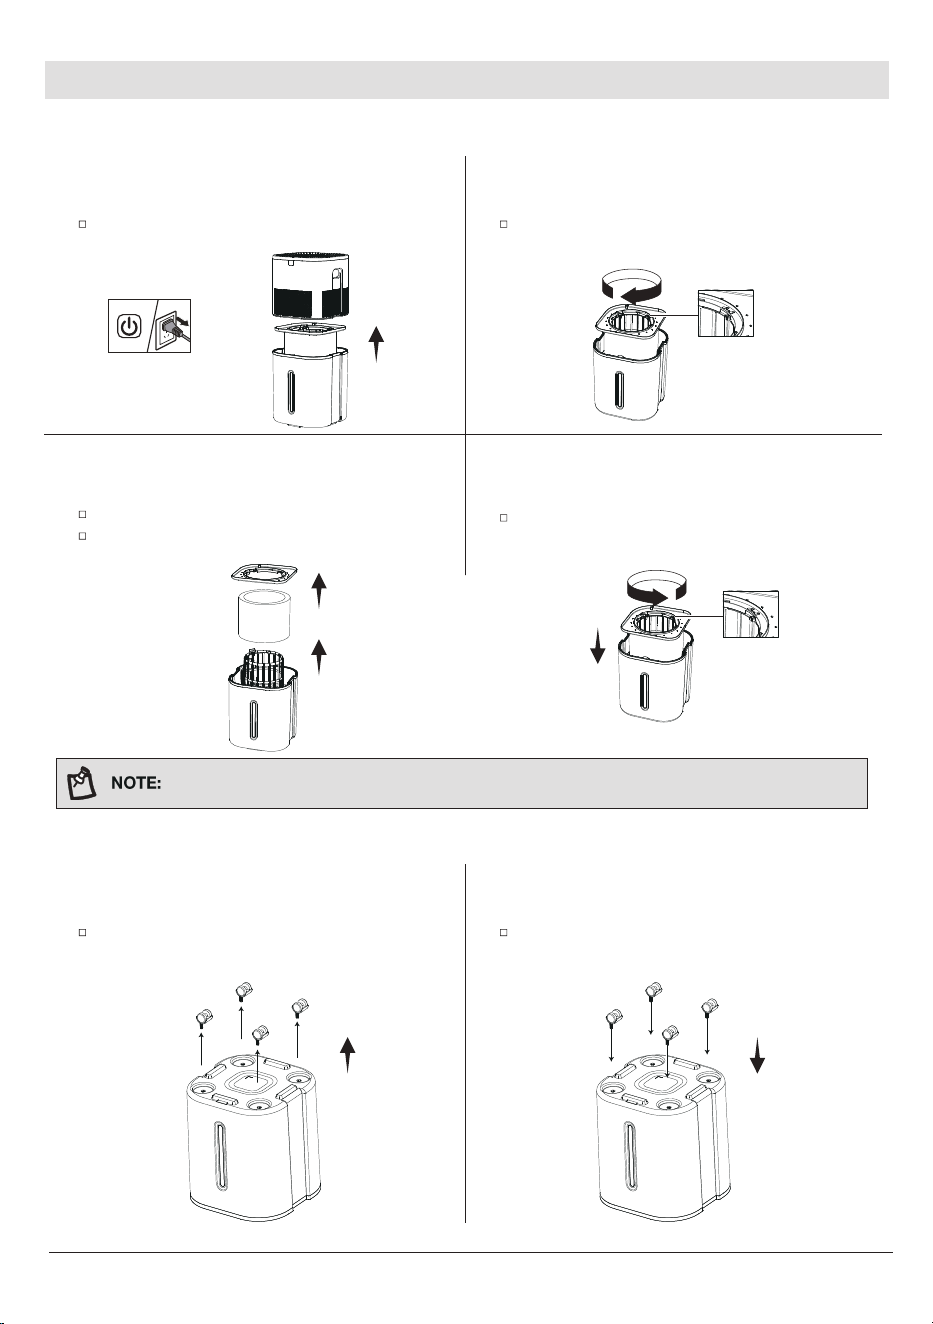
1 Turning off
2 Rinse the water tank
Rinse the water tank,then pour out any water from
the tank .
Unplug the humidier, remove the humidier
top and lter bracket from the water tank.
3
To descale the humidifier
Fill the tank with 3 US cups /710 mL of distilled
white vinegar.
Swish the vinegar around the tank,soak for 15-20
minutes.
Pull out the pumb lter,outer cover,inner cover and
blade
Fill with enough vinegar to cover them.Soak for
15-20 minutes.
Rinse all parts until any vinegar smell is completely
gone.
NOTE: Do not break the ceramic shaft of
the pump.
All maintenance should be done on a water-resistant surface, such as a kitchen counter
Change the water every 3 days to avoid bacteria growth.
Use a tissue or cloth to clean the water tank regularly.
If not using the humidier for 3 days or longer, do not leave water inside.
CLEANING
Never immerse the base in water or liquid. Do not place any part of the humidier in dishwasher.
Do not use detergents to clean the humidier.
You should clean your humidier's water tank every 3 days,and dry the lter when you're ready to store it.
12
4 Wipe and let dry 5 Reassembling
reassembling the pumb blade,inner cove , outer cover
and pumb lter on the pumb body.
Dry all parts with a cloth.Make sure all parts are
completely dry before reassembling or storing.
Care & Maintenance (continued)
NOTE: Do not pour liquid cleaners or
detergents into the aroma pad or tray.
CLEANING THE AROMA PAD
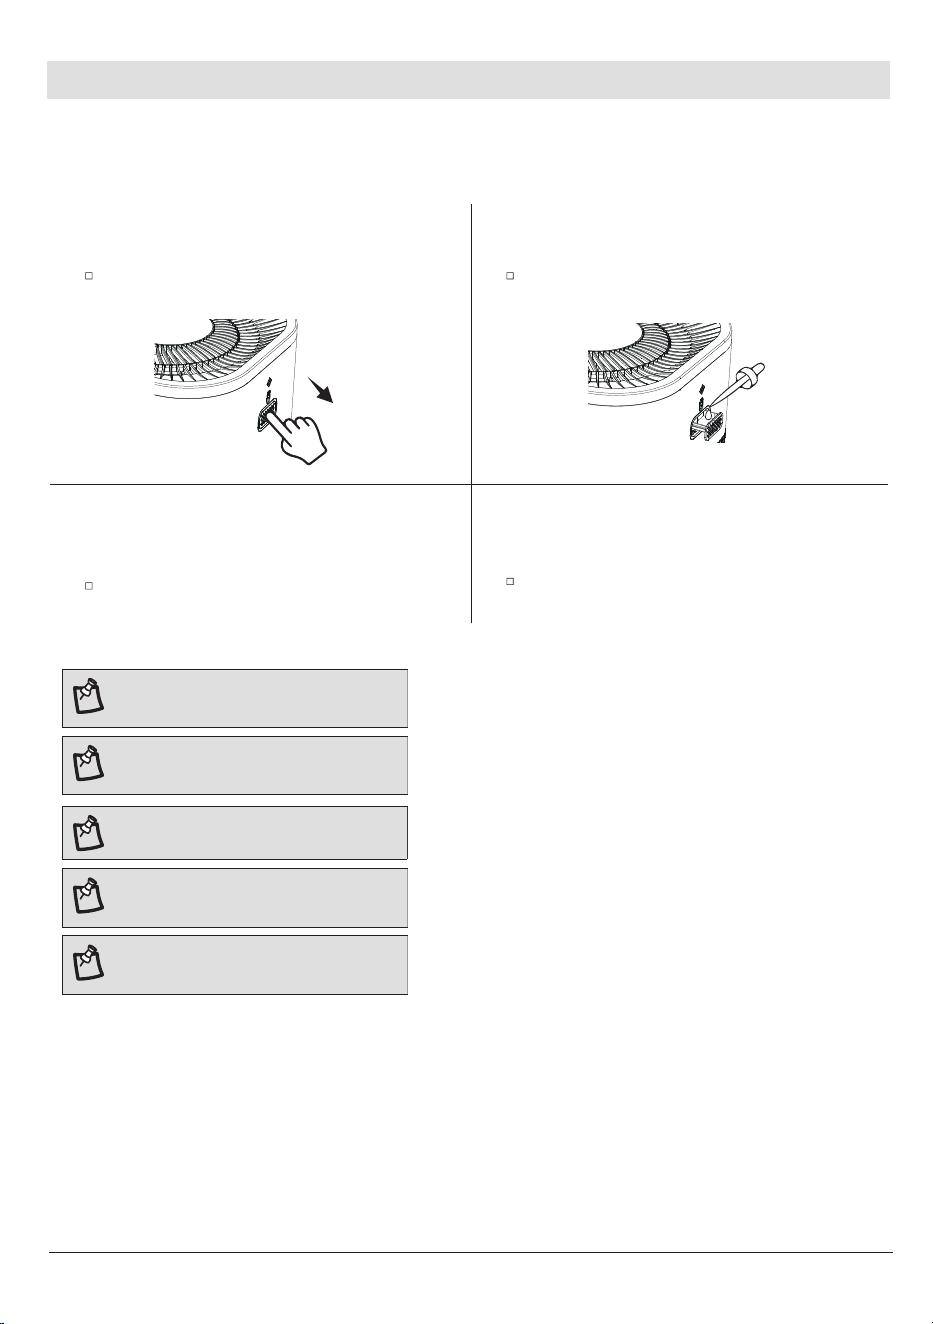
1Pull out aroma tray
2 Cleaning the aroma tray
Remove the aroma pad and rinse under warm,
running water.
Press the aroma tray to release it from the
huimidier top and pull it out.
3
Close the aroma tray
Dry with a clean cloth and place it back into the
aroma tray.
HOMEDEPOT.COM
Please contact 1-855-VISSANI (1-855-847-7264) for further.
Care & Maintenance (continued)
13
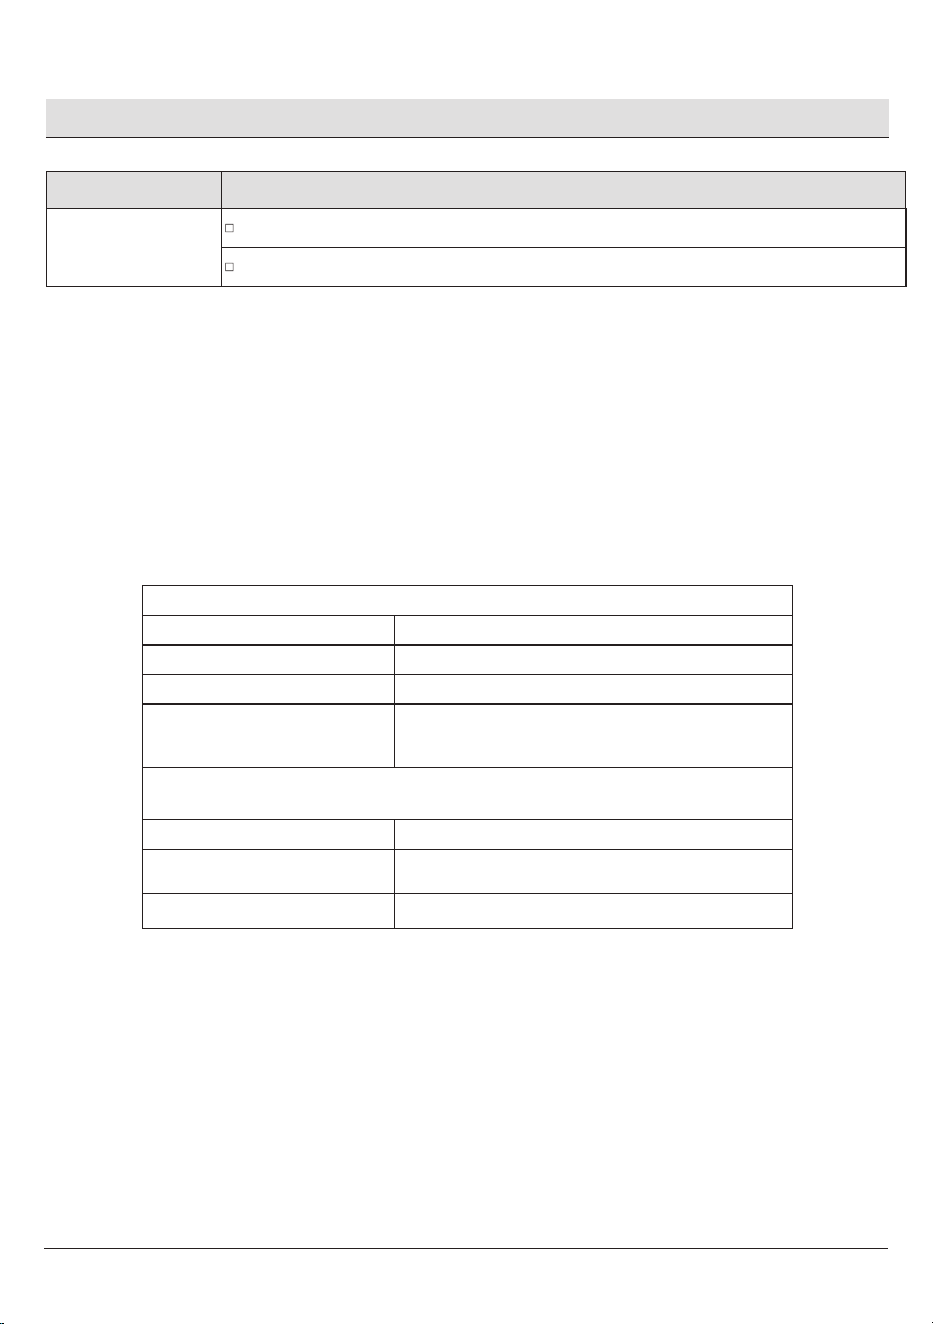
REPLACING THE REMOTE CONTROL BATTERY
STORING
Follow the cleaning instructions and allow all parts to dry completely before storing.
Store in a cool,dry location.
Open the battery box cover and remove the old batteries .
Replace the new batteries (AAA) and cover it.
Note that the positive and negative terminals of the batteries should be aligned with the positive and negative
terminals of the remote control box, do not place in reverse.
Follow the cleaning instructions and allow all parts to dry completely before storing.
Store the humidier in a cool and dry position.
1Replace water filter bracket
2Replace the humidifier top
Place the humidier top on the tank.Place the water lter bracket back into the
tank.
REASSEMBLING
Troubleshooting
This chapter summarizes the most common problems you could encounter with the appliance. If you are unable to solve
the problem with the information below, contact the Customer Service Team at 1-855-VISSANI (1-855-847-7264).
Problem
Possible Solution
Humidier doesn't
turn on,or turns off
unexpectedly.
Plug the humidier into a working outlet and turn it on.
Add tap water to the water tank.
Low water Indicator
lights up red.
Fill the water tank.
Make sure all parts are installed correctly.
Mold grows inside
the humidier.
Clean the water tank regularly (see Care&Maintenance, page 11).
Display shows an
incorrect humidity
percentage.
Moisture may have built up inside the humidity sensor. Turn off the humidier and allow the
sensor to air dry.
If the humidier is placed within 12 inches/30 cm of a wall or in a corner,the humidity sensor
cannot provide a proper reading for the relative humidity in the room.
The humidity sensor will give an improper reading if it is exposed to dust. Avoid using the
humidier in dusty rooms.
Humidier produces
an unusual smell.
Humidier makes a
loud or unusual
noise.
Water visibly leaks
from the humidier.
If the humidier is new, unplug and rinse all parts, then place in a cool, dry place for 12 hours.
Make sure the water tank is properly in place.
Set mist level to a lower setting.
The humidier may be malfunctioning. Stop using the humidier and contact Customer
Support (see page 16).
Avoid running the humidier in a room with over 60% relative humidity.
Wipe any excess water off the top and bottom of the tank.
Do not shake the humidier.
Make sure to place the humidier on a at, level surface.
Check the water tank for leaks. If there are leaks, contact Customer Support (see page 16).
Clean the humidier (see Care &Maintenance, page 11).
The area around the
humidier is damp
or wet from
condensation.
Humidity may be too high. Turn down the fan speed, turn of the humidier, or open a door or
window to the room.
Open a window to ensure proper airow for the humidier, or move the humidier to a more
well-ventilated room.
Make sure the water tank is properly in place.
When replacing the water tank, wipe off excess water from the water tank.
Empty the water tank then rell the water tank (see Filling & Relling, page 8)
Air doesn't seem
to be humid.
Humidier uses
water too quickly.
Turn the fan speed to a higher setting.
Fill the water tank.
Make sure the humidier is on a level surface.
There may be too much water in the tank. Pour out some of the water from the tank.
Clean the humidier (see Care &Maintenance, page 11).
Replace a new lter with Best Air H75 found on homedepot.com.
Clean the water pump sponge or replace it with a new one. Water pump sponge has ve for
replacement .
The humidier uses up water based on the environmental temperature and humidity. If your
environment is cold and/or dry, the humidier will run out of water faster.
14
15
HOMEDEPOT.COM
Please contact 1-855-VISSANI (1-855-847-7264) for further.
Troubleshooting (continued)
Problem
Possible Cause
This chapter summarizes the most common problems you could encounter with the appliance. If you are unable to
solve the problem with the information below, contact the Customer Service Team at 1-855-847-7264.
The humidity level
isn't changing in
my room.
Use a higher fan speed setting.
Depending on your environment, the humidier may take longer to humidify your air.
Information to the user:
Information on the following matters shall be provided to the user in the instruction manual or
on the packaging if an instruction manual is not
provided for any type of ISM equipment:
(a) The interference potential of the device or system.
(b) Maintenance of the system.
(c) Simple measures that can be taken by the user to correct interference.
(d) Manufacturers of RF lighting devices must provide an advisory statement , either on the
product packaging or with other user documentation , similar to the following: This product
may cause interference to radio equipment and should not be installed near maritime safety
communications equipment or other critical navigation or communication equipment operating
between 0. 45-30MHz. Variations of this language are permitted provided all the points of the
statement are addressed and may be presented in any legible font or text style.
FCC SUPPLIER'S DECLARATION OF CONFORMITY
This device complies with part 18 of the FCC Rules.
VK-8529A
VISSANI
FCC CFR Title 47 part 18 Subpart B
The following responsible party designated in FCC §2.909 is responsible for this declaration:
Humidifier
Product information
Product Name:
Model No.:
Trade Mark:
Applicable standards:
Company Name:
Address:
Telephone Number:
HOME DEPOT
2455 PACES FERRY ROAD ATLANTA, GA 30339
1 -855-VISSANI (1-855-847-7264)
Problem Possible Cause Solution
HOMEDEPOT.COM
Please contact 1-855-VISSANI (1-855-847-7264) for further assistance.

16
Questions, problems, missing parts? Before returning to the store,
call Vissani Customer Service
9 a.m. – 7 p.m., EST, Monday-Friday, 9 a.m. – 6 p.m., EST, Saturday
1-855-VISSANI (1-855-847-7264)
HOMEDEPOT.COM
Retain this manual for future use.
