OPERATING INSTRUCTIONS
MOUNTAIN LAB GEAR
SCOUT 2W 2-WAY RADIO
Note:
Please read the operating instructions carefully
before using the device.
KEY FUNCTIONS
7
8
9
10
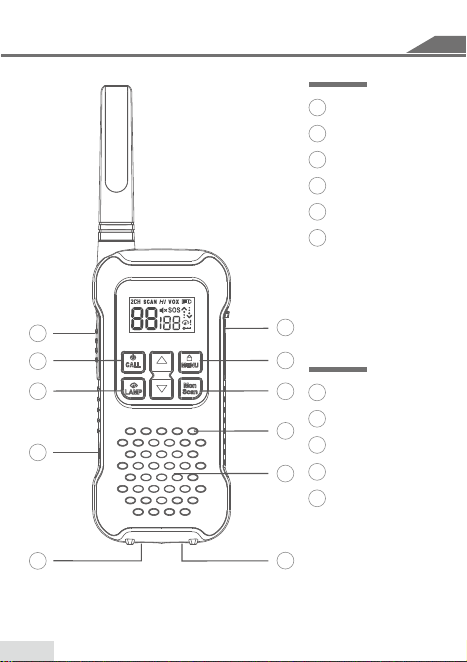
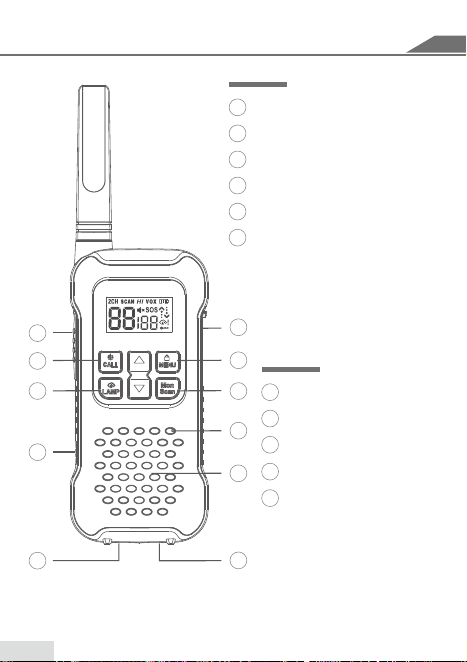
Speaker
Microphone
Monitor/Scan
Lock/Menu
Speaker Microphone
Accessory Port
7
8
9
10
11
11
1
2
3
4
5
Push-To-Talk (PTT)
Power/Call Tone
Lamp/Weather
Signal Light Button
LED Light
Signal Light
1
2
3
4
5
6
6
1
GETTING STARTED
Install the AA NiMH Rechargeable Batteries
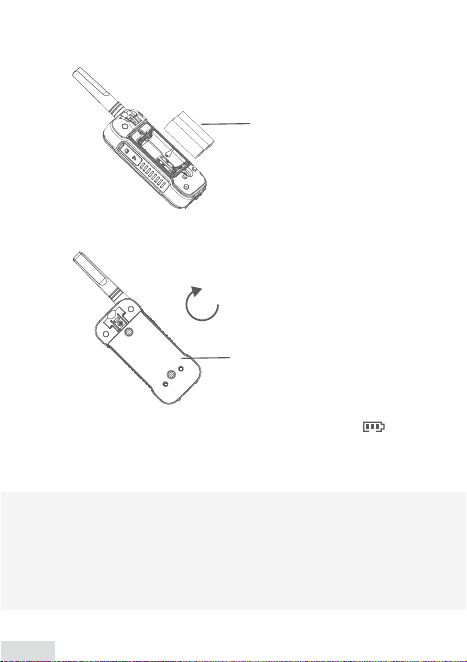
1. Remove the belt clip by inserting a finger under the tab at the top
and sliding the belt clip up.
2. Remove the two screws on the back of the radio by turning them
counter-clockwise to open the cover.
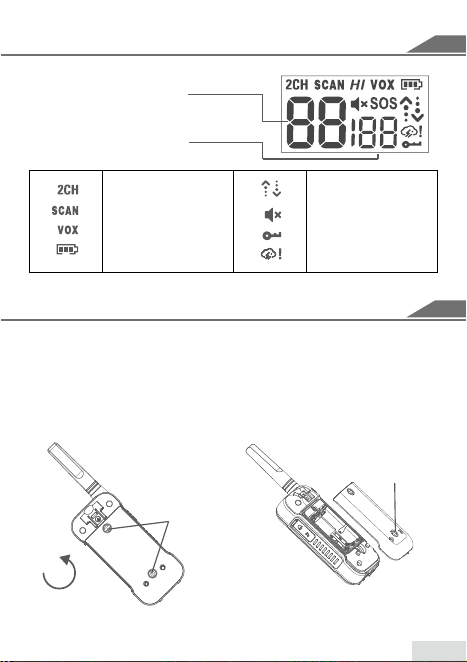
DISPLAY SCREEN GUIDE
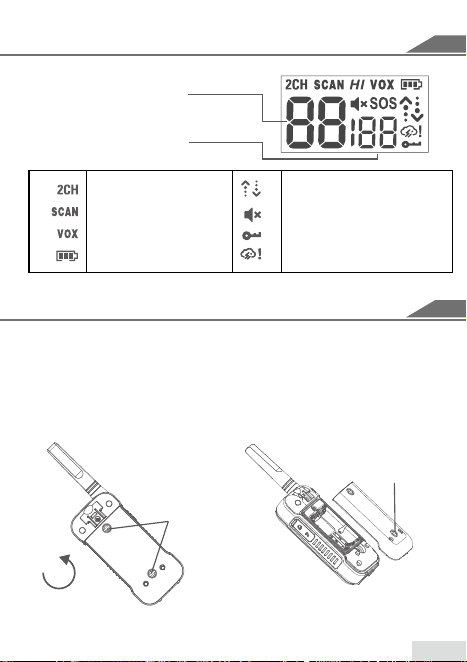
Channel Number
Sub-code
Dual Channel
Scan
VOX
Battery Life
Status
(Transmit/Receive)
Volume Mute
Keypad Lock
Weather Alert
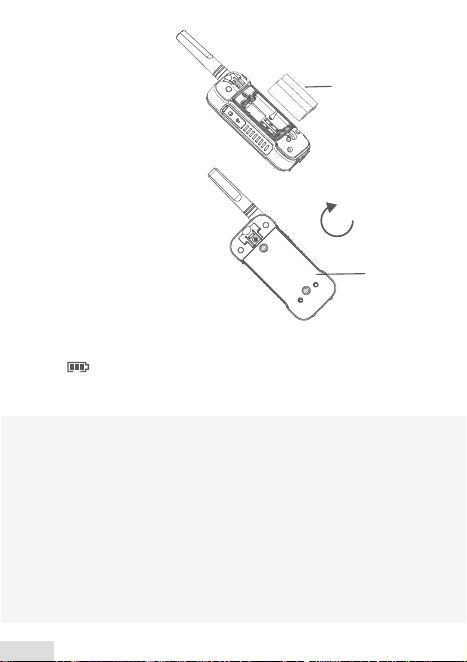
Remove the
battery cover.
screws
2
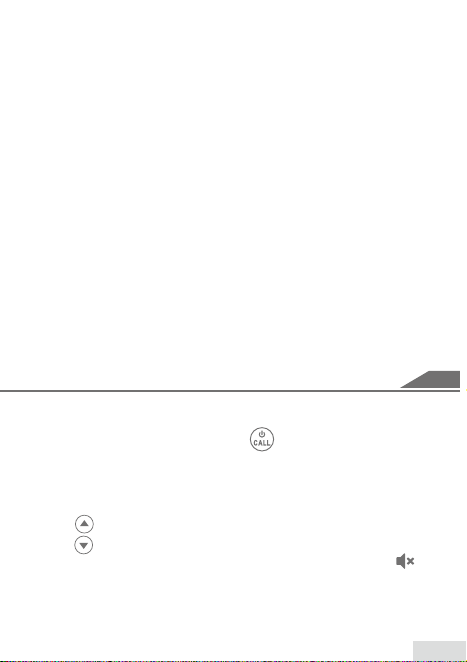
Insert 3 AA NiMH
batteries.
Close the battery
cover.
Battery Life
3. Install the included AA NiMH batteries according to the
orientation shown in the battery compartment.
4. Close the battery compartment cover and replace the screws,
turning clockwise until snug.
A fully charged battery is indicated by three solid bars .
When the battery is low, the display will show one blinking bar
and the radio will emit a low battery warning beep after each
transmission.
Note:
• Remove the batteries from the radio prior to storage. Batteries left
in the radio during storage may corrode over time and may cause
permanent damage to your radio.
• Do not mix old and new or alkaline and NiMH batteries.
• Charge the supplied NiMH batteries once every three
months when not in use.
3
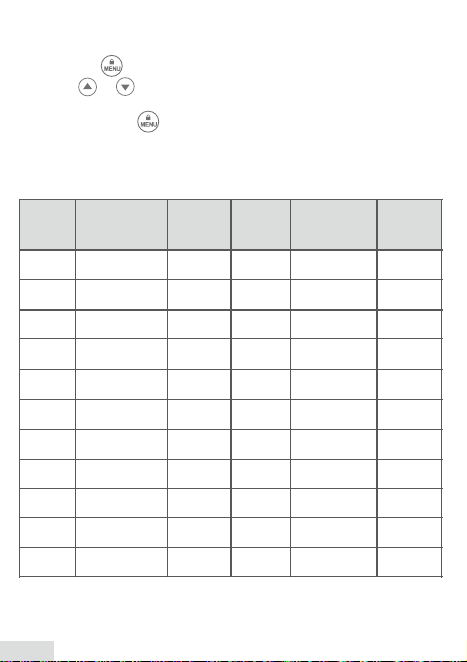
1. Press to increase the volume (maximum volume is 7).
Press to decrease the volume (minimum volume is 1).
2. When volume level 0 is selected, the radio is muted and
is displayed.
Using the Charging Dock
The Micro-USB charging dock allows you to conveniently charge
the NiMH battery of your SCOUT radio in the dedicated dock,
using the included certified charging adaptor (5V, ≥1A).
Note: Do not attempt to charge alkaline batteries.
How To Charge the Battery
1. Ensure that your radio is turned OFF.
2. Plug the Micro-USB cable into the Micro-USB port on the
charging dock. Insert the USB connector into the charging
adapter. Plug the charging adapter into a household electrical
outlet.
3. Place the radio into the charging dock. The battery meter on the
display will cycle to indicate the battery is charging. The battery
is fully charged when the display shows three solid bars.
BASIC OPERATION
Turning the Radio On and Off
1. Press and hold the power button to turn your radio on/off.
2. The display will show the current channel, sub-code and
enabled features.
Setting the Volume
4
1. Press the button. The channel number will start to flash.
2. Press or to change the channel number.
3. Press the PTT button to select the channel and exit the
menu, or press again to proceed to the sub-code
selection menu.
Setting the Channel
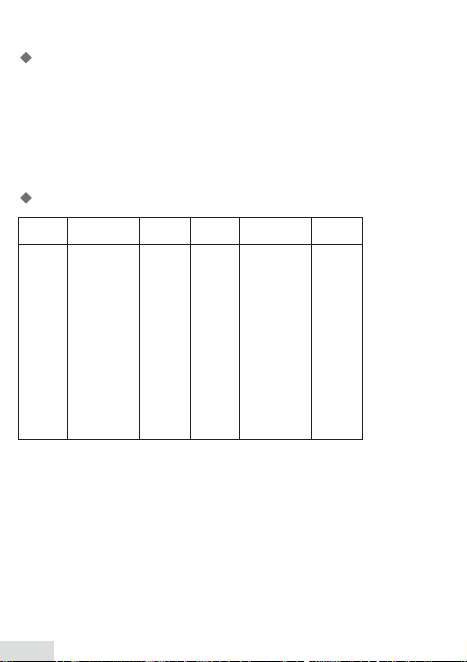
CH
Frequency
(MHz)
Max
Power
Out put
(MHz)
Frequency
Max
Power
Out put
1 462.5625 2W 12 467.6625 0.5W
2 462.5875 2W 13 467.6875 0.5W
3 462.6125 2W 14
467.7125 0.5W
4 462.6375 2W 15 462.5500 2W
5 462.6625 2W 16 462.5750 2W
6 462.6875 2W 17 462.6000
2W
7 462.7125 2W 18 462.6250 2W
8 467.5625 0.5W 19 462.6500 2W
9 467.5875 0.5W 20 462.6750 2W
10 467.6125 0.5W 21 462.7000 2W
11 467.6375 0.5W 22 462.7250 2W
CH
Channels and Frequencies
5
1. Press the button until the sub-code number starts to
flash.
2. Press or to change the sub-code number.
3. Press the PTT button to exit the menu.
Note: When sub-code “0” is selected, the radio can receive
transmissions from any radio on the same channel, regardless
of sub-code. However, only those radios also on sub-code “0”
will be able to receive its transmissions.
If the PTT button is held for longer than 60 seconds, radio will stop
transmitting. This is to prevent accidental transmission.
1. To talk, press and hold the PTT button. When transmitting, the
icon is shown. Release the PTT button when you are
finished talking. Do not use the radios closer than two meters
apart or the radios may experience feedback.
2. When receiving a transmission, the icon will be displayed.
Note: With all radios, it is good practice to hold the PTT button for
a half second longer before and after speaking to ensure your
transmission is not cut off.
PTT Timeout Timer
Setting the Sub-Code
Transmitting and Receiving
6
The scan function allows the user to listen for any activity on
any channel and its matched sub-code (as is selected in the
main menu).
1. Press the button to start scanning. The “SCAN” icon will
show and the display will cycle through the channels and
sub-codes being scanned for activity.
2. When activity is detected, the radio will stop scanning and
receive the transmission. At the end of transmission, press
the PTT button within five seconds to respond. Otherwise the
radio will resume scanning.
3. If the PTT button is pressed while the device is scanning, the
transmission will be sent on the main selected channel.
4. Press the button to exit scan mode.
Note: If the device stops on an unintended/undesired
transmission, press or to resume scan OR temporarily
remove that channel from the scan list by pressing and holding
or for three seconds.
To restore removed channels to the scan list, press to exit
and re-enter scan mode.
To transmit a call tone, press the button.
Setting the Call Tone
1. To select the call tone to be used, press the button until
the call tone menu “CA” appears. The flashing number
indicates the current call tone.
2. Press or to change the call tone.
3. Press the PTT button to exit the menu.
Note: Call tone “0” mutes the call tone feature. No call tone will
be sent, but they can still be received.
Call Tone
The keypad lock feature prevents accidental keypad button
activation. This is especially useful when the radio is used with
the included speaker microphone accessory and placed inside
a backpack or otherwise secured.
1. To lock the keypad buttons, press and hold the button
until the lock indicator is displayed.
2. Repeat the procedure to unlock the keypad.
Keypad Lock
Scan
KEYPAD FEATURES
7
Monitor mode can be used to listen for weak signals or to check
activity on the current channel.
1. Press and hold for three seconds to enter monitor mode.
2. Release the button to exit monitor mode.
The scan function allows the user to listen for any activity on
any channel and its matched sub-code (as is selected in the
main menu).
1. Press the button to start scanning. The “SCAN” icon will
show and the display will cycle through the channels and
sub-codes being scanned for activity.
2. When activity is detected, the radio will stop scanning and
receive the transmission. At the end of transmission, press
the PTT button within five seconds to respond. Otherwise the
radio will resume scanning.
3. If the PTT button is pressed while the device is scanning, the
transmission will be sent on the main selected channel.
4. Press the button to exit scan mode.
Note: If the device stops on an unintended/undesired
transmission, press or to resume scan OR temporarily
remove that channel from the scan list by pressing and holding
or for three seconds.
To restore removed channels to the scan list, press to exit
and re-enter scan mode.
Monitor
Press the button to turn on/off the lamp. The lamp feature
is disabled by the keypad lock.
LED Lamp
In weather mode, your radio can receive NOAA weather
information, warnings and alerts.
Press and hold the button for three seconds to enter or
exit weather mode.
Weather
8
Setting the Weather Channel
1. In weather mode, press the button until the weather
channel number flashes.
2. Press or to select the appropriate channel for your area.
3. Press the PTT button to set the channel and exit the menu.
Setting the Weather Alert
You radio can be set to respond to NOAA Weather Radio
emergency messages.
1. In weather mode, press the button twice. The icon will
be displayed.
2. Press or to turn weather alert on or off.
3. Press the PTT button or to exit the weather alert menu.
4. Repeat the step to disable the weather alert.
2. When activity is detected, the radio will stop scanning and
receive the transmission. At the end of transmission, press
the PTT button within five seconds to respond. Otherwise the
radio will resume scanning.
3. If the PTT button is pressed while the device is scanning, the
transmission will be sent on the main selected channel.
4. Press the button to exit scan mode.
Note: If the device stops on an unintended/undesired
transmission, press or to resume scan OR temporarily
remove that channel from the scan list by pressing and holding
or for three seconds.
To restore removed channels to the scan list, press to exit
and re-enter scan mode.
Weather
WEATHER CHANNELS & FREQUENCIES
Weather
Channel
(MHz)
Frequency
Weather
Channel
Frequency
(MHz)
WX1 162.550 WX7 162.525
WX2 162.400 WX8 161.650
WX3 162.475 WX9 161.775
WX4 162.425 WX10 161.750
WX5 162.450 WX11 162.000
WX6 162.500
9
Voice-operated transmission allows the user to send
transmissions without pressing the PTT button. The radio will
detect an increase in sound levels and transmit automatically.
1. To activate VOX, press the button until “VOX” appears
on the display, along with a flashing number (0-3).
2. Press or to change the VOX sensitivity level (1-3) or
turn off (0).
• 0 = VOX function off
• 1 = Low sensitivity
• 2 = Medium sensitivity
• 3 = High sensitivity
3. Press the PTT button to exit the menu.
Note: The PTT button can still be used to send transmissions
in VOX mode.
The signal light button can be used to emit an emergency call
tone and SOS flashing light. This feature should only be used
in a real emergency to increase visibility.
Note: This device does not have the capability to contact
emergency services or provide any location information, and
should not be confused with a dedicated personal locator
device that is designed to do so.
1. Press and hold the SOS button for three seconds. The red
LED light will begin to flash the SOS signal light and an
emergency tone will be transmitted.
2. To cancel the emergency signal light, press the SOS button
once more.
Signal Light (SOS)
Voice-Operated Transmission (VOX)
MENU FEATURES
10
1. Press the button until the power selection menu “Pr”
appears.
2. Press or to select the flashing “HI” or “LO” power.
Note: High power (2 watts) is only available on channels 1-7 and
15-22. Channels 8-14 are restricted to Low power (0.5 watts)
only, in accordance with governmental regulation.
3. Press the PTT button to exit the menu.
High power is indicated on the main display (indicated by “HI”) when
channels 1-7 or 15-22 are selected.
Note: The power setting does not affect the ability of the radio to
receive transmissions. Only the output power is affected by this setting.
Dual channel monitor allows the user to listen for transmissions
on two channels at the same time—the main channel and
sub-code as set on in the main menu, and a second channel
and sub-code.
1. Press the button until the dual channel monitor menu
“2CH” appears. The flashing number indicates the current
secondary channel to be monitored (1-22), and “OF”
indicates that the feature is turned off.
2. Press or to select which secondary channel to
monitor.
Note: There is no option to select a sub-code in the dual channel
monitor menu. The sub-code is dictated by the sub-code that is
selected for that channel in the main sub-code menu setting. For
example: If the main channel setting for channel 5 is set to
sub-code 121, then that will be the sub-code used for the channel
5 dual channel monitor selection.
3. Press the PTT button to exit the menu.
In dual channel monitor mode, the display will alternate
between the main channel (and sub-code) setting and the dual
channel secondary channel.
In the case that a transmission is received on the secondary
dual channel monitor channel, any transmissions made within
10 seconds of receiving will be occur on the secondary
channel. Otherwise, all transmissions will be made on the main
channel and sub-code setting.
Dual Channel Monitor (2CH)
Setting High and Low Transmission Power
Any changes or modifications not expressly approved by the
party responsible for compliance could void the user's authority
to operate the equipment.
This device complies with part 15 of the FCC Rules. Operation
is subject to the following two conditions: (1) This device may
not cause harmful interference, and (2) this device must accept
any interference received, including interference that may
cause undesired operation.
Note: This equipment has been tested and found to comply
with the limits for a Class B digital device, pursuant to part 15
of the FCC Rules. These limits are designed to provide
reasonable protection against harmful interference in a
residential installation. This equipment generates, uses and can
radiate radio frequency energy and, if not installed and used in
accordance with the instructions, may cause harmful
interference to radio communications. However, there is no
guarantee that interference will not occur in a particular
installation. If this equipment does cause harmful interference to
radio or television reception, which can be determined by turning
the equipment off and on, the user is encouraged to try to
correct the interference by one or more of the following
measures:
• Reorient or relocate the receiving antenna.
• Increase the separation between the equipment and receiver.
• Connect the equipment into an outlet on a circuit different from
that to which the receiver is connected.
• Consult the dealer or an experienced radio/TV technician for help.
Safety Information for Radios
Your wireless handheld portable transceiver contains a low power
transmitter. When the talk button is pushed, it sends out radio
frequency (RF) signals. The device is authorized to operate at a
duty factor not to exceed 50%. In August 1996, the Federal
Communications Commissions (FCC) adopted RF exposure
guidelines with safety levels for handheld wireless devices.
Important
FCC RF Exposure Requirements: For body-worn operation, this
radio has been tested and meets the FCC RF exposure guidelines
when used with accessories supplied or designated for this product.
Use of other accessories may not ensure compliance with FCC RF
exposure guidelines. Use only the supplied antenna. Unauthorized
antennas, modifications or attachments could damage the
transmitter and may violate FCC regulations.
Normal Position
Hold the transmitter approximately 25 mm from your face and
speak in a normal voice, with the antenna pointed up and away.
11
1. Press the button until the power selection menu “Pr”
appears.
2. Press or to select the flashing “HI” or “LO” power.
Note: High power (2 watts) is only available on channels 1-7 and
15-22. Channels 8-14 are restricted to Low power (0.5 watts)
only, in accordance with governmental regulation.
3. Press the PTT button to exit the menu.
High power is indicated on the main display (indicated by “HI”) when
channels 1-7 or 15-22 are selected.
Note: The power setting does not affect the ability of the radio to
receive transmissions. Only the output power is affected by this setting.
Any changes or modifications not expressly approved by the
party responsible for compliance could void the user's authority
to operate the equipment.
This device complies with part 15 of the FCC Rules. Operation
is subject to the following two conditions: (1) This device may
not cause harmful interference, and (2) this device must accept
any interference received, including interference that may
cause undesired operation.
Note: This equipment has been tested and found to comply
with the limits for a Class B digital device, pursuant to part 15
Keypad Tone On/Off
Press and hold the button while turning the radio on to turn the
keypad tone off or back on.
Roger Tone On/Off
Press and hold the button while turning the radio on to turn the
roger beep (PTT transmit beep) off or back on.
Automatic Power Saving
This feature turns off the display automatically when not in use to
save battery life.
Water Activated LED
If the radio is dropped in water, a flashing white LED light will be
activated automatically to assist in finding the dropped radio in
darkness. After retrieving the radio, press any button to
deactivate the flashing light.
ADDITIONAL FEATURES
of the FCC Rules. These limits are designed to provide
reasonable protection against harmful interference in a
residential installation. This equipment generates, uses and can
radiate radio frequency energy and, if not installed and used in
accordance with the instructions, may cause harmful
interference to radio communications. However, there is no
guarantee that interference will not occur in a particular
installation. If this equipment does cause harmful interference to
radio or television reception, which can be determined by turning
the equipment off and on, the user is encouraged to try to
correct the interference by one or more of the following
measures:
• Reorient or relocate the receiving antenna.
• Increase the separation between the equipment and receiver.
• Connect the equipment into an outlet on a circuit different from
that to which the receiver is connected.
• Consult the dealer or an experienced radio/TV technician for help.
Safety Information for Radios
Your wireless handheld portable transceiver contains a low power
transmitter. When the talk button is pushed, it sends out radio
frequency (RF) signals. The device is authorized to operate at a
duty factor not to exceed 50%. In August 1996, the Federal
Communications Commissions (FCC) adopted RF exposure
guidelines with safety levels for handheld wireless devices.
Important
FCC RF Exposure Requirements: For body-worn operation, this
radio has been tested and meets the FCC RF exposure guidelines
when used with accessories supplied or designated for this product.
Use of other accessories may not ensure compliance with FCC RF
exposure guidelines. Use only the supplied antenna. Unauthorized
antennas, modifications or attachments could damage the
transmitter and may violate FCC regulations.
Normal Position
Hold the transmitter approximately 25 mm from your face and
speak in a normal voice, with the antenna pointed up and away.
12
Any changes or modifications not expressly approved by the
party responsible for compliance could void the user's authority
to operate the equipment.
This device complies with part 15 of the FCC Rules. Operation
is subject to the following two conditions: (1) This device may
not cause harmful interference, and (2) this device must accept
any interference received, including interference that may
cause undesired operation.
Note: This equipment has been tested and found to comply
with the limits for a Class B digital device, pursuant to part 15
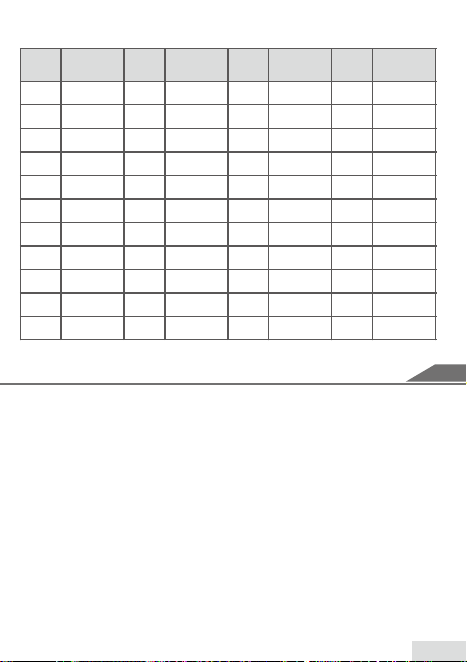
Code
No
Frequency
(Hz)
Code
No
Frequency
(Hz)
Code
No
Frequency
(Hz)
Code
No
Frequency
(Hz)
1 67
71.9
74.4
77
79.7
82.5
85.4
88.5
91.5
94.8
97.4
100
103.5
107.2
110.9
114.8
118.8
123
127.3
131.8
136.5
141.3
146.2
151.4
156.7
162.2
167.9
173.8
179.9
186.2
192.8
203.5
210.7
218.1
225.7
233.6
241.8
250.3
2
3
4
5
6
7
8
9
11
12
13
14
15
16
17
18
19
21
22
23
24
25
26
27
31
32
33
34
35
36
37
28 38
29
10 20 30
No Code No Code No Code No Code
39 23
25
26
31
32
43
47
51
54
65
71
72
73
74
114
115
116
125
131
132
134
143
152
155
156
162
165
172
174
205
223
226
243
244
245
251
261
265
271
263
40
41
42
43
44
45
46
47
49
50
51
52
53
54
55
56
57
59
60
61
62
63
64
65
69
70
71
72
73
74
75
66 76
77
78
67
48 58 68
RADIO FREQUENCIES
CTCSS 38
of the FCC Rules. These limits are designed to provide
reasonable protection against harmful interference in a
residential installation. This equipment generates, uses and can
radiate radio frequency energy and, if not installed and used in
accordance with the instructions, may cause harmful
interference to radio communications. However, there is no
guarantee that interference will not occur in a particular
installation. If this equipment does cause harmful interference to
radio or television reception, which can be determined by turning
the equipment off and on, the user is encouraged to try to
correct the interference by one or more of the following
measures:
• Reorient or relocate the receiving antenna.
• Increase the separation between the equipment and receiver.
• Connect the equipment into an outlet on a circuit different from
that to which the receiver is connected.
• Consult the dealer or an experienced radio/TV technician for help.
Safety Information for Radios
Your wireless handheld portable transceiver contains a low power
transmitter. When the talk button is pushed, it sends out radio
frequency (RF) signals. The device is authorized to operate at a
duty factor not to exceed 50%. In August 1996, the Federal
Communications Commissions (FCC) adopted RF exposure
guidelines with safety levels for handheld wireless devices.
Important
FCC RF Exposure Requirements: For body-worn operation, this
radio has been tested and meets the FCC RF exposure guidelines
when used with accessories supplied or designated for this product.
Use of other accessories may not ensure compliance with FCC RF
exposure guidelines. Use only the supplied antenna. Unauthorized
antennas, modifications or attachments could damage the
transmitter and may violate FCC regulations.
Normal Position
Hold the transmitter approximately 25 mm from your face and
speak in a normal voice, with the antenna pointed up and away.
13
Any changes or modifications not expressly approved by the
party responsible for compliance could void the user's authority
to operate the equipment.
This device complies with part 15 of the FCC Rules. Operation
is subject to the following two conditions: (1) This device may
not cause harmful interference, and (2) this device must accept
any interference received, including interference that may
cause undesired operation.
Note: This equipment has been tested and found to comply
with the limits for a Class B digital device, pursuant to part 15
FCC Warning
No Code No Code No Code No Code
79 306
311
315
331
343
346
351
364
365
371
412
413
423
431
432
445
464
465
466
503
516
532
546
565
606
612
624
627
631
632
662
664
703
712
723
731
732
734
743
754
80
81
82
83
84
85
86
87
90
91
92
93
94
95
96
97
98
101
102
103
104
105
106
107
112
113
114
115
116
117
118
108 119
120
121
109
88 99 110
411 506 65489 100 111
SAFETY AND GENERAL INFORMATION
CDCSS 83
of the FCC Rules. These limits are designed to provide
reasonable protection against harmful interference in a
residential installation. This equipment generates, uses and can
radiate radio frequency energy and, if not installed and used in
accordance with the instructions, may cause harmful
interference to radio communications. However, there is no
guarantee that interference will not occur in a particular
installation. If this equipment does cause harmful interference to
radio or television reception, which can be determined by turning
the equipment off and on, the user is encouraged to try to
correct the interference by one or more of the following
measures:
• Reorient or relocate the receiving antenna.
• Increase the separation between the equipment and receiver.
• Connect the equipment into an outlet on a circuit different from
that to which the receiver is connected.
• Consult the dealer or an experienced radio/TV technician for help.
Safety Information for Radios
Your wireless handheld portable transceiver contains a low power
transmitter. When the talk button is pushed, it sends out radio
frequency (RF) signals. The device is authorized to operate at a
duty factor not to exceed 50%. In August 1996, the Federal
Communications Commissions (FCC) adopted RF exposure
guidelines with safety levels for handheld wireless devices.
Important
FCC RF Exposure Requirements: For body-worn operation, this
radio has been tested and meets the FCC RF exposure guidelines
when used with accessories supplied or designated for this product.
Use of other accessories may not ensure compliance with FCC RF
exposure guidelines. Use only the supplied antenna. Unauthorized
antennas, modifications or attachments could damage the
transmitter and may violate FCC regulations.
Normal Position
Hold the transmitter approximately 25 mm from your face and
speak in a normal voice, with the antenna pointed up and away.
14

Any changes or modifications not expressly approved by the
party responsible for compliance could void the user's authority
to operate the equipment.
This device complies with part 15 of the FCC Rules. Operation
is subject to the following two conditions: (1) This device may
not cause harmful interference, and (2) this device must accept
any interference received, including interference that may
cause undesired operation.
Note: This equipment has been tested and found to comply
with the limits for a Class B digital device, pursuant to part 15
of the FCC Rules. These limits are designed to provide
reasonable protection against harmful interference in a
residential installation. This equipment generates, uses and can
radiate radio frequency energy and, if not installed and used in
accordance with the instructions, may cause harmful
interference to radio communications. However, there is no
guarantee that interference will not occur in a particular
installation. If this equipment does cause harmful interference to
radio or television reception, which can be determined by turning
the equipment off and on, the user is encouraged to try to
correct the interference by one or more of the following
measures:
• Reorient or relocate the receiving antenna.
• Increase the separation between the equipment and receiver.
• Connect the equipment into an outlet on a circuit different from
that to which the receiver is connected.
• Consult the dealer or an experienced radio/TV technician for help.
Safety Information for Radios
Your wireless handheld portable transceiver contains a low power
transmitter. When the talk button is pushed, it sends out radio
frequency (RF) signals. The device is authorized to operate at a
duty factor not to exceed 50%. In August 1996, the Federal
Communications Commissions (FCC) adopted RF exposure
guidelines with safety levels for handheld wireless devices.
Important
FCC RF Exposure Requirements: For body-worn operation, this
radio has been tested and meets the FCC RF exposure guidelines
when used with accessories supplied or designated for this product.
Use of other accessories may not ensure compliance with FCC RF
exposure guidelines. Use only the supplied antenna. Unauthorized
antennas, modifications or attachments could damage the
transmitter and may violate FCC regulations.
Normal Position
Hold the transmitter approximately 25 mm from your face and
speak in a normal voice, with the antenna pointed up and away.
15
Any changes or modifications not expressly approved by the
party responsible for compliance could void the user's authority
to operate the equipment.
This device complies with part 15 of the FCC Rules. Operation
is subject to the following two conditions: (1) This device may
not cause harmful interference, and (2) this device must accept
any interference received, including interference that may
cause undesired operation.
Note: This equipment has been tested and found to comply
with the limits for a Class B digital device, pursuant to part 15
of the FCC Rules. These limits are designed to provide
reasonable protection against harmful interference in a
residential installation. This equipment generates, uses and can
radiate radio frequency energy and, if not installed and used in
accordance with the instructions, may cause harmful
interference to radio communications. However, there is no
guarantee that interference will not occur in a particular
installation. If this equipment does cause harmful interference to
radio or television reception, which can be determined by turning
the equipment off and on, the user is encouraged to try to
correct the interference by one or more of the following
measures:
• Reorient or relocate the receiving antenna.
• Increase the separation between the equipment and receiver.
• Connect the equipment into an outlet on a circuit different from
that to which the receiver is connected.
• Consult the dealer or an experienced radio/TV technician for help.
Safety Information for Radios
Your wireless handheld portable transceiver contains a low power
transmitter. When the talk button is pushed, it sends out radio
frequency (RF) signals. The device is authorized to operate at a
duty factor not to exceed 50%. In August 1996, the Federal
Communications Commissions (FCC) adopted RF exposure
guidelines with safety levels for handheld wireless devices.
Important
FCC RF Exposure Requirements: For body-worn operation, this
radio has been tested and meets the FCC RF exposure guidelines
when used with accessories supplied or designated for this product.
Use of other accessories may not ensure compliance with FCC RF
exposure guidelines. Use only the supplied antenna. Unauthorized
antennas, modifications or attachments could damage the
transmitter and may violate FCC regulations.
Normal Position
Hold the transmitter approximately 25 mm from your face and
speak in a normal voice, with the antenna pointed up and away.
Warnings
Product safety and RF Exposure for two way radio:
Before using this two way radio, please read the
manual which contains important operating
instructions for safe usage, RF Energy Awareness,
control information and operational instructions for
compliance with RF Energy Exposure limits in
applicable national and international standards, and
also read the operational instructions for safe use.
Test position and configuration Head SAR was performed with
the device configured in the positions according to IEEE1528,
and face up SAR was performed with the device 25mm from the
phantom. Body SAR was performed with the belt clip on the
device 0 mm from the phantom. Body SAR was also performed
with the headset attached and without.
Antennas
CAUTION
WARNING
1. The antenna is unique to this product. Please do not attempt
to alter or replace.
2. For safe operation, the antenna for the product shall be least
25mm away from your face when speaking.
16
Any changes or modifications not expressly approved by the
party responsible for compliance could void the user's authority
to operate the equipment.
This device complies with part 15 of the FCC Rules. Operation
is subject to the following two conditions: (1) This device may
not cause harmful interference, and (2) this device must accept
any interference received, including interference that may
cause undesired operation.
Note: This equipment has been tested and found to comply
with the limits for a Class B digital device, pursuant to part 15
of the FCC Rules. These limits are designed to provide
reasonable protection against harmful interference in a
residential installation. This equipment generates, uses and can
radiate radio frequency energy and, if not installed and used in
accordance with the instructions, may cause harmful
interference to radio communications. However, there is no
guarantee that interference will not occur in a particular
installation. If this equipment does cause harmful interference to
radio or television reception, which can be determined by turning
the equipment off and on, the user is encouraged to try to
correct the interference by one or more of the following
measures:
• Reorient or relocate the receiving antenna.
• Increase the separation between the equipment and receiver.
• Connect the equipment into an outlet on a circuit different from
that to which the receiver is connected.
• Consult the dealer or an experienced radio/TV technician for help.
Safety Information for Radios
Your wireless handheld portable transceiver contains a low power
transmitter. When the talk button is pushed, it sends out radio
frequency (RF) signals. The device is authorized to operate at a
duty factor not to exceed 50%. In August 1996, the Federal
Communications Commissions (FCC) adopted RF exposure
guidelines with safety levels for handheld wireless devices.
Important
FCC RF Exposure Requirements: For body-worn operation, this
radio has been tested and meets the FCC RF exposure guidelines
when used with accessories supplied or designated for this product.
Use of other accessories may not ensure compliance with FCC RF
exposure guidelines. Use only the supplied antenna. Unauthorized
antennas, modifications or attachments could damage the
transmitter and may violate FCC regulations.
Normal Position
Hold the transmitter approximately 25 mm from your face and
speak in a normal voice, with the antenna pointed up and away.
Batteries
All batteries can cause property damage and/or bodily injury
such as burns if a conductive material touches exposed
terminals. The conductive material may complete an electrical
circuit (short circuit) and become hot.
• Exercise care when removing NiMH or AA batteries. Do not
use sharp or conductive tools to remove these batteries.
• Exercise care in handling any charged battery, particularly
when placing it inside a pocket or enclosed container with
metal objects.
• Do not discard your battery in a fire.
• Do not replace the battery in any area labeled “Hazardous
Atmosphere”. Any sparks created in a potentially explosive
atmosphere can cause explosion or fire.
• Do not disassemble, crush, puncture, shred or otherwise
attempt to change the form of your battery.
• Do not dry a wet battery or damp battery with an appliance
or heat source, such as a hair dryer or microwave oven.
• If the radio battery contact area has been submerged in
water, dry and clean the battery contacts before attaching
the battery to the radio.
• Do not attempt to charge alkaline batteries
WARNING
3. Attempting to alter or replace the antenna will affect
performance and void the warranty.
4. DO NOT use any portable radio that has a damaged
antenna. If a damaged antenna comes into contact with
your skin, a minor burn can result.
17

Any changes or modifications not expressly approved by the
party responsible for compliance could void the user's authority
to operate the equipment.
This device complies with part 15 of the FCC Rules. Operation
is subject to the following two conditions: (1) This device may
not cause harmful interference, and (2) this device must accept
any interference received, including interference that may
cause undesired operation.
Note: This equipment has been tested and found to comply
with the limits for a Class B digital device, pursuant to part 15
of the FCC Rules. These limits are designed to provide
reasonable protection against harmful interference in a
residential installation. This equipment generates, uses and can
radiate radio frequency energy and, if not installed and used in
accordance with the instructions, may cause harmful
interference to radio communications. However, there is no
guarantee that interference will not occur in a particular
installation. If this equipment does cause harmful interference to
radio or television reception, which can be determined by turning
the equipment off and on, the user is encouraged to try to
correct the interference by one or more of the following
measures:
• Reorient or relocate the receiving antenna.
• Increase the separation between the equipment and receiver.
• Connect the equipment into an outlet on a circuit different from
that to which the receiver is connected.
• Consult the dealer or an experienced radio/TV technician for help.
Safety Information for Radios
Your wireless handheld portable transceiver contains a low power
transmitter. When the talk button is pushed, it sends out radio
frequency (RF) signals. The device is authorized to operate at a
duty factor not to exceed 50%. In August 1996, the Federal
Communications Commissions (FCC) adopted RF exposure
guidelines with safety levels for handheld wireless devices.
Important
FCC RF Exposure Requirements: For body-worn operation, this
radio has been tested and meets the FCC RF exposure guidelines
when used with accessories supplied or designated for this product.
Use of other accessories may not ensure compliance with FCC RF
exposure guidelines. Use only the supplied antenna. Unauthorized
antennas, modifications or attachments could damage the
transmitter and may violate FCC regulations.
Normal Position
Hold the transmitter approximately 25 mm from your face and
speak in a normal voice, with the antenna pointed up and away.
CAUTION
Battery Charger Safety Instructions
1. Turn the radio off when charging the battery.
2. Do not expose the charger to outside environment.
Chargers should only be used indoors.
3. Do not operate or disassemble the charger. Do not use a
charger that has been dropped or damaged in any way.
4. Never alter the AC cord or plug provided with the unit. If the
plug will not fit the outlet, have the proper outlet installed by
a qualified electrician. An improper condition can result in a
risk of electric shock.
5. To reduce the risk of damage to the cord or plug, pull the
plug rather than the cord when disconnecting the charger
from the AC receptacle.
6. To reduce the risk of electric shock, unplug the charger
from the outlet before attempting any maintenance or
cleaning.
7. Use of an attachment not recommended or sold by
Mountain Lab Gearmay result in a risk of fire, electric shock
or personal injury.
8. Make sure the cord is located so it will not be stepped on,
tripped over or subjected to damage or stress.
9. An extension cord should not be used unless absolutely
necessary. Use of an improper extension cord could result
in a risk of a fire and/or electric shock. If an extension cord
must be used, make sure that:
• The pins on the plug of the extension cord are the same
number, size and shape as those on the plug of the
charger.
18
WARNING
The information listed below provides the user with the information
needed to make him or her aware of RF exposure, and what to do
to as-sure that this radio operates with the FCC RF exposure limitsof
this radio.
Electromagnetic Interference/Compatibility
Note: Nearly every electronic device is susceptible to electromag-
netic interference (EMI) if inadequately shielded, designed or
otherwise configured for electromagnetic compatibility. During
transmissions, this radio generates RF energy that can possibly
cause interference with other devices or systems.
Facilities
To avoid electromagnetic interference and/or compatibility
conflicts,turn off your radio in any facility where posted notices
instruct you to do so. Hospitals or health care facilities may be using
equipment that is sensitive to external RF energy.
Aircraft
When instructed to do so, turn off your radio when onboard an
aircraft. Any use of a radio must be in accordance with applicable
regulations per airline crew instructions.
• The extension cord is properly wired and in good condition.
10. The supply cord of the AC adaptor cannot be replaced. If the
cord is damaged, call customer service.
19

Medical Devices – Pacemakers, Defibrillators or other Implanted
Medical Devices Persons with pacemakers, implantable
cardioverter defibrillators (ICDs) or other active implantable
medical devices (AIMD) should:
• Consult with their physicians regarding the potential risk of
interference from radio frequency transmitters, such as portable
radios (poorly shielded medical devices may be more susceptible
to interference).
• Turn the radio OFF immediately if there is any reason to suspect
that interference is taking place.
• Do not carry the radio in a chest pocket or near the implantation
site, and carry or use the radio on the opposite side of their body
from the implantable device to minimize the potential for
interference.
Hearing Aids
Some digital wireless radios may interfere with some hearing
aidsIn the event of such interference, you may want to consult
your hearing aid manufacturer to discuss alternatives.
Other Medical Devices
If you use any other personal medical device, consult the
manufacturer of your device to determine if it is adequately
shielded from RF energy. Your physician may be able to assist
you in obtaining this information.
Use of Communication Devices While Driving
Always check the laws and regulations on the use of radios in the
areas where you drive.• Give full attention to driving and to the
road.• Use hands-free operation, if available.• Pull off the road
and park before making or answering a call, if driving conditions
or regulations so require.
20

For Vehicle with Air Bags
Refer to the vehicle manufacturer’s manual prior to installation of
electronic equipment to avoid interference with air bag wiring. Do not
place a portable radio in the area over an air bag or in the air bag
deployment area. Air bags inflate with great force. If a portable radio
is placed in the air bag deployment area and the air bag inflates, the
radio may be propelled with great force and cause serious injury to
occupants of the vehicle.
Potentially Explosive Atmosphere
Turn off your radio prior to entering any area with a potentially
explosive atmosphere. Only radio types that are especially qualified
should be used in such areas as “Intrinsically Safe”. Donot remove,
install or charge batteries in such areas. Sparks in apotentially
explosive atmosphere can cause an explosion or fireresulting in
bodily injury or even death.
Note:
The areas with potentially explosive atmosphere referred to above
include fueling areas such as below decks on boats, fuel or chemical
transfer or storage facilities, areas where the air contains chemicals
or particles (such as grain, dust or metal powders) and any other
area where you would normally be advised to turn off your vehicle
engine. Areas with potentially explosive atmospheres are often – but
not always posted.
21
Blasting Caps and Areas
To avoid possible interference with blasting operations, turn off
your radio when you are near electrical blasting caps, in a blasting
area, or in areas posted “Turn off two-way radios”. Obeyall signs
and instructions.
Warning: CHOKING HAZARD – Small Parts. Not for children
under 3 years.
Attention! RISQUE D’ÉTOUFFEMENT – Contient de petits
éléments. Ne convient pas aux enfants de moins de 3 ans
Advertencia: PELIGRO DE ASFIXIA – Contiene piezas
pequeñas. No conveniente para niños menores de 3 años.
Achtung: ERSTICKUNGSGEFAHR – Kleinteile. Nicht für Kinder
unter 3 Jahren geeignet.
Waarschuwing: VERSTIKKINGSGEVAAR – Bevat kleine
onderdelen. Niet geschikt voor kinderen jonger dan 3 jaar.
Attenzione: RISCHIO DI SOFFOCAMENTO – Contiene pezzi di
piccole dimensioni. Non adatto a bambini di età inferiore a 3
anni.
Aviso: RISCO DE ASFIXIA – Peças pequenas. Produto não
recomendado para crianças com menos de 3 anos.
22
Technical specifications and warnings (US)
Technical specifications (US)
Technical Parameters (US)
Operating frequency: 462~467MHz
Output Power: ≤2.0W
Channels: 22 FRS
Modulation type: F3E
Power source: AA Alkaline 4.5V DC /
NiMH battery 3.6V DC 2500mAh
Channel and frequency correspondence list (US)
Note:Above channels are FRS license free channels
1
2
3
4
5
6
7
8
9
10
11
462.5625
462.5875
462.6125
462.6375
462.6625
462.6875
462.7125
467.5625
467.5875
467.6125
467.6375
2.0
2.0
2.0
2.0
2.0
2.0
2.0
0.5
0.5
0.5
0.5
Channel
Frequencies
(MHz)
Power
-Watts
12
13
14
15
16
17
18
19
20
21
22
467.6625
467.6875
467.7125
462.5500
462.5750
462.6000
462.6250
462.6500
462.6750
462.7000
462.7250
0.5
0.5
0.5
2.0
2.0
2.0
2.0
2.0
2.0
2.0
2.0
Channel
Frequencies
(MHz)
Power
-Watts
23
WARNING
WARNING
Warnings (US)
Your Retevis radio is designed to comply with the following national
and international standards and guidelines regarding exposure
ofhuman beings to radio frequency electromagnetic energy:
· United States Federal Communications Commission, Code of
Federal Regulations: 47 CFR part 2.1093
· IEEE Std. 1528:2013 and KDB447498, Evaluating Compliance
with FCC Guidelines for Human Exposure to Radio Frequency
Electromagnetic Fields.
· American National Standards Institute (ANSI)/Institute of Electrical
& Electronic Engineers (IEEE) C95. 1-2005
· Institute of Electrical and Electronic Engineers (IEEE) C95.3-2002
· International Electrotechnical Commission IEC62209-2:2010
This product is compliance to FCC RF Exposure requirements and
refers to FCC website
https://apps.fcc.gov/oetcf/eas/reports/GenericSearch.cfm
search for FCC ID: 2AAR8RETEVISROAM to gain further
information include SAR Values.
24
WARNING
WARNING
SAFETY INFORMATION
Your wireless hand-held portable transceiver contains a low
power transmitter. This product sends out radio frequency (RF)
signals when the Push-to-Talk (PTT) button is pressed. The
device is authorized to operate at a duty factor not to exceed
50% In August 1996, the Federal Communications Commis-
sions (FCC) adopted RF exposure guidelines with safety levels
for hand-heldwireless devices.To control your exposure and
ensure compliance with the general population or uncontrolled
environment exposure limits, transmitno more than 50% of the
time. The radio generates measurable RF energy exposure
only when transmitting.
Any Changes or modifications not expressly approved by the
party responsible for compliance could void the user’s authority
to operate the equipment and should not be made. To comply
with FCC requirements, transmitter adjustments should be
made only by or under the supervision of a person certified as
technically qualified to perform transmitter maintenance and
repairs in the private land mobile and fixed services as certified
by an organization representative of the user of those services.
Replacement of any transmitter component (crystal,
semiconductor,etc) not authorized by the FCC equipment
authorization for this radio could violate FCC rules.
25

WARNING
Note: Use of this radio outside the country where it was
intend to be distributed is subject to government
regulations and may be prohibited.
Body-Worn Operation
To maintain compliance with FCC’s RF exposure guidelines,
for body-worn operation, this radio has been tested and
meets the FCC RF exposure guidelines when used with
accessories supplied or designated for this product. Use of
other accessories may not ensure compliance with FCC RF
exposure guidelines.
If you wear the radio on your body when transmitting always
use an approved belt clip, holster, case, or body harness for
this product.
When not using an approved accessory, always ensure that
the radio and its antenna are at least 1 inch (2.5cm) from
your body when transmitting.
26
Technical specifications and warnings (Canada)
Technical Parameters (Canada)
Operating frequency: 462~467MHz
Output Power: ≤2.0W
Channels: 22 FRS/GMRS
Modulation type: F3E
Power source: AA Alkaline 4.5V DC /
NiMH battery 3.6V DC 2500mAh
Channel and frequency correspondence list (Canada)
Note: Above channels are FRS/GMRS license free channels
1
2
3
4
5
6
7
8
9
10
11
462.5625
462.5875
462.6125
462.6375
462.6625
462.6875
462.7125
467.5625
467.5875
467.6125
467.6375
2.0
2.0
2.0
2.0
2.0
2.0
2.0
0.5
0.5
0.5
0.5
Channel
Frequencies
(MHz)
Power
-Watts
12
13
14
15
16
17
18
19
20
21
22
467.6625
467.6875
467.7125
462.5500
462.5750
462.6000
462.6250
462.6500
462.6750
462.7000
462.7250
0.5
0.5
0.5
2.0
2.0
2.0
2.0
2.0
2.0
2.0
2.0
Channel
Frequencies
(MHz)
Power
-Watts
27
WARNING
Warnings (Canada)
This device complies with Industry Canada licence-exempt
RSS standard(s). Operation is subject to the following two
conditions
(1) This device may not cause interference, and
(2) This device must accept any interference, including
interference that may cause undesired operation of the device.
Compliance with RF Exposure Standards
This radio is designed to comply with the following national and
international standards and guidelines regarding exposure of
human beings to radio frequency electromagnetic energy:
- American National Standards Institute (ANSI)/Institute of
Electrical & Electronic Engineers (IEEE) C95. 1.
- IEEE Std. 1528:2013 and KDB447498, Evaluating
Compliance with FCC Guidelines for Human Exposure to Radio
Frequency Electromagnetic Fields.
- Ministry of Health (Canada) Safety Code 6 & Industry Canada
RSS-102.
- International Commission on Non-lonizing Radiation
Protection(ICNIRP).e.
- International Electrotechnical Commission IEC62209-2:2010
CAUTION
28
IC Radiation Exposure Statement
This EUT is compliance with SAR for controlled exposure
limits in IC RSS-102 and had been tested in accordance with
the measurement methods and procedures specified in IEEE
1528 and IEC 62209, this equipment should be installed and
operated with minimum distance 1 cm between the radiator
and your body. This device and its antenna(s) must not be
co-located or operating in conjunction with any other antenna
or transmitter.
Please refer to the following websites and Guidance
documents for more information on what RF energy exposure
is and how to control your exposure to assure compliance
with established RF exposure limits: RSS-102, Safety Code 6
and www.who.int/en/.
For warranty inquiries, please contact:
CAUTION
CAUTION
29
MANUEL DE L'UTILISATEUR
FRANÇAIS
MOUNTAIN LAB GEAR
RADIO BIDIRECTIONNELLE
SCOUT 2W
Remarque:
Veuillez lire attentivement le mode
d'emploi avant d'utiliser l'appareil.
FONCTIONS CLÉS
7
8
9
10
Haut-Parleur
Micro
Surveiller/Balayage
Verrouiller/Menu
Port Pour Accessoires
de Microphone Haut-Parleur
7
8
9
10
11
11
1
2
3
4
5
Push-To-Talk (PTT)
Tonalité d'Alimentation/d'Appel
Lampe/Météo
Bouton De Signal Lumineux
Lumière DEL
Signal Lumineux
1
2
3
4
5
6
6
30
POUR COMMENCER
Installez les Piles Rechargeables AA NiMH
1. Enlevez le clip de ceinture en insérant un doigt sous la languette
en haut et en faisant glisser le clip de ceinture vers le haut.
2. Enlevez les deux vis à l'arrière de la radio en les tournant dans le
sens antihoraire pour ouvrir le couvercle.
ÉCRAN D'AFFICHAGE
Numéro De Canal
Sous-code
Double Canal
Balayage
VOX
Autonomie De La Pile
État (Émission/Réception)
Volume/Muet
Verrouillage Du Clavier
Alerte Météo
Retirez le
couvercle
de la pile
Des vis
31
Insérez les
piles AA NiMH
Fermez le
couvercle
de la pile
Autonomie De La Pile
3. Installez les piles AA
NiMH fournies selon
l'orientation indiquée
dans le compartiment
des piles.
4. Fermez le couvercle du
compartiment des piles
et remettez les vis en
place, en les tournant
dans le sens horaire
jusqu'à ce qu'elles
soient bien serrées.
Une pile complètement chargée est indiquée par trois barres
pleines . Quand la pile est faible, l'écran affichera une barre
clignotante et la radio émettra un bip d'avertissement de pile
faible après chaque transmission.
Remarque:
• Enlevez les piles de la radio avant de la ranger. Les piles
laissées dans la radio pendant le remisage peuvent se
corroder avec le temps et causer des dommages permanents
à votre radio.
• Ne mélangez pas des piles anciennes et neuves ou alcalines
et NiMH.
• Chargez les piles NiMH fournies une fois tous les trois mois
lorsqu'elles ne sont pas utilisées.
32
1. Appuyez sur pour augmenter le volume (le volume
maximum est de 7). Appuyez sur pour diminuer le
volume (le volume minimum est de 1).
2. Quand le niveau de volume 0 est sélectionné, la radio est
mise en sourdine et s'affiche.
Utilisation de la Station De Chargement
La station de chargement Micro-USB vous permet de charger
facilement la pile NiMH de votre radio SCOUT dans la station
d'accueil dédiée, en utilisant l'adaptateur de charge certifié inclus
(5V, ≥1A).
Remarque: N'essayez pas de charger des piles alcalines.
Comment Charger La Pile
1. Assurez-vous que votre radio est éteinte.
2. Branchez le câble Micro-USB dans le port Micro-USB de la
station de chargement. Insérez le connecteur USB dans
l'adaptateur de charge. Branchez l'adaptateur de charge dans
une prise électrique domestique.
3. Placez la radio dans la station de chargement. L'indicateur de
niveau de pile sur l'écran se mettra en marche pour indiquer
que la pile est en cours de chargement. La pile est complète-
ment chargée quand l'écran affiche trois barres pleines.
OPÉRATION DE BASE
Allumer Et Éteindre La Radio
1. Appuyez sur le bouton d'alimentation et maintenez-le
enfoncé pour allumer/éteindre votre radio.
2. L'écran affichera le canal actuel, le sous-code et les fonctions activées.
Régler Le Volume
33
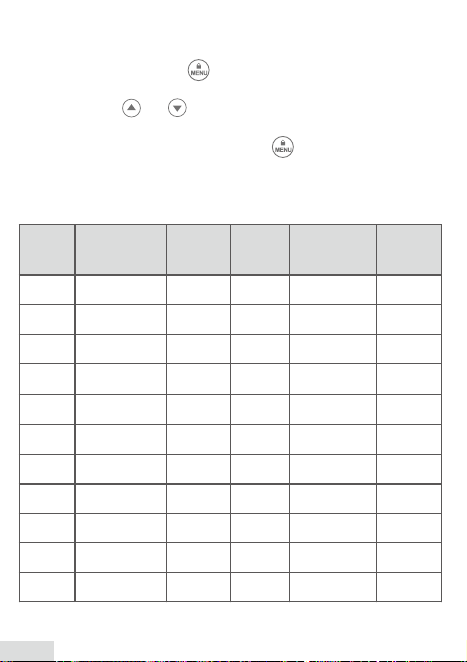
1. Appuyez sur le bouton . Le numéro de canal commencera à
clignoter.
2. Appuyez sur ou pour changer le numéro de canal.
3. Appuyez sur le bouton PTT pour sélectionner le canal et quitter
le menu, ou appuyez à nouveau sur pour passer au menu
de sélection de sous-code.
Réglage Du Canal
CH
Fréquence
(MHz)
Puissance
(MHz)
1 462.5625 2W 12 467.6625 0.5W
2 462.5875 2W 13 467.6875 0.5W
3 462.6125 2W 14
467.7125 0.5W
4 462.6375 2W 15 462.5500 2W
5 462.6625 2W 16 462.5750 2W
6 462.6875 2W 17 462.6000
2W
7 462.7125 2W 18 462.6250 2W
8 467.5625 0.5W 19 462.6500 2W
9 467.5875 0.5W 20 462.6750 2W
10 467.6125 0.5W 21 462.7000 2W
11 467.6375 0.5W 22 462.7250 2W
CH
Fréquence
Puissance
Canaux et Fréquences
34
1. Appuyez sur le bouton jusqu'à ce que le numéro de
sous-code se mette à clignoter.
2. Appuyez sur ou pour changer le numéro de sous-code.
3. Appuyez sur le bouton PTT pour quitter le menu.
Remarque: Quand le sous-code "0" est sélectionné, la radio peut
recevoir des transmissions de n'importe quelle radio sur le même
canal, peu importe le sous-code. Cependant, seules les radios
également sur le sous-code "0" pourront recevoir ses transmis-
sions.
Si le bouton PTT est maintenu pendant plus de 60 secondes, la
radio arrêtera de transmettre. Ceci afin d'éviter une transmission
accidentelle.
Pour communiquer, toutes les radios de votre groupe doivent
être réglées sur le même canal et sous-code.
1. Pour parler, maintenez le bouton PTT enfoncé. Pendant la
transmission, l'icône s'affiche. Relâchez le bouton PTT
quand vous avez fini de parler. N'utilisez pas les radios à
moins de deux mètres l'une de l'autre, sinon les radios peuvent
éprouver des retours.
2. Pendant la réception d'une transmission, l'icône s'affiche.
Remarque: avec toutes les radios, il est recommandé de
maintenir le bouton PTT pendant une demi-seconde de plus
avant et après avoir parlé pour vous assurer que votre
transmission n'est pas coupée.
Délai PTT
Réglage Du Sous-Code
Transmission Et Réception
35
2. Lorsqu'une activité est détectée, la radio arrêtera de balayer et
recevra la transmission. À la fin de la transmission, appuyez sur
le bouton PTT dans les cinq secondes pour répondre. Sinon, la
radio reprendra le balayage.
3. Si le bouton PTT est enfoncé pendant que l'appareil balaye, la
transmission sera envoyée sur le canal principal sélectionné.
4. Appuyez sur le bouton pour quitter le mode de balayage.
Remarque: Si l'appareil s'arrête sur une transmission
involontaire/indésirable, appuyez sur ou pour reprendre le
balayage OU supprimez temporairement ce canal de la liste de
balayage en appuyant et en maintenant or pendant trois
secondes.
Pour restaurer les canaux supprimés dans la liste de balayage,
appuyez sur pour quitter et revenir en mode de balayage.
Pour tranmettre une tonalité d'appel, appuyez sur le bouton
Réglage de la Tonalité d'Appel
1. Pour sélectionner la tonalité d'appel à utiliser, appuyez sur le
bouton jusqu'à ce que le menu de tonalité d'appel "CA"
apparaisse. Le chiffre clignotant indique la tonalité d'appel en
cours.
2. Appuyez sur ou pour modifier la tonalité d'appel.
3. Appuyez sur le bouton PTT pour quitter le menu.
Remarque: La tonalité d'appel "0" met la fonction de tonalité d'appel
en sourdine. Aucune tonalité d'appel ne sera envoyée, mais ils
peuvent toujours être reçus.
La fonction de balayage permet à l'utilisateur d'écouter toute
activité sur n'importe quel canal et son sous-code correspondant
(tel que sélectionné dans le menu principal).
1. Appuyez sur le bouton pour lancer le balayage. L'icône
"SCAN" s'affichera et l'affichage passera en revue les canaux
et sous-codes en cours de balayage pour de l'activité.
Tonalité d'Appel
La fonction de verrouillage du clavier empêche l'activation
accidentelle des boutons du clavier. Ceci est particulièrement utile
quand la radio est utilisée avec l'accessoire microphone
haut-parleur inclus et placée à l'intérieur d'un sac à dos ou fixée
d'une autre manière.
1. Pour verrouiller les boutons du clavier, appuyez et maintenez le
bouton jusqu'à ce que l'indicateur de verrouillage s'affiche.
2. Répétez la procédure pour déverrouiller le clavier.
Verrouillage Du Clavier
Balayage
CARACTÉRISTIQUES DU CLAVIER
36
2. Lorsqu'une activité est détectée, la radio arrêtera de balayer et
recevra la transmission. À la fin de la transmission, appuyez sur
le bouton PTT dans les cinq secondes pour répondre. Sinon, la
radio reprendra le balayage.
3. Si le bouton PTT est enfoncé pendant que l'appareil balaye, la
transmission sera envoyée sur le canal principal sélectionné.
4. Appuyez sur le bouton pour quitter le mode de balayage.
Remarque: Si l'appareil s'arrête sur une transmission
involontaire/indésirable, appuyez sur ou pour reprendre le
balayage OU supprimez temporairement ce canal de la liste de
balayage en appuyant et en maintenant or pendant trois
secondes.
Pour restaurer les canaux supprimés dans la liste de balayage,
appuyez sur pour quitter et revenir en mode de balayage.
Le mode surveiller peut être utilisé pour écouter les signaux
faibles ou pour vérifier l'activité sur le canal actuel.
1. Appuyez et maintenez pendant trois secondes pour
passer en mode surveiller.
2. Relâchez le bouton pour quitter le mode surveiller.
La fonction de balayage permet à l'utilisateur d'écouter toute
activité sur n'importe quel canal et son sous-code correspondant
(tel que sélectionné dans le menu principal).
1. Appuyez sur le bouton pour lancer le balayage. L'icône
"SCAN" s'affichera et l'affichage passera en revue les canaux
et sous-codes en cours de balayage pour de l'activité.
Surveiller
Appuyez sur le bouton pour allumer/éteindre la lampe. La
fonction de lampe est désactivée par le verrouillage du clavier.
Lampe à DEL
En mode météo, votre radio peut recevoir des informations
météorologiques, des avertissements et des alertes de la NOAA.
Appuyez sur le bouton et maintenez-le enfoncé pendant trois
secondes pour entrer ou sortir du mode météo.
Météo
37
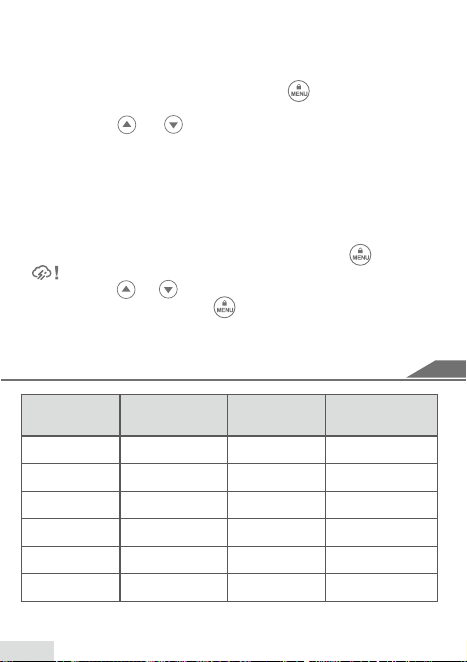
Réglage du Canal Météo
Votre radio peut être réglée pour répondre aux messages
d'urgence de la Radio Météo de la NOAA.
1. En mode météo, appuyez sur le bouton jusqu'à ce que le
numéro de canal météo clignote.
2. Appuyez sur ou pour sélectionner le canal approprié
pour votre région.
3. Appuyez sur le bouton PTT pour régler le canal et quitter le
menu.
Réglage de l'Alerte Météo
Votre radio peut être réglée pour répondre aux messages
d'urgence de la Radio Météo de la NOAA.
1. En mode météo, appuyez deux fois sur le bouton . L’icône
s'affiche.
2. Appuyez sur ou pour activer ou désactiver l'alerte météo.
3. Appuyez sur le bouton PTT ou pour quitter le menu d'alerte météo.
4. Répétez l'étape pour désactiver l'alerte météo.
CANAL MÉTÉO ET FRÉQUENCES
(MHz)
Canal Météo
Fréquence
(MHz)
WX1 162.550 WX7 162.525
WX2 162.400 WX8 161.650
WX3 162.475 WX9 161.775
WX4 162.425 WX10 161.750
WX5 162.450 WX11 162.000
WX6 162.500
Fréquence
Canal Météo
38
La transmission à commande vocale permet à l'utilisateur
d'envoyer des transmissions sans appuyer sur le bouton PTT. La
radio détectera une augmentation des niveaux sonores et
transmettra automatiquement.
1. Pour activer VOX, appuyez sur le bouton jusqu'à ce que
“VOX” apparaisse sur l'affichage, accompagné d'un chiffre
clignotant (0-3).
2. Appuyez sur ou pour modifier le niveau de sensibilité
VOX (1-3) ou désactiver (0).
• 0 = fonction VOX désactivée
• 1 = faible sensibilité
• 2 = moyenne sensibilité
• 3 = haute sensibilité
3. Appuyez sur le bouton PTT pour quitter le menu.
Remarque: Le bouton PTT peut toujours être utilisé pour envoyer
des transmissions en mode VOX.
Réglage du Canal Météo
Votre radio peut être réglée pour répondre aux messages
d'urgence de la Radio Météo de la NOAA.
1. En mode météo, appuyez sur le bouton jusqu'à ce que le
numéro de canal météo clignote.
2. Appuyez sur ou pour sélectionner le canal approprié
pour votre région.
3. Appuyez sur le bouton PTT pour régler le canal et quitter le
menu.
Réglage de l'Alerte Météo
Votre radio peut être réglée pour répondre aux messages
d'urgence de la Radio Météo de la NOAA.
1. En mode météo, appuyez deux fois sur le bouton . L’icône
s'affiche.
2. Appuyez sur ou pour activer ou désactiver l'alerte météo.
3. Appuyez sur le bouton PTT ou pour quitter le menu d'alerte météo.
4. Répétez l'étape pour désactiver l'alerte météo.
Le bouton de signal lumineux peut être utilisé pour émettre une
tonalité d'appel d'urgence et un voyant clignotant SOS. Cette
fonction ne doit être utilisée qu'en cas d'urgence réelle pour
augmenter la visibilité.
Remarque: Cet appareil n'a pas la capacité de contacter les
services d'urgence ou de fournir des informations de localisation,
et ne doit pas être confondu avec un dispositif de localisation
personnel dédié conçu à cet effet.
1. Appuyez sur le bouton SOS et maintenez-le enfoncé pendant
trois secondes. Le voyant DEL rouge commencera à faire
clignoter le voyant SOS et une tonalité d'urgence sera transmise.
2. Pour annuler le signal lumineux d'urgence, appuyez à nouveau
sur le bouton SOS.
Signal Lumineux (SOS)
Transmission à commande vocale (VOX)
CARACTÉRISTIQUES DU MENU
39

Le moniteur double canal permet à l'utilisateur d'écouter les
transmissions sur deux canaux en même temps - le canal
principal et sous-code comme défini dans le menu principal, et un
deuxième canal et sous-code.
1. Appuyez sur le bouton jusqu'à ce que le menu du moniteur
double canal "2CH" apparaisse. Le chiffre clignotant indique le
canal secondaire actuel à surveiller (1-22) et "OF" indique que
la fonction est désactivée.
2. Appuyez sur ou pour sélectionner le canal secondaire à
surveiller.
Remarque: Il n'y a pas d'option pour sélectionner un sous-code
dans le menu du moniteur double canal. Le sous-code est dicté
par le sous-code qui est sélectionné pour ce canal dans le réglage
du menu de sous-code principal. Par exemple: Si le réglage du
canal principal pour le canal 5 est réglé sur le sous-code 121,
alors ce sera le sous-code utilisé pour la sélection du moniteur à
double canal du canal 5.
3. Appuyez sur le bouton PTT pour quitter le menu.
En mode moniteur double canal, l'affichage alterne entre le réglage
du canal principal (et sous-code) et le canal secondaire double canal.
Dans le cas où une transmission est reçue sur le canal de
contrôle secondaire à double canal, toutes les transmissions
effectuées dans les 10 secondes suivant la réception se
produiront sur le canal secondaire.
Sinon, toutes les transmissions seront effectuées sur le réglage
du canal principal et sous-code.
2. Appuyez sur ou pour sélectionner la puissance
clignotante "HI" ou "LO".
Remarque: la puissance élevée (2 watts) n'est disponible que sur les
canaux 1 à 7 et 15 à 22. Les canaux 8 à 14 sont limités à faible
puissance (0.5 watts) uniquement, conformément à la réglementa-
tion gouvernementale.
3. Appuyez sur le bouton PTT pour quitter le menu.
La puissance élevée est indiquée sur l'affichage principal (indiqué
par "HI") quand les canaux 1 à 7 ou 15 à 22 sont sélectionnés.
Remarque: Le réglage de la puissance n'affecte pas la capacité de la
radio à recevoir des transmissions. Seule la puissance de sortie est
affectée par ce réglage.
Moniteur Double Canal (2CH)
1. Appuyez sur le bouton jusqu'à ce que le menu de sélection
d'alimentation "Pr" apparaisse.
Réglage de la Puissance De Transmission Élevée Et Faible
40
2. Appuyez sur ou pour sélectionner la puissance
clignotante "HI" ou "LO".
Remarque: la puissance élevée (2 watts) n'est disponible que sur les
canaux 1 à 7 et 15 à 22. Les canaux 8 à 14 sont limités à faible
puissance (0.5 watts) uniquement, conformément à la réglementa-
tion gouvernementale.
3. Appuyez sur le bouton PTT pour quitter le menu.
La puissance élevée est indiquée sur l'affichage principal (indiqué
par "HI") quand les canaux 1 à 7 ou 15 à 22 sont sélectionnés.
Remarque: Le réglage de la puissance n'affecte pas la capacité de la
radio à recevoir des transmissions. Seule la puissance de sortie est
affectée par ce réglage.
1. Appuyez sur le bouton jusqu'à ce que le menu de sélection
d'alimentation "Pr" apparaisse.
Tonalité du Clavier Activée / Désactivée
Appuyez sur le bouton et maintenez-le enfoncé tout en allumant
la radio pour désactiver ou réactiver la tonalité du clavier.
Roger Tone Activé / Désactivé
Appuyez et maintenez le bouton tout en allumant la radio pour
désactiver ou réactiver le bip Roger (bip de transmission PTT).
Économie d'Énergie Automatique
Cette fonction éteint automatiquement l'écran lorsqu'il n'est pas utilisé
pour économiser la pile.
DEL Activée Par l'Eau
Si la radio tombe dans l'eau, une lumière DEL blanche clignotante
sera automatiquement activée pour aider à trouver la radio échappée
dans l'obscurité. Après avoir récupéré la radio, appuyez sur n'importe
quel bouton pour désactiver la lumière clignotante.
CARACTÉRISTIQUES SUPPLÉMENTAIRES
41
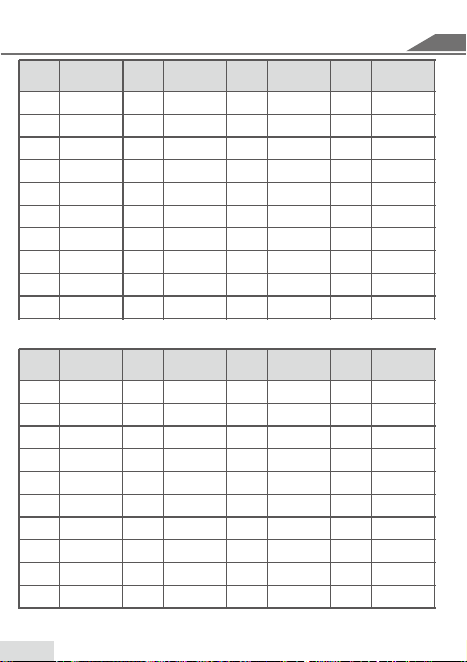
Code
No
Fréquence
(Hz)
Code
No
Fréquence
(Hz)
Code
No
Fréquence
(Hz)
Code
No
Fréquence
(Hz)
1 67
71.9
74.4
77
79.7
82.5
85.4
88.5
91.5
94.8
97.4
100
103.5
107.2
110.9
114.8
118.8
123
127.3
131.8
136.5
141.3
146.2
151.4
156.7
162.2
167.9
173.8
179.9
186.2
192.8
203.5
210.7
218.1
225.7
233.6
241.8
250.3
2
3
4
5
6
7
8
9
11
12
13
14
15
16
17
18
19
21
22
23
24
25
26
27
31
32
33
34
35
36
37
28 38
29
10 20 30
No Code No Code No Code No Code
39 23
25
26
31
32
43
47
51
54
65
71
72
73
74
114
115
116
125
131
132
134
143
152
155
156
162
165
172
174
205
223
226
243
244
245
251
261
265
271
263
40
41
42
43
44
45
46
47
49
50
51
52
53
54
55
56
57
59
60
61
62
63
64
65
69
70
71
72
73
74
75
66 76
77
78
67
48 58 68
FRÉQUENCES RADIO
CTCSS 38
42
La transmission à commande vocale permet à l'utilisateur
d'envoyer des transmissions sans appuyer sur le bouton PTT. La
radio détectera une augmentation des niveaux sonores et
transmettra automatiquement.
1. Pour activer VOX, appuyez sur le bouton jusqu'à ce que
“VOX” apparaisse sur l'affichage, accompagné d'un chiffre
clignotant (0-3).
2. Appuyez sur ou pour modifier le niveau de sensibilité
VOX (1-3) ou désactiver (0).
• 0 = fonction VOX désactivée
• 1 = faible sensibilité
• 2 = moyenne sensibilité
• 3 = haute sensibilité
3. Appuyez sur le bouton PTT pour quitter le menu.
Remarque: Le bouton PTT peut toujours être utilisé pour envoyer
des transmissions en mode VOX.
Le présent matériel est conforme aux specifications techniques
applicables d’Industrie Canada.
Le présent appareil est conforme aux CNR d'ISEDC
applicables aux appareils radio exempts de licence.
L'exploitation est autorisée aux deux conditions suivantes: (1)
l'appareil ne doit pas produire de brouillage, et (2) l'utilisateur
de l'appareil doit accepter tout brouillage radioélectrique subi,
même si le brouillage est susceptible d'en compromettre le
fonctionnement.
Avertissement ISEDC
No Code No Code No Code No Code
79 306
311
315
331
343
346
351
364
365
371
412
413
423
431
432
445
464
465
466
503
516
532
546
565
606
612
624
627
631
632
662
664
703
712
723
731
732
734
743
754
80
81
82
83
84
85
86
87
90
91
92
93
94
95
96
97
98
101
102
103
104
105
106
107
112
113
114
115
116
117
118
108 119
120
121
109
88 99 110
411 506 65489 100 111
SÉCURITÉ ET INFORMATIONS GÉNÉRALES
CDCSS 83
43
Avertissements
Sureté du produit et exposition aux radiofréquences pour les radios
bidirectionnelles :
Antennes
Sureté du produit et exposition aux radiofréquences
pour les radios bidirectionnelles :
Avant d’utiliser cette radio bidirectionnelle, veuillez lire
attentivement le mode d’emploi. Celui-ci contient
d’importantes informations sur l’utilisation sécuritaire, la
sensibilisation à l’exposition aux radiofréquences, des
données de contrôle et des directives opérationnelles
concernant la conformité à l’exposition aux
radiofréquences selon les standards nationaux et
internationaux pour un usage sécuritaire.
Des tests du débit d’absorption spécifique (DAS) à la tête, selon la
position et la configuration, ont été effectués sur l’appareil selon
IEEE1528. Des tests DAS sur le visage ont été effectués avec
l’appareil à 25mm. Des tests DAS sur le corps ont été effectués
lorsque l’appareil est utilisé avec l’attache à la ceinture, soit à 0mm
du corps. Les tests DAS au corps ont aussi été effectués avec un
casque d’écoute et sans.
1. L’antenne sur la radio est unique, veuillez ne pas essayer de la
changer ou la remplacer.
2. Pour une utilisation sécuritaire, l’antenne devrait être à un
minimum de 25mm de votre visage lorsque vous parlez.
ATTENTION
44

Piles
Toutes les piles peuvent causer des dommages matériels ou des
lésions corporelles tels que des brulures si un matériel conducteur
touches les pôles exposés. Le matériel conducteur peut créer un
court-circuit et devenir chaud.
• Soyez prudent lorsque vous retirer les piles NiMH ou AA. Ne pas
utiliser d’outil pointu, aiguisé ou conducteur pour retirer les piles.
• Soyez prudent lorsque vous manipulez des piles chargées,
spécifiquement lorsque vous les mettez dans une poche, un sac ou
tout autre réceptacle contenant des objets métalliques.
• Ne pas exposer vos piles au feu.
• Ne pas changer vos piles lorsque vous êtes dans un environne-
ment à « atmosphère dangereuse ». Toute étincelle peut créer une
atmosphère explosive et causer un feu ou une explosion.
• De pas démonter, écraser, perforer, broyer ou tenter de changer
la forme de la pile d’une quelconque façon.
• Ne pas assécher une pile humide ou mouillée avec un appareil
ou une source de chaleur telle qu’un séchoir à cheveux ou un four
à microondes.
• Si les pôles de batterie ont été submergés dans l’eau, séchez et
nettoyez les pôles de la piles avant de la remettre dans la radio.
• Ne pas recharger des piles alcalines.
3. Modifier ou changer l’antenne aura un impact sur la performance
de votre radio et annulera la garantie.
4. NE PAS utiliser une radio portable dont l’antenne est
endommagée. Si une antenne endommagée vient à être en contact
avec votre peau, cela peut causer une brulure mineure.
ATTENTION
45

Directives de sécurité pour le chargement des piles
1. Éteignez la radio lorsque vous chargez les piles.
2. Ne pas exposer le chargeur à l’environnement extérieur. Les
chargeurs ne devraient être utilisés qu’à l’intérieur.
3. N’essayez pas de réparer ou démonter le chargeur. N’utilisez
pas un chargeur qui a été échappé ou abimé d’une quelconque
façon.
4. Ne jamais modifié le câble AC ou la fiche fournie avec la radio.
Si la fiche n’entre pas dans la prise de courant, veuillez faire
installer une nouvelle prise de courant par un électricien qualifié.
Un usage ou une installation inadéquate peut résulter en un
risque de choc électrique.
5. Afin de réduire les risques de damages au câble ou à la fiche,
tirez sur la fiche plutôt que sur le câble lorsque vous souhaitez
déconnecter le chargeur de la prise de courant.
6. Afin de réduire les risques d’électrocution, veuillez déconnect-
er le chargeur de la prise de courant afin toute maintenance ou
entretien.
7. L’usage d’accessoires non-recommandés ou vendus par
Mountain Lab Gear peut entrainer des risques de feu,
électrocution et dommages corporels.
8. Assurez-vous que le câble est positionné de manière à ce que
personne ne puisse marcher ou trébucher dessus, ou qu’il
puisse être endommagé ou soumis à un stress.
9. Aucune rallonge électrique ne devrait être utilisée, à moins
que ce ne soit absolument nécessaire. L’usage d’une rallonge
électrique inappropriée peut entrainer des risques de feu et
d’électrocution. Si une rallonge électrique doit absolument être
utilisée, veuillez vous assurer que :
• La fiche de la rallonge électrique contient le même nombre de
tiges et qu’elles sont de la même taille et forme que celle de la
ATTENTION
46

Les informations ici-bas sont fournies afin que l’usager soit
informé sur l’exposition au RF et sur comment s’assurer que la
radio opère selon les limites d’expositions au FR établies par la
Federal Communications Commission.
Interférence électromagnétique/compatibilité
Note : Presque tous les appareils électroniques sont suscepti-
bles aux interférences électromagnétiques (EMI) si protégé,
conçu ou configuré inadéquatement. Lors de la transmission, ces
radios génèrent des RF qui peuvent potentiellement causer des
interférences avec d’autres appareils ou systèmes.
Établissements
Afin d’éviter les interférences électromagnétiques et/ou des
problèmes de compatibilité, veuillez éteindre votre radio dans
tous établissements qui le demanderaient. Les hôpitaux et les
centres de soin peuvent utiliser de l’équipement sensible à
l’énergie RF externe.
Aéronautique
Lorsque avisé d’éteindre vos appareils à bord d’un avion,
veuillez éteindre votre radio. Tout usage d’une radio doit être en
accord avec les normes du transport aérien.
Appareils médicaux – Stimulateurs cardiaques, défibrillateurs et
autres dispositifs médicaux implantés.
ATTENTION
fiche du chargeur.
• La rallonge électrique est correctement connectée et en bon état.
10. Le câble ne peut pas être remplacé. Si celui-ci est
endommagé, veuillez contacter le service à la clientèle.
47

Les personnes avec un stimulateur cardiaque, défibrillateur
automatique implantable (DAI) ou tout autre dispositif médical
implantable actif (DMIA) devraient :• Consulter leur médecin
concernant les risques potentiels d’interférence avec les appareils
émetteurs de radiofréquences, tels que les radios portables (les
dispositifs médicaux peu protégés sont potentiellement à plus haut
risque).
• Éteindre toute radio immédiatement s’ils suspectent qu’il y a
interférence.
• Ne pas transporter la radio dans une poche à la poitrine ou près
du site d’implantation. Veillez à utiliser et transporter la radio du
côté du corps opposé au site d’implantation de l’appareil afin de
minimiser les risques d’interférences.
Appareils auditifs
Certaines radios sans-fils digitales peuvent interférer avec des
appareils auditifs. Dans une telle situation, il est recommandé de
consulter votre fabricant d’appareils auditifs pour discuter
d’alternatives.
Autres appareils médicaux
Si vous utilisez tout autre appareil médical, veuillez consulter le
fabricant de votre appareil afin de déterminer s’il est adéquatement
protégé des RF. Votre médecin est peut-être en mesure de vous
fournir cette information.
Utilisation d’appareil de communication lors de la conduite
Vérifier toujours les lois et réglementations sur l’usage de radios
portables lors de la conduite dans de nouvelles régions.
• Porter une attention complète à la conduite et la route.
• Utilisez la fonctionnalité mains-libres, si disponible.
• Arrêtez-vous prudemment avant de transmettre ou de répondre à
48

un appel, si les conditions de conduite ou les lois et
régulations l’exigent.
Véhicules avec sacs gonflables
Référez-vous au manuel du fabricant du véhicule avant
l’installation d’équipement électronique afin d’éviter les
interférences avec le câblage des sacs gonflables. Ne pas
placer de radio portable sur un sac gonflable ou dans la région
de déploiement de celui-ci. Les sacs gonflables se gonflent
avec force. Si une radio portable est placée dans la zone de
déploiement et que le sac gonflable se gonfle, la radio peut
être propulsée avec force et causer des blessures sérieuses
aux occupants du véhicule.
Atmosphère potentiellement explosive
Éteignez votre radio avant d’entrer dans des zones à
atmosphère potentiellement explosive. Seules les radios
spécialement certifiées devraient être utilisées dans ces
environnements. Ne pas retirer, installer ou changer les piles
dans un tel environnement. Une étincelle dans une
atmosphère potentiellement explosive peut causer une
explosion ou un feu causant des lésions corporelles ou même
la mort.
Note :Les zones à atmosphère potentiellement explosive
mentionnées incluent les zones de ravitaillement en carburant
telles que sous les ponts des bateaux, des installations de
transfert d’essence ou de produits chimiques, des zones où
l’air contient des composés chimiques ou des particules
(grains, poussières, poudres métalliques, etc) et toute autre
zone où il est généralement recommandé d’éteindre votre
véhicule. Les zones à atmosphère potentiellement explosive
sont généralement affichées comme l’étant, mais pas toujours.
49
Détonateurs et zone de dynamitage
Afin d’éviter tout potentiel d’interférence avec des opérations
de dynamitage, veuillez éteindre votre radio lorsque vous vous
rapprochez de détonateurs, d’une zone de dynamitage ou
d’une région demandant l’extinction des radios bidirection-
nelles (Two-Way Radios). Respectez toute signalisation et
instruction.
Warning: CHOKING HAZARD – Small Parts. Not for
children under 3 years.
Attention! RISQUE D’ÉTOUFFEMENT – Contient de
petits éléments. Ne convient pas aux enfants de moins
de 3 ans
Advertencia: PELIGRO DE ASFIXIA – Contiene piezas
pequeñas. No conveniente para niños menores de 3
años.
Achtung: ERSTICKUNGSGEFAHR – Kleinteile. Nicht für
Kinder unter 3 Jahren geeignet.
Waarschuwing: VERSTIKKINGSGEVAAR – Bevat kleine
onderdelen. Niet geschikt voor kinderen jonger dan 3
jaar.
Attenzione: RISCHIO DI SOFFOCAMENTO – Contiene
pezzi di piccole dimensioni. Non adatto a bambini di età
inferiore a 3 anni.
Aviso: RISCO DE ASFIXIA – Peças pequenas. Produto
não recomendado para crianças com menos de 3 anos.
50
Spécifications techniques et avertissement (Canada)
Paramètres techniques (Canada)
Fréquence d’opération : 462~467MHz
Puissance de sortie : ≤2.0W
Canaux : 22 FRS/GMRS
Type de modulation : F3E
Source d’énergie : AA Alkaline 4.5V DC /
NiMH battery 3.6V DC 2500mAh
Listes des canaux et fréquences correspondantes
(Canada)
Note : Les canaux ici-haut sont des canaux FRS/GMRS
autorisés ne demandant pas de licence.
1
2
3
4
5
6
7
8
9
10
11
462.5625
462.5875
462.6125
462.6375
462.6625
462.6875
462.7125
467.5625
467.5875
467.6125
467.6375
2.0
2.0
2.0
2.0
2.0
2.0
2.0
0.5
0.5
0.5
0.5
Channel
Frequencies
(MHz)
Power
-Watts
12
13
14
15
16
17
18
19
20
21
22
467.6625
467.6875
467.7125
462.5500
462.5750
462.6000
462.6250
462.6500
462.6750
462.7000
462.7250
0.5
0.5
0.5
2.0
2.0
2.0
2.0
2.0
2.0
2.0
2.0
Channel
Frequencies
(MHz)
Power
-Watts
51
Avertissement (Canada)
Conformité aux standards d’exposition aux radiofréquences
Cet appareil est conforme aux normes CNR d’Industrie Canada
applicables aux appareils radio exempts de licence.
L’exploitation est soumise aux deux conditions suivantes :
1. Cet appareil ne doit pas causer d’interférence, et
2. Cet appareil doit accepter les interférences, même celles
susceptibles d'en compromettre le bon fonctionnement.
Cette radio est conçue en conformité avec les standards et
directives nationales et internationales concernant l’exposition
des êtres humains à l’énergie électromagnétique des
radiofréquences :
- American National Standards Institute (ANSI)/Institute of
Electrical & Electronic Engineers (IEEE) C95. 1.
- IEEE Std. 1528:2013 and KDB447498, Evaluating Compliance
with FCC Guidelines for Human Exposure to Radio Frequency
Electromagnetic Fields.
- Ministry of Health (Canada) Safety Code 6 & Industry Canada
RSS-102.
- International Commission on Non-lonizing Radiation
Protection (ICNIRP).e.
- International Electrotechnical Commission IEC62209-2:2010
ATTENTION
ATTENTION
52
Déclaration d’IC d’exposition au radiation
Cet appareil est conforme aux limites d'exposition contrôlée
DAS pour de la norme CNR-102 d'Industrie Canada et a été
testé en conformité avec les méthodes de mesure et les
procédures spécifiées dans IEEE 1528 et IEC 62209.
Cet appareil doit être installé et utilisé à une distance
minimale de 1 cm entre le transmetteur et votre corps. Cet
appareil et son antenne ne doivent pas être coimplantés ou
fonctionner en conjonction avec toute autre antenne ou
transmetteur.
Veuillez vous référer au site Internet et
documents de référence suivants pour plus
d’information sur l’exposition aux RF et
comment la contrôler afin de respecter les
limites d’exposition au RF : CNR-102, Code
de sécurité 6 et https://www.who.int/fr.
Pour toutes questions concernant la garantie,
veuillez contactez:
ATTENTION
ATTENTION
53