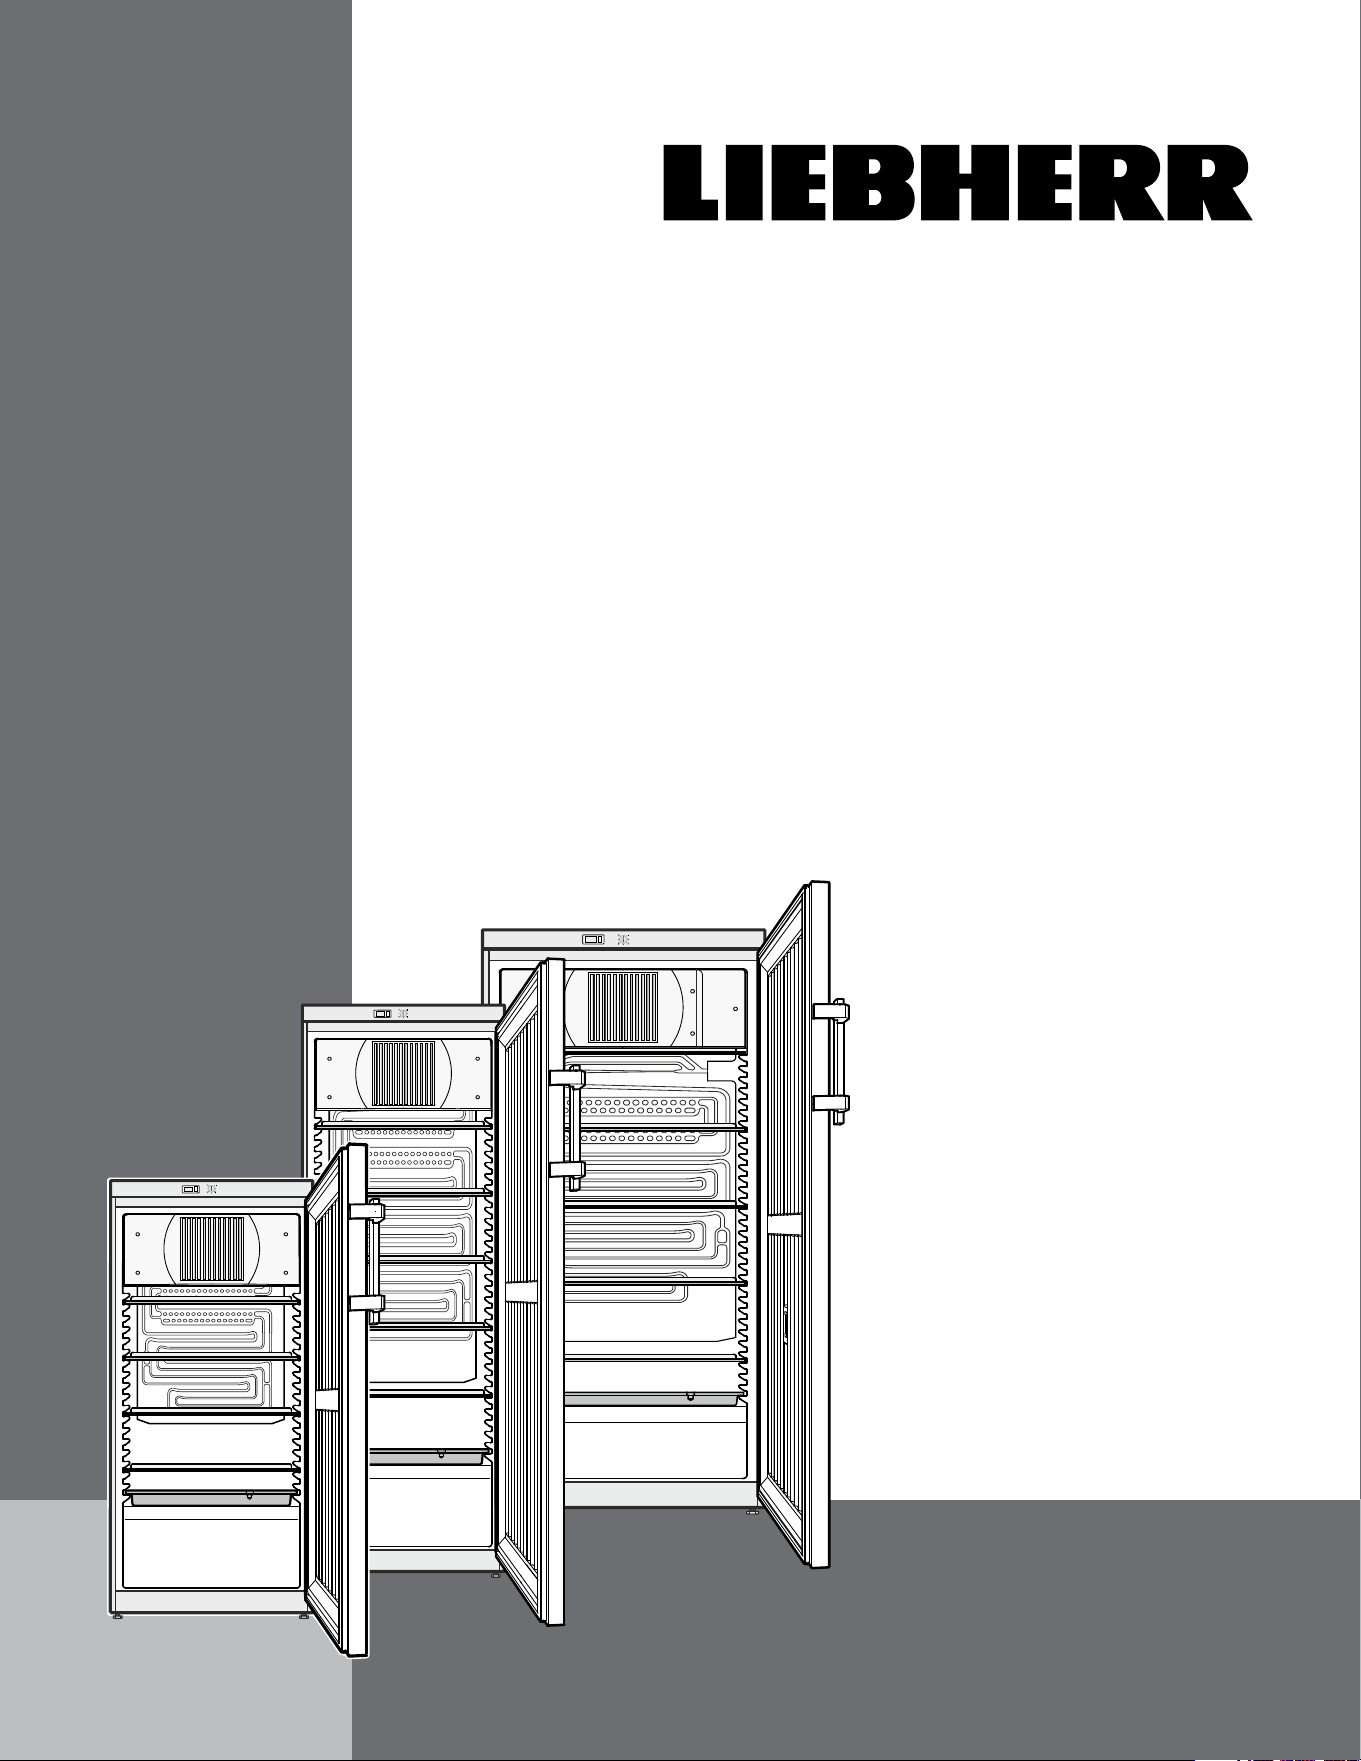
Use and
Care Manual
Flammable Material
Storage Refrigerator
LRBFS09W1HC
LRBFS12W1HC
LRBFS20W1HC
7085 841-00
2
T
able
of
C
onTenTs
Table of Contents Page
Please Read and Follow these Instructions ...................... 2
California Proposition 65 .................................................... 2
Disposal of Old Appliance .................................................. 3
Disposal of this Appliance .................................................. 3
Disposal of Carton .............................................................. 3
R600a/R290 Refrigerant .................................................... 3
Important Safety Information .............................................. 4
Electrical Safety .................................................................. 4
Safety Regulations ............................................................. 5
Setting Up ........................................................................... 5
Installing the Equipment ..................................................... 5
Dimensions ......................................................................... 6
Description of the Appliance .............................................. 6
Switching the appliance on and off .................................... 7
Setting the temperature ...................................................... 7
Temperature display ........................................................... 7
Safety Lock ......................................................................... 7
Defrosting ............................................................................ 8
Cleaning .............................................................................. 8
Troubleshooting .................................................................. 9
Customer Service ............................................................... 9
Turning Off the Appliance ................................................... 9
Changing Over Door Hinges ............................................ 10
Warranty ............................................................................ 14
IMPORTANT
All types and models are subject to continuous
improvement. The manufacturer reserves the right
to make modifications to the shape, equipment
and technology.
Please Read and Follow these
Instructions
These instructions contain Danger, Warning and
Caution notes.
This information is important for safe and efficient
installation and operation.
Always read and comply with all Danger, Warning and
Caution notes!
DANGER!
Danger indicates a hazard which
will cause serious injury or death if
precautions are not followed.
WARNING!
Warning indicates a potentially hazardous
situation which, if not avoided, could
result in death or serious injury.
CAUTION!
Caution indicates a potentially hazardous
situation which, if not avoided, may result
in minor or moderate injury.
IMPORTANT
This indicates information that is especially
relevant to a problem-free installation and
operation.
California Proposition 65
- This product contains chemicals known to the state
of California to cause cancer or reproductive harm.
- This product can expose you to chemicals including
Diisononyl Phthalate (DINP) which is known to the
State of California to cause cancer. For more infor-
mation go to www.P65Warnings.ca.gov.
- This product can expose you to chemicals includ-
ing Di-isodecyl Phthalate (DIDP) which is known to
the State of California to cause birth defects or other
reproductive harm. For more information go to
www.P65Warnings.ca.gov.
3
s
afeTy
Disposal of Carton
The packaging is designed to protect the appliance and
individual components during transport and is made of
recyclable materials.
WARNING!
Keep packaging materials away from
children. Polythene sheets and bags can
cause suffocation!
If possible, please recycle packaging material at a recy-
cling facility.
Disposal of Old Appliance
DANGER!
Risk of child entrapment.
Child entrapment and suffocation are not problems of
the past.
Junked or abandoned refrigerators are still dangerous –
even if they will sit for “just a few days.”
If you are getting rid of your old refrigerator, please
follow these instructions to help prevent accidents.
Before you discard old appliances:
• Takeoffthedoors.
• Leavetheshelvesinplacesothatchildren
may not easily climb inside.
• Cutoffthepowercablefromthediscarded
appliance. Discard separately from the
appliance.
• Besuretofollowyourlocalrequirementsfor
disposal of appliances.
Contact the trash collection agency in
your area for additional information.
Disposal of this Appliance
This appliance contains flammable gases within
the refrigeration circuit and insulation foam.
Contact the municipality or disposal company
in your area for information on approved
recycling or disposal.
R600a/R290 Refrigerant
WARNING!
The refrigerant R600a/R290 contained
within the appliance is environmentally
friendly, but flammable. Leaking
refrigerant can ignite.
To prevent possible ignition, follow the warnings
below:
•
Keep ventilation openings, in
the appliance enclosure or in
the built-in structure, clear of
obstruction.
• Donotusemechanicaldevices
or other means to accelerate the
defrosting process,
other than
those recommended by the manufacturer.
• Donotdamagetherefrigerantcircuit.
• Componentpartsandpowercordsshallbe
replaced with like components performed by
factory authorized service personnel only.
• Donotuseelectricalappliancesinsidethe
food storage compartments of the appliance,
unless they are of the type recommended by
the manufacturer.
4
s
afeTy
Important Safety Information
• Iftheapplianceisdamagedondelivery,
contact the supplier immediately before con-
necting it to the power source.
• Toguaranteesafeoperation,ensurethat
the appliance is set up and connected as
described in this manual.
• Disconnecttheappliancefromthepower
source if a fault occurs. Pull out the plug,
turn off or disable the power source.
• Whendisconnectingtheappliance,always
pull it out by the plug; never pull on the
cable.
• Anyrepairsandworkontheappliance
should only be performed by the customer
service department. Unauthorized work may
be dangerous to the user. The power source
cable should only be changed or replaced
by the customer service department.
• Topreventpossibleinjuryduetoanelectri-
cal shock, be sure to disconnect the power
cord or turn off the circuit breaker before
cleaning the appliance.
• Toavoidinjuryordamagetotheappliance,
do not use steam cleaning equipment to
clean the appliance.
• Donotoperatetheapplianceinthepres-
ence of explosive fumes.
• Intheeventofapoweroutage,openthe
door as infrequently as possible.
• Toprotecttheappliancefrompossibledam-
age, allow it to stand 1/2 to 1 hour in place
before turning on the electricity. This allows
the refrigerant and system lubrication to
reach equilibrium.
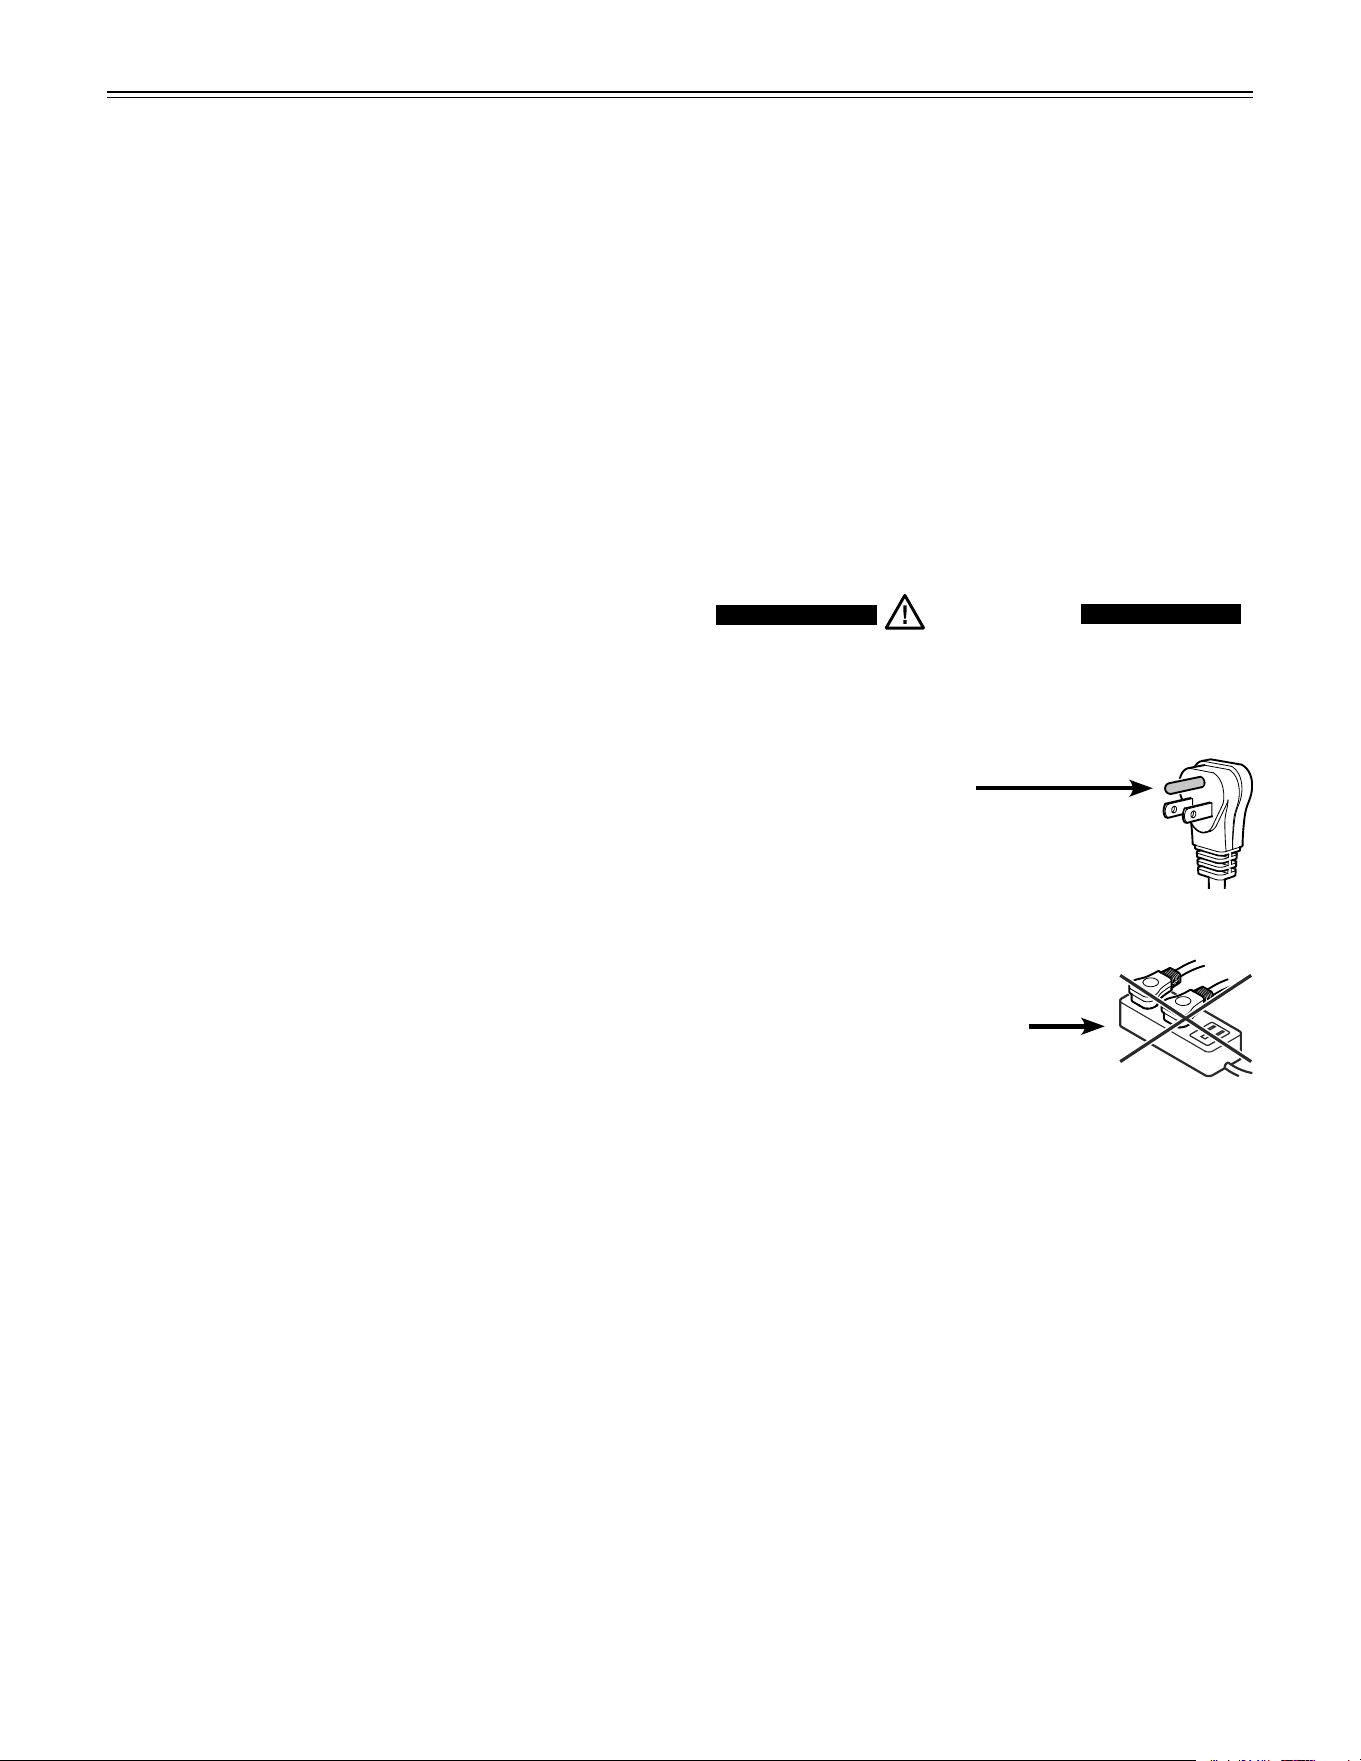
Electrical Safety
Connect this appliance to a 15 amp or 20 amp, 110-
120 VAC, circuit which is grounded and protected by a
circuit breaker or fuse.
We recommend using a dedicated circuit for this appli-
ance to prevent circuit overload and the chance of
interruption to the appliance.
This appliance is equipped with a three-prong (ground-
ing) polarized plug for your protection against possible
shock hazards.
Where a two-prong wall receptacle is encountered,
contact a qualified electrician and have it replaced with
a properly grounded three-prong receptacle in accor-
dance with all local codes and ordinances.
WARNING!
Electrocution hazard.
Electricalgroundingrequired.
•
Do not remove the round grounding
prong from the plug.
•
Do not use extension cords or
ungrounded (two-prong) adapters.
• Donotuseapowercordthatisfrayedor
damaged.
•
Do not use a power strip.
Failure to follow these instructions may
result in fire, electrical shock or death.
5
Setting Up
CAUTION!
To avoid risk of personal injury or property
damage, have two people to move this
appliance into place.
Avoid placing the appliance in direct sunlight or near
the stove, range top, radiators and similar heat sources.
• Examinetheunitandpackagingforshippingdam-
age. Contact the carrier immediately if you suspect
there is any damage.
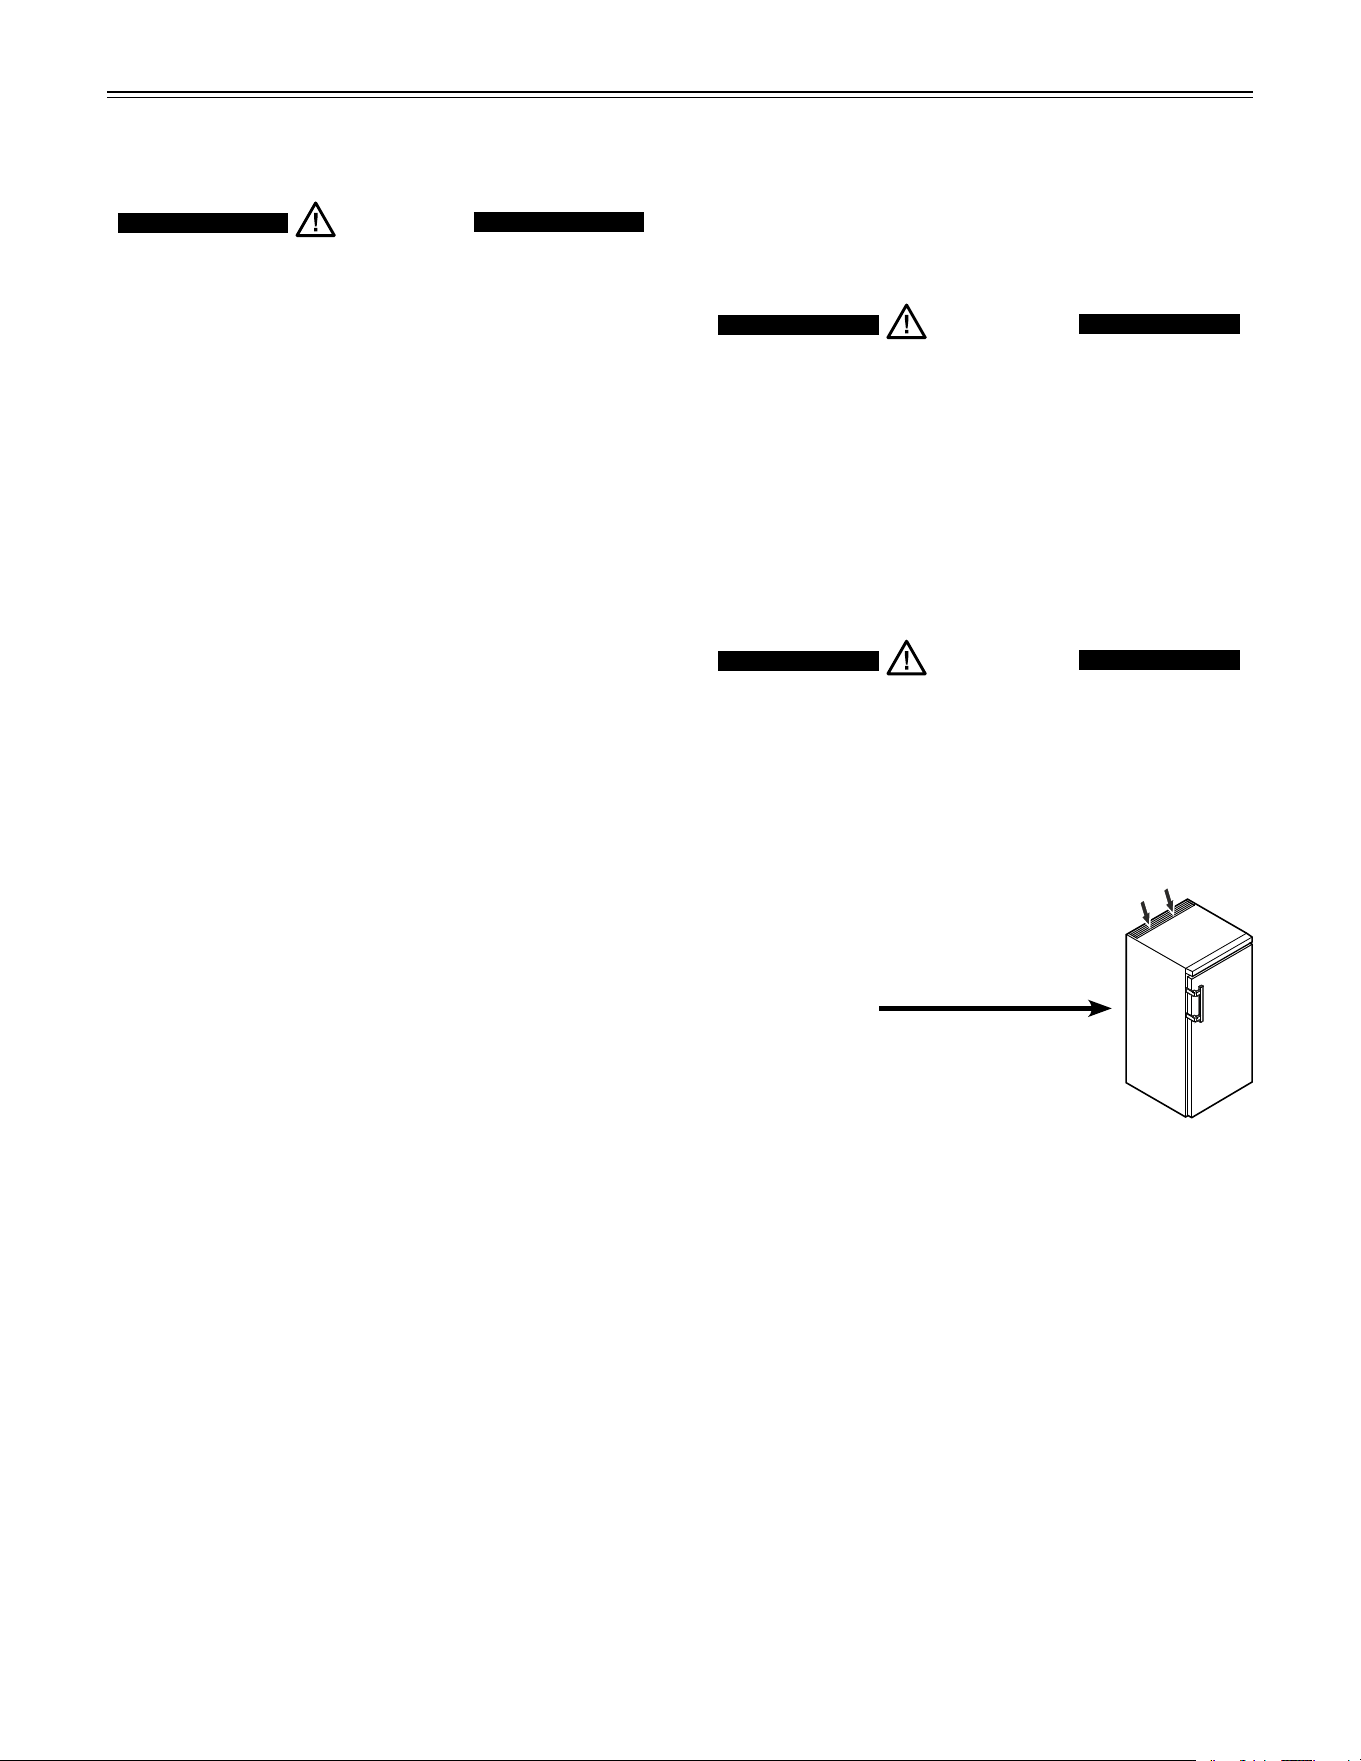
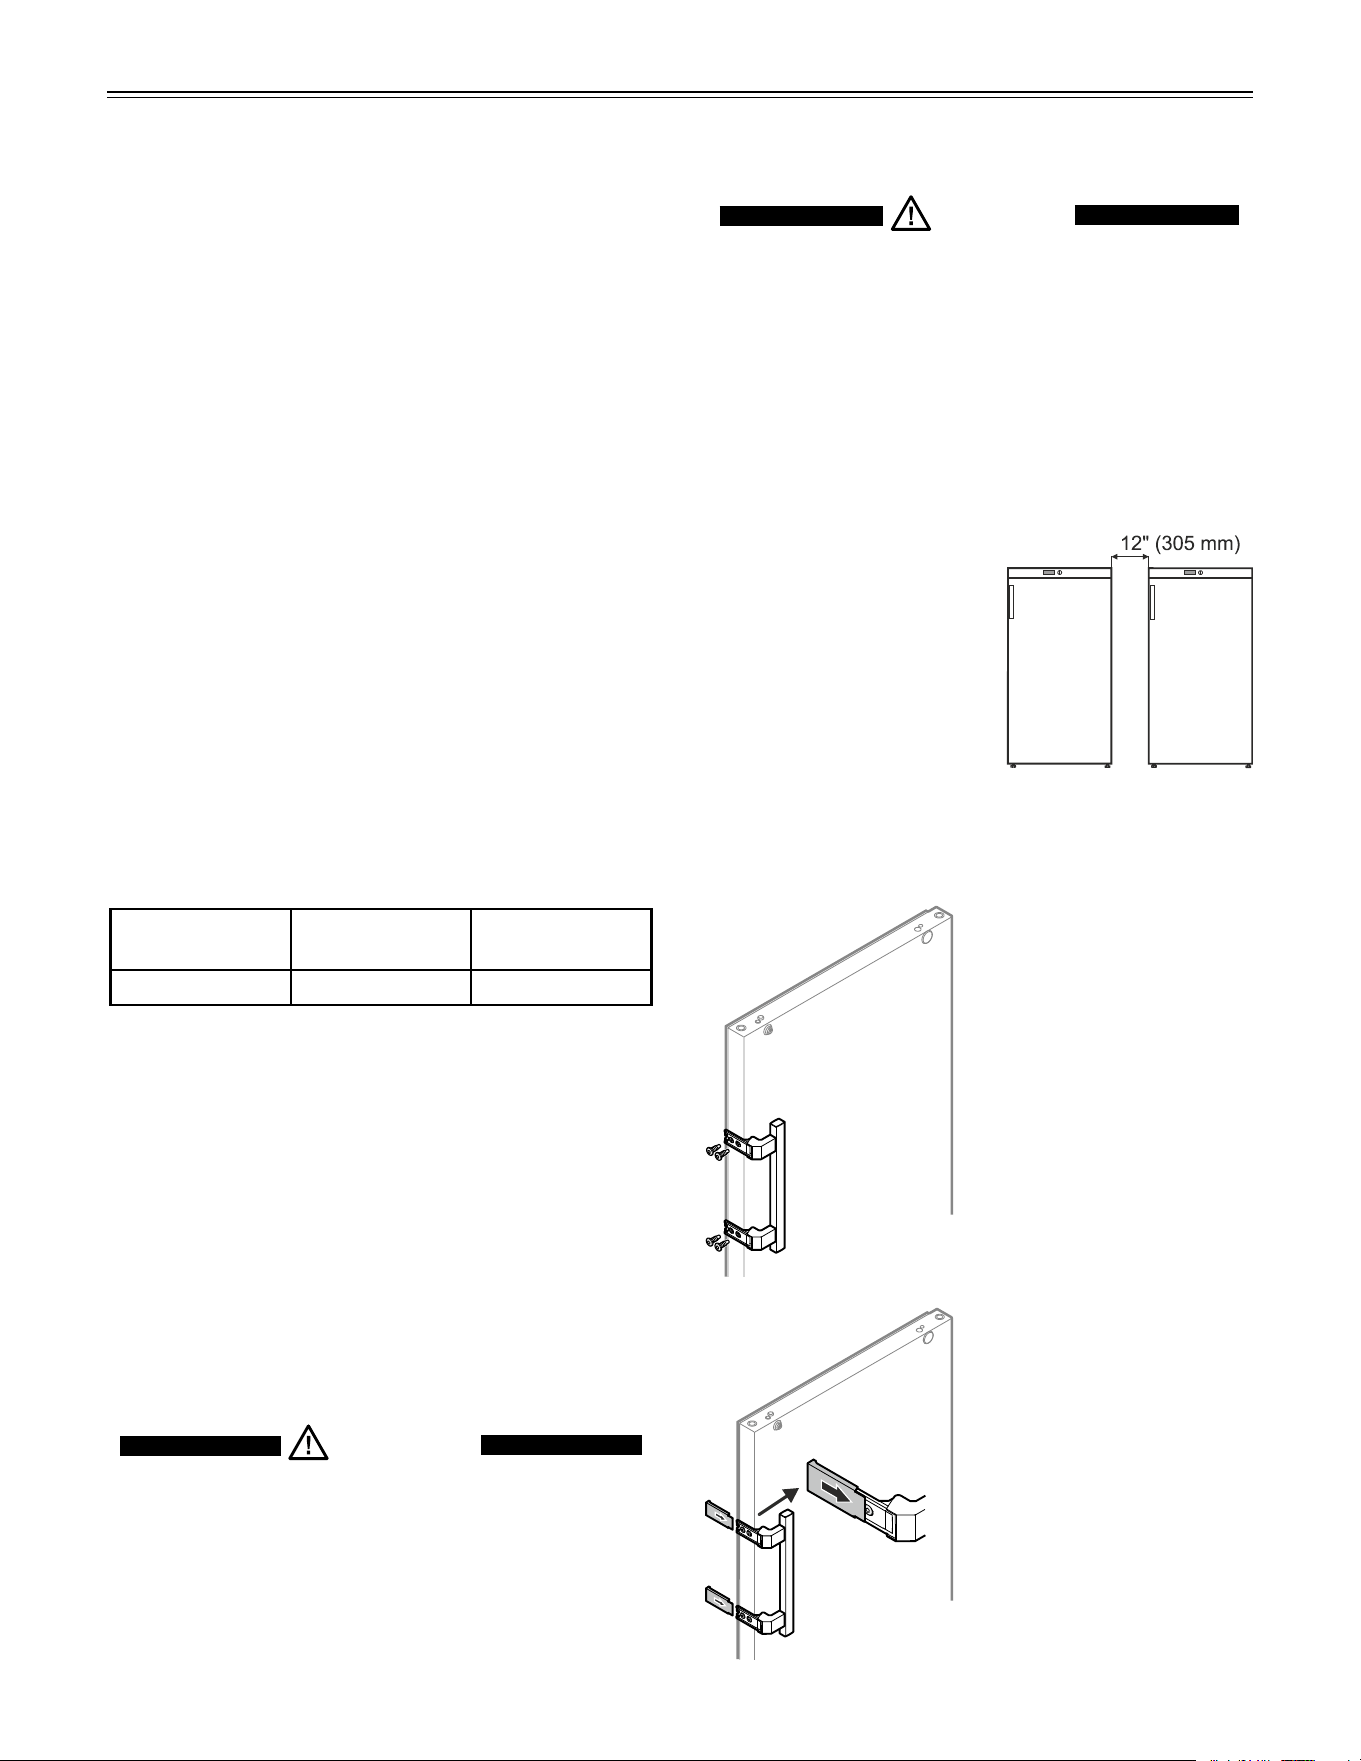
IMPORTANT
If several appliances are
installed next to each
other, leave a gap of 12"
(305 mm) between them.
s
eTTing
U
p
Safety Regulations
Range of appliance use
These units are ideal for storing cyclopropane, ethyl
ether, ethylene, acetone, alcohol, benzene, butane,
gasoline, hexane, lacquer solvent vapors, naphtha, nat-
ural gas or propane along with many other potentially
hazardous materials. Please also contact your supplier
regarding the material safety data sheets for the stored
materials.
IMPORTANT
- The appliance is not intended for outdoor use.
- The appliance is not intended for storage of blood or
blood products.
- The appliance is not intended to be used for medical
applications.
- The appliance is not suitable for operation in
potentially explosive atmospheres or hazardous
(classified) locations.
Climate rating
The climate rating indicates at what room temperature
the appliance may be operated to achieve full cooling
capacity and what the maximum humidity level in the
area around the appliance may be to ensure that no
condensation forms on the exterior housing.
Climate Rating Max. Ambient
Temperature
Max. relative
humidity
7 95°F (35°C) 75%
The minimum room temperature at the place of installa-
tion is 50°F (10°C).
IMPORTANT
Do not operate the appliance outside the specified
ambient temperature and humidity range.
- The refrigerant circuit has been tested for leaks.
- The appliance complies with current safety regula-
tions
C22.2 No. 120-13
UL 471 - 10
th
Edition
ANSI/ISA 12.12.01 - 9
th
Edition
WARNING!
Do not allow children to play with the
appliance. Children must not climb, sit or
stand on the shelves or door.
Failure to follow these instructions may
result in death or serious injury.
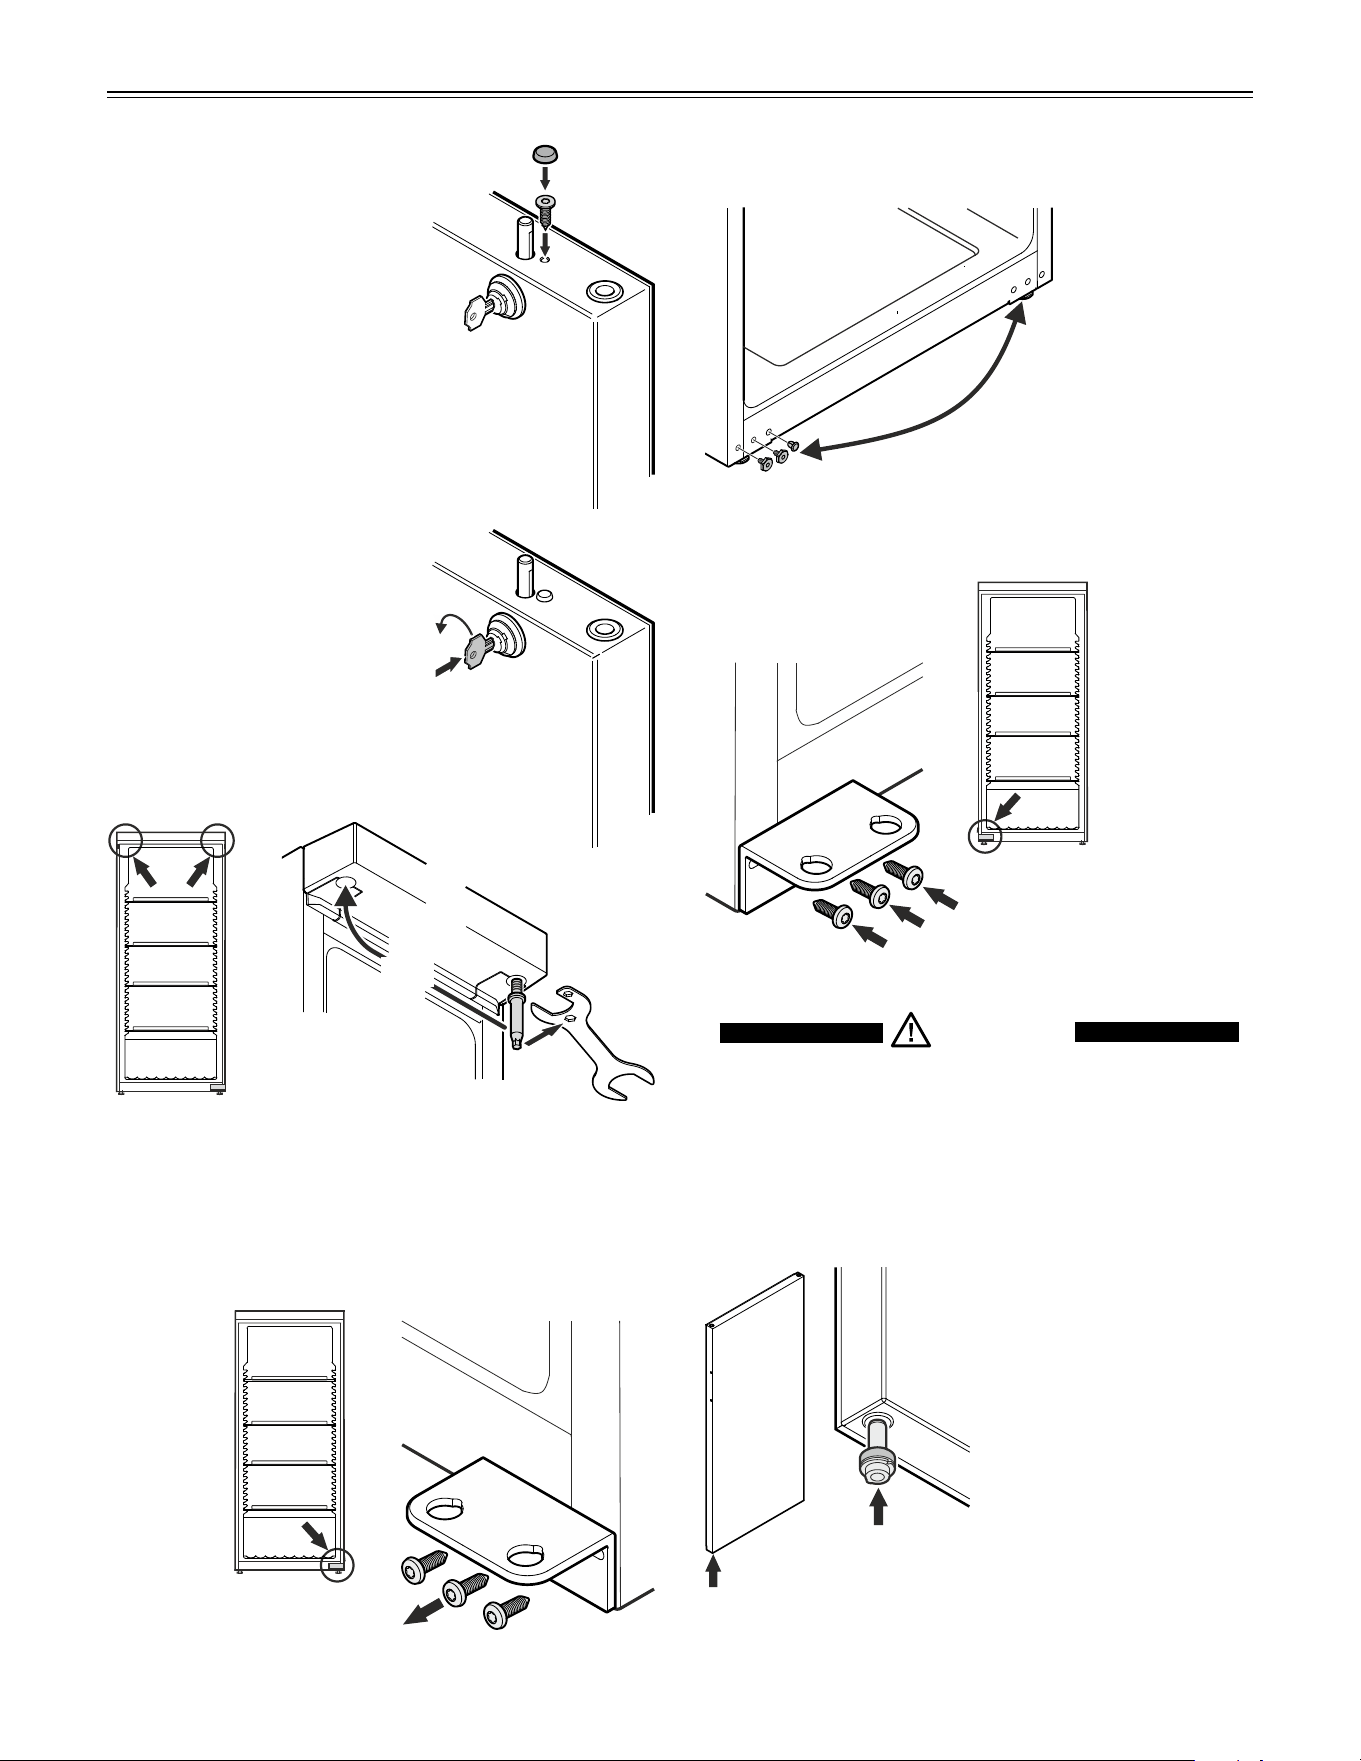
Installing the Equipment
Screw on the handle.
Handle, screws and key
are supplied in the acces-
sory pack.
Push on pressure plates
until they engage.
6
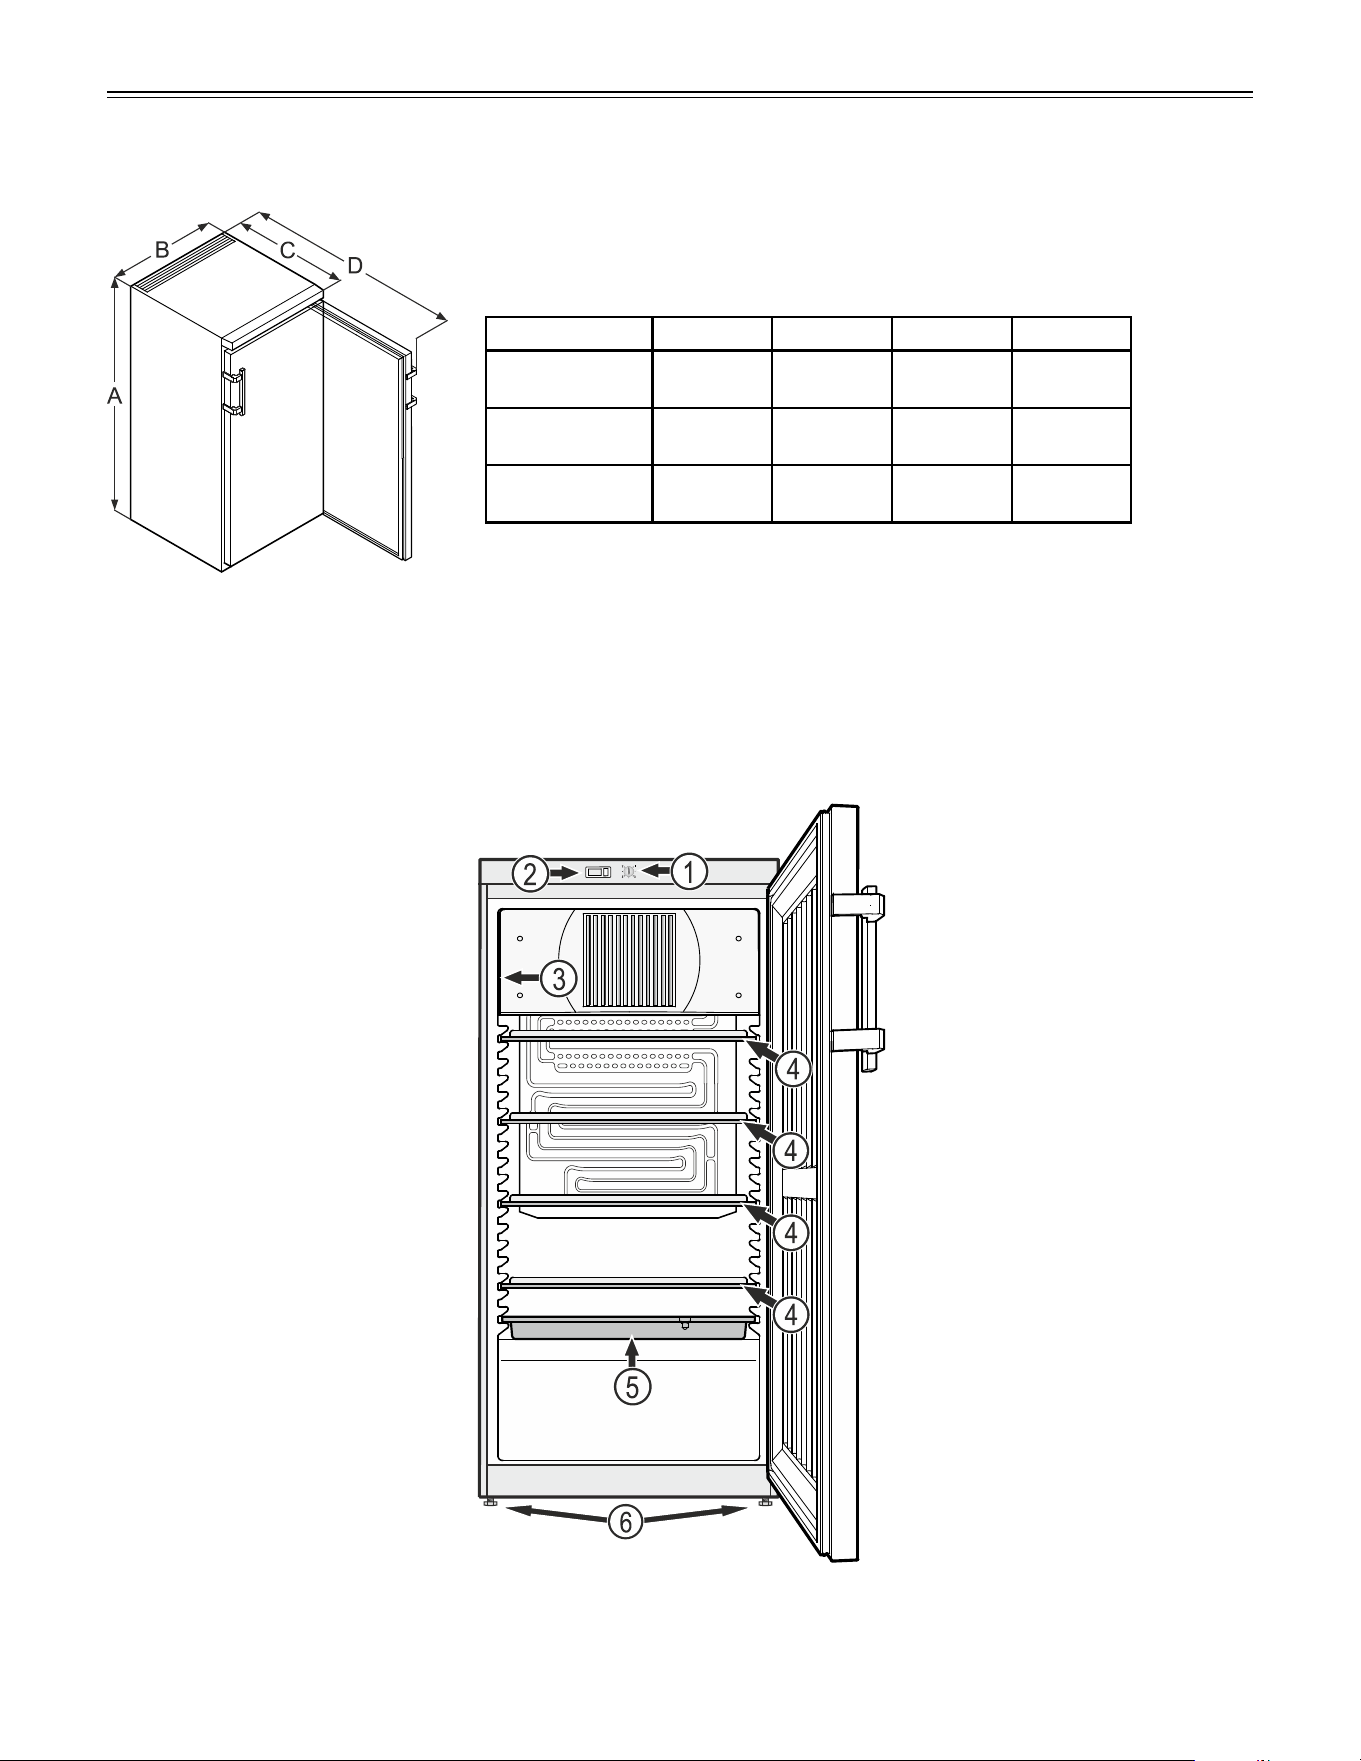
f
eaTUres
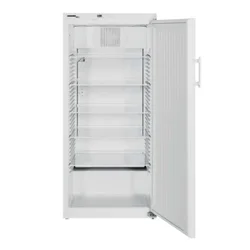
Description of the Appliance
IMPORTANT
The maximum load per
shelf is 88 lbs (40 kg).
Dimensions
Model A B C D
LRBFS09W1HC
49 - 7/32"
1250 mm
23 - 5/8"
600 mm
24"
610 mm
46 - 9/16"
118 3 mm
LRBFS12W1HC
64 - 5/8"
1641 mm
23 - 5/8"
600 mm
24"
610 mm
46 - 9/16"
118 0 m m
LRBFS20W1HC
64 - 5/8"
1641 mm
29 - 17/32"
750 mm
28 - 3/4"
729 mm
54 - 15/16"
1396 mm
(1) Temperature control
(2) Temperature display
(3) Model plate
(4) Adjustable shelves
(5) Defrost water collection tray
(6) Adustable-height feet
7
f
eaTUres
Switching the appliance on and off
Switching the appliance on
Connect the appliance to the electrical outlet - the appli-
ance is switched on.
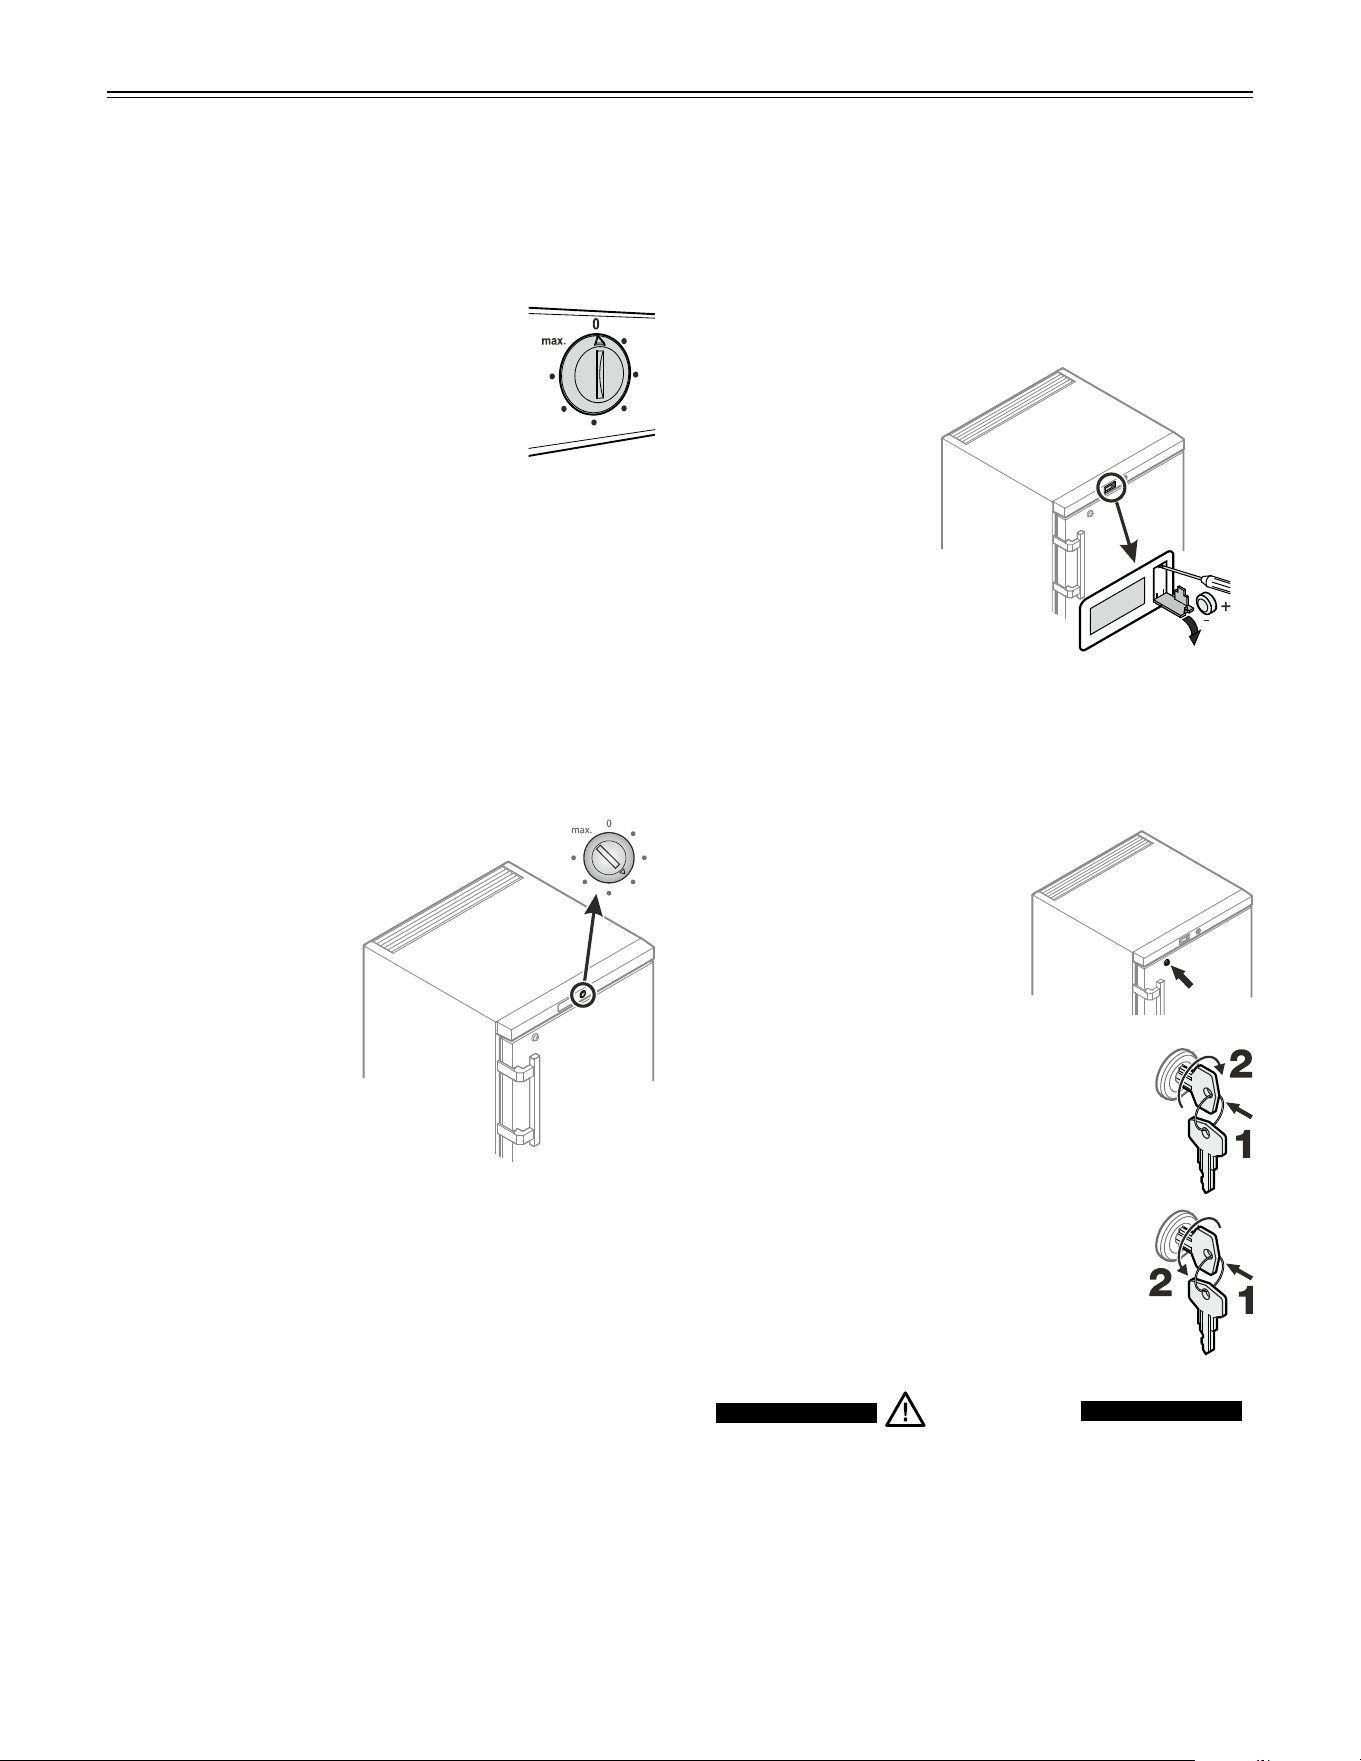
Switching the appliance off
Pull out the plug or set the temperature
control to 0.
IMPORTANT
When the temperature control is turned to “0”,
the refrigeration system is switched off, but the
appliance is not completely disconnected from the
power supply. Before cleaning, always disconnect
the appliance from the power supply. Remove the
plug.
Setting the temperature
Set the temperature
inside the appliance
using the temperature
control.
The nearer the tem-
perature control is to the
max. setting, the colder
the interior temperature.
Set the control between
"0" and "max." as
required.
Temperature Display
The temperature display is powered by a battery which
is available from your specialist dealer.
If no temperature is displayed, change the battery.
Type of battery: Button cell LR44 or equivalent type.
• Openthebattery
compartment using
a small screwdriver.
• Replacethebattery.
• Closethebattery
compartment.
If ER or HH appears
on the display, the
thermometer is defec-
tive.
Consult the customer serv ice department indicating the
fault number displayed.
Safety Lock
The lock in the appliance door
is equipped with a safety mech-
anism.
Locking the appliance
• Insertthekeyandpushasshownby
arrow 1.
• Turnthekey90°clockwise2.
Unlocking the appliance
• Insertthekeyandpushasshownby
arrow 1.
• Turnthekey90°counterclockwise2.
WARNING!
Risk of child entrapment and suffocation
due to a locked appliance door.
To Prevent A Child From Being Entrapped,
Keep The Key Out Of Reach Of Children
And Not In The Vicinity Of Freezer (Or
Refrigerator).
8
C
leaning
WARNING!
Danger of sparks produced by friction due
to dust on the fan blades.
Do not store dusty objects in the
appliance.
Clean the ventilation slots on the
recirculated air fan every month using a
vacuum cleaner.
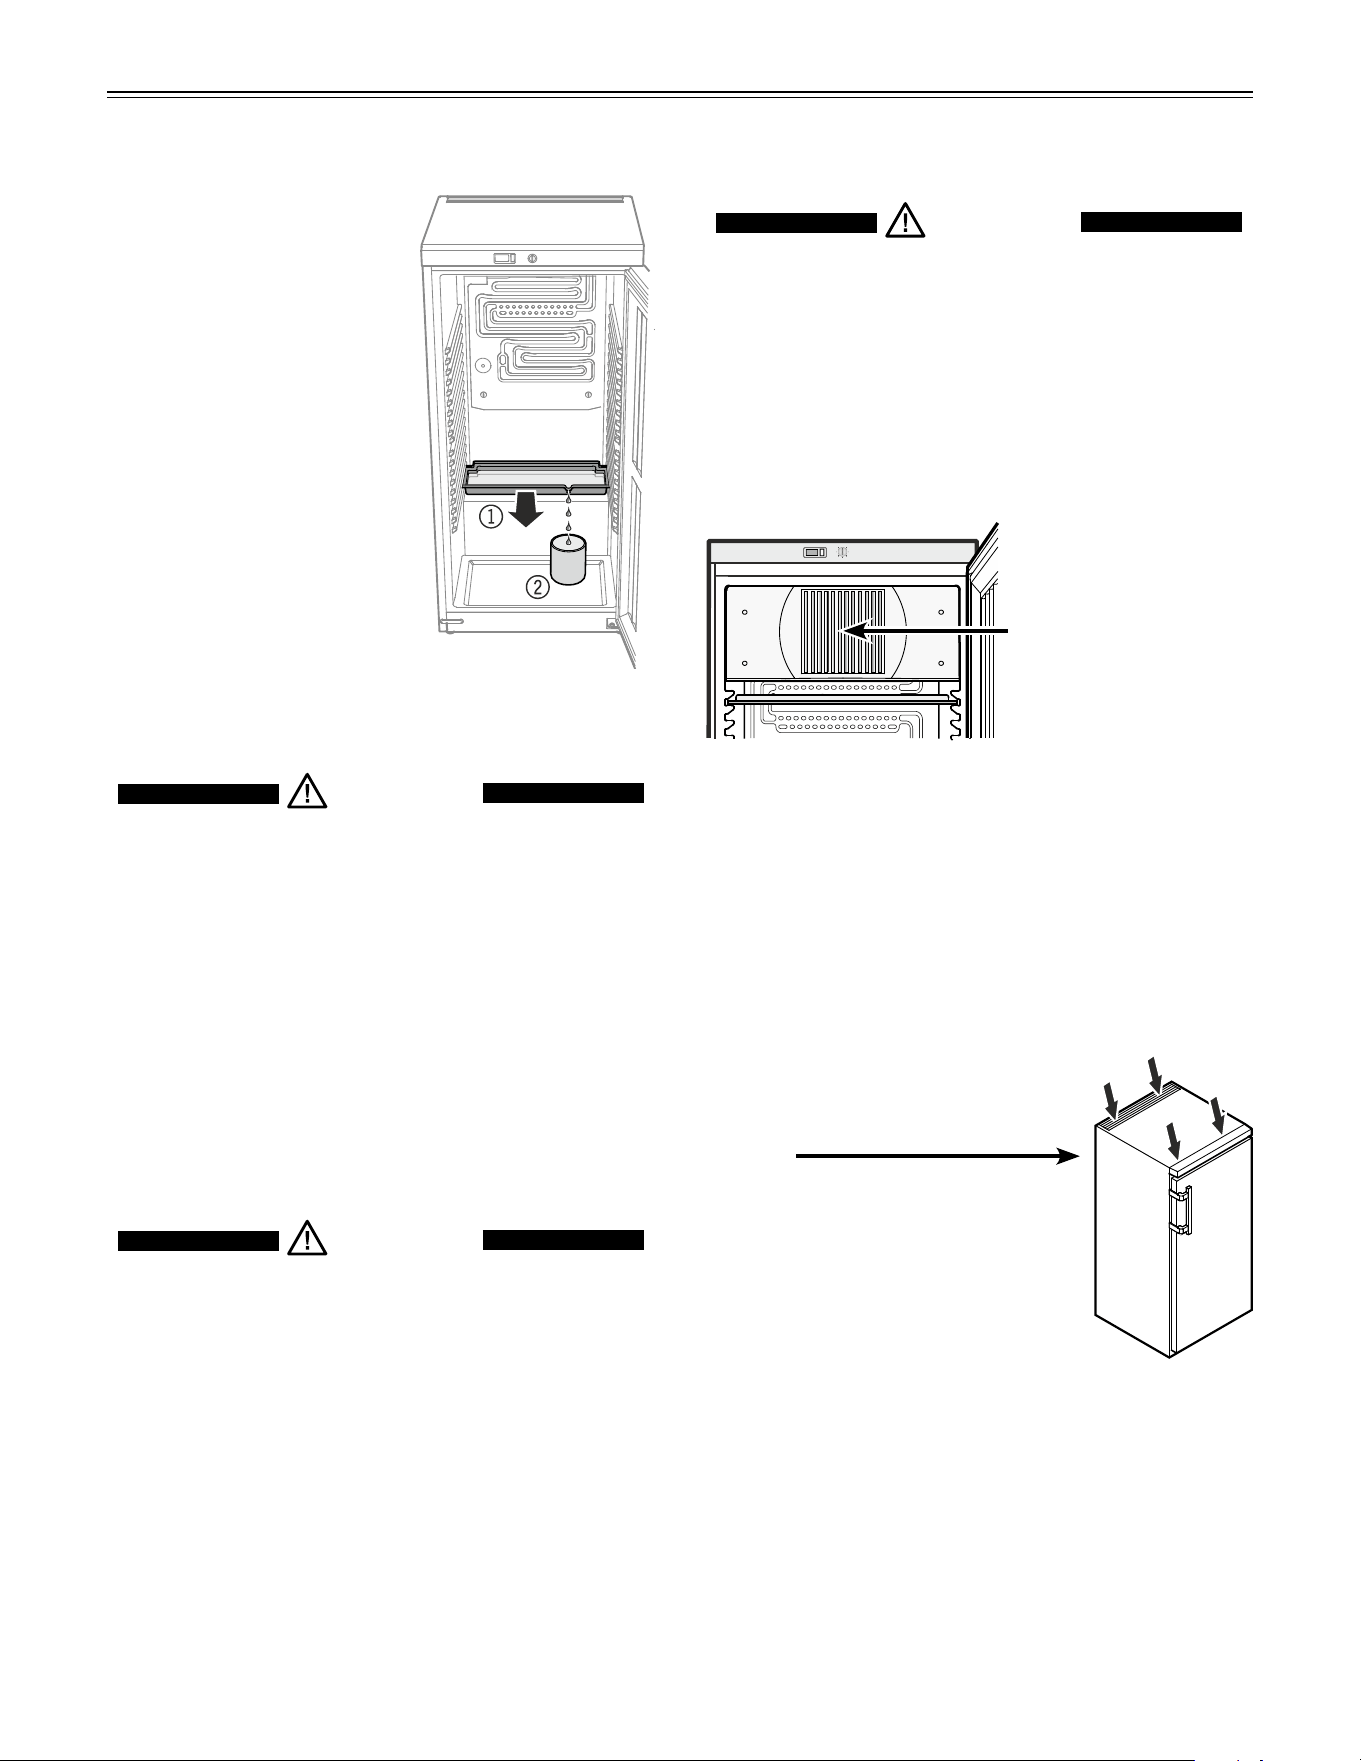
Defrosting
The refrigerator compartment
defrosts automatically.
1 The defrost water drains
into a tray located below
the evaporator. This tray
must be emptied from time
to time.
Pull the tray out towards
you and empty it.
2 To avoid having to empty
the defrost water collection
tray frequently, you can
place a container under the
drain opening in the tray.
Cleaning
WARNING!
• Topreventpossibleinjuryduetoan
electrical shock, be sure to disconnect the
power cord or turn off the circuit breaker
before cleaning the appliance.
• Toavoidinjuryordamage,donotusesteam
cleaningequipmenttocleantheappliance.
Cleaning the appliance interior
• Removetheshelves.
• Cleantheinsideoftheapplianceandequipment
parts with lukewarm water and a little detergent.
WARNING!
Risk of electrostatic discharge.
Only clean plastic parts with a damp cloth!
• Do not damage or remove the model plate on the
inside of the appliance. It is very important for servic-
ing your appliance.
• Inserttheshelves.
Cleaning the appliance outside
• Cleanthedoorsurfaceandouterwallswithlukewarm
water and a little detergent.
IMPORTANT
Do not use abrasive or scouring pads or sponges.
Do not use concentrated cleaning agents. Never
use abrasive or acid-based cleaners or chemical
solvents.
• Ensurenocleaningwaterpen-
etrates into the electrical compo-
nents.
Do not use a sponge or cloth that is
overly wet.
Ventilation slots
9
T
roUbleshooTing
Troubleshooting
Your appliance is designed and manufactured for a long life and reliable operation.
If a problem occurs during operation, check whether it is due to an operating error.
Please note that even during the warranty period, you may be responsible for certain repair costs.
Turning Off the Appliance
If your appliance is to be turned off for any length of
time, switch it off and disconnect the plug or switch off
or unscrew the fuse.
Clean the appliance and leave the door open in order to
prevent unpleasant odors.
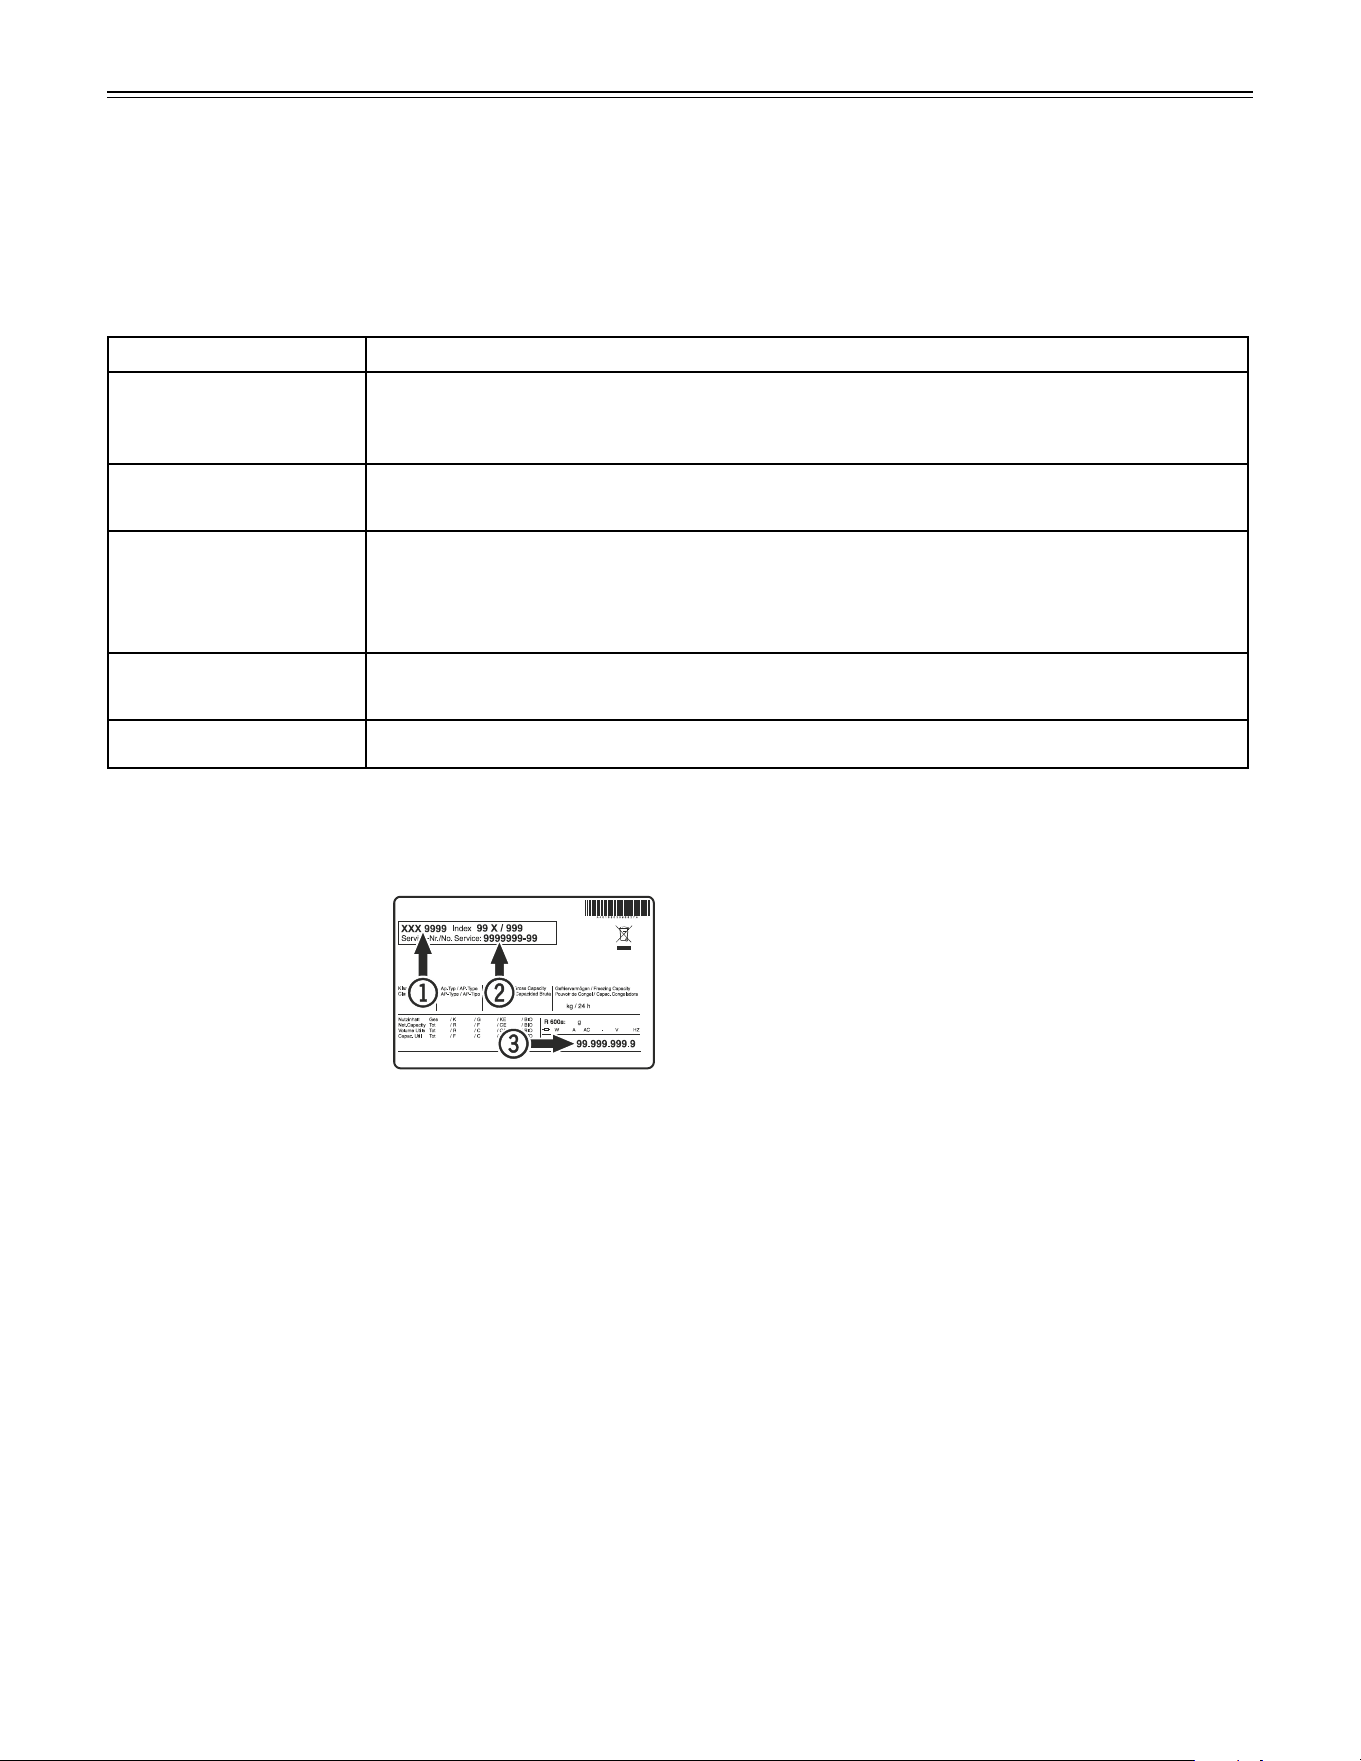
Customer Service
If none of the above pos-
sible causes apply, and
you can not rectify the
fault yourself, contact the
customer service departe-
ment. Indicate the type (1)
of appliance, service num-
ber (2) and the appliance /
serial number (3) as shown on the model plate.
The position of the model plate is shown in the section
entitled Description of the Appliance.
Problem Possible cause and remedy
Appliance does not
work.
- Is the appliance turned on?
- Is the power cord properly inserted in the outlet?
- Is the circuit breaker or fuse in working order?
Motor seems to
run too long.
- Is the ambient temperature too hot? See Safety Regulations.
- Has the appliance been opened too often or left open too long?
The temperature is
not cold enough.
- Is the temperature setting correct? See Setting the Temperature.
- Does a separately installed thermometer show the correct reading?
- Is the ventilation system working properly?
- Is the appliance set up too close to a heat source?
The temperature display
shows ER or HH.
- The thermometer is defective. Contact the customer service department.
No temperature display. - Change the battery of the thermometer. See Temperature Display.
10
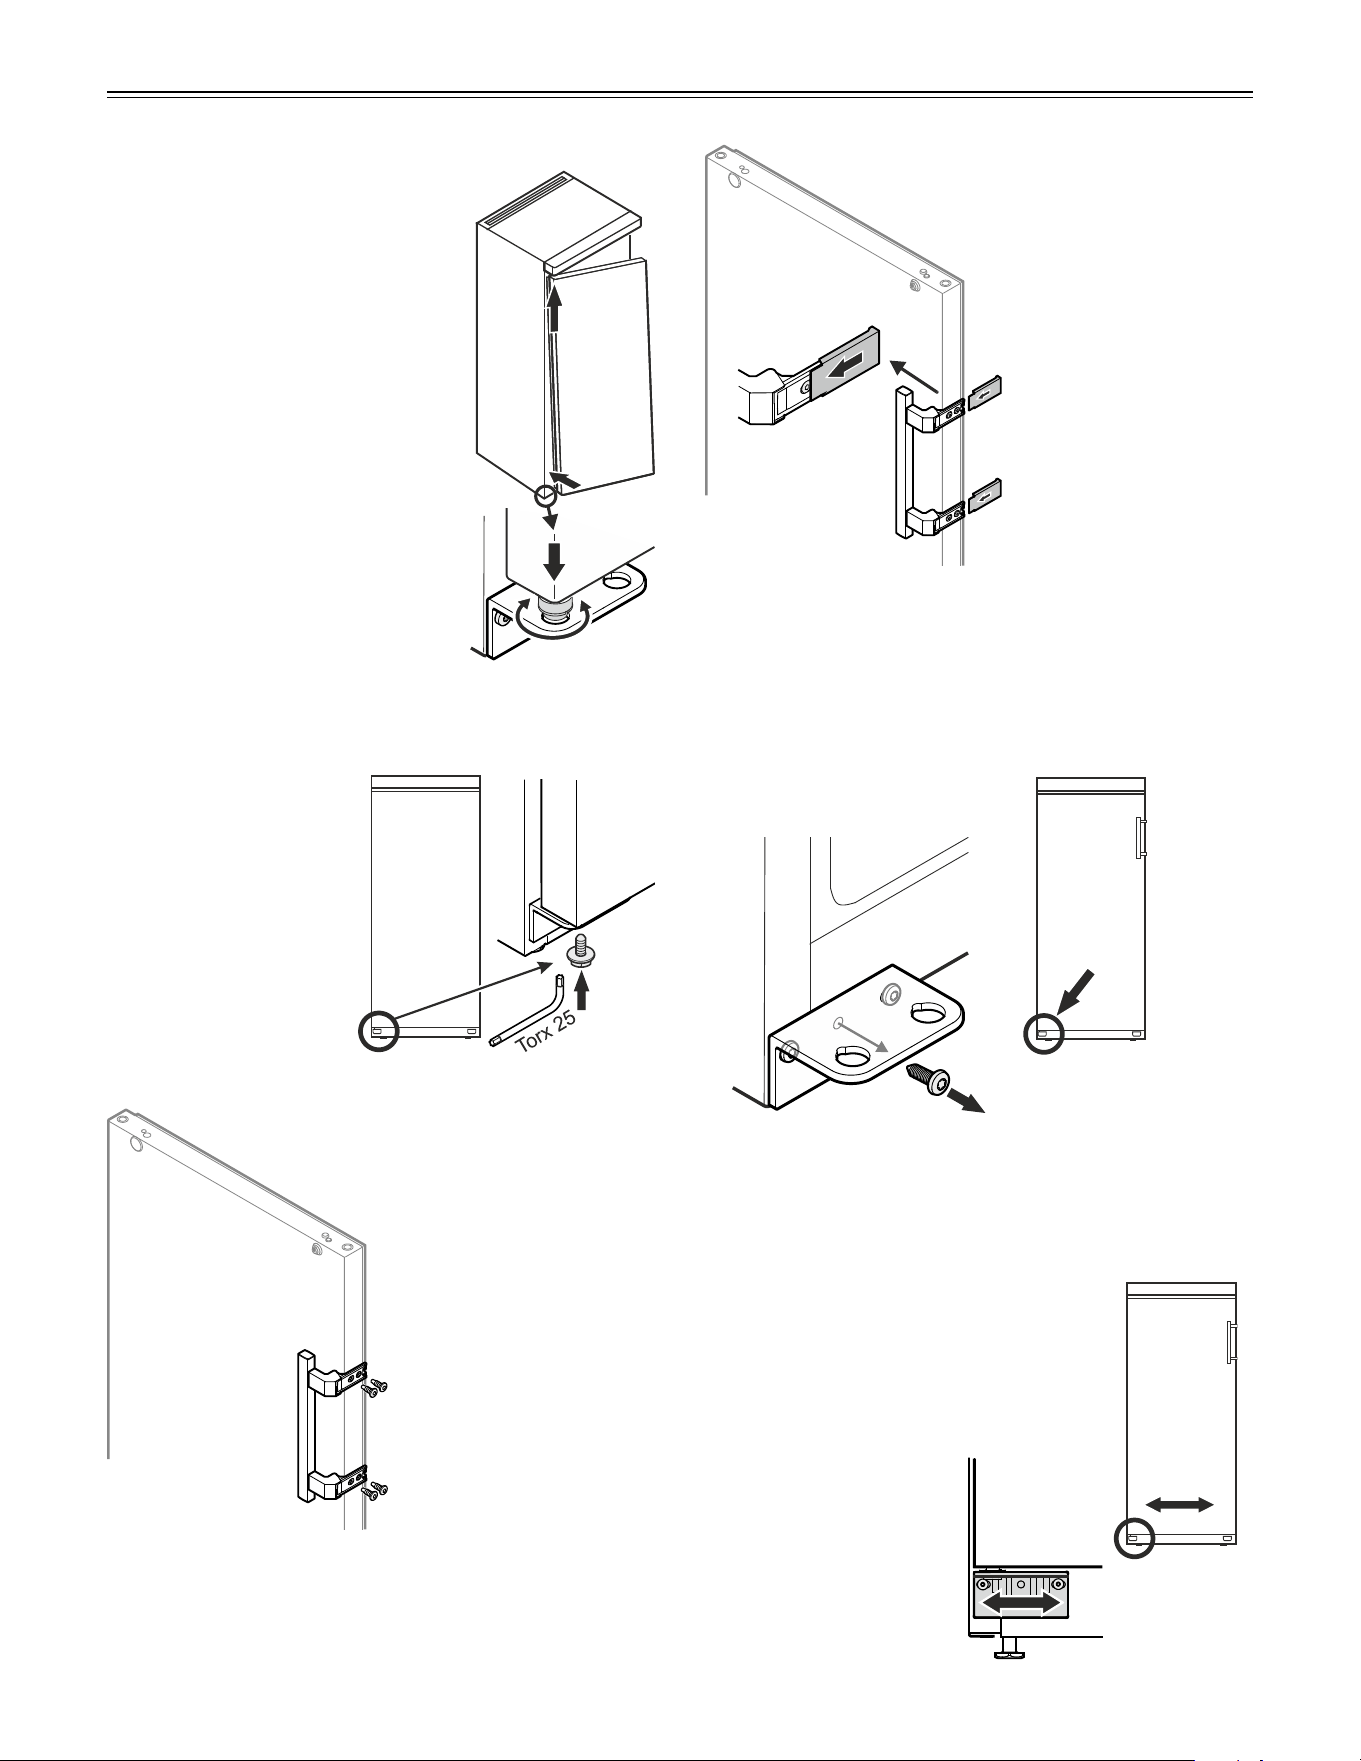
Changing Over Door Hinges
Door hinges should only be changed by a trained
expert.
Changing over the door hinges requires two people.
Changing over Door hinges
5
1
2
3
4
2. Open the door approx. 45°
and lift upwards.
3. Push the pin upwards
using your fingertip.
4. Pull the door to the front
and remove it downwards.
1. Remove screw from
lower hinge bracket.
5. Transfer plugs to
the other side.
6
7
8
9
10
6. Insert the key.
Turn the
key 90°.
7. Remove cover.
8. Remove screw.
9. Turn the lock
approx. 3° clockwise.
10. Remove pin.
CAUTION!
Risk of injury and damage due to a falling
appliance door.
The door must be held secure by one
person to ensure that a second person can
remove or install the hinge components.
11
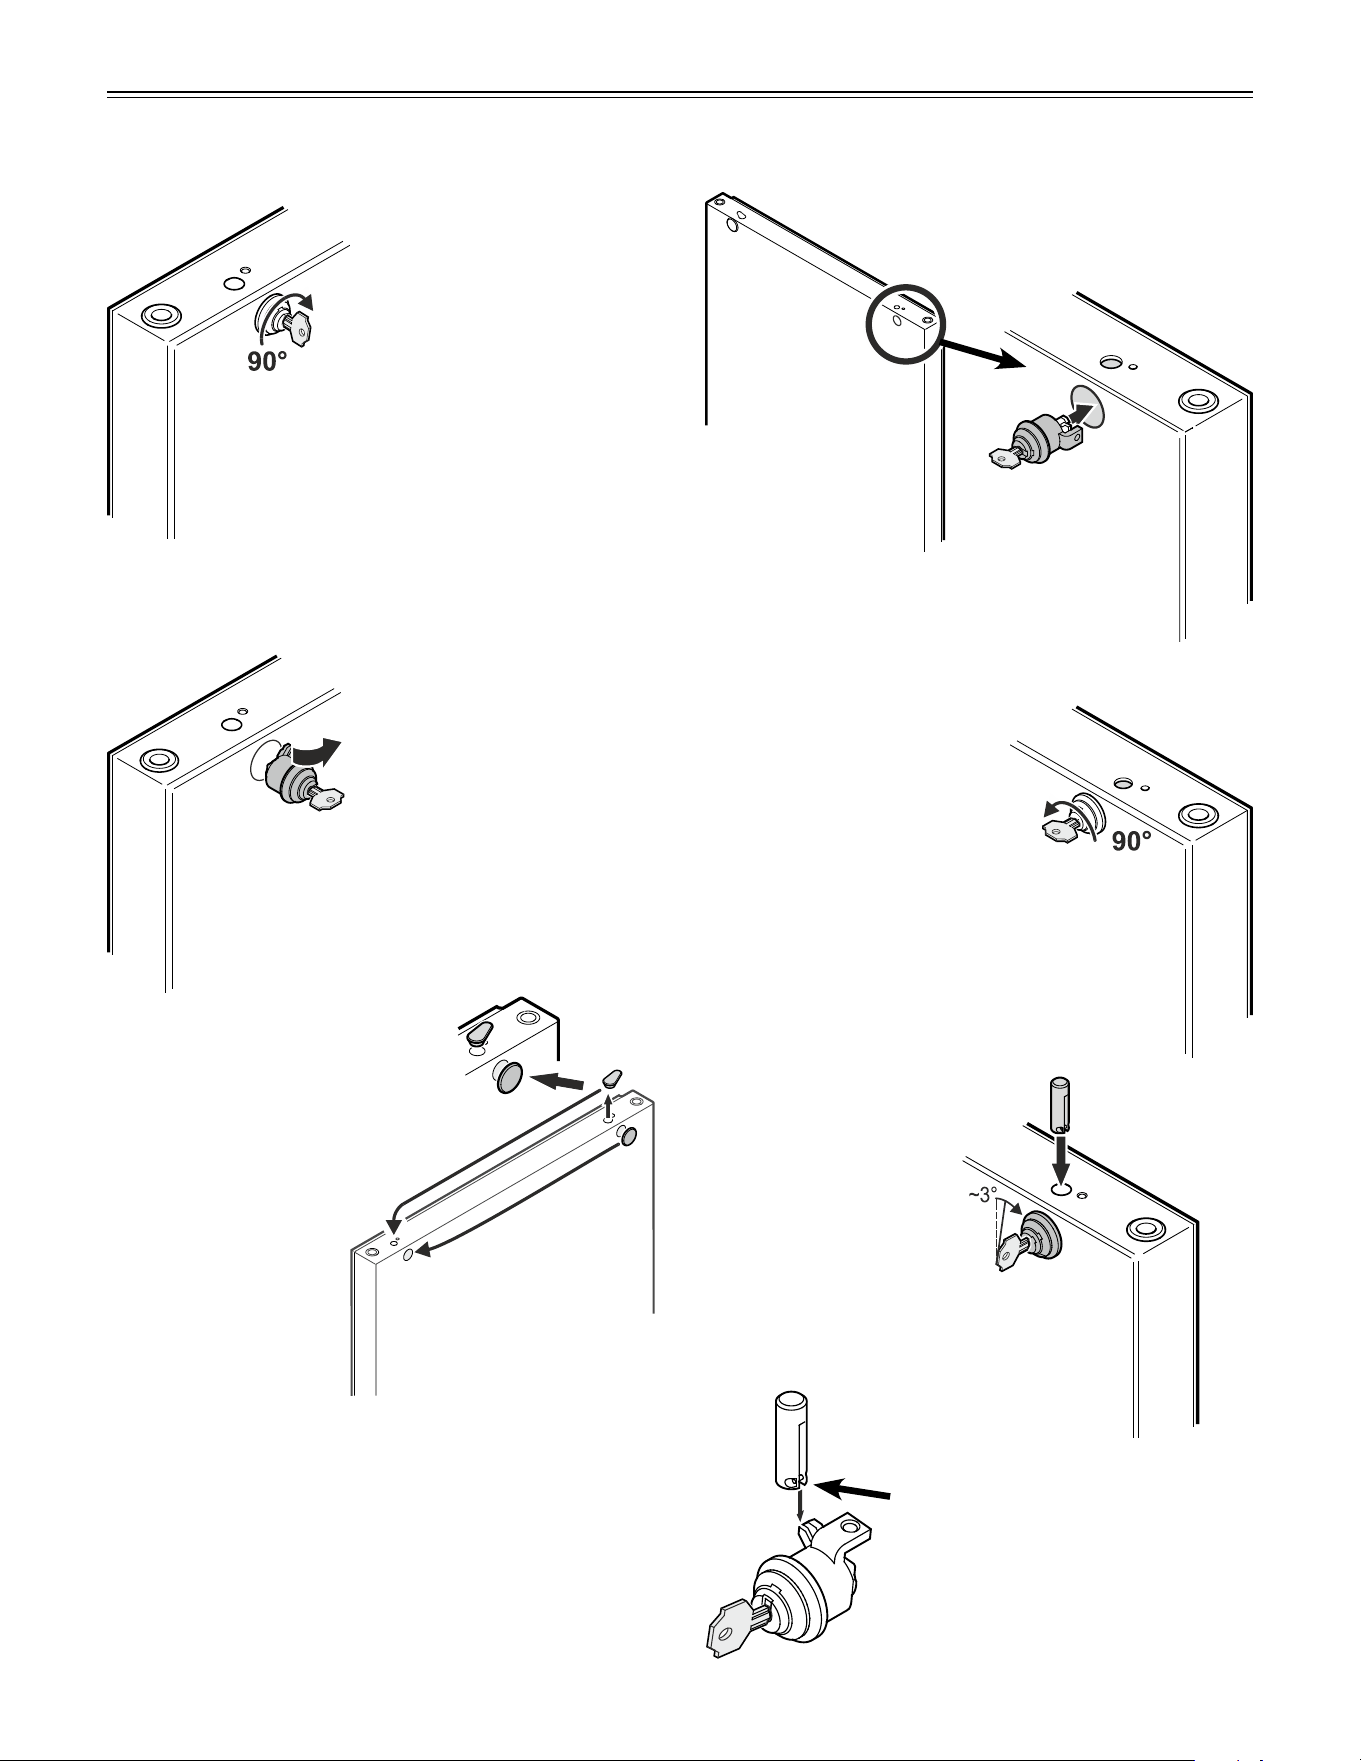
Changing over Door hinges
11. Turn the lock 90°
clockwise.
11
12. Remove lock.
13. Transfer covers to the
opposite side.
14. Insert the lock as shown in
the illustration.
12
14
13
15. Turn back the lock
90° counterclockwise.
16. Turn the lock fur-
ther - approx. 3°
clockwise.
17. Insert pin.
Note on point 17
After insertion, the pin's cross pin
must be engaged in the groove of
the catch.
15
16
17
12
Changing over Door hinges
24. Screw hinge bracket into
place.
23. Transfer screws and plug
to the opposite side.
22. Unscrew hinge
bracket.
20. Unscrew the pin.
Use the spanner provided.
21. Screw in the pin on the opposite
side.
22
23
24
20
21
25
25. Insert the pin into the left-hand door mounting.
Use your index finger to hold the pin while you
are assembling the door.
18
19
18. Screw in the screw and
attach the cover cap.
19. Insert the key.
Turn the key 90°.
CAUTION!
Risk of injury and damage due to a falling
appliance door.
The door must be held secure by one
person to ensure that a second person can
remove or install the hinge components.
13
Changing over Door hinges
26
27
26. Locate the door on the upper
pin as shown in the illustration
and guide it to the lower hinge
bracket.
27. Lift the door upwards and turn
the pin until it fits into the bore
hole of the hinge bracket.
Slowly lower the door down-
wards. The lower part of the pin
must be fully engaged in the
bore hole of the hinge bracket.
28. Screw the screw
into the pin again
and tighten.
28
Adjusting the lateral tilt of the door
If the door is at an angle, adjust the angle.
32. Undo screws and slide hinge
bracket to the right or left.
Tighten screws.
32
31. Remove middle screw from hinge bracket.
This screw is no longer needed.
31
29
30
29. Screw on the handle.
Handle, screws and
key are supplied in the
accessory pack.
30. Push on pressure
plates until they
engage.

14
COMMERCIAL LABORATORY AND MEDICAL PRODUCTS
FULL THREE YEAR WARRANTY
For three years from the date of original purchase, your Liebherr warranty covers all parts and labor to repair or replace
any part of the product which proves to be defective in materials or workmanship under normal and proper use and main-
tenance as specified by Liebherr and upon proper installation and start-up in accordance with the Owner’s Use and Care
Guide supplied with each Liebherr unit.
TERMS APPLICABLE TO EACH WARRANTY
This warranty will apply to products purchased and located in the United States and Canada. Products must be purchased
in the country where service is requested. Any part covered under the above warranties that is determined by Liebherr
to have been defective within the time frame is limited to the repair or replacement, including labor charges, of defective
parts or assemblies. The labor warranty will include standard straight time labor charges only and reasonable travel time,
as determined by Liebherr. This warranty is void for any misuse of the intended application of these products.
All service provided by Liebherr under the warranty must be performed by authorized Liebherr service representatives,
unless otherwise specified by Liebherr. The warranty does not cover any parts or labor to correct any defect or damage
caused by negligence, accident, fire, flood, acts of God, improper use, improper maintenance, improper delivery, improper
installation, power interruptions, power surges, incorrect electric current, voltage or supply, use of extension cords,
improper grounding, removal and reinstallation of the product if it is not installed in accordance with published installation
instructions or in an inaccessible location, service cost or service call to instruct the user on the proper use of the product
or repairs to parts or systems resulting from unauthorized modifications made to the product repairs when the product is
used in a manner that is contrary to published user or operator instructions and/or installation instructions.
Liebherr is not responsible for economic loss, profit loss or direct, indirect or consequential damages, losses or other costs
and expenses resulting from any spoilage of any items stored in a Liebherr refrigeration system including refrigerators,
freezers, and wine coolers whether they be food, medicine, wine or otherwise. In no event will Liebherr have any liability
or responsibility whatsoever for damage to surrounding property, including but not limited to cabinetry, floors, ceilings and
other structures or objects around the product. You are solely responsible for any structure and setting for the product
including but not limited to all electrical, plumbing or other connecting facilities, for proper foundation/flooring and for
any alterations including without limitation cabinetry, walls, flooring and shelving. Warranties are void if the original serial
numbers have been removed, altered or cannot be readily determined. Liebherr reserves the right to amend or alter this
warranty and/or any warranty terms at Liebherr’s discretion.
THE REMEDIES DESCRIBED ABOVE FOR EACH WARRANTY ARE THE ONLY ONES WHICH
LIEBHERR WILL PROVIDE, EITHER UNDER THESE WARRANTIES OR UNDER ANY WARRANTY
ARISING BY OPERATION OF LAW. LIEBHERR WILL NOT BE RESPONSIBLE FOR ANY
CONSEQUENTIAL OR INCIDENTAL DAMAGES ARISING FROM THE BREACH OF THESE
WARRANTIES OR ANY OTHER WARRANTIES, WHETHER EXPRESS, IMPLIED OR STATUTORY.
Some states/provinces do not allow the exclusion or limitation of incidental or consequential damages so the above limi-
tation or exclusion may not apply to you. This warranty gives you specific legal rights and you may also have other legal
rights which vary from state to state, or province to province.
For all other warranty inquiries or to receive parts and/or service and the name of the Liebherr authorized service represen-
tative nearest you, for the USA and Canada, contact the Liebherr designated national service provider at service-commer-
cial.us@ liebherr.com or call 1-844-LICOSVC (1-844-542-6782) or contact your authorized Liebherr dealer or distributor.
W
arranTy

www.liebherr-appliances.com
For Service in the U.S. and Canada
Toll Free: 1-844-LICOSVC or 1-844-542-6782
Email: service-commercial.us@liebherr.com
*708584100*
