MANUAL 10047-SB REV 0 (11/21)
$21.00
Pressure Cookers
MANUAL SECTION CO
IMPORTANT FOR FUTURE REFERENCE
Please complete this information and retain this
manual for the life of the equipment:
Model #:
___________________________
Serial #:
___________________________
Date Purchased:
_____________________
WARNING
Improper installation, adjustment, alteration, service or maintenance can cause property damage, injury
or death. Read the installation, operating and maintenance instructions thoroughly before installing or
servicing this equipment.
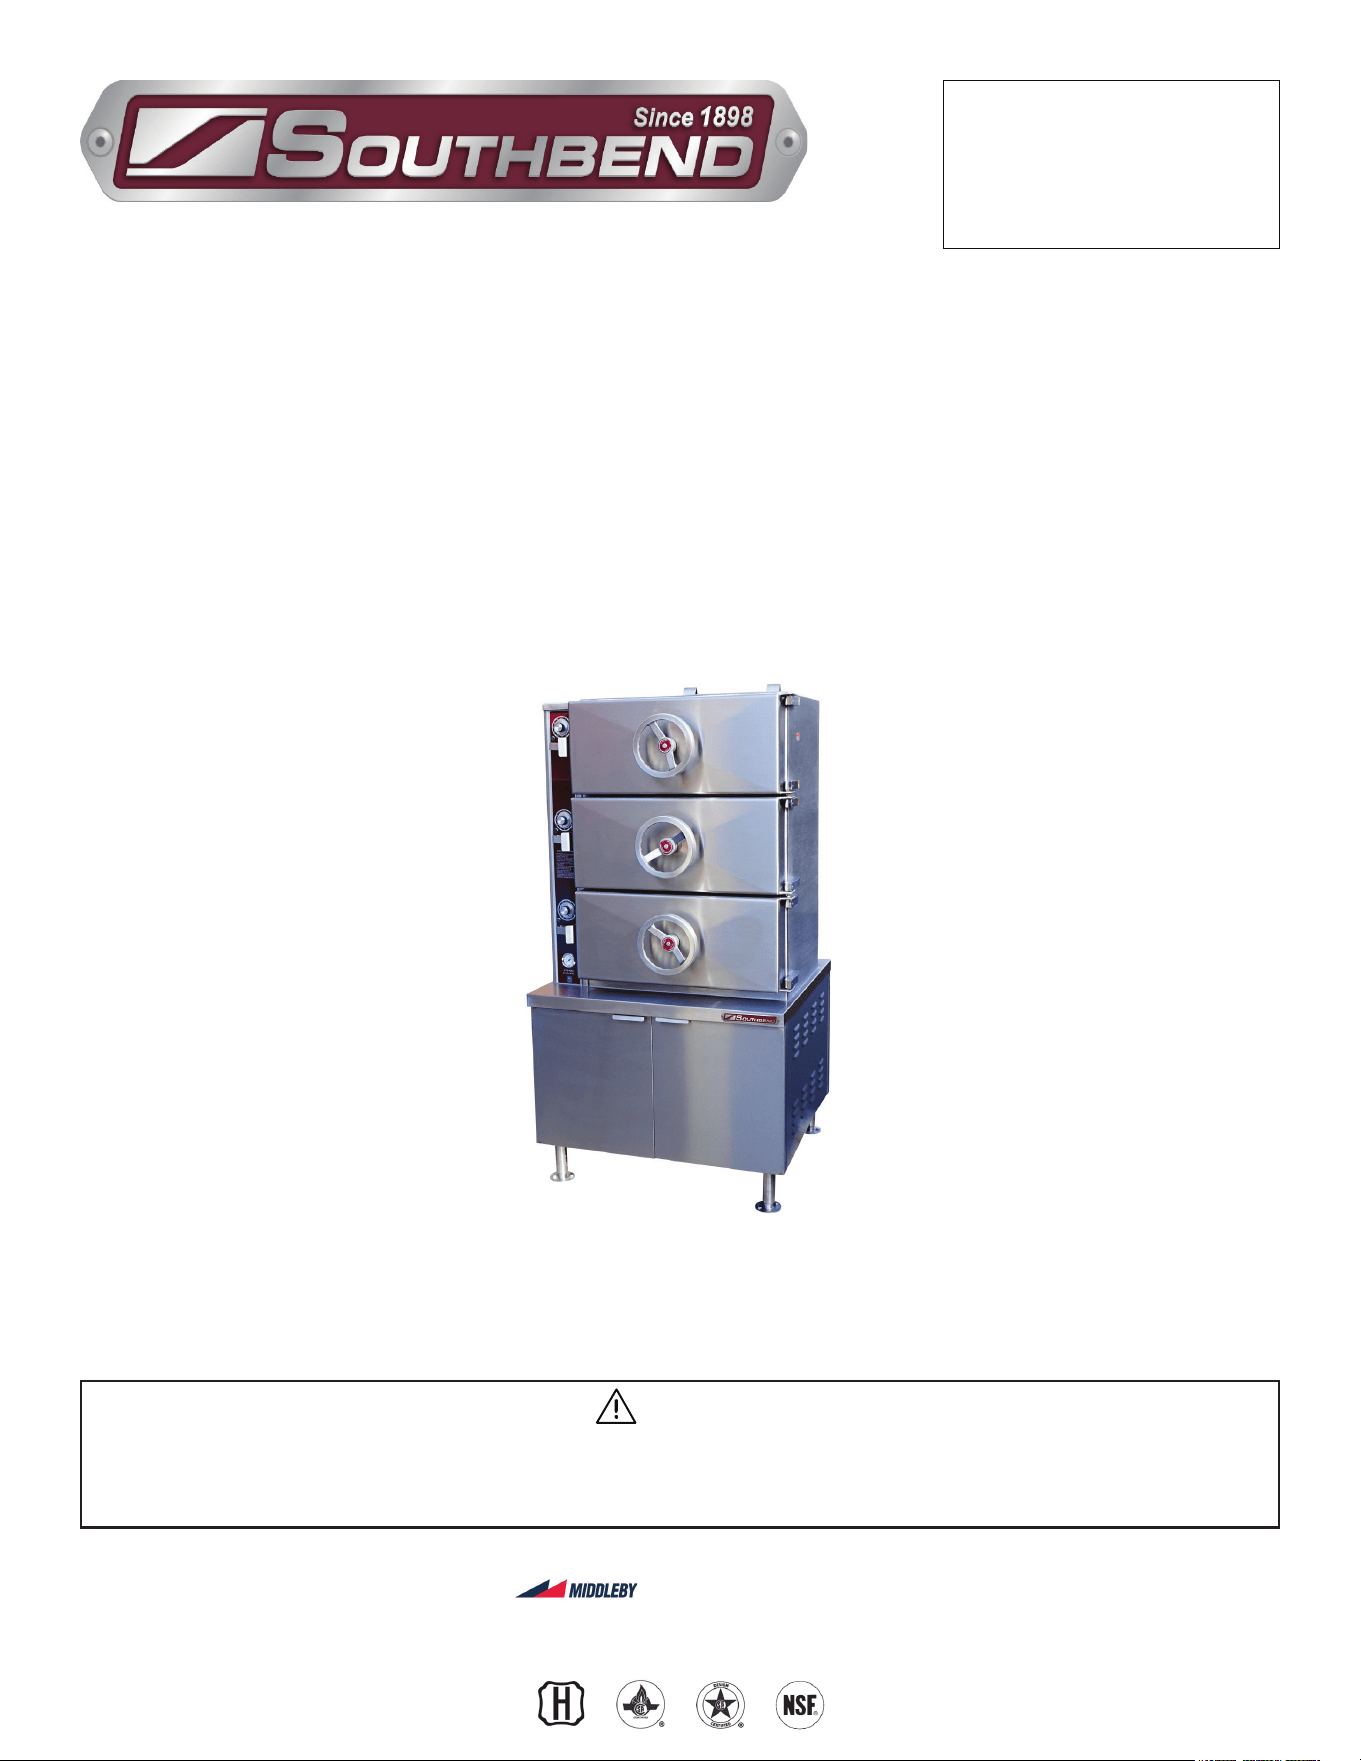
Model GC-3S
Pressure Cookers
GC-2S, GC-3S, GDA-2S & GDA-3S
Installation & Operation Manual
SOUTHBEND STEAM
A Middleby Company
1100 Old Honeycutt Road Fuquay-Varina, North Carolina 27526 USA
www.southbendnc.com
INSTALLATION & OPERATION MANUAL 10047-SB REV 0 (11/21)
PAGE
2
OF 24
Pressure Cookers
SAFETY PRECAUTIONS
Before installing and operating this equipment, be sure everyone involved in its operation is fully trained and aware of
precautions. Accidents and problems can be caused by failure to follow fundamental rules and precautions.
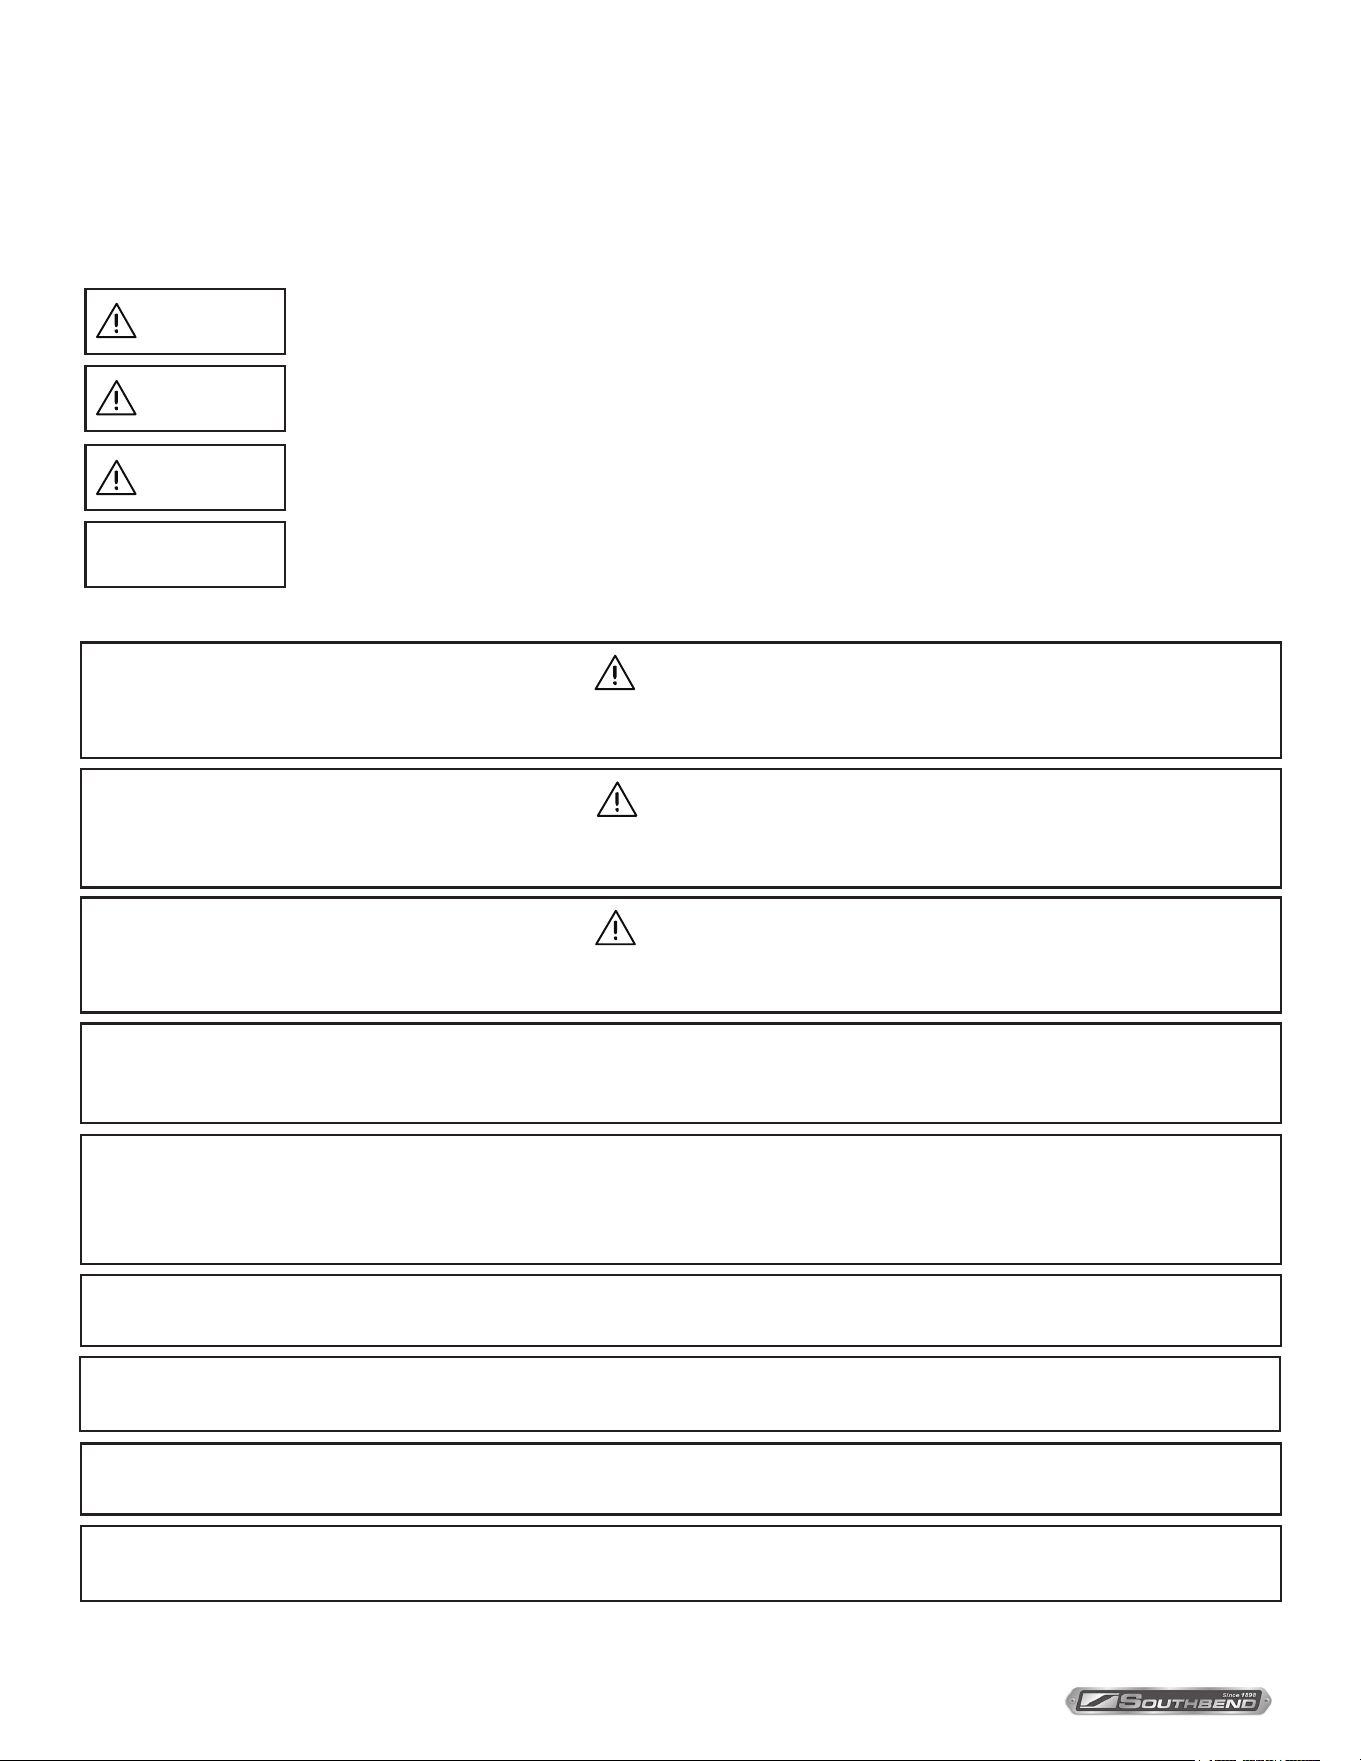
The following symbols, found throughout this manual, alert you to potentially dangerous conditions to the operator,
service personnel, or to the equipment.
CAUTION
WARNING
NOTICE
This symbol warns of immediate hazards that will result in severe injury or death.
This symbol refers to a potential hazard or unsafe practice that could result in injury or death.
This symbol refers to a potential hazard or unsafe practice that could result in injury, product
damage, or property damage.
This symbol refers to information that needs special attention or must be fully
understood, even though not dangerous.
DANGER
Copyright © 2021 by Southbend Steam. All rights reserved. Published in the United States of America.
Safety Precautions
IMPORTANT NOTES FOR INSTALLATION AND OPERATION
NOTICE
Contact the factory, the factory representative or local service company to perform maintenance and repairs.
It is recommended that this manual be read thoroughly and that all instructions be followed carefully.
WARNING
Improper installation, operation, adjustment, alteration, service or maintenance can cause property damage, injury or death. Read
the installation, operating and maintenance instructions thoroughly before installing, operating or servicing this equipment.
NOTICE
PURCHASER: Instructions to be followed in the event that the operator of this appliance smells gas must be posted in
a prominent location. This information shall be obtained by consulting the local gas supplier.
NOTICE
Keep the appliance area free and clear from combustibles.
Do not obstruct the ow of combustion and ventilation air.
Adequate clearances must be maintained for servicing and proper operation.
WARNING
This is the safety alert symbol. It is used to alert you to potential personal injury hazards. Obey all safety messages
that follow this symbol to avoid possible injury or death.
WARNING
FOR YOUR SAFETY:
Do not store or use gasoline or other ammable vapors or liquids in the vicinity of this or any other appliance.
NOTICE
This manual should be retained for future reference.
NOTICE
This product is intended for commercial use only. NOT FOR HOUSEHOLD USE.
NOTICE
Do not attempt to operate this unit in the event of a power failure.

INSTALLATION & OPERATION MANUAL 10047-SB REV 0 (11/21)
PAGE
3
OF 24
Pressure Cookers
RETAIN THIS MANUAL FOR FUTURE REFERENCE.
Table of Contents
Important Notes For Installation and Operation .................................................................... 2
Service Connections ............................................................................................................. 4
Installation Instructions ......................................................................................................... 6
Operation .............................................................................................................................. 9
Operating Instructions for Boilers with CSD-1 Controls ...................................................... 13
Cooking Guidelines ............................................................................................................... 15
Cleaning ................................................................................................................................ 16
Maintenance ......................................................................................................................... 17
Troubleshooting .................................................................................................................... 20
Table of Contents
INSTALLATION & OPERATION MANUAL 10047-SB REV 0 (11/21)
PAGE
4
OF 24
Pressure Cookers
SERVICE CONNECTIONS
Service Connections
As continued product improvement is a policy of Southbend Steam, specications are subject to change without notice.
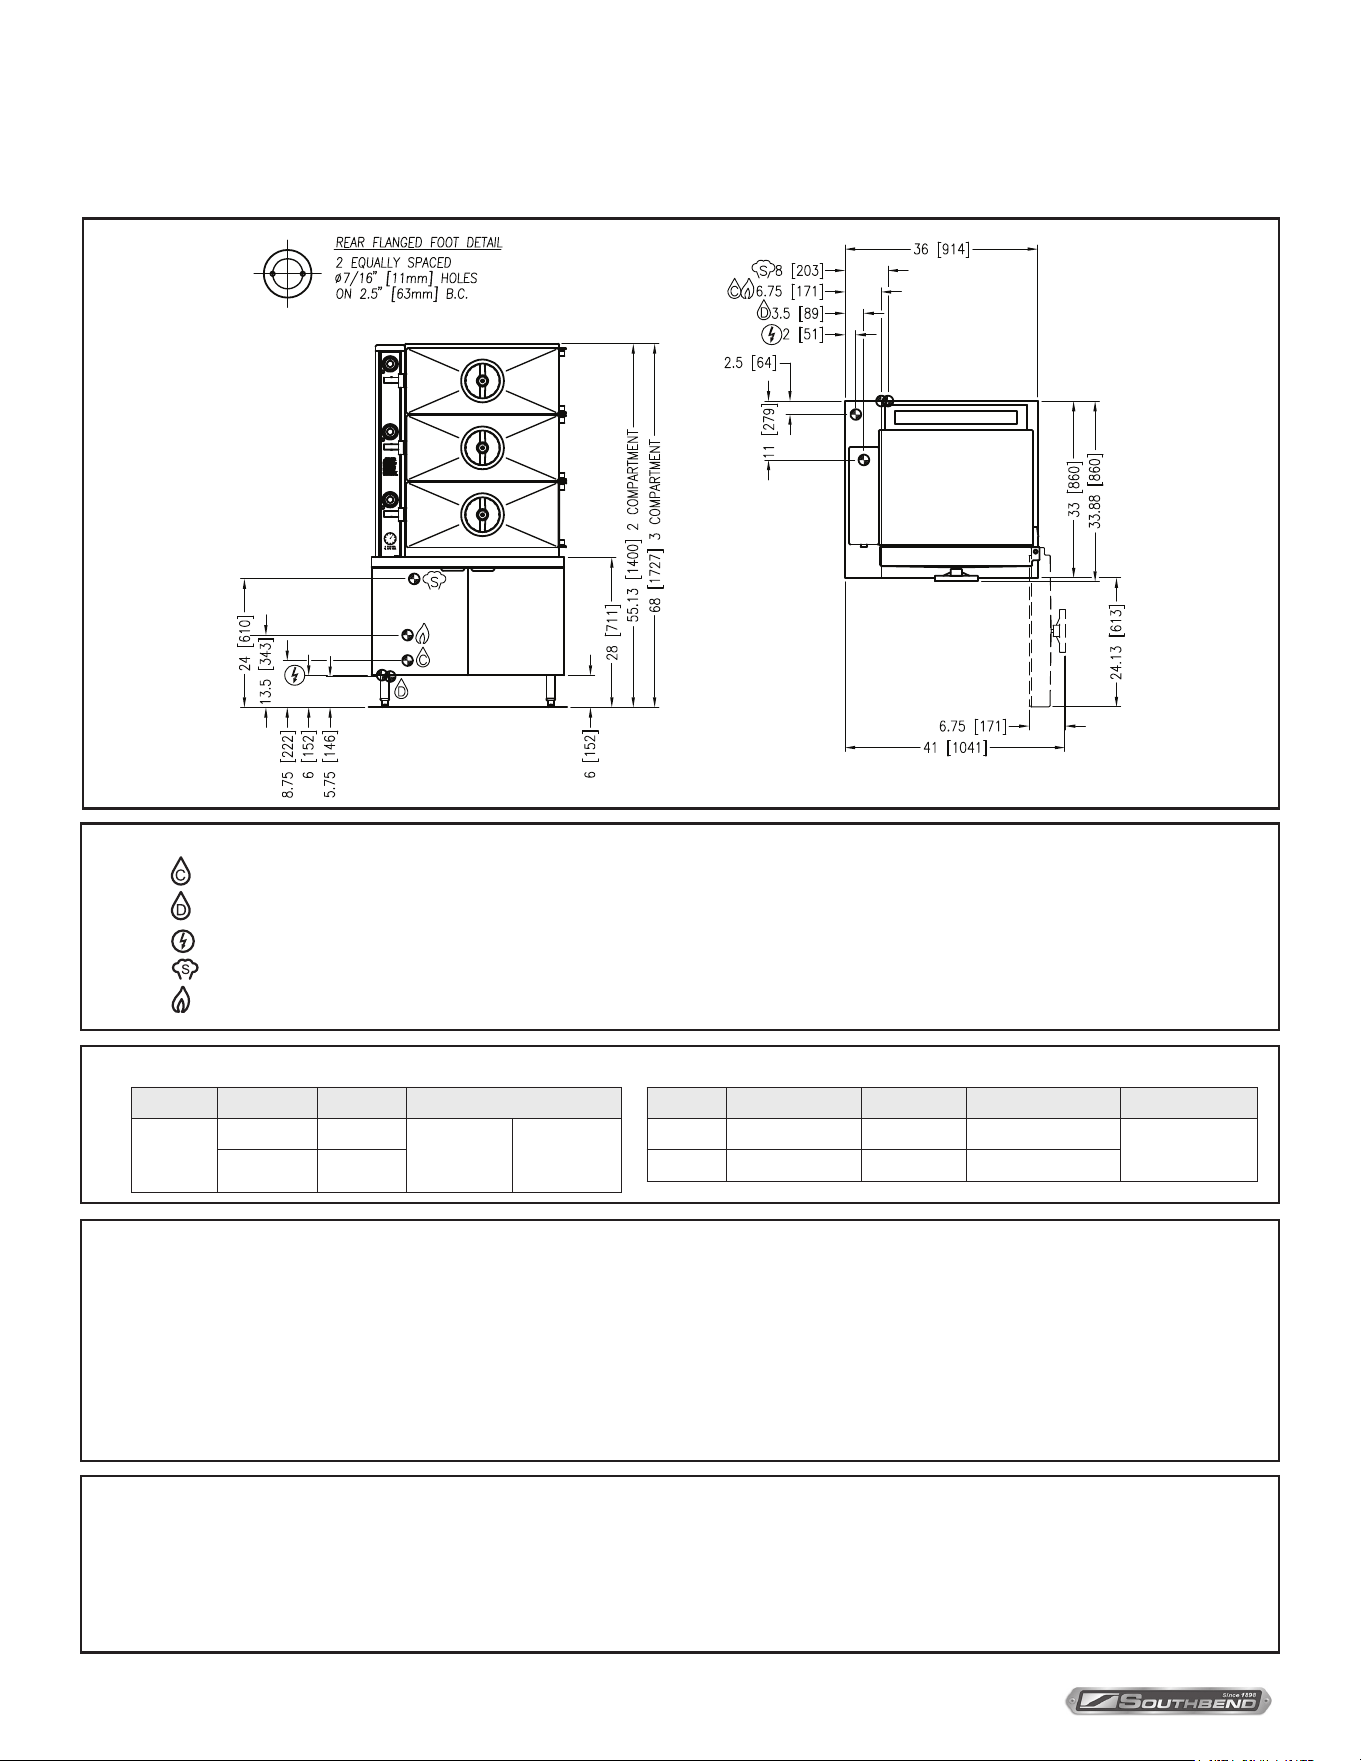
GAS SUPPLY AND SPECIFICATIONS
SERVICE CONNECTIONS
- COLD WATER: 1/2” (13 mm)
– DRAIN: 2” (51 mm) IPS piped to open oor drain. No solid connection.
–
ELECTRICAL CONNECTIONS: 1/2” (13 mm) conduit connection to controls. 2 Amps per compartment, 120-60-1, 220-50-1.
– STEAM TAKE-OFF CONNECTION: 3/4” IPS optional to operate adjacent equipment.
- GAS CONNECTION: 3/4” (19 mm) IPS
Model BTU/Hour kW/Hour Water Column Pressures
GC-2S
GC-3S
250,000 73.3 Natural
min. 7”
(178 mm)
Propane
min. 11”
(279 mm)
300,000 87.9
Model Compartments Capacity Shipping Weight Min. Clearance
GC-2S 2 8-16 Pans 1,100 lbs. [499 kg.]
SIDES 0 [0 mm]
BACK 0 [0 mm]
GC-3S 3 12-24 Pans 1,170 lbs. [531 kg.]
If installing on any oor with an epoxy coating or other combustible oor surface (i.e., a surface other than quarry tile, cement or natural stone), contact
the factory for installation options as damage due to improper installation is not covered under warranty.
Terry System Cartridge Changes / Installation – “2-3 gallons of water MUST be purged at each cartridge change or new installation prior to
water supply being fed to the steamer. Failure to do so can result in component damage within the steamer which is not covered under warranty.
For additional guidance on proper installation, refer to install documentation provided with each Terry System and Replacement Cartridge Set.”
DISCLAIMER
WATER QUALITY STATEMENT
Water is the essential ingredient in steam equipment, water quality is the major factor aecting the performance of your appliance. Crown Steam Group oers a
Comprehensive Water Treatment System which exceeds our minimum water requirements. Proof of installation and proper cartridges replacement is required for
warranty coverage. Water supply to Crown Steam Group steamers must be within these guidelines.
Total dissolved solids.......................Less than 60 PPM Chlorine ............................Less than 1.5 PPM
Total alkalinity ........................................ Less than 20 PPM pH Factor .........................6.8 - 7.3
Silica ....................................................... Less than 13 PPM
Water which does not meet these standards should be treated with the installation of Middleby’s Water Treatment System. Call 919-762-1000 if you have questions
concerning your water meeting these parameters.
*Failure or malfunction of this appliance due to poor water quality is not covered under warranty.
Reference www.crownsteamgroup.com for complete warranty details and instructions.
INSTALLATION & OPERATION MANUAL 10047-SB REV 0 (11/21)
PAGE
5
OF 24
Pressure Cookers
As continued product improvement is a policy of Southbend Steam, specications are subject to change without notice.
Service Connections
If installing on any oor with an epoxy coating or other combustible oor surface (i.e., a surface other than quarry tile, cement or natural stone), contact
the factory for installation options as damage due to improper installation is not covered under warranty.
Terry System Cartridge Changes / Installation – “2-3 gallons of water MUST be purged at each cartridge change or new installation prior to
water supply being fed to the steamer. Failure to do so can result in component damage within the steamer which is not covered under warranty.
For additional guidance on proper installation, refer to install documentation provided with each Terry System and Replacement Cartridge Set.”
DISCLAIMER
WATER QUALITY STATEMENT
Water is the essential ingredient in steam equipment, water quality is the major factor aecting the performance of your appliance. Crown Steam Group oers a
Comprehensive Water Treatment System which exceeds our minimum water requirements. Proof of installation and proper cartridges replacement is required for
warranty coverage. Water supply to Crown Steam Group steamers must be within these guidelines.
Total dissolved solids.......................Less than 60 PPM Chlorine ............................Less than 1.5 PPM
Total alkalinity ........................................ Less than 20 PPM pH Factor .........................6.8 - 7.3
Silica ....................................................... Less than 13 PPM
Water which does not meet these standards should be treated with the installation of Middleby’s Water Treatment System. Call 919-762-1000 if you have questions
concerning your water meeting these parameters.
*Failure or malfunction of this appliance due to poor water quality is not covered under warranty.
Reference www.crownsteamgroup.com for complete warranty details and instructions.
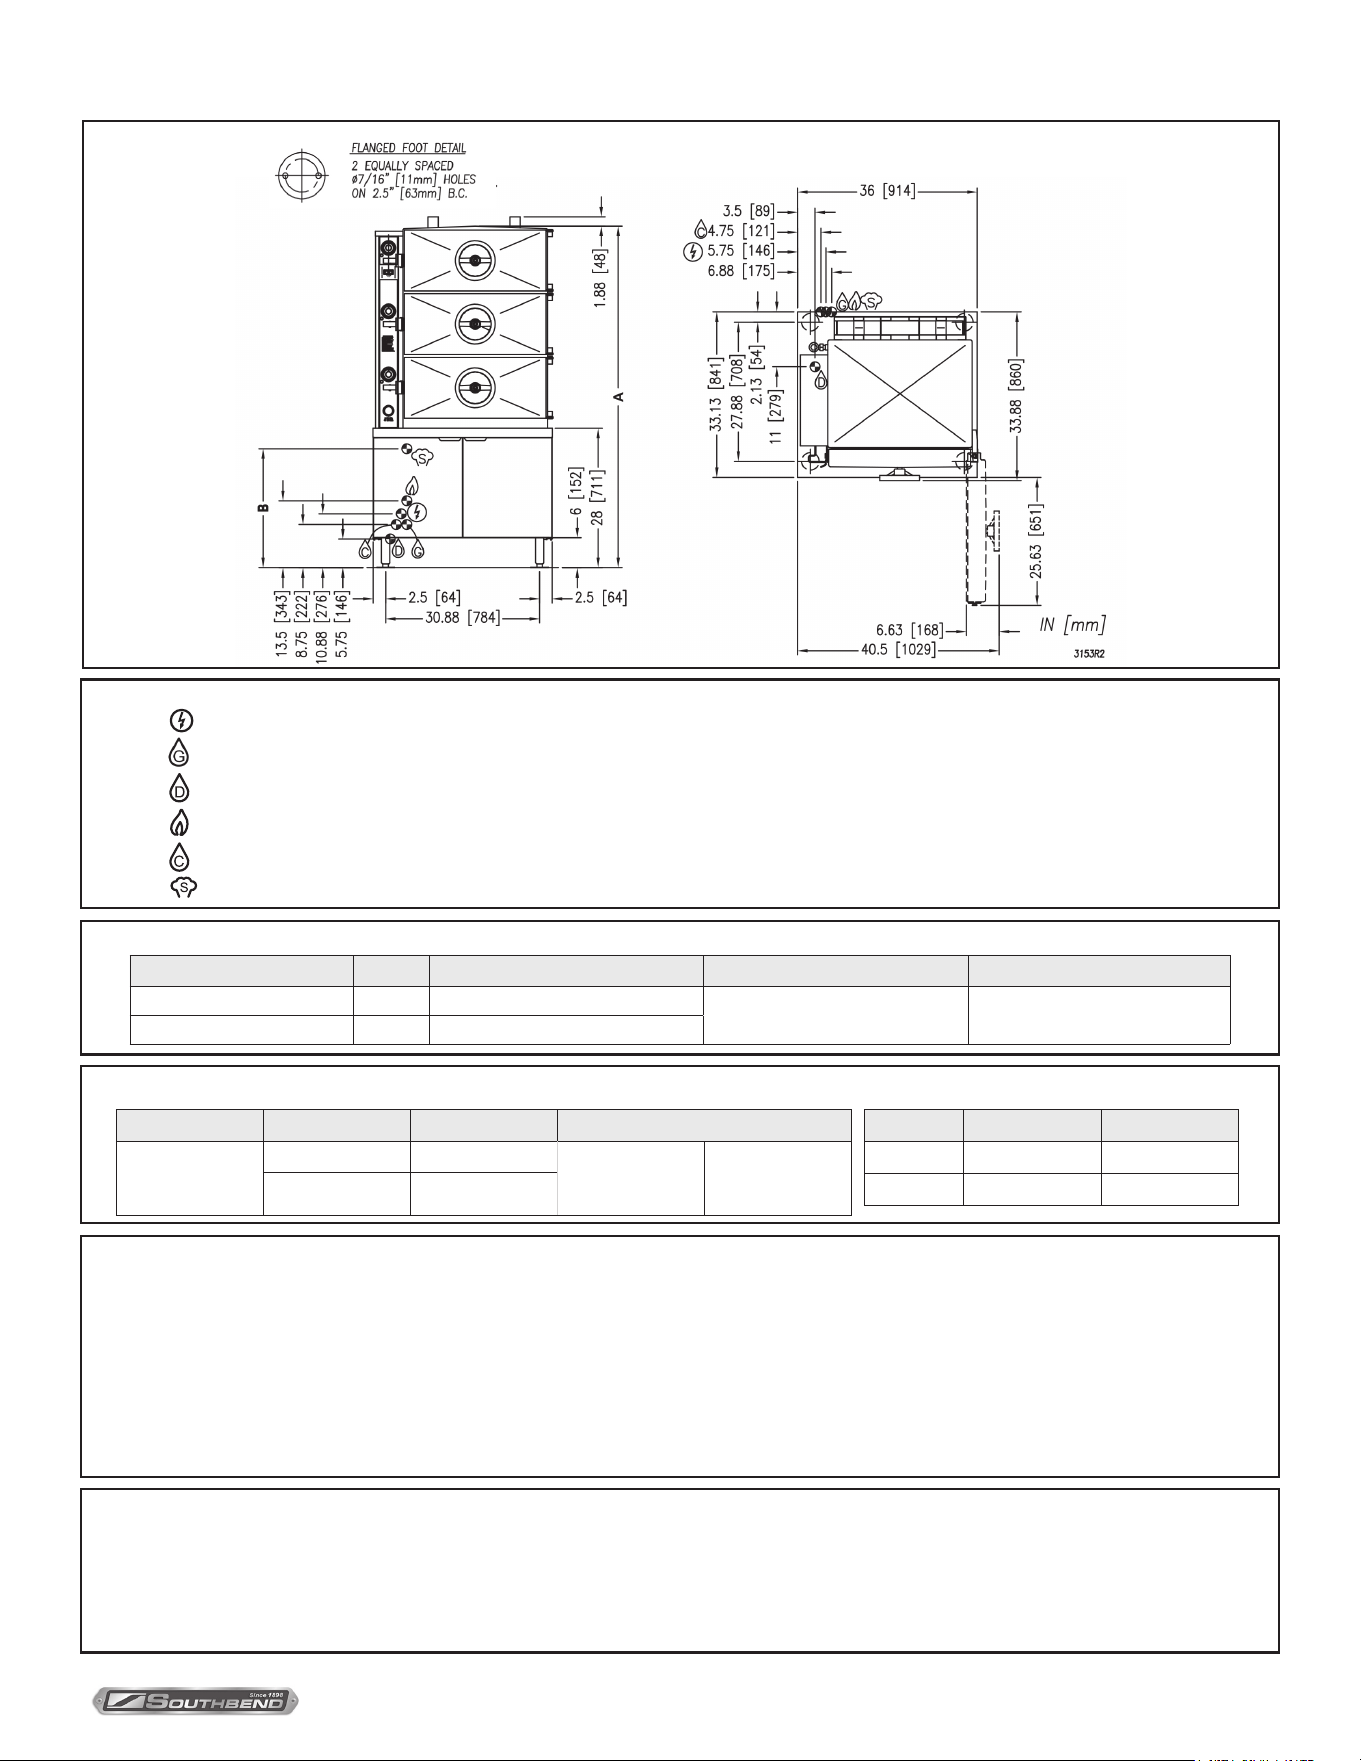
DIMENSIONS
UTILITIES AND COMPARTMENT PAN CAPACITY
SERVICE CONNECTIONS
–
ELECTRICAL CONNECTIONS: 1/2” (13 mm) conduit connection to controls. 2 Amps per compartment, 120-60-1, 220-50-1.
– GENERATOR WATER:1/2” (13 mm) NPT at 25-50 PSI (170-345 kPa).
– DRAIN: 2” (51 mm) IPS piped to open oor drain. No solid connection.
– GAS CONNECTION: 3/4” (19 mm) IPS supply line required.
– COLD WATER: 1/2” (13 mm) NPT at 25-50 PSI (170-345 kPa).
–
STEAM TAKE-OFF CONNECTION: 3/4” IPS optional to operate adjacent equipment.
Model Units A B (250k BTU) B (300k BTU)
GDA-2S in (mm) 55.75” (1416)
23.88” (606) 20.88” (530)
GDA-3S in (mm) 68.5” (1740)
Model Compartments Capacity
GDA-2S 2 8-16 Pans
GDA-3S 3 12-24 Pans
Model BTU/Hour kW/Hour Water Column Pressure
GDA-2S
or
GDA-3S
250,000 73.33
Propane
min. 11” (279 mm)
Natural
min. 7” (178 mm)
300,000 87.9
INSTALLATION & OPERATION MANUAL 10047-SB REV 0 (11/21)
PAGE
6
OF 24
Pressure Cookers
General
Models GC-2S and GC-3S Cookers have two and three pressurized steaming compartments for cooking vegetables, sh,
eggs, and other foods.
Models GDA-2S and GDA-3S Cookers have two or three compartments; the upper compartment can be switched to
provide either pressurized or pressureless steaming while the lower compartment(s) provide pressurized cooking only.
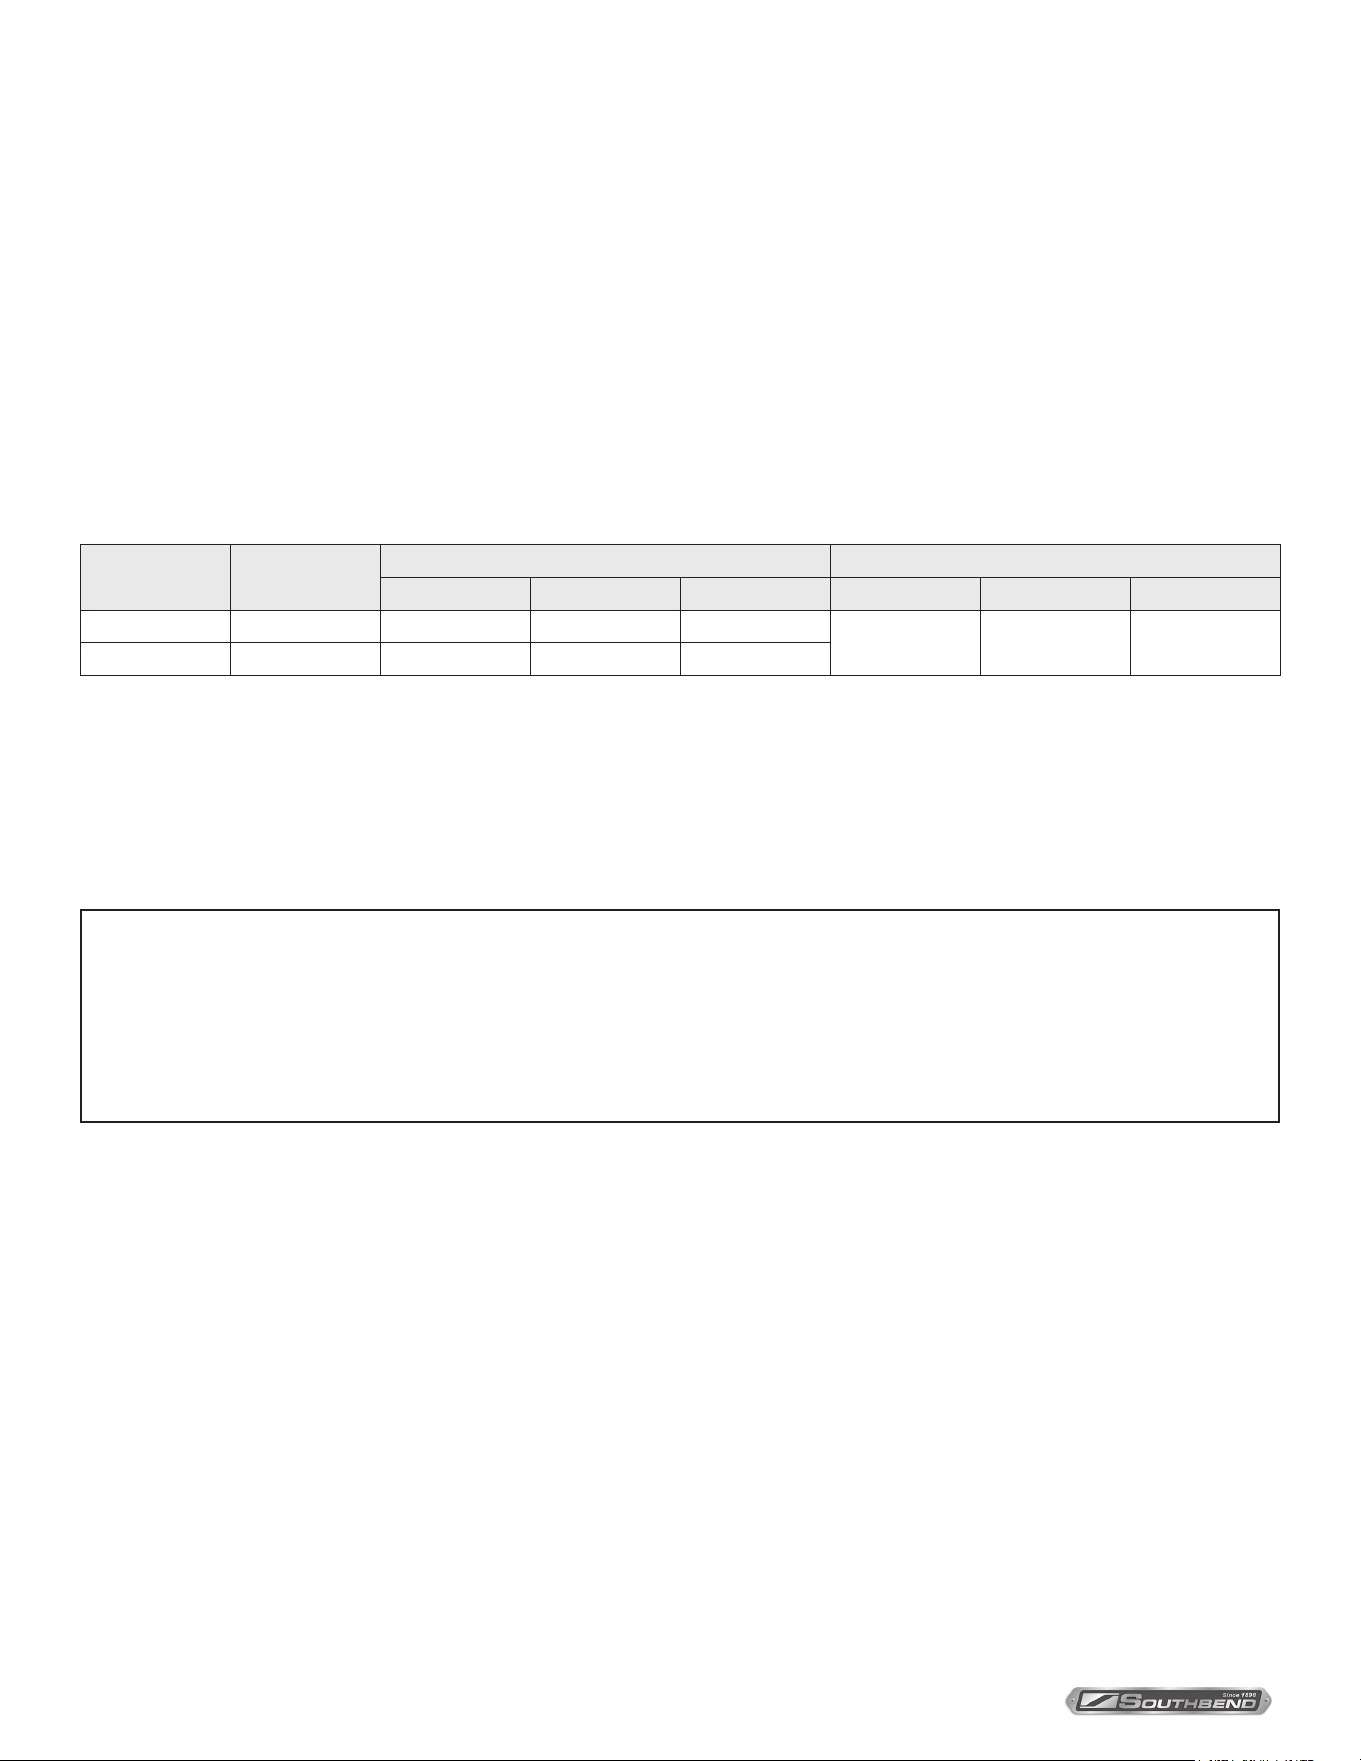
The gas boiler in the cabinet base is rated, 250,000 BTU/hr and available in 300,000 BTU/hour, in natural or propane gas.
Accessory 12 × 20” stainless steel pans are available, solid or perforated, in 2.5, 4 and 6” depth.
ACCOMMODATION
Model Compartments
Total Number of Pans Number of Pans per Compartment
2.5" Depth 4" Depth 6" Depth 2.5" Depth 4" Depth 6" Depth
GC-2S, GDA-2S 2 16 8 4
8 4 2
GC-3S, GDA-3S 3 24 12 6
Each compartment has a 0 - 60 minute timer and a buzzer that requires manual shut-o. Doors cannot be opened during
cooking; each door is equipped with an interlock feature that stops delivery of steam to the compartment before the door
can be opened.
An optional Steam Take-O Connection (3/4” NPT) can provide steam for adjacent equipment.
Unpacking
IMMEDIATELY INSPECT FOR SHIPPING DAMAGE
Immediately after unpacking, check for possible shipping damage. If the appliance is found to be damaged, save the
packaging material and contact the carrier within 15 days of delivery.
We cannot assume responsibility for damage or loss incurred in transit.
Before installing, verify the electrical rating agrees with the specication on the rating plate.
INSTALLATION INSTRUCTIONS
Installation
Location
Position the boiler in its installation location. Check that there are sucient clearances to service the controls, door swing,
etc. Also, adequate clearance must be left for making the required supply and drain connections.
Allow enough space between any other piece of equipment or wall for service access.
Service to the controls may be required on the left and/or right side panels of the cabinet.
Installation Codes and Standards
Gas installation to conform to local codes, or in absence of local codes, with the National Fuel Gas Code - ANSI Z223.1/NFPA 54,
or the Natural Gas and Propane Installation Code, CSA B149.1, as applicable, including:
1. The appliance and its individual shut o valve must be disconnected from the gas supply piping system during any
pressure testing of that system at pressures in excess of 1/2 psi (3.5 kPa).
2. The appliance must be isolated from the gas supply piping system by closing its individual manual shut o valve
during any pressure testing of the gas supply piping system at test pressures equal to or less than 1/2 psi (3.5 kPa).
Electrical grounding must be provided in accordance with local codes, or in the absence of local codes, with the National Electrical
Code ANSI/NFPA 70. In Canada, installation must be in accordance with the Canadian Electrical Code CSA C22.2.
INSTALLATION & OPERATION MANUAL 10047-SB REV 0 (11/21)
PAGE
7
OF 24
Pressure Cookers
Levelling and Anchoring the Appliance
1. Place appliance in the installation position.
2. Using a spirit level or pan of water, level the appliance. Then elevate the right side about 1/8” to assure proper
compartment drainage.
3. Mark hole locations on the oor through the anchoring holes provided in the rear anged adjustable feet.
4. Remove appliance from installation position and drill holes in locations marked on the oor. (See installation diagram
on page 4.) Insert proper anchoring devices (not supplied).
5. Place appliance back in the installation position.
6. Recheck level.
7. Bolt and anchor appliance securely to the oor.
8. Seal bolts and anged feet with silastic or equivalent compound.
Electrical Connections
WARNING
Electrical and grounding connections must comply with the applicable portions of the National Electrical Code
and/or other local electrical codes.
Installation
WARNING
Disconnect electrical power supply and place a tag at the disconnect switch to indicate you are working on the circuit.
When making electrical connections, use copper wire suitable for at least 200°F (90°C). The steamer must be grounded in
accordance with the National Electrical Code or applicable local codes. The wiring diagram is located on the inside of the right panel.
Exhaust Hood
An exhaust system should be located directly above the steamer to exhaust steam and heat generated by the steamer.
Service Connections
WARNING
Plumbing connections must comply with applicable sanitary, safety, and plumbing codes.
Plumbing Connections
NOTICE
If this equipment is being installed at over 2,000 feet altitude and was not so specified on order, contact
service department. Failure to install with proper orifice sizing may void the warranty.
Water Supply Connection
The incoming cold water supply connection, at the rear of the boiler cabinet, requires 3/8” tubing and water pressure of 25 to 50 psi.
A manual shut-o valve must be provided convenient to the boiler; this valve should be open when the boiler is in operation.
FAILURE OR MALFUNCTION OF THIS APPLIANCE DUE TO POOR WATER QUALITY IS NOT COVERED UNDER
WARRANTY. SEE WATER QUALITY STATEMENT (PAGE 4 AND 5.)
Drain Connection
The boiler drain (2” IPS) should be piped to a oor drain near the boiler. There should be no solid drain connection; an
“open gap” between the boiler and the oor drain is required.
INSTALLATION & OPERATION MANUAL 10047-SB REV 0 (11/21)
PAGE
8
OF 24
Pressure CookersInstallation
Gas Connection
1. The data plate on the cabinet door of the boiler indicates the type of gas your unit is equipped to burn. DO NOT
connect to any other gas type.
Keep the appliance area free and clear from combustible substances. Do not obstruct the ow of combustion and
ventilation air.
2. A 3/4” NPT line is provided at the rear for the connection. Each boiler is equipped with an internal pressure regulator
which is set at 3.5” W.C. manifold pressure for natural gas or 10.5” W.C. for L.P. gas. Use the 1/8” pipe tap on the
burner manifold for checking pressure.
An adequate gas supply is necessary. Undersized or low pressure lines will restrict the volume of gas required for
satisfactory performance. A steady supply pressure, between 7” W.C. and 14” W.C. for natural gas and 11” W.C. and
14” W.C. for propane gas is recommended. With all units operating simultaneously, the manifold pressure on all units
should not show any appreciable drop. Fluctuations of more than 25% on natural gas, and 10% on propane gas, will
create pilot problems and aect burner operating characteristics. Contact your gas company for correct supply line sizes.
Purge the supply line to clean out any dust, dirt, or foreign matter before connecting the line to the unit.
CAUTION
The pipe thread compound used when installing pipes must be a type that is resistant to the action of liquied
petroleum or propane gases.
Codes require that a gas shut-o valve be installed in the gas line prior to the steamer. Make sure the pipes are clean and
free of obstructions, dirt, and piping compound.
WARNING
Prior to start-up, check all joints in the gas supply line for leaks. Use soap and water solution.
Do not use an open flame.
NOTICE
If applicable, the vent line from the gas appliance pressure regulator shall be installed to the outdoors in
accordance with local codes or, in the absence of local codes, with the National Fuel Gas Code, ANSI
Z223.1/NFPA 54, or the Natural Gas and Propane Installation Code CSA B149.1, as applicable.
INSTALLATION & OPERATION MANUAL 10047-SB REV 0 (11/21)
PAGE
9
OF 24
Pressure Cookers
OPERATION
Initial Operations Check
The pressure gauge on the face of the Cooker Control Panel should indicate pressure of 5 to 6 psi. Open cooker
compartment door and set timer dial to 5 minutes and pull out operating handle and observe that steam is entering
the compartment.
Operation
CAUTION
Operating, testing, and servicing should only be performed by qualified personnel.
CAUTION
The appliance and its parts are hot. Use care when operating, cleaning and servicing the appliance.
CAUTION
Stand clear of compartment opening as live steam is being released.
Set timer dial back to “O” and the buzzer will sound and may only be silenced by pushing in on the operating handle.
Check each compartment in this manner.
Close compartment door and turn handwheel clockwise so the door gasket seals.
Set timer at 5 minutes. Pull out operating handle and set in position. Steam should be heard entering the compartment;
also you should hear a hissing sound as compartment air exits the vent at the rear side, until replaced by steam.
Observe that door gasket seals properly and that no leaks are evident.
After ve minutes: Timer should read “0”, steam will stop entering compartment, the exhaust valve will open allowing
steam and condensate water to exit, and the buzzer will sound.
To silence the buzzer, push in the operating handle.
Observe ow at the open drain. Steam from the compartment is cooled by a ow of cold water from the thermostatically
controlled valve. Pause one minute to allow steam and condensate to exit. Turn handwheel counterclockwise to avoid
pressure on the door gasket when not in use.
Move the door latch to the left to release and open the door. Check each compartment in this manner.
The gas boiler cycles on and o maintaining steam pressure in the boiler from 9 to 11 psi.
Turn main power switch OFF. Open the manual Blowdown valve. This will release hot water and steam from the boiler
tank which mixes with cold water released by the thermostatically controlled solenoid valve and travels to the drain.
If equipped with automatic blowdown valve, hot water and steam will be released once the main power switch has been
turned o.
CAUTION
Live steam and accumulated hot water in the compartment may be released when the door is opened.
WARNING
The steamer and its parts are hot. Use care when operating, cleaning, or servicing the steamer.
INSTALLATION & OPERATION MANUAL 10047-SB REV 0 (11/21)
PAGE
10
OF 24
Pressure Cookers
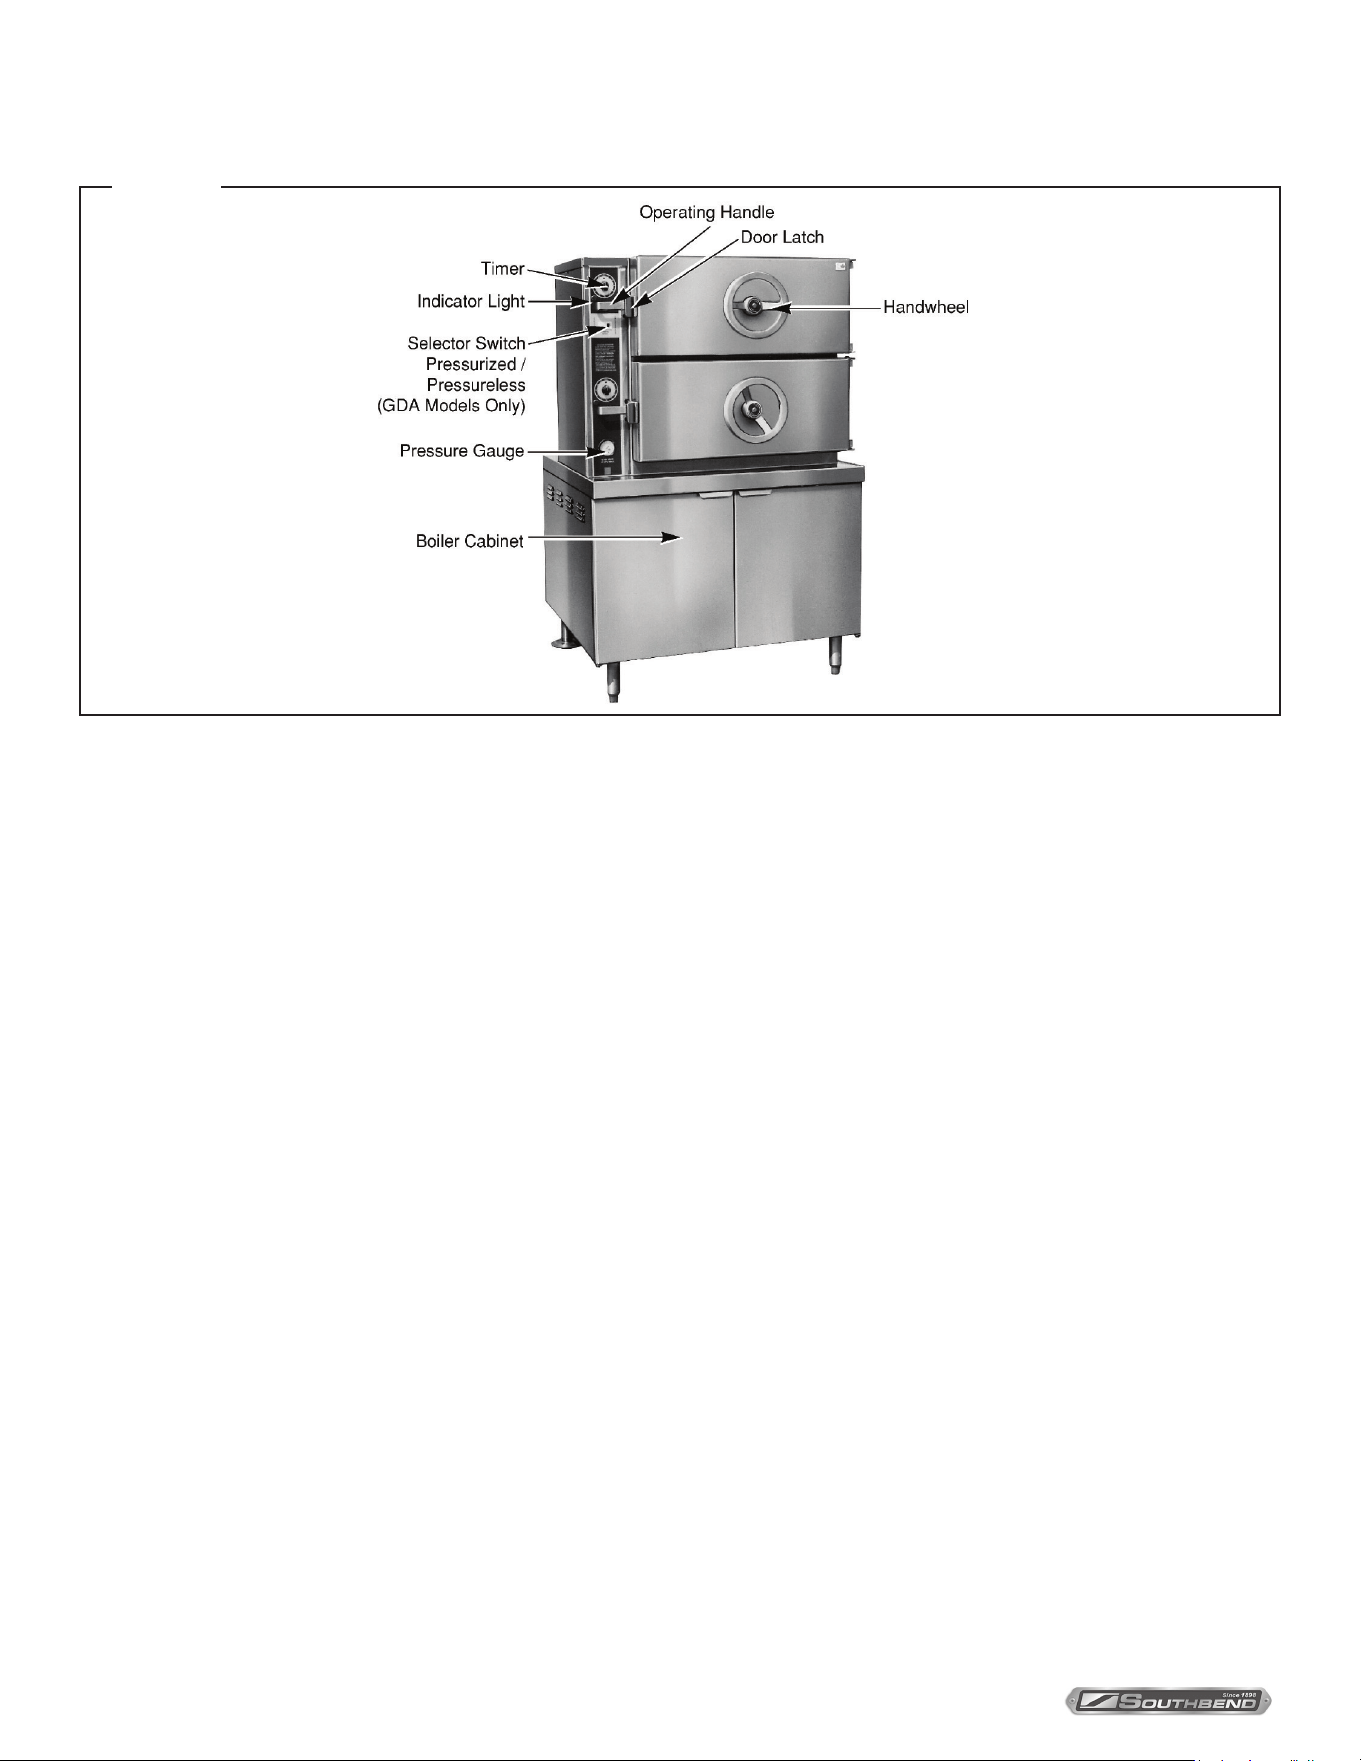
Compartment Controls
Timer (0 to 60 minutes) - Sets the steam time for the compartment.
Indicator Light - Timed cycle is in progress when lit.
Selector Switch - PRESSURIZED means top compartment operates at 6 psi. (GDA Models Only)
PRESSURELESS means top compartment steams without pressure, the exhaust valve
is open to the drain.
Operating Handle - PULL OUT to send steam to compartment, lock door, and enable operation. PUSH IN
to silence buzzer at end of cycle.
Door Latch - Holds door closed and prevents door from fully opening until operating handle
is pushed in; move the door latch to the left to fully open door after steam and
condensate drain (1 minute) and handwheel is turned fully counterclockwise.
Handwheel - Turn clockwise to seal door at start of cycle. After pressure release at end of cycle,
turn counterclockwise to open.
Buzzer (not shown) - Sounds an audible signal when timer cycle is complete. To silence buzzer, push in
operating handle.
Pressure Gauge - Indicates steam pressure: 6 psi with compartments inactive, 4.5 - 6 psi during a
cooking cycle.
Steaming
Each cooker compartment is controlled by its own controls. When a compartment is not operating, the drain is open and the
steam inlet valve from the boiler is closed. Food, properly portioned and in appropriate solid or perforated pans, is placed
on rack supports (or wire shelves) in the steaming compartment. After closing and sealing the door, setting the timer, and
pulling out the operating handle, the steam inlet valve from the boiler opens, allowing steam at a pressure of 6 psi to enter
the compartment. Air from the sealed compartment exits through the vent until the temperature reaches 180 °F; then the vent
closes and the compartment can become pressurized. [On GDA models only, if the top compartment has been switched to
pressureless steaming, steam enters the compartment and is exhausted to the drain without pressurizing the compartment.]
Steaming continues until the timer reaches “0” and the buzzer sounds. To silence the buzzer, push in the operating handle.
Wait one minute for steam or hot water to drain away. Open the door and remove the cooked food.
The cabinet (lower portion of steamer) contains the gas steam generator or boiler.
Figure 1
Operation
INSTALLATION & OPERATION MANUAL 10047-SB REV 0 (11/21)
PAGE
11
OF 24
Pressure Cookers Operation
PREHEAT COMPARTMENTS
If the steamer has been standing idle and the compartments are cold, preheat before loading.
WARNING
Do not force the gas control knob. Use only your hand to turn the gas control knob. Never use any tool. If the
gas control knob will not operate by hand the gas control should be replaced by a qualied service technician.
WARNING
Do not disassemble the gas control; it contains no replaceable components. Attempted disassembly or
repair may damage the gas control.
WARNING
In the event of main burner ignition failure, a 5 minute purge period must be observed prior to re-establishing
ignition source.
Boiler Operating Instructions
For CSD-1 equipped boilers, see Operation Instructions for CSD-1 Equipped Boiler in this manual.
Boiler Controls (Inside Cabinet)
Main Power Switch - ON lls the boiler tank and turns the boiler controls on. You should allow 20 minutes to ll
the tank and generate steam.
- OFF shuts o the boiler controls and opens the Automatic Blowdown Valve, emptying the
boiler tank and releasing water and steam to the drain. This should be done at least once
daily to remove sediment, lime, or scale.
Pilot Light - Indicates main power is ON.
Boiler Pressure Gauge - Should read 9 to 11 psi during operation; 0 psi during shutdown.
Water Level Sight Glass - Observe level of water in the boiler and water quality. Murkiness in the water indicates
inadequate water quality; the owner must supply proper water to the boiler (see page 4,
Water Quality Statement).
Water Level Control - While ON, briey open the water level control daily to remove any sediment that might
accumulate. (See Maintenance Section of this manual for detailed instructions.)
Safety Valve - This valve will release (pop o) if the boiler has too much pressure. Once a week, this
valve should be tripped during operation to make sure it functions properly.
Pressure Regulator - Reduces the steam pressure from the boiler to the steamer compartments to 6 psi. Twice
a year, unscrew the large hex head plug located at the bottom of the regulator and remove
and clean the strainer. Carefully reassemble.

INSTALLATION & OPERATION MANUAL 10047-SB REV 0 (11/21)
PAGE
12
OF 24
Pressure Cookers
Start-Up - Boiler Operation with Standing Pilot Ignition
Open manual gas shut o supply valve and if the appliance has a manual blowdown valve, close it. Open cabinet door
and turn ON power switch located on left side. Green pilot light will come on, water will begin to enter boiler and required
water level will be reached in about three minutes. Observe water gauge glass to verify.
The dial on the combination gas control valve has three positions (ON-PILOT-OFF) for manual gas control of main
burners and pilot. Turn DIAL to PILOT. Depress dial and light burner located on centre main burner of boiler. Maintain dial
in depressed position for about 30 seconds and release. Observe that the pilot burner ame stays on. If at any time the
ame should become extinguished, a 5 minute period of complete shut o of gas supply is required before relighting.
Turn dial to ON and burners should ignite. Steam generation will now commence and be completed in approximately
15 minutes. Steam generation should reach approximately 11 psi as indicated on the pressure gauge on the boiler.
Start-Up - Boiler Operation with Electronic Ignition
Open manual gas supply valve.
Open cabinet door and turn main power switch ON. Green pilot light will come on, water will begin to enter boiler and
required water level will be reached in about three minutes. Observe water gauge sight glass to verify.
Operation
CAUTION
If you smell gas during the lighting procedure, immediately shut o the gas supply until the leak has been corrected.
INSTALLATION & OPERATION MANUAL 10047-SB REV 0 (11/21)
PAGE
13
OF 24
Pressure Cookers Operation
Operating Instructions for Boilers
with CSD-1 Controls
WARNING
In the event of main burner ignition failure, a 5 minute purge period must be observed prior to re-establishing
ignition source.
Initial Start-Up Procedure
1. Open the manual gas shut-off supply valve.
2. Close the manual blowdown valve, if so equipped.
3. Light the pilot burner.
The dial on the gas combination valve has three positions (ON - OFF - PILOT) for manual gas control of main
burners and pilot burner. Turn the dial on the gas combination valve to “PILOT”, depress the dial and light the
pilot burner on the centre burner. Maintain the dial in depressed position for about 30 seconds and release.
Observe the pilot flame stays ON. Turn dial to “ON”.
If at any time the flame should become extinguished, a five (5) minute purging is required before relighting is
attempted.
4. Open cabinet door and turn “ON” the power switch.
The green pilot light will come “ON”. Water should begin to enter the boiler. When enough water has entered
the boiler the (amber) “STANDBY” pilot light will come on.
5. Press the “RESET” switch to begin boiler operation.
The “STANDBY” pilot light will go off and the boiler will begin operation.
Daily Start-Up Procedure
1. Close the manual blowdown valve, if so equipped.
2. Examine that the pilot burner flame is burning. If the pilot burner is out, a five (5) minute period of complete
gas supply shut off is required before relighting.
3. Open cabinet door and turn “ON” the power switch.
The green pilot light will come “ON”. Water will begin to enter the boiler. When enough water has entered the
boiler the (amber) “STANDBY” pilot light will come on.
4. Press the “RESET” switch to begin the boiler operation. The “STANDBY” pilot light will go off and the boiler will
begin operation.
Daily Shutdown Procedure
1. Turn “OFF” the power switch. Observe that the burners go off.
2. Open the manual blowdown valve, if so equipped. If the appliance is equipped with an automatic blowdown
solenoid valve, the boiler’s contents, water and steam will be blown out and exhausted through the appliance
drain. The cold water solenoid valve will be activated.

INSTALLATION & OPERATION MANUAL 10047-SB REV 0 (11/21)
PAGE
14
OF 24
Pressure CookersOperation
Complete Shutdown Procedure
If the appliance is not intended to be operational for a lengthy period, then shut it down completely.
1. Open the manual blowdown valve, if so equipped.
2. Shut off all supplies of power, gas and water to the appliance.
NORMAL BOILER OPERATING CYCLE
Water Fill Cycle
On the initial lling of the boiler, the reset switch must be activated to initialize the safety lockout circuit. Once the water
in the boiler has reached the proper level, the level control will open the circuit to the ll solenoid valve, stopping the ow
of water to the boiler. As the water is consumed in the production of steam, the level control will close the circuit to the ll
solenoid and water will be supplied to the boiler.
Firing Cycle
The gas valve is operated by pressure sensing devices. On the initial operation of the boiler, steam generation should
reach 11 psi in approximately 15 minutes. At this point the “Operating Pressure” switch will open, closing the gas valve.
When pressure drops to 9 psi, the pressure switch closes, the gas valve will open and ignition should occur.
Should the pressure rise more than 14.5 psi the “Override Pressure Switch” will close the circuit to the override solenoid
valve, releasing excess steam.
Condensing Drain
A thermostat is located in the drain assembly and is activated by the temperature of steam. The thermostat opens the
cooling solenoid valve, in turn supplying water to the drain to condense steam.
Automatic Blowdown Valve
If the unit has an automatic blowdown valve, it is activated by the main power switch. The boiler will be drained should the
main power switch be turned “OFF”.
SAFETY LOCKOUT CONDITIONS
High Temperature Condition
A high temperature safety device is installed on the boiler. Should the temperature exceed the limit of this device, the
boiler will be shut down and put in a state of lockout. The “Temperature” pilot light (red), and the “Standby” pilot (amber),
will come on.
High Pressure Condition
A high pressure safety switch is installed on the boiler. Should the pressure exceed the limit of this device, the boiler will
be shut down and put into a state of lockout. The “Pressure” pilot light (red), and the standby pilot light (amber), will come
on. Should this device fail to operate, the safety relief valve will open.
Low Water Condition
A second low water safety cut o is supplied with the boiler. Should the water level fall below normal operating levels, this
device will shut down and put the boiler in a state of lockout. The “Low Water” pilot light (red), and the “Standby” pilot light
(amber) will come on.
INSTALLATION & OPERATION MANUAL 10047-SB REV 0 (11/21)
PAGE
15
OF 24
Pressure Cookers
Cooking Guidelines
The cooking guidelines in this manual are suggestions only. You should experiment with your food products to determine
cooking times that will give you the best results. Variables which aect cooking time include size, weight, thickness of foods,
temperature, density, previous condition of the foods (fresh, pre-blanched or frozen) and degree of doneness desired.
To allow steam to circulate around the pans, food must be spread evenly and not piled too high. Best results are obtained
after the compartments are allowed to preheat. When all compartments are to be loaded at the same time, it is best to allow
the rst compartment to reach 4 - 4.5 psig before starting the next compartment. When processing frozen vegetables, use
half the suggested pan weights and allow sucient time for cooking doneness.
PRODUCT PAN DEPTH
PERFORATED
OR SOLID
WEIGHT / QUANTITY
PER PAN
STEAM TIME
MINUTES
PANS PER
COMPARTMENT
VEGETABLES (Fresh)
Beans, lima 2.5" Perforated 5 lbs.
10 – 12
13 - 15
1 - 3
4 - 6
Beans, string or wax 2.5" Perforated 6 lbs.
15 - 20
20 - 25
1 – 3
4 - 6
Broccoli, orets 2.5" Perforated 6 lbs.
8 - 10
10 - 12
1 – 3
4 - 6
Broccoli, stalks 2.5" Perforated 6 lbs.
10 - 15
15 - 20
1 – 3
4 - 6
Carrots, sliced 2.5" Perforated 9 lbs.
18 - 21
21 - 25
1 – 3
4 - 6
Corn 2.5" Perforated 5 lbs.
9 - 10
11 - 13
1 – 3
4 - 6
Peas 2.5" Perforated 5 lbs.
6 - 7
8 - 9
1 – 3
4 - 6
Potatoes, chunked 2.5" Perforated 10 lbs.
20 - 25
25 - 30
1 – 3
4 - 6
Rice. add 1 gallon
water
4" Solid 4 lb
22 - 24
25 - 27
1 – 2
3 -4
Spinach, cut, cleaned 4” Perforated 3 lbs.
3 - 5
4 - 6
1 – 2
3 -4
Vegetables, canned 2.5" Solid 7 lbs.
4 - 5
5 - 8
1 – 3
4 - 6
OTHER FOODS
Chicken 2.5" Perforated 8 lbs.
18 - 25
25 - 30
1 – 3
4 - 6
Eggs, out-of-shell 2.5" Solid 4 doz.
6 - 7
7 - 8
1 – 3
4 - 6
Eggs, in-shell 2.5" Perforated 3 doz.
2 - 3
4 - 6
1 – 3
4 - 6
Fish, llets 2.5" Perforated 3 lbs.
8 - 12
10 - 15
1 – 3
4 - 6
Meatloaf 2.5" Solid (for broth) 15 lbs.
35 - 40
40 - 45
1 – 3
4 - 6
Spaghetti, add 7 quarts
of water
4" Solid 3 lbs.
20 - 22
23 - 26
1 – 2
3 -4
Turkey 2.5" Perforated 10 - 12 lbs.
50 - 60
60 - 75
1 – 3
4 - 6
Cooking Guidelines
INSTALLATION & OPERATION MANUAL 10047-SB REV 0 (11/21)
PAGE
16
OF 24
Pressure Cookers
Cleaning
WARNING
Disconnect the power supply to the appliance before cleaning or servicing.
CAUTION
Do not use cleaning agents that are corrosive.
CAUTION
The appliance and its parts are hot. Use care when operating, cleaning or servicing the appliance.
WARNING
Never spray water into electric controls.
Keep exposed cleanable areas of unit clean at all times. Use a mild soap and warm clean water. Rinse thoroughly with
clean water and wipe dry with a clean soft cloth.
Remove pans, shelves, slide racks and compartment strainers and clean using mild warm clean soapy water.
Remove food sediment from compartment and thoroughly wash oven cavities, door liners and door gaskets at the end of
each day or as required.
Never use steel wool on stainless steel.
Do not apply food oils or petroleum lubricants to the door gaskets.
Replace racks, shelves and compartment strainers.
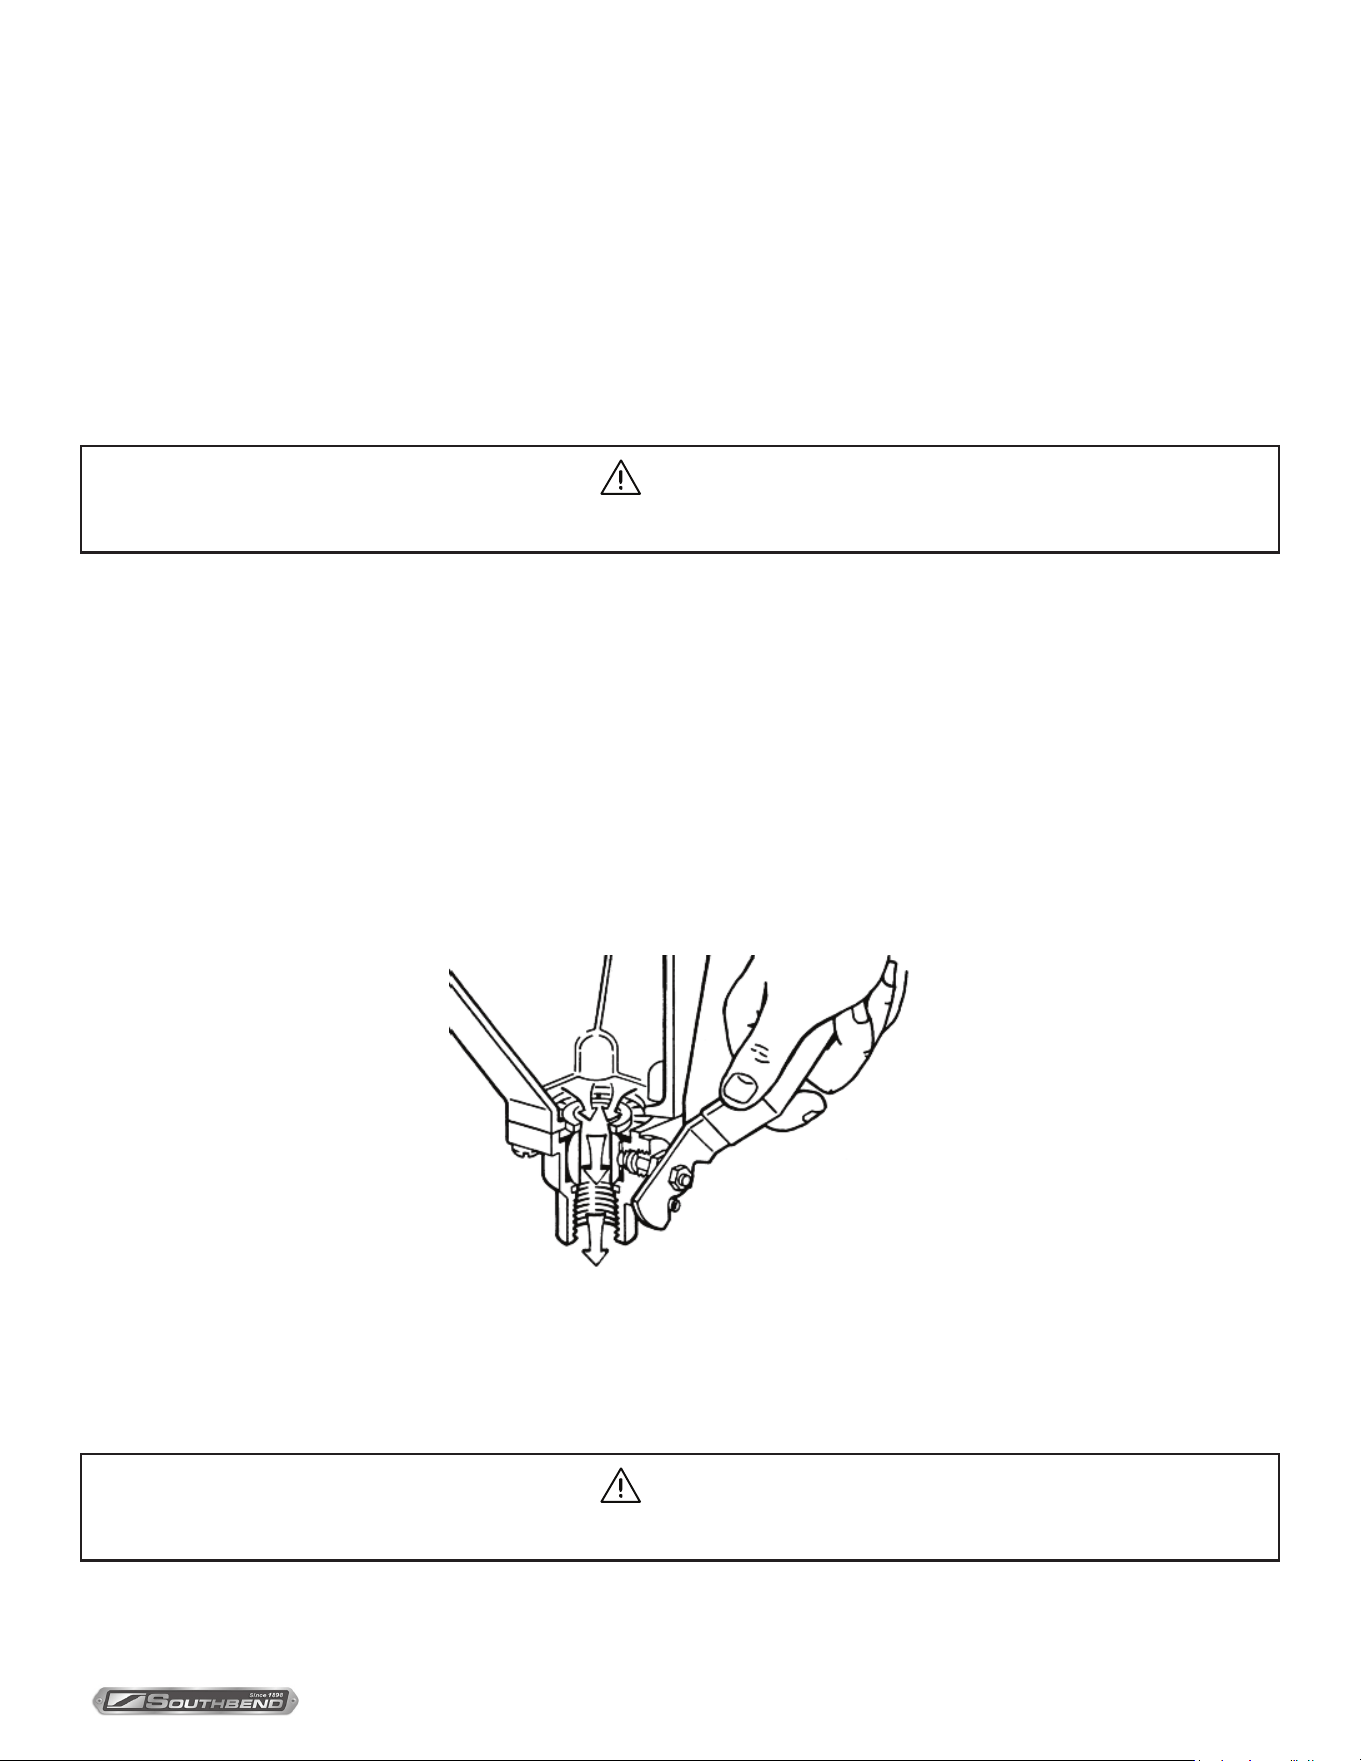
Turn handwheel fully counterclockwise to retract the gasket plate and avoid pressure on the door gasket when the cooker
is not in use.
Cleaning
INSTALLATION & OPERATION MANUAL 10047-SB REV 0 (11/21)
PAGE
17
OF 24
Pressure Cookers
CAUTION
An obstructed drain can cause personal injury or property damage.
Maintenance
Maintenance
1. Water Level Control should be opened daily to blow down sediment and scalant.
2. Observe that the water in gauge glass is clean and clear. Extreme murkiness in water indicates inadequate water
quality.
3. Safety valve should be tripped during operation once a week to assure that it functions properly.
4. Keep all exposed cleanable areas of unit clean at all times.
5. De-Scaling is based on water quality and usage.
Do not allow any sediment to be exhausted through exhaust valves (compartment drains). Remove all sediment and
clean. Greasy foods may leave deposits that will accumulate in the exhaust drain and drain lines. To remove close doors
and seal, set timers and at frequent intervals release operating arm and blowdown unit, releasing steam through valves
and drain lines to dissolve grease.
The thrust screw in each compartment door should be lubricated each month to prevent handwheel from becoming
dicult to turn. To lubricate, turn handwheel clockwise until gasket plate is fully extended. Grasp nger hooks on door
plate and lift up and out. Apply grease NLG12 consistency of 285W60 viscosity liberally on thrust screw, rotate handwheel
to ensure complete coverage. Replace gasket plate.
IMPORTANT INSTRUCTIONS
Be sure to ush your boiler water level control daily. Failure to follow this procedure can cause the control to malfunction
resulting in serious boiler damage.
The Boiler Water Level Control installed on your boiler requires periodic maintenance. As boiler water circulates into
the oat chamber, sand, scale and other sediment may be deposited in the oat chamber. While the chamber has been
designed with a large accumulation bowl, it is necessary to ush the sediment from the chamber by blowing down the
control so that the accumulation of sediment does not interfere with the movement of the oat in the control.
Control must be ushed at least once a day.
CAUTION
Protect yourself. When ushing control, hot water and steam will ow out of the drain.
When ushing control, note water level in gauge glass, allow the boiler to ll if necessary, and also to come up to
temperature.

INSTALLATION & OPERATION MANUAL 10047-SB REV 0 (11/21)
PAGE
18
OF 24
Pressure CookersMaintenance
Before ushing control, note that water level in gauge glass is within operating range and the boiler pressure is at least
6 psi. While the boiler is being red, open blowdown valve at bottom of control by rotating the handle counterclockwise
about 1/4 turn to fully open the valve.
Opening the blowdown valve also checks the cut-o operation. Float should drop shutting burners o, hot water and
steam will ow out the drain ushing away sediment.
CAUTION
If burner does not shut o during blowdown, immediately discontinue use of appliance and call for service.
Continue draining water for about fteen (15) seconds, from control until water is clean. Manually close valve.
Recheck gauge glass. If water level has dropped signicantly, wait for the boiler to restore water level and pressure
and repeat if necessary.
Adjustments
At least twice a year have an authorized service person clean and adjust the unit for maximum performance.
Descaling Boiler
It is recommended that the boiler should be checked every 90 to 120 days for scale build up. Regular maintenance should
be carried out at this time.
If the boiler has been descaled, a new Anode should be installed in the boiler to help extend its life.
1. With boiler empty, close manual blowdown valve. If appliance is equipped with automatic blowdown, turn water supply
OFF to appliance. Turn power switch ON. This will energize and close blowdown valve.
2. Remove 3/4” pipe plug from tting on left front of boiler.
3. Insert appropriate hose or tube through tting and pour in (1/2) half gallon (U.S.) of CLR Descaling Solution or use the
Optional Deliming Assembly DPA-1 available from your dealer.
For appliances equipped with CSD-1, descaling solution must be introduced through hand hole.
4. Replace 3/4” pipe plug securely.
5. Open water supply to appliance allowing water to ll boiler to required level.
6. Let appliance cycle, allow two hours for descaling and cleaning. DO NOT TURN STEAM ON TO THE
COMPARTMENTS.
7. Open both the blowdown and low water level control valves for complete drainage and then close both valves.
Appliance equipped with automatic blowdown - turn OFF power switch and open low water control valve. This will
allow complete drainage. Once drained close water level control valve.
8. Turn appliance switch ON. When boiler is completely lled, turn power switch OFF. This will rinse and drain boiler.
Appliance with manual blowdown valve must be opened to drain.
9. Complete Step 8 twice to assure boiler is completely rinsed.
10. Appliance is now ready for use.
INSTALLATION & OPERATION MANUAL 10047-SB REV 0 (11/21)
PAGE
19
OF 24
Pressure Cookers Maintenance
Calibrate Pressure Switches
Pressure switch range is from 1 to 15 psi.
Adjust all settings to maximum on high signal adjustment screw on pressure switches.
Adjust in the following sequence:
- High limit pressure switch.
- Override pressure switch.
- Operating pressure switch.
- Turning screw clockwise to increase, counterclockwise to decrease pressure.
- Use relief valve to release pressure from boiler for setting adjustments.
HIGH LIMIT PRESSURE SWITCHES
Allow pressure to build until unit shuts o. This should occur at 15 psi. Set the high signal to switch at 14.5 psi on the
gauge and the low signal to 13.0 psi.
OVERRIDE PRESSURE SWITCHES
Allow pressure to increase to 13 psi. Set the high signal to switch at 13 psi on the gauge and the low signal to 11 psi.
OPERATING PRESSURE SWITCHES
Set the high signal to switch at 11 psi on the gauge and the low signal to 9 psi.
Release pressure in boiler to below 9 psi. Burner will come on. Once pressure has reached 11 psi, burners will shut o.
Repeat this process several times to make sure burners come on at 9 psi and shut o at 11 psi.
Once completed, pressure switches have been calibrated.
Should your unit not have the High Limit pressure switch, start procedure at Override pressure switch.
Service
Contact your local authorized service oce for any repairs or adjustments needed on this equipment.
NOTICE
Pressure switches are factory set. Calibration is only required if pressure switches are replaced or if
adjustment is required.
NOTICE
Contact the factory, the factory representative or local service company to perform maintenance and repairs.

INSTALLATION & OPERATION MANUAL 10047-SB REV 0 (11/21)
PAGE
20
OF 24
Pressure Cookers
Troubleshooting
Cooker
Door hasp will not engage
1. Door loose and requires new bushings.
2. Hasp requires adjustment by adding or removing of washers under hasp.
Handwheel hard to turn
1. Foreign matter on thrust screw or lack of lubricant.
2. Thrust screw bent or worn.
Door gasket leaks
1. Gasket screw loose.
2. Gasket damaged or at end of useful life.
3. Door loose and not aligned correctly.
4. Gasket plate installed incorrectly.
5. Handwheel binding so that not enough pressure to seal door.
Water accumulates in compartments
1. Appliance not levelled properly.
2. Compartment screen plugged.
3. Exhaust valve plugged or defective.
4. Exhaust drain line plugged.
Compartment pressurized at end of cooking cycle
1. Exhaust valve plugged or defective.
Steam escapes from compartment during cooking cycle
1. Compartment vent plugged.
2. Exhaust valve plugged or defective.
Cooking cycle cannot be activated
1. Loose wire terminations.
2. Steam valve plugged or defective.
3. Timer defective.
4. Micro switch on operation arm defective or requires adjustment.
Water enters compartment through steam valve
1. Water level control defective or requires cleaning.
Troubleshooting

INSTALLATION & OPERATION MANUAL 10047-SB REV 0 (11/21)
PAGE
21
OF 24
Pressure Cookers Troubleshooting
Boiler
NOTICE
At least twice a year have an authorized service person clean and adjust the unit for maximum performance.
Water not being supplied to boiler
1. Water supply is “OFF”.
2. Defective water ll solenoid.
3. Water level control clogged or defective, unable to operate ll valve.
4. Check drain valve is closed.
5. Supply water pressure too low.
Automatic blowdown valve does not drain
1. Defective blowdown valve.
2. Heat exchanger build up of scalant clogging drain lines and valve.
Boiler achieves pressure slower than normal
1. Heavy build up of lime or scalant hampering heat transfer. Call for service to inspect interior of boiler. Should a
considerable amount of scalant be found, have steam lines, water level control and valve also inspected.
Safety valve blows
1. Defective safety valve.
2. Pressure too high, pressure switch requires adjustment (lower) or may be defective.

INSTALLATION & OPERATION MANUAL 10047-SB REV 0 (11/21)
PAGE
22
OF 24
Pressure Cookers
Notes

INSTALLATION & OPERATION MANUAL 10047-SB REV 0 (11/21)
PAGE
23
OF 24
Pressure Cookers
Notes
INSTALLATION & OPERATION MANUAL 10047-SB REV 0 (11/21)
PAGE
24
OF 24
Pressure Cookers
GC-2S, GC-3S, GDA-2S & GDA-3S
Pressure Cookers
A product with the Southbend Steam name incorporates the best in durability and low maintenance. We all recognize,
however, that replacement parts and occasional professional service may be necessary to extend the useful life of this
appliance. When service is needed, contact a Southbend Steam Authorized Service Agency, or your dealer. To avoid
confusion, always refer to the model number, serial number, and type of your appliance.
SOUTHBEND STEAM
A Middleby Company
1100 Old Honeycutt Road Fuquay-Varina, North Carolina 27526 USA
www.southbendnc.com