
en Table of contents
You can find additional information and explanations online.
Scan the QR code on the title page.
Table of contentsTable of contents
1Safety ............................................ 3
1.1 Definition of the signal
words ............................................. 3
1.2 General information .................... 4
1.3 Intended use ................................ 4
1.4 Restriction on user group .......... 4
1.5 Safe installation ........................... 5
1.6 Safe use ........................................ 7
1.7 Safe cleaning and mainten-
ance ............................................... 9
2Preventing material damage .... 10
3Environmental protection and
saving energy ............................ 11
3.1 Disposing of packaging ........... 11
3.2 Saving energy ............................ 11
3.3 Energy saving mode ................ 11
4Installation and connection ...... 11
4.1 Unpacking the appliance ........ 11
4.2 Contents of package ................ 11
4.3 Requirements for the installa-
tion location ................................ 12
4.4 Water outlet hose ...................... 12
4.5 Aligning the appliance ............. 14
4.6 Connecting the appliance to
the electricity supply ................. 14
5Familiarising yourself with
your appliance ........................... 15
5.1 Appliance .................................... 15
5.2 Control panel ............................. 16
5.3 Operating logic .......................... 16
6Display ........................................ 16
7Buttons ....................................... 18
8Programmes .............................. 19
8.1 Automatic programmes ........... 20
8.2 Timed programmes .................. 21
8.3 Other programmes ................... 21
9Accessories ............................... 22
10 Laundry .................................... 22
10.1 Preparing the laundry ............ 22
10.2 Care symbols on the care la-
bels ............................................ 23
11 Basic operation ....................... 23
11.1 Switching on the appliance .. 23
11.2 Setting a programme ............. 23
11.3 Saving the programme set-
tings ........................................... 23
11.4 Opening the door ................... 23
11.5 Loading laundry ...................... 24
11.6 Starting the programme ........ 24
11.7 Adding laundry ........................ 24
11.8 Cancelling the programme ... 24
11.9 Unloading the laundry ............ 24
11.10 Put the appliance into
standby mode ....................... 24
11.11 Fluff filter ................................. 24
11.12 Condensation container ...... 26
12 Dryness level ........................... 27
12.1 Changing the dryness level .. 27
12.2 Adjusting the dryness level ... 27
13 Childproof lock ........................ 27
13.1 Activating the childproof
lock ............................................ 28
13.2 Deactivating the childproof
lock ............................................ 28
14 Wool basket ............................. 28
14.1 Inserting the wool basket ...... 28
14.2 Starting a programme with
the wool basket ....................... 28
14.3 Examples of how to use the
wool basket ............................. 29
15 HomeConnect ........................ 30
15.1 Setting up HomeConnect ..... 30
2
Safety en
15.2 Deactivating Wi-Fi on the ap-
pliance ...................................... 30
15.3 Activating Wi-Fi on the appli-
ance .......................................... 30
15.4 Installing the software up-
date ........................................... 31
15.5 Resetting the appliance net-
work settings ........................... 31
15.6 Remote start ............................ 31
15.7 Intelligent programme recom-
mendation ................................ 31
15.8 Remote diagnostics ............... 32
15.9 Data protection ........................ 32
16 Basic settings .......................... 32
16.1 Overview of the basic set-
tings ........................................... 32
16.2 Changing the basic set-
tings ........................................... 33
17 Appliance care ......................... 33
17.1 Preparing for appliance
care ........................................... 34
17.2 Running the basic appliance
care programme ..................... 34
17.3 Running the intensive appli-
ance care programme ........... 34
18 Cleaning and servicing ........... 35
18.1 Moisture sensor ...................... 35
18.2 Condensation container fil-
ter ............................................... 36
19 Troubleshooting ...................... 36
20 Transportation, storage and
disposal ................................... 40
20.1 Disposing of old appliance ... 40
21 Customer Service ................... 41
21.1 Product number (E-Nr.), pro-
duction number (FD) and
consecutive numbering (Z-
Nr.) ............................................. 41
22 Consumption values ............... 41
23 Technical data ......................... 42
23.1 Information regarding Free
and Open Source Software .. 42
24 Declaration of Conformity ...... 43
Safety 1 Safety
Observe the following safety instructions.
1.1 Definition of the signal words
This is where you can find explanations for the safety signal words
used in this manual.
WARNING
This indicates that death or serious injuries may occur as a result
of non-observance of this warning.
CAUTION
This indicates that minor or moderate injuries may occur as a res-
ult of non-observance of this warning.
3

en Safety
ATTENTION
This indicates that damage to the appliance or other material
damage may occur as a result of non-compliance with this warn-
ing.
Note: This alerts you to important information.
1.2 General information
¡ Read this instruction manual carefully.
¡ Keep the instruction manual and the product information safe
for future reference or for the next owner.
¡ Do not connect the appliance if it has been damaged in transit.
1.3 Intended use
Only use this appliance:
¡ for drying and freshening up fabrics that are washed with water
and suitable for dryers.
¡ in closed rooms in the home and with similar applications, e.g.:
in canteens in shops, offices and other work environments; in
agricultural businesses; use by customers in hotels, motels and
other typical home environments; in bed and breakfasts.
¡ Up to an altitude of 4000 m above sea level.
1.4 Restriction on user group
This appliance may be used by children aged 8 or over and by
people who have reduced physical, sensory or mental abilities or
inadequate experience and/or knowledge, provided that they are
supervised or have been instructed on how to use the appliance
safely and have understood the resulting dangers.
Do not let children play with the appliance.
Cleaning and user maintenance must not be performed by chil-
dren unless they are being supervised.
Keep children under the age of 3 years and pets away from the
appliance.
4

Safety en
1.5 Safe installation
WARNING‒Risk of electric shock!
Incorrect installation is dangerous.
Connect and operate the appliance only in accordance with the
specifications on the rating plate.
Connect the appliance to a power supply with alternating cur-
rent only via a properly installed socket with earthing.
The protective conductor system of the domestic electrical in-
stallation must be properly installed. The installation must have
a sufficiently large cross section.
When using a residual current circuit breaker, only use a type
with the mark.
Never equip the appliance with an external switching device,
e.g. a timer or remote control.
Never connect the appliance to a circuit that is regularly
switched on and off by the energy supplier.
When the appliance is installed, the mains plug of the power
cord must be freely accessible. If free access is not possible, an
isolating switch must be integrated into the permanent electrical
installation according to the installation regulations.
When installing the appliance, check that the power cable is not
trapped or damaged.
If the insulation of the power cord is damaged, this is dangerous.
Never let the power cord come into contact with hot appliance
parts or heat sources.
Never let the power cord come into contact with sharp points or
edges.
Never kink, crush or modify the power cord.
WARNING‒Risk of fire!
It is dangerous to use an extended power cord and non-approved
adapters.
Do not use extension cables or multiple socket strips.
Only use adapters and power cords approved by the manufac-
turer.
If the power cord is too short and a longer one is not available,
please contact an electrician to have the domestic installation
adapted.
5

en Safety
WARNING‒Risk of injury!
The heavy weight of the appliance may result in injury when lifted.
Do not lift the appliance on your own.
If this appliance is not correctly installed in a washer-dryer stack,
the installed appliance may fall.
Only stack the dryer on a washing machine using the connec-
tion kit from the dryer manufacturer.
Page22
No other install-
ation method is permitted.
Do not install the appliance in a washer-dryer stack if the dryer
manufacturer does not offer a suitable connection kit.
Do not install appliances from different manufacturers and with
varying depths and widths in a washer-dryer stack.
Do not install a washer-dryer stack on a platform; the appli-
ances may tip over.
WARNING‒Risk of suffocation!
Children may put packaging material over their heads or wrap
themselves up in it and suffocate.
Keep packaging material away from children.
Do not allow children to play with packaging material.
CAUTION‒Risk of injury!
The appliance may vibrate or move when in use.
Place the appliance on a clean, even, solid surface.
Align the appliance using the appliance feet and a spirit level.
If hoses and power cords have been laid incorrectly, this causes a
tripping hazard.
Lay hoses and power cords in such a way that there is no risk
of tripping.
If the appliance is moved by holding onto protruding components,
such as the appliance door, the parts may break off.
Do not move the appliance by holding onto protruding parts.
CAUTION‒Risk of cutting!
Touching sharp edges on the appliance may lead to cuts.
Do not touch the sharp edges on the appliance.
Wear protective gloves when installing and transporting the ap-
pliance.
6

Safety en
1.6 Safe use
WARNING‒Risk of electric shock!
If the appliance or the power cord is damaged, this is dangerous.
Never operate a damaged appliance.
Never pull on the power cord to unplug the appliance. Always
unplug the appliance at the mains.
If the appliance or the power cord is damaged, immediately un-
plug the power cord or switch off the fuse in the fuse box.
Call customer service.
Page41
An ingress of moisture can cause an electric shock.
Only use the appliance in enclosed spaces.
Never expose the appliance to intense heat or humidity.
Do not use steam- or high-pressure cleaners, hoses or sprays
to clean the appliance.
WARNING‒Risk of harm to health!
Children can lock themselves in the appliance, thereby putting
their lives at risk.
The appliance must not be set up behind a lockable door, a
sliding door or a door with a hinge on the side opposite to the
appliance, which prevents appliance from opening fully.
With redundant appliances, unplug the power cord. Then cut
through the cord and damage the lock on the appliance door
beyond repair so that the appliance door will no longer close.
WARNING‒Risk of suffocation!
Children may breathe in or swallow small parts, causing them to
suffocate.
Keep small parts away from children.
Do not let children play with small parts.
WARNING‒Risk of explosion!
If there is coal dust or flour in the air around the appliance, this
may cause an explosion.
Keep the area around the appliance clean during operation.
7
en Safety
WARNING‒Risk of poisoning!
Condensation water from this appliance is not suitable for drinking
and may be contaminated with fluff.
Do not drink or reuse the condensation water from the appli-
ance.
Detergents and care products may result in poisoning if con-
sumed.
If accidentally swallowed, seek medical advice.
Keep detergents and care products out of the reach of children.
WARNING‒Risk of fire!
The refrigerant R290 in this appliance is environmentally friendly
yet combustible and may ignite if it comes into contact with open
flames or ignition sources.
Keep naked flames and ignition sources away from the appli-
ance.
Dispose of the appliance properly.
Do not damage the tubing of the refrigerant circuit.
WARNING‒Risk of explosion!
If there is any residual material left in the fluff filter, this may ignite
during the drying process.
Clean the fluff filter regularly.
Highly flammable objects such as lighters or matches may ignite
during the drying process.
Remove all highly flammable objects from any pockets in your
laundry before the drying process.
Unwashed laundry may ignite during drying.
Do not dry laundry in this appliance if the laundry has not been
washed first.
If laundry has been contaminated with substances such as
cooking oil, acetone, alcohol, petrol, kerosene, stain-remover,
turpentine, wax and wax-remover, wash it in hot water with an
additional quantity of detergent before drying it in the appliance.
Rinse the laundry thoroughly with warm water and detergent be-
fore drying it in the machine.
Do not use the appliance if industrial chemicals have been used
to clean the laundry beforehand.
8

Safety en
WARNING‒Risk of fire!
If drying is interrupted early, the laundry is not cooled sufficiently
and may ignite.
Do not interrupt the drying programme early.
If drying is interrupted early, remove the laundry immediately
and spread it out.
CAUTION‒Risk of injury!
The covering plate may break if you stand on or climb onto the
appliance.
Do not stand on or climb onto the appliance.
The appliance may tip over if you sit on or lean against the open
door.
Do not sit on or lean against the appliance door.
Do not place any objects on the appliance door.
Reaching into the drum while it is still turning may cause hand in-
juries.
Wait for the drum to come to a complete stop before reaching
inside.
1.7 Safe cleaning and maintenance
WARNING‒Risk of electric shock!
Improper repairs are dangerous.
Never make any technical modifications to the appliance or its
features.
Repairs to the appliance should only be carried out by trained
specialist staff.
Only use genuine spare parts when repairing the appliance.
If the power cord of this appliance is damaged, it must be re-
placed by the manufacturer, the manufacturer's Customer Ser-
vice or a similarly qualified person in order to prevent any risk.
An ingress of moisture can cause an electric shock.
Before cleaning, pull out the mains plug or switch off the fuse in
the fuse box.
Do not use steam- or high-pressure cleaners, hoses or sprays
to clean the appliance.
Do not use the appliance with damp hands.
9

en Preventing material damage
WARNING‒Risk of injury!
The use of non-original spare parts and non-original accessories
is dangerous.
Only use the manufacturer's original spare parts and original ac-
cessories.
WARNING‒Risk of poisoning!
Poisonous fumes may be given off if you use cleaning agents that
contain solvents.
Do not use cleaning agents that contain solvents.
Preventing material damage2 Preventing material
damage
ATTENTION
The functionality of the appliance
may be impaired if you use the
wrong quantity of fabric softener, de-
tergent, care product or cleaning
agent.
Follow the dosage recommenda-
tions from the manufacturer.
Exceeding the maximum load capa-
city impairs the function of the appli-
ance.
Observe the maximum load capa-
city for each programme and do
not exceed it.
Page19
The function of the appliance may be
impaired if the appliance overheats.
Keep the ventilation opening on
the appliance clear during opera-
tion.
Make sure that the area is ad-
equately ventilated.
Light objects such as hair and fluff
may be sucked in from the ventilation
opening on the appliance during op-
eration and impair the function of the
appliance.
Keep the area around the appli-
ance clean during operation.
Keep light objects away from the
appliance.
If you operate the appliance without a
fluff guard (e.g. fluff filter, fluff col-
lector, filter mat, etc., depending on
appliance specifications), or if the
fluff guard is incomplete or defective,
this may result in damage to the ap-
pliance.
Do not operate the appliance
without a fluff guard, or with a fluff
guard that is incomplete or defect-
ive.
Foam and foam rubber may deform
or melt during the drying process.
Objects such as foam rubber
(latex foam), shower caps, water-
proof textiles, rubberised items
and clothing or cushions with
sponge rubber padding must not
be dried in the appliance.
Unsuitable cleaning products may
damage the surfaces of the appli-
ance.
Do not use harsh or abrasive de-
tergents.
Do not use cleaning products with
a high alcohol content.
Do not use hard scouring pads or
cleaning sponges.
Clean the appliance with nothing
but water and a soft, damp cloth.
Remove all detergent residue,
spray residue or other residues im-
10

Environmental protection and saving energy en
mediately if they come into contact
with the appliance.
Environmental protection and saving energy3 Environmental protec-
tion and saving energy
3.1 Disposing of packaging
The packaging materials are environ-
mentally compatible and can be re-
cycled.
Sort the individual components by
type and dispose of them separ-
ately.
3.2 Saving energy
If you follow these instructions, your
appliance will use less power.
Operate the appliance in a well-
ventilated room and keep the vent-
ilation opening on the appliance
clear.
Spin the laundry in the washing
machine before drying.
For each drying process, use the
maximum load for the programs.
Page19
Do not exceed the programme's
maximum load capacity.
Page19
After drying, clean the fluff filter.
Page24
Deactivate Wi-Fi on the appliance if
it is not being used.
Page30
3.3 Energy saving mode
If you do not use the appliance for a
brief period, it automatically switches
to energy-saving mode. All displays
go out and ( ) flashes.
Energy-saving mode ends when you
use the appliance again.
If you do not use the appliance for an
extended period, it automatically
switches to standby mode.
Installation and connection4 Installation and con-
nection
4.1 Unpacking the appliance
ATTENTION
Objects remaining in the drum that
are not designed for operation with
the appliance may cause material
damage and damage to the appli-
ance.
Remove these objects, along with
all supplied accessories, from the
drum before starting the appliance.
1.
Remove any packaging and pro-
tective covers completely from the
appliance.
Page11
2.
Check the appliance for visible
damage.
3.
Open the door.
Page23
4.
Remove any accessories from the
drum.
5.
Close the door.
4.2 Contents of package
After unpacking all parts, check for
any damage in transit and complete-
ness of the delivery.
ATTENTION
If the appliance is operated with in-
complete or defective accessories,
the appliance may not be able to op-
erate properly, or this may result in
material damage or damage to the
appliance.
Do not operate the appliance with
incomplete or defective accessor-
ies.
Replace the accessories in ques-
tion before operating the appli-
ance.
"Accessories", Page22
The delivery consists of the following:
Tumble dryer
11
en Installation and connection
Accompanying documents
Wool basket with insert
Page28
Water outlet hose with connection
adapter, fixing material and elbow
Page12
4.3 Requirements for the in-
stallation location
Observe the instructions for the in-
stallation location.
ATTENTION
If the appliance is tilted at an angle
greater than 40°, residual water may
leak out of the appliance and cause
material damage.
Tilt the appliance carefully.
Transport the appliance in an up-
right position.
If residual water in the appliance
freezes, this may cause damage to
the appliance.
Do not install or operate this appli-
ance anywhere that is liable to ex-
perience frost or outdoors.
If the appliance is operated immedi-
ately after transportation, the refriger-
ant contained in the appliance may
result in damage to the appliance.
Immediately after transporting the
appliance, leave it to rest for two
hours before putting it into opera-
tion.
On the floor
Place the appliance on a clean, level
and firm surface.
Align the appliance.
Page14
In a washer-dryer stack
Only use the original connection set
from the dryer manufacturer when
setting up this appliance in a washer-
dryer stack.
Connection kit
Page22
Connection kit with pull-out work-
top
Page22
This appliance must only be stacked
on a washing machine from the
same manufacturer. The depth and
width of this appliance must corres-
pond with the dimensions of the
washing machine.
Do not place the washer-dryer stack
on a platform.
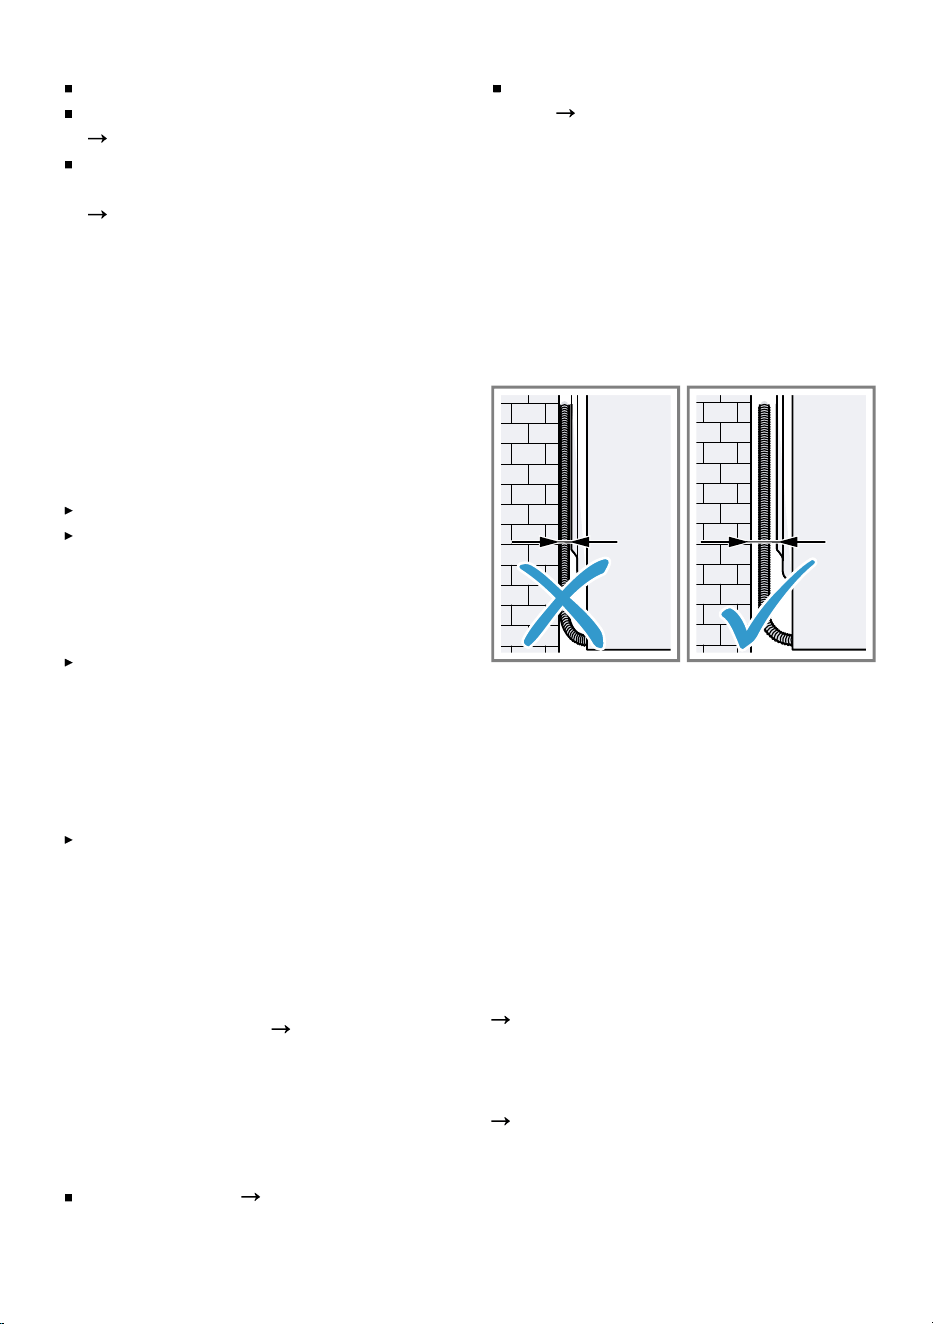
Against a wall
Do not trap the hoses and power
cord between the wall and the appli-
ance.
4.4 Water outlet hose
Condensation that forms in the appli-
ance as it dries the laundry is collec-
ted by default in the condensation
container. Use the water outlet hose
to drain away excess condensation
directly into the waste water system.
Note: Operate this appliance using
the water outlet hose provided.
Page13
If you connect the water outlet hose,
you do not have to regularly empty
the condensation container.
"Emptying the condensation con-
tainer", Page26
12
Installation and connection en
Connecting the water outlet hose
If you do not want to regularly empty
the appliance's condensation con-
tainer, connect the water outlet hose.
ATTENTION
When operating the appliance
without the condensation hose or wa-
ter outlet hose being connected
properly, liquid may leak out of the
connecting piece.
Before operating the appliance,
connect the condensation hose or
water outlet hose properly to the
connecting piece.
Requirements
The appliance and the accessory
have been unpacked.
Page11
The appliance is installed at the in-
stallation location.
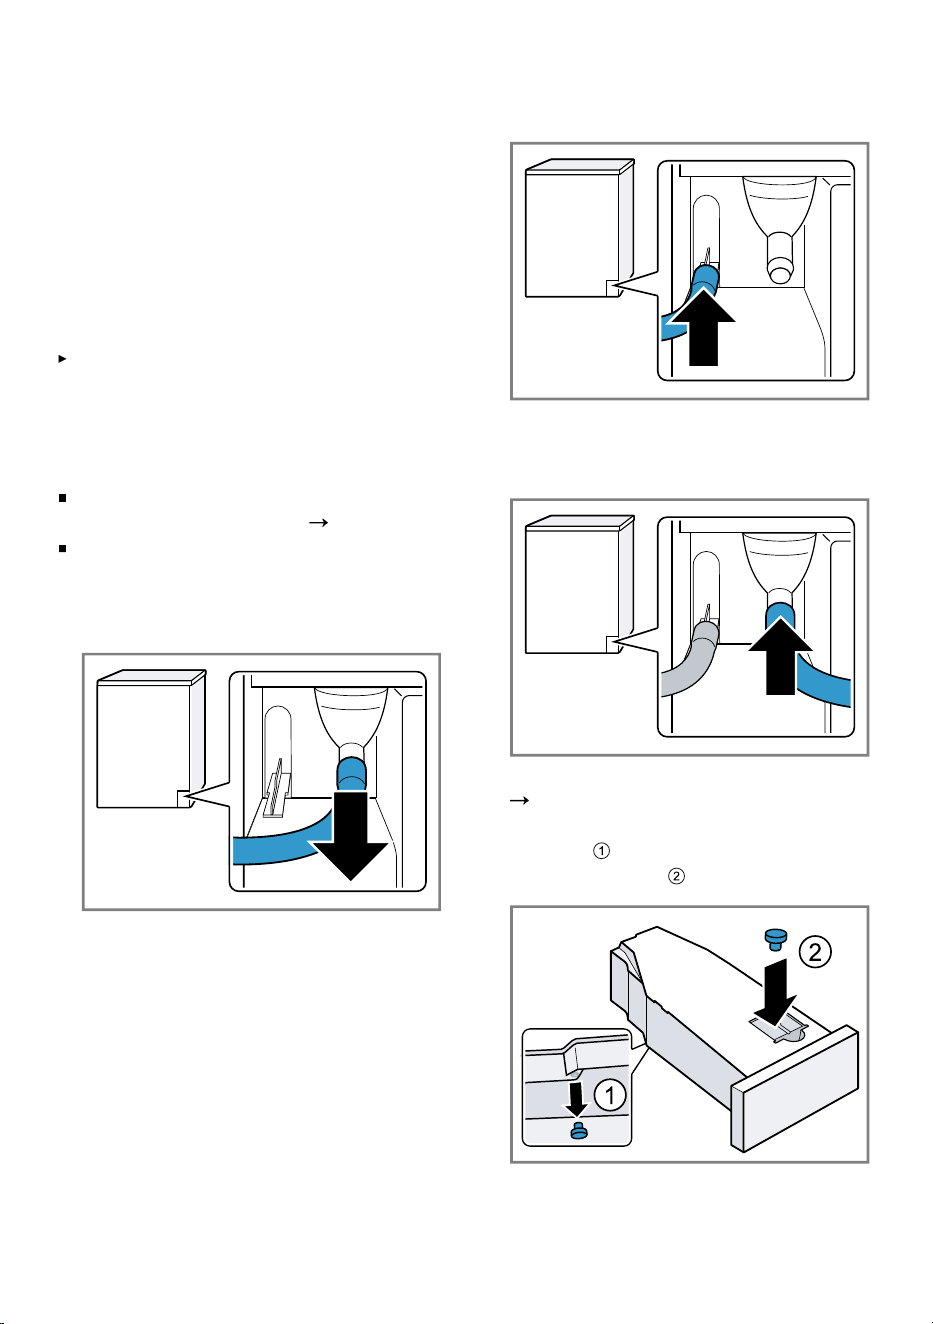
1.
Pull out the condensation hose
from the connecting piece.
The condensation hose is connec-
ted to the connecting piece at the
factory.
Note: When removing the con-
densation hose, liquid may leak
out of the connecting piece.
2.
Push the condensation hose into
the holder.
3.
Push the water outlet hose as far
as it will go into the connecting
piece.
4.
Empty the condensation container.
Page26
5.
Remove the stopper from the un-
derside and insert it in the re-
cess in the top .
13
en Installation and connection
6.
Insert the condensation container.
Page27
7.
Connect the appliance to the water
drain.
Page14
Tip: To collect condensation in the
condensation container again (e.g. if
you change where the appliance is
located), carry out these steps in re-
verse order.
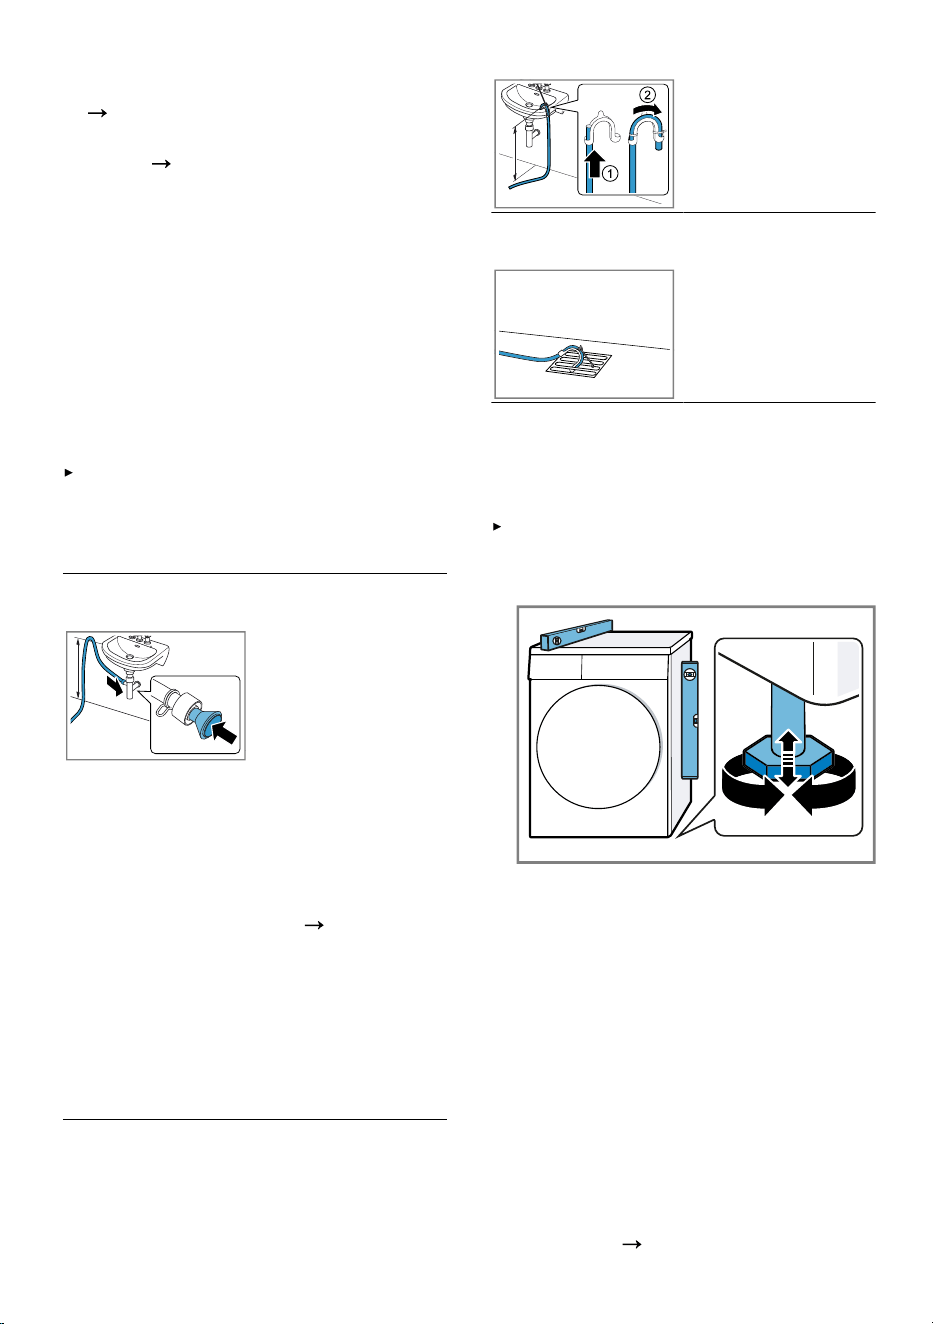
Water outlet connection types
ATTENTION
In the event of a blocked or covered
outlet, accumulated wastewater can
flow back into the appliance.
Before operating the appliance, en-
sure that the wastewater drains
away quickly and eliminate any
blockages.
Drainage into a
siphon.
Secure the con-
nection point with
a (12-22 mm)
hose clamp.
Secure the water
outlet hose with a
hose guide at a
height of at least
80 cm and no
more than 100
cm.
Note: You can
use the Y-distrib-
utor
Page22
to connect the wa-
ter outlet hose of
an additional ap-
pliance, such as a
washing machine,
to the same si-
phon outlet.
Drainage into a
wash basin.
Push the water
outlet hose fully
through the elbow
and secure it us-
ing fixing material.
Secure the elbow
at a height of no
more than 100
cm.
Drainage into a
gully.
Push the water
outlet hose fully
through the elbow
and secure it us-
ing fixing material.
Secure the elbow
to the gully.
4.5 Aligning the appliance
In order to reduce vibrations and
noises, align the appliance correctly.
To align the appliance, turn the ap-
pliance feet. Check that the appli-
ance is level using a spirit level.
All appliance feet must stand firmly
on the ground.
4.6 Connecting the appliance
to the electricity supply
Requirement: After transporting the
appliance in a horizontal position and
installing it, wait at least one hour be-
fore connecting it to the mains.
1.
Insert the mains plug of the appli-
ance's power cable in a socket
nearby.
The connection details of the appli-
ance can be found under Tech-
nical data
Page42
.
14
Familiarising yourself with your appliance en
2.
Check the mains plug is inserted
properly.
The appliance is now ready for
use.
Familiarising yourself with your appliance5 Familiarising yourself with your appliance
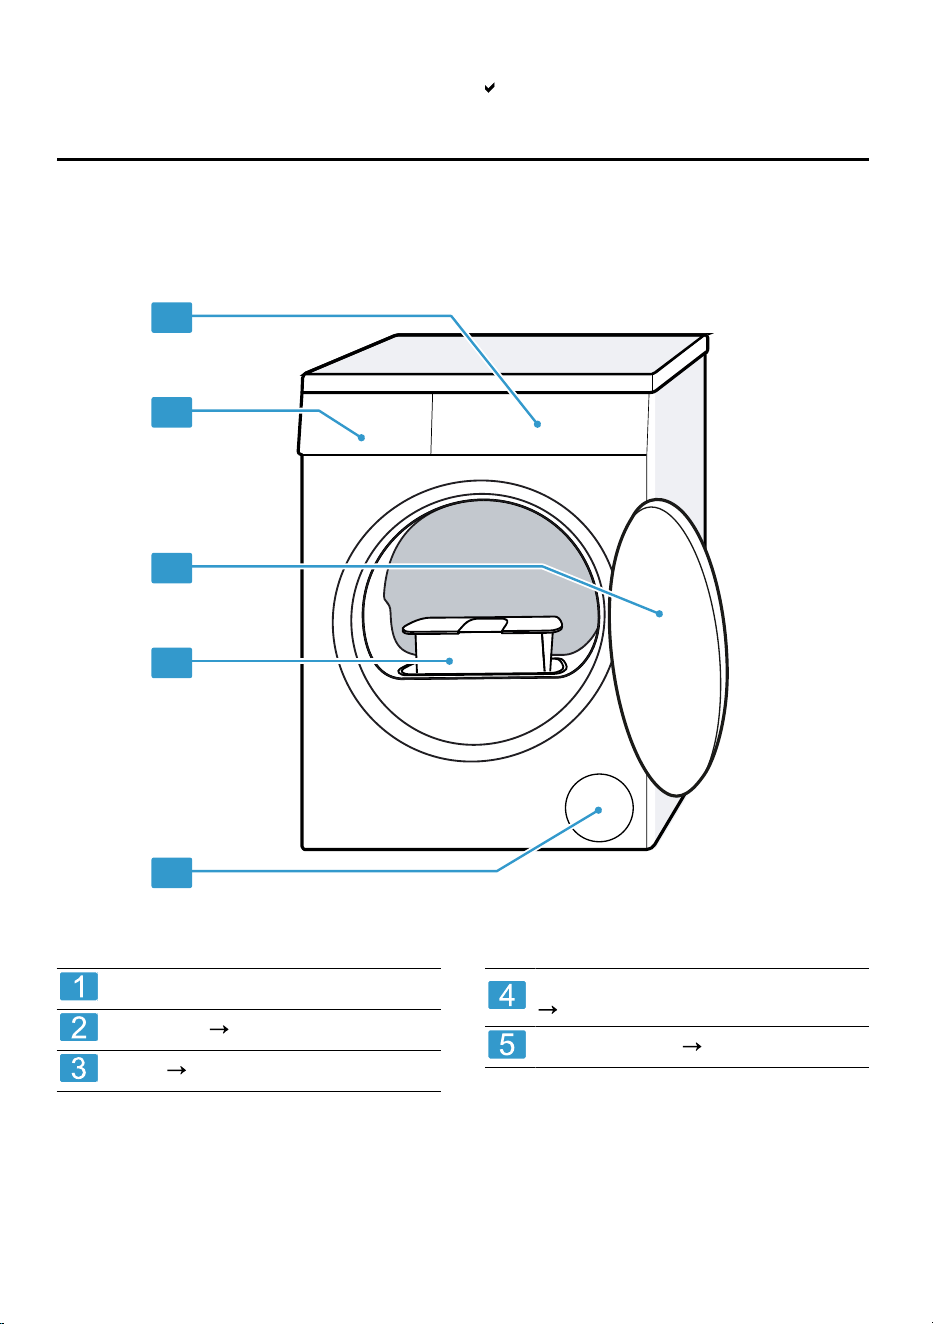
5.1 Appliance
You can find an overview of the parts of your appliance here.
1
2
3
4
5
On certain models, specific details such as the colour and shape may differ from those
pictured.
Ventilation opening
Fluff filter
Page24
Door
Page23
Condensation container
Page26
Control panel
Page16
15
en Display
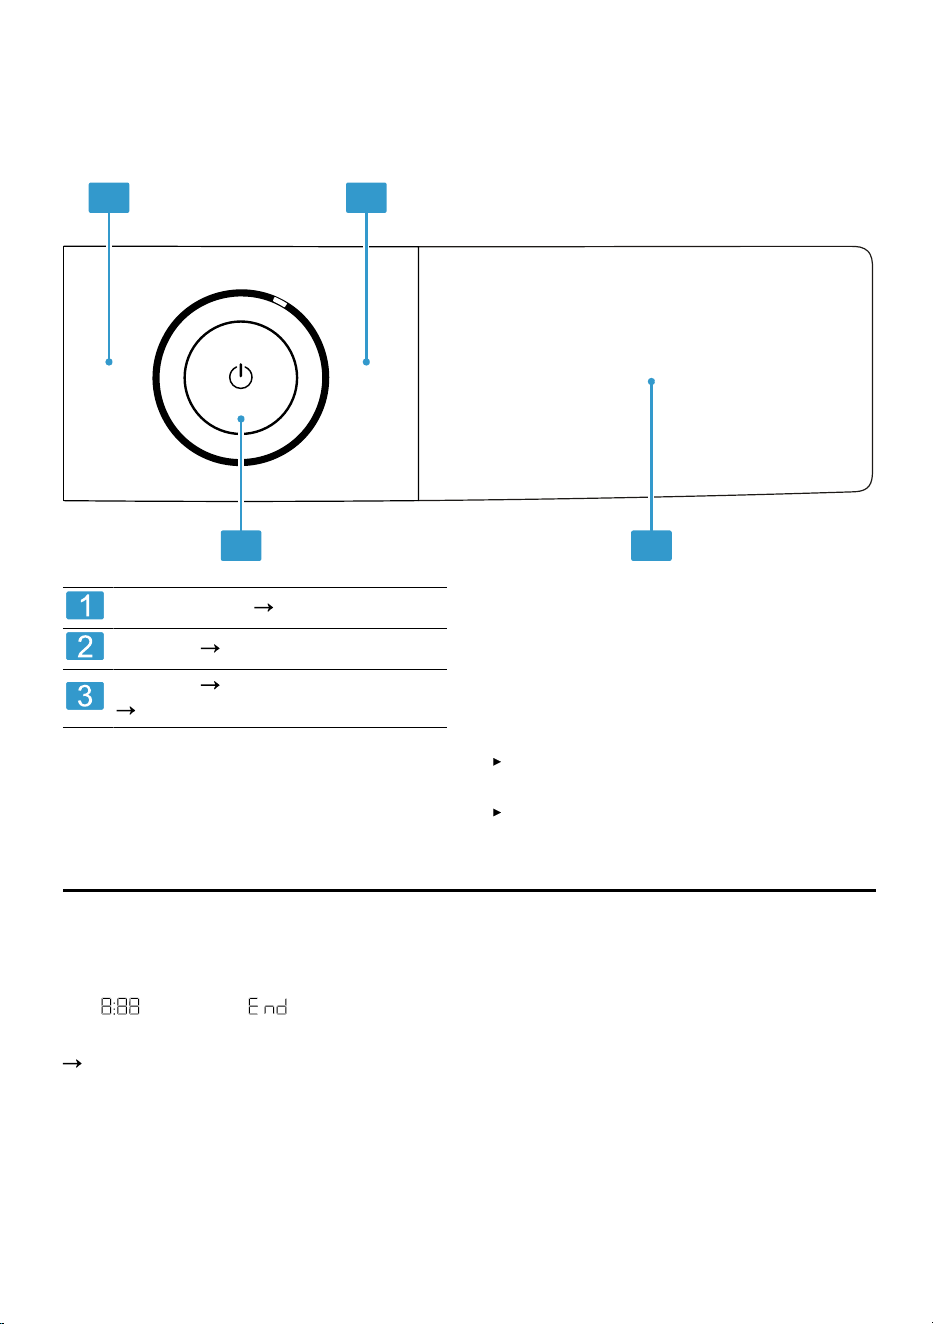
5.2 Control panel
You can use the control panel to configure all functions of your appliance and
to obtain information about the operating status.
3
1
2
1
Programmes
Page19
Buttons
Page18
Buttons
Page18
and display
Page16
5.3 Operating logic
Some areas of the display are but-
tons and respond to touch. You can
activate, deactivate or change set-
tings by pressing the buttons. The ac-
tivated settings are highlighted
brightly on the display.
ATTENTION
Pressing on the display with force
may cause damage.
Do not apply heavy pressure on
the display.
Do not press on the display using
pointed or sharp objects.
Display6 Display
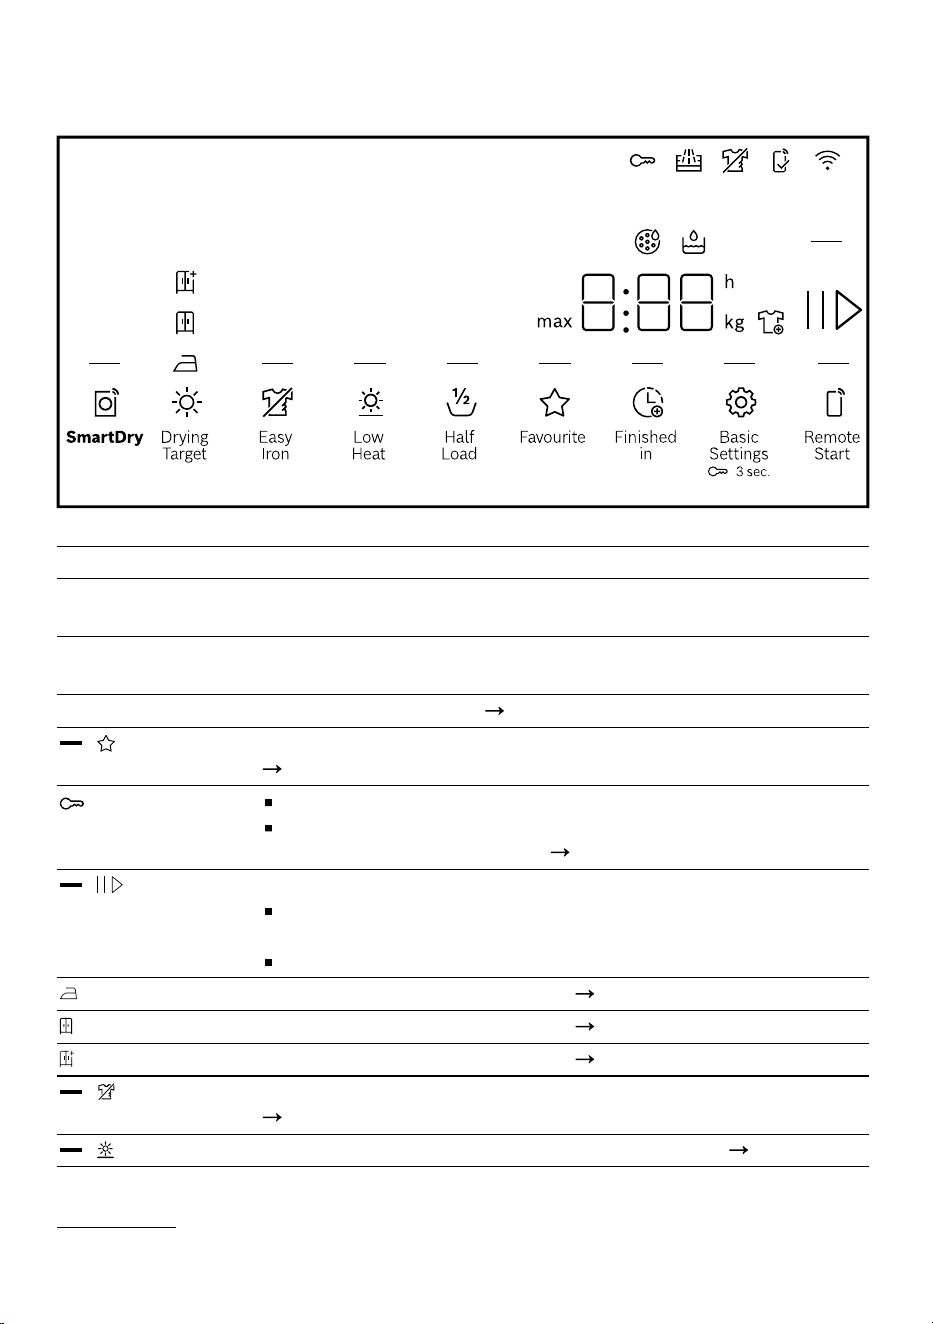
The display shows the current settings, options or relevant information.
Depending on the programme status, the display shows some information in
the area, e.g. .
Note: Additional functions may be available as a result of software updates.
Page31
16
Display en
If a software update is available, you can find further information in the
HomeConnect app.
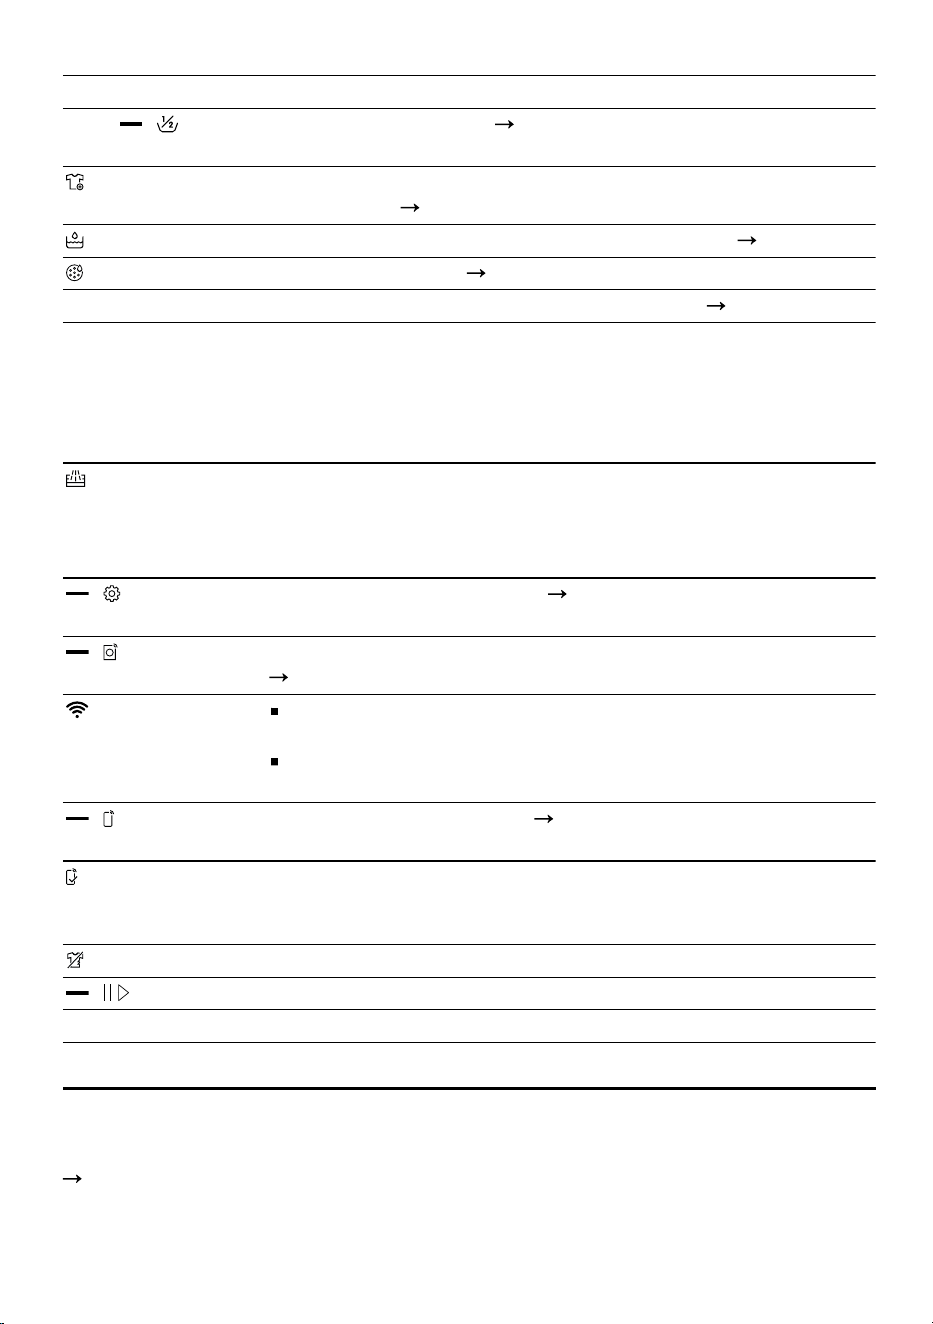
Example: Display
Display Description
0:40
1
Expected programme duration or programme time remain-
ing in hours and minutes.
max 8.0
1
Recommendation for the maximum load capacity for the
selected program in kg.
10 h
1
Programme end time
Page19
( Favourite) Save a programme.
"Buttons", Page19
Lights up: The childproof lock is activated.
Flashes: The childproof lock is activated and the appli-
ance has been operated.
Page28
( ) Start, cancel or pause
Lights up: The programme is running and can be can-
celled or paused.
Flashes: The programme can be started or continued.
The dryness level is activated.
Page27
The dryness level is activated.
Page27
The dryness level is activated.
Page27
( Easy Iron) The crease-reduction function is activated.
"Buttons", Page19
( Low Heat) Gentle drying is activated for delicate fabrics.
Page19
1
Example
17
en Buttons
Display Description
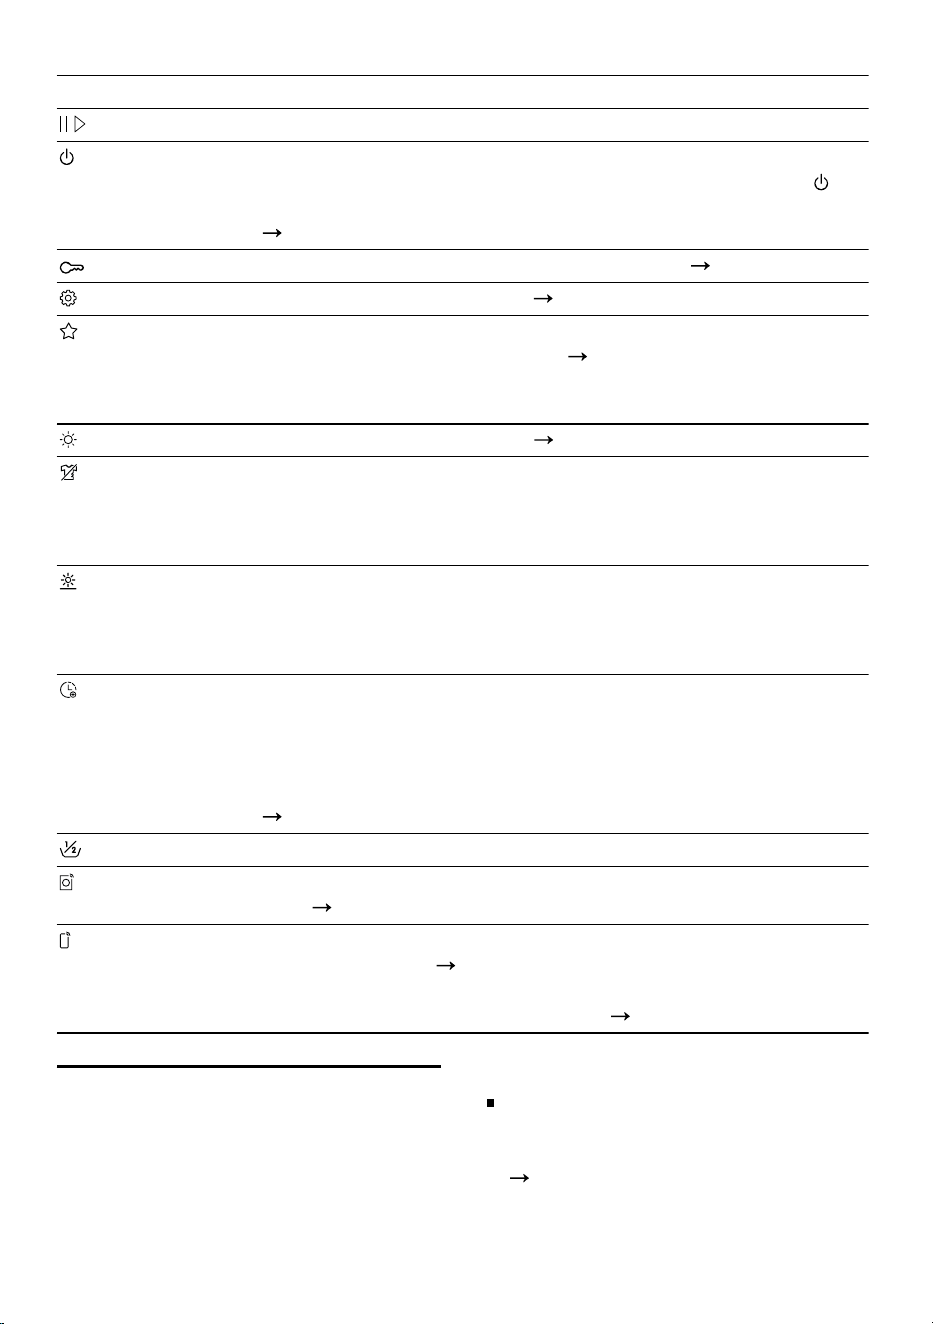
4 kg ( Half
Load)
Half load is activated.
Page19
You can remove or add laundry, and interrupt the current
programme.
Page24
Empty and insert the condensation container.
Page26
Clean the fluff filter
Page24
.
CrE Run the basic appliance care programme.
Page33
Hot The cooling process cools the laundry independently of the
programme status for a few minutes while the drum is ro-
tating, in order to avoid damage to the laundry. The cooling
process can be cancelled by opening the door.
Note: Do not change the set programme.
The automatic self-cleaning function rinses the appliance's
heat exchanger.
Note: Do not remove the condensation container and do
not interrupt the programme.
( Basic Set-
tings)
Change the basic settings.
Page33
( SmartDry) Intelligent programme recommendation is activated.
Page19
Lights up: The appliance is connected to your home net-
work via Wi-Fi.
Flashes: The appliance is trying to connect to your home
network via Wi-Fi.
( Remote
Start)
Remote start is activated.
Page19
Settings that are not available on the appliance have been
set via the HomeConnect app.
You can find more information in the HomeConnectapp.
Programme status: Crease-reduction function
( ) Programme status: Pause
End Programme status: Programme end
Buttons7 Buttons
Note: Additional functions may be available as a result of software updates.
Page31
If a software update is available, you can find further information in the
HomeConnect app.
18
Programmes en
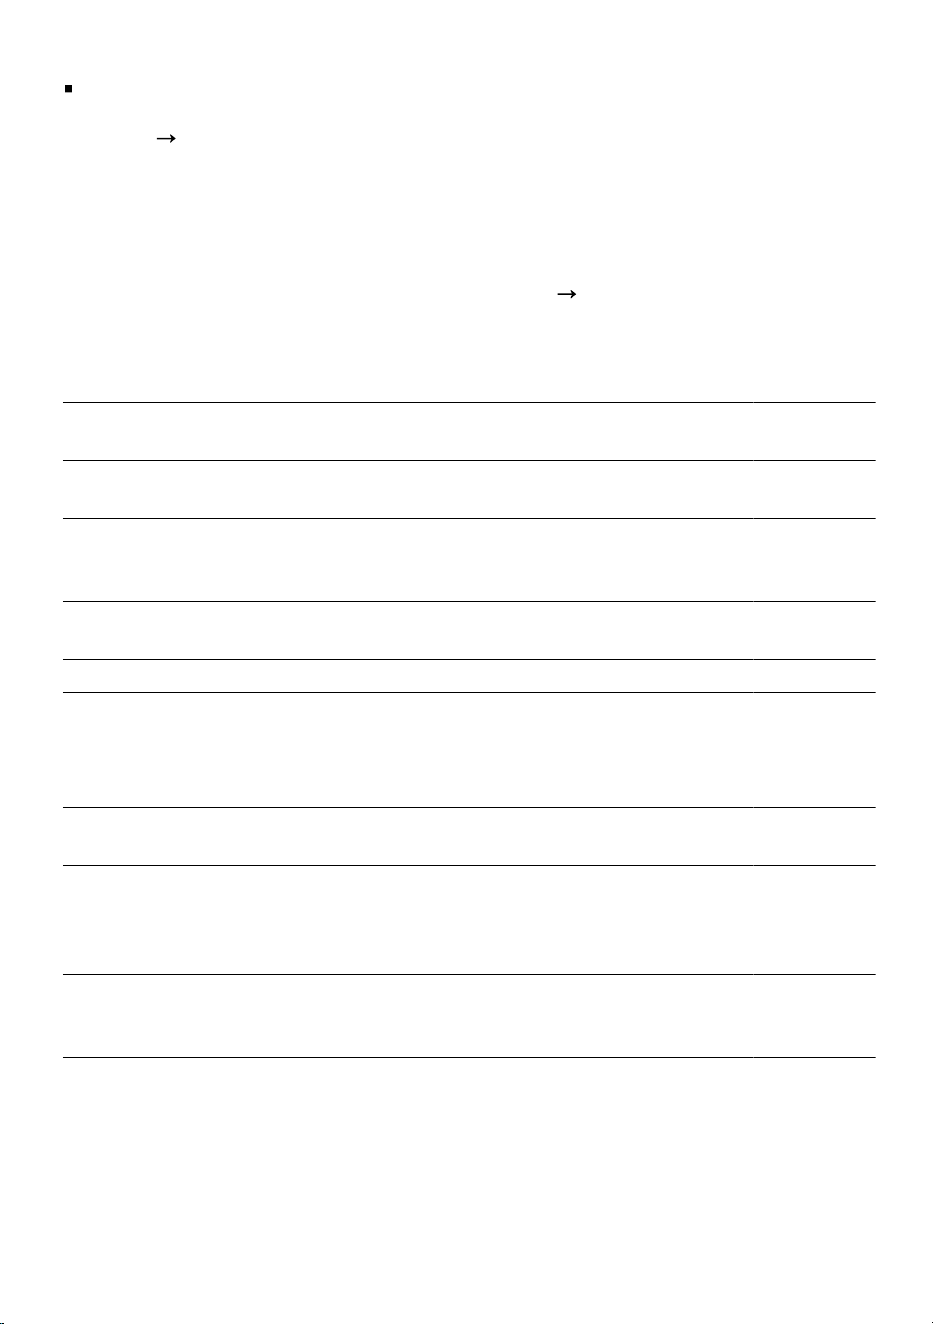
Button Description
Start, cancel or pause the programme.
Switch on the appliance or put it in standby mode.
If the control panel does not respond, press and hold
for approximately 5seconds to restart the appliance.
Page37
3 sec. Activate or deactivate the childproof lock.
Page27
Basic Settings Call up the basic settings.
Page32
Favourite Press the button for approx. 3 seconds to save your cus-
tomised programme settings.
Page23
If you briefly press the button, you set your saved pro-
gramme with individual programme settings.
DryingTarget Change the dryness level.
Page27
Easy Iron Activate or deactivate the crease-reduction function.
Once the programme has ended, the drum moves the
laundry at regular intervals for 120 minutes to prevent
creasing.
Low Heat Activate or deactivate gentle drying.
The temperature is reduced for delicate fabrics, e.g. poly-
acrylic or elastane.
The programme duration is extended.
Finished in Set the programme end time. The programme duration is
already included in the set number of hours. Once the
programme has started, the programme duration is dis-
played.
Set the programme duration for timed programmes.
Page21
Half Load Dry individual items of laundry or small loads of laundry.
SmartDry Activate or deactivate intelligent programme recommenda-
tion.
Page31
Remote Start If you press the button briefly, you can activate or deactiv-
ate remote start.
Page31
If you press and hold the button for approx. 3seconds,
the HomeConnect settings open.
Page30
Programmes8 Programmes
You can dry your fabrics using either
an automatic programme or a timed
programme.
Notes
The laundry's care labels provide
you with additional information
about programme selection.
"Care symbols on the care la-
bels", Page23
19
en Programmes
Additional functions may be avail-
able as a result of software up-
dates.
Page31
If a software update is available,
you can find further information in
the HomeConnect app.
8.1 Automatic programmes
Automatic programmes are programmes in which humidity sensors measure
the residual moisture in the laundry during the drying cycle. The programme
only ends once the set dryness level is reached.
Each automatic programme has a dryness level
Page27
. The dryness level
defines how dry or damp the laundry is after the programme ends.
Tip: Select the dryness level according to the type of fabric or the desired dry-
ing result.
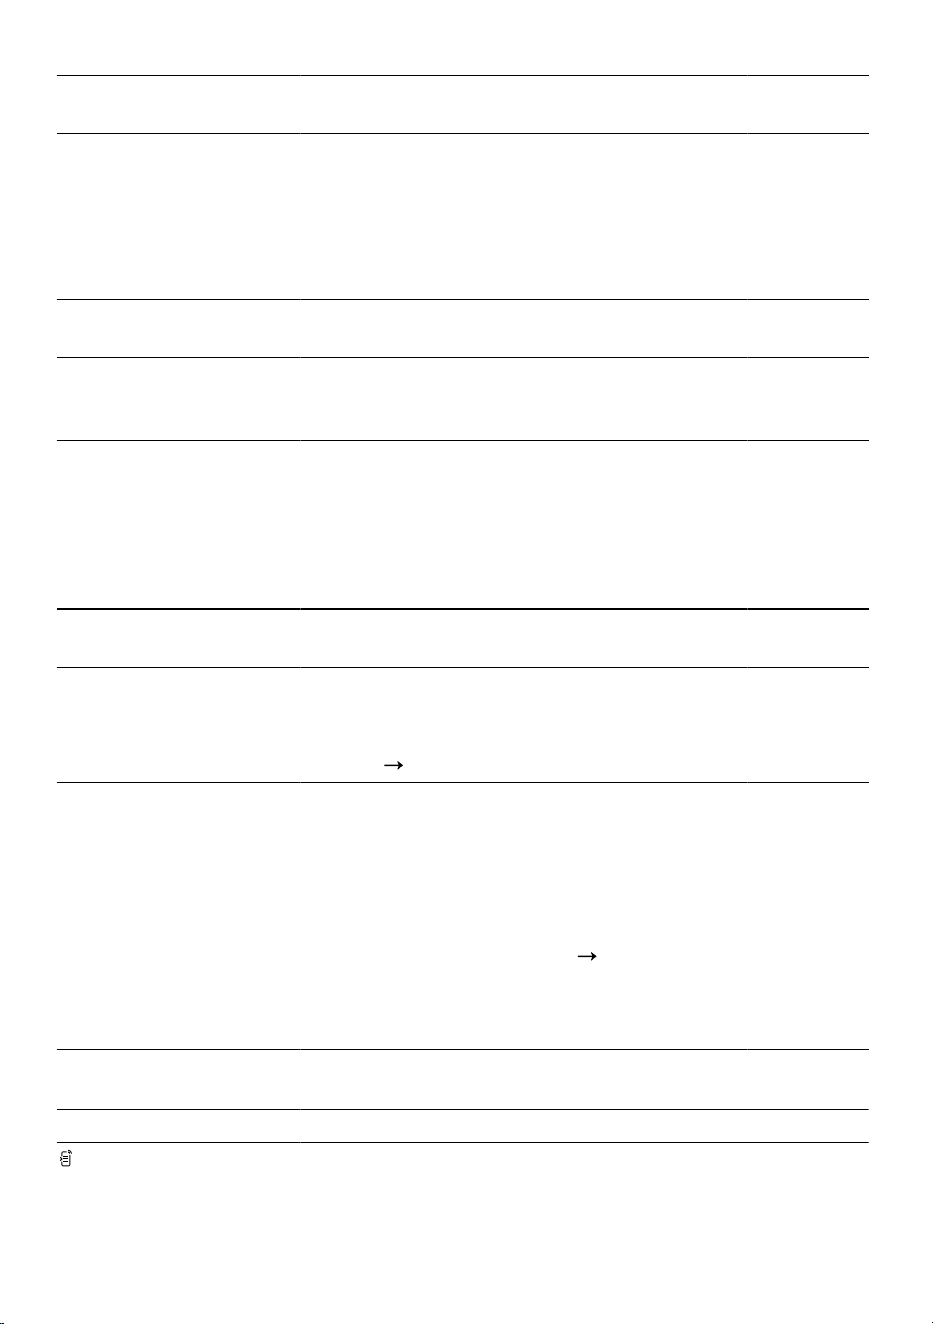
Programme Description Max. load
(kg)
Cottons Dry hard-wearing, heat-resistant fabrics
made of cotton or linen.
8.0
Cottons Eco Dry hard-wearing, heat-resistant fabrics
made of cotton or linen.
Energy-saving programme.
8.0
Easy Care Dry items made of synthetic materials or
blended fabrics.
3.5
Mixed Dry items made of cotton and synthetics. 3.0
Bed Sheets Dry duvet covers, pillowcases and sheets
made of cotton.
Note: The drum movement is optimised
for drying large items of laundry.
3.5
Delicates Dry delicate items made of satin, synthet-
ics or blended fabrics.
2.0
Hygiene Plus Dry hard-wearing, heat-resistant fabrics
made of cotton or linen.
Suitable for increased hygiene require-
ments.
4.0
Sportswear Dry self-drying sportswear made of per-
formance fibres, microfibres and synthet-
ics.
1.5
Shirts/Blouses Suitable for shirts and blouses made of
cotton, linen, synthetics or blended fab-
rics.
1.5
20
Programmes en
Programme Description Max. load
(kg)
Note: For optimal drying results, dry a
maximum of 5 shirts or 5 blouses at the
same time.
Once the laundry is dry, iron it or hang it
up. The residual moisture is then distrib-
uted evenly.
Super 40' Dry items made of synthetics and light
cotton.
1.0
Towels Dry hard-wearing, heat-resistant towels
and dressing gowns made of cotton or
linen.
6.0
8.2 Timed programmes
Timed programmes are programmes with a defined or adjustable programme
duration. The programme ends once this time has elapsed, even if the laundry
is still not dry, for example. Timed programmes are suitable for drying individual
items of laundry or thin fabrics.
Programme Description Max. load
(kg)
Wool in Basket Dry items made of wool or containing
wool.
Note: Dry these items only using the wool
basket.
Page28
One item
of laundry
Timed Program Warm Dry all types of fabric except for wool and
silk.
Suitable for pre-dried or slightly damp
laundry and for drying off multi-layered,
thick laundry.
Note: This programme is suitable for dry-
ing using the wool basket.
Page28
If you are using the wool basket, you can
also dry fabrics made from wool using this
programme.
3.0
8.3 Other programmes
Programme Description
App Programs Select additional programmes directly via the
HomeConnect app.
A description of the programmes can be found in the
HomeConnect app.
21
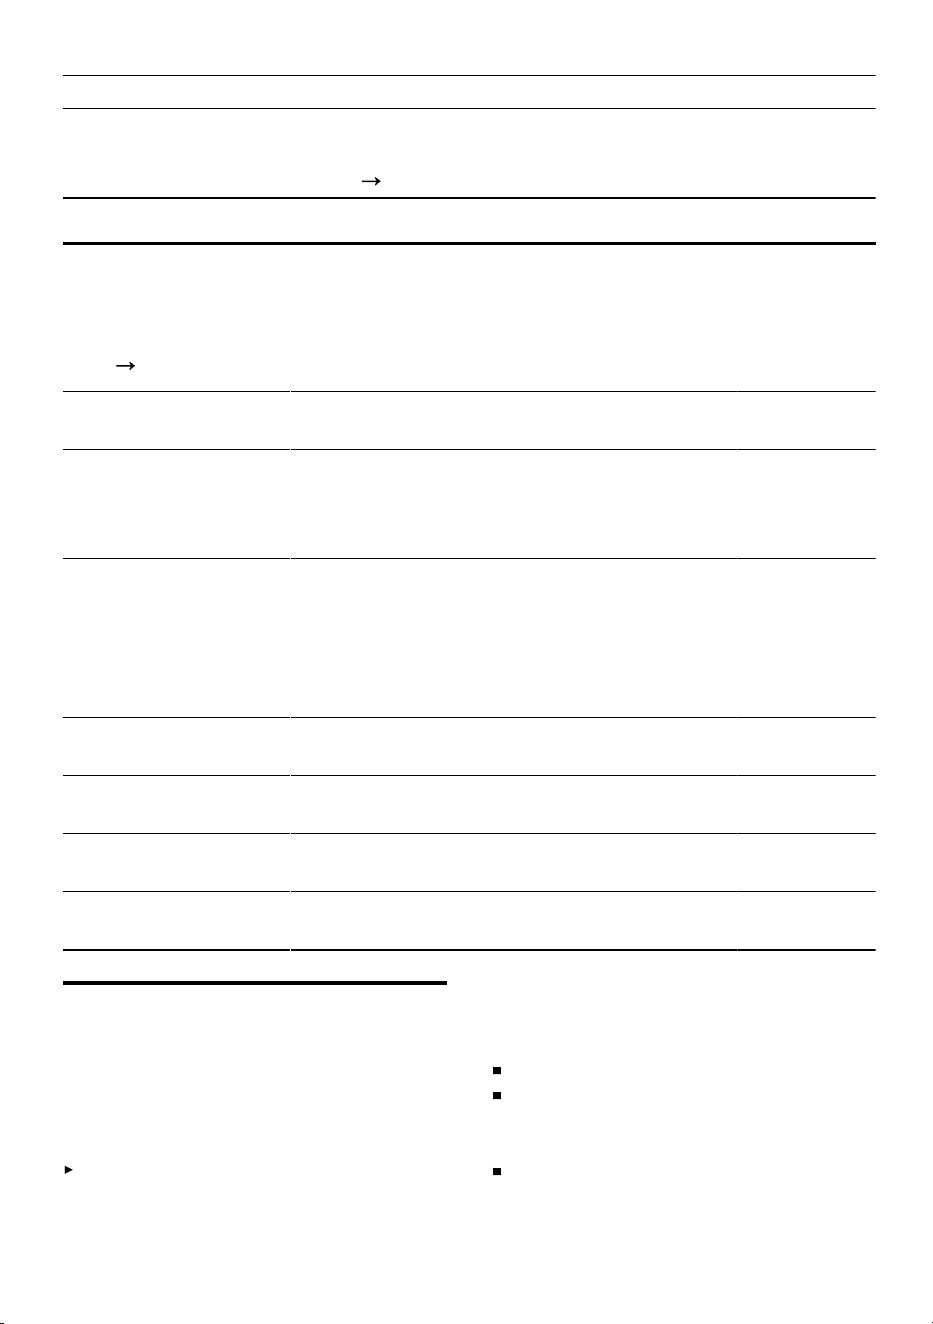
en Accessories
Programme Description
Note: Your appliance must be connected to your
home network and registered in your HomeConnect
app.
Page30
Accessories9 Accessories
Use original accessories. These have been made especially for your appliance.
Tip: Some accessories are available in other colours. Contact customer ser-
vice.
Page41
Use Order num-
ber
Connection kit To save space, stack the appliance on a
suitable washing machine of the same
width and depth and that is from the same
manufacturer.
WTZ27510
Connection kit with
pull-out worktop
To save space, stack the appliance on a
suitable washing machine of the same
width and depth and that is from the same
manufacturer.
The pull-out worktop makes it easier to
load and unload the appliance.
WTZ27500
Wool basket Dry or air individual woollen items, sports
shoes and soft toys.
WMZ20600
Y-distributor Connect the water outlet hose of an addi-
tional appliance to the same siphon outlet.
15000490
Appliance care
product
Spare part for the intensive appliance care
function.
00312474
Platform Install the appliance at a raised height so
that it can be easily loaded and unloaded.
WTZPW40D
Laundry10 Laundry
10.1 Preparing the laundry
ATTENTION
Objects remaining in the laundry may
damage the laundry and the drum.
Remove all items from any pock-
ets in your laundry before using
the appliance.
Note
The appliance and fabrics are protec-
ted when you prepare your laundry.
Brush off sand and soil
Sort the laundry according to col-
our and textiles and observe the
care labels
Close all zips, hook and loop
fasteners, hooks and eyes
22
Basic operation en
Remove curtain fittings and lead
strips
Load the laundry unfolded into the
drum
Spin the laundry before drying
Dry woollen items, sports shoes
and soft toys in the wool basket
"Wool basket", Page28
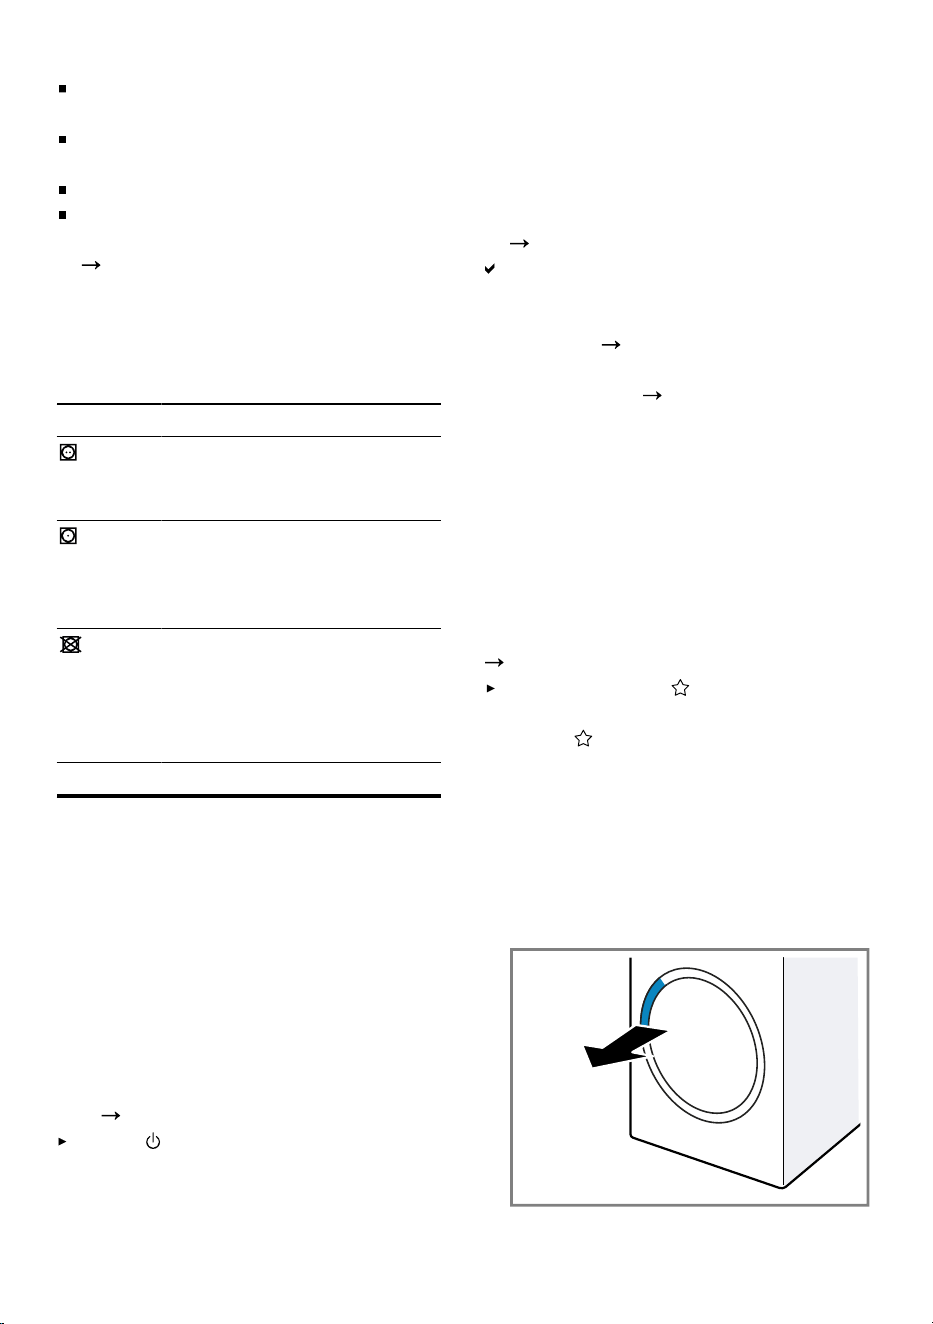
10.2 Care symbols on the care
labels
Drying care symbols
Symbol Fabrics
Items made from cotton
and linen, e.g. towels, bed
linen, underwear
Items made from synthetic,
blended or delicate fab-
rics, e.g. functional gar-
ments, shirts
Do not tumble dry items
made from silk, nylon, air-
impermeable and rubber-
coated fabrics, synthetic
curtains
Basic operation11 Basic operation
11.1 Switching on the appli-
ance
Note: If you switch the appliance on
the first time after you have connec-
ted it to the electrical system, the
switch-on process takes up to one
minute.
Requirement: The appliance has
been correctly installed and connec-
ted.
Page11
Press .
The switch-on process takes a few
seconds.
Note: The lighting for the drum goes
out automatically.
11.2 Setting a programme
1.
Turn the programme selector and
set the required programme.
Page19
The display shows the programme
settings.
2.
If required, adjust the programme
settings.
Page18
Observe the information about op-
erating logic
Page16
.
The programme settings are not
saved permanently for the pro-
gramme.
11.3 Saving the programme
settings
You can save your individual pro-
gramme settings as favourites.
Requirement: A programme is set.
Page23
Press and hold Favourite for
approx. 3 seconds.
Press Favourite to call up the
saved programme.
Note: To overwrite the saved pro-
gramme, repeat the steps above.
11.4 Opening the door
1.
Grip under the door handle and
pull on the door.
23
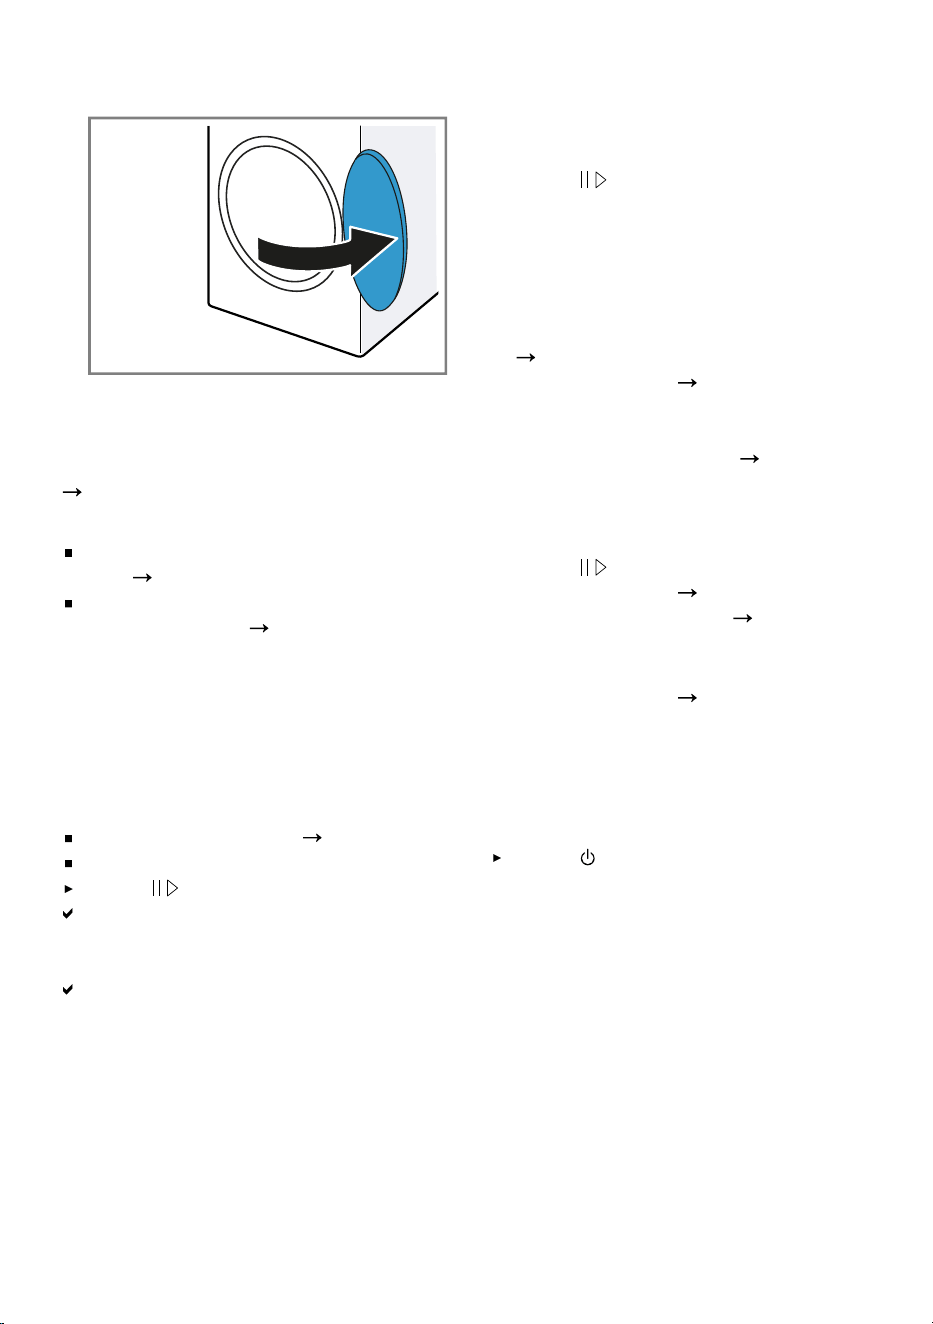
en Basic operation
2.
Open the door.
11.5 Loading laundry
Note: To prevent creasing, note the
maximum load for the programmes.
Page19
Requirements
The laundry is prepared and sor-
ted.
Page22
The drum is empty.
1.
Open the door.
Page23
2.
Place the laundry in the drum.
3.
Close the door.
Ensure that there is no laundry
trapped in the door.
11.6 Starting the programme
Requirements
A programme is set.
Page23
The door is closed.
Press .
The display shows the programme
duration or the programme end
time.
After the programme has ended,
the display shows: "End".
Note: When "Hot" is shown on the
display, the appliance cools the laun-
dry.
When "Hot" goes out, the laundry has
cooled down.
11.7 Adding laundry
After the programme starts, you can
remove or add laundry at any time.
1.
Press .
The cooling process starts auto-
matically after approximately 30
seconds and cools down the laun-
dry while the drum is rotating. If
you want to avoid or cancel the
cooling process, open the door.
Page18
2.
Open the door.
Page23
3.
Add or remove laundry.
4.
Close the door.
5.
Start the programme.
Page24
11.8 Cancelling the pro-
gramme
1.
Press .
2.
Open the door.
Page23
3.
Remove the laundry.
Page24
11.9 Unloading the laundry
1.
Open the door.
Page23
2.
Remove the laundry from the
drum.
11.10 Put the appliance into
standby mode
Press .
11.11 Fluff filter
During drying, fluff from the laundry is
collected in the fluff filter. The fluff fil-
ter protects the appliance from fluff.
Cleaning the fluff filter
If the drying programme has finished
or the display shows a notification
while the appliance is in operation,
clean the fluff filter after the pro-
gramme end.
Note: If you do not clean the appli-
ance as described, the appliance's
functionality may be impaired.
24
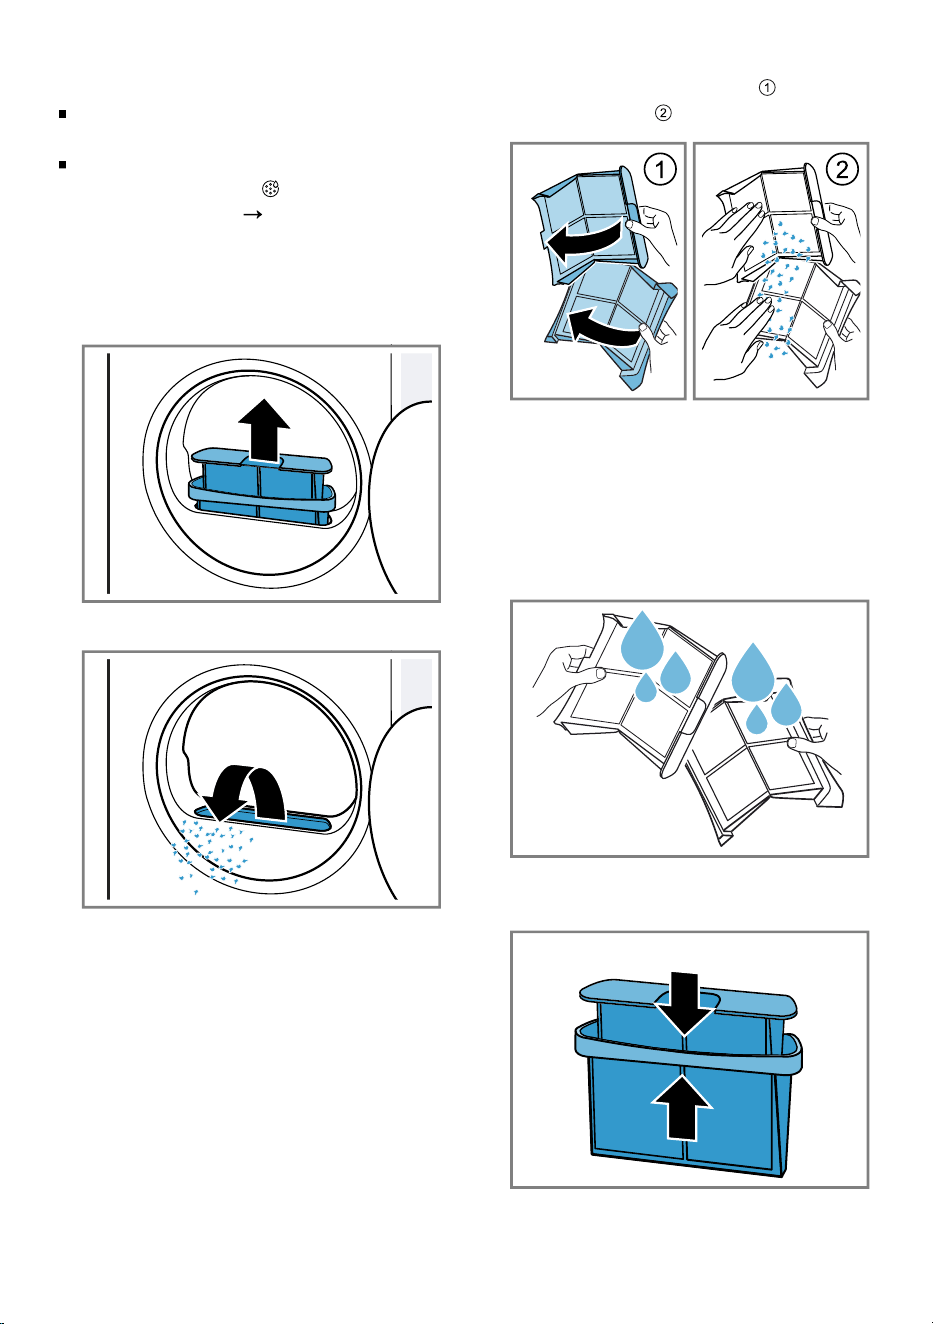
Basic operation en
Requirements
The display shows the following
after drying: "End"
or the display shows the following
during operation: .
1.
Open the door.
Page23
2.
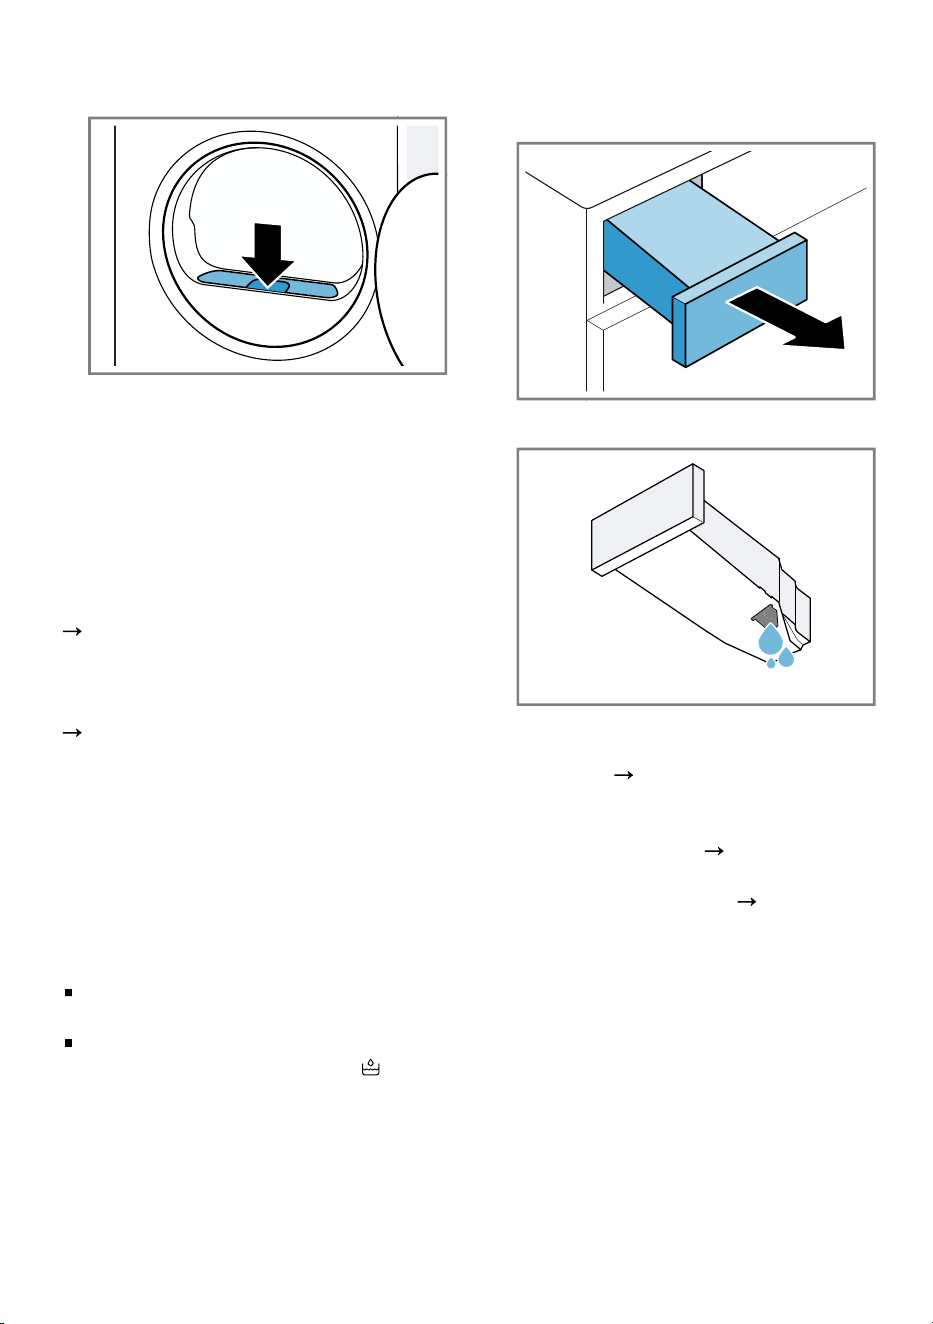
Remove the fluff from the inside of
the door.
3.
Remove the two-part fluff filter one
part at a time.
4.
Remove the fluff from the recess.
Ensure that no fluff falls into the air
channel.
5.
Open the two fluff filters and re-
move the fluff .
Dispose of the fluff with the house-
hold waste in order to prevent the
water from being contaminated
with microplastics.
6.
Clean the two fluff filters thoroughly
under warm, running water and
then dry them off.
7.
Close the two fluff filters and put
them together.
25
en Basic operation
8.
Insert the two-part fluff filter.
9.
Close the door.
11.12 Condensation container
Condensation that forms in the appli-
ance as it dries the laundry is collec-
ted by default in the condensation
container.
Note: Operate this appliance using
the water outlet hose provided.
Page13
If you connect the water outlet hose,
you do not have to regularly empty
the condensation container.
"Emptying the condensation con-
tainer", Page26
Emptying the condensation con-
tainer
If the drying programme has finished
or the display shows a notification
that the drying programme is paused,
empty the condensation container.
Requirements
The display shows the following
after drying: "End"
or the display shows the following
while operation is paused: .
1.
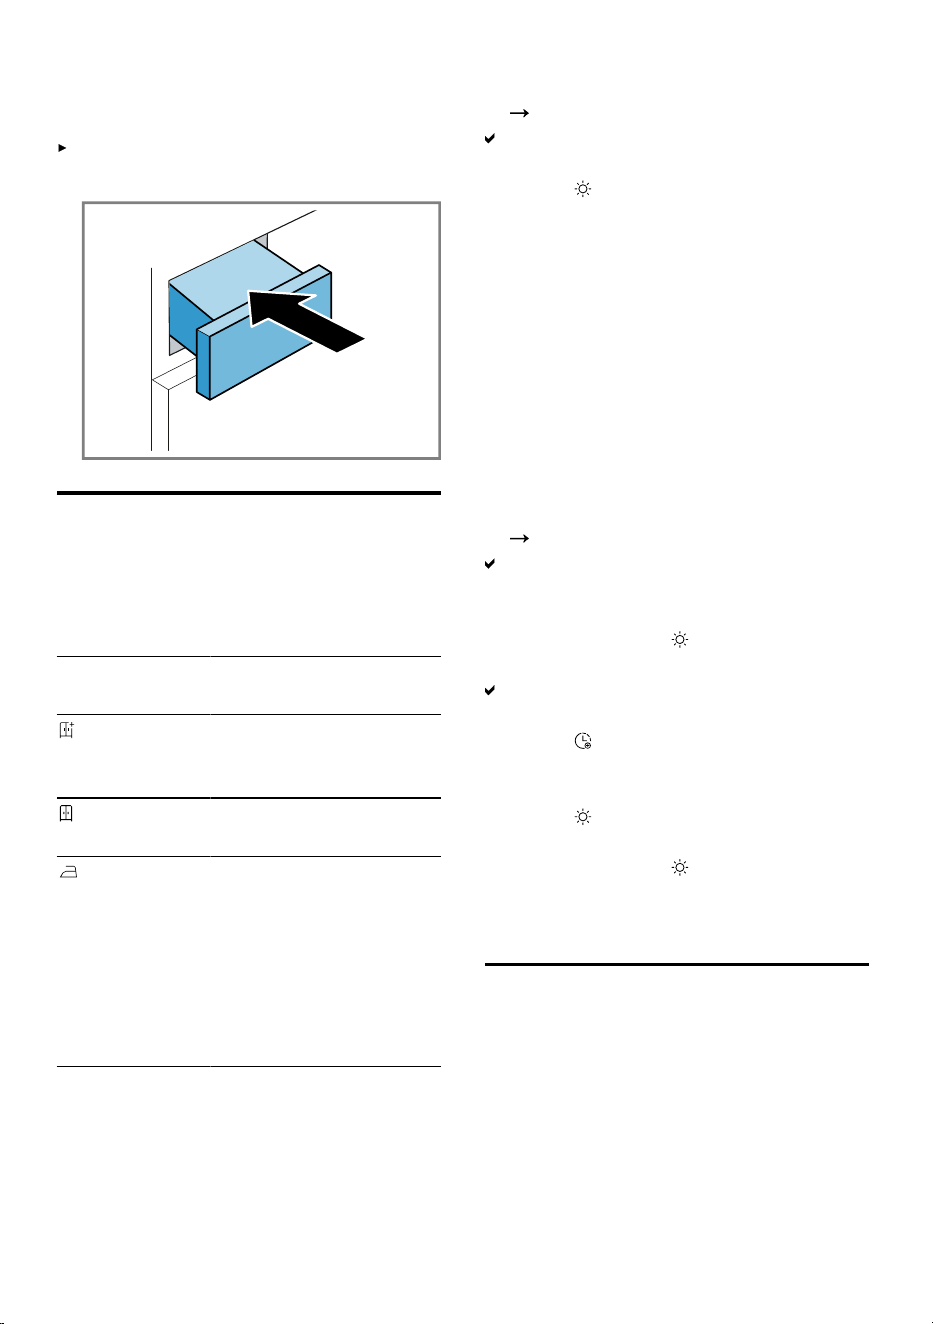
Pull out the condensation con-
tainer, keeping it level.
2.
Empty the condensation container.
Check the condensation container
filter regularly and clean the filter if
it is dirty.
Page36
Make sure that you insert the con-
densation container before operat-
ing the appliance.
Page27
3.
If the drying programme is paused,
start the programme.
Page24
26
Dryness level en
Inserting the condensation con-
tainer
Push the condensation container
in as far as it will go.
Dryness level12 Dryness level
Each automatic programme has a
specified dryness level. The dryness
level defines how dry or damp your
laundry is after the programme ends.
Dryness
level
Description
For multi-layered,
thick laundry that
does not dry readily.
For normal, single-
layered laundry.
For normal, single-
layered laundry.
The laundry is still
slightly damp after the
programme ends. To
prevent creasing after
drying, iron the laun-
dry or hang it up.
12.1 Changing the dryness
level
For some automatic programmes,
you can change the dryness level so
that your laundry will be drier or more
damp.
1.
Set an automatic programme.
Page20
The display shows the specified
dryness level.
2.
Press DryingTarget repeatedly
until the display shows your re-
quired dryness level.
12.2 Adjusting the dryness
level
If the laundry feels too damp after it
has been dried to a particular dry-
ness level, you can adjust the dry-
ness level.
Note: You can also adjust the dry-
ness level in the basic settings.
1.
Set an automatic programme.
Page20
The display shows the specified
dryness level.
2.
Set the required dryness level.
3.
Press and hold DryingTarget for
approx. 3 seconds.
The display shows "d:0", "d:1",
"d:2" or "d:3".
4.
Press Finished in to adjust the
selected dryness level from "d:0"
(dry) to "d:3" (driest).
Press DryingTarget to change
the adjusted dryness level.
5.
Press and hold DryingTarget for
approx. 3seconds to return to the
automatic programme.
Childproof lock13 Childproof lock
Secure your appliance against being
operated unintentionally using the
controls.
27
en Wool basket
13.1 Activating the childproof
lock
Press and hold 3 sec. for ap-
prox. 3seconds.
The display shows .
The control elements are locked.
The childproof lock also remains
activated when the appliance is in
standby mode and in the event of
a power cut.
13.2 Deactivating the child-
proof lock
Requirement: To deactivate the
childproof lock, the appliance must
be switched on.
Press and hold 3 sec. for ap-
prox. 3seconds.
goes out on the display.
Wool basket14 Wool basket
Use the wool basket to gently dry
delicate fabrics, soft toys or sports
shoes in a stationary position.
14.1 Inserting the wool basket
1.
Open the door.
Page23
Ensure that the drum is empty.
2.
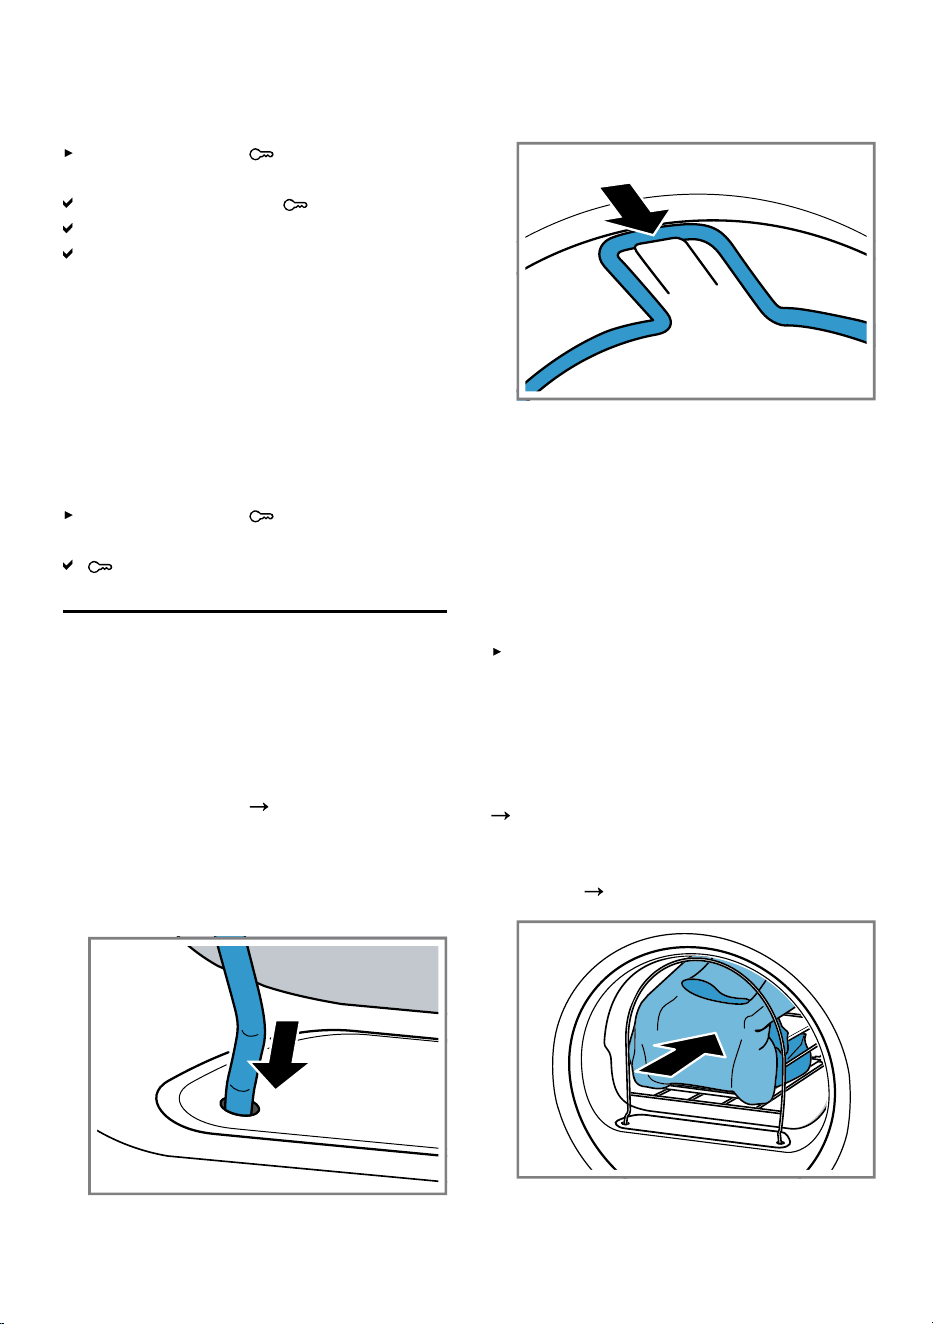
Insert the feet of the wool basket
into the holes from the door open-
ing.
3.
Insert the tab on the front of the
wool basket into the upper hooks.
14.2 Starting a programme
with the wool basket
ATTENTION
If items of laundry in the wool basket
touch the rotating drum or the ribs of
the drum, the laundry may cause ma-
terial damage and damage to the ap-
pliance.
Place the items of laundry in the in-
sert or wool basket such that they
do not touch the drum or the ribs
of the drum.
Requirement: The wool basket is in-
serted into the appliance.
Page28
1.
Place the laundry into the wool
basket, either directly or using the
insert.
Page29
2.
Close the door.
28
Wool basket en
3.
Set a programme that is suitable
for drying with the wool basket.
Observe the programme descrip-
tion.
Page21
4.
If required, adjust the duration of
the programme.
"Buttons", Page19
Observe the recommended pro-
gramme duration for items of laun-
dry in the wool basket:
Laundry item Programme dur-
ation in
hours:minutes
Thin woollen
pullover
Approx. 1:20
Thick woollen
pullover
Approx. 1:30 -
3:00
Skirt Approx. 1:00 -
1:30
Trousers Approx. 1:00 -
1:30
Gloves Approx. 0:30
Sports shoes Approx. 1:30/
max. 2:00 with
airing
Tip: Increase the programme dura-
tion for thick or multi-layered items
of laundry.
5.
Start the programme.
Page24
6.
Remove the wool basket once the
programme has ended.
14.3 Examples of how to use
the wool basket
Drying the items of laundry
Note: Spin the laundry before drying.
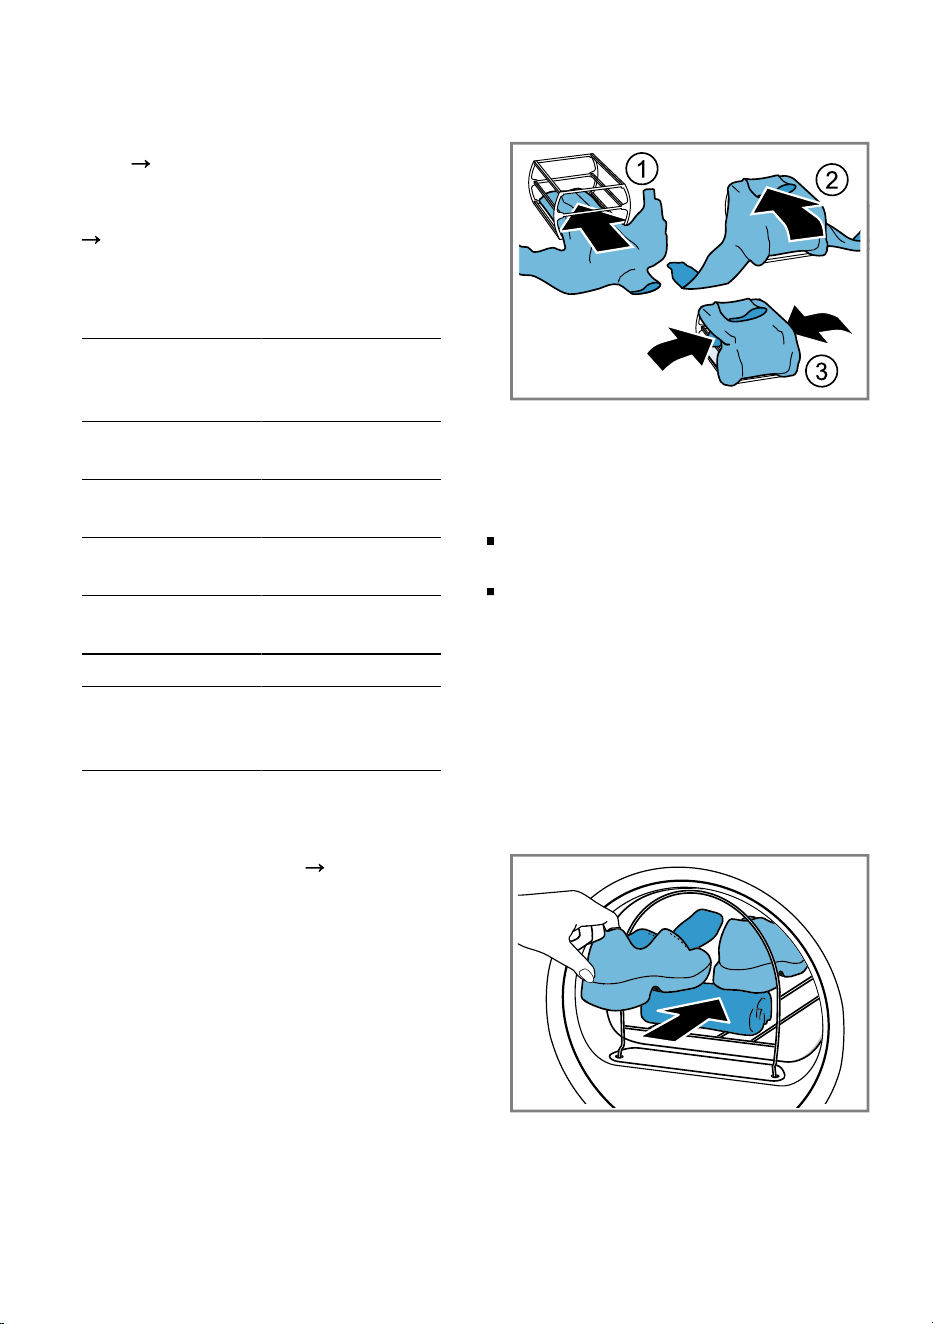
1.
Place the items of laundry unfol-
ded into the insert.
2.
Fold larger items of laundry onto
or into the insert.
3.
Place the items of laundry with the
insert into the wool basket.
Drying sports shoes
Notes
Do not use the insert for the wool
basket.
Do not dry leather shoes or shoes
with leather parts.
1.
Lift the tongues of the shoes.
2.
Remove the insoles or heel cush-
ions.
3.
Place a rolled-up hand towel in the
wool basket to create an inclined
surface.
4.
Place the shoes on the towel with
the heels facing down.
Drying soft toys
Note: Do not use the insert for the
wool basket.
29
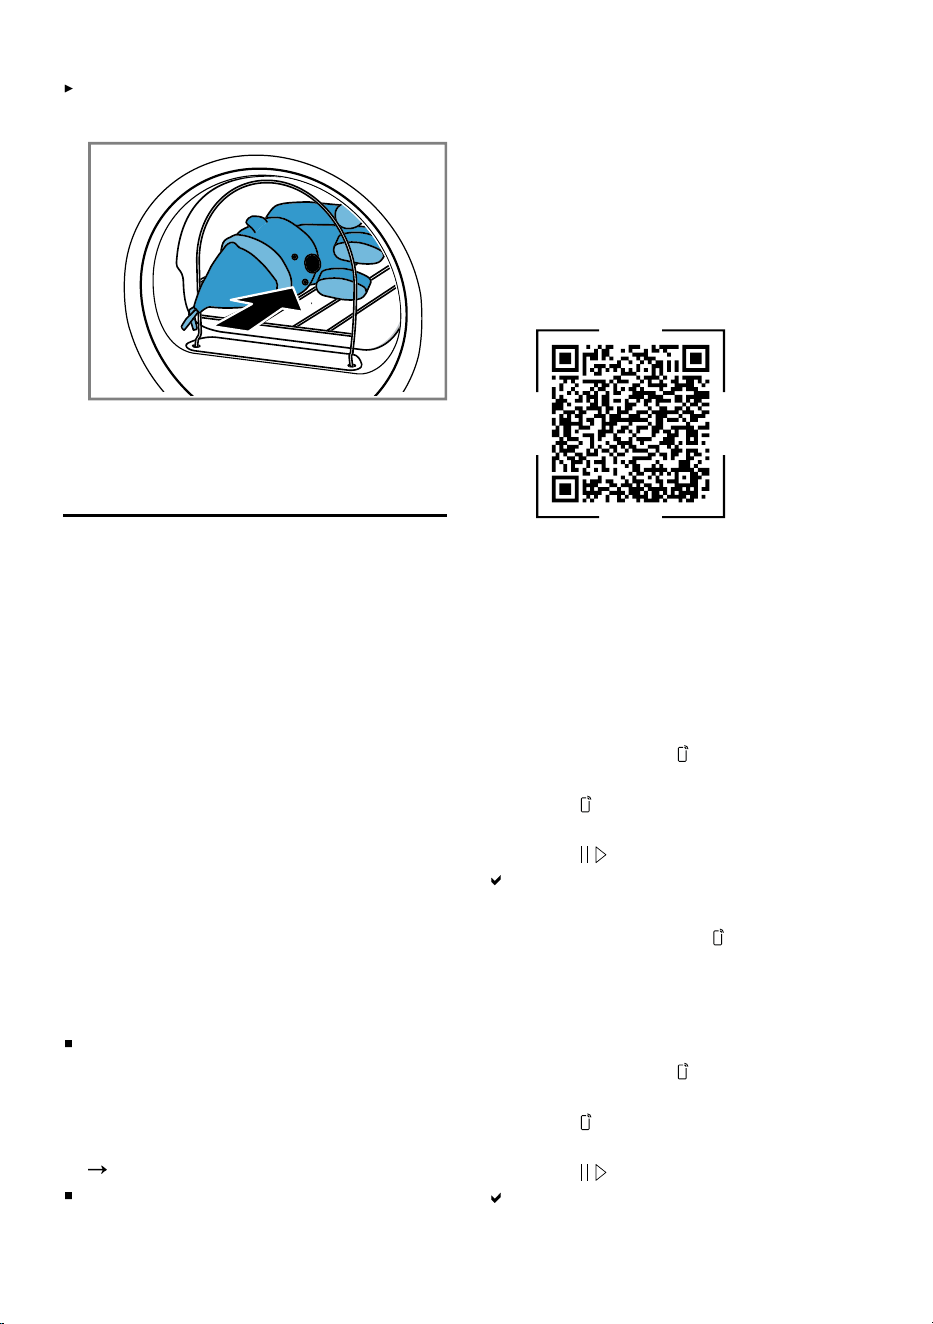
en HomeConnect
Place the soft toy in the wool bas-
ket.
If you place numerous or small
soft toys in the wool basket, en-
sure that they do not fall out.
HomeConnect15 HomeConnect
This appliance is network-capable.
Connecting your appliance to a mo-
bile device lets you control its func-
tions via the HomeConnect app, ad-
just its basic settings and monitor its
operating status.
The HomeConnect services are not
available in every country. The avail-
ability of the HomeConnect function
depends on the availability of the
HomeConnect services in your coun-
try. You can find information about
this at:
www.home-connect.com
.
The HomeConnect app guides you
through the entire login process. Fol-
low the instructions, noting the in-
formation in the HomeConnect app.
Notes
Please note the safety precautions
in this instruction manual and
make sure that they are also ob-
served when operating the appli-
ance via the HomeConnect app.
"Safety", Page3
Operating the appliance on the ap-
pliance itself always takes priority.
During this time it is not possible
to operate the appliance using the
HomeConnect app.
15.1 Setting up HomeConnect
Requirement: The appliance is re-
ceiving signals from the WLAN home
network (Wi-Fi) at its installation loca-
tion.
1.
Scan the following QR code.
PLC_SMM_Control
You can install the HomeConnect
app and connect your appliance
via the QR code.
2.
Follow the instructions in the
HomeConnect app.
15.2 Deactivating Wi-Fi on the
appliance
1.
Press and hold Remote Start for
approx. 3seconds.
2.
Press Remote Start repeatedly
until the display shows "on".
3.
Press to deactivate the Wi-Fi.
The display shows "oFF".
Note: To exit the HomeConnect set-
tings, press and hold Remote Start
for approx. 3 seconds.
15.3 Activating Wi-Fi on the
appliance
1.
Press and hold Remote Start for
approx. 3seconds.
2.
Press Remote Start repeatedly
until the display shows "oFF".
3.
Press to activate the Wi-Fi.
The display shows "on".
30

HomeConnect en
Notes
If the Wi-Fi is activated, the display
alternately shows "on" and the sig-
nal strength of the Wi-Fi connec-
tion.
To exit the HomeConnect settings,
press and hold Remote Start for
approx. 3 seconds.
15.4 Installing the software up-
date
Note: If a software update is avail-
able, a message appears in the
HomeConnectapp.
To install the software update, fol-
low the instructions in the
HomeConnectapp.
The control panel is partially
locked during the installation.
In the event of a malfunction, in-
stallation may take up to
40minutes. Do not reset the net-
work settings or the appliance to
the factory settings.
Note: You can find the current soft-
ware version in the HomeConnect
app under the appliance information
for the appliance.
15.5 Resetting the appliance
network settings
1.
Press and hold Remote Start for
approx. 3seconds.
2.
Press Remote Start repeatedly
until the display shows "rES".
3.
Press and hold for approx.
3seconds.
The network settings are reset.
15.6 Remote start
Enable the appliance for remote start
via the HomeConnect app.
Note
Remote start will be deactivated in
the following circumstances:
The appliance door is opened.
is pressed to pause the pro-
gramme.
Following a power cut.
Activating remote start
Requirement: The appliance door is
closed.
Press Remote Start.
( Remote Start) lights up and
the appliance is enabled for re-
mote start via the HomeConnect
app.
Deactivating remote start
Press Remote Start.
( Remote Start) goes out.
15.7 Intelligent programme re-
commendation
When you activate the intelligent pro-
gramme recommendation, your appli-
ance recommends a suitable pro-
gramme for drying the laundry once
you have washed your laundry in the
washing machine.
Intelligent programme recom-
mendation
Requirements
Your washing machine has the
HomeConnect function.
Your washing machine and your
dryer must be connected to your
home network and registered in
your HomeConnect app.
1.
Press SmartDry.
The appliance detects a suitable
programme. To cancel the pro-
cess, set a different programme or
31

en Basic settings
switch the appliance to standby
mode.
If the appliance finds a suitable
programme, the display for the
programme lights up and the pro-
gramme information is displayed.
If the appliance does not find a
suitable programme, a signal tone
sounds and the display shows "-
--".
2.
Press .
15.8 Remote diagnostics
Customer Service can use Remote
Diagnostics to access your appliance
if you contact them, have your appli-
ance connected to the HomeCon-
nect server and if Remote Dia-
gnostics is available in the country in
which you are using the appliance.
Tip: For further information and de-
tails about the availability of Remote
Diagnostics in your country, please
visit the service/support section of
your local website:
www.home-
connect.com
.
15.9 Data protection
Please see the information on data
protection.
The first time your appliance is re-
gistered on a home network connec-
ted to the Internet, your appliance will
transmit the following types of data to
the HomeConnect server (initial re-
gistration):
Unique appliance identification
(consisting of appliance codes as
well as the MAC address of the in-
stalled Wi-Fi communication
module).
Security certificate of the Wi-Fi
communication module (to ensure
a secure data connection).
The current software and hardware
version of your appliance.
Status of any previous resetting to
factory settings.
This initial registration prepares the
HomeConnect functions for use and
is only required when you want to
use the HomeConnect functions for
the first time.
Note: Please note that the
HomeConnect functions can only be
utilised with the HomeConnect app.
Information on data protection can be
retrieved in the HomeConnect app.
Basic settings16 Basic settings
You can configure the basic settings
for your appliance to meet your
needs.
Note: You can also adjust the basic
settings in the HomeConnect app.
Additional functions may be available
in the HomeConnect app.
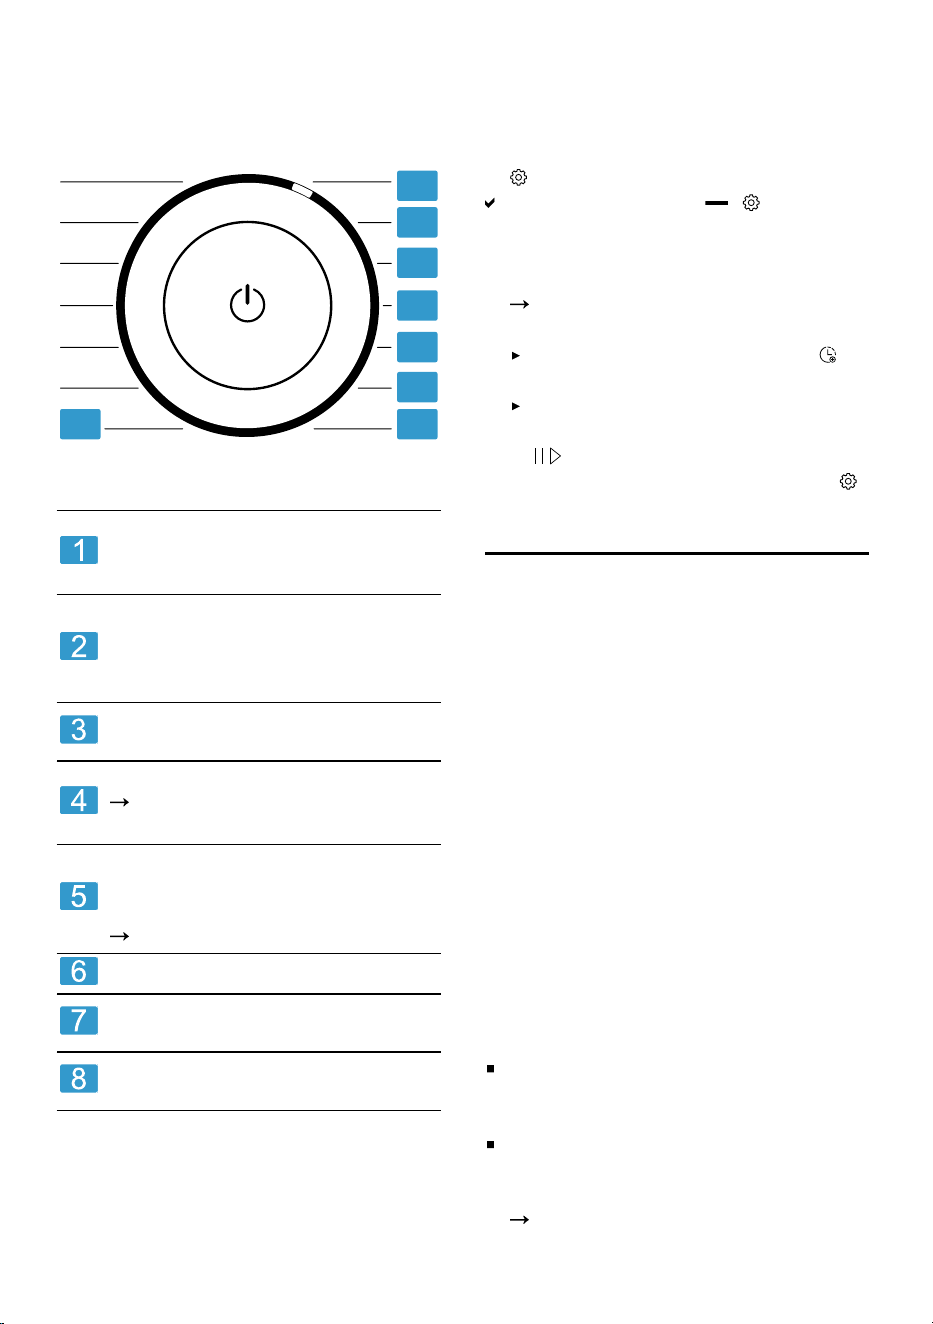
16.1 Overview of the basic set-
tings
Note: Additional functions may be
available as a result of software up-
dates.
Page31
32
Appliance care en
If a software update is available, you
can find further information in the
HomeConnect app.
1
2
3
4
5
6
78
Programme selector with programme po-
sitions
Set the volume of the signal at
the end of the programme:
A: 0 (off) to A: 4 (very loud)
Set the volume of the signal
tone emitted when the buttons
are pressed:
b: 0 (off) to b: 4 (very loud)
Set the display brightness:
C: 1 (low) to C: 4 (very high)
Adjust the dryness level
Page27
:
d: 0 (dry) to d: 3 (driest)
Start the basic (CP1) or intens-
ive (CP2) appliance care pro-
gramme.
"Appliance care", Page33
No basic setting.
Display the number of started
programmes (PC).
Restore the appliance to the
factory settings (rES).
16.2 Changing the basic set-
tings
1.
To call up the basic settings, press
Basic Settings.
The display shows ( Basic Set-
tings).
2.
Use the programme selector to se-
lect the required basic setting.
Page32
3.
Adjust the basic setting:
To change the value, press
Finished in.
To reset the appliance to the
factory settings, press and hold
for approx.3seconds.
4.
To exit the basic settings, press
Basic Settings.
Appliance care17 Appliance care
The appliance offers cleaning pro-
grammes for basic and intensive ap-
pliance care.
To remove light dirt deposits in the
appliance, you can run the basic ap-
pliance care programme when the
display shows "CrE " after a longer
period of use.
Note: The basic appliance care pro-
gramme runs for approximately
1hour.
To remove any stubborn dirt deposits
in the appliance and odours after a
downtime of more than one month,
you can run the intensive appliance
care programme.
Notes
The intensive appliance care pro-
gramme runs for approximately 4
hours and must not be cancelled.
When you run the intensive appli-
ance care programme, you need
the original appliance care product
Page22
.
33
en Appliance care
17.1 Preparing for appliance
care
Preparing the appliance
Requirement: The drum is empty.
1.
Put the appliance into standby
mode.
Page24
2.
Clean the fluff filter
Page24
.
3.
Empty the condensation container.
Page26
Preparing the condensation con-
tainer
If you drain the condensation using
the water outlet hose, prepare the
condensation container.
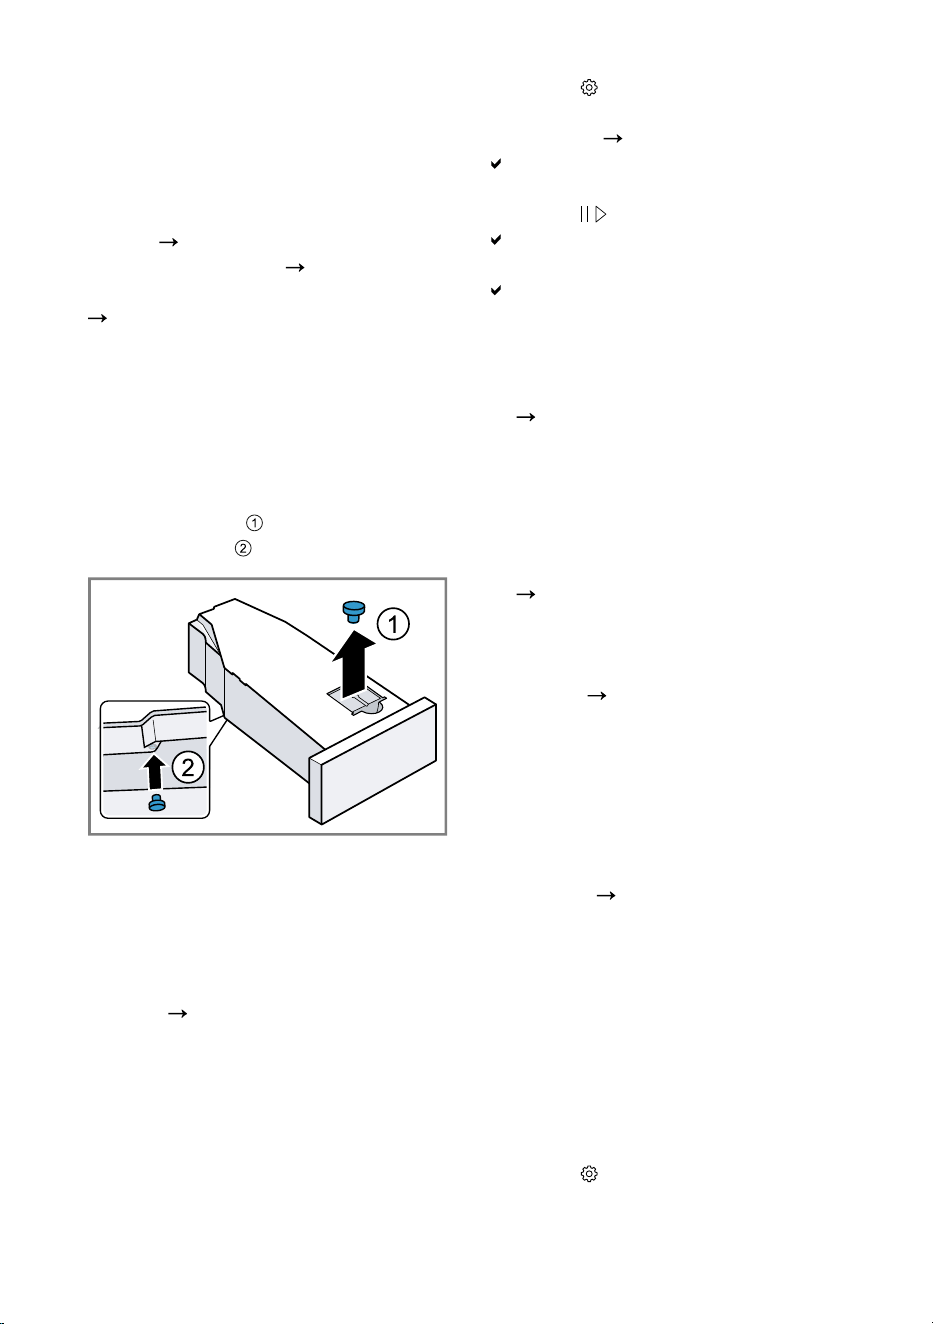
1.
Remove the stopper from the re-
cess in the top and insert it in
the underside .
2.
Clean the filter in the condensation
container.
17.2 Running the basic appli-
ance care programme
Requirement: The appliance care is
prepared.
Page34
1.
Pour approx. 1.5litres of hot mains
water into the condensation con-
tainer.
Hold the filled condensation con-
tainer level so that no liquid spills
out.
2.
Insert the condensation container
so that it locks into place.
3.
Switch on the appliance.
4.
Press Basic Settings.
5.
Set the programme selector to po-
sition 5.
Page32
"CP1"and the programme duration
alternate on the display.
6.
Press .
The appliance care programme
starts and a signal tone sounds.
"End"appears on the display and
a signal tone sounds once the ap-
pliance care programme has
ended.
7.
Empty the condensation container.
Page26
8.
If you drain the condensation using
the water outlet hose, remove the
stopper from the underside of the
condensation container and insert
it into the recess in the top of the
condensation container.
Page34
9.
Insert the condensation container
so that it locks into place.
10.
Put the appliance into standby
mode.
Page24
17.3 Running the intensive ap-
pliance care programme
Starting the intensive appliance
care programme
Requirement: The appliance care is
prepared.
Page34
1.
Pour a bottle of the appliance care
product and approx. 1.5 litres of
hot mains water into the condensa-
tion container.
Hold the filled condensation con-
tainer level so that no liquid spills
out.
2.
Insert the condensation container
so that it locks into place.
3.
Switch on the appliance.
4.
Press Basic Settings.
34

Cleaning and servicing en
5.
Set the programme selector to po-
sition 5.
Page32
"CP1"and the programme duration
alternate on the display.
6.
Press Finished in.
"CP2"and the programme duration
alternate on the display.
7.
Press .
The appliance care programme
starts and a signal tone sounds.
After around 3hours, the appli-
ance pauses the appliance care
programme and the remaining pro-
gramme duration flashes on the
display.
8.
Empty the condensation container.
Page26
9.
Pour approx. 1.5litres of hot mains
water into the condensation con-
tainer.
10.
Carefully swivel the condensation
container horizontally and empty it
to rinse out any remaining appli-
ance care product.
Continuing the intensive appli-
ance care programme
1.
Pour approx. 1.5litres of hot mains
water into the condensation con-
tainer.
Hold the filled condensation con-
tainer level so that no liquid spills
out.
2.
Insert the condensation container
so that it locks into place.
3.
Press .
The appliance care programme
continues.
"End"appears on the display and
a signal tone sounds once the ap-
pliance care programme has
ended.
4.
Empty the condensation container.
Page26
5.
If you drain the condensation using
the water outlet hose, remove the
stopper from the underside of the
condensation container and insert
it into the recess in the top of the
condensation container.
Page34
6.
Put the appliance into standby
mode.
Page24
Cleaning and servicing18 Cleaning and servi-
cing
ATTENTION
Heavy, sharp or rough objects may
damage the appliance.
Do not use hard or sharp objects,
abrasive cleaning products or steel
wool for cleaning.
Clean the appliance using only wa-
ter and a soft cloth.
18.1 Moisture sensor
The moisture sensor in this appliance
measures how damp the laundry is
during the drying cycle. The appli-
ance changes the duration of the
automatic programme depending on
the residual moisture in the laundry.
Cleaning the moisture sensor
Over time, residue from limescale,
detergents and care products can
build up on the moisture sensor.
Clean the moisture sensor regularly.
Note: If you do not clean the appli-
ance as described, the appliance's
functionality may be impaired.
35
en Troubleshooting
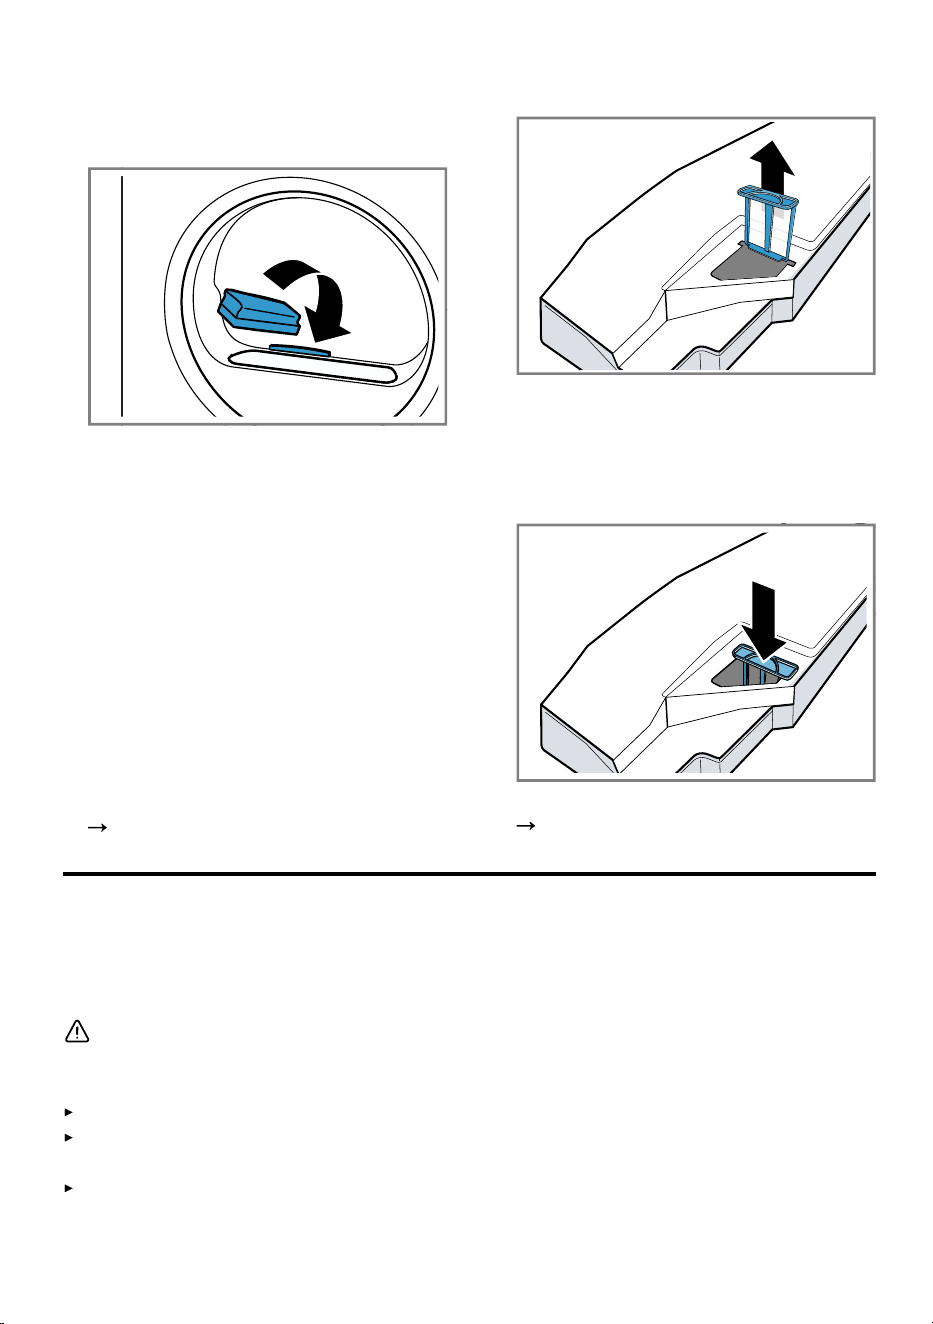
1.
Open the door.
2.
Clean the moisture sensor with a
sponge.
18.2 Condensation container
filter
During drying, fluff from the laundry
gets into the condensation. The filter
in the condensation container pro-
tects the appliance from fluff.
Clean the filter for the condensa-
tion tank.
The filter is cleaned automatically
when the condensation container is
emptied. Check the filter regularly
and clean the filter if it is dirty.
1.
Empty the condensation container.
Page26
2.
Remove the filter.
3.
Clean the filter under warm, run-
ning water.
You can also clean the filter in the
dishwasher.
4.
Slide in the filter as far as it will go.
5.
Insert the condensation container.
Page27
Troubleshooting19 Troubleshooting
You can rectify minor faults on your appliance yourself. Read the troubleshoot-
ing information before contacting after-sales service. This will avoid unneces-
sary costs.
WARNING
Risk of electric shock!
Improper repairs are dangerous.
Never make any technical modifications to the appliance or its features.
Repairs to the appliance should only be carried out by trained specialist
staff.
Only use genuine spare parts when repairing the appliance.
36
Troubleshooting en
If the power cord of this appliance is damaged, it must be replaced by the
manufacturer, the manufacturer's Customer Service or a similarly qualified
person in order to prevent any risk.
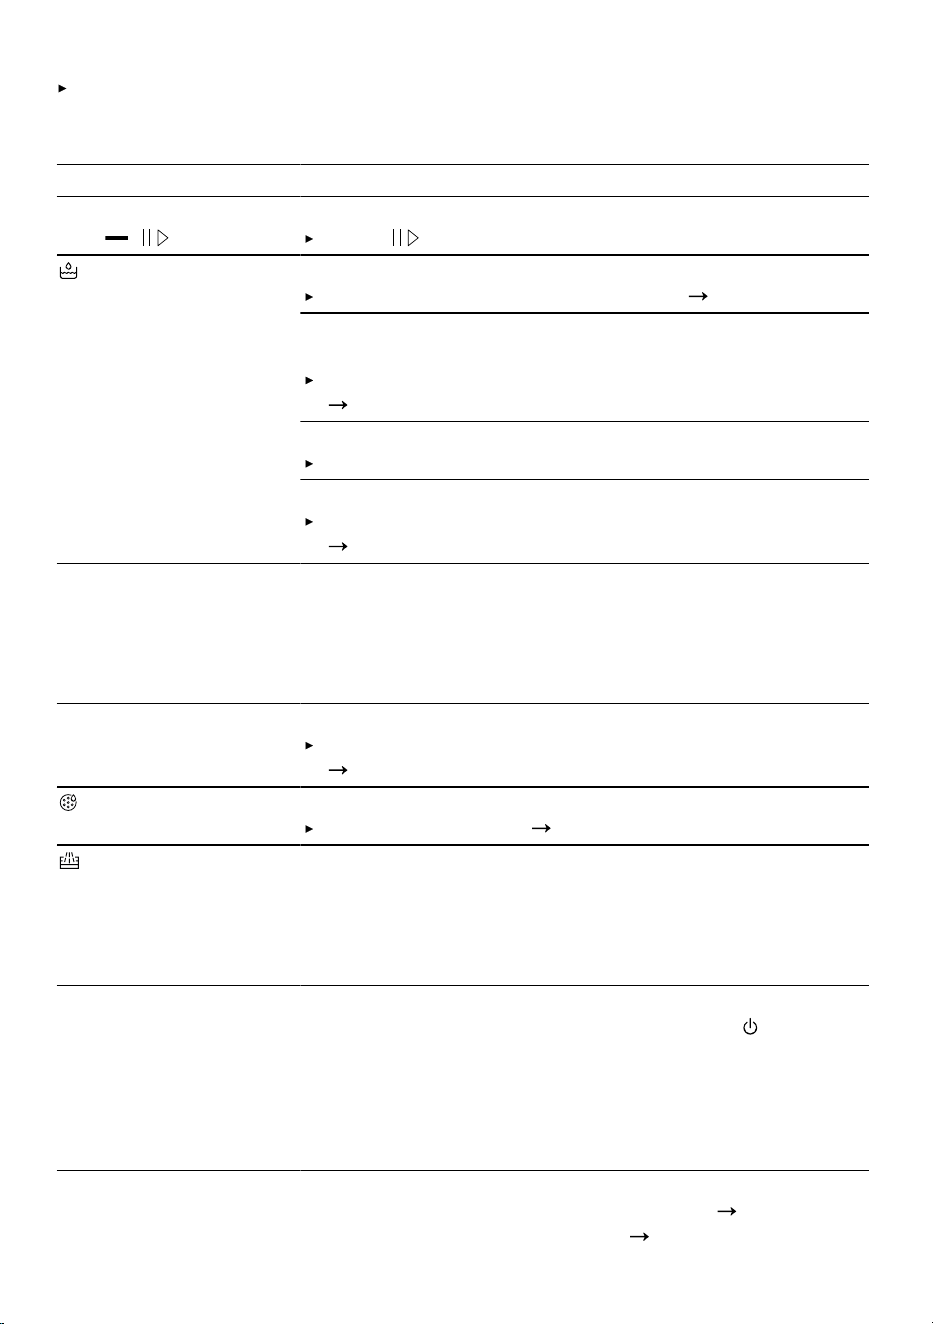
Fault Cause and troubleshooting
The display goes out
and ( ) flashes.
Energy-saving mode is active
Press .
and programme ter-
minated.
The condensation container is full.
Empty the condensation container.
Page26
The water outlet hose is not connected correctly, or is
kinked or trapped.
Check the installation of the water outlet hose.
Page12
Water outlet hose is blocked.
Rinse the water outlet hose with tap water.
The filter for the condensation tank is soiled.
Clean the filter for the condensation container.
Page36
"Hot" and the drum ro-
tates.
Not a fault. The cooling process is active.
No action required.
Note: Do not change the programme during the cool-
ing process. The cooling process takes up to 10
minutes.
"CrE" The basic appliance care programme should be run.
Run the basic appliance care programme
Page33
.
Fluff filter is soiled.
Clean the fluff filter.
Page24
Not a fault. The automatic self-cleaning function rinses
the appliance's heat exchanger.
No action required.
Note: Do not pull out the condensation container and
do not interrupt the programme.
The display and but-
tons do not respond.
Software fault.
1.
To restart the appliance, press and hold for ap-
proximately 5seconds.
2.
If the fault occurs again, disconnect the appliance
from the power supply for at least 30 seconds. Un-
plug the appliance from the mains or switch off the
circuit breaker in the fuse box.
HomeConnect is not
working properly.
Different causes are possible.
1.
Reset the appliance network settings.
Page31
2.
Set up HomeConnect again.
Page30
37
en Troubleshooting
Fault Cause and troubleshooting
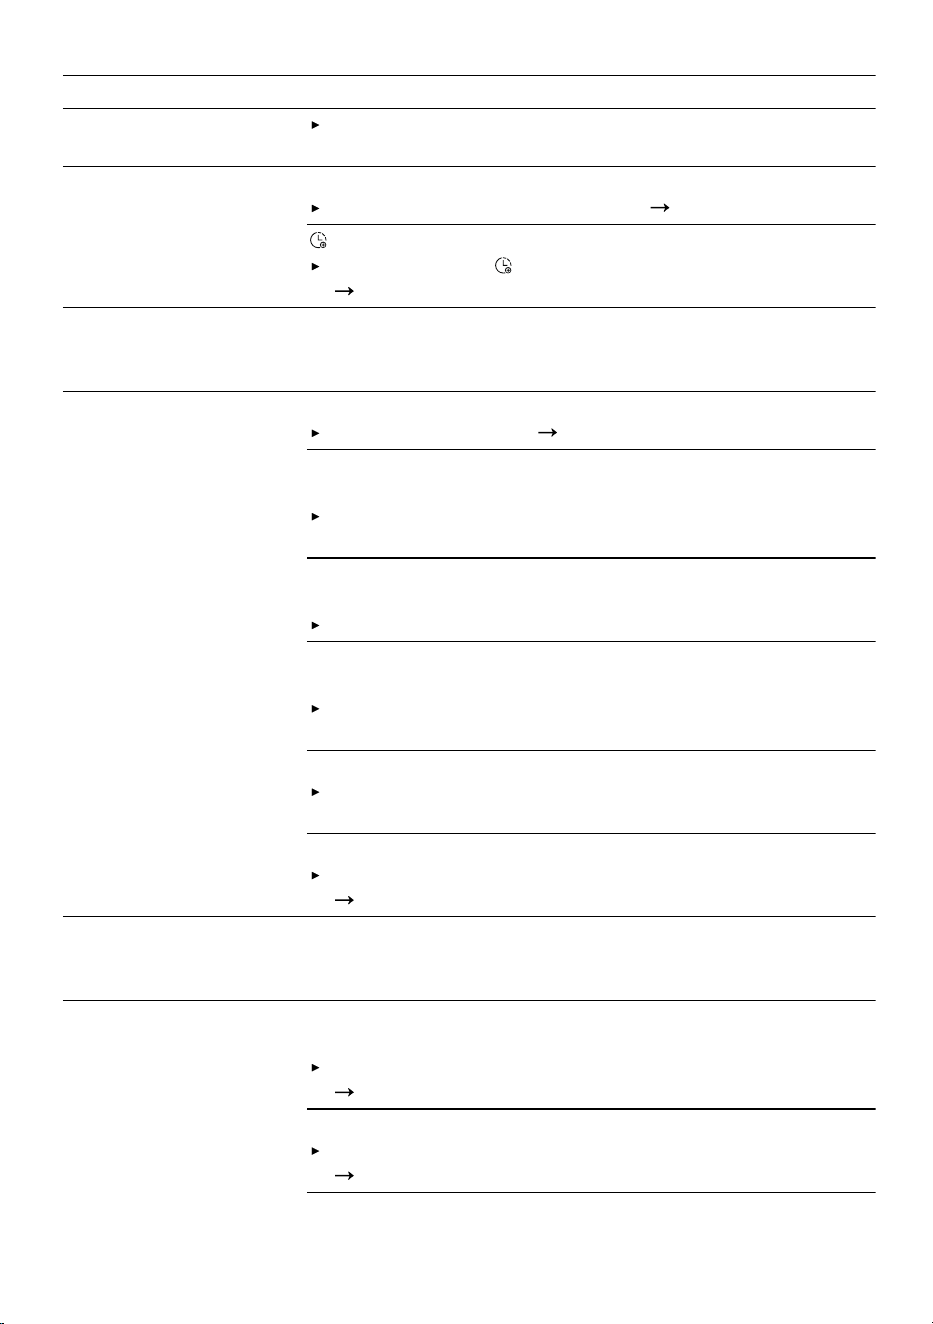
HomeConnect is not
working properly.
Go to
www.home-connect.com
.
The programme does
not start.
Childproof lock is activated.
Deactivate the childproof lock.
Page28
Finished in is activated.
Check whether Finished in is activated.
Page19
The length of the pro-
gramme changes dur-
ing the drying cycle.
Not a fault. The programme sequence is optimised
electronically.
No action required.
The drying time is too
long.
Fluff filter is soiled.
Clean the fluff filter.
Page24
The ambient temperature is lower than 15 °C or higher
than 30°C.
Ensure that the ambient temperature is between 15
°C and 30 °C.
The air circulation at the appliance's installation loca-
tion is insufficient.
Ventilate the appliance's installation location.
Insufficient condensation for the automatic self-cleaning
when permanently drying small loads of laundry.
Regularly dry a load weighing more than 3kg of
damp laundry until the programme ends.
The appliance's ventilation opening is blocked.
Ensure that the ventilation opening of the appliance
is kept clear.
Heat exchanger is soiled.
Run the basic appliance care programme
Page33
.
Humming, whirring or
pumping noises.
Not a fault. The compressor, compressor ventilation or
condensation pump is active.
No action required.
The laundry is too
damp.
The selected programme is unsuitable for the type of
fabric.
Set a time programme for subsequent drying.
Page21
The load is too large.
Observe the programme's maximum load capacity.
Page19
38
Troubleshooting en
Fault Cause and troubleshooting
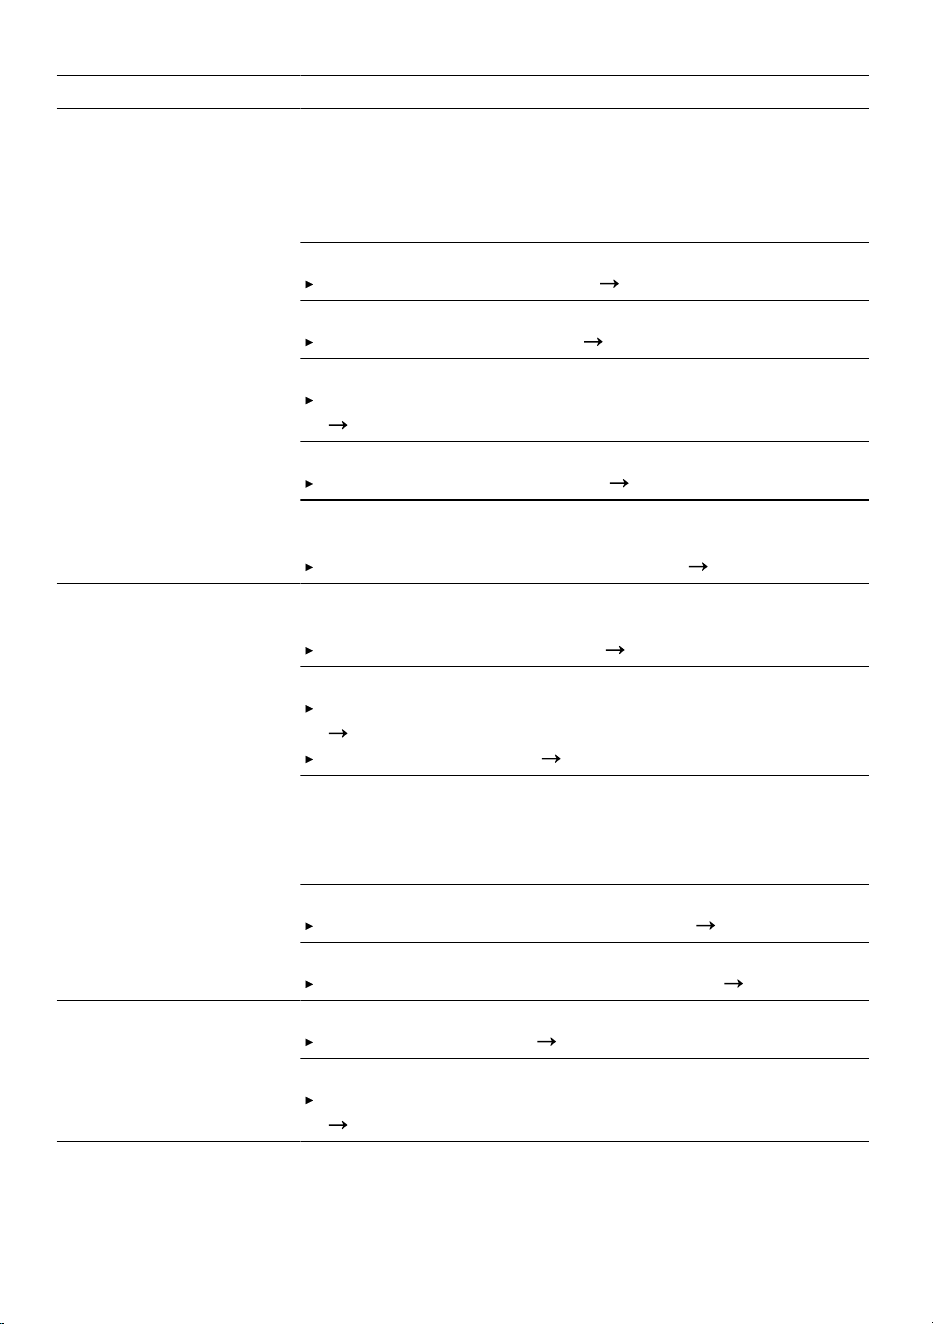
The laundry is too
damp.
After the end of the programme, warm laundry feels
damper than it actually is.
1.
Remove the laundry from the drum as soon as the
drying programme has finished.
2.
Spread the items of laundry for cooling.
The selected dryness level is unsuitable.
Change the dryness level.
Page27
The dryness level is not adjusted.
Adjust the dryness level.
Page27
The load is too small.
Set a time programme for subsequent drying.
Page21
The moisture sensor is dirty.
Clean the moisture sensor.
Page35
The appliance has interrupted the drying process due
to the condensation container being full.
Empty the condensation container.
Page26
Creasing. The selected programme is unsuitable for the type of
fabric.
Set a suitable programme.
Page19
The load is unsuitable.
Observe the programme's maximum load capacity.
Page19
Prepare the laundry.
Page22
The laundry lies in the drum for too long after drying.
1.
Remove the laundry from the drum as soon as the
drying programme has finished.
2.
Spread the items of laundry for cooling.
Easy Care fabrics have been dried for too long.
Change or adjust the dryness level.
Page27
The crease-reduction function is not activated.
Activate the crease-reduction function.
Page18
Water is leaking from
the appliance.
Appliance is not correctly aligned.
Align the appliance.
Page14
Water outlet hose is not connected correctly.
Check the installation of the water outlet hose.
Page12
39
en Transportation, storage and disposal
Fault Cause and troubleshooting
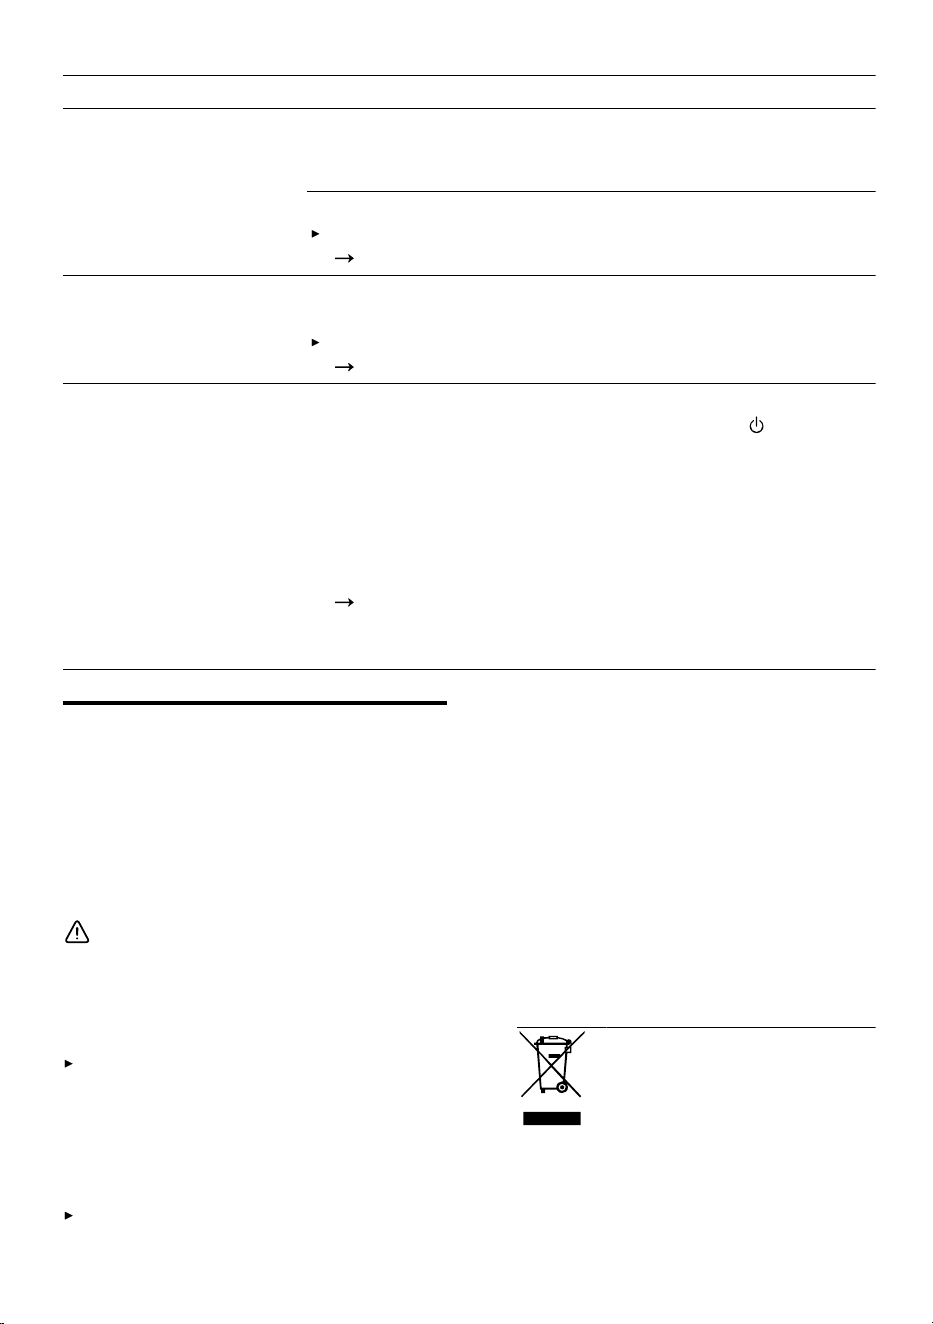
Condensation collects
in the condensation
container despite the
water outlet hose be-
ing connected.
Not a fault. The remaining volume of condensation may
remain in the condensation container.
No action required.
Water outlet hose is not connected correctly.
Check the installation of the water outlet hose.
Page12
Odours have formed
in the appliance.
Stubborn dirt in the appliance or an extended appli-
ance downtime of more than one month.
Run the intensive appliance care programme.
Page33
All other error codes. Malfunction
1.
To restart the appliance, press and hold for ap-
proximately 5seconds.
2.
If the fault occurs again, disconnect the appliance
from the power supply for at least 30 seconds.
Unplug the appliance from the mains or switch off the
circuit breaker in the fuse box.
3.
If the fault persists, call customer service.
Page41
Please specify the exact error message when calling. If
possible, document the fault with photos and videos.
Transportation, storage and disposal20 Transportation, stor-
age and disposal
20.1 Disposing of old appli-
ance
Valuable raw materials can be re-
used by recycling.
WARNING
Risk of harm to health!
Children can lock themselves in the
appliance, thereby putting their lives
at risk.
The appliance must not be set up
behind a lockable door, a sliding
door or a door with a hinge on the
side opposite to the appliance,
which prevents appliance from
opening fully.
With redundant appliances, unplug
the power cord. Then cut through
the cord and damage the lock on
the appliance door beyond repair
so that the appliance door will no
longer close.
1.
Unplug the appliance from the
mains.
2.
Cut through the power cord.
3.
Dispose of the appliance in an en-
vironmentally friendly manner.
Information about current disposal
methods are available from your
specialist dealer or local authority.
This appliance is labelled
in accordance with
European Directive
2012/19/EU concerning
used electrical and elec-
tronic appliances (waste
electrical and electronic
equipment - WEEE).
40
Customer Service en
The guideline determines
the framework for the re-
turn and recycling of
used appliances as ap-
plicable throughout the
EU.
Customer Service21 Customer Service
You can obtain function-relevant and
storable genuine spare parts from
our Customer Service for up to
15years from the date on which your
appliance was placed on the market.
For more information, please contact
our Customer Service team.
Detailed information about the war-
ranty period and the warranty condi-
tions in your country is available via
the QR code on the enclosed docu-
ment on service contacts and war-
ranty conditions, from our customer
service or on our website.
You can find the contact details for
our customer service via the QR
code on the enclosed document on
service contacts and warranty condi-
tions or on our website.
21.1 Product number (E-Nr.),
production number (FD)
and consecutive number-
ing (Z-Nr.)
If you contact Customer Service, you
will require the product number (E-
Nr.), the production number (FD) and
the consecutive numbering (Z-Nr.),
which you can find on the appliance's
rating plate.
Depending on the model, the rating
plate is located:
On the inside of the door.
Underneath the drum opening.
On the inside of the maintenance
flap.
On the rear of the appliance.
Make a note of your appliance's de-
tails and the Customer Service tele-
phone number to find them again
quickly.
Consumption values22 Consumption values
The specified values are indicative only and were determined in accordance
with the applicable standard IEC61121.
The actual values may deviate from the indicated values depending on the type
of fabric, composition of laundry to be dried, residual moisture in the fabric, set
degree of dryness, amount of laundry being loaded, environmental conditions
and the activation of additional functions.
The expected programme duration/"Ready in" time that is shown on the appli-
ance display when selecting the programme is based on the spin speed in the
washing machine of 1000rpm when the appliance is delivered.
Programme Final
mois-
ture
level
(%)
Load
(kg)
Spin
speed
(rpm)
Initial
mois-
ture
level
(%)
Pro-
gramm
e dura-
tion
(h:min)
Energy
con-
sump-
tion
(kWh/
cycle)
Cottons + -1.5 8.0 1400 50 3:10 1.46
41
en Technical data
Programme Final
mois-
ture
level
(%)
Load
(kg)
Spin
speed
(rpm)
Initial
mois-
ture
level
(%)
Pro-
gramm
e dura-
tion
(h:min)
Energy
con-
sump-
tion
(kWh/
cycle)
Cottons + -1.5 8.0 1000 60 3:27 1.64
Cottons + -1.5 8.0 800 70 3:44 1.83
Cottons Eco 0.0 8.0 1400 50 2:39 1.20
Cottons Eco 0.0 8.0 1000 60 2:59 1.42
Cottons Eco 0.0 8.0 800 70 3:20 1.64
Cottons + 12.0 8.0 1400 50 2:00 0.87
Cottons + 12.0 8.0 1000 60 2:18 1.06
Cottons + 12.0 8.0 800 70 2:36 1.25
Easy Care + 2.0 3.5 800 40 1:10 0.43
Easy Care + 2.0 3.5 600 50 1:21 0.53
Technical data23 Technical data
Appliance height 84.2cm
Appliance width 59.8cm
Appliance depth 61.3cm
Appliance depth
with door closed
64.8cm
Appliance depth
with door open
109.6cm
Weight 55.5kg
Maximum load 8.0kg
Mains voltage 220-240V, 50Hz
Minimum in-
stallation protec-
tion
10A
Nominal power 600W
Power consump-
tion
Standby mode:
0.30W
Left-on mode:
0.30W
Ambient temper-
ature
Minimum: 5°C
Maximum:
35°C
Length of the
power cord
145cm
23.1 Information regarding
Free and Open Source
Software
This product includes software com-
ponents that are licensed by the
copyright holders as free software or
open source software.
The applicable licence information is
stored on your home appliance. You
can also access the applicable li-
cence information via your
HomeConnect app: "Profile -> Legal
information -> Licence Information".
1
You can also download the licence
information on the brand product
website. (Please search on the
1
Depending on the appliance specifications
42
Declaration of Conformity en
product website for your appliance
model and additional documents). Al-
ternatively, you can request the relev-
ant information from oss-
[email protected] or BSH Hausger-
äte GmbH, Carl-Wery-Str. 34, 81739
Munich, Germany.
The relevant source code will be
made available on request.
Please send your request to oss-
[email protected] or BSH Hausger-
äte GmbH, Carl-Wery-Str.34, 81739
Munich, Germany.
Subject: „OSSREQUEST“
The cost of performing your request
will be charged to you. This offer is
valid for three years from the date of
purchase or at least as long as we
offer support and spare parts for the
relevant appliance.
Declaration of Conformity24 Declaration of Conformity
BSH Hausgeräte GmbH hereby declares that the appliance with Home Connect
functionality conforms to the essential requirements and other relevant provi-
sions of Directive 2014/53/EU.
A detailed RED Declaration of Conformity can be found online at
www.bosch-
home.com
among the additional documents on the product page for your ap-
pliance.
2.4 GHz band (2400–2483.5MHz): Max. 100mW
5-GHz band (5150–5350MHz + 5470–5725MHz): max. 180mW
BE BG CZ DK DE EE IE EL ES
FR HR IT CY LI LV LT LU HU
MT NL AT PL PT RO SI SK FI
SE NO CH TR IS UK (NI)
5GHz WLAN (Wi-Fi): For indoor use only.
AL BA MD ME MK RS UK UA
5GHz WLAN (Wi-Fi): For indoor use only.
43
Bosch Home Connect
App
Connect your home appliance today and enjoy the
following benefits:
• Extend the service life of the appliance with regular
updates and an overview of recommended maintenance
and cleaning.
• Improve appliance performance thanks to helpful function
descriptions in the app and programme assistants.
• Receive relevant notifications, control your appliance
effortlessly and use voice control via a partner.
Need some help?
You can find it here.
Expert advice on your Bosch home appliances, help with problems or repairs by
professionals from Bosch.
Discover all the different ways Bosch can assist you:
www.bosch-home.com/service
The contact details of all countries are listed in the attached service directory.
BSH Hausgeräte GmbH
Carl-Wery-Straße 34
81739 München, GERMANY
www.bosch-home.com
A Bosch Company
*9002073748*
9002073748 (060609)
en