User Manual Bosch WQG233D8GB Heat pump tumble dryer
Cleaning and servicing
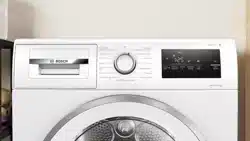
Tips on cleaning and care
| Wipe down the housing and the controls with nothing but water and a damp cloth. |
This ensures the parts of the appliance will remain clean and hygienic. |
| Remove all detergent residue, spray residue or other residues immediately. |
Fresh deposits are easier to remove without leaving any residue. |
| Leave the appliance door open after use. |
This allows the residual water to dry, reducing odours in the appliance. |
Base unit
The base unit is the accessible area at the bottom of the appliance in which you will find the heat exchanger.
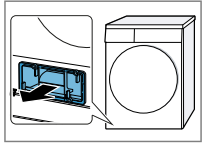
Opening the base unit
Requirements
- The appliance has cooled down for 30 minutes
- The appliance door is closed.
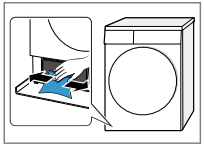
1. Open the maintenance flap. 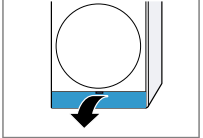
If you place a cloth beneath the maintenance flap, you can collect the remaining water from the base unit.
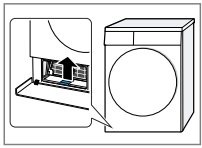
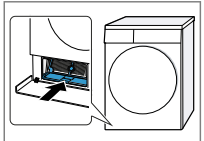
2. Open the lever for the heat exchanger cover.
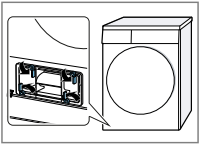
3. Pull out the heat exchanger cover by the handle.
Cleaning the base unit
1. Open the base unit
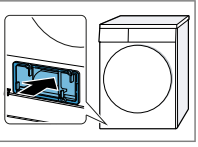
2. Use a soft brush to clean the heat exchanger cover.
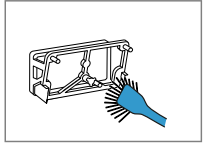
Make sure that you remove all dirt from the seal.
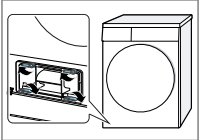
3. Lift the middle tab on the insert slightly.
4. Pull the insert out horizontally.

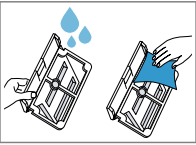
5.Clean the insert under running water and dry it off.
6. Carefully clean the fins on the heat exchanger with a vacuum cleaner and brush attachment.

Ensure that you vacuum the fins from top to bottom so that they do not become deformed or damaged.
7. Carefully clean the air inlet grille with a vacuum cleaner and brush attachment.

In doing so, ensure that you do not deform or damage the grille
8. Clean the opening with a soft, damp cloth.
9. Push the insert in horizontally until the tab clicks into place.
10.Close the base unit
Closing the base unit
1. Insert the heat exchanger cover by the handle.
2. Close the lever for the heat exchanger.
3. Close the maintenance flap.

Moisture sensor
Cleaning the moisture sensor
Over time, residue from limescale, detergents and care products can build up on the moisture sensor. Clean the moisture sensor regularly.
Note: If you do not clean the appliance as described, the appliance's functionality may be impaired.
- Open the door
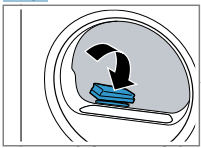
- Clean the moisture sensor with a sponge.
Troubleshooting
| Fault |
Cause and troubleshooting |
| "Hot" and the drum rotates. |
Cooling process active.
- Not a fault.
- Do not change the programme during the cooling process.
Note: The cooling process takes up to 10 minutes. You can continue to operate the appliance.
|
| Humming noise. |
Compressor active. ▶ Not a fault – normal operating noise. |
| The display goes out and Start/Reload flashes. |
Energy-saving mode is active ▶ Press any button. ▶ The symbol lights up again. |
 |
Fluff filter is soiled. ▶ → "Cleaning the fluff filter" |
|

|
The base unit's filter is soiled. ▶ → "Cleaning the filter system on the base unit" |
| The appliance is not working. |
- The mains plug of the power cord is not plugged in. ▶ Connect the appliance to the power supply.
- The circuit breaker in the fuse box has tripped. ▶ Check the circuit breaker in the fuse box
- There has been a power cut. ▶ Check whether the lighting in your kitchen or other appliances are working.
|
| Appliance paused, but the drum is rotating. |
Cooling process active. ▶ Not a fault – no action required. |
| Creasing. |
- The load is too large. ▶ Observe the maximum load capacity of theObserve the "Programmes"
- Unsuitable programme for the type of fabric. ▶ Set the suitable programme for the type of fabric. → "Programmes
- Easy-Care fabrics are dried for too long. ▶ → "Changing the dryness level". ▶ → "Adjusting the dryness level"
|
 |
- Condensation tank filled.
- → "Emptying the condensation container"
- → "Inserting the condensation container"
- → "Starting the programme"
- Water drain hose is caught or jammed.
- Ensure that the water drain hose is not kinked or trapped.
- Route the water drain hose without kinks.
- Water drain hose is not connected correctly Ensure that the water drain hose is connected correctly. → "Connecting the water drain hose"
- Water drain hose is blocked. ▶ Rinse the water drain hose with tap water.
|
|
Condensation in the condensation tank even though the water drain hose is connected.
|
- The appliance uses condensation for the automatic self-cleaning. ▶ Not a fault – no action required.
- Water drain hose is not connected correctly.
|
| Condensation in the condensation tank even though the water drain hose is connected. |
- Ensure that the water drain hose is connected correctly. → "Connecting the water drain hose"
|
| The programme does not start. |
- Childproof lock is activated. ▶ → "Deactivating the childproof lock"
- You have not pressed Start/Reload. ▶ Press Start/Reload.
- No programme set.
- → "Setting a programme"
- → "Starting the programme
|
| The length of the programme changes during the drying cycle. |
The programme operation is optimised electronically.
This may change the programme duration. ▶ Not a fault – no action required.
|
| Pumping noise. |
Condensation pump active. ▶ Not a fault – normal operating noise. |
| Buzzing noise. |
Compressor ventilation active. ▶ Not a fault – normal operating noise |
| The drying time is too long. |
- The base unit's filter is soiled. ▶ → "Cleaning the filter system on the base unit"
- Fluff filter is soiled. ▶ → "Cleaning the fluff filter"
- The ambient temperature is greater than 30 °C. ▶ Ensure that the ambient temperature is lower than 30 °C.
- The ambient temperature is lower than 15 °C. ▶ Ensure that the ambient temperature is above 15 °C.
- Insufficient air circulation at the appliance's installation location. ▶ Ventilate the appliance's installation location.
- Appliance air inlet is blocked. ▶ Ensure that the air inlet on the appliance is kept clear
- Heat exchanger is soiled.
- -> "Opening the base unit"
- Clean the heat exchanger. → "Cleaning the base unit"
- → "Closing the base unit",
|
| Water is leaking from the appliance. |
- Appliance is not correctly aligned. ▶ → "Aligning the appliance"
- The seal for the heat exchanger cover is dirty. ▶ Clean the seal for the heat exchanger cover. → "Cleaning the filter system on the base unit"
- Water drain hose is not connected correctly. ▶ Ensure that the water drain hose is connected correctly. → "Connecting the water drain hose"
- The lever for the heat exchanger cover is not closed correctly. ▶ Ensure that the lever for the heat exchanger cover is closed correctly. → "Closing the base unit"
|
| The laundry is too damp. |
- Unsuitable programme for the type of fabric. ▶ Set a timed programme for the subsequent drying. → "Programmes"
- There has been a power cut. ▶ Check whether the lighting in your kitchen or other appliances are working.
- The load is too large. ▶ Observe the maximum load capacity of the → "Programmes"
- Unsuitable dryness level set. ▶ → "Changing the dryness level
- Unsuitable dryness level set. ▶ → "Changing the dryness level"
- Load too small. ▶ Set a timed programme for the subsequent drying. → "Programmes
- Moisture sensor dirty.
|
| The laundry is too damp. |
▶ → "Cleaning the moisture sensor" |
| |
The drying process is interrupted and the condensation tank has been filled.
- → "Emptying the condensation container
- → "Inserting the condensation container"
- "Starting the programme"
|
Customer Service
If you have any queries on use, are unable to rectify faults on the appliance yourself or if your appliance needs to be repaired, contact Customer Service
Function-relevant genuine spare parts according to the corresponding Ecodesign Order can be obtained from Customer Service for a period of at least 10 years from the date on which your appliance was placed on the market within the European Economic Area.
Note: Under the terms of the manufacturer's warranty the use of Customer Service is free of charge.
Detailed information on the warranty period and terms of warranty in your country is available from our aftersales service, your retailer or on our website.
If you contact Customer Service, you will require the product number (ENr.) and the production number (FD) of your appliance. The contact details for Customer Service can be found in the enclosed Customer Service directory or on our website
Product number (E-Nr.) and production number (FD)
You can find the product number (ENr.) and the production number (FD) on the appliance's rating plate. Depending on the model, the rating plate is located:
- On the inside of the door
- On the inside of the maintenance flap.
- On the rear of the appliance.
Make a note of your appliance's details and the Customer Service telephone number to find them again quickly