High-definition
dashcam
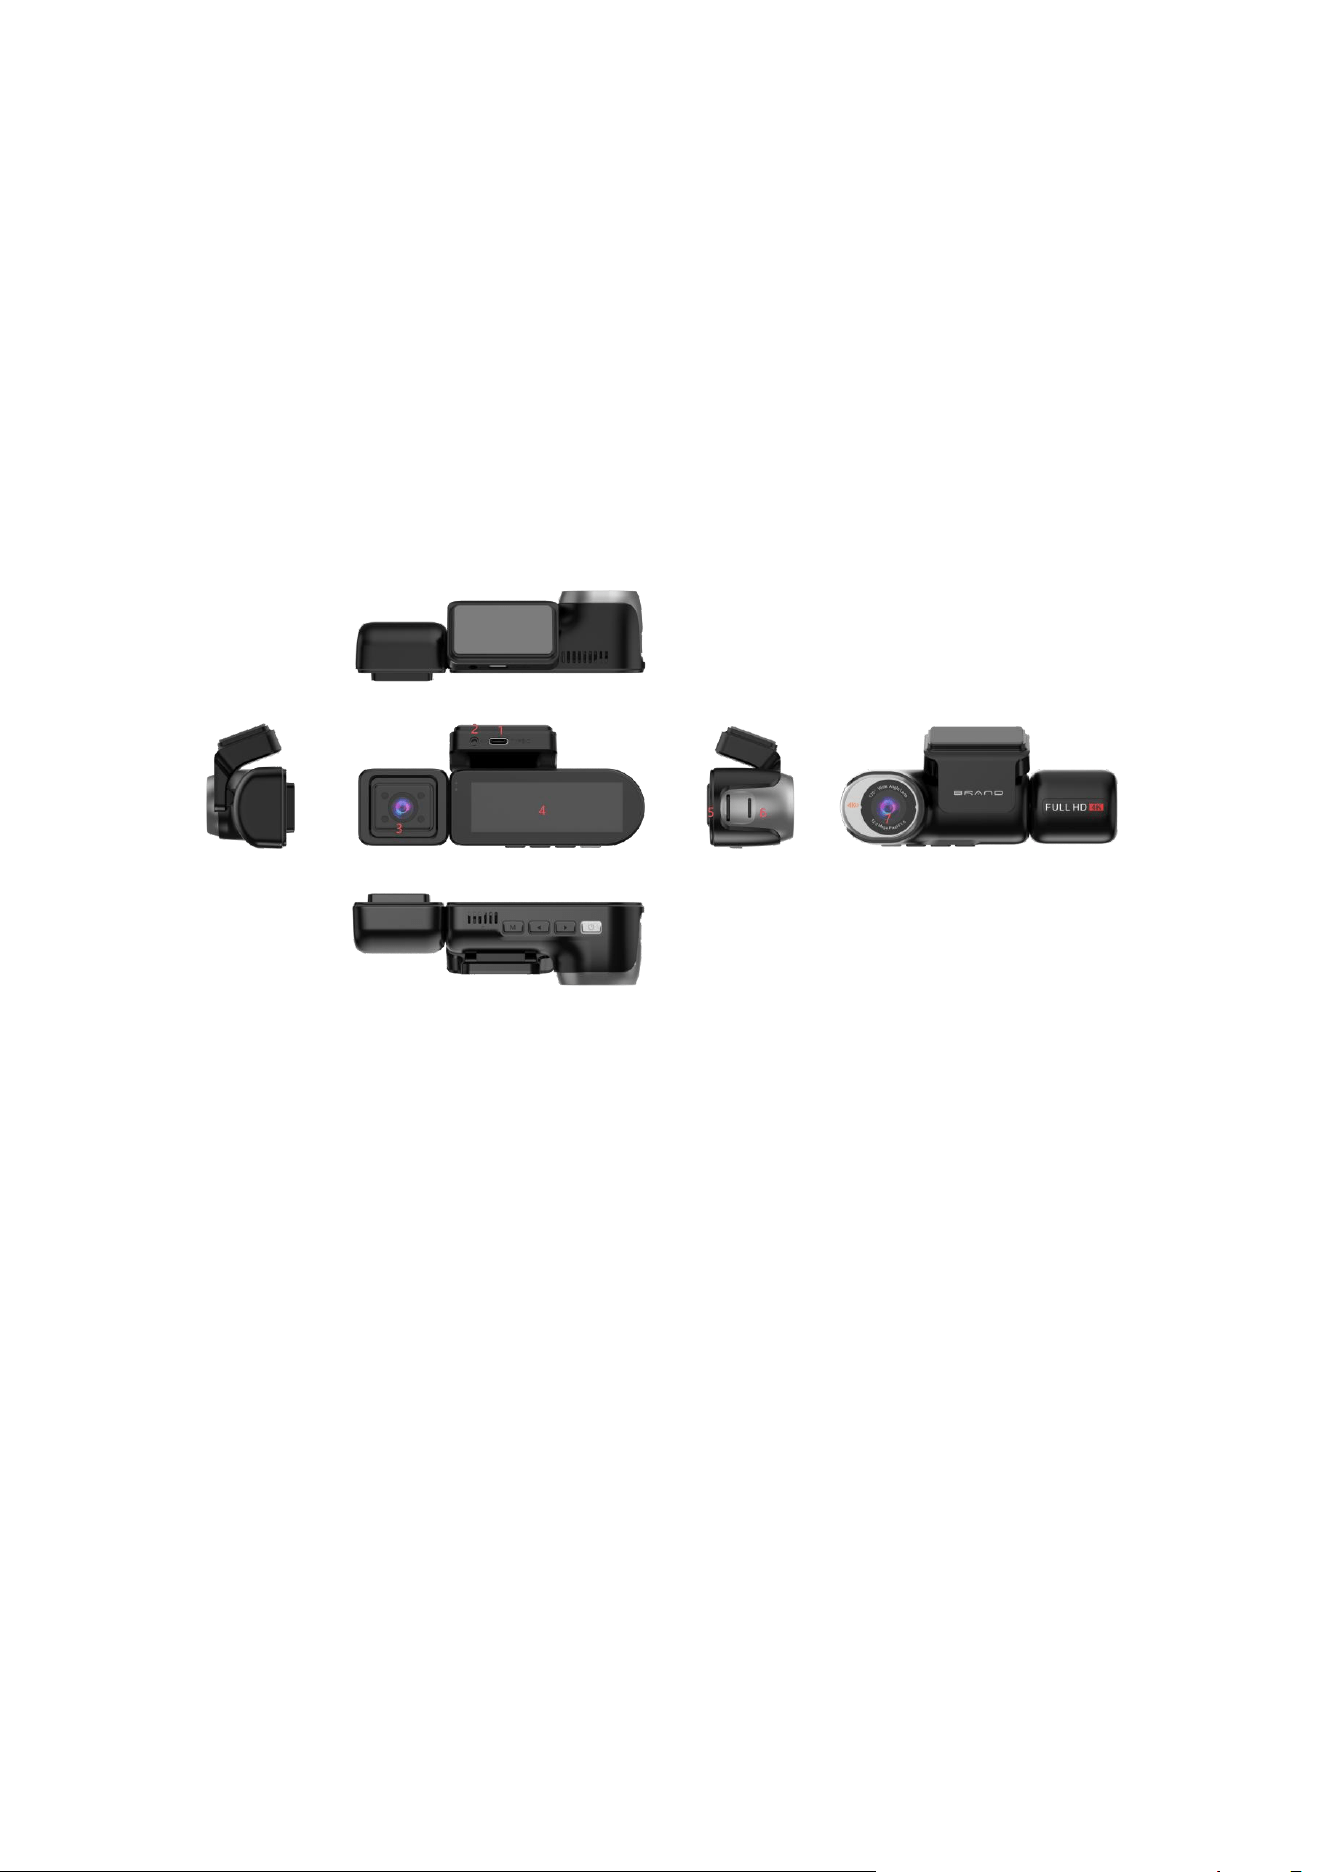
1. Power socket 2. Rearview socket 3. In-car camera 4. Display area 5.SD card slot socket 6.
Speaker 7. Front camera
2. The main functions are as follows:
① 3.2-inch full-view screen, IPS high-definition screen
② Front 4K(3840*2160)25fps+ rear 1080P 25fps+ interior 1080P
20fps
③ Supports Wi-Fi mobile phone interconnection function
④ Built-in G-SENSOR collision video locking function
⑤ Supports time-lapse video parking monitoring function
⑥ Supports GPS and ADAS functions
⑦ Supports up to 256G-TF cards
⑧ Supports OTA online upgrade when connected to WIFI
一、Installation Instructions
Use a 12V to 5V voltage reduction cable. Connect the yellow power cord to
the 12V power supply, the red ACC ignition control wire, and the black
ground wire. Start the engine. The light will come on and be flashing. The
machine starts and enters the video recording state. Or you can directly
use a 12V to 5V step-down car charging cable.
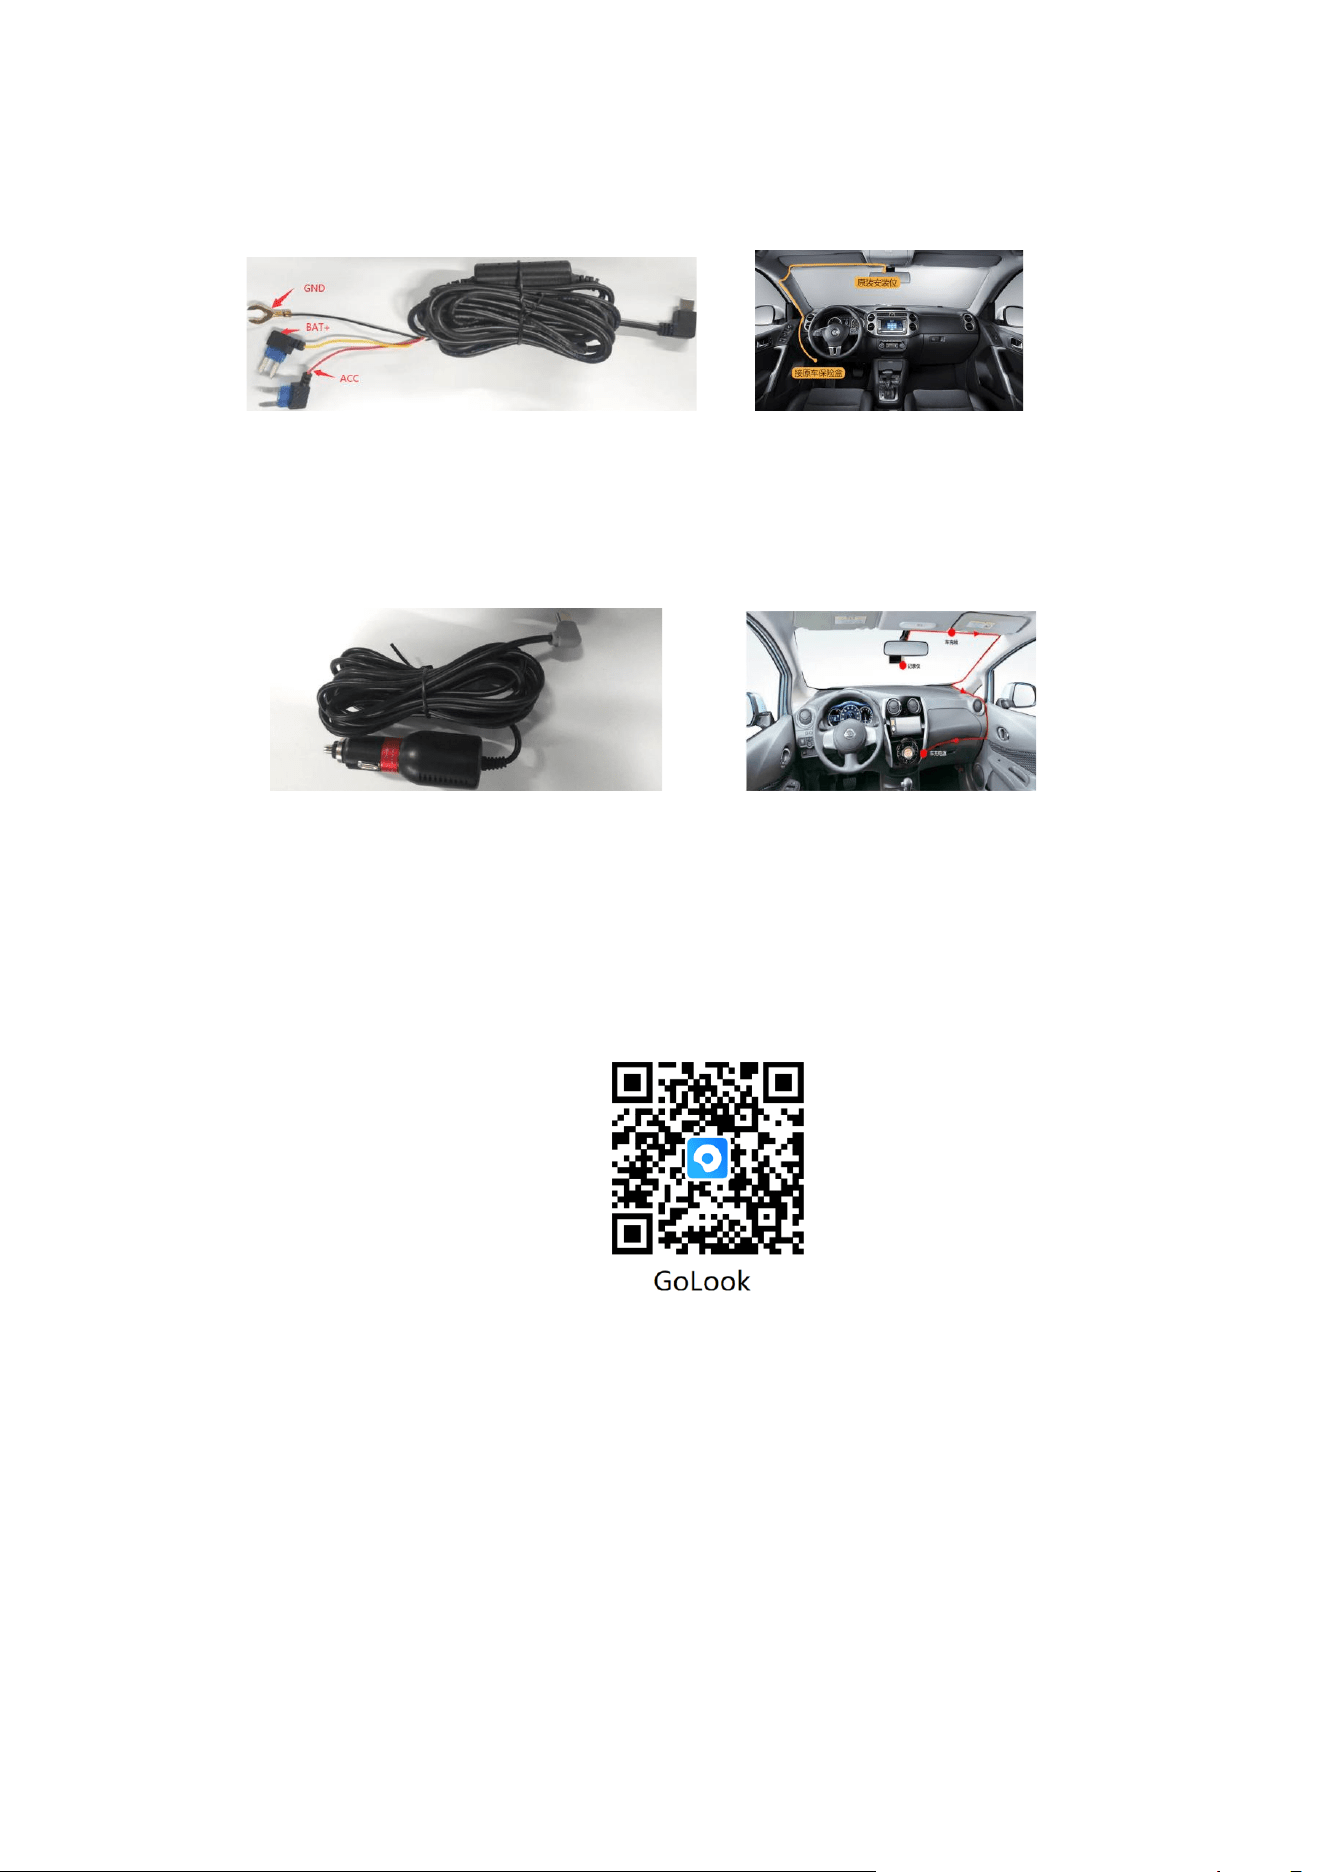
1.Installation diagram of the voltage reduction line
Figure 1 Wiring diagram Figure 2 Interior installation diagram
2.Schematic diagram of vehicle charger installation
Figure 3 Schematic diagram of the vehicle charger
Figure 4 Schematic diagram of vehicle charging
二、Download and install the APP
1. For the first time using the recorder, please scan the QR code below with
your mobile phone to download the APP
“GoLook”APP;
2. For iphones, you can search for "GoLook (or Luying)" in the Apple app store
to download and install it. For Android phones, you can search for "GoLook (or
Luying)" in the App Store to download and install it.
3. After starting the car and turning on the recorder to make it work, find the
WIFI starting with "HisDvr_******" in the phone Settings and enter the default
password 12345678 to connect.
After the connection is completed, enter the APP. The time of the recorder will
be synchronized with the current time on your phone. Additionally, you need to
enter the recorder Settings option and select "Format SD Card".
1. Iii. Instructions for the Recorder
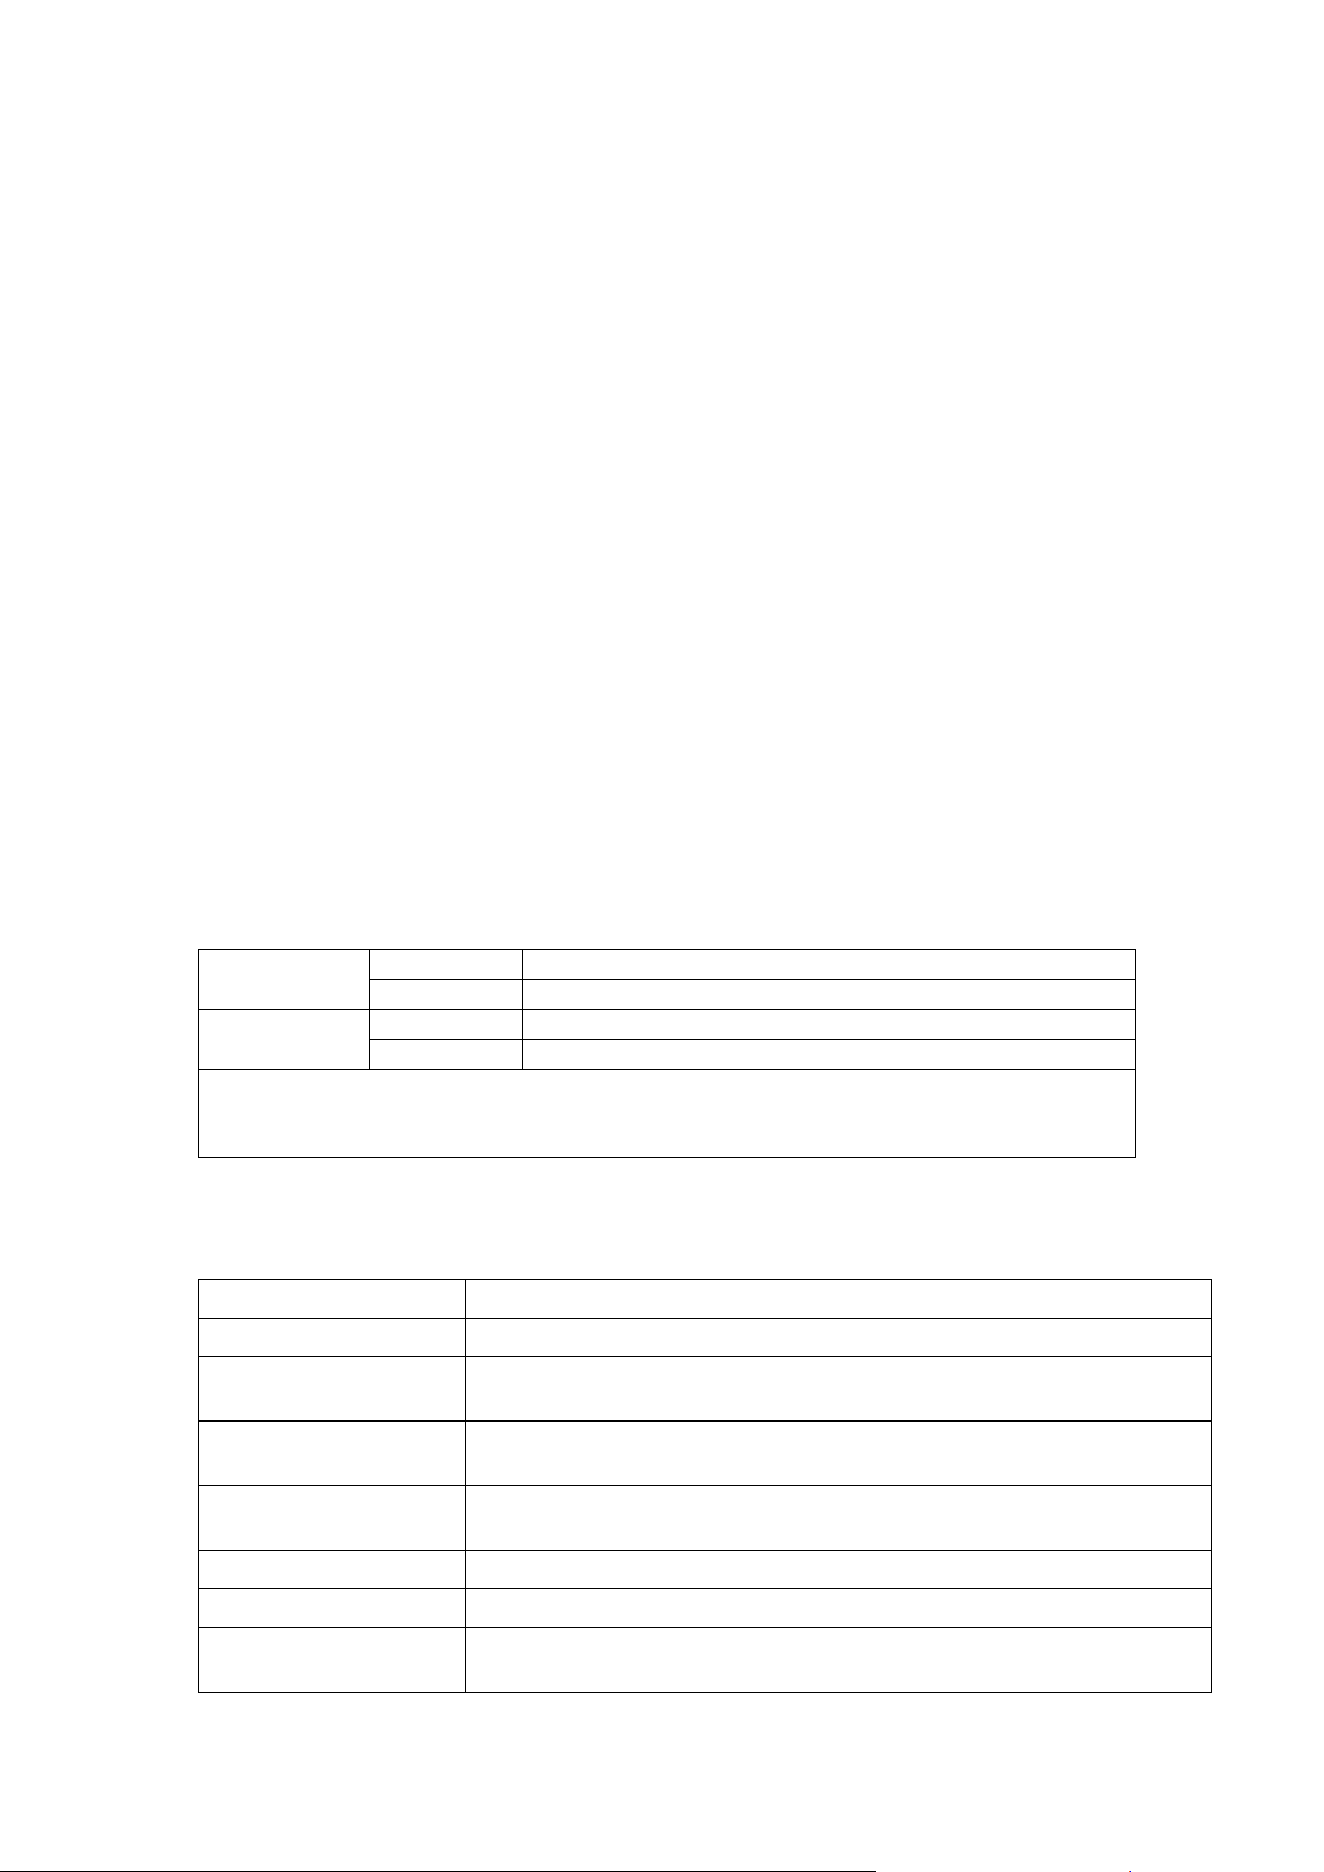
2. Description and explanation of key functions
3.
Key
function
Quick
function of
the equipment
"M key"
Short press
Menu Function/Return to
Video
Power
button
Short press
Pause recording/Start
recording
Long press
for 2
seconds
Power off/Power on
"Next
key
Short press
Before and after
switching. Internal video
"Up key
Short press
Turn on recording/Turn
off recording
LCD menu
function
"M key"
Short press
Return
Long press
for 3
seconds
Exit file management
"Up key
Short press
Move left/up
Down
key
Short press
Move to the right/down
Power
button
Short press
Confirm to delete the
file/confirm to lock the
file
➢ 【M Key 】 Menu key/Back key
Function 1: In the video recording mode; Press the [M key] briefly to enter the menu mode.
Function 2: In the menu, briefly press the [M key] to return. In the file management mode,
long press the [M key] for 3 seconds to exit file management.
➢ Flip up key/Play the previous video/recording to turn
on/off
Function 1: Page-flipping function
In the menu Settings and playback mode, briefly pressing the "Up Key" activates the
function of moving left or up.
Function 2: Play the previous video
In playback mode, during the video playback process, briefly press the [Up Key] to play the
previous video.
Function 3: In the video recording mode, briefly press the [Up Key] to turn off the recording,
and briefly press it again to turn it on
➢ Power button/Video recording button/Confirm button
Function 1: Power on/Off function
When the machine is turned off, press and hold the [Power Button] for 2 seconds to turn
on the power of this machine, and it will start working automatically. When the device is
powered on, long press the [Power Button] and hold it for 2 seconds. The device will
automatically save the video file and user Settings and then shut down.
Function 2: In video recording mode, a short press can turn the recording on or off.
Function 3: Briefly press "OK" on the menu page
➢ Scroll down/Play the next video/Turn WiFi on/off/Turn
recording on/off
Function 1: Page-flipping function. In the menu Settings and playback mode, briefly press
the [Page-flipping Key] to move to the right or down
Function 2: In playback mode, during the video playback process, briefly press the [Down
Scroll Key] to play the next video.
Function 3: In the video recording mode, briefly press the [Down Scroll Key] to switch
between the front and rear camera views
2. Indicator light description
Blue light
Slow flash
Video
Chang Liang
Not recorded
Red light
Flash
The TF card is not inserted or the card is abnormal
Chang Liang
The TF card has been inserted
Note: The red and blue lights are flashing rapidly simultaneously: The recorder
device is
upgrading its firmware
3.Description of the main functions of the APP Settings
interface
Recording switch
On (default)/Off
Time watermark
On (default)/Off
Video recording
duration
1 minute (default)/2 minutes
Speaker volume
To adjust the playback volume of the recorder's speaker,
you can choose off/low/medium (default)/high
Emergency video
trigger sensitivity
The collision sensitivity adjustment during normal working
video recording can be selected as off/low (default)/ high
Vibration startup
Parking monitoring switch on/off (default)
Format the TF card
Format the memory card (FAT32 64KB)
Modify the Wi-Fi of
the recorder
Change the WIFI account/password (If you forget the WIFI
password, you can long press the photo button to restore
the factory Settings)
factory data reset
Reset Settings function (WiFi will also be restored to the
default account and password)
About the recorder
Recorder firmware and APP information
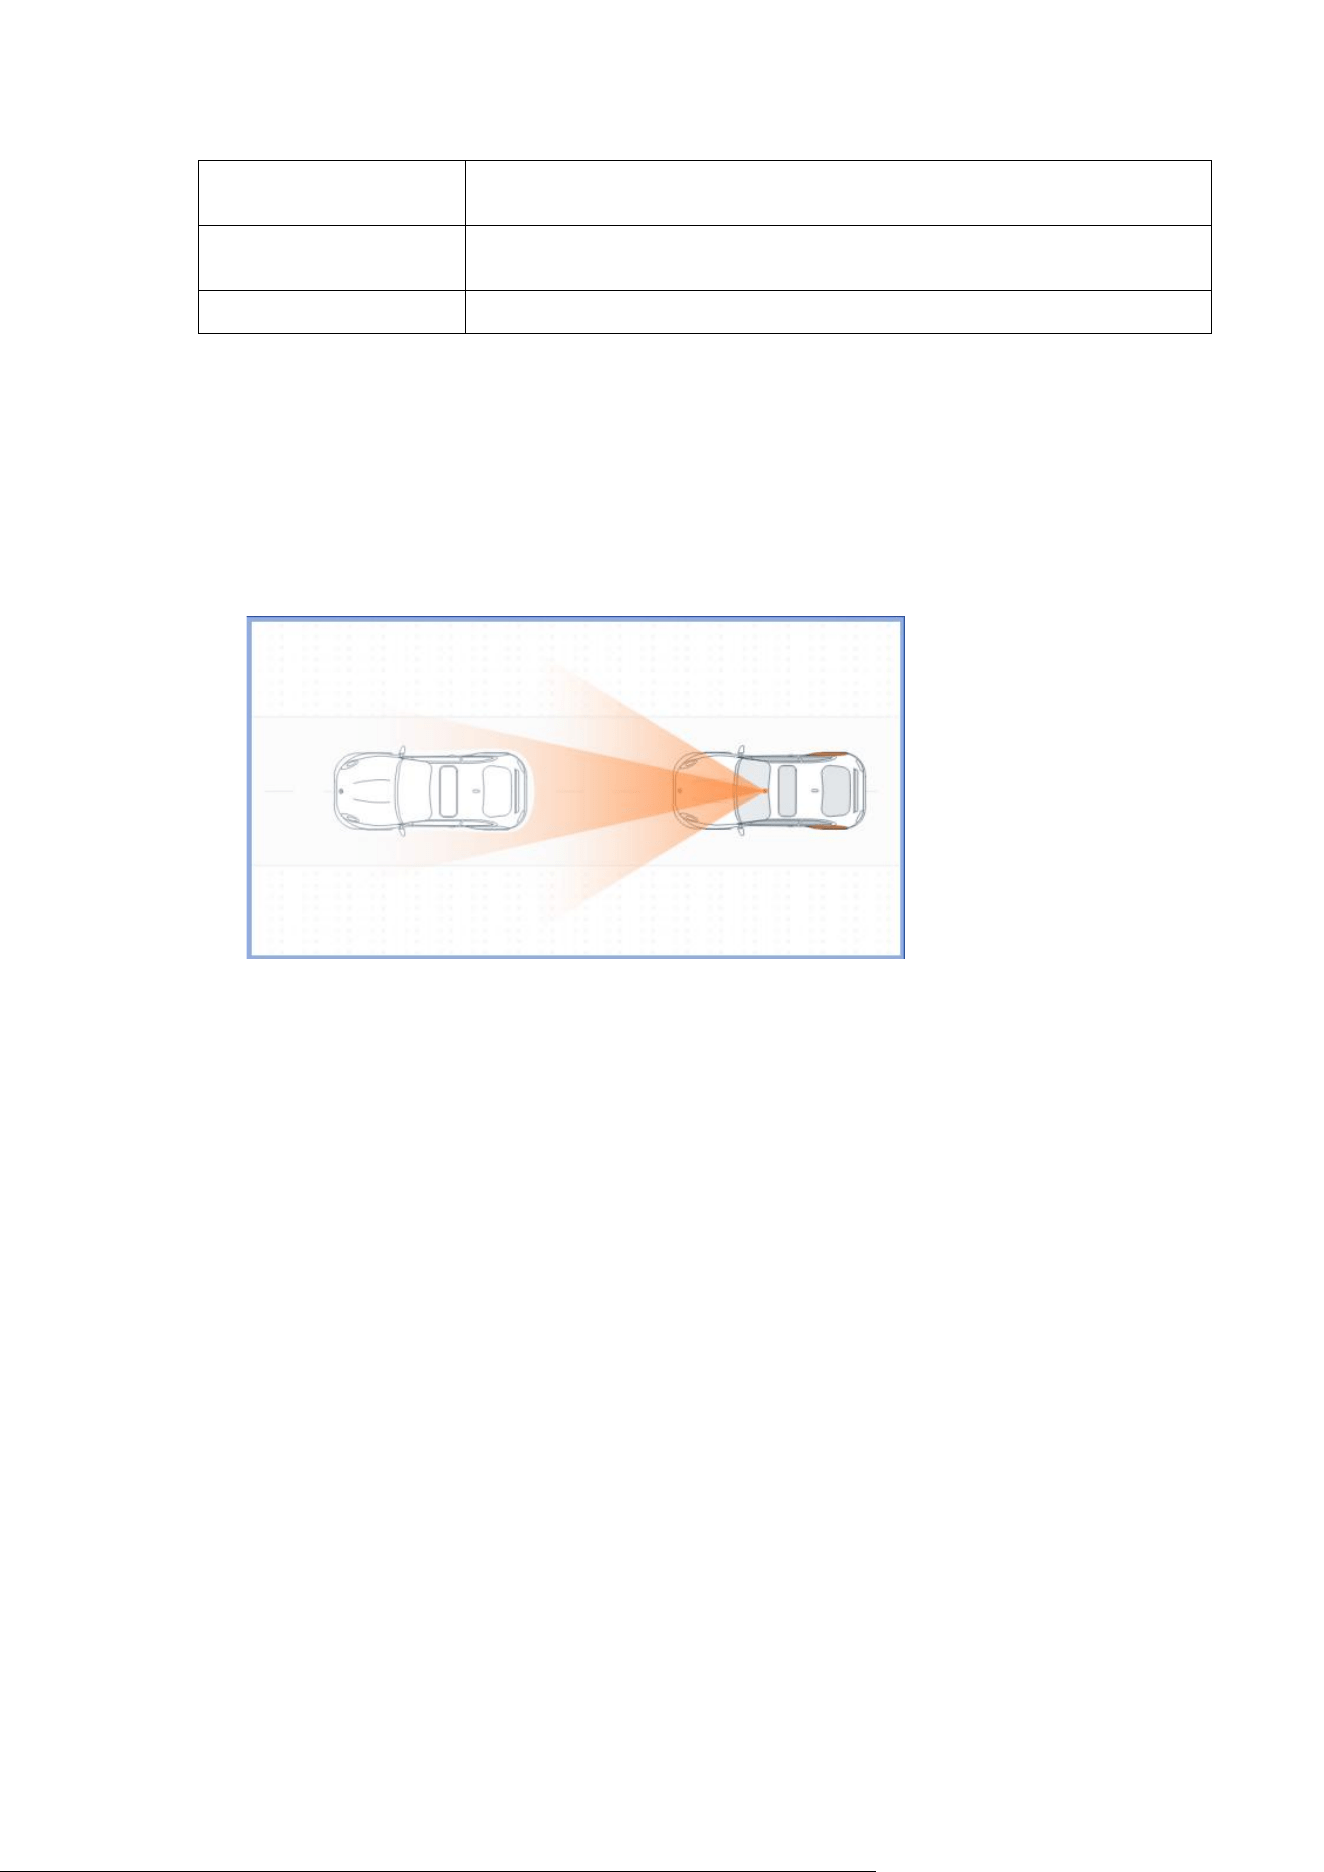
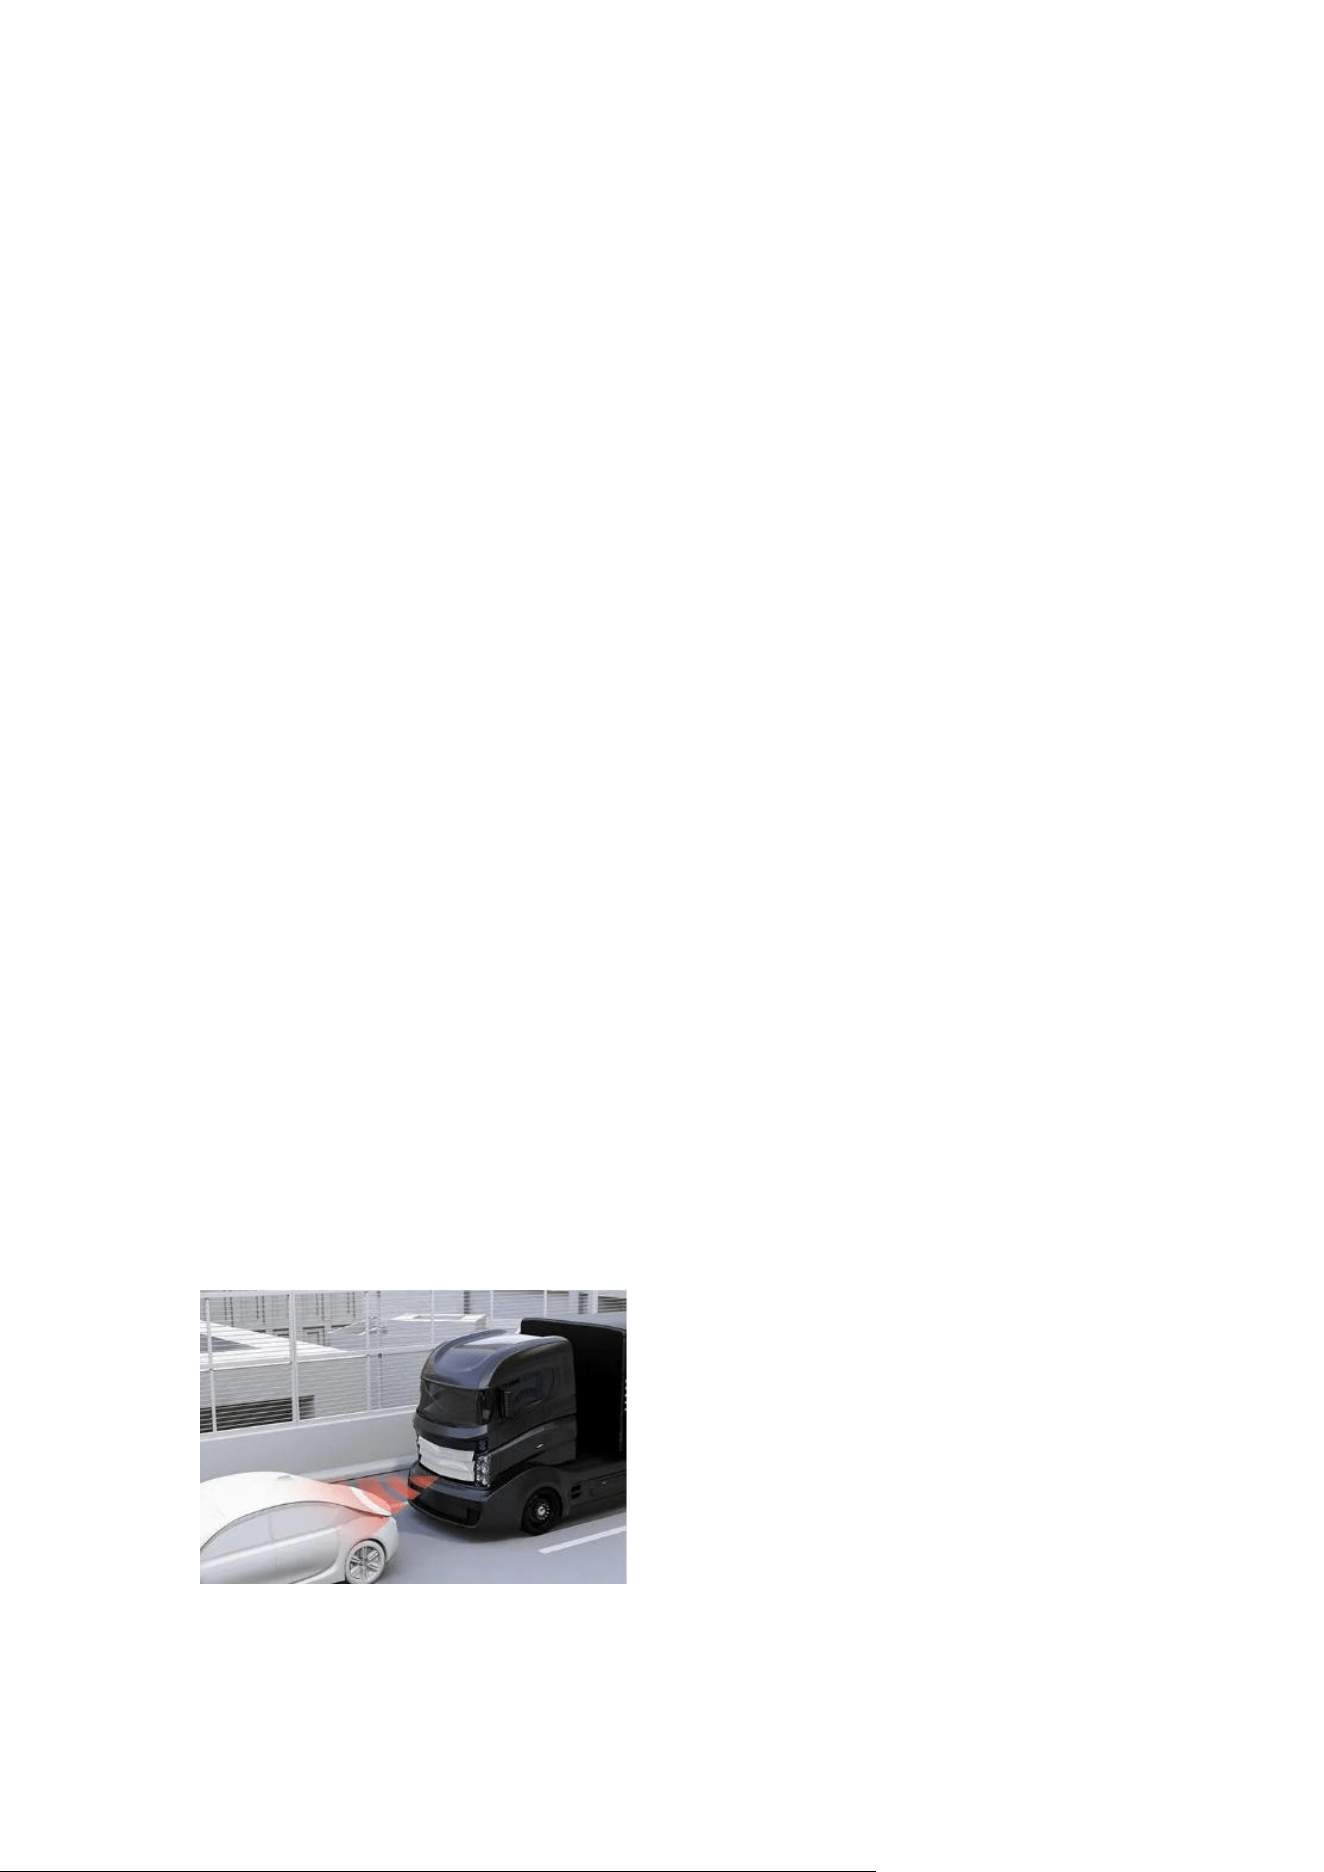
Dashcam ADAS refers to the application of Advanced Driver
Assistance Systems in dashcams. ADAS utilizes a variety of
sensors and algorithms to provide drivers with auxiliary
functions for safe driving, helping them better perceive
and respond to the road environment, thereby enhancing
driving safety.
The following are the main functions of the dashcam
ADAS:
一、Front vehicle collision warning(FCW)
1. The speed range of this vehicle is 30km/h-200km/h
2. Relative distance range to the vehicle in front: 0m-100m
3. Alarm for relative distance/vehicle speed less than a certain value: low -
1.5 seconds; Medium -2.0 seconds; High -1.5 seconds
4. Alarm for relative distance/relative vehicle speed less than a certain value:
low -1.5 seconds; Medium -2.7 High -8.0 seconds All the above four points must
be met simultaneously
Alarm prompt tone(pyation_frontcar.wav):
“ Please pay attention to traffic ahead”
二、Pedestrian/non-motorized vehicle collision warning
(PCW)
1. The speed range of this vehicle is 5km/h-100km/h
2. Relative distance range to the vehicle in front: 0m-20m
3. Alarm for relative distance/vehicle speed less than a certain value: low -
2.0 seconds; Medium -3.0 seconds; High -4.0 seconds
4. Alarm for relative distance/relative vehicle speed less than a certain value:
100 seconds
All the above four points must be met simultaneously (both pedestrians and non-
motorized vehicles should announce "Pay attention to pedestrians").
Alarm prompt tone(ped_collision.wav;rider_collision.wav):
“ Please pay attention to traffic ahead”;“Please pay attention to non motor
vehicles”
三、Vehicle departure warning(LDW)
1. The speed range of this vehicle is 40km/h-200km/h
2. Alarm when the distance between the tire and the lane line is less than a
certain value: low -0.1m; Medium -0.0m; Height: -0.1m
3. If the tire pressure on the lane line exceeds a certain value, an alarm will
be triggered: low -4.0 seconds. Medium -2.0 seconds; High -1.0 seconds
All the above three points must be met simultaneously
Alarm prompt tone(lane_change.wav; lane_press.wav):
“ Please pay attention to lane departure”;“Please do not press the thread”
四、Front vehicle start reminder(FMW)
1. If the time when this vehicle and the vehicle in front stop exceeds a
certain value, an alarm will be triggered: low -6 seconds. Medium-4s; High -2s
2. Alarm when the relative distance to the vehicle in front is less than a
certain value: low -6 meters. Medium -7m; Height: -8 meters
3. Alarm if the distance traveled by the vehicle in front after starting
exceeds a certain value: low -1 meter. Medium -0.8m Height: -0.6 meters
All the above three points must be met simultaneously
Alarm prompt tone(car_start.wav.wav):
“ Please pay attention to the front car starting”
五、Warning for too close distance between vehicles(HMW)
1. The speed range of this vehicle is 30km/h-200km/h
2. 2. Relative distance range to the vehicle in front: 0m-100m
3. Alarm for relative distance/vehicle speed less than a certain value: low -
1.0 seconds; Medium -1.5 seconds; High -2.0 seconds
All the above three points must be met simultaneously
Alarm prompt tone(didi.wav):
“Didi”Sound prompt

FCC Warning
This device complies with Part 15 of the FCC Rules. Operation is subject to the following two conditions:
(1) This device may not cause harmful interference, and (2) this device must accept any interference received, including
interference that may cause undesired operation.
NOTE 1: This equipment has been tested and found to comply with the limits for a Class B digital device, pursuant to part 15 of
the FCC Rules. These limits are designed to provide reasonable protection against harmful interference in a residential
installation. This equipment generates, uses and can radiate radio frequency energy and, if not installed and used in accordance
with the instructions, may cause harmful interference to radio communications. However, there is no guarantee that
interference will not occur in a particular installation. If this equipment does cause harmful interference to radio or television
reception, which can be determined by turning the equipment off and on, the user is encouraged to try to correct the
interference by one or more of the following measures:
- Reorient or relocate the receiving antenna.
- Increase the separation between the equipment and receiver.
-Connect the equipment into an outlet on a circuit different from that to which the receiver is connected.
-Consult the dealer or an experienced radio/TV technician for help.
NOTE 2: Any changes or modifications to this unit not expressly approved by the party responsible for compliance could void the
user's authority to operate the equipment.
RF Exposure Statement
To maintain compliance with FCC'S RF Exposure guidelines, This equipment should be installed and operated with minimum
distance of 20cm between the radiator and your body. This device and its antenna(s) must not be co-located or operation in
conjunction with any other antenna or transmitter.