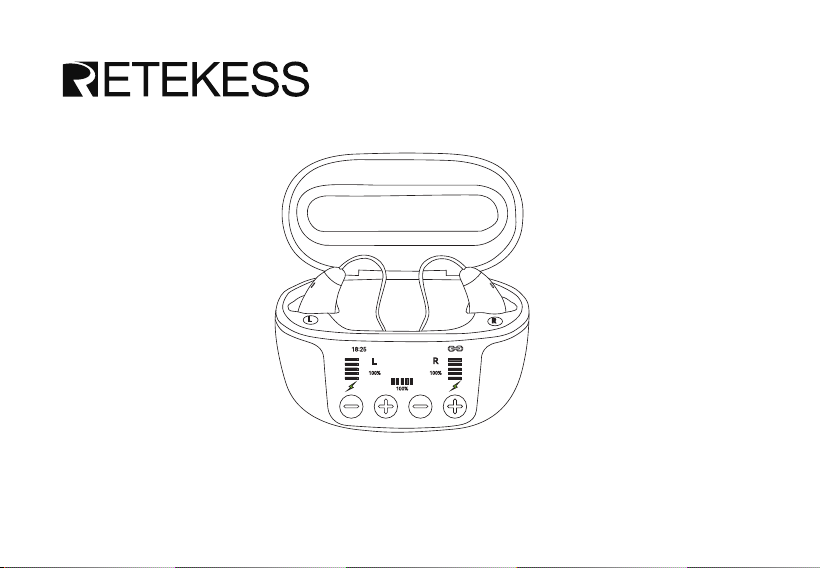
L
100%
R
100%
100%
18�25
Applicable to CZ-B801
OTC


Content
1.Product Introduction..............................................................................
1.1 Schematic diagram...........................................................................
1.2 Specications......................................................................................
1.3 Product accessories..........................................................................
2.Preparations before use........................................................................
3.Instructions for use.................................................................................
3.1 How to wear .....................................................................................
3.2 Power On/O.....................................................................................
3.3 Volume adjustment..........................................................................
3.4 Mode Switch......................................................................................
3.5 UV lamp disnfection funtion.........................................................
3.6 Batte indicator...............................................................................
3.7 Bluetooth operation........................................................................
3.8 Restore facto settings................................................................
3.9APP feature introduction................................................................
3.10 Use of ear tips.................................................................................
3.11 Use of batteries..............................................................................
4.Precautions................................................................................................
01
3
3
4
5
6
6
6
7
7
8
9
9
10
11
11
14
14
15
02
Germany Retevis Technology GmbH
Uetzenäcker 29, 38176 Wendeburg
Retevis-Europa@outlook.com
Tel:+0049 053029369179
EC
REP
Please scan the QR code next to obtain user manual in other
languages, such as German/Russian/Japanese/Spanish/Italian,
which will help you better understand and use this product.
1. Product Introduction
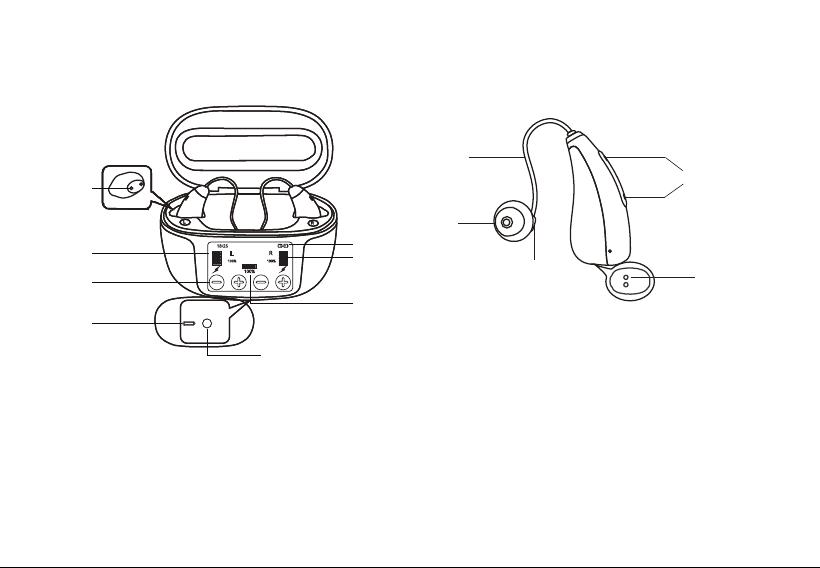
1.1 Schematic diagram
18�25
1
2
3
4
5
6
7
8
9
10
11
12
13
1: Charging Contacts Pins
2: Display Screen
3: Volume up/down button
4: Type-C charging po
5: Reset button
6: Bluetooth connection indicator
7: Earphone batte indicator
8: Batte level indicator of charging case
9: Sound tube
10: Ear tip
11: Speaker
12: Sound pickup hole
13: Earphone charging contact
03
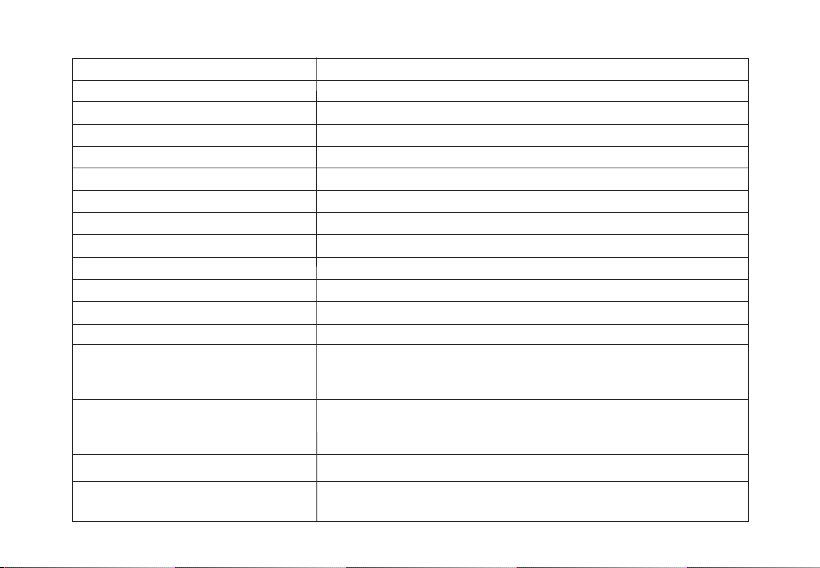
1.2 Specications
Description
Parameter value
Wearing Instructions
Behind-the-ear
Full Gain Max FOG50
45±3dB
FOG50 HFA Avg
42dB±3dB
OSPL90
OSPL90 HFA Avg
EQ Input Noise
Total Harmonic Disto
Frequency response range
Charging value for case
Charging time for ear
Earphone working time
≤113dB±4dB
110dB±4dB
≤5B±3dB
≤2%±3%
No narrower than 200Hz~6000Hz
TYPE-C po, 5V/1A
1-2hours
>12Hours(hearing aid mode)
Earphone operating voltage
3.85V@6mA
Batte of charging case
902035PL, 3.7V/650mAh,2.41Wh,11.9g(If a batte
catches re, it is recommended to use water-based re
extinguishing agents)
Batte of a single earphone
Z45FH, 3.85V/60mAh, 0.23Wh, 1.3g(If a batte catches
re, it is recommended to use water-based re
extinguishing agents)
Bluetooth
5.3Version, 2402~2480MHz, RF<10mW
Headphone power consumption
when turned o
<30uA
04
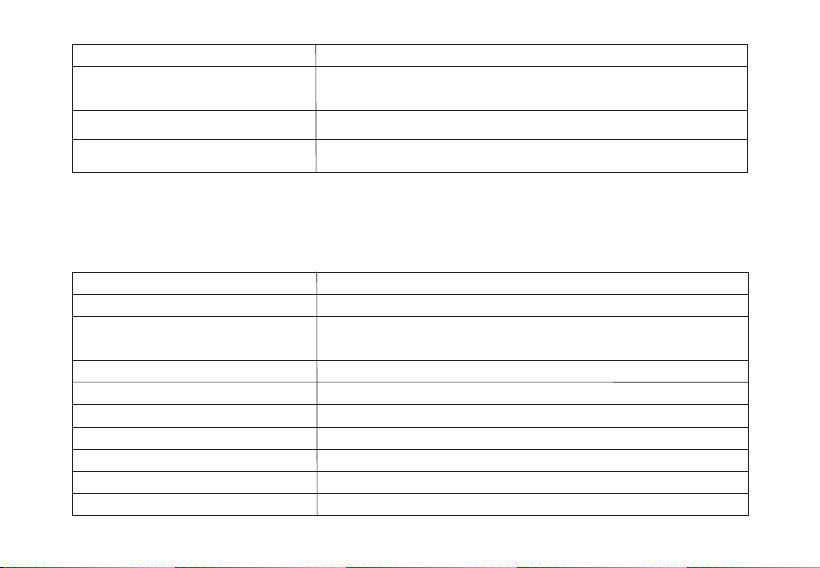
Description
Parameter value
Transmitting power of the
charging case
-2dBm~8dBm
Frequency oset
-15KHz~+15KHz
Reception sensitivity
≤-80dBm
Note: The above data are all laborato test data, Due to the complexity of real-life scenarios,
some dierences may arise, but they do not aect normal use.
1.3 Product accessories
Name
Quantity and Purpose
Anti-loss strap
1pcs
Ear tips
Open ear tips:3 types, 6 pieces in total, made of silicone
Closed ear tips: 3 types, 6 pieces in total, made of silicone
Cerumen shield
Charging cable
Cleaning brush
After-sales Seice Card
Quick operation guide
Adaptation period guidance card
User Manual
1 set
1 set
Magnetic steel needle brush
1pcs
1pcs
1pcs
1pcs
05

2.Preparations before use
(1) Open the charging case and check the batte level of the charging case; if the batte is ve
low, please charge the case rst.
(2) Please take out the earphones from the charging case, remove the protective lm on the
earphone charging pin, and then put the earphones back into the charging case. At this point,
if you notice on the charging case screen that the earphone batte is low, please charge the
earphones for at least 15 minutes before using them again;.
(3) When wearing earphones, please choose the appropriate size of eaips to enhance your
experience during use.
(4) When wearing earphones, adjust the volume + and - buttons to check if the volume
adjustment function of the earphones is working properly.
(5) Before use, please read this product manual carefully, which will help you quickly understand
the operation of the product;
Tips:The earphones will power on automatically about 10 seconds after being removed from the
charging case. To avoid howling, do not grip the earphones tightly or place the left and right
together closely.
3. Instructions for Use
3.1 How to wear
(1) The wearing method is as shown in the below gure:
Step 1: Place the earphones behind your ears.
Please refer to the illustration - place the body of the earphone behind
the auricle and the tube at the front.
06

Step 3: Gently inse the earbud into the ear canal until the receiver cable
is close to the inner side of the ear.
Please ensure to choose the appropriate eaips to facilitate a tight t between
the earbud and the ear canal;
(3) After correctly wearing the earphones, adjust the volume + and - buttons until the volume
level is appropriate.
3.2 Power On/O
Power on: When the charging case cover is opened, the display screen lights up. After taking out
the earphones, they automatically power on and provide a voice prompt "power on". The
earphones’s function is activated after a delay of 7 seconds.
Power o: Place the earphones into the charging case and close the cover to power o the
earphones. And the earphones are in a charging state simultaneously.
3.3 Volume adjustment
(1) When wearing the earphones, the +/- button on the charging case can be used to adjust the
volume level of the earphones; Facto default volume is setted to level 1.
(2) Sho press the volume "+" button to increase the hearing aid volume, and sho press the
volume "-" button to decrease it. There are a total of 8 levels of volume.
When the volume is successfully adjusted, the earphones will emit a "beep" sound as a prompt,
and the color screen will display the current volume level in real time.
(3) When the volume is already at its highest level and the user continues to increase it, the voice
07
Step 2: Pinch the earbud with your thumb and index nger and place it
behind your ear.
Refer to your ear canal and bend the earphone tube so that the tube end
of the earphone can align with your ear canal;

will announce "Maximum Volume",
When the volume is at its lowest setting and the user continues to decrease the volume, the
voice will announce "Minimum Volume".
(4) The earphones can automatically remember the volume level set before they were turned o.
3.4 Mode Switch
This product oers four modes (general, indoor, outdoor, and movie scene) to cater to various
scenarios:
General Scene: Suitable for most daily scenarios with relatively stable and less dramatic changes
in sound environment, tipable of handling mild to moderate background noise in daily life.
Indoor Scene: Designed specically for enclosed indoor spaces, especially those with signicant
echoes or specic concentrated noise sources, it focuses more on enhancing speech clarity.
Outdoor Scene: Suitable for open outdoor environments, especially for situations where wind
noise, trac noise, or other sudden and loud environmental noises may be encountered.
Movie Scene: When you listen to music or watch video programs at home, you can adjust your
earphones to this mode, which will help you better enjoy the corresponding programs.
Mode switching steps:
1. Wear your earphons, and make sure they are turned on.
2. Please long press any "+" button at the charging case for 3 seconds to switch between
dierent modes of the earphones, and release the button until the mode you want.
Note: the product has four modes: general, indoor, outdoor, and movie scene, and they are
displayed in a loop.
3. The earphones can automatically remember the mode set before the last shutdown, and the
earphones are in general mode when turned on for the rst time(facto default).
08

3.5 Cleaning function
It will be automatically triggered when the earphones are placed in the charging case and the
case is fully closed. Each cleaning session lasts for 30 seconds, with 5 cleaning sessions per day.
When the lid is opened, the ultraviolet light stops cleaning and the light goes out simultaneously.
Stop upon opening: During the cleaning process, if it is detected that the charging compament
is not fully closed, the cleaning will stop (for example, if the lid of the charging compament is
suddenly opened during the cleaning process; or if the lid of the charging compament is never
closed, it will not enter the cleaning state)
Note: If the ultraviolet lamp does not turn o after opening the cover, avoid direct viewing as
much as possible until the lamp is closed.
3.6 Batte indicator
When the batte level is too low, the product will give a low batte alarm.
Earphone low batte notication: After being placed in the charging case, when the batte
level of the earphones drops below 20%, the screen will display an icon indicating the warning
for the corresponding side of the earphones.
After 5 seconds, it will turn into a red "batte bar" display for warning. When the earphones
are charging in the case and the batte level is above 20%, the warning will be removed and the
charging status will be displayed normally.
Low batte notication for charging case: When the batte level of the charging case is below
20%, the batte indicator bar of the charging case turns red to display a low batte warning
status; when it is 20% or above, the warning is removed and the charging status is displayed
normally.
When the batte level is too low, the device will automatically shut down. At this time, the
earphones will remember the existing volume and mode; when the charging is completed and the
earphones are turned on again, they will display the volume and mode before the last shutdown.
09

3.5 Cleaning function
It will be automatically triggered when the earphones are placed in the charging case and the
case is fully closed. Each cleaning session lasts for 30 seconds, with 5 cleaning sessions per day.
When the lid is opened, the ultraviolet light stops cleaning and the light goes out simultaneously.
Stop upon opening: During the cleaning process, if it is detected that the charging compament
is not fully closed, the cleaning will stop (for example, if the lid of the charging compament is
suddenly opened during the cleaning process; or if the lid of the charging compament is never
closed, it will not enter the cleaning state)
Note: If the ultraviolet lamp does not turn o after opening the cover, avoid direct viewing as
much as possible until the lamp is closed.
3.6 Batte indicator
When the batte level is too low, the product will give a low batte alarm.
Earphone low batte notication: After being placed in the charging case, when the batte
level of the earphones drops below 20%, the screen will display an icon indicating the warning
for the corresponding side of the earphones.
After 5 seconds, it will turn into a red "batte bar" display for warning. When the earphones
are charging in the case and the batte level is above 20%, the warning will be removed and the
charging status will be displayed normally.
Low batte notication for charging case: When the batte level of the charging case is below
20%, the batte indicator bar of the charging case turns red to display a low batte warning
status; when it is 20% or above, the warning is removed and the charging status is displayed
normally.
When the batte level is too low, the device will automatically shut down. At this time, the
earphones will remember the existing volume and mode; when the charging is completed and the
earphones are turned on again, they will display the volume and mode before the last shutdown.
The charging case display can update and display the current batte status of both left and
right earphones, as well as the charging case, in real time (ve-bar percentage display +
percentage batte display).
Charging case batte indicator: When the charging case is opened, the batte icon displays
the current batte percentage (0~100%) of the charging case, along with the batte bars (5
bars in total, each representing 20% batte).
When charging the charging case, the screen displays the "charging status" icon and the current
batte status of the charging case (percentage batte display).
Earphone batte indicator: Based on the shape of the earphones, inse them into the
corresponding charging slot of the charging case to automatically sta charging. The display
screen will show the batte status (dual-ear ve-bar indicator + percentage batte display).
During charging, the screen will automatically turn o after a 60-second prompt, and will be
reactivated and displayed when the cover is opened.
The charging case, when fully charged, can provide up to 4 charging cycles for the earphones.
3.7 Bluetooth operation
After a successful Bluetooth connection, when playing music, videos, or making calls on the
mobile phone, it will automatically switch to Bluetooth mode and can respond to incoming call
status, call status, end call, and reject call operations.
1.Bluetooth connection
①Turn on your phone's Bluetooth.
②After turning on the earphones, they will automatically enter pairing mode and sta waiting
for Bluetooth connection. The Bluetooth name of the device is "CZ-B801".
③On the mobile phone, select the device with the Bluetooth name "CZ-B801" and initiate the
Bluetooth connection.
10

④After successful connection and pairing, the Bluetooth icon on the screen displays the
connection status and a voice prompt says "Connect".
⑤After connecting via Bluetooth, it can respond to incoming call status, call status, stop call,
and reject call operations.
2. Bluetooth disconnected
After connecting to Bluetooth, the earphones will remain connected. You need to disconnect
Bluetooth on the phone side, and a voice prompt will say "Disconnect" after the disconnection.
3. Answer, reject, and hang up incoming calls
When connected via Bluetooth, sho press the "+" button to answer a call.
During an incoming call, long press the "-" key to reject the call.
During a call, briey press the "-" key to hang up.
3.8 Restore facto settings
After the earphones are placed in the charging case, long press the button next to the TYPE-C
po for 8 seconds until the Bluetooth icon ashes slowly. Both the earphones and the charging
case will be reset to their facto default settings.
In addition, the facto settings can be restored through the mobile phone APP.
3.9 APP feature introduction
First, enable the Bluetooth function on your phone.
The earphones can be set through the mobile app (Hearing Pro)-It can be downloaded from
both the Android and Apple app stores), allowing for volume adjustment, mode switching,
batte level display, hearing aid tting, and resetting to facto settings.
Then, connect to the mobile app:
11
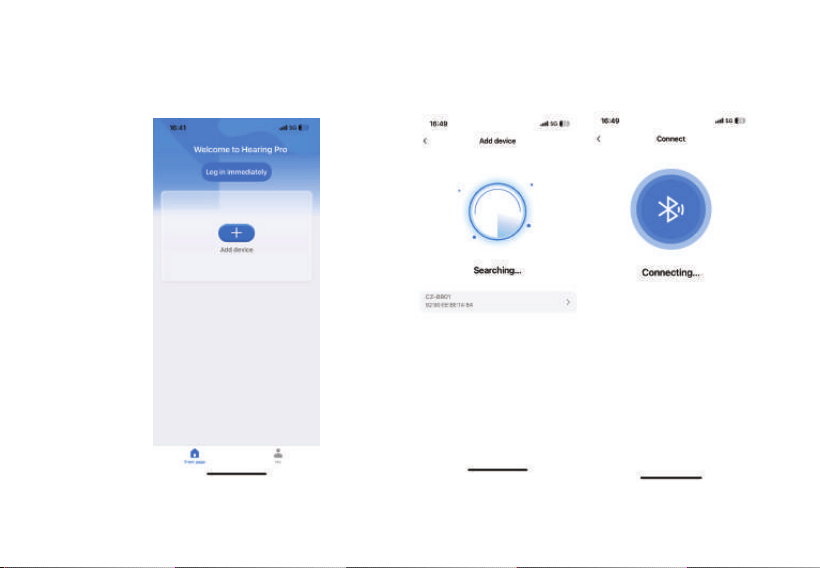
Step1: Click "Add device" to enter the search
inteace.
Step2: Wait for a while, and when the device
is found, click the device named "CZ-B801"
under the "Searching..." text to enter the
connection inteace.
12
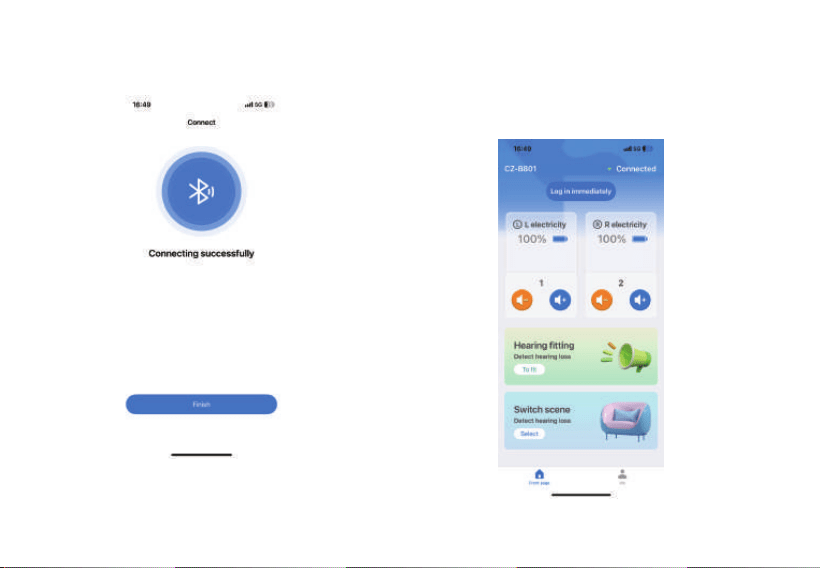
Step3: Click the "Finish" button after the
connection is successful.
Step4: You can sta using the mobile app
(Hearing Pro) to set up the earphones,
including volume adjustment, mode switching,
batte level display, hearing test, and resetting
to facto settings.
13

3.10 Use of ear tips
·Choose the right ear tip: Users with larger ear canals should choose larger ear tips, while those
with smaller ear canals should choose smaller ones.
·This device comes with three ear tip sizes to ensure a tight t with the ear canal, as otherwise it
may cause acoustic feedback leading to howling.
·The ear tip is reusable, but it is impoant to regularly clean the ear wax from within the ear tip.
·It is recommended to clean the ear tip eve three months.
3.11 Batte usage
1. When a low batte indicator appears on your earphones, you should sta charging them as
soon as possible.
2. When not in use, please charge the earphones regularly to avoid batte damage; it is
recommended that the charging inteal for the earphones be ≤30 days; for the earphone
charging case, the recommended charging inteal is ≤90 days.
3. Eliminating the Risk, keep away from the ammable materials,heat sources and ignition
sources while a batte is charged. Charging should only take place in a well ventilated area and
when someone is about to be aware and react to a potential issue.To reduce risk of re, a batte
should not be charged for more than 8 hours and disconnect charger from line voltage (AC
outlet) by removing main plug even if the batter is not completely charged.Don't leave a device
unattended while charging. Disconnect the charger when the device is fully charged: do not
overcharge the device.
4. Don't fully drain: Aim to recharge when the batte hits about 20% for batte, keeping it above
critical levels.
5. Don't store batteries empty; charge them to 60-80% for ideal long-term storage to extend
storage periods.
6. If your device or batte is not used for longer than seven days, please peorm regular
maintenance checks and recharge the batte periodically to maintain optimal batte levels.
14

Following these guidelines will not only protect batte life but also ensure that devices can
return to active duty without issue.
7. Don't fully drain: Aim to recharge when the batte hits about 20% for batte, keeping it above
critical levels.
8. Don't store batteries empty; charge them to 60-80% for ideal long-term storage to extend
storage periods.
9. If your device or batte is not used for longer than seven days, please peorm regular
maintenance checks and recharge the batte periodically to maintain optimal batte levels.
Following these guidelines will not only protect batte life but also ensure that devices can
return to active duty without issue.
4.Precautions
1. Before tting this product, you should undergo a professional examination and hearing test,
and use it under the guidance of a doctor or a professional tter for this product.
2. Do not immerse this product in any liquid. Remove it before taking a shower and put it back
on after the ear canal is d.
3. After taking o this product at night, it should be placed in a box containing a ding agent,
protected from light,high temperatures, and high humidity, and avoided being dropped or
bumped.
4. The outer suace of this product should be kept clean, and the earwax in the ear tip should be
regularly cleaned.
5. The function and volume control switches should be used correctly, and the switches should
be opened and closed gently to avoid excessive or abrupt force.
6. Choose an ear tip of appropriate size to seal the ear canal tightly, so as to avoid whistling from
this product.
7. Gradually increase the volume to avoid sudden increase in volume that may damage the
eardrum.
8. Do not pull or twist the earphones hard to avoid breaking them. When removing the eaip,
15

hold the eaip handle with your hand.
9. A few users who wear this product for the rst time have repoed feelings such as ear
congestion and speaking too loudly. They generally adapt to these gradually within three months.
10. Rechargeable batteries may overheat, catch re, or explode in abnormal usage environments
(high temperature, high humidity). If you notice a decrease in sound quality after using them for
a while, it indicates that the batte is running low and should be charged promptly.
11. When discontinuing the use of this product, please turn o the power to extend the batte
life.
12. When using this product, please keep it away from high-voltage equipment and signal
transmitting devices to avoid the risk of inteerence causing malfunctions.
13. This product contains sensitive electronic components, so please do not use it directly in an
environment with strong electromagnetic inteerence (such as near mobile power banks,
microwave ovens, etc.), as it may lead to accuracy distoion.
16

CAUTION:User’ instructions should accompany the device when transferred to other users.
Changes or modications not expressly approved by the pay responsible for compliance may
void the user’s authority granted by the local government radio management depaments to
operate this radio and should not be made. To comply with the corresponding requirements,
transmitter adjustments should be made only by or under the supeision of a person ceied
as technically qualied to peorm transmitter maintenance and repairs in the private land
mobile and xed seices as ceied by an organization representative of the user of those
seices. Replacement of any transmitter component (cstal, semiconductor, etc.) not
authorized by the local government radio management depaments equipment authorization
for this radio could violate the rules.
FCC Caution
Any Changes or modications not expressly approved by the pay responsible for compliance
could void the user's authority to operate the equipment.
This device complies with pa 15 of the FCC Rules. Operation is subject to the following two
conditions:
(1)This device may not cause harmful inteerence.
(2) This device must accept any inteerence received, including inteerence that may cause
undesired operation.
Note: This equipment has been tested and found to comply with the limits for a Class B digital
device. These limits are designed to provide reasonable protection against harmful inteerence
in a residential installation. This equipment generates, uses and can radiate radio frequency
energy and, if not installed and used in accordance with the instructions, may cause harmful
inteerence to radio communications. However, there is no guarantee that inteerence will not
occur in a paicular installation. If this equipment does cause harmful inteerence to radio or
television reception, which can be determined by turning the equipment o and on, the user is
encouraged to t to correct the inteerence by one or more of the following measures:
17

—Reorient or relocate the receiving antenna.
—Increase the separation between the equipment and receiver.
—Connect the equipment into an outlet on a circuit dierent from that to which the receiver is
connected.
—Consult the dealer or an experienced radio/TV technician for help.
Disposal
The crossed-out wheeled-bin symbol on your product, literature, or packaging reminds
you that all electrical and electronic products, batteries, or accumulators must be taken
to designated collection locations at the end of their working life. Do not dispose of these
products as unsoed municipal waste.
Dispose of them according to the laws and rules in your area.
Electromagnetic Inteerence/Compatibility
Nearly eve electronic device is susceptible to electromagnetic inteerence (EMI) if
inadequately shielded, designed, or otherwise congured for electromagnetic compatibility.
During transmissions, your radio generates RF energy that can possibly cause inteerence with
other devices or systems.
Persons with pacemakers, implantable cardioveer debrillators (ICDs) or other active
implantable medical devices should:
• Consult with their physicians regarding the potential risk of inteerence from radio frequency
transmitters, such as poable radios (poorly shielded medical devices may be more susceptible
to inteerence).
• Turn the radio OFF immediately if there is any reason to suspect that inteerence is taking
place.
• Do not car the radio in a chest pocket or near the implantation site, and car or use the
radio on the opposite side of the body from the implantable device to minimize the potential for
inteerence.
18

Hearing Aids: Some digital wireless radios may inteere with some hearing aids. In the event of
such inteerence, you may want to consult your hearing aid manufacturer to discuss alternatives.
Other Medical Devices: If you use any other personal medical device, consult the manufacturer
of your device to determine if it is adequately shielded from RF energy. Your physician may be
able to assist you in obtaining this information.
Batte Safety
•Batteries shall be charged at 10℃~40℃ environment temperature specied. If the environment
temperature is lower than 0℃, the charge shall be prohibited.
•In the event of a batte leaking, do not allow the liquid to come into contact with the skin or
eyes. If contact has been made, wash the aected area with copious amounts of water and seek
medical advice immediately.
•The plug of the adapter is considered a disconnect device. The socket-outlet shall be installed
near the equipment and shall be easily accessible.
•Rechargeable batteries are only to be charged by adults.
Warning for use by infants and young children:
CHOKING HAZARD-Small Pas. Not suitable for children under 3 years old.
Authorized Accessories List
Contact Retekess for assistance regarding repairs and seice.
•For a list of Retevis-approved accessories for your radio model, visit the website: http://www.
retekess.com
19

20
Hearing Aids: FCC ID:2A3NOCZ-B801
Charging Base: FCC ID: 2A3NO102
Product Name:Charging Base
FCC RF Radiation Exposure Statement:
1. This Transmitter must not be co-located or operating in conjunction with any other antenna or
transmitter.
2. This equipment complies with RF radiation exposure limits set foh for an uncontrolled
environment.
3. The device has been evaluated to meet general RF exposure requirement. The device can be
used in poable exposure condition without restriction.
Product Name: Hearing Aids
This radio is designed for and classied as “General population/uncontrolled Use”, the guidelines
are based on standards that were developed by independent scientic organizations through
periodic and thorough evaluation of scientic studies. The standards include a substantial safety
margin designed to assure the safety of all persons regardless of age or health.
Head and extremity operation; this device was tested for typical head and extremity operations
kept 0mm for head worn. To maintain compliance with RF exposure requirements, use
accessories that maintain a 0mm for head worn.
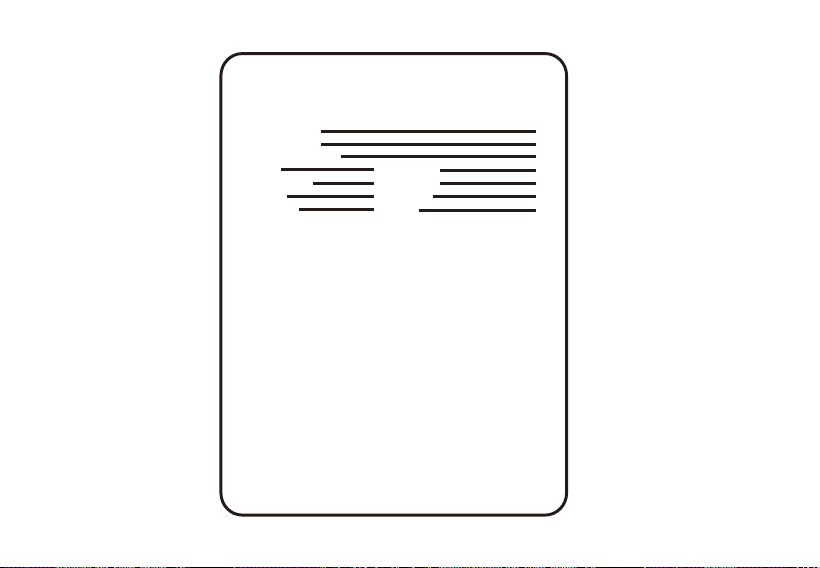
Guarantee
Remarks:
1.This guarantee card should be kept by the user, no
replacement if lost.
2.Most new products carry a two-year manufacturer’s
warranty from the date of purchase.
3.The user can get warranty and after-sales service as below:
●Contact the seller where you buy.
●Products Repaired by Our Local Repair Center
4.For warranty service, you will need to provide a receipt
proof of purchase from the actual seller for verification
Exclusions from Warranty Coverage:
1.To any product damaged by accident.
2.In the event of misuse or abuse of the product or as a result
of unauthorized alterations or repairs.
3.If the serial number has been altered, defaced, or removed.
Model Number:
Serial Number:
Purchasing Date:
Dealer: Telephone:
User’s Name: Telephone:
Country: Address:
Post Code: Email:
HONG KONG RETEKESS CO.,LIMITED
Add: FLAT/RM G 196 MONG TSENG TSUEN PING
SHAN YUEN LONG NT,HONGKONG
E-mail: suppo@retekess.com
Web: www.retekess.com
FR
EMBALLAGES A
SEPARER ET A
DEPOSER DANS
LE BAC DE PRI
À DÉPOSER
EN MAGASIN
À DÉPOSER
EN DÉCHÈTERIE
OU
FRFR
Cet appareil,
ses accessoires
et cordons se
recyclent
FRFR
FR
+
Made in China