DLC:GHB6CJ6A
BD9:AB&%(.
&'"HE::99G>AAEG:HH
E]dcZ/(+%,()"()-'Dc"A^cZIZX]c^XVaHjeedgi/iZX]"hjeedgi5h]de[dm#W^o
8DENG><=I;:7GJ6GN!'%%+7NLDD9HID8@>CI:GC6I>DC6A!>C8#G:K>H:9?JAN!'%%-IG
L6GC>C</CDEDGI>DCD;I=>HB6CJ6AB6N7:G:EGD9J8:9>C6CNH=6E:DG;DGBL>I=DJI
I=:LG>II:C6EEGDK6AD;LDD9HID8@>CI:GC6I>DC6A!>C8#
Eg^ciZY^c8]^cV
,-.)?@
K_`jdXelXcgifm`[\jZi`k`ZXcjX]\kp`ejkilZk`fejfek_\gifg\ij\klg#
fg\iXk`fe#dX`ek\eXeZ\Xe[j\im`Z\f]k_`jdXZ_`e\&\hl`gd\ek%
=X`cli\kfi\X[#le[\ijkXe[Xe[]fccfnk_\`ejkilZk`fej^`m\e`ek_`j
dXelXcdXpi\jlck`ej\i`fljg\ijfeXc`ealip#`eZcl[`e^XdglkXk`fe#
\c\ZkifZlk`fefi[\Xk_%
K_\fne\if]k_`jdXZ_`e\&\hl`gd\ek`jjfc\cpi\jgfej`Yc\]fi`kjjX]\
lj\%K_`ji\jgfej`Y`c`kp`eZcl[\jYlk`jefkc`d`k\[kfgifg\i`ejkXccX$
k`fe`eXjX]\\em`ifed\ek#g\ijfee\ckiX`e`e^Xe[ljX^\Xlk_fi`qX$
k`fe#gifg\i`ejg\Zk`feXe[dX`ek\eXeZ\#dXelXcXmX`cXY`c`kpXe[
Zfdgi\_\ej`fe#Xggc`ZXk`fef]jX]\kp[\m`Z\j#YcX[\&Zlkk\i`ek\^i`kp#
Xe[k_\ljX^\f]g\ijfeXcgifk\Zk`m\\hl`gd\ek%
K_\dXel]XZkli\in`ccefkY\_\c[c`XYc\]fi`ealipfigifg\ikp
[XdX^\]ifde\^c`^\eZ\#`dgifg\ikiX`e`e^#dXZ_`e\df[`]`ZXk`fejfi
d`jlj\%
Jfd\[ljkZi\Xk\[Ypgfn\ijXe[`e^#jXn`e^#^i`e[`e^#[i`cc`e^#Xe[
fk_\iZfejkilZk`feXZk`m`k`\jZfekX`ejZ_\d`ZXcjbefnekfk_\JkXk\f]
:Xc`]fie`XkfZXlj\ZXeZ\i#Y`ik_[\]\Zkjfifk_\ii\gif[lZk`m\_Xid%
Jfd\\oXdgc\jf]k_\j\Z_\d`ZXcjXi\1
C\X[]ifdc\X[$YXj\[gX`ekj%
:ipjkXcc`e\j`c`ZX]ifdYi`Zbj#Z\d\ekXe[fk_\idXjfeipgif[lZkj%
8ij\e`ZXe[Z_ifd`ld]ifdZ_\d`ZXccp$ki\Xk\[cldY\i%
Pflii`jb]ifdk_\j\\ogfjli\jmXi`\j#[\g\e[`e^fe_fnf]k\epfl
[fk_`jkpg\f]nfib%Kfi\[lZ\pfli\ogfjli\kfk_\j\Z_\d`ZXcj1
Nfib`eXn\ccm\ek`cXk\[Xi\X#Xe[nfibn`k_Xggifm\[jX]\kp\hl`g$
d\ek#jlZ_Xjk_fj\[ljkdXjbjk_XkXi\jg\Z`Xccp[\j`^e\[kf]`ck\i
flkd`ZifjZfg`ZgXik`Zc\j%

J<KLG<C<:KI@:8C D8@EK<E8E:< J<IM@:< G8IKJFG<I8K@FEJJ8=<KP@EKIF;L:K@FE
LJ<K?<HL@:B>L@;<G8><C89<CJKFJ<8I:?FLK@E=FID8K@FE=8JK
:fek\ekj
@EKIF;L:K@FE%%%%%%%%%%%%%%%%%%%%%%%%%%%%%%%%%%%%%%%%%%%%%%%%%%%%%%%%%%%%%%%%%%%%%%%%%%%%%%%%%%%%%%%%%%%%%%%%%%*
Woodstock Technical Support ............................................................................ 3
About Your New 12-Speed Drill Press ................................................................... 3
Specifications ............................................................................................... 4
J8=<KP%%%%%%%%%%%%%%%%%%%%%%%%%%%%%%%%%%%%%%%%%%%%%%%%%%%%%%%%%%%%%%%%%%%%%%%%%%%%%%%%%%%%%%%%%%%%%%%%%%%%%%%%%%%%-
Additional Safety Instructions for Drill Presses ........................................................ 8
<C<:KI@:8C%%%%%%%%%%%%%%%%%%%%%%%%%%%%%%%%%%%%%%%%%%%%%%%%%%%%%%%%%%%%%%%%%%%%%%%%%%%%%%%%%%%%%%%%%%%%%%%%%%%%%%0
110V/220V Operation ...................................................................................... 9
Extension Cords ............................................................................................ 9
Grounding ................................................................................................... 9
J<KLG%%%%%%%%%%%%%%%%%%%%%%%%%%%%%%%%%%%%%%%%%%%%%%%%%%%%%%%%%%%%%%%%%%%%%%%%%%%%%%%%%%%%%%%%%%%%%%%%%%%%%%%%%% ('
Unpacking ................................................................................................. 10
Inventory .................................................................................................. 10
Machine Placement ...................................................................................... 11
Cleaning Machine......................................................................................... 11
Mounting to Shop Floor.................................................................................. 12
Column and Base ......................................................................................... 13
Table Bracket ............................................................................................. 13
Headstock ................................................................................................. 15
Drill Chuck and Arbor .................................................................................... 16
Downfeed Handles and Belt Cover Knob ............................................................. 17
Light (110V Only) ......................................................................................... 17
Table ....................................................................................................... 17
Recommended Adjustments ............................................................................ 18
Test Run .................................................................................................... 18
FG<I8K@FEJ%%%%%%%%%%%%%%%%%%%%%%%%%%%%%%%%%%%%%%%%%%%%%%%%%%%%%%%%%%%%%%%%%%%%%%%%%%%%%%%%%%%%%%%%%%%%%%%%%%% (0
General .................................................................................................... 19
Installing/Removing Bits ................................................................................ 19
Choosing Speeds .......................................................................................... 20
Changing Speeds ......................................................................................... 20
Drilling ..................................................................................................... 23
Depth Stop ................................................................................................ 23
Adjusting Table ........................................................................................... 24
Arbor Removal ............................................................................................ 25
D8@EK<E8E:<%%%%%%%%%%%%%%%%%%%%%%%%%%%%%%%%%%%%%%%%%%%%%%%%%%%%%%%%%%%%%%%%%%%%%%%%%%%%%%%%%%%%%%%%%%%%%%%%% )-
General .................................................................................................... 26
Cleaning ................................................................................................... 26
Table, Column, & Base .................................................................................. 26
Lubrication ................................................................................................ 26
V-Belts ..................................................................................................... 26
J<IM@:<%%%%%%%%%%%%%%%%%%%%%%%%%%%%%%%%%%%%%%%%%%%%%%%%%%%%%%%%%%%%%%%%%%%%%%%%%%%%%%%%%%%%%%%%%%%%%%%%%%%%%%%%% ).
General .................................................................................................... 27
Depth Stop Calibration .................................................................................. 27
Feed Shaft Spring Tension .............................................................................. 28
Electrical Components .................................................................................. 29
Wiring Diagram ........................................................................................... 30
Troubleshooting........................................................................................... 31
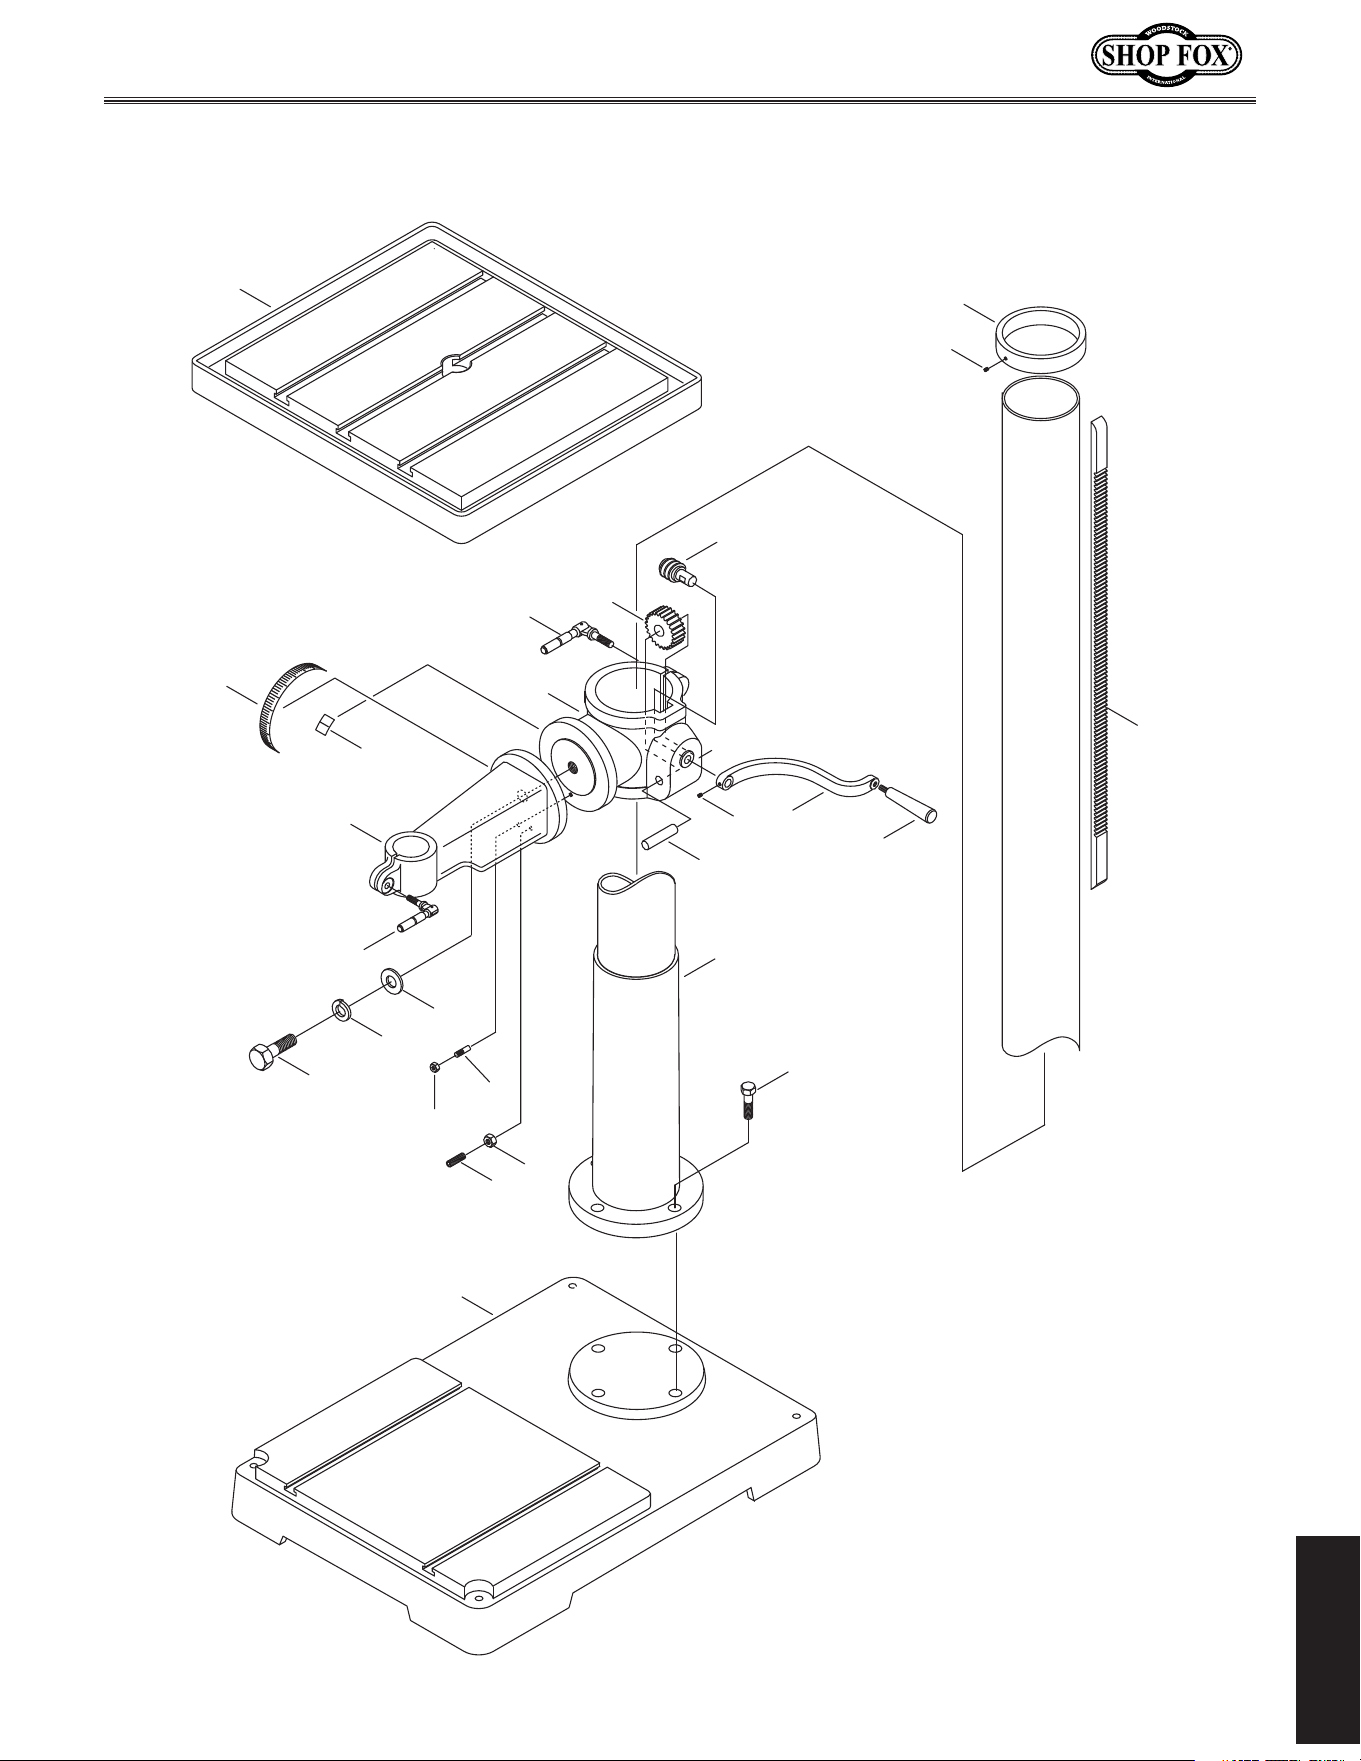
Table/Column Breakdown............................................................................... 33

LJ<K?<HL@:B>L@;<G8><C89<CJKFJ<8I:?FLK@E=FID8K@FE=8JK
J<KLG <C<:KI@:8CD8@EK<E8E:<
J<IM@:<G8IKJ
FG<I8K@FEJ J8=<KP @EKIF;L:K@FE
G8IKJ%%%%%%%%%%%%%%%%%%%%%%%%%%%%%%%%%%%%%%%%%%%%%%%%%%%%%%%%%%%%%%%%%%%%%%%%%%%%%%%%%%%%%%%%%%%%%%%%%%%%%%%%%%% **
Headstock Breakdown ................................................................................... 34
Parts List ................................................................................................... 35
Safety Label Placement ................................................................................. 36
N8II8EKP%%%%%%%%%%%%%%%%%%%%%%%%%%%%%%%%%%%%%%%%%%%%%%%%%%%%%%%%%%%%%%%%%%%%%%%%%%%%%%%%%%%%%%%%%%%%%%%%%%%%% */
-3-
D('*0()$Jg\\[;i`ccGi\jj
@EKIF;L:K@FE
Nff[jkfZbK\Z_e`ZXcJlggfik
We stand behind our machines! In the event that questions arise about your machine, parts are miss-
ing, or a defect is found, please contact Woodstock International Technical Support at (360) 734-3482 or
send e-mail to: k\Z_$jlggfik7j_fg]fo%Y`q. Our knowledgeable staff will help you troubleshoot prob-
lems and send out parts for warranty claims.
Your new E:AB8AJ
®
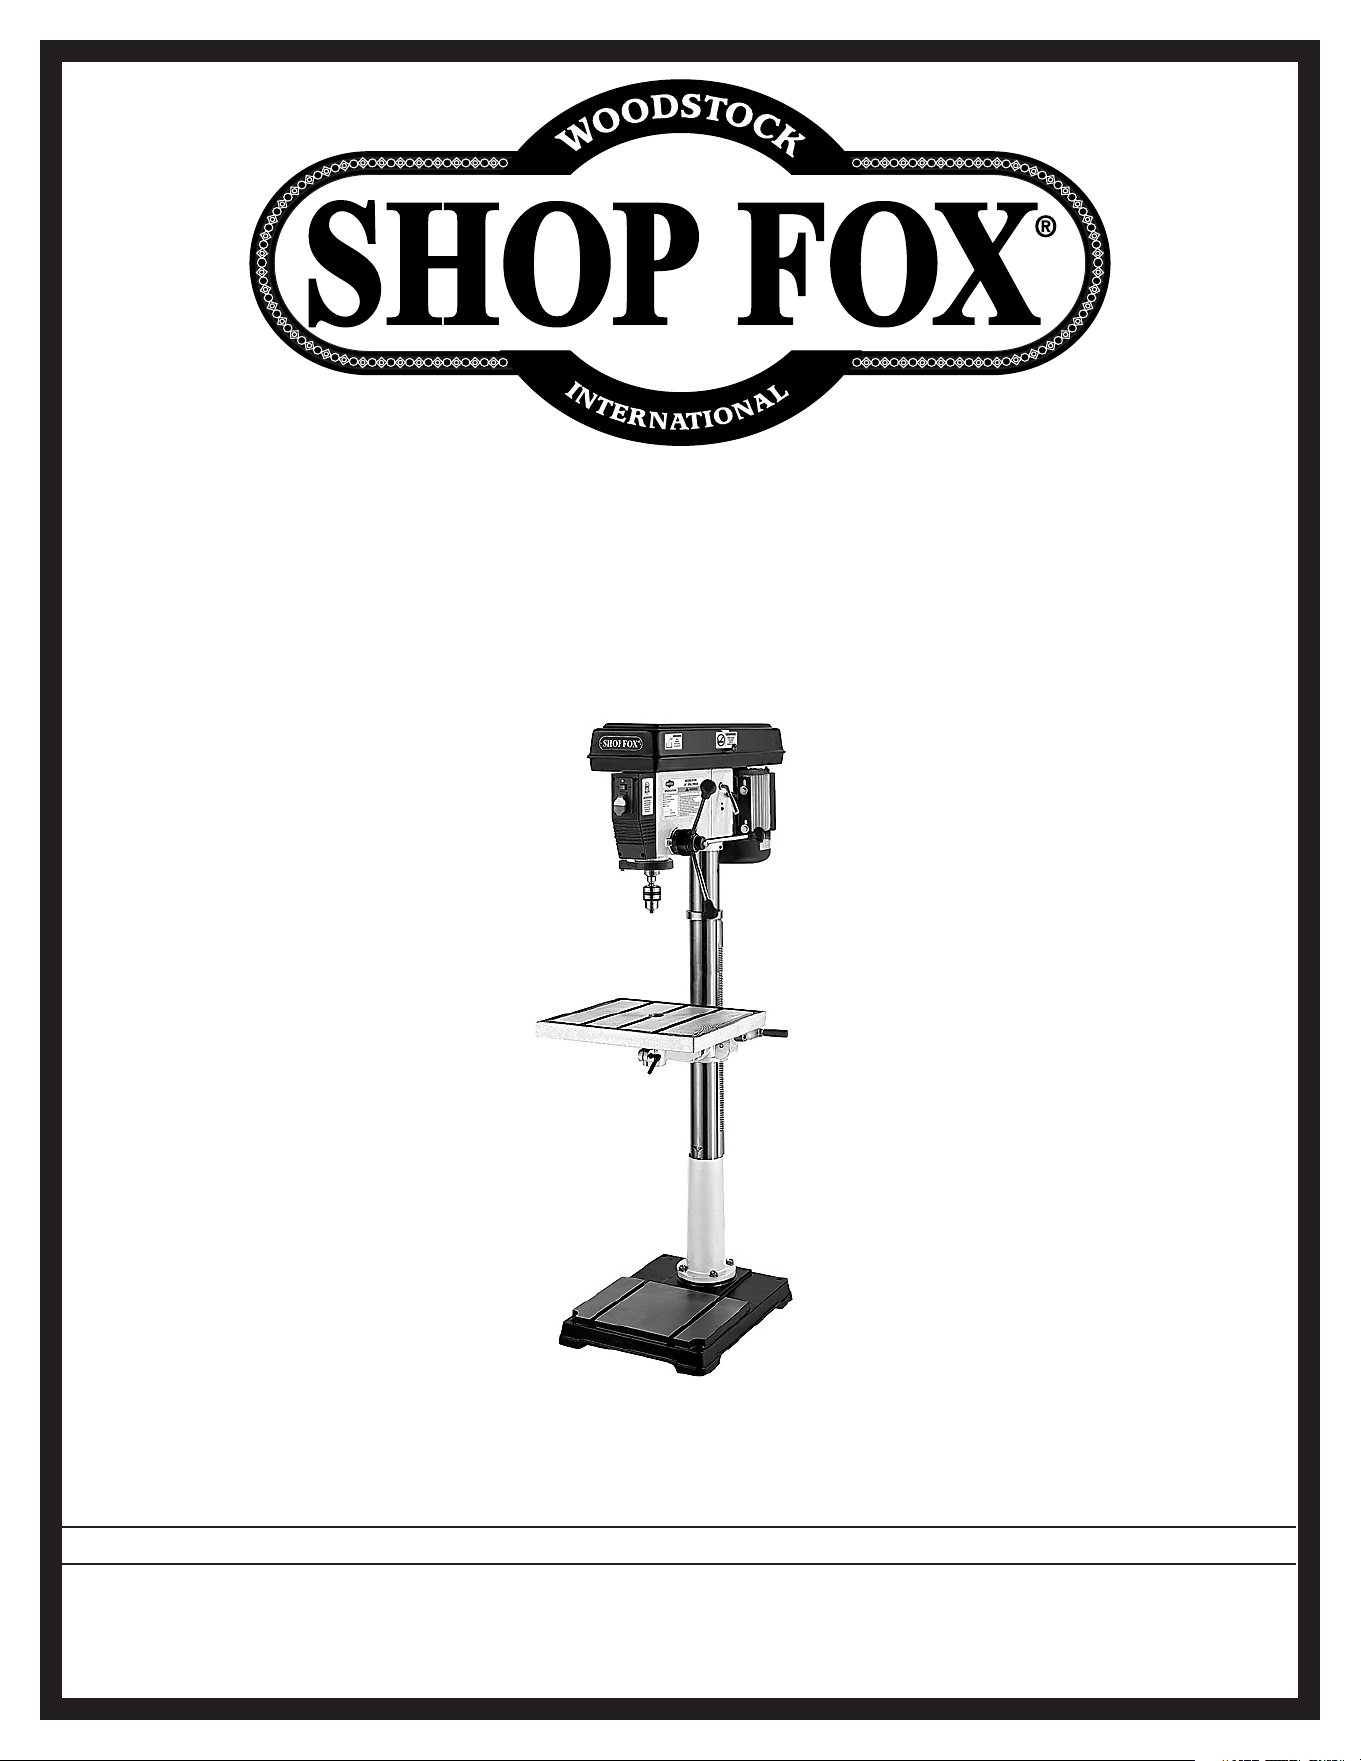
12-Speed Drill Press has been specially designed to provide many years of trouble-
free service. Close attention to detail, ruggedly built parts and a rigid quality control program assure
safe and reliable operation.
This drill press has a moveable table and headstock, both capable of 360º rotation around the column.
The Model M1039 has a 20" swing and is capable of drilling 1
1
⁄4" steel. Spindle speeds range from 210
RPM to 3300 RPM, and speeds are easily changed via the V-belt pulley system.
Woodstock International, Inc. is committed to customer satisfaction in providing this manual. It is our
intent to include all the information necessary for safety, ease of assembly, practical use and durability
of this product.
8YflkPfliE\n()$Jg\\[;i`ccGi\jj
@EKIF;L:K@FE
If you need the latest edition of this manual, you can download it from _kkg1&&nnn%j_fg]fo%Y`q.
If you have comments about this manual, please contact us at:
Nff[jkfZb@ek\ieXk`feXc#@eZ%
8kke1K\Z_e`ZXc;fZld\ekXk`feDXeX^\i
G%F%9fo)*'0
9\cc`e^_Xd#N80/)).

-4-
D('*0()$Jg\\[;i`ccGi\jj
@EKIF;L:K@FE
Jg\Z`]`ZXk`fej
Gif[lZk;`d\ej`fej1
Approximate Machine Weight ...................................................................... 320 lbs.
Length/Width/Height ....................................................................34
3
⁄4 x 21 x 70
3
⁄4"
Footprint .............................................................................................. 23 x 18"
Dfkfi1
Type ....................................................................... TEFC Capacitor Start Induction
Horsepower ............................................................................................ 1
1
⁄2 HP
Voltage .......................................................... 110/220V (prewired 110V), Single-Phase
Amps .................................................................................................. 15A/7.5A
Speed ................................................................................................ 1725 RPM
Cycle ...................................................................................................... 60 Hz
Number of Speeds ........................................................................................... 1
Power Transfer .................................................................................. V-Belt Drive
Bearings ............................................................................Shielded and Lubricated
Jg`e[c\@e]fidXk`fe1
Spindle Taper .............................................................................................MT#4
Spindle Travel .............................................................................................4
3
⁄4"
Distance fom Spindle to Column ......................................................................... 10"
Distance fom Spindle to Table ........................................................................ 28
1
⁄2"
Distance fom Spindle to Base ......................................................................... 50
1
⁄4"
KXYc\ @e]fidXk`fe1
Table Length/Width/Thickness ....................................................... 18
3
⁄4 x 16
3
⁄4 x 1
1
⁄2"
Vertical Table movement ........................................................ Crank Handle Operation
Table Swing .......................................................................................... 360 deg.
Table Tilt .............................................................................Left and Right 90 deg.
Table Swivel Around Center ........................................................................270 deg.
Table Swivel Around Column ...................................................................... 360 deg.
Maximum Movement of Worktable ...................................................................... 22"
T-Slots ......................................................................................................... 3
T-Slot Length/Width ............................................................................. 14
1
⁄2 x 1
1
⁄2"
Fg\iXk`fe@e]fidXk`fe1
Swing ........................................................................................................ 20"
Drilling Capacity ................................................................................ 1
1
⁄4" in Steel
Spindle Speeds .............210, 310, 400, 440, 630, 670, 1260, 1430, 1650, 2050, 2350, 3300 RPM
Chuck Type/Size .............................................................. JT3 16mm (
5
⁄8") Key Chuck
Fk_\i@e]fidXk`fe1
Column Diameter ...................................................................................... 3.642"
Illumination ................................................................................110V, 60W Socket
-5-
D('*0()$Jg\\[;i`ccGi\jj
@EKIF;L:K@FE
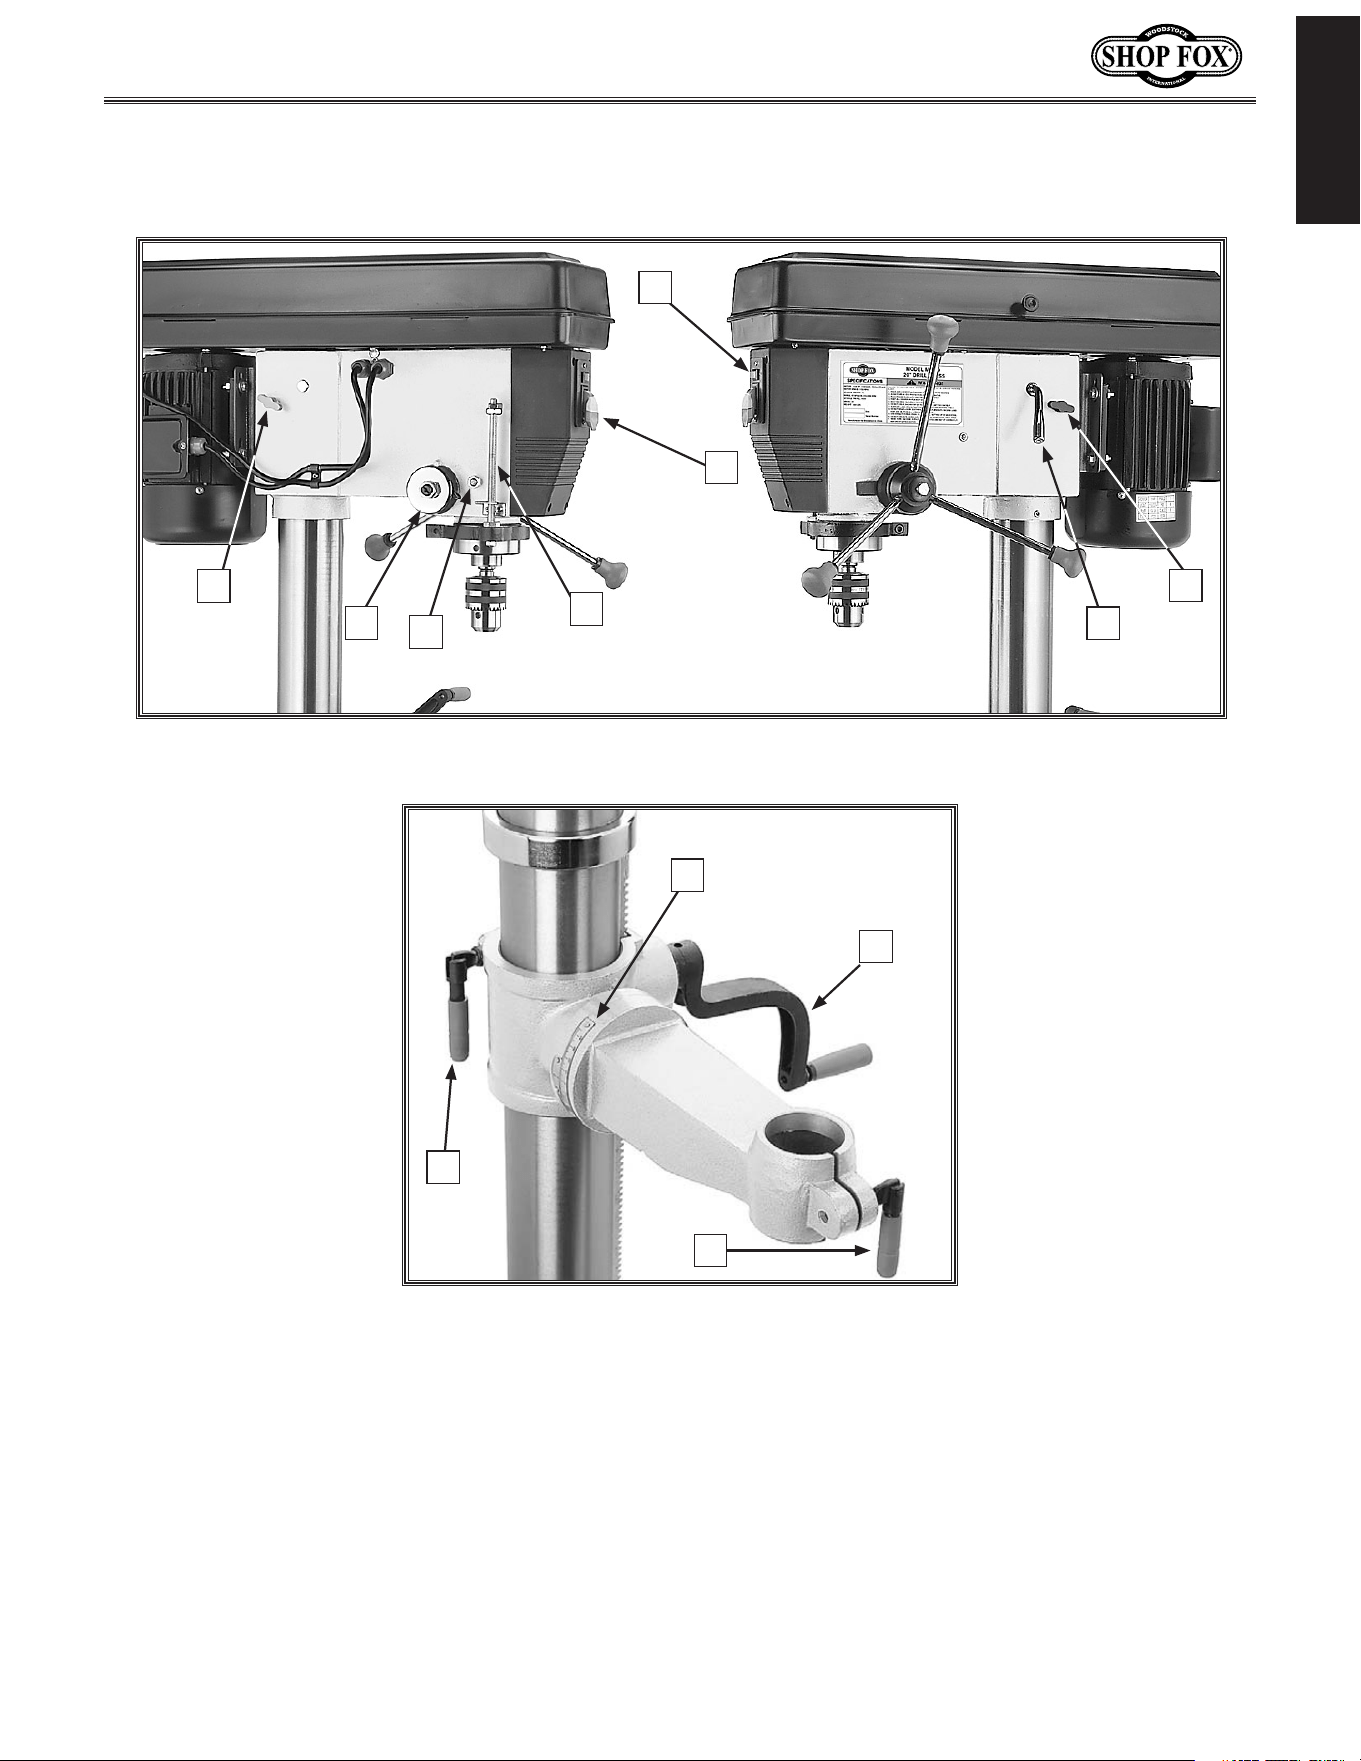
=`^li\)% M1039 table controls.
:fekifcjXe[=\Xkli\j
8% Light Switch (110V only)
9% Power Switch
:% Belt Tension Lock
;% Torsion Spring
<% Lash Screw
=% Depth Stop
>% Belt Tension Lever
?% Scale
@% Table Height Crank Handle
A% Small Lock Lever
B% Large Lock Lever
=`^li\(% M1039 headstock controls.
A
B
C
D
G
H
I
J
F
E
K
C
-6-
D('*0()$Jg\\[;i`ccGi\jj
J8=<KP
J8=<KP
I<8;D8EL8C9<=FI<FG<I8K@E>D8:?@E<%
=8@CLI<KF=FCCFN@EJKIL:K@FEJ9<CFNN@CC
I<JLCK@EG<IJFE8C@EALIP%
(% I<8;K?IFL>?K?<<EK@I<D8EL8C9<=FI<JK8IK@E>D8:?@E<IP% Machinery presents serious
injury hazards to untrained users.
)% 8CN8PJLJ<8EJ@8GGIFM<;J8=<KP>C8JJ<JN?<EFG<I8K@E>D8:?@E<IP% Everyday eye-
glasses only have impact resistant lenses—they are NOT safety glasses.
*% 8CN8PJN<8I8E@FJ?8GGIFM<;I<JG@I8KFIN?<EFG<I8K@E>D8:?@E<IPK?8KGIF;L:<J
;LJK% Wood dust is a carcinogen and can cause cancer and severe respiratory illnesses.
+% 8CN8PJLJ<?<8I@E>GIFK<:K@FEN?<EFG<I8K@E>D8:?@E<IP% Machinery noise can cause
permanent hearing damage.
,% N<8IGIFG<I8GG8I<C% DO NOT wear loose clothing, gloves, neckties, rings, or jewelry which
may get caught in moving parts. Wear protective hair covering to contain long hair and wear non-
slip footwear.
-% E<M<IFG<I8K<D8:?@E<IPN?<EK@I<;#FILE;<IK?<@E=CL<E:<F=;IL>JFI8C:F?FC%
Be mentally alert at all times when running machinery.
.% FECP8CCFNKI8@E<;8E;GIFG<ICPJLG<IM@J<;G<IJFEE<CKFFG<I8K<D8:?@E<IP% Make
sure operation instructions are safe and clearly understood.
/% B<<G:?@C;I<E8E;M@J@KFIJ8N8P% Keep all children and visitors a safe distance from the work
area.
0% D8B<NFIBJ?FG:?@C;GIFF=% Use padlocks, master switches, and remove start switch keys.
('% E<M<IC<8M<N?<ED8:?@E<@JILEE@E>% Turn power F== and allow all moving parts to come
to a complete stop before leaving machine unattended.
Indicates an imminently hazardous situation which, if not avoided, WILL
result in death or serious injury.
Indicates a potentially hazardous situation which, if not avoided, COULD
result in death or serious injury.
Indicates a potentially hazardous situation which, if not avoided, MAY
result in minor or moderate injury.
This symbol is used to alert the user to useful information about proper
operation of the equipment, and/or a situation that may cause damage
to the machinery.
EFK@:<

-7-
D('*0()$Jg\\[;i`ccGi\jj
J8=<KP
((%;FEFKLJ<@E;8E><IFLJ<EM@IFED<EKJ% DO NOT use machinery in damp, wet locations, or
where any flammable or noxious fumes may exist.
()%B<<GNFIB8I<8:C<8E8E;N<CCC@K% Clutter and dark shadows may cause accidents.
(*% LJ<8>IFLE;<;<OK<EJ@FE:FI;I8K<;=FIK?<D8:?@E<8DG<I8><% Undersized cords
overheat and lose power. Replace extension cords if they become damaged. DO NOT use extension
cords for 220V machinery.
(+% 8CN8PJ;@J:FEE<:K=IFDGFN<IJFLI:<9<=FI<J<IM@:@E>D8:?@E<IP% Make sure switch is
in OFF position before reconnecting.
(,% D8@EK8@ED8:?@E<IPN@K?:8I<% Keep blades sharp and clean for best and safest performance.
Follow instructions for lubricating and changing accessories.
(-%D8B<JLI<>L8I;J8I<@EGC8:<8E;NFIB:FII<:KCP9<=FI<LJ@E>D8:?@E<IP%
(.%I<DFM<8;ALJK@E>B<PJ8E;NI<E:?<J% Make a habit of checking for keys and adjusting
wrenches before turning machinery FE.
(/% :?<:B=FI;8D8><;G8IKJ9<=FI<LJ@E>D8:?@E<IP% Check for binding and alignment of
parts, broken parts, part mounting, loose bolts, and any other conditions that may affect machine
operation. Repair or replace damaged parts.
(0% LJ<I<:FDD<E;<;8::<JJFI@<J% Refer to the instruction manual for recommended accessories.
The use of improper accessories may cause risk of injury.
)'%;FEFK=FI:<D8:?@E<IP% Work at the speed for which the machine or accessory was designed.
)(% J<:LI<NFIBG@<:<% Use clamps or a vise to hold the workpiece when practical. A secured
workpiece protects your hands and frees both hands to operate the machine.
))% ;FEFKFM<II<8:?% Keep proper footing and balance at all times.
)*% D8EPD8:?@E<JN@CC<A<:KK?<NFIBG@<:<KFN8I;K?<FG<I8KFI% Know and avoid condi-
tions that cause the workpiece to "kickback."
)+% 8CN8PJCF:BDF9@C<98J<J@=LJ<; 9<=FI<FG<I8K@E>D8:?@E<IP%
),%9<8N8I<K?8K:<IK8@E;LJKD8P9<?8Q8I;FLJKFK?<I<JG@I8KFIPJPJK<DJF=
G<FGC<8E;8E@D8CJ#especially fine dust. Make sure you know the hazards associated with the
type of dust you will be exposed to and always wear a respirator approved for that type of dust.
-8-
D('*0()$Jg\\[;i`ccGi\jj
J8=<KP
8[[`k`feXcJX]\kp@ejkilZk`fej]fi;i`ccGi\jj\j
LJ<k_`jXe[fk_\idXZ_`e\ipn`k_ZXlk`fe
Xe[ i\jg\Zk% 8cnXpj Zfej`[\i jX]\kp ]`ijk#
Xj `k Xggc`\j kf pfli `e[`m`[lXc nfib`e^
Zfe[`k`fej%Efc`jkf]jX]\kp^l`[\c`e\jZXe
Y\ Zfdgc\k\Ç\m\ip j_fg \em`ifed\ek `j
[`]]\i\ek%=X`cli\kf]fccfn^l`[\c`e\jZflc[
i\jlck `e j\i`flj g\ijfeXc `ealip# [XdX^\
kf\hl`gd\ekfigffinfibi\jlckj%
I<8;Xe[le[\ijkXe[k_`j
\ek`i\ `ejkilZk`fe dXelXc
Y\]fi\lj`e^k_`jdXZ_`e\%
J\i`flj g\ijfeXc `ealip
dXp fZZli `] jX]\kp Xe[
fg\iXk`feXc`e]fidXk`fe`j
efk le[\ijkff[ Xe[ ]fc$
cfn\[% ;F EFK i`jb pfli
jX]\kpYpefki\X[`e^
(% <P<&=8:<&?8E;GIFK<:K@FE% A face shield used with safety glasses is recommended. Always
keep hands and fingers away from the drill bit. Never hold a workpiece by hand while drilling! DO
NOT wear gloves when operating the drill.
)% J<:LI@E>9@K% Properly tighten and securely lock the drill bit in the chuck.
*% :FII<:K9@K% Use only round, hex, or triangular shank drill bits, or tapered shank drill bits mated
with the appropriate sleeve.
+% 8;ALJK@E>B<PJ8E;NI<E:?<J% Remove all adjusting keys and wrenches before turning the
machine FE.
,% ;I@CC@E>J?<<KD<K8C% Never drill sheet metal unless it is securely clamped to the table.
-% JLI=8:<&NFIBG@<:<GI<G8I8K@FE% Never turn the drill press FE before clearing the table
of all objects (tools, scrap wood, etc.) DO NOT drill material that does not have a flat surface,
unless a suitable support is used.
.% ;8D8><;KFFCJ% Never use tools in poor condition. Dull or damaged cutting tools are hard to
control and may cause serious injury.
/% ;I@CCFG<I8K@FE% Never start the drill press with the drill bit pressed against the workpiece.
Feed the drill bit evenly into the workpiece. Back the bit out of deep holes. Turn the machine
F== and clear chips and scrap pieces with a brush. Shut power F==, remove drill bit, and clean
table before leaving the machine.
0% FG<I8K@E>JG<<;% Always operate your drill press at speeds that are appropriate for the drill bit
size and the material that you are drilling.
('% D8@EK<E8E:<&JG<<;:?8E><J% Never do maintenance or change speeds with the machine
plugged in.
((% DFLEK@E>NFIBG@<:<J% Use clamps or vises to secure workpiece before drilling. Position work
so you avoid drilling into the table.
()% K89C<CF:B% Make sure the table lock is tightened before starting the drill press.
-9-
D('*0()$Jg\\[;i`ccGi\jj
<C<:KI@:8C
<C<:KI@:8C
We do not recommend using an extension cord for 220V
operation. When it is necessary to use an extension cord,
use the following guidelines:
• Use cords rated for Standard Service
• Never exceed a length of 50 feet
• Ensure cord has a ground wire and pin
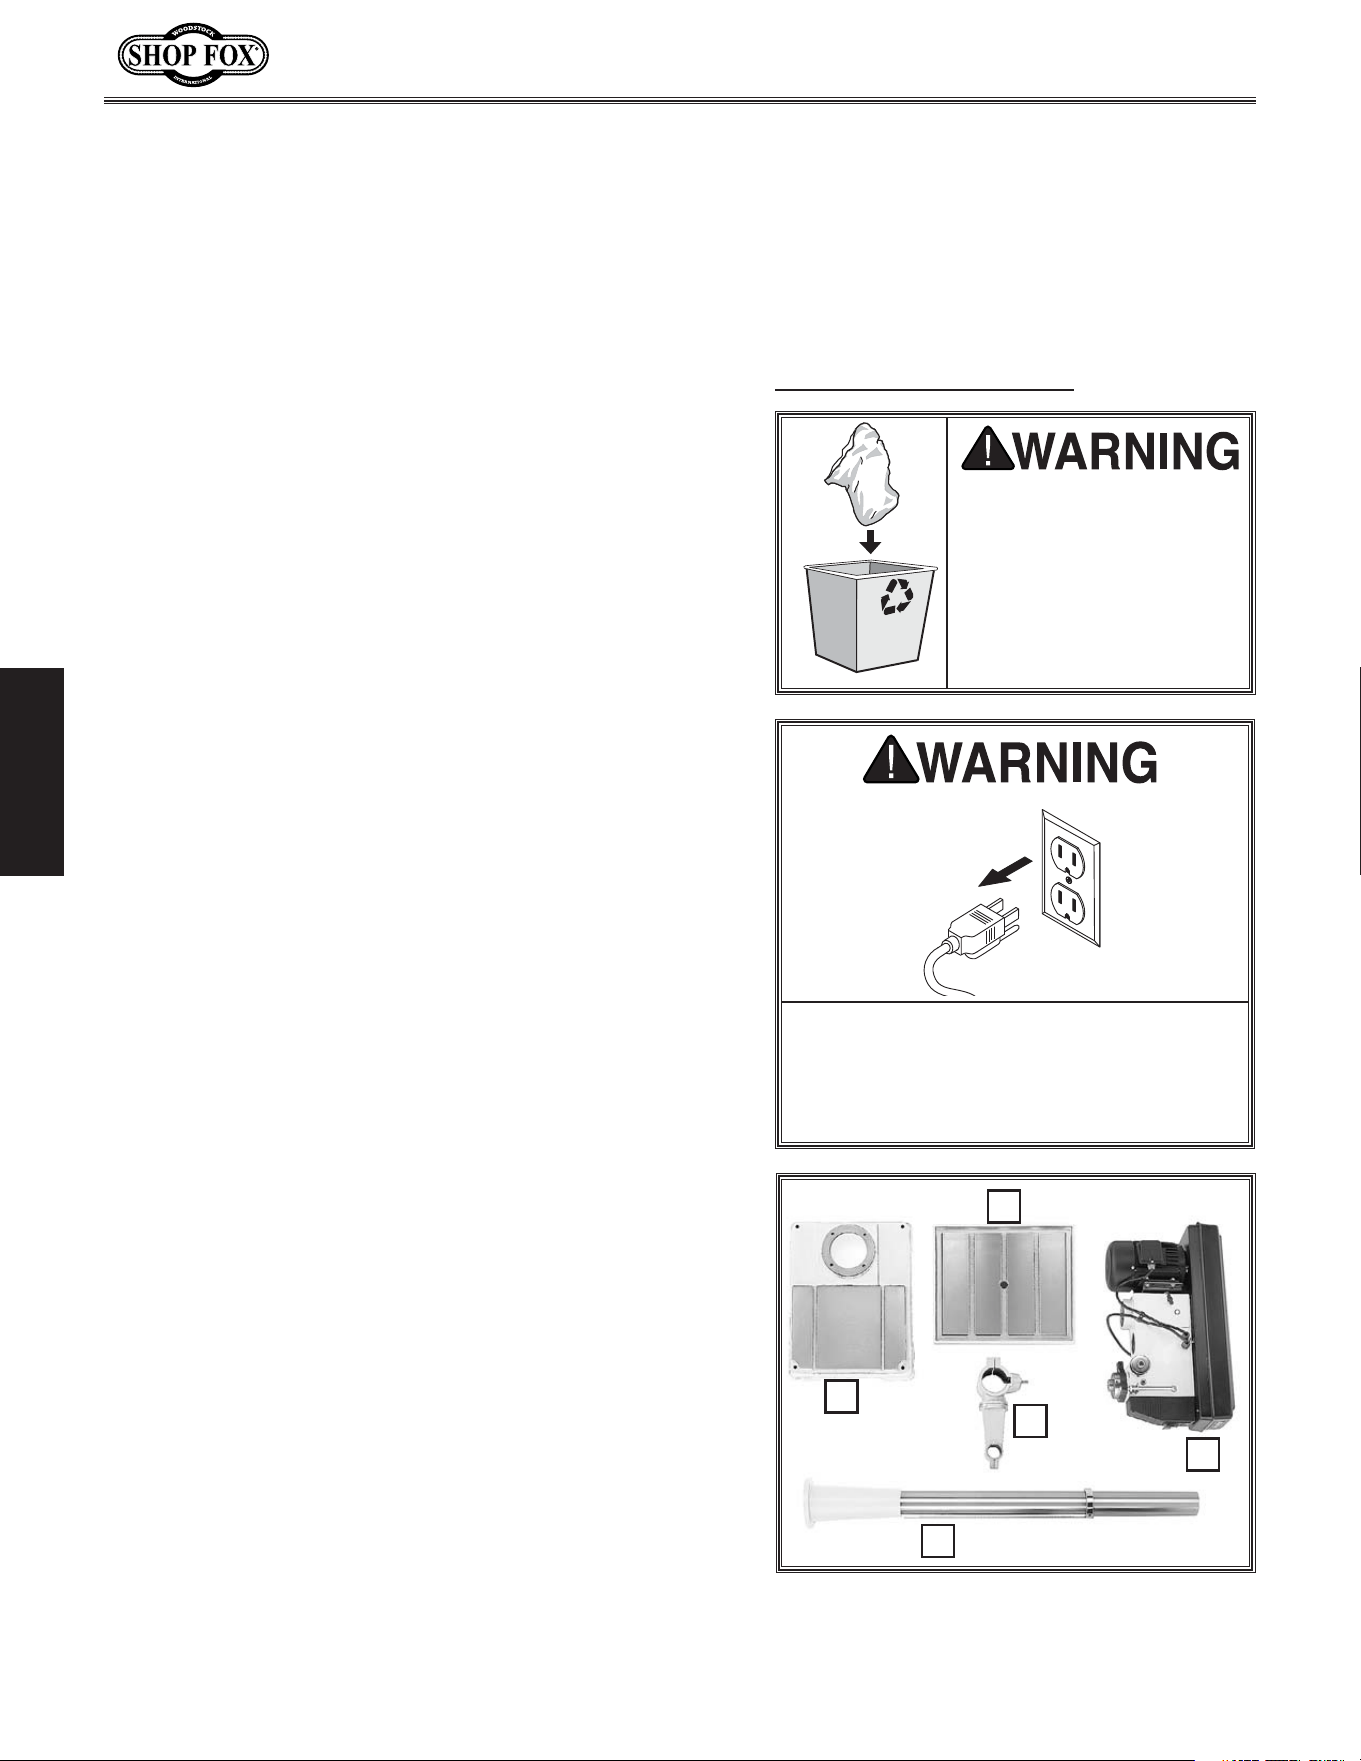
• Do not use cords in need of repair
<ok\ej`fe:fi[j
>ifle[`e^
This machine must be grounded! The electrical cord sup-
plied with this machine comes with a grounding pin. Do
not remove it. If converting to 220V operation, always
use a plug with a ground pin. If your outlet does not
accommodate a ground pin, have it replaced by a quali-
fied electrician or have an appropriate adapter installed.
Efk\1 N_\elj`e^XeX[Xgk\i#k_\X[Xgk\idljkY\
^ifle[\[%
(('M&))'MFg\iXk`fe
The E:AB8AJ
ModelM1039 is prewired for 110V opera-
tion, but may be rewired for 220V operation. To do this,
consult the wiring diagram in the back of this manual.
Always connect this machine to a dedicated circuit (wire,
breaker, plug, receptacle) with a verified ground, using
the recommended circuit breakers and plugs/receptacles
listed at the bottom of this page.
Never replace a circuit breaker with one of higher amper-
age without consulting a qualified electrician to ensure
compliance with wiring codes.@]pflXi\lejli\XYflk
k_\n`i`e^Zf[\j`epfliXi\XfigcXekfZfee\Zkpfli
dXZ_`e\kfXj_Xi\[Z`iZl`k#pfldXpZi\Xk\X]`i\_Xq$
Xi[ÇZfejlckXhlXc`]`\[\c\Zki`Z`Xekfi\[lZ\k_`ji`jb%
K_`j \hl`gd\ek dljk Y\ ^ifle[\[%
Le[\i ef Z`iZldjkXeZ\j j_flc[ k_\
^ifle[`e^ g`e Y\ i\dfm\[ ]ifd Xep
k_i\\$gife^\[ gcl^ fi j\i`flj `ealip
dXpfZZli%
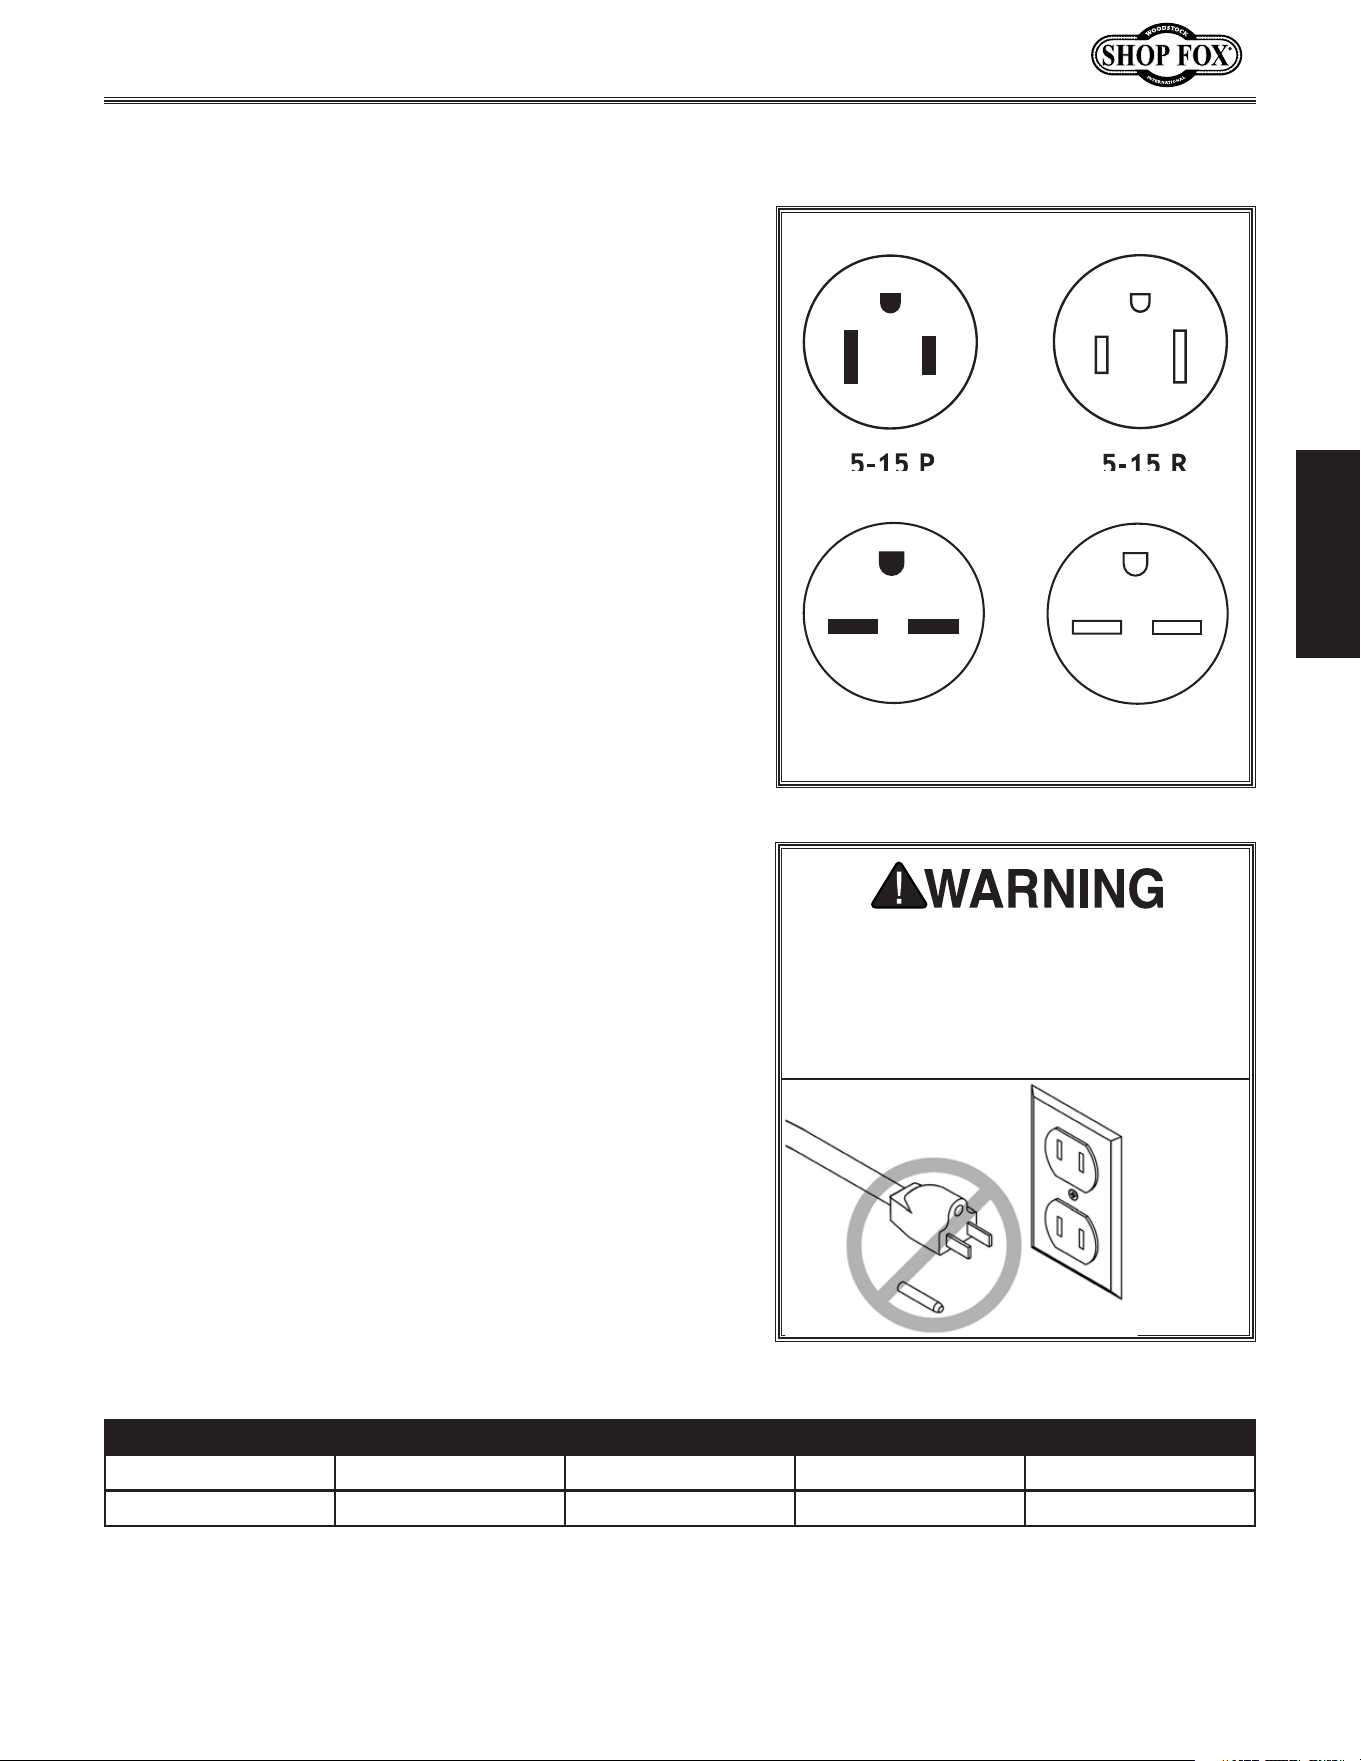
6-15 P
6-15 R
=`^li\*% NEMA 5-15 and 6-15 plug wiring.
Fg\iXk`e^MfckX^\ 8dg;iXn 9i\Xb\iJ`q\ Gcl^&I\Z\gkXZc\ <ok\ej`fe:fi[
110V Operation 15 Amps
20A
NEMA 5-15 12 Gauge, NEMA 5-15
220V Operation 7.5 Amps 15A NEMA 6-15 14 Gauge, NEMA 6-15
-10-
D('*0()$Jg\\[;i`ccGi\jj
J<KLG
The E:AB8AJ
Model M1039 has been carefully pack-
aged for safe transporting. If you notice the machine has
been damaged, please contact your authorized
E:AB
8AJ
dealer immediately.
LEGCL> gfn\i Zfi[ Y\]fi\ pfl [f
Xep Xjj\dYcp fi X[aljkd\ek kXjbj
Fk_\in`j\# j\i`flj g\ijfeXc `ealip kf
pflfifk_\ijdXpfZZli
LegXZb`e^
J<KLG
The following is a description of the main components
shipped with the
E:AB8AJ
®
Model M1039. Lay the
components out to inventory them.
Efk\1 Jfd\gXikjXe[_Xi[nXi\dXpXci\X[pY\
`ejkXcc\[fek_\dXZ_`e\%DXb\jli\kfZ_\Zbk_\
dXZ_`e\n_\epfllj\k_`j`em\ekfipc`jk%
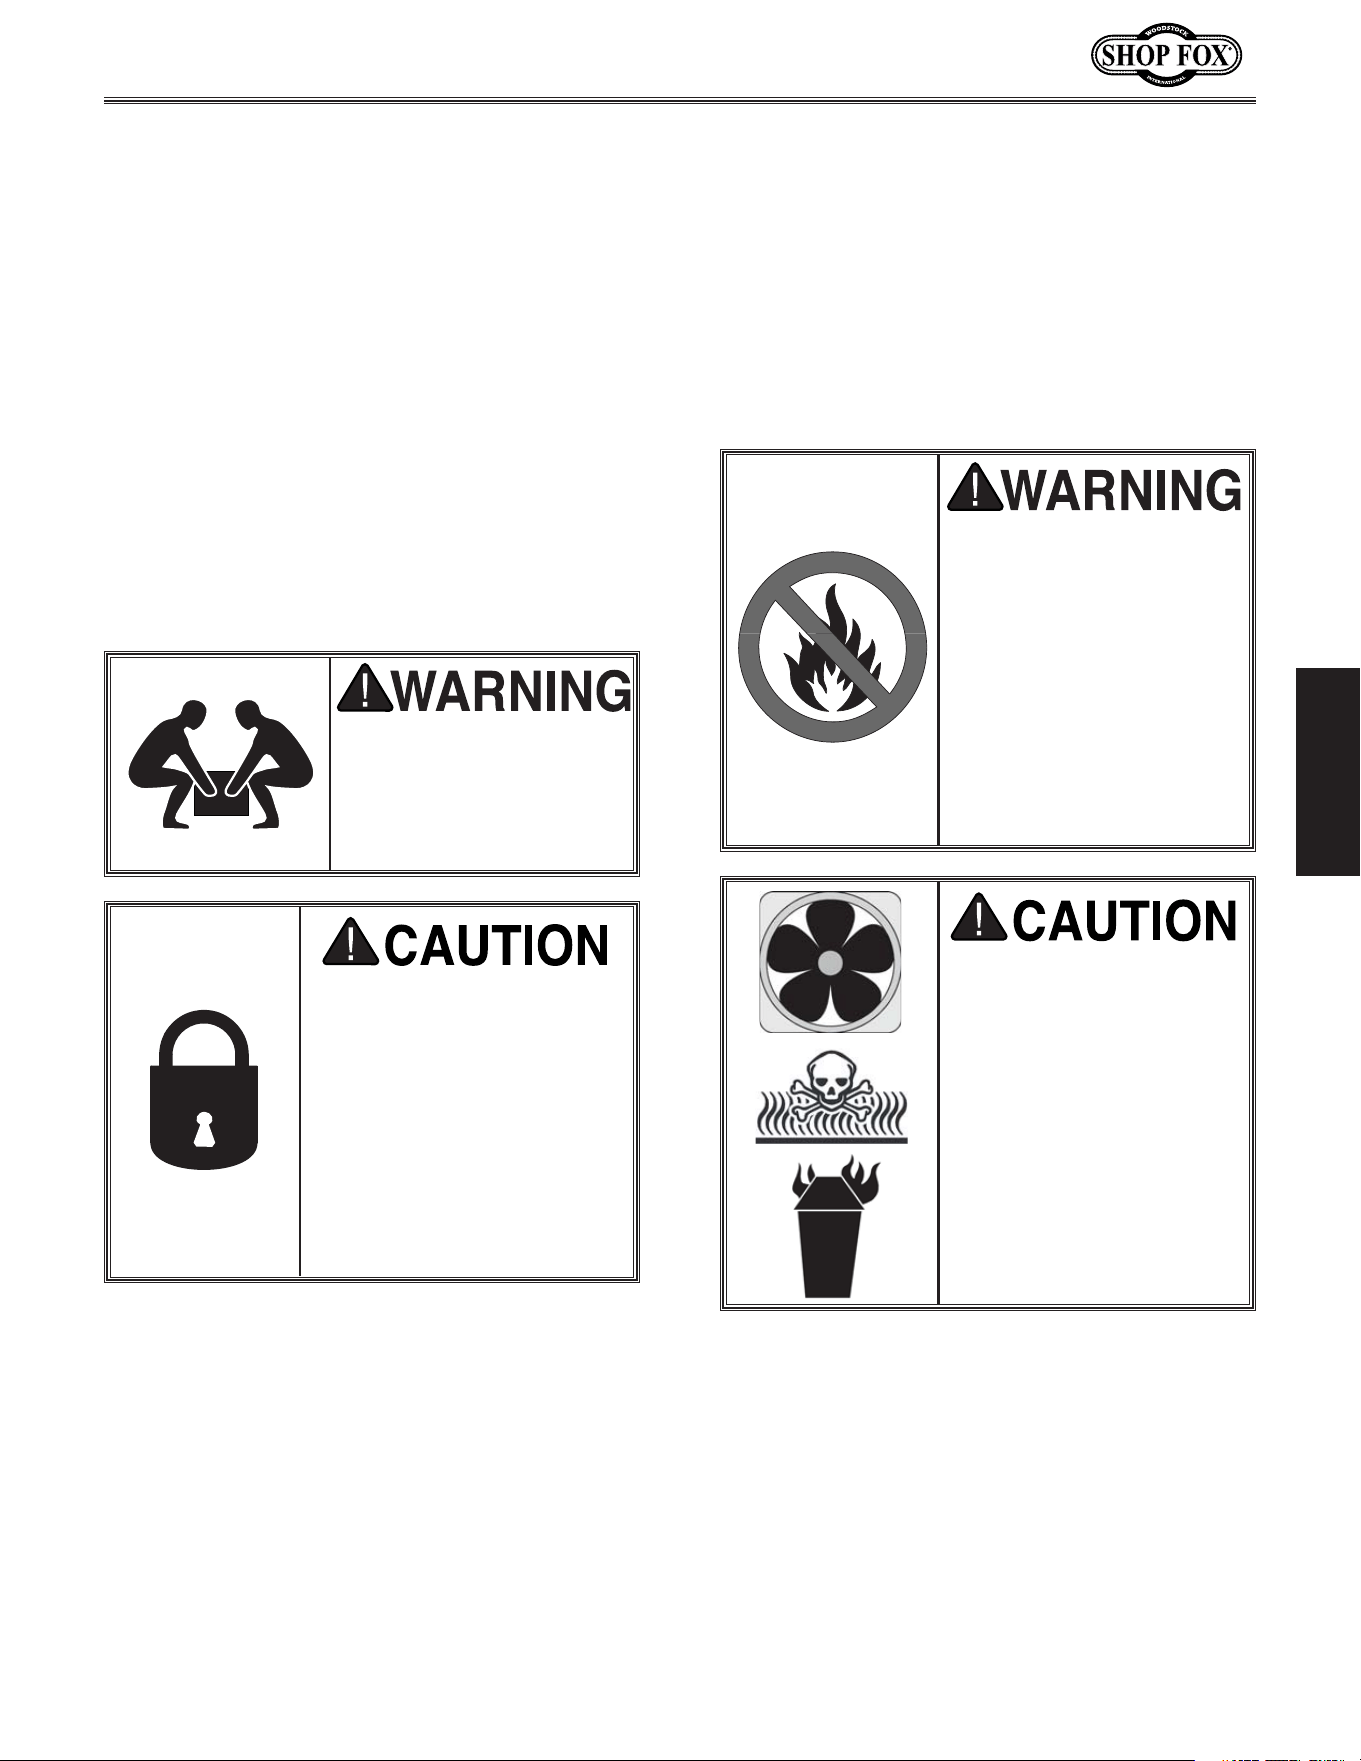
9fo@em\ekfip=`^li\+ Hkp
8% Base ......................................................... 1
9% Table ........................................................ 1
:% Table Bracket .............................................. 1
;% Headstock .................................................. 1
<% Column ..................................................... 1
?Xi[nXi\Xe[KffcjEfkJ_fne
• Large Lock Lever ..........................................1
• Small Lock Lever ..........................................1
• Crank handle ...............................................1
• Handle .......................................................1
• Arbor ........................................................1
• Drift Key ....................................................1
• Chuck ........................................................1
• Chuck Key ...................................................1
• Downfeed Handles.........................................3
• Lock Wrench ................................................1
• Pinion ........................................................1
• Belt Cover Knob ............................................1
• Hex Wrench 3mm ..........................................1
• Hex Wrench 4mm ..........................................1
• Hex Wrench 5mm ..........................................1
• Hex Bolt M12-1.75 x 45mm ..............................4
@em\ekfip
If any parts are missing, examine the pack-
aging for the missing parts. For any missing
parts, find the part number in the back
of this manual and contact Woodstock
International, Inc. at (360) 734-3482 or at
k\Z_$jlggfik7j_fg]fo%Y`q
JL==F:8K@FE?8Q8I;
@dd\[`Xk\cp [`jZXi[ Xcc
gcXjk`Z YX^j Xe[ gXZb$
`e^ dXk\i`Xcj kf \c`d`$
eXk\Z_fb`e^&jl]]fZXk`fe
_XqXi[j]fiZ_`c[i\eXe[
Xe`dXcj%
=`^li\+% Large component inventory.
A
B
C
D
E
-11-
D('*0()$Jg\\[;i`ccGi\jj
J<KLG
=cffiCfX[1 This machine distributes a
heavy load in a small footprint. Some floors
may require additional bracing to support
both machine and operator.
Nfib`e^:c\XiXeZ\j1 Consider existing and
anticipated needs, size of material to be
processed through the machine, and space
for auxiliary stands, work tables or other
machinery when establishing a location for
your drill press.
C`^_k`e^1 Lighting should be bright enough
to eliminate shadow and prevent eye strain.
D8B<pflij_fgÈZ_`c[
jX]\%É <ejli\ k_Xk pfli
nfibgcXZ\ `j `eXZZ\jj`Yc\
kf pfle^jk\ij Yp Zcfj`e^
Xe[ cfZb`e^ Xcc \ekiXeZ\j
n_\epflXi\XnXp%E<M<I
Xccfn lekiX`e\[ m`j`kfij `e
pfli j_fg n_\e Xjj\d$
Yc`e^# X[aljk`e^ fi fg\iXk$
`e^\hl`gd\ek%
:c\Xe`e^DXZ_`e\
The table and other unpainted parts of your
machine type are coated with a waxy grease
that protects them from corrosion during ship-
ment. Clean this grease off with a solvent clean-
er or citrus-based degreaser. DO NOT use chlo-
rine-based solvents such as brake parts cleaner
or acetone—if you happen to splash some onto a
painted surface, you will ruin the finish.
DXZ_`e\GcXZ\d\ek
LJ<_\cg\ijfigfn\ic`]k$
`e^\hl`gd\ekkfc`]kk_`j
[i`cc gi\jj% Fk_\in`j\#
j\i`flj g\ijfeXc `ealip
dXpfZZli%
E<M<I lj\ ^Xjfc`e\ fi
fk_\i g\kifc\ld$YXj\[
jfcm\ekj kf Zc\Xe n`k_%
Dfjk _Xm\ cfn ]cXj_
gf`ekj# n_`Z_dXb\ k_\d
\oki\d\cp ]cXddXYc\%
8 i`jb f] \ogcfj`fe Xe[
Ylie`e^ \o`jkj `] k_\j\
gif[lZkjXi\lj\[%J\i`flj
g\ijfeXc`ealipdXpfZZli
`]k_`jnXie`e^`j`^efi\[
8CN8PJ nfib `e n\cc$
m\ek`cXk\[Xi\Xj]Xi]ifd
gfjj`Yc\ `^e`k`fe jfliZ\j
n_\e lj`e^ jfcm\ekj kf
Zc\Xe dXZ_`e\ip% DXep
jfcm\ekj Xi\ kfo`Z n_\e
`e_Xc\[fi`e^\jk\[%Lj\
ZXi\ n_\e [`jgfj`e^
f] nXjk\ iX^j Xe[
kfn\cj kf Y\ jli\ k_\p
;F EFK Zi\Xk\ ]`i\ fi
\em`ifed\ekXc_XqXi[j%
-12-
D('*0()$Jg\\[;i`ccGi\jj
J<KLG
Although not required, we recommend that you mount
your new machine to the floor. Because this is an
optional step and floor materials may vary, floor mount-
ing hardware is not included. Generally, you can either
bolt your machine to the floor or mount it on machine
mounts. Both options are described below. Whichever
option you choose it will be necessary to use a precison
level to level your machine.
9fck`e^kf:feZi\k\=cffij
Lag shield anchors with lag bolts (=`^li\,) and anchor
studs (=`^li\-) are two popular methods for anchoring
an object to a concrete floor. We suggest you research
the many options and methods for mounting your
machine and choose the best that fits your specific appli-
cation.
Dflek`e^kfJ_fg=cffi
=`^li\,% Typical lag shield anchor and lag
bolt.
=`^li\-% Typical anchor stud.
EFK@:<
8eZ_fijkl[jXi\jkife^\iXe[dfi\g\idXe\ekXck\i$
eXk`m\jkfcX^j_`\c[XeZ_fij2_fn\m\i#k_\pn`ccjk`Zb
flkf]k_\]cffi#n_`Z_dXpZXlj\Xki`gg`e^_XqXi[`]
pfl[\Z`[\kfdfm\pflidXZ_`e\XkXcXk\igf`ek%
=`^li\.% Machine mount example.
Lj`e^DXZ_`e\Dflekj
Using machine mounts, shown in =`^li\., gives the
advantage of fast leveling and vibration reduction. If you
choose to use machine mounts, attach them to the base
before assembling the drill press.
-13-
D('*0()$Jg\\[;i`ccGi\jj
J<KLG
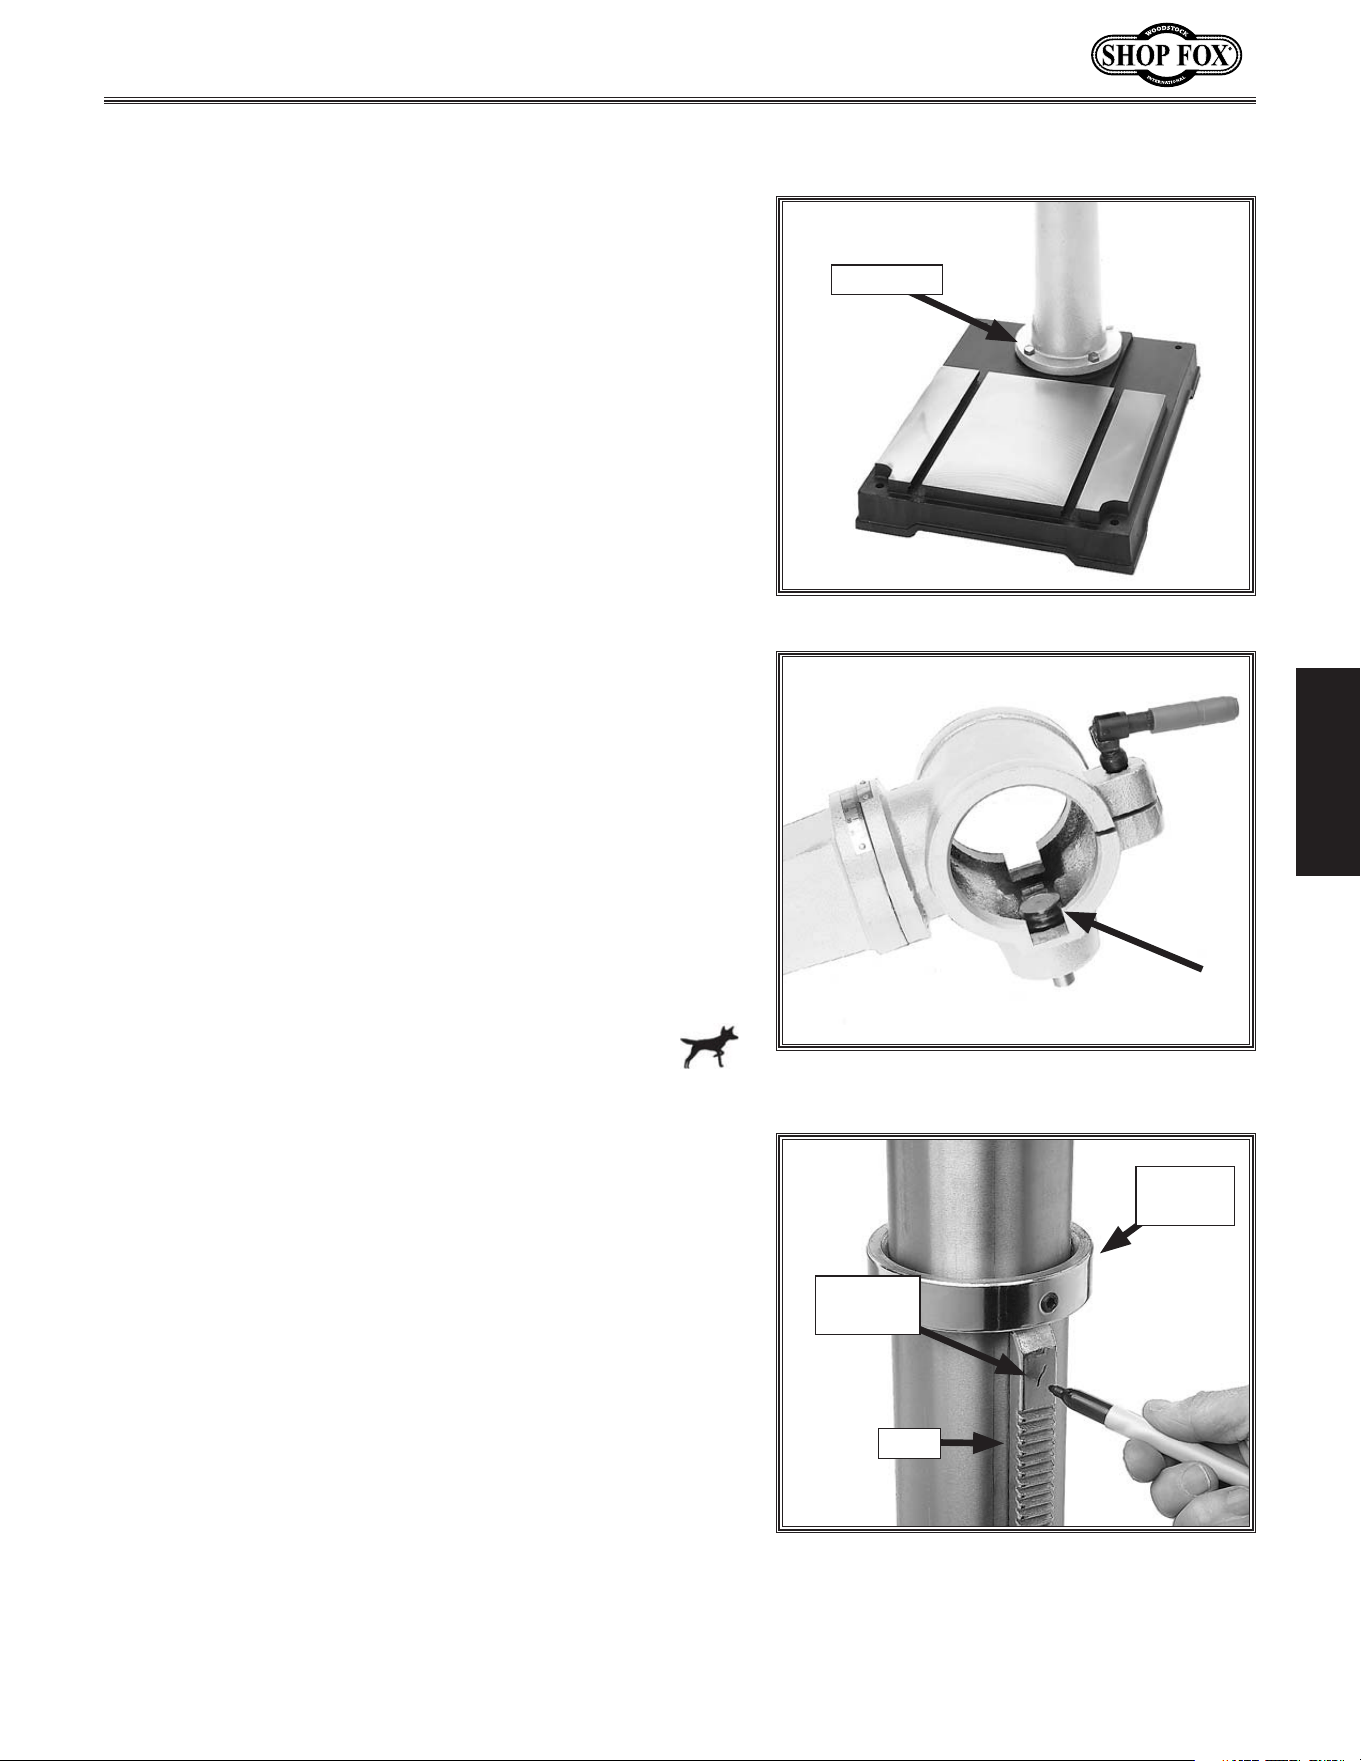
The column must be secured on the base to properly
assemble your drill press.
Kfj\Zli\k_\Zfcldekfk_\YXj\#[fk_\j\jk\gj1
(% Place the column on the base and align the mount-
ing holes.
)% Secure the column to the base with the four M12-1.75
x 45 hex bolts, as shown in =`^li\/.
:fcldeXe[9Xj\
=`^li\/% Column secured to base.
Hex Bolts
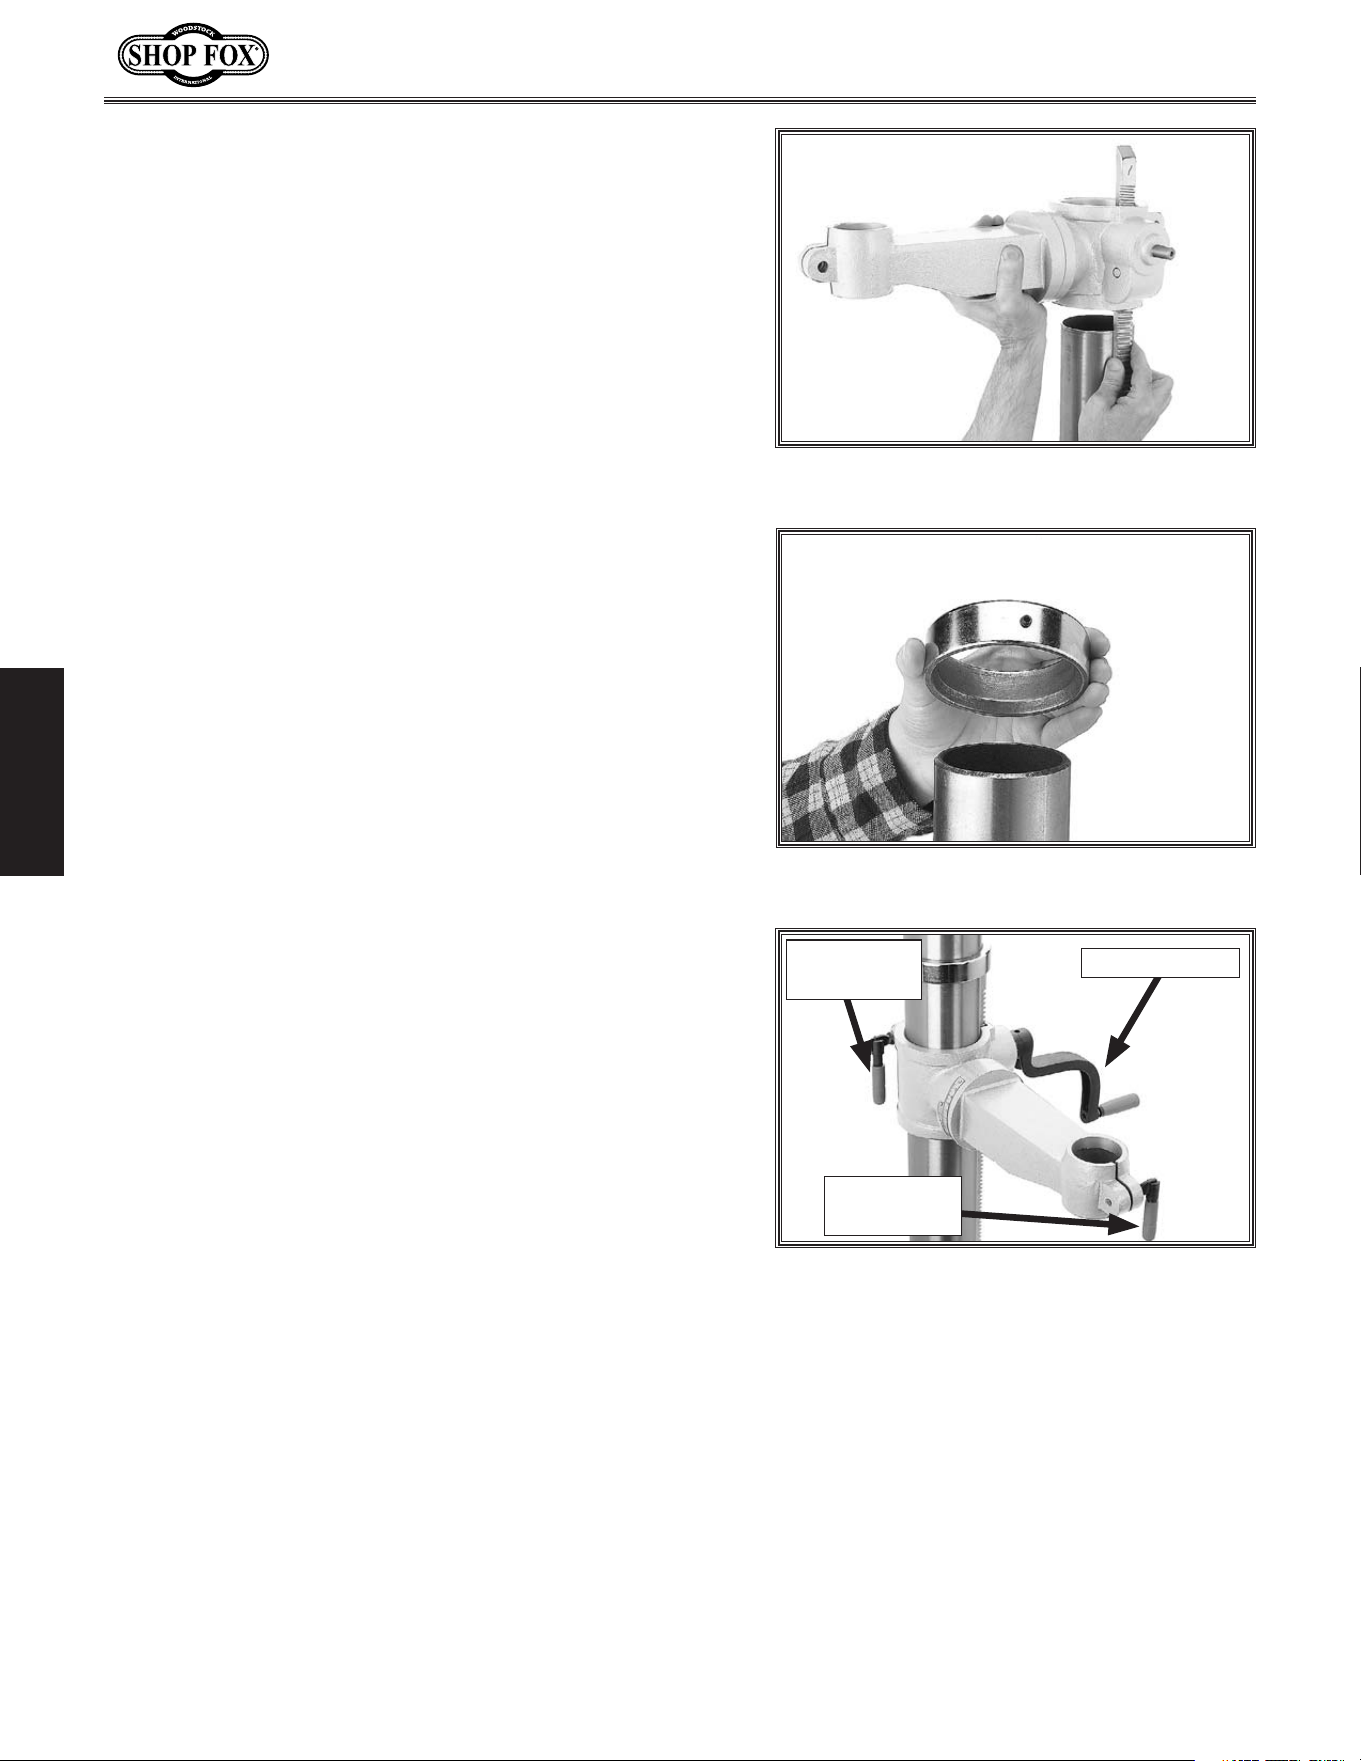
=`^li\0% Pinion correctly installed in
table bracket.
The table bracket must be installed as described to prop-
erly assemble your drill press.
Kf`ejkXcck_\kXYc\jlggfik#[fk_\j\jk\gj1
(% Place the pinion in the table bracket, as shown in
=`^li\0, so the pinion and gear teeth mesh togeth-
er.
)% Mark the top of the rack, as shown in =`^li\(', to
keep track of which end is up.
*% Remove the column ring by loosening the setscrew,
and remove the rack.
KXYc\9iXZb\k
=`^li\('% Marking the top of the rack.
Column
Ring
Marking
Location
Rack
Continued on next page
-14-
D('*0()$Jg\\[;i`ccGi\jj
J<KLG
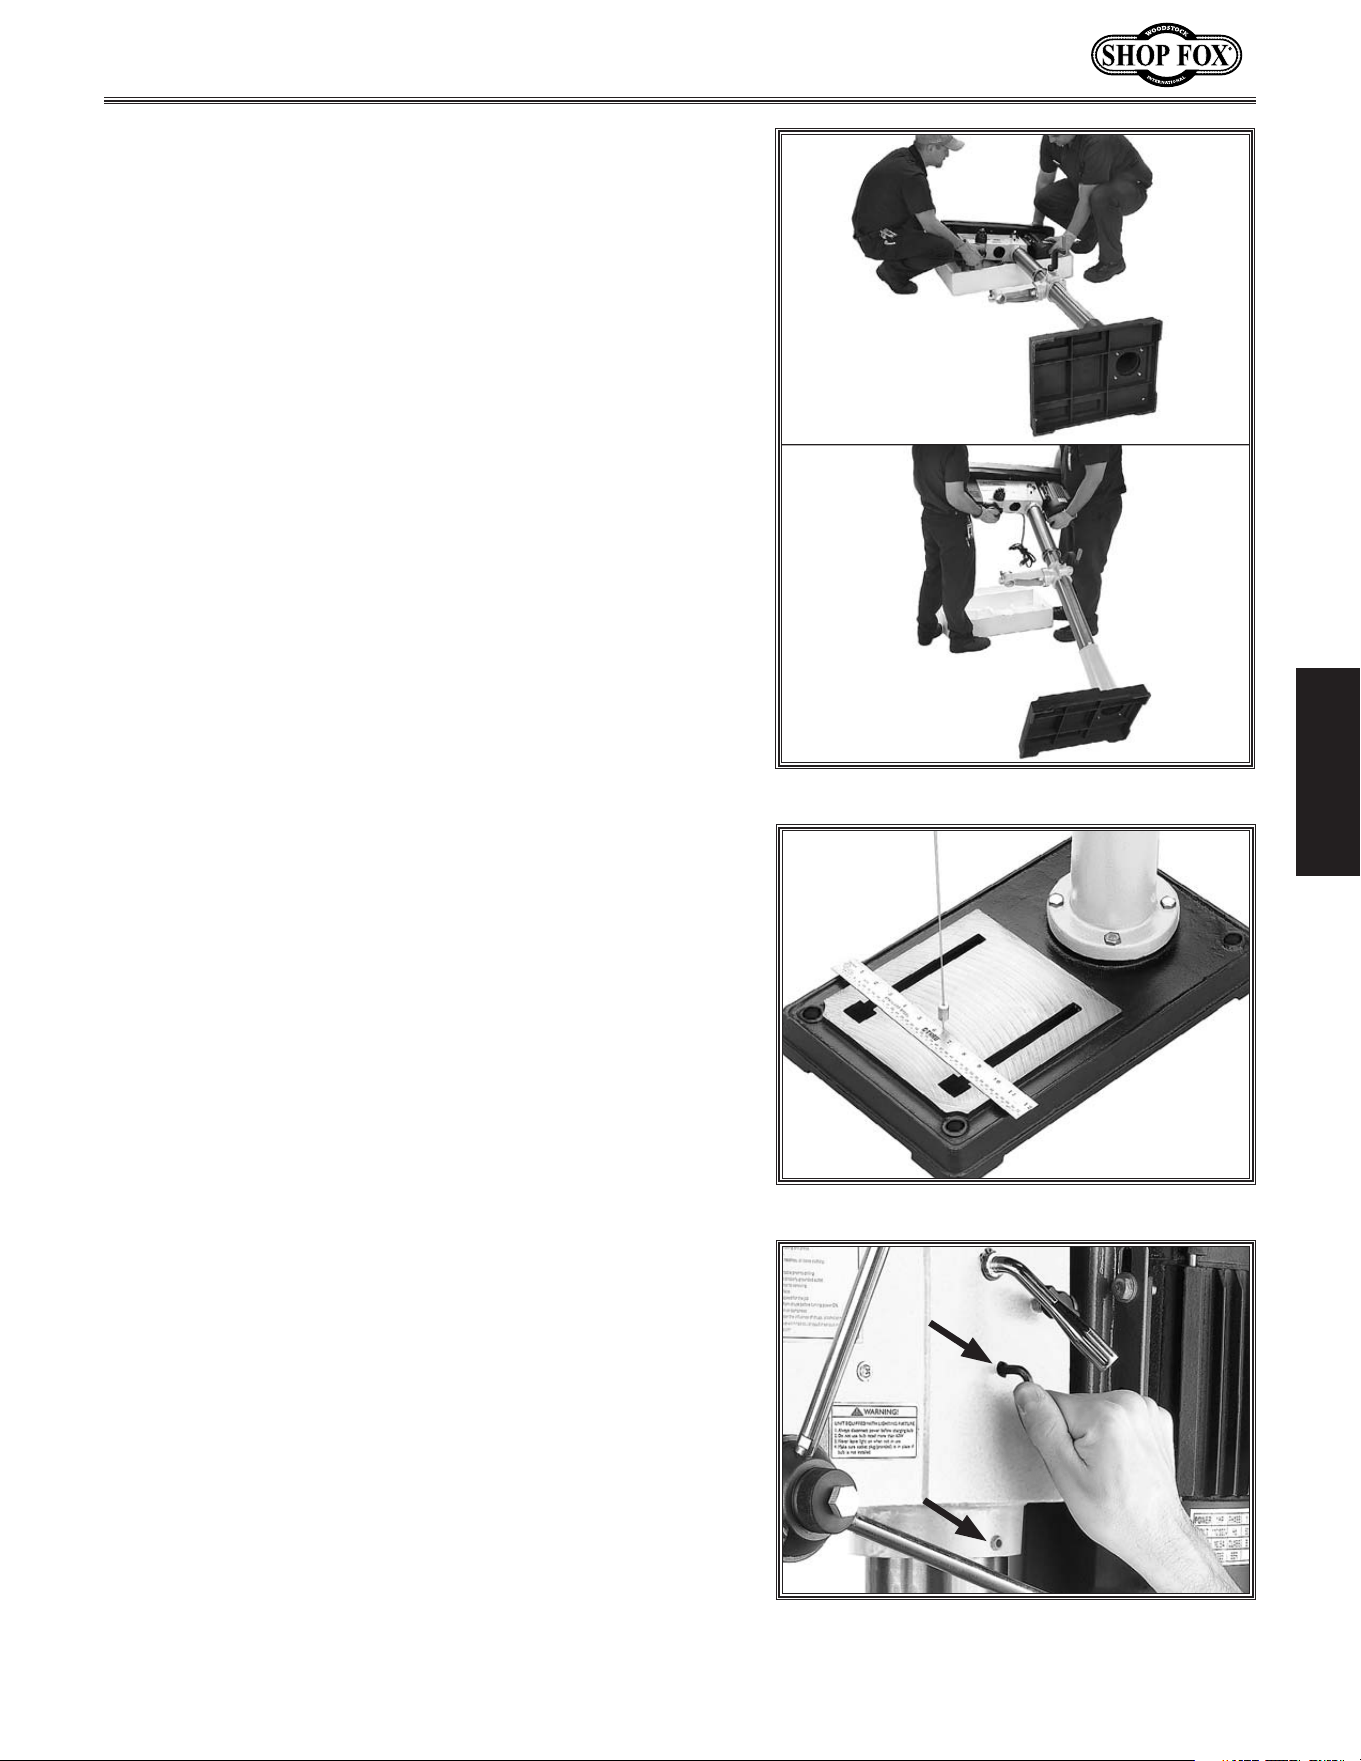
+% Place the rack inside of the table bracket, mesh it
together with the pinion, and slide the table sup-
port/rack assembly over the column, as shown in
=`^li\((.
,% Slide the column ring over the column with the bev-
eled edge facing down (=`^li\()), fit the beveled
edge of the column ring over the rack, and tighten
the setscrew.
Efk\1 DXb\jli\k_\iXZb`jj\Xk\[]`idcp`ek_\
cfn\ii`e^Y\]fi\k`^_k\e`e^k_\j\kjZi\n%;fefk
fm\i$k`^_k\ek_\j\kjZi\nfipfldXpjgc`kk_\Zfc$
ldei`e^%
-% Install the crank handle over the pinion shaft, and
tighten the setscrew in the crank handle against the
flat part of the pinion shaft.
.% Thread the handle into the crank handle.
/% Thread the large lock lever into the back of the
table bracket approximately three turns, for now.
0% Thread the small lock lever into the front part of
the table bracket approximately three turns, for
now. The assembly should now be assembled as
shown in =`^li\(*.
=`^li\((% Sliding table bracket and rack
over column.
=`^li\()% Correct column ring
orientation.
=`^li\(*% Handles and lock levers
installed.
Large Lock
Lever
Crank Handle
Small Lock
Lever
-15-
D('*0()$Jg\\[;i`ccGi\jj
J<KLG
The headstock must be mounted on the column/base
assembly before the drill press can be operated. Moving
and installing the headstock is a two-person job, at the
very least. Although the headstock can be lifted directly
onto the column while upright, doing so is difficult and
potentially dangerous because of the heavy weight
involved. We recommend sliding the column into the
headstock, then tilting the entire assembly fully upright,
as described and shown in this section.
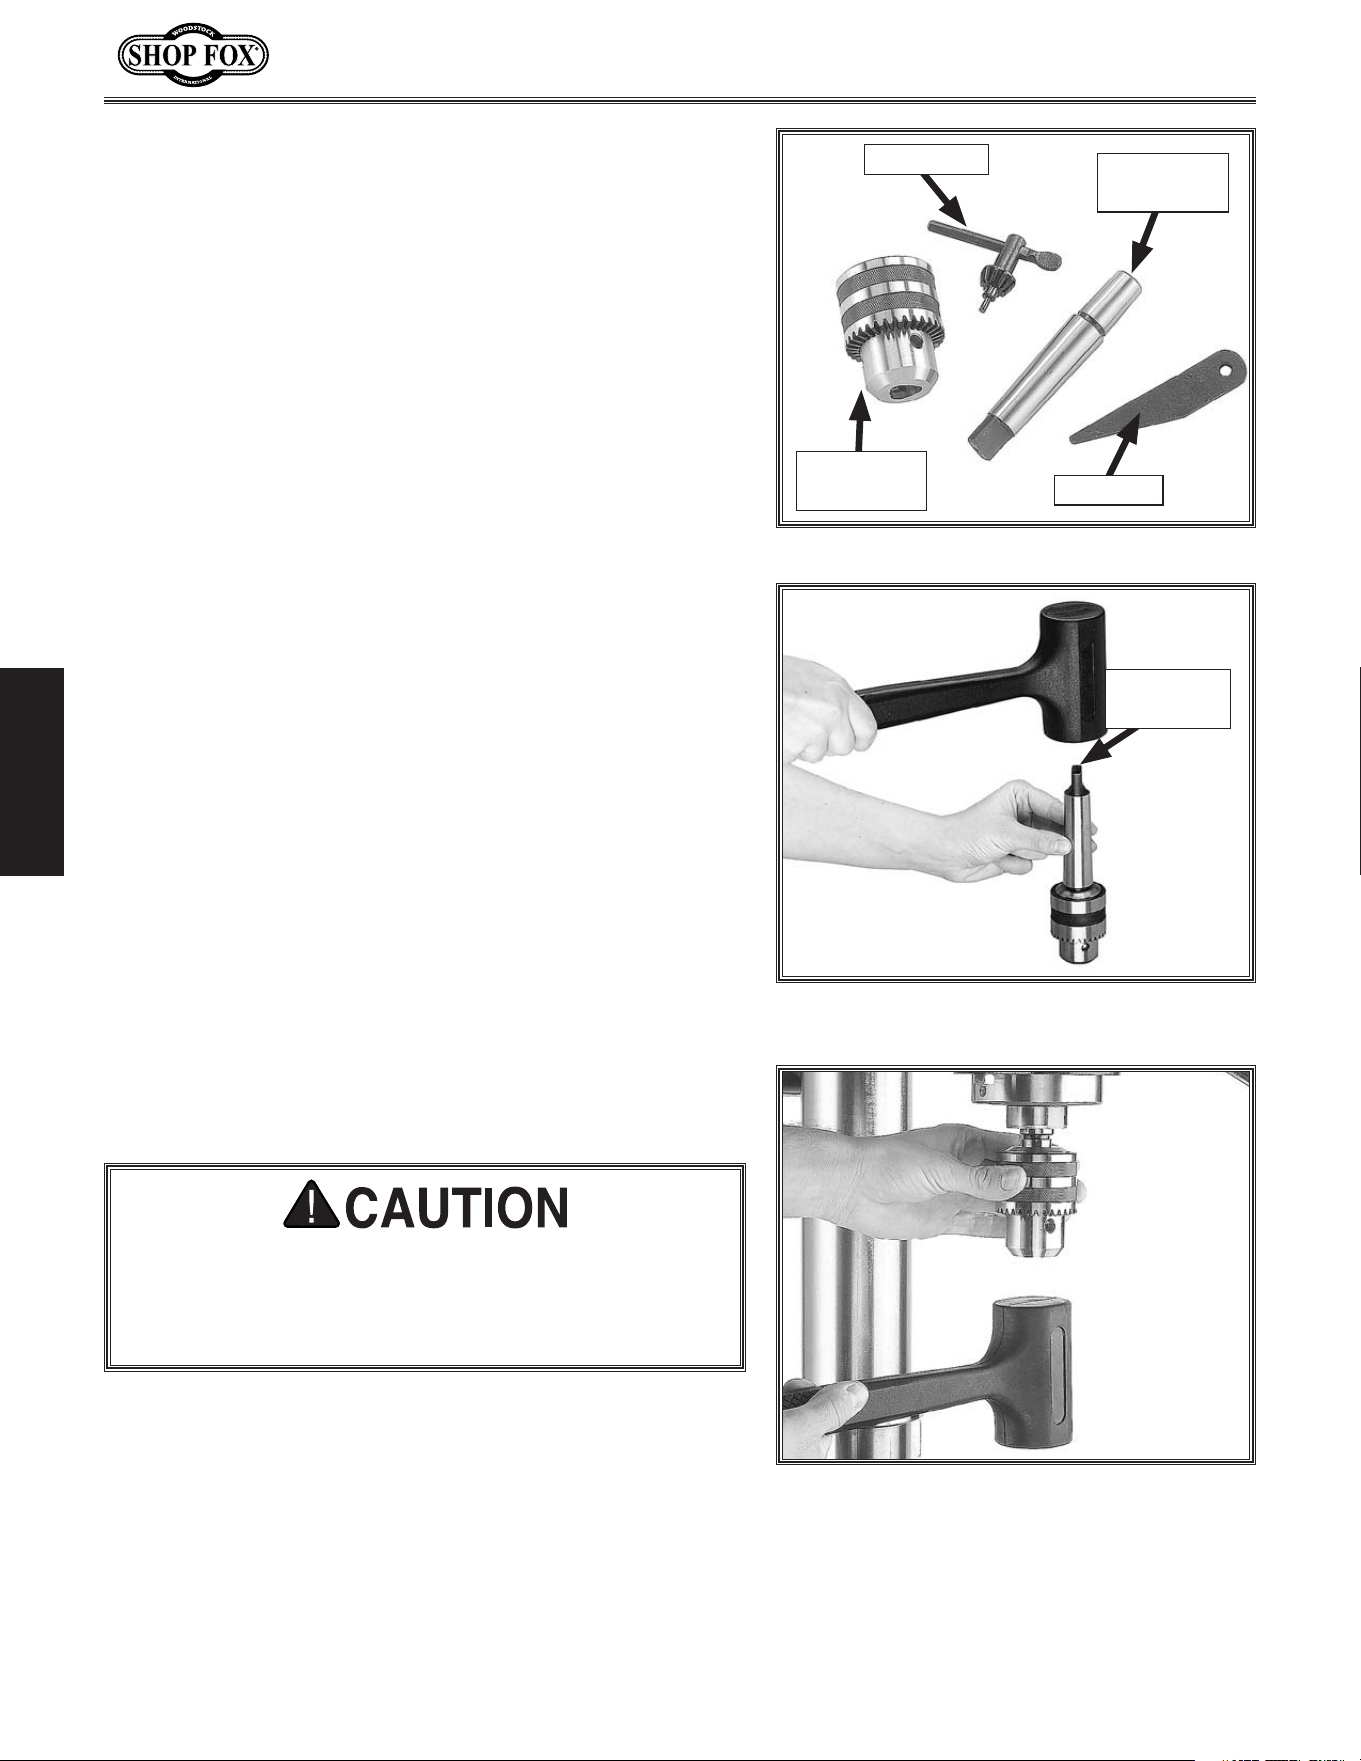
Kfdflekk_\_\X[jkfZbfekfk_\Zfclde#[fk_\j\
jk\gj1
(% Set the top piece of the headstock styrofoam pack-
ing approximately six feet away from the column/
base assembly.
)% Remove the headstock from the box and place it on
the styrofoam packing piece you laid out in Jk\g(.
Efk\1 KfXmf`[[XdX^`e^k_\dXZ_`e\#Y\ZXi\]lc
efkkf_fc[k_\_\X[jkfZbYpk_\jn`kZ_fik_\kfg
gXikf]k_\Y\ckZfm\in_\ec`]k`e^%
*% Carefully lay the column/base on its side.
+% Slide the column all the way into the bottom of the
headstock (approximately 4"—6").
,% Tilt the entire assembly up (see =`^li\(+) and
carefully position the drill press on its base in the
fully upright position.
-% Center a tape or ruler on the base, and suspend a
plumb bob from the center of the headstock spindle
so it is over the tape/ruler as shown in =`^li\(,.
.% Center the headstock directly over the base as indi-
cated by the plumb bob and ruler.
/% Tighten the two headstock setscrews to the column,
as shown in =`^li\(-.
?\X[jkfZb
=`^li\(,% Aligning headstock with base.
=`^li\(+% Mounting the headstock.
=`^li\(-% Securing the headstock.
-16-
D('*0()$Jg\\[;i`ccGi\jj
J<KLG
The drill chuck attaches to the spindle by means of the
arbor, shown in =`^li\(.. Matched tapers on the arbor
and the inside of the chuck create a semi-permanent
assembly when properly joined.
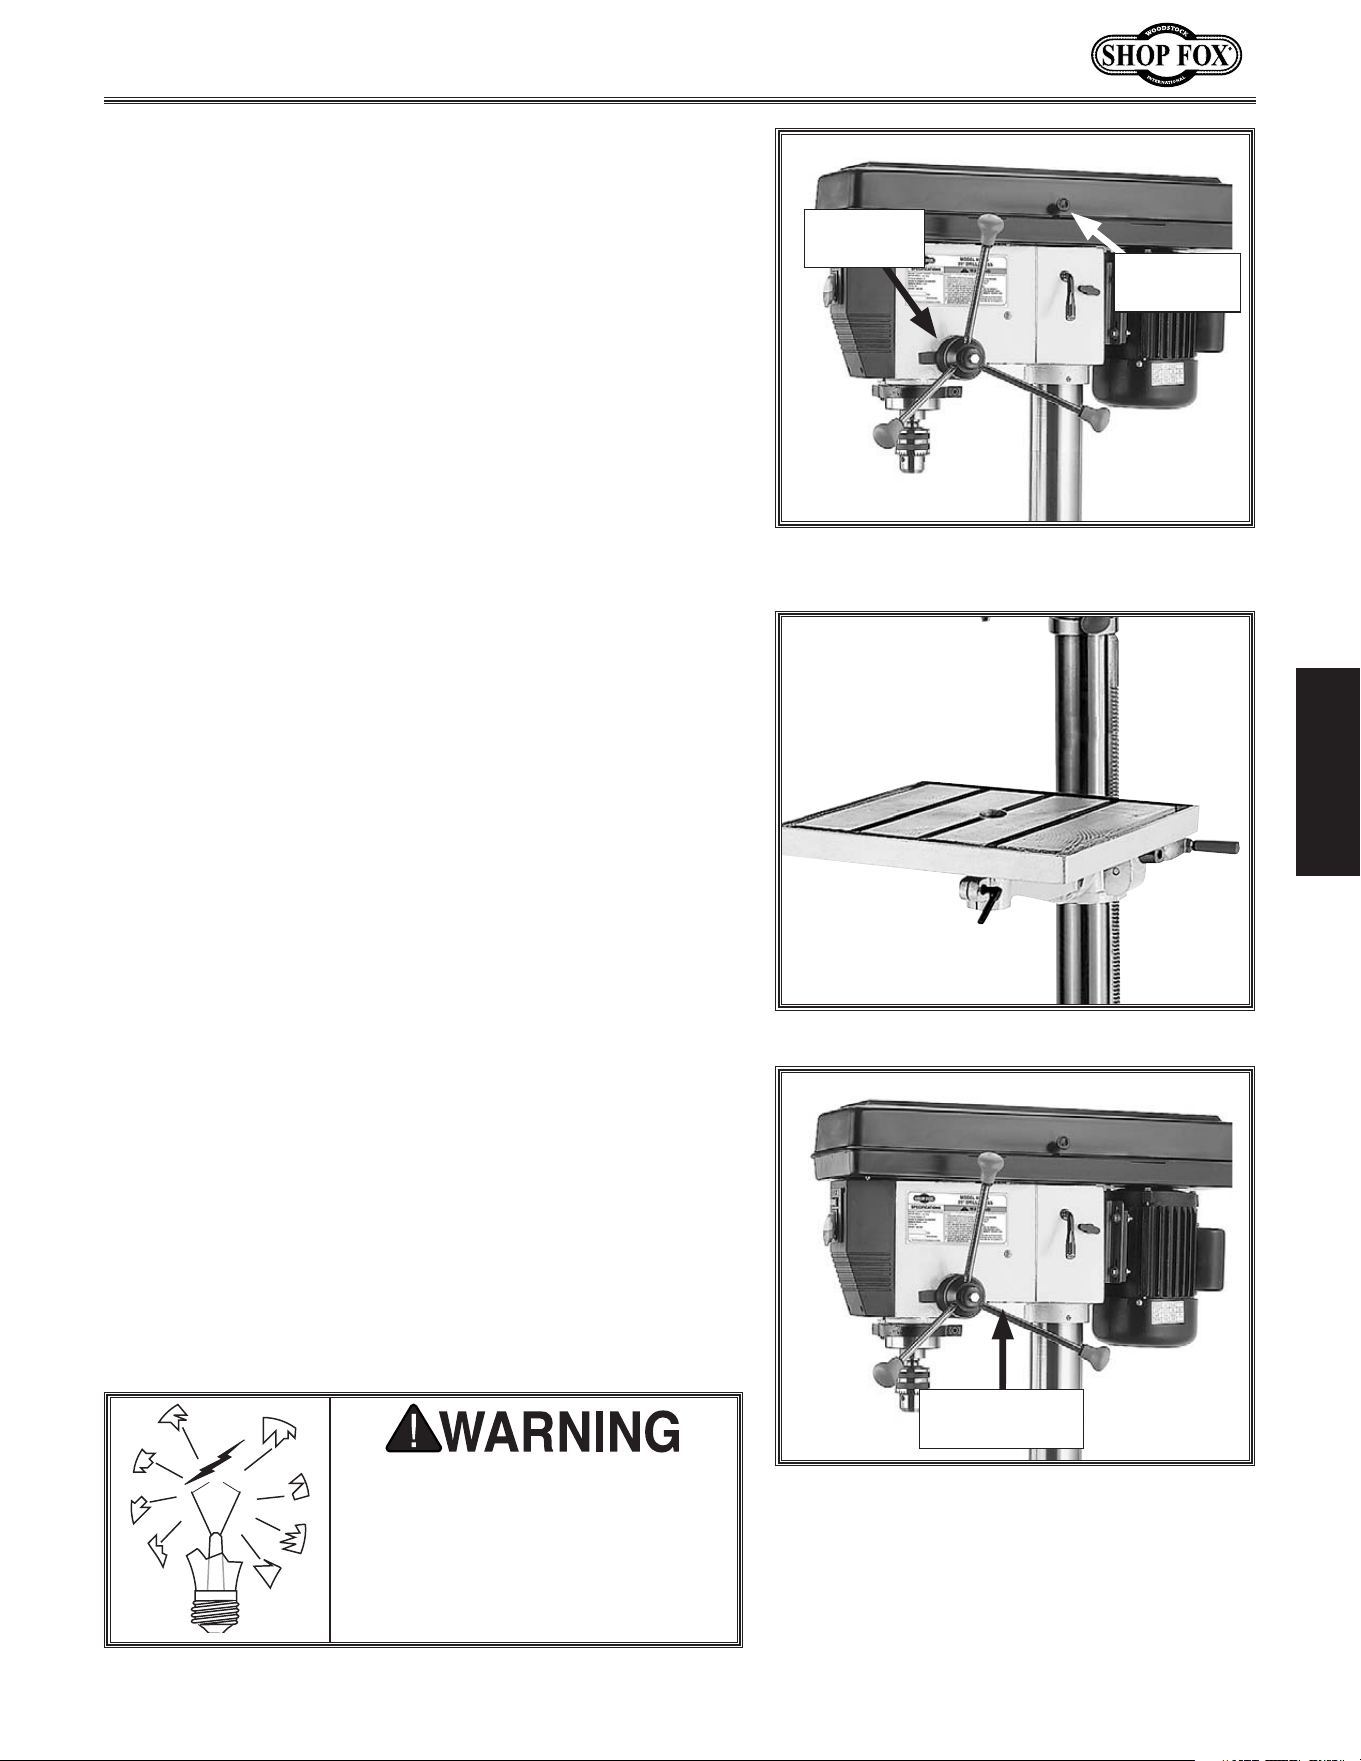
KfXjj\dYc\k_\[i`ccZ_lZbXe[dflek`kkfk_\jg`e$
[c\#[fk_\j\jk\gj1
(% Use mineral spirits to thoroughly clean the drill
chuck, arbor, and spindle sockets and dry all sur-
faces before assembly. Follow all safety warnings
on the container of the mineral spirits.=X`cli\kf
Zc\Xek_\dXk`e^jli]XZ\jdXpZXlj\k_\kXg\i\[
]`kkfcffj\e[li`e^fg\iXk`fe#i\jlck`e^`ej\gXiX$
k`feXe[XelejX]\Zfe[`k`fe%
)% Use the chuck key to adjust the jaws of the drill
chuck until they are inside the drill chuck body.
*% Place the drill chuck face down on a workbench.
The arbor has a short taper and a long taper. Place
the short taper into the socket in the back of the
drill chuck and tap it with a rubber or wooden mal-
let, as shown in =`^li\(/. If the chuck fails to
remain secure on the arbor, repeat Jk\gj( & *.
+% Slide the arbor into the spindle socket while slowly
rotating the drill chuck. The socket has a rectangu-
lar pocket into which the tang (or flat portion of the
arbor shown in =`^li\(/) will fit.
,% Using a rubber mallet, seat the chuck as shown in
=`^li\(0.
;i`cc:_lZbXe[8iYfi
=`^li\(/% Seating the arbor into the
chuck.
=`^li\(.% Chuck components and tools.
JT3 Drill
Chuck
Chuck Key
MT4/JT3
Arbor
Drift Key
Tang-Side
Up
=`^li\(0% Seating the arbor and chuck
into the spindle.
;FEFKlj\Xjk\\c_Xdd\ifek_\[i`ccZ_lZbkf
j\Xkk_\XiYfi`ekfk_\jg`e[c\%Pfln`cc[XdX^\k_\
Z_lZbXe[&fijg`e[c\#n_`Z_dXpdXb\k_\dlelj$
XYc\filejX]\%
-17-
D('*0()$Jg\\[;i`ccGi\jj
J<KLG
The downfeed handles must be installed to properly oper-
ate the drill press.
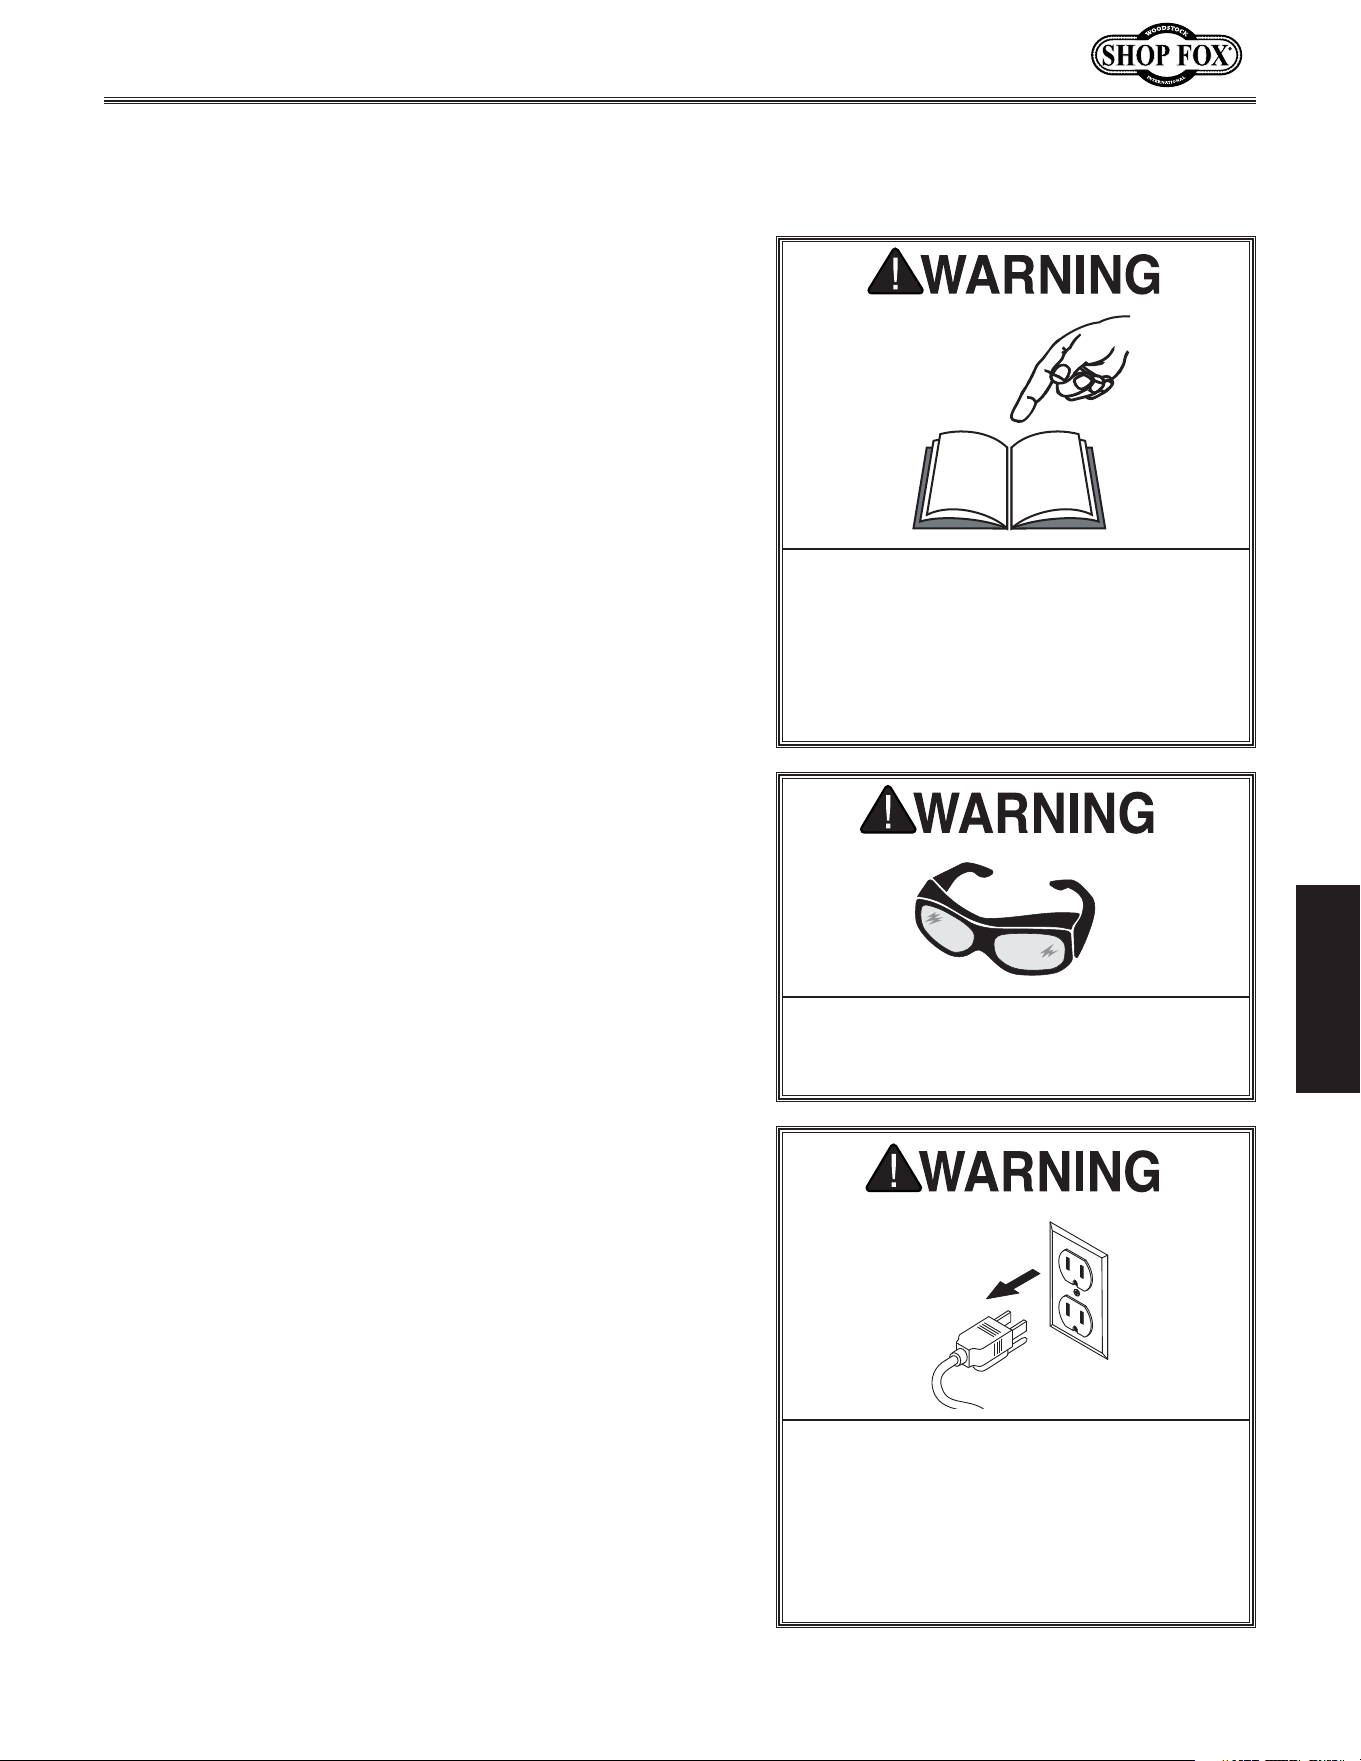
Kf`ejkXcck_\[fne]\\[_Xe[c\j#[fk_\j\jk\gj1
(% Thread the handles into the pinion hub, as shown in
=`^li\)', and tighten.
)% Remove the screw that fastens the belt cover in
place and install the belt cover knob in its place (see
=`^li\)' for location).
;fne]\\[?Xe[c\jXe[
9\ck:fm\iBefY
=`^li\)(% Table installed.
=`^li\)'% Downfeed handles and belt
cover knob installed.
=`^li\))% Light socket access
(110V only).
Belt Cover
Knob
Spindle
Hub
The table must be installed to properly support the
workpiece during operation.
Kf`ejkXcck_\kXYc\#[fk_\j\jk\gj1
(% Insert the table shaft into the table bracket.
)% Tighten the small locking lever to secure the table
in the table bracket. The table should now be
installed as shown in =`^li\)(.
KXYc\
The Model M1039 includes a light socket, [\j`^e\[]fi
(('Mlj\fecp. When the drill press is shipped from the
factory, a dust plug is installed in the socket.
Kf`ejkXccXc`^_kYlcY`ek_\[i`ccgi\jj#[fk_\j\jk\gj1
(% Remove the dust plug from the light socket.
)% Install a 60W or smaller light bulb in the location
shown in =`^li\)).
C`^_k(('MFecp
Light Socket
Access Here
K_\c`^_kjfZb\k`eZcl[\[n`k_
k_`j[i`ccgi\jj`j]fi(('MLJ<
FECP%@]k_\c`^_kjfZb\k`jlj\[
n_`c\fg\iXk`e^Xk))'M#k_\c`^_k
YlcYN@CC<OGCF;<#gfk\ek`Xccp
ZXlj`e^j\i`fljg\ijfeXc`ealip%

-18-
D('*0()$Jg\\[;i`ccGi\jj
J<KLG
Before installing a drill bit, test run the machine to iso-
late any problems that may occur.
(% Plug the drill press into the power supply.
)% Turn the drill press FE; if there is a problem, turn
the drill press F== immediately.
The drill press should run smoothly, with little or no
vibration or rubbing noises. Strange or unusual noises
should be investigated and corrected before operating
the machine further. See GX^\*' for troubleshooting
instructions.
K\jk Ile
For your convenience, the adjustments listed below have
been performed at the factory and no further setup is
required to operate your machine.
However, because of the many variables involved with
shipping, some of these adjustments may need to be
repeated to ensure optimum results. Keep this in mind as
you start to use your new drill press.
Step-by-step instructions for these adjustments can be
found in theJ<IM@:<section of this manual.
(% ;\gk_Jkfg:Xc`YiXk`feGX^\)-
)% =\\[J_X]kJgi`e^K\ej`feGX^\).
I\Zfdd\e[\[
8[aljkd\ekj
-19-
D('*0()$Jg\\[;i`ccGi\jj
FG<I8K@FEJ
FG<I8K@FEJ
>\e\iXc
The Model M1039 will perform many types of operations
that are beyond the scope of this manual. Many of these
operations can be dangerous or deadly if performed
incorrectly.
The instructions in this section are written with the
understanding that the operator has the necessary knowl-
edge and skills to operate this machine. @]XkXepk`d\
pflXi\\og\i`\eZ`e^[`]]`Zlck`\jg\i]fid`e^Xepfg\iX$
k`fe#jkfglj`e^k_\dXZ_`e\
If you are an inexperienced operator, we strongly recom-
mend that you read books, trade articles, and/or seek
training from an experienced drill press operator before
performing any unfamiliar operations. 8Yfm\Xcc#pfli
jX]\kpj_flc[Zfd\]`ijk
8cnXpjn\XijX]\kp^cXjj\jn_\efg\i$
Xk`e^k_\[i`ccgi\jj%=X`cli\kfZfdgcp
dXpi\jlck`ej\i`fljg\ijfeXc`ealip%
;FEFK`em\jk`^Xk\gifYc\djfiX[aljk
k_\ [i`cc gi\jj n_`c\ `k `j ilee`e^%
NX`klek`ck_\dXZ_`e\`jklie\[F==#
legcl^^\[ Xe[ Xcc nfib`e^ gXikj
_Xm\Zfd\kfXZfdgc\k\jkfgY\]fi\
gifZ\\[`e^
I<8;Xe[le[\ijkXe[k_`j\ek`i\`ejkilZ$
k`fe dXelXcY\]fi\ lj`e^ k_`j dXZ_`e\%
J\i`flj g\ijfeXc `ealip dXp fZZli `]
jX]\kpXe[fg\iXk`feXc`e]fidXk`fe`jefk
le[\ijkff[ Xe[ ]fccfn\[% ;F EFK i`jb
pflijX]\kpYpefki\X[`e^
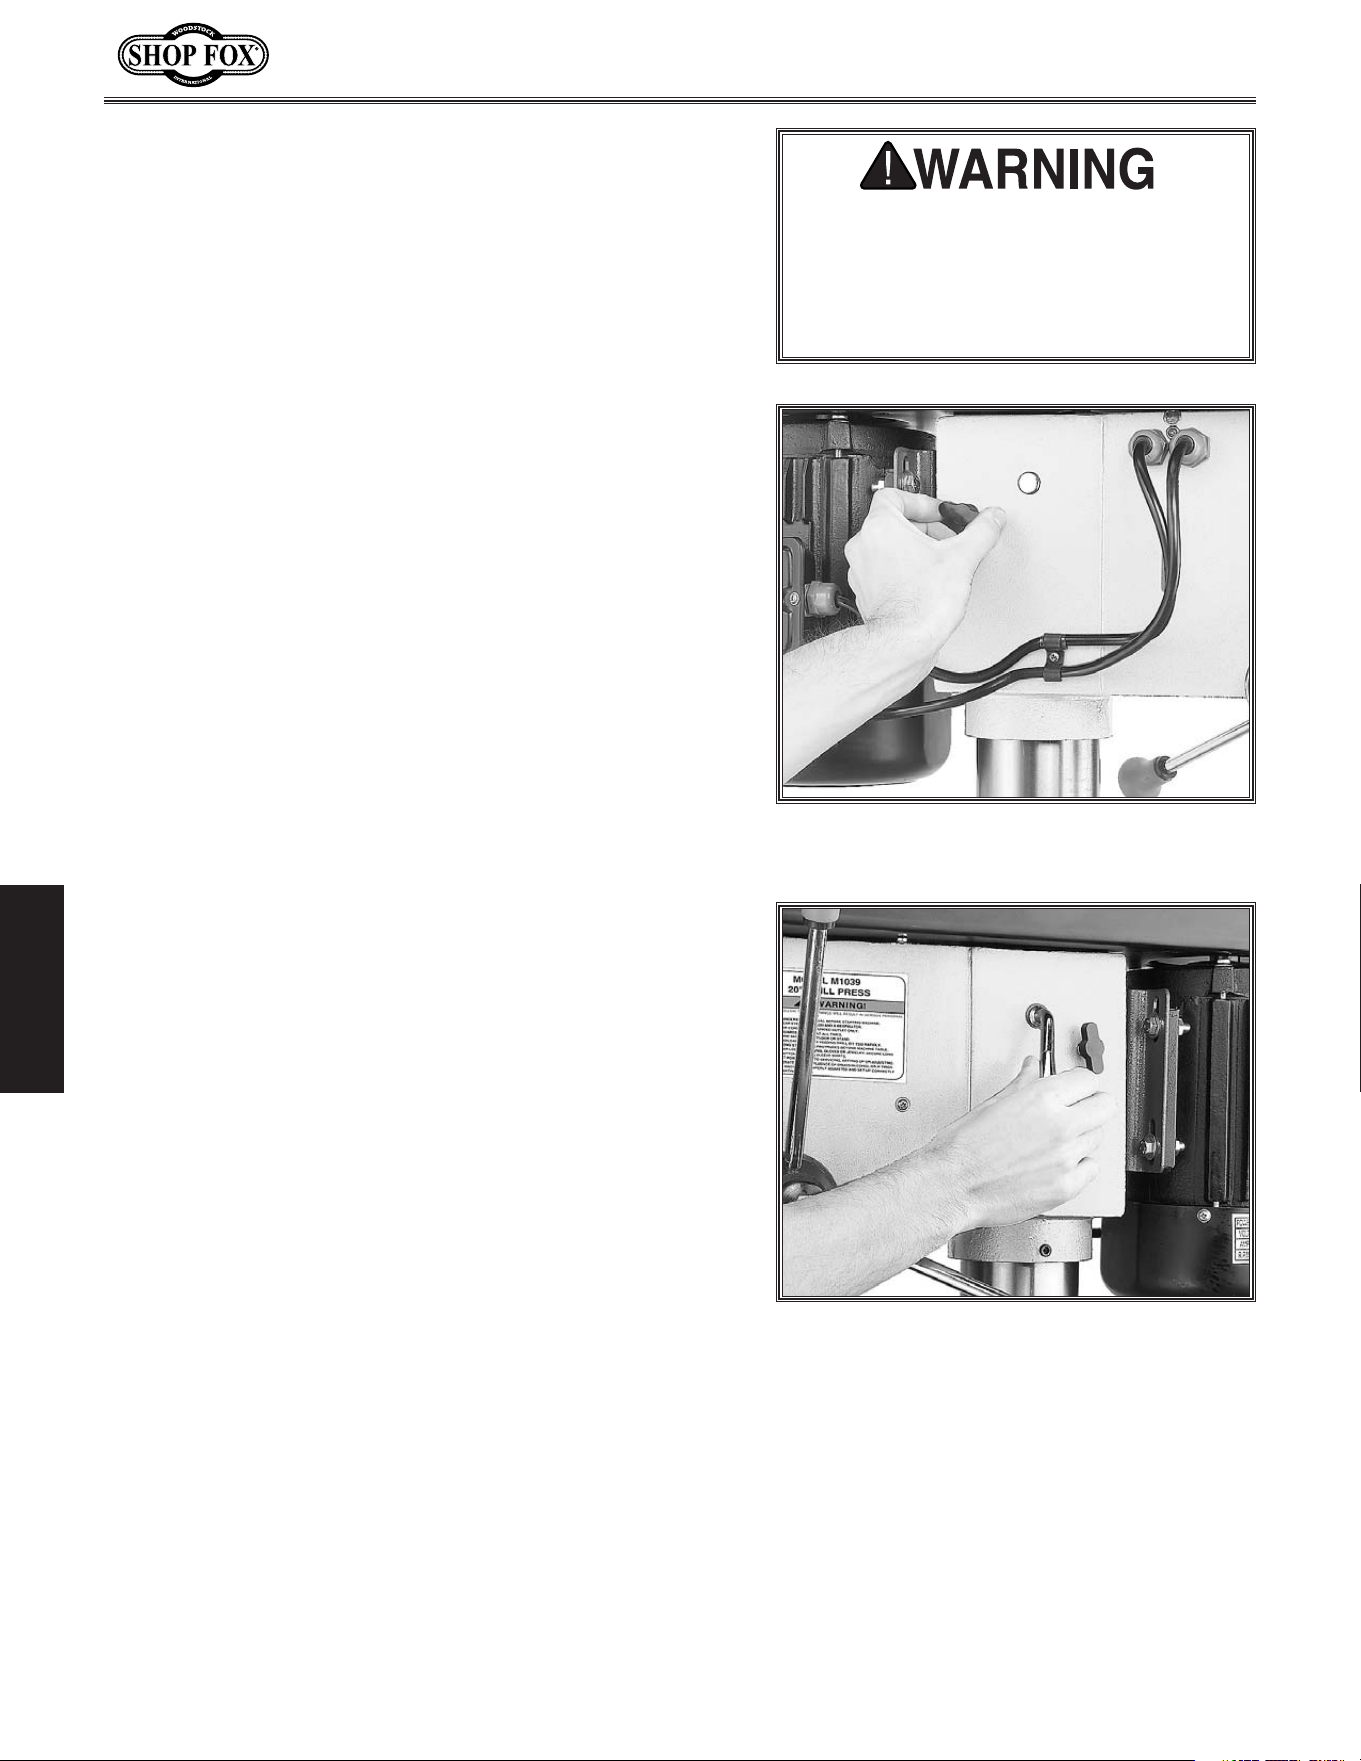
Any drill bit you install in the chuck must be tight enough
that it will not come loose during operation.
Kf`ejkXccX[i`ccY`k#[fk_\j\jk\gj1
(% UNPLUG THE DRILL PRESS!
)% Open the drill chuck wide enough to accept the
shank of the drill bit.
*% Insert the drill bit as far as possible into the chuck
WITHOUT allowing the chuck jaws to touch the flut-
ed portion of the bit, and hand tighten the chuck.
Efk\1 DXb\jli\jdXccY`kjXi\efkkiXgg\[Y\kn\\e
k_\\[^\jf]knfaXnj2`]k_\pXi\#i\`ejkXcck_\
[i`ccY`kfi`kn`ccefkY\j\Zli\\efl^_kflj\%
+% Final tighten the drill bit with the chuck key.
Kfi\dfm\X[i`ccY`k#[fk_\j\jk\gj1
(% UNPLUG THE DRILL PRESS!
)% Use the chuck key to open the drill chuck, and catch
the drill bit with a rag to protect your hands.
@ejkXcc`e^&I\dfm`e^9`kj
-20-
D('*0()$Jg\\[;i`ccGi\jj
FG<I8K@FEJ
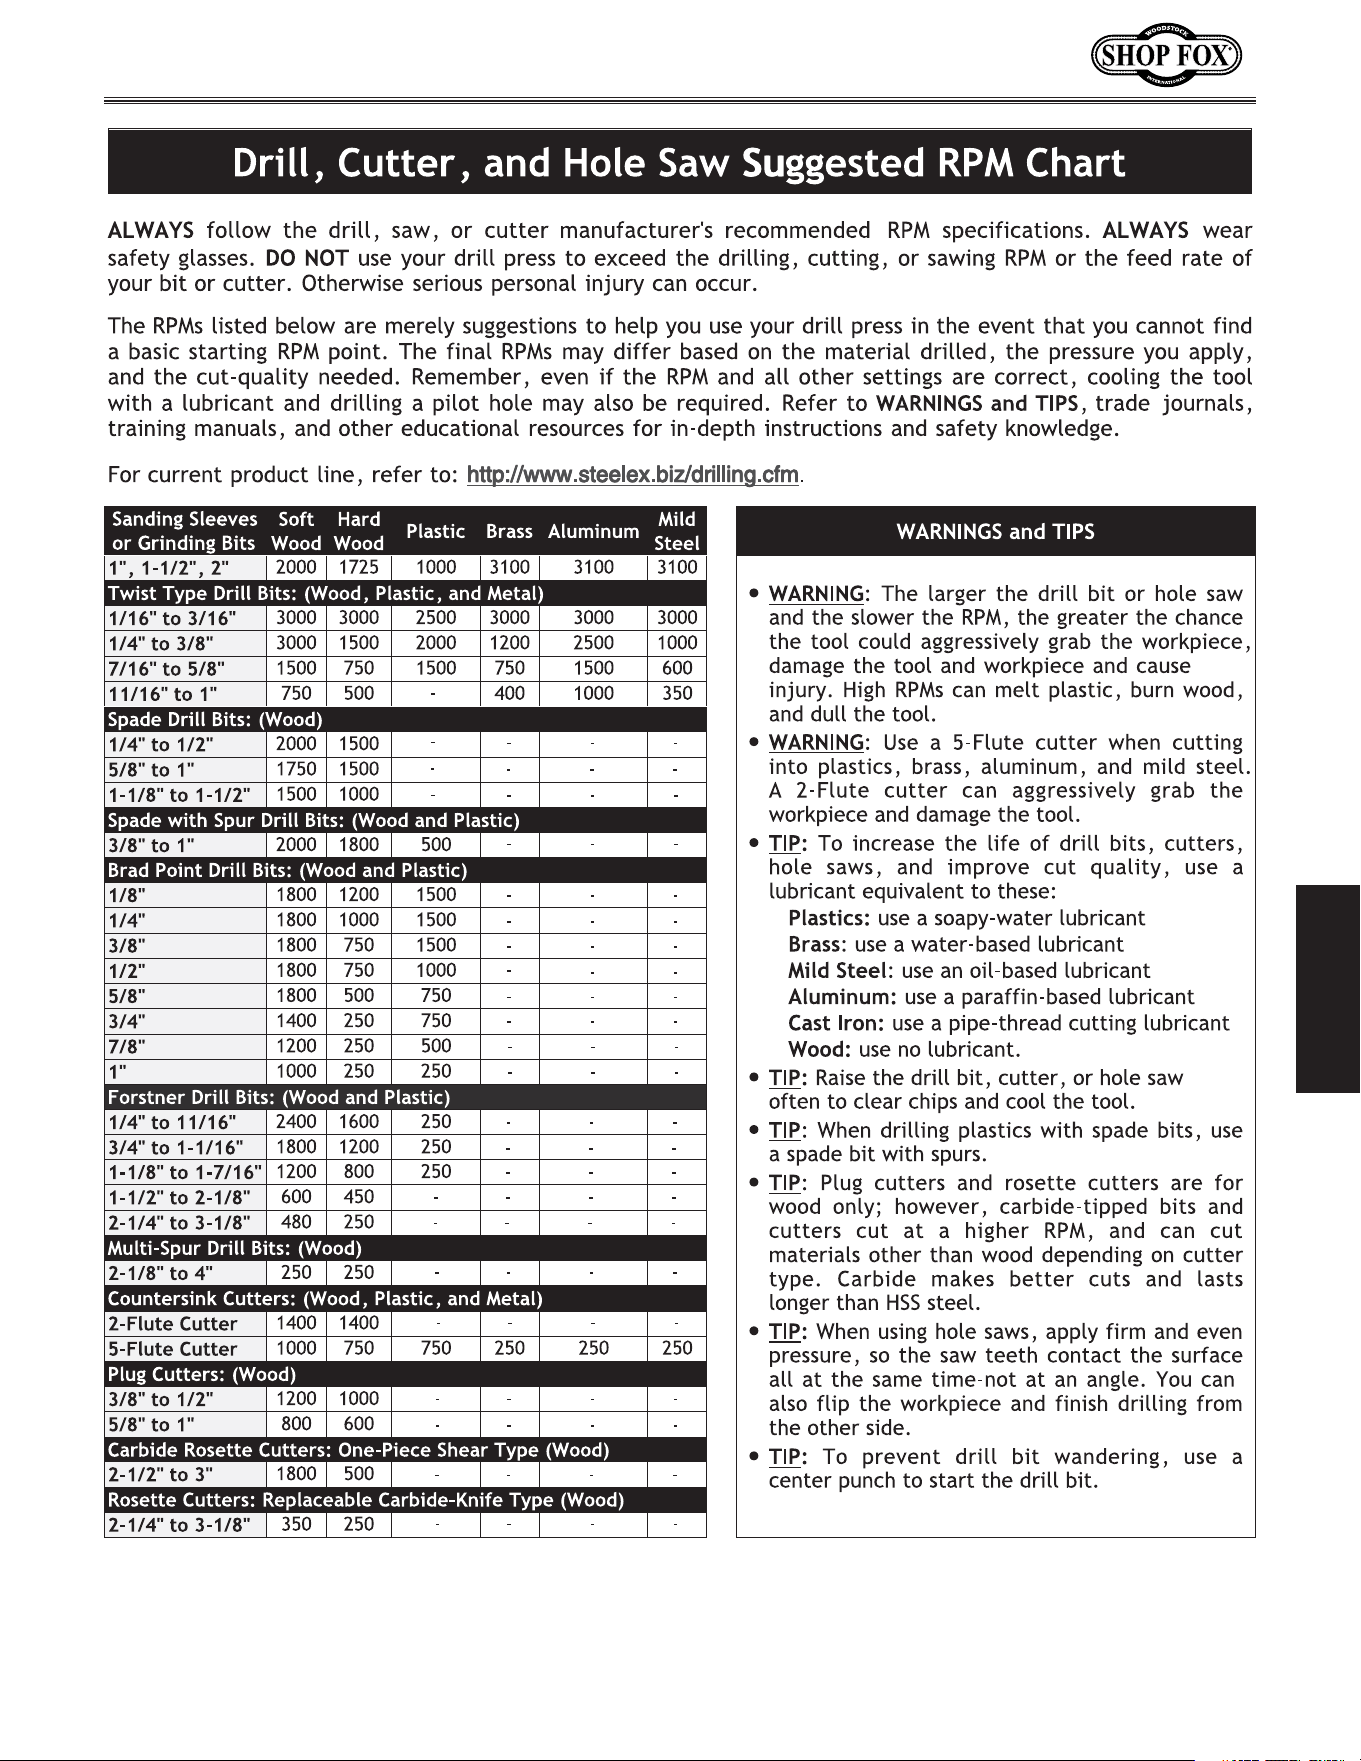
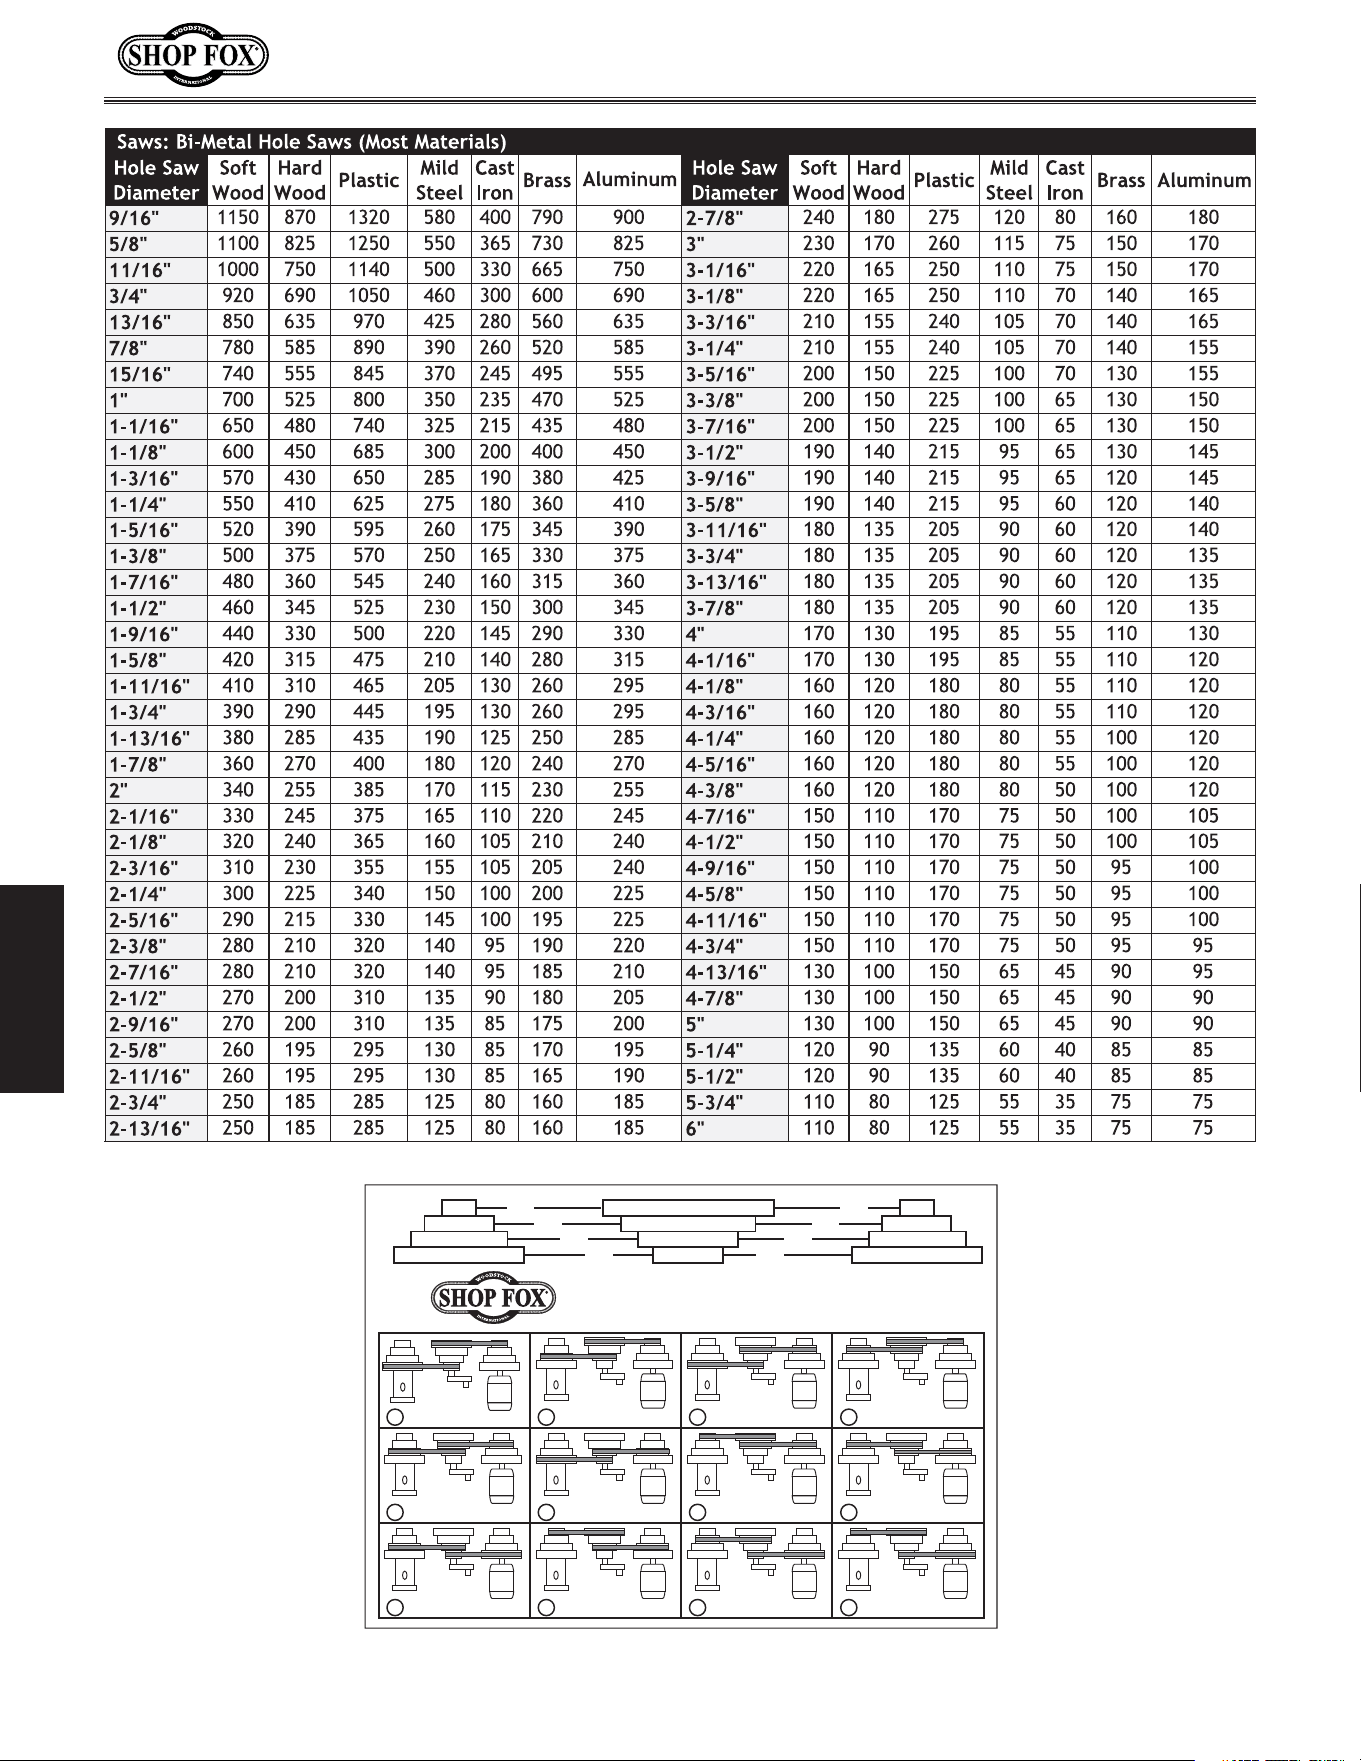
Lj`e^k_\;i`cc9`kJg\\[:_Xikj
The charts shown on GX^\)' & GX^\)(are intended as
guides only. Always follow the manufacturer's speed rec-
ommendations if provided with your drill bits, cutters, or
hole saws. Exceeding the recommended speeds may be
dangerous.
The speeds shown are intended to get you started. The
optimum speed will always depend on various factors,
including tool diameter, drilling pressure, material hard-
ness, material quality, and desired finish.
:_ffj`e^Jg\\[j
8cnXpj\ejli\Y`kjXi\`ejkXcc\[gifg$
\icp9<=FI<klie`e^k_\dXZ_`e\FE%
=X`cli\kf]fccfnZfii\Zk[i`ccY`k`ejkXc$
cXk`fe gifZ\[li\j ZXe c\X[ kf j\i`flj
g\ijfeXc`ealip%
The belts in the head of the drill press must be rear-
ranged to change speeds. A chart under the belt cover
shows the belt positions needed to make the drill press
run at the desired speed.
KfZ_Xe^\jg\\[j#[fk_\j\jk\gj1
(% UNPLUG THE DRILL PRESS!
)% Loosen the belt tension lock knobs (shown in =`^li\
)*) on both sides of the headstock, so the motor is
free to move.
*% Rotate the belt tension lever counterclockwise, as
shown in =`^li\)+, to take tension off the V-belts.
+% Locate the desired speed on the speed chart under
the belt cover and move the V-belts to the desired
V-grooves on the motor, idler, and spindle pulleys.
=fi<oXdgc\1 As indicated on the drill press speed
chart on GX^\)(, a belt combination of A-2 creates
670 RPM.
Efk\1 9fk_Y\ckjdXp_Xm\kfY\i\dfm\[Y\]fi\
Z\ikX`ejg\\[Z_Xe^\jZXeY\dX[\%
,% Rotate the belt tension lever until the belts are
tight. Tighten both lock knobs.
-% Close the cover before plugging in the machine.
:_Xe^`e^Jg\\[j
=`^li\)+% Using the belt tension lever.
=`^li\)*% Loosening the lock knobs
(both sides).
-21-
D('*0()$Jg\\[;i`ccGi\jj
FG<I8K@FEJ
-22-
D('*0()$Jg\\[;i`ccGi\jj
FG<I8K@FEJ
-/$%,-
30%%$$2),,02%33
HE>C9A:HE::9H:II>C<HGEB
&'&%GEB7:AI6") '(&%GEB7:AI7") ()%%GEB7:AI6"( )))%GEB7:AI8")
*+(%GEB7:AI7"( ++,%GEB7:AI6"' ,&'+%GEB7:AI9"( -&)(%GEB7:AI8"'
.&+*%GEB7:AI7"& &%'%*%GEB7:AI9"' &&'(*%GEB7:AI8"& &'((%%GEB7:AI9"&
&6
'7
8 (
)9
=`^li\),. Belt configuration and speed settings.
-23-
D('*0()$Jg\\[;i`ccGi\jj
FG<I8K@FEJ
The Model M1039 is designed for drilling holes in wood
or metal. The basic operation of a drill press is lining up
your drill bit with the intended hole location, turning the
drill press FE, and using the down feed levers to move
the spinning drill bit into the workpiece.
=fijX]\fg\iXk`feXe[fgk`dldi\jlckj#`k`jm\ip
`dgfikXekkf]fccfnk_\j\^l`[\c`e\jXe[k_fj\feGX^\
)' n_\e[i`cc`e^1
:C<8I@E>:?@GJ1 Raise the drill bit often to clear chips
and cool the drill bit. This will ease the work of the drill
press motor and extend the life of your drill bits.
J<:LI@E>NFIBG@<:<KFK89C<1 Secure the workpiece
to the table or in a vise that is secured to the table
before drilling.
GIFK<:K@E>K89C<1 Protect the table by placing the
workpiece on scrap wood, or center the location of the
hole to be drilled over the pocket in the table when
through drilling. Also, make use of the depth stop so that
the drill bit goes no deeper than necessary.
LJ@E>:FII<:KJG<<;J1 Use the correct speed for the
diameter of the drill bit being used and the type of mate-
rial being drilled. Refer to the ;i`cc9`kJg\\[:_Xikj on
GX^\)' & GX^\)(to help you choose the correct speed
for your application.
;i`cc`e^
The Model M1039 has a depth stop that allows you to drill
repeated non-through holes of same depth every time.
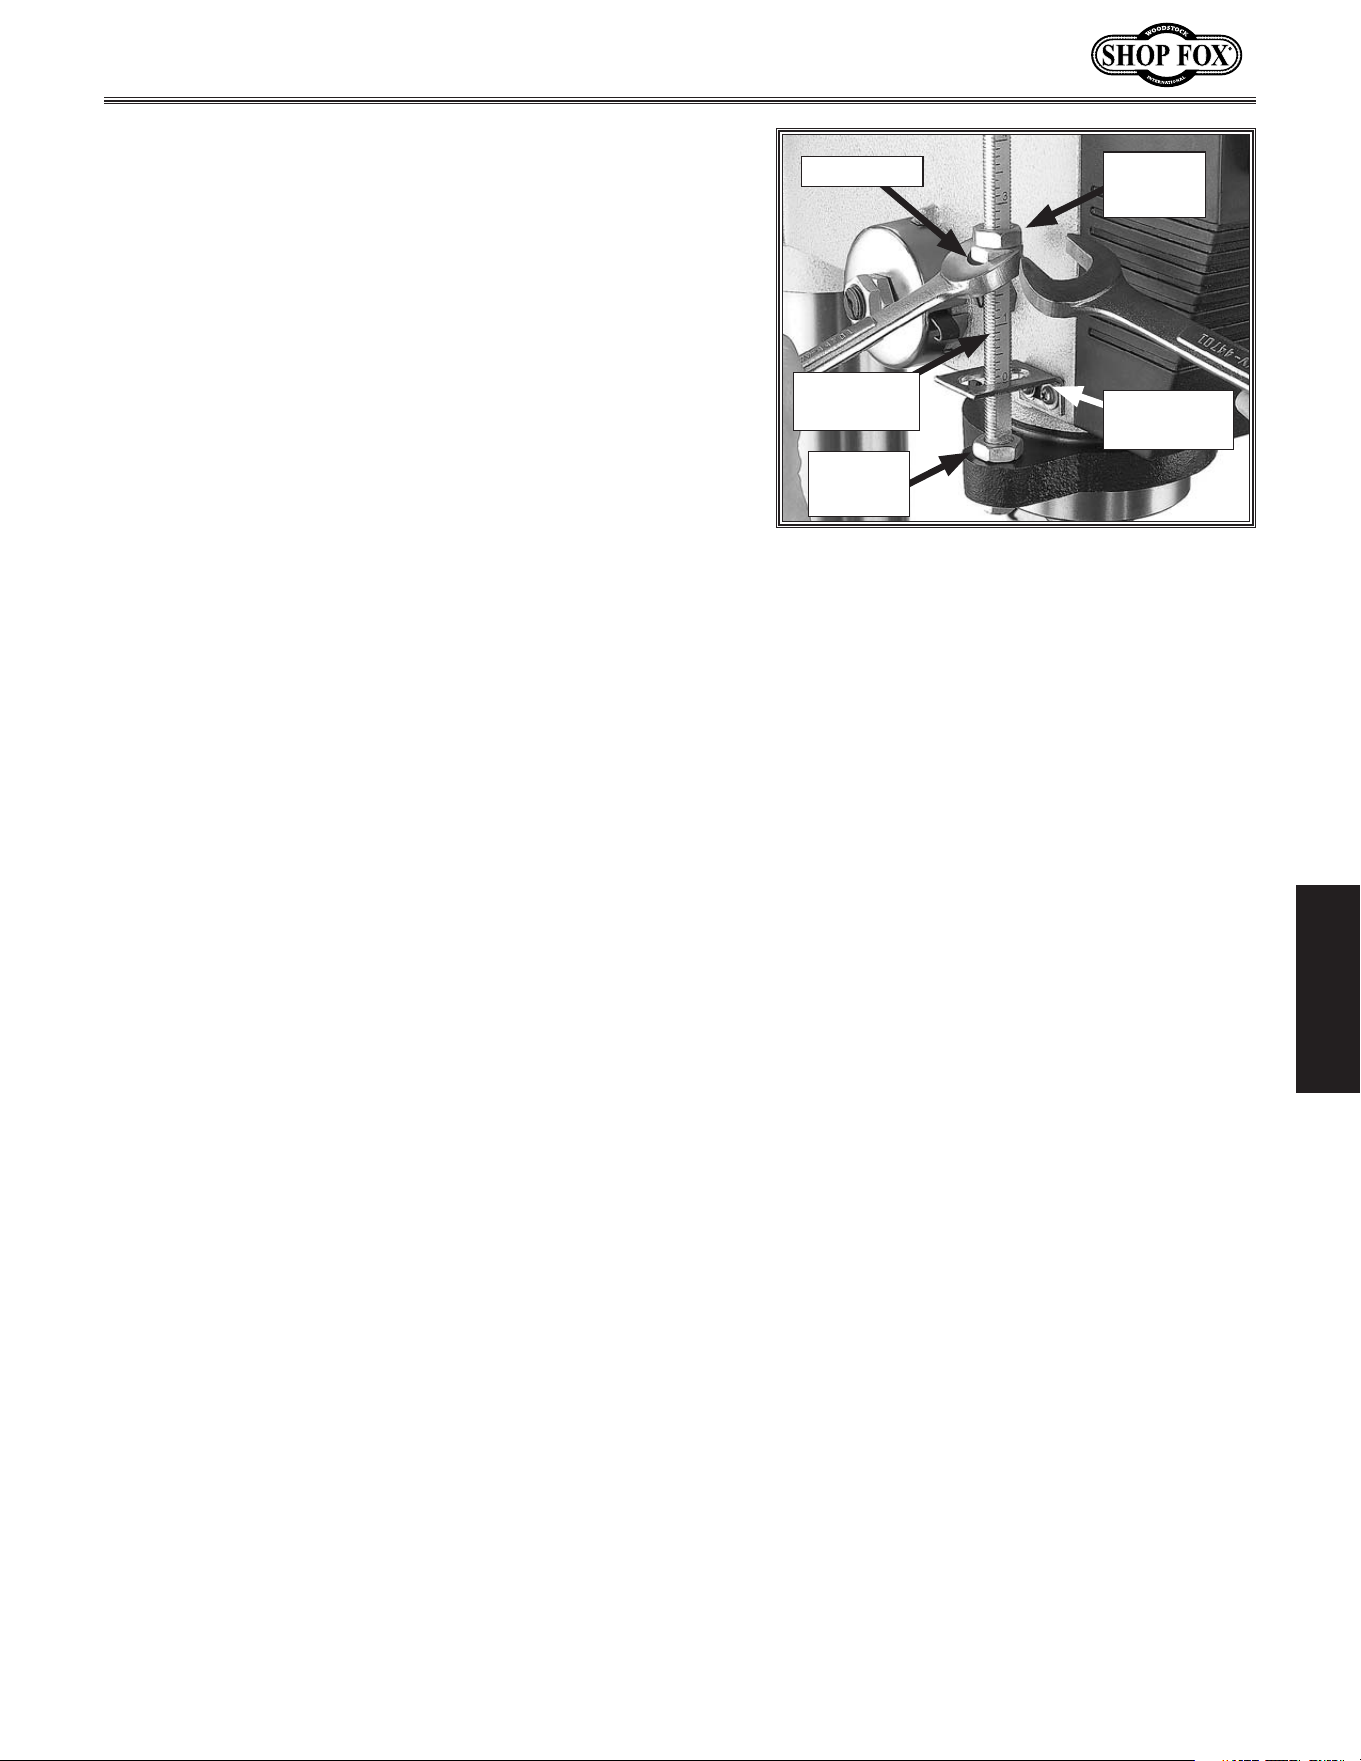
The depth stop consists of a stud attached to the quill,
with two hex nuts that can be lowered or raised on the
stud so the lower nut (depth nut) hits a stop bracket
when the drill bit is lowered. The upper hex nut (upper
jam nut) is then used to secure the depth nut in place
so it doesn't move with repeated operations. =`^li\)-
shows the various depth stop components.
Kfj\kk_\[\gk_jkfg#[fk_\j\jk\gj1
(% Lower the drill bit to the required height.
)% Thread the depth nut against the stop bracket.
;\gk_Jkfg
=`^li\)-% Depth stop components.
Depth Nut
Upper
Jam Nut
Depth
Stop Stud
Depth Stop
Bracket
Lower
Jam Nut
-24-
D('*0()$Jg\\[;i`ccGi\jj
FG<I8K@FEJ
8[aljk`e^KXYc\
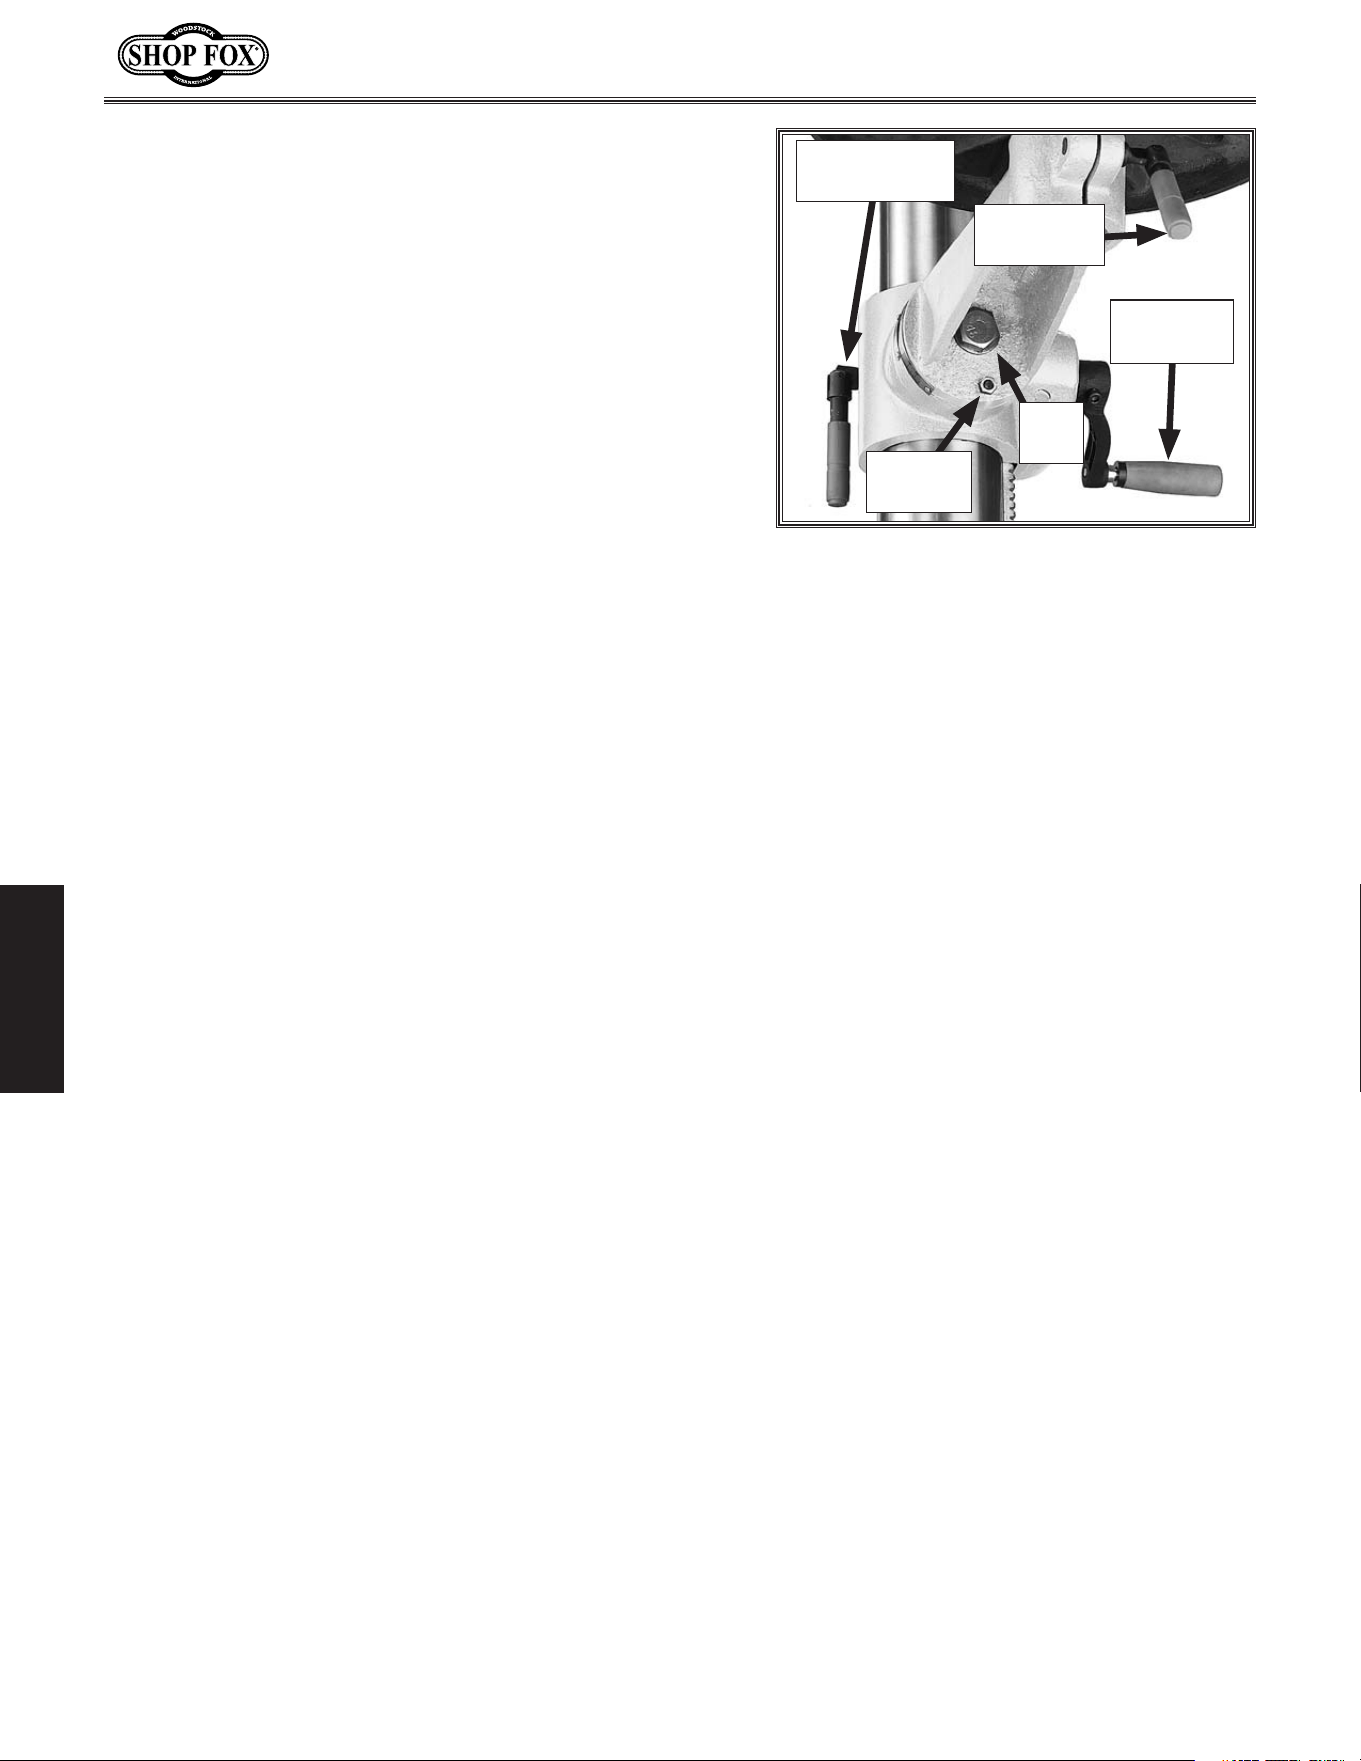
The table can be raised/lowered, rotated, and tilted
90º left or right. Table adjustment controls are shown in
=`^li\)..
KXYc\?\`^_k
(% Loosen the large lock lever.
)% Adjust the height.
*% Lock the large lock lever.
KXYc\IfkXk`fe
(% Loosen the small lock lever.
)% Rotate the table as necessary.
*% Lock the table small lock lever.
KXYc\K`ck
(% Tighten the location pin nut to draw the location pin
out of the hole.
Efk\1 K_\cfZXk`feg`e`j]i`Zk`fe]`k`ek_\_fc\
kfcfZbk_\kXYc\Xk'²%N_\ei\`ejkXcc`e^#j\kk_\
kXYc\kf'²#YXZbk_\elkf]]#Xe[kXgk_\g`eYXZb
`ek_\_fc\%
)% Loosen the lock bolt and tilt the table to the desired
angle (make sure table lock lever is locked, so the
table won't fall out).
*% Tighten the lock nut bolt.
=`^li\).% Typical table adjustment
controls.
Large Lock
Lever
Location
Pin Nut
Crank
Handle
Small Lock
Lever
Lock
Bolt
*% Lower the upper jam nut against the depth nut.
+% Using wrenches, hold the depth nut in place and
tighten the upper jam nut against the depth nut.
Efk\1 K_\jZXc\fek_\[\gk_jkfgZXeY\i\ZXc`YiXk$
\[`]`k^\kjdfm\[fi_XjZ_Xe^\[j`eZ\k_\]XZkfip
j\kk`e^%I\]\ikf;\gk_Jkfg:Xc`YiXk`fefeGX^\
)-]fi`ejkilZk`fejfe_fnk_`j`j[fe\%
-25-
D('*0()$Jg\\[;i`ccGi\jj
FG<I8K@FEJ
The arbor can be removed to install other Morse Taper
tooling in the spindle. A drift key is included to help
remove the arbor or other tooling from the spindle.
Usually, once the chuck and arbor have been properly
mounted together, they are considered semi-perma-
nent connections. (If you would like to install a differ-
ent chuck, we recommend getting a new arbor for that
chuck.)
Kfi\dfm\k_\[i`ccZ_lZbXe[XiYfi#[fk_\j\jk\gj1
(% UNPLUG THE DRILL PRESS!
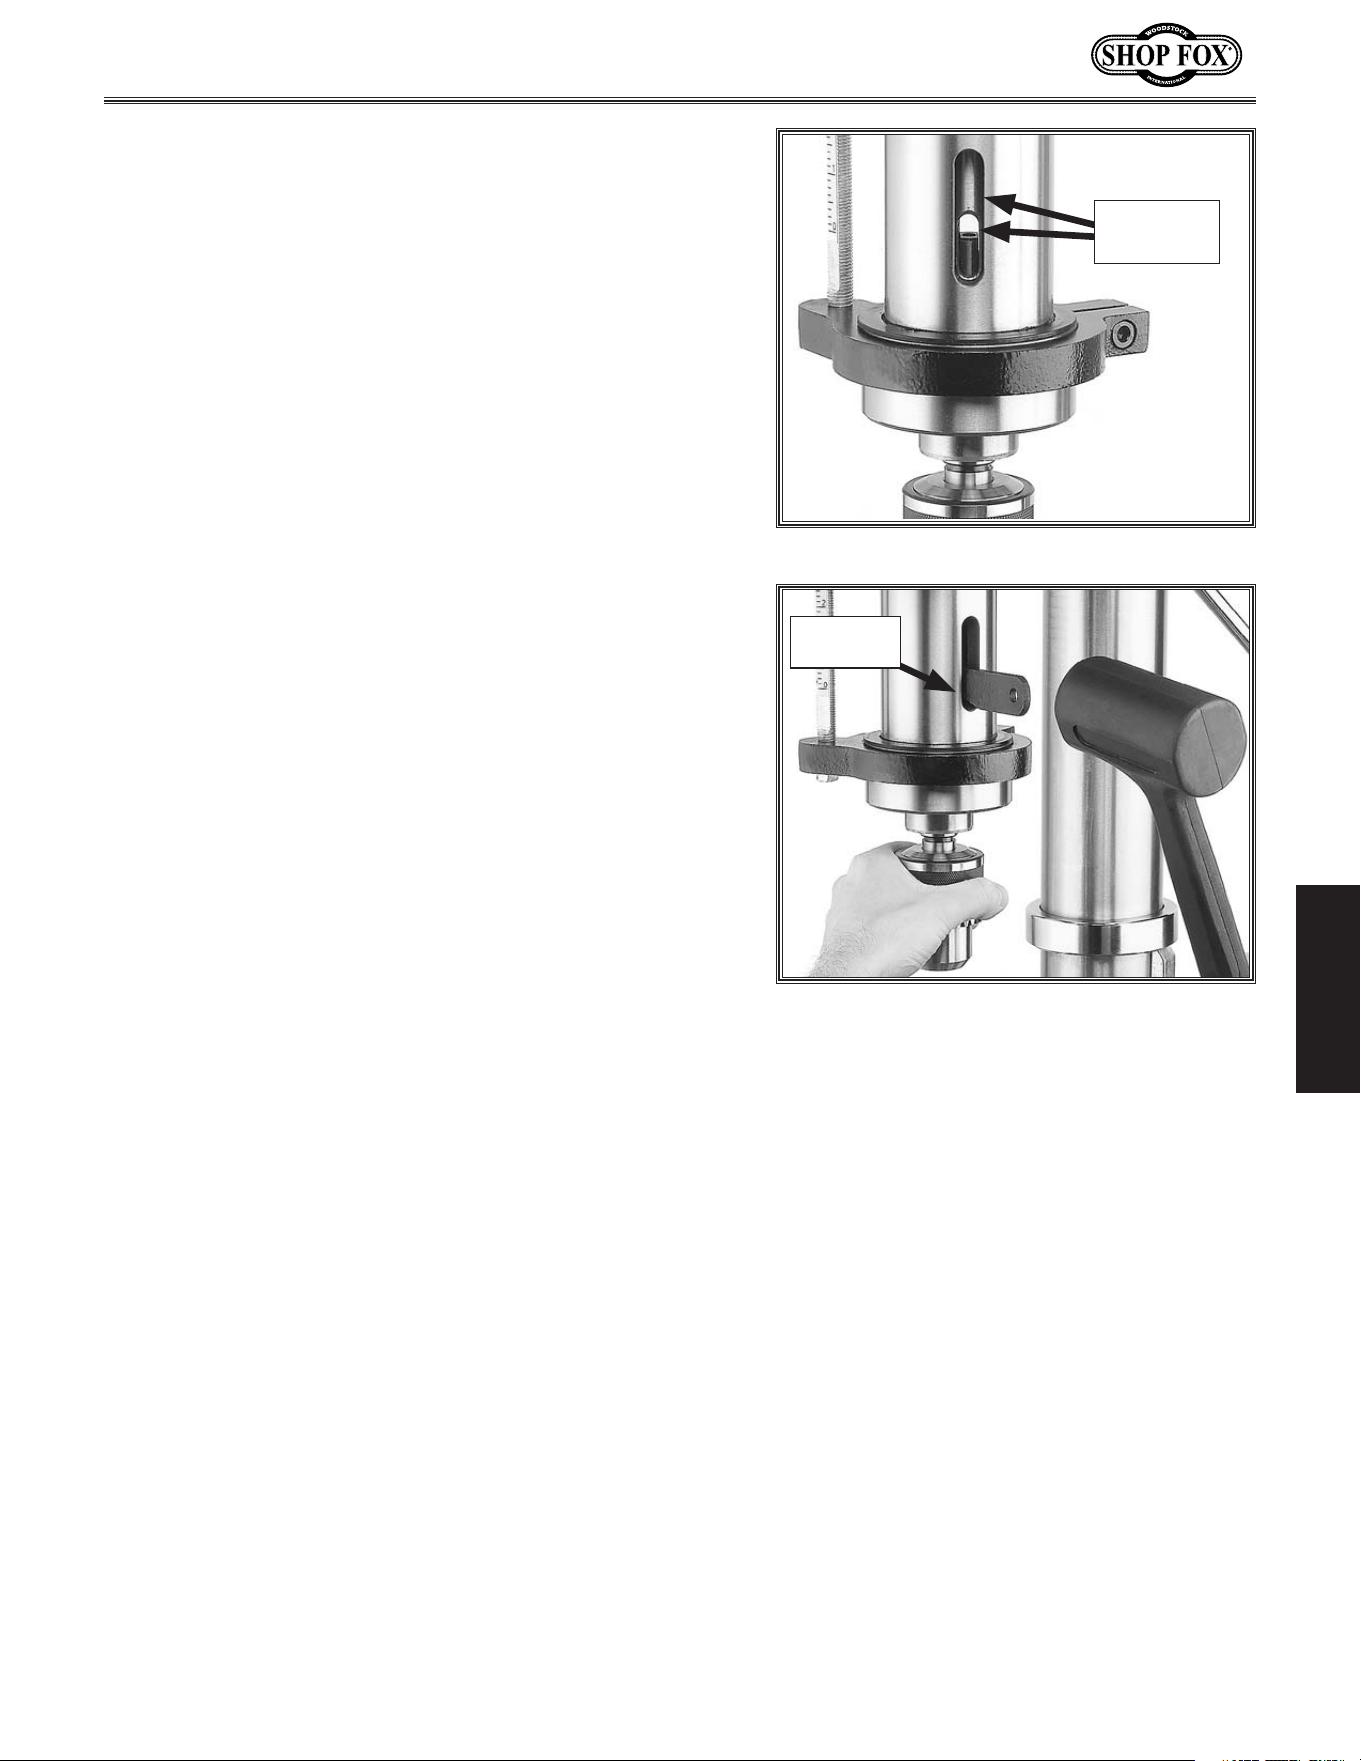
)% Rotate the spindle handles until the drift key slot is
exposed in the side of the quill.
*% Tighten the lower jam nut against the depth stop
bracket. The quill should not return up into the
head casting when the depth stop is adjusted this
way.
+% Rotate the spindle until the inner drift key slot is
aligned with the outer slot, as shown in =`^li\)/.
You will see through the spindle when the slot is
properly aligned.
,% Insert the drift key into the drift key slot.
-% Hold a downfeed handle with one hand, and slightly
loosen the lower jam nut with the other hand. This
will allow the quill to rise, trapping the drift key.
.% Hold the drill chuck with one hand, and tap on the
drift key with a rubber or wooden mallet, as shown
in =`^li\)0, until the arbor releases from the spin-
dle taper.
/% Hold a downfeed handle with one hand, and loosen
the lower jam nut with the other hand.
0% Carefully retract the quill into the head stock.
8iYfiI\dfmXc
=`^li\)0% Arbor removal.
=`^li\)/% Drift key slots aligned.
Both Slots
Aligned
Drift Key
-26-
D('*0()$Jg\\[;i`ccGi\jj
D8@EK<E8E:<
D8@EK<E8E:<
ClYi`ZXk`fe
Since all bearings are sealed and per-
manently lubricated, simply leave them
alone until they need to be replaced. Do
not lubricate them.
Regular periodic maintenance on your E:AB8AJ
®
Model M1039 will ensure its optimum performance. Make
a habit of inspecting your machine each time you use it.
:_\Zb]fik_\]fccfn`e^Zfe[`k`fejXe[i\gX`ifi
i\gcXZ\n_\ee\Z\jjXip1
Loose mounting bolts.
Loose chuck and/or arbor.
Worn switch.
Worn or damaged cords and plugs.
Damaged V-belt.
Any other condition that could hamper the safe
operation of this machine.
Frequently blow-off sawdust with compressed air. This is
especially important for the internal working parts and
motor. Dust build-up around the motor is a sure way to
decrease its life span.
Occasionally it will become necessary to clean the inter-
nal parts with more than compressed air. To do this,
remove the table top and clean the internal parts with
a citrus cleaner or mineral spirits and a stiff wire brush
or steel wool. Make sure the internal workings are dry
before using the saw again, so that wood dust will not
accumulate. If any essential lubrication is removed dur-
ing cleaning, relubricate those areas.
Tables can be kept rust-free with regular applications
of products like SLIPIT. For long term storage you may
want to consider products like Boeshield T-9.
KXYc\#:fclde#9Xj\
:c\Xe`e^
>\e\iXc
D8B< JLI< k_Xk pfli dXZ_`e\ `j
legcl^^\[[li`e^ Xcc dX`ek\eXeZ\gif$
Z\[li\j@]k_`jnXie`e^`j`^efi\[#j\i`$
fljg\ijfeXc`ealipdXpfZZli%
M$9\ckj
Inspect regularly for tension and wear.
Check pulleys to ensure that they are
properly aligned. See :_Xe^`e^Jg\\[j
on GX^\(0 for more information about
removing/installing belts if you need help
replacing the belts.
-27-
D('*0()$Jg\\[;i`ccGi\jj
J<IM@:<
J<IM@:<
This section covers the most common service adjustments
or procedures that may need to be made during the life
of your machine.
If you require additional machine service not included
in this section, please contact Woodstock International
Technical Support at (360) 734-3482 or send e-mail to:
k\Z_$jlggfik7j_fg]fo%Y`q.
>\e\iXc
D8B< JLI< k_Xk pfli dXZ_`e\ `j
legcl^^\[ [li`e^ Xcc j\im`Z\ gifZ\$
[li\j @] k_`j nXie`e^ `j `^efi\[# j\i`$
fljg\ijfeXc`ealipdXpfZZli%
The drill press comes fitted with a depth stop to use
when drilling multiple holes at the same depth. The scale
on this depth stop can be calibrated if it ever becomes
incorrect.
KfZXc`YiXk\k_\[\gk_jkfg#[fk_\j\jk\gj1
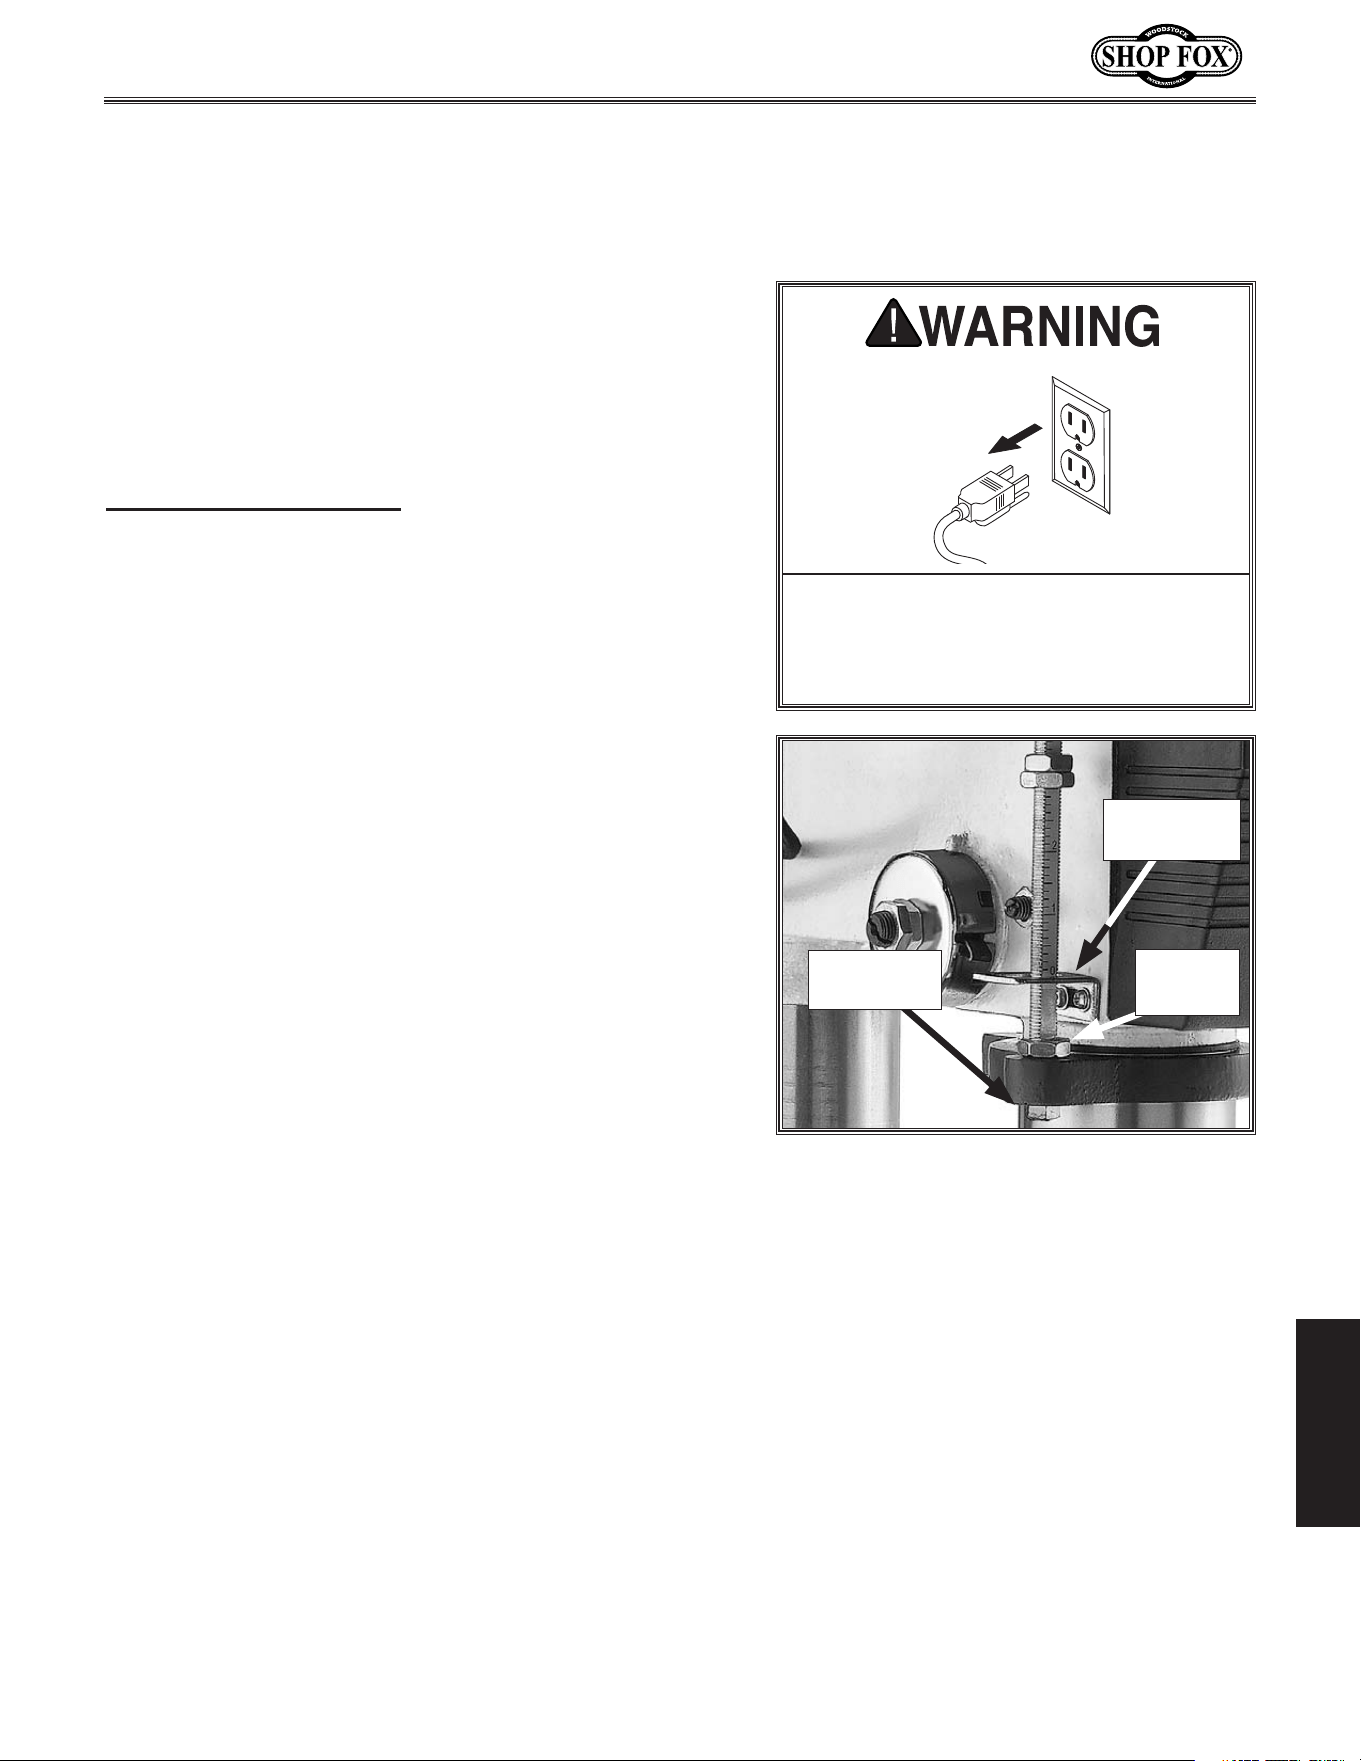
(% Loosen the lower jam nut and calibration nut shown
in=`^li\*'.
)% Use the calibration nut to zero the depth stop scale
with the depth stop bracket.
*% Hold the depth stop at zero, and tighten the lower
jam nut to hold the depth stop in position.
+% Test the depth stop by measuring how far the spin-
dle actually moves with respect to where you set
the depth stop.
;\gk_Jkfg:Xc`YiXk`fe
=`^li\*'% Depth stop calibration.
Lower
Jam Nut
Calibration
Nut
Depth Stop
Bracket
-28-
D('*0()$Jg\\[;i`ccGi\jj
J<IM@:<
The feed shaft return spring is adjusted at the factory;
however, during the life of the drill press you may want
to adjust the feed shaft return spring so the return pres-
sure suits your operating needs.
Kf X[aljk k_\ ]\\[ j_X]k jgi`e^ k\ej`fe# [f k_\j\
jk\gj1
(% UNPLUG THE DRILL PRESS!
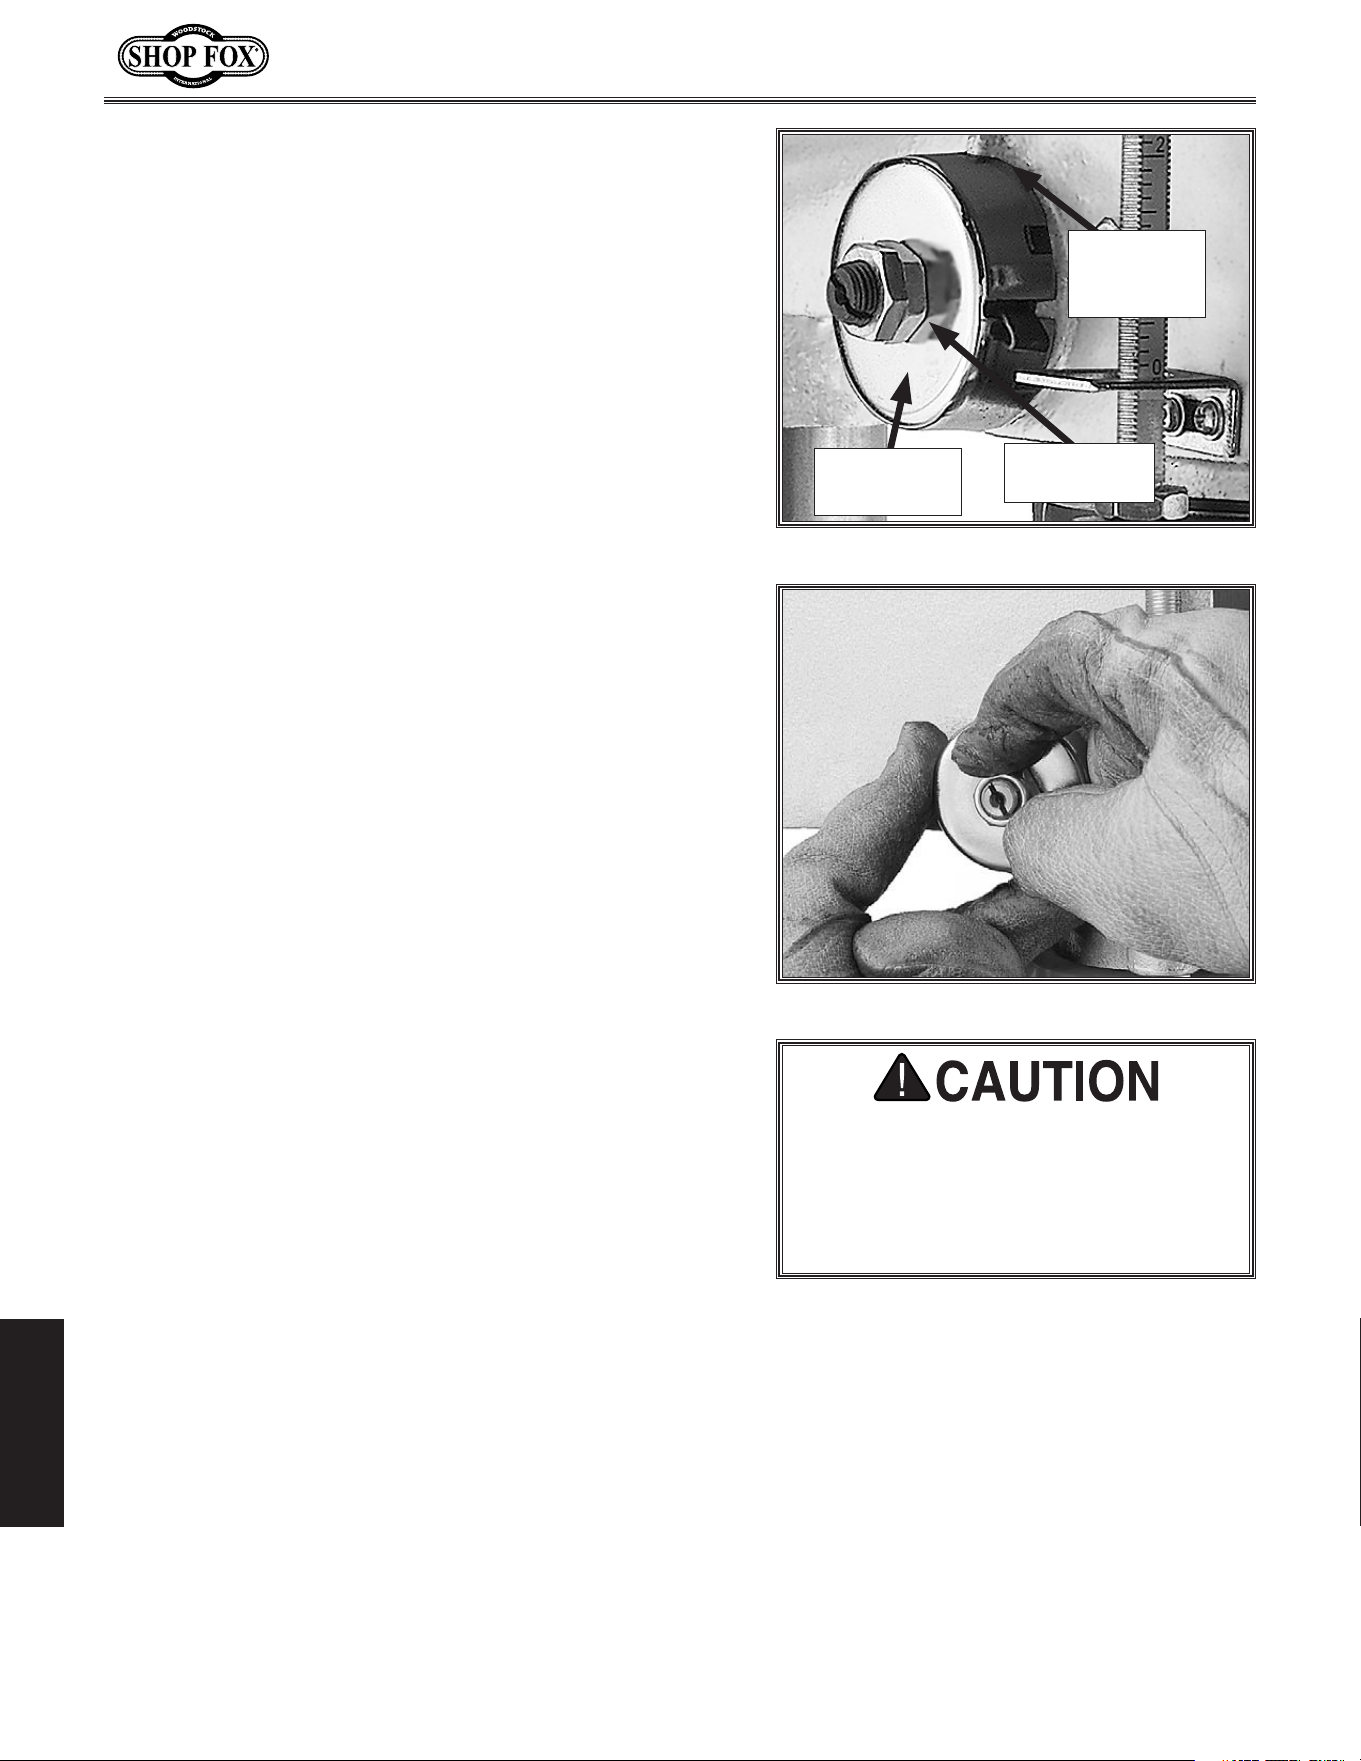
)% Wipe off any oil on the spring lock cover (=`^li\*()
so it does not slip in your fingers when you hold the
cover from spinning.
*% While holding the spring lock cover against the side
of the head stock so the cover stays splined with the
locking lug; loosen the jam nut and loosen the cover
nut approximately
1
⁄4" (see =`^li\*)).
+% Put on heavy leather gloves to protect your hands
from possible lacerations if the spring uncoils during
the next step.
,% Pull the cover outward just enough to disengage the
spring-cover lock slot from the locking lug.
Efk\1 @k`j`dgfikXekkfb\\gX^ff[^i`g[li`e^k_`j
jk\g%C\kk`e^^ff]k_\Zfm\in`ccZXlj\k_\jgi`e^
kfiXg`[cpleZf`c%
-% Rotate the cover counterclockwise to increase spring
tension, or let the cover slowly unwind in the clock-
wise direction to reduce spring tension.
.% Engage the next available spring-cover lock slot with
the locking lug and hold the spring lock cover tightly
against the side of the head stock.
/% Snug the cover nut against the spring cover just
until the nut stops, and then back off the nut
approximately
1
⁄3 turn, or just enough so there is no
binding at complete spindle travel.
0% Hold the cover nut and tighten the jam nut against
the cover nut.
=\\[J_X]kJgi`e^
K\ej`fe
=`^li\*)% Loosening spring nut.
=`^li\*(% Feed shaft spring.
Jam nut and
cover nut
Spring lock
cover
Spring
Cover Lock
Slot
8 _`^_ k\ej`fe Zf`c\[ jgi`e^ `jle[\i$
e\Xk_k_\Zfm\i%Glkfe_\Xmpc\Xk_\i
^cfm\j kf gifk\Zk pflij _Xe[j ]ifd
gfjj`Yc\ cXZ\iXk`fej n_\e i\dfm`e^
k_\Zfm\i%
-29-
D('*0()$Jg\\[;i`ccGi\jj
J<IM@:<
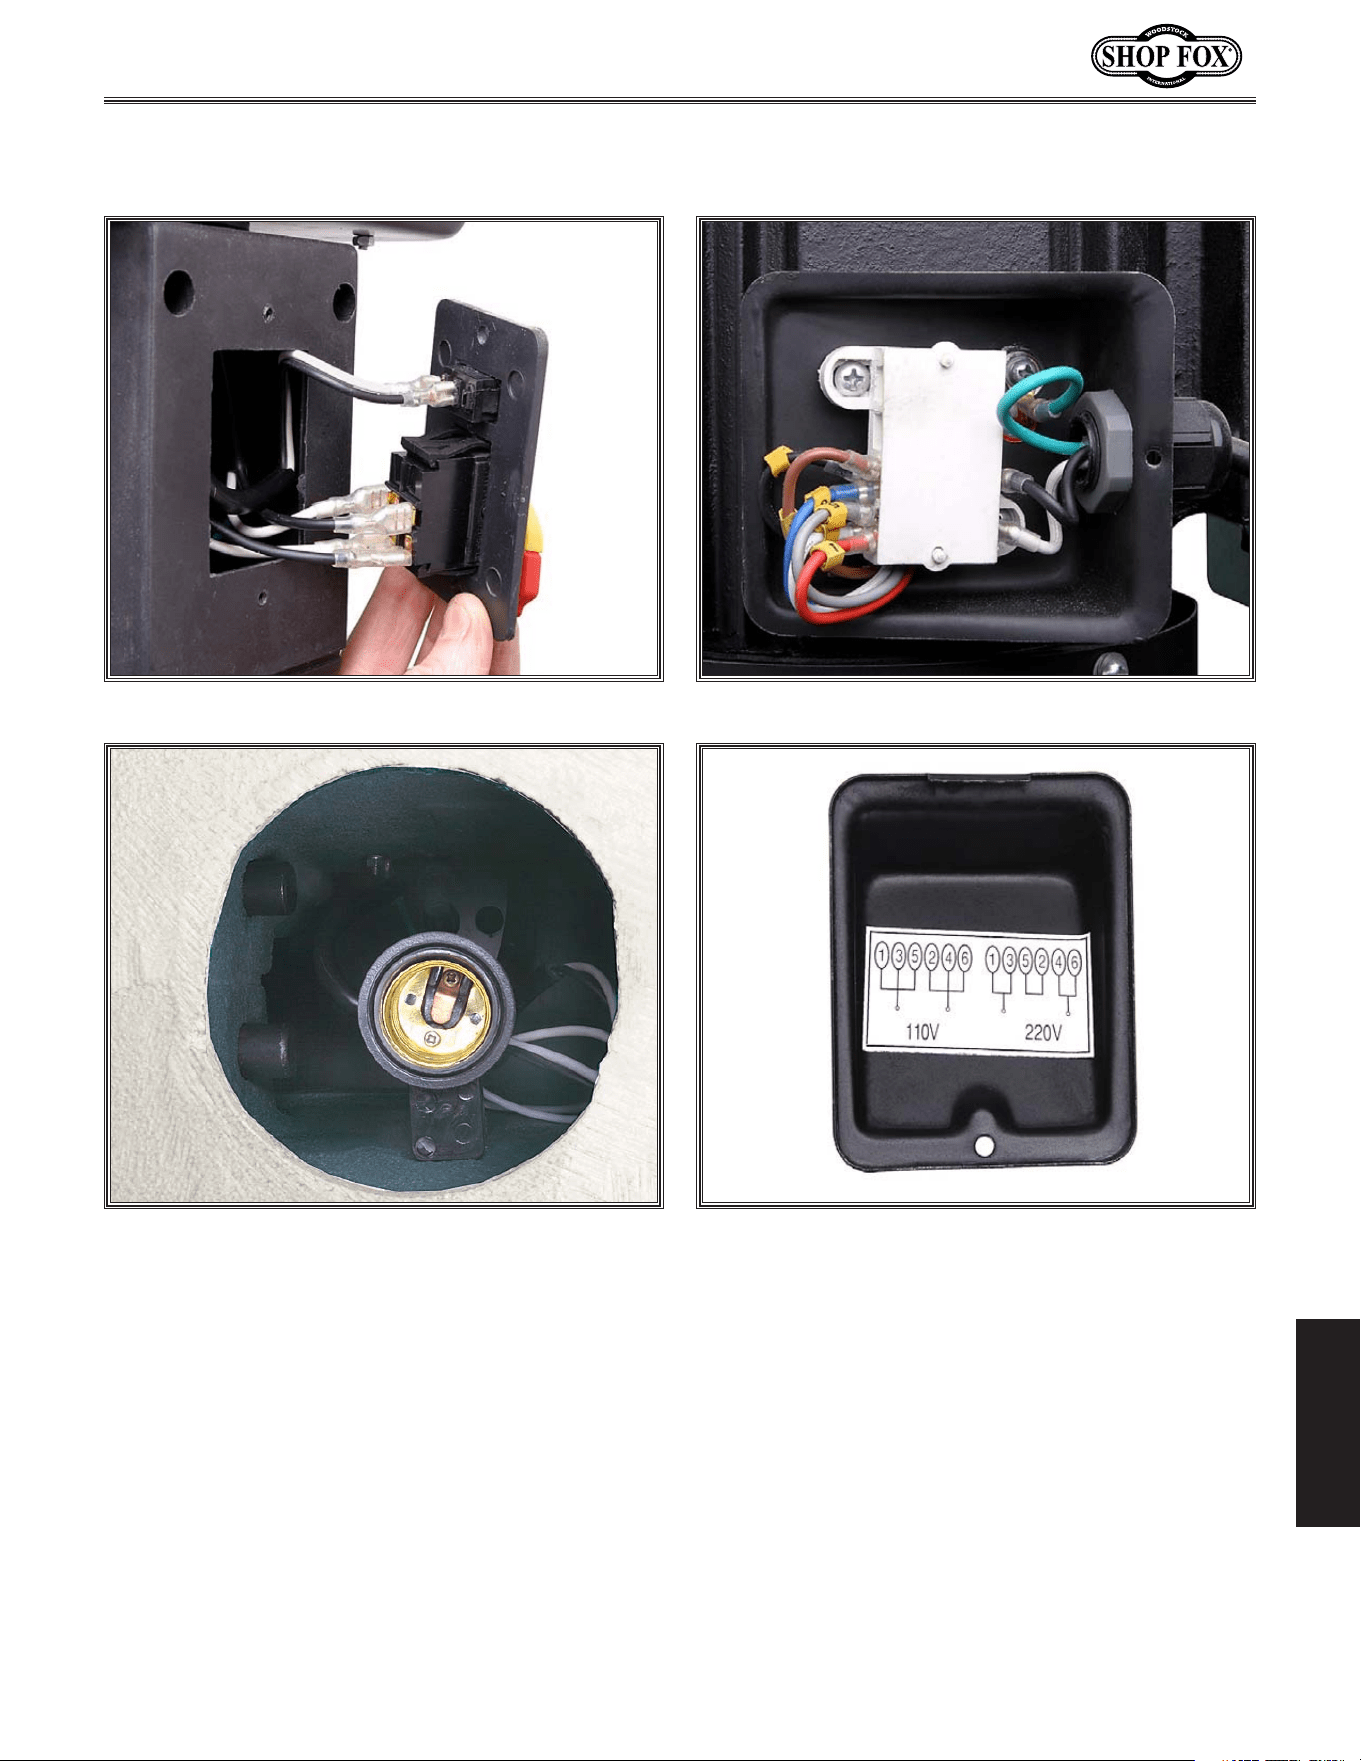
=`^li\**% Power and light switch wiring. =`^li\*,% Motor junction box wiring.
=`^li\*+% 110V light socket. =`^li\*-% Wiring diagram on inside of junction
box cover.
<c\Zki`ZXc:fdgfe\ekj
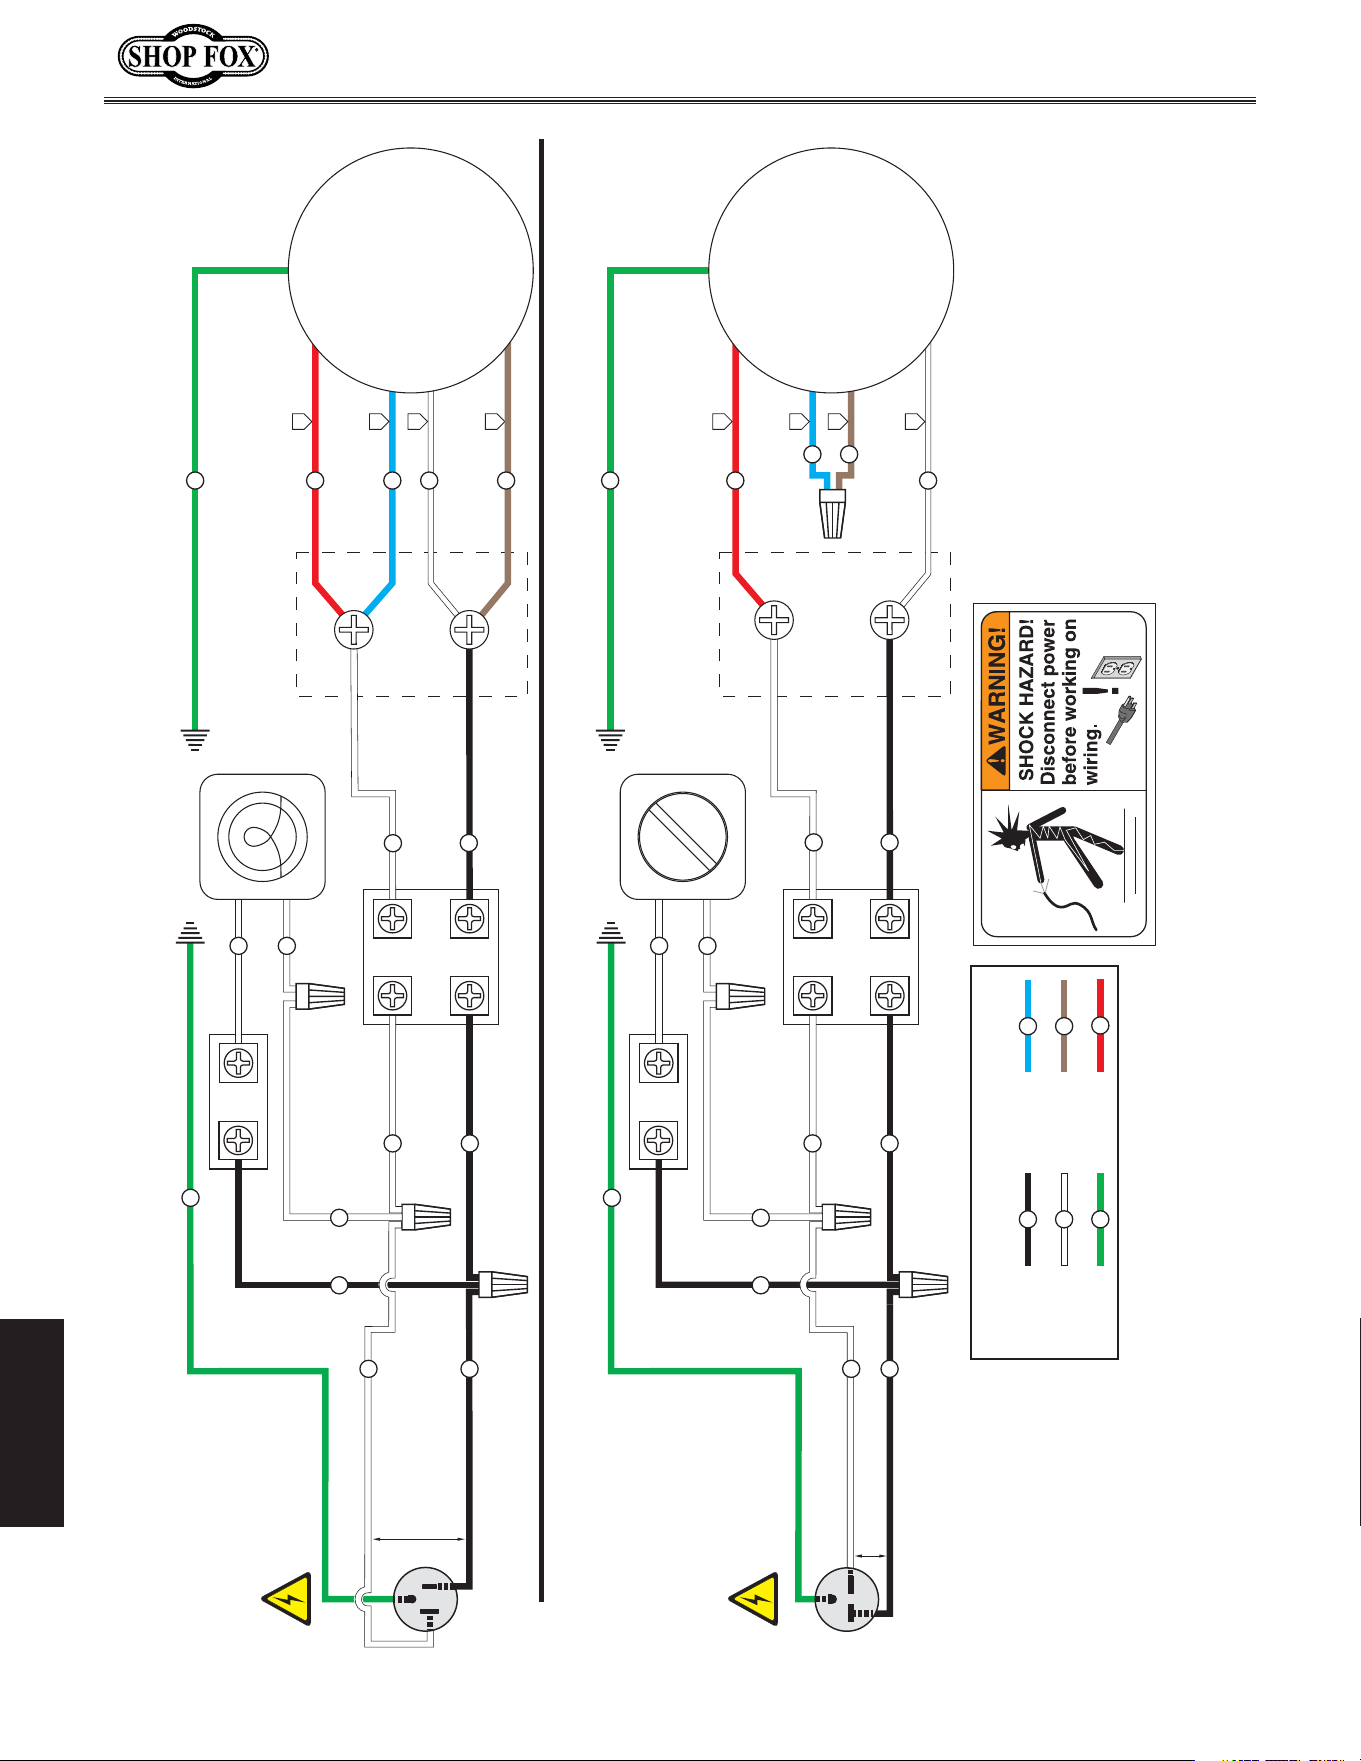
-30-
D('*0()$Jg\\[;i`ccGi\jj
J<IM@:<
EFK@:<1K_\j\dfkfin`i`e^[`X^iXdjXi\Zlii\ekXkk_\k`d\f]gi`ek`e^2_fn\m\i#
XcnXpjlj\k_\[`X^iXdfek_\`ej`[\f]k_\aleZk`feYfoZfm\in_\ei\n`i`e^pflidfkfi
220V WIRING
MOTOR
1-1/2 HP, 1725 RPM
7c
7a
Li
GY
<c
7` Li
7`
Li
Li
Li
Li
(
)
'
&
POWER SWITCH
LIGHT SWITCH
LIGHT SOCKET
AND PLUG
110V WIRING
)
(
'
&
<c
7` Li
7`
Li
Li
Li
POWER SWITCH
LIGHT SWITCH
LIGHT
SOCKET
MOTOR
1-1/2 HP, 1725 RPM
7c
7a
Li
GY
<c
7`
COLOR KEY
7a
7AJ:
7g
7GDLC
GY
G:9
<c
<G::C
Li
L=>I:
7`
7A68@
Neutral
110 VAC
220 VAC
Hot
Ground
NEMA 6-15 Plug
(As recommended)
NEMA 5-15 Plug
(As recommended)
Hot
Ground
Hot
G
7`
<c
G
W
Li
Li
Li
7`
7`
-31-
D('*0()$Jg\\[;i`ccGi\jj
J<IM@:<
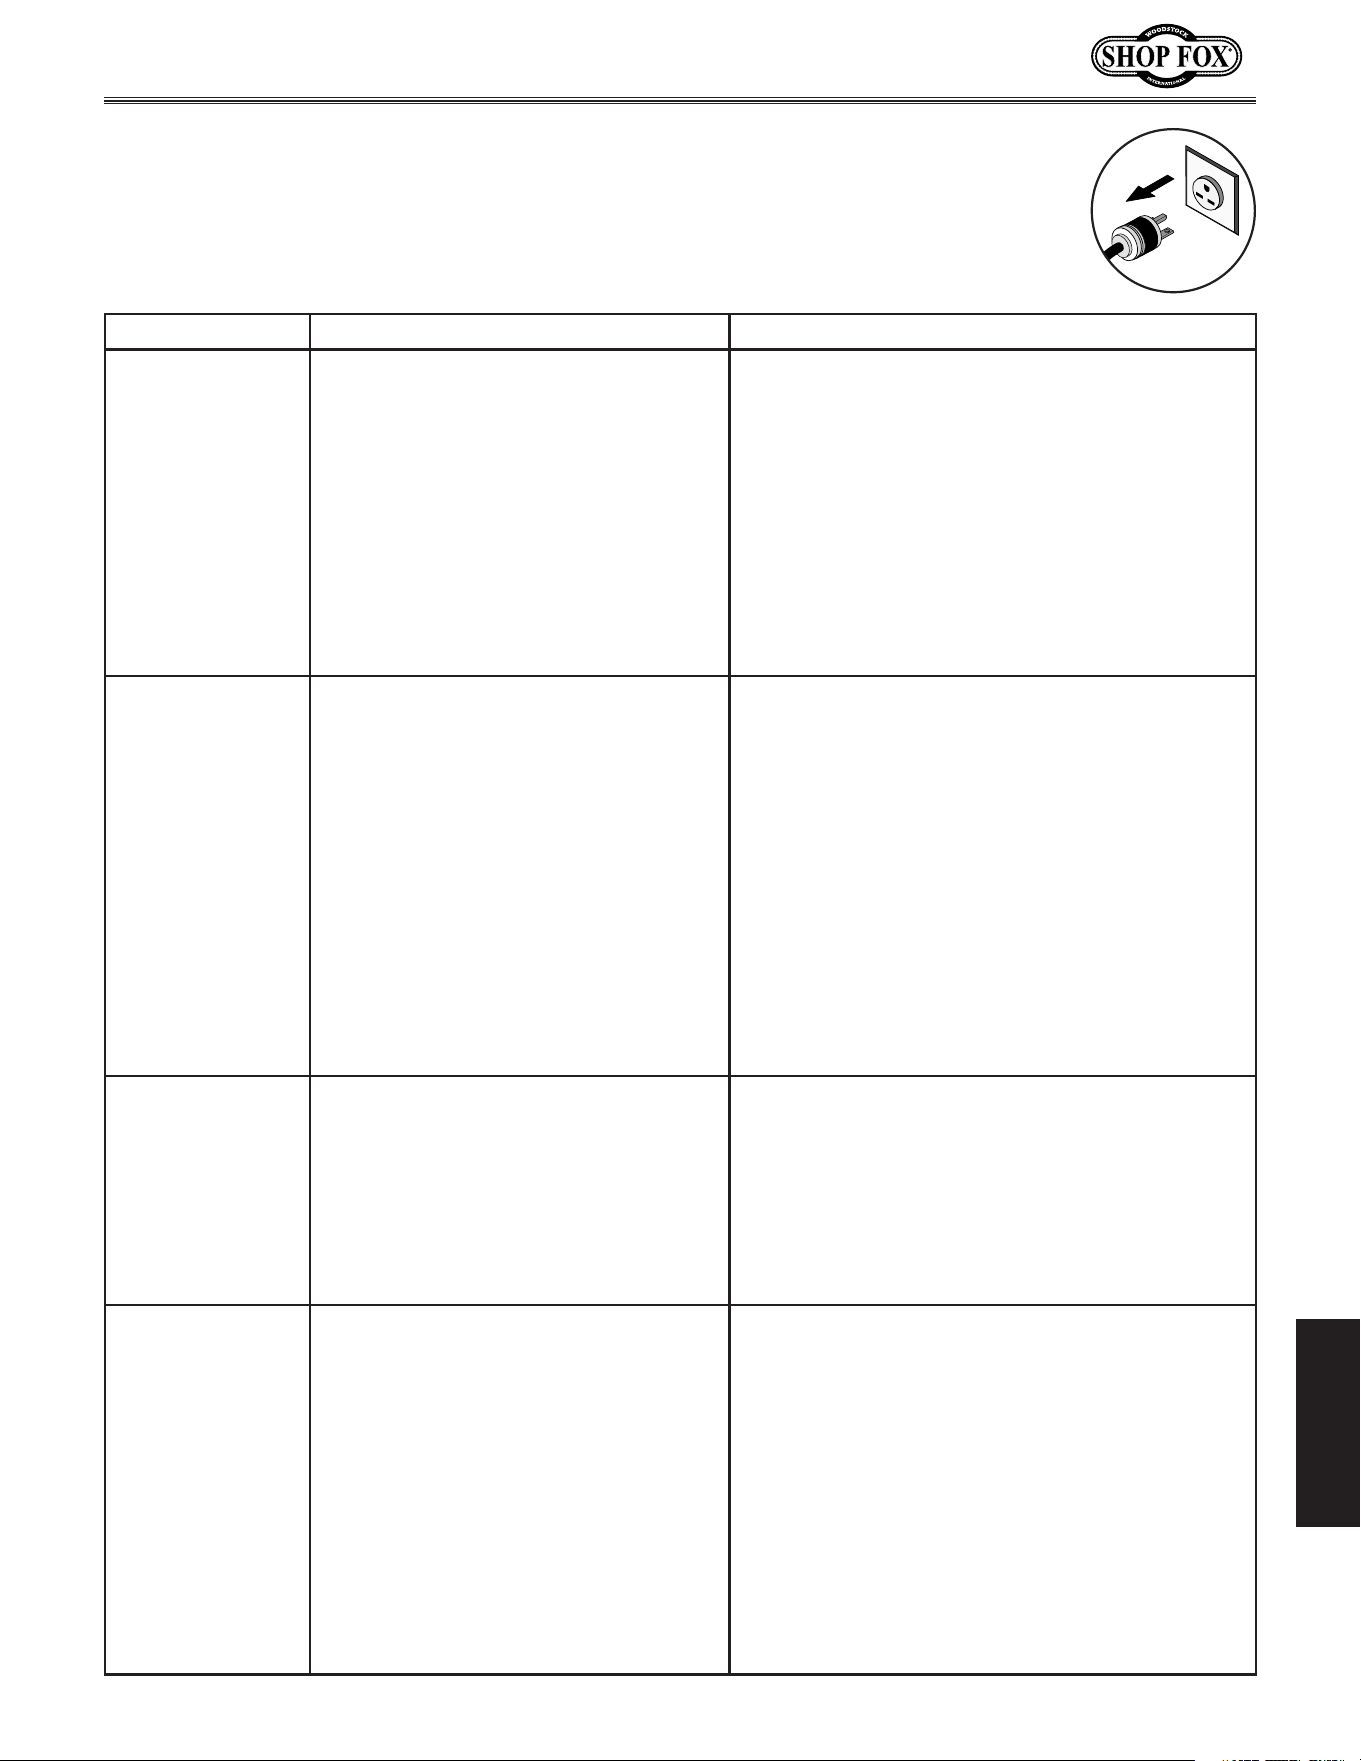
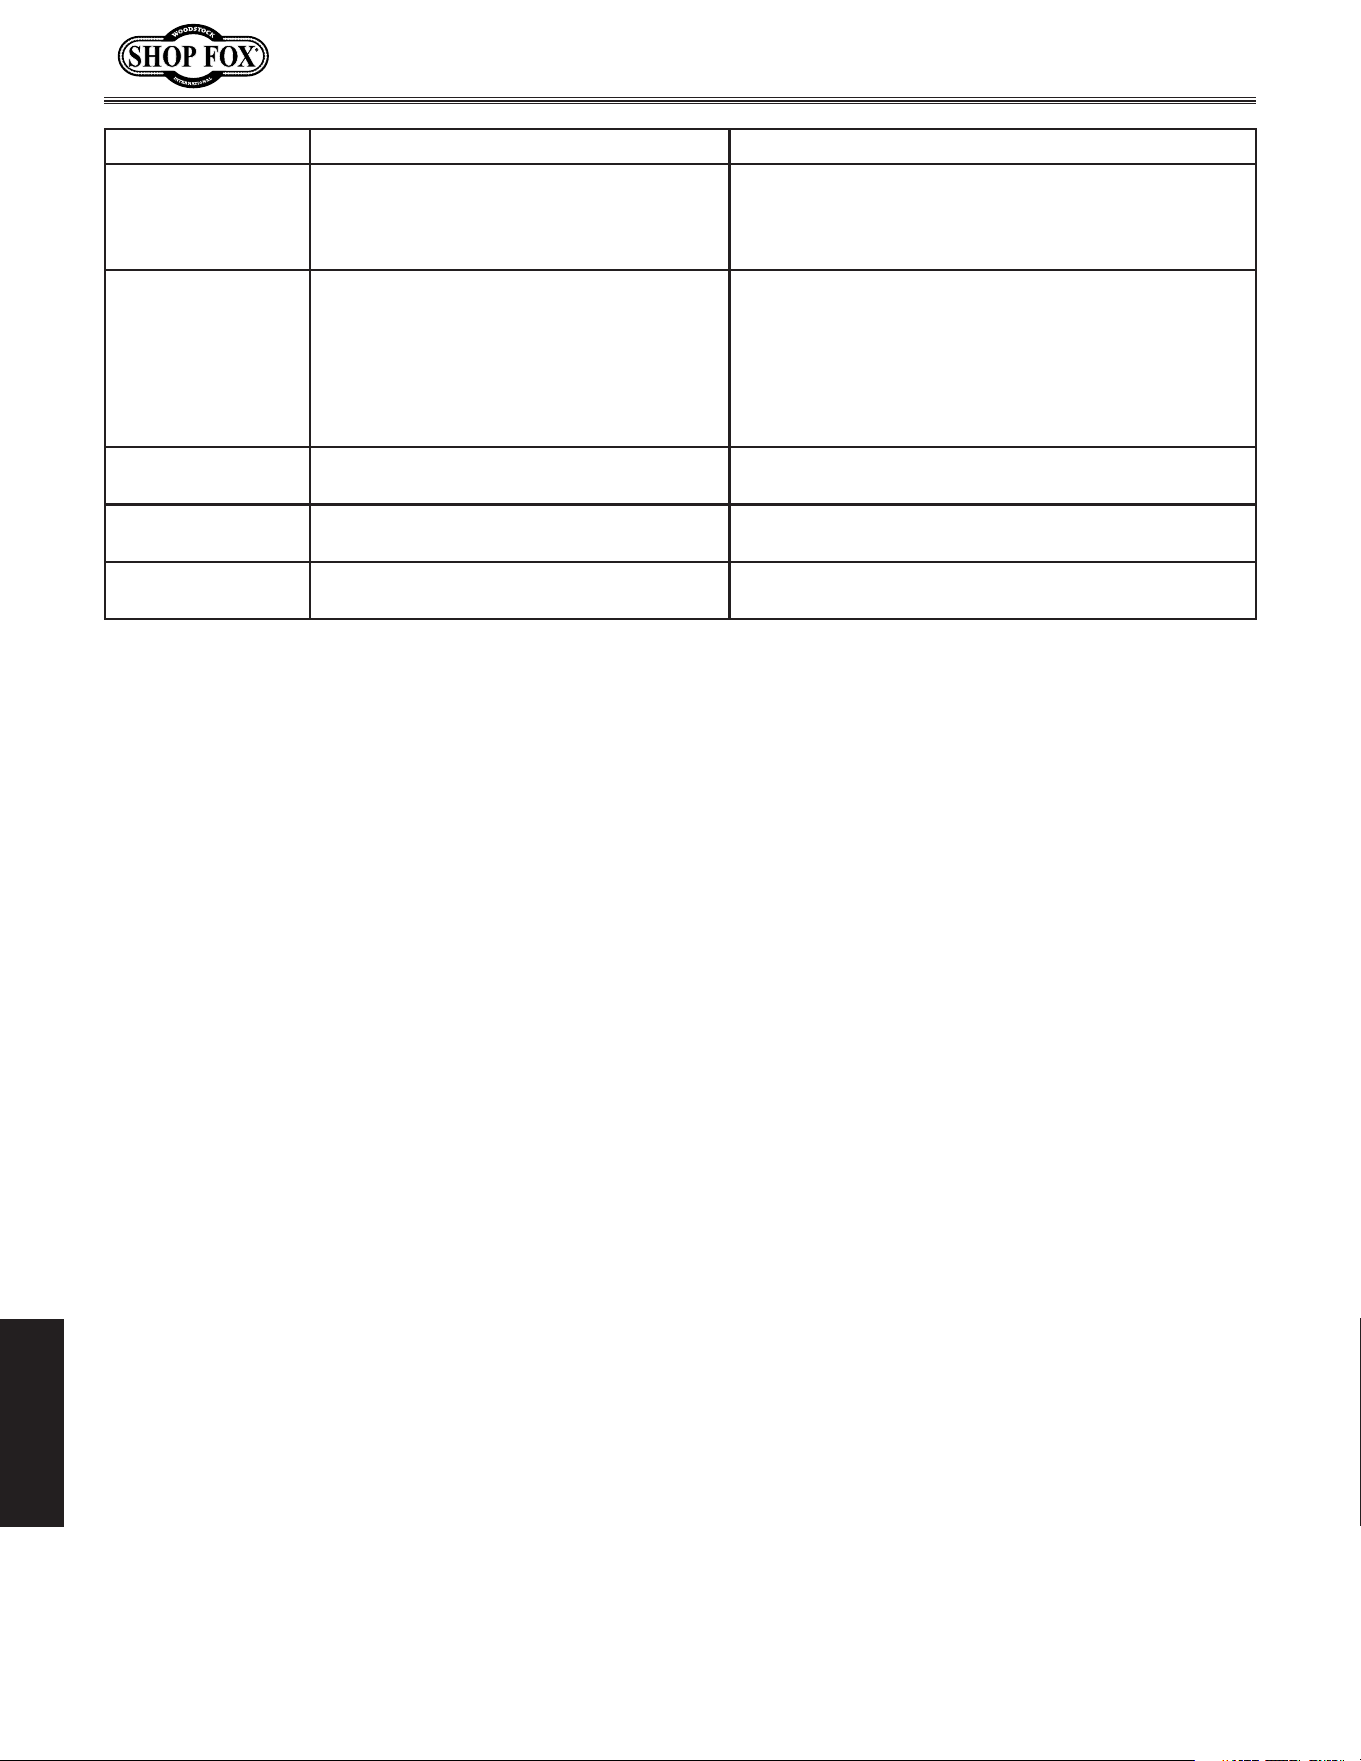
KiflYc\j_ffk`e^
This section covers the most common problems and corrections with this type of
machine. N8IE@E>;FEFKdXb\XepX[aljkd\ekjlek`cgfn\i`j[`jZfee\Zk\[Xe[
dfm`e^gXikj_Xm\Zfd\kfXZfdgc\k\jkfg
GIF9C<D GFJJ@9C<:8LJ< :FII<:K@M<8:K@FE
Machine does not
start or a breaker
trips.
1. Plug or receptacle at fault or wired
incorrectly.
2. Start capacitor is faulty.
3. Motor connection is wired Incorrectly.
4. Power supply is faulty, or is switched
OFF.
5. Safety switch key at fault.
6. ON/OFF switch is faulty.
7. Cable or wiring is open or has high
resistance.
8. Motor is at fault.
1. Test power plug and receptacle for good contact
and correct wiring.
2. Replace capacitor.
3. Correct motor wiring (see GX^\)0).
4. Make sure all hot lines and grounds are operation-
al and have correct voltage on all legs.
5. Install or replace safety key, or replace switch
assembly.
6. Replace faulty switch.
7. Troubleshoot wires for internal or external breaks,
check for disconnected or corroded connections
and repair or replace wiring.
8. Test, repair or replace motor.
Machine stalls or is
underpowered.
1. Incorrect spindle speed.
2. Bit is too large for task.
3. Bit is dull.
4. Low power supply voltage.
5. Belt(s) is slipping.
6. Plug or receptacle is at fault.
7. Motor connection wired incorrectly.
8. Pulley slipping on shaft.
9. Motor bearings are at fault.
10. Motor has overheated.
11. Motor at fault.
1. Re-check spindle speed.
2. Use smaller drill bits. Reduce feed rate and spin-
dle speed.
3. Sharpen/replace bit.
4. Make sure hot lines and grounds are operational
w/correct voltage.
5. Replace bad belts, align pulleys, and re-tension.
6. Test power plug and receptacle for good contact
and correct wiring.
7. Correct motor wiring (see GX^\)0).
8. Replace loose pulley and shaft.
9. Rotate motor shaft for noisy or burnt bearings,
repair/replace as required.
10. Clean inside/outside of motor, let cool, and
reduce workload on machine.
11. Test, repair or replace motor.
Drilling stops, but
motor still operates.
1. Belt is loose or worn.
2. Pulley for spindle shaft or motor is
slipping on shaft.
3. Bit slips in chuck.
1. Replace and/or adjust belt.
2. To resecure pulley, do these steps:
a. UNPLUG DRILL PRESS.
b. Remove setscrew on slipping pulley.
c. Align flats on pulley shaft with
setscrew hole.
d. Reinstall and tighten setscrew.
3. Tighten bit; inspect bit for burrs or other obstruc-
tions that might interfere with clamping surface.
Machine has vibra-
tion or noisy opera-
tion.
1. Motor or component is loose.
2. Belts are slapping belt cover.
3. V-belt(s) is worn or is loose.
4. Motor fan is rubbing on fan cover.
5. Pulley is loose.
6. Machine is incorrectly mounted to
floor.
7. Chuck is at fault.
8. Motor bearings are at fault.
9. Spindle bearings at fault.
1. Inspect, replace damaged bolts/nuts. Re-tighten.
2. Replace/realign belts with a new matched set,
and retension belts (refer to GX^\(0).
3. Replace belts.
4. Replace/repair dented fan cover, and replace
loose or damaged fan.
5. Remove pulley, replace with key as required, and
re-install securely.
6. Re-check floor mounting hardware; tighten.
7. Replace out-of-round chuck, use appropriate feed
rate and drilling RPM.
8. Check bearings, replace motor or bearings as
required.
9. Replace bearing.
-32-
D('*0()$Jg\\[;i`ccGi\jj
J<IM@:<
GIF9C<D GFJJ@9C<:8LJ< :FII<:K@M<8:K@FE
Chuck wobbles or
is loose on spindle
shaft.
1. Foreign material is stuck between
chuck-to-spindle mating surface.
2. Damaged chuck.
1. Remove chuck and clean and de-burr tapered
chuck and spindle mating surfaces, then reas-
semble.
2. Replace.
Spindle does not
retract completely
in uppermost posi-
tion or it binds.
1. Quill shaft is gummy with sawdust and
oil.
2. Feed shaft return spring is weak.
3. Quill deflection screw is binding quill.
1. Clean gummy substance with penetrating oil and
lubricate with a light coat of oil.
2. Increase feed shaft return spring tension as
described on GX^\)..
3. Loosen jam nut, and slightly turn out screw where
quill binds. Retighten jam nut and recheck for
binding and looseness at all spindle locations.
Quill has excessive
deflection.
1. Quill shaft is at fault.
2. Quill and/or bearings are worn.
1. Adjust quill screw.
2. Replace quill and/or bearings.
Holes drilled at an
angle.
1. Table is not at 90 degrees.
1. Adjust table angle (see GX^\)*).
Drill bit wobbles,
holes are oversized.
1. Drill bit incorrectly installed. 1. Remove drill bit and reinstall.
-33-
D('*0()$Jg\\[;i`ccGi\jj
G8IKJ
())
(',
('*
('-
('0
('/
('.
(('
(.
()'
(-
((/
((-
()(
((,
()*
()+
((*
((+
(()
(*
(((
((0
(,
(+
((.
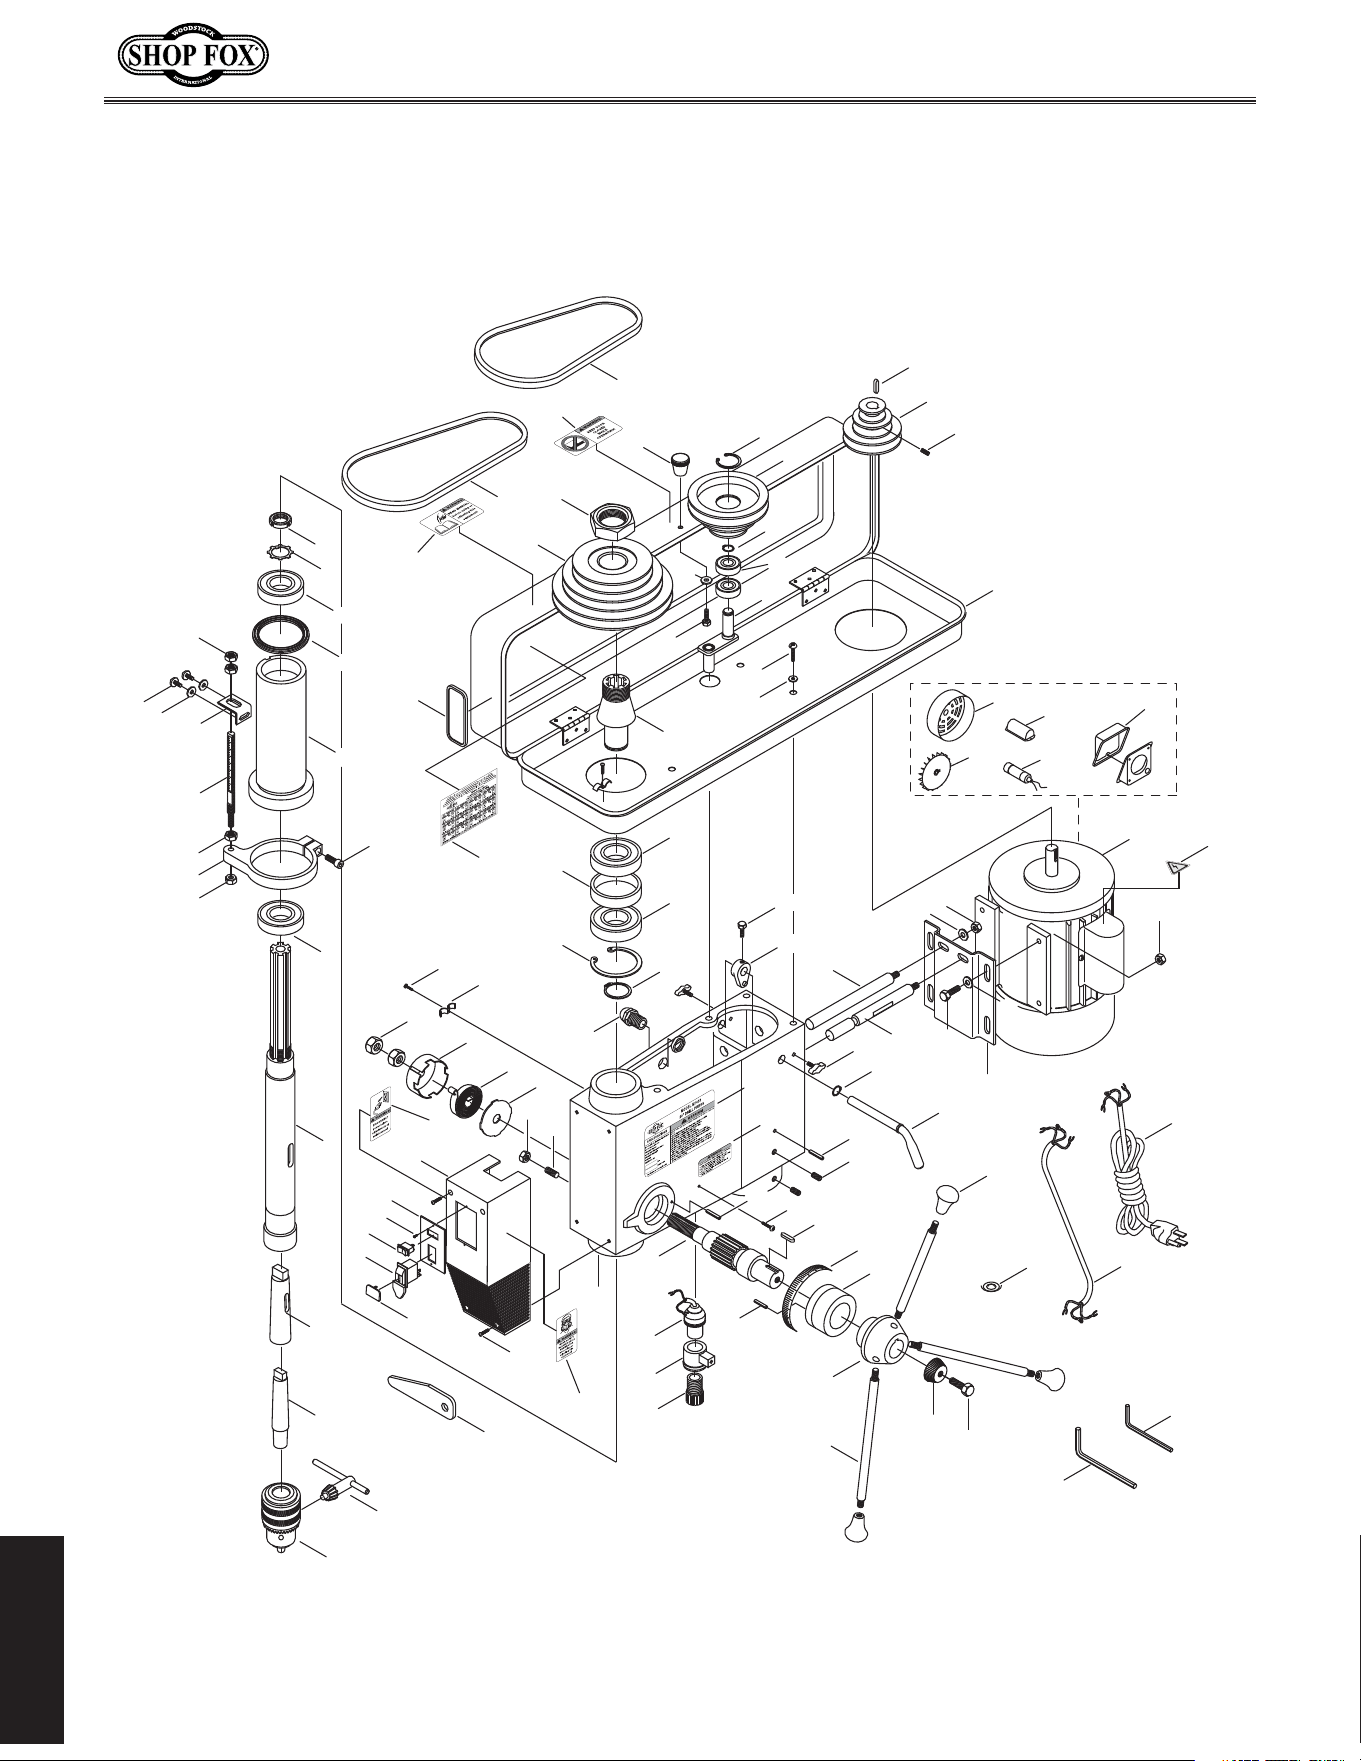
KXYc\&:fclde9i\Xb[fne
-34-
D('*0()$Jg\\[;i`ccGi\jj
G8IKJ
+/
/+
/*
/)
/(
/-
**
/,
*'
*)
*(
(')
.,
./$(
./$)
.0
./
./$*
/'
*,
*+
)+
)(
)'
.-
..
))
++
.+
.*
.)
.(
0'
0(
0)
.'
/.
//
/0
-.
,*
-+
--
-,
,.
+0
)*
,/
-/
-0
+.
+-
+,
+
*-
),
*.
*/
*0
+'
+(
+)
+*
).
0*
0+
/'
('+
('(
0-
0.
)-
)-$)
)-$(
0/
0,$(
0,
00
)/
)0
('+
(''
(
(/
,0
-'
-(
-)
,-
,,
,)
,'
*
,(
-*
,+
(0
'
(
)
*
,
.
-
()
/
0
('
((
()
+,"&
+,"*
+,"'
+,"(
+,")
)
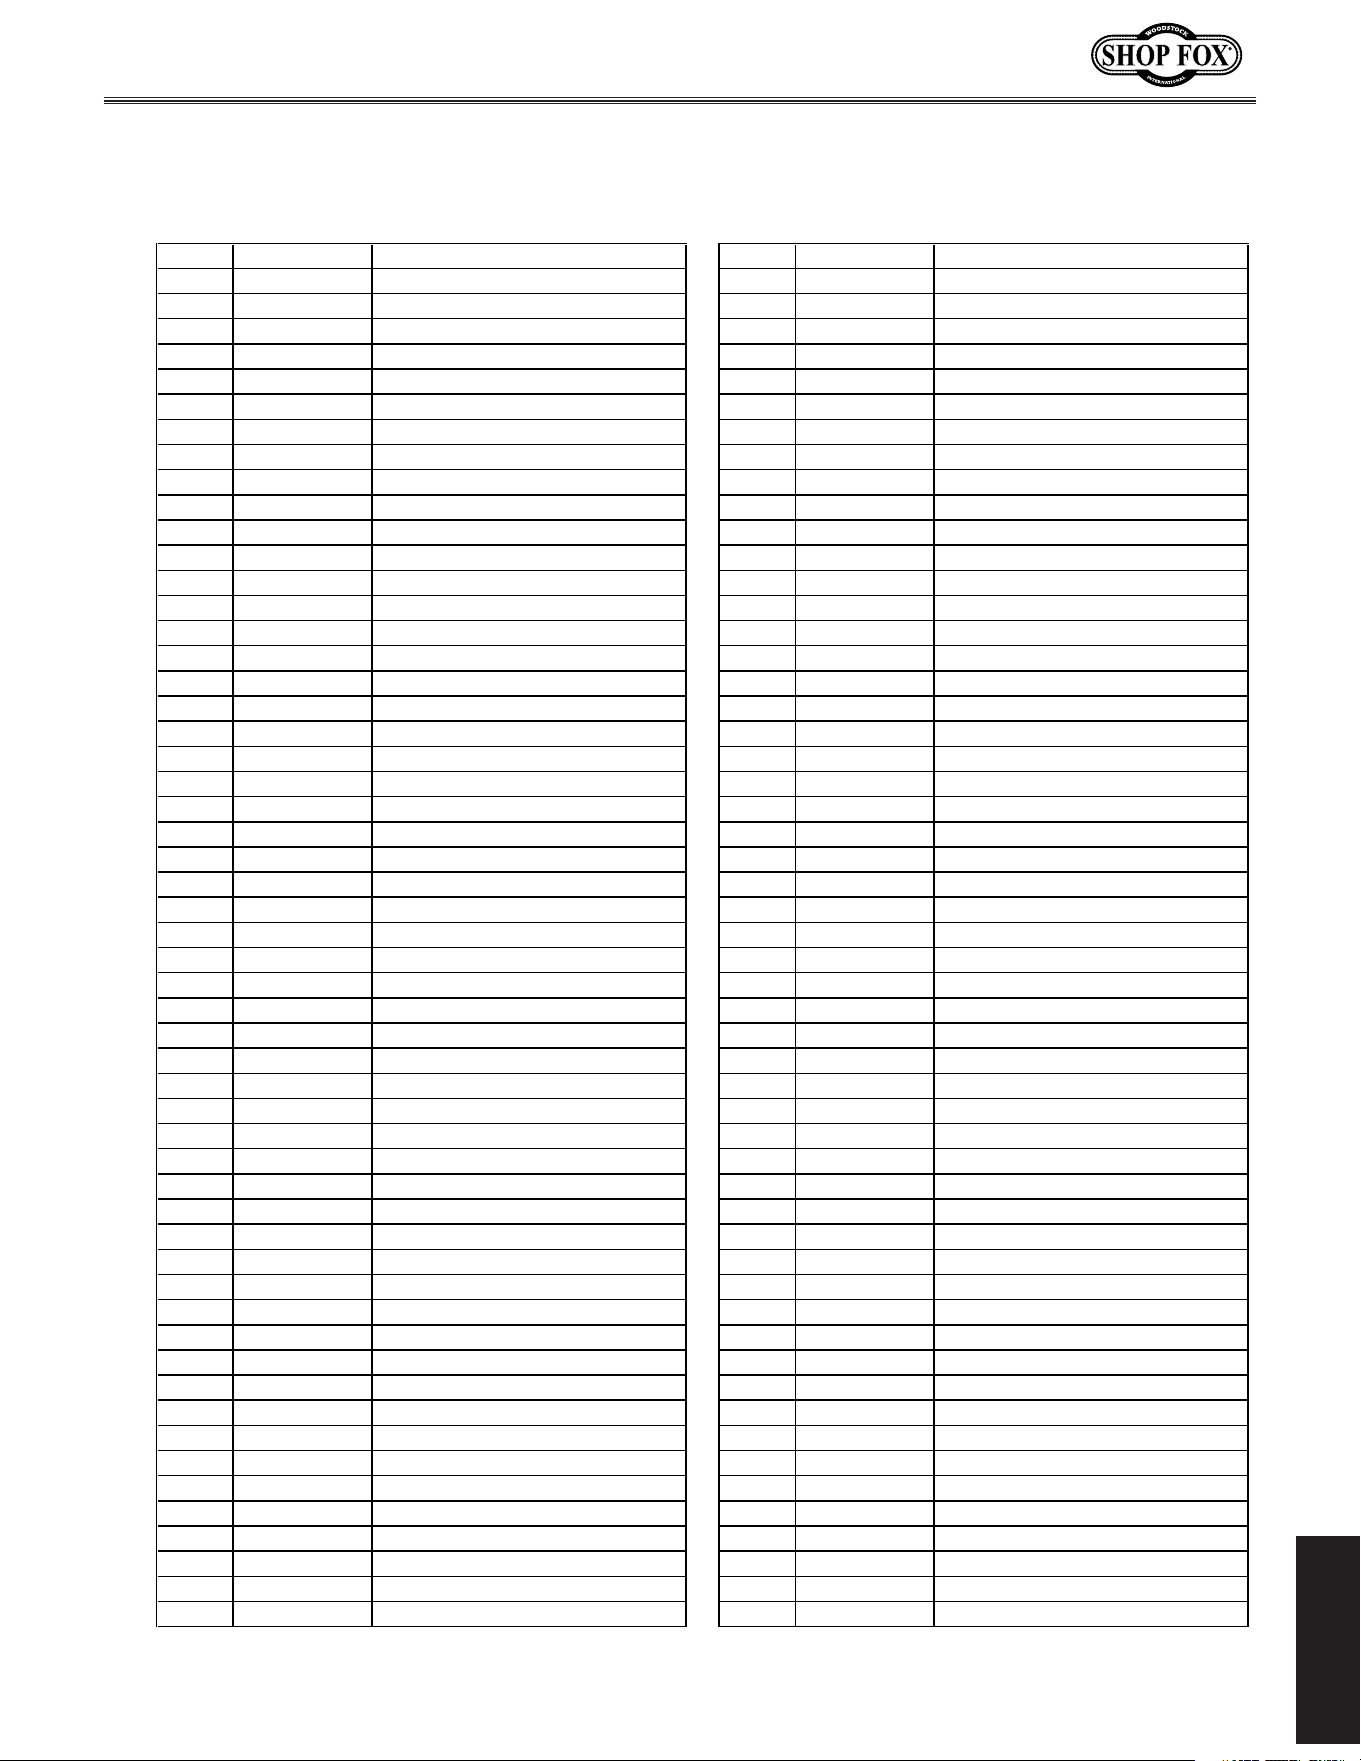
?\X[jkfZb9i\Xb[fne
-35-
D('*0()$Jg\\[;i`ccGi\jj
G8IKJ
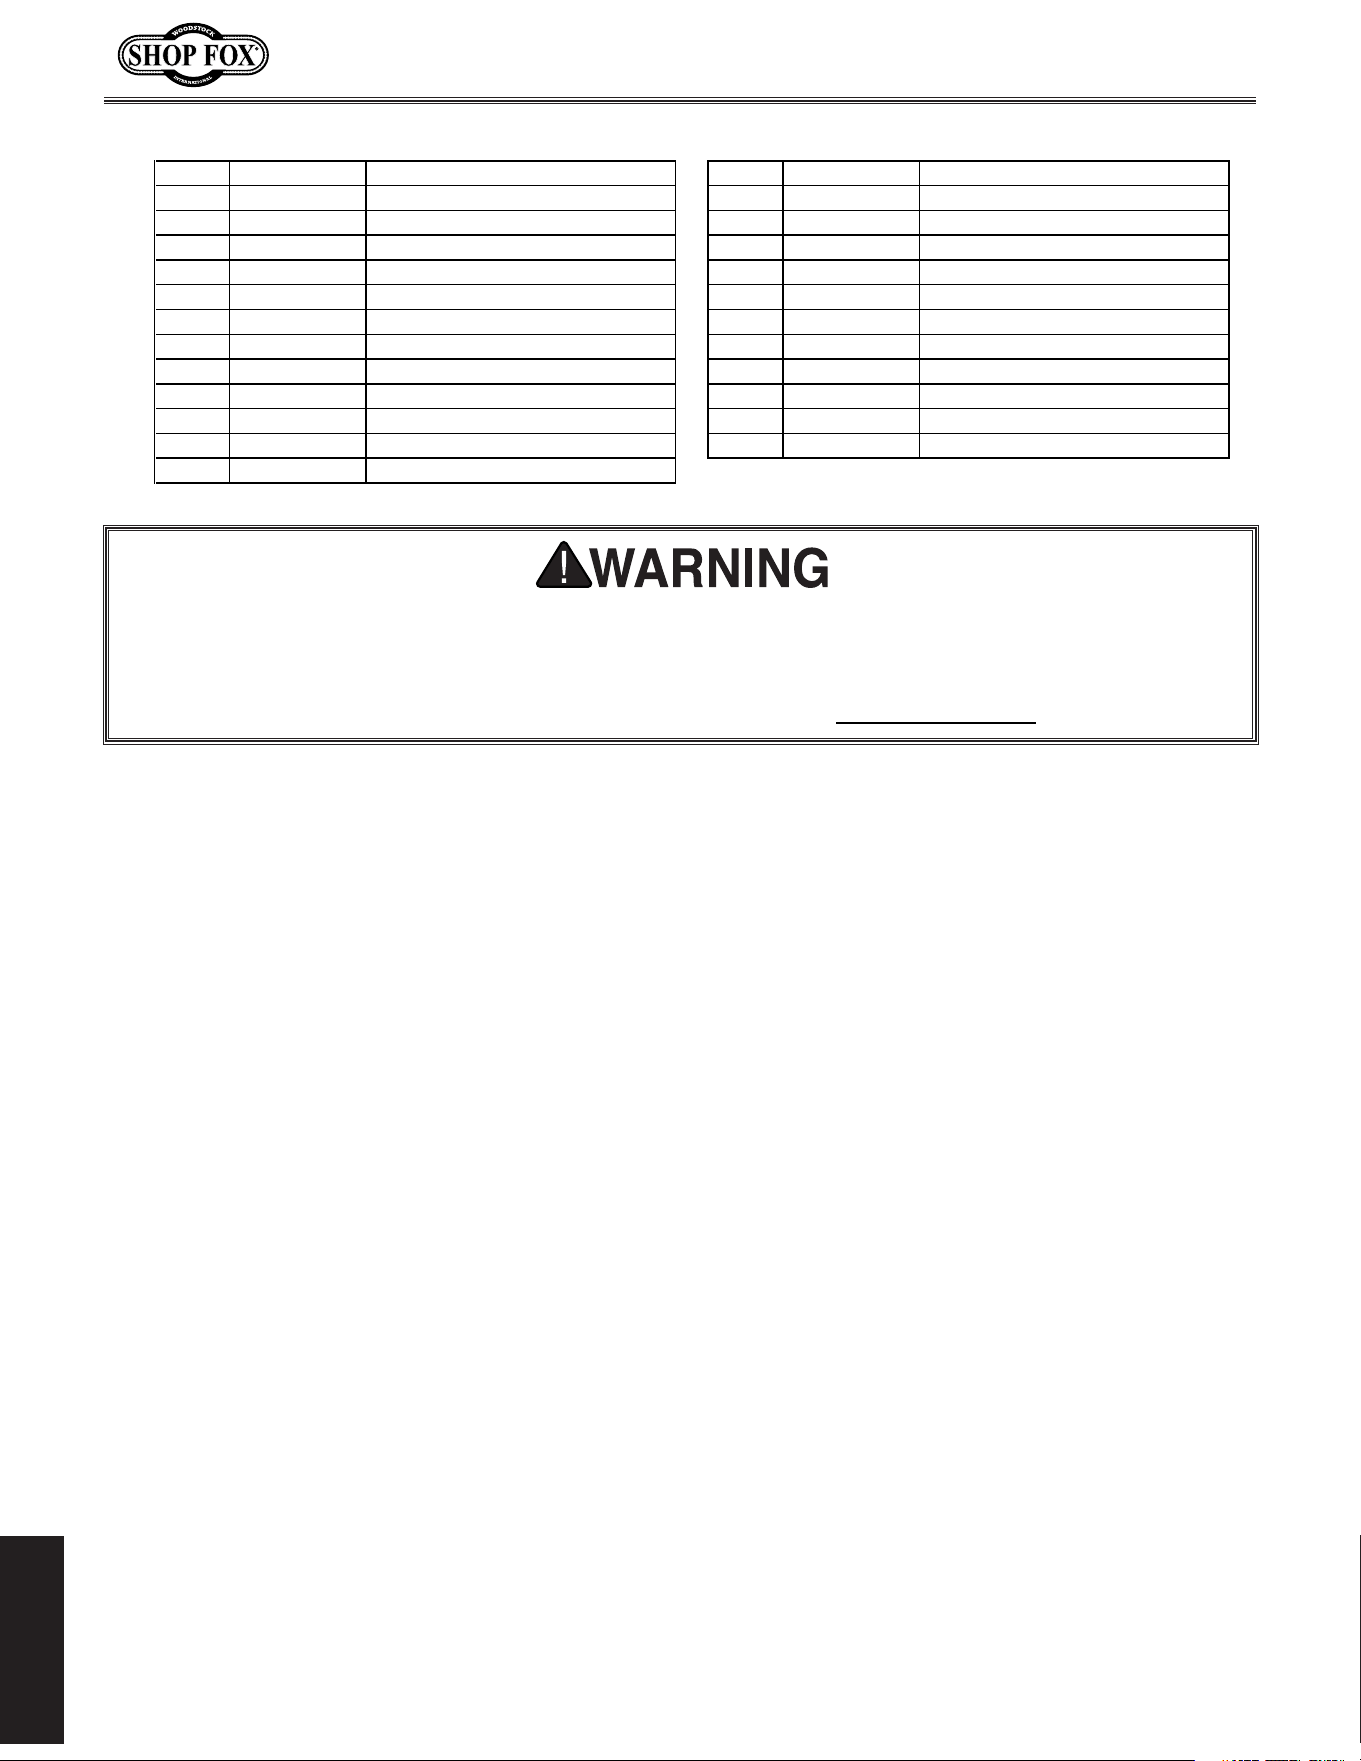
GXikjC`jk
REF PART# DESCRIPTION REF PART# DESCRIPTION
1 XLABEL04 ELECTRICITYLABEL 54 XM1039054 ROUNDKNOBM5-.8
2 XM1039002 CLOSEDOORHORIZLABEL 55 XPW02M FLATWASHER5MM
3 XLABEL08H READMANUALLABEL 56 XPS09M PHLPHDSCRM5-.8X10
4 XLABEL06 RESP/GLASSESLABEL 57 XPS14M PHLPHDSCRM6-1X12
5 XPSB14M CAPSCREWM8-1.25X20 58 XPW03M FLATWASHER6MM
6 XM1039006 QUILLCLAMP 59 XM1039059 CENTERPULLEY
7 XPN03M HEXNUTM8-1.25 60 XPR02M EXTRETAININGRING14MM
8 XM1039008 DEPTHSTOPSCALESTUD 61 XP6202 BALLBEARING6202
9 XM1039009 DEPTHSTOPBRACKET 62 XM1039062 CENTERSHAFT
10 XPW02M FLATWASHER5MM 63 XPVA26 V-BELTA-264L260
11 XPS05M PHLPHDSCRM5-.8X8 64 XPSS01M SETSCREWM6-1X10
12 XPN31M HEXNUTM12-1.5 65 XPK23M KEY5X5X25
13 XPLW10 LOCKWASHER3/4 66 XM1039066 MOTORPULLEY
14 XPN03M HEXNUTM8-1.25 67 XM1039067 MOTOR1-1⁄2HP
15 XPSS21M SETSCREWM8-1.25X25 67-1 XM1039067-1 MOTORFAN
16 XM1039016 INDICATOR 67-2 XM1039067-2 CAPACITORCOVER
17 XM1039017 DEGREESCALE 67-3 XM1039067-3 SCAPACITOR400MFD250VAC
18 XPR21M INTRETAININGRING35MM 67-4 XM1039067-4 WIRINGBOXCOVER
19 XM1039019 STRAINRELIEF 67-5 XM1039067-5 FANCOVER
20 XM1039020 UNPLUGLABEL 68 XPN02M NUTM10-1.5
21 XM1039021 DPLIGHTSLABEL 69 XPW04M FLATWASHER10MM
22 XM1039022 SHOPFOXBLACK/ALLABEL 70 XM1039070 MOTORBASE
23 XM1039023 SPEEDCHARTM1039 71 XM1039071 SLIDEBAR(RIGHT)
24 XM1039024 MACHINEIDLABEL 72 XM1039072 SLIDEBAR(LEFT)
25 XM1039025 SLEEVEMT#4 73 XM1039073 SHIFTER
26 XPWRCRD110L POWERCORD110V,LONG 74 XPB03M HEXBOLTM8-1.25X16
26-1 XM1039026-1 WIREGASKET 75 XM1039075 HEADSTOCK
26-2 XM1039026-2 MOTOR
CORD 76 XM1039076 CLAMPCORD
27 XM1039027 DRIFTKEY 77 XPS14M PHLPHDSCRM6-1X12
28 XPAW04M HEXWRENCH4MM 78 XPSW08 SWITCH110VWITHKEY
29 XPAW03M HEXWRENCH3MM 78-1 XM1039078-1 SWITCHPLATE
30 XM1039030 LIGHTDUSTPLUG 78-2 XPHTEK6M TAPSCREWM4X16
31 XM1039031 LIGHTSOCKET 78-3 XM1039078-3 SWITCHKEY
32 XM1039032 LIGHTBASE 79 XM1039079 SWITCH(LIGHT)
33 XM1039033 SWITCHBOX 80 XPS08M PHLPHDSCRM5-.8X12
34 XM1039034 CHUCKKEY 81 XM1039081 SPRINGCOVER
35 XM1039035 CHUCKJT3X1-16MM 82 XM1039082 FLATCOILSPRING
36 XM1039036 ARBORJT3xMT#4 83 XM1039083 SPRINGCAP
37 XM1039037 SPINDLE 84 XPN31M HEXNUTM12X1.5
38 XP6206 BALLBEARING6205 85 XM1039084 SPECSETSCREWM10-1.5X30
39 XM1039039 SPINDLESLEEVE 86 XPN02M HEXNUTM10-1.5
40 XM1039040 RUBBERWASHER 87 XPN03M HEXNUTM8-1.25
41 XP6206 BALLBEARING6206 88 XPW01M FLATWASHER8MM
42 XM1039042 TABWASHER 89 XPB07M HEXBOLTM8-1.25X25
43 XM1039043 ROUNDNUT 90 XM1039091 KNOBBOLTM10-1.5X35
44 XPR37M EXTRETAININGRING32MM 91 XM1039092 SHIFTERBAR
45 XP6207 BALLBEARING6207 92 XPR05M EXTRETAININGRING15MM
46 XM1039046 SPACER 93 XM1039088 ROLLPIN8X105MM
47 XP6207 BALLBEARING6207 94 XM1039089 SETSCREWM10-1.5X30
48 XPR26M INTRETAININGRING52MM 95 XPB01M HEXBOLTM10-1.5X30
49 XM1039049 PULLEYINSERT 95-1 XM1039095-1 PLASTICLOCKCAP
50 XM1039050 SPINDLEPULLEY 96 XM1039096 STAFFGAUGE
51 XM1039051 PULLEYNUT 97 XM1039097 FEEDHANDLEKNOBM12-1.75
52 XPVA32 V-BELTA-324L320 98 XM1039098 HANDLE
53 XM1039053 PULLEYCOVER 99 XM1039099 HANDLEBODY
-36-
D('*0()$Jg\\[;i`ccGi\jj
G8IKJ
REF PART# DESCRIPTION REF PART# DESCRIPTION
100 XPK07M KEY6X6X20 113 XPW13 FLATWASHER3/4
101 XM1039101 SCALERING 114 XM1039114 PIN
102 XM1039102 FEEDSHAFT 115 XPN01M HEXNUTM6-1
103 XPSS01M SETSCREWM6-1.0X10 116 XM1039116 SHAFT
104 XPRP04M ROLLPIN4X24 117 XPSS01M SETSCREWM6-1X10
105 XM1039105 RACKRING 118 XM1039118 HANDLEARM
106 XM1039106 WORMGEAR 119 XM1039119 HANDLE
107 XM1039107 GEAR 120 XM1039120 TABLEBRACKET
108 XM1039108 LARGELOCKINGLEVER 121 XM1039121 COLUMN
109 XM1039109 TABLE 122 XM1039122 RACK
110 XM1039110 TABLEARMBRACKET 123 XPB27M HEXBOLTM12-1.75X30
111 XM1039111 SMALLLOCKINGLEVER 124 XM1039124 BASE
112 XM1039112 HEXBOLTM20-2.5x45
JX]\kpCXY\cGcXZ\d\ek
K_\jX]\kpcXY\cjfek_`jdXZ_`e\nXieXe[`e[`ZXk\_fnkfgifk\Zkk_\fg\iXkfifiYpjkXe[\i]ifd
dXZ_`e\_XqXi[j%K_\dXZ_`e\fne\iDLJKdX`ekX`ek_\fi`^`eXccXY\ccfZXk`feXe[i\X[XY`c`kp%@]
XcXY\c`ji\dfm\[fiY\Zfd\jlei\X[XYc\#I<GC8:<k_\cXY\cY\]fi\lj`e^k_\dXZ_`e\%=fie\n
cXY\cj#ZfekXZkNff[jkfZb@ek\ieXk`feXcXk*-' .*+$*+/)finnn%j_fg]fo%Y`q%

-37-

-38-
NXiiXekp
N8II8EKP
Nff[jkfZb@ek\ieXk`feXc#@eZ%nXiiXekjXccJ_fg=fodXZ_`e\ipkfY\]i\\f][\]\Zkj]ifdnfibdXej_`g
Xe[dXk\i`Xcj]fiXg\i`f[f]knfp\Xij]ifdk_\[Xk\f]fi`^`eXcgliZ_Xj\Ypk_\fi`^`eXcfne\i%
K_`jnXiiXekp[f\jefkXggcpkf[\]\Zkj[l\[`i\Zkcpfi`e[`i\Zkcpkfd`jlj\#XYlj\#e\^c`^\eZ\fi
XZZ`[\ekj#cXZbf]dX`ek\eXeZ\#fii\`dYlij\d\ekf]k_`i[gXikp\og\ej\j`eZlii\[%
Nff[jkfZb@ek\ieXk`feXc#@eZ%n`cci\gX`ifii\gcXZ\#Xk`kj\og\ej\Xe[Xk`kjfgk`fe#k_\J_fg=fo
dXZ_`e\fidXZ_`e\gXik#n_`Z_`eefidXclj\_Xjgifm\ekfY\[\]\Zk`m\#gifm`[\[k_Xkk_\fi`^`eXc
fne\ii\kliejk_\gif[lZkgi\gX`[kfXJ_fg=fo]XZkfipj\im`Z\Z\ek\in`k_giff]f]k_\`igliZ_Xj\
f]k_\gif[lZkn`k_`eknfp\Xij#Xe[gifm`[\jNff[jkfZb@ek\ieXk`feXc#@eZ%i\XjfeXYc\fggfikle`kpkf
m\i`]pk_\Xcc\^\[[\]\Zkk_ifl^_`ejg\Zk`fe%@]`k`j[\k\id`e\[k_\i\`jef[\]\Zk#fik_Xkk_\[\]\Zk
i\jlck\[]ifdZXlj\jefkn`k_`ek_\jZfg\f]Nff[jkfZb@ek\ieXk`feXc@eZ%jnXiiXekp#k_\ek_\fi`^`eXc
fne\idljkY\Xik_\Zfjkf]jkfi`e^Xe[i\klie`e^k_\gif[lZk%
K_`j`jNff[jkfZb@ek\ieXk`feXc#@eZ%jjfc\ni`kk\enXiiXekpXe[XepXe[XccnXiiXek`\jk_XkdXp
Y\`dgc`\[YpcXn#`eZcl[`e^Xepd\iZ_XekXY`c`kpfi]`ke\jj#]fiXepgXik`ZlcXigligfj\#Xi\_\i\Yp
c`d`k\[kfk_\[liXk`fef]k_`jni`kk\enXiiXekp%N\[fefknXiiXekk_XkJ_fg=fodXZ_`e\ipZfdgc`\j
n`k_k_\gifm`j`fejf]XepcXnfiXZkj%@eef\m\ekj_XccNff[jkfZb@ek\ieXk`feXc#@eZ%jc`XY`c`kple[\i
k_`jnXiiXekp\oZ\\[k_\gliZ_Xj\gi`Z\gX`[]fik_\gif[lZk#Xe[Xepc\^XcXZk`fejYifl^_kX^X`ejk
Nff[jkfZb@ek\ieXk`feXc#@eZ%j_XccY\ki`\[`ek_\JkXk\f]NXj_`e^kfe#:flekpf]N_XkZfd%N\j_Xcc
`eef\m\ekY\c`XYc\]fi[\Xk_#`eali`\jkfg\ijfejfigifg\ikpfi]fi`eZ`[\ekXc#Zfek`e^\ek#jg\Z`Xcfi
Zfej\hl\ek`Xc[XdX^\jXi`j`e^]ifdk_\lj\f]fligif[lZkj%
<m\ip\]]fik_XjY\\edX[\kf\ejli\k_XkXccJ_fg=fodXZ_`e\ipd\\kj_`^_hlXc`kpXe[[liXY`c`kp
jkXe[Xi[j%N\i\j\im\k_\i`^_kkfZ_Xe^\jg\Z`]`ZXk`fejXkXepk`d\Y\ZXlj\f]fliZfdd`kd\ekkf
Zfek`elfljcp`dgifm\k_\hlXc`kpf]fligif[lZkj%

D('*0()$Jg\\[;i`ccGi\jj
CUT ALONG DOTTED LINE
Name ___________________________________________________________________________________
Street __________________________________________________________________________________
City _________________________ State ___________________________Zip ________________________
Phone # ______________________ Email___________________________Invoice # ___________________
Model #_________Serial #______________Dealer Name__________________Purchase Date___________
NXiiXekpI\^`jkiXk`fe
K_\]fccfn`e^`e]fidXk`fe`j^`m\efeXmfclekXipYXj`j%@kn`ccY\lj\[]fidXib\k`e^gligfj\jkf_\cglj
[\m\cfgY\kk\igif[lZkjXe[j\im`Z\j%F]Zflij\#Xcc`e]fidXk`fe`jjki`ZkcpZfe]`[\ek`Xc%
(% How did you learn about us?
_____ Advertisement _____ Friend ____ Local Store
_____ Mail Order Catalog _____ Website ____ Other:
)% How long have you been a woodworker/metalworker?
_____ 0-2 Years _____ 2-8 Years ____ 8-20 Years _____ 20+ Years
*% How many of your machines or tools are EZab8aj
?
_____ 0-2 _____ 3-5 ____ 6-9 _____ 10+
+% Do you think your machine represents a good value? _____ Yes ____ No
,% Would you recommend EZab8aj
products to a friend? _____ Yes ____ No
-% What is your age group?
_____ 20-29 _____ 30-39 ____ 40-49
_____ 50-59 _____ 60-69 ____ 70+
.% What is your annual household income?
_____ $20,000-$29,000 _____ $30,000-$39,000 ____ $40,000-$49,000
_____ $50,000-$59,000 _____ $60,000-$69,000 ____ $70,000+
/% Which of the following magazines do you subscribe to?
0% Comments:VVVVVVVVVVVVVVVVVVVVVVVVVVVVVVVVVVVVVVVVVVVVVVVVVVVVVVVVVVVVVVVVVV
VVVVVVVVVVVVVVVVVVVVVVVVVVVVVVVVVVVVVVVVVVVVVVVVVVVVVVVVVVVVVVVVVVVVVVVVVVVVV
VVVVVVVVVVVVVVVVVVVVVVVVVVVVVVVVVVVVVVVVVVVVVVVVVVVVVVVVVVVVVVVVVVVVVVVVVVVVV
VVVVVVVVVVVVVVVVVVVVVVVVVVVVVVVVVVVVVVVVVVVVVVVVVVVVVVVVVVVVVVVVVVVVVVVVVVVVV
VVVVVVVVVVVVVVVVVVVVVVVVVVVVVVVVVVVVVVVVVVVVVVVVVVVVVVVVVVVVVVVVVVVVVVVVVVVVV
____ Cabinet Maker
____ Family Handyman
____ Hand Loader
____ Handy
____ Home Shop Machinist
____ Journal of Light Cont.
____ Live Steam
____ Model Airplane News
____ Modeltec
____ Old House Journal
____ Popular Mechanics
____ Popular Science
____ Popular Woodworking
____ Practical Homeowner
____ Precision Shooter
____ Projects in Metal
____ RC Modeler
____ Rifle
____ Shop Notes
____ Shotgun News
____ Today’s Homeowner
____ Wood
____ Wooden Boat
____ Woodshop News
____ Woodsmith
____ Woodwork
____ Woodworker West
____ Woodworker’s Journal
____ Other:

TAPE ALONG EDGES--PLEASE DO NOT STAPLE
FOLD ALONG DOTTED LINE
FOLD ALONG DOTTED LINE
NFF;JKF:B@EK<IE8K@FE8C@E:%
G%F%9FO)*'0
9<CC@E>?8D#N80/)).$)*'0
Place
Stamp
Here