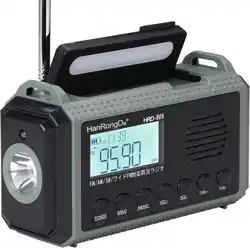
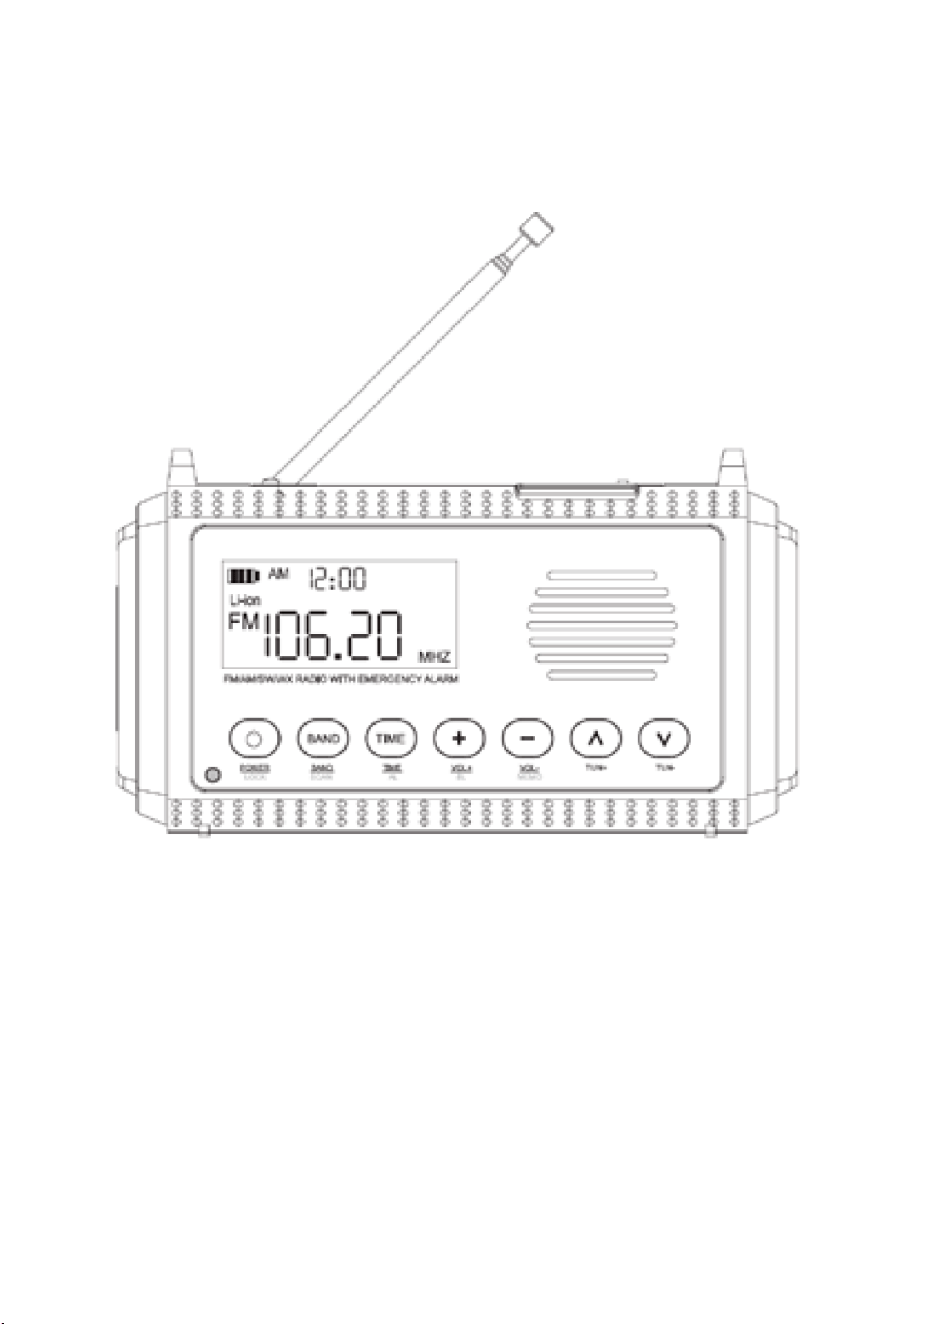
HanRongDa HRD-905 emergency - emergency
radio
User manual
1. Introducon to HanRongDa HRD-905 emergency radio
Thank you for your purchase of our versale emergency radio, which oers wide
coverage of radio bands thanks to advanced soware technology.
This soware allows for digital tuning of a variety of radio bands, including FM,
AM, shortwave (SW), and specically the weather band (WX), which is essenal
for accessing weather-related broadcasts and alerts, primarily used in the United
States.

Page 2
With a high-capacity lithium-ion baery, the radio is designed to oer dierent
charging methods – solar, manual hand generator, or DC 5V external power – so
you always have access to reliable informaon and light when you need it most.
The radio also supports emergency power supply with 3 x 1.5V AAA baeries.
The radio is equipped with a reading light, a ashlight, SOS alarm and emergency
equipment that can be used as a power bank. It is a product for use both at
home and outdoors.
2. Funcons of the radio
2.1: SOS Alarm: A single touch acvates the SOS alarm, vital in emergency
situaons.
2.2: Lighng Funcons: Flashlight and reading light, this one with two brightness
levels, facilitates dark use.
2.3: Baery capacity and charging: 10,000 mAh baery for long performance,
charged via solar panel, generator, or DC 5V.
2.4: Emergency Power Supply: 3 x 1.5V AAA baeries ensure addional power
supply.
2.5: Signal Recepon: Receives FM, AM, SW, and WX clearly via a 360 degree
antenna.
2.6: Channel Search and Storage: Use ATS or SCAN for easy channel
management.
2.7: Time Display: 12-hour clock for me control.
2.8: Sound quality: 40mm speaker delivers clear sound.
2.9: LCD Display: Informaon on frequency, baery, and more, clear in the dark
with backlight.
2.10: Earphone Output: 3.5mm output for private listening.
This advanced emergency radio is designed to be a reliable companion, both at
home and outdoors, with its wide range of life-saving features and ease of use.
Remember to read the instrucon manual carefully to maximize your use of all
these features.
Page 3
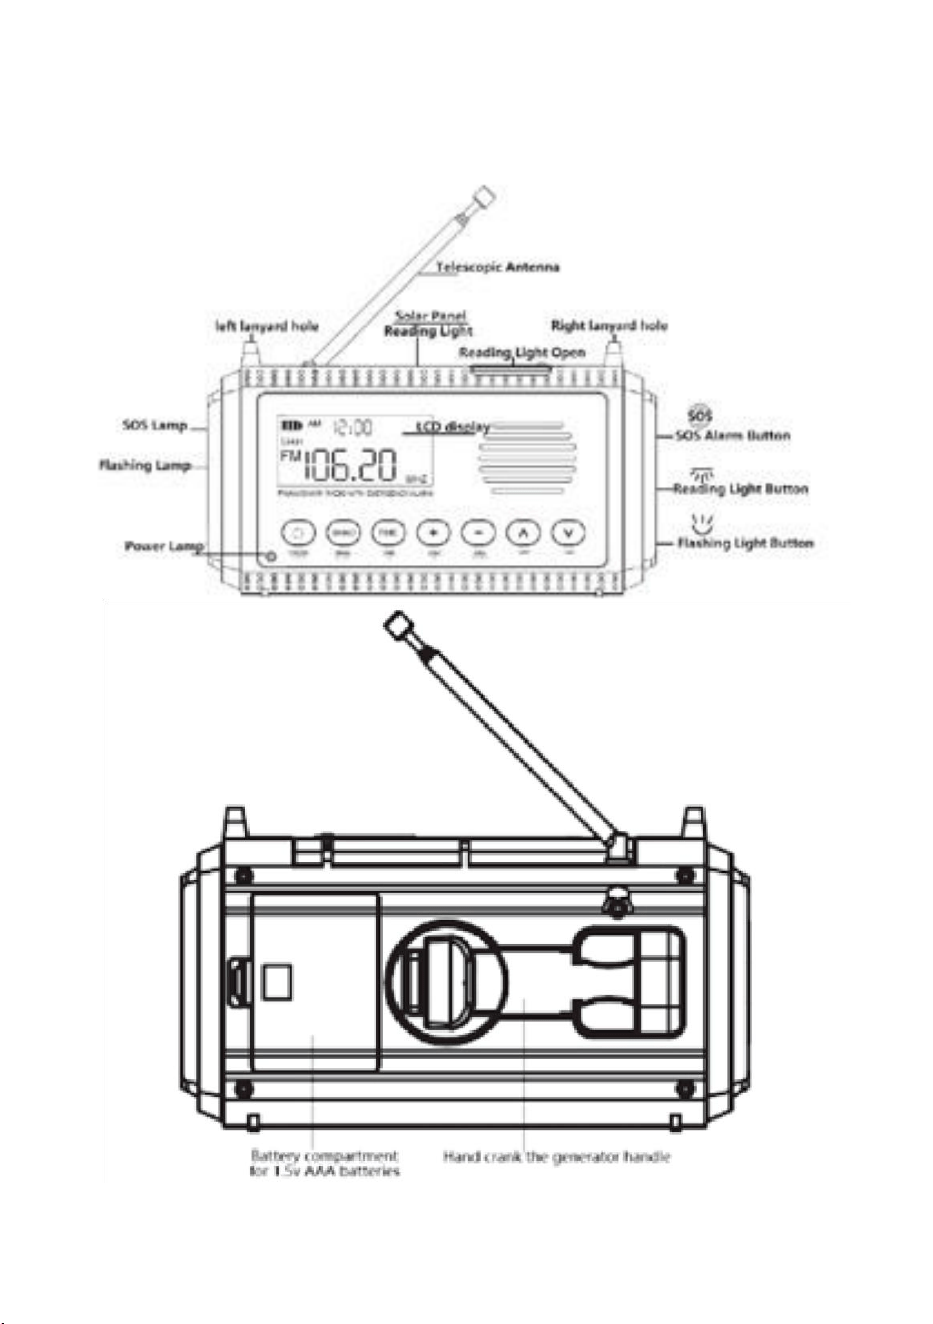
3. Overview of the radio's buttons

Page 4
4: Functions of the buttons
POWER/LOCK
POWER: To turn on, hold down "POWER". To turn o, lightly press "POWER". The
default seng at startup is WX mode, where the "WX" symbol ashes as a sign
of acve alarm. (Refer to secon 6.1).
LOCK: When powered on, lock the radio by holding down "LOCK" and do the
same to unlock. (See secon 6.2).
BANDSCAN
Change the band by lightly pressing "BAND" when the radio is on. (See secon
6.3).
In AM/FM/SW mode, start SCAN by holding down "BAND" for two seconds. (See
secon 6.5.2.3).
Switch between 9 kHz and 10 kHz AM steps by holding down "BAND" for two
seconds aer powering on. (See secon 6.5.4).
TIME/AL
Start alarm with a long press, shows "Alarm" symbol. Cancel alarm with a light
touch.
Set the me by long press and adjust with "TUN+" or "TUN-". (See secon 13.)
VOL+/BL
Turn LCD backlight on/o. (See secon 8.1).
Adjust volume up with a light tap.
VOL/MEMO
Adjust volume down with a light touch.
In AM/FM/SW mode, save a channel automacally with long press. Select the
channel to save with "VOL+" or "VOL-" when the address is displayed. (See
secon 6.5.3).
TUN+
When the radio is on, adjust the frequency upwards by lightly pressing "TUN+".
This increases the frequency gradually in the smallest possible increments for
each band. To automacally search for channels upwards, hold down "TUN+" for

Page 5
two seconds, which iniates a search for staons using the minimum frequency
steps available for each band.
TUNA-
Lightly press "TUN-" when the radio is on, and the frequency will decrease in
small increments. Hold down the buon for two seconds to automacally search
for downward channels.
(Alarm)
Acvate the alarm by a light press in the on state; Press again to disable. (See
secon 7.)
(Reading lamp)
To turn on the reading light, press lightly once; To mute, press again; Turn o on
the third press. (See secon 8.3).
(Flashlight)
Turn on the ashlight with a light touch; mute with a dierent pressure; Turn o
with a third press. (See secon 8.3).
Power lamp
Switched o when the radio is o.
Green during use, indicates switched on radio.
Red while charging, shows charging status.
TYPE-C USB FLASH DRIVE
5V DC input for charging.
USB CHARGING
DC 5V Output: Allows for charging external devices, making the radio a
convenient power bank.
Page 6
3.5mm headphone jack: Connect headphones for private listening without
disturbing the surroundings.
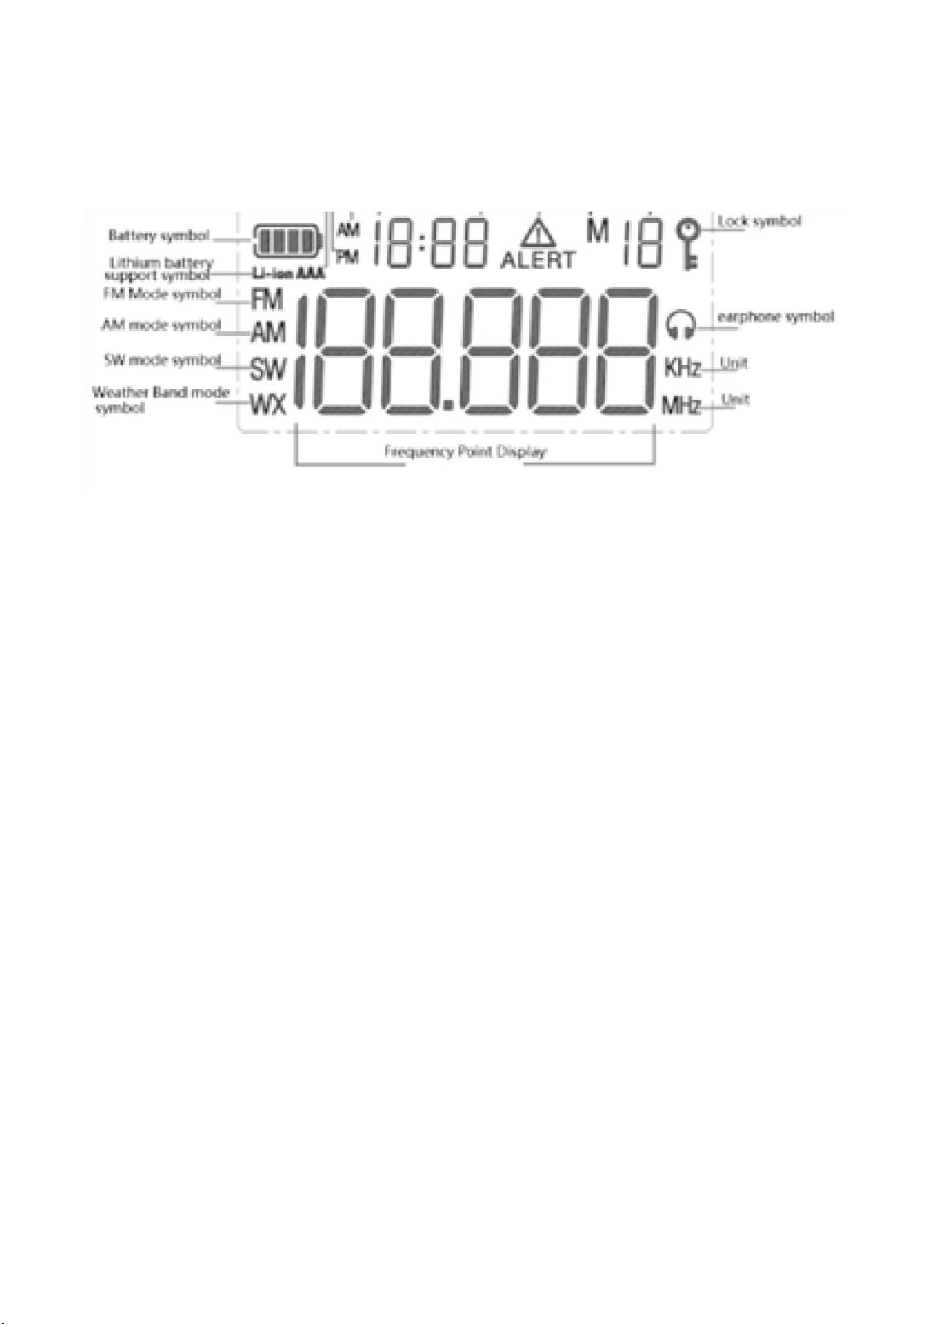
5: Symbols on the LCD screen
6. Operang the radio
6.1. Turning the Radio On/O
To acvate the radio, which is provided with a built-in lithium baery, press and
hold the "POWER/LOCK" buon. When turned on, it will automacally set itself
to WX mode, indicated by a ashing "WX" symbol, and begin searching for alarm
signals. To turn o, short press the "POWER/LOCK" buon.
Important: Make sure to fully charge the baery before rst use.
To avoid unwanted operaon during use, the radio's lock funcon can be used by
holding down the "POWER/LOCK" buon for two seconds when the radio is on.
6.3. Select a Receive Mode
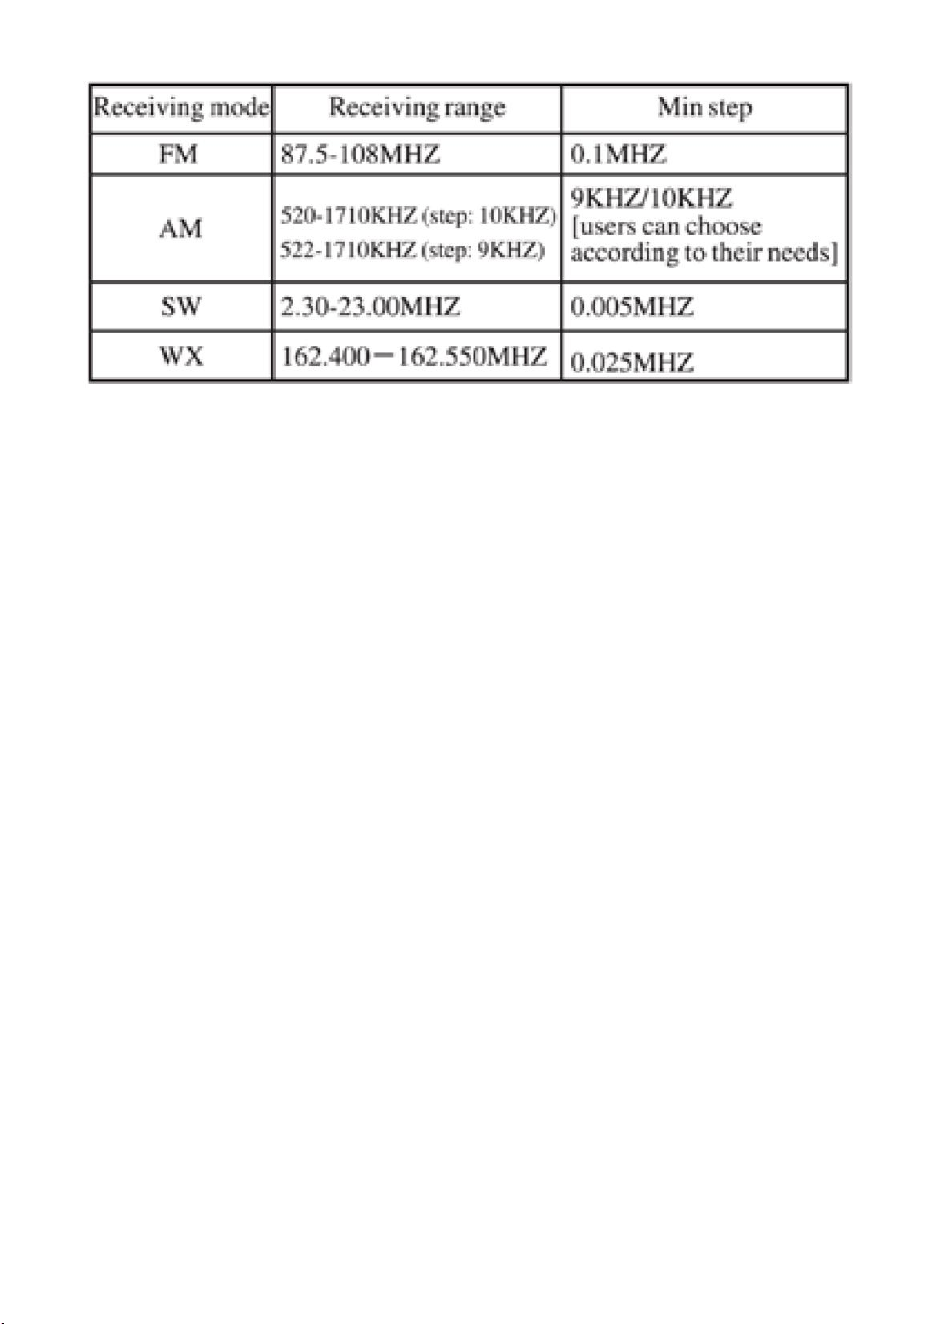
To switch the receiving mode, short press "BAND/SCAN" with the radio on. You
can choose between FM, AM, SW, and WB.
6.4. WX (Weather frequencies, used in the United States.)
Page 7
Seven WX frequencies are available: 162.400 MHz, 162.425 MHz, 162.450 MHz,
162.475 MHz, 162.500 MHz, 162.525 MHz, and 162.550 MHz.
6.4.1. Receiving WX When the Radio Is O
To acvate WX recepon with the radio o, lightly press "POWER/ LOCK". The
"WX" symbol ashes and the radio automacally searches for weather-related
alarm signals. Turn o the radio and disconnect the alarm signal by a short press
of "POWER/LOCK".
6.4.2. Select WX Weather Frequency
With the radio on, switch the WX frequency by lightly pressing "BAND/SCAN".
This allows you to review and select from the seven available WX frequencies for
updates on weather condions.
With the radio on, switch the WX frequency by lightly pressing "BAND/SCAN".
This allows you to review and select from the seven available WX frequencies for
updates on weather condions.
6.4.3. When the radio is on, in WX mode, lightly press "TIME/AL" to start the
alarm funcon. The "ALERT ON" symbol will appear on the LCD and the radio will
automacally enter "ALERT" mode.
6.5. Listening
6.5.1. Using the Antenna
6.5.1.1. FM/SW/WX Recepon: To listen to FM, SW, or WX, unfold the antenna
rst. The radio has a 7-secon, 360-degree rotatable antenna. Adjust its length

Page 8
and posion for opmal recepon. Note: In case of channel interference due to
heavy interference, shortening the antenna may be benecial.
6.5.1.2. AM Recepon: For AM, a built-in magnec antenna is used, sensive for
orientaon when receiving. Opmal posion is found by rotang the radio.
6.5.2. Channel search methods
6.5.2.1. Manual tuning: Adjust frequency up or down with "TUN+" or "TUN-" in
small steps.
6.5.2.2. Automac Tuning System (ATS): By holding down "TUN+" or "TUN-" for
two seconds in FM/AM/SW, an automac channel search starts up or down and
plays the rst clear channel it nds. 6.5.2.3. Automac Channel Search and Save
by Scan (SCAN) In FM/AM/SW modes, press and hold "BAND/SCAN" for two
seconds to enter "SCAN" and automacally search channels from the lowest
frequency to the highest frequency based on the smallest step.
6.5.3. Manual Channel Selecon
Aer automac scanning, you can manually save a channel in FM/AM/SW mode.
Hold down "VOL-" for two seconds to acvate save mode, indicated by [M*] on
the screen. Select and save channel with "VOL+" or "VOL-".
6.5.4. Switching between AM stages of 9 kHz and 10 kHz
6.5.4.1. To switch between 9 kHz and 10 kHz, hold down "BAND" for two seconds
at power-up. Switch between "9KHZ" and "10KHZ" by pressing "BAND".
6.5.4.2. In recepon mode, acvate WX weather alert by pressing "TIME/AL"
and switching AM steps with "BAND". The selected step is conrmed aer two
seconds.
Note: The AM stage is set to 10KHZ in America and to 9KHZ in other countries.
6.6. Adjusng the volume
Adjust the volume with "VOL-" or "VOL+". For quick adjustment, hold down the
buon. The volume is adjusted from 00 to 16.
7. SOS Alarm
7.1. Acvang the Alarm: Trigger the alarm with "SOS". The alarm sound starts
loudly and a red LED ashes.
7.2. Cancelling the Alarm: Stop the alarm by pressing "SOS" again.

8. Use of light
Turn on the radio by holding down the [POWER] buon to access the lighng
funcons: LCD backlight, reading light, and ashlight.
8.1. LCD Backlight
Enable or disable the LCD backlight by holding down "VOL/ BL" for two seconds
while the radio is on. "OFF" indicates the o state, and "ON" on. The backlight
will automacally turn o aer 15 seconds of non-use. Reacvate with a light
press of any buon.
8.2. Reading lamp
The reading light, with three light levels, is acvated by light pressure: once for
full light, again to dim, and a third me to turn o.
8.3. Flashlight
The ashlight, also with three light levels, is turned on by a light touch: once for
bright light, again for less brightness, and a third me to turn o.
9: Charging the Radio
The radio can be charged via hand generator, DC5V external power or solar
power.
9.1. Hand generator
Charge with the hand generator by opening the handle and turning it in any
direcon.
When the radio is charging, the red LED will light up to indicate charging in
progress. Aer a full charge, the charging symbol will stop ashing, signaling a
fully charged baery.
Page 10

Page 10
9.2. DC5V External Power
Connect a DC5V power source to the TYPE-C USB charging connector to charge.
The red LED will light up and the charging symbol will ash while charging.
When the baery is fully charged, the symbol will stop ashing.
9.3. Solar energy.
For solar charging, posion the radio so that its solar panel is directly in sunlight.
The red LED and ashing charging symbol indicate that charging is in progress.
Charging will end when the symbol stops ashing and the baery is fully
charged.
10: USB Charging (Power Output)
As an external mobile power supply
The radio can store electricity from solar power, hand generator, or DC5V to
charge devices. Connect the USB cable to the USB interface of the radio and the
device to be charged. Charging stops automacally in the event of an overload
or short circuit, and is interrupted if the voltage drops below 2.5V.
Note:
The radio works as a power bank at voltage ≥ 3.5V.
The voltage must match the voltage of the device.
External input charging and internal output charging cannot be done
simultaneously.
11. TYPE-C USB (Power Input) Charging
Use a charger on DC5V/1A-DC3A to avoid damage. Charge the lithium baery
monthly during prolonged inacvity. While charging, the red "POWER" light will
illuminate and the charging symbol will ash. When charging is complete, the
symbol will become solid, indicang a fully charged baery. The charging me is
about 10 hours.
12. Using Lithium Baery and Dry Baeries12.1.
Use three 1.5V AAA baeries as an emergency soluon.
12.2. "Li-ion" is displayed when the radio is using lithium baery. If the voltage
drops below 3.5V, the display will change to "AAA", indicang switching to AAA
baeries. Charge for connuous funcon.

Page 11
13. Seng the me
To set the me, hold down "TIME/AL" unl the me indicator ashes. Adjust
mer with "TUN+" or "TUN-", and minutes by pressing "TIME/AL" again rst.
Conrm the me with a light press of "TIME/AL" or wait ve seconds for
automac conrmaon. The radio uses the 12-hour format.
Observaons
Ensure proper charging and baery maintenance for opmal performance.
Remember to adjust the me correctly for accurate mekeeping.
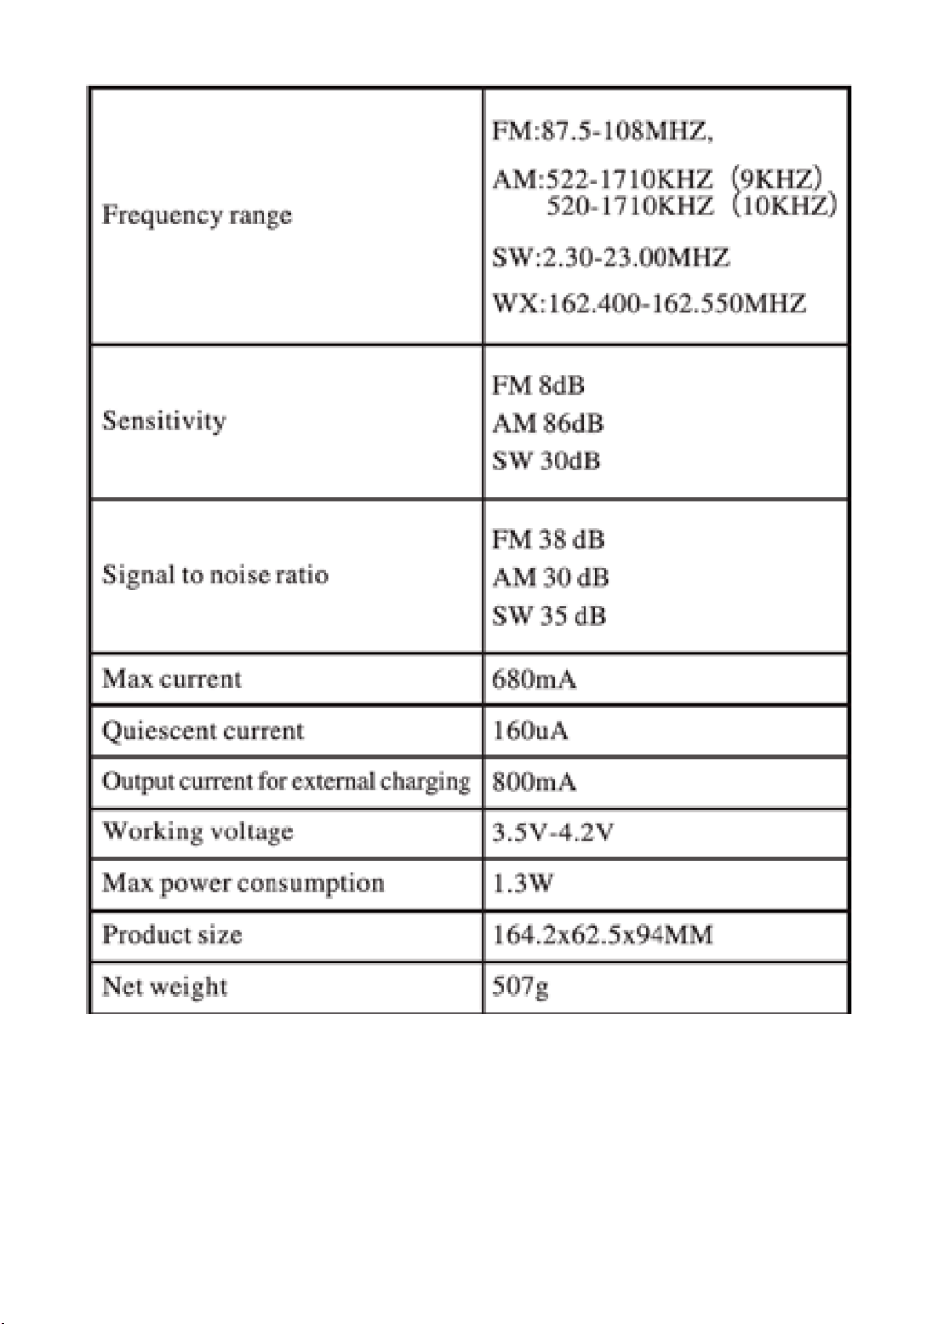
Technical data
Page 12
Precauons for Safe and Reliable Use
Read and understand the safety instrucons: Read and understand all safety
instrucons and the instrucon manual before using the product.

Page 13
LCD and baery indicaon: If "AAA" is displayed on the LCD, it means that the
lithium baery's voltage is low and should be charged. Flashing red power light
or baery symbol also indicates low baery.
Lithium Baery Acvaon: For extended periods of inacvity and low baery,
use the hand generator for a short charge of 5-10 minutes to acvate the
baery.
Recommended Charging Device: Use only one charging device on DC5V/1A-
DC3A to avoid damage to baery or radio.
Monthly charging when idle: Charge the radio at least once a month if it is not
used for a long me.
Protecon from Liquid and Moisture: Avoid exposure to rain or moisture and do
not expose the device to liquids.
Avoid high temperature: Keep the radio away from heat sources and avoid
heang or drying at high temperature.
Direct sunlight protecon: Do not leave the radio exposed to direct sunlight for
extended periods of me.
Avoid physical injury: Protect against falls, heavy impacts, and heavy loads to
prevent injuries.

