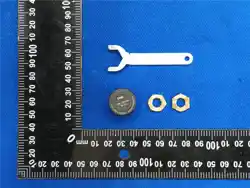

Package Contents(产品清单)
Install the tire pressure sensor onto the tire valve to complete the installation. Once connected to the onboard
display unit, the tire pressure and tire temperature will be shown in real time, helping ensure safer driving.
将胎压传感器安装在轮胎阀上,即可完成安装。通过与车机连接,轮胎气压和轮胎温度实时显示车机上,有助于安全行驶。
External Sensors ×2
外置传感器 ×2
Anti-theft Nuts ×2
防盗螺母 ×2
Wrench ×1
扳手 ×1
Ensure the vehicle is stationary and prepare the
included wrench.
请确保车辆处于静止状态,并准备好随附的专用扳手。
Remove the original valve caps(拆卸原厂气嘴帽):
Remove the factory valve caps from the front and
rear tire valves.
取下前后轮气门嘴上的原厂气嘴帽。
Install the anti-theft nuts(安装防盗螺母):
Screw the included anti-theft nuts onto the front and
rear tire valves.
将附赠的防盗螺母分别拧入前后轮的气门嘴。
提示: 此时只需将螺母拧到底部即可,无需过分发力,待配对
完成后再进行固定。
Note: At this stage, simply screw the nut down to the base;
do not overtighten. Final tightening should be done after
pairing is complete.
设备主页点击胎压-进入胎压配对页,点击配对
图标“ ”开始配对。
On the device home screen, tap Tire Pressure
to enter the pairing page, then tap the pairing
icon “ ” to start pairing.
① When the front wheel icon flashes, screw the sensor onto the front
tire valve. The device will display the front tire reading.
当前轮图标闪烁时,将传感器拧入前轮气嘴,设备显示前轮数值。
② When the rear wheel icon flashes, screw the other sensor onto the
rear tire valve. The device will display the rear tire reading
后轮图标闪烁时,将另一传感器拧入后轮气嘴,设备显示后轮数值。
③ After pairing is complete, use the included wrench to tighten the
anti-theft nuts on both the front and rear wheels.
配对完成后,使用附赠扳手拧紧前后轮防盗螺母。
Note: The sensors do not need to be distinguished between the
front and rear wheels.
注:传感器无需区分前后轮
外置胎压监测传感器(蓝牙版)外置胎压监测传感器(蓝牙版)
External Tire Pressure
Monitoring Sensor(BLE)
User Manual V1.0
Product Overview
(产品概述)
Installation and Pairing
(安装与配对)
Installation and Pairing
(安装与配对)
Specifications
(参数)
Installation and Pairing
(安装与配对)
1
2
Battery Life/ 电池寿命
Dimensions/ 尺寸
Battery Replacement/ 电池更换
1year/1 年
CR 1632
21.5 x 15.8 mm
0.01 Bar
0-8 Bar
Measurement Accuracy/ 测量精度
Pressure Measurement Range
/压力测量范围
Anti-theft Nuts
防盗螺母

FCC Warnning:
This equipment has been tested and found to comply with the limits for a Class B digital device,
pursuant to part 15 of the FCC Rules. These limits are designed to provide
reasonable
protection againstharmful interference in a residential installation. This equipment generates,
uses and can radiateradio
frequency
energy
and,
if
not
installed
and
used
in
accordance
with
the
instructions,
maycause
harmful
interference
to
radio
communications.
However,
there
is
no
guarantee
thatinterference
will
not
occur
in
a
particular
installation.
If
this
equipment
does
cause
harmfulinterference to radio or television reception, which can be
determined by turning the equipmentoff
and
on,
the
user
is
encouraged
to
try
to
correct
the
interference
by
one
or
more
of
thefollowing measures:
•
Reorient or relocate the receiving antenna.
•
Increase the separation between the equipment and receiver.
•
Connect the equipment into an outlet on a circuit different from that to which the receiver is
connected.
• Consult the dealer or an experienced radio/TV technician for help.
Caution:
Any
changes
or
modifications
to
this
device
not
explicitly
approved
by
manufacturer
could void your authority to operate this equipment.
This
device
complies
with
part
15
of
the
FCC
Rules.
Operation
is
subject
to
the
following
two
conditions:
(1)This
device
may
not
cause
harmful
interference,
and
(2)
this
device
must
accept
any
interference received, including interference that may cause undesired operation.
This
equipment
complies
with
FCC
radiation
exposure
limits
set
forth
for
an
uncontrolled
environment.
This
equipment
should
be
installed
and
operated
with
minimum
distance
20cm
between the radiator and your body.