EG9875 Revised 03/24
Adjustable Wall Mounts
For shelving that requires mid brackets, see inside.
ASSEMBLY INSTRUCTIONS
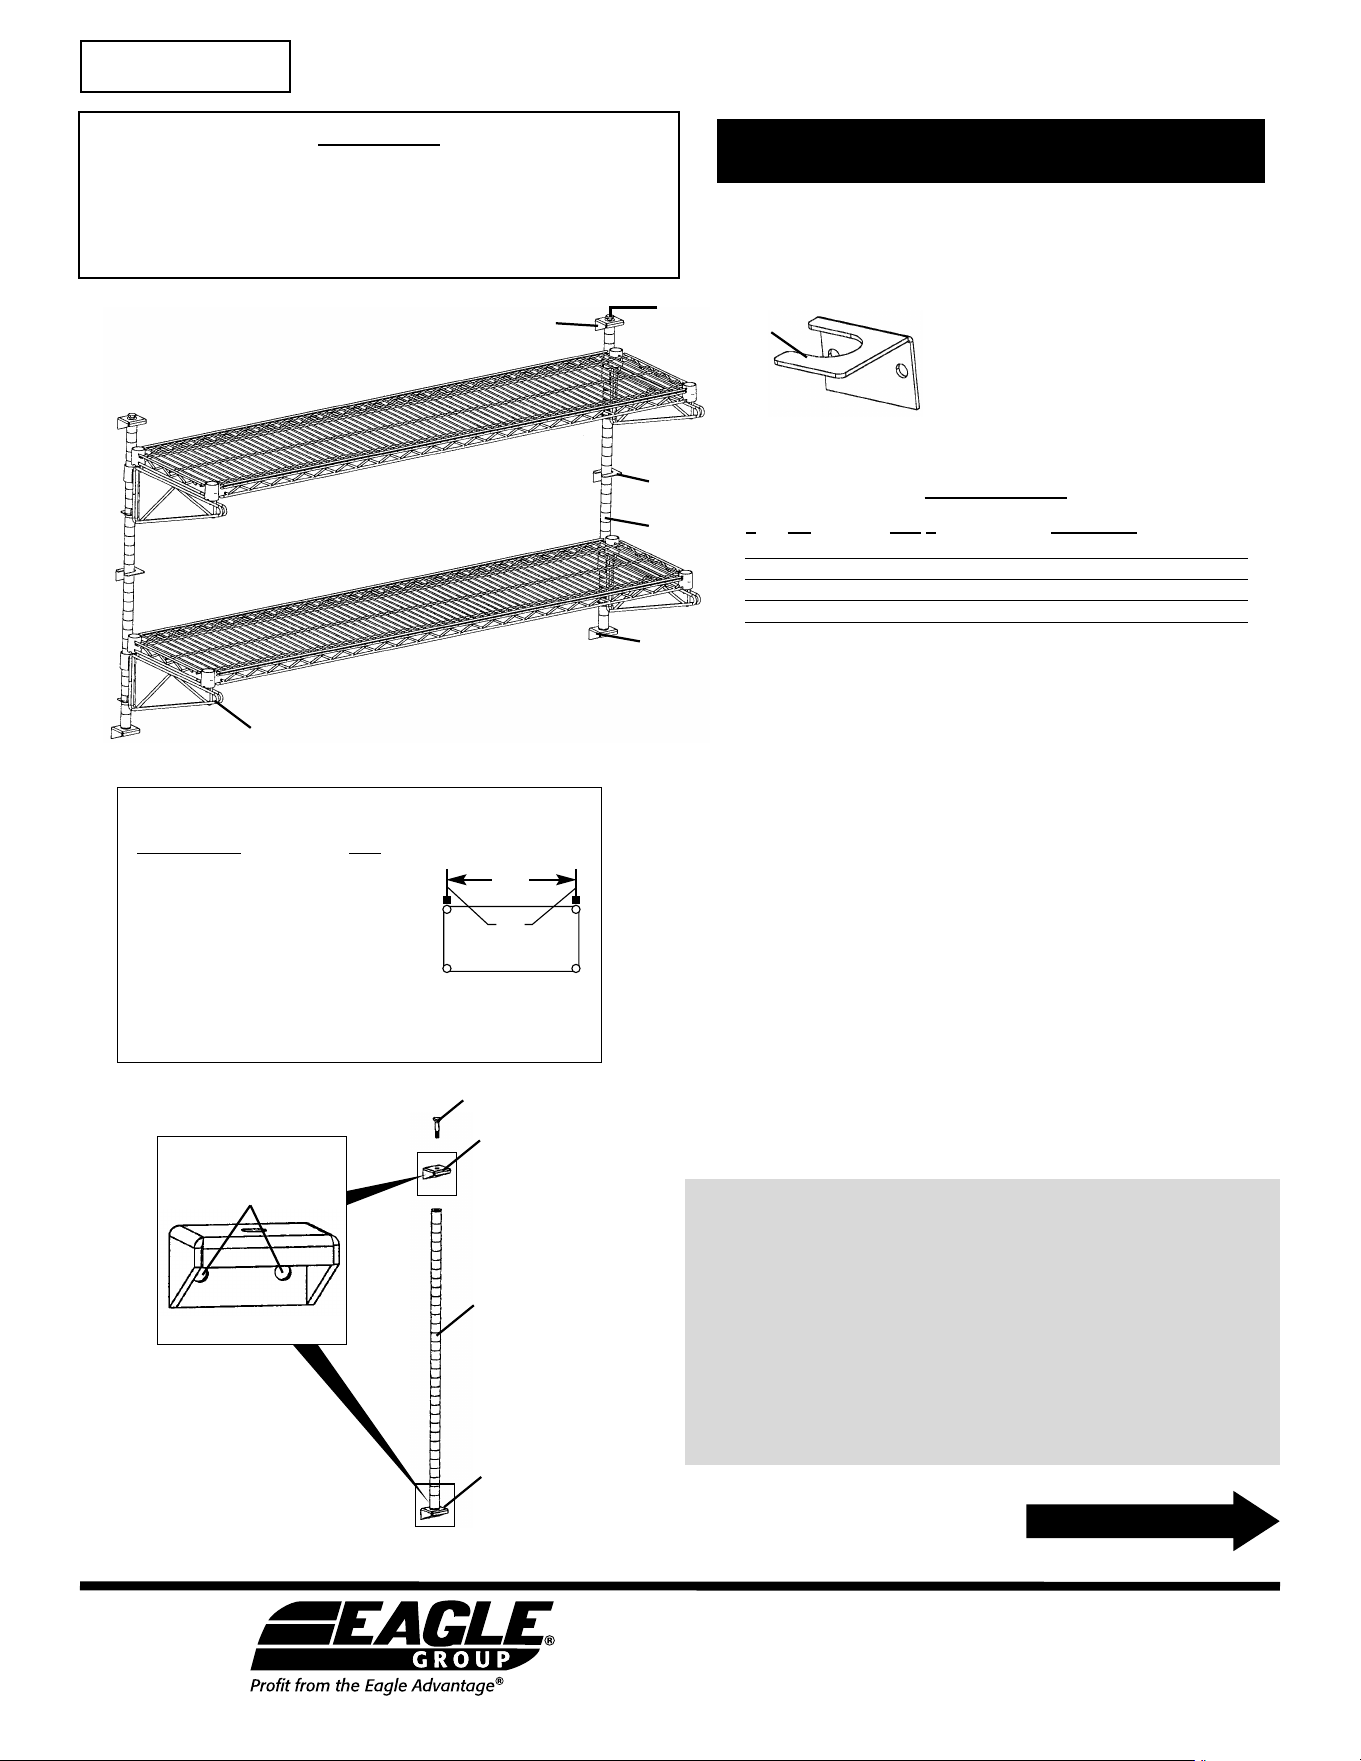
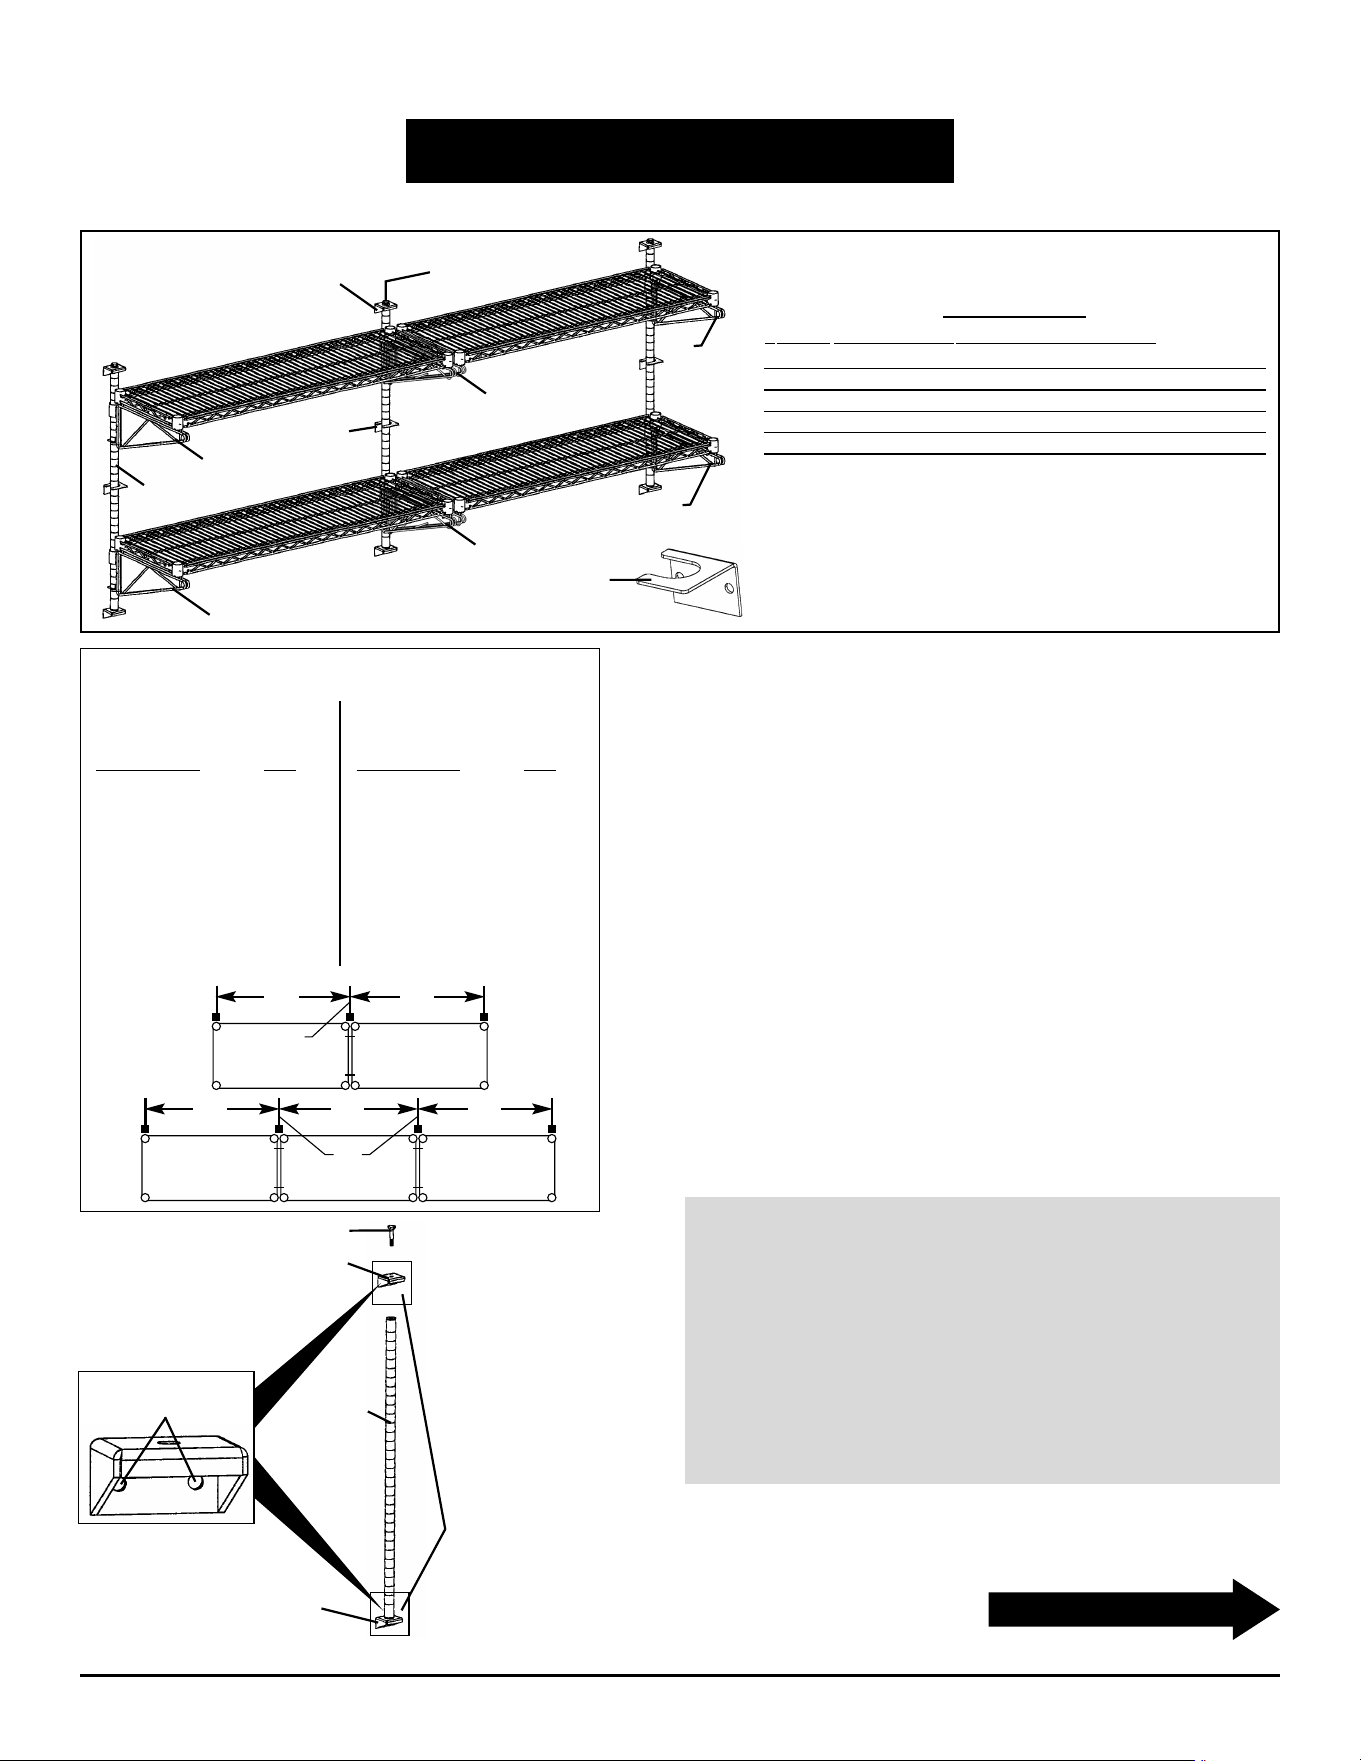
For Shelving That Does Not Need Mid Brackets
1) Centerline
Refer to “Centerline Chart” at left to determine proper centerline
distances between posts.
Shelf Length C.L.
24˝ . . . . . . . . . . . . .22
7
⁄16˝
30˝ . . . . . . . . . . . . .28
7
⁄16˝
36˝ . . . . . . . . . . . . .34
7
⁄16˝
42˝ . . . . . . . . . . . . .40
7
⁄16˝
48˝ . . . . . . . . . . . . .46
7
⁄16˝
54˝ . . . . . . . . . . . . .52
7
⁄16˝
60˝ . . . . . . . . . . . . .58
7
⁄16˝
72˝ . . . . . . . . . . . . .70
7
⁄16˝
Centerline Chart
# qty part # description
#1 4 A203060 top/bottom support
#2 4 303999 bolt 3/8-16 x 1
1
⁄4˝
#3 2 A203059** center support bracket**
#4 4 * post-wall bracket
#5 2 or 3* * posts
* Quantities and part numbers vary, depending on what is ordered.
** Center support brackets are for multi-shelf units only.
(double-tier unit shown;
shelves sold separately)
#1
#2
#5
#1
#3
#4
#3
figure 2
bolt
top
support
bottom
support
post
figure 1
holes for
mounting
to wall
Parts List
2) Top & Bottom Supports
• Mark bottom support location at desired height (see figure 1)
—using a level to ensure support is level—and then screw*
bottom support into wall.
• To determine top support location, bolt the post to the bottom
support on the wall, then bolt the top support to the post (see
figure 2). IMPORTANT: Use a level to ensure post is straight.
• Mark top support location. Disassemble the post and supports.
Screw* top support into wall (see figure 1).
• Based on “Centerline Chart,” measure and mark locations of the
other pair of supports, and then screw* supports into wall.
* Screws not included for
top/bottom supports.
CAUTION
INSPECT CONTENTS IMMEDIATELY AND FILE CLAIM WITH
DELIVERING CARRIER FOR ANY DAMAGE.
SAVE YOUR BOX AND ALL PACKING MATERIALS.
YOU ARE RESPONSIBLE FOR DAMAGE TO YOUR UNIT IF
RETURNED IMPROPERLY PACKED.
C.L.
end
brackets
IMPORTANT NOTE: Depending on construction of wall,
supports should be attached to wall studs, in-wall grounds (wall
backing) of plywood or sheet metal, or solid part of brick or
concrete wall with appropriate fasteners. Failure to use
appropriate fasteners could result in collapse and personal
injury. Eagle Group cannot be held responsible for failure of the
device or any other devices due to improper installation. Also, it
is your responsibility to make certain the mounting surface and
method of mounting are suitable to support the anticipated
weight which will be placed on this unit.
INSTRUCTION SHEET
#A203752
Eagle Foodservice Equipment, Eagle MHC, and SpecFAB
®
are divisions of Eagle Group. ©2024 by the Eagle Group
• 100 Industrial Boulevard, Clayton, Delaware 19938-8903 U.S.A.
• Phone: 302/653-3000 • 800/441-8440 • Fax: 302/653-2065
• www.eaglegrp.com • www.eaglemhc.com
(continued on Page 2)
2
BEFORE YOU CONTINUE, PLEASE NOTE…
Open box(es) of wire shelving* and set aside. You will find
plastic split sleeves
(pack of four per shelf), which you will
need in order to complete Step 4 below.
* Shelves sold separately.
figure 3
figure 4
figure 5
holes for
mounting
to wall
wall
bracket
collar
bolt
bolt
top support
bottom support
post
center
support
split sleeve
(underneath
bracket
collar)
figure 6
shelf
shelf
collar
collar
plug
loop of
shelf
bracket
Adjustable Wall Mounts
ASSEMBLY INSTRUCTIONS
For Shelving That Does Not Need Mid Brackets
3) Center Brackets for Multi-Tier Units
(Note: If you are installing a single-shelf unit, then proceed
to Step 4.)
Install center bracket at desired location (see figure 3). We
recommend that the bracket be positioned towards the center
of the post for extra support.
4) Shelf Brackets
• Snap the plastic split sleeve onto the post where you want
the shelf to rest (the wider part of the taper on the split sleeve
faces the bottom of the post).
(Note: If you are installing a multi-tier unit, then start at
the bottom of the post.)
• Slide the wall bracket collar (see figure 4) over top of post
and down onto the plastic split sleeve. Repeat for each
shelf bracket.
5) Posts & Shelves*
• Install post/bracket assemblies to supports, using bolts
provided (see figure 5).
• Lay shelf* on top of wall brackets, and cover shelf collar
openings with collar plugs (see figure 6).
(End)
3
figure 2
bolt
top
support
bottom
support
NOTE: Top and bottom
supports go in the
same direction on both
ends of the post.
post
figure 1
holes for
mounting to wall
#1
#2
#5
#5
#6
#4
#4
#4
# qty part # description
#1 * A203060 top/bottom support
#2 * 303999 bolt 3/8-16 x 1
1
⁄4˝
#3 * A203059** center support bracket**
#4 * PWB14C post-wall end bracket
#5 * * post-wall mid bracket
#6 * * posts
* Quantities and/or part numbers vary, depending on what is ordered.
** Center support brackets are for multi-shelf units only.
Parts List
#3
#3
#4
Shelf Length C.L.
24˝ . . . . . . . . .23
3
⁄16˝
30˝ . . . . . . . . .29
3
⁄16˝
36˝ . . . . . . . . .35
3
⁄16˝
42˝ . . . . . . . . .41
3
⁄16˝
48˝ . . . . . . . . .47
3
⁄16˝
54˝ . . . . . . . . .53
3
⁄16˝
60˝ . . . . . . . . .59
3
⁄16˝
72˝ . . . . . . . . .71
3
⁄16˝
Centerline Charts
(for units with only
one mid bracket)
Shelf Length C.L.
24˝ . . . . . . . .23
15
⁄16˝
30˝ . . . . . . . .29
15
⁄16˝
36˝ . . . . . . . .35
15
⁄16˝
42˝ . . . . . . . .41
15
⁄16˝
48˝ . . . . . . . .47
15
⁄16˝
54˝ . . . . . . . .53
15
⁄16˝
60˝ . . . . . . . .59
15
⁄16˝
72˝ . . . . . . . .71
15
⁄16˝
(for units with two or more
mid brackets)
C.L. C.L.
C.L. C.L. C.L.
two
mid brackets
* Screws not included for top/bottom supports.
(double-tier unit shown;
shelves sold separately)
one
mid bracket
(continued on back page)
IMPORTANT NOTE: Depending on construction of wall,
supports should be attached to wall studs, in-wall grounds (wall
backing) of plywood or sheet metal, or solid part of brick or
concrete wall with appropriate fasteners. Failure to use
appropriate fasteners could result in collapse and personal
injury. Eagle Group cannot be held responsible for failure of the
device or any other devices due to improper installation. Also, it
is your responsibility to make certain the mounting surface and
method of mounting are suitable to support the anticipated
weight which will be placed on this unit.
Adjustable Wall Mounts
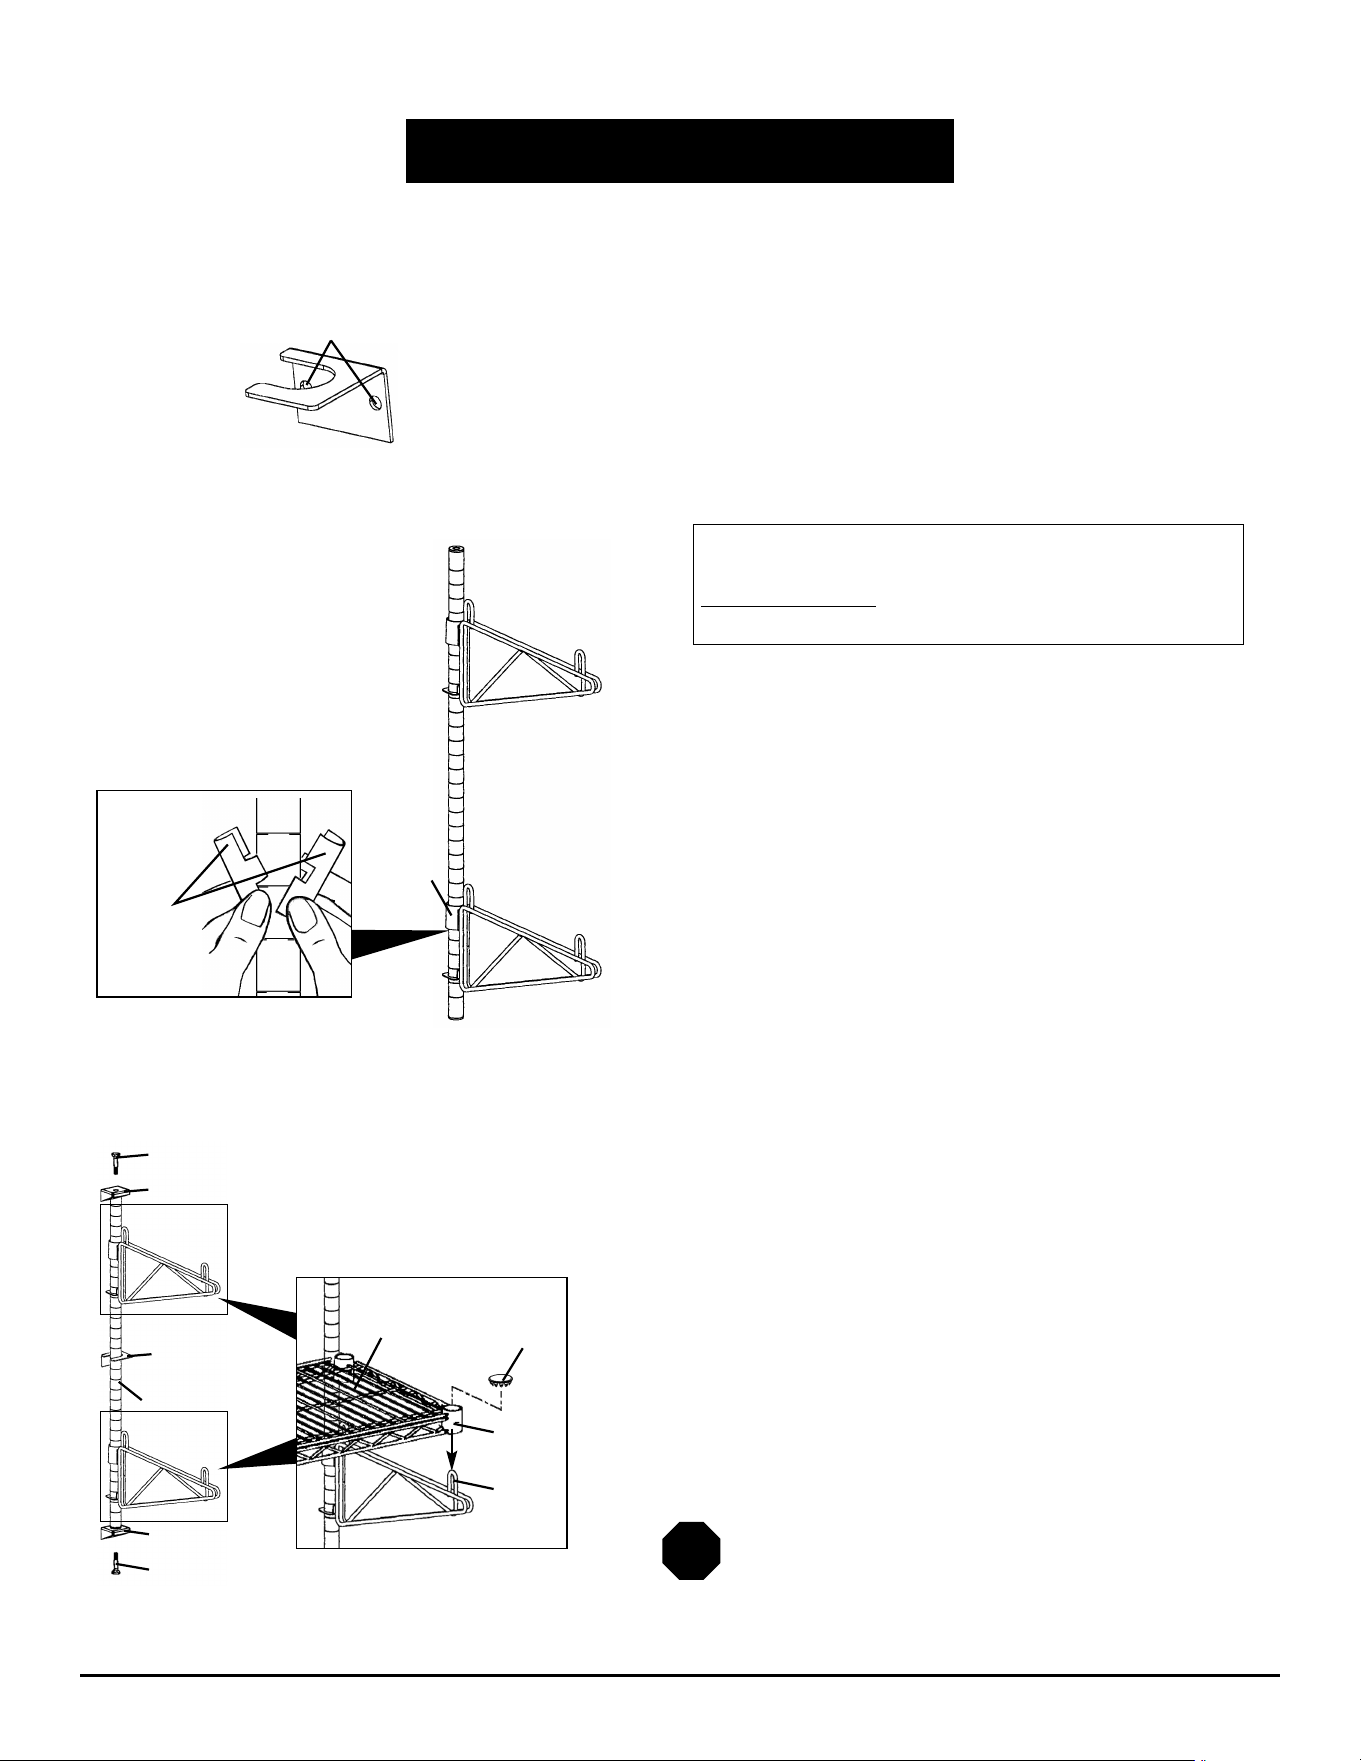
ASSEMBLY INSTRUCTIONS
For Shelving That Requires Mid Brackets
1) Centerline
Refer to chart at left to determine proper centerline distances
between posts.
2) Top & Bottom Supports
• Mark bottom support location at desired height (see figure 1)
—using a level to ensure support is level—and then screw*
bottom support into wall.
• To determine top support location, bolt the post to the bottom
support on the wall, then bolt the top support to the post (see
figure 2). IMPORTANT: Use a level to ensure post is straight.
• Mark top support location. Disassemble the post and supports.
Screw* top support into wall (see figure 1).
• Based on “Centerline Chart,” measure and mark locations of
additional pair(s) of top/bottom supports, and then screw*
top/bottom supports into wall.
For shelving that does not require mid brackets, see front page.
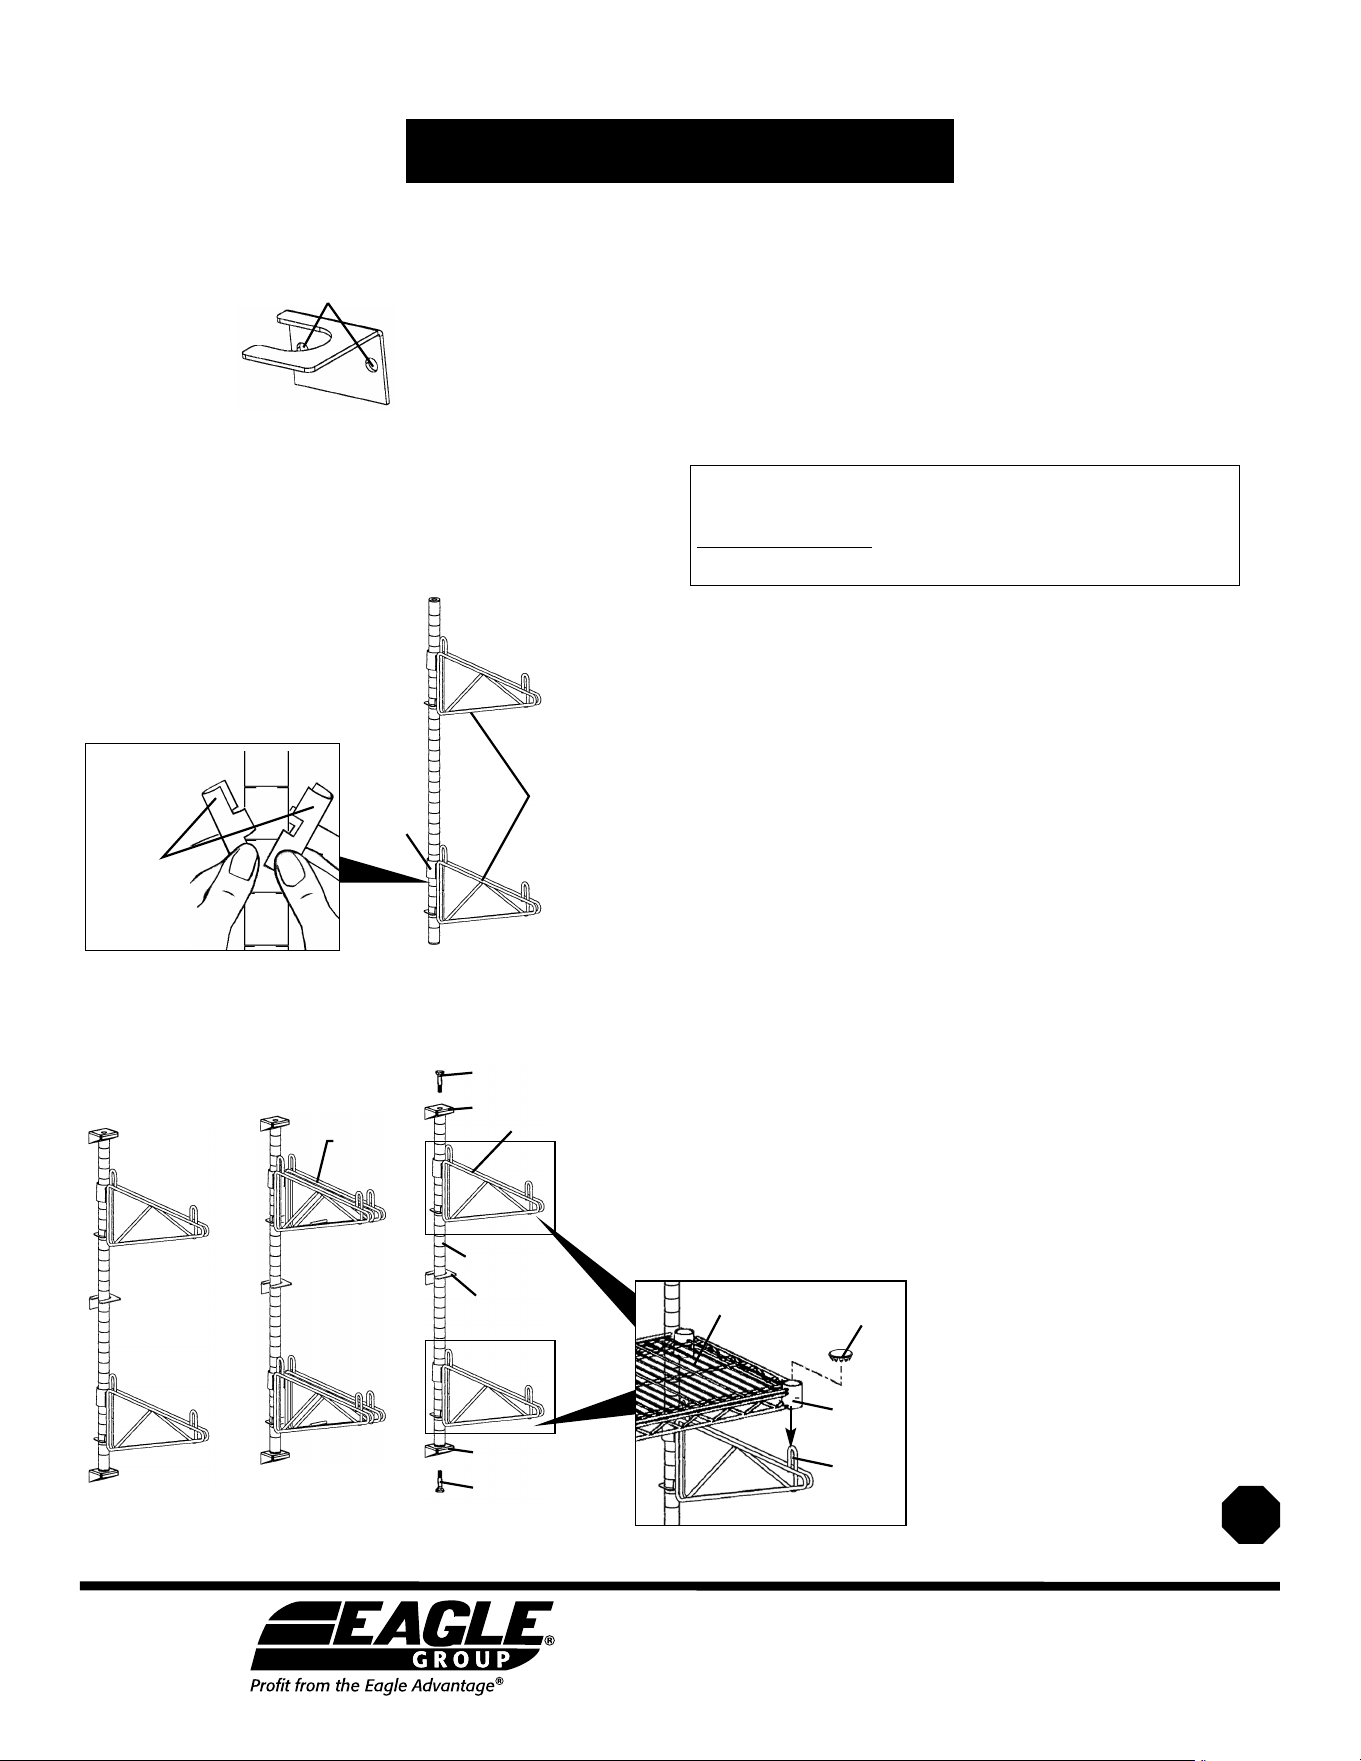
figure 3
holes for
mounting
to wall
Repeat this step to assemble mid brackets to remaining post(s).
figure 4
end
bracket
collar
split sleeve
(underneath
bracket
collar)
bolt
bolt
top support
end bracket
bottom support
post
center
support
figure 5
end
brackets
mid
bracket
figure 6
shelf
shelf
collar
collar
plug
loop of
shelf
bracket
* Shelves sold separately.
(End)
Adjustable Wall Mounts
ASSEMBLY INSTRUCTIONS
For Shelving That Requires Mid Brackets
3) Center Brackets for Multi-Tier Units
(Note: If you are installing a single-shelf unit, then proceed
to Step 4.)
Install center bracket at desired location (see figure 3). We
recommend that the bracket be positioned towards the center
of the post for extra support.
4) End Brackets
• Snap the plastic split sleeve onto the post where you want
the shelf to rest (the wider part of the taper on the split sleeve
faces the bottom of the post).
(Note: If you are installing a multi-tier unit, then start at
the bottom of the post.)
• Slide the end bracket collar (see figure 4) over top of post
and down onto the plastic split sleeve. Repeat for each
shelf bracket.
5) Posts & Shelves*
• Install post/bracket assemblies to supports using bolts
provided (see figure 5). Make sure the post(s) with mid
brackets is in the middle.
• Lay each shelf* on top of wall brackets, and cover shelf collar
openings with collar plugs (see figure 6).
BEFORE YOU CONTINUE, PLEASE NOTE…
Open box(es) of wire shelving* and set aside. You will find
plastic split sleeves (pack of four per shelf), which you will
need in order to complete Step 4 below.
Eagle Foodservice Equipment, Eagle MHC, and SpecFAB
®
are divisions of Eagle Group. ©2024 by the Eagle Group
• 100 Industrial Boulevard, Clayton, Delaware 19938-8903 U.S.A.
• Phone: 302/653-3000 • 800/441-8440 • Fax: 302/653-2065
• www.eaglegrp.com • www.eaglemhc.com