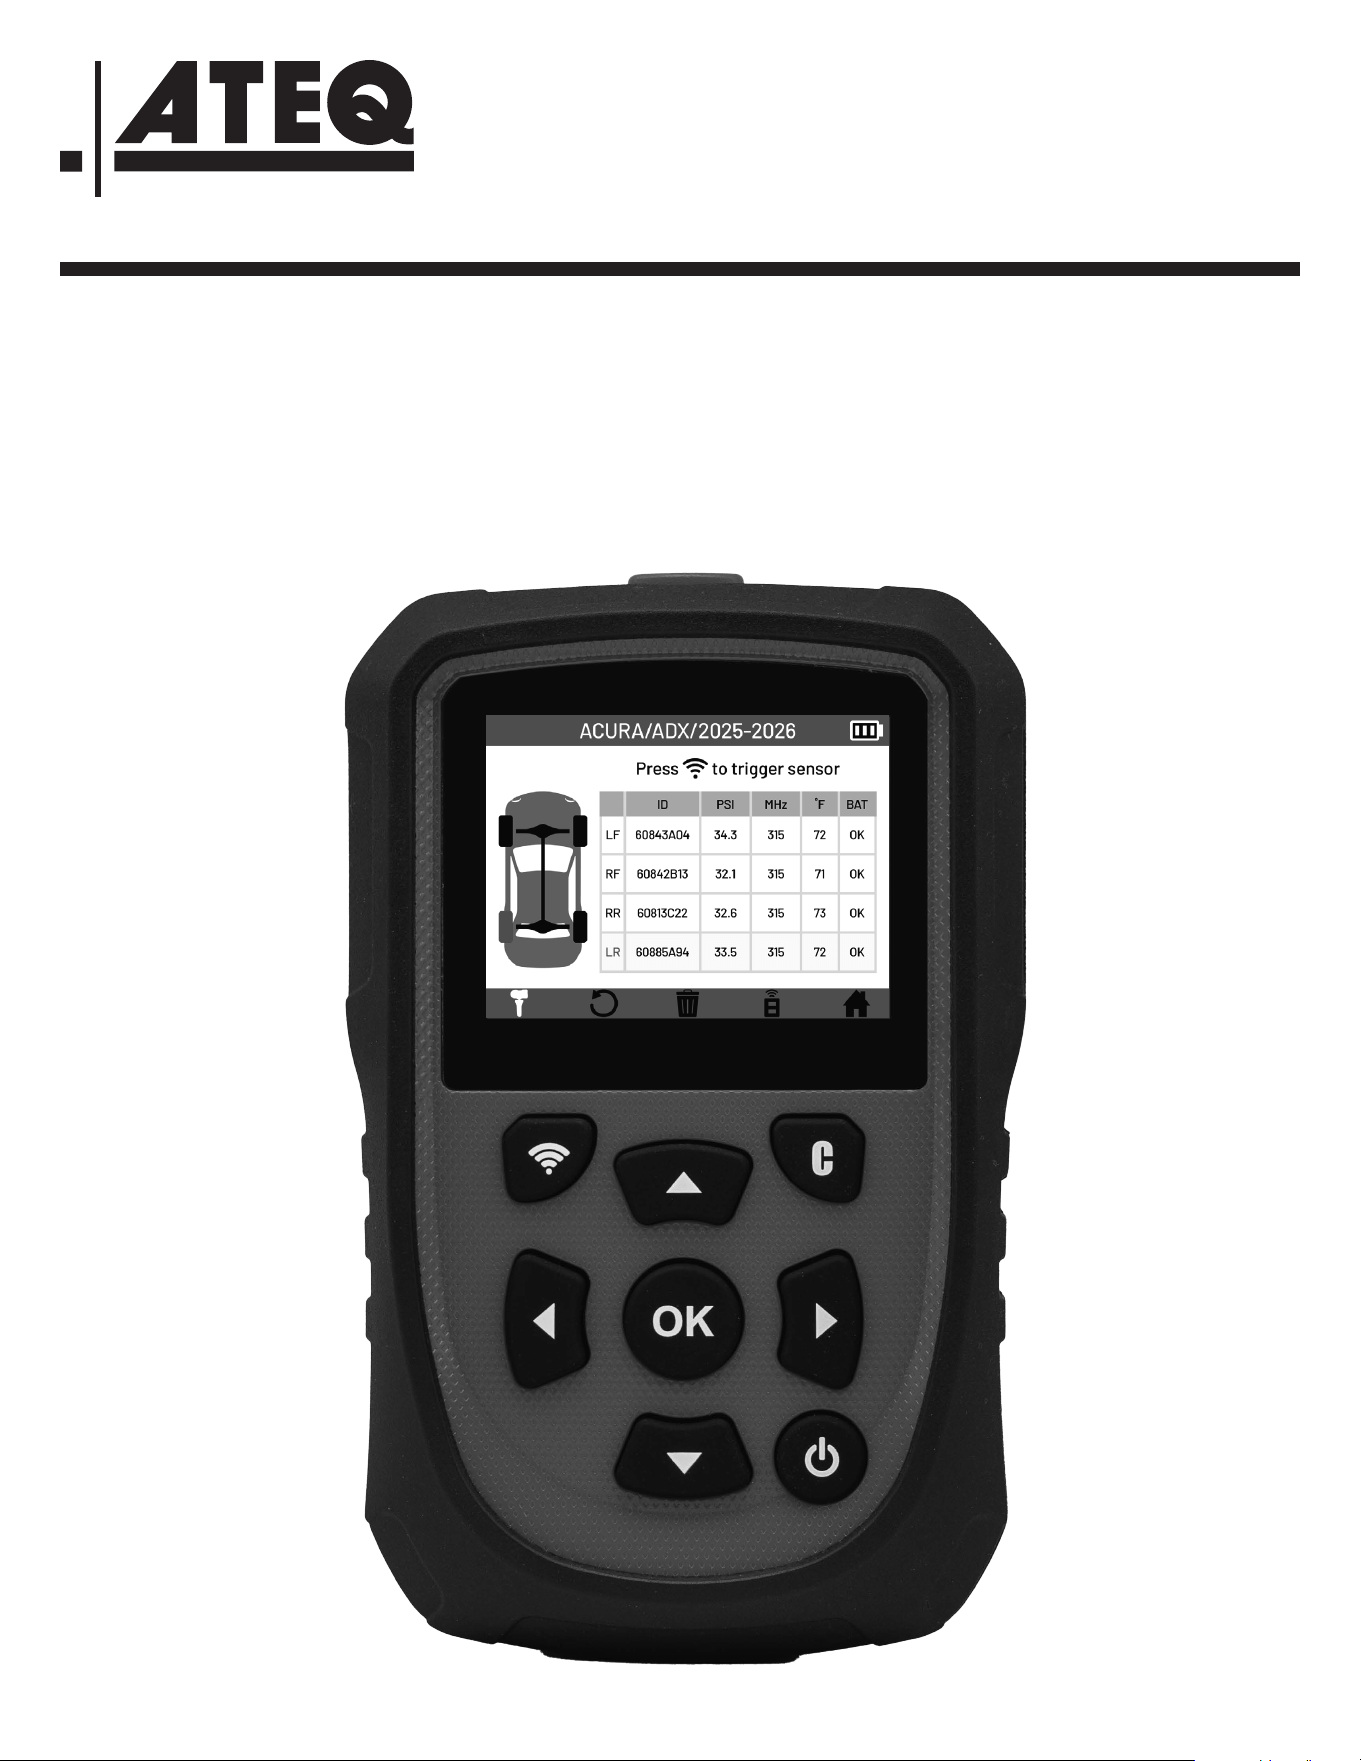
User Manual
VT18

2English | 03-20-2026
1. INTRODUCTION 3
1.1
Specifications 3
1.2
Important Safety Information 4
1.3 Warnings 5
1
.4 Tool Overview 6
1.5 Getting Started 7
2. PAIR WITH SCAN TOOL
8
3
. STAND ALONE
9
4
. READ SENSORS
11
4.1
TPMS screen overview
11
4
.2 Reading TPMS Sensors 12
5. PROGRAM
13
5.1
Accessing the Program functions menu 13
5.2 Create New Sensor 14
5.3 Copy ID 15
5.4
Batch 18
5.5 Manual ID 20
5.6 Copy Set 22
6. RELEARN
25
6.1
Accessing the Relearn functions menu 25
6. 2
Manual Relearn 26
6.3
Scan Tool 27
7. DELETE JOB/GO HOME 28
8. KEYFOB
29
9
. SETTINGS 30
9.1
Accessing the Settings menu 30
9.2 Region 31
9.3
Units 32
9.4 Format 33
9.5 Buzzer ON 34
9.6
Auto O 35
9.7 Language 36
9.8 Update/WIFI 37
9.8.1 Update 38
9.8.2 WIF I Settings 39
9.8.3 Renew Lice nse 41
9.9 Certifications 42
9.10 About 43
10. MISCELLANEOUS
44
10.1
Charging the battery 44
10.2 Warranty 45
10.3 Safety Precautions 46
10.4 FCC Statements 47
10.5 ISED Statements 47
10.6 CE Statements 48
10.7
Recycling 48
TABLE OF CONTENTS
ATEQ | VT18 | TABLE OF CONTENTS
3
English | 03-20-2026
1.1 Specifications
Battery Type Rechargeable Li-Po 3.7 V 3000 mAh
Battery Life Approximately
3
00
a
ctivations
p
er
f
ull
c
harge.
Dimensions (Max. L,W,D) 6.25” x 3.8” x 1.6” (15.9 cm x 9.7 cm x 4.1 cm)
Case Material High
I
mpact
A
BS
Response Frequency
Frequencies: 315 MHz and 433.92 MHz
(supporting
most specific frequencies)
Low Battery Indication LCD
b
ar
gr
aph
di
splay.
Weight Approx. 1 lb (454 g)
Screen Size 2.8”
di
splay
Temperature
Operation: -20°C to +45°C (-4°F to 131°F)
Storage:
-
20°C
t
o
+4
5°C
(-
4°F
t
o
1
31°F)
Operating Altitude Maximum
O
perating
Al
titude:
2
000
m (
6560
f
t)
Environment: Indoor/Outdoor
U
se
(<
80%
H
umidity)
Product contents:
• TPMS tool
• USB cable
• Power supply
1. INTRODUCTION
ATEQ | VT18 | INTRODUCTION
4
English | 03-20-2026
This device complies with :
• Part 15 of the US FCC Rules
• CE / CEM standards
• RoHS standards
Operation is subject to the following two points:
(1) This device will not cause harmful interference, and
(2) This tool can be aected by any type of interference, including interference that may cause a malfunction.
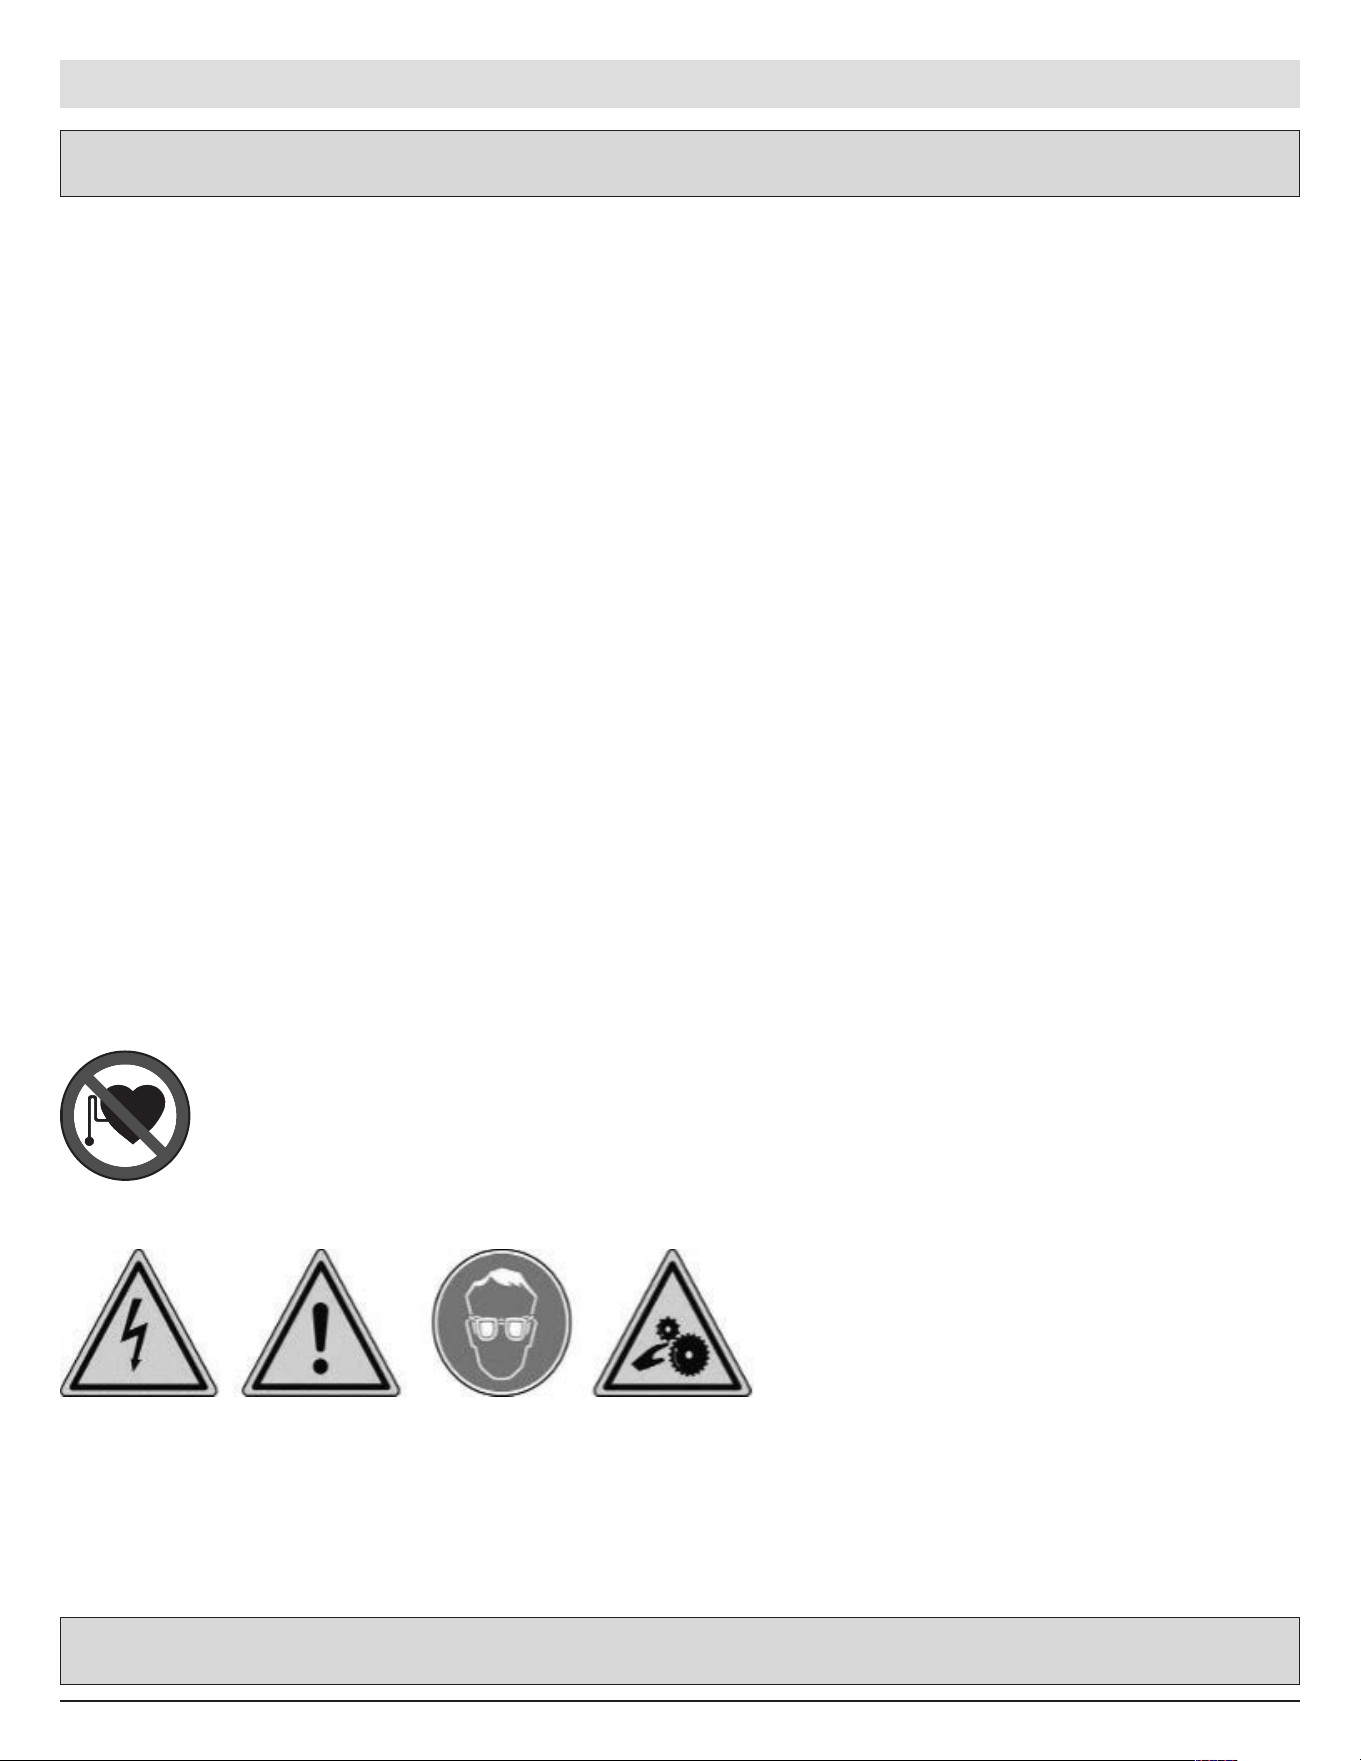
CAUTION: This product emits electromagnetic and electronically generated waves that may
interfere with the safe operation of pacemakers.
Individuals that have pacemakers should never use this product.
CAUTION:
Do not use on live electrical circuits.
Please read instructions before use.
Wear safety goggles. (User and bystanders).
Risk of entanglement and strangulation.
Read the Warranty, Safety and recycling information at the end of this user guide.
Do not discard this manual. Keep it for future reference.
Please note that changes or modifications not expressly approved by the party responsible for compliance
could void the user’s authority to operate the equipment.
Note: This equipment has been tested and found to comply with the limits for a Class B digital device, pursuant
to part 15 of the FCC Rules. These limits are designed to provide reasonable protection against harmful
interference in a residential installation. This equipment generates, uses and can radiate radio frequency energy
and, if not installed and used in accordance with the instructions, may cause harmful interference to radio
communications. However, there is no guarantee that interference will not occur in a particular installation. If
this equipment does cause harmful interference to radio or television reception, which can be determined by
turning the equipment o and on, the user is encouraged to try to correct the interference by one or more of the
following measures:
- Reorient or relocate the receiving antenna.
- Increase the separation between the equipment and receiver.
- Connect the equipment into an outlet on a circuit dierent from that to which the receiver is connected.
- Consult the dealer or an experienced radio/TV technician for help.
1.2 Important Safety Information
ATEQ | VT18 | INTRODUCTION

5English | 03-20-2026
1.3 Warnings
PLEASE READ THESE INSTRUCTIONS BEFORE USE
The tool has been designed to be robust, durable, safe and reliable when properly used.
• Please
read all instructions below before
use.
• Always follow these
safety instructions.
• If
you have
any questions on the
safe
use
of
this tool, please
contact your local dealer.
1. Read All Instructions
• All warnings on the tool and in this manual should be adhered to.
• All operating instructions should be
followed.
2. Retain Instructions
The
safety and operating instructions should be
retained for future
reference.
3. Heed Warnings
To use this tool safely, you and any bystanders must:
• wear safety go ggles,
• read instructions before
use,
• not use
on live
electrical circuits,
• pay attention to the
risk of
entanglement and strangulation.
4. Cleaning
Clean with a soft dry cloth, or if
necessary, a soft damp cloth. Do not use
any harsh chemical solvents such
a
s acetone, thinner, brake
cleaner, alcohol, etc
as this may damage
the
tool.
5. Water & Moisture
Do not use
this tool where
contact or immersion in water is a possibility.
Never spill liquid of
any kind onto the
tool.
6. Storage
Do
not store or use the tool when exposed to direct sunlight, heat or excessive humidity.
7. Usage
To reduce the risk of fire:
•
do not use
the
tool near flammable
liquids,
• do not use
the
tool where
there
is a risk o f
exposure
to explosive
gases or vapours,
•
keep the tool away from heat sources,
•
do not operate
the
tool with the
battery cover removed.
ATEQ | VT18 | INTRODUCTION
6
English | 03-20-2026
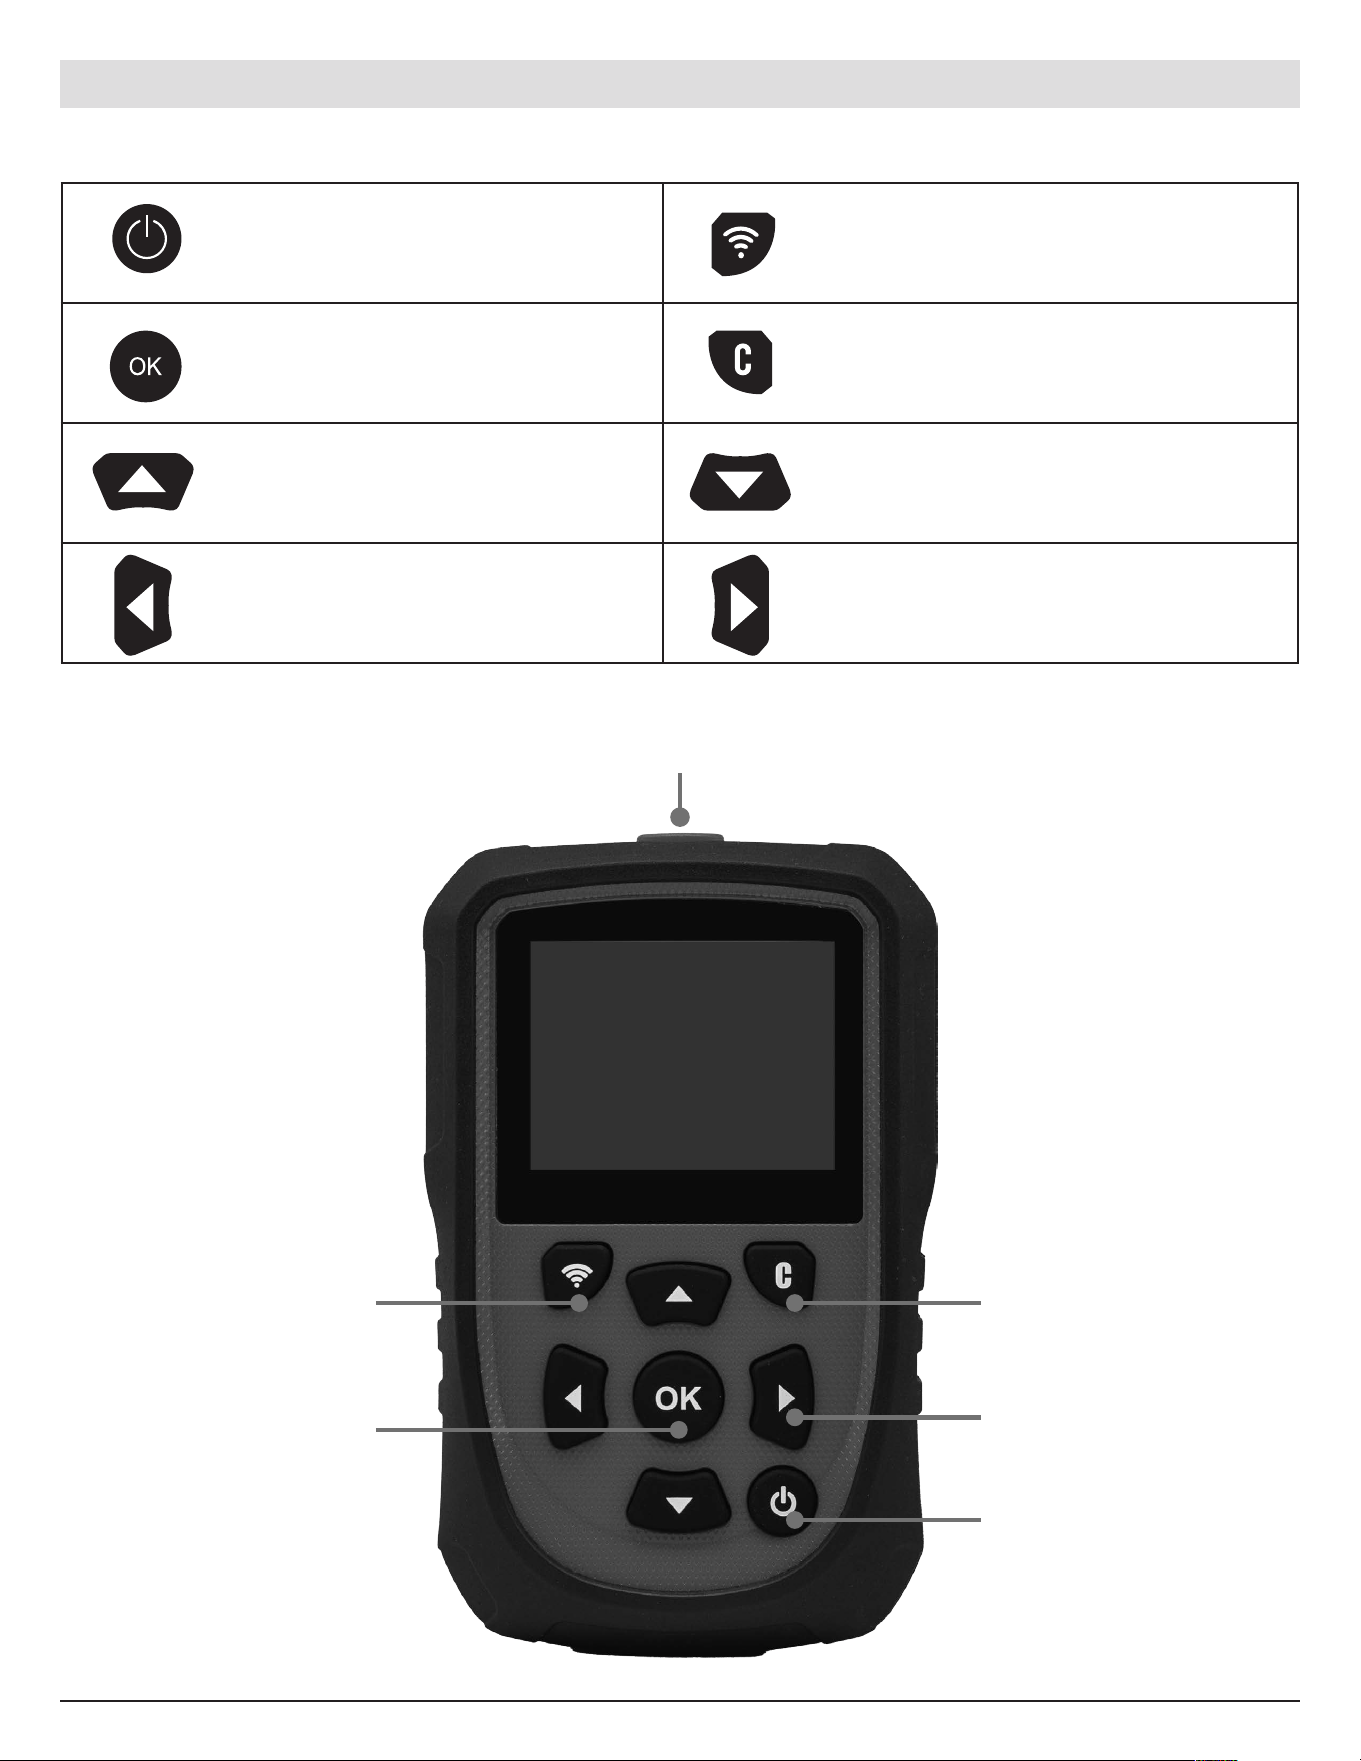
Antenna
Trigger
OK/Confirm
Arrow Keys
Cancel/Back
Power On/O
1.4 Tool Overview
Power ON /OFF button Read or trigger sensor.
Next,
c
ontinue
or c
onfirm. Cancel,
pr
evious
s
tep.
Navigate
t
o
s
elec t
“
up”. Navigate
t
o
s
elec t
“
down”.
Navigate to select “left”. Navigate to select “right”.
ATEQ | VT18 | INTRODUCTION
7
English | 03-20-2026
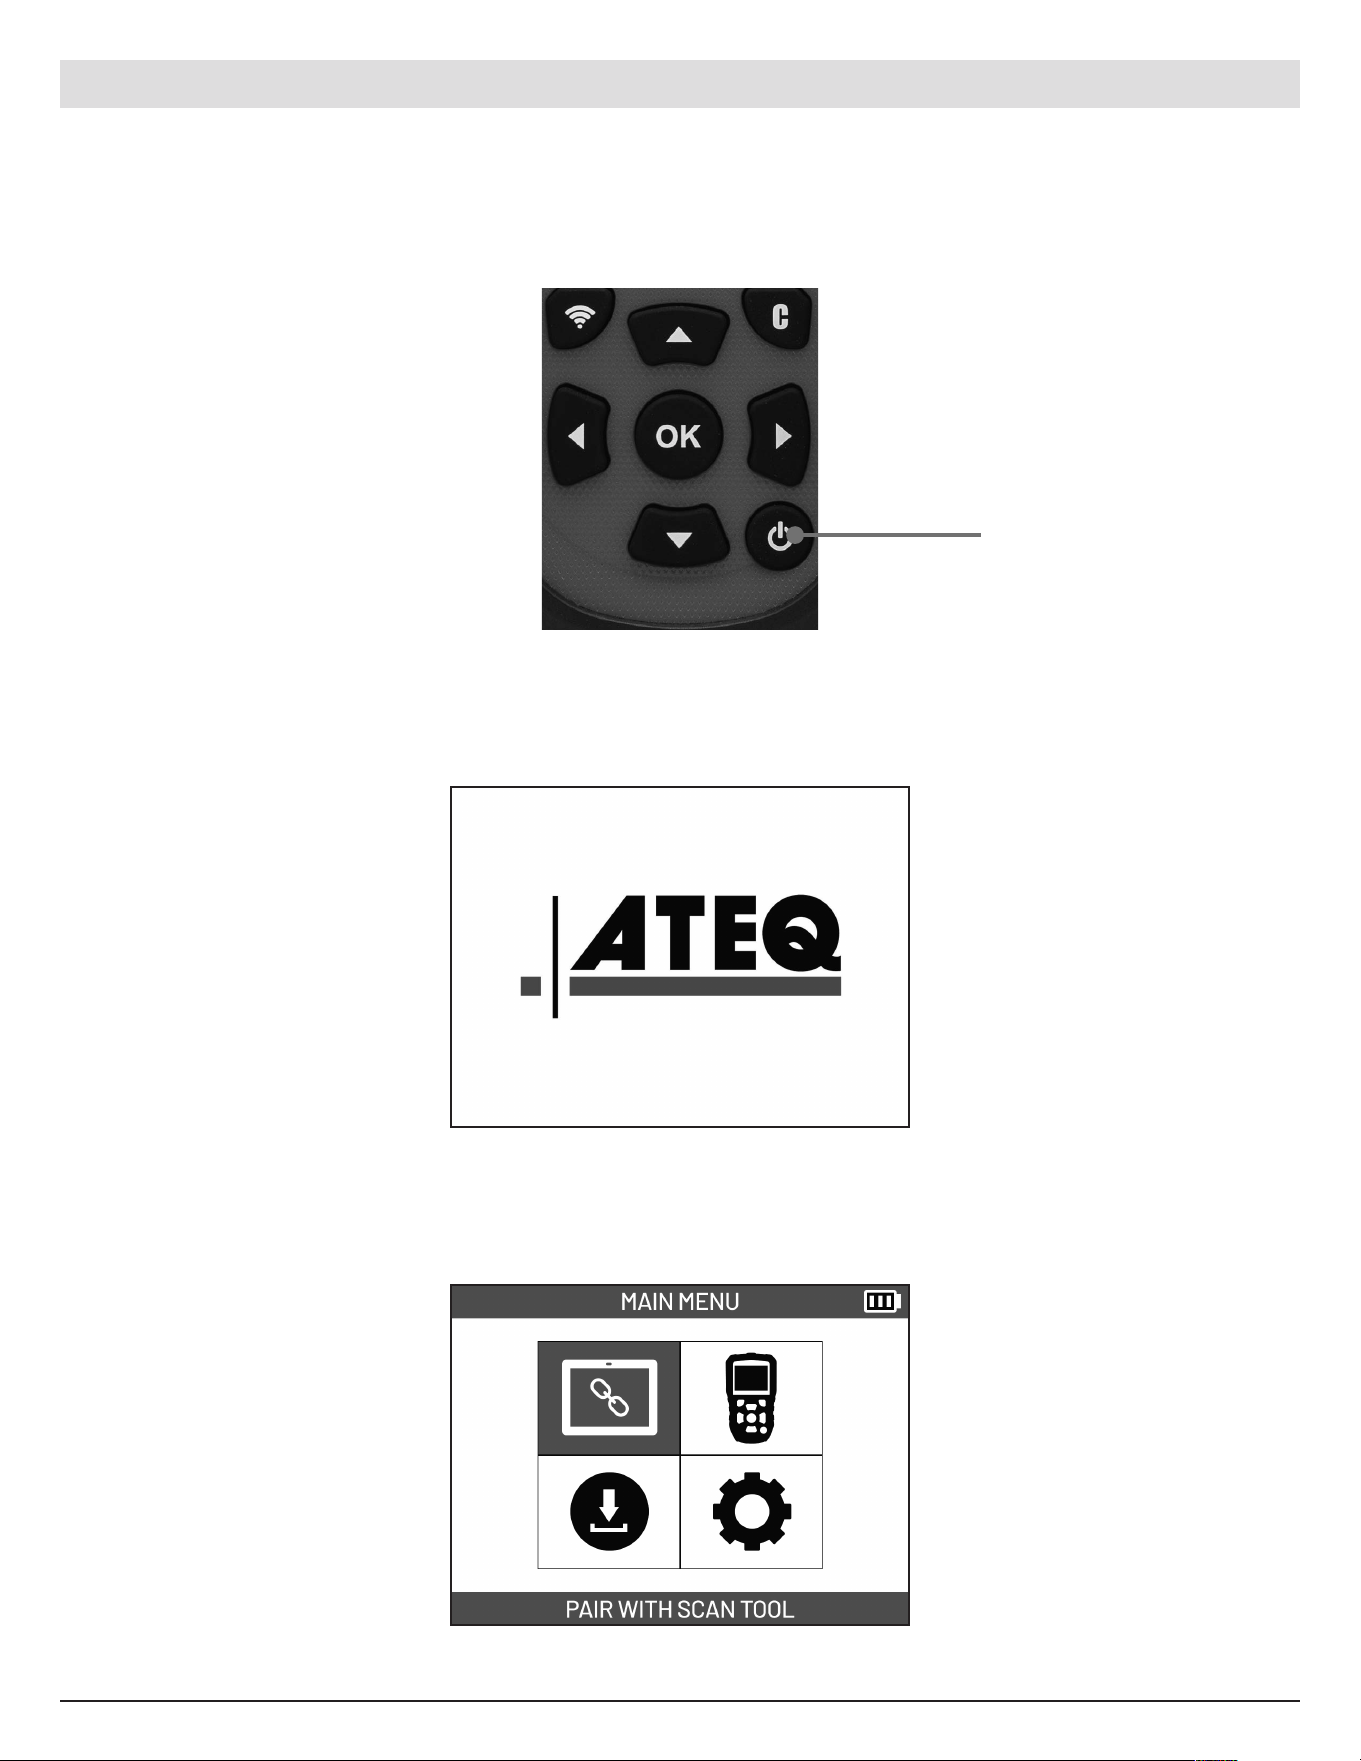
1.5 Getting Started
Pre ss and hold the Power
button to turn on/o the
device. Release button once
it powers on/o.
The tool will power ON and
the splash screen will be
display ed.
Once the tool is completely
powered on, the main menu
will be displayed and the tool
is ready for use.
ATEQ | VT18 | INTRODUCTION
Power Button
8
English | 03-20-2026
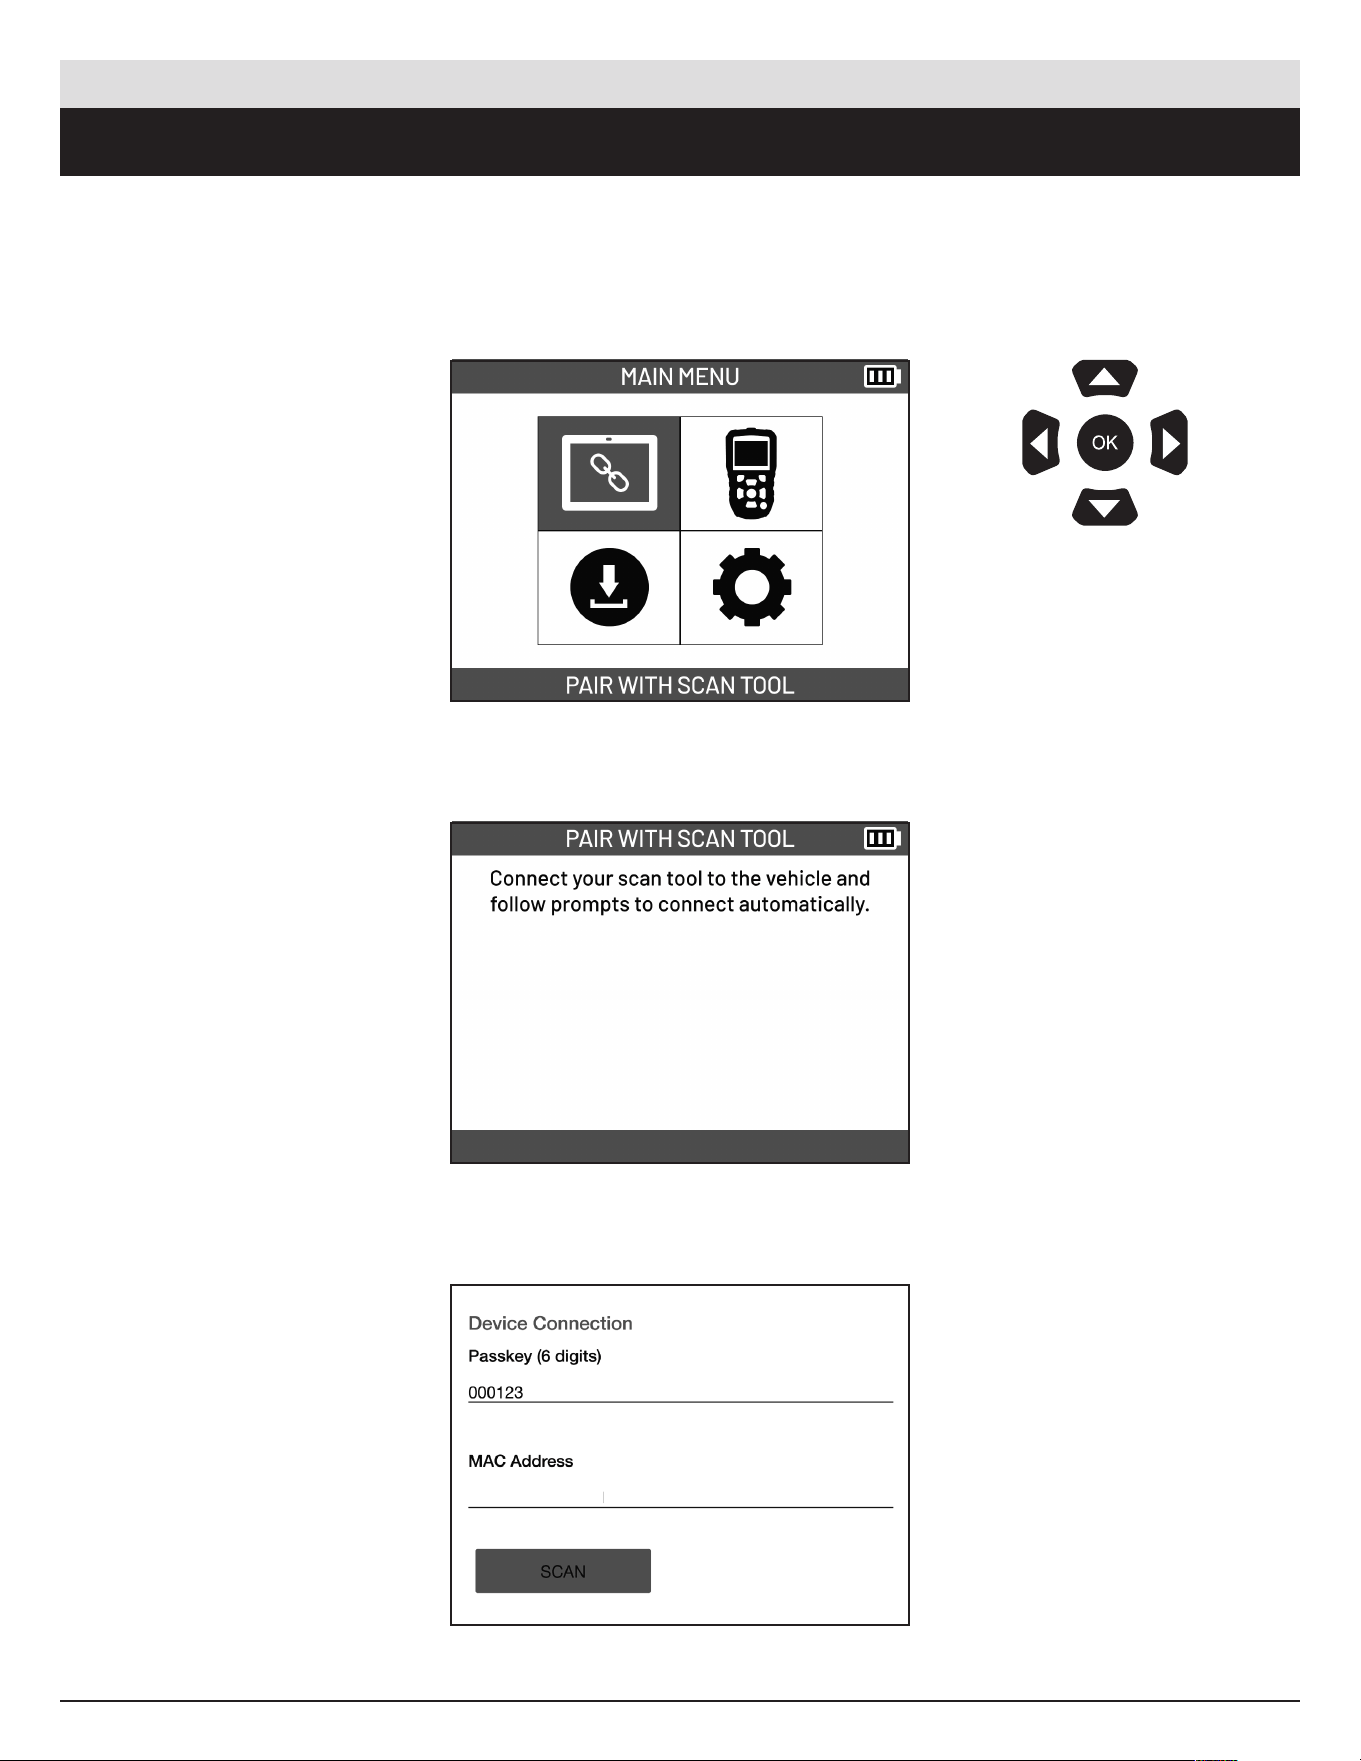
2. PAIR WITH SCAN TOOL
From the main menu, select
PAIR WITH SCAN TOOL.
Message about connecting
scan tool to the vehicle will
be displayed.
In the scan tool, enter the
passkey (0 followed by last
5 digits of the tool serial
number). Se lect the SCAN
button then select the device
to connect.
Use the arrow
buttons to navigate.
Pre ss OK to confirm
your choice.
ATEQ | VT18 | PAIR WITH SCAN TOOL
9
English | 03-20-2026
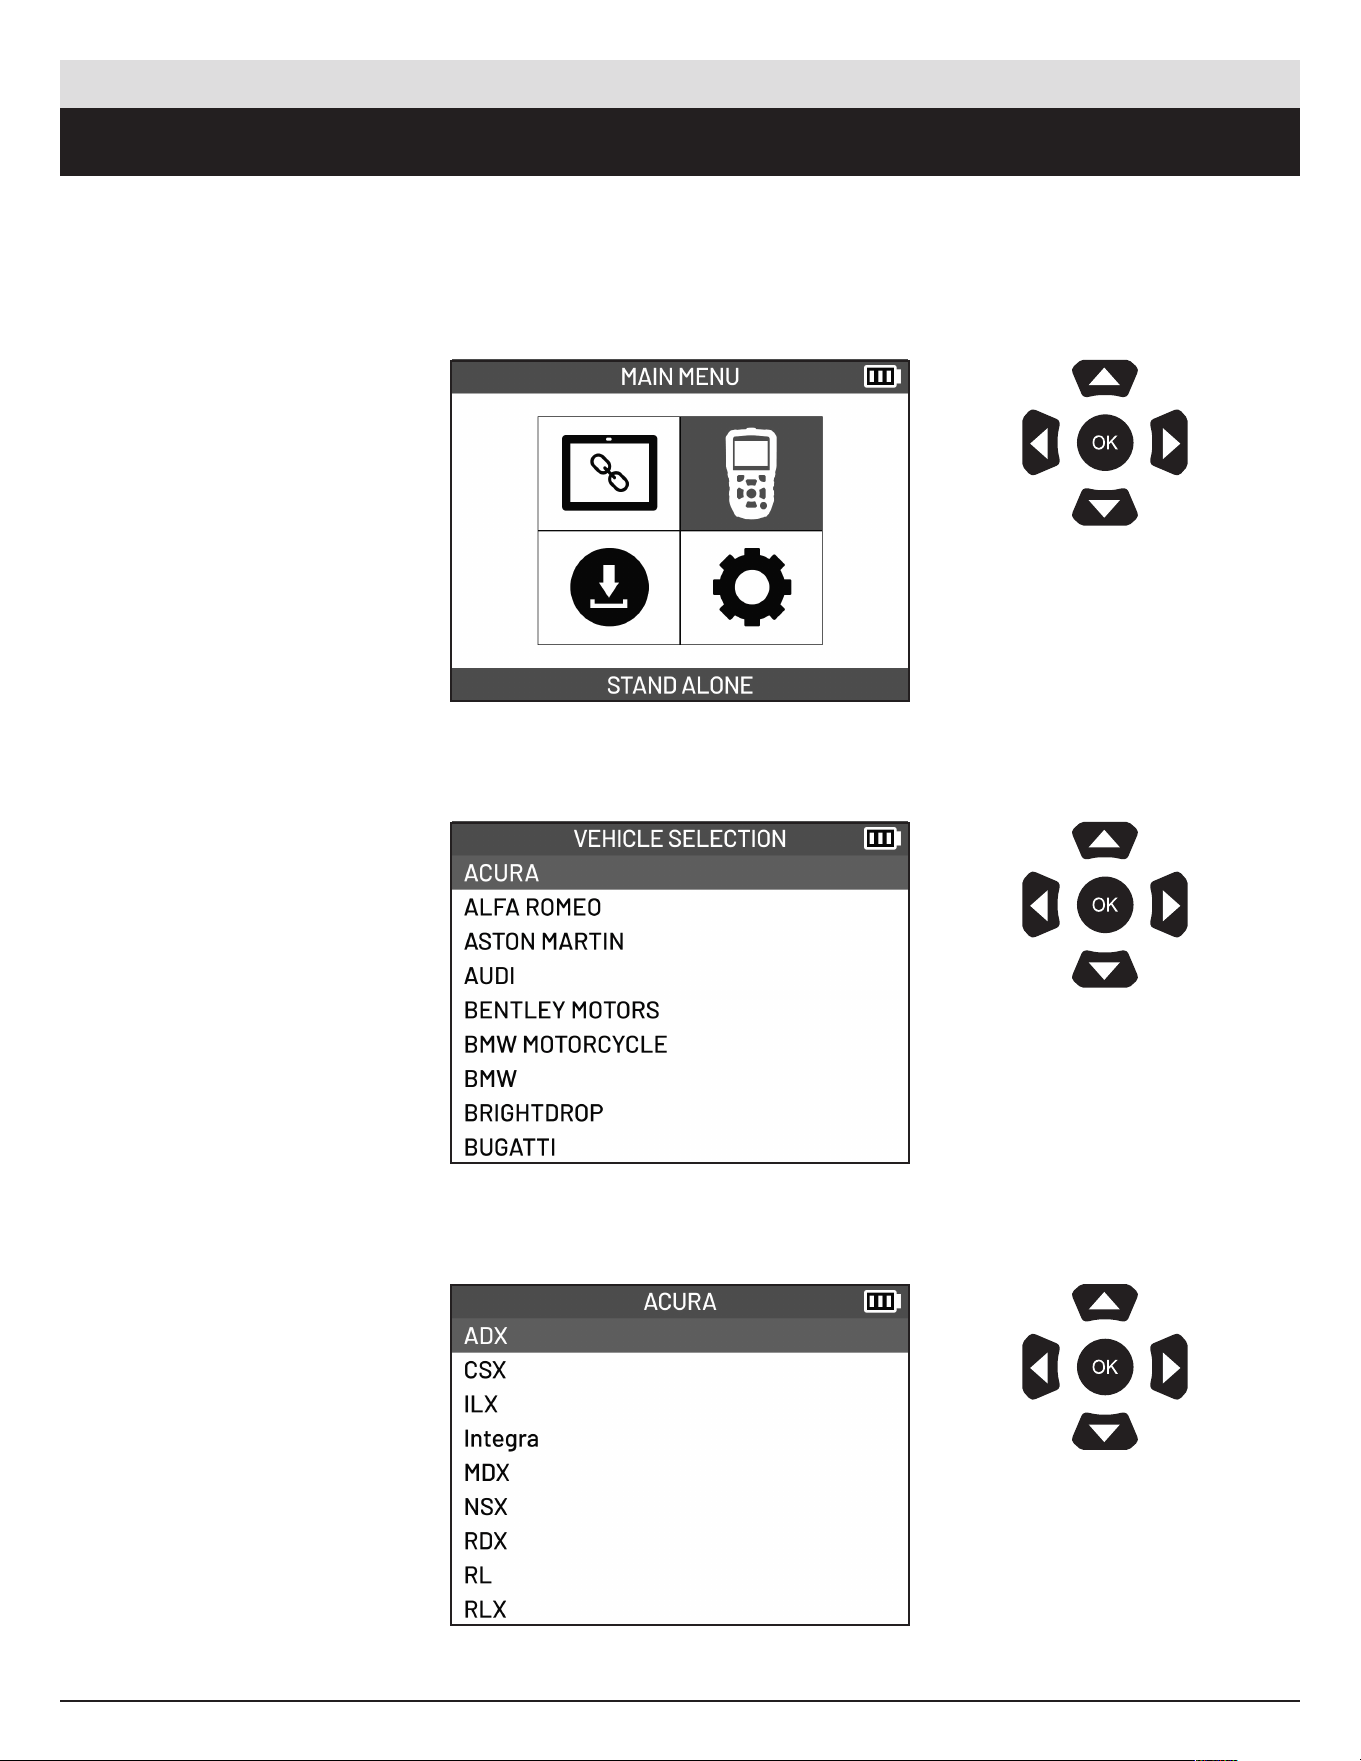
3. STAND ALONE
From the main menu, select
STAND ALONE.
Select the vehicle make.
Select the vehicle model.
Use the arrow
buttons to navigate.
Pre ss OK to confirm
your choice.
Use the arrow
buttons to navigate.
Pre ss OK to confirm
your choice.
Use the arrow
buttons to navigate.
Pre ss OK to confirm
your choice.
ATEQ | VT18 | STAND ALONE
10
English | 03-20-2026
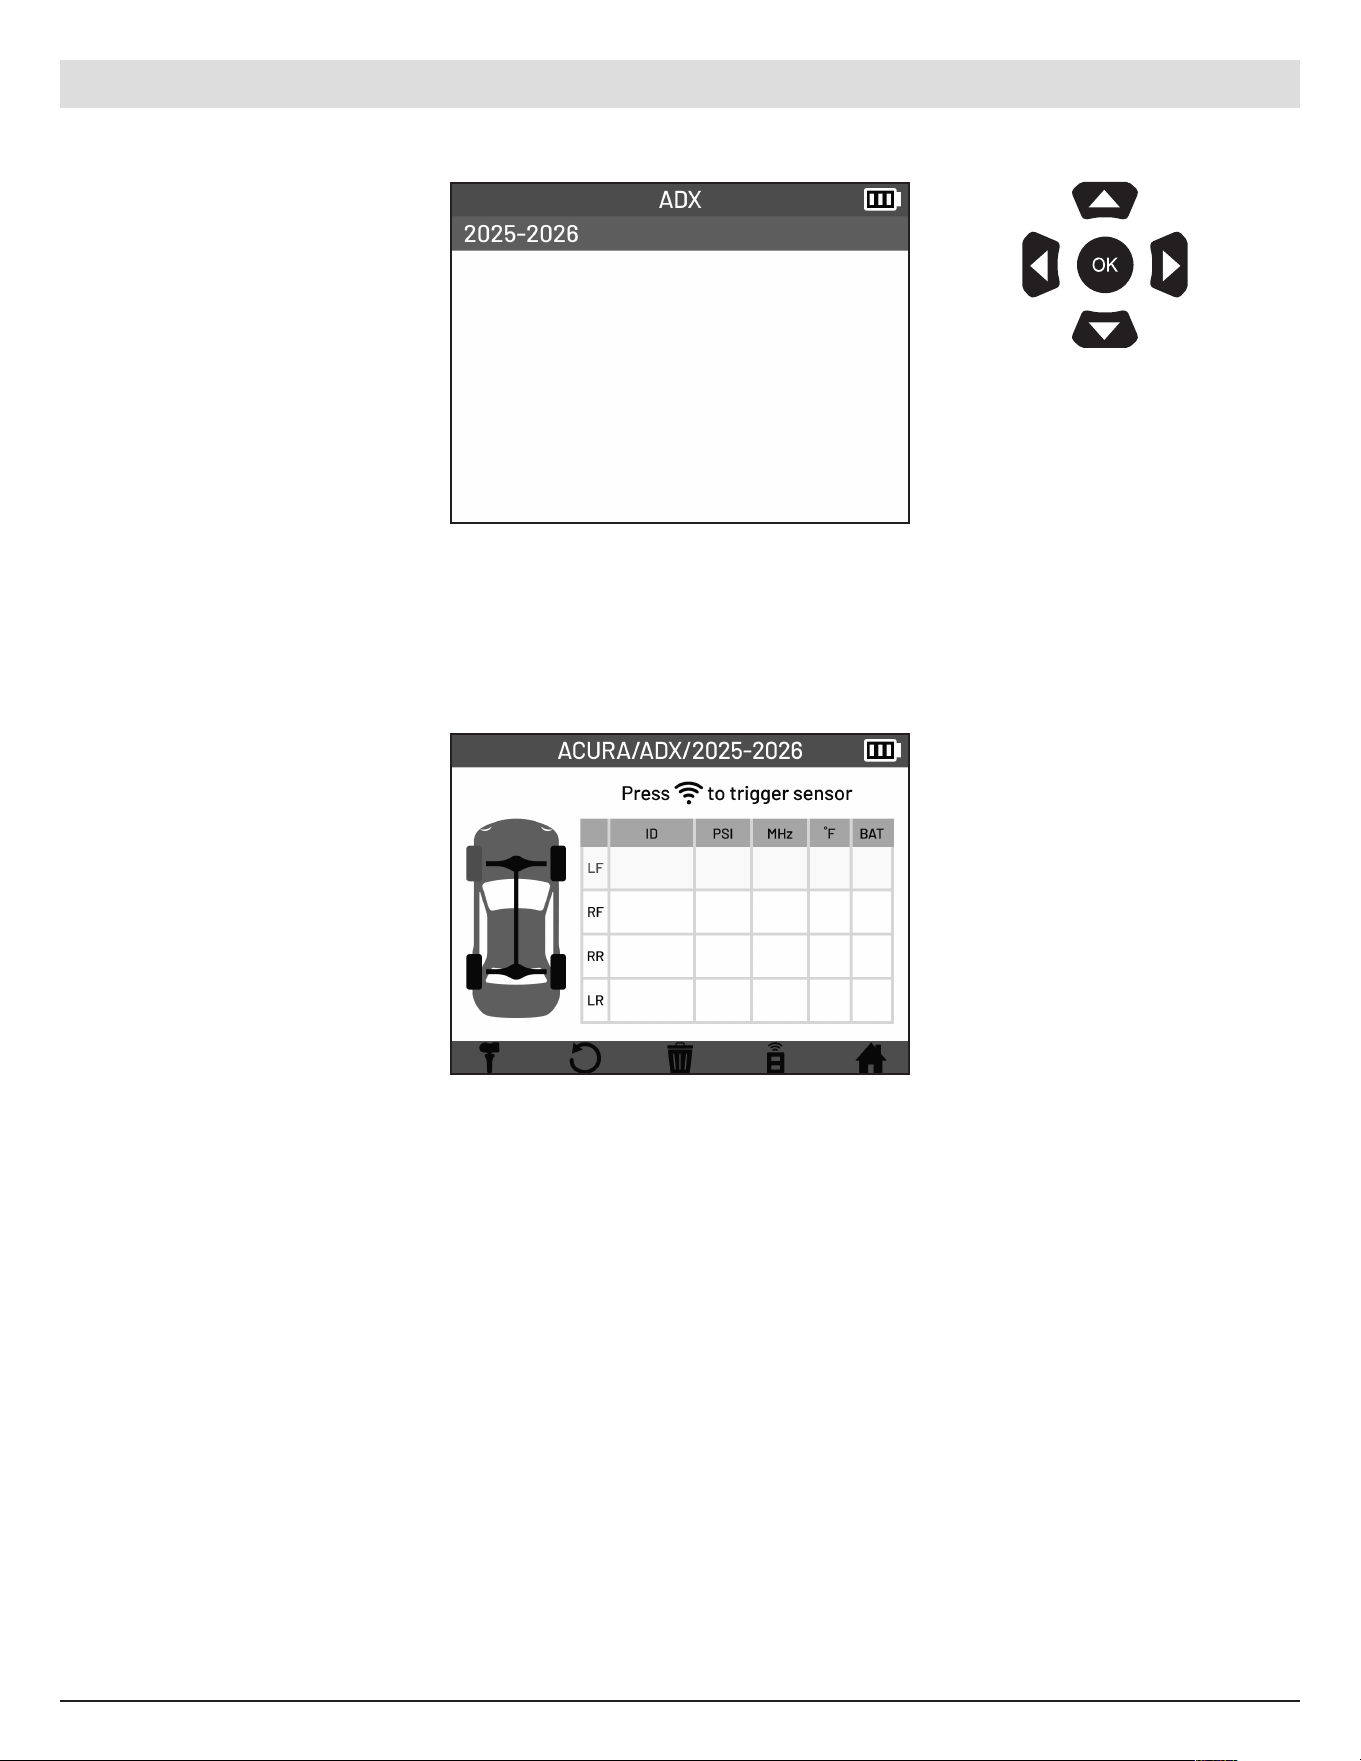
Select the vehicle year.
Arrive at TPMS screen.
Ready to read TPMS
sensors.
Use the arrow
buttons to navigate.
Pre ss OK to confirm
your choice.
ATEQ | VT18 | STAND ALONE
11
English | 03-20-2026
4. READ SENSORS
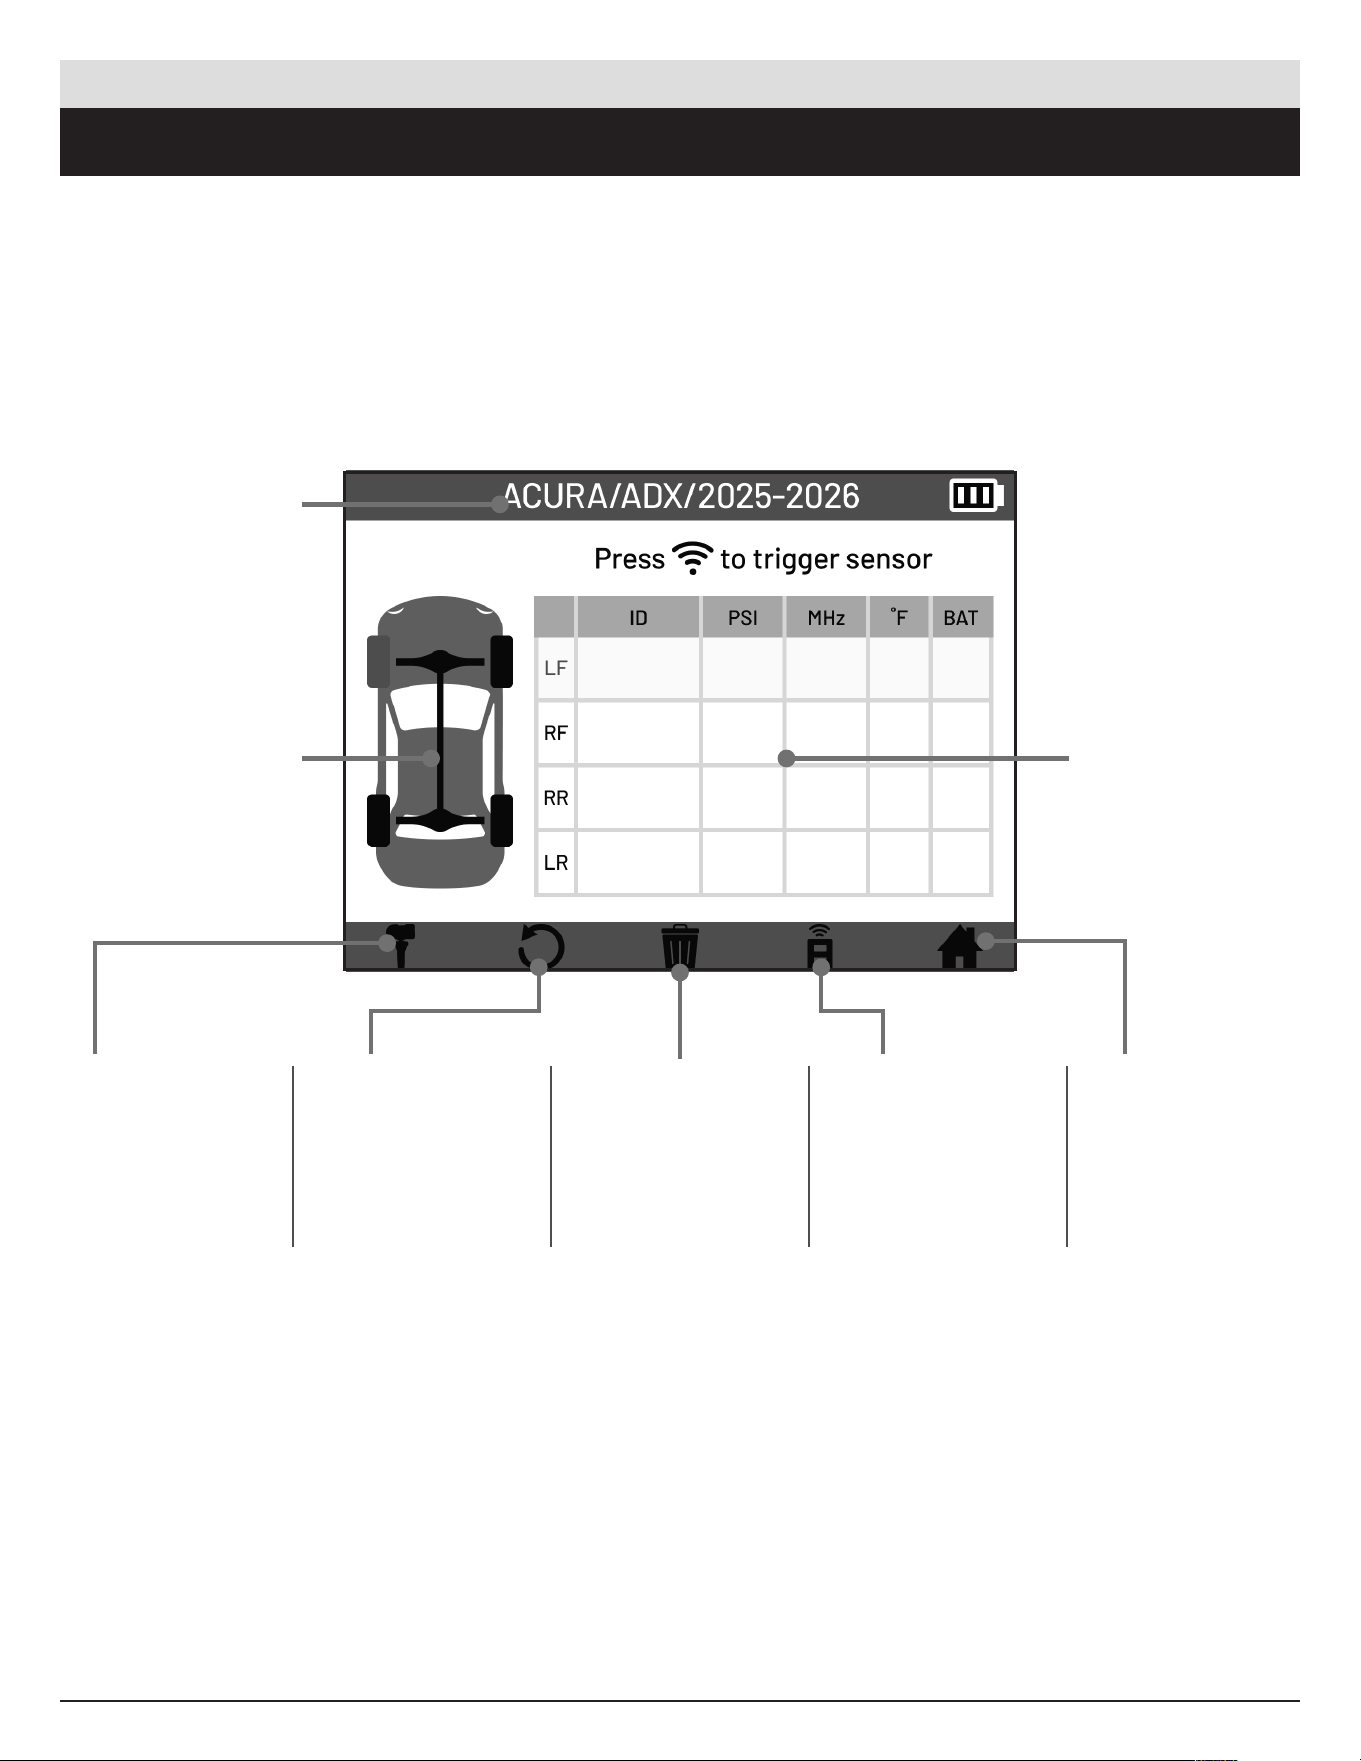
4.1 TPMS Screen overview
The TPMS screen is where the main functionality of the tool is located. You can read the TPMS sensors to
display the Sensor ID, Pressure, Frequency, Temp e rature, and Battery Status. Selecting the icons on the
bottom of the screen provide additional functions.
Selected Vehicle
Vehicle Display
Program
Assign sensor IDs
to sensors. Pro gram
functions available.
Create, Copy, Batch,
Manual ID, and
Copy Set.
Relearn
Preform relearn
function so the
vehicles ECU can
recognize the new
sensor.
Delete Job
Erase records of
current job.
Keyfob
Test vehicle keyfob
battery status and
signal strength.
Home
Go back to main
menu.
Sensor
Information
Chart
ATEQ | VT18 | READ SENSORS
12
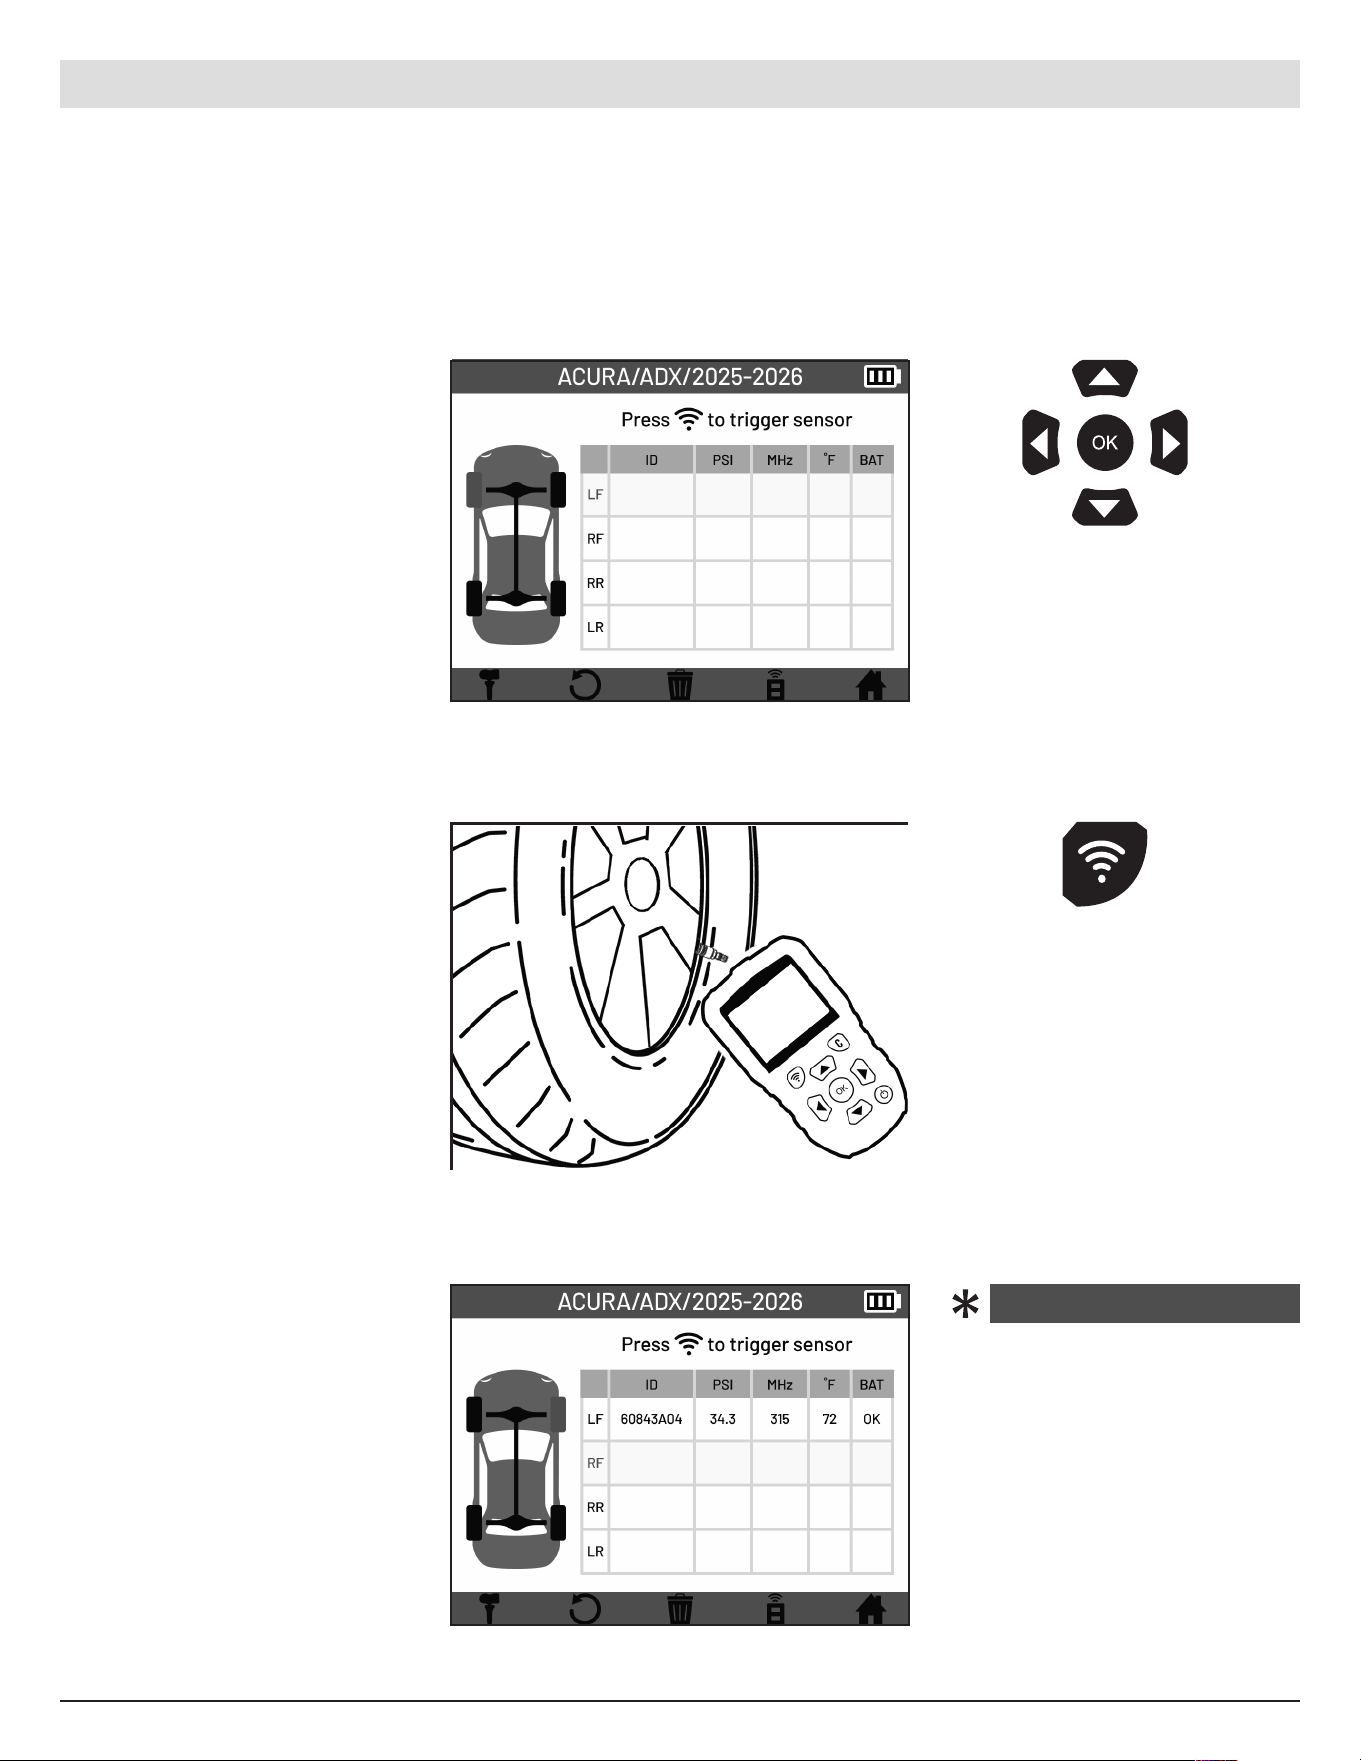
English | 03-20-2026
Select the wheel of the
sensor you wish to scan.
The selected wheel will
be displayed in red on
the vehicle display and
highlighted on the sensor
information chart .
The sensor’s information will
be displayed on the chart.
The wheel selection will
automatically advance to the
next wheel. C ontinue reading
the remaining se nsors.
Use the arrow
buttons to se lect
wheel.
Pre ss the trigger
button on the tool to
read the sensor.
ATEQ | VT18 | READ SENSORS
IMPORTANT! Vehicle-specific information in this manual is used as an example and cannot represent
instructions specific to each make and model of vehicle. When using the various functions on the TPMS tool,
it is important to refer to the on-screen prompts and/or to information in the vehicle’s manual.
NOTE! To get the best
reading from the TPMS
sensors, point the tool’s
antenna at the sensor through
the tire sidewall, not directly
through the rim.
4.2 Reading TPMS Sensors
Place the tool’s antenna
towards the sensor through
the tire sidewall. Press the
trigger button to read the
sensor.
In the event that a “NO
SENSOR DETECTED”
error displays , reposition
the tool and attempt to
read the sensor again. If
the error p e rsists, this may
be an indication that the
sensor is dead and needs
to be replaced.
NO SENSOR DETECTED
13
English | 03-20-2026
5. PROGRAM
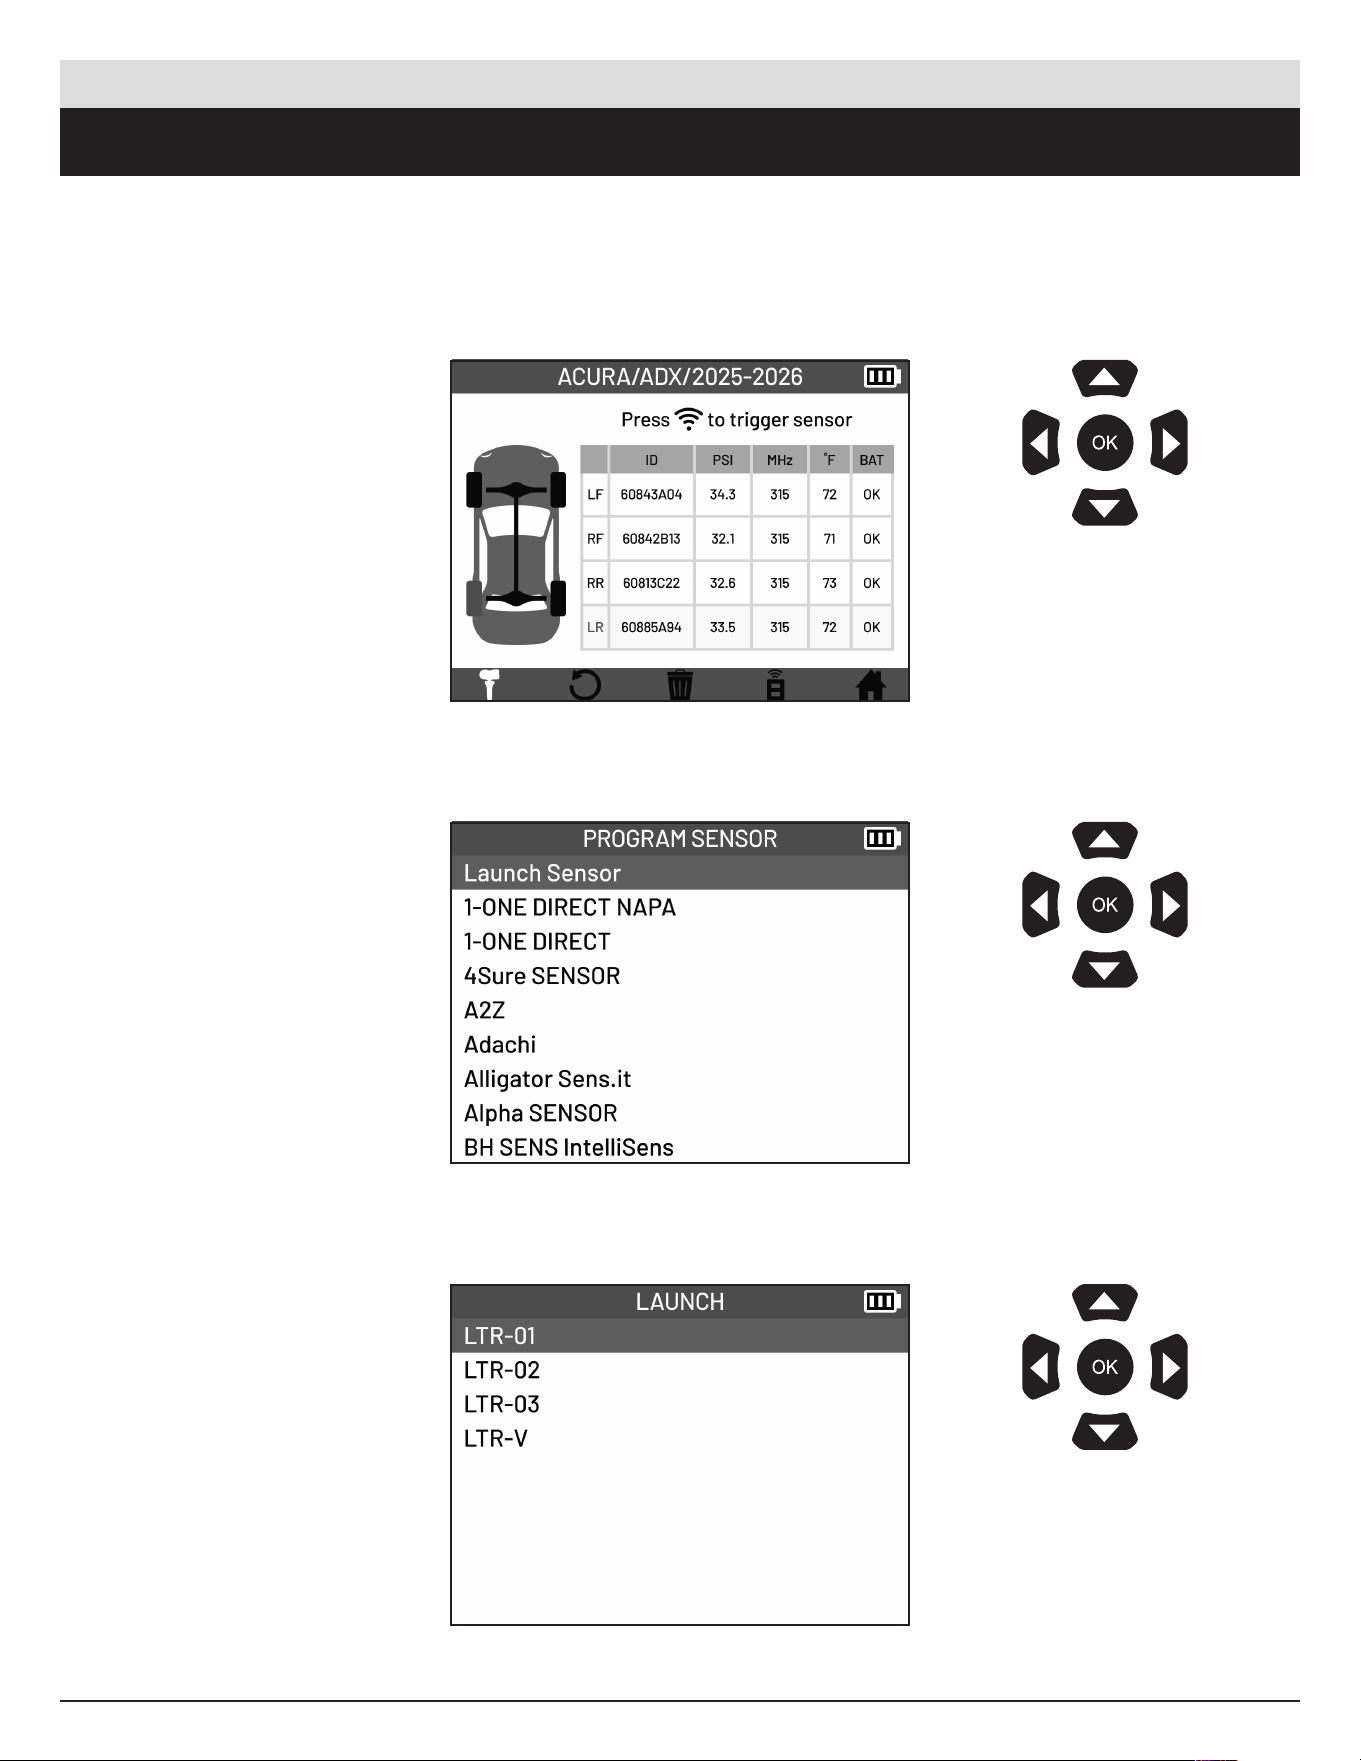
5.1 Accessing the Program functions menu
The Program function allows you to write new vehicle-speci fic data to a programmable TPMS sensor so it
can operate correctly with the vehicle’s TPMS system.
From the TPMS Screen,
select the Program Icon
located in the bottom bar.
Select the make of the
programmable sensor.
Select the model of the
programmable sensor.
Use the arrow
buttons to navigate.
Pre ss OK to confirm
your choice.
Use the arrow
buttons to navigate.
Pre ss OK to confirm
your choice.
Use the arrow
buttons to navigate.
Pre ss OK to confirm
your choice.
ATEQ | VT18 | PROGRAM
14
English | 03-20-2026
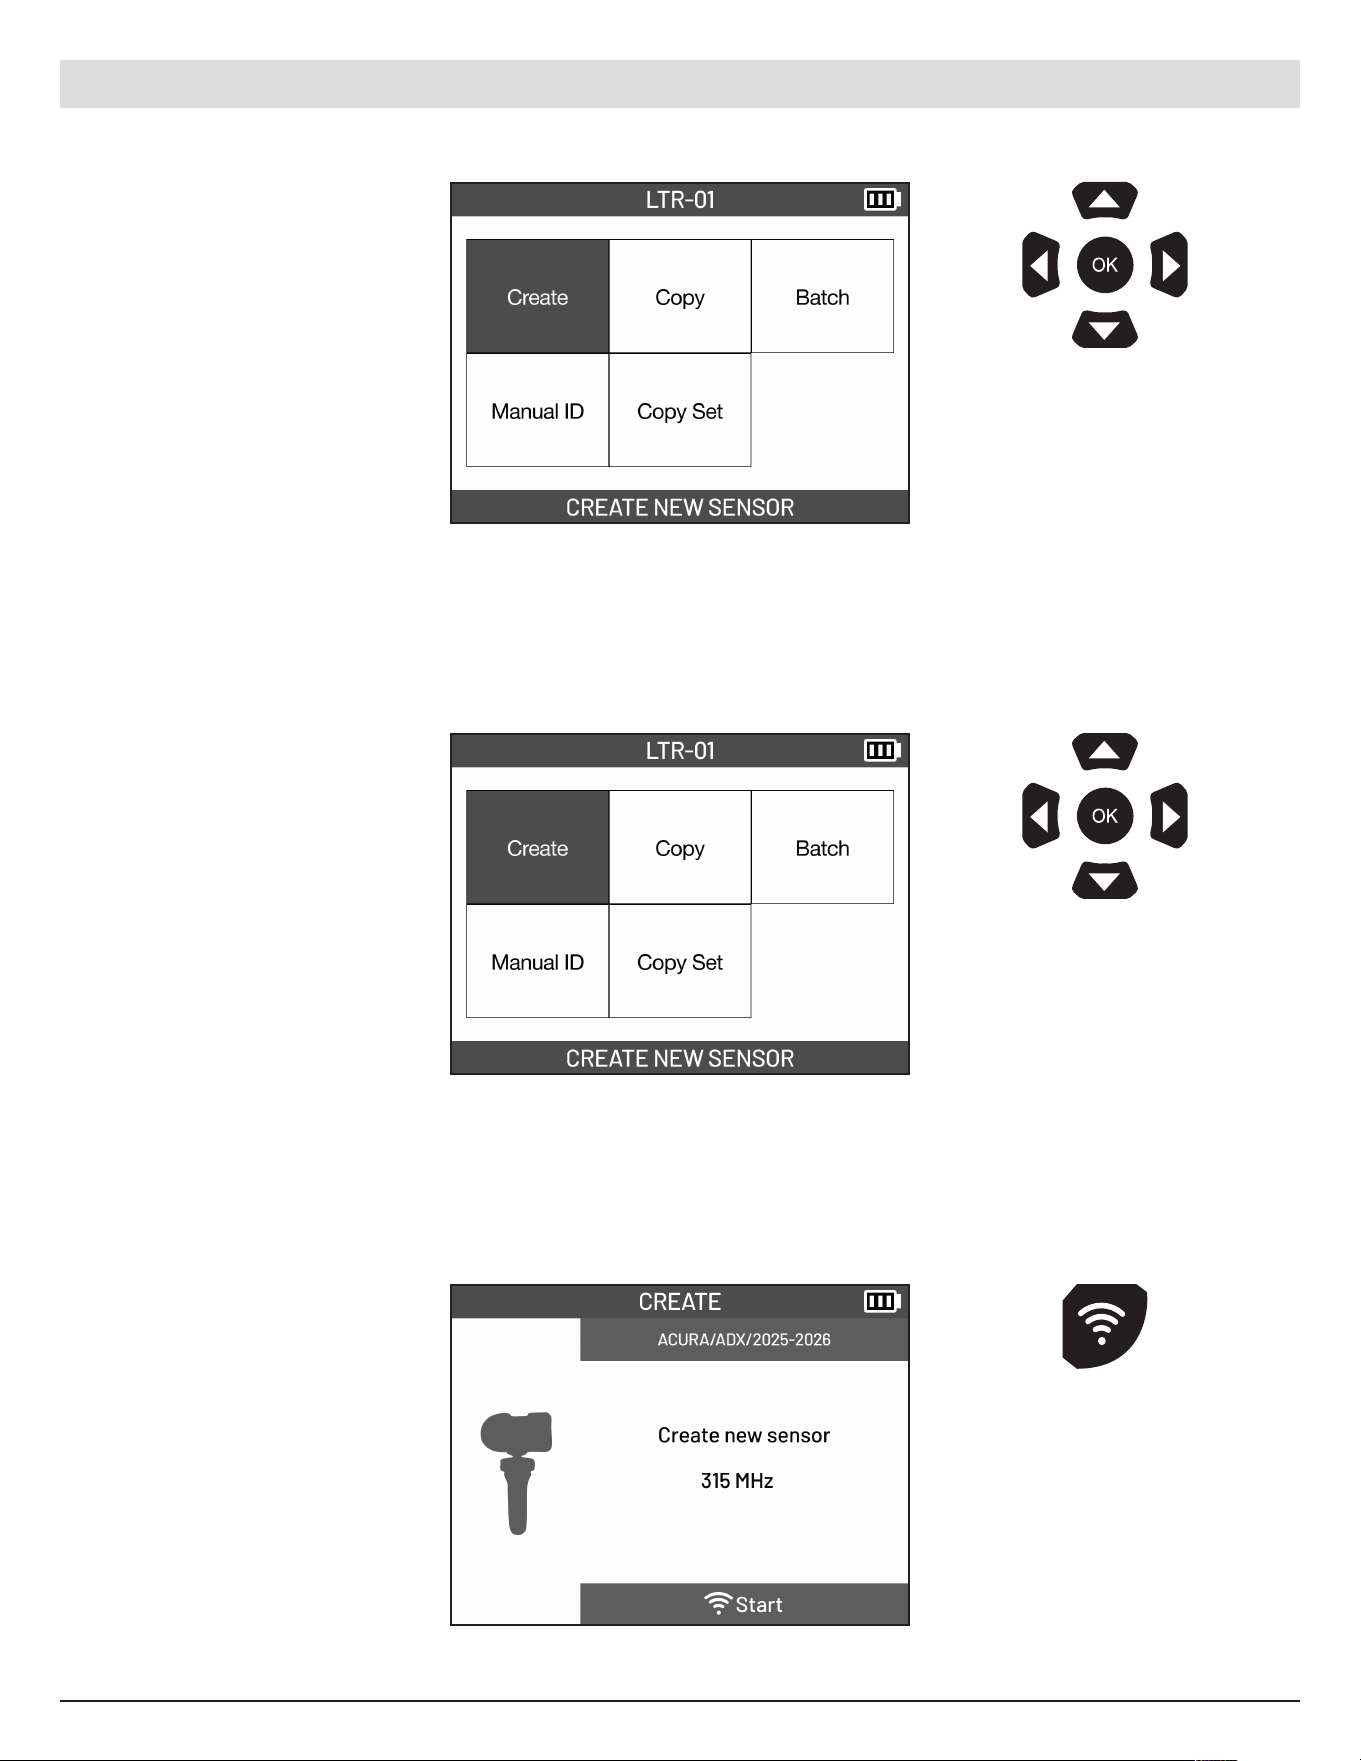
Arrive at the Program
Functions screen.
Select the CREATE NEW
SENSOR function.
Hold the new programmable
sensor near the tool antenna.
Pre ss the Trigger button on
the tool to program.
Use the arrow
buttons to navigate.
Pre ss OK to confirm
your choice.
Use the arrow
buttons to navigate.
Pre ss OK to confirm
your choice.
ATEQ | VT18 | PROGRAM
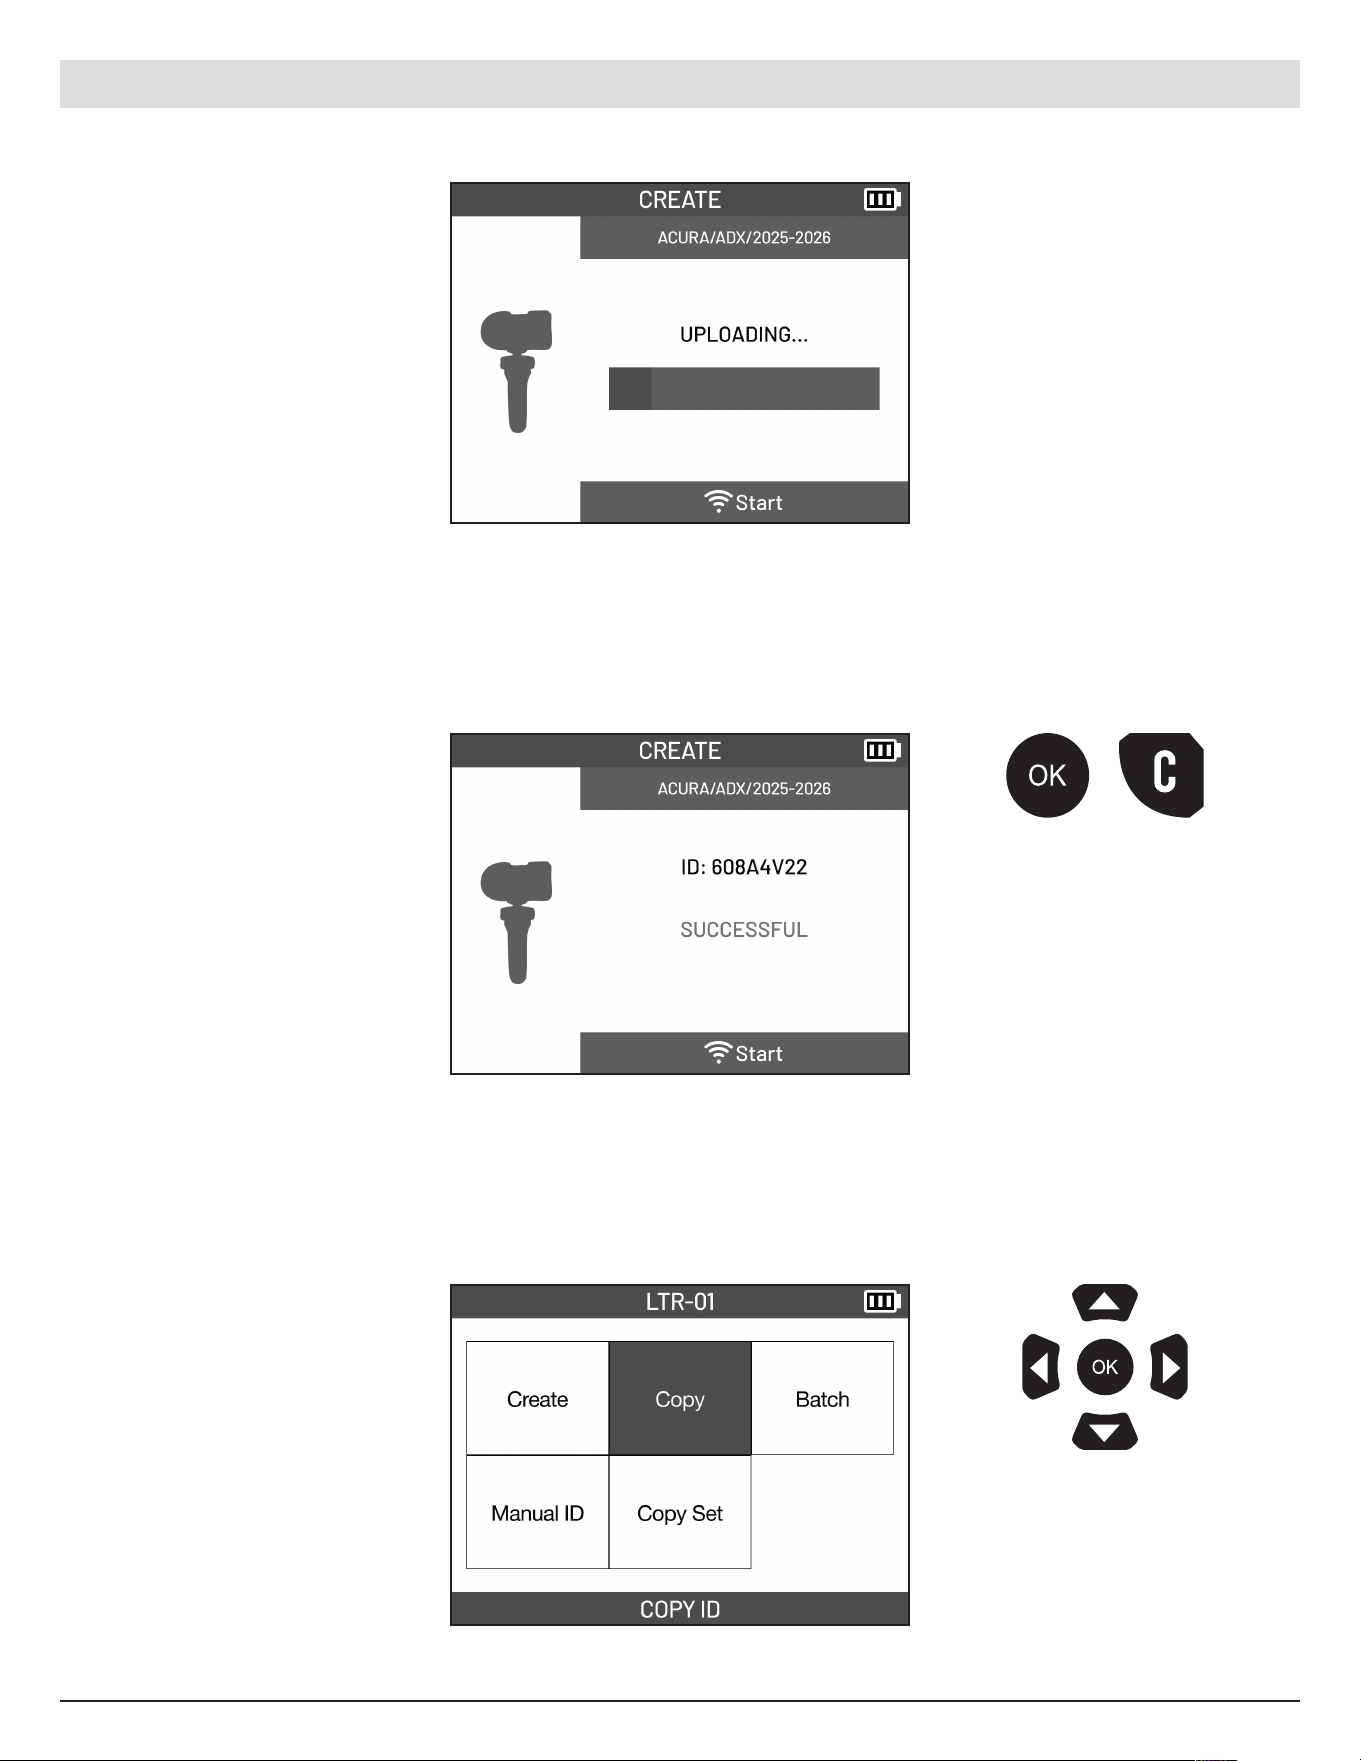
5.2 Create New Sensor
Generates a new, vehicle- compatible TPMS sensor I D and programs it into a programmable sensor.
Pre ss the trigger
button on the tool to
program sensor.
15
English | 03-20-2026
Wait for the sensor to be
programed.
Once complete, the new
sensor ID will be displayed.
Pre ss the OK or
Cancel button to
go back to the
Program Menu.
5.3 Copy ID
Copy the unique ID from an existing TPMS sensor and programs it into a new programmable sensor. Allows
the replac e me nt sensor to be recognized b y the vehicle without requiring a relearn procedure in most cases.
Select the COPY ID function.
Use the arrow
buttons to navigate.
Pre ss OK to confirm
your choice.
16
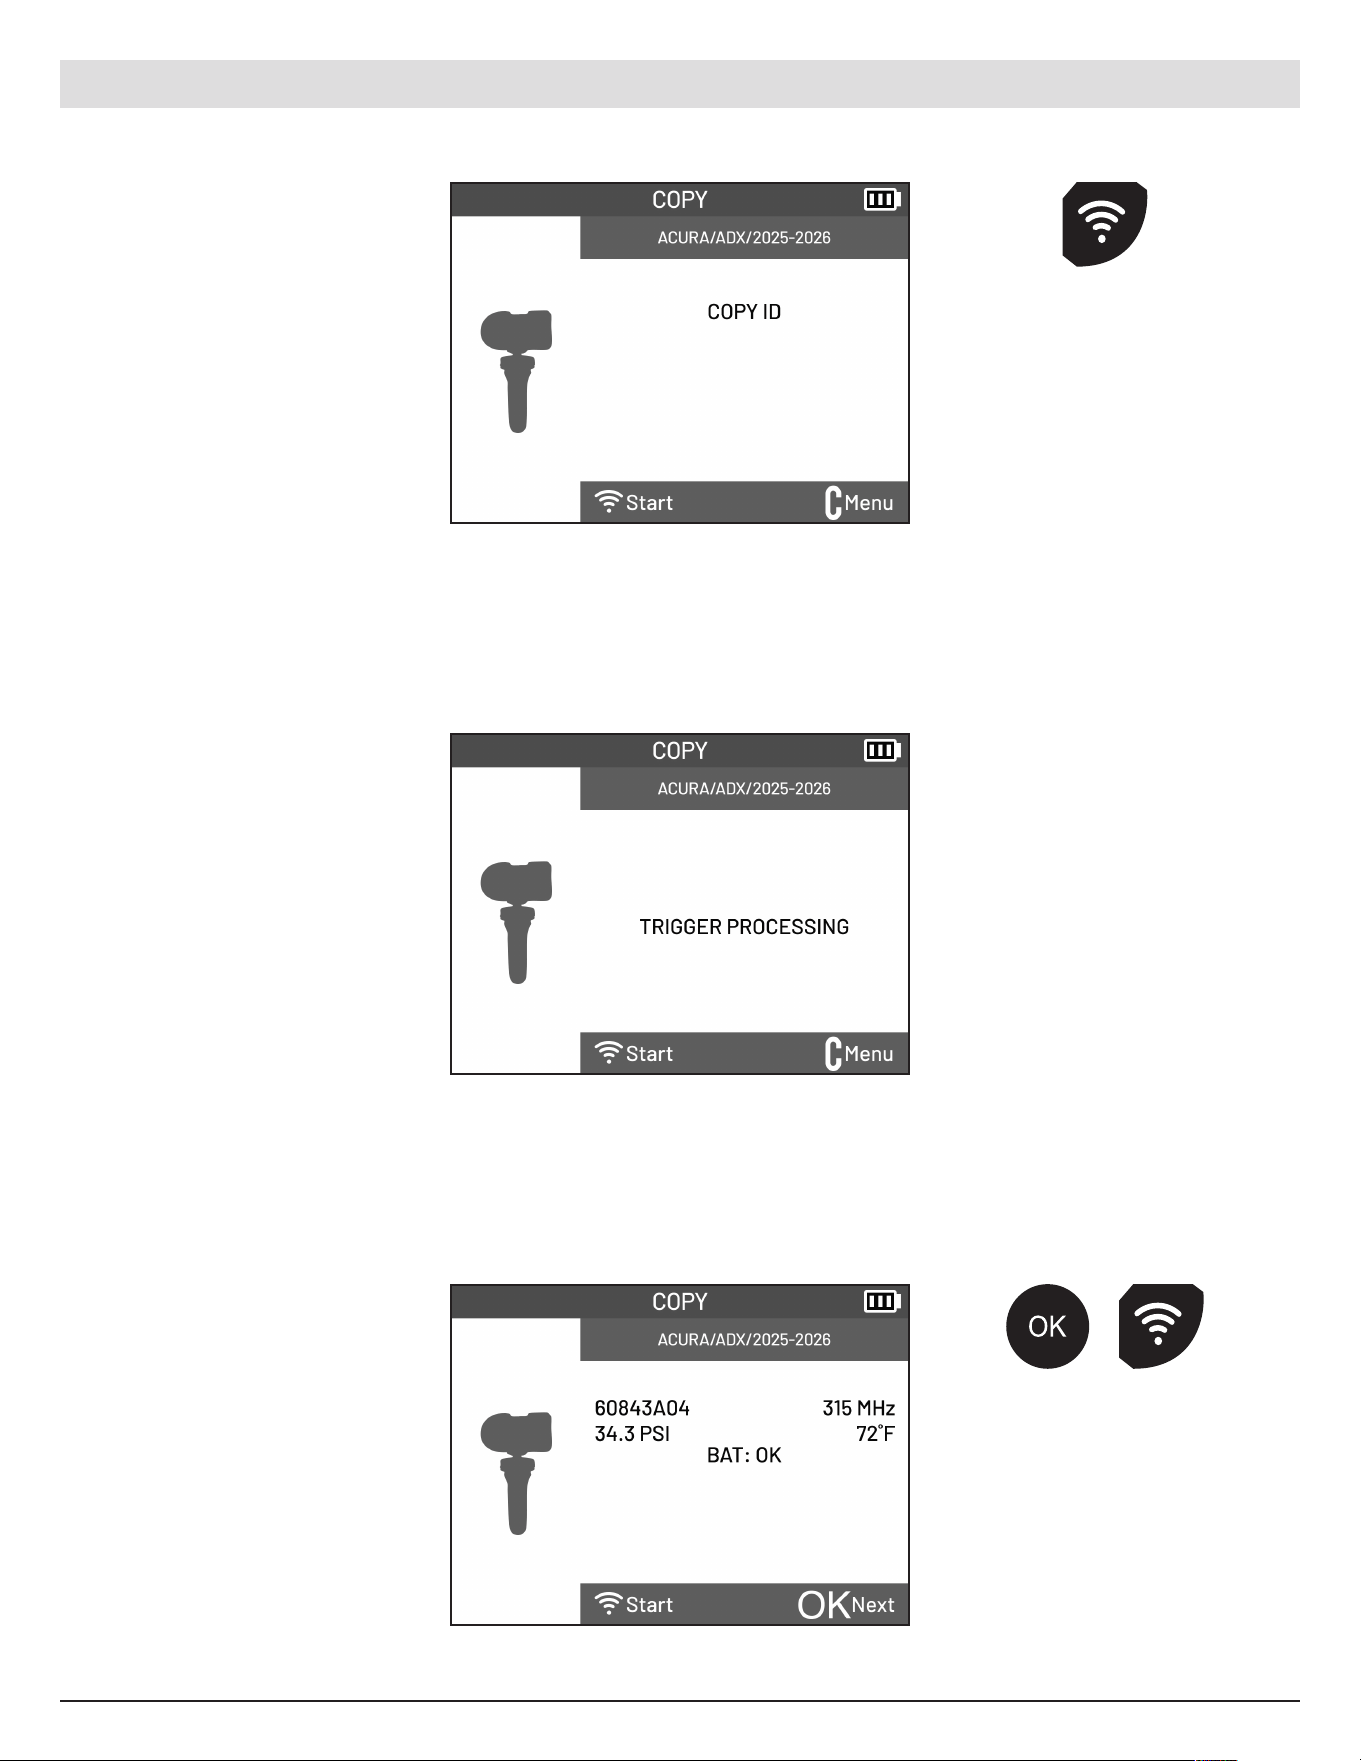
English | 03-20-2026
Hold the sensor you wish to
copy near the tool antenna.
Pre ss the Trigger button on
the tool to read the sensor
ID.
Wait for the sensor ID to be
retriev ed.
The ID of the sensor along
with pressure, frequenc y,
temperature and battery
status will be displayed.
ATEQ | VT18 | PROGRAM
Pre ss the Trigger
button on the tool to
read the sensor ID.
Pre ss the OK or
the Trigger button
to proceed the
Copy function.
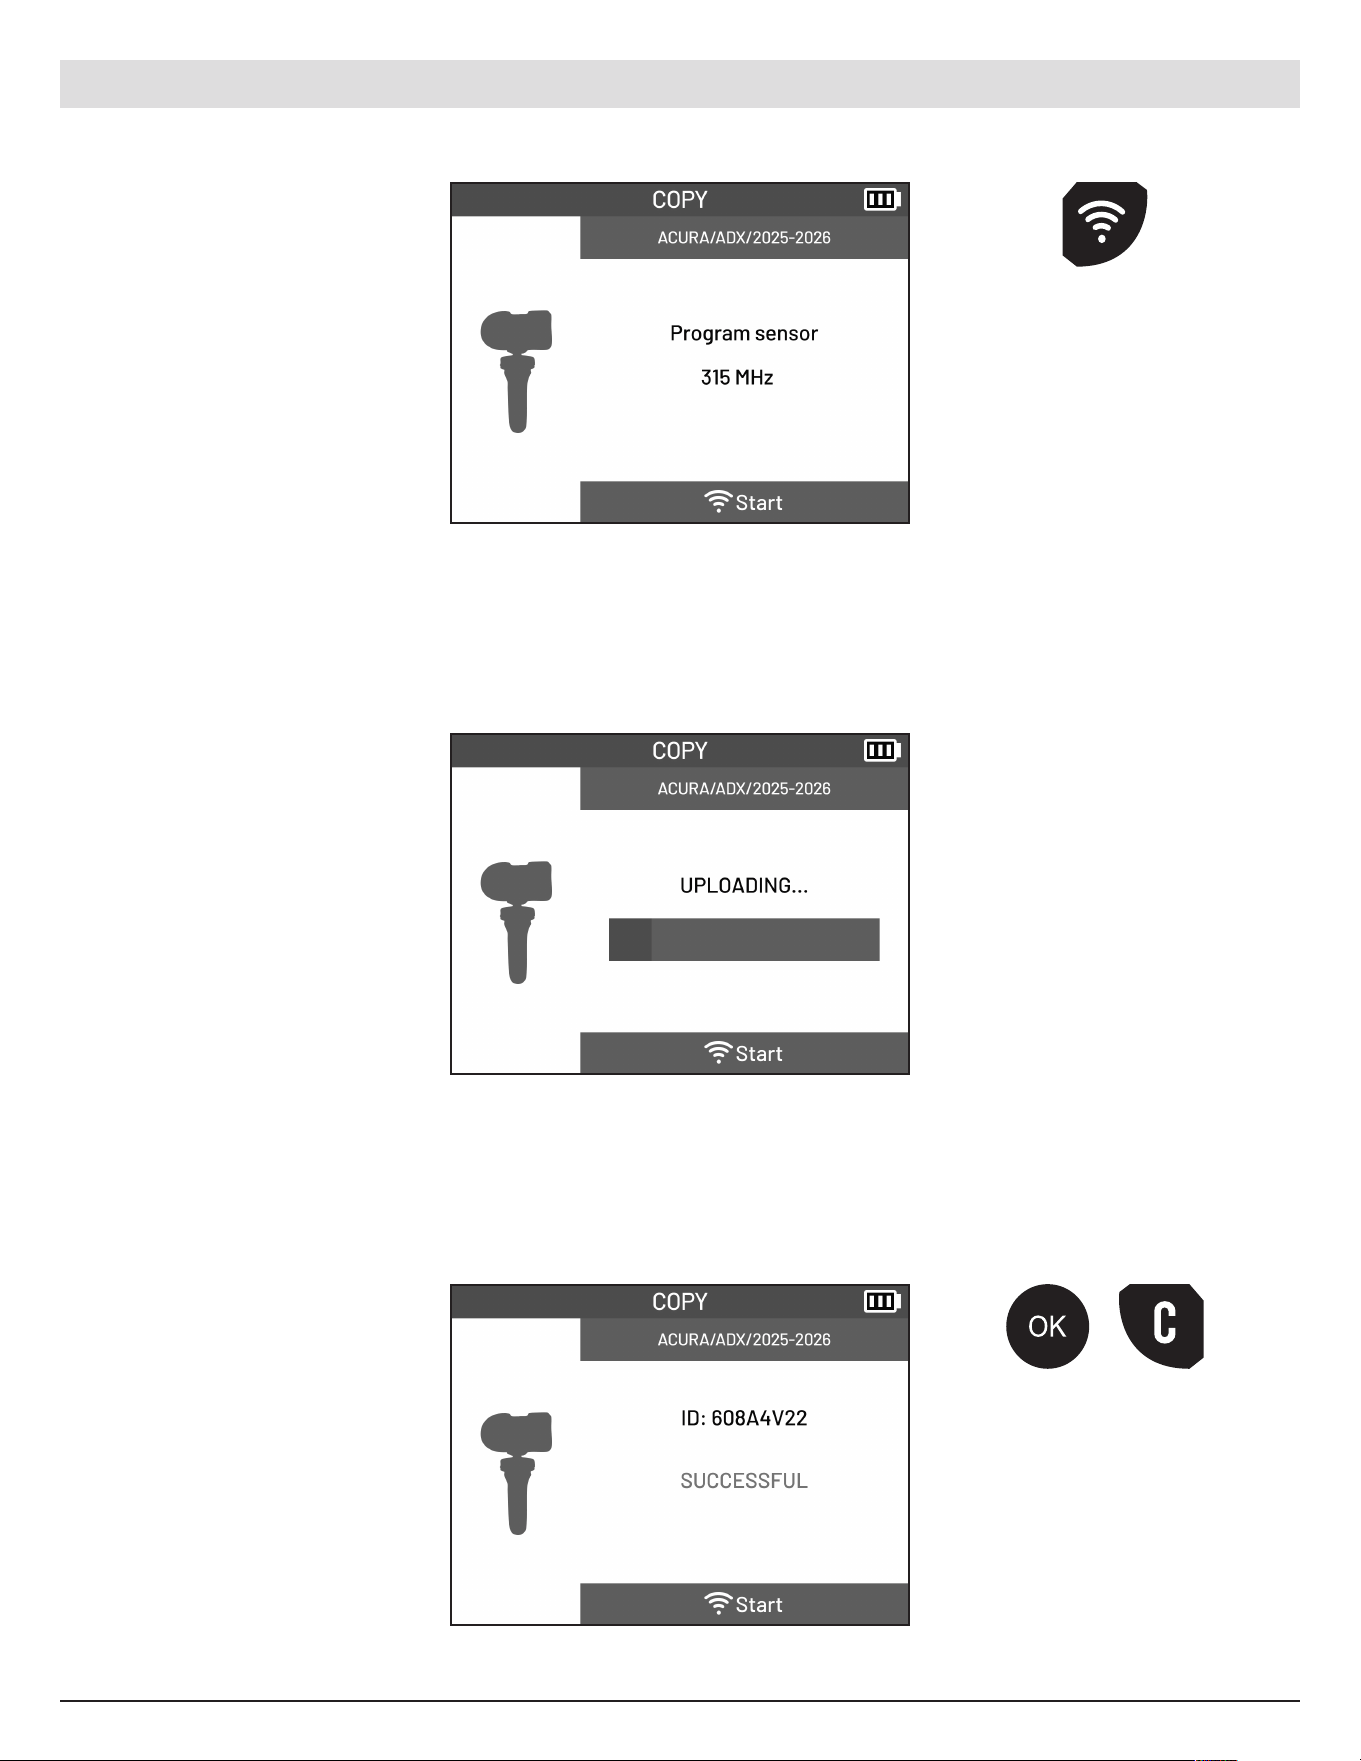
17
English | 03-20-2026
Hold the new programmable
sensor near the tool antenna.
Pre ss the Trigger button on
the tool to program.
ATEQ | VT18 | PROGRAM
Pre ss the trigger
button on the tool to
program sensor.
Wait for the sensor to be
programed.
Once complete, the new
sensor ID will be displayed.
Pre ss the OK or
Cancel button to
go back to the
Program Menu.
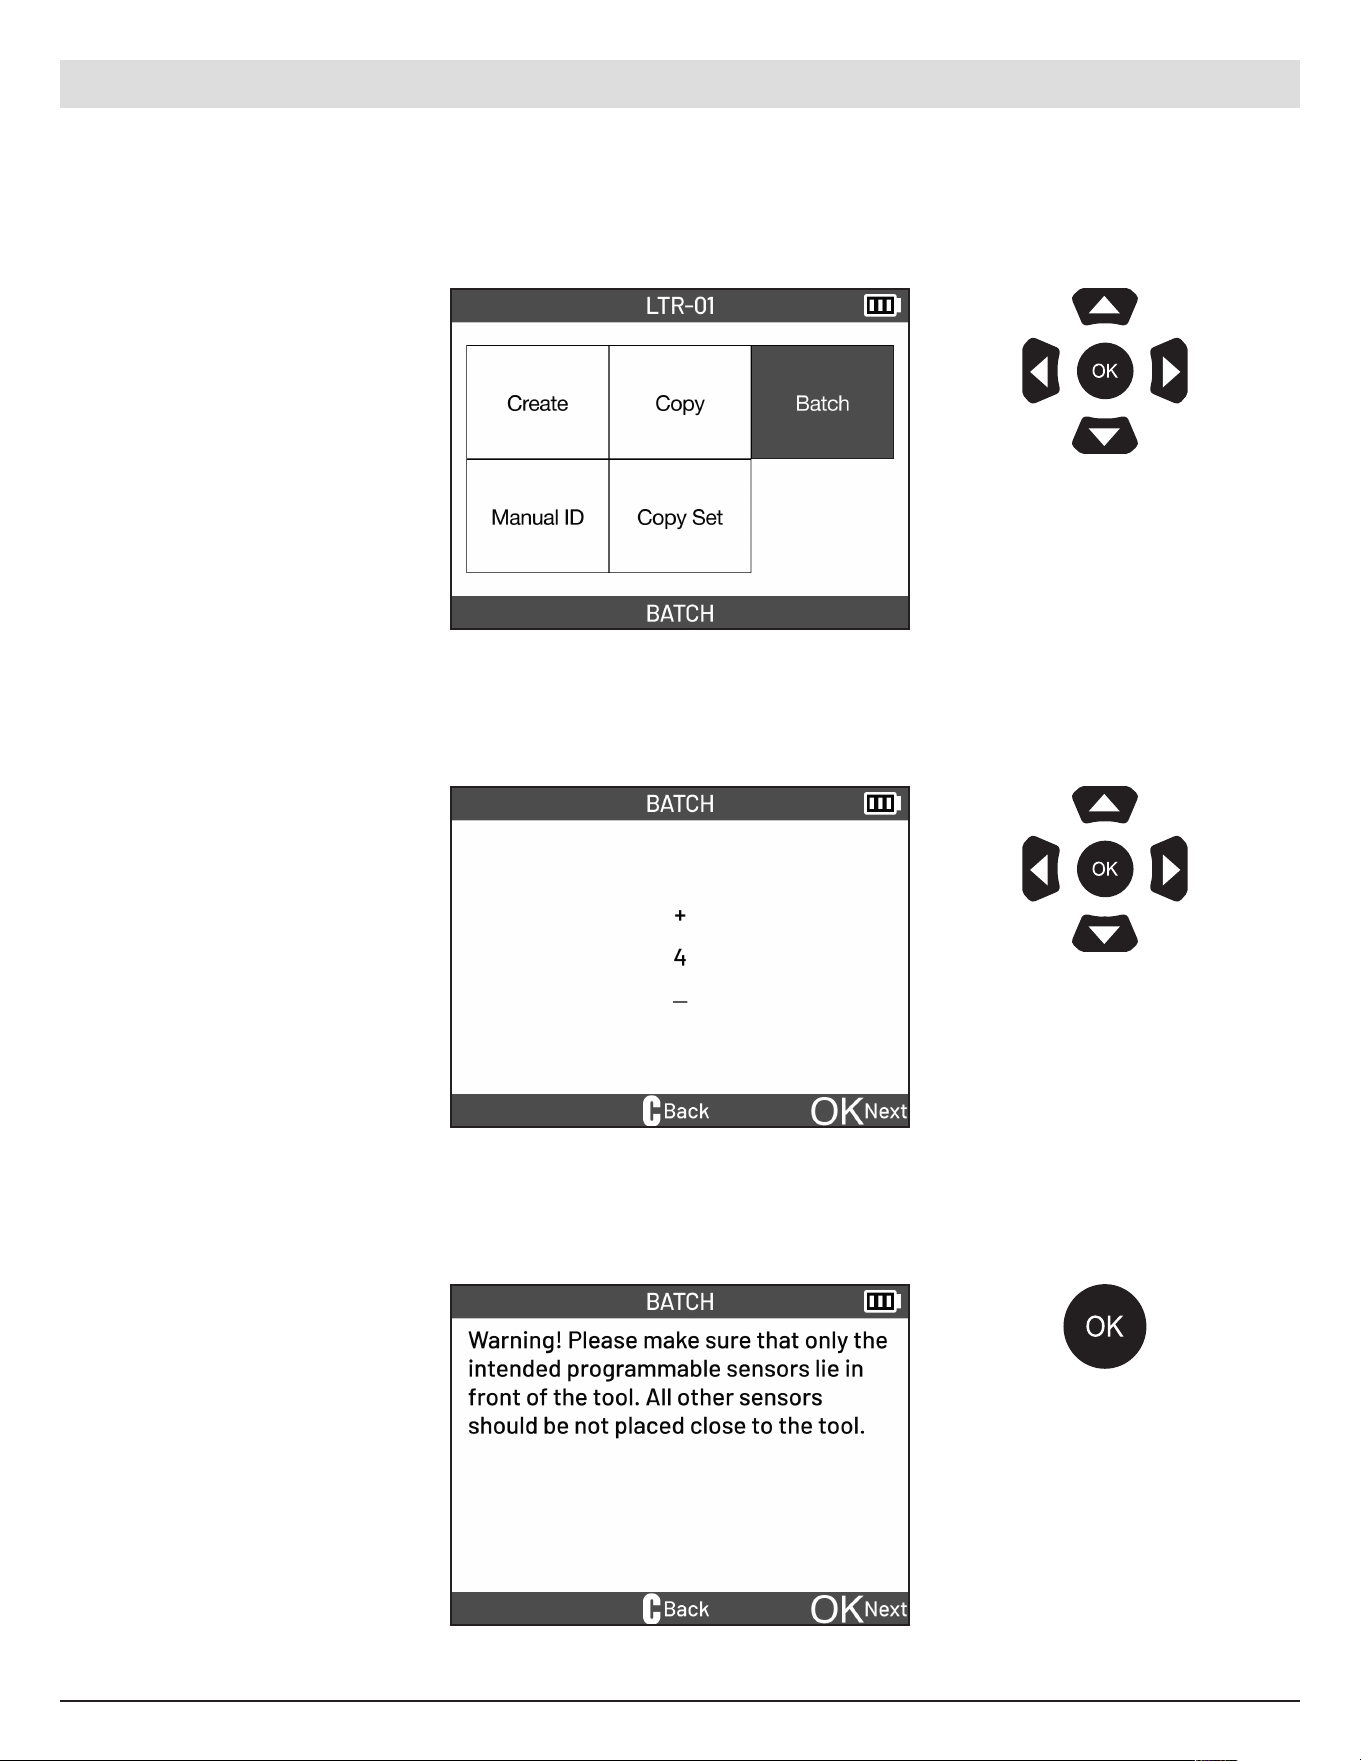
18
English | 03-20-2026
Select the BATCH function.
Select the number of sensors
you want to program.
Use the arrow
buttons to navigate.
Pre ss OK to confirm
your choice.
Use the UP and Down
arrow buttons to increase
or decrease number. Press
OK to confirm your choice.
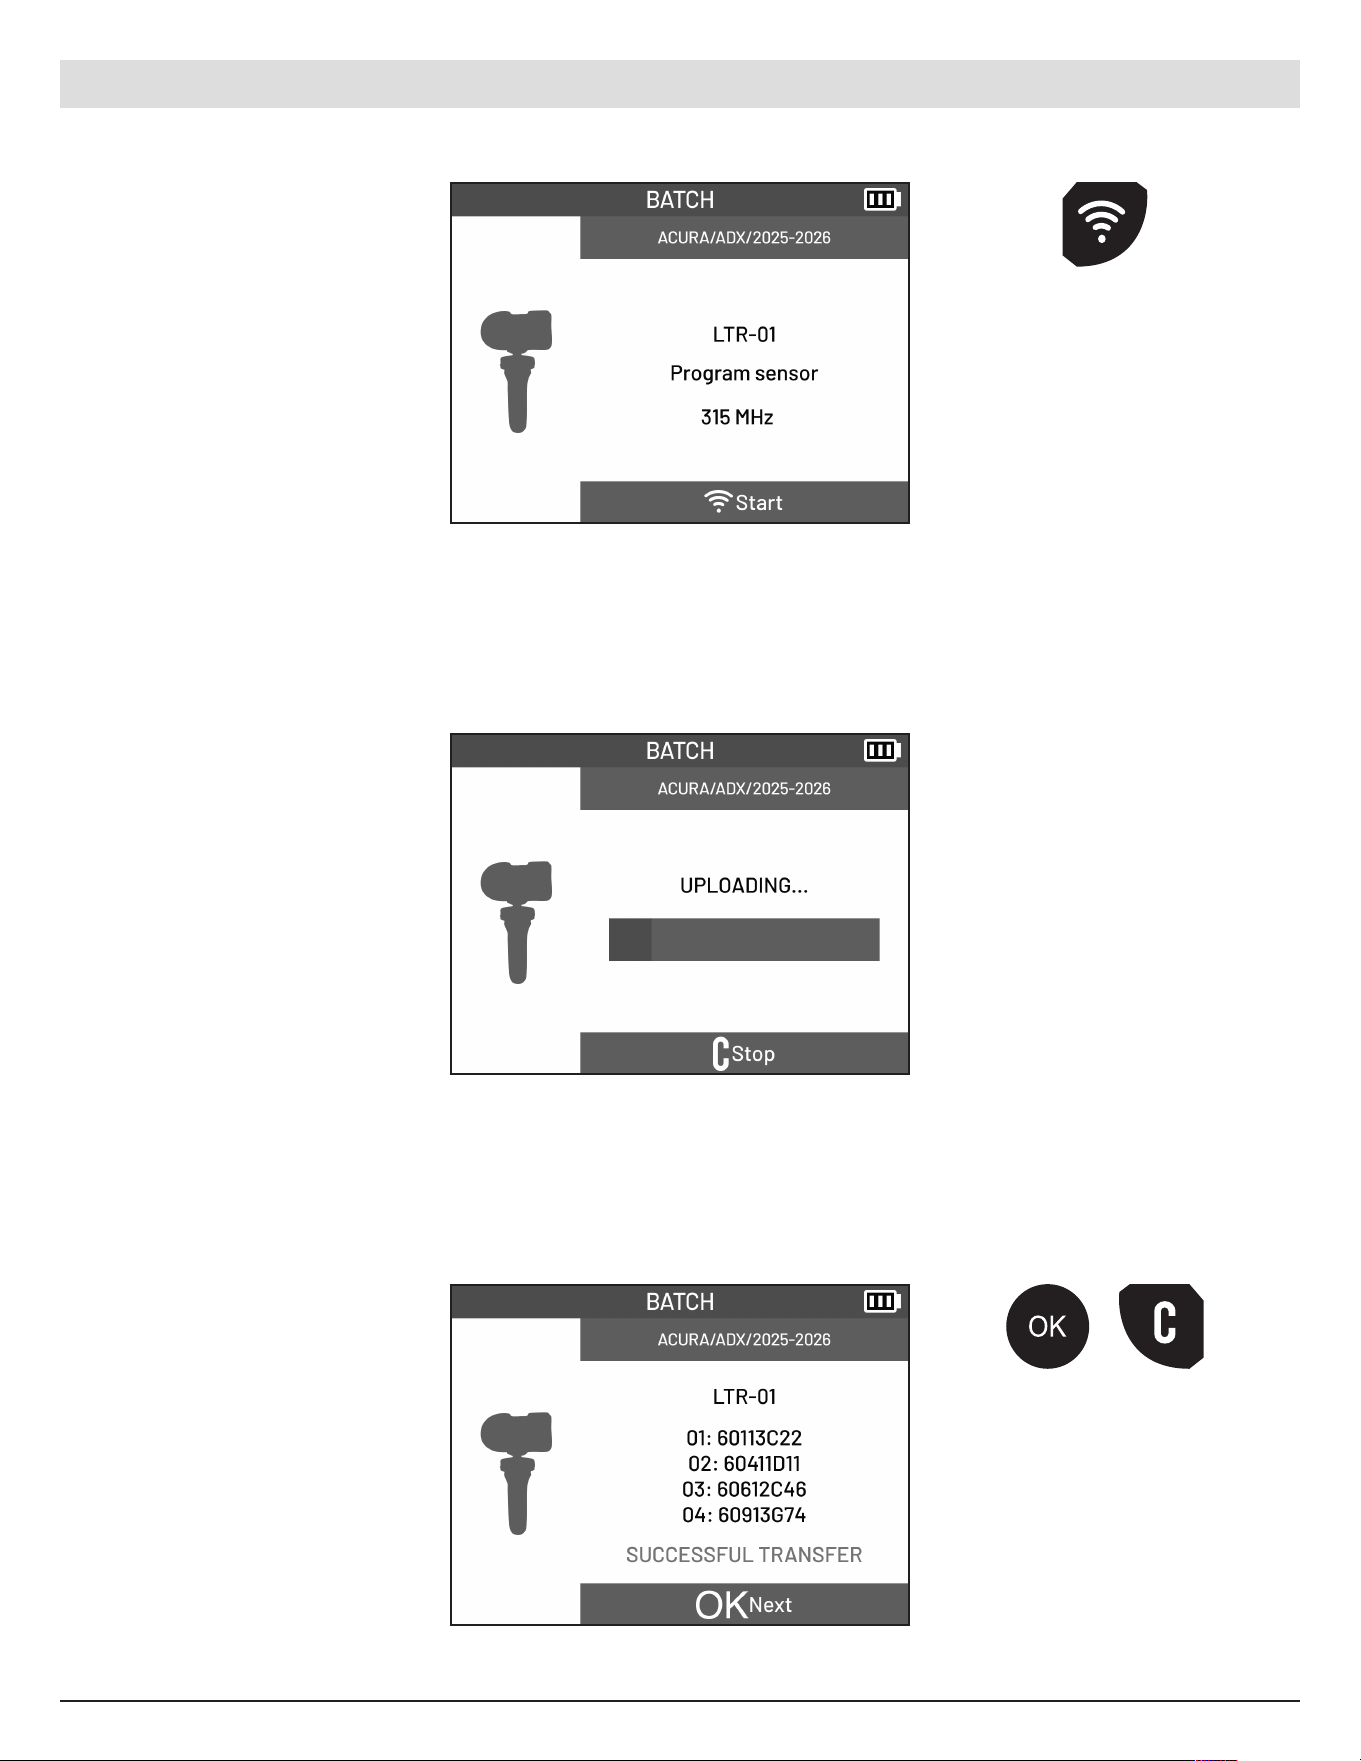
5.4 Batch
In one step this function programs multiple sensors at the same time to unique IDs ensuring they are
compatible with the vehicle selected.
Take note of the Warning text
on screen.
Pre ss the OK button
to proceed.
ATEQ | VT18 | PROGRAM
19
English | 03-20-2026
Place the multiple sensors in
front of the tool with the tool
antenna pointing towards
the sensors.
ATEQ | VT18 | PROGRAM
Pre ss the trigger
button on the tool to
program sensors.
Wait for the sensors to be
programed.
Once complete, the new
sensor IDs will be displayed.
Pre ss the OK or
Cancel button to
go back to the
Program Menu.
20
English | 03-20-2026
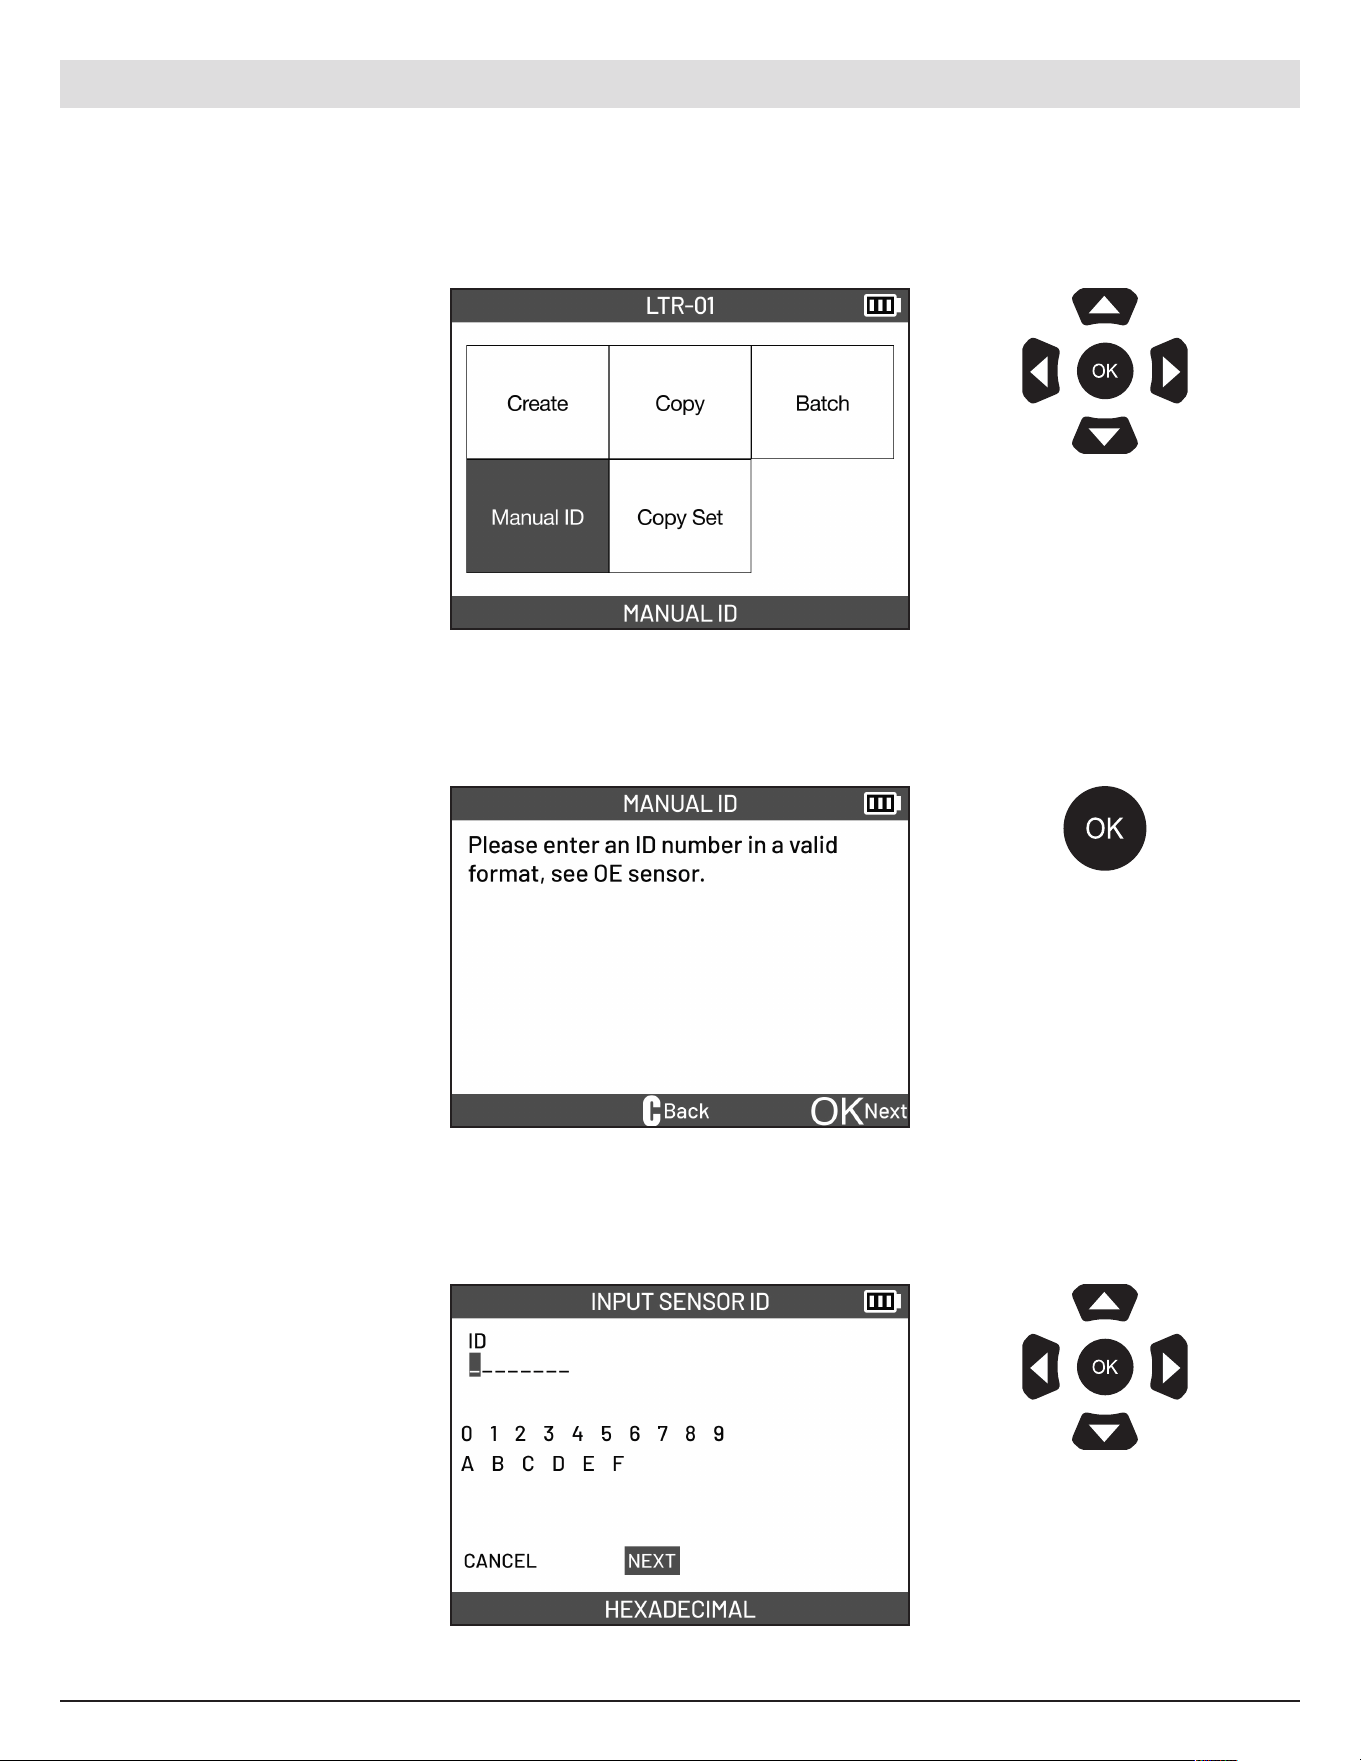
Select the MANUAL ID
function.
Read instructions on screen.
Use the arrow
buttons to navigate.
Pre ss OK to confirm
your choice.
Use the arrow
buttons to navigate.
Pre ss OK to confirm
your choice.
5.5 Manual ID
Manually enter an ID for a damaged TPMS sensor. You must know the ID of the damaged sensor to use
this function. The manual ID entry function is only available for ce rtain makes of programmable sensors.
Enter the sensor ID. Select
NEXT once finished.
Pre ss the OK button
to proceed.
ATEQ | VT18 | PROGRAM

21
English | 03-20-2026
ATEQ | VT18 | PROGRAM
Hold the sensor near the
tool antenna. Press the
Trigger button on the tool to
program.
Pre ss the trigger
button on the tool to
program sensor.
Wait for the sensor to be
programed.
Once complete, the entered
sensor ID will be displayed.
Pre ss the OK or
Cancel button to
go back to the
Program Menu.
22
English | 03-20-2026
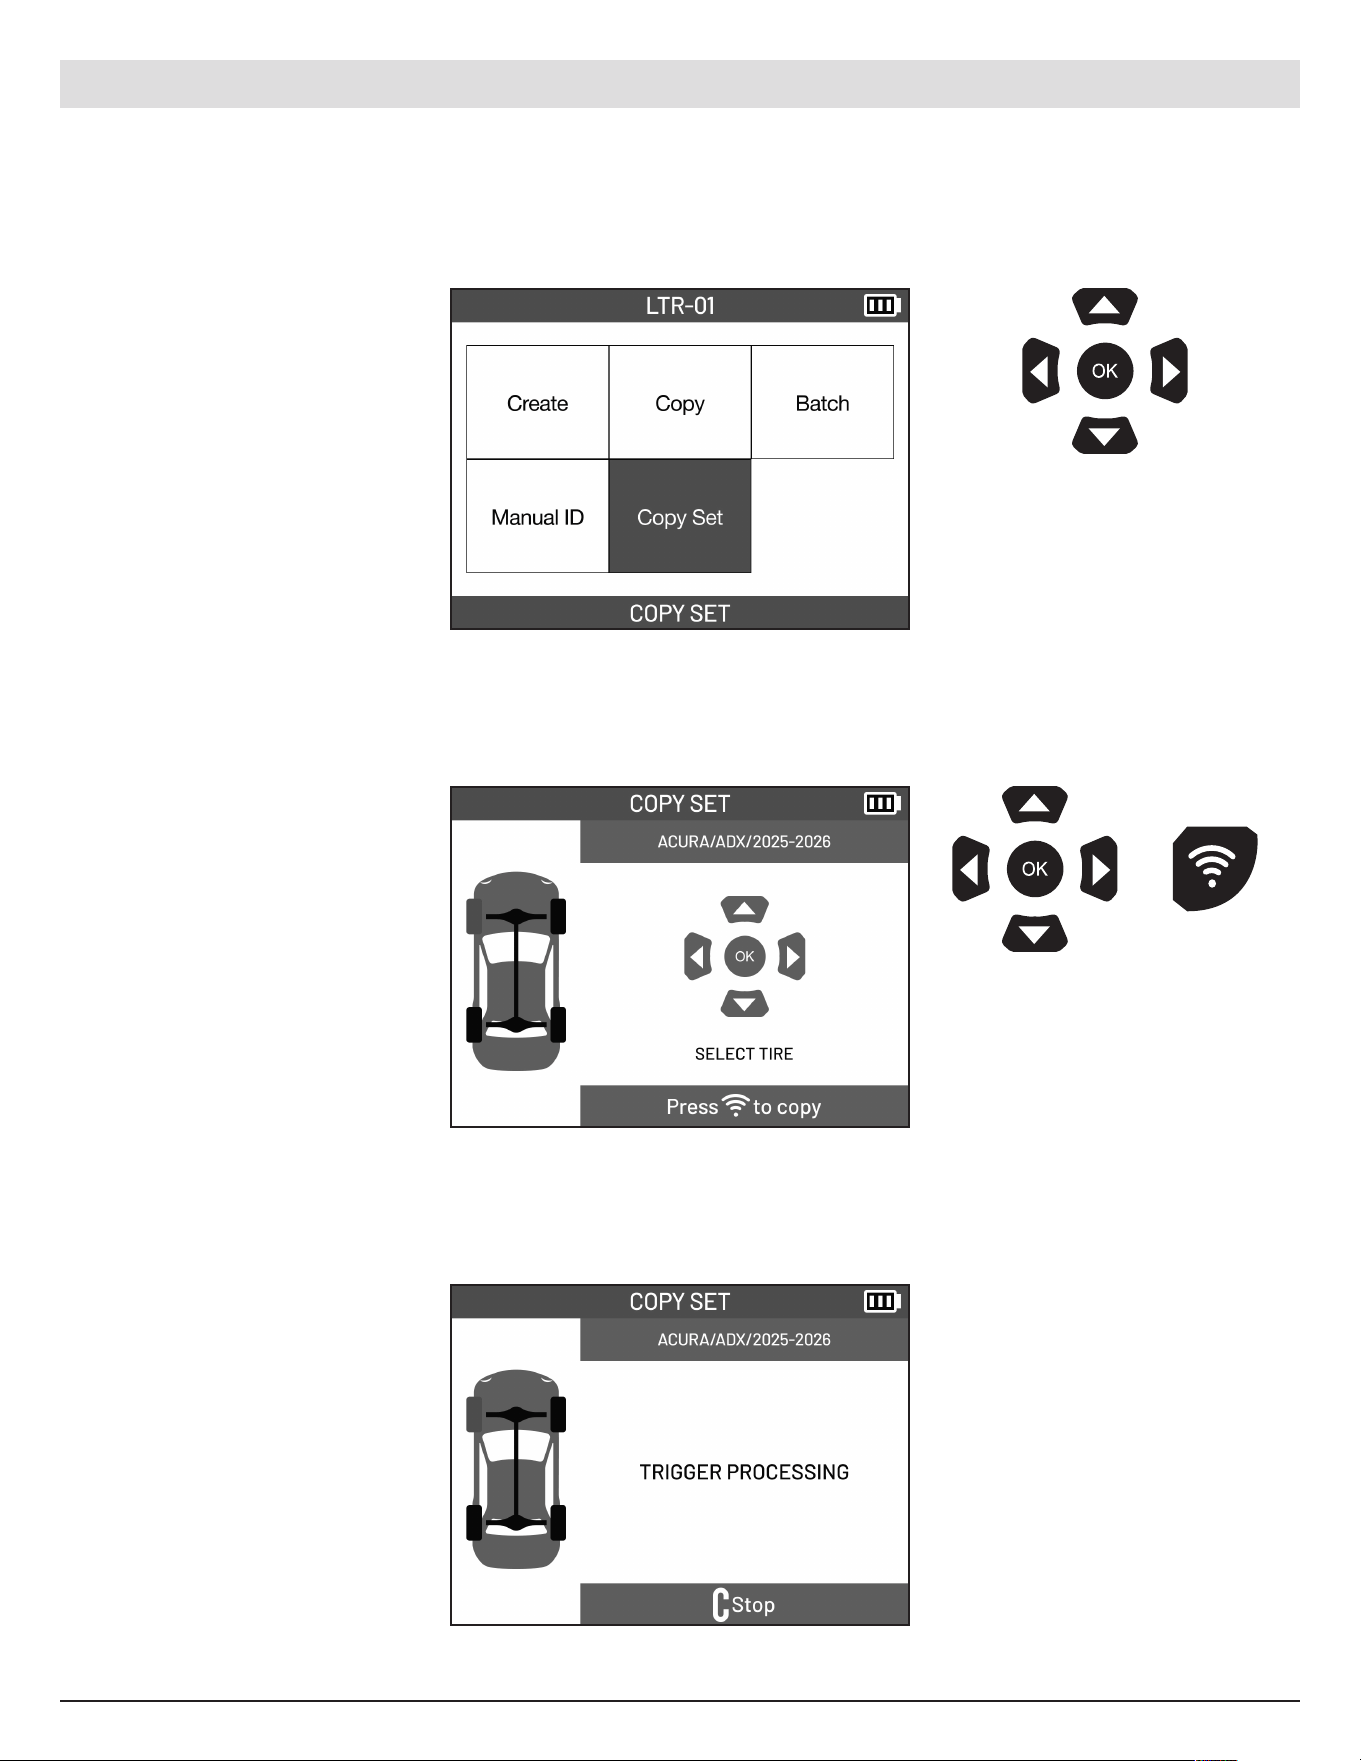
Select the COPY SET
function.
Select the first tire to copy.
Pre ss the Trigger button to
proceed.
Use the arrow
buttons to navigate.
Pre ss OK to confirm
your choice.
Use the arrow
buttons to se lect tire.
Pre ss the Trigger
button to read sensor.
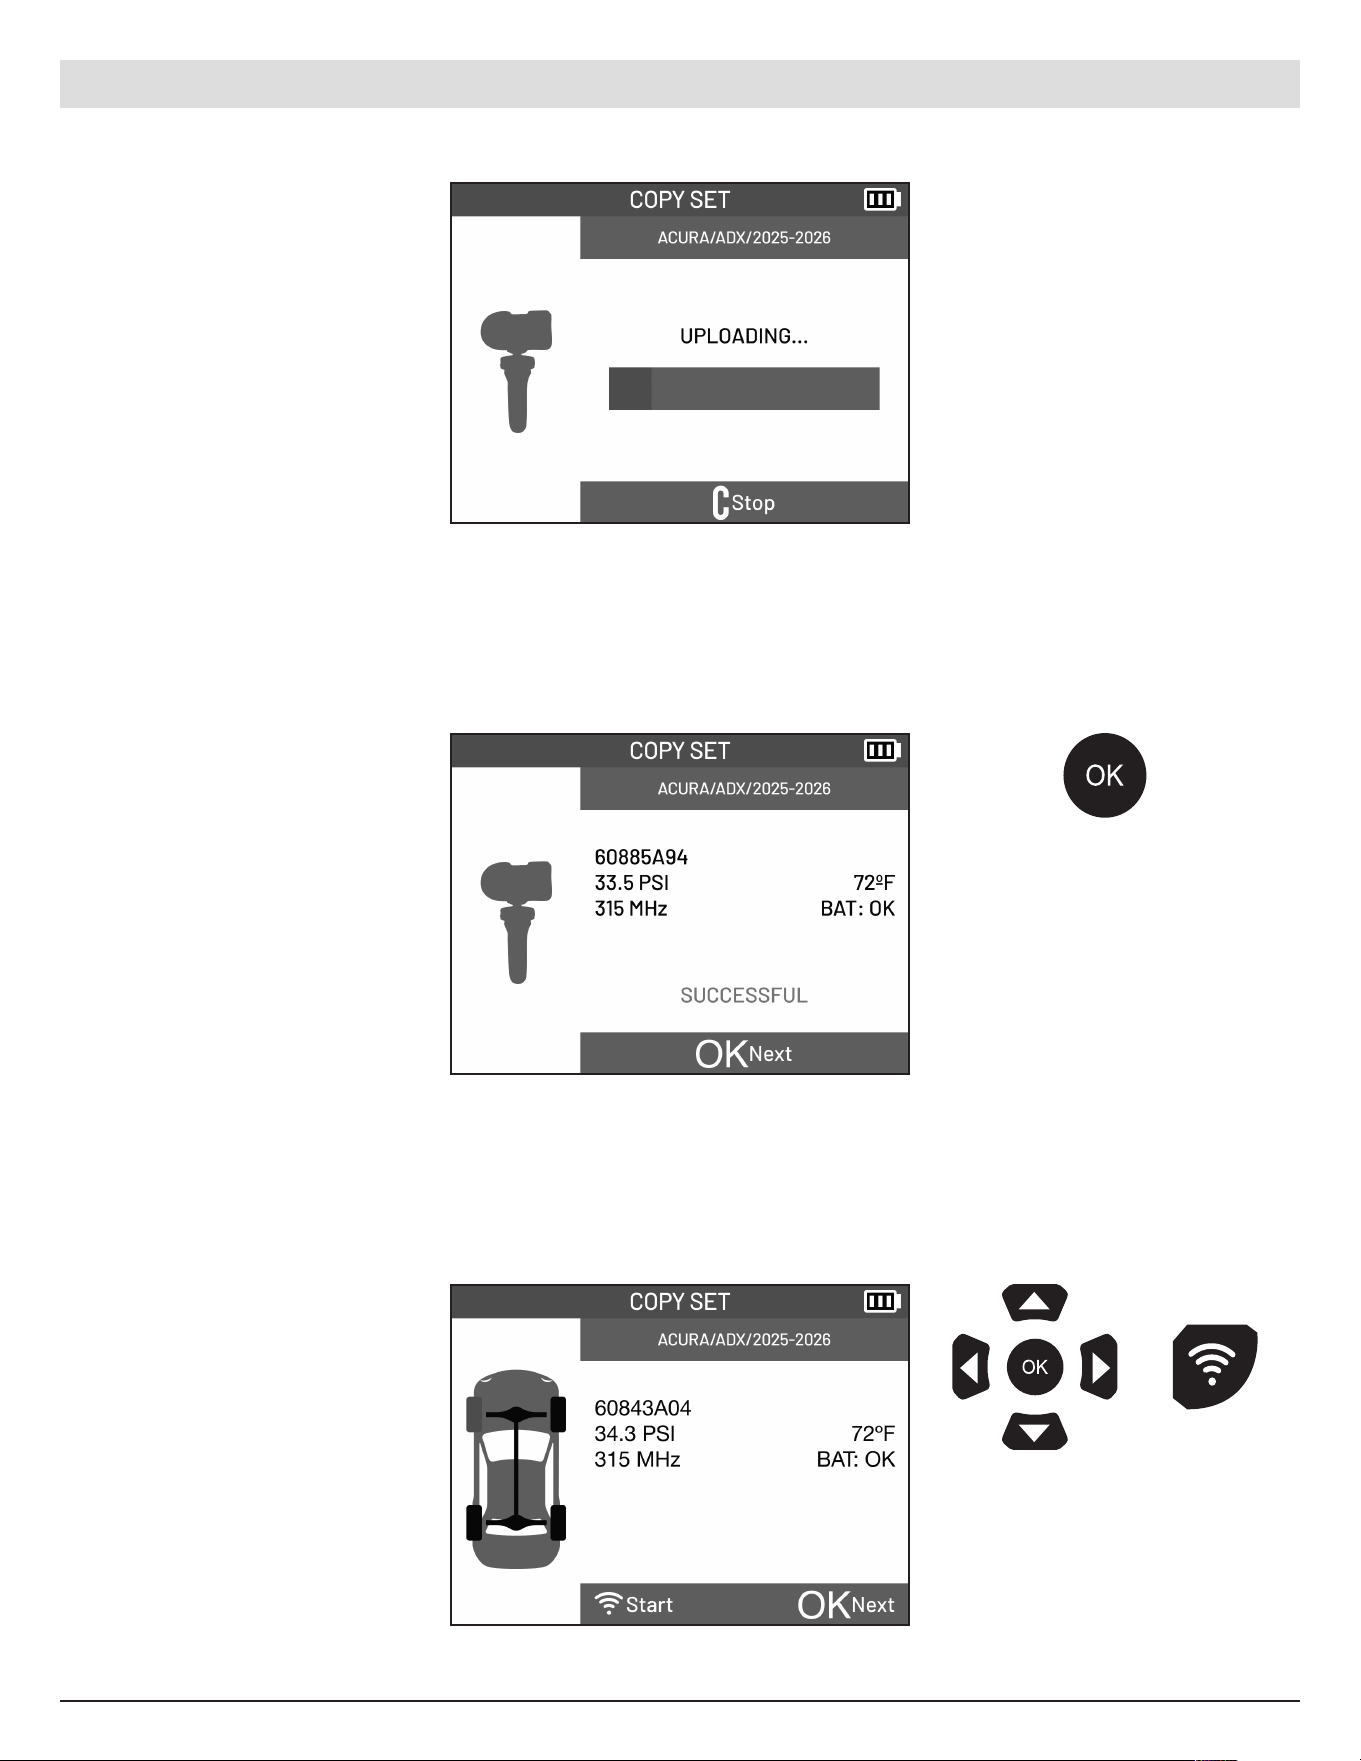
5.6 Copy Set
Retrieves existing sensor IDs from active sensors and programs them into a new set of pro grammable sensors.
This allows the creation of seasonal (winter/summer) wheel sets without requiring a TPMS relearn pro cedure.
Wait for the sensor to be
triggered.
ATEQ | VT18 | PROGRAM
23
English | 03-20-2026
ATEQ | VT18 | PROGRAM
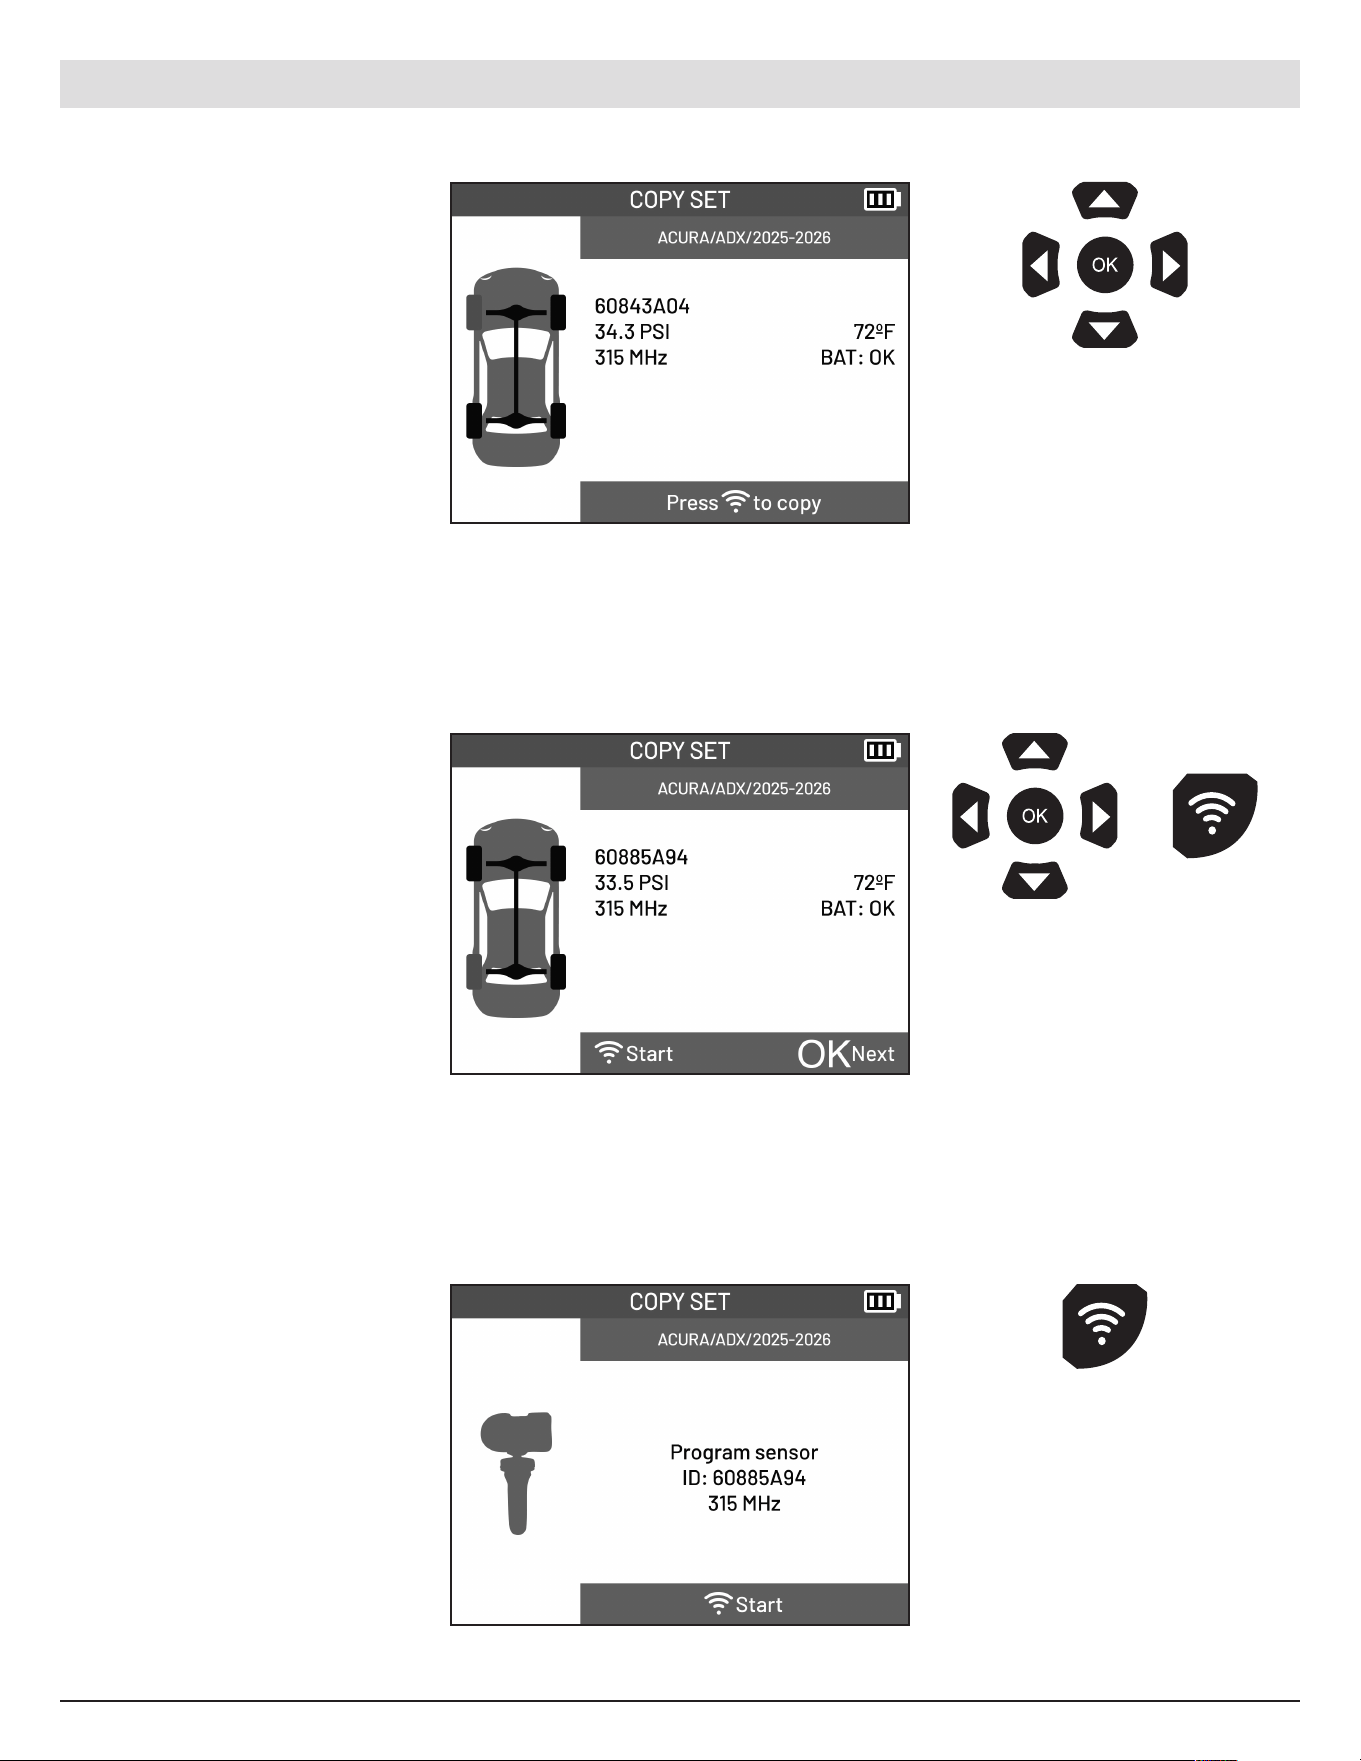
The ID of the sensor along
with pressure, frequenc y,
temperature and battery
status will be displayed.
Repeat the steps above and
copy the remaining sensors.
Once all sensors have been
read, the to ol is ready to
program the new sensors.
Select the first tire you wish
you program.
Use the arrow
buttons to navigate
to the next tire.
Use the arrow buttons
to select tire. Press
the OK or Trigger
button to proceed.
Pre ss the trigger
button on the tool to
program sensor.
Hold the new programmable
sensor near the tool antenna.
Pre ss the Trigger button on
the tool to program.
24
English | 03-20-2026
ATEQ | VT18 | PROGRAM
Wait for the sensor to be
programed.
Pre ss the OK button
to return to the tire
selection screen.
Repeat the steps above to
program the remaining tires.
The ID of the sensor along
with pressure, frequenc y,
temperature and battery
status will be displayed.
Pre ss the OK button to
continue copying the
remaining tires.
Use the arrow buttons
to select tire. Press
the OK or Trigger
button to proceed.
25
English | 03-20-2026
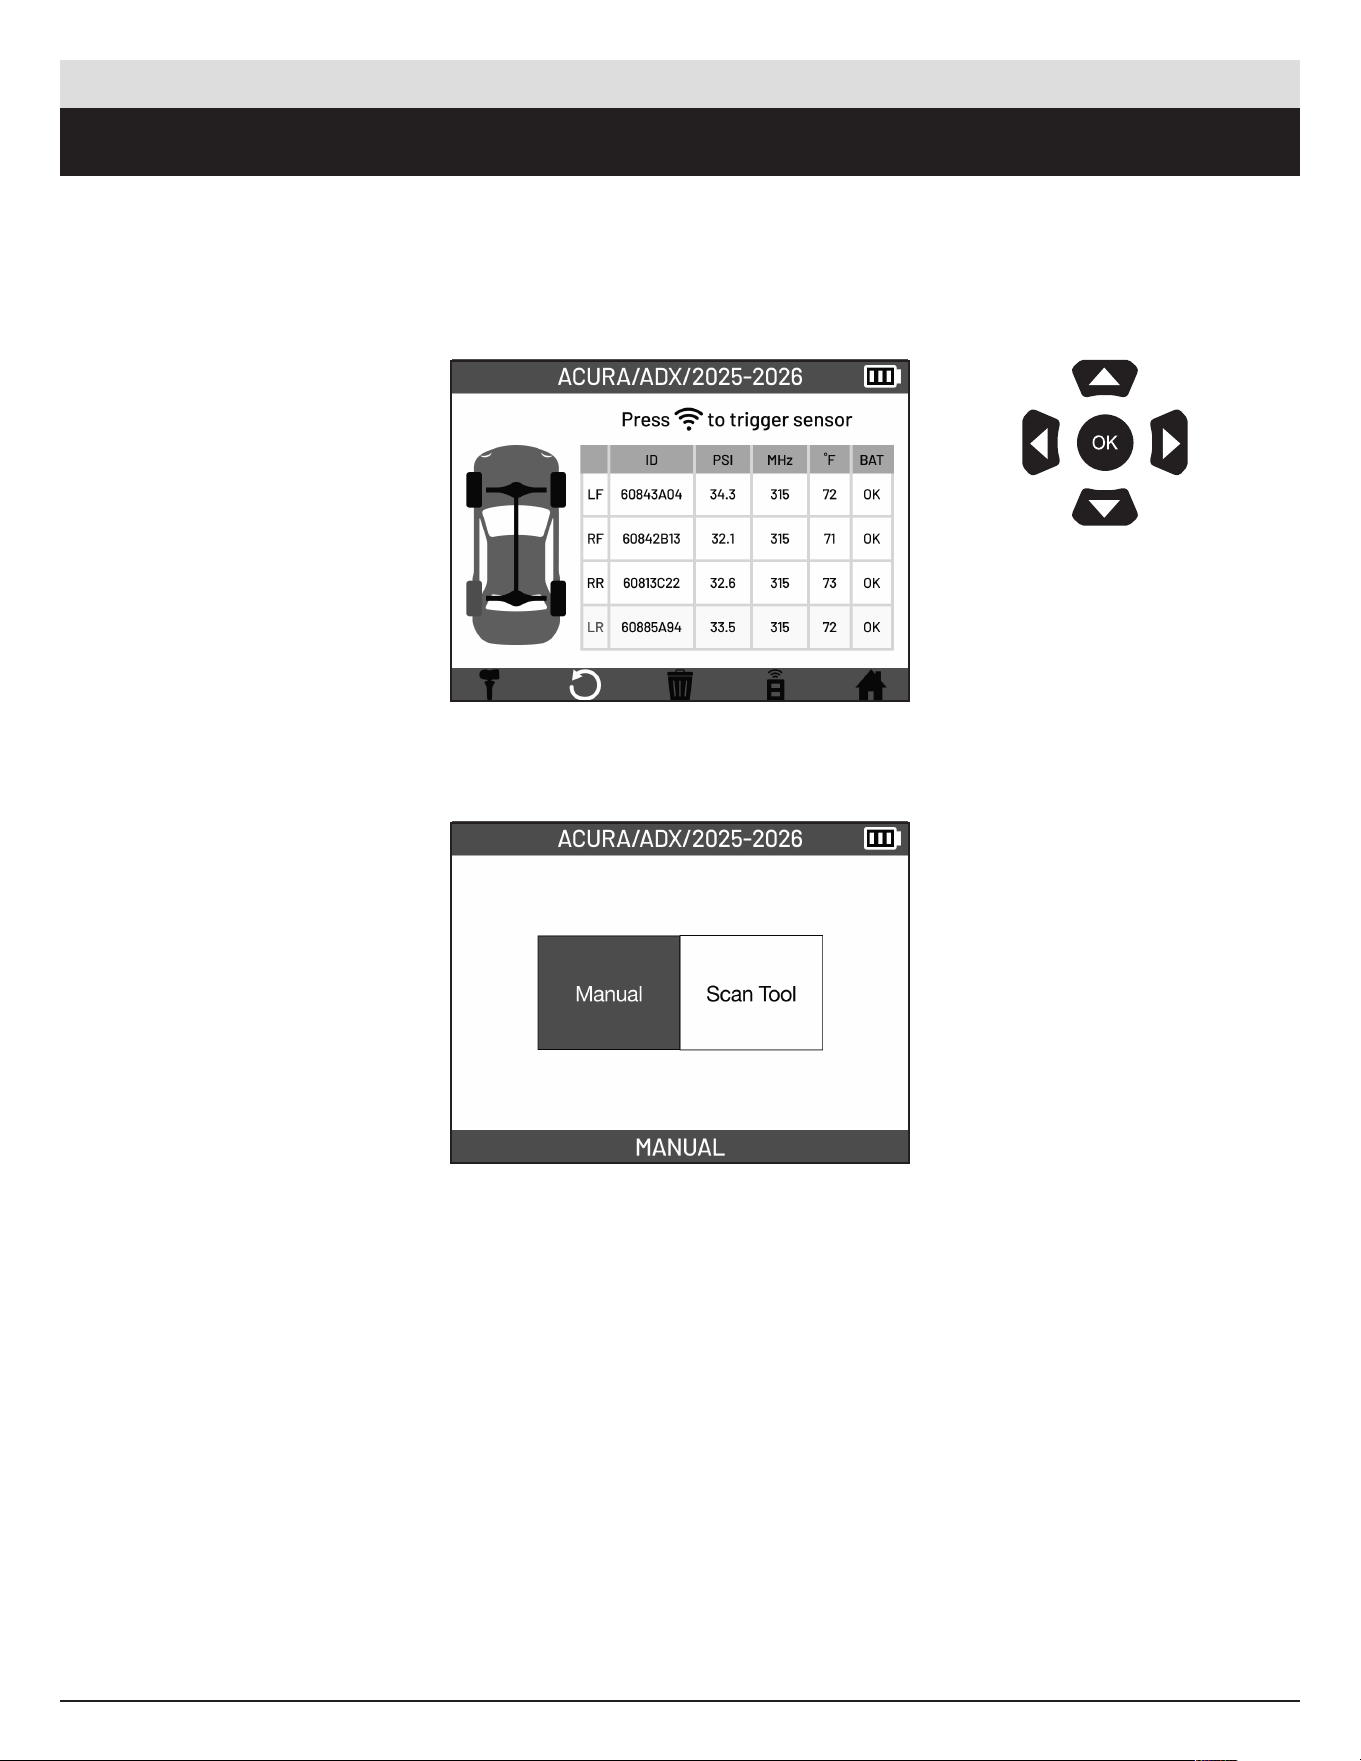
6. RELEARN
6.1 Accessing the Relearn functions menu
The Program function allows you to write new vehicle-speci fic data to a programmable TPMS sensor so it
can operate correctly with the vehicle’s TPMS system.
From the TPMS Screen,
select the Relearn Icon
located in the bottom bar.
Arrive at the Relearn
functions menu.
Use the arrow
buttons to navigate.
Pre ss OK to confirm
your choice.
ATEQ | VT18 | RELEARN
26
English | 03-20-2026
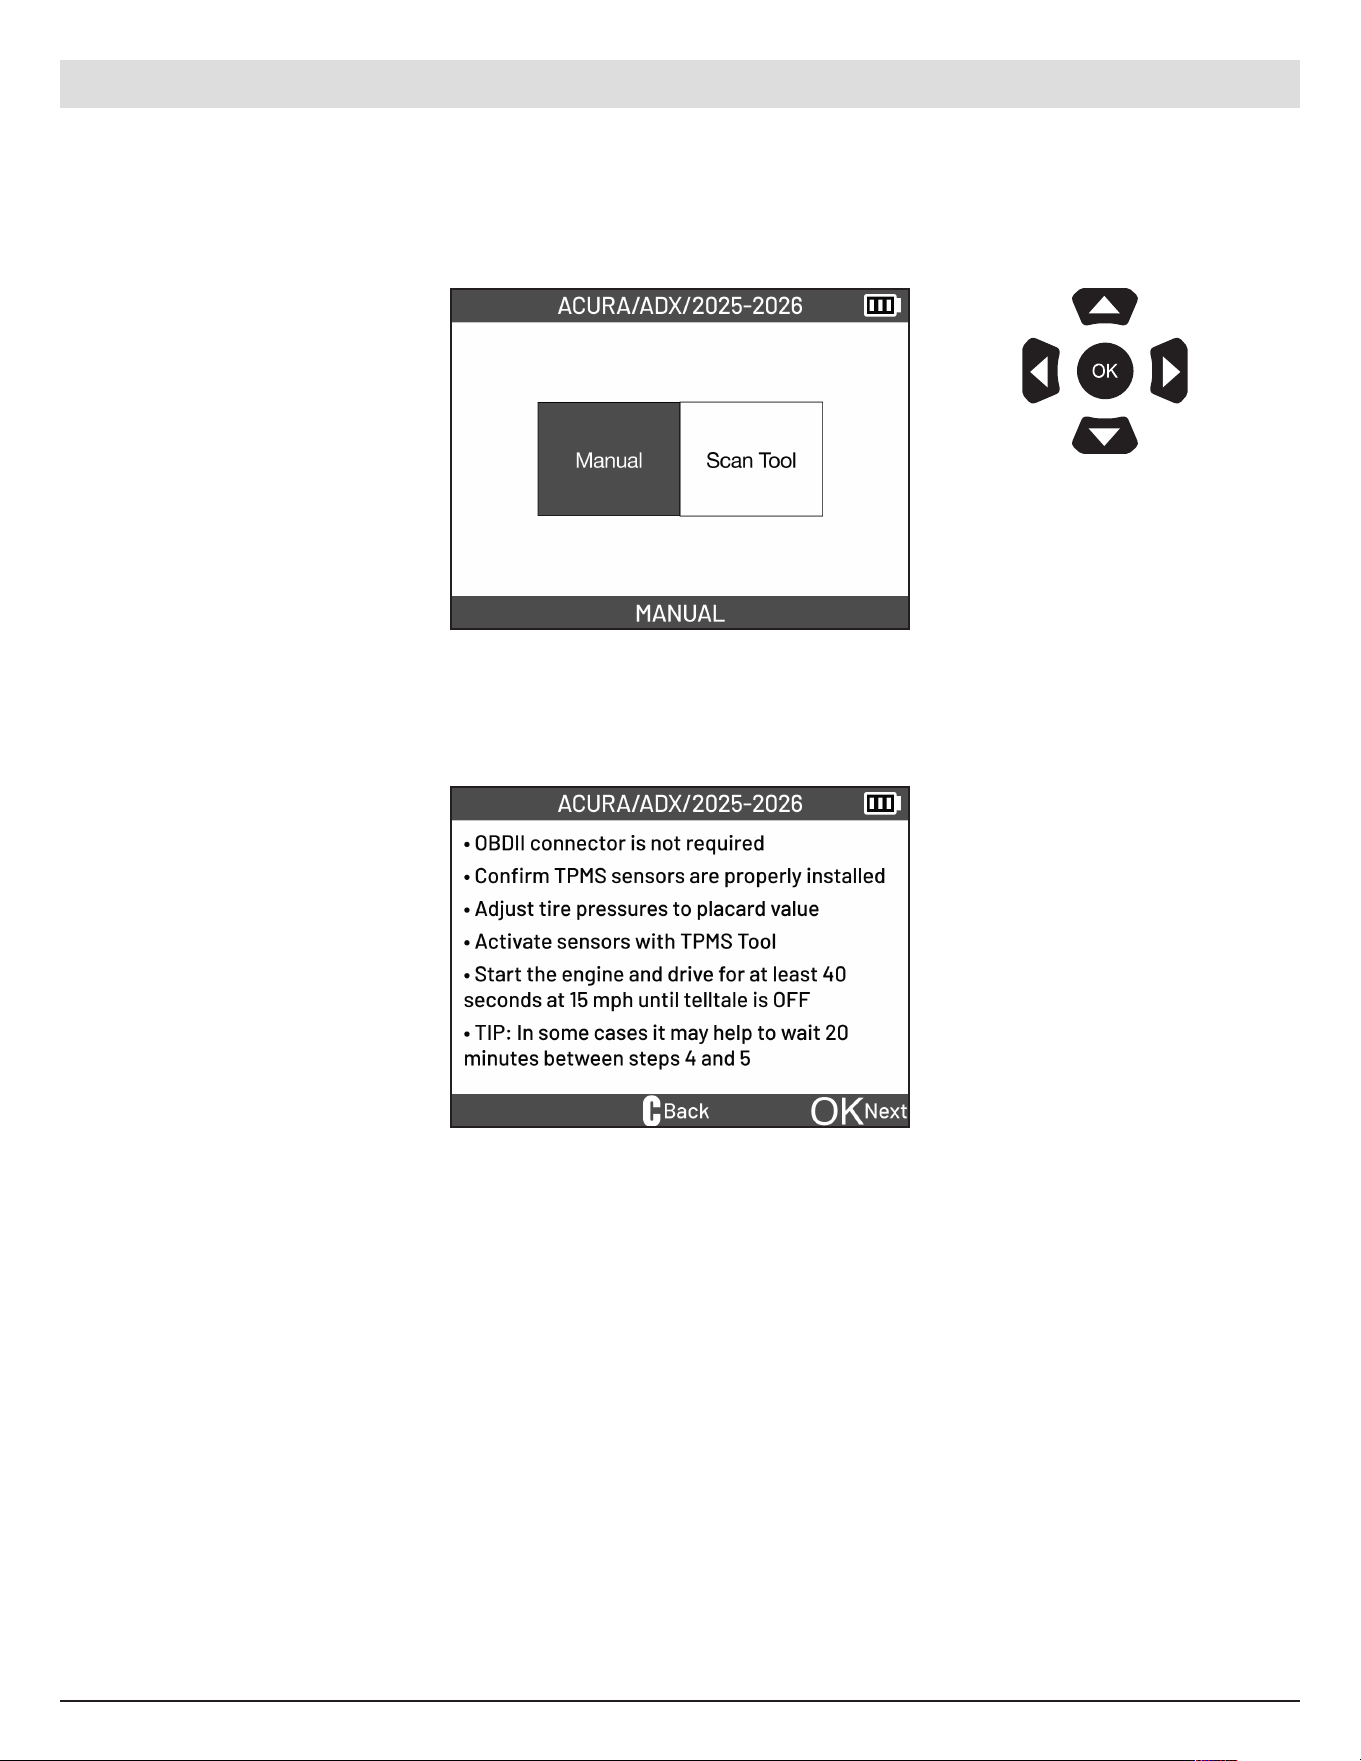
Select the MANUAL
function.
Follow the instructions on
screen to put the vehicle into
relearn mode.
Use the arrow
buttons to navigate.
Pre ss OK to confirm
your choice.
6.2 Manual Relearn
Process o f teaching the vehicle to recognize new TPMS sensor IDs by following a specific sequence of
actions using the vehicle controls.
ATEQ | VT18 | RELEARN
27
English | 03-20-2026
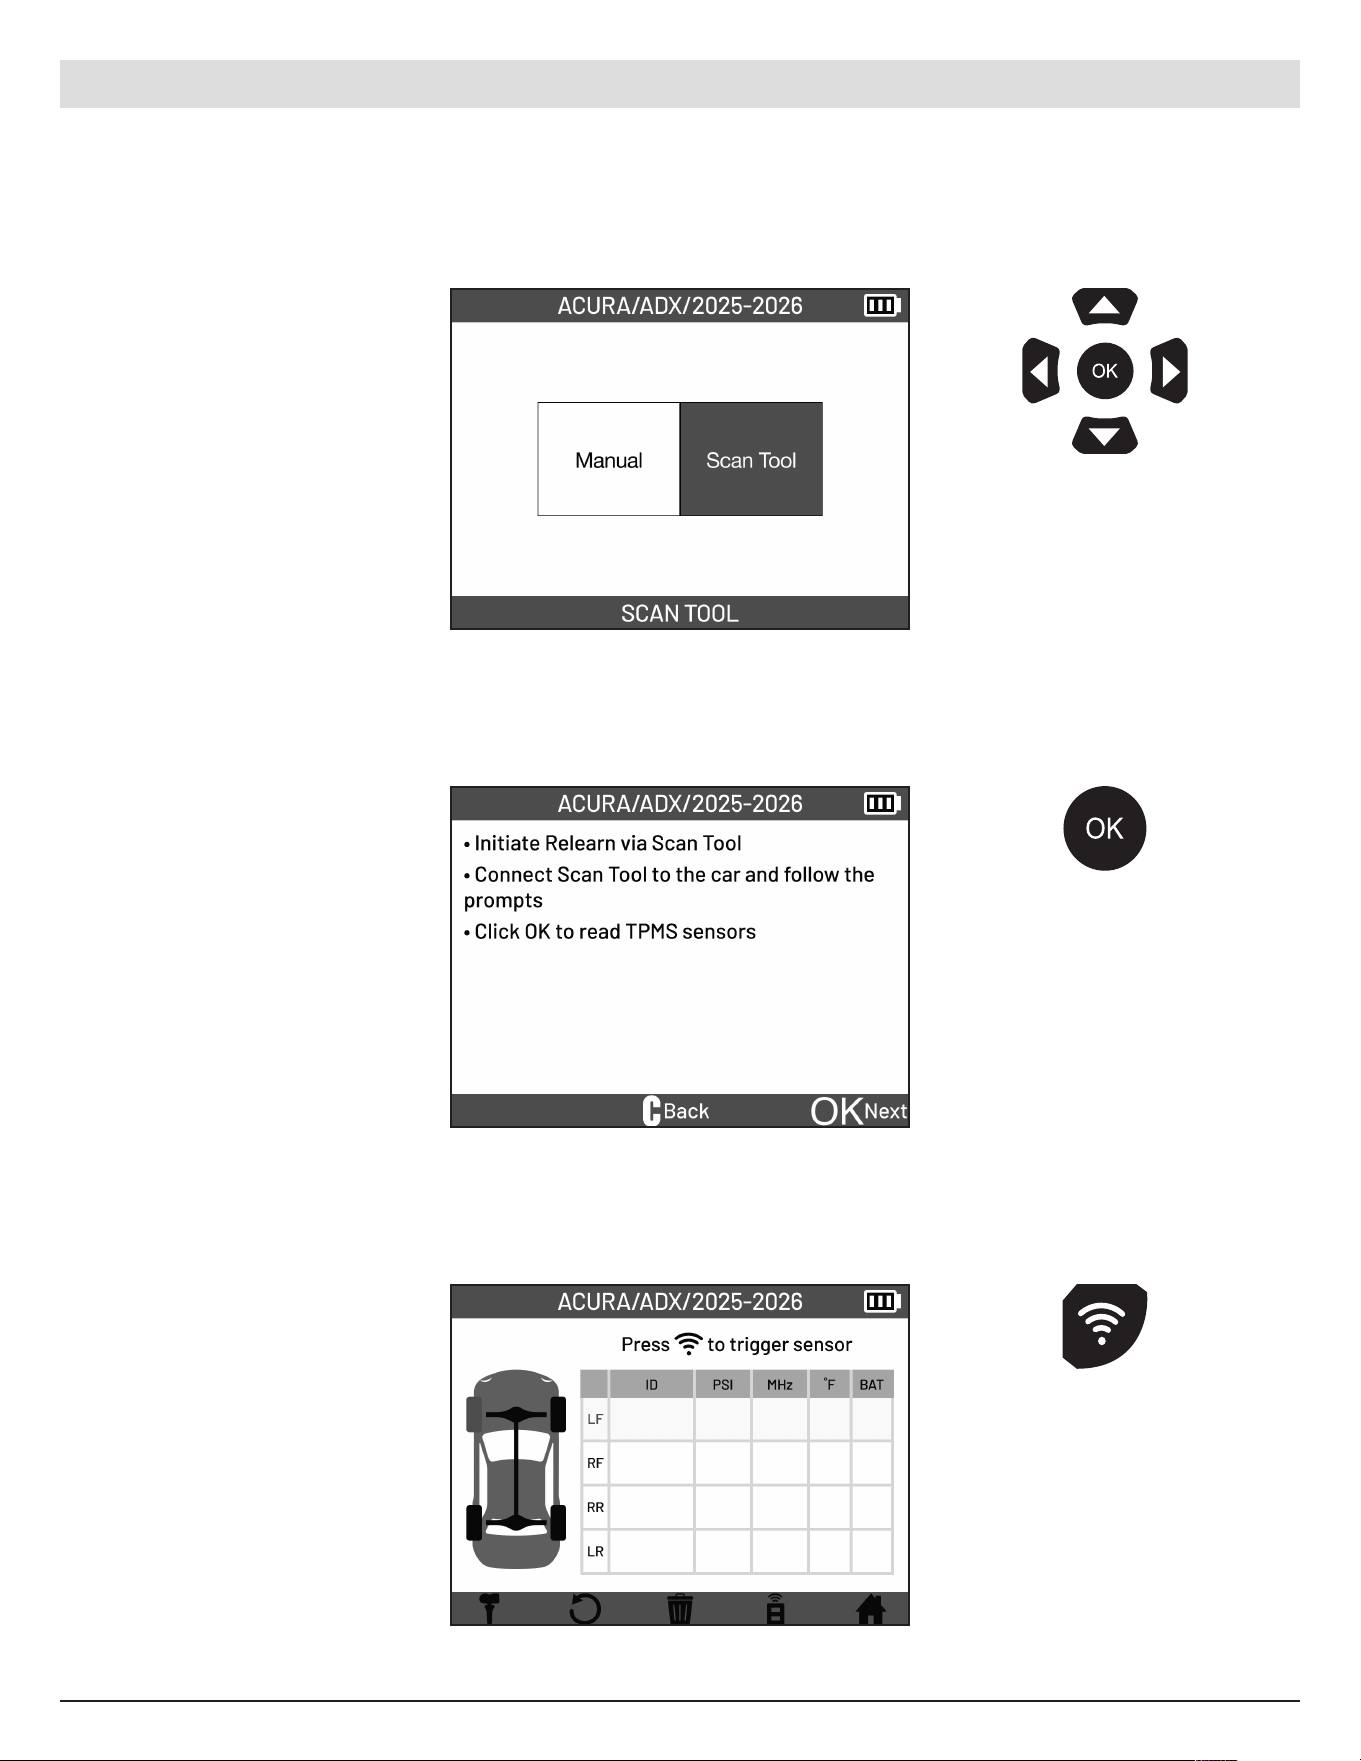
Select the SCAN TOOL
function.
Follow the instructions on
screen.
Use the arrow
buttons to navigate.
Pre ss OK to confirm
your choice.
6.3 SCAN TOOL
Use Scan Tool to initiate relearn.
ATEQ | VT18 | RELEARN
Read all the sensors to finish
the relearn.
Pre ss the OK button
to proceed to read
TPMS sensors.
Pre ss the trigger
button on the tool to
read the sensor.
28
English | 03-20-2026
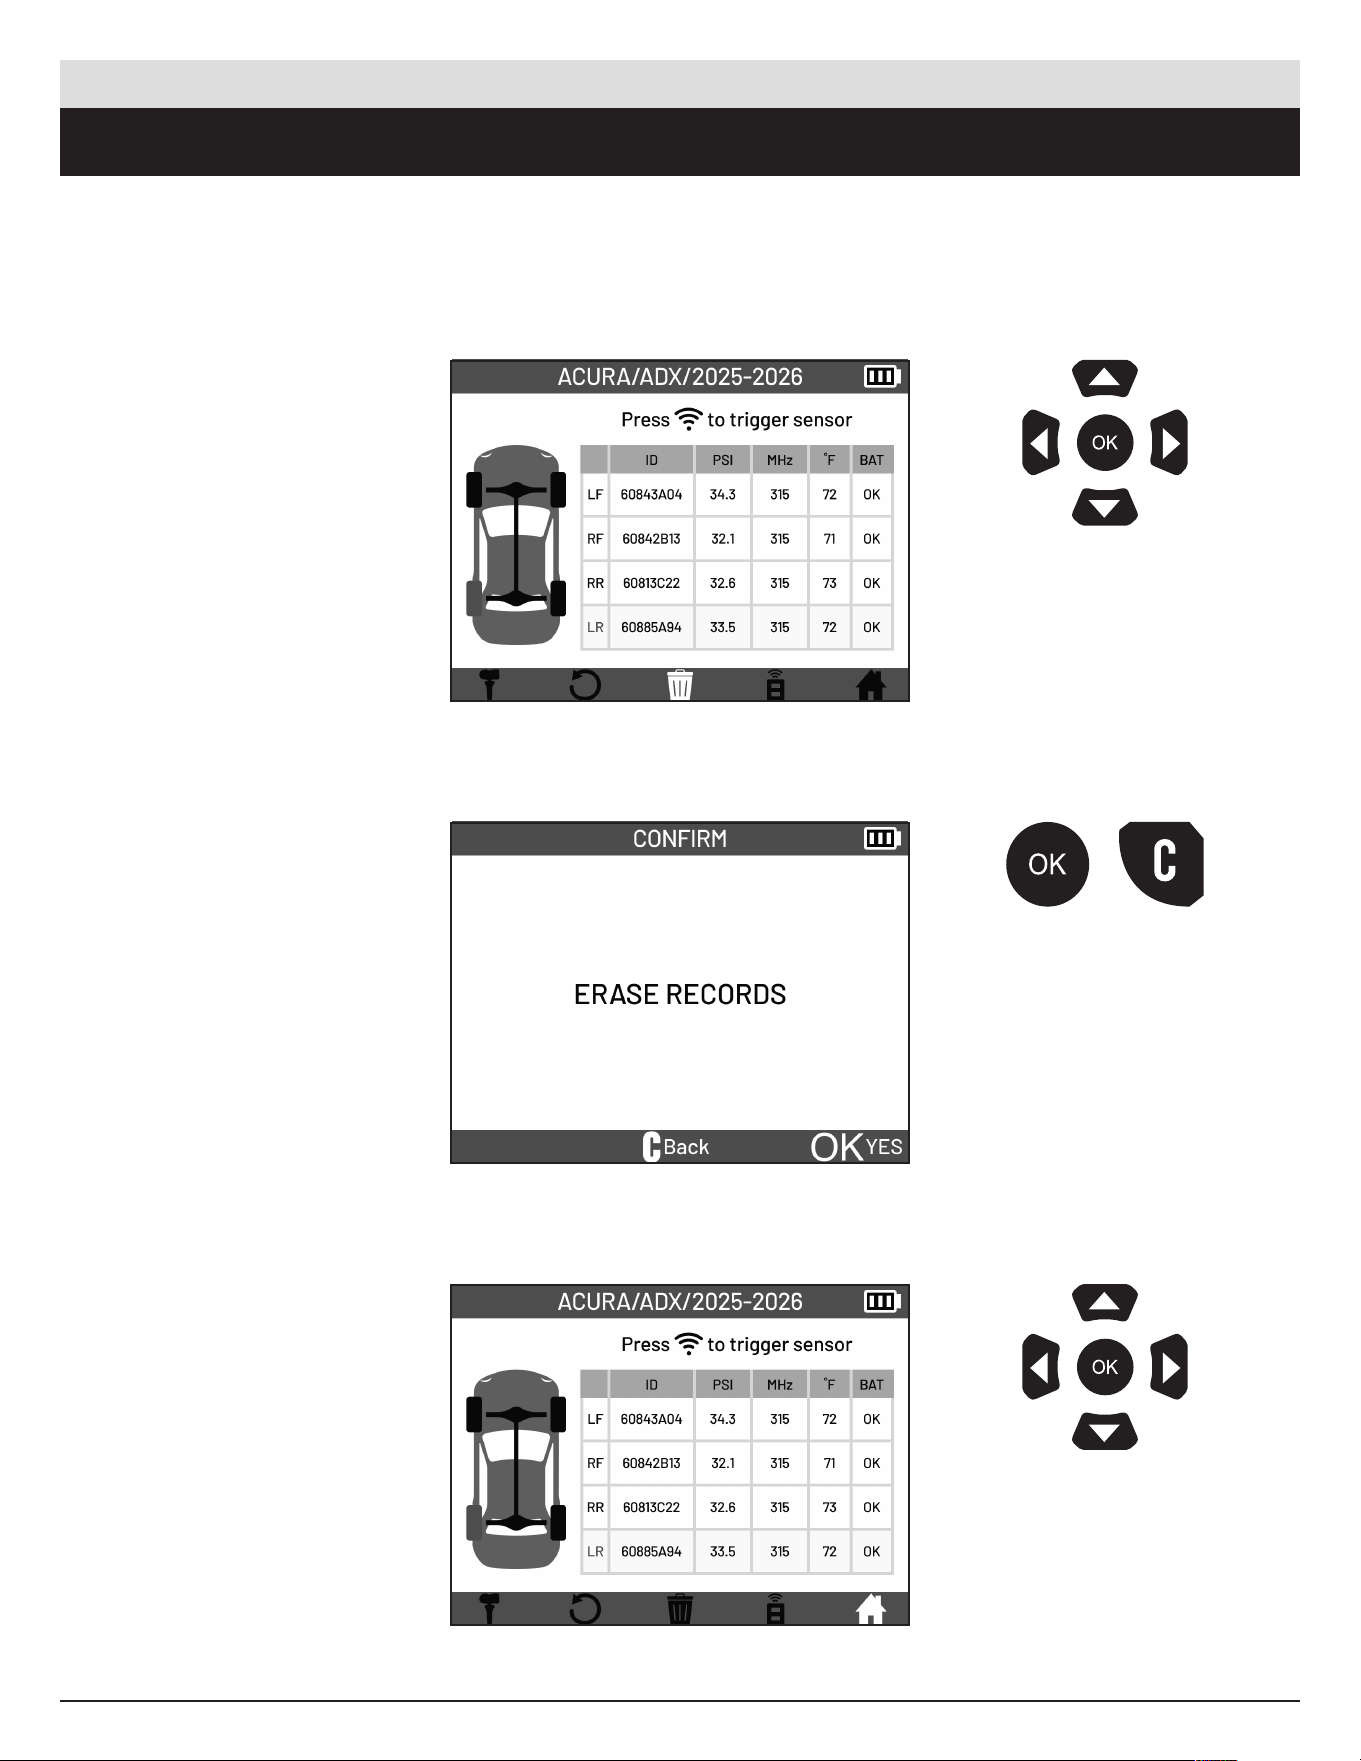
7. DELETE JOB / GO HOME
From the TPMS Screen,
select the Delete Job Icon
located in the bottom bar.
Pre ss the OK button to erase
records.
Use the arrow
buttons to navigate.
Pre ss OK to confirm
your choice.
Use the arrow
buttons to navigate.
Pre ss OK to confirm
your choice.
ATEQ | VT18 | DELETE JOB / GO HOME
From the TPMS Screen,
select the Go Home Icon
located in the bottom bar
to return back to the Main
Menu.
Pre ss the OK button to
erase records or Cancel
button to go back.
29
English | 03-20-2026
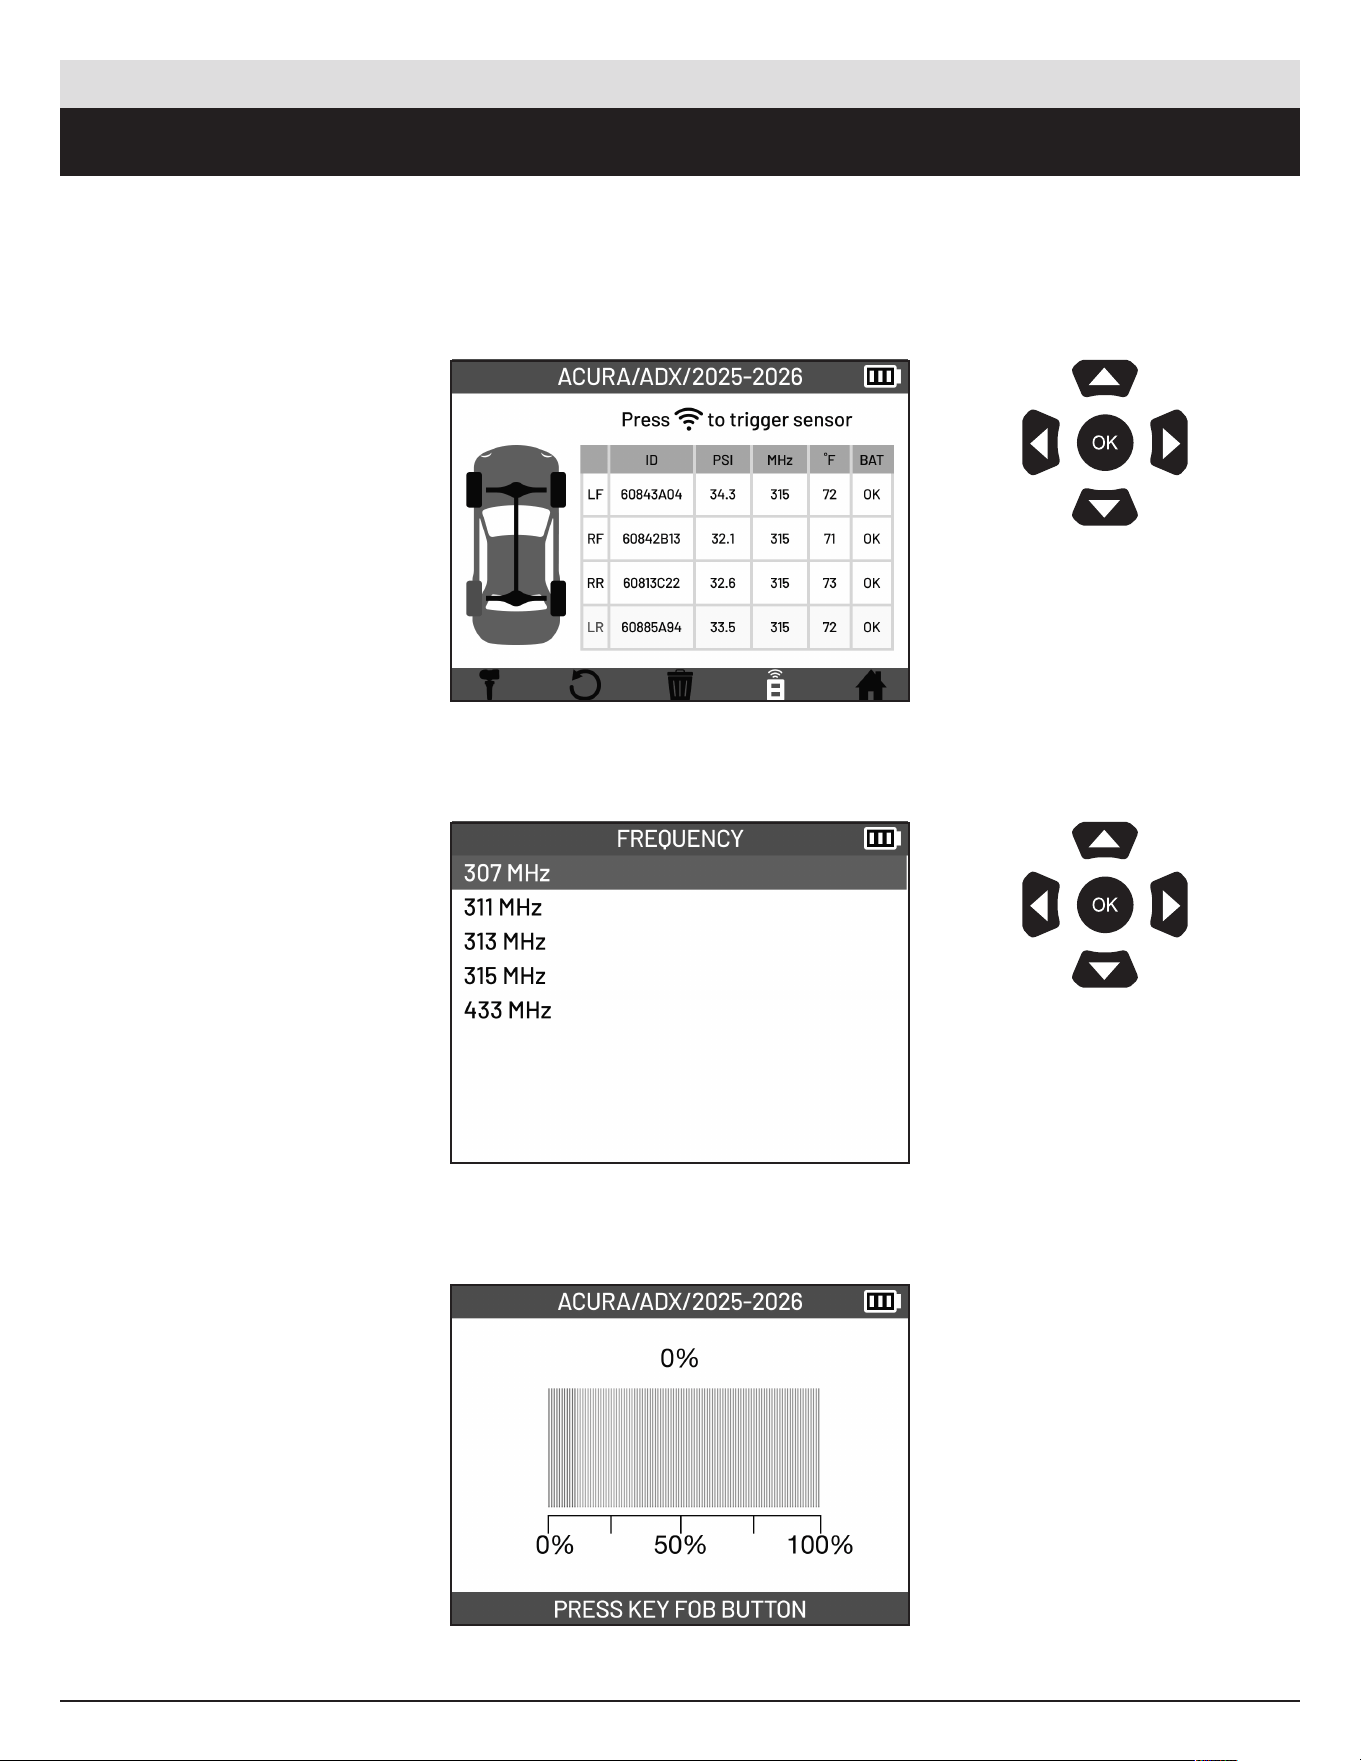
8. KEYFOB
Test vehicle keyfob battery status and signal strength.
From the TPMS Screen,
select the Keyfob Icon
located in the bottom bar.
Select the frequency of the
keyfob. This is dependent on
the vehicle choice.
Hold the keyfob near the tool
antenna and press and hold
button on keyfob. Signal
strength will be displayed on
screen.
Use the arrow
buttons to navigate.
Pre ss OK to confirm
your choice.
Use the arrow
buttons to navigate.
Pre ss OK to confirm
your choice.
ATEQ | VT18 | KEYFOB
30
English | 03-20-2026
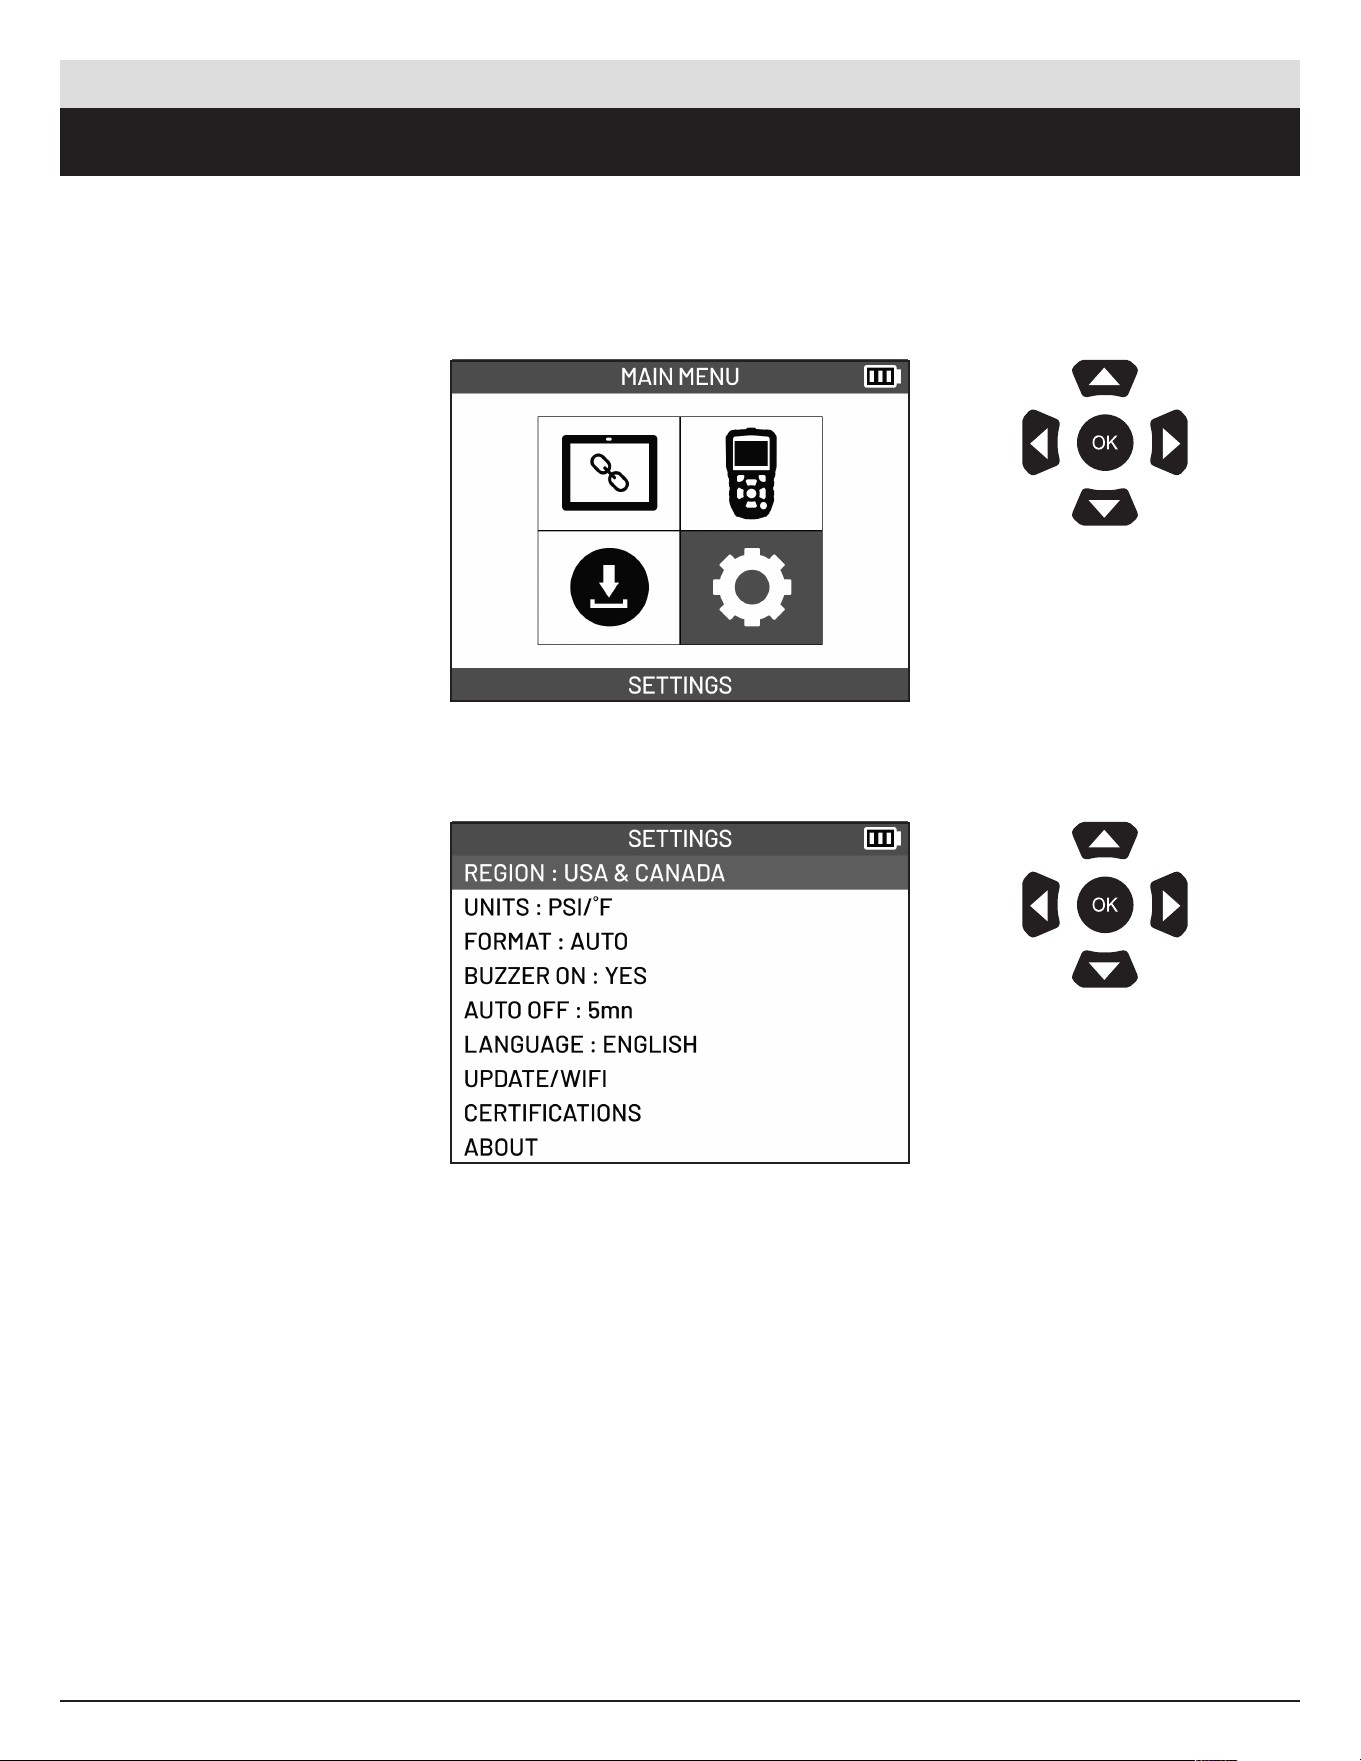
9. SETTINGS
From the main menu, select
SETTINGS.
The dierent tool settings
will be displayed.
Description of settings.
Use the arrow
buttons to navigate.
Pre ss OK to confirm
your choice.
Use the arrow
buttons to navigate.
Pre ss OK to confirm
your choice.
ATEQ | VT18 | SETTINGS
LANGUAGE
Change the language that is
displayed on the tool.
AUTO OFF
Set the time before the tool
switches o automatically when
not in use.
CERTIFICATIONS
View
t
ool
c
ertifications.
REGION
Select
t
he
g
eographical
r
egion
of t
he
d
atabase.
ABOUT
Display
t
he
v
ersion
n
umbers
o
f
the t
ool.
UPDATE/WIFI
Update
t
he
t
ool
v
ia
W
IFI
and
ch
ange
t
he
W
IFI
s
ettings.
FORMAT
Change
t
he
f
ormat
u
sed
t
o
dis
play
t
he
s
ensor
I
D.
BUZZER ON
Enable
or di
sable
s
ound.
UNITS
Change
t
he
uni
ts
u
sed
t
o
di
splay
pre
ssure
and t
emperature.
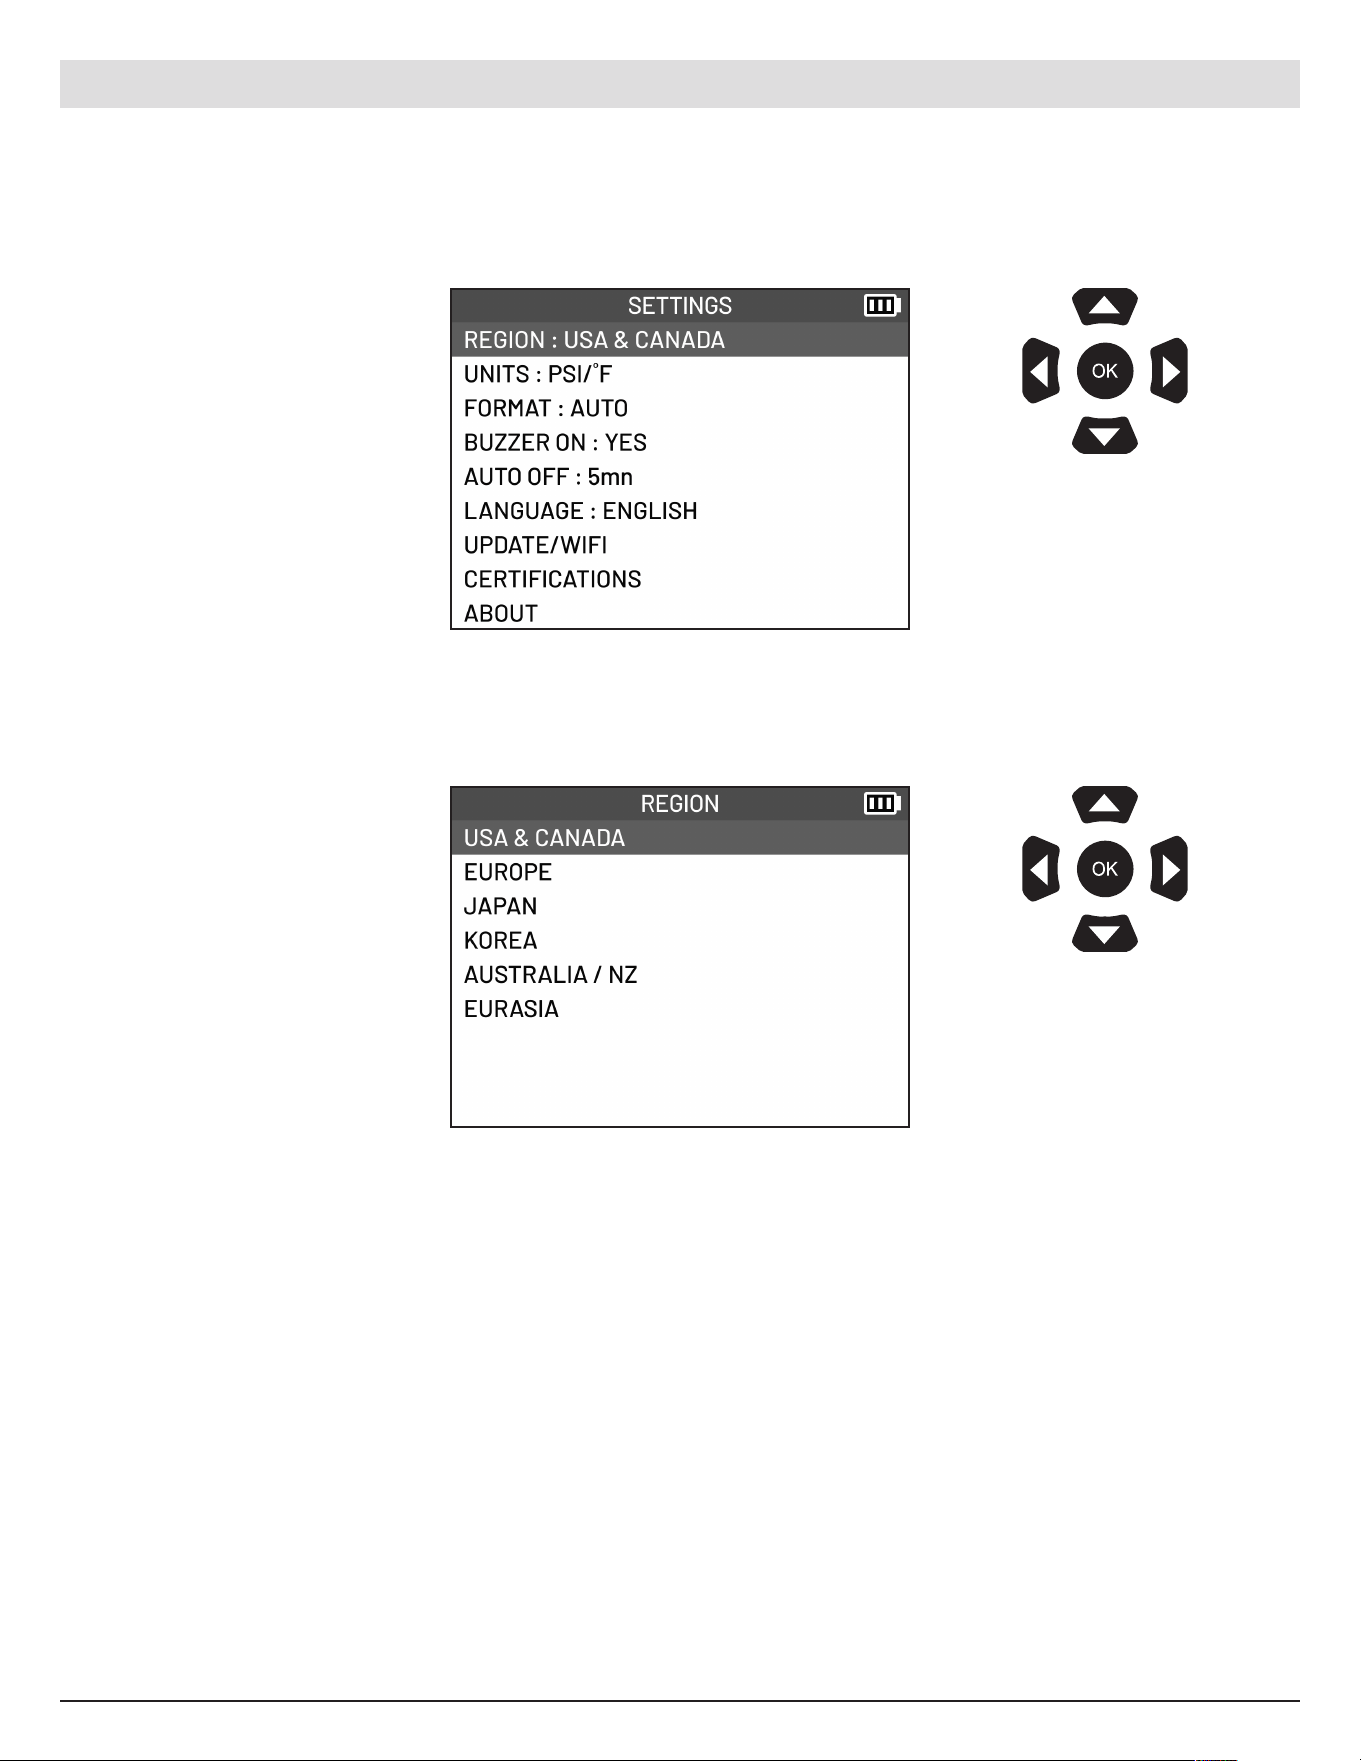
9.1 Accessing the Settings menu
31
English | 03-20-2026
Select REGION
Select what re gional
database you wish to use.
Use the arrow
buttons to navigate.
Pre ss OK to confirm
your choice.
Use the arrow
buttons to navigate.
Pre ss OK to confirm
your choice.
9.2 Region
Select the geographical region of the database.
ATEQ | VT18 | SETTINGS

32
English | 03-20-2026
Select UNITS
Select what unit you
would like to use to display
pressure and temperature.
Use the arrow
buttons to navigate.
Pre ss OK to confirm
your choice.
Use the arrow
buttons to navigate.
Pre ss OK to confirm
your choice.
9.3 Units
Change the units used to display pressure and temperature.
ATEQ | VT18 | SETTINGS

33
English | 03-20-2026
Select FORMAT
Select what format you
would like to use to display
the sensor ID.
• AUTO displays the sensor
ID following the format sent
by the sensor.
• DECIMAL displays the
sensor ID in decimal format
(0 to 9).
• HEXADECIMAL display s
the sensor ID in hexadecimal
format (0 to 9 and A to F).
Use the arrow
buttons to navigate.
Pre ss OK to confirm
your choice.
Use the arrow
buttons to navigate.
Pre ss OK to confirm
your choice.
9.4 Format
Change the format used to display the sensor ID.
ATEQ | VT18 | SETTINGS
34
English | 03-20-2026
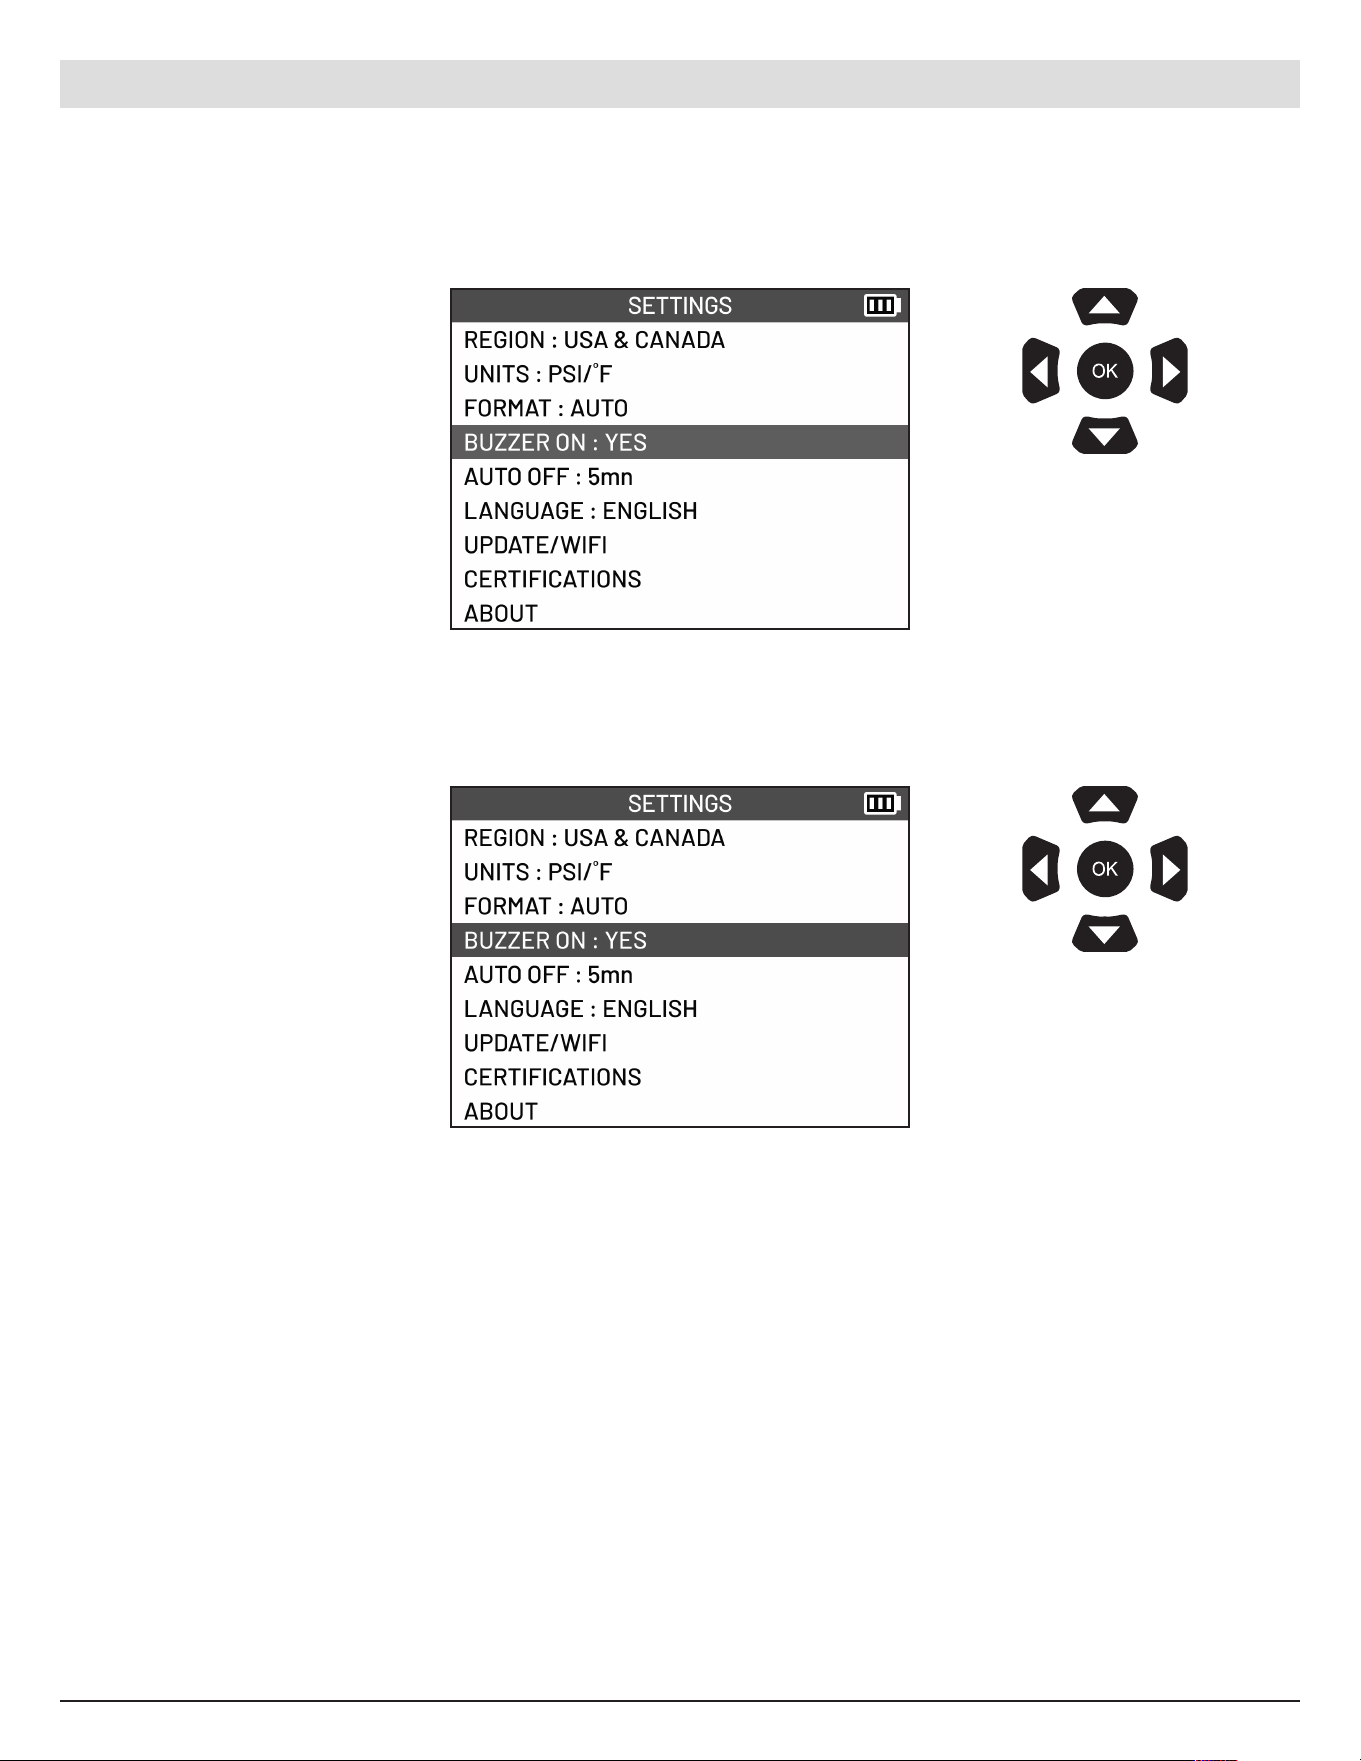
Select BUZZER ON
Use the Up and Down arrow
buttons to se lect YES or NO.
• NO
Mute sound from the tool
• YES
Enable the tool’s sound
Use the arrow
buttons to navigate.
Pre ss OK to confirm
your choice.
Use the arrow
buttons to navigate.
Pre ss OK to confirm
your choice.
9.5 Buzzer ON
Enable or dis able sound.
ATEQ | VT18 | SETTINGS

35
English | 03-20-2026
Select AUTO OFF
Use the Up and Down
arrow buttons to increase or
decrease delay by 1 minute.
It is possible to disable the
tool’s automatic power o
function when not in use by
reducing the time to 1 minute
and then pressing the down
arrow again.
Use the arrow
buttons to navigate.
Pre ss OK to confirm
your choice.
Use the arrow
buttons to navigate.
Pre ss OK to confirm
your choice.
9.6 Auto O
Set the time before the tool switches o automatically when not in use.
ATEQ | VT18 | SETTINGS
36
English | 03-20-2026
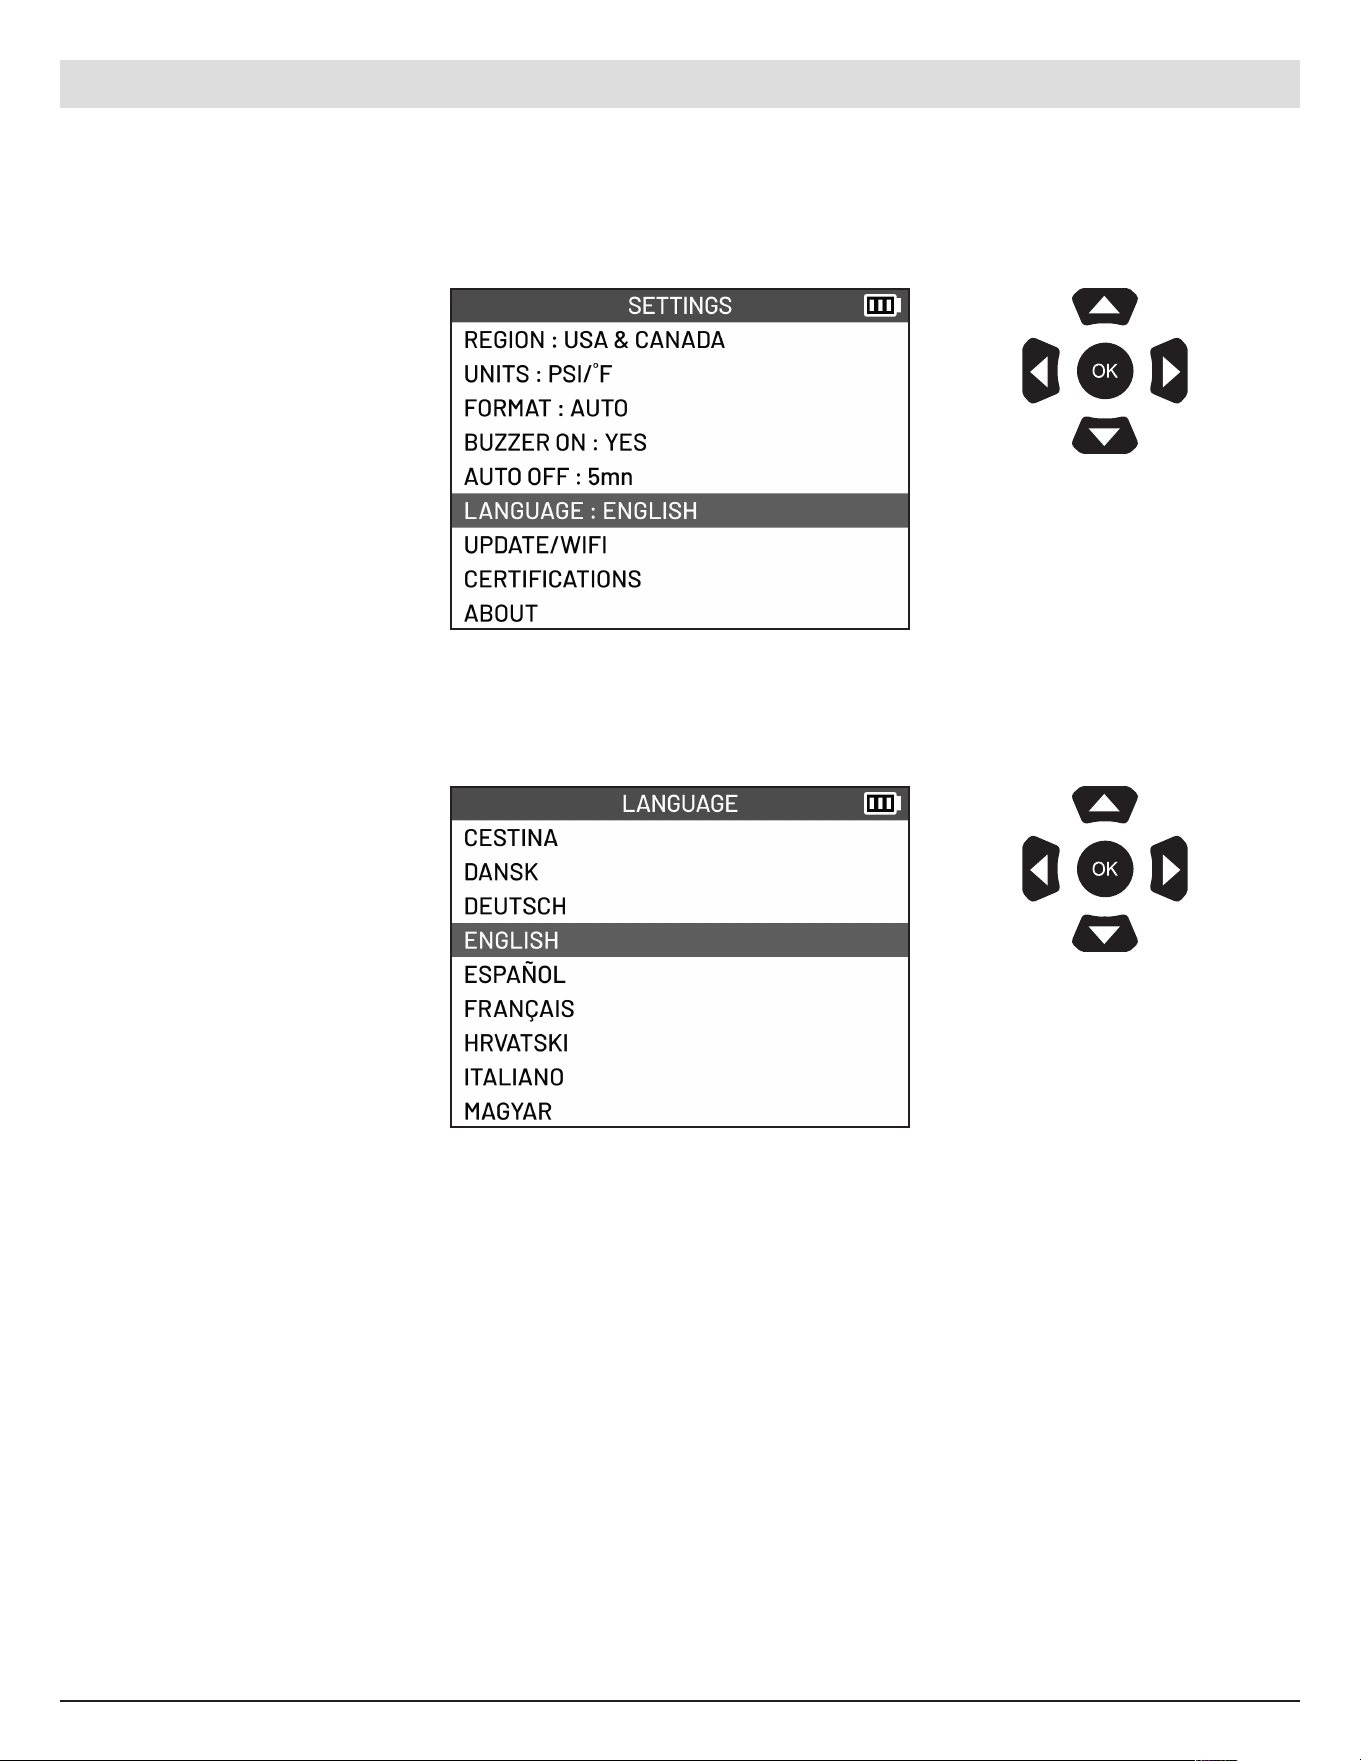
Select LANGUAGE
Select what language you
wish the tool to display.
Use the arrow
buttons to navigate.
Pre ss OK to confirm
your choice.
Use the arrow
buttons to navigate.
Pre ss OK to confirm
your choice.
9.7 Language
Change the language that is displayed on the tool.
ATEQ | VT18 | SETTINGS
37
English | 03-20-2026
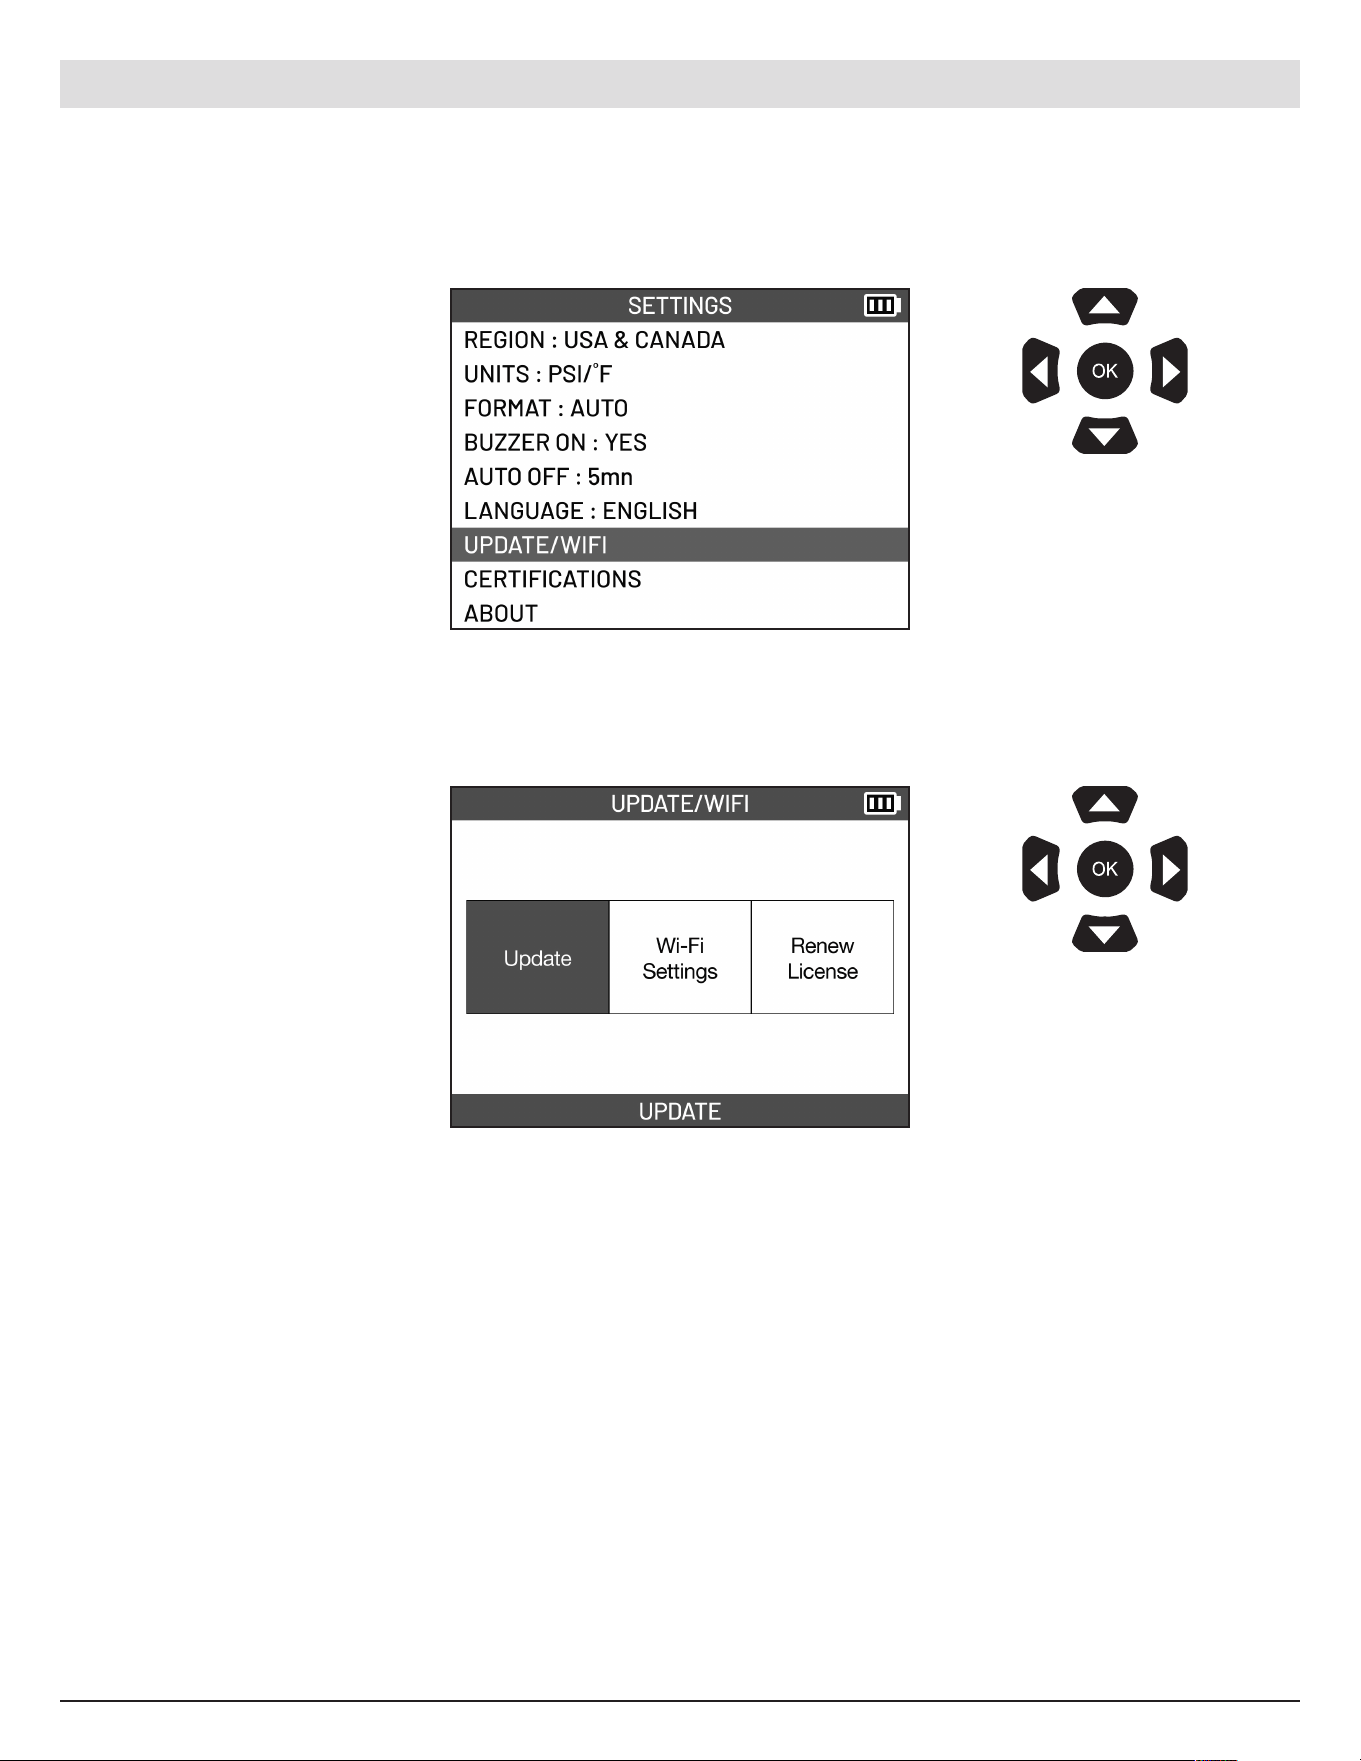
Select UPDATE/WIFI
The Update/WIF I Settings
will be displayed. WIFI
connec tion is required
to perform updates and
renew license. If tool is not
connec ted to WIFI, tool will
display the WIFI Settings
screen when selecting any of
the options. See page 40 on
how to connect to WIFI.
Use the arrow
buttons to navigate.
Pre ss OK to confirm
your choice.
Use the arrow
buttons to navigate.
Pre ss OK to confirm
your choice.
9.8 Update/WIFI
Update the tool via WIFI and change the WIFI s ettings.
ATEQ | VT18 | SETTINGS
38
English | 03-20-2026
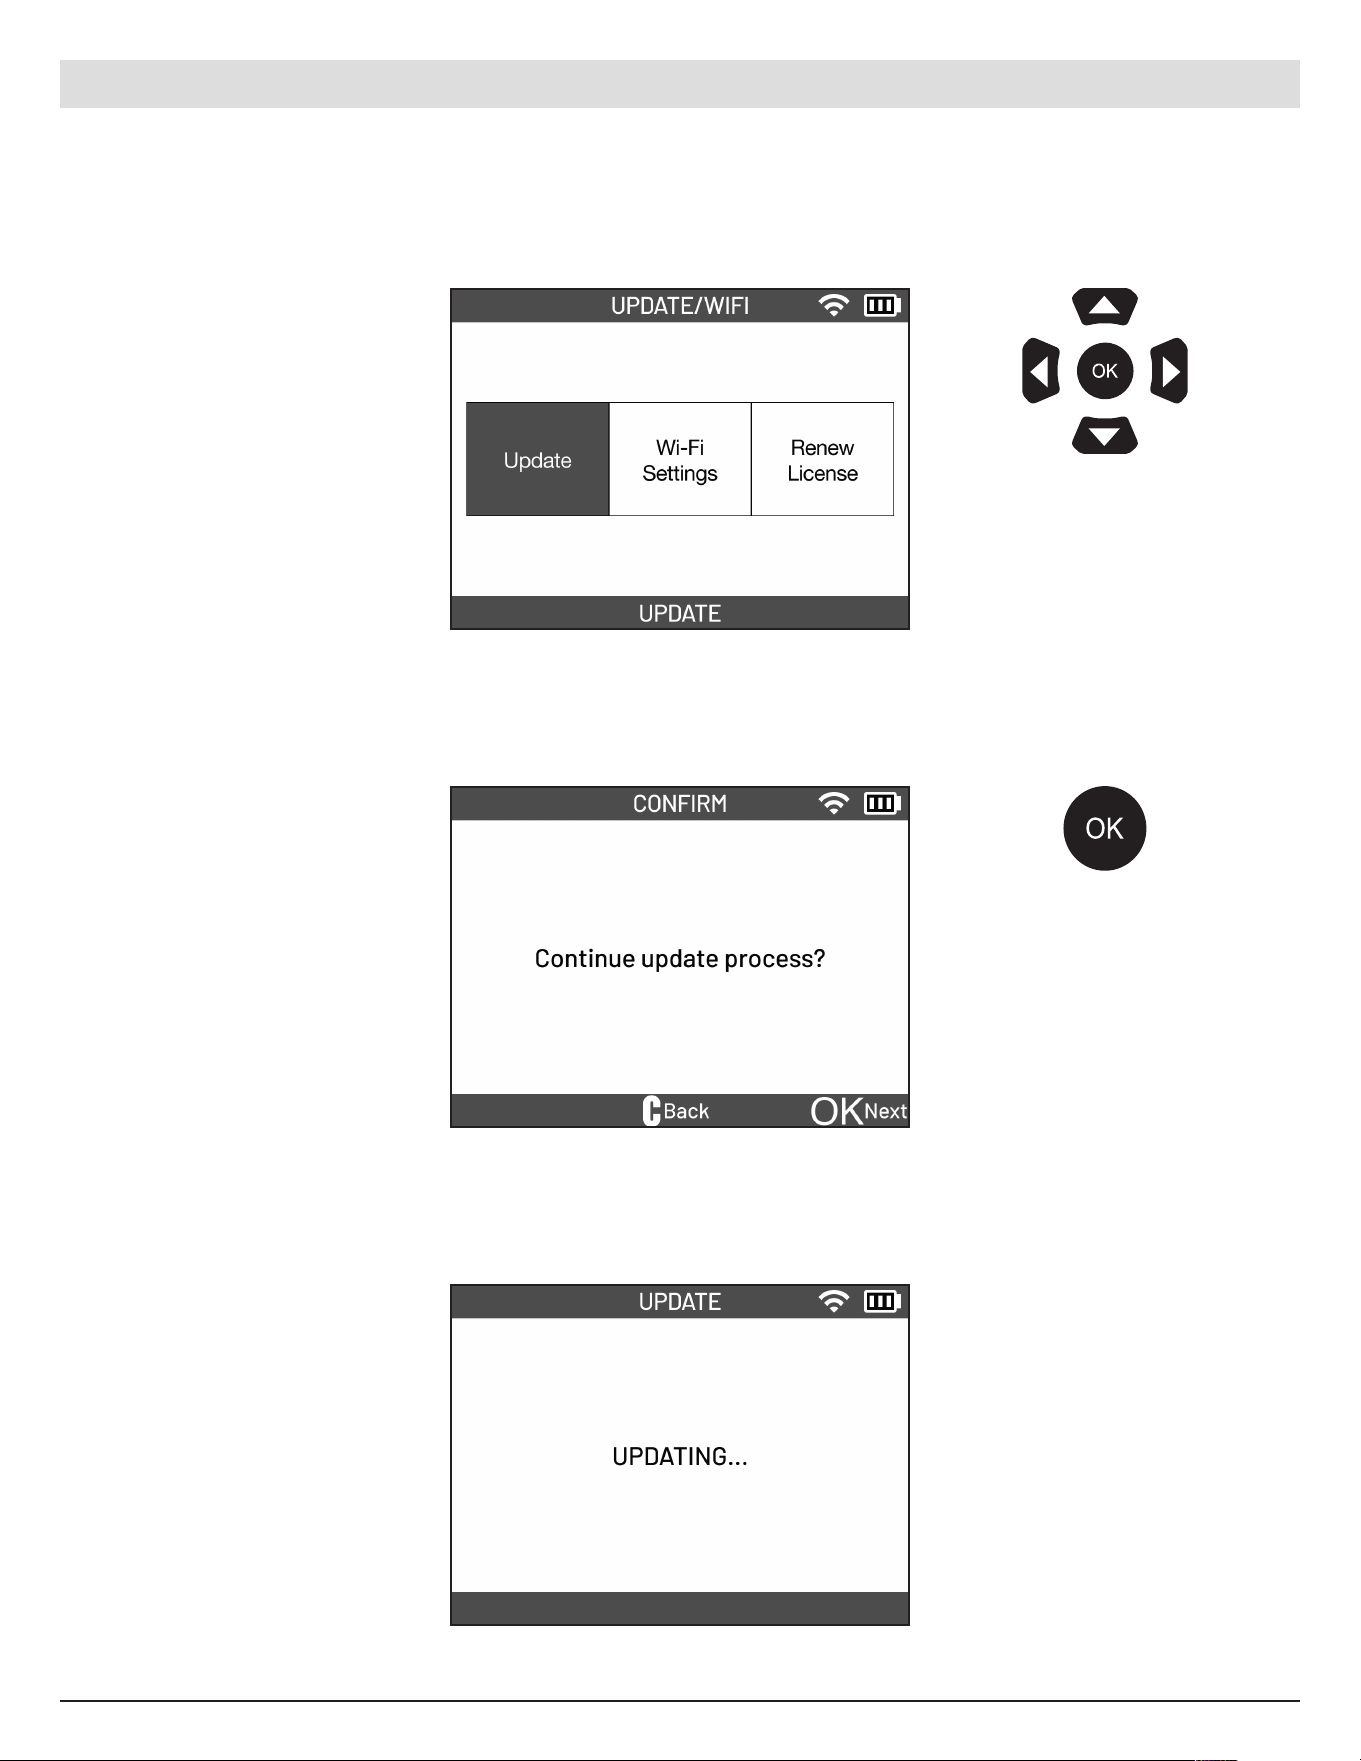
Select UPDATE.
Can access the Update
function through the
UPDATE/WIFI menu or
by selecting the UPDATE
function from the Main Menu.
Pre ss the OK button on the
tool to begin the update
process.
Wait for the update process
to finish.
• Do not use the tool while
update is in progress
• Do not turn o the tool
while update is in progress
• Recommende d to connect
tool to charger while
updating the tool
Use the arrow
buttons to navigate.
Pre ss OK to confirm
your choice.
9.8.1 Update
ATEQ | VT18 | SETTINGS
Pre ss the OK button
to update tool.
39
English | 03-20-2026
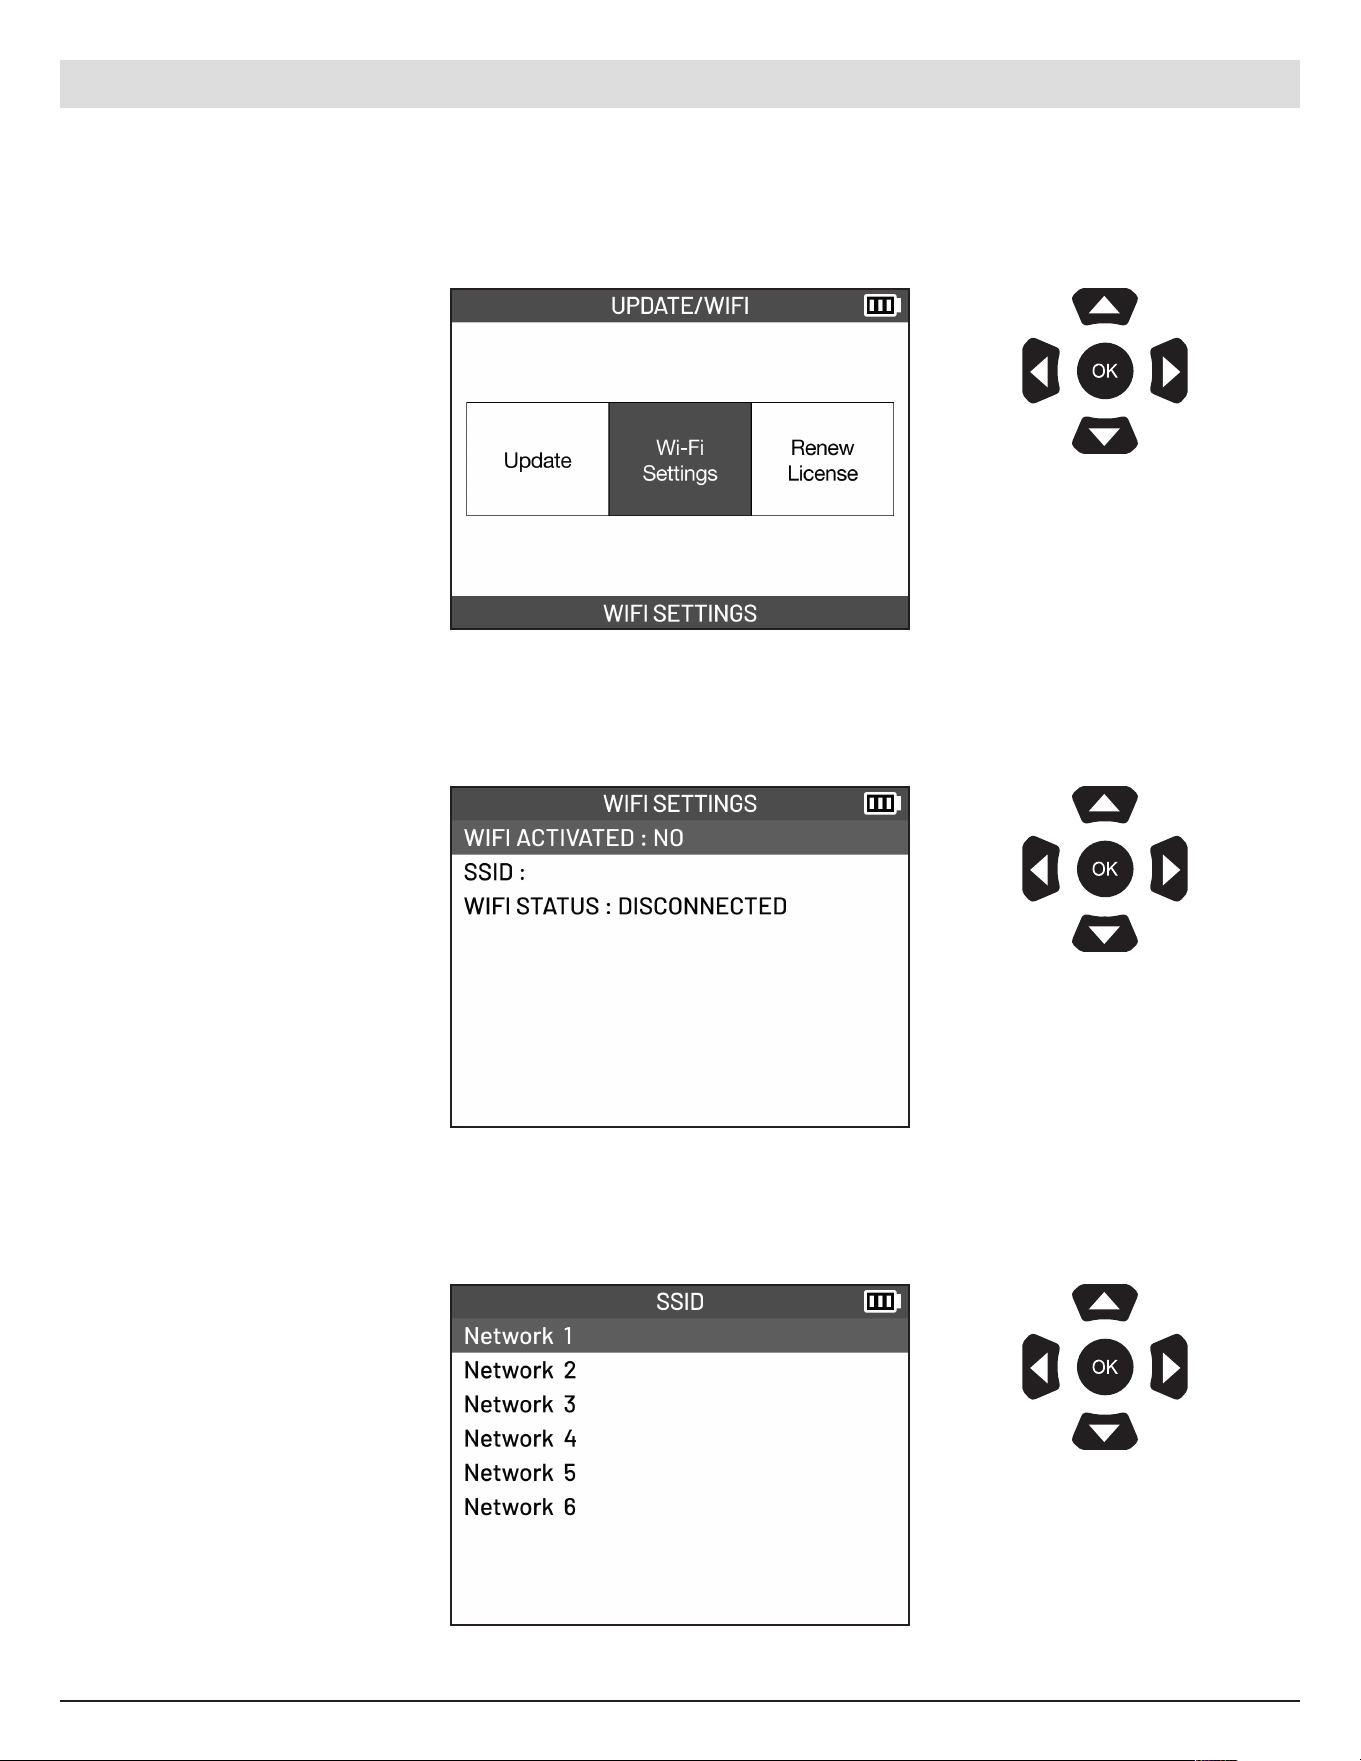
Select WIFI SETTINGS
Select WIFI ACTIVATED. Use
the UP and DOWN arrows
to select between YES and
NO. Select YES to connect to
WIFI.
Select the network you wish
to connect to.
Use the arrow
buttons to navigate.
Pre ss OK to confirm
your choice.
Use the arrow
buttons to navigate.
Pre ss OK to confirm
your choice.
Use the arrow
buttons to navigate.
Pre ss OK to confirm
your choice.
9.8.2 WIFI Settings
ATEQ | VT18 | SETTINGS
40
English | 03-20-2026
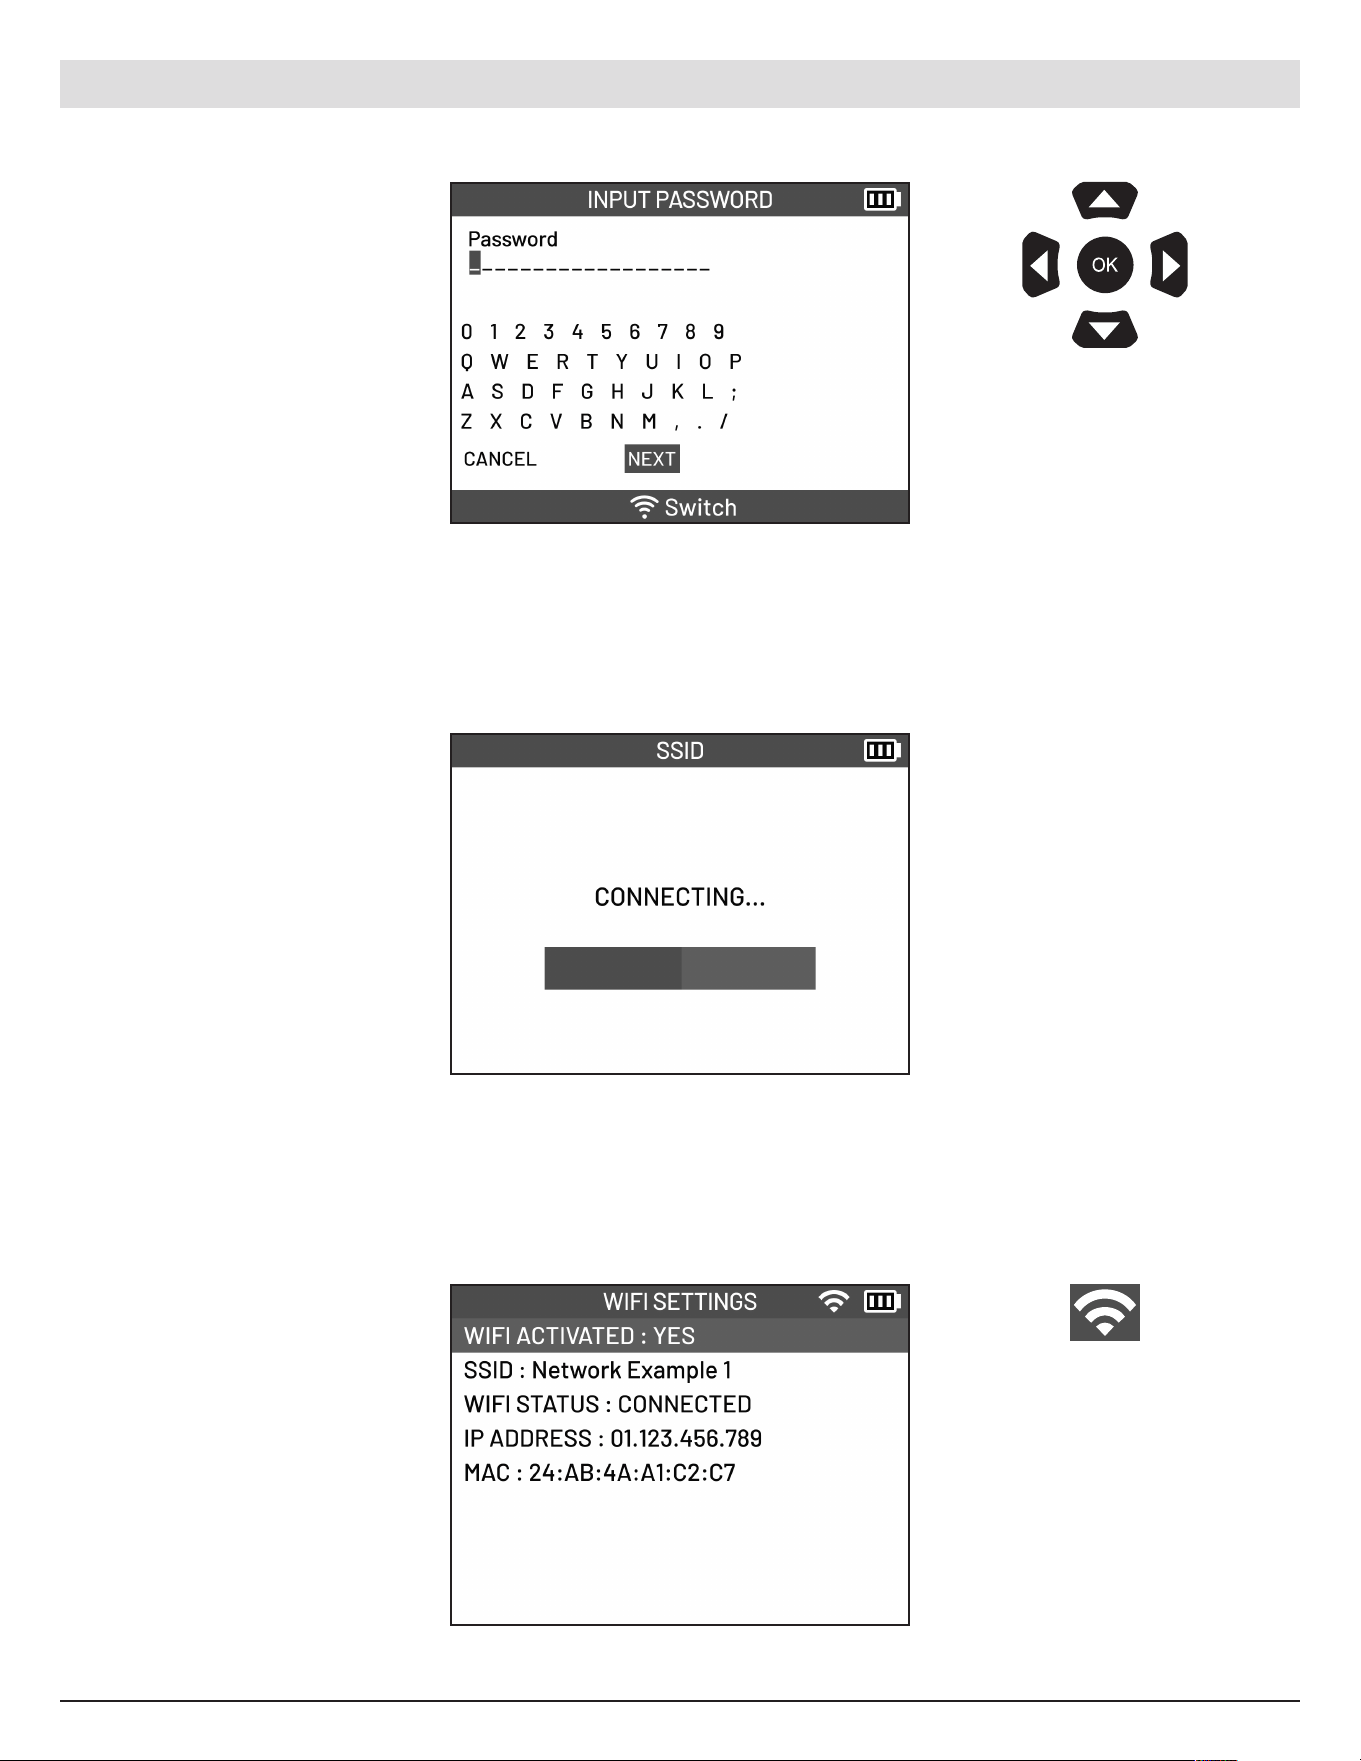
Enter the network password.
Select NEXT once finished.
ATEQ | VT18 | SETTINGS
Wait a few seconds to
connec t to the network.
Once connected, the
network details will be
display ed.
Use the arrow
buttons to navigate.
Pre ss OK to confirm
your choice.
WIFI icon displayed in
the top right corner of
the screen indicates
that the device is
connec ted to WIFI.
41
English | 03-20-2026
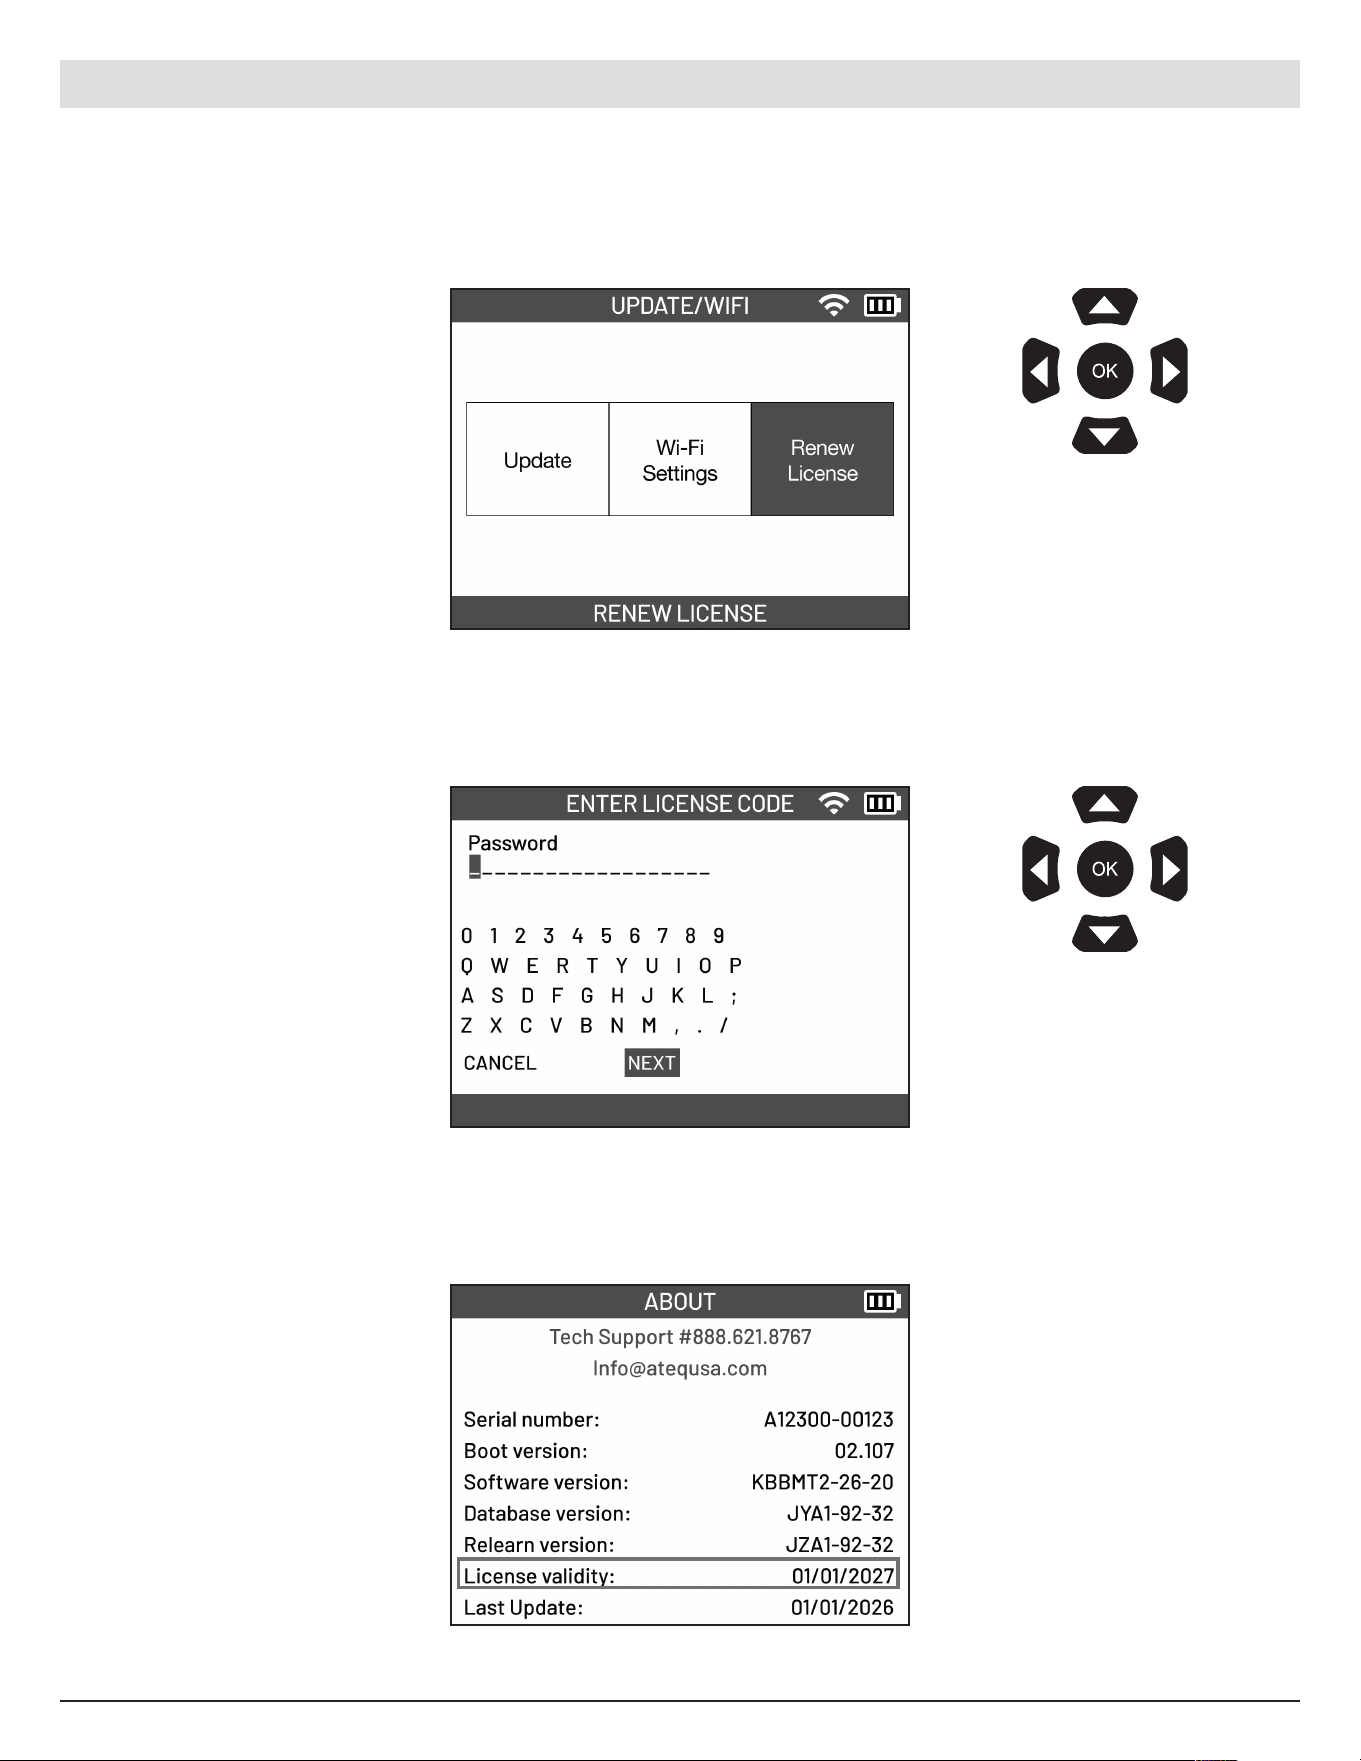
Select RENEW LICENSE
Enter the license code.
Select NEXT to proceed.
The license validity can be
found under the ABOUT
setting.
Use the arrow
buttons to navigate.
Pre ss OK to confirm
your choice.
Use the arrow
buttons to navigate.
Pre ss OK to confirm
your choice.
9.8.3 Renew License
ATEQ | VT18 | SETTINGS
42
English | 03-20-2026
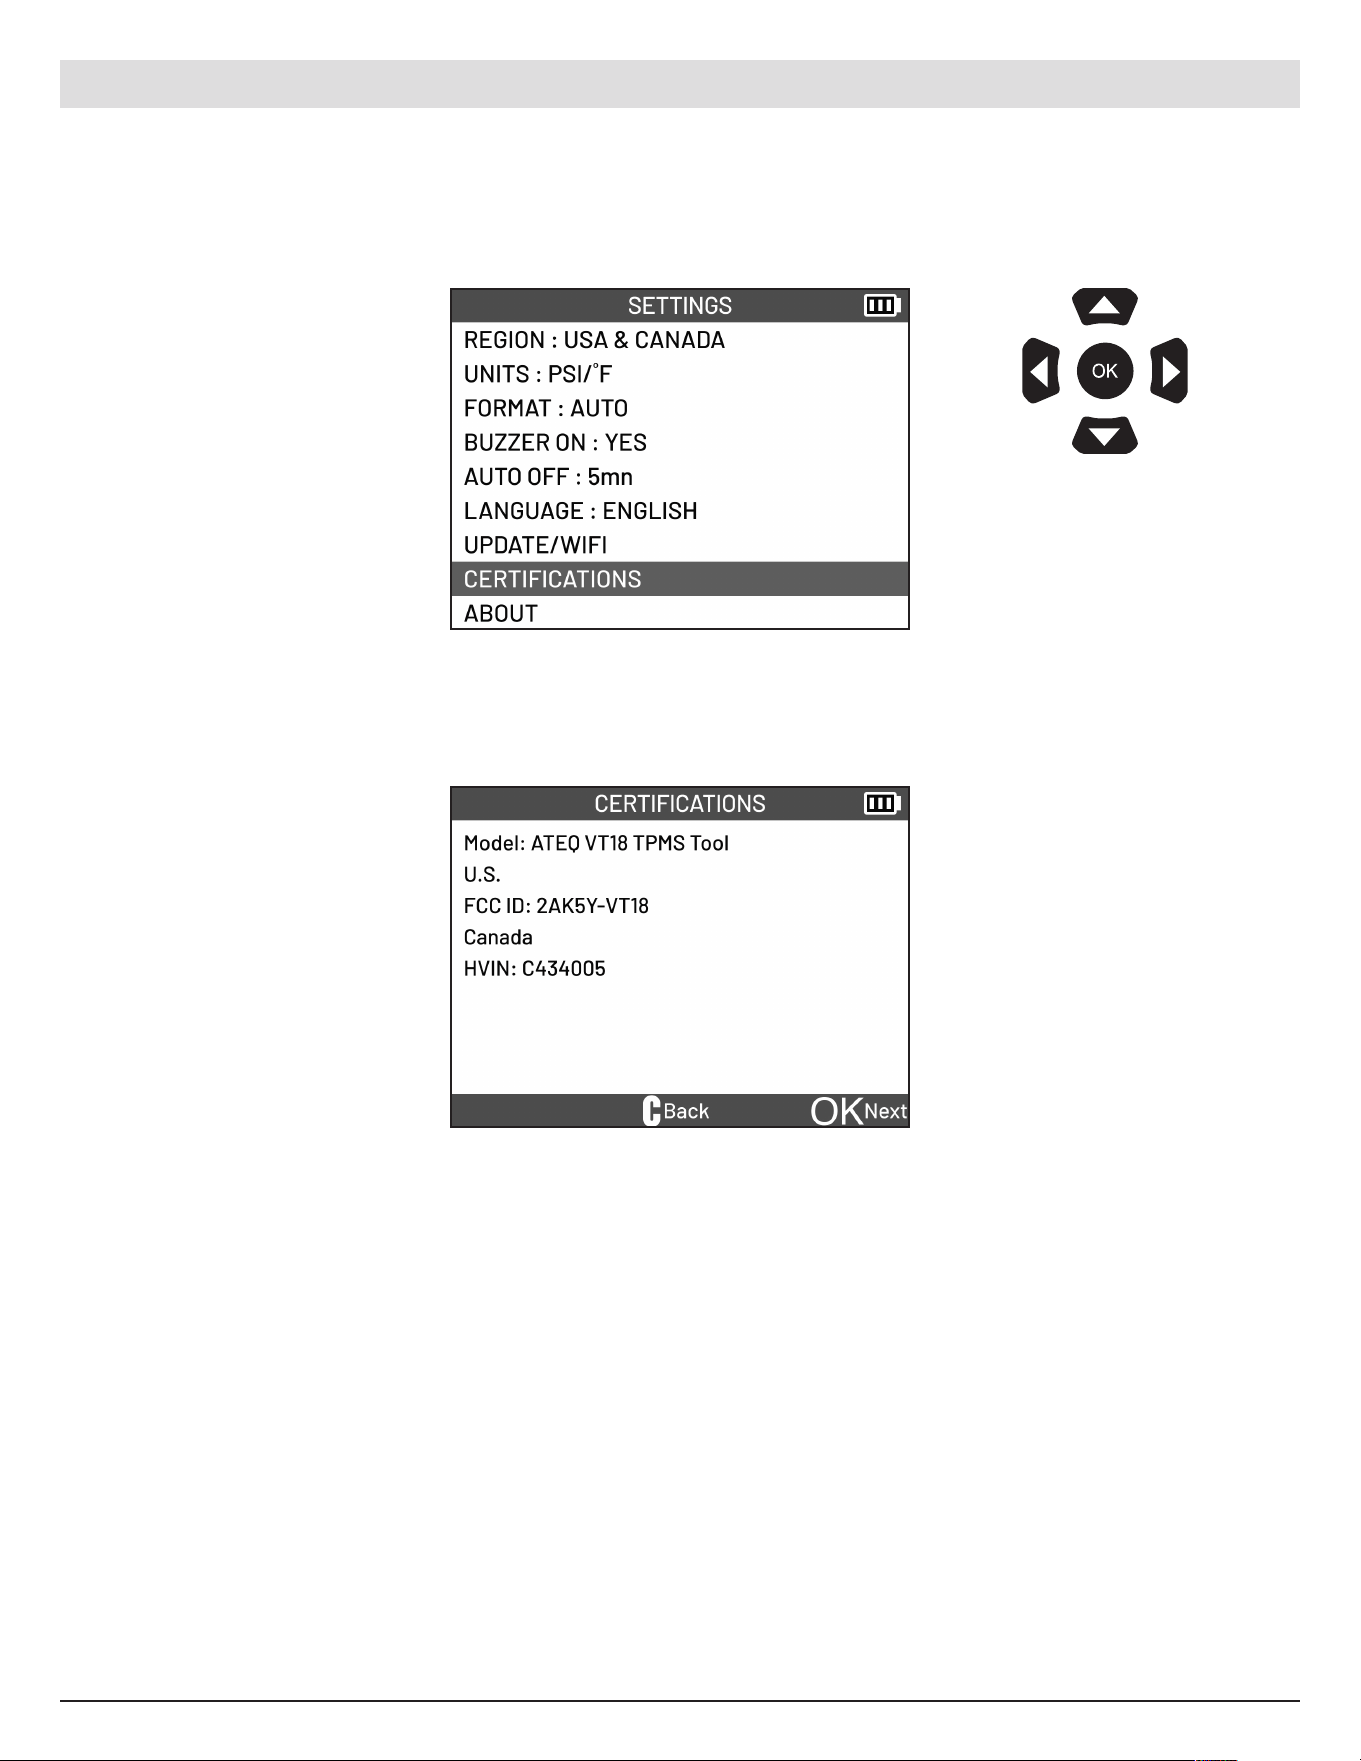
Select CERTIFICATIONS
Certification information will
be displayed.
Use the arrow
buttons to navigate.
Pre ss OK to confirm
your choice.
9.9 Certifications
View tool certifications.
ATEQ | VT18 | SETTINGS
43
English | 03-20-2026
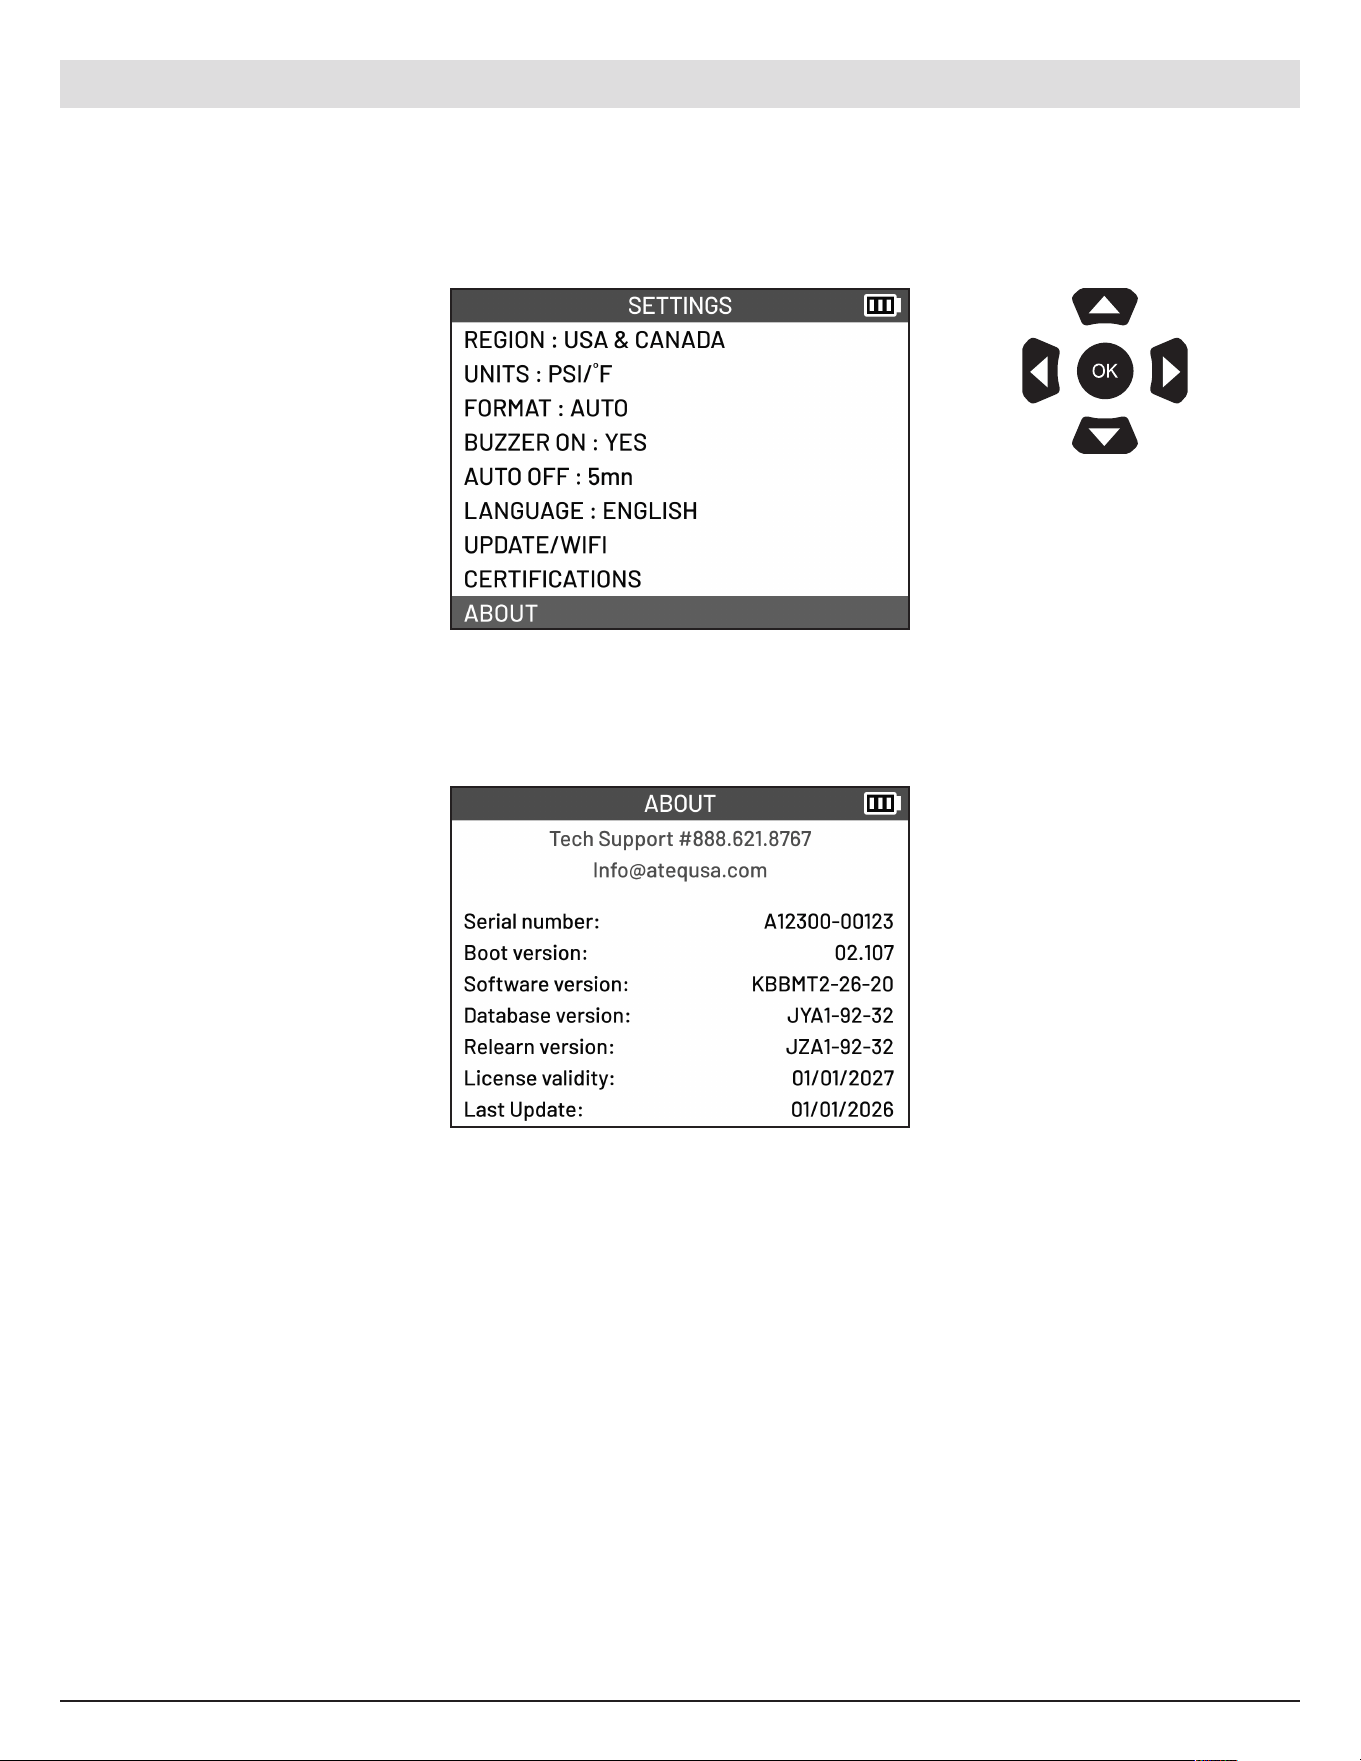
Select ABOUT
This displays the tool’s serial
number, the firmware and
database version numbers,
the validity of the software
license, and when the tool
was last updated.
Use the arrow
buttons to navigate.
Pre ss OK to confirm
your choice.
9.10 About
Display the version numbers of the tool.
ATEQ | VT18 | SETTINGS
44
English | 03-20-2026
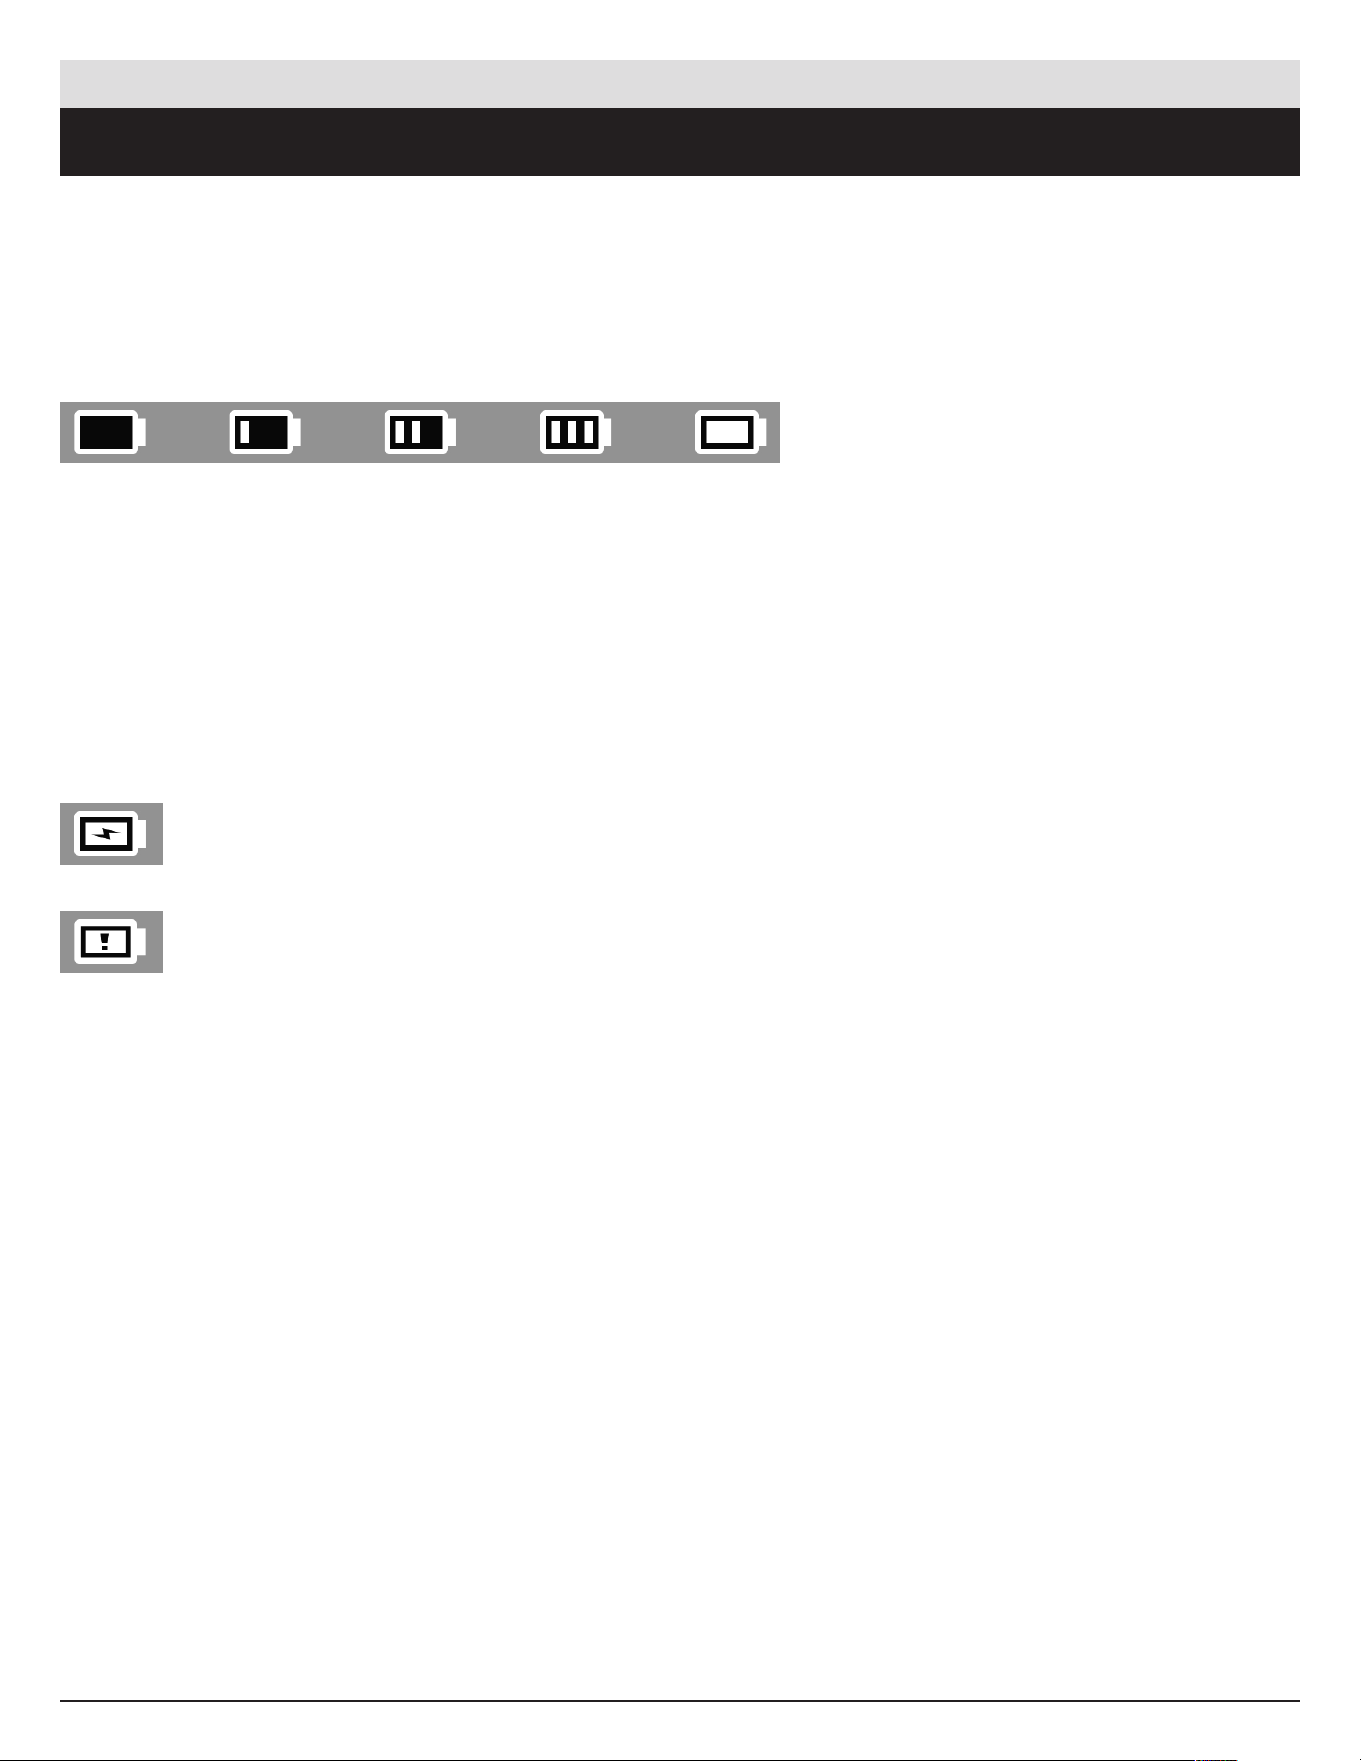
Battery level indicators
0%
Battery charging
Battery faulty
25% 50% 75% 100%
10.1 Charging the battery
A full charge enables an average o f 300 sensors to be read (approximately 60 to 80 vehicles).
This may change depending on the sensor model.
10. MISCELLANEOUS
ATEQ | VT18 | MISCELLANEO US
Battery replacement
If the battery is defective, the tool must be returned to the after sales service for battery replacement.
Opening the tool or tampering with the seal placed on the tool, if broken, will void the warranty.
DO NOT use the
tool with low battery
status because the
transmission and
emission may not
be reliable.

45English | 03-20-2026
10.2 Warranty
Limited Hardware Warranty
ATEQ warrants to the
original purchaser that your
A
TEQ hardware
product shall be
free
from defects
in
material and workmanship for the
length of
time, identified on your product package and/
or contained in your user documentation, from
the date of purchase. Except where prohibited by
applic
able
law, this warranty is non-transferable
and
is limited to the
original buyer. This warranty
gives you specific statutor y rights, and you may
al
so have
other rights that vary under local laws.
Remedies
In the
event of
breach of
the
warranty, the
sole
r
esponsibility of
ATEQ and your sole
remedy
consists, at ATEQ's choice, in repairing or replacing
the hardware. Shipping and handling charges
may apply, unless prohibited by the applicable
l
aw. To repair or replace
any hardware, ATEQ may,
a
s it chooses, use
parts that are
new, restored
or already used but in good working order. Any
replacement hardware product will be warranted
for the remainder o f the original warranty period
or
thirty (30) days, whichever is longer or for any
a
dditional period of
time
that may be
applicable
in
your jurisdiction.
This warranty does not cover problems or damage
r
esulting (a) from accidents, abuse, incorrect use
or
any repair, any modification or any unauthorized
di
sassembly; (b) from inappropriate
use
or
maintenanc e, use not in compliance with the
instructions of the product or from connecting
t
o power supply with incorrect voltage; or (c)
f
rom use
of
consumables, such as replacement
b
atteries, not supplied by ATEQ, apart from where
such restric tion is prohibited by the applicable law.
How to Obtain Warranty Support
Before
submitting a warranty claim, we
r
ecommend you visit the
technical support section
of our website at https://www.ateq-tpms.com/
for technical assistance. Valid warranty claims
are generally processed through the point of sale
during the first thirty (30) days after purchase.
H
owever, this period of
time
may vary depending
on
the
place
of
purchase. Contact ATE Q or the
r
etailer who sold you the
product to get more
de
tails. Warrant y claims that cannot be
processed
through the point of s ale and any other product-
relate d qu estions should be
addressed directly to
ATEQ. The addresses and contact details of ATEQ's
c
ustomer services are
given in the
documentation
pr
ovided with your product, and on the
internet at
https://www.ateq-tpms.com/.
Limitation of Liability
ATEQ SHALL NOT BE LIABLE FOR ANY
S
PECIAL, INDIRECT OR ACCIDENTAL DAMAGE
W
HATSOEVER, INCLUDING BUT NOT LIMITED
TO LOSS OF PROFITS, REVENUE OR DATA
( WHETHER DIRECT OR INDIRECT) OR
COMMERCIAL LOSS FOR BREACH OF ANY
E
XPRESS OR IMPLIED WARRANTY ON YOUR
P
RODUCT, EVEN IF YOU HAVE NOT BEEN
ADVISED OF THE POSSIBILITY OF SUCH
DAMAGE. Some jurisdictions do not allow the
exclusion or limitation of special, indirect or
a
ccidental damage, and so the
above
limitations or
e
xclusions may not apply to you.
Duration of Implied Warranties
EXCEPT TO THE EXTENT PROHIBITED BY
A
PPLICABLE LAW, ANY IMPLIED WAR RANTY OR
C
ONDITION OF MER C HANTABILITY OR FI TNESS
ON
THIS HARDWARE PRODUCT IS LIMITED
IN DURATION TO THE DURATION OF THE
APPLICABLE LIMITED WARRANTY PERIOD FOR
Y
OUR PRODUCT. Some
jurisdictions do not allow
limi
tations on how long an implied warranty lasts,
and
so the
above
limitation may not apply to you.
National Statutory Rights
Consumers have statutory rights under applicable
n
ational legislation governing the
sale
of
consumer
g
oods . Such rights are
not aected by the
warranties in this Limited Warranty.
ATEQ | VT18 | MISCELLANEO US

46English | 03-20-2026
No Other Warranties
No ATEQ dealer, agent, or employee
is authorized
t
o make
any modific ation, extension, or addition to
t
his warranty.
Warranty Period
The warranty period for ATEQ tools is one year.
10.3 Safety Precautions
You must read and understand these safety
precautions and warnings before using or
charging your Li-Po batteries.
Operating environment
Remember to always follow any specific
r
egulations in forc e
in your sector of
work, and to
s
witch o
your device
when its use
is prohibited, or
when it may cause interference or danger. Only use
the tool in its normal operating position.
About charging
Only use the power supply provided with your tool.
T
he
use
of
any other power suppl y may damage
the tool and/or be dangerous.
About the charger
Do not use this charger in wet environments; never
touch the charger if your hands or feet are wet.
Allow suicient space around the charger for
ventilation when you use it to power or recharge
the tool’s battery. Do not cover the charger with
objects liable to aect cooling. Do not use this
charger inside a bag.
Connect the charger to a sui table power outlet.
Do not use the charger if it is damaged or if its
power lead is damaged. Do not disassemble the
charger and do not modify any of its parts. Do not
a
ttempt to repair the
charger. It does not contain any
p
art that can be
repaired. Replace
the
charger if
it
has been damaged or exposed to excess moisture.
Do not try to use it as a power source. Unplug it
before undertaking any cleaning or care.
About the battery
Always use
the
power supply approved by ATEQ
and
supplied with the
device.
The tool must b e returned to the factory for battery
r
eplacement.
Opening the tool or tampering with or breaking the
s
eal placed on the
tool will invalidate
the
warranty.
CAUTION: This unit contains an internal Lithium-
polymer battery. The battery can burst or explode,
releasing hazardous chemicals. To reduce the risk
of fire or burns, do not disassemble, crush, pierce
or dispose of the battery or the instrument in fire or
water, do not short circuit or short the contacts with
a metal object.
Safety instructions for Li-Po battery use
The tool must b e placed on a non-flammable
s
urface
during charging (ceramic
tray or metal
b
ox).
Only charge the Li-Po battery WITH the specific
charger provided.
NEVER use a Ni-MH (Nickel Metal Hydride) type
battery charger to charge a Lithium-polymer
b
attery.
If the battery begins to overheat more than 60°C
(140°F), STOP CHARGING IMMEDIATELY. The
battery must NEVER exceed 60°C (140°F) during
the charging process.
NEVER
charge
a battery pack imme diately after
u
se
and while
it is still hot. Let i t cool down to room
temperature.
If you see any smoke or liquid coming out of the
battery, stop charging immediately. Disconnect
the battery from the charger and place the battery
in an isolated area for at least 15 minutes. STOP
USING THE BATTERY, and return the device to
your dealer.
Always keep a fire extinguisher for electrical fires
within reach while charging the battery. In the
unlikely event that the Li-Po battery catches fire,
DO NOT use water to extinguish the fire, use sand
or the extinguisher described above.
The
parts of
a Li-Po battery must be
neutralized
ou
t of
use. The
neutralization procedure
must be
ATEQ | VT18 | MISCELLANEO US

47English | 03-20-2026
carried out within very strict safety parameters.
Y
ou are
recommended to contact a specialist in
t
his battery ty pe
to carry out this process. They
w
ill have
the
out-of-use
battery collected by a
s
pecialized recycling organization. Alternatively,
contact your dealer.
Do not dispose
of
Li-Po batteries with house hold
waste.
To avoid leaks or other hazards, do not store
b
atteries above
60°C. Never leave
the
battery
inside a car (for example) where the temperature
c
ould be
very high or in a place
where
the
temperature might exceed 60°C. Store the battery
in
a dry place
to avoid contact with any type
of
liquid
. Store
the
battery only on a non-flammable
surface that is heat resistant and non-conduc tive,
and away from any flammable materials or sources.
A Li-Po battery must be stored with a minimum
c
harge
of
30%. If
you store
the
battery completely
di
scharged, it will quickly become
unusable. If
it
has to be stored for a long period (over 6 months),
remember to recharge it regularly (to more than
30%).
If
you do not follow these
safety instructions, you
r
isk causing se rious damage
to people
or property,
and you even risk causing a fire!
ATEQ ac cepts no responsibility in the event of
d
amage
arising as a re sult of
non-compliance
with
t
hese
safety instructions.
Since
use
of
a Li-Po battery entails signif icant fire
risks capable of causing serious damage to people
and property, the user agrees to accept the risks
and
the
responsibility involved.
Since
ATEQ cannot control correct use
of
the
b
attery (charging, discharging, storage, etc.), it
cannot be held responsible for damage caused to
people or property.
10.4 FCC Statements
FCC
ID: 2AK5Y-VT18
Federal Communication Commission Interferenc e
Statement
This equipment has been tested and found to
c
omply with the
limits for a Class B digital device,
pur
suant to Part 15 of
the
FCC Rules . These
limits
are designed to provide reasonable protection
ag
ainst harmful interference
in a residential
in
stallation. This equipment generates, uses
and
can radiate
radio freque ncy energy and, i f
no
t installed and used in accordance
with the
instructions, may cause harmful interference
t
o radio communications. However, there
is no
guarantee that interference will not occur in a
p
articular installation. If
this equipment does
c
ause
harmful interference
to radio or television
reception, which can be determined by turning the
e
quipment o
and on, the
user is encouraged to try
to correct the interference by one of the following
mea
sures:
- Reorient or relocate
the
receiving antenna.
- Increase the separation between the equipment
and receiver.
- Connect the equipment into an outlet on a
c
ircuit dierent from that to which the
receiver is
c
onnected.
- Consult the dealer or an experienced radio/TV
technician for help.
FCC Caution: Any changes or modifications not
e
xpressly approved by the
party responsible
for
c
ompliance
could void the
user’s authority to
operate this equipment.
This device complies with Part 15 of the FCC
R
ules. Operation is subject to the
following two
c
onditions: (1) This dev ice
may not cause
harmful
in
terference, and (2) this device
must accept any
interference received, including interference that
may cause undesired operation.
10.5. ISED STATEMENTS - Notice to User
This
de
vice
c
ontains
lic
ence-exempt
t
ransmitter(s)/
receiver(s) that comply with Innovation, Science
and Economic Development Canada’s licence -
exempt RSS(s). Operation is subject to the
f
ollowing two conditions:
(1)
This device
may not cause
interference.
(2) This device must accept any interference,
including interference that may cause undesired
operation of the device.
ATEQ | VT18 | MISCELLANEO US
48English | 03-20-2026
L’émetteur/récepteur exempt de licence contenu
d
ans le
présent appareil est conforme
aux
C
NR d’Innovation, Sciences et Développement
é
conomique
Canada applicables aux appareils
r
adio exempts de
licence. L’exploitation est
autorisée aux deux conditions suivante s :
1. L’appareil ne
doit pas produire
de
brouillage;
2. L’appareil doit accepter tout brouillage
r
adioélectrique
subi, même
si le
brouillage
est
s
usceptible
d’en compromettre
le
fonctionnement.
RF Exposure Information
This equipment complies with ISED radiation
exposure limits set forth for an uncontrolled
e
nvironment. The
device
can be
used in portable
e
xposure
condition without restriction.
10.6. CE Statements
DECLARATION OF
CONFORMITY
The manufacturer of the TPMS TOOL declares that
t
his device
complies with the
requirements of:
- ETSI EN 300 330-1
V1.8.1
(2015-03):
Electromagnetic compatibility and Radio spectrum
Matters (ERM); Short Range Devices (SRD); Radio
equipment in the frequency range 9 kHz to 25 MHz
and
inductive
loop systems in the
frequency range
9
kHz to 30 MHz; Part 1: Technical characteristics
and test methods.
- ETSI EN 300 330-2 V1.6.1 (2015-03):
Electromagnetic compatibility and Radio spectrum
Matters (ERM); Short Range Devices (SRD); Radio
e
quipment in the
frequency range
9
kHz to 25 MHz
and
inductive
loop systems in the
frequency range
9 kHz to 30 MHz; Part 2: Harmonize d EN covering
the essential requirements of article 3.2 of the
R&TTE Directive.
BS EN 62479:2010:
Assessment of
the
compliance
of
low power
electronic and electrical equipment with the
basic restrictions related to human exposure to
electromagnetic fields (10 MHz to 300 GHz).
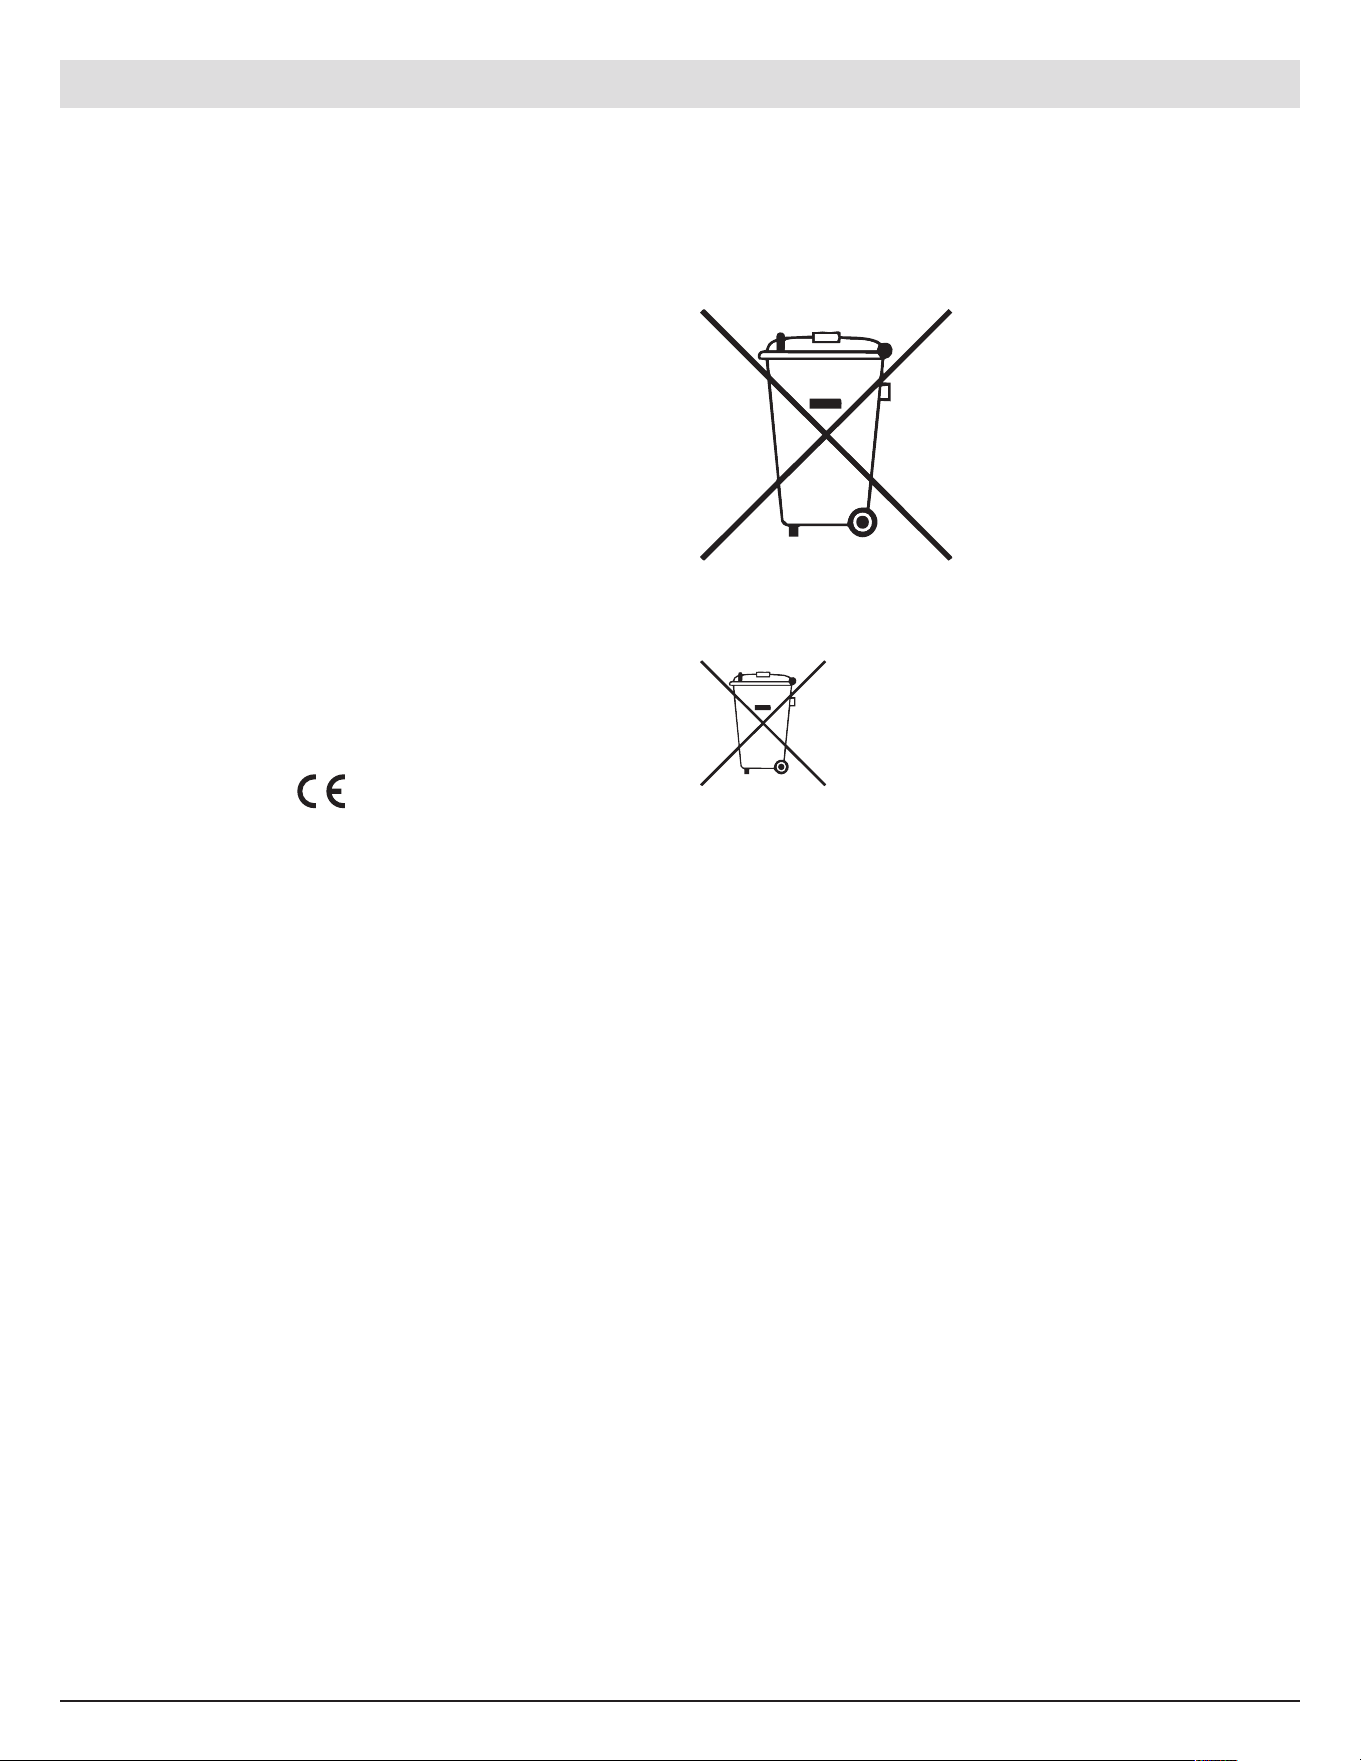
10.7. Recycling
Do
not dispose
of
the
rechargeable
Li thium-
polymer battery or the
tool and/or
its accessories in the general waste.
These
components must be
collec ted and recycled.
The crossed-out wheeled waste bin means that
the product must be taken to separate c ollection
a
t the
end of
the
product's se rvice
life. This
applie
s to your tool and also to any enhancements
marked with this symbol. Do not dispose of these
products as unsorted municipal waste. For further
information, please contact ATE Q.
ATEQ | VT18 | MISCELLANEO US