※Quick Installation Guide※
Attention
Please read this manual carefully before use and keep it for
future reference.
1.The projector is non dustproof or waterproof.
2.In order to reduce the risk of fire and electric shock, do
not expose the projector to rain and fog.
3.Please use the original power adapter. The projector
should work under specified rated power supply.
4.When projector is working, please do not look directly
into the lens, the strong light will flash your eyes and cause
slight pain. Children should use the projector under the
supervision of adults.
5.Do not cover the vents of projector. Heating will reduce
the life of projector and cause danger.
6.Regularly clean projector vents, or dust may cause
cooling malfunction.
7.Do not use the projector in greasy, damp, dusty or smoky
environment. Oil or chemicals will cause malfunction.
8.Please handle with care during daily use.
9.Please cut off the power if the projector is out of use for
long time.
10.Non-professionals are forbidden to disassemble the
projector for testing and maintenance.
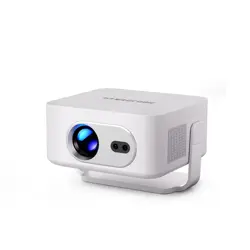
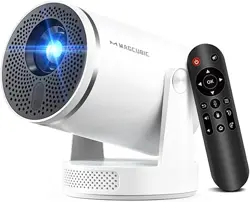
Smart Projector
HY300Max
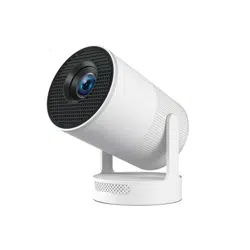
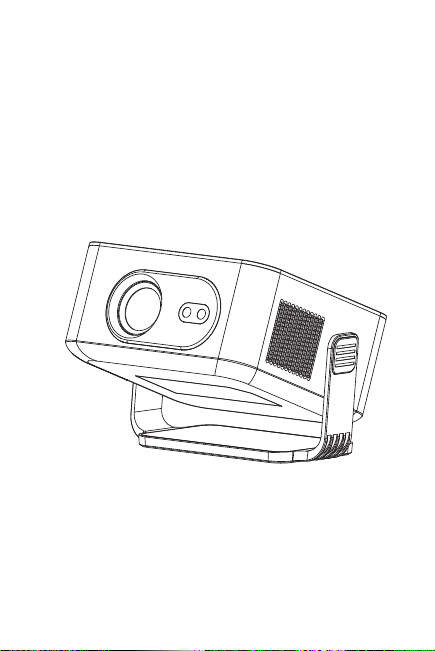
Structure description
This manual is for reference only. It is subject to change
without prior notice. This company reserves the right of
final interpretation.
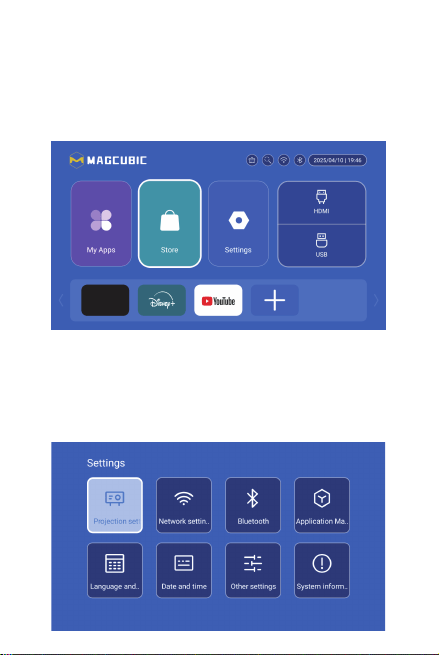
Settings
Enter to Projection settings, Network settings, Bluetooth,
Application Management, Language, Date and time, Other
Setting, System information.
App Store
In the App Store, applications can be installed with one click,
and they can be used directly after installation. Our company
also brings the applications to the market, enabling users to
obtain and use them easily and conveniently.
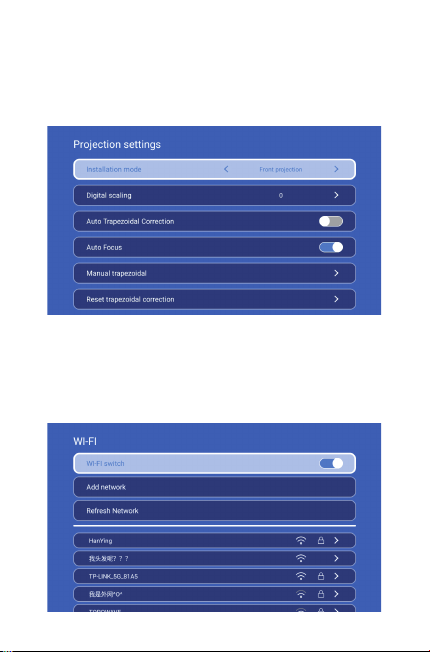
Projection Setting
Setting - Projector setting, enter to setup projection mode,
Installation mode, Digial scaling, Auto Trapezoidal
Correction,
Auto Focus, Manual trapezoidal, Reset trapezoidal correction.
Networking Setting
Settings - Networking Setting - WIFI setting, WIFI “ON”,select
objective WIFI ID and input password to connect internet.
ON/OFF
Vent
POWER
USB
Air inlet
ROTATE
Speaker
Lens
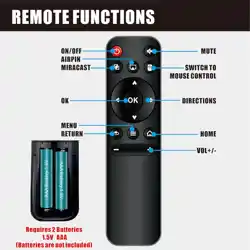
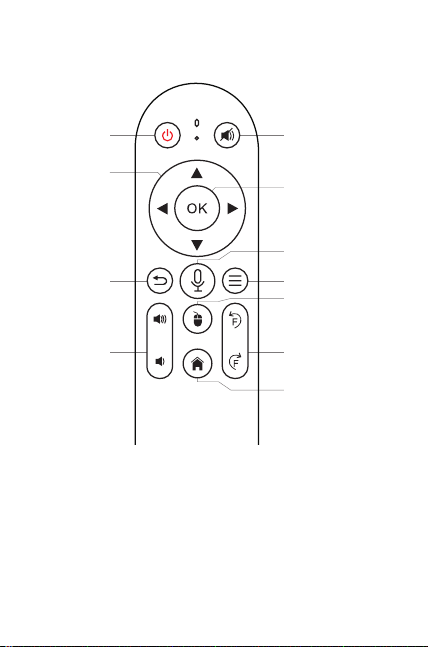
BT Air Remote
Calibration of the flying squirrel micro-drift:
ON/OFF
DIRECTIONS
RETURN
VOL+/-
MUTE
OK
BT AIR
REMOTE
MENU
SWITCH TO
MOUSE CONTROL
EIECTRONIC
FOCUS
HOME
After the remote control is connected to Bluetooth,
simultaneously press and hold the "OK" and "HOME" buttons on
the remote control for 2 seconds. At this time, the indicator
light will stay on. Then place the remote control flat on the
desktop. After keeping it still for 5 seconds, the light will go
off, and the flying squirrel will be successfully calibrated.
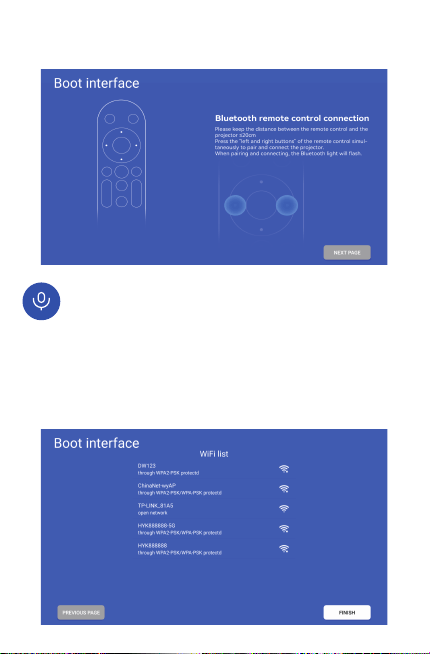
Note: the matching interface of Bluetooth remote control,
Press“Voice input” button to bring up the matching guide.
Bluetooth remote controller pairing
Wi-Fi
To choose the network and type the password that you want
to connect to.
英语【English】

※Quick Installation Guide※
Attention
Please read this manual carefully before use and keep it for
future reference.
1.The projector is non dustproof or waterproof.
2.In order to reduce the risk of fire and electric shock, do
not expose the projector to rain and fog.
3.Please use the original power adapter. The projector
should work under specified rated power supply.
4.When projector is working, please do not look directly
into the lens, the strong light will flash your eyes and cause
slight pain. Children should use the projector under the
supervision of adults.
5.Do not cover the vents of projector. Heating will reduce
the life of projector and cause danger.
6.Regularly clean projector vents, or dust may cause
cooling malfunction.
7.Do not use the projector in greasy, damp, dusty or smoky
environment. Oil or chemicals will cause malfunction.
8.Please handle with care during daily use.
9.Please cut off the power if the projector is out of use for
long time.
10.Non-professionals are forbidden to disassemble the
projector for testing and maintenance.
Smart Projector
HY300Max
Structure description
This manual is for reference only. It is subject to change
without prior notice. This company reserves the right of
final interpretation.
Settings
Enter to Projection settings, Network settings, Bluetooth,
Application Management, Language, Date and time, Other
Setting, System information.
App Store
In the App Store, applications can be installed with one click,
and they can be used directly after installation. Our company
also brings the applications to the market, enabling users to
obtain and use them easily and conveniently.
Projection Setting
Setting - Projector setting, enter to setup projection mode,
Installation mode, Digial scaling, Auto Trapezoidal
Correction,
Auto Focus, Manual trapezoidal, Reset trapezoidal correction.
Networking Setting
Settings - Networking Setting - WIFI setting, WIFI “ON”,select
objective WIFI ID and input password to connect internet.
ON/OFF
Vent
POWER
USB
Air inlet
ROTATE
Speaker
Lens
BT Air Remote
Calibration of the flying squirrel micro-drift:
ON/OFF
DIRECTIONS
RETURN
VOL+/-
MUTE
OK
BT AIR
REMOTE
MENU
SWITCH TO
MOUSE CONTROL
EIECTRONIC
FOCUS
HOME
After the remote control is connected to Bluetooth,
simultaneously press and hold the "OK" and "HOME" buttons on
the remote control for 2 seconds. At this time, the indicator
light will stay on. Then place the remote control flat on the
desktop. After keeping it still for 5 seconds, the light will go
off, and the flying squirrel will be successfully calibrated.
Note: the matching interface of Bluetooth remote control,
Press“Voice input” button to bring up the matching guide.
Bluetooth remote controller pairing
Wi-Fi
To choose the network and type the password that you want
to connect to.
英语【English】
※Quick Installation Guide※
Attention
Please read this manual carefully before use and keep it for
future reference.
1.The projector is non dustproof or waterproof.
2.In order to reduce the risk of fire and electric shock, do
not expose the projector to rain and fog.
3.Please use the original power adapter. The projector
should work under specified rated power supply.
4.When projector is working, please do not look directly
into the lens, the strong light will flash your eyes and cause
slight pain. Children should use the projector under the
supervision of adults.
5.Do not cover the vents of projector. Heating will reduce
the life of projector and cause danger.
6.Regularly clean projector vents, or dust may cause
cooling malfunction.
7.Do not use the projector in greasy, damp, dusty or smoky
environment. Oil or chemicals will cause malfunction.
8.Please handle with care during daily use.
9.Please cut off the power if the projector is out of use for
long time.
10.Non-professionals are forbidden to disassemble the
projector for testing and maintenance.
Smart Projector
HY300Max
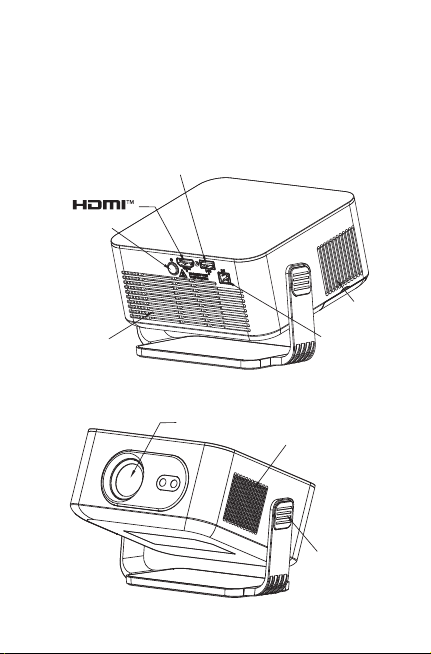
Structure description
This manual is for reference only. It is subject to change
without prior notice. This company reserves the right of
final interpretation.
Settings
Enter to Projection settings, Network settings, Bluetooth,
Application Management, Language, Date and time, Other
Setting, System information.
App Store
In the App Store, applications can be installed with one click,
and they can be used directly after installation. Our company
also brings the applications to the market, enabling users to
obtain and use them easily and conveniently.
Projection Setting
Setting - Projector setting, enter to setup projection mode,
Installation mode, Digial scaling, Auto Trapezoidal
Correction,
Auto Focus, Manual trapezoidal, Reset trapezoidal correction.
Networking Setting
Settings - Networking Setting - WIFI setting, WIFI “ON”,select
objective WIFI ID and input password to connect internet.
ON/OFF
Vent
POWER
USB
Air inlet
ROTATE
Speaker
Lens
BT Air Remote
Calibration of the flying squirrel micro-drift:
ON/OFF
DIRECTIONS
RETURN
VOL+/-
MUTE
OK
BT AIR
REMOTE
MENU
SWITCH TO
MOUSE CONTROL
EIECTRONIC
FOCUS
HOME
After the remote control is connected to Bluetooth,
simultaneously press and hold the "OK" and "HOME" buttons on
the remote control for 2 seconds. At this time, the indicator
light will stay on. Then place the remote control flat on the
desktop. After keeping it still for 5 seconds, the light will go
off, and the flying squirrel will be successfully calibrated.
Note: the matching interface of Bluetooth remote control,
Press“Voice input” button to bring up the matching guide.
Bluetooth remote controller pairing
Wi-Fi
To choose the network and type the password that you want
to connect to.
英语【English】
※Quick Installation Guide※
Attention
Please read this manual carefully before use and keep it for
future reference.
1.The projector is non dustproof or waterproof.
2.In order to reduce the risk of fire and electric shock, do
not expose the projector to rain and fog.
3.Please use the original power adapter. The projector
should work under specified rated power supply.
4.When projector is working, please do not look directly
into the lens, the strong light will flash your eyes and cause
slight pain. Children should use the projector under the
supervision of adults.
5.Do not cover the vents of projector. Heating will reduce
the life of projector and cause danger.
6.Regularly clean projector vents, or dust may cause
cooling malfunction.
7.Do not use the projector in greasy, damp, dusty or smoky
environment. Oil or chemicals will cause malfunction.
8.Please handle with care during daily use.
9.Please cut off the power if the projector is out of use for
long time.
10.Non-professionals are forbidden to disassemble the
projector for testing and maintenance.
Smart Projector
HY300Max
Structure description
This manual is for reference only. It is subject to change
without prior notice. This company reserves the right of
final interpretation.
Settings
Enter to Projection settings, Network settings, Bluetooth,
Application Management, Language, Date and time, Other
Setting, System information.
App Store
In the App Store, applications can be installed with one click,
and they can be used directly after installation. Our company
also brings the applications to the market, enabling users to
obtain and use them easily and conveniently.
Projection Setting
Setting - Projector setting, enter to setup projection mode,
Installation mode, Digial scaling, Auto Trapezoidal
Correction,
Auto Focus, Manual trapezoidal, Reset trapezoidal correction.
Networking Setting
Settings - Networking Setting - WIFI setting, WIFI “ON”,select
objective WIFI ID and input password to connect internet.
ON/OFF
Vent
POWER
USB
Air inlet
ROTATE
Speaker
Lens
BT Air Remote
Calibration of the flying squirrel micro-drift:
ON/OFF
DIRECTIONS
RETURN
VOL+/-
MUTE
OK
BT AIR
REMOTE
MENU
SWITCH TO
MOUSE CONTROL
EIECTRONIC
FOCUS
HOME
After the remote control is connected to Bluetooth,
simultaneously press and hold the "OK" and "HOME" buttons on
the remote control for 2 seconds. At this time, the indicator
light will stay on. Then place the remote control flat on the
desktop. After keeping it still for 5 seconds, the light will go
off, and the flying squirrel will be successfully calibrated.
Note: the matching interface of Bluetooth remote control,
Press“Voice input” button to bring up the matching guide.
Bluetooth remote controller pairing
Wi-Fi
To choose the network and type the password that you want
to connect to.
英语【English】
※Quick Installation Guide※
Attention
Please read this manual carefully before use and keep it for
future reference.
1.The projector is non dustproof or waterproof.
2.In order to reduce the risk of fire and electric shock, do
not expose the projector to rain and fog.
3.Please use the original power adapter. The projector
should work under specified rated power supply.
4.When projector is working, please do not look directly
into the lens, the strong light will flash your eyes and cause
slight pain. Children should use the projector under the
supervision of adults.
5.Do not cover the vents of projector. Heating will reduce
the life of projector and cause danger.
6.Regularly clean projector vents, or dust may cause
cooling malfunction.
7.Do not use the projector in greasy, damp, dusty or smoky
environment. Oil or chemicals will cause malfunction.
8.Please handle with care during daily use.
9.Please cut off the power if the projector is out of use for
long time.
10.Non-professionals are forbidden to disassemble the
projector for testing and maintenance.
Smart Projector
HY300Max
Structure description
This manual is for reference only. It is subject to change
without prior notice. This company reserves the right of
final interpretation.
Settings
Enter to Projection settings, Network settings, Bluetooth,
Application Management, Language, Date and time, Other
Setting, System information.
App Store
In the App Store, applications can be installed with one click,
and they can be used directly after installation. Our company
also brings the applications to the market, enabling users to
obtain and use them easily and conveniently.
Projection Setting
Setting - Projector setting, enter to setup projection mode,
Installation mode, Digial scaling, Auto Trapezoidal
Correction,
Auto Focus, Manual trapezoidal, Reset trapezoidal correction.
Networking Setting
Settings - Networking Setting - WIFI setting, WIFI “ON”,select
objective WIFI ID and input password to connect internet.
ON/OFF
Vent
POWER
USB
Air inlet
ROTATE
Speaker
Lens
BT Air Remote
Calibration of the flying squirrel micro-drift:
ON/OFF
DIRECTIONS
RETURN
VOL+/-
MUTE
OK
BT AIR
REMOTE
MENU
SWITCH TO
MOUSE CONTROL
EIECTRONIC
FOCUS
HOME
After the remote control is connected to Bluetooth,
simultaneously press and hold the "OK" and "HOME" buttons on
the remote control for 2 seconds. At this time, the indicator
light will stay on. Then place the remote control flat on the
desktop. After keeping it still for 5 seconds, the light will go
off, and the flying squirrel will be successfully calibrated.
Note: the matching interface of Bluetooth remote control,
Press“Voice input” button to bring up the matching guide.
Bluetooth remote controller pairing
Wi-Fi
To choose the network and type the password that you want
to connect to.
英语【English】
※Quick Installation Guide※
Attention
Please read this manual carefully before use and keep it for
future reference.
1.The projector is non dustproof or waterproof.
2.In order to reduce the risk of fire and electric shock, do
not expose the projector to rain and fog.
3.Please use the original power adapter. The projector
should work under specified rated power supply.
4.When projector is working, please do not look directly
into the lens, the strong light will flash your eyes and cause
slight pain. Children should use the projector under the
supervision of adults.
5.Do not cover the vents of projector. Heating will reduce
the life of projector and cause danger.
6.Regularly clean projector vents, or dust may cause
cooling malfunction.
7.Do not use the projector in greasy, damp, dusty or smoky
environment. Oil or chemicals will cause malfunction.
8.Please handle with care during daily use.
9.Please cut off the power if the projector is out of use for
long time.
10.Non-professionals are forbidden to disassemble the
projector for testing and maintenance.
Smart Projector
HY300Max
Structure description
This manual is for reference only. It is subject to change
without prior notice. This company reserves the right of
final interpretation.
Settings
Enter to Projection settings, Network settings, Bluetooth,
Application Management, Language, Date and time, Other
Setting, System information.
App Store
In the App Store, applications can be installed with one click,
and they can be used directly after installation. Our company
also brings the applications to the market, enabling users to
obtain and use them easily and conveniently.
Projection Setting
Setting - Projector setting, enter to setup projection mode,
Installation mode, Digial scaling, Auto Trapezoidal
Correction,
Auto Focus, Manual trapezoidal, Reset trapezoidal correction.
Networking Setting
Settings - Networking Setting - WIFI setting, WIFI “ON”,select
objective WIFI ID and input password to connect internet.
ON/OFF
Vent
POWER
USB
Air inlet
ROTATE
Speaker
Lens
BT Air Remote
Calibration of the flying squirrel micro-drift:
ON/OFF
DIRECTIONS
RETURN
VOL+/-
MUTE
OK
BT AIR
REMOTE
MENU
SWITCH TO
MOUSE CONTROL
EIECTRONIC
FOCUS
HOME
After the remote control is connected to Bluetooth,
simultaneously press and hold the "OK" and "HOME" buttons on
the remote control for 2 seconds. At this time, the indicator
light will stay on. Then place the remote control flat on the
desktop. After keeping it still for 5 seconds, the light will go
off, and the flying squirrel will be successfully calibrated.
Note: the matching interface of Bluetooth remote control,
Press“Voice input” button to bring up the matching guide.
Bluetooth remote controller pairing
Wi-Fi
To choose the network and type the password that you want
to connect to.
英语【English】
※Quick Installation Guide※
Attention
Please read this manual carefully before use and keep it for
future reference.
1.The projector is non dustproof or waterproof.
2.In order to reduce the risk of fire and electric shock, do
not expose the projector to rain and fog.
3.Please use the original power adapter. The projector
should work under specified rated power supply.
4.When projector is working, please do not look directly
into the lens, the strong light will flash your eyes and cause
slight pain. Children should use the projector under the
supervision of adults.
5.Do not cover the vents of projector. Heating will reduce
the life of projector and cause danger.
6.Regularly clean projector vents, or dust may cause
cooling malfunction.
7.Do not use the projector in greasy, damp, dusty or smoky
environment. Oil or chemicals will cause malfunction.
8.Please handle with care during daily use.
9.Please cut off the power if the projector is out of use for
long time.
10.Non-professionals are forbidden to disassemble the
projector for testing and maintenance.
Smart Projector
HY300Max
Structure description
This manual is for reference only. It is subject to change
without prior notice. This company reserves the right of
final interpretation.
Settings
Enter to Projection settings, Network settings, Bluetooth,
Application Management, Language, Date and time, Other
Setting, System information.
App Store
In the App Store, applications can be installed with one click,
and they can be used directly after installation. Our company
also brings the applications to the market, enabling users to
obtain and use them easily and conveniently.
Projection Setting
Setting - Projector setting, enter to setup projection mode,
Installation mode, Digial scaling, Auto Trapezoidal
Correction,
Auto Focus, Manual trapezoidal, Reset trapezoidal correction.
Networking Setting
Settings - Networking Setting - WIFI setting, WIFI “ON”,select
objective WIFI ID and input password to connect internet.
ON/OFF
Vent
POWER
USB
Air inlet
ROTATE
Speaker
Lens
BT Air Remote
Calibration of the flying squirrel micro-drift:
ON/OFF
DIRECTIONS
RETURN
VOL+/-
MUTE
OK
BT AIR
REMOTE
MENU
SWITCH TO
MOUSE CONTROL
EIECTRONIC
FOCUS
HOME
After the remote control is connected to Bluetooth,
simultaneously press and hold the "OK" and "HOME" buttons on
the remote control for 2 seconds. At this time, the indicator
light will stay on. Then place the remote control flat on the
desktop. After keeping it still for 5 seconds, the light will go
off, and the flying squirrel will be successfully calibrated.
Note: the matching interface of Bluetooth remote control,
Press“Voice input” button to bring up the matching guide.
Bluetooth remote controller pairing
Wi-Fi
To choose the network and type the password that you want
to connect to.
英语【English】
Safety instructions
• Please pay attention to important information related to the
operation and maintenance of the projector. You should read
this information carefully to avoid problems. Following safety
instructions will increase the life of projector.
• Please consult the qualified personnel for installation and
repair services, and do not use damaged wires, accessories
and other peripherals.
• Projector should be kept away from flammable, explosive,
strong electromagnetic interference (large radar stations,
power stations, substations) ,etc. Strong ambient light (avoid
direct sunlight), etc.
• Do not cover projector vents.
• Please use the original power adapter.
• Keep adequate ventilation and make sure vents are not
covered to avoid projector overheating
• When projector is working, please do not look directly into
the lens, the strong light will flash your eyes and cause slight
pain.
• Do not bend or drag the power cord.
• Do not put power cord under projector or any heavy objects.
• Do not cover other soft materials on power cord.
• Do not heat the power cord.
• Avoid touching power adaptor with wet hands.
Disclaim
This manual is general instructions, The pictures and functions
in this manual should subject to the actual product. Our
company is devoting to improve product performance, we
reserve the right to modify product functions and interface
described in this manual without notice.
Please keep your device properly. We are not responsible for
any loss caused by wrong operation of software/hardware or
repairing or any other reasons. We are not responsible for any
loss of any third party claims.
This manual has been carefully checked by professional
engineer, please understand for any inevitable omissions.
Attention:
Please do not look directly into the lens when
projecting to prevent the strong light
doing harm toyour eyes. Kids should use
the projector under thesupervision of adults.
Thanks for purchasing! Need help?
Please send email inclose
item name to our BrandSupport Team
([email protected])in order
to get better experience, promptreply and
further assistance
BT Setting
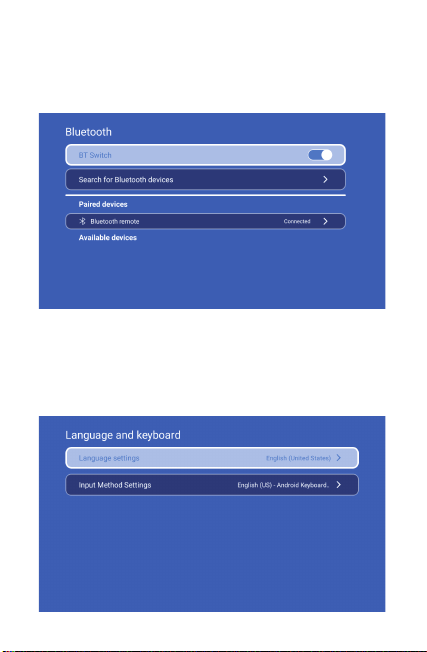
Settings - BT setting, BT “ON”, click Refresh Device and choose
objective device to pair.
Language Setting
Settings - Language Setting, enter to setup language and
select input method.
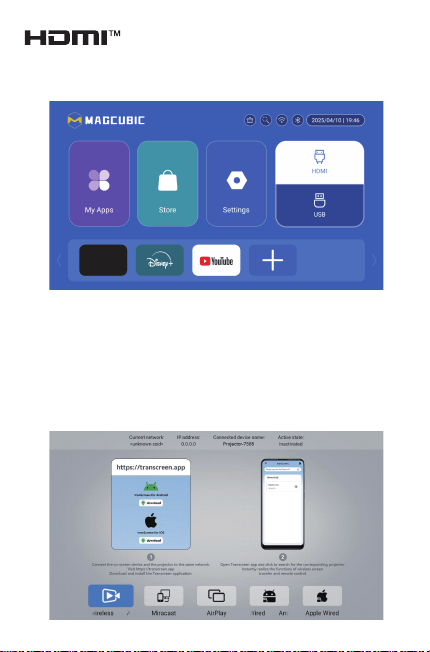
Wireless Screen
Ensure that Android devices(phone,pad,ect)are in the same
local wireless LAN with these devices
Operations on Devices:
Home Screen→My Apps→ScreenCast→Open ScreenCast service
→Turn on the phone mirroring→Connection.
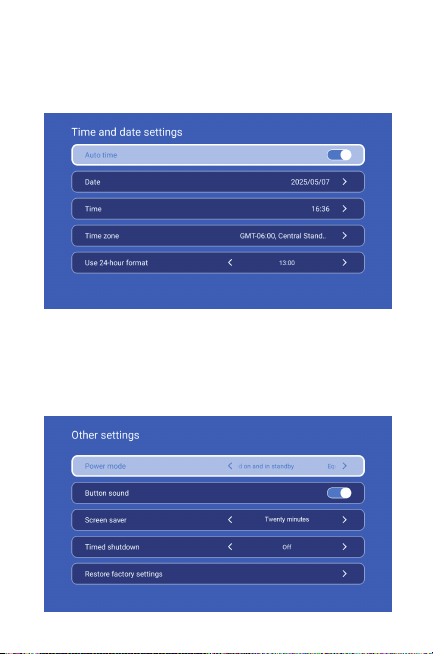
Date And Time Setting
Setting - Date And Time Setting, enter to Date, Time and Use
24-hour format.
Other Setting
Setting - Other Setting, enter to get Power mode, Button sound,
Screen saver, Timed shutdown and Restore factory settings.
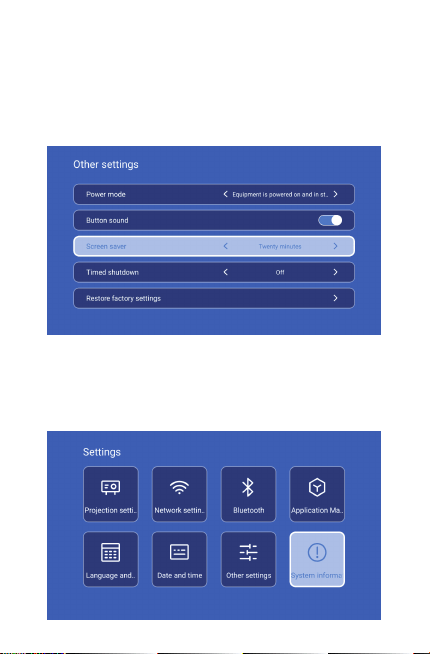
Screen saver
Settings - Other Settings - Screen saver, Screen saver time
setting (The projector will enter the screen saver mode after
the set time elapses when there is no operation or playback).
When the projector enters the screen saver mode, you can
exit it by pressing any key.
After connecting projector to other output device, enter HDMI
or Audio/Video.
Signal
System information
Setting - System information, enter to UI version, Resoluton,
Running menory, Storage space and Local upgrade.
Safety instructions
• Please pay attention to important information related to the
operation and maintenance of the projector. You should read
this information carefully to avoid problems. Following safety
instructions will increase the life of projector.
• Please consult the qualified personnel for installation and
repair services, and do not use damaged wires, accessories
and other peripherals.
• Projector should be kept away from flammable, explosive,
strong electromagnetic interference (large radar stations,
power stations, substations) ,etc. Strong ambient light (avoid
direct sunlight), etc.
• Do not cover projector vents.
• Please use the original power adapter.
• Keep adequate ventilation and make sure vents are not
covered to avoid projector overheating
• When projector is working, please do not look directly into
the lens, the strong light will flash your eyes and cause slight
pain.
• Do not bend or drag the power cord.
• Do not put power cord under projector or any heavy objects.
• Do not cover other soft materials on power cord.
• Do not heat the power cord.
• Avoid touching power adaptor with wet hands.
Disclaim
This manual is general instructions, The pictures and functions
in this manual should subject to the actual product. Our
company is devoting to improve product performance, we
reserve the right to modify product functions and interface
described in this manual without notice.
Please keep your device properly. We are not responsible for
any loss caused by wrong operation of software/hardware or
repairing or any other reasons. We are not responsible for any
loss of any third party claims.
This manual has been carefully checked by professional
engineer, please understand for any inevitable omissions.
Attention:
Please do not look directly into the lens when
projecting to prevent the strong light
doing harm toyour eyes. Kids should use
the projector under thesupervision of adults.
Thanks for purchasing! Need help?
Please send email inclose
item name to our BrandSupport Team
([email protected])in order
to get better experience, promptreply and
further assistance
BT Setting
Settings - BT setting, BT “ON”, click Refresh Device and choose
objective device to pair.
Language Setting
Settings - Language Setting, enter to setup language and
select input method.
Wireless Screen
Ensure that Android devices(phone,pad,ect)are in the same
local wireless LAN with these devices
Operations on Devices:
Home Screen→My Apps→ScreenCast→Open ScreenCast service
→Turn on the phone mirroring→Connection.
Date And Time Setting
Setting - Date And Time Setting, enter to Date, Time and Use
24-hour format.
Other Setting
Setting - Other Setting, enter to get Power mode, Button sound,
Screen saver, Timed shutdown and Restore factory settings.
Screen saver
Settings - Other Settings - Screen saver, Screen saver time
setting (The projector will enter the screen saver mode after
the set time elapses when there is no operation or playback).
When the projector enters the screen saver mode, you can
exit it by pressing any key.
After connecting projector to other output device, enter HDMI
or Audio/Video.
Signal
System information
Setting - System information, enter to UI version, Resoluton,
Running menory, Storage space and Local upgrade.
Safety instructions
• Please pay attention to important information related to the
operation and maintenance of the projector. You should read
this information carefully to avoid problems. Following safety
instructions will increase the life of projector.
• Please consult the qualified personnel for installation and
repair services, and do not use damaged wires, accessories
and other peripherals.
• Projector should be kept away from flammable, explosive,
strong electromagnetic interference (large radar stations,
power stations, substations) ,etc. Strong ambient light (avoid
direct sunlight), etc.
• Do not cover projector vents.
• Please use the original power adapter.
• Keep adequate ventilation and make sure vents are not
covered to avoid projector overheating
• When projector is working, please do not look directly into
the lens, the strong light will flash your eyes and cause slight
pain.
• Do not bend or drag the power cord.
• Do not put power cord under projector or any heavy objects.
• Do not cover other soft materials on power cord.
• Do not heat the power cord.
• Avoid touching power adaptor with wet hands.
Disclaim
This manual is general instructions, The pictures and functions
in this manual should subject to the actual product. Our
company is devoting to improve product performance, we
reserve the right to modify product functions and interface
described in this manual without notice.
Please keep your device properly. We are not responsible for
any loss caused by wrong operation of software/hardware or
repairing or any other reasons. We are not responsible for any
loss of any third party claims.
This manual has been carefully checked by professional
engineer, please understand for any inevitable omissions.
Attention:
Please do not look directly into the lens when
projecting to prevent the strong light
doing harm toyour eyes. Kids should use
the projector under thesupervision of adults.
Thanks for purchasing! Need help?
Please send email inclose
item name to our BrandSupport Team
([email protected])in order
to get better experience, promptreply and
further assistance
BT Setting
Settings - BT setting, BT “ON”, click Refresh Device and choose
objective device to pair.
Language Setting
Settings - Language Setting, enter to setup language and
select input method.
Wireless Screen
Ensure that Android devices(phone,pad,ect)are in the same
local wireless LAN with these devices
Operations on Devices:
Home Screen→My Apps→ScreenCast→Open ScreenCast service
→Turn on the phone mirroring→Connection.
Date And Time Setting
Setting - Date And Time Setting, enter to Date, Time and Use
24-hour format.
Other Setting
Setting - Other Setting, enter to get Power mode, Button sound,
Screen saver, Timed shutdown and Restore factory settings.
Screen saver
Settings - Other Settings - Screen saver, Screen saver time
setting (The projector will enter the screen saver mode after
the set time elapses when there is no operation or playback).
When the projector enters the screen saver mode, you can
exit it by pressing any key.
After connecting projector to other output device, enter HDMI
or Audio/Video.
Signal
System information
Setting - System information, enter to UI version, Resoluton,
Running menory, Storage space and Local upgrade.
Safety instructions
• Please pay attention to important information related to the
operation and maintenance of the projector. You should read
this information carefully to avoid problems. Following safety
instructions will increase the life of projector.
• Please consult the qualified personnel for installation and
repair services, and do not use damaged wires, accessories
and other peripherals.
• Projector should be kept away from flammable, explosive,
strong electromagnetic interference (large radar stations,
power stations, substations) ,etc. Strong ambient light (avoid
direct sunlight), etc.
• Do not cover projector vents.
• Please use the original power adapter.
• Keep adequate ventilation and make sure vents are not
covered to avoid projector overheating
• When projector is working, please do not look directly into
the lens, the strong light will flash your eyes and cause slight
pain.
• Do not bend or drag the power cord.
• Do not put power cord under projector or any heavy objects.
• Do not cover other soft materials on power cord.
• Do not heat the power cord.
• Avoid touching power adaptor with wet hands.
Disclaim
This manual is general instructions, The pictures and functions
in this manual should subject to the actual product. Our
company is devoting to improve product performance, we
reserve the right to modify product functions and interface
described in this manual without notice.
Please keep your device properly. We are not responsible for
any loss caused by wrong operation of software/hardware or
repairing or any other reasons. We are not responsible for any
loss of any third party claims.
This manual has been carefully checked by professional
engineer, please understand for any inevitable omissions.
Attention:
Please do not look directly into the lens when
projecting to prevent the strong light
doing harm toyour eyes. Kids should use
the projector under thesupervision of adults.
Thanks for purchasing! Need help?
Please send email inclose
item name to our BrandSupport Team
([email protected])in order
to get better experience, promptreply and
further assistance
BT Setting
Settings - BT setting, BT “ON”, click Refresh Device and choose
objective device to pair.
Language Setting
Settings - Language Setting, enter to setup language and
select input method.
Wireless Screen
Ensure that Android devices(phone,pad,ect)are in the same
local wireless LAN with these devices
Operations on Devices:
Home Screen→My Apps→ScreenCast→Open ScreenCast service
→Turn on the phone mirroring→Connection.
Date And Time Setting
Setting - Date And Time Setting, enter to Date, Time and Use
24-hour format.
Other Setting
Setting - Other Setting, enter to get Power mode, Button sound,
Screen saver, Timed shutdown and Restore factory settings.
Screen saver
Settings - Other Settings - Screen saver, Screen saver time
setting (The projector will enter the screen saver mode after
the set time elapses when there is no operation or playback).
When the projector enters the screen saver mode, you can
exit it by pressing any key.
After connecting projector to other output device, enter HDMI
or Audio/Video.
Signal
System information
Setting - System information, enter to UI version, Resoluton,
Running menory, Storage space and Local upgrade.

Safety instructions
• Please pay attention to important information related to the
operation and maintenance of the projector. You should read
this information carefully to avoid problems. Following safety
instructions will increase the life of projector.
• Please consult the qualified personnel for installation and
repair services, and do not use damaged wires, accessories
and other peripherals.
• Projector should be kept away from flammable, explosive,
strong electromagnetic interference (large radar stations,
power stations, substations) ,etc. Strong ambient light (avoid
direct sunlight), etc.
• Do not cover projector vents.
• Please use the original power adapter.
• Keep adequate ventilation and make sure vents are not
covered to avoid projector overheating
• When projector is working, please do not look directly into
the lens, the strong light will flash your eyes and cause slight
pain.
• Do not bend or drag the power cord.
• Do not put power cord under projector or any heavy objects.
• Do not cover other soft materials on power cord.
• Do not heat the power cord.
• Avoid touching power adaptor with wet hands.
Disclaim
This manual is general instructions, The pictures and functions
in this manual should subject to the actual product. Our
company is devoting to improve product performance, we
reserve the right to modify product functions and interface
described in this manual without notice.
Please keep your device properly. We are not responsible for
any loss caused by wrong operation of software/hardware or
repairing or any other reasons. We are not responsible for any
loss of any third party claims.
This manual has been carefully checked by professional
engineer, please understand for any inevitable omissions.
Attention:
Please do not look directly into the lens when
projecting to prevent the strong light
doing harm toyour eyes. Kids should use
the projector under thesupervision of adults.
Thanks for purchasing! Need help?
Please send email inclose
item name to our BrandSupport Team
([email protected])in order
to get better experience, promptreply and
further assistance
BT Setting
Settings - BT setting, BT “ON”, click Refresh Device and choose
objective device to pair.
Language Setting
Settings - Language Setting, enter to setup language and
select input method.
Wireless Screen
Ensure that Android devices(phone,pad,ect)are in the same
local wireless LAN with these devices
Operations on Devices:
Home Screen→My Apps→ScreenCast→Open ScreenCast service
→Turn on the phone mirroring→Connection.
Date And Time Setting
Setting - Date And Time Setting, enter to Date, Time and Use
24-hour format.
Other Setting
Setting - Other Setting, enter to get Power mode, Button sound,
Screen saver, Timed shutdown and Restore factory settings.
Screen saver
Settings - Other Settings - Screen saver, Screen saver time
setting (The projector will enter the screen saver mode after
the set time elapses when there is no operation or playback).
When the projector enters the screen saver mode, you can
exit it by pressing any key.
After connecting projector to other output device, enter HDMI
or Audio/Video.
Signal
System information
Setting - System information, enter to UI version, Resoluton,
Running menory, Storage space and Local upgrade.

Safety instructions
• Please pay attention to important information related to the
operation and maintenance of the projector. You should read
this information carefully to avoid problems. Following safety
instructions will increase the life of projector.
• Please consult the qualified personnel for installation and
repair services, and do not use damaged wires, accessories
and other peripherals.
• Projector should be kept away from flammable, explosive,
strong electromagnetic interference (large radar stations,
power stations, substations) ,etc. Strong ambient light (avoid
direct sunlight), etc.
• Do not cover projector vents.
• Please use the original power adapter.
• Keep adequate ventilation and make sure vents are not
covered to avoid projector overheating
• When projector is working, please do not look directly into
the lens, the strong light will flash your eyes and cause slight
pain.
• Do not bend or drag the power cord.
• Do not put power cord under projector or any heavy objects.
• Do not cover other soft materials on power cord.
• Do not heat the power cord.
• Avoid touching power adaptor with wet hands.
Disclaim
This manual is general instructions, The pictures and functions
in this manual should subject to the actual product. Our
company is devoting to improve product performance, we
reserve the right to modify product functions and interface
described in this manual without notice.
Please keep your device properly. We are not responsible for
any loss caused by wrong operation of software/hardware or
repairing or any other reasons. We are not responsible for any
loss of any third party claims.
This manual has been carefully checked by professional
engineer, please understand for any inevitable omissions.
Attention:
Please do not look directly into the lens when
projecting to prevent the strong light
doing harm toyour eyes. Kids should use
the projector under thesupervision of adults.
Thanks for purchasing! Need help?
Please send email inclose
item name to our BrandSupport Team
([email protected])in order
to get better experience, promptreply and
further assistance
BT Setting
Settings - BT setting, BT “ON”, click Refresh Device and choose
objective device to pair.
Language Setting
Settings - Language Setting, enter to setup language and
select input method.
Wireless Screen
Ensure that Android devices(phone,pad,ect)are in the same
local wireless LAN with these devices
Operations on Devices:
Home Screen→My Apps→ScreenCast→Open ScreenCast service
→Turn on the phone mirroring→Connection.
Date And Time Setting
Setting - Date And Time Setting, enter to Date, Time and Use
24-hour format.
Other Setting
Setting - Other Setting, enter to get Power mode, Button sound,
Screen saver, Timed shutdown and Restore factory settings.
Screen saver
Settings - Other Settings - Screen saver, Screen saver time
setting (The projector will enter the screen saver mode after
the set time elapses when there is no operation or playback).
When the projector enters the screen saver mode, you can
exit it by pressing any key.
After connecting projector to other output device, enter HDMI
or Audio/Video.
Signal
System information
Setting - System information, enter to UI version, Resoluton,
Running menory, Storage space and Local upgrade.

Safety instructions
• Please pay attention to important information related to the
operation and maintenance of the projector. You should read
this information carefully to avoid problems. Following safety
instructions will increase the life of projector.
• Please consult the qualified personnel for installation and
repair services, and do not use damaged wires, accessories
and other peripherals.
• Projector should be kept away from flammable, explosive,
strong electromagnetic interference (large radar stations,
power stations, substations) ,etc. Strong ambient light (avoid
direct sunlight), etc.
• Do not cover projector vents.
• Please use the original power adapter.
• Keep adequate ventilation and make sure vents are not
covered to avoid projector overheating
• When projector is working, please do not look directly into
the lens, the strong light will flash your eyes and cause slight
pain.
• Do not bend or drag the power cord.
• Do not put power cord under projector or any heavy objects.
• Do not cover other soft materials on power cord.
• Do not heat the power cord.
• Avoid touching power adaptor with wet hands.
Disclaim
This manual is general instructions, The pictures and functions
in this manual should subject to the actual product. Our
company is devoting to improve product performance, we
reserve the right to modify product functions and interface
described in this manual without notice.
Please keep your device properly. We are not responsible for
any loss caused by wrong operation of software/hardware or
repairing or any other reasons. We are not responsible for any
loss of any third party claims.
This manual has been carefully checked by professional
engineer, please understand for any inevitable omissions.
Attention:
Please do not look directly into the lens when
projecting to prevent the strong light
doing harm toyour eyes. Kids should use
the projector under thesupervision of adults.
Thanks for purchasing! Need help?
Please send email inclose
item name to our BrandSupport Team
([email protected])in order
to get better experience, promptreply and
further assistance
BT Setting
Settings - BT setting, BT “ON”, click Refresh Device and choose
objective device to pair.
Language Setting
Settings - Language Setting, enter to setup language and
select input method.
Wireless Screen
Ensure that Android devices(phone,pad,ect)are in the same
local wireless LAN with these devices
Operations on Devices:
Home Screen→My Apps→ScreenCast→Open ScreenCast service
→Turn on the phone mirroring→Connection.
Date And Time Setting
Setting - Date And Time Setting, enter to Date, Time and Use
24-hour format.
Other Setting
Setting - Other Setting, enter to get Power mode, Button sound,
Screen saver, Timed shutdown and Restore factory settings.
Screen saver
Settings - Other Settings - Screen saver, Screen saver time
setting (The projector will enter the screen saver mode after
the set time elapses when there is no operation or playback).
When the projector enters the screen saver mode, you can
exit it by pressing any key.
After connecting projector to other output device, enter HDMI
or Audio/Video.
Signal
System information
Setting - System information, enter to UI version, Resoluton,
Running menory, Storage space and Local upgrade.