
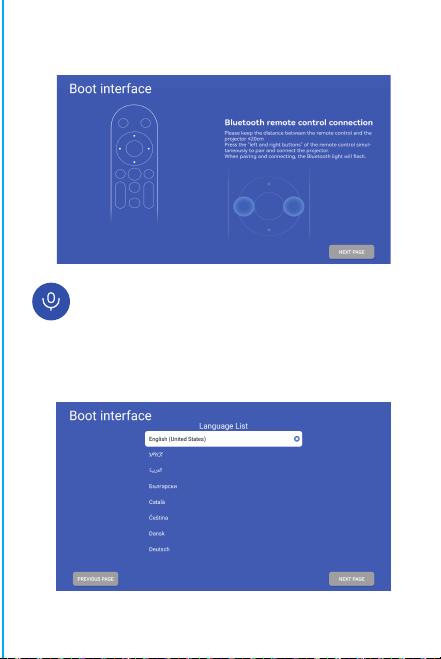
Note: the matching interface of Bluetooth remote control,
Press“Voice input” button to bring up the matching guide.
Bluetooth remote controller pairing
Select your Language
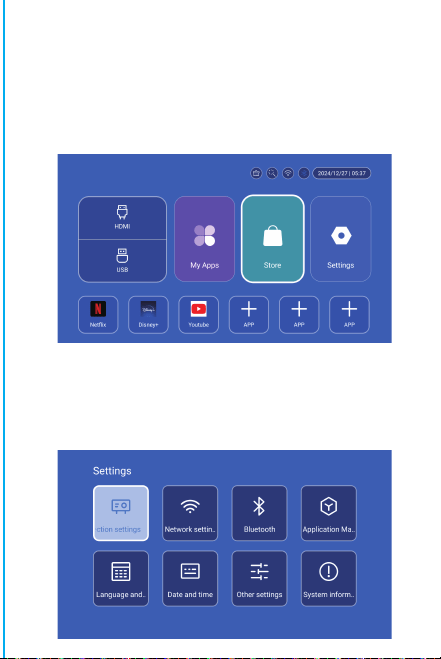
Settings
Enter to Projection settings, Network settings, Bluetooth,
Application Management, Language, Date and time, Other
Setting, System information.
App Store
In the App Store, applications can be installed with one click,
and they can be used directly after installation. Our company
also brings the applications to the market, enabling users to
obtain and use them easily and conveniently.
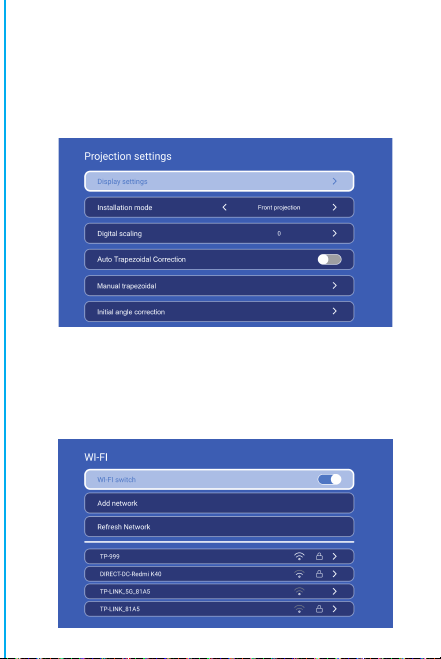
Projection Setting
Setting - Projector setting, enter to setup projection mode,
Display settings, Installation mode, Digial scaling, Auto
Trapezoidal Correction, Manual trapezoidal, Initial angle
correction.
Networking Setting
Settings - Networking Setting - WIFI setting, WIFI “ON”,select
objective WIFI ID and input password to connect internet.
BT Air Remote
Calibration of the flying squirrel micro-drift:
ON/OFF
DIRECTIONS
RETURN
VOL+/-
MUTE
OK
BT AIR
REMOTE
MENU
SWITCH TO
MOUSE CONTROL
EIECTRONIC
FOCUS
HOME
After the remote control is connected to Bluetooth,
simultaneously press and hold the "OK" and "HOME" buttons on
the remote control for 2 seconds. At this time, the indicator
light will stay on. Then place the remote control flat on the
desktop. After keeping it still for 5 seconds, the light will go
off, and the flying squirrel will be successfully calibrated.
※Quick Installation Guide※
Attention
Please read this manual carefully before use and keep it for
future reference.
1.The projector is non dustproof or waterproof.
2.In order to reduce the risk of fire and electric shock, do
not expose the projector to rain and fog.
3.Please use the original power adapter. The projector
should work under specified rated power supply.
4.When projector is working, please do not look directly
into the lens, the strong light will flash your eyes and cause
slight pain. Children should use the projector under the
supervision of adults.
5.Do not cover the vents of projector. Heating will reduce
the life of projector and cause danger.
6.Regularly clean projector vents, or dust may cause
cooling malfunction.
7.Do not use the projector in greasy, damp, dusty or smoky
environment. Oil or chemicals will cause malfunction.
8.Please handle with care during daily use.
9.Please cut off the power if the projector is out of use for
long time.
10.Non-professionals are forbidden to disassemble the
projector for testing and maintenance.
Structure description
This manual is for reference only. It is subject to change
without prior notice. Hotack reserves the right of final
interpretation.
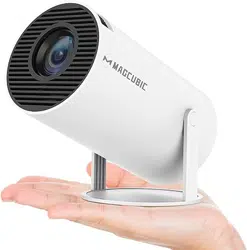
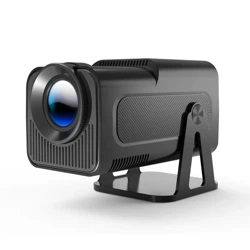
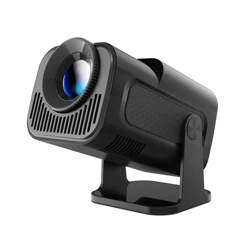
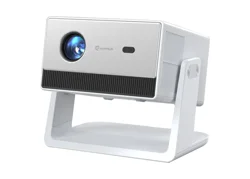
Smart Projector
HY300 UItra
Speaker
ON/OFF
Vent
POWER
USB
ROTATE
Lens
Air inlet

Note: the matching interface of Bluetooth remote control,
Press“Voice input” button to bring up the matching guide.
Bluetooth remote controller pairing
Select your Language
Settings
Enter to Projection settings, Network settings, Bluetooth,
Application Management, Language, Date and time, Other
Setting, System information.
App Store
In the App Store, applications can be installed with one click,
and they can be used directly after installation. Our company
also brings the applications to the market, enabling users to
obtain and use them easily and conveniently.
Projection Setting
Setting - Projector setting, enter to setup projection mode,
Display settings, Installation mode, Digial scaling, Auto
Trapezoidal Correction, Manual trapezoidal, Initial angle
correction.
Networking Setting
Settings - Networking Setting - WIFI setting, WIFI “ON”,select
objective WIFI ID and input password to connect internet.
BT Air Remote
Calibration of the flying squirrel micro-drift:
ON/OFF
DIRECTIONS
RETURN
VOL+/-
MUTE
OK
BT AIR
REMOTE
MENU
SWITCH TO
MOUSE CONTROL
EIECTRONIC
FOCUS
HOME
After the remote control is connected to Bluetooth,
simultaneously press and hold the "OK" and "HOME" buttons on
the remote control for 2 seconds. At this time, the indicator
light will stay on. Then place the remote control flat on the
desktop. After keeping it still for 5 seconds, the light will go
off, and the flying squirrel will be successfully calibrated.
※Quick Installation Guide※
Attention
Please read this manual carefully before use and keep it for
future reference.
1.The projector is non dustproof or waterproof.
2.In order to reduce the risk of fire and electric shock, do
not expose the projector to rain and fog.
3.Please use the original power adapter. The projector
should work under specified rated power supply.
4.When projector is working, please do not look directly
into the lens, the strong light will flash your eyes and cause
slight pain. Children should use the projector under the
supervision of adults.
5.Do not cover the vents of projector. Heating will reduce
the life of projector and cause danger.
6.Regularly clean projector vents, or dust may cause
cooling malfunction.
7.Do not use the projector in greasy, damp, dusty or smoky
environment. Oil or chemicals will cause malfunction.
8.Please handle with care during daily use.
9.Please cut off the power if the projector is out of use for
long time.
10.Non-professionals are forbidden to disassemble the
projector for testing and maintenance.
Structure description
This manual is for reference only. It is subject to change
without prior notice. Hotack reserves the right of final
interpretation.
Smart Projector
HY300 UItra
Speaker
ON/OFF
Vent
POWER
USB
ROTATE
Lens
Air inlet
Attention:
Please do not look directly into the lens when
projecting to prevent the strong light doing harm to
your eyes. Kids should use the projector under the
supervision of adults.
Thanks for purchasing! Need help?
Please send email incloseitem name to
our BrandSupport Team([email protected])
in orderto get better experience,
promptreply andfurther assistance
Safety instructions
• Please pay attention to important information related to the
operation and maintenance of the projector. You should read
this information carefully to avoid problems. Following safety
instructions will increase the life of projector.
• Please consult the qualified personnel for installation and
repair services, and do not use damaged wires, accessories
and other peripherals.
• Projector should be kept away from flammable, explosive,
strong electromagnetic interference (large radar stations,
power stations, substations) ,etc. Strong ambient light (avoid
direct sunlight), etc.
• Do not cover projector vents.
• Please use the original power adapter.
• Keep adequate ventilation and make sure vents are not
covered to avoid projector overheating
• When projector is working, please do not look directly into
the lens, the strong light will flash your eyes and cause slight
pain.
• Do not bend or drag the power cord.
• Do not put power cord under projector or any heavy objects.
• Do not cover other soft materials on power cord.
• Do not heat the power cord.
• Avoid touching power adaptor with wet hands.
Disclaim
This manual is general instructions, The pictures and functions
in this manual should subject to the actual product. Our
company is devoting to improve product performance, we
reserve the right to modify product functions and interface
described in this manual without notice.
Please keep your device properly. We are not responsible for
any loss caused by wrong operation of software/hardware or
repairing or any other reasons. We are not responsible for any
loss of any third party claims.
This manual has been carefully checked by professional
engineer, please understand for any inevitable omissions.
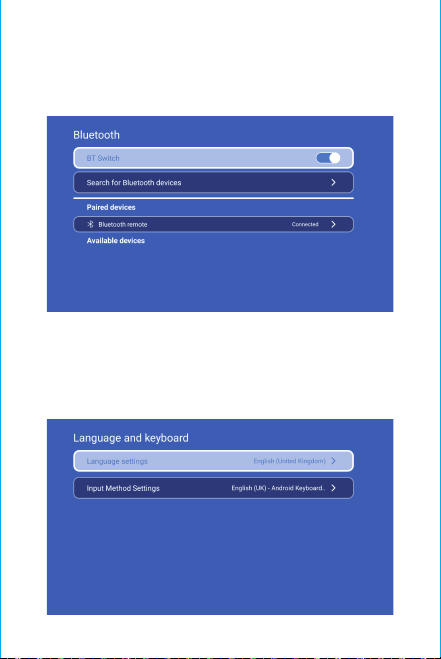
BT Setting
Settings - BT setting, BT “ON”, click Refresh Device and choose
objective device to pair.
Language Setting
Settings - Language Setting, enter to setup language and
select input method.
Wireless Screen
Ensure that Android devices(phone,pad,ect)are in the same
local wireless LAN with these devices
Operations on Devices:
Home Screen→My Apps→ScreenCast→Open ScreenCast service
→Turn on the phone mirroring→Connection.
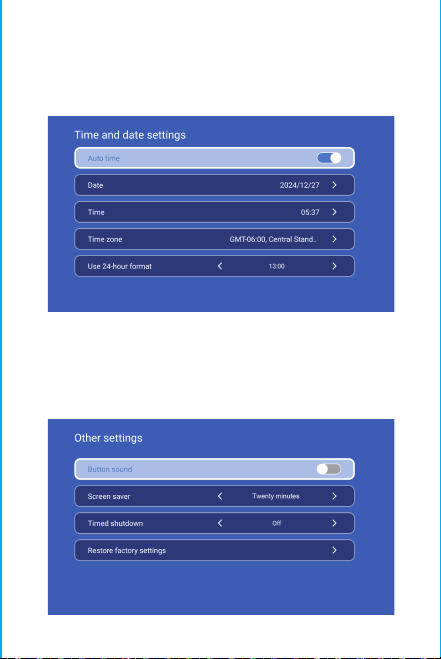
Date And Time Setting
Setting - Date And Time Setting, enter to Date, Time and Use
24-hour format.
Other Setting
Setting - Other Setting, enter to get Button sound, Screen
saver, Timed shutdown and Restore factory settings.
Screen saver
Setting - Other Setting - Screen saver, Screen saver time
setting(The projection will enter screensaver mode at the
set time without any operation or playback), screensaver
mode can be released by pressing the power button.
After connecting projector to other output device, enter HDMI
or Audio/Video.
Signal
System information
Setting - System information, enter to UI version, Resoluton,
Running menory and Storage space.
Attention:
Please do not look directly into the lens when
projecting to prevent the strong light doing harm to
your eyes. Kids should use the projector under the
supervision of adults.
Thanks for purchasing! Need help?
Please send email incloseitem name to
our BrandSupport Team([email protected])
in orderto get better experience,
promptreply andfurther assistance
Safety instructions
• Please pay attention to important information related to the
operation and maintenance of the projector. You should read
this information carefully to avoid problems. Following safety
instructions will increase the life of projector.
• Please consult the qualified personnel for installation and
repair services, and do not use damaged wires, accessories
and other peripherals.
• Projector should be kept away from flammable, explosive,
strong electromagnetic interference (large radar stations,
power stations, substations) ,etc. Strong ambient light (avoid
direct sunlight), etc.
• Do not cover projector vents.
• Please use the original power adapter.
• Keep adequate ventilation and make sure vents are not
covered to avoid projector overheating
• When projector is working, please do not look directly into
the lens, the strong light will flash your eyes and cause slight
pain.
• Do not bend or drag the power cord.
• Do not put power cord under projector or any heavy objects.
• Do not cover other soft materials on power cord.
• Do not heat the power cord.
• Avoid touching power adaptor with wet hands.
Disclaim
This manual is general instructions, The pictures and functions
in this manual should subject to the actual product. Our
company is devoting to improve product performance, we
reserve the right to modify product functions and interface
described in this manual without notice.
Please keep your device properly. We are not responsible for
any loss caused by wrong operation of software/hardware or
repairing or any other reasons. We are not responsible for any
loss of any third party claims.
This manual has been carefully checked by professional
engineer, please understand for any inevitable omissions.
BT Setting
Settings - BT setting, BT “ON”, click Refresh Device and choose
objective device to pair.
Language Setting
Settings - Language Setting, enter to setup language and
select input method.
Wireless Screen
Ensure that Android devices(phone,pad,ect)are in the same
local wireless LAN with these devices
Operations on Devices:
Home Screen→My Apps→ScreenCast→Open ScreenCast service
→Turn on the phone mirroring→Connection.
Date And Time Setting
Setting - Date And Time Setting, enter to Date, Time and Use
24-hour format.
Other Setting
Setting - Other Setting, enter to get Button sound, Screen
saver, Timed shutdown and Restore factory settings.
Screen saver
Setting - Other Setting - Screen saver, Screen saver time
setting(The projection will enter screensaver mode at the
set time without any operation or playback), screensaver
mode can be released by pressing the power button.
After connecting projector to other output device, enter HDMI
or Audio/Video.
Signal
System information
Setting - System information, enter to UI version, Resoluton,
Running menory and Storage space.

Hinweis: Die passende Schnittstelle der Bluetooth
Fernbedienung, drücken Sie die Taste „Spracheingabe“,
um die passende Anleitung aufzurufen.
Kopplung der Bluetooth-Fernbedienung
Wählen Sie Ihre Sprache
Einstellung
Gehen Sie zu Projektionseinstellungen,
Netzwerkeinstellungen, Bluetooth, Anwendungsverwaltung
, Sprache, Datum und Uhrzeit, Sonstige Einstellungen,
Systeminformationen.
App Store
Im App Store lassen sich Anwendungen mit einem Klick
installieren und können direkt nach der Installation genutzt
werden. Unser Unternehmen bringt die Anwendungen auch
auf den Markt, damit die Nutzer sie einfach und bequem
erhalten und nutzen können.
Projektion Einstellung
Einstellung - Projektoreinstellung, Aufrufen des
Projektionsmodus, Anzeigeeinstellungen, Installationsmodus
, digitale Skalierung, automatische Trapezkorrektur,
manuelle Trapezkorrektur, Anfangswinkelkorrektur.
Vernetzung Einstellung
Einstellungen - Netzwerkeinstellungen - WIFI-Einstellung, WIFI
„ON“, wählen Sie eine objektive WIFI-ID und geben Sie ein
Passwort ein, um eine Internetverbindung herzustellen.
BT Air Fernbedienung
Kalibrierung der Mikrodrift des Flughörnchens
ON/OFF
ANWEISUNGEN
RETURN
VOL+/-
MUTE
OK
BT AIR REMOTE
FERNBEDIENUNG
MENU
SCHALTEN ZU MOUSE
STEUERUNG
EIECTRONIC
FOKUS
HOME
Nachdem die Fernbedienung mit Bluetooth verbunden ist,
drücken Sie gleichzeitig die Tasten „OK“ und „HOME“ auf der
Fernbedienung und halten Sie sie 2 Sekunden lang gedrückt.
Während dieser Zeit leuchtet die Kontrollleuchte. Legen Sie dann
die Fernbedienung flach auf den Tisch.
Nachdem Sie sie 5 Sekunden lang ruhig gehalten haben,
erlischt das Licht, und das Flughörnchen ist erfolgreich kalibriert.
※Kurzanleitung zur Installation※
Achtung
Bitte lesen Sie dieses Handbuch vor dem Gebrauch sorgfältig
durch und bewahren Sie es zum späteren Nachschlagen auf.
1. Der Projektor ist nicht staub- oder wasserdicht.
2. Setzen Sie den Projektor nicht Regen oder Nebel aus, um die
Gefahr von Bränden und Stromschlägen zu verringern.
3. Bitte verwenden Sie das Originalnetzteil. Der Projektor sollte
mit der angegebenen Nennleistung betrieben werden.
4. Wenn der Projektor in Betrieb ist, schauen Sie bitte nicht
direkt in die Linse, da das starke Licht Ihre Augen blendet und
leichte Schmerzen verursacht. Kinder sollten den Projektor nur
unter Aufsicht von Erwachsenen benutzen.
5. Decken Sie die Lüftungsöffnungen des Projektors nicht ab. Die
Erwärmung verkürzt die Lebensdauer des Projektors und stellt
eine Gefahr dar.
6. Reinigen Sie die Lüftungsöffnungen des Projektors regelmäßig,
da sonst Staub zu Fehlfunktionen der Kühlung führen kann.
7. Verwenden Sie den Projektor nicht in einer fettigen, feuchten,
staubigen oder rauchigen Umgebung. Öl oder Chemikalien
können zu Fehlfunktionen führen.
8. Behandeln Sie den Projektor im täglichen Gebrauch mit
Vorsicht.
9. Bitte schalten Sie den Projektor aus, wenn er für längere Zeit
nicht benutzt wird.
10. Laien ist es untersagt, den Projektor zu Test- und
Wartungszwecken zu zerlegen.
Beschreibung der Struktur
Dieses Handbuch ist nur als Referenz gedacht. Es kann
ohne vorherige Ankündigung geändert werden. Hotack
behält sich das Recht der endgültigen Auslegung vor.
Intelligenter Projektor
HY300 UItra
Sprecher
ON/OFF
Entlüftung
POWER
USB
DREHEN
Objektiv
Lufteinlass

Achtung:
Bitte schauen Sie beim Projizieren nicht
direkt in das Objektiv, damit das starke Licht
Ihre Augen nicht schädigt. Kinder sollten den
Projektor unter der Aufsicht von
Danke für den Kauf! Brauchen Sie Hilfe?
Bitte senden Sie eine E-Mail mit dem Namen des
Artikels an unser Brand Support Team
um eine bessere Erfahrung, eine
schnelle Antwort und weitere Hilfe zu erhalten.
Erwachsenen benutzen
Sicherheitshinweise
• Bitte beachten Sie die wichtigen Informationen zur Bedienun
g und Wartung des Projektors. Sie sollten diese Informationen
sorgfältig lesen, um Probleme zu vermeiden. Die Einhaltung de
r Sicherheitshinweise erhöht die Lebensdauer des Projektors.
• Wenden Sie sich für Installations- und Reparaturarbeiten a
n qualifiziertes Personal, und verwenden Sie keine beschädi
gten Kabel, Zubehörteile oder andere Peripheriegeräte.
• Der Projektor sollte nicht in der Nähe von brennbaren oder
explosiven Stoffen aufgestellt werden, starken elektromagnet
ischen Störungen (große Radarstationen, Kraftwerken, Umspa
nnwerken), usw. Starkem Umgebungslicht (vermeiden Sie dir
ektes Sonnenlicht), usw.
• Decken Sie die Lüftungsöffnungen des Projektors nicht ab.
• Bitte verwenden Sie den Original-Netzadapter.
• Sorgen Sie für ausreichende Belüftung und stellen Sie sicher,
dass die Lüftungsöffnungen nicht abgedeckt sind, um eine
Überhitzung d es Projektors zu vermeiden.
• Wenn der Projektor in Betrieb ist, schauen Sie bitte nicht di
rekt in das Objektiv, da das starke Licht Ihre Augen blitzen u
nd leichte Schmerzen verursachen kann.
• Das Netzkabel darf nicht geknickt oder gezogen werden.
• Legen Sie das Netzkabel nicht unter den Projektor oder andere
schwere Gegenstände.
• Decken Sie das Netzkabel nicht mit anderen weichen
Materialien ab.
• Erhitzen Sie das Netzkabel nicht.
• Vermeiden Sie es, den Netzadapter mit nassen Händen zu
berühren.
Ablehnung
Dieses Handbuch ist eine allgemeine Anleitung. Die Bilder und
Funktionen in diesem Handbuch sollten dem tatsächlichen
Produkt entsprechen. Unser Unternehmen ist bestrebt, die
Produktleistung zu verbessern. Wir behalten uns das Recht vor,
die in diesem Handbuch beschriebenen Produktfunktionen und
Schnittstellen ohne vorherige Ankündigung zu ändern.
Bitte bewahren Sie Ihr Gerät ordnungsgemäß auf. Wir sind
nicht verantwortlich für Verluste, die durch falsche Bedienung
von Software/Hardware oder Reparaturen oder aus anderen
Gründen verursacht werden. Wir sind nicht verantwortlich für
den Verlust von Ansprüchen Dritter.
Dieses Handbuch wurde von einem professionellen
Ingenieur sorgfältig geprüft, bitte haben Sie Verständnis
für unvermeidliche Auslassungen.
BT-Einstellung
Einstellungen - BT-Einstellung, BT „EIN“, klicken Sie auf
Gerät aktualisieren und wählen Sie das zu koppelnde Gerät.
Einstellung der Sprache
Drahtloser Bildschirm
Stellen Sie sicher, dass sich Android-Geräte (Telefon, Pad, etc.)
im selben lokalen drahtlosen LAN mit diesen Geräten befinden
Operationen auf Geräten:
Startbildschirm→Meine Apps→ScreenCast→ScreenCast-Dienst
öff nen→Spiegelung des Telefons einschalten→Verbindung.
Datum und Uhrzeit einstellen
Setting - Date And Time Setting (Einstellung von Datum und
Uhrzeit), geben Sie Datum und Uhrzeit ein und verwenden
Sie das 24-Stunden-Format.
Andere Einstellung
Setting - Other Setting, geben Sie ein, um Tastentöne,
Bildschirmschoner, zeitgesteuertes Herunterfahren und
Wiederherstellen der Werkseinstellungen zu erhalten.
Bildschirmschoner
Einstellungen - Andere Einstellungen - Bildschirmschoner,
Einstellung der Bildschirmschonerzeit(Der Projektor
wechselt zur eingestellten Zeit in den
Bildschirmschonermodus, ohne dass eine Bedienung oder
Wiedergabe erfolgt), der Bildschirmschonermodus kann
durch Drücken der Einschalttaste beendet werden.
Nachdem Sie den Projektor an ein anderes Ausgabegerät
angeschlossen haben, geben Sie HDMI oder Audio/Video ein.
Signal
System information
Einstellungen - Systeminformationen, Eingabe der UI-Version
, Resoluton, Betriebsmenü und Speicherplatz.
Einstellungen - Spracheinstellung, um die Sprache
einzustellen und die Eingabemethode auszuwählen.
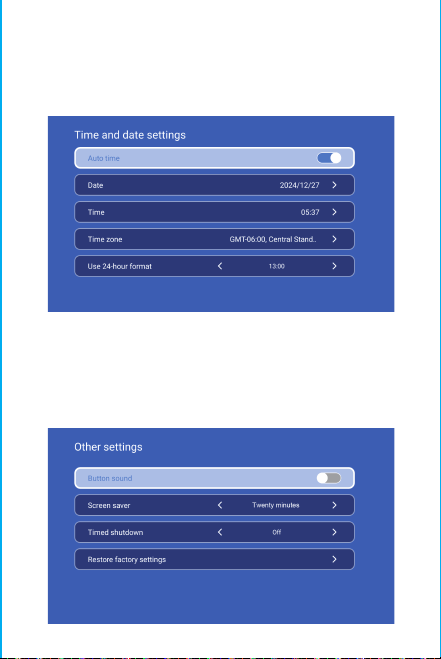
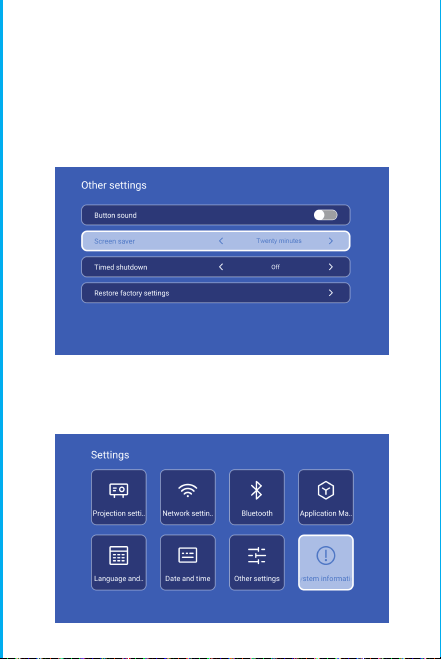
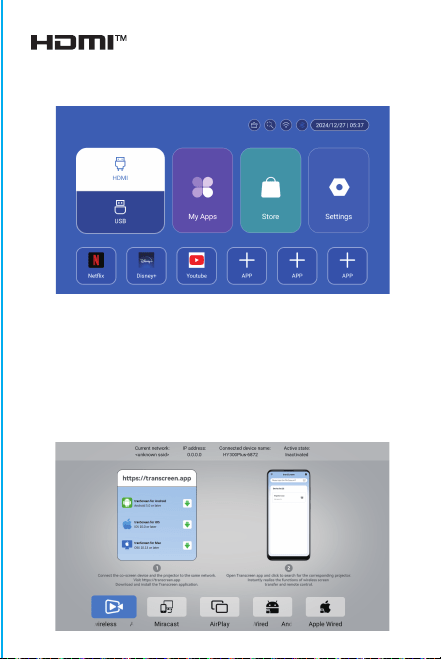

Nota: l'interfaccia di abbinamento del telecomando
Bluetooth, premere il pulsante "Input vocale" per v
isualizzare la guida di abbinamento.
Associazione del telecomando Bluetooth
Selezionare la lingua
Impostazioni
Accedi a Impostazioni proiezione, Impostazioni di rete,
Bluetooth, Gestione applicazioni, Lingua, Data e ora, Altre
impostazioni, Informazioni di sistema.
App Store
Nell'App Store, le applicazioni possono essere installate con un
clic e possono essere utilizzate direttamente dopo
l'installazione. La nostra azienda porta anche le applicazioni
sul mercato, consentendo agli utenti di ottenerle e utilizzarle
facilmente e comodamente.
Impostazione proiezione
Impostazione - Impostazione proiettore, accedi per configurare
la modalità proiezione, Impostazioni display, Modalità
installazione, Scala digitale, Correzione trapezoidale
automatica, Trapezio manuale, Correzione angolo iniziale.
Impostazione di rete
Impostazioni - Impostazione di rete - Impostazione WIFI, WIFI
"ON", seleziona ID WIFI obiettivo e inserisci password per
connetterti a Internet.
BT Air Remote
Calibrazione del micro-drift dello scoiattolo
volante:
ON/OFF
INDICAZIONI
RETURN
VOL+/-
MUTE
OK
BT AIR
REMOTE
MENU
PASSARE AL
CONTROLLO MOUSE
MESSA A FUOCO
ELETTRONICA
HOME
Dopo che il telecomando è connesso al Bluetooth, premere e
tenere premuti contemporaneamente i pulsanti "OK" e "HOME"
sul telecomando per 2 secondi. A questo punto, la spia
luminosa rimarrà accesa. Quindi appoggiare il telecomando sul
tavolo. Dopo averlo tenuto fermo per 5 secondi, la luce si
spegnerà e lo scoiattolo volante sarà calibrato correttamente.
※Guida di Installazione Rapida※
Attenzione
Leggere attentamente questo manuale prima dell'uso e
conservarlo per riferimento futuro.
1. Il proiettore non è antipolvere né impermeabile.
2. Per ridurre il rischio di incendio e scosse elettriche, non
esporre il proiettore a pioggia e nebbia.
3. Utilizzare l'adattatore di alimentazione originale. Il
proiettore dovrebbe funzionare con l'alimentazione nominale
specificata.
4. Quando il proiettore è in funzione, non guardare
direttamente nell'obiettivo, la luce intensa lampeggerà negli
occhi e causerà un leggero dolore. I bambini devono
utilizzare il proiettore sotto la supervisione di un adulto.
5. Non coprire le prese d'aria del proiettore. Il riscaldamento
ridurrà la durata del proiettore e causerà pericolo.
6. Pulire regolarmente le prese d'aria del proiettore,
altrimenti la polvere potrebbe causare malfunzionamenti del
raffreddamento.
7. Non utilizzare il proiettore in ambienti unti, umidi,
polverosi o fumosi. Olio o sostanze chimiche potrebbero
causare malfunzionamenti.
8. Maneggiare con cura durante l'uso quotidiano.
9. Interrompere l'alimentazione se il proiettore non viene
utilizzato per un lungo periodo.
10. È vietato ai non professionisti smontare il proiettore per
prove e manutenzione.
Descrizione della Struttura
Questo manuale è solo di riferimento. È soggetto a
modifiche senza preavviso. Hotack si riserva il diritto di
interpretazione finale.
Proiettore Intelligente
HY300 UItra
Speaker
ON/OFF
Vent
POWER
USB
ROTATE
Lens
Air inlet
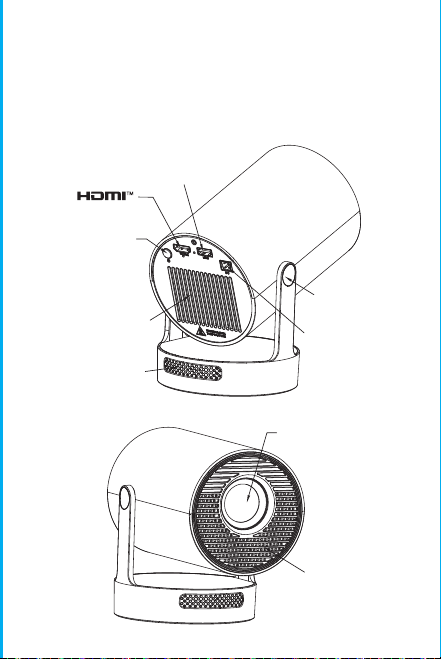
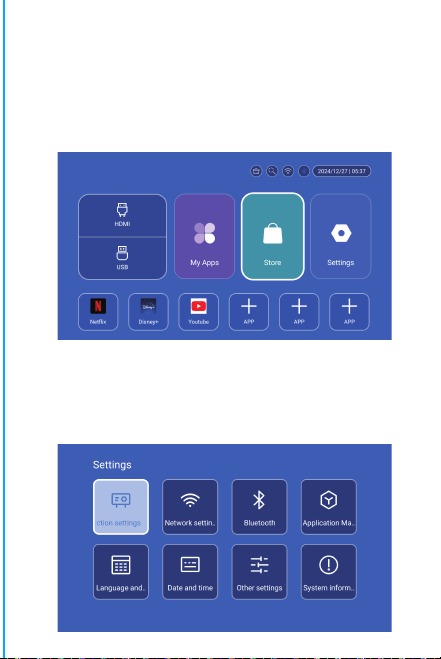

Atención:
Si prega di non guardare direttamente nella lente
durante la
proiezione per evitare che la luce intensa danneggi
gli occhi. I bambini devono usare il proiettore sotto
la supervisione di un adulto.
Grazie per l'acquisto! Hai bisogno di aiuto?
Invia un'e-mail con il nome dell'articolo al nostro
per ottenere un'esperienza migliore, una risposta
rapida e ulteriore assistenza.
Istruzioni di sicurezza
• Prestare attenzione alle informazioni importanti relative al
funzionamento e alla manutenzione del proiettore. Leggere
attentamente queste informazioni per evitare problemi.
Seguire le istruzioni di sicurezza aumenterà la durata del
proiettore.
• Consultare personale qualificato per i servizi di installazione
e riparazione e non utilizzare fili, accessori e altre periferiche
danneggiati.
• Tenere il proiettore lontano da infiammabili, esplosivi, forti
interferenze elettromagnetiche (grandi stazioni radar, centrali
elettriche, sottostazioni), ecc. Forte luce ambientale (evitare
la luce solare diretta), ecc.
• Non coprire le prese d'aria del proiettore.
• Utilizzare l'adattatore di alimentazione originale.
• Mantenere una ventilazione adeguata e assicurarsi che le
prese d'aria non siano coperte per evitare il surriscaldamento
del proiettore
• Quando il proiettore è in funzione, non guardare
direttamente nell'obiettivo, la luce forte lampeggerà negli
occhi e causerà un leggero dolore.
• Non piegare o trascinare il cavo di alimentazione.
• Non mettere il cavo di alimentazione sotto il proiettore o
altri oggetti pesanti.
• Non coprire altri materiali morbidi sul cavo di alimentazi-
one.
• Non riscaldare il cavo di alimentazione.
• Evitare di toccare l'adattatore di alimentazione con le mani
bagnate.
Disclaimer
Questo manuale contiene istruzioni generali. Le immagini e le
funzioni in questo manuale devono essere soggette al prodotto
effettivo. La nostra azienda si impegna a migliorare le
prestazioni del prodotto, ci riserviamo il diritto di modificare
le funzioni del prodotto e l'interfaccia descritte in questo
manuale senza preavviso.
Si prega di conservare il dispositivo in modo appropriato. Non
siamo responsabili per eventuali perdite causate da un
funzionamento errato di software/hardware o riparazioni o
per qualsiasi altro motivo. Non siamo responsabili per
eventuali perdite di reclami di terze parti.
Questo manuale è stato attentamente controllato da un
ingegnere professionista, si prega di comprendere eventuali
omissioni inevitabili.
Impostazioni BT
Impostazioni - Impostazioni BT, BT "ON", clicca su Aggiorna
dispositivo e scegli il dispositivo obiettivo da associare.
Impostazioni lingua
Impostazioni - Impostazioni lingua, accedi per impostare la
lingua e seleziona il metodo di input.
Schermo wireless
Assicurati che i dispositivi Android (telefono, tablet, ecc.)
siano nella stessa LAN wireless locale di questi dispositivi
Operazioni sui dispositivi:
Schermata iniziale→Le mie app→ScreenCast→Apri il servizio
ScreenCast→Attiva il mirroring del telefono→Connessione.
Impostazione data e ora
Impostazione - Impostazione data e ora, accedi a Data, Ora e
Usa formato 24 ore.
Altre impostazioni
Impostazione - Altre impostazioni, accedi per ottenere Suono
pulsante, Salvaschermo, Spegnimento temporizzato e
Ripristina impostazioni di fabbrica.
Salvaschermo
Impostazione - Altre impostazioni - Salvaschermo,
Impostazione tempo salvaschermo (La proiezione entrerà in
modalità salvaschermo all'ora impostata senza alcuna
operazione o riproduzione), la modalità salvaschermo può
essere disattivata premendo il pulsante di accensione.
Dopo aver collegato il proiettore a un altro dispositivo di
output, inserisci HDMI o Audio/Video.
Segnale
Informazioni di sistema
Impostazione - Informazioni di sistema, accesso alla versione
Ul, Risoluzione, Memoria in esecuzione e Spazio di
archiviazione.
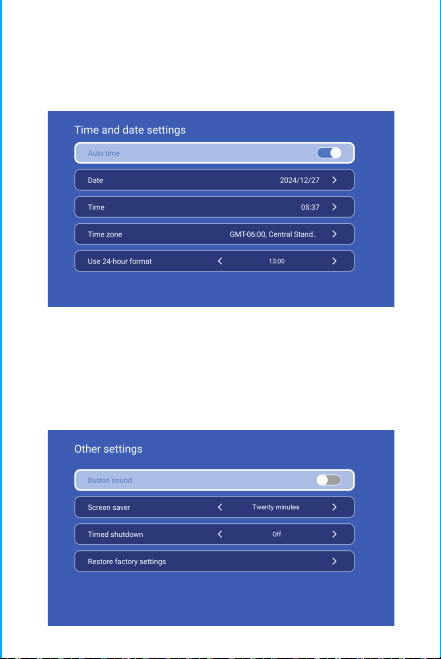
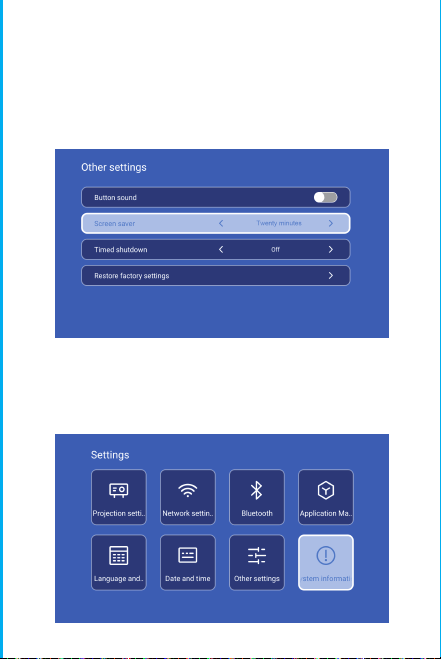
Atención:
Si prega di non guardare direttamente nella lente
durante la
proiezione per evitare che la luce intensa danneggi
gli occhi. I bambini devono usare il proiettore sotto
la supervisione di un adulto.
Grazie per l'acquisto! Hai bisogno di aiuto?
Invia un'e-mail con il nome dell'articolo al nostro
Brand Support Team ([email protected]),
per ottenere un'esperienza migliore, una risposta
rapida e ulteriore assistenza.
Istruzioni di sicurezza
• Prestare attenzione alle informazioni importanti relative al
funzionamento e alla manutenzione del proiettore. Leggere
attentamente queste informazioni per evitare problemi.
Seguire le istruzioni di sicurezza aumenterà la durata del
proiettore.
• Consultare personale qualificato per i servizi di installazione
e riparazione e non utilizzare fili, accessori e altre periferiche
danneggiati.
• Tenere il proiettore lontano da infiammabili, esplosivi, forti
interferenze elettromagnetiche (grandi stazioni radar, centrali
elettriche, sottostazioni), ecc. Forte luce ambientale (evitare
la luce solare diretta), ecc.
• Non coprire le prese d'aria del proiettore.
• Utilizzare l'adattatore di alimentazione originale.
• Mantenere una ventilazione adeguata e assicurarsi che le
prese d'aria non siano coperte per evitare il surriscaldamento
del proiettore
• Quando il proiettore è in funzione, non guardare
direttamente nell'obiettivo, la luce forte lampeggerà negli
occhi e causerà un leggero dolore.
• Non piegare o trascinare il cavo di alimentazione.
• Non mettere il cavo di alimentazione sotto il proiettore o
altri oggetti pesanti.
• Non coprire altri materiali morbidi sul cavo di alimentazi-
one.
• Non riscaldare il cavo di alimentazione.
• Evitare di toccare l'adattatore di alimentazione con le mani
bagnate.
Disclaimer
Questo manuale contiene istruzioni generali. Le immagini e le
funzioni in questo manuale devono essere soggette al prodotto
effettivo. La nostra azienda si impegna a migliorare le
prestazioni del prodotto, ci riserviamo il diritto di modificare
le funzioni del prodotto e l'interfaccia descritte in questo
manuale senza preavviso.
Si prega di conservare il dispositivo in modo appropriato. Non
siamo responsabili per eventuali perdite causate da un
funzionamento errato di software/hardware o riparazioni o
per qualsiasi altro motivo. Non siamo responsabili per
eventuali perdite di reclami di terze parti.
Questo manuale è stato attentamente controllato da un
ingegnere professionista, si prega di comprendere eventuali
omissioni inevitabili.
Impostazioni BT
Impostazioni - Impostazioni BT, BT "ON", clicca su Aggiorna
dispositivo e scegli il dispositivo obiettivo da associare.
Impostazioni lingua
Impostazioni - Impostazioni lingua, accedi per impostare la
lingua e seleziona il metodo di input.
Schermo wireless
Assicurati che i dispositivi Android (telefono, tablet, ecc.)
siano nella stessa LAN wireless locale di questi dispositivi
Operazioni sui dispositivi:
Schermata iniziale→Le mie app→ScreenCast→Apri il servizio
ScreenCast→Attiva il mirroring del telefono→Connessione.
Impostazione data e ora
Impostazione - Impostazione data e ora, accedi a Data, Ora e
Usa formato 24 ore.
Altre impostazioni
Impostazione - Altre impostazioni, accedi per ottenere Suono
pulsante, Salvaschermo, Spegnimento temporizzato e
Ripristina impostazioni di fabbrica.
Salvaschermo
Impostazione - Altre impostazioni - Salvaschermo,
Impostazione tempo salvaschermo (La proiezione entrerà in
modalità salvaschermo all'ora impostata senza alcuna
operazione o riproduzione), la modalità salvaschermo può
essere disattivata premendo il pulsante di accensione.
Dopo aver collegato il proiettore a un altro dispositivo di
output, inserisci HDMI o Audio/Video.
Segnale
Informazioni di sistema
Impostazione - Informazioni di sistema, accesso alla versione
Ul, Risoluzione, Memoria in esecuzione e Spazio di
archiviazione.

Nota: para la interfaz de emparejamiento del control remoto
Bluetooth, presione el botón "Entrada de voz" para que
aparezca la guía de emparejamiento.
Emparejamiento del control remoto
Bluetooth
Seleccione su idioma
Configuración
Acceda a Configuración de proyección, Configuración de red,
Bluetooth, Gestión de aplicaciones, Idioma, Fecha y hora,
Otras configuraciones, Información del sistema.
App Store
En la App Store, las aplicaciones se pueden instalar con un solo
clic y se pueden usar directamente después de la instalación.
Nuestra empresa también lleva las aplicaciones al mercado, lo
que permite a los usuarios obtenerlas y usarlas de manera fácil
y cómoda.
Configuración de proyección
Configuración-configuración del proyector, ingrese para
configurar el modo de proyección, configuración de pantalla,
modo de instalación, escala digital, corrección trapezoidal
automática, corrección trapezoidal manual, corrección de
ángulo inicial.
Configuración de red
Configuración-configuración de red-configuración de WIFI,
WIFI "ON", seleccione la ID de WIFI del objetivo e ingrese la
contraseña para conectarse a Internet.
BT Air Remote
Calibración del micro-drift de ardilla voladora:
ON/OFF
DIRECTIONS
RETURN
VOL+/-
MUTE
OK
BT AIR
REMOTE
MENU
SWITCH TO
MOUSE CONTROL
EIECTRONIC
FOCUS
HOME
Después de que el control remoto esté conectado a Bluetooth,
presione y mantenga presionados simultáneamente los botones
"OK" e "HOME" en el control remoto durante 2 segundos. En este
momento, la luz indicadora permanecerá encendida. Luego,
coloque el control remoto plano sobre el escritorio. Después de
mantenerlo quieto durante 5 segundos, la luz se apagará y la
ardilla voladora estará calibrada correctamente.
※Guía de Instalación Rápida※
Atención
Lea atentamente este manual antes de usarlo y consérvelo
para futuras consultas.
1. El proyector no es resistente al polvo ni al agua.
2. Para reducir el riesgo de incendio y descarga eléctrica, no
exponga el proyector a la lluvia ni a la niebla.
3. Utilice el adaptador de corriente original. El proyector
debe funcionar con la fuente de alimentación nominal
especificada.
4. Cuando el proyector esté funcionando, no mire
directamente a la lente, la luz intensa puede destellarle los
ojos y causarle un ligero dolor. Los niños deben utilizar el
proyector bajo la supervisión de adultos.
5. No cubra las rejillas de ventilación del proyector. El calor
reducirá la vida útil del proyector y causará peligro.
6. Limpie periódicamente las rejillas de ventilación del
proyector, ya que el polvo puede provocar un mal
funcionamiento del sistema de refrigeración.
7. No utilice el proyector en entornos grasosos, húmedos,
polvorientos o con humo. El aceite o los productos químicos
pueden provocar un mal funcionamiento.
8. Manipúlelo con cuidado durante el uso diario.
9. Desconecte la alimentación si el proyector no va a
utilizarse durante un tiempo prolongado.
10. Las personas no profesionales tienen prohibido
desmontar el proyector para realizar pruebas y
mantenimiento.
Descripción de la Estructura
This manual is for reference only. It is subject to change
without prior notice. Hotack reserves the right of final
interpretation.
Proyector Inteligente
HY300 UItra
Altavoz
ON/OFF
Ventilación
ENCENDIDO
USB
ROTACIÓN
Lente
Entrada de aire
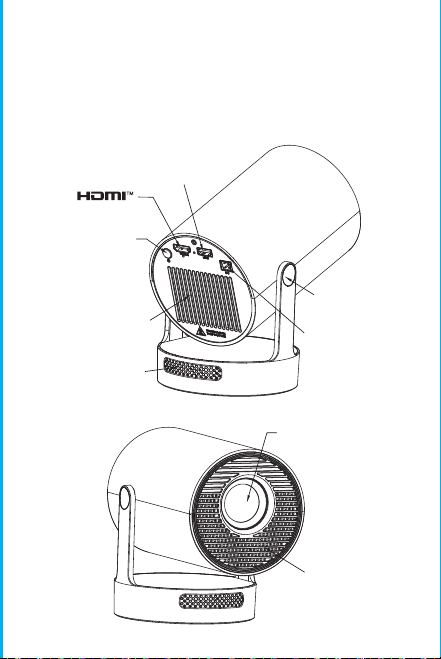
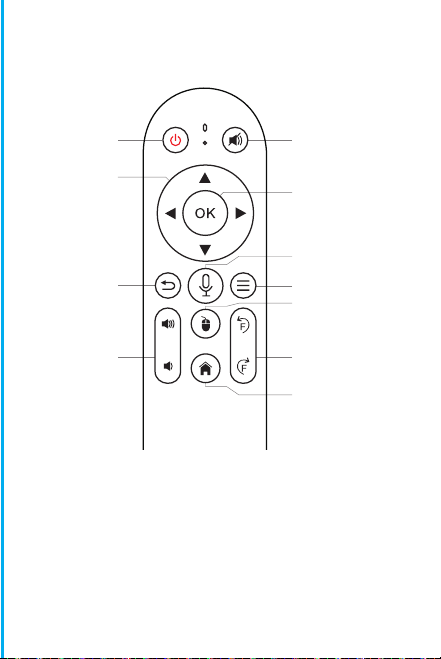
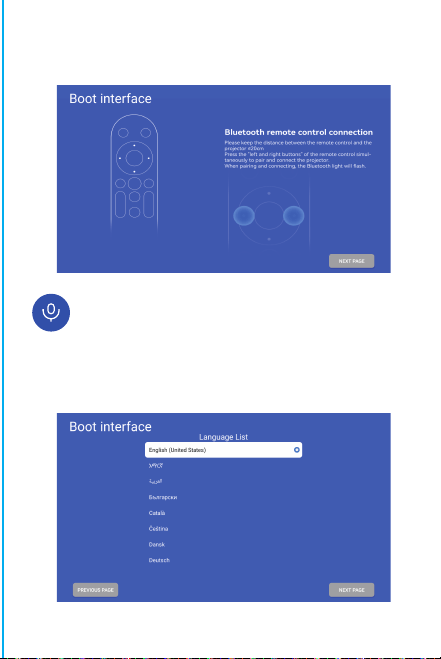
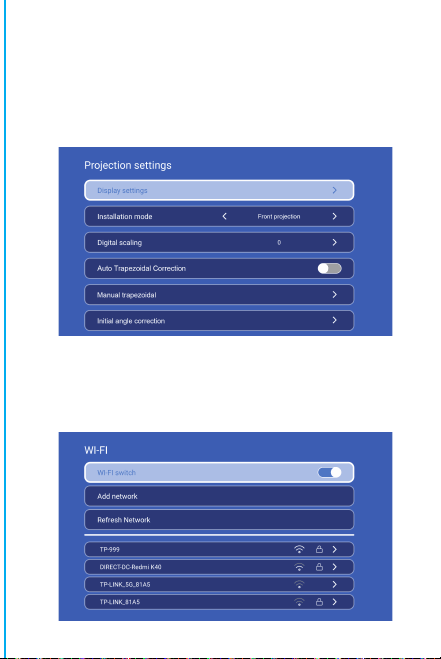

Atención:
No mire directamente a la lente cuando proyecte para
evitar que la luz intensa dañe sus ojos.
Los niños deben utilizar el
proyector bajo la supervisión de adultos.
¡Gracias por comprar! ¿Necesita ayuda?
Envíe un correo electrónico con el nombre del artículo
adjunto a nuestro Equipo de soporte de marca
([email protected]) para obtener una mejor
experiencia,
una respuesta rápida y más ayuda.
Instrucciones de seguridad
• Preste atención a la información importante relacionada con el
funcionamiento y el mantenimiento del proyector. Lea esta
información atentamente para evitar problemas. Si sigue las
instrucciones de seguridad, aumentará la vida útil del proyector.
• Consulte con personal calificado para los servicios de
instalación y reparación, y no utilice cables, accesorios ni otros
periféricos dañados.
• El proyector debe mantenerse alejado de materiales
inflamables, explosivos, interferencias electromagnéticas fuertes
(estaciones de radar grandes, centrales eléctricas,
subestaciones), etc. Luz ambiental fuerte (evite la luz solar
directa), etc.
• No cubra las rejillas de ventilación del proyector.
• Utilice el adaptador de corriente original.
• Mantenga una ventilación adecuada y asegúrese de que las
rejillas de ventilación no estén cubiertas para evitar el
sobrecalentamiento del proyector.
• Cuando el proyector esté funcionando, no mire directamente a
la lente, la luz intensa le hará destellar los ojos y le provocará un
ligero dolor.
• No doble ni arrastre el cable de alimentación.
• No coloque el cable de alimentación debajo del proyector ni de
ningún objeto pesado.
• No cubra el cable de alimentación con otros materiales
blandos.
• No caliente el cable de alimentación.
• Evite tocar el adaptador de corriente con las manos mojadas.
Aviso legal
Este manual es un manual de instrucciones generales. Las
imágenes y funciones de este manual deben estar sujetas al
producto real. Nuestra empresa se dedica a mejorar el
rendimiento del producto y nos reservamos el derecho de
modificar las funciones y la interfaz del producto descritas en
este manual sin previo aviso.
Conserve su dispositivo en buen estado. No nos hacemos
responsables de ninguna pérdida causada por un funciona-
miento incorrecto del software o hardware, por reparaciones
o por cualquier otro motivo. No nos hacemos responsables de
ninguna pérdida o reclamación de terceros.
Este manual ha sido revisado cuidadosamente por un ingeniero
profesional. Por favor, comprenda que no puede haber
omisiones inevitables.
Configuración de Bluetooth
Configuración- configuración de Bluetooth, Bluetooth activado,
haga clic en Actualizar dispositivo y elija el dispositivo de
destino para emparejar.
Configuración de idioma
Configuración-configuración de idioma, ingrese para
configurar el idioma y seleccionar el método de entrada.
Pantalla inalámbrica
Asegúrese de que los dispositivos Android (teléfono, tableta,
etc.) estén en la misma LAN inalámbrica local que estos
dispositivos
Operaciones en dispositivos:
Pantalla de inicio → Mis aplicaciones → ScreenCast → Abrir el
servicio ScreenCast → Activar la duplicación de pantalla del
teléfono → Conexión.
Configuración de fecha y hora
Configuración- configuración de fecha y hora. Ingrese para
Fecha, Hora y Usar formato de 24 horas.
Otras configuraciones
Configuración- Otras configuraciones. Ingrese para obtener
Sonido de botón, Protector de pantalla, Apagado programado
y Restaurar configuración de fábrica.
Protector de pantalla
Configuración - Otras configuraciones - Protector de pantalla,
configuración de tiempo del protector de pantalla (la proyección
entrará en modo protector de pantalla en el momento
establecido sin ninguna operación o reproducción), el modo
protector de pantalla se puede salir presionando el botón de
encendido.
Después de conectar el proyector a otro dispositivo de salida,
ingrese HDMI o Audio/Video.
Señal
Información del sistema
Configuración - Información del sistema, ingrese a la versión
Ul, Resolución, Memoria en ejecución y Espacio de
almacenamiento.
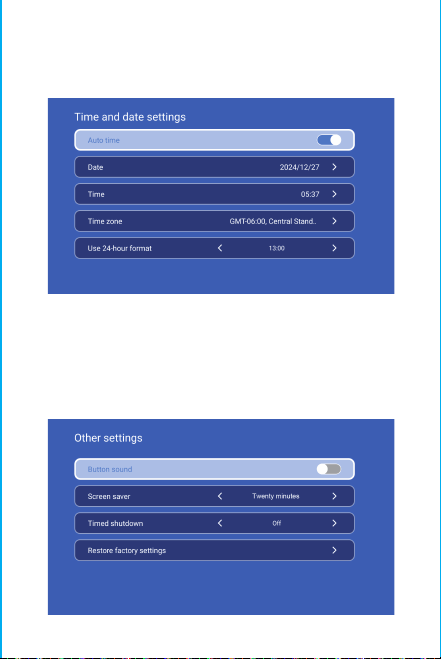
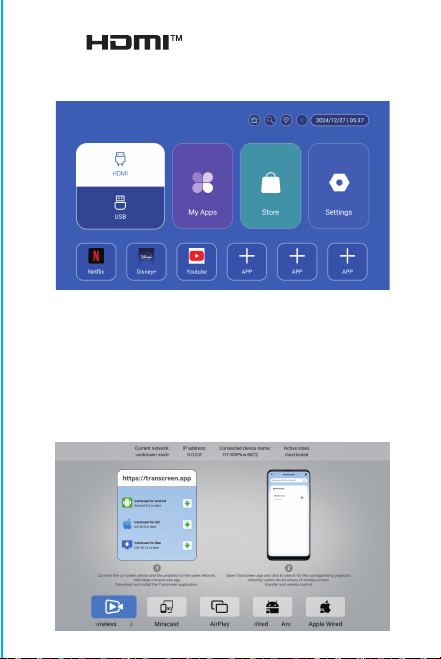

注意: Bluetooth リモコンのマッチング インターフェースでは、
「音声入力」ボタンを押すとマッチング ガイドが表示されます。
Bluetoothリモコンのペアリング
言語を選択します
設定
投影設定、ネットワーク設定、Bluetooth、アプリケーション管理、言
語、日付と時刻、その他の設定、システム情報に進みます。
AppStore
App Store では、アプリケーションをワンクリックでインストールで
き、インストール後すぐに使用できます。当社ではアプリケーション
を市場に投入し、ユーザーが簡単に便利に入手して使用できるよう
にしています。
投影設定
設定 - プロジェクター設定、投影モードの設定、ディスプレイ設定、
設置モード、デジタルスケーリング、自動台形補正、手動台形補正、
初期角度補正。
ネットワーク設定
設定 - ネットワーク設定 - WIFI 設定、WIFI「オン」、目的の WIFI ID
を選択し、パスワードを入力してインターネットに接続します。
BTエアリモート
ムササビのマイクロドリフトの調整:
オン/オフ
方向
戻る
音量+/-
ミュート
OK
BT エア リモート
メニュー
マウス コントロー
ルに切り替え
電子フォーカス
ホーム
リモコンを Bluetooth に接続したら、リモコンの「OK」ボタンと「ホ
ーム」ボタンを同時に 2 秒間押し続けます。このとき、インジケータ
ライトが点灯したままになります。次に、リモコンをデスクトップに
平らに置きます。5 秒間そのままにしておくと、ライトが消え、ムサ
サビの調整が完了します。
※クイックインストールガイド※
注意
ご使用前にこのマニュアルをよくお読みになり、今後の参考の
ために保管してください。
1. プロジェクターは防塵または防水ではありません。
2. 火災や感電の危険を減らすため、プロジェクターを雨や霧に
さらさないでください。
3. オリジナルの電源アダプターを使用してください。プロジェク
ターは指定された定格電源で動作します。
4. プロジェクターの動作中は、レンズを直接見ないでください。
強い光が目に当たって軽い痛みを感じることがあります。子供
は大人の監督下でプロジェクターを使用する必要があります。
5. プロジェクターの通気口を覆わないでください。加熱により
プロジェクターの寿命が短くなり、危険が生じます。
6. プロジェクターの通気口を定期的に清掃してください。ほこり
により冷却が故障する場合があります。
7. 油っぽい、湿気のある、ほこりっぽい、または煙の多い環境で
プロジェクターを使用しないでください。油や化学物質は故障
の原因になります。
8. 日常使用中は慎重に取り扱ってください。
9. プロジェクターを長期間使用しない場合は、電源を切ってく
ださい。
10. 専門家以外の人がテストやメンテナンスのためにプロジェ
クターを分解することは禁止されています。
構造の説明
このマニュアルは参考用です。予告なしに変更されることがあり
ます。Hotack は最終的な解釈権を留保します。
スマートプロジェクター
HY300 UItra
スピーカー
オン/オフ
通気口
電源
USB
回転
レンズ
吸気口
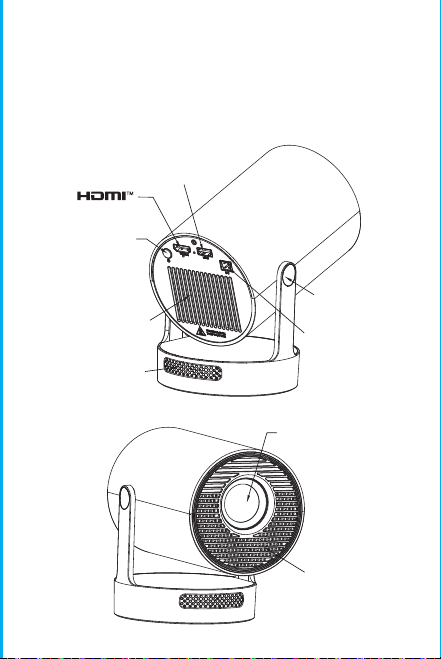

注意ください:
強い光による目の損傷を避けるため、投影中はレンズを直視
しないでくださいお子様は大人の監督。
のもとでご使用ください。ご購入ありがとうごさいます
アイテム名を添えてメ-ルを送信し
てください。より良い体験を得るために、
迅速な返信とさらなるサポ-トを提供します。
アイテム名を添えてメ-ルを送信し
てく ださい。より良い体験を得るために、
迅速な返信とさらなるサポ-トを提供します。
安全に関する注意事項
• プロジェクターの操作とメンテナンスに関する重要な情報に注
意してください。問題を回避するために、この情報を注意深くお読
みください。安全に関する注意事項に従うことで、プロジェクター
の寿命が延びます。
• 設置および修理サービスについては、資格のある担当者に相談
してください。また、損傷した配線、アクセサリ、その他の周辺機器
は使用しないでください。
• プロジェクターは、可燃性、爆発性、強力な電磁干渉(大型レーダ
ーステーション、発電所、変電所など)や強い周囲光(直射日光を避
ける)などから遠ざけてください。
• プロジェクターの通気口を覆わないでください。
• オリジナルの電源アダプターを使用してください。
• プロジェクターの過熱を防ぐため、十分な換気を保ち、通気口が
覆われていないことを確認してください。
• プロジェクターが作動しているときは、レンズを直接見ないでく
ださい。強い光が目に当たって軽い痛みを引き起こします。
• 電源コードを曲げたり引きずったりしないでください。
• 電源コードをプロジェクターや重い物の下に置かないでくださ
い。
• 電源コードに他の柔らかい素材を被せないでください。
•
電源コードを加熱しないでください。
• 濡れた手で電源アダプターに触れないでください。
免責事項
このマニュアルは一般的な説明です。このマニュアルの画像と機能
は実際の製品に準じます。当社は製品のパフォーマンス向上に注
力しており、このマニュアルに記載されている製品の機能とインタ
ーフェースを予告なしに変更する権利を留保します。
デバイスを適切に保管してください。ソフトウェア/ハードウェアの
誤った操作、修理、またはその他の理由により生じた損失について
は責任を負いません。第三者の請求による損失については責任を
負いません。
このマニュアルはプロのエンジニアによって慎重にチェックされて
います。避けられない省略についてはご了承ください。
BT設定
設定 - BT 設定、BT「オン」、デバイスの更新をクリックし、ペアリン
グする対象デバイスを選択します。
言語設定
設定 - 言語設定、言語の設定と入力方法の選択に進みます。
ワイヤレススクリーン
Android デバイス (電話、パッドなど) がこれらのデバイスと同じロ
ーカル ワイヤレス LAN 内にあることを確認します
デバイスでの操作:
ホーム画面 → マイ アプリ → ScreenCast → ScreenCast サービ
スを開く → 電話のミラーリングをオンにする → 接続。
日付と時刻の設定
設定 - 日付と時刻の設定、日付、時刻、24 時間形式の使用を入力
します。
その他の設定
設定 - その他の設定、ボタン音、スクリーン セーバー、時間指定シ
ャットダウン、工場出荷時設定の復元を入力します。
スクリーンセーバー
設定 - その他の設定 - スクリーンセーバー、スクリーンセーバー
時間設定(操作や再生をせずに設定された時間に投影がスクリー
ンセーバー モードになります)、スクリーンセーバー モードは電源
ボタンを押すことで解除できます。
プロジェクターを他の出力デバイスに接続した後、HDMI またはオ
ーディオ/ビデオを入力します。
信号
システム情報
設定 - システム情報、Ul バージョン、解像度、実行メモリ、およびス
トレージ容量を入力します。
注意ください:
強い光による目の損傷を避けるため、投影中はレンズを直視
しないでくださいお子様は大人の監督。
のもとでご使用ください。ご購入ありがとうごさいます
プランドサポ-トチ-ム([email protected])に
アイテム名を添えてメ-ルを送信し
てください。より良い体験を得るために、
迅速な返信とさらなるサポ-トを提供します。
プランドサポ-トチ-ム([email protected])に
アイテム名を添えてメ-ルを送信し
てく ださい。より良い体験を得るために、
迅速な返信とさらなるサポ-トを提供します。
安全に関する注意事項
• プロジェクターの操作とメンテナンスに関する重要な情報に注
意してください。問題を回避するために、この情報を注意深くお読
みください。安全に関する注意事項に従うことで、プロジェクター
の寿命が延びます。
• 設置および修理サービスについては、資格のある担当者に相談
してください。また、損傷した配線、アクセサリ、その他の周辺機器
は使用しないでください。
• プロジェクターは、可燃性、爆発性、強力な電磁干渉(大型レーダ
ーステーション、発電所、変電所など)や強い周囲光(直射日光を避
ける)などから遠ざけてください。
• プロジェクターの通気口を覆わないでください。
• オリジナルの電源アダプターを使用してください。
• プロジェクターの過熱を防ぐため、十分な換気を保ち、通気口が
覆われていないことを確認してください。
• プロジェクターが作動しているときは、レンズを直接見ないでく
ださい。強い光が目に当たって軽い痛みを引き起こします。
• 電源コードを曲げたり引きずったりしないでください。
• 電源コードをプロジェクターや重い物の下に置かないでくださ
い。
• 電源コードに他の柔らかい素材を被せないでください。
•
電源コードを加熱しないでください。
• 濡れた手で電源アダプターに触れないでください。
免責事項
このマニュアルは一般的な説明です。このマニュアルの画像と機能
は実際の製品に準じます。当社は製品のパフォーマンス向上に注
力しており、このマニュアルに記載されている製品の機能とインタ
ーフェースを予告なしに変更する権利を留保します。
デバイスを適切に保管してください。ソフトウェア/ハードウェアの
誤った操作、修理、またはその他の理由により生じた損失について
は責任を負いません。第三者の請求による損失については責任を
負いません。
このマニュアルはプロのエンジニアによって慎重にチェックされて
います。避けられない省略についてはご了承ください。
BT設定
設定 - BT 設定、BT「オン」、デバイスの更新をクリックし、ペアリン
グする対象デバイスを選択します。
言語設定
設定 - 言語設定、言語の設定と入力方法の選択に進みます。
ワイヤレススクリーン
Android デバイス (電話、パッドなど) がこれらのデバイスと同じロ
ーカル ワイヤレス LAN 内にあることを確認します
デバイスでの操作:
ホーム画面 → マイ アプリ → ScreenCast → ScreenCast サービ
スを開く → 電話のミラーリングをオンにする → 接続。
日付と時刻の設定
設定 - 日付と時刻の設定、日付、時刻、24 時間形式の使用を入力
します。
その他の設定
設定 - その他の設定、ボタン音、スクリーン セーバー、時間指定シ
ャットダウン、工場出荷時設定の復元を入力します。
スクリーンセーバー
設定 - その他の設定 - スクリーンセーバー、スクリーンセーバー
時間設定(操作や再生をせずに設定された時間に投影がスクリー
ンセーバー モードになります)、スクリーンセーバー モードは電源
ボタンを押すことで解除できます。
プロジェクターを他の出力デバイスに接続した後、HDMI またはオ
ーディオ/ビデオを入力します。
信号
システム情報
設定 - システム情報、Ul バージョン、解像度、実行メモリ、およびス
トレージ容量を入力します。
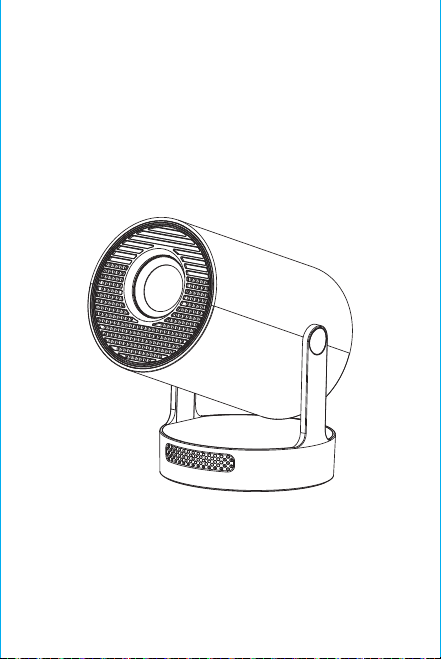
Remarque : l'interface de correspondance de la
télécommande Bluetooth, appuyez sur le bouton « Voice
input » pour afficher le guide de correspondance.
Appairage de la télécommande Bluetooth
Sélectionnez votre langue
Paramètres
Entrer dans Paramètres de projection, Paramètres réseau,
Bluetooth, Gestion des applications, Langue, Date et
heure, Autres paramètres, Informations système.
App Store
Dans l'App Store, les applications peuvent être installées en
un seul clic, et elles peuvent être utilisées directement après
l'installation. Notre société met également les applications
sur le marché, ce qui permet aux utilisateurs de les obtenir et
de les utiliser facilement.
Réglage de la projection
R
églage - Réglage du projecteur, entrée dans la
configuration du mode de projection, réglages de l'
affichage, mode d'installation, mise à l'échelle numérique,
correction trapézoïdale automatique, correction
trapézoïdale manuelle, correction de l'angle initial.
P
aramètres de mise en réseau
Paramètres - Paramètres de réseau - Paramètres WIFI, WIFI «
ON », sélectionnez l'ID WIFI objectif et entrez le mot de passe
pour vous connecter à Internet.
BT Télécommande à air
Étalonnage de la micro-dérive de l'écureuil volant:
ON/OFF
DIRECTIONS
RETOUR
VOL+/-
MUTE
OK
COMMUTATION A
CONTRÔLE DE LA
BT AIR
REMOTE
MENU
SOURIS
FOCUS
ÉLECTRONIQUE
HOME
Une fois la télécommande connectée à Bluetooth, appuyez
simultanément sur les touches « OK » et « HOME » de la
télécommande et maintenez-les enfoncées pendant 2
secondes. Le voyant reste alors allumé. Placez ensuite la
télécommande à plat sur le bureau. Après l'avoir maintenue
immobile pendant 5 secondes, le voyant s'éteint et l'écureuil
volant est calibré avec succès.
Attention
Veuillez lire attentivement ce manuel avant de l'utiliser et
conservez-le pour toute référence ultérieure.
1 Le projecteur n'est pas étanche à la poussière ou à l'eau.
2.Afin de réduire les risques d'incendie et d'électrocution, n'
exposez pas le projecteur à la pluie ou au brouillard. ne pas
exposer le projecteur à la pluie ou au brouillard.
3. veuillez utiliser l'adaptateur d'alimentation d'origine. Le
projecteur doit fonctionner sous l'alimentation électrique
nominale spécifiée.
4. lorsque le projecteur fonctionne, ne regardez pas
directement dans l'objectif. directement dans l'objectif, la
lumière intense vous éblouira les yeux et provoquera une
légère douleur. Les enfants doivent utiliser le projecteur
sous la sous la surveillance d'un adulte.
5. ne pas couvrir les orifices d'aération du projecteur. La
chaleur réduira la durée de vie du projecteur et entraînera
un danger. réduire la durée de vie du projecteur et
provoquer un danger.
6.nettoyez régulièrement les orifices d'aération du
projecteur. un mauvais fonctionnement du refroidissement.
7.n'utilisez pas le projecteur dans un environnement gras,
humide, poussiéreux ou enfumé. L'huile ou les produits
chimiques provoquent des dysfonctionnements.
8. manipulez le projecteur avec précaution lors de son
utilisation quotidienne.
9. coupez l'alimentation si le projecteur n'est pas utilisé
pendant une longue période.
10.Il est interdit aux non-professionnels de démonter le
projecteur démonter le projecteur à des fins de test et d'
entretien.
Description de la structure
Intelligent Projecteur
Ce manuel est destiné à servir de référence uniquement. Il
peut être modifié sans préavis. Hotack se réserve le droit
d'interprétation finale.
HY300 UItra
※Guide d'installation rapide※
Intervenants
ON/OFF
Évent
PUISSANCE
USB
ROTATION
Lentille
Entrée d'air
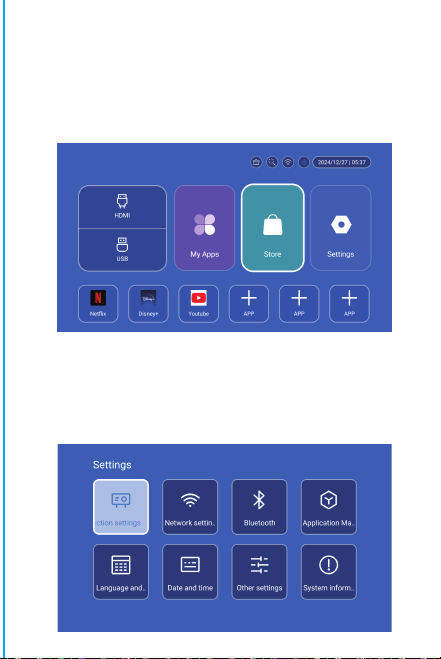
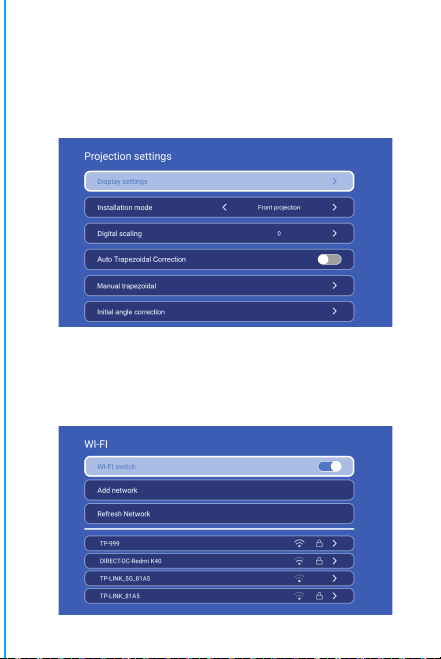

Ne regardez pas directement l'objectif
lorsque vous projetez afin d'éviter que la forte
lumière n'abîme vos yeux. Les enfants
doivent utiliser le projecteur sous la sous la
surveillance d'un adulte.
Merci d'avoir acheté ! Besoin d'aide ?
Veuillez envoyer un e-mail avec le nom de
l'article à notre équipe de soutien à la
marque ([email protected] 'd nif a,)
obtenir une meilleure expérience, une
réponse rapide et une assistance
supplémentaire.
un adulte.
Consignes de sécurité
• Veuillez prêter attention aux informations importantes relati
ves au fonctionnement et à l'entretien du projecteur. Vous dev
ez lire attentivement ces informations pour éviter tout problè
me. Le respect des consignes de sécurité augmentera la durée
de vie du projecteur.
• Veuillez consulter le personnel qualifié pour les services d'
installation et de réparation, et n'utilisez pas de fils, d'acce
ssoires ou d'autres périphériques endommagés.
• Le projecteur doit être tenu à l'écart des produits inflamma
bles, explosifs, des fortes interférences électromagnétiques (
grandes stations radar, centrales électriques, sous-stations),
etc. d'une forte lumière ambiante (éviter la lumière directe d
u soleil), etc.
• Ne pas couvrir les orifices d'aération du projecteur.
• Veuillez utiliser l'adaptateur électrique d'origine.
• Assurez une ventilation adéquate et veillez à ce que les orifices
d'aération ne soient pas couverts afin d'éviter la surchauffe du pro
jecteur.
• Lorsque le projecteur fonctionne, ne regardez pas directem
ent dans l'objectif, car la lumière intense vous éblouira les ye
ux et provoquera une légère douleur.
• Ne pas plier ou traîner le cordon d'alimentation.
• Ne placez pas le cordon d'alimentation sous le projecteur ou
sous des objets lourds.
• Ne pas couvrir le cordon d'alimentation avec d'autres matériaux
souples.
• Ne pas chauffer le cordon d'alimentation.
• Évitez de toucher l'adaptateur électrique avec des mains
mouillées.
Clause de non-responsabilité
Ce manuel est une instruction générale. Les images et les
fonctions de ce manuel doivent correspondre au produit réel.
Notre société s'efforce d'améliorer les performances du produit
, nous nous réservons le droit de modifier les fonctions du
produit et l'interface décrite dans ce manuel sans préavis.
Veuillez conserver votre appareil correctement. Nous ne
sommes pas responsables de toute perte causée par un
mauvais fonctionnement du logiciel/matériel, une réparation
ou toute autre raison. Nous ne sommes pas responsables des
pertes causées par des réclamations de tiers.
Ce manuel a été soigneusement vérifié par un ingénieur
professionnel, veuillez le comprendre pour toute
omission inévitable.
BT Paramètre
Paramètres - Paramètres BT, BT « ON », cliquez sur Rafraîchir l'
appareil et choisissez l'appareil objectif à appairer.
Réglage de la langue
Réglages - Réglage de la langue, entrer pour régler la
langue et sélectionner la méthode d'entrée.
Écran sans fil
Assurez-vous que les appareils Android (téléphone, tablette, etc.)
se trouvent dans le même réseau local sans fil que ces appareils.
Opérations sur les dispositifs:
Écran d'accueil→Mes Apps→ScreenCast→Ouvrir le service ScreenC
ast
→Activer la fonction miroir du téléphone→Connexion.
Réglage de la date et de l'heure
Réglage - Réglage de la date et de l'heure, entrez dans Date,
Heure et Utilisez le format 24 heures.
Autre cadre
Paramètres - Autres paramètres, entrez pour obtenir les
options Son des boutons, Économiseur d'écran, Arrêt
programmé et Restaurer les paramètres d'usine.
Économiseur d'écran
Setting - Other Setting - Screen saver, Screen saver time
setting
La projection passera en mode économiseur d'
écran à l'heure définie sans aucune opération ou lecture
le mode économiseur d'écran peut être désactivé en
appuyant sur le bouton d'alimentation.
Après avoir connecté le projecteur à un autre appareil de
sortie, entrez HDMI ou Audio/Vidéo.
Signal
Informations sur le système
Paramètres - Informations sur le système, accès à la version
de l'interface utilisateur, à la résolution, à la mémoire d'
exécution et à l'espace de stockage.
L'attention: