
Technical Support and E-Warranty Certificate www.vevor.com/support
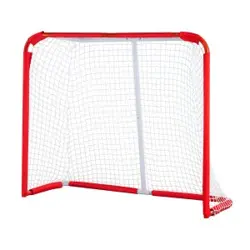
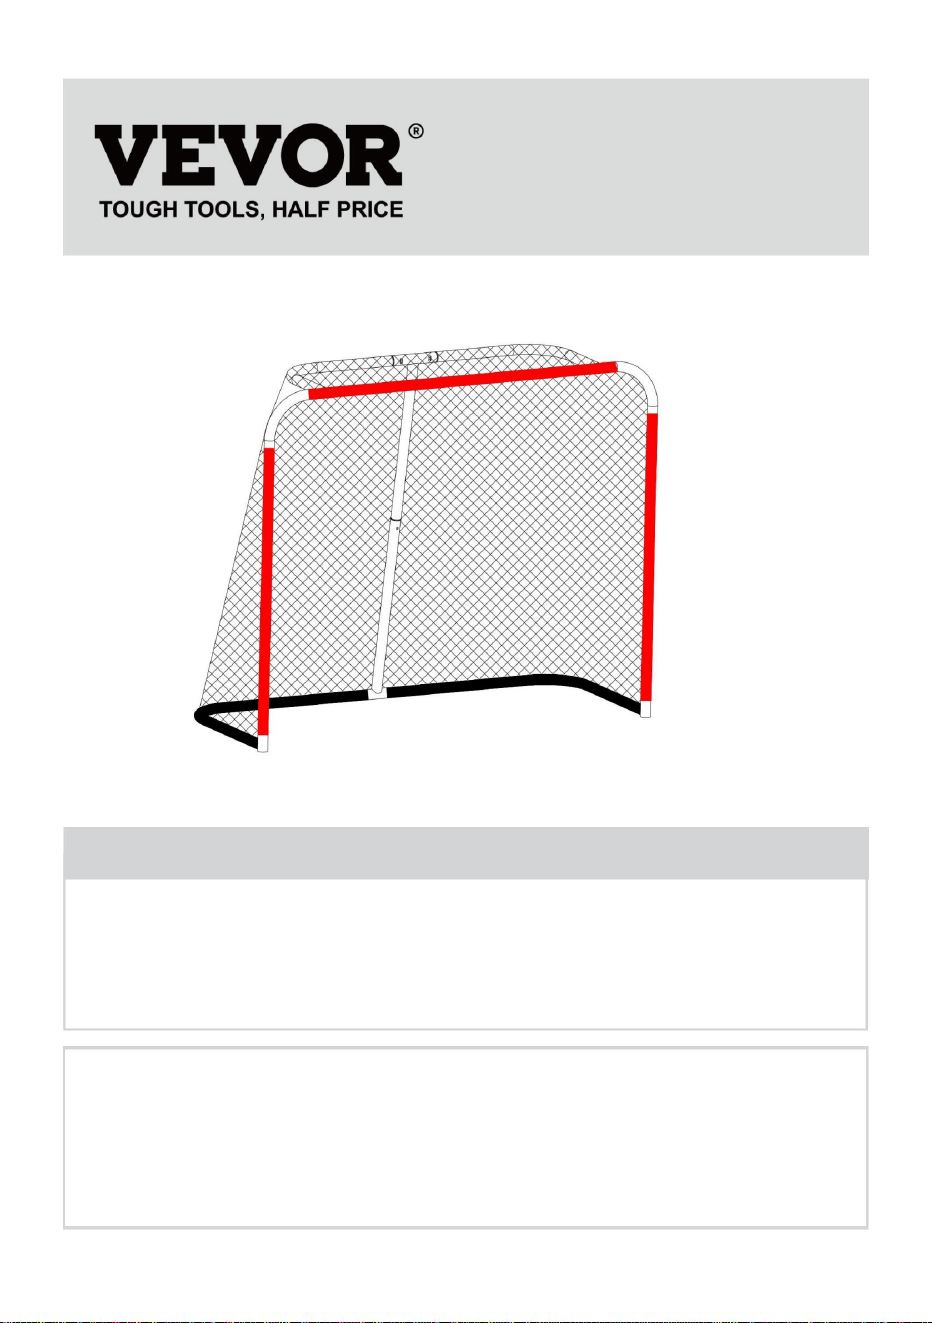
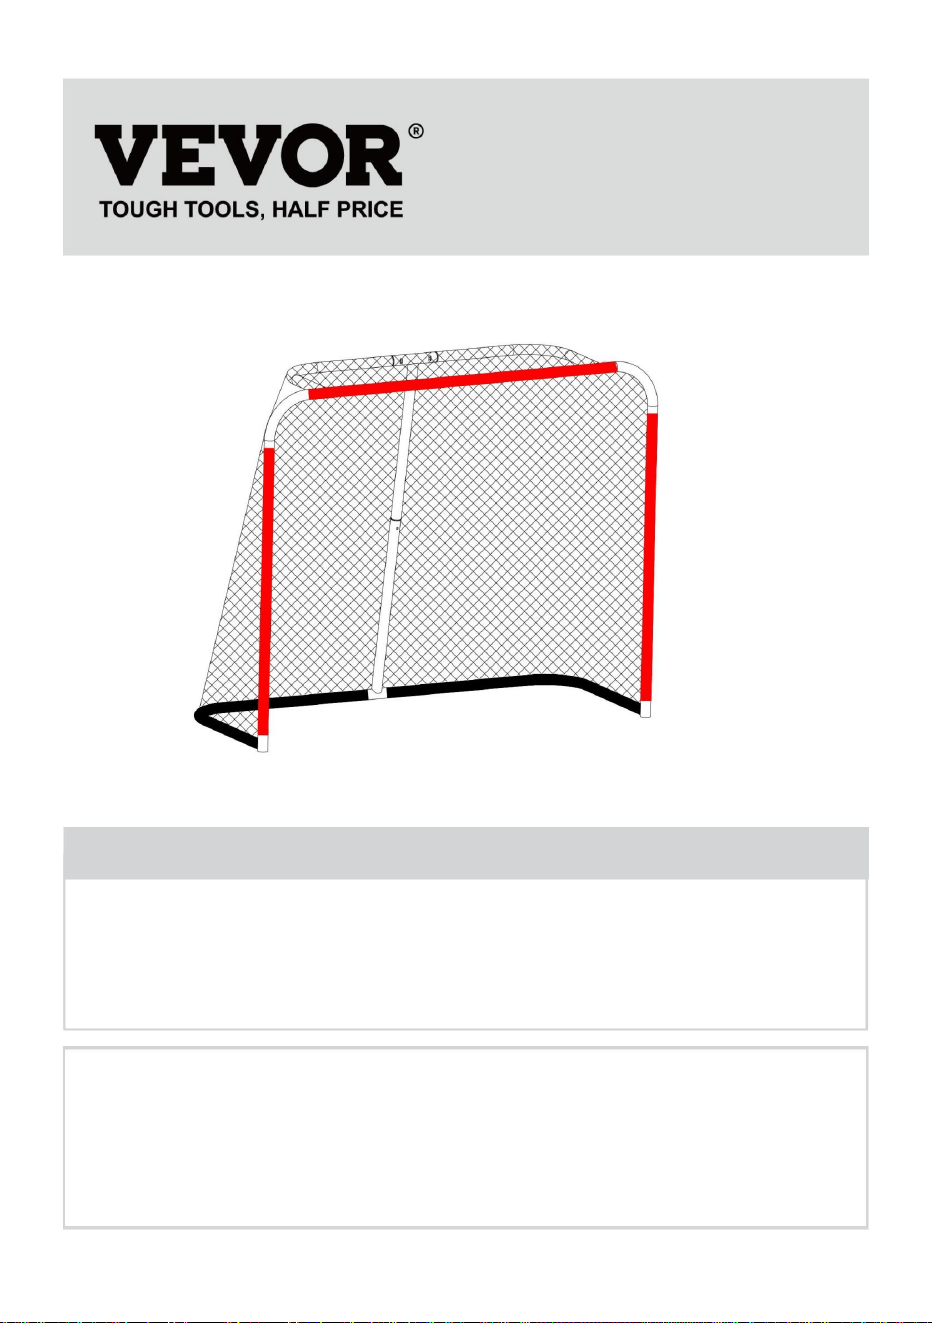
HOCKEY GOAL
MODEL: CD-HG01-A
We continue to be committed to provide you tools with competitive price.
"Save Half", "Half Price" or any other similar expressions used by us only represents an
estimate of savings you might benefit from buying certain tools with us compared to the major
top brands and does not necessarily mean to cover all categories of tools offered by us. You
are kindly reminded to verify carefully when you are placing an order with us if you are
actually saving half in comparison with the top major brands.

- 1 -
MODEL: CD-HG01-A
Have product questions? Need technical support? Please feel free to
contact us:
Technical Support and E-Warranty Certificate
www.vevor.com/support
NEED HELP? CONTACT US!
This is the original instruction, please read all manual instructions
carefully before operating. VEVOR reserves a clear interpretation of our
user manual. The appearance of the product shall be subject to the
product you received. Please forgive us that we won't inform you again if
there are any technology or software updates on our product.
HOCKEY GOAL

- 2 -
Thank you very much for choosing this Product . Please read all of the
instructions before using it.The information will help you achieve the best
possible results.
INTRODUCTION
WARNING:
Please read all instructions before using this product
It is the Owner's responsibility to ensure that all users of this product are
fully aware of all warnings and precautions.
► Always inspect the goal post and net for defects before use and replace
damaged parts.
► Do not use the goal with faulty parts.
► The product is gently placed on a flat ground for use.
► Never climb on the net or the goal frame.The goal must never be
used without the net fitted.Please always adhere to the safety
instructions.
► Remove all weights and anchors before moving or
disassembling the goal.Do not use the goal in windy weather.
► Do not use the goal in sub zero temperatures.We advise adult
supervision during assembly and use.Do not drop any heavy
objects on the tubes.
► When dismantling the goal ensure that all fittings are packed
away, and that non are left on the playing surface.
► Check whether the installation is firm before use to avoid
potential safety hazards.
► Check and tighten the screw interface of each
component regularly.
►It should be stored in a dry environment if not used for a long time.
- 3 -
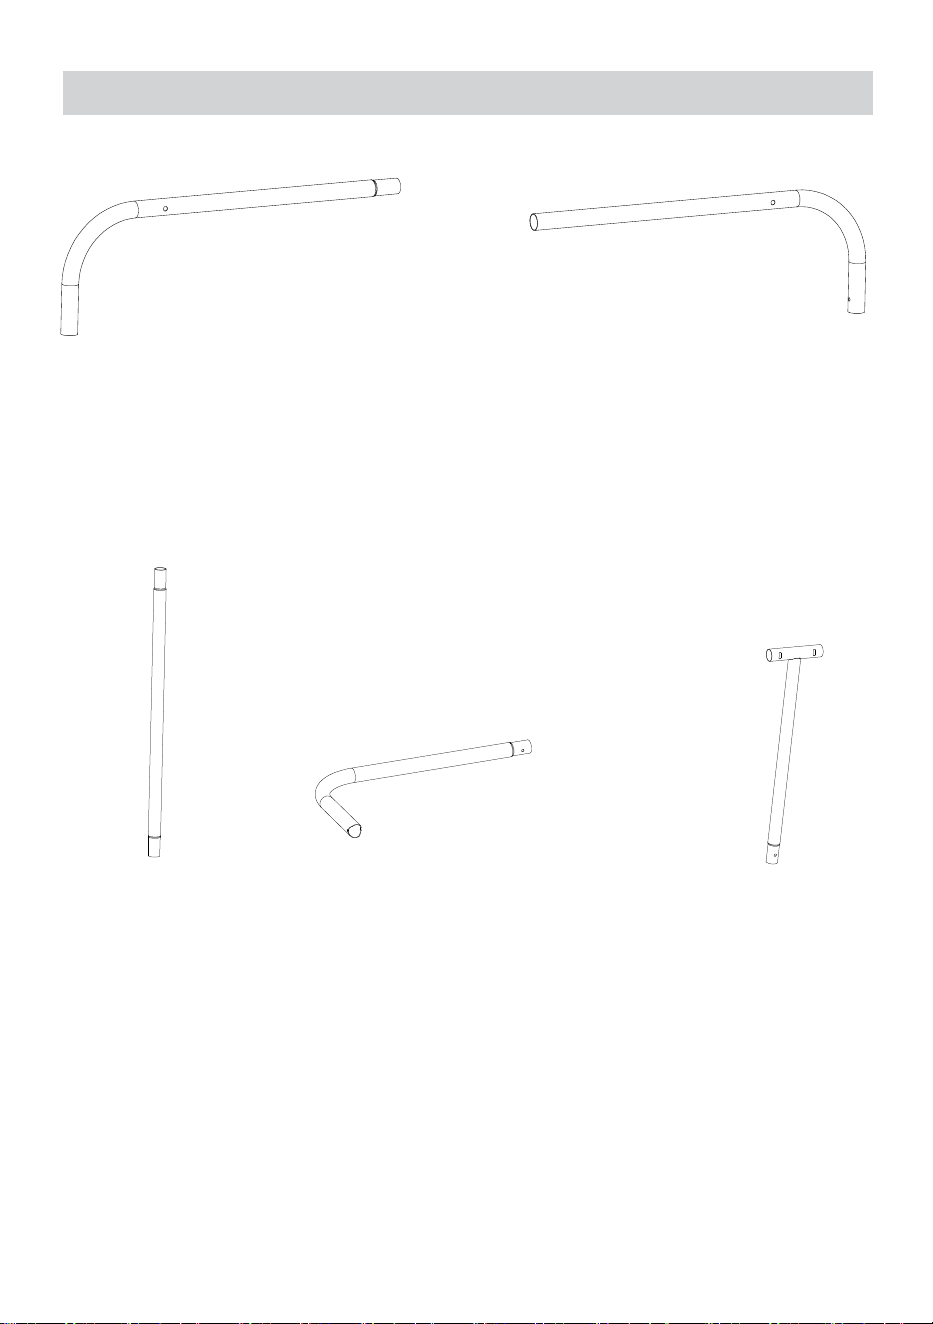
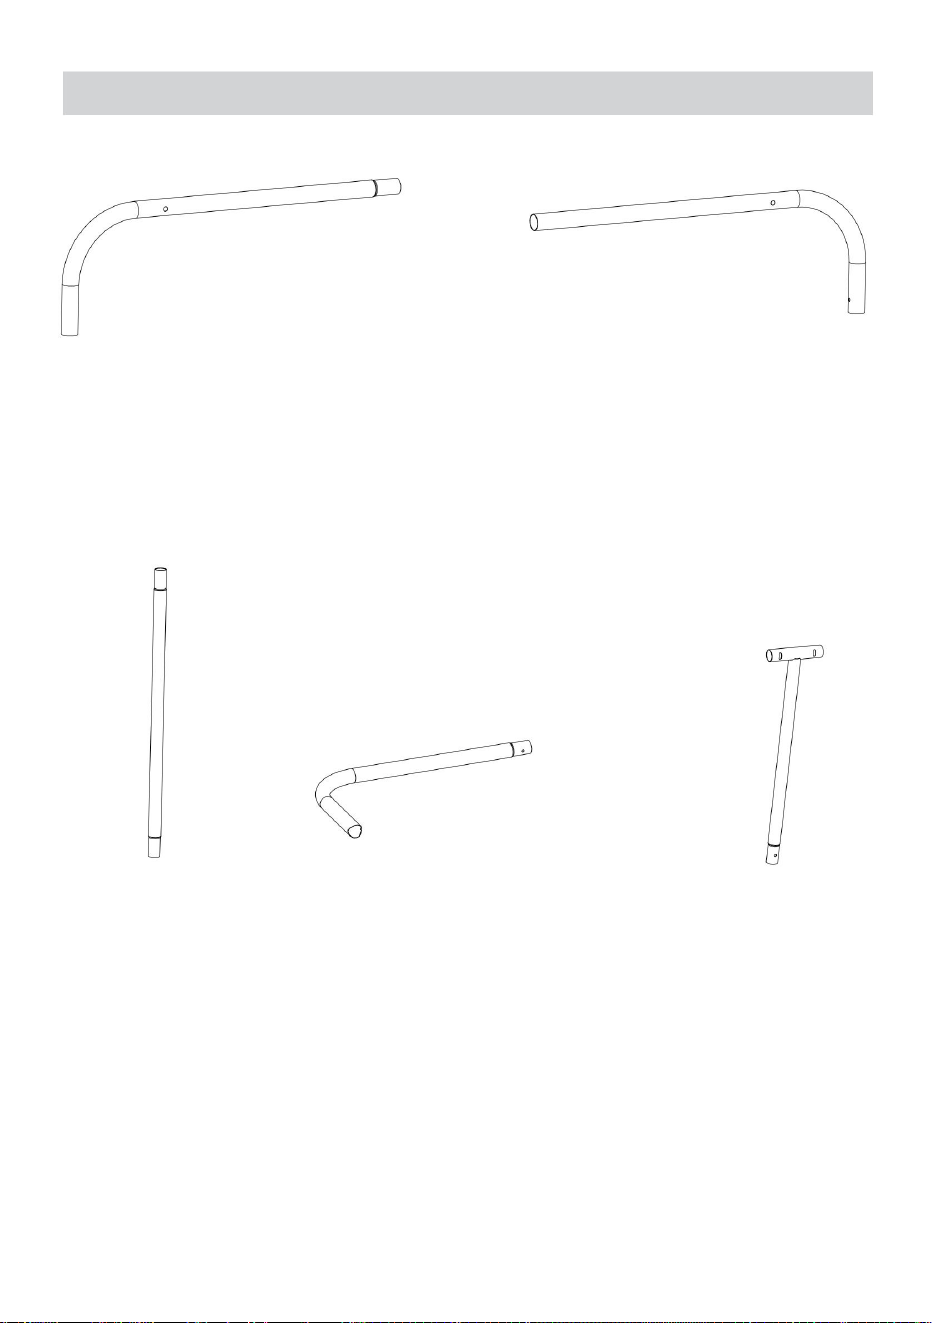
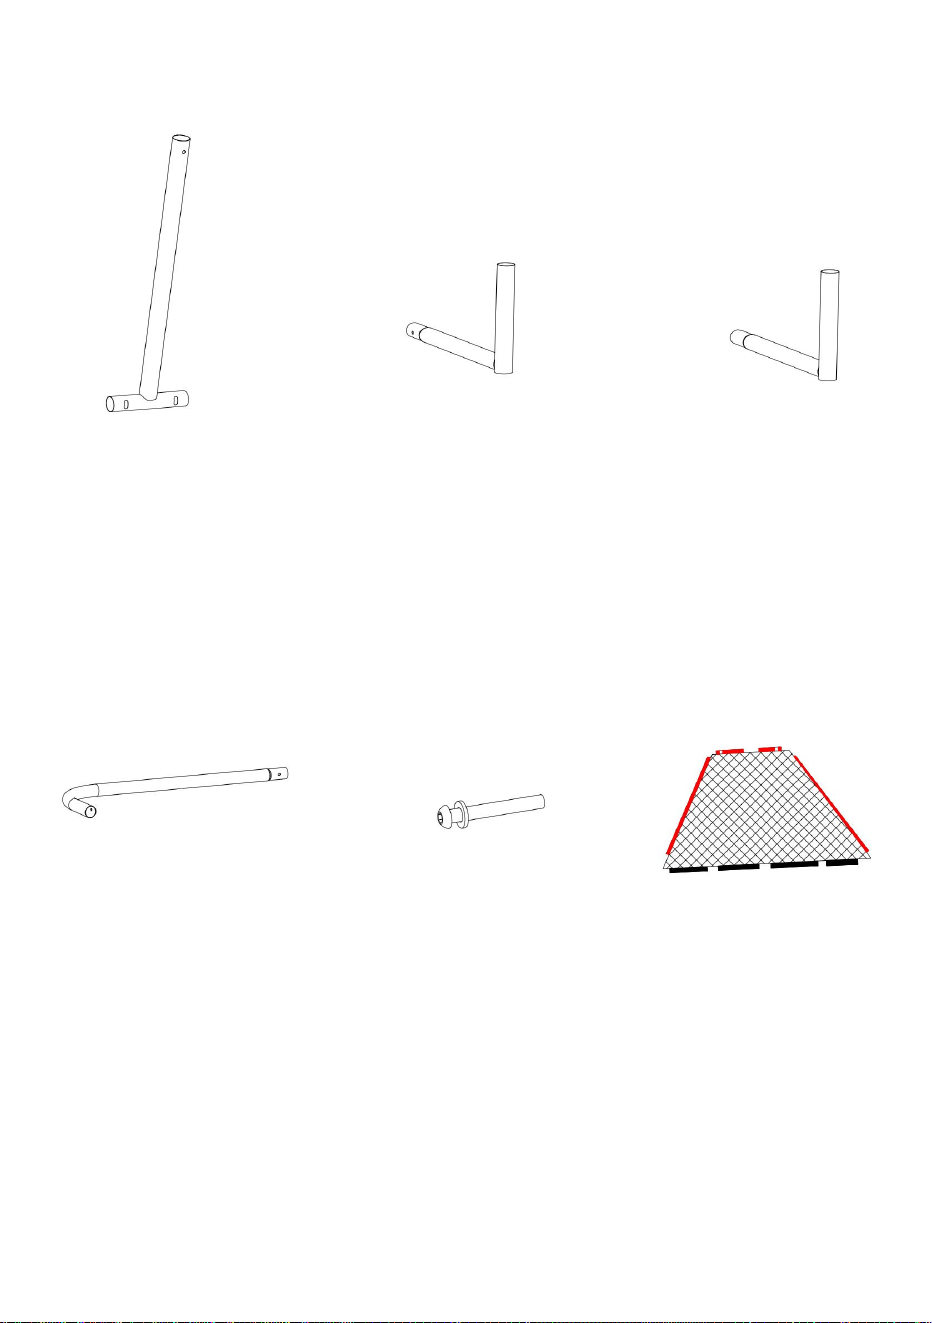
PART LIST
A 1PCS
B 1PCS
C 2PCS
D 2PCS
E 1PCS
- 4 -
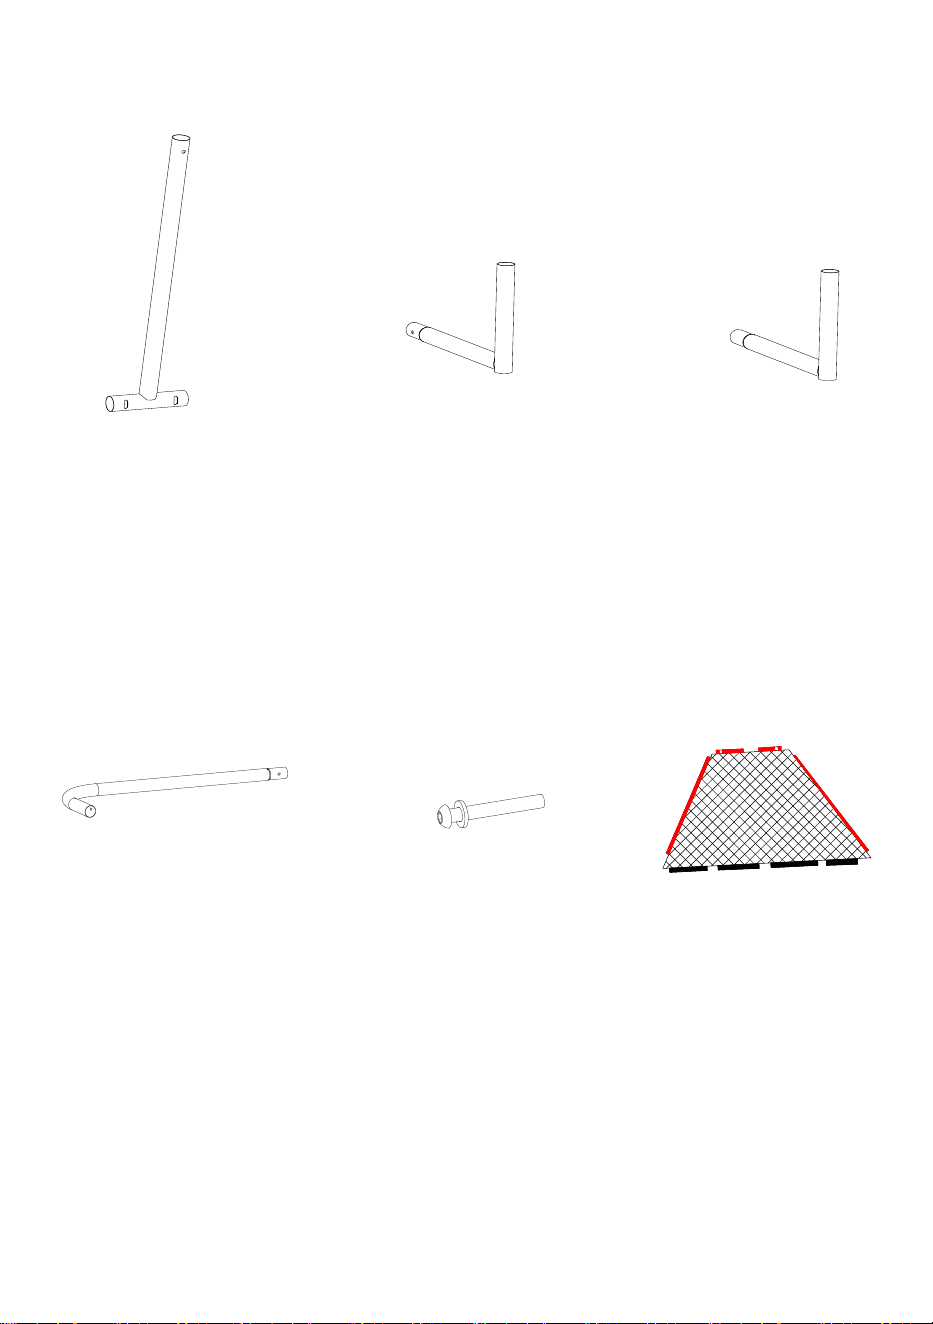
F 1PCS
G 1PCS
H 1PCS
I 2PCS
J 2PCS
M6*45
K 1PCS
- 5 -
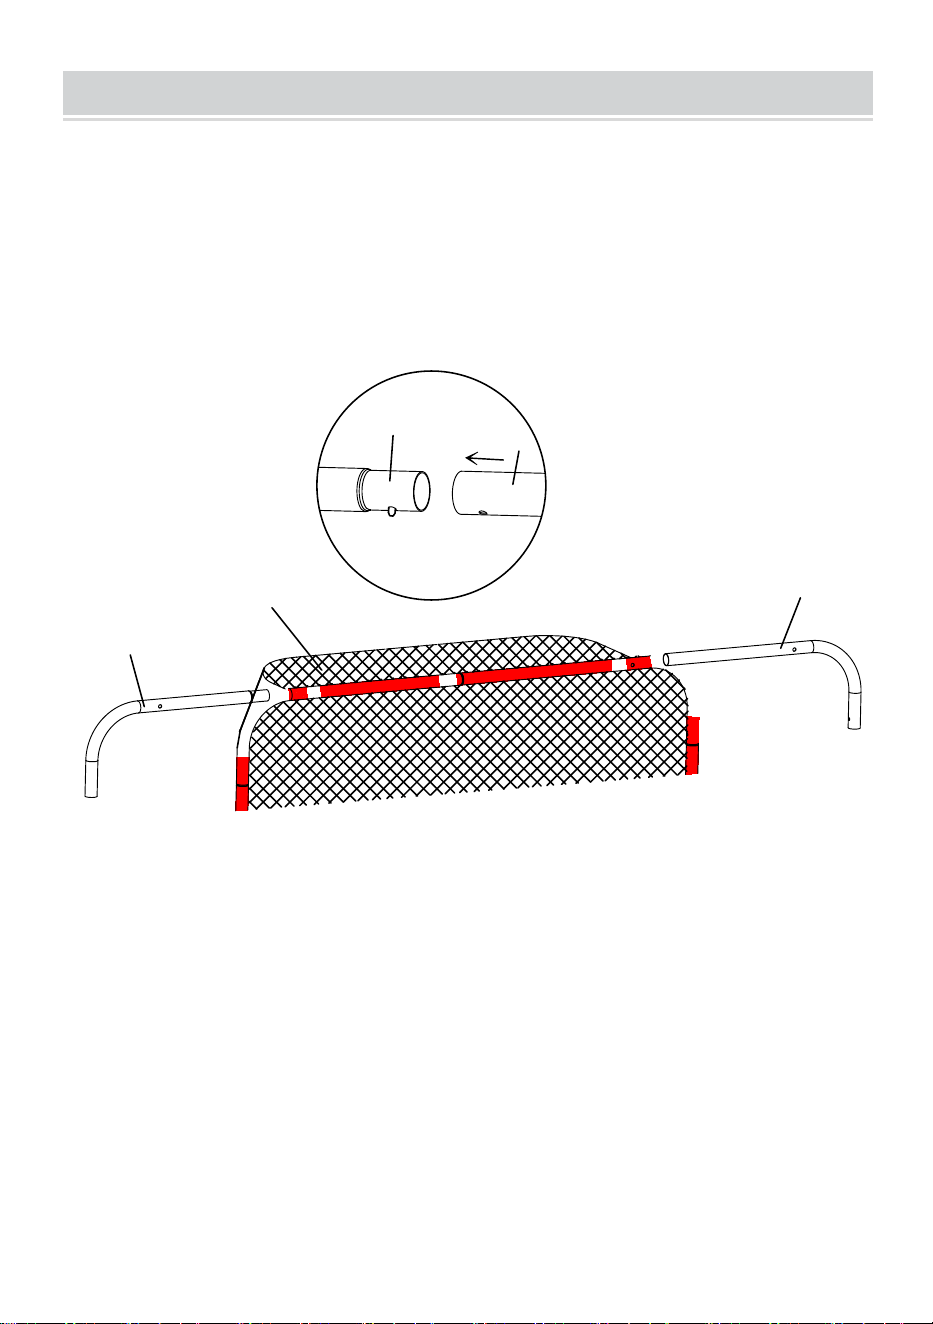
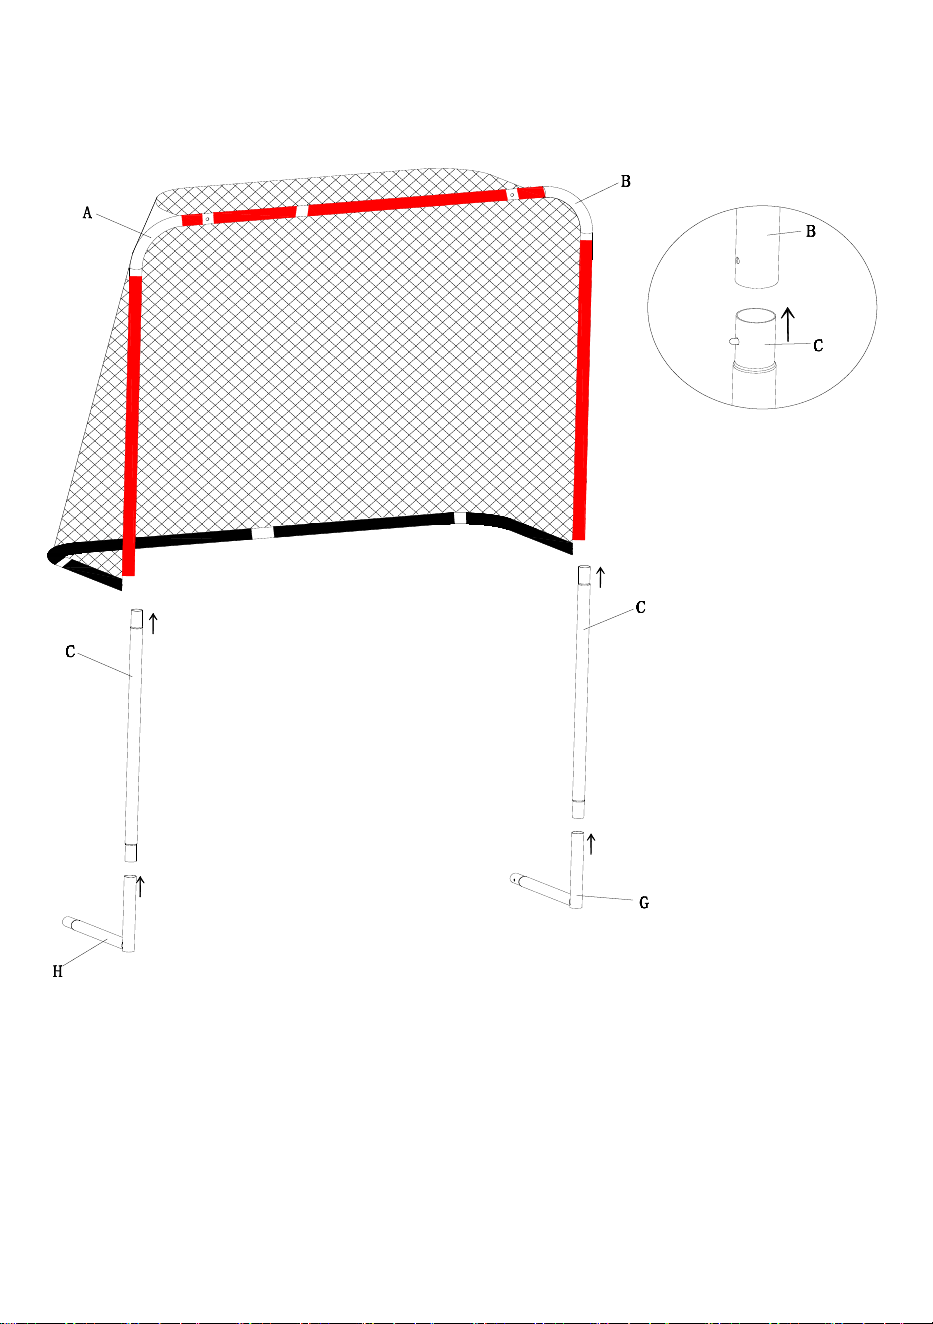
ASSEMBLY
Step 1:Connect iron pipes A and B and pass them through the top of
the net
A
↑
B
↑
K
A
B
- 6 -
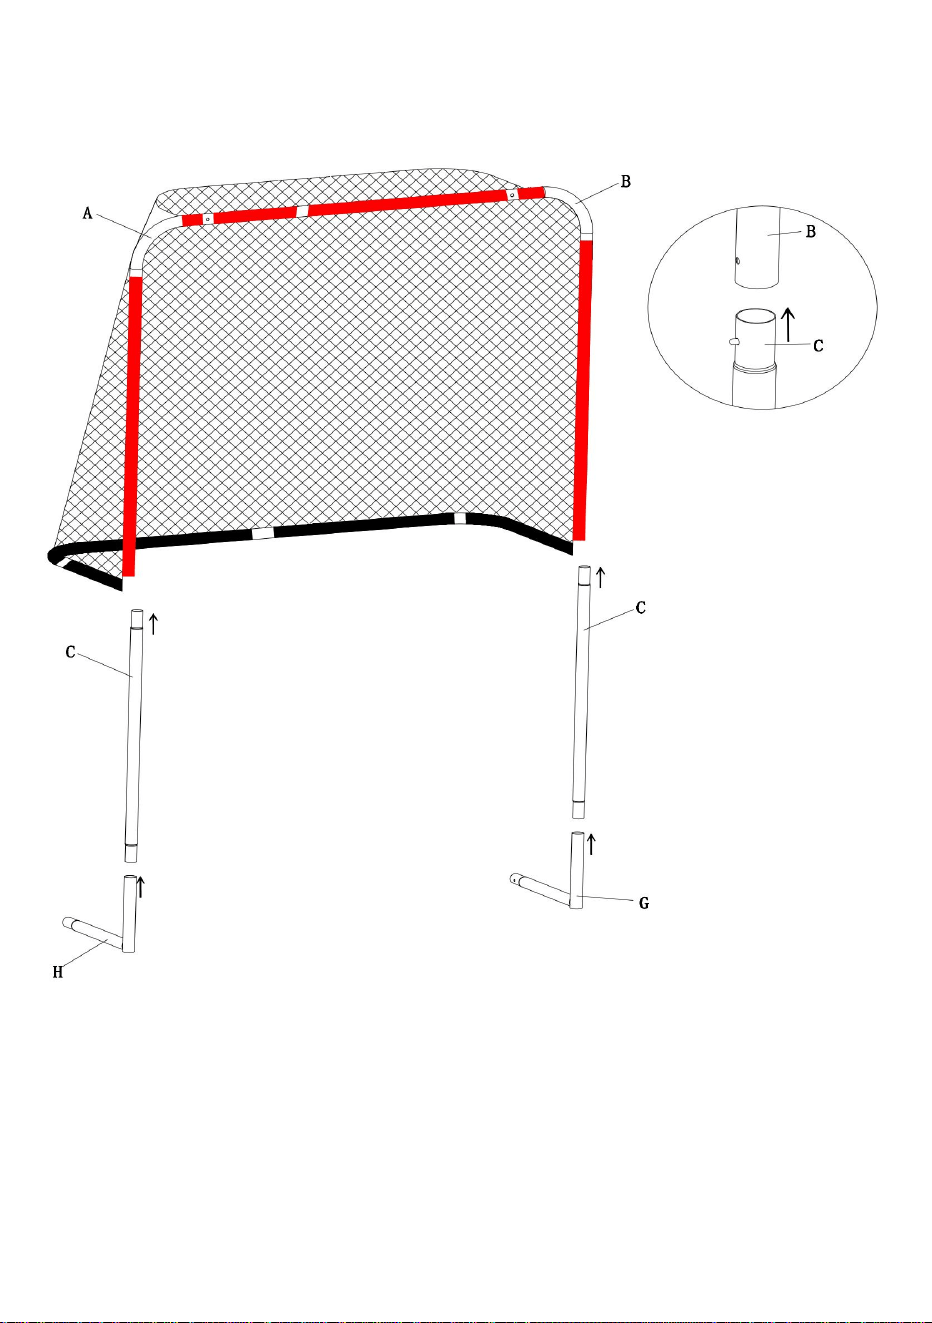
Step 2:Pass iron tubes C through both sides of the net and connect
them to iron tubes A and B respectively
- 7 -
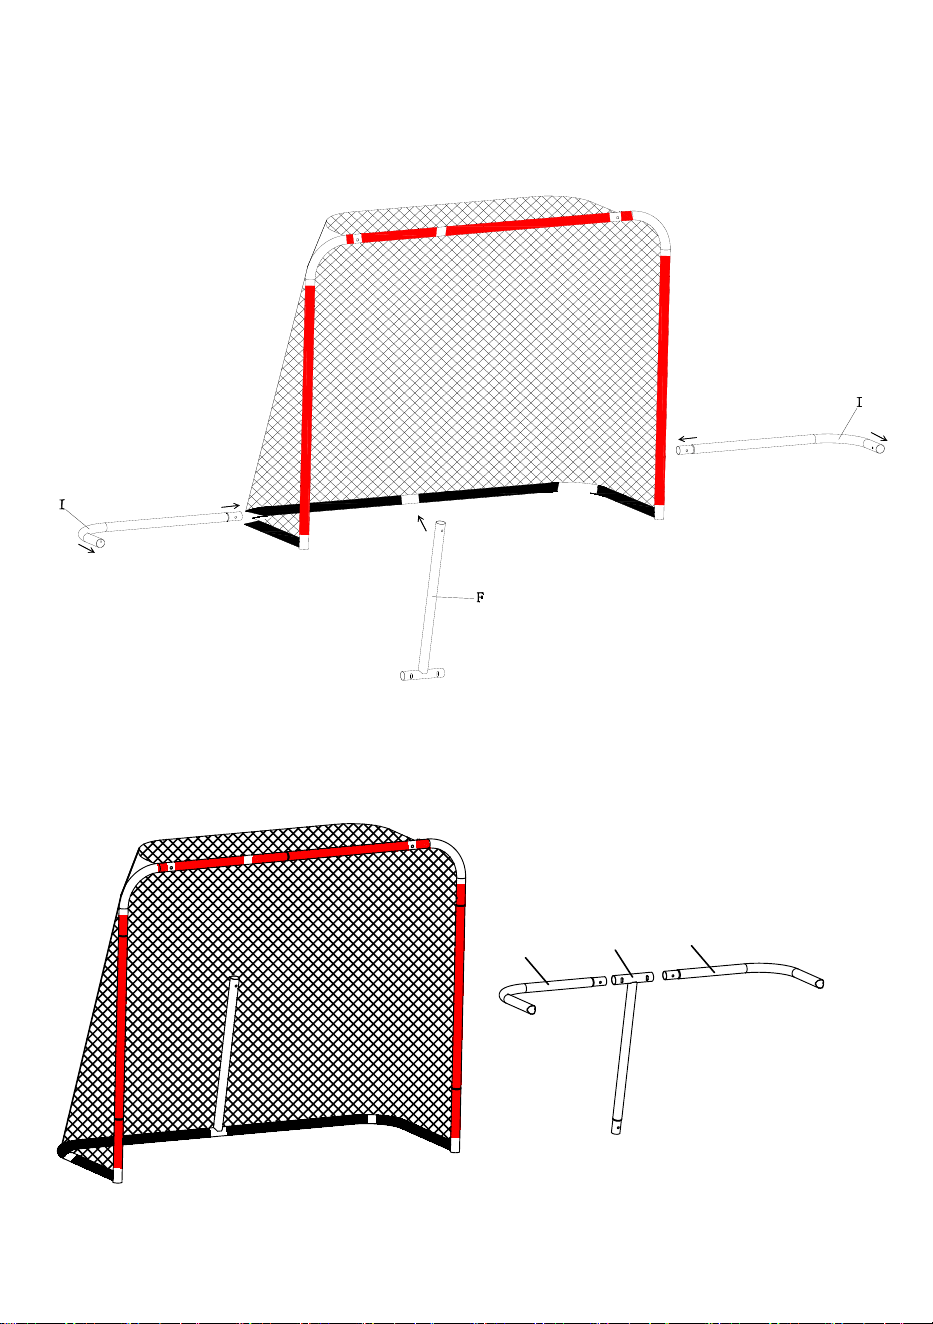
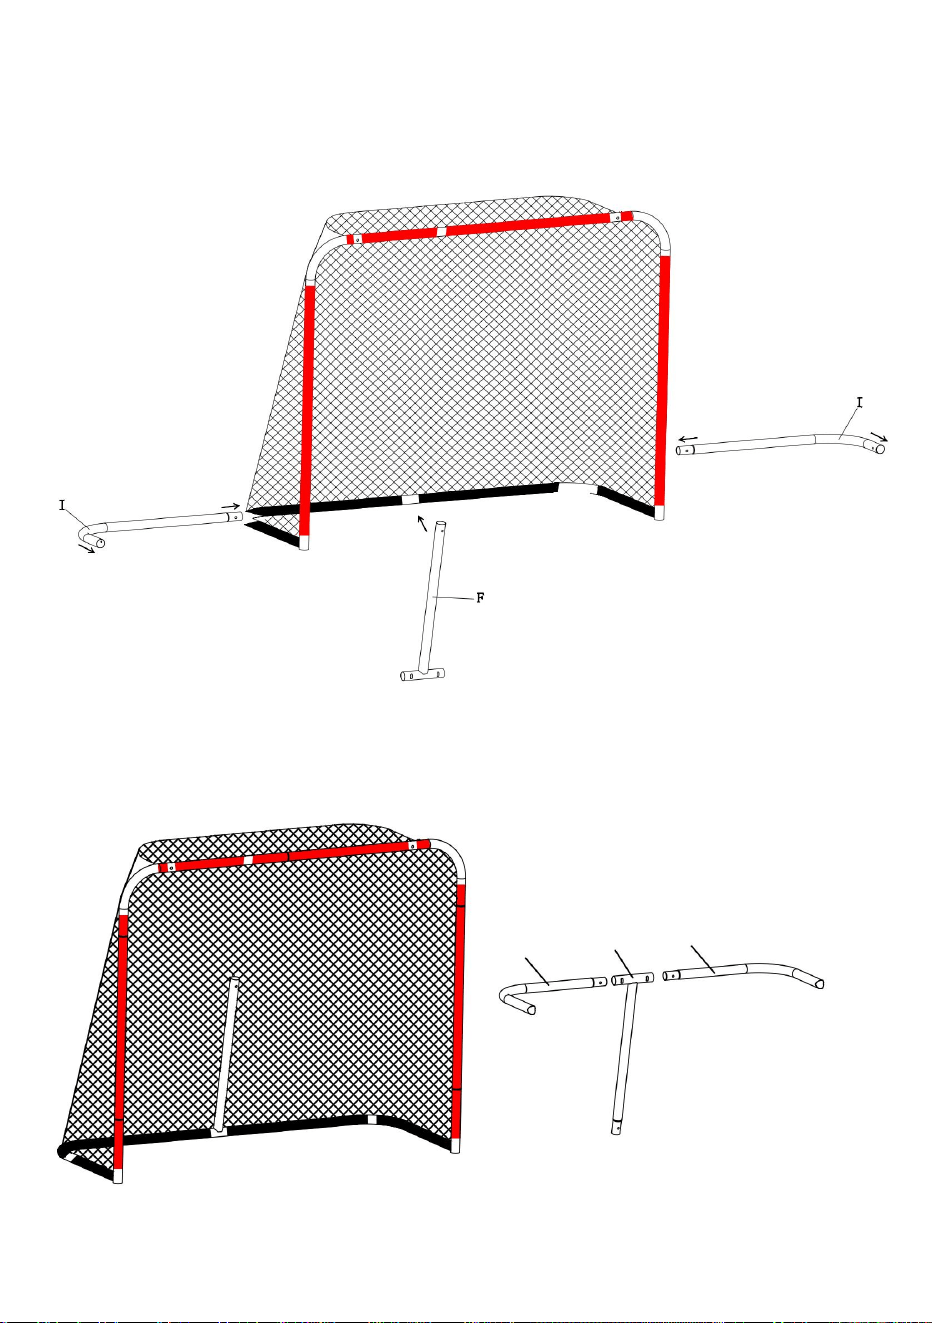
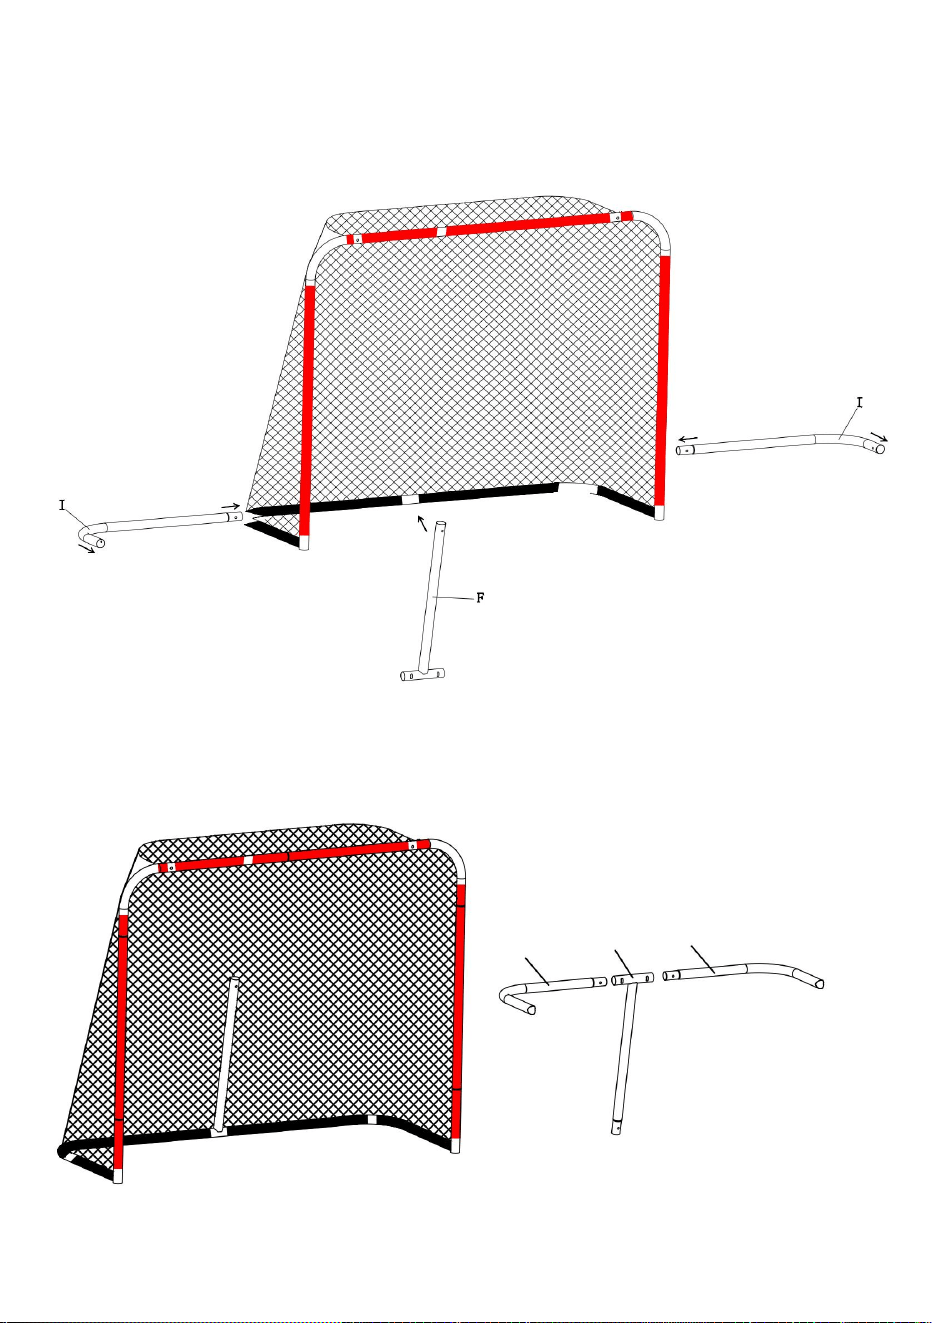
Step 3:As shown in the figure, iron pipe I is passed through the
bottom end of the net and connected to iron pipe H and iron pipe F
respectively,Finished.
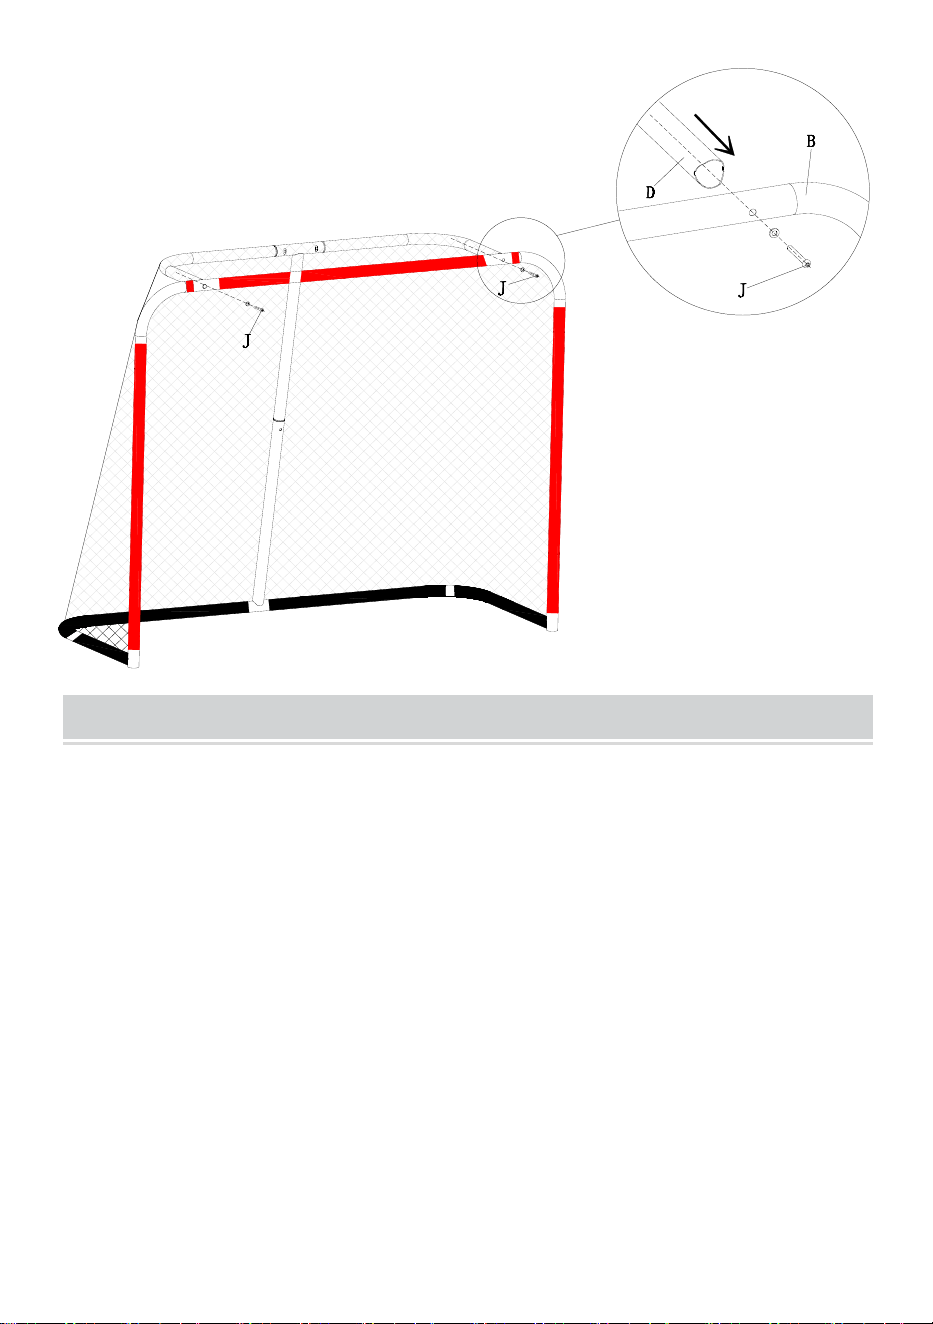
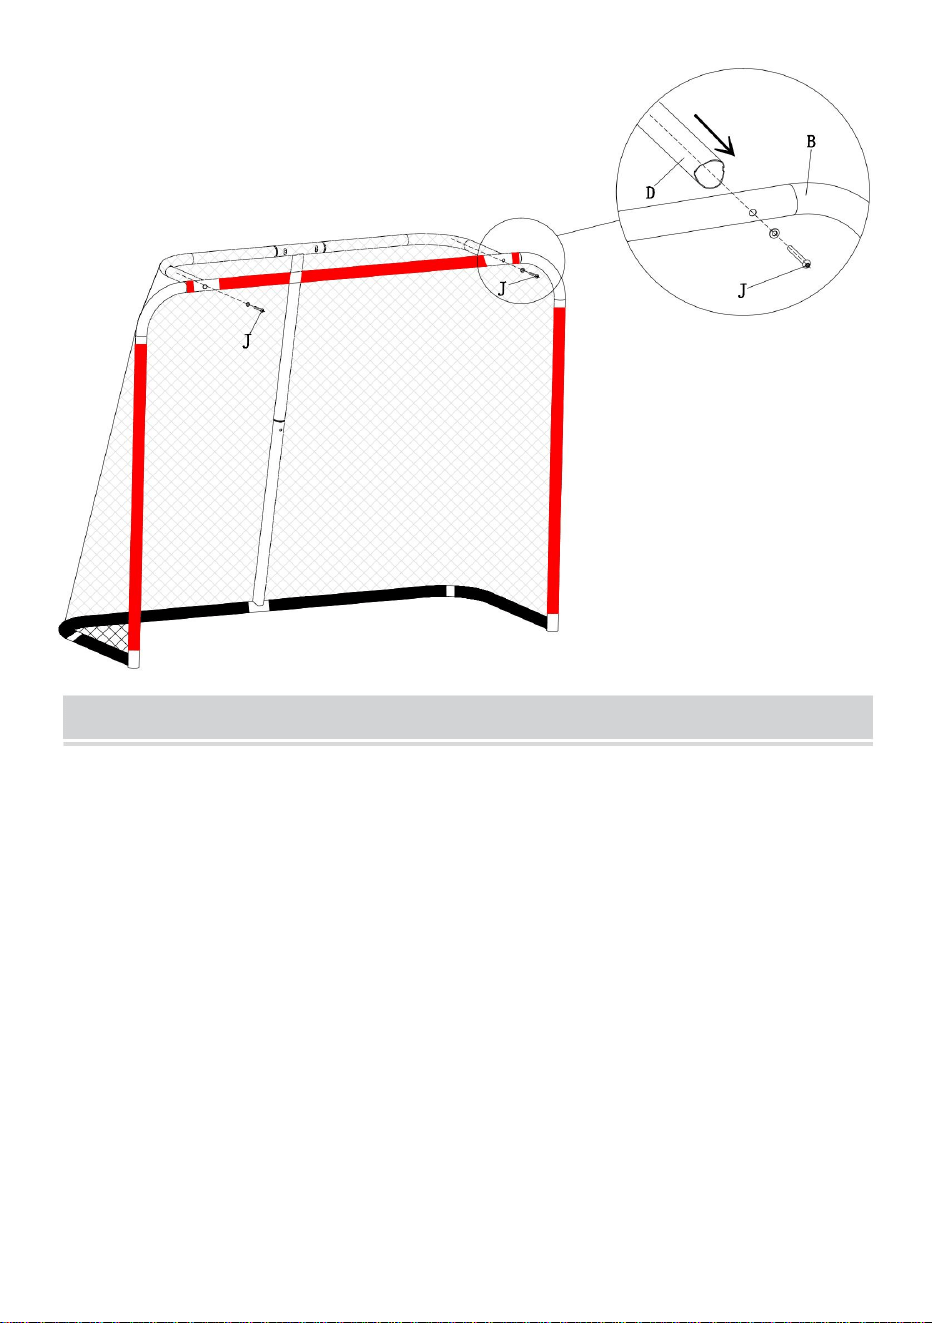
Step 4:After connecting the iron pipes E and D, connect the
components to the frame.
D
D
↑
↑
E
↑
- 8 -
Step 5:As shown, lock the screw,Finished.
CLEANING AND MAINTENANCE
►Clean the stand with a wet towel, the Net can be removed for
washing and allowed to dry naturally.
- 9 -
Manufacturer: Shanghaimuxinmuyeyouxiangongsi
Address: Shuangchenglu 803nong11hao1602A-1609shi, baoshanqu,
shanghai 200000 CN.
Imported to AUS: SIHAO PTY LTD. 1 ROKEVA STREETEASTWOOD
NSW 2122 Australia
Imported to USA: Sanven Technology Ltd. Suite 250, 9166 Anaheim
Place, Rancho Cucamonga, CA 91730
REP
EC
E-CrossStu GmbH
Mainzer Landstr.69, 60329 Frankfurt am Main.
REP
UK
YH CONSULTING LIMITED.
C/O YH Consulting Limited Office 147, Centurion
House, London Road, Staines-upon-Thames, Surrey,
TW18 4AX


BUTDEHOCKEY
MODÈLE:CDHG01A
Assistancetechniqueetcertificatdegarantieélectroniquewww.vevor.com/support
«Économisezlamoitié»,«Moitiéprix»outouteautreexpressionsimilaireutiliséeparnousnereprésente
qu'uneestimationdeséconomiesquevouspourriezréaliserenachetantcertainsoutilscheznousparrapport
auxgrandesmarquesetnecouvrepasnécessairementtouteslescatégoriesd'outilsquenousproposons.
Nousvousrappelonsdebienvouloirvérifiersoigneusementlorsquevouspassezunecommandechez
noussivouséconomisezréellementlamoitiéparrapportauxgrandesmarques.
Nouscontinuonsànousengageràvousfournirdesoutilsàdesprixcompétitifs.
Machine Translated by Google

BESOIND'AIDE?CONTACTEZNOUS!
Vousavezdesquestionssurnosproduits?Vousavezbesoind'assistancetechnique?
N'hésitezpas
ànouscontacter:Assistancetechniqueetcertificatdegarantie
électroniquewww.vevor.com/support
MODÈLE:CDHG01A
Ils'agitdelanoticed'utilisationd'origine.Veuillezlireattentivementtoutesles
instructionsdumanuelavantdel'utiliser.VEVORseréserveledroitd'interpréterclairement
notremanueld'utilisation.L'apparenceduproduitdépendduproduitquevousavez
reçu.Veuilleznousexcuser,nousnevousinformeronsplusencasdemiseàjourtechnologique
oulogicielledenotreproduit.
BUTDEHOCKEY
1
Machine Translated by Google

►Retireztouslespoidsetancragesavantdedéplacerou
surveillancependantlemontageetl'utilisation.Nelaissezpastomberd'objetslourds
►Nepasutiliserlebutàdestempératuresinférieuresàzéro.Nousconseillons
auxadultesdenepasutiliserlebutpartempsventeux.
utilisésanslefiletinstallé.Veuilleztoujoursrespecterlesconsignesdesécurité
instructions.
►Nepasutiliser
lebutavecdespiècesdéfectueuses.►Leproduit
estposédélicatementsurunsolplatpourl'utilisation.►Nejamais
grimpersurlefiletoulecadredubut.Lebutnedoitjamaisêtre
INTRODUCTION
►Lorsdudémontagedubut,assurezvousquetouslesaccessoiressontemballés
àl'écart,etqu'aucunnesoitlaissésurlasurfacedejeu.
objetssurlestubes.
►Inspecteztoujourslepoteaudebutetlefiletpourdécelertoutdéfautavantutilisationetremplacezles
pleinementconscientdetouslesavertissementsetprécautions.
AVERTISSEMENT:
Ilestdelaresponsabilitédupropriétairedes'assurerquetouslesutilisateursdeceproduitsont
►Vérifiezsil'installationestfermeavantutilisationpouréviter
résultatspossibles.
Veuillezliretouteslesinstructionsavantd'utiliserceproduit
instructionsavantdel'utiliser.Lesinformationsvousaiderontàobtenirlemeilleur
Mercibeaucoupd'avoirchoisiceproduit.Veuillezliretoutesles
dangerspotentielspourlasécurité.
►Vérifiezetserrezl'interfacedevisdechaque
►Ildoitêtrestockédansunenvironnementsecs'iln'estpasutilisépendantunelonguepériode.
composantrégulièrement.
2
Machine Translated by Google

3
LISTEDESPIÈCES
C2PIÈCES
E1PIÈCES
B1PIÈCES
Un1pièce
D2PIÈCES
Machine Translated by Google

G1PIÈCES
Je2pièces
F1PIÈCES
H1PIÈCES
J2pièces
K1PIÈCES
M6*45
4
Machine Translated by Google

B
K
B
UN
UN
↑
ASSEMBLÉE
Étape1:ConnectezlestuyauxenferAetBetfaiteslespasserparlehautdufilet
↑
5
Machine Translated by Google

6
Étape2:PassezlestubesenferCàtraverslesdeuxcôtésdufiletetconnectez
lesrespectivementauxtubesenferAetB
Machine Translated by Google

↑
↑
D
ET
D
Étape4:AprèsavoirconnectélestuyauxenferEetD,connectezles
composantsaucadre.
Étape3:Commeindiquésurlafigure,letuyauenferIestpasséàtravers
l'extrémitéinférieuredufiletetconnectérespectivementautuyauenferHet
autuyauenferF,terminé.
↑
7
Machine Translated by Google
8
NETTOYAGEETENTRETIEN
Étape5:Commeindiqué,verrouillezlavis,c'estterminé.
►Nettoyezlesupportavecuneserviettehumide,lefiletpeutêtreretiré
pourlelaveretlaisséséchernaturellement.
Machine Translated by Google

REPRÉSENTANTDUROYAUMEUNI
REPRÉSENTANTDELACE
ECrossStuGmbH
YHCONSULTINGLIMITÉE.
ImportéenAUS:SIHAOPTYLTD.1ROKEVASTREETEASTWOODNSW2122Australie
ImportéauxUSA:
SanvenTechnologyLtd.Suite250,9166AnaheimPlace,RanchoCucamonga,CA91730
Fabricant:ShanghaimuxinmuyeyouxiangongsiAdresse:
Shuangchenglu803nong11hao1602A1609shi,baoshanqu,shanghai200000CN.
MainzerLandstr.69,60329FrancfortsurleMain.
A/SYHConsultingLimitedBureau147,CenturionHouse,
LondonRoad,StainesuponThames,Surrey,TW184AX
9
Machine Translated by Google

Machine Translated by Google


HOCKEY-TOR
MODELL: CD-HG01-A
Technischer Support und E-Garantie-Zertifikat www.vevor.com/support
Wir sind weiterhin bestrebt, Ihnen Werkzeuge zu wettbewerbsfähigen Preisen anzubieten.
„Sparen Sie die Hälfte“, „Halber Preis“ oder andere ähnliche Ausdrücke, die wir verwenden, stellen nur eine
Schätzung der Ersparnis dar, die Sie beim Kauf bestimmter Werkzeuge bei uns im Vergleich zu den großen
Topmarken erzielen können, und decken nicht unbedingt alle von uns angebotenen Werkzeugkategorien ab. Wir
möchten Sie freundlich daran erinnern, bei Ihrer Bestellung bei uns sorgfältig zu prüfen, ob Sie im Vergleich
zu den großen Topmarken tatsächlich die Hälfte sparen.
Machine Translated by Google

Brauchen Sie Hilfe? Kontaktieren Sie uns!
Haben Sie Fragen zum Produkt? Benötigen Sie technischen Support? Bitte kontaktieren Sie
uns:
Technischer Support und E-Garantie-Zertifikat www.vevor.com/
support
MODELL: CD-HG01-A
Dies ist die Originalanleitung. Bitte lesen Sie alle Anweisungen sorgfältig durch, bevor
Sie das Gerät in Betrieb nehmen. VEVOR behält sich eine klare Auslegung unserer
Bedienungsanleitung vor. Das Erscheinungsbild des Produkts richtet sich nach dem
Produkt, das Sie erhalten haben. Bitte verzeihen Sie uns, dass wir Sie nicht erneut informieren,
wenn es Technologie- oder Software-Updates für unser Produkt gibt.
HOCKEY-TOR
- 1 -
Machine Translated by Google

ÿ Überprüfen Sie Torpfosten und Netz vor jedem Gebrauch auf Defekte und ersetzen Sie diese
ÿ Entfernen Sie alle Gewichte und Anker, bevor Sie das Gerät bewegen oder
Montage und Gebrauch unter Aufsicht. Lassen Sie keine schweren Gegenstände fallen.
ÿ Das Tor nicht bei Wind verwenden. ÿ Das Tor nicht bei Minustemperaturen verwenden.
Wir empfehlen erwachsenen
ohne Netz verwendet werden. Bitte beachten Sie immer die Sicherheitshinweise
Anweisungen.
beschädigte Teile.
ÿ Benutzen Sie das Tor nicht mit defekten Teilen. ÿ Das
Produkt wird zur Benutzung vorsichtig auf einen ebenen Untergrund gestellt. ÿ
Klettern Sie niemals auf das Netz oder den Torrahmen. Das Tor darf niemals
EINFÜHRUNG
weg, und dass keine auf der Spielfläche zurückbleiben.
ÿ Achten Sie beim Abbau des Tores darauf, dass alle Teile verpackt sind
Gegenstände auf den Rohren.
sich aller Warnungen und Vorsichtsmaßnahmen voll bewusst sein.
WARNUNG:
Es liegt in der Verantwortung des Eigentümers, sicherzustellen, dass alle Benutzer dieses Produkts
ÿ Prüfen Sie vor der Inbetriebnahme, ob die Installation fest ist, um
mögliche Ergebnisse.
Bitte lesen Sie alle Anweisungen, bevor Sie dieses Produkt verwenden
Lesen Sie vor der Verwendung die Bedienungsanleitung sorgfältig durch. Die Informationen helfen Ihnen, die
Vielen Dank, dass Sie sich für dieses Produkt entschieden haben. Bitte lesen Sie alle
ÿ Überprüfen Sie die
Schraubverbindungen der einzelnen
Komponente regelmäßig.
ÿBei längerem Nichtgebrauch sollte es in einer trockenen Umgebung gelagert werden.
- 2 -
Machine Translated by Google

C 2 STK
E 1 STK
B 1 STK
EIN 1 STÜCK
D 2 STK
TEILELISTE
- 3 -
Machine Translated by Google

- 4 -
G 1 STK
Ich 2 STK
F 1 STK
H 1 STK
J 2 STK
K 1 STK
M6*45
Machine Translated by Google

ÿ
B
K
B
A
A
Schritt 1: Verbinden Sie die Eisenrohre A und B und führen Sie sie durch die Oberseite
des Netzes
MONTAGE
ÿ
- 5 -
Machine Translated by Google

- 6 -
Schritt 2: Führen Sie die Eisenrohre C durch beide Seiten des Netzes und
verbinden Sie sie mit den Eisenrohren A und B.
Machine Translated by Google

ÿ
ÿ
D
UND
D
Schritt 3: Wie in der Abbildung gezeigt, wird Eisenrohr I durch das untere Ende des Netzes
geführt und jeweils mit Eisenrohr H und Eisenrohr F verbunden. Fertig.
Schritt 4: Nachdem Sie die Eisenrohre E und D angeschlossen haben, verbinden Sie
die Komponenten mit dem Rahmen.
ÿ
- 7 -
Machine Translated by Google

ÿReinigen Sie den Ständer mit einem feuchten Handtuch. Das Netz kann zum
Waschen abgenommen und an der Luft trocknen gelassen werden.
REINIGUNG UND WARTUNG
Schritt 5: Wie gezeigt die Schraube festziehen, fertig.
- 8 -
Machine Translated by Google

UK REP
Vertreter der EG
E-CrossStu GmbH
YH CONSULTING LIMITED.
Importiert nach AUS: SIHAO PTY LTD. 1 ROKEVA STREETEASTWOOD NSW 2122
Australien Importiert
nach USA: Sanven Technology Ltd. Suite 250, 9166 Anaheim Place, Rancho Cucamonga,
CA 91730
Hersteller: Shanghaimuxinmuyeyouxiangongsi Adresse:
Shuangchenglu 803nong11hao1602A-1609shi, baoshanqu, Shanghai 200000 CN.
Mainzer Landstr.69, 60329 Frankfurt am Main.
C/O YH Consulting Limited Office 147, Centurion House,
London Road, Staines-upon-Thames, Surrey, TW18 4AX
- 9 -
Machine Translated by Google

Machine Translated by Google


"Risparmia la metà", "Metà prezzo" o qualsiasi altra espressione simile da noi utilizzata rappresenta
solo una stima del risparmio che potresti ottenere acquistando determinati utensili con noi rispetto ai
principali marchi principali e non significa necessariamente coprire tutte le categorie di utensili da noi
offerti. Ti ricordiamo gentilmente di verificare attentamente quando effettui un ordine con noi se
stai effettivamente risparmiando la metà rispetto ai principali marchi principali.
Continuiamo a impegnarci per fornirvi strumenti a prezzi competitivi.
MODELLO: CD-HG01-A
Supporto tecnico e certificato di garanzia elettronica www.vevor.com/support
PORTA DA HOCKEY
Machine Translated by Google

Questa è l'istruzione originale, si prega di leggere attentamente tutte le istruzioni del
manuale prima di utilizzare. VEVOR si riserva una chiara interpretazione del nostro manuale
utente. L'aspetto del prodotto sarà soggetto al prodotto ricevuto. Vi preghiamo di
perdonarci se non vi informeremo di nuovo se ci sono aggiornamenti tecnologici o software sul
nostro prodotto.
MODELLO: CD-HG01-A
Hai domande sul prodotto? Hai bisogno di supporto tecnico? Non esitare a contattarci:
Supporto
tecnico e certificato di garanzia elettronica www.vevor.com/
support
HAI BISOGNO DI AIUTO? CONTATTACI!
PORTA DA HOCKEY
- 1 -
Machine Translated by Google

ÿ Rimuovere tutti i pesi e gli ancoraggi prima di spostare o
supervisione durante il montaggio e l'uso. Non far cadere oggetti pesanti
istruzioni.
oggetti sui tubi.
parti danneggiate.
ÿ Non utilizzare la porta con parti difettose. ÿ Il
prodotto viene posizionato delicatamente su una superficie piana per
l'uso. ÿ Non salire mai sulla rete o sulla struttura della porta. La porta non deve mai essere
ÿ Non utilizzare la porta in caso di vento. ÿ Non utilizzare la porta a
temperature inferiori allo zero. Si consiglia agli adulti
utilizzato senza la rete montata. Si prega di rispettare sempre le norme di sicurezza
INTRODUZIONE
ÿ Quando si smonta la porta assicurarsi che tutti i raccordi siano imballati
via, e che non ne rimangano sulla superficie di gioco.
ÿ Ispezionare sempre il palo della porta e la rete per eventuali difetti prima dell'uso e sostituirli
AVVERTIMENTO:
È responsabilità del proprietario garantire che tutti gli utenti di questo prodotto siano
pienamente consapevole di tutte le avvertenze e precauzioni.
ÿSe non utilizzato per lungo tempo, conservarlo in un ambiente asciutto.
istruzioni prima di utilizzarlo. Le informazioni ti aiuteranno a ottenere il meglio
Si prega di leggere tutte le istruzioni prima di utilizzare questo prodotto
possibili risultati.
Grazie mille per aver scelto questo prodotto. Si prega di leggere attentamente tutte le
componente regolarmente.
ÿ Prima dell'uso, verificare che l'installazione sia stabile per evitare
potenziali pericoli per la sicurezza.
ÿ Controllare e serrare l'interfaccia della vite di ogni
- 2 -
Machine Translated by Google

- 3 -
ELENCO DEI PEZZI
B 1 PZ
E 1 PZ
C 2 PZ
Un 1PZ
D 2 PZ
Machine Translated by Google

G 1 PZ
Io 2 PZ
F 1PZ
H 1 PZ
K 1 PZ
J 2 PZ
M6*45
- 4 -
Machine Translated by Google

ÿ
B
E
B
UN
UN
Fase 1: Collegare i tubi di ferro A e B e farli passare attraverso la parte superiore della rete
ASSEMBLAGGIO
- 5 -
ÿ
Machine Translated by Google

- 6 -
Fase 2: far passare i tubi di ferro C attraverso entrambi i lati della rete e
collegarli rispettivamente ai tubi di ferro A e B
Machine Translated by Google

ÿ
ÿ
D
E
D
Fase 3: Come mostrato nella figura, il tubo di ferro I viene fatto passare
attraverso l'estremità inferiore della rete e collegato rispettivamente al tubo di
ferro H e al tubo di ferro F. Finito.
Fase 4: Dopo aver collegato i tubi di ferro E e D, collegare i componenti
al telaio.
- 7 -
ÿ
Machine Translated by Google

ÿPulisci il supporto con un panno umido; la rete può essere rimossa
per il lavaggio e lasciata asciugare naturalmente.
PULIZIA E MANUTENZIONE
Fase 5: Come mostrato, bloccare la vite. Finito.
- 8 -
Machine Translated by Google
RAPPRESENTANZA DEL REGNO UNITO
Rappresentante della CE
E-CrossStu GmbH
CONSULENZA YH LIMITATA.
Importato in AUS: SIHAO PTY LTD. 1 ROKEVA STREETEASTWOOD NSW 2122
Australia Importato negli
USA: Sanven Technology Ltd. Suite 250, 9166 Anaheim Place, Rancho Cucamonga, CA
91730
Produttore: Shanghaimuxinmuyeyouxiangongsi Indirizzo:
Shuangchenglu 803nong11hao1602A-1609shi, baoshanqu, shanghai 200000 CN.
Mainzer Landstr.69, 60329 Francoforte sul Meno.
C/O YH Consulting Limited Ufficio 147, Centurion House,
London Road, Staines-upon-Thames, Surrey, TW18 4AX
- 9 -
Machine Translated by Google

Machine Translated by Google


PORTERODEHOCKEY
MODELO:CDHG01A
Soportetécnicoycertificadodegarantíaelectrónicawww.vevor.com/support
"Ahorrelamitad","mitaddeprecio"ocualquierotraexpresiónsimilarqueutilicemossolorepresenta
unaestimacióndelahorroquepodríaobteneralcomprarciertasherramientasconnosotrosencomparación
conlasprincipalesmarcasynonecesariamentesignificaquecubratodaslascategoríasdeherramientas
queofrecemos.Lerecordamosque,alrealizarunpedidoconnosotros,verifiquecuidadosamentesi
realmenteestáahorrandolamitadencomparaciónconlasprincipalesmarcas.
Seguimoscomprometidosabrindarleherramientasaprecioscompetitivos.
Machine Translated by Google

¿NECESITAAYUDA?¡CONTÁCTENOS!
Estassonlasinstruccionesoriginales,leaatentamentetodaslasinstruccionesdel
manualantesdeutilizarelproducto.VEVORsereservaunainterpretaciónclaradenuestro
manualdeusuario.Laaparienciadelproductoestarásujetaalproductoquerecibió.
Perdónenospornoinformarlenuevamentesihayactualizacionesdetecnologíaosoftwareen
nuestroproducto.
MODELO:CDHG01A
¿Tienepreguntassobreelproducto?¿Necesitaasistenciatécnica?Nodudeenponerseen
contactocon
nosotros:Asistenciatécnicaycertificadodegarantíaelectrónica
www.vevor.com/support
PORTERODEHOCKEY
1
Machine Translated by Google

►Retiretodoslospesosyanclajesantesdemovero
Supervisiónduranteelmontajeyuso.Nodejecaerobjetospesados.
►Noutilicelaporteríaencondicionesdeviento.►Noutilicelaporteríaen
temperaturasbajocero.Recomendamoslapresenciadeunadulto.
►Noutilicela
porteríaconpiezasdefectuosas.►Elproductose
colocaconcuidadosobreunasuperficieplanaparasuuso.►Nuncase
subaalarednialmarcodelaportería.Laporteríanuncadebe
instrucciones.
Seutilizasinlaredinstalada.Respetesiemprelasnormasdeseguridad.
INTRODUCCIÓN
►Aldesmontarlaportería,asegúresedequetodoslosaccesoriosesténembalados
lejos,yquenoquedeningunosobrelasuperficiedejuego.
objetosenlostubos.
►Inspeccionesiempreelposteylareddelaporteríaparadetectardefectosantesdeusarlosyreemplácelos.
plenamenteconscientedetodaslasadvertenciasyprecauciones.
ADVERTENCIA:
EsresponsabilidaddelPropietariogarantizarquetodoslosusuariosdeesteproducto
►Compruebesilainstalaciónesfirmeantesdeusarlaparaevitar
Posiblesresultados.
Leatodaslasinstruccionesantesdeutilizaresteproducto.
Instruccionesantesdeusarlo.Lainformaciónleayudaráalograrelmejorresultado.
Muchasgraciasporelegiresteproducto.Leatodaslasinstrucciones.
posiblesriesgosdeseguridad.►
Compruebeyaprietelainterfazdetornillodecada
►Debealmacenarseenunambientesecosinoseutilizaduranteuntiempoprolongado.
componenteregularmente.
2
Machine Translated by Google

3
LISTADEPIEZAS
B1pieza
1pieza
C2piezas
Unapieza
D2piezas
Machine Translated by Google

4
1pieza
Yo2piezas
1pieza
1pieza
J2piezas
1pieza
M6*45
Machine Translated by Google

↑
B
K
B
A
A
ASAMBLEA
Paso1:ConectelostubosdehierroAyBypáselosporlapartesuperiordelared.
↑
5
Machine Translated by Google

6
Paso2:PaselostubosdehierroCatravésdeambosladosdelaredy
conéctelosalostubosdehierroAyBrespectivamente.
Machine Translated by Google

↑
↑
D
Y
D
Paso4:DespuésdeconectarlostubosdehierroEyD,conectelos
componentesalmarco.
Paso3:Comosemuestraenlafigura,eltubodehierroIpasaatravésdel
extremoinferiordelaredyseconectaaltubodehierroHyaltubodehierroF
respectivamente.Terminado.
↑
7
Machine Translated by Google

8
LIMPIEZAYMANTENIMIENTO
Paso5:Comosemuestra,bloqueeeltornillo,listo.
►Limpieelsoporteconunatoallahúmeda,laredsepuedequitar
paralavarlaydejarsecarnaturalmente.
Machine Translated by Google

REPRESENTANTECE
REPRESENTANTEDELREINOUNIDO
ECrossStuGmbH
YHCONSULTINGLIMITADA.
ImportadoaAUS:SIHAOPTYLTD.1ROKEVASTREETEASTWOODNSW2122
AustraliaImportadoaEE.
UU.:SanvenTechnologyLtd.Suite250,9166AnaheimPlace,RanchoCucamonga,CA
91730
Fabricante:ShanghaimuxinmuyeyouxiangongsiDirección:
Shuangchenglu803nong11hao1602A1609shi,baoshanqu,shanghai200000CN.
MainzerLandstr.69,60329FráncfortdelMeno.
C/OYHConsultingLimitedOficina147,CenturionHouse,
LondonRoad,StainesuponThames,Surrey,TW184AX
9
Machine Translated by Google

Machine Translated by Google


Nadal staramy się oferować Państwu narzędzia w konkurencyjnych cenach.
„Oszczędź połowę”, „Połowa ceny” lub inne podobne wyrażenia używane przez nas stanowią
jedynie szacunkowe oszczędności, jakie możesz uzyskać, kupując u nas określone narzędzia w
porównaniu z głównymi markami i niekoniecznie oznaczają one objęcie wszystkich kategorii narzędzi
oferowanych przez nas. Uprzejmie przypominamy, aby dokładnie sprawdzić, czy składając u nas
zamówienie faktycznie oszczędzasz połowę w porównaniu z głównymi markami.
MODEL: CD-HG01-A
Wsparcie techniczne i certyfikat gwarancji elektronicznej www.vevor.com/support
BRAMKA HOKEJOWA
Machine Translated by Google
To jest oryginalna instrukcja, przed użyciem należy uważnie przeczytać wszystkie
instrukcje. VEVOR zastrzega sobie jasną interpretację naszej instrukcji obsługi. Wygląd produktu
będzie zależał od produktu, który otrzymałeś. Prosimy o wybaczenie, że nie poinformujemy
Cię ponownie, jeśli w naszym produkcie pojawią się jakiekolwiek aktualizacje technologiczne lub
oprogramowania.
MODEL: CD-HG01-A
Masz pytania dotyczące produktu? Potrzebujesz wsparcia technicznego? Skontaktuj się z
nami: Wsparcie
techniczne i certyfikat E-Gwarancji www.vevor.com/support
POTRZEBUJESZ POMOCY? SKONTAKTUJ SIĘ Z NAMI!
BRAMKA HOKEJOWA
- 1 -
Machine Translated by Google

Przed przeprowadzką lub
nadzór podczas montażu i użytkowania. Nie upuszczaj ciężkich przedmiotów
instrukcje.
obiekty na rurach.
uszkodzone
części. Nie należy używać bramki z uszkodzonymi
częściami. Produkt należy ostrożnie umieścić na płaskim podłożu w
celu jego użycia. Nigdy nie wspinaj się na siatkę lub ramę bramki. Bramka nigdy nie może być
rozmontowanie bramki. Nie używaj bramki przy wietrznej pogodzie.
Nie używaj bramki przy temperaturach poniżej zera. Zalecamy, aby dorośli
używane bez zamontowanej siatki. Zawsze przestrzegaj zasad bezpieczeństwa
WSTĘP
Podczas demontażu bramki należy upewnić się, że wszystkie elementy mocujące są spakowane
z dala i że żadna nie pozostaje na powierzchni boiska.
Przed każdym użyciem należy sprawdzić słupek bramki i siatkę pod kątem uszkodzeń i wymienić je
OSTRZEŻENIE:
Właściciel jest odpowiedzialny za zapewnienie, że wszyscy użytkownicy tego produktu są:
w pełni świadomy wszystkich ostrzeżeń i środków ostrożności.
Jeśli nie będziesz używać produktu przez dłuższy czas, przechowuj go w suchym miejscu.
przed użyciem zapoznaj się z instrukcją. Informacje te pomogą Ci osiągnąć najlepszy efekt
Przed użyciem tego produktu należy przeczytać wszystkie instrukcje.
możliwe wyniki.
Dziękujemy bardzo za wybranie tego produktu. Prosimy o przeczytanie wszystkich
Przed użyciem sprawdź, czy instalacja jest stabilna, aby uniknąć
składnik regularnie.
potencjalne zagrożenia
bezpieczeństwa. Sprawdź i dokręć połączenie śrubowe każdego
- 2 -
Machine Translated by Google

C 2 SZT.
E 1 SZT.
B 1 SZT.
1 SZT.
D 2 SZT.
LISTA CZĘŚCI
- 3 -
Machine Translated by Google

G 1 SZT.
Ja 2 SZT.
F 1 SZT.
H 1 SZT.
K 1 SZT.
J 2 SZT.
M6*45
- 4 -
Machine Translated by Google

B
K
B
A
A
MONTAŻ
Krok 1: Połącz rury żelazne A i B i przeciągnij je przez górną część siatki
- 5 -
Machine Translated by Google
- 6 -
Krok 2: Przeciągnij rurki żelazne C przez obie strony siatki i podłącz
je odpowiednio do rurek żelaznych A i B.
Machine Translated by Google
D
I
D
Krok 3: Jak pokazano na rysunku, rurę żelazną I przeprowadza
się przez dolny koniec siatki i łączy odpowiednio z rurą żelazną H i
rurą żelazną F. Gotowe.
Krok 4: Po połączeniu rur żeliwnych E i D należy połączyć
elementy z ramą.
- 7 -
Machine Translated by Google

Stojak należy czyścić wilgotnym ręcznikiem, siatkę można zdjąć do
prania i pozostawić do naturalnego wyschnięcia.
CZYSZCZENIE I KONSERWACJA
Krok 5: Zablokuj śrubę, jak pokazano. Gotowe.
- 8 -
Machine Translated by Google
- 9 -
E-CrossStu GmbH
YH CONSULTING LIMITED.
Importowane do AUS: SIHAO PTY LTD. 1 ROKEVA STREETEASTWOOD NSW 2122 Australia
Importowane do USA:
Sanven Technology Ltd. Suite 250, 9166 Anaheim Place, Rancho Cucamonga, CA 91730
Producent: Shanghaimuxinmuyeyouxiangongsi Adres:
Shuangchenglu 803nong11hao1602A-1609shi, baoshanqu, szanghaj 200000 CN.
Mainzer Landstr.69, 60329 Frankfurt nad Menem.
C/O YH Consulting Limited Biuro 147, Centurion House,
London Road, Staines-upon-Thames, Surrey, TW18 4AX
Przedstawiciel UE
REP WIELKIEJ BRYTANII
Machine Translated by Google

Machine Translated by Google


HOCKEYDOEL
MODEL: CD-HG01-A
Technische ondersteuning en e-garantiecertificaat www.vevor.com/support
Wij streven er voortdurend naar om u gereedschappen tegen concurrerende prijzen te leveren.
"Save Half", "Half Price" of andere soortgelijke uitdrukkingen die wij gebruiken, geven alleen een schatting van de
besparingen die u kunt behalen door bepaalde gereedschappen bij ons te kopen in vergelijking met de grote topmerken
en betekent niet noodzakelijkerwijs dat alle categorieën gereedschappen die wij aanbieden, worden gedekt. Wij
herinneren u eraan om zorgvuldig te controleren of u daadwerkelijk de helft bespaart in vergelijking met de grote
topmerken wanneer u een bestelling bij ons plaatst.
Machine Translated by Google
HULP NODIG? NEEM CONTACT MET ONS OP!
- 1 -
Heeft u vragen over het product? Heeft u technische ondersteuning nodig? Neem dan gerust
contact met
ons op: Technische ondersteuning en E-garantiecertificaat
www.vevor.com/support
MODEL: CD-HG01-A
Dit is de originele instructie, lees alle handleidingen zorgvuldig door voordat u het
product gebruikt. VEVOR behoudt zich een duidelijke interpretatie van onze gebruikershandleiding
voor. Het uiterlijk van het product is afhankelijk van het product dat u hebt ontvangen.
Vergeef ons dat we u niet opnieuw zullen informeren als er technologie- of software-updates
voor ons product zijn.
HOCKEYDOEL
Machine Translated by Google

ÿ Controleer de doelpaal en het net altijd op gebreken voordat u ze gebruikt en vervang ze.
- 2 -
het demonteren van het doel. Gebruik het doel niet bij winderig weer. ÿ Gebruik
het doel niet bij temperaturen onder nul. Wij adviseren volwassenen
ÿ Verwijder alle gewichten en ankers voordat u gaat verplaatsen of
toezicht tijdens de montage en het gebruik. Laat geen zware voorwerpen vallen
weg, en dat er geen op het speelveld achterblijft.
beschadigde
onderdelen. ÿ Gebruik het doel niet met defecte
onderdelen. ÿ Plaats het product voorzichtig op een vlakke ondergrond
voor gebruik. ÿ Klim nooit op het net of het doelframe. Het doel mag nooit worden
instructies.
gebruikt zonder dat het net is gemonteerd. Houd u altijd aan de veiligheidsvoorschriften
INVOERING
voorwerpen op de buizen.
ÿ Zorg ervoor dat bij het demonteren van het doel alle toebehoren zijn ingepakt
Het is de verantwoordelijkheid van de eigenaar om ervoor te zorgen dat alle gebruikers van dit product
volledig op de hoogte zijn van alle waarschuwingen en voorzorgsmaatregelen.
Lees alle instructies voordat u dit product gebruikt
ÿ Controleer voor gebruik of de installatie stevig is om te voorkomen dat
instructies voordat u het gebruikt. De informatie zal u helpen om het beste te bereiken
WAARSCHUWING:
mogelijke resultaten.
Hartelijk dank voor het kiezen van dit product. Lees alle
mogelijke veiligheidsrisico's. ÿ
Controleer en draai de schroefinterface van elk onderdeel vast
component regelmatig.
ÿAls u het langere tijd niet gebruikt, moet u het op een droge plek bewaren.
Machine Translated by Google

C 2STUKS
D 2STUKS
B 1STUKS
Een 1PCS
E 1STUKS
ONDERDELENLIJST
- 3 -
Machine Translated by Google

- 4 -
G 1STUKS
M6*45
F 1STUKS
H 1STUKS
K 1STUKS
Ik 2PCS
J 2PCS
Machine Translated by Google

ÿ
ÿ
B
B
A
A
Ik
Stap 1: Verbind de ijzeren buizen A en B en laat ze door de bovenkant van het net lopen
MONTAGE
- 5 -
Machine Translated by Google

- 6 -
Stap 2: Haal de ijzeren buizen C door beide zijden van het net en verbind ze
respectievelijk met de ijzeren buizen A en B.
Machine Translated by Google

ÿ
ÿ
ÿ
D
EN
D
Stap 4: Nadat u de ijzeren buizen E en D hebt aangesloten, bevestigt u
de componenten aan het frame.
Stap 3: Zoals weergegeven in de afbeelding wordt ijzeren pijp I door het
onderste uiteinde van het net geleid en respectievelijk verbonden met ijzeren pijp
H en ijzeren pijp F. Klaar.
- 7 -
Machine Translated by Google

ÿMaak de standaard schoon met een natte handdoek. Het net kan verwijderd
worden om te wassen en kan dan op natuurlijke wijze drogen.
REINIGING EN ONDERHOUD
Stap 5: Draai de schroef vast zoals afgebeeld. Klaar.
- 8 -
Machine Translated by Google

VK REP
EC-REP
Geïmporteerd naar AUS: SIHAO PTY LTD. 1 ROKEVA STREETEASTWOOD NSW 2122
Australië Geïmporteerd
naar de VS: Sanven Technology Ltd. Suite 250, 9166 Anaheim Place, Rancho Cucamonga,
CA 91730
Mainzer Landstr.69, 60329 Frankfurt am Main.
E-CrossStu GmbH
Fabrikant: Shanghaimuxinmuyeyouxiangongsi Adres:
Shuangchenglu 803nong11hao1602A-1609shi, baoshanqu, shanghai 200000 CN.
C/O YH Consulting Limited Kantoor 147, Centurion House,
London Road, Staines-upon-Thames, Surrey, TW18 4AX
YH CONSULTING LIMITED.
- 9 -
Machine Translated by Google

Machine Translated by Google


HOCKEYMÅL
Teknisk support och e-garanticertifikat www.vevor.com/support
MODELL: CD-HG01-A
"Spara hälften", "halva priset" eller andra liknande uttryck som används av oss representerar
bara en uppskattning av besparingar du kan dra nytta av att köpa vissa verktyg hos oss jämfört med
de stora toppmärkena och betyder inte nödvändigtvis att täcka alla kategorier av verktyg som erbjuds
av oss. Du påminns vänligen om att noggrant kontrollera när du gör en beställning hos oss om
du faktiskt sparar hälften i jämförelse med de främsta stora varumärkena.
Vi fortsätter att vara engagerade i att ge dig verktyg till konkurrenskraftiga priser.
Machine Translated by Google

BEHÖVER HJÄLP? KONTAKTA OSS!
- 1 -
Detta är den ursprungliga instruktionen, läs alla instruktioner noggrant innan du
använder den. VEVOR reserverar sig för en tydlig tolkning av vår användarmanual. Utseendet
på produkten är beroende av den produkt du fått. Ursäkta oss att vi inte kommer att
informera dig igen om det finns någon teknik eller mjukvaruuppdateringar på vår produkt.
MODELL: CD-HG01-A
Har du produktfrågor? Behöver du teknisk support? Kontakta oss gärna: Teknisk support och
e-
garanticertifikat www.vevor.com/support
HOCKEYMÅL
Machine Translated by Google

ÿ Inspektera alltid målstolpen och nätet för defekter före användning och byt ut dem
- 2 -
demontering av målet. Använd inte målet i blåsigt väder. ÿ Använd inte målet
i minusgrader. Vi rekommenderar vuxna
ÿ Ta bort alla vikter och ankare innan du flyttar eller
övervakning under montering och användning. Tappa inte något tungt
ÿ Se till att alla beslag är packade vid demontering av målet
används utan att nätet är monterat. Vänligen följ alltid säkerheten
instruktioner.
skadade delar.
ÿ Använd inte målet med defekta delar. ÿ
Produkten placeras försiktigt på en plan mark för användning. ÿ Klättra
aldrig på nätet eller målramen. Målet får aldrig vara det
INTRODUKTION
bort, och att icke lämnas på spelytan.
föremål på rören.
Det är ägarens ansvar att se till att alla användare av denna produkt är
fullt medveten om alla varningar och försiktighetsåtgärder.
Läs alla instruktioner innan du använder denna produkt
ÿ Kontrollera om installationen är stadig innan användning för att undvika
möjliga resultat.
VARNING:
instruktioner innan du använder den. Informationen hjälper dig att uppnå det bästa
Tack så mycket för att du valde denna produkt. Vänligen läs alla
potentiella säkerhetsrisker. ÿ
Kontrollera och dra åt skruvgränssnittet på var och en
komponent regelbundet.
ÿDen bör förvaras i en torr miljö om den inte används under en längre tid.
Machine Translated by Google
C 2 st
D 2 st
B 1 st
En 1 st
E 1 st
DELLISTA
- 3 -
Machine Translated by Google
- 4 -
F 1 st
M6*45
G 1 st
H 1 st
K 1 st
Jag 2st
J 2 st
Machine Translated by Google

ÿ
ÿ
B
B
A
A
K
Steg 1: Anslut järnrör A och B och för dem genom toppen av nätet
MONTERING
- 5 -
Machine Translated by Google

Steg 2: Passera järnrör C genom båda sidor av nätet och anslut dem
till järnrör A respektive B
- 6 -
Machine Translated by Google
D
OCH
D
ÿ
ÿ
ÿ
Steg 3:Som visas i figuren, förs järnrör I genom den nedre
änden av nätet och ansluts till järnrör H respektive järnrör F, Färdig.
Steg 4: Efter att ha anslutit järnrören E och D, anslut
komponenterna till ramen.
- 7 -
Machine Translated by Google

- 8 -
RENGÖRING OCH UNDERHÅLL
Steg 5:Som visat, lås skruven, färdig.
ÿRengör stativet med en våt handduk, nätet kan tas bort för tvätt
och tillåtas torka naturligt.
Machine Translated by Google

EC REP
UK REP
E-CrossStu GmbH
Mainzer Landstr.69, 60329 Frankfurt am Main.
Importerad till AUS: SIHAO PTY LTD. 1 ROKEVA STREETEASTWOOD NSW 2122
Australien Importerad
till USA: Sanven Technology Ltd. Suite 250, 9166 Anaheim Place, Rancho Cucamonga,
CA 91730
Tillverkare: Shanghaimuxinmuyeyouxiangongsi Adress:
Shuangchenglu 803nong11hao1602A-1609shi, baoshanqu, shanghai 200000 CN.
C/O YH Consulting Limited Office 147, Centurion House,
London Road, Staines-upon-Thames, Surrey, TW18 4AX
YH CONSULTING LIMITED.
- 9 -
Machine Translated by Google

Machine Translated by Google

